This is the multi-page printable view of this section. Click here to print.
Kubernetes Blog
- Spotlight on SIG Apps
- Kubernetes v1.37: Tracking When a PersistentVolumeClaim Was Last Used (Beta)
- Kubernetes v1.37: Hardening Container Storage with Bind Mount Options and EmptyDir Permissions
- Kubernetes v1.37: Pod-Level Resource Managers graduated to Beta
- Kubernetes Changed Block Tracking API - Beta Differences
- Kubernetes v1.37: Memory QoS Graduates to Beta
- Kubernetes v1.37: Native Histograms Graduates to Beta
- Kubernetes v1.37: Scheduler Preemption for In-Place Pod Resize (Alpha)
- Kubernetes v1.37: Introducing Node Lifecycle Conditions
- Kubernetes v1.37: Advancing Workload-Aware Scheduling
- Kubernetes v1.37: KubeletInUserNamespace (aka Rootless mode) Graduates to Beta
- Kubernetes v1.37: DRA Updates
- Kubernetes v1.37: Scale Workloads to Zero with HorizontalPodAutoscaler
- Kubernetes v1.37: etcd RangeStream Cuts Memory Use on Large List Reads
- Kubernetes v1.37: Storage Version Migration Enabled by Default
- Kubernetes v1.37: Pod Certificates and Cluster Trust Bundles
- Kubernetes v1.37: Metrics API graduates to stable
- Kubernetes v1.37: Garhwal
- How to Pretty-Print Your Kubernetes YAML as KYAML and Why You'd Want To
- Gateway API v1.6: TCPRoute and UDPRoute Graduate to Standard
- Kubernetes v1.37 Sneak Peek
- How the controller-runtime Cache Actually Works, and Why Your Controller Does Not Crash the API Server
- Building a Custom Metrics Exporter for Kubernetes
- Operating AI/ML Workloads on Kubernetes: A Headlamp Plugin for Kubeflow
- Kubernetes Dashboard to Headlamp: A Step-by-Step Guide
- Announcing etcd v3.7.0
- Open source maintainership in the age of AI
- Introducing the Cluster API plugin for Headlamp
- Inspect Volcano workloads faster with Headlamp
- See your serverless: introducing the Headlamp plugin for Knative
- Spotlight on WG Device Management
- Spotlight on SIG Storage
- From Kubernetes Dashboard to Headlamp: Understanding the Transition
- Reconciling the Past: Correcting Records for Unfixed Kubernetes CVEs
- Announcing etcd 3.7.0-beta.0
- Kubernetes v1.36: New Metric for Route Sync in the Cloud Controller Manager
- Kubernetes v1.36: Mixed Version Proxy Graduates to Beta
- Kubernetes v1.36: Deprecation and removal of Service ExternalIPs
- Kubernetes v1.36: Advancing Workload-Aware Scheduling
- Kubernetes v1.36: PSI Metrics for Kubernetes Graduates to GA
- Kubernetes v1.36: Moving Volume Group Snapshots to GA
- Kubernetes v1.36: More Drivers, New Features, and the Next Era of DRA
- Kubernetes v1.36: Server-Side Sharded List and Watch
- Kubernetes v1.36: Declarative Validation Graduates to GA
- Kubernetes v1.36: Admission Policies That Can't Be Deleted
- Kubernetes v1.36: Pod-Level Resource Managers (Alpha)
- Kubernetes v1.36: In-Place Vertical Scaling for Pod-Level Resources Graduates to Beta
- Kubernetes v1.36: Tiered Memory Protection with Memory QoS
- Kubernetes v1.36: Staleness Mitigation and Observability for Controllers
- Kubernetes v1.36: Mutable Pod Resources for Suspended Jobs (beta)
- Kubernetes v1.36: Fine-Grained Kubelet API Authorization Graduates to GA
- Kubernetes v1.36: User Namespaces in Kubernetes are finally GA
- SELinux Volume Label Changes goes GA (and likely implications in v1.37)
- Kubernetes v1.36: ハル (Haru)
- Gateway API v1.5: Moving features to Stable
- Kubernetes v1.36 Sneak Peek
- Announcing Ingress2Gateway 1.0: Your Path to Gateway API
- Running Agents on Kubernetes with Agent Sandbox
- Securing Production Debugging in Kubernetes
- The Invisible Rewrite: Modernizing the Kubernetes Image Promoter
- Announcing the AI Gateway Working Group
- Before You Migrate: Five Surprising Ingress-NGINX Behaviors You Need to Know
- Spotlight on SIG Architecture: API Governance
- Introducing Node Readiness Controller
- New Conversion from cgroup v1 CPU Shares to v2 CPU Weight
- Ingress NGINX: Statement from the Kubernetes Steering and Security Response Committees
- Experimenting with Gateway API using kind
- Cluster API v1.12: Introducing In-place Updates and Chained Upgrades
- Headlamp in 2025: Project Highlights
- Announcing the Checkpoint/Restore Working Group
- Uniform API server access using clientcmd
- Kubernetes v1.35: Restricting executables invoked by kubeconfigs via exec plugin allowList added to kuberc
- Kubernetes v1.35: Mutable PersistentVolume Node Affinity (alpha)
- Kubernetes v1.35: A Better Way to Pass Service Account Tokens to CSI Drivers
- Kubernetes v1.35: Extended Toleration Operators to Support Numeric Comparisons (Alpha)
- Kubernetes v1.35: New level of efficiency with in-place Pod restart
- Kubernetes 1.35: Enhanced Debugging with Versioned z-pages APIs
- Kubernetes v1.35: Watch Based Route Reconciliation in the Cloud Controller Manager
- Kubernetes v1.35: Introducing Workload Aware Scheduling
- Kubernetes v1.35: Fine-grained Supplemental Groups Control Graduates to GA
- Kubernetes v1.35: Kubelet Configuration Drop-in Directory Graduates to GA
- Avoiding Zombie Cluster Members When Upgrading to etcd v3.6
- Kubernetes 1.35: In-Place Pod Resize Graduates to Stable
- Kubernetes v1.35: Job Managed By Goes GA
- Kubernetes v1.35: Timbernetes (The World Tree Release)
- Kubernetes v1.35 Sneak Peek
- Kubernetes Configuration Good Practices
- Ingress NGINX Retirement: What You Need to Know
- Announcing the 2025 Steering Committee Election Results
- Gateway API 1.4: New Features
- 7 Common Kubernetes Pitfalls (and How I Learned to Avoid Them)
- Spotlight on Policy Working Group
- Introducing Headlamp Plugin for Karpenter - Scaling and Visibility
- Announcing Changed Block Tracking API support (alpha)
- Kubernetes v1.34: Pod Level Resources Graduated to Beta
- Kubernetes v1.34: Recovery From Volume Expansion Failure (GA)
- Kubernetes v1.34: DRA Consumable Capacity
- Kubernetes v1.34: Pods Report DRA Resource Health
- Kubernetes v1.34: Moving Volume Group Snapshots to v1beta2
- Kubernetes v1.34: Decoupled Taint Manager Is Now Stable
- Kubernetes v1.34: Autoconfiguration for Node Cgroup Driver Goes GA
- Kubernetes v1.34: Mutable CSI Node Allocatable Graduates to Beta
- Kubernetes v1.34: Use An Init Container To Define App Environment Variables
- Kubernetes v1.34: Snapshottable API server cache
- Kubernetes v1.34: VolumeAttributesClass for Volume Modification GA
- Kubernetes v1.34: Pod Replacement Policy for Jobs Goes GA
- Kubernetes v1.34: PSI Metrics for Kubernetes Graduates to Beta
- Kubernetes v1.34: Service Account Token Integration for Image Pulls Graduates to Beta
- Kubernetes v1.34: Introducing CPU Manager Static Policy Option for Uncore Cache Alignment
- Kubernetes v1.34: DRA has graduated to GA
- Kubernetes v1.34: Finer-Grained Control Over Container Restarts
- Kubernetes v1.34: User preferences (kuberc) are available for testing in kubectl 1.34
- Kubernetes v1.34: Of Wind & Will (O' WaW)
- Tuning Linux Swap for Kubernetes: A Deep Dive
- Introducing Headlamp AI Assistant
- Kubernetes v1.34 Sneak Peek
- Post-Quantum Cryptography in Kubernetes
- Navigating Failures in Pods With Devices
- Image Compatibility In Cloud Native Environments
- Changes to Kubernetes Slack
- Enhancing Kubernetes Event Management with Custom Aggregation
- Introducing Gateway API Inference Extension
- Start Sidecar First: How To Avoid Snags
- Gateway API v1.3.0: Advancements in Request Mirroring, CORS, Gateway Merging, and Retry Budgets
- Kubernetes v1.33: In-Place Pod Resize Graduated to Beta
- Announcing etcd v3.6.0
- Kubernetes 1.33: Job's SuccessPolicy Goes GA
- Kubernetes v1.33: Updates to Container Lifecycle
- Kubernetes v1.33: Job's Backoff Limit Per Index Goes GA
- Kubernetes v1.33: Image Pull Policy the way you always thought it worked!
- Kubernetes v1.33: Streaming List responses
- Kubernetes 1.33: Volume Populators Graduate to GA
- Kubernetes v1.33: From Secrets to Service Accounts: Kubernetes Image Pulls Evolved
- Kubernetes v1.33: Fine-grained SupplementalGroups Control Graduates to Beta
- Kubernetes v1.33: Prevent PersistentVolume Leaks When Deleting out of Order graduates to GA
- Kubernetes v1.33: Mutable CSI Node Allocatable Count
- Kubernetes v1.33: New features in DRA
- Kubernetes v1.33: Storage Capacity Scoring of Nodes for Dynamic Provisioning (alpha)
- Kubernetes v1.33: Image Volumes graduate to beta!
- Kubernetes v1.33: HorizontalPodAutoscaler Configurable Tolerance
- Kubernetes v1.33: User Namespaces enabled by default!
- Kubernetes v1.33: Continuing the transition from Endpoints to EndpointSlices
- Kubernetes v1.33: Octarine
- Kubernetes Multicontainer Pods: An Overview
- Introducing kube-scheduler-simulator
- Kubernetes v1.33 sneak peek
- Fresh Swap Features for Linux Users in Kubernetes 1.32
- Ingress-nginx CVE-2025-1974: What You Need to Know
- Introducing JobSet
- Spotlight on SIG Apps
- Spotlight on SIG etcd
- NFTables mode for kube-proxy
- The Cloud Controller Manager Chicken and Egg Problem
- Spotlight on SIG Architecture: Enhancements
- Kubernetes 1.32: Moving Volume Group Snapshots to Beta
- Enhancing Kubernetes API Server Efficiency with API Streaming
- Kubernetes v1.32 Adds A New CPU Manager Static Policy Option For Strict CPU Reservation
- Kubernetes v1.32: Memory Manager Goes GA
- Kubernetes v1.32: QueueingHint Brings a New Possibility to Optimize Pod Scheduling
- Kubernetes v1.32: Penelope
- Gateway API v1.2: WebSockets, Timeouts, Retries, and More
- How we built a dynamic Kubernetes API Server for the API Aggregation Layer in Cozystack
- Kubernetes v1.32 sneak peek
- Spotlight on Kubernetes Upstream Training in Japan
- Announcing the 2024 Steering Committee Election Results
- Spotlight on CNCF Deaf and Hard-of-hearing Working Group (DHHWG)
- Spotlight on SIG Scheduling
- Kubernetes v1.31: kubeadm v1beta4
- Kubernetes 1.31: Custom Profiling in Kubectl Debug Graduates to Beta
- Kubernetes 1.31: Fine-grained SupplementalGroups control
- Kubernetes v1.31: New Kubernetes CPUManager Static Policy: Distribute CPUs Across Cores
- Kubernetes 1.31: Autoconfiguration For Node Cgroup Driver (beta)
- Kubernetes 1.31: Streaming Transitions from SPDY to WebSockets
- Kubernetes 1.31: Pod Failure Policy for Jobs Goes GA
- Kubernetes 1.31: MatchLabelKeys in PodAffinity graduates to beta
- Kubernetes 1.31: Prevent PersistentVolume Leaks When Deleting out of Order
- Kubernetes 1.31: Read Only Volumes Based On OCI Artifacts (alpha)
- Kubernetes 1.31: VolumeAttributesClass for Volume Modification Beta
- Kubernetes v1.31: Accelerating Cluster Performance with Consistent Reads from Cache
- Kubernetes 1.31: Moving cgroup v1 Support into Maintenance Mode
- Kubernetes v1.31: PersistentVolume Last Phase Transition Time Moves to GA
- Kubernetes v1.31: Elli
- Introducing Feature Gates to Client-Go: Enhancing Flexibility and Control
- Spotlight on SIG API Machinery
- Kubernetes Removals and Major Changes In v1.31
- Spotlight on SIG Node
- 10 Years of Kubernetes
- Completing the largest migration in Kubernetes history
- Gateway API v1.1: Service mesh, GRPCRoute, and a whole lot more
- Container Runtime Interface streaming explained
- Kubernetes 1.30: Preventing unauthorized volume mode conversion moves to GA
- Kubernetes 1.30: Multi-Webhook and Modular Authorization Made Much Easier
- Kubernetes 1.30: Structured Authentication Configuration Moves to Beta
- Kubernetes 1.30: Validating Admission Policy Is Generally Available
- Kubernetes 1.30: Read-only volume mounts can be finally literally read-only
- Kubernetes 1.30: Beta Support For Pods With User Namespaces
- Kubernetes v1.30: Uwubernetes
- Spotlight on SIG Architecture: Code Organization
- DIY: Create Your Own Cloud with Kubernetes (Part 3)
- DIY: Create Your Own Cloud with Kubernetes (Part 2)
- DIY: Create Your Own Cloud with Kubernetes (Part 1)
- Introducing the Windows Operational Readiness Specification
- A Peek at Kubernetes v1.30
- CRI-O: Applying seccomp profiles from OCI registries
- Spotlight on SIG Cloud Provider
- A look into the Kubernetes Book Club
- Image Filesystem: Configuring Kubernetes to store containers on a separate filesystem
- Spotlight on SIG Release (Release Team Subproject)
- Contextual logging in Kubernetes 1.29: Better troubleshooting and enhanced logging
- Kubernetes 1.29: Decoupling taint manager from node lifecycle controller
- Kubernetes 1.29: PodReadyToStartContainers Condition Moves to Beta
- Kubernetes 1.29: New (alpha) Feature, Load Balancer IP Mode for Services
- Kubernetes 1.29: Single Pod Access Mode for PersistentVolumes Graduates to Stable
- Kubernetes 1.29: CSI Storage Resizing Authenticated and Generally Available in v1.29
- Kubernetes 1.29: VolumeAttributesClass for Volume Modification
- Kubernetes 1.29: Cloud Provider Integrations Are Now Separate Components
- Kubernetes v1.29: Mandala
- New Experimental Features in Gateway API v1.0
- Spotlight on SIG Testing
- Kubernetes Removals, Deprecations, and Major Changes in Kubernetes 1.29
- The Case for Kubernetes Resource Limits: Predictability vs. Efficiency
- Introducing SIG etcd
- Kubernetes Contributor Summit: Behind-the-scenes
- Spotlight on SIG Architecture: Production Readiness
- Gateway API v1.0: GA Release
- Introducing ingress2gateway; Simplifying Upgrades to Gateway API
- Plants, process and parties: the Kubernetes 1.28 release interview
- PersistentVolume Last Phase Transition Time in Kubernetes
- A Quick Recap of 2023 China Kubernetes Contributor Summit
- Bootstrap an Air Gapped Cluster With Kubeadm
- CRI-O is moving towards pkgs.k8s.io
- Spotlight on SIG Architecture: Conformance
- Announcing the 2023 Steering Committee Election Results
- Happy 7th Birthday kubeadm!
- kubeadm: Use etcd Learner to Join a Control Plane Node Safely
- User Namespaces: Now Supports Running Stateful Pods in Alpha!
- Comparing Local Kubernetes Development Tools: Telepresence, Gefyra, and mirrord
- Kubernetes Legacy Package Repositories Will Be Frozen On September 13, 2023
- Gateway API v0.8.0: Introducing Service Mesh Support
- Kubernetes 1.28: A New (alpha) Mechanism For Safer Cluster Upgrades
- Kubernetes v1.28: Introducing native sidecar containers
- Kubernetes 1.28: Beta support for using swap on Linux
- Kubernetes 1.28: Node podresources API Graduates to GA
- Kubernetes 1.28: Improved failure handling for Jobs
- Kubernetes v1.28: Retroactive Default StorageClass move to GA
- Kubernetes 1.28: Non-Graceful Node Shutdown Moves to GA
- pkgs.k8s.io: Introducing Kubernetes Community-Owned Package Repositories
- Kubernetes v1.28: Planternetes
- Spotlight on SIG ContribEx
- Spotlight on SIG CLI
- Confidential Kubernetes: Use Confidential Virtual Machines and Enclaves to improve your cluster security
- Verifying Container Image Signatures Within CRI Runtimes
- dl.k8s.io to adopt a Content Delivery Network
- Using OCI artifacts to distribute security profiles for seccomp, SELinux and AppArmor
- Having fun with seccomp profiles on the edge
- Kubernetes 1.27: KMS V2 Moves to Beta
- Kubernetes 1.27: updates on speeding up Pod startup
- Kubernetes 1.27: In-place Resource Resize for Kubernetes Pods (alpha)
- Kubernetes 1.27: Avoid Collisions Assigning Ports to NodePort Services
- Kubernetes 1.27: Safer, More Performant Pruning in kubectl apply
- Kubernetes 1.27: Introducing An API For Volume Group Snapshots
- Kubernetes 1.27: Quality-of-Service for Memory Resources (alpha)
- Kubernetes 1.27: StatefulSet PVC Auto-Deletion (beta)
- Kubernetes 1.27: HorizontalPodAutoscaler ContainerResource type metric moves to beta
- Kubernetes 1.27: StatefulSet Start Ordinal Simplifies Migration
- Updates to the Auto-refreshing Official CVE Feed
- Kubernetes 1.27: Server Side Field Validation and OpenAPI V3 move to GA
- Kubernetes 1.27: Query Node Logs Using The Kubelet API
- Kubernetes 1.27: Single Pod Access Mode for PersistentVolumes Graduates to Beta
- Kubernetes 1.27: Efficient SELinux volume relabeling (Beta)
- Kubernetes 1.27: More fine-grained pod topology spread policies reached beta
- Kubernetes v1.27: Chill Vibes
- Keeping Kubernetes Secure with Updated Go Versions
- Kubernetes Validating Admission Policies: A Practical Example
- Kubernetes Removals and Major Changes In v1.27
- k8s.gcr.io Redirect to registry.k8s.io - What You Need to Know
- Forensic container analysis
- Introducing KWOK: Kubernetes WithOut Kubelet
- Free Katacoda Kubernetes Tutorials Are Shutting Down
- k8s.gcr.io Image Registry Will Be Frozen From the 3rd of April 2023
- Spotlight on SIG Instrumentation
- Consider All Microservices Vulnerable — And Monitor Their Behavior
- Protect Your Mission-Critical Pods From Eviction With PriorityClass
- Kubernetes 1.26: Eviction policy for unhealthy pods guarded by PodDisruptionBudgets
- Kubernetes v1.26: Retroactive Default StorageClass
- Kubernetes v1.26: Alpha support for cross-namespace storage data sources
- Kubernetes v1.26: Advancements in Kubernetes Traffic Engineering
- Kubernetes 1.26: Job Tracking, to Support Massively Parallel Batch Workloads, Is Generally Available
- Kubernetes v1.26: CPUManager goes GA
- Kubernetes 1.26: Pod Scheduling Readiness
- Kubernetes 1.26: Support for Passing Pod fsGroup to CSI Drivers At Mount Time
- Kubernetes v1.26: GA Support for Kubelet Credential Providers
- Kubernetes 1.26: Introducing Validating Admission Policies
- Kubernetes 1.26: Device Manager graduates to GA
- Kubernetes 1.26: Non-Graceful Node Shutdown Moves to Beta
- Kubernetes 1.26: Alpha API For Dynamic Resource Allocation
- Kubernetes 1.26: Windows HostProcess Containers Are Generally Available
- Kubernetes 1.26: We're now signing our binary release artifacts!
- Kubernetes v1.26: Electrifying
- Forensic container checkpointing in Kubernetes
- Finding suspicious syscalls with the seccomp notifier
- Boosting Kubernetes container runtime observability with OpenTelemetry
- registry.k8s.io: faster, cheaper and Generally Available (GA)
- Kubernetes Removals, Deprecations, and Major Changes in 1.26
- Live and let live with Kluctl and Server Side Apply
- Server Side Apply Is Great And You Should Be Using It
- Current State: 2019 Third Party Security Audit of Kubernetes
- Introducing Kueue
- Kubernetes 1.25: alpha support for running Pods with user namespaces
- Enforce CRD Immutability with CEL Transition Rules
- Kubernetes 1.25: Kubernetes In-Tree to CSI Volume Migration Status Update
- Kubernetes 1.25: CustomResourceDefinition Validation Rules Graduate to Beta
- Kubernetes 1.25: Use Secrets for Node-Driven Expansion of CSI Volumes
- Kubernetes 1.25: Local Storage Capacity Isolation Reaches GA
- Kubernetes 1.25: Two Features for Apps Rollouts Graduate to Stable
- Kubernetes 1.25: PodHasNetwork Condition for Pods
- Announcing the Auto-refreshing Official Kubernetes CVE Feed
- Kubernetes 1.25: KMS V2 Improvements
- Kubernetes’s IPTables Chains Are Not API
- Introducing COSI: Object Storage Management using Kubernetes APIs
- Kubernetes 1.25: cgroup v2 graduates to GA
- Kubernetes 1.25: CSI Inline Volumes have graduated to GA
- Kubernetes v1.25: Pod Security Admission Controller in Stable
- PodSecurityPolicy: The Historical Context
- Kubernetes v1.25: Combiner
- Spotlight on SIG Storage
- Meet Our Contributors - APAC (China region)
- Enhancing Kubernetes one KEP at a Time
- Kubernetes Removals and Major Changes In 1.25
- Spotlight on SIG Docs
- Kubernetes Gateway API Graduates to Beta
- Annual Report Summary 2021
- Kubernetes 1.24: Maximum Unavailable Replicas for StatefulSet
- Contextual Logging in Kubernetes 1.24
- Kubernetes 1.24: Avoid Collisions Assigning IP Addresses to Services
- Kubernetes 1.24: Introducing Non-Graceful Node Shutdown Alpha
- Kubernetes 1.24: Prevent unauthorised volume mode conversion
- Kubernetes 1.24: Volume Populators Graduate to Beta
- Kubernetes 1.24: gRPC container probes in beta
- Kubernetes 1.24: Storage Capacity Tracking Now Generally Available
- Kubernetes 1.24: Volume Expansion Now A Stable Feature
- Dockershim: The Historical Context
- Kubernetes 1.24: Stargazer
- Increasing the security bar in Ingress-NGINX v1.2.0
- Kubernetes Removals and Deprecations In 1.24
- Is Your Cluster Ready for v1.24?
- Meet Our Contributors - APAC (Aus-NZ region)
- Updated: Dockershim Removal FAQ
- SIG Node CI Subproject Celebrates Two Years of Test Improvements
- Spotlight on SIG Multicluster
- Securing Admission Controllers
- Meet Our Contributors - APAC (India region)
- Kubernetes is Moving on From Dockershim: Commitments and Next Steps
- Kubernetes-in-Kubernetes and the WEDOS PXE bootable server farm
- Using Admission Controllers to Detect Container Drift at Runtime
- What's new in Security Profiles Operator v0.4.0
- Kubernetes 1.23: StatefulSet PVC Auto-Deletion (alpha)
- Kubernetes 1.23: Prevent PersistentVolume leaks when deleting out of order
- Kubernetes 1.23: Kubernetes In-Tree to CSI Volume Migration Status Update
- Kubernetes 1.23: Pod Security Graduates to Beta
- Kubernetes 1.23: Dual-stack IPv4/IPv6 Networking Reaches GA
- Kubernetes 1.23: The Next Frontier
- Contribution, containers and cricket: the Kubernetes 1.22 release interview
- Quality-of-Service for Memory Resources
- Dockershim removal is coming. Are you ready?
- Non-root Containers And Devices
- Announcing the 2021 Steering Committee Election Results
- Use KPNG to Write Specialized kube-proxiers
- Introducing ClusterClass and Managed Topologies in Cluster API
- A Closer Look at NSA/CISA Kubernetes Hardening Guidance
- How to Handle Data Duplication in Data-Heavy Kubernetes Environments
- Spotlight on SIG Node
- Introducing Single Pod Access Mode for PersistentVolumes
- Alpha in Kubernetes v1.22: API Server Tracing
- Kubernetes 1.22: A New Design for Volume Populators
- Minimum Ready Seconds for StatefulSets
- Enable seccomp for all workloads with a new v1.22 alpha feature
- Alpha in v1.22: Windows HostProcess Containers
- Kubernetes Memory Manager moves to beta
- Kubernetes 1.22: CSI Windows Support (with CSI Proxy) reaches GA
- New in Kubernetes v1.22: alpha support for using swap memory
- Kubernetes 1.22: Server Side Apply moves to GA
- Kubernetes 1.22: Reaching New Peaks
- Roorkee robots, releases and racing: the Kubernetes 1.21 release interview
- Updating NGINX-Ingress to use the stable Ingress API
- Kubernetes Release Cadence Change: Here’s What You Need To Know
- Spotlight on SIG Usability
- Kubernetes API and Feature Removals In 1.22: Here’s What You Need To Know
- Announcing Kubernetes Community Group Annual Reports
- Writing a Controller for Pod Labels
- Using Finalizers to Control Deletion
- Kubernetes 1.21: Metrics Stability hits GA
- Evolving Kubernetes networking with the Gateway API
- Graceful Node Shutdown Goes Beta
- Annotating Kubernetes Services for Humans
- Defining Network Policy Conformance for Container Network Interface (CNI) providers
- Introducing Indexed Jobs
- Volume Health Monitoring Alpha Update
- Three Tenancy Models For Kubernetes
- Local Storage: Storage Capacity Tracking, Distributed Provisioning and Generic Ephemeral Volumes hit Beta
- kube-state-metrics goes v2.0
- Introducing Suspended Jobs
- Kubernetes 1.21: CronJob Reaches GA
- Kubernetes 1.21: Power to the Community
- PodSecurityPolicy Deprecation: Past, Present, and Future
- The Evolution of Kubernetes Dashboard
- A Custom Kubernetes Scheduler to Orchestrate Highly Available Applications
- Kubernetes 1.20: Pod Impersonation and Short-lived Volumes in CSI Drivers
- Third Party Device Metrics Reaches GA
- Kubernetes 1.20: Granular Control of Volume Permission Changes
- Kubernetes 1.20: Kubernetes Volume Snapshot Moves to GA
- Kubernetes 1.20: The Raddest Release
- GSoD 2020: Improving the API Reference Experience
- Dockershim Deprecation FAQ
- Don't Panic: Kubernetes and Docker
- Cloud native security for your clusters
- Remembering Dan Kohn
- Announcing the 2020 Steering Committee Election Results
- Contributing to the Development Guide
- GSoC 2020 - Building operators for cluster addons
- Introducing Structured Logs
- Warning: Helpful Warnings Ahead
- Scaling Kubernetes Networking With EndpointSlices
- Ephemeral volumes with storage capacity tracking: EmptyDir on steroids
- Increasing the Kubernetes Support Window to One Year
- Kubernetes 1.19: Accentuate the Paw-sitive
- Moving Forward From Beta
- Introducing Hierarchical Namespaces
- Physics, politics and Pull Requests: the Kubernetes 1.18 release interview
- Music and math: the Kubernetes 1.17 release interview
- SIG-Windows Spotlight
- Working with Terraform and Kubernetes
- A Better Docs UX With Docsy
- Supporting the Evolving Ingress Specification in Kubernetes 1.18
- K8s KPIs with Kuberhealthy
- My exciting journey into Kubernetes’ history
- An Introduction to the K8s-Infrastructure Working Group
- WSL+Docker: Kubernetes on the Windows Desktop
- How Docs Handle Third Party and Dual Sourced Content
- Introducing PodTopologySpread
- Two-phased Canary Rollout with Open Source Gloo
- Cluster API v1alpha3 Delivers New Features and an Improved User Experience
- How Kubernetes contributors are building a better communication process
- API Priority and Fairness Alpha
- Introducing Windows CSI support alpha for Kubernetes
- Improvements to the Ingress API in Kubernetes 1.18
- Kubernetes 1.18 Feature Server-side Apply Beta 2
- Kubernetes Topology Manager Moves to Beta - Align Up!
- Kubernetes 1.18: Fit & Finish
- Join SIG Scalability and Learn Kubernetes the Hard Way
- Kong Ingress Controller and Service Mesh: Setting up Ingress to Istio on Kubernetes
- Contributor Summit Amsterdam Postponed
- Bring your ideas to the world with kubectl plugins
- Contributor Summit Amsterdam Schedule Announced
- Deploying External OpenStack Cloud Provider with Kubeadm
- KubeInvaders - Gamified Chaos Engineering Tool for Kubernetes
- CSI Ephemeral Inline Volumes
- Reviewing 2019 in Docs
- Kubernetes on MIPS
- Announcing the Kubernetes bug bounty program
- Remembering Brad Childs
- Testing of CSI drivers
- Kubernetes 1.17: Stability
- Kubernetes 1.17 Feature: Kubernetes Volume Snapshot Moves to Beta
- Kubernetes 1.17 Feature: Kubernetes In-Tree to CSI Volume Migration Moves to Beta
- When you're in the release team, you're family: the Kubernetes 1.16 release interview
- Gardener Project Update
- Develop a Kubernetes controller in Java
- Running Kubernetes locally on Linux with Microk8s
- Grokkin' the Docs
- Kubernetes Documentation Survey
- Contributor Summit San Diego Schedule Announced!
- 2019 Steering Committee Election Results
- Contributor Summit San Diego Registration Open!
- Kubernetes 1.16: Custom Resources, Overhauled Metrics, and Volume Extensions
- Announcing etcd 3.4
- OPA Gatekeeper: Policy and Governance for Kubernetes
- Get started with Kubernetes (using Python)
- Deprecated APIs Removed In 1.16: Here’s What You Need To Know
- Recap of Kubernetes Contributor Summit Barcelona 2019
- Automated High Availability in kubeadm v1.15: Batteries Included But Swappable
- Introducing Volume Cloning Alpha for Kubernetes
- Future of CRDs: Structural Schemas
- Kubernetes 1.15: Extensibility and Continuous Improvement
- Join us at the Contributor Summit in Shanghai
- Kyma - extend and build on Kubernetes with ease
- Kubernetes, Cloud Native, and the Future of Software
- Expanding our Contributor Workshops
- Cat shirts and Groundhog Day: the Kubernetes 1.14 release interview
- Join us for the 2019 KubeCon Diversity Lunch & Hack
- How You Can Help Localize Kubernetes Docs
- Hardware Accelerated SSL/TLS Termination in Ingress Controllers using Kubernetes Device Plugins and RuntimeClass
- Introducing kube-iptables-tailer: Better Networking Visibility in Kubernetes Clusters
- The Future of Cloud Providers in Kubernetes
- Pod Priority and Preemption in Kubernetes
- Process ID Limiting for Stability Improvements in Kubernetes 1.14
- Kubernetes 1.14: Local Persistent Volumes GA
- Kubernetes v1.14 delivers production-level support for Windows nodes and Windows containers
- kube-proxy Subtleties: Debugging an Intermittent Connection Reset
- Running Kubernetes locally on Linux with Minikube - now with Kubernetes 1.14 support
- Kubernetes 1.14: Production-level support for Windows Nodes, Kubectl Updates, Persistent Local Volumes GA
- Kubernetes End-to-end Testing for Everyone
- A Guide to Kubernetes Admission Controllers
- A Look Back and What's in Store for Kubernetes Contributor Summits
- KubeEdge, a Kubernetes Native Edge Computing Framework
- Kubernetes Setup Using Ansible and Vagrant
- Raw Block Volume support to Beta
- Automate Operations on your Cluster with OperatorHub.io
- Building a Kubernetes Edge (Ingress) Control Plane for Envoy v2
- Runc and CVE-2019-5736
- Poseidon-Firmament Scheduler – Flow Network Graph Based Scheduler
- Update on Volume Snapshot Alpha for Kubernetes
- Container Storage Interface (CSI) for Kubernetes GA
- APIServer dry-run and kubectl diff
- Kubernetes Federation Evolution
- etcd: Current status and future roadmap
- New Contributor Workshop Shanghai
- Production-Ready Kubernetes Cluster Creation with kubeadm
- Kubernetes 1.13: Simplified Cluster Management with Kubeadm, Container Storage Interface (CSI), and CoreDNS as Default DNS are Now Generally Available
- Kubernetes Docs Updates, International Edition
- gRPC Load Balancing on Kubernetes without Tears
- Tips for Your First Kubecon Presentation - Part 2
- Tips for Your First Kubecon Presentation - Part 1
- Kubernetes 2018 North American Contributor Summit
- 2018 Steering Committee Election Results
- Topology-Aware Volume Provisioning in Kubernetes
- Kubernetes v1.12: Introducing RuntimeClass
- Introducing Volume Snapshot Alpha for Kubernetes
- Support for Azure VMSS, Cluster-Autoscaler and User Assigned Identity
- Introducing the Non-Code Contributor’s Guide
- KubeDirector: The easy way to run complex stateful applications on Kubernetes
- Building a Network Bootable Server Farm for Kubernetes with LTSP
- Health checking gRPC servers on Kubernetes
- Kubernetes 1.12: Kubelet TLS Bootstrap and Azure Virtual Machine Scale Sets (VMSS) Move to General Availability
- Hands On With Linkerd 2.0
- 2018 Steering Committee Election Cycle Kicks Off
- The Machines Can Do the Work, a Story of Kubernetes Testing, CI, and Automating the Contributor Experience
- Introducing Kubebuilder: an SDK for building Kubernetes APIs using CRDs
- Out of the Clouds onto the Ground: How to Make Kubernetes Production Grade Anywhere
- Dynamically Expand Volume with CSI and Kubernetes
- KubeVirt: Extending Kubernetes with CRDs for Virtualized Workloads
- Feature Highlight: CPU Manager
- The History of Kubernetes & the Community Behind It
- Kubernetes Wins the 2018 OSCON Most Impact Award
- 11 Ways (Not) to Get Hacked
- How the sausage is made: the Kubernetes 1.11 release interview, from the Kubernetes Podcast
- Resizing Persistent Volumes using Kubernetes
- Dynamic Kubelet Configuration
- CoreDNS GA for Kubernetes Cluster DNS
- Meet Our Contributors - Monthly Streaming YouTube Mentoring Series
- IPVS-Based In-Cluster Load Balancing Deep Dive
- Airflow on Kubernetes (Part 1): A Different Kind of Operator
- Kubernetes 1.11: In-Cluster Load Balancing and CoreDNS Plugin Graduate to General Availability
- Dynamic Ingress in Kubernetes
- 4 Years of K8s
- Say Hello to Discuss Kubernetes
- Introducing kustomize; Template-free Configuration Customization for Kubernetes
- Kubernetes Containerd Integration Goes GA
- Getting to Know Kubevirt
- Gardener - The Kubernetes Botanist
- Docs are Migrating from Jekyll to Hugo
- Announcing Kubeflow 0.1
- Current State of Policy in Kubernetes
- Developing on Kubernetes
- Zero-downtime Deployment in Kubernetes with Jenkins
- Kubernetes Community - Top of the Open Source Charts in 2017
- Kubernetes Application Survey 2018 Results
- Local Persistent Volumes for Kubernetes Goes Beta
- Migrating the Kubernetes Blog
- Container Storage Interface (CSI) for Kubernetes Goes Beta
- Fixing the Subpath Volume Vulnerability in Kubernetes
- Kubernetes 1.10: Stabilizing Storage, Security, and Networking
- Principles of Container-based Application Design
- Expanding User Support with Office Hours
- How to Integrate RollingUpdate Strategy for TPR in Kubernetes
- Apache Spark 2.3 with Native Kubernetes Support
- Kubernetes: First Beta Version of Kubernetes 1.10 is Here
- Reporting Errors from Control Plane to Applications Using Kubernetes Events
- Core Workloads API GA
- Introducing client-go version 6
- Extensible Admission is Beta
- Introducing Container Storage Interface (CSI) Alpha for Kubernetes
- Kubernetes v1.9 releases beta support for Windows Server Containers
- Five Days of Kubernetes 1.9
- Introducing Kubeflow - A Composable, Portable, Scalable ML Stack Built for Kubernetes
- Kubernetes 1.9: Apps Workloads GA and Expanded Ecosystem
- Using eBPF in Kubernetes
- PaddlePaddle Fluid: Elastic Deep Learning on Kubernetes
- Autoscaling in Kubernetes
- Certified Kubernetes Conformance Program: Launch Celebration Round Up
- Kubernetes is Still Hard (for Developers)
- Securing Software Supply Chain with Grafeas
- Containerd Brings More Container Runtime Options for Kubernetes
- Kubernetes the Easy Way
- Enforcing Network Policies in Kubernetes
- Using RBAC, Generally Available in Kubernetes v1.8
- It Takes a Village to Raise a Kubernetes
- kubeadm v1.8 Released: Introducing Easy Upgrades for Kubernetes Clusters
- Five Days of Kubernetes 1.8
- Introducing Software Certification for Kubernetes
- Request Routing and Policy Management with the Istio Service Mesh
- Kubernetes Community Steering Committee Election Results
- Kubernetes 1.8: Security, Workloads and Feature Depth
- Kubernetes StatefulSets & DaemonSets Updates
- Introducing the Resource Management Working Group
- Windows Networking at Parity with Linux for Kubernetes
- Kubernetes Meets High-Performance Computing
- High Performance Networking with EC2 Virtual Private Clouds
- Kompose Helps Developers Move Docker Compose Files to Kubernetes
- Happy Second Birthday: A Kubernetes Retrospective
- How Watson Health Cloud Deploys Applications with Kubernetes
- Kubernetes 1.7: Security Hardening, Stateful Application Updates and Extensibility
- Managing microservices with the Istio service mesh
- Draft: Kubernetes container development made easy
- Kubernetes: a monitoring guide
- Kubespray Ansible Playbooks foster Collaborative Kubernetes Ops
- Dancing at the Lip of a Volcano: The Kubernetes Security Process - Explained
- How Bitmovin is Doing Multi-Stage Canary Deployments with Kubernetes in the Cloud and On-Prem
- RBAC Support in Kubernetes
- Configuring Private DNS Zones and Upstream Nameservers in Kubernetes
- Advanced Scheduling in Kubernetes
- Scalability updates in Kubernetes 1.6: 5,000 node and 150,000 pod clusters
- Dynamic Provisioning and Storage Classes in Kubernetes
- Five Days of Kubernetes 1.6
- Kubernetes 1.6: Multi-user, Multi-workloads at Scale
- The K8sPort: Engaging Kubernetes Community One Activity at a Time
- Deploying PostgreSQL Clusters using StatefulSets
- Containers as a Service, the foundation for next generation PaaS
- Inside JD.com's Shift to Kubernetes from OpenStack
- Run Deep Learning with PaddlePaddle on Kubernetes
- Highly Available Kubernetes Clusters
- Fission: Serverless Functions as a Service for Kubernetes
- Running MongoDB on Kubernetes with StatefulSets
- How we run Kubernetes in Kubernetes aka Kubeception
- Scaling Kubernetes deployments with Policy-Based Networking
- A Stronger Foundation for Creating and Managing Kubernetes Clusters
- Kubernetes UX Survey Infographic
- Kubernetes supports OpenAPI
- Cluster Federation in Kubernetes 1.5
- Windows Server Support Comes to Kubernetes
- StatefulSet: Run and Scale Stateful Applications Easily in Kubernetes
- Five Days of Kubernetes 1.5
- Introducing Container Runtime Interface (CRI) in Kubernetes
- Kubernetes 1.5: Supporting Production Workloads
- From Network Policies to Security Policies
- Kompose: a tool to go from Docker-compose to Kubernetes
- Kubernetes Containers Logging and Monitoring with Sematext
- Visualize Kubelet Performance with Node Dashboard
- CNCF Partners With The Linux Foundation To Launch New Kubernetes Certification, Training and Managed Service Provider Program
- Bringing Kubernetes Support to Azure Container Service
- Modernizing the Skytap Cloud Micro-Service Architecture with Kubernetes
- Introducing Kubernetes Service Partners program and a redesigned Partners page
- Tail Kubernetes with Stern
- How We Architected and Run Kubernetes on OpenStack at Scale at Yahoo! JAPAN
- Building Globally Distributed Services using Kubernetes Cluster Federation
- Helm Charts: making it simple to package and deploy common applications on Kubernetes
- Dynamic Provisioning and Storage Classes in Kubernetes
- How we improved Kubernetes Dashboard UI in 1.4 for your production needs
- How we made Kubernetes insanely easy to install
- How Qbox Saved 50% per Month on AWS Bills Using Kubernetes and Supergiant
- Kubernetes 1.4: Making it easy to run on Kubernetes anywhere
- High performance network policies in Kubernetes clusters
- Creating a PostgreSQL Cluster using Helm
- Deploying to Multiple Kubernetes Clusters with kit
- Cloud Native Application Interfaces
- Security Best Practices for Kubernetes Deployment
- Scaling Stateful Applications using Kubernetes Pet Sets and FlexVolumes with Datera Elastic Data Fabric
- Kubernetes Namespaces: use cases and insights
- SIG Apps: build apps for and operate them in Kubernetes
- Create a Couchbase cluster using Kubernetes
- Challenges of a Remotely Managed, On-Premises, Bare-Metal Kubernetes Cluster
- Why OpenStack's embrace of Kubernetes is great for both communities
- A Very Happy Birthday Kubernetes
- Happy Birthday Kubernetes. Oh, the places you’ll go!
- The Bet on Kubernetes, a Red Hat Perspective
- Bringing End-to-End Kubernetes Testing to Azure (Part 2)
- Dashboard - Full Featured Web Interface for Kubernetes
- Steering an Automation Platform at Wercker with Kubernetes
- Citrix + Kubernetes = A Home Run
- Cross Cluster Services - Achieving Higher Availability for your Kubernetes Applications
- Stateful Applications in Containers!? Kubernetes 1.3 Says “Yes!”
- Thousand Instances of Cassandra using Kubernetes Pet Set
- Autoscaling in Kubernetes
- Kubernetes in Rancher: the further evolution
- Five Days of Kubernetes 1.3
- Minikube: easily run Kubernetes locally
- rktnetes brings rkt container engine to Kubernetes
- Updates to Performance and Scalability in Kubernetes 1.3 -- 2,000 node 60,000 pod clusters
- Kubernetes 1.3: Bridging Cloud Native and Enterprise Workloads
- Container Design Patterns
- The Illustrated Children's Guide to Kubernetes
- Bringing End-to-End Kubernetes Testing to Azure (Part 1)
- Hypernetes: Bringing Security and Multi-tenancy to Kubernetes
- CoreOS Fest 2016: CoreOS and Kubernetes Community meet in Berlin (& San Francisco)
- Introducing the Kubernetes OpenStack Special Interest Group
- SIG-UI: the place for building awesome user interfaces for Kubernetes
- SIG-ClusterOps: Promote operability and interoperability of Kubernetes clusters
- SIG-Networking: Kubernetes Network Policy APIs Coming in 1.3
- How to deploy secure, auditable, and reproducible Kubernetes clusters on AWS
- Adding Support for Kubernetes in Rancher
- Container survey results - March 2016
- Configuration management with Containers
- Using Deployment objects with Kubernetes 1.2
- Kubernetes 1.2 and simplifying advanced networking with Ingress
- Using Spark and Zeppelin to process big data on Kubernetes 1.2
- AppFormix: Helping Enterprises Operationalize Kubernetes
- Building highly available applications using Kubernetes new multi-zone clusters (a.k.a. 'Ubernetes Lite')
- 1000 nodes and beyond: updates to Kubernetes performance and scalability in 1.2
- Five Days of Kubernetes 1.2
- How container metadata changes your point of view
- Scaling neural network image classification using Kubernetes with TensorFlow Serving
- Kubernetes 1.2: Even more performance upgrades, plus easier application deployment and management
- ElasticBox introduces ElasticKube to help manage Kubernetes within the enterprise
- Kubernetes in the Enterprise with Fujitsu’s Cloud Load Control
- Kubernetes Community Meeting Notes - 20160225
- State of the Container World, February 2016
- KubeCon EU 2016: Kubernetes Community in London
- Kubernetes Community Meeting Notes - 20160218
- Kubernetes Community Meeting Notes - 20160211
- ShareThis: Kubernetes In Production
- Kubernetes Community Meeting Notes - 20160204
- Kubernetes Community Meeting Notes - 20160128
- State of the Container World, January 2016
- Kubernetes Community Meeting Notes - 20160114
- Kubernetes Community Meeting Notes - 20160121
- Why Kubernetes doesn’t use libnetwork
- Simple leader election with Kubernetes and Docker
- Creating a Raspberry Pi cluster running Kubernetes, the installation (Part 2)
- Managing Kubernetes Pods, Services and Replication Controllers with Puppet
- How Weave built a multi-deployment solution for Scope using Kubernetes
- Creating a Raspberry Pi cluster running Kubernetes, the shopping list (Part 1)
- Monitoring Kubernetes with Sysdig
- One million requests per second: Dependable and dynamic distributed systems at scale
- Kubernetes 1.1 Performance upgrades, improved tooling and a growing community
- Kubernetes as Foundation for Cloud Native PaaS
- Some things you didn’t know about kubectl
- Kubernetes Performance Measurements and Roadmap
- Using Kubernetes Namespaces to Manage Environments
- Weekly Kubernetes Community Hangout Notes - July 31 2015
- The Growing Kubernetes Ecosystem
- Weekly Kubernetes Community Hangout Notes - July 17 2015
- Strong, Simple SSL for Kubernetes Services
- Weekly Kubernetes Community Hangout Notes - July 10 2015
- Announcing the First Kubernetes Enterprise Training Course
- How did the Quake demo from DockerCon Work?
- Kubernetes 1.0 Launch Event at OSCON
- The Distributed System ToolKit: Patterns for Composite Containers
- Slides: Cluster Management with Kubernetes, talk given at the University of Edinburgh
- Cluster Level Logging with Kubernetes
- Weekly Kubernetes Community Hangout Notes - May 22 2015
- Kubernetes on OpenStack
- Docker and Kubernetes and AppC
- Weekly Kubernetes Community Hangout Notes - May 15 2015
- Kubernetes Release: 0.17.0
- Resource Usage Monitoring in Kubernetes
- Weekly Kubernetes Community Hangout Notes - May 1 2015
- Kubernetes Release: 0.16.0
- AppC Support for Kubernetes through RKT
- Weekly Kubernetes Community Hangout Notes - April 24 2015
- Borg: The Predecessor to Kubernetes
- Kubernetes and the Mesosphere DCOS
- Weekly Kubernetes Community Hangout Notes - April 17 2015
- Introducing Kubernetes API Version v1beta3
- Kubernetes Release: 0.15.0
- Weekly Kubernetes Community Hangout Notes - April 10 2015
- Faster than a speeding Latte
- Weekly Kubernetes Community Hangout Notes - April 3 2015
- Participate in a Kubernetes User Experience Study
- Weekly Kubernetes Community Hangout Notes - March 27 2015
- Kubernetes Gathering Videos
- Welcome to the Kubernetes Blog!
Spotlight on SIG Apps
As Kubernetes adoption has grown, the conversation has shifted beyond running containers to managing increasingly complex application lifecycles. Modern platforms support stateless web services, stateful databases, batch processing, AI workloads, and platform services. At the same time, they must remain reliable during upgrades, scaling events, and infrastructure failures.
Every Kubernetes user relies on SIG Apps, whether they realize it or not. Deployments, StatefulSets, DaemonSets, Jobs, and CronJobs form the foundation of how applications are deployed, updated, scaled, and operated across the Kubernetes ecosystem.
SIG Apps is focused on improving workload resilience, refining application lifecycle management, and addressing the operational challenges that emerge when applications encounter node failures, rollout disruptions, and increasingly complex infrastructure environments.
In this spotlight, we sit down with two of the three SIG Apps chairs Janet Kuo and Maciej Szulik to discuss the evolution of Kubernetes workload management, the challenges of balancing application reliability with operational simplicity, and the future of application lifecycle management within one of Kubernetes’ most influential Special Interest Groups.
Introducing SIG Apps
Natalie Fisher: Can you introduce yourself, your role, and how you got involved in SIG Apps?
Janet Kuo: I'm a Senior Staff Software Engineer at Google and have been a Kubernetes maintainer since 2015, joining the community just as we were racing toward the 1.0 launch. In those early days, my focus was on building the core Workloads API, specifically developing controllers like Deployment, ReplicaSet, StatefulSet, and DaemonSet, defining their rollout behaviors, and bringing them from initial designs to GA. That hands-on work was my entry point into SIG Apps.
Since then, I've stayed deeply involved in both the technical and community sides of Kubernetes. I have led SIG Apps as Co-Chair and Tech Lead since 2019. Currently, in addition to maintaining the workloads API, I am driving new subprojects like the Agent Sandbox to ensure Kubernetes is ready for next-generation agentic and AI workloads.
Maciej Szulik: I started contributing to Kubernetes all the way back in 2014. Since then, I've worked across various areas of the project: controllers, kubectl, and apimachinery, which eventually led me to become one of the Chairs and Tech Leads for SIG Apps. My current focus is reliability of the workload controllers under the SIG Apps umbrella and stability and ease of use of kubectl as part of my SIG CLI Tech Lead role. I also care about overall community health and growth as part of my Steering Committee role. Outside of Kubernetes, I work as a Staff Platform Engineer at Defense Unicorns, where I'm helping make Kubernetes more airgap-native with a project called zarf.
The problem and the solution
SIG Apps is responsible for the core workload APIs that power how applications run on Kubernetes. From Deployments and StatefulSets to Jobs and CronJobs, these controllers determine how workloads are created, updated, scaled, and recovered when things go wrong.
As Kubernetes expands to support increasingly diverse workloads – including AI, batch processing, and large-scale distributed applications – SIG Apps continues to evolve these APIs while balancing reliability, backward compatibility, and operational simplicity.
NF: For readers who may not be familiar, what is SIG Apps, and what role does it play within the broader Kubernetes ecosystem?
MS: SIG Apps is the Kubernetes Special Interest Group responsible for the workloads APIs. CronJob and Job help running batch workloads, whereas DaemonSet, Deployment, ReplicaSet, and StatefulSet serve the majority of other applications. More broadly, SIG Apps owns the layer most developers actually touch day-to-day: the controllers that turn a workload specification into running, self-healing pods. It's the group deciding how Deployments roll out, how Jobs retry, how DaemonSets place a pod per node.
JK: Adding to what Maciej described, as the industry shifts, we are seeing a massive demand to run complex, non-traditional workloads like distributed AI training, batch computing, and dynamic agent environments. Our role is expanding: we aren't just maintaining the classic workloads API, but we are actively evolving it and establishing new patterns (like the Agent Sandbox) to make sure Kubernetes remains the best platform for the next generation of workloads, such as AI.
NF: Looking at the workload APIs owned by SIG Apps (Deployments, StatefulSets, DaemonSets, Jobs, and CronJobs), which areas are receiving the most attention from maintainers and contributors?
MS: After a long stretch focused on making batch workloads run smoothly on Kubernetes, we’ve shifted attention to make sure serving workloads (DaemonSets, StatefulSets, etc) aren’t left behind. This means performance and high-scale improvements to rollout and scaling behavior, plus working through our backlog of user-reported issues, prioritizing the ones with the strongest support from the user base.
Current focus areas
As Kubernetes workloads grow in scale and complexity, the challenges facing workload controllers evolve as well. We asked the SIG Apps chairs where contributors are focusing their efforts today and which resilience problems they believe are the highest priorities.
NF: From your perspective, what are the most important workload resilience problems SIG Apps is trying to solve today?
MS: Node lifecycle challenges have come up repeatedly across SIG Apps, SIG Node, and SIG Autoscaling discussions. DaemonSets and Jobs are just where the pain is most visible, since they're the workloads most directly bound to node state. Rather than solve it piecemeal within one SIG, we've settled on spinning up a dedicated Node Lifecycle Working Group to focus on this properly and hopefully land long-term solutions instead of one-off patches.
JK: From an AI perspective, resilience is critical. When you are running a massive distributed LLM training job that spans hundreds of GPUs, a single node failure can halt the entire pipeline. Similarly, if a DaemonSet that runs your logging or GPU monitoring agent gets stuck on a bad node, it impacts the entire cluster's health.
In addition to the work in the Node Lifecycle WG to handle infrastructure-level degradation, SIG Apps is addressing this at the orchestration layer through subprojects like JobSet (for distributed training) and LeaderWorkerSet (LWS) (for sharded LLM inference). These APIs introduce patterns like "all-or-nothing" failure handling, where a single pod or job failure triggers a coordinated group-level restart to resume from the last clean checkpoint, rather than letting stuck workloads hang in an inconsistent state.
Real-world impact
The work happening within SIG Apps extends far beyond controller implementations and API design. We wanted to understand what these improvements mean in practice for platform teams operating Kubernetes clusters in production.
NF: For platform teams operating Kubernetes in production, what practical improvements would they notice if the node lifecycle and workload resilience work currently under discussion is successfully delivered?
MS: I’m mostly looking from the sidelines, the folks actually in the Node Lifecycle Working Group would give you a sharper answer. But from where I sit, I’m hoping their work translates into fewer 3am pages that turn out to be “a DaemonSet rollout got stuck because node X was flaky, and someone had to manually cordon/delete/restart to unstick it.”
JK: +1 to what Maciej said, and beyond reducing manual intervention, platform teams will also see much better resource predictability and cost efficiency. For example, in AI workloads where GPU idle time is extremely expensive, having Kubernetes automatically detect a degraded node and reschedule the training coordinator or agent before the job crashes means less wasted compute and more stable job execution.
Challenges and trade-offs
Evolving APIs that millions of workloads rely on requires careful engineering and even more careful decision-making. We asked the SIG Apps chairs about the technical and operational trade-offs they weigh when introducing changes to Kubernetes’ core workload controllers.
NF: What are some of the hardest technical or operational trade-offs SIG Apps encounters when evolving core workload controllers?
MS: Honestly, a few tensions keep coming up: how aggressively a controller should give up on stuck pods, and what signals it actually needs to make that call correctly. At the same time, we always have to think about backward compatibility. Deployment, DaemonSet, and Job behavior has been depended on for a decade [by Kubernetes users, tooling, automation, and higher-level controllers], so even a change that’s clearly “more correct” can break automation people built around the old behavior without meaning to.
JK: One of our hardest trade-offs is resisting the urge to make "elegant" design changes that break backward compatibility. Instead, we have to design opt-in features that let users adopt new behaviors without forcing them on legacy workloads. When we need to support completely new paradigms, we prefer introducing them as CRDs first rather than bloating the core APIs, like we are doing with Agent Sandbox, JobSet, and LWS.
Looking ahead
While much of SIG Apps’ work focuses on maintaining the stability of existing workload APIs, the group is also shaping the future of Kubernetes through new enhancements and proposals. We concluded by asking about one proposal that recently returned to active development and what it represents for the future of workload management.
NF: The SIG recently discussed reviving KEP-4443 with a target release of Kubernetes 1.38. What opportunities or challenges does this proposal aim to address, and why is now the right time to revisit it?
KEP-4443 addresses a small but real gap in the Job API: a PodFailurePolicy can be configured to add a condition reason to the JobFailed condition, but different pod failure policy rules targeting different container exit codes all produce that same generic reason. The proposal is simple: an optional Name field on each PodFailurePolicyRule, which gets appended to the JobFailed condition reason, so higher-level tools like JobSet can finally react differently depending on which rule triggered the failure.
As for timing, the answer is as simple as it always is in open source: we lost the original contributor who was driving this. Now we’ve got someone new interested in picking it up, that’s why we’re targeting the next release.
Getting Involved
NF: For someone interested in contributing to SIG Apps, where would you recommend they start, especially if they are not yet a Kubernetes maintainer?
MS: The best place to start is the #sig-apps slack channel and our regular SIG Apps meetings. We’ve all started there, and if it feels intimidating, or nobody replies right away, that’s completely normal. Everyone's busy. It's not personal.
JK: In addition to what Maciej answered, I'd suggest looking at our newer subprojects and initiatives. Contributing to stable APIs like Deployment or StatefulSet can be daunting because the barrier for making changes is very high due to backward compatibility, and there is much less low-hanging fruit.
If you are new to the community, projects like the Agent Sandbox are fantastic entry points. They are actively evolving, have a friendly group of maintainers, and offer plenty of greenfield development opportunities where you can make a significant impact quickly.
Summary
SIG Apps has shaped how Kubernetes applications are deployed and operated since the project’s earliest days. While users often interact with Deployments, StatefulSets, Jobs, and DaemonSets without thinking about the controllers behind them, the work within SIG Apps continues to shape the reliability and scalability of workloads across the Kubernetes ecosystem.
From improving workload resilience and node lifecycle behavior to enabling new patterns for AI and distributed computing, the SIG is evolving Kubernetes while remaining committed to one of the project’s core principles: preserving the stability and backward compatibility that users depend on. Whether you’re interested in core workload APIs, emerging projects like Agent Sandbox, or helping improve the operational experience of Kubernetes users everywhere, SIG Apps offers many opportunities to get involved.
Kubernetes v1.37: Tracking When a PersistentVolumeClaim Was Last Used (Beta)
Kubernetes v1.37 promotes the PersistentVolumeClaimUnusedSinceTime feature gate to Beta (enabled by
default). With this feature, the PersistentVolumeClaim (PVC) protection controller adds an Unused
condition to each PVC, telling you whether any running pod currently references it — no custom
tooling or cross-referencing required.
For the API definition of PVC conditions, see the
PersistentVolumeClaim API reference.
Read on to learn how the Unused condition works and how to use it.
Why track PVC usage?
In large-scale Kubernetes clusters, it is common for users to create PVCs and then delete the associated pods without cleaning up the storage, because Kubernetes does not automatically delete PVCs when their pods are removed (to protect against accidental data loss). Over time, these orphaned PVCs may accumulate, silently consuming storage capacity and driving up cloud costs.
Before Kubernetes v1.37, it was easy to identify an unused PersistentVolume, but much harder to determine whether a PVC was still being used. Doing so required cross-referencing pods, PersistentVolumes, and PVCs over a potentially large window of time. Administrators often resorted to custom monitoring pipelines or scripts to answer a seemingly simple question: "Is anything actually using this volume?"
The PersistentVolumeClaimUnusedSinceTime feature solves this by making the answer available
natively in the PVC status. Once the feature is enabled, every PVC gets an Unused condition managed
by the PVC protection controller.
User stories
- Storage administrator: "I want to know which PVCs in my cluster are not being used by any pod so I can safely identify orphaned volumes and schedule them for deletion."
- DevOps engineer: "I want to list PVCs that have the
Unusedcondition set toTrueso I can automate cleanup in development environments."
How does it work?
The PVC protection controller — which already watches pods to enforce the
storage object in use protection
— now also manages a new Unused condition on PVCs.
The condition works as follows:
| Scenario | Condition status | Reason |
|---|---|---|
| No non-terminal pods reference the PVC | Unused=True | NoPodsUsingPVC |
| At least one running or pending pod references the PVC | Unused=False | PodUsingPVC |
A few details worth noting:
- Terminated pods don't count: A pod that has completed (phase
SucceededorFailed) does not keep the PVC marked as in use. This means batch jobs withrestartPolicy: Neverwon't prevent the PVC from becomingUnused=Trueafter they finish. - Pending pods do count: Even an unschedulable pod (for example, one with an impossible node selector) still counts as using the PVC. The intent to use the volume is enough.
- Multiple pods: If several pods reference the same PVC, the condition transitions to
Unused=Trueonly after the *last" non-terminated pod is removed or terminates.
Using lastTransitionTime to find when a PVC became idle
Like every Kubernetes condition, the Unused condition carries a standard lastTransitionTime
field. This means you get a useful bonus for free: when the condition transitions from False to
True, the lastTransitionTime records exactly when the PVC became idle. You can use this
timestamp to answer questions like "how long has this PVC been sitting unused?" — for example,
to find PVCs that have been idle for more than 30 days (see the
example query below).
What changed from Alpha to Beta?
Kubernetes v1.36 introduced this feature as Alpha, where you had to enable the
PersistentVolumeClaimUnusedSinceTime feature gate explicitly. For Beta in v1.37, the feature gate
is enabled by default, and the feature has full end-to-end test coverage.
How to use it
Since the feature is Beta and enabled by default in Kubernetes v1.37, the Unused condition will
appear on PVCs automatically. Here is a walkthrough to see it in action:
Create a PVC:
apiVersion: v1 kind: PersistentVolumeClaim metadata: name: my-data spec: accessModes: - ReadWriteOnce resources: requests: storage: 1GiAfter a short time, inspect the PVC conditions:
kubectl get pvc my-data -o jsonpath='{.status.conditions[*]}' | jq .You should see an
Unusedcondition with statusTrueand reasonNoPodsUsingPVC:{ "lastProbeTime": null, "lastTransitionTime": "2026-09-14T12:03:11Z", "message": "No pods are currently referencing this PVC", "reason": "NoPodsUsingPVC", "status": "True", "type": "Unused" }Create a pod that uses the PVC:
apiVersion: v1 kind: Pod metadata: name: my-app spec: containers: - name: app image: busybox command: ["sleep", "3600"] volumeMounts: - name: data mountPath: /data volumes: - name: data persistentVolumeClaim: claimName: my-dataCheck the condition again — it should now show
Unused=False:kubectl get pvc my-data -o jsonpath='{.status.conditions[?(@.type=="Unused")].status}'Output:
FalseDelete the pod and wait for the condition to transition back to
Unused=True:kubectl delete pod my-app kubectl get pvc my-data -o jsonpath='{.status.conditions[?(@.type=="Unused")]}'The condition should show
Unused=Truewith reasonNoPodsUsingPVCagain.
Finding unused PVCs across the cluster
To list all PVCs that have been unused for more than 30 days, you can use a command like:
Note:
This command usesjq, a command-line JSON processor.kubectl get pvc -A -o json | jq -r '
.items[]
| select(.status.conditions[]? | select(.type=="Unused" and .status=="True"))
| select(
(.status.conditions[] | select(.type=="Unused") | .lastTransitionTime) as $t
| (now - ($t | fromdateiso8601)) > (30 * 86400)
)
| "\(.metadata.namespace)/\(.metadata.name) unused since \(.status.conditions[] | select(.type=="Unused") | .lastTransitionTime)"
'
What's next?
Depending on feedback and adoption, the Kubernetes project intends to graduate this feature to General Availability (GA) in a future release. If you have feedback on this feature, please open an issue in the kubernetes/kubernetes repository.
To learn more about this enhancement, refer to KEP-5541: PersistentVolumeClaim last used time.
Getting involved
The Kubernetes project always welcomes new contributors. If you would like to get involved, you can join us at SIG Storage.
If you would like to share feedback, you can do so on our public Slack channel (visit https://slack.k8s.io/ for an invitation if you need one).
Special thanks to the contributors who helped design and implement this feature (alphabetical order):
- Arvind Parekh (ArvindParekh)
- Hemant Kumar (gnufied)
- Jan Šafránek (jsafrane)
- Kevin Hannon (kannon92)
- Roman Bednář (RomanBednar)
Kubernetes v1.37: Hardening Container Storage with Bind Mount Options and EmptyDir Permissions
Kubernetes v1.37 brings important storage security features: emptyDir permission modes and bind mount options. They help application programmers and security professionals implement rigorous security policies, for example, prohibiting deletion of files across containers or execution of arbitrary binaries from writable volumes, directly in Kubernetes without any complicated circumvention.
Linux storage and permission fundamentals
Before diving into the new Kubernetes features, let us briefly review the low-level Linux security mechanisms that make them possible.
Bind mount flags
When Linux mounts or remounts a directory, Virtual File System (VFS) flags control what actions are permitted on that filesystem:
noexec: Do not permit direct execution of any binaries on the mounted filesystem.nosuid: Do not allow set-user-identifier or set-group-identifier bits to take effect.nodev: Do not interpret character or block special devices on the file system.
Directory permissions and the sticky bit
Standard Unix permissions regulate access across three scopes: Owner, Group, and Others (e.g., 0755 or 0777).
Beyond standard read, write, and execute bits, Linux supports the sticky bit (as in mode 01777).
When applied to a directory, the sticky bit ensures that a file inside that directory can only be deleted or renamed by the file's owner or root. This is essential for shared writable directories like /tmp.
Motivation for the improvements
Why does Kubernetes need bind mount options and emptyDir permissions?
The primary goal of these features is to increase the security of Kubernetes workloads by allowing security-related bind mount options on volume mounts. By default, volumes are bind-mounted into containers by the container runtime and kubelet without noexec, nosuid, or nodev flags. This default can undermine security. For example, with noexec missing, a compromised process can use any writable volume (emptyDir, PersistentVolume, etc.) to download, chmod +x, and execute arbitrary binaries even when the container has a read-only root filesystem (readOnlyRootFilesystem: true). Supporting noexec, nodev, and nosuid gives users a native way to harden volume mounts to match security benchmarks and policy.
The gap is most visible with emptyDir volumes, which are the most common writable volume type and have been the subject of multiple security findings:
- Issue #48912: Recognized security gap - the inability to set mount options on
emptyDirwas flagged in an audit but remained unresolved until now. - Issue #119627: Kubernetes 1.24 Security Audit (Finding NCC-E003660-7HM) - external auditors specifically noted that the inability to mount
emptyDirwithnoexecrepresents a security failure.
However, the same gap applies to all volume types. PersistentVolumes have a mountOptions field, but those options are filesystem-level flags applied by the CSI driver at the node, so they do not reliably translate into bind mount flags inside the container. Previously, there was no mechanism to set noexec, nosuid, or nodev on the bind mount that the container runtime creates for any volume type.
Additionally, the emptyDir volume type defaults to creating directories with a hardcoded mode of 0777.
This previously meant that any process that can discover the volume could read, write, and delete anything in the volume, regardless of who created it.
You could - and still can - use an initial container to set a different access mode, but this is more complex, and hard to verify for compliance.
This causes real problems:
- Multi-container pods sharing an
emptyDircould not prevent one container from deleting another's files. The sticky bit (01777) solves this, but there was no native way to set it. - Some applications and security frameworks expect
/tmpdirectories to have the sticky bit set (mode01777). Without native support for setting theemptyDirmode, users had to use init containers or alternative volume types to meet this requirement. - Platform engineers who want tighter permissions (e.g.,
0750for owner and group only) have to use init containers runningchmod, which adds unnecessary complexity.
The emptyDir volume type was a notable gap.
As one of the most common writable volume types in Kubernetes, it had no way to control its creation permissions.
Real-world use cases
Application developers, working closely with security engineers, are responsible for maintaining the security posture of their applications and ensuring workloads do not pose risks to the wider infrastructure. These features allow development teams to confidently address critical security scenarios:
Preventing Privilege Escalation on Writable Mounts: An application developer configuring temporary workspace volumes (like emptyDir or /tmp mounts) can ensure they are mounted with nosuid and noexec. This guarantees that even if the application is compromised and a malicious payload is downloaded, the workload cannot execute the payload or use it to escalate privileges on the node.
Securing Shared Scratch Space in Multi-Container Pods: A developer configuring CI/CD pipeline pods often needs multiple containers (e.g., a builder container and a sidecar logger) to share a workspace. By setting mode: 01777 on an emptyDir, the developer ensures the shared workspace behaves like a traditional Unix /tmp directory. Each container can write files independently, but a compromised process in one container cannot delete the build artifacts produced by another.
Enforcing Principle of Least Privilege for Application Data: An application developer deploying a database pod can lock down access to the database's temporary storage. By setting mode: 0750 on the emptyDir, the developer ensures that only the specific database user and group can read or write to the volume, explicitly denying access to any other processes or sidecars in the same pod.
Note: Both features are behind Alpha feature gates in Kubernetes v1.37. To use them, enable VolumeBindMountOptions and EmptyDirVolumeMode on the API server and kubelet.
Example 1: Enforcing bind mount options
This full Pod manifest mounts an emptyDir volume at /tmp with bindMountOptions: [noexec, nosuid].
apiVersion: v1
kind: Pod
metadata:
name: hardened-bindmount-pod
namespace: default
spec:
os:
name: linux
containers:
- name: hardened-app
image: alpine:latest
command: ["sleep", "3600"]
securityContext:
readOnlyRootFilesystem: true
volumeMounts:
- name: temp-storage
mountPath: /tmp
bindMountOptions:
- noexec
- nosuid
volumes:
- name: temp-storage
emptyDir: {}
Example 2: emptyDir volume permission mode with sticky bit
This full Pod manifest creates an emptyDir volume using mode: 01777 to enforce standard Unix /tmp sticky bit protections across containers.
apiVersion: v1
kind: Pod
metadata:
name: hardened-emptydir-pod
namespace: default
spec:
os:
name: linux
containers:
- name: app-container
image: alpine:latest
command: ["sleep", "3600"]
volumeMounts:
- name: shared-tmp
mountPath: /tmp
volumes:
- name: shared-tmp
emptyDir:
mode: 01777
Verifying the features in Linux
To verify that these features are actively enforcing restrictions, you can run kubectl exec into the container. The following examples simulate attempts to perform actions that are successfully blocked by these features.
Verifying noexec
Attempt to write and run a script on a volume mounted with noexec:
# 1. Exec into the pod
kubectl exec -it hardened-bindmount-pod -- sh
# 2. Create an executable script on the mounted volume
cd /tmp
echo '#!/bin/sh' > test.sh
echo 'echo "Executing untrusted code..."' >> test.sh
chmod +x test.sh
# 3. Attempt to run the script
./test.sh
Expected result:
sh: ./test.sh: Permission denied
Even if an executable file is created, the Linux kernel refuses execution because MS_NOEXEC is enforced at the bind mount level.
Verifying the sticky bit
Attempt to delete another user's file in an emptyDir with 01777 permission mode:
# 1. Exec into the pod
kubectl exec -it hardened-emptydir-pod -- sh
# 2. Verify directory permissions on /tmp
ls -ld /tmp
# Output: drwxrwxrwt 2 root root ... /tmp (Notice the 't' indicating sticky bit)
# 3. Create a file as the guest user
su -s /bin/sh -c "touch /tmp/guest_file" guest
# 4. Attempt to delete that file as nobody
su -s /bin/sh -c "rm /tmp/guest_file" nobody
Expected result:
rm: can't remove '/tmp/guest_file': Operation not permitted
The kernel blocks deletion because the sticky bit (01777) restricts file removal strictly to the owner of the file.
Things to know
Keep these key details in mind as you begin using these features. Full details are available in the official documentation for bind mount options, emptyDir volume mode, and emptyDir volumes.
- Default unchanged: If you omit
bindMountOptionsor do not set anemptyDirmode, you get standard default behaviors (like0777permissions) exactly as before. - Broad volume support:
bindMountOptionsworks withemptyDir, PersistentVolumes, CSI volumes, projected volumes, ConfigMaps, Secrets, and more. The only exception is image volumes, which are explicitly unsupported. Themodefield works with allemptyDirmedium types: default (disk-backed),Memory(tmpfs), andHugePages. - Runtime capabilities matter (for
bindMountOptions): The container runtime must support the CRImount_optionsfield and advertise it viaruntimeFeatures. The scheduler uses node declared features to avoid placing pods on incompatible nodes. If a pod reaches such a node anyway, the kubelet rejects it. There is no silent degradation. However, usingmodefor anemptyDirdoes not require runtime support. - Not the same as PV mountOptions: PersistentVolume
mountOptionsapply at the storage layer via the CSI driver. The newbindMountOptionscontrols bind mount flags applied inside the container by the runtime. They operate at different layers and do not conflict. - fsGroup interaction: If
fsGroupis set in the pod's security context, the group permissions applied byfsGroupwill override themodespecified for theemptyDirvolume. This is the same behavior that exists fordefaultModeon Secret and ConfigMap volumes. - Linux only: Flags like
noexec,nosuid,nodev, and Unix permission modes are Linux concepts.bindMountOptionshas no effect on Windows nodes. On Windows, themodefield is also skipped foremptyDirvolumes, since Windows does not support Unix-style file permissions. - Version skew safety: Both features are additive. For
emptyDirmode: if the API server has the gate enabled but the kubelet does not, the field is accepted but ignored - the kubelet falls back to0777. ForbindMountOptions: the scheduler uses Node Declared Features to prevent placing pods on nodes without runtime support; if a pod reaches such a node, the kubelet rejects it rather than silently ignoring the options. - Feature Gates: Both capabilities are available as Alpha features in Kubernetes v1.37:
VolumeBindMountOptions: Controls bind mount flags on volume mounts.EmptyDirVolumeMode: Controls creation permission modes onemptyDirvolumes.
How do I get involved?
These new features are driven by SIG Node and SIG Storage.
You can find more details in the KEPs for these enhancements: KEP-5855 (bind mount options) and KEP-5502 (emptyDir permission mode).
Reach out to SIG Node:
- Slack: #sig-node
- Mailing list
Reach out to SIG Storage:
- Slack: #sig-storage
- Mailing list
Kubernetes v1.37: Pod-Level Resource Managers graduated to Beta
With the release of Kubernetes v1.37, the Pod-Level Resource Managers feature has graduated to Beta status (disabled by default)!
First introduced as an Alpha feature in
Kubernetes v1.36,
this enhancement builds on
Pod-Level Resources by
equipping Kubelet's Topology Manager, CPU Manager, and Memory Manager to use
Pod-level resource declarations (.spec.resources) directly when making
hardware placement decisions.
Bringing pod-level resources to node managers
Before this feature, obtaining exclusive NUMA-aligned CPU cores or memory for latency-critical applications forced cluster operators into an all-or-nothing choice: assign integer resource requests to every container in the Pod, or forfeit exclusive NUMA alignment entirely. For modern workloads running lightweight sidecars (such as logging agents or telemetry exporters), allocating dedicated physical cores to auxiliary containers was wasteful.
Pod-Level Resource Managers solves this challenge by enabling hybrid allocation models. The Kubelet can reserve exclusive NUMA-aligned resources for primary application containers while placing non-Guaranteed sidecars into a pod-isolated shared pool. This ensures primary workloads get unthrottled, NUMA-local performance while sidecars benefit from running in a pod-isolated shared pool, enjoying local NUMA alignment and protection from external node interference without consuming dedicated physical cores.
What's new in Beta
Graduating to Beta brings key operational and API enhancements:
- Graduation to Beta: Controlled by the
PodLevelResourceManagersfeature gate, available to opt in (disabled by default) in Kubernetes v1.37. - PodResources API Reporting: The
v1PodResources gRPC service (PodResourcesLister) introduces top-levelcpu_idsandmemoryfields onPodResourcesresponses. Monitoring tools and device plugins can query pod-level exclusive assignments directly without double-counting container allocations.
Getting started and providing feedback
For a deep dive into the technical details and configuration of this feature, check out the official documentation:
To follow a step-by-step tutorial on configuring and deploying workloads:
To learn more about how to assign resources to pods:
As this feature moves through Beta toward GA, your feedback is invaluable. Please report any issues or share your experiences via the standard Kubernetes communication channels:
Kubernetes Changed Block Tracking API - Beta Differences
Changed Block Tracking (CBT) support for CSI drivers
shipped as Alpha in
September 2025. With the March 2026 v1.0.0 release of the
external-snapshot-metadata
project, the feature moved to Beta.
If you aren't yet familiar with changed block tracking for storage in
Kubernetes, the
Alpha announcement covers
the motivation, the three primary components (the CSI SnapshotMetadata
gRPC service, the SnapshotMetadataService CRD, and the
external-snapshot-metadata sidecar), and a walkthrough of how to use the
API. CBT currently applies to block volumes; file-volume and network
file-share changed-list tracking is not covered by this feature. This post
focuses on what is different in Beta.
What's new in Beta
The main change in that release was the promotion of the
SnapshotMetadataService CRD from v1alpha1 to v1beta1. The CRD used to
advertise a driver's metadata service now serves
cbt.storage.k8s.io/v1beta1. The schema itself is unchanged, but this
release removed v1alpha1 (rather than serving it alongside the new version).
If you are upgrading from Alpha, you need to:
- Re-apply the CRD definition shipped with
v1.0.0. - Update SnapshotMetadataService manifests to use
apiVersion: cbt.storage.k8s.io/v1beta1. - Update any client or controller code that talks to the CRD.
This is a one-time change. There is no automatic conversion between the two versions.
Compatibility
- Minimum Kubernetes version: 1.33
- CSI spec: 1.10 or newer
- Container image:
registry.k8s.io/sig-storage/csi-snapshot-metadata:v1.0.0
Trying it out
The Getting Started section in the Alpha blog still applies. In short:
- Make sure your CSI driver supports volume snapshots and ships the
external-snapshot-metadatasidecar. - Install the SnapshotMetadataService CRD (the
v1beta1definition from thev1.0.0release). - Create a SnapshotMetadataService resource for your driver.
- Use a client —
snapshot-metadata-lister, or your own implementation — to callGetMetadataAllocatedandGetMetadataDelta.
If you want to see the full flow end-to-end, the hostpath driver example is a good starting point.
What's next?
The focus for the rest of the Beta cycle is wider CSI driver adoption and operational feedback before the feature moves towards GA. If you maintain a CSI driver, this is a good time to evaluate adding support. If you are building a backup application on top of the API, feedback on the streaming clients and the iterator package is very welcome.
Where can I learn more?
- The CSI developer documentation for snapshot metadata.
- KEP-3314.
- The external-snapshot-metadata repository.
- The gRPC schema.
- The snapshot-metadata-lister example client.
How do I get involved?
This work is the result of contributions from many people across SIG Storage. A big thank you to everyone who helped review, code, and test the feature through Alpha and into Beta:
- Ben Swartzlander (bswartz)
- Carl Braganza (carlbraganza)
- Daniil Fedotov (hairyhum)
- Ivan Sim (ihcsim)
- Nikhil Ladha (Nikhil-Ladha)
- Praveen M (iPraveenParihar)
- Rakshith R (Rakshith-R)
- Xing Yang (xing-yang)
If you would like to get involved with CSI or storage in Kubernetes, SIG Storage is the place to start. The Data Protection Working Group also holds regular meetings, and new attendees are always welcome.
Kubernetes v1.37: Memory QoS Graduates to Beta
Memory QoS has graduated to Beta in Kubernetes v1.37 and is now enabled by default. On Linux nodes running cgroup v2, the feature uses the memory controller to give the kernel better guidance on how to treat container memory. It was first introduced as Alpha in v1.22, and expanded in v1.36 with tiered memory reservation.
This post covers what changed in v1.37, what the Beta promotion means for cluster operators, and how to configure the feature.
What changed in v1.37
Memory QoS is Beta and enabled by default
The MemoryQoS feature gate is now Beta in v1.37.
This means every v1.37 kubelet has the feature gate turned on without any
configuration change. Turning on the feature by default is safe because the
default kubelet configuration does not enable memory throttling or memory
reservation. No memory.high, memory.min, or memory.low values are
written to cgroups unless you explicitly configure them.
You can opt into specific behaviors through kubelet configuration fields:
- Set
memoryThrottlingFactor(for example,0.9) to enablememory.highthrottling on Burstable and BestEffort containers. The default isnull, which means no throttling. - Set
memoryReservationPolicytoTieredReservationto enable tiered memory protection viamemory.minandmemory.low. The default isNone, which means no memory reservation.
Default memoryThrottlingFactor changed to null
In earlier Alpha releases, memoryThrottlingFactor defaulted to 0.9, which
meant enabling the feature gate caused the kubelet to set
memory.high on containers. In v1.37, the default is null, so the kubelet
does not set memory.high unless you configure a value.
This change was made because, with the feature gate now on by default, an
automatic memory.high could throttle workloads that were previously running
without throttling. Making it null ensures that upgrading to v1.37 does not
change runtime behavior for existing clusters.
If your kubelet configuration file already contains an explicit
memoryThrottlingFactor value, that value is preserved during the upgrade and
throttling continues to work as before. If your configuration file does not
include memoryThrottlingFactor, the kubelet uses the new null default and
stops setting memory.high. To keep throttling in that case, add
memoryThrottlingFactor explicitly:
apiVersion: kubelet.config.k8s.io/v1beta1
kind: KubeletConfiguration
memoryThrottlingFactor: 0.9
How to configure MemoryQoS in v1.37
For full details on configuring Memory QoS, see Memory QoS with cgroup v2, Configuring memory reservation, and System requirements
Enable memory throttling only
Set memoryThrottlingFactor to a value between 0 and 1. The kubelet uses this
factor to calculate memory.high for Burstable and BestEffort containers. See
Memory throttling
for how memory.high is calculated for each QoS class.
apiVersion: kubelet.config.k8s.io/v1beta1
kind: KubeletConfiguration
memoryThrottlingFactor: 0.9
Enable memory throttling and tiered reservation
apiVersion: kubelet.config.k8s.io/v1beta1
kind: KubeletConfiguration
memoryThrottlingFactor: 0.9
memoryReservationPolicy: TieredReservation
Enable tiered reservation without throttling
apiVersion: kubelet.config.k8s.io/v1beta1
kind: KubeletConfiguration
memoryReservationPolicy: TieredReservation
Disable Memory QoS entirely
To disable the feature after upgrading, set the feature gate to false
and ensure a compatible kubelet configuration. The kubelet rejects the configuration if
memoryThrottlingFactor is set to anything other than the former default of 0.9, or if
memoryReservationPolicy is TieredReservation, so remove or adjust those fields if you set them.
apiVersion: kubelet.config.k8s.io/v1beta1
kind: KubeletConfiguration
featureGates:
MemoryQoS: false
When the feature gate is off, or memoryReservationPolicy is not TieredReservation, the
kubelet resets stale protection at startup on cgroup v2 nodes: memory.min=0 and memory.low=0
on the root kubepods cgroup, and memory.low=0 on the Burstable QoS cgroup.
For containers, stale memory.high values are reset to max on reconciliation paths such as restart or resize.
Known limitation: memory reservation is node-wide
memoryReservationPolicy applies to every pod on the node. With TieredReservation, every Guaranteed pod gets memory.min and every Burstable pod gets memory.low; there is no way to opt individual pods in or out. A node that mixes workloads needing hard reservation with workloads that should stay reclaimable has to choose one policy for all of them.
Hard reservation also covers everything charged to the container's cgroup, including page cache, so a pod that reads large files can hold memory the kernel would otherwise reclaim to serve its neighbors.
SIG Node is tracking both in kubernetes/kubernetes#140246. If this affects you, that issue is the best place to describe your workload.
What to expect next
The next milestone for Memory QoS is graduation to GA. Feedback from Beta users will shape any remaining adjustments before that step. If you run into issues, please file bugs at kubernetes/kubernetes.
How can I learn more?
- KEP-2570: Memory QoS
- Pod Quality of Service Classes
- Memory QoS with cgroup v2
- Managing Resources for Containers
- Kubernetes cgroups v2 support
- Linux kernel cgroups v2 documentation
Getting involved
This feature is driven by SIG Node. If you are interested in contributing or have feedback, you can reach out through:
Kubernetes v1.37: Native Histograms Graduates to Beta
I'm excited to announce that native histogram support for Kubernetes metrics is graduating to Beta and is enabled by default in Kubernetes v1.37!
Native histograms (previously introduced as Alpha in Kubernetes v1.36 under KEP-5808) bring high-resolution, low-cardinality observability to Kubernetes metrics. By adopting Prometheus Native Histograms, Kubernetes components now expose latency and duration metrics with far greater accuracy while significantly reducing telemetry storage and scraping overhead.
Why move beyond classic histograms?
Since the early days of Kubernetes observability, duration and latency metrics (such as API server request latencies or scheduling durations) have relied on classic Prometheus histograms.
Classic histograms require metric authors to define a static list of cumulative bucket boundaries (le labels), such as 0.005, 0.01, 0.025, 0.05, 0.1, 0.25, 0.5, 1, 2.5, 5, 10. While familiar, this approach introduces three major challenges:
- The Bucket Guessing Game: If a workload's latency profile changes, for example, shifting into microsecond ranges or experiencing long-tail tail latencies beyond the highest bucket, the histogram loses visibility. Specifying bucket boundaries upfront requires knowing the distribution before observing it
- High Cardinality & Storage Cost: With classic histograms, each bucket boundary is exported as a separate time series (
_bucket{le="..."}). A histogram with 10 buckets across multiple labels multiplies the number of time series by 10, increasing memory consumption in Prometheus and inflating time series database (TSDB) storage costs - Interpolation Error in Quantiles: Calculating percentiles using
histogram_quantile()relies on linear interpolation between static bucket boundaries. When bucket spans are coarse, quantile calculations can suffer from significant estimation error
What are Prometheus native histograms?
Prometheus Native Histograms replace static user-defined buckets with dynamic, exponential buckets.
Instead of emitting a separate time series for every single bucket boundary, a native histogram is stored as a single time series containing a rich schema of positive and negative spans, zero thresholds, and exponential scaling factors.
- High Resolution Automatically: Exponential buckets dynamically adjust to any value range — from nanoseconds to hours — without requiring pre-configured bucket boundaries
- Up to 90% Fewer Time Series: By consolidating buckets into structured spans within a single time series, scraping and storage overhead are dramatically reduced
- Accurate Quantile Calculation: Quantiles can be calculated with mathematical bounds on error (≃5% worst-case relative error under default settings) across the entire spectrum of observations
How native histograms work in Kubernetes
In Kubernetes, native histogram support is implemented directly inside the shared metrics subsystem (k8s.io/component-base/metrics).
Figure 1 illustrates how native histogram metrics are processed and exposed across Kubernetes components.
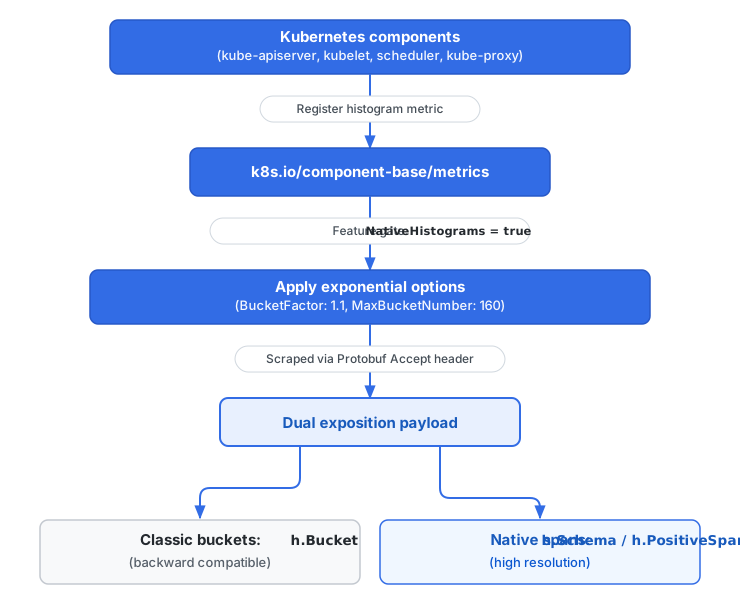
Figure 1. Native histogram processing and dual exposition flow in Kubernetes.
1. Dual exposition for zero breaking changes
A primary design requirement for KEP-5808 was zero disruption for existing observability stacks. When the NativeHistograms feature gate is enabled, Kubernetes components use dual exposition:
- Classic buckets (
h.Bucket) are still emitted alongside native spans. Existing Prometheus servers, dashboards, and alerting rules that rely on traditional text scraping or classic bucket labels continue to work unmodified - Native spans (
h.Schema,h.PositiveSpan) are included in the same Protobuf payload for collectors that understand native histograms
2. Tuned default exponential configuration
When NativeHistograms is enabled, the k8s.io/component-base/metrics package automatically applies standardized exponential options to all histogram metrics:
BucketFactor: 1.1: Configures exponential buckets where each bucket is at most 10% wider than the preceding one. This guarantees a mathematically bounded worst-case relative error of at most ~5% for quantile calculations regardless of whether an operation takes 1 millisecond or 10 seconds.MaxBucketNumber: 160: Caps the maximum number of buckets per histogram to 160. Following OpenTelemetry SDK recommendations for base-2 exponential histogram aggregation, this limit protects component memory usage even under extreme outlier distributions.
3. Broad component support
Because native histograms are integrated into component-base/metrics, all major Kubernetes control plane and node components inherit support automatically, including:
kube-apiserver(e.g.,apiserver_request_duration_seconds, authentication/authorization metrics, validation latencies)kube-scheduler(e.g.,scheduler_plugin_execution_duration_seconds,scheduler_scheduling_algorithm_duration_seconds)kubelet(node-level container runtime and pod lifecycle metrics)kube-controller-managerandkube-proxy
How to scrape native histograms
The simple answer: upgrade to Kubernetes v1.37, and it works.
Because Kubernetes v1.37 enables NativeHistograms by default, your cluster is already emitting dual-exposition metrics. How you configure Prometheus to scrape native histograms depends on your Prometheus version:
1. Prometheus scrape configuration by version
Prometheus 3.0+ (Recommended): Use explicit per-job configuration in your
scrape_configsrather than global flags (the global--enable-feature=native-histogramsflag is deprecated in Prometheus 3.9+):scrape_configs: - job_name: 'kubernetes-apiservers' scrape_native_histograms: true always_scrape_classic_histograms: true # Recommended during transitionYou must read the caution in Migrating dashboards and alerts in the Native Histograms documentation. In summary: always set
always_scrape_classic_histograms: trueduring your transition period. Without this setting, Prometheus will only ingest the native format and stop ingesting classic_bucket,_count, and_sumseries. Settingalways_scrape_classic_histograms: trueensures existing dashboards (histogram_quantile(..._bucket...)) and alerts continue to work while you migrate them to native histograms.Prometheus 2.40 – 2.x: Enable Native Histograms globally by starting Prometheus with the feature flag:
prometheus --enable-feature=native-histogramsNote that in Prometheus 2.x, this is an all-or-nothing setting for all scrape targets.
2. Verify Protobuf dual exposition
Standard Prometheus text scraping (application/openmetrics-text or plain text format) only transfers classic buckets. When scrape_native_histograms is enabled, Prometheus automatically negotiates Protobuf format with Kubernetes endpoints.
You can verify that a Kubernetes component is exporting native histograms using curl with an Accept header specifying Protobuf. For example:
## THIS IS NOT SECURE. ONLY DO THIS IN A TEST CONTEXT.
curl --insecure \
-H "Accept: application/vnd.google.protobuf;proto=io.prometheus.client.MetricFamily;encoding=delimited" \
--header "Authorization: Bearer $(cat /var/run/secrets/kubernetes.io/serviceaccount/token)" \
https://localhost:6443/metrics
When decoded, the returned MetricFamily for histogram metrics (like apiserver_request_duration_seconds) will contain both traditional bucket entries and populated schema / positive_span fields.
Querying native histograms in PromQL
Once native histograms are ingested into Prometheus, you can query them using standard PromQL histogram functions without needing static le bucket labels or _bucket suffixes:
# 1. Calculating P99 latency for a single target:
# Classic histogram (requires _bucket suffix):
histogram_quantile(0.99, rate(apiserver_request_duration_seconds_bucket[5m]))
# Native histogram (operates directly on the metric name):
histogram_quantile(0.99, rate(apiserver_request_duration_seconds[5m]))
# 2. Aggregating across multiple instances (e.g., all API servers):
# Classic histogram (requires sum by (le) to preserve bucket boundaries):
histogram_quantile(0.99, sum by (le) (rate(apiserver_request_duration_seconds_bucket[5m])))
# Native histogram (no grouping by le required!):
histogram_quantile(0.99, sum(rate(apiserver_request_duration_seconds[5m])))
With native histograms, functions like histogram_quantile() operate directly on the dynamic exponential spans inside the time series, producing highly accurate quantiles without static bucket interpolation error.
For official documentation on querying Native Histograms in PromQL, see:
- PromQL
histogram_quantiledocumentation - PromQL
histogram_fractiondocumentation - PromQL
histogram_sumdocumentation - PromQL
histogram_countdocumentation - PromQL
histogram_countdocumentation - PromQL
histogram_stddevandhistogram_stdvardocumentation
Dashboard migration & rollback strategy
Recommended migration workflow
To safely transition your monitoring infrastructure to Native Histograms without breaking existing alerts or dashboards, I recommend a four-step migration workflow:
- Enable Both Formats: In your Prometheus 3.x scrape config, set
scrape_native_histograms: trueANDalways_scrape_classic_histograms: trueso both formats are collected safely during transition - Migrate Queries: Update your Grafana dashboards and Prometheus alerting rules from classic quantile queries (
histogram_quantile(..._bucket...)) to native histogram queries (histogram_quantile(...)), and replace references to classic_countand_sumseries withhistogram_count(...)andhistogram_sum(...) - Verify in Staging/Production: Validate that all dashboards and SLO alerts fire and graph correctly using the new native histogram queries
- Unlock ~10x Storage Savings: Once migration is complete, set
always_scrape_classic_histograms: false. Prometheus will stop ingesting the static_bucket,_count, and_sumtime series, reducing your histogram time series count by up to 90%!
Opt-out and rollback flexibility
Because native histograms are dual-exposed, using them is entirely opt-in from a collector perspective:
- Instant Collector Rollback: If you need to stop ingesting native histograms, simply set
scrape_native_histograms: falsein your Prometheus job configuration. No Kubernetes restart is required, and Prometheus will immediately resume scraping only the classic format without data loss - Component Feature Gate Rollback: Administrators can also disable the feature gate on Kubernetes components using
--feature-gates=NativeHistograms=false(requires component restart)
What's next & how to get involved
As native histograms progress toward General Availability (GA) in future Kubernetes releases, SIG Instrumentation will continue evaluating ecosystem readiness, performance characteristics, and long-term plans for eventually deprecating static classic buckets once native histogram adoption becomes ubiquitous across the monitoring community.
- Read the KEP-5808 page or the KEP GitHub issue to learn more.
- Read the Prometheus Native Histograms specification and PromQL querying functions documentation
- Get involved with SIG Instrumentation on Slack in #sig-instrumentation or join the weekly SIG meetings
Acknowledgements
A huge thank you to contributors across SIG Instrumentation and component owners who collaborated on the design, implementation, testing, and review of native histograms in Kubernetes!
Kubernetes v1.37: Scheduler Preemption for In-Place Pod Resize (Alpha)
In Kubernetes, resource allocation has historically been a static decision made during a Pod's initial scheduling and placement. With the graduation of the core in-Place Pod resize feature to General Availability in v1.35, application developers and cluster operators gained the powerful ability to dynamically adjust CPU and memory allocations of running containers without incurring disruptive restarts or application downtime.
However, in-place resizing introduced a unique resource scheduling gap: if a running Pod requested a resource scale-up that exceeded the host node's allocatable headroom, the Kubelet was forced to mark the request as Deferred. The Pod would remain parked in this state indefinitely, waiting for resources on the node to naturally free up.
To bridge this scheduling gap, Kubernetes v1.37 introduces scheduler preemption for in-place Pod resize (Alpha), behind the InPlacePodVerticalScalingSchedulerPreemption feature gate.
This feature allows the Kubernetes scheduler to actively free up capacity on a fully-utilized node by preempting lower-priority workloads, enabling the pending in-place resizes of critical, higher-priority applications to succeed.
The "deferred" resize challenge
To understand why this preemption mechanism is needed, it is helpful to look at how Kubernetes handles running Pod resizing. When a user or controller (such as the Vertical Pod Autoscaler) updates the resource requests of an active container, the Kubelet evaluates whether the underlying node has enough spare allocatable capacity to fulfill the increase.
If the node's resources are fully utilized and cannot satisfy the new limits, the Kubelet sets the container's resizeStatus (reported in the Pod's status.containerStatuses[]) to Deferred. Unlike an Infeasible resize request (which is immediately rejected because it exceeds physical machine boundaries, namespace limit ranges, or admission quotas) a Deferred status indicates that the request is valid but is temporarily unable to be actuated, waiting until node capacity becomes available.
Before the introduction of this preemption mechanism, a Pod's in-place resize scale-up request could become permanently blocked if the node was heavily utilized. Even when a critical application (such as an in-memory database or a real-time web server) required more memory to prevent an imminent out-of-memory (OOM) crash, and the node lacked free capacity, the resize remained Deferred.
In this scenario, cluster administrators had limited choices:
- Manually evict lower-priority Pods from the node to clear resource headroom.
- Rely on the cluster autoscaler to eventually spin up a larger node and reschedule the Pod. However, this is an operation that is highly disruptive and violates the core "no restart" value proposition of in-place scaling.
- Rely on a custom autoscaling solution, for example a cluster autoscaler that can trigger dynamic node resizing operations itself.
Because the kube-scheduler was unaware of deferred resizes on running Pods, it could not leverage standard priority-based preemption to evict lower-priority workloads and make room for the higher-priority running Pod's resource growth.
Why this matters
In production Kubernetes environments, cluster administrators strive to maximize resource utilization and efficiency. A common strategy is to bin-pack unused capacity on not-yet-full nodes with lower-priority workloads, such as batch jobs, background data processing, or best-effort tasks.
Without scheduler preemption for in-place resizing, this created a major operational dilemma. If lower-priority workloads consumed the remaining headroom on a node, higher-priority applications running on that same node would become blocked (Deferred) when they needed to scale up to handle sudden traffic surges or memory spikes. Operators were forced to choose between running low-utilization clusters with idle buffer capacity or risking that critical workloads could not resize when needed.
With scheduler preemption for in-place Pod resize, you can confidently bin-pack unused space across your clusters with lower-priority workloads without worrying about them degrading higher-priority Pods or blocking their scale-up requests. If a high-priority workload requires an in-place resize that exceeds available node capacity, the scheduler automatically preempts the lower-priority Pods to clear headroom. You achieve high cluster utilization and cost efficiency while preserving the responsiveness and reliability of critical services.
Architectural mechanics: How it works
Scheduler preemption for in-place Pod resize integrates directly into the core scheduling cycle to coordinate resources dynamically and safely.
Centralized scheduler tracking
The kube-scheduler monitors the cluster for running Pods with a Deferred resize status condition. Normally, Pods with spec.nodeName populated are considered successfully placed and bypass the active scheduling queue. Under this feature gate, the scheduler intercepts Pods carrying the Deferred condition, permitting them to remain in active scheduling evaluations specifically to trigger preemption. The scheduler maintains continuous tracking of these Pods until the Kubelet successfully completes the resize actuation.
Single-node preemption boundary
Unlike placement preemption, which evaluates all nodes in a cluster to find the best scheduling fit, preemption for in-place resizing is strictly localized to the Pod's currently assigned node. The scheduler identifies eligible lower-priority "victim" Pods on the same host and initiates their graceful eviction, freeing up local capacity. Preemption is strictly scoped to the same node where the deferred Pod is running; if a node cannot accommodate the resize even after evicting all eligible lower-priority workloads, the resize remains in the Deferred state.
Resource reservation safety
To prevent scheduling races and double-allocation, the scheduler treats resources requested for a resize as already consumed. This enables the Kubelet to actuate the resize once the preemption takes effect.
Separation of concerns & critical admission
When a node is under resource pressure, the Kubelet includes a local mechanism known as the critical Pod admission handler. During initial Pod admission, if a critical system Pod arrives on a node that lacks spare capacity, this local handler can directly evict lower-priority Pods on that node to guarantee admission for the critical workload.
A significant architectural benefit of this new feature is the strict separation of concerns between the Kubelet and the scheduler. Under the InPlacePodVerticalScalingSchedulerPreemption feature gate, the Kubelet's critical Pod admission handler does not perform local preemption checks or trigger local evictions for in-place resizing operations. Instead, the Kubelet defers the request and delegates the preemption decision entirely to the scheduler. This guarantees that a single, centralized orchestrator manages all resize-related preemption logic, respecting global priorities, Pod disruption budgets (PDBs), and graceful termination policies.
Managing competing updates & races
If a competing, higher-priority resize request is submitted for another running Pod on the same node during an active preemption cycle, the Kubelet prioritizes the higher-priority request. The scheduler is designed to observe these updates and will dynamically trigger a new round of preemption if more capacity is required to fulfill the new state.
Node-level preemption configuration
Administrators and automated controllers (such as a cluster autoscaler) can disable preemption specifically for in-place resizes on particular nodes. This is configured using the new spec.podPreemptionPolicy field in the Node Spec:
apiVersion: v1
kind: Node
metadata:
name: batch-workload-node
spec:
podPreemptionPolicy:
disableResizePreemption:
- "cluster-autoscaler.kubernetes.io/disable-preemption"
- "operator.example.com/policy-override"
An example use case for this policy is when a controller would prefer to size down other pods or dynamically adjust the node capacity itself when possible, only enabling scheduler preemption as a last resort.
Try it out!
To utilize scheduler preemption for in-place Pod resize:
- Your cluster must be running Kubernetes v1.37 or later across both the control plane and all worker nodes.
- The
InPlacePodVerticalScalingSchedulerPreemptionfeature gate must be enabled across all control plane components (kube-apiserver,kube-scheduler) and thekubelet.
Mini-tutorial: Observe resize preemption in action
To see this feature in action locally, you can test scheduler preemption on a single-node kind cluster with constrained CPU headroom.
1. Create a kind cluster with scheduler resize preemption enabled
Create a kind cluster configuration file named kind-config.yaml with the InPlacePodVerticalScalingSchedulerPreemption feature gate enabled:
# kind-config.yaml
kind: Cluster
apiVersion: kind.x-k8s.io/v1alpha4
featureGates:
InPlacePodVerticalScalingSchedulerPreemption: true
Create the cluster using this configuration, passing the --image flag to ensure the cluster is running Kubernetes v1.37 (or later):
kind create cluster --config kind-config.yaml --image kindest/node:v1.37.0
Note:
Make sure that the node image you specify corresponds to a Kubernetes v1.37 cluster or later (such askindest/node:v1.37.0). Older Kubernetes releases do not support the InPlacePodVerticalScalingSchedulerPreemption feature gate.Once your cluster is ready, inspect the node to check how many allocatable CPU cores it has:
kubectl get nodes -o custom-columns=NAME:.metadata.name,ALLOCATABLE_CPU:.status.allocatable.cpu
In a standard local kind environment, the output shows 8 allocatable CPU cores:
NAME ALLOCATABLE_CPU
kind-control-plane 8
2. Create PriorityClasses and deploy Pods
Create two PriorityClasses and deploy a low-priority Pod (requesting 3 CPU) alongside a high-priority Pod (requesting 4 CPU). Together, these workloads consume 7 of the 8 available CPU cores, leaving 1 CPU of free allocatable headroom on the node.
# preemption-demo.yaml
apiVersion: scheduling.k8s.io/v1
kind: PriorityClass
metadata:
name: high-priority
value: 1000000
globalDefault: false
description: "High priority workload"
---
apiVersion: scheduling.k8s.io/v1
kind: PriorityClass
metadata:
name: low-priority
value: 1000
globalDefault: false
description: "Low priority workload"
---
apiVersion: v1
kind: Pod
metadata:
name: low-priority-pod
spec:
priorityClassName: low-priority
containers:
- name: worker
image: nginx
resources:
requests:
cpu: "3"
memory: "500Mi"
limits:
cpu: "3"
memory: "500Mi"
---
apiVersion: v1
kind: Pod
metadata:
name: high-priority-pod
spec:
priorityClassName: high-priority
containers:
- name: app
image: nginx
resources:
requests:
cpu: "4"
memory: "1Gi"
limits:
cpu: "4"
memory: "1Gi"
Save this manifest to preemption-demo.yaml and apply it:
kubectl apply -f preemption-demo.yaml
Wait until both Pods are running on the node:
kubectl get pods
Output:
NAME READY STATUS RESTARTS AGE
high-priority-pod 1/1 Running 0 9s
low-priority-pod 1/1 Running 0 9s
3. Request an in-place scale-up
Patch the high-priority Pod to increase its CPU request from 4 to 6 (+2 CPU delta). Because only 1 CPU of headroom is free on the node, this resize request exceeds remaining allocatable capacity:
kubectl patch pod high-priority-pod --subresource resize --patch \
'{"spec":{"containers":[{"name":"app", "resources":{"requests":{"cpu":"6"}, "limits":{"cpu":"6"}}}]}}'
4. Inspect the preemption event on the low-priority Pod
With InPlacePodVerticalScalingSchedulerPreemption enabled, the scheduler intercepts the Deferred resize condition on high-priority-pod and targets low-priority-pod for preemption.
To verify that the scheduler actively preempted the low-priority Pod, inspect its events:
kubectl get events --field-selector involvedObject.name=low-priority-pod
In the event stream (or via kubectl describe pod low-priority-pod), you will see a Preempted event emitted by the scheduler:
LAST SEEN TYPE REASON OBJECT MESSAGE
5s Normal Preempted pod/low-priority-pod Preempted by pod 97dba925-6b5f-4e2f-99f9-d51c30016586 on node kind-control-plane
5s Normal Killing pod/low-priority-pod Stopping container worker
5. Trace the resize event lifecycle on the high-priority Pod
Next, inspect the event history on high-priority-pod to observe how the resize progressed from being deferred to successfully completed:
kubectl get events --field-selector involvedObject.name=high-priority-pod
You will observe a sequence of events as the Kubelet coordinates with the scheduler:
LAST SEEN TYPE REASON OBJECT MESSAGE
33s Warning ResizeDeferred pod/high-priority-pod Pod resize OutOfcpu: {"containers":[{"name":"app","resources":{"limits":{"cpu":"6","memory":"1Gi"},"requests":{"cpu":"6","memory":"1Gi"}}}],"generation":2,"error":"Node didn't have enough resource: cpu, requested: 6000, used: 3950, capacity: 8000"}
32s Normal ResizeStarted pod/high-priority-pod Pod resize started: {"containers":[{"name":"app","resources":{"limits":{"cpu":"6","memory":"1Gi"},"requests":{"cpu":"6","memory":"1Gi"}}}],"generation":2}
32s Normal ResizeCompleted pod/high-priority-pod Pod resize completed: {"containers":[{"name":"app","resources":{"limits":{"cpu":"6","memory":"1Gi"},"requests":{"cpu":"6","memory":"1Gi"}}}],"generation":2}
ResizeDeferred: The Kubelet initially marks the resize request as deferred (Warning) due to insufficient CPU headroom on the node (OutOfcpu).ResizeStarted: Once the scheduler preemptslow-priority-podand capacity is released, the Kubelet accepts the new allocation and begins actuating the resize.ResizeCompleted: The Kubelet successfully updates container cgroup limits via the container runtime without restarting the Pod.
Finally, verify that the allocated CPU on the container reflects the new request (appending {"\n"} to the JSONPath query ensures a trailing newline in your terminal):
kubectl get pod high-priority-pod -o jsonpath='{.status.containerStatuses[0].allocatedResources.cpu}{"\n"}'
Output:
6
This confirms that the in-place resize succeeded.
Getting involved
This feature represents a major step forward for resource scheduling, bringing enterprise-grade density control and workload prioritization to dynamic resource scaling. We invite cluster operators, platform architects, and developers to enable the InPlacePodVerticalScalingSchedulerPreemption feature gate in their testing environments and share feedback.
If you want to share your experience with this feature, please get in touch with the community via SIG Scheduling or SIG Node channels!
Kubernetes v1.37: Introducing Node Lifecycle Conditions
Kubernetes has many ways to describe what is happening on a Node. Readiness, taints, Pod state, labels, annotations, and provider-specific APIs each expose part of the picture. What has been missing is a shared, Kubernetes-owned way to say that a Node is draining, undergoing maintenance, or undergoing Graceful Node Shutdown.
Kubernetes v1.37 introduces five well-known Node conditions that provide that description:
DrainInProgressDrainedMaintenancePlannedMaintenanceInProgressGracefulNodeShutdownInProgress
The new Node lifecycle conditions
| Condition | What it reports |
|---|---|
DrainInProgress | The Node is actively being drained according to the administrator's chosen drain criteria. |
Drained | The Node has reached the drain criteria selected by the administrator. |
MaintenancePlanned | The Node is expected to undergo a change in the future. |
MaintenanceInProgress | The Node is actively undergoing maintenance. |
GracefulNodeShutdownInProgress | Graceful Node Shutdown is determined to be in progress on the Node. |
Maintenance can include hardware or software rollout, remediation, decommissioning, or debugging. Whether maintenance requires a drain depends on its impact. A Kubernetes upgrade usually should follow a drain, while a kernel live patch might not need one.
Like other Node conditions, each lifecycle condition uses status to report
whether the observation is active:
True: the lifecycle state is currently observed.False: the lifecycle state is not currently observed.Unknown: Kubernetes cannot determine whether the lifecycle state is active.
The reason provides a stable, machine-readable cause for the current status,
and message can provide additional human-readable detail.
For example, an authorized maintenance controller could publish:
# Node .status excerpt
status:
conditions:
- type: MaintenancePlanned
status: "True"
reason: MaintenanceWindow
lastTransitionTime: "2026-12-09T12:00:00Z"
message: "Hardware maintenance is scheduled for this Node"
What changes in Kubernetes v1.37
The v1.37 release reserves these names as well-known NodeConditionType
constants and introduces the Alpha NodeLifecycleConditions feature gate,
which is disabled by default. In v1.37 the gate is effectively a no-op: it does
not restrict who can set these conditions, and no core component reads them. It
exists so that the built-in behavior planned for future releases — controllers
that consume these conditions — can be opted into when it arrives. You do not
need to enable it to start publishing the conditions today.
For this release, an administrator or an administrator-authorized controller is responsible for setting and clearing the lifecycle conditions.
In this first release, no core workload controller changes its behavior based on these conditions, but an administrator can publish them to communicate maintenance and drains to cluster users.
How to use lifecycle conditions today
The immediate value is operational clarity. Administrators and lifecycle automation can use these conditions as a common status channel for Node lifecycle work that already happens today.
For example, maintenance automation can set MaintenancePlanned when a future
maintenance window is scheduled, then set MaintenanceInProgress when work
starts. Drain automation can set DrainInProgress when it begins evicting Pods
and Drained when the administrator's selected drain criteria have been met.
The GracefulNodeShutdownInProgress condition can report that Graceful Node
Shutdown is in progress on the Node.
The recommended pattern is to use lifecycle conditions to report status, while
lifecycle operations are managed through other mechanisms. Continue to use
existing Kubernetes mechanisms such as kubectl cordon,
kubectl drain,
taints, and
workload-specific controls to change scheduling or eviction behavior. Use
lifecycle conditions to make the state of that work visible to people,
dashboards, alerts, and automation that choose to consume the signal.
When setting a condition, use True while the lifecycle state is active. Set the
condition to False, or remove it, when the state is no longer active. Use a
stable reason value and a clear message so that both people and automation
can understand why the condition changed. Cluster administrators should also
decide which component owns each lifecycle condition to avoid conflicting writes.
Why a shared signal matters
Node lifecycle affects components across the cluster. The kubelet, node
lifecycle controller, workload controllers, scheduler, autoscalers, storage
operators, and external maintenance systems all need some understanding of what
is happening to a Node.
Today, each component has to reconstruct that understanding from indirect signals. One controller might look at Node readiness, another at taints, and another at Pods that are terminating or missing. Infrastructure providers and operators often add their own labels or annotations.
Those signals remain useful for their intended purposes, but they do not answer
the same question. A taint can influence scheduling or eviction, for example,
but it does not attest that a drain is in progress or that an administrator's
drain criteria have been met. A NotReady Node does not explain whether the
cause is an unexpected failure, a graceful shutdown, or planned maintenance.
Without shared lifecycle context, independently correct components can make
conflicting decisions. A DaemonSet controller can replace a Pod that the
kubelet intentionally terminated during graceful shutdown. A Job controller can
wait indefinitely for a terminal Pod phase on a Node that an administrator is
removing. A storage operator might learn about maintenance only after drain has
already started.
The new conditions provide a stable place on the Node for that missing context, as part of the larger effort to enhance Node Lifecycle management.
The foundation for lifecycle-aware Kubernetes
The value of a shared signal comes from what can consume it — core controllers, administrators, or the ecosystem of lifecycle projects. Follow-up enhancements can build on the conditions without every component inventing a different way to infer Node lifecycle state.
Consider a long-standing DaemonSet rollout edge case. A Node that is broken or undergoing maintenance can remain unavailable for reasons unrelated to the new DaemonSet revision. That Node still consumes the rollout's availability budget, which can slow or block the controller from progressing the rollout on healthy Nodes.
The DaemonSet controller knows that a Pod is unavailable, but it cannot tell whether the new revision failed or an administrator intentionally took the Node out of service. Readiness, taints, and Pod state expose pieces of the situation, but none provides authoritative maintenance context.
The MaintenanceInProgress condition creates a Kubernetes-owned place to publish
that context. Future work can define how the DaemonSet controller uses it for
rollout ordering, availability accounting, and status reporting. Those behaviors
still require careful design, but the goal is for administrators to no longer
have to manually adjust the rollout.
Future expansions and getting involved
Node lifecycle is a cross-cutting problem. Solving it starts with components sharing enough context to make compatible decisions. The next stage is to build on Node Lifecycle Conditions to improve scenarios such as Graceful Node Shutdown, drain, and maintenance. Longer-term lifecycle coordination may require explicit ownership, locking, and potentially a dedicated API.
The Kubernetes ecosystem already includes many solutions for Node maintenance, remediation, drain, autoscaling, and fleet management. The experience behind those projects is essential to building a foundation that works across different environments and operational models. The Node Lifecycle Working Group, SIG Node, and SIG Apps invite maintainers and users to share their use cases and ideas to shape the future work.
Follow the work through KEP-5683: Node Lifecycle Conditions. To participate in our discussions, join one of our groups:
Kubernetes v1.37: Advancing Workload-Aware Scheduling
AI/ML and complex batch workloads continue to push the boundaries of Kubernetes scheduling. Following the foundational workload-centric enhancements introduced in previous releases, Kubernetes v1.37 delivers the next major milestone in the Workload-Aware Scheduling (WAS) journey. In this release, the core Workload and PodGroup APIs—enabling gang scheduling—along with Workload-Aware Preemption (WAP) and shared DRA ResourceClaims for PodGroups, all graduate to Beta, solidifying their role in the Kubernetes ecosystem.
To address the hierarchical scheduling requirements of modern high-performance distributed workloads, v1.37 introduces the new CompositePodGroup API. This new API allows expressing multi-level topology constraints, gang scheduling, and preemption policies for complex, heterogeneous groups of Pods. Crucially, this architectural expansion unlocks native scheduling support for advanced workload structures commonly managed by higher-order extension APIs such as JobSet and LeaderWorkerSet (LWS).
Alongside these API additions, v1.37 focuses on streamlining adoption by introducing a new set of controller integration APIs and the workloadbuilder Go library. These provide standardized building blocks that significantly simplify how out-of-tree controllers can integrate with WAS capabilities.
Utilizing these new tools, the native Job controller integration has been upgraded to fully consume the expanded WAS APIs—enabling advanced scheduling policies, flexible disruption modes, and topology-aware scheduling for standard batch workloads.
Gang scheduling and Workload / PodGroup APIs
Kubernetes v1.37 delivers a major milestone: Workload / PodGroup APIs and gang scheduling are officially graduating to Beta. This graduation signals that native, "all-or-nothing" scheduling for workloads is solidifying for wider adoption.
Key updates to the API and gang scheduling algorithm in this release include:
Beta graduation and API versioning changes
The core Workload and PodGroup APIs have been promoted to v1beta1, meaning they are now one step away from
General Availability (GA). For early adopters who have been testing these features,
take note of the alpha versioning transition: v1alpha2 has been entirely replaced by v1alpha3.
This transition introduces breaking changes designed to clean up the API structure around disruptionMode.
Native PodGroup queueing
A significant under-the-hood improvement in v1.37 makes the PodGroup a first-class citizen in the scheduling queue. Previously, even if belonging to a PodGroup, all member Pods were queued individually. Now, only the top-level PodGroup object is queued. This ensures all Pods share the same queueing behavior and lays the groundwork for more advanced PodGroup queueing strategies in the future.
Dynamic elasticity with minCount mutability
In earlier iterations, the minCount field, which dictates the minimum number of Pods required
to successfully schedule a PodGroup, was strictly immutable. In v1.37, minCount is now mutable.
This API change unlocks flexibility for elastic workloads. Controllers can now dynamically
adjust the minimum required size of a gang on the fly, allowing workloads to gracefully degrade
or expand without interrupting already-scheduled Pods.
Workload-aware preemption
In Kubernetes v1.37 the separate
WorkloadAwarePreemption feature gate
for workload-aware preemption was merged into the GenericWorkload feature gate,
becoming a core part of the gang scheduling effort.
While the core concepts of workload-aware preemption stay the same, there are some differences between the v1.36 and v1.37 releases:
Performance and optimality
To check whether a preemptor can fit in the cluster thanks to preemption, the scheduler simulates the removal of all potential victims and re-runs the scheduling algorithm. After that it tries to reprieve as many victims as possible. In the v1.36 release, the scheduling algorithm was run for each victim reprieval, verifying whether with the victim reprieved, the algorithm can still find a valid placement for the preemptor. In v1.37, the scheduling algorithm is run only once and the preemptor Pods are assumed based on its output. Later, the reprieval checks whether a victim can still run in its place with the preemptor assumed.
PodGroup as a victim
One of the limitations of v1.36 was the fact that the default preemption for single Pods
was not aware of PodGroups and was not respecting their disruptionMode fields, allowing
for disruption of single Pods even when the PodGroup had disruptionMode: {all: {}} set.
Kubernetes v1.37 removes this limitation; the default preemption now respects the PodGroup
disruptionMode field.
Rename of the disruptionMode fields
During the promotion of the API to Beta, the disruptionMode field was changed to decouple
its naming from the PodGroup object, allowing consistent naming across PodGroups and CompositePodGroups.
The modes changed as follows: PodGroup became all, and Pod became single.
Support for preemptionPolicy
In v1.36, the PodGroup does not have a preemptionPolicy field. The PodGroup can perform
preemption as long as none of the Pods forming it has preemptionPolicy: Never set. In v1.37,
when the PodGroupPreemptionPolicy
feature gate is enabled, a PodGroup also has a preemptionPolicy field. It serves as an authoritative field for whether
a PodGroup can perform preemption.
CompositePodGroup API
In Kubernetes v1.36, workload-aware scheduling established a clean separation between static workload templates (Workload) and runtime group state (PodGroup), but the supported scheduling policies were limited to a single, flat group. The CompositePodGroup API, introduced in Kubernetes v1.37, extends this model to support hierarchical scheduling requirements.
This API allows its consumers to express multi-level scheduling requirements by organizing a workload in a tree-shaped hierarchy consisting of CompositePodGroup and PodGroup objects. Each CompositePodGroup carries policies and constraints that apply to other groups (CompositePodGroups and/or PodGroups), similar to how PodGroups govern scheduling behavior for a flat group of Pods. The scheduler treats such a hierarchy as a single scheduling unit and aims to satisfy the requirements specified by every group within that hierarchy.
Defining a workload hierarchy
To express multi-level scheduling requirements, you define a hierarchy of templates in a Workload object. Controllers then create the corresponding CompositePodGroup and PodGroup objects from that hierarchy.
To support this, the Workload API is extended with the spec.compositePodGroupTemplates field. Each CompositePodGroupTemplate defines a template for a parent CompositePodGroup and directly nests the templates (podGroupTemplates and/or compositePodGroupTemplates) from which its child groups derive.
Below is a sample Workload object that defines a two-level template hierarchy:
apiVersion: scheduling.k8s.io/v1beta1
kind: Workload
metadata:
name: example-workload
annotations:
kubernetes.io/description: "Two-level workload hierarchy requiring 4 worker Pods and 1 driver Pod to schedule together."
spec:
compositePodGroupTemplates:
- name: workload-root
schedulingPolicy:
gang:
minGroupCount: 2
podGroupTemplates:
- name: workers
schedulingPolicy:
gang:
minCount: 4
- name: driver
schedulingPolicy:
gang:
minCount: 1
After creating example-workload, a controller can stamp out the corresponding runtime group objects from these templates:
A root CompositePodGroup that references the
workload-roottemplate inexample-workloadand carries its group-level scheduling policy (gang scheduling withminGroupCount: 2):apiVersion: scheduling.k8s.io/v1alpha3 kind: CompositePodGroup metadata: name: example-root-group annotations: kubernetes.io/description: "Root group coordinating gang scheduling across child worker and driver PodGroups." spec: workloadRef: workloadName: example-workload templateName: workload-root schedulingPolicy: gang: minGroupCount: 2Two child PodGroup objects (
example-workload-workersandexample-workload-driver) that reference their respective leaf templates inexample-workloadand link to the root group viaparentCompositePodGroupName:apiVersion: scheduling.k8s.io/v1beta1 kind: PodGroup metadata: name: example-workload-workers annotations: kubernetes.io/description: "Worker group requiring at least 4 Pods to be scheduled together." spec: parentCompositePodGroupName: example-root-group workloadRef: workloadName: example-workload templateName: workers schedulingPolicy: gang: minCount: 4 --- apiVersion: scheduling.k8s.io/v1beta1 kind: PodGroup metadata: name: example-workload-driver annotations: kubernetes.io/description: "Driver group requiring 1 Pod to schedule alongside the workers." spec: parentCompositePodGroupName: example-root-group workloadRef: workloadName: example-workload templateName: driver schedulingPolicy: gang: minCount: 1
How multi-level gang scheduling works
To schedule a hierarchical workload, kube-scheduler evaluates the entire group tree as a unified scheduling unit:
- Recursive evaluation: The scheduler traverses the hierarchy from the root CompositePodGroup down to the leaf PodGroup objects. At each level, a parent CompositePodGroup is considered schedulable only when its child groups satisfy its scheduling policy (for example, placing at least
minGroupCountof child groups when using the gang policy), while each leaf PodGroup must satisfy its own Pod-level policy (for example, placing at leastminCountof member Pods when using the gang policy). - All-or-nothing scheduling: Once a valid combination of child groups is found that satisfies the requirements of the root CompositePodGroup, the Pods across the entire hierarchy are scheduled and bound atomically. If the root group cannot satisfy its policy constraints, the entire hierarchy remains unschedulable and no Pods are bound, preventing partial deployments and deadlocks.
Workload-aware preemption for the CompositePodGroup API
Kubernetes v1.37 extends workload-aware preemption to support CompositePodGroup hierarchies as well. Specifically, if a CompositePodGroup cannot be scheduled due to insufficient capacity in the cluster, the scheduler can invoke preemption to evict lower-priority workloads in order to fit the Pods belonging to that CompositePodGroup.
A CompositePodGroup can be selected for preemption as well. To specify the desired behavior during preemption, workload owners can specify an appropriate disruptionMode in the CompositePodGroup spec:
single: Allows individual child groups within the CompositePodGroup to be preempted and disrupted independently. This is the behavior whendisruptionModeis not set.all: Enforces "all-or-nothing" disruption semantics across the entire CompositePodGroup hierarchy. If any Pod within the descendant subtree must be preempted, the scheduler evicts all Pods across the entire hierarchy together.
Topology-aware scheduling
In Kubernetes v1.37, topology-aware scheduling expands to support complex, multi-level workload hierarchies and delivers performance improvements for existing single-level deployments.
Multi-level topology-aware scheduling
In Kubernetes v1.36, we introduced foundational topology-aware scheduling, allowing you to define co-location constraints directly on a PodGroup. While effective for single-level groupings, complex distributed workloads—such as large-scale AI/ML training, JobSet deployments, or disaggregated inference via LeaderWorkerSet (LWS)—often require co-location across multiple levels of cluster infrastructure simultaneously.
For example, an entire workload may need to run within a single availability zone, while different parts of that workload (such as specific worker groups or driver processes) require strict co-location within specific server racks.
In Kubernetes v1.37, alongside the new CompositePodGroup API (scheduling.k8s.io/v1alpha3), topology-aware scheduling expands to support multi-level topology-aware scheduling. You can now express complex co-location requirements by specifying topology constraints at different levels of a group hierarchy.
Top-down topology constraint resolution
During hierarchical scheduling, the kube-scheduler resolves multi-level topology constraints in a top-down manner. Specifically, topology domains that are considered during the scheduling of a child group are confined within a topology domain that corresponds to the placement assumed by the parent group.
Configuration and runtime execution
Using the updated Workload API (scheduling.k8s.io/v1beta1), you can configure multi-level topology constraints directly within compositePodGroupTemplates. In the example below, the parent template constrains the overall workload to a single availability zone (topology.kubernetes.io/zone), while child templates for workers and driver constrain their respective Pods to server racks (topology.example.com/rack) within that selected zone:
apiVersion: scheduling.k8s.io/v1beta1
kind: Workload
metadata:
name: multi-level-tas-workload
namespace: job-ns
annotations:
kubernetes.io/description: "Workload defining zone-level co-location for the root group and rack-level co-location for child groups."
spec:
compositePodGroupTemplates:
- name: root
schedulingPolicy:
gang:
minGroupCount: 2
schedulingConstraints:
topology:
- key: topology.kubernetes.io/zone
podGroupTemplates:
- name: workers
schedulingPolicy:
gang:
minCount: 8
schedulingConstraints:
topology:
- key: topology.example.com/rack
- name: driver
schedulingPolicy:
gang:
minCount: 1
schedulingConstraints:
topology:
- key: topology.example.com/rack
When a controller creates an instance of this workload at runtime, it spawns the corresponding runtime objects from these templates:
- The root CompositePodGroup referencing the
roottemplate, carrying the availability zone topology constraint and the hierarchical gang scheduling policy. - The two child PodGroup objects (
tas-workload-workersandtas-workload-driver), each referencing the root CompositePodGroup as their parent group via theparentCompositePodGroupNamespec field:
apiVersion: scheduling.k8s.io/v1alpha3
kind: CompositePodGroup
metadata:
name: tas-workload-root
namespace: job-ns
annotations:
kubernetes.io/description: "Root group constraining the entire workload to a single availability zone."
spec:
workloadRef:
workloadName: multi-level-tas-workload
templateName: root
schedulingPolicy:
gang:
minGroupCount: 2
schedulingConstraints:
topology:
- key: topology.kubernetes.io/zone
---
apiVersion: scheduling.k8s.io/v1beta1
kind: PodGroup
metadata:
name: tas-workload-workers
namespace: job-ns
annotations:
kubernetes.io/description: "Worker group requiring 8 Pods co-located within a single rack in the selected zone."
spec:
parentCompositePodGroupName: tas-workload-root
workloadRef:
workloadName: multi-level-tas-workload
templateName: workers
schedulingPolicy:
gang:
minCount: 8
schedulingConstraints:
topology:
- key: topology.example.com/rack
---
apiVersion: scheduling.k8s.io/v1beta1
kind: PodGroup
metadata:
name: tas-workload-driver
namespace: job-ns
annotations:
kubernetes.io/description: "Driver group requiring 1 Pod placed in a rack within the selected zone."
spec:
parentCompositePodGroupName: tas-workload-root
workloadRef:
workloadName: multi-level-tas-workload
templateName: driver
schedulingPolicy:
gang:
minCount: 1
schedulingConstraints:
topology:
- key: topology.example.com/rack
During scheduling, the scheduler evaluates multiple candidate availability zones across the cluster for tas-workload-root. For each candidate zone, it subdivides the nodes by rack topology to explore feasible rack placements for tas-workload-workers and tas-workload-driver strictly within that zone, systematically evaluating multiple combinations across available zones and racks before making a scheduling decision.
By allowing topology constraints to be modeled hierarchically, Kubernetes v1.37 provides a structured way to express multi-level co-location requirements across complex cluster infrastructures.
Performance improvements for single-level TAS
Alongside the Alpha introduction of multi-level hierarchies, Kubernetes v1.37 reduces the cost of placement evaluation for existing single-level topology-aware scheduling. We are continuously working to optimize the efficiency of placement evaluation algorithms in kube-scheduler and plan to deliver further performance improvements in future releases.
Controller Integration APIs
Kubernetes v1.37 introduces new standard building blocks so that every controller can expose the same scheduling primitives in their own APIs, and share the same logic for translating them into scheduling objects. These primitives express specific scheduling behaviors — such as policies or disruption logic — while leaving the field naming flexible for each controller. A prime example of this is the native Job controller, which we detail in the next section.
Types prefixed with WorkloadPodGroup describe a leaf group of Pods; types prefixed with
WorkloadCompositePodGroup describe a group of groups. A controller embeds them verbatim into
its own API, under whatever field name fits its domain:
WorkloadPodGroupSchedulingPolicy— eitherbasic, meaning standard Pod-by-Pod scheduling, organgwith aminCount. The composite variant takes aminGroupCountinstead.WorkloadPodGroupSchedulingConstraints— the topology constraints (topology[].key) the group's Pods must be co-located within.WorkloadPodGroupDisruptionMode—singleorall, with the preemption semantics described earlier in this post.WorkloadPodGroupResourceClaim— the ResourceClaims shared across the group.
Only the shapes are shared, so controllers retain full autonomy over how they name and nest these fields in their own APIs.
The workloadbuilder library turns that intent into the scheduling objects. A controller describes its workload as a tree of WorkloadItem nodes — a node with children compiles to a CompositePodGroupTemplate, a node without children to a PodGroupTemplate — and attaches its own defaults plus the user-supplied building blocks to each node. From there, Validate() reports problems back at the exact field path within the controller's own API, BuildWorkload() compiles the tree into a Workload, and NewPodGroup() and NewCompositePodGroup() stamp out the runtime group objects.
Validation is deny-by-default: a controller declares the policies and disruption modes it actually supports through AllowedPolicies and AllowedDisruptionModes, and anything outside those lists is rejected. Building blocks added in future releases therefore stay unavailable until a controller explicitly opts into them.
For hierarchical workloads where a parent controller owns the Workload and delegates group creation to its children, NewBuilderFromExistingWorkload lets a child materialize only its own PodGroup from the parent's Workload.
Neither the building blocks nor the library have a feature gate of their own; they become user-visible through whichever controller adopts them. The native Job controller is the first to do so, and we detail it in the next section.
Integration with the Job controller
Building upon the new controller integration APIs, the Job API now features an explicit .spec.scheduling field, so you can declare how a Job should be scheduled instead of relying on the Job controller to infer it from the Job's shape. This expands support well beyond static, indexed, and fully-parallel Jobs.
.spec.scheduling is composed of the building blocks described above:
schedulingPolicy—basicfor standard Pod-by-Pod scheduling, organgfor all-or-nothing scheduling.schedulingConstraints— the topology domain the Job's Pods must be co-located within.disruptionMode— whether the Job's Pods can be preempted individually (single) or only as a whole (all).resourceClaims— the ResourceClaims shared by all of the Job's Pods.
For example:
apiVersion: batch/v1
kind: Job
metadata:
name: distributed-training-job
annotations:
kubernetes.io/description: "Distributed Job using explicit WAS scheduling with gang policy and zone topology constraints."
spec:
parallelism: 8
completions: 8
scheduling:
schedulingPolicy:
gang: {} # minCount omitted → defaults to parallelism (8)
schedulingConstraints:
topology:
- key: topology.kubernetes.io/zone
disruptionMode:
all: {}
template:
spec:
containers:
...
Omitting .spec.scheduling, or omitting schedulingPolicy within it, selects the basic policy, which behaves exactly like standard Job scheduling today.
For every Job it manages, the controller compiles this configuration into a Workload and a PodGroup
owned by the Job, and sets .spec.schedulingGroup.podGroupName on each Pod it creates so the scheduler
treats them as one group. Once created, .spec.scheduling is immutable, with one exception:
schedulingPolicy.gang.minCount can be updated, which lets you resize a running gang.
DRA ResourceClaim support for workloads
As the core WAS APIs mature, so do their integrations with Dynamic Resource Allocation
(DRA). Kubernetes v1.36 introduced the DRAWorkloadResourceClaims
feature gate. The associated feature allows ResourceClaims
to be replicated and reserved for entire PodGroups and shared by all their
member Pods:
apiVersion: scheduling.k8s.io/v1beta1
kind: PodGroup
metadata:
name: training-job-workers-pg
spec:
...
resourceClaims:
- name: pg-claim
resourceClaimTemplateName: my-claim-template
---
apiVersion: v1
kind: Pod
metadata:
name: topology-aware-workers-pg-pod
spec:
...
schedulingGroup:
podGroupName: training-job-workers-pg
resourceClaims:
- name: pg-claim
resourceClaimTemplateName: my-claim-template
In Kubernetes v1.37, the DRAWorkloadResourceClaims feature gate graduated to Beta.
While the API and core functionality of the feature remain unchanged, one change
eliminates some potentially surprising behavior when disabling the feature.
Previously when one of a Pod's spec.resourceClaims referenced a
ResourceClaimTemplate and matched one of its PodGroup's spec.resourceClaims
and the DRAWorkloadResourceClaims feature gate was disabled, a ResourceClaim was created for the Pod instead
of the PodGroup. In that scenario in v1.37, no ResourceClaim is created at all.
This change prevents Kubernetes from creating a flood of ResourceClaims from a
ResourceClaimTemplate and potentially exhausting DRA resources when a
claim intended to be shared by a whole PodGroup is replicated for each and every
Pod in the group.
For more information, see the feature documentation.
What's next?
The Workload-Aware Scheduling Working Group (WG WAS) is currently finalizing its plans for the Kubernetes v1.38 release cycle. While the roadmap is still taking shape (stay tuned!), the following key initiatives are already planned:
- Graduation of Workload and PodGroup APIs to GA: Solidifying the core foundation of workload-aware scheduling as a stable Kubernetes API.
- Graduation of Topology-Aware Scheduling (TAS) and CompositePodGroup (CPG) to Beta: Bringing these advanced placement and hierarchical scheduling features to Beta stability.
- Graduation of controller integration building blocks to Beta: Further refining the integration APIs to ensure a robust developer experience.
- Increased adoption and integration: Expanding the ecosystem by integrating workload-aware scheduling with other controllers, with a particular focus on hierarchical orchestrators such as JobSet.
- Kueue Integration: Fostering closer alignment between WAS and Kueue. In the near term, we aim to ensure Kueue is fully aware of WAS features for seamless interoperability. In the long term, we envision Kueue leveraging WAS as its underlying engine for capabilities like gang-scheduling and topology-aware placement.
Getting started
Many of the workload-aware scheduling improvements are now available as Beta features in v1.37, while new advanced capabilities are introduced in Alpha. Both Beta and Alpha features here are disabled by default and require manual enablement.
Beta features:
- Workload API, gang scheduling, and preemption: The
GenericWorkloadfeature gate (which now integrates gang scheduling and workload-aware preemption) is Beta and disabled by default on thekube-apiserver,kube-controller-managerandkube-scheduler. Ensure your manifests are updated to use thescheduling.k8s.io/v1beta1API group. - DRA ResourceClaim support for workloads: Enable the
DRAWorkloadResourceClaimsfeature gate on thekube-apiserver,kube-controller-manager,kube-schedulerandkubelet.
Alpha features:
Topology-aware scheduling: Enable the
TopologyAwareWorkloadSchedulingfeature gate on thekube-apiserverandkube-scheduler.CompositePodGroup API: Enable the
CompositePodGroupfeature gate on thekube-apiserver,kube-controller-managerandkube-scheduler, and ensure thescheduling.k8s.io/v1alpha3API version is enabled. Note that enablingCompositePodGroupon thekube-controller-manageralso requires theTopologyAwareWorkloadSchedulingfeature gate to be enabled.Workload API integration with the Job controller: Enable the
WorkloadWithJobfeature gate on thekube-apiserverandkube-controller-manager.PodGroup
preemptionPolicy: Enable thePodGroupPreemptionPolicyfeature gate on thekube-apiserverandkube-scheduler.
Controller integration APIs:
The new workloadbuilder library is available to developers building both out-of-tree and in-tree controllers who want to integrate with WAS. It does not require a feature gate. You can explore the library and find usage examples directly in the kubernetes/component-helpers repository.
We encourage you to try out workload-aware scheduling in your test clusters and share your experiences to help shape the future of Kubernetes scheduling. You can send your feedback by:
- Reaching out via Slack (#wg-workload-aware-scheduling).
- Joining the WG Workload-Aware Scheduling or SIG Scheduling meetings.
- Filing a new issue in the Kubernetes repository.
Learn more
To dive deeper into the architecture and design of these features, read the KEPs:
- KEP-4671: Gang Scheduling Support in Kubernetes
- KEP-5710: Workload-aware preemption
- KEP-5732: Topology-aware workload scheduling
- KEP-6012: CompositePodGroup API
- KEP-6089: WAS: Controller Integration APIs
- KEP-5547: WAS: Integrate Workload APIs with Job controller
- KEP-5729: DRA: ResourceClaim Support for Workloads
Kubernetes v1.37: KubeletInUserNamespace (aka Rootless mode) Graduates to Beta
Kubernetes v1.37 promotes the KubeletInUserNamespace feature gate to beta.
With this feature enabled, all of the node components (kubelet, CRI and OCI runtimes,
CNI plugins, and kube-proxy) can run as a non-root user on the host, using a
Linux user namespace.
This technique is also known as rootless mode.
The work started as an experiment in 2018, and was merged into Kubernetes v1.22 (2021)
as an alpha feature (Kubernetes Enhancement Proposal KEP-2033).
This feature should not be confused with user namespaces for pods
(hostUsers: false with the UserNamespacesSupport feature gate, GA since v1.36),
which puts pods in user namespaces but still runs the node components as root.
These two features do not conflict.
Moreover, they can be combined to nest Kubernetes inside Kubernetes without resorting to
the full privileged: true.
Why run the node components in a user namespace?
Because the node components have historically had container-breakout vulnerabilities that could compromise full root privileges on the host.
Examples of such vulnerabilities include:
- CVE-2022-0811
("cr8escape"): CRI-O could be tricked into setting arbitrary sysctls, such as
kernel.core_pattern, resulting in arbitrary code execution as root on the host - CVE-2023-27561: runc could be tricked into bypassing the masked paths of a container via a volume mount race, exposing the host's procfs files (a regression of CVE-2019-19921)
- CVE-2024-10220:
the kubelet could be made to execute arbitrary commands as root via
gitRepovolumes (gitRepovolumes had a similar vulnerability, CVE-2018-11235, back in 2018 too) - CVE-2025-31133:
runc could be tricked into bind-mounting attacker-controlled paths and writing to the
host's procfs files, such as
/proc/sysrq-triggerand/proc/sys/kernel/core_pattern - CVE-2026-53488: containerd could be tricked into executing arbitrary commands on the host, via crafted labels in a container image
By running the node components in a user namespace, the potential damage is confined to the non-root user's account. Notably, an attacker cannot conceal their intrusion by modifying the kernel, the boot loader, or the firmware.
It should still be noted that user namespaces are not effective for mitigating vulnerabilities in the kernel itself. User namespaces should be used in conjunction with traditional hardening measures such as seccomp to prevent containers from invoking unnecessary system calls.
Use cases
- Production clusters: mitigate potential container-breakout vulnerabilities.
- Shared machines (e.g., HPC): users can deploy Kubernetes without asking the machine administrator for root privileges, and without the risk of accidentally breaking other users' environments.
- Laptops: prevent a local cluster from accidentally breaking the host system configuration, e.g., the host iptables rules used for VPNs.
- AI sandbox: a Kubernetes application developer may create a dedicated local user account for running an AI coding agent and a test Kubernetes cluster. This setup is useful for preventing the AI agent from breaking the host when it is deceived by malicious information on the Internet.
- Kubernetes-in-Kubernetes: a nested cluster can run inside a parent cluster as a user-namespaced
pod (
hostUsers: false), isolating workloads more strictly than Kubernetes API namespaces do. - Bootstrapping: a temporary unprivileged cluster can be used to bootstrap an actual cluster, e.g., with Cluster API.
How does it work?
A Linux kernel user namespace maps a host level non-root user (e.g., UID 1000) to a fake root user inside the namespace. The UID 0 privileges are limited to the inside of the namespace. The fake root is enough for most of the node components' tasks: mounting volumes, creating cgroups, and configuring the network namespaces of pods. It still comes with some caveats that may break compatibility with specific CNI and CSI drivers, though.
The user namespace has to be created outside of Kubernetes. For example, Rootless Docker can be used to prepare the user namespace in which Kubernetes runs.
The KubeletInUserNamespace feature gate itself is quite "boring": basically it just lets the kubelet
ignore permission errors that occur when setting some sysctl values
(e.g., vm.overcommit_memory and kernel.panic)
and when watching kernel messages via /dev/kmsg.
See Running Kubernetes Node Components as a Non-root User for further information.
What changed from Alpha to Beta?
- The
KubeletInUserNamespacefeature gate is now enabled by default. Enabling the gate does not put the kubelet into a user namespace automatically, so nothing changes for existing "rootful" clusters. kubectl get nodes -o yamlnow reports whether nodes are running in a user namespace via therunningInUserNamespaceproperty. A cluster administrator can use this property to set node labels or taints, to avoid scheduling workloads that need real root privileges (e.g., some CNI plugin installers) onto rootless nodes.- For Kubernetes' own CI/CD testing, the node conformance end to end tests now run on a rootless cluster (ci-kubernetes-e2e-kind-rootless).
Several related improvements have also happened outside the promotion of the feature gate itself:
- Linux kernel v6.3 (2023): added support for idmapped tmpfs.
- Kubernetes v1.33 (2025): enabled the
UserNamespacesSupportfeature gate by default, allowing user-namespaced pods (hostUsers: false) to be created without extra configuration. - containerd v2.1 (2025): added support for writable cgroups.
With these improvements, a Kubernetes cluster with KubeletInUserNamespace can now also be nested
inside Kubernetes pods with hostUsers: false (UserNamespacesSupport).
How to use it
kind
The easiest way is to use kind (a Kubernetes SIG Testing project) to run a Kubernetes cluster in rootless Docker, rootless nerdctl, or rootless Podman:
# Example using Docker
dockerd-rootless-setuptool.sh install
kind create cluster
Depending on the host configuration, you may need additional configuration for systemd, kernel modules, sysctl, etc.
See the Docker documentation and the kind documentation for further information.
minikube
minikube (a Kubernetes SIG Cluster Lifecycle project) also supports running a Kubernetes cluster in rootless Docker or rootless Podman:
dockerd-rootless-setuptool.sh install
minikube start --driver=docker
See the minikube documentation for further information.
Usernetes
Usernetes (a third-party project)
is a distribution of rootless Kubernetes, maintained by the author of this article.
The project began in 2018, and it is where the KubeletInUserNamespace feature gate
originally came from.
Unlike kind and minikube, Usernetes supports creating a cluster with multiple rootless Docker / Podman / nerdctl nodes, connected using VXLAN via the Flannel CNI plugin.
Usernetes also experimentally supports a Kubernetes-in-Kubernetes mode.
k3s
k3s (a CNCF Sandbox project) also supports rootless mode. Unlike kind, minikube, and the current generation of Usernetes, rootless k3s does not rely on an external runtime such as rootless Docker.
What's next?
Depending on feedback and adoption, the Kubernetes project plans to graduate this feature to General Availability (GA) in a future release. If you have feedback on this feature, please open an issue in the kubernetes/kubernetes repository.
The project is also discussing several Kubernetes Enhancement Proposals that may contribute to simplifying Kubernetes-in-Kubernetes with this feature:
- KEP-5474: Enable Writable cgroups for unprivileged containers
- KEP-5714: Allow specifying whether to unshare cgroup namespaces
Getting involved
We always welcome new contributors. If you would like to get involved, you can join the Node Special Interest Group (SIG Node).
If you would like to share feedback, you can do so on our public Slack channel (visit https://slack.k8s.io/ for an invitation if you need one).
Special thanks to everyone who helped design and implement this feature, including but not limited to (in alphabetical order):
- Bing Hongtao (HirazawaUi)
- Jordan Liggitt (liggitt)
- Sergey Kanzhelev (SergeyKanzhelev)
- Tim Hockin (thockin)
Kubernetes v1.37: DRA Updates
Kubernetes 1.37 is here and Dynamic Resource Allocation (DRA) keeps pushing past where it started! This release brings DRA Extended Resource support to GA, a milestone the team has been building toward for three straight releases. Several more features graduate to Beta or GA. A fresh batch of alpha features rounds out the release.
I'll dive into what's new for DRA in Kubernetes 1.37!
What's stable in 1.37
DRA Extended Resource support has graduated to GA. This is the mechanism that lets DRA drivers satisfy requests made through the traditional extended resource API, think example.com/gpu in a Pod spec, without requiring a separate device plugin alongside the DRA driver. An extended resource name can be set directly on a DeviceClass, and Pods requesting it get matched to a device through DRA with no ResourceClaim needed on the workload's part.
It's been on a steady path since KEP acceptance in 1.34. Alpha landed in 1.35, Beta in 1.36, and now it's Stable. For cluster operators, this is what makes DRA adoption gradual. Existing workloads written against extended resources keep working unmodified while the backend allocation logic moves over to DRA.
ResourceClaims status with possible standardized network interface data adds a devices field to ResourceClaim .status, letting DRA drivers report per-device status, including, for network devices, the interface name, MAC address, and IP addresses. This gives users and controllers visibility into device state that was previously invisible once a device was configured in a Pod, and makes it possible to build things like network services that rely on a device's reported IPs.
DRA: device taints and tolerations is now Stable; DRA drivers can mark devices as tainted so they're skipped for new Pod scheduling, and cluster admins can apply the same taints cluster-wide via a DeviceTaintRule, without reconfiguring drivers. Pods already using a tainted device can be evicted automatically, unless their ResourceClaim explicitly tolerates the taint. This mirrors node taints and tolerations, letting operators take a single device offline for maintenance or mark it degraded, without disrupting the rest of the cluster.
Standard numaNode device attribute standardizes resource.kubernetes.io/numaNode as a shared attribute name, so devices from different drivers can be compared on the same NUMA node instead of each driver inventing its own name for it. It landed directly as stable in 1.37, since it's a naming/registration KEP with no feature gate or in-tree behavior change.
Feature promoted to Beta
ResourceClaim support for workloads
graduates to Beta behind the DRAWorkloadResourceClaims feature gate, which stays disabled by default.
In a cluster that has the feature enabled, Workloads and PodGroups can reference ResourceClaims directly, so
a single claim can be shared across an entire group of Pods. This is instead of claims being capped at 256
Pods through the old per-Pod reservation limit.
The DRA Device Attributes Downward API is aimed at
supporting device injection into KubeVirt VMs. Drivers populate a Metadata field when preparing a claim,
and the framework writes it to a JSON file mounted into the container via CDI, letting workloads read a
device's PCI bus address, MAC address, and other attributes directly instead of requiring custom controllers
to watch and translate ResourceClaims and ResourceSlices.
Alpha features
List types for attributes moved into a second Alpha in 1.37, letting a device attribute hold more than one value instead of a single scalar, such as a CPU that's adjacent to more than one PCIe root. This makes it possible to match or distinguish devices based on overlapping or non-overlapping sets of values, while single-value attributes keep working as they do today.
Node allocatable resource requests moved into Alpha 2. It lets the scheduler and kubelet treat DRA-managed CPU, memory, and similar node resources the same way they treat ordinary resource requests, so a node doesn't get oversubscribed and users no longer have to duplicate the same request in both a ResourceClaim and the pod spec.
Resource availability visibility moved to a second Alpha in Kubernetes 1.37. Users create a ResourcePoolStatusRequest to get a point-in-time availability snapshot. To refresh it, delete and recreate the request; it is not a continuous monitoring API.
DRA: Optional Node Operations lets a driver skip kubelet's prepare and unprepare calls for allocations that don't need any setup on the node. This makes it possible to avoid an unnecessary dependency on the driver for allocations where there's genuinely nothing for it to do locally.
Derived Attributes is a new feature that lets you use CEL expressions to match up devices based on your own
custom rules. Before this, pairing devices from different vendors (like a GPU/TPU and a NIC on the same NUMA
node) only worked if both drivers used the exact same attribute name. If one used numa and the other used
numaNode, the scheduler couldn't pair them together. Now, you can easily bridge these differences yourself
inside your manifest, meaning you don't have to wait for hardware vendors to agree on standardized attribute
names. Beyond just fixing naming differences, you can also use CEL to handle more complex scenarios like
slicing a specific ID out of a long, monolithic topology string, or grouping devices into custom performance
tiers based on their available capacity.
DRA Device Compatibility Groups lets drivers tag partitions
of a device, like MIG vs vGPU profiles on the same GPU, with compatibility groups, so the scheduler rejects
incompatible combinations up front instead of the driver failing at node preparation time. It's controlled by
the DRADeviceCompatibilityGroups feature gate, disabled by default.
PreQueueingHint extension point is new as Alpha in 1.37.
DRA ResourceClaim events used to trigger a full scan of every unschedulable pod, an O(N²) cost during large
scale-ups. The DRA plugin now uses a pod informer index to narrow that to just the pods actually affected,
cutting the requeue path to O(1) and roughly doubling scheduling throughput in early benchmarks. Controlled
by the SchedulerPreQueueingHints feature gate.
DRA Consumable Capacity now supports fractional values in
CapacityRequestPolicyRange, enabling more precise capacity requests and allocation for devices with fractional resources.
This improves flexibility for workloads that require fine-grained resource allocation. The enhancement is gated by the
DRAFractionalCapacityRange feature gate, which is in Beta in 1.37.
What’s next
DRA continues to mature with every release. Several features currently in Alpha and Beta are on track to progress in the coming releases, and the community keeps working on DRA's performance, scalability, and reliability. Expect another ambitious set of DRA features in Kubernetes 1.38.
Getting involved
A good starting point is joining the WG Device Management Slack channel and meetings which happens at US/EU and EU/APAC friendly time slots.
Not all enhancement ideas are tracked as issues yet, so come talk to us if you want to help or have some ideas yourself! We have work to do at all levels, from difficult core changes to usability enhancements in kubectl which could be picked up by newcomers.
Acknowledgments
The following KEP owners added or promoted a feature in the 1.37 release (in alphabetic order):
- Alay Patel (alaypatel07)
- Byonggon Chun(bg-chun)
- Gaurav Ghildiyal (gauravkghildiyal)
- Jiefeng Xu (jiefeng-xu)
- John A. Hull (johnahull)
- Jon Huhn (nojnhuh)
- Lionel Jouin (LionelJouin)
- Patrick Ohly (pohly)
- Praveen Krishna (pravk03)
- Shingo Omura (everpeace)
- Troy Chiu (troychiu)
This would not have been possible without the help of the reviewers and approvers. So a huge thanks to everyone else who helped shape this release, in ways big and small. Given enough eyeballs, all bugs are shallow and this release had plenty of them, watching closely and caring enough to make things better. DRA got better this cycle because of all of you.
Kubernetes v1.37: Scale Workloads to Zero with HorizontalPodAutoscaler
Kubernetes v1.37 includes API support for horizontal autoscaling of workloads down to zero replicas. This feature is now Beta and enabled by default. A HorizontalPodAutoscaler (HPA) that uses a suitable object metric or external metric can now scale a workload to zero replicas, then bring it back when the metric changes.
Before v1.37, you needed an add-on or external component, or you had to enable the Alpha feature gate, to scale from zero. It is now part of core Kubernetes.
Scaling to zero removes the last idle Pod from workloads such as queue consumers and batch processors. The savings are largest when each Pod reserves expensive resources, including dedicated CPUs or GPUs.
The trade-off is cold-start time: the HPA must observe the metric, schedule a Pod, and start the application. This works well when work can wait in a durable queue.
Kubernetes Services do not buffer requests while no Pods are ready, so HTTP and other request-driven workloads need a separate buffering layer.
Why scaling from zero needs a different metric
The HPA commonly scales on CPU or memory usage. Both metrics come from running Pods. Once the replica count reaches zero, there are no Pods left to measure and no signal that can tell the HPA to scale back up.
Object and external metrics do not have that limitation. A queue length, for example, exists independently of the workers that consume it. The HPA can continue reading the queue length while no workers are running.
The following example scales a queue consumer to and from zero using an external metric.
Configure an external metric
The following example uses a Prometheus metric named queue_consumer_lag. It assumes
that Prometheus already collects a series similar to this one:
queue_consumer_lag{namespace="default",name="worker_tasks"}
Kubernetes needs a metrics adapter to make that value available through the External
Metrics API. One implementation is the
Prometheus Adapter, which can
expose the series using an externalRules entry:
externalRules:
- seriesQuery: '{__name__="queue_consumer_lag",name!=""}'
metricsQuery: sum(<<.Series>>{<<.LabelMatchers>>}) by (name)
resources:
overrides:
namespace:
resource: namespace
The exact adapter installation and discovery rules depend on your monitoring setup. See the Prometheus Adapter guide to external metrics for the full configuration options.
Before creating the HPA, you can verify that Kubernetes can read the metric:
kubectl get --raw \
'/apis/external.metrics.k8s.io/v1beta1/namespaces/default/queue_consumer_lag?labelSelector=name%3Dworker_tasks'
The request should return the current value for worker_tasks. If it does not, fix the
metrics pipeline before configuring the HPA. An HPA cannot scale from zero when its
metric is unavailable.
Configure the HPA
The following HPA targets a Deployment named queue-worker. It allows between zero
and ten replicas, with one replica requested for each 30 queued tasks:
apiVersion: autoscaling/v2
kind: HorizontalPodAutoscaler
metadata:
name: queue-worker
annotations:
kubernetes.io/description: "Scales queue-worker based on the number of queued tasks"
spec:
scaleTargetRef:
apiVersion: apps/v1
kind: Deployment
name: queue-worker
minReplicas: 0
maxReplicas: 10
metrics:
- type: External
external:
metric:
name: queue_consumer_lag
selector:
matchLabels:
name: worker_tasks
target:
type: Value
value: "30"
When the queue is empty, the HPA can reduce the Deployment to zero replicas. When
tasks arrive, the external metric remains available and the HPA calculates a new
replica count, capped at ten by maxReplicas.
Start the Deployment with at least one replica. Manually setting a Deployment to zero has always paused autoscaling. The HPA preserves that behavior and will not wake a workload that it did not scale down itself.
Normal HPA behavior still applies. In particular, the default downscale stabilization
window is five minutes. The window prevents a short drop in queue length from
immediately removing all workers. You can configure the window through
spec.behavior.scaleDown if your workload needs different behavior.
How the HPA distinguishes zero from paused
Scaling from zero creates an ambiguity. A replica count of zero can mean that the HPA scaled the workload down, or that an operator manually paused it.
The controller resolves this with a ScaledToZero status condition. When the HPA
scales a workload from one or more replicas to zero, it records
ScaledToZero=True. The condition tells later reconciliation loops that the
controller owns the zero state and should continue evaluating object or external
metrics.
After scaling the workload back up, the controller changes the condition to
ScaledToZero=False with the reason NotScaledToZero. A workload at zero without
the ScaledToZero=True condition remains paused.
You can inspect the conditions with:
kubectl describe hpa queue-worker
If the adapter cannot return the configured metric, the HPA reports
ScalingActive=False with a reason such as FailedGetExternalMetric. Restore the
metric or manually scale the workload to recover capacity.
Before upgrading or rolling back
In Kubernetes v1.37, the HPAScaleToZero feature gate is enabled by default on both the
kube-apiserver and kube-controller-manager. The API server accepts
minReplicas: 0; the controller manager performs the condition-based scaling.
During a version-skewed control plane upgrade, wait until both components support the
feature and have it enabled before creating HPAs with minReplicas: 0. A controller
manager with the feature disabled treats replicas: 0 as a manual pause and may leave
a workload at zero.
Before disabling the feature gate or downgrading to a version without the condition-based implementation:
- Change affected HPAs to
minReplicas: 1or higher. - Scale any workload currently at zero to at least one replica.
minReplicas: 0 also requires at least one object or external metric. The API server
rejects an HPA that only contains resource metrics such as CPU or memory.
From Alpha to Beta
The first Alpha implementation shipped in Kubernetes v1.16. Kubernetes v1.36 added
the ScaledToZero condition and the controller behavior needed to distinguish an
automatic scale-down from a manual pause.
Kubernetes v1.37 enables the feature by default after adding integration and end-to-end coverage for scaling down to zero and back up from an external metric. The next step is to gather operational feedback before considering graduation to GA.
How can I learn more?
- Read the documentation for scaling to and from zero.
- Read KEP-2021: HPA supports scaling to and from zero pods for object and external metrics.
- Learn how to configure the Prometheus Adapter for external metrics.
How to get involved
This feature is owned by
SIG Autoscaling.
Join Kubernetes Slack and the
#sig-autoscaling channel to share
feedback from Beta usage.
Acknowledgements
Thanks to the SIG Autoscaling contributors who took this feature from the original v1.16 implementation to the condition-based redesign and Beta graduation. Thanks also to Guy Templeton and Adrian Moisey for reviewing the KEP, and to the release, documentation, and production-readiness reviewers who helped prepare it for Kubernetes v1.37.
Kubernetes v1.37: etcd RangeStream Cuts Memory Use on Large List Reads
I am excited to announce that etcd RangeStream is graduating to beta in Kubernetes v1.37. Paired with etcd v3.7, it reduces the memory the API server and etcd need to read a large collection, and makes peak usage more predictable.
The cost of large reads
The API server serves most list and watch requests from its in-memory watch cache. Populating that cache requires reading a resource's full state from etcd, at startup and on every re-initialization. For a resource with many objects, or large ones, such as Pods, that read is expensive.
The API server already paginated these reads, asking etcd for a fixed number of
keys at a time rather than the whole collection at once. But a page bounded by key
count has no awareness of object size, so a page of large objects can still be
very large. That makes memory usage hard to predict, and a bad combination of
object size and concurrent reads can be enough to trigger an OOM. etcd's unary
Range assembles each page in full before sending it, and the API server holds it
while decoding, so the same payload sits in memory on both sides at once. Most of
that cost lands on etcd, which is also where streaming helps most.
Streaming reads with RangeStream
etcd v3.7 adds a streaming version of that read, the RangeStream RPC. It takes
the same RangeRequest as Range and returns the same result set, but instead of
building the whole response up front, etcd splits it into chunks and streams them.
Chunk size is tuned adaptively to the values being returned, so a collection of
large objects is bounded by bytes rather than by a key count, and memory is freed
as the stream progresses instead of being held until a whole page is assembled.
When the feature is enabled, the API server uses RangeStream wherever it reads a
whole collection out of etcd. This includes watch cache initialization, and the
fallback paths where a list request cannot be served from the cache and reads etcd
directly. In either case the API server decodes each chunk as it arrives and
releases it before pulling the next one, so neither side ever holds the whole
collection.
Requirements
- Kubernetes v1.37 or later
- etcd v3.7 or later
RangeStream is used when the EtcdRangeStream feature gate is enabled on the
kube-apiserver, which is beta and on by default in v1.37, and etcd is v3.7 or
later. The API server resolves etcd's support at startup
and also falls back at runtime if a call returns Unimplemented, so an API server
paired with an older etcd keeps using the paginated Range path on its own. To
turn it off, disable the gate:
--feature-gates=EtcdRangeStream=false
Confirming RangeStream is in use
The API server records streamed reads under their own operation label on its etcd
metrics. A non-zero count here means RangeStream is in use:
etcd_request_duration_seconds_count{operation="listStream"}
If it stays at zero, the API server is still using the paginated Range path, most
likely because etcd is older than v3.7.
Learn more
If you have questions or feedback, join the #sig-etcd channel on
Kubernetes Slack.
Kubernetes v1.37: Storage Version Migration Enabled by Default
I am excited that storage version migration (SVM) has graduated to General Availability (GA) in Kubernetes v1.37!
After a number of releases of work and testing, the built-in StorageVersionMigration API (storagemigration.k8s.io/v1)
and control plane controller are now fully stable and enabled by default across all v1.37 Kubernetes clusters.
The problem with stale storage versions
In Kubernetes, stored API resources are written using a specific storage version (schema representation). The way Kubernetes interacts with object storage fundamentally requires mutation of a resource in order to ensure that the latest storage version is used for all resources. This creates problems when you want to change the storage version of a resource.
One example of a scenario where you may want to change the storage version of a resource is when you are promoting a CRD to drop an older API version (such as v1alpha1) to a newer version (leaving just v1beta1 and v1). It's a problem to drop the older API version whilst there are still resources stored with the old alpha version.
To avoid problems, you designate v1 as the new storage version; but, on it's own, that's not enough. While new writes are stored as v1, any existing resource could remain stored as v1alpha1 or v1beta1 in storage. You cannot safely remove v1alpha1 from the CRD's .status.storedVersions or drop serving support until every single resource in storage has been re-written to not be serialized and stored with the alpha version.
Another relevant example is encryption at rest and, related, key rotation. When you configure encryption at rest or rotate encryption keys, existing resources in storage remain unencrypted (or encrypted under old keys) until they are actively re-written through the Kubernetes API server.
Historically, cluster administrators and CRD authors had to rely on manual
kubectl get / kubectl replace scripts, or to deploy the out-of-tree kube-storage-version-migrator component to force re-writes.
These approaches were often tedious, error-prone, and difficult to monitor.
How storage version migration works
Initiating a storage version migration is as simple as creating a declarative StorageVersionMigration object. The built-in StorageVersionMigrator controller in the Kubernetes control plane watches for these objects, and automatically migrates existing resources to the default storage version for that API.
Example: Migrating a custom resource API
Suppose you have updated a CustomResourceDefinition (crontabs.example.com) to use v1 as its storage version.
To migrate all existing stored resources off older versions, create a StorageVersionMigration:
apiVersion: storagemigration.k8s.io/v1
kind: StorageVersionMigration
metadata:
name: crontabs-migration
spec:
resource:
group: example.com
resource: crontabs
Apply the manifest using kubectl:
kubectl apply -f crontabs-migration.yaml
Monitoring and verifying migrations
The StorageVersionMigrator controller updates the status of the StorageVersionMigration object as migration progresses.
You can inspect the migration status using kubectl:
kubectl get storageversionmigration.storagemigration.k8s.io/crontabs-migration -o yaml
A successful migration will report a Succeeded condition set to True:
status:
conditions:
- type: Running
status: "False"
lastUpdateTime: "2026-08-02T10:05:00Z"
reason: StorageVersionMigrationInProgress
- type: Succeeded
status: "True"
lastUpdateTime: "2026-08-02T10:05:00Z"
reason: StorageVersionMigrationSucceeded
Once the migration has succeeded, you can be confident that all instances of the resource in storage are stored in the current storage version. For
CRDs, the stored version should be updated in the CRD's .status.storedVersions to only contain the preferred version. If the
.status.storedVersions is not updated following a successful migration then that means that the CRD was updated during the migration. In
that case, the migration should be retried in order to safely deprecate an older storage version.
Including migrations in your CRD manifests
Because StorageVersionMigration is a standard declarative Kubernetes API, CRD authors can bundle or trigger migrations directly alongside CRD upgrades. For example, you can include the migration in the same manifest as your updated CustomResourceDefinition:
apiVersion: apiextensions.k8s.io/v1
kind: CustomResourceDefinition
metadata:
name: crontabs.example.com
spec:
group: example.com
# Updated versions list where v1 has storage: true
...
---
apiVersion: storagemigration.k8s.io/v1
kind: StorageVersionMigration
metadata:
name: crontabs-migration
spec:
resource:
group: example.com
resource: crontabs
What's next?
- Learn more about the concepts behind Storage Versions.
- Read the step-by-step task guide: Migrate Kubernetes Objects Using Storage Version Migration.
SIG API Machinery would love to hear your feedback as you adopt built-in Storage Version Migration in your clusters. Reach out to us on the #sig-api-machinery Slack channel or participate in our community discussions!
Kubernetes v1.37: Pod Certificates and Cluster Trust Bundles
Kubernetes brings a wealth of features that make it easy to run your production workloads securely and reliably. While aspects like scheduling, health checks and resource limits are probably at the front of your mind, one other important feature of Kubernetes is production identity — how your workload can authenticate to other systems in order to do its job.
Up until now, the primary production identity mechanism built into Kubernetes has been service account JWTs (JSON Web Tokens). These are cryptographically-signed tokens, issued by the control plane of your cluster, that let anyone in the world understand who is calling when your workload uses them.
In Kubernetes 1.37, the foundations of a new built-in production identity technology have gone GA. Pod Certificates (and the closely-associated Cluster Trust Bundles) build X.509 certificate issuance for TLS and mTLS directly into core Kubernetes.
Why?
Service account JWTs have a lot going for them:
- They are built directly into Kubelet, and work pretty magically. They are written to your workload container’s filesystem before your workload starts up, and automatically kept up to date.
- The issuance system follows least-privilege principles; the node restriction admission plugin ensures that tokens can only be requested by the Kubelet that is actually currently running your pod.
- They can be federated, allowing you to use them to authenticate to other systems outside of Kubernetes. Service account JWTs underpin the pod-to-cloud authentication store for all of the largest cloud providers, and have widespread support across many additional services and software packages. If it can understand JWTs, you can authenticate to it with a service account token.
However, service account JWTs have one big downside — they are bearer tokens. With bearer tokens, if you have the token, then you are the identity asserted by the token. And since you necessarily have to hand copies of the JWT to all your peers in order to authenticate to them, they can be you, too.
There are partial mitigations for this, and service account tokens make use of them (time-, object-, and audience-binding), but none are complete defences.
A solution to this problem lies in proof-of-possession credentials, where you don’t send your entire credential to your peer, but only a proof that you possess the credential. In practice, these schemes are always built on asymmetric cryptographic signatures (RSA, ECDSA, and friends).
There are few different standard approaches, such as request signing (AWS SigV4, JWT DPoP, RFC 9421), but the most widely-deployed and understood solution is X.509 certificates, as used in TLS. In TLS, your credential is split into two pieces
- A private key, which for maximum security should be generated within your workload (or within a hardware security module), and never leave.
- A certificate, which is a description of your identity and public key, signed by a Certificate Authority.
The goal of Pod Certificates is to make using X.509 certificates from your Kubernetes workload just as easy as using service account JWTs, while maintaining Kubernetes’ high security bar. I think we’ve hit this target.
As I’ll cover in the architecture and example sections below, there are many similarities between the design of service account JWT issuance and Pod Certificates. One significant place they diverge, however, is that Pod Certificates is a much more flexible mechanism. Kubernetes only offers one flavor of service account JWTs, with standardized claims.
The X.509 ecosystem is significantly more varied than the JWT ecosystem, and X.509 certificates used for different purposes contain different extensions and information. For this reason, Pod Certificates has common machinery built into Kubelet, but offers a pluggable interface so that many different types of certificates can be issued within a single cluster, at the same time.
In the fullness of time, I expect Kubernetes to offer at least two built-in certificate providers:
- One that issues server TLS certificates for the DNS names used by Kubernetes services.
- One that offers SPIFFE client certificates, filling the same role that service account JWTs fill today.
In the remainder of this article, I’ll take you through the overall architecture of a Kubernetes workload using Pod Certificates, as well as give you an example of installing and using a real (toy) Pod Certificates signer controller.
Architecture
When you use Pod Certificates and Cluster Trust Bundles, there are the following major components:
- Your application, which requests certificates in its pod spec, and reads the keys, certificates and trust bundles from the container filesystem to use for (m)TLS.
- Kubelet, which issues PodCertificateRequest objects and reads ClusterTrustBundle objects on behalf of your workload.
- The signer controller, which answers PodCertificateRequests and publishes ClusterTrustBundles.

Architecture of an application using Pod Certificates
The best way to get a sense of what these components each do is to follow the issuance process chronologically:
- Once your application pod is scheduled to a node, Kubelet identifies all of the podCertificate and clusterTrustBundle projected volumes sources in its spec.
- For each podCertificate source:
- Kubelet generates a new private key according to the keyType field.
- Kubelet creates a PodCertificateRequest addressed to the signer named in the source.
- The signer controller sees the PodCertificateRequest and decides whether or not to issue the certificate.
- The signer controller issues the certificate by filling out the status.certificateChain field.
- The signer controller also fills out the status.beginRefreshAt field to
instruct Kubelet when it should begin trying to refresh the certificate.
certificate to the container filesystem.
- For each clusterTrustBundle source:
6) Kubelet retrieves the issued certificate, and writes the private key and- Kubelet collects all the ClusterTrustBundles that match the signer name
- Kubelet unifies all of the certificates from all matching
ClusterTrustBundles, and (stably) reorders them (to prevent applications
from accidentally depending on a particular ordering).
and label selectors in the source. - Kubelet writes the certificates to the file path named in the source.
and trust anchors from the filesystem.
- Your application pod starts up, and the application reads keys, certificates,
- Kubelet periodically updates the files from clusterTrustBundle sources as the contents of the selected ClusterTrustBundles changes. The application must pick up the changes using inotify or polling.
- As each certificate’s beginRefreshAt time passes, Kubelet repeats the process in step 2 to refresh the certificates, and write the update private keys and certificate chains to the filesystem. As in step 5, the application must pick up changes using inotify or polling.
Some key takeaways:
- Automatic rotation is built in. Applications must properly handle it. Any signers eventually shipped in core Kubernetes will issue certificates with a max lifetime of 24 hours. The maximum lifetime allowed for other signers is 91 days.
- To make automatic rotation support as simple as possible, Kubelet supports writing the private key and certificate chain to a single file (a credential bundle) This allows the application to simply subscribe to inotify events for (or poll) the single file, read the contents, and use them. Kubelet does support writing the private key and certificate chain to separate files, but then the application needs to carefully manage the potential race conditions of reading the files mid-rotation.
- Wherever possible, security checks are built into kube-apiserver, rather than burdening signer or application developers. As an example, the built-in node restriction admission plugin enforces node isolation, ensuring that one compromised node cannot spread access by requesting certificates for pods that aren’t scheduled to it.
Try it out
Because the Kubernetes project does not yet ship any Pod Certificate signers in core, in order to try these features out, you will need to install a third-party signer into your cluster. To make this easier, I have written Tinycert, which you can install into your cluster (or a Kind cluster).
Tinycert is not a full production solution, but it’s a good starting point for experimenting with Pod Certificates, as well as a base for creating your own signers.
Tinycert provides:
- The ahmedtd.github.io/tinycert-service signer, which issues certificates with DNS SANs for all of the Kubernetes Services your Pod is part of.
- The ahmedtd.github.io/tinycert-spiffe signer, which issues SPIFFE-compatible certificates that identify the namespace and service account of your Pod. These can be used as both client and (with effort) server certificates.
- A Go library, github.com/ahmedtd/tinycert/lib/spiffefsd to help your applications load SPIFFE certificates and trust bundles from a SPIFFE Filesystem Delivery (Draft Standard) folder, as well as configure the Go TLS library for proper client and server authentication.
- An example of a SPIFFE client and server application communicating using mutual TLS and SPIFFE certificates.
What next?
- Take a look at the documentation for Pod Certificates and Cluster Trust Bundles.
- Review and offer feedback on the SPIFFE Filesystem Delivery draft standard, which aims to make it as easy as possible to use SPIFFE certificates directly on native Kubernetes.
- Participate in Kubernetes SIG Auth to help shape the future of signers that are built directly in to core Kubernetes.
- Try building your own signer based on Tinycert.
Happy hacking!
Kubernetes v1.37: Metrics API graduates to stable
Kubernetes v1.37 promotes the metrics.k8s.io API to stable (v1). This
API provides CPU and memory usage for nodes and Pods, and is the API behind
commands such as kubectl top and resource-metrics-based autoscaling.
For cluster operators and application developers, this graduation means that
the API now has the stability guarantees associated with a Kubernetes stable
API. The v1 API has the same resource types and fields as v1beta1; this is
an API-version graduation, not a change to the metrics that are collected or
returned.
A long-lived API reaches stable
The resource Metrics API was introduced as alpha in Kubernetes v1.6 and became
beta in v1.8. It has remained unchanged and has been used in production for
years by clients including the HorizontalPodAutoscaler (HPA) and kubectl top.
Kubernetes v1.37 formally graduates that proven API to metrics.k8s.io/v1.
The API exposes two resource types:
NodeMetrics, for CPU and memory usage for a node.PodMetrics, for CPU and memory usage for a Pod, with a per-container breakdown in itscontainersfield.
The API remains intentionally small. It provides the resource metrics needed
for autoscaling and basic inspection; it is not a replacement for a full
monitoring pipeline or the custom metrics (custom.metrics.k8s.io) API.
What changed with the v1.37 release?
The v1 API surface is identical to v1beta1, except for the API version.
There are no renamed fields, new fields, or changes to the meaning of the
returned CPU and memory values.
For example, a client can retrieve node metrics from the stable endpoint:
kubectl get --raw /apis/metrics.k8s.io/v1/nodes
Likewise, it can retrieve metrics for the pods in a namespace:
kubectl get --raw /apis/metrics.k8s.io/v1/namespaces/default/pods
kubectl top supports both API versions. It prefers v1 when available and
automatically falls back to v1beta1 on clusters that do not yet serve v1.
The HPA controller currently supports only v1beta1. Support for
discovery-based selection between v1 and v1beta1 is planned, but is not
available in Kubernetes v1.37.
What you need to do
You don't need to enable any feature gate. The Metrics API is served through the
API aggregation layer,
by an implementation such as metrics-server.
You can choose any implementation of metrics.k8s.io; for the v1 metrics API to be
available in your cluster, your chosen implementation must serve the v1.metrics.k8s.io API, and you need to register an associated APIService.
During the transition, implementations should serve both v1 and v1beta1.
Keeping both versions available maintains compatibility with older clients.
The v1beta1 API remains available in Kubernetes v1.37.
You can see which versions your cluster serves with:
kubectl get --raw /apis/metrics.k8s.io/ | jq .
Once your metrics implementation supports v1, you can also check that its
APIService is available:
kubectl get apiservice v1.metrics.k8s.io
Learn more
- Read the Resource metrics pipeline documentation.
- Read KEP-5207, the proposal for (graduating) this API.
- Learn about the Metrics API and its reference implementation, metrics-server.
Get involved
The Metrics API is maintained by SIG Instrumentation. To ask questions, share feedback, or contribute, join the #sig-instrumentation channel on Kubernetes Slack or attend a SIG Instrumentation meeting.
Kubernetes v1.37: Garhwal
Editors: Arsh Sharma, Christopher Tineo, Kirti Goyal, Sophia Ugochukwu, Swathi Rao, Troy Connor
Similar to previous releases, the release of Kubernetes v1.37 introduces new Stable, Beta, and Alpha features. The consistent delivery of high-quality releases underscores the strength of our development cycle and the vibrant support from our community.
This release consists of 67 enhancements. Of those enhancements, 16 have graduated to Stable, 23 have graduated to Beta, 27 are entering Alpha, and 1 is a deprecation/removal.
Release theme and logo

The theme for Kubernetes v1.37 is Garhwal (गढ़वाल, pronounced gaṛhvāl), a Himalayan region of Uttarakhand, India. The snow-capped peaks of the Garhwal Himalaya, deodar forests, terraced fields, rivers and streams, and mountain paths shape both the region and the logo. Together, these elements reflect a community in which every layer, route, and contribution is connected.
The logo is imagined as a window into Garhwal's landscape.1 Inside, terraced fields climb towards the snowy peaks, each level supported by the one below, much as every Kubernetes release depends on work carried forward. A river winds through the valley and gathers mountain streams, reflecting contributions from many SIGs and communities flowing into one project.
The deodar forest represents the wider Kubernetes ecosystem, where distinct projects share common ground and grow side by side. Stonework and woodcraft shape the path and mountain house, placing people at the centre and evoking shared foundations maintained for those who follow. Above the river, colourful flags catch the wind and bring the scene to life.
Encircling the scene is a patterned frame inspired by basketry woven from ringaal, a flexible dwarf Himalayan bamboo. Individual strips gain strength when interlaced, just as code, reviews, tests, documentation, and coordination come together to make a release.
Within the frame, the Himalayan monal, Uttarakhand's state bird, lives at high altitudes in the Himalaya. Its iridescent plumage holds many colours at once, much as the Kubernetes community brings many skills and perspectives into one project. Flowers of red buransh (Rhododendron arboreum), Uttarakhand's state tree, carry Kubernetes helms at their centres, linking a familiar bloom of Garhwal with the symbol shared by the community. The house bears १.३७ (1.37 in Devanagari numerals), grounding the release in the landscape.
1. Keep looking through the window (the logo). Watch the river flow and the flags catch the wind. In 37 seconds, the landscape reveals its magic. 😉
Spotlight on key updates
Kubernetes v1.37 is packed with new features and improvements. Here are a few select updates the Release Team would like to highlight!
Stable: Resilient watchcache initialization
Kubernetes v1.37 completes the work on resilient watch cache initialization: the
ResilientWatchCacheInitialization feature gate reached Stable back in v1.34, and in v1.37 the remaining
WatchCacheInitializationPostStartHook gate graduates to Stable and is locked on. It has defaulted to
enabled since v1.36, hardening the API server at startup and during
recovery. Watchcache initialization and reinitialization no longer create a traffic spike of requests against etcd, and
requests are handled gracefully instead of piling up while the cache warms.
Instead of allowing expensive list and watch requests to overload etcd or exhaust API Priority and Fairness capacity, kube-apiserver now safely delegates bounded requests and rejects others with HTTP 429 responses. This reduces the risk of control
plane outages in large clusters. Clients (including custom controllers and operators) should be designed to handle HTTP 429 Too Many Requests responses gracefully by respecting Retry-After headers and implementing exponential backoff.
This work was done as part of KEP #4568 led by SIG API Machinery.
Beta: HorizontalPodAutoscaler scale to zero
In Kubernetes v1.37, HorizontalPodAutoscaler scale to zero support is graduating to Beta. First introduced in
Kubernetes v1.16, it is now enabled by default.
For workloads that are using object or external metrics, this feature allows HorizontalPodAutoscalers to scale down to
zero Pods when idle, then restore them when demand returns. Doing that can reduce costs for queue consumers, batch jobs,
and GPU workloads. Setting spec.minReplicas: 0 applies this functionality for workloads.
Scaling to zero based on CPU and memory metrics is not supported because those metrics depend on active Pods. Instead, this feature is for situations such as leaving the replica count at zero until there is queued work to process.
While the HorizontalPodAutoscaler is holding a
workload at zero replicas, it records a ScaledToZero condition with True in the HorizontalPodAutoscaler's status. The
HorizontalPodAutoscaler controller then uses this condition to distinguish a workload that it scaled to zero (and will
scale back up when the metric returns) from one that was manually deactivated by setting its replica count to 0. Once the
workload is scaled back up, the condition is set to False with the reason NotScaledToZero.
This work was done as part of KEP #2021 led by SIG Autoscaling.
Beta: Manifest-based admission control configuration
Kubernetes v1.37 graduates manifest-based admission control
configuration to Beta. Admission webhooks and CEL-based policies can now be loaded from manifest files on disk, via the
staticManifestsDir field in AdmissionConfiguration, instead of living only in the Kubernetes API. Policies loaded this
way are enforced from API server startup, keep working while etcd is unavailable, and can protect the API-based admission
resources themselves from modification.
This work was done as part of KEP #5793 led by SIG API Machinery.
Alpha: Pod-level checkpoint and restore
Kubernetes v1.37 introduces Alpha support for Pod-level checkpoint and restore,
extending the CRI with CheckpointPod and RestorePod RPCs, which allow the kubelet and compatible container runtimes to create a Pod checkpoint and restore a Pod from it.
To use this feature, your container runtime(s) must also implement these new RPCs.
This work was done as part of KEP #5823 led by SIG Node.
Features graduating to Stable
This lists all the features that graduated to Stable (also known as General Availability). For a full list of updates including new features and graduations from Alpha to Beta, see the release notes.
This release includes a total of 16 enhancements promoted to Stable:
KYAML
KYAML is a safer and less ambiguous subset of YAML designed specifically for Kubernetes, not a replacement for it. Every
KYAML file is valid YAML, so KYAML is a valid input for any version of kubectl, and spec files do not need to be written in
KYAML for the input to be parsed. Your existing manifests, tooling, and pipelines don't need to change.
Introduced as an Alpha feature in v1.34 and graduating to Beta in v1.35, KYAML graduates to Stable in v1.37 with conformance
testing complete, and kubectl get -o kyaml is now Stable.
To learn more about KYAML, check out How to Pretty-Print Your Kubernetes YAML as KYAML and Why You'd Want To.
This work was done as part of KEP #5295 led by SIG CLI.
The metrics.k8s.io API
The metrics.k8s.io API graduates to Stable in Kubernetes v1.37 after spending nearly nine years in Beta. The API provides a
standard way to retrieve CPU and memory usage for pods and nodes, powering widely used Kubernetes features such as the
HorizontalPodAutoscaler (HPA) and commands like kubectl top.
The graduation follows the Kubernetes project’s goal of avoiding permanent Beta APIs. Now that v1 exists, future
Kubernetes releases will move over to it; v1beta1 remains usable throughout the transition, in line with the API
deprecation policy, so you can adopt the Stable API without breaking existing workflows.
This work was done as part of KEP #5207 led by SIG Instrumentation.
SELinuxMount and SELinuxChangePolicy
In Kubernetes v1.37, SELinuxMount and SELinuxChangePolicy flags reach Stable and are enabled by default: this means that
volumes get mounted with -o context=<label> (the MountOption default) instead of being recursively relabeled, but only when
the volume's CSI driver opts in via .spec.seLinuxMount: true for the CSIDriver object.
A mount can only carry one SELinux context, so Pods with different SELinux labels sharing a volume on the same node, which
used to coexist under recursive relabeling, can now fail to start.
To retain the old behavior for a workload, it is advised to set the .spec.seLinuxChangePolicy to Recursive on a Pod.
This behavior itself also isn't locked until v1.38, so disabling it cluster-wide remains an option for one more release.
Clusters without SELinux enabled see no effect at all. To learn more, check SELinux Volume Label Changes goes GA (and likely implications in v1.37).
This work was done as part of KEP #1710 led by SIG Storage.
DRA features graduating to Stable
DRA: ResourceClaim status with possible standardized network interface data
The ResourceClaim .status.devices reaches Stable in Kubernetes v1.37, which allows drivers to report device-specific device
status data for each allocated device in a resource claim. This makes it easier to see how a device is configured,
troubleshoot problems, and use the device with other services.
This is particularly useful for network devices; before this field was added, if a Pod requested a network device via DRA, there was no way for any other component in the system to learn the IP address that was assigned to that network device. The new status field provides a standardized way for the DRA driver to export that information to components that need it, making DRA fully usable for attaching secondary network interfaces to Pods.
This work was done as part of KEP #4817 led by SIG Node and SIG Network.
DRA: handle extended resource requests via DRA Driver
DRA Extended Resource support reaches Stable in Kubernetes v1.37. This feature allows DRA drivers to fulfill requests made
through the traditional extended resource mechanism, such as abc.example/gpu: 3 in a Pod spec, without requiring a
separate device plugin.
With this mechanism, an extended resource name can be assigned directly to a DeviceClass. Pods requesting that resource can then have a device allocated through DRA without needing to define a ResourceClaim in the workload.
This work was done as part of KEP #5004 led by SIG Scheduling.
DRA: device taints and tolerations
Support for taints and tolerations for physical devices managed through DRA is now Stable in Kubernetes v1.37. By default, any available device can be considered for scheduling. This enhancement provides greater control over device scheduling by allowing DRA drivers to mark specific devices as tainted, preventing them from being selected for workloads. Alternatively, cluster administrators can create a DeviceTaintRule to taint devices based on specific selection criteria, such as all devices managed by a particular driver.
This work was done as part of KEP #5055 led by SIG Scheduling.
DRA: standard numaNode device attribute
Kubernetes v1.37 defines a new standard NUMA node device attribute. It standardizes
resource.kubernetes.io/numaNode as a shared attribute name for device NUMA node information, allowing devices managed by
different DRA drivers to be compared based on the same NUMA node. This avoids each driver defining its own attribute name and
provides a consistent way to identify NUMA placement across devices. The enhancement lands directly as Stable because it is a
naming and registration KEP with no feature gate or in-tree behavior changes.
This work was done as part of KEP #6072 led by SIG Node.
Node declared features
Node declared features graduate to Stable in Kubernetes v1.37, providing a framework to declare the availability of specific, feature-gated Kubernetes features for Nodes.
This would then be used by control plane components (such as the kube-scheduler, admission controllers, or the API server itself) to manage version skew.
The feature introduces a new .status.declaredFeatures field for Nodes, which is used to declare a feature graduating
through the Alpha → Beta → Stable stages. The control plane can use this to adopt
the correct behavior even in a cluster running a mixture of different node versions.
Once features graduate to Stable and the control plane can assume all nodes support them across the supported version skew window, nodes stop reporting them.
The kubelet determines its declared features when it starts, based only on feature gates and the node’s static
configuration (so any changes require a kubelet restart).
This work was done as part of KEP #5328 led by SIG Node.
Storage version migrator
Kubernetes v1.37 sees the StorageVersionMigration API (storagemigration.k8s.io/v1) graduate to Stable and become enabled by
default. It helps migrate existing resources, both built-in and custom, from an older storage version to the new storage
version after an API upgrade, such as when the preferred storage version changes from v1beta1 to v1. It can also be used to rewrite existing
data after a change to encryption at rest, so that stale data is stored using the new encryption settings.
Historically, cluster administrators and CustomResourceDefinition authors had to use manual kubectl get or
kubectl replace scripts, or deploy the out-of-tree kube-storage-version-migrator component to rewrite existing resources. These
approaches were often tedious, error-prone, and difficult to monitor.
To start a storage version migration, users would need to create a declarative StorageVersionMigration object. The built-in
StorageVersionMigrator controller in the Kubernetes control plane watches for these objects and automatically migrates
existing resources to the default storage version for that API. Since StorageVersionMigration is a standard Kubernetes API,
CRD authors can trigger migrations as part of a CRD upgrade instead of managing the migration separately.
This work was done as part of KEP #4192 led by SIG API Machinery.
Stable: Pod certificates and Cluster Trust Bundles
Pod certificates and the closely related ClusterTrustBundles both graduate to Stable in Kubernetes v1.37, providing first-class support for distributing private keys, X.509 certificates, and trust bundles to Pods.
To use this, the developer or administrator chooses a signer name and deploys a signer controller that
watches PodCertificateRequest objects, issues and refreshes certificates for eligible Pods, and maintains the corresponding ClusterTrustBundle objects containing the trust anchors needed to verify those certificates.
A workload then opts into this identity by defining a podCertificate projected volume with the chosen signer name. Workloads can also mount a ClusterTrustBundle projected volume to load the trust anchor information.
This work was done as part of two KEPs - KEP #4317 and KEP #3257 led by SIG Auth.
Features graduating to Beta
Gang scheduling support in Kubernetes
As Kubernetes becomes the de facto standard for managing AI/ML workloads at scale, scheduling workloads such as AI/ML training jobs and HPC simulations becomes more important than ever. However, scheduling becomes challenging because the default Kubernetes scheduler schedules Pods individually, which can result in some Pods being scheduled while others remain pending due to insufficient resources. This partial scheduling can lead to deadlocks and inefficient use of cluster resources.
Gang scheduling graduates to Beta in Kubernetes v1.37, improving upon native support for gang scheduling through the Workload API and PodGroup concept. This feature implements an all-or-nothing scheduling strategy, ensuring that a defined group of Pods is scheduled only when the cluster has sufficient resources to accommodate the entire group. The Beta graduation of this enhancement also introduces workload-aware preemption to avoid premature preemptions that do not help a workload make progress, along with PodGroup queueing to better coordinate competing workloads.
Importantly, it addresses livelock scenarios that can occur when multiple workloads are being scheduled simultaneously by the kube-scheduler, preventing them from repeatedly interfering with one another without making progress.
This work was done as part of KEP #4671 led by SIG Scheduling.
Native histogram support for Kubernetes metrics
Kubernetes exposes hundreds of histogram metrics in Prometheus format across its control plane components, which are essential to monitor cluster health and debug performance issues. However, classical Prometheus histograms relied on static, pre-defined buckets that forced a compromise between data accuracy and memory usage. To mitigate this, Prometheus introduced native histograms that use dynamic exponential bucket boundaries instead of fixed boundaries, providing significant storage efficiency, improved query performance, and finer-grained visibility into distributions while maintaining full backward compatibility with existing monitoring infrastructure.
Kubernetes v1.37 graduates native histogram support for Kubernetes metrics to Beta. Building on the Alpha implementation,
which introduced the NativeHistograms feature gate, the Beta phase improves the implementation and rollout experience. When
enabled, Kubernetes components expose histograms in both classic and native formats when the requested scrape protocol supports Native
Histograms, (specifically PrometheusProto), allowing existing dashboards and alerts to continue working while users migrate at
their own pace. The implementation also refactored histograms created in init() functions to use lazy initialization,
ensuring native histogram options are correctly applied after feature gates are parsed. These changes provide a more reliable
implementation while retaining safe rollout and rollback through the feature gate or Prometheus-side configuration for
Prometheus 3.x users.
This work was done as part of KEP #5808 led by SIG Instrumentation.
WAS: Features graduating to Beta
Workload-aware preemption
Kubernetes traditionally performs preemption at the Pod level, which can be inefficient for workloads made up of multiple tightly coupled Pods. In Kubernetes v1.37, workload-aware preemption graduates to Beta, allowing the scheduler to consider a PodGroup when making preemption decisions. This helps the scheduler consider the workload as a whole when preempting lower priority workloads, reducing cases where individual Pods are disrupted without providing enough capacity for the workload to make progress.
This work was done as part of KEP #5710 led by SIG Scheduling.
DRA: ResourceClaim support for workloads
Dynamic Resource Allocation (DRA) allows Pods to request specialized resources through ResourceClaims. In Kubernetes v1.37, DRA ResourceClaims support for workloads graduates to Beta, allowing Workload and PodGroup APIs to associate ResourceClaims and ResourceClaimTemplates with the groups of Pods. This allows ResourceClaims to be shared across a workload rather than reserved individually for each Pod, while ResourceClaimTemplates can create claims for PodGroups automatically.
This work was done as part of KEP #5729 led by SIG Scheduling.
cAdvisor-less, CRI-full container and Pod stats
The kubelet has historically obtained container and Pod statistics from cAdvisor, while the Container Runtime
Interface (CRI) exposes statistics of its own. Having two sources for the same metrics makes it harder to tell where a
particular value came from.
In Kubernetes v1.37, the cAdvisor-less, CRI-full Container and Pod Stats enhancement graduates to Beta. The enhancement
expands the CRI to provide the container and pod statistics needed by Kubernetes, allowing the kubelet to get these metrics
directly from the container runtime instead of relying on cAdvisor for them.
This moves container and pod metrics toward a single source of truth, while reducing duplicated metric collection and
simplifying how the kubelet gathers and exposes these statistics.
This feature is Beta in v1.37 but off by default; enable the PodAndContainerStatsFromCRI feature gate to try it.
This work was done as part of KEP #2371 led by SIG Node.
Support memory QoS with cgroups v2
Kubernetes is improving its quality of service mechanisms to cover memory protection and isolation for Kubernetes workloads. For nodes running Linux, the memory QoS feature uses memory requests and limits to configure cgroup controls that can protect requested memory from reclamation and throttle memory usage before workloads reach their hard limits. This can help reduce the impact of memory pressure on memory-sensitive workloads and improve node stability.
In Kubernetes v1.37, memory QoS support is graduating to Beta. The feature uses cgroups v2 memory controls such as memory.min,
memory.low and memory.high to provide different levels of memory protection and throttling. For example, memory requests
can be used to protect memory from reclamation, while memory.high can be used to throttle workloads that exceed their
configured threshold.
The MemoryQoS feature gate is enabled by default in v1.37. Cluster operators can control memory protection through the kubelet’s
memoryReservationPolicy setting and configure memory throttling with memoryThrottlingFactor. The defaults are designed to
avoid introducing unexpected memory throttling for existing workloads when upgrading to v1.37, while allowing operators to
opt into the additional memory protection capabilities.
This work was done as part of KEP #2570 led by SIG Node.
Pod-level resource managers
In Kubernetes v1.37, Pod-level resource managers graduate to Beta behind the PodLevelResourceManagers feature gate,
which stays disabled by default. Enabling it allows the topology, CPU, and memory resource
managers to use the resources defined for an entire Pod when making
allocation and NUMA alignment decisions. This makes it possible to manage a Pod as a single resource unit while still supporting different resource requirements between the containers within it.
With pod-level resource management, a Pod can reserve a NUMA-aligned pool of CPU and memory based on its overall resource budget. Containers that require dedicated resources can receive exclusive portions of that pool, while other containers, such as sidecars or supporting workloads, can share the remaining resources. This is particularly useful for performance-sensitive workloads such as AI/ML and high-performance computing, where keeping resources close to each other on the same NUMA node can improve performance without requiring every container in the Pod to have dedicated resources.
The feature also supports a container scope, where containers can continue to receive independent NUMA-aligned allocations. This provides more flexibility for workloads that combine a performance-sensitive container with other containers that have different resource requirements.
This work was done as part of KEP #5526 led by SIG Node.
Watch-based route controller reconciliation
The route controller in the cloud-controller-manager library previously reconciled routes on a fixed interval, by default every 10 seconds. This could result in unnecessary requests to infrastructure providers, even when nothing had changed and could also delay route updates when a new Node is added.
Watch-based route controller reconciliation graduated to beta in Kubernetes v1.37. This release also adds observability for this work: the route controller's Alpha route_sync_total metric gains two labels, trigger (periodic or node_change) and outcome (changed, noop, or error), so operators can see whether periodic reconciliation is actually correcting route drift or just running as a no-op, and can track failed reconciles.
With watch-based route controller reconciliation, the route controller can reconcile routes from watch events instead of waiting for the next fixed interval: a reconciliation can start as soon as relevant Node changes occur, such as a Node being added or removed or when its addresses or assigned Pod CIDRs change. A less frequent periodic reconciliation still runs to catch outdated routes and keep the state consistent. This behavior sits behind the CloudControllerManagerWatchBasedRoutesReconciliation feature gate and is disabled by default, so the transition has not changed default behavior.
This reduces unnecessary requests to infrastructure providers while allowing routes for newly added Nodes to be reconciled sooner. The change does not alter the route reconciliation logic itself; it changes when reconciliation is triggered.
This work was done as part of KEP #5237 led by SIG Cloud Provider.
Storage capacity scoring of Nodes
The VolumeBinding scheduler plugin has always been able to score nodes for statically bound PVs based on free capacity, but that scoring never extended to dynamic provisioning.
When a CSI driver provisions a new volume on demand, the scheduler had no way to prefer a node with more or less free space.
This was a gap for local storage, as an admin might want pods landing on the node with the most free capacity to leave room for a later volume expansion or on the node with the least (but still sufficient) free capacity to bin-pack workloads and cut down on the number of nodes a cloud cluster needs to run.
Kubernetes v1.37 graduates storage capacity scoring for dynamic provisioning to Beta behind the StorageCapacityScoring
feature gate. First introduced in Alpha in v1.33, this feature consolidates (and deprecates) the older
VolumeCapacityPriority gate from KEP #1845. When enabled, the
VolumeBinding plugin's Score extension point reads CSIStorageCapacity objects published by a driver's external
provisioner sidecar and scores nodes for dynamic provisioning the same way it already does for static bindings. Admins choose
the strategy via the Shape setting in VolumeBindingArgs, defaulting to "prefer the node with the maximum allocatable" so
there is room for expansion later.
The feature depends solely on the StorageCapacityScoring gate: scoring for statically
bound PVs runs as soon as it's enabled, independent of any CSI driver. A driver only needs StorageCapacity: true on its
CSIDriver object so that its dynamically-provisioned volumes also get capacity-aware scoring. The feature is fully
reversible, and disabling the gate stops all VolumeBinding capacity scoring — static and dynamic alike — without affecting
already scheduled pods.
This work was done as part of KEP #4049 led by SIG Storage.
Integrate CSI volume attach limits with Cluster Autoscaler
Kubernetes v1.37 improves Cluster Autoscaler's integration with CSI volume attach limits, so that when it creates new
nodes for pending Pods, Cluster Autoscaler can more accurately determine how many new nodes are required to attach all
pending Pods that use CSI volumes. Cluster Autoscaler already had visibility into CSI volume attach limits for existing
nodes, but not for the nodes it was about to create, which means it could undershoot scale-ups and leave volume-backed
Pods pending even after adding capacity. The problem compounds on the scheduling side: the NodeVolumeLimits plugin treats a node with no published CSI driver info as having no limits at all, so a freshly created node that hasn't yet reported its CSINode object can get crowded with more volume-backed pods than it can actually mount, which is a race condition that, until now, cluster admins had no way to close.
Kubernetes v1.37 graduates CSI-aware autoscaling to Beta behind the VolumeLimitScaling feature gate, first introduced in Alpha in v1.35. Cluster autoscaler now runs its scale-up simulations against templated CSINode objects, so it correctly accounts for attach limits whether it's scaling an existing node group or scaling one from zero. On the scheduler side, admins can opt in per CSIDriver, via a new PreventPodSchedulingIfMissing field, to block pod placement on nodes that haven't reported their driver yet, with dedicated CSIDriverMissingOnNode and CSINodeMissing errors making those scheduling failures easier to debug. The Beta phase adds e2e coverage for scale-down behavior and CSI opt-in scenarios, and updates the failed_scale_ups_total and scaled_up_nodes_total metrics to include CSI driver information. Both the autoscaler and scheduler changes stay strictly opt-in: disabling the feature gate restores today's default of unlimited pod placement on nodes without CSINode data, so distros and admins running autoscalers that aren't CSI-aware yet (e.g. Karpenter) aren't forced into the new behavior.
This work was done as part of KEP #5030 led by SIG Autoscaling.
Report last used time on a PVC
PersistentVolumeClaims tend to outlive the workloads that created them. When an app gets deleted or migrated, its PVC remains behind, consuming storage and increasing costs.
Kubernetes v1.37 graduates PVC "last used" tracking to Beta behind the PersistentVolumeClaimUnusedSinceTime feature gate, which shipped disabled by default in Alpha (v1.36) and is now enabled by default. The feature adds a new Unused condition to PersistentVolumeClaimStatus, managed by the existing PVC protection controller: Status=True (Reason=NoPodsUsingPVC) once the last non-terminal Pod referencing the PVC goes away, and back to Status=False (Reason=PodUsingPVC) as soon as a Pod starts referencing it again. The condition's lastTransitionTime doubles as an "unused since" timestamp, so admins can query how long a PVC has actually been idle without Kubernetes tracking which Pod used it last or making any deletion decision itself; that's left entirely to the admin. One thing worth noting is that the timestamp reflects when the controller observed no Pods using the PVC, not the exact moment the volume unmounted at the infrastructure level, so the reported idle time may run a little short of the true figure but should never overstate it.
This work was done as part of KEP #5541 led by SIG Storage.
etcd RangeStream support
etcd's unary Range RPC builds an entire response in memory before sending it back, which becomes a problem at scale. On a large list, say kube-apiserver's watch cache warming up on a big cluster, the raw key-value slice, its serialized protobuf form, and the gRPC send buffer all have to coexist in memory at once, and the resulting spikes ripple through kube-apiserver too. Pagination doesn't really fix the underlying cost either because each paginated page still walks the entire B-tree index to recompute the total result count, turning what should be an O(limit) operation into an O(total_keys) one on every single page.
Kubernetes v1.37 ships etcd RangeStream support directly at Beta, behind the EtcdRangeStream feature gate (kube-apiserver only, on by default).
This release adds a new server-streaming RangeStream RPC that reuses the existing RangeRequest but returns chunks instead of one buffered blob: the server paginates internally with adaptive chunk sizing (each chunk's target size adjusts based on MaxRequestBytes and the value sizes observed so far), pins a single MVCC revision so the merged stream stays snapshot-consistent, and derives the total key count from the running tally it builds while streaming, rather than a separate index walk.
kube-apiserver's watch cache initialization is the primary consumer, and it now decodes each chunk into synthetic created events inline as they arrive instead of assembling the full list in memory first, with the same treatment applied to direct GetList calls when WatchList is disabled.
The feature requires etcd 3.7+; against older etcd, kube-apiserver detects the Unimplemented response and falls back to unary Range automatically, with zero behavior change. If the pinned revision gets compacted mid-stream, kube-apiserver treats it the same as any other watch cache init failure and retries, which is no worse than the compaction races a paginated List call can already hit today. Beta graduation criteria include a scalability test measuring large-list latency on a 5000-node cluster, and etcdctl get --stream ships alongside it for anyone who wants to poke at the new RPC directly.
This work was done as part of KEP #5966 led by SIG etcd.
Concurrent watch object decode
kube-apiserver decodes and transforms every watch event from etcd one at a time on a single goroutine, so one slow per-event transform, most notably a CRD conversion webhook call, blocks every event queued behind it. That's mostly a nuisance for built-in resources, but for a CRD whose served version differs from its stored version, converting a cold cache serially can take minutes. If that exceeds etcd's default 5-minute compaction interval, the revision the cache started reading from gets compacted before initialization finishes, the watch can't resume, and init just restarts and never converges for a large enough resource, with every client trying to list or watch it getting errors in the meantime.
The ConcurrentWatchObjectDecode gate has actually been in Beta, off by default, since v1.31, and Kubernetes v1.37 flips it on by default. Enabling it moves the decode/transform step onto a bounded pool of worker goroutines (10 by default, tuned from a sweep that showed gains flattening out around 8–12) instead of a single one, with a collector reassembling events back into their original order before delivery, so event ordering is preserved exactly. In benchmarks over 150k pods, concurrent decode alone cuts cache initialization about 40%, and about 55% combined with the new EtcdRangeStream feature also landing this release (see KEP 5966). The main tradeoff to watch is conversion webhook load. With the feature on, up to 10 conversions can now run concurrently against a webhook during cache init instead of one at a time. The total call volume is unchanged, only how many run at once, so this mainly matters for webhooks that cap their own concurrency below 10.
This work was done as part of KEP #6178 led by SIG API Machinery.
Stale controller mitigation
Every controller in kube-controller-manager works off a local cache built from watching the kube-apiserver, and that watch
stream is only eventually consistent. A change can show up in milliseconds, or it can take seconds or even minutes under
load. Today operators have no visibility into that lag and no way to tell a normal delay from a controller that's fallen
dangerously out of sync, so a controller can keep reconciling against a view of the world that's already stale.
Stale controller mitigation has been Beta since v1.36, enabled by default per controller behind a StaleControllerConsistency<Controller>
feature gate; Kubernetes v1.37 extends it to the HorizontalPodAutoscaler controller and adds the circuit-breaking variant and
extra metrics described below. The core mechanism
is a read your writes guarantee: client-go's ResourceEventHandlerFuncs gets a new BookmarkFunc callback so a controller
can reliably track the resource version of objects it cares about, even through edge cases the existing add/update/delete
callbacks miss. A controller records the resource version of its own writes and, on its next reconcile, skips and requeues
until its informer cache has actually caught up to that write. The DaemonSet controller is a good example of this. It tracks
DaemonSet → Pod resource versions so it won't re-reconcile against its own stale pod cache. A second, circuit-breaking
variant targets latency-sensitive controllers like node-lifecycle, which can otherwise read a stale node lease from cache and
wrongly decide it's expired; instead, it does a live GET on the disruptive decision and marks its cache "not ready" until
it's caught up, rather than acting on a stale read. StaleControllerConsistency gates the mitigation itself (scoped
initially to controllers KCM has flagged as high-scale), MonitorInformerStaleness is a separate, observation-only gate that
polls the apiserver directly every 5 seconds purely to surface how far behind an informer's cache actually is, and
AtomicFIFO / UnlockWhileProcessingFIFO are the underlying client-go workqueue plumbing the mitigation depends on. None of
this changes default reconciler behavior; a paused-and-requeued controller can look stuck when it's really just waiting on
its cache, and it rolls back cleanly since nothing it does is irreversible.
This work was done as part of KEP #5647 led by SIG API Machinery.
Manifest-based admission control config
In Kubernetes, admission control is responsible for enforcing policies on resources before they are accepted by the API server. However, admission webhooks and policies configured through the Kubernetes API are dependent on the API server and etcd during cluster startup and cannot protect the admission configuration resources themselves. This creates a gap during cluster bootstrap and allows critical admission policies to be modified or removed by users with sufficient privileged access.
In Kubernetes v1.37, manifest-based admission control configuration graduates to Beta, allowing admission webhooks and CEL-based
policies to be loaded from manifest files on disk and enforced from API server startup. Because the configuration is managed independently of the Kubernetes API, it can also protect API-based admission resources from modification. Manifest files are watched for changes and valid updates are reloaded automatically, while invalid updates leave the previously loaded configuration in place.
This work was done as part of KEP #5793 led by SIG API Machinery
Improved handling for undecryptable resources
Kubernetes stores resources in etcd, where encryption at rest can be used to protect sensitive data. However, when encrypted resources can no longer be decrypted, for example because the encryption key is unavailable, the API server cannot read or manage those resources normally. This can leave resources in the cluster that cannot be accessed through the Kubernetes API, requiring administrators to manually modify the underlying etcd data to recover them.
Kubernetes v1.37 includes Beta support for cluster administrators to identify and remove resources that cannot be decrypted by the API server.
Previously Alpha, and introduced in Kubernetes v1.32, this support allows problem API resources to be removed via
the Kubernetes API rather than directly manipulating the etcd file. This feature also provides safeguards for administrators to verify affected resources before deletion.
This work was done as part of KEP #3926 led by SIG Auth.
New features in Alpha
New Recreate strategy for StatefulSet rollouts
Kubernetes v1.37 introduces the Recreate strategy for StatefulSet rollouts. The StatefulSet API previously only offered two update
strategies: OnDelete (manual) and RollingUpdate (automatic, default). Similar to Deployments, the Recreate update strategy
deletes all of the StatefulSet's Pods before creating new Pods that reflect modifications made to a StatefulSet's
.spec.template. Using this strategy requires the StatefulSetRecreateStrategy feature gate to be enabled.
This work was done as part of KEP #3541 led by SIG Apps.
DRA: Alpha features to look out for
DRA: Node allocatable resource request
Kubernetes v1.37 improves Alpha support for managing node resources such as CPU, memory, and huge pages through DRA. It unifies standard and DRA resource accounting, helping prevent the same node capacity from being counted twice.
This update introduces distinct API fields for mapping (for devices directly modeling core resources, like CPU/memory DRA drivers) and overhead (like auxiliary host memory for accelerator devices). The kubelet now enforces these allocations across pod and container cgroups, integrates them with Memory QoS, OOM score calculations, and in-place pod resizing.
This work was done as part of KEP #5517, led by SIG Scheduling with participation from SIG Node.
DRA: derived attributes
Kubernetes v1.37 introduces Alpha support for derived attributes in DRA. Workloads can use CEL expressions to create virtual attributes from device information and use them when selecting related devices.
This makes it easier to co-locate devices such as GPUs and network interfaces, even when their drivers use different attribute names or formats. For example, a workload can derive a shared NUMA identifier and use it to select devices with matching topology.
This work was done as part of KEP #6080, led by SIG Scheduling with participation from SIG Network.
DRA: device compatibility groups
DRA can be used to manage devices that support different partitioning or virtualization schemes. However, some of these configurations cannot be used together on the same physical device, such as MIG and vGPU on a GPU. Previously, these incompatibilities could only be detected during device preparation, after the scheduler had already made its decision.
In Kubernetes v1.37, DRA adds device compatibility groups, allowing resource drivers to describe which devices can be allocated together. The scheduler can use this information when making allocation decisions, preventing incomplete devices from being assigned together and avoiding Pod startup failures caused by incomplete device configurations.
This work was done as part of KEP #5963, led by SIG Scheduling.
Scheduler preemption for in-place Pod resize
Kubernetes v1.37 introduces scheduler preemption for in-place pod resize, behind the (opt-in, Alpha) InPlacePodVerticalScalingSchedulerPreemption feature gate. This change addresses an important feature gap that remained after the core in-place Pod vertical scaling feature graduated to Stable: if a running pod requested additional resources that exceeded the node's available capacity, kubelet marked the
request as Deferred, leaving the pod waiting until sufficient resources became available on the node. With this
enhancement, the Kubernetes control plane can actively free up capacity on a fully-utilized node and preempt lower-priority
workloads, enabling the pending in-place resizes of critical, higher-priority applications to succeed.
This work was done as part of KEP #5836 led by SIG Scheduling.
Dynamic resize of memory-backed volumes
Also building upon in-place Pod vertical scaling, the Alpha in-place scaling for memory backed volumes feature extends the pod
/resize subresource, which previously only enabled dynamic CPU and memory adjustments without restarting containers, to
support updating the sizeLimit of memory-backed (medium: Memory) emptyDir volumes on running pods. When a volume's sizeLimit
is explicitly adjusted via the /resize subresource, Kubelet dynamically updates the underlying tmpfs mount without container
disruption while safely preventing out-of-memory errors or false-positive eviction triggers. This is particularly useful for
stateful and memory-intensive workloads that rely on in-memory ephemeral storage, allowing them to dynamically scale storage
limits alongside container memory capacity without incurring Pod restarts or application downtime.
This is an opt-in, off-by-default Alpha feature. To try it out, enable the
InPlacePodVerticalScalingMemoryBackedVolumes feature gate.
This work was done as part of KEP #6030 led by SIG Node and SIG Storage.
Specialized lifecycle management for Nodes
Several Kubernetes components need to understand a Node's lifecycle state, and today each one infers it from a different mix
of Node readiness, taints, Pod state, labels, annotations, and provider APIs. This enhancement introduces well-known
lifecycle conditions on Nodes, giving administrators a single Kubernetes-owned place to publish lifecycle state that core
controllers and ecosystem tooling can consume. These new Node Conditions are: DrainInProgress, Drained, MaintenancePlanned, MaintenanceInProgress, and GracefulNodeShutdownInProgress
This work was done as part of KEP #5683 led by SIG Node.
WAS: Alpha features to look out for
CompositePodGroup API
While previous releases introduced support for gang scheduling of workloads with
a flat structure, modern AI/ML workloads are complex and have more sophisticated
scheduling requirements. In Kubernetes v1.37, the new Alpha CompositePodGroup
API allows Kubernetes to describe complex workloads as a hierarchy of groups
instead of a flat set of Pods. This enables multi-level gang scheduling,
workload-aware preemption and topology-aware scheduling.
This work was done as part of KEP #6012 led by SIG Scheduling
Workload Aware Scheduling Controller APIs
As an Alpha feature Kubernetes v1.37 provides a common framework for integrating workload controllers (such as JobSet, TrainJob, LWS, and RayJob, along with core workloads such as Job) with Workload-aware Scheduling (WAS).
The framework provides reusable scheduling.k8s.io API primitives, such as topology constraints and disruption policies,
along with shared libraries that handle the creation of scheduling resources. This allows controllers to expose WAS features
natively within their APIs in a consistent way without implementing the same scheduling logic separately.
This work was done as part of KEP #6089 led by SIG Scheduling.
Integrate workload APIs with the Job controller
Initially introduced in Kubernetes v1.36 with limited functionality, this feature builds on top of the Workload Aware Scheduling Controller APIs adding a new user-facing spec.scheduling field to the batch/v1 Job in Kubernetes v1.37, allowing users
to explicitly configure scheduling policies, topology constraints, disruption modes, and resource claims. If
spec.scheduling is omitted, the Job defaults to Basic scheduling, preserving existing behavior while still creating a Basic
Workload/PodGroup for workload-aware scheduling, without enforcing a minCount gate. Users can explicitly opt into Gang
scheduling, where minCount defaults to the Job’s parallelism, and the controller uses the shared workloadbuilder library
to translate the scheduling configuration into the corresponding Workload and PodGroup objects instead of implementing custom
translation logic.
This work was done as part of KEP #5547 led by SIG Scheduling.
localhost NodePort userspace proxy for nftables
Kubernetes v1.37 adds an opt-in userspace proxy to the nftables kube-proxy backend, allowing NodePort services to be accessed
through localhost over IPv4 and IPv6. This closes a gap between the nftables and iptables backends, as nftables could not
previously serve localhost NodePorts.
The proxy is enabled when localhost or a loopback address is included in the kube-proxy --nodeport-addresses
configuration. This can be useful for workloads such as local container registries that rely on localhost:<NodePort>
connections. The existing behavior of the iptables and ipvs backends is unchanged.
This work was done as part of KEP #6032 led by SIG Network.
Other notable changes
maxUnavailable for StatefulSets back on by default
The maxUnavailable field for StatefulSets has been re-enabled by default in Kubernetes v1.37 (after a bug was observed
in v1.36).
The bug occurred where a faulty initial StatefulSet revision created a Pod that never became ready, and with
MaxUnavailableStatefulSet enabled, the StatefulSet controller failed to update that Pod to the newer, corrected
revision. When the bug triggered, the affected Pod could end up stuck in a CrashLoopBackOff state indefinitely (see kubernetes#137409).
Improved nftables performance
kube-proxy now uses the kernel’s netlink interface for nftables rule operations, bypassing the nft command-line tool. This makes kube-proxy more efficient when inspecting and managing its nftables rules, improving rule-management performance.
Context handling and contextual logging in client-go
Support for context propagation and contextual logging in client-go is complete, with the exception of a small number of authentication plugin log calls that still rely on the global klog logger because the underlying APIs do not support context passing.
Graduations, deprecations, and removals in v1.37
Graduations to Stable
This lists all the features that graduated to Stable (also known as general availability). For a full list of updates including new features and graduations from Alpha to Beta, see the release notes.
This release includes a total of 16 enhancements promoted to Stable:
- Speed up recursive SELinux label change
- ClusterTrustBundles
- Pod Certificates
- Allow setting arbitrary FQDN as the pod's hostname
- DRA: Resource Claim Status with possible standardized network interface data
- Configurable tolerance for HorizontalPodAutoscalers
- Relaxed validation for Services names
- Add Resource Health Status to the Pod Status for Device Plugin and DRA
- DRA: device taints and tolerations
- DRA: Handle extended resource requests via DRA Driver
- Node Declared Features
- Add condition for sandbox creation
- Move Storage Version Migrator in-tree
- Resilient Watchcache Initialization
- DRA: Standard numaNode Device Attribute
- metrics.k8s.io API definition
- KYAML
Deprecations, removals and community updates
As Kubernetes develops and matures, features may be deprecated, removed, or replaced with better ones for the project's overall health. See the Kubernetes deprecation and removal policy for more details on this process. Many of these deprecations and removals were announced in the Deprecations and Removals blog
Deprecation of kube-dns
CoreDNS has been the default cluster DNS add-on since Kubernetes v1.13, and kube-dns has not kept pace since then; features like EndpointSlices and dual-stack Services aren't available in it.
Kubernetes has already retired the kube-dns subproject and has split node-local-dns out into its own repository, where it continues to be maintained and works with CoreDNS. It is expected that no new packages will be built for kube-dns after v1.40.
If you still run kube-dns, start planning to migrate your clusters to CoreDNS.
Deprecating kube-proxy's support for ipvs mode
kube-proxy support for ipvs mode was introduced in v1.8 to resolve iptables performance bottlenecks. However, since the
kernel ipvs API alone cannot fully implement Kubernetes Services, ipvs mode continues to use iptables underneath
(KEP-3866, "The ipvs mode of kube-proxy will not save us").
Clusters running kube-proxy in ipvs mode (or mode: ipvs in KubeProxyConfiguration) now log a deprecation warning on startup. The deprecation timeline looks like this:
- By v1.40,
ipvsmode forkube-proxyis expected to be disabled by default (still selectable via the feature gate) - By v1.43, support for
ipvsmode would be removed entirely KEP #5495, Graduation Criteria. To confirm which mode you’re currently running, use:
kubectl -n kube-system get configmap kube-proxy -o jsonpath='{.data.config\.conf}' | grep 'mode:'
To understand the rationale behind this deprecation, see KEP #5495.
kubectl: kubectl run --filename/-f to be deprecated
The --filename (or -f) flag for kubectl run is being deprecated as the generated pod is always built purely from CLI arguments like NAME and --image.
See kubernetes/kubernetes#138671 for the original issue and discussion.
kubelet: static Pods can no longer reference Secrets or ConfigMaps
Static Pods were never meant to read API resources directly, since they aren't created through the API server — but a bug let them reference Secrets or ConfigMaps via fields like configMapRef or secretRef. That bug is now fixed: as of v1.37 these references are strictly prohibited, and the PreventStaticPodAPIReferences feature gate that previously let you opt out of the restriction has been removed.
See kubernetes/kubernetes#140226 for the original issue and discussion.
Ongoing major change: Future removal of cgroup v1 support
As modern Linux distributions and container runtimes use cgroup v2 as the default,
support for the legacy cgroup v1 is officially being phased out. Since the v1.35 release, the failCgroupV1 setting has
defaulted to true. Consequently, the kubelet will fail to initialize on any nodes that still rely on cgroup v1 unless an
explicit configuration override is applied.
apiVersion: kubelet.config.k8s.io/v1beta1
kind: KubeletConfiguration
failCgroupV1: false # temporary override
Using this override should be considered a short-term fix. Advanced resource management capabilities, such as memory QoS and in-place scaling for memory-backed volumes, work only on cgroups v2. While the override remains available in Kubernetes v1.37, users are encouraged to migrate to cgroups v2, as support for cgroups v1 is planned to be removed in a future release.
To learn more about this deprecation, refer to KEP #5573.
Release notes
Check out the full details of the Kubernetes v1.37 release in our release notes.
Availability
Kubernetes v1.37 is available for download from the Kubernetes download page or direct from on GitHub.
To get started with Kubernetes, check out these tutorials or run local Kubernetes clusters using minikube. You can also easily install v1.37 using kubeadm.
Release team
Kubernetes is only possible with the support, commitment, and hard work of its community. Each release team is made up of dedicated community volunteers who work together to build the many pieces that make up the Kubernetes releases you rely on.
This requires the specialized skills of people from all corners of our community, from the code itself to its documentation and project management.
We would like to thank the entire release team for the hours spent hard at work to deliver the Kubernetes v1.37 release to our community.
The Release Team's membership ranges from first-time shadows to returning team leads with experience forged over several release cycles.
A very special thanks goes out to our release lead, Dipesh Rawat, for supporting us through a successful release cycle, advocating for us, making sure that we could all contribute in the best way possible, and challenging us to improve the release process.
Project velocity
The CNCF K8s DevStats project aggregates a number of interesting data points related to the velocity of Kubernetes and various sub-projects.
This includes everything from individual contributions to the number of companies that are contributing and is an illustration of the depth and breadth of effort that goes into evolving this ecosystem.
In the v1.37 release cycle, which ran for 15 weeks from May 18th, 2026, to August 26th, 2026, contributions to Kubernetes reached a maximum of 212 different companies and 1,754 individuals.
Source for this data:
By contribution we mean when someone makes a commit, code review, comment, creates an issue or PR, reviews a PR (including blogs and documentation), or comments on issues and PRs.
If you are interested in contributing, check out our getting started page.
Event updates
Explore the upcoming KubeCons worldwide:
- KubeCon + CloudNativeCon China: September 7–9, 2026, in Shanghai, China
- KubeCon + CloudNativeCon North America: November 9–12, 2026, in Salt Lake City, United States
Explore the upcoming Kubernetes Community Days (KCDs) taking place for the rest of 2026:
September 2026
- KCD x Ceph x OpenInfra Day Korea: September 1, 2026, in Seoul, South Korea
- KCD San Francisco Bay Area: September 1, 2026, in Mountain View, United States
- KCD Washington DC: September 15, 2026, in Washington, DC, United States
- KCD Gujarat: September 19, 2026, in Ahmedabad, India
- KCD São Paulo: September 26, 2026, in São Paulo, Brazil
- KCD Sofia: September 29, 2026, in Sofia, Bulgaria
October 2026
- KCD UK – Edinburgh: October 19–20, 2026, in Edinburgh, United Kingdom
- KCD Nigeria: October 24, 2026, in Lagos, Nigeria
November 2026
- KCD Porto: November 19–20, 2026, in Porto, Portugal
- KCD Hangzhou: November 28, 2026, in Hangzhou, China
December 2026
- KCD Suisse Romande: December 9–10, 2026, in Meyrin, Switzerland
- KCD Provence: December 10, 2026, in Aix-en-Provence, France
- KCD Florida – Miami: December 11, 2026, in Miami, United States
You can find the latest event details at the CNCF Events Page.
Upcoming release webinar
Join members of the Kubernetes v1.37 Release Team on Wednesday, September 23rd, 2026 at 4:00 PM (UTC) to learn about the release highlights of this release. For more information and registration, visit the event page on the CNCF Online Programs site.
Get involved
The simplest way to get involved with Kubernetes is by joining one of the many Special Interest Groups (SIGs) that align with your interests.
If you don't know where to start, join our monthly New Contributor Orientations where we teach the community how the project is structured, and we'll guide you on how to make your first contribution to the project.
- Read more on how to become a Kubernetes Contributor
- Read more about what’s happening with Kubernetes on our blog
- Join us on Slack
- Follow us on Bluesky for the latest updates
- Follow us on LinkedIn
- Follow us on X
- Join the community discussion on Discuss
- Post questions (or answer questions) on Stack Overflow
- Share your Kubernetes End User Story
- Learn more about the Kubernetes Release Team
How to Pretty-Print Your Kubernetes YAML as KYAML and Why You'd Want To
YAML has been the standard way to write Kubernetes manifests for years. Every example, tutorial, and configuration file you come across is written in it. The problem isn't that YAML is a bad format. It's that YAML gives you a lot of choices, and not all of them are equally good for writing Kubernetes manifests. Some features make files harder to read, some are easy to misuse and others can lead to surprising behavior.
The interesting part is that Kubernetes doesn't actually need most of those features. It only relies on a small subset of YAML. This led to a simple question: if Kubernetes only needs a small part of YAML, why not standardize on that part and avoid the rest? Instead of introducing a new configuration language, SIG CLI introduced KYAML, a stricter, more consistent way to write YAML.
What is KYAML?
KYAML is a strict subset (or "dialect") of standard YAML, designed to be parseable by the existing ecosystem without any changes, as proposed in KEP 5295. It does not introduce a new format or a new parser. It just narrows the scope of choices you make when writing YAML, so everyone ends up making the same ones.
Think of it less like a new language and more like an agreed-upon style. Everything valid in KYAML is valid YAML.
How KYAML solves it
Standard YAML has a few well-known traps and JSON is not without its own.
Whitespace sensitivity. Indentation defines structure in YAML, which means a wrongly indented file can remain syntactically valid while representing a different object than intended. This gets especially painful with templating tools like Helm, where you are manipulating indentation from outside the YAML context.
Silent type coercion. String quoting is optional in YAML, which sounds convenient until it is not. Some values that look like strings get coerced into other types without warning. The classic example is the "Norway Bug".
country: NO
In standard YAML, NO is parsed as a boolean false, not the string "NO" and it has caught more than a few people off guard.
JSON is not the answer either. It lacks comment support, is strict about trailing commas, and requires every key to be quoted, none of which makes for a good config writing experience.
KYAML addresses all of these by making structure and types explicit:
- Does not depend on whitespace for structure
- Always quotes value strings so no silent type coercion
- Always uses
{}for maps and structs - Always uses
[]for lists - Allows comments and trailing commas, unlike JSON
- Includes a
---header to distinguish it from JSON at a glance, since both start with{
YAML calls this flow style, as opposed to the conventional block style most people use. KYAML sits halfway between JSON and YAML, more explicit than default YAML, friendlier than JSON.
Here is the same Pod manifest written in both formats for comparison.
Standard YAML
apiVersion: v1
kind: Pod
metadata:
name: my-pod
labels:
app: demo
spec:
containers:
- name: nginx
image: nginx:1.20
KYAML
---
{
apiVersion: "v1",
kind: "Pod",
metadata: {
name: "my-pod",
labels: {
app: "demo",
},
},
spec: {
containers: [{
name: "nginx",
image: "nginx:1.20",
}],
},
}
Notice the double-quoted string values, the braces around every mapping, the brackets around the list and the trailing commas. The additional syntax makes the document structure explicit instead of relying on indentation.
How to pretty print YAML as KYAML
There are different ways to get KYAML output.
Option 1: kubectl -o kyaml
Since Kubernetes 1.34, kubectl supports KYAML as a native output format.
# Kubernetes 1.35+ (beta; feature enabled by default, still requires -o kyaml CLI param)
kubectl get deployment my-app -o kyaml
# Kubernetes 1.34 (alpha, opt-in)
export KUBECTL_KYAML=true
kubectl get deployment my-app -o kyaml
To save the output to a file:
kubectl get deployment my-app -o kyaml > my-app.yaml
There are currently no plans to make KYAML the default output format. If you prefer using KYAML by default, you can configure your preferred default with kuberc. For more details, see the kuberc documentation.
# Kubernetes 1.36+
kubectl kuberc set --section defaults --command get --option output=kyaml
# Kubernetes 1.33–1.35 (alpha prefix still required)
kubectl alpha kuberc set --section defaults --command get --option output=kyaml
Option 2: Kubernetes' yamlfmt
sigs.k8s.io/yaml ships a yamlfmt tool that can convert files to KYAML.
Install via Go:
go install sigs.k8s.io/yaml/yamlfmt@latest
Running it against a file prints the KYAML version to stdout. It also accepts a directory, in which case it converts and prints every file in that directory. So you'll need to redirect the output to a file (or files) if you want the conversion to stick.
yamlfmt -o=kyaml my-deployment.yaml
It can also show you a diff instead of a full conversion:
yamlfmt -o=kyaml -d my-deployment.yaml
Option 3: Google's yamlfmt
For converting existing files, Google's yamlfmt added a dedicated kyaml formatter in v0.21.0.
Install via Go, or grab a binary from the releases page:
go install github.com/google/yamlfmt/cmd/yamlfmt@latest
It is also available as a pre-commit hook and as a Docker image for CI pipelines.
Add a .yamlfmt config to your project root:
formatter:
type: kyaml
Preview the output without modifying your file:
yamlfmt -dry my-deployment.yaml
then apply:
yamlfmt my-deployment.yaml
To convert an entire directory:
yamlfmt ./k8s/
The kyaml formatter takes no additional configuration and does not share options with the default formatter so mixing them will cause an error.
For more on the available modes and flags, check the command usage docs.
Is KYAML worth adopting?
Every valid KYAML file is a valid YAML file. So whatever you write in KYAML, your existing tools, your kubectl, your CI pipelines, none of them need to change. You can even pass KYAML as input to any version of kubectl, not just 1.34+, because at the end of the day it is just YAML.
KYAML is not strictly necessary. You can keep writing block-style YAML and things will work. But it is a deliberate choice to make your configs less error-prone and more consistent especially across a team or a larger repo.
It is less of a migration and more of a better habit.
Gateway API v1.6: TCPRoute and UDPRoute Graduate to Standard
The Kubernetes SIG Network community is thrilled to share the release of Gateway API v1.6.0, which was released on June 30th of this year!
Gateway API has become the standard for modern, role-oriented, and expressive service networking in Kubernetes. In previous releases, Gateway API established a production-grade foundation for HTTP and TLS layer 7 traffic. With version 1.6.0, Gateway API takes a major step forward by expanding standard layer 4 protocol routing and introducing cleaner API boundaries for experimental innovation.
Here is a quick summary of what's new in Gateway API v1.6.0:
- TCPRoute and UDPRoute Graduate to Standard: Raw L4 TCP and UDP traffic routing reach GA stability in the
v1API version. - Experimental API Group Separation: Experimental resources transition to a distinct API group (
gateway.networking.x-k8s.io) with anXprefix to make experimental vs. standard boundaries crystal clear.
Let's dive into the details!
TCPRoute and UDPRoute graduate to Standard
Leads: Nick Young, Ricardo Katz and Zac Nixon
Until now, Gateway API only offered a stable routing model for HTTP and TLS traffic. Workloads that speak a raw protocol over TCP or UDP - databases, DNS, VoIP, gaming, IoT telemetry - had no portable way to plug into a Gateway. Users either fell back to a plain Kubernetes Service, or to an implementation-specific CRD that doesn't travel between Gateway controllers.
TCPRoute and UDPRoute close that gap: they route traffic to backends based on protocol and port alone, no L7 awareness required.
With this release, both have graduated from the Experimental channel to Standard, and moved to the v1 API version.
The v1alpha2 version of each was deprecated as of the v1.6 release, and will be removed in a future release.
How it works
A Gateway needs a listener that allows TCPRoute attachment:
apiVersion: gateway.networking.k8s.io/v1
kind: Gateway
metadata:
name: example-gateway
spec:
gatewayClassName: example-gateway-class
listeners:
- name: foo
protocol: TCP
port: 12345
allowedRoutes:
kinds:
- kind: TCPRoute
A TCPRoute then attaches to that listener and forwards traffic to a backend:
apiVersion: gateway.networking.k8s.io/v1
kind: TCPRoute
metadata:
name: tcp-app
spec:
parentRefs:
- name: example-gateway
sectionName: foo
rules:
- backendRefs:
- name: my-foo-service
port: 6000
Traffic arriving on the Gateway's port 12345 is proxied to the endpoints of my-foo-service on port 6000. Omitting sectionName and port from parentRefs attaches the route to every TCP listener on the Gateway instead of a single one.
UDPRoute follows the same pattern; swap the listener protocol and the route kind:
apiVersion: gateway.networking.k8s.io/v1
kind: Gateway
metadata:
name: example-gateway
spec:
gatewayClassName: example-gateway-class
listeners:
- name: foo
protocol: UDP
port: 12345
allowedRoutes:
kinds:
- kind: UDPRoute
---
apiVersion: gateway.networking.k8s.io/v1
kind: UDPRoute
metadata:
name: udp-app
spec:
parentRefs:
- name: example-gateway
sectionName: foo
rules:
- backendRefs:
- name: my-foo-service
port: 6000
XBackend arrives in Experimental
Leads: Keith Mattix II
Gateway API v1.6 introduces the new XBackend resource, which is a general-purpose decorator for Service (and other backend types) within Gateway API.
The Service resource is an amazing, stable, and flexible object, but that comes with some costs: The flexibility creates a lot of edge cases that Gateway API needs to handle, and the stability makes it impossible to add new concepts to Service.
The XBackend resource builds on the ideas in the upstream EndpointSelector KEP, to add a Gateway API-native object that still targets the backend app, while allowing the community to extend it to handle use cases that are difficult or dangerous to handle with Service.
The first version of XBackend includes support for ExternalHostname destinations, which are ruled out from Service support in Gateway API because of the possibility of confused deputy attacks.
For XBackend, this support is an Extended/Optional feature, allowing implementations and users to opt in once they understand the security tradeoffs.
This support is very useful for egress use cases (which are most commonly used for cluster-hosted agentic workloads), which the community is also working towards formalizing in GEPs about Gateways for Egress (work in progress, stay tuned!)
The XBackend API is experimental and its behavior can change, do not assume it is ready for production
An example of a Gateway with an ExternalName backend that can be used for egress to a cloud AI API is as follows:
# Gateway-level TLS remains authoritative for incoming connections
apiVersion: gateway.networking.k8s.io/v1
kind: Gateway
spec:
listeners:
- name: https
protocol: HTTPS
tls:
certificateRefs:
- name: gateway-cert
---
# Backend resource for external destination
apiVersion: gateway.networking.x-k8s.io/v1alpha1
kind: XBackend
metadata:
name: ai-provider-api
namespace: ai-apps
spec:
type: ExternalHostname
externalHostname:
hostname: api.ai-provider.com
---
# HTTPRoute referencing XBackend
apiVersion: gateway.networking.k8s.io/v1
kind: HTTPRoute
spec:
rules:
- backendRefs:
- name: ai-provider-api
kind: XBackend
group: gateway.networking.x-k8s.io
The community is also working on moving Session Persistence config from XBackendTrafficPolicy into XBackend, along with other use cases like retries, TLS origination and similar config that is useful to be able to configure per-application rather than per-Route.
Experimental resources move off the standard API group
Previously, experimental resources shared the same API group as standard ones - gateway.networking.k8s.io - distinguished only by a v1alpha2-style version. TCPRoute and UDPRoute were the last resources to graduate under that scheme.
Going forward, new experimental resources are defined in a separate group,
gateway.networking.x-k8s.io,
and the names of their API types get an X prefix - for example XBackend and XMesh.
When one of these graduates to Standard, it's renamed into the gateway.networking.k8s.io group
and drops the X prefix, the same way XMesh is expected to become Mesh.
This separation makes the experimental/standard boundary explicit at the API group level, rather than relying on version strings alone.
What's next & getting involved
The graduation of TCPRoute and UDPRoute to Standard marks an essential milestone in making Gateway API a complete, universal ingress and mesh networking API for Kubernetes workloads across layer 4 and layer 7 protocols.
Try it out
You can start using Gateway API v1.6.0 today with your favorite Gateway controller implementation:
- Check out the Gateway API Documentation for detailed guides and API references.
- View the v1.6.0 Release Notes for complete details on the CRD installation and changes.
Gateway API relies on an extensive conformance test suite to ensure consistent, portable behavior across all implementations. Here is a list of the implementations that are conforment with v1.6 on the day we published the article:
Get involved
Gateway API is an open, community-driven project built under Kubernetes SIG Network. We welcome contributions, feedback, and participation from everyone!
- Join our Slack Channel: Join
#sig-network-gateway-apion the Kubernetes Slack. - Attend Community Meetings: We hold weekly community meetings. Check out the SIG Network Calendar for dates and agendas.
- Contribute on GitHub: File issues, suggest enhancements (GEPs), or submit PRs at kubernetes-sigs/gateway-api.
Acknowledgments
A huge thank you to all the contributors, reviewers, maintainers, and implementation authors whose hard work made Gateway API v1.6.0 possible!
Kubernetes v1.37 Sneak Peek
As we get closer to the release date for Kubernetes v1.37, the project develops and matures, features may be deprecated, removed, or replaced with better ones for the project's overall health. This blog outlines some of the planned changes for the Kubernetes v1.37 release that the release team feels you should be aware of for the continued maintenance of your Kubernetes environment and keeping up to date with the latest changes. The information below reflects the current status of the v1.37 release and may change before the actual release date.
Deprecations and removals for Kubernetes v1.37
Kubectl: kubectl run --filename/-f to be deprecated
The --filename (or -f) flag for kubectl run is being deprecated as the generated pod is always built purely from CLI arguments like NAME and --image.
See kubernetes/kubernetes#138671 for the original issue and discussion.
Kubelet: Static Pods can no longer reference Secrets or ConfigMaps
Static Pods were never meant to read API resources directly, since they aren't created through the API server — but a bug let them reference Secrets or ConfigMaps via fields like configMapRef or secretRef. That bug is now fixed: as of v1.37 these references are strictly prohibited, and the PreventStaticPodAPIReferences feature gate that previously let you opt out of the restriction has been removed.
See kubernetes/kubernetes#140226 for the original issue and discussion.
Deprecating kube-proxy's support for ipvs mode
kube-proxy support for ipvs mode was introduced in v1.8 to resolve iptables performance bottlenecks. However, since the kernel ipvs API alone cannot fully implement Kubernetes Services, ipvs mode continues to use iptables underneath (KEP-3866, "The ipvs mode of kube-proxy will not save us").
Clusters running kube-proxy in ipvs mode (or mode: ipvs in KubeProxyConfiguration) would now be logging a deprecation warning on startup. The deprecation timeline looks like this:
- By v1.40,
ipvsmode forkube-proxyis expected to be disabled by default (still selectable via the feature gate) - By v1.43, support for
ipvsmode would be removed entirely KEP-5495, Graduation Criteria. To confirm which mode you’re currently running, use:
kubectl -n kube-system get configmap kube-proxy -o jsonpath='{.data.config\.conf}' | grep 'mode:'
To understand the rationale behind this deprecation, see KEP-5495: Deprecate ipvs mode in kube-proxy.
Ongoing major changes
Future removal of cgroup v1 support
As modern Linux distributions and container runtimes use cgroup v2 as the default, support for the legacy cgroup v1 is officially being phased out. Since the v1.35 release, the failCgroupV1 setting has defaulted to true. Consequently, the kubelet will fail to initialize on any nodes that still rely on cgroup v1 unless an explicit configuration override is applied.
apiVersion: kubelet.config.k8s.io/v1beta1
kind: KubeletConfiguration
failCgroupV1: false # temporary override
Using this override should be considered a short-term fix. Advanced resource management capabilities, such as In-Place Pod Resizing and Tiered Memory Protection, depend entirely on cgroup v2. While the override remains available in Kubernetes v1.37, users are encouraged to migrate to cgroup v2, as support for cgroup v1 is planned to be removed in a future release.
To learn more about this deprecation, refer to KEP-5573: Remove cgroup v1 support.
Breaking changes in Kubernetes v1.37
SELinux volume relabeling ("SELinuxMount") graduates to GA
SELinuxMount is expected to reach GA and be enabled by default in v1.37. Volumes would then be
mounted with -o context=<label> (the mount option default) instead of being recursively
relabeled, but only when the volume's CSI driver opts in via a CSIDriver that sets .spec seLinuxMount: true.
Because a single mount can only hold one SELinux context, pods with different SELinux labels sharing a volume on the same node (which previously coexisted under recursive relabeling) may now fail to start. To retain the previous recursive behavior for a specific workload, set seLinuxChangePolicy: Recursive in the Pod spec.
Clusters without SELinux enabled see no effect at all. To learn more, check SELinux Volume Label Changes goes GA (and likely implications in v1.37)
Featured enhancements of Kubernetes v1.37
Metrics API goes GA
The metrics.k8s.io API is expected to graduate to Stable (GA) in Kubernetes v1.37 after spending nearly nine years in Beta. The API provides a standard way to retrieve CPU and memory usage for pods and nodes, powering widely used Kubernetes features such as the Horizontal Pod Autoscaler (HPA) and commands like kubectl top.
This graduation recognizes the API's stability and widespread adoption, with no functional changes expected. Both v1 and v1beta1 will remain usable during the transition, enabling developers to adopt the stable API at their own pace without breaking existing workflows.
To learn more about this enhancement, refer to KEP-5207: metrics.k8s.io API definition.
Kubelet in UserNS a.k.a. Rootless Mode
Traditionally, Kubernetes node components such as the kubelet run with root privileges on the host. While necessary for many deployments, this also means that a vulnerability in one of these components could potentially have a greater impact on the underlying system.
With Kubernetes v1.37, kubelet in User Namespace (Rootless Mode) is expected to graduate to Beta. This enhancement allows Kubernetes node components to run inside a Linux user namespace as an unprivileged user on the host while still behaving as root within the namespace. By reducing the need for host-level root privileges, it adds an extra layer of isolation and helps limit the impact of potential vulnerabilities affecting node components.
To learn more about this enhancement, refer to KEP-2033: Kubelet in UserNS(aka Rootless Mode).
Volume health monitor
Historically, Kubernetes has lacked an API for CSI drivers to report storage failures, which become evident only through failed mounts or hung I/O. Since remediation controllers had nothing machine-readable to act upon, the only way to figure out the root cause behind this failure was to cross-reference Kubernetes objects alongside external vendor dashboards.
In Kubernetes v1.37, this KEP resets graduation to Alpha after an initial implementation in v1.21 and introduces four new CSI
RPCs. The controller plugin reports the health of storage volumes using ControllerListVolumeHealth (lists unhealthy volumes) and ControllerGetVolumeHealth (checks a specific volume). A controller-side health monitor polls these CSI controllers and stores the results in
PersistentVolumeClaim.status.healthStatus.
On the node side, the kubelet calls NodeGetVolumeHealth to obtain the health of individual volumes on that node and records
it in Pod.status.volumeHealth, while NodeGetStorageHealth reports the health of the drivers registered to a node in
CSINode.status.storageHealth.
The error vocabulary is kept simple, extensible, and machine-parsable (Inaccessible, Degraded, etc.), with further driver-specific elaboration available via reason and message. Finally, the controller-side and node-side reports are kept independent and are hence displayed separately, providing a more holistic view of storage health to consumers.
To learn more about this enhancement, refer to KEP-1432: Volume Health Monitor.
Want to know more?
New features and deprecations are also announced in the Kubernetes release notes. We will formally announce what's new in Kubernetes v1.37 as part of the CHANGELOG for that release.
Kubernetes v1.37 release is planned for Wednesday, August 26th, 2026. Stay tuned for updates!
You can see the announcements of changes in the release notes for:
Get involved
The simplest way to get involved with Kubernetes is by joining one of the many Special Interest Groups (SIGs) that align with your interests.
If you don't know where to start, join our monthly New Contributor Orientations where we teach the community how the project is structured, and we'll guide you on how to make your first contribution to the project.
- Read more on how to become a Kubernetes Contributor
- Read more about what’s happening with Kubernetes on our blog
- Join us on Slack
- Follow us on X
- Follow us on LinkedIn
- Follow us on Bluesky for the latest updates
- Join the community discussion on Discuss
- Post questions (or answer questions) on Stack Overflow
- Share your Kubernetes End User Story
- Learn more about the Kubernetes Release Team
How the controller-runtime Cache Actually Works, and Why Your Controller Does Not Crash the API Server
This article has been revised since it was first published, to correct several significant technical inaccuracies in the original text.
Kubernetes has long been the default platform for distributed workloads, and writing your own
controller for it is now a matter of a few hours. The common path — Golang, using kubebuilder on top of
controller-runtime — gives you a project scaffold, types, and a reconciler. For typical
scenarios that is more than enough. But as soon as load grows or the controller starts behaving
in ways you did not expect, a whole class of edge cases shows up. Most of them trace back to
the same root cause: a fuzzy mental model of how controller-runtime works inside. If you
write Kubernetes controllers in Go, this article should help you build a coherent picture and
avoid expensive surprises in production.
This article walks through the internals of controller-runtime and, along the way, shows which
architectural decisions are baked into Kubernetes itself. The starting point is how
controllers actually read objects from the Kubernetes API.
A common misconception goes like this: r.Get() inside Reconcile queries kube-apiserver
directly; r.List() returns a fresh, live view of the world; and after r.Update() you can
re-read the object and immediately see the new state. In practice the model is the opposite:
controller-runtime operates against a local copy of the data populated through list + watch.
Reads inside a reconciler cost almost nothing and do not load the control plane even at
hundreds of calls per second — but the price of this design is that a controller can quietly
consume gigabytes of memory, perform hidden O(n) scans, and regularly trip over stale reads.
This post is aimed at engineers who already write controllers in Go with controller-runtime
but want to consolidate the pieces into a single mental model rather than carry around a bag
of isolated observations. The focus is the practical impact on production clusters: memory,
network traffic, read consistency, and reconciler behavior.
TL;DR
If you take only one idea from this article, take this:
r.Get() and r.List() inside a reconciler typically do not read from the API server. They
read from a local in-memory cache, which the manager warms up with list and then keeps
current through watch.
Almost every other property of the system follows from that one fact:
- Reads are cheap, but not strongly consistent immediately after a write.
- Writes go straight to the API server, not through the cache.
- The size of the local cache and the set of indexes directly drive memory consumption.
- An incorrectly written
List()can silently turn into a linear scan over tens of thousands of objects. APIReaderis rarely needed — but in some places you really cannot do without it.
The rest of the article unpacks why this is so and how the model is wired underneath.
A bit of context: what a reconciliation loop is
To avoid arguments about terminology, start with the basic model.
A controller in Kubernetes lives inside a reconciliation loop: it continuously compares the desired state of an object with the actual state and tries to bring one in line with the other. The idea is described in the original architectural notes on Kubernetes. In practice it looks like this:
- A user or another controller mutates an object.
- An event lands in a queue.
Reconcilereads the current state.- The controller decides what to create, update, or delete.
- The system produces a new event and the loop repeats.
What matters here is not that the controller "does something" — it is where it learns about changes from and where it reads state from. That is exactly where the cache comes in.
On a live cluster, the easiest way to see this in action is:
kubectl get pods --watch
In watch mode, kubectl subscribes to the same event stream that controllers consume.
You create or delete a Pod and you see not a single "final" object but a chain of states: the
scheduler assigns a node, the kubelet updates status, other controllers contribute their
changes. Kubernetes controllers do not poll continuously — they consume an event stream and
maintain a local state that is kept current.
For a visual walkthrough, see Reconciliation loop pattern in visual representation, a talk that shows how the reconciliation loop plays out on a real Pod and the states it passes through.
Why the cache exists in controller-runtime at all
Imagine the simplest possible controller:
func (r *Reconciler) Reconcile(ctx context.Context, req ctrl.Request) (ctrl.Result, error) {
var pod corev1.Pod
if err := r.Get(ctx, req.NamespacedName, &pod); err != nil {
return ctrl.Result{}, err
}
// ... meaningful logic ...
}
Looks straightforward. But what happens when you call r.Get? Does it fire an HTTP request at
the API server? If it did, picture the scene: a dozen controllers, each issuing a get and
a list per reconcile, with hundreds of reconciles per second. The API server and etcd
would be writing each other farewell letters within minutes.
To prevent that, Kubernetes was built around a watch model rather than polling from the very beginning. The standard mechanism works like this: a client takes a snapshot of the slice of the world it cares about once, then subscribes to a stream of changes and keeps a local copy current. This is the list + watch pattern, and there is no "what is in the world right now?" loop anywhere in it.
This idea has lived in client-go since the very first controllers in
kube-controller-manager. controller-runtime wraps it in a friendly framework so
that you do not have to glue the Reflector, the delta queue, and the Indexer together
yourself (more on those below).
So when people talk about "the controller-runtime cache", they are not talking about a clever optimization. They are describing the foundation of the entire model: you read from memory, you write to the API server, and you receive feedback through a watch.
The rest of this article walks through how each piece is wired up.
Glossary
A few terms collected up front, so you do not have to jump back and forth later. Skim or skip if any of them are already familiar.
GVK (GroupVersionKind) — the triple that uniquely identifies an API type in Kubernetes: group, version, and kind, for example
apps/v1/Deployment. Almost every API incontroller-runtimeworks in terms of GVK rather than the name you would type inkubectl(such asdeployments).resourceVersion — a monotonic counter that the API server tracks automatically, and that changes every time the object is written. Although it's a decimal number, the field is represented as a string. Resource versions serve two main purposes. The first one, you can use them for optimistic concurrency control (for example: on update, the API server checks that the
resourceVersionyou provide matches the one inetcd, otherwise it returns409 Conflict). The second place you are going to see resource versions in your controller is to resume a watch. Read watch bookmarks to learn more.Manager — the
ctrl.Managerobject incontroller-runtime. This is what your controller constructs inmain.goand runs throughmgr.Start(ctx). It orchestrates everything: it owns the shared cache, builds the client, starts controllers, webhooks, the healthz endpoint, and other runnables. A single process usually has exactly one manager, with many controllers living inside it.Informer — an entity from
client-gothat maintains a watch on a single GVK, keeps an indexed local store, and dispatches events to subscribers. Incontroller-runtimean informer is created automatically when you registerWatches(...)or perform the firstGet/Liston a given type.Store — the in-memory backing store of an informer, where the objects themselves live. Each informer in
controller-runtimehas its own store.ResourceEventHandler — an interface with three methods:
OnAdd,OnUpdate,OnDelete. The informer calls them for every event delivered through the delta queue. The store is always updated before the handler runs, so a handler never sees an indexer that is behind its own event. Subscribers (your controllers) register handlers like this and learn about changes through them.workqueue — a queue of reconcile requests (
namespace/name) with deduplication and rate limiting. On every event the controller enqueues a request; workers pop them one at a time and hand them toReconcileas actrl.Request.Predicate — a controller-side filter. A predicate decides whether an event should be enqueued at all (for example, "react only to changes in
spec, ignorestatus").
With those in hand, you can dive in.
Anatomy: what lives under the cache package
If you peek into sigs.k8s.io/controller-runtime/pkg/cache, you will see that it is a thin
wrapper over k8s.io/client-go/tools/cache. The same primitives that power the rest of
Kubernetes live underneath:
Reflector — keeps a watch open against the API server and writes incoming changes into a queue as deltas. A delta is a record of the form "object X received an
Added/Updated/Deletedevent, and here is its new version". Effectively a single line in a change log.The delta queue (
RealFIFO, orDeltaFIFOon older client-go) — holds those deltas in arrival order until the informer processes them.Indexer (Store) — the in-memory object store, plus the indexes built over it.
SharedIndexInformer — the conductor that ties everything together and dispatches events to subscribers — your controllers and any other observers.
At a glance the pipeline looks like this:
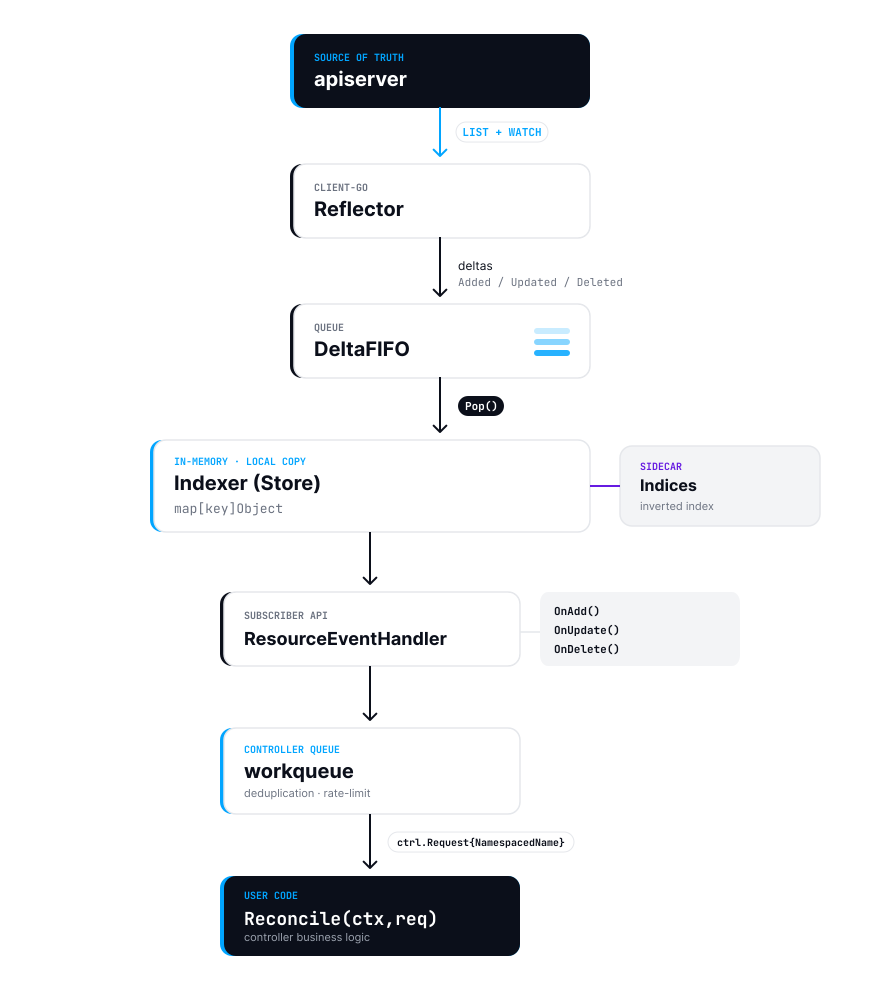
Pipeline diagram: API server to Reflector to the delta queue to Indexer to Event handlers
Now walk through each link.
Reflector and resourceVersion
Within the cache, the Reflector is the only component that talks to the API server. It has
exactly two jobs: fetch the initial snapshot at startup, then keep a watch open from there
on. (Writes and APIReader reads bypass the cache entirely and reach the API server on their
own — more on those later.)
This is where the resourceVersion earns its keep. Along with the objects, the API server
reports the version at which the snapshot was produced. The Reflector then says to the API
server, "open a watch from version X", and receives a stream of events for everything that
happened after that version. That is the basis of consistency: there is no gap between the
snapshot and the stream, because the stream resumes exactly where the snapshot ended.
That snapshot no longer arrives as a separate list call by default. Current versions use a
streaming list instead: the Reflector
opens the watch with sendInitialEvents=true, and the API server begins the stream with
synthetic ADDED events for the whole current state before switching to live changes. One
request instead of two, and a plain list as the fallback. The pattern is unchanged —
snapshot, then stream — which is why this article keeps saying list + watch, the way the
Kubernetes documentation does.
If the connection drops, the Reflector reconnects with the last known resourceVersion. If
the API server replies with 410 Gone ("that version is no longer in the history, you are
too far behind"), the Reflector fetches a fresh snapshot and starts over. This is called a
relist, and it does not happen on a schedule — only in those failure scenarios.
The delta queue
This piece is worth pausing on, and it is also the piece that changed most recently.
Historically the buffer between the Reflector and the rest of the informer was DeltaFIFO,
which held deltas in a map keyed by namespace/name: deltas for one object accumulated in a
slot, Pop() handed back the whole slice for that key at once, and a dedupDeltas helper
collapsed consecutive Deleted entries. If you have read about informer internals before,
that is probably the picture you are carrying.
That is no longer the default. Shared informers now use RealFIFO, and since client-go 1.36
DeltaFIFO cannot be switched back on at all. Which version you compile against is what
decides this, not the version of the cluster you point at. The new queue is deliberately
simpler — a flat, strictly ordered slice of deltas:
type RealFIFO struct {
// ...
items []Delta
}
Its own documentation states the design goal plainly: every notification from the Reflector is
passed, in order, through Pop. Which means:
- Order is preserved globally, not just per object. Deltas come out in exactly the sequence they arrived.
- One
Pop, one delta. There is no per-key slot and no slice —Poptakesitems[0]. (There is also aPopBatchfor processing several deltas in one pass, on by default since client-go 1.35, but it is a batching optimization, not a merge: each delta is still delivered.) - No deduplication whatsoever.
RealFIFOhas nodedupDeltasequivalent. Nothing is collapsed — including consecutive deletes, and including intermediate states.
So the worked example gets simpler than it used to be. Suppose three events for
default/my-deploy arrive in quick succession:
Added— the Deployment is created (say, withspec.replicas=1).Updated— somebody bumpsspec.replicasto2.Updated— and immediately to3.
All three are appended to the queue and popped one at a time, and the informer dispatches them
in order: first OnAdd, then two OnUpdate calls (the intermediate 1→2, then the final
2→3). The event handler runs three times, no shortcuts.
The store is written before the handlers are notified, and handler delivery is asynchronous — the informer writes the indexer, then hands the
notification to a per-subscriber buffer that the subscriber's own goroutine drains later. So
your handler never sees an indexer lagging behind its own event, but it can see one that has
moved well past it. Handling the 1→2 update, a Get from the cache can legitimately
return 3 — or NotFound, if the object has since been deleted. Never treat the object in the
store as "the state at the time of my event".
Deduplication does exist — but it lives one layer up, in the controller's workqueue, and with
RealFIFO that is now the only place it happens. The mechanic is straightforward: for each
delta, the controller's event handler extracts the namespace/name key from the object and
enqueues it. Re-inserting the same key silently coalesces with the existing entry; the
workqueue does not care about the object itself.
A concrete picture: you create a Pod. Within a second or two a flurry of Updated deltas
arrives — the scheduler assigns a node, the kubelet sets Pending, then ContainerCreating,
Running, Ready. Five deltas in a row, and the event handler fires on every one of them —
but throughout this window the workqueue holds a single entry with the key default/my-pod.
By the time Reconcile pops it, the cache already holds the final state, and Reconcile
runs once.
So you get two layers with cleanly separated responsibilities:
- The delta queue — an ordered stream of change facts, delivered one at a time and without merging. Its job is to tell consumers everything that happened, in the right order.
- workqueue — a queue of keys with deduplication. This is the layer that collapses "ten updates in a row → a reconcile or two".
If you keep that two-layer picture in your head, it becomes clear why a flood of events against a single object barely affects controller throughput — the workqueue absorbs them.
Indexer: the local copy of the cluster
The Indexer, backed by a ThreadSafeStore, is the local copy of the cluster. Underneath
it is a plain map[string]interface{} keyed by namespace/name, plus a single
sync.RWMutex, plus a dictionary of registered indexes (covered in their own section below).
An uncontended r.Get is cheap: a map lookup followed by a DeepCopy of the object. The
part of that structure that matters most at scale, though, is not the map — it is the one
sync.RWMutex, which guards the store and every index at once. Readers hold it for shared
access, the informer needs it exclusively to write, so the two genuinely compete: a List
holds the read lock while it walks every object of that kind, and the next store write waits
behind that walk. This was a real bottleneck in kube-controller-manager at scale
(kubernetes#130767); recent
client-go releases hold the write lock for much less time.
SharedIndexInformer and subscriptions
A SharedIndexInformer fuses the Reflector, the delta queue, and the Indexer together and exposes two interfaces to the rest of the world:
- Read objects directly from the indexer.
- Register a
ResourceEventHandlerand receive notifications for every event coming out of the queue —OnAdd,OnUpdate,OnDelete. The store is written before the handler call, so by the time your handler runs the indexer already reflects that event, and possibly later ones too.
"Outside" here means your controllers. When a controller registers Watches(...), under the
hood it asks the informer: "add a handler that, on every change, enqueues the key into my
workqueue". The controller's workers then pop keys one at a time and call your
Reconcile(ctx, ctrl.Request{NamespacedName: ...}).
The keyword in the name is Shared. The manager creates one informer per GVK, and every controller, webhook, and event source within that manager subscribes to it:
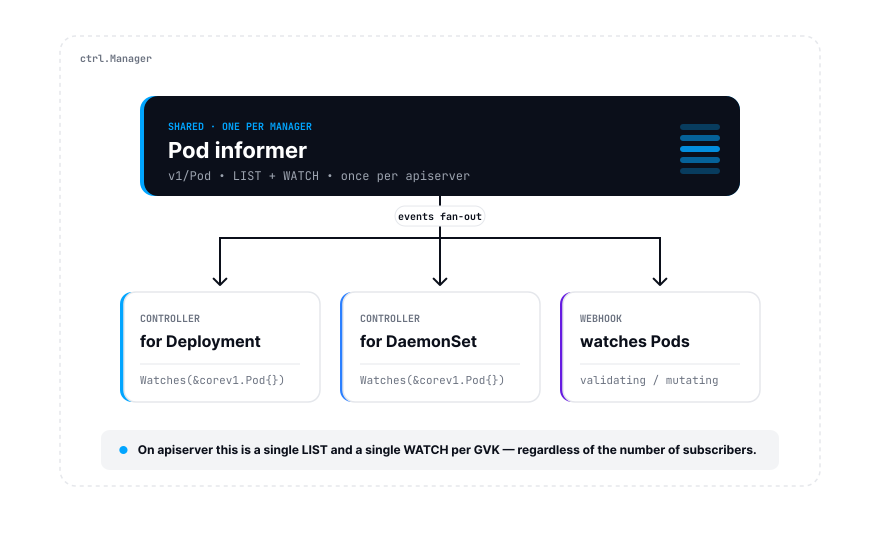
Shared informer diagram: a single list / watch per GVK, feeding multiple subscribers
In other words: an informer is the thing that subscribed to Pods once, holds them locally, and serves every interested party in the process. From the API server's perspective, that is one snapshot and one watch per GVK, regardless of how many reconcilers live inside your process.
What happens at startup and on the very first r.Get
Step by step, here is what happens between the moment the manager starts and the first
r.Get inside your reconciler:
- The manager's
mgr.Start(ctx)brings up every registered informer. - For each GVK, the Reflector fetches a full snapshot: every object of that type that falls within your scope.
- The snapshot is loaded into the informer's store, registered indexes are rebuilt, and the informer is marked as synced.
- The same stream then continues as an ordinary watch from the
resourceVersionthe snapshot synced to. - Only then does the controller start invoking
Reconcile— specifically, once every source it owns reports synced, which includes its event handlers having processed the initial snapshot. Until that point, workers do not drain the workqueue, even if events have already started piling up.
So "the reconciler is running but the cache is still empty" is not a state you can
observe — the warm-up happens before the first Reconcile. (The one exception: a Get for a
type nothing registered a watch for starts a new informer on the spot, and blocks until it is
warm.)
What happens during the first r.Get? Suppose your reconciler contains:
var obj appsv1.Deployment
err := r.Get(ctx, req.NamespacedName, &obj)
Under the hood it boils down to roughly this:
item, exists, err := indexer.GetByKey("default/my-deploy")
if !exists {
return apierrors.NewNotFound(...)
}
// DeepCopy into obj
No HTTP, no TLS, no protobuf serialization, no etcd. A map lookup plus a deep copy of the
object, and no I/O at all.
To repeat, because it matters: even the very first Get for a registered type reads from a
fully warmed-up, fully indexed snapshot. There is no "first time slow, then fast".
Note: This applies specifically to mgr.GetClient(). If for some reason you need to
read objects before mgr.Start() (for example, during initialization), use
mgr.GetAPIReader(), which goes straight to the API server. The regular client does not hand
you an empty result at that point — it fails fast with ErrCacheNotStarted. More on this
later.
Client ≠ Cache: read from memory, write to the API server
Another point that often gets lost. client.Client in controller-runtime is a composite
object:
- Reads (
Get,List) go through the cache. - Writes (
Create,Update,Patch,Apply,Delete,DeleteAllOf) go straight to the API server.
This is not a hack — it is a deliberate design choice:
- Reads are frequent; they should be cheap.
- Writes are rare; they should be exact.
- Writing through the cache would invite split-brain — the local copy thinks the change went through, while the API server has already rejected it.
It is worth dwelling on "should be exact". This is where resourceVersion shows up again.
When you read an object from the cache, you do not get its current state in etcd — you get
the state as the Reflector last observed it. That state carries a resourceVersion. You then
mutate the object and call r.Update(ctx, &obj). The request goes to the API server right
now, and the API server checks:
- Does the
resourceVersionin your PUT match theresourceVersioninetcd? Yes — write it. - No,
etcdalready has a newer one? Reply with409 Conflict— somebody beat you to it.
This is optimistic concurrency control. No real locks are taken; everybody writes in
parallel; but only one of the racing Update calls wins — the one that arrives with the
current version. Everyone else gets a 409 and is expected to re-read and try again.
Why does this matter for the cache? If you naively send a PUT with "your" resourceVersion
from the cache and somebody has updated the object since you read it, you will get 409.
That is not a bug. It is exactly the protection the system is supposed to give you.
Writing without the resourceVersion check (via Patch without an optimistic lock, or via
Server-Side Apply) is also possible, but that
is a separate conversation.
The "write → visibility" cycle now looks like this:
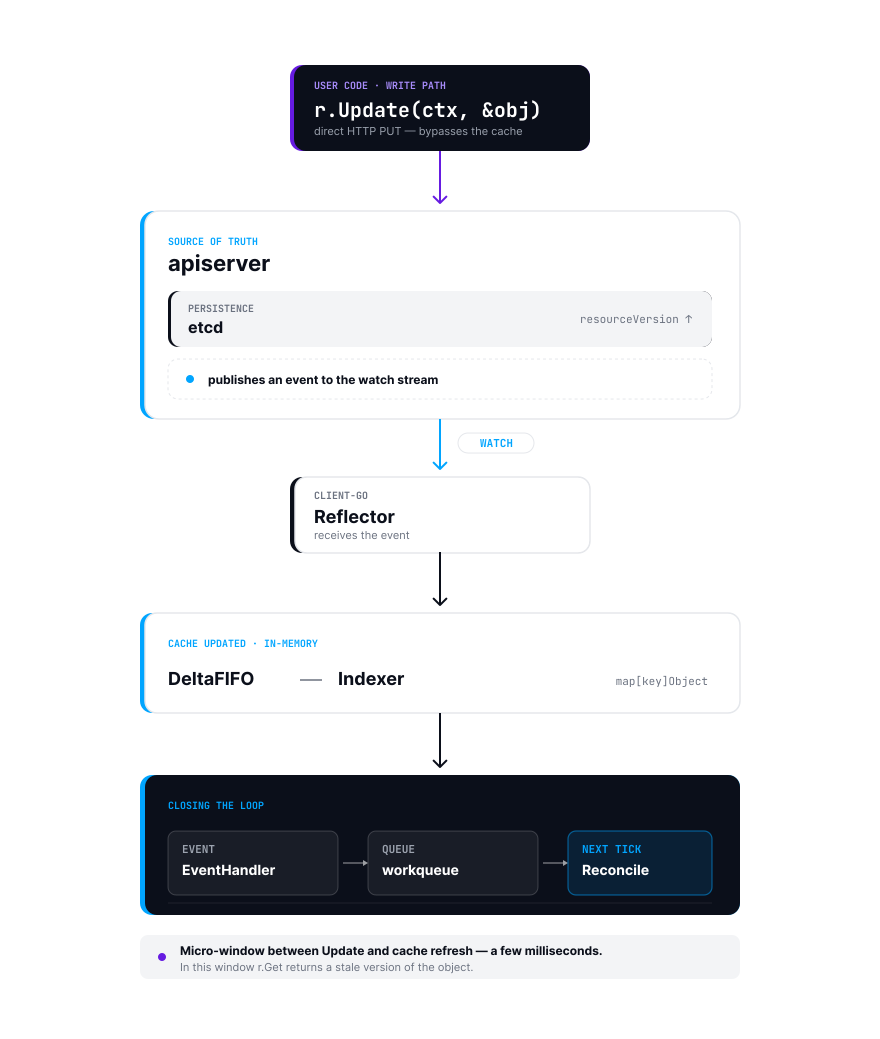
Write visibility diagram: client.Update to API server to watch event to cache
Between "you executed Update" and "the cache reflects the new state" there is a window —
usually milliseconds, but with no guaranteed upper bound. Inside that window, an r.Get for the
same object returns the previous version. The next section is essentially a list of mistakes
that grow out of that window.
Common mistakes that everyone makes
Mistake 1: expecting read-after-write
A familiar pattern:
obj.Spec.Replicas = ptr.To(int32(5))
if err := r.Update(ctx, &obj); err != nil {
return ctrl.Result{}, err
}
// re-read and confirm it is now 5
var fresh appsv1.Deployment
_ = r.Get(ctx, key, &fresh)
fmt.Println(*fresh.Spec.Replicas) // surprise: 3
This is not a controller-runtime bug. It is a property of an eventually consistent system:
the cache catches up asynchronously, through the watch.
The right pattern is to never rely on instant freshness. Reconcile must be idempotent and
must always look at the current state. If it does not match the desired state, the next
reconcile fixes it. You do not need to "wait 100ms" or "re-trigger". You need to write the
logic so that one or two extra invocations break nothing.
If a stale read is a genuine correctness problem for you, a live read does not fix it — a concurrent write can be mid-commit anyway. See the controller-runtime FAQ for patterns that do.
Mistake 2: DeepCopy and who owns the memory
To make sense of this, a quick word on event mechanics inside a controller. When you register
a source via Watches(...), two layers sit between the indexer and your Reconcile:
- Predicate — the filter. It looks at an event (
CreateEvent,UpdateEvent,DeleteEvent,GenericEvent) and decides whether to pass it through. - EventHandler — the transformer. It receives the object and turns it into one or more
ctrl.Requestvalues that go into the workqueue. The classicEnqueueRequestForObjectenqueues thenamespace/nameof the current object.
Here is the critical part. Predicates and handlers receive the same objects that live in
the informer's shared store. The same *corev1.Pod is seen by every controller subscribed
to Pods.
Because Go has no immutable structs, nothing prevents you from doing
pod.Labels["foo"] = "bar" directly inside a handler — and that Pod is the one in the store.
Raw client-go listers have always worked this way; ThreadSafeStore's own documentation puts
it bluntly: you must not modify anything returned by Get or List as it will break the indexing
feature. Patch a status "for convenience" in a handler and you break the world view of an
unrelated controller next door.
The cache-backed client from controller-runtime shields you from that on the read path: Get and
List deep-copy by default, and have since its earliest releases. You can opt out with
UnsafeDisableDeepCopy, which is named that way on purpose. The event path is not shielded —
there is no DeepCopy anywhere between the informer and your predicate. The simple rule:
- Anything you receive from
r.Get/r.Listis yours; mutate freely. - Anything you receive in a
Predicateor anEventHandleris shared, not yours. If you must mutate it, callobj.DeepCopy()first; otherwise you are silently corrupting the cache for every other controller subscribed to the same type.
A concrete review heuristic: if predicate.Funcs{UpdateFunc: ...} or
handler.EnqueueRequestsFromMapFunc(...) contains expressions like
e.ObjectNew.SetLabels(...) or obj.Status.X = Y, stop and ask whether a DeepCopy is
missing before that mutation.
Mistake 3: resync is not relist
An informer has a resync period (cache.Options.SyncPeriod, 10 hours by default in
controller-runtime), and many people read it as meaning: rebuild the cache from the API
server every n hours, fetching every resource once again.
It does not. A resync does not perform a list. It re-emits everything currently in
the indexer back through the delta queue, and the informer dispatches an update per object,
calling OnUpdate(old, old) for each one. This is for controllers that manage state outside
the Kubernetes API (a cloud provider resource, for example): out-of-band changes produce no
watch event, and a periodic resync is the only way to notice them. It generates no traffic to
the API server.
One caveat before you rely on resync as a safety net: because both sides of the synthetic
update are the same object, predicates that compare old and new — such as
GenerationChangedPredicate — will drop it.
A real relist happens only in two cases: when the watch died with 410 Gone, and when
you explicitly recreate the informer.
Mistake 4: do not confuse RequeueAfter with a timer
A small note that often saves time. Sometimes you want to wait inside a reconciler — "we
just called the provider's API; if it is not ready yet, retry in a minute". The temptation is
to spin up time.Sleep or your own goroutine.
Resist it. controller-runtime already provides a built-in mechanism:
return ctrl.Result{RequeueAfter: 30 * time.Second}, nil
The controller puts your req back into the workqueue with a delayed trigger 30 seconds out.
If a real event for the same object arrives within that window, the reconcile fires
immediately, without waiting for the timer (the key is deduplicated in the queue). This is
both cheaper and more correct than a hand-rolled timer: you do not hold a worker, and you do
not risk missing a real event.
cache + index = almost SQL
Now you get to what is, arguably, the most useful capability of the cache — and the one most controllers leave unused.
By default, a List from the cache looks like this:
var pods corev1.PodList
_ = r.List(ctx, &pods)
for _, p := range pods.Items {
if p.Spec.NodeName == "node-1" {
// do something
}
}
It works — until the cluster has 50,000 Pods and reconciles run hundreds of times per second. Then the loop turns slow: every trigger walks all 50,000 Pods under the store's read lock, then deep-copies each one after the lock is released, doing O(n) work per reconcile, and it is the walk, not the copying, that blocks writers into the store.
The Indexer in client-go can do much better. You declare up front which field you want to
index on:
// Index by spec.nodeName for Pods
if err := mgr.GetFieldIndexer().IndexField(
ctx,
&corev1.Pod{},
"spec.nodeName",
func(obj client.Object) []string {
pod := obj.(*corev1.Pod)
if pod.Spec.NodeName == "" {
return nil
}
return []string{pod.Spec.NodeName}
},
); err != nil {
return err
}
Two things about that call are worth making explicit, because the tidy example hides them behind a convention.
The index name is arbitrary. That second argument, "spec.nodeName", is only a
string key the index is registered under. controller-runtime does not parse it as
JSONPath and does not check it against the object's schema — you could write "by-node"
or "xyzzy" and it would behave identically. The only rule is that the exact same
string comes back in MatchingFields at query time. Naming the index after the field it
happens to read is a readability convention, nothing more.
But remember: this only works for reads served from the cache.
The indexed value is computed, not read. The function returns whatever strings you
build; they need not be the verbatim contents of any single field. You can lowercase a
value, join several fields into one composite key, bucket a timestamp (the time-bucket
trick below does exactly this), or emit a string that appears nowhere in the object
literally. Whatever the function returns becomes a key in the inverted dictionary, and a
MatchingFields lookup for that exact key is what finds the objects again. The only
constraint is that the value has to be derivable from the object you are indexing.
What is an inverted index? The term comes from search engines. Normally you have
documents and each document has a list of words in it. "Inverted" means the relationship is
flipped: a dictionary in which the key is a word and the value is the list of documents that
contain it. Same idea here: the key is the value of a field (for example, node-1), and the
value is the list of object keys whose field has that value:
map["node-1"] = {"default/pod-a", "kube-system/pod-b", ...}
map["node-2"] = {"default/pod-c", ...}
What the indexer does:
- On every incoming event (
ADDED,MODIFIED,DELETED), the indexer runs the object through your indexing function, gets back the set of index keys, and updates the inverted dictionary. If a Pod migrates fromnode-1tonode-2, thenode-1key loses its reference to it and thenode-2key gains one. - By the time you call
List, the index is already current. You do not pay for a rebuild at query time — no scan over all objects, no dictionary reconstruction. All the work was done up front, at the moment the object changed.
And now you can write:
var pods corev1.PodList
_ = r.List(ctx, &pods,
client.MatchingFields{"spec.nodeName": "node-1"},
)
This is not "fetch the full list, then filter". It is a lookup in the inverted index → a ready set of keys → a fetch of the corresponding objects. A different code path entirely.
The comparison to SQL is more accurate than it might look at first:
| SQL | controller-runtime |
|---|---|
CREATE INDEX idx_node ON pods(node_name) | IndexField(&Pod{}, "spec.nodeName", fn) |
SELECT * FROM pods WHERE node_name = 'node-1' | List(&pods, MatchingFields{"spec.nodeName": "node-1"}) |
SELECT * FROM obj WHERE owner_uid = $1 | List(&list, MatchingFields{"metadata.ownerReferences.uid": uid}) (requires an IndexField for that field) |
Note the last row: MatchingFields does not make magic out of thin air. For every field
you want to look up via MatchingFields you need a corresponding IndexField registered
during manager setup. Without one, controller-runtime rejects the query and returns
an error.
A few things worth keeping in mind:
Equality only. No range queries, no
LIKE, no sorts, no aggregates. If you need "everything older than five minutes", either do a regularListand filter in code, or use a time-bucket trick: instead of indexing the precisetime.Time, index a rounded value (for example,now.Truncate(5*time.Minute).Format(...)). You can then select objects by a specific window.MatchingLabelsis not an index. Many people assume that since label-based lookups are so common, there must be an optimization for them. There is not:ThreadSafeStorekeeps no separate label dictionary. The only indexes the cache has are the namespace index and the field indexes you register yourself.Two separate things follow, and they get conflated. The walk really is O(n): with no label index,
List(..., MatchingLabels{...})still visits every cached object of that kind, or whatever subset the namespace or a field index already narrowed it to. But the selector is evaluated before the deep copy, so objects that do not match are skipped without ever being copied. Against 50,000 Pods with ten matches, that is 50,000 cheap comparisons and ten expensive copies — not 50,000 copies. Which is why a label-filteredListis still much better than fetching everything and filtering in your own code afterwards: same walk either way, and the filtered version skips the copies you were going to throw away.So
MatchingLabelsis fine to use — just do not expect it to make the traversal cheaper. To shrink the candidate set itself, use a namespace or a field selector backed by a registeredIndexField. To avoid holding the objects at all, filter at cache population time viacache.ByObject{Label: ...}orDefaultLabelSelector, which pushes the selector down to the watch itself — covered in the next section on selective caches.An index costs memory. An index maps each indexed value to a set of
namespace/namekeys — not to copies of the objects. Cheap per object, not free, and still not a reason to index everything in sight speculatively.You can only index data that is in the object itself. You cannot index a Pod by "has a related PVC with such-and-such flag". Either store that bit in the Pod itself, or index the PVC, not the Pod.
Note: An index is built at registration time and is populated as part of the initial
snapshot. By the time the first Reconcile runs, List with MatchingFields already works —
the index is not built lazily. (Get never consults a field index; it is a direct lookup by
store key.)
Selective cache: do not pull the whole cluster into your controller
By default, an informer pulls every object of its type from every namespace. For Pod, Secret, ConfigMap, and Event in a large cluster, that is a multi-gigabyte surprise delivered on the first list at startup.
It hurts especially with:
- Secrets, because Helm stores release state in them (
helm.sh/release.v1.*), and those secrets are often a hundred kilobytes each. v1.Nodeobjects, whosestatus.imagesfield carries a list of every image that has ever landed on the node — tens of kilobytes per node in busy clusters.- Events, which can be very numerous and which you almost certainly do not need cached at all.
In controller-runtime, caching policy lives in cache.Options, passed when constructing
the manager:
mgr, err := ctrl.NewManager(cfg, ctrl.Options{
Cache: cache.Options{
ByObject: map[client.Object]cache.ByObject{
// Cache Secrets only from your own namespace, and only by label
&corev1.Secret{}: {
Namespaces: map[string]cache.Config{
"my-controller": {},
},
Label: labels.SelectorFromSet(labels.Set{
"app.kubernetes.io/managed-by": "my-controller",
}),
},
// Cache all Pods, but trim noise on the way into the store
&corev1.Pod{}: {
Transform: func(obj any) (any, error) {
pod := obj.(*corev1.Pod)
pod.ManagedFields = nil
return pod, nil
},
},
},
},
})
A subtle point: this is a manager-level setting and it affects every controller in the process that reads the corresponding type. If you narrow the cache for Secrets to a single namespace and another controller in the same binary needs all secrets in the cluster, that controller will not see them. Before you tighten the scope, audit who else is reading the type.
A short tour of the options:
Namespacesrestricts the visible scope. If your controller only manages its own namespace, there is no reason to keep other people's objects in memory.Label/Fieldbecome parameters of the watch itself. The API server only sends matching objects, saving network and memory.Transformis invoked before the object lands in the store. It is the perfect place to dropmanagedFields, oversizedannotations, or the binarydataof ConfigMaps that you do not need.DefaultLabelSelector/DefaultNamespacesapply the same restriction globally, when every type needs the same scope.
Caveat: A selector limits what is cached, not what exists. If an object does
not match your selector, then as far as your controller is concerned, it does not exist in
either Get or List. This bites people: somebody mislabels a single Secret and then
spends half a day figuring out why their controller "cannot see it".
Metadata-only: when spec and data are not needed
A separate pattern: you need to know that an object exists, but you do not need its spec or
data. Typical examples: a controller that waits for a Secret with a particular name to
appear but never reads it; one that counts PersistentVolume objects by the
topology.kubernetes.io/zone label; one that reacts to ConfigMap objects in a namespace
by name and does not care about contents.
Caveat: PartialObjectMetadata by definition gives you nothing from spec or
status — only ObjectMeta. So you cannot filter through it on spec fields (such as
a PersistentVolume's storageClassName or a Pod's nodeName); those fields do not
exist in the local copy. Everything covered by metadata-only is labels, annotations,
ownerReferences, finalizers, creationTimestamp, and the rest of metadata.
For this case there is PartialObjectMetadata:
var list metav1.PartialObjectMetadataList
// controller-runtime infers the list shape from the variable type.
list.SetGroupVersionKind(schema.GroupVersionKind{
Group: "",
Version: "v1",
Kind: "Secret",
})
if err := r.List(ctx, &list, client.InNamespace("my-ns")); err != nil {
return err
}
Under the hood this is a separate watch that asks the API server for metadata only. The
store keeps such objects without Data, Spec, or Status — only ObjectMeta. For
Secrets the memory difference can reach an order of magnitude.
APIReader: when the cache is not enough
mgr.GetAPIReader() returns a client.Reader that goes straight to the API server, around
the cache. When you actually need it:
- A one-off read of a resource for which you do not maintain an informer. Spinning up a watch for a single operation is expensive.
- Reads before
mgr.Start(), for instance during initialization. At that point the cache-backed client fails withErrCacheNotStartedrather than returning data. - Paginated traversal of large result sets through
client.Continue. The cache-backed client rejectsContinuewith an explicit error, and honorsLimitonly as truncation — an arbitrary N objects, not a stable "first N". For genuine pagination you needAPIReaderor a direct client of your own.
The price is a real network request, and it is easy to underestimate: on top of the round trip you pay to deserialize whatever comes back, which for a large collection is not cheap. So the trade is less obvious than it looks — reading from the API server is not automatically cheaper just because it avoids keeping objects in memory. Measure before you "optimize" a cached read into a live one. One thing to avoid outright: do not build "look in the cache, and if missing, fall back to the API" logic. That is exactly the split-brain pattern the cache is meant to protect you from.
Disabling the cache for a type entirely
If you do not need a local cache for a given type at all — say, the type is "fat", read
rarely, and the list + watch overhead is not worth paying — you can tell the manager not to
cache it. This is configured through client.Options.Cache.DisableFor:
mgr, err := ctrl.NewManager(cfg, ctrl.Options{
Client: client.Options{
Cache: &client.CacheOptions{
DisableFor: []client.Object{
&corev1.Secret{},
},
},
},
})
With this configuration, mgr.GetClient().Get(...) and List(...) for Secret go straight
to the API server, bypassing the cache. No informer is started for that type, which means no
list at startup and no permanent memory pressure from a store. That also means no events:
nothing will trigger your controller when such an object changes. If you need those triggers,
pair the direct reads with a metadata-only watch. This is a more radical
alternative to APIReader: where APIReader is reached for ad hoc, individual requests,
DisableFor turns the cache off for the type wholesale.
Real-world projects use this: external-secrets, for instance, has flags that disable caching for Secrets and ConfigMaps, trading memory for API traffic.
Aside: If you want to avoid a watch on the API server entirely, you can feed the
controller events from a source of your own design, bypassing list + watch. In
controller-runtime this is done with WatchesRawSource / source.Channel: you can wire
the controller to events from any place — an internal queue, a kubelet, a custom watch.
Niche, but a perfectly valid pattern when the API server should not be touched.
Good practices
A short checklist worth running through before you ship a controller into a live cluster:
- Constrain cache scope (
Namespaces,Label,Fieldselectors), especially for "fat" types: Secret, ConfigMap, Event, Pod, Node. - Remember that a constrained cache acts as if everything outside its scope does not exist. A mislabeled object "disappears" with no error anywhere.
- Add a
Transformfor objects whose heavy fields you do not need —ManagedFieldsalone consume a noticeable share of memory. - Add an
IndexFieldfor everyListthat usesMatchingFields. Without a matching index the query does not silently degrade — it fails with an error. - Do not mutate objects you receive in an
EventHandleror aPredicatewithout a priorDeepCopy. Mutations to the store break neighboring controllers silently and persistently. - Make
Reconcileidempotent. It must behave correctly even if it is invoked five times in a row with no real change. - Do not expect read-after-write from the cache immediately after
Update. The cache lags during that window. - When the cache cannot serve a read (initialization, deliberately uncached types), use
APIReader, not the regular client. - Use
PartialObjectMetadatafor types where you only need metadata. It can save gigabytes. - Do not call
mgr.GetClient()beforemgr.Start(). The cache is not running yet, so reads fail withErrCacheNotStartedinstead of returning data. Usemgr.GetAPIReader()when you genuinely need to read during initialization. - For deferred actions, use
RequeueAfter, nottime.Sleepand not your own goroutines.
Wrapping up
In one breath:
- The cache in
controller-runtimeis not an optimization, it is the operating model. Under the hood it isReflector+ a delta queue +Indexer— exactly the same primitives that power Kubernetes itself. r.Getandr.Listgo to memory;Create,Update,Patch, andDeletego straight to the API server. Feedback flows in through the watch.IndexFieldplusMatchingFieldsturn the cache into a near-complete query engine with inverted indexes.Namespaces, selectors,PartialObjectMetadata, andTransformare the levers that control how much memory and traffic you actually consume.APIReaderbypasses the cache for the rare read the cache cannot serve — but it is not a fix for staleness races; see the controller-runtime FAQ.
And the single sentence to remember: r.Get inside a reconciler reads from memory, not from the
API server — not even the first time. The exceptions are the ones you opt into yourself:
APIReader, Cache.DisableFor, and unstructured reads. Once that becomes a reflex, half the
questions on controller code reviews answer themselves.
Building a Custom Metrics Exporter for Kubernetes
Kubernetes ships with built-in awareness of CPU and memory, but most real-world scaling decisions depend on signals that live entirely outside that narrow window: how many messages are waiting in a queue, how long the last batch job took, how many active WebSocket connections a pod is holding. When the built-in metrics are not enough, a metrics exporter bridges that gap.
This post walks through writing one from scratch, packaging it as a container, and wiring it into a cluster so that Prometheus — and ultimately the HorizontalPodAutoscaler — can consume it.
What a metrics exporter actually does
An exporter is a small HTTP server with a single responsibility: expose
application state as text on a /metrics endpoint. Prometheus scrapes
that endpoint on a regular interval, stores the time-series data, and
makes it available for queries, alerts, and autoscaling rules.
In some cases you can instrument your application directly — embedding
the Prometheus client library and exposing /metrics from within the
same process — rather than running a separate exporter. A standalone
exporter makes more sense when the data source is external to your
application or when you do not control the application code.
The format Prometheus expects is plain text — one metric per line, with a name, optional labels, and a numeric value. Client libraries handle the serialization for you, so in practice you only need to decide what to measure and call the right function when that value changes.
Choosing what to measure
Before writing any code, it helps to decide what kind of signal you are dealing with. The Prometheus data model has three main types:
Counters only ever increase. They are the right tool for totals: requests served, jobs processed, errors encountered. Never use a counter for a value that can go down.
Gauges represent a current snapshot of a value that can rise and fall freely. Queue depth, active connections, and cache size are all gauges.
Histograms record the distribution of observed values, such as request latency. They let you calculate percentiles (p99, p50) rather than just averages.
Once you know which type fits your signal, choose a name that follows
the convention <namespace>_<name>_<unit> in snake_case. A job
processor might expose worker_jobs_processed_total (counter),
worker_queue_depth (gauge), and worker_job_duration_seconds
(histogram). Clear names save everyone debugging time later.
Setting up the project
The Go Prometheus client is the most common choice for exporters in the Kubernetes ecosystem, largely because the same library powers most of the official Kubernetes components. Start by creating a module and pulling in the dependency:
mkdir my-exporter && cd my-exporter
go mod init example.com/my-exporter
go get github.com/prometheus/client_golang/prometheus
go get github.com/prometheus/client_golang/prometheus/promhttp
Registering metrics
Create main.go. The first thing to do is declare the metrics and
register them with Prometheus's default registry. Registration tells
the library that these metrics exist so they appear in the output even
before the first observation is recorded:
package main
import (
"log"
"net/http"
"github.com/prometheus/client_golang/prometheus"
"github.com/prometheus/client_golang/prometheus/promhttp"
)
var (
jobsProcessed = prometheus.NewCounterVec(
prometheus.CounterOpts{
Name: "worker_jobs_processed_total",
Help: "Total number of jobs processed, partitioned by status.",
},
[]string{"status"},
)
queueDepth = prometheus.NewGauge(prometheus.GaugeOpts{
Name: "worker_queue_depth",
Help: "Current number of jobs waiting in the queue.",
})
jobDuration = prometheus.NewHistogram(prometheus.HistogramOpts{
Name: "worker_job_duration_seconds",
Help: "Time spent processing a single job.",
Buckets: prometheus.DefBuckets,
})
)
func init() {
prometheus.MustRegister(jobsProcessed, queueDepth, jobDuration)
}
prometheus.MustRegister panics on a duplicate registration, which
makes misconfigurations obvious at startup rather than silently at
runtime. If you are embedding this exporter inside a library that other
packages will also instrument, prefer prometheus.Register and handle
the error yourself.
Collecting real values
With the metrics registered, the next step is to keep them current. You can either continually update the data as the data change, or run your own internal refresh loop. The pattern below shows a polling loop — a goroutine that periodically reads from whatever data source your application owns and updates the registered metrics. Replace the simulated values with real calls to your database, internal API, or message broker:
import (
"math/rand"
"time"
)
func collectMetrics() {
for {
// Replace these with real reads from your application.
depth := float64(rand.Intn(50))
queueDepth.Set(depth)
start := time.Now()
time.Sleep(time.Duration(rand.Intn(200)) * time.Millisecond)
jobDuration.Observe(time.Since(start).Seconds())
jobsProcessed.WithLabelValues("success").Inc()
time.Sleep(5 * time.Second)
}
}
The polling interval (here five seconds) should be shorter than Prometheus's scrape interval so that each scrape sees a fresh value. The default scrape interval in most cluster deployments is fifteen seconds, which gives you comfortable headroom.
Exposing the endpoint
Wire the collection loop and the HTTP handler together in main. A
/healthz path alongside /metrics gives Kubernetes a liveness probe
target without exposing metric data on the health route:
func main() {
go collectMetrics()
http.Handle("/metrics", promhttp.Handler())
http.HandleFunc("/healthz", func(w http.ResponseWriter, r *http.Request) {
w.WriteHeader(http.StatusOK)
})
log.Println("Listening on :8080")
if err := http.ListenAndServe(":8080", nil); err != nil {
log.Fatalf("server error: %v", err)
}
}
Verify the output locally before building the image:
go run .
curl http://localhost:8080/metrics | grep worker_
You should see three # HELP and # TYPE blocks followed by the
current metric values. If those lines appear, the exporter is working
correctly and is ready to be containerized.
Build a container image
A multi-stage build keeps the final image small and avoids shipping a Go toolchain to production. The first stage compiles a statically linked binary; the second stage copies only that binary into a minimal base. The example below uses Docker, but the same pattern works with any OCI-compatible build tool such as Buildah or Podman:
FROM golang:1.21-alpine AS builder
WORKDIR /src
COPY go.mod go.sum ./
RUN go mod download
COPY . .
RUN CGO_ENABLED=0 go build -o /exporter .
FROM gcr.io/distroless/static:nonroot
COPY --from=builder /exporter /exporter
EXPOSE 8080
ENTRYPOINT ["/exporter"]
distroless/static:nonroot contains no shell, no package manager, and
runs as a non-root user by default, which satisfies most cluster
security policies without extra configuration.
Build and push the image, replacing <registry> with your own registry
address:
docker build -t <registry>/my-exporter:v1.0.0 .
docker push <registry>/my-exporter:v1.0.0
(Note: Using a CI/CD pipeline to automate this is generally a better pattern than running these commands manually.)
Deploying to the cluster
Two manifests are enough to run the exporter: a Deployment that manages the pod lifecycle, and a Service that gives Prometheus a stable address to scrape. (You might prefer to have Prometheus scrape from every Pod; if that makes sense for your use case, then it's OK to configure instead).
The examples below use the monitoring namespace, which is a common
convention when running Prometheus and related components together. Adjust
the namespace to match your own cluster setup.
The Deployment sets conservative resource limits appropriate for a
lightweight sidecar-style process, and uses the /healthz route for
its liveness probe:
apiVersion: apps/v1
kind: Deployment
metadata:
name: my-exporter
namespace: monitoring
labels:
app.kubernetes.io/name: my-exporter
spec:
replicas: 1
selector:
matchLabels:
app.kubernetes.io/name: my-exporter
template:
metadata:
labels:
app.kubernetes.io/name: my-exporter
spec:
containers:
- name: exporter
image: <registry>/my-exporter:v1.0.0
ports:
- name: metrics
containerPort: 8080
livenessProbe:
httpGet:
path: /healthz
port: 8080
initialDelaySeconds: 5
periodSeconds: 10
resources:
requests:
cpu: 50m
memory: 32Mi
limits:
cpu: 100m
memory: 64Mi
The Service names the port metrics, which the ServiceMonitor in the
next section will reference by that name:
apiVersion: v1
kind: Service
metadata:
name: my-exporter
namespace: monitoring
labels:
app.kubernetes.io/name: my-exporter
spec:
selector:
app.kubernetes.io/name: my-exporter
ports:
- name: metrics
port: 8080
targetPort: metrics
Apply both:
kubectl apply -f deployment.yaml -f service.yaml
Telling Prometheus where to look
How you configure scraping depends on how Prometheus was installed.
Option 1: Prometheus Operator (ServiceMonitor)
If you installed Prometheus using the
Prometheus Operator
or the kube-prometheus-stack Helm chart, the operator must be running
in your cluster before you create a ServiceMonitor. The release label
must match the label selector configured on your Prometheus resource —
kube-prometheus-stack is the default for a standard Helm install:
apiVersion: monitoring.coreos.com/v1
kind: ServiceMonitor
metadata:
name: my-exporter
namespace: monitoring
labels:
release: kube-prometheus-stack
spec:
selector:
matchLabels:
app.kubernetes.io/name: my-exporter
endpoints:
- port: metrics
interval: 15s
path: /metrics
Option 2: Annotation-based discovery
If your Prometheus uses annotation-based pod discovery instead, you will
need a matching scrape_config rule in your Prometheus configuration —
check with whoever manages your Prometheus installation to confirm it is
in place.
You can add the following three annotations to the Pod template regardless of which scraping method you use. They are ignored by the Prometheus Operator but picked up automatically by annotation-based setups:
annotations:
prometheus.io/scrape: "true"
prometheus.io/port: "8080" # omit if not using annotation-based discovery
prometheus.io/path: "/metrics" # omit if not using annotation-based discovery
If you are unsure which setup your cluster uses, the ServiceMonitor approach is more explicit and easier to debug.
Verifying the scrape
Port-forward to the Prometheus service and open the targets page to confirm the exporter has been discovered:
kubectl port-forward svc/prometheus-operated 9090 -n monitoring
Navigate to http://localhost:9090/targets. The my-exporter target
should appear with state UP. If it shows DOWN, check that the
ServiceMonitor's release label matches and that the pod is running:
kubectl get pods -n monitoring -l app.kubernetes.io/name=my-exporter
kubectl describe servicemonitor my-exporter -n monitoring
Once the target is healthy, run a quick query in the expression browser to confirm data is flowing:
rate(worker_jobs_processed_total{status="success"}[2m])
A non-zero result here means the full pipeline is working: your application is producing data, Prometheus is scraping it, and the time-series are stored and queryable.
What comes next
A working exporter is the foundation, not the destination. The natural
next step is surfacing these metrics to the
HorizontalPodAutoscaler
so that your workload scales on the signals that actually drive load,
not just CPU. That requires a metrics adapter — the Prometheus Adapter
is the most widely deployed option — which registers your custom metrics
with the Kubernetes Custom Metrics API. Once registered, any
HorizontalPodAutoscaler in the cluster can reference worker_queue_depth
or worker_jobs_processed_total directly in its metrics block.
For a walkthrough of that setup, see Autoscaling on multiple metrics and custom metrics. For a catalog of ready-made exporters covering databases, message brokers, and cloud services, the Prometheus exporters and integrations page is a good starting point.
Operating AI/ML Workloads on Kubernetes: A Headlamp Plugin for Kubeflow
Kubernetes has quietly become the default platform for AI and machine learning. Whether you run notebook servers for data scientists, schedule distributed training jobs, tune hyperparameters, or orchestrate multi-step ML pipelines, those workloads increasingly land on a Kubernetes cluster. Kubeflow is one of the most popular ways to assemble that stack, and it does so the Kubernetes-native way: every capability is exposed as a Custom Resource Definition (CRD).
That design is a gift to cluster operators, because it means ML workloads can be observed and managed with the same primitives as everything else in the cluster. But in practice the specialized ML dashboards that ship with these platforms hide the Kubernetes layer underneath. When a notebook is stuck or a training run fails, the operator is often left dropping back to kubectl to find out what actually happened at the Pod level.
This post introduces the Headlamp Kubeflow plugin, which closes that gap by surfacing Kubeflow's custom resources directly inside a general-purpose Kubernetes UI. It is a worked example of a pattern any CRD-heavy platform can follow: meet operators where they already work, and show them the cluster-level truth.
Headlamp itself is an extensible Kubernetes web UI maintained under Kubernetes SIG UI and licensed under Apache 2.0. It runs as a desktop app or in-cluster, and its plugin system lets anyone add first-class views for custom resources.
Why operators need a different view
Purpose-built ML dashboards help data scientists submit experiments, pipelines, and notebooks. Cluster operators and site reliability engineers (SREs) troubleshoot the Kubernetes resources underneath, and they ask different questions:
- Why is a notebook stuck? Is it
ImagePullBackOff,OOMKilled, or a Pod waiting on a PersistentVolumeClaim? - Which Run resources failed recently across namespaces?
- Which parameter set does a Katib Experiment report as optimal?
- Do TrainJob resources reference the expected TrainingRuntime resources?
- Which batch workloads are running, and what state does Kubernetes report?
The Headlamp Kubeflow plugin helps answer these questions by reading directly from the Kubernetes API server. It shows Pod conditions, Kubernetes failure reasons, and resources across namespaces without requiring an intermediary ML service or database.
What the plugin covers
Kubeflow is modular, and teams often install only the components they need. The plugin discovers the Kubeflow API groups on a cluster and displays only the corresponding sections.
The plugin supports the following component families and API resources:
| Component | Purpose | API resources |
|---|---|---|
| Notebooks | Provides development environments such as Jupyter, VS Code, and RStudio | Notebook, Profile, PodDefault |
| Pipelines | Defines and tracks pipelines, versions, experiments, runs, and schedules | Pipeline, PipelineVersion, Run, RecurringRun, Experiment |
| Katib | Automates hyperparameter tuning and neural architecture search | Experiment, Trial, Suggestion |
| Training | Runs distributed training workloads such as PyTorch and TensorFlow jobs | TrainJob, TrainingRuntime, ClusterTrainingRuntime |
| Spark | Runs large-scale data processing with Apache Spark | SparkApplication, ScheduledSparkApplication |
What you can see
Inspect notebook Pods
The Notebook detail view shows Pod conditions and their reason and message
fields. It also shows CPU, memory, and GPU requests and limits; volume mounts and
their backing types, such as PersistentVolumeClaim, ConfigMap, Secret, or
emptyDir; environment variables that reference Secret or ConfigMap objects;
sidecar containers; and node tolerations. This view consolidates information that
would otherwise require several kubectl describe commands.
Inspect hyperparameter tuning
The Katib views show the tuning algorithm, search space, every Trial with its live status, and the current best Trial with its metric values and parameter assignments. They also show the early-stopping configuration and the number of Trial resources that stopped early, so you can follow the search without leaving the cluster UI.
Inspect pipeline state without the backend database
The Pipelines views read Kubernetes API resources directly and do not query the
Kubeflow Pipelines API service or backend database. You can inspect stored pipeline
state even when that service is unavailable. The Pipeline detail view compares the
latest and previous PipelineVersion specifications in a side-by-side YAML diff. Run
views show state and duration, RecurringRun views show human-readable schedules, and
the artifacts view aggregates pipelineRoot values from recent Run resources.
Map ML resources
The plugin registers a
Headlamp map source
that renders Notebook, Profile, PodDefault, Experiment, Pipeline, SparkApplication,
and TrainJob resources as graph nodes. It draws edges between supported resources
based on .metadata.ownerReferences. Headlamp also shows inline summaries for these
resource types when you hover over them.
Try it
The Kubeflow plugin README explains installation and local-cluster setup, including a lightweight CRD-only path for evaluation. Because the plugin discovers installed API groups, you can use it with an existing modular Kubeflow installation or create an evaluation cluster with only the CRDs and sample resources.
Apply the pattern to other platforms
Kubeflow illustrates a broader pattern. Platforms often model domain-specific workflows with custom resources. Their dashboards focus on those workflows, while Kubernetes operators also need the state of the underlying API resources and Pods. A CRD-driven plugin in a general Kubernetes UI can expose that state without making operators switch between unrelated tools.
The plugin uses the Apache 2.0 license and is developed under Kubernetes SIG UI. To report a problem or contribute an improvement, use the Headlamp plugins repository's issue tracker or pull requests.
Kubernetes Dashboard to Headlamp: A Step-by-Step Guide
1. Before you start: know what is changing
Kubernetes Dashboard and Headlamp both show what is running in a cluster, but they work differently. When Headlamp runs on the desktop, it uses your existing kubeconfig to connect to one or more clusters and can be extended with plugins. When Headlamp runs inside a cluster, it uses a Kubernetes ServiceAccount to access the API and follow RBAC rules. Kubernetes Dashboard, in contrast, only runs in-cluster and always relies on service account tokens. Understanding these models early helps you choose the right setup and permissions.
1.1 How Kubernetes Dashboard works
Dashboard is a web app that runs inside your cluster.
- You install it in the cluster, often with Helm.
- You usually run one Dashboard per cluster.
- You often reach it with
kubectl port-forwardor an ingress. - You log in with a Bearer token. That token is often from a service account.
- It includes forms that help you create resources.
- It leans on tables and lists for navigation.
It feels like this: a UI that lives with the cluster.
1.2 How Headlamp works
Headlamp acts more like a Kubernetes client with a UI.
- It can run on your desktop or in a cluster.
- It reads your kubeconfig, like kubectl does.
- It can show more than one cluster in one place.
- It favors YAML when you create or change resources.
- It includes list views and a visual map.
- You can add features with plugins.
Headlamp is a UI that follows your identity, not your cluster.
1.3 What stays the same
Many workflows will feel familiar:
- Browse workloads and resources
- Filter by namespace
- Inspect YAML, events, and status
- View logs
- Take actions your RBAC allows
1.4 What changes
A few things will feel different:
- Login shifts from pasted tokens to kubeconfig (and sometimes SSO).
- Creation shifts from forms to "apply YAML."
- Multi-cluster becomes normal, not a special case.
- The map view helps you see how resources connect.
2. Pre-migration checklist
This checklist helps you avoid surprises during the switch. It makes sure Headlamp can use the same identity and permissions you already trust in Kubernetes. It also gives you a quick way to prove the migration worked before you turn off Dashboard.
2.1 Write down what you use today
List the basics:
- Which clusters you use (dev, staging, prod)
- Which namespaces you touch most
- What you do most often (view, edit, scale, delete, debug)
- How you access Dashboard today (port-forward or ingress)
- How you log in (service account token, and which RBAC bindings)
This is your baseline.
2.2 Check that kubeconfig works
Headlamp uses kubeconfig, especially on desktop. Make sure yours works before you install anything.
Run:
kubectl config current-context
Then try:
kubectl get nodes
If you cannot list nodes, test in a namespace you can access:
kubectl get pods -n <namespace>
If these work, Headlamp can use the same identity and RBAC.
2.3 Pick a rollout plan
There is no need to rush. Most teams choose one of these:
Parallel rollout (recommended)
- Install Headlamp
- Let people try it
- Keep Dashboard for a short time
- Remove Dashboard after the team is ready
Cutover
- Install Headlamp
- Switch docs and links
- Remove Dashboard soon after
Parallel rollout is safer for shared clusters.
2.4 Decide where Headlamp will run
You can use either option. Many teams use both.
Desktop
- Uses your kubeconfig
- Uses no cluster resources
- No port-forward needed
- Multi-cluster works out of the box
In-cluster
- Works well for shared, browser access
- Can be managed like other cluster apps
- Often paired with ingress and SSO
2.5 Note optional dependencies
These are common. You can handle them later.
metrics-server(for CPU and memory graphs)- ingress (for an in-cluster URL)
- OIDC / SSO (for browser sign-in)
- cleanup of old Dashboard service accounts and RBAC
3. Choose where Headlamp will run (desktop or in-cluster)
Headlamp can run on your desktop or inside a cluster. Both work well, but they fit different needs. Desktop is the fastest way to start because it uses your kubeconfig and does not run in the cluster. In-cluster is best when you need a shared URL and want the platform team to manage upgrades and access.
Option A: Desktop (user-managed)
Desktop Headlamp runs on each user's machine. It reads the same kubeconfig you use with kubectl. This keeps access tied to each user's identity and RBAC.
Why teams pick it
- No in-cluster service to deploy or expose.
- It uses no cluster CPU or memory.
- It uses your kubeconfig and RBAC.
- It works with many clusters in one app.
- You do not need port-forward for day-to-day use.
Option B: In-cluster (best for shared access)
In-cluster Headlamp is installed as a Kubernetes workload (often via Helm). This lets cluster admins manage it like other in-cluster apps.
- Cluster admins manage install, upgrades, and configuration through the Helm chart and standard Kubernetes tooling.
- Admins control ingress and can set up OIDC login for shared access.
- It supports shared use in team environments.
4. Install Headlamp (desktop and in-cluster)
This section gets Headlamp running. Follow the path you chose in Section 3.
4.1 Desktop install (fastest way to start)
Install Headlamp on your machine. Then open it like any other app. Headlamp reads your kubeconfig and uses the same identity and RBAC rules as kubectl.
Windows
Install with WinGet:
winget install headlamp
Or with Chocolatey:
choco install headlamp
macOS
Install with Homebrew:
brew install --cask headlamp
Linux
Install with Flatpak (Flathub):
flatpak install flathub io.kinvolk.Headlamp
Quick check
- Launch Headlamp.
- Confirm you can see a cluster context.
- Open a namespace you can access and confirm you can list workloads. Headlamp will only show actions your RBAC allows.
4.2 In-cluster install (shared access)
Use this path when you want a shared UI that the platform team can manage. Headlamp supports in-cluster deployment with Helm or a YAML manifest.
Install with Helm
Add the repo and update:
helm repo add headlamp https://kubernetes-sigs.github.io/headlamp/
helm repo update
Create a namespace (example):
kubectl create namespace headlamp
Install the chart:
helm install headlamp headlamp/headlamp --namespace headlamp
Install with a YAML manifest (optional)
Headlamp also provides a YAML manifest you can apply and then adjust to your needs.
Check the install
Confirm the pod is running:
kubectl get pods -n headlamp
Confirm the service exists:
kubectl get svc -n headlamp
Access it (two common ways)
Quick test with port-forward
This is the fastest way to verify the service works:
kubectl port-forward -n headlamp svc/headlamp 8080:80
Then open: http://localhost:8080
Shared access with ingress
If you want a stable URL, expose the service through your ingress controller. Your exact ingress YAML depends on your setup. Headlamp's OIDC callback URL is your public URL plus /oidc-callback, so ingress and TLS settings matter.
4.3 Updating Headlamp
Updates depend on how you installed Headlamp. Package managers upgrade in place. DMG or EXE installs update by reinstalling the newer download.
macOS
If you installed with Homebrew, run:
brew upgrade headlamp
If you installed from a DMG, download the newest DMG and drag Headlamp into /Applications, replacing the old version. DMG installs do not auto upgrade.
Windows
If you installed with WinGet, run:
winget upgrade headlamp
If you installed with Chocolatey, run:
choco upgrade headlamp
If you installed from the EXE, download the newest installer and run it again. EXE installs do not auto upgrade.
Linux
If you installed with Flatpak, run:
flatpak update io.kinvolk.Headlamp
If you installed with AppImage, download the newest AppImage and run that file instead.
If you installed with a tarball, download the newest tarball, extract it, and run the new headlamp binary.
4.4 Notes for in-cluster access (keep it safe)
Treat an in-cluster UI like any other cluster-facing service. Use TLS, lock down who can reach it, and rely on Kubernetes auth and RBAC to control what users can do.
5. Authentication and RBAC
Headlamp uses the Kubernetes API the same way kubectl does. Your cluster still decides who can do what. Headlamp only shows actions your identity is allowed to take.
This section covers two setups: desktop and in-cluster.
5.1 Desktop: use kubeconfig
On desktop, Headlamp reads your kubeconfig and uses the same credentials you use with kubectl. There is no separate token login flow to manage.
Step 1: Confirm your kubeconfig works
Run:
kubectl config current-context
Then test access:
kubectl get nodes
If you cannot list nodes, test a namespace you can access:
kubectl get pods -n <namespace>
If these commands work, your kubeconfig and credentials are valid for Headlamp too.
Step 2: Point Headlamp at the right kubeconfig (if needed)
Headlamp can use the default kubeconfig path. It can also use a custom file path. You can set KUBECONFIG to choose a specific file.
Example:
KUBECONFIG=/path/to/config headlamp
You can also use more than one kubeconfig file at once. On Unix systems, separate paths with :. On Windows, separate paths with ;.
What to expect in the UI
Headlamp adapts to your RBAC permissions. If you do not have permission to edit or delete a resource, Headlamp will not offer those actions.
5.2 In-cluster: shared access needs a sign-in plan
In-cluster Headlamp is shared by many users. You need a clear plan for sign-in and access. Headlamp supports OpenID Connect (OIDC) for a "Sign in" flow.
You will usually choose one of these patterns:
- A. Configure Headlamp with OIDC (built-in).
- B. Put an auth layer in front of Headlamp (common in enterprises).
A. Built-in OIDC (Headlamp)
To use OIDC, Headlamp needs:
- Client ID
- Client secret
- Issuer URL
- (Optional) scopes
Your OIDC provider must also allow Headlamp's callback URL. The callback is your Headlamp URL plus:
/oidc-callback
Example:
https://headlamp.example.com/oidc-callback
Ingress note
If Headlamp is behind an ingress or load balancer, make sure it forwards X-Forwarded-Proto. If it does not, Headlamp may generate an http callback URL instead of https. That can break login.
B. Auth layer in front of Headlamp
Some teams protect Headlamp with an identity-aware proxy or a platform auth system. This keeps sign-in consistent across tools. Headlamp docs include an example using OpenUnison, which can deploy Headlamp with hardened defaults and integrate with identity providers.
5.3 RBAC: keep it least privilege
Kubernetes security starts with API authentication and authorization (RBAC). Headlamp respects those rules.
Practical guidance:
- Start with the lowest permissions that still let users do their job.
- If Dashboard used a high-privilege service account token, plan to remove or tighten that access after the move.
- For in-cluster, treat the UI like any other endpoint. Use TLS and limit network access.
5.4 Quick troubleshooting
Desktop: "I do not see my cluster"
Your kubeconfig may not be in the default location. Point Headlamp to the file with KUBECONFIG or a file path.
In-cluster: "OIDC login fails after redirect"
Confirm your provider allows https://YOUR_URL/oidc-callback. If you use ingress, make sure it forwards X-Forwarded-Proto.
6. Manage multiple clusters
Kubernetes Dashboard is usually tied to one cluster at a time. Headlamp is built for multi-cluster work. It is a client that follows your kubeconfig, not a single cluster install. That means you can keep one UI open and switch clusters as you work.
Clusters come from your kubeconfig
Headlamp reads clusters from your kubeconfig files. That means the clusters you can access with kubectl can also show up in Headlamp.
Switch clusters in the UI
Once Headlamp loads your kubeconfig, you can switch clusters using the cluster selector. This makes it easier to move between dev, staging, and prod without changing tools.
Optional: use more than one kubeconfig file
If you keep separate kubeconfig files, you can load them together. Headlamp supports multiple kubeconfig paths in KUBECONFIG.
Unix/macOS/Linux (: separator):
KUBECONFIG=~/.kube/dev:~/.kube/prod headlamp
Windows (; separator):
$env:KUBECONFIG="$HOME\.kube\dev;$HOME\.kube\prod"
Optional: add a cluster from inside Headlamp
You can also add clusters by loading additional kubeconfig files from the UI.
Permissions stay the same
Multi-cluster does not change security rules. Each cluster still enforces its own RBAC. Headlamp shows only what your identity can do in the selected cluster.
7. Navigate and understand resources
If you used Kubernetes Dashboard, this part will feel familiar. Headlamp keeps the same core resource views, but makes it easier to move around and understand what is connected.
Find resources in familiar places
Headlamp groups resources in a way that maps closely to Dashboard:
- Workloads for Pods, Deployments, StatefulSets, and Jobs
- Network for Services and Ingress
- Storage for PersistentVolumes and Claims
- Configuration for ConfigMaps and Secrets
- Nodes for cluster infrastructure
You can filter by namespace at the top of the UI, just like in Dashboard.
Inspect and edit resources
From any list, you can click into a resource to see details:
- Status and conditions
- Events
- Labels and annotations
- The full YAML definition
If your RBAC allows it, you can edit YAML directly from the UI. If it does not, Headlamp shows the resource as read-only. This matches how kubectl behaves.
Use search and filters to move faster
Headlamp adds faster search and filtering across lists. This helps when clusters or namespaces get large. You can narrow views without jumping between pages.
Understand relationships with Map View
Dashboard mostly shows resources as lists. Headlamp also includes a Map View.
Map View shows how resources relate to each other:
- Deployments
- ReplicaSets
- Pods
- Services
This helps when you are troubleshooting. Instead of clicking through several pages, you can see the connections at once. You can spot missing links or broken relationships faster.
When to use lists vs Map View
- Use lists when you know what resource you are looking for.
- Use Map View when you are trying to understand why something is not working.
Both views work on the same data. You are just choosing how much context you want at that moment.
8. Deploy applications with YAML
This is the biggest change for most Kubernetes Dashboard users. Dashboard relied on forms. Headlamp relies on manifests. The goal is not to slow you down. It is to align the UI with how Kubernetes is usually run in practice.
From forms to manifests
In Kubernetes Dashboard, you often deployed an app by filling in a form:
- container image
- replicas
- service type
Headlamp does not include the same wizard. Instead, it lets you apply YAML directly from the UI.
This matches how most teams deploy today:
- manifests live in Git
- CI/CD applies them
- Helm or GitOps tools manage changes
Headlamp fits into that flow rather than replacing it.
Create resources using YAML
To deploy an application in Headlamp:
- Select a cluster and namespace.
- Click Create.
- Paste or upload a YAML manifest.
- Review it.
- Click Apply.

The resource appears immediately in the UI.
If the manifest is not valid, Headlamp shows the same errors you would see from the Kubernetes API.
Generate YAML the easy way
If you miss the Dashboard wizard, you can still generate YAML quickly.
For example:
kubectl create deployment nginx \
--image=nginx \
--dry-run=client \
-o yaml > nginx.yaml
You can edit the file if needed, then paste it into Headlamp and apply it.
This gives you a repeatable manifest instead of an object created only through a UI.
What if you use Helm or GitOps?
That works well with Headlamp.
- Install with Helm as usual.
- Deploy with GitOps pipelines as usual.
- Use Headlamp to view, inspect, and debug what is running.
Headlamp does not replace those tools. It gives you visibility into what they create.
What to expect compared to Dashboard
- You will not see a multi-step deploy form.
- You will work more with YAML.
- You gain clarity about what is actually applied to the cluster.
- The same manifest can be reused in CI, Git, or other tools.
9. Deploy and debug workloads
One of the main reasons people used Kubernetes Dashboard was day-to-day debugging. Headlamp covers the same tasks and adds a few useful upgrades.
View logs
You can view pod logs directly in the UI.
To check logs:
- Open Workloads.
- Select Pods.
- Click a pod.
- Open the Logs tab.

If the pod has more than one container, you can switch between containers. Logs stream live, which helps during rollouts or active incidents.
Exec into running pods
Headlamp also lets you open a shell inside a container.
From a pod view:
- Open the pod actions menu.
- Choose Terminal or Exec.
This opens an interactive session inside the container. It replaces the need to switch back to the terminal for quick checks.
This action follows RBAC rules. If you cannot run kubectl exec, Headlamp will not allow it either.
Check metrics and resource usage
Headlamp can show CPU and memory usage for pods and nodes. This works the same way it did in Dashboard.
A few things to know:
- Metrics require
metrics-serverto be installed in the cluster. - If metrics are missing, Headlamp shows a clear notice.
- Once metrics are available, usage appears on pod and node views.
This makes it easy to answer simple questions:
- Is this pod using too much memory?
- Is a node under pressure?
View events when something goes wrong
Events are often the fastest way to understand failures.
In Headlamp, you can:
- View events on resource detail pages.
- See warnings and errors tied to pods, nodes, or deployments.
This is often the first place to look when a workload is stuck or crashes.
How this compares to Dashboard
What stays the same:
- Log viewing
- Event inspection
- RBAC-aware actions
What improves:
- Built-in exec sessions
- Clearer layout and filtering
- Fewer context switches between UI and CLI
10. Remove Kubernetes Dashboard
After Headlamp is working and your team is comfortable using it, you can remove Kubernetes Dashboard. This is the final cleanup step.
Removing Dashboard reduces clutter and avoids keeping unused access paths around.
Confirm Headlamp covers your needs
Before uninstalling anything, make sure:
- Users can access the clusters they need in Headlamp.
- Common tasks work:
- browse resources
- deploy with YAML
- view logs and events
- exec into pods (if allowed)
- RBAC behaves as expected for different roles.
Once these checks pass, you are ready to remove Dashboard.
Uninstall the Dashboard
If you installed Kubernetes Dashboard with Helm, remove it with:
helm uninstall kubernetes-dashboard -n kubernetes-dashboard
If Dashboard was installed by a manifest or addon, remove it using the same method you used to install it.
After removal, confirm the resources are gone:
kubectl get pods -n kubernetes-dashboard
Clean up access artifacts (recommended)
Many Dashboard setups used dedicated service accounts and cluster-wide roles.
Review and remove anything that was created only for Dashboard access, such as:
- service accounts
- role bindings or cluster role bindings
- old documentation that points users to Dashboard URLs or port-forward commands
This reduces long-lived credentials and unused permissions.
Communicate the change
Make sure your team knows:
- Headlamp is now the primary Kubernetes UI.
- How to access it (desktop or URL).
- Where to go for help if something feels different.
11. Post-migration checklist
This final checklist helps you confirm the migration is complete. It gives you confidence that Headlamp is working as expected and that nothing important was left behind.
Access and visibility
- Headlamp opens without errors.
- Users can access the correct clusters.
- Namespace filtering works as expected.
- Multi-cluster switching behaves correctly.
Authentication and RBAC
- Desktop users access clusters using kubeconfig.
- In-cluster users can sign in using the chosen auth method.
- Users only see actions their RBAC allows.
- No unexpected permission errors appear during normal use.
Core workflows
- Resources load under Workloads, Network, and Configuration.
- YAML can be viewed and edited where permissions allow.
- Applications can be deployed using Create and YAML.
- Logs load correctly for running pods.
- Exec works for users who are allowed to use it.
- Metrics appear if metrics-server is installed.
Operational confidence
- Teams can troubleshoot without switching tools.
- Map View helps explain relationships during debugging.
- Platform or DevOps teams know how Headlamp is installed and managed.
Cleanup confirmation
- Kubernetes Dashboard is no longer running.
- Dashboard-only service accounts and RBAC bindings are removed.
- Internal docs no longer reference Dashboard URLs or port-forward commands.
Team alignment
- The team knows Headlamp is the default Kubernetes UI.
- Onboarding docs point new users to Headlamp.
- There is a clear path for feedback or questions.
You've now completed the move from Kubernetes Dashboard to Headlamp. Your team can use the same Kubernetes access model, work across clusters, and rely on workflows that match how Kubernetes is used today. From here, Headlamp becomes your default UI, whether on the desktop or in shared environments. As your needs grow, you can keep using it as-is or extend it with plugins and new views over time.
If you want to help shape what comes next, join the Headlamp community and contribute at headlamp.dev.
Announcing etcd v3.7.0
This article is a mirror of the original announcement
Today, SIG etcd is releasing etcd v3.7.0, the latest minor release of the popular distributed key-value store and core Kubernetes component. v3.7 ships the long-requested RangeStream feature, delivers several other performance improvements, removes the last remnants of the legacy v2store, and completes a major protobuf overhaul.
You can download etcd v3.7.0 here:
This release also includes new versions of the two core etcd dependencies, bbolt v1.5.0 and raft v3.7.0.
For instructions on installing etcd, see the install documentation. For the full list of changes, see the etcd v3.7 changelog.
A heartfelt thank you to all the contributors who made this release possible!
Major features
The most significant changes in v3.7.0 include:
- RangeStream — stream large result sets in chunks instead of buffering the whole response.
- Keys-only range requests, faster and more reliable leases, and several other performance improvements.
- etcd now boots entirely from v3store, eliminating a long-standing dependency on the legacy v2 store
- A completed protobuf overhaul, replacing outdated protobuf libraries with fully supported ones.
- etcd v3.7 ships with bbolt v1.5.1 and raft v3.7.0.
Features
RangeStream
In etcd v3.6 and earlier, it is challenging to work with requests that return large result sets. The database would buffer the full result set before sending, leading to unpredictable latency and memory usage, both on the server and the client. The RangeStream RPC lets calling applications accept result sets in chunks, reducing latency and making buffering memory usage more predictable.
Instructions on how to use RangeStream in gRPC calls and in etcdctl can be found in the etcd documentation. Users should try it out for their own applications.
In coordinated releases, the RangeStream feature will become available to users running the upcoming v1.37 of Kubernetes by enabling the EtcdRangeStream feature gate. This early and planned adoption is possible thanks to the merger of etcd and Kubernetes development in 2023.
Performance improvements
v3.7 delivers multiple specific performance improvements, both for the Kubernetes control plane and for other use cases. Kubernetes users should see a significant decrease in overall CPU usage by the etcd members, compared with v3.6.
Keys-only range optimization
etcd v3.7.0 includes a keys-only Range optimization (#21791: keys-only Range optimization). When processing a keys_only Range request or etcdctl get --keys-only, etcd reads solely from its in-memory index. It returns the matched keys without loading all serialized values from bbolt as it did previously. The only exception where loading from bbolt is still required is when keys_only Range requests must be sorted by value (i.e., when SortTarget is set to VALUE).
This reduces unnecessary backend reads and memory use for workloads that only need key names, making large keys-only range requests more efficient.
Faster, more reliable etcd leases
v3.7 improves lease expiration and renewal:
- LeaseRevoke requests are now prioritized to ensure timely lease expiration during overload (#20492: stability enhancement during overload conditions).
- The new FastLeaseKeepAlive feature enables faster lease renewal by skipping the wait for the applied index (#20589: etcdserver: improve linearizable renew lease).
Faster find() operations
etcd 3.7 improves the performance of concurrent watches on keys by making find() operations faster (#19768: adt: split interval tree by right endpoint on matched left endpoints).
Other features
Protobuf overhaul
v3.7 migrates and replaces multiple outdated protobuf libraries with fully supported dependencies. This includes replacing github.com/golang/protobuf and github.com/gogo/protobuf with the fully-supported google.golang.org/protobuf (#14533: Protobuf: cleanup both golang/protobuf and gogo/protobuf), and migrating grpc-logging to grpc-middleware v2 (#20420: Migrate grpc-logging to grpc-middleware v2).
As well as improving security and maintainability, this refactor has been shown to reduce CPU usage by etcd components.
While these changes are not expected to directly affect users running etcd via official binaries or container images, they may affect users who depend on etcd Go modules, such as the client SDK or packages under api/ or pkg/. These consumers may need to update their code or dependencies due to protobuf and related API changes introduced in this release. More detailed information is available from the API change tracking issue.
Unix socket support
etcd now supports Unix socket endpoints (#19760: Add Support for Unix Socket endpoints), enabling local communication without a TCP port. Since this is restricted to single-member clusters, it is mainly aimed at development, testing, and edge device use-cases.
Bootstrap from v3store
One of the major changes in etcd v3.7 is that the server now bootstraps entirely from the v3 store (#20187 Bootstrap etcdserver from v3store), eliminating its dependency on the legacy v2 store during startup.
This milestone is the result of a long-term effort spanning multiple releases, from v3.4 through v3.7. It resolves a long-standing technical debt, significantly simplifies the bootstrap workflow, and lays the foundation for future improvements to etcd.
To maintain backward compatibility, etcd v3.7 continues to generate v2 snapshots. As a result, the --snapshot-count flag is also retained in v3.7. This is the last remaining dependency on the legacy v2 store, and both the v2 snapshot generation and the --snapshot-count flag will be removed in v3.8.
etcdutl timeouts
All etcdutl commands now have a timeout command line argument (#20708: etcdutl: enable timeout functionality for all commands), so offline utility commands no longer block indefinitely when holding a lock.
Setting the authentication token directly
Client v3 now allows users to set the JWT directly, offering more flexibility in authentication options (#16803: clientv3: allow setting JWT directly, #20747: clientv3: disable auth retry when token is set),
Retrieve AuthStatus without authenticating
Clients can check their AuthStatus without attempting to authenticate first, eliminating some application overhead (#20802: etcdserver: remove permission check on AuthStatus api).
New watch metrics
v3.7 adds optional watch send-loop metrics (#21030: Instrument watchstream send loop) for better observability of the watch path:
etcd_debugging_server_watch_send_loop_watch_stream_duration_secondsetcd_debugging_server_watch_send_loop_watch_stream_duration_per_event_secondsetcd_debugging_server_watch_send_loop_control_stream_duration_secondsetcd_debugging_server_watch_send_loop_progress_duration_seconds
There is also a new etcd_server_request_duration_seconds metric (#21038: Add metric etcd_server_request_duration_seconds).
etcdctl command cleanup
etcdctl commands were reorganized for clarity (#20162: etcdctl: organize etcdctl subcommand) and global command line arguments are now hidden to streamline help output (#20493: etcdctl: hide global flags).
Upgrading
This release contains breaking changes, particularly around the removal of legacy v2 components. Users should review the upgrade guide before upgrading their nodes. As with all minor releases, perform a rolling upgrade one member at a time and confirm cluster health between steps.
Experimental flags removed
All deprecated experimental flags have been removed (#19959: Cleanup the deprecated experimental flags). Features in etcd now follow the Kubernetes-style feature-gate lifecycle (Alpha → Beta → GA) introduced in v3.6, rather than the old --experimental prefix. If your configuration still relies on --experimental-* command line arguments, migrate to using the corresponding feature gates or stable command line arguments before you upgrade to etcd 3.7.
Legacy V2 API packages and code cleanup
To remove the dependencies on v2store, the following components have been removed:
- v2 discovery (#20109: Remove v2discovery) packages removed,
- v2 request support (#21263: Remove v2 Request and apply_v2.go)
- v2 client support (#20117: Remove client/internal/v2).
These changes may create some breakage for users, particularly those who have not already updated to v3.6.11 or later. Users should report any blockers encountered, or cases that need better upgrade documentation.
Non-blocking client creation
etcd no longer honors the deprecated grpc.WithBlock dial option ( #21942: Make the etcd client creation non-blocking). To preserve the previous blocking behavior when needed, follow the guidance in grpc-go's anti-patterns documentation.
Multiarch container images only
For users relying on the official etcd container images, v3.7 will be distributed only as multiarch containers. Architecture-tagged images will not be available, so adjust deployments accordingly.
API changes
As with every etcd release, there are a number of API changes. These are designed to be backwards-compatible to the extent possible, but may require adjustment by some users. See our API documentation page for full information.
bbolt v1.5.1
etcd v3.7 depends on, and includes, v1.5.1 of the bbolt storage engine. v1.5 includes several improvements to functionality and performance, including:
- Database file size limits: users may set, and bbolt will enforce, file size limits. When a bolt database exceeds these limits it will refuse to accept writes until the database is compacted or the limit is changed.
- Disable statistics for performance: users may set
NoStatisticsto limit overhead from locks taken by the database statistics viewer. - More efficient hashmap processing: merge spans faster and with less overhead.
raft v3.7.0
etcd 3.7 depends on, and includes, v3.7.0 of the raft consensus engine. v3.7 includes several improvements, including:
- Update the bootstrap process: v3.7 now allows booting from partly initialized snapshots, supporting etcd's initializing directly from v3store.
- Improve the ReadIndex flow to prevent stale reads by injecting a unique identifier into the heartbeat context for read-only operations.
raft v3.7.0 also includes the same protobuf library updates and refactoring as etcd does.
Dependency updates
Other dependency updates include a bump to golang.org/x/crypto v0.52.0 for CVE resolution (#21903: [release-3.7] Bump golang.org/x/crypto to v0.52.0), an OpenTelemetry contrib update to v0.61.0 (#20017: Update otelgrpc to v0.61.0), and compilation with Go 1.26.4 (#21891: [release-3.7] Update Go to 1.26.4).
Contributors
etcd v3.7.0 is the product of more than a hundred contributors across the community. Thank you to everyone who wrote code, reviewed PRs, filed and triaged issues, and helped test the alpha, beta, and release candidates.
Leads
The SIG etcd leads for the v3.7 release are ivanvc, serathius, ahrtr, fuweid, siyuanfoundation, and jberkus. Ivan leads our release team.
Other contributors
ah8ad3, ajaysundark, aladesawe, amosehiguese, ArkaSaha30, ashikjm, AwesomePatrol, dims, Elbehery, gangli113, henrybear327, Jille, jmhbnz, joshuazh-x, kishen-v, lavishpal, liggitt, marcelfranca, miancheng7, mmorel-35, MrDXY, mrueg, purpleidea, qsyqian, redwrasse, ronaldngounou, skitt, spzala, tcchawla, tjungblu, vivekpatani, wenjiaswe
New contributors
A special welcome to the contributors who made their first etcd contribution in this cycle — including Jeffrey Ying, whose work drove the RangeStream feature. New contributors can have a substantial impact on etcd; if you’d like to get involved, see the contributor guide.
1911860538, 4rivappa, aaronjzhang, abdurrehman107, ABin-Huang, adeptvin1, aditya7880900936, AHBICJ, akstron, alliasgher, aman4433, aojea, apullo777, AR21SM, arturmelanchyk, AshrafAhmed9, asttool, asutorufa, BBQing, beforetech, boqishan, caltechustc, carsontham, christophsj, chuanye-gao, cnuss, cuiweixie, dmvolod, Dogacel, dongjiang1989, EduardoVega, evertrain, eyupcanakman, gaganhr94, goingforstudying-ctrl, greenblade29, Himanshu-370, HossamSaberX, huajianxiaowanzi, hwdef, ishan-gupta2005, ishan16696, ivangsm, JasonLove-Coding, Jefftree, jihogh, jonathan-albrecht-ibm, joshjms, kairosci, kei01234kei, kjgorman, kovan, kstrifonoff, Kunalbehbud, letreturn, lorenz, m4l1c1ou5, madhav-murali, madvimer, majiayu000, marcus-hodgson-antithesis, mattsains, mcrute, mingl1, MohanadKh03, mstrYoda, NAM-MAN, neeraj542, nicknikolakakis, nihalmaddala, niuyueyang1996, notandruu, ntdkhiem, nwnt, olamilekan000, pigeio, pjsharath28, progmem, Qian-Cheng-nju, quocvibui, ravisastryk, robin-vidal, robinkb, rockswe, roman-khimov, rsafonseca, sahilpatel09, SalehBorhani, SebTardif, seshachalam-yv, shashwat010, shivamgcodes, shuan1026, silentred, sneaky-potato, socketpair, srri, subrajeet-maharana, sxllwx, tchap, tsujiri, tzfun, upamanyus, uzairhameed, varunu28, vihasmakwana, wendy-ha18, xiaoxiangirl, xigang, xUser5000, yagikota, yajianggroup, yedou37, Zanda256, zechariahkasina, zhijun42, zhoujiaweii
Feedback can be shared through:
Open source maintainership in the age of AI
AI has really changed the game around software development. More people are leveraging AI than ever to contribute patches to projects they use. To me, this is a good thing as more folks will contribute patches rather than fork or not fix them. The main problem is that AI has made generating code fast but there has been very little improvement in maintaining code bases. In this post, we will highlight the ways the Kubernetes community is adapting to the world of AI assisted coding.
The first step of this journey was to develop an AI policy. This seems mundane and bureaucratic but there were many PRs that derailed into discussions around AI usage. The AI policy helps steer the conversation around the project's stance on AI and provides a clear signal to contributors on how to use these tools responsibly.
Kubernetes AI policy
The Kubernetes project has established clear guidelines for AI-assisted contributions that balance innovation with accountability. These policies are designed to maintain code quality and ensure human oversight while acknowledging that AI tools can be valuable aids in the development process.
Transparency first
Contributors must disclose when AI tools have been used to assist with a pull request. A simple statement in the PR description such as "This PR was written in part with the assistance of generative AI" is sufficient. This transparency helps reviewers understand the context and apply appropriate scrutiny.
Human accountability
While AI tools can assist, the human contributor remains fully responsible for every change. The policy explicitly prohibits:
- Listing AI as a co-author on commits
- Using AI co-signing on commits
- Adding trailers like "assisted-by" or "co-developed" that attribute work to AI
This isn't about diminishing AI's role as a tool—it's about maintaining clear accountability. If something breaks, there needs to be a human who understands why and can fix it.
CLA enforcement for co-authors
The CNCF provides a tool for verifying the contributor license agreements on each pull request. AI agents are not able to solve these contributor license agreements so one enforcement the project made is to enable the CLA check for co-authors. This provides a flag to reviewers that the PR is not ready to merge.
Human engagement required
Perhaps the most critical aspect of the policy: reviewers expect to engage with humans, not with AI. Contributors cannot rely on AI to respond to review comments. If you cannot personally explain changes that AI helped generate, your PR will be closed. This requirement ensures that knowledge transfer happens and that contributors genuinely understand the code they're submitting.
Verification obligations
Contributors must verify AI-generated changes through code review, testing, and personal understanding. It's not enough for the code to work—you need to know why it works and be able to maintain it.
These policies reflect a mature approach to AI: embrace it as a tool, but never let it replace human judgment, understanding, or responsibility.
Automated AI reviews
There exist many tools to aid in reviewing code. AI pull request tools introduce governance challenges so one of the first tasks the community took on was to document the process for what is needed to bring in new AI tools. One of the major evaluation criteria for these tools is to find maintainers willing to test drive them in kubernetes-sigs repositories. Kueue, JobSet and Agent-Sandbox have been experimenting with these tools to provide more support for maintainers.
Copilot
One tool that many maintainers started using was GitHub Copilot. The CNCF provides access for maintainers so this ended up being the first tool many started using. It provides some good experience on tuning reviews but there were some growing pains with this tool. The biggest blocker for community adoption is relying on contributors to have a copilot license. Only maintainers were able to request copilot reviews and automated reviews of pull requests was out of reach for the community. One of the goals of AI review tools is to provide an automated review tool that maintainers don't need to request. This demonstrated the need for organization control rather than relying on contributors having access.
CodeRabbit
In mid 2026, the Kubernetes community has rolled out CodeRabbit to a few projects. As with copilot, some tuning has been required to provide better reviews but the overall feedback has been positive. There is a lot of configuration available for this tool and one of the most interesting uses of this tool comes from agent-sandbox.
AI pull request tools can be a quality gate. Contributors can at least get a quick spot check review without waiting for a maintainer. Agent-sandbox has added a label on PRs to reflect that there is still a need to resolve some of the comments from AI tools.
Next steps
The reality is that leveraging AI in open source projects is an area of active exploration. The community could use your help in tuning reviews tools, evaluating tools or evaluating emerging technologies in the AI space.
Some areas we are exploring more:
- The use of AI skills to reduce maintainer burnout.
- AI assisted triage of failing tests.
- Skills to aid the operational aspects of Kubernetes.
Introducing the Cluster API plugin for Headlamp
Headlamp is an open-source, extensible Kubernetes SIG UI project designed to let you explore, manage, and debug cluster resources directly from a browser.
Cluster API (CAPI) is a Kubernetes sub-project that brings declarative, Kubernetes-style APIs to cluster lifecycle management. It lets platform teams provision, upgrade, and manage the lifecycle of Kubernetes clusters using standard Kubernetes objects stored and reconciled in a management cluster.
Managing Cluster API resources has historically required raw kubectl commands and
deep familiarity with ownership hierarchies. The Headlamp Cluster API plugin brings
visual clarity, faster debugging, and simplified operations for platform teams,
directly inside Headlamp.
What this plugin provides
The Cluster API plugin adds a dedicated Cluster API section to Headlamp and brings full visibility into core CAPI resources through consistent list and detail views.
| Feature | Description |
|---|---|
| Cluster overview | View clusters with live control plane and worker replica status. |
| Machine visibility | Inspect MachineDeployments, MachineSets, Machines, and MachinePools with status and conditions. |
| Cluster API dashboard | Get a centralized view of Cluster API resource health, active condition issues, provider information, and remediation guidance. |
| Control plane monitoring | Track KubeadmControlPlane replicas, versions, and associated Machines. |
| Scale from the UI | Scale MachineDeployments and MachineSets directly from Headlamp. |
| Owned resource hierarchy | Trace relationships between clusters, deployments, sets, and machines. |
| KubeadmConfig inspection | View bootstrap configs, files, kubelet args, and join/init settings. |
| Topology awareness | Automatically detect and label ClusterClass-managed resources. |
| Map view | Visualize Cluster, Control Plane, and Worker relationships. |
| Dynamic API versioning | Supports both v1beta1 and v1beta2 Cluster API versions. |
| Prometheus metrics | View live metrics from the Headlamp Prometheus plugin inline on Cluster API resource detail pages. |
A tour of the plugin
The Headlamp Cluster API plugin brings core Cluster API resources into a consistent, visual interface inside Headlamp. Here are some of the key views included in the first release.
Cluster API dashboard
The dashboard provides a centralized view of Cluster API resources and their health across a management cluster.
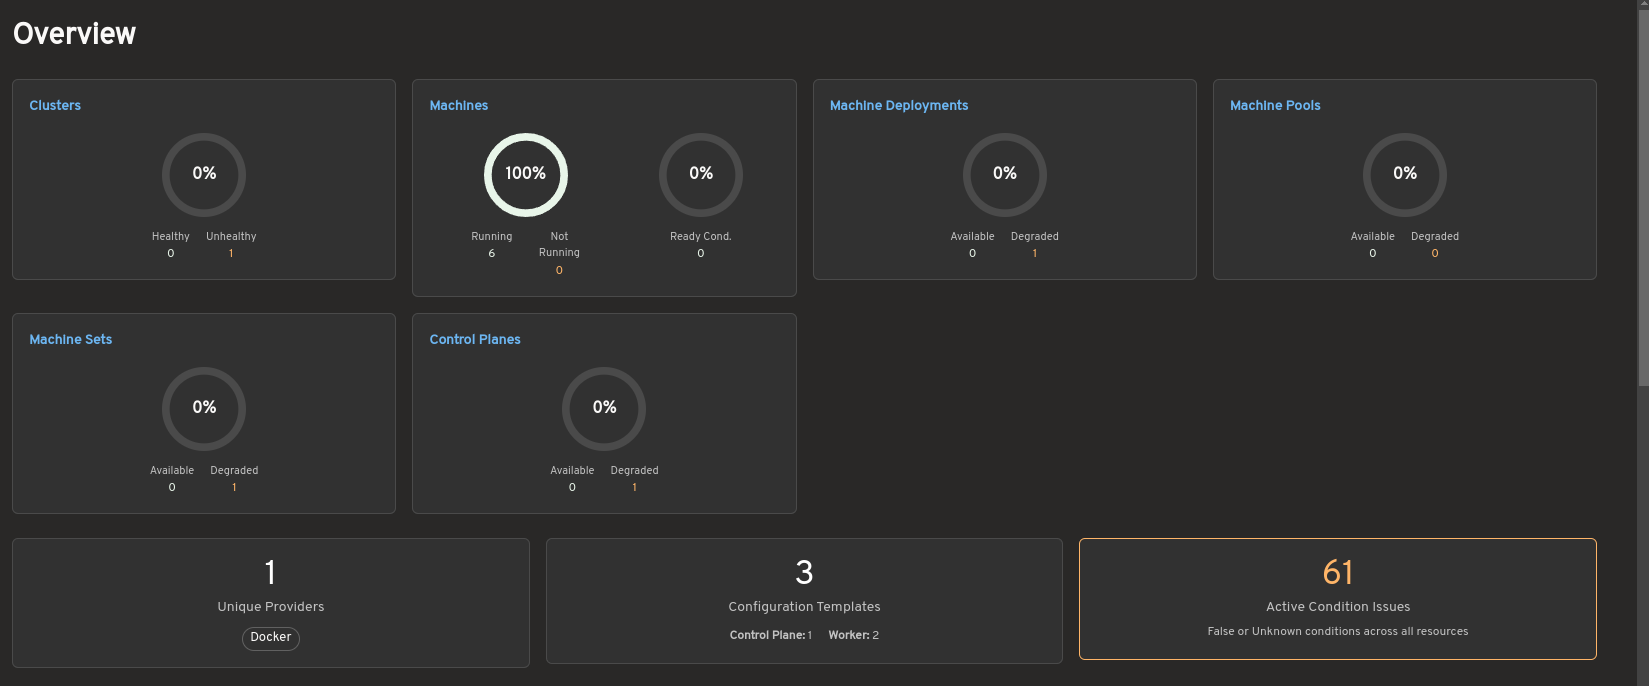
The overview summarizes the status of clusters, Machines, MachineDeployments, MachinePools, MachineSets, and control planes. It also highlights active condition issues, provider information, and configuration template counts to help operators quickly identify degraded or unhealthy resources.
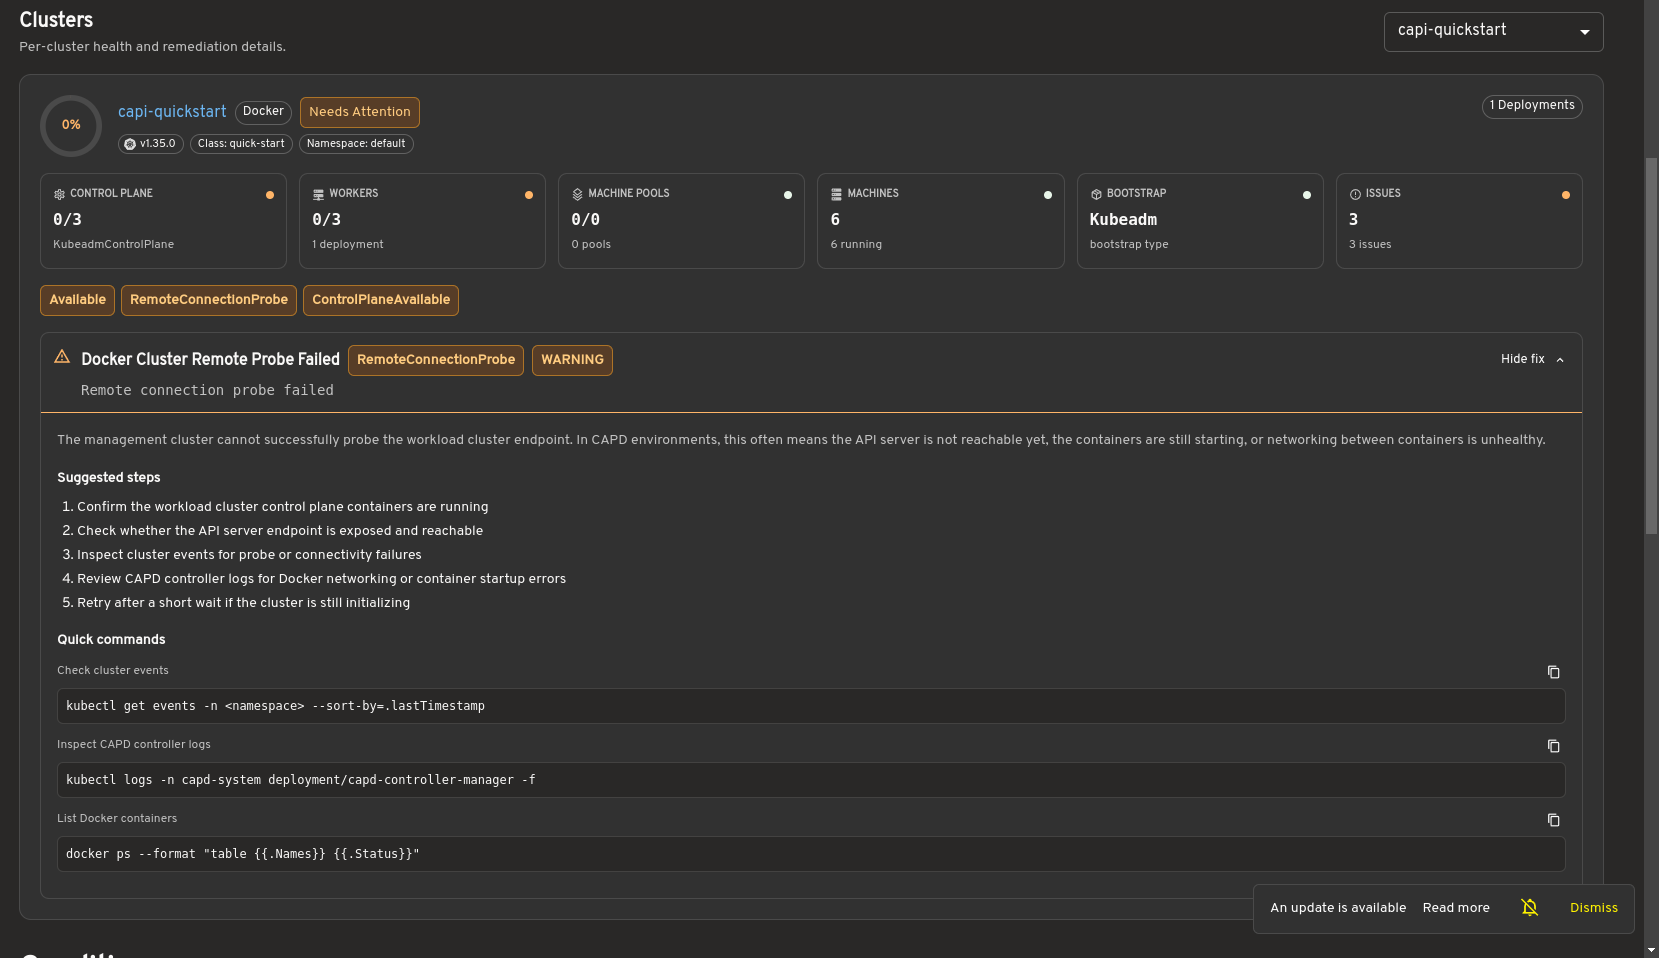
Selecting a cluster opens a detailed health view showing control plane and worker status, machine information, infrastructure details, and resource conditions. When issues are detected, the dashboard provides remediation guidance and diagnostic commands to assist with troubleshooting.
Bring full Cluster API visibility into Headlamp
The cluster list view shows all Cluster resources in the management cluster, including control plane and worker replica status. This gives you an at-a-glance understanding of overall cluster health.

The cluster detail view provides resource status, conditions, infrastructure references, control plane references, and related Machines on a single page.
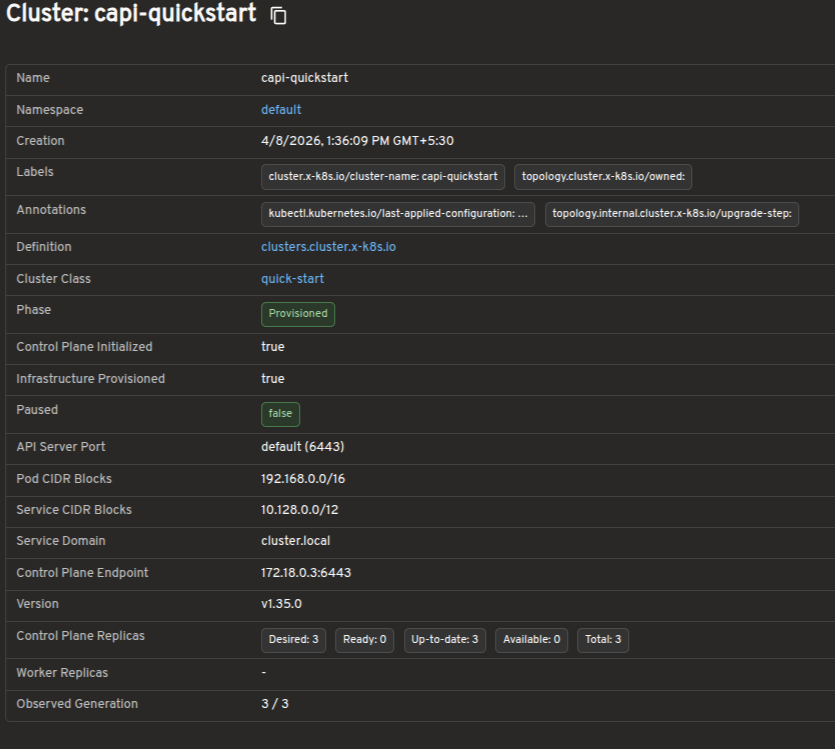
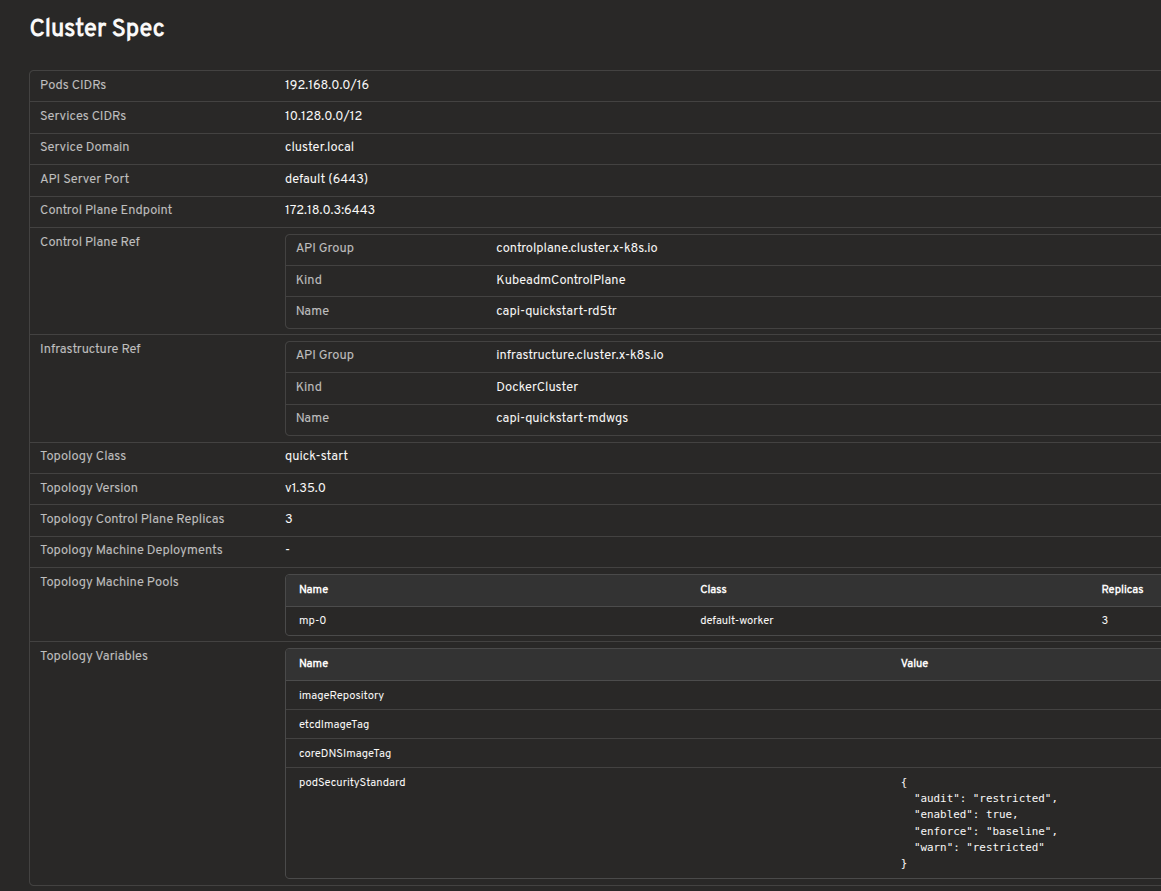
Explore Cluster API resources in a visual interface
Dedicated views are available for MachineDeployments, MachineSets, Machines, and MachinePools. These pages surface replica counts, ownership relationships, provider IDs, versions, and conditions to support day-to-day operations and debugging.
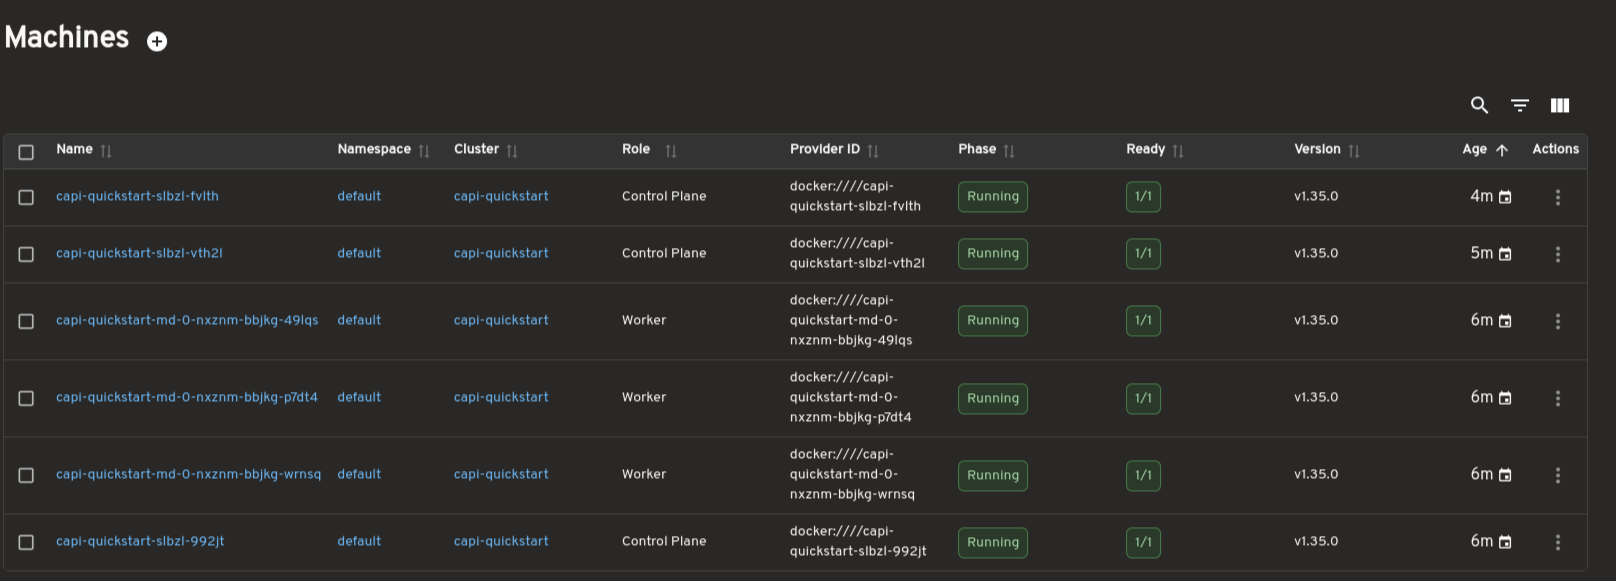
Scale workloads directly from Headlamp
MachineDeployments and MachineSets include a built-in Scale action, allowing you to adjust replica counts directly from Headlamp without using terminal commands.
For topology-managed clusters, the plugin also indicates when scaling should be performed at the Cluster level.
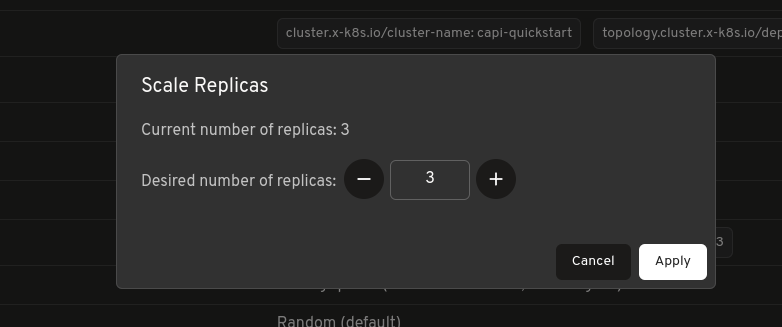
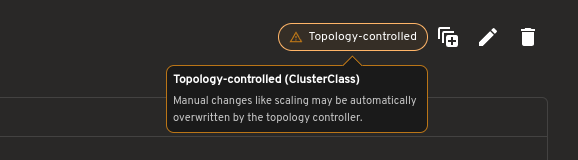
Inspect bootstrap configuration without raw YAML
Bootstrap configurations can be viewed in a structured format, including inline files, kubelet arguments, extra volumes, and join or init settings. This removes the need to inspect raw YAML or secrets manually.
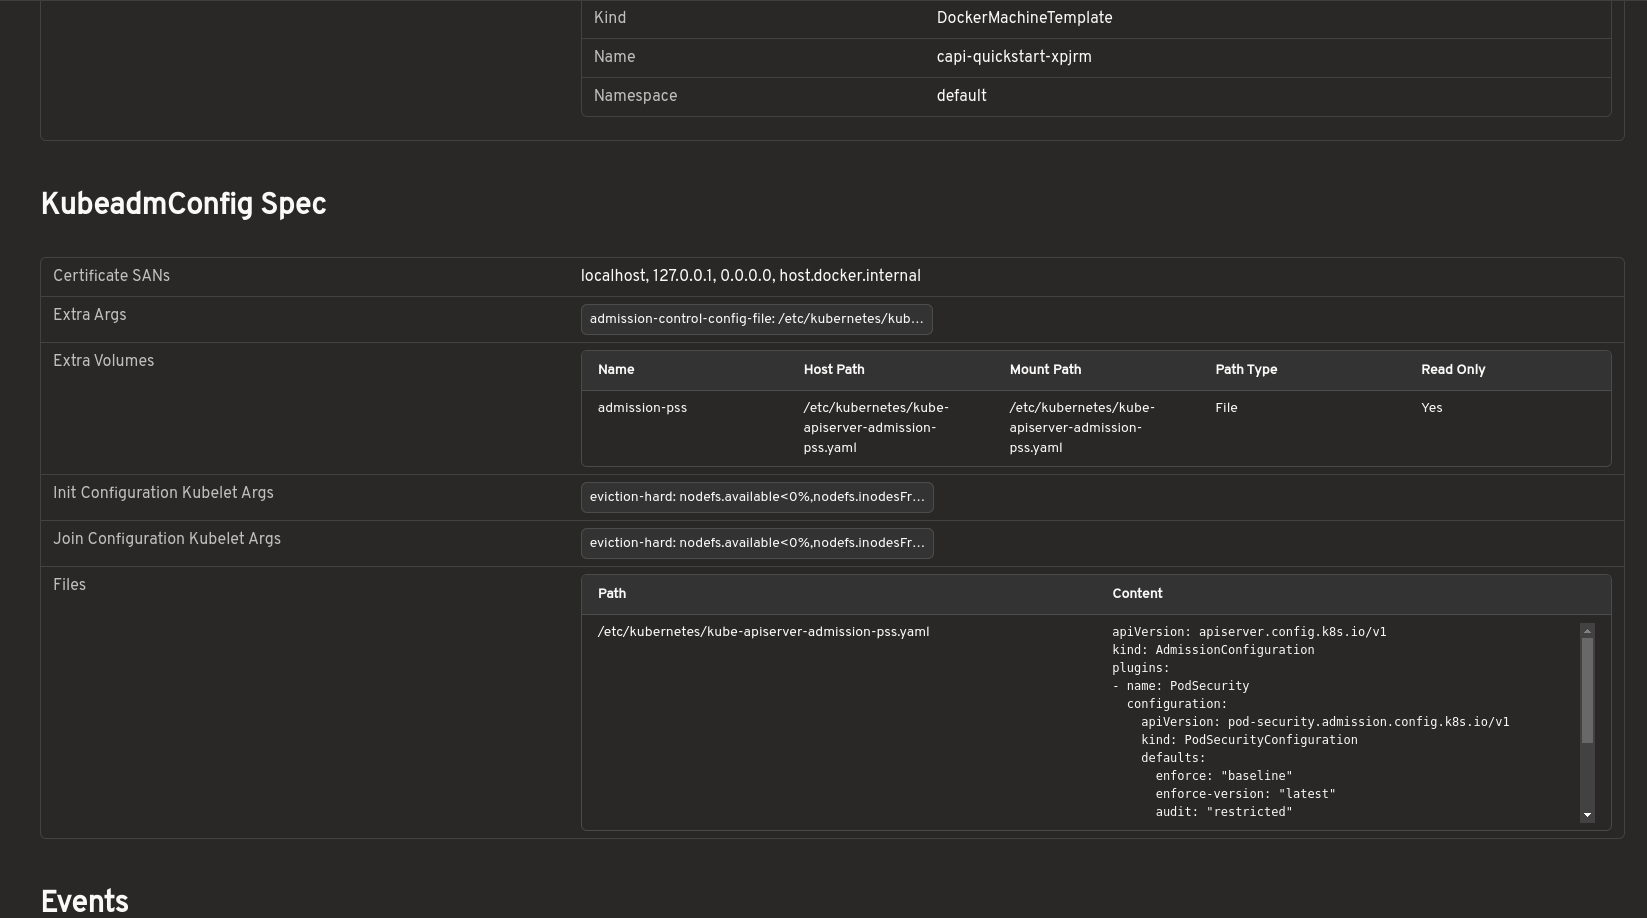
Visualize cluster relationships with map view
A visual map view displays the relationships between Cluster, control plane, and worker resources. It offers a faster way to understand ownership hierarchies and overall cluster structure.
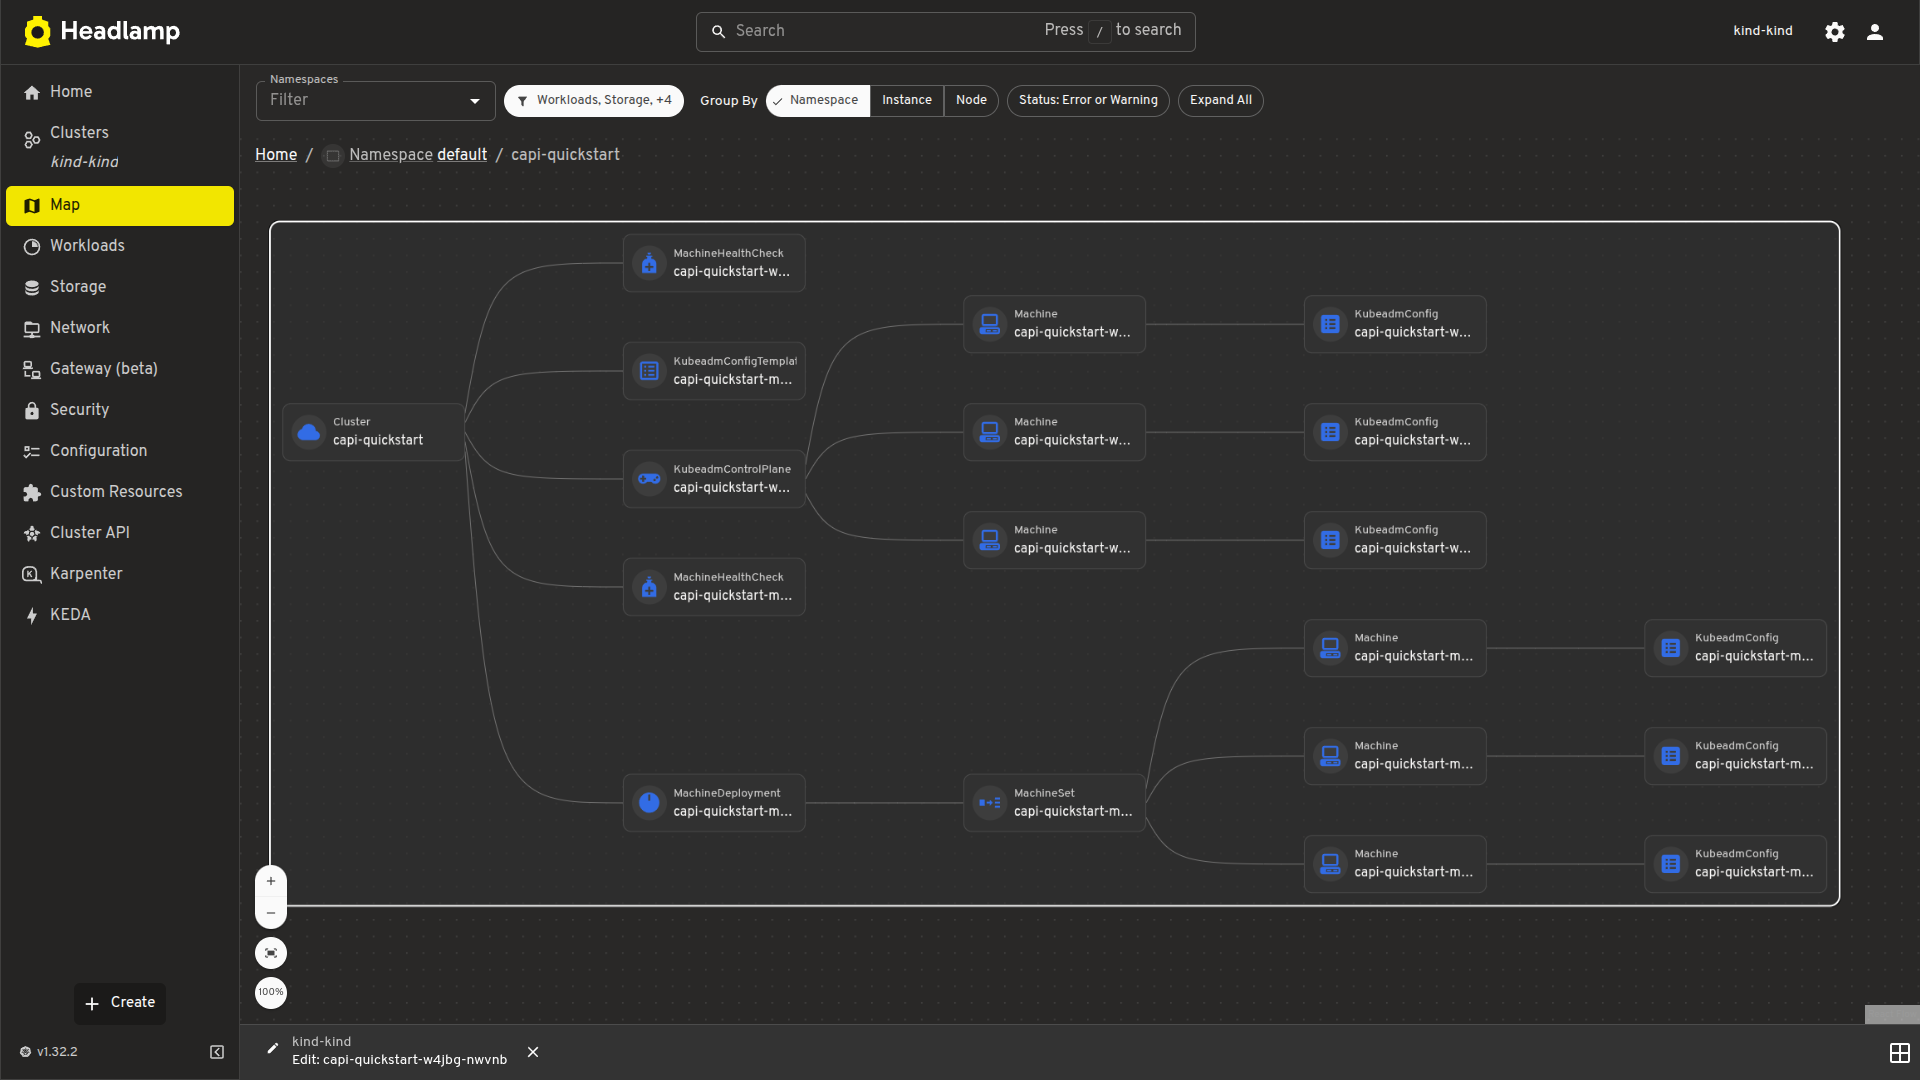
Prometheus metrics integration
The Cluster API plugin integrates with the Headlamp Prometheus plugin to surface metrics directly inside Cluster API resource detail pages.
When the Prometheus plugin is installed and configured, metrics are embedded inline on the detail pages for Clusters, MachineDeployments, MachineSets, and Machines. You can view resource health and performance data alongside status conditions and ownership relationships, without switching to a separate dashboard.
This makes it easier to correlate infrastructure state with live metrics during debugging or day-to-day cluster operations, all from within Headlamp.
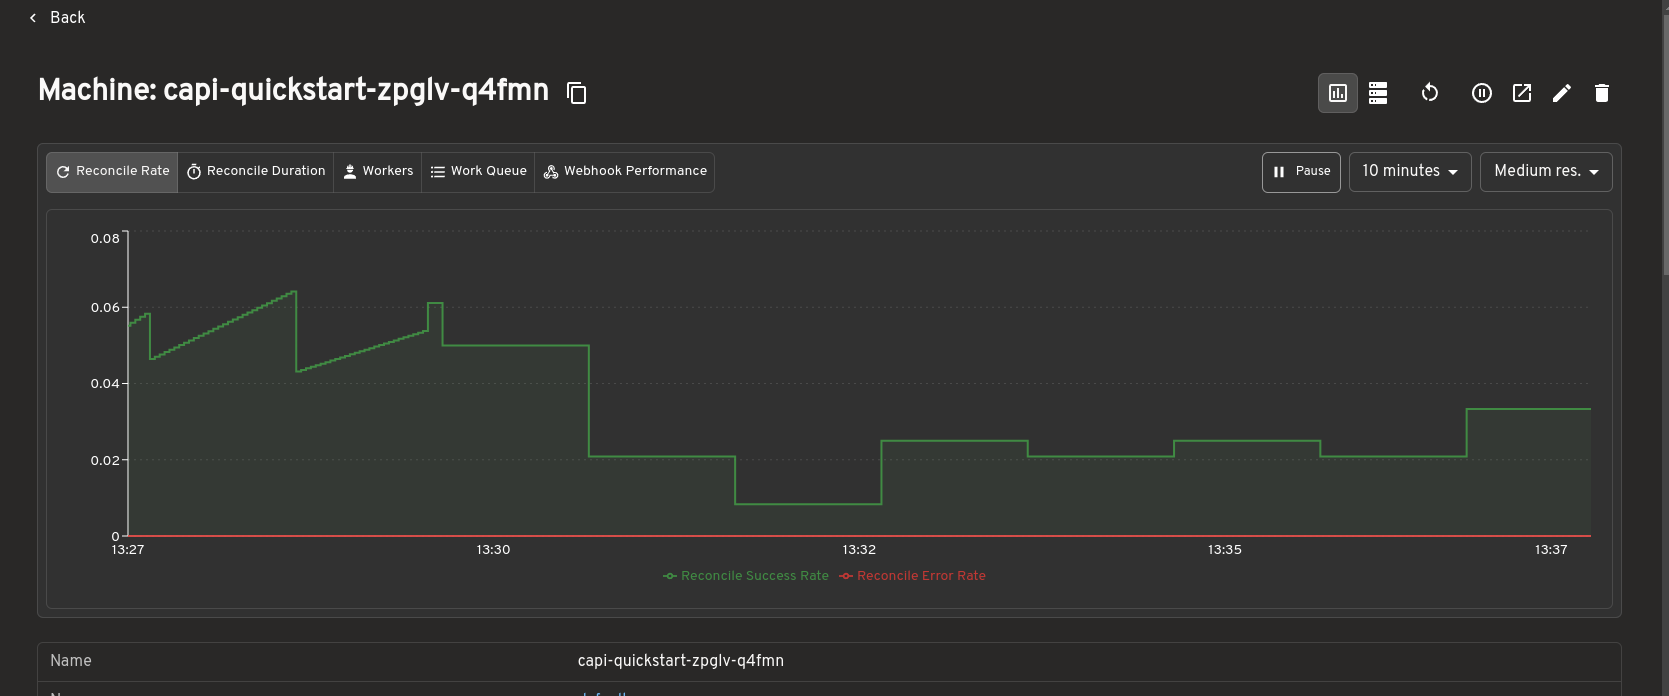
How to use
See the
plugins/cluster-api/README.md
for installation and usage instructions.
Developed during LFX Mentorship
This plugin was developed as part of the CNCF LFX Mentorship program under the Headlamp project. The mentorship provided an opportunity to work closely with the Headlamp community while building features to improve the Cluster API management experience.
The focus was not only on implementing features but also on understanding real-world usability challenges around Cluster API operations. Discussions with mentors and community members helped shape the plugin's direction, improve the user experience, and prioritize features most useful to platform teams.
The mentorship also provided valuable experience contributing to large open-source projects: collaborating with maintainers, participating in design discussions, handling release feedback, and iterating on features based on community input.
Work on the plugin is ongoing, with additional improvements and features planned beyond the initial Alpha release.
Feedback and questions
This is an Alpha release, and community feedback directly shapes what comes next.
- Bug reports: Open an issue
- Feature requests: Start a discussion
- Contributing: PRs are welcome
- Kubernetes Slack: Join the #headlamp channel for questions and discussion
Inspect Volcano workloads faster with Headlamp
Volcano is a cloud native batch scheduler for Kubernetes, built for high-performance computing, AI/ML, and other batch workloads.
Headlamp is an extensible Kubernetes web UI. With its plugin system, Headlamp can surface APIs and workflows beyond the built-in Kubernetes resources. The Volcano plugin brings core Volcano resources into Headlamp so you can inspect workload state, queue behavior, and gang scheduling details in one place.
Kubernetes was originally designed around long-running services, where applications are expected to start and remain available over time. Batch, AI/ML, and HPC workloads often behave differently: jobs arrive dynamically, compete for limited resources, and may need multiple workers to start together before useful work can begin.
Volcano extends Kubernetes with concepts such as queues, priorities, quotas, and gang scheduling. Instead of treating every Pod independently, Volcano schedules workloads with awareness of the job as a whole and the resources it needs to make progress.
To make these workloads easier to operate and troubleshoot, the Volcano plugin brings that scheduling context directly into Headlamp.
Watch this short walkthrough to see the Volcano plugin in Headlamp:
Visual context helps teams understand Volcano jobs, queues, and PodGroups faster
Working with Volcano often means moving across several related resources while trying to understand a batch workload. You might start with a Job, then look at the related PodGroup, inspect the Pods behind it, check the Queue, and finally return to the Job again. All of that is possible with CLI tools like kubectl and the Volcano CLI, but it can become fragmented very quickly.
The Volcano plugin for Headlamp makes that workflow easier by bringing the key resources together in a single UI. Instead of reconstructing relationships manually, you can move directly between Jobs, Queues, PodGroups, Pods, and events from the same interface.
Volcano introduces its own resources on top of core Kubernetes objects:
- Job
- Describes a batch workload as a set of tasks and the Pods they create.
- Queue
- Divides cluster capacity between teams or workloads using quotas and priorities.
- PodGroup
- Ties a group of Pods together so the scheduler can treat them as a single unit for gang scheduling.
The plugin surfaces all three resource types directly in Headlamp, providing dedicated list and detail views for each of them under a Volcano section in the sidebar.
Jobs: workload status, actions, and logs
The Job view is the center of the plugin experience. In the list view, you can quickly understand the basics of a workload, including its status, queue, running versus minimum-available values, task count, and age.
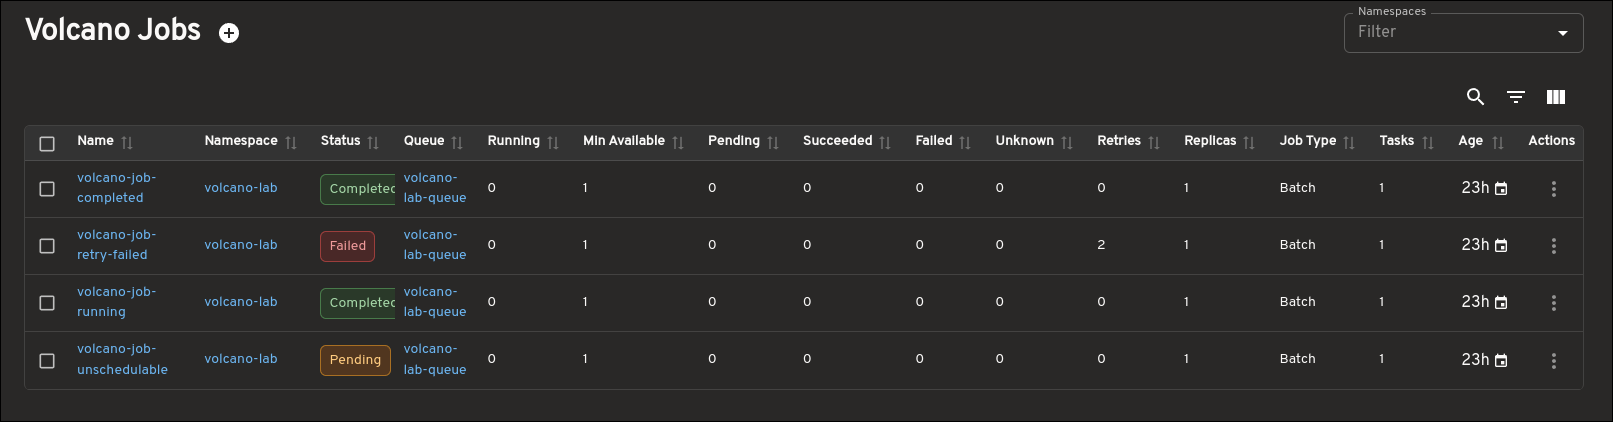
The detail view goes further by surfacing the information you usually need while debugging a Job: task details, Pod status, related Queue and PodGroup links, conditions, events, and more. Instead of forcing you to jump between several CLI commands, the plugin keeps that context together in a single page.
The Job page also adds supported lifecycle actions for appropriate states, including Suspend and Resume, so you can act on a Job directly from the UI.
Another useful addition is direct Job logs access. You can open logs for Pods created by a Volcano Job without leaving the Job detail page. The logs viewer supports both single-Pod and all-Pods views, along with container selection and common log controls such as line count, previous logs, timestamps, and follow.
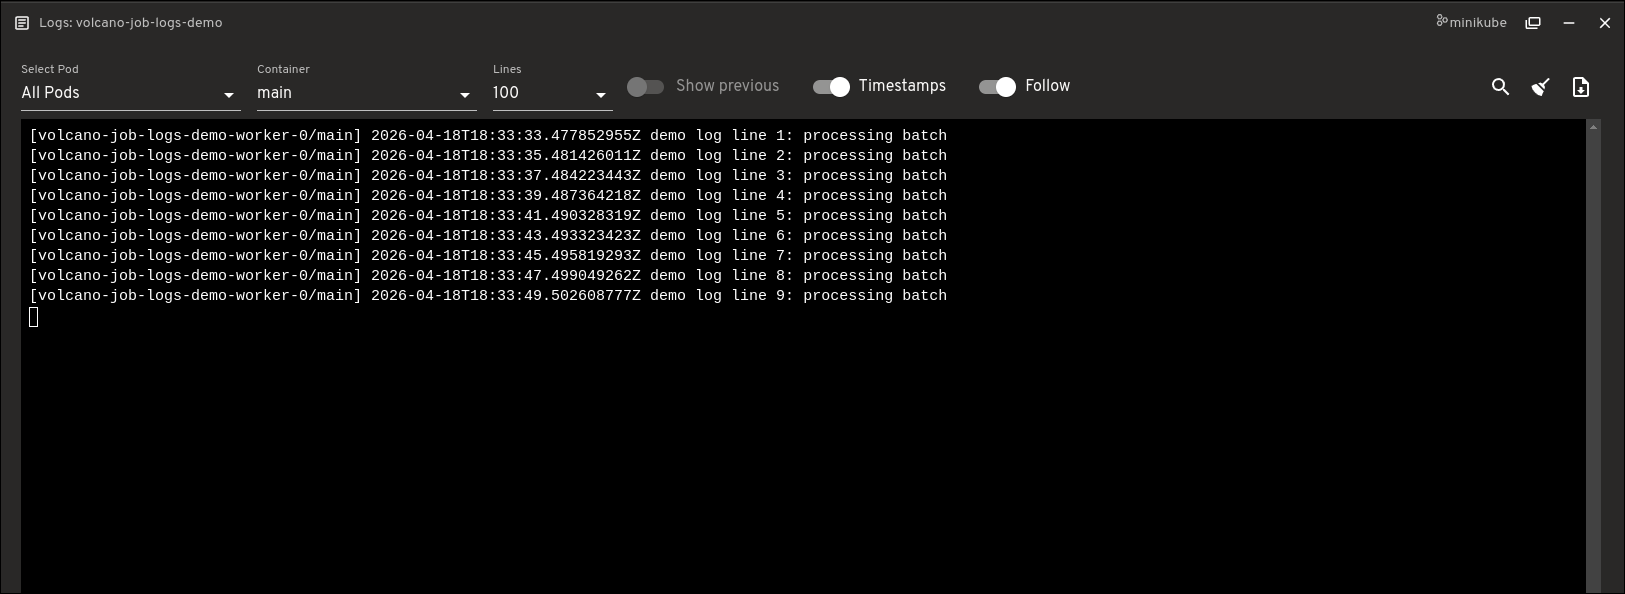
Queues: scheduling capacity and resource context
The Queue view provides much more than a small set of top-level fields. It helps you understand how resources are being allocated and constrained by surfacing capacity, allocated resources, deserved and guaranteed resources, reservation details, child queues, and more.
This makes the Queue page much more useful when trying to understand how resources are being shared and limited across queues.
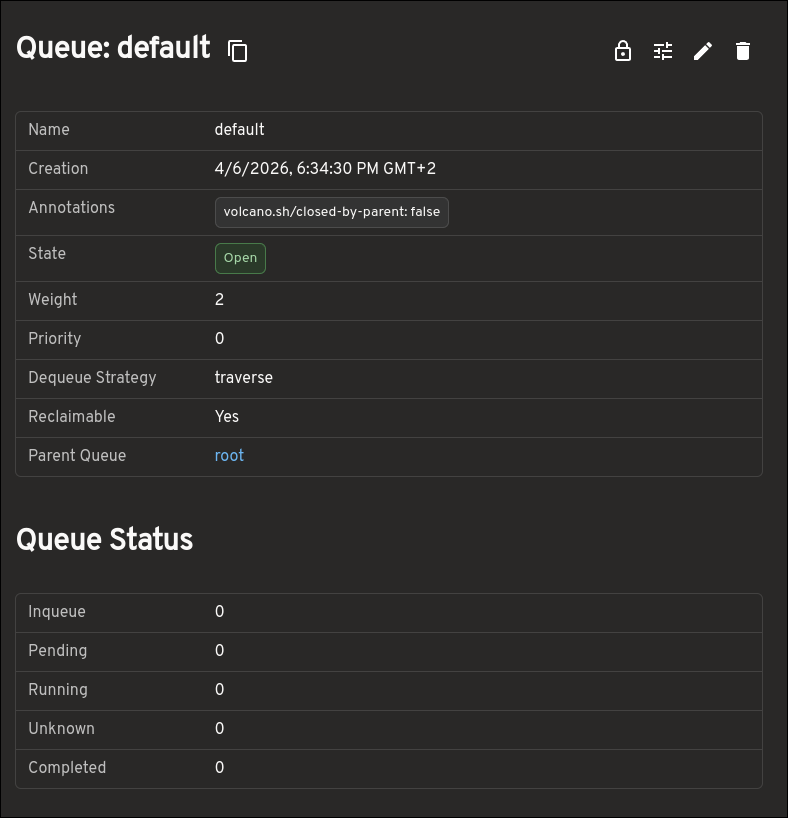
PodGroups: gang scheduling state and blockers
PodGroups are central to understanding gang scheduling in Volcano, and the plugin makes that state easier to inspect. The PodGroup view highlights progress, conditions, minimum resource requirements, and more.
This also gives you a clearer picture of whether a workload is blocked because it has not yet met the scheduling conditions required to run as a group.
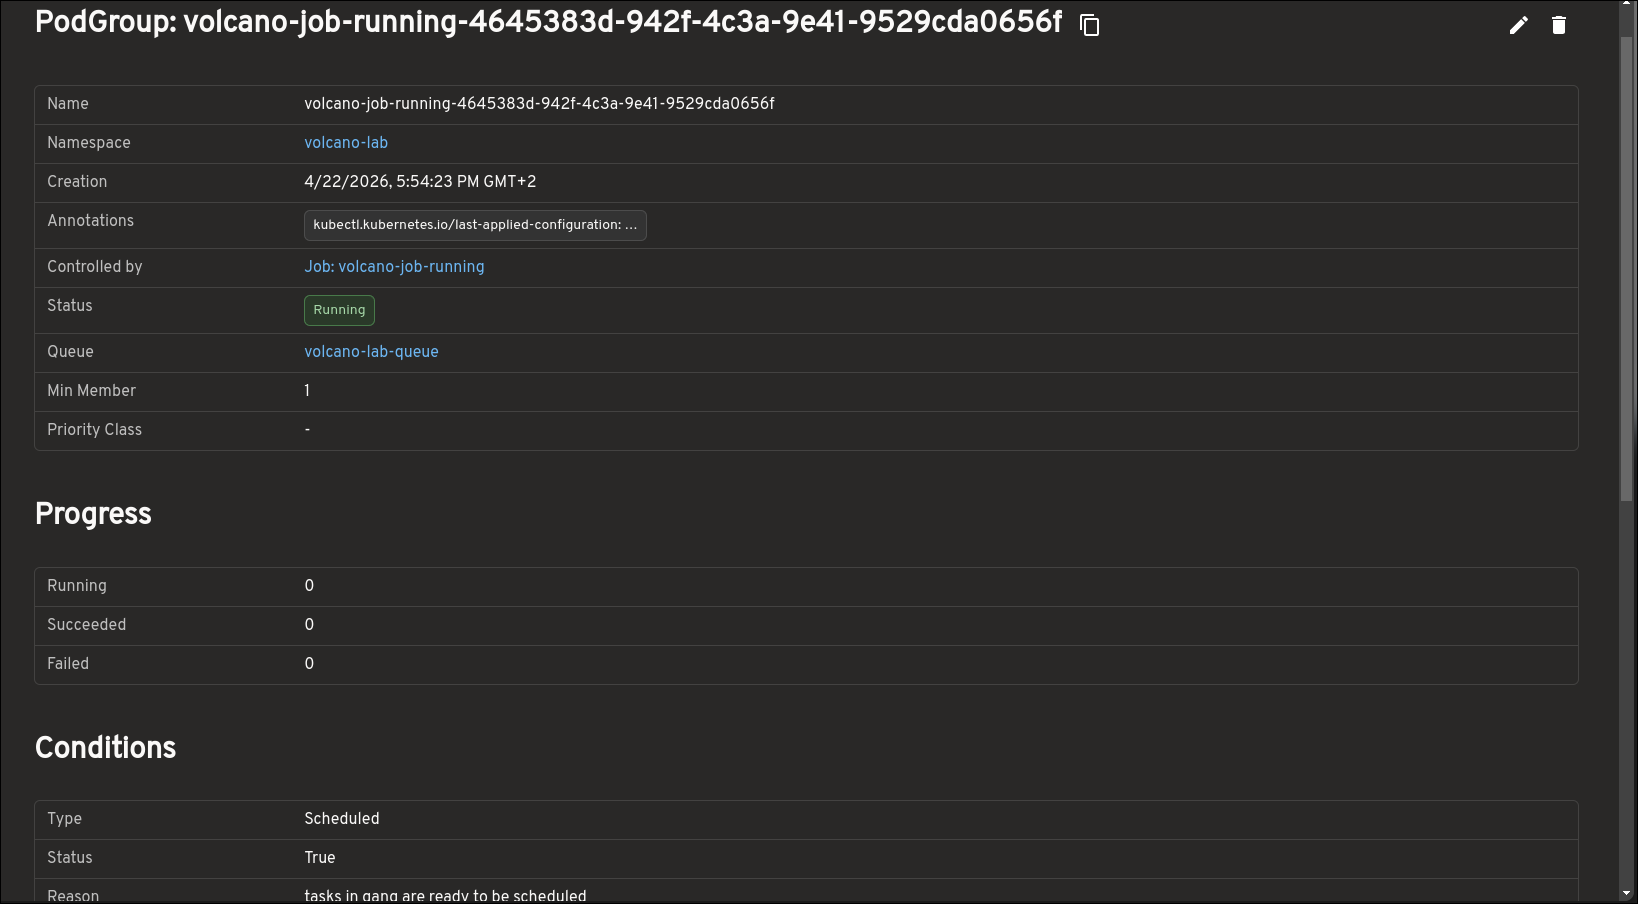
Map view: jobs, queues, PodGroups, and pods in one place
The map view shows how Volcano resources are connected. Instead of inspecting each resource separately, you can see how Jobs, PodGroups, Queues, and Pods relate to one another.
This is especially useful when a workload is pending or not progressing as expected. The map can show the Job, its related PodGroup, the Pods created for the workload, and the Queue context around it. Warning and error states also make it easier to spot resources that need attention.
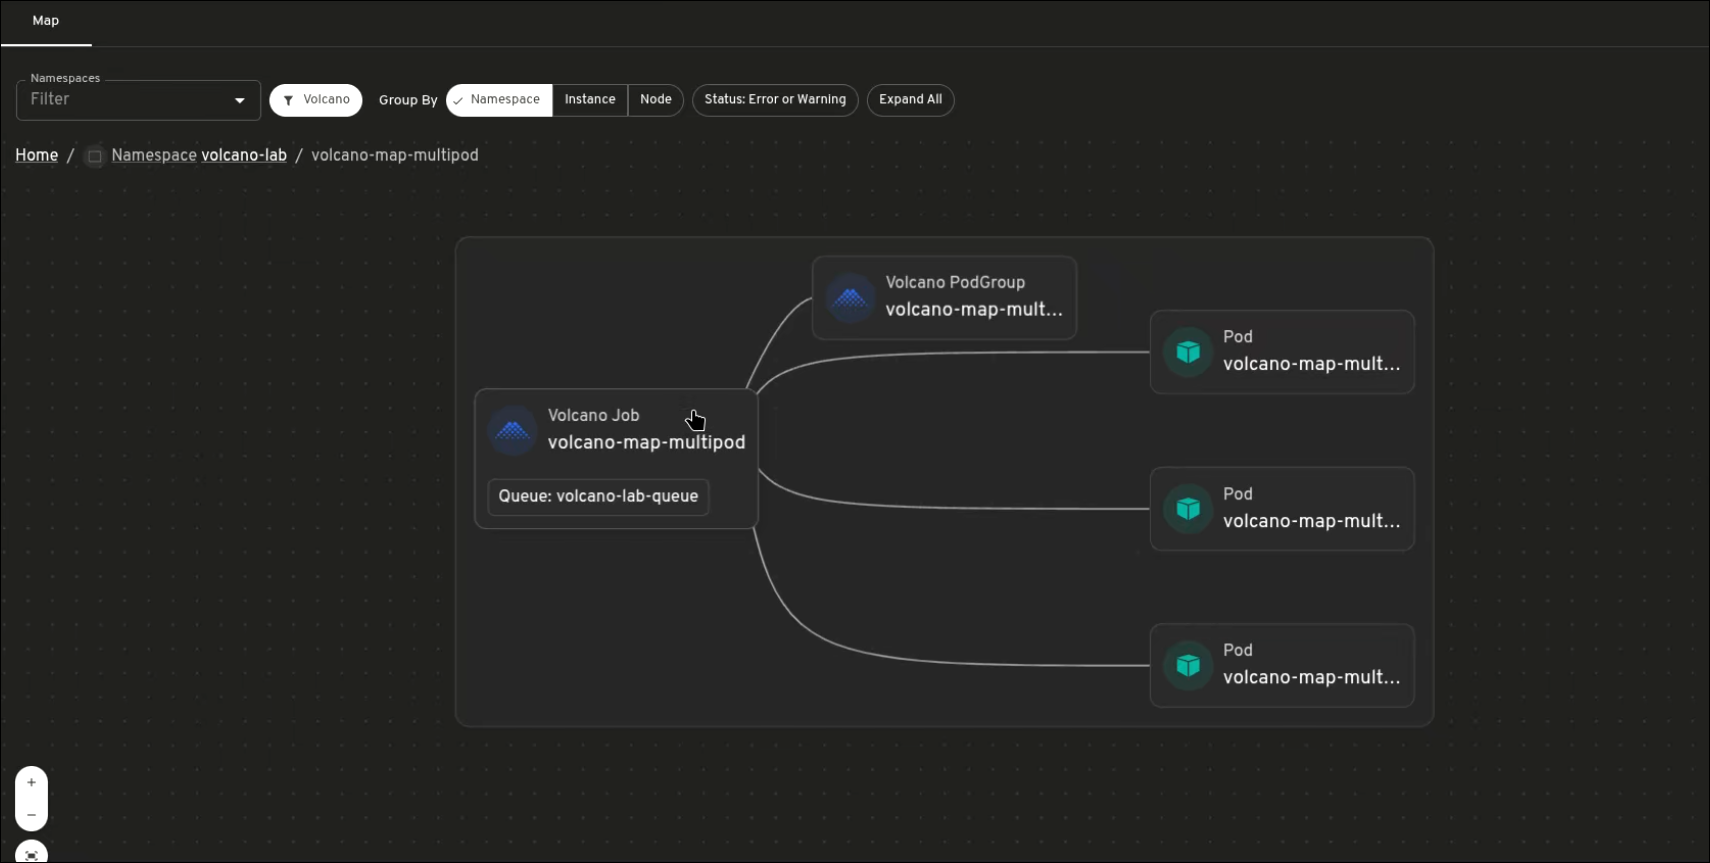
Why use this alongside CLI tools
The plugin is not trying to replace kubectl or the Volcano CLI. Those remain important for automation, scripting, and raw object inspection. What the plugin improves is the interactive troubleshooting experience: discovering related resources more quickly, understanding structured detail pages, and moving from scheduling state to runtime output without switching tools constantly.
What’s next
This work brings the main Volcano workflow into Headlamp, including Jobs, Queues, PodGroups, and the map view. Possible future work includes Prometheus integration, richer scheduling insights, and more workflow-oriented visibility across Volcano workloads.
Try it and share feedback
To try the plugin:
- Install Headlamp.
- Open the Plugin Catalog from the Headlamp UI.
- Search for Volcano.
- Install the Volcano plugin.
- Connect Headlamp to a Kubernetes cluster where Volcano is already installed.
If you have ideas, feature requests, or bug reports, open an issue in the Headlamp plugins repository. Feedback from real Volcano users will help shape what comes next.
See your serverless: introducing the Headlamp plugin for Knative
Headlamp is an open-source, extensible Kubernetes SIG UI project designed to let you explore, manage, and debug cluster resources.
Knative brings serverless workloads to Kubernetes, handling traffic routing, autoscaling, and revision management so teams can deploy and iterate without fighting infrastructure. But operating Knative workloads day-to-day can be difficult, there's still a lot of jumping between the kn CLI, kubectl, and the Kubernetes UI to get a full picture of what's running.
We built the Headlamp Knative plugin to bridge that very gap, allowing operators to inspect, understand and act on their workloads all from a single place. This plugin was built as part of the LFX mentorship. Here's a tour of what we shipped.
Here is a short walkthrough of the Knative plugin for Headlamp:
Integrating Knative resources with Headlamp's map view
Headlamp's resource mapping works for Knative CRDs too. You can see how KServices, Revisions, and DomainMappings relate to each other in a single graph view.
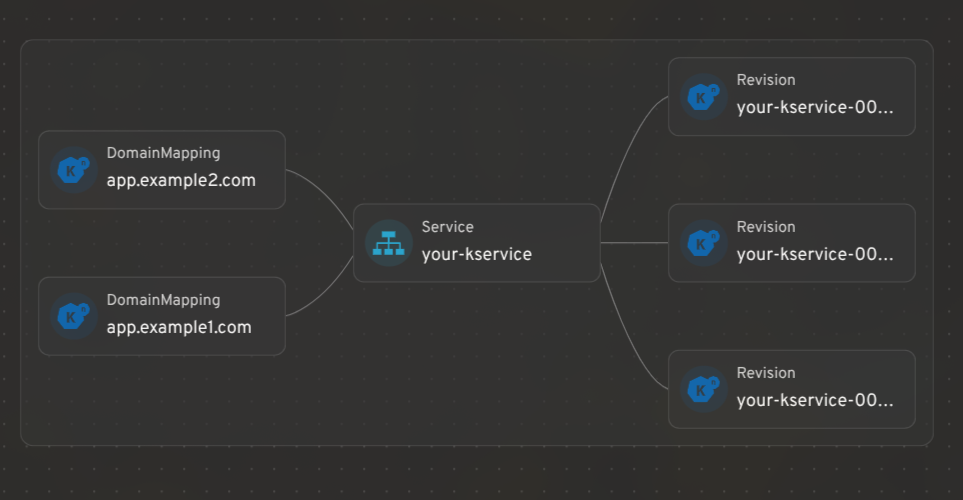
KService management: edit traffic splits, restart pods, and view logs
A KService is the top-level resource in Knative: it manages the lifecycle of Routes, Configurations, Revisions, and everything needed to run and expose your application.
The plugin gives KServices a full detail view with an Edit Mode toggle for making live changes to traffic splits, autoscaling annotations, and more. Common actions like viewing the YAML, opening logs, triggering a redeploy, or restarting backing pods are surfaced in the header, gated by your current RBAC permissions.
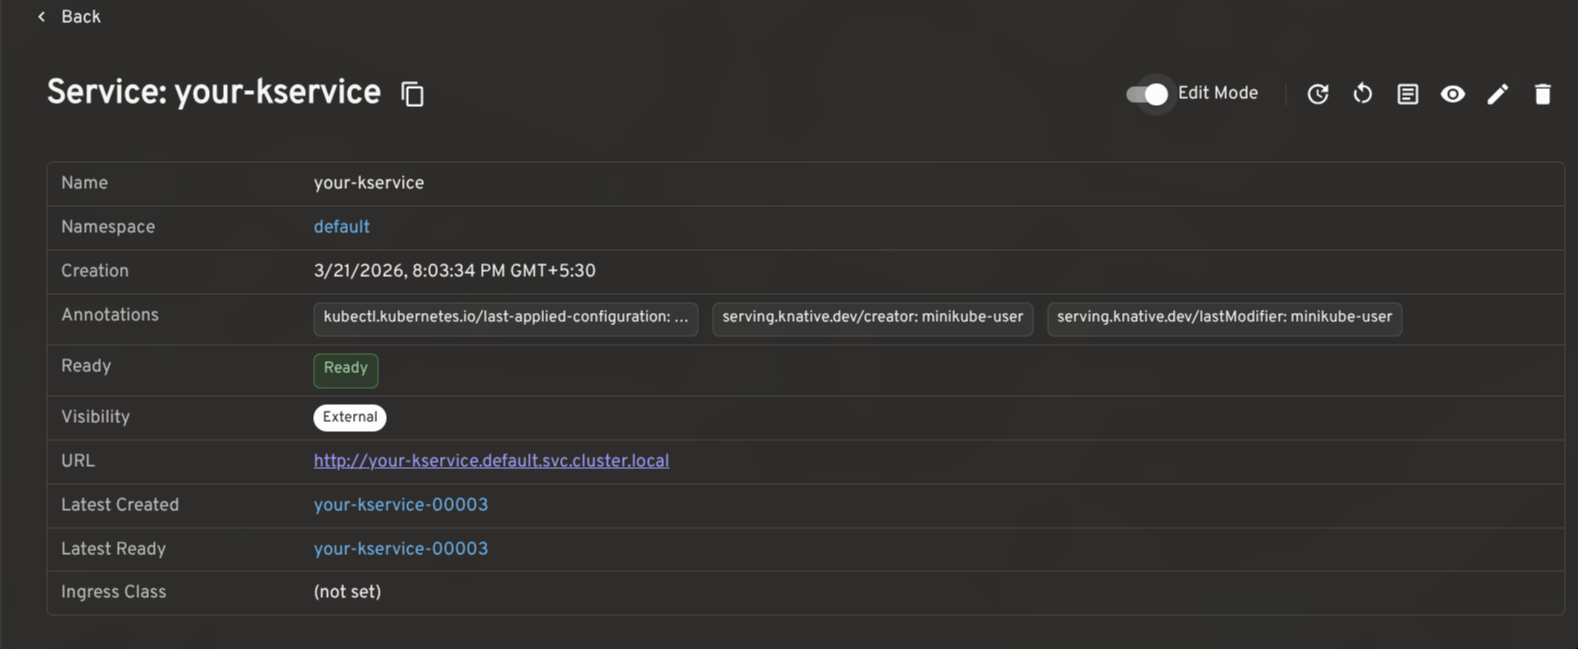
Traffic splitting: route across revisions for gradual rollouts and testing
Knative makes it possible to route traffic across multiple Revisions of the same service. This is useful for canary releases, gradual rollouts, tagged preview URLs, and A/B testing.
The plugin shows the traffic assigned to each Revision, the latest ready Revision, readiness status, age, and configured tags. In edit mode, you can adjust percentages and tags inline. The plugin validates that traffic sums to 100% and that tags are unique before saving. Tagged routes with a reported URL render as clickable links.
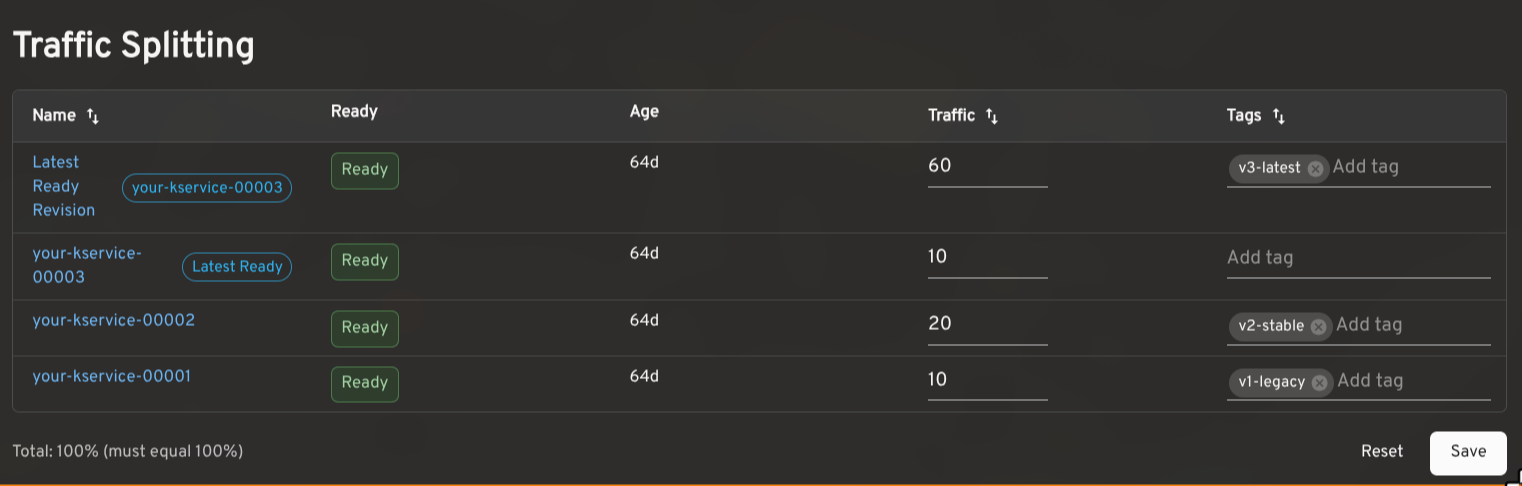
Autoscaling configuration: view effective settings and cluster defaults
Knative's autoscaler supports a range of settings: concurrency targets, target utilization, RPS targets, min/max scale, initial scale, stable window, scale-down delay, and more. The effective value for any workload is a combination of KService-level annotations and cluster-wide ConfigMaps.
The plugin reads config-autoscaler and config-defaults and shows the effective configuration per KService in context, so you can see at a glance whether a setting is explicitly configured or falling back to the cluster default.
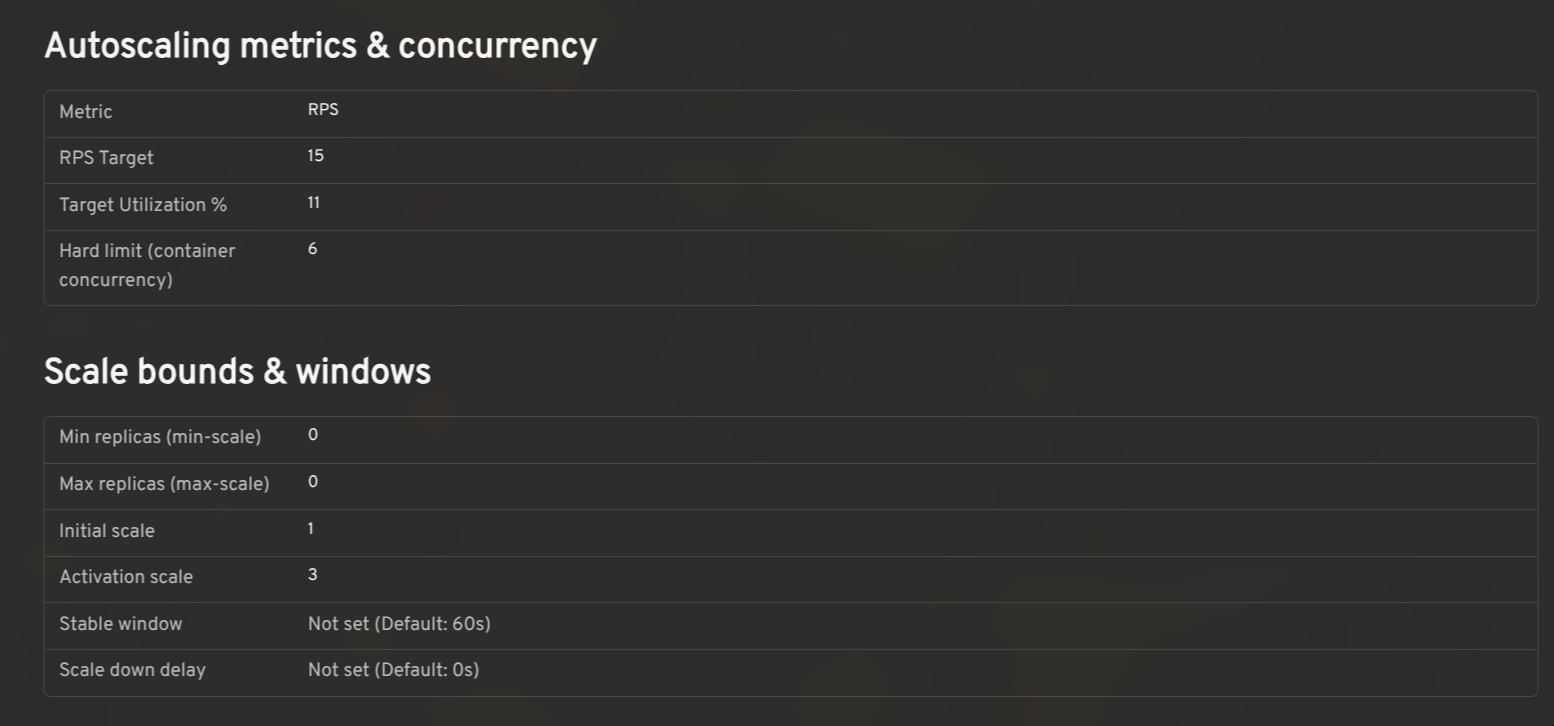
Prometheus metrics: monitor request rates, latency, and resource utilization
When paired with the Prometheus plugin for Headlamp, the plugin renders request rate, latency, and resource utilization graphs on KService and Revision detail pages. The per-revision request rate breakdown is particularly useful when validating a traffic split in progress.
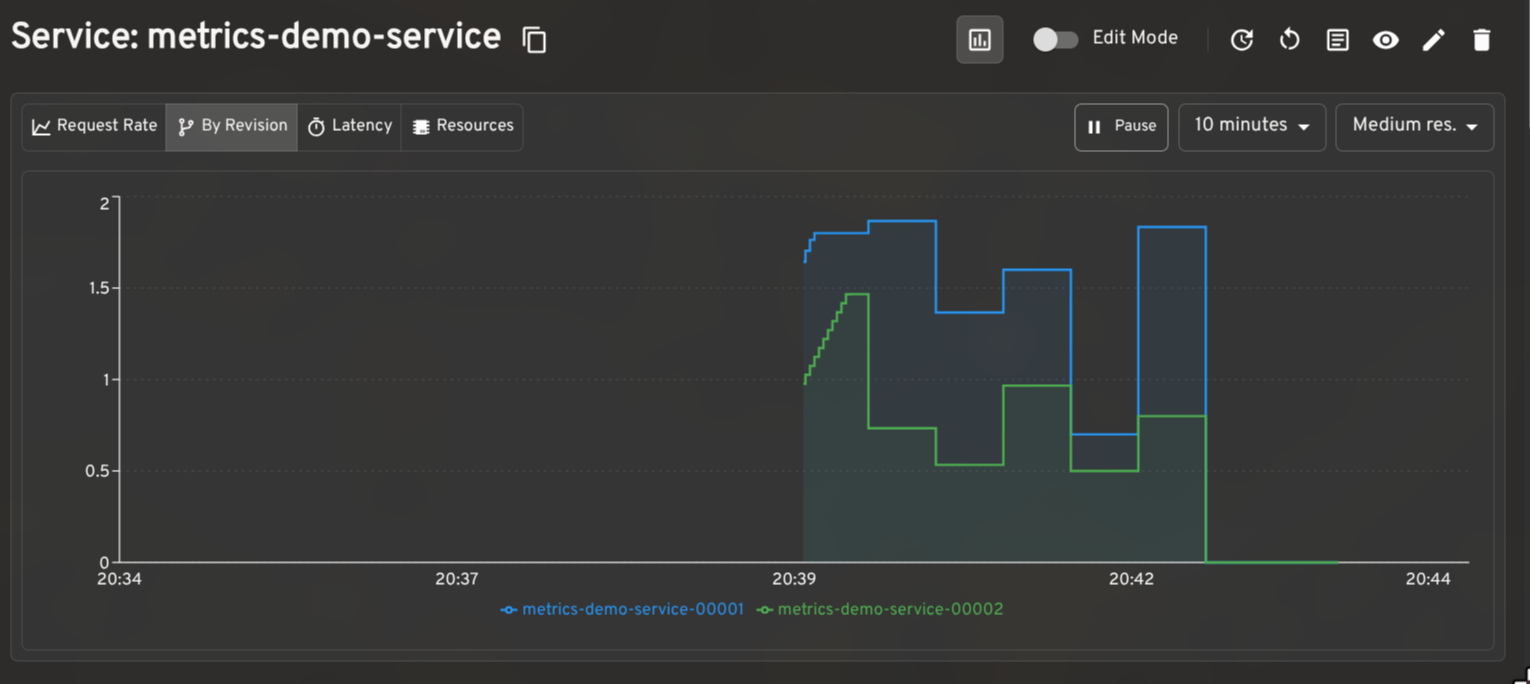
Dashboard for other CRDs
The plugin also includes list and detail views for Revisions, DomainMappings, ClusterDomainClaims, and a cluster-level Networking overview (reading config-network and config-gateway to surface the effective ingress class, gateway settings, and backing services). These give operators a complete picture of Knative's state without leaving Headlamp.
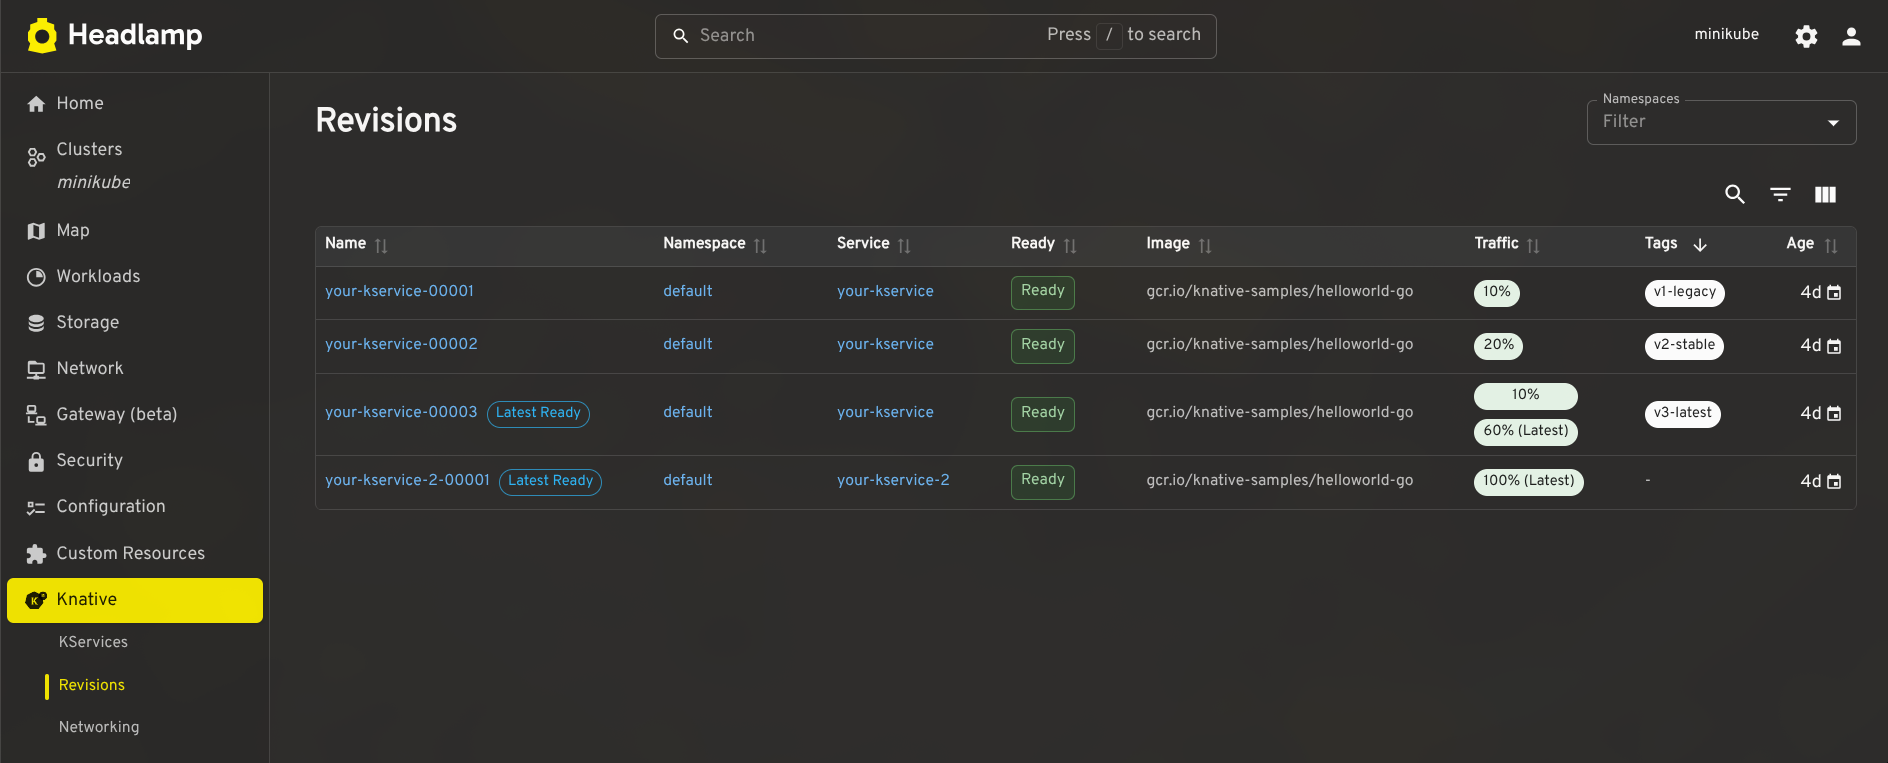
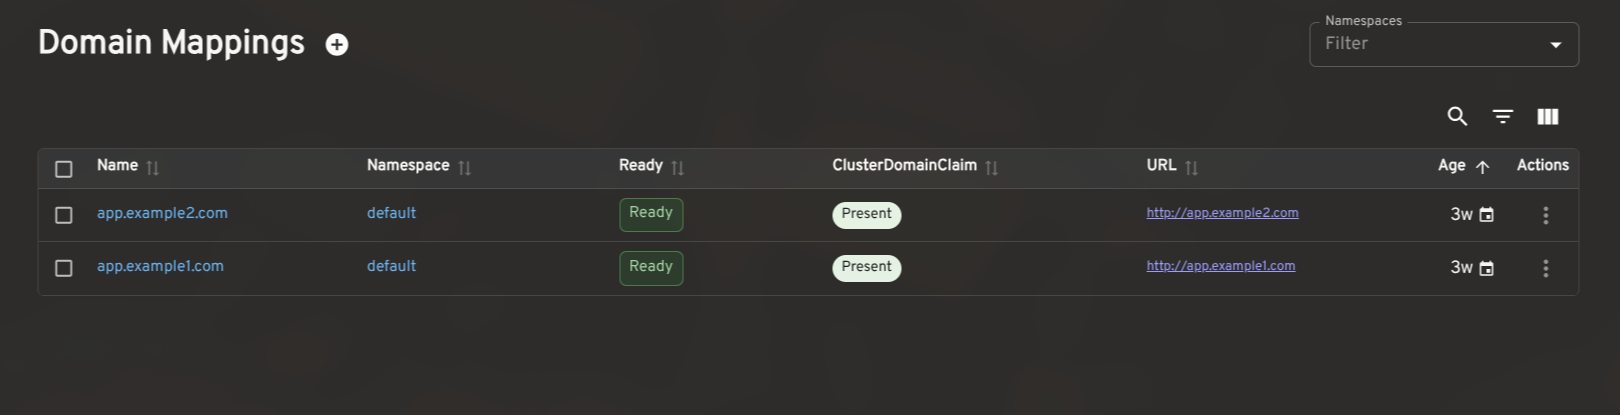
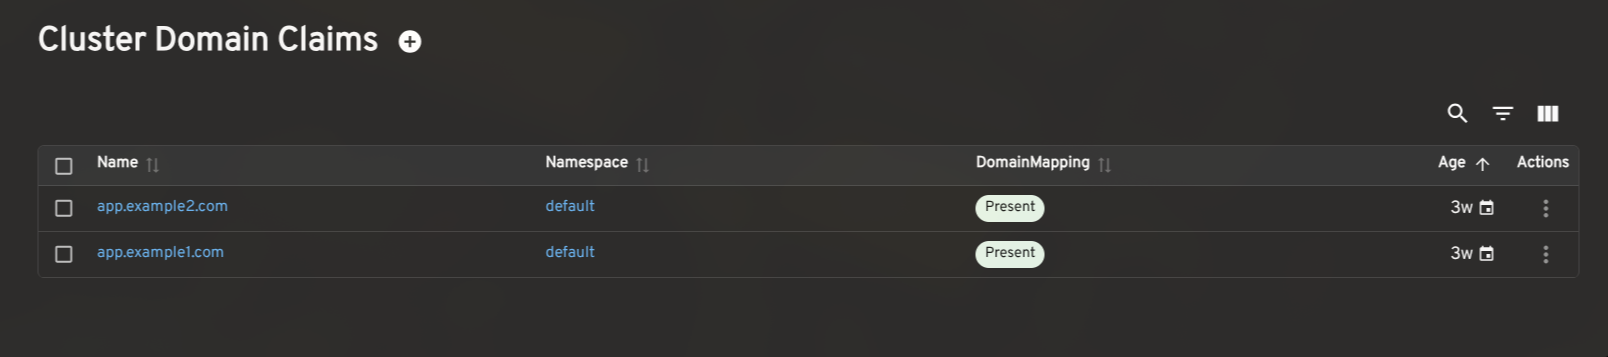
How to install the Knative plugin in Headlamp
- Make sure Knative is installed in your cluster.
- In Headlamp Desktop, open the Plugin Catalog, search for Knative, and click Install.
- Reload Headlamp, a new Knative entry will appear in the sidebar.
For development or source-level setup, see the Knative plugin README. The current release is 0.3.0-beta.
Share your feedback
We'd love feedback from Knative operators and users. If you hit a bug or want support for a workflow we haven't covered, please open an issue. You can also find us in the Kubernetes Slack #headlamp channel.
Spotlight on WG Device Management
The rising popularity of AI, Edge, and Telecommunications workloads on Kubernetes has led to new requirements for hardware management. We now need hardware specification beyond CPU time and memory allocations. This includes allocating GPUs, TPUs, network interfaces, and other hardware, sometimes after pod start and occasionally through time-sharing.
Efficiently managing this specialized hardware is the mission of the Device Management Working Group. Their cornerstone project, Dynamic Resource Allocation (DRA), recently graduated to GA, marking a fundamental shift in how the project handles hardware-intensive workloads at scale.
In this spotlight, we sit down with working group chairs Kevin Klues, Patrick Ohly, and John Belamaric to discuss the limitations of the legacy device model, the NP-hard challenges of scheduling, and how they’re building a more programmable, hardware-aware future for Kubernetes.
Introducing Device Management
Natalie Fisher: Can you introduce yourself, your role, and how you got involved in the Device Management Working Group?
Kevin Klues: My name is Kevin Klues. I am a Distinguished Engineer at NVIDIA. I have been a co-chair of the device management working group since its inception at Kubecon EU 2024. I have also been involved with DRA (the working group's primary deliverable) since its inception in 2019 / 2020. I have also been a kubelet maintainer since 2019, with a focus on its device manager, CPU manager, and topology manager subcomponents. The challenges we saw with using these components for workloads that relied on external accelerators (e.g., GPUs) are what triggered us to start working on DRA in the first place.
Patrick Ohly: I am a Principal Engineer at Intel. In Kubernetes, I am a Tech Lead for SIG Testing and SIG Instrumentation and co-chair of the Device Management WG. I was co-chair of the WG Structured Logging and a member of the Steering Committee. Some of my early contributions to Kubernetes include ephemeral CSI volumes and storage capacity tracking, so I had some experience with API design, implementation, and scheduling. We knew that introducing a major new API for accelerators would be hard. Somewhat foolishly, I accepted that challenge in 2020, wrote the initial DRA KEP (now known as “classic DRA”) and implemented most of it, then started over with a second KEP for today’s "structured parameters DRA". Initially, it was an uphill battle to convince maintainers that this work was necessary. It was only around 2023 that interest in DRA picked up, leading to the formation of the working group.
John Belamaric: I am a Senior Staff SWE at Google, and the third co-chair of WG Device Management, also since its inception. I am also a co-chair of SIG Architecture since 2019. As Patrick mentioned, in late 2023, interest in DRA really picked up. The initial implementation, made autoscaling very challenging, and so there was some concern in the community about advancing it to beta. I got involved to try to help address some of those concerns, and the three of us, along with Tim Hockin, worked hard over the next few months to build a consensus around a new design. To facilitate this collaboration, we formed the working group after discussion at KubeCon in Paris in 2024.
The problem and the solution
The working group emerged from a fundamental rethink of how Kubernetes interacts with specialized hardware. At the heart of this evolution is Dynamic Resource Allocation (DRA). Rather than treating devices as simple integers, DRA provides a structured framework that breaks device management into four distinct stages:
- Modeling: Vendors use the ResourceSlice API to advertise the granular capabilities and capacity of their hardware.
- Requesting: Users define their specific hardware needs—such as GPU memory or interconnect requirements—through the
ResourceClaimAPI. - Scheduling: The Kubernetes scheduler uses these APIs to match workload requirements against available hardware intelligently.
- Actuation: Once a match is made, the system handles the "handshake" that prepares and secures the device for the Pod's use.
NF: For readers who may not be familiar, what is the Device Management Working Group, and what problems is it trying to solve?
KK: The Device Management Working Group was chartered to enable simple and efficient configuration, sharing, and allocation of accelerators and other specialized hardware across Kubernetes workloads. Think GPUs, TPUs, FPGAs, and similar devices that don't fit neatly into Kubernetes' traditional resource model.
The problem we set out to solve is that the legacy Device Plugin API (which has been the primary mechanism for exposing hardware accelerators in Kubernetes) is fundamentally limited. It treats devices as opaque integers: you can request "2 GPUs," but you can't say anything meaningful about which GPUs you need, how they should be connected to each other, whether they can be shared, or how they should be partitioned. That was fine for simple cases, but modern AI/ML workloads are anything but simple. They span multiple nodes, require specific interconnect topologies, and increasingly need to share or partition hardware dynamically.
The working group's primary deliverable is Dynamic Resource Allocation (DRA), a new framework that replaces the rigid device plugin model with a flexible, declarative API. With DRA, workloads can describe their hardware requirements (e.g., GPU type, memory capacity, interconnect topology, desired partitioning) and drivers can publish fine-grained device attributes that the scheduler can act on. DRA graduated to GA in Kubernetes 1.34, and the ecosystem around it (e.g., drivers, tooling, and new API extensions) is growing rapidly.
PO: As Kevin said, the working group was formed around the existing effort to develop DRA. The initial work was done with only a handful of people actively involved, and perhaps also could only be done successfully in such a setup. But because it touches on so many different areas of Kubernetes, we also needed a place to discuss that and get the broader community of Kubernetes maintainers, device vendors, and, to a lesser extent, also end-users involved. The working group provides that place, with regular meetings online (one slot for Americas/EMEA, one for EMEA/Asia) and at KubeCon.
JB: DRA is the first problem the WG has addressed. It is focused on selection, allocation, and configuration of the devices. We broke the problem down into four parts: how does the vendor model the device and advertise capacity, how does the user request it, how do we schedule that request on top of the advertised capacity, and how do we actuate that result (that is, how do we make the device ready and available to the Pod).
One thing that is fundamental to the approach we took is an awareness of the incredible diversity of hardware and the rapid rate of change in the hardware industry. We knew that we couldn’t keep up with the change if the Kubernetes APIs had to change for every type of hardware. Instead, we created a general approach where we address the hardware aspects that are important to Kubernetes. What we have done so far is focus on the scheduling and configuration aspects of devices. We build a device modeling API (the ResourceSlice API) that vendors use to model the scheduling characteristics of their devices, and allow users to pass through arbitrary configurations to those devices. By doing this, Kubernetes can be “programmed” to understand these aspects of the devices, without needing to be modified.
But DRA, as it stands right now, is very focused on scheduling. There are other aspects of Device Management that are in scope for the WG. In particular, we are looking into device failure detection and mitigation, and whether there is some better support we can build into Kubernetes to help.
Also, as Kevin alluded to, devices are often allocated and used in groups, rather than individually. Choosing the right devices to work together in a group depends on how they are interconnected; for example, NVIDIA GPUs may be in an any-to-any fabric arrangement in an NVLINK domain, whereas TPUs may have a 3D torus interconnect. This affects the “selection, allocation and configuration” of devices, and we have a lot more work to do to address these use cases.
A cross-SIG effort
Because device management touches scheduling, node operations, autoscaling, networking, and API design, the work naturally spans multiple SIGs across the Kubernetes project.
NF: How does collaboration across these SIGs work in practice, and why is it necessary?
KK: Device management touches nearly every layer of the Kubernetes stack, which is why the working group was chartered as a cross-SIG effort from the start. We have five stakeholder SIGs: sig-node, sig-scheduling, sig-autoscaling, sig-network, and sig-architecture.
In practice, the working group serves as a coordination layer. We don't own code directly; instead, our deliverables take the form of KEPs and implementations that live in the respective SIGs. What we provide is a unified forum where the people building the scheduler, the kubelet, the autoscaler, and the network plane can design together rather than in isolation.
Why is this necessary? Consider a simple example: a user requests a set of GPUs that need to communicate via NVLink. That requirement involves the scheduler (place the pods on the right nodes), the kubelet (configure the devices and expose them to the container), and potentially autoscaling (provision the right node type if none exists).
If those three groups design independently, you end up with inconsistent abstractions, duplicated logic, and integration bugs that only surface in production. The working group ensures that a single coherent API and data model flows through all of these components.
The cross-SIG model also means that design decisions are reviewed from multiple angles. Someone from sig-scheduling will catch scheduler complexity that a sig-node contributor might overlook, and vice versa. It slows down individual decisions slightly, but produces much more robust outcomes.
Current focus areas
With DRA now generally available, the working group’s focus has expanded to enable more advanced scheduling models, shared semantics, operational visibility, and support for increasingly complex hardware topologies.
NF: What are some of the key initiatives or deliverables the working group is currently focused on?
KK: We maintain a project board at Kubernetes Project Board with real-time tracking of our initiatives and their progress.
PO: The scope and feature set of core DRA were intentionally limited to enable graduation to GA within a reasonable time. Additional KEPs add more features, on their own schedule. Those fall roughly into three categories:
- Extend the expressiveness of DRA to support more complex devices and scheduling scenarios.
- Support day two operations like health monitoring.
- Improve multi-node support, primarily by integrating with workload-aware scheduling.
In addition to the project board, we also maintain a table which summarizes all the KEPs which are currently in flight. This is the status for 1.36; more are likely to be added for 1.37:
| KEP | Description | Release | ||||
|---|---|---|---|---|---|---|
| 1.32 | 1.33 | 1.34 | 1.35 | 1.36 | ||
| 4381 | DRA: Structured Parameters | Beta | Beta | Stable | ||
| 5004 | DRA: Extended Resource Requests via DRA | Alpha | Alpha | Beta | ||
| 4817 | DRA: Resource Claim Status | Alpha | Beta | Beta | Beta | Beta |
| 5018 | DRA: Namespace Controlled Admin Access | Alpha | Beta | Beta | Stable | |
| 5055 | DRA: Device Taints and Tolerations | Alpha | Alpha | Alpha | Beta | |
| 4816 | DRA: Prioritized Alternatives in Device Requests | Alpha | Beta | Beta | Stable | |
| 5075 | DRA: Consumable Capacity | Alpha | Alpha | Beta | ||
| 4815 | DRA: Partitionable Devices | Alpha | Alpha | Alpha | Beta | |
| 5304 | DRA: Attributes Downward API | Alpha | ||||
| 5729 | DRA: ResourceClaim Support for Workloads | Alpha | ||||
| 4680 | Resource Health Status in Pod Status | Alpha | Alpha | Alpha | Alpha | Beta |
| 5517 | DRA: Native Resource Requests | Alpha | ||||
| 5677 | DRA: Resource Availability Visibility | Alpha | ||||
| 5007 | DRA: Device Binding Conditions | Alpha | Alpha | Beta | ||
| 5491 | DRA: List Types for Attributes | Alpha |
NF: One of the core challenges is efficient device utilization and sharing. What progress is being made in this area?
JB: Good question. One way to think about it is what we are doing in the two primary APIs: ResourceClaim and ResourceSlice.
The ResourceClaim API is how the user asks for devices. We have built some features that allow the user to be more flexible in their requests. For example, instead of asking for a specific model of GPU, they can ask for a GPU with at least a certain amount of memory. Or they can ask for a list of alternatives: "I’d like one A100 (80GB) GPU, but if you don’t have it, I’ll take 2 A100 (40 GB) GPUs." This gives the scheduler some options to satisfy the request, which can lead to better obtainability and utilization of hardware that otherwise would not be selected.
The ResourceClaim API allows users to explicitly share devices. You can point multiple containers (in the same or different Pods) at a ResourceClaim; this allows the devices allocated by that claim to be used in all of those containers, if the device supports it.
The ResourceSlice API is how vendors model and advertise their devices. This is where we implement support for other sharing models. For example, we have a way to represent "overlapping partitions", enabling the scheduler to dynamically select a MIG partition, and make any overlapping MIG partitions unavailable automatically. This works well in combination with a request like “give me any GPU with 20GB or more of memory” - the scheduler can satisfy that with a MIG or a real GPU.
Some features require changes in both. We have another sharing method we call “consumable capacity”. In the explicit sharing case described above, a user needs to point containers at the same ResourceClaim; there is one ResourceClaim shared amongst several containers and Pods. With consumable capacity, the device sharing works more like how Pods share a Node. The user creates a ResourceClaim that asks for a certain amount of resources, for example, “I need a NIC with 2Gbps of bandwidth”. The scheduler knows that there is a NIC with 40Gbps of bandwidth available, and so it allocates 2Gbps out of that 40Gbps and gives it to that ResourceClaim. In this case, each Pod has its own ResourceClaim, but the underlying device is shared between those claims. It’s up to the on-node DRA driver to properly set up the device for this sort of sharing (in the NIC case, likely by creating a subinterface). We call this “platform-mediated sharing” to differentiate it from the explicit "user-mediated sharing".
Real-world impact
While much of the work is deeply technical, the underlying goal is practical: enabling Kubernetes to better support real-world AI/ML and hardware-intensive workloads at scale.
NF: What are the biggest challenges users face today when running hardware-intensive workloads (like AI/ML) on Kubernetes?
PO: Such workloads depart from traditional container workloads in several ways: they may consist of multiple communicating pods which all need to run at the same time (“gang scheduling”). They are often long-running and expensive to initialize, and their performance is sensitive to where they run (topology within a node and interconnects between nodes for multiple pods). The Kubernetes scheduler traditionally has not supported either of this well because it schedules one pod at a time and is unaware of the topology within a node. Several external schedulers try to fill this gap, which often isn’t ideal, in particular when the Kubernetes scheduler schedules other pods to the same cluster.
NF: How should platform engineers think about device management when designing their Kubernetes platforms?
JB: We’re still learning here, but one idea of DRA is to enable a shift to more "requirements driven" specifications. This can allow less coupling between end users that write the workload specification and the cluster administrators that set up the clusters. Instead of agreeing on labeling conventions and requiring users to understand the cluster topology, the users can specify what their workload needs, and the scheduler can figure out how to satisfy it. If we can make this work, it can make even complex workloads more portable across clusters.
Challenges and trade-offs
As with many areas of Kubernetes, increasing flexibility and expressiveness also introduces new layers of complexity, particularly around scheduling and optimization.
NF: What are some of the hardest technical challenges the working group is tackling today?
PO: There’s an inherent conflict between flexibility and scheduling complexity. The current implementation is focused on finding some solution that satisfies the requested resources, but it’s not necessarily the best one, whatever “best” means, which is also not always clear. The other big challenge is exposing node-allocatable resources (RAM, CPU) as devices with additional metadata; this is necessary to fine-tune scheduling of workloads which need perfect alignment on a node for optimal performance.
JB: Patrick’s list is good. Complex device modeling is hard, and making sure that we build the right semantics such that they apply to lots of different hardware is always tricky.
On top of that, scheduling in general is very complex and is an NP-hard problem. All the metadata and flexibility DRA adds gives the scheduler more options, which has pros and cons. More options are helpful if you are constrained in your choices, as it means you can schedule something that you otherwise could not. But it also means it is even harder to find an optimal solution when there are many possibilities in a given cluster. DRA works well in our common use cases so far, but we have a lot of work to do to improve the optimality of the chosen scheduling solution and ensure the performance of making that choice.
Looking ahead
Despite the challenges, contributors across the working group remain excited about the pace of innovation and the growing community forming around device management in Kubernetes.
NF: Looking ahead, what are you most excited about in the future of device management in Kubernetes?
KK: NVIDIA recently donated its DRA driver for GPUs to the Kubernetes project. I’m personally excited for more community members to start contributing to the project and defining its future direction.
PO: For me, it’s primarily the number of new contributors and people stepping up to help out. This poses new challenges around reviewing proposals and helping developers get those implemented and merged. It’s nice and rewarding to see others succeed, and it bodes well for the future because more people are familiar with the topic.
JB: I am excited about a lot of things. The community really has grown and has so many interesting features in the works to enable modeling of more complex devices, and to better model multi-node devices.
I am really excited to see the creative ways people will use these APIs. They were primarily designed to address "devices", but just like how "everything is a file" in Unix/Linux, the APIs themselves are quite flexible as to what they model. They really build out a more programmable scheduler, which can have interesting applications. For example, I recently prototyped using DRA to schedule pods to nodes where a large AI model is already locally cached. It’s really quite flexible, and I have great confidence in the creativity of our community, so I think we’ll see some unexpected solutions in the ecosystem.
Getting involved
NF: How can contributors get involved with the Device Management Working Group?
KK: The easiest first step is to join our mailing list at wg-device-management@kubernetes.io. Subscribing will automatically add calendar invites for our biweekly meetings to your calendar.
We have two meeting slots to accommodate different time zones:
- Europe/Americas: Tuesdays at 8:30 AM PT (biweekly)
- Asia/Europe: Wednesdays at 9:00 AM CET (biweekly)
Meeting notes, agendas, and recordings are all publicly accessible (links available from Device Management page). You can get a feel for the work in progress before attending your first meeting.
On Slack, find us in #wg-device-management on the Kubernetes Slack workspace. That's the best place for quick questions or to introduce yourself.
For more hands-on contributions, the DRA Driver for NVIDIA GPUs is now a community project and a great place to start. It's a real-world, production-grade implementation that the broader community is now shaping together.
We welcome contributors at all levels – whether you're interested in the API design, the scheduler internals, driver development, or documentation. Come say hello.
Summary
As Kubernetes evolves to support the AI/ML revolution and high-performance computing, the work happening within WG Device Management is becoming the foundation for how modern workloads are scheduled and operated at scale.
From the graduation of Dynamic Resource Allocation (DRA) to the next frontiers of health monitoring and topology-aware scheduling, this group is effectively rewriting the "handshake" between software and hardware.
If you’re interested in shaping the future of hardware-aware orchestration, now is the perfect time to get involved. Whether you want to help refine the API, build out drivers, or improve documentation, the working group welcomes all levels of experience and perspectives from across the community.
Spotlight on SIG Storage
In our ongoing SIG Spotlight series, we shine a light on the groups that keep the Kubernetes project moving forward. This time, we catch up with SIG Storage, the group responsible for persistent data, volume management, and the interfaces that connect Kubernetes workloads to the storage systems beneath them.
We spoke with Xing Yang, Co-Chair of SIG Storage and Software Engineer at VMware by Broadcom, about the SIG's history, the features shipping in recent Kubernetes releases, and where storage in Kubernetes is headed as AI workloads become the norm.
Introductions
Could you introduce yourself and share your role(s) within SIG Storage?
My name is Xing Yang, a software engineer at VMware by Broadcom. I'm a co-chair in SIG Storage, alongside another co-chair Saad Ali from Google. There are also two Tech Leads in SIG Storage: Michelle Au from Google and Jan Šafránek from Red Hat.
What first drew you to storage in Kubernetes, and how did you start contributing?
I have always been working in the storage domain, so SIG Storage was a natural place for me to get started when I began to learn Kubernetes. I started attending SIG Storage meetings, trying to figure out what I could do to help. This was before the first Container Storage Interface (CSI) release — lots of things were still evolving. It was a very exciting time.
What subprojects or areas do you actively maintain or review today?
I'm a maintainer in Kubernetes CSI. There are multiple CSI sidecars — such as csi-provisioner,
csi-attacher, csi-resizer, and csi-snapshotter — that we need to release following every
Kubernetes release. I'm also a co-chair for a Data Protection Working Group co-sponsored by SIG
Storage and SIG Apps. Several features have come out of that WG aimed at filling gaps in data
protection support within Kubernetes. One is Volume Group
Snapshot, which provides
crash-consistent group snapshots for multiple volumes used by an application. Changed Block
Tracking (CBT) is another critical feature
from the DP WG designed to support efficient backups.
About SIG Storage
For folks who are new: what is SIG Storage, in your own words? What problems in Kubernetes are you trying to solve?
SIG Storage is a Special Interest Group focused on how to provide storage to containers running in your Kubernetes cluster. We define standard interfaces so that a storage vendor can write a driver and have its underlying storage system consumed by containers in Kubernetes.
Why does Kubernetes need a dedicated storage SIG? What makes storage hard in a distributed system?
When Kubernetes was first introduced, it was meant for stateless workloads only. Container applications were regarded as ephemeral and therefore did not need to persist data. However, that changed drastically. Stateful workloads started running in Kubernetes, and we needed a dedicated SIG to tackle the associated storage challenges. PersistentVolumeClaims, PersistentVolumes, and StorageClasses were all introduced to provision data volumes for applications running in Kubernetes.
How did SIG Storage originally form, and how has its mission changed over time?
SIG Storage was formed to address the challenges of handling persistent data within Kubernetes. Initially, PersistentVolumes were implemented as in-tree plugins, and the SIG managed those plugins while developing core storage primitives like PersistentVolumes and PersistentVolumeClaims.
Container Storage Interface (CSI) was introduced later and played a crucial role in simplifying storage integration, enabling third-party storage providers to develop and maintain their own out-of-tree plugins without modifying Kubernetes core code.
With basic integration addressed by CSI, the SIG's mission expanded to include advanced storage features that leverage the new interface. The SIG has also expanded its scope to support object storage through the Container Object Storage Interface (COSI).
Current work and roadmap
What are the top features SIG Storage is actively working on right now?
The Data Protection WG has been working on a couple of exciting features:
VolumeGroupSnapshot is a Kubernetes feature enabling a crash-consistent, point-in-time snapshot of multiple PersistentVolumes simultaneously. This ensures data integrity for applications — like databases — that rely on multiple volumes by capturing all volumes in the group atomically, at the exact same point in time. It just moved to GA in Kubernetes v1.36.
CSI Changed Block Tracking (CBT) enables efficient, incremental backups. By allowing storage systems to report only the blocks that have changed since the last snapshot, it significantly reduces the amount of data that needs to be transferred. It just moved to Beta in Kubernetes v1.36.
Another feature worth highlighting is Container Object Storage Interface (COSI). COSI provides
a standard interface for provisioning and consuming object storage buckets in Kubernetes —
standardizing object storage for containerized applications much like CSI did for block and file
storage. COSI is now transitioning to v1alpha2, with plans for promotion to Beta in a future
release.
What recent work from SIG Storage do you consider a "win" for users?
The graduation of VolumeAttributesClass to GA in Kubernetes v1.34 is a major win for users managing stateful workloads. Previously, changing volume attributes like IOPS or throughput required out-of-band actions or disruptive operations. Now, users can dynamically tune storage properties such as IOPS or throughput directly through the Kubernetes API — scaling up for peak loads or down to optimize costs — without external processes or downtime.
VolumeAttributesClass enables dynamic modification of storage characteristics without recreating the volume. This completes the picture by allowing users to tune both capacity and other storage properties dynamically, just as they can now tune both CPU and memory for compute.
Looking ahead one or two releases, what's on the roadmap that people should watch for?
I'd like to draw attention to the Volume Health feature. This feature is designed to offer critical visibility into the operational status and integrity of persistent volumes. By enabling storage drivers and the Kubernetes control plane to report issues, it allows for proactive monitoring and identification of volume-related problems.
Currently, volume health information is reported via non-persistent events. We are actively investigating enhancements to this feature with the goal of supporting automated remediation capabilities in the future.
Are there areas where you'd really like more discussion or help from the community?
We always need help from the community to fix bugs, add tests, and help with reviews.
We'd also like to get feedback on the Alpha feature Mutable PV Affinity, which was introduced in Kubernetes v1.35. Use cases include migrating volumes from zonal to regional storage or migrating from one disk type to another.
Another topic is volume replication. It was raised at KubeCon Atlanta and has been discussed in the Data Protection WG. Community members interested in this topic are encouraged to join the DP WG meetings.
What are the biggest challenges users face today when running stateful workloads on Kubernetes?
While Kubernetes has moved stateful workloads — like databases and AI pipelines — into the mainstream, managing "state" in a system designed for ephemerality remains difficult:
Data Gravity and Storage Locality: Pods move in seconds, but data has gravity. If a node fails, a pod using local storage is stuck. Operators must decide whether the failure is transient or permanent — a high-stakes call. This is why we are enhancing the Volume Health feature to provide the visibility needed to automate recovery choices.
Day 2 Complexity: Setting up a database is easy; maintaining its health over time is the real challenge. Standard Kubernetes objects like StatefulSets offer a baseline, but they lack the operational logic needed for tasks such as schema upgrades, engine patching, or cluster-wide Kubernetes upgrades.
Data Mobility: Moving persistent data remains a significant hurdle — whether migrating between storage tiers, shifting workloads across availability zones, or moving to a different cluster. This challenge includes ongoing synchronization and replication for high availability and disaster recovery across a distributed system.
Storage and AI
How do you see storage evolving in Kubernetes over the next few years, especially as AI/ML workloads grow?
I see several trends shaping storage in Kubernetes as it evolves from a container orchestrator into the "Operating System" for AI:
More Intelligent Data Management: We'll see a shift toward smarter CSI drivers and data management tools offering advanced features like automatic tiering, snapshots, migration, and replication — optimized specifically for high-performance AI/ML workflows and large data platforms.
Object Storage as a First-Class Citizen: AI datasets now frequently reach exabyte scale, making object storage the preferred choice for AI workloads. COSI is standardizing bucket management just as CSI did for disks, allowing data scientists to use a BucketClaim to provision S3-compatible storage natively and unifying object, file, and block storage into a single workflow.
Performance and Low Latency: For AI/ML, storage needs to keep up with GPU processing speeds. This will accelerate adoption of high-performance parallel file systems and NVMe-over-Fabrics (NVMe-oF) technologies managed natively via Kubernetes. The line between traditional block/file and memory-speed storage will continue to blur.
Data-Aware Scheduling: Instead of just considering CPU and RAM, the Kubernetes scheduler will increasingly prioritize placing Pods based on data locality — calculating the cost of moving data versus moving compute to keep massive data platforms performant.
SIG Storage continues to tackle some of the hardest problems in Kubernetes: keeping stateful applications running reliably, making storage operations transparent and composable, and now scaling up to meet the demands of AI-era workloads. Whether you're a user managing databases in production or a developer curious about storage internals, there's a place for you in SIG Storage.
If you'd like to get involved, check out the SIG Storage community page and join the bi-weekly meetings. You can also find the SIG on Slack at #sig-storage.
From Kubernetes Dashboard to Headlamp: Understanding the Transition
For many people, Kubernetes Dashboard was their first window into Kubernetes. It offered a simple visual way to see what was running in a cluster, inspect resources, and build confidence without relying on the command line. For years, it helped developers, students, and operators make sense of Kubernetes, and it served as an important onramp into the ecosystem.
The Kubernetes Dashboard project has now been archived. We deeply respect the work the team did and the role Dashboard played in making Kubernetes more approachable for so many users.
Headlamp builds on that foundation and carries it forward. It keeps the clarity of a visual interface while adding capabilities that match how Kubernetes is used today. This includes multi-cluster visibility, application-centric views, extensibility through plugins, and flexible deployment options that work both in-cluster and on the desktop.
This guide is meant to help you navigate that transition with confidence. Before diving into the mechanics of migration, we start with familiar ground by looking at how common Kubernetes Dashboard workflows map to Headlamp. We also cover what stays the same and what improves after the switch. The goal is not just to replace a tool, but to honor a user-centered legacy and help you land in a UI that can grow with you as your Kubernetes usage evolves.
Mapping Kubernetes Dashboard workloads to Headlamp
If you have used Kubernetes Dashboard before, many workflows in Headlamp will feel familiar. Headlamp does not introduce a new way of thinking. Instead, it builds on workloads users already know and extends them in practical ways. The focus is continuity. What worked before still works, with more room to grow.
Viewing workloads and resources
In Kubernetes Dashboard, most users started by browsing workloads like pods, deployments, services, and namespaces. Headlamp keeps this same starting point. Workloads are easy to find and inspect, and moving between namespaces and clusters is simpler. Resources are still organized in familiar ways, and navigation feels smoother, especially when you work across multiple environments.
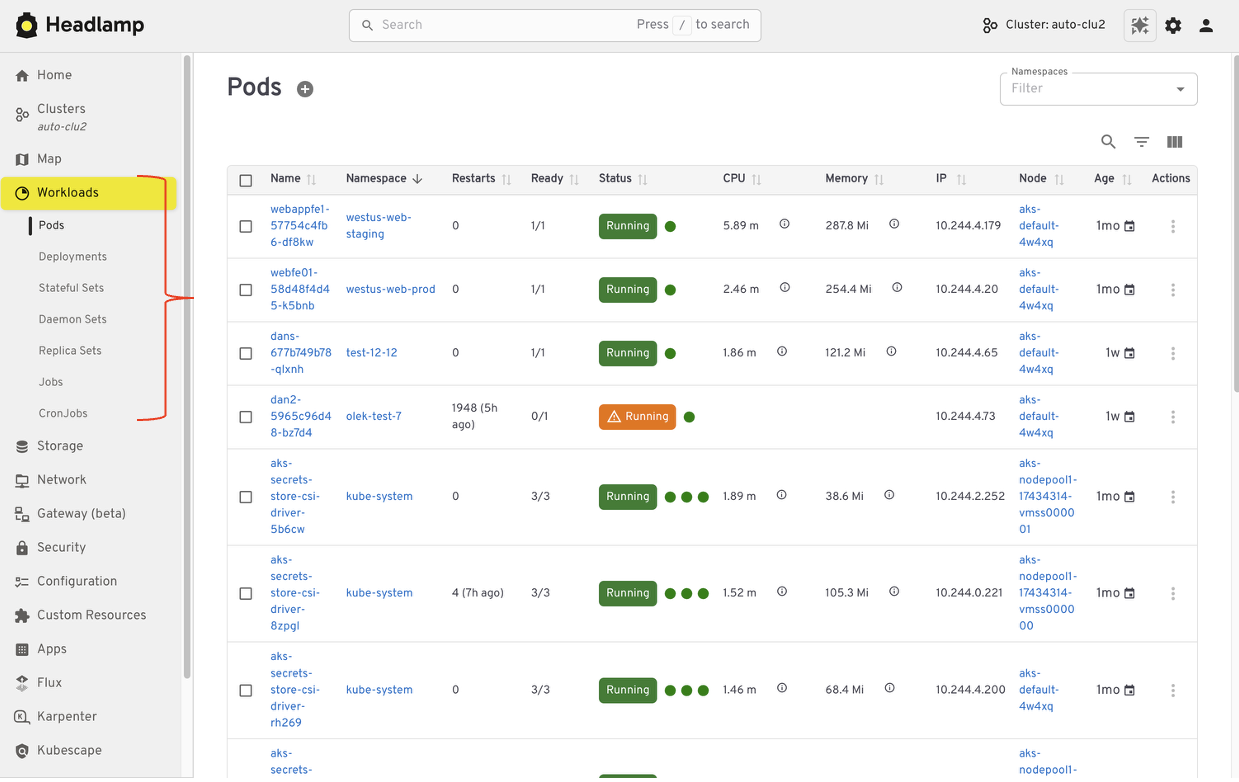
Editing and interacting with resources
Like Kubernetes Dashboard, Headlamp lets you view and edit manifests directly in the UI based on your permissions. You can delete resources, scale workloads, or update configurations from the interface. All actions follow standard Kubernetes RBAC. If you could perform an action in Dashboard, you will find the same capability in Headlamp, with the same respect for access controls.
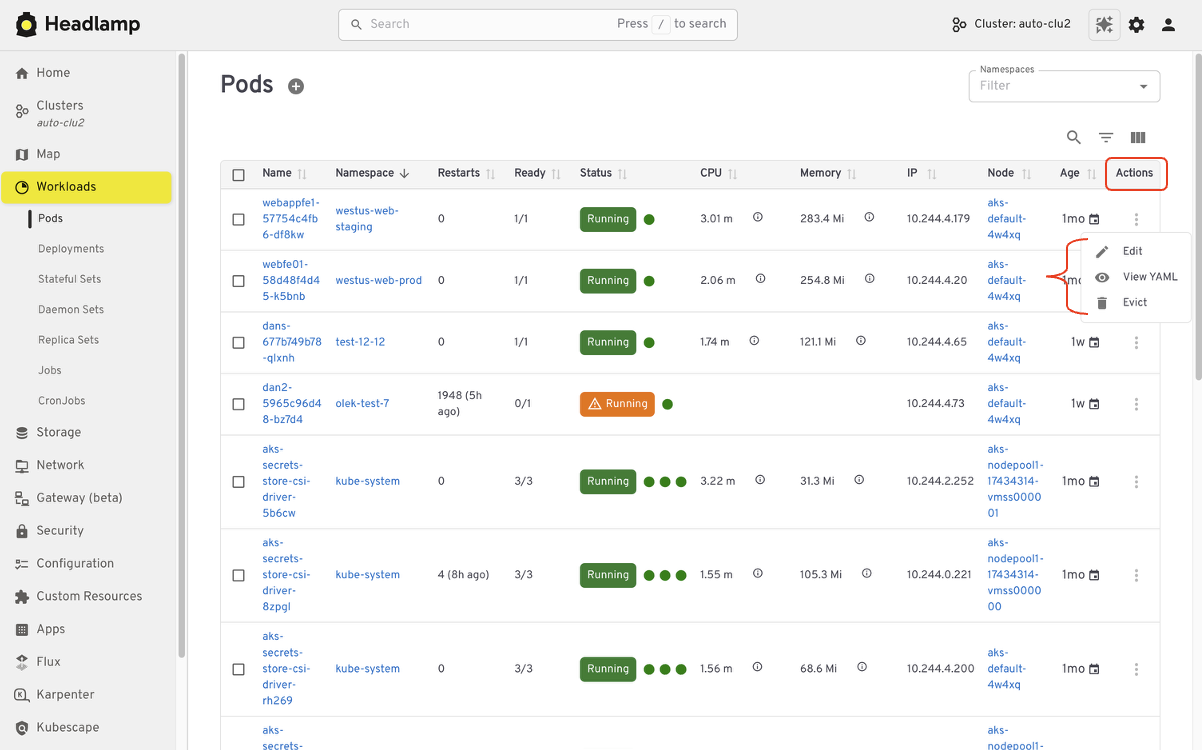
Understanding relationships
Where Headlamp begins to expand the experience is in how it presents relationships between resources. In addition to list views, Headlamp offers visual ways to see how workloads, services, and configurations connect. This helps provide context without changing the underlying workloads users already rely on.
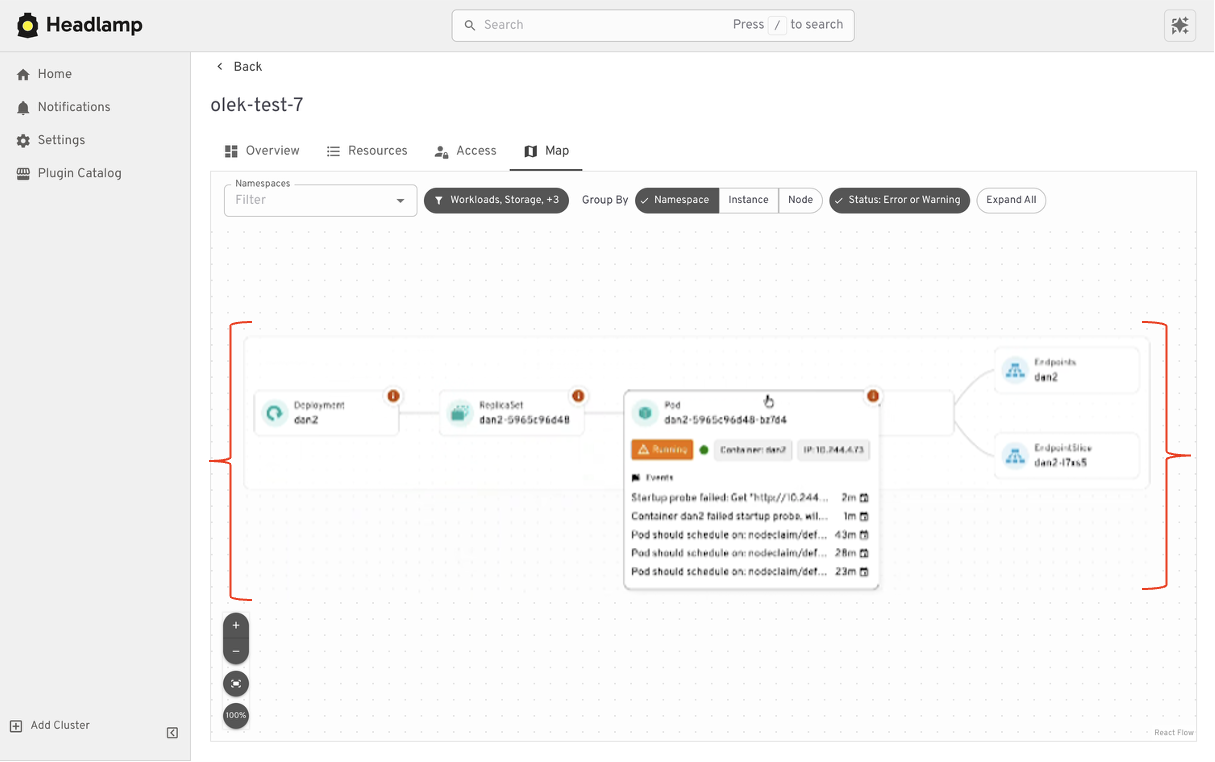
At a high level, the tasks you performed in Kubernetes Dashboard are still there. Headlamp keeps familiar workflows while making it easier to scale as clusters, teams, and applications grow.
Where Headlamp goes beyond Kubernetes Dashboard
Expanding from single cluster to multi-cluster workflows
Kubernetes Dashboard was designed to work with one cluster at a time. That model worked well for simple setups, but it became limiting as teams adopted multiple environments. Headlamp expands this view by letting you work with multiple clusters from a single interface without switching tools or losing context. This makes it easier to manage development, staging, and production environments side by side.
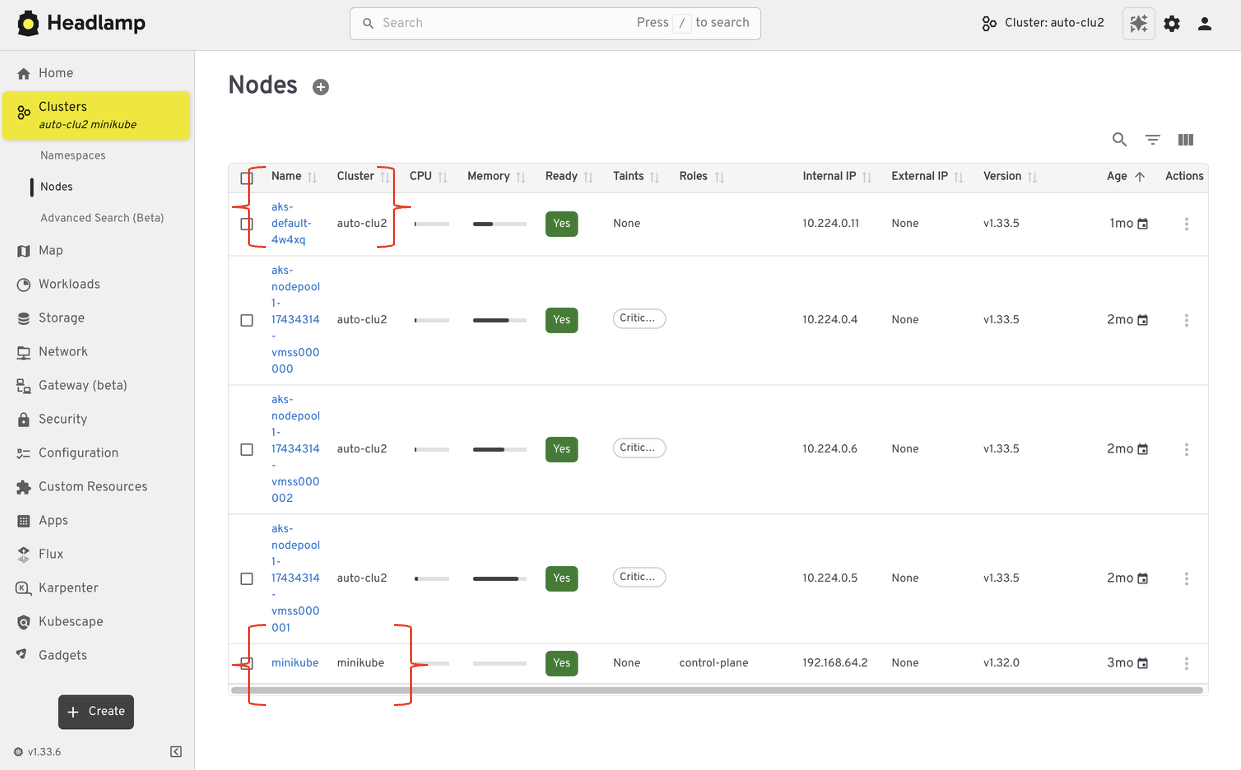
For teams running Kubernetes in more than one place, this shift reduces friction. You can stay oriented and move between clusters with confidence.
From resource lists to application context with Projects
Projects give you an application-centered way to view Kubernetes. Instead of jumping between lists, you can group related workloads, services, and supporting resources in one place. This makes applications easier to understand. You can see what belongs together, track changes in context, and troubleshoot without scanning the cluster piece by piece.
Projects are built on native Kubernetes concepts. Namespaces, labels, and RBAC continue to work the same way they always have. Headlamp adds a visual layer that brings related resources together.
Projects are optional. You can still work at the individual resource level when that fits your task. When you need more context, Projects help you step back and see the bigger picture.
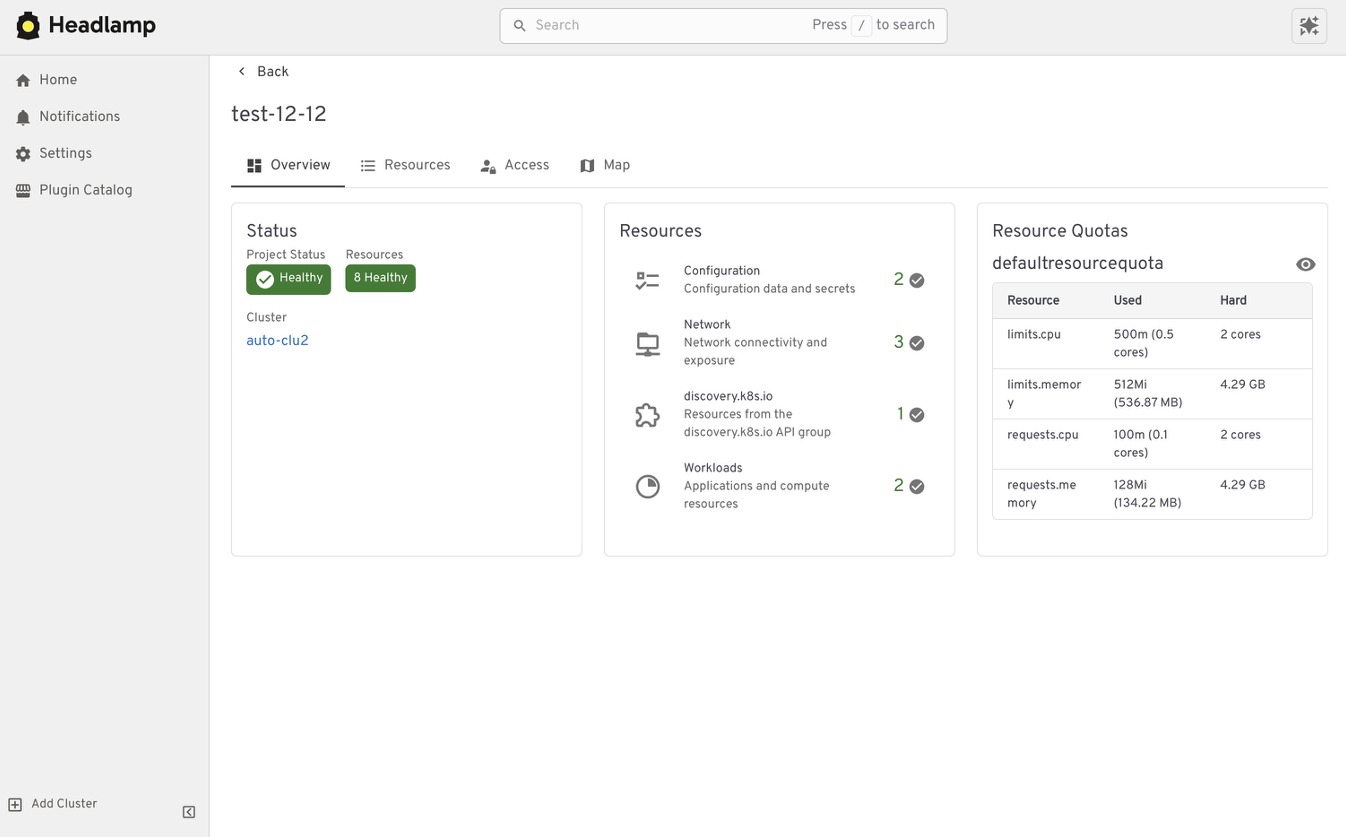
Extend the Headlamp UI with plugins
Headlamp can be extended through plugins that bring common workflows directly into the UI. Instead of switching tools, you work in one place with the same context.
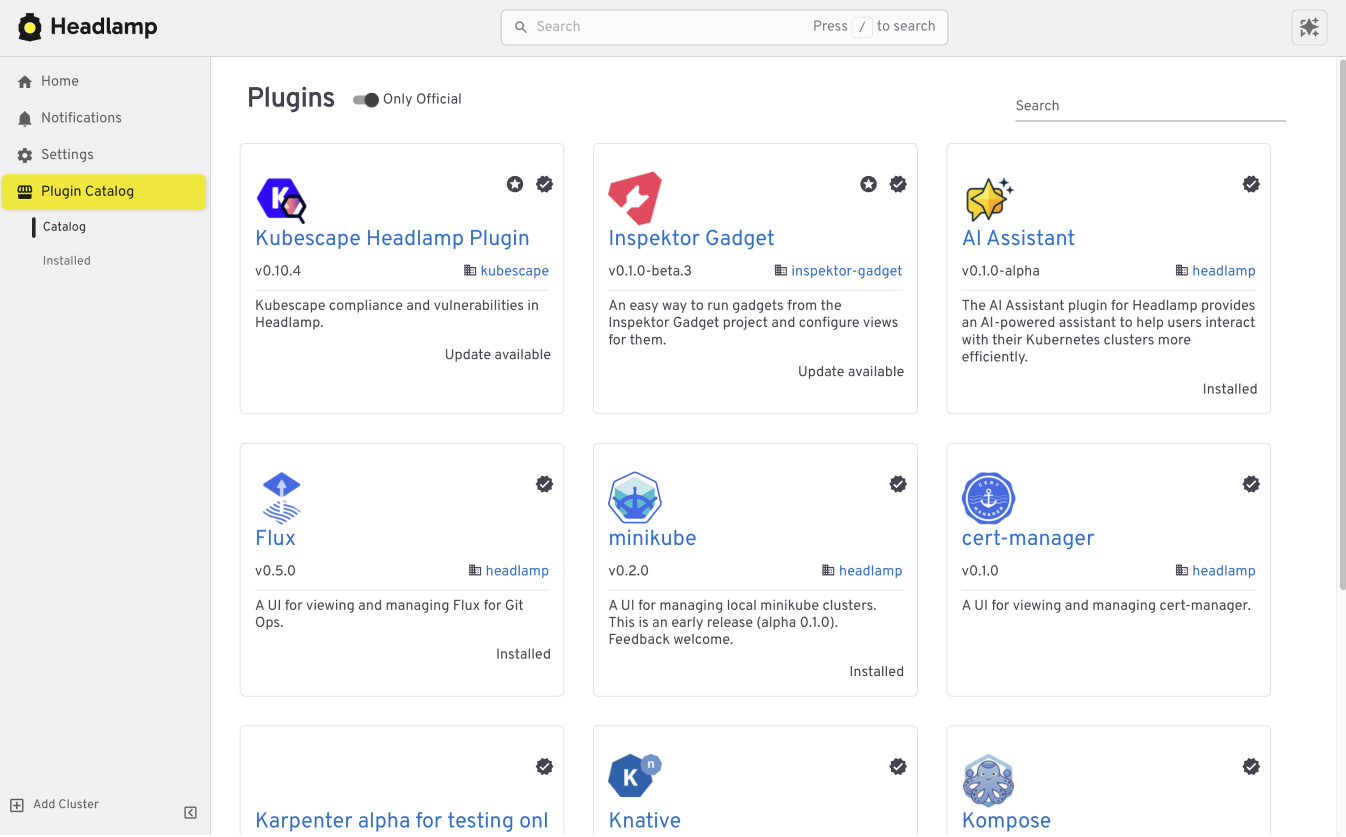
For example, the Flux plugin brings GitOps workflows into Headlamp. It allows teams to view application state alongside the Kubernetes resources that Flux manages, making it easier to understand how changes in Git relate to what is running in the cluster.
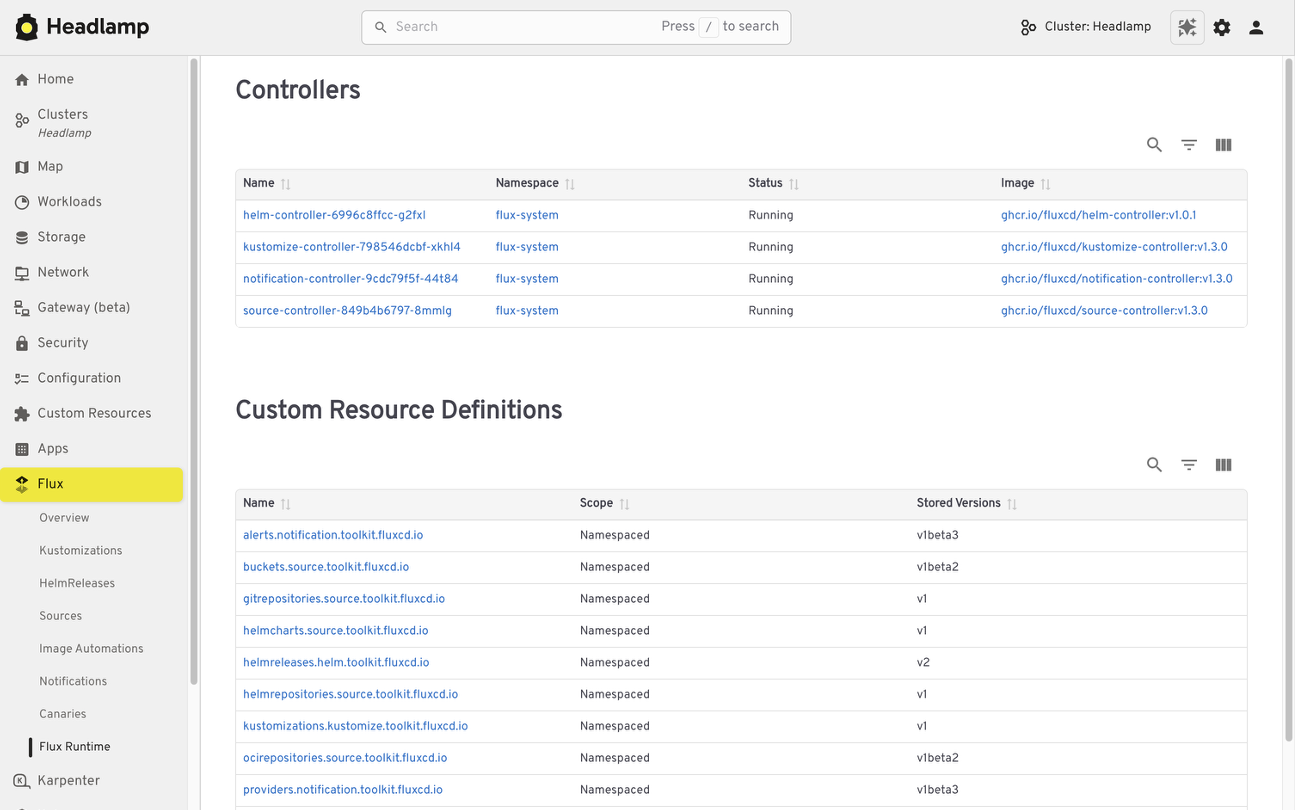
The AI Assistant follows a similar pattern. It adds a conversational layer to the UI that helps users understand what they are seeing, troubleshoot issues, or take action. All of this happens in the same screen where the problem appears.
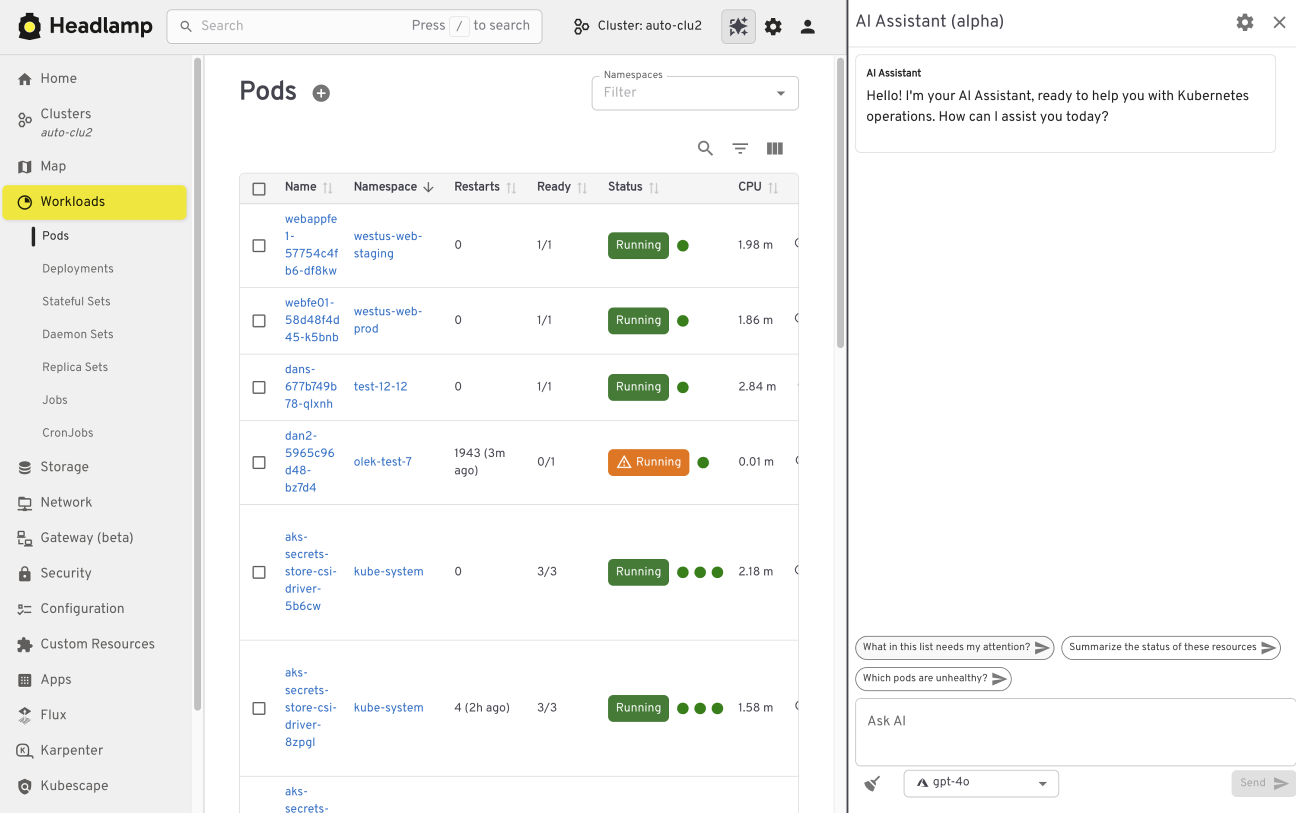
Building your own plugins
Plugins are optional and not limited to community-built extensions. Platform and project teams can also create their own plugins. This allows organizations to add custom integrations that match their specific workflows and internal tooling, while keeping the user experience consistent.
Choosing how and where Headlamp runs
Headlamp gives teams flexibility in how they use a Kubernetes UI. You can run it directly in a cluster, use it as a desktop application, or combine both approaches based on your needs.
Running Headlamp in-cluster works well for shared environments. It provides a centrally managed UI with controlled access and fits naturally into Kubernetes setups, following the same authentication and RBAC rules as other in-cluster components.
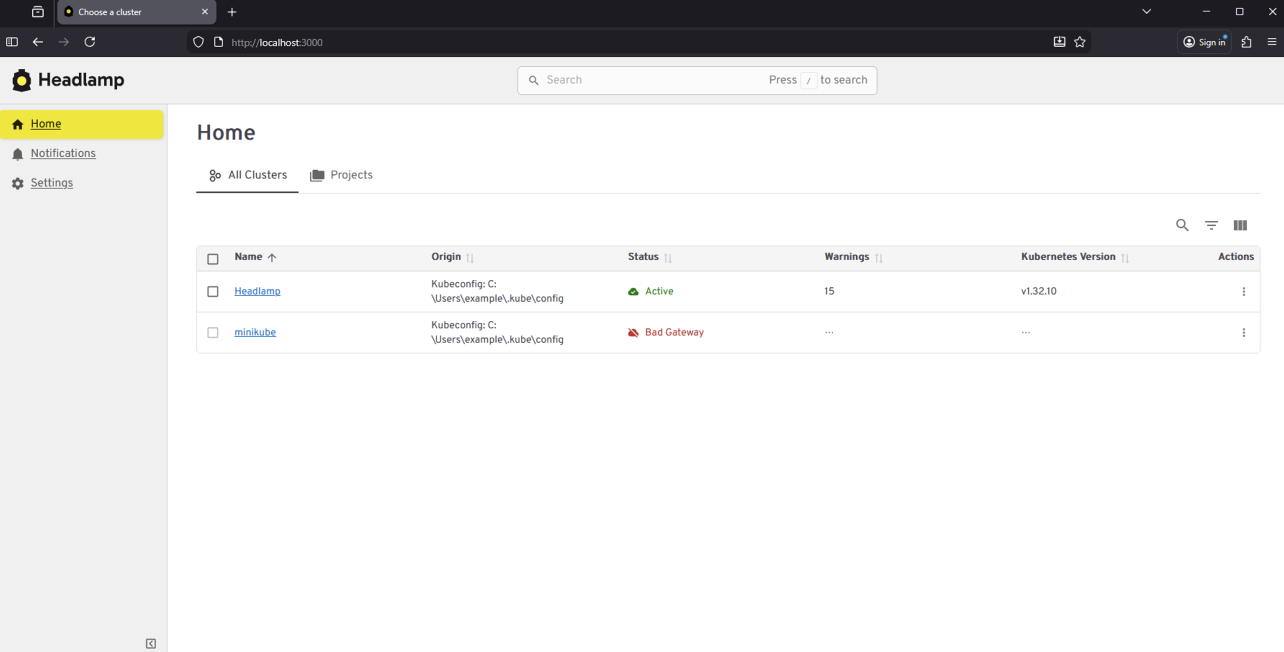
The desktop application is often a better fit for local development and onboarding. It also works well when you need to manage multiple clusters from one place. Users can connect using their existing kubeconfig without deploying anything into the cluster.
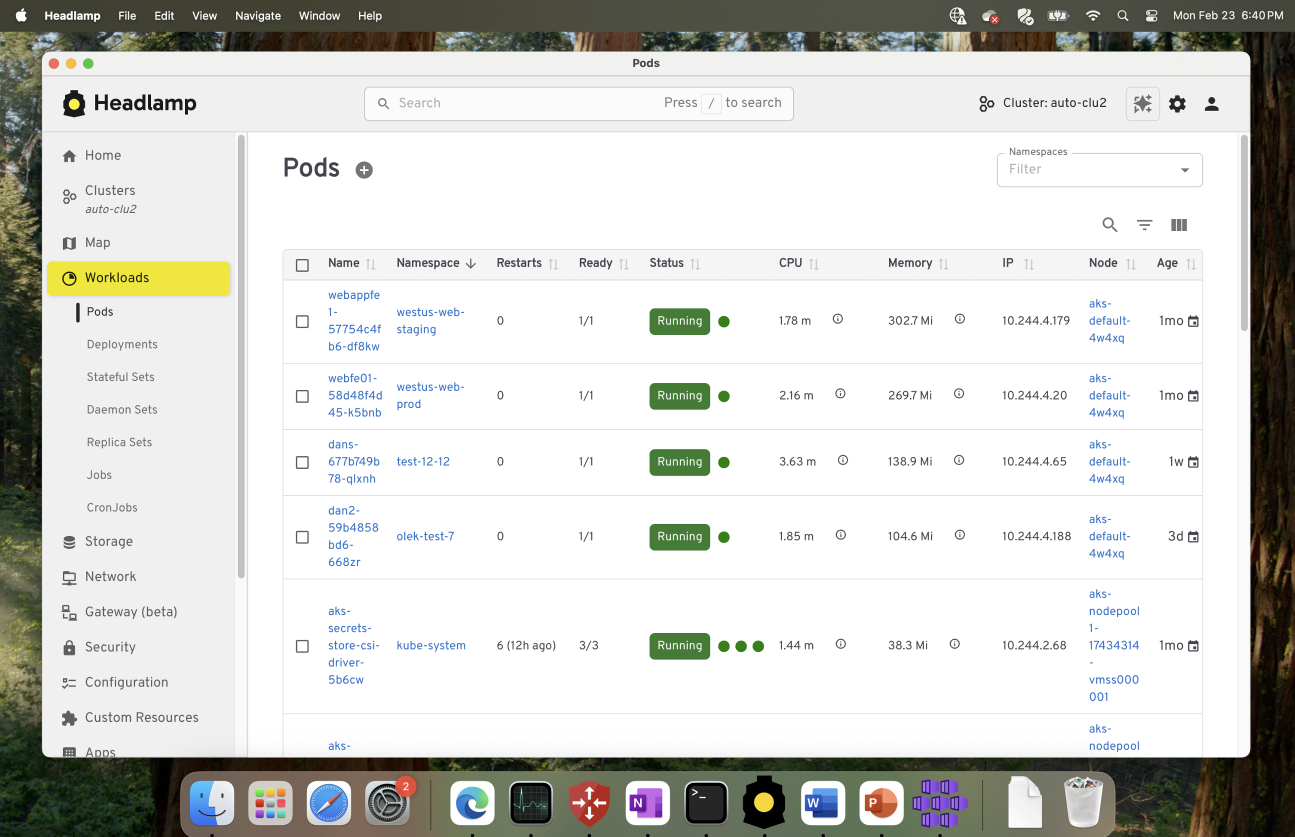
These options are not mutually exclusive. Many teams use the desktop app for day-to-day work, while relying on an in-cluster deployment for shared or production environments.
Preparing for the Migration
Before moving from Kubernetes Dashboard to Headlamp, it can be helpful to pause and take stock of how you use the Dashboard today. A little reflection up front can go a long way toward making the transition feel smooth and familiar.
Start by noting which clusters and namespaces you access and how authentication works. Headlamp relies on standard Kubernetes authentication and RBAC. In most cases, existing access models carry over without change. If users already connect using kubeconfig files or service accounts, they will be able to access the same resources in Headlamp.
It is also useful to think about the workflows that matter most to your team. Some users rely on Dashboard for quick inspection or troubleshooting, while others use it for lightweight edits or validation. Headlamp supports these same workflows and adds optional capabilities on top. Knowing what you rely on today helps the transition feel predictable and confidence building.
If you would like to explore Headlamp or try it out before migrating, you can learn more at headlamp.dev.
This blog focused on understanding the transition and what to expect. A step by step migration guide is coming soon and will walk through installation and migration in detail.
Reconciling the Past: Correcting Records for Unfixed Kubernetes CVEs
The Kubernetes project relies on transparency to empower cluster administrators and security researchers. One important way we do that is by publishing CVE records into the Common Vulnerabilities and Exposures database. As part of our ongoing effort to mature the official Kubernetes CVE Feed, we have identified some discrepancies. CVE records for a few older, unfixed issues incorrectly include a fixed version field.
The Kubernetes Security Response Committee (SRC) will correct the affected CVE records on June 1, 2026. This may result in vulnerability scanners identifying these vulnerabilities in places where they were previously not detected.
To help reduce confusion, this post provides a technical update on three vulnerabilities that were disclosed in previous years but remain unfixed: CVE-2020-8561, CVE-2020-8562, and CVE-2021-25740.
Why we are updating these records now
While these vulnerabilities have been public for several years, the recent work to generate official Open Source Vulnerabilities (OSV) files revealed that their corresponding CVE records did not accurately reflect their status. Specifically, some records suggested a fixed version existed, when in reality, these issues are architectural design trade-offs that cannot be fully remediated through code without breaking fundamental Kubernetes functionality.
Correcting these records is vital for the community for:
- Automation Fidelity: Modern vulnerability scanners depend on precise version ranges. Inaccurate fixed tags lead to false negatives, giving users a false sense of security.
- Risk Documentation: By formalizing these as unfixed, we ensure that platform providers and administrators are aware of the persistent need for administrative mitigations.
For completeness, we should also mention that CVE-2020-8554 is an unfixed CVE with a correct CVE record stating that it affects all versions. That record will also be updated to use a more-standardized version number format.
Technical analysis of unfixed architectural risks
The following vulnerabilities will not be fixed by the Kubernetes project. GitHub issues remain the best reference for the technical mechanics of these flaws.
CVE-2020-8561: Webhook redirect in kube-apiserver
- Severity: Medium (4.1).
- The Issue: The kube-apiserver follows HTTP redirects when communicating with admission webhooks. An actor capable of configuring an AdmissionWebhookConfiguration can redirect API server requests to internal, private networks.
- Why it remains unfixed: Restricting this behavior would require breaking the standard HTTP client behavior that many legitimate integrations rely on.
- Mitigation: Set the API server log level to less than 10 (to prevent logging response bodies) and disable
dynamic profiling (
--profiling=false) to prevent unauthorized log-level changes.
CVE-2020-8562: Proxy bypass via DNS TOCTOU
- Severity: Low (3.1).
- The Issue: A Time-of-Check to Time-of-Use (TOCTOU) race condition in the API server proxy allows users to bypass IP restrictions. The system performs a DNS check to validate an IP, but then performs a second resolution for the actual connection, which an attacker can manipulate.
- Why it remains unfixed: Fixing this requires pinning resolved IPs in a way that breaks complex split-horizon DNS or dynamic IP environments.
- Mitigation: Use a local DNS caching server like dnsmasq for the API server and configure
min-cache-ttlto enforce consistent responses between the check and the connection.
CVE-2021-25740: Cross-namespace forwarding via Endpoints
- Severity: Low (3.1).
- The Issue: A design flaw in the Endpoints and EndpointSlice API objects allows users to manually specify IP addresses, which can be used to point a LoadBalancer or Ingress toward backends in other namespaces.
- Why it remains unfixed: This is a fundamental feature of the Endpoints API used by many networking tools and operators.
- Mitigation: Restrict write access to Endpoints (legacy) and EndpointSlices. Since Kubernetes 1.22,
Kubernetes RBAC authorization mode no longer includes those permissions in the default edit and admin
ClusterRoles. That removal applies to clusters created using Kubernetes v1.22; for clusters upgraded from
older versions, administrators should manually audit and reconcile the
system:aggregate-to-editClusterRole.
Note:
On June 1, 2026, these CVE records will be updated to correctly reflect the fact that all versions are affected. You may see them begin to appear in vulnerability scanner results.Required actions for administrators
The Kubernetes project recommends a secure by configuration approach to manage these persistent risks:
| Vulnerability | Action item | Severity score (Rating) | Command / configuration |
|---|---|---|---|
| CVE-2020-8561 | Restrict Log Verbosity | 4.1 (Medium) | Ensure --v is set to < 10 and --profiling=false. |
| CVE-2020-8562 | Enforce DNS Consistency | 3.1 (Low) | Deploy dnsmasq or a similar caching resolver on control plane nodes. |
| CVE-2021-25740 | Hardened RBAC | 3.1 (Low) | kubectl auth reconcile to remove Endpoints write access from broad roles. |
The RBAC action for CVE-2021-25740 applies when your cluster uses RBAC authorization mode, which is the default for clusters created with standard Kubernetes tooling. Administrators should independently test and validate these configurations in a non-production environment, assessing the architectural risks against their specific threat model and risk tolerance.
Conclusion: maturity through transparency
The effort to reconcile these records is a sign of a maturing security ecosystem. By moving away from the "patch-only" mindset and accurately documenting architectural debt, the Kubernetes project provides the community with the high-fidelity data needed to secure modern cloud native infrastructure.
We would like to thank the security researchers—QiQi Xu, Javier Provecho, and others—who identified these risks, and the SIG Security Tooling contributors who continue to refine our official feeds. Special shoutout to Rory McCune for sharing information around these CVEs through his blog posts.
Update 2026/06/01: Today, the Kubernetes SRC has updated the CVE records for CVE-2020-8554, CVE-2020-8561, CVE-2020-8562, and CVE-2021-25740.
Announcing etcd 3.7.0-beta.0
SIG-Etcd announces the availability of the first beta release of etcd v3.7.0. This new version of the popular distributed database and key Kubernetes component includes the long-requested RangeStream feature, as well as a refactoring and cleanup of multiple legacy components and interfaces. v3.7 will deliver improved security, better operational reliability, and an improved experience for working with large resultsets.
First, however, the project needs users to test the beta. You can find v3.7.0-beta.0 here:
Please try it out and report issues in the etcd repo.
This beta also determines the EOL of version 3.4.
RangeStream
In etcd v3.6 and earlier, it is challenging to work with requests that return large resultsets. The client or requesting application is forced to wait for the full result set, leading to unpredictable latency and memory usage. The RangeStream RPC lets calling applications accept result sets in chunks, reducing latency and making buffering memory usage more predictable.
Much of the work on RangeStream was done by a relatively new contributor to etcd, Jeffrey Ying, a software engineer at Google. New contributors can have a substantial impact on etcd development.
"I've always been fascinated by database internals, and building RangeStream was a great opportunity to solve a bottleneck we were hitting in production with Kubernetes. It was the perfect opportunity to collaborate across projects and improve the ecosystem as a whole. Jumping into etcd as a new contributor had a bit of a learning curve, but the community is incredibly welcoming. The leads were very receptive to my ideas and helped me iterate quickly, while maintaining the project's high bar for reliability and code quality," said Jeffrey.
Instructions on how to use RangeStream in gRPC calls and in etcdctl can be found in the etcd documentation. Users should try it out for their own applications.
Removal of v2store
The last vestiges of etcd v2store have been removed in v3.7, making this the first release that is 100% on v3store. This includes discovery, bootstrap, v2 requests, and the v2 client. Our team has also removed multiple deprecated experimental flags.
All of these changes may create some breakage for users, particularly those who have not already updated to v3.6.11. We are interested in hearing about blockers encountered by users and dependent applications; please report anything you find that can't be remedied or needs better upgrade documentation.
etcd v3.7.0-beta.0 also includes bbolt v1.5.0 and raft v3.7.0.
3.4 EOL
According to our community support policy, we typically maintain only the latest two minor versions, currently v3.6 and v3.5. Etcd v3.5 will be supported for 1 year after v3.7.0 final release.
As mentioned in extended support for v3.4 in the etcd v3.6.0 release announcement, etcd v3.4 has been EOL since May 15, 2026. SIG-etcd may release one more security patch for that version at the end of May, if warranted by patched vulnerabilities. In any case, it will cease being updated after the end of May. Users on v3.4 should be planning to upgrade their clusters.
Feedback and Future Betas
Reach the etcd contributors with your feedback about v3.7.0-beta.0 in any of the following places:
SIG-etcd may release additional betas of version v3.7.0 with additional refactoring, particularly of our use of protobuf libraries. Release candidates and the final release will probably happen through June, possibly into early July.
Kubernetes v1.36: New Metric for Route Sync in the Cloud Controller Manager
This article was originally published with the wrong date. It was later republished, dated the 15th of May 2026.
Kubernetes v1.36 introduces a new alpha counter metric route_controller_route_sync_total
to the Cloud Controller Manager (CCM) route controller implementation at
k8s.io/cloud-provider. This metric
increments each time routes are synced with the cloud provider.
A/B testing watch-based route reconciliation
This metric was added to help operators validate the
CloudControllerManagerWatchBasedRoutesReconciliation feature gate introduced in
Kubernetes v1.35.
That feature gate switches the route controller from a fixed-interval loop to a watch-based
approach that only reconciles when nodes actually change. This reduces unnecessary API calls
to the infrastructure provider, lowering pressure on rate-limited APIs and allowing operators
to make more efficient use of their available quota.
To A/B test this, compare route_controller_route_sync_total with the feature gate
disabled (default) versus enabled. In clusters where node changes are infrequent, you should
see a significant drop in the sync rate with the feature gate turned on.
Example: expected behavior
With the feature gate disabled (the default fixed-interval loop), the counter increments steadily regardless of whether any node changes occurred:
# After 10 minutes with no node changes
route_controller_route_sync_total 60
# After 20 minutes, still no node changes
route_controller_route_sync_total 120
With the feature gate enabled (watch-based reconciliation), the counter only increments when nodes are actually added, removed, or updated:
# After 10 minutes with no node changes
route_controller_route_sync_total 1
# After 20 minutes, still no node changes — counter unchanged
route_controller_route_sync_total 1
# A new node joins the cluster — counter increments
route_controller_route_sync_total 2
The difference is especially visible in stable clusters where nodes rarely change.
Where can I give feedback?
If you have feedback, feel free to reach out through any of the following channels:
- The #sig-cloud-provider channel on Kubernetes Slack
- The KEP-5237 issue on GitHub
- The SIG Cloud Provider community page for other communication channels
How can I learn more?
For more details, refer to KEP-5237.
Kubernetes v1.36: Mixed Version Proxy Graduates to Beta
Back in Kubernetes 1.28, we introduced the Mixed Version Proxy (MVP) as an Alpha feature (under the feature gate UnknownVersionInteroperabilityProxy) in a previous blog post. The goal was simple but critical: make cluster upgrades safer by ensuring that requests for resources not yet known to an older API server are correctly routed to a newer peer API server, instead of returning an incorrect 404 Not Found.
We are excited to announce that the Mixed Version Proxy is moving to Beta in Kubernetes 1.36 and will be enabled by default! The feature has evolved significantly since its initial release, addressing key gaps and modernizing its architecture.
Here is a look at how the feature has evolved and what you need to know to leverage it in your clusters.
What problem are we solving?
In a highly available control plane undergoing an upgrade, you often have API servers running different versions. These servers might serve different sets of APIs (Groups, Versions, Resources).
Without MVP, if a client request lands on an API server that does not serve the requested resource (e.g., a new API version introduced in the upgrade), that server returns a 404 Not Found. This is technically incorrect because the resource is available in the cluster, just not on that specific server. This can lead to serious side effects, such as mistaken garbage collection or blocked namespace deletions.
MVP solves this by proxying the request to a peer API server that can serve it.
How has it evolved since 1.28
The initial Alpha implementation was a great proof of concept, but it had some limitations and relied on older mechanisms. Here is how we have modernized it for Beta:
From StorageVersion API to Aggregated Discovery In the Alpha version, API servers relied on the
StorageVersion APIto figure out which peers served which resources. While functional, this approach had a significant limitation: theStorageVersion APIis not yet supported for CRDs and aggregated APIs. For Beta, we have replaced the reliance onStorageVersion APIcalls with the use ofAggregated Discovery. API servers now use the aggregated discovery data to dynamically understand the capabilities of their peers.The Missing Piece: Peer-Aggregated Discovery The 1.28 blog post noted a significant gap: while we could proxy resource requests, discovery requests still only showed what the local API server knew about. In 1.36, we have added
Peer-Aggregated Discoverysupport! Now, when a client performs discovery (e.g., listing available APIs), the API server merges its local view with the discovery data from all active peers. This provides clients with a complete, unified view of all APIs available across the entire cluster, regardless of which API server they connected to.
While peer-aggregated discovery will be the default behavior (note that peer-aggregated discovery is enabled if the --peer-ca-file flag is set, otherwise the server will fallback to showing only its local APIs), there may be cases where you need to inspect only the resources served by the specific API server you are connected to. You can request this non-aggregated view by including the profile=nopeer parameter in your request's Accept header (e.g., Accept: application/json;g=apidiscovery.k8s.io;v=v2;as=APIGroupDiscoveryList;profile=nopeer).
Required configuration
While the feature gate will be enabled by default, it requires certain flags to be set to allow for secure communication between peer API servers. To function correctly, make sure your API server is configured with the following flags:
--feature-gates=UnknownVersionInteroperabilityProxy=true: This will be default in 1.36, but it is good to verify--peer-ca-file=<path-to-ca>: [CRITICAL] This is a required flag. You must provide the CA bundle that the source API server will use to authenticate the serving certificates of destination peer API servers. Without this, proxying will fail due to TLS verification errors.--peer-advertise-ipand--peer-advertise-port: These flags are used to set the network address that peers should use to reach this API server. If unset, the values from--advertise-addressor--bind-addressare used. If you have complex network topologies where API servers communicate over a specific internal interface, setting these flags explicitly is highly recommended.
Configuring with kubeadm
If you manage your cluster with kubeadm, you can configure these flags in your ClusterConfiguration file:
apiVersion: kubeadm.k8s.io/v1beta4
kind: ClusterConfiguration
apiServer:
extraArgs:
peer-ca-file: "/etc/kubernetes/pki/ca.crt"
# peer-advertise-ip and port if needed
Call to action
If you are running multi-master clusters and upgrading them regularly, the Mixed Version Proxy is a major safety improvement. With it becoming default in 1.36, we encourage you to:
- Review your API server flags to ensure
--peer-ca-fileis set properly. - Test the feature in your staging environments as you prepare for the 1.36 upgrade.
- Provide feedback to SIG API Machinery (Slack, mailing list, or by attending SIG API Machinery meetings) on your experience.
Kubernetes v1.36: Deprecation and removal of Service ExternalIPs
The .spec.externalIPs field for Service was an early attempt to provide
cloud-load-balancer-like functionality for non-cloud clusters.
Unfortunately, the API assumes that every user in the cluster is fully
trusted, and in any situation where that is not the case, it enables
various security exploits, as described in
CVE-2020-8554.
Since Kubernetes 1.21, the Kubernetes project has recommended that all users disable
.spec.externalIPs. To make that easier, Kubernetes also added an admission controller
(DenyServiceExternalIPs) that can be enabled to do this. At the time,
SIG Network felt that blocking the functionality by default was too large a
breaking change to consider.
However, the security problems are still there, and as a project we're increasingly unhappy with the "insecure by default" state of the feature. Additionally, there are now several better alternatives for non-cloud clusters wanting load-balancer-like functionality.
As a result, the .spec.externalIPs field for Service is now formally deprecated in Kubernetes 1.36.
We expect that a future minor release of Kubernetes will drop
implementation of the behavior from kube-proxy, and will update the
Kubernetes conformance criteria to require that conforming implementations
do not provide support.
A note on terminology, and what hasn't been deprecated
The phrase external IP is somewhat overloaded in Kubernetes:
The Service API has a field
.spec.externalIPsthat can be used to add additional IP addresses that a Service will respond on.The Node API's
.status.addressesfield can list addresses of several different types, one of which is calledExternalIP.The
kubectltool, when displaying information about a Service of type LoadBalancer in the default output format, will show the load balancer IP address under the column headingEXTERNAL-IP.
This deprecation is about the first of those. If you are not setting
the field externalIPs in any of your Services, then it does not
apply to you.
That said, as a precaution, you may still want to enable the DenyServiceExternalIPs admission controller to
block any future use of the externalIPs field.
Alternatives to externalIPs
If you are using .spec.externalIPs, then there are several alternatives.
Consider a Service like the following:
apiVersion: v1
kind: Service
metadata:
name: my-example-service
spec:
type: ClusterIP
selector:
app.kubernetes.io/name: my-example-app
ports:
- protocol: TCP
port: 80
targetPort: 8080
externalIPs:
- "192.0.2.4"
Using manually-managed LoadBalancer Services instead of externalIPs
The easiest (but also worst) option is to just switch from using
externalIPs to using a type: LoadBalancer service, and assigning a
load balancer IP by hand. This is, essentially, exactly the same as
externalIPs, with one important difference: the load balancer IP is
part of the Service's .status, not its .spec, and in a cluster
with RBAC enabled, it can't be edited by ordinary users by default.
Thus, this replacement for externalIPs would only be available to
users who were given permission by the admins (although those users
would then be fully empowered to replicate CVE-2020-8554; there would
still not be any further checks to ensure that one user wasn't
stealing another user's IPs, etc.)
Because of the way that .status works in Kubernetes, you must create the
Service without a load balancer IP, and then add the IP as a second step:
$ cat loadbalancer-service.yaml
apiVersion: v1
kind: Service
metadata:
name: my-example-service
spec:
# prevent any real load balancer controllers from managing this service
# by using a non-existent loadBalancerClass
loadBalancerClass: non-existent-class
type: LoadBalancer
selector:
app.kubernetes.io/name: my-example-app
ports:
- protocol: TCP
port: 80
targetPort: 8080
$ kubectl apply -f loadbalancer-service.yaml
service/my-example-service created
$ kubectl patch service my-example-service --subresource=status --type=merge -p '{"status":{"loadBalancer":{"ingress":[{"ip":"192.0.2.4"}]}}}'
Using a non-cloud based load balancer controller
Although LoadBalancer services were originally designed to be backed by
cloud load balancers, Kubernetes can also support them on non-cloud platforms
by using a third-party load balancer controller such as MetalLB.
This solves the security problems associated with externalIPs because the
administrator can configure what ranges of IP addresses the controller will assign
to services, and the controller will ensure that two services can't both use the same
IP.
So, for example, after installing and configuring MetalLB, a cluster administrator could configure a pool of IP addresses for use in the cluster:
apiVersion: metallb.io/v1beta1
kind: IPAddressPool
metadata:
name: production
namespace: metallb-system
spec:
addresses:
- 192.0.2.0/24
autoAssign: true
avoidBuggyIPs: false
After which a user can create a type: LoadBalancer Service and MetalLB will handle the
assignment of the IP address. MetalLB even supports the deprecated loadBalancerIP
field in Service, so the end user can request a specific IP (assuming it is available)
for backward-compatibility with the externalIPs approach, rather than being
assigned one at random:
apiVersion: v1
kind: Service
metadata:
name: my-example-service
spec:
type: LoadBalancer
selector:
app.kubernetes.io/name: my-example-app
ports:
- protocol: TCP
port: 80
targetPort: 8080
loadBalancerIP: "192.0.2.4"
Similar approaches would work with other load balancer controllers. This approach can allow cluster administrators to have control over which IP addresses are assigned, rather than users.
Using Gateway API
Another potential solution is to use an implementation of the Gateway API.
Gateway API allows cluster administrators to define a Gateway resource, which can have an IP address
attached to it via the .spec.addresses field. Since Gateway resources are designed to be managed by
cluster administrators, RBAC rules can be put in place to only allow privileged users to manage them.
An example of how this could look is:
apiVersion: gateway.networking.k8s.io/v1
kind: Gateway
metadata:
name: example-gateway
spec:
gatewayClassName: example-gateway-class
addresses:
- type: IPAddress
value: "192.0.2.4"
---
apiVersion: gateway.networking.k8s.io/v1
kind: HTTPRoute
metadata:
name: example-route
spec:
parentRefs:
- name: example-gateway
rules:
- backendRefs:
- name: example-svc
port: 80
---
apiVersion: v1
kind: Service
metadata:
name: example-svc
spec:
type: ClusterIP
selector:
app.kubernetes.io/name: example-app
ports:
- protocol: TCP
port: 80
targetPort: 8080
The Gateway API project is the next generation of Kubernetes Ingress, Load Balancing, and Service Mesh APIs within Kubernetes. Gateway API was designed to fix the shortcomings of the Service and Ingress resource, making it a very reliable robust solution that is under active development.
Timeline for externalIPs deprecation
The rough timeline for this deprecation is as follows:
- With the release of Kubernetes 1.36, the field was deprecated; Kubernetes now emits warnings when a user uses this field
- About a year later (v1.40 at the earliest) support for
.spec.externalIPswill be disabled in kube-proxy, but users will have a way to opt back in should they require more time to migrate away - About another year later - (v1.43 at the earliest) support will be disabled completely; users won't have a way to opt back in
Kubernetes v1.36: Advancing Workload-Aware Scheduling
AI/ML and batch workloads introduce unique scheduling challenges that go beyond simple Pod-by-Pod scheduling. In Kubernetes v1.35, we introduced the first tranche of workload-aware scheduling improvements, featuring the foundational Workload API alongside basic gang scheduling support built on a Pod-based framework, and an opportunistic batching feature to efficiently process identical Pods.
Kubernetes v1.36 introduces a significant architectural evolution by cleanly separating API concerns:
the Workload API acts as a static template, while the new PodGroup API handles the runtime state.
To support this, the kube-scheduler features a new PodGroup scheduling cycle that enables atomic workload processing
and paves the way for future enhancements. This release also debuts the first iterations of topology-aware scheduling
and workload-aware preemption to advance scheduling capabilities. Additionally,
ResourceClaim support for workloads unlocks Dynamic Resource Allocation
(DRA) for PodGroups. Finally,
to demonstrate real-world readiness, v1.36 delivers the first phase of integration between the Job controller and the new API.
Workload and PodGroup API updates
The Workload API now serves as a static template, while the new PodGroup API describes the runtime object.
Kubernetes v1.36 introduces the Workload and PodGroup APIs as part of the
scheduling.k8s.io/v1alpha2 API group,
completely replacing the previous v1alpha1 API version.
In v1.35, Pod groups and their runtime states were embedded within the Workload resource. The new model decouples these concepts: the Workload now serves as a static template object, while the PodGroup manages the runtime state. This separation also improves performance and scalability as the PodGroup API allows per-replica sharding of status updates.
Because the Workload API acts merely as a template, the kube-scheduler's logic is streamlined.
The scheduler can directly read the PodGroup, which contains all the information required by the scheduler,
without needing to watch or parse the Workload object itself.
Here is what the updated configuration looks like. Workload controllers (such as the Job controller) define the Workload object, which now acts as a static template for your Pod groups:
apiVersion: scheduling.k8s.io/v1alpha2
kind: Workload
metadata:
name: training-job-workload
namespace: some-ns
spec:
# Pod groups are now defined as templates,
# which contains the PodGroup objects' spec fields.
podGroupTemplates:
- name: workers
schedulingPolicy:
gang:
# The gang is schedulable only if 4 pods can run at once
minCount: 4
Controllers then stamp out runtime PodGroup instances based on those templates. The PodGroup runtime object holds the actual scheduling policy and references the template from which it was created. It also has a status containing conditions that mirror the states of individual Pods, reflecting the overall scheduling state of the group:
apiVersion: scheduling.k8s.io/v1alpha2
kind: PodGroup
metadata:
name: training-job-workers-pg
namespace: some-ns
spec:
# The PodGroup references the Workload template it originated from.
# In comparison, .metadata.ownerReferences points to the "true" workload object,
# e.g., a Job.
podGroupTemplateRef:
workload:
workloadName: training-job-workload
podGroupTemplateName: workers
# The actual scheduling policy is placed inside the runtime PodGroup
schedulingPolicy:
gang:
minCount: 4
status:
# The status contains conditions mirroring individual Pod conditions.
conditions:
- type: PodGroupScheduled
status: "True"
lastTransitionTime: 2026-04-03T00:00:00Z
Finally, to bridge this new architecture with individual Pods, the workloadRef field in the Pod API has been replaced
with the schedulingGroup field. When creating Pods, you link them directly to the runtime PodGroup:
apiVersion: v1
kind: Pod
metadata:
name: worker-0
namespace: some-ns
spec:
# The workloadRef field has been replaced by schedulingGroup
schedulingGroup:
podGroupName: training-job-workers-pg
...
By keeping the Workload as a static template and elevating the PodGroup to a first-class, standalone API, we establish a robust foundation for building advanced workload scheduling capabilities in future Kubernetes releases.
PodGroup scheduling cycle and gang scheduling
To efficiently manage these workloads, the kube-scheduler now features a dedicated PodGroup scheduling cycle. Instead of evaluating and reserving resources sequentially Pod-by-Pod, which risks scheduling deadlocks, the scheduler evaluates the group as a unified operation.
When the scheduler pops a PodGroup member from the scheduling queue, regardless of the group's specific policy, it fetches the rest of the queued Pods for that group, sorts them deterministically, and executes an atomic scheduling cycle as follows:
The scheduler takes a single snapshot of the cluster state to prevent race conditions and ensure consistency while evaluating the entire group.
It then attempts to find valid Node placements for all Pods in the group using a PodGroup scheduling algorithm, which leverages the standard Pod-based filtering and scoring phases.
Based on the algorithm's outcome, the scheduling decision is applied atomically for the entire PodGroup.
Success: If the placement is found and group constraints are met, the schedulable member Pods are moved directly to the binding phase together. Any remaining unschedulable Pods are returned to the scheduling queue to wait for available resources so they can join the already scheduled Pods.
(Note: If new Pods are added to a PodGroup after others are already scheduled, the cycle evaluates the new Pods while accounting for the existing ones. Crucially, Pods already assigned to Nodes remain running. The scheduler will not unassign or evict them, even if the group fails to meet its requirements in subsequent cycles.)
Failure: If the group fails to meet its requirements, the entire group is considered unschedulable. None of the Pods are bound, and they are returned to the scheduling queue to retry later after a backoff period.
This cycle acts as the foundation for gang scheduling. When your workload requires strict all-or-nothing placement,
the gang policy leverages this cycle to prevent partial deployments that lead to resource wastage and potential deadlocks.
While the scheduler still holds the Pods in the PreEnqueue until the minCount requirement is met, the actual scheduling phase now relies entirely
on the new PodGroup cycle. Specifically, during the algorithm's execution, the scheduler verifies
that the number of schedulable Pods satisfies the minCount. If the cluster cannot accommodate the required minimum,
none of the pods are bound. The group fails and waits for sufficient resources to free up.
Limitations
The first version of the PodGroup scheduling cycle comes with certain limitations:
For basic homogeneous Pod groups (i.e., those where all Pods have identical scheduling requirements and lack inter-Pod dependencies like affinity, anti-affinity, or topology spread constraints), the algorithm is expected to find a placement if one exists.
For heterogeneous Pod groups, finding a valid placement if one exists is not guaranteed, even when the solution might seem trivial.
For Pod groups with inter-Pod dependencies, finding a valid placement if one exists is not guaranteed.
In addition to the above, for cases involving intra-group dependencies (e.g., when the schedulability of one Pod depends on another group member via inter-Pod affinity), this algorithm may fail to find a placement regardless of cluster state due to its deterministic processing order.
Topology-aware scheduling
For complex distributed workloads like AI/ML training or batch processing, placing Pods randomly across a cluster can introduce significant network latency and bottleneck overall performance.
Topology-aware scheduling addresses this problem by allowing you to define topology constraints directly on a PodGroup, ensuring its Pods are co-located within specific physical or logical domains:
apiVersion: scheduling.k8s.io/v1alpha2
kind: PodGroup
metadata:
name: topology-aware-workers-pg
spec:
schedulingPolicy:
gang:
minCount: 4
# Enforce that the pods are co-located based on the rack topology
schedulingConstraints:
topology:
- key: topology.kubernetes.io/rack
In this example, the kube-scheduler attempts to schedule the Pods across various combinations of Nodes
that match the rack topology constraint. It then selects the optimal placement based on how efficiently
the PodGroup utilizes resources and how many Pods can successfully be scheduled within that domain.
To achieve this, the scheduler extends the PodGroup scheduling cycle with a dedicated placement-based algorithm consisting of three phases:
Generate candidate placements (subsets of Nodes that are theoretically feasible for the PodGroup's assignment) based on the group's scheduling constraints. The topology-aware scheduling plugin uses the new
PlacementGenerateextension point to create these placements.Evaluate each proposed placement to confirm whether the entire PodGroup can actually fit there.
Score all feasible placements to select the best fit for the PodGroup. The topology-aware scheduling plugins use the new
PlacementScoreextension point to score these placements.
Currently, topology-aware scheduling does not trigger Pod preemption to satisfy constraints. However, we plan to integrate workload-aware preemption with topology constraints in the upcoming release.
While Kubernetes v1.36 delivers this foundational topology-aware scheduling, the Kubernetes project is planning
expand its capabilities soon. Future updates will introduce support for multiple topology levels,
soft constraints (preferences), deeper integration with Dynamic Resource Allocation (DRA),
and more robust behavior when paired with the basic scheduling policy.
Workload-aware preemption
To support the new PodGroup scheduling cycle, Kubernetes v1.36 introduces a new type of preemption mechanism called workload-aware preemption. When a PodGroup cannot be scheduled, the scheduler utilizes this mechanism to try making a scheduling of this PodGroup possible.
Compared to the default preemption used in the standard Pod-by-Pod scheduling cycle, this new mechanism treats the entire PodGroup as a single preemptor unit. Instead of evaluating preemption victims on each Node separately, it searches across the entire cluster. This allows the scheduler to preempt Pods from multiple Nodes simultaneously, making enough space to schedule the whole PodGroup afterwards.
Workload-aware preemption also introduces two additional concepts directly to the PodGroup API:
PodGroup
prioritythat overrides the priority of the individual Pods forming the PodGroup.PodGroup
disruptionModethat dictates whether the Pods within a PodGroup can be preempted independently, or if they have to be preempted together in an all-or-nothing fashion.
In Kubernetes v1.36, these fields are only respected by the workload-aware preemption mechanism. The people working on this set of features are hoping to extend support for these fields to other disruption sources, including default preemption used in the Pod-by-Pod scheduling cycle, in future releases.
apiVersion: scheduling.k8s.io/v1alpha2
kind: PodGroup
metadata:
name: victim-pg
spec:
priorityClassName: high-priority
priority: 1000
disruptionMode: PodGroup
In this example, when the scheduler evaluates victim-pg as a potential preemption victim
during a workload-aware preemption cycle, it will use 1000 as its priority and preempt the PodGroup
in a strictly all-or-nothing fashion.
DRA ResourceClaim support for workloads
Since its general availability in Kubernetes v1.34, DRA has enabled Pods to make detailed requests for devices like GPUs, TPUs, and NICs. Requested devices can be shared by multiple Pods requesting the same ResourceClaim by name. Other requests can be replicated through a ResourceClaimTemplate, in which Kubernetes generates one ResourceClaim with a non-deterministic name for each Pod referencing the template. However, large-scale workloads that require certain Pods to share certain devices are currently left to manage creating individual ResourceClaims themselves.
Now, in addition to Pods, PodGroups can represent the replicable unit for a
ResourceClaimTemplate. For ResourceClaimTemplates referenced by one of a
PodGroup's spec.resourceClaims, Kubernetes generates one ResourceClaim for the
entire PodGroup, no matter how many Pods are in the group. When one of a Pod's
spec.resourceClaims for a ResourceClaimTemplate matches one of its PodGroup's
spec.resourceClaims, the Pod's claim resolves to the ResourceClaim generated
for the PodGroup and a ResourceClaim will not be generated for that individual
Pod. A single PodGroupTemplate in a Workload object can express resource
requests which are both copied for each distinct PodGroup and shareable by the
Pods within each group.
The following example shows two Pods requesting the same ResourceClaim generated from a ResourceClaimTemplate for their PodGroup:
apiVersion: scheduling.k8s.io/v1alpha2
kind: PodGroup
metadata:
name: training-job-workers-pg
spec:
...
resourceClaims:
- name: pg-claim
resourceClaimTemplateName: my-claim-template
---
apiVersion: v1
kind: Pod
metadata:
name: topology-aware-workers-pg-pod-1
spec:
...
schedulingGroup:
podGroupName: training-job-workers-pg
resourceClaims:
- name: pg-claim
resourceClaimTemplateName: my-claim-template
---
apiVersion: v1
kind: Pod
metadata:
name: topology-aware-workers-pg-pod-2
spec:
...
schedulingGroup:
podGroupName: training-job-workers-pg
resourceClaims:
- name: pg-claim
resourceClaimTemplateName: my-claim-template
In addition, ResourceClaims referenced by PodGroups, either through
resourceClaimName or the claim generated from resourceClaimTemplateName,
become reserved for the entire PodGroup. Previously, kube-scheduler could only
list individual Pods in a ResourceClaim's status.reservedFor field which is
limited to 256 items. Now, a single PodGroup reference in status.reservedFor
can represent many more than 256 Pods, allowing high-cardinality sharing of
devices.
Together, these changes enable massive workloads with complex topologies to utilize DRA for scalable device management.
Integration with the Job controller
In Kubernetes v1.36, the Job controller can create and manage Workload and PodGroup objects on your behalf, so that Jobs representing a tightly coupled parallel application, such as distributed AI training, are gang-scheduled without any additional tooling. Without this integration, you would have to create the Workload and PodGroup yourself and wire their references into the Pod template. Now, the Job controller automates this process natively.
When the WorkloadWithJob
feature gate is enabled, the Job controller automatically:
creates a Workload and a corresponding runtime PodGroup for each qualifying Job,
sets
.spec.schedulingGrouponto every Pod the Job creates so the scheduler treats them as a single gang, andsets the Job as the owner of the generated objects, so they are garbage-collected when the Job is deleted.
When does the integration kick in?
To keep the first feature iteration predictable, the Job controller only creates a Workload and PodGroup when the Job has a well-defined, fixed shape:
.spec.parallelismis greater than 1.spec.completionModeis set toIndexed.spec.completionsis equal to.spec.parallelismThe
schedulingGroupis not already set on the Pod template.
These conditions describe the class of Jobs that gang scheduling can reason about:
each Pod has a stable identity (Indexed), the gang size is known and fixed at admission time
(parallelism == completions), and no other controller has already claimed scheduling responsibility
(schedulingGroup field is unset). Jobs that do not meet these conditions are scheduled Pod-by-Pod,
exactly as before.
If you set schedulingGroup on the Pod template yourself (for example,
because a higher-level controller is managing the workload), the Job controller leaves
the Pod template alone and does not create its own Workload or PodGroup. This makes the feature
safe to enable in clusters that already use an external batch system.
Here is an example of a Job that qualifies for gang scheduling:
apiVersion: batch/v1
kind: Job
metadata:
name: training-job
namespace: job-ns
spec:
completionMode: Indexed
parallelism: 4
completions: 4
template:
spec:
restartPolicy: Never
containers:
- name: worker
image: registry.example/trainer:latest
The Job controller creates a Workload and a PodGroup owned by this Job,
and every Pod it creates carries a .spec.schedulingGroup that points at the generated PodGroup.
The Pods are then scheduled together once all four can be placed at the same time using
the PodGroup scheduling cycle described earlier in this post.
What's not covered yet
The current constraints limit this integration to static, indexed, fully-parallel Jobs. Support for additional workload shapes, including elastic Jobs and other built-in controllers, is tracked in KEP-5547.
In future Kubernetes releases, this integration will expand to support additional workload controllers, and the current constraints for Jobs may be relaxed.
What's next?
The journey for workload-aware scheduling doesn't stop here. For v1.37, the community is actively working on:
Graduating Workload and PodGroup APIs to Beta: Our primary goal is to mature the Workload and PodGroup APIs to the Beta stage, solidifying their foundational role in the Kubernetes ecosystem. As part of this graduation process, we also plan to introduce
minCountmutability to unlock elastic jobs and allow dynamic workloads to scale efficiently.Multi-level Workload hierarchies: To support complex modern AI workloads like JobSet or Disaggregated Inference via LeaderWorkerSet (LWS), we are working on expanding the architecture to support multi-level hierarchies. We aim to introduce a new API that allows grouping multiple PodGroups into hierarchical structures, directly reflecting the organization of real-world workload controllers.
Graduating advanced scheduling features: We are focused on driving the maturity of the broader workload-aware scheduling ecosystem. This includes bringing existing features, such as topology-aware scheduling and workload-aware preemption, to the Beta stage.
Unified controller integration API: To streamline adoption, we’re working on a controller integration API. This will provide real-world workload controllers with a unified, standardized method for consuming workload-aware scheduling capabilities.
The priority and implementation order of these focus areas are subject to change. Stay tuned for further updates.
Getting started
All below workload-aware scheduling improvements are available as Alpha features in v1.36. To try them out, you must configure the following:
- Prerequisite: Workload and PodGroup API support: Enable the
GenericWorkloadfeature gate on both thekube-apiserverandkube-scheduler, and ensure thescheduling.k8s.io/v1alpha2API group is enabled.
Once the prerequisite is met, you can enable specific features:
- Gang scheduling: Enable the
GangSchedulingfeature gate on thekube-scheduler. - Topology-aware scheduling: Enable the
TopologyAwareWorkloadSchedulingfeature gate on thekube-scheduler. - Workload-aware preemption: Enable the
WorkloadAwarePreemptionfeature gate on thekube-scheduler(requiresGangSchedulingto also be enabled). - DRA ResourceClaim support for workloads: Enable the
DRAWorkloadResourceClaimsfeature gate on thekube-apiserver,kube-controller-manager,kube-schedulerandkubelet. - Workload API integration with the Job controller: Enable the
WorkloadWithJobfeature gate on thekube-apiserverandkube-controller-manager.
We encourage you to try out workload-aware scheduling in your test clusters and share your experiences to help shape the future of Kubernetes scheduling. You can send your feedback by:
- Reaching out via Slack (#workload-aware-scheduling).
- Joining the SIG Scheduling meetings.
- Filing a new issue in the Kubernetes repository.
Learn more
To dive deeper into the architecture and design of these features, read the KEPs:
Kubernetes v1.36: PSI Metrics for Kubernetes Graduates to GA
Since its original implementation in the Linux kernel in 2018, Pressure Stall Information (PSI) has provided users with the high-fidelity signals needed to identify resource saturation before it becomes an outage. Unlike traditional utilization metrics, PSI tells the story of tasks stalled and time lost, all in nicely-packaged percentages of time across the CPU, memory, and I/O.
With the recent release of Kubernetes v1.36, users across the ecosystem have a stable, reliable interface to observe resource contention at the node, pod, and container levels. In this post, we will dive into the improvements and performance testing that proved its readiness for production.
Beyond utilization: why PSI?
Monitoring CPU or memory usage alone can be misleading. A node may report XX% (below 100%) CPU utilization while certain tasks are experiencing severe latency due to scheduling delays. PSI fills this gap by providing:
- Cumulative Totals: Absolute time spent in a stalled state.
- Moving Averages: 10s, 60s, and 300s windows that allow operators to distinguish between transient spikes and sustained resource tension.
Proving stability: performance testing at scale
A common concern when graduating telemetry features is the resource overhead required to collect and serve the metrics. To address this, SIG Node conducted extensive performance validation on high-density workloads (80+ pods) across various machine types.
Our testing focused on two primary scenarios to isolate the impact of the Kubelet and kernel-level collection respectively:
- Kernel PSI ON / Kubelet Feature OFF vs Kernel PSI ON / Kubelet Feature ON (Kubelet overhead)
- Kernel PSI OFF / Kubelet Feature ON vs Kernel PSI ON / Kubelet Feature ON (Kernel overhead)
Scenario 1: The Kubelet Overhead
First, we looked at the kubelet usage on 4 core machines (Case 1). For these, the Linux kernel was already tracking pressure on both clusters by default(psi=1), but we toggled the KubeletPSI feature gate to see if the Kubelet actively querying and exposing these metrics impacted the resource usage. The synchronized bursts seen in the graph are practically identical in both magnitude and frequency, confirming that the Kubelet's collection logic is highly lightweight and blends seamlessly into standard housekeeping cycles. There is no issue about the feature affecting the pre-existing resource use, staying within the normal 0.1 cores or 2.5% of the total node capacity, and is therefore safe for production-scale deployments.
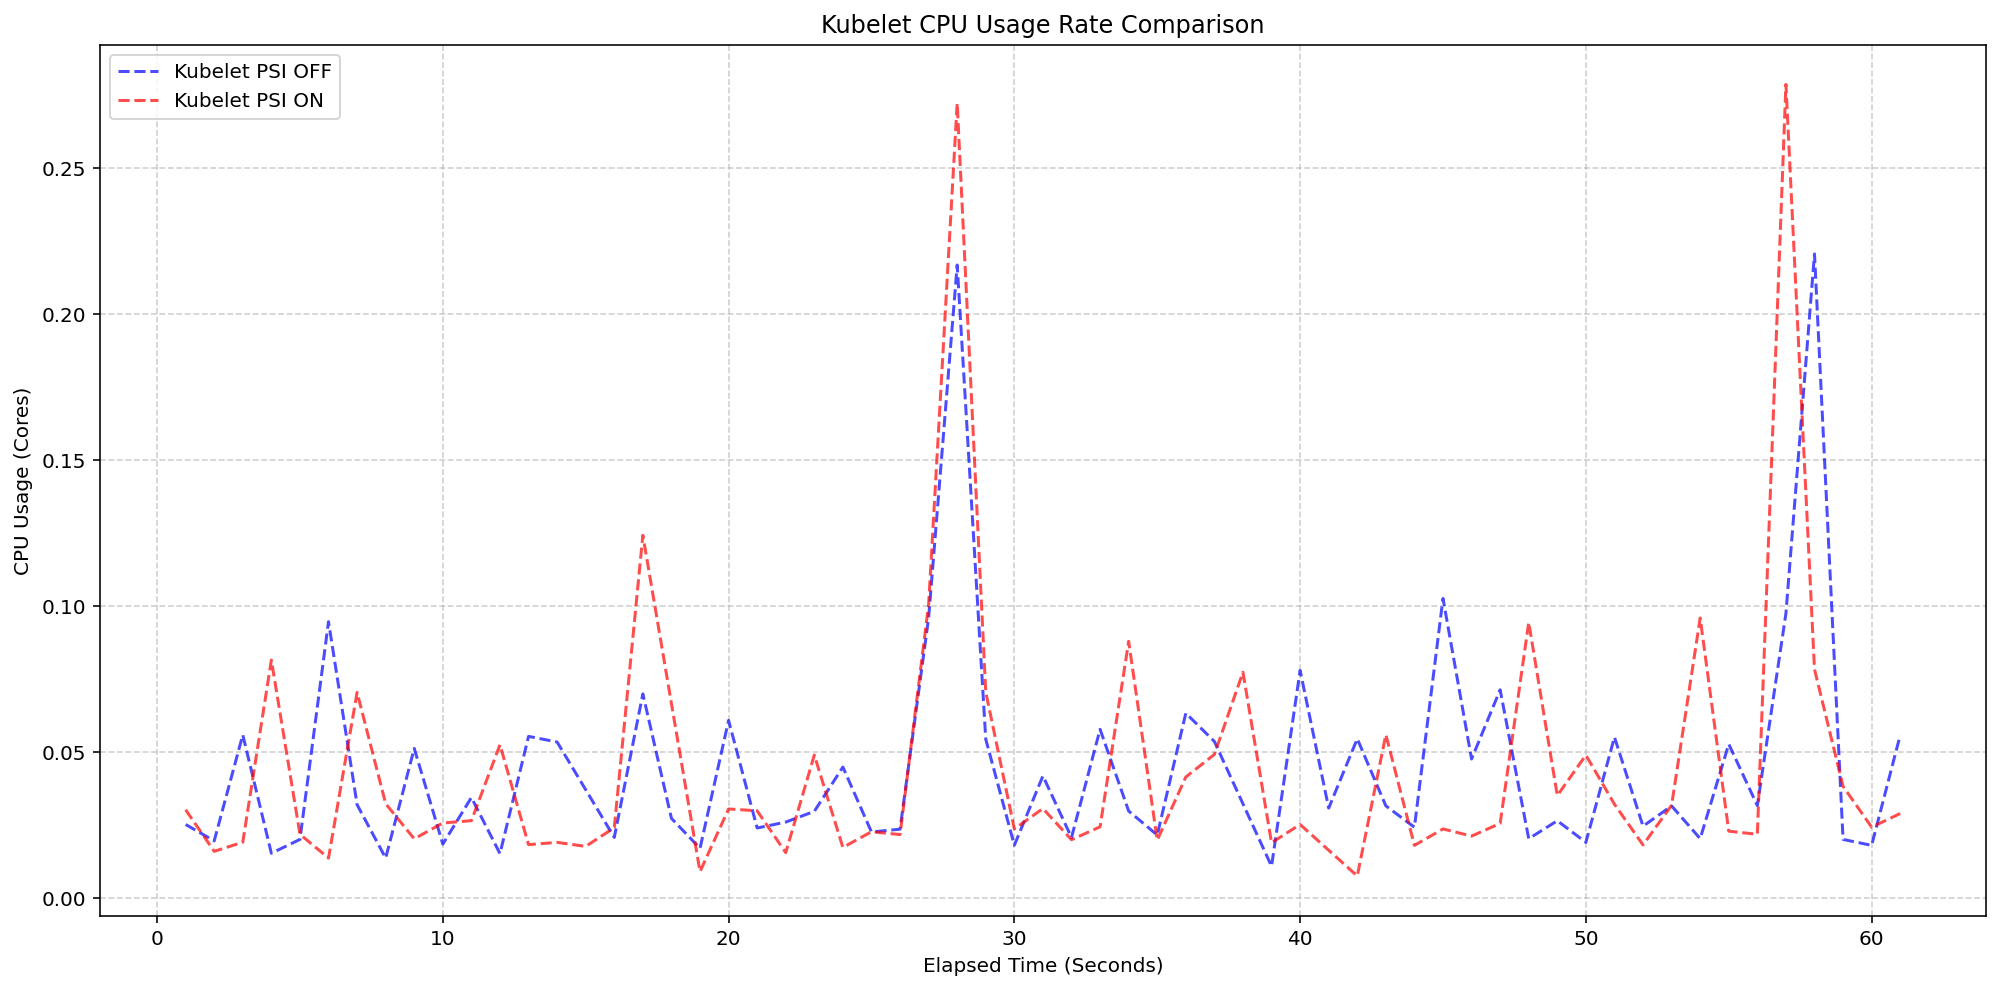
(Case 1) Kubelet CPU Usage Rate Comparison
Figure 2: Kubelet CPU Usage Rate Comparison.
Next, we evaluated the system overhead in the same run. As seen in the following graph, the System CPU usage lines for the Kubelet PSI-enabled (red) follows the same pattern as the Kubelet PSI-disabled (blue) clusters, with a slight expected increase from the baseline. This visualizes that once the OS is tracking PSI, at around 2.5 cores, the act of Kubernetes reading those cgroup metrics is negligible to performance.
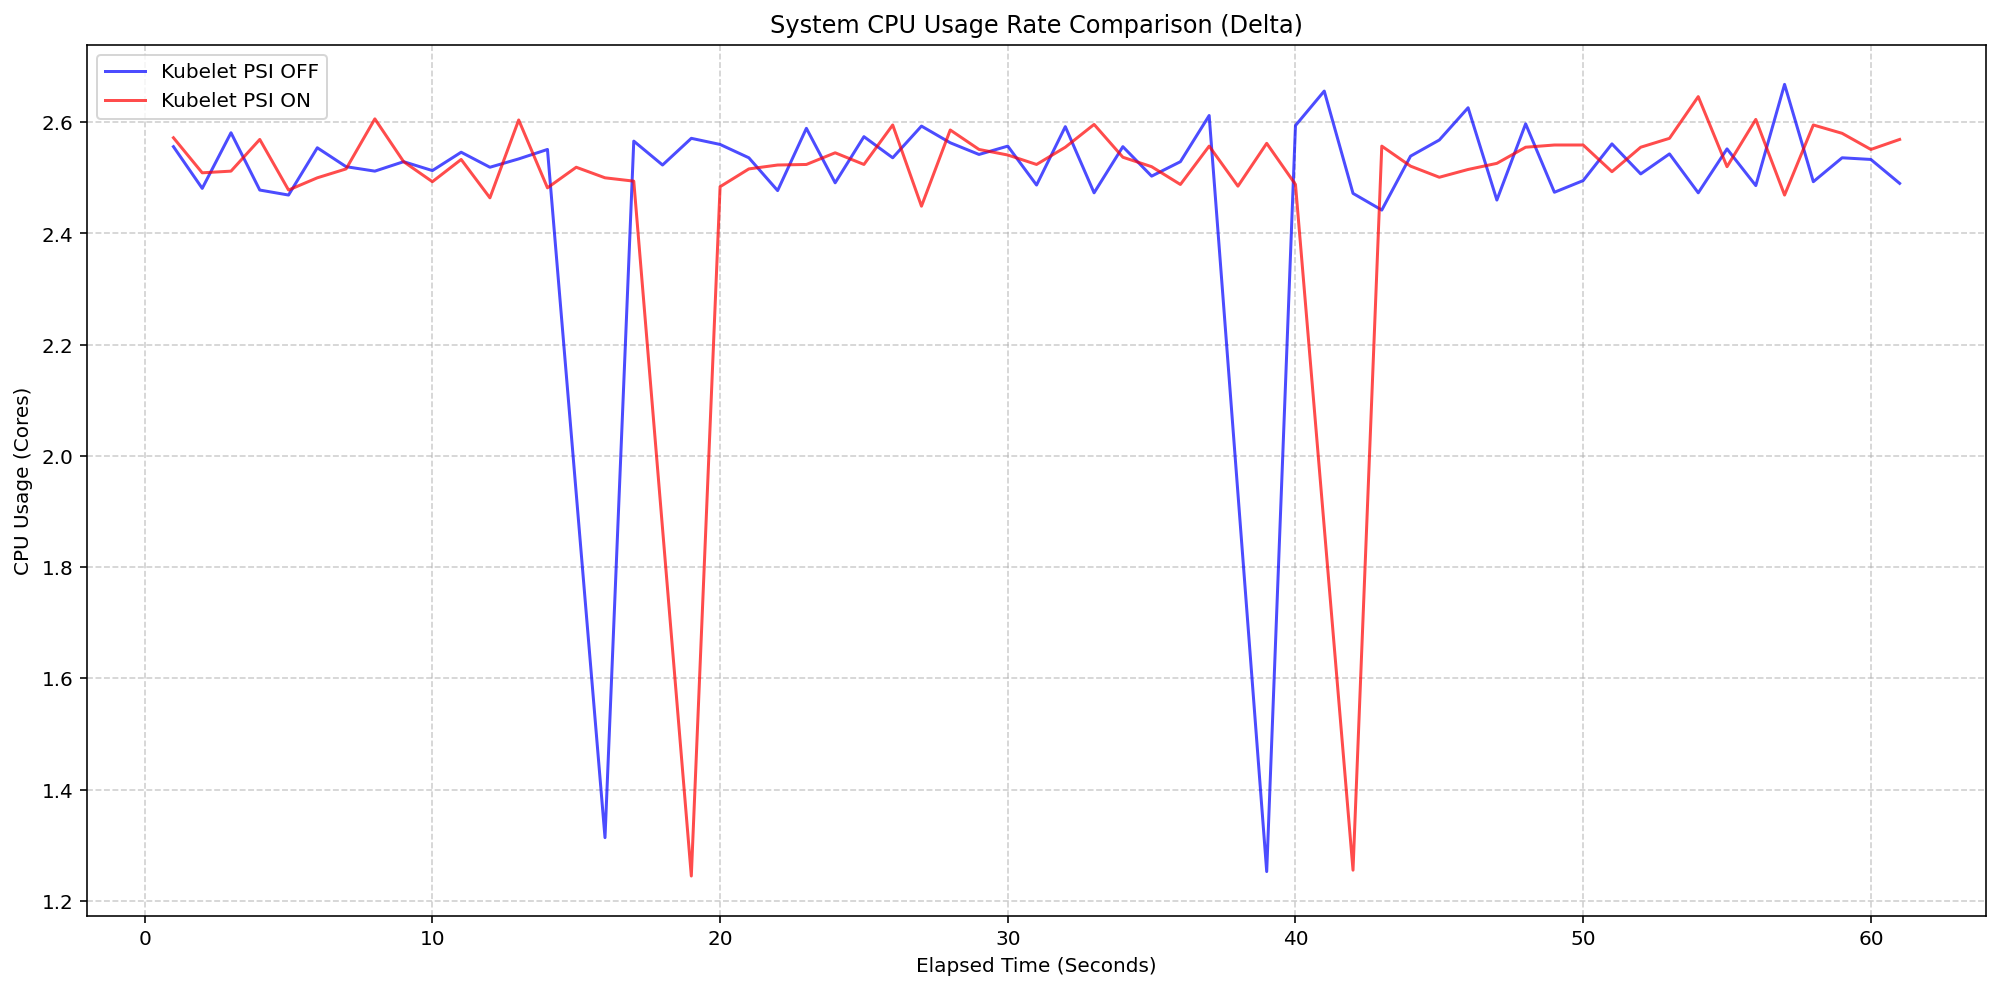
(Case 1) System CPU Usage Rate Comparison
Figure 1: Node System CPU Usage Rate Comparison.
Scenario 2: The Kernel Overhead
Shifting gears, we evaluated the underlying overhead of enabling PSI on the Linux kernel also on a 4 core machine. By comparing a cluster booted with psi=1 (COS default) against a cluster with psi=0, we isolated the exact cost of the OS-level bookkeeping. Even under heavy I/O and CPU load at an 80-pod density, the System CPU delta between the kernel-enabled and kernel-disabled clusters remained consistently between 0.037 cores and 0.125 cores or 0.925% - 3.125% of the total node capacity. There was a single spike to 0.225 cores, or 5.6%, but was controlled back down within a few seconds. This confirms that the internal kernel tracking is highly efficient under load.
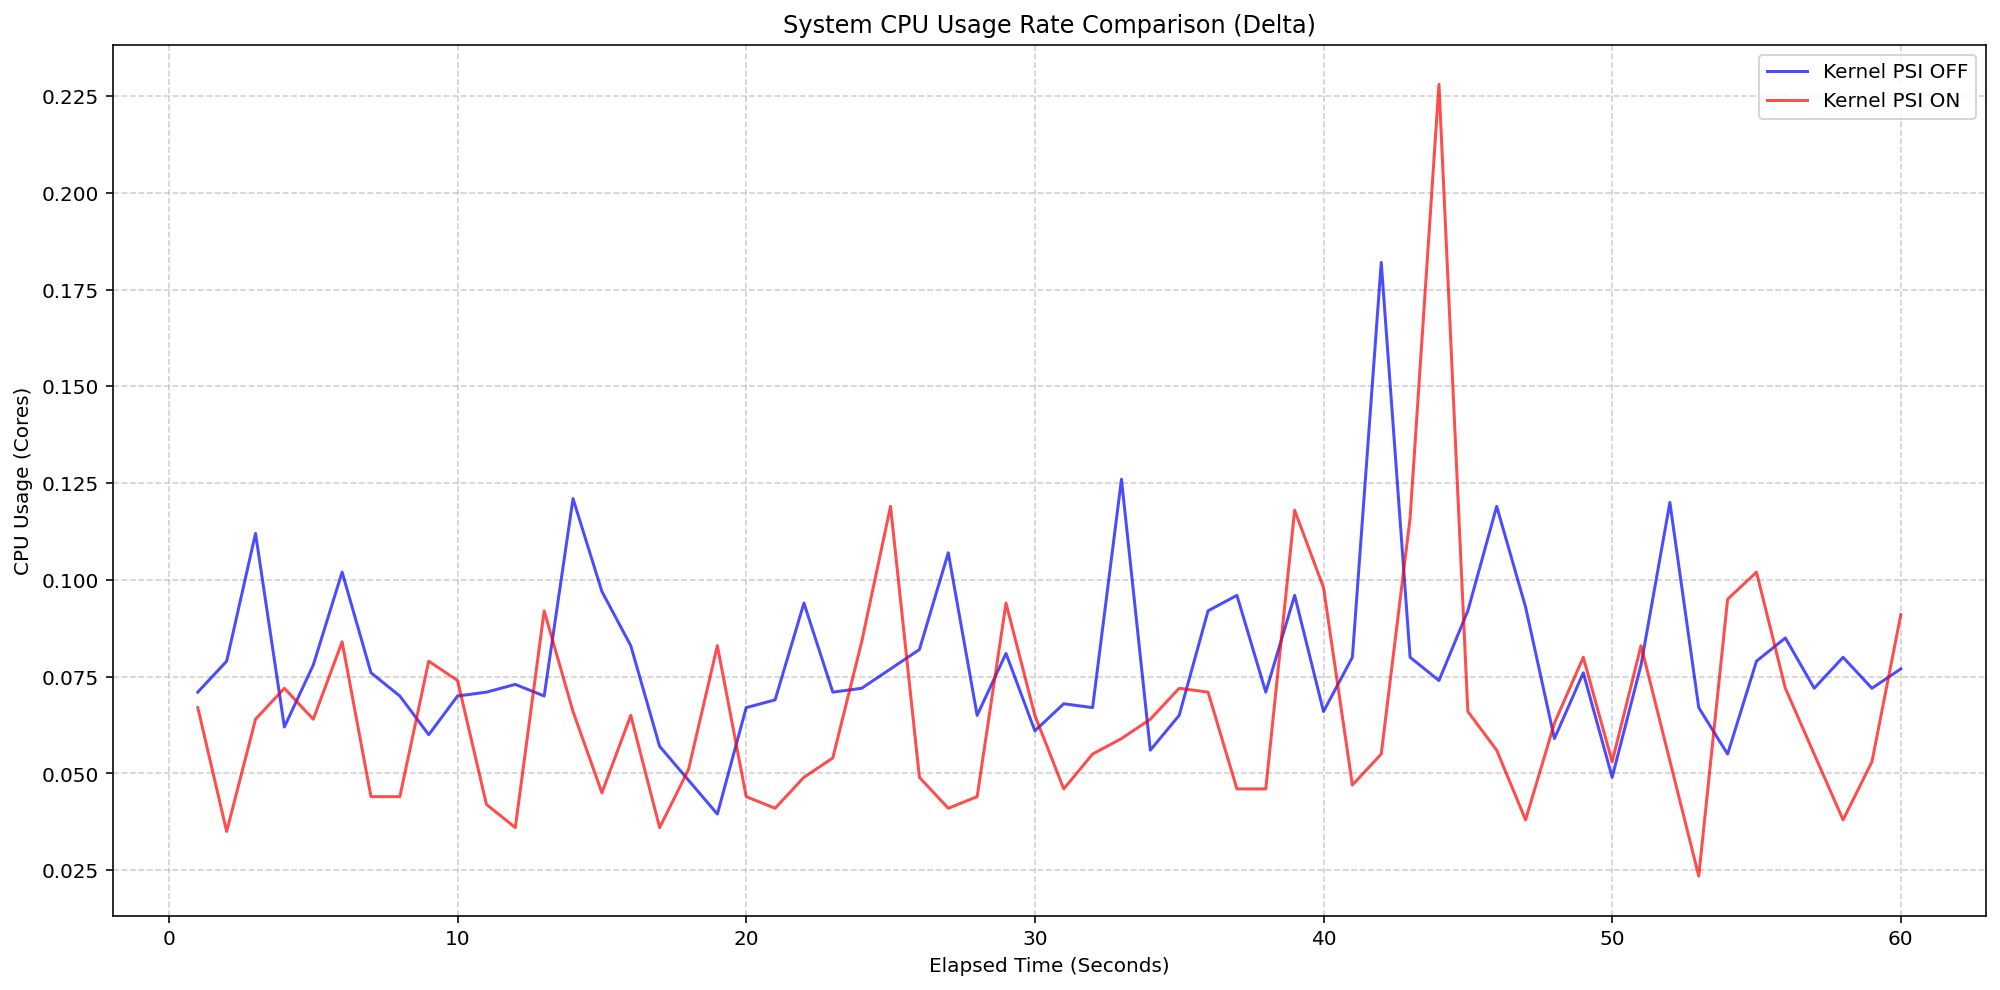
(Case 2) Node System CPU Usage Rate Comparison
Figure 3: Node System CPU Usage Rate Comparison.
Figure 4 zooms in on the kubelet process itself, which serves as the primary collector for these metrics. . The results show that even while the kubelet performs periodic sweeps to aggregate data from the cgroup hierarchy, its CPU usage remains remarkably low with interchangeable spikes and nothing exceeding 0.25 cores or 6.25% of total capacity for longer than a second.
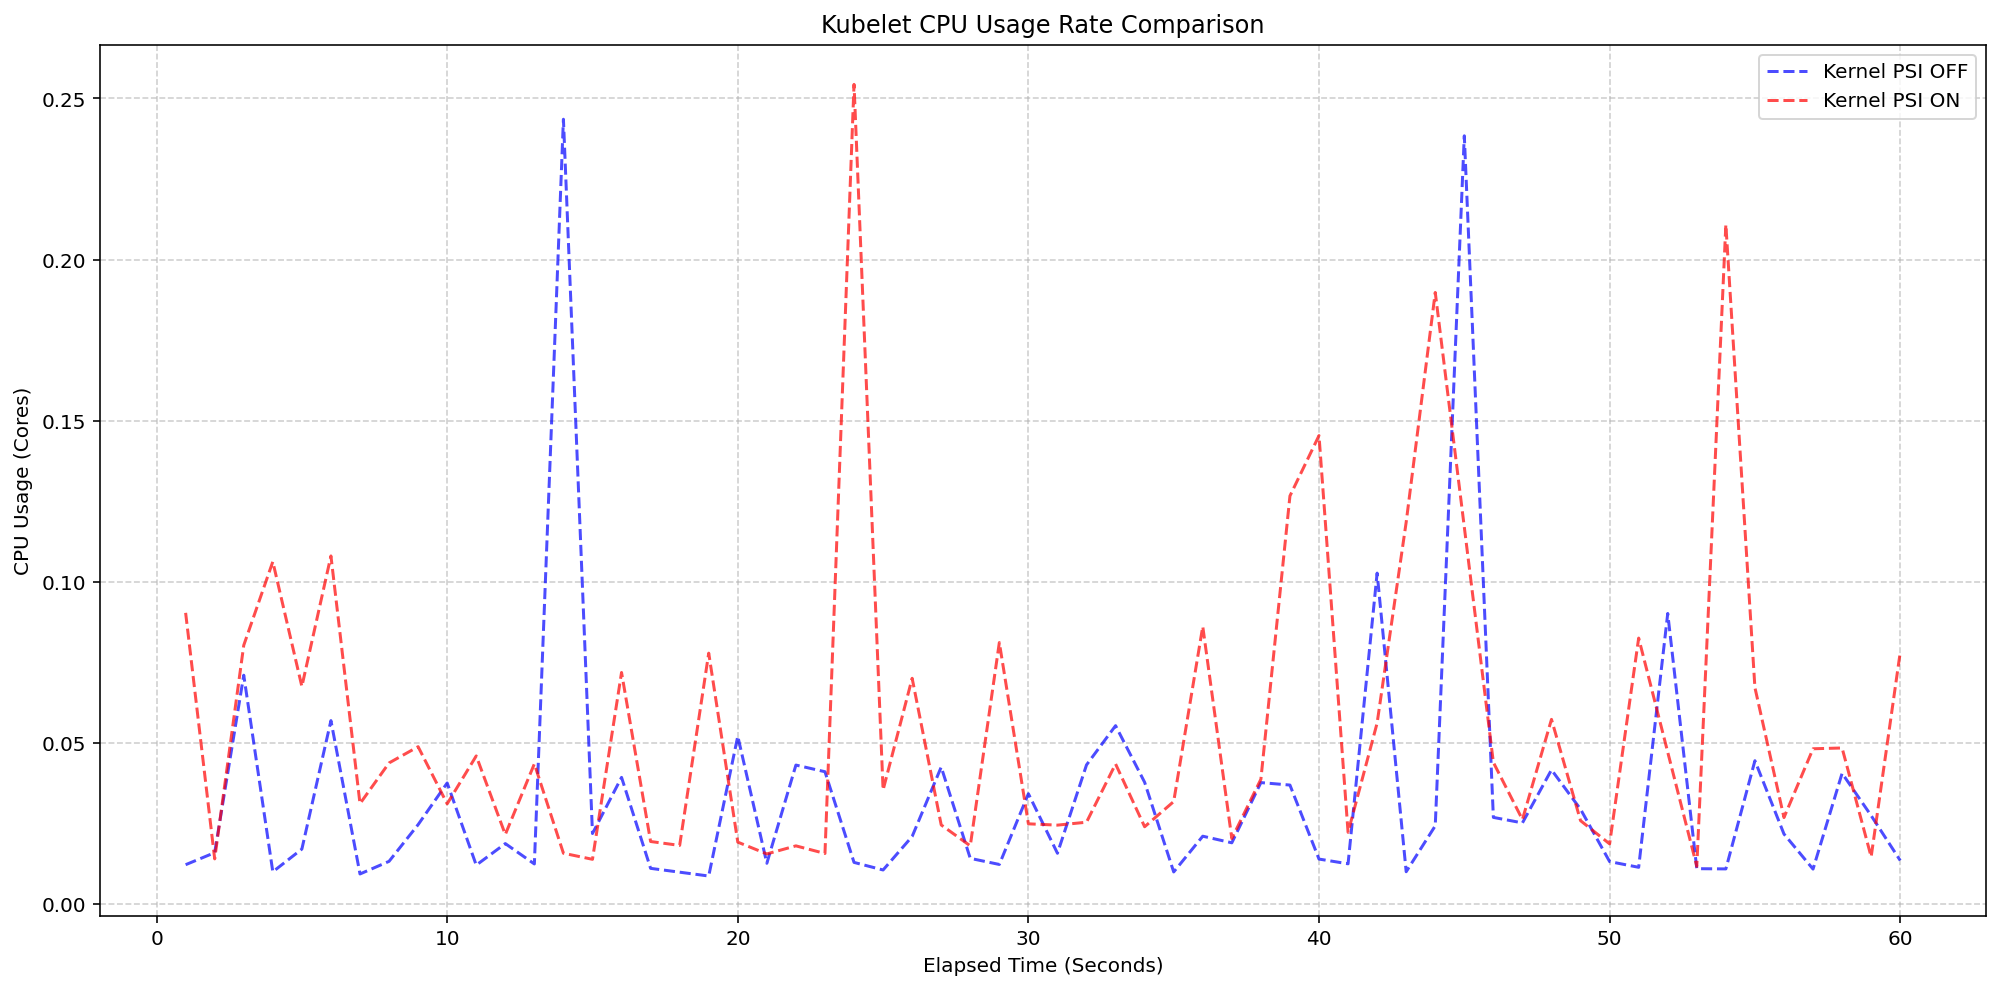
(Case 2) Kubelet CPU Usage Rate Comparison
Figure 4: Kubelet CPU Usage Rate Comparison.
Improvements between beta (1.34) and stable (1.36)
- Smarter Metric Emission for GA: We improved how the Kubelet handles underlying OS support for PSI. Previously, if the feature was enabled in Kubernetes but the underlying Linux kernel didn't support PSI (
psi=0), the Kubelet would emit misleading zero-valued metrics. These could trigger false alarms when read as real metrics instead of missing values. In v1.36, the Kubelet now detects OS-level PSI support via cgroup configurations before reporting. This ensures that pressure metrics are only collected and emitted when they are actually supported by the node, providing cleaner data for monitoring and alerting systems.
Getting started
To use PSI metrics in your Kubernetes cluster, your nodes must meet the following requirements:
- Ensure your nodes are running a Linux kernel version 4.20 or later and are using cgroup v2.
- Ensure PSI is enabled at the OS level (your kernel must be compiled with
CONFIG_PSI=yand must not be booted with thepsi=0parameter).
As of v1.36, Kubelet PSI metrics are generally available and you do not need to opt in to any feature gate.
Once the OS prerequisites are met, you can start scraping the /metrics/cadvisor endpoint with your Prometheus-compatible monitoring solution or query the Summary API to collect and visualize the new PSI metrics. Note that PSI is a Linux-kernel feature, so these metrics are not available on Windows nodes. Your cluster can contain a mix of Linux and Windows nodes, and on the Windows nodes, the kubelet will simply omit the PSI metrics.
If your cluster is running a recent enough version of Kubernetes and you are a privileged node administrator, you can also proxy to the kubelet's HTTP API via the control plane's API server to see real-time pressure data from the Summary API.
Caution: Proxying to the kubelet is a privileged operation. Granting access to it is a security risk, so ensure you have the appropriate administrative permissions before executing these commands.
CONTAINER_NAME="example-container"
kubectl get --raw "/api/v1/nodes/$(kubectl get nodes -o jsonpath='{.items[0].metadata.name}')/proxy/stats/summary" | jq '.pods[].containers[] | select(.name=="'"$CONTAINER_NAME"'") | {name, cpu: .cpu.psi, memory: .memory.psi, io: .io.psi}'
Further reading
If you want to dive deeper into how these metrics are calculated and exposed, check out these resources:
- The official Kernel documentation
- Understanding PSI in the Kubernetes documentation
- cAdvisor Metrics Implementation
Acknowledgements
Support for PSI metrics was developed through the collaborative efforts of SIG Node. Special thanks to all contributors who helped design, implement, test, review, and document this feature across its journey from alpha in v1.33, through beta in v1.34, to GA in v1.36.
To provide feedback on this feature, join the Kubernetes Node Special Interest Group, participate in discussions on the public Slack channel (#sig-node), or file an issue on GitHub.
Feedback
If you have feedback and want to share your experience using this feature, join the discussion:
- SIG Node community page
- Kubernetes Slack in the #sig-node channel
- SIG Node mailing list
SIG Node would love to hear about your experiences using this feature in production!
Kubernetes v1.36: Moving Volume Group Snapshots to GA
Volume group snapshots were introduced as an Alpha feature with the Kubernetes v1.27 release, moved to Beta in v1.32, and to a second Beta in v1.34. We are excited to announce that in the Kubernetes v1.36 release, support for volume group snapshots has reached General Availability (GA).
The support for volume group snapshots relies on a set of extension APIs for group snapshots. These APIs allow users to take crash-consistent snapshots for a set of volumes. Behind the scenes, Kubernetes uses a label selector to group multiple PersistentVolumeClaim objects for snapshotting. A key aim is to allow you to restore that set of snapshots to new volumes and recover your workload based on a crash-consistent recovery point.
This feature is only supported for CSI volume drivers.
An overview of volume group snapshots
Some storage systems provide the ability to create a crash-consistent snapshot of multiple volumes. A group snapshot represents copies made from multiple volumes that are taken at the same point-in-time. A group snapshot can be used either to rehydrate new volumes (pre-populated with the snapshot data) or to restore existing volumes to a previous state (represented by the snapshots).
Why add volume group snapshots to Kubernetes?
The Kubernetes volume plugin system already provides a powerful abstraction that automates the provisioning, attaching, mounting, resizing, and snapshotting of block and file storage. Underpinning all these features is the Kubernetes goal of workload portability.
There was already a VolumeSnapshot API that provides the ability to take a snapshot of a persistent volume to protect against data loss or data corruption. However, some storage systems support consistent group snapshots that allow a snapshot to be taken from multiple volumes at the same point-in-time to achieve write order consistency. This is extremely useful for applications that contain multiple volumes. For example, an application may have data stored in one volume and logs stored in another. If snapshots for these volumes are taken at different times, the application will not be consistent and will not function properly if restored from those snapshots.
While you can quiesce the application first and take individual snapshots sequentially, this process can be time-consuming or sometimes impossible. Consistent group support provides crash consistency across all volumes in the group without the need for application quiescence.
Kubernetes APIs for volume group snapshots
Kubernetes' support for volume group snapshots relies on three API kinds that are used for managing snapshots:
- VolumeGroupSnapshot
- Created by a Kubernetes user (or automation) to request creation of a volume group snapshot for multiple persistent volume claims.
- VolumeGroupSnapshotContent
- Created by the snapshot controller for a dynamically created VolumeGroupSnapshot. It contains information about the provisioned cluster resource (a group snapshot). The object binds to the VolumeGroupSnapshot for which it was created with a one-to-one mapping.
- VolumeGroupSnapshotClass
- Created by cluster administrators to describe how volume group snapshots should be created, including the driver information, the deletion policy, etc.
These three API kinds are defined as CustomResourceDefinitions (CRDs). For the GA release, the API version has been promoted to v1.
What's new in GA?
- The API version for
VolumeGroupSnapshot,VolumeGroupSnapshotContent, andVolumeGroupSnapshotClassis promoted togroupsnapshot.storage.k8s.io/v1. - Enhanced stability and bug fixes based on feedback from the beta releases, including the improvements introduced in v1beta2 for accurate
restoreSizereporting.
How do I use Kubernetes volume group snapshots
Creating a new group snapshot with Kubernetes
Once a VolumeGroupSnapshotClass object is defined and you have volumes you want to snapshot together, you may request a new group snapshot by creating a VolumeGroupSnapshot object.
Label the PVCs you wish to group:
% kubectl label pvc pvc-0 group=myGroup
persistentvolumeclaim/pvc-0 labeled
% kubectl label pvc pvc-1 group=myGroup
persistentvolumeclaim/pvc-1 labeled
For dynamic provisioning, a selector must be set so that the snapshot controller can find PVCs with the matching labels to be snapshotted together.
apiVersion: groupsnapshot.storage.k8s.io/v1
kind: VolumeGroupSnapshot
metadata:
name: snapshot-daily-20260422
namespace: demo-namespace
spec:
volumeGroupSnapshotClassName: csi-groupSnapclass
source:
selector:
matchLabels:
group: myGroup
The VolumeGroupSnapshotClass is required for dynamic provisioning:
apiVersion: groupsnapshot.storage.k8s.io/v1
kind: VolumeGroupSnapshotClass
metadata:
name: csi-groupSnapclass
driver: example.csi.k8s.io
deletionPolicy: Delete
How to use group snapshot for restore
At restore time, request a new PersistentVolumeClaim to be created from a VolumeSnapshot object that is part of a VolumeGroupSnapshot. Repeat this for all volumes that are part of the group snapshot.
apiVersion: v1
kind: PersistentVolumeClaim
metadata:
name: examplepvc-restored-2026-04-22
namespace: demo-namespace
spec:
storageClassName: example-sc
dataSource:
name: snapshot-0962a745b2bf930bb385b7b50c9b08af471f1a16780726de19429dd9c94eaca0
kind: VolumeSnapshot
apiGroup: snapshot.storage.k8s.io
accessModes:
- ReadWriteOncePod
resources:
requests:
storage: 100Mi
As a storage vendor, how do I add support for group snapshots?
To implement the volume group snapshot feature, a CSI driver must:
- Implement a new group controller service.
- Implement group controller RPCs:
CreateVolumeGroupSnapshot,DeleteVolumeGroupSnapshot, andGetVolumeGroupSnapshot. - Add group controller capability
CREATE_DELETE_GET_VOLUME_GROUP_SNAPSHOT.
See the CSI spec and the Kubernetes-CSI Driver Developer Guide for more details.
How can I learn more?
- The design spec for the volume group snapshot feature.
- The code repository for volume group snapshot APIs and controller.
- CSI documentation on the group snapshot feature.
How do I get involved?
This project, like all of Kubernetes, is the result of hard work by many contributors from diverse backgrounds working together. On behalf of SIG Storage, I would like to offer a huge thank you to all the contributors who stepped up over the years to help the project reach GA:
- Ben Swartzlander (bswartz)
- Cici Huang (cici37)
- Darshan Murthy (darshansreenivas)
- Hemant Kumar (gnufied)
- James Defelice (jdef)
- Jan Šafránek (jsafrane)
- Madhu Rajanna (Madhu-1)
- Manish M Yathnalli (manishym)
- Michelle Au (msau42)
- Niels de Vos (nixpanic)
- Leonardo Cecchi (leonardoce)
- Rakshith R (Rakshith-R)
- Raunak Shah (RaunakShah)
- Saad Ali (saad-ali)
- Wei Duan (duanwei33)
- Xing Yang (xing-yang)
- Yati Padia (yati1998)
For those interested in getting involved with the design and development of CSI or any part of the Kubernetes Storage system, join the Kubernetes Storage Special Interest Group (SIG). We always welcome new contributors.
We also hold regular Data Protection Working Group meetings. New attendees are welcome to join our discussions.
Kubernetes v1.36: More Drivers, New Features, and the Next Era of DRA
Dynamic Resource Allocation (DRA) has fundamentally changed how platform administrators handle hardware accelerators and specialized resources in Kubernetes. In the v1.36 release, DRA continues to mature, bringing a wave of feature graduations, critical usability improvements, and new capabilities that extend the flexibility of DRA to native resources like memory and CPU, and support for ResourceClaims in PodGroups.
Driver availability continues to expand. Beyond specialized compute accelerators, the ecosystem includes support for networking and other hardware types, reflecting a move toward a more robust, hardware-agnostic infrastructure.
Whether you are managing massive fleets of GPUs, need better handling of failures, or simply looking for better ways to define resource fallback options, the upgrades to DRA in 1.36 have something for you. Let's dive into the new features and graduations!
Feature graduations
The community has been hard at work stabilizing core DRA concepts. In Kubernetes 1.36, several highly anticipated features have graduated to Beta and Stable.
Prioritized list (stable)
Hardware heterogeneity is a reality in most clusters. With the Prioritized list feature, you can confidently define fallback preferences when requesting devices. Instead of hardcoding a request for a specific device model, you can specify an ordered list of preferences (e.g., "Give me an H100, but if none are available, fall back to an A100"). The scheduler will evaluate these requests in order, drastically improving scheduling flexibility and cluster utilization.
Extended resource support (beta)
As DRA becomes the standard for resource allocation, bridging the gap with legacy systems is crucial. The DRA Extended resource feature allows users to request resources via traditional extended resources on a Pod. This allows for a gradual transition to DRA, meaning cluster operators can migrate clusters to DRA but let application developers adopt the ResourceClaim API on their own schedule.
Partitionable devices (beta)
Hardware accelerators are powerful, and sometimes a single workload doesn't need an entire device. The Partitionable devices feature, provides native DRA support for dynamically carving physical hardware into smaller, logical instances (such as Multi-Instance GPUs) based on workload demands. This allows administrators to safely and efficiently share expensive accelerators across multiple Pods.
Device taints (beta)
Just as you can taint a Kubernetes Node, you can apply taints directly to specific DRA devices. Device taints and tolerations empower cluster administrators to manage hardware more effectively. You can taint faulty devices to prevent them from being allocated to standard claims, or reserve specific hardware for dedicated teams, specialized workloads, and experiments. Ultimately, only Pods with matching tolerations are permitted to claim these tainted devices.
Device binding conditions (beta)
To improve scheduling reliability, the Kubernetes scheduler can use the Binding conditions feature to delay committing a Pod to a Node until its required external resources—such as attachable devices or FPGAs—are fully prepared. By explicitly modeling resource readiness, this prevents premature assignments that can lead to Pod failures, ensuring a much more robust and predictable deployment process.
Resource health status (beta)
Knowing when a device has failed or become unhealthy is critical for workloads running on specialized hardware. With Resource health status, Kubernetes expose device health information directly in the Pod status, giving users and controllers crucial visibility to quickly identify and react to hardware failures. The feature includes support for human-readable health status messages, making it significantly easier to diagnose issues without the need to dive into complex driver logs.
New Features
Beyond stabilizing existing capabilities, v1.36 introduces foundational new features that expand what DRA can do. These are alpha features, so they are behind feature gates that are disabled by default.
ResourceClaim support for workloads
To optimize large-scale AI/ML workloads that rely on strict topological scheduling, the ResourceClaim support for workloads feature enables Kubernetes to seamlessly manage shared resources across massive sets of Pods. By associating ResourceClaims or ResourceClaimTemplates with PodGroups, this feature eliminates previous scaling bottlenecks, such as the limit on the number of pods that can share a claim, and removes the burden of manual claim management from specialized orchestrators.
Node allocatable resources
Why should DRA only be for external accelerators? In v1.36, we are introducing the first iteration of using the DRA APIs to manage node allocatable infrastructure resources (like CPU and memory). By bringing CPU and memory allocation under the DRA umbrella with the DRA Node allocatable resources feature, users can leverage DRA's advanced placement, NUMA-awareness, and prioritization semantics for standard compute resources, paving the way for incredibly fine-grained performance tuning.
DRA resource availability visibility
One of the most requested features from cluster administrators has been better visibility
into hardware capacity. The new
Resource pool status
feature allows you to query the availability of devices in DRA resource pools. By creating a
ResourcePoolStatusRequest object, you get a point-in-time snapshot of device counts
— total, allocated, available, and unavailable — for each pool managed by a given
driver. This enables better integration with dashboards and capacity planning tools.
List types for attributes
ResourceClaim constraint evaluation has changed to work better with scalar
and list values:
matchAttribute now checks for a non-empty intersection, and
distinctAttribute checks for pairwise disjoint values.
An includes() function in CEL has also been introduced,
that lets device selectors keep working more easily when an attribute
changes between scalar and list representations.
(The includes() function is only available in DRA
contexts for expression evaluation).
Deterministic device selection
The Kubernetes scheduler has been updated to evaluate devices using lexicographical ordering based on resource pool and ResourceSlice names. This change empowers drivers to proactively influence the scheduling process, leading to improved throughput and more optimal scheduling decisions. The ResourceSlice controller toolkit automatically generates names that reflect the exact device ordering specified by the driver author.
Discoverable device metadata in containers
Workloads running on nodes with DRA devices often need to discover details about their allocated devices, such as PCI bus addresses or network interface configuration, without querying the Kubernetes API. With Device metadata, Kubernetes defines a standard protocol for how DRA drivers expose device attributes to containers as versioned JSON files at well-known paths. Drivers built with the DRA kubelet plugin library get this behavior transparently; they just provide the metadata and the library handles file layout, CDI bind-mounts, versioning, and lifecycle. This gives applications a consistent, driver-independent way to discover and consume device metadata, eliminating the need for custom controllers or looking up ResourceSlice objects to get metadata via attributes.
What’s next?
This release introduced a wealth of new Dynamic Resource Allocation (DRA) features, and the momentum is only building. As we look ahead, our roadmap focuses on maturing existing features toward beta and stable releases while hardening DRA’s performance, scalability, and reliability. A key priority over the coming cycles will be deep integration with workload aware and topology aware scheduling.
A big goal for us is to migrate users from Device Plugin to DRA, and we want you involved. Whether you are currently maintaining a driver or are just beginning to explore the possibilities, your input is vital. Partner with us to shape the next generation of resource management. Reach out today to collaborate on development, share feedback, or start building your first DRA driver.
Getting involved
A good starting point is joining the WG Device Management Slack channel and meetings, which happen at Americas/EMEA and EMEA/APAC friendly time slots.
Not all enhancement ideas are tracked as issues yet, so come talk to us if you want to help or have some ideas yourself! We have work to do at all levels, from difficult core changes to usability enhancements in kubectl, which could be picked up by newcomers.
Kubernetes v1.36: Server-Side Sharded List and Watch
As Kubernetes clusters grow to tens of thousands of nodes, controllers that watch high-cardinality resources like Pods face a scaling wall. Every replica of a horizontally scaled controller receives the full stream of events from the API server, paying the CPU, memory, and network cost to deserialize everything, only to discard the objects it is not responsible for. Scaling out the controller does not reduce per-replica cost; it multiplies it.
Kubernetes v1.36 introduces server-side sharded list and watch as an alpha feature (KEP-5866). With this feature enabled, the API server filters events at the source so that each controller replica receives only the slice of the resource collection it owns.
The problem with client-side sharding
Some controllers, such as kube-state-metrics, already support horizontal sharding. Each replica is assigned a portion of the keyspace and discards objects that do not belong to it. While this works functionally, it does not reduce the volume of data flowing from the API server:
- N replicas x full event stream: every replica deserializes and processes every event, then throws away what it does not need.
- Network bandwidth scales with replicas, not with shard size.
- CPU spent on deserialization is wasted for the discarded fraction.
Server-side sharded list and watch solves this by moving the filtering upstream into the API server. Each replica tells the API server which hash range it owns, and the API server only sends matching events.
How it works
The feature adds a shardSelector field to ListOptions. Clients specify a
hash range using the shardRange() function:
shardRange(object.metadata.uid, '0x0000000000000000', '0x8000000000000000')
The API server computes a deterministic 64-bit
FNV-1a
hash of the specified field and returns only objects whose hash falls within the
range [start, end). This applies to both list responses and watch event
streams. The hash function produces the same result across all API server
instances, so the feature is safe to use with multiple API server replicas.
Currently supported field paths are object.metadata.uid and
object.metadata.namespace.
Using sharded watches in controllers
Controllers typically use informers to list and watch resources. To shard the
workload, each replica injects the shardSelector into the ListOptions used
by its informers via WithTweakListOptions:
import (
metav1 "k8s.io/apimachinery/pkg/apis/meta/v1"
"k8s.io/client-go/informers"
)
shardSelector := "shardRange(object.metadata.uid, '0x0000000000000000', '0x8000000000000000')"
factory := informers.NewSharedInformerFactoryWithOptions(client, resyncPeriod,
informers.WithTweakListOptions(func(opts *metav1.ListOptions) {
opts.ShardSelector = shardSelector
}),
)
For a 2-replica deployment, the selectors split the hash space in half:
// Replica 0: lower half of the hash space
"shardRange(object.metadata.uid, '0x0000000000000000', '0x8000000000000000')"
// Replica 1: upper half of the hash space
"shardRange(object.metadata.uid, '0x8000000000000000', '0x10000000000000000')"
A single replica can also cover non-contiguous ranges using ||:
"shardRange(object.metadata.uid, '0x0000000000000000', '0x4000000000000000') || " +
"shardRange(object.metadata.uid, '0x8000000000000000', '0xc000000000000000')"
Verifying server support
When the API server honors a shard selector, the list response includes a
shardInfo field in the response metadata that echoes back the applied
selector:
{
"kind": "PodList",
"apiVersion": "v1",
"metadata": {
"resourceVersion": "10245",
"shardInfo": {
"selector": "shardRange(object.metadata.uid, '0x0000000000000000', '0x8000000000000000')"
}
},
"items": [...]
}
If shardInfo is absent, the server did not honor the shard selector and the
client received the complete, unfiltered collection. In this case, the client
should be prepared to handle the full result set, for example by applying
client-side filtering to discard objects outside its assigned shard range.
Getting involved
This feature is in alpha and requires enabling the ShardedListAndWatch feature
gate on the API server. We are looking for feedback from controller authors and
operators running large clusters.
If you have questions or feedback, join the #sig-api-machinery channel on
Kubernetes Slack.
Kubernetes v1.36: Declarative Validation Graduates to GA
In Kubernetes v1.36, Declarative Validation for Kubernetes native types has reached General Availability (GA).
For users, this means more reliable, predictable, and better-documented APIs. By moving to a declarative model, the project also unlocks the future ability to publish validation rules via OpenAPI and integrate with ecosystem tools like Kubebuilder. For contributors and ecosystem developers, this replaces thousands of lines of handwritten validation code with a unified, maintainable framework.
This post covers why this migration was necessary, how the declarative validation framework works, and what new capabilities come with this GA release.
The Motivation: Escaping the "Handwritten" Technical Debt
For years, the validation of Kubernetes native APIs relied almost entirely on handwritten Go code. If a field needed to be bounded by a minimum value, or if two fields needed to be mutually exclusive, developers had to write explicit Go functions to enforce those constraints.
As the Kubernetes API surface expanded, this approach led to several systemic issues:
- Technical Debt: The project accumulated roughly 18,000 lines of boilerplate validation code. This code was difficult to maintain, error-prone, and required intense scrutiny during code reviews.
- Inconsistency: Without a centralized framework, validation rules were sometimes applied inconsistently across different resources.
- Opaque APIs: Handwritten validation logic was difficult to discover or analyze programmatically. This meant clients and tooling couldn't predictably know validation rules without consulting the source code or encountering errors at runtime.
The solution proposed by SIG API Machinery was Declarative Validation: using Interface Definition Language (IDL) tags (specifically +k8s: marker tags) directly within types.go files to define validation rules.
Enter validation-gen
At the core of the declarative validation feature is a new code generator called validation-gen. Just as Kubernetes uses generators for deep copies, conversions, and defaulting, validation-gen parses +k8s: tags and automatically generates the corresponding Go validation functions.
These generated functions are then registered seamlessly with the API scheme. The generator is designed as an extensible framework, allowing developers to plug in new "Validators" by describing the tags they parse and the Go logic they should produce.
A Comprehensive Suite of +k8s: Tags
The declarative validation framework introduces a comprehensive suite of marker tags that provide rich validation capabilities highly optimized for Go types. For a full list of supported tags, check out the official documentation. Here is a catalog of some of the most common tags you will now see in the Kubernetes codebase:
- Presence:
+k8s:optional,+k8s:required - Basic Constraints:
+k8s:minimum=0,+k8s:maximum=100,+k8s:maxLength=16,+k8s:format=k8s-short-name - Collections:
+k8s:listType=map,+k8s:listMapKey=type - Unions:
+k8s:unionMember,+k8s:unionDiscriminator - Immutability:
+k8s:immutable,+k8s:update=[NoSet, NoModify, NoClear]
Example Usage:
type ReplicationControllerSpec struct {
// +k8s:optional
// +k8s:minimum=0
Replicas *int32 `json:"replicas,omitempty"`
}
By placing these tags directly above the field definitions, the constraints are self-documenting and immediately visible to anyone reading the type definitions.
Advanced Capabilities: "Ambient Ratcheting"
One of the most substantial outcomes of this work is that validation ratcheting is now a standard, ambient part of the API. In the past, if we needed to tighten validation, we had to first add handwritten ratcheting code, wait a release, and then tighten the validation to avoid breaking existing objects.
With declarative validation, this safety mechanism is built-in. If a user updates an existing object, the validation framework compares the incoming object with the oldObject. If a specific field's value is semantically equivalent to its prior state (i.e., the user didn't change it), the new validation rule is bypassed. This "ambient ratcheting" means we can loosen or tighten validation immediately and in the least disruptive way possible.
Scaling API Reviews with kube-api-linter
Reaching GA required absolute confidence in the generated code, but our vision extends beyond just validation. Declarative validation is a key part of a comprehensive approach to making API review easier, more consistent, and highly scalable.
By moving validation rules out of opaque Go functions and into structured markers, we are empowering tools like kube-api-linter. This linter can now statically analyze API types and enforce API conventions automatically, significantly reducing the manual burden on SIG API Machinery reviewers and providing immediate feedback to contributors.
What's next?
With the release of Kubernetes v1.36, Declarative Validation graduates to General Availability (GA). As a stable feature, the associated DeclarativeValidation feature gate is now enabled by default. It has become the primary mechanism for adding new validation rules to Kubernetes native types.
Looking forward, the project is committed to adopting declarative validation even more extensively. This includes migrating the remaining legacy handwritten validation code for established APIs and requiring its use for all new APIs and new fields. This ongoing transition will continue to shrink the codebase's complexity while enhancing the consistency and reliability of the entire Kubernetes API surface.
Beyond the core migration, declarative validation also unlocks an exciting future for the broader ecosystem. Because validation rules are now defined as structured markers rather than opaque Go code, they can be parsed and reflected in the OpenAPI schemas published by the Kubernetes API server. This paves the way for tools like kubectl, client libraries, and IDEs to perform rich client-side validation before a request is ever sent to the cluster. The same declarative framework can also be consumed by ecosystem tools like Kubebuilder, enabling a more consistent developer experience for authors of Custom Resource Definitions (CRDs).
Getting involved
The migration to declarative validation is an ongoing effort. While the framework itself is GA, there is still work to be done migrating older APIs to the new declarative format.
If you are interested in contributing to the core of Kubernetes API Machinery, this is a fantastic place to start. Check out the validation-gen documentation, look for issues tagged with sig/api-machinery, and join the conversation in the #sig-api-machinery and #sig-api-machinery-dev-tools channels on Kubernetes Slack (for an invitation, visit https://slack.k8s.io/). You can also attend the SIG API Machinery meetings to get involved directly.
Acknowledgments
A huge thank you to everyone who helped bring this feature to GA:
- Tim Hockin
- Joe Betz
- Aaron Prindle
- Lalit Chauhan
- David Eads
- Darshan Murthy
- Jordan Liggitt
- Patrick Ohly
- Maciej Szulik
- Wojciech Tyczynski
- Joel Speed
- Bryce Palmer
And the many others across the Kubernetes community who contributed along the way.
Welcome to the declarative future of Kubernetes validation!
Kubernetes v1.36: Admission Policies That Can't Be Deleted
If you've ever tried to enforce a security policy across a fleet of Kubernetes clusters, you've probably run into a frustrating chicken-and-egg problem. Your admission policies are API objects, which means they don't exist until someone creates them, and they can be deleted by anyone with the right permissions. There's always a window during cluster bootstrap where your policies aren't active yet, and there's no way to prevent a privileged user from removing them.
Kubernetes v1.36 introduces an alpha feature that addresses this: manifest-based admission control. It lets you define admission webhooks and CEL-based policies as files on disk, loaded by the API server at startup, before it serves any requests.
The gap we're closing
Most Kubernetes policy enforcement today works through the API. You create a ValidatingAdmissionPolicy or a webhook configuration as an API object, and the admission controller picks it up. This works well in steady state, but it has some fundamental limitations.
During cluster bootstrap, there's a gap between when the API server starts serving requests and when your policies are created and active. If you're restoring from a backup or recovering from an etcd failure, that gap can be significant.
There's also a self-protection problem. Admission webhooks and policies can't intercept operations on their own configuration resources. Kubernetes skips invoking webhooks on types like ValidatingWebhookConfiguration to avoid circular dependencies. That means a sufficiently privileged user can delete your critical admission policies, and there's nothing in the admission chain to stop them.
We - Kubernetes SIG API Machinery - wanted a way to say "these policies are always on, full stop."
How it works
You add a staticManifestsDir field to the AdmissionConfiguration file
that you already pass to the API server via --admission-control-config-file.
Point it at a directory, drop your policy YAML files in there, and the API
server loads them before it starts serving.
apiVersion: apiserver.config.k8s.io/v1
kind: AdmissionConfiguration
plugins:
- name: ValidatingAdmissionPolicy
configuration:
apiVersion: apiserver.config.k8s.io/v1
kind: ValidatingAdmissionPolicyConfiguration
staticManifestsDir: "/etc/kubernetes/admission/validating-policies/"
The manifest files are standard Kubernetes resource definitions. The only
requirement is that all the objects that these manifests define must have names ending in .static.k8s.io.
This reserved suffix prevents collisions with API-based configurations and
makes it easy to tell where an admission decision came from when you're
looking at metrics or audit logs.
Here's a complete example that denies privileged containers outside kube-system:
apiVersion: admissionregistration.k8s.io/v1
kind: ValidatingAdmissionPolicy
metadata:
name: "deny-privileged.static.k8s.io"
annotations:
kubernetes.io/description: "Deny launching privileged pods, anywhere this policy is applied"
spec:
failurePolicy: Fail
matchConstraints:
resourceRules:
- apiGroups: [""]
apiVersions: ["v1"]
operations: ["CREATE", "UPDATE"]
resources: ["pods"]
variables:
- name: allContainers
expression: >-
object.spec.containers +
(has(object.spec.initContainers) ? object.spec.initContainers : []) +
(has(object.spec.ephemeralContainers) ? object.spec.ephemeralContainers : [])
validations:
- expression: >-
!variables.allContainers.exists(c,
has(c.securityContext) && has(c.securityContext.privileged) &&
c.securityContext.privileged == true)
message: "Privileged containers are not allowed"
---
apiVersion: admissionregistration.k8s.io/v1
kind: ValidatingAdmissionPolicyBinding
metadata:
name: "deny-privileged-binding.static.k8s.io"
annotations:
kubernetes.io/description: "Bind deny-privileged policy to all namespaces except kube-system"
spec:
policyName: "deny-privileged.static.k8s.io"
validationActions:
- Deny
matchResources:
namespaceSelector:
matchExpressions:
- key: "kubernetes.io/metadata.name"
operator: NotIn
values: ["kube-system"]
Protecting what couldn't be protected before
The part we're most excited about is the ability to intercept operations on admission configuration resources themselves.
With API-based admission, webhooks and policies are never invoked on types like ValidatingAdmissionPolicy or ValidatingWebhookConfiguration. That restriction exists for good reason: if a webhook could reject changes to its own configuration, you could end up locked out with no way to fix it through the API.
Manifest-based policies don't have that problem. If a bad policy is blocking something it shouldn't, you fix the file on disk and the API server picks up the change. There's no circular dependency because the recovery path doesn't go through the API.
This means you can write a manifest-based policy that prevents deletion of your critical API-based admission policies. For platform teams managing shared clusters, this is a significant improvement. You can now guarantee that your baseline security policies can't be removed by a cluster admin, accidentally or otherwise.
Here's what that looks like in practice. This policy prevents any
modification or deletion of admission resources that carry the
platform.example.com/protected: "true" label:
apiVersion: admissionregistration.k8s.io/v1
kind: ValidatingAdmissionPolicy
metadata:
name: "protect-policies.static.k8s.io"
annotations:
kubernetes.io/description: "Prevent modification or deletion of protected admission resources"
spec:
failurePolicy: Fail
matchConstraints:
resourceRules:
- apiGroups: ["admissionregistration.k8s.io"]
apiVersions: ["*"]
operations: ["DELETE", "UPDATE"]
resources:
- "validatingadmissionpolicies"
- "validatingadmissionpolicybindings"
- "validatingwebhookconfigurations"
- "mutatingwebhookconfigurations"
validations:
- expression: >-
!has(oldObject.metadata.labels) ||
!('platform.example.com/protected' in oldObject.metadata.labels) ||
oldObject.metadata.labels['platform.example.com/protected'] != 'true'
message: "Protected admission resources cannot be modified or deleted"
---
apiVersion: admissionregistration.k8s.io/v1
kind: ValidatingAdmissionPolicyBinding
metadata:
name: "protect-policies-binding.static.k8s.io"
annotations:
kubernetes.io/description: "Bind protect-policies policy to all admission resources"
spec:
policyName: "protect-policies.static.k8s.io"
validationActions:
- Deny
With this in place, any API-based admission policy or webhook configuration
labeled platform.example.com/protected: "true" is shielded from tampering.
The protection itself lives on disk and can't be removed through the API.
A few things to know
Manifest-based configurations are intentionally self-contained. They can't
reference API resources, which means no paramKind for policies, no
Service references for admission webhooks (instead they are URL-only),
and bindings may only reference
policies in the same manifest set. These restrictions exist because the
configurations need to work without any cluster state, including at startup
before etcd is available.
If you run multiple API server instances, each one loads its own manifest files independently. There's no cross-server synchronization built in. This is the same model as other file-based API server configurations like encryption at rest. When this feature is enabled, Kubernetes exposes a configuration hash as a label on relevant metrics, so you can detect drift.
Files are watched for changes at runtime, so you don't need to restart the API server to update policies. If you update a manifest file, the API server validates the new configuration and swaps it in atomically. If validation fails, it keeps the previous good configuration and logs the error. This means you can roll out policy changes across your fleet using standard configuration management tools (Ansible, Puppet, or even mounted ConfigMaps) without any API server downtime.
The initial load at startup is stricter: if any manifest is invalid, the API server won't start. This is intentional. At startup, failing fast is safer than running without your expected policies.
Try it out
To try this in Kubernetes v1.36:
- Enable the
ManifestBasedAdmissionControlConfigfeature gate for each kube-apiserver. - Create a directory with your static manifest files. If you need to mount that in to the Pod where the API server runs, do that too. Read-only is fine.
- Configure
staticManifestsDirin yourAdmissionConfigurationwith the directory path. - Start the API server with
--admission-control-config-filepointing to yourAdmissionConfigurationfile.
The full documentation is at Manifest-Based Admission Control, and you can follow KEP-5793 for ongoing progress.
We'd love to hear your feedback. Reach out on the #sig-api-machinery channel on Kubernetes Slack (for an invitation, visit https://slack.k8s.io/).
How to get involved
If you're interested in contributing to this feature or other SIG API Machinery projects, join us on #sig-api-machinery on Kubernetes Slack. You're also welcome to attend the SIG API Machinery meetings, held every other Wednesday.
Kubernetes v1.36: Pod-Level Resource Managers (Alpha)
Kubernetes v1.36 introduces
Pod-Level Resource Managers
as an alpha feature, bringing a more flexible and powerful resource management
model to performance-sensitive workloads. This enhancement extends the kubelet's
Topology, CPU, and Memory Managers to support pod-level resource specifications
(.spec.resources), evolving them from a strictly per-container allocation
model to a pod-centric one.
Why do we need pod-level resource managers?
When running performance-critical workloads such as machine learning (ML) training, high-frequency trading applications, or low-latency databases, you often need exclusive, NUMA-aligned resources for your primary application containers to ensure predictable performance.
However, modern Kubernetes pods rarely consist of just one container. They frequently include sidecar containers for logging, monitoring, service meshes, or data ingestion.
Before this feature, this created a trade-off, to get NUMA-aligned, exclusive resources for your main application, you had to allocate exclusive, integer-based CPU resources to every container in the pod. This might be wasteful for lightweight sidecars. If you didn't do this, you forfeited the pod's Guaranteed Quality of Service (QoS) class entirely, losing the performance benefits.
Introducing pod-level resource managers
Enabling pod-level resources support for the resource managers (via the
PodLevelResourceManagers and PodLevelResources feature gates) allows the
kubelet to create hybrid resource allocation models. This brings flexibility
and efficiency to high-performance workloads without sacrificing NUMA alignment.
Real-world use cases
Here are a few practical scenarios demonstrating how this feature can be applied, depending on the configured Topology Manager scope:
1. Tightly-coupled database (Topology manager's pod scope)
Consider a latency-sensitive database pod that includes a main database container, a local metrics exporter, and a backup agent sidecar.
When configured with the pod Topology Manager scope, the kubelet performs a
single NUMA alignment based on the entire pod's budget. The database container
gets its exclusive CPU and memory slices from that NUMA node. The remaining
resources from the pod's budget form a new pod shared pool. The metrics
exporter and backup agent run in this pod shared pool. They share resources with
each other, but they are strictly isolated from the database's exclusive slices
and the rest of the node.
This allows you to safely co-locate auxiliary containers on the same NUMA node as your primary workload without wasting dedicated cores on them.
apiVersion: v1
kind: Pod
metadata:
name: tightly-coupled-database
spec:
# Pod-level resources establish the overall budget and NUMA alignment size.
resources:
requests:
cpu: "8"
memory: "16Gi"
limits:
cpu: "8"
memory: "16Gi"
initContainers:
- name: metrics-exporter
image: metrics-exporter:v1
restartPolicy: Always
- name: backup-agent
image: backup-agent:v1
restartPolicy: Always
containers:
- name: database
image: database:v1
# This Guaranteed container gets an exclusive 6 CPU slice from the pod's budget.
# The remaining 2 CPUs and 4Gi memory form the pod shared pool for the sidecars.
resources:
requests:
cpu: "6"
memory: "12Gi"
limits:
cpu: "6"
memory: "12Gi"
2. ML workload with infrastructure sidecars (Topology manager's container scope)
Imagine a pod running a GPU-accelerated ML training workload alongside a generic service mesh sidecar.
Under the container Topology Manager scope, the kubelet evaluates each
container individually. You can grant the ML container exclusive, NUMA-aligned
CPUs and Memory for maximum performance. Meanwhile, the service mesh sidecar
doesn't need to be NUMA-aligned; it can run in the general node-wide shared
pool. The collective resource consumption is still safely bounded by the overall
pod limits, but you only allocate NUMA-aligned, exclusive resources to the
specific containers that actually require them.
apiVersion: v1
kind: Pod
metadata:
name: ml-workload
spec:
# Pod-level resources establish the overall budget constraint.
resources:
requests:
cpu: "4"
memory: "8Gi"
limits:
cpu: "4"
memory: "8Gi"
initContainers:
- name: service-mesh-sidecar
image: service-mesh:v1
restartPolicy: Always
containers:
- name: ml-training
image: ml-training:v1
# Under the 'container' scope, this Guaranteed container receives exclusive,
# NUMA-aligned resources, while the sidecar runs in the node's shared pool.
resources:
requests:
cpu: "3"
memory: "6Gi"
limits:
cpu: "3"
memory: "6Gi"
CPU quotas (CFS) and isolation
When running these mixed workloads within a pod, isolation is enforced differently depending on the allocation:
- Exclusive containers: Containers granted exclusive CPU slices have their CPU CFS quota enforcement disabled at the container level, allowing them to run without being throttled by the Linux scheduler.
- Pod shared pool containers: Containers falling into the pod shared pool have CPU CFS quotas enforced at the pod level, ensuring they do not consume more than the leftover pod budget.
How to enable Pod-Level Resource Managers
Using this feature requires Kubernetes v1.36 or newer. To enable it, you must configure the kubelet with the appropriate feature gates and policies:
- Enable the
PodLevelResourcesandPodLevelResourceManagersfeature gates. - Configure the
Topology Manager
with a policy other than
none(i.e.,best-effort,restricted, orsingle-numa-node). - Set the
Topology Manager scope
to either
podorcontainerusing thetopologyManagerScopefield in theKubeletConfiguration. - Configure the
CPU Manager with
the
staticpolicy. - Configure the
Memory Manager with the
Staticpolicy.
Observability
To help cluster administrators monitor and debug these new allocation models, we have introduced several new kubelet metrics when the feature gate is enabled:
resource_manager_allocations_total: Counts the total number of exclusive resource allocations performed by a manager. Thesourcelabel ("pod" or "node") distinguishes between allocations drawn from the node-level pool versus a pre-allocated pod-level pool.resource_manager_allocation_errors_total: Counts errors encountered during exclusive resource allocation, distinguished by the intended allocationsource("pod" or "node").resource_manager_container_assignments: Tracks the cumulative number of containers running with specific assignment types. Theassignment_typelabel ("node_exclusive", "pod_exclusive", "pod_shared") provides visibility into how workloads are distributed.
Current limitations and caveats
While this feature opens up new possibilities, there are a few things to keep in mind during its alpha phase. Be sure to review the Limitations and caveats in the official documentation for full details on compatibility, requirements, and downgrade instructions.
Getting started and providing feedback
For a deep dive into the technical details and configuration of this feature, check out the official concept documentation:
To learn more about the overall pod-level resources feature and how to assign resources to pods, see:
As this feature moves through Alpha, your feedback is invaluable. Please report any issues or share your experiences via the standard Kubernetes communication channels:
Kubernetes v1.36: In-Place Vertical Scaling for Pod-Level Resources Graduates to Beta
Following the graduation of Pod-Level Resources to Beta in v1.34 and the General Availability (GA) of In-Place Pod Vertical Scaling in v1.35, the Kubernetes community is thrilled to announce that In-Place Pod-Level Resources Vertical Scaling has graduated to Beta in v1.36!
This feature is now enabled by default via the InPlacePodLevelResourcesVerticalScaling feature gate. It allows users to update the aggregate Pod resource budget (.spec.resources) for a running Pod, often without requiring a container restart.
Why Pod-level in-place resize?
The Pod-level resource model simplified management for complex Pods (such as those with sidecars) by allowing containers to share a collective pool of resources. In v1.36, you can now adjust this aggregate boundary on-the-fly.
This is particularly useful for Pods where containers do not have individual limits defined. These containers automatically scale their effective boundaries to fit the newly resized Pod-level dimensions, allowing you to expand the shared pool during peak demand without manual per-container recalculations.
Resource inheritance and the resizePolicy
When a Pod-level resize is initiated, the Kubelet treats the change as a resize event for every container that inherits its limits from the Pod-level budget. To determine whether a restart is required, the Kubelet consults the resizePolicy defined within individual containers:
- Non-disruptive Updates: If a container's
restartPolicyis set toNotRequired, the Kubelet attempts to update the cgroup limits dynamically via the Container Runtime Interface (CRI). - Disruptive Updates: If set to
RestartContainer, the container will be restarted to apply the new aggregate boundary safely.
Note: Currently,
resizePolicyis not supported at the Pod level. The Kubelet always defers to individual container settings to decide if an update can be applied in-place or requires a restart.
Example: Scaling a shared resource pool
In this scenario, a Pod is defined with a 2 CPU pod-level limit. Because the individual containers do not have their own limits defined, they share this total pool.
1. Initial Pod specification
apiVersion: v1
kind: Pod
metadata:
name: shared-pool-app
spec:
resources: # Pod-level limits
limits:
cpu: "2"
memory: "4Gi"
containers:
- name: main-app
image: my-app:v1
resizePolicy: [{resourceName: "cpu", restartPolicy: "NotRequired"}]
- name: sidecar
image: logger:v1
resizePolicy: [{resourceName: "cpu", restartPolicy: "NotRequired"}]
2. The resize operation
To double the CPU capacity to 4 CPUs, apply a patch using the resize subresource:
kubectl patch pod shared-pool-app --subresource resize --patch \
'{"spec":{"resources":{"limits":{"cpu":"4"}}}}'
Node-Level reality: feasibility and safety
Applying a resize patch is only the first step. The Kubelet performs several checks and follows a specific sequence to ensure node stability:
1. The feasibility check
Before admitting a resize, the Kubelet verifies if the new aggregate request fits within the Node's allocatable capacity. If the Node is overcommitted, the resize is not ignored; instead, the PodResizePending condition will reflect a Deferred or Infeasible status, providing immediate feedback on why the "envelope" hasn't grown.
2. Update sequencing
To prevent resource "overshoot", the Kubelet coordinates the cgroup updates in a specific order:
- When Increasing: The Pod-level cgroup is expanded first, creating the "room" before the individual container cgroups are enlarged.
- When Decreasing: The container cgroups are throttled first, and only then is the aggregate Pod-level cgroup shrunken.
Observability: tracking resize status
With the move to Beta, Kubernetes uses Pod Conditions to track the lifecycle of a resize:
PodResizePending: The spec is updated, but the Node hasn't admitted the change (e.g., due to capacity).PodResizeInProgress: The Node has admitted the resize (status.allocatedResources) but the changes aren't yet fully applied to the cgroups (status.resources).
status:
allocatedResources:
cpu: "4"
resources:
limits:
cpu: "4"
conditions:
- type: PodResizeInProgress
status: "True"
Constraints and requirements
- cgroup v2 Only: Required for accurate aggregate enforcement.
- CRI Support: Requires a container runtime that supports the
UpdateContainerResourcesCRI call (e.g., containerd v2.0+ or CRI-O). - Feature Gates: Requires
PodLevelResources,InPlacePodVerticalScaling,InPlacePodLevelResourcesVerticalScaling, andNodeDeclaredFeatures. - Linux Only: Currently exclusive to Linux-based nodes.
What's next?
As we move toward General Availability (GA), the community is focusing on Vertical Pod Autoscaler (VPA) Integration, enabling VPA to issue Pod-level resource recommendations and trigger in-place actuation automatically.
Getting started and providing feedback
We encourage you to test this feature and provide feedback via the standard Kubernetes communication channels:
Kubernetes v1.36: Tiered Memory Protection with Memory QoS
On behalf of SIG Node, we are pleased to announce updates to the Memory QoS
feature (alpha) in Kubernetes v1.36. Memory QoS uses the cgroup v2 memory
controller to give the kernel better guidance on how to treat container memory.
It was first introduced in v1.22 and updated in v1.27. In Kubernetes v1.36, we're introducing: opt-in memory reservation, tiered
protection by QoS class, observability metrics, and kernel-version warning for memory.high.
What's new in v1.36
Opt-in memory reservation with memoryReservationPolicy
v1.36 separates throttling from reservation. Enabling the feature gate turns on
memory.high throttling (the kubelet sets memory.high based on
memoryThrottlingFactor, default 0.9), but memory reservation is now controlled
by a separate kubelet configuration field:
None(default): nomemory.minormemory.lowis written. Throttling viamemory.highstill works.TieredReservation: the kubelet writes tiered memory protection based on the Pod's QoS class:
Guaranteed Pods get hard protection via memory.min. For example, a
Guaranteed Pod requesting 512 MiB of memory results in:
$ cat /sys/fs/cgroup/kubepods.slice/kubepods-pod6a4f2e3b_1c9d_4a5e_8f7b_2d3e4f5a6b7c.slice/memory.min
536870912
The kernel will not reclaim this memory under any circumstances. If it cannot honor the guarantee, it invokes the OOM killer on other processes to free pages.
Burstable Pods get soft protection via memory.low. For the same 512 MiB
request on a Burstable Pod:
$ cat /sys/fs/cgroup/kubepods.slice/kubepods-burstable.slice/kubepods-burstable-pod8b3c7d2e_4f5a_6b7c_9d1e_3f4a5b6c7d8e.slice/memory.low
536870912
The kernel avoids reclaiming this memory under normal pressure, but may reclaim it if the alternative is a system-wide OOM.
BestEffort Pods get neither memory.min nor memory.low. Their memory
remains fully reclaimable.
Comparison with v1.27 behavior
In earlier versions, enabling the MemoryQoS feature gate immediately set memory.min for every container with a memory request. memory.min is a hard reservation that the kernel will not reclaim, regardless of memory pressure.
Consider a node with 8 GiB of RAM where Burstable Pod requests total 7 GiB. In earlier versions, that 7 GiB would be locked as memory.min, leaving little headroom for the kernel, system daemons, or BestEffort workloads and increasing the risk of OOM kills.
With v1.36 tiered reservation, those Burstable requests map to memory.low instead of memory.min. Under normal pressure, the kernel still protects that memory, but under extreme pressure it can reclaim part of it to avoid system-wide OOM. Only Guaranteed Pods use memory.min, which keeps hard reservation lower.
With memoryReservationPolicy in v1.36, you can enable throttling first, observe workload behavior, and opt into reservation when your node has enough headroom.
Observability metrics
Two alpha-stability metrics are exposed on the kubelet /metrics endpoint:
| Metric | Description |
|---|---|
kubelet_memory_qos_node_memory_min_bytes | Total memory.min across Guaranteed Pods |
kubelet_memory_qos_node_memory_low_bytes | Total memory.low across Burstable Pods |
These are useful for capacity planning. If kubelet_memory_qos_node_memory_min_bytes
is creeping toward your node's physical memory, you know hard reservation is
getting tight.
$ curl -sk https://localhost:10250/metrics | grep memory_qos
# HELP kubelet_memory_qos_node_memory_min_bytes [ALPHA] Total memory.min in bytes for Guaranteed pods
kubelet_memory_qos_node_memory_min_bytes 5.36870912e+08
# HELP kubelet_memory_qos_node_memory_low_bytes [ALPHA] Total memory.low in bytes for Burstable pods
kubelet_memory_qos_node_memory_low_bytes 2.147483648e+09
Kernel version check
On kernels older than 5.9, memory.high throttling can trigger the
kernel livelock issue. The bug was fixed
in kernel 5.9. In v1.36, when the feature gate is enabled, the kubelet checks the
kernel version at startup and logs a warning if it is below 5.9. The feature
continues to work — this is informational, not a hard block.
How Kubernetes maps Memory QoS to cgroup v2
Memory QoS uses four cgroup v2 memory controller interfaces:
memory.max: hard memory limit — unchanged from previous versionsmemory.min: hard memory protection — withTieredReservation, set only for Guaranteed Podsmemory.low: soft memory protection — set for Burstable Pods withTieredReservationmemory.high: memory throttling threshold — unchanged from previous versions
The following table shows how Kubernetes container resources map to cgroup v2
interfaces when memoryReservationPolicy: TieredReservation is configured.
With the default memoryReservationPolicy: None, no memory.min or
memory.low values are set.
| QoS Class | memory.min | memory.low | memory.high | memory.max |
|---|---|---|---|---|
| Guaranteed | Set to requests.memory(hard protection) | Not set | Not set (requests == limits, so throttling is not useful) | Set to limits.memory |
| Burstable | Not set | Set to requests.memory(soft protection) | Calculated based on formula with throttling factor | Set to limits.memory(if specified) |
| BestEffort | Not set | Not set | Calculated based on node allocatable memory | Not set |
Cgroup hierarchy
cgroup v2 requires that a parent cgroup's memory protection is at least as
large as the sum of its children's. The kubelet maintains this by setting
memory.min on the kubepods root cgroup to the sum of all Guaranteed and
Burstable Pod memory requests, and memory.low on the Burstable QoS cgroup
to the sum of all Burstable Pod memory requests. This way the kernel can
enforce the per-container and per-pod protection values correctly.
The kubelet manages pod-level and QoS-class cgroups directly using the runc libcontainer library, while container-level cgroups are managed by the container runtime (containerd or CRI-O).
How do I use it?
Prerequisites
- Kubernetes v1.36 or later
- Linux with cgroup v2. Kernel 5.9 or higher is recommended — earlier kernels
work but may experience the livelock issue. You can verify cgroup v2 is
active by running
mount | grep cgroup2. - A container runtime that supports cgroup v2 (containerd 1.6+, CRI-O 1.22+)
Configuration
To enable Memory QoS with tiered protection:
apiVersion: kubelet.config.k8s.io/v1beta1
kind: KubeletConfiguration
featureGates:
MemoryQoS: true
memoryReservationPolicy: TieredReservation # Options: None (default), TieredReservation
memoryThrottlingFactor: 0.9 # Optional: default is 0.9
If you want memory.high throttling without memory protection, omit
memoryReservationPolicy or set it to None:
apiVersion: kubelet.config.k8s.io/v1beta1
kind: KubeletConfiguration
featureGates:
MemoryQoS: true
memoryReservationPolicy: None # This is the default
How can I learn more?
- KEP-2570: Memory QoS
- Pod Quality of Service Classes
- Managing Resources for Containers
- Kubernetes cgroups v2 support
- Linux kernel cgroups v2 documentation
Getting involved
This feature is driven by SIG Node. If you are interested in contributing or have feedback, you can find us on Slack (#sig-node), the mailing list, or at the regular SIG Node meetings. Please file bugs at kubernetes/kubernetes and enhancement proposals at kubernetes/enhancements.
Kubernetes v1.36: Staleness Mitigation and Observability for Controllers
Staleness in Kubernetes controllers is a problem that affects many controllers, and is something may affect controller behavior in subtle ways. It is usually not until it is too late, when a controller in production has already taken incorrect action, that staleness is found to be an issue due to some underlying assumption made by the controller author. Some issues caused by staleness include controllers taking incorrect actions, controllers not taking action when they should, and controllers taking too long to take action. I am excited to announce that Kubernetes v1.36 includes new features that help mitigate staleness in controllers and provide better observability into controller behavior.
What is staleness?
Staleness in controllers comes from an outdated view of the world inside of the controller cache. In order to provide a fast user experience, controllers typically maintain a local cache of the state of the cluster. This cache is populated by watching the Kubernetes API server for changes to objects that the controller cares about. When the controller needs to take action, it will first check its cache to see if it has the latest information. If it does not, it will then update its cache by watching the API server for changes to objects that the controller cares about. This process is known as reconciliation.
However, there are some cases where the controller's cache may be outdated. For example, if the controller is restarted, it will need to rebuild its cache by watching the API server for changes to objects that the controller cares about. During this time, the controller's cache will be outdated, and it will not be able to take action. Additionally, if the API server is down, the controller's cache will not be updated, and it will not be able to take action. These are just a few examples of cases where the controller's cache may be outdated.
Improvements in 1.36
Kubernetes v1.36 includes improvements in both client-go as well as implementations of highly contended controllers in kube-controller-manager, using those client-go improvements.
client-go improvements
In client-go, the project added atomic FIFO processing (feature gate
name AtomicFIFO), which is on top of the existing FIFO queue implementation. The new approach allows for
the queue to atomically handle operations that are received in batches, such as the initial set of objects from a
list operation that an informer uses to populate its cache. This ensures that the queue is always in a consistent state,
even when events come out of order. Prior to this, events were added to the queue
in the order that they were received, which could lead to an inconsistent state in the cache that does not accurately reflect
the state of the cluster.
With this change, you can now ensure that the queue is always in a consistent state, even when events come out of order. To take
advantage of this, clients using client-go can now introspect into the cache to determine the latest resource version that the
controller cache has seen. This is done with the newly added function LastStoreSyncResourceVersion() implemented on the Store
interface here. This function is the basis for the staleness mitigation
features in kube-controller-manager.
kube-controller-manager improvements
In kube-controller-manager, the v1.36 release has added the ability for 4 different controllers to use this new capability. The controllers are:
- DaemonSet controller
- StatefulSet controller
- ReplicaSet controller
- Job controller
These controllers all act on pods, which in most cases are under the highest amount of contention in a cluster. The changes are
on by default for these controllers, and can be disabled by setting the feature gates StaleControllerConsistency<API type>
to false for the specific controller you wish to disable it for. For example, to disable the feature for the DaemonSet controller,
you would set the feature gate StaleControllerConsistencyDaemonSet to false.
When the relevant feature gate is enabled, the controller will first check the latest resource version of the cache before taking action. If the latest resource version of the cache is lower than what the controller has written to the API server for the object it is trying to reconcile, the controller will not take action. This is because the controller's cache is outdated, and it does not have the latest information about the state of the cluster.
Use for informer authors
Informer authors using client-go can also immediately take advantage of these improvements. See an example of how to use this feature
in the ReplicaSet informer. This PR shows how to use the new feature to check
if the informer's cache is stale before taking action. The client-go library provides a ConsistencyStore data structure that queries the store
and compares the latest resource version of the cache with the written resource version of the object.
The ReplicaSet controller tracks both the ReplicaSet's resource version and the resource version of the pods that the ReplicaSet manages. For a specific ReplicaSet, it tracks the latest written resource version of the pods that the ReplicaSet owns as well as any writes to the ReplicaSet itself. If the latest resource version of the cache is lower than what the controller has written to the API server for the object it is trying to reconcile, the controller will not take action. This is because the controller's cache is outdated, and it does not have the latest information about the state of the cluster.
An informer author can use the ConsistencyStore to track the latest resource version of the objects that the informer cares about.
It provides 3 main functions:
type ConsistencyStore interface {
// WroteAt records that the given object was written at the given resource version.
WroteAt(owningObj runtime.Object, uid types.UID, groupResource schema.GroupResource, resourceVersion string)
// EnsureReady returns true if the cache is up to date for the given object.
// It is used prior to reconciliation to decide whether to reconcile or not.
EnsureReady(namespacedName types.NamespacedName) bool
// Clear removes the given object from the consistency store.
// It is used when an object is deleted.
Clear(namespacedName types.NamespacedName, uid types.UID)
}
WroteAt: This function is called by the controller when it writes to the API server for an object. It is used to record the latest resource version of the object that the controller has written to the API server. TheowningObjis the object that the controller is reconciling, and theuidis the UID of that object. The resource version and GroupResource are the resource version and GroupResource of the object that the controller has written to the API server. The object is not explicitly tracked, since the controller only cares about waiting to catch up to the latest resource version of the written object.EnsureReady: This function is called by the controller to ensure that the cache is up to date for the object. It is used prior to reconciliation to decide whether to reconcile or not. It returns true if the cache is up to date for the object, and false otherwise. It will use the information provided byWroteAtto determine if the cache is up to date.Clear: This function is called by the controller when an object is deleted. It is used to remove the object from the consistency store. This is mostly used for cleanup when an object is deleted to prevent the consistency store from growing indefinitely.
The UID is used to distinguish between different objects that have the same name, such as when an object is deleted and then recreated. It is not needed for EnsureReady because the consistency store is only concerned with catching up to the latest resource version of the object, not the specific object. It is primarily used to ensure that the controller doesn't delete the entry for an object when it is recreated with a new UID.
With these 3 functions, an informer author can implement staleness mitigation in their controller.
Observability
In addition to the staleness mitigation features, the Kubernetes project has also added related instrumentation to kube-controller-manager in 1.36. These metrics are also enabled by default, and are controlled using the same set of feature gates.
Metrics
The following alpha metrics have been added to kube-controller-manager in 1.36:
stale_sync_skips_total: The number of times the controller has skipped a sync due to stale cache. This metric is exposed
for each controller that uses the staleness mitigation feature with the subsystem of the controller.
This metric is exposed by the kube-controller-manager metrics endpoint, and can be used to monitor the health of the controller.
Along with this metric, client-go also emits metrics that expose the latest resource version of every shared informer with the subsystem of the informer. This allows you to see the latest resource version of each informer, and use that to determine if the controller's cache is stale, especially great for comparing against the resource version of the API server.
This metric is named store_resource_version and has the Group, Version, and Resource as labels.
What's next?
Kubernetes SIG API Machinery is excited to continue working on this feature and hope to bring it to more controllers in the future. We are also interested in hearing your feedback on this feature. Please let us know what you think in the comments below or by opening an issue on the Kubernetes GitHub repository.
We are also working with controller-runtime to enable this set of semantics for all controllers built with controller-runtime. This will allow any controller built with controller-runtime to gain the benefits of read your own writes, without having to implement the logic themselves.
Kubernetes v1.36: Mutable Pod Resources for Suspended Jobs (beta)
Kubernetes v1.36 promotes the ability to modify container resource requests and limits in the pod template of a suspended Job to beta. First introduced as alpha in v1.35, this feature allows queue controllers and cluster administrators to adjust CPU, memory, GPU, and extended resource specifications on a Job while it is suspended, before it starts or resumes running.
Why mutable pod resources for suspended Jobs?
Batch and machine learning workloads often have resource requirements that are not precisely known at Job creation time. The optimal resource allocation depends on current cluster capacity, queue priorities, and the availability of specialized hardware like GPUs.
Before this feature, resource requirements in a Job's pod template were immutable once set. If a queue controller like Kueue determined that a suspended Job should run with different resources, the only option was to delete and recreate the Job, losing any associated metadata, status, or history. This feature also provides a way to let a specific Job instance for a CronJob progress slowly with reduced resources, rather than outright failing to run if the cluster is heavily loaded.
Consider a machine learning training Job initially requesting 4 GPUs:
apiVersion: batch/v1
kind: Job
metadata:
name: training-job-example-abcd123
labels:
app.kubernetes.io/name: trainer
spec:
suspend: true
template:
metadata:
annotations:
kubernetes.io/description: "ML training, ID abcd123"
spec:
containers:
- name: trainer
image: example-registry.example.com/training:2026-04-23T150405.678
resources:
requests:
cpu: "8"
memory: "32Gi"
example-hardware-vendor.com/gpu: "4"
limits:
cpu: "8"
memory: "32Gi"
example-hardware-vendor.com/gpu: "4"
restartPolicy: Never
A queue controller managing cluster resources might determine that only 2 GPUs are available. With this feature, the controller can update the Job's resource requests before resuming it:
apiVersion: batch/v1
kind: Job
metadata:
name: training-job-example-abcd123
labels:
app.kubernetes.io/name: trainer
spec:
suspend: true
template:
metadata:
annotations:
kubernetes.io/description: "ML training, ID abcd123"
spec:
containers:
- name: trainer
image: example-registry.example.com/training:2026-04-23T150405.678
resources:
requests:
cpu: "4"
memory: "16Gi"
example-hardware-vendor.com/gpu: "2"
limits:
cpu: "4"
memory: "16Gi"
example-hardware-vendor.com/gpu: "2"
restartPolicy: Never
Once the resources are updated, the controller resumes the Job by setting
spec.suspend to false, and the new Pods are created with the adjusted
resource specifications.
How it works
The Kubernetes API server relaxes the immutability constraint on pod template resource fields specifically for suspended Jobs. No new API types have been introduced; the existing Job and pod template structures accommodate the change through relaxed validation.
The mutable fields are:
spec.template.spec.containers[*].resources.requestsspec.template.spec.containers[*].resources.limitsspec.template.spec.initContainers[*].resources.requestsspec.template.spec.initContainers[*].resources.limits
Resource updates are permitted when the following conditions are met:
- The Job has
spec.suspendset totrue. - For a Job that was previously running and then suspended, all active
Pods must have terminated (
status.activeequals 0) before resource mutations are accepted.
Standard resource validation still applies. For example, resource limits must be greater than or equal to requests, and extended resources must be specified as whole numbers where required.
What's new in beta
With the promotion to beta in Kubernetes v1.36, the
MutablePodResourcesForSuspendedJobs feature gate is enabled by default.
This means clusters running v1.36 can use this feature without any additional
configuration on the API server.
Try it out
If your cluster is running Kubernetes v1.36 or later, this feature is available
by default. For v1.35 clusters, enable the MutablePodResourcesForSuspendedJobs
feature gate on
the kube-apiserver.
You can test it by creating a suspended Job, updating its container resources
using kubectl edit or a controller, and then resuming the Job:
# Create a suspended Job
kubectl apply -f my-job.yaml --server-side
# Edit the resource requests
kubectl edit job training-job-example-abcd123
# Resume the Job
kubectl patch job training-job-example-abcd123 -p '{"spec":{"suspend":false}}'
Considerations
Running Jobs that are suspended
If you suspend a Job that was already running, you must wait for all of that Job's active
Pods to terminate before modifying resources. The API server rejects resource
mutations while status.active is greater than zero. This prevents inconsistency
between running Pods and the updated pod template.
Pod replacement policy
When using this feature with Jobs that may have failed Pods, consider setting
podReplacementPolicy: Failed. This ensures that replacement Pods are only
created after the previous Pods have fully terminated, preventing resource
contention from overlapping Pods.
ResourceClaims
Dynamic Resource Allocation (DRA) resourceClaimTemplates remain immutable.
If your workload uses DRA, you must recreate the claim templates separately
to match any resource changes.
Getting involved
This feature was developed by SIG Apps This feature was developed by SIG Apps with input from WG Batch. Both groups welcome feedback as the feature progresses toward stable.
You can reach out through:
Kubernetes v1.36: Fine-Grained Kubelet API Authorization Graduates to GA
On behalf of Kubernetes SIG Auth and SIG Node, we are pleased to announce the
graduation of fine-grained kubelet API authorization to General Availability
(GA) in Kubernetes v1.36!
The KubeletFineGrainedAuthz feature gate was introduced as an opt-in alpha
feature in Kubernetes v1.32, then graduated to beta (enabled by default) in
v1.33. Now, the feature is generally available and the feature gate is locked
to enabled. This feature enables more precise, least-privilege access control
over the kubelet's HTTPS API, replacing the need to grant the overly broad
nodes/proxy permission for common monitoring and observability use cases.
Motivation: the nodes/proxy problem
The kubelet exposes an HTTPS endpoint with several APIs that give access to data
of varying sensitivity, including pod listings, node metrics, container logs,
and, critically, the ability to execute commands inside running containers.
Prior to this feature, kubelet authorization used a coarse-grained model. When
webhook authorization was enabled, almost all kubelet API paths were mapped to a
single nodes/proxy subresource. This meant that any workload needing to read
metrics or health status from the kubelet required nodes/proxy permission,
the same permission that also grants the ability to execute arbitrary commands
in any container running on the node.
What's wrong with that?
Granting nodes/proxy to monitoring agents, log collectors, or health-checking
tools violates the principle of least privilege. If any of those workloads were
compromised, an attacker would gain the ability to run commands in every
container on the node. The nodes/proxy permission is effectively a node-level
superuser capability, and granting it broadly dramatically increases the blast
radius of a security incident.
This problem has been well understood in the community for years (see kubernetes/kubernetes#83465), and was the driving motivation behind this enhancement KEP-2862.
The nodes/proxy GET WebSocket RCE risk
The situation is more severe than it might appear at first glance. Security
researchers demonstrated in early 2026
that nodes/proxy GET alone, which is the minimal read-only permission routinely
granted to monitoring tools, can be abused to execute commands in any pod on
reachable nodes.
The root cause is a mismatch between how WebSocket connections work and how the
kubelet maps HTTP methods to RBAC verbs. The
WebSocket protocol (RFC 6455)
requires an HTTP GET request for the initial connection handshake. The kubelet
maps this GET to the RBAC get verb and authorizes the request without
performing a secondary check to confirm that CREATE permission is also present
for the write operation that follows. Using a WebSocket client like websocat,
an attacker can reach the kubelet's /exec endpoint directly on port 10250 and
execute arbitrary commands:
websocat --insecure \
--header "Authorization: Bearer $TOKEN" \
--protocol v4.channel.k8s.io \
"wss://$NODE_IP:10250/exec/default/nginx/nginx?output=1&error=1&command=id"
uid=0(root) gid=0(root) groups=0(root)
Fine-grained kubelet authorization: how it works
With KubeletFineGrainedAuthz, the kubelet now performs an additional, more
specific authorization check before falling back to the nodes/proxy
subresource. Several commonly used kubelet API paths are mapped to their own
dedicated subresources:
kubelet API | Resource | Subresource |
|---|---|---|
/stats/* | nodes | stats |
/metrics/* | nodes | metrics |
/logs/* | nodes | log |
/pods | nodes | pods, proxy |
/runningPods/ | nodes | pods, proxy |
/healthz | nodes | healthz, proxy |
/configz | nodes | configz, proxy |
/spec/* | nodes | spec |
/checkpoint/* | nodes | checkpoint |
| all others | nodes | proxy |
For the endpoints that now have fine-grained subresources (/pods,
/runningPods/, /healthz, /configz), the kubelet first sends a
SubjectAccessReview for the specific subresource. If that check succeeds, the
request is authorized. If it fails, the kubelet retries with the coarse-grained
nodes/proxy subresource for backward compatibility.
This dual-check approach ensures a smooth migration path. Existing workloads
with nodes/proxy permissions continue to work, while new deployments can adopt
least-privilege access from day one.
What this means in practice
Consider a Prometheus node exporter or a monitoring DaemonSet that needs to
scrape /metrics from the kubelet. Previously, you would need an RBAC
ClusterRole like this:
# Old approach: overly broad
apiVersion: rbac.authorization.k8s.io/v1
kind: ClusterRole
metadata:
name: monitoring-agent
rules:
- apiGroups: [""]
resources: ["nodes/proxy"]
verbs: ["get"]
This grants the monitoring agent far more access than it needs. With fine-grained authorization, you can now scope the permissions precisely:
# New approach: least privilege
apiVersion: rbac.authorization.k8s.io/v1
kind: ClusterRole
metadata:
name: monitoring-agent
rules:
- apiGroups: [""]
resources: ["nodes/metrics", "nodes/stats"]
verbs: ["get"]
The monitoring agent can now read metrics and stats from the kubelet without
ever being able to execute commands in containers.
Updated system:kubelet-api-admin ClusterRole
When RBAC authorization is enabled, the built-in system:kubelet-api-admin
ClusterRole is automatically updated to include permissions for all the new
fine-grained subresources. This ensures that cluster administrators who already
use this role, including the API server's kubelet client, continue to have
full access without any manual configuration changes.
The role now includes permissions for:
nodes/proxynodes/statsnodes/metricsnodes/lognodes/specnodes/checkpointnodes/configznodes/healthznodes/pods
Upgrade considerations
Because the kubelet performs a dual authorization check (fine-grained first,
then falling back to nodes/proxy), upgrading to v1.36 should be seamless for
most clusters:
- Existing workloads with
nodes/proxypermissions continue to work without changes. The fallback tonodes/proxyensures backward compatibility. - The API server always has
nodes/proxypermissions viasystem:kubelet-api-admin, sokube-apiserver-to-kubeletcommunication is unaffected regardless of feature gate state. - Mixed-version clusters are handled gracefully. If a
kubeletsupports fine-grained authorization but the API server does not (or vice versa),nodes/proxypermissions serve as the fallback.
Verifying the feature is enabled
You can confirm that the feature is active on a given node by checking the
kubelet metrics endpoint. Since the metrics endpoint on port 10250 requires
authorization, you'll first need to create appropriate RBAC bindings for the pod
or ServiceAccount making the request.
Step 1: Create a ServiceAccount and ClusterRole
apiVersion: v1
kind: ServiceAccount
metadata:
name: kubelet-metrics-checker
namespace: default
---
apiVersion: rbac.authorization.k8s.io/v1
kind: ClusterRole
metadata:
name: kubelet-metrics-reader
rules:
- apiGroups: [""]
resources: ["nodes/metrics"]
verbs: ["get"]
Step 2: Bind the ClusterRole to the ServiceAccount
apiVersion: rbac.authorization.k8s.io/v1
kind: ClusterRoleBinding
metadata:
name: kubelet-metrics-checker
subjects:
- kind: ServiceAccount
name: kubelet-metrics-checker
namespace: default
roleRef:
kind: ClusterRole
name: kubelet-metrics-reader
apiGroup: rbac.authorization.k8s.io
Apply both manifests:
kubectl apply -f serviceaccount.yaml
kubectl apply -f clusterrole.yaml
kubectl apply -f clusterrolebinding.yaml
Step 3: Run a pod with the ServiceAccount and check the feature flag
kubectl run kubelet-check \
--image=curlimages/curl \
--serviceaccount=kubelet-metrics-checker \
--restart=Never \
--rm -it \
-- sh
Then from within the pod, retrieve the node IP and query the metrics endpoint:
# Get the token
TOKEN=$(cat /var/run/secrets/kubernetes.io/serviceaccount/token)
# Query the kubelet metrics and filter for the feature gate
curl -sk \
--header "Authorization: Bearer $TOKEN" \
https://$NODE_IP:10250/metrics \
| grep kubernetes_feature_enabled \
| grep KubeletFineGrainedAuthz
If the feature is enabled, you should see output like:
kubernetes_feature_enabled{name="KubeletFineGrainedAuthz",stage="GA"} 1
Note: Replace
$NODE_IPwith the IP address of the node you want to check. You can retrieve node IPs withkubectl get nodes -o wide.
The journey from alpha to GA
| Release | Stage | Details |
|---|---|---|
| v1.32 | Alpha | Feature gate KubeletFineGrainedAuthz introduced, disabled by default |
| v1.33 | Beta | Enabled by default; fine-grained checks for /pods, /runningPods/, /healthz, /configz |
| v1.36 | GA | Feature gate locked to enabled; fine-grained kubelet authorization is always active |
What's next?
With fine-grained kubelet authorization now GA, the Kubernetes community can
begin recommending and eventually enforcing the use of specific subresources
instead of nodes/proxy for monitoring and observability workloads. The urgency
of this migration is underscored by
research showing that nodes/proxy GET can be abused for unlogged remote code execution via the WebSocket protocol. This risk is present in the default RBAC
configurations of dozens of widely deployed Helm charts. Over time, we expect:
- Ecosystem adoption: Monitoring tools like Prometheus, Datadog agents, and
other
DaemonSetscan update their default RBAC configurations to usenodes/metrics,nodes/stats, andnodes/podsinstead ofnodes/proxy. This directly eliminates the WebSocket RCE attack surface for those workloads. - Policy enforcement: Admission controllers and policy engines can flag or
reject RBAC bindings that grant
nodes/proxywhen fine-grained alternatives exist, helping organizations adopt least-privilege access at scale. - Deprecation path: As adoption grows,
nodes/proxymay eventually be deprecated for monitoring use cases, further reducing the attack surface of Kubernetes clusters.
Getting involved
This enhancement was driven by SIG Auth and SIG Node. If you are interested in contributing to the security and authorization features of Kubernetes, please join us:
- SIG Auth
- SIG Node
- Slack:
#sig-authand#sig-node - KEP-2862: Fine-Grained Kubelet API Authorization
We look forward to hearing your feedback and experiences with this feature!
Kubernetes v1.36: User Namespaces in Kubernetes are finally GA
After several years of development, User Namespaces support in Kubernetes reached General Availability (GA) with the v1.36 release. This is a Linux-only feature.
For those of us working on low level container runtimes and rootless technologies, this has been a long awaited milestone. We finally reached the point where "rootless" security isolation can be used for Kubernetes workloads.
This feature also enables a critical pattern: running workloads with
privileges and still being confined in the user namespace. When
hostUsers: false is set, capabilities like CAP_NET_ADMIN become
namespaced, meaning they grant administrative power over container
local resources without affecting the host. This effectively enables
new use cases that were not possible before without running a fully
privileged container.
The Problem with UID 0
A process running as root inside a container is also seen from the kernel as root on the host. If an attacker manages to break out of the container, whether through a kernel vulnerability or a misconfigured mount, they are root on the host.
While there are many security measures in place for running containers, these measures don't change the underlying identity of the process, it still has some "parts" of root.
The engine: ID-mapped mounts
The road to GA wasn't just about the Kubernetes API; it was about
making the kernel work for us. In the early stages, one of the
biggest blockers was volume ownership. If you mapped a container to a
high UID range, the Kubelet had to recursively chown every file in
the attached volume so the container could read/write them. For large
volumes, this was such an expensive operation that destroyed startup
performance.
The key enabler was ID-mapped mounts (introduced in Linux 5.12 and refined in later versions). Instead of rewriting file ownership on disk, the kernel remaps it at mount time.
When a volume is mounted into a Pod with User Namespaces enabled, the
kernel performs a transparent translation of the UIDs (user ids) and
GIDs (group ids). To the container, the files appear owned by
UID 0. On disk, file ownership is unchanged — no chown is needed.
This is an O(1) operation, instant and efficient.
Using it in Kubernetes v1.36
Using user namespaces is straightforward: all you need to do is set
hostUsers: false in your Pod spec. No changes to your container
images, no complex configuration. The interface remains the same one
introduced during the Alpha phase. In the spec for a Pod (or PodTemplate), you explicitly
opt-out of the host user namespace:
apiVersion: v1
kind: Pod
metadata:
name: isolated-workload
spec:
hostUsers: false
containers:
- name: app
image: fedora:42
securityContext:
runAsUser: 0
For more details on how user namespaces work in practice and demos of CVEs rated HIGH mitigated, see the previous blog posts: User Namespaces alpha, User Namespaces stateful pods in alpha, User Namespaces beta, and User Namespaces enabled by default.
Getting involved
If you're interested in user namespaces or want to contribute, here are some useful links:
Acknowledgments
This feature has been years in the making: the first KEP was opened 10 years ago by other contributors, and we have been actively working on it for the last 6 years. We'd like to thank everyone who contributed across SIG Node, the container runtimes, and the Linux kernel. Special thanks to the reviewers and early adopters who helped shape the design through multiple alpha and beta cycles.
SELinux Volume Label Changes goes GA (and likely implications in v1.37)
If you run Kubernetes on Linux with SELinux in enforcing mode, plan ahead: a future release (anticipated to be v1.37) is
expected to turn the SELinuxMount feature gate on by default. This makes volume setup faster
for most workloads, but it can break applications that still depend on the older recursive relabeling
model in subtle ways (for example, sharing one volume between privileged and unprivileged Pods on the same node).
Kubernetes v1.36 is the right release to audit your cluster and fix or opt out of this change.
If your nodes do not use SELinux, nothing changes for you: the kubelet skips the whole SELinux logic when SELinux is unavailable or disabled in the Linux kernel. You can skip this article completely.
This blog builds on the earlier work described in the
Kubernetes 1.27: Efficient SELinux Relabeling (Beta)
post, where the SELinuxMountReadWriteOncePod feature gate was described. The problem to be addressed remains
the same, however, this blog extends that same approach to all volumes.
The problem
Linux systems with Security Enhanced Linux (SELinux) enabled use labels attached to objects
(for example, files and network sockets) to make access control decisions.
Historically, the container runtime applies SELinux labels to a Pod and all its volumes. Kubernetes only passes the SELinux label from a Pod's securityContext fields
to the container runtime.
The container runtime then recursively changes the SELinux label on all files that are visible to the Pod's containers. This can be time-consuming if there are many files on the volume, especially when the volume is on a remote filesystem.
Caution:
If a container usessubPath of a volume, only that subPath of the whole
volume is relabeled. This allows two Pods that have two different SELinux labels
to use the same volume, as long as they use different subpaths of it.If a Pod does not have any SELinux label assigned in the Kubernetes API, the container runtime assigns a unique random label, so a process that potentially escapes the container boundary cannot access data of any other container on the host. The container runtime still recursively relabels all Pod volumes with this random SELinux label.
What Kubernetes is improving
Where the stack supports it, the kubelet can mount the volume with -o context=<label> so the kernel
applies the correct label for all inodes on that mount without a recursive inode traversal. That path is
gated by feature flags and requires, among other things, that the Pod expose enough of an SELinux
label (for example spec.securityContext.seLinuxOptions.level) and that the volume driver opts in (for CSI,
CSIDriver field spec.seLinuxMount: true).
The project rolled this out in phases:
- ReadWriteOncePod volumes were handled under the
SELinuxMountReadWriteOncePodfeature gate, on by default since v1.28 and GA in v1.36. - Broader coverage was handled under the
SELinuxMountflag, paired with thespec.securityContext.seLinuxChangePolicyfield on Pods.
If a Pod and its volume meet all of the following conditions, Kubernetes will mount the volume directly with the right SELinux label. Such a mount will happen in a constant time and the container runtime will not need to recursively relabel any files on it. For such a mount to happen:
The operating system must support SELinux. Without SELinux support detected, the kubelet and the container runtime do not do anything with regard to SELinux.
The feature gate
SELinuxMountReadWriteOncePodmust be enabled. If you're running Kubernetes v1.36, the feature is enabled unconditionally.The Pod must use a PersistentVolumeClaim with applicable
accessModes:- Either the volume has
accessModes: ["ReadWriteOncePod"] - or the volume can use any other access mode(s), provided that the feature gates
SELinuxChangePolicyandSELinuxMountare both enabled and the Pod hasspec.securityContext.seLinuxChangePolicyset to nil (default) or asMountOption.
The feature gate
SELinuxMountis Beta and disabled by default in Kubernetes 1.36. All other SELinux-related feature gates are now General Availability (GA).With any of these feature gates disabled, SELinux labels will always be applied by the container runtime via recursively traversing through the volume (or its subPaths).
- Either the volume has
The Pod must have at least
seLinuxOptions.levelassigned in its security context or all containers in that Pod must have it set in their container-level security contexts. Kubernetes will read the defaultuser,roleandtypefrom the operating system defaults (typicallysystem_u,system_randcontainer_t).Without Kubernetes knowing at least the SELinux
level, the container runtime will assign a random level after the volumes are mounted. The container runtime will still relabel the volumes recursively in that case.The volume plugin or the CSI driver responsible for the volume supports mounting with SELinux mount options.
These in-tree volume plugins support mounting with SELinux mount options:
fcandiscsi.CSI drivers that support mounting with SELinux mount options must declare this capability in their CSIDriver instance by setting the
seLinuxMountfield.Volumes managed by other volume plugins or CSI drivers that do not set
seLinuxMount: truewill be recursively relabeled by the container runtime.
The breaking change
The SELinuxMount feature gate changes what volumes can be shared among multiple Pods in a subtle way.
Both of these cases work with recursive relabeling:
- Two Pods with different SELinux labels share the same volume, but each of them uses a different
subPathto the volume. - A privileged Pod and an unprivileged Pod share the same volume.
The above scenarios will not work with modern, target behavior for Kubernetes mounting when SELinux is active. Instead, one of these Pods will be stuck in ContainerCreating until the other Pod is terminated.
The first case is very niche and hasn't been seen in practice.
Although the second case is still quite rare, this setup has been observed in applications.
Kubernetes v1.36 offers metrics and events to identify these Pods and allows cluster administrators to opt out of the
mount option through the Pod field spec.securityContext.seLinuxChangePolicy.
seLinuxChangePolicy
The new Pod field spec.securityContext.seLinuxChangePolicy specifies how the SELinux label is applied to all Pod volumes.
In Kubernetes v1.36, this field is part of the stable Pod API.
There are three choices available:
- field not set (default)
- In Kubernetes v1.36, the behavior depends on whether the
SELinuxMountfeature gate is enabled. By default that feature gate is not enabled, and the SELinux label is applied recursively. If you enable that feature gate in your cluster, and all other conditions are met, labelling will be applied using the mount option. Recursive- the SELinux label is applied recursively. This opts out from using the mount option.
MountOption- the SELinux label is applied using the mount option, if all other conditions are met.
This choice is available only when the
SELinuxMountfeature gate is enabled.
SELinux warning controller (optional)
Kubernetes v1.36 provides a new controller within the control plane, selinux-warning-controller.
This controller runs within the kube-controller-manager controller.
To use it, you pass --controllers=*,selinux-warning-controller on the kube-controller-manager command line;
you also must not have explicitly overridden the SELinuxChangePolicy feature gate to be disabled.
The controller watches all Pods in the cluster and emits an Event when it finds two Pods that share the same
volume in a way that is not compatible with the SELinuxMount feature gate.
All such conflicting Pods will receive an event, such as:
SELinuxLabel "system_u:system_r:container_t:s0:c98,c99" conflicts with pod my-other-pod that uses the same volume as this pod with SELinuxLabel "system_u:system_r:container_t:s0:c0,c1". If both pods land on the same node, only one of them may access the volume.
The actual Pod name may be censored when the conflicting Pods run in different namespaces to prevent leaking information across namespace boundaries.
The controller reports such an event even when these Pods don't run on the same node, to make sure all Pods work regardless of the Kubernetes scheduler decision. They could run on the same node next time.
In addition, the controller emits the metric selinux_warning_controller_selinux_volume_conflict that lists all current conflicts among Pods.
The metric has labels that identify the conflicting Pods and their SELinux labels, such as:
selinux_warning_controller_selinux_volume_conflict{pod1_name="my-other-pod",pod1_namespace="default",pod1_value="system_u:object_r:container_file_t:s0:c0,c1",pod2_name="my-pod",pod2_namespace="default",pod2_value="system_u:object_r:container_file_t:s0:c0,c2",property="SELinuxLabel"} 1
There is a security consequence from enabling this opt-in controller: it may reveal namespace names, which are always present in the metric. The Kubernetes project assumes only cluster administrators can access kube-controller-manager metrics.
Suggested upgrade path
To ensure a smooth upgrade path from v1.36 to a release with SELinuxMount enabled (anticipated to be v1.37), we suggest you follow these steps:
- Enable selinux-warning-controller in the kube-controller-manager.
- Check the
selinux_warning_controller_selinux_volume_conflictmetric. It shows all potential conflicts between Pods. For each conflicting Pod (Deployment, StatefulSet, etc.), either apply the opt-out (set Pod'sspec.securityContext.seLinuxChangePolicy: Recursive) or re-architect the application to remove such a conflict. For example, do your Pods really need to run as privileged? - Check the
volume_manager_selinux_volume_context_mismatch_warnings_totalmetric. This metric is emitted by the kubelet when it actually starts a Pod that runs whenSELinuxMountis disabled, but such a Pod won't start whenSELinuxMountis enabled. This metric lists the number of Pods that will experience a true conflict. Unfortunately, this metric does not expose the exact Pod name as a label. The full Pod name is available only in theselinux_warning_controller_selinux_volume_conflictmetric. - Once both metrics have been accounted for, upgrade to a Kubernetes version that has
SELinuxMountenabled.
Consider using a MutatingAdmissionPolicy, a mutating webhook, or a policy engine like Kyverno or Gatekeeper to apply the opt-out to all Pods in a namespace or across the entire cluster.
When SELinuxMount is enabled, the kubelet will emit the metric volume_manager_selinux_volume_context_mismatch_errors_total with the number of
Pods that could not start because their SELinux label conflicts with an existing Pod that uses the same volume.
The exact Pod names should still be available in the selinux_warning_controller_selinux_volume_conflict metric,
if the selinux-warning-controller is enabled.
Further reading
- KEP: Speed up SELinux volume relabeling using mounts
- SELinux Volume Relabeling Feature Gates
- Story 3: cluster upgrade
- Configure a security context for a Pod — Efficient SELinux volume relabeling and selinux-warning-controller
Acknowledgements
If you run into issues, have feedback, or want to contribute, find us
on the Kubernetes Slack in #sig-node and #sig-storage or join a
SIG Node or SIG Storage meetings.
Kubernetes v1.36: ハル (Haru)
Editors: Chad M. Crowell, Kirti Goyal, Sophia Ugochukwu, Swathi Rao, Utkarsh Umre
Similar to previous releases, the release of Kubernetes v1.36 introduces new stable, beta, and alpha features. The consistent delivery of high-quality releases underscores the strength of our development cycle and the vibrant support from our community.
This release consists of 70 enhancements. Of those enhancements, 18 have graduated to Stable, 25 are entering Beta, and 25 have graduated to Alpha.
There are also some deprecations and removals in this release; make sure to read about those.
Release theme and logo
We open 2026 with Kubernetes v1.36, a release that arrives as the season turns and the light shifts on the mountain. ハル (Haru) is a sound in Japanese that carries many meanings; among those we hold closest are 春 (spring), 晴れ (hare, clear skies), and 遥か (haruka, far-off, distant). A season, a sky, and a horizon. You will find all three in what follows.
The logo, created by avocadoneko / Natsuho Ide, draws inspiration from Katsushika Hokusai's Thirty-six Views of Mount Fuji (富嶽三十六景, Fugaku Sanjūrokkei), the same series that gave the world The Great Wave off Kanagawa. Our v1.36 logo reimagines one of the series' most celebrated prints, Fine Wind, Clear Morning (凱風快晴, Gaifū Kaisei), also known as Red Fuji (赤富士, Aka Fuji): the mountain lit red in a summer dawn, bare of snow after the long thaw. Thirty-six views felt like a fitting number to sit with at v1.36, and a reminder that even Hokusai didn't stop there.1 Keeping watch over the scene is the Kubernetes helm, set into the sky alongside the mountain.
At the foot of Fuji sit Stella (left) and Nacho (right), two cats with the Kubernetes helm on their collars, standing in for the role of komainu, the paired lion-dog guardians that watch over Japanese shrines. Paired, because nothing is guarded alone. Stella and Nacho stand in for a very much larger set of paws: the SIGs and working groups, the maintainers and reviewers, the people behind docs, blogs, and translations, the release team, first-time contributors taking their first steps, and lifelong contributors returning season after season. Kubernetes v1.36 is, as always, held up by many hands.
Brushed across Red Fuji in the logo is the calligraphy 晴れに翔け (hare ni kake), "soar into clear skies". It is the first half of a couplet that was too long to fit on the mountain:
晴れに翔け、未来よ明け
hare ni kake, asu yo ake
"Soar into clear skies; toward tomorrow's sunrise."2
That is the wish we carry for this release: to soar into clear skies, for the release itself, for the project, and for everyone who ships it together. The dawn breaking over Red Fuji is not an ending but a passage: this release carries us to the next, and that one to the one after, on toward horizons far beyond what any single view can hold.
1. The series was so popular that Hokusai added ten more prints, bringing the total to forty-six.
2. 未来 means "the future" in its widest sense, not just tomorrow but everything still to come. It is usually read mirai; here it takes the informal reading asu.
Spotlight on key updates
Kubernetes v1.36 is packed with new features and improvements. Here are a few select updates the Release Team would like to highlight!
Stable: Fine-grained API authorization
On behalf of Kubernetes SIG Auth and SIG Node, we are pleased to announce the
graduation of fine-grained kubelet API authorization to General Availability
(GA) in Kubernetes v1.36!
The KubeletFineGrainedAuthz feature gate was introduced as an opt-in alpha feature
in Kubernetes v1.32, then graduated to beta (enabled by default) in v1.33.
Now, the feature is generally available.
This feature enables more precise, least-privilege access control over the kubelet's
HTTPS API replacing the need to grant the overly broad nodes/proxy permission for
common monitoring and observability use cases.
This work was done as a part of KEP #2862 led by SIG Auth and SIG Node.
Beta: Resource health status
Before the v1.34 release, Kubernetes lacked a native way to report the health of allocated devices,
making it difficult to diagnose Pod crashes caused by hardware failures.
Building on the initial alpha release in v1.31 which focused on Device Plugins,
Kubernetes v1.36 expands this feature by promoting the allocatedResourcesStatus
field within the .status for each Pod (to beta). This field provides a unified health
reporting mechanism for all specialized hardware.
Users can now run kubectl describe pod to determine if a container's crash loop is
due to an Unhealthy or Unknown device status, regardless of whether the hardware was
provisioned via traditional plugins or the newer DRA framework.
This enhanced visibility allows administrators and automated controllers to
quickly identify faulty hardware and streamline the recovery of high-performance workloads.
This work was done as part of KEP #4680 led by SIG Node.
Alpha: Workload Aware Scheduling (WAS) features
Previously, the Kubernetes scheduler and job controllers managed pods as independent units, often leading to fragmented scheduling or resource waste for complex, distributed workloads. Kubernetes v1.36 introduces a comprehensive suite of Workload Aware Scheduling (WAS) features in Alpha, natively integrating the Job controller with a revised Workload API and a new decoupled PodGroup API, to treat related pods as a single logical entity.
Kubernetes v1.35 already supported gang scheduling by requiring a minimum number of pods to be schedulable before any were bound to nodes. v1.36 goes further with a new PodGroup scheduling cycle that evaluates the entire group atomically, either all pods in the group are bound together, or none are.
This work was done across several KEPs (including #4671, #5547, #5832, #5732, and #5710) led by SIG Scheduling and SIG Apps.
Features graduating to Stable
This is a selection of some of the improvements that are now stable following the v1.36 release.
Volume group snapshots
After several cycles in beta, VolumeGroupSnapshot support reaches General Availability (GA) in Kubernetes v1.36. This feature allows you to take crash-consistent snapshots across multiple PersistentVolumeClaims simultaneously. The support for volume group snapshots relies on a set of extension APIs for group snapshots. These APIs allow users to take crash consistent snapshots for a set of volumes. A key aim is to allow you to restore that set of snapshots to new volumes and recover your workload based on a crash consistent recovery point.
This work was done as part of KEP #3476 led by SIG Storage.
Mutable volume attach limits
In Kubernetes v1.36, the mutable CSINode allocatable feature graduates to stable.
This enhancement allows Container Storage Interface (CSI) drivers to
dynamically update the reported maximum number of volumes that a node can handle.
With this update, the kubelet can dynamically update a node's volume limits and capacity information.
The kubelet adjusts these limits based on periodic checks or in response to
resource exhaustion errors from the CSI driver, without requiring a component restart.
This ensures the Kubernetes scheduler maintains an accurate view of storage availability,
preventing pod scheduling failures caused by outdated volume limits.
This work was done as part of KEP #4876 led by SIG Storage.
API for external signing of ServiceAccount tokens
In Kubernetes v1.36, the external ServiceAccount token signer feature for service accounts graduates to stable, making it possible to offload token signing to an external system while still integrating cleanly with the Kubernetes API. Clusters can now rely on an external JWT signer for issuing projected service account tokens that follow the standard service account token format, including support for extended expiration when needed. This is especially useful for clusters that already rely on external identity or key management systems, allowing Kubernetes to integrate without duplicating key management inside the control plane.
The kube-apiserver is wired to discover public keys from the external signer, cache them, and validate tokens it did not sign itself, so existing authentication and authorization flows continue to work as expected. Over the alpha and beta phases, the API and configuration for the external signer plugin, path validation, and OIDC discovery were hardened to handle real-world deployments and rotation patterns safely.
With GA in v1.36, external ServiceAccount token signing is now a fully supported option for platforms that centralize identity and signing, simplifying integration with external IAM systems and reducing the need to manage signing keys directly inside the control plane.
This work was done as part of KEP #740 led by SIG Auth.
DRA features graduating to Stable
Part of the Dynamic Resource Allocation (DRA) ecosystem reaches full production maturity in Kubernetes v1.36 as key governance and selection features graduate to Stable. The transition of DRA admin access to GA provides a permanent, secure framework for cluster administrators to access and manage hardware resources globally, while the stabilization of prioritized lists ensures that resource selection logic remains consistent and predictable across all cluster environments.
Now, organizations can confidently deploy mission-critical hardware automation with the guarantee of long-term API stability and backward compatibility. These features empower users to implement sophisticated resource-sharing policies and administrative overrides that are essential for large-scale GPU clusters and multi-tenant AI platforms, marking the completion of the core architectural foundation for next-generation resource management.
This work was done as part of KEPs #5018 and #4816 led by SIG Auth and SIG Scheduling.
Mutating admission policies
Declarative cluster management reaches a new level of sophistication in Kubernetes v1.36 with the graduation of MutatingAdmissionPolicies to Stable. This milestone provides a native, high-performance alternative to traditional webhooks by allowing administrators to define resource mutations directly in the API server using the Common Expression Language (CEL), fully replacing the need for external infrastructure for many common use cases.
Now, cluster operators can modify incoming requests without the latency and operational complexity associated with managing custom admission webhooks. By moving mutation logic into a declarative, versioned policy, organizations can achieve more predictable cluster behavior, reduced network overhead, and a hardened security model with the full guarantee of long-term API stability.
This work was done as part of KEP #3962 led by SIG API Machinery.
Declarative validation of Kubernetes native types with validation-gen
The development of custom resources reaches a new level of efficiency in Kubernetes v1.36
as declarative validation (with validation-gen) graduates to Stable.
This milestone replaces the manual and often error-prone task of writing complex
OpenAPI schemas by allowing developers to define sophisticated validation logic directly
within Go struct tags using the Common Expression Language (CEL).
Instead of writing custom validation functions, Kubernetes contributors can now define validation
rules using IDL marker comments (such as +k8s:minimum or +k8s:enum) directly
within the API type definitions (types.go). The validation-gen tool parses these
comments to automatically generate robust API validation code at compile-time.
This reduces maintenance overhead and ensures that API validation
remains consistent and synchronized with the source code.
This work was done as part of KEP #5073 led by SIG API Machinery.
Removal of gogo protobuf dependency for Kubernetes API types
Security and long-term maintainability for the Kubernetes codebase take a major step forward
in Kubernetes v1.36 with the completion of the gogoprotobuf removal.
This initiative has eliminated a significant dependency on the unmaintained gogoprotobuf library,
which had become a source of potential security vulnerabilities and
a blocker for adopting modern Go language features.
Instead of migrating to standard Protobuf generation, which presented compatibility risks
for Kubernetes API types, the project opted to fork and internalize the required
generation logic within k8s.io/code-generator. This approach successfully eliminates
the unmaintained runtime dependencies from the Kubernetes dependency graph
while preserving existing API behavior and serialization compatibility.
For consumers of Kubernetes API Go types, this change reduces technical debt and
prevents accidental misuse with standard protobuf libraries.
This work was done as part of KEP #5589 led by SIG API Machinery.
Node log query
Previously, Kubernetes required cluster administrators to log into nodes via SSH or implement a
client-side reader for debugging issues pertaining to control-plane or worker nodes.
While certain issues still require direct node access, issues with the kube-proxy or kubelet
can be diagnosed by inspecting their logs. Node logs offer cluster administrators
a method to view these logs using the kubelet API and kubectl plugin
to simplify troubleshooting without logging into nodes, similar to debugging issues
related to a pod or container. This method is operating system agnostic and
requires the services or nodes to log to /var/log.
As this feature reaches GA in Kubernetes 1.36 after thorough performance validation on production workloads,
it is enabled by default on the kubelet through the NodeLogQuery feature gate.
In addition, the enableSystemLogQuery kubelet configuration option must also be enabled.
This work was done as a part of KEP #2258 led by SIG Windows.
Support User Namespaces in pods
Container isolation and node security reach a major maturity milestone in Kubernetes v1.36 as support for User Namespaces graduates to Stable. This long-awaited feature provides a critical layer of defense-in-depth by allowing the mapping of a container's root user to a non-privileged user on the host, ensuring that even if a process escapes the container, it possesses no administrative power over the underlying node.
Now, cluster operators can confidently enable this hardened isolation for production workloads to mitigate the impact of container breakout vulnerabilities. By decoupling the container's internal identity from the host's identity, Kubernetes provides a robust, standardized mechanism to protect multi-tenant environments and sensitive infrastructure from unauthorized access, all with the full guarantee of long-term API stability.
This work was done as part of KEP #127 led by SIG Node.
Support PSI based on cgroupv2
Node resource management and observability become more precise in Kubernetes v1.36 as the export of Pressure Stall Information (PSI) metrics graduates to Stable. This feature provides the kubelet with the ability to report "pressure" metrics for CPU, memory, and I/O, offering a more granular view of resource contention than traditional utilization metrics.
Cluster operators and autoscalers can use these metrics to distinguish between a system that is simply busy and one that is actively stalling due to resource exhaustion. By leveraging these signals, users can more accurately tune pod resource requests, improve the reliability of vertical autoscaling, and detect noisy neighbor effects before they lead to application performance degradation or node instability.
This work was done as part of KEP #4205 led by SIG Node.
Volume source: OCI artifact and/or image
The distribution of container data becomes more flexible in Kubernetes v1.36 as OCI volume source support graduates to Stable. This feature moves beyond the traditional requirement of mounting volumes from external storage providers or config maps by allowing the kubelet to pull and mount content directly from any OCI-compliant registry, such as a container image or an artifact repository.
Now, developers and platform engineers can package application data, models, or static assets as OCI artifacts and deliver them to pods using the same registries and versioning workflows they already use for container images. This convergence of image and volume management simplifies CI/CD pipelines, reduces dependency on specialized storage backends for read-only content, and ensures that data remains portable and securely accessible across any environment.
This work was done as part of KEP #4639 led by SIG Node.
New features in Beta
This is a selection of some of the improvements that are now beta following the v1.36 release.
Staleness mitigation for controllers
Staleness in Kubernetes controllers is a problem that affects many controllers and can subtly affect controller behavior. It is usually not until it is too late, when a controller in production has already taken incorrect action, that staleness is found to be an issue due to some underlying assumption made by the controller author. This could lead to conflicting updates or data corruption upon controller reconciliation during times of cache staleness.
We are excited to announce that Kubernetes v1.36 includes new features that help mitigate controller staleness and provide better observability of controller behavior. This prevents reconciliation based on an outdated view of cluster state that can often lead to harmful behavior.
This work was done as part of KEP #5647 led by SIG API Machinery.
IP/CIDR validation improvements
In Kubernetes v1.36, the StrictIPCIDRValidation feature for API IP and CIDR fields graduates to beta,
tightening validation to catch malformed addresses and prefixes that previously slipped through.
This helps prevent subtle configuration bugs where Services, Pods, NetworkPolicies,
or other resources reference invalid IPs, which could otherwise lead to
confusing runtime behavior or security surprises.
Controllers are updated to canonicalize IPs they write back into objects and to warn when they
encounter bad values that were already stored, so clusters can gradually converge on clean,
consistent data. With beta, StrictIPCIDRValidation is ready for wider use,
giving operators more reliable guardrails around IP-related configuration
as they evolve networks and policies over time.
This work was done as a part of KEP #4858 led by SIG Network.
Separate kubectl user preferences from cluster configs
The .kuberc feature for customizing kubectl user preferences continues to be beta
and is enabled by default. The ~/.kube/kuberc file allows users to store aliases, default flags,
and other personal settings separately from kubeconfig files, which hold cluster endpoints and credentials.
This separation prevents personal preferences from interfering with CI pipelines or shared kubeconfig files,
while maintaining a consistent kubectl experience across different clusters and contexts.
In Kubernetes v1.36, .kuberc was expanded with the ability to define policies for credential plugins
(allowlists or denylists) to enforce safer authentication practicies.
Users can disable this functionality if needed by setting the KUBECTL_KUBERC=false or KUBERC=off environment variables.
This work was done as a part of KEP #3104 led by SIG CLI, with the help from SIG Auth.
Mutable container resources when Job is suspended
In Kubernetes v1.36, the MutablePodResourcesForSuspendedJobs feature graduates to beta and is enabled by default.
This update relaxes Job validation to allow updates to container CPU, memory,
GPU, and extended resource requests and limits while a Job is suspended.
This capability allows queue controllers and operators to adjust batch workload requirements based on real‑time cluster conditions. For example, a queueing system can suspend incoming Jobs, adjust their resource requirements to match available capacity or quota, and then unsuspend them. The feature strictly limits mutability to suspended Jobs (or Jobs whose pods have been terminated upon suspension) to prevent disruptive changes to actively running pods.
This work was done as a part of KEP #5440 led by SIG Apps.
Constrained impersonation
In Kubernetes v1.36, the ConstrainedImpersonation feature for user impersonation graduates to beta,
tightening a historically all‑or‑nothing mechanism into something that can actually follow least‑privilege principles.
When this feature is enabled, an impersonator must have two distinct sets of permissions:
one to impersonate a given identity, and another to perform specific actions on that identity’s behalf.
This prevents support tools, controllers, or node agents from using impersonation to gain broader access
than they themselves are allowed, even if their impersonation RBAC is misconfigured.
Existing impersonate rules keep working, but the API server prefers the new constrained checks first,
making the transition incremental instead of a flag day. With beta in v1.36, ConstrainedImpersonation is tested,
documented, and ready for wider adoption by platform teams that rely on impersonation for debugging, proxying,
or node‑level controllers.
This work was done as a part of KEP #5284 led by SIG Auth.
DRA features in beta
The Dynamic Resource Allocation (DRA) framework reaches another maturity milestone in Kubernetes v1.36 as several core features graduate to beta and are enabled by default. This transition moves DRA beyond basic allocation by graduating partitionable devices and consumable capacity, allowing for more granular sharing of hardware like GPUs, while device taints and tolerations ensure that specialized resources are only utilized by the appropriate workloads.
Now, users benefit from a much more reliable and observable resource lifecycle through ResourceClaim device status and the ability to ensure device attachment before Pod scheduling. By integrating these features with extended resource support, Kubernetes provides a robust production-ready alternative to the legacy device plugin system, enabling complex AI and HPC workloads to manage hardware with unprecedented precision and operational safety.
This work was done across several KEPs (including #5004, #4817, #5055, #5075, #4815, and #5007) led by SIG Scheduling and SIG Node.
Statusz for Kubernetes components
In Kubernetes v1.36, the ComponentStatusz feature gate for core Kubernetes components graduates to beta,
providing a /statusz endpoint (enabled by default) that surfaces real‑time build and version details for each component.
This low‑overhead z-page exposes information like start time, uptime, Go version, binary version,
emulation version, and minimum compatibility version, so operators and developers can quickly see exactly
what is running without digging through logs or configs.
The endpoint offers a human‑readable text view by default, plus a versioned structured API (config.k8s.io/v1beta1)
for programmatic access in JSON, YAML, or CBOR via explicit content negotiation.
Access is granted to the system:monitoring group, keeping it aligned with existing protections on
health and metrics endpoints and avoiding exposure of sensitive data.
With beta, ComponentStatusz is enabled by default across all core control‑plane components and node agents,
backed by unit, integration, and end‑to‑end tests so it can be safely used in production for
observability and debugging workflows.
This work was done as a part of KEP #4827 led by SIG Instrumentation.
Flagz for Kubernetes components
In Kubernetes v1.36, the ComponentFlagz feature gate for core Kubernetes components graduates to beta,
standardizing a /flagz endpoint that exposes the effective command‑line flags each component was started with.
This gives cluster operators and developers real‑time, in‑cluster visibility into component configuration,
making it much easier to debug unexpected behavior or verify that a flag rollout actually took effect after a restart.
The endpoint supports both a human‑readable text view and a versioned structured API (initially config.k8s.io/v1beta1),
so you can either curl it during an incident or wire it into automated tooling once you are ready.
Access is granted to the system:monitoring group and sensitive values can be redacted,
keeping configuration insight aligned with existing security practices around health and status endpoints.
With beta, ComponentFlagz is now enabled by default and implemented across all core control‑plane components
and node agents, backed by unit, integration, and end‑to‑end tests to ensure the endpoint is reliable in production clusters.
This work was done as a part of KEP #4828 led by SIG Instrumentation.
Mixed version proxy (aka unknown version interoperability proxy)
In Kubernetes v1.36, the mixed version proxy feature graduates to beta, building on its alpha introduction in v1.28 to provide safer control-plane upgrades for mixed-version clusters. Each API request can now be routed to the apiserver instance that serves the requested group, version, and resource, reducing 404s and failures due to version skew.
The feature relies on peer-aggregated discovery, so apiservers share information about which resources and versions they expose, then use that data to transparently reroute requests when needed. New metrics on rerouted traffic and proxy behavior help operators understand how often requests are forwarded and to which peers. Together, these changes make it easier to run highly available, mixed-version API control planes in production while performing multi-step or partial control-plane upgrades.
This work was done as a part of KEP #4020 led by SIG API Machinery
Memory QoS with cgroups v2
Kubernetes now enhances memory QoS on Linux cgroup v2 nodes with smarter, tiered memory protection that better aligns kernel controls with pod requests and limits, reducing interference and thrashing for workloads sharing the same node. This iteration also refines how kubelet programs memory.high and memory.min, adds metrics and safeguards to avoid livelocks, and introduces configuration options so cluster operators can tune memory protection behavior for their environments.
This work was done as part of KEP #2570 led by SIG Node.
New features in Alpha
This is a selection of some of the improvements that are now alpha following the v1.36 release.
HPA scale to zero for custom metrics
Until now, the HorizontalPodAutoscaler (HPA) required a minimum of at least one replica to remain active, as it could only calculate scaling needs based on metrics (like CPU or Memory) from running pods. Kubernetes v1.36 continues the development of the HPA scale to zero feature (disabled by default) in Alpha, allowing workloads to scale down to zero replicas specifically when using Object or External metrics.
Now, users can experiment with significantly reducing infrastructure costs by completely idling heavy workloads when
no work is pending. While the feature remains behind the HPAScaleToZero feature gate,
it enables the HPA to stay active even with zero running pods,
automatically scaling the deployment back up as soon as the external metric (e.g., queue length)
indicates that new tasks have arrived.
This work was done as part of KEP #2021 led by SIG Autoscaling.
DRA features in Alpha
Historically, the Dynamic Resource Allocation (DRA) framework lacked seamless integration with high-level controllers and provided limited visibility into device-specific metadata or availability. Kubernetes v1.36 introduces a wave of DRA enhancements in Alpha, including native ResourceClaim support for workloads, and DRA native resources to provide the flexibility of DRA to cpu management.
Now, users can leverage the downward API to expose complex resource attributes directly to containers and benefit from improved resource availability visibility for more predictable scheduling. these updates, combined with support for list types in device attributes, transform DRA from a low-level primitive into a robust system capable of handling the sophisticated networking and compute requirements of modern AI and high-performance computing (HPC) stacks.
This work was done across several KEPs (including #5729, #5304, #5517, #5677, and #5491) led by SIG Scheduling and SIG Node.
Native histogram support for Kubernetes metrics
High-resolution monitoring reaches a new milestone in Kubernetes v1.36 with the introduction of native histogram support in Alpha. While classical Prometheus histograms relied on static, pre-defined buckets that often forced a compromise between data accuracy and memory usage, this update allows the control plane to export sparse histograms that dynamically adjust their resolution based on real-time data.
Now, cluster operators can capture precise latency distributions for the kube-apiserver and other core components without the overhead of manual bucket management. This architectural shift ensures more reliable SLIs and SLOs, providing high-fidelity heatmaps that remain accurate even during the most unpredictable workload spikes.
This work was done as part of KEP #5808 led by SIG Instrumentation.
Manifest based admission control config
Managing admission controllers moves toward a more declarative and consistent model in Kubernetes v1.36 with the introduction of manifest-based admission control configuration in Alpha. This change addresses the long-standing challenge of configuring admission plugins through disparate command-line flags or separate, complex config files by allowing administrators to define the desired state of admission control directly through a structured manifest.
Now, cluster operators can manage admission plugin settings with the same versioned, declarative workflows used for other Kubernetes objects, significantly reducing the risk of configuration drift and manual errors during cluster upgrades. By centralizing these configurations into a unified manifest, the kube-apiserver becomes easier to audit and automate, paving the way for more secure and reproducible cluster deployments.
This work was done as part of KEP #5793 led by SIG API Machinery.
CRI list streaming
With the introduction of CRI list streaming in Alpha, Kubernetes v1.36 uses new internal streaming operations.
This enhancement addresses the memory pressure and latency spikes often seen on large-scale nodes by replacing traditional,
monolithic List requests between the kubelet and the container runtime with a more efficient server-side streaming RPC.
Now, instead of waiting for a single, massive response containing all container or image data, the kubelet can process results incrementally as they are streamed. This shift significantly reduces the peak memory footprint of the kubelet and improves responsiveness on high-density nodes, ensuring that cluster management remains fluid even as the number of containers per node continues to grow.
This work was done as part of KEP #5825 led by SIG Node.
Other notable changes
Ingress NGINX retirement
To prioritize the safety and security of the ecosystem, Kubernetes SIG Network and the Security Response Committee have retired Ingress NGINX on March 24, 2026. Since that date, there have been no further releases, no bugfixes, and no updates to resolve any security vulnerabilities discovered. Existing deployments of Ingress NGINX will continue to function, and installation artifacts like Helm charts and container images will remain available.
For full details, see the official retirement announcement.
Faster SELinux labelling for volumes (GA)
Kubernetes v1.36 makes the SELinux volume mounting improvement generally available. This change replaced recursive file
relabeling with mount -o context=XYZ option, applying the correct SELinux label to the entire volume at mount time.
It brings more consistent performance and reduces Pod startup delays on SELinux-enforcing systems.
This feature was introduced as beta in v1.28 for ReadWriteOncePod volumes. In v1.32, it gained metrics and an opt-out
option (securityContext.seLinuxChangePolicy: Recursive) to help catch conflicts. Now in v1.36,
it reaches Stable and defaults to all volumes, with Pods or CSIDrivers opting in via spec.seLinuxMount.
However, we expect this feature to create the risk of breaking changes in the future Kubernetes releases, potentially due to sharing one volume between privileged and unprivileged Pods on the same node.
Developers have the responsibility of setting the seLinuxChangePolicy field and SELinux volume labels on Pods. Regardless of whether they are writing a Deployment, StatefulSet, DaemonSet or even a custom resource that includes a Pod template, being careless with these settings can lead to a range of problems such as Pods not starting up correctly when Pods share a volume.
Kubernetes v1.36 is the ideal release to audit your clusters. To learn more, check out SELinux Volume Label Changes goes GA (and likely implications in v1.37) blog.
For more details on this enhancement, refer to KEP-1710: Speed up recursive SELinux label change.
Graduations, deprecations, and removals in v1.36
Graduations to stable
This lists all the features that graduated to stable (also known as general availability). For a full list of updates including new features and graduations from alpha to beta, see the release notes.
This release includes a total of 18 enhancements promoted to stable:
- Support User Namespaces in pods
- API for external signing of Service Account tokens
- Speed up recursive SELinux label change
- Portworx file in-tree to CSI driver migration
- Fine grained Kubelet API authorization
- Mutating Admission Policies
- Node log query
- VolumeGroupSnapshot
- Mutable CSINode Allocatable Property
- DRA: Prioritized Alternatives in Device Requests
- Support PSI based on cgroupv2
- add ProcMount option
- DRA: Extend PodResources to include resources from Dynamic Resource Allocation
- VolumeSource: OCI Artifact and/or Image
- Split L3 Cache Topology Awareness in CPU Manager
- DRA: AdminAccess for ResourceClaims and ResourceClaimTemplates
- Remove gogo protobuf dependency for Kubernetes API types
- CSI driver opt-in for service account tokens via secrets field
Deprecations removals, and community updates
As Kubernetes develops and matures, features may be deprecated, removed, or replaced with better ones to improve the project's overall health. See the Kubernetes deprecation and removal policy for more details on this process. Kubernetes v1.36 includes a couple of deprecations.
Deprecation of Service .spec.externalIPs
With this release, the externalIPs field in Service spec is deprecated. This means the functionality exists, but will no longer function in a future version of Kubernetes. You should plan to migrate if you currently rely on that field.
This field has been a known security headache for years,
enabling man-in-the-middle attacks on your cluster traffic, as documented in CVE-2020-8554.
From Kubernetes v1.36 and onwards, you will see deprecation warnings when using it, with full removal planned for v1.43.
If your Services still lean on externalIPs, consider using LoadBalancer services for cloud-managed ingress,
NodePort for simple port exposure, or Gateway API for a more flexible and secure way to handle external traffic.
For more details on this field and its deprecation, refer to External IPs or read KEP-5707: Deprecate service.spec.externalIPs.
Removal of the gitRepo volume driver
The gitRepo volume type has been deprecated since v1.11. For Kubernetes v1.36, the gitRepo volume plugin is
permanently disabled and cannot be turned back on. This change protects clusters from a critical security issue where
using gitRepo could let an attacker run code as root on the node.
Although gitRepo has been deprecated for years and better alternatives have been recommended,
it was still technically possible to use it in previous releases.
From v1.36 onward, that path is closed for good, so any existing workloads depending on gitRepo will need to migrate to
supported approaches such as init containers or external git-sync style tools.
For more details on this removal, refer to KEP-5040: Remove gitRepo volume driver
Release notes
Check out the full details of the Kubernetes v1.36 release in our release notes.
Availability
Kubernetes v1.36 is available for download on GitHub or on the Kubernetes download page.
To get started with Kubernetes, check out these tutorials or run local Kubernetes clusters using minikube. You can also easily install v1.36 using kubeadm.
Release Team
Kubernetes is only possible with the support, commitment, and hard work of its community. Each release team is made up of dedicated community volunteers who work together to build the many pieces that make up the Kubernetes releases you rely on. This requires the specialized skills of people from all corners of our community, from the code itself to its documentation and project management.
We would like to thank the entire Release Team for the hours spent hard at work to deliver the Kubernetes v1.36 release to our community. The Release Team's membership ranges from first-time shadows to returning team leads with experience forged over several release cycles. A very special thanks goes out to our release lead, Ryota Sawada, for guiding us through a successful release cycle, for his hands-on approach to solving challenges, and for bringing the energy and care that drives our community forward.
Project Velocity
The CNCF K8s DevStats project aggregates a number of interesting data points related to the velocity of Kubernetes and various sub-projects. This includes everything from individual contributions to the number of companies that are contributing, and is an illustration of the depth and breadth of effort that goes into evolving this ecosystem.
During the v1.36 release cycle, which spanned 15 weeks from 12th January 2026 to 22nd April 2026, Kubernetes received contributions from as many as 106 different companies and 491 individuals. In the wider cloud native ecosystem, the figure goes up to 370 companies, counting 2235 total contributors.
Note that “contribution” counts when someone makes a commit, code review, comment, creates an issue or PR, reviews a PR (including blogs and documentation) or comments on issues and PRs. If you are interested in contributing, visit Getting Started on our contributor website.
Source for this data:
Events Update
Explore upcoming Kubernetes and cloud native events, including KubeCon + CloudNativeCon, KCD, and other notable conferences worldwide. Stay informed and get involved with the Kubernetes community!
April 2026
- KCD - Kubernetes Community Days: Guadalajara: April 18, 2026 | Guadalajara, Mexico
May 2026
- KCD - Kubernetes Community Days: Toronto: May 13, 2026 | Toronto, Canada
- KCD - Kubernetes Community Days: Texas: May 15, 2026 | Austin, USA
- KCD - Kubernetes Community Days: Istanbul: May 15, 2026 | Istanbul, Turkey
- KCD - Kubernetes Community Days: Helsinki: May 20, 2026 | Helsinki, Finland
- KCD - Kubernetes Community Days: Czech & Slovak: May 21, 2026 | Prague, Czechia
June 2026
- KCD - Kubernetes Community Days: New York: June 10, 2026 | New York, USA
- KCD - Kubernetes Community Days: Kuala Lumpur: June 27, 2026 | Kuala Lumpur, Malaysia
- KubeCon + CloudNativeCon India 2026: June 18-19, 2026 | Mumbai, India
July 2026
- KubeCon + CloudNativeCon Japan 2026: July 29-30, 2026 | Yokohama, Japan
September 2026
- KCD - Kubernetes Community Days: San Francisco Bay Area: September 1, 2026 | Mountain View, USA
- KubeCon + CloudNativeCon China 2026: September 8-9, 2026 | Shanghai, China
October 2026
- KCD - Kubernetes Community Days: UK: Oct 19, 2026 | Edinburgh, UK
November 2026
- KCD - Kubernetes Community Days: Porto: Nov 19, 2026 | Porto, Portugal
- KubeCon + CloudNativeCon North America 2026: Nov 9-12, 2026 | Salt Lake City, USA
You can find the latest event details here.
Upcoming Release Webinar
Join members of the Kubernetes v1.36 Release Team on Wednesday, May 20th 2026 at 4:00 PM (UTC) to learn about the release highlights of this release. For more information and registration, visit the event page on the CNCF Online Programs site.
Get Involved
The simplest way to get involved with Kubernetes is by joining one of the many Special Interest Groups (SIGs) that align with your interests. Have something you’d like to broadcast to the Kubernetes community? Share your voice at our weekly community meeting, and through the channels below. Thank you for your continued feedback and support.
- Follow us on Bluesky @kubernetes.io for the latest updates
- Join the community discussion on Discuss
- Join the community on Slack
- Post questions (or answer questions) on Stack Overflow
- Share your Kubernetes story
- Read more about what’s happening with Kubernetes on the blog
- Learn more about the Kubernetes Release Team
Gateway API v1.5: Moving features to Stable
The Kubernetes SIG Network community presents the release of Gateway API (v1.5)! Released on February 27, 2026, version 1.5 is our biggest release yet, and concentrates on moving existing Experimental features to Standard (Stable).
The Gateway API v1.5.1 patch release is already available.
The Gateway API v1.5 brings six widely-requested feature promotions to the Standard channel (Gateway API's GA release channel):
- ListenerSet
- TLSRoute
- HTTPRoute CORS Filter
- Client Certificate Validation
- Certificate Selection for Gateway TLS Origination
- ReferenceGrant
Special thanks for Gateway API Contributors for their efforts on this release.
New release process
As of Gateway API v1.5, the project has moved to a release train model, where on a feature freeze date, any features that are ready are shipped in the release.
This applies to both Experimental and Standard, and also applies to documentation -- if the documentation isn't ready to ship, the feature isn't ready to ship.
We are aiming for this to produce a more reliable release cadence (since we are basing our work off the excellent work done by SIG Release on Kubernetes itself). As part of this change, we've also introduced Release Manager and Release Shadow roles to our release team. Many thanks to Flynn (Buoyant) and Beka Modebadze (Google) for all the great work coordinating and filing the rough edges of our release process. They are both going to continue in this role for the next release as well.
New standard features
ListenerSet
Leads: Dave Protasowski, David Jumani
Why ListenerSet?
Prior to ListenerSet, all listeners had to be specified directly on the Gateway object. While this worked well for simple use cases, it created challenges for more complex or multi-tenant environments:
- Platform teams and application teams often needed to coordinate changes to the same Gateway
- Safely delegating ownership of individual listeners was difficult
- Extending existing Gateways required direct modification of the original resource
ListenerSet addresses these limitations by allowing listeners to be defined independently and then merged onto a target Gateway.
ListenerSets also enable attaching more than 64 listeners to a single, shared Gateway. This is critical for large scale deployments and scenarios with multiple hostnames per listener.
Even though the ListenerSet feature significantly enhances scalability, the listener field in Gateway remains a mandatory requirement and the Gateway must have at least one valid listener.
How it works
A ListenerSet attaches to a Gateway and contributes one or more listeners. The Gateway controller is responsible for merging listeners from the Gateway resource itself and any attached ListenerSet resources.
In this example, a central infrastructure team defines a Gateway with a default HTTP listener, while two different application teams define their own ListenerSet resources in separate namespaces. Both ListenerSets attach to the same Gateway and contribute additional HTTPS listeners.
---
apiVersion: gateway.networking.k8s.io/v1
kind: Gateway
metadata:
name: example-gateway
namespace: infra
spec:
gatewayClassName: example-gateway-class
allowedListeners:
namespaces:
from: All # A selector lets you fine tune this
listeners:
- name: http
protocol: HTTP
port: 80
---
apiVersion: gateway.networking.k8s.io/v1
kind: ListenerSet
metadata:
name: team-a-listeners
namespace: team-a
spec:
parentRef:
name: example-gateway
namespace: infra
listeners:
- name: https-a
protocol: HTTPS
port: 443
hostname: a.example.com
tls:
certificateRefs:
- name: a-cert
---
apiVersion: gateway.networking.k8s.io/v1
kind: ListenerSet
metadata:
name: team-b-listeners
namespace: team-b
spec:
parentRef:
name: example-gateway
namespace: infra
listeners:
- name: https-b
protocol: HTTPS
port: 443
hostname: b.example.com
tls:
certificateRefs:
- name: b-cert
TLSRoute
Leads: Rostislav Bobrovsky, Ricardo Pchevuzinske Katz
The TLSRoute resource allows you to route requests by matching the Server Name Indication (SNI) presented by the client during the TLS handshake and directing the stream to the appropriate Kubernetes backends.
When working with TLSRoute, a Gateway's TLS listener can be configured in one of two modes: Passthrough or Terminate.
If you install Gateway API v1.5 Standard over v1.4 or earlier Experimental, your existing
Experimental TLSRoutes will not be usable. This is because they will be stored in the v1alpha2 or v1alpha3 version, which is not included in the v1.5 Standard YAMLs.
If this applies to you, either continue using Experimental for v1.5.1 and onward, or you'll need to download and migrate your TLSRoutes to v1, which is present in the Standard YAMLs.
Passthrough mode
The Passthrough mode is designed for strict security requirements. It is ideal for scenarios where traffic must remain encrypted end-to-end until it reaches the destination backend, when the external client and backend need to authenticate directly with each other, or when you can’t store certificates on the Gateway. This configuration is also applicable when an encrypted TCP stream is required instead of standard HTTP traffic.
In this mode, the encrypted byte stream is proxied directly to the destination backend. The Gateway has zero access to private keys or unencrypted data.
The following TLSRoute is attached to a listener that is configured in Passthrough mode. It will match only TLS handshakes with the foo.example.com SNI hostname and apply its routing rules to pass the encrypted TCP stream to the configured backend:
---
apiVersion: gateway.networking.k8s.io/v1
kind: Gateway
metadata:
name: example-gateway
spec:
gatewayClassName: example-gateway-class
listeners:
- name: tls-passthrough
protocol: TLS
port: 8443
tls:
mode: Passthrough
---
apiVersion: gateway.networking.k8s.io/v1
kind: TLSRoute
metadata:
name: foo-route
spec:
parentRefs:
- name: example-gateway
sectionName: tls-passthrough
hostnames:
- "foo.example.com"
rules:
- backendRefs:
- name: foo-svc
port: 8443
Terminate mode
The Terminate mode provides the convenience of centralized TLS certificate management directly at the Gateway.
In this mode, the TLS session is fully terminated at the Gateway, which then routes the decrypted payload to the destination backend as a plain text TCP stream.
The following TLSRoute is attached to a listener that is configured in Terminate mode.
It will match only TLS handshakes with the bar.example.com SNI hostname and apply its routing rules to pass the decrypted TCP stream to the configured backend:
apiVersion: gateway.networking.k8s.io/v1
kind: Gateway
metadata:
name: example-gateway
spec:
gatewayClassName: example-gateway-class
listeners:
- name: tls-terminate
protocol: TLS
port: 443
tls:
mode: Terminate
certificateRefs:
- name: tls-terminate-certificate
---
apiVersion: gateway.networking.k8s.io/v1
kind: TLSRoute
metadata:
name: bar-route
spec:
parentRefs:
- name: example-gateway
sectionName: tls-terminate
hostnames:
- "bar.example.com"
rules:
- backendRefs:
- name: bar-svc
port: 8080
HTTPRoute CORS filter
Leads: Damian Sawicki, Ricardo Pchevuzinske Katz, Norwin Schnyder, Huabing (Robin) Zhao, LiangLliu,
Cross-origin resource sharing (CORS) is an HTTP-header based security mechanism that allows (or denies) a web page to access resources from a server on an origin different from the domain that served the web page. See our documentation page for more information. The HTTPRoute resource can be used to configure Cross-Origin Resource Sharing (CORS). The following HTTPRoute allows requests from https://app.example:
apiVersion: gateway.networking.k8s.io/v1
kind: HTTPRoute
metadata:
name: cors
spec:
parentRefs:
- name: same-namespace
rules:
- matches:
- path:
type: PathPrefix
value: /cors-behavior-creds-false
backendRefs:
- name: infra-backend-v1
port: 8080
filters:
- cors:
allowOrigins:
- https://app.example
type: CORS
Instead of specifying a list of specific origins, you can also specify a single wildcard ("*"), which will allow any origin. It is also allowed to use semi-specified origins in the list, where the wildcard appears after the scheme and at the beginning of the hostname, e.g. https://*.bar.com:
apiVersion: gateway.networking.k8s.io/v1
kind: HTTPRoute
metadata:
name: cors
spec:
parentRefs:
- name: same-namespace
rules:
- matches:
- path:
type: PathPrefix
value: /cors-behavior-creds-false
backendRefs:
- name: infra-backend-v1
port: 8080
filters:
- cors:
allowOrigins:
- https://www.baz.com
- https://*.bar.com
- https://*.foo.com
type: CORS
HTTPRoute filters allow for the configuration of CORS settings. See a list of supported options below:
allowCredentials- Specifies whether the browser is allowed to include credentials (such as cookies and HTTP authentication) in the CORS request.
allowMethods- The HTTP methods that are allowed for CORS requests.
allowHeaders- The HTTP headers that are allowed for CORS requests.
exposeHeaders- The HTTP headers that are exposed to the client.
maxAge- The maximum time in seconds that the browser should cache the preflight response.
A comprehensive example:
apiVersion: gateway.networking.k8s.io/v1
kind: HTTPRoute
metadata:
name: cors-allow-credentials
spec:
parentRefs:
- name: same-namespace
rules:
- matches:
- path:
type: PathPrefix
value: /cors-behavior-creds-true
backendRefs:
- name: infra-backend-v1
port: 8080
filters:
- cors:
allowOrigins:
- "https://www.foo.example.com"
- "https://*.bar.example.com"
allowMethods:
- GET
- OPTIONS
allowHeaders:
- "*"
exposeHeaders:
- "x-header-3"
- "x-header-4"
allowCredentials: true
maxAge: 3600
type: CORS
Gateway client certificate validation
Leads: Arko Dasgupta, Katarzyna Łach, Norwin Schnyder
Client certificate validation, also known as mutual TLS (mTLS), is a security mechanism where the client provides a certificate to the server to prove its identity. This is in contrast to standard TLS, where only the server presents a certificate to the client. In the context of the Gateway API, frontend mTLS means that the Gateway validates the client's certificate before allowing the connection to proceed to a backend service. This validation is done by checking the client certificate against a set of trusted Certificate Authorities (CAs) configured on the Gateway. The API was shaped this way to address a critical security vulnerability related to connection reuse and still provide some level of flexibility.
Configuration overview
Client validation is defined using the frontendValidation struct, which specifies how the Gateway should verify the client's identity.
- caCertificateRefs: A list of references to Kubernetes objects (typically ConfigMap's) containing PEM-encoded CA certificate bundles used as trust anchors to validate the client's certificate.
- mode: Defines the validation behavior.
- AllowValidOnly (Default): The Gateway accepts connections only if the client presents a valid certificate that passes validation against the specified CA bundle.
- AllowInsecureFallback: The Gateway accepts connections even if the client certificate is missing or fails verification. This mode typically delegates authorization to the backend and should be used with caution.
Validation can be applied globally to the Gateway or overridden for specific ports:
- Default Configuration: This configuration applies to all HTTPS listeners on the Gateway, unless a per-port override is defined.
- Per-Port Configuration: This allows for fine-grained control, overriding the default configuration for all listeners handling traffic on a specific port.
Example:
apiVersion: gateway.networking.k8s.io/v1
kind: Gateway
metadata:
name: client-validation-basic
spec:
gatewayClassName: acme-lb
tls:
frontend:
default:
validation:
caCertificateRefs:
- kind: ConfigMap
group: ""
name: foo-example-com-ca-cert
perPort:
- port: 8443
tls:
validation:
caCertificateRefs:
- kind: ConfigMap
group: ""
name: foo-example-com-ca-cert
mode: "AllowInsecureFallback"
listeners:
- name: foo-https
protocol: HTTPS
port: 443
hostname: foo.example.com
tls:
certificateRefs:
- kind: Secret
group: ""
name: foo-example-com-cert
- name: bar-https
protocol: HTTPS
port: 8443
hostname: bar.example.com
tls:
certificateRefs:
- kind: Secret
group: ""
name: bar-example-com-cert
Certificate selection for Gateway TLS origination
Leads: Marcin Kosieradzki, Rob Scott, Norwin Schnyder, Lior Lieberman, Katarzyna Lach
Mutual TLS (mTLS) for upstream connections requires the Gateway to present a client certificate to the backend, in addition to verifying the backend's certificate. This ensures that the backend only accepts connections from authorized Gateways.
Gateway’s client certificate configuration
To configure the client certificate that the Gateway uses when connecting to backends, use the tls.backend.clientCertificateRef field in the Gateway resource. This configuration applies to the Gateway as a client for all upstream connections managed by that Gateway.
apiVersion: gateway.networking.k8s.io/v1
kind: Gateway
metadata:
name: backend-tls
spec:
gatewayClassName: acme-lb
tls:
backend:
clientCertificateRef:
kind: Secret
group: "" # empty string means core API group
name: foo-example-cert
listeners:
- name: foo-http
protocol: HTTP
port: 80
hostname: foo.example.com
ReferenceGrant promoted to v1
The ReferenceGrant resource has not changed in more than a year, and we do not expect it to change further, so its version has been bumped to v1, and it is now officially in the Standard channel, and abides by the GA API contract (that is, no breaking changes).
Try it out
Unlike other Kubernetes APIs, you don't need to upgrade to the latest version of Kubernetes to get the latest version of Gateway API. As long as you're running Kubernetes 1.30 or later, you'll be able to get up and running with this version of Gateway API.
To try out the API, follow the Getting Started Guide.
As of this writing, seven implementations are already fully conformant with Gateway API v1.5. In alphabetical order:
Get involved
Wondering when a feature will be added? There are lots of opportunities to get involved and help define the future of Kubernetes routing APIs for both ingress and service mesh.
- Check out the user guides to see what use-cases can be addressed.
- Try out one of the existing Gateway controllers.
- Or join us in the community and help us build the future of Gateway API together!
The maintainers would like to thank everyone who's contributed to Gateway API, whether in the form of commits to the repo, discussion, ideas, or general support. We could never have made this kind of progress without the support of this dedicated and active community.
This article was edited in April 2026 to correct the release date for Gateway API 1.5.0.
Kubernetes v1.36 Sneak Peek
Kubernetes v1.36 is coming at the end of April 2026. This release will include removals and deprecations, and it is packed with an impressive number of enhancements. Here are some of the features we are most excited about in this cycle!
Please note that this information reflects the current state of v1.36 development and may change before release.
The Kubernetes API removal and deprecation process
The Kubernetes project has a well-documented deprecation policy for features. This policy states that stable APIs may only be deprecated when a newer, stable version of that same API is available and that APIs have a minimum lifetime for each stability level. A deprecated API has been marked for removal in a future Kubernetes release. It will continue to function until removal (at least one year from the deprecation), but usage will result in a warning being displayed. Removed APIs are no longer available in the current version, at which point you must migrate to using the replacement.
- Generally available (GA) or stable API versions may be marked as deprecated but must not be removed within a major version of Kubernetes.
- Beta or pre-release API versions must be supported for 3 releases after the deprecation.
- Alpha or experimental API versions may be removed in any release without prior deprecation notice; this process can become a withdrawal in cases where a different implementation for the same feature is already in place.
Whether an API is removed as a result of a feature graduating from beta to stable, or because that API simply did not succeed, all removals comply with this deprecation policy. Whenever an API is removed, migration options are communicated in the deprecation guide.
A recent example of this principle in action is the retirement of the ingress-nginx project, announced by SIG-Security on March 24, 2026. As stewardship shifts away from the project, the community has been encouraged to evaluate alternative ingress controllers that align with current security and maintenance best practices. This transition reflects the same lifecycle discipline that underpins Kubernetes itself, ensuring continued evolution without abrupt disruption.
Ingress NGINX retirement
To prioritize the safety and security of the ecosystem, Kubernetes SIG Network and the Security Response Committee have retired Ingress NGINX on March 24, 2026. Since that date, there have been no further releases, no bugfixes, and no updates to resolve any security vulnerabilities discovered. Existing deployments of Ingress NGINX will continue to function, and installation artifacts like Helm charts and container images will remain available.
For full details, see the official retirement announcement.
Deprecations and removals for Kubernetes v1.36
Deprecation of .spec.externalIPs in Service
The externalIPs field in Service spec is being deprecated, which means you’ll soon lose a quick way to route arbitrary externalIPs to your Services. This
field has been a known security headache for years, enabling man-in-the-middle attacks on your cluster traffic, as documented in CVE-2020-8554. From Kubernetes v1.36 and onwards, you will see deprecation warnings when using it, with full removal
planned for v1.43.
If your Services still lean on externalIPs, consider using LoadBalancer services for cloud-managed ingress, NodePort for simple port exposure, or Gateway API
for a more flexible and secure way to handle external traffic.
For more details on this enhancement, refer to KEP-5707: Deprecate service.spec.externalIPs
Removal of gitRepo volume driver
The gitRepo volume type has been deprecated since v1.11. Starting Kubernetes v1.36, the gitRepo volume plugin is permanently disabled and cannot be turned back
on. This change protects clusters from a critical security issue where using gitRepo could let an attacker run code as root on the node.
Although gitRepo has been deprecated for years and better alternatives have been recommended, it was still technically possible to use it in previous releases.
From v1.36 onward, that path is closed for good, so any existing workloads depending on gitRepo will need to migrate to supported approaches such as init
containers or external git-sync style tools.
For more details on this enhancement, refer to KEP-5040: Remove gitRepo volume driver
Featured enhancements of Kubernetes v1.36
The following list of enhancements is likely to be included in the upcoming v1.36 release. This is not a commitment and the release content is subject to change.
Faster SELinux labelling for volumes (GA)
Kubernetes v1.36 makes the SELinux volume mounting improvement generally available. This change replaced recursive file relabeling with mount -o context=XYZ option, applying the correct SELinux label to the entire volume at mount time. It brings more consistent performance and reduces Pod startup delays on SELinux-enforcing systems.
This feature was introduced as beta in v1.28 for ReadWriteOncePod volumes. In v1.32, it gained metrics and an opt-out option
(securityContext.seLinuxChangePolicy: Recursive) to help catch conflicts. Now in v1.36, it reaches stable and defaults to all volumes, with Pods or
CSIDrivers opting in via spec.SELinuxMount.
However, we expect this feature to create the risk of breaking changes in the future Kubernetes releases, due to the potential for mixing of privileged and unprivileged pods.
Setting the seLinuxChangePolicy field and
SELinux volume labels on Pods, correctly, is the responsibility of the Pod author
Developers have that responsibility whether they are writing a Deployment, StatefulSet, DaemonSet or even a custom resource that includes a Pod template.
Being careless
with these settings can lead to a range of problems when Pods share volumes.
For more details on this enhancement, refer to KEP-1710: Speed up recursive SELinux label change
External signing of ServiceAccount tokens
As a beta feature, Kubernetes already supports external signing of ServiceAccount tokens. This allows clusters to integrate with external key management systems or signing services instead of relying only on internally managed keys.
With this enhancement, the kube-apiserver can delegate token signing to external systems such as cloud key management services or hardware security modules. This
improves security and simplifies key management services for clusters that rely on centralized signing infrastructure.
We expect that this will graduate to stable (GA) in Kubernetes v1.36.
For more details on this enhancement, refer to KEP-740: Support external signing of service account tokens
DRA Driver support for Device taints and tolerations
Kubernetes v1.33 introduced support for taints and tolerations for physical devices managed through Dynamic Resource Allocation (DRA). Normally, any device can be
used for scheduling. However, this enhancement allows DRA drivers to mark devices as tainted, which ensures that they will not be used for scheduling purposes.
Alternatively, cluster administrators can create a DeviceTaintRule to mark devices that match a certain selection criteria(such as all devices of a certain
driver) as tainted. This improves scheduling control and helps ensure that specialized hardware resources are only used by workloads that explicitly request them.
In Kubernetes v1.36, this feature graduates to beta with more comprehensive testing complete, making it accessible by default without the need for a feature flag and open to user feedback.
To learn about taints and tolerations, see taints and tolerations.
For more details on this enhancement, refer to KEP-5055: DRA: device taints and tolerations.
DRA support for partitionable devices
Kubernetes v1.36 expands Dynamic Resource Allocation (DRA) by introducing support for partitionable devices, allowing a single hardware accelerator to be split into multiple logical units that can be shared across workloads. This is especially useful for high-cost resources like GPUs, where dedicating an entire device to a single workload can lead to underutilization.
With this enhancement, platform teams can improve overall cluster efficiency by allocating only the required portion of a device to each workload, rather than reserving it entirely. This makes it easier to run multiple workloads on the same hardware while maintaining isolation and control, helping organizations get more value out of their infrastructure.
To learn more about this enhancement, refer to KEP-4815: DRA Partitionable Devices
Want to know more?
New features and deprecations are also announced in the Kubernetes release notes. We will formally announce what's new in Kubernetes v1.36 as part of the CHANGELOG for that release.
Kubernetes v1.36 release is planned for Wednesday, April 22, 2026. Stay tuned for updates!
You can also see the announcements of changes in the release notes for:
Get involved
The simplest way to get involved with Kubernetes is by joining one of the many Special Interest Groups (SIGs) that align with your interests. Have something you’d like to broadcast to the Kubernetes community? Share your voice at our weekly community meeting, and through the channels below. Thank you for your continued feedback and support.
- Follow us on Bluesky @kubernetes.io for the latest updates
- Join the community discussion on Discuss
- Join the community on Slack
- Post questions (or answer questions) on Server Fault or Stack Overflow
- Share your Kubernetes story
- Read more about what’s happening with Kubernetes on the blog
- Learn more about the Kubernetes Release Team
Announcing Ingress2Gateway 1.0: Your Path to Gateway API
With the Ingress-NGINX retirement scheduled for March 2026, the Kubernetes networking landscape is at a turning point. For most organizations, the question isn't whether to migrate to Gateway API, but how to do so safely.
Migrating from Ingress to Gateway API is a fundamental shift in API design. Gateway API provides a modular, extensible API with strong support for Kubernetes-native RBAC. Conversely, the Ingress API is simple, and implementations such as Ingress-NGINX extend the API through esoteric annotations, ConfigMaps, and CRDs. Migrating away from Ingress controllers such as Ingress-NGINX presents the daunting task of capturing all the nuances of the Ingress controller, and mapping that behavior to Gateway API.
Ingress2Gateway is an assistant that helps teams confidently move from Ingress to Gateway API. It translates Ingress resources/manifests along with implementation-specific annotations to Gateway API while warning you about untranslatable configuration and offering suggestions.
Today, SIG Network is proud to announce the 1.0 release of Ingress2Gateway. This milestone represents a stable, tested migration assistant for teams ready to modernize their networking stack.
Ingress2Gateway 1.0
Ingress-NGINX annotation support
The main improvement for the 1.0 release is more comprehensive Ingress-NGINX support. Before the 1.0 release, Ingress2Gateway only supported three Ingress-NGINX annotations. For the 1.0 release, Ingress2Gateway supports over 30 common annotations (CORS, backend TLS, regex matching, path rewrite, etc.).
Comprehensive integration testing
Each supported Ingress-NGINX annotation, and representative combinations of common annotations, is backed by controller-level integration tests that verify the behavioral equivalence of the Ingress-NGINX configuration and the generated Gateway API. These tests exercise real controllers in live clusters and compare runtime behavior (routing, redirects, rewrites, etc.), not just YAML structure.
The tests:
- spin up an Ingress-NGINX controller
- spin up multiple Gateway API controllers
- apply Ingress resources that have implementation-specific configuration
- translate Ingress resources to Gateway API with
ingress2gatewayand apply generated manifests - verify that the Gateway API controllers and the Ingress controller exhibit equivalent behavior.
A comprehensive test suite not only catches bugs in development, but also ensures the correctness of the translation, especially given surprising edge cases and unexpected defaults, so that you don't find out about them in production.
Notification & error handling
Migration is not a "one-click" affair. Surfacing subtleties and untranslatable behavior is as important as translating supported configuration. The 1.0 release cleans up the formatting and content of notifications, so it is clear what is missing and how you can fix it.
Using Ingress2Gateway
Ingress2Gateway is a migration assistant, not a one-shot replacement. Its goal is to
- migrate supported Ingress configuration and behavior
- identify unsupported configuration and suggest alternatives
- reevaluate and potentially discard undesirable configuration
The rest of the section shows you how to safely migrate the following Ingress-NGINX configuration
apiVersion: networking.k8s.io/v1
kind: Ingress
metadata:
annotations:
nginx.ingress.kubernetes.io/proxy-body-size: "1G"
nginx.ingress.kubernetes.io/use-regex: "true"
nginx.ingress.kubernetes.io/proxy-send-timeout: "1"
nginx.ingress.kubernetes.io/proxy-read-timeout: "1"
nginx.ingress.kubernetes.io/enable-cors: "true"
nginx.ingress.kubernetes.io/configuration-snippet: |
more_set_headers "Request-Id: $req_id";
name: my-ingress
namespace: my-ns
spec:
ingressClassName: nginx
rules:
- host: my-host.example.com
http:
paths:
- backend:
service:
name: website-service
port:
number: 80
path: /users/(\d+)
pathType: ImplementationSpecific
tls:
- hosts:
- my-host.example.com
secretName: my-secret
1. Install Ingress2Gateway
If you have a Go environment set up, you can install Ingress2Gateway with
go install github.com/kubernetes-sigs/ingress2gateway@v1.0.0
Otherwise,
brew install ingress2gateway
You can also download the binary from GitHub or build from source.
2. Run Ingress2Gateway
You can pass Ingress2Gateway Ingress manifests, or have the tool read directly from your cluster.
# Pass it files
ingress2gateway print --input-file my-manifest.yaml,my-other-manifest.yaml --providers=ingress-nginx > gwapi.yaml
# Use a namespace in your cluster
ingress2gateway print --namespace my-api --providers=ingress-nginx > gwapi.yaml
# Or your whole cluster
ingress2gateway print --providers=ingress-nginx --all-namespaces > gwapi.yaml
Note:
You can also pass--emitter <agentgateway|envoy-gateway|kgateway> to output implementation-specific extensions.3. Review the output
This is the most critical step.
The commands from the previous section output a Gateway API manifest to gwapi.yaml, and they also emit warnings that explain what did not translate exactly and what to review manually.
apiVersion: gateway.networking.k8s.io/v1
kind: Gateway
metadata:
annotations:
gateway.networking.k8s.io/generator: ingress2gateway-dev
name: nginx
namespace: my-ns
spec:
gatewayClassName: nginx
listeners:
- hostname: my-host.example.com
name: my-host-example-com-http
port: 80
protocol: HTTP
- hostname: my-host.example.com
name: my-host-example-com-https
port: 443
protocol: HTTPS
tls:
certificateRefs:
- group: ""
kind: Secret
name: my-secret
---
apiVersion: gateway.networking.k8s.io/v1
kind: HTTPRoute
metadata:
annotations:
gateway.networking.k8s.io/generator: ingress2gateway-dev
name: my-ingress-my-host-example-com
namespace: my-ns
spec:
hostnames:
- my-host.example.com
parentRefs:
- name: nginx
port: 443
rules:
- backendRefs:
- name: website-service
port: 80
filters:
- cors:
allowCredentials: true
allowHeaders:
- DNT
- Keep-Alive
- User-Agent
- X-Requested-With
- If-Modified-Since
- Cache-Control
- Content-Type
- Range
- Authorization
allowMethods:
- GET
- PUT
- POST
- DELETE
- PATCH
- OPTIONS
allowOrigins:
- '*'
maxAge: 1728000
type: CORS
matches:
- path:
type: RegularExpression
value: (?i)/users/(\d+).*
name: rule-0
timeouts:
request: 10s
---
apiVersion: gateway.networking.k8s.io/v1
kind: HTTPRoute
metadata:
annotations:
gateway.networking.k8s.io/generator: ingress2gateway-dev
name: my-ingress-my-host-example-com-ssl-redirect
namespace: my-ns
spec:
hostnames:
- my-host.example.com
parentRefs:
- name: nginx
port: 80
rules:
- filters:
- requestRedirect:
scheme: https
statusCode: 308
type: RequestRedirect
Ingress2Gateway successfully translated some annotations into their Gateway API equivalents.
For example, the nginx.ingress.kubernetes.io/enable-cors annotation was translated into a CORS filter.
But upon closer inspection, the nginx.ingress.kubernetes.io/proxy-{read,send}-timeout and nginx.ingress.kubernetes.io/proxy-body-size annotations do not map perfectly.
The logs show the reason for these omissions as well as reasoning behind the translation.
┌─ WARN ────────────────────────────────────────
│ Unsupported annotation nginx.ingress.kubernetes.io/configuration-snippet
│ source: INGRESS-NGINX
│ object: Ingress: my-ns/my-ingress
└─
┌─ INFO ────────────────────────────────────────
│ Using case-insensitive regex path matches. You may want to change this.
│ source: INGRESS-NGINX
│ object: HTTPRoute: my-ns/my-ingress-my-host-example-com
└─
┌─ WARN ────────────────────────────────────────
│ ingress-nginx only supports TCP-level timeouts; i2gw has made a best-effort translation to Gateway API timeouts.request. Please verify that this meets your needs. See documentation: https://gateway-api.sigs.k8s.io/guides/http-timeouts/
│ source: INGRESS-NGINX
│ object: HTTPRoute: my-ns/my-ingress-my-host-example-com
└─
┌─ WARN ────────────────────────────────────────
│ Failed to apply my-ns.my-ingress.metadata.annotations."nginx.ingress.kubernetes.io/proxy-body-size" from my-ns/my-ingress: Most Gateway API implementations have reasonable body size and buffering defaults
│ source: STANDARD_EMITTER
│ object: HTTPRoute: my-ns/my-ingress-my-host-example-com
└─
┌─ WARN ────────────────────────────────────────
│ Gateway API does not support configuring URL normalization (RFC 3986, Section 6). Please check if this matters for your use case and consult implementation-specific details.
│ source: STANDARD_EMITTER
└─
There is a warning that Ingress2Gateway does not support the nginx.ingress.kubernetes.io/configuration-snippet annotation.
You will have to check your Gateway API implementation documentation to see if there is a way to achieve equivalent behavior.
The tool also notified us that Ingress-NGINX regex matches are case-insensitive prefix matches, which is why there is a match pattern of (?i)/users/(\d+).*.
Most organizations will want to change this behavior to be an exact case-sensitive match by removing the leading (?i) and the trailing .* from the path pattern.
Ingress2Gateway made a best-effort translation from the nginx.ingress.kubernetes.io/proxy-{send,read}-timeout annotations to a 10 second request timeout in our HTTP route.
If requests for this service should be much shorter, say 3 seconds, you can make the corresponding changes to your Gateway API manifests.
Also, nginx.ingress.kubernetes.io/proxy-body-size does not have a Gateway API equivalent, and was thus not translated.
However, most Gateway API implementations have reasonable defaults for maximum body size and buffering, so this might not be a problem in practice.
Further, some emitters might offer support for this annotation through implementation-specific extensions.
For example, adding the --emitter agentgateway, --emitter envoy-gateway, or --emitter kgateway flag to the previous ingress2gateway print command would have resulted in additional implementation-specific configuration in the generated Gateway API manifests that attempted to capture the body size configuration.
We also see a warning about URL normalization. Gateway API implementations such as Agentgateway, Envoy Gateway, Kgateway, and Istio have some level of URL normalization, but the behavior varies across implementations and is not configurable through standard Gateway API. You should check and test the URL normalization behavior of your Gateway API implementation to ensure it is compatible with your use case.
To match Ingress-NGINX default behavior, Ingress2Gateway also added a listener on port 80 and a HTTP Request redirect filter to redirect HTTP traffic to HTTPS. You may not want to serve HTTP traffic at all and remove the listener on port 80 and the corresponding HTTPRoute.
Caution:
Always thoroughly review the generated output and logs.After manually applying these changes, the Gateway API manifests might look as follows.
---
apiVersion: gateway.networking.k8s.io/v1
kind: Gateway
metadata:
annotations:
gateway.networking.k8s.io/generator: ingress2gateway-dev
name: nginx
namespace: my-ns
spec:
gatewayClassName: nginx
listeners:
- hostname: my-host.example.com
name: my-host-example-com-https
port: 443
protocol: HTTPS
tls:
certificateRefs:
- group: ""
kind: Secret
name: my-secret
---
apiVersion: gateway.networking.k8s.io/v1
kind: HTTPRoute
metadata:
annotations:
gateway.networking.k8s.io/generator: ingress2gateway-dev
name: my-ingress-my-host-example-com
namespace: my-ns
spec:
hostnames:
- my-host.example.com
parentRefs:
- name: nginx
port: 443
rules:
- backendRefs:
- name: website-service
port: 80
filters:
- cors:
allowCredentials: true
allowHeaders:
- DNT
...
allowMethods:
- GET
...
allowOrigins:
- '*'
maxAge: 1728000
type: CORS
matches:
- path:
type: RegularExpression
value: /users/(\d+)
name: rule-0
timeouts:
request: 3s
4. Verify
Now that you have Gateway API manifests, you should thoroughly test them in a development cluster. In this case, you should at least double-check that your Gateway API implementation's maximum body size defaults are appropriate for you and verify that a three-second timeout is enough.
After validating behavior in a development cluster, deploy your Gateway API configuration alongside your existing Ingress. We strongly suggest that you then gradually shift traffic using weighted DNS, your cloud load balancer, or traffic-splitting features of your platform. This way, you can quickly recover from any misconfiguration that made it through your tests.
Finally, when you have shifted all your traffic to your Gateway API controller, delete your Ingress resources and uninstall your Ingress controller.
Conclusion
The Ingress2Gateway 1.0 release is just the beginning, and we hope that you use Ingress2Gateway to safely migrate to Gateway API. As we approach the March 2026 Ingress-NGINX retirement, we invite the community to help us increase our configuration coverage, expand testing, and improve UX.
Resources about Gateway API
The scope of Gateway API can be daunting. Here are some resources to help you work with Gateway API:
- Listener sets allow application developers to manage gateway listeners.
gwctlgives you a comprehensive view of your Gateway resources, such as attachments and linter errors.- Gateway API Slack:
#sig-network-gateway-apion Kubernetes Slack - Ingress2Gateway Slack:
#sig-network-ingress2gatewayon Kubernetes Slack - GitHub: kubernetes-sigs/ingress2gateway
Running Agents on Kubernetes with Agent Sandbox
The landscape of artificial intelligence is undergoing a massive architectural shift. In the early days of generative AI, interacting with a model was often treated as a transient, stateless function call: a request that spun up, executed for perhaps 50 milliseconds, and terminated.
Today, the world is witnessing AI v2 eating AI v1. The ecosystem is moving from short-lived, isolated tasks to deploying multiple, coordinated AI agents that run constantly. These autonomous agents need to maintain context, use external tools, write and execute code, and communicate with one another over extended periods.
As platform engineering teams look for the right infrastructure to host these new AI workloads, one platform stands out as the natural choice: Kubernetes. However, mapping these unique agentic workloads to traditional Kubernetes primitives requires a new abstraction.
This is where the new Agent Sandbox project (currently in development under SIG Apps) comes into play.
The Kubernetes advantage (and the abstraction gap)
Kubernetes is the de facto standard for orchestrating cloud-native applications precisely because it solves the challenges of extensibility, robust networking, and ecosystem maturity. However, as AI evolves from short-lived inference requests to long-running, autonomous agents, we are seeing the emergence of a new operational pattern.
AI agents, by contrast, are typically isolated, stateful, singleton workloads. They act as a digital workspace or execution environment for an LLM. An agent needs a persistent identity and a secure scratchpad for writing and executing (often untrusted) code. Crucially, because these long-lived agents are expected to be mostly idle except for brief bursts of activity, they require a lifecycle that supports mechanisms like suspension and rapid resumption.
While you could theoretically approximate this by stringing together a StatefulSet of size 1, a headless Service, and a PersistentVolumeClaim for every single agent, managing this at scale becomes an operational nightmare.
Because of these unique properties, traditional Kubernetes primitives don't perfectly align.
Introducing Kubernetes Agent Sandbox
To bridge this gap, SIG Apps is developing agent-sandbox. The project introduces a declarative, standardized API specifically tailored for singleton, stateful workloads like AI agent runtimes.
At its core, the project introduces the Sandbox CRD. It acts as a lightweight, single-container environment built entirely on Kubernetes primitives, offering:
- Strong isolation for untrusted code: When an AI agent generates and executes code autonomously, security is paramount. The Sandbox custom resource natively supports different runtimes, like gVisor or Kata Containers. This provides the necessary kernel and network isolation required for multi-tenant, untrusted execution.
- Lifecycle management: Unlike traditional web servers optimized for steady, stateless traffic, an AI agent operates as a stateful workspace that may be idle for hours between tasks. Agent Sandbox supports scaling these idle environments to zero to save resources, while ensuring they can resume exactly where they left off.
- Stable identity: Coordinated multi-agent systems require stable networking. Every Sandbox is given a stable hostname and network identity, allowing distinct agents to discover and communicate with each other seamlessly.
Scaling agents with extensions
Because the AI space is moving incredibly quickly, we built an Extensions API layer that enables even faster iteration and development.
Starting a new pod adds about a second of overhead. That's perfectly fine when deploying a new version of a microservice, but when an agent is invoked after being idle, a one-second cold start breaks the continuity of the interaction. It forces the user or the orchestrating service to wait for the environment to provision before the model can even begin to think or act. SandboxWarmPool solves this by maintaining a pool of pre-provisioned Sandbox pods, effectively eliminating cold starts. Users or orchestration services can simply issue a SandboxClaim against a SandboxTemplate, and the controller immediately hands over a pre-warmed, fully isolated environment to the agent.
Quick start
Ready to try it yourself? You can install the Agent Sandbox core components and extensions directly into your learning or sandbox cluster, using your chosen release.
We recommend you use the latest release as the project is moving fast.
# Replace "vX.Y.Z" with a specific version tag (e.g., "v0.1.0") from
# https://github.com/kubernetes-sigs/agent-sandbox/releases
export VERSION="vX.Y.Z"
# Install the core components:
kubectl apply -f https://github.com/kubernetes-sigs/agent-sandbox/releases/download/${VERSION}/manifest.yaml
# Install the extensions components (optional):
kubectl apply -f https://github.com/kubernetes-sigs/agent-sandbox/releases/download/${VERSION}/extensions.yaml
# Install the Python SDK (optional):
# Create a virtual Python environment
python3 -m venv .venv
source .venv/bin/activate
# Install from PyPI
pip install k8s-agent-sandbox
Once installed, you can try out the Python SDK for AI agents or deploy one of the ready-to-use examples to see how easy it is to spin up an isolated agent environment.
The future of agents is cloud native
Whether it’s a 50-millisecond stateless task, or a multi-week, mostly-idle collaborative process, extending Kubernetes with primitives designed specifically for isolated stateful singletons allows us to leverage all the robust benefits of the cloud-native ecosystem.
The Agent Sandbox project is open source and community-driven. If you are building AI platforms, developing agentic frameworks, or are interested in Kubernetes extensibility, we invite you to get involved:
- Check out the project on GitHub: kubernetes-sigs/agent-sandbox
- Join the discussion in the #sig-apps and #agent-sandbox channels on the Kubernetes Slack.
Securing Production Debugging in Kubernetes
During production debugging, the fastest route is often broad access such as cluster-admin (a ClusterRole that grants administrator-level access), shared bastions/jump boxes, or long-lived SSH keys. It works in the moment, but it comes with two common problems: auditing becomes difficult, and temporary exceptions have a way of becoming routine.
This post offers my recommendations for good practices applicable to existing Kubernetes environments with minimal tooling changes:
- Least privilege with RBAC
- Short-lived, identity-bound credentials
- An SSH-style handshake model for cloud native debugging
A good architecture for securing production debugging workflows is to use a just-in-time secure shell gateway
(often deployed as an on demand pod in the cluster).
It acts as an SSH-style “front door” that makes temporary access actually temporary. You can
authenticate with short-lived, identity-bound credentials, establish a session to the gateway,
and the gateway uses the Kubernetes API and RBAC to control what they can do, such as pods/log, pods/exec, and pods/portforward.
Sessions expire automatically, and both the gateway logs and Kubernetes audit logs capture who accessed what and when without shared bastion accounts or long-lived keys.
1) Using an access broker on top of Kubernetes RBAC
RBAC controls who can do what in Kubernetes. Many Kubernetes environments rely primarily on RBAC for authorization, although Kubernetes also supports other authorization modes such as Webhook authorization. You can enforce access directly with Kubernetes RBAC, or put an access broker in front of the cluster that still relies on Kubernetes permissions under the hood. In either model, Kubernetes RBAC remains the source of truth for what the Kubernetes API allows and at what scope.
An access broker adds controls that RBAC does not cover well. For example, it can decide whether a request is auto-approved or requires manual approval, whether a user can run a command, and which commands are allowed in a session. It can also manage group membership so that you grant permissions to groups instead of individual users. Kubernetes RBAC can allow actions such as pods/exec, but it cannot restrict which commands run inside an exec session.
With that model, Kubernetes RBAC defines the allowed actions for a user or group (for example, an on-call team in a single namespace). I recommend you only define access rules that grant rights to groups or to ServiceAccounts - never to individual users. The broker or identity provider then adds or removes users from that group as needed.
The broker can also enforce extra policy on top, like which commands are permitted in an interactive session and which requests can be auto-approved versus require manual approval. That policy can live in a JSON or XML file and be maintained through code review, so updates go through a formal pull request and are reviewed like any other production change.
Example: a namespaced on-call debug Role
apiVersion: rbac.authorization.k8s.io/v1
kind: Role
metadata:
name: oncall-debug
namespace: <namespace>
rules:
# Discover what’s running
- apiGroups: [""]
resources: ["pods", "events"]
verbs: ["get", "list", "watch"]
# Read logs
- apiGroups: [""]
resources: ["pods/log"]
verbs: ["get"]
# Interactive debugging actions
- apiGroups: [""]
resources: ["pods/exec", "pods/portforward"]
verbs: ["create"]
# Understand rollout/controller state
- apiGroups: ["apps"]
resources: ["deployments", "replicasets"]
verbs: ["get", "list", "watch"]
# Optional: allow kubectl debug ephemeral containers
- apiGroups: [""]
resources: ["pods/ephemeralcontainers"]
verbs: ["update"]
Bind the Role to a group (rather than individual users) so membership can be managed through your identity provider:
apiVersion: rbac.authorization.k8s.io/v1
kind: RoleBinding
metadata:
name: oncall-debug
namespace: <namespace>
subjects:
- kind: Group
name: oncall-<team-name>
apiGroup: rbac.authorization.k8s.io
roleRef:
kind: Role
name: oncall-debug
apiGroup: rbac.authorization.k8s.io
2) Short-lived, identity-bound credentials
The goal is to use short-lived, identity-bound credentials that clearly tie a session to a real person and expire quickly. These credentials can include the user’s identity and the scope of what they’re allowed to do. They’re typically signed using a private key that stays with the engineer, such as a hardware-backed key (for example, a YubiKey), so they can not be forged without access to that key.
You can implement this with Kubernetes-native authentication (for example, client certificates or an OIDC-based flow), or have the access broker from the previous section issue short-lived credentials on the user’s behalf. In many setups, Kubernetes still uses RBAC to enforce permissions based on the authenticated identity and groups/claims. If you use an access broker, it can also encode additional scope constraints in the credential and enforce them during the session, such as which cluster or namespace the session applies to and which actions (or approved commands) are allowed against pods or nodes. In either case, the credentials should be signed by a certificate authority (CA), and that CA should be rotated on a regular schedule (for example, quarterly) to limit long-term risk.
Option A: short-lived OIDC tokens
A lot of managed Kubernetes clusters already give you short-lived tokens. The main thing is to make sure your kubeconfig refreshes them automatically instead of copying a long-lived token into the file.
For example:
users:
- name: oncall
user:
exec:
apiVersion: client.authentication.k8s.io/v1
command: cred-helper
args: ["--cluster=prod", "--ttl=30m"]
Option B: Short-lived client certificates (X.509)
If your API server (or your access broker from the previous section) is set up to trust a client CA, you can use short-lived client certificates for debugging access. The idea is:
- The private key is created and kept under the engineer’s machine (ideally hardware-backed, like a non-exportable key in a YubiKey/PIV token)
- A short-lived certificate is issued (often via the CertificateSigningRequest API, or your access broker from the previous section, with a TTL).
- RBAC maps the authenticated identity to a minimal Role
This is straightforward to operationalize with the Kubernetes CertificateSigningRequest API.
Generate a key and CSR locally:
# Generate a private key.
# This could instead be generated within a hardware token;
# OpenSSL and several similar tools include support for that.
openssl genpkey -algorithm Ed25519 -out oncall.key
openssl req -new -key oncall.key -out oncall.csr \
-subj "/CN=user/O=oncall-payments"
Create a CertificateSigningRequest with a short expiration:
apiVersion: certificates.k8s.io/v1
kind: CertificateSigningRequest
metadata:
name: oncall-<user>-20260218
spec:
request: <base64-encoded oncall.csr>
signerName: kubernetes.io/kube-apiserver-client
expirationSeconds: 1800 # 30 minutes
usages:
- client auth
After the CSR is approved and signed, you extract the issued certificate and use it together with the private key to authenticate, for example via kubectl.
3) Use a just-in-time access gateway to run debugging commands
Once you have short-lived credentials, you can use them to open a secure shell session to a just-in-time access gateway, often exposed over SSH and created on demand. If the gateway is exposed over SSH, a common pattern is to issue the engineer a short-lived OpenSSH user certificate for the session. The gateway trusts your SSH user CA, authenticates the engineer at connection time, and then applies the approved session policy before making Kubernetes API calls on the user’s behalf. OpenSSH certificates are separate from Kubernetes X.509 client certificates, so these are usually treated as distinct layers.
The resulting session should also be scoped so it cannot be reused outside of what was approved. For example, the gateway or broker can limit it to a specific cluster and namespace, and optionally to a narrower target such as a pod or node. That way, even if someone tries to reuse the access, it will not work outside the intended scope. After the session is established, the gateway executes only the allowed actions and records what happened for auditing.
Example: Namespace-scoped role bindings
apiVersion: rbac.authorization.k8s.io/v1
kind: Role
metadata:
name: jit-debug
namespace: <namespace>
annotations:
kubernetes.io/description: >
Colleagues performing semi-privileged debugging, with access provided
just in time and on demand.
rules:
- apiGroups: [""]
resources: ["pods", "pods/log"]
verbs: ["get", "list", "watch"]
- apiGroups: [""]
resources: ["pods/exec"]
verbs: ["create"]
---
apiVersion: rbac.authorization.k8s.io/v1
kind: RoleBinding
metadata:
name: jit-debug
namespace: <namespace>
subjects:
- kind: Group
name: jit:oncall:<namespace> # mapped from the short-lived credential (cert/OIDC)
apiGroup: rbac.authorization.k8s.io
roleRef:
kind: Role
name: jit-debug
apiGroup: rbac.authorization.k8s.io
These RBAC objects, and the rules they define, allow debugging only within the specified namespace; attempts to access other namespaces are not allowed.
Example: Cluster-scoped role binding
apiVersion: rbac.authorization.k8s.io/v1
kind: ClusterRole
metadata:
name: jit-cluster-read
rules:
- apiGroups: [""]
resources: ["nodes", "namespaces"]
verbs: ["get", "list", "watch"]
---
apiVersion: rbac.authorization.k8s.io/v1
kind: ClusterRoleBinding
metadata:
name: jit-cluster-read
subjects:
- kind: Group
name: jit:oncall:cluster
apiGroup: rbac.authorization.k8s.io
roleRef:
kind: ClusterRole
name: jit-cluster-read
apiGroup: rbac.authorization.k8s.io
These RBAC rules grant cluster-wide read access (for example, to nodes and namespaces) and should be used only for workflows that truly require cluster-scoped resources.
Finer-grained restrictions like “only this pod/node” or “only these commands” are typically enforced by the access gateway/broker during the session, but Kubernetes also offers other options, such as ValidatingAdmissionPolicy for restricting writes and webhook authorization for custom authorization across verbs.
In environments with stricter access controls, you can add an extra, short-lived session mediation layer to separate session establishment from privileged actions. Both layers are ephemeral, use identity-bound expiring credentials, and produce independent audit trails. The mediation layer handles session setup/forwarding, while the execution layer performs only RBAC-authorized Kubernetes actions. This separation can reduce exposure by narrowing responsibilities, scoping credentials per step, and enforcing end-to-end session expiry.
References
- Authorization
- Using RBAC Authorization
- Authenticating
- Certificates and Certificate Signing Requests
- Issue a Certificate for a Kubernetes API Client Using a CertificateSigningRequest
- Role Based Access Control Good Practices
Disclaimer: The views expressed in this post are solely those of the author and do not reflect the views of the author’s employer or any other organization.
The Invisible Rewrite: Modernizing the Kubernetes Image Promoter
Every container image you pull from registry.k8s.io got there through
kpromo, the Kubernetes image
promoter. It copies images from staging registries to
production, signs them with cosign, replicates
signatures across more than 20 regional mirrors, and generates
SLSA provenance attestations. If this tool breaks, no
Kubernetes release ships. Over the past few weeks, we rewrote its core from
scratch, deleted 20% of the codebase, made it dramatically faster, and
nobody noticed. That was the whole point.
A bit of history
The image promoter started in late 2018 as an internal Google project by
Linus Arver. The goal was simple: replace the
manual, Googler-gated process of copying container images into k8s.gcr.io with
a community-owned, GitOps-based workflow. Push to a staging registry, open a PR
with a YAML manifest, get it reviewed and merged, and automation handles the
rest. KEP-1734
formalized this proposal.
In early 2019, the code moved to kubernetes-sigs/k8s-container-image-promoter
and grew quickly. Over the next few years,
Stephen Augustus consolidated multiple tools
(cip, gh2gcs, krel promote-images, promobot-files) into a single CLI
called kpromo. The repository was renamed to
promo-tools.
Adolfo Garcia Veytia (Puerco) added cosign signing
and SBOM support. Tyler Ferrara built
vulnerability scanning. Carlos Panato kept the project in a healthy and
releasable state. 42 contributors made about 3,500 commits across more than 60 releases.
It worked. But by 2025 the codebase carried the weight of seven years of incremental additions from multiple SIGs and subprojects. The README said it plainly: you will see duplicated code, multiple techniques for accomplishing the same thing, and several TODOs.
The problems we needed to solve
Production promotion jobs for Kubernetes core images regularly took over 30 minutes and frequently failed with rate limit errors. The core promotion logic had grown into a monolith that was hard to extend and difficult to test, making new features like provenance or vulnerability scanning painful to add.
On the SIG Release roadmap, two work items had been sitting for a while: "Rewrite artifact promoter" and "Make artifact validation more robust". We had discussed these at SIG Release meetings and KubeCons, and the open research spikes on project board #171 captured eight questions that needed answers before we could move forward.
One issue to answer them all
In February 2026, we opened issue #1701 ("Rewrite artifact promoter pipeline") and answered all eight spikes in a single tracking issue. The rewrite was deliberately phased so that each step could be reviewed, merged, and validated independently. Here is what we did:
Phase 1: Rate Limiting (#1702). Rewrote rate limiting to properly throttle all registry operations with adaptive backoff.
Phase 2: Interfaces (#1704). Put registry and auth operations behind clean interfaces so they can be swapped out and tested independently.
Phase 3: Pipeline Engine (#1705). Built a pipeline engine that runs promotion as a sequence of distinct phases instead of one large function.
Phase 4: Provenance (#1706). Added SLSA provenance verification for staging images.
Phase 5: Scanner and SBOMs (#1709). Added vulnerability scanning and SBOM support. Flipped the default to the new pipeline engine. At this point we cut v4.2.0 and let it soak in production before continuing.
Phase 6: Split Signing from Replication (#1713). Separated image signing from signature replication into their own pipeline phases, eliminating the rate limit contention that caused most production failures.
Phase 7: Remove Legacy Pipeline (#1712). Deleted the old code path entirely.
Phase 8: Remove Legacy Dependencies (#1716). Deleted the audit subsystem, deprecated tools, and e2e test infrastructure.
Phase 9: Delete the Monolith (#1718). Removed the old monolithic core and its supporting packages. Thousands of lines deleted across phases 7 through 9.
Each phase shipped independently. v4.3.0 followed the next day with the legacy code fully removed.
With the new architecture in place, a series of follow-up improvements landed: parallelized registry reads (#1736), retry logic for all network operations (#1742), per-request timeouts to prevent pipeline hangs (#1763), HTTP connection reuse (#1759), local registry integration tests (#1746), the removal of deprecated credential file support (#1758), a rework of attestation handling to use cosign's OCI APIs and the removal of deprecated SBOM support (#1764), and a dedicated promotion record predicate type registered with the in-toto attestation framework (#1767). These would have been much harder to land without the clean separation the rewrite provided. v4.4.0 shipped all of these improvements and enabled provenance generation and verification by default.
The new pipeline
The promotion pipeline now has seven clearly separated phases:
graph LR
Setup --> Plan --> Provenance --> Validate --> Promote --> Sign --> Attest| Phase | What it does |
|---|---|
| Setup | Validate options, prewarm TUF cache. |
| Plan | Parse manifests, read registries, compute which images need promotion. |
| Provenance | Verify SLSA attestations on staging images. |
| Validate | Check cosign signatures, exit here for dry runs. |
| Promote | Copy images server-side, preserving digests. |
| Sign | Sign promoted images with keyless cosign. |
| Attest | Generate promotion provenance attestations using a dedicated in-toto predicate type. |
Phases run sequentially, so each one gets exclusive access to the full rate limit budget. No more contention. Signature replication to mirror registries is no longer part of this pipeline and runs as a dedicated periodic Prow job instead.
Making it fast
With the architecture in place, we turned to performance.
Parallel registry reads (#1736): The plan phase reads 1,350 registries. We parallelized this and the plan phase dropped from about 20 minutes to about 2 minutes.
Two-phase tag listing (#1761): Instead of checking all 46,000 image groups across more than 20 mirrors, we first check only the source repositories. About 57% of images have no signatures at all because they were promoted before signing was enabled. We skip those entirely, cutting API calls roughly in half.
Source check before replication (#1727): Before iterating all mirrors for a given image, we check if the signature exists on the primary registry first. In steady state where most signatures are already replicated, this reduced the work from about 17 hours to about 15 minutes.
Per-request timeouts (#1763): We observed intermittent hangs where a stalled connection blocked the pipeline for over 9 hours. Every network operation now has its own timeout and transient failures are retried automatically.
Connection reuse (#1759): We started reusing HTTP connections and auth state across operations, eliminating redundant token negotiations. This closed a long-standing request from 2023.
By the numbers
Here is what the rewrite looks like in aggregate.
- Over 40 PRs merged, 3 releases shipped (v4.2.0, v4.3.0, v4.4.0)
- Over 10,000 lines added and over 16,000 lines deleted, a net reduction of about 5,000 lines (20% smaller codebase)
- Performance drastically improved across the board
- Robustness improved with retry logic, per-request timeouts, and adaptive rate limiting
- 19 long-standing issues closed
The codebase shrank by a fifth while gaining provenance attestations, a pipeline engine, vulnerability scanning integration, parallelized operations, retry logic, integration tests against local registries, and a standalone signature replication mode.
No user-facing changes
This was a hard requirement. The kpromo cip command accepts the same flags and
reads the same YAML manifests. The
post-k8sio-image-promo
Prow job continued working throughout. The promotion manifests in
kubernetes/k8s.io did not change. Nobody
had to update their workflows or configuration.
We caught two regressions early in production. One (#1731) caused a registry key mismatch that made every image appear as "lost" so that nothing was promoted. Another (#1733) set the default thread count to zero, blocking all goroutines. Both were fixed within hours. The phased release strategy (v4.2.0 with the new engine, v4.3.0 with legacy code removed) gave us a clear rollback path that we fortunately never needed.
What comes next
Signature replication across all mirror registries remains the most expensive
part of the promotion cycle. Issue #1762
proposes eliminating it entirely by having
archeio (the registry.k8s.io
redirect service) route signature tag requests to a single canonical upstream
instead of per-region backends. Another option would be to move signing closer
to the registry infrastructure itself. Both approaches need further discussion
with the SIG Release and infrastructure teams, but either one would remove
thousands of API calls per promotion cycle and simplify the codebase even
further.
Thank you
This project has been a community effort spanning seven years. Thank you to Linus, Stephen, Adolfo, Carlos, Ben, Marko, Lauri, Tyler, Arnaud, and many others who contributed code, reviews, and planning over the years. The SIG Release and Release Engineering communities provided the context, the discussions, and the patience for a rewrite of infrastructure that every Kubernetes release depends on.
If you want to get involved, join us in
#release-management on the
Kubernetes Slack or check out the
repository.
Announcing the AI Gateway Working Group
The community around Kubernetes includes a number of Special Interest Groups (SIGs) and Working Groups (WGs) facilitating discussions on important topics between interested contributors. Today, we're excited to announce the formation of the AI Gateway Working Group, a new initiative focused on developing standards and best practices for networking infrastructure that supports AI workloads in Kubernetes environments.
What is an AI Gateway?
In a Kubernetes context, an AI Gateway refers to network gateway infrastructure (including proxy servers, load-balancers, etc.) that generally implements the Gateway API specification with enhanced capabilities for AI workloads. Rather than defining a distinct product category, AI Gateways describe infrastructure designed to enforce policy on AI traffic, including:
- Token-based rate limiting for AI APIs.
- Fine-grained access controls for inference APIs.
- Payload inspection enabling intelligent routing, caching, and guardrails.
- Support for AI-specific protocols and routing patterns.
Working group charter and mission
The AI Gateway Working Group operates under a clear charter with the mission to develop proposals for Kubernetes Special Interest Groups (SIGs) and their sub-projects. Its primary goals include:
- Standards Development: Create declarative APIs, standards, and guidance for AI workload networking in Kubernetes.
- Community Collaboration: Foster discussions and build consensus around best practices for AI infrastructure.
- Extensible Architecture: Ensure composability, pluggability, and ordered processing for AI-specific gateway extensions.
- Standards-Based Approach: Build on established networking foundations, layering AI-specific capabilities on top of proven standards.
Active proposals
WG AI Gateway currently has several active proposals that address key challenges in AI workload networking:
Payload Processing
The payload processing proposal addresses the critical need for AI workloads to inspect and transform full HTTP request and response payloads. This enables:
AI Inference Security
- Guard against malicious prompts and prompt injection attacks.
- Content filtering for AI responses.
- Signature-based detection and anomaly detection for AI traffic.
AI Inference Optimization
- Semantic routing based on request content.
- Intelligent caching to reduce inference costs and improve response times.
- RAG (Retrieval-Augmented Generation) system integration for context enhancement.
The proposal defines standards for declarative payload processor configuration, ordered processing pipelines, and configurable failure modes - all essential for production AI workload deployments.
Egress gateways
Modern AI applications increasingly depend on external inference services, whether for specialized models, failover scenarios, or cost optimization. The egress gateways proposal aims to define standards for securely routing traffic outside the cluster. Key features include:
External AI Service Integration
- Secure access to cloud-based AI services (OpenAI, Vertex AI, Bedrock, etc.).
- Managed authentication and token injection for third-party AI APIs.
- Regional compliance and failover capabilities.
Advanced Traffic Management
- Backend resource definitions for external FQDNs and services.
- TLS policy management and certificate authority control.
- Cross-cluster routing for centralized AI infrastructure.
User Stories We're Addressing
- Platform operators providing managed access to external AI services.
- Developers requiring inference failover across multiple cloud providers.
- Compliance engineers enforcing regional restrictions on AI traffic.
- Organizations centralizing AI workloads on dedicated clusters.
Upcoming events
KubeCon + CloudNativeCon Europe 2026, Amsterdam
AI Gateway working group members will be presenting at KubeCon + CloudNativeCon Europe in Amsterdam, discussing the problems at the intersection of AI and networking, including the working group's active proposals, as well as the intersection of AI gateways with Model Context Protocol (MCP) and agent networking patterns.
This session will showcase how AI Gateway working group proposals enable the infrastructure needed for next-generation AI deployments and communication patterns.
The session will also include the initial designs, early prototypes, and emerging directions shaping the WG’s roadmap.
For more details see our session here:
Get involved
The AI Gateway Working Group represents the Kubernetes community's commitment to standardizing AI workload networking. As AI becomes increasingly integral to modern applications, we need robust, standardized infrastructure that can support the unique requirements of inference workloads while maintaining the security, observability, and reliability standards that Kubernetes users expect.
Our proposals are currently in active development, with implementations beginning across various gateway projects. We're working closely with SIG Network on Gateway API enhancements and collaborating with the broader cloud-native community to ensure our standards meet real-world production needs.
Whether you're a gateway implementer, platform operator, AI application developer, or simply interested in the intersection of Kubernetes and AI, we'd love your input. The working group follows an open contribution model - you can review our proposals, join our weekly meetings, or start discussions on our GitHub repository. To learn more:
- Visit the working group's umbrella GitHub repository.
- Read the working group's charter.
- Join the weekly meeting on Thursdays at 2PM EST.
- Connect with the working group on Slack (#wg-ai-gateway) (visit https://slack.k8s.io/ for an invitation).
- Join the AI Gateway mailing list.
The future of AI infrastructure in Kubernetes is being built today, join up and learn how you can contribute and help shape the future of AI-aware gateway capabilities in Kubernetes.
Before You Migrate: Five Surprising Ingress-NGINX Behaviors You Need to Know
As announced November 2025, Kubernetes will retire Ingress-NGINX in March 2026. Despite its widespread usage, Ingress-NGINX is full of surprising defaults and side effects that are probably present in your cluster today. This blog highlights these behaviors so that you can migrate away safely and make a conscious decision about which behaviors to keep. This post also compares Ingress-NGINX with Gateway API and shows you how to preserve Ingress-NGINX behavior in Gateway API. The recurring risk pattern in every section is the same: a seemingly correct translation can still cause outages if it does not consider Ingress-NGINX's quirks.
I'm going to assume that you, the reader, have some familiarity with Ingress-NGINX and the Ingress API.
Most examples use httpbin as the backend.
Also, note that Ingress-NGINX and NGINX Ingress are two separate Ingress controllers. Ingress-NGINX is an Ingress controller maintained and governed by the Kubernetes community that is retiring March 2026. NGINX Ingress is an Ingress controller by F5. Both use NGINX as the dataplane, but are otherwise unrelated. From now on, this blog post only discusses Ingress-NGINX.
1. Regex matches are prefix-based and case insensitive
Suppose that you wanted to route all requests with a path consisting of only three uppercase letters to the httpbin service.
You might create the following Ingress with the nginx.ingress.kubernetes.io/use-regex: "true" annotation and the regex pattern of /[A-Z]{3}.
apiVersion: networking.k8s.io/v1
kind: Ingress
metadata:
name: regex-match-ingress
annotations:
nginx.ingress.kubernetes.io/use-regex: "true"
spec:
ingressClassName: nginx
rules:
- host: regex-match.example.com
http:
paths:
- path: "/[A-Z]{3}"
pathType: ImplementationSpecific
backend:
service:
name: httpbin
port:
number: 8000
However, because regex matches are prefix and case insensitive, Ingress-NGINX routes any request with a path that starts with any three letters to httpbin:
curl -sS -H "Host: regex-match.example.com" http://<your-ingress-ip>/uuid
The output is similar to:
{
"uuid": "e55ef929-25a0-49e9-9175-1b6e87f40af7"
}
Note: The /uuid endpoint of httpbin returns a random UUID.
A UUID in the response body means that the request was successfully routed to httpbin.
With Gateway API, you can use an HTTP path match with a type of RegularExpression for regular expression path matching.
RegularExpression matches are implementation specific, so check with your Gateway API implementation to verify the semantics of RegularExpression matching.
Popular Envoy-based Gateway API implementations such as Istio1, Envoy Gateway, and Kgateway do a full case-sensitive match.
Thus, if you are unaware that Ingress-NGINX patterns are prefix and case-insensitive, and, unbeknownst to you,
clients or applications send traffic to /uuid (or /uuid/some/other/path), you might create the following HTTP route.
apiVersion: gateway.networking.k8s.io/v1
kind: HTTPRoute
metadata:
name: regex-match-route
spec:
hostnames:
- regex-match.example.com
parentRefs:
- name: <your gateway> # Change this depending on your use case
rules:
- matches:
- path:
type: RegularExpression
value: "/[A-Z]{3}"
backendRefs:
- name: httpbin
port: 8000
However, if your Gateway API implementation does full case-sensitive matches,
the above HTTP route would not match a request with a path of /uuid.
The above HTTP route would thus cause an outage because requests
that Ingress-NGINX routed to httpbin would fail with a 404 Not Found at the gateway.
To preserve the case-insensitive regex matching, you can use the following HTTP route.
apiVersion: gateway.networking.k8s.io/v1
kind: HTTPRoute
metadata:
name: regex-match-route
spec:
hostnames:
- regex-match.example.com
parentRefs:
- name: <your gateway> # Change this depending on your use case
rules:
- matches:
- path:
type: RegularExpression
value: "/[a-zA-Z]{3}.*"
backendRefs:
- name: httpbin
port: 8000
Alternatively, the aforementioned proxies support the (?i) flag to indicate case insensitive matches.
Using the flag, the pattern could be (?i)/[a-z]{3}.*.
2. The nginx.ingress.kubernetes.io/use-regex applies to all paths of a host across all (Ingress-NGINX) Ingresses
Now, suppose that you have an Ingress with the nginx.ingress.kubernetes.io/use-regex: "true" annotation, but you want to route
requests with a path of exactly /headers to httpbin.
Unfortunately, you made a typo and set the path to /Header instead of /headers.
---
apiVersion: networking.k8s.io/v1
kind: Ingress
metadata:
name: regex-match-ingress
annotations:
nginx.ingress.kubernetes.io/use-regex: "true"
spec:
ingressClassName: nginx
rules:
- host: regex-match.example.com
http:
paths:
- path: "<some regex pattern>"
pathType: ImplementationSpecific
backend:
service:
name: <your backend>
port:
number: 8000
---
apiVersion: networking.k8s.io/v1
kind: Ingress
metadata:
name: regex-match-ingress-other
spec:
ingressClassName: nginx
rules:
- host: regex-match.example.com
http:
paths:
- path: "/Header" # typo here, should be /headers
pathType: Exact
backend:
service:
name: httpbin
port:
number: 8000
Most would expect a request to /headers to respond with a 404 Not Found, since /headers does not match the Exact path of /Header.
However, because the regex-match-ingress Ingress has the nginx.ingress.kubernetes.io/use-regex: "true" annotation and the regex-match.example.com host,
all paths with the regex-match.example.com host are treated as regular expressions across all (Ingress-NGINX) Ingresses.
Since regex patterns are case-insensitive prefix matches, /headers matches the /Header pattern and Ingress-NGINX routes such requests to httpbin.
Running the command
curl -sS -H "Host: regex-match.example.com" http://<your-ingress-ip>/headers
the output looks like:
{
"headers": {
...
}
}
Note: The /headers endpoint of httpbin returns the request headers.
The fact that the response contains the request headers in the body means that the request was successfully routed to httpbin.
Gateway API does not silently convert or interpret Exact and Prefix matches as regex patterns.
So if you converted the above Ingresses into the following HTTP route and
preserved the typo and match types, requests to /headers will respond with a 404 Not Found instead of a 200 OK.
apiVersion: gateway.networking.k8s.io/v1
kind: HTTPRoute
metadata:
name: regex-match-route
spec:
hostnames:
- regex-match.example.com
rules:
...
- matches:
- path:
type: Exact
value: "/Header"
backendRefs:
- name: httpbin
port: 8000
To keep the case-insensitive prefix matching, you can change
- matches:
- path:
type: Exact
value: "/Header"
to
- matches:
- path:
type: RegularExpression
value: "(?i)/Header"
Or even better, you could fix the typo and change the match to
- matches:
- path:
type: Exact
value: "/headers"
3. Rewrite target implies regex
In this case, suppose you want to rewrite the path of requests with a path of /ip to /uuid before routing them to httpbin, and
as in Section 2, you want to route requests with the path of exactly /headers to httpbin.
However, you accidentally make a typo and set the path to /IP instead of /ip and /Header instead of /headers.
---
apiVersion: networking.k8s.io/v1
kind: Ingress
metadata:
name: rewrite-target-ingress
annotations:
nginx.ingress.kubernetes.io/rewrite-target: "/uuid"
spec:
ingressClassName: nginx
rules:
- host: rewrite-target.example.com
http:
paths:
- path: "/IP"
pathType: Exact
backend:
service:
name: httpbin
port:
number: 8000
---
apiVersion: networking.k8s.io/v1
kind: Ingress
metadata:
name: rewrite-target-ingress-other
spec:
ingressClassName: nginx
rules:
- host: rewrite-target.example.com
http:
paths:
- path: "/Header"
pathType: Exact
backend:
service:
name: httpbin
port:
number: 8000
The nginx.ingress.kubernetes.io/rewrite-target: "/uuid" annotation
causes requests that match paths in the rewrite-target-ingress Ingress to have their paths rewritten to /uuid before being routed to the backend.
Even though no Ingress has the nginx.ingress.kubernetes.io/use-regex: "true" annotation,
the presence of the nginx.ingress.kubernetes.io/rewrite-target annotation in the rewrite-target-ingress Ingress causes all paths with the rewrite-target.example.com host to be treated as regex patterns.
In other words, the nginx.ingress.kubernetes.io/rewrite-target silently adds the nginx.ingress.kubernetes.io/use-regex: "true" annotation, along with all the side effects discussed above.
For example, a request to /ip has its path rewritten to /uuid because /ip matches the case-insensitive prefix pattern of /IP in the rewrite-target-ingress Ingress.
After running the command
curl -sS -H "Host: rewrite-target.example.com" http://<your-ingress-ip>/ip
the output is similar to:
{
"uuid": "12a0def9-1adg-2943-adcd-1234aadfgc67"
}
Like in the nginx.ingress.kubernetes.io/use-regex example, Ingress-NGINX treats paths of other ingresses with the rewrite-target.example.com host as case-insensitive prefix patterns.
Running the command
curl -sS -H "Host: rewrite-target.example.com" http://<your-ingress-ip>/headers
gives an output that looks like
{
"headers": {
...
}
}
You can configure path rewrites in Gateway API with the HTTP URL rewrite filter which does not silently convert your Exact and Prefix matches into regex patterns.
However, if you are unaware of the side effects of the nginx.ingress.kubernetes.io/rewrite-target annotation
and do not realize that /Header and /IP are both typos, you might create the following
HTTP route.
apiVersion: gateway.networking.k8s.io/v1
kind: HTTPRoute
metadata:
name: rewrite-target-route
spec:
hostnames:
- rewrite-target.example.com
parentRefs:
- name: <your-gateway>
rules:
- matches:
- path:
type: Exact
value: "/IP"
filters:
- type: URLRewrite
urlRewrite:
path:
type: ReplaceFullPath
replaceFullPath: /uuid
backendRefs:
- name: httpbin
port: 8000
- matches:
- path:
# This is an exact match, irrespective of other rules
type: Exact
value: "/Header"
backendRefs:
- name: httpbin
port: 8000
As with Section 2, because /IP is now an Exact match type in your HTTP route, requests to /ip will respond with a 404 Not Found instead of a 200 OK.
Similarly, requests to /headers will also respond with a 404 Not Found instead of a 200 OK.
Thus, this HTTP route will break applications and clients that rely on the /ip and /headers routes.
To fix this, you can change the matches in the HTTP route to be regex matches, and change the path patterns to be case-insensitive prefix matches, as follows.
- matches:
- path:
type: RegularExpression
value: "(?i)/IP.*"
...
- matches:
- path:
type: RegularExpression
value: "(?i)/Header.*"
Or, you can keep the Exact match type and fix the typos.
4. Requests missing a trailing slash are redirected to the same path with a trailing slash
Consider the following Ingress:
apiVersion: networking.k8s.io/v1
kind: Ingress
metadata:
name: trailing-slash-ingress
spec:
ingressClassName: nginx
rules:
- host: trailing-slash.example.com
http:
paths:
- path: "/my-path/"
pathType: Exact
backend:
service:
name: <your-backend>
port:
number: 8000
You might expect Ingress-NGINX to respond to /my-path with a 404 Not Found since the /my-path does not exactly match the Exact path of /my-path/.
However, Ingress-NGINX redirects the request to /my-path/ with a 301 Moved Permanently because the only difference between /my-path and /my-path/ is a trailing slash.
curl -isS -H "Host: trailing-slash.example.com" http://<your-ingress-ip>/my-path
The output looks like:
HTTP/1.1 301 Moved Permanently
...
Location: http://trailing-slash.example.com/my-path/
...
The same applies if you change the pathType to Prefix.
However, the redirect does not happen if the path is a regex pattern.
Conformant Gateway API implementations do not silently configure any kind of redirects.
If clients or downstream services depend on this redirect, a migration to Gateway API that
does not explicitly configure request redirects will cause an outage because
requests to /my-path will now respond with a 404 Not Found instead of a 301 Moved Permanently.
You can explicitly configure redirects using the HTTP request redirect filter as follows:
apiVersion: gateway.networking.k8s.io/v1
kind: HTTPRoute
metadata:
name: trailing-slash-route
spec:
hostnames:
- trailing-slash.example.com
parentRefs:
- name: <your-gateway>
rules:
- matches:
- path:
type: Exact
value: "/my-path"
filters:
requestRedirect:
statusCode: 301
path:
type: ReplaceFullPath
replaceFullPath: /my-path/
- matches:
- path:
type: Exact # or Prefix
value: "/my-path/"
backendRefs:
- name: <your-backend>
port: 8000
5. Ingress-NGINX normalizes URLs
URL normalization is the process of converting a URL into a canonical form before matching it against Ingress rules and routing it. The specifics of URL normalization are defined in RFC 3986 Section 6.2, but some examples are
- removing path segments that are just a
.:my/./path -> my/path - having a
..path segment remove the previous segment:my/../path -> /path - deduplicating consecutive slashes in a path:
my//path -> my/path
Ingress-NGINX normalizes URLs before matching them against Ingress rules. For example, consider the following Ingress:
apiVersion: networking.k8s.io/v1
kind: Ingress
metadata:
name: path-normalization-ingress
spec:
ingressClassName: nginx
rules:
- host: path-normalization.example.com
http:
paths:
- path: "/uuid"
pathType: Exact
backend:
service:
name: httpbin
port:
number: 8000
Ingress-NGINX normalizes the path of the following requests to /uuid.
Now that the request matches the Exact path of /uuid, Ingress-NGINX responds with either a 200 OK response or a 301 Moved Permanently to /uuid.
For the following commands
curl -sS -H "Host: path-normalization.example.com" http://<your-ingress-ip>/uuid
curl -sS -H "Host: path-normalization.example.com" http://<your-ingress-ip>/ip/abc/../../uuid
curl -sSi -H "Host: path-normalization.example.com" http://<your-ingress-ip>////uuid
the outputs are similar to
{
"uuid": "29c77dfe-73ec-4449-b70a-ef328ea9dbce"
}
{
"uuid": "d20d92e8-af57-4014-80ba-cf21c0c4ffae"
}
HTTP/1.1 301 Moved Permanently
...
Location: /uuid
...
Your backends might rely on the Ingress/Gateway API implementation to normalize URLs.
That said, most Gateway API implementations will have some path normalization enabled by default.
For example, Istio, Envoy Gateway, and Kgateway all normalize . and .. segments out of the box.
For more details, check the documentation for each Gateway API implementation that you use.
Conclusion
As we all race to respond to the Ingress-NGINX retirement, I hope this blog post instills some confidence that you can migrate safely and effectively despite all the intricacies of Ingress-NGINX.
SIG Network has also been working on supporting the most common Ingress-NGINX annotations (and some of these unexpected behaviors) in Ingress2Gateway to help you translate Ingress-NGINX configuration into Gateway API, and offer alternatives to unsupported behavior.
SIG Network released Gateway API 1.5 earlier today (27th February 2026), which graduates features such as ListenerSet (that allow app developers to better manage TLS certificates), and the HTTPRoute CORS filter that allows CORS configuration.
You can use Istio purely as Gateway API controller with no other service mesh features. ↩︎
Spotlight on SIG Architecture: API Governance
This is the fifth interview of a SIG Architecture Spotlight series that covers the different subprojects, and we will be covering SIG Architecture: API Governance.
In this SIG Architecture spotlight we talked with Jordan Liggitt, lead of the API Governance sub-project.
Introduction
FM: Hello Jordan, thank you for your availability. Tell us a bit about yourself, your role and how you got involved in Kubernetes.
JL: My name is Jordan Liggitt. I'm a Christian, husband, father of four, software engineer at Google by day, and amateur musician by stealth. I was born in Texas (and still like to claim it as my point of origin), but I've lived in North Carolina for most of my life.
I've been working on Kubernetes since 2014. At that time, I was working on authentication and authorization at Red Hat, and my very first pull request to Kubernetes attempted to add an OAuth server to the Kubernetes API server. It never exited work-in-progress status. I ended up going with a different approach that layered on top of the core Kubernetes API server in a different project (spoiler alert: this is foreshadowing), and I closed it without merging six months later.
Undeterred by that start, I stayed involved, helped build Kubernetes authentication and
authorization capabilities, and got involved in the definition and evolution of the core Kubernetes
APIs from early beta APIs, like v1beta3 to v1. I got tagged as an API reviewer in 2016 based on
those contributions, and was added as an API approver in 2017.
Today, I help lead the API Governance and code organization subprojects for SIG Architecture, and I am a tech lead for SIG Auth.
FM: And when did you get specifically involved in the API Governance project?
JL: Around 2019.
Goals and scope of API Governance
FM: How would you describe the main goals and areas of intervention of the subproject?
The surface area includes all the various APIs Kubernetes has, and there are APIs that people do not always realize are APIs: command-line flags, configuration files, how binaries are run, how they talk to back-end components like the container runtime, and how they persist data. People often think of "the API" as only the REST API... that is the biggest and most obvious one, and the one with the largest audience, but all of these other surfaces are also APIs. Their audiences are narrower, so there is more flexibility there, but they still require consideration.
The goals are to be stable while still enabling innovation. Stability is easy if you never change anything, but that contradicts the goal of evolution and growth. So we balance "be stable" with "allow change".
FM: Speaking of changes, in terms of ensuring consistency and quality (which is clearly one of the reasons this project exists), what are the specific quality gates in the lifecycle of a Kubernetes change? Does API Governance get involved during the release cycle, prior to it through guidelines, or somewhere in between? At what points do you ensure the intended role is fulfilled?
JL: We have guidelines and conventions, both for APIs in general and for how to change an API. These are living documents that we update as we encounter new scenarios. They are long and dense, so we also support them with involvement at either the design stage or the implementation stage.
Sometimes, due to bandwidth constraints, teams move ahead with design work without feedback from API Review. That’s fine, but it means that when implementation begins, the API review will happen then, and there may be substantial feedback. So we get involved when a new API is created or an existing API is changed, either at design or implementation.
FM: Is this during the Kubernetes Enhancement Proposal (KEP) process? Since KEPs are mandatory for enhancements, I assume part of the work intersects with API Governance?
JL: It can. KEPs vary in how detailed they are. Some include literal API definitions. When they do, we can perform an API review at the design stage. Then implementation becomes a matter of checking fidelity to the design.
Getting involved early is ideal. But some KEPs are conceptual and leave details to the implementation. That’s not wrong; it just means the implementation will be more exploratory. Then API Review gets involved later, possibly recommending structural changes.
There’s a trade-off regardless: detailed design upfront versus iterative discovery during implementation. People and teams work differently, and we’re flexible and happy to consult early or at implementation time.
FM: This reminds me of what Fred Brooks wrote in "The Mythical Man-Month" about conceptual integrity being central to product quality... No matter how you structure the process, there must be a point where someone looks at what is coming and ensures conceptual integrity. Kubernetes uses APIs everywhere -- externally and internally -- so API Governance is critical to maintaining that integrity. How is this captured?
JL: Yes, the conventions document captures patterns we’ve learned over time: what to do in various situations. We also have automated linters and checks to ensure correctness around patterns like spec/status semantics. These automated tools help catch issues even when humans miss them.
As new scenarios arise -- and they do constantly -- we think through how to approach them and fold the results back into our documentation and tools. Sometimes it takes a few attempts before we settle on an approach that works well.
FM: Exactly. Each new interaction improves the guidelines.
JL: Right. And sometimes the first approach turns out to be wrong. It may take two or three iterations before we land on something robust.
The impact of Custom Resource Definitions
FM: Is there any particular change, episode, or domain that stands out as especially noteworthy, complex, or interesting in your experience?
JL: The watershed moment was Custom Resources. Prior to that, every API was handcrafted by us and fully reviewed. There were inconsistencies, but we understood and controlled every type and field.
When Custom Resources arrived, anyone could define anything. The first version did not even require a schema. That made it extremely powerful -- it enabled change immediately -- but it left us playing catch-up on stability and consistency.
When Custom Resources graduated to General Availability (GA), schemas became required, but escape hatches still existed for backward compatibility. Since then, we’ve been working on giving CRD authors validation capabilities comparable to built-ins. Built-in validation rules for CRDs have only just reached GA in the last few releases.
So CRDs opened the "anything is possible" era. Built-in validation rules are the second major milestone: bringing consistency back.
The three major themes have been defining schemas, validating data, and handling pre-existing invalid data. With ratcheting validation (allowing data to improve without breaking existing objects), we can now guide CRD authors toward conventions without breaking the world.
API Governance in context
FM: How does API Governance relate to SIG Architecture and API Machinery?
JL: API Machinery provides the actual code and tools that people build APIs on. They don’t review APIs for storage, networking, scheduling, etc.
SIG Architecture sets the overall system direction and works with API Machinery to ensure the system supports that direction. API Governance works with other SIGs building on that foundation to define conventions and patterns, ensuring consistent use of what API Machinery provides.
FM: Thank you. That clarifies the flow. Going back to release cycles: do release phases -- enhancements freeze, code freeze -- change your workload? Or is API Governance mostly continuous?
JL: We get involved in two places: design and implementation. Design involvement increases before enhancements freeze; implementation involvement increases before code freeze. However, many efforts span multiple releases, so there is always some design and implementation happening, even for work targeting future releases. Between those intense periods, we often have time to work on long-term design work.
An anti-pattern we see is teams thinking about a large feature for months and then presenting it three weeks before enhancements freeze, saying, "Here is the design, please review." For big changes with API impact, it’s much better to involve API Governance early.
And there are good times in the cycle for this -- between freezes -- when people have bandwidth. That’s when long-term review work fits best.
Getting involved
FM: Clearly. Now, regarding team dynamics and new contributors: how can someone get involved in API Governance? What should they focus on?
JL: It’s usually best to follow a specific change rather than trying to learn everything at once. Pick a small API change, perhaps one someone else is making or one you want to make, and observe the full process: design, implementation, review.
High-bandwidth review -- live discussion over video -- is often very effective. If you’re making or following a change, ask whether there’s a time to go over the design or PR together. Observing those discussions is extremely instructive.
Start with a small change. Then move to a bigger one. Then maybe a new API. That builds understanding of conventions as they are applied in practice.
FM: Excellent. Any final comments, or anything we missed?
JL: Yes... the reason we care so much about compatibility and stability is for our users. It’s easy for contributors to see those requirements as painful obstacles preventing cleanup or requiring tedious work... but users integrated with our system, and we made a promise to them: we want them to trust that we won’t break that contract. So even when it requires more work, moves slower, or involves duplication, we choose stability.
We are not trying to be obstructive; we are trying to make life good for users.
A lot of our questions focus on the future: you want to do something now... how will you evolve it later without breaking it? We assume we will know more in the future, and we want the design to leave room for that.
We also assume we will make mistakes. The question then is: how do we leave ourselves avenues to improve while keeping compatibility promises?
FM: Exactly. Jordan, thank you, I think we’ve covered everything. This has been an insightful view into the API Governance project and its role in the wider Kubernetes project.
JL: Thank you.
Introducing Node Readiness Controller

In the standard Kubernetes model, a node’s suitability for workloads hinges on a single binary "Ready" condition. However, in modern Kubernetes environments, nodes require complex infrastructure dependencies—such as network agents, storage drivers, GPU firmware, or custom health checks—to be fully operational before they can reliably host pods.
Today, on behalf of the Kubernetes project, I am announcing the Node Readiness Controller. This project introduces a declarative system for managing node taints, extending the readiness guardrails during node bootstrapping beyond standard conditions. By dynamically managing taints based on custom health signals, the controller ensures that workloads are only placed on nodes that met all infrastructure-specific requirements.
Why the Node Readiness Controller?
Core Kubernetes Node "Ready" status is often insufficient for clusters with sophisticated bootstrapping requirements. Operators frequently struggle to ensure that specific DaemonSets or local services are healthy before a node enters the scheduling pool.
The Node Readiness Controller fills this gap by allowing operators to define custom scheduling gates tailored to specific node groups. This enables you to enforce distinct readiness requirements across heterogeneous clusters, ensuring for example, that GPU equipped nodes only accept pods once specialized drivers are verified, while general purpose nodes follow a standard path.
It provides three primary advantages:
- Custom Readiness Definitions: Define what ready means for your specific platform.
- Automated Taint Management: The controller automatically applies or removes node taints based on condition status, preventing pods from landing on unready infrastructure.
- Declarative Node Bootstrapping: Manage multi-step node initialization reliably, with a clear observability into the bootstrapping process.
Core concepts and features
The controller centers around the NodeReadinessRule (NRR) API, which allows you to define declarative gates for your nodes.
Flexible enforcement modes
The controller supports two distinct operational modes:
- Continuous enforcement
- Actively maintains the readiness guarantee throughout the node’s entire lifecycle. If a critical dependency (like a device driver) fails later, the node is immediately tainted to prevent new scheduling.
- Bootstrap-only enforcement
- Specifically for one-time initialization steps, such as pre-pulling heavy images or hardware provisioning. Once conditions are met, the controller marks the bootstrap as complete and stops monitoring that specific rule for the node.
Condition reporting
The controller reacts to Node Conditions rather than performing health checks itself. This decoupled design allows it to integrate seamlessly with other tools existing in the ecosystem as well as custom solutions:
- Node Problem Detector (NPD): Use existing NPD setups and custom scripts to report node health.
- Readiness Condition Reporter: A lightweight agent provided by the project that can be deployed to periodically check local HTTP endpoints and patch node conditions accordingly.
Operational safety with dry run
Deploying new readiness rules across a fleet carries inherent risk. To mitigate this, dry run mode allows operators to first simulate impact on the cluster. In this mode, the controller logs intended actions and updates the rule's status to show affected nodes without applying actual taints, enabling safe validation before enforcement.
Example: CNI bootstrapping
The following NodeReadinessRule ensures a node remains unschedulable until its CNI agent is functional. The controller monitors a custom cniplugin.example.net/NetworkReady condition and only removes the readiness.k8s.io/acme.com/network-unavailable taint once the status is True.
apiVersion: readiness.node.x-k8s.io/v1alpha1
kind: NodeReadinessRule
metadata:
name: network-readiness-rule
spec:
conditions:
- type: "cniplugin.example.net/NetworkReady"
requiredStatus: "True"
taint:
key: "readiness.k8s.io/acme.com/network-unavailable"
effect: "NoSchedule"
value: "pending"
enforcementMode: "bootstrap-only"
nodeSelector:
matchLabels:
node-role.kubernetes.io/worker: ""
Demo:
Getting involved
The Node Readiness Controller is just getting started, with our initial releases out, and we are seeking community feedback to refine the roadmap. Following our productive Unconference discussions at KubeCon NA 2025, we are excited to continue the conversation in person.
Join us at KubeCon + CloudNativeCon Europe 2026 for our maintainer track session: Addressing Non-Deterministic Scheduling: Introducing the Node Readiness Controller.
In the meantime, you can contribute or track our progress here:
- GitHub: https://sigs.k8s.io/node-readiness-controller
- Slack: Join the conversation in #sig-node-readiness-controller
- Documentation: Getting Started
New Conversion from cgroup v1 CPU Shares to v2 CPU Weight
I'm excited to announce the implementation of an improved conversion formula from cgroup v1 CPU shares to cgroup v2 CPU weight. This enhancement addresses critical issues with CPU priority allocation for Kubernetes workloads when running on systems with cgroup v2.
Background
Kubernetes was originally designed with cgroup v1 in mind, where CPU shares were derived from a container's CPU requests using the following formula:
Note that the value 1024 in this formula is the default cpu.shares value
in cgroup v1, and is unrelated to millicores. For example, a container
requesting 1 CPU (1000m) would get (cpu.shares = 1000 \times 1024 / 1000 = 1024),
and a container requesting 100m would get (cpu.shares = 100 \times 1024 / 1000 = 102).
After a while, cgroup v1 started being replaced by its successor, cgroup v2. In cgroup v2, the concept of CPU shares (which ranges from 2 to 262144, or from 2¹ to 2¹⁸) was replaced with CPU weight (which ranges from [1, 10000], or 10⁰ to 10⁴).
With the transition to cgroup v2,
KEP-2254
introduced a conversion formula to map cgroup v1 CPU shares to cgroup v2 CPU
weight. The conversion formula was defined as: cpu.weight = (1 + ((cpu.shares - 2) * 9999) / 262142)
This formula linearly maps values from [2¹, 2¹⁸] to [10⁰, 10⁴].
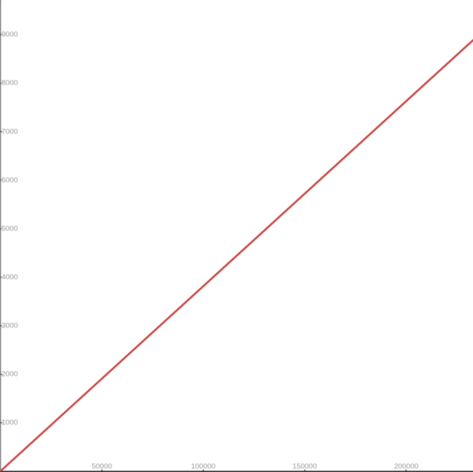
While this approach is simple, the linear mapping imposes a few significant problems and impacts both performance and configuration granularity.
Problems with previous conversion formula
The current conversion formula creates two major issues:
1. Reduced priority against non-Kubernetes workloads
In cgroup v1, the default value for CPU shares is 1024, meaning a container
requesting 1 CPU has equal priority with system processes that live outside
of Kubernetes' scope.
However, in cgroup v2, the default CPU weight is 100, but the current
formula converts 1 CPU (1000m) to only ≈39 weight - less than 40% of the
default.
Example:
- Container requesting 1 CPU (1000m)
- cgroup v1:
cpu.shares = 1024(equal to default) - cgroup v2 (current):
cpu.weight = 39(much lower than default 100)
This means that after moving to cgroup v2, Kubernetes (or OCI) workloads would de-facto reduce their CPU priority against non-Kubernetes processes. The problem can be severe for setups with many system daemons that run outside of Kubernetes' scope and expect Kubernetes workloads to have priority, especially in situations of resource starvation.
2. Unmanageable granularity
The current formula produces very low values for small CPU requests, limiting the ability to create sub-cgroups within containers for fine-grained resource distribution (which will possibly be much easier moving forward, see KEP #5474 for more info).
Example:
- Container requesting 100m CPU
- cgroup v1:
cpu.shares = 102 - cgroup v2 (current):
cpu.weight = 4(too low for sub-cgroup configuration)
With cgroup v1, requesting 100m CPU which led to 102 CPU shares was manageable in the sense that sub-cgroups could have been created inside the main container, assigning fine-grained CPU priorities for different groups of processes. With cgroup v2 however, having 4 shares is very hard to distribute between sub-cgroups since it's not granular enough.
With plans to allow writable cgroups for unprivileged containers, this becomes even more relevant.
New conversion formula
Description
The new formula is more complicated, but does a much better job mapping between cgroup v1 CPU shares and cgroup v2 CPU weight:
The idea is that this is a quadratic function to cross the following values:
- (2, 1): The minimum values for both ranges.
- (1024, 100): The default values for both ranges.
- (262144, 10000): The maximum values for both ranges.
Visually, the new function looks as follows:
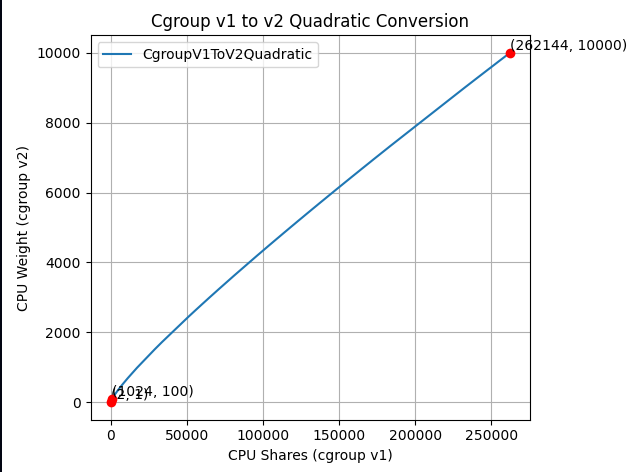
And if you zoom in to the important part:
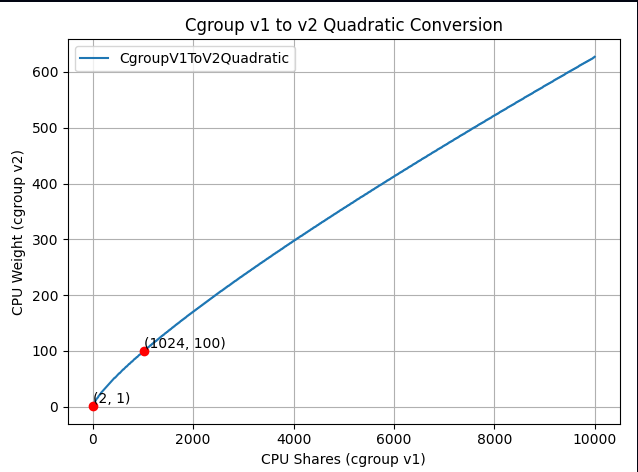
The new formula is "close to linear", yet it is carefully designed to map the ranges in a clever way so the three important points above would cross.
How it solves the problems
Better priority alignment:
- A container requesting 1 CPU (1000m) will now get a
cpu.weight = 102. This value is close to cgroup v2's default 100. This restores the intended priority relationship between Kubernetes workloads and system processes.
- A container requesting 1 CPU (1000m) will now get a
Improved granularity:
- A container requesting 100m CPU will get
cpu.weight = 17, (see here). Enables better fine-grained resource distribution within containers.
- A container requesting 100m CPU will get
Adoption and integration
This change was implemented at the OCI layer. In other words, this is not implemented in Kubernetes itself; therefore the adoption of the new conversion formula depends solely on the OCI runtime adoption.
For example:
- runc: The new formula is enabled from version 1.3.2.
- crun: The new formula is enabled from version 1.23.
Impact on existing deployments
Important: Some consumers may be affected if they assume the older linear conversion formula. Applications or monitoring tools that directly calculate expected CPU weight values based on the previous formula may need updates to account for the new quadratic conversion. This is particularly relevant for:
- Custom resource management tools that predict CPU weight values.
- Monitoring systems that validate or expect specific weight values.
- Applications that programmatically set or verify CPU weight values.
Also note that reversing the conversion from cpu.weight back to milliCPU
will not always yield the exact original value. There are two sources of
information loss: the milliCPU to cpu.shares conversion involves integer
truncation (e.g. 100m becomes 102 shares, not 102.4), and more significantly,
the shares-to-weight mapping is many-to-one (e.g. milliCPU values 90
through 109 all map to cpu.weight = 17). Tools that need precise CPU
request values should read them directly from the pod spec rather than
deriving them from cgroup parameters.
The Kubernetes project recommends testing the new conversion formula in non-production environments before upgrading OCI runtimes to ensure compatibility with existing tooling.
Where can I learn more?
For those interested in this enhancement:
- Kubernetes GitHub Issue #131216 - Detailed technical analysis and examples, including discussions and reasoning for choosing the above formula.
- KEP-2254: cgroup v2 - Original cgroup v2 implementation in Kubernetes.
- Kubernetes cgroup documentation - Current resource management guidance.
How do I get involved?
For those interested in getting involved with Kubernetes node-level features, join the Kubernetes Node Special Interest Group. We always welcome new contributors and diverse perspectives on resource management challenges.
Ingress NGINX: Statement from the Kubernetes Steering and Security Response Committees
In March 2026, Kubernetes will retire Ingress NGINX, a piece of critical infrastructure for about half of cloud native environments. The retirement of Ingress NGINX was announced for March 2026, after years of public warnings that the project was in dire need of contributors and maintainers. There will be no more releases for bug fixes, security patches, or any updates of any kind after the project is retired. This cannot be ignored, brushed off, or left until the last minute to address. We cannot overstate the severity of this situation or the importance of beginning migration to alternatives like Gateway API or one of the many third-party Ingress controllers immediately.
To be abundantly clear: choosing to remain with Ingress NGINX after its retirement leaves you and your users vulnerable to attack. None of the available alternatives are direct drop-in replacements. This will require planning and engineering time. Half of you will be affected. You have two months left to prepare.
Existing deployments will continue to work, so unless you proactively check, you may not know you are affected until you are compromised. In most cases, you can check to find out whether or not you rely on Ingress NGINX by running kubectl get pods --all-namespaces --selector app.kubernetes.io/name=ingress-nginx with cluster administrator permissions.
Despite its broad appeal and widespread use by companies of all sizes, and repeated calls for help from the maintainers, the Ingress NGINX project never received the contributors it so desperately needed. According to internal Datadog research, about 50% of cloud native environments currently rely on this tool, and yet for the last several years, it has been maintained solely by one or two people working in their free time. Without sufficient staffing to maintain the tool to a standard both ourselves and our users would consider secure, the responsible choice is to wind it down and refocus efforts on modern alternatives like Gateway API.
We did not make this decision lightly; as inconvenient as it is now, doing so is necessary for the safety of all users and the ecosystem as a whole. Unfortunately, the flexibility Ingress NGINX was designed with, that was once a boon, has become a burden that cannot be resolved. With the technical debt that has piled up, and fundamental design decisions that exacerbate security flaws, it is no longer reasonable or even possible to continue maintaining the tool even if resources did materialize.
We issue this statement together to reinforce the scale of this change and the potential for serious risk to a significant percentage of Kubernetes users if this issue is ignored. It is imperative that you check your clusters now. If you are reliant on Ingress NGINX, you must begin planning for migration.
Thank you,
Kubernetes Steering Committee
Kubernetes Security Response Committee
Experimenting with Gateway API using kind
This document will guide you through setting up a local experimental environment with Gateway API on kind. This setup is designed for learning and testing. It helps you understand Gateway API concepts without production complexity.
Caution:
This is an experimentation learning setup, and should not be used for production. The components used on this document are not suited for production usage. Once you're ready to deploy Gateway API in a production environment, select an implementation that suits your needs.Overview
In this guide, you will:
- Set up a local Kubernetes cluster using kind (Kubernetes in Docker)
- Deploy cloud-provider-kind, which provides both LoadBalancer Services and a Gateway API controller
- Create a Gateway and HTTPRoute to route traffic to a demo application
- Test your Gateway API configuration locally
This setup is ideal for learning, development, and experimentation with Gateway API concepts.
Prerequisites
Before you begin, ensure you have the following installed on your local machine:
- Docker - Required to run kind and cloud-provider-kind
- kubectl - The Kubernetes command-line tool
- kind - Kubernetes in Docker
- curl - Required to test the routes
Create a kind cluster
Create a new kind cluster by running:
kind create cluster
This will create a single-node Kubernetes cluster running in a Docker container.
Install cloud-provider-kind
Next, you need cloud-provider-kind, which provides two key components for this setup:
- A LoadBalancer controller that assigns addresses to LoadBalancer-type Services
- A Gateway API controller that implements the Gateway API specification
It also automatically installs the Gateway API Custom Resource Definitions (CRDs) in your cluster.
Run cloud-provider-kind as a Docker container on the same host where you created the kind cluster:
VERSION="$(basename $(curl -s -L -o /dev/null -w '%{url_effective}' https://github.com/kubernetes-sigs/cloud-provider-kind/releases/latest))"
docker run -d --name cloud-provider-kind --rm --network host -v /var/run/docker.sock:/var/run/docker.sock registry.k8s.io/cloud-provider-kind/cloud-controller-manager:${VERSION}
Note: On some systems, you may need elevated privileges to access the Docker socket.
Verify that cloud-provider-kind is running:
docker ps --filter name=cloud-provider-kind
You should see the container listed and in a running state. You can also check the logs:
docker logs cloud-provider-kind
Experimenting with Gateway API
Now that your cluster is set up, you can start experimenting with Gateway API resources.
cloud-provider-kind automatically provisions a GatewayClass called cloud-provider-kind. You'll use this class to create your Gateway.
It is worth noticing that while kind is not a cloud provider, the project is named as cloud-provider-kind as it provides features that simulate a cloud-enabled environment.
Deploy a Gateway
The following manifest will:
- Create a new namespace called
gateway-infra - Deploy a Gateway that listens on port 80
- Accept HTTPRoutes with hostnames matching the
*.exampledomain.examplepattern - Allow routes from any namespace to attach to the Gateway.
Note: In real clusters, prefer Same or Selector values on the
allowedRoutesnamespace selector field to limit attachments.
Apply the following manifest:
---
apiVersion: v1
kind: Namespace
metadata:
name: gateway-infra
---
apiVersion: gateway.networking.k8s.io/v1
kind: Gateway
metadata:
name: gateway
namespace: gateway-infra
spec:
gatewayClassName: cloud-provider-kind
listeners:
- name: default
hostname: "*.exampledomain.example"
port: 80
protocol: HTTP
allowedRoutes:
namespaces:
from: All
Then verify that your Gateway is properly programmed and has an address assigned:
kubectl get gateway -n gateway-infra gateway
Expected output:
NAME CLASS ADDRESS PROGRAMMED AGE
gateway cloud-provider-kind 172.18.0.3 True 5m6s
The PROGRAMMED column should show True, and the ADDRESS field should contain an IP address.
Deploy a demo application
Next, deploy a simple echo application that will help you test your Gateway configuration. This application:
- Listens on port 3000
- Echoes back request details including path, headers, and environment variables
- Runs in a namespace called
demo
Apply the following manifest:
apiVersion: v1
kind: Namespace
metadata:
name: demo
---
apiVersion: v1
kind: Service
metadata:
labels:
app.kubernetes.io/name: echo
name: echo
namespace: demo
spec:
ports:
- name: http
port: 3000
protocol: TCP
targetPort: 3000
selector:
app.kubernetes.io/name: echo
type: ClusterIP
---
apiVersion: apps/v1
kind: Deployment
metadata:
labels:
app.kubernetes.io/name: echo
name: echo
namespace: demo
spec:
selector:
matchLabels:
app.kubernetes.io/name: echo
template:
metadata:
labels:
app.kubernetes.io/name: echo
spec:
containers:
- env:
- name: POD_NAME
valueFrom:
fieldRef:
apiVersion: v1
fieldPath: metadata.name
- name: NAMESPACE
valueFrom:
fieldRef:
apiVersion: v1
fieldPath: metadata.namespace
image: registry.k8s.io/gateway-api/echo-basic:v20251204-v1.4.1
name: echo-basic
Create an HTTPRoute
Now create an HTTPRoute to route traffic from your Gateway to the echo application. This HTTPRoute will:
- Respond to requests for the hostname
some.exampledomain.example - Route traffic to the echo application
- Attach to the Gateway in the
gateway-infranamespace
Apply the following manifest:
apiVersion: gateway.networking.k8s.io/v1
kind: HTTPRoute
metadata:
name: echo
namespace: demo
spec:
parentRefs:
- name: gateway
namespace: gateway-infra
hostnames: ["some.exampledomain.example"]
rules:
- matches:
- path:
type: PathPrefix
value: /
backendRefs:
- name: echo
port: 3000
Test your route
The final step is to test your route using curl. You'll make a request to the Gateway's IP address with the hostname some.exampledomain.example. The command below is for POSIX shell only, and may need to be adjusted for your environment:
GW_ADDR=$(kubectl get gateway -n gateway-infra gateway -o jsonpath='{.status.addresses[0].value}')
curl --resolve some.exampledomain.example:80:${GW_ADDR} http://some.exampledomain.example
You should receive a JSON response similar to this:
{
"path": "/",
"host": "some.exampledomain.example",
"method": "GET",
"proto": "HTTP/1.1",
"headers": {
"Accept": [
"*/*"
],
"User-Agent": [
"curl/8.15.0"
]
},
"namespace": "demo",
"ingress": "",
"service": "",
"pod": "echo-dc48d7cf8-vs2df"
}
If you see this response, congratulations! Your Gateway API setup is working correctly.
Troubleshooting
If something isn't working as expected, you can troubleshoot by checking the status of your resources.
Check the Gateway status
First, inspect your Gateway resource:
kubectl get gateway -n gateway-infra gateway -o yaml
Look at the status section for conditions. Your Gateway should have:
Accepted: True- The Gateway was accepted by the controllerProgrammed: True- The Gateway was successfully configured.status.addressespopulated with an IP address
Check the HTTPRoute status
Next, inspect your HTTPRoute:
kubectl get httproute -n demo echo -o yaml
Check the status.parents section for conditions. Common issues include:
- ResolvedRefs set to False with reason
BackendNotFound; this means that the backend Service doesn't exist or has the wrong name - Accepted set to False; this means that the route couldn't attach to the Gateway (check namespace permissions or hostname matching)
Example error when a backend is not found:
status:
parents:
- conditions:
- lastTransitionTime: "2026-01-19T17:13:35Z"
message: backend not found
observedGeneration: 2
reason: BackendNotFound
status: "False"
type: ResolvedRefs
controllerName: kind.sigs.k8s.io/gateway-controller
Check controller logs
If the resource statuses don't reveal the issue, check the cloud-provider-kind logs:
docker logs -f cloud-provider-kind
This will show detailed logs from both the LoadBalancer and Gateway API controllers.
Cleanup
When you're finished with your experiments, you can clean up the resources:
Remove Kubernetes resources
Delete the namespaces (this will remove all resources within them):
kubectl delete namespace gateway-infra
kubectl delete namespace demo
Stop cloud-provider-kind
Stop and remove the cloud-provider-kind container:
docker stop cloud-provider-kind
Because the container was started with the --rm flag, it will be automatically removed when stopped.
Delete the kind cluster
Finally, delete the kind cluster:
kind delete cluster
Next steps
Now that you've experimented with Gateway API locally, you're ready to explore production-ready implementations:
- Production Deployments: Review the Gateway API implementations to find a controller that matches your production requirements
- Learn More: Explore the Gateway API documentation to learn about advanced features like TLS, traffic splitting, and header manipulation
- Advanced Routing: Experiment with path-based routing, header matching, request mirroring and other features following Gateway API user guides
A final word of caution
This kind setup is for development and learning only. Always use a production-grade Gateway API implementation for real workloads.
Cluster API v1.12: Introducing In-place Updates and Chained Upgrades
Cluster API brings declarative management to Kubernetes cluster lifecycle, allowing users and platform teams to define the desired state of clusters and rely on controllers to continuously reconcile toward it.
Similar to how you can use StatefulSets or Deployments in Kubernetes to manage a group of Pods, in Cluster API you can use KubeadmControlPlane to manage a set of control plane Machines, or you can use MachineDeployments to manage a group of worker Nodes.
The Cluster API v1.12.0 release expands what is possible in Cluster API, reducing friction in common lifecycle operations by introducing in-place updates and chained upgrades.
Emphasis on simplicity and usability
With v1.12.0, the Cluster API project demonstrates once again that this community is capable of delivering a great amount of innovation, while at the same time minimizing impact for Cluster API users.
What does this mean in practice?
Users simply have to change the Cluster or the Machine spec (just as with previous Cluster API releases), and Cluster API will automatically trigger in-place updates or chained upgrades when possible and advisable.
In-place Updates
Like Kubernetes does for Pods in Deployments, when the Machine spec changes also Cluster API performs rollouts by creating a new Machine and deleting the old one.
This approach, inspired by the principle of immutable infrastructure, has a set of considerable advantages:
- It is simple to explain, predictable, consistent and easy to reason about with users and engineers.
- It is simple to implement, because it relies only on two core primitives, create and delete.
- Implementation does not depend on Machine-specific choices, like OS, bootstrap mechanism etc.
As a result, Machine rollouts drastically reduce the number of variables to be considered when managing the lifecycle of a host server that is hosting Nodes.
However, while advantages of immutability are not under discussion, both Kubernetes and Cluster API are undergoing a similar journey, introducing changes that allow users to minimize workload disruption whenever possible.
Over time, also Cluster API has introduced several improvements to immutable rollouts, including:
- Support for in-place propagation of changes affecting Kubernetes resources only, thus avoiding unnecessary rollouts
- A way to Taint outdated nodes with PreferNoSchedule, thus reducing Pod churn by optimizing how Pods are rescheduled during rollouts.
- Support for the delete first rollout strategy, thus making it easier to do immutable rollouts on bare metal / environments with constrained resources.
The new in-place update feature in Cluster API is the next step in this journey.
With the v1.12.0 release, Cluster API introduces support for update extensions allowing users to make changes on existing machines in-place, without deleting and re-creating the Machines.
Both KubeadmControlPlane and MachineDeployments support in-place updates based on the new update extension, and this means that the boundary of what is possible in Cluster API is now changed in a significant way.
How do in-place updates work?
The simplest way to explain it is that once the user triggers an update by changing the desired state of Machines, then Cluster API chooses the best tool to achieve the desired state.
The news is that now Cluster API can choose between immutable rollouts and in-place update extensions to perform required changes.

Importantly, this is not immutable rollouts vs in-place updates; Cluster API considers both valid options and selects the most appropriate mechanism for a given change.
From the perspective of the Cluster API maintainers, in-place updates are most useful for making changes that don't otherwise require a node drain or pod restart; for example: changing user credentials for the Machine. On the other hand, when the workload will be disrupted anyway, just do a rollout.
Nevertheless, Cluster API remains true to its extensible nature, and everyone can create their own update extension and decide when and how to use in-place updates by trading in some of the benefits of immutable rollouts.
For a deep dive into this feature, make sure to attend the session In-place Updates with Cluster API: The Sweet Spot Between Immutable and Mutable Infrastructure at KubeCon EU in Amsterdam!
Chained Upgrades
ClusterClass and managed topologies in Cluster API jointly provided a powerful and effective framework that acts as a building block for many platforms offering Kubernetes-as-a-Service.
Now with v1.12.0 this feature is making another important step forward, by allowing users to upgrade by more than one Kubernetes minor version in a single operation, commonly referred to as a chained upgrade.
This allows users to declare a target Kubernetes version and let Cluster API safely orchestrate the required intermediate steps, rather than manually managing each minor upgrade.
The simplest way to explain how chained upgrades work, is that once the user triggers an update by changing the desired version for a Cluster, Cluster API computes an upgrade plan, and then starts executing it. Rather than (for example) update the Cluster to v1.33.0 and then v1.34.0 and then v1.35.0, checking on progress at each step, a chained upgrade lets you go directly to v1.35.0.
Executing an upgrade plan means upgrading control plane and worker machines in a strictly controlled order, repeating this process as many times as needed to reach the desired state. The Cluster API is now capable of managing this for you.
Cluster API takes care of optimizing and minimizing the upgrade steps for worker machines, and in fact worker machines will skip upgrades to intermediate Kubernetes minor releases whenever allowed by the Kubernetes version skew policies.

Also in this case extensibility is at the core of this feature, and upgrade plan runtime extensions can be used to influence how the upgrade plan is computed; similarly, lifecycle hooks can be used to automate other tasks that must be performed during an upgrade, e.g. upgrading an addon after the control plane update completed.
From our perspective, chained upgrades are most useful for users that struggle to keep up with Kubernetes minor releases, and e.g. they want to upgrade only once per year and then upgrade by three versions (n-3 → n). But be warned: the fact that you can now easily upgrade by more than one minor version is not an excuse to not patch your cluster frequently!
Release team
I would like to thank all the contributors, the maintainers, and all the engineers that volunteered for the release team.
The reliability and predictability of Cluster API releases, which is one of the most appreciated features from our users, is only possible with the support, commitment, and hard work of its community.
Kudos to the entire Cluster API community for the v1.12.0 release and all the great releases delivered in 2025! If you are interested in getting involved, learn about Cluster API contributing guidelines.
What’s next?
If you read the Cluster API manifesto, you can see how the Cluster API subproject claims the right to remain unfinished, recognizing the need to continuously evolve, improve, and adapt to the changing needs of Cluster API’s users and the broader Cloud Native ecosystem.
As Kubernetes itself continues to evolve, the Cluster API subproject will keep advancing alongside it, focusing on safer upgrades, reduced disruption, and stronger building blocks for platforms managing Kubernetes at scale.
Innovation remains at the heart of Cluster API, stay tuned for an exciting 2026!
Useful links:
Headlamp in 2025: Project Highlights
This announcement is a recap from a post originally published on the Headlamp blog.
Headlamp has come a long way in 2025. The project has continued to grow – reaching more teams across platforms, powering new workflows and integrations through plugins, and seeing increased collaboration from the broader community.
We wanted to take a moment to share a few updates and highlight how Headlamp has evolved over the past year.
Updates
Joining Kubernetes SIG UI
This year marked a big milestone for the project: Headlamp is now officially part of Kubernetes SIG UI. This move brings roadmap and design discussions even closer to the core Kubernetes community and reinforces Headlamp’s role as a modern, extensible UI for the project.
As part of that, we’ve also been sharing more about making Kubernetes approachable for a wider audience, including an appearance on Enlightening with Whitney Lee and a talk at KCD New York 2025.
Linux Foundation mentorship
This year, we were excited to work with several students through the Linux Foundation’s Mentorship program, and our mentees have already left a visible mark on Headlamp:
- Adwait Godbole built the KEDA plugin, adding a UI in Headlamp to view and manage KEDA resources like ScaledObjects and ScaledJobs.
- Dhairya Majmudar set up an OpenTelemetry-based observability stack for Headlamp, wiring up metrics, logs, and traces so the project is easier to monitor and debug.
- Aishwarya Ghatole led a UX audit of Headlamp plugins, identifying usability issues and proposing design improvements and personas for plugin users.
- Anirban Singha developed the Karpenter plugin, giving Headlamp a focused view into Karpenter autoscaling resources and decisions.
- Aditya Chaudhary improved Gateway API support, so you can see networking relationships on the resource map, as well as improved support for many of the new Gateway API resources.
- Faakhir Zahid completed a way to easily manage plugin installation with Headlamp deployed in clusters.
- Saurav Upadhyay worked on backend caching for Kubernetes API calls, reducing load on the API server and improving performance in Headlamp.
New changes
Multi-cluster view
Managing multiple clusters is challenging: teams often switch between tools and lose context when trying to see what runs where. Headlamp solves this by giving you a single view to compare clusters side-by-side. This makes it easier to understand workloads across environments and reduces the time spent hunting for resources.
View of multi-cluster workloads
Projects
Kubernetes apps often span multiple namespaces and resource types, which makes troubleshooting feel like piecing together a puzzle. We’ve added Projects to give you an application-centric view that groups related resources across multiple namespaces – and even clusters. This allows you to reduce sprawl, troubleshoot faster, and collaborate without digging through YAML or cluster-wide lists.
View of the new Projects feature
Changes:
- New “Projects” feature for grouping namespaces into app- or team-centric projects
- Extensible Projects details view that plugins can customize with their own tabs and actions
Navigation and Activities
Day-to-day ops in Kubernetes often means juggling logs, terminals, YAML, and dashboards across clusters. We redesigned Headlamp’s navigation to treat these as first-class “activities” you can keep open and come back to, instead of one-off views you lose as soon as you click away.
View of the new task bar
Changes:
- A new task bar/activities model lets you pin logs, exec sessions, and details as ongoing activities
- An activity overview with a “Close all” action and cluster information
- Multi-select and global filters in tables
Thanks to Jan Jansen and Aditya Chaudhary.
Search and map
When something breaks in production, the first two questions are usually “where is it?” and “what is it connected to?” We’ve upgraded both search and the map view so you can get from a high-level symptom to the right set of objects much faster.
View of the new Advanced Search feature
Changes:
- An Advanced search view that supports rich, expression-based queries over Kubernetes objects
- Improved global search that understands labels and multiple search items, and can even update your current namespace based on what you find
- EndpointSlice support in the Network section
- A richer map view that now includes Custom Resources and Gateway API objects
Thanks to Fabian, Alexander North, and Victor Marcolino from Swisscom, and also to Aditya Chaudhary.
OIDC and authentication
We’ve put real work into making OIDC setup clearer and more resilient, especially for in-cluster deployments.
View of user information for OIDC clusters
Changes:
- User information displayed in the top bar for OIDC-authenticated users
- PKCE support for more secure authentication flows, as well as hardened token refresh handling
- Documentation for using the access token using
-oidc-use-access-token=true - Improved support for public OIDC clients like AKS and EKS
- New guide for setting up Headlamp on AKS with Azure Entra-ID using OAuth2Proxy
Thanks to David Dobmeier and Harsh Srivastava.
App Catalog and Helm
We’ve broadened how you deploy and source apps via Headlamp, specifically supporting vanilla Helm repos.
Changes:
- A more capable Helm chart with optional backend TLS termination, PodDisruptionBudgets, custom pod labels, and more
- Improved formatting and added missing access token arg in the Helm chart
- New in-cluster Helm support with an
--enable-helmflag and a service proxy
Thanks to Vrushali Shah and Murali Annamneni from Oracle, and also to Pat Riehecky, Joshua Akers, Rostislav Stříbrný, Rick L, and Victor.
Performance, accessibility, and UX
Finally, we’ve spent a lot of time on the things you notice every day but don’t always make headlines: startup time, list views, log viewers, accessibility, and small network UX details. A continuous accessibility self-audit has also helped us identify key issues and make Headlamp easier for everyone to use.
View of the Learn section in docs
Changes:
- Significant desktop improvements, with up to 60% faster app loads and much quicker dev-mode reloads for contributors
- Numerous table and log viewer refinements: persistent sort order, consistent row actions, copy-name buttons, better tooltips, and more forgiving log inputs
- Accessibility and localization improvements, including fixes for zoom-related layout issues, better color contrast, improved screen reader support, and expanded language coverage
- More control over resources, with live pod CPU/memory metrics, richer pod details, and inline editing for secrets and CRD fields
- A refreshed documentation and plugin onboarding experience, including a “Learn” section and plugin showcase
- A more complete NetworkPolicy UI and network-related polish
- Nightly builds available for early testing
Thanks to Jaehan Byun and Jan Jansen.
Plugins and extensibility
Discovering plugins is simpler now – no more hopping between Artifact Hub and assorted GitHub repos. Browse our dedicated Plugins page for a curated catalog of Headlamp-endorsed plugins, along with a showcase of featured plugins.
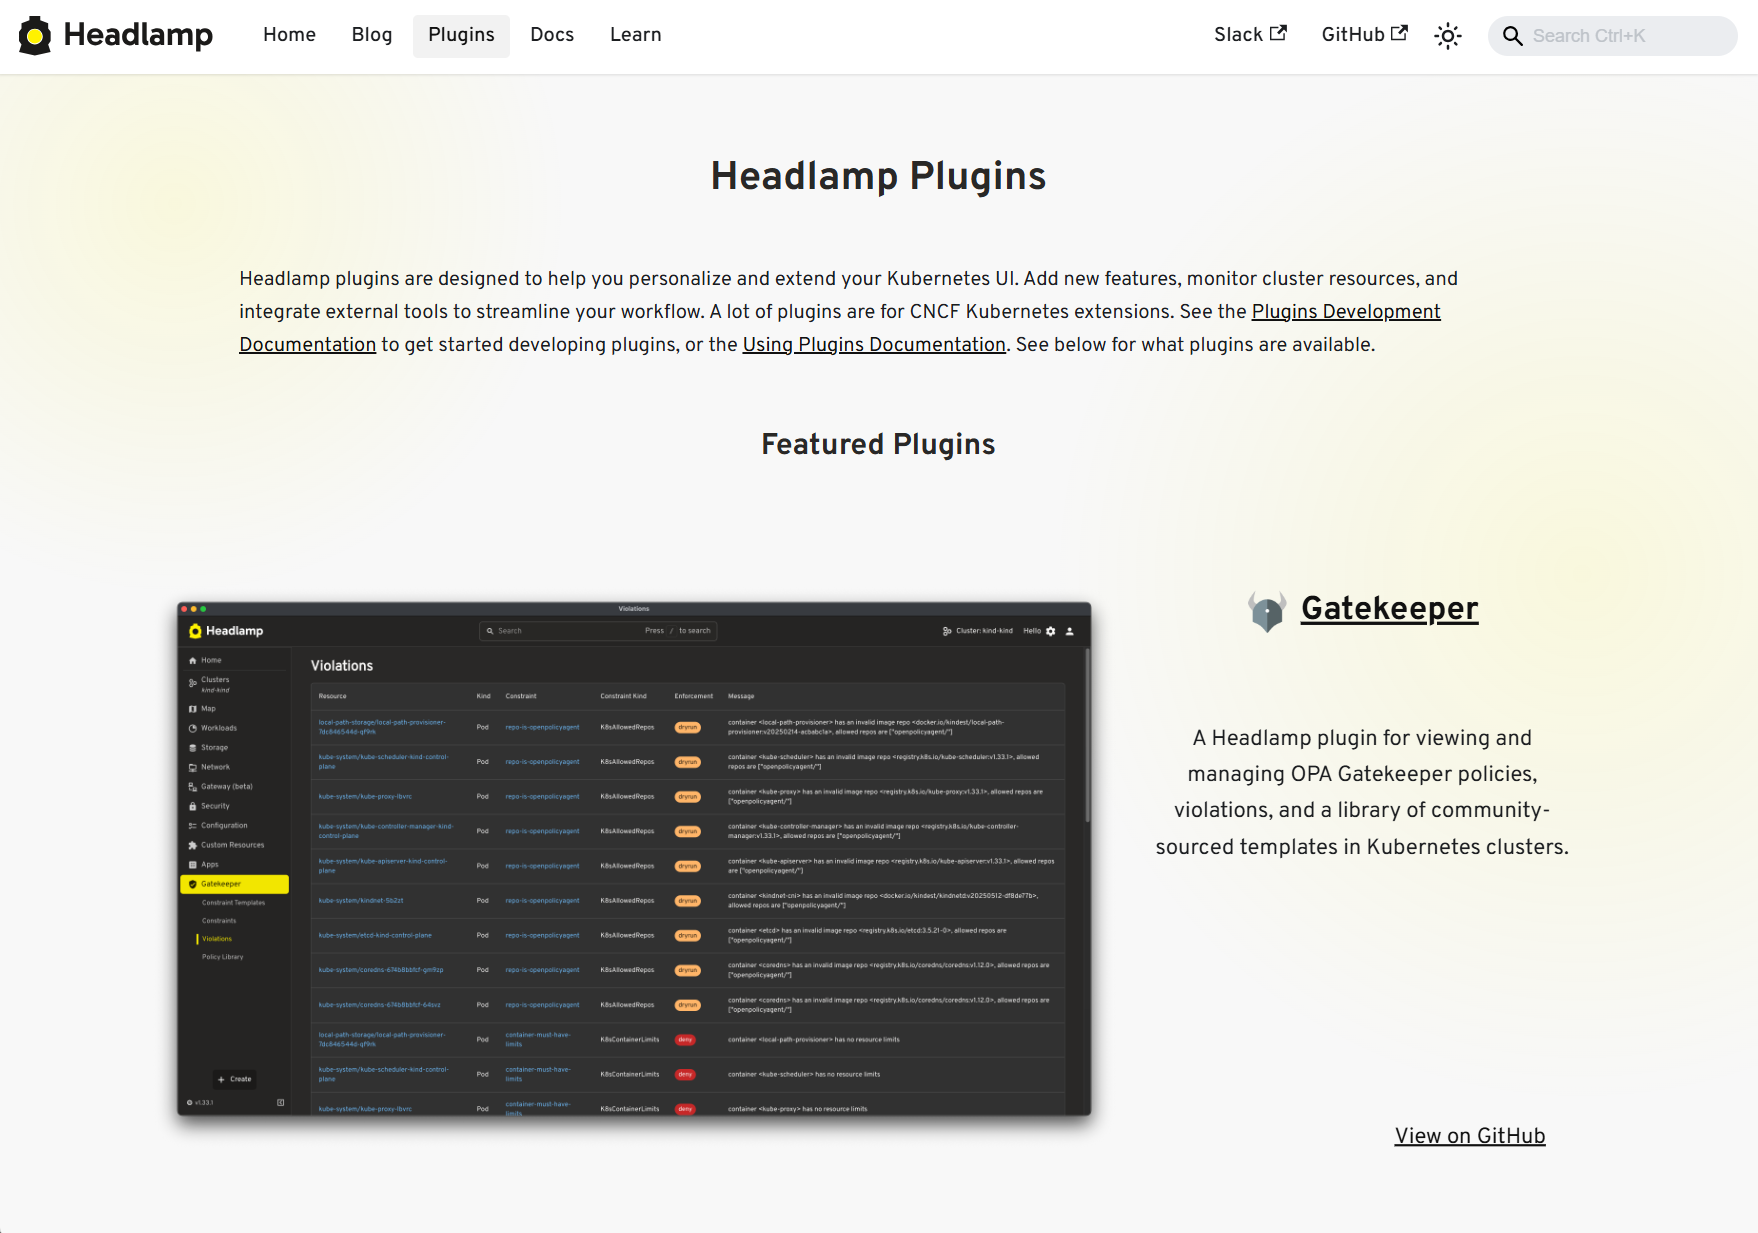
View of the Plugins showcase
Headlamp AI Assistant
Managing Kubernetes often means memorizing commands and juggling tools. Headlamp’s new AI Assistant changes this by adding a natural-language interface built into the UI. Now, instead of typing kubectl or digging through YAML you can ask, “Is my app healthy?” or “Show logs for this deployment,” and get answers in context, speeding up troubleshooting and smoothing onboarding for new users. Learn more about it here.
New plugins additions
Alongside the new AI Assistant, we’ve been growing Headlamp’s plugin ecosystem so you can bring more of your workflows into a single UI, with integrations like Minikube, Karpenter, and more.
Highlights from the latest plugin releases:
- Minikube plugin, providing a locally stored single node Minikube cluster
- Karpenter plugin, with support for Azure Node Auto-Provisioning (NAP)
- KEDA plugin, which you can learn more about here
- Community-maintained plugins for Gatekeeper and KAITO
Thanks to Vrushali Shah and Murali Annamneni from Oracle, and also to Anirban Singha, Adwait Godbole, Sertaç Özercan, Ernest Wong, and Chloe Lim.
Other plugins updates
Alongside new additions, we’ve also spent time refining plugins that many of you already use, focusing on smoother workflows and better integration with the core UI.
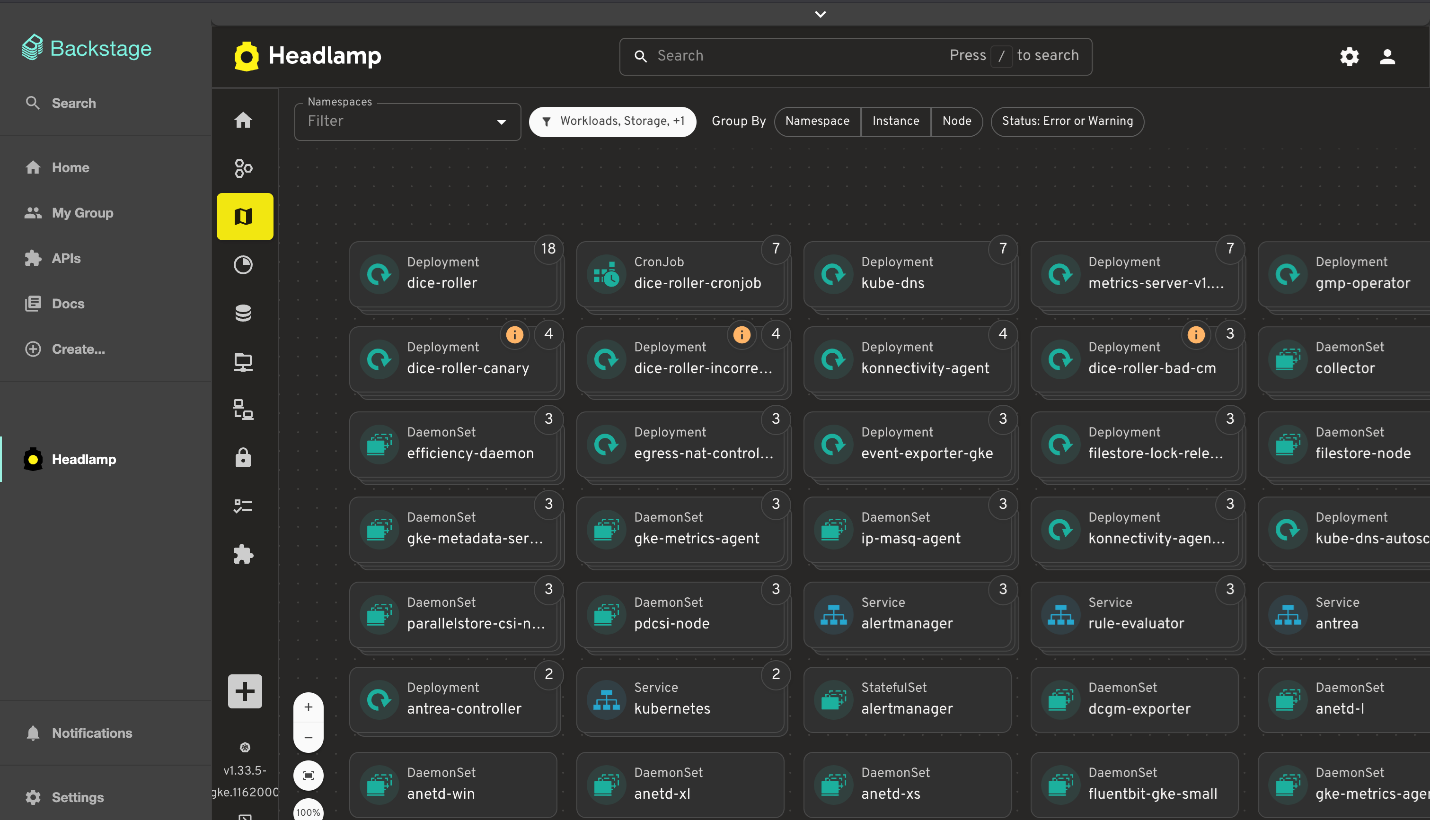
View of the Backstage plugin
Changes:
- Flux plugin: Updated for Flux v2.7, with support for newer CRDs, navigation fixes so it works smoothly on recent clusters
- App Catalog: Now supports Helm repos in addition to Artifact Hub, can run in-cluster via /serviceproxy, and shows both current and latest app versions
- Plugin Catalog: Improved card layout and accessibility, plus dependency and Storybook test updates
- Backstage plugin: Dependency and build updates, more info here
Plugin development
We’ve focused on making it faster and clearer to build, test, and ship Headlamp plugins, backed by improved documentation and lighter tooling.
View of the Plugin Development guide
Changes:
- New and expanded guides for plugin architecture and development, including how to publish and ship plugins
- Added i18n support documentation so plugins can be translated and localized
- Added example plugins: ui-panels, resource-charts, custom-theme, and projects
- Improved type checking for Headlamp APIs, restored Storybook support for component testing, and reduced dependencies for faster installs and fewer updates
- Documented plugin install locations, UI signifiers in Plugin Settings, and labels that differentiated shipped, UI-installed, and dev-mode plugins
Security upgrades
We've also been investing in keeping Headlamp secure – both by tightening how authentication works and by staying on top of upstream vulnerabilities and tooling.
Updates:
- We've been keeping up with security updates, regularly updating dependencies and addressing upstream security issues.
- We tightened the Helm chart's default security context and fixed a regression that broke the plugin manager.
- We've improved OIDC security with PKCE support, helping unblock more secure and standards-compliant OIDC setups when deploying Headlamp in-cluster.
Conclusion
Thank you to everyone who has contributed to Headlamp this year – whether through pull requests, plugins, or simply sharing how you're using the project. Seeing the different ways teams are adopting and extending the project is a big part of what keeps us moving forward. If your organization uses Headlamp, consider adding it to our adopters list.
If you haven't tried Headlamp recently, all these updates are available today. Check out the latest Headlamp release, explore the new views, plugins, and docs, and share your feedback with us on Slack or GitHub – your feedback helps shape where Headlamp goes next.
Announcing the Checkpoint/Restore Working Group
The community around Kubernetes includes a number of Special Interest Groups (SIGs) and Working Groups (WGs) facilitating discussions on important topics between interested contributors. Today we would like to announce the new Kubernetes Checkpoint Restore WG focusing on the integration of Checkpoint/Restore functionality into Kubernetes.
Motivation and use cases
There are several high-level scenarios discussed in the working group:
- Optimizing resource utilization for interactive workloads, such as Jupyter notebooks and AI chatbots
- Accelerating startup of applications with long initialization times, including Java applications and LLM inference services
- Using periodic checkpointing to enable fault-tolerance for long-running workloads, such as distributed model training
- Providing interruption-aware scheduling with transparent checkpoint/restore, allowing lower-priority Pods to be preempted while preserving the runtime state of applications
- Facilitating Pod migration across nodes for load balancing and maintenance, without disrupting workloads.
- Enabling forensic checkpointing to investigate and analyze security incidents such as cyberattacks, data breaches, and unauthorized access.
Across these scenarios, the goal is to help facilitate discussions of ideas between the Kubernetes community and the growing Checkpoint/Restore in Userspace (CRIU) ecosystem. The CRIU community includes several projects that support these use cases, including:
- CRIU - A tool for checkpointing and restoring running applications and containers
- checkpointctl - A tool for in-depth analysis of container checkpoints
- criu-coordinator - A tool for coordinated checkpoint/restore of distributed applications with CRIU
- checkpoint-restore-operator - A Kubernetes operator for managing checkpoints
More information about the checkpoint/restore integration with Kubernetes is also available here.
Related events
Following our presentation about transparent checkpointing at KubeCon EU 2025, we are excited to welcome you to our panel discussion and AI + ML session at KubeCon + CloudNativeCon Europe 2026.
Connect with us
If you are interested in contributing to Kubernetes or CRIU, there are several ways to participate:
- Join our meeting every second Thursday at 17:00 UTC via the Zoom link in our meeting notes; recordings of our prior meetings are available here.
- Chat with us on the Kubernetes Slack: #wg-checkpoint-restore
- Email us at the wg-checkpoint-restore mailing list
Uniform API server access using clientcmd
If you've ever wanted to develop a command line client for a Kubernetes API,
especially if you've considered making your client usable as a kubectl plugin,
you might have wondered how to make your client feel familiar to users of kubectl.
A quick glance at the output of kubectl options might put a damper on that:
"Am I really supposed to implement all those options?"
Fear not, others have done a lot of the work involved for you.
In fact, the Kubernetes project provides two libraries to help you handle
kubectl-style command line arguments in Go programs:
clientcmd and
cli-runtime
(which uses clientcmd).
This article will show how to use the former.
General philosophy
As might be expected since it's part of client-go,
clientcmd's ultimate purpose is to provide an instance of
restclient.Config
that can issue requests to an API server.
It follows kubectl semantics:
- defaults are taken from
~/.kubeor equivalent; - files can be specified using the
KUBECONFIGenvironment variable; - all of the above settings can be further overridden using command line arguments.
It doesn't set up a --kubeconfig command line argument,
which you might want to do to align with kubectl;
you'll see how to do this
in the "Bind the flags" section.
Available features
clientcmd allows programs to handle
kubeconfigselection (usingKUBECONFIG);- context selection;
- namespace selection;
- client certificates and private keys;
- user impersonation;
- HTTP Basic authentication support (username/password).
Configuration merging
In various scenarios, clientcmd supports merging configuration settings:
KUBECONFIG can specify multiple files whose contents are combined.
This can be confusing, because settings are merged in different directions
depending on how they are implemented.
If a setting is defined in a map, the first definition wins,
subsequent definitions are ignored.
If a setting is not defined in a map, the last definition wins.
When settings are retrieved using KUBECONFIG,
missing files result in warnings only.
If the user explicitly specifies a path (in --kubeconfig style),
there must be a corresponding file.
If KUBECONFIG isn't defined,
the default configuration file, ~/.kube/config, is used instead,
if present.
Overall process
The general usage pattern is succinctly expressed in
the clientcmd package documentation:
loadingRules := clientcmd.NewDefaultClientConfigLoadingRules()
// if you want to change the loading rules (which files in which order), you can do so here
configOverrides := &clientcmd.ConfigOverrides{}
// if you want to change override values or bind them to flags, there are methods to help you
kubeConfig := clientcmd.NewNonInteractiveDeferredLoadingClientConfig(loadingRules, configOverrides)
config, err := kubeConfig.ClientConfig()
if err != nil {
// Do something
}
client, err := metav1.New(config)
// ...
In the context of this article, there are six steps:
- Configure the loading rules.
- Configure the overrides.
- Build a set of flags.
- Bind the flags.
- Build the merged configuration.
- Obtain an API client.
Configure the loading rules
clientcmd.NewDefaultClientConfigLoadingRules() builds loading rules which will use either the contents of the KUBECONFIG environment variable,
or the default configuration file name (~/.kube/config).
In addition, if the default configuration file is used,
it is able to migrate settings from the (very) old default configuration file
(~/.kube/.kubeconfig).
You can build your own ClientConfigLoadingRules,
but in most cases the defaults are fine.
Configure the overrides
clientcmd.ConfigOverrides is a struct storing overrides which will be applied over the settings loaded from the configuration derived using the loading rules.
In the context of this article,
its primary purpose is to store values obtained from command line arguments.
These are handled using the pflag library,
which is a drop-in replacement for Go's flag package,
adding support for double-hyphen arguments with long names.
In most cases there's nothing to set in the overrides; I will only bind them to flags.
Build a set of flags
In this context, a flag is a representation of a command line argument,
specifying its long name (such as --namespace),
its short name if any (such as -n),
its default value,
and a description shown in the usage information.
Flags are stored in instances of
the FlagInfo struct.
Three sets of flags are available, representing the following command line arguments:
- authentication arguments (certificates, tokens, impersonations, username/password);
- cluster arguments (API server, certificate authority, TLS configuration, proxy, compression)
- context arguments (cluster name,
kubeconfiguser name, namespace)
The recommended selection includes all three with a named context selection argument and a timeout argument.
These are all available using the Recommended…Flags functions.
The functions take a prefix, which is prepended to all the argument long names.
So calling
clientcmd.RecommendedConfigOverrideFlags("")
results in command line arguments such as --context, --namespace, and so on.
The --timeout argument is given a default value of 0,
and the --namespace argument has a corresponding short variant, -n.
Adding a prefix, such as "from-", results in command line arguments such as
--from-context, --from-namespace, etc.
This might not seem particularly useful on commands involving a single API server,
but they come in handy when multiple API servers are involved,
such as in multi-cluster scenarios.
There's a potential gotcha here: prefixes don't modify the short name,
so --namespace needs some care if multiple prefixes are used:
only one of the prefixes can be associated with the -n short name.
You'll have to clear the short names associated with the other prefixes'
--namespace , or perhaps all prefixes if there's no sensible
-n association.
Short names can be cleared as follows:
kflags := clientcmd.RecommendedConfigOverrideFlags(prefix)
kflags.ContextOverrideFlags.Namespace.ShortName = ""
In a similar fashion, flags can be disabled entirely by clearing their long name:
kflags.ContextOverrideFlags.Namespace.LongName = ""
Bind the flags
Once a set of flags has been defined,
it can be used to bind command line arguments to overrides using
clientcmd.BindOverrideFlags.
This requires a
pflag FlagSet
rather than one from Go's flag package.
If you also want to bind --kubeconfig, you should do so now,
by binding ExplicitPath in the loading rules:
flags.StringVarP(&loadingRules.ExplicitPath, "kubeconfig", "", "", "absolute path(s) to the kubeconfig file(s)")
Build the merged configuration
Two functions are available to build a merged configuration:
clientcmd.NewInteractiveDeferredLoadingClientConfigclientcmd.NewNonInteractiveDeferredLoadingClientConfig
As the names suggest, the difference between the two is that the first can ask for authentication information interactively, using a provided reader, whereas the second only operates on the information given to it by the caller.
The "deferred" mention in these function names refers to the fact that the final configuration will be determined as late as possible. This means that these functions can be called before the command line arguments are parsed, and the resulting configuration will use whatever values have been parsed by the time it's actually constructed.
Obtain an API client
The merged configuration is returned as a
ClientConfig instance.
An API client can be obtained from that by calling the ClientConfig() method.
If no configuration is given
(KUBECONFIG is empty or points to non-existent files,
~/.kube/config doesn't exist,
and no configuration is given using command line arguments),
the default setup will return an obscure error referring to KUBERNETES_MASTER.
This is legacy behaviour;
several attempts have been made to get rid of it,
but it is preserved for the --local and --dry-run command line arguments in --kubectl.
You should check for "empty configuration" errors by calling clientcmd.IsEmptyConfig()
and provide a more explicit error message.
The Namespace() method is also useful:
it returns the namespace that should be used.
It also indicates whether the namespace was overridden by the user
(using --namespace).
Full example
Here's a complete example.
package main
import (
"context"
"fmt"
"os"
"github.com/spf13/pflag"
v1 "k8s.io/apimachinery/pkg/apis/meta/v1"
"k8s.io/client-go/kubernetes"
"k8s.io/client-go/tools/clientcmd"
)
func main() {
// Loading rules, no configuration
loadingRules := clientcmd.NewDefaultClientConfigLoadingRules()
// Overrides and flag (command line argument) setup
configOverrides := &clientcmd.ConfigOverrides{}
flags := pflag.NewFlagSet("clientcmddemo", pflag.ExitOnError)
clientcmd.BindOverrideFlags(configOverrides, flags,
clientcmd.RecommendedConfigOverrideFlags(""))
flags.StringVarP(&loadingRules.ExplicitPath, "kubeconfig", "", "", "absolute path(s) to the kubeconfig file(s)")
flags.Parse(os.Args)
// Client construction
kubeConfig := clientcmd.NewNonInteractiveDeferredLoadingClientConfig(loadingRules, configOverrides)
config, err := kubeConfig.ClientConfig()
if err != nil {
if clientcmd.IsEmptyConfig(err) {
panic("Please provide a configuration pointing to the Kubernetes API server")
}
panic(err)
}
client, err := kubernetes.NewForConfig(config)
if err != nil {
panic(err)
}
// How to find out what namespace to use
namespace, overridden, err := kubeConfig.Namespace()
if err != nil {
panic(err)
}
fmt.Printf("Chosen namespace: %s; overridden: %t\n", namespace, overridden)
// Let's use the client
nodeList, err := client.CoreV1().Nodes().List(context.TODO(), v1.ListOptions{})
if err != nil {
panic(err)
}
for _, node := range nodeList.Items {
fmt.Println(node.Name)
}
}
Happy coding, and thank you for your interest in implementing tools with familiar usage patterns!
Kubernetes v1.35: Restricting executables invoked by kubeconfigs via exec plugin allowList added to kuberc
Did you know that kubectl can run arbitrary executables, including shell
scripts, with the full privileges of the invoking user, and without your
knowledge? Whenever you download or auto-generate a kubeconfig, the
users[n].exec.command field can specify an executable to fetch credentials on
your behalf. Don't get me wrong, this is an incredible feature that allows you
to authenticate to the cluster with external identity providers. Nevertheless,
you probably see the problem: Do you know exactly what executables your kubeconfig
is running on your system? Do you trust the pipeline that generated your kubeconfig?
If there has been a supply-chain attack on the code that generates the kubeconfig,
or if the generating pipeline has been compromised, an attacker might well be
doing unsavory things to your machine by tricking your kubeconfig into running
arbitrary code.
To give the user more control over what gets run on their system, SIG-Auth and SIG-CLI added the credential plugin policy and allowlist as a beta feature to
Kubernetes 1.35. This is available to all clients using the client-go library,
by filling out the ExecProvider.PluginPolicy struct on a REST config. To
broaden the impact of this change, Kubernetes v1.35 also lets you manage this without
writing a line of application code. You can configure kubectl to enforce
the policy and allowlist by adding two fields to the kuberc configuration
file: credentialPluginPolicy and credentialPluginAllowlist. Adding one or
both of these fields restricts which credential plugins kubectl is allowed to execute.
How it works
A full description of this functionality is available in our official documentation for kuberc, but this blog post will give a brief overview of the new security knobs. The new features are in beta and available without using any feature gates.
The following example is the simplest one: simply don't specify the new fields.
apiVersion: kubectl.config.k8s.io/v1beta1
kind: Preference
This will keep kubectl acting as it always has, and all plugins will be
allowed.
The next example is functionally identical, but it is more explicit and therefore preferred if it's actually what you want:
apiVersion: kubectl.config.k8s.io/v1beta1
kind: Preference
credentialPluginPolicy: AllowAll
If you don't know whether or not you're using exec credential plugins, try
setting your policy to DenyAll:
apiVersion: kubectl.config.k8s.io/v1beta1
kind: Preference
credentialPluginPolicy: DenyAll
If you are using credential plugins, you'll quickly find out what kubectl is
trying to execute. You'll get an error like the following.
Unable to connect to the server: getting credentials: plugin "cloudco-login" not allowed: policy set to "DenyAll"
If there is insufficient information for you to debug the issue, increase the logging verbosity when you run your next command. For example:
# increase or decrease verbosity if the issue is still unclear
kubectl get pods --verbosity 5
Selectively allowing plugins
What if you need the cloudco-login plugin to do your daily work? That is why
there's a third option for your policy, Allowlist. To allow a specific plugin,
set the policy and add the credentialPluginAllowlist:
apiVersion: kubectl.config.k8s.io/v1beta1
kind: Preference
credentialPluginPolicy: Allowlist
credentialPluginAllowlist:
- name: /usr/local/bin/cloudco-login
- name: get-identity
You'll notice that there are two entries in the allowlist. One of them is
specified by full path, and the other, get-identity is just a basename. When
you specify just the basename, the full path will be looked up using
exec.LookPath, which does not expand globbing or handle wildcards.
Globbing is not supported at this time. Both forms
(basename and full path) are acceptable, but the full path is preferable because
it narrows the scope of allowed binaries even further.
Future enhancements
Currently, an allowlist entry has only one field, name. In the future, we
(Kubernetes SIG CLI) want to see other requirements added. One idea that seems
useful is checksum verification whereby, for example, a binary would only be allowed
to run if it has the sha256 sum
b9a3fad00d848ff31960c44ebb5f8b92032dc085020f857c98e32a5d5900ff9c and
exists at the path /usr/bin/cloudco-login.
Another possibility is only allowing binaries that have been signed by one of a set of a trusted signing keys.
Get involved
The credential plugin policy is still under development and we are very interested in your feedback. We'd love to hear what you like about it and what problems you'd like to see it solve. Or, if you have the cycles to contribute one of the above enhancements, they'd be a great way to get started contributing to Kubernetes. Feel free to join in the discussion on slack:
Kubernetes v1.35: Mutable PersistentVolume Node Affinity (alpha)
The PersistentVolume node affinity API dates back to Kubernetes v1.10. It is widely used to express that volumes may not be equally accessible by all nodes in the cluster. This field was previously immutable, and it is now mutable in Kubernetes v1.35 (alpha). This change opens a door to more flexible online volume management.
Why make node affinity mutable?
This raises an obvious question: why make node affinity mutable now? While stateless workloads like Deployments can be changed freely and the changes will be rolled out automatically by re-creating every Pod, PersistentVolumes (PVs) are stateful and cannot be re-created easily without losing data.
However, Storage providers evolve and storage requirements change. Most notably, multiple providers are offering regional disks now. Some of them even support live migration from zonal to regional disks, without disrupting the workloads. This change can be expressed through the VolumeAttributesClass API, which recently graduated to GA in 1.34. However, even if the volume is migrated to regional storage, Kubernetes still prevents scheduling Pods to other zones because of the node affinity recorded in the PV object. In this case, you may want to change the PV node affinity from:
spec:
nodeAffinity:
required:
nodeSelectorTerms:
- matchExpressions:
- key: topology.kubernetes.io/zone
operator: In
values:
- us-east1-b
to:
spec:
nodeAffinity:
required:
nodeSelectorTerms:
- matchExpressions:
- key: topology.kubernetes.io/region
operator: In
values:
- us-east1
As another example, providers sometimes offer new generations of disks. New disks cannot always be attached to older nodes in the cluster. This accessibility can also be expressed through PV node affinity and ensures the Pods can be scheduled to the right nodes. But when the disk is upgraded, new Pods using this disk can still be scheduled to older nodes. To prevent this, you may want to change the PV node affinity from:
spec:
nodeAffinity:
required:
nodeSelectorTerms:
- matchExpressions:
- key: provider.com/disktype.gen1
operator: In
values:
- available
to:
spec:
nodeAffinity:
required:
nodeSelectorTerms:
- matchExpressions:
- key: provider.com/disktype.gen2
operator: In
values:
- available
So, it is mutable now, a first step towards a more flexible online volume management. While it is a simple change that removes one validation from the API server, we still have a long way to go to integrate well with the Kubernetes ecosystem.
Try it out
This feature is for you if you are a Kubernetes cluster administrator, and your storage provider allows online update that you want to utilize, but those updates can affect the accessibility of the volume.
Note that changing PV node affinity alone will not actually change the accessibility of the underlying volume. Before using this feature, you must first update the underlying volume in the storage provider, and understand which nodes can access the volume after the update. You can then enable this feature and keep the PV node affinity in sync.
Currently, this feature is in alpha state.
It is disabled by default, and may subject to change.
To try it out, enable the MutablePVNodeAffinity feature gate on APIServer, then you can edit the PV spec.nodeAffinity field.
Typically only administrators can edit PVs, please make sure you have the right RBAC permissions.
Race condition between updating and scheduling
There are only a few factors outside of a Pod that can affect the scheduling decision, and PV node affinity is one of them.
It is fine to allow more nodes to access the volume by relaxing node affinity,
but there is a race condition when you try to tighten node affinity:
it is unclear how the Scheduler will see the modified PV in its cache,
so there is a small window where the scheduler may place a Pod on an old node that can no longer access the volume.
In this case, the Pod will stuck at ContainerCreating state.
One mitigation currently under discussion is for the kubelet to fail Pod startup if the PersistentVolume’s node affinity is violated. This has not landed yet. So if you are trying this out now, please watch subsequent Pods that use the updated PV, and make sure they are scheduled onto nodes that can access the volume. If you update PV and immediately start new Pods in a script, it may not work as intended.
Future integration with CSI (Container Storage Interface)
Currently, it is up to the cluster administrator to modify both PV's node affinity and the underlying volume in the storage provider. But manual operations are error-prone and time-consuming. It is preferred to eventually integrate this with VolumeAttributesClass, so that an unprivileged user can modify their PersistentVolumeClaim (PVC) to trigger storage-side updates, and PV node affinity is updated automatically when appropriate, without the need for cluster admin's intervention.
We welcome your feedback from users and storage driver developers
As noted earlier, this is only a first step.
If you are a Kubernetes user, we would like to learn how you use (or will use) PV node affinity. Is it beneficial to update it online in your case?
If you are a CSI driver developer, would you be willing to implement this feature? How would you like the API to look?
Please provide your feedback via:
- Slack channel #sig-storage.
- Mailing list kubernetes-sig-storage.
- The KEP issue Mutable PersistentVolume Node Affinity.
For any inquiries or specific questions related to this feature, please reach out to the SIG Storage community.
Kubernetes v1.35: A Better Way to Pass Service Account Tokens to CSI Drivers
If you maintain a CSI driver that uses service account tokens,
Kubernetes v1.35 brings a refinement you'll want to know about.
Since the introduction of the TokenRequests feature,
service account tokens requested by CSI drivers have been passed to them through the volume_context field.
While this has worked, it's not the ideal place for sensitive information,
and we've seen instances where tokens were accidentally logged in CSI drivers.
Kubernetes v1.35 introduces a beta solution to address this:
CSI Driver Opt-in for Service Account Tokens via Secrets Field.
This allows CSI drivers to receive service account tokens
through the secrets field in NodePublishVolumeRequest,
which is the appropriate place for sensitive data in the CSI specification.
Understanding the existing approach
When CSI drivers use the TokenRequests feature,
they can request service account tokens for workload identity
by configuring the TokenRequests field in the CSIDriver spec.
These tokens are passed to drivers as part of the volume attributes map,
using the key csi.storage.k8s.io/serviceAccount.tokens.
The volume_context field works, but it's not designed for sensitive data.
Because of this, there are a few challenges:
First, the protosanitizer tool that CSI drivers use doesn't treat volume context as sensitive,
so service account tokens can end up in logs when gRPC requests are logged.
This happened with CVE-2023-2878 in the Secrets Store CSI Driver
and CVE-2024-3744 in the Azure File CSI Driver.
Second, each CSI driver that wants to avoid this issue needs to implement its own sanitization logic, which leads to inconsistency across drivers.
The CSI specification already has a secrets field in NodePublishVolumeRequest
that's designed exactly for this kind of sensitive information.
The challenge is that we can't just change where we put the tokens
without breaking existing CSI drivers that expect them in volume context.
How the opt-in mechanism works
Kubernetes v1.35 introduces an opt-in mechanism that lets CSI drivers choose how they receive service account tokens. This way, existing drivers continue working as they do today, and drivers can move to the more appropriate secrets field when they're ready.
CSI drivers can set a new field in their CSIDriver spec:
#
# CAUTION: this is an example configuration.
# Do not use this for your own cluster!
#
apiVersion: storage.k8s.io/v1
kind: CSIDriver
metadata:
name: example-csi-driver
spec:
# ... existing fields ...
tokenRequests:
- audience: "example.com"
expirationSeconds: 3600
# New field for opting into secrets delivery
serviceAccountTokenInSecrets: true # defaults to false
The behavior depends on the serviceAccountTokenInSecrets field:
When set to false (the default), tokens are placed in VolumeContext with the key csi.storage.k8s.io/serviceAccount.tokens, just like today.
When set to true, tokens are placed only in the Secrets field with the same key.
About the beta release
The CSIServiceAccountTokenSecrets feature gate is enabled by default
on both kubelet and kube-apiserver.
Since the serviceAccountTokenInSecrets field defaults to false,
enabling the feature gate doesn't change any existing behavior.
All drivers continue receiving tokens via volume context unless they explicitly opt in.
This is why we felt comfortable starting at beta rather than alpha.
Guide for CSI driver authors
If you maintain a CSI driver that uses service account tokens, here's how to adopt this feature.
Adding fallback logic
First, update your driver code to check both locations for tokens. This makes your driver compatible with both the old and new approaches:
const serviceAccountTokenKey = "csi.storage.k8s.io/serviceAccount.tokens"
func getServiceAccountTokens(req *csi.NodePublishVolumeRequest) (string, error) {
// Check secrets field first (new behavior when driver opts in)
if tokens, ok := req.Secrets[serviceAccountTokenKey]; ok {
return tokens, nil
}
// Fall back to volume context (existing behavior)
if tokens, ok := req.VolumeContext[serviceAccountTokenKey]; ok {
return tokens, nil
}
return "", fmt.Errorf("service account tokens not found")
}
This fallback logic is backward compatible and safe to ship in any driver version, even before clusters upgrade to v1.35.
Rollout sequence
CSI driver authors need to follow a specific sequence when adopting this feature to avoid breaking existing volumes.
Driver preparation (can happen anytime)
You can start preparing your driver right away by adding fallback logic that checks both the secrets field and volume context for tokens. This code change is backward compatible and safe to ship in any driver version, even before clusters upgrade to v1.35. We encourage you to add this fallback logic early, cut releases, and even backport to maintenance branches where feasible.
Cluster upgrade and feature enablement
Once your driver has the fallback logic deployed, here's the safe rollout order for enabling the feature in a cluster:
- Complete the kube-apiserver upgrade to 1.35 or later
- Complete kubelet upgrade to 1.35 or later on all nodes
- Ensure CSI driver version with fallback logic is deployed (if not already done in preparation phase)
- Fully complete CSI driver DaemonSet rollout across all nodes
- Update your CSIDriver manifest to set
serviceAccountTokenInSecrets: true
Important constraints
The most important thing to remember is timing.
If your CSI driver DaemonSet and CSIDriver object are in the same manifest or Helm chart,
you need two separate updates.
Deploy the new driver version with fallback logic first,
wait for the DaemonSet rollout to complete,
then update the CSIDriver spec to set serviceAccountTokenInSecrets: true.
Also, don't update the CSIDriver before all driver pods have rolled out. If you do, volume mounts will fail on nodes still running the old driver version, since those pods only check volume context.
Why this matters
Adopting this feature helps in a few ways:
- It eliminates the risk of accidentally logging service account tokens as part of volume context in gRPC requests
- It uses the CSI specification's designated field for sensitive data, which feels right
- The
protosanitizertool automatically handles the secrets field correctly, so you don't need driver-specific workarounds - It's opt-in, so you can migrate at your own pace without breaking existing deployments
Call to action
We (Kubernetes SIG Storage) encourage CSI driver authors to adopt this feature and provide feedback on the migration experience. If you have thoughts on the API design or run into any issues during adoption, please reach out to us on the #csi channel on Kubernetes Slack (for an invitation, visit https://slack.k8s.io/).
You can follow along on KEP-5538 to track progress across the coming Kubernetes releases.
Kubernetes v1.35: Extended Toleration Operators to Support Numeric Comparisons (Alpha)
Many production Kubernetes clusters blend on-demand (higher-SLA) and spot/preemptible (lower-SLA) nodes to optimize costs while maintaining reliability for critical workloads. Platform teams need a safe default that keeps most workloads away from risky capacity, while allowing specific workloads to opt-in with explicit thresholds like "I can tolerate nodes with failure probability up to 5%".
Today, Kubernetes taints and tolerations can match exact values or check for existence, but they can't compare numeric thresholds. You'd need to create discrete taint categories, use external admission controllers, or accept less-than-optimal placement decisions.
In Kubernetes v1.35, we're introducing Extended Toleration Operators as an alpha feature. This enhancement adds Gt (Greater Than) and Lt (Less Than) operators to spec.tolerations, enabling threshold-based scheduling decisions that unlock new possibilities for SLA-based placement, cost optimization, and performance-aware workload distribution.
The evolution of tolerations
Historically, Kubernetes supported two primary toleration operators:
Equal: The toleration matches a taint if the key and value are exactly equalExists: The toleration matches a taint if the key exists, regardless of value
While these worked well for categorical scenarios, they fell short for numeric comparisons. Starting with v1.35, we are closing this gap.
Consider these real-world scenarios:
- SLA requirements: Schedule high-availability workloads only on nodes with failure probability below a certain threshold
- Cost optimization: Allow cost-sensitive batch jobs to run on cheaper nodes that exceed a specific cost-per-hour value
- Performance guarantees: Ensure latency-sensitive applications run only on nodes with disk IOPS or network bandwidth above minimum thresholds
Without numeric comparison operators, cluster operators have had to resort to workarounds like creating multiple discrete taint values or using external admission controllers, neither of which scale well or provide the flexibility needed for dynamic threshold-based scheduling.
Why extend tolerations instead of using NodeAffinity?
You might wonder: NodeAffinity already supports numeric comparison operators, so why extend tolerations? While NodeAffinity is powerful for expressing pod preferences, taints and tolerations provide critical operational benefits:
- Policy orientation: NodeAffinity is per-pod, requiring every workload to explicitly opt-out of risky nodes. Taints invert control—nodes declare their risk level, and only pods with matching tolerations may land there. This provides a safer default; most pods stay away from spot/preemptible nodes unless they explicitly opt-in.
- Eviction semantics: NodeAffinity has no eviction capability. Taints support the
NoExecuteeffect withtolerationSeconds, enabling operators to drain and evict pods when a node's SLA degrades or spot instances receive termination notices. - Operational ergonomics: Centralized, node-side policy is consistent with other safety taints like disk-pressure and memory-pressure, making cluster management more intuitive.
This enhancement preserves the well-understood safety model of taints and tolerations while enabling threshold-based placement for SLA-aware scheduling.
Introducing Gt and Lt operators
Kubernetes v1.35 introduces two new operators for tolerations:
Gt(Greater Than): The toleration matches if the taint's numeric value is greater than the toleration's valueLt(Less Than): The toleration matches if the taint's numeric value is less than the toleration's value
When a pod tolerates a taint with Lt, it's saying "I can tolerate nodes where this metric is less than my threshold". Since tolerations allow scheduling, the pod can run on nodes where the taint value is greater than the toleration value. Think of it as: "I tolerate nodes that are above my minimum requirements".
These operators work with numeric taint values and enable the scheduler to make sophisticated placement decisions based on continuous metrics rather than discrete categories.
Note:
Numeric values for Gt and Lt operators must be positive 64-bit integers without leading zeros. For example, "100" is valid, but "0100" (with leading zero) and "0" (zero value) are not permitted.
The Gt and Lt operators work with all taint effects: NoSchedule, NoExecute, and PreferNoSchedule.
Use cases and examples
Let's explore how Extended Toleration Operators solve real-world scheduling challenges.
Example 1: Spot instance protection with SLA thresholds
Many clusters mix on-demand and spot/preemptible nodes to optimize costs. Spot nodes offer significant savings but have higher failure rates. You want most workloads to avoid spot nodes by default, while allowing specific workloads to opt-in with clear SLA boundaries.
First, taint spot nodes with their failure probability (for example, 15% annual failure rate):
apiVersion: v1
kind: Node
metadata:
name: spot-node-1
spec:
taints:
- key: "failure-probability"
value: "15"
effect: "NoExecute"
On-demand nodes have much lower failure rates:
apiVersion: v1
kind: Node
metadata:
name: ondemand-node-1
spec:
taints:
- key: "failure-probability"
value: "2"
effect: "NoExecute"
Critical workloads can specify strict SLA requirements:
apiVersion: v1
kind: Pod
metadata:
name: payment-processor
spec:
tolerations:
- key: "failure-probability"
operator: "Lt"
value: "5"
effect: "NoExecute"
tolerationSeconds: 30
containers:
- name: app
image: payment-app:v1
This pod will only schedule on nodes with failure-probability less than 5 (meaning ondemand-node-1 with 2% but not spot-node-1 with 15%). The NoExecute effect with tolerationSeconds: 30 means if a node's SLA degrades (for example, cloud provider changes the taint value), the pod gets 30 seconds to gracefully terminate before forced eviction.
Meanwhile, a fault-tolerant batch job can explicitly opt-in to spot instances:
apiVersion: v1
kind: Pod
metadata:
name: batch-job
spec:
tolerations:
- key: "failure-probability"
operator: "Lt"
value: "20"
effect: "NoExecute"
containers:
- name: worker
image: batch-worker:v1
This batch job tolerates nodes with failure probability up to 20%, so it can run on both on-demand and spot nodes, maximizing cost savings while accepting higher risk.
Example 2: AI workload placement with GPU tiers
AI and machine learning workloads often have specific hardware requirements. With Extended Toleration Operators, you can create GPU node tiers and ensure workloads land on appropriately powered hardware.
Taint GPU nodes with their compute capability score:
apiVersion: v1
kind: Node
metadata:
name: gpu-node-a100
spec:
taints:
- key: "gpu-compute-score"
value: "1000"
effect: "NoSchedule"
---
apiVersion: v1
kind: Node
metadata:
name: gpu-node-t4
spec:
taints:
- key: "gpu-compute-score"
value: "500"
effect: "NoSchedule"
A heavy training workload can require high-performance GPUs:
apiVersion: v1
kind: Pod
metadata:
name: model-training
spec:
tolerations:
- key: "gpu-compute-score"
operator: "Gt"
value: "800"
effect: "NoSchedule"
containers:
- name: trainer
image: ml-trainer:v1
resources:
limits:
nvidia.com/gpu: 1
This ensures the training pod only schedules on nodes with compute scores greater than 800 (like the A100 node), preventing placement on lower-tier GPUs that would slow down training.
Meanwhile, inference workloads with less demanding requirements can use any available GPU:
apiVersion: v1
kind: Pod
metadata:
name: model-inference
spec:
tolerations:
- key: "gpu-compute-score"
operator: "Gt"
value: "400"
effect: "NoSchedule"
containers:
- name: inference
image: ml-inference:v1
resources:
limits:
nvidia.com/gpu: 1
Example 3: Cost-optimized workload placement
For batch processing or non-critical workloads, you might want to minimize costs by running on cheaper nodes, even if they have lower performance characteristics.
Nodes can be tainted with their cost rating:
spec:
taints:
- key: "cost-per-hour"
value: "50"
effect: "NoSchedule"
A cost-sensitive batch job can express its tolerance for expensive nodes:
tolerations:
- key: "cost-per-hour"
operator: "Lt"
value: "100"
effect: "NoSchedule"
This batch job will schedule on nodes costing less than $100/hour but avoid more expensive nodes. Combined with Kubernetes scheduling priorities, this enables sophisticated cost-tiering strategies where critical workloads get premium nodes while batch workloads efficiently use budget-friendly resources.
Example 4: Performance-based placement
Storage-intensive applications often require minimum disk performance guarantees. With Extended Toleration Operators, you can enforce these requirements at the scheduling level.
tolerations:
- key: "disk-iops"
operator: "Gt"
value: "3000"
effect: "NoSchedule"
This toleration ensures the pod only schedules on nodes where disk-iops exceeds 3000. The Gt operator means "I need nodes that are greater than this minimum".
How to use this feature
Extended Toleration Operators is an alpha feature in Kubernetes v1.35. To try it out:
Enable the feature gate on both your API server and scheduler:
--feature-gates=TaintTolerationComparisonOperators=trueTaint your nodes with numeric values representing the metrics relevant to your scheduling needs:
kubectl taint nodes node-1 failure-probability=5:NoSchedule kubectl taint nodes node-2 disk-iops=5000:NoScheduleUse the new operators in your pod specifications:
spec: tolerations: - key: "failure-probability" operator: "Lt" value: "1" effect: "NoSchedule"
Note:
As an alpha feature, Extended Toleration Operators may change in future releases and should be used with caution in production environments. Always test thoroughly in non-production clusters first.What's next?
This alpha release is just the beginning. As we gather feedback from the community, we plan to:
- Add support for CEL (Common Expression Language) expressions in tolerations and node affinity for even more flexible scheduling logic, including semantic versioning comparisons
- Improve integration with cluster autoscaling for threshold-aware capacity planning
- Graduate the feature to beta and eventually GA with production-ready stability
We're particularly interested in hearing about your use cases! Do you have scenarios where threshold-based scheduling would solve problems? Are there additional operators or capabilities you'd like to see?
Getting involved
This feature is driven by the SIG Scheduling community. Please join us to connect with the community and share your ideas and feedback around this feature and beyond.
You can reach the maintainers of this feature at:
- Slack: #sig-scheduling on Kubernetes Slack
- Mailing list: kubernetes-sig-scheduling@googlegroups.com
For questions or specific inquiries related to Extended Toleration Operators, please reach out to the SIG Scheduling community. We look forward to hearing from you!
How can I learn more?
- Taints and Tolerations for understanding the fundamentals
- Numeric comparison operators for details on using
GtandLtoperators - KEP-5471: Extended Toleration Operators for Threshold-Based Placement
Kubernetes v1.35: New level of efficiency with in-place Pod restart
The release of Kubernetes 1.35 introduces a powerful new feature that provides a much-requested capability: the ability to trigger a full, in-place restart of the Pod. This feature, Restart All Containers (alpha in 1.35), allows for an efficient way to reset a Pod's state compared to resource-intensive approach of deleting and recreating the entire Pod. This feature is especially useful for AI/ML workloads allowing application developers to concentrate on their core training logic while offloading complex failure-handling and recovery mechanisms to sidecars and declarative Kubernetes configuration. With RestartAllContainers and other planned enhancements, Kubernetes continues to add building blocks for creating the most flexible, robust, and efficient platforms for AI/ML workloads.
This new functionality is available by enabling the RestartAllContainersOnContainerExits feature gate. This alpha feature extends the Container Restart Rules feature, which graduated to beta in Kubernetes 1.35.
The problem: when a single container restart isn't enough and recreating pods is too costly
Kubernetes has long supported restart policies at the Pod level (restartPolicy) and, more recently, at the individual container level. These policies are great for handling crashes in a single, isolated process. However, many modern applications have more complex inter-container dependencies. For instance:
- An init container prepares the environment by mounting a volume or generating a configuration file. If the main application container corrupts this environment, simply restarting that one container is not enough. The entire initialization process needs to run again.
- A watcher sidecar monitors system health. If it detects an unrecoverable but retriable error state, it must trigger a restart of the main application container from a clean slate.
- A sidecar that manages a remote resource fails. Even if the sidecar restarts on its own, the main container may be stuck trying to access an outdated or broken connection.
In all these cases, the desired action is not to restart a single container, but all of them. Previously, the only way to achieve this was to delete the Pod and have a controller (like a Job or ReplicaSet) create a new one. This process is slow and expensive, involving the scheduler, node resource allocation and re-initialization of networking and storage.
This inefficiency becomes even worse when handling large-scale AI/ML workloads (>= 1,000 Nodes with one Pod per Node). A common requirement for these synchronous workloads is that when a failure occurs (such as a Node crash), all Pods in the fleet must be recreated to reset the state before training can resume, even if all the other Pods were not directly affected by the failure. Deleting, creating and scheduling thousands of Pods simultaneously creates a massive bottleneck. The estimated overhead of this failure could cost $100,000 per month in wasted resources.
Handling these failures for AI/ML training jobs requires a complex integration touching both the training framework and Kubernetes, which are often fragile and toilsome. This feature introduces a Kubernetes-native solution, improving system robustness and allowing application developers to concentrate on their core training logic.
Another major benefit of restarting Pods in place is that keeping Pods on their assigned Nodes allows for further optimizations. For example, one can implement node-level caching tied to a specific Pod identity, something that is impossible when Pods are unnecessarily being recreated on different Nodes.
Introducing the RestartAllContainers action
To address this, Kubernetes v1.35 adds a new action to the container restart rules: RestartAllContainers. When a container exits in a way that matches a rule with this action, the kubelet initiates a fast, in-place restart of the Pod.
This in-place restart is highly efficient because it preserves the Pod's most important resources:
- The Pod's UID, IP address and network namespace.
- The Pod's sandbox and any attached devices.
- All volumes, including
emptyDirand mounted volumes from PVCs.
After terminating all running containers, the Pod's startup sequence is re-executed from the very beginning. This means all init containers are run again in order, followed by the sidecar and regular containers, ensuring a completely fresh start in a known-good environment. With the exception of ephemeral containers (which are terminated), all other containers—including those that previously succeeded or failed—will be restarted, regardless of their individual restart policies.
Use cases
1. Efficient restarts for ML/Batch jobs
For ML training jobs, rescheduling a worker Pod on failure is a costly operation that wastes valuable compute resources. On a 1,000-node training cluster, rescheduling overhead can waste over $100,000 in compute resources monthly.
With RestartAllContainers actions you can address this by enabling a much faster, hybrid recovery strategy: recreate only the "bad" Pods (e.g., those on unhealthy Nodes) while triggering RestartAllContainers for the remaining healthy Pods. Benchmarks show this reduces the recovery overhead from minutes to a few seconds.
With in-place restarts, a watcher sidecar can monitor the main training process. If it encounters a specific, retriable error, the watcher can exit with a designated code to trigger a fast reset of the worker Pod, allowing it to restart from the last checkpoint without involving the Job controller. This capability is now natively supported by Kubernetes.
Read more details about future development and JobSet features at KEP-467 JobSet in-place restart.
apiVersion: v1
kind: Pod
metadata:
name: ml-worker-pod
spec:
restartPolicy: Never
initContainers:
# This init container will re-run on every in-place restart
- name: setup-environment
image: my-repo/setup-worker:1.0
- name: watcher-sidecar
image: my-repo/watcher:1.0
restartPolicy: Always
restartPolicyRules:
- action: RestartAllContainers
exitCodes:
operator: In
# A specific exit code from the watcher triggers a full pod restart
values: [88]
containers:
- name: main-application
image: my-repo/training-app:1.0
2. Re-running init containers for a clean state
Imagine a scenario where an init container is responsible for fetching credentials or setting up a shared volume. If the main application fails in a way that corrupts this shared state, you need the init container to rerun.
By configuring the main application to exit with a specific code upon detecting such a corruption, you can trigger the RestartAllContainers action, guaranteeing that the init container provides a clean setup before the application restarts.
3. Handling high rate of similar tasks execution
There are cases when tasks are best represented as a Pod execution. And each task requires a clean execution. The task may be a game session backend or some queue item processing. If the rate of tasks is high, running the whole cycle of Pod creation, scheduling and initialization is simply too expensive, especially when tasks can be short. The ability to restart all containers from scratch enables a Kubernetes-native way to handle this scenario without custom solutions or frameworks.
How to use it
To try this feature, you must enable the RestartAllContainersOnContainerExits feature gate on your Kubernetes cluster components (API server and kubelet) running Kubernetes v1.35+. This alpha feature extends the ContainerRestartRules feature, which graduated to beta in v1.35 and is enabled by default.
Once enabled, you can add restartPolicyRules to any container (init, sidecar, or regular) and use the RestartAllContainers action.
The feature is designed to be easily usable on existing apps. However, if an application does not follow some best practices, it may cause issues for the application or for observability tooling. When enabling the feature, make sure that all containers are reentrant and that external tooling is prepared for init containers to re-run. Also, when restarting all containers, the kubelet does not run preStop hooks. This means containers must be designed to handle abrupt termination without relying on preStop hooks for graceful shutdown.
Observing the restart
To make this process observable, a new Pod condition, AllContainersRestarting, is added to the Pod's status. When a restart is triggered, this condition becomes True and it reverts to False once all containers have terminated and the Pod is ready to start its lifecycle anew. This provides a clear signal to users and other cluster components about the Pod's state.
All containers restarted by this action will have their restart count incremented in the container status.
Learn more
- Read the official documentation on Pod Lifecycle.
- Read the detailed proposal in the KEP-5532: Restart All Containers on Container Exits.
- Read the proposal for JobSet in-place restart in JobSet issue #467.
We want your feedback!
As an alpha feature, RestartAllContainers is ready for you to experiment with and any use cases and feedback are welcome. This feature is driven by the SIG Node community. If you are interested in getting involved, sharing your thoughts, or contributing, please join us!
You can reach SIG Node through:
- Slack: #sig-node
- Mailing list
Kubernetes 1.35: Enhanced Debugging with Versioned z-pages APIs
Debugging Kubernetes control plane components can be challenging, especially when you need to quickly understand the runtime state of a component or verify its configuration. With Kubernetes 1.35, we're enhancing the z-pages debugging endpoints with structured, machine-parseable responses that make it easier to build tooling and automate troubleshooting workflows.
What are z-pages?
z-pages are special debugging endpoints exposed by Kubernetes control plane components. Introduced as an alpha feature in Kubernetes 1.32, these endpoints provide runtime diagnostics for components like kube-apiserver, kube-controller-manager, kube-scheduler, kubelet and kube-proxy. The name "z-pages" comes from the convention of using /*z paths for debugging endpoints.
Currently, Kubernetes supports two primary z-page endpoints:
/statusz- Displays high-level component information including version information, start time, uptime, and available debug paths
/flagz- Shows all command-line arguments and their values used to start the component (with confidential values redacted for security)
These endpoints are valuable for human operators who need to quickly inspect component state, but until now, they only returned plain text output that was difficult to parse programmatically.
What's new in Kubernetes 1.35?
Kubernetes 1.35 introduces structured, versioned responses for both /statusz and /flagz endpoints. This enhancement maintains backward compatibility with the existing plain text format while adding support for machine-readable JSON responses.
Backward compatible design
The new structured responses are opt-in. Without specifying an Accept header, the endpoints continue to return the familiar plain text format:
$ curl --cert /etc/kubernetes/pki/apiserver-kubelet-client.crt \
--key /etc/kubernetes/pki/apiserver-kubelet-client.key \
--cacert /etc/kubernetes/pki/ca.crt \
https://localhost:6443/statusz
kube-apiserver statusz
Warning: This endpoint is not meant to be machine parseable, has no formatting compatibility guarantees and is for debugging purposes only.
Started: Wed Oct 16 21:03:43 UTC 2024
Up: 0 hr 00 min 16 sec
Go version: go1.23.2
Binary version: 1.35.0-alpha.0.1595
Emulation version: 1.35
Paths: /healthz /livez /metrics /readyz /statusz /version
Structured JSON responses
To receive a structured response, include the appropriate Accept header:
Accept: application/json;v=v1alpha1;g=config.k8s.io;as=Statusz
This returns a versioned JSON response:
{
"kind": "Statusz",
"apiVersion": "config.k8s.io/v1alpha1",
"metadata": {
"name": "kube-apiserver"
},
"startTime": "2025-10-29T00:30:01Z",
"uptimeSeconds": 856,
"goVersion": "go1.23.2",
"binaryVersion": "1.35.0",
"emulationVersion": "1.35",
"paths": [
"/healthz",
"/livez",
"/metrics",
"/readyz",
"/statusz",
"/version"
]
}
Similarly, /flagz supports structured responses with the header:
Accept: application/json;v=v1alpha1;g=config.k8s.io;as=Flagz
Example response:
{
"kind": "Flagz",
"apiVersion": "config.k8s.io/v1alpha1",
"metadata": {
"name": "kube-apiserver"
},
"flags": {
"advertise-address": "192.168.8.4",
"allow-privileged": "true",
"authorization-mode": "[Node,RBAC]",
"enable-priority-and-fairness": "true",
"profiling": "true"
}
}
Why structured responses matter
The addition of structured responses opens up several new possibilities:
1. Automated health checks and monitoring
Instead of parsing plain text, monitoring tools can now easily extract specific fields. For example, you can programmatically check if a component has been running with an unexpected emulated version or verify that critical flags are set correctly.
2. Better debugging tools
Developers can build sophisticated debugging tools that compare configurations across multiple components or track configuration drift over time. The structured format makes it trivial to diff configurations or validate that components are running with expected settings.
3. API versioning and stability
By introducing versioned APIs (starting with v1alpha1), we provide a clear path to stability. As the feature matures, we'll introduce v1beta1 and eventually v1, giving you confidence that your tooling won't break with future Kubernetes releases.
How to use structured z-pages
Prerequisites
Both endpoints require feature gates to be enabled:
/statusz: Enable theComponentStatuszfeature gate/flagz: Enable theComponentFlagzfeature gate
Example: Getting structured responses
Here's an example using curl to retrieve structured JSON responses from the kube-apiserver:
# Get structured statusz response
curl \
--cert /etc/kubernetes/pki/apiserver-kubelet-client.crt \
--key /etc/kubernetes/pki/apiserver-kubelet-client.key \
--cacert /etc/kubernetes/pki/ca.crt \
-H "Accept: application/json;v=v1alpha1;g=config.k8s.io;as=Statusz" \
https://localhost:6443/statusz | jq .
# Get structured flagz response
curl \
--cert /etc/kubernetes/pki/apiserver-kubelet-client.crt \
--key /etc/kubernetes/pki/apiserver-kubelet-client.key \
--cacert /etc/kubernetes/pki/ca.crt \
-H "Accept: application/json;v=v1alpha1;g=config.k8s.io;as=Flagz" \
https://localhost:6443/flagz | jq .
Note:
The examples above use client certificate authentication and verify the server's certificate using--cacert.
If you need to bypass certificate verification in a test environment, you can use --insecure (or -k),
but this should never be done in production as it makes you vulnerable to man-in-the-middle attacks.Important considerations
Alpha feature status
The structured z-page responses are an alpha feature in Kubernetes 1.35. This means:
- The API format may change in future releases
- These endpoints are intended for debugging, not production automation
- You should avoid relying on them for critical monitoring workflows until they reach beta or stable status
Security and access control
z-pages expose internal component information and require proper access controls. Here are the key security considerations:
Authorization: Access to z-page endpoints is restricted to members of the system:monitoring group, which follows the same authorization model as other debugging endpoints like /healthz, /livez, and /readyz. This ensures that only authorized users and service accounts can access debugging information. If your cluster uses RBAC, you can manage access by granting appropriate permissions to this group.
Authentication: The authentication requirements for these endpoints depend on your cluster's configuration. Unless anonymous authentication is enabled for your cluster, you typically need to use authentication mechanisms (such as client certificates) to access these endpoints.
Information disclosure: These endpoints reveal configuration details about your cluster components, including:
- Component versions and build information
- All command-line arguments and their values (with confidential values redacted)
- Available debug endpoints
Only grant access to trusted operators and debugging tools. Avoid exposing these endpoints to unauthorized users or automated systems that don't require this level of access.
Future evolution
As the feature matures, we (Kubernetes SIG Instrumentation) expect to:
- Introduce
v1beta1and eventuallyv1versions of the API - Gather community feedback on the response schema
- Potentially add additional z-page endpoints based on user needs
Try it out
We encourage you to experiment with structured z-pages in a test environment:
- Enable the
ComponentStatuszandComponentFlagzfeature gates on your control plane components - Try querying the endpoints with both plain text and structured formats
- Build a simple tool or script that uses the structured data
- Share your feedback with the community
Learn more
- z-pages documentation
- KEP-4827: Component Statusz
- KEP-4828: Component Flagz
- Join the discussion in the #sig-instrumentation channel on Kubernetes Slack
Get involved
We'd love to hear your feedback! The structured z-pages feature is designed to make Kubernetes easier to debug and monitor. Whether you're building internal tooling, contributing to open source projects, or just exploring the feature, your input helps shape the future of Kubernetes observability.
If you have questions, suggestions, or run into issues, please reach out to SIG Instrumentation. You can find us on Slack or at our regular community meetings.
Happy debugging!
Kubernetes v1.35: Watch Based Route Reconciliation in the Cloud Controller Manager
Up to and including Kubernetes v1.34, the route controller in Cloud Controller Manager (CCM) implementations built using the k8s.io/cloud-provider library reconciles routes at a fixed interval. This causes unnecessary API requests to the cloud provider when there are no changes to routes. Other controllers implemented through the same library already use watch-based mechanisms, leveraging informers to avoid unnecessary API calls. A new feature gate is being introduced in v1.35 to allow changing the behavior of the route controller to use watch-based informers.
What's new?
The feature gate CloudControllerManagerWatchBasedRoutesReconciliation has been
introduced to k8s.io/cloud-provider in alpha stage by SIG Cloud Provider.
To enable this feature you can use --feature-gate=CloudControllerManagerWatchBasedRoutesReconciliation=true
in the CCM implementation you are using.
About the feature gate
This feature gate will trigger the route reconciliation loop whenever a node is
added, deleted, or the fields .spec.podCIDRs or .status.addresses are updated.
An additional reconcile is performed in a random interval between 12h and 24h, which is chosen at the controller's start time.
This feature gate does not modify the logic within the reconciliation loop. Therefore, users of a CCM implementation should not experience significant changes to their existing route configurations.
How can I learn more?
For more details, refer to the KEP-5237.
Kubernetes v1.35: Introducing Workload Aware Scheduling
Scheduling large workloads is a much more complex and fragile operation than scheduling a single Pod, as it often requires considering all Pods together instead of scheduling each one independently. For example, when scheduling a machine learning batch job, you often need to place each worker strategically, such as on the same rack, to make the entire process as efficient as possible. At the same time, the Pods that are part of such a workload are very often identical from the scheduling perspective, which fundamentally changes how this process should look.
There are many custom schedulers adapted to perform workload scheduling efficiently,
but considering how common and important workload scheduling is to Kubernetes users,
especially in the AI era with the growing number of use cases,
it is high time to make workloads a first-class citizen for kube-scheduler and support them natively.
Workload aware scheduling
The recent 1.35 release of Kubernetes delivered the first tranche of workload aware scheduling improvements. These are part of a wider effort that is aiming to improve scheduling and management of workloads. The effort will span over many SIGs and releases, and is supposed to gradually expand capabilities of the system toward reaching the north star goal, which is seamless workload scheduling and management in Kubernetes including, but not limited to, preemption and autoscaling.
Kubernetes v1.35 introduces the Workload API that you can use to describe the desired shape
as well as scheduling-oriented requirements of the workload. It comes with an initial implementation
of gang scheduling that instructs the kube-scheduler to schedule gang Pods in the all-or-nothing fashion.
Finally, we improved scheduling of identical Pods (that typically make a gang) to speed up the process
thanks to the opportunistic batching feature.
Workload API
The new Workload API resource is part of the scheduling.k8s.io/v1alpha1
API group.
This resource acts as a structured, machine-readable definition of the scheduling requirements
of a multi-Pod application. While user-facing workloads like Jobs define what to run, the Workload resource
determines how a group of Pods should be scheduled and how its placement should be managed
throughout its lifecycle.
A Workload allows you to define a group of Pods and apply a scheduling policy to them.
Here is what a gang scheduling configuration looks like. You can define a podGroup named workers
and apply the gang policy with a minCount of 4.
apiVersion: scheduling.k8s.io/v1alpha1
kind: Workload
metadata:
name: training-job-workload
namespace: some-ns
spec:
podGroups:
- name: workers
policy:
gang:
# The gang is schedulable only if 4 pods can run at once
minCount: 4
When you create your Pods, you link them to this Workload using the new workloadRef field:
apiVersion: v1
kind: Pod
metadata:
name: worker-0
namespace: some-ns
spec:
workloadRef:
name: training-job-workload
podGroup: workers
...
How gang scheduling works
The gang policy enforces all-or-nothing placement. Without gang scheduling,
a Job might be partially scheduled, consuming resources without being able to run,
leading to resource wastage and potential deadlocks.
When you create Pods that are part of a gang-scheduled pod group, the scheduler's GangScheduling
plugin manages the lifecycle independently for each pod group (or replica key):
When you create your Pods (or a controller makes them for you), the scheduler blocks them from scheduling, until:
- The referenced Workload object is created.
- The referenced pod group exists in a Workload.
- The number of pending Pods in that group meets your
minCount.
Once enough Pods arrive, the scheduler tries to place them. However, instead of binding them to nodes immediately, the Pods wait at a
Permitgate.The scheduler checks if it has found valid assignments for the entire group (at least the
minCount).- If there is room for the group, the gate opens, and all Pods are bound to nodes.
- If only a subset of the group pods was successfully scheduled within a timeout (set to 5 minutes), the scheduler rejects all of the Pods in the group. They go back to the queue, freeing up the reserved resources for other workloads.
We'd like to point out that that while this is a first implementation, the Kubernetes project firmly intends to improve and expand the gang scheduling algorithm in future releases. Benefits we hope to deliver include a single-cycle scheduling phase for a whole gang, workload-level preemption, and more, moving towards the north star goal.
Opportunistic batching
In addition to explicit gang scheduling, v1.35 introduces opportunistic batching. This is a Beta feature that improves scheduling latency for identical Pods.
Unlike gang scheduling, this feature does not require the Workload API or any explicit opt-in on the user's part. It works opportunistically within the scheduler by identifying Pods that have identical scheduling requirements (container images, resource requests, affinities, etc.). When the scheduler processes a Pod, it can reuse the feasibility calculations for subsequent identical Pods in the queue, significantly speeding up the process.
Most users will benefit from this optimization automatically, without taking any special steps, provided their Pods meet the following criteria.
Restrictions
Opportunistic batching works under specific conditions. All fields used by the kube-scheduler
to find a placement must be identical between Pods. Additionally, using some features
disables the batching mechanism for those Pods to ensure correctness.
Note that you may need to review your kube-scheduler configuration
to ensure it is not implicitly disabling batching for your workloads.
See the docs for more details about restrictions.
The north star vision
The project has a broad ambition to deliver workload aware scheduling. These new APIs and scheduling enhancements are just the first steps. In the near future, the effort aims to tackle:
- Introducing a workload scheduling phase
- Improved support for multi-node DRA and topology aware scheduling
- Workload-level preemption
- Improved integration between scheduling and autoscaling
- Improved interaction with external workload schedulers
- Managing placement of workloads throughout their entire lifecycle
- Multi-workload scheduling simulations
And more. The priority and implementation order of these focus areas are subject to change. Stay tuned for further updates.
Getting started
To try the workload aware scheduling improvements:
- Workload API: Enable the
GenericWorkloadfeature gate on bothkube-apiserverandkube-scheduler, and ensure thescheduling.k8s.io/v1alpha1API group is enabled. - Gang scheduling: Enable the
GangSchedulingfeature gate onkube-scheduler(requires the Workload API to be enabled). - Opportunistic batching: As a Beta feature, it is enabled by default in v1.35.
You can disable it using the
OpportunisticBatchingfeature gate onkube-schedulerif needed.
We encourage you to try out workload aware scheduling in your test clusters and share your experiences to help shape the future of Kubernetes scheduling. You can send your feedback by:
- Reaching out via Slack (#sig-scheduling).
- Commenting on the workload aware scheduling tracking issue
- Filing a new issue in the Kubernetes repository.
Learn more
- Read the KEPs for Workload API and gang scheduling and Opportunistic batching.
- Track the Workload aware scheduling issue for recent updates.
Kubernetes v1.35: Fine-grained Supplemental Groups Control Graduates to GA
On behalf of Kubernetes SIG Node, we are pleased to announce the graduation of fine-grained supplemental groups control to General Availability (GA) in Kubernetes v1.35!
The new Pod field, supplementalGroupsPolicy, was introduced as an opt-in alpha feature for Kubernetes v1.31, and then had graduated to beta in v1.33.
Now, the feature is generally available.
This feature allows you to implement more precise control over supplemental groups in Linux containers that can strengthen the security posture particularly in accessing volumes.
Moreover, it also enhances the transparency of UID/GID details in containers, offering improved security oversight.
If you are planning to upgrade your cluster from v1.32 or an earlier version, please be aware that some behavioral breaking change introduced since beta (v1.33). For more details, see the behavioral changes introduced in beta and the upgrade considerations sections of the previous blog for graduation to beta.
Motivation: Implicit group memberships defined in /etc/group in the container image
Even though the majority of Kubernetes cluster admins/users may not be aware of this,
by default Kubernetes merges group information from the Pod with information defined in /etc/group in the container image.
Here's an example; a Pod manifest that specifies spec.securityContext.runAsUser: 1000, spec.securityContext.runAsGroup: 3000 and spec.securityContext.supplementalGroups: 4000 as part of the Pod's security context.
apiVersion: v1
kind: Pod
metadata:
name: implicit-groups-example
spec:
securityContext:
runAsUser: 1000
runAsGroup: 3000
supplementalGroups: [4000]
containers:
- name: example-container
image: registry.k8s.io/e2e-test-images/agnhost:2.45
command: [ "sh", "-c", "sleep 1h" ]
securityContext:
allowPrivilegeEscalation: false
What is the result of id command in the example-container container? The output should be similar to this:
uid=1000 gid=3000 groups=3000,4000,50000
Where does group ID 50000 in supplementary groups (groups field) come from, even though 50000 is not defined in the Pod's manifest at all? The answer is /etc/group file in the container image.
Checking the contents of /etc/group in the container image contains something like the following:
user-defined-in-image:x:1000:
group-defined-in-image:x:50000:user-defined-in-image
This shows that the container's primary user 1000 belongs to the group 50000 in the last entry.
Thus, the group membership defined in /etc/group in the container image for the container's primary user is implicitly merged to the information from the Pod. Please note that this was a design decision the current CRI implementations inherited from Docker, and the community never really reconsidered it until now.
What's wrong with it?
The implicitly merged group information from /etc/group in the container image poses a security risk. These implicit GIDs can't be detected or validated by policy engines because there's no record of them in the Pod manifest. This can lead to unexpected access control issues, particularly when accessing volumes (see kubernetes/kubernetes#112879 for details) because file permission is controlled by UID/GIDs in Linux.
Fine-grained supplemental groups control in a Pod: supplementaryGroupsPolicy
To tackle this problem, a Pod's .spec.securityContext now includes supplementalGroupsPolicy field.
This field lets you control how Kubernetes calculates the supplementary groups for container processes within a Pod. The available policies are:
Merge: The group membership defined in
/etc/groupfor the container's primary user will be merged. If not specified, this policy will be applied (i.e. as-is behavior for backward compatibility).Strict: Only the group IDs specified in
fsGroup,supplementalGroups, orrunAsGroupare attached as supplementary groups to the container processes. Group memberships defined in/etc/groupfor the container's primary user are ignored.
I'll explain how the Strict policy works. The following Pod manifest specifies supplementalGroupsPolicy: Strict:
apiVersion: v1
kind: Pod
metadata:
name: strict-supplementalgroups-policy-example
spec:
securityContext:
runAsUser: 1000
runAsGroup: 3000
supplementalGroups: [4000]
supplementalGroupsPolicy: Strict
containers:
- name: example-container
image: registry.k8s.io/e2e-test-images/agnhost:2.45
command: [ "sh", "-c", "sleep 1h" ]
securityContext:
allowPrivilegeEscalation: false
The result of id command in the example-container container should be similar to this:
uid=1000 gid=3000 groups=3000,4000
You can see Strict policy can exclude group 50000 from groups!
Thus, ensuring supplementalGroupsPolicy: Strict (enforced by some policy mechanism) helps prevent the implicit supplementary groups in a Pod.
Note:
A container with sufficient privileges can change its process identity.
The supplementalGroupsPolicy only affect the initial process identity.
Read on for more details.
Attached process identity in Pod status
This feature also exposes the process identity attached to the first container process of the container
via .status.containerStatuses[].user.linux field. It would be helpful to see if implicit group IDs are attached.
...
status:
containerStatuses:
- name: ctr
user:
linux:
gid: 3000
supplementalGroups:
- 3000
- 4000
uid: 1000
...
Note:
Please note that the values in status.containerStatuses[].user.linux field is the firstly attached
process identity to the first container process in the container. If the container has sufficient privilege
to call system calls related to process identity (e.g. setuid(2), setgid(2) or setgroups(2), etc.), the container process can change its identity. Thus, the actual process identity will be dynamic.
There are several ways to restrict these permissions in containers. We suggest the belows as simple solutions:
- setting
privilege: falseandallowPrivilegeEscalation: falsein your container'ssecurityContext, or - conform your pod to
Restrictedpolicy in Pod Security Standard.
Also, kubelet has no visibility into NRI plugins or container runtime internal workings. Cluster Administrator configuring nodes or highly privilege workloads with the permission of a local administrator may change supplemental groups for any pod. However this is outside of a scope of Kubernetes control and should not be a concern for security-hardened nodes.
Strict policy requires up-to-date container runtimes
The high level container runtime (e.g. containerd, CRI-O) plays a key role for calculating supplementary group ids
that will be attached to the containers. Thus, supplementalGroupsPolicy: Strict requires a CRI runtime that support this feature.
The old behavior (supplementalGroupsPolicy: Merge) can work with a CRI runtime that does not support this feature,
because this policy is fully backward compatible.
Here are some CRI runtimes that support this feature, and the versions you need to be running:
- containerd: v2.0 or later
- CRI-O: v1.31 or later
And, you can see if the feature is supported in the Node's .status.features.supplementalGroupsPolicy field. Please note that this field is different from status.declaredFeatures introduced in KEP-5328: Node Declared Features(formerly Node Capabilities).
apiVersion: v1
kind: Node
...
status:
features:
supplementalGroupsPolicy: true
As container runtimes support this feature universally, various security policies may start enforcing the Strict behavior as more secure. It is the best practice to ensure that your Pods are ready for this enforcement and all supplemental groups are transparently declared in Pod spec, rather than in images.
Getting involved
This enhancement was driven by the SIG Node community. Please join us to connect with the community and share your ideas and feedback around the above feature and beyond. We look forward to hearing from you!
How can I learn more?
- Configure a Security Context for a Pod or Container
for the further details of
supplementalGroupsPolicy - KEP-3619: Fine-grained SupplementalGroups control
Kubernetes v1.35: Kubelet Configuration Drop-in Directory Graduates to GA
With the recent v1.35 release of Kubernetes, support for a kubelet configuration drop-in directory is generally available. The newly stable feature simplifies the management of kubelet configuration across large, heterogeneous clusters.
With v1.35, the kubelet command line argument --config-dir is production-ready and fully supported,
allowing you to specify a directory containing kubelet configuration drop-in files.
All files in that directory will be automatically merged with your main kubelet configuration.
This allows cluster administrators to maintain a cohesive base configuration for kubelets while enabling targeted customizations for different node groups or use cases, and without complex tooling or manual configuration management.
The problem: managing kubelet configuration at scale
As Kubernetes clusters grow larger and more complex, they often include heterogeneous node pools with different hardware capabilities, workload requirements, and operational constraints. This diversity necessitates different kubelet configurations across node groups—yet managing these varied configurations at scale becomes increasingly challenging. Several pain points emerge:
- Configuration drift: Different nodes may have slightly different configurations, leading to inconsistent behavior
- Node group customization: GPU nodes, edge nodes, and standard compute nodes often require different kubelet settings
- Operational overhead: Maintaining separate, complete configuration files for each node type is error-prone and difficult to audit
- Change management: Rolling out configuration changes across heterogeneous node pools requires careful coordination
Before this support was added to Kubernetes, cluster administrators had to choose between using a single monolithic configuration file for all nodes, manually maintaining multiple complete configuration files, or relying on separate tooling. Each approach had its own drawbacks. This graduation to stable gives cluster administrators a fully supported fourth way to solve that challenge.
Example use cases
Managing heterogeneous node pools
Consider a cluster with multiple node types: standard compute nodes, high-capacity nodes (such as those with GPUs or large amounts of memory), and edge nodes with specialized requirements.
Base configuration
File: 00-base.conf
apiVersion: kubelet.config.k8s.io/v1beta1
kind: KubeletConfiguration
clusterDNS:
- "10.96.0.10"
clusterDomain: cluster.local
High-capacity node override
File: 50-high-capacity-nodes.conf
apiVersion: kubelet.config.k8s.io/v1beta1
kind: KubeletConfiguration
maxPods: 50
systemReserved:
memory: "4Gi"
cpu: "1000m"
Edge node override
File: 50-edge-nodes.conf (edge compute typically has lower capacity)
apiVersion: kubelet.config.k8s.io/v1beta1
kind: KubeletConfiguration
evictionHard:
memory.available: "500Mi"
nodefs.available: "5%"
With this structure, high-capacity nodes apply both the base configuration and the capacity-specific overrides, while edge nodes apply the base configuration with edge-specific settings.
Gradual configuration rollouts
When rolling out configuration changes, you can:
- Add a new drop-in file with a high numeric prefix (e.g.,
99-new-feature.conf) - Test the changes on a subset of nodes
- Gradually roll out to more nodes
- Once stable, merge changes into the base configuration
Viewing the merged configuration
Since configuration is now spread across multiple files, you can inspect the final merged configuration using the kubelet's /configz endpoint:
# Start kubectl proxy
kubectl proxy
# In another terminal, fetch the merged configuration
# Change the '<node-name>' placeholder before running the curl command
curl -X GET http://127.0.0.1:8001/api/v1/nodes/<node-name>/proxy/configz | jq .
This shows the actual configuration the kubelet is using after all merging has been applied. The merged configuration also includes any configuration settings that were specified via kubelet command-line arguments.
For detailed setup instructions, configuration examples, and merging behavior, see the official documentation:
Good practices
When using the kubelet configuration drop-in directory:
Test configurations incrementally: Always test new drop-in configurations on a subset of nodes before rolling out cluster-wide to minimize risk
Version control your drop-ins: Store your drop-in configuration files in version control (or the configuration source from which these are generated) alongside your infrastructure as code to track changes and enable easy rollbacks
Use numeric prefixes for predictable ordering: Name files with numeric prefixes (e.g.,
00-,50-,90-) to explicitly control merge order and make the configuration layering obvious to other administratorsBe mindful of temporary files: Some text editors automatically create backup files (such as
.bak,.swp, or files with~suffix) in the same directory when editing. Ensure these temporary or backup files are not left in the configuration directory, as they may be processed by the kubelet
Acknowledgments
This feature was developed through the collaborative efforts of SIG Node. Special thanks to all contributors who helped design, implement, test, and document this feature across its journey from alpha in v1.28, through beta in v1.30, to GA in v1.35.
To provide feedback on this feature, join the Kubernetes Node Special Interest Group, participate in discussions on the public Slack channel (#sig-node), or file an issue on GitHub.
Get involved
If you have feedback or questions about kubelet configuration management, or want to share your experience using this feature, join the discussion:
- SIG Node community page
- Kubernetes Slack in the #sig-node channel
- SIG Node mailing list
SIG Node would love to hear about your experiences using this feature in production!
Avoiding Zombie Cluster Members When Upgrading to etcd v3.6
This article is a mirror of an original that was recently published to the official etcd blog. The key takeaway? Always upgrade to etcd v3.5.26 or later before moving to v3.6. This ensures your cluster is automatically repaired, and avoids zombie members.
Issue summary
Recently, the etcd community addressed an issue that may appear when users upgrade from v3.5 to v3.6. This bug can cause the cluster to report "zombie members", which are etcd nodes that were removed from the database cluster some time ago, and are re-appearing and joining database consensus. The etcd cluster is then inoperable until these zombie members are removed.
In etcd v3.5 and earlier, the v2store was the source of truth for membership data, even though the v3store was also present. As a part of our v2store deprecation plan, in v3.6 the v3store is the source of truth for cluster membership. Through a bug report we found out that, in some older clusters, v2store and v3store could become inconsistent. This inconsistency manifests after upgrading as seeing old, removed "zombie" cluster members re-appearing in the cluster.
The fix and upgrade path
We’ve added a mechanism in etcd v3.5.26 to automatically sync v3store from v2store, ensuring that affected clusters are repaired before upgrading to 3.6.x.
To support the many users currently upgrading to 3.6, we have provided the following safe upgrade path:
- Upgrade your cluster to v3.5.26 or later.
- Wait and confirm that all members are healthy post-update.
- Upgrade to v3.6.
We are unable to provide a safe workaround path for users who have some obstacle preventing updating to v3.5.26. As such, if v3.5.26 is not available from your packaging source or vendor, you should delay upgrading to v3.6 until it is.
Additional technical detail
Information below is offered for reference only. Users can follow the safe upgrade path without knowledge of the following details.
This issue is encountered with clusters that have been running in production on etcd v3.5.25 or earlier. It is a side effect of adding and removing members from the cluster, or recovering the cluster from failure. This means that the issue is more likely the older the etcd cluster is, but it cannot be ruled out for any user regardless of the age of the cluster.
etcd maintainers, working with issue reporters, have found three possible triggers for the issue based on symptoms and an analysis of etcd code and logs:
- Bug in
etcdctl snapshot restore(v3.4 and old versions): When restoring a snapshot usingetcdctl snapshot restore, etcdctl was supposed to remove existing members before adding the new ones. In v3.4, due to a bug, old members were not removed, resulting in zombie members. Refer to the comment on etcdctl. --force-new-clusterin v3.5 and earlier versions: In rare cases, forcibly creating a new single-member cluster did not fully remove old members, leaving zombies. The issue was resolved in v3.5.22. Please refer to this PR in the Raft project for detailed technical information.- --unsafe-no-sync enabled: If
--unsafe-no-syncis enabled, in rare cases etcd might persist a membership change to v3store but crash before writing it to the WAL, causing inconsistency between v2store and v3store. This is a problem for single-member clusters. For multi-member clusters, forcibly creating a new single-member cluster from the crashed node’s data may lead to zombie members.
--unsafe-no-sync is generally not recommended, as it may break the guarantees given by the consensus protocol.
Importantly, there may be other triggers for v2store and v3store membership data becoming inconsistent that we have not yet found. This means that you cannot assume that you are safe just because you have not performed any of the three actions above. Once users are upgraded to etcd v3.6, v3store becomes the source of membership data, and further inconsistency is not possible.
Advanced users who want to verify the consistency between v2store and v3store can follow the steps described in this comment. This check is not required to fix the issue, nor does SIG etcd recommend bypassing the v3.5.26 update regardless of the results of the check.
Key takeaway
Always upgrade to v3.5.26 or later before moving to v3.6. This ensures your cluster is automatically repaired and avoids zombie members.
Acknowledgements
We would like to thank Christian Baumann for reporting this long-standing upgrade issue. His report and follow-up work helped bring the issue to our attention so that we could investigate and resolve it upstream.
Kubernetes 1.35: In-Place Pod Resize Graduates to Stable
This release marks a major step: more than 6 years after its initial conception, the In-Place Pod Resize feature (also known as In-Place Pod Vertical Scaling), first introduced as alpha in Kubernetes v1.27, and graduated to beta in Kubernetes v1.33, is now stable (GA) in Kubernetes 1.35!
This graduation is a major milestone for improving resource efficiency and flexibility for workloads running on Kubernetes.
What is in-place Pod Resize?
In the past, the CPU and memory resources allocated to a container in a Pod were immutable. This meant changing them required deleting and recreating the entire Pod. For stateful services, batch jobs, or latency-sensitive workloads, this was an incredibly disruptive operation.
In-Place Pod Resize makes CPU and memory requests and limits mutable, allowing you to adjust these resources within a running Pod, often without requiring a container restart.
Key Concept:
- Desired Resources: A container's
spec.containers[*].resourcesfield now represents the desired resources. For CPU and memory, these fields are now mutable. - Actual Resources: The
status.containerStatuses[*].resourcesfield reflects the resources currently configured for a running container. - Triggering a Resize: You can request a resize by updating the desired
requestsandlimitsin the Pod's specification by utilizing the newresizesubresource.
How can I start using in-place Pod Resize?
Detailed usage instructions and examples are provided in the official documentation: Resize CPU and Memory Resources assigned to Containers.
How does this help me?
In-place Pod Resize is a foundational building block that unlocks seamless, vertical autoscaling and improvements to workload efficiency.
- Resources adjusted without disruption Workloads sensitive to latency or restarts can have their resources modified in-place without downtime or loss of state.
- More powerful autoscaling Autoscalers are now empowered to adjust resources and with less
impact. For example, Vertical Pod Autoscaler (VPA)'s
InPlaceOrRecreateupdate mode, which leverages this feature, has graduated to beta. This allows resources to be adjusted automatically and seamlessly based on usage with minimal disruption.- See AEP-4016 for more details.
- Address transient resource needs Workloads that temporarily need more resources can be adjusted quickly. This enables features like the CPU Startup Boost (AEP-7862) where applications can request more CPU during startup and then automatically scale back down.
Here are a few examples of some use cases:
- A game server that needs to adjust its size with shifting player count.
- A pre-warmed worker that can be shrunk while unused but inflated with the first request.
- Dynamically scale with load for efficient bin-packing.
- Increased resources for JIT compilation on startup.
Changes between beta (1.33) and stable (1.35)
Since the initial beta in v1.33, development effort has primarily been around stabilizing the feature and improving its usability based on community feedback. Here are the primary changes for the stable release:
- Memory limit decrease Decreasing memory limits was previously prohibited. This restriction has been lifted, and memory limit decreases are now permitted. The Kubelet attempts to prevent OOM-kills by allowing the resize only if the current memory usage is below the new desired limit. However, this check is best-effort and not guaranteed.
- Prioritized resizes If a node doesn't have enough room to accept all resize requests, Deferred resizes
are reattempted based on the following priority:
- PriorityClass
- QoS class
- Duration Deferred, with older requests prioritized first.
- Pod Level Resources (Alpha) Support for in-place Pod Resize with Pod Level Resources has been introduced behind its own feature gate, which is alpha in v1.35.
- Increased observability: There are now new Kubelet metrics and Pod events specifically associated with In-Place Pod Resize to help users track and debug resource changes.
What's next?
The graduation of In-Place Pod Resize to stable opens the door for powerful integrations across the Kubernetes ecosystem. There are several areas for futher improvement that are currently planned.
Integration with autoscalers and other projects
There are planned integrations with several autoscalers and other projects to improve workload efficiency at a larger scale. Some projects under discussion:
- VPA CPU startup boost (AEP-7862): Allows applications to request more CPU at startup and scale back down after a specific period of time.
- VPA Support for in-place updates (AEP-4016): VPA support for
InPlaceOrRecreatehas recently graduated to beta, with the eventual goal being to graduate the feature to stable. Support forInPlacemode is still being worked on; see this pull request. - Ray autoscaler: Plans to leverage In-Place Pod Resize to improve workload efficiency. See this Google Cloud blog post for more details.
- Agent-sandbox "Soft-Pause": Investigating leveraging in-place Pod Resize for better improved latency. See the Github issue for more details.
- Runtime support: Java and Python runtimes do not support resizing memory without restart. There is an open conversation with the Java developers, see the bug.
If you have a project that could benefit from integration with in-place pod resize, please reach out using the channels listed in the feedback section!
Feature expansion
Today, In-Place Pod Resize is prohibited when used in combination with: swap, the static CPU Manager, and the static Memory Manager. Additionally, resources other than CPU and memory are still immutable. Expanding the set of supported features and resources is under consideration as more feedback about community needs comes in.
There are also plans to support workload preemption; if there is not enough room on the node for the resize of a high priority pod, the goal is to enable policies to automatically evict a lower-priority pod or upsize the node.
Improved stability
Resolve kubelet-scheduler race conditions There are known race conditions between the kubelet and scheduler with regards to in-place pod resize. Work is underway to resolve these issues over the next few releases. See the issue for more details.
Safer memory limit decrease The Kubelet's best-effort check for OOM-kill prevention can be made even safer by moving the memory usage check into the container runtime itself. See the issue for more details.
Providing feedback
Looking to further build on this foundational feature, please share your feedback on how to improve and extend this feature. You can share your feedback through GitHub issues, mailing lists, or Slack channels related to the Kubernetes #sig-node and #sig-autoscaling communities.
Thank you to everyone who contributed to making this long-awaited feature a reality!
Kubernetes v1.35: Job Managed By Goes GA
In Kubernetes v1.35, the ability to specify an external Job controller (through .spec.managedBy) graduates to General Availability.
This feature allows external controllers to take full responsibility for Job reconciliation, unlocking powerful scheduling patterns like multi-cluster dispatching with MultiKueue.
Why delegate Job reconciliation?
The primary motivation for this feature is to support multi-cluster batch scheduling architectures, such as MultiKueue.
The MultiKueue architecture distinguishes between a Management Cluster and a pool of Worker Clusters:
- The Management Cluster is responsible for dispatching Jobs but not executing them. It needs to accept Job objects to track status, but it skips the creation and execution of Pods.
- The Worker Clusters receive the dispatched Jobs and execute the actual Pods.
- Users usually interact with the Management Cluster. Because the status is automatically propagated back, they can observe the Job's progress "live" without accessing the Worker Clusters.
- In the Worker Clusters, the dispatched Jobs run as regular Jobs managed by the built-in Job controller, with no
.spec.managedByset.
By using .spec.managedBy, the MultiKueue controller on the Management Cluster can take over the reconciliation of a Job. It copies the status from the "mirror" Job running on the Worker Cluster back to the Management Cluster.
Why not just disable the Job controller? While one could theoretically achieve this by disabling the built-in Job controller entirely, this is often impossible or impractical for two reasons:
- Managed Control Planes: In many cloud environments, the Kubernetes control plane is locked, and users cannot modify controller manager flags.
- Hybrid Cluster Role: Users often need a "hybrid" mode where the Management Cluster dispatches some heavy workloads to remote clusters but still executes smaller or control-plane-related Jobs in the Management Cluster.
.spec.managedByallows this granularity on a per-Job basis.
How .spec.managedBy works
The .spec.managedBy field indicates which controller is responsible for the Job, specifically there are two modes of operation:
- Standard: if unset or set to the reserved value
kubernetes.io/job-controller, the built-in Job controller reconciles the Job as usual (standard behavior). - Delegation: If set to any other value, the built-in Job controller skips reconciliation entirely for that Job.
To prevent orphaned Pods or resource leaks, this field is immutable. You cannot transfer a running Job from one controller to another.
If you are looking into implementing an external controller, be aware that your controller needs to be conformant with the definitions for the Job API. In order to enforce the conformance, a significant part of the effort was to introduce the extensive Job status validation rules. Navigate to the How can you learn more? section for more details.
Ecosystem Adoption
The .spec.managedBy field is rapidly becoming the standard interface for delegating control in the Kubernetes batch ecosystem.
Various custom workload controllers are adding this field (or an equivalent) to allow MultiKueue to take over their reconciliation and orchestrate them across clusters:
While it is possible to use .spec.managedBy to implement a custom Job controller from scratch, we haven't observed that yet. The feature is specifically designed to support delegation patterns, like MultiKueue, without reinventing the wheel.
How can you learn more?
If you want to dig deeper:
Read the user-facing documentation for:
Deep dive into the design history:
- The Kubernetes Enhancement Proposal (KEP) Job's managed-by mechanism including introduction of the extensive Job status validation rules.
- The Kueue KEP for MultiKueue.
Explore how MultiKueue uses .spec.managedBy in practice in the task guide for running Jobs across clusters.
Acknowledgments
As with any Kubernetes feature, a lot of people helped shape this one through design discussions, reviews, test runs, and bug reports.
We would like to thank, in particular:
- Maciej Szulik - for guidance, mentorship, and reviews.
- Filip Křepinský - for guidance, mentorship, and reviews.
Get involved
This work was sponsored by the Kubernetes Batch Working Group in close collaboration with the SIG Apps, and with strong input from the SIG Scheduling community.
If you are interested in batch scheduling, multi-cluster solutions, or further improving the Job API:
- Join us in the Batch WG and SIG Apps meetings.
- Subscribe to the WG Batch Slack channel.
Kubernetes v1.35: Timbernetes (The World Tree Release)
Editors: Aakanksha Bhende, Arujjwal Negi, Chad M. Crowell, Graziano Casto, Swathi Rao
Similar to previous releases, the release of Kubernetes v1.35 introduces new stable, beta, and alpha features. The consistent delivery of high-quality releases underscores the strength of our development cycle and the vibrant support from our community.
This release consists of 60 enhancements, including 17 stable, 19 beta, and 22 alpha features.
There are also some deprecations and removals in this release; make sure to read about those.
Release theme and logo
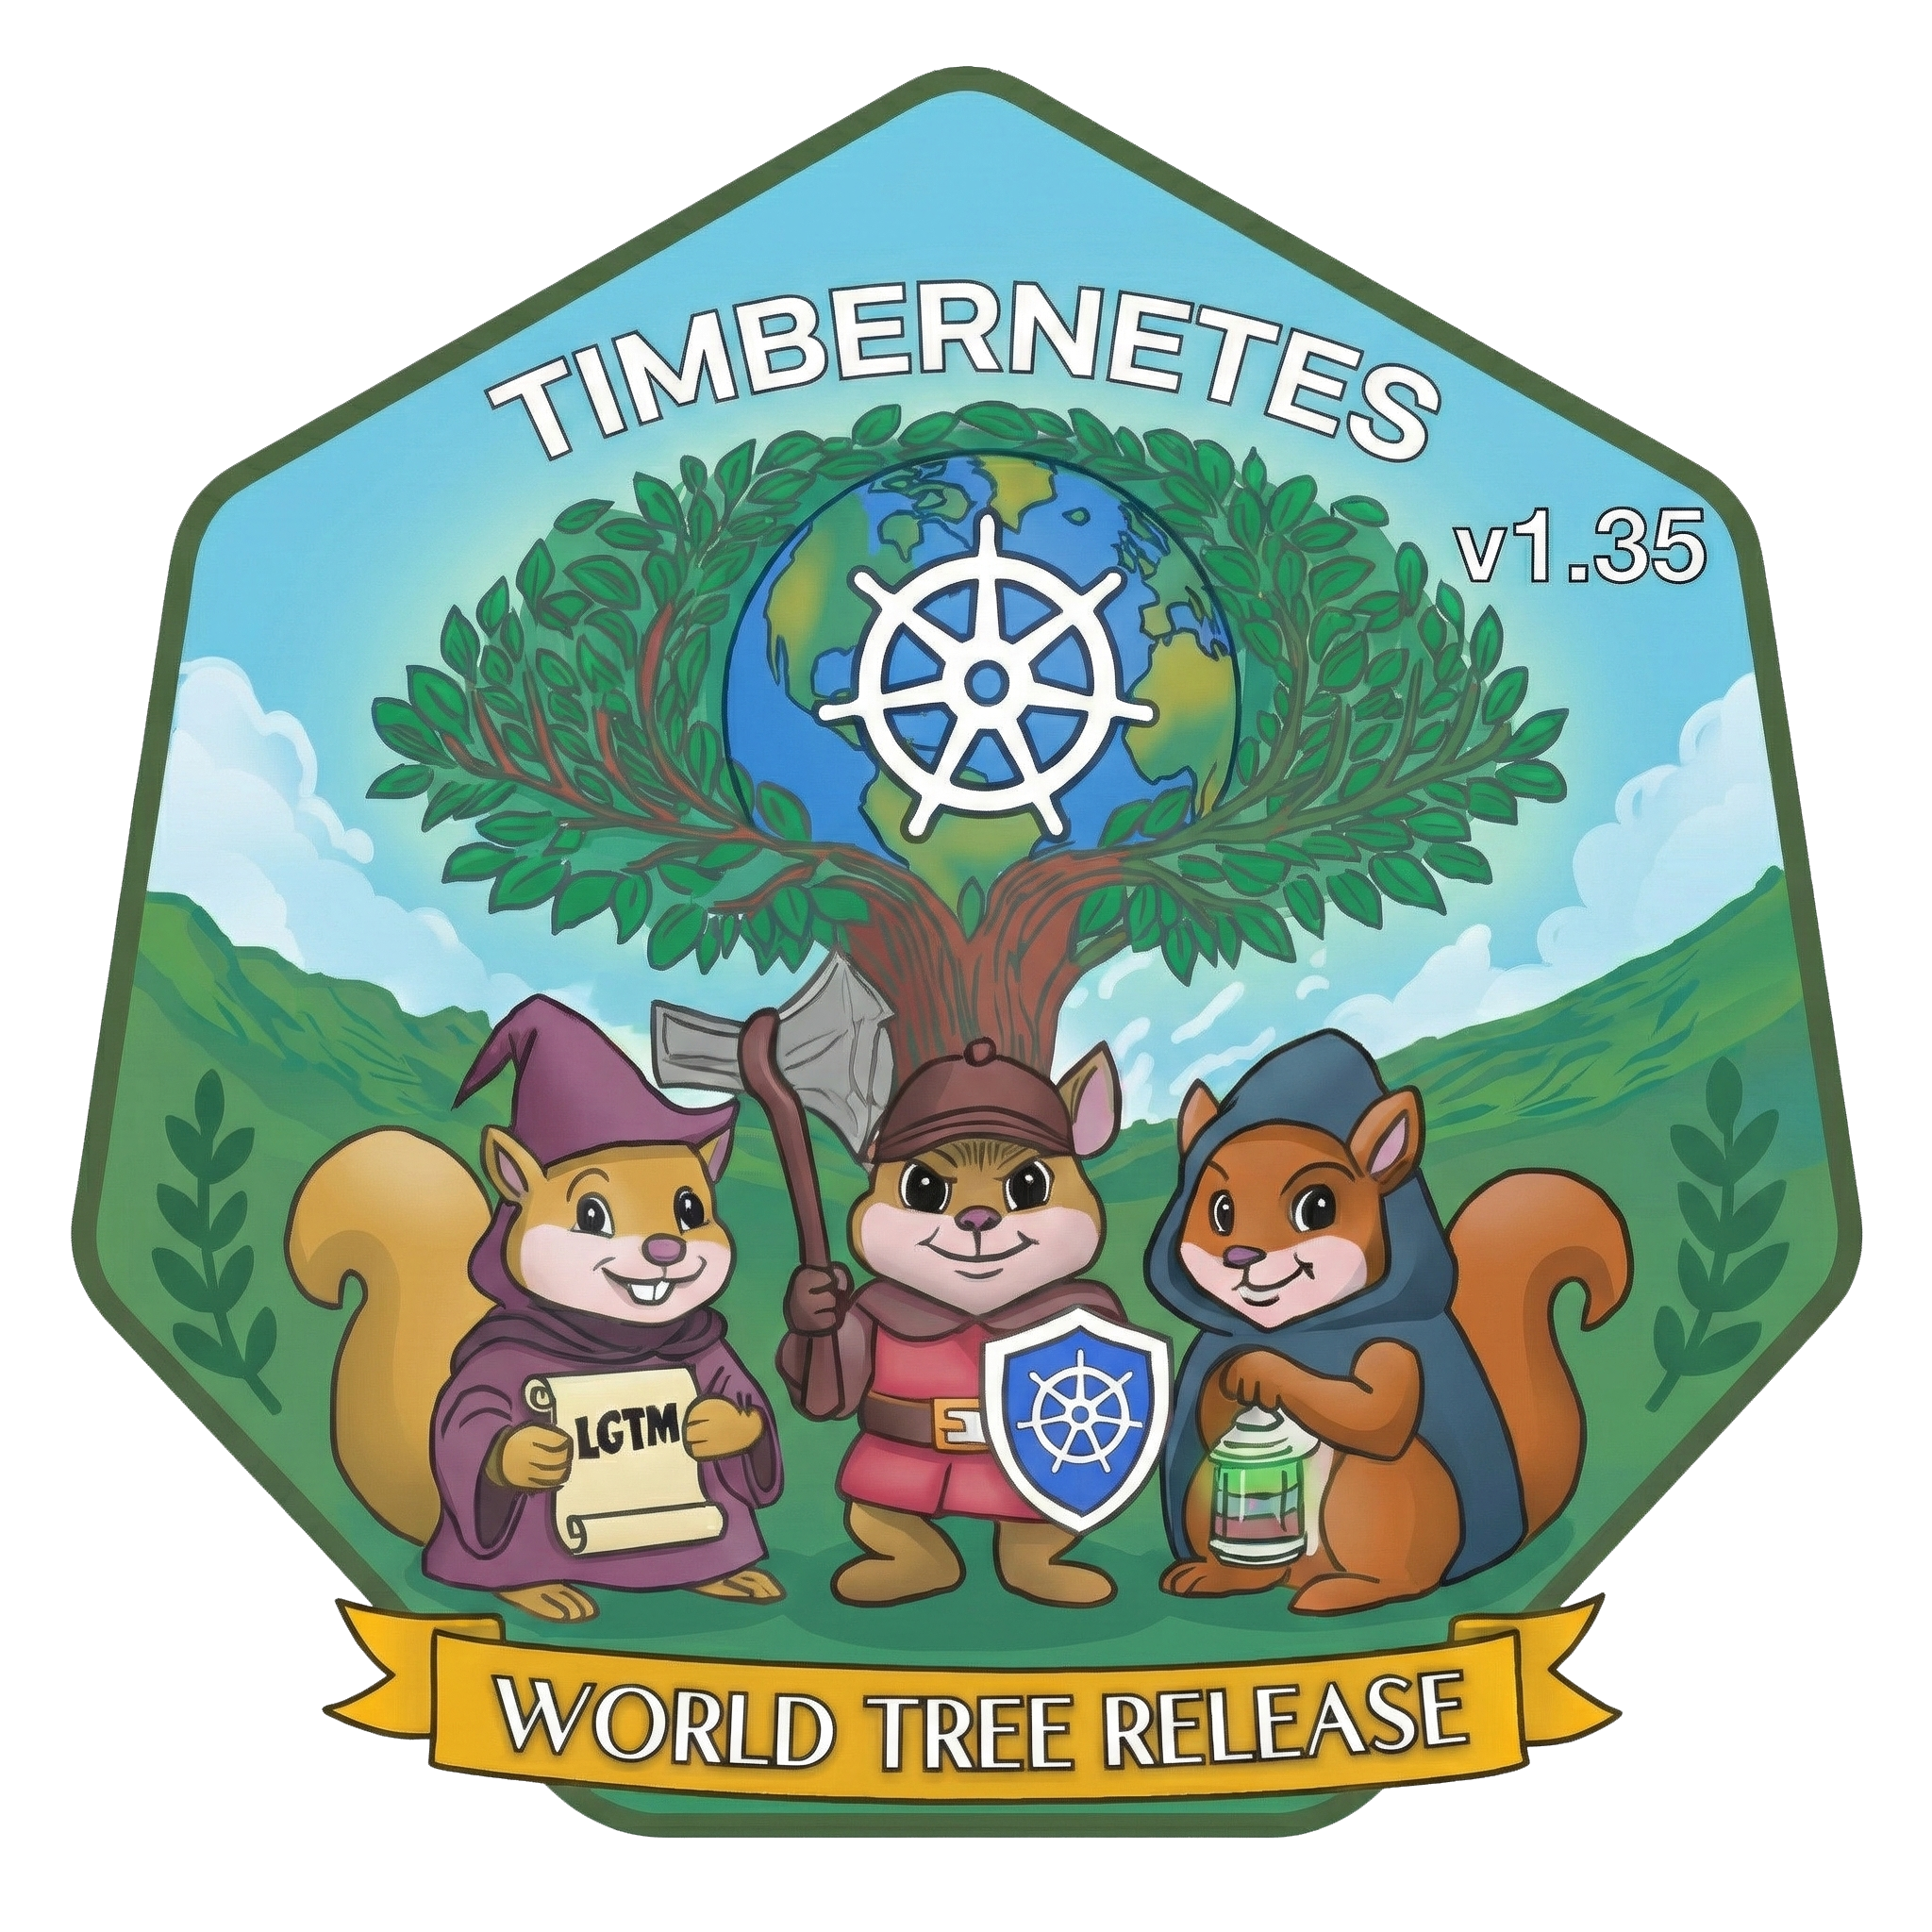
2025 began in the shimmer of Octarine: The Color of Magic (v1.33) and rode the gusts Of Wind & Will (v1.34). We close the year with our hands on the World Tree, inspired by Yggdrasil, the tree of life that binds many realms. Like any great tree, Kubernetes grows ring by ring and release by release, shaped by the care of a global community.
At its center sits the Kubernetes wheel wrapped around the Earth, grounded by the resilient maintainers, contributors and users who keep showing up. Between day jobs, life changes, and steady open-source stewardship, they prune old APIs, graft new features and keep one of the world’s largest open source projects healthy.
Three squirrels guard the tree: a wizard holding the LGTM scroll for reviewers, a warrior with an axe and Kubernetes shield for the release crews who cut new branches, and a rogue with a lantern for the triagers who bring light to dark issue queues.
Together, they stand in for a much larger adventuring party. Kubernetes v1.35 adds another growth ring to the World Tree, a fresh cut shaped by many hands, many paths and a community whose branches reach higher as its roots grow deeper.
Spotlight on key updates
Kubernetes v1.35 is packed with new features and improvements. Here are a few select updates the Release Team would like to highlight!
Stable: In-place update of Pod resources
Kubernetes has graduated in-place updates for Pod resources to General Availability (GA). This feature allows users to adjust CPU and memory resources without restarting Pods or Containers. Previously, such modifications required recreating Pods, which could disrupt workloads, particularly for stateful or batch applications. Earlier Kubernetes releases allowed you to change only infrastructure resource settings (requests and limits) for existing Pods. The new in-place functionality allows for smoother, nondisruptive vertical scaling, improves efficiency, and can also simplify development.
This work was done as part of KEP #1287 led by SIG Node.
Beta: Pod certificates for workload identity and security
Previously, delivering certificates to pods required external controllers (cert-manager, SPIFFE/SPIRE), CRD orchestration, and Secret management, with rotation handled by sidecars or init containers. Kubernetes v1.35 enables native workload identity with automated certificate rotation, drastically simplifying service mesh and zero-trust architectures.
Now, the kubelet generates keys, requests certificates via PodCertificateRequest, and writes credential bundles directly to the Pod's filesystem. The kube-apiserver enforces node restriction at admission time, eliminating the most common pitfall for third-party signers: accidentally violating node isolation boundaries. This enables pure mTLS flows with no bearer tokens in the issuance path.
This work was done as part of KEP #4317 led by SIG Auth.
Alpha: Node declared features before scheduling
When control planes enable new features but nodes lag behind (permitted by Kubernetes skew policy), the scheduler can place pods requiring those features onto incompatible older nodes.
The node-declaration features framework allows nodes to declare their supported Kubernetes features. With the new alpha feature enabled, a Node reports the features it supports, publishing this information to the control plane via a new .status.declaredFeatures field. Then, the kube-scheduler, admission controllers, and third-party components can use these declarations. For example, you can enforce scheduling and API validation constraints to ensure that Pods run only on compatible nodes.
This work was done as part of KEP #5328 led by SIG Node.
Features graduating to Stable
This is a selection of some of the improvements that are now stable following the v1.35 release.
PreferSameNode traffic distribution
The trafficDistribution field for Services has been updated to provide more explicit control over traffic routing. A new option, PreferSameNode, has been introduced to let services strictly prioritize endpoints on the local node if available, falling back to remote endpoints otherwise.
Simultaneously, the existing PreferClose option has been renamed to PreferSameZone. This change makes the API self-explanatory by explicitly indicating that traffic is preferred within the current availability zone. While PreferClose is preserved for backward compatibility, PreferSameZone is now the standard for zonal routing, ensuring that both node-level and zone-level preferences are clearly distinguished.
This work was done as part of KEP #3015 led by SIG Network.
Job API managed-by mechanism
The Job API now includes a managedBy field that allows an external controller to handle Job status synchronization. This feature, which graduates to stable in Kubernetes v1.35, is primarily driven by MultiKueue, a multi-cluster dispatching system where a Job created in a management cluster is mirrored and executed in a worker cluster, with status updates propagated back. To enable this workflow, the built-in Job controller must not act on a particular Job resource so that the Kueue controller can manage status updates instead.
The goal is to allow clean delegation of Job synchronization to another controller. It does not aim to pass custom parameters to that controller or modify CronJob concurrency policies.
This work was done as part of KEP #4368 led by SIG Apps.
Reliable Pod update tracking with .metadata.generation
Historically, the Pod API lacked the metadata.generation field found in other Kubernetes objects such as Deployments.
Because of this omission, controllers and users had no reliable way to verify whether the kubelet had actually processed the latest changes to a Pod's specification. This ambiguity was particularly problematic for features like In-Place Pod Vertical Scaling, where it was difficult to know exactly when a resource resize request had been enacted.
Kubernetes v1.33 added .metadata.generation fields for Pods, as an alpha feature. That field is now stable in the v1.35 Pod API, which means that every time a Pod's spec is updated, the .metadata.generation value is incremented. As part of this improvement, the Pod API also gained a .status.observedGeneration field, which reports the generation that the kubelet has successfully seen and processed. Pod conditions also each contain their own individual observedGeneration field that clients can report and / or observe.
Because this feature has graduated to stable in v1.35, it is available for all workloads.
This work was done as part of KEP #5067 led by SIG Node.
Configurable NUMA node limit for topology manager
The topology manager historically used a hard-coded limit of 8 for the maximum number of NUMA nodes it can support, preventing state explosion during affinity calculation. (There's an important detail here; a NUMA node is not the same as a Node in the Kubernetes API.) This limit on the number of NUMA nodes prevented Kubernetes from fully utilizing modern high-end servers, which increasingly feature CPU architectures with more than 8 NUMA nodes.
Kubernetes v1.31 introduced a new, beta max-allowable-numa-nodes option to the topology manager policy configuration. In Kubernetes v1.35, that option is stable. Cluster administrators who enable it can use servers with more than 8 NUMA nodes.
Although the configuration option is stable, the Kubernetes community is aware of the poor performance for large NUMA hosts, and there is a proposed enhancement (KEP-5726) that aims to improve on it. You can learn more about this by reading Control Topology Management Policies on a node.
This work was done as part of KEP #4622 led by SIG Node.
New features in Beta
This is a selection of some of the improvements that are now beta following the v1.35 release.
Expose node topology labels via Downward API
Accessing node topology information, such as region and zone, from within a Pod has typically required querying the Kubernetes API server. While functional, this approach creates complexity and security risks by necessitating broad RBAC permissions or sidecar containers just to retrieve infrastructure metadata. Kubernetes v1.35 promotes the capability to expose node topology labels directly via the Downward API to beta.
The kubelet can now inject standard topology labels, such as topology.kubernetes.io/zone and topology.kubernetes.io/region, into Pods as environment variables or projected volume files. The primary benefit is a safer and more efficient way for workloads to be topology-aware. This allows applications to natively adapt to their availability zone or region without dependencies on the API server, strengthening security by upholding the principle of least privilege and simplifying cluster configuration.
Note: Kubernetes now injects available topology labels to every Pod so that they can be used as inputs to the downward API. With the v1.35 upgrade, most cluster administrators will see several new labels added to each Pod; this is expected as part of the design.
This work was done as part of KEP #4742 led by SIG Node.
Native support for storage version migration
In Kubernetes v1.35, the native support for storage version migration graduates to beta and is enabled by default. This move integrates the migration logic directly into the core Kubernetes control plane ("in-tree"), eliminating the dependency on external tools.
Historically, administrators relied on manual "read/write loops"—often piping kubectl get into kubectl replace—to update schemas or re-encrypt data at rest. This method was inefficient and prone to conflicts, especially for large resources like Secrets. With this release, the built-in controller automatically handles update conflicts and consistency tokens, providing a safe, streamlined, and reliable way to ensure stored data remains current with minimal operational overhead.
This work was done as part of KEP #4192 led by SIG API Machinery.
Mutable Volume attach limits
A CSI (Container Storage Interface) driver is a Kubernetes plugin that provides a consistent way for storage systems to be exposed to containerized workloads. The CSINode object records details about all CSI drivers installed on a node. However, a mismatch can arise between the reported and actual attachment capacity on nodes. When volume slots are consumed after a CSI driver starts up, the kube-scheduler may assign stateful pods to nodes without sufficient capacity, ultimately getting stuck in a ContainerCreating state.
Kubernetes v1.35 makes CSINode.spec.drivers[*].allocatable.count mutable so that a node’s available volume attachment capacity can be updated dynamically. It also allows CSI drivers to control how frequently the allocatable.count value is updated on all nodes by introducing a configurable refresh interval, defined through the CSIDriver object. Additionally, it automatically updates CSINode.spec.drivers[*].allocatable.count on detecting a failure in volume attachment due to insufficient capacity. Although this feature graduated to beta in v1.34 with the feature flag MutableCSINodeAllocatableCount disabled by default, it remains in beta for v1.35 to allow time for feedback, but the feature flag is enabled by default.
This work was done as part of KEP #4876 led by SIG Storage.
Opportunistic batching
Historically, the Kubernetes scheduler processes pods sequentially with time complexity of O(num pods × num nodes), which can result in redundant computation for compatible pods. This KEP introduces an opportunistic batching mechanism that aims to improve performance by identifying such compatible Pods via Pod scheduling signature and batching them together, allowing shared filtering and scoring results across them.
The pod scheduling signature ensures that two pods with the same signature are “the same” from a scheduling perspective. It takes into account not only the pod and node attributes, but also the other pods in the system and global data about the pod placement. This means that any pod with the given signature will get the same scores/feasibility results from any arbitrary set of nodes.
The batching mechanism consists of two operations that can be invoked whenever needed - create and nominate. Create leads to the creation of a new set of batch information from the scheduling results of Pods that have a valid signature. Nominate uses the batching information from create to set the nominated node name from a new Pod whose signature matches the canonical Pod’s signature.
This work was done as part of KEP #5598 led by SIG Scheduling.
maxUnavailable for StatefulSets
A StatefulSet runs a group of Pods and maintains a sticky identity for each of those Pods. This is critical for stateful workloads requiring stable network identifiers or persistent storage. When a StatefulSet's .spec.updateStrategy.<type> is set to RollingUpdate, the StatefulSet controller will delete and recreate each Pod in the StatefulSet. It will proceed in the same order as Pod termination (from the largest ordinal to the smallest), updating each Pod one at a time.
Kubernetes v1.24 added a new alpha field to a StatefulSet's rollingUpdate configuration settings, called maxUnavailable. That field wasn't part of the Kubernetes API unless your cluster administrator explicitly opted in.
In Kubernetes v1.35 that field is beta and is available by default. You can use it to define the maximum number of pods that can be unavailable during an update. This setting is most effective in combination with .spec.podManagementPolicy set to Parallel. You can set maxUnavailable as either a positive number (example: 2) or a percentage of the desired number of Pods (example: 10%). If this field is not specified, it will default to 1, to maintain the previous behavior of only updating one Pod at a time. This improvement allows stateful applications (that can tolerate more than one Pod being down) to finish updating faster.
This work was done as part of KEP #961 led by SIG Apps.
Configurable credential plugin policy in kuberc
The optional kuberc file is a way to separate server configurations and cluster credentials from user preferences without disrupting already running CI pipelines with unexpected outputs.
As part of the v1.35 release, kuberc gains additional functionality which allows users to configure credential plugin policy. This change introduces two fields credentialPluginPolicy, which allows or denies all plugins, and allows specifying a list of allowed plugins using credentialPluginAllowlist.
This work was done as part of KEP #3104 as a cooperation between SIG Auth and SIG CLI.
KYAML
YAML is a human-readable format of data serialization. In Kubernetes, YAML files are used to define and configure resources, such as Pods, Services, and Deployments. However, complex YAML is difficult to read. YAML's significant whitespace requires careful attention to indentation and nesting, while its optional string-quoting can lead to unexpected type coercion (see: The Norway Bug). While JSON is an alternative, it lacks support for comments and has strict requirements for trailing commas and quoted keys.
KYAML is a safer and less ambiguous subset of YAML designed specifically for Kubernetes. Introduced as an opt-in alpha feature in v1.34, this feature graduated to beta in Kubernetes v1.35 and has been enabled by default. It can be disabled by setting the environment variable KUBECTL_KYAML=false.
KYAML addresses challenges pertaining to both YAML and JSON. All KYAML files are also valid YAML files. This means you can write KYAML and pass it as an input to any version of kubectl. This also means that you don’t need to write in strict KYAML for the input to be parsed.
This work was done as part of KEP #5295 led by SIG CLI.
Configurable tolerance for HorizontalPodAutoscalers
The Horizontal Pod Autoscaler (HPA) has historically relied on a fixed, global 10% tolerance for scaling actions. A drawback of this hardcoded value was that workloads requiring high sensitivity, such as those needing to scale on a 5% load increase, were often blocked from scaling, while others might oscillate unnecessarily.
With Kubernetes v1.35, the configurable tolerance feature graduates to beta and is enabled by default. This enhancement allows users to define a custom tolerance window on a per-resource basis within the HPA behavior field. By setting a specific tolerance (e.g., lowering it to 0.05 for 5%), operators gain precise control over autoscaling sensitivity, ensuring that critical workloads react quickly to small metric changes, without requiring cluster-wide configuration adjustments.
This work was done as part of KEP #4951 led by SIG Autoscaling.
Support for user namespaces in Pods
Kubernetes is adding support for user namespaces, allowing pods to run with isolated user and group ID mappings instead of sharing host IDs. This means containers can operate as root internally while actually being mapped to an unprivileged user on the host, reducing the risk of privilege escalation in the event of a compromise. The feature improves pod-level security and makes it safer to run workloads that need root inside the container. Over time, support has expanded to both stateless and stateful Pods through id-mapped mounts.
This work was done as part of KEP #127 led by SIG Node.
VolumeSource: OCI artifact and/or image
When creating a Pod, you often need to provide data, binaries, or configuration files for your containers. This meant including the content into the main container image or using a custom init container to download and unpack files into an emptyDir. Both these approaches are still valid. Kubernetes v1.31 added support for the image volume type allowing Pods to declaratively pull and unpack OCI container image artifacts into a volume. This lets you package and deliver data-only artifacts such as configs, binaries, or machine learning models using standard OCI registry tools.
With this feature, you can fully separate your data from your container image and remove the need for extra init containers or startup scripts. The image volume type has been in beta since v1.33 and is enabled by default in v1.35. Please note that using this feature requires a compatible container runtime, such as containerd v2.1 or later.
This work was done as part of KEP #4639 led by SIG Node.
Enforced kubelet credential verification for cached images
The imagePullPolicy: IfNotPresent setting currently allows a Pod to use a container image that is already cached on a node, even if the Pod itself does not possess the credentials to pull that image. A drawback of this behavior is that it creates a security vulnerability in multi-tenant clusters: if a Pod with valid credentials pulls a sensitive private image to a node, a subsequent unauthorized Pod on the same node can access that image simply by relying on the local cache.
This KEP introduces a mechanism where the kubelet enforces credential verification for cached images. Before allowing a Pod to use a locally cached image, the kubelet checks if the Pod has the valid credentials to pull it. This ensures that only authorized workloads can use private images, regardless of whether they are already present on the node, significantly hardening the security posture for shared clusters.
In Kubernetes v1.35, this feature has graduated to beta and is enabled by default. Users can still disable it by setting the KubeletEnsureSecretPulledImages feature gate to false. Additionally, the imagePullCredentialsVerificationPolicy flag allows operators to configure the desired security level, ranging from a mode that prioritizes backward compatibility to a strict enforcement mode that offers maximum security.
This work was done as part of KEP #2535 led by SIG Node.
Fine-grained Container restart rules
Historically, the restartPolicy field was defined strictly at the Pod level, forcing the same behavior on all containers within a Pod. A drawback of this global setting was the lack of granularity for complex workloads, such as AI/ML training jobs. These often required restartPolicy: Never for the Pod to manage job completion, yet individual containers would benefit from in-place restarts for specific, retriable errors (like network glitches or GPU init failures).
Kubernetes v1.35 addresses this by enabling restartPolicy and restartPolicyRules within the container API itself. This allows users to define restart strategies for individual regular and init containers that operate independently of the Pod's overall policy. For example, a container can now be configured to restart automatically only if it exits with a specific error code, avoiding the expensive overhead of rescheduling the entire Pod for a transient failure.
In this release, the feature has graduated to beta and is enabled by default. Users can immediately leverage restartPolicyRules in their container specifications to optimize recovery times and resource utilization for long-running workloads, without altering the broader lifecycle logic of their Pods.
This work was done as part of KEP #5307 led by SIG Node.
CSI driver opt-in for service account tokens via secrets field
Providing ServiceAccount tokens to Container Storage Interface (CSI) drivers has traditionally relied on injecting them into the volume_context field. This approach presents a significant security risk because volume_context is intended for non-sensitive configuration data and is frequently logged in plain text by drivers and debugging tools, potentially leaking credentials.
Kubernetes v1.35 introduces an opt-in mechanism for CSI drivers to receive ServiceAccount tokens via the dedicated secrets field in the NodePublishVolume request. Drivers can now enable this behavior by setting the serviceAccountTokenInSecrets field to true in their CSIDriver object, instructing the kubelet to populate the token securely.
The primary benefit is the prevention of accidental credential exposure in logs and error messages. This change ensures that sensitive workload identities are handled via the appropriate secure channels, aligning with best practices for secret management while maintaining backward compatibility for existing drivers.
This work was done as part of KEP #5538 led by SIG Auth in cooperation with SIG Storage.
Deployment status: count of terminating replicas
Historically, the Deployment status provided details on available and updated replicas but lacked explicit visibility into Pods that were in the process of shutting down. A drawback of this omission was that users and controllers could not easily distinguish between a stable Deployment and one that still had Pods executing cleanup tasks or adhering to long grace periods.
Kubernetes v1.35 promotes the terminatingReplicas field within the Deployment status to beta. This field provides a count of Pods that have a deletion timestamp set but have not yet been removed from the system. This feature is a foundational step in a larger initiative to improve how Deployments handle Pod replacement, laying the groundwork for future policies regarding when to create new Pods during a rollout.
The primary benefit is improved observability for lifecycle management tools and operators. By exposing the number of terminating Pods, external systems can now make more informed decisions such as waiting for a complete shutdown before proceeding with subsequent tasks without needing to manually query and filter individual Pod lists.
This work was done as part of KEP #3973 led by SIG Apps.
New features in Alpha
This is a selection of some of the improvements that are now alpha following the v1.35 release.
Gang scheduling support in Kubernetes
Scheduling interdependent workloads, such as AI/ML training jobs or HPC simulations, has traditionally been challenging because the default Kubernetes scheduler places Pods individually. This often leads to partial scheduling where some Pods start while others wait indefinitely for resources, resulting in deadlocks and wasted cluster capacity.
Kubernetes v1.35 introduces native support for so-called "gang scheduling" via the new Workload API and PodGroup concept. This feature implements an "all-or-nothing" scheduling strategy, ensuring that a defined group of Pods is scheduled only if the cluster has sufficient resources to accommodate the entire group simultaneously.
The primary benefit is improved reliability and efficiency for batch and parallel workloads. By preventing partial deployments, it eliminates resource deadlocks and ensures that expensive cluster capacity is utilized only when a complete job can run, significantly optimizing the orchestration of large-scale data processing tasks.
This work was done as part of KEP #4671 led by SIG Scheduling.
Constrained impersonation
Historically, the impersonate verb in Kubernetes RBAC functioned on an all-or-nothing basis: once a user was authorized to impersonate a target identity, they gained all associated permissions. A drawback of this broad authorization was that it violated the principle of least privilege, preventing administrators from restricting impersonators to specific actions or resources.
Kubernetes v1.35 introduces a new alpha feature, constrained impersonation, which adds a secondary authorization check to the impersonation flow. When enabled via the ConstrainedImpersonation feature gate, the API server verifies not only the basic impersonate permission but also checks if the impersonator is authorized for the specific action using new verb prefixes (e.g., impersonate-on:<mode>:<verb>). This allows administrators to define fine-grained policies—such as permitting a support engineer to impersonate a cluster admin solely to view logs, without granting full administrative access.
This work was done as part of KEP #5284 led by SIG Auth.
Flagz for Kubernetes components
Verifying the runtime configuration of Kubernetes components, such as the API server or kubelet, has traditionally required privileged access to the host node or process arguments. To address this, the /flagz endpoint was introduced to expose command-line options via HTTP. However, its output was initially limited to plain text, making it difficult for automated tools to parse and validate configurations reliably.
In Kubernetes v1.35, the /flagz endpoint has been enhanced to support structured, machine-readable JSON output. Authorized users can now request a versioned JSON response using standard HTTP content negotiation, while the original plain text format remains available for human inspection. This update significantly improves observability and compliance workflows, allowing external systems to programmatically audit component configurations without fragile text parsing or direct infrastructure access.
This work was done as part of KEP #4828 led by SIG Instrumentation.
Statusz for Kubernetes components
Troubleshooting Kubernetes components like the kube-apiserver or kubelet has traditionally involved parsing unstructured logs or text output, which is brittle and difficult to automate. While a basic /statusz endpoint existed previously, it lacked a standardized, machine-readable format, limiting its utility for external monitoring systems.
In Kubernetes v1.35, the /statusz endpoint has been enhanced to support structured, machine-readable JSON output. Authorized users can now request this format using standard HTTP content negotiation to retrieve precise status data—such as version information and health indicators—without relying on fragile text parsing. This improvement provides a reliable, consistent interface for automated debugging and observability tools across all core components.
This work was done as part of KEP #4827 led by SIG Instrumentation.
CCM: watch-based route controller reconciliation using informers
Managing network routes within cloud environments has traditionally relied on the Cloud Controller Manager (CCM) periodically polling the cloud provider's API to verify and update route tables. This fixed-interval reconciliation approach can be inefficient, often generating a high volume of unnecessary API calls and introducing latency between a node state change and the corresponding route update.
For the Kubernetes v1.35 release, the cloud-controller-manager library introduces a watch-based reconciliation strategy for the route controller. Instead of relying on a timer, the controller now utilizes informers to watch for specific Node events, such as additions, deletions, or relevant field updates and triggers route synchronization only when a change actually occurs.
The primary benefit is a significant reduction in cloud provider API usage, which lowers the risk of hitting rate limits and reduces operational overhead. Additionally, this event-driven model improves the responsiveness of the cluster's networking layer by ensuring that route tables are updated immediately following changes in cluster topology.
This work was done as part of KEP #5237 led by SIG Cloud Provider.
Extended toleration operators for threshold-based placement
Kubernetes v1.35 introduces SLA-aware scheduling by enabling workloads to express reliability requirements. The feature adds numeric comparison operators to tolerations, allowing pods to match or avoid nodes based on SLA-oriented taints such as service guarantees or fault-domain quality.
The primary benefit is enhancing the scheduler with more precise placement. Critical workloads can demand higher-SLA nodes, while lower priority workloads can opt into lower SLA ones. This improves utilization and reduces cost without compromising reliability.
This work was done as part of KEP #5471 led by SIG Scheduling.
Mutable container resources when Job is suspended
Running batch workloads often involves trial and error with resource limits. Currently, the Job specification is immutable, meaning that if a Job fails due to an Out of Memory (OOM) error or insufficient CPU, the user cannot simply adjust the resources; they must delete the Job and create a new one, losing the execution history and status.
Kubernetes v1.35 introduces the capability to update resource requests and limits for Jobs that are in a suspended state. Enabled via the MutablePodResourcesForSuspendedJobs feature gate, this enhancement allows users to pause a failing Job, modify its Pod template with appropriate resource values, and then resume execution with the corrected configuration.
The primary benefit is a smoother recovery workflow for misconfigured jobs. By allowing in-place corrections during suspension, users can resolve resource bottlenecks without disrupting the Job's lifecycle identity or losing track of its completion status, significantly improving the developer experience for batch processing.
This work was done as part of KEP #5440 led by SIG Apps.
Other notable changes
Continued innovation in Dynamic Resource Allocation (DRA)
The core functionality was graduated to stable in v1.34, with the ability to turn it off. In v1.35 it is always enabled. Several alpha features have also been significantly improved and are ready for testing. We encourage users to provide feedback on these capabilities to help clear the path for their target promotion to beta in upcoming releases.
Extended Resource Requests via DRA
Several functional gaps compared to Extended Resource requests via Device Plugins were addressed, for example scoring and reuse of devices in init containers.
Device Taints and Tolerations
The new "None" effect can be used to report a problem without immediately affecting scheduling or running pod. DeviceTaintRule now provides status information about an ongoing eviction. The "None" effect can be used for a "dry run" before actually evicting pods:
- Create DeviceTaintRule with "effect: None".
- Check the status to see how many pods would be evicted.
- Replace "effect: None" with "effect: NoExecute".
Partitionable Devices
Devices belonging to the same partitionable devices may now be defined in different ResourceSlices. You can read more in the official documentation.
Consumable Capacity, Device Binding Conditions
Several bugs were fixed and/or more tests added. You can learn more about Consumable Capacity and Binding Conditions in the official documentation.
Comparable resource version semantics
Kubernetes v1.35 changes the way that clients are allowed to interpret resource versions.
Before v1.35, the only supported comparison that clients could make was to check for string equality: if two resource versions were equal, they were the same. Clients could also provide a resource version to the API server and ask the control plane to do internal comparisons, such as streaming all events since a particular resource version.
In v1.35, all in-tree resource versions meet a new stricter definition: the values are a special form of decimal number. And, because they can be compared, clients can do their own operations to compare two different resource versions. For example, this means that a client reconnecting after a crash can detect when it has lost updates, as distinct from the case where there has been an update but no lost changes in the meantime.
This change in semantics enables other important use cases such as storage version migration, performance improvements to informers (a client helper concept), and controller reliability. All of those cases require knowing whether one resource version is newer than another.
This work was done as part of KEP #5504 led by SIG API Machinery.
Graduations, deprecations, and removals in v1.35
Graduations to stable
This lists all the features that graduated to stable (also known as general availability). For a full list of updates including new features and graduations from alpha to beta, see the release notes.
This release includes a total of 15 enhancements promoted to stable:
- Add CPUManager policy option to restrict reservedSystemCPUs to system daemons and interrupt processing
- Pod Generation
- Invariant Testing
- In-Place Update of Pod Resources
- Fine-grained SupplementalGroups control
- Add support for a drop-in kubelet configuration directory
- Remove gogo protobuf dependency for Kubernetes API types
- kubelet image GC after a maximum age
- Kubelet limit of Parallel Image Pulls
- Add a TopologyManager policy option for MaxAllowableNUMANodes
- Include kubectl command metadata in http request headers
- PreferSameNode Traffic Distribution (formerly PreferLocal traffic policy / Node-level topology)
- Job API managed-by mechanism
- Transition from SPDY to WebSockets
Deprecations, removals and community updates
As Kubernetes develops and matures, features may be deprecated, removed, or replaced with better ones to improve the project's overall health. See the Kubernetes deprecation and removal policy for more details on this process. Kubernetes v1.35 includes a couple of deprecations.
Ingress NGINX retirement
For years, the Ingress NGINX controller has been a popular choice for routing traffic into Kubernetes clusters. It was flexible, widely adopted, and served as the standard entry point for countless applications.
However, maintaining the project has become unsustainable. With a severe shortage of maintainers and mounting technical debt, the community recently made the difficult decision to retire it. This isn't strictly part of the v1.35 release, but it's such an important change that we wanted to highlight it here.
Consequently, the Kubernetes project announced that Ingress NGINX will receive only best-effort maintenance until March 2026. After this date, it will be archived with no further updates. The recommended path forward is to migrate to the Gateway API, which offers a more modern, secure, and extensible standard for traffic management.
You can find more in the official blog post.
Removal of cgroup v1 support
When it comes to managing resources on Linux nodes, Kubernetes has historically relied on cgroups (control groups). While the original cgroup v1 was functional, it was often inconsistent and limited. That is why Kubernetes introduced support for cgroup v2 back in v1.25, offering a much cleaner, unified hierarchy and better resource isolation.
Because cgroup v2 is now the modern standard, Kubernetes is ready to retire the legacy cgroup v1 support in v1.35. This is an important notice for cluster administrators: if you are still running nodes on older Linux distributions that don't support cgroup v2, your kubelet will fail to start. To avoid downtime, you will need to migrate those nodes to systems where cgroup v2 is enabled.
To learn more, read about cgroup v2;
you can also track the switchover work via KEP-5573: Remove cgroup v1 support.
Deprecation of ipvs mode in kube-proxy
Years ago, Kubernetes adopted the ipvs mode in kube-proxy to provide faster load balancing than the standard iptables. While it offered a performance boost, keeping it in sync with evolving networking requirements created too much technical debt and complexity.
Because of this maintenance burden, Kubernetes v1.35 deprecates ipvs mode. Although the mode remains available in this release, kube-proxy will now emit a warning on startup when configured to use it. The goal is to streamline the codebase and focus on modern standards. For Linux nodes, you should begin transitioning to nftables, which is now the recommended replacement.
You can find more in KEP-5495: Deprecate ipvs mode in kube-proxy.
Final call for containerd v1.X
While Kubernetes v1.35 still supports containerd 1.7 and other LTS releases, this is the final version with such support. The SIG Node community has designated v1.35 as the last release to support the containerd v1.X series.
This serves as an important reminder: before upgrading to the next Kubernetes version, you must switch to containerd 2.0 or later. To help identify which nodes need attention, you can monitor the kubelet_cri_losing_support metric within your cluster.
You can find more in the official blog post or in KEP-4033: Discover cgroup driver from CRI.
Improved Pod stability during kubelet restarts
Previously, restarting the kubelet service often caused a temporary disruption in Pod status. During a restart, the kubelet would reset container states, causing healthy Pods to be marked as NotReady and removed from load balancers, even if the application itself was still running correctly.
To address this reliability issue, this behavior has been corrected to ensure seamless node maintenance. The kubelet now properly restores the state of existing containers from the runtime upon startup. This ensures that your workloads remain Ready and traffic continues to flow uninterrupted during kubelet restarts or upgrades.
You can find more in KEP-4781: Fix inconsistent container ready state after kubelet restart.
Release notes
Check out the full details of the Kubernetes v1.35 release in our release notes.
Availability
Kubernetes v1.35 is available for download on GitHub or on the Kubernetes download page.
To get started with Kubernetes, check out these interactive tutorials or run local Kubernetes clusters using minikube. You can also easily install v1.35 using kubeadm.
Release team
Kubernetes is only possible with the support, commitment, and hard work of its community. Each release team is made up of dedicated community volunteers who work together to build the many pieces that make up the Kubernetes releases you rely on. This requires the specialized skills of people from all corners of our community, from the code itself to its documentation and project management.
We honor the memory of Han Kang, a long-time contributor and respected engineer whose technical excellence and infectious enthusiasm left a lasting impact on the Kubernetes community. Han was a significant force within SIG Instrumentation and SIG API Machinery, earning a 2021 Kubernetes Contributor Award for his critical work and sustained commitment to the project's core stability. Beyond his technical contributions, Han was deeply admired for his generosity as a mentor and his passion for building connections among people. He was known for "opening doors" for others, whether guiding new contributors through their first pull requests or supporting colleagues with patience and kindness. Han’s legacy lives on through the engineers he inspired, the robust systems he helped build, and the warm, collaborative spirit he fostered within the cloud native ecosystem.
We would like to thank the entire Release Team for the hours spent hard at work to deliver the Kubernetes v1.35 release to our community. The Release Team's membership ranges from first-time shadows to returning team leads with experience forged over several release cycles. We are incredibly grateful to our Release Lead, Drew Hagen, whose hands-on guidance and vibrant energy not only navigated us through complex challenges but also fueled the community spirit behind this successful release.
Project velocity
The CNCF K8s DevStats project aggregates a number of interesting data points related to the velocity of Kubernetes and various sub-projects. This includes everything from individual contributions to the number of companies that are contributing and is an illustration of the depth and breadth of effort that goes into evolving this ecosystem.
During the v1.35 release cycle, which spanned 14 weeks from 15th September 2025 to 17th December 2025, Kubernetes received contributions from as many as 85 different companies and 419 individuals. In the wider cloud native ecosystem, the figure goes up to 281 companies, counting 1769 total contributors.
Note that "contribution" counts when someone makes a commit, code review, comment, creates an issue or PR, reviews a PR (including blogs and documentation) or comments on issues and PRs.
If you are interested in contributing, visit Getting Started on our contributor website.
Sources for this data:
Events update
Explore upcoming Kubernetes and cloud native events, including KubeCon + CloudNativeCon, KCD, and other notable conferences worldwide. Stay informed and get involved with the Kubernetes community!
February 2026
- KCD - Kubernetes Community Days: New Delhi: Feb 21, 2026 | New Delhi, India
- KCD - Kubernetes Community Days: Guadalajara: Feb 23, 2026 | Guadalajara, Mexico
March 2026
- KubeCon + CloudNativeCon Europe 2026: Mar 23-26, 2026 | Amsterdam, Netherlands
May 2026
- KCD - Kubernetes Community Days: Toronto: May 13, 2026 | Toronto, Canada
- KCD - Kubernetes Community Days: Helsinki: May 20, 2026 | Helsinki, Finland
June 2026
- KubeCon + CloudNativeCon India 2026: Jun 18-19, 2026 | Mumbai, India
- KCD - Kubernetes Community Days: Kuala Lumpur: Jun 27, 2026 | Kuala Lumpur, Malaysia
July 2026
- KubeCon + CloudNativeCon Japan 2026: Jul 29-30, 2026 | Yokohama, Japan
You can find the latest event details here.
Upcoming release webinar
Join members of the Kubernetes v1.35 Release Team on Wednesday, January 14, 2026, at 5:00 PM (UTC) to learn about the release highlights of this release. For more information and registration, visit the event page on the CNCF Online Programs site.
Get involved
The simplest way to get involved with Kubernetes is by joining one of the many Special Interest Groups (SIGs) that align with your interests. Have something you’d like to broadcast to the Kubernetes community? Share your voice at our weekly community meeting, and through the channels below. Thank you for your continued feedback and support.
- Follow us on Bluesky @Kubernetesio for the latest updates
- Join the community discussion on Discuss
- Join the community on Slack
- Post questions (or answer questions) on Stack Overflow
- Share your Kubernetes story
- Read more about what’s happening with Kubernetes on the blog
- Learn more about the Kubernetes Release Team
Kubernetes v1.35 Sneak Peek
As the release of Kubernetes v1.35 approaches, the Kubernetes project continues to evolve. Features may be deprecated, removed, or replaced to improve the project's overall health. This blog post outlines planned changes for the v1.35 release that the release team believes you should be aware of to ensure the continued smooth operation of your Kubernetes cluster(s), and to keep you up to date with the latest developments. The information below is based on the current status of the v1.35 release and is subject to change before the final release date.
Deprecations and removals for Kubernetes v1.35
cgroup v1 support
On Linux nodes, container runtimes typically rely on cgroups (short for "control groups").
Support for using cgroup v2 has been stable in Kubernetes since v1.25, providing an alternative to the original v1 cgroup support. While cgroup v1 provided the initial resource control mechanism, it suffered from well-known
inconsistencies and limitations. Adding support for cgroup v2 allowed use of a unified control group hierarchy, improved resource isolation, and served as the foundation for modern features, making legacy cgroup v1 support ready for removal.
The removal of cgroup v1 support will only impact cluster administrators running nodes on older Linux distributions that do not support cgroup v2; on those nodes, the kubelet will fail to start. Administrators must migrate their nodes to systems with cgroup v2 enabled. More details on compatibility requirements will be available in a blog post soon after the v1.35 release.
To learn more, read about cgroup v2;
you can also track the switchover work via KEP-5573: Remove cgroup v1 support.
Deprecation of ipvs mode in kube-proxy
Many releases ago, the Kubernetes project implemented an ipvs mode in kube-proxy. It was adopted as a way to provide high-performance service load balancing, with better performance than the existing iptables mode. However, maintaining feature parity between ipvs and other kube-proxy modes became difficult, due to technical complexity and diverging requirements. This created significant technical debt and made the ipvs backend impractical to support alongside newer networking capabilities.
The Kubernetes project intends to deprecate kube-proxy ipvs mode in the v1.35 release, to streamline the kube-proxy codebase. For Linux nodes, the recommended kube-proxy mode is already nftables.
You can find more in KEP-5495: Deprecate ipvs mode in kube-proxy
Kubernetes is deprecating containerd v1.y support
While Kubernetes v1.35 still supports containerd 1.7 and other LTS releases of containerd, as a consequence of automated cgroup driver detection, the Kubernetes SIG Node community has formally agreed upon a final support timeline for containerd v1.X. Kubernetes v1.35 is the last release to offer this support (aligned with containerd 1.7 EOL).
This is a final warning that if you are using containerd 1.X, you must switch to 2.0 or later before upgrading Kubernetes to the next version. You are able to monitor the kubelet_cri_losing_support metric to determine if any nodes in your cluster are using a containerd version that will soon be unsupported.
You can find more in the official blog post or in KEP-4033: Discover cgroup driver from CRI
Featured enhancements of Kubernetes v1.35
The following enhancements are some of those likely to be included in the v1.35 release. This is not a commitment, and the release content is subject to change.
Node declared features
When scheduling Pods, Kubernetes uses node labels, taints, and tolerations to match workload requirements with node capabilities. However, managing feature compatibility becomes challenging during cluster upgrades due to version skew between the control plane and nodes. This can lead to Pods being scheduled on nodes that lack required features, resulting in runtime failures.
The node declared features framework will introduce a standard mechanism for nodes to declare their supported Kubernetes features. With the new alpha feature enabled, a Node reports the features it can support, publishing this information to the control plane through a new .status.declaredFeatures field. Then, the kube-scheduler, admission controllers and third-party components can use these declarations. For example, you can enforce scheduling and API validation constraints, ensuring that Pods run only on compatible nodes.
This approach reduces manual node labeling, improves scheduling accuracy, and prevents incompatible pod placements proactively. It also integrates with the Cluster Autoscaler for informed scale-up decisions. Feature declarations are temporary and tied to Kubernetes feature gates, enabling safe rollout and cleanup.
Targeting alpha in v1.35, node declared features aims to solve version skew scheduling issues by making node capabilities explicit, enhancing reliability and cluster stability in heterogeneous version environments.
To learn more about this before the official documentation is published, you can read KEP-5328.
In-place update of Pod resources
Kubernetes is graduating in-place updates for Pod resources to General Availability (GA). This feature allows users to adjust cpu and memory resources without restarting Pods or Containers. Previously, such modifications required recreating Pods, which could disrupt workloads, particularly for stateful or batch applications.
Previous Kubernetes releases already allowed you to change infrastructure resources settings (requests and limits) for existing Pods. This allows for smoother vertical scaling, improves efficiency, and can also simplify solution development.
The Container Runtime Interface (CRI) has also been improved, extending the UpdateContainerResources API for Windows and future runtimes while allowing ContainerStatus to report real-time resource configurations. Together, these changes make scaling in Kubernetes faster, more flexible, and disruption-free.
The feature was introduced as alpha in v1.27, graduated to beta in v1.33, and is targeting graduation to stable in v1.35.
You can find more in KEP-1287: In-place Update of Pod Resources
Pod certificates
When running microservices, Pods often require a strong cryptographic identity to authenticate with each other using mutual TLS (mTLS). While Kubernetes provides Service Account tokens, these are designed for authenticating to the API server, not for general-purpose workload identity.
Before this enhancement, operators had to rely on complex, external projects like SPIFFE/SPIRE or cert-manager to provision and rotate certificates for their workloads. But what if you could issue a unique, short-lived certificate to your Pods natively and automatically? KEP-4317 is designed to enable such native workload identity. It opens up various possibilities for securing pod-to-pod communication by allowing the kubelet to request and mount certificates for a Pod via a projected volume.
This provides a built-in mechanism for workload identity, complete with automated certificate rotation, significantly simplifying the setup of service meshes and other zero-trust network policies. This feature was introduced as alpha in v1.34 and is targeting beta in v1.35.
You can find more in KEP-4317: Pod Certificates
Numeric values for taints
Kubernetes is enhancing taints and tolerations by adding numeric comparison operators, such as Gt (Greater Than) and Lt (Less Than).
Previously, tolerations supported only exact (Equal) or existence (Exists) matches, which were not suitable for numeric properties such as reliability SLAs.
With this change, a Pod can use a toleration to "opt-in" to nodes that meet a specific numeric threshold. For example, a Pod can require a Node with an SLA taint value greater than 950 (operator: Gt, value: "950").
This approach is more powerful than Node Affinity because it supports the NoExecute effect, allowing Pods to be automatically evicted if a node's numeric value drops below the tolerated threshold.
You can find more in KEP-5471: Enable SLA-based Scheduling
User namespaces
When running Pods, you can use securityContext to drop privileges, but containers inside the pod often still run as root (UID 0). This simplicity poses a significant challenge, as that container UID 0 maps directly to the host's root user.
Before this enhancement, a container breakout vulnerability could grant an attacker full root access to the node. But what if you could dynamically remap the container's root user to a safe, unprivileged user on the host? KEP-127 specifically allows such native support for Linux User Namespaces. It opens up various possibilities for pod security by isolating container and host user/group IDs. This allows a process to have root privileges (UID 0) within its namespace, while running as a non-privileged, high-numbered UID on the host.
Released as alpha in v1.25 and beta in v1.30, this feature continues to progress through beta maturity, paving the way for truly "rootless" containers that drastically reduce the attack surface for a whole class of security vulnerabilities.
You can find more in KEP-127: User Namespaces
Support for mounting OCI images as volumes
When provisioning a Pod, you often need to bundle data, binaries, or configuration files for your containers.
Before this enhancement, people often included that kind of data directly into the main container image, or required a custom init container to download and unpack files into an emptyDir. You can still take either of those approaches, of course.
But what if you could populate a volume directly from a data-only artifact in an OCI registry, just like pulling a container image? Kubernetes v1.31 added support for the image volume type, allowing Pods to pull and unpack OCI container image artifacts into a volume declaratively.
This allows for seamless distribution of data, binaries, or ML models using standard registry tooling, completely decoupling data from the container image and eliminating the need for complex init containers or startup scripts. This volume type has been in beta since v1.33 and will likely be enabled by default in v1.35.
You can try out the beta version of image volumes, or you can learn more about the plans from KEP-4639: OCI Volume Source.
Want to know more?
New features and deprecations are also announced in the Kubernetes release notes. We will formally announce what's new in Kubernetes v1.35 as part of the CHANGELOG for that release.
The Kubernetes v1.35 release is planned for December 17, 2025. Stay tuned for updates!
You can also see the announcements of changes in the release notes for:
Get involved
The simplest way to get involved with Kubernetes is by joining one of the many Special Interest Groups (SIGs) that align with your interests. Have something you’d like to broadcast to the Kubernetes community? Share your voice at our weekly community meeting, and through the channels below. Thank you for your continued feedback and support.
- Follow us on Bluesky @kubernetes.io for the latest updates
- Join the community discussion on Discuss
- Join the community on Slack
- Post questions (or answer questions) on Server Fault or Stack Overflow
- Share your Kubernetes story
- Read more about what’s happening with Kubernetes on the blog
- Learn more about the Kubernetes Release Team
Kubernetes Configuration Good Practices
Configuration is one of those things in Kubernetes that seems small until it's not. Configuration is at the heart of every Kubernetes workload. A missing quote, a wrong API version or a misplaced YAML indent can ruin your entire deploy.
This blog brings together tried-and-tested configuration best practices. The small habits that make your Kubernetes setup clean, consistent and easier to manage. Whether you are just starting out or already deploying apps daily, these are the little things that keep your cluster stable and your future self sane.
This blog is inspired by the original Configuration Best Practices page, which has evolved through contributions from many members of the Kubernetes community.
General configuration practices
Use the latest stable API version
Kubernetes evolves fast. Older APIs eventually get deprecated and stop working. So, whenever you are defining resources, make sure you are using the latest stable API version. You can always check with
kubectl api-resources
This simple step saves you from future compatibility issues.
Store configuration in version control
Never apply manifest files directly from your desktop. Always keep them in a version control system like Git, it's your safety net. If something breaks, you can instantly roll back to a previous commit, compare changes or recreate your cluster setup without panic.
Write configs in YAML not JSON
Write your configuration files using YAML rather than JSON. Both work technically, but YAML is just easier for humans. It's cleaner to read and less noisy and widely used in the community.
YAML has some sneaky gotchas with boolean values:
Use only true or false.
Don't write yes, no, on or off.
They might work in one version of YAML but break in another. To be safe, quote anything that looks like a Boolean (for example "yes").
Keep configuration simple and minimal
Avoid setting default values that are already handled by Kubernetes. Minimal manifests are easier to debug, cleaner to review and less likely to break things later.
Group related objects together
If your Deployment, Service and ConfigMap all belong to one app, put them in a single manifest file.
It's easier to track changes and apply them as a unit.
See the Guestbook all-in-one.yaml file for an example of this syntax.
You can even apply entire directories with:
kubectl apply -f configs/
One command and boom everything in that folder gets deployed.
Add helpful annotations
Manifest files are not just for machines, they are for humans too. Use annotations to describe why something exists or what it does. A quick one-liner can save hours when debugging later and also allows better collaboration.
The most helpful annotation to set is kubernetes.io/description. It's like using comment, except that it gets copied into the API so that everyone else can see it even after you deploy.
Managing Workloads: Pods, Deployments, and Jobs
A common early mistake in Kubernetes is creating Pods directly. Pods work, but they don't reschedule themselves if something goes wrong.
Naked Pods (Pods not managed by a controller, such as Deployment or a StatefulSet) are fine for testing, but in real setups, they are risky.
Why? Because if the node hosting that Pod dies, the Pod dies with it and Kubernetes won't bring it back automatically.
Use Deployments for apps that should always be running
A Deployment, which both creates a ReplicaSet to ensure that the desired number of Pods is always available, and specifies a strategy to replace Pods (such as RollingUpdate), is almost always preferable to creating Pods directly. You can roll out a new version, and if something breaks, roll back instantly.
Use Jobs for tasks that should finish
A Job is perfect when you need something to run once and then stop like database migration or batch processing task. It will retry if the pods fails and report success when it's done.
Service Configuration and Networking
Services are how your workloads talk to each other inside (and sometimes outside) your cluster. Without them, your pods exist but can't reach anyone. Let's make sure that doesn't happen.
Create Services before workloads that use them
When Kubernetes starts a Pod, it automatically injects environment variables for existing Services. So, if a Pod depends on a Service, create a Service before its corresponding backend workloads (Deployments or StatefulSets), and before any workloads that need to access it.
For example, if a Service named foo exists, all containers will get the following variables in their initial environment:
FOO_SERVICE_HOST=<the host the Service runs on>
FOO_SERVICE_PORT=<the port the Service runs on>
DNS based discovery doesn't have this problem, but it's a good habit to follow anyway.
Use DNS for Service discovery
If your cluster has the DNS add-on (most do), every Service automatically gets a DNS entry. That means you can access it by name instead of IP:
curl http://my-service.default.svc.cluster.local
It's one of those features that makes Kubernetes networking feel magical.
Avoid hostPort and hostNetwork unless absolutely necessary
You'll sometimes see these options in manifests:
hostPort: 8080
hostNetwork: true
But here's the thing:
They tie your Pods to specific nodes, making them harder to schedule and scale. Because each <hostIP, hostPort, protocol> combination must be unique. If you don't specify the hostIP and protocol explicitly, Kubernetes will use 0.0.0.0 as the default hostIP and TCP as the default protocol.
Unless you're debugging or building something like a network plugin, avoid them.
If you just need local access for testing, try kubectl port-forward:
kubectl port-forward deployment/web 8080:80
See Use Port Forwarding to access applications in a cluster to learn more.
Or if you really need external access, use a type: NodePort Service. That's the safer, Kubernetes-native way.
Use headless Services for internal discovery
Sometimes, you don't want Kubernetes to load balance traffic. You want to talk directly to each Pod. That's where headless Services come in.
You create one by setting clusterIP: None.
Instead of a single IP, DNS gives you a list of all Pods IPs, perfect for apps that manage connections themselves.
Working with labels effectively
Labels are key/value pairs that are attached to objects such as Pods. Labels help you organize, query and group your resources. They don't do anything by themselves, but they make everything else from Services to Deployments work together smoothly.
Use semantics labels
Good labels help you understand what's what, even after months later. Define and use labels that identify semantic attributes of your application or Deployment. For example;
labels:
app.kubernetes.io/name: myapp
app.kubernetes.io/component: web
tier: frontend
phase: test
app.kubernetes.io/name: what the app istier: which layer it belongs to (frontend/backend)phase: which stage it's in (test/prod)
You can then use these labels to make powerful selectors. For example:
kubectl get pods -l tier=frontend
This will list all frontend Pods across your cluster, no matter which Deployment they came from. Basically you are not manually listing Pod names; you are just describing what you want. See the guestbook app for examples of this approach.
Use common Kubernetes labels
Kubernetes actually recommends a set of common labels. It's a standardized way to name things across your different workloads or projects. Following this convention makes your manifests cleaner, and it means that tools such as Headlamp, dashboard, or third-party monitoring systems can all automatically understand what's running.
Manipulate labels for debugging
Since controllers (like ReplicaSets or Deployments) use labels to manage Pods, you can remove a label to “detach” a Pod temporarily.
Example:
kubectl label pod mypod app-
The app- part removes the label key app.
Once that happens, the controller won’t manage that Pod anymore.
It’s like isolating it for inspection, a “quarantine mode” for debugging. To interactively remove or add labels, use kubectl label.
You can then check logs, exec into it and once done, delete it manually. That’s a super underrated trick every Kubernetes engineer should know.
Handy kubectl tips
These small tips make life much easier when you are working with multiple manifest files or clusters.
Apply entire directories
Instead of applying one file at a time, apply the whole folder:
# Using server-side apply is also a good practice
kubectl apply -f configs/ --server-side
This command looks for .yaml, .yml and .json files in that folder and applies them all together.
It's faster, cleaner and helps keep things grouped by app.
Use label selectors to get or delete resources
You don't always need to type out resource names one by one. Instead, use selectors to act on entire groups at once:
kubectl get pods -l app=myapp
kubectl delete pod -l phase=test
It's especially useful in CI/CD pipelines, where you want to clean up test resources dynamically.
Quickly create Deployments and Services
For quick experiments, you don't always need to write a manifest. You can spin up a Deployment right from the CLI:
kubectl create deployment webapp --image=nginx
Then expose it as a Service:
kubectl expose deployment webapp --port=80
This is great when you just want to test something before writing full manifests. Also, see Use a Service to Access an Application in a cluster for an example.
Conclusion
Cleaner configuration leads to calmer cluster administrators. If you stick to a few simple habits: keep configuration simple and minimal, version-control everything, use consistent labels, and avoid relying on naked Pods, you'll save yourself hours of debugging down the road.
The best part? Clean configurations stay readable. Even after months, you or anyone on your team can glance at them and know exactly what’s happening.
Ingress NGINX Retirement: What You Need to Know
To prioritize the safety and security of the ecosystem, Kubernetes SIG Network and the Security Response Committee are announcing the upcoming retirement of Ingress NGINX. Best-effort maintenance will continue until March 2026. Afterward, there will be no further releases, no bugfixes, and no updates to resolve any security vulnerabilities that may be discovered. Existing deployments of Ingress NGINX will continue to function and installation artifacts will remain available.
We recommend migrating to one of the many alternatives. Consider migrating to Gateway API, the modern replacement for Ingress. If you must continue using Ingress, many alternative Ingress controllers are listed in the Kubernetes documentation. Continue reading for further information about the history and current state of Ingress NGINX, as well as next steps.
About Ingress NGINX
Ingress is the original user-friendly way to direct network traffic to workloads running on Kubernetes. (Gateway API is a newer way to achieve many of the same goals.) In order for an Ingress to work in your cluster, there must be an Ingress controller running. There are many Ingress controller choices available, which serve the needs of different users and use cases. Some are cloud-provider specific, while others have more general applicability.
Ingress NGINX was an Ingress controller, developed early in the history of the Kubernetes project as an example implementation of the API. It became very popular due to its tremendous flexibility, breadth of features, and independence from any particular cloud or infrastructure provider. Since those days, many other Ingress controllers have been created within the Kubernetes project by community groups, and by cloud native vendors. Ingress NGINX has continued to be one of the most popular, deployed as part of many hosted Kubernetes platforms and within innumerable independent users’ clusters.
History and Challenges
The breadth and flexibility of Ingress NGINX has caused maintenance challenges. Changing expectations about cloud native software have also added complications. What were once considered helpful options have sometimes come to be considered serious security flaws, such as the ability to add arbitrary NGINX configuration directives via the "snippets" annotations. Yesterday’s flexibility has become today’s insurmountable technical debt.
Despite the project’s popularity among users, Ingress NGINX has always struggled with insufficient or barely-sufficient maintainership. For years, the project has had only one or two people doing development work, on their own time, after work hours and on weekends. Last year, the Ingress NGINX maintainers announced their plans to wind down Ingress NGINX and develop a replacement controller together with the Gateway API community. Unfortunately, even that announcement failed to generate additional interest in helping maintain Ingress NGINX or develop InGate to replace it. (InGate development never progressed far enough to create a mature replacement; it will also be retired.)
Current State and Next Steps
Currently, Ingress NGINX is receiving best-effort maintenance. SIG Network and the Security Response Committee have exhausted our efforts to find additional support to make Ingress NGINX sustainable. To prioritize user safety, we must retire the project.
In March 2026, Ingress NGINX maintenance will be halted, and the project will be retired. After that time, there will be no further releases, no bugfixes, and no updates to resolve any security vulnerabilities that may be discovered. The GitHub repositories will be made read-only and left available for reference.
Existing deployments of Ingress NGINX will not be broken. Existing project artifacts such as Helm charts and container images will remain available.
In most cases, you can check whether you use Ingress NGINX by running kubectl get pods \--all-namespaces \--selector app.kubernetes.io/name=ingress-nginx with cluster administrator permissions.
We would like to thank the Ingress NGINX maintainers for their work in creating and maintaining this project–their dedication remains impressive. This Ingress controller has powered billions of requests in datacenters and homelabs all around the world. In a lot of ways, Kubernetes wouldn’t be where it is without Ingress NGINX, and we are grateful for so many years of incredible effort.
SIG Network and the Security Response Committee recommend that all Ingress NGINX users begin migration to Gateway API or another Ingress controller immediately. Many options are listed in the Kubernetes documentation: Gateway API, Ingress. Additional options may be available from vendors you work with.
Announcing the 2025 Steering Committee Election Results
The 2025 Steering Committee Election is now complete. The Kubernetes Steering Committee consists of 7 seats, 4 of which were up for election in 2025. Incoming committee members serve a term of 2 years, and all members are elected by the Kubernetes Community.
The Steering Committee oversees the governance of the entire Kubernetes project. With that great power comes great responsibility. You can learn more about the steering committee’s role in their charter.
Thank you to everyone who voted in the election; your participation helps support the community’s continued health and success.
Results
Congratulations to the elected committee members whose two year terms begin immediately (listed in alphabetical order by GitHub handle):
- Kat Cosgrove (@katcosgrove), Minimus
- Paco Xu (@pacoxu), DaoCloud
- Rita Zhang (@ritazh), Microsoft
- Maciej Szulik (@soltysh), Defense Unicorns
They join continuing members:
- Antonio Ojea (@aojea), Google
- Benjamin Elder (@BenTheElder), Google
- Sascha Grunert (@saschagrunert), Red Hat
Maciej Szulik and Paco Xu are returning Steering Committee Members.
Big thanks!
Thank you and congratulations on a successful election to this round’s election officers:
- Christoph Blecker (@cblecker)
- Nina Polshakova (@npolshakova)
- Sreeram Venkitesh (@sreeram-venkitesh)
Thanks to the Emeritus Steering Committee Members. Your service is appreciated by the community:
- Stephen Augustus (@justaugustus), Bloomberg
- Patrick Ohly (@pohly), Intel
And thank you to all the candidates who came forward to run for election.
Get involved with the Steering Committee
This governing body, like all of Kubernetes, is open to all. You can follow along with Steering Committee meeting notes and weigh in by filing an issue or creating a PR against their repo. They have an open meeting on the first Wednesday at 8am PT of every month. They can also be contacted at their public mailing list steering@kubernetes.io.
You can see what the Steering Committee meetings are all about by watching past meetings on the YouTube Playlist.
This post was adapted from one written by the Contributor Comms Subproject. If you want to write stories about the Kubernetes community, learn more about us.
This article was revised in November 2025 to update the information about when the steering committee meets.
Gateway API 1.4: New Features
Ready to rock your Kubernetes networking? The Kubernetes SIG Network community presented the General Availability (GA) release of Gateway API (v1.4.0)! Released on October 6, 2025, version 1.4.0 reinforces the path for modern, expressive, and extensible service networking in Kubernetes.
Gateway API v1.4.0 brings three new features to the Standard channel (Gateway API's GA release channel):
- BackendTLSPolicy for TLS between gateways and backends
supportedFeaturesin GatewayClass status- Named rules for Routes
and introduces three new experimental features:
- Mesh resource for service mesh configuration
- Default gateways to ease configuration burden**
externalAuthfilter for HTTPRoute
Graduations to Standard Channel
Backend TLS policy
Leads: Candace Holman, Norwin Schnyder, Katarzyna Łach
GEP-1897: BackendTLSPolicy
BackendTLSPolicy is a new Gateway API type for specifying the TLS configuration of the connection from the Gateway to backend pod(s). . Prior to the introduction of BackendTLSPolicy, there was no API specification that allowed encrypted traffic on the hop from Gateway to backend.
The BackendTLSPolicy validation configuration requires a hostname. This hostname
serves two purposes. It is used as the SNI header when connecting to the backend and
for authentication, the certificate presented by the backend must match this hostname,
unless subjectAltNames is explicitly specified.
If subjectAltNames (SANs) are specified, the hostname is only used for SNI, and authentication is performed against the SANs instead. If you still need to authenticate against the hostname value in this case, you MUST add it to the subjectAltNames list.
BackendTLSPolicy validation configuration also requires either caCertificateRefs or wellKnownCACertificates.
caCertificateRefs refer to one or more (up to 8) PEM-encoded TLS certificate bundles. If there are no specific certificates to use,
then depending on your implementation, you may use wellKnownCACertificates,
set to "System" to tell the Gateway to use an implementation-specific set of trusted CA Certificates.
In this example, the BackendTLSPolicy is configured to use certificates defined in the auth-cert ConfigMap
to connect with a TLS-encrypted upstream connection where pods backing the auth service are expected to serve a
valid certificate for auth.example.com. It uses subjectAltNames with a Hostname type, but you may also use a URI type.
apiVersion: gateway.networking.k8s.io/v1
kind: BackendTLSPolicy
metadata:
name: tls-upstream-auth
spec:
targetRefs:
- kind: Service
name: auth
group: ""
sectionName: "https"
validation:
caCertificateRefs:
- group: "" # core API group
kind: ConfigMap
name: auth-cert
subjectAltNames:
- type: "Hostname"
hostname: "auth.example.com"
In this example, the BackendTLSPolicy is configured to use system certificates to connect with a TLS-encrypted backend connection where Pods backing the dev Service are expected to serve a valid certificate for dev.example.com.
apiVersion: gateway.networking.k8s.io/v1
kind: BackendTLSPolicy
metadata:
name: tls-upstream-dev
spec:
targetRefs:
- kind: Service
name: dev
group: ""
sectionName: "btls"
validation:
wellKnownCACertificates: "System"
hostname: dev.example.com
More information on the configuration of TLS in Gateway API can be found in Gateway API - TLS Configuration.
Status information about the features that an implementation supports
Leads: Lior Lieberman, Beka Modebadze
GEP-2162: Supported features in GatewayClass Status
GatewayClass status has a new field, supportedFeatures.
This addition allows implementations to declare the set of features they support. This provides a clear way for users and tools to understand the capabilities of a given GatewayClass.
This feature's name for conformance tests (and GatewayClass status reporting) is SupportedFeatures.
Implementations must populate the supportedFeatures field in the .status of the GatewayClass before the GatewayClass
is accepted, or in the same operation.
Here’s an example of a supportedFeatures published under GatewayClass' .status:
apiVersion: gateway.networking.k8s.io/v1
kind: GatewayClass
...
status:
conditions:
- lastTransitionTime: "2022-11-16T10:33:06Z"
message: Handled by Foo controller
observedGeneration: 1
reason: Accepted
status: "True"
type: Accepted
supportedFeatures:
- HTTPRoute
- HTTPRouteHostRewrite
- HTTPRoutePortRedirect
- HTTPRouteQueryParamMatching
Graduation of SupportedFeatures to Standard, helped improve the conformance testing process for Gateway API. The conformance test suite will now automatically run tests based on the features populated in the GatewayClass' status. This creates a strong, verifiable link between an implementation's declared capabilities and the test results, making it easier for implementers to run the correct conformance tests and for users to trust the conformance reports.
This means when the SupportedFeatures field is populated in the GatewayClass status there will be no need for additional
conformance tests flags like –suported-features, or –exempt or –all-features.
It's important to note that Mesh features are an exception to this and can be tested for conformance by using
Conformance Profiles, or by manually providing any combination of features related flags until the dedicated resource
graduates from the experimental channel.
Named rules for Routes
GEP-995: Adding a new name field to all xRouteRule types (HTTPRouteRule, GRPCRouteRule, etc.)
Leads: Guilherme Cassolato
This enhancement enables route rules to be explicitly identified and referenced across the Gateway API ecosystem. Some of the key use cases include:
- Status: Allowing status conditions to reference specific rules directly by name.
- Observability: Making it easier to identify individual rules in logs, traces, and metrics.
- Policies: Enabling policies (GEP-713) to target specific route rules via the
sectionNamefield in theirtargetRef[s]. - Tooling: Simplifying filtering and referencing of route rules in tools such as
gwctl,kubectl, and general-purpose utilities likejqandyq. - Internal configuration mapping: Facilitating the generation of internal configurations that reference route rules by name within gateway and mesh implementations.
This follows the same well-established pattern already adopted for Gateway listeners, Service ports, Pods (and containers), and many other Kubernetes resources.
While the new name field is optional (so existing resources remain valid), its use is strongly encouraged. Implementations are not expected to assign a default value, but they may enforce constraints such as immutability.
Finally, keep in mind that the name format is validated,
and other fields (such as sectionName)
may impose additional, indirect constraints.
Experimental channel changes
Enabling external Auth for HTTPRoute
Giving Gateway API the ability to enforce authentication and maybe authorization as well at the Gateway or HTTPRoute level has been a highly requested feature for a long time. (See the GEP-1494 issue for some background.)
This Gateway API release adds an Experimental filter in HTTPRoute that tells the Gateway API implementation to call out to an external service to authenticate (and, optionally, authorize) requests.
This filter is based on the Envoy ext_authz API, and allows talking to an Auth service that uses either gRPC or HTTP for its protocol.
Both methods allow the configuration of what headers to forward to the Auth service, with the HTTP protocol allowing some extra information like a prefix path.
A HTTP example might look like this (noting that this example requires the Experimental channel to be installed and an implementation that supports External Auth to actually understand the config):
apiVersion: gateway.networking.k8s.io/v1
kind: HTTPRoute
metadata:
name: require-auth
namespace: default
spec:
parentRefs:
- name: your-gateway-here
rules:
- matches:
- path:
type: Prefix
value: /admin
filters:
- type: ExternalAuth
externalAuth:
protocol: HTTP
backendRef:
name: auth-service
http:
# These headers are always sent for the HTTP protocol,
# but are included here for illustrative purposes
allowedHeaders:
- Host
- Method
- Path
- Content-Length
- Authorization
backendRefs:
- name: admin-backend
port: 8080
This allows the backend Auth service to use the supplied headers to make a determination about the authentication for the request.
When a request is allowed, the external Auth service will respond with a 200 HTTP response code, and optionally extra headers to be included in the request that is forwarded to the backend. When the request is denied, the Auth service will respond with a 403 HTTP response.
Since the Authorization header is used in many authentication methods, this method can be used to do Basic, Oauth, JWT, and other common authentication and authorization methods.
Mesh resource
Lead(s): Flynn
GEP-3949: Mesh-wide configuration and supported features
Gateway API v1.4.0 introduces a new experimental Mesh resource, which provides a way to configure mesh-wide settings and discover the features supported by a given mesh implementation. This resource is analogous to the Gateway resource and will initially be mainly used for conformance testing, with plans to extend its use to off-cluster Gateways in the future.
The Mesh resource is cluster-scoped and, as an experimental feature, is named XMesh and resides in the gateway.networking.x-k8s.io API group. A key field is controllerName, which specifies the mesh implementation responsible for the resource. The resource's status stanza indicates whether the mesh implementation has accepted it and lists the features the mesh supports.
One of the goals of this GEP is to avoid making it more difficult for users to adopt a mesh. To simplify adoption, mesh implementations are expected to create a default Mesh resource upon startup if one with a matching controllerName doesn't already exist. This avoids the need for manual creation of the resource to begin using a mesh.
The new XMesh API kind, within the gateway.networking.x-k8s.io/v1alpha1 API group, provides a central point for mesh configuration and feature discovery (source).
A minimal XMesh object specifies the controllerName:
apiVersion: gateway.networking.x-k8s.io/v1alpha1
kind: XMesh
metadata:
name: one-mesh-to-mesh-them-all
spec:
controllerName: one-mesh.example.com/one-mesh
The mesh implementation populates the status field to confirm it has accepted the resource and to list its supported features ( source):
status:
conditions:
- type: Accepted
status: "True"
reason: Accepted
supportedFeatures:
- name: MeshHTTPRoute
- name: OffClusterGateway
Introducing default Gateways
Lead(s): Flynn
GEP-3793: Allowing Gateways to program some routes by default.
For application developers, one common piece of feedback has been the need to explicitly name a parent Gateway for every single north-south Route. While this explicitness prevents ambiguity, it adds friction, especially for developers who just want to expose their application to the outside world without worrying about the underlying infrastructure's naming scheme. To address this, we have introduce the concept of Default Gateways.
For application developers: Just "use the default"
As an application developer, you often don't care about the specific Gateway your traffic flows through, you just want it to work. With this enhancement, you can now create a Route and simply ask it to use a default Gateway.
This is done by setting the new useDefaultGateways field in your Route's spec.
Here’s a simple HTTPRoute that uses a default Gateway:
apiVersion: gateway.networking.k8s.io/v1
kind: HTTPRoute
metadata:
name: my-route
spec:
useDefaultGateways: All
rules:
- backendRefs:
- name: my-service
port: 80
That's it! No more need to hunt down the correct Gateway name for your environment. Your Route is now a "defaulted Route."
For cluster operators: You're still in control
This feature doesn't take control away from cluster operators ("Chihiro"). In fact, they have explicit control over which Gateways can act as a default. A Gateway will only accept these defaulted Routes if it is configured to do so.
You can also use a ValidatingAdmissionPolicy to either require or even forbid for Routes to rely on a default Gateway.
As a cluster operator, you can designate a Gateway as a default
by setting the (new) .spec.defaultScope field:
apiVersion: gateway.networking.k8s.io/v1
kind: Gateway
metadata:
name: my-default-gateway
namespace: default
spec:
defaultScope: All
# ... other gateway configuration
Operators can choose to have no default Gateways, or even multiple.
How it works and key details
To maintain a clean, GitOps-friendly workflow, a default Gateway does not modify the
spec.parentRefsof your Route. Instead, the binding is reflected in the Route'sstatusfield. You can always inspect thestatus.parentsstanza of your Route to see exactly which Gateway or Gateways have accepted it. This preserves your original intent and avoids conflicts with CD tools.The design explicitly supports having multiple Gateways designated as defaults within a cluster. When this happens, a defaulted Route will bind to all of them. This enables cluster operators to perform zero-downtime migrations and testing of new default Gateways.
You can create a single Route that handles both north-south traffic (traffic entering or leaving the cluster, via a default Gateway) and east-west/mesh traffic (traffic between services within the cluster), by explicitly referencing a Service in
parentRefs.
Default Gateways represent a significant step forward in making the Gateway API simpler and more intuitive for everyday use cases, bridging the gap between the flexibility needed by operators and the simplicity desired by developers.
Configuring client certificate validation
Lead(s): Arko Dasgupta, Katarzyna Łach
GEP-91: Address connection coalescing security issue
This release brings updates for configuring client certificate validation, addressing a critical security vulnerability related to connection reuse. HTTP connection coalescing is a web performance optimization that allows a client to reuse an existing TLS connection for requests to different domains. While this reduces the overhead of establishing new connections, it introduces a security risk in the context of API gateways. The ability to reuse a single TLS connection across multiple Listeners brings the need to introduce shared client certificate configuration in order to avoid unauthorized access.
Why SNI-based mTLS is not the answer
One might think that using Server Name Indication (SNI) to differentiate between Listeners would solve this problem. However, TLS SNI is not a reliable mechanism for enforcing security policies in a connection coalescing scenario. A client could use a single TLS connection for multiple peer connections, as long as they are all covered by the same certificate. This means that a client could establish a connection by indicating one peer identity (using SNI), and then reuse that connection to access a different virtual host that is listening on the same IP address and port. That reuse, which is controlled by client side heuristics, could bypass mutual TLS policies that were specific to the second listener configuration.
Here's an example to help explain it:
apiVersion: gateway.networking.k8s.io/v1
kind: Gateway
metadata:
name: wildcard-tls-gateway
spec:
gatewayClassName: example
listeners:
- name: foo-https
protocol: HTTPS
port: 443
hostname: foo.example.com
tls:
certificateRefs:
- group: "" # core API group
kind: Secret
name: foo-example-com-cert # SAN: foo.example.com
- name: wildcard-https
protocol: HTTPS
port: 443
hostname: "*.example.com"
tls:
certificateRefs:
- group: "" # core API group
kind: Secret
name: wildcard-example-com-cert # SAN: *.example.com
I have configured a Gateway with two listeners, both having overlapping hostnames.
My intention is for the foo-http listener to be accessible only by clients presenting the foo-example-com-cert certificate.
In contrast, the wildcard-https listener should allow access to a broader audience using any certificate valid for the *.example.com domain.
Consider a scenario where a client initially connects to foo.example.com. The server requests and successfully validates the
foo-example-com-cert certificate, establishing the connection. Subsequently, the same client wishes to access other sites within this domain,
such as bar.example.com, which is handled by the wildcard-https listener. Due to connection reuse,
clients can access wildcard-https backends without an additional TLS handshake on the existing connection.
This process functions as expected.
However, a critical security vulnerability arises when the order of access is reversed.
If a client first connects to bar.example.com and presents a valid bar.example.com certificate, the connection is successfully established.
If this client then attempts to access foo.example.com, the existing connection's client certificate will not be re-validated.
This allows the client to bypass the specific certificate requirement for the foo backend, leading to a serious security breach.
The solution: per-port TLS configuration
The updated Gateway API gains a tls field in the .spec of a Gateway, that allows you to define a default client certificate
validation configuration for all Listeners, and then if needed override it on a per-port basis. This provides a flexible and
powerful way to manage your TLS policies.
Here’s a look at the updated API definitions (shown as Go source code):
// GatewaySpec defines the desired state of Gateway.
type GatewaySpec struct {
...
// GatewayTLSConfig specifies frontend tls configuration for gateway.
TLS *GatewayTLSConfig `json:"tls,omitempty"`
}
// GatewayTLSConfig specifies frontend tls configuration for gateway.
type GatewayTLSConfig struct {
// Default specifies the default client certificate validation configuration
Default TLSConfig `json:"default"`
// PerPort specifies tls configuration assigned per port.
PerPort []TLSPortConfig `json:"perPort,omitempty"`
}
// TLSPortConfig describes a TLS configuration for a specific port.
type TLSPortConfig struct {
// The Port indicates the Port Number to which the TLS configuration will be applied.
Port PortNumber `json:"port"`
// TLS store the configuration that will be applied to all Listeners handling
// HTTPS traffic and matching given port.
TLS TLSConfig `json:"tls"`
}
Breaking changes
Standard GRPCRoute - .spec field required (technicality)
The promotion of GRPCRoute to Standard introduces a minor but technically breaking change regarding the presence of the top-level .spec field.
As part of achieving Standard status, the Gateway API has tightened the OpenAPI schema validation within the GRPCRoute
CustomResourceDefinition (CRD)
to explicitly ensure the spec field is required for all GRPCRoute resources.
This change enforces stricter conformance to Kubernetes object standards and enhances the resource's stability and predictability.
While it is highly unlikely that users were attempting to define a GRPCRoute without any specification, any existing automation
or manifests that might have relied on a relaxed interpretation allowing a completely absent spec field will now fail validation
and must be updated to include the .spec field, even if empty.
Experimental CORS support in HTTPRoute - breaking change for allowCredentials field
The Gateway API subproject has introduced a breaking change to the Experimental CORS support in HTTPRoute, concerning the allowCredentials field
within the CORS policy.
This field's definition has been strictly aligned with the upstream CORS specification, which dictates that the corresponding
Access-Control-Allow-Credentials header must represent a Boolean value.
Previously, the implementation might have been overly permissive, potentially accepting non-standard or string representations such as
true due to relaxed schema validation.
Users who were configuring CORS rules must now review their manifests and ensure the value for allowCredentials
strictly conforms to the new, more restrictive schema.
Any existing HTTPRoute definitions that do not adhere to this stricter validation will now be rejected by the API server,
requiring a configuration update to maintain functionality.
Improving the development and usage experience
As part of this release, we have improved some of the developer experience workflow:
- Added Kube API Linter to the CI/CD pipelines, reducing the burden of API reviewers and also reducing the amount of common mistakes.
- Improving the execution time of CRD tests with the usage of
envtest.
Additionally, as part of the effort to improve Gateway API usage experience, some efforts were made to remove some ambiguities and some old tech-debts from our documentation website:
- The API reference is now explicit when a field is
experimental. - The GEP (GatewayAPI Enhancement Proposal) navigation bar is automatically generated, reflecting the real status of the enhancements.
Try it out
Unlike other Kubernetes APIs, you don't need to upgrade to the latest version of Kubernetes to get the latest version of Gateway API. As long as you're running Kubernetes 1.26 or later, you'll be able to get up and running with this version of Gateway API.
To try out the API, follow the Getting Started Guide.
As of this writing, seven implementations are already conformant with Gateway API v1.4.0. In alphabetical order:
Get involved
Wondering when a feature will be added? There are lots of opportunities to get involved and help define the future of Kubernetes routing APIs for both ingress and service mesh.
- Check out the user guides to see what use-cases can be addressed.
- Try out one of the existing Gateway controllers.
- Or join us in the community and help us build the future of Gateway API together!
The maintainers would like to thank everyone who's contributed to Gateway API, whether in the form of commits to the repo, discussion, ideas, or general support. We could never have made this kind of progress without the support of this dedicated and active community.
Related Kubernetes blog articles
- Gateway API v1.3.0: Advancements in Request Mirroring, CORS, Gateway Merging, and Retry Budgets (June 2025)
- Gateway API v1.2: WebSockets, Timeouts, Retries, and More (November 2024)
- Gateway API v1.1: Service mesh, GRPCRoute, and a whole lot more (May 2024)
- New Experimental Features in Gateway API v1.0 (November 2023)
- Gateway API v1.0: GA Release (October 2023)
7 Common Kubernetes Pitfalls (and How I Learned to Avoid Them)
It’s no secret that Kubernetes can be both powerful and frustrating at times. When I first started dabbling with container orchestration, I made more than my fair share of mistakes enough to compile a whole list of pitfalls. In this post, I want to walk through seven big gotchas I’ve encountered (or seen others run into) and share some tips on how to avoid them. Whether you’re just kicking the tires on Kubernetes or already managing production clusters, I hope these insights help you steer clear of a little extra stress.
1. Skipping resource requests and limits
The pitfall: Not specifying CPU and memory requirements in Pod specifications. This typically happens because Kubernetes does not require these fields, and workloads can often start and run without them—making the omission easy to overlook in early configurations or during rapid deployment cycles.
Context: In Kubernetes, resource requests and limits are critical for efficient cluster management. Resource requests ensure that the scheduler reserves the appropriate amount of CPU and memory for each pod, guaranteeing that it has the necessary resources to operate. Resource limits cap the amount of CPU and memory a pod can use, preventing any single pod from consuming excessive resources and potentially starving other pods. When resource requests and limits are not set:
- Resource Starvation: Pods may get insufficient resources, leading to degraded performance or failures. This is because Kubernetes schedules pods based on these requests. Without them, the scheduler might place too many pods on a single node, leading to resource contention and performance bottlenecks.
- Resource Hoarding: Conversely, without limits, a pod might consume more than its fair share of resources, impacting the performance and stability of other pods on the same node. This can lead to issues such as other pods getting evicted or killed by the Out-Of-Memory (OOM) killer due to lack of available memory.
How to avoid it:
- Start with modest
requests(for example100mCPU,128Mimemory) and see how your app behaves. - Monitor real-world usage and refine your values; the HorizontalPodAutoscaler can help automate scaling based on metrics.
- Keep an eye on
kubectl top podsor your logging/monitoring tool to confirm you’re not over- or under-provisioning.
My reality check: Early on, I never thought about memory limits. Things seemed fine on my local cluster. Then, on a larger environment, Pods got OOMKilled left and right. Lesson learned. For detailed instructions on configuring resource requests and limits for your containers, please refer to Assign Memory Resources to Containers and Pods (part of the official Kubernetes documentation).
2. Underestimating liveness and readiness probes
The pitfall: Deploying containers without explicitly defining how Kubernetes should check their health or readiness. This tends to happen because Kubernetes will consider a container “running” as long as the process inside hasn’t exited. Without additional signals, Kubernetes assumes the workload is functioning—even if the application inside is unresponsive, initializing, or stuck.
Context:
Liveness, readiness, and startup probes are mechanisms Kubernetes uses to monitor container health and availability.
- Liveness probes determine if the application is still alive. If a liveness check fails, the container is restarted.
- Readiness probes control whether a container is ready to serve traffic. Until the readiness probe passes, the container is removed from Service endpoints.
- Startup probes help distinguish between long startup times and actual failures.
How to avoid it:
- Add a simple HTTP
livenessProbeto check a health endpoint (for example/healthz) so Kubernetes can restart a hung container. - Use a
readinessProbeto ensure traffic doesn’t reach your app until it’s warmed up. - Keep probes simple. Overly complex checks can create false alarms and unnecessary restarts.
My reality check: I once forgot a readiness probe for a web service that took a while to load. Users hit it prematurely, got weird timeouts, and I spent hours scratching my head. A 3-line readiness probe would have saved the day.
For comprehensive instructions on configuring liveness, readiness, and startup probes for containers, please refer to Configure Liveness, Readiness and Startup Probes in the official Kubernetes documentation.
3. “We’ll just look at container logs” (famous last words)
The pitfall: Relying solely on container logs retrieved via kubectl logs. This often happens because the command is quick and convenient, and in many setups, logs appear accessible during development or early troubleshooting. However, kubectl logs only retrieves logs from currently running or recently terminated containers, and those logs are stored on the node’s local disk. As soon as the container is deleted, evicted, or the node is restarted, the log files may be rotated out or permanently lost.
How to avoid it:
- Centralize logs using CNCF tools like Fluentd or Fluent Bit to aggregate output from all Pods.
- Adopt OpenTelemetry for a unified view of logs, metrics, and (if needed) traces. This lets you spot correlations between infrastructure events and app-level behavior.
- Pair logs with Prometheus metrics to track cluster-level data alongside application logs. If you need distributed tracing, consider CNCF projects like Jaeger.
My reality check: The first time I lost Pod logs to a quick restart, I realized how flimsy “kubectl logs” can be on its own. Since then, I’ve set up a proper pipeline for every cluster to avoid missing vital clues.
4. Treating dev and prod exactly the same
The pitfall: Deploying the same Kubernetes manifests with identical settings across development, staging, and production environments. This often occurs when teams aim for consistency and reuse, but overlook that environment-specific factors—such as traffic patterns, resource availability, scaling needs, or access control—can differ significantly. Without customization, configurations optimized for one environment may cause instability, poor performance, or security gaps in another.
How to avoid it:
- Use environment overlays or kustomize to maintain a shared base while customizing resource requests, replicas, or config for each environment.
- Extract environment-specific configuration into ConfigMaps and / or Secrets. You can use a specialized tool such as Sealed Secrets to manage confidential data.
- Plan for scale in production. Your dev cluster can probably get away with minimal CPU/memory, but prod might need significantly more.
My reality check: One time, I scaled up replicaCount from 2 to 10 in a tiny dev environment just to “test.” I promptly ran out of resources and spent half a day cleaning up the aftermath. Oops.
5. Leaving old stuff floating around
The pitfall: Leaving unused or outdated resources—such as Deployments, Services, ConfigMaps, or PersistentVolumeClaims—running in the cluster. This often happens because Kubernetes does not automatically remove resources unless explicitly instructed, and there is no built-in mechanism to track ownership or expiration. Over time, these forgotten objects can accumulate, consuming cluster resources, increasing cloud costs, and creating operational confusion, especially when stale Services or LoadBalancers continue to route traffic.
How to avoid it:
- Label everything with a purpose or owner label. That way, you can easily query resources you no longer need.
- Regularly audit your cluster: run
kubectl get all -n <namespace>to see what’s actually running, and confirm it’s all legit. - Adopt Kubernetes’ Garbage Collection: K8s docs show how to remove dependent objects automatically.
- Leverage policy automation: Tools like Kyverno can automatically delete or block stale resources after a certain period, or enforce lifecycle policies so you don’t have to remember every single cleanup step.
My reality check: After a hackathon, I forgot to tear down a “test-svc” pinned to an external load balancer. Three weeks later, I realized I’d been paying for that load balancer the entire time. Facepalm.
6. Diving too deep into networking too soon
The pitfall: Introducing advanced networking solutions—such as service meshes, custom CNI plugins, or multi-cluster communication—before fully understanding Kubernetes' native networking primitives. This commonly occurs when teams implement features like traffic routing, observability, or mTLS using external tools without first mastering how core Kubernetes networking works: including Pod-to-Pod communication, ClusterIP Services, DNS resolution, and basic ingress traffic handling. As a result, network-related issues become harder to troubleshoot, especially when overlays introduce additional abstractions and failure points.
How to avoid it:
- Start small: a Deployment, a Service, and a basic ingress controller such as one based on NGINX (e.g., Ingress-NGINX).
- Make sure you understand how traffic flows within the cluster, how service discovery works, and how DNS is configured.
- Only move to a full-blown mesh or advanced CNI features when you actually need them, complex networking adds overhead.
My reality check: I tried Istio on a small internal app once, then spent more time debugging Istio itself than the actual app. Eventually, I stepped back, removed Istio, and everything worked fine.
7. Going too light on security and RBAC
The pitfall: Deploying workloads with insecure configurations, such as running containers as the root user, using the latest image tag, disabling security contexts, or assigning overly broad RBAC roles like cluster-admin. These practices persist because Kubernetes does not enforce strict security defaults out of the box, and the platform is designed to be flexible rather than opinionated. Without explicit security policies in place, clusters can remain exposed to risks like container escape, unauthorized privilege escalation, or accidental production changes due to unpinned images.
How to avoid it:
- Use RBAC to define roles and permissions within Kubernetes. While RBAC is the default and most widely supported authorization mechanism, Kubernetes also allows the use of alternative authorizers. For more advanced or external policy needs, consider solutions like OPA Gatekeeper (based on Rego), Kyverno, or custom webhooks using policy languages such as CEL or Cedar.
- Pin images to specific versions (no more
:latest!). This helps you know what’s actually deployed. - Look into Pod Security Admission (or other solutions like Kyverno) to enforce non-root containers, read-only filesystems, etc.
My reality check: I never had a huge security breach, but I’ve heard plenty of cautionary tales. If you don’t tighten things up, it’s only a matter of time before something goes wrong.
Final thoughts
Kubernetes is amazing, but it’s not psychic, it won’t magically do the right thing if you don’t tell it what you need. By keeping these pitfalls in mind, you’ll avoid a lot of headaches and wasted time. Mistakes happen (trust me, I’ve made my share), but each one is a chance to learn more about how Kubernetes truly works under the hood. If you’re curious to dive deeper, the official docs and the community Slack are excellent next steps. And of course, feel free to share your own horror stories or success tips, because at the end of the day, we’re all in this cloud native adventure together.
Happy Shipping!
Spotlight on Policy Working Group
(Note: The Policy Working Group has completed its mission and is no longer active. This article reflects its work, accomplishments, and insights into how a working group operates.)
In the complex world of Kubernetes, policies play a crucial role in managing and securing clusters. But have you ever wondered how these policies are developed, implemented, and standardized across the Kubernetes ecosystem? To answer that, let's take a look back at the work of the Policy Working Group.
The Policy Working Group was dedicated to a critical mission: providing an overall architecture that encompasses both current policy-related implementations and future policy proposals in Kubernetes. Their goal was both ambitious and essential: to develop a universal policy architecture that benefits developers and end-users alike.
Through collaborative methods, this working group strove to bring clarity and consistency to the often complex world of Kubernetes policies. By focusing on both existing implementations and future proposals, they ensured that the policy landscape in Kubernetes remains coherent and accessible as the technology evolves.
This blog post dives deeper into the work of the Policy Working Group, guided by insights from its former co-chairs:
Interviewed by Arujjwal Negi.
These co-chairs explained what the Policy Working Group was all about.
Introduction
Hello, thank you for the time! Let’s start with some introductions, could you tell us a bit about yourself, your role, and how you got involved in Kubernetes?
Jim Bugwadia: My name is Jim Bugwadia, and I am a co-founder and the CEO at Nirmata which provides solutions that automate security and compliance for cloud-native workloads. At Nirmata, we have been working with Kubernetes since it started in 2014. We initially built a Kubernetes policy engine in our commercial platform and later donated it to CNCF as the Kyverno project. I joined the CNCF Kubernetes Policy Working Group to help build and standardize various aspects of policy management for Kubernetes and later became a co-chair.
Andy Suderman: My name is Andy Suderman and I am the CTO of Fairwinds, a managed Kubernetes-as-a-Service provider. I began working with Kubernetes in 2016 building a web conferencing platform. I am an author and/or maintainer of several Kubernetes-related open-source projects such as Goldilocks, Pluto, and Polaris. Polaris is a JSON-schema-based policy engine, which started Fairwinds' journey into the policy space and my involvement in the Policy Working Group.
Poonam Lamba: My name is Poonam Lamba, and I currently work as a Product Manager for Google Kubernetes Engine (GKE) at Google. My journey with Kubernetes began back in 2017 when I was building an SRE platform for a large enterprise, using a private cloud built on Kubernetes. Intrigued by its potential to revolutionize the way we deployed and managed applications at the time, I dove headfirst into learning everything I could about it. Since then, I've had the opportunity to build the policy and compliance products for GKE. I lead and contribute to GKE CIS benchmarks. I am involved with the Gatekeeper project as well as I have contributed to Policy-WG for over 2 years and served as a co-chair for the group.
Responses to the following questions represent an amalgamation of insights from the former co-chairs.
About Working Groups
One thing even I am not aware of is the difference between a working group and a SIG. Can you help us understand what a working group is and how it is different from a SIG?
Unlike SIGs, working groups are temporary and focused on tackling specific, cross-cutting issues or projects that may involve multiple SIGs. Their lifespan is defined, and they disband once they've achieved their objective. Generally, working groups don't own code or have long-term responsibility for managing a particular area of the Kubernetes project.
(To know more about SIGs, visit the list of Special Interest Groups)
You mentioned that Working Groups involve multiple SIGS. What SIGS was the Policy WG closely involved with, and how did you coordinate with them?
The group collaborated closely with Kubernetes SIG Auth throughout our existence, and more recently, the group also worked with SIG Security since its formation. Our collaboration occurred in a few ways. We provided periodic updates during the SIG meetings to keep them informed of our progress and activities. Additionally, we utilize other community forums to maintain open lines of communication and ensured our work aligned with the broader Kubernetes ecosystem. This collaborative approach helped the group stay coordinated with related efforts across the Kubernetes community.
Policy WG
Why was the Policy Working Group created?
To enable a broad set of use cases, we recognize that Kubernetes is powered by a highly declarative, fine-grained, and extensible configuration management system. We've observed that a Kubernetes configuration manifest may have different portions that are important to various stakeholders. For example, some parts may be crucial for developers, while others might be of particular interest to security teams or address operational concerns. Given this complexity, we believe that policies governing the usage of these intricate configurations are essential for success with Kubernetes.
Our Policy Working Group was created specifically to research the standardization of policy definitions and related artifacts. We saw a need to bring consistency and clarity to how policies are defined and implemented across the Kubernetes ecosystem, given the diverse requirements and stakeholders involved in Kubernetes deployments.
Can you give me an idea of the work you did in the group?
We worked on several Kubernetes policy-related projects. Our initiatives included:
- We worked on a Kubernetes Enhancement Proposal (KEP) for the Kubernetes Policy Reports API. This aims to standardize how policy reports are generated and consumed within the Kubernetes ecosystem.
- We conducted a CNCF survey to better understand policy usage in the Kubernetes space. This helped gauge the practices and needs across the community at the time.
- We wrote a paper that will guide users in achieving PCI-DSS compliance for containers. This is intended to help organizations meet important security standards in their Kubernetes environments.
- We also worked on a paper highlighting how shifting security down can benefit organizations. This focuses on the advantages of implementing security measures earlier in the development and deployment process.
Can you tell us what were the main objectives of the Policy Working Group and some of your key accomplishments?
The charter of the Policy WG was to help standardize policy management for Kubernetes and educate the community on best practices.
To accomplish this we updated the Kubernetes documentation (Policies | Kubernetes), produced several whitepapers (Kubernetes Policy Management, Kubernetes GRC), and created the Policy Reports API (API reference) which standardizes reporting across various tools. Several popular tools such as Falco, Trivy, Kyverno, kube-bench, and others support the Policy Report API. A major milestone for the Policy WG was promoting the Policy Reports API to a SIG-level API or finding it a stable home.
Beyond that, as ValidatingAdmissionPolicy and MutatingAdmissionPolicy approached GA in Kubernetes, a key goal of the WG was to guide and educate the community on the tradeoffs and appropriate usage patterns for these built-in API objects and other CNCF policy management solutions like OPA/Gatekeeper and Kyverno.
Challenges
What were some of the major challenges that the Policy Working Group worked on?
During our work in the Policy Working Group, we encountered several challenges:
One of the main issues we faced was finding time to consistently contribute. Given that many of us have other professional commitments, it can be difficult to dedicate regular time to the working group's initiatives.
Another challenge we experienced was related to our consensus-driven model. While this approach ensures that all voices are heard, it can sometimes lead to slower decision-making processes. We valued thorough discussion and agreement, but this can occasionally delay progress on our projects.
We've also encountered occasional differences of opinion among group members. These situations require careful navigation to ensure that we maintain a collaborative and productive environment while addressing diverse viewpoints.
Lastly, we've noticed that newcomers to the group may find it difficult to contribute effectively without consistent attendance at our meetings. The complex nature of our work often requires ongoing context, which can be challenging for those who aren't able to participate regularly.
Can you tell me more about those challenges? How did you discover each one? What has the impact been? What were some strategies you used to address them?
There are no easy answers, but having more contributors and maintainers greatly helps! Overall the CNCF community is great to work with and is very welcoming to beginners. So, if folks out there are hesitating to get involved, I highly encourage them to attend a WG or SIG meeting and just listen in.
It often takes a few meetings to fully understand the discussions, so don't feel discouraged if you don't grasp everything right away. We made a point to emphasize this and encouraged new members to review documentation as a starting point for getting involved.
Additionally, differences of opinion were valued and encouraged within the Policy-WG. We adhered to the CNCF core values and resolve disagreements by maintaining respect for one another. We also strove to timebox our decisions and assign clear responsibilities to keep things moving forward.
This is where our discussion about the Policy Working Group ends. The working group, and especially the people who took part in this article, hope this gave you some insights into the group's aims and workings. You can get more info about Working Groups here.
Introducing Headlamp Plugin for Karpenter - Scaling and Visibility
Headlamp is an open‑source, extensible Kubernetes SIG UI project designed to let you explore, manage, and debug cluster resources.
Karpenter is a Kubernetes Autoscaling SIG node provisioning project that helps clusters scale quickly and efficiently. It launches new nodes in seconds, selects appropriate instance types for workloads, and manages the full node lifecycle, including scale-down.
The new Headlamp Karpenter Plugin adds real-time visibility into Karpenter’s activity directly from the Headlamp UI. It shows how Karpenter resources relate to Kubernetes objects, displays live metrics, and surfaces scaling events as they happen. You can inspect pending pods during provisioning, review scaling decisions, and edit Karpenter-managed resources with built-in validation. The Karpenter plugin was made as part of a LFX mentor project.
The Karpenter plugin for Headlamp aims to make it easier for Kubernetes users and operators to understand, debug, and fine-tune autoscaling behavior in their clusters. Now we will give a brief tour of the Headlamp plugin.
Map view of Karpenter Resources and how they relate to Kubernetes resources
Easily see how Karpenter Resources like NodeClasses, NodePool and NodeClaims connect with core Kubernetes resources like Pods, Nodes etc.

Visualization of Karpenter Metrics
Get instant insights of Resource Usage v/s Limits, Allowed disruptions, Pending Pods, Provisioning Latency and many more .
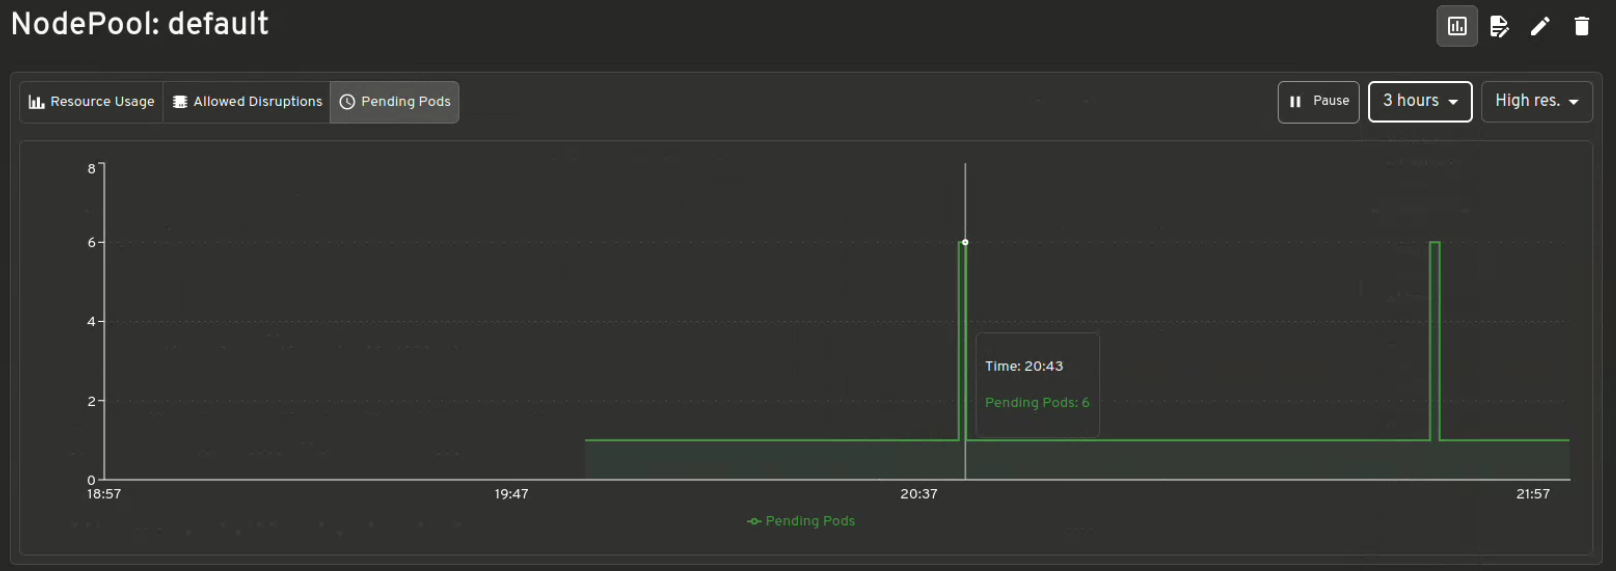
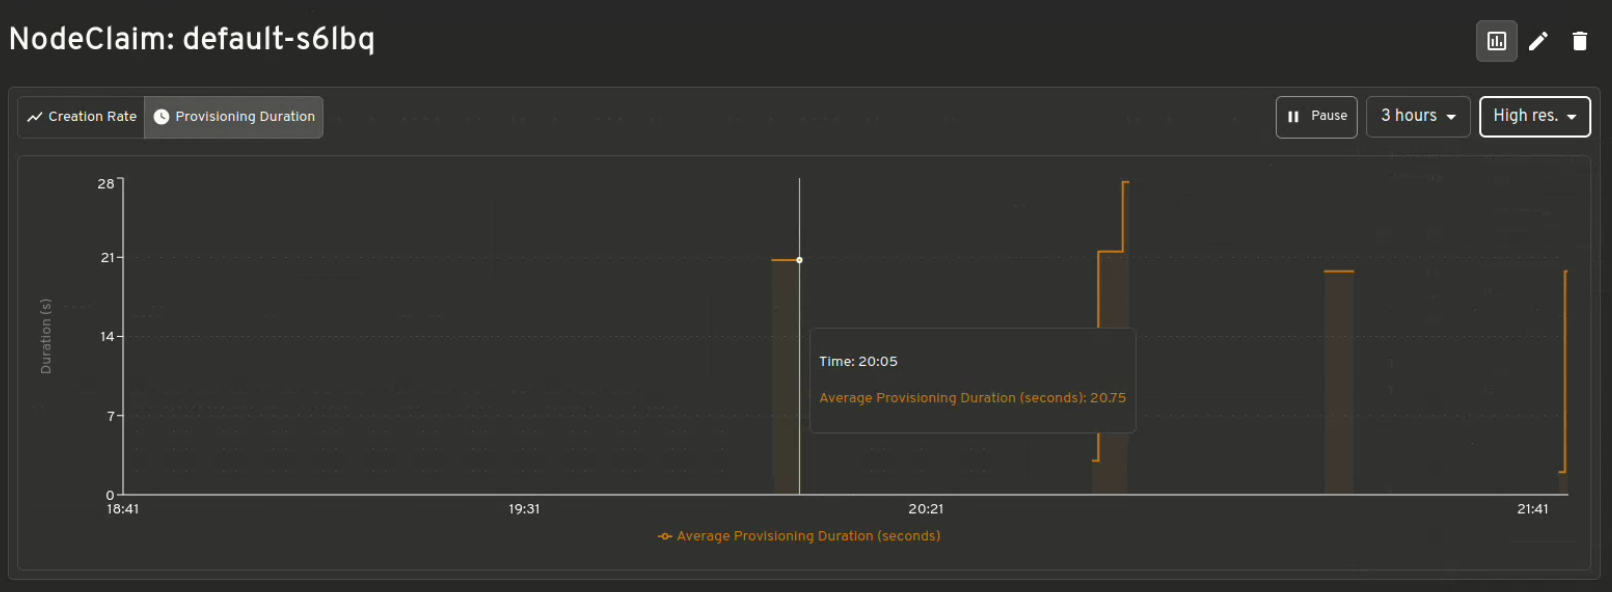
Scaling decisions
Shows which instances are being provisioned for your workloads and understand the reason behind why Karpenter made those choices. Helpful while debugging.
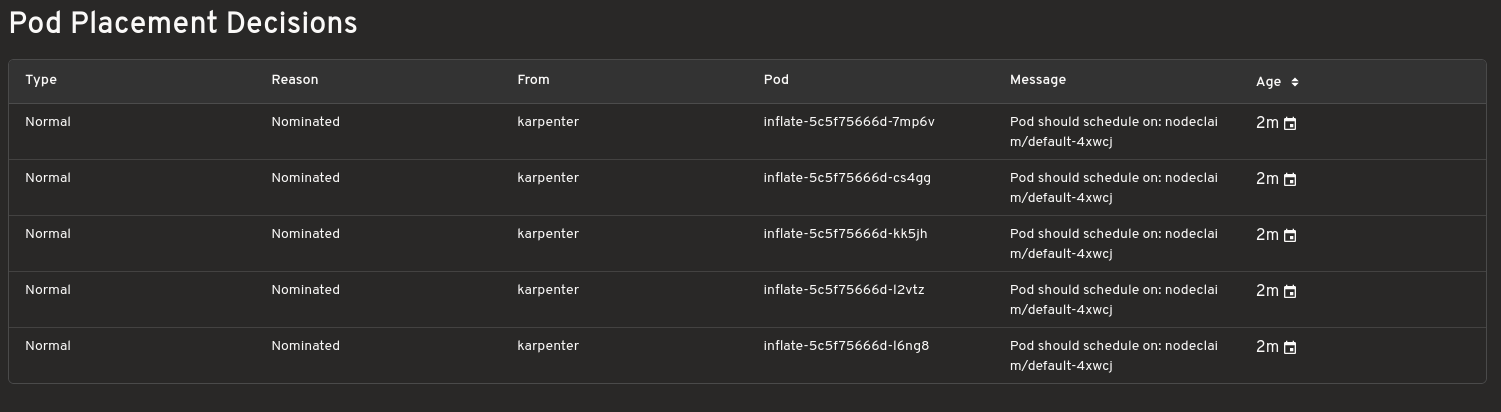

Config editor with validation support
Make live edits to Karpenter configurations. The editor includes diff previews and resource validation for safer adjustments.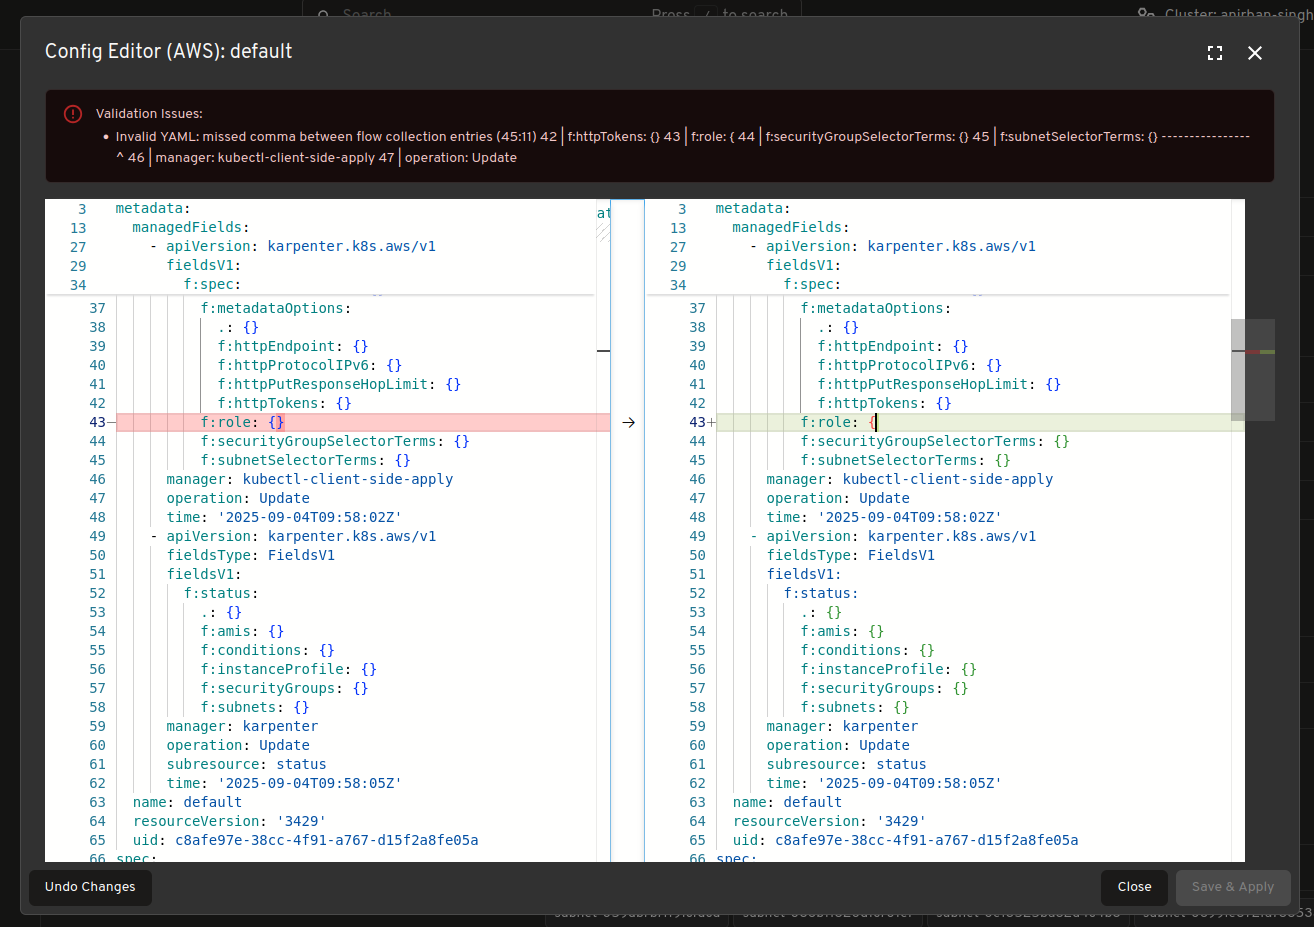
Real time view of Karpenter resources
View and track Karpenter specific resources in real time such as “NodeClaims” as your cluster scales up and down.



Dashboard for Pending Pods
View all pending pods with unmet scheduling requirements/Failed Scheduling highlighting why they couldn't be scheduled.
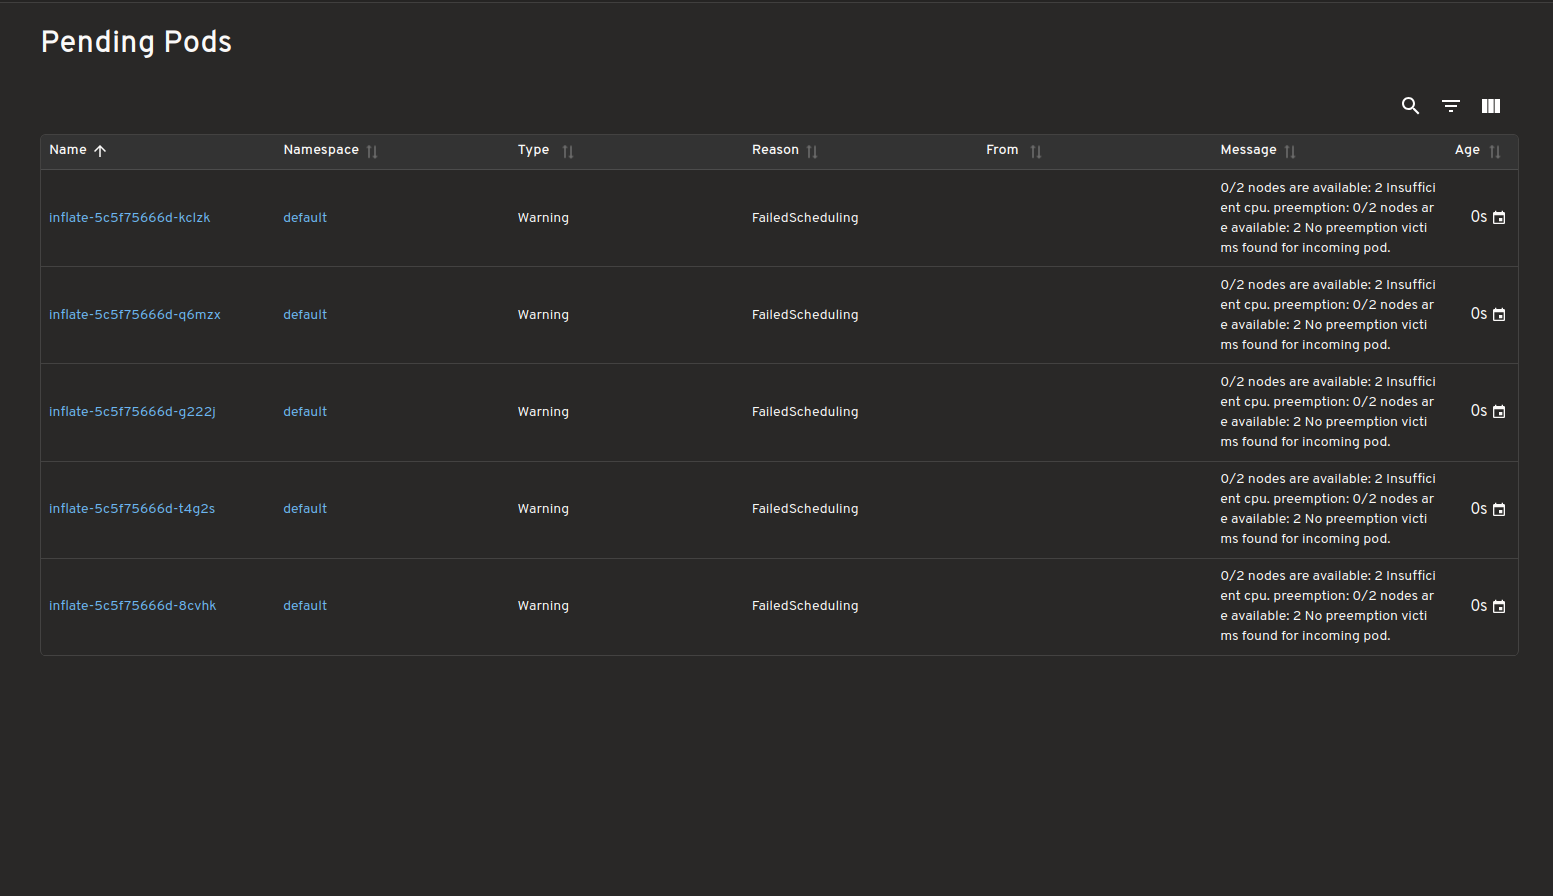
Karpenter Providers
This plugin should work with most Karpenter providers, but has only so far been tested on the ones listed in the table. Additionally, each provider gives some extra information, and the ones in the table below are displayed by the plugin.
| Provider Name | Tested | Extra provider specific info supported |
|---|---|---|
| AWS | ✅ | ✅ |
| Azure | ✅ | ✅ |
| AlibabaCloud | ❌ | ❌ |
| Bizfly Cloud | ❌ | ❌ |
| Cluster API | ❌ | ❌ |
| GCP | ❌ | ❌ |
| Proxmox | ❌ | ❌ |
| Oracle Cloud Infrastructure (OCI) | ❌ | ❌ |
Please submit an issue if you test one of the untested providers or if you want support for this provider (PRs also gladly accepted).
How to use
Please see the plugins/karpenter/README.md for instructions on how to use.
Feedback and Questions
Please submit an issue if you use Karpenter and have any other ideas or feedback. Or come to the Kubernetes slack headlamp channel for a chat.
Announcing Changed Block Tracking API support (alpha)
We're excited to announce the alpha support for a changed block tracking mechanism. This enhances the Kubernetes storage ecosystem by providing an efficient way for CSI storage drivers to identify changed blocks in PersistentVolume snapshots. With a driver that can use the feature, you could benefit from faster and more resource-efficient backup operations.
If you're eager to try this feature, you can skip to the Getting Started section.
What is changed block tracking?
Changed block tracking enables storage systems to identify and track modifications at the block level between snapshots, eliminating the need to scan entire volumes during backup operations. The improvement is a change to the Container Storage Interface (CSI), and also to the storage support in Kubernetes itself. With the alpha feature enabled, your cluster can:
- Identify allocated blocks within a CSI volume snapshot
- Determine changed blocks between two snapshots of the same volume
- Streamline backup operations by focusing only on changed data blocks
For Kubernetes users managing large datasets, this API enables significantly more efficient backup processes. Backup applications can now focus only on the blocks that have changed, rather than processing entire volumes.
Note:
As of now, the Changed Block Tracking API is supported only for block volumes and not for file volumes. CSI drivers that manage file-based storage systems will not be able to implement this capability.Benefits of changed block tracking support in Kubernetes
As Kubernetes adoption grows for stateful workloads managing critical data, the need for efficient backup solutions becomes increasingly important. Traditional full backup approaches face challenges with:
- Long backup windows: Full volume backups can take hours for large datasets, making it difficult to complete within maintenance windows.
- High resource utilization: Backup operations consume substantial network bandwidth and I/O resources, especially for large data volumes and data-intensive applications.
- Increased storage costs: Repetitive full backups store redundant data, causing storage requirements to grow linearly even when only a small percentage of data actually changes between backups.
The Changed Block Tracking API addresses these challenges by providing native Kubernetes support for incremental backup capabilities through the CSI interface.
Key components
The implementation consists of three primary components:
- CSI SnapshotMetadata Service API: An API, offered by gRPC, that provides volume snapshot and changed block data.
- SnapshotMetadataService API: A Kubernetes CustomResourceDefinition (CRD) that advertises CSI driver metadata service availability and connection details to cluster clients.
- External Snapshot Metadata Sidecar: An intermediary component that connects CSI drivers to backup applications via a standardized gRPC interface.
Implementation requirements
Storage provider responsibilities
If you're an author of a storage integration with Kubernetes and want to support the changed block tracking feature, you must implement specific requirements:
Implement CSI RPCs: Storage providers need to implement the
SnapshotMetadataservice as defined in the CSI specifications protobuf. This service requires server-side streaming implementations for the following RPCs:GetMetadataAllocated: For identifying allocated blocks in a snapshotGetMetadataDelta: For determining changed blocks between two snapshots
Storage backend capabilities: Ensure the storage backend has the capability to track and report block-level changes.
Deploy external components: Integrate with the
external-snapshot-metadatasidecar to expose the snapshot metadata service.Register custom resource: Register the
SnapshotMetadataServiceresource using a CustomResourceDefinition and create aSnapshotMetadataServicecustom resource that advertises the availability of the metadata service and provides connection details.Support error handling: Implement proper error handling for these RPCs according to the CSI specification requirements.
Backup solution responsibilities
A backup solution looking to leverage this feature must:
Set up authentication: The backup application must provide a Kubernetes ServiceAccount token when using the Kubernetes SnapshotMetadataService API. Appropriate access grants, such as RBAC RoleBindings, must be established to authorize the backup application ServiceAccount to obtain such tokens.
Implement streaming client-side code: Develop clients that implement the streaming gRPC APIs defined in the schema.proto file. Specifically:
- Implement streaming client code for
GetMetadataAllocatedandGetMetadataDeltamethods - Handle server-side streaming responses efficiently as the metadata comes in chunks
- Process the
SnapshotMetadataResponsemessage format with proper error handling
The
external-snapshot-metadataGitHub repository provides a convenient iterator support package to simplify client implementation.- Implement streaming client code for
Handle large dataset streaming: Design clients to efficiently handle large streams of block metadata that could be returned for volumes with significant changes.
Optimize backup processes: Modify backup workflows to use the changed block metadata to identify and only transfer changed blocks to make backups more efficient, reducing both backup duration and resource consumption.
Getting started
To use changed block tracking in your cluster:
- Ensure your CSI driver supports volume snapshots and implements the snapshot metadata capabilities with the required
external-snapshot-metadatasidecar - Make sure the SnapshotMetadataService custom resource is registered using CRD
- Verify the presence of a SnapshotMetadataService custom resource for your CSI driver
- Create clients that can access the API using appropriate authentication (via Kubernetes ServiceAccount tokens)
The API provides two main functions:
GetMetadataAllocated: Lists blocks allocated in a single snapshotGetMetadataDelta: Lists blocks changed between two snapshots
What’s next?
Depending on feedback and adoption, the Kubernetes developers hope to push the CSI Snapshot Metadata implementation to Beta in the future releases.
Where can I learn more?
For those interested in trying out this new feature:
- Official Kubernetes CSI Developer Documentation
- The enhancement proposal for the snapshot metadata feature.
- GitHub repository for implementation and release status of
external-snapshot-metadata - Complete gRPC protocol definitions for snapshot metadata API: schema.proto
- Example snapshot metadata client implementation: snapshot-metadata-lister
- End-to-end example with csi-hostpath-driver: example documentation
How do I get involved?
This project, like all of Kubernetes, is the result of hard work by many contributors from diverse backgrounds working together. On behalf of SIG Storage, I would like to offer a huge thank you to the contributors who helped review the design and implementation of the project, including but not limited to the following:
- Ben Swartzlander (bswartz)
- Carl Braganza (carlbraganza)
- Daniil Fedotov (hairyhum)
- Ivan Sim (ihcsim)
- Nikhil Ladha (Nikhil-Ladha)
- Prasad Ghangal (PrasadG193)
- Praveen M (iPraveenParihar)
- Rakshith R (Rakshith-R)
- Xing Yang (xing-yang)
Thank also to everyone who has contributed to the project, including others who helped review the KEP and the CSI spec PR
For those interested in getting involved with the design and development of CSI or any part of the Kubernetes Storage system, join the Kubernetes Storage Special Interest Group (SIG). We always welcome new contributors.
The SIG also holds regular Data Protection Working Group meetings. New attendees are welcome to join our discussions.
Kubernetes v1.34: Pod Level Resources Graduated to Beta
On behalf of the Kubernetes community, I am thrilled to announce that the Pod Level Resources feature has graduated to Beta in the Kubernetes v1.34 release and is enabled by default! This significant milestone introduces a new layer of flexibility for defining and managing resource allocation for your Pods. This flexibility stems from the ability to specify CPU and memory resources for the Pod as a whole. Pod level resources can be combined with the container-level specifications to express the exact resource requirements and limits your application needs.
Pod-level specification for resources
Until recently, resource specifications that applied to Pods were primarily defined at the individual container level. While effective, this approach sometimes required duplicating or meticulously calculating resource needs across multiple containers within a single Pod. As a beta feature, Kubernetes allows you to specify the CPU, memory and hugepages resources at the Pod-level. This means you can now define resource requests and limits for an entire Pod, enabling easier resource sharing without requiring granular, per-container management of these resources where it's not needed.
Why does Pod-level specification matter?
This feature enhances resource management in Kubernetes by offering flexible resource management at both the Pod and container levels.
It provides a consolidated approach to resource declaration, reducing the need for meticulous, per-container management, especially for Pods with multiple containers.
Pod-level resources enable containers within a pod to share unused resoures amongst themselves, promoting efficient utilization within the pod. For example, it prevents sidecar containers from becoming performance bottlenecks. Previously, a sidecar (e.g., a logging agent or service mesh proxy) hitting its individual CPU limit could be throttled and slow down the entire Pod, even if the main application container had plenty of spare CPU. With pod-level resources, the sidecar and the main container can share Pod's resource budget, ensuring smooth operation during traffic spikes - either the whole Pod is throttled or all containers work.
When both pod-level and container-level resources are specified, pod-level requests and limits take precedence. This gives you – and cluster administrators - a powerful way to enforce overall resource boundaries for your Pods.
For scheduling, if a pod-level request is explicitly defined, the scheduler uses that specific value to find a suitable node, insteaf of the aggregated requests of the individual containers. At runtime, the pod-level limit acts as a hard ceiling for the combined resource usage of all containers. Crucially, this pod-level limit is the absolute enforcer; even if the sum of the individual container limits is higher, the total resource consumption can never exceed the pod-level limit.
Pod-level resources are prioritized in influencing the Quality of Service (QoS) class of the Pod.
For Pods running on Linux nodes, the Out-Of-Memory (OOM) score adjustment calculation considers both pod-level and container-level resources requests.
Pod-level resources are designed to be compatible with existing Kubernetes functionalities, ensuring a smooth integration into your workflows.
How to specify resources for an entire Pod
Using PodLevelResources feature
gate requires
Kubernetes v1.34 or newer for all cluster components, including the control plane
and every node. This feature gate is in beta and enabled by default in v1.34.
Example manifest
You can specify CPU, memory and hugepages resources directly in the Pod spec manifest at the resources field for the entire Pod.
Here’s an example demonstrating a Pod with both CPU and memory requests and limits defined at the Pod level:
apiVersion: v1
kind: Pod
metadata:
name: pod-resources-demo
namespace: pod-resources-example
spec:
# The 'resources' field at the Pod specification level defines the overall
# resource budget for all containers within this Pod combined.
resources: # Pod-level resources
# 'limits' specifies the maximum amount of resources the Pod is allowed to use.
# The sum of the limits of all containers in the Pod cannot exceed these values.
limits:
cpu: "1" # The entire Pod cannot use more than 1 CPU core.
memory: "200Mi" # The entire Pod cannot use more than 200 MiB of memory.
# 'requests' specifies the minimum amount of resources guaranteed to the Pod.
# This value is used by the Kubernetes scheduler to find a node with enough capacity.
requests:
cpu: "1" # The Pod is guaranteed 1 CPU core when scheduled.
memory: "100Mi" # The Pod is guaranteed 100 MiB of memory when scheduled.
containers:
- name: main-app-container
image: nginx
...
# This container has no resource requests or limits specified.
- name: auxiliary-container
image: fedora
command: ["sleep", "inf"]
...
# This container has no resource requests or limits specified.
In this example, the pod-resources-demo Pod as a whole requests 1 CPU and 100 MiB of memory, and is limited to 1 CPU and 200 MiB of memory. The containers within will operate under these overall Pod-level constraints, as explained in the next section.
Interaction with container-level resource requests or limits
When both pod-level and container-level resources are specified, pod-level requests and limits take precedence. This means the node allocates resources based on the pod-level specifications.
Consider a Pod with two containers where pod-level CPU and memory requests and limits are defined, and only one container has its own explicit resource definitions:
apiVersion: v1
kind: Pod
metadata:
name: pod-resources-demo
namespace: pod-resources-example
spec:
resources:
limits:
cpu: "1"
memory: "200Mi"
requests:
cpu: "1"
memory: "100Mi"
containers:
- name: main-app-container
image: nginx
resources:
requests:
cpu: "0.5"
memory: "50Mi"
- name: auxiliary-container
image: fedora
command: [ "sleep", "inf"]
# This container has no resource requests or limits specified.
Pod-Level Limits: The pod-level limits (cpu: "1", memory: "200Mi") establish an absolute boundary for the entire Pod. The sum of resources consumed by all its containers is enforced at this ceiling and cannot be surpassed.
Resource Sharing and Bursting: Containers can dynamically borrow any unused capacity, allowing them to burst as needed, so long as the Pod's aggregate usage stays within the overall limit.
Pod-Level Requests: The pod-level requests (cpu: "1", memory: "100Mi") serve as the foundational resource guarantee for the entire Pod. This value informs the scheduler's placement decision and represents the minimum resources the Pod can rely on during node-level contention.
Container-Level Requests: Container-level requests create a priority system within the Pod's guaranteed budget. Because main-app-container has an explicit request (cpu: "0.5", memory: "50Mi"), it is given precedence for its share of resources under resource pressure over the auxiliary-container, which has no such explicit claim.
Limitations
First of all, in-place resize of pod-level resources is not supported for Kubernetes v1.34 (or earlier). Attempting to modify the pod-level resource limits or requests on a running Pod results in an error: the resize is rejected. The v1.34 implementation of Pod level resources focuses on allowing initial declaration of an overall resource envelope, that applies to the entire Pod. That is distinct from in-place pod resize, which (despite what the name might suggest) allows you to make dynamic adjustments to container resource requests and limits, within a running Pod, and potentially without a container restart. In-place resizing is also not yet a stable feature; it graduated to Beta in the v1.33 release.
Only CPU, memory, and hugepages resources can be specified at pod-level.
Pod-level resources are not supported for Windows pods. If the Pod specification explicitly targets Windows (e.g., by setting spec.os.name: "windows"), the API server will reject the Pod during the validation step. If the Pod is not explicitly marked for Windows but is scheduled to a Windows node (e.g., via a nodeSelector), the Kubelet on that Windows node will reject the Pod during its admission process.
The Topology Manager, Memory Manager and CPU Manager do not align pods and containers based on pod-level resources as these resource managers don't currently support pod-level resources.
Getting started and providing feedback
Ready to explore Pod Level Resources feature? You'll need a Kubernetes cluster running version 1.34 or later. Remember to enable the PodLevelResources feature gate across your control plane and all nodes.
As this feature moves through Beta, your feedback is invaluable. Please report any issues or share your experiences via the standard Kubernetes communication channels:
Kubernetes v1.34: Recovery From Volume Expansion Failure (GA)
Have you ever made a typo when expanding your persistent volumes in Kubernetes? Meant to specify 2TB
but specified 20TiB? This seemingly innocuous problem was kinda hard to fix - and took the project almost 5 years to fix.
Automated recovery from storage expansion has been around for a while in beta; however, with the v1.34 release, we have graduated this to
general availability.
While it was always possible to recover from failing volume expansions manually, it usually required cluster-admin access and was tedious to do (See aformentioned link for more information).
What if you make a mistake and then realize immediately? With Kubernetes v1.34, you should be able to reduce the requested size of the PersistentVolumeClaim (PVC) and, as long as the expansion to previously requested size hadn't finished, you can amend the size requested. Kubernetes will automatically work to correct it. Any quota consumed by failed expansion will be returned to the user and the associated PersistentVolume should be resized to the latest size you specified.
I'll walk through an example of how all of this works.
Reducing PVC size to recover from failed expansion
Imagine that you are running out of disk space for one of your database servers, and you want to expand the PVC from previously
specified 10TB to 100TB - but you make a typo and specify 1000TB.
kind: PersistentVolumeClaim
apiVersion: v1
metadata:
name: myclaim
spec:
accessModes:
- ReadWriteOnce
resources:
requests:
storage: 1000TB # newly specified size - but incorrect!
Now, you may be out of disk space on your disk array or simply ran out of allocated quota on your cloud-provider. But, assume that expansion to 1000TB is never going to succeed.
In Kubernetes v1.34, you can simply correct your mistake and request a new PVC size, that is smaller than the mistake, provided it is still larger than the original size of the actual PersistentVolume.
kind: PersistentVolumeClaim
apiVersion: v1
metadata:
name: myclaim
spec:
accessModes:
- ReadWriteOnce
resources:
requests:
storage: 100TB # Corrected size; has to be greater than 10TB.
# You cannot shrink the volume below its actual size.
This requires no admin intervention. Even better, any surplus Kubernetes quota that you temporarily consumed will be automatically returned.
This fault recovery mechanism does have a caveat: whatever new size you specify for the PVC, it must be still higher than the original size in .status.capacity.
Since Kubernetes doesn't support shrinking your PV objects, you can never go below the size that was originally allocated for your PVC request.
Improved error handling and observability of volume expansion
Implementing what might look like a relatively minor change also required us to almost fully redo how volume expansion works under the hood in Kubernetes. There are new API fields available in PVC objects which you can monitor to observe progress of volume expansion.
Improved observability of in-progress expansion
You can query .status.allocatedResourceStatus['storage'] of a PVC to monitor progress of a volume expansion operation.
For a typical block volume, this should transition between ControllerResizeInProgress, NodeResizePending and NodeResizeInProgress and become nil/empty when volume expansion has finished.
If for some reason, volume expansion to requested size is not feasible it should accordingly be in states like - ControllerResizeInfeasible or NodeResizeInfeasible.
You can also observe size towards which Kubernetes is working by watching pvc.status.allocatedResources.
Improved error handling and reporting
Kubernetes should now retry your failed volume expansions at slower rate, it should make fewer requests to both storage system and Kubernetes apiserver.
Errors observerd during volume expansion are now reported as condition on PVC objects and should persist unlike events. Kubernetes will now populate pvc.status.conditions with error keys ControllerResizeError or NodeResizeError when volume expansion fails.
Fixes long standing bugs in resizing workflows
This feature also has allowed us to fix long standing bugs in resizing workflow such as Kubernetes issue #115294. If you observe anything broken, please report your bugs to https://github.com/kubernetes/kubernetes/issues, along with details about how to reproduce the problem.
Working on this feature through its lifecycle was challenging and it wouldn't have been possible to reach GA without feedback from @msau42, @jsafrane and @xing-yang.
All of the contributors who worked on this also appreciate the input provided by @thockin and @liggitt at various Kubernetes contributor summits.
Kubernetes v1.34: DRA Consumable Capacity
Dynamic Resource Allocation (DRA) is a Kubernetes API for managing scarce resources across Pods and containers. It enables flexible resource requests, going beyond simply allocating N number of devices to support more granular usage scenarios. With DRA, users can request specific types of devices based on their attributes, define custom configurations tailored to their workloads, and even share the same resource among multiple containers or Pods.
In this blog, we focus on the device sharing feature and dive into a new capability introduced in Kubernetes 1.34: DRA consumable capacity, which extends DRA to support finer-grained device sharing.
Background: device sharing via ResourceClaims
From the beginning, DRA introduced the ability for multiple Pods to share a device by referencing the same ResourceClaim. This design decouples resource allocation from specific hardware, allowing for more dynamic and reusable provisioning of devices.
In Kubernetes 1.33, the new support for partitionable devices allowed resource drivers to advertise slices of a device that are available, rather than exposing the entire device as an all-or-nothing resource. This enabled Kubernetes to model shareable hardware more accurately.
But there was still a missing piece: it didn't yet support scenarios where the device driver manages fine-grained, dynamic portions of a device resource — like network bandwidth — based on user demand, or to share those resources independently of ResourceClaims, which are restricted by their spec and namespace.
That’s where consumable capacity for DRA comes in.
Benefits of DRA consumable capacity support
Here's a taste of what you get in a cluster with the DRAConsumableCapacity
feature gate enabled.
Device sharing across multiple ResourceClaims or DeviceRequests
Resource drivers can now support sharing the same device — or even a slice of a device — across multiple ResourceClaims or across multiple DeviceRequests.
This means that Pods from different namespaces can simultaneously share the same device, if permitted and supported by the specific DRA driver.
Device resource allocation
Kubernetes extends the allocation algorithm in the scheduler to support allocating a portion of a device's resources, as defined in the capacity field.
The scheduler ensures that the total allocated capacity across all consumers never exceeds the device’s total capacity, even when shared across multiple ResourceClaims or DeviceRequests.
This is very similar to the way the scheduler allows Pods and containers to share allocatable resources on Nodes;
in this case, it allows them to share allocatable (consumable) resources on Devices.
This feature expands support for scenarios where the device driver is able to manage resources within a device and on a per-process basis — for example, allocating a specific amount of memory (e.g., 8 GiB) from a virtual GPU, or setting bandwidth limits on virtual network interfaces allocated to specific Pods. This aims to provide safe and efficient resource sharing.
DistinctAttribute constraint
This feature also introduces a new constraint: DistinctAttribute, which is the complement of the existing MatchAttribute constraint.
The primary goal of DistinctAttribute is to prevent the same underlying device from being allocated multiple times within a single ResourceClaim, which could happen since we are allocating shares (or subsets) of devices.
This constraint ensures that each allocation refers to a distinct resource, even if they belong to the same device class.
It is useful for use cases such as allocating network devices connecting to different subnets to expand coverage or provide redundancy across failure domains.
How to use consumable capacity?
DRAConsumableCapacity is introduced as an alpha feature in Kubernetes 1.34. The feature gate DRAConsumableCapacity must be enabled in kubelet, kube-apiserver, kube-scheduler and kube-controller-manager.
--feature-gates=...,DRAConsumableCapacity=true
As a DRA driver developer
As a DRA driver developer writing in Golang, you can make a device within a ResourceSlice allocatable to multiple ResourceClaims (or devices.requests) by setting AllowMultipleAllocations to true.
Device {
...
AllowMultipleAllocations: ptr.To(true),
...
}
Additionally, you can define a policy to restrict how each device's Capacity should be consumed by each DeviceRequest by defining RequestPolicy field in the DeviceCapacity.
The example below shows how to define a policy that requires a GPU with 40 GiB of memory to allocate at least 5 GiB per request, with each allocation in multiples of 5 GiB.
DeviceCapacity{
Value: resource.MustParse("40Gi"),
RequestPolicy: &CapacityRequestPolicy{
Default: ptr.To(resource.MustParse("5Gi")),
ValidRange: &CapacityRequestPolicyRange {
Min: ptr.To(resource.MustParse("5Gi")),
Step: ptr.To(resource.MustParse("5Gi")),
}
}
}
This will be published to the ResourceSlice, as partially shown below:
apiVersion: resource.k8s.io/v1
kind: ResourceSlice
...
spec:
devices:
- name: gpu0
allowMultipleAllocations: true
capacity:
memory:
value: 40Gi
requestPolicy:
default: 5Gi
validRange:
min: 5Gi
step: 5Gi
An allocated device with a specified portion of consumed capacity will have a ShareID field set in the allocation status.
claim.Status.Allocation.Devices.Results[i].ShareID
This ShareID allows the driver to distinguish between different allocations that refer to the same device or same statically-partitioned slice but come from different ResourceClaim requests.
It acts as a unique identifier for each shared slice, enabling the driver to manage and enforce resource limits independently across multiple consumers.
As a consumer
As a consumer (or user), the device resource can be requested with a ResourceClaim like this:
apiVersion: resource.k8s.io/v1
kind: ResourceClaim
...
spec:
devices:
requests: # for devices
- name: req0
exactly:
deviceClassName: resource.example.com
capacity:
requests: # for resources which must be provided by those devices
memory: 10Gi
This configuration ensures that the requested device can provide at least 10GiB of memory.
Notably that any resource.example.com device that has at least 10GiB of memory can be allocated.
If a device that does not support multiple allocations is chosen, the allocation would consume the entire device.
To filter only devices that support multiple allocations, you can define a selector like this:
selectors:
- cel:
expression: |-
device.allowMultipleAllocations == true
Integration with DRA device status
In device sharing, general device information is provided through the resource slice.
However, some details are set dynamically after allocation.
These can be conveyed using the .status.devices field of a ResourceClaim.
That field is only published in clusters where the DRAResourceClaimDeviceStatus
feature gate is enabled.
If you do have device status support available, a driver can expose additional device-specific information beyond the ShareID.
One particularly useful use case is for virtual networks, where a driver can include the assigned IP address(es) in the status.
This is valuable for both network service operations and troubleshooting.
You can find more information by watching our recording at: KubeCon Japan 2025 - Reimagining Cloud Native Networks: The Critical Role of DRA.
What can you do next?
Check out the CNI DRA Driver project for an example of DRA integration in Kubernetes networking. Try integrating with network resources like
macvlan,ipvlan, or smart NICs.Start enabling the
DRAConsumableCapacityfeature gate and experimenting with virtualized or partitionable devices. Specify your workloads with consumable capacity (for example: fractional bandwidth or memory).Let us know your feedback:
- ✅ What worked well?
- ⚠️ What didn’t?
If you encountered issues to fix or opportunities to enhance, please file a new issue and reference KEP-5075 there, or reach out via Slack (#wg-device-management).
Conclusion
Consumable capacity support enhances the device sharing capability of DRA by allowing effective device sharing across namespaces, across claims, and tailored to each Pod’s actual needs. It also empowers drivers to enforce capacity limits, improves scheduling accuracy, and unlocks new use cases like bandwidth-aware networking and multi-tenant device sharing.
Try it out, experiment with consumable resources, and help shape the future of dynamic resource allocation in Kubernetes!
Further Reading
Kubernetes v1.34: Pods Report DRA Resource Health
The rise of AI/ML and other high-performance workloads has made specialized hardware like GPUs, TPUs, and FPGAs a critical component of many Kubernetes clusters. However, as discussed in a previous blog post about navigating failures in Pods with devices, when this hardware fails, it can be difficult to diagnose, leading to significant downtime. With the release of Kubernetes v1.34, we are excited to announce a new alpha feature that brings much-needed visibility into the health of these devices.
This work extends the functionality of KEP-4680, which first introduced a mechanism for reporting the health of devices managed by Device Plugins. Now, this capability is being extended to Dynamic Resource Allocation (DRA). Controlled by the ResourceHealthStatus feature gate, this enhancement allows DRA drivers to report device health directly into a Pod's .status field, providing crucial insights for operators and developers.
Why expose device health in Pod status?
For stateful applications or long-running jobs, a device failure can be disruptive and costly. By exposing device health in the .status field for a Pod, Kubernetes provides a standardized way for users and automation tools to quickly diagnose issues. If a Pod is failing, you can now check its status to see if an unhealthy device is the root cause, saving valuable time that might otherwise be spent debugging application code.
How it works
This feature introduces a new, optional communication channel between the Kubelet and DRA drivers, built on three core components.
A new gRPC health service
A new gRPC service, DRAResourceHealth, is defined in the dra-health/v1alpha1 API group. DRA drivers can implement this service to stream device health updates to the Kubelet. The service includes a NodeWatchResources server-streaming RPC that sends the health status (Healthy, Unhealthy, or Unknown) for the devices it manages.
Kubelet integration
The Kubelet’s DRAPluginManager discovers which drivers implement the health service. For each compatible driver, it starts a long-lived NodeWatchResources stream to receive health updates. The DRA Manager then consumes these updates and stores them in a persistent healthInfoCache that can survive Kubelet restarts.
Populating the Pod status
When a device's health changes, the DRA manager identifies all Pods affected by the change and triggers a Pod status update. A new field, allocatedResourcesStatus, is now part of the v1.ContainerStatus API object. The Kubelet populates this field with the current health of each device allocated to the container.
A practical example
If a Pod is in a CrashLoopBackOff state, you can use kubectl describe pod <pod-name> to inspect its status. If an allocated device has failed, the output will now include the allocatedResourcesStatus field, clearly indicating the problem:
status:
containerStatuses:
- name: my-gpu-intensive-container
# ... other container statuses
allocatedResourcesStatus:
- name: "claim:my-gpu-claim"
resources:
- resourceID: "example.com/gpu-a1b2-c3d4"
health: "Unhealthy"
This explicit status makes it clear that the issue is with the underlying hardware, not the application.
Now you can improve the failure detection logic to react on the unhealthy devices associated with the Pod by de-scheduling a Pod.
How to use this feature
As this is an alpha feature in Kubernetes v1.34, you must take the following steps to use it:
- Enable the
ResourceHealthStatusfeature gate on your kube-apiserver and kubelets. - Ensure you are using a DRA driver that implements the
v1alpha1 DRAResourceHealthgRPC service.
DRA drivers
If you are developing a DRA driver, make sure to think about device failure detection strategy and ensure that your driver is integrated with this feature. This way, your driver will improve the user experience and simplify debuggability of hardware issues.
What's next?
This is the first step in a broader effort to improve how Kubernetes handles device failures. As we gather feedback on this alpha feature, the community is planning several key enhancements before graduating to Beta:
- Detailed health messages: To improve the troubleshooting experience, we plan to add a human-readable message field to the gRPC API. This will allow DRA drivers to provide specific context for a health status, such as "GPU temperature exceeds threshold" or "NVLink connection lost".
- Configurable health timeouts: The timeout for marking a device's health as "Unknown" is currently hardcoded. We plan to make this configurable, likely on a per-driver basis, to better accommodate the different health-reporting characteristics of various hardware.
- Improved post-mortem troubleshooting: We will address a known limitation where health updates may not be applied to pods that have already terminated. This fix will ensure that the health status of a device at the time of failure is preserved, which is crucial for troubleshooting batch jobs and other "run-to-completion" workloads.
This feature was developed as part of KEP-4680, and community feedback is crucial as we work toward graduating it to Beta. We have more improvements of device failure handling in k8s and encourage you to try it out and share your experiences with the SIG Node community!
Kubernetes v1.34: Moving Volume Group Snapshots to v1beta2
Volume group snapshots were introduced as an Alpha feature with the Kubernetes 1.27 release and moved to Beta in the Kubernetes 1.32 release. The recent release of Kubernetes v1.34 moved that support to a second beta. The support for volume group snapshots relies on a set of extension APIs for group snapshots. These APIs allow users to take crash consistent snapshots for a set of volumes. Behind the scenes, Kubernetes uses a label selector to group multiple PersistentVolumeClaims for snapshotting. A key aim is to allow you restore that set of snapshots to new volumes and recover your workload based on a crash consistent recovery point.
This new feature is only supported for CSI volume drivers.
What's new in Beta 2?
While testing the beta version, we encountered an issue where the restoreSize field is not set for individual VolumeSnapshotContents and VolumeSnapshots if CSI driver does not implement the ListSnapshots RPC call.
We evaluated various options here and decided to make this change releasing a new beta for the API.
Specifically, a VolumeSnapshotInfo struct is added in v1beta2, it contains information for an individual volume snapshot that is a member of a volume group snapshot. VolumeSnapshotInfoList, a list of VolumeSnapshotInfo, is added to VolumeGroupSnapshotContentStatus, replacing VolumeSnapshotHandlePairList. VolumeSnapshotInfoList is a list of snapshot information returned by the CSI driver to identify snapshots on the storage system. VolumeSnapshotInfoList is populated by the csi-snapshotter sidecar based on the CSI CreateVolumeGroupSnapshotResponse returned by the CSI driver's CreateVolumeGroupSnapshot call.
The existing v1beta1 API objects will be converted to the new v1beta2 API objects by a conversion webhook.
What’s next?
Depending on feedback and adoption, the Kubernetes project plans to push the volume group snapshot implementation to general availability (GA) in a future release.
How can I learn more?
- The design spec for the volume group snapshot feature.
- The code repository for volume group snapshot APIs and controller.
- CSI documentation on the group snapshot feature.
How do I get involved?
This project, like all of Kubernetes, is the result of hard work by many contributors from diverse backgrounds working together. On behalf of SIG Storage, I would like to offer a huge thank you to the contributors who stepped up these last few quarters to help the project reach beta:
- Ben Swartzlander (bswartz)
- Hemant Kumar (gnufied)
- Jan Šafránek (jsafrane)
- Madhu Rajanna (Madhu-1)
- Michelle Au (msau42)
- Niels de Vos (nixpanic)
- Leonardo Cecchi (leonardoce)
- Saad Ali (saad-ali)
- Xing Yang (xing-yang)
- Yati Padia (yati1998)
For those interested in getting involved with the design and development of CSI or any part of the Kubernetes Storage system, join the Kubernetes Storage Special Interest Group (SIG). We always welcome new contributors.
We also hold regular Data Protection Working Group meetings. New attendees are welcome to join our discussions.
Kubernetes v1.34: Decoupled Taint Manager Is Now Stable
This enhancement separates the responsibility of managing node lifecycle and pod eviction into two distinct components. Previously, the node lifecycle controller handled both marking nodes as unhealthy with NoExecute taints and evicting pods from them. Now, a dedicated taint eviction controller manages the eviction process, while the node lifecycle controller focuses solely on applying taints. This separation not only improves code organization but also makes it easier to improve taint eviction controller or build custom implementations of the taint based eviction.
What's new?
The feature gate SeparateTaintEvictionController has been promoted to GA in this release.
Users can optionally disable taint-based eviction by setting --controllers=-taint-eviction-controller
in kube-controller-manager.
How can I learn more?
For more details, refer to the KEP and to the beta announcement article: Kubernetes 1.29: Decoupling taint manager from node lifecycle controller.
How to get involved?
We offer a huge thank you to all the contributors who helped with design, implementation, and review of this feature and helped move it from beta to stable:
- Ed Bartosh (@bart0sh)
- Yuan Chen (@yuanchen8911)
- Aldo Culquicondor (@alculquicondor)
- Baofa Fan (@carlory)
- Sergey Kanzhelev (@SergeyKanzhelev)
- Tim Bannister (@lmktfy)
- Maciej Skoczeń (@macsko)
- Maciej Szulik (@soltysh)
- Wojciech Tyczynski (@wojtek-t)
Kubernetes v1.34: Autoconfiguration for Node Cgroup Driver Goes GA
Historically, configuring the correct cgroup driver has been a pain point for users running new
Kubernetes clusters. On Linux systems, there are two different cgroup drivers:
cgroupfs and systemd. In the past, both the kubelet
and CRI implementation (like CRI-O or containerd) needed to be configured to use
the same cgroup driver, or else the kubelet would misbehave without any explicit
error message. This was a source of headaches for many cluster admins. Now, we've
(almost) arrived at the end of that headache.
Automated cgroup driver detection
In v1.28.0, the SIG Node community introduced the feature gate
KubeletCgroupDriverFromCRI, which instructs the kubelet to ask the CRI
implementation which cgroup driver to use. You can read more here.
After many releases of waiting for each CRI implementation to have major versions released
and packaged in major operating systems, this feature has gone GA as of Kubernetes 1.34.0.
In addition to setting the feature gate, a cluster admin needs to ensure their CRI implementation is new enough:
- containerd: Support was added in v2.0.0
- CRI-O: Support was added in v1.28.0
Announcement: Kubernetes is deprecating containerd v1.y support
While CRI-O releases versions that match Kubernetes versions, and thus CRI-O versions without this behavior are no longer supported, containerd maintains its own release cycle. containerd support for this feature is only in v2.0 and later, but Kubernetes 1.34 still supports containerd 1.7 and other LTS releases of containerd.
The Kubernetes SIG Node community has formally agreed upon a final support
timeline for containerd v1.y. The last Kubernetes release to offer this support
will be the last released version of v1.35, and support will be dropped in
v1.36.0. To assist administrators in managing this future transition,
a new detection mechanism is available. You are able to monitor
the kubelet_cri_losing_support metric to determine if any nodes in your cluster
are using a containerd version that will soon be outdated. The presence of
this metric with a version label of 1.36.0 will indicate that the node's containerd
runtime is not new enough for the upcoming requirements. Consequently, an
administrator will need to upgrade containerd to v2.0 or a later version before,
or at the same time as, upgrading the kubelet to v1.36.0.
Kubernetes v1.34: Mutable CSI Node Allocatable Graduates to Beta
The functionality for CSI drivers to update information about attachable volume count on the nodes, first introduced as Alpha in Kubernetes v1.33, has graduated to Beta in the Kubernetes v1.34 release! This marks a significant milestone in enhancing the accuracy of stateful pod scheduling by reducing failures due to outdated attachable volume capacity information.
Background
Traditionally, Kubernetes CSI drivers report a static maximum volume attachment limit when initializing. However, actual attachment capacities can change during a node's lifecycle for various reasons, such as:
- Manual or external operations attaching/detaching volumes outside of Kubernetes control.
- Dynamically attached network interfaces or specialized hardware (GPUs, NICs, etc.) consuming available slots.
- Multi-driver scenarios, where one CSI driver’s operations affect available capacity reported by another.
Static reporting can cause Kubernetes to schedule pods onto nodes that appear to have capacity but don't, leading to pods stuck in a ContainerCreating state.
Dynamically adapting CSI volume limits
With this new feature, Kubernetes enables CSI drivers to dynamically adjust and report node attachment capacities at runtime. This ensures that the scheduler, as well as other components relying on this information, have the most accurate, up-to-date view of node capacity.
How it works
Kubernetes supports two mechanisms for updating the reported node volume limits:
- Periodic Updates: CSI drivers specify an interval to periodically refresh the node's allocatable capacity.
- Reactive Updates: An immediate update triggered when a volume attachment fails due to exhausted resources (
ResourceExhaustederror).
Enabling the feature
To use this beta feature, the MutableCSINodeAllocatableCount feature gate must be enabled in these components:
kube-apiserverkubelet
Example CSI driver configuration
Below is an example of configuring a CSI driver to enable periodic updates every 60 seconds:
apiVersion: storage.k8s.io/v1
kind: CSIDriver
metadata:
name: example.csi.k8s.io
spec:
nodeAllocatableUpdatePeriodSeconds: 60
This configuration directs kubelet to periodically call the CSI driver's NodeGetInfo method every 60 seconds, updating the node’s allocatable volume count. Kubernetes enforces a minimum update interval of 10 seconds to balance accuracy and resource usage.
Immediate updates on attachment failures
When a volume attachment operation fails due to a ResourceExhausted error (gRPC code 8), Kubernetes immediately updates the allocatable count instead of waiting for the next periodic update. The Kubelet then marks the affected pods as Failed, enabling their controllers to recreate them. This prevents pods from getting permanently stuck in the ContainerCreating state.
Getting started
To enable this feature in your Kubernetes v1.34 cluster:
- Enable the feature gate
MutableCSINodeAllocatableCounton thekube-apiserverandkubeletcomponents. - Update your CSI driver configuration by setting
nodeAllocatableUpdatePeriodSeconds. - Monitor and observe improvements in scheduling accuracy and pod placement reliability.
Next steps
This feature is currently in beta and the Kubernetes community welcomes your feedback. Test it, share your experiences, and help guide its evolution to GA stability.
Join discussions in the Kubernetes Storage Special Interest Group (SIG-Storage) to shape the future of Kubernetes storage capabilities.
Kubernetes v1.34: Use An Init Container To Define App Environment Variables
Kubernetes typically uses ConfigMaps and Secrets to set environment variables, which introduces additional API calls and complexity, For example, you need to separately manage the Pods of your workloads and their configurations, while ensuring orderly updates for both the configurations and the workload Pods.
Alternatively, you might be using a vendor-supplied container that requires environment variables (such as a license key or a one-time token), but you don’t want to hard-code them or mount volumes just to get the job done.
If that's the situation you are in, you now have a new (alpha) way to
achieve that. Provided you have the EnvFiles
feature gate
enabled across your cluster, you can tell the kubelet to load a container's
environment variables from a volume (the volume must be part of the Pod that
the container belongs to).
this feature gate allows you to load environment variables directly from a file in an emptyDir volume
without actually mounting that file into the container.
It’s a simple yet elegant solution to some surprisingly common problems.
What’s this all about?
At its core, this feature allows you to point your container to a file,
one generated by an initContainer,
and have Kubernetes parse that file to set your environment variables.
The file lives in an emptyDir volume (a temporary storage space that lasts as long as the pod does),
Your main container doesn’t need to mount the volume.
The kubelet will read the file and inject these variables when the container starts.
How It Works
Here's a simple example:
apiVersion: v1
kind: Pod
spec:
initContainers:
- name: generate-config
image: busybox
command: ['sh', '-c', 'echo "CONFIG_VAR=HELLO" > /config/config.env']
volumeMounts:
- name: config-volume
mountPath: /config
containers:
- name: app-container
image: gcr.io/distroless/static
env:
- name: CONFIG_VAR
valueFrom:
fileKeyRef:
path: config.env
volumeName: config-volume
key: CONFIG_VAR
volumes:
- name: config-volume
emptyDir: {}
Using this approach is a breeze.
You define your environment variables in the pod spec using the fileKeyRef field,
which tells Kubernetes where to find the file and which key to pull.
The file itself resembles the standard for .env syntax (think KEY=VALUE),
and (for this alpha stage at least) you must ensure that it is written into
an emptyDir volume. Other volume types aren't supported for this feature.
At least one init container must mount that emptyDir volume (to write the file),
but the main container doesn’t need to—it just gets the variables handed to it at startup.
A word on security
While this feature supports handling sensitive data such as keys or tokens,
note that its implementation relies on emptyDir volumes mounted into pod.
Operators with node filesystem access could therefore
easily retrieve this sensitive data through pod directory paths.
If storing sensitive data like keys or tokens using this feature, ensure your cluster security policies effectively protect nodes against unauthorized access to prevent exposure of confidential information.
Summary
This feature will eliminate a number of complex workarounds used today, simplifying apps authoring, and opening doors for more use cases. Kubernetes stays flexible and open for feedback. Tell us how you use this feature or what is missing.
Kubernetes v1.34: Snapshottable API server cache
For years, the Kubernetes community has been on a mission to improve the stability and performance predictability of the API server.
A major focus of this effort has been taming list requests, which have historically been a primary source of high memory usage and heavy load on the etcd datastore.
With each release, we've chipped away at the problem, and today, we're thrilled to announce the final major piece of this puzzle.
The snapshottable API server cache feature has graduated to Beta in Kubernetes v1.34, culminating a multi-release effort to allow virtually all read requests to be served directly from the API server's cache.
Evolving the cache for performance and stability
The path to the current state involved several key enhancements over recent releases that paved the way for today's announcement.
Consistent reads from cache (Beta in v1.31)
While the API server has long used a cache for performance, a key milestone was guaranteeing consistent reads of the latest data from it. This v1.31 enhancement allowed the watch cache to be used for strongly-consistent read requests for the first time, a huge win as it enabled filtered collections (e.g. "a list of pods bound to this node") to be safely served from the cache instead of etcd, dramatically reducing its load for common workloads.
Taming large responses with streaming (Beta in v1.33)
Another key improvement was tackling the problem of memory spikes when transmitting large responses. The streaming encoder, introduced in v1.33, allowed the API server to send list items one by one, rather than buffering the entire multi-gigabyte response in memory. This made the memory cost of sending a response predictable and minimal, regardless of its size.
The missing piece
Despite these huge improvements, a critical gap remained. Any request for a historical LIST—most commonly used for paginating through large result sets—still had to bypass the cache and query etcd directly. This meant that the cost of retrieving the data was still unpredictable and could put significant memory pressure on the API server.
Kubernetes 1.34: snapshots complete the picture
The snapshottable API server cache solves this final piece of the puzzle. This feature enhances the watch cache, enabling it to generate efficient, point-in-time snapshots of its state.
Here’s how it works: for each update, the cache creates a lightweight snapshot. These snapshots are "lazy copies," meaning they don't duplicate objects but simply store pointers, making them incredibly memory-efficient.
When a list request for a historical resourceVersion arrives, the API server now finds the corresponding snapshot and serves the response directly from its memory.
This closes the final major gap, allowing paginated requests to be served entirely from the cache.
A new era of API Server performance 🚀
With this final piece in place, the synergy of these three features ushers in a new era of API server predictability and performance:
- Get Data from Cache: Consistent reads and snapshottable cache work together to ensure nearly all read requests—whether for the latest data or a historical snapshot—are served from the API server's memory.
- Send data via stream: Streaming list responses ensure that sending this data to the client has a minimal and constant memory footprint.
The result is a system where the resource cost of read operations is almost fully predictable and much more resiliant to spikes in request load.
This means dramatically reduced memory pressure, a lighter load on etcd, and a more stable, scalable, and reliable control plane for all Kubernetes clusters.
How to get started
With its graduation to Beta, the SnapshottableCache feature gate is enabled by default in Kubernetes v1.34. There are no actions required to start benefiting from these performance and stability improvements.
Acknowledgements
Special thanks for designing, implementing, and reviewing these critical features go to:
- Ahmad Zolfaghari (@ah8ad3)
- Ben Luddy (@benluddy) – Red Hat
- Chen Chen (@z1cheng) – Microsoft
- Davanum Srinivas (@dims) – Nvidia
- David Eads (@deads2k) – Red Hat
- Han Kang (@logicalhan) – CoreWeave
- haosdent (@haosdent) – Shopee
- Joe Betz (@jpbetz) – Google
- Jordan Liggitt (@liggitt) – Google
- Łukasz Szaszkiewicz (@p0lyn0mial) – Red Hat
- Maciej Borsz (@mborsz) – Google
- Madhav Jivrajani (@MadhavJivrajani) – UIUC
- Marek Siarkowicz (@serathius) – Google
- NKeert (@NKeert)
- Tim Bannister (@lmktfy)
- Wei Fu (@fuweid) - Microsoft
- Wojtek Tyczyński (@wojtek-t) – Google
...and many others in SIG API Machinery. This milestone is a testament to the community's dedication to building a more scalable and robust Kubernetes.
Kubernetes v1.34: VolumeAttributesClass for Volume Modification GA
The VolumeAttributesClass API, which empowers users to dynamically modify volume attributes, has officially graduated to General Availability (GA) in Kubernetes v1.34. This marks a significant milestone, providing a robust and stable way to tune your persistent storage directly within Kubernetes.
What is VolumeAttributesClass?
At its core, VolumeAttributesClass is a cluster-scoped resource that defines a set of mutable parameters for a volume. Think of it as a "profile" for your storage, allowing cluster administrators to expose different quality-of-service (QoS) levels or performance tiers.
Users can then specify a volumeAttributesClassName in their PersistentVolumeClaim (PVC) to indicate which class of attributes they desire. The magic happens through the Container Storage Interface (CSI): when a PVC referencing a VolumeAttributesClass is updated, the associated CSI driver interacts with the underlying storage system to apply the specified changes to the volume.
This means you can now:
- Dynamically scale performance: Increase IOPS or throughput for a busy database, or reduce it for a less critical application.
- Optimize costs: Adjust attributes on the fly to match your current needs, avoiding over-provisioning.
- Simplify operations: Manage volume modifications directly within the Kubernetes API, rather than relying on external tools or manual processes.
What is new from Beta to GA
There are two major enhancements from beta.
Cancellation support when errors occur
To improve resilience and user experience, the GA release introduces explicit cancel support when a requested volume modification encounters an error. If the underlying storage system or CSI driver indicates that the requested changes cannot be applied (e.g., due to invalid arguments), users can cancel the operation and revert the volume to its previous stable configuration, preventing the volume from being left in an inconsistent state.
Quota support based on scope
While VolumeAttributesClass doesn't add a new quota type, the Kubernetes control plane can be configured to enforce quotas on PersistentVolumeClaims that reference a specific VolumeAttributesClass.
This is achieved by using the scopeSelector field in a ResourceQuota to target PVCs that have .spec.volumeAttributesClassName set to a particular VolumeAttributesClass name. Please see more details here.
Drivers support VolumeAttributesClass
- Amazon EBS CSI Driver: The AWS EBS CSI driver has robust support for VolumeAttributesClass and allows you to modify parameters like volume type (e.g., gp2 to gp3, io1 to io2), IOPS, and throughput of EBS volumes dynamically.
- Google Compute Engine (GCE) Persistent Disk CSI Driver (pd.csi.storage.gke.io): This driver also supports dynamic modification of persistent disk attributes, including IOPS and throughput, via VolumeAttributesClass.
Contact
For any inquiries or specific questions related to VolumeAttributesClass, please reach out to the SIG Storage community.
Kubernetes v1.34: Pod Replacement Policy for Jobs Goes GA
In Kubernetes v1.34, the Pod replacement policy feature has reached general availability (GA). This blog post describes the Pod replacement policy feature and how to use it in your Jobs.
About Pod Replacement Policy
By default, the Job controller immediately recreates Pods as soon as they fail or begin terminating (when they have a deletion timestamp).
As a result, while some Pods are terminating, the total number of running Pods for a Job can temporarily exceed the specified parallelism. For Indexed Jobs, this can even mean multiple Pods running for the same index at the same time.
This behavior works fine for many workloads, but it can cause problems in certain cases.
For example, popular machine learning frameworks like TensorFlow and JAX expect exactly one Pod per worker index. If two Pods run at the same time, you might encounter errors such as:
/job:worker/task:4: Duplicate task registration with task_name=/job:worker/replica:0/task:4
Additionally, starting replacement Pods before the old ones fully terminate can lead to:
- Scheduling delays by kube-scheduler as the nodes remain occupied.
- Unnecessary cluster scale-ups to accommodate the replacement Pods.
- Temporary bypassing of quota checks by workload orchestrators like Kueue.
With Pod replacement policy, Kubernetes gives you control over when the control plane replaces terminating Pods, helping you avoid these issues.
How Pod Replacement Policy works
This enhancement means that Jobs in Kubernetes have an optional field .spec.podReplacementPolicy.
You can choose one of two policies:
TerminatingOrFailed(default): Replaces Pods as soon as they start terminating.Failed: Replaces Pods only after they fully terminate and transition to theFailedphase.
Setting the policy to Failed ensures that a new Pod is only created after the previous one has completely terminated.
For Jobs with a Pod Failure Policy, the default podReplacementPolicy is Failed, and no other value is allowed.
See Pod Failure Policy to learn more about Pod Failure Policies for Jobs.
You can check how many Pods are currently terminating by inspecting the Job’s .status.terminating field:
kubectl get job myjob -o=jsonpath='{.status.terminating}'
Example
Here’s a Job example that executes a task two times (spec.completions: 2) in parallel (spec.parallelism: 2) and
replaces Pods only after they fully terminate (spec.podReplacementPolicy: Failed):
apiVersion: batch/v1
kind: Job
metadata:
name: example-job
spec:
completions: 2
parallelism: 2
podReplacementPolicy: Failed
template:
spec:
restartPolicy: Never
containers:
- name: worker
image: your-image
If a Pod receives a SIGTERM signal (deletion, eviction, preemption...), it begins terminating. When the container handles termination gracefully, cleanup may take some time.
When the Job starts, we will see two Pods running:
kubectl get pods
NAME READY STATUS RESTARTS AGE
example-job-qr8kf 1/1 Running 0 2s
example-job-stvb4 1/1 Running 0 2s
Let's delete one of the Pods (example-job-qr8kf).
With the TerminatingOrFailed policy, as soon as one Pod (example-job-qr8kf) starts terminating, the Job controller immediately creates a new Pod (example-job-b59zk) to replace it.
kubectl get pods
NAME READY STATUS RESTARTS AGE
example-job-b59zk 1/1 Running 0 1s
example-job-qr8kf 1/1 Terminating 0 17s
example-job-stvb4 1/1 Running 0 17s
With the Failed policy, the new Pod (example-job-b59zk) is not created while the old Pod (example-job-qr8kf) is terminating.
kubectl get pods
NAME READY STATUS RESTARTS AGE
example-job-qr8kf 1/1 Terminating 0 17s
example-job-stvb4 1/1 Running 0 17s
When the terminating Pod has fully transitioned to the Failed phase, a new Pod is created:
kubectl get pods
NAME READY STATUS RESTARTS AGE
example-job-b59zk 1/1 Running 0 1s
example-job-stvb4 1/1 Running 0 25s
How can you learn more?
- Read the user-facing documentation for Pod Replacement Policy, Backoff Limit per Index, and Pod Failure Policy.
- Read the KEPs for Pod Replacement Policy, Backoff Limit per Index, and Pod Failure Policy.
Acknowledgments
As with any Kubernetes feature, multiple people contributed to getting this done, from testing and filing bugs to reviewing code.
As this feature moves to stable after 2 years, we would like to thank the following people:
- Kevin Hannon - for writing the KEP and the initial implementation.
- Michał Woźniak - for guidance, mentorship, and reviews.
- Aldo Culquicondor - for guidance, mentorship, and reviews.
- Maciej Szulik - for guidance, mentorship, and reviews.
- Dejan Zele Pejchev - for taking over the feature and promoting it from Alpha through Beta to GA.
Get involved
This work was sponsored by the Kubernetes batch working group in close collaboration with the SIG Apps community.
If you are interested in working on new features in the space we recommend subscribing to our Slack channel and attending the regular community meetings.
Kubernetes v1.34: PSI Metrics for Kubernetes Graduates to Beta
As Kubernetes clusters grow in size and complexity, understanding the health and performance of individual nodes becomes increasingly critical. We are excited to announce that as of Kubernetes v1.34, Pressure Stall Information (PSI) Metrics has graduated to Beta.
What is Pressure Stall Information (PSI)?
Pressure Stall Information (PSI) is a feature of the Linux kernel (version 4.20 and later) that provides a canonical way to quantify pressure on infrastructure resources, in terms of whether demand for a resource exceeds current supply. It moves beyond simple resource utilization metrics and instead measures the amount of time that tasks are stalled due to resource contention. This is a powerful way to identify and diagnose resource bottlenecks that can impact application performance.
PSI exposes metrics for CPU, memory, and I/O, categorized as either some or full pressure:
some- The percentage of time that at least one task is stalled on a resource. This indicates some level of resource contention.
full- The percentage of time that all non-idle tasks are stalled on a resource simultaneously. This indicates a more severe resource bottleneck.
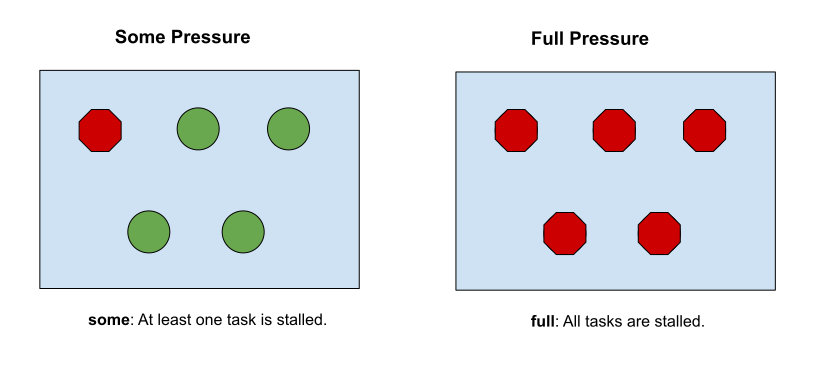
PSI: 'Some' vs. 'Full' Pressure
These metrics are aggregated over 10-second, 1-minute, and 5-minute rolling windows, providing a comprehensive view of resource pressure over time.
PSI metrics in Kubernetes
With the KubeletPSI feature gate enabled, the kubelet can now collect PSI metrics from the Linux kernel and expose them through two channels: the Summary API and the /metrics/cadvisor Prometheus endpoint. This allows you to monitor and alert on resource pressure at the node, pod, and container level.
The following new metrics are available in Prometheus exposition format via /metrics/cadvisor:
container_pressure_cpu_stalled_seconds_totalcontainer_pressure_cpu_waiting_seconds_totalcontainer_pressure_memory_stalled_seconds_totalcontainer_pressure_memory_waiting_seconds_totalcontainer_pressure_io_stalled_seconds_totalcontainer_pressure_io_waiting_seconds_total
These metrics, along with the data from the Summary API, provide a granular view of resource pressure, enabling you to pinpoint the source of performance issues and take corrective action. For example, you can use these metrics to:
- Identify memory leaks: A steadily increasing
somepressure for memory can indicate a memory leak in an application. - Optimize resource requests and limits: By understanding the resource pressure of your workloads, you can more accurately tune their resource requests and limits.
- Autoscale workloads: You can use PSI metrics to trigger autoscaling events, ensuring that your workloads have the resources they need to perform optimally.
How to enable PSI metrics
To enable PSI metrics in your Kubernetes cluster, you need to:
- Ensure your nodes are running a Linux kernel version 4.20 or later and are using cgroup v2.
- Enable the
KubeletPSIfeature gate on the kubelet.
Once enabled, you can start scraping the /metrics/cadvisor endpoint with your Prometheus-compatible monitoring solution or query the Summary API to collect and visualize the new PSI metrics. Note that PSI is a Linux-kernel feature, so these metrics are not available on Windows nodes. Your cluster can contain a mix of Linux and Windows nodes, and on the Windows nodes the kubelet does not expose PSI metrics.
What's next?
We are excited to bring PSI metrics to the Kubernetes community and look forward to your feedback. As a beta feature, we are actively working on improving and extending this functionality towards a stable GA release. We encourage you to try it out and share your experiences with us.
To learn more about PSI metrics, check out the official Kubernetes documentation. You can also get involved in the conversation on the #sig-node Slack channel.
Kubernetes v1.34: Service Account Token Integration for Image Pulls Graduates to Beta
The Kubernetes community continues to advance security best practices by reducing reliance on long-lived credentials. Following the successful alpha release in Kubernetes v1.33, Service Account Token Integration for Kubelet Credential Providers has now graduated to beta in Kubernetes v1.34, bringing us closer to eliminating long-lived image pull secrets from Kubernetes clusters.
This enhancement allows credential providers to use workload-specific service account tokens to obtain registry credentials, providing a secure, ephemeral alternative to traditional image pull secrets.
What's new in beta?
The beta graduation brings several important changes that make the feature more robust and production-ready:
Required cacheType field
Breaking change from alpha: The cacheType field is required
in the credential provider configuration when using service account tokens.
This field is new in beta and must be specified to ensure proper caching behavior.
# CAUTION: this is not a complete configuration example, just a reference for the 'tokenAttributes.cacheType' field.
tokenAttributes:
serviceAccountTokenAudience: "my-registry-audience"
cacheType: "ServiceAccount" # Required field in beta
requireServiceAccount: true
Choose between two caching strategies:
Token: Cache credentials per service account token (use when credential lifetime is tied to the token). This is useful when the credential provider transforms the service account token into registry credentials with the same lifetime as the token, or when registries support Kubernetes service account tokens directly. Note: The kubelet cannot send service account tokens directly to registries; credential provider plugins are needed to transform tokens into the username/password format expected by registries.ServiceAccount: Cache credentials per service account identity (use when credentials are valid for all pods using the same service account)
Isolated image pull credentials
The beta release provides stronger security isolation for container images when using service account tokens for image pulls. It ensures that pods can only access images that were pulled using ServiceAccounts they're authorized to use. This prevents unauthorized access to sensitive container images and enables granular access control where different workloads can have different registry permissions based on their ServiceAccount.
When credential providers use service account tokens, the system tracks ServiceAccount identity (namespace, name, and UID) for each pulled image. When a pod attempts to use a cached image, the system verifies that the pod's ServiceAccount matches exactly with the ServiceAccount that was used to originally pull the image.
Administrators can revoke access to previously pulled images by deleting and recreating the ServiceAccount, which changes the UID and invalidates cached image access.
For more details about this capability, see the image pull credential verification documentation.
How it works
Configuration
Credential providers opt into using ServiceAccount tokens
by configuring the tokenAttributes field:
#
# CAUTION: this is an example configuration.
# Do not use this for your own cluster!
#
apiVersion: kubelet.config.k8s.io/v1
kind: CredentialProviderConfig
providers:
- name: my-credential-provider
matchImages:
- "*.myregistry.io/*"
defaultCacheDuration: "10m"
apiVersion: credentialprovider.kubelet.k8s.io/v1
tokenAttributes:
serviceAccountTokenAudience: "my-registry-audience"
cacheType: "ServiceAccount" # New in beta
requireServiceAccount: true
requiredServiceAccountAnnotationKeys:
- "myregistry.io/identity-id"
optionalServiceAccountAnnotationKeys:
- "myregistry.io/optional-annotation"
Image pull flow
At a high level, kubelet coordinates with your credential provider
and the container runtime as follows:
When the image is not present locally:
kubeletchecks its credential cache using the configuredcacheType(TokenorServiceAccount)- If needed,
kubeletrequests a ServiceAccount token for the pod's ServiceAccount and passes it, plus any required annotations, to the credential provider - The provider exchanges that token for registry credentials
and returns them to
kubelet kubeletcaches credentials per thecacheTypestrategy and pulls the image with those credentialskubeletrecords the ServiceAccount coordinates (namespace, name, UID) associated with the pulled image for later authorization checks
When the image is already present locally:
kubeletverifies the pod's ServiceAccount coordinates match the coordinates recorded for the cached image- If they match exactly, the cached image can be used without pulling from the registry
- If they differ,
kubeletperforms a fresh pull using credentials for the new ServiceAccount
With image pull credential verification enabled:
- Authorization is enforced using the recorded ServiceAccount coordinates, ensuring pods only use images pulled by a ServiceAccount they are authorized to use
- Administrators can revoke access by deleting and recreating a ServiceAccount; the UID changes and previously recorded authorization no longer matches
Audience restriction
The beta release builds on service account node audience restriction
(beta since v1.33) to ensure kubelet can only request tokens for authorized audiences.
Administrators configure allowed audiences using RBAC to enable kubelet to request service account tokens for image pulls:
#
# CAUTION: this is an example configuration.
# Do not use this for your own cluster!
#
apiVersion: rbac.authorization.k8s.io/v1
kind: ClusterRole
metadata:
name: kubelet-credential-provider-audiences
rules:
- verbs: ["request-serviceaccounts-token-audience"]
apiGroups: [""]
resources: ["my-registry-audience"]
resourceNames: ["registry-access-sa"] # Optional: specific SA
Getting started with beta
Prerequisites
- Kubernetes v1.34 or later
- Feature gate enabled:
KubeletServiceAccountTokenForCredentialProviders=true(beta, enabled by default) - Credential provider support: Update your credential provider to handle ServiceAccount tokens
Migration from alpha
If you're already using the alpha version, the migration to beta requires minimal changes:
- Add
cacheTypefield: Update your credential provider configuration to include the requiredcacheTypefield - Review caching strategy:
Choose between
TokenandServiceAccountcache types based on your provider's behavior - Test audience restrictions: Ensure your RBAC configuration, or other cluster authorization rules, will properly restrict token audiences
Example setup
Here's a complete example for setting up a credential provider with service account tokens (this example assumes your cluster uses RBAC authorization):
#
# CAUTION: this is an example configuration.
# Do not use this for your own cluster!
#
# Service Account with registry annotations
apiVersion: v1
kind: ServiceAccount
metadata:
name: registry-access-sa
namespace: default
annotations:
myregistry.io/identity-id: "user123"
---
# RBAC for audience restriction
apiVersion: rbac.authorization.k8s.io/v1
kind: ClusterRole
metadata:
name: registry-audience-access
rules:
- verbs: ["request-serviceaccounts-token-audience"]
apiGroups: [""]
resources: ["my-registry-audience"]
resourceNames: ["registry-access-sa"] # Optional: specific ServiceAccount
---
apiVersion: rbac.authorization.k8s.io/v1
kind: ClusterRoleBinding
metadata:
name: kubelet-registry-audience
roleRef:
apiGroup: rbac.authorization.k8s.io
kind: ClusterRole
name: registry-audience-access
subjects:
- kind: Group
name: system:nodes
apiGroup: rbac.authorization.k8s.io
---
# Pod using the ServiceAccount
apiVersion: v1
kind: Pod
metadata:
name: my-pod
spec:
serviceAccountName: registry-access-sa
containers:
- name: my-app
image: myregistry.example/my-app:latest
What's next?
For Kubernetes v1.35, we - Kubernetes SIG Auth - expect the feature to stay in beta, and we will continue to solicit feedback.
You can learn more about this feature on the service account token for image pulls page in the Kubernetes documentation.
You can also follow along on the KEP-4412 to track progress across the coming Kubernetes releases.
Call to action
In this blog post,
I have covered the beta graduation of ServiceAccount token integration
for Kubelet Credential Providers in Kubernetes v1.34.
I discussed the key improvements,
including the required cacheType field
and enhanced integration with Ensure Secret Pull Images.
We have been receiving positive feedback from the community during the alpha phase and would love to hear more as we stabilize this feature for GA. In particular, we would like feedback from credential provider implementors as they integrate with the new beta API and caching mechanisms. Please reach out to us on the #sig-auth-authenticators-dev channel on Kubernetes Slack.
How to get involved
If you are interested in getting involved in the development of this feature, share feedback, or participate in any other ongoing SIG Auth projects, please reach out on the #sig-auth channel on Kubernetes Slack.
You are also welcome to join the bi-weekly SIG Auth meetings, held every other Wednesday.
Kubernetes v1.34: Introducing CPU Manager Static Policy Option for Uncore Cache Alignment
A new CPU Manager Static Policy Option called prefer-align-cpus-by-uncorecache was introduced in Kubernetes v1.32 as an alpha feature, and has graduated to beta in Kubernetes v1.34.
This CPU Manager Policy Option is designed to optimize performance for specific workloads running on processors with a split uncore cache architecture.
In this article, I'll explain what that means and why it's useful.
Understanding the feature
What is uncore cache?
Until relatively recently, nearly all mainstream computer processors had a monolithic last-level-cache cache that was shared across every core in a multiple CPU package. This monolithic cache is also referred to as uncore cache (because it is not linked to a specific core), or as Level 3 cache. As well as the Level 3 cache, there is other cache, commonly called Level 1 and Level 2 cache, that is associated with a specific CPU core.
In order to reduce access latency between the CPU cores and their cache, recent AMD64 and ARM
architecture based processors have introduced a split uncore cache architecture,
where the last-level-cache is divided into multiple physical caches,
that are aligned to specific CPU groupings within the physical package.
The shorter distances within the CPU package help to reduce latency.
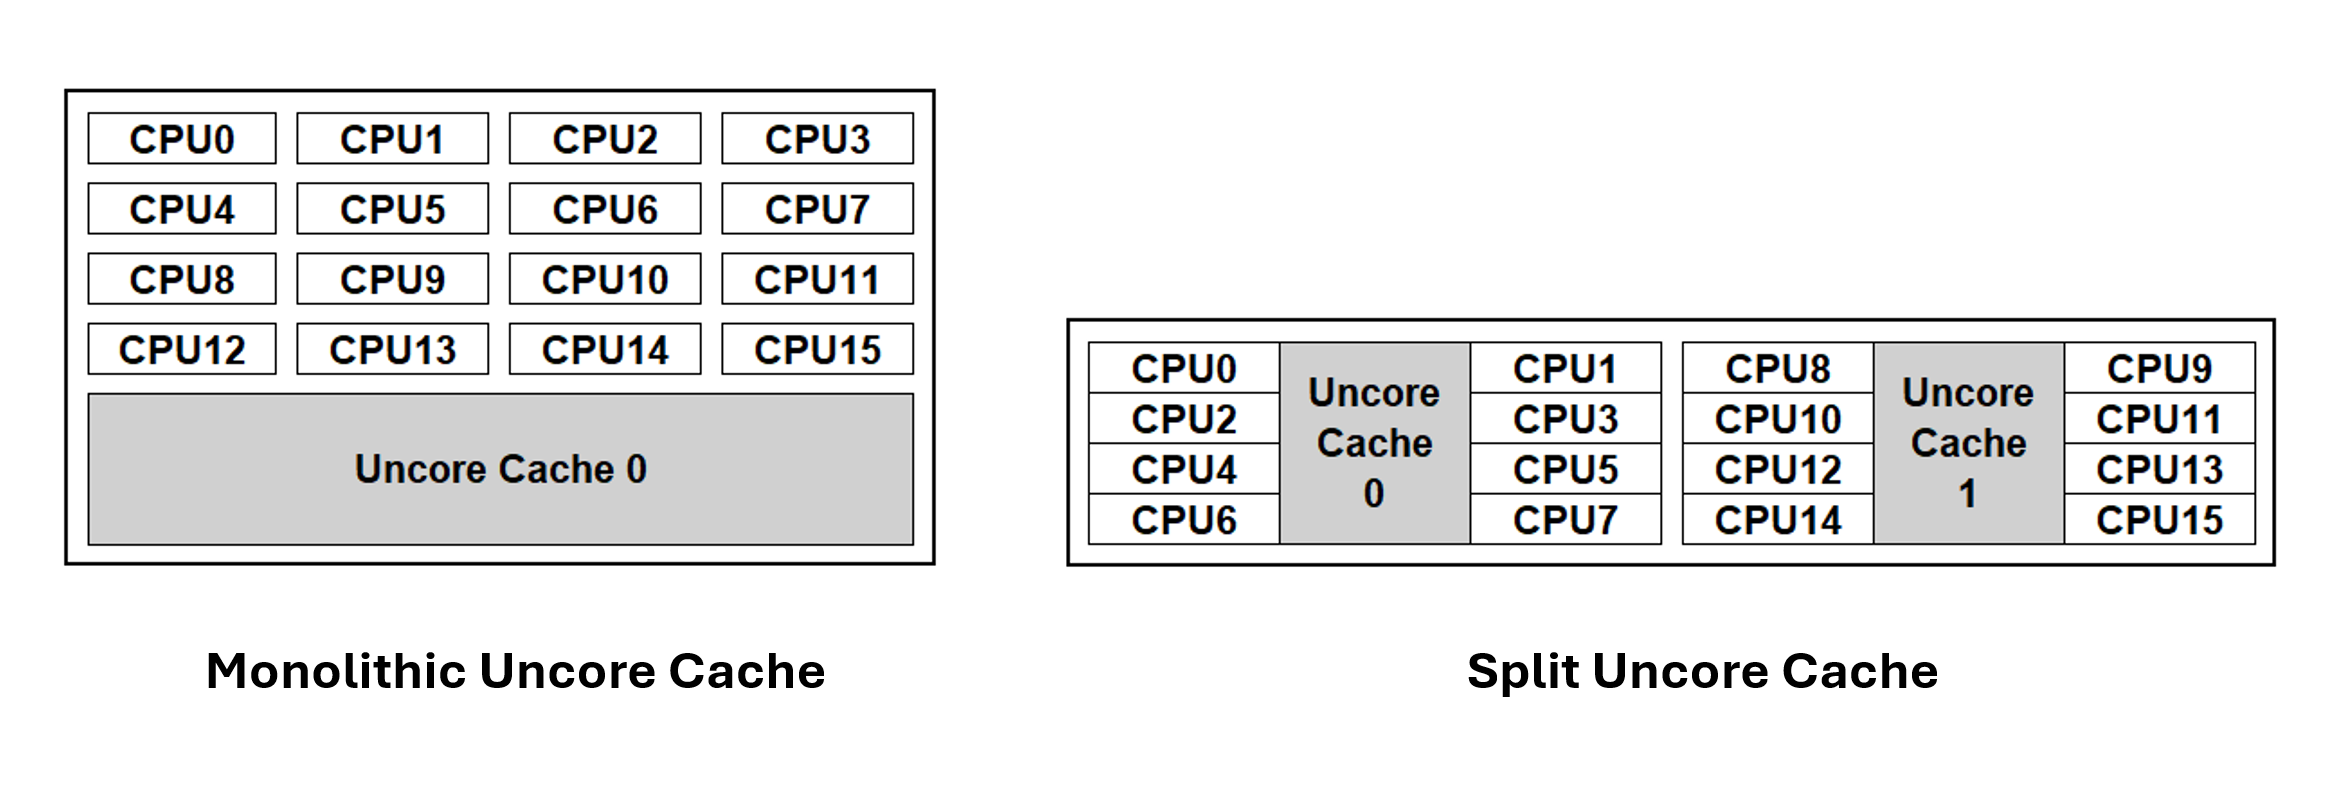
Kubernetes is able to place workloads in a way that accounts for the cache topology within the CPU package(s).
Cache-aware workload placement
The matrix below shows the CPU-to-CPU latency measured in nanoseconds (lower is better) when
passing a packet between CPUs, via its cache coherence protocol on a processor that
uses split uncore cache.
In this example, the processor package consists of 2 uncore caches.
Each uncore cache serves 8 CPU cores.
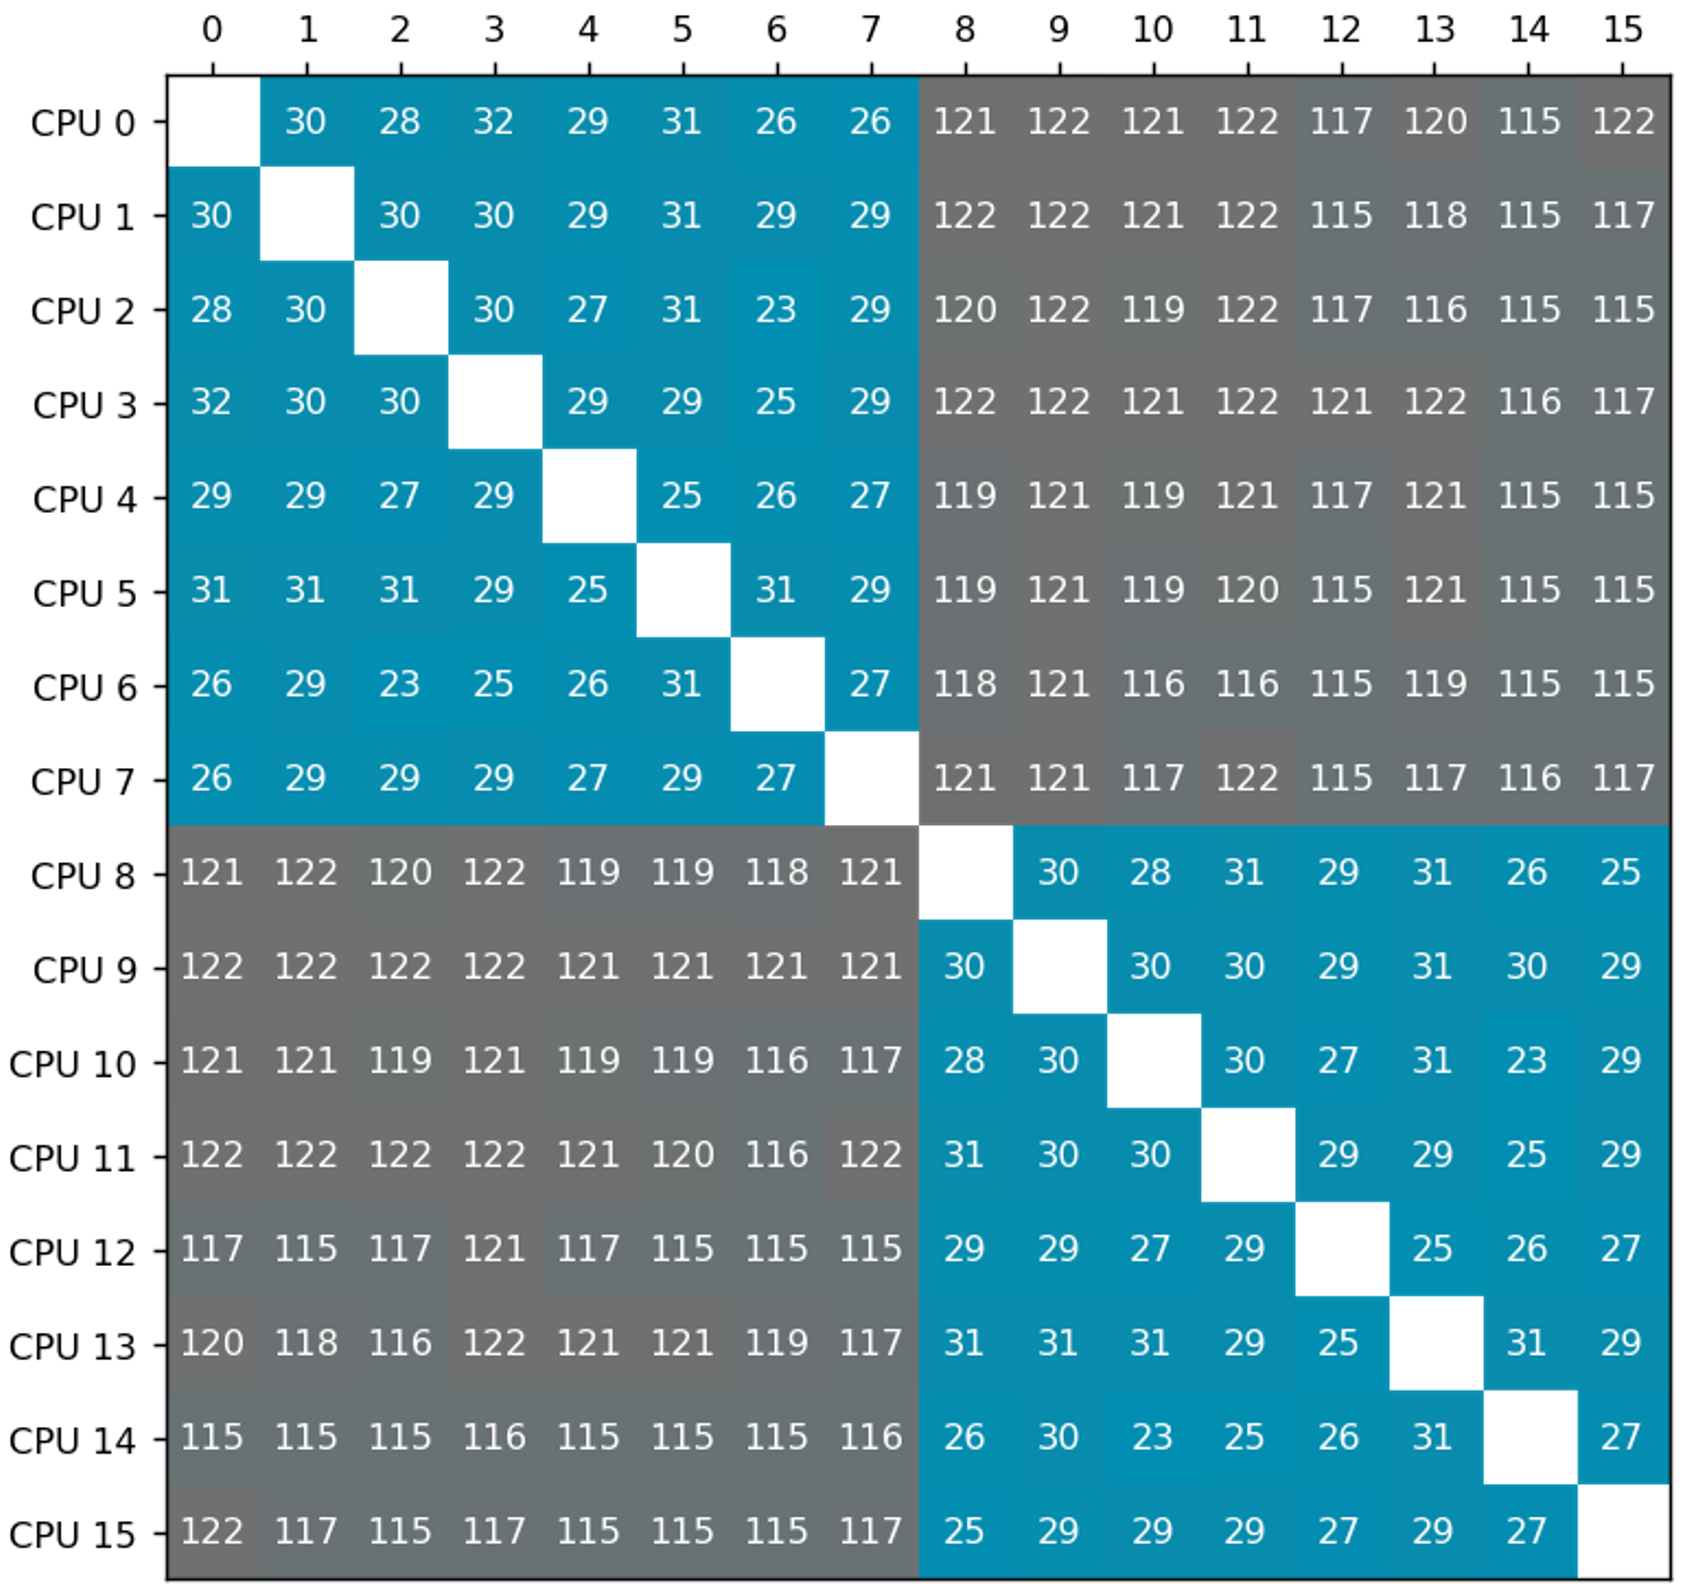 Blue entries in the matrix represent latency between CPUs sharing the same uncore cache, while grey entries indicate latency between CPUs corresponding to different uncore caches. Latency between CPUs that correspond to different caches are higher than the latency between CPUs that belong to the same cache.
With prefer-align-cpus-by-uncorecache enabled, the
static CPU Manager attempts to allocates CPU resources for a container, such that all CPUs assigned to a container share the same uncore cache.
This policy operates on a best-effort basis, aiming to minimize the distribution of a container's CPU resources across uncore caches, based on the
container's requirements, and accounting for allocatable resources on the node.
By running a workload, where it can, on a set of CPUS that use the smallest feasible number of uncore caches, applications benefit from reduced cache latency (as seen in the matrix above), and from reduced contention against other workloads, which can result in overall higher throughput. The benefit only shows up if your nodes use a split uncore cache topology for their processors.
The following diagram below illustrates uncore cache alignment when the feature is enabled.
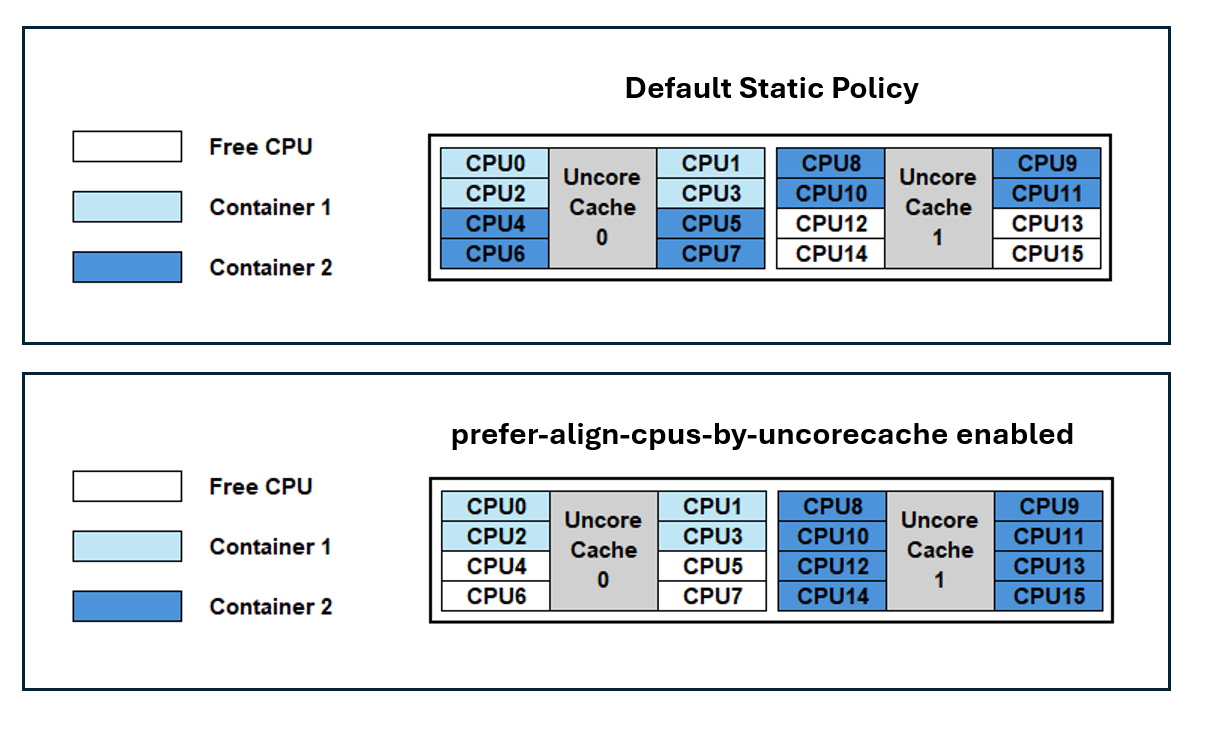
By default, Kubernetes does not account for uncore cache topology; containers are assigned CPU resources using a packed methodology. As a result, Container 1 and Container 2 can experience a noisy neighbor impact due to cache access contention on Uncore Cache 0. Additionally, Container 2 will have CPUs distributed across both caches which can introduce a cross-cache latency.
With prefer-align-cpus-by-uncorecache enabled, each container is isolated on an individual cache. This resolves the cache contention between the containers and minimizes the cache latency for the CPUs being utilized.
Use cases
Common use cases can include telco applications like vRAN, Mobile Packet Core, and Firewalls. It's important to note that the optimization provided by prefer-align-cpus-by-uncorecache can be dependent on the workload. For example, applications that are memory bandwidth bound may not benefit from uncore cache alignment, as utilizing more uncore caches can increase memory bandwidth access.
Enabling the feature
To enable this feature, set the CPU Manager Policy to static and enable the CPU Manager Policy Options with prefer-align-cpus-by-uncorecache.
For Kubernetes 1.34, the feature is in the beta stage and requires the CPUManagerPolicyBetaOptions
feature gate to also be enabled.
Append the following to the kubelet configuration file:
kind: KubeletConfiguration
apiVersion: kubelet.config.k8s.io/v1beta1
featureGates:
...
CPUManagerPolicyBetaOptions: true
cpuManagerPolicy: "static"
cpuManagerPolicyOptions:
prefer-align-cpus-by-uncorecache: "true"
reservedSystemCPUs: "0"
...
If you're making this change to an existing node, remove the cpu_manager_state file and then restart kubelet.
prefer-align-cpus-by-uncorecache can be enabled on nodes with a monolithic uncore cache processor. The feature will mimic a best-effort socket alignment effect and will pack CPU resources on the socket similar to the default static CPU Manager policy.
Further reading
See Node Resource Managers to learn more about the CPU Manager and the available policies.
Reference the documentation for prefer-align-cpus-by-uncorecache here.
Please see the Kubernetes Enhancement Proposal for more information on how prefer-align-cpus-by-uncorecache is implemented.
Getting involved
This feature is driven by SIG Node. If you are interested in helping develop this feature, sharing feedback, or participating in any other ongoing SIG Node projects, please attend the SIG Node meeting for more details.
Kubernetes v1.34: DRA has graduated to GA
Kubernetes 1.34 is here, and it has brought a huge wave of enhancements for Dynamic Resource Allocation (DRA)! This
release marks a major milestone with many APIs in the resource.k8s.io group graduating to General Availability (GA),
unlocking the full potential of how you manage devices on Kubernetes. On top of that, several key features have
moved to beta, and a fresh batch of new alpha features promise even more expressiveness and flexibility.
Let's dive into what's new for DRA in Kubernetes 1.34!
The core of DRA is now GA
The headline feature of the v1.34 release is that the core of DRA has graduated to General Availability.
Kubernetes Dynamic Resource Allocation (DRA) provides a flexible framework for managing specialized hardware and infrastructure resources, such as GPUs or FPGAs. DRA provides APIs that enable each workload to specify the properties of the devices it needs, but leaving it to the scheduler to allocate actual devices, allowing increased reliability and improved utilization of expensive hardware.
With the graduation to GA, DRA is stable and will be part of Kubernetes for the long run. The community can still expect a steady stream of new features being added to DRA over the next several Kubernetes releases, but they will not make any breaking changes to DRA. So users and developers of DRA drivers can start adopting DRA with confidence.
Starting with Kubernetes 1.34, DRA is enabled by default; the DRA features that have reached beta are also enabled by default.
That's because the default API version for DRA is now the stable v1 version, and not the earlier versions
(eg: v1beta1 or v1beta2) that needed explicit opt in.
Features promoted to beta
Several powerful features have been promoted to beta, adding more control, flexibility, and observability to resource management with DRA.
Admin access labelling has been updated.
In v1.34, you can restrict device support to people (or software) authorized to use it. This is meant
as a way to avoid privilege escalation if a DRA driver grants additional privileges when admin access is requested
and to avoid accessing devices which are in use by normal applications, potentially in another namespace.
The restriction works by ensuring that only users with access to a namespace with the
resource.k8s.io/admin-access: "true" label are authorized to create
ResourceClaim or ResourceClaimTemplates objects with the adminAccess field set to true. This ensures that non-admin users cannot misuse the feature.
Prioritized list lets users specify a list of acceptable devices for their workloads, rather than just a single type of device. So while the workload might run best on a single high-performance GPU, it might also be able to run on 2 mid-level GPUs. The scheduler will attempt to satisfy the alternatives in the list in order, so the workload will be allocated the best set of devices available on the node.
The kubelet's API has been updated to report on Pod resources allocated through DRA. This allows node monitoring agents to know the allocated DRA resources for Pods on a node and makes it possible to use the DRA information in the PodResources API to develop new features and integrations.
New alpha features
Kubernetes 1.34 also introduces several new alpha features that give us a glimpse into the future of resource management with DRA.
Extended resource mapping support in DRA allows cluster administrators to advertise DRA-managed resources as extended resources, allowing developers to consume them using the familiar, simpler request syntax while still benefiting from dynamic allocation. This makes it possible for existing workloads to start using DRA without modifications, simplifying the transition to DRA for both application developers and cluster administrators.
Consumable capacity introduces a flexible device sharing model where multiple, independent resource claims from unrelated pods can each be allocated a share of the same underlying physical device. This new capability is managed through optional, administrator-defined sharing policies that govern how a device's total capacity is divided and enforced by the platform for each request. This allows for sharing of devices in scenarios where pre-defined partitions are not viable.
For more information, see Kubernetes v1.34: DRA Consumable Capacity
Binding conditions improve scheduling reliability for certain classes of devices by allowing the Kubernetes scheduler to delay binding a pod to a node until its required external resources, such as attachable devices or FPGAs, are confirmed to be fully prepared. This prevents premature pod assignments that could lead to failures and ensures more robust, predictable scheduling by explicitly modeling resource readiness before the pod is committed to a node.
Resource health status for DRA improves observability by exposing the health status of devices allocated to a Pod via Pod Status. This works whether the device is allocated through DRA or Device Plugin. This makes it easier to understand the cause of an unhealthy device and respond properly.
For more information, see Kubernetes v1.34: Pods Report DRA Resource Health
What’s next?
While DRA got promoted to GA this cycle, the hard work on DRA doesn't stop. There are several features in alpha and beta that we plan to bring to GA in the next couple of releases and we are looking to continue to improve performance, scalability and reliability of DRA. So expect an equally ambitious set of features in DRA for the 1.35 release.
Getting involved
A good starting point is joining the WG Device Management Slack channel and meetings, which happen at US/EU and EU/APAC friendly time slots.
Not all enhancement ideas are tracked as issues yet, so come talk to us if you want to help or have some ideas yourself! We have work to do at all levels, from difficult core changes to usability enhancements in kubectl, which could be picked up by newcomers.
Acknowledgments
A huge thanks to the new contributors to DRA this cycle:
- Alay Patel (alaypatel07)
- Gaurav Kumar Ghildiyal (gauravkghildiyal)
- JP (Jpsassine)
- Kobayashi Daisuke (KobayashiD27)
- Laura Lorenz (lauralorenz)
- Sunyanan Choochotkaew (sunya-ch)
- Swati Gupta (guptaNswati)
- Yu Liao (yliaog)
Kubernetes v1.34: Finer-Grained Control Over Container Restarts
With the release of Kubernetes 1.34, a new alpha feature is introduced
that gives you more granular control over container restarts within a Pod. This
feature, named Container Restart Policy and Rules, allows you to specify a
restart policy for each container individually, overriding the Pod's global
restart policy. In addition, it also allows you to conditionally restart
individual containers based on their exit codes. This feature is available
behind the alpha feature gate ContainerRestartRules.
This has been a long-requested feature. Let's dive into how it works and how you can use it.
The problem with a single restart policy
Before this feature, the restartPolicy was set at the Pod level. This meant
that all containers in a Pod shared the same restart policy (Always,
OnFailure, or Never). While this works for many use cases, it can be
limiting in others.
For example, consider a Pod with a main application container and an init container that performs some initial setup. You might want the main container to always restart on failure, but the init container should only run once and never restart. With a single Pod-level restart policy, this wasn't possible.
Introducing per-container restart policies
With the new ContainerRestartRules feature gate, you can now specify a
restartPolicy for each container in your Pod's spec. You can also define
restartPolicyRules to control restarts based on exit codes. This gives you
the fine-grained control you need to handle complex scenarios.
Use cases
Let's look at some real-life use cases where per-container restart policies can be beneficial.
In-place restarts for training jobs
In ML research, it's common to orchestrate a large number of long-running AI/ML training workloads. In these scenarios, workload failures are unavoidable. When a workload fails with a retriable exit code, you want the container to restart quickly without rescheduling the entire Pod, which consumes a significant amount of time and resources. Restarting the failed container "in-place" is critical for better utilization of compute resources. The container should only restart "in-place" if it failed due to a retriable error; otherwise, the container and Pod should terminate and possibly be rescheduled.
This can now be achieved with container-level restartPolicyRules. The workload
can exit with different codes to represent retriable and non-retriable errors.
With restartPolicyRules, the workload can be restarted in-place quickly, but
only when the error is retriable.
Try-once init containers
Init containers are often used to perform initialization work for the main container, such as setting up environments and credentials. Sometimes, you want the main container to always be restarted, but you don't want to retry initialization if it fails.
With a container-level restartPolicy, this is now possible. The init container
can be executed only once, and its failure would be considered a Pod failure. If
the initialization succeeds, the main container can be always restarted.
Pods with multiple containers
For Pods that run multiple containers, you might have different restart requirements for each container. Some containers might have a clear definition of success and should only be restarted on failure. Others might need to be always restarted.
This is now possible with a container-level restartPolicy, allowing individual
containers to have different restart policies.
How to use it
To use this new feature, you need to enable the ContainerRestartRules feature
gate on your Kubernetes cluster control-plane and worker nodes running
Kubernetes 1.34+. Once enabled, you can specify the restartPolicy and
restartPolicyRules fields in your container definitions.
Here are some examples:
Example 1: Restarting on specific exit codes
In this example, the container should restart if and only if it fails with a retriable error, represented by exit code 42.
To achieve this, the container has restartPolicy: Never, and a restart
policy rule that tells Kubernetes to restart the container in-place if it exits
with code 42.
apiVersion: v1
kind: Pod
metadata:
name: restart-on-exit-codes
annotations:
kubernetes.io/description: "This Pod only restart the container only when it exits with code 42."
spec:
restartPolicy: Never
containers:
- name: restart-on-exit-codes
image: docker.io/library/busybox:1.28
command: ['sh', '-c', 'sleep 60 && exit 0']
restartPolicy: Never # Container restart policy must be specified if rules are specified
restartPolicyRules: # Only restart the container if it exits with code 42
- action: Restart
exitCodes:
operator: In
values: [42]
Example 2: A try-once init container
In this example, a Pod should always be restarted once the initialization succeeds. However, the initialization should only be tried once.
To achieve this, the Pod has an Always restart policy. The init-once
init container will only try once. If it fails, the Pod will fail. This allows
the Pod to fail if the initialization failed, but also keep running once the
initialization succeeds.
apiVersion: v1
kind: Pod
metadata:
name: fail-pod-if-init-fails
annotations:
kubernetes.io/description: "This Pod has an init container that runs only once. After initialization succeeds, the main container will always be restarted."
spec:
restartPolicy: Always
initContainers:
- name: init-once # This init container will only try once. If it fails, the Pod will fail.
image: docker.io/library/busybox:1.28
command: ['sh', '-c', 'echo "Failing initialization" && sleep 10 && exit 1']
restartPolicy: Never
containers:
- name: main-container # This container will always be restarted once initialization succeeds.
image: docker.io/library/busybox:1.28
command: ['sh', '-c', 'sleep 1800 && exit 0']
Example 3: Containers with different restart policies
In this example, there are two containers with different restart requirements. One should always be restarted, while the other should only be restarted on failure.
This is achieved by using a different container-level restartPolicy on each of
the two containers.
apiVersion: v1
kind: Pod
metadata:
name: on-failure-pod
annotations:
kubernetes.io/description: "This Pod has two containers with different restart policies."
spec:
containers:
- name: restart-on-failure
image: docker.io/library/busybox:1.28
command: ['sh', '-c', 'echo "Not restarting after success" && sleep 10 && exit 0']
restartPolicy: OnFailure
- name: restart-always
image: docker.io/library/busybox:1.28
command: ['sh', '-c', 'echo "Always restarting" && sleep 1800 && exit 0']
restartPolicy: Always
Learn more
- Read the documentation for container restart policy.
- Read the KEP for the Container Restart Rules
Roadmap
More actions and signals to restart Pods and containers are coming! Notably, there are plans to add support for restarting the entire Pod. Planning and discussions on these features are in progress. Feel free to share feedback or requests with the SIG Node community!
Your feedback is welcome!
This is an alpha feature, and the Kubernetes project would love to hear your feedback. Please try it out. This feature is driven by the SIG Node. If you are interested in helping develop this feature, sharing feedback, or participating in any other ongoing SIG Node projects, please reach out to the SIG Node community!
You can reach SIG Node by several means:
Kubernetes v1.34: User preferences (kuberc) are available for testing in kubectl 1.34
Have you ever wished you could enable interactive delete,
by default, in kubectl? Or maybe, you'd like to have custom aliases defined,
but not necessarily generate hundreds of them manually?
Look no further. SIG-CLI
has been working hard to add user preferences to kubectl,
and we are happy to announce that this functionality is reaching beta as part
of the Kubernetes v1.34 release.
How it works
A full description of this functionality is available in our official documentation, but this blog post will answer both of the questions from the beginning of this article.
Before we dive into details, let's quickly cover what the user preferences file
looks like and where to place it. By default, kubectl will look for kuberc
file in your default kubeconfig
directory, which is $HOME/.kube. Alternatively, you can specify this location
using --kuberc option or the KUBERC environment variable.
Just like every Kubernetes manifest, kuberc file will start with an apiVersion
and kind:
apiVersion: kubectl.config.k8s.io/v1beta1
kind: Preference
# the user preferences will follow here
Defaults
Let's start by setting default values for kubectl command options. Our goal
is to always use interactive delete, which means we want the --interactive
option for kubectl delete to always be set to true. This can be achieved
with the following addition to our kuberc file:
defaults:
- command: delete
options:
- name: interactive
default: "true"
In the above example, I'm introducing defaults section, which allows users to
define default values for kubectl options. In this case, we're setting the
interactive option for kubectl delete to be true by default. This default
can be overridden if a user explicitly provides a different value such as
kubectl delete --interactive=false, in which case the explicit option takes
precedence.
Another highly encouraged default from SIG-CLI, is using Server-Side Apply. To do so, you can add the following snippet to your preferences:
# continuing defaults section
- command: apply
options:
- name: server-side
default: "true"
Aliases
The ability to define aliases allows us to save precious seconds when typing
commands. I bet that you most likely have one defined for kubectl, because
typing seven letters is definitely longer than just pressing k.
For this reason, the ability to define aliases was a must-have when we decided
to implement user preferences, alongside defaulting. To define an alias for any
of the built-in commands, expand your kuberc file with the following addition:
aliases:
- name: gns
command: get
prependArgs:
- namespace
options:
- name: output
default: json
There's a lot going on above, so let me break this down. First, we're introducing
a new section: aliases. Here, we're defining a new alias gns, which is mapped
to the command get command. Next, we're defining arguments (namespace resource)
that will be inserted right after the command name. Additionally, we're setting
--output=json option for this alias. The structure of options block is identical
to the one in the defaults section.
You probably noticed that we've introduced a mechanism for prepending arguments,
and you might wonder if there is a complementary setting for appending them (in
other words, adding to the end of the command, after user-provided arguments).
This can be achieved through appendArgs block, which is presented below:
# continuing aliases section
- name: runx
command: run
options:
- name: image
default: busybox
- name: namespace
default: test-ns
appendArgs:
- --
- custom-arg
Here, we're introducing another alias: runx, which invokes kubectl run command,
passing --image and --namespace options with predefined values, and also
appending -- and custom-arg at the end of the invocation.
Debugging
We hope that kubectl user preferences will open up new possibilities for our users.
Whenever you're in doubt, feel free to run kubectl with increased verbosity.
At -v=5, you should get all the possible debugging information from this feature,
which will be crucial when reporting issues.
To learn more, I encourage you to read through our official documentation and the actual proposal.
Get involved
Kubectl user preferences feature has reached beta, and we are very interested in your feedback. We'd love to hear what you like about it and what problems you'd like to see it solve. Feel free to join SIG-CLI slack channel, or open an issue against kubectl repository. You can also join us at our community meetings, which happen every other Wednesday, and share your stories with us.
Kubernetes v1.34: Of Wind & Will (O' WaW)
Editors: Agustina Barbetta, Alejandro Josue Leon Bellido, Graziano Casto, Melony Qin, Dipesh Rawat
Similar to previous releases, the release of Kubernetes v1.34 introduces new stable, beta, and alpha features. The consistent delivery of high-quality releases underscores the strength of our development cycle and the vibrant support from our community.
This release consists of 58 enhancements. Of those enhancements, 23 have graduated to Stable, 22 have entered Beta, and 13 have entered Alpha.
There are also some deprecations and removals in this release; make sure to read about those.
Release theme and logo

A release powered by the wind around us — and the will within us.
Every release cycle, we inherit winds that we don't really control — the state of our tooling, documentation, and the historical quirks of our project. Sometimes these winds fill our sails, sometimes they push us sideways or die down.
What keeps Kubernetes moving isn't the perfect winds, but the will of our sailors who adjust the sails, man the helm, chart the courses and keep the ship steady. The release happens not because conditions are always ideal, but because of the people who build it, the people who release it, and the bears ^, cats, dogs, wizards, and curious minds who keep Kubernetes sailing strong — no matter which way the wind blows.
This release, Of Wind & Will (O' WaW), honors the winds that have shaped us, and the will that propels us forward.
^ Oh, and you wonder why bears? Keep wondering!
Spotlight on key updates
Kubernetes v1.34 is packed with new features and improvements. Here are a few select updates the Release Team would like to highlight!
Stable: The core of DRA is GA
Dynamic Resource Allocation (DRA) enables more powerful ways to select, allocate, share, and configure GPUs, TPUs, NICs and other devices.
Since the v1.30 release, DRA has been based around claiming devices using
structured parameters that are opaque to the core of Kubernetes.
This enhancement took inspiration from dynamic provisioning for storage volumes.
DRA with structured parameters relies on a set of supporting API kinds:
ResourceClaim, DeviceClass, ResourceClaimTemplate, and ResourceSlice API types
under resource.k8s.io, while extending the .spec for Pods with a new resourceClaims field.
The resource.k8s.io/v1 APIs have graduated to stable and are now available by default.
This work was done as part of KEP #4381 led by WG Device Management.
Beta: Projected ServiceAccount tokens for kubelet image credential providers
The kubelet credential providers, used for pulling private container images, traditionally relied on long-lived Secrets stored on the node or in the cluster. This approach increased security risks and management overhead, as these credentials were not tied to the specific workload and did not rotate automatically.
To solve this, the kubelet can now request short-lived, audience-bound ServiceAccount tokens for authenticating to container registries. This allows image pulls to be authorized based on the Pod's own identity rather than a node-level credential.
The primary benefit is a significant security improvement. It eliminates the need for long-lived Secrets for image pulls, reducing the attack surface and simplifying credential management for both administrators and developers.
This work was done as part of KEP #4412 led by SIG Auth and SIG Node.
Alpha: Support for KYAML, a Kubernetes dialect of YAML
KYAML aims to be a safer and less ambiguous YAML subset, and was designed specifically for Kubernetes. Whatever version of Kubernetes you use, starting from Kubernetes v1.34 you are able to use KYAML as a new output format for kubectl.
KYAML addresses specific challenges with both YAML and JSON. YAML's significant whitespace requires careful attention to indentation and nesting, while its optional string-quoting can lead to unexpected type coercion (for example: "The Norway Bug"). Meanwhile, JSON lacks comment support and has strict requirements for trailing commas and quoted keys.
You can write KYAML and pass it as an input to any version of kubectl, because all KYAML files are also valid as YAML. With kubectl v1.34, you are also able to request KYAML output (as in kubectl get -o kyaml …) by setting environment variable KUBECTL_KYAML=true. If you prefer, you can still request the output in JSON or YAML format.
This work was done as part of KEP #5295 led by SIG CLI.
Features graduating to Stable
This is a selection of some of the improvements that are now stable following the v1.34 release.
Delayed creation of Job’s replacement Pods
By default, Job controllers create replacement Pods immediately when a Pod starts terminating, causing both Pods to run simultaneously. This can cause resource contention in constrained clusters, where the replacement Pod may struggle to find available nodes until the original Pod fully terminates. The situation can also trigger unwanted cluster autoscaler scale-ups.
Additionally, some machine learning frameworks like TensorFlow and JAX require only one Pod per index to run at a time, making simultaneous Pod execution problematic.
This feature introduces .spec.podReplacementPolicy in Jobs. You may choose to create replacement Pods only when the Pod is fully terminated (has .status.phase: Failed). To do this, set .spec.podReplacementPolicy: Failed.
Introduced as alpha in v1.28, this feature has graduated to stable in v1.34.
This work was done as part of KEP #3939 led by SIG Apps.
Recovery from volume expansion failure
This feature allows users to cancel volume expansions that are unsupported by the underlying storage provider, and retry volume expansion with smaller values that may succeed.
Introduced as alpha in v1.23, this feature has graduated to stable in v1.34.
This work was done as part of KEP #1790 led by SIG Storage.
VolumeAttributesClass for volume modification
VolumeAttributesClass has graduated to stable in v1.34. VolumeAttributesClass is a generic, Kubernetes-native API for modifying volume parameters like provisioned IO. It allows workloads to vertically scale their volumes on-line to balance cost and performance, if supported by their provider.
Like all new volume features in Kubernetes, this API is implemented via the container storage interface (CSI). Your provisioner-specific CSI driver must support the new ModifyVolume API which is the CSI side of this feature.
This work was done as part of KEP #3751 led by SIG Storage.
Structured authentication configuration
Kubernetes v1.29 introduced a configuration file format to manage API server client authentication, moving away from the previous reliance on a large set of command-line options. The AuthenticationConfiguration kind allows administrators to support multiple JWT authenticators, CEL expression validation, and dynamic reloading. This change significantly improves the manageability and auditability of the cluster's authentication settings - and has graduated to stable in v1.34.
This work was done as part of KEP #3331 led by SIG Auth.
Finer-grained authorization based on selectors
Kubernetes authorizers, including webhook authorizers and the built-in node authorizer, can now make authorization decisions based on field and label selectors in incoming requests. When you send list, watch or deletecollection requests with selectors, the authorization layer can now evaluate access with that additional context.
For example, you can write an authorization policy that only allows listing Pods bound to a specific .spec.nodeName.
The client (perhaps the kubelet on a particular node) must specify
the field selector that the policy requires, otherwise the request is forbidden.
This change makes it feasible to set up least privilege rules, provided that the client knows how to conform to the restrictions you set.
Kubernetes v1.34 now supports more granular control in environments like per-node isolation or custom multi-tenant setups.
This work was done as part of KEP #4601 led by SIG Auth.
Restrict anonymous requests with fine-grained controls
Instead of fully enabling or disabling anonymous access, you can now configure a strict list of endpoints where unauthenticated requests are allowed. This provides a safer alternative for clusters that rely on anonymous access to health or bootstrap endpoints like /healthz, /readyz, or /livez.
With this feature, accidental RBAC misconfigurations that grant broad access to anonymous users can be avoided without requiring changes to external probes or bootstrapping tools.
This work was done as part of KEP #4633 led by SIG Auth.
More efficient requeueing through plugin-specific callbacks
The kube-scheduler can now make more accurate decisions about when to retry scheduling Pods that were previously unschedulable. Each scheduling plugin can now register callback functions that tell the scheduler whether an incoming cluster event is likely to make a rejected Pod schedulable again.
This reduces unnecessary retries and improves overall scheduling throughput - especially in clusters using dynamic resource allocation. The feature also lets certain plugins skip the usual backoff delay when it is safe to do so, making scheduling faster in specific cases.
This work was done as part of KEP #4247 led by SIG Scheduling.
Ordered Namespace deletion
Semi-random resource deletion order can create security gaps or unintended behavior, such as Pods persisting after their associated NetworkPolicies are deleted.
This improvement introduces a more structured deletion process for Kubernetes namespaces to ensure secure and deterministic resource removal. By enforcing a structured deletion sequence that respects logical and security dependencies, this approach ensures Pods are removed before other resources.
This feature was introduced in Kubernetes v1.33 and graduated to stable in v1.34. The graduation improves security and reliability by mitigating risks from non-deterministic deletions, including the vulnerability described in CVE-2024-7598.
This work was done as part of KEP #5080 led by SIG API Machinery.
Streaming list responses
Handling large list responses in Kubernetes previously posed a significant scalability challenge. When clients requested extensive resource lists, such as thousands of Pods or Custom Resources, the API server was required to serialize the entire collection of objects into a single, large memory buffer before sending it. This process created substantial memory pressure and could lead to performance degradation, impacting the overall stability of the cluster.
To address this limitation, a streaming encoding mechanism for collections (list responses)
has been introduced. For the JSON and Kubernetes Protobuf response formats, that streaming mechanism
is automatically active and the associated feature gate is stable.
The primary benefit of this approach is the avoidance of large memory allocations on the API server, resulting in a much smaller and more predictable memory footprint.
Consequently, the cluster becomes more resilient and performant, especially in large-scale environments where frequent requests for extensive resource lists are common.
This work was done as part of KEP #5116 led by SIG API Machinery.
Resilient watch cache initialization
Watch cache is a caching layer inside kube-apiserver that maintains an eventually consistent cache of cluster state stored in etcd. In the past, issues could occur when the watch cache was not yet initialized during kube-apiserver startup or when it required re-initialization.
To address these issues, the watch cache initialization process has been made more resilient to failures, improving control plane robustness and ensuring controllers and clients can reliably establish watches. This improvement was introduced as beta in v1.31 and is now stable.
This work was done as part of KEP #4568 led by SIG API Machinery and SIG Scalability.
Relaxing DNS search path validation
Previously, the strict validation of a Pod's DNS search path in Kubernetes often created integration challenges in complex or legacy network environments. This restrictiveness could block configurations that were necessary for an organization's infrastructure, forcing administrators to implement difficult workarounds.
To address this, relaxed DNS validation was introduced as alpha in v1.32 and has now graduated to stable in v1.34. A common use case involves Pods that need to communicate with both internal Kubernetes services and external domains. By setting a single dot (.) as the first entry in the searches list of the Pod's .spec.dnsConfig, administrators can prevent the system's resolver from appending the cluster's internal search domains to external queries. This avoids generating unnecessary DNS requests to the internal DNS server for external hostnames, improving efficiency and preventing potential resolution errors.
This work was done as part of KEP #4427 led by SIG Network.
Support for Direct Service Return (DSR) in Windows kube-proxy
DSR provides performance optimizations by allowing return traffic routed through load balancers to bypass the load balancer and respond directly to the client, reducing load on the load balancer and improving overall latency. For information on DSR on Windows, read Direct Server Return (DSR) in a nutshell.
Initially introduced in v1.14, this feature has graduated to stable in v1.34.
This work was done as part of KEP #5100 led by SIG Windows.
Sleep action for Container lifecycle hooks
A Sleep action for containers’ PreStop and PostStart lifecycle hooks was introduced to provide a straightforward way to manage graceful shutdowns and improve overall container lifecycle management.
The Sleep action allows containers to pause for a specified duration after starting or before termination. Using a negative or zero sleep duration returns immediately, resulting in a no-op.
The Sleep action was introduced in Kubernetes v1.29, with zero value support added in v1.32. Both features graduated to stable in v1.34.
This work was done as part of KEP #3960 and KEP #4818 led by SIG Node.
Linux node swap support
Historically, the lack of swap support in Kubernetes could lead to workload instability, as nodes under memory pressure often had to terminate processes abruptly. This particularly affected applications with large but infrequently accessed memory footprints and prevented more graceful resource management.
To address this, configurable per-node swap support was introduced in v1.22. It has progressed through alpha and beta stages and has graduated to stable in v1.34. The primary mode, LimitedSwap, allows Pods to use swap within their existing memory limits, providing a direct solution to the problem. By default, the kubelet is configured with NoSwap mode, which means Kubernetes workloads cannot use swap.
This feature improves workload stability and allows for more efficient resource utilization. It enables clusters to support a wider variety of applications, especially in resource-constrained environments, though administrators must consider the potential performance impact of swapping.
This work was done as part of KEP #2400 led by SIG Node.
Allow special characters in environment variables
The environment variable validation rules in Kubernetes have been relaxed
to allow nearly all printable ASCII characters in variable names, excluding =.
This change supports scenarios where workloads require nonstandard characters in variable names - for example, frameworks like .NET Core that use : to represent nested configuration keys.
The relaxed validation applies to environment variables defined directly in Pod spec,
as well as those injected using envFrom references to ConfigMaps and Secrets.
This work was done as part of KEP #4369 led by SIG Node.
Taint management is separated from Node lifecycle
Historically, the TaintManager's logic for applying NoSchedule and NoExecute taints to nodes based on their condition (NotReady, Unreachable, etc.) was tightly coupled with the node lifecycle controller. This tight coupling made the code harder to maintain and test, and it also limited the flexibility of the taint-based eviction mechanism.
This KEP refactors the TaintManager into its own separate controller within the Kubernetes controller manager. It is an internal architectural improvement designed to increase code modularity and maintainability. This change allows the logic for taint-based evictions to be tested and evolved independently, but it has no direct user-facing impact on how taints are used.
This work was done as part of KEP #3902 led by SIG Scheduling and SIG Node.
New features in Beta
This is a selection of some of the improvements that are now beta following the v1.34 release.
Pod-level resource requests and limits
Defining resource needs for Pods with multiple containers has been challenging, as requests and limits could only be set on a per-container basis. This forced developers to either over-provision resources for each container or meticulously divide the total desired resources, making configuration complex and often leading to inefficient resource allocation. To simplify this, the ability to specify resource requests and limits at the Pod level was introduced. This allows developers to define an overall resource budget for a Pod, which is then shared among its constituent containers. This feature was introduced as alpha in v1.32 and has graduated to beta in v1.34, with HPA now supporting pod-level resource specifications.
The primary benefit is a more intuitive and straightforward way to manage resources for multi-container Pods. It ensures that the total resources used by all containers do not exceed the Pod's defined limits, leading to better resource planning, more accurate scheduling, and more efficient utilization of cluster resources.
This work was done as part of KEP #2837 led by SIG Scheduling and SIG Autoscaling.
.kuberc file for kubectl user preferences
A .kuberc configuration file allows you to define preferences for kubectl, such as default options and command aliases. Unlike the kubeconfig file, the .kuberc configuration file does not contain cluster details, usernames or passwords.
This feature was introduced as alpha in v1.33, gated behind the environment variable KUBECTL_KUBERC. It has graduated to beta in v1.34 and is enabled by default.
This work was done as part of KEP #3104 led by SIG CLI.
External ServiceAccount token signing
Traditionally, Kubernetes manages ServiceAccount tokens using static signing keys that are loaded from disk at kube-apiserver startup. This feature introduces an ExternalJWTSigner gRPC service for out-of-process signing, enabling Kubernetes distributions to integrate with external key management solutions (for example, HSMs, cloud KMSes) for ServiceAccount token signing instead of static disk-based keys.
Introduced as alpha in v1.32, this external JWT signing capability advances to beta and is enabled by default in v1.34.
This work was done as part of KEP #740 led by SIG Auth.
DRA features in beta
Admin access for secure resource monitoring
DRA supports controlled administrative access via the adminAccess field in ResourceClaims or ResourceClaimTemplates, allowing cluster operators to access devices already in use by others for monitoring or diagnostics. This privileged mode is limited to users authorized to create such objects in namespaces labeled resource.k8s.io/admin-access: "true", ensuring regular workloads remain unaffected. Graduating to beta in v1.34, this feature provides secure introspection capabilities while preserving workload isolation through namespace-based authorization checks.
This work was done as part of KEP #5018 led by WG Device Management and SIG Auth.
Prioritized alternatives in ResourceClaims and ResourceClaimTemplates
While a workload might run best on a single high-performance GPU, it might also be able to run on two mid-level GPUs.
With the feature gate DRAPrioritizedList (now enabled by default), ResourceClaims and ResourceClaimTemplates get a new field named firstAvailable. This field is an ordered list that allows users to specify that a request may be satisfied in different ways, including allocating nothing at all if specific hardware is not available. The scheduler will attempt to satisfy the alternatives in the list in order, so the workload will be allocated the best set of devices available in the cluster.
This work was done as part of KEP #4816 led by WG Device Management.
The kubelet reports allocated DRA resources
The kubelet's API has been updated to report on Pod resources allocated through DRA. This allows node monitoring agents to discover the allocated DRA resources for Pods on a node. Additionally, it enables node components to use the PodResourcesAPI and leverage this DRA information when developing new features and integrations.
Starting from Kubernetes v1.34, this feature is enabled by default.
This work was done as part of KEP #3695 led by WG Device Management.
kube-scheduler non-blocking API calls
The kube-scheduler makes blocking API calls during scheduling cycles, creating performance bottlenecks. This feature introduces asynchronous API handling through a prioritized queue system with request deduplication, allowing the scheduler to continue processing Pods while API operations complete in the background. Key benefits include reduced scheduling latency, prevention of scheduler thread starvation during API delays, and immediate retry capability for unschedulable Pods. The implementation maintains backward compatibility and adds metrics for monitoring pending API operations.
This work was done as part of KEP #5229 led by SIG Scheduling.
Mutating admission policies
MutatingAdmissionPolicies offer a declarative, in-process alternative to mutating admission webhooks. This feature leverages CEL's object instantiation and JSON Patch strategies, combined with Server Side Apply’s merge algorithms.
This significantly simplifies admission control by allowing administrators to define mutation rules directly in the API server.
Introduced as alpha in v1.32, mutating admission policies has graduated to beta in v1.34.
This work was done as part of KEP #3962 led by SIG API Machinery.
Snapshottable API server cache
The kube-apiserver's caching mechanism (watch cache) efficiently serves requests for the latest observed state. However, list requests for previous states (for example, via pagination or by specifying a resourceVersion) often bypass this cache and are served directly from etcd. This direct etcd access significantly increases performance costs and can lead to stability issues, particularly with large resources, due to memory pressure from transferring large data blobs.
With the ListFromCacheSnapshot feature gate enabled by default, kube-apiserver will attempt to serve the response from snapshots if one is available with resourceVersion older than requested. The kube-apiserver starts with no snapshots, creates a new snapshot on every watch event, and keeps them until it detects etcd is compacted or if cache is full with events older than 75 seconds. If the provided resourceVersion is unavailable, the server will fallback to etcd.
This work was done as part of KEP #4988 led by SIG API Machinery.
Tooling for declarative validation of Kubernetes-native types
Prior to this release, validation rules for the
APIs built into Kubernetes were written entirely by hand, which makes them difficult for maintainers to discover, understand, improve or test.
There was no single way to find all the validation rules that might apply to an API.
Declarative validation benefits Kubernetes maintainers by making API development, maintenance, and review easier while enabling programmatic inspection for better tooling and documentation.
For people using Kubernetes libraries to write their own code
(for example: a controller), the new approach streamlines adding new fields through IDL tags, rather than complex validation functions.
This change helps speed up API creation by automating validation boilerplate,
and provides more relevant error messages by performing validation on versioned types.
This enhancement (which graduated to beta in v1.33 and continues as beta in v1.34) brings CEL-based validation rules to native Kubernetes types. It allows for more granular and declarative validation to be defined directly in the type definitions, improving API consistency and developer experience.
This work was done as part of KEP #5073 led by SIG API Machinery.
Streaming informers for list requests
The streaming informers feature, which has been in beta since v1.32, gains further beta refinements in v1.34. This capability allows list requests to return data as a continuous stream of objects from the API server’s watch cache, rather than assembling paged results directly from etcd. By reusing the same mechanics used for watch operations, the API server can serve large datasets while keeping memory usage steady and avoiding allocation spikes that can affect stability.
In this release, the kube-apiserver and kube-controller-manager both take advantage of the new WatchList mechanism by default. For the kube-apiserver, this means list requests are streamed more efficiently, while the kube-controller-manager benefits from a more memory-efficient and predictable way to work with informers. Together, these improvements reduce memory pressure during large list operations, and improve reliability under sustained load, making list streaming more predictable and efficient.
This work was done as part of KEP #3157 led by SIG API Machinery and SIG Scalability.
Graceful node shutdown handling for Windows nodes
The kubelet on Windows nodes can now detect system shutdown events and begin graceful termination of running Pods. This mirrors existing behavior on Linux and helps ensure workloads exit cleanly during planned shutdowns or restarts.
When the system begins shutting down, the kubelet reacts by using standard termination logic. It respects the configured lifecycle hooks and grace periods, giving Pods time to stop before the node powers off. The feature relies on Windows pre-shutdown notifications to coordinate this process. This enhancement improves workload reliability during maintenance, restarts, or system updates. It is now in beta and enabled by default.
This work was done as part of KEP #4802 led by SIG Windows.
In-place Pod resize improvements
Graduated to beta and enabled by default in v1.33, in-place Pod resizing receives further improvements in v1.34. These include support for decreasing memory usage and integration with Pod-level resources.
This feature remains in beta in v1.34. For detailed usage instructions and examples, refer to the documentation: Resize CPU and Memory Resources assigned to Containers.
This work was done as part of KEP #1287 led by SIG Node and SIG Autoscaling.
New features in Alpha
This is a selection of some of the improvements that are now alpha following the v1.34 release.
Pod certificates for mTLS authentication
Authenticating workloads within a cluster, especially for communication with the API server, has primarily relied on ServiceAccount tokens. While effective, these tokens aren't always ideal for establishing a strong, verifiable identity for mutual TLS (mTLS) and can present challenges when integrating with external systems that expect certificate-based authentication.
Kubernetes v1.34 introduces a built-in mechanism for Pods to obtain X.509 certificates via PodCertificateRequests. The kubelet can request and manage certificates for Pods, which can then be used to authenticate to the Kubernetes API server and other services using mTLS.
The primary benefit is a more robust and flexible identity mechanism for Pods. It provides a native way to implement strong mTLS authentication without relying solely on bearer tokens, aligning Kubernetes with standard security practices and simplifying integrations with certificate-aware observability and security tooling.
This work was done as part of KEP #4317 led by SIG Auth.
"Restricted" Pod security standard now forbids remote probes
The host field within probes and lifecycle handlers allows users to specify an entity other than the podIP for the kubelet to probe.
However, this opens up a route for misuse and for attacks that bypass security controls, since the host field could be set to any value, including security sensitive external hosts, or localhost on the node.
In Kubernetes v1.34, Pods only meet the
Restricted
Pod security standard if they either leave the host field unset, or if they don't even use this
kind of probe.
You can use Pod security admission, or a third party solution, to enforce that Pods meet this standard. Because these are security controls, check
the documentation to understand the limitations and behavior of the enforcement mechanism you choose.
This work was done as part of KEP #4940 led by SIG Auth.
Use .status.nominatedNodeName to express Pod placement
When the kube-scheduler takes time to bind Pods to Nodes, cluster autoscalers may not understand that a Pod will be bound to a specific Node. Consequently, they may mistakenly consider the Node as underutilized and delete it.
To address this issue, the kube-scheduler can use .status.nominatedNodeName not only to indicate ongoing preemption but also to express Pod placement intentions. By enabling the NominatedNodeNameForExpectation feature gate, the scheduler uses this field to indicate where a Pod will be bound. This exposes internal reservations to help external components make informed decisions.
This work was done as part of KEP #5278 led by SIG Scheduling.
DRA features in alpha
Resource health status for DRA
It can be difficult to know when a Pod is using a device that has failed or is temporarily unhealthy, which makes troubleshooting Pod crashes challenging or impossible.
Resource Health Status for DRA improves observability by exposing the health status of devices allocated to a Pod in the Pod’s status. This makes it easier to identify the cause of Pod issues related to unhealthy devices and respond appropriately.
To enable this functionality, the ResourceHealthStatus feature gate must be enabled, and the DRA driver must implement the DRAResourceHealth gRPC service.
This work was done as part of KEP #4680 led by WG Device Management.
Extended resource mapping
Extended resource mapping provides a simpler alternative to DRA's expressive and flexible approach by offering a straightforward way to describe resource capacity and consumption. This feature enables cluster administrators to advertise DRA-managed resources as extended resources, allowing application developers and operators to continue using the familiar container’s .spec.resources syntax to consume them.
This enables existing workloads to adopt DRA without modifications, simplifying the transition to DRA for both application developers and cluster administrators.
This work was done as part of KEP #5004 led by WG Device Management.
DRA consumable capacity
Kubernetes v1.33 added support for resource drivers to advertise slices of a device that are available, rather than exposing the entire device as an all-or-nothing resource. However, this approach couldn't handle scenarios where device drivers manage fine-grained, dynamic portions of a device resource based on user demand, or share those resources independently of ResourceClaims, which are restricted by their spec and namespace.
Enabling the DRAConsumableCapacity feature gate
(introduced as alpha in v1.34)
allows resource drivers to share the same device, or even a slice of a device, across multiple ResourceClaims or across multiple DeviceRequests.
The feature also extends the scheduler to support allocating portions of device resources,
as defined in the capacity field.
This DRA feature improves device sharing across namespaces and claims, tailoring it to Pod needs. It enables drivers to enforce capacity limits, enhances scheduling, and supports new use cases like bandwidth-aware networking and multi-tenant sharing.
This work was done as part of KEP #5075 led by WG Device Management.
Device binding conditions
The Kubernetes scheduler gets more reliable by delaying binding a Pod to a Node until its required external resources, such as attachable devices or FPGAs, are confirmed to be ready.
This delay mechanism is implemented in the PreBind phase of the scheduling framework. During this phase, the scheduler checks whether all required device conditions are satisfied before proceeding with binding. This enables coordination with external device controllers, ensuring more robust, predictable scheduling.
This work was done as part of KEP #5007 led by WG Device Management.
Container restart rules
Currently, all containers within a Pod will follow the same .spec.restartPolicy when exited or crashed. However, Pods that run multiple containers might have different restart requirements for each container. For example, for init containers used to perform initialization, you may not want to retry initialization if they fail. Similarly, in ML research environments with long-running training workloads, containers that fail with retriable exit codes should restart quickly in place, rather than triggering Pod recreation and losing progress.
Kubernetes v1.34 introduces the ContainerRestartRules feature gate. When enabled, a restartPolicy can be specified for each container within a Pod. A restartPolicyRules list can also be defined to override restartPolicy based on the last exit code. This provides the fine-grained control needed to handle complex scenarios and better utilization of compute resources.
This work was done as part of KEP #5307 led by SIG Node.
Load environment variables from files created in runtime
Application developers have long requested greater flexibility in declaring environment variables. Traditionally, environment variables are declared on the API server side via static values, ConfigMaps, or Secrets.
Behind the EnvFiles feature gate, Kubernetes v1.34 introduces the ability to declare environment variables at runtime.
One container (typically an init container) can generate the variable and store it in a file,
and a subsequent container can start with the environment variable loaded from that file.
This approach eliminates the need to "wrap" the target container's entry point,
enabling more flexible in-Pod container orchestration.
This feature particularly benefits AI/ML training workloads, where each Pod in a training Job requires initialization with runtime-defined values.
This work was done as part of KEP #5307 led by SIG Node.
Graduations, deprecations, and removals in v1.34
Graduations to stable
This lists all the features that graduated to stable (also known as general availability). For a full list of updates including new features and graduations from alpha to beta, see the release notes.
This release includes a total of 23 enhancements promoted to stable:
- Allow almost all printable ASCII characters in environment variables
- Allow for recreation of pods once fully terminated in the job controller
- Allow zero value for Sleep Action of PreStop Hook
- API Server tracing
- AppArmor support
- Authorize with Field and Label Selectors
- Consistent Reads from Cache
- Decouple TaintManager from NodeLifecycleController
- Discover cgroup driver from CRI
- DRA: structured parameters
- Introducing Sleep Action for PreStop Hook
- Kubelet OpenTelemetry Tracing
- Kubernetes VolumeAttributesClass ModifyVolume
- Node memory swap support
- Only allow anonymous auth for configured endpoints
- Ordered namespace deletion
- Per-plugin callback functions for accurate requeueing in kube-scheduler
- Relaxed DNS search string validation
- Resilient Watchcache Initialization
- Streaming Encoding for LIST Responses
- Structured Authentication Config
- Support for Direct Service Return (DSR) and overlay networking in Windows kube-proxy
- Support recovery from volume expansion failure
Deprecations and removals
As Kubernetes develops and matures, features may be deprecated, removed, or replaced with better ones to improve the project's overall health. See the Kubernetes deprecation and removal policy for more details on this process. Kubernetes v1.34 includes a couple of deprecations.
Manual cgroup driver configuration is deprecated
Historically, configuring the correct cgroup driver has been a pain point for users running Kubernetes clusters.
Kubernetes v1.28 added a way for the kubelet
to query the CRI implementation and find which cgroup driver to use. That automated detection is now
strongly recommended and support for it has graduated to stable in v1.34.
If your CRI container runtime does not support the
ability to report the cgroup driver it needs, you
should upgrade or change your container runtime.
The cgroupDriver configuration setting in the kubelet configuration file is now deprecated.
The corresponding command-line option --cgroup-driver was previously deprecated,
as Kubernetes recommends using the configuration file instead.
Both the configuration setting and command-line option will be removed in a future release,
that removal will not happen before the v1.36 minor release.
This work was done as part of KEP #4033 led by SIG Node.
Kubernetes to end containerd 1.x support in v1.36
While Kubernetes v1.34 still supports containerd 1.7 and other LTS releases of containerd,
as a consequence of automated cgroup driver detection, the Kubernetes SIG Node community
has formally agreed upon a final support timeline for containerd v1.X.
The last Kubernetes release to offer this support will be v1.35 (aligned with containerd 1.7 EOL).
This is an early warning that if you are using containerd 1.X, consider switching to 2.0+ soon.
You are able to monitor the kubelet_cri_losing_support metric to determine if any nodes in your
cluster are using a containerd version that will soon be outdated.
This work was done as part of KEP #4033 led by SIG Node.
PreferClose traffic distribution is deprecated
The spec.trafficDistribution field within a Kubernetes Service allows users to express preferences for how traffic should be routed to Service endpoints.
KEP-3015 deprecates PreferClose and introduces two additional values: PreferSameZone and PreferSameNode. PreferSameZone is an alias for the existing PreferClose to clarify its semantics. PreferSameNode allows connections to be delivered to a local endpoint when possible, falling back to a remote endpoint when not possible.
This feature was introduced in v1.33 behind the PreferSameTrafficDistribution feature gate. It has graduated to beta in v1.34 and is enabled by default.
This work was done as part of KEP #3015 led by SIG Network.
Release notes
Check out the full details of the Kubernetes v1.34 release in our release notes.
Availability
Kubernetes v1.34 is available for download on GitHub or on the Kubernetes download page.
To get started with Kubernetes, check out these interactive tutorials or run local Kubernetes clusters using minikube. You can also easily install v1.34 using kubeadm.
Release Team
Kubernetes is only possible with the support, commitment, and hard work of its community. Each release team is made up of dedicated community volunteers who work together to build the many pieces that make up the Kubernetes releases you rely on. This requires the specialized skills of people from all corners of our community, from the code itself to its documentation and project management.
We honor the memory of Rodolfo "Rodo" Martínez Vega, a dedicated contributor whose passion for technology and community building left a mark on the Kubernetes community. Rodo served as a member of the Kubernetes Release Team across multiple releases, including v1.22-v1.23 and v1.25-v1.30, demonstrating unwavering commitment to the project's success and stability.
Beyond his Release Team contributions, Rodo was deeply involved in fostering the Cloud Native LATAM community, helping to bridge language and cultural barriers in the space. His work on the Spanish version of Kubernetes documentation and the CNCF Glossary exemplified his dedication to making knowledge accessible to Spanish-speaking developers worldwide. Rodo's legacy lives on through the countless community members he mentored, the releases he helped deliver, and the vibrant LATAM Kubernetes community he helped cultivate.
We would like to thank the entire Release Team for the hours spent hard at work to deliver the Kubernetes v1.34 release to our community. The Release Team's membership ranges from first-time shadows to returning team leads with experience forged over several release cycles. A very special thanks goes out to our release lead, Vyom Yadav, for guiding us through a successful release cycle, for his hands-on approach to solving challenges, and for bringing the energy and care that drives our community forward.
Project Velocity
The CNCF K8s DevStats project aggregates a number of interesting data points related to the velocity of Kubernetes and various sub-projects. This includes everything from individual contributions to the number of companies that are contributing and is an illustration of the depth and breadth of effort that goes into evolving this ecosystem.
During the v1.34 release cycle, which spanned 15 weeks from 19th May 2025 to 27th August 2025, Kubernetes received contributions from as many as 106 different companies and 491 individuals. In the wider cloud native ecosystem, the figure goes up to 370 companies, counting 2235 total contributors.
Note that "contribution" counts when someone makes a commit, code review, comment, creates an issue or PR, reviews a PR (including blogs and documentation) or comments on issues and PRs.
If you are interested in contributing, visit Getting Started on our contributor website.
Source for this data:
Event Update
Explore upcoming Kubernetes and cloud native events, including KubeCon + CloudNativeCon, KCD, and other notable conferences worldwide. Stay informed and get involved with the Kubernetes community!
August 2025
- KCD - Kubernetes Community Days: Colombia: Aug 28, 2025 | Bogotá, Colombia
September 2025
- CloudCon Sydney: Sep 9–10, 2025 | Sydney, Australia.
- KCD - Kubernetes Community Days: San Francisco Bay Area: Sep 9, 2025 | San Francisco, USA
- KCD - Kubernetes Community Days: Washington DC: Sep 16, 2025 | Washington, D.C., USA
- KCD - Kubernetes Community Days: Sofia: Sep 18, 2025 | Sofia, Bulgaria
- KCD - Kubernetes Community Days: El Salvador: Sep 20, 2025 | San Salvador, El Salvador
October 2025
- KCD - Kubernetes Community Days: Warsaw: Oct 9, 2025 | Warsaw, Poland
- KCD - Kubernetes Community Days: Edinburgh: Oct 21, 2025 | Edinburgh, United Kingdom
- KCD - Kubernetes Community Days: Sri Lanka: Oct 26, 2025 | Colombo, Sri Lanka
November 2025
- KCD - Kubernetes Community Days: Porto: Nov 3, 2025 | Porto, Portugal
- KubeCon + CloudNativeCon North America 2025: Nov 10-13, 2025 | Atlanta, USA
- KCD - Kubernetes Community Days: Hangzhou: Nov 15, 2025 | Hangzhou, China
December 2025
- KCD - Kubernetes Community Days: Suisse Romande: Dec 4, 2025 | Geneva, Switzerland
You can find the latest event details here.
Upcoming Release Webinar
Join members of the Kubernetes v1.34 Release Team on Wednesday, September 24th 2025 at 4:00 PM (UTC), to learn about the release highlights of this release. For more information and registration, visit the event page on the CNCF Online Programs site.
Get Involved
The simplest way to get involved with Kubernetes is by joining one of the many Special Interest Groups (SIGs) that align with your interests. Have something you’d like to broadcast to the Kubernetes community? Share your voice at our weekly community meeting, and through the channels below. Thank you for your continued feedback and support.
- Follow us on Bluesky @Kubernetesio for the latest updates
- Join the community discussion on Discuss
- Join the community on Slack
- Post questions (or answer questions) on Stack Overflow
- Share your Kubernetes story
- Read more about what’s happening with Kubernetes on the blog
- Learn more about the Kubernetes Release Team
Tuning Linux Swap for Kubernetes: A Deep Dive
The Kubernetes NodeSwap feature, likely to graduate to stable in the upcoming Kubernetes v1.34 release, allows swap usage: a significant shift from the conventional practice of disabling swap for performance predictability. This article focuses exclusively on tuning swap on Linux nodes, where this feature is available. By allowing Linux nodes to use secondary storage for additional virtual memory when physical RAM is exhausted, node swap support aims to improve resource utilization and reduce out-of-memory (OOM) kills.
However, enabling swap is not a "turn-key" solution. The performance and stability of your nodes under memory pressure are critically dependent on a set of Linux kernel parameters. Misconfiguration can lead to performance degradation and interfere with Kubelet's eviction logic.
In this blogpost, I'll dive into critical Linux kernel parameters that govern swap behavior. I will explore how these parameters influence Kubernetes workload performance, swap utilization, and crucial eviction mechanisms. I will present various test results showcasing the impact of different configurations, and share my findings on achieving optimal settings for stable and high-performing Kubernetes clusters.
Introduction to Linux swap
At a high level, the Linux kernel manages memory through pages, typically 4KiB in size. When physical memory becomes constrained, the kernel's page replacement algorithm decides which pages to move to swap space. While the exact logic is a sophisticated optimization, this decision-making process is influenced by certain key factors:
- Page access patterns (how recently pages are accessed)
- Page dirtyness (whether pages have been modified)
- Memory pressure (how urgently the system needs free memory)
Anonymous vs File-backed memory
It is important to understand that not all memory pages are the same. The kernel distinguishes between anonymous and file-backed memory.
Anonymous memory: This is memory that is not backed by a specific file on the disk, such as a program's heap and stack. From the application's perspective this is private memory, and when the kernel needs to reclaim these pages, it must write them to a dedicated swap device.
File-backed memory: This memory is backed by a file on a filesystem. This includes a program's executable code, shared libraries, and filesystem caches. When the kernel needs to reclaim these pages, it can simply discard them if they have not been modified ("clean"). If a page has been modified ("dirty"), the kernel must first write the changes back to the file before it can be discarded.
While a system without swap can still reclaim clean file-backed pages memory under pressure by dropping them, it has no way to offload anonymous memory. Enabling swap provides this capability, allowing the kernel to move less-frequently accessed memory pages to disk to conserve memory to avoid system OOM kills.
Key kernel parameters for swap tuning
To effectively tune swap behavior, Linux provides several kernel parameters that can be managed via sysctl.
vm.swappiness: This is the most well-known parameter. It is a value from 0 to 200 (100 in older kernels) that controls the kernel's preference for swapping anonymous memory pages versus reclaiming file-backed memory pages (page cache).- High value (eg: 90+): The kernel will be aggressive in swapping out less-used anonymous memory to make room for file-cache.
- Low value (eg: < 10): The kernel will strongly prefer dropping file cache pages over swapping anonymous memory.
vm.min_free_kbytes: This parameter tells the kernel to keep a minimum amount of memory free as a buffer. When the amount of free memory drops below the this safety buffer, the kernel starts more aggressively reclaiming pages (swapping, and eventually handling OOM kills).- Function: It acts as a safety lever to ensure the kernel has enough memory for critical allocation requests that cannot be deferred.
- Impact on swap: Setting a higher
min_free_kbyteseffectively raises the floor for for free memory, causing the kernel to initiate swap earlier under memory pressure.
vm.watermark_scale_factor: This setting controls the gap between different watermarks:min,lowandhigh, which are calculated based onmin_free_kbytes.- Watermarks explained:
low: When free memory is below this mark, thekswapdkernel process wakes up to reclaim pages in the background. This is when a swapping cycle begins.min: When free memory hits this minimum level, then aggressive page reclamation will block process allocation. Failing to reclaim pages will cause OOM kills.high: Memory reclamation stops once the free memory reaches this level.
- Impact: A higher
watermark_scale_factorcareates a larger buffer between thelowandminwatermarks. This giveskswapdmore time to reclaim memory gradually before the system hits a critical state.
- Watermarks explained:
In a typical server workload, you might have a long-running process with some memory that becomes 'cold'. A higher swappiness value can free up RAM by swapping out the cold memory, for other active processes that can benefit from keeping their file-cache.
Tuning the min_free_kbytes and watermark_scale_factor parameters to move the swapping window early will give more room for kswapd to offload memory to disk and prevent OOM kills during sudden memory spikes.
Swap tests and results
To understand the real-impact of these parameters, I designed a series of stress tests.
Test setup
- Environment: GKE on Google Cloud
- Kubernetes version: 1.33.2
- Node configuration:
n2-standard-2(8GiB RAM, 50GB swap on apd-balanceddisk, without encryption), Ubuntu 22.04 - Workload: A custom Go application designed to allocate memory at a configurable rate, generate file-cache pressure, and simulate different memory access patterns (random vs sequential).
- Monitoring: A sidecar container capturing system metrics every second.
- Protection: Critical system components (kubelet, container runtime, sshd) were prevented from swapping by setting
memory.swap.max=0in their respective cgroups.
Test methodology
I ran a stress-test pod on nodes with different swappiness settings (0, 60, and 90) and varied the min_free_kbytes and watermark_scale_factor parameters to observe the outcomes under heavy memory allocation and I/O pressure.
Visualizing swap in action
The graph below, from a 100MBps stress test, shows swap in action. As free memory (in the "Memory Usage" plot) decreases, swap usage (Swap Used (GiB)) and swap-out activity (Swap Out (MiB/s)) increase. Critically, as the system relies more on swap, the I/O activity and corresponding wait time (IO Wait % in the "CPU Usage" plot) also rises, indicating CPU stress.
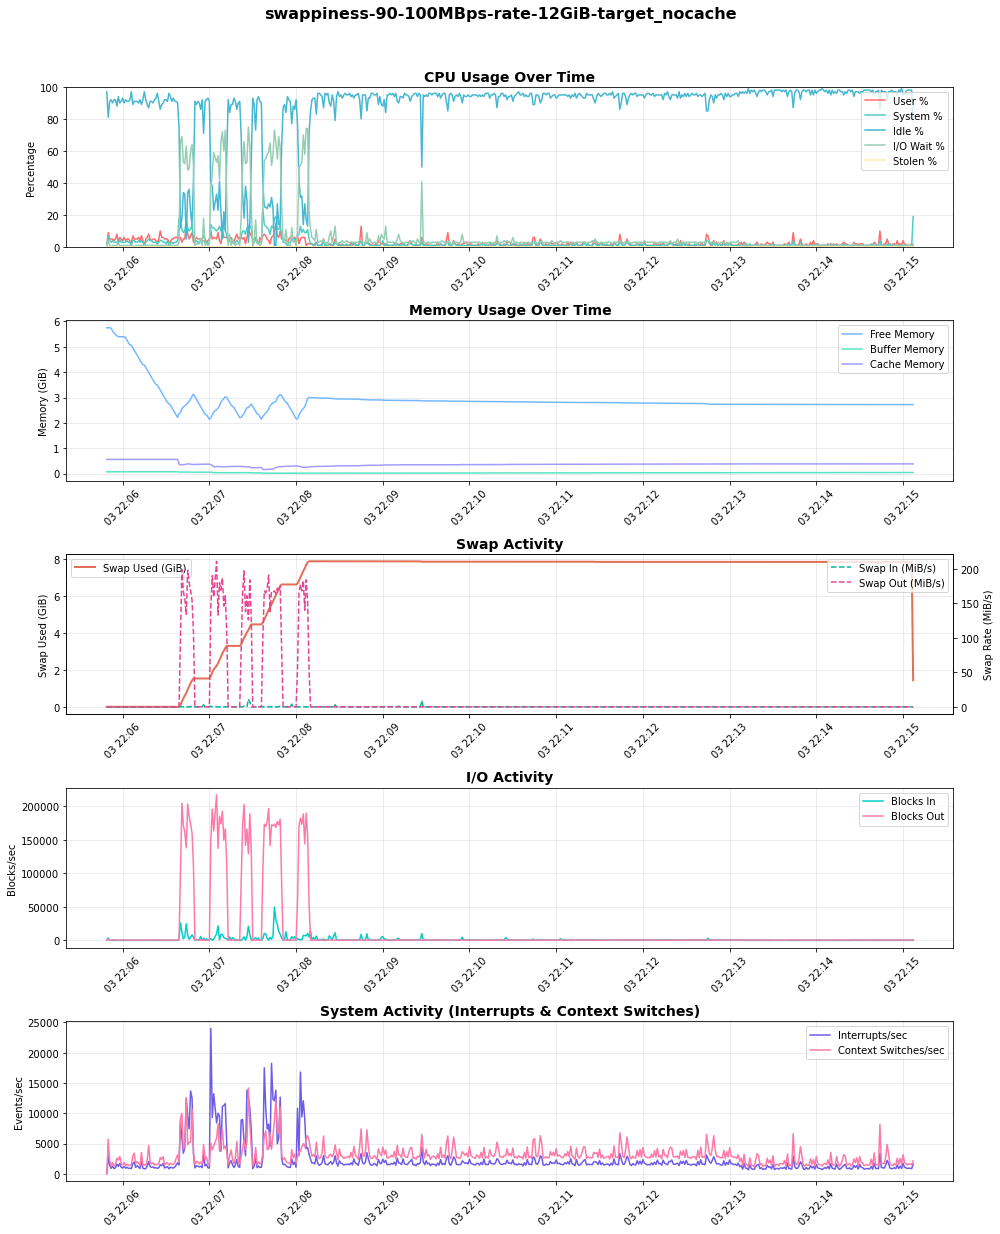
Findings
My initial tests with default kernel parameters (swappiness=60, min_free_kbytes=68MB, watermark_scale_factor=10) quickly led to OOM kills and even unexpected node restarts under high memory pressure. With selecting appropriate kernel parameters a good balance in node stability and performance can be achieved.
The impact of swappiness
The swappiness parameter directly influences the kernel's choice between reclaiming anonymous memory (swapping) and dropping page cache. To observe this, I ran a test where one pod generated and held file-cache pressure, followed by a second pod allocating anonymous memory at 100MB/s, to observe the kernel preference on reclaim:
My findings reveal a clear trade-off:
swappiness=90: The kernel proactively swapped out the inactive anonymous memory to keep the file cache. This resulted in high and sustained swap usage and significant I/O activity ("Blocks Out"), which in turn caused spikes in I/O wait on the CPU.swappiness=0: The kernel favored dropping file-cache pages delaying swap consumption. However, it's critical to understand that this does not disable swapping. When memory pressure was high, the kernel still swapped anonymous memory to disk.
The choice is workload-dependent. For workloads sensitive to I/O latency, a lower swappiness is preferable. For workloads that rely on a large and frequently accessed file cache, a higher swappiness may be beneficial, provided the underlying disk is fast enough to handle the load.
Tuning watermarks to prevent eviction and OOM kills
The most critical challenge I encountered was the interaction between rapid memory allocation and Kubelet's eviction mechanism. When my test pod, which was deliberately configured to overcommit memory, allocated it at a high rate (e.g., 300-500 MBps), the system quickly ran out of free memory.
With default watermarks, the buffer for reclamation was too small. Before kswapd could free up enough memory by swapping, the node would hit a critical state, leading to two potential outcomes:
- Kubelet eviction If kubelet's eviction manager detected
memory.availablewas below its threshold, it would evict the pod. - OOM killer In some high-rate scenarios, the OOM Killer would activate before eviction could complete, sometimes killing higher priority pods that were not the source of the pressure.
To mitigate this I tuned the watermarks:
- Increased
min_free_kbytesto 512MiB: This forces the kernel to start reclaiming memory much earlier, providing a larger safety buffer. - Increased
watermark_scale_factorto 2000: This widened the gap between thelowandhighwatermarks (from ≈337MB to ≈591MB in my test node's/proc/zoneinfo), effectively increasing the swapping window.
This combination gave kswapd a larger operational zone and more time to swap pages to disk during memory spikes, successfully preventing both premature evictions and OOM kills in my test runs.
Table compares watermark levels from /proc/zoneinfo (Non-NUMA node):
min_free_kbytes=67584KiB and watermark_scale_factor=10 | min_free_kbytes=524288KiB and watermark_scale_factor=2000 |
|---|---|
| Node 0, zone Normal pages free 583273 boost 0 min 10504 low 13130 high 15756 spanned 1310720 present 1310720 managed 1265603 | Node 0, zone Normal pages free 470539 min 82109 low 337017 high 591925 spanned 1310720 present 1310720 managed 1274542 |
The graph below reveals that the kernel buffer size and scaling factor play a crucial role in determining how the system responds to memory load. With the right combination of these parameters, the system can effectively use swap space to avoid eviction and maintain stability.
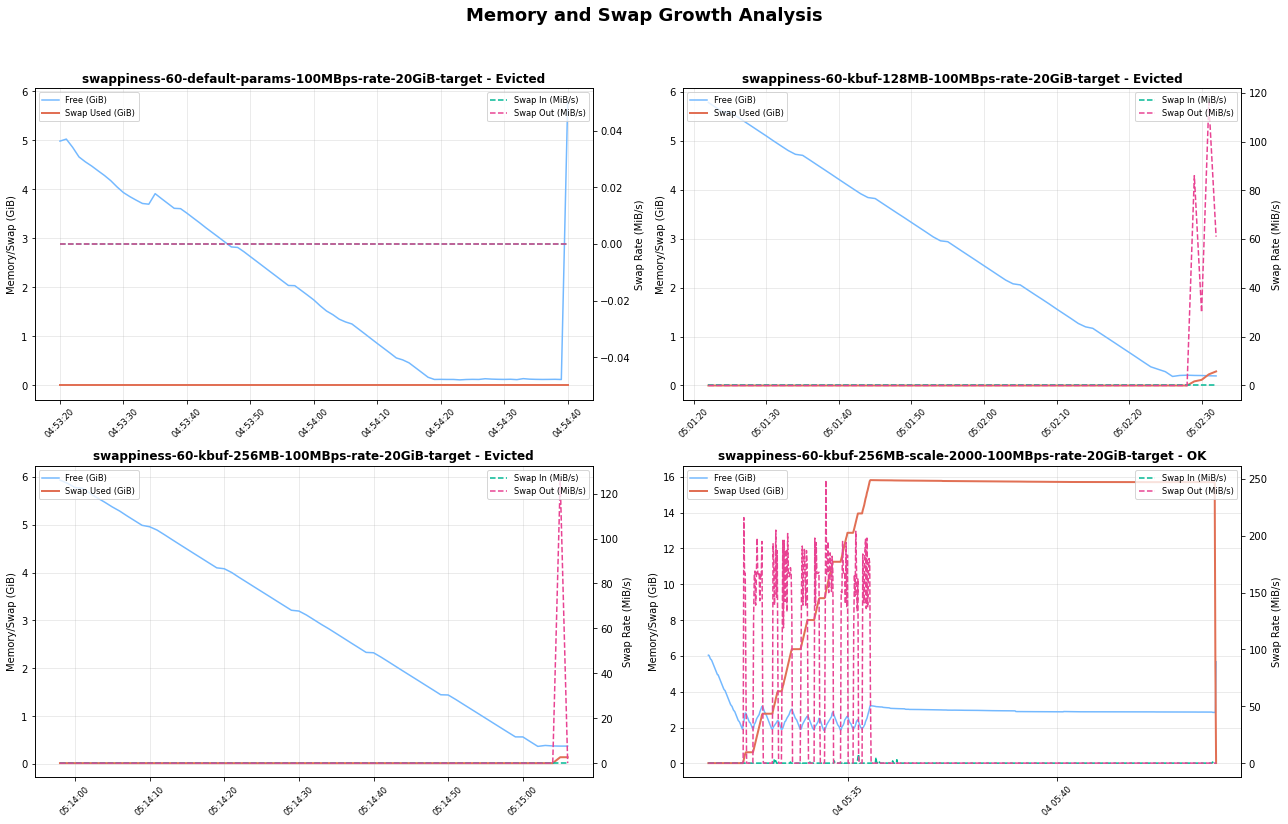
Risks and recommendations
Enabling swap in Kubernetes is a powerful tool, but it comes with risks that must be managed through careful tuning.
Risk of performance degradation Swapping is orders of magnitude slower than accessing RAM. If an application's active working set is swapped out, its performance will suffer dramatically due to high I/O wait times (thrashing). Swap could preferably be provisioned with a SSD backed storage to improve performance.
Risk of masking memory leaks Swap can hide memory leaks in applications, which might otherwise lead to a quick OOM kill. With swap, a leaky application might slowly degrade node performance over time, making the root cause harder to diagnose.
Risk of disabling evictions Kubelet proactively monitors the node for memory-pressure and terminates pods to reclaim the resources. Improper tuning can lead to OOM kills before kubelet has a chance to evict pods gracefully. A properly configured
min_free_kbytesis essential to ensure kubelet's eviction mechanism remains effective.
Kubernetes context
Together, the kernel watermarks and kubelet eviction threshold create a series of memory pressure zones on a node. The eviction-threshold parameters need to be adjusted to configure Kubernetes managed evictions occur before the OOM kills.
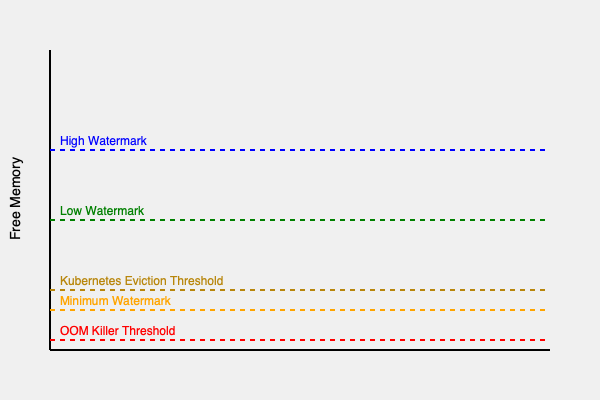
As the diagram shows, an ideal configuration will be to create a large enough 'swapping zone' (between high and min watermarks) so that the kernel can handle memory pressure by swapping before available memory drops into the Eviction/Direct Reclaim zone.
Recommended starting point
Based on these findings, I recommend the following as a starting point for Linux nodes with swap enabled. You should benchmark this with your own workloads.
vm.swappiness=60: Linux default is a good starting point for general-purpose workloads. However, the ideal value is workload-dependent, and swap-sensitive applications may need more careful tuning.vm.min_free_kbytes=500000(500MB): Set this to a reasonably high value (e.g., 2-3% of total node memory) to give the node a reasonable safety buffer.vm.watermark_scale_factor=2000: Create a larger window forkswapdto work with, preventing OOM kills during sudden memory allocation spikes.
I encourage running benchmark tests with your own workloads in test-environments, when setting up swap for the first time in your Kubernetes cluster. Swap performance can be sensitive to different environment differences such as CPU load, disk type (SSD vs HDD) and I/O patterns.
Introducing Headlamp AI Assistant
This announcement originally appeared on the Headlamp blog.
To simplify Kubernetes management and troubleshooting, we're thrilled to introduce Headlamp AI Assistant: a powerful new plugin for Headlamp that helps you understand and operate your Kubernetes clusters and applications with greater clarity and ease.
Whether you're a seasoned engineer or just getting started, the AI Assistant offers:
- Fast time to value: Ask questions like "Is my application healthy?" or "How can I fix this?" without needing deep Kubernetes knowledge.
- Deep insights: Start with high-level queries and dig deeper with prompts like "List all the problematic pods" or "How can I fix this pod?"
- Focused & relevant: Ask questions in the context of what you're viewing in the UI, such as "What's wrong here?"
- Action-oriented: Let the AI take action for you, like "Restart that deployment", with your permission.
Here is a demo of the AI Assistant in action as it helps troubleshoot an application running with issues in a Kubernetes cluster:
Hopping on the AI train
Large Language Models (LLMs) have transformed not just how we access data but also how we interact with it. The rise of tools like ChatGPT opened a world of possibilities, inspiring a wave of new applications. Asking questions or giving commands in natural language is intuitive, especially for users who aren't deeply technical. Now everyone can quickly ask how to do X or Y, without feeling awkward or having to traverse pages and pages of documentation like before.
Therefore, Headlamp AI Assistant brings a conversational UI to Headlamp, powered by LLMs that Headlamp users can configure with their own API keys. It is available as a Headlamp plugin, making it easy to integrate into your existing setup. Users can enable it by installing the plugin and configuring it with their own LLM API keys, giving them control over which model powers the assistant. Once enabled, the assistant becomes part of the Headlamp UI, ready to respond to contextual queries and perform actions directly from the interface.
Context is everything
As expected, the AI Assistant is focused on helping users with Kubernetes concepts. Yet, while there is a lot of value in responding to Kubernetes related questions from Headlamp's UI, we believe that the great benefit of such an integration is when it can use the context of what the user is experiencing in an application. So, the Headlamp AI Assistant knows what you're currently viewing in Headlamp, and this makes the interaction feel more like working with a human assistant.
For example, if a pod is failing, users can simply ask "What's wrong here?" and the AI Assistant will respond with the root cause, like a missing environment variable or a typo in the image name. Follow-up prompts like "How can I fix this?" allow the AI Assistant to suggest a fix, streamlining what used to take multiple steps into a quick, conversational flow.
Sharing the context from Headlamp is not a trivial task though, so it's something we will keep working on perfecting.
Tools
Context from the UI is helpful, but sometimes additional capabilities are needed. If the user is viewing the pod list and wants to identify problematic deployments, switching views should not be necessary. To address this, the AI Assistant includes support for a Kubernetes tool. This allows asking questions like "Get me all deployments with problems" prompting the assistant to fetch and display relevant data from the current cluster. Likewise, if the user requests an action like "Restart that deployment" after the AI points out what deployment needs restarting, it can also do that. In case of "write" operations, the AI Assistant does check with the user for permission to run them.
AI Plugins
Although the initial version of the AI Assistant is already useful for Kubernetes users, future iterations will expand its capabilities. Currently, the assistant supports only the Kubernetes tool, but further integration with Headlamp plugins is underway. Similarly, we could get richer insights for GitOps via the Flux plugin, monitoring through Prometheus, package management with Helm, and more.
And of course, as the popularity of MCP grows, we are looking into how to integrate it as well, for a more plug-and-play fashion.
Try it out!
We hope this first version of the AI Assistant helps users manage Kubernetes clusters more effectively and assist newcomers in navigating the learning curve. We invite you to try out this early version and give us your feedback. The AI Assistant plugin can be installed from Headlamp's Plugin Catalog in the desktop version, or by using the container image when deploying Headlamp. Stay tuned for the future versions of the Headlamp AI Assistant!
Kubernetes v1.34 Sneak Peek
Kubernetes v1.34 is coming at the end of August 2025. This release will not include any removal or deprecation, but it is packed with an impressive number of enhancements. Here are some of the features we are most excited about in this cycle!
Please note that this information reflects the current state of v1.34 development and may change before release.
Featured enhancements of Kubernetes v1.34
The following list highlights some of the notable enhancements likely to be included in the v1.34 release, but is not an exhaustive list of all planned changes. This is not a commitment and the release content is subject to change.
The core of DRA targets stable
Dynamic Resource Allocation (DRA) provides a flexible way to categorize, request, and use devices like GPUs or custom hardware in your Kubernetes cluster.
Since the v1.30 release, DRA has been based around claiming devices using structured parameters that are opaque to the core of Kubernetes.
The relevant enhancement proposal, KEP-4381, took inspiration from dynamic provisioning for storage volumes.
DRA with structured parameters relies on a set of supporting API kinds: ResourceClaim, DeviceClass, ResourceClaimTemplate,
and ResourceSlice API types under resource.k8s.io, while extending the .spec for Pods with a new resourceClaims field.
The core of DRA is targeting graduation to stable in Kubernetes v1.34.
With DRA, device drivers and cluster admins define device classes that are available for use. Workloads can claim devices from a device class within device requests. Kubernetes allocates matching devices to specific claims and places the corresponding Pods on nodes that can access the allocated devices. This framework provides flexible device filtering using CEL, centralized device categorization, and simplified Pod requests, among other benefits.
Once this feature has graduated, the resource.k8s.io/v1 APIs will be available by default.
ServiceAccount tokens for image pull authentication
The ServiceAccount token integration for kubelet credential providers is likely to reach beta and be enabled by default in Kubernetes v1.34.
This allows the kubelet to use these tokens when pulling container images from registries that require authentication.
That support already exists as alpha, and is tracked as part of KEP-4412.
The existing alpha integration allows the kubelet to use short-lived, automatically rotated ServiceAccount tokens (that follow OIDC-compliant semantics) to authenticate to a container image registry.
Each token is scoped to one associated Pod; the overall mechanism replaces the need for long-lived image pull Secrets.
Adopting this new approach reduces security risks, supports workload-level identity, and helps cut operational overhead. It brings image pull authentication closer to modern, identity-aware good practice.
Pod replacement policy for Deployments
After a change to a Deployment, terminating pods may stay up for a considerable amount of time and may consume additional resources.
As part of KEP-3973, the .spec.podReplacementPolicy field will be introduced (as alpha) for Deployments.
If your cluster has the feature enabled, you'll be able to select one of two policies:
TerminationStarted- Creates new pods as soon as old ones start terminating, resulting in faster rollouts at the cost of potentially higher resource consumption.
TerminationComplete- Waits until old pods fully terminate before creating new ones, resulting in slower rollouts but ensuring controlled resource consumption.
This feature makes Deployment behavior more predictable by letting you choose when new pods should be created during updates or scaling. It's beneficial when working in clusters with tight resource constraints or with workloads with long termination periods.
It's expected to be available as an alpha feature and can be enabled using the DeploymentPodReplacementPolicy and DeploymentReplicaSetTerminatingReplicas feature gates in the API server and kube-controller-manager.
Production-ready tracing for kubelet and API Server
To address the longstanding challenge of debugging node-level issues by correlating disconnected logs,
KEP-2831 provides deep, contextual insights into the kubelet.
This feature instruments critical kubelet operations, particularly its gRPC calls to the Container Runtime Interface (CRI), using the vendor-agnostic OpenTelemetry standard.
It allows operators to visualize the entire lifecycle of events (for example: a Pod startup) to pinpoint sources of latency and errors.
Its most powerful aspect is the propagation of trace context; the kubelet passes a trace ID with its requests to the container runtime, enabling runtimes to link their own spans.
This effort is complemented by a parallel enhancement, KEP-647, which brings the same tracing capabilities to the Kubernetes API server. Together, these enhancements provide a more unified, end-to-end view of events, simplifying the process of pinpointing latency and errors from the control plane down to the node. These features have matured through the official Kubernetes release process. KEP-2831 was introduced as an alpha feature in v1.25, while KEP-647 debuted as alpha in v1.22. Both enhancements were promoted to beta together in the v1.27 release. Looking forward, Kubelet Tracing (KEP-2831) and API Server Tracing (KEP-647) are now targeting graduation to stable in the upcoming v1.34 release.
PreferSameZone and PreferSameNode traffic distribution for Services
The spec.trafficDistribution field within a Kubernetes Service allows users to express preferences for how traffic should be routed to Service endpoints.
KEP-3015 deprecates PreferClose and introduces two additional values: PreferSameZone and PreferSameNode.
PreferSameZone is equivalent to the current PreferClose.
PreferSameNode prioritizes sending traffic to endpoints on the same node as the client.
This feature was introduced in v1.33 behind the PreferSameTrafficDistribution feature gate.
It is targeting graduation to beta in v1.34 with its feature gate enabled by default.
Support for KYAML: a Kubernetes dialect of YAML
KYAML aims to be a safer and less ambiguous YAML subset, and was designed specifically
for Kubernetes. Whatever version of Kubernetes you use, you'll be able use KYAML for writing manifests
and/or Helm charts.
You can write KYAML and pass it as an input to any version of kubectl,
because all KYAML files are also valid as YAML.
With kubectl v1.34, we expect you'll also be able to request KYAML output from kubectl (as in kubectl get -o kyaml …).
If you prefer, you can still request the output in JSON or YAML format.
KYAML addresses specific challenges with both YAML and JSON. YAML's significant whitespace requires careful attention to indentation and nesting, while its optional string-quoting can lead to unexpected type coercion (for example: "The Norway Bug"). Meanwhile, JSON lacks comment support and has strict requirements for trailing commas and quoted keys.
KEP-5295 introduces KYAML, which tries to address the most significant problems by:
Always double-quoting value strings
Leaving keys unquoted unless they are potentially ambiguous
Always using
{}for mappings (associative arrays)Always using
[]for lists
This might sound a lot like JSON, because it is! But unlike JSON, KYAML supports comments, allows trailing commas, and doesn't require quoted keys.
We're hoping to see KYAML introduced as a new output format for kubectl v1.34.
As with all these features, none of these changes are 100% confirmed; watch this space!
As a format, KYAML is and will remain a strict subset of YAML, ensuring that any compliant YAML parser can parse KYAML documents. Kubernetes does not require you to provide input specifically formatted as KYAML, and we have no plans to change that.
Fine-grained autoscaling control with HPA configurable tolerance
KEP-4951 introduces a new feature that allows users to configure autoscaling tolerance on a per-HPA basis,
overriding the default cluster-wide 10% tolerance setting that often proves too coarse-grained for diverse workloads.
The enhancement adds an optional tolerance field to the HPA's spec.behavior.scaleUp and spec.behavior.scaleDown sections,
enabling different tolerance values for scale-up and scale-down operations,
which is particularly valuable since scale-up responsiveness is typically more critical than scale-down speed for handling traffic surges.
Released as alpha in Kubernetes v1.33 behind the HPAConfigurableTolerance feature gate, this feature is expected to graduate to beta in v1.34.
This improvement helps to address scaling challenges with large deployments, where for scaling in,
a 10% tolerance might mean leaving hundreds of unnecessary Pods running.
Using the new, more flexible approach would enable workload-specific optimization for both
responsive and conservative scaling behaviors.
Want to know more?
New features and deprecations are also announced in the Kubernetes release notes. We will formally announce what's new in Kubernetes v1.34 as part of the CHANGELOG for that release.
The Kubernetes v1.34 release is planned for Wednesday 27th August 2025. Stay tuned for updates!
Get involved
The simplest way to get involved with Kubernetes is to join one of the many Special Interest Groups (SIGs) that align with your interests. Have something you'd like to broadcast to the Kubernetes community? Share your voice at our weekly community meeting, and through the channels below. Thank you for your continued feedback and support.
- Follow us on Bluesky @kubernetes.io for the latest updates
- Join the community discussion on Discuss
- Join the community on Slack
- Post questions (or answer questions) on Server Fault or Stack Overflow
- Share your Kubernetes story
- Read more about what's happening with Kubernetes on the blog
- Learn more about the Kubernetes Release Team
Post-Quantum Cryptography in Kubernetes
The world of cryptography is on the cusp of a major shift with the advent of quantum computing. While powerful quantum computers are still largely theoretical for many applications, their potential to break current cryptographic standards is a serious concern, especially for long-lived systems. This is where Post-Quantum Cryptography (PQC) comes in. In this article, I'll dive into what PQC means for TLS and, more specifically, for the Kubernetes ecosystem. I'll explain what the (suprising) state of PQC in Kubernetes is and what the implications are for current and future clusters.
What is Post-Quantum Cryptography
Post-Quantum Cryptography refers to cryptographic algorithms that are thought to
be secure against attacks by both classical and quantum computers. The primary
concern is that quantum computers, using algorithms like Shor's Algorithm,
could efficiently break widely used public-key cryptosystems such as RSA and
Elliptic Curve Cryptography (ECC), which underpin much of today's secure
communication, including TLS. The industry is actively working on standardizing
and adopting PQC algorithms. One of the first to be standardized by NIST is
the Module-Lattice Key Encapsulation Mechanism (ML-KEM), formerly known as
Kyber, and now standardized as FIPS-203 (PDF download).
It is difficult to predict when quantum computers will be able to break classical algorithms. However, it is clear that we need to start migrating to PQC algorithms now, as the next section shows. To get a feeling for the predicted timeline we can look at a NIST report covering the transition to post-quantum cryptography standards. It declares that system with classical crypto should be deprecated after 2030 and disallowed after 2035.
Key exchange vs. digital signatures: different needs, different timelines
In TLS, there are two main cryptographic operations we need to secure:
Key Exchange: This is how the client and server agree on a shared secret to encrypt their communication. If an attacker records encrypted traffic today, they could decrypt it in the future, if they gain access to a quantum computer capable of breaking the key exchange. This makes migrating KEMs to PQC an immediate priority.
Digital Signatures: These are primarily used to authenticate the server (and sometimes the client) via certificates. The authenticity of a server is verified at the time of connection. While important, the risk of an attack today is much lower, because the decision of trusting a server cannot be abused after the fact. Additionally, current PQC signature schemes often come with significant computational overhead and larger key/signature sizes compared to their classical counterparts.
Another significant hurdle in the migration to PQ certificates is the upgrade of root certificates. These certificates have long validity periods and are installed in many devices and operating systems as trust anchors.
Given these differences, the focus for immediate PQC adoption in TLS has been
on hybrid key exchange mechanisms. These combine a classical algorithm (such as
Elliptic Curve Diffie-Hellman Ephemeral (ECDHE)) with a PQC algorithm (such as
ML-KEM). The resulting shared secret is secure as long as at least one of the
component algorithms remains unbroken. The X25519MLKEM768 hybrid scheme is the
most widely supported one.
State of PQC key exchange mechanisms (KEMs) today
Support for PQC KEMs is rapidly improving across the ecosystem.
Go: The Go standard library's crypto/tls package introduced support for
X25519MLKEM768 in version 1.24 (released February 2025). Crucially, it's
enabled by default when there is no explicit configuration, i.e.,
Config.CurvePreferences is nil.
Browsers & OpenSSL: Major browsers like Chrome (version 131, November 2024)
and Firefox (version 135, February 2025), as well as OpenSSL (version 3.5.0,
April 2025), have also added support for the ML-KEM based hybrid scheme.
Apple is also rolling out support for X25519MLKEM768 in version
26 of their operating systems. Given the proliferation of Apple devices, this
will have a significant impact on the global PQC adoption.
For a more detailed overview of the state of PQC in the wider industry, see this blog post by Cloudflare.
Post-quantum KEMs in Kubernetes: an unexpected arrival
So, what does this mean for Kubernetes? Kubernetes components, including the API server and kubelet, are built with Go.
As of Kubernetes v1.33, released in April 2025, the project uses Go 1.24. A
quick check of the Kubernetes codebase reveals that Config.CurvePreferences
is not explicitly set. This leads to a fascinating conclusion: Kubernetes
v1.33, by virtue of using Go 1.24, supports hybrid post-quantum
X25519MLKEM768 for TLS connections by default!
You can test this yourself. If you set up a Minikube cluster running Kubernetes v1.33.0, you can connect to the API server using a recent OpenSSL client:
$ minikube start --kubernetes-version=v1.33.0
$ kubectl cluster-info
Kubernetes control plane is running at https://127.0.0.1:<PORT>
$ kubectl config view --minify --raw -o jsonpath=\'{.clusters[0].cluster.certificate-authority-data}\' | base64 -d > ca.crt
$ openssl version
OpenSSL 3.5.0 8 Apr 2025 (Library: OpenSSL 3.5.0 8 Apr 2025)
$ echo -n "Q" | openssl s_client -connect 127.0.0.1:<PORT> -CAfile ca.crt
[...]
Negotiated TLS1.3 group: X25519MLKEM768
[...]
DONE
Lo and behold, the negotiated group is X25519MLKEM768! This is a significant
step towards making Kubernetes quantum-safe, seemingly without a major
announcement or dedicated KEP (Kubernetes Enhancement Proposal).
The Go version mismatch pitfall
An interesting wrinkle emerged with Go versions 1.23 and 1.24. Go 1.23
included experimental support for a draft version of ML-KEM, identified as
X25519Kyber768Draft00. This was also enabled by default if
Config.CurvePreferences was nil. Kubernetes v1.32 used Go 1.23. However,
Go 1.24 removed the draft support and replaced it with the standardized version
X25519MLKEM768.
What happens if a client and server are using mismatched Go versions (one on
1.23, the other on 1.24)? They won't have a common PQC KEM to negotiate, and
the handshake will fall back to classical ECC curves (e.g., X25519). How
could this happen in practice?
Consider a scenario:
A Kubernetes cluster is running v1.32 (using Go 1.23 and thus
X25519Kyber768Draft00). A developer upgrades their kubectl to v1.33,
compiled with Go 1.24, only supporting X25519MLKEM768. Now, when kubectl
communicates with the v1.32 API server, they no longer share a common PQC
algorithm. The connection will downgrade to classical cryptography, silently
losing the PQC protection that has been in place. This highlights the
importance of understanding the implications of Go version upgrades, and the
details of the TLS stack.
Limitations: packet size
One practical consideration with ML-KEM is the size of its public keys
with encoded key sizes of around 1.2 kilobytes for ML-KEM-768.
This can cause the initial TLS ClientHello message not to fit inside
a single TCP/IP packet, given the typical networking constraints
(most commonly, the standard Ethernet frame size limit of 1500
bytes). Some TLS libraries or network appliances might not handle this
gracefully, assuming the Client Hello always fits in one packet. This issue
has been observed in some Kubernetes-related projects and networking
components, potentially leading to connection failures when PQC KEMs are used.
More details can be found at tldr.fail.
State of Post-Quantum Signatures
While KEMs are seeing broader adoption, PQC digital signatures are further
behind in terms of widespread integration into standard toolchains. NIST has
published standards for PQC signatures, such as ML-DSA (FIPS-204) and
SLH-DSA (FIPS-205). However, implementing these in a way that's broadly
usable (e.g., for PQC Certificate Authorities) presents challenges:
Larger Keys and Signatures: PQC signature schemes often have significantly larger public keys and signature sizes compared to classical algorithms like Ed25519 or RSA. For instance, Dilithium2 keys can be 30 times larger than Ed25519 keys, and certificates can be 12 times larger.
Performance: Signing and verification operations can be substantially slower. While some algorithms are on par with classical algorithms, others may have a much higher overhead, sometimes on the order of 10x to 1000x worse performance. To improve this situation, NIST is running a second round of standardization for PQC signatures.
Toolchain Support: Mainstream TLS libraries and CA software do not yet have
mature, built-in support for these new signature algorithms. The Go team, for
example, has indicated that ML-DSA support is a high priority, but the
soonest it might appear in the standard library is Go 1.26 (as of May 2025).
Cloudflare's CIRCL (Cloudflare Interoperable Reusable Cryptographic Library)
library implements some PQC signature schemes like variants of Dilithium, and
they maintain a fork of Go (cfgo) that integrates CIRCL. Using cfgo, it's
possible to experiment with generating certificates signed with PQC algorithms
like Ed25519-Dilithium2. However, this requires using a custom Go toolchain and
is not yet part of the mainstream Kubernetes or Go distributions.
Conclusion
The journey to a post-quantum secure Kubernetes is underway, and perhaps
further along than many realize, thanks to the proactive adoption of ML-KEM
in Go. With Kubernetes v1.33, users are already benefiting from hybrid post-quantum key
exchange in many TLS connections by default.
However, awareness of potential pitfalls, such as Go version mismatches leading to downgrades and issues with Client Hello packet sizes, is crucial. While PQC for KEMs is becoming a reality, PQC for digital signatures and certificate hierarchies is still in earlier stages of development and adoption for mainstream use. As Kubernetes maintainers and contributors, staying informed about these developments will be key to ensuring the long-term security of the platform.
Navigating Failures in Pods With Devices
Kubernetes is the de facto standard for container orchestration, but when it comes to handling specialized hardware like GPUs and other accelerators, things get a bit complicated. This blog post dives into the challenges of managing failure modes when operating pods with devices in Kubernetes, based on insights from Sergey Kanzhelev and Mrunal Patel's talk at KubeCon NA 2024. You can follow the links to slides and recording.
The AI/ML boom and its impact on Kubernetes
The rise of AI/ML workloads has brought new challenges to Kubernetes. These workloads often rely heavily on specialized hardware, and any device failure can significantly impact performance and lead to frustrating interruptions. As highlighted in the 2024 Llama paper, hardware issues, particularly GPU failures, are a major cause of disruption in AI/ML training. You can also learn how much effort NVIDIA spends on handling devices failures and maintenance in the KubeCon talk by Ryan Hallisey and Piotr Prokop All-Your-GPUs-Are-Belong-to-Us: An Inside Look at NVIDIA's Self-Healing GeForce NOW Infrastructure (recording) as they see 19 remediation requests per 1000 nodes a day! We also see data centers offering spot consumption models and overcommit on power, making device failures commonplace and a part of the business model.
However, Kubernetes’s view on resources is still very static. The resource is either there or not. And if it is there, the assumption is that it will stay there fully functional - Kubernetes lacks good support for handling full or partial hardware failures. These long-existing assumptions combined with the overall complexity of a setup lead to a variety of failure modes, which we discuss here.
Understanding AI/ML workloads
Generally, all AI/ML workloads require specialized hardware, have challenging scheduling requirements, and are expensive when idle. AI/ML workloads typically fall into two categories - training and inference. Here is an oversimplified view of those categories’ characteristics, which are different from traditional workloads like web services:
- Training
- These workloads are resource-intensive, often consuming entire machines and running as gangs of pods. Training jobs are usually "run to completion" - but that could be days, weeks or even months. Any failure in a single pod can necessitate restarting the entire step across all the pods.
- Inference
- These workloads are usually long-running or run indefinitely, and can be small enough to consume a subset of a Node’s devices or large enough to span multiple nodes. They often require downloading huge files with the model weights.
These workload types specifically break many past assumptions:
| Before | Now |
|---|---|
| Can get a better CPU and the app will work faster. | Require a specific device (or class of devices) to run. |
| When something doesn’t work, just recreate it. | Allocation or reallocation is expensive. |
| Any node will work. No need to coordinate between Pods. | Scheduled in a special way - devices often connected in a cross-node topology. |
| Each Pod can be plug-and-play replaced if failed. | Pods are a part of a larger task. Lifecycle of an entire task depends on each Pod. |
| Container images are slim and easily available. | Container images may be so big that they require special handling. |
| Long initialization can be offset by slow rollout. | Initialization may be long and should be optimized, sometimes across many Pods together. |
| Compute nodes are commoditized and relatively inexpensive, so some idle time is acceptable. | Nodes with specialized hardware can be an order of magnitude more expensive than those without, so idle time is very wasteful. |
The existing failure model was relying on old assumptions. It may still work for the new workload types, but it has limited knowledge about devices and is very expensive for them. In some cases, even prohibitively expensive. You will see more examples later in this article.
Why Kubernetes still reigns supreme
This article is not going deeper into the question: why not start fresh for
AI/ML workloads since they are so different from the traditional Kubernetes
workloads. Despite many challenges, Kubernetes remains the platform of choice
for AI/ML workloads. Its maturity, security, and rich ecosystem of tools make it
a compelling option. While alternatives exist, they often lack the years of
development and refinement that Kubernetes offers. And the Kubernetes developers
are actively addressing the gaps identified in this article and beyond.
The current state of device failure handling
This section outlines different failure modes and the best practices and DIY (Do-It-Yourself) solutions used today. The next session will describe a roadmap of improving things for those failure modes.
Failure modes: K8s infrastructure
In order to understand the failures related to the Kubernetes infrastructure, you need to understand how many moving parts are involved in scheduling a Pod on the node. The sequence of events when the Pod is scheduled in the Node is as follows:
- Device plugin is scheduled on the Node
- Device plugin is registered with the kubelet via local gRPC
- Kubelet uses device plugin to watch for devices and updates capacity of the node
- Scheduler places a user Pod on a Node based on the updated capacity
- Kubelet asks Device plugin to Allocate devices for a User Pod
- Kubelet creates a User Pod with the allocated devices attached to it
This diagram shows some of those actors involved:
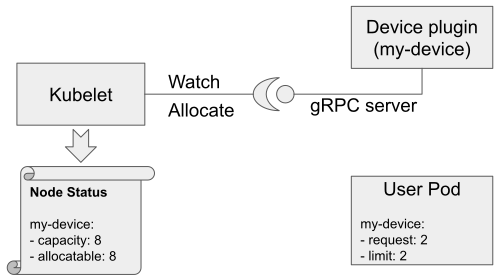
As there are so many actors interconnected, every one of them and every connection may experience interruptions. This leads to many exceptional situations that are often considered failures, and may cause serious workload interruptions:
- Pods failing admission at various stages of its lifecycle
- Pods unable to run on perfectly fine hardware
- Scheduling taking unexpectedly long time
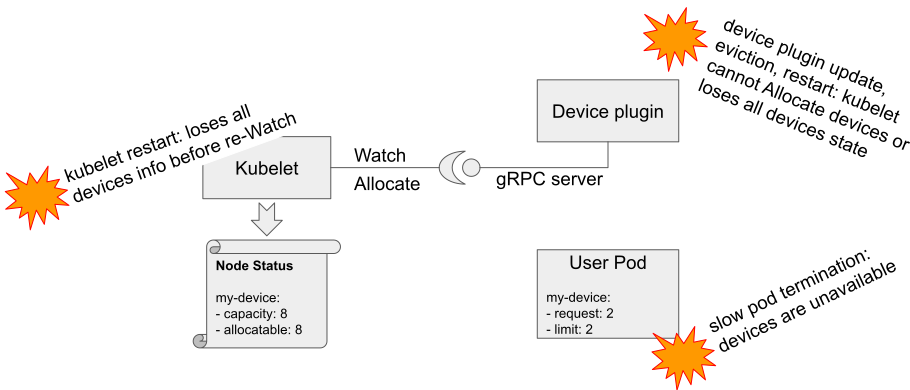
The goal for Kubernetes is to make the interruption between these components as reliable as possible. Kubelet already implements retries, grace periods, and other techniques to improve it. The roadmap section goes into details on other edge cases that the Kubernetes project tracks. However, all these improvements only work when these best practices are followed:
- Configure and restart kubelet and the container runtime (such as containerd or CRI-O) as early as possible to not interrupt the workload.
- Monitor device plugin health and carefully plan for upgrades.
- Do not overload the node with less-important workloads to prevent interruption of device plugin and other components.
- Configure user pods tolerations to handle node readiness flakes.
- Configure and code graceful termination logic carefully to not block devices for too long.
Another class of Kubernetes infra-related issues is driver-related. With traditional resources like CPU and memory, no compatibility checks between the application and hardware were needed. With special devices like hardware accelerators, there are new failure modes. Device drivers installed on the node:
- Must match the hardware
- Be compatible with an app
- Must work with other drivers (like nccl, etc.)
Best practices for handling driver versions:
- Monitor driver installer health
- Plan upgrades of infrastructure and Pods to match the version
- Have canary deployments whenever possible
Following the best practices in this section and using device plugins and device driver installers from trusted and reliable sources generally eliminate this class of failures. Kubernetes is tracking work to make this space even better.
Failure modes: device failed
There is very little handling of device failure in Kubernetes today. Device plugins report the device failure only by changing the count of allocatable devices. And Kubernetes relies on standard mechanisms like liveness probes or container failures to allow Pods to communicate the failure condition to the kubelet. However, Kubernetes does not correlate device failures with container crashes and does not offer any mitigation beyond restarting the container while being attached to the same device.
This is why many plugins and DIY solutions exist to handle device failures based on various signals.
Health controller
In many cases a failed device will result in unrecoverable and very expensive nodes doing nothing. A simple DIY solution is a node health controller. The controller could compare the device allocatable count with the capacity and if the capacity is greater, it starts a timer. Once the timer reaches a threshold, the health controller kills and recreates a node.
There are problems with the health controller approach:
- Root cause of the device failure is typically not known
- The controller is not workload aware
- Failed device might not be in use and you want to keep other devices running
- The detection may be too slow as it is very generic
- The node may be part of a bigger set of nodes and simply cannot be deleted in isolation without other nodes
There are variations of the health controller solving some of the problems above. The overall theme here though is that to best handle failed devices, you need customized handling for the specific workload. Kubernetes doesn’t yet offer enough abstraction to express how critical the device is for a node, for the cluster, and for the Pod it is assigned to.
Pod failure policy
Another DIY approach for device failure handling is a per-pod reaction on a failed device. This approach is applicable for training workloads that are implemented as Jobs.
Pod can define special error codes for device failures. For example, whenever unexpected device behavior is encountered, Pod exits with a special exit code. Then the Pod failure policy can handle the device failure in a special way. Read more on Handling retriable and non-retriable pod failures with Pod failure policy
There are some problems with the Pod failure policy approach for Jobs:
- There is no well-known device failed condition, so this approach does not work for the generic Pod case
- Error codes must be coded carefully and in some cases are hard to guarantee.
- Only works with Jobs with
restartPolicy: Never, due to the limitation of a pod failure policy feature.
So, this solution has limited applicability.
Custom pod watcher
A little more generic approach is to implement the Pod watcher as a DIY solution or use some third party tools offering this functionality. The pod watcher is most often used to handle device failures for inference workloads.
Since Kubernetes just keeps a pod assigned to a device, even if the device is reportedly unhealthy, the idea is to detect this situation with the pod watcher and apply some remediation. It often involves obtaining device health status and its mapping to the Pod using Pod Resources API on the node. If a device fails, it can then delete the attached Pod as a remediation. The replica set will handle the Pod recreation on a healthy device.
The other reasons to implement this watcher:
- Without it, the Pod will keep being assigned to the failed device forever.
- There is no descheduling for a pod with
restartPolicy=Always. - There are no built-in controllers that delete Pods in CrashLoopBackoff.
Problems with the custom pod watcher:
- The signal for the pod watcher is expensive to get, and involves some privileged actions.
- It is a custom solution and it assumes the importance of a device for a Pod.
- The pod watcher relies on external controllers to reschedule a Pod.
There are more variations of DIY solutions for handling device failures or upcoming maintenance. Overall, Kubernetes has enough extension points to implement these solutions. However, some extension points require higher privilege than users may be comfortable with or are too disruptive. The roadmap section goes into more details on specific improvements in handling the device failures.
Failure modes: container code failed
When the container code fails or something bad happens with it, like out of
memory conditions, Kubernetes knows how to handle those cases. There is either
the restart of a container, or a crash of a Pod if it has restartPolicy: Never
and scheduling it on another node. Kubernetes has limited expressiveness on what
is a failure (for example, non-zero exit code or liveness probe failure) and how
to react on such a failure (mostly either Always restart or immediately fail the
Pod).
This level of expressiveness is often not enough for the complicated AI/ML workloads. AI/ML pods are better rescheduled locally or even in-place as that would save on image pulling time and device allocation. AI/ML pods are often interconnected and need to be restarted together. This adds another level of complexity and optimizing it often brings major savings in running AI/ML workloads.
There are various DIY solutions to handle Pod failures orchestration. The most typical one is to wrap a main executable in a container by some orchestrator. And this orchestrator will be able to restart the main executable whenever the job needs to be restarted because some other pod has failed.
Solutions like this are very fragile and elaborate. They are often worth the money saved comparing to a regular JobSet delete/recreate cycle when used in large training jobs. Making these solutions less fragile and more streamlined by developing new hooks and extension points in Kubernetes will make it easy to apply to smaller jobs, benefiting everybody.
Failure modes: device degradation
Not all device failures are terminal for the overall workload or batch job. As the hardware stack gets more and more complex, misconfiguration on one of the hardware stack layers, or driver failures, may result in devices that are functional, but lagging on performance. One device that is lagging behind can slow down the whole training job.
We see reports of such cases more and more often. Kubernetes has no way to express this type of failures today and since it is the newest type of failure mode, there is not much of a best practice offered by hardware vendors for detection and third party tooling for remediation of these situations.
Typically, these failures are detected based on observed workload characteristics. For example, the expected speed of AI/ML training steps on particular hardware. Remediation for those issues is highly depend on a workload needs.
Roadmap
As outlined in a section above, Kubernetes offers a lot of extension points which are used to implement various DIY solutions. The space of AI/ML is developing very fast, with changing requirements and usage patterns. SIG Node is taking a measured approach of enabling more extension points to implement the workload-specific scenarios over introduction of new semantics to support specific scenarios. This means prioritizing making information about failures readily available over implementing automatic remediations for those failures that might only be suitable for a subset of workloads.
This approach ensures there are no drastic changes for workload handling which may break existing, well-oiled DIY solutions or experiences with the existing more traditional workloads.
Many error handling techniques used today work for AI/ML, but are very expensive. SIG Node will invest in extension points to make those cheaper, with the understanding that the price cutting for AI/ML is critical.
The following is the set of specific investments we envision for various failure modes.
Roadmap for failure modes: K8s infrastructure
The area of Kubernetes infrastructure is the easiest to understand and very important to make right for the upcoming transition from Device Plugins to DRA. SIG Node is tracking many work items in this area, most notably the following:
- integrate kubelet with the systemd watchdog · Issue #127460
- DRA: detect stale DRA plugin sockets · Issue #128696
- Support takeover for devicemanager/device-plugin · Issue #127803
- Kubelet plugin registration reliability · Issue #127457
- Recreate the Device Manager gRPC server if failed · Issue #128167
- Retry pod admission on device plugin grpc failures · Issue #128043
Basically, every interaction of Kubernetes components must be reliable via either the kubelet improvements or the best practices in plugins development and deployment.
Roadmap for failure modes: device failed
For the device failures some patterns are already emerging in common scenarios that Kubernetes can support. However, the very first step is to make information about failed devices available easier. The very first step here is the work in KEP 4680 (Add Resource Health Status to the Pod Status for Device Plugin and DRA).
Longer term ideas include to be tested:
- Integrate device failures into Pod Failure Policy.
- Node-local retry policies, enabling pod failure policies for Pods with restartPolicy=OnFailure and possibly beyond that.
- Ability to deschedule pod, including with the
restartPolicy: Always, so it can get a new device allocated. - Add device health to the ResourceSlice used to represent devices in DRA, rather than simply withdrawing an unhealthy device from the ResourceSlice.
Roadmap for failure modes: container code failed
The main improvements to handle container code failures for AI/ML workloads are all targeting cheaper error handling and recovery. The cheapness is mostly coming from reuse of pre-allocated resources as much as possible. From reusing the Pods by restarting containers in-place, to node local restart of containers instead of rescheduling whenever possible, to snapshotting support, and re-scheduling prioritizing the same node to save on image pulls.
Consider this scenario: A big training job needs 512 Pods to run. And one of the pods failed. It means that all Pods need to be interrupted and synced up to restart the failed step. The most efficient way to achieve this generally is to reuse as many Pods as possible by restarting them in-place, while replacing the failed pod to clear up the error from it. Like demonstrated in this picture:
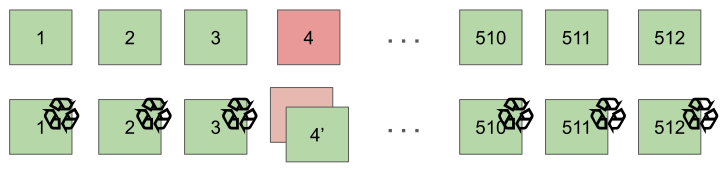
It is possible to implement this scenario, but all solutions implementing it are fragile due to lack of certain extension points in Kubernetes. Adding these extension points to implement this scenario is on the Kubernetes roadmap.
Roadmap for failure modes: device degradation
There is very little done in this area - there is no clear detection signal, very limited troubleshooting tooling, and no built-in semantics to express the "degraded" device on Kubernetes. There has been discussion of adding data on device performance or degradation in the ResourceSlice used by DRA to represent devices, but it is not yet clearly defined. There are also projects like node-healthcheck-operator that can be used for some scenarios.
We expect developments in this area from hardware vendors and cloud providers, and we expect to see mostly DIY solutions in the near future. As more users get exposed to AI/ML workloads, this is a space needing feedback on patterns used here.
Join the conversation
The Kubernetes community encourages feedback and participation in shaping the future of device failure handling. Join SIG Node and contribute to the ongoing discussions!
This blog post provides a high-level overview of the challenges and future directions for device failure management in Kubernetes. By addressing these issues, Kubernetes can solidify its position as the leading platform for AI/ML workloads, ensuring resilience and reliability for applications that depend on specialized hardware.
Image Compatibility In Cloud Native Environments
In industries where systems must run very reliably and meet strict performance criteria such as telecommunication, high-performance or AI computing, containerized applications often need specific operating system configuration or hardware presence. It is common practice to require the use of specific versions of the kernel, its configuration, device drivers, or system components. Despite the existence of the Open Container Initiative (OCI), a governing community to define standards and specifications for container images, there has been a gap in expression of such compatibility requirements. The need to address this issue has led to different proposals and, ultimately, an implementation in Kubernetes' Node Feature Discovery (NFD).
NFD is an open source Kubernetes project that automatically detects and reports hardware and system features of cluster nodes. This information helps users to schedule workloads on nodes that meet specific system requirements, which is especially useful for applications with strict hardware or operating system dependencies.
The need for image compatibility specification
Dependencies between containers and host OS
A container image is built on a base image, which provides a minimal runtime environment, often a stripped-down Linux userland, completely empty or distroless. When an application requires certain features from the host OS, compatibility issues arise. These dependencies can manifest in several ways:
- Drivers: Host driver versions must match the supported range of a library version inside the container to avoid compatibility problems. Examples include GPUs and network drivers.
- Libraries or Software: The container must come with a specific version or range of versions for a library or software to run optimally in the environment. Examples from high performance computing are MPI, EFA, or Infiniband.
- Kernel Modules or Features: Specific kernel features or modules must be present. Examples include having support of write protected huge page faults, or the presence of VFIO
- And more…
While containers in Kubernetes are the most likely unit of abstraction for these needs, the definition of compatibility can extend further to include other container technologies such as Singularity and other OCI artifacts such as binaries from a spack binary cache.
Multi-cloud and hybrid cloud challenges
Containerized applications are deployed across various Kubernetes distributions and cloud providers, where different host operating systems introduce compatibility challenges. Often those have to be pre-configured before workload deployment or are immutable. For instance, different cloud providers will include different operating systems like:
- RHCOS/RHEL
- Photon OS
- Amazon Linux 2
- Container-Optimized OS
- Azure Linux OS
- And more...
Each OS comes with unique kernel versions, configurations, and drivers, making compatibility a non-trivial issue for applications requiring specific features. It must be possible to quickly assess a container for its suitability to run on any specific environment.
Image compatibility initiative
An effort was made within the Open Containers Initiative Image Compatibility working group to introduce a standard for image compatibility metadata. A specification for compatibility would allow container authors to declare required host OS features, making compatibility requirements discoverable and programmable. The specification implemented in Kubernetes Node Feature Discovery is one of the discussed proposals. It aims to:
- Define a structured way to express compatibility in OCI image manifests.
- Support a compatibility specification alongside container images in image registries.
- Allow automated validation of compatibility before scheduling containers.
The concept has since been implemented in the Kubernetes Node Feature Discovery project.
Implementation in Node Feature Discovery
The solution integrates compatibility metadata into Kubernetes via NFD features and the NodeFeatureGroup API. This interface enables the user to match containers to nodes based on exposing features of hardware and software, allowing for intelligent scheduling and workload optimization.
Compatibility specification
The compatibility specification is a structured list of compatibility objects containing Node Feature Groups. These objects define image requirements and facilitate validation against host nodes. The feature requirements are described by using the list of available features from the NFD project. The schema has the following structure:
- version (string) - Specifies the API version.
- compatibilities (array of objects) - List of compatibility sets.
- rules (object) - Specifies NodeFeatureGroup to define image requirements.
- weight (int, optional) - Node affinity weight.
- tag (string, optional) - Categorization tag.
- description (string, optional) - Short description.
An example might look like the following:
version: v1alpha1
compatibilities:
- description: "My image requirements"
rules:
- name: "kernel and cpu"
matchFeatures:
- feature: kernel.loadedmodule
matchExpressions:
vfio-pci: {op: Exists}
- feature: cpu.model
matchExpressions:
vendor_id: {op: In, value: ["Intel", "AMD"]}
- name: "one of available nics"
matchAny:
- matchFeatures:
- feature: pci.device
matchExpressions:
vendor: {op: In, value: ["0eee"]}
class: {op: In, value: ["0200"]}
- matchFeatures:
- feature: pci.device
matchExpressions:
vendor: {op: In, value: ["0fff"]}
class: {op: In, value: ["0200"]}
Client implementation for node validation
To streamline compatibility validation, we implemented a client tool that allows for node validation based on an image's compatibility artifact. In this workflow, the image author would generate a compatibility artifact that points to the image it describes in a registry via the referrers API. When a need arises to assess the fit of an image to a host, the tool can discover the artifact and verify compatibility of an image to a node before deployment. The client can validate nodes both inside and outside a Kubernetes cluster, extending the utility of the tool beyond the single Kubernetes use case. In the future, image compatibility could play a crucial role in creating specific workload profiles based on image compatibility requirements, aiding in more efficient scheduling. Additionally, it could potentially enable automatic node configuration to some extent, further optimizing resource allocation and ensuring seamless deployment of specialized workloads.
Examples of usage
Define image compatibility metadata
A container image can have metadata that describes its requirements based on features discovered from nodes, like kernel modules or CPU models. The previous compatibility specification example in this article exemplified this use case.
Attach the artifact to the image
The image compatibility specification is stored as an OCI artifact. You can attach this metadata to your container image using the oras tool. The registry only needs to support OCI artifacts, support for arbitrary types is not required. Keep in mind that the container image and the artifact must be stored in the same registry. Use the following command to attach the artifact to the image:
oras attach \ --artifact-type application/vnd.nfd.image-compatibility.v1alpha1 <image-url> \ <path-to-spec>.yaml:application/vnd.nfd.image-compatibility.spec.v1alpha1+yamlValidate image compatibility
After attaching the compatibility specification, you can validate whether a node meets the image's requirements. This validation can be done using the nfd client:
nfd compat validate-node --image <image-url>Read the output from the client
Finally you can read the report generated by the tool or use your own tools to act based on the generated JSON report.
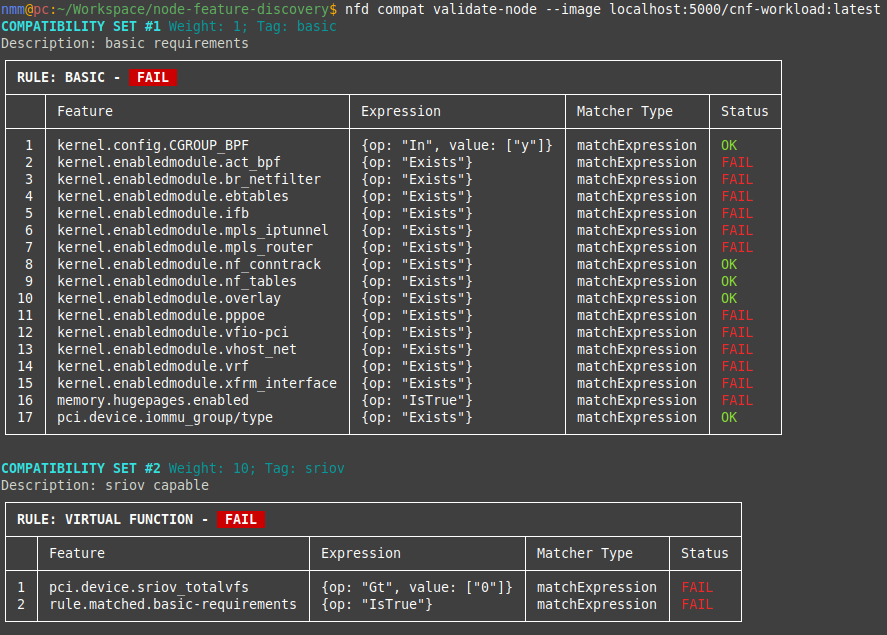
Conclusion
The addition of image compatibility to Kubernetes through Node Feature Discovery underscores the growing importance of addressing compatibility in cloud native environments. It is only a start, as further work is needed to integrate compatibility into scheduling of workloads within and outside of Kubernetes. However, by integrating this feature into Kubernetes, mission-critical workloads can now define and validate host OS requirements more efficiently. Moving forward, the adoption of compatibility metadata within Kubernetes ecosystems will significantly enhance the reliability and performance of specialized containerized applications, ensuring they meet the stringent requirements of industries like telecommunications, high-performance computing or any environment that requires special hardware or host OS configuration.
Get involved
Join the Kubernetes Node Feature Discovery project if you're interested in getting involved with the design and development of Image Compatibility API and tools. We always welcome new contributors.
Changes to Kubernetes Slack
UPDATE: We’ve received notice from Salesforce that our Slack workspace WILL NOT BE DOWNGRADED on June 20th. Stand by for more details, but for now, there is no urgency to back up private channels or direct messages.
Kubernetes Slack will lose its special status and will be changing into a standard free Slack on June 20, 2025. Sometime later this year, our community may move to a new platform. If you are responsible for a channel or private channel, or a member of a User Group, you will need to take some actions as soon as you can.
For the last decade, Slack has supported our project with a free customized enterprise account. They have let us know that they can no longer do so, particularly since our Slack is one of the largest and more active ones on the platform. As such, they will be downgrading it to a standard free Slack while we decide on, and implement, other options.
On Friday, June 20, we will be subject to the feature limitations of free Slack. The primary ones which will affect us will be only retaining 90 days of history, and having to disable several apps and workflows which we are currently using. The Slack Admin team will do their best to manage these limitations.
Responsible channel owners, members of private channels, and members of User Groups should take some actions to prepare for the upgrade and preserve information as soon as possible.
The CNCF Projects Staff have proposed that our community look at migrating to Discord. Because of existing issues where we have been pushing the limits of Slack, they have already explored what a Kubernetes Discord would look like. Discord would allow us to implement new tools and integrations which would help the community, such as GitHub group membership synchronization. The Steering Committee will discuss and decide on our future platform.
Please see our FAQ, and check the kubernetes-dev mailing list and the #announcements channel for further news. If you have specific feedback on our Slack status join the discussion on GitHub.
Enhancing Kubernetes Event Management with Custom Aggregation
Kubernetes Events provide crucial insights into cluster operations, but as clusters grow, managing and analyzing these events becomes increasingly challenging. This blog post explores how to build custom event aggregation systems that help engineering teams better understand cluster behavior and troubleshoot issues more effectively.
The challenge with Kubernetes events
In a Kubernetes cluster, events are generated for various operations - from pod scheduling and container starts to volume mounts and network configurations. While these events are invaluable for debugging and monitoring, several challenges emerge in production environments:
- Volume: Large clusters can generate thousands of events per minute
- Retention: Default event retention is limited to one hour
- Correlation: Related events from different components are not automatically linked
- Classification: Events lack standardized severity or category classifications
- Aggregation: Similar events are not automatically grouped
To learn more about Events in Kubernetes, read the Event API reference.
Real-World value
Consider a production environment with tens of microservices where the users report intermittent transaction failures:
Traditional event aggregation process: Engineers are wasting hours sifting through thousands of standalone events spread across namespaces. By the time they look into it, the older events have long since purged, and correlating pod restarts to node-level issues is practically impossible.
With its event aggregation in its custom events: The system groups events across resources, instantly surfacing correlation patterns such as volume mount timeouts before pod restarts. History indicates it occurred during past record traffic spikes, highlighting a storage scalability issue in minutes rather than hours.
The benefit of this approach is that organizations that implement it commonly cut down their troubleshooting time significantly along with increasing the reliability of systems by detecting patterns early.
Building an Event aggregation system
This post explores how to build a custom event aggregation system that addresses these challenges, aligned to Kubernetes best practices. I've picked the Go programming language for my example.
Architecture overview
This event aggregation system consists of three main components:
- Event Watcher: Monitors the Kubernetes API for new events
- Event Processor: Processes, categorizes, and correlates events
- Storage Backend: Stores processed events for longer retention
Here's a sketch for how to implement the event watcher:
package main
import (
"context"
metav1 "k8s.io/apimachinery/pkg/apis/meta/v1"
"k8s.io/client-go/kubernetes"
"k8s.io/client-go/rest"
eventsv1 "k8s.io/api/events/v1"
)
type EventWatcher struct {
clientset *kubernetes.Clientset
}
func NewEventWatcher(config *rest.Config) (*EventWatcher, error) {
clientset, err := kubernetes.NewForConfig(config)
if err != nil {
return nil, err
}
return &EventWatcher{clientset: clientset}, nil
}
func (w *EventWatcher) Watch(ctx context.Context) (<-chan *eventsv1.Event, error) {
events := make(chan *eventsv1.Event)
watcher, err := w.clientset.EventsV1().Events("").Watch(ctx, metav1.ListOptions{})
if err != nil {
return nil, err
}
go func() {
defer close(events)
for {
select {
case event := <-watcher.ResultChan():
if e, ok := event.Object.(*eventsv1.Event); ok {
events <- e
}
case <-ctx.Done():
watcher.Stop()
return
}
}
}()
return events, nil
}
Event processing and classification
The event processor enriches events with additional context and classification:
type EventProcessor struct {
categoryRules []CategoryRule
correlationRules []CorrelationRule
}
type ProcessedEvent struct {
Event *eventsv1.Event
Category string
Severity string
CorrelationID string
Metadata map[string]string
}
func (p *EventProcessor) Process(event *eventsv1.Event) *ProcessedEvent {
processed := &ProcessedEvent{
Event: event,
Metadata: make(map[string]string),
}
// Apply classification rules
processed.Category = p.classifyEvent(event)
processed.Severity = p.determineSeverity(event)
// Generate correlation ID for related events
processed.CorrelationID = p.correlateEvent(event)
// Add useful metadata
processed.Metadata = p.extractMetadata(event)
return processed
}
Implementing Event correlation
One of the key features you could implement is a way of correlating related Events. Here's an example correlation strategy:
func (p *EventProcessor) correlateEvent(event *eventsv1.Event) string {
// Correlation strategies:
// 1. Time-based: Events within a time window
// 2. Resource-based: Events affecting the same resource
// 3. Causation-based: Events with cause-effect relationships
correlationKey := generateCorrelationKey(event)
return correlationKey
}
func generateCorrelationKey(event *eventsv1.Event) string {
// Example: Combine namespace, resource type, and name
return fmt.Sprintf("%s/%s/%s",
event.InvolvedObject.Namespace,
event.InvolvedObject.Kind,
event.InvolvedObject.Name,
)
}
Event storage and retention
For long-term storage and analysis, you'll probably want a backend that supports:
- Efficient querying of large event volumes
- Flexible retention policies
- Support for aggregation queries
Here's a sample storage interface:
type EventStorage interface {
Store(context.Context, *ProcessedEvent) error
Query(context.Context, EventQuery) ([]ProcessedEvent, error)
Aggregate(context.Context, AggregationParams) ([]EventAggregate, error)
}
type EventQuery struct {
TimeRange TimeRange
Categories []string
Severity []string
CorrelationID string
Limit int
}
type AggregationParams struct {
GroupBy []string
TimeWindow string
Metrics []string
}
Good practices for Event management
Resource Efficiency
- Implement rate limiting for event processing
- Use efficient filtering at the API server level
- Batch events for storage operations
Scalability
- Distribute event processing across multiple workers
- Use leader election for coordination
- Implement backoff strategies for API rate limits
Reliability
- Handle API server disconnections gracefully
- Buffer events during storage backend unavailability
- Implement retry mechanisms with exponential backoff
Advanced features
Pattern detection
Implement pattern detection to identify recurring issues:
type PatternDetector struct {
patterns map[string]*Pattern
threshold int
}
func (d *PatternDetector) Detect(events []ProcessedEvent) []Pattern {
// Group similar events
groups := groupSimilarEvents(events)
// Analyze frequency and timing
patterns := identifyPatterns(groups)
return patterns
}
func groupSimilarEvents(events []ProcessedEvent) map[string][]ProcessedEvent {
groups := make(map[string][]ProcessedEvent)
for _, event := range events {
// Create similarity key based on event characteristics
similarityKey := fmt.Sprintf("%s:%s:%s",
event.Event.Reason,
event.Event.InvolvedObject.Kind,
event.Event.InvolvedObject.Namespace,
)
// Group events with the same key
groups[similarityKey] = append(groups[similarityKey], event)
}
return groups
}
func identifyPatterns(groups map[string][]ProcessedEvent) []Pattern {
var patterns []Pattern
for key, events := range groups {
// Only consider groups with enough events to form a pattern
if len(events) < 3 {
continue
}
// Sort events by time
sort.Slice(events, func(i, j int) bool {
return events[i].Event.LastTimestamp.Time.Before(events[j].Event.LastTimestamp.Time)
})
// Calculate time range and frequency
firstSeen := events[0].Event.FirstTimestamp.Time
lastSeen := events[len(events)-1].Event.LastTimestamp.Time
duration := lastSeen.Sub(firstSeen).Minutes()
var frequency float64
if duration > 0 {
frequency = float64(len(events)) / duration
}
// Create a pattern if it meets threshold criteria
if frequency > 0.5 { // More than 1 event per 2 minutes
pattern := Pattern{
Type: key,
Count: len(events),
FirstSeen: firstSeen,
LastSeen: lastSeen,
Frequency: frequency,
EventSamples: events[:min(3, len(events))], // Keep up to 3 samples
}
patterns = append(patterns, pattern)
}
}
return patterns
}
With this implementation, the system can identify recurring patterns such as node pressure events, pod scheduling failures, or networking issues that occur with a specific frequency.
Real-time alerts
The following example provides a starting point for building an alerting system based on event patterns. It is not a complete solution but a conceptual sketch to illustrate the approach.
type AlertManager struct {
rules []AlertRule
notifiers []Notifier
}
func (a *AlertManager) EvaluateEvents(events []ProcessedEvent) {
for _, rule := range a.rules {
if rule.Matches(events) {
alert := rule.GenerateAlert(events)
a.notify(alert)
}
}
}
Conclusion
A well-designed event aggregation system can significantly improve cluster observability and troubleshooting capabilities. By implementing custom event processing, correlation, and storage, operators can better understand cluster behavior and respond to issues more effectively.
The solutions presented here can be extended and customized based on specific requirements while maintaining compatibility with the Kubernetes API and following best practices for scalability and reliability.
Next steps
Future enhancements could include:
- Machine learning for anomaly detection
- Integration with popular observability platforms
- Custom event APIs for application-specific events
- Enhanced visualization and reporting capabilities
For more information on Kubernetes events and custom controllers, refer to the official Kubernetes documentation.
Introducing Gateway API Inference Extension
Modern generative AI and large language model (LLM) services create unique traffic-routing challenges on Kubernetes. Unlike typical short-lived, stateless web requests, LLM inference sessions are often long-running, resource-intensive, and partially stateful. For example, a single GPU-backed model server may keep multiple inference sessions active and maintain in-memory token caches.
Traditional load balancers focused on HTTP path or round-robin lack the specialized capabilities needed for these workloads. They also don’t account for model identity or request criticality (e.g., interactive chat vs. batch jobs). Organizations often patch together ad-hoc solutions, but a standardized approach is missing.
Gateway API Inference Extension
Gateway API Inference Extension was created to address this gap by building on the existing Gateway API, adding inference-specific routing capabilities while retaining the familiar model of Gateways and HTTPRoutes. By adding an inference extension to your existing gateway, you effectively transform it into an Inference Gateway, enabling you to self-host GenAI/LLMs with a “model-as-a-service” mindset.
The project’s goal is to improve and standardize routing to inference workloads across the ecosystem. Key objectives include enabling model-aware routing, supporting per-request criticalities, facilitating safe model roll-outs, and optimizing load balancing based on real-time model metrics. By achieving these, the project aims to reduce latency and improve accelerator (GPU) utilization for AI workloads.
How it works
The design introduces two new Custom Resources (CRDs) with distinct responsibilities, each aligning with a specific user persona in the AI/ML serving workflow:
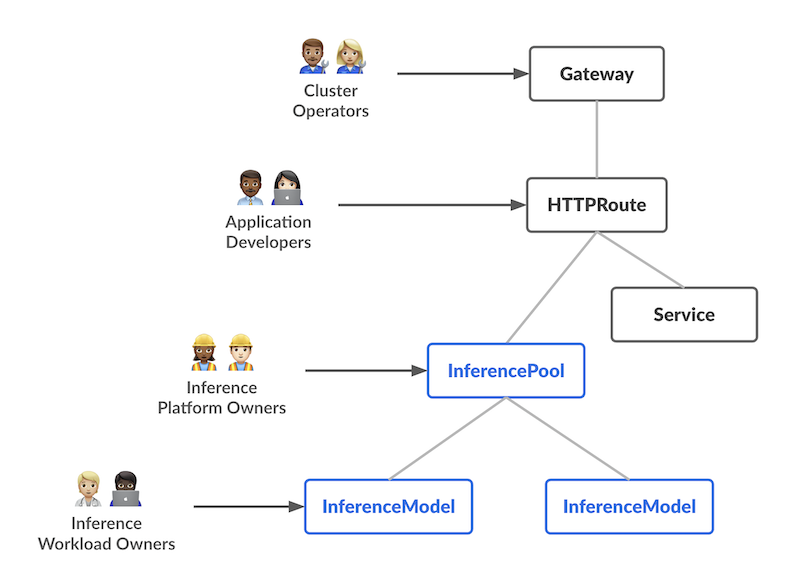
InferencePool Defines a pool of pods (model servers) running on shared compute (e.g., GPU nodes). The platform admin can configure how these pods are deployed, scaled, and balanced. An InferencePool ensures consistent resource usage and enforces platform-wide policies. An InferencePool is similar to a Service but specialized for AI/ML serving needs and aware of the model-serving protocol.
InferenceModel A user-facing model endpoint managed by AI/ML owners. It maps a public name (e.g., "gpt-4-chat") to the actual model within an InferencePool. This lets workload owners specify which models (and optional fine-tuning) they want served, plus a traffic-splitting or prioritization policy.
In summary, the InferenceModel API lets AI/ML owners manage what is served, while the InferencePool lets platform operators manage where and how it’s served.
Request flow
The flow of a request builds on the Gateway API model (Gateways and HTTPRoutes) with one or more extra inference-aware steps (extensions) in the middle. Here’s a high-level example of the request flow with the Endpoint Selection Extension (ESE):
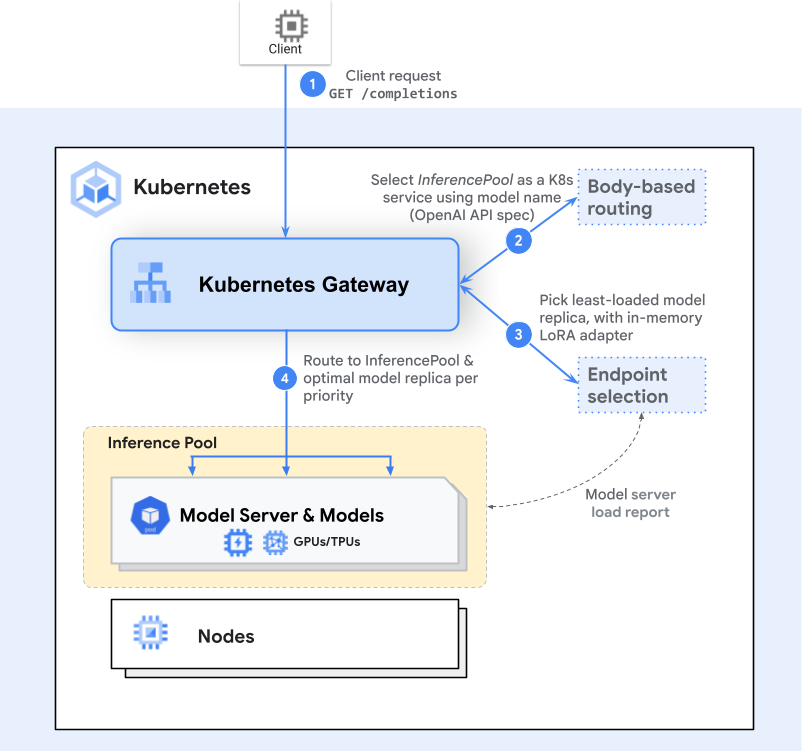
Gateway Routing
A client sends a request (e.g., an HTTP POST to /completions). The Gateway (like Envoy) examines the HTTPRoute and identifies the matching InferencePool backend.Endpoint Selection
Instead of simply forwarding to any available pod, the Gateway consults an inference-specific routing extension— the Endpoint Selection Extension—to pick the best of the available pods. This extension examines live pod metrics (queue lengths, memory usage, loaded adapters) to choose the ideal pod for the request.Inference-Aware Scheduling
The chosen pod is the one that can handle the request with the lowest latency or highest efficiency, given the user’s criticality or resource needs. The Gateway then forwards traffic to that specific pod.
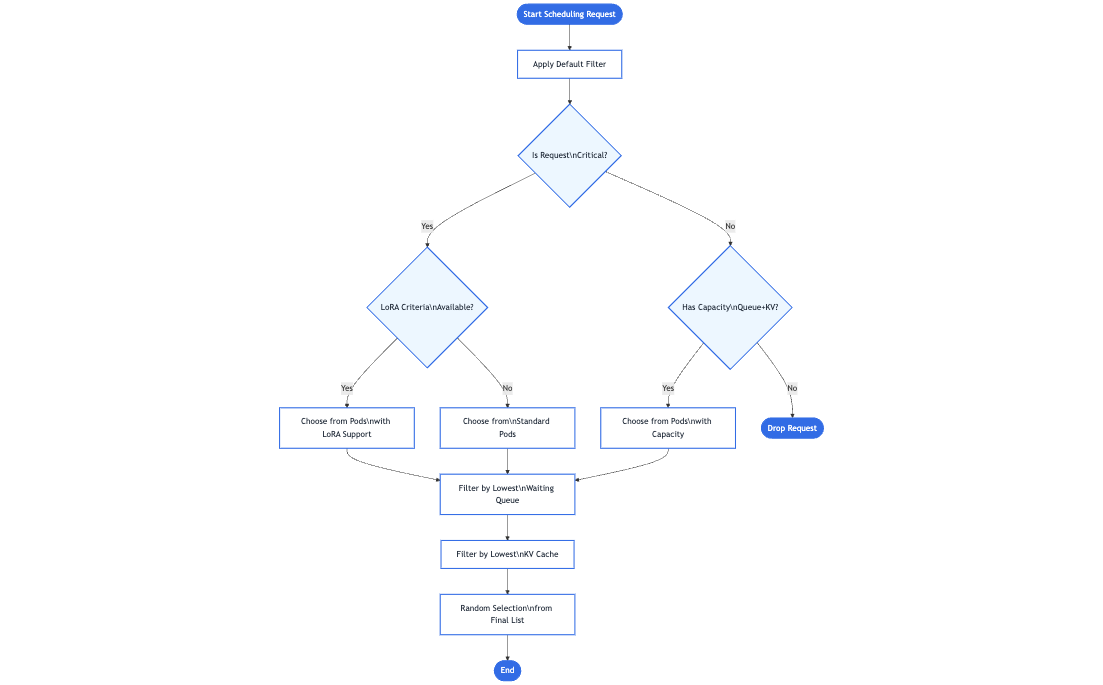
This extra step provides a smarter, model-aware routing mechanism that still feels like a normal single request to the client. Additionally, the design is extensible—any Inference Gateway can be enhanced with additional inference-specific extensions to handle new routing strategies, advanced scheduling logic, or specialized hardware needs. As the project continues to grow, contributors are encouraged to develop new extensions that are fully compatible with the same underlying Gateway API model, further expanding the possibilities for efficient and intelligent GenAI/LLM routing.
Benchmarks
We evaluated this extension against a standard Kubernetes Service for a vLLM‐based model serving deployment. The test environment consisted of multiple H100 (80 GB) GPU pods running vLLM (version 1) on a Kubernetes cluster, with 10 Llama2 model replicas. The Latency Profile Generator (LPG) tool was used to generate traffic and measure throughput, latency, and other metrics. The ShareGPT dataset served as the workload, and traffic was ramped from 100 Queries per Second (QPS) up to 1000 QPS.
Key results
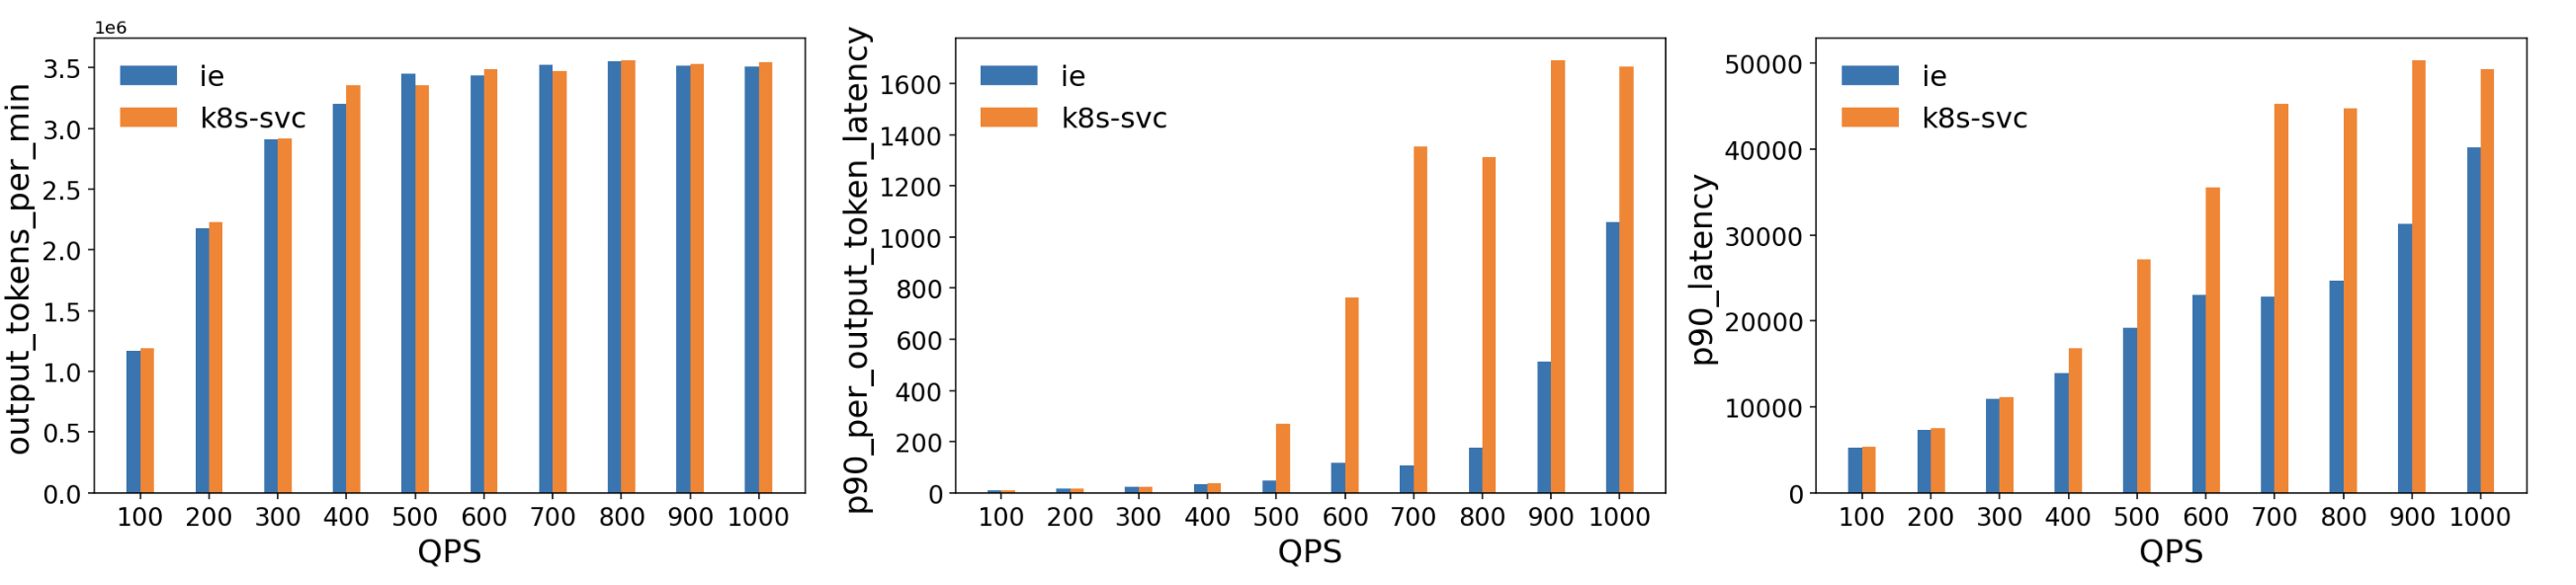
Comparable Throughput: Throughout the tested QPS range, the ESE delivered throughput roughly on par with a standard Kubernetes Service.
Lower Latency:
- Per‐Output‐Token Latency: The ESE showed significantly lower p90 latency at higher QPS (500+), indicating that its model-aware routing decisions reduce queueing and resource contention as GPU memory approaches saturation.
- Overall p90 Latency: Similar trends emerged, with the ESE reducing end‐to‐end tail latencies compared to the baseline, particularly as traffic increased beyond 400–500 QPS.
These results suggest that this extension's model‐aware routing significantly reduced latency for GPU‐backed LLM workloads. By dynamically selecting the least‐loaded or best‐performing model server, it avoids hotspots that can appear when using traditional load balancing methods for large, long‐running inference requests.
Roadmap
As the Gateway API Inference Extension heads toward GA, planned features include:
- Prefix-cache aware load balancing for remote caches
- LoRA adapter pipelines for automated rollout
- Fairness and priority between workloads in the same criticality band
- HPA support for scaling based on aggregate, per-model metrics
- Support for large multi-modal inputs/outputs
- Additional model types (e.g., diffusion models)
- Heterogeneous accelerators (serving on multiple accelerator types with latency- and cost-aware load balancing)
- Disaggregated serving for independently scaling pools
Summary
By aligning model serving with Kubernetes-native tooling, Gateway API Inference Extension aims to simplify and standardize how AI/ML traffic is routed. With model-aware routing, criticality-based prioritization, and more, it helps ops teams deliver the right LLM services to the right users—smoothly and efficiently.
Ready to learn more? Visit the project docs to dive deeper, give an Inference Gateway extension a try with a few simple steps, and get involved if you’re interested in contributing to the project!
Start Sidecar First: How To Avoid Snags
From the Kubernetes Multicontainer Pods: An Overview blog post you know what their job is, what are the main architectural patterns, and how they are implemented in Kubernetes. The main thing I’ll cover in this article is how to ensure that your sidecar containers start before the main app. It’s more complicated than you might think!
A gentle refresher
I'd just like to remind readers that the v1.29.0 release of Kubernetes added native support for
sidecar containers, which can now be defined within the .spec.initContainers field,
but with restartPolicy: Always. You can see that illustrated in the following example Pod manifest snippet:
initContainers:
- name: logshipper
image: alpine:latest
restartPolicy: Always # this is what makes it a sidecar container
command: ['sh', '-c', 'tail -F /opt/logs.txt']
volumeMounts:
- name: data
mountPath: /opt
What are the specifics of defining sidecars with a .spec.initContainers block, rather than as a legacy multi-container pod with multiple .spec.containers?
Well, all .spec.initContainers are always launched before the main application. If you define Kubernetes-native sidecars, those are terminated after the main application. Furthermore, when used with Jobs, a sidecar container should still be alive and could potentially even restart after the owning Job is complete; Kubernetes-native sidecar containers do not block pod completion.
To learn more, you can also read the official Pod sidecar containers tutorial.
The problem
Now you know that defining a sidecar with this native approach will always start it before the main application. From the kubelet source code, it's visible that this often means being started almost in parallel, and this is not always what an engineer wants to achieve. What I'm really interested in is whether I can delay the start of the main application until the sidecar is not just started, but fully running and ready to serve. It might be a bit tricky because the problem with sidecars is there’s no obvious success signal, contrary to init containers - designed to run only for a specified period of time. With an init container, exit status 0 is unambiguously "I succeeded". With a sidecar, there are lots of points at which you can say "a thing is running". Starting one container only after the previous one is ready is part of a graceful deployment strategy, ensuring proper sequencing and stability during startup. It’s also actually how I’d expect sidecar containers to work as well, to cover the scenario where the main application is dependent on the sidecar. For example, it may happen that an app errors out if the sidecar isn’t available to serve requests (e.g., logging with DataDog). Sure, one could change the application code (and it would actually be the “best practice” solution), but sometimes they can’t - and this post focuses on this use case.
I'll explain some ways that you might try, and show you what approaches will really work.
Readiness probe
To check whether Kubernetes native sidecar delays the start of the main application until the sidecar is ready, let’s simulate a short investigation. Firstly, I’ll simulate a sidecar container which will never be ready by implementing a readiness probe which will never succeed. As a reminder, a readiness probe checks if the container is ready to start accepting traffic and therefore, if the pod can be used as a backend for services.
(Unlike standard init containers, sidecar containers can have probes so that the kubelet can supervise the sidecar and intervene if there are problems. For example, restarting a sidecar container if it fails a health check.)
apiVersion: apps/v1
kind: Deployment
metadata:
name: myapp
labels:
app: myapp
spec:
replicas: 1
selector:
matchLabels:
app: myapp
template:
metadata:
labels:
app: myapp
spec:
containers:
- name: myapp
image: alpine:latest
command: ["sh", "-c", "sleep 3600"]
initContainers:
- name: nginx
image: nginx:latest
restartPolicy: Always
ports:
- containerPort: 80
protocol: TCP
readinessProbe:
exec:
command:
- /bin/sh
- -c
- exit 1 # this command always fails, keeping the container "Not Ready"
periodSeconds: 5
volumes:
- name: data
emptyDir: {}
The result is:
controlplane $ kubectl get pods -w
NAME READY STATUS RESTARTS AGE
myapp-db5474f45-htgw5 1/2 Running 0 9m28s
controlplane $ kubectl describe pod myapp-db5474f45-htgw5
Name: myapp-db5474f45-htgw5
Namespace: default
(...)
Events:
Type Reason Age From Message
---- ------ ---- ---- -------
Normal Scheduled 17s default-scheduler Successfully assigned default/myapp-db5474f45-htgw5 to node01
Normal Pulling 16s kubelet Pulling image "nginx:latest"
Normal Pulled 16s kubelet Successfully pulled image "nginx:latest" in 163ms (163ms including waiting). Image size: 72080558 bytes.
Normal Created 16s kubelet Created container nginx
Normal Started 16s kubelet Started container nginx
Normal Pulling 15s kubelet Pulling image "alpine:latest"
Normal Pulled 15s kubelet Successfully pulled image "alpine:latest" in 159ms (160ms including waiting). Image size: 3652536 bytes.
Normal Created 15s kubelet Created container myapp
Normal Started 15s kubelet Started container myapp
Warning Unhealthy 1s (x6 over 15s) kubelet Readiness probe failed:
From these logs it’s evident that only one container is ready - and I know it can’t be the sidecar, because I’ve defined it so it’ll never be ready (you can also check container statuses in kubectl get pod -o json). I also saw that myapp has been started before the sidecar is ready. That was not the result I wanted to achieve; in this case, the main app container has a hard dependency on its sidecar.
Maybe a startup probe?
To ensure that the sidecar is ready before the main app container starts, I can define a startupProbe. It will delay the start of the main container until the command is successfully executed (returns 0 exit status). If you’re wondering why I’ve added it to my initContainer, let’s analyse what happens If I’d added it to myapp container. I wouldn’t have guaranteed the probe would run before the main application code - and this one, can potentially error out without the sidecar being up and running.
apiVersion: apps/v1
kind: Deployment
metadata:
name: myapp
labels:
app: myapp
spec:
replicas: 1
selector:
matchLabels:
app: myapp
template:
metadata:
labels:
app: myapp
spec:
containers:
- name: myapp
image: alpine:latest
command: ["sh", "-c", "sleep 3600"]
initContainers:
- name: nginx
image: nginx:latest
ports:
- containerPort: 80
protocol: TCP
restartPolicy: Always
startupProbe:
httpGet:
path: /
port: 80
initialDelaySeconds: 5
periodSeconds: 30
failureThreshold: 10
timeoutSeconds: 20
volumes:
- name: data
emptyDir: {}
This results in 2/2 containers being ready and running, and from events, it can be inferred that the main application started only after nginx had already been started. But to confirm whether it waited for the sidecar readiness, let’s change the startupProbe to the exec type of command:
startupProbe:
exec:
command:
- /bin/sh
- -c
- sleep 15
and run kubectl get pods -w to watch in real time whether the readiness of both containers only changes after a 15 second delay. Again, events confirm the main application starts after the sidecar.
That means that using the startupProbe with a correct startupProbe.httpGet request helps to delay the main application start until the sidecar is ready. It’s not optimal, but it works.
What about the postStart lifecycle hook?
Fun fact: using the postStart lifecycle hook block will also do the job, but I’d have to write my own mini-shell script, which is even less efficient.
initContainers:
- name: nginx
image: nginx:latest
restartPolicy: Always
ports:
- containerPort: 80
protocol: TCP
lifecycle:
postStart:
exec:
command:
- /bin/sh
- -c
- |
echo "Waiting for readiness at http://localhost:80"
until curl -sf http://localhost:80; do
echo "Still waiting for http://localhost:80..."
sleep 5
done
echo "Service is ready at http://localhost:80"
Liveness probe
An interesting exercise would be to check the sidecar container behavior with a liveness probe. A liveness probe behaves and is configured similarly to a readiness probe - only with the difference that it doesn’t affect the readiness of the container but restarts it in case the probe fails.
livenessProbe:
exec:
command:
- /bin/sh
- -c
- exit 1 # this command always fails, keeping the container "Not Ready"
periodSeconds: 5
After adding the liveness probe configured just as the previous readiness probe and checking events of the pod by kubectl describe pod it’s visible that the sidecar has a restart count above 0. Nevertheless, the main application is not restarted nor influenced at all, even though I'm aware that (in our imaginary worst-case scenario) it can error out when the sidecar is not there serving requests.
What if I’d used a livenessProbe without lifecycle postStart? Both containers will be immediately ready: at the beginning, this behavior will not be different from the one without any additional probes since the liveness probe doesn’t affect readiness at all. After a while, the sidecar will begin to restart itself, but it won’t influence the main container.
Findings summary
I’ll summarize the startup behavior in the table below:
| Probe/Hook | Sidecar starts before the main app? | Main app waits for the sidecar to be ready? | What if the check doesn’t pass? |
|---|---|---|---|
readinessProbe | Yes, but it’s almost in parallel (effectively no) | No | Sidecar is not ready; main app continues running |
livenessProbe | Yes, but it’s almost in parallel (effectively no) | No | Sidecar is restarted, main app continues running |
startupProbe | Yes | Yes | Main app is not started |
| postStart | Yes, main app container starts after postStart completes | Yes, but you have to provide custom logic for that | Main app is not started |
To summarize: with sidecars often being a dependency of the main application, you may want to delay the start of the latter until the sidecar is healthy. The ideal pattern is to start both containers simultaneously and have the app container logic delay at all levels, but it’s not always possible. If that's what you need, you have to use the right kind of customization to the Pod definition. Thankfully, it’s nice and quick, and you have the recipe ready above.
Happy deploying!
Gateway API v1.3.0: Advancements in Request Mirroring, CORS, Gateway Merging, and Retry Budgets
Join us in the Kubernetes SIG Network community in celebrating the general availability of Gateway API v1.3.0! We are also pleased to announce that there are already a number of conformant implementations to try, made possible by postponing this blog announcement. Version 1.3.0 of the API was released about a month ago on April 24, 2025.
Gateway API v1.3.0 brings a new feature to the Standard channel (Gateway API's GA release channel): percentage-based request mirroring, and introduces three new experimental features: cross-origin resource sharing (CORS) filters, a standardized mechanism for listener and gateway merging, and retry budgets.
Also see the full release notes and applaud the v1.3.0 release team next time you see them.
Graduation to Standard channel
Graduation to the Standard channel is a notable achievement for Gateway API features, as inclusion in the Standard release channel denotes a high level of confidence in the API surface and provides guarantees of backward compatibility. Of course, as with any other Kubernetes API, Standard channel features can continue to evolve with backward-compatible additions over time, and we (SIG Network) certainly expect further refinements and improvements in the future. For more information on how all of this works, refer to the Gateway API Versioning Policy.
Percentage-based request mirroring
Leads: Lior Lieberman,Jake Bennert
GEP-3171: Percentage-Based Request Mirroring
Percentage-based request mirroring is an enhancement to the existing support for HTTP request mirroring, which allows HTTP requests to be duplicated to another backend using the RequestMirror filter type. Request mirroring is particularly useful in blue-green deployment. It can be used to assess the impact of request scaling on application performance without impacting responses to clients.
The previous mirroring capability worked on all the requests to a backendRef.
Percentage-based request mirroring allows users to specify a subset of requests
they want to be mirrored, either by percentage or fraction. This can be
particularly useful when services are receiving a large volume of requests.
Instead of mirroring all of those requests, this new feature can be used to
mirror a smaller subset of them.
Here's an example with 42% of the requests to "foo-v1" being mirrored to "foo-v2":
apiVersion: gateway.networking.k8s.io/v1
kind: HTTPRoute
metadata:
name: http-filter-mirror
labels:
gateway: mirror-gateway
spec:
parentRefs:
- name: mirror-gateway
hostnames:
- mirror.example
rules:
- backendRefs:
- name: foo-v1
port: 8080
filters:
- type: RequestMirror
requestMirror:
backendRef:
name: foo-v2
port: 8080
percent: 42 # This value must be an integer.
You can also configure the partial mirroring using a fraction. Here is an example with 5 out of every 1000 requests to "foo-v1" being mirrored to "foo-v2".
rules:
- backendRefs:
- name: foo-v1
port: 8080
filters:
- type: RequestMirror
requestMirror:
backendRef:
name: foo-v2
port: 8080
fraction:
numerator: 5
denominator: 1000
Additions to Experimental channel
The Experimental channel is Gateway API's channel for experimenting with new features and gaining confidence with them before allowing them to graduate to standard. Please note: the experimental channel may include features that are changed or removed later.
Starting in release v1.3.0, in an effort to distinguish Experimental channel
resources from Standard channel resources, any new experimental API kinds have the
prefix "X". For the same reason, experimental resources are now added to the
API group gateway.networking.x-k8s.io instead of gateway.networking.k8s.io.
Bear in mind that using new experimental channel resources means they can coexist
with standard channel resources, but migrating these resources to the standard
channel will require recreating them with the standard channel names and API
group (both of which lack the "x-k8s" designator or "X" prefix).
The v1.3 release introduces two new experimental API kinds: XBackendTrafficPolicy and XListenerSet. To be able to use experimental API kinds, you need to install the Experimental channel Gateway API YAMLs from the locations listed below.
CORS filtering
Leads: Liang Li, Eyal Pazz, Rob Scott
GEP-1767: CORS Filter
Cross-origin resource sharing (CORS) is an HTTP-header based mechanism that allows
a web page to access restricted resources from a server on an origin (domain,
scheme, or port) different from the domain that served the web page. This feature
adds a new HTTPRoute filter type, called "CORS", to configure the handling of
cross-origin requests before the response is sent back to the client.
To be able to use experimental CORS filtering, you need to install the Experimental channel Gateway API HTTPRoute yaml.
Here's an example of a simple cross-origin configuration:
apiVersion: gateway.networking.k8s.io/v1
kind: HTTPRoute
metadata:
name: http-route-cors
spec:
parentRefs:
- name: http-gateway
rules:
- matches:
- path:
type: PathPrefix
value: /resource/foo
filters:
- cors:
- type: CORS
allowOrigins:
- *
allowMethods:
- GET
- HEAD
- POST
allowHeaders:
- Accept
- Accept-Language
- Content-Language
- Content-Type
- Range
backendRefs:
- kind: Service
name: http-route-cors
port: 80
In this case, the Gateway returns an origin header of "*", which means that the
requested resource can be referenced from any origin, a methods header
(Access-Control-Allow-Methods) that permits the GET, HEAD, and POST
verbs, and a headers header allowing Accept, Accept-Language,
Content-Language, Content-Type, and Range.
HTTP/1.1 200 OK
Access-Control-Allow-Origin: *
Access-Control-Allow-Methods: GET, HEAD, POST
Access-Control-Allow-Headers: Accept,Accept-Language,Content-Language,Content-Type,Range
The complete list of fields in the new CORS filter:
allowOriginsallowMethodsallowHeadersallowCredentialsexposeHeadersmaxAge
See CORS protocol for details.
XListenerSets (standardized mechanism for Listener and Gateway merging)
Lead: Dave Protasowski
GEP-1713: ListenerSets - Standard Mechanism to Merge Multiple Gateways
This release adds a new experimental API kind, XListenerSet, that allows a shared list of listeners to be attached to one or more parent Gateway(s). In addition, it expands upon the existing suggestion that Gateway API implementations may merge configuration from multiple Gateway objects. It also:
- adds a new field
allowedListenersto the.specof a Gateway. TheallowedListenersfield defines from which Namespaces to select XListenerSets that are allowed to attach to that Gateway: Same, All, None, or Selector based. - increases the previous maximum number (64) of listeners with the addition of XListenerSets.
- allows the delegation of listener configuration, such as TLS, to applications in other namespaces.
To be able to use experimental XListenerSet, you need to install the Experimental channel Gateway API XListenerSet yaml.
The following example shows a Gateway with an HTTP listener and two child HTTPS
XListenerSets with unique hostnames and certificates. The combined set of listeners
attached to the Gateway includes the two additional HTTPS listeners in the
XListenerSets that attach to the Gateway. This example illustrates the
delegation of listener TLS config to application owners in different namespaces
("store" and "app"). The HTTPRoute has both the Gateway listener named "foo" and
one XListenerSet listener named "second" as parentRefs.
apiVersion: gateway.networking.k8s.io/v1
kind: Gateway
metadata:
name: prod-external
namespace: infra
spec:
gatewayClassName: example
allowedListeners:
- from: All
listeners:
- name: foo
hostname: foo.com
protocol: HTTP
port: 80
---
apiVersion: gateway.networking.x-k8s.io/v1alpha1
kind: XListenerSet
metadata:
name: store
namespace: store
spec:
parentRef:
name: prod-external
listeners:
- name: first
hostname: first.foo.com
protocol: HTTPS
port: 443
tls:
mode: Terminate
certificateRefs:
- kind: Secret
group: ""
name: first-workload-cert
---
apiVersion: gateway.networking.x-k8s.io/v1alpha1
kind: XListenerSet
metadata:
name: app
namespace: app
spec:
parentRef:
name: prod-external
listeners:
- name: second
hostname: second.foo.com
protocol: HTTPS
port: 443
tls:
mode: Terminate
certificateRefs:
- kind: Secret
group: ""
name: second-workload-cert
---
apiVersion: gateway.networking.k8s.io/v1
kind: HTTPRoute
metadata:
name: httproute-example
spec:
parentRefs:
- name: app
kind: XListenerSet
sectionName: second
- name: parent-gateway
kind: Gateway
sectionName: foo
...
Each listener in a Gateway must have a unique combination of port, protocol,
(and hostname if supported by the protocol) in order for all listeners to be
compatible and not conflicted over which traffic they should receive.
Furthermore, implementations can merge separate Gateways into a single set of listener addresses if all listeners across those Gateways are compatible. The management of merged listeners was under-specified in releases prior to v1.3.0.
With the new feature, the specification on merging is expanded. Implementations must treat the parent Gateways as having the merged list of all listeners from itself and from attached XListenerSets, and validation of this list of listeners must behave the same as if the list were part of a single Gateway. Within a single Gateway, listeners are ordered using the following precedence:
- Single Listeners (not a part of an XListenerSet) first,
- Remaining listeners ordered by:
- object creation time (oldest first), and if two listeners are defined in objects that have the same timestamp, then
- alphabetically based on "{namespace}/{name of listener}"
Retry budgets (XBackendTrafficPolicy)
Leads: Eric Bishop, Mike Morris
GEP-3388: Retry Budgets
This feature allows you to configure a retry budget across all endpoints of a destination Service. This is used to limit additional client-side retries after reaching a configured threshold. When configuring the budget, the maximum percentage of active requests that may consist of retries may be specified, as well as the interval over which requests will be considered when calculating the threshold for retries. The development of this specification changed the existing experimental API kind BackendLBPolicy into a new experimental API kind, XBackendTrafficPolicy, in the interest of reducing the proliferation of policy resources that had commonalities.
To be able to use experimental retry budgets, you need to install the Experimental channel Gateway API XBackendTrafficPolicy yaml.
The following example shows an XBackendTrafficPolicy that applies a
retryConstraint that represents a budget that limits the retries to a maximum
of 20% of requests, over a duration of 10 seconds, and to a minimum of 3 retries
over 1 second.
apiVersion: gateway.networking.x-k8s.io/v1alpha1
kind: XBackendTrafficPolicy
metadata:
name: traffic-policy-example
spec:
retryConstraint:
budget:
percent: 20
interval: 10s
minRetryRate:
count: 3
interval: 1s
...
Try it out
Unlike other Kubernetes APIs, you don't need to upgrade to the latest version of Kubernetes to get the latest version of Gateway API. As long as you're running Kubernetes 1.26 or later, you'll be able to get up and running with this version of Gateway API.
To try out the API, follow the Getting Started Guide. As of this writing, four implementations are already conformant with Gateway API v1.3 experimental channel features. In alphabetical order:
Get involved
Wondering when a feature will be added? There are lots of opportunities to get involved and help define the future of Kubernetes routing APIs for both ingress and service mesh.
- Check out the user guides to see what use-cases can be addressed.
- Try out one of the existing Gateway controllers.
- Or join us in the community and help us build the future of Gateway API together!
The maintainers would like to thank everyone who's contributed to Gateway API, whether in the form of commits to the repo, discussion, ideas, or general support. We could never have made this kind of progress without the support of this dedicated and active community.
Related Kubernetes blog articles
- Gateway API v1.2: WebSockets, Timeouts, Retries, and More (November 2024)
- Gateway API v1.1: Service mesh, GRPCRoute, and a whole lot more (May 2024)
- New Experimental Features in Gateway API v1.0 (November 2023)
- Gateway API v1.0: GA Release (October 2023)
Kubernetes v1.33: In-Place Pod Resize Graduated to Beta
On behalf of the Kubernetes project, I am excited to announce that the in-place Pod resize feature (also known as In-Place Pod Vertical Scaling), first introduced as alpha in Kubernetes v1.27, has graduated to Beta and will be enabled by default in the Kubernetes v1.33 release! This marks a significant milestone in making resource management for Kubernetes workloads more flexible and less disruptive.
What is in-place Pod resize?
Traditionally, changing the CPU or memory resources allocated to a container required restarting the Pod. While acceptable for many stateless applications, this could be disruptive for stateful services, batch jobs, or any workloads sensitive to restarts.
In-place Pod resizing allows you to change the CPU and memory requests and limits assigned to containers within a running Pod, often without requiring a container restart.
Here's the core idea:
- The
spec.containers[*].resourcesfield in a Pod specification now represents the desired resources and is mutable for CPU and memory. - The
status.containerStatuses[*].resourcesfield reflects the actual resources currently configured on a running container. - You can trigger a resize by updating the desired resources in the Pod spec via the new
resizesubresource.
You can try it out on a v1.33 Kubernetes cluster by using kubectl to edit a Pod (requires kubectl v1.32+):
kubectl edit pod <pod-name> --subresource resize
For detailed usage instructions and examples, please refer to the official Kubernetes documentation: Resize CPU and Memory Resources assigned to Containers.
Why does in-place Pod resize matter?
Kubernetes still excels at scaling workloads horizontally (adding or removing replicas), but in-place Pod resizing unlocks several key benefits for vertical scaling:
- Reduced Disruption: Stateful applications, long-running batch jobs, and sensitive workloads can have their resources adjusted without suffering the downtime or state loss associated with a Pod restart.
- Improved Resource Utilization: Scale down over-provisioned Pods without disruption, freeing up resources in the cluster. Conversely, provide more resources to Pods under heavy load without needing a restart.
- Faster Scaling: Address transient resource needs more quickly. For example Java applications often need more CPU during startup than during steady-state operation. Start with higher CPU and resize down later.
What's changed between Alpha and Beta?
Since the alpha release in v1.27, significant work has gone into maturing the feature, improving its stability, and refining the user experience based on feedback and further development. Here are the key changes:
Notable user-facing changes
resizeSubresource: Modifying Pod resources must now be done via the Pod'sresizesubresource (kubectl patch pod <name> --subresource resize ...).kubectlversions v1.32+ support this argument.- Resize Status via Conditions: The old
status.resizefield is deprecated. The status of a resize operation is now exposed via two Pod conditions:PodResizePending: Indicates the Kubelet cannot grant the resize immediately (e.g.,reason: Deferredif temporarily unable,reason: Infeasibleif impossible on the node).PodResizeInProgress: Indicates the resize is accepted and being applied. Errors encountered during this phase are now reported in this condition's message withreason: Error.
- Sidecar Support: Resizing sidecar containers in-place is now supported.
Stability and reliability enhancements
- Refined Allocated Resources Management: The allocation management logic with the Kubelet was significantly reworked, making it more consistent and robust. The changes eliminated whole classes of bugs, and greatly improved the reliability of in-place Pod resize.
- Improved Checkpointing & State Tracking: A more robust system for tracking "allocated" and "actuated" resources was implemented, using new checkpoint files (
allocated_pods_state,actuated_pods_state) to reliably manage resize state across Kubelet restarts and handle edge cases where runtime-reported resources differ from requested ones. Several bugs related to checkpointing and state restoration were fixed. Checkpointing efficiency was also improved. - Faster Resize Detection: Enhancements to the Kubelet's Pod Lifecycle Event Generator (PLEG) allow the Kubelet to respond to and complete resizes much more quickly.
- Enhanced CRI Integration: A new
UpdatePodSandboxResourcesCRI call was added to better inform runtimes and plugins (like NRI) about Pod-level resource changes. - Numerous Bug Fixes: Addressed issues related to systemd cgroup drivers, handling of containers without limits, CPU minimum share calculations, container restart backoffs, error propagation, test stability, and more.
What's next?
Graduating to Beta means the feature is ready for broader adoption, but development doesn't stop here! Here's what the community is focusing on next:
- Stability and Productionization: Continued focus on hardening the feature, improving performance, and ensuring it is robust for production environments.
- Addressing Limitations: Working towards relaxing some of the current limitations noted in the documentation, such as allowing memory limit decreases.
- VerticalPodAutoscaler (VPA) Integration: Work to enable VPA to leverage in-place Pod resize is already underway. A new
InPlaceOrRecreateupdate mode will allow it to attempt non-disruptive resizes first, or fall back to recreation if needed. This will allow users to benefit from VPA's recommendations with significantly less disruption. - User Feedback: Gathering feedback from users adopting the beta feature is crucial for prioritizing further enhancements and addressing any uncovered issues or bugs.
Getting started and providing feedback
With the InPlacePodVerticalScaling feature gate enabled by default in v1.33, you can start experimenting with in-place Pod resizing right away!
Refer to the documentation for detailed guides and examples.
As this feature moves through Beta, your feedback is invaluable. Please report any issues or share your experiences via the standard Kubernetes communication channels (GitHub issues, mailing lists, Slack). You can also review the KEP-1287: In-place Update of Pod Resources for the full in-depth design details.
We look forward to seeing how the community leverages in-place Pod resize to build more efficient and resilient applications on Kubernetes!
Announcing etcd v3.6.0
This announcement originally appeared on the etcd blog.
Today, we are releasing etcd v3.6.0, the first minor release since etcd v3.5.0 on June 15, 2021. This release introduces several new features, makes significant progress on long-standing efforts like downgrade support and migration to v3store, and addresses numerous critical & major issues. It also includes major optimizations in memory usage, improving efficiency and performance.
In addition to the features of v3.6.0, etcd has joined Kubernetes as a SIG (sig-etcd), enabling us to improve project sustainability. We've introduced systematic robustness testing to ensure correctness and reliability. Through the etcd-operator Working Group, we plan to improve usability as well.
What follows are the most significant changes introduced in etcd v3.6.0, along with the discussion of the roadmap for future development. For a detailed list of changes, please refer to the CHANGELOG-3.6.
A heartfelt thank you to all the contributors who made this release possible!
Security
etcd takes security seriously. To enhance software security in v3.6.0, we have improved our workflow checks by
integrating govulncheck to scan the source code and trivy to scan container images. These improvements
have also been backported to supported stable releases.
etcd continues to follow the Security Release Process to ensure vulnerabilities are properly managed and addressed.
Features
Migration to v3store
The v2store has been deprecated since etcd v3.4 but could still be enabled via --enable-v2. It remained the source of
truth for membership data. In etcd v3.6.0, v2store can no longer be enabled as the --enable-v2 flag has been removed,
and v3store has become the sole source of truth for membership data.
While v2store still exists in v3.6.0, etcd will fail to start if it contains any data other than membership information.
To assist with migration, etcd v3.5.18+ provides the etcdutl check v2store command, which verifies that v2store
contains only membership data (see PR 19113).
Compared to v2store, v3store offers better performance and transactional support. It is also the actively maintained storage engine moving forward.
The removal of v2store is still ongoing and is tracked in issues/12913.
Downgrade
etcd v3.6.0 is the first version to fully support downgrade. The effort for this downgrade task spans both versions 3.5 and 3.6, and all related work is tracked in issues/11716.
At a high level, the process involves migrating the data schema to the target version (e.g., v3.5), followed by a rolling downgrade.
Ensure the cluster is healthy, and take a snapshot backup. Validate whether the downgrade is valid:
$ etcdctl downgrade validate 3.5
Downgrade validate success, cluster version 3.6
If the downgrade is valid, enable downgrade mode:
$ etcdctl downgrade enable 3.5
Downgrade enable success, cluster version 3.6
etcd will then migrate the data schema in the background. Once complete, proceed with the rolling downgrade.
For details, refer to the Downgrade-3.6 guide.
Feature gates
In etcd v3.6.0, we introduced Kubernetes-style feature gates for managing new features. Previously, we
indicated unstable features through the --experimental prefix in feature flag names. The prefix was removed
once the feature was stable, causing a breaking change. Now, features will start in Alpha, progress
to Beta, then GA, or get deprecated. This ensures a much smoother upgrade and downgrade experience for users.
See feature-gates for details.
livez / readyz checks
etcd now supports /livez and /readyz endpoints, aligning with Kubernetes' Liveness and Readiness probes.
/livez indicates whether the etcd instance is alive, while /readyz indicates when it is ready to serve requests.
This feature has also been backported to release-3.5 (starting from v3.5.11) and release-3.4 (starting from v3.4.29).
See livez/readyz for details.
The existing /health endpoint remains functional. /livez is similar to /health?serializable=true, while
/readyz is similar to /health or /health?serializable=false. Clearly, the /livez and /readyz
endpoints provide clearer semantics and are easier to understand.
v3discovery
In etcd v3.6.0, the new discovery protocol v3discovery was introduced, based on clientv3. It facilitates the discovery of all cluster members during the bootstrap phase.
The previous v2discovery protocol, based on clientv2, has been deprecated. Additionally, the public discovery service at https://discovery.etcd.io/, which relied on v2discovery, is no longer maintained.
Performance
Memory
In this release, we reduced average memory consumption by at least 50% (see Figure 1). This improvement is primarily due to two changes:
- The default value of
--snapshot-counthas been reduced from 100,000 in v3.5 to 10,000 in v3.6. As a result, etcd v3.6 now retains only about 10% of the history records compared to v3.5. - Raft history is compacted more frequently, as introduced in PR/18825.
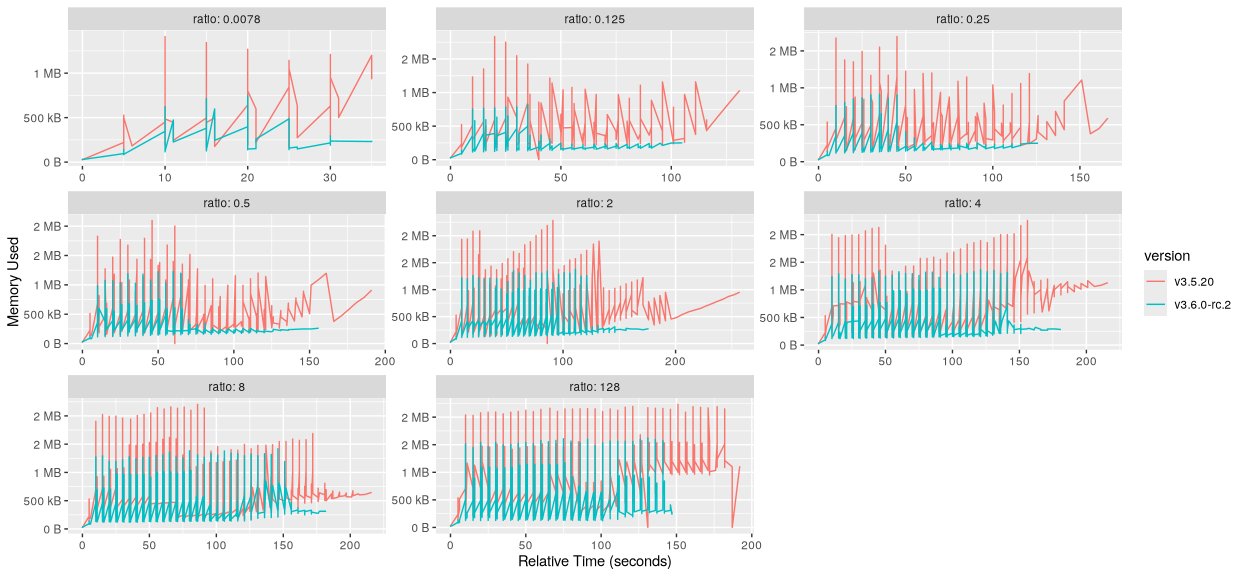
Figure 1: Memory usage comparison between etcd v3.5.20 and v3.6.0-rc.2 under different read/write ratios. Each subplot shows the memory usage over time with a specific read/write ratio. The red line represents etcd v3.5.20, while the teal line represents v3.6.0-rc.2. Across all tested ratios, v3.6.0-rc.2 exhibits lower and more stable memory usage.
Throughput
Compared to v3.5, etcd v3.6 delivers an average performance improvement of approximately 10% in both read and write throughput (see Figure 2, 3, 4 and 5). This improvement is not attributed to any single major change, but rather the cumulative effect of multiple minor enhancements. One such example is the optimization of the free page queries introduced in PR/419.
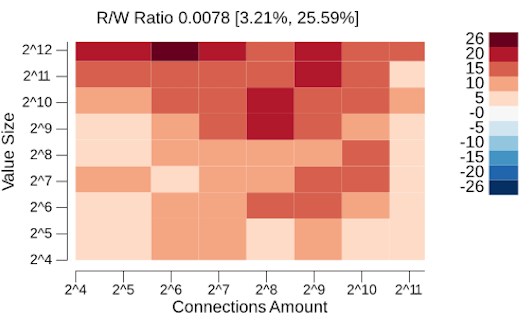
Figure 2: Read throughput comparison between etcd v3.5.20 and v3.6.0-rc.2 under a high write ratio. The read/write ratio is 0.0078, meaning 1 read per 128 writes. The right bar shows the percentage improvement in read throughput of v3.6.0-rc.2 over v3.5.20, ranging from 3.21% to 25.59%.
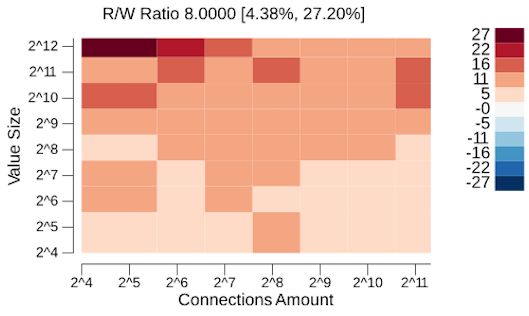
Figure 3: Read throughput comparison between etcd v3.5.20 and v3.6.0-rc.2 under a high read ratio. The read/write ratio is 8, meaning 8 reads per write. The right bar shows the percentage improvement in read throughput of v3.6.0-rc.2 over v3.5.20, ranging from 4.38% to 27.20%.
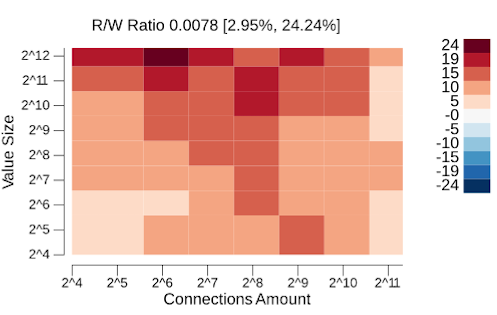
Figure 4: Write throughput comparison between etcd v3.5.20 and v3.6.0-rc.2 under a high write ratio. The read/write ratio is 0.0078, meaning 1 read per 128 writes. The right bar shows the percentage improvement in write throughput of v3.6.0-rc.2 over v3.5.20, ranging from 2.95% to 24.24%.
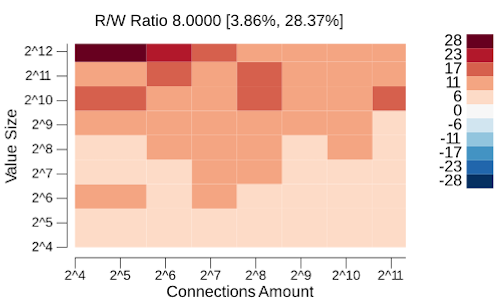
Figure 5: Write throughput comparison between etcd v3.5.20 and v3.6.0-rc.2 under a high read ratio. The read/write ratio is 8, meaning 8 reads per write. The right bar shows the percentage improvement in write throughput of v3.6.0-rc.2 over v3.5.20, ranging from 3.86% to 28.37%.
Breaking changes
This section highlights a few notable breaking changes. For a complete list, please refer to the Upgrade etcd from v3.5 to v3.6 and the CHANGELOG-3.6.
Old binaries are incompatible with new schema versions
Old etcd binaries are not compatible with newer data schema versions. For example, etcd 3.5 cannot start with data created by etcd 3.6, and etcd 3.4 cannot start with data created by either 3.5 or 3.6.
When downgrading etcd, it's important to follow the documented downgrade procedure. Simply replacing the binary or image will result in the incompatibility issue.
Peer endpoints no longer serve client requests
Client endpoints (--advertise-client-urls) are intended to serve client requests only, while peer
endpoints (--initial-advertise-peer-urls) are intended solely for peer communication. However, due to an implementation
oversight, the peer endpoints were also able to handle client requests in etcd 3.4 and 3.5. This behavior was misleading and
encouraged incorrect usage patterns. In etcd 3.6, this misleading behavior was corrected via PR/13565; peer endpoints
no longer serve client requests.
Clear boundary between etcdctl and etcdutl
Both etcdctl and etcdutl are command line tools. etcdutl is an offline utility designed to operate directly on
etcd data files, while etcdctl is an online tool that interacts with etcd over a network. Previously, there were some
overlapping functionalities between the two, but these overlaps were removed in 3.6.0.
Removed
etcdctl defrag --data-dirThe
etcdctl defragcommand only support online defragmentation and no longer supports offline defragmentation. To perform offline defragmentation, use theetcdutl defrag --data-dircommand instead.Removed
etcdctl snapshot statusetcdctlno longer supports retrieving the status of a snapshot. Use theetcdutl snapshot statuscommand instead.Removed
etcdctl snapshot restoreetcdctlno longer supports restoring from a snapshot. Use theetcdutl snapshot restorecommand instead.
Critical bug fixes
Correctness has always been a top priority for the etcd project. In the process of developing 3.6.0, we found and fixed a few notable bugs that could lead to data inconsistency in specific cases. These fixes have been backported to previous releases, but we believe they deserve special mention here.
- Data Inconsistency when Crashing Under Load
Previously, when etcd was applying data, it would update the consistent-index first, followed by committing the data. However, these operations were not atomic. If etcd crashed in between, it could lead to data inconsistency (see issue/13766). The issue was introduced in v3.5.0, and fixed in v3.5.3 with PR/13854.
- Durability API guarantee broken in single node cluster
When a client writes data and receives a success response, the data is expected to be persisted. However, the data might be lost if etcd crashes immediately after sending the success response to the client. This was a legacy issue (see issue/14370) affecting all previous releases. It was addressed in v3.4.21 and v3.5.5 with PR/14400, and fixed in raft side in main branch (now release-3.6) with PR/14413.
- Revision Inconsistency when Crashing During Defragmentation
If etcd crashed during the defragmentation operation, upon restart, it might reapply some entries which had already been applied, accordingly leading to the revision inconsistency issue (see the discussions in PR/14685). The issue was introduced in v3.5.0, and fixed in v3.5.6 with PR/14730.
Upgrade issue
This section highlights a common issue issues/19557 in the etcd v3.5 to v3.6 upgrade that may cause the upgrade process to fail. For a complete upgrade guide, refer to Upgrade etcd from v3.5 to v3.6.
The issue was introduced in etcd v3.5.1, and resolved in v3.5.20.
Key takeaway: users are required to first upgrade to etcd v3.5.20 (or a higher patch version) before upgrading to etcd v3.6.0; otherwise, the upgrade may fail.
For more background and technical context, see upgrade_from_3.5_to_3.6_issue.
Testing
We introduced the Robustness testing to verify correctness, which has always been our top priority. It plays traffic of various types and volumes against an etcd cluster, concurrently injects a random failpoint, records all operations (including both requests and responses), and finally performs a linearizability check. It also verifies that the Watch APIs guarantees have not been violated. The robustness test increases our confidence in ensuring the quality of each etcd release.
We have migrated most of the etcd workflow tests to Kubernetes' Prow testing infrastructure to take advantage of its benefit, such as nice dashboards for viewing test results and the ability for contributors to rerun failed tests themselves.
Platforms
While retaining all existing supported platforms, we have promoted Linux/ARM64 to Tier 1 support. For more details, please refer to issues/15951. For the complete list of supported platforms, see supported-platform.
Dependencies
Dependency bumping guide
We have published an official guide on how to bump dependencies for etcd’s main branch and stable releases. It also covers how to update the Go version. For more details, please refer to dependency_management. With this guide available, any contributors can now help with dependency upgrades.
Core Dependency Updates
bbolt and raft are two core dependencies of etcd.
Both etcd v3.4 and v3.5 depend on bbolt v1.3, while etcd v3.6 depends on bbolt v1.4.
For the release-3.4 and release-3.5 branches, raft is included in the etcd repository itself, so etcd v3.4 and v3.5 do not depend on an external raft module. Starting from etcd v3.6, raft was moved to a separate repository (raft), and the first standalone raft release is v3.6.0. As a result, etcd v3.6.0 depends on raft v3.6.0.
Please see the table below for a summary:
| etcd versions | bbolt versions | raft versions |
|---|---|---|
| 3.4.x | v1.3.x | N/A |
| 3.5.x | v1.3.x | N/A |
| 3.6.x | v1.4.x | v3.6.x |
grpc-gateway@v2
We upgraded grpc-gateway from v1 to v2 via PR/16595 in etcd v3.6.0. This is a major step toward migrating to protobuf-go, the second major version of the Go protocol buffer API implementation.
grpc-gateway@v2 is designed to work with protobuf-go. However, etcd v3.6 still depends on the deprecated gogo/protobuf, which is actually protocol buffer v1 implementation. To resolve this incompatibility, we applied a patch to the generated *.pb.gw.go files to convert v1 messages to v2 messages.
grpc-ecosystem/go-grpc-middleware/providers/prometheus
We switched from the deprecated (and archived) grpc-ecosystem/go-grpc-prometheus to grpc-ecosystem/go-grpc-middleware/providers/prometheus via PR/19195. This change ensures continued support and access to the latest features and improvements in the gRPC Prometheus integration.
Community
There are exciting developments in the etcd community that reflect our ongoing commitment to strengthening collaboration, improving maintainability, and evolving the project’s governance.
etcd Becomes a Kubernetes SIG
etcd has officially become a Kubernetes Special Interest Group: SIG-etcd. This change reflects etcd’s critical role as the primary datastore for Kubernetes and establishes a more structured and transparent home for long-term stewardship and cross-project collaboration. The new SIG designation will help streamline decision-making, align roadmaps with Kubernetes needs, and attract broader community involvement.
New contributors, maintainers, and reviewers
We’ve seen increasing engagement from contributors, which has resulted in the addition of three new maintainers:
Their continued contributions have been instrumental in driving the project forward.
We also welcome two new reviewers to the project:
We appreciate their dedication to code quality and their willingness to take on broader review responsibilities within the community.
New release team
We've formed a new release team led by ivanvc and jmhbnz, streamlining the release process by automating many previously manual steps. Inspired by Kubernetes SIG Release, we've adopted several best practices, including clearly defined release team roles and the introduction of release shadows to support knowledge sharing and team sustainability. These changes have made our releases smoother and more reliable, allowing us to approach each release with greater confidence and consistency.
Introducing the etcd Operator Working Group
To further advance etcd’s operational excellence, we have formed a new working group: WG-etcd-operator. The working group is dedicated to enabling the automatic and efficient operation of etcd clusters that run in the Kubernetes environment using an etcd-operator.
Future Development
The legacy v2store has been deprecated since etcd v3.4, and the flag --enable-v2 was removed entirely in v3.6.
This means that starting from v3.6, there is no longer a way to enable or use the v2store. However, etcd still
bootstraps internally from the legacy v2 snapshots. To address this inconsistency, We plan to change etcd to
bootstrap from the v3store and replay the WAL entries based on the consistent-index. The work is being tracked
in issues/12913.
One of the most persistent challenges remains the large range of queries from the kube-apiserver, which can lead to process crashes due to their unpredictable nature. The range stream feature, originally outlined in the v3.5 release blog/Future roadmaps, remains an idea worth revisiting to address the challenges of large range queries.
For more details and upcoming plans, please refer to the etcd roadmap.
Kubernetes 1.33: Job's SuccessPolicy Goes GA
On behalf of the Kubernetes project, I'm pleased to announce that Job success policy has graduated to General Availability (GA) as part of the v1.33 release.
About Job's Success Policy
In batch workloads, you might want to use leader-follower patterns like MPI, in which the leader controls the execution, including the followers' lifecycle.
In this case, you might want to mark it as succeeded even if some of the indexes failed. Unfortunately, a leader-follower Kubernetes Job that didn't use a success policy, in most cases, would have to require all Pods to finish successfully for that Job to reach an overall succeeded state.
For Kubernetes Jobs, the API allows you to specify the early exit criteria using the .spec.successPolicy
field (you can only use the .spec.successPolicy field for an indexed Job).
Which describes a set of rules either using a list of succeeded indexes for a job, or defining a minimal required size of succeeded indexes.
This newly stable field is especially valuable for scientific simulation, AI/ML and High-Performance Computing (HPC) batch workloads. Users in these areas often run numerous experiments and may only need a specific number to complete successfully, rather than requiring all of them to succeed. In this case, the leader index failure is the only relevant Job exit criteria, and the outcomes for individual follower Pods are handled only indirectly via the status of the leader index. Moreover, followers do not know when they can terminate themselves.
After Job meets any Success Policy, the Job is marked as succeeded, and all Pods are terminated including the running ones.
How it works
The following excerpt from a Job manifest, using .successPolicy.rules[0].succeededCount, shows an example of
using a custom success policy:
parallelism: 10
completions: 10
completionMode: Indexed
successPolicy:
rules:
- succeededCount: 1
Here, the Job is marked as succeeded when one index succeeded regardless of its number.
Additionally, you can constrain index numbers against succeededCount in .successPolicy.rules[0].succeededCount
as shown below:
parallelism: 10
completions: 10
completionMode: Indexed
successPolicy:
rules:
- succeededIndexes: 0 # index of the leader Pod
succeededCount: 1
This example shows that the Job will be marked as succeeded once a Pod with a specific index (Pod index 0) has succeeded.
Once the Job either reaches one of the successPolicy rules, or achieves its Complete criteria based on .spec.completions,
the Job controller within kube-controller-manager adds the SuccessCriteriaMet condition to the Job status.
After that, the job-controller initiates cleanup and termination of Pods for Jobs with SuccessCriteriaMet condition.
Eventually, Jobs obtain Complete condition when the job-controller finished cleanup and termination.
Learn more
- Read the documentation for success policy.
- Read the KEP for the Job success/completion policy
Get involved
This work was led by the Kubernetes batch working group in close collaboration with the SIG Apps community.
If you are interested in working on new features in the space I recommend subscribing to our Slack channel and attending the regular community meetings.
Kubernetes v1.33: Updates to Container Lifecycle
Kubernetes v1.33 introduces a few updates to the lifecycle of containers. The Sleep action for container lifecycle hooks now supports a zero sleep duration (feature enabled by default). There is also alpha support for customizing the stop signal sent to containers when they are being terminated.
This blog post goes into the details of these new aspects of the container lifecycle, and how you can use them.
Zero value for Sleep action
Kubernetes v1.29 introduced the Sleep action for container PreStop and PostStart Lifecycle hooks. The Sleep action lets your containers pause for a specified duration after the container is started or before it is terminated. This was needed to provide a straightforward way to manage graceful shutdowns. Before the Sleep action, folks used to run the sleep command using the exec action in their container lifecycle hooks. If you wanted to do this you'd need to have the binary for the sleep command in your container image. This is difficult if you're using third party images.
The sleep action when it was added initially didn't have support for a sleep duration of zero seconds. The time.Sleep which the Sleep action uses under the hood supports a duration of zero seconds. Using a negative or a zero value for the sleep returns immediately, resulting in a no-op. We wanted the same behaviour with the sleep action. This support for the zero duration was later added in v1.32, with the PodLifecycleSleepActionAllowZero feature gate.
The PodLifecycleSleepActionAllowZero feature gate has graduated to beta in v1.33, and is now enabled by default.
The original Sleep action for preStop and postStart hooks is been enabled by default, starting from Kubernetes v1.30.
With a cluster running Kubernetes v1.33, you are able to set a
zero duration for sleep lifecycle hooks. For a cluster with default configuration, you don't need
to enable any feature gate to make that possible.
Container stop signals
Container runtimes such as containerd and CRI-O honor a StopSignal instruction in the container image definition. This can be used to specify a custom stop signal
that the runtime will used to terminate containers based on that image.
Stop signal configuration was not originally part of the Pod API in Kubernetes.
Until Kubernetes v1.33, the only way to override the stop signal for containers was by rebuilding your container image with the new custom stop signal
(for example, specifying STOPSIGNAL in a Containerfile or Dockerfile).
The ContainerStopSignals feature gate which is newly added in Kubernetes v1.33 adds stop signals to the Kubernetes API. This allows users to specify a custom stop signal in the container spec. Stop signals are added to the API as a new lifecycle along with the existing PreStop and PostStart lifecycle handlers. In order to use this feature, we expect the Pod to have the operating system specified with spec.os.name. This is enforced so that we can cross-validate the stop signal against the operating system and make sure that the containers in the Pod are created with a valid stop signal for the operating system the Pod is being scheduled to. For Pods scheduled on Windows nodes, only SIGTERM and SIGKILL are allowed as valid stop signals. Find the full list of signals supported in Linux nodes here.
Default behaviour
If a container has a custom stop signal defined in its lifecycle, the container runtime would use the signal defined in the lifecycle to kill the container, given that the container runtime also supports custom stop signals. If there is no custom stop signal defined in the container lifecycle, the runtime would fallback to the stop signal defined in the container image. If there is no stop signal defined in the container image, the default stop signal of the runtime would be used. The default signal is SIGTERM for both containerd and CRI-O.
Version skew
For the feature to work as intended, both the versions of Kubernetes and the container runtime should support container stop signals. The changes to the Kuberentes API and kubelet are available in alpha stage from v1.33, which can be enabled with the ContainerStopSignals feature gate. The container runtime implementations for containerd and CRI-O are still a work in progress and will be rolled out soon.
Using container stop signals
To enable this feature, you need to turn on the ContainerStopSignals feature gate in both the kube-apiserver and the kubelet. Once you have nodes where the feature gate is turned on, you can create Pods with a StopSignal lifecycle and a valid OS name like so:
apiVersion: v1
kind: Pod
metadata:
name: nginx
spec:
os:
name: linux
containers:
- name: nginx
image: nginx:latest
lifecycle:
stopSignal: SIGUSR1
Do note that the SIGUSR1 signal in this example can only be used if the container's Pod is scheduled to a Linux node. Hence we need to specify spec.os.name as linux to be able to use the signal. You will only be able to configure SIGTERM and SIGKILL signals if the Pod is being scheduled to a Windows node. You cannot specify a containers[*].lifecycle.stopSignal if the spec.os.name field is nil or unset either.
How do I get involved?
This feature is driven by the SIG Node. If you are interested in helping develop this feature, sharing feedback, or participating in any other ongoing SIG Node projects, please reach out to us!
You can reach SIG Node by several means:
You can also contact me directly:
- GitHub: @sreeram-venkitesh
- Slack: @sreeram.venkitesh
Kubernetes v1.33: Job's Backoff Limit Per Index Goes GA
In Kubernetes v1.33, the Backoff Limit Per Index feature reaches general availability (GA). This blog describes the Backoff Limit Per Index feature and its benefits.
About backoff limit per index
When you run workloads on Kubernetes, you must consider scenarios where Pod failures can affect the completion of your workloads. Ideally, your workload should tolerate transient failures and continue running.
To achieve failure tolerance in a Kubernetes Job, you can set the
spec.backoffLimit field. This field specifies the total number of tolerated
failures.
However, for workloads where every index is considered independent, like
embarassingly parallel
workloads - the spec.backoffLimit field is often not flexible enough.
For example, you may choose to run multiple suites of integration tests by
representing each suite as an index within an Indexed Job.
In that setup, a fast-failing index (test suite) is likely to consume your
entire budget for tolerating Pod failures, and you might not be able to run the
other indexes.
In order to address this limitation, Kubernetes introduced backoff limit per index, which allows you to control the number of retries per index.
How backoff limit per index works
To use Backoff Limit Per Index for Indexed Jobs, specify the number of tolerated
Pod failures per index with the spec.backoffLimitPerIndex field. When you set
this field, the Job executes all indexes by default.
Additionally, to fine-tune the error handling:
- Specify the cap on the total number of failed indexes by setting the
spec.maxFailedIndexesfield. When the limit is exceeded the entire Job is terminated. - Define a short-circuit to detect a failed index by using the
FailIndexaction in the Pod Failure Policy mechanism.
When the number of tolerated failures is exceeded, the Job marks that index as
failed and lists it in the Job's status.failedIndexes field.
Example
The following Job spec snippet is an example of how to combine backoff limit per index with the Pod Failure Policy feature:
completions: 10
parallelism: 10
completionMode: Indexed
backoffLimitPerIndex: 1
maxFailedIndexes: 5
podFailurePolicy:
rules:
- action: Ignore
onPodConditions:
- type: DisruptionTarget
- action: FailIndex
onExitCodes:
operator: In
values: [ 42 ]
In this example, the Job handles Pod failures as follows:
- Ignores any failed Pods that have the built-in
disruption condition,
called
DisruptionTarget. These Pods don't count towards Job backoff limits. - Fails the index corresponding to the failed Pod if any of the failed Pod's containers finished with the exit code 42 - based on the matching "FailIndex" rule.
- Retries the first failure of any index, unless the index failed due to the
matching
FailIndexrule. - Fails the entire Job if the number of failed indexes exceeded 5 (set by the
spec.maxFailedIndexesfield).
Learn more
- Read the blog post on the closely related feature of Pod Failure Policy Kubernetes 1.31: Pod Failure Policy for Jobs Goes GA
- For a hands-on guide to using Pod failure policy, including the use of FailIndex, see Handling retriable and non-retriable pod failures with Pod failure policy
- Read the documentation for Backoff limit per index and Pod failure policy
- Read the KEP for the Backoff Limits Per Index For Indexed Jobs
Get involved
This work was sponsored by the Kubernetes batch working group in close collaboration with the SIG Apps community.
If you are interested in working on new features in the space we recommend subscribing to our Slack channel and attending the regular community meetings.
Kubernetes v1.33: Image Pull Policy the way you always thought it worked!
Image Pull Policy the way you always thought it worked!
Some things in Kubernetes are surprising, and the way imagePullPolicy behaves might
be one of them. Given Kubernetes is all about running pods, it may be peculiar
to learn that there has been a caveat to restricting pod access to authenticated images for
over 10 years in the form of issue 18787!
It is an exciting release when you can resolve a ten-year-old issue.
Note:
Throughout this blog post, the term "pod credentials" will be used often. In this context, the term generally encapsulates the authentication material that is available to a pod to authenticate a container image pull.IfNotPresent, even if I'm not supposed to have it
The gist of the problem is that the imagePullPolicy: IfNotPresent strategy has done
precisely what it says, and nothing more. Let's set up a scenario. To begin, Pod A in Namespace X is scheduled to Node 1 and requires image Foo from a private repository.
For it's image pull authentication material, the pod references Secret 1 in its imagePullSecrets. Secret 1 contains the necessary credentials to pull from the private repository. The Kubelet will utilize the credentials from Secret 1 as supplied by Pod A
and it will pull container image Foo from the registry. This is the intended (and secure)
behavior.
But now things get curious. If Pod B in Namespace Y happens to also be scheduled to Node 1, unexpected (and potentially insecure) things happen. Pod B may reference the same private image, specifying the IfNotPresent image pull policy. Pod B does not reference Secret 1
(or in our case, any secret) in its imagePullSecrets. When the Kubelet tries to run the pod, it honors the IfNotPresent policy. The Kubelet sees that the image Foo is already present locally, and will provide image Foo to Pod B. Pod B gets to run the image even though it did not provide credentials authorizing it to pull the image in the first place.
Using a private image pulled by a different pod
While IfNotPresent should not pull image Foo if it is already present
on the node, it is an incorrect security posture to allow all pods scheduled
to a node to have access to previously pulled private image. These pods were never
authorized to pull the image in the first place.
IfNotPresent, but only if I am supposed to have it
In Kubernetes v1.33, we - SIG Auth and SIG Node - have finally started to address this (really old) problem and getting the verification right! The basic expected behavior is not changed. If an image is not present, the Kubelet will attempt to pull the image. The credentials each pod supplies will be utilized for this task. This matches behavior prior to 1.33.
If the image is present, then the behavior of the Kubelet changes. The Kubelet will now verify the pod's credentials before allowing the pod to use the image.
Performance and service stability have been a consideration while revising the feature. Pods utilizing the same credential will not be required to re-authenticate. This is also true when pods source credentials from the same Kubernetes Secret object, even when the credentials are rotated.
Never pull, but use if authorized
The imagePullPolicy: Never option does not fetch images. However, if the
container image is already present on the node, any pod attempting to use the private
image will be required to provide credentials, and those credentials require verification.
Pods utilizing the same credential will not be required to re-authenticate. Pods that do not supply credentials previously used to successfully pull an image will not be allowed to use the private image.
Always pull, if authorized
The imagePullPolicy: Always has always worked as intended. Each time an image
is requested, the request goes to the registry and the registry will perform an authentication
check.
In the past, forcing the Always image pull policy via pod admission was the only way to ensure
that your private container images didn't get reused by other pods on nodes which already pulled the images.
Fortunately, this was somewhat performant. Only the image manifest was pulled, not the image. However, there was still a cost and a risk. During a new rollout, scale up, or pod restart, the image registry that provided the image MUST be available for the auth check, putting the image registry in the critical path for stability of services running inside of the cluster.
How it all works
The feature is based on persistent, file-based caches that are present on each of the nodes. The following is a simplified description of how the feature works. For the complete version, please see KEP-2535.
The process of requesting an image for the first time goes like this:
- A pod requesting an image from a private registry is scheduled to a node.
- The image is not present on the node.
- The Kubelet makes a record of the intention to pull the image.
- The Kubelet extracts credentials from the Kubernetes Secret referenced by the pod as an image pull secret, and uses them to pull the image from the private registry.
- After the image has been successfully pulled, the Kubelet makes a record of the successful pull. This record includes details about credentials used (in the form of a hash) as well as the Secret from which they originated.
- The Kubelet removes the original record of intent.
- The Kubelet retains the record of successful pull for later use.
When future pods scheduled to the same node request the previously pulled private image:
- The Kubelet checks the credentials that the new pod provides for the pull.
- If the hash of these credentials, or the source Secret of the credentials match the hash or source Secret which were recorded for a previous successful pull, the pod is allowed to use the previously pulled image.
- If the credentials or their source Secret are not found in the records of successful pulls for that image, the Kubelet will attempt to use these new credentials to request a pull from the remote registry, triggering the authorization flow.
Try it out
In Kubernetes v1.33 we shipped the alpha version of this feature. To give it a spin,
enable the KubeletEnsureSecretPulledImages feature gate for your 1.33 Kubelets.
You can learn more about the feature and additional optional configuration on the concept page for Images in the official Kubernetes documentation.
What's next?
In future releases we are going to:
- Make this feature work together with Projected service account tokens for Kubelet image credential providers which adds a new, workload-specific source of image pull credentials.
- Write a benchmarking suite to measure the performance of this feature and assess the impact of any future changes.
- Implement an in-memory caching layer so that we don't need to read files for each image pull request.
- Add support for credential expirations, thus forcing previously validated credentials to be re-authenticated.
How to get involved
Reading KEP-2535 is a great way to understand these changes in depth.
If you are interested in further involvement, reach out to us on the #sig-auth-authenticators-dev channel on Kubernetes Slack (for an invitation, visit https://slack.k8s.io/). You are also welcome to join the bi-weekly SIG Auth meetings, held every other Wednesday.
Kubernetes v1.33: Streaming List responses
Managing Kubernetes cluster stability becomes increasingly critical as your infrastructure grows. One of the most challenging aspects of operating large-scale clusters has been handling List requests that fetch substantial datasets - a common operation that could unexpectedly impact your cluster's stability.
Today, the Kubernetes community is excited to announce a significant architectural improvement: streaming encoding for List responses.
The problem: unnecessary memory consumption with large resources
Current API response encoders just serialize an entire response into a single contiguous memory and perform one ResponseWriter.Write call to transmit data to the client. Despite HTTP/2's capability to split responses into smaller frames for transmission, the underlying HTTP server continues to hold the complete response data as a single buffer. Even as individual frames are transmitted to the client, the memory associated with these frames cannot be freed incrementally.
When cluster size grows, the single response body can be substantial - like hundreds of megabytes in size. At large scale, the current approach becomes particularly inefficient, as it prevents incremental memory release during transmission. Imagining that when network congestion occurs, that large response body’s memory block stays active for tens of seconds or even minutes. This limitation leads to unnecessarily high and prolonged memory consumption in the kube-apiserver process. If multiple large List requests occur simultaneously, the cumulative memory consumption can escalate rapidly, potentially leading to an Out-of-Memory (OOM) situation that compromises cluster stability.
The encoding/json package uses sync.Pool to reuse memory buffers during serialization. While efficient for consistent workloads, this mechanism creates challenges with sporadic large List responses. When processing these large responses, memory pools expand significantly. But due to sync.Pool's design, these oversized buffers remain reserved after use. Subsequent small List requests continue utilizing these large memory allocations, preventing garbage collection and maintaining persistently high memory consumption in the kube-apiserver even after the initial large responses complete.
Additionally, Protocol Buffers are not designed to handle large datasets. But it’s great for handling individual messages within a large data set. This highlights the need for streaming-based approaches that can process and transmit large collections incrementally rather than as monolithic blocks.
As a general rule of thumb, if you are dealing in messages larger than a megabyte each, it may be time to consider an alternate strategy.
Streaming encoder for List responses
The streaming encoding mechanism is specifically designed for List responses, leveraging their common well-defined collection structures. The core idea focuses exclusively on the Items field within collection structures, which represents the bulk of memory consumption in large responses. Rather than encoding the entire Items array as one contiguous memory block, the new streaming encoder processes and transmits each item individually, allowing memory to be freed progressively as frame or chunk is transmitted. As a result, encoding items one by one significantly reduces the memory footprint required by the API server.
With Kubernetes objects typically limited to 1.5 MiB (from ETCD), streaming encoding keeps memory consumption predictable and manageable regardless of how many objects are in a List response. The result is significantly improved API server stability, reduced memory spikes, and better overall cluster performance - especially in environments where multiple large List operations might occur simultaneously.
To ensure perfect backward compatibility, the streaming encoder validates Go struct tags rigorously before activation, guaranteeing byte-for-byte consistency with the original encoder. Standard encoding mechanisms process all fields except Items, maintaining identical output formatting throughout. This approach seamlessly supports all Kubernetes List types—from built-in *List objects to Custom Resource UnstructuredList objects - requiring zero client-side modifications or awareness that the underlying encoding method has changed.
Performance gains you'll notice
- Reduced Memory Consumption: Significantly lowers the memory footprint of the API server when handling large list requests, especially when dealing with large resources.
- Improved Scalability: Enables the API server to handle more concurrent requests and larger datasets without running out of memory.
- Increased Stability: Reduces the risk of OOM kills and service disruptions.
- Efficient Resource Utilization: Optimizes memory usage and improves overall resource efficiency.
Benchmark results
To validate results Kubernetes has introduced a new list benchmark which executes concurrently 10 list requests each returning 1GB of data.
The benchmark has showed 20x improvement, reducing memory usage from 70-80GB to 3GB.
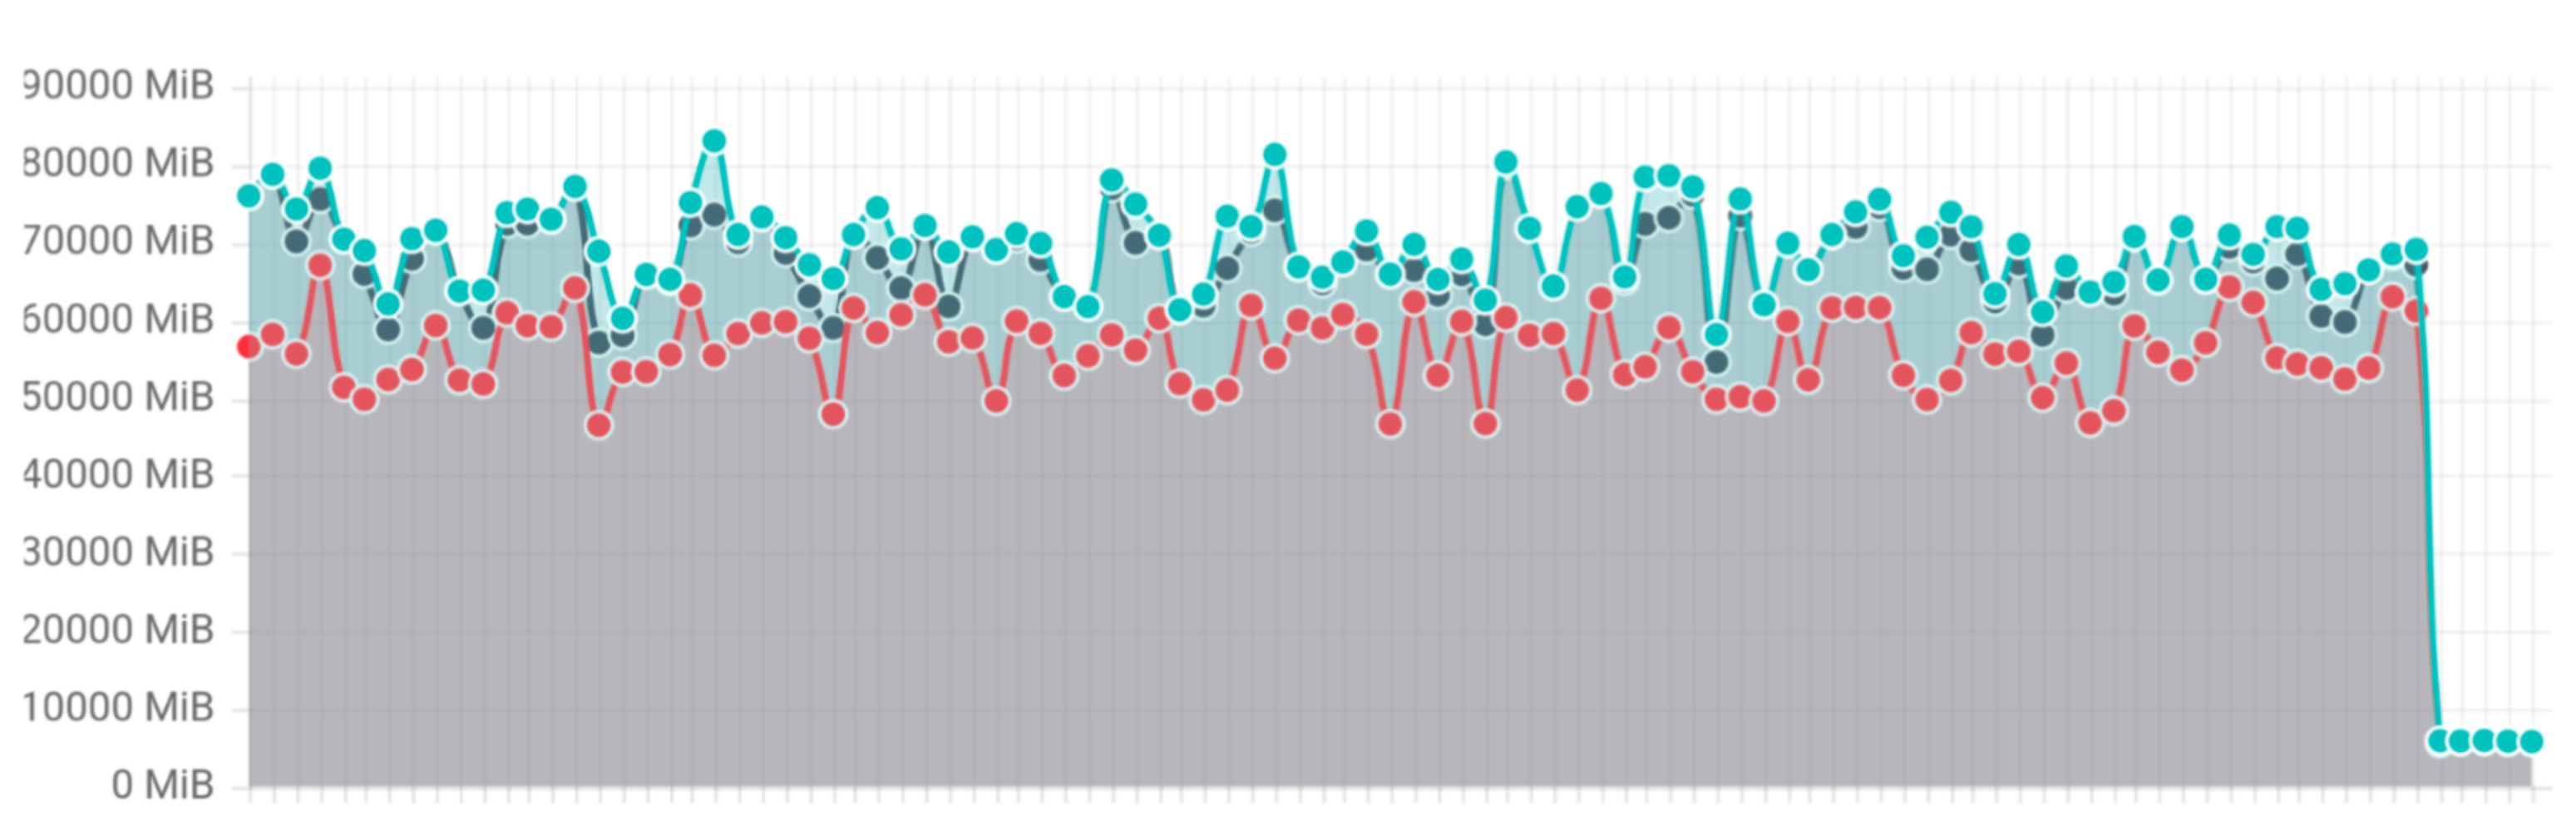
List benchmark memory usage
Kubernetes 1.33: Volume Populators Graduate to GA
Kubernetes volume populators are now generally available (GA)! The AnyVolumeDataSource feature
gate is treated as always enabled for Kubernetes v1.33, which means that users can specify any appropriate
custom resource
as the data source of a PersistentVolumeClaim (PVC).
An example of how to use dataSourceRef in PVC:
apiVersion: v1
kind: PersistentVolumeClaim
metadata:
name: pvc1
spec:
...
dataSourceRef:
apiGroup: provider.example.com
kind: Provider
name: provider1
What is new
There are four major enhancements from beta.
Populator Pod is optional
During the beta phase, contributors to Kubernetes identified potential resource leaks with PersistentVolumeClaim (PVC) deletion while volume population was in progress; these leaks happened due to limitations in finalizer handling. Ahead of the graduation to general availability, the Kubernetes project added support to delete temporary resources (PVC prime, etc.) if the original PVC is deleted.
To accommodate this, we've introduced three new plugin-based functions:
PopulateFn(): Executes the provider-specific data population logic.PopulateCompleteFn(): Checks if the data population operation has finished successfully.PopulateCleanupFn(): Cleans up temporary resources created by the provider-specific functions after data population is completed
A provider example is added in lib-volume-populator/example.
Mutator functions to modify the Kubernetes resources
For GA, the CSI volume populator controller code gained a MutatorConfig, allowing the specification of mutator functions to modify Kubernetes resources.
For example, if the PVC prime is not an exact copy of the PVC and you need provider-specific information for the driver, you can include this information in the optional MutatorConfig.
This allows you to customize the Kubernetes objects in the volume populator.
Flexible metric handling for providers
Our beta phase highlighted a new requirement: the need to aggregate metrics not just from lib-volume-populator, but also from other components within the provider's codebase.
To address this, SIG Storage introduced a provider metric manager. This enhancement delegates the implementation of metrics logic to the provider itself, rather than relying solely on lib-volume-populator. This shift provides greater flexibility and control over metrics collection and aggregation, enabling a more comprehensive view of provider performance.
Clean up for temporary resources
During the beta phase, we identified potential resource leaks with PersistentVolumeClaim (PVC) deletion while volume population was in progress, due to limitations in finalizer handling. We have improved the populator to support the deletion of temporary resources (PVC prime, etc.) if the original PVC is deleted in this GA release.
How to use it
To try it out, please follow the steps in the previous beta blog.
Future directions and potential feature requests
For next step, there are several potential feature requests for volume populator:
- Multi sync: the current implementation is a one-time unidirectional sync from source to destination. This can be extended to support multiple syncs, enabling periodic syncs or allowing users to sync on demand
- Bidirectional sync: an extension of multi sync above, but making it bidirectional between source and destination
- Populate data with priorities: with a list of different dataSourceRef, populate based on priorities
- Populate data from multiple sources of the same provider: populate multiple different sources to one destination
- Populate data from multiple sources of the different providers: populate multiple different sources to one destination, pipelining different resources’ population
To ensure we're building something truly valuable, Kubernetes SIG Storage would love to hear about any specific use cases you have in mind for this feature. For any inquiries or specific questions related to volume populator, please reach out to the SIG Storage community.
Kubernetes v1.33: From Secrets to Service Accounts: Kubernetes Image Pulls Evolved
Kubernetes has steadily evolved to reduce reliance on long-lived credentials stored in the API. A prime example of this shift is the transition of Kubernetes Service Account (KSA) tokens from long-lived, static tokens to ephemeral, automatically rotated tokens with OpenID Connect (OIDC)-compliant semantics. This advancement enables workloads to securely authenticate with external services without needing persistent secrets.
However, one major gap remains: image pull authentication. Today, Kubernetes clusters rely on image pull secrets stored in the API, which are long-lived and difficult to rotate, or on node-level kubelet credential providers, which allow any pod running on a node to access the same credentials. This presents security and operational challenges.
To address this, Kubernetes is introducing Service Account Token Integration for Kubelet Credential Providers, now available in alpha. This enhancement allows credential providers to use pod-specific service account tokens to obtain registry credentials, which kubelet can then use for image pulls — eliminating the need for long-lived image pull secrets.
The problem with image pull secrets
Currently, Kubernetes administrators have two primary options for handling private container image pulls:
Image pull secrets stored in the Kubernetes API
- These secrets are often long-lived because they are hard to rotate.
- They must be explicitly attached to a service account or pod.
- Compromise of a pull secret can lead to unauthorized image access.
Kubelet credential providers
- These providers fetch credentials dynamically at the node level.
- Any pod running on the node can access the same credentials.
- There’s no per-workload isolation, increasing security risks.
Neither approach aligns with the principles of least privilege or ephemeral authentication, leaving Kubernetes with a security gap.
The solution: Service Account token integration for Kubelet credential providers
This new enhancement enables kubelet credential providers to use workload identity when fetching image registry credentials. Instead of relying on long-lived secrets, credential providers can use service account tokens to request short-lived credentials tied to a specific pod’s identity.
This approach provides:
- Workload-specific authentication: Image pull credentials are scoped to a particular workload.
- Ephemeral credentials: Tokens are automatically rotated, eliminating the risks of long-lived secrets.
- Seamless integration: Works with existing Kubernetes authentication mechanisms, aligning with cloud-native security best practices.
How it works
1. Service Account tokens for credential providers
Kubelet generates short-lived, automatically rotated tokens for service accounts
if the credential provider it communicates with has opted into receiving
a service account token for image pulls.
These tokens conform to OIDC ID token semantics
and are provided to the credential provider
as part of the CredentialProviderRequest.
The credential provider can then use this token
to authenticate with an external service.
2. Image registry authentication flow
- When a pod starts, the kubelet requests credentials from a credential provider.
- If the credential provider has opted in, the kubelet generates a service account token for the pod.
- The service account token is included in the
CredentialProviderRequest, allowing the credential provider to authenticate and exchange it for temporary image pull credentials from a registry (e.g. AWS ECR, GCP Artifact Registry, Azure ACR). - The kubelet then uses these credentials to pull images on behalf of the pod.
Benefits of this approach
- Security: Eliminates long-lived image pull secrets, reducing attack surfaces.
- Granular Access Control: Credentials are tied to individual workloads rather than entire nodes or clusters.
- Operational Simplicity: No need for administrators to manage and rotate image pull secrets manually.
- Improved Compliance: Helps organizations meet security policies that prohibit persistent credentials in the cluster.
What's next?
For Kubernetes v1.34, we expect to ship this feature in beta while continuing to gather feedback from users.
In the coming releases, we will focus on:
- Implementing caching mechanisms to improve performance for token generation.
- Giving more flexibility to credential providers to decide how the registry credentials returned to the kubelet are cached.
- Making the feature work with Ensure Secret Pulled Images to ensure pods that use an image are authorized to access that image when service account tokens are used for authentication.
You can learn more about this feature on the service account token for image pulls page in the Kubernetes documentation.
You can also follow along on the KEP-4412 to track progress across the coming Kubernetes releases.
Try it out
To try out this feature:
- Ensure you are running Kubernetes v1.33 or later.
- Enable the
ServiceAccountTokenForKubeletCredentialProvidersfeature gate on the kubelet. - Ensure credential provider support: Modify or update your credential provider to use service account tokens for authentication.
- Update the credential provider configuration
to opt into receiving service account tokens
for the credential provider by configuring the
tokenAttributesfield. - Deploy a pod that uses the credential provider to pull images from a private registry.
We would love to hear your feedback on this feature. Please reach out to us on the #sig-auth-authenticators-dev channel on Kubernetes Slack (for an invitation, visit https://slack.k8s.io/).
How to get involved
If you are interested in getting involved in the development of this feature, sharing feedback, or participating in any other ongoing SIG Auth projects, please reach out on the #sig-auth channel on Kubernetes Slack.
You are also welcome to join the bi-weekly SIG Auth meetings, held every other Wednesday.
Kubernetes v1.33: Fine-grained SupplementalGroups Control Graduates to Beta
The new field, supplementalGroupsPolicy, was introduced as an opt-in alpha feature for Kubernetes v1.31 and has graduated to beta in v1.33; the corresponding feature gate (SupplementalGroupsPolicy) is now enabled by default. This feature enables to implement more precise control over supplemental groups in containers that can strengthen the security posture, particularly in accessing volumes. Moreover, it also enhances the transparency of UID/GID details in containers, offering improved security oversight.
Please be aware that this beta release contains some behavioral breaking change. See The Behavioral Changes Introduced In Beta and Upgrade Considerations sections for details.
Motivation: Implicit group memberships defined in /etc/group in the container image
Although the majority of Kubernetes cluster admins/users may not be aware, kubernetes, by default, merges group information from the Pod with information defined in /etc/group in the container image.
Let's see an example, below Pod manifest specifies runAsUser=1000, runAsGroup=3000 and supplementalGroups=4000 in the Pod's security context.
apiVersion: v1
kind: Pod
metadata:
name: implicit-groups
spec:
securityContext:
runAsUser: 1000
runAsGroup: 3000
supplementalGroups: [4000]
containers:
- name: ctr
image: registry.k8s.io/e2e-test-images/agnhost:2.45
command: [ "sh", "-c", "sleep 1h" ]
securityContext:
allowPrivilegeEscalation: false
What is the result of id command in the ctr container? The output should be similar to this:
uid=1000 gid=3000 groups=3000,4000,50000
Where does group ID 50000 in supplementary groups (groups field) come from, even though 50000 is not defined in the Pod's manifest at all? The answer is /etc/group file in the container image.
Checking the contents of /etc/group in the container image should show below:
user-defined-in-image:x:1000:
group-defined-in-image:x:50000:user-defined-in-image
This shows that the container's primary user 1000 belongs to the group 50000 in the last entry.
Thus, the group membership defined in /etc/group in the container image for the container's primary user is implicitly merged to the information from the Pod. Please note that this was a design decision the current CRI implementations inherited from Docker, and the community never really reconsidered it until now.
What's wrong with it?
The implicitly merged group information from /etc/group in the container image poses a security risk. These implicit GIDs can't be detected or validated by policy engines because there's no record of them in the Pod manifest. This can lead to unexpected access control issues, particularly when accessing volumes (see kubernetes/kubernetes#112879 for details) because file permission is controlled by UID/GIDs in Linux.
Fine-grained supplemental groups control in a Pod: supplementaryGroupsPolicy
To tackle the above problem, Pod's .spec.securityContext now includes supplementalGroupsPolicy field.
This field lets you control how Kubernetes calculates the supplementary groups for container processes within a Pod. The available policies are:
Merge: The group membership defined in
/etc/groupfor the container's primary user will be merged. If not specified, this policy will be applied (i.e. as-is behavior for backward compatibility).Strict: Only the group IDs specified in
fsGroup,supplementalGroups, orrunAsGroupare attached as supplementary groups to the container processes. Group memberships defined in/etc/groupfor the container's primary user are ignored.
Let's see how Strict policy works. Below Pod manifest specifies supplementalGroupsPolicy: Strict:
apiVersion: v1
kind: Pod
metadata:
name: strict-supplementalgroups-policy
spec:
securityContext:
runAsUser: 1000
runAsGroup: 3000
supplementalGroups: [4000]
supplementalGroupsPolicy: Strict
containers:
- name: ctr
image: registry.k8s.io/e2e-test-images/agnhost:2.45
command: [ "sh", "-c", "sleep 1h" ]
securityContext:
allowPrivilegeEscalation: false
The result of id command in the ctr container should be similar to this:
uid=1000 gid=3000 groups=3000,4000
You can see Strict policy can exclude group 50000 from groups!
Thus, ensuring supplementalGroupsPolicy: Strict (enforced by some policy mechanism) helps prevent the implicit supplementary groups in a Pod.
Note:
A container with sufficient privileges can change its process identity. ThesupplementalGroupsPolicy only affect the initial process identity. See the following section for details.Attached process identity in Pod status
This feature also exposes the process identity attached to the first container process of the container
via .status.containerStatuses[].user.linux field. It would be helpful to see if implicit group IDs are attached.
...
status:
containerStatuses:
- name: ctr
user:
linux:
gid: 3000
supplementalGroups:
- 3000
- 4000
uid: 1000
...
Note:
Please note that the values instatus.containerStatuses[].user.linux field is the firstly attached
process identity to the first container process in the container. If the container has sufficient privilege
to call system calls related to process identity (e.g. setuid(2), setgid(2) or setgroups(2), etc.), the container process can change its identity. Thus, the actual process identity will be dynamic.Strict Policy requires newer CRI versions
Actually, CRI runtime (e.g. containerd, CRI-O) plays a core role for calculating supplementary group ids to be attached to the containers. Thus, SupplementalGroupsPolicy=Strict requires a CRI runtime that support this feature (SupplementalGroupsPolicy: Merge can work with the CRI runtime which does not support this feature because this policy is fully backward compatible policy).
Here are some CRI runtimes that support this feature, and the versions you need to be running:
- containerd: v2.0 or later
- CRI-O: v1.31 or later
And, you can see if the feature is supported in the Node's .status.features.supplementalGroupsPolicy field.
apiVersion: v1
kind: Node
...
status:
features:
supplementalGroupsPolicy: true
The behavioral changes introduced in beta
In the alpha release, when a Pod with supplementalGroupsPolicy: Strict was scheduled to a node that did not support the feature (i.e., .status.features.supplementalGroupsPolicy=false), the Pod's supplemental groups policy silently fell back to Merge.
In v1.33, this has entered beta to enforce the policy more strictly, where kubelet rejects pods whose nodes cannot ensure the specified policy. If your pod is rejected, you will see warning events with reason=SupplementalGroupsPolicyNotSupported like below:
apiVersion: v1
kind: Event
...
type: Warning
reason: SupplementalGroupsPolicyNotSupported
message: "SupplementalGroupsPolicy=Strict is not supported in this node"
involvedObject:
apiVersion: v1
kind: Pod
...
Upgrade consideration
If you're already using this feature, especially the supplementalGroupsPolicy: Strict policy, we assume that your cluster's CRI runtimes already support this feature. In that case, you don't need to worry about the pod rejections described above.
However, if your cluster:
- uses the
supplementalGroupsPolicy: Strictpolicy, but - its CRI runtimes do NOT yet support the feature (i.e.,
.status.features.supplementalGroupsPolicy=false),
you need to prepare the behavioral changes (pod rejection) when upgrading your cluster.
We recommend several ways to avoid unexpected pod rejections:
- Upgrading your cluster's CRI runtimes together with kubernetes or before the upgrade
- Putting some label to your nodes describing CRI runtime supports this feature or not and also putting label selector to pods with
Strictpolicy to select such nodes (but, you will need to monitor the number ofPendingpods in this case instead of pod rejections).
Getting involved
This feature is driven by the SIG Node community. Please join us to connect with the community and share your ideas and feedback around the above feature and beyond. We look forward to hearing from you!
How can I learn more?
- Configure a Security Context for a Pod or Container
for the further details of
supplementalGroupsPolicy - KEP-3619: Fine-grained SupplementalGroups control
Kubernetes v1.33: Prevent PersistentVolume Leaks When Deleting out of Order graduates to GA
I am thrilled to announce that the feature to prevent PersistentVolume (or PVs for short) leaks when deleting out of order has graduated to General Availability (GA) in Kubernetes v1.33! This improvement, initially introduced as a beta feature in Kubernetes v1.31, ensures that your storage resources are properly reclaimed, preventing unwanted leaks.
How did reclaim work in previous Kubernetes releases?
PersistentVolumeClaim (or PVC for short) is a user's request for storage. A PV and PVC are considered Bound if a newly created PV or a matching PV is found. The PVs themselves are backed by volumes allocated by the storage backend.
Normally, if the volume is to be deleted, then the expectation is to delete the PVC for a bound PV-PVC pair. However, there are no restrictions on deleting a PV before deleting a PVC.
For a Bound PV-PVC pair, the ordering of PV-PVC deletion determines whether
the PV reclaim policy is honored. The reclaim policy is honored if the PVC is
deleted first; however, if the PV is deleted prior to deleting the PVC, then the
reclaim policy is not exercised. As a result of this behavior, the associated
storage asset in the external infrastructure is not removed.
PV reclaim policy with Kubernetes v1.33
With the graduation to GA in Kubernetes v1.33, this issue is now resolved. Kubernetes
now reliably honors the configured Delete reclaim policy, even when PVs are deleted
before their bound PVCs. This is achieved through the use of finalizers,
ensuring that the storage backend releases the allocated storage resource as intended.
How does it work?
For CSI volumes, the new behavior is achieved by adding a finalizer external-provisioner.volume.kubernetes.io/finalizer
on new and existing PVs. The finalizer is only removed after the storage from the backend is deleted. Addition or removal of finalizer is handled by external-provisioner
`
An example of a PV with the finalizer, notice the new finalizer in the finalizers list
kubectl get pv pvc-a7b7e3ba-f837-45ba-b243-dec7d8aaed53 -o yaml
apiVersion: v1
kind: PersistentVolume
metadata:
annotations:
pv.kubernetes.io/provisioned-by: csi.example.driver.com
creationTimestamp: "2021-11-17T19:28:56Z"
finalizers:
- kubernetes.io/pv-protection
- external-provisioner.volume.kubernetes.io/finalizer
name: pvc-a7b7e3ba-f837-45ba-b243-dec7d8aaed53
resourceVersion: "194711"
uid: 087f14f2-4157-4e95-8a70-8294b039d30e
spec:
accessModes:
- ReadWriteOnce
capacity:
storage: 1Gi
claimRef:
apiVersion: v1
kind: PersistentVolumeClaim
name: example-vanilla-block-pvc
namespace: default
resourceVersion: "194677"
uid: a7b7e3ba-f837-45ba-b243-dec7d8aaed53
csi:
driver: csi.example.driver.com
fsType: ext4
volumeAttributes:
storage.kubernetes.io/csiProvisionerIdentity: 1637110610497-8081-csi.example.driver.com
type: CNS Block Volume
volumeHandle: 2dacf297-803f-4ccc-afc7-3d3c3f02051e
persistentVolumeReclaimPolicy: Delete
storageClassName: example-vanilla-block-sc
volumeMode: Filesystem
status:
phase: Bound
The finalizer prevents this PersistentVolume from being removed from the cluster. As stated previously, the finalizer is only removed from the PV object after it is successfully deleted from the storage backend. To learn more about finalizers, please refer to Using Finalizers to Control Deletion.
Similarly, the finalizer kubernetes.io/pv-controller is added to dynamically provisioned in-tree plugin volumes.
Important note
The fix does not apply to statically provisioned in-tree plugin volumes.
How to enable new behavior?
To take advantage of the new behavior, you must have upgraded your cluster to the v1.33 release of Kubernetes
and run the CSI external-provisioner version 5.0.1 or later.
The feature was released as beta in v1.31 release of Kubernetes, where it was enabled by default.
References
How do I get involved?
The Kubernetes Slack channel SIG Storage communication channels are great mediums to reach out to the SIG Storage and migration working group teams.
Special thanks to the following people for the insightful reviews, thorough consideration and valuable contribution:
- Fan Baofa (carlory)
- Jan Šafránek (jsafrane)
- Xing Yang (xing-yang)
- Matthew Wong (wongma7)
Join the Kubernetes Storage Special Interest Group (SIG) if you're interested in getting involved with the design and development of CSI or any part of the Kubernetes Storage system. We’re rapidly growing and always welcome new contributors.
Kubernetes v1.33: Mutable CSI Node Allocatable Count
Scheduling stateful applications reliably depends heavily on accurate information about resource availability on nodes. Kubernetes v1.33 introduces an alpha feature called mutable CSI node allocatable count, allowing Container Storage Interface (CSI) drivers to dynamically update the reported maximum number of volumes that a node can handle. This capability significantly enhances the accuracy of pod scheduling decisions and reduces scheduling failures caused by outdated volume capacity information.
Background
Traditionally, Kubernetes CSI drivers report a static maximum volume attachment limit when initializing. However, actual attachment capacities can change during a node's lifecycle for various reasons, such as:
- Manual or external operations attaching/detaching volumes outside of Kubernetes control.
- Dynamically attached network interfaces or specialized hardware (GPUs, NICs, etc.) consuming available slots.
- Multi-driver scenarios, where one CSI driver’s operations affect available capacity reported by another.
Static reporting can cause Kubernetes to schedule pods onto nodes that appear to have capacity but don't, leading to pods stuck in a ContainerCreating state.
Dynamically adapting CSI volume limits
With the new feature gate MutableCSINodeAllocatableCount, Kubernetes enables CSI drivers to dynamically adjust and report node attachment capacities at runtime. This ensures that the scheduler has the most accurate, up-to-date view of node capacity.
How it works
When this feature is enabled, Kubernetes supports two mechanisms for updating the reported node volume limits:
- Periodic Updates: CSI drivers specify an interval to periodically refresh the node's allocatable capacity.
- Reactive Updates: An immediate update triggered when a volume attachment fails due to exhausted resources (
ResourceExhaustederror).
Enabling the feature
To use this alpha feature, you must enable the MutableCSINodeAllocatableCount feature gate in these components:
kube-apiserverkubelet
Example CSI driver configuration
Below is an example of configuring a CSI driver to enable periodic updates every 60 seconds:
apiVersion: storage.k8s.io/v1
kind: CSIDriver
metadata:
name: example.csi.k8s.io
spec:
nodeAllocatableUpdatePeriodSeconds: 60
This configuration directs Kubelet to periodically call the CSI driver's NodeGetInfo method every 60 seconds, updating the node’s allocatable volume count. Kubernetes enforces a minimum update interval of 10 seconds to balance accuracy and resource usage.
Immediate updates on attachment failures
In addition to periodic updates, Kubernetes now reacts to attachment failures. Specifically, if a volume attachment fails with a ResourceExhausted error (gRPC code 8), an immediate update is triggered to correct the allocatable count promptly.
This proactive correction prevents repeated scheduling errors and helps maintain cluster health.
Getting started
To experiment with mutable CSI node allocatable count in your Kubernetes v1.33 cluster:
- Enable the feature gate
MutableCSINodeAllocatableCounton thekube-apiserverandkubeletcomponents. - Update your CSI driver configuration by setting
nodeAllocatableUpdatePeriodSeconds. - Monitor and observe improvements in scheduling accuracy and pod placement reliability.
Next steps
This feature is currently in alpha and the Kubernetes community welcomes your feedback. Test it, share your experiences, and help guide its evolution toward beta and GA stability.
Join discussions in the Kubernetes Storage Special Interest Group (SIG-Storage) to shape the future of Kubernetes storage capabilities.
Kubernetes v1.33: New features in DRA
Kubernetes Dynamic Resource Allocation (DRA) was originally introduced as an alpha feature in the v1.26 release, and then went through a significant redesign for Kubernetes v1.31. The main DRA feature went to beta in v1.32, and the project hopes it will be generally available in Kubernetes v1.34.
The basic feature set of DRA provides a far more powerful and flexible API for requesting devices than Device Plugin. And while DRA remains a beta feature for v1.33, the DRA team has been hard at work implementing a number of new features and UX improvements. One feature has been promoted to beta, while a number of new features have been added in alpha. The team has also made progress towards getting DRA ready for GA.
Features promoted to beta
Driver-owned Resource Claim Status was promoted to beta. This allows the driver to report driver-specific device status data for each allocated device in a resource claim, which is particularly useful for supporting network devices.
New alpha features
Partitionable Devices lets a driver advertise several overlapping logical devices (“partitions”), and the driver can reconfigure the physical device dynamically based on the actual devices allocated. This makes it possible to partition devices on-demand to meet the needs of the workloads and therefore increase the utilization.
Device Taints and Tolerations allow devices to be tainted and for workloads to tolerate those taints. This makes it possible for drivers or cluster administrators to mark devices as unavailable. Depending on the effect of the taint, this can prevent devices from being allocated or cause eviction of pods that are using the device.
Prioritized List lets users specify a list of acceptable devices for their workloads, rather than just a single type of device. So while the workload might run best on a single high-performance GPU, it might also be able to run on 2 mid-level GPUs. The scheduler will attempt to satisfy the alternatives in the list in order, so the workload will be allocated the best set of devices available in the cluster.
Admin Access has been updated so that only users with access to a namespace with the resource.k8s.io/admin-access: "true" label are authorized to create ResourceClaim or ResourceClaimTemplates objects with the adminAccess field within the namespace. This grants administrators access to in-use devices and may enable additional permissions when making the device available in a container. This ensures that non-admin users cannot misuse the feature.
Preparing for general availability
A new v1beta2 API has been added to simplify the user experience and to prepare for additional features being added in the future. The RBAC rules for DRA have been improved and support has been added for seamless upgrades of DRA drivers.
What’s next?
The plan for v1.34 is even more ambitious than for v1.33. Most importantly, we (the Kubernetes device management working group) hope to bring DRA to general availability, which will make it available by default on all v1.34 Kubernetes clusters. This also means that many, perhaps all, of the DRA features that are still beta in v1.34 will become enabled by default, making it much easier to use them.
The alpha features that were added in v1.33 will be brought to beta in v1.34.
Getting involved
A good starting point is joining the WG Device Management Slack channel and meetings, which happen at US/EU and EU/APAC friendly time slots.
Not all enhancement ideas are tracked as issues yet, so come talk to us if you want to help or have some ideas yourself! We have work to do at all levels, from difficult core changes to usability enhancements in kubectl, which could be picked up by newcomers.
Acknowledgments
A huge thanks to everyone who has contributed:
Kubernetes v1.33: Storage Capacity Scoring of Nodes for Dynamic Provisioning (alpha)
Kubernetes v1.33 introduces a new alpha feature called StorageCapacityScoring. This feature adds a scoring method for pod scheduling
with the topology-aware volume provisioning.
This feature eases to schedule pods on nodes with either the most or least available storage capacity.
About this feature
This feature extends the kube-scheduler's VolumeBinding plugin to perform scoring using node storage capacity information obtained from Storage Capacity. Currently, you can only filter out nodes with insufficient storage capacity. So, you have to use a scheduler extender to achieve storage-capacity-based pod scheduling.
This feature is useful for provisioning node-local PVs, which have size limits based on the node's storage capacity. By using this feature, you can assign the PVs to the nodes with the most available storage space so that you can expand the PVs later as much as possible.
In another use case, you might want to reduce the number of nodes as much as possible for low operation costs in cloud environments by choosing the least storage capacity node. This feature helps maximize resource utilization by filling up nodes more sequentially, starting with the most utilized nodes first that still have enough storage capacity for the requested volume size.
How to use
Enabling the feature
In the alpha phase, StorageCapacityScoring is disabled by default. To use this feature, add StorageCapacityScoring=true
to the kube-scheduler command line option --feature-gates.
Configuration changes
You can configure node priorities based on storage utilization using the shape parameter in the VolumeBinding plugin configuration.
This allows you to prioritize nodes with higher available storage capacity (default) or, conversely, nodes with lower available storage capacity.
For example, to prioritize lower available storage capacity, configure KubeSchedulerConfiguration as follows:
apiVersion: kubescheduler.config.k8s.io/v1
kind: KubeSchedulerConfiguration
profiles:
...
pluginConfig:
- name: VolumeBinding
args:
...
shape:
- utilization: 0
score: 0
- utilization: 100
score: 10
For more details, please refer to the documentation.
Further reading
Additional note: Relationship with VolumeCapacityPriority
The alpha feature gate VolumeCapacityPriority, which performs node scoring based on available storage capacity during static provisioning,
will be deprecated and replaced by StorageCapacityScoring.
Please note that while VolumeCapacityPriority prioritizes nodes with lower available storage capacity by default,
StorageCapacityScoring prioritizes nodes with higher available storage capacity by default.
Kubernetes v1.33: Image Volumes graduate to beta!
Image Volumes were introduced as an Alpha feature with the Kubernetes v1.31 release as part of KEP-4639. In Kubernetes v1.33, this feature graduates to beta.
Please note that the feature is still disabled by default, because not all container runtimes have full support for it. CRI-O supports the initial feature since version v1.31 and will add support for Image Volumes as beta in v1.33. containerd merged support for the alpha feature which will be part of the v2.1.0 release and is working on beta support as part of PR #11578.
What's new
The major change for the beta graduation of Image Volumes is the support for
subPath and
subPathExpr mounts
for containers via spec.containers[*].volumeMounts.[subPath,subPathExpr]. This
allows end-users to mount a certain subdirectory of an image volume, which is
still mounted as readonly (ro). This means that non-existing
subdirectories cannot be mounted by default. As for other subPath and
subPathExpr values, Kubernetes will ensure that there are no absolute path or
relative path components part of the specified sub path. Container runtimes are
also required to double check those requirements for safety reasons. If a
specified subdirectory does not exist within a volume, then runtimes should fail
on container creation and provide user feedback by using existing kubelet
events.
Besides that, there are also three new kubelet metrics available for image volumes:
kubelet_image_volume_requested_total: Outlines the number of requested image volumes.kubelet_image_volume_mounted_succeed_total: Counts the number of successful image volume mounts.kubelet_image_volume_mounted_errors_total: Accounts the number of failed image volume mounts.
To use an existing subdirectory for a specific image volume, just use it as
subPath (or
subPathExpr)
value of the containers volumeMounts:
apiVersion: v1
kind: Pod
metadata:
name: image-volume
spec:
containers:
- name: shell
command: ["sleep", "infinity"]
image: debian
volumeMounts:
- name: volume
mountPath: /volume
subPath: dir
volumes:
- name: volume
image:
reference: quay.io/crio/artifact:v2
pullPolicy: IfNotPresent
Then, create the pod on your cluster:
kubectl apply -f image-volumes-subpath.yaml
Now you can attach to the container:
kubectl attach -it image-volume bash
And check the content of the file from the dir sub path in the volume:
cat /volume/file
The output will be similar to:
1
Thank you for reading through the end of this blog post! SIG Node is proud and happy to deliver this feature graduation as part of Kubernetes v1.33.
As writer of this blog post, I would like to emphasize my special thanks to all involved individuals out there!
If you would like to provide feedback or suggestions feel free to reach out to SIG Node using the Kubernetes Slack (#sig-node) channel or the SIG Node mailing list.
Further reading
Kubernetes v1.33: HorizontalPodAutoscaler Configurable Tolerance
This post describes configurable tolerance for horizontal Pod autoscaling, a new alpha feature first available in Kubernetes 1.33.
What is it?
Horizontal Pod Autoscaling is a well-known Kubernetes feature that allows your workload to automatically resize by adding or removing replicas based on resource utilization.
Let's say you have a web application running in a Kubernetes cluster with 50 replicas. You configure the HorizontalPodAutoscaler (HPA) to scale based on CPU utilization, with a target of 75% utilization. Now, imagine that the current CPU utilization across all replicas is 90%, which is higher than the desired 75%. The HPA will calculate the required number of replicas using the formula:
In this example:
So, the HPA will increase the number of replicas from 50 to 60 to reduce the load on each pod. Similarly, if the CPU utilization were to drop below 75%, the HPA would scale down the number of replicas accordingly. The Kubernetes documentation provides a detailed description of the scaling algorithm.
In order to avoid replicas being created or deleted whenever a small metric fluctuation occurs, Kubernetes applies a form of hysteresis: it only changes the number of replicas when the current and desired metric values differ by more than 10%. In the example above, since the ratio between the current and desired metric values is \(90/75\), or 20% above target, exceeding the 10% tolerance, the scale-up action will proceed.
This default tolerance of 10% is cluster-wide; in older Kubernetes releases, it could not be fine-tuned. It's a suitable value for most usage, but too coarse for large deployments, where a 10% tolerance represents tens of pods. As a result, the community has long asked to be able to tune this value.
In Kubernetes v1.33, this is now possible.
How do I use it?
After enabling the HPAConfigurableTolerance
feature gate in
your Kubernetes v1.33 cluster, you can add your desired tolerance for your
HorizontalPodAutoscaler object.
Tolerances appear under the spec.behavior.scaleDown and
spec.behavior.scaleUp fields and can thus be different for scale up and scale
down. A typical usage would be to specify a small tolerance on scale up (to
react quickly to spikes), but higher on scale down (to avoid adding and removing
replicas too quickly in response to small metric fluctuations).
For example, an HPA with a tolerance of 5% on scale-down, and no tolerance on scale-up, would look like the following:
apiVersion: autoscaling/v2
kind: HorizontalPodAutoscaler
metadata:
name: my-app
spec:
...
behavior:
scaleDown:
tolerance: 0.05
scaleUp:
tolerance: 0
I want all the details!
Get all the technical details by reading KEP-4951 and follow issue 4951 to be notified of the feature graduation.
Kubernetes v1.33: User Namespaces enabled by default!
In Kubernetes v1.33 support for user namespaces is enabled by default. This means that, when the stack requirements are met, pods can opt-in to use user namespaces. To use the feature there is no need to enable any Kubernetes feature flag anymore!
In this blog post we answer some common questions about user namespaces. But, before we dive into that, let's recap what user namespaces are and why they are important.
What is a user namespace?
Note: Linux user namespaces are a different concept from Kubernetes namespaces. The former is a Linux kernel feature; the latter is a Kubernetes feature.
Linux provides different namespaces to isolate processes from each other. For example, a typical Kubernetes pod runs within a network namespace to isolate the network identity and a PID namespace to isolate the processes.
One Linux namespace that was left behind is the user namespace. It isolates the UIDs and GIDs of the containers from the ones on the host. The identifiers in a container can be mapped to identifiers on the host in a way where host and container(s) never end up in overlapping UID/GIDs. Furthermore, the identifiers can be mapped to unprivileged, non-overlapping UIDs and GIDs on the host. This brings three key benefits:
Prevention of lateral movement: As the UIDs and GIDs for different containers are mapped to different UIDs and GIDs on the host, containers have a harder time attacking each other, even if they escape the container boundaries. For example, suppose container A runs with different UIDs and GIDs on the host than container B. In that case, the operations it can do on container B's files and processes are limited: only read/write what a file allows to others, as it will never have permission owner or group permission (the UIDs/GIDs on the host are guaranteed to be different for different containers).
Increased host isolation: As the UIDs and GIDs are mapped to unprivileged users on the host, if a container escapes the container boundaries, even if it runs as root inside the container, it has no privileges on the host. This greatly protects what host files it can read/write, which process it can send signals to, etc. Furthermore, capabilities granted are only valid inside the user namespace and not on the host, limiting the impact a container escape can have.
Enablement of new use cases: User namespaces allow containers to gain certain capabilities inside their own user namespace without affecting the host. This unlocks new possibilities, such as running applications that require privileged operations without granting full root access on the host. This is particularly useful for running nested containers.
User namespace IDs allocation
If a pod running as the root user without a user namespace manages to breakout, it has root privileges on the node. If some capabilities were granted to the container, the capabilities are valid on the host too. None of this is true when using user namespaces (modulo bugs, of course 🙂).
Demos
Rodrigo created demos to understand how some CVEs are mitigated when user namespaces are used. We showed them here before (see here and here), but take a look if you haven't:
Mitigation of CVE 2024-21626 with user namespaces:
Mitigation of CVE 2022-0492 with user namespaces:
Everything you wanted to know about user namespaces in Kubernetes
Here we try to answer some of the questions we have been asked about user namespaces support in Kubernetes.
1. What are the requirements to use it?
The requirements are documented here. But we will elaborate a bit more, in the following questions.
Note this is a Linux-only feature.
2. How do I configure a pod to opt-in?
A complete step-by-step guide is available here. But the short
version is you need to set the hostUsers: false field in the pod spec. For
example like this:
apiVersion: v1
kind: Pod
metadata:
name: userns
spec:
hostUsers: false
containers:
- name: shell
command: ["sleep", "infinity"]
image: debian
Yes, it is that simple. Applications will run just fine, without any other changes needed (unless your application needs the privileges).
User namespaces allows you to run as root inside the container, but not have privileges in the host. However, if your application needs the privileges on the host, for example an app that needs to load a kernel module, then you can't use user namespaces.
3. What are idmap mounts and why the file-systems used need to support it?
Idmap mounts are a Linux kernel feature that uses a mapping of UIDs/GIDs when accessing a mount. When combined with user namespaces, it greatly simplifies the support for volumes, as you can forget about the host UIDs/GIDs the user namespace is using.
In particular, thanks to idmap mounts we can:
- Run each pod with different UIDs/GIDs on the host. This is key for the lateral movement prevention we mentioned earlier.
- Share volumes with pods that don't use user namespaces.
- Enable/disable user namespaces without needing to chown the pod's volumes.
Support for idmap mounts in the kernel is per file-system and different kernel releases added support for idmap mounts on different file-systems.
To find which kernel version added support for each file-system, you can check
out the mount_setattr man page, or the online version of it
here.
Most popular file-systems are supported, the notable absence that isn't supported yet is NFS.
4. Can you clarify exactly which file-systems need to support idmap mounts?
The file-systems that need to support idmap mounts are all the file-systems used
by a pod in the pod.spec.volumes field.
This means: for PV/PVC volumes, the file-system used in the PV needs to support idmap mounts; for hostPath volumes, the file-system used in the hostPath needs to support idmap mounts.
What does this mean for secrets/configmaps/projected/downwardAPI volumes? For
these volumes, the kubelet creates a tmpfs file-system. So, you will need a
6.3 kernel to use these volumes (note that if you use them as env variables it
is fine).
And what about emptyDir volumes? Those volumes are created by the kubelet by
default in /var/lib/kubelet/pods/. You can also use a custom directory for
this. But what needs to support idmap mounts is the file-system used in that
directory.
The kubelet creates some more files for the container, like /etc/hostname,
/etc/resolv.conf, /dev/termination-log, /etc/hosts, etc. These files are
also created in /var/lib/kubelet/pods/ by default, so it's important for the
file-system used in that directory to support idmap mounts.
Also, some container runtimes may put some of these ephemeral volumes inside a
tmpfs file-system, in which case you will need support for idmap mounts in
tmpfs.
5. Can I use a kernel older than 6.3?
Yes, but you will need to make sure you are not using a tmpfs file-system. If
you avoid that, you can easily use 5.19 (if all the other file-systems you use
support idmap mounts in that kernel).
It can be tricky to avoid using tmpfs, though, as we just described above.
Besides having to avoid those volume types, you will also have to avoid mounting the
service account token. Every pod has it mounted by default, and it uses a
projected volume that, as we mentioned, uses a tmpfs file-system.
You could even go lower than 5.19, all the way to 5.12. However, your container rootfs probably uses an overlayfs file-system, and support for overlayfs was added in 5.19. We wouldn't recommend to use a kernel older than 5.19, as not being able to use idmap mounts for the rootfs is a big limitation. If you absolutely need to, you can check this blog post Rodrigo wrote some years ago, about tricks to use user namespaces when you can't support idmap mounts on the rootfs.
6. If my stack supports user namespaces, do I need to configure anything else?
No, if your stack supports it and you are using Kubernetes v1.33, there is nothing you need to configure. You should be able to follow the task: Use a user namespace with a pod.
However, in case you have specific requirements, you may configure various options. You can find more information here. You can also enable a feature gate to relax the PSS rules.
7. The demos are nice, but are there more CVEs that this mitigates?
Yes, quite a lot, actually! Besides the ones in the demo, the KEP has more CVEs you can check. That list is not exhaustive, there are many more.
8. Can you sum up why user namespaces is important?
Think about running a process as root, maybe even an untrusted process. Do you think that is secure? What if we limit it by adding seccomp and apparmor, mask some files in /proc (so it can't crash the node, etc.) and some more tweaks?
Wouldn't it be better if we don't give it privileges in the first place, instead of trying to play whack-a-mole with all the possible ways root can escape?
This is what user namespaces does, plus some other goodies:
Run as an unprivileged user on the host without making changes to your application. Greg and Vinayak did a great talk on the pains you can face when trying to run unprivileged without user namespaces. The pains part starts in this minute.
All pods run with different UIDs/GIDs, we significantly improve the lateral movement. This is guaranteed with user namespaces (the kubelet chooses it for you). In the same talk, Greg and Vinayak show that to achieve the same without user namespaces, they went through a quite complex custom solution. This part starts in this minute.
The capabilities granted are only granted inside the user namespace. That means that if a pod breaks out of the container, they are not valid on the host. We can't provide that without user namespaces.
It enables new use-cases in a secure way. You can run docker in docker, unprivileged container builds, Kubernetes inside Kubernetes, etc all in a secure way. Most of the previous solutions to do this required privileged containers or putting the node at a high risk of compromise.
9. Is there container runtime documentation for user namespaces?
Yes, we have containerd
documentation.
This explains different limitations of containerd 1.7 and how to use
user namespaces in containerd without Kubernetes pods (using ctr). Note that
if you use containerd, you need containerd 2.0 or higher to use user namespaces
with Kubernetes.
CRI-O doesn't have special documentation for user namespaces, it works out of the box.
10. What about the other container runtimes?
No other container runtime that we are aware of supports user namespaces with Kubernetes. That sadly includes cri-dockerd too.
11. I'd like to learn more about it, what would you recommend?
Rodrigo did an introduction to user namespaces at KubeCon 2022:
- Run As “Root”, Not Root: User Namespaces In K8s- Marga Manterola, Isovalent & Rodrigo Campos Catelin
Also, this aforementioned presentation at KubeCon 2023 can be useful as a motivation for user namespaces:
Bear in mind the presentation are some years old, some things have changed since then. Use the Kubernetes documentation as the source of truth.
If you would like to learn more about the low-level details of user namespaces,
you can check man 7 user_namespaces and man 1 unshare. You can easily create
namespaces and experiment with how they behave. Be aware that the unshare tool
has a lot of flexibility, and with that options to create incomplete setups.
If you would like to know more about idmap mounts, you can check its Linux kernel documentation.
Conclusions
Running pods as root is not ideal and running them as non-root is also hard with containers, as it can require a lot of changes to the applications. User namespaces are a unique feature to let you have the best of both worlds: run as non-root, without any changes to your application.
This post covered: what are user namespaces, why they are important, some real world examples of CVEs mitigated by user-namespaces, and some common questions. Hopefully, this post helped you to eliminate the last doubts you had and you will now try user-namespaces (if you didn't already!).
How do I get involved?
You can reach SIG Node by several means:
You can also contact us directly:
- GitHub: @rata @giuseppe @saschagrunert
- Slack: @rata @giuseppe @sascha
Kubernetes v1.33: Continuing the transition from Endpoints to EndpointSlices
Since the addition of EndpointSlices (KEP-752) as alpha in v1.15 and later GA in v1.21, the Endpoints API in Kubernetes has been gathering dust. New Service features like dual-stack networking and traffic distribution are only supported via the EndpointSlice API, so all service proxies, Gateway API implementations, and similar controllers have had to be ported from using Endpoints to using EndpointSlices. At this point, the Endpoints API is really only there to avoid breaking end user workloads and scripts that still make use of it.
As of Kubernetes 1.33, the Endpoints API is now officially deprecated, and the API server will return warnings to users who read or write Endpoints resources rather than using EndpointSlices.
Eventually, the plan (as documented in KEP-4974) is to change the Kubernetes Conformance criteria to no longer require that clusters run the Endpoints controller (which generates Endpoints objects based on Services and Pods), to avoid doing work that is unneeded in most modern-day clusters.
Thus, while the Kubernetes deprecation policy means that the Endpoints type itself will probably never completely go away, users who still have workloads or scripts that use the Endpoints API should start migrating them to EndpointSlices.
Notes on migrating from Endpoints to EndpointSlices
Consuming EndpointSlices rather than Endpoints
For end users, the biggest change between the Endpoints API and the
EndpointSlice API is that while every Service with a selector has
exactly 1 Endpoints object (with the same name as the Service), a
Service may have any number of EndpointSlices associated with it:
$ kubectl get endpoints myservice
Warning: v1 Endpoints is deprecated in v1.33+; use discovery.k8s.io/v1 EndpointSlice
NAME ENDPOINTS AGE
myservice 10.180.3.17:443 1h
$ kubectl get endpointslice -l kubernetes.io/service-name=myservice
NAME ADDRESSTYPE PORTS ENDPOINTS AGE
myservice-7vzhx IPv4 443 10.180.3.17 21s
myservice-jcv8s IPv6 443 2001:db8:0123::5 21s
In this case, because the service is dual stack, it has 2 EndpointSlices: 1 for IPv4 addresses and 1 for IPv6 addresses. (The Endpoints API does not support dual stack, so the Endpoints object shows only the addresses in the cluster's primary address family.) Although any Service with multiple endpoints can have multiple EndpointSlices, there are three main cases where you will see this:
An EndpointSlice can only represent endpoints of a single IP family, so dual-stack Services will have separate EndpointSlices for IPv4 and IPv6.
All of the endpoints in an EndpointSlice must target the same ports. So, for example, if you have a set of endpoint Pods listening on port 80, and roll out an update to make them listen on port 8080 instead, then while the rollout is in progress, the Service will need 2 EndpointSlices: 1 for the endpoints listening on port 80, and 1 for the endpoints listening on port 8080.
When a Service has more than 100 endpoints, the EndpointSlice controller will split the endpoints into multiple EndpointSlices rather than aggregating them into a single excessively-large object like the Endpoints controller does.
Because there is not a predictable 1-to-1 mapping between Services and
EndpointSlices, there is no way to know what the actual name of the
EndpointSlice resource(s) for a Service will be ahead of time; thus,
instead of fetching the EndpointSlice(s) by name, you instead ask for
all EndpointSlices with a "kubernetes.io/service-name"
label pointing
to the Service:
$ kubectl get endpointslice -l kubernetes.io/service-name=myservice
A similar change is needed in Go code. With Endpoints, you would do something like:
// Get the Endpoints named `name` in `namespace`.
endpoint, err := client.CoreV1().Endpoints(namespace).Get(ctx, name, metav1.GetOptions{})
if err != nil {
if apierrors.IsNotFound(err) {
// No Endpoints exists for the Service (yet?)
...
}
// handle other errors
...
}
// process `endpoint`
...
With EndpointSlices, this becomes:
// Get all EndpointSlices for Service `name` in `namespace`.
slices, err := client.DiscoveryV1().EndpointSlices(namespace).List(ctx,
metav1.ListOptions{LabelSelector: discoveryv1.LabelServiceName + "=" + name})
if err != nil {
// handle errors
...
} else if len(slices.Items) == 0 {
// No EndpointSlices exist for the Service (yet?)
...
}
// process `slices.Items`
...
Generating EndpointSlices rather than Endpoints
For people (or controllers) generating Endpoints, migrating to EndpointSlices is slightly easier, because in most cases you won't have to worry about multiple slices. You just need to update your YAML or Go code to use the new type (which organizes the information in a slightly different way than Endpoints did).
For example, this Endpoints object:
apiVersion: v1
kind: Endpoints
metadata:
name: myservice
subsets:
- addresses:
- ip: 10.180.3.17
nodeName: node-4
- ip: 10.180.5.22
nodeName: node-9
- ip: 10.180.18.2
nodeName: node-7
notReadyAddresses:
- ip: 10.180.6.6
nodeName: node-8
ports:
- name: https
protocol: TCP
port: 443
would become something like:
apiVersion: discovery.k8s.io/v1
kind: EndpointSlice
metadata:
name: myservice
labels:
kubernetes.io/service-name: myservice
addressType: IPv4
endpoints:
- addresses:
- 10.180.3.17
nodeName: node-4
- addresses:
- 10.180.5.22
nodeName: node-9
- addresses:
- 10.180.18.12
nodeName: node-7
- addresses:
- 10.180.6.6
nodeName: node-8
conditions:
ready: false
ports:
- name: https
protocol: TCP
port: 443
Some points to note:
This example uses an explicit
name, but you could also usegenerateNameand let the API server append a unique suffix. The name itself does not matter: what matters is the"kubernetes.io/service-name"label pointing back to the Service.You have to explicitly indicate
addressType: IPv4(orIPv6).An EndpointSlice is similar to a single element of the
"subsets"array in Endpoints. An Endpoints object with multiple subsets will normally need to be expressed as multiple EndpointSlices, each with different"ports".The
endpointsandaddressesfields are both arrays, but by convention, eachaddressesarray only contains a single element. If your Service has multiple endpoints, then you need to have multiple elements in theendpointsarray, each with a single element in itsaddressesarray.The Endpoints API lists "ready" and "not-ready" endpoints separately, while the EndpointSlice API allows each endpoint to have conditions (such as "
ready: false") associated with it.
And of course, once you have ported to EndpointSlice, you can make use of EndpointSlice-specific features, such as topology hints and terminating endpoints. Consult the EndpointSlice API documentation for more information.
Kubernetes v1.33: Octarine
Editors: Agustina Barbetta, Aakanksha Bhende, Udi Hofesh, Ryota Sawada, Sneha Yadav
Similar to previous releases, the release of Kubernetes v1.33 introduces new stable, beta, and alpha features. The consistent delivery of high-quality releases underscores the strength of our development cycle and the vibrant support from our community.
This release consists of 64 enhancements. Of those enhancements, 18 have graduated to Stable, 20 are entering Beta, 24 have entered Alpha, and 2 are deprecated or withdrawn.
There are also several notable deprecations and removals in this release; make sure to read about those if you already run an older version of Kubernetes.
Release theme and logo
The theme for Kubernetes v1.33 is Octarine: The Color of Magic1, inspired by Terry Pratchett’s Discworld series. This release highlights the open source magic2 that Kubernetes enables across the ecosystem.
If you’re familiar with the world of Discworld, you might recognize a small swamp dragon perched atop the tower of the Unseen University, gazing up at the Kubernetes moon above the city of Ankh-Morpork with 64 stars3 in the background.
As Kubernetes moves into its second decade, we celebrate both the wizardry of its maintainers, the curiosity of new contributors, and the collaborative spirit that fuels the project. The v1.33 release is a reminder that, as Pratchett wrote, “It’s still magic even if you know how it’s done.” Even if you know the ins and outs of the Kubernetes code base, stepping back at the end of the release cycle, you’ll realize that Kubernetes remains magical.
Kubernetes v1.33 is a testament to the enduring power of open source innovation, where hundreds of contributors4 from around the world work together to create something truly extraordinary. Behind every new feature, the Kubernetes community works to maintain and improve the project, ensuring it remains secure, reliable, and released on time. Each release builds upon the other, creating something greater than we could achieve alone.
1. Octarine is the mythical eighth color, visible only to those attuned to the arcane—wizards,
witches, and, of course, cats. And occasionally, someone who’s stared at IPtable rules for too
long.
2. Any sufficiently advanced technology is indistinguishable from magic…?
3. It’s not a coincidence 64 KEPs (Kubernetes Enhancement Proposals) are also included in
v1.33.
4. See the Project Velocity section for v1.33 🚀
Spotlight on key updates
Kubernetes v1.33 is packed with new features and improvements. Here are a few select updates the Release Team would like to highlight!
Stable: Sidecar containers
The sidecar pattern involves deploying separate auxiliary container(s) to handle extra capabilities in areas such as networking, logging, and metrics gathering. Sidecar containers graduate to stable in v1.33.
Kubernetes implements sidecars as a special class of init containers with restartPolicy: Always,
ensuring that sidecars start before application containers, remain running throughout the pod's
lifecycle, and terminate automatically after the main containers exit.
Additionally, sidecars can utilize probes (startup, readiness, liveness) to signal their operational state, and their Out-Of-Memory (OOM) score adjustments are aligned with primary containers to prevent premature termination under memory pressure.
To learn more, read Sidecar Containers.
This work was done as part of KEP-753: Sidecar Containers led by SIG Node.
Beta: In-place resource resize for vertical scaling of Pods
Workloads can be defined using APIs like Deployment, StatefulSet, etc. These describe the template
for the Pods that should run, including memory and CPU resources, as well as the replica count of
the number of Pods that should run. Workloads can be scaled horizontally by updating the Pod replica
count, or vertically by updating the resources required in the Pods container(s). Before this
enhancement, container resources defined in a Pod's spec were immutable, and updating any of these
details within a Pod template would trigger Pod replacement.
But what if you could dynamically update the resource configuration for your existing Pods without restarting them?
The KEP-1287 is precisely to allow such in-place Pod updates. It was released as alpha in v1.27, and has graduated to beta in v1.33. This opens up various possibilities for vertical scale-up of stateful processes without any downtime, seamless scale-down when the traffic is low, and even allocating larger resources during startup, which can then be reduced once the initial setup is complete.
This work was done as part of KEP-1287: In-Place Update of Pod Resources led by SIG Node and SIG Autoscaling.
Alpha: New configuration option for kubectl with .kuberc for user preferences
In v1.33, kubectl introduces a new alpha feature with opt-in configuration file .kuberc for user
preferences. This file can contain kubectl aliases and overrides (e.g. defaulting to use
server-side apply), while leaving cluster
credentials and host information in kubeconfig. This separation allows sharing the same user
preferences for kubectl interaction, regardless of target cluster and kubeconfig used.
To enable this alpha feature, users can set the environment variable of KUBECTL_KUBERC=true and
create a .kuberc configuration file. By default, kubectl looks for this file in
~/.kube/kuberc. You can also specify an alternative location using the --kuberc flag, for
example: kubectl --kuberc /var/kube/rc.
This work was done as part of KEP-3104: Separate kubectl user preferences from cluster configs led by SIG CLI.
Features graduating to Stable
This is a selection of some of the improvements that are now stable following the v1.33 release.
Backoff limits per index for indexed Jobs
This release graduates a feature that allows setting backoff limits on a per-index basis for Indexed
Jobs. Traditionally, the backoffLimit parameter in Kubernetes Jobs specifies the number of retries
before considering the entire Job as failed. This enhancement allows each index within an Indexed
Job to have its own backoff limit, providing more granular control over retry behavior for
individual tasks. This ensures that the failure of specific indices does not prematurely terminate
the entire Job, allowing the other indices to continue processing independently.
This work was done as part of KEP-3850: Backoff Limit Per Index For Indexed Jobs led by SIG Apps.
Job success policy
Using .spec.successPolicy, users can specify which pod indexes must succeed (succeededIndexes),
how many pods must succeed (succeededCount), or a combination of both. This feature benefits
various workloads, including simulations where partial completion is sufficient, and leader-worker
patterns where only the leader's success determines the Job's overall outcome.
This work was done as part of KEP-3998: Job success/completion policy led by SIG Apps.
Bound ServiceAccount token security improvements
This enhancement introduced features such as including a unique token identifier (i.e. JWT ID Claim, also known as JTI) and node information within the tokens, enabling more precise validation and auditing. Additionally, it supports node-specific restrictions, ensuring that tokens are only usable on designated nodes, thereby reducing the risk of token misuse and potential security breaches. These improvements, now generally available, aim to enhance the overall security posture of service account tokens within Kubernetes clusters.
This work was done as part of KEP-4193: Bound service account token improvements led by SIG Auth.
Subresource support in kubectl
The --subresource argument is now generally available for kubectl subcommands such as get,
patch, edit, apply and replace, allowing users to fetch and update subresources for all
resources that support them. To learn more about the subresources supported, visit the
kubectl reference.
This work was done as part of KEP-2590: Add subresource support to kubectl led by SIG CLI.
Multiple Service CIDRs
This enhancement introduced a new implementation of allocation logic for Service IPs. Across the
whole cluster, every Service of type: ClusterIP must have a unique IP address assigned to it.
Trying to create a Service with a specific cluster IP that has already been allocated will return an
error. The updated IP address allocator logic uses two newly stable API objects: ServiceCIDR and
IPAddress. Now generally available, these APIs allow cluster administrators to dynamically
increase the number of IP addresses available for type: ClusterIP Services (by creating new
ServiceCIDR objects).
This work was done as part of KEP-1880: Multiple Service CIDRs led by SIG Network.
nftables backend for kube-proxy
The nftables backend for kube-proxy is now stable, adding a new implementation that significantly
improves performance and scalability for Services implementation within Kubernetes clusters. For
compatibility reasons, iptables remains the default on Linux nodes. Check the
migration guide
if you want to try it out.
This work was done as part of KEP-3866: nftables kube-proxy backend led by SIG Network.
Topology aware routing with trafficDistribution: PreferClose
This release graduates topology-aware routing and traffic distribution to GA, which would allow us
to optimize service traffic in multi-zone clusters. The topology-aware hints in EndpointSlices would
enable components like kube-proxy to prioritize routing traffic to endpoints within the same zone,
thereby reducing latency and cross-zone data transfer costs. Building upon this,
trafficDistribution field is added to the Service specification, with the PreferClose option
directing traffic to the nearest available endpoints based on network topology. This configuration
enhances performance and cost-efficiency by minimizing inter-zone communication.
This work was done as part of KEP-4444: Traffic Distribution for Services and KEP-2433: Topology Aware Routing led by SIG Network.
Options to reject non SMT-aligned workload
This feature added policy options to the CPU Manager, enabling it to reject workloads that do not align with Simultaneous Multithreading (SMT) configurations. This enhancement, now generally available, ensures that when a pod requests exclusive use of CPU cores, the CPU Manager can enforce allocation of entire core pairs (comprising primary and sibling threads) on SMT-enabled systems, thereby preventing scenarios where workloads share CPU resources in unintended ways.
This work was done as part of KEP-2625: node: cpumanager: add options to reject non SMT-aligned workload led by SIG Node.
Defining Pod affinity or anti-affinity using matchLabelKeys and mismatchLabelKeys
The matchLabelKeys and mismatchLabelKeys fields are available in Pod affinity terms, enabling
users to finely control the scope where Pods are expected to co-exist (Affinity) or not
(AntiAffinity). These newly stable options complement the existing labelSelector mechanism. The
affinity fields facilitate enhanced scheduling for versatile rolling updates, as well as isolation
of services managed by tools or controllers based on global configurations.
This work was done as part of KEP-3633: Introduce MatchLabelKeys to Pod Affinity and Pod Anti Affinity led by SIG Scheduling.
Considering taints and tolerations when calculating Pod topology spread skew
This enhanced PodTopologySpread by introducing two fields: nodeAffinityPolicy and
nodeTaintsPolicy. These fields allow users to specify whether node affinity rules and node taints
should be considered when calculating pod distribution across nodes. By default,
nodeAffinityPolicy is set to Honor, meaning only nodes matching the pod's node affinity or
selector are included in the distribution calculation. The nodeTaintsPolicy defaults to Ignore,
indicating that node taints are not considered unless specified. This enhancement provides finer
control over pod placement, ensuring that pods are scheduled on nodes that meet both affinity and
taint toleration requirements, thereby preventing scenarios where pods remain pending due to
unsatisfied constraints.
This work was done as part of KEP-3094: Take taints/tolerations into consideration when calculating PodTopologySpread skew led by SIG Scheduling.
Volume populators
After being released as beta in v1.24, volume populators have graduated to GA in v1.33. This newly
stable feature provides a way to allow users to pre-populate volumes with data from various sources,
and not just from PersistentVolumeClaim (PVC) clones or volume snapshots. The mechanism relies on
the dataSourceRef field within a PersistentVolumeClaim. This field offers more flexibility than
the existing dataSource field, and allows for custom resources to be used as data sources.
A special controller, volume-data-source-validator, validates these data source references,
alongside a newly stable CustomResourceDefinition (CRD) for an API kind named VolumePopulator. The
VolumePopulator API allows volume populator controllers to register the types of data sources they
support. You need to set up your cluster with the appropriate CRD in order to use volume populators.
This work was done as part of KEP-1495: Generic data populators led by SIG Storage.
Always honor PersistentVolume reclaim policy
This enhancement addressed an issue where the Persistent Volume (PV) reclaim policy is not consistently honored, leading to potential storage resource leaks. Specifically, if a PV is deleted before its associated Persistent Volume Claim (PVC), the "Delete" reclaim policy may not be executed, leaving the underlying storage assets intact. To mitigate this, Kubernetes now sets finalizers on relevant PVs, ensuring that the reclaim policy is enforced regardless of the deletion sequence. This enhancement prevents unintended retention of storage resources and maintains consistency in PV lifecycle management.
This work was done as part of KEP-2644: Always Honor PersistentVolume Reclaim Policy led by SIG Storage.
New features in Beta
This is a selection of some of the improvements that are now beta following the v1.33 release.
Support for Direct Service Return (DSR) in Windows kube-proxy
DSR provides performance optimizations by allowing the return traffic routed through load balancers to bypass the load balancer and respond directly to the client; reducing load on the load balancer and also reducing overall latency. For information on DSR on Windows, read Direct Server Return (DSR) in a nutshell.
Initially introduced in v1.14, support for DSR has been promoted to beta by SIG Windows as part of KEP-5100: Support for Direct Service Return (DSR) and overlay networking in Windows kube-proxy.
Structured parameter support
While structured parameter support continues as a beta feature in Kubernetes v1.33, this core part
of Dynamic Resource Allocation (DRA) has seen significant improvements. A new v1beta2 version
simplifies the resource.k8s.io API, and regular users with the namespaced cluster edit role can
now use DRA.
The kubelet now includes seamless upgrade support, enabling drivers deployed as DaemonSets to use
a rolling update mechanism. For DRA implementations, this prevents the deletion and re-creation of
ResourceSlices, allowing them to remain unchanged during upgrades. Additionally, a 30-second grace
period has been introduced before the kubelet cleans up after unregistering a driver, providing
better support for drivers that do not use rolling updates.
This work was done as part of KEP-4381: DRA: structured parameters by WG Device Management, a cross-functional team including SIG Node, SIG Scheduling, and SIG Autoscaling.
Dynamic Resource Allocation (DRA) for network interfaces
The standardized reporting of network interface data via DRA, introduced in v1.32, has graduated to beta in v1.33. This enables more native Kubernetes network integrations, simplifying the development and management of networking devices. This was covered previously in the v1.32 release announcement blog.
This work was done as part of KEP-4817: DRA: Resource Claim Status with possible standardized network interface data led by SIG Network, SIG Node, and WG Device Management.
Handle unscheduled pods early when scheduler does not have any pod on activeQ
This feature improves queue scheduling behavior. Behind the scenes, the scheduler achieves this by popping pods from the backoffQ, which are not backed off due to errors, when the activeQ is empty. Previously, the scheduler would become idle even when the activeQ was empty; this enhancement improves scheduling efficiency by preventing that.
This work was done as part of KEP-5142: Pop pod from backoffQ when activeQ is empty led by SIG Scheduling.
Asynchronous preemption in the Kubernetes Scheduler
Preemption ensures higher-priority pods get the resources they need by evicting lower-priority ones. Asynchronous Preemption, introduced in v1.32 as alpha, has graduated to beta in v1.33. With this enhancement, heavy operations such as API calls to delete pods are processed in parallel, allowing the scheduler to continue scheduling other pods without delays. This improvement is particularly beneficial in clusters with high Pod churn or frequent scheduling failures, ensuring a more efficient and resilient scheduling process.
This work was done as part of KEP-4832: Asynchronous preemption in the scheduler led by SIG Scheduling.
ClusterTrustBundles
ClusterTrustBundle, a cluster-scoped resource designed for holding X.509 trust anchors (root certificates), has graduated to beta in v1.33. This API makes it easier for in-cluster certificate signers to publish and communicate X.509 trust anchors to cluster workloads.
This work was done as part of KEP-3257: ClusterTrustBundles (previously Trust Anchor Sets) led by SIG Auth.
Fine-grained SupplementalGroups control
Introduced in v1.31, this feature graduates to beta in v1.33 and is now enabled by default. Provided
that your cluster has the SupplementalGroupsPolicy feature gate enabled, the
supplementalGroupsPolicy field within a Pod's securityContext supports two policies: the default
Merge policy maintains backward compatibility by combining specified groups with those from the
container image's /etc/group file, whereas the new Strict policy applies only to explicitly
defined groups.
This enhancement helps to address security concerns where implicit group memberships from container images could lead to unintended file access permissions and bypass policy controls.
This work was done as part of KEP-3619: Fine-grained SupplementalGroups control led by SIG Node.
Support for mounting images as volumes
Support for using Open Container Initiative (OCI) images as volumes in Pods, introduced in v1.31, has graduated to beta. This feature allows users to specify an image reference as a volume in a Pod while reusing it as a volume mount within containers. It opens up the possibility of packaging the volume data separately, and sharing them among containers in a Pod without including them in the main image, thereby reducing vulnerabilities and simplifying image creation.
This work was done as part of KEP-4639: VolumeSource: OCI Artifact and/or Image led by SIG Node and SIG Storage.
Support for user namespaces within Linux Pods
One of the oldest open KEPs as of writing is KEP-127, Pod security improvement by using Linux User namespaces for Pods. This KEP was first opened in late 2016, and after multiple iterations, had its alpha release in v1.25, initial beta in v1.30 (where it was disabled by default), and has moved to on-by-default beta as part of v1.33.
This support will not impact existing Pods unless you manually specify pod.spec.hostUsers to opt
in. As highlighted in the
v1.30 sneak peek blog, this is an important
milestone for mitigating vulnerabilities.
This work was done as part of KEP-127: Support User Namespaces in pods led by SIG Node.
Pod procMount option
The procMount option, introduced as alpha in v1.12, and off-by-default beta in v1.31, has moved to
an on-by-default beta in v1.33. This enhancement improves Pod isolation by allowing users to
fine-tune access to the /proc filesystem. Specifically, it adds a field to the Pod
securityContext that lets you override the default behavior of masking and marking certain /proc
paths as read-only. This is particularly useful for scenarios where users want to run unprivileged
containers inside the Kubernetes Pod using user namespaces. Normally, the container runtime (via the
CRI implementation) starts the outer container with strict /proc mount settings. However, to
successfully run nested containers with an unprivileged Pod, users need a mechanism to relax those
defaults, and this feature provides exactly that.
This work was done as part of KEP-4265: add ProcMount option led by SIG Node.
CPUManager policy to distribute CPUs across NUMA nodes
This feature adds a new policy option for the CPU Manager to distribute CPUs across Non-Uniform Memory Access (NUMA) nodes, rather than concentrating them on a single node. It optimizes CPU resource allocation by balancing workloads across multiple NUMA nodes, thereby improving performance and resource utilization in multi-NUMA systems.
This work was done as part of KEP-2902: Add CPUManager policy option to distribute CPUs across NUMA nodes instead of packing them led by SIG Node.
Zero-second sleeps for container PreStop hooks
Kubernetes 1.29 introduced a Sleep action for the preStop lifecycle hook in Pods, allowing
containers to pause for a specified duration before termination. This provides a straightforward
method to delay container shutdown, facilitating tasks such as connection draining or cleanup
operations.
The Sleep action in a preStop hook can now accept a zero-second duration as a beta feature. This
allows defining a no-op preStop hook, which is useful when a preStop hook is required but no
delay is desired.
This work was done as part of KEP-3960: Introducing Sleep Action for PreStop Hook and KEP-4818: Allow zero value for Sleep Action of PreStop Hook led by SIG Node.
Internal tooling for declarative validation of Kubernetes-native types
Behind the scenes, the internals of Kubernetes are starting to use a new mechanism for validating
objects and changes to objects. Kubernetes v1.33 introduces validation-gen, an internal tool that
Kubernetes contributors use to generate declarative validation rules. The overall goal is to improve
the robustness and maintainability of API validations by enabling developers to specify validation
constraints declaratively, reducing manual coding errors and ensuring consistency across the
codebase.
This work was done as part of KEP-5073: Declarative Validation Of Kubernetes Native Types With validation-gen led by SIG API Machinery.
New features in Alpha
This is a selection of some of the improvements that are now alpha following the v1.33 release.
Configurable tolerance for HorizontalPodAutoscalers
This feature introduces configurable tolerance for HorizontalPodAutoscalers, which dampens scaling reactions to small metric variations.
This work was done as part of KEP-4951: Configurable tolerance for Horizontal Pod Autoscalers led by SIG Autoscaling.
Configurable container restart delay
Introduced as alpha1 in v1.32, this feature provides a set of kubelet-level configurations to fine-tune how CrashLoopBackOff is handled.
This work was done as part of KEP-4603: Tune CrashLoopBackOff led by SIG Node.
Custom container stop signals
Before Kubernetes v1.33, stop signals could only be set in container image definitions (for example,
via the StopSignal configuration field in the image metadata). If you wanted to modify termination
behavior, you needed to build a custom container image. By enabling the (alpha)
ContainerStopSignals feature gate in Kubernetes v1.33, you can now define custom stop signals
directly within Pod specifications. This is defined in the container's lifecycle.stopSignal field
and requires the Pod's spec.os.name field to be present. If unspecified, containers fall back to
the image-defined stop signal (if present), or the container runtime default (typically SIGTERM for
Linux).
This work was done as part of KEP-4960: Container Stop Signals led by SIG Node.
DRA enhancements galore!
Kubernetes v1.33 continues to develop Dynamic Resource Allocation (DRA) with features designed for today’s complex infrastructures. DRA is an API for requesting and sharing resources between pods and containers inside a pod. Typically those resources are devices such as GPUs, FPGAs, and network adapters.
The following are all the alpha DRA feature gates introduced in v1.33:
- Similar to Node taints, by enabling the
DRADeviceTaintsfeature gate, devices support taints and tolerations. An admin or a control plane component can taint devices to limit their usage. Scheduling of pods which depend on those devices can be paused while a taint exists and/or pods using a tainted device can be evicted. - By enabling the feature gate
DRAPrioritizedList, DeviceRequests get a new field namedfirstAvailable. This field is an ordered list that allows the user to specify that a request may be satisfied in different ways, including allocating nothing at all if some specific hardware is not available. - With feature gate
DRAAdminAccessenabled, only users authorized to create ResourceClaim or ResourceClaimTemplate objects in namespaces labeled withresource.k8s.io/admin-access: "true"can use theadminAccessfield. This ensures that non-admin users cannot misuse theadminAccessfeature. - While it has been possible to consume device partitions since v1.31, vendors had to pre-partition
devices and advertise them accordingly. By enabling the
DRAPartitionableDevicesfeature gate in v1.33, device vendors can advertise multiple partitions, including overlapping ones. The Kubernetes scheduler will choose the partition based on workload requests, and prevent the allocation of conflicting partitions simultaneously. This feature gives vendors the ability to dynamically create partitions at allocation time. The allocation and dynamic partitioning are automatic and transparent to users, enabling improved resource utilization.
These feature gates have no effect unless you also enable the DynamicResourceAllocation feature
gate.
This work was done as part of KEP-5055: DRA: device taints and tolerations, KEP-4816: DRA: Prioritized Alternatives in Device Requests, KEP-5018: DRA: AdminAccess for ResourceClaims and ResourceClaimTemplates, and KEP-4815: DRA: Add support for partitionable devices, led by SIG Node, SIG Scheduling and SIG Auth.
Robust image pull policy to authenticate images for IfNotPresent and Never
This feature allows users to ensure that kubelet requires an image pull authentication check for each new set of credentials, regardless of whether the image is already present on the node.
This work was done as part of KEP-2535: Ensure secret pulled images led by SIG Auth.
Node topology labels are available via downward API
This feature enables Node topology labels to be exposed via the downward API. Prior to Kubernetes v1.33, a workaround involved using an init container to query the Kubernetes API for the underlying node; this alpha feature simplifies how workloads can access Node topology information.
This work was done as part of KEP-4742: Expose Node labels via downward API led by SIG Node.
Better pod status with generation and observed generation
Prior to this change, the metadata.generation field was unused in pods. Along with extending to
support metadata.generation, this feature will introduce status.observedGeneration to provide
clearer pod status.
This work was done as part of KEP-5067: Pod Generation led by SIG Node.
Support for split level 3 cache architecture with kubelet’s CPU Manager
The previous kubelet’s CPU Manager was unaware of split L3 cache architecture (also known as Last Level Cache, or LLC), and can potentially distribute CPU assignments without considering the split L3 cache, causing a noisy neighbor problem. This alpha feature improves the CPU Manager to better assign CPU cores for better performance.
This work was done as part of KEP-5109: Split L3 Cache Topology Awareness in CPU Manager led by SIG Node.
PSI (Pressure Stall Information) metrics for scheduling improvements
This feature adds support on Linux nodes for providing PSI stats and metrics using cgroupv2. It can detect resource shortages and provide nodes with more granular control for pod scheduling.
This work was done as part of KEP-4205: Support PSI based on cgroupv2 led by SIG Node.
Secret-less image pulls with kubelet
The kubelet's on-disk credential provider now supports optional Kubernetes ServiceAccount (SA) token fetching. This simplifies authentication with image registries by allowing cloud providers to better integrate with OIDC compatible identity solutions.
This work was done as part of KEP-4412: Projected service account tokens for Kubelet image credential providers led by SIG Auth.
Graduations, deprecations, and removals in v1.33
Graduations to stable
This lists all the features that have graduated to stable (also known as general availability). For a full list of updates including new features and graduations from alpha to beta, see the release notes.
This release includes a total of 18 enhancements promoted to stable:
- Take taints/tolerations into consideration when calculating PodTopologySpread skew
- Introduce
MatchLabelKeysto Pod Affinity and Pod Anti Affinity - Bound service account token improvements
- Generic data populators
- Multiple Service CIDRs
- Topology Aware Routing
- Portworx file in-tree to CSI driver migration
- Always Honor PersistentVolume Reclaim Policy
- nftables kube-proxy backend
- Deprecate status.nodeInfo.kubeProxyVersion field
- Add subresource support to kubectl
- Backoff Limit Per Index For Indexed Jobs
- Job success/completion policy
- Sidecar Containers
- CRD Validation Ratcheting
- node: cpumanager: add options to reject non SMT-aligned workload
- Traffic Distribution for Services
- Recursive Read-only (RRO) mounts
Deprecations and removals
As Kubernetes develops and matures, features may be deprecated, removed, or replaced with better ones to improve the project's overall health. See the Kubernetes deprecation and removal policy for more details on this process. Many of these deprecations and removals were announced in the Deprecations and Removals blog post.
Deprecation of the stable Endpoints API
The EndpointSlices API has been stable since v1.21, which effectively replaced the original Endpoints API. While the original Endpoints API was simple and straightforward, it also posed some challenges when scaling to large numbers of network endpoints. The EndpointSlices API has introduced new features such as dual-stack networking, making the original Endpoints API ready for deprecation.
This deprecation affects only those who use the Endpoints API directly from workloads or scripts; these users should migrate to use EndpointSlices instead. There will be a dedicated blog post with more details on the deprecation implications and migration plans.
You can find more in KEP-4974: Deprecate v1.Endpoints.
Removal of kube-proxy version information in node status
Following its deprecation in v1.31, as highlighted in the v1.31
release announcement,
the .status.nodeInfo.kubeProxyVersion field for Nodes was removed in v1.33.
This field was set by kubelet, but its value was not consistently accurate. As it has been disabled by default since v1.31, this field has been removed entirely in v1.33.
You can find more in KEP-4004: Deprecate status.nodeInfo.kubeProxyVersion field.
Removal of in-tree gitRepo volume driver
The gitRepo volume type has been deprecated since v1.11, nearly 7 years ago. Since its deprecation, there have been security concerns, including how gitRepo volume types can be exploited to gain remote code execution as root on the nodes. In v1.33, the in-tree driver code is removed.
There are alternatives such as git-sync and initContainers. gitVolumes in the Kubernetes API is
not removed, and thus pods with gitRepo volumes will be admitted by kube-apiserver, but kubelets
with the feature-gate GitRepoVolumeDriver set to false will not run them and return an appropriate
error to the user. This allows users to opt-in to re-enabling the driver for 3 versions to give them
enough time to fix workloads.
The feature gate in kubelet and in-tree plugin code is planned to be removed in the v1.39 release.
You can find more in KEP-5040: Remove gitRepo volume driver.
Removal of host network support for Windows pods
Windows Pod networking aimed to achieve feature parity with Linux and provide better cluster density by allowing containers to use the Node’s networking namespace. The original implementation landed as alpha with v1.26, but because it faced unexpected containerd behaviours and alternative solutions were available, the Kubernetes project has decided to withdraw the associated KEP. Support was fully removed in v1.33.
Please note that this does not affect HostProcess containers, which provides host network as well as host level access. The KEP withdrawn in v1.33 was about providing the host network only, which was never stable due to technical limitations with Windows networking logic.
You can find more in KEP-3503: Host network support for Windows pods.
Release notes
Check out the full details of the Kubernetes v1.33 release in our release notes.
Availability
Kubernetes v1.33 is available for download on GitHub or on the Kubernetes download page.
To get started with Kubernetes, check out these interactive tutorials or run local Kubernetes clusters using minikube. You can also easily install v1.33 using kubeadm.
Release Team
Kubernetes is only possible with the support, commitment, and hard work of its community. Release Team is made up of dedicated community volunteers who work together to build the many pieces that make up the Kubernetes releases you rely on. This requires the specialized skills of people from all corners of our community, from the code itself to its documentation and project management.
We would like to thank the entire Release Team for the hours spent hard at work to deliver the Kubernetes v1.33 release to our community. The Release Team's membership ranges from first-time shadows to returning team leads with experience forged over several release cycles. There was a new team structure adopted in this release cycle, which was to combine Release Notes and Docs subteams into a unified subteam of Docs. Thanks to the meticulous effort in organizing the relevant information and resources from the new Docs team, both Release Notes and Docs tracking have seen a smooth and successful transition. Finally, a very special thanks goes out to our release lead, Nina Polshakova, for her support throughout a successful release cycle, her advocacy, her efforts to ensure that everyone could contribute effectively, and her challenges to improve the release process.
Project velocity
The CNCF K8s DevStats project aggregates several interesting data points related to the velocity of Kubernetes and various subprojects. This includes everything from individual contributions, to the number of companies contributing, and illustrates the depth and breadth of effort that goes into evolving this ecosystem.
During the v1.33 release cycle, which spanned 15 weeks from January 13 to April 23, 2025, Kubernetes received contributions from as many as 121 different companies and 570 individuals (as of writing, a few weeks before the release date). In the wider cloud native ecosystem, the figure goes up to 435 companies counting 2400 total contributors. You can find the data source in this dashboard. Compared to the velocity data from previous release, v1.32, we see a similar level of contribution from companies and individuals, indicating strong community interest and engagement.
Note that, “contribution” counts when someone makes a commit, code review, comment, creates an issue or PR, reviews a PR (including blogs and documentation) or comments on issues and PRs. If you are interested in contributing, visit Getting Started on our contributor website.
Check out DevStats to learn more about the overall velocity of the Kubernetes project and community.
Event update
Explore upcoming Kubernetes and cloud native events, including KubeCon + CloudNativeCon, KCD, and other notable conferences worldwide. Stay informed and get involved with the Kubernetes community!
May 2025
- KCD - Kubernetes Community Days: Costa Rica: May 3, 2025 | Heredia, Costa Rica
- KCD - Kubernetes Community Days: Helsinki: May 6, 2025 | Helsinki, Finland
- KCD - Kubernetes Community Days: Texas Austin: May 15, 2025 | Austin, USA
- KCD - Kubernetes Community Days: Seoul: May 22, 2025 | Seoul, South Korea
- KCD - Kubernetes Community Days: Istanbul, Turkey: May 23, 2025 | Istanbul, Turkey
- KCD - Kubernetes Community Days: San Francisco Bay Area: May 28, 2025 | San Francisco, USA
June 2025
- KCD - Kubernetes Community Days: New York: June 4, 2025 | New York, USA
- KCD - Kubernetes Community Days: Czech & Slovak: June 5, 2025 | Bratislava, Slovakia
- KCD - Kubernetes Community Days: Bengaluru: June 6, 2025 | Bangalore, India
- KubeCon + CloudNativeCon China 2025: June 10-11, 2025 | Hong Kong
- KCD - Kubernetes Community Days: Antigua Guatemala: June 14, 2025 | Antigua Guatemala, Guatemala
- KubeCon + CloudNativeCon Japan 2025: June 16-17, 2025 | Tokyo, Japan
- KCD - Kubernetes Community Days: Nigeria, Africa: June 19, 2025 | Nigeria, Africa
July 2025
- KCD - Kubernetes Community Days: Utrecht: July 4, 2025 | Utrecht, Netherlands
- KCD - Kubernetes Community Days: Taipei: July 5, 2025 | Taipei, Taiwan
- KCD - Kubernetes Community Days: Lima, Peru: July 19, 2025 | Lima, Peru
August 2025
- KubeCon + CloudNativeCon India 2025: August 6-7, 2025 | Hyderabad, India
- KCD - Kubernetes Community Days: Colombia: August 29, 2025 | Bogotá, Colombia
You can find the latest KCD details here.
Upcoming release webinar
Join members of the Kubernetes v1.33 Release Team on Friday, May 16th 2025 at 4:00 PM (UTC), to learn about the release highlights of this release, as well as deprecations and removals to help plan for upgrades. For more information and registration, visit the event page on the CNCF Online Programs site.
Get involved
The simplest way to get involved with Kubernetes is by joining one of the many Special Interest Groups (SIGs) that align with your interests. Have something you’d like to broadcast to the Kubernetes community? Share your voice at our weekly community meeting, and through the channels below. Thank you for your continued feedback and support.
- Follow us on Bluesky @kubernetes.io for the latest updates
- Join the community discussion on Discuss
- Join the community on Slack
- Post questions (or answer questions) on Server Fault or Stack Overflow
- Share your Kubernetes story
- Read more about what’s happening with Kubernetes on the blog
- Learn more about the Kubernetes Release Team
Kubernetes Multicontainer Pods: An Overview
As cloud-native architectures continue to evolve, Kubernetes has become the go-to platform for deploying complex, distributed systems. One of the most powerful yet nuanced design patterns in this ecosystem is the sidecar pattern—a technique that allows developers to extend application functionality without diving deep into source code.
The origins of the sidecar pattern
Think of a sidecar like a trusty companion motorcycle attachment. Historically, IT infrastructures have always used auxiliary services to handle critical tasks. Before containers, we relied on background processes and helper daemons to manage logging, monitoring, and networking. The microservices revolution transformed this approach, making sidecars a structured and intentional architectural choice. With the rise of microservices, the sidecar pattern became more clearly defined, allowing developers to offload specific responsibilities from the main service without altering its code. Service meshes like Istio and Linkerd have popularized sidecar proxies, demonstrating how these companion containers can elegantly handle observability, security, and traffic management in distributed systems.
Kubernetes implementation
In Kubernetes, sidecar containers operate within
the same Pod as the main application, enabling communication and resource sharing.
Does this sound just like defining multiple containers along each other inside the Pod? It actually does, and
this is how sidecar containers had to be implemented before Kubernetes v1.29.0, which introduced
native support for sidecars.
Sidecar containers can now be defined within a Pod manifest using the spec.initContainers field. What makes
it a sidecar container is that you specify it with restartPolicy: Always. You can see an example of this below, which is a partial snippet of the full Kubernetes manifest:
initContainers:
- name: logshipper
image: alpine:latest
restartPolicy: Always
command: ['sh', '-c', 'tail -F /opt/logs.txt']
volumeMounts:
- name: data
mountPath: /opt
That field name, spec.initContainers may sound confusing. How come when you want to define a sidecar container, you have to put an entry in the spec.initContainers array? spec.initContainers are run to completion just before main application starts, so they’re one-off, whereas sidecars often run in parallel to the main app container. It’s the spec.initContainers with restartPolicy:Always which differs classic init containers from Kubernetes-native sidecar containers and ensures they are always up.
When to embrace (or avoid) sidecars
While the sidecar pattern can be useful in many cases, it is generally not the preferred approach unless the use case justifies it. Adding a sidecar increases complexity, resource consumption, and potential network latency. Instead, simpler alternatives such as built-in libraries or shared infrastructure should be considered first.
Deploy a sidecar when:
- You need to extend application functionality without touching the original code
- Implementing cross-cutting concerns like logging, monitoring or security
- Working with legacy applications requiring modern networking capabilities
- Designing microservices that demand independent scaling and updates
Proceed with caution if:
- Resource efficiency is your primary concern
- Minimal network latency is critical
- Simpler alternatives exist
- You want to minimize troubleshooting complexity
Four essential multi-container patterns
Init container pattern
The Init container pattern is used to execute (often critical) setup tasks before the main application container starts. Unlike regular containers, init containers run to completion and then terminate, ensuring that preconditions for the main application are met.
Ideal for:
- Preparing configurations
- Loading secrets
- Verifying dependency availability
- Running database migrations
The init container ensures your application starts in a predictable, controlled environment without code modifications.
Ambassador pattern
An ambassador container provides Pod-local helper services that expose a simple way to access a network service. Commonly, ambassador containers send network requests on behalf of a an application container and take care of challenges such as service discovery, peer identity verification, or encryption in transit.
Perfect when you need to:
- Offload client connectivity concerns
- Implement language-agnostic networking features
- Add security layers like TLS
- Create robust circuit breakers and retry mechanisms
Configuration helper
A configuration helper sidecar provides configuration updates to an application dynamically, ensuring it always has access to the latest settings without disrupting the service. Often the helper needs to provide an initial configuration before the application would be able to start successfully.
Use cases:
- Fetching environment variables and secrets
- Polling configuration changes
- Decoupling configuration management from application logic
Adapter pattern
An adapter (or sometimes façade) container enables interoperability between the main application container and external services. It does this by translating data formats, protocols, or APIs.
Strengths:
- Transforming legacy data formats
- Bridging communication protocols
- Facilitating integration between mismatched services
Wrap-up
While sidecar patterns offer tremendous flexibility, they're not a silver bullet. Each added sidecar introduces complexity, consumes resources, and potentially increases operational overhead. Always evaluate simpler alternatives first. The key is strategic implementation: use sidecars as precision tools to solve specific architectural challenges, not as a default approach. When used correctly, they can improve security, networking, and configuration management in containerized environments. Choose wisely, implement carefully, and let your sidecars elevate your container ecosystem.
Introducing kube-scheduler-simulator
The Kubernetes Scheduler is a crucial control plane component that determines which node a Pod will run on. Thus, anyone utilizing Kubernetes relies on a scheduler.
kube-scheduler-simulator is a simulator for the Kubernetes scheduler, that started as a Google Summer of Code 2021 project developed by me (Kensei Nakada) and later received a lot of contributions. This tool allows users to closely examine the scheduler’s behavior and decisions.
It is useful for casual users who employ scheduling constraints (for example, inter-Pod affinity) and experts who extend the scheduler with custom plugins.
Motivation
The scheduler often appears as a black box, composed of many plugins that each contribute to the scheduling decision-making process from their unique perspectives. Understanding its behavior can be challenging due to the multitude of factors it considers.
Even if a Pod appears to be scheduled correctly in a simple test cluster, it might have been scheduled based on different calculations than expected. This discrepancy could lead to unexpected scheduling outcomes when deployed in a large production environment.
Also, testing a scheduler is a complex challenge. There are countless patterns of operations executed within a real cluster, making it unfeasible to anticipate every scenario with a finite number of tests. More often than not, bugs are discovered only when the scheduler is deployed in an actual cluster. Actually, many bugs are found by users after shipping the release, even in the upstream kube-scheduler.
Having a development or sandbox environment for testing the scheduler — or, indeed, any Kubernetes controllers — is a common practice. However, this approach falls short of capturing all the potential scenarios that might arise in a production cluster because a development cluster is often much smaller with notable differences in workload sizes and scaling dynamics. It never sees the exact same use or exhibits the same behavior as its production counterpart.
The kube-scheduler-simulator aims to solve those problems. It enables users to test their scheduling constraints, scheduler configurations, and custom plugins while checking every detailed part of scheduling decisions. It also allows users to create a simulated cluster environment, where they can test their scheduler with the same resources as their production cluster without affecting actual workloads.
Features of the kube-scheduler-simulator
The kube-scheduler-simulator’s core feature is its ability to expose the scheduler's internal decisions. The scheduler operates based on the scheduling framework, using various plugins at different extension points, filter nodes (Filter phase), score nodes (Score phase), and ultimately determine the best node for the Pod.
The simulator allows users to create Kubernetes resources and observe how each plugin influences the scheduling decisions for Pods. This visibility helps users understand the scheduler’s workings and define appropriate scheduling constraints.
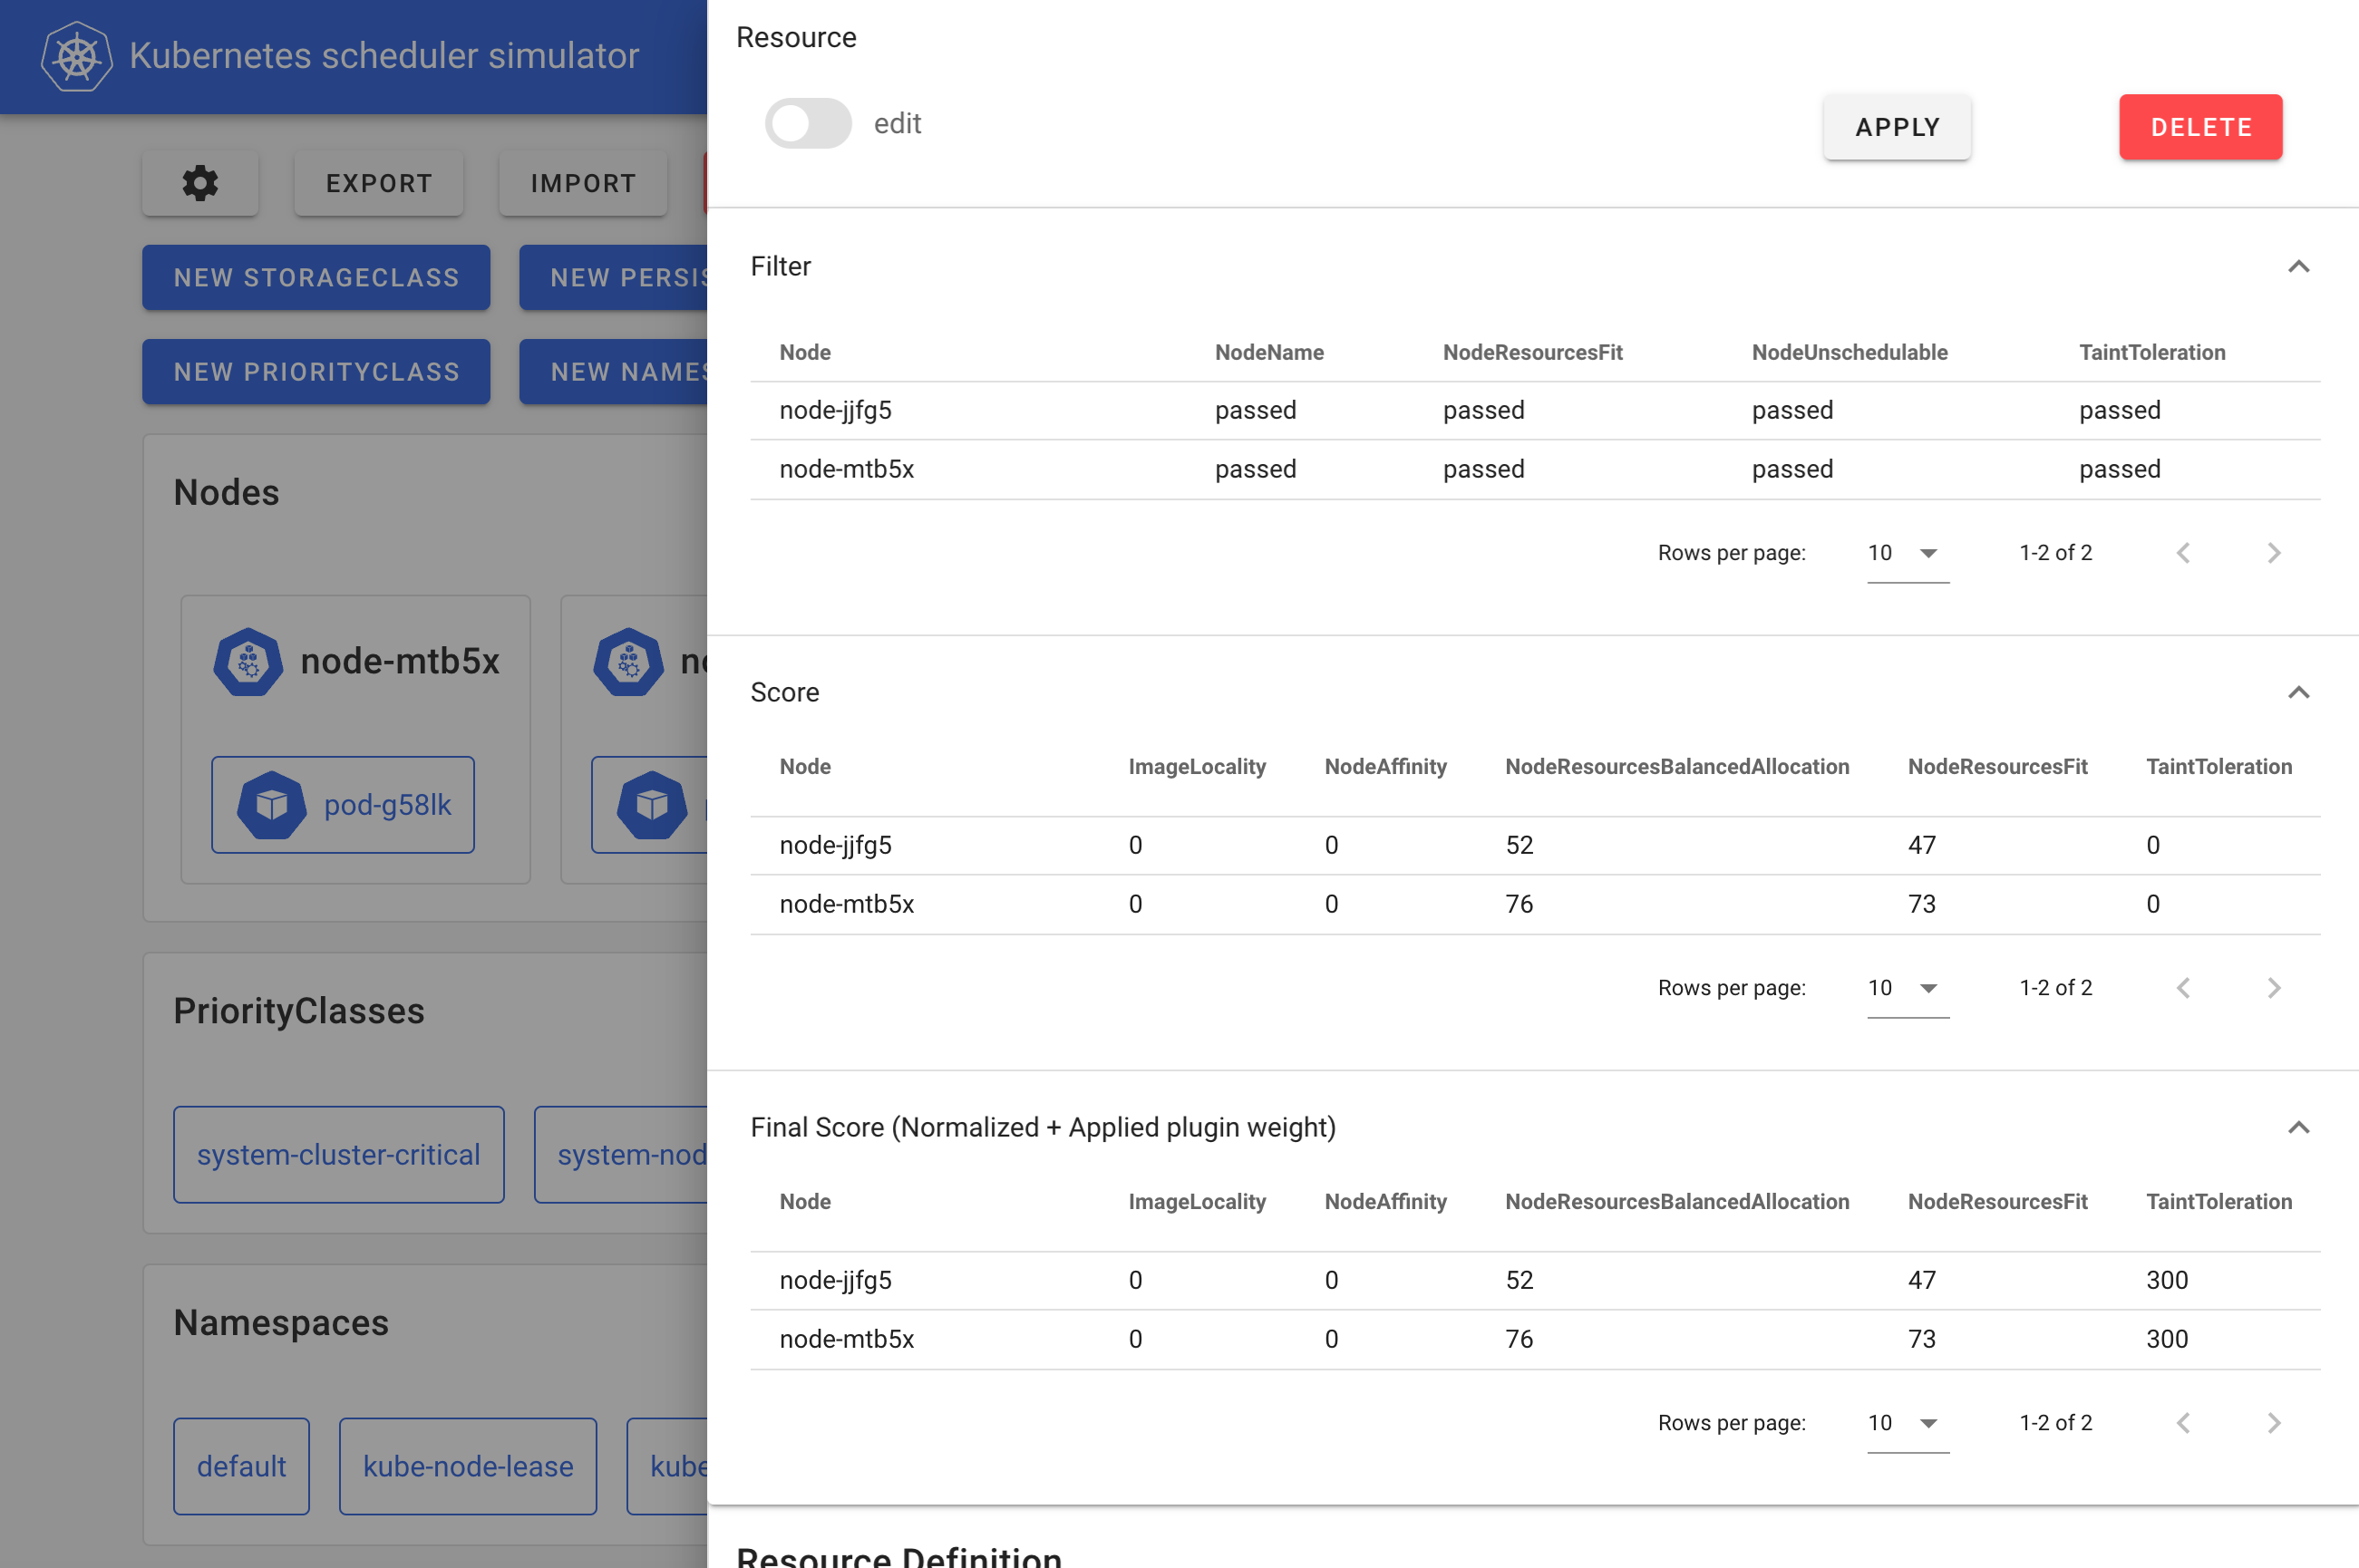
The simulator web frontend
Inside the simulator, a debuggable scheduler runs instead of the vanilla scheduler. This debuggable scheduler outputs the results of each scheduler plugin at every extension point to the Pod’s annotations like the following manifest shows and the web front end formats/visualizes the scheduling results based on these annotations.
kind: Pod
apiVersion: v1
metadata:
# The JSONs within these annotations are manually formatted for clarity in the blog post.
annotations:
kube-scheduler-simulator.sigs.k8s.io/bind-result: '{"DefaultBinder":"success"}'
kube-scheduler-simulator.sigs.k8s.io/filter-result: >-
{
"node-jjfg5":{
"NodeName":"passed",
"NodeResourcesFit":"passed",
"NodeUnschedulable":"passed",
"TaintToleration":"passed"
},
"node-mtb5x":{
"NodeName":"passed",
"NodeResourcesFit":"passed",
"NodeUnschedulable":"passed",
"TaintToleration":"passed"
}
}
kube-scheduler-simulator.sigs.k8s.io/finalscore-result: >-
{
"node-jjfg5":{
"ImageLocality":"0",
"NodeAffinity":"0",
"NodeResourcesBalancedAllocation":"52",
"NodeResourcesFit":"47",
"TaintToleration":"300",
"VolumeBinding":"0"
},
"node-mtb5x":{
"ImageLocality":"0",
"NodeAffinity":"0",
"NodeResourcesBalancedAllocation":"76",
"NodeResourcesFit":"73",
"TaintToleration":"300",
"VolumeBinding":"0"
}
}
kube-scheduler-simulator.sigs.k8s.io/permit-result: '{}'
kube-scheduler-simulator.sigs.k8s.io/permit-result-timeout: '{}'
kube-scheduler-simulator.sigs.k8s.io/postfilter-result: '{}'
kube-scheduler-simulator.sigs.k8s.io/prebind-result: '{"VolumeBinding":"success"}'
kube-scheduler-simulator.sigs.k8s.io/prefilter-result: '{}'
kube-scheduler-simulator.sigs.k8s.io/prefilter-result-status: >-
{
"AzureDiskLimits":"",
"EBSLimits":"",
"GCEPDLimits":"",
"InterPodAffinity":"",
"NodeAffinity":"",
"NodePorts":"",
"NodeResourcesFit":"success",
"NodeVolumeLimits":"",
"PodTopologySpread":"",
"VolumeBinding":"",
"VolumeRestrictions":"",
"VolumeZone":""
}
kube-scheduler-simulator.sigs.k8s.io/prescore-result: >-
{
"InterPodAffinity":"",
"NodeAffinity":"success",
"NodeResourcesBalancedAllocation":"success",
"NodeResourcesFit":"success",
"PodTopologySpread":"",
"TaintToleration":"success"
}
kube-scheduler-simulator.sigs.k8s.io/reserve-result: '{"VolumeBinding":"success"}'
kube-scheduler-simulator.sigs.k8s.io/result-history: >-
[
{
"kube-scheduler-simulator.sigs.k8s.io/bind-result":"{\"DefaultBinder\":\"success\"}",
"kube-scheduler-simulator.sigs.k8s.io/filter-result":"{\"node-jjfg5\":{\"NodeName\":\"passed\",\"NodeResourcesFit\":\"passed\",\"NodeUnschedulable\":\"passed\",\"TaintToleration\":\"passed\"},\"node-mtb5x\":{\"NodeName\":\"passed\",\"NodeResourcesFit\":\"passed\",\"NodeUnschedulable\":\"passed\",\"TaintToleration\":\"passed\"}}",
"kube-scheduler-simulator.sigs.k8s.io/finalscore-result":"{\"node-jjfg5\":{\"ImageLocality\":\"0\",\"NodeAffinity\":\"0\",\"NodeResourcesBalancedAllocation\":\"52\",\"NodeResourcesFit\":\"47\",\"TaintToleration\":\"300\",\"VolumeBinding\":\"0\"},\"node-mtb5x\":{\"ImageLocality\":\"0\",\"NodeAffinity\":\"0\",\"NodeResourcesBalancedAllocation\":\"76\",\"NodeResourcesFit\":\"73\",\"TaintToleration\":\"300\",\"VolumeBinding\":\"0\"}}",
"kube-scheduler-simulator.sigs.k8s.io/permit-result":"{}",
"kube-scheduler-simulator.sigs.k8s.io/permit-result-timeout":"{}",
"kube-scheduler-simulator.sigs.k8s.io/postfilter-result":"{}",
"kube-scheduler-simulator.sigs.k8s.io/prebind-result":"{\"VolumeBinding\":\"success\"}",
"kube-scheduler-simulator.sigs.k8s.io/prefilter-result":"{}",
"kube-scheduler-simulator.sigs.k8s.io/prefilter-result-status":"{\"AzureDiskLimits\":\"\",\"EBSLimits\":\"\",\"GCEPDLimits\":\"\",\"InterPodAffinity\":\"\",\"NodeAffinity\":\"\",\"NodePorts\":\"\",\"NodeResourcesFit\":\"success\",\"NodeVolumeLimits\":\"\",\"PodTopologySpread\":\"\",\"VolumeBinding\":\"\",\"VolumeRestrictions\":\"\",\"VolumeZone\":\"\"}",
"kube-scheduler-simulator.sigs.k8s.io/prescore-result":"{\"InterPodAffinity\":\"\",\"NodeAffinity\":\"success\",\"NodeResourcesBalancedAllocation\":\"success\",\"NodeResourcesFit\":\"success\",\"PodTopologySpread\":\"\",\"TaintToleration\":\"success\"}",
"kube-scheduler-simulator.sigs.k8s.io/reserve-result":"{\"VolumeBinding\":\"success\"}",
"kube-scheduler-simulator.sigs.k8s.io/score-result":"{\"node-jjfg5\":{\"ImageLocality\":\"0\",\"NodeAffinity\":\"0\",\"NodeResourcesBalancedAllocation\":\"52\",\"NodeResourcesFit\":\"47\",\"TaintToleration\":\"0\",\"VolumeBinding\":\"0\"},\"node-mtb5x\":{\"ImageLocality\":\"0\",\"NodeAffinity\":\"0\",\"NodeResourcesBalancedAllocation\":\"76\",\"NodeResourcesFit\":\"73\",\"TaintToleration\":\"0\",\"VolumeBinding\":\"0\"}}",
"kube-scheduler-simulator.sigs.k8s.io/selected-node":"node-mtb5x"
}
]
kube-scheduler-simulator.sigs.k8s.io/score-result: >-
{
"node-jjfg5":{
"ImageLocality":"0",
"NodeAffinity":"0",
"NodeResourcesBalancedAllocation":"52",
"NodeResourcesFit":"47",
"TaintToleration":"0",
"VolumeBinding":"0"
},
"node-mtb5x":{
"ImageLocality":"0",
"NodeAffinity":"0",
"NodeResourcesBalancedAllocation":"76",
"NodeResourcesFit":"73",
"TaintToleration":"0",
"VolumeBinding":"0"
}
}
kube-scheduler-simulator.sigs.k8s.io/selected-node: node-mtb5x
Users can also integrate their custom plugins or extenders, into the debuggable scheduler and visualize their results.
This debuggable scheduler can also run standalone, for example, on any Kubernetes cluster or in integration tests. This would be useful to custom plugin developers who want to test their plugins or examine their custom scheduler in a real cluster with better debuggability.
The simulator as a better dev cluster
As mentioned earlier, with a limited set of tests, it is impossible to predict every possible scenario in a real-world cluster. Typically, users will test the scheduler in a small, development cluster before deploying it to production, hoping that no issues arise.
The simulator’s importing feature provides a solution by allowing users to simulate deploying a new scheduler version in a production-like environment without impacting their live workloads.
By continuously syncing between a production cluster and the simulator, users can safely test a new scheduler version with the same resources their production cluster handles. Once confident in its performance, they can proceed with the production deployment, reducing the risk of unexpected issues.
What are the use cases?
- Cluster users: Examine if scheduling constraints (for example, PodAffinity, PodTopologySpread) work as intended.
- Cluster admins: Assess how a cluster would behave with changes to the scheduler configuration.
- Scheduler plugin developers: Test a custom scheduler plugins or extenders, use the debuggable scheduler in integration tests or development clusters, or use the syncing feature for testing within a production-like environment.
Getting started
The simulator only requires Docker to be installed on a machine; a Kubernetes cluster is not necessary.
git clone git@github.com:kubernetes-sigs/kube-scheduler-simulator.git
cd kube-scheduler-simulator
make docker_up
You can then access the simulator's web UI at http://localhost:3000.
Visit the kube-scheduler-simulator repository for more details!
Getting involved
The scheduler simulator is developed by Kubernetes SIG Scheduling. Your feedback and contributions are welcome!
Open issues or PRs at the kube-scheduler-simulator repository. Join the conversation on the #sig-scheduling slack channel.
Acknowledgments
The simulator has been maintained by dedicated volunteer engineers, overcoming many challenges to reach its current form.
A big shout out to all the awesome contributors!
Kubernetes v1.33 sneak peek
As the release of Kubernetes v1.33 approaches, the Kubernetes project continues to evolve. Features may be deprecated, removed, or replaced to improve the overall health of the project. This blog post outlines some planned changes for the v1.33 release, which the release team believes you should be aware of to ensure the continued smooth operation of your Kubernetes environment and to keep you up-to-date with the latest developments. The information below is based on the current status of the v1.33 release and is subject to change before the final release date.
The Kubernetes API removal and deprecation process
The Kubernetes project has a well-documented deprecation policy for features. This policy states that stable APIs may only be deprecated when a newer, stable version of that same API is available and that APIs have a minimum lifetime for each stability level. A deprecated API has been marked for removal in a future Kubernetes release. It will continue to function until removal (at least one year from the deprecation), but usage will result in a warning being displayed. Removed APIs are no longer available in the current version, at which point you must migrate to using the replacement.
Generally available (GA) or stable API versions may be marked as deprecated but must not be removed within a major version of Kubernetes.
Beta or pre-release API versions must be supported for 3 releases after the deprecation.
Alpha or experimental API versions may be removed in any release without prior deprecation notice; this process can become a withdrawal in cases where a different implementation for the same feature is already in place.
Whether an API is removed as a result of a feature graduating from beta to stable, or because that API simply did not succeed, all removals comply with this deprecation policy. Whenever an API is removed, migration options are communicated in the deprecation guide.
Deprecations and removals for Kubernetes v1.33
Deprecation of the stable Endpoints API
The EndpointSlices API has been stable since v1.21, which effectively replaced the original Endpoints API. While the original Endpoints API was simple and straightforward, it also posed some challenges when scaling to large numbers of network endpoints. The EndpointSlices API has introduced new features such as dual-stack networking, making the original Endpoints API ready for deprecation.
This deprecation only impacts those who use the Endpoints API directly from workloads or scripts; these users should migrate to use EndpointSlices instead. There will be a dedicated blog post with more details on the deprecation implications and migration plans in the coming weeks.
You can find more in KEP-4974: Deprecate v1.Endpoints.
Removal of kube-proxy version information in node status
Following its deprecation in v1.31, as highlighted in the release announcement, the status.nodeInfo.kubeProxyVersion field will be removed in v1.33. This field was set by kubelet, but its value was not consistently accurate. As it has been disabled by default since v1.31, the v1.33 release will remove this field entirely.
You can find more in KEP-4004: Deprecate status.nodeInfo.kubeProxyVersion field.
Removal of host network support for Windows pods
Windows Pod networking aimed to achieve feature parity with Linux and provide better cluster density by allowing containers to use the Node’s networking namespace. The original implementation landed as alpha with v1.26, but as it faced unexpected containerd behaviours, and alternative solutions were available, the Kubernetes project has decided to withdraw the associated KEP. We're expecting to see support fully removed in v1.33.
You can find more in KEP-3503: Host network support for Windows pods.
Featured improvement of Kubernetes v1.33
As authors of this article, we picked one improvement as the most significant change to call out!
Support for user namespaces within Linux Pods
One of the oldest open KEPs today is KEP-127, Pod security improvement by using Linux User namespaces for Pods. This KEP was first opened in late 2016, and after multiple iterations, had its alpha release in v1.25, initial beta in v1.30 (where it was disabled by default), and now is set to be a part of v1.33, where the feature is available by default.
This support will not impact existing Pods unless you manually specify pod.spec.hostUsers to opt in. As highlighted in the v1.30 sneak peek blog, this is an important milestone for mitigating vulnerabilities.
You can find more in KEP-127: Support User Namespaces in pods.
Selected other Kubernetes v1.33 improvements
The following list of enhancements is likely to be included in the upcoming v1.33 release. This is not a commitment and the release content is subject to change.
In-place resource resize for vertical scaling of Pods
When provisioning a Pod, you can use various resources such as Deployment, StatefulSet, etc. Scalability requirements may need horizontal scaling by updating the Pod replica count, or vertical scaling by updating resources allocated to Pod’s container(s). Before this enhancement, container resources defined in a Pod's spec were immutable, and updating any of these details within a Pod template would trigger Pod replacement.
But what if you could dynamically update the resource configuration for your existing Pods without restarting them?
The KEP-1287 is precisely to allow such in-place Pod updates. It opens up various possibilities of vertical scale-up for stateful processes without any downtime, seamless scale-down when the traffic is low, and even allocating larger resources during startup that is eventually reduced once the initial setup is complete. This was released as alpha in v1.27, and is expected to land as beta in v1.33.
You can find more in KEP-1287: In-Place Update of Pod Resources.
DRA’s ResourceClaim Device Status graduates to beta
The devices field in ResourceClaim status, originally introduced in the v1.32 release, is likely to graduate to beta in v1.33. This field allows drivers to report device status data, improving both observability and troubleshooting capabilities.
For example, reporting the interface name, MAC address, and IP addresses of network interfaces in the status of a ResourceClaim can significantly help in configuring and managing network services, as well as in debugging network related issues. You can read more about ResourceClaim Device Status in Dynamic Resource Allocation: ResourceClaim Device Status document.
Also, you can find more about the planned enhancement in KEP-4817: DRA: Resource Claim Status with possible standardized network interface data.
Ordered namespace deletion
This KEP introduces a more structured deletion process for Kubernetes namespaces to ensure secure and deterministic resource removal. The current semi-random deletion order can create security gaps or unintended behaviour, such as Pods persisting after their associated NetworkPolicies are deleted. By enforcing a structured deletion sequence that respects logical and security dependencies, this approach ensures Pods are removed before other resources. The design improves Kubernetes’s security and reliability by mitigating risks associated with non-deterministic deletions.
You can find more in KEP-5080: Ordered namespace deletion.
Enhancements for indexed job management
These two KEPs are both set to graduate to GA to provide better reliability for job handling, specifically for indexed jobs. KEP-3850 provides per-index backoff limits for indexed jobs, which allows each index to be fully independent of other indexes. Also, KEP-3998 extends Job API to define conditions for making an indexed job as successfully completed when not all indexes are succeeded.
You can find more in KEP-3850: Backoff Limit Per Index For Indexed Jobs and KEP-3998: Job success/completion policy.
Want to know more?
New features and deprecations are also announced in the Kubernetes release notes. We will formally announce what's new in Kubernetes v1.33 as part of the CHANGELOG for that release.
Kubernetes v1.33 release is planned for Wednesday, 23rd April, 2025. Stay tuned for updates!
You can also see the announcements of changes in the release notes for:
Get involved
The simplest way to get involved with Kubernetes is by joining one of the many Special Interest Groups (SIGs) that align with your interests. Have something you’d like to broadcast to the Kubernetes community? Share your voice at our weekly community meeting, and through the channels below. Thank you for your continued feedback and support.
- Follow us on Bluesky @kubernetes.io for the latest updates
- Join the community discussion on Discuss
- Join the community on Slack
- Post questions (or answer questions) on Server Fault or Stack Overflow
- Share your Kubernetes story
- Read more about what’s happening with Kubernetes on the blog
- Learn more about the Kubernetes Release Team
Fresh Swap Features for Linux Users in Kubernetes 1.32
Swap is a fundamental and an invaluable Linux feature. It offers numerous benefits, such as effectively increasing a node’s memory by swapping out unused data, shielding nodes from system-level memory spikes, preventing Pods from crashing when they hit their memory limits, and much more. As a result, the node special interest group within the Kubernetes project has invested significant effort into supporting swap on Linux nodes.
The 1.22 release introduced Alpha support for configuring swap memory usage for Kubernetes workloads running on Linux on a per-node basis. Later, in release 1.28, support for swap on Linux nodes has graduated to Beta, along with many new improvements. In the following Kubernetes releases more improvements were made, paving the way to GA in the near future.
Prior to version 1.22, Kubernetes did not provide support for swap memory on Linux systems. This was due to the inherent difficulty in guaranteeing and accounting for pod memory utilization when swap memory was involved. As a result, swap support was deemed out of scope in the initial design of Kubernetes, and the default behavior of a kubelet was to fail to start if swap memory was detected on a node.
In version 1.22, the swap feature for Linux was initially introduced in its Alpha stage. This provided Linux users the opportunity to experiment with the swap feature for the first time. However, as an Alpha version, it was not fully developed and only partially worked on limited environments.
In version 1.28 swap support on Linux nodes was promoted to Beta.
The Beta version was a drastic leap forward.
Not only did it fix a large amount of bugs and made swap work in a stable way,
but it also brought cgroup v2 support, introduced a wide variety of tests
which include complex scenarios such as node-level pressure, and more.
It also brought many exciting new capabilities such as the LimitedSwap behavior
which sets an auto-calculated swap limit to containers, OpenMetrics instrumentation
support (through the /metrics/resource endpoint) and Summary API for
VerticalPodAutoscalers (through the /stats/summary endpoint), and more.
Today we are working on more improvements, paving the way for GA.
Currently, the focus is especially towards ensuring node stability,
enhanced debug abilities, addressing user feedback,
polishing the feature and making it stable.
For example, in order to increase stability, containers in high-priority pods
cannot access swap which ensures the memory they need is ready to use.
In addition, the UnlimitedSwap behavior was removed since it might compromise
the node's health.
Secret content protection against swapping has also been introduced
(see relevant security-risk section for more info).
To conclude, compared to previous releases, the kubelet's support for running with swap enabled is more stable and robust, more user-friendly, and addresses many known shortcomings. That said, the NodeSwap feature introduces basic swap support, and this is just the beginning. In the near future, additional features are planned to enhance swap functionality in various ways, such as improving evictions, extending the API, increasing customizability, and more!
How do I use it?
In order for the kubelet to initialize on a swap-enabled node, the failSwapOn
field must be set to false on kubelet's configuration setting, or the deprecated
--fail-swap-on command line flag must be deactivated.
It is possible to configure the memorySwap.swapBehavior option to define the
manner in which a node utilizes swap memory.
For instance,
# this fragment goes into the kubelet's configuration file
memorySwap:
swapBehavior: LimitedSwap
The currently available configuration options for swapBehavior are:
NoSwap(default): Kubernetes workloads cannot use swap. However, processes outside of Kubernetes' scope, like system daemons (such as kubelet itself!) can utilize swap. This behavior is beneficial for protecting the node from system-level memory spikes, but it does not safeguard the workloads themselves from such spikes.LimitedSwap: Kubernetes workloads can utilize swap memory, but with certain limitations. The amount of swap available to a Pod is determined automatically, based on the proportion of the memory requested relative to the node's total memory. Only non-high-priority Pods under the Burstable Quality of Service (QoS) tier are permitted to use swap. For more details, see the section below.
If configuration for memorySwap is not specified,
by default the kubelet will apply the same behaviour as the NoSwap setting.
On Linux nodes, Kubernetes only supports running with swap enabled for hosts that use cgroup v2. On cgroup v1 systems, all Kubernetes workloads are not allowed to use swap memory.
Install a swap-enabled cluster with kubeadm
Before you begin
It is required for this demo that the kubeadm tool be installed, following the steps outlined in the kubeadm installation guide. If swap is already enabled on the node, cluster creation may proceed. If swap is not enabled, please refer to the provided instructions for enabling swap.
Create a swap file and turn swap on
I'll demonstrate creating 4GiB of swap, both in the encrypted and unencrypted case.
Setting up unencrypted swap
An unencrypted swap file can be set up as follows.
# Allocate storage and restrict access
fallocate --length 4GiB /swapfile
chmod 600 /swapfile
# Format the swap space
mkswap /swapfile
# Activate the swap space for paging
swapon /swapfile
Setting up encrypted swap
An encrypted swap file can be set up as follows.
Bear in mind that this example uses the cryptsetup binary (which is available
on most Linux distributions).
# Allocate storage and restrict access
fallocate --length 4GiB /swapfile
chmod 600 /swapfile
# Create an encrypted device backed by the allocated storage
cryptsetup --type plain --cipher aes-xts-plain64 --key-size 256 -d /dev/urandom open /swapfile cryptswap
# Format the swap space
mkswap /dev/mapper/cryptswap
# Activate the swap space for paging
swapon /dev/mapper/cryptswap
Verify that swap is enabled
Swap can be verified to be enabled with both swapon -s command or the free command
> swapon -s
Filename Type Size Used Priority
/dev/dm-0 partition 4194300 0 -2
> free -h
total used free shared buff/cache available
Mem: 3.8Gi 1.3Gi 249Mi 25Mi 2.5Gi 2.5Gi
Swap: 4.0Gi 0B 4.0Gi
Enable swap on boot
After setting up swap, to start the swap file at boot time,
you either set up a systemd unit to activate (encrypted) swap, or you
add a line similar to /swapfile swap swap defaults 0 0 into /etc/fstab.
Set up a Kubernetes cluster that uses swap-enabled nodes
To make things clearer, here is an example kubeadm configuration file kubeadm-config.yaml for the swap enabled cluster.
---
apiVersion: "kubeadm.k8s.io/v1beta3"
kind: InitConfiguration
---
apiVersion: kubelet.config.k8s.io/v1beta1
kind: KubeletConfiguration
failSwapOn: false
memorySwap:
swapBehavior: LimitedSwap
Then create a single-node cluster using kubeadm init --config kubeadm-config.yaml.
During init, there is a warning that swap is enabled on the node and in case the kubelet
failSwapOn is set to true. We plan to remove this warning in a future release.
How is the swap limit being determined with LimitedSwap?
The configuration of swap memory, including its limitations, presents a significant challenge. Not only is it prone to misconfiguration, but as a system-level property, any misconfiguration could potentially compromise the entire node rather than just a specific workload. To mitigate this risk and ensure the health of the node, we have implemented Swap with automatic configuration of limitations.
With LimitedSwap, Pods that do not fall under the Burstable QoS classification (i.e.
BestEffort/Guaranteed QoS Pods) are prohibited from utilizing swap memory.
BestEffort QoS Pods exhibit unpredictable memory consumption patterns and lack
information regarding their memory usage, making it difficult to determine a safe
allocation of swap memory.
Conversely, Guaranteed QoS Pods are typically employed for applications that rely on the
precise allocation of resources specified by the workload, with memory being immediately available.
To maintain the aforementioned security and node health guarantees,
these Pods are not permitted to use swap memory when LimitedSwap is in effect.
In addition, high-priority pods are not permitted to use swap in order to ensure the memory
they consume always residents on disk, hence ready to use.
Prior to detailing the calculation of the swap limit, it is necessary to define the following terms:
nodeTotalMemory: The total amount of physical memory available on the node.totalPodsSwapAvailable: The total amount of swap memory on the node that is available for use by Pods (some swap memory may be reserved for system use).containerMemoryRequest: The container's memory request.
Swap limitation is configured as:
(containerMemoryRequest / nodeTotalMemory) × totalPodsSwapAvailable
In other words, the amount of swap that a container is able to use is proportionate to its memory request, the node's total physical memory and the total amount of swap memory on the node that is available for use by Pods.
It is important to note that, for containers within Burstable QoS Pods, it is possible to opt-out of swap usage by specifying memory requests that are equal to memory limits. Containers configured in this manner will not have access to swap memory.
How does it work?
There are a number of possible ways that one could envision swap use on a node. When swap is already provisioned and available on a node, the kubelet is able to be configured so that:
- It can start with swap on.
- It will direct the Container Runtime Interface to allocate zero swap memory to Kubernetes workloads by default.
Swap configuration on a node is exposed to a cluster admin via the
memorySwap in the KubeletConfiguration.
As a cluster administrator, you can specify the node's behaviour in the
presence of swap memory by setting memorySwap.swapBehavior.
The kubelet employs the CRI
(container runtime interface) API, and directs the container runtime to
configure specific cgroup v2 parameters (such as memory.swap.max) in a manner that will
enable the desired swap configuration for a container. For runtimes that use control groups,
the container runtime is then responsible for writing these settings to the container-level cgroup.
How can I monitor swap?
Node and container level metric statistics
Kubelet now collects node and container level metric statistics,
which can be accessed at the /metrics/resource (which is used mainly by monitoring
tools like Prometheus) and /stats/summary (which is used mainly by Autoscalers) kubelet HTTP endpoints.
This allows clients who can directly interrogate the kubelet to
monitor swap usage and remaining swap memory when using LimitedSwap.
Additionally, a machine_swap_bytes metric has been added to cadvisor to show
the total physical swap capacity of the machine.
See this page for more info.
Node Feature Discovery (NFD)
Node Feature Discovery is a Kubernetes addon for detecting hardware features and configuration. It can be utilized to discover which nodes are provisioned with swap.
As an example, to figure out which nodes are provisioned with swap, use the following command:
kubectl get nodes -o jsonpath='{range .items[?(@.metadata.labels.feature\.node\.kubernetes\.io/memory-swap)]}{.metadata.name}{"\t"}{.metadata.labels.feature\.node\.kubernetes\.io/memory-swap}{"\n"}{end}'
This will result in an output similar to:
k8s-worker1: true
k8s-worker2: true
k8s-worker3: false
In this example, swap is provisioned on nodes k8s-worker1 and k8s-worker2, but not on k8s-worker3.
Caveats
Having swap available on a system reduces predictability. While swap can enhance performance by making more RAM available, swapping data back to memory is a heavy operation, sometimes slower by many orders of magnitude, which can cause unexpected performance regressions. Furthermore, swap changes a system's behaviour under memory pressure. Enabling swap increases the risk of noisy neighbors, where Pods that frequently use their RAM may cause other Pods to swap. In addition, since swap allows for greater memory usage for workloads in Kubernetes that cannot be predictably accounted for, and due to unexpected packing configurations, the scheduler currently does not account for swap memory usage. This heightens the risk of noisy neighbors.
The performance of a node with swap memory enabled depends on the underlying physical storage. When swap memory is in use, performance will be significantly worse in an I/O operations per second (IOPS) constrained environment, such as a cloud VM with I/O throttling, when compared to faster storage mediums like solid-state drives or NVMe. As swap might cause IO pressure, it is recommended to give a higher IO latency priority to system critical daemons. See the relevant section in the recommended practices section below.
Memory-backed volumes
On Linux nodes, memory-backed volumes (such as secret
volume mounts, or emptyDir with medium: Memory)
are implemented with a tmpfs filesystem.
The contents of such volumes should remain in memory at all times, hence should
not be swapped to disk.
To ensure the contents of such volumes remain in memory, the noswap tmpfs option
is being used.
The Linux kernel officially supports the noswap option from version 6.3 (more info
can be found in Linux Kernel Version Requirements).
However, the different distributions often choose to backport this mount option to older
Linux versions as well.
In order to verify whether the node supports the noswap option, the kubelet will do the following:
- If the kernel's version is above 6.3 then the
noswapoption will be assumed to be supported. - Otherwise, kubelet would try to mount a dummy tmpfs with the
noswapoption at startup. If kubelet fails with an error indicating of an unknown option,noswapwill be assumed to not be supported, hence will not be used. A kubelet log entry will be emitted to warn the user about memory-backed volumes might swap to disk. If kubelet succeeds, the dummy tmpfs will be deleted and thenoswapoption will be used.- If the
noswapoption is not supported, kubelet will emit a warning log entry, then continue its execution.
- If the
It is deeply encouraged to encrypt the swap space. See the section above with an example for setting unencrypted swap. However, handling encrypted swap is not within the scope of kubelet; rather, it is a general OS configuration concern and should be addressed at that level. It is the administrator's responsibility to provision encrypted swap to mitigate this risk.
Good practice for using swap in a Kubernetes cluster
Disable swap for system-critical daemons
During the testing phase and based on user feedback, it was observed that the performance
of system-critical daemons and services might degrade.
This implies that system daemons, including the kubelet, could operate slower than usual.
If this issue is encountered, it is advisable to configure the cgroup of the system slice
to prevent swapping (i.e., set memory.swap.max=0).
Protect system-critical daemons for I/O latency
Swap can increase the I/O load on a node. When memory pressure causes the kernel to rapidly swap pages in and out, system-critical daemons and services that rely on I/O operations may experience performance degradation.
To mitigate this, it is recommended for systemd users to prioritize the system slice in terms of I/O latency.
For non-systemd users,
setting up a dedicated cgroup for system daemons and processes and prioritizing I/O latency in the same way is advised.
This can be achieved by setting io.latency for the system slice,
thereby granting it higher I/O priority.
See cgroup's documentation for more info.
Swap and control plane nodes
The Kubernetes project recommends running control plane nodes without any swap space configured. The control plane primarily hosts Guaranteed QoS Pods, so swap can generally be disabled. The main concern is that swapping critical services on the control plane could negatively impact performance.
Use of a dedicated disk for swap
It is recommended to use a separate, encrypted disk for the swap partition. If swap resides on a partition or the root filesystem, workloads may interfere with system processes that need to write to disk. When they share the same disk, processes can overwhelm swap, disrupting the I/O of kubelet, container runtime, and systemd, which would impact other workloads. Since swap space is located on a disk, it is crucial to ensure the disk is fast enough for the intended use cases. Alternatively, one can configure I/O priorities between different mapped areas of a single backing device.
Looking ahead
As you can see, the swap feature was dramatically improved lately, paving the way for a feature GA. However, this is just the beginning. It's a foundational implementation marking the beginning of enhanced swap functionality.
In the near future, additional features are planned to further improve swap capabilities, including better eviction mechanisms, extended API support, increased customizability, better debug abilities and more!
How can I learn more?
You can review the current documentation for using swap with Kubernetes.
For more information, please see KEP-2400 and its design proposal.
How do I get involved?
Your feedback is always welcome! SIG Node meets regularly and can be reached via Slack (channel #sig-node), or the SIG's mailing list. A Slack channel dedicated to swap is also available at #sig-node-swap.
Feel free to reach out to me, Itamar Holder (@iholder101 on Slack and GitHub) if you'd like to help or ask further questions.
Ingress-nginx CVE-2025-1974: What You Need to Know
Today, the ingress-nginx maintainers have released patches for a batch of critical vulnerabilities that could make it easy for attackers to take over your Kubernetes cluster: ingress-nginx v1.12.1 and ingress-nginx v1.11.5. If you are among the over 40% of Kubernetes administrators using ingress-nginx, you should take action immediately to protect your users and data.
Background
Ingress is the traditional Kubernetes feature for exposing your workload Pods to the world so that they can be useful. In an implementation-agnostic way, Kubernetes users can define how their applications should be made available on the network. Then, an ingress controller uses that definition to set up local or cloud resources as required for the user’s particular situation and needs.
Many different ingress controllers are available, to suit users of different cloud providers or brands of load balancers. Ingress-nginx is a software-only ingress controller provided by the Kubernetes project. Because of its versatility and ease of use, ingress-nginx is quite popular: it is deployed in over 40% of Kubernetes clusters!
Ingress-nginx translates the requirements from Ingress objects into configuration for nginx, a powerful open source webserver daemon. Then, nginx uses that configuration to accept and route requests to the various applications running within a Kubernetes cluster. Proper handling of these nginx configuration parameters is crucial, because ingress-nginx needs to allow users significant flexibility while preventing them from accidentally or intentionally tricking nginx into doing things it shouldn’t.
Vulnerabilities Patched Today
Four of today’s ingress-nginx vulnerabilities are improvements to how ingress-nginx handles particular bits of nginx config. Without these fixes, a specially-crafted Ingress object can cause nginx to misbehave in various ways, including revealing the values of Secrets that are accessible to ingress-nginx. By default, ingress-nginx has access to all Secrets cluster-wide, so this can often lead to complete cluster takeover by any user or entity that has permission to create an Ingress.
The most serious of today’s vulnerabilities, CVE-2025-1974, rated 9.8 CVSS, allows anything on the Pod network to exploit configuration injection vulnerabilities via the Validating Admission Controller feature of ingress-nginx. This makes such vulnerabilities far more dangerous: ordinarily one would need to be able to create an Ingress object in the cluster, which is a fairly privileged action. When combined with today’s other vulnerabilities, CVE-2025-1974 means that anything on the Pod network has a good chance of taking over your Kubernetes cluster, with no credentials or administrative access required. In many common scenarios, the Pod network is accessible to all workloads in your cloud VPC, or even anyone connected to your corporate network! This is a very serious situation.
Today, we have released ingress-nginx v1.12.1 and ingress-nginx v1.11.5, which have fixes for all five of these vulnerabilities.
Your next steps
First, determine if your clusters are using ingress-nginx. In most cases, you can check this by running kubectl get pods --all-namespaces --selector app.kubernetes.io/name=ingress-nginx with cluster administrator permissions.
If you are using ingress-nginx, make a plan to remediate these vulnerabilities immediately.
The best and easiest remedy is to upgrade to the new patch release of ingress-nginx. All five of today’s vulnerabilities are fixed by installing today’s patches.
If you can’t upgrade right away, you can significantly reduce your risk by turning off the Validating Admission Controller feature of ingress-nginx.
- If you have installed ingress-nginx using Helm
- Reinstall, setting the Helm value
controller.admissionWebhooks.enabled=false
- Reinstall, setting the Helm value
- If you have installed ingress-nginx manually
- delete the ValidatingWebhookconfiguration called
ingress-nginx-admission - edit the
ingress-nginx-controllerDeployment or Daemonset, removing--validating-webhookfrom the controller container’s argument list
- delete the ValidatingWebhookconfiguration called
If you turn off the Validating Admission Controller feature as a mitigation for CVE-2025-1974, remember to turn it back on after you upgrade. This feature provides important quality of life improvements for your users, warning them about incorrect Ingress configurations before they can take effect.
Conclusion, thanks, and further reading
The ingress-nginx vulnerabilities announced today, including CVE-2025-1974, present a serious risk to many Kubernetes users and their data. If you use ingress-nginx, you should take action immediately to keep yourself safe.
Thanks go out to Nir Ohfeld, Sagi Tzadik, Ronen Shustin, and Hillai Ben-Sasson from Wiz for responsibly disclosing these vulnerabilities, and for working with the Kubernetes SRC members and ingress-nginx maintainers (Marco Ebert and James Strong) to ensure we fixed them effectively.
For further information about the maintenance and future of ingress-nginx, please see this GitHub issue and/or attend James and Marco’s KubeCon/CloudNativeCon EU 2025 presentation.
For further information about the specific vulnerabilities discussed in this article, please see the appropriate GitHub issue: CVE-2025-24513, CVE-2025-24514, CVE-2025-1097, CVE-2025-1098, or CVE-2025-1974
This blog post was revised in May 2025 to update the hyperlinks.
Introducing JobSet
Authors: Daniel Vega-Myhre (Google), Abdullah Gharaibeh (Google), Kevin Hannon (Red Hat)
In this article, we introduce JobSet, an open source API for representing distributed jobs. The goal of JobSet is to provide a unified API for distributed ML training and HPC workloads on Kubernetes.
Why JobSet?
The Kubernetes community’s recent enhancements to the batch ecosystem on Kubernetes has attracted ML engineers who have found it to be a natural fit for the requirements of running distributed training workloads.
Large ML models (particularly LLMs) which cannot fit into the memory of the GPU or TPU chips on a single host are often distributed across tens of thousands of accelerator chips, which in turn may span thousands of hosts.
As such, the model training code is often containerized and executed simultaneously on all these hosts, performing distributed computations which often shard both the model parameters and/or the training dataset across the target accelerator chips, using communication collective primitives like all-gather and all-reduce to perform distributed computations and synchronize gradients between hosts.
These workload characteristics make Kubernetes a great fit for this type of workload, as efficiently scheduling and managing the lifecycle of containerized applications across a cluster of compute resources is an area where it shines.
It is also very extensible, allowing developers to define their own Kubernetes APIs, objects, and controllers which manage the behavior and life cycle of these objects, allowing engineers to develop custom distributed training orchestration solutions to fit their needs.
However, as distributed ML training techniques continue to evolve, existing Kubernetes primitives do not adequately model them alone anymore.
Furthermore, the landscape of Kubernetes distributed training orchestration APIs has become fragmented, and each of the existing solutions in this fragmented landscape has certain limitations that make it non-optimal for distributed ML training.
For example, the KubeFlow training operator defines custom APIs for different frameworks (e.g. PyTorchJob, TFJob, MPIJob, etc.); however, each of these job types are in fact a solution fit specifically to the target framework, each with different semantics and behavior.
On the other hand, the Job API fixed many gaps for running batch workloads, including Indexed completion mode, higher scalability, Pod failure policies and Pod backoff policy to mention a few of the most recent enhancements. However, running ML training and HPC workloads using the upstream Job API requires extra orchestration to fill the following gaps:
Multi-template Pods : Most HPC or ML training jobs include more than one type of Pods. The different Pods are part of the same workload, but they need to run a different container, request different resources or have different failure policies. A common example is the driver-worker pattern.
Job groups : Large scale training workloads span multiple network topologies, running across multiple racks for example. Such workloads are network latency sensitive, and aim to localize communication and minimize traffic crossing the higher-latency network links. To facilitate this, the workload needs to be split into groups of Pods each assigned to a network topology.
Inter-Pod communication : Create and manage the resources (e.g. headless Services) necessary to establish communication between the Pods of a job.
Startup sequencing : Some jobs require a specific start sequence of pods; sometimes the driver is expected to start first (like Ray or Spark), in other cases the workers are expected to be ready before starting the driver (like MPI).
JobSet aims to address those gaps using the Job API as a building block to build a richer API for large-scale distributed HPC and ML use cases.
How JobSet Works
JobSet models a distributed batch workload as a group of Kubernetes Jobs. This allows a user to easily specify different pod templates for different distinct groups of pods (e.g. a leader, workers, parameter servers, etc.).
It uses the abstraction of a ReplicatedJob to manage child Jobs, where a ReplicatedJob is essentially a Job Template with some desired number of Job replicas specified. This provides a declarative way to easily create identical child-jobs to run on different islands of accelerators, without resorting to scripting or Helm charts to generate many versions of the same job but with different names.
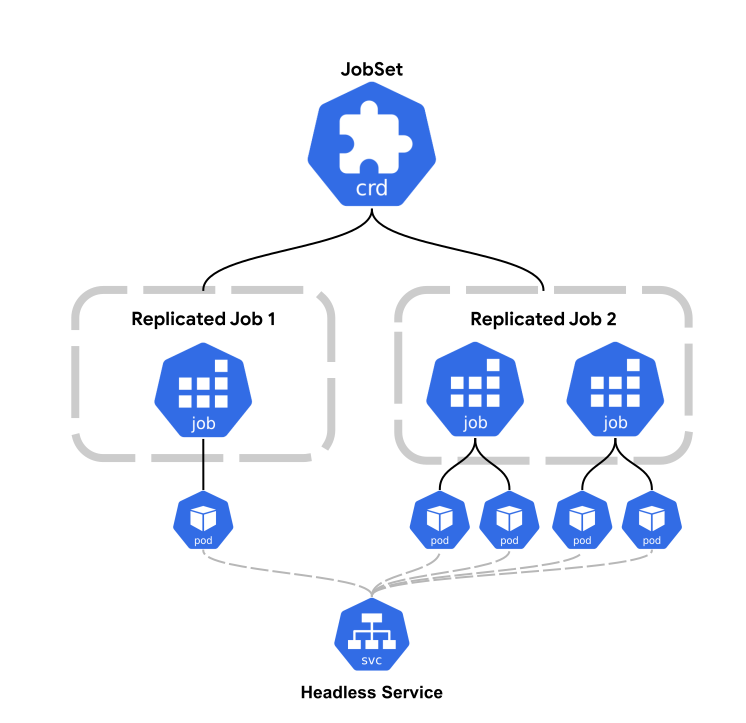
Some other key JobSet features which address the problems described above include:
Replicated Jobs : In modern data centers, hardware accelerators like GPUs and TPUs allocated in islands of homogenous accelerators connected via a specialized, high bandwidth network links. For example, a user might provision nodes containing a group of hosts co-located on a rack, each with H100 GPUs, where GPU chips within each host are connected via NVLink, with a NVLink Switch connecting the multiple NVLinks. TPU Pods are another example of this: TPU ViperLitePods consist of 64 hosts, each with 4 TPU v5e chips attached, all connected via ICI mesh. When running a distributed training job across multiple of these islands, we often want to partition the workload into a group of smaller identical jobs, 1 per island, where each pod primarily communicates with the pods within the same island to do segments of distributed computation, and keeping the gradient synchronization over DCN (data center network, which is lower bandwidth than ICI) to a bare minimum.
Automatic headless service creation, configuration, and lifecycle management : Pod-to-pod communication via pod hostname is enabled by default, with automatic configuration and lifecycle management of the headless service enabling this.
Configurable success policies : JobSet has configurable success policies which target specific ReplicatedJobs, with operators to target “Any” or “All” of their child jobs. For example, you can configure the JobSet to be marked complete if and only if all pods that are part of the “worker” ReplicatedJob are completed.
Configurable failure policies : JobSet has configurable failure policies which allow the user to specify a maximum number of times the JobSet should be restarted in the event of a failure. If any job is marked failed, the entire JobSet will be recreated, allowing the workload to resume from the last checkpoint. When no failure policy is specified, if any job fails, the JobSet simply fails.
Exclusive placement per topology domain : JobSet allows users to express that child jobs have 1:1 exclusive assignment to a topology domain, typically an accelerator island like a rack. For example, if the JobSet creates two child jobs, then this feature will enforce that the pods of each child job will be co-located on the same island, and that only one child job is allowed to schedule per island. This is useful for scenarios where we want to use a distributed data parallel (DDP) training strategy to train a model using multiple islands of compute resources (GPU racks or TPU slices), running 1 model replica in each accelerator island, ensuring the forward and backward passes themselves occur within a single model replica occurs over the high bandwidth interconnect linking the accelerators chips within the island, and only the gradient synchronization between model replicas occurs across accelerator islands over the lower bandwidth data center network.
Integration with Kueue : Users can submit JobSets via Kueue to oversubscribe their clusters, queue workloads to run as capacity becomes available, prevent partial scheduling and deadlocks, enable multi-tenancy, and more.
Example use case
Distributed ML training on multiple TPU slices with Jax
The following example is a JobSet spec for running a TPU Multislice workload on 4 TPU v5e slices. To learn more about TPU concepts and terminology, please refer to these docs.
This example uses Jax, an ML framework with native support for Just-In-Time (JIT) compilation targeting TPU chips via OpenXLA. However, you can also use PyTorch/XLA to do ML training on TPUs.
This example makes use of several JobSet features (both explicitly and implicitly) to support the unique scheduling requirements of TPU multislice training out-of-the-box with very little configuration required by the user.
# Run a simple Jax workload on
apiVersion: jobset.x-k8s.io/v1alpha2
kind: JobSet
metadata:
name: multislice
annotations:
# Give each child Job exclusive usage of a TPU slice
alpha.jobset.sigs.k8s.io/exclusive-topology: cloud.google.com/gke-nodepool
spec:
failurePolicy:
maxRestarts: 3
replicatedJobs:
- name: workers
replicas: 4 # Set to number of TPU slices
template:
spec:
parallelism: 2 # Set to number of VMs per TPU slice
completions: 2 # Set to number of VMs per TPU slice
backoffLimit: 0
template:
spec:
hostNetwork: true
dnsPolicy: ClusterFirstWithHostNet
nodeSelector:
cloud.google.com/gke-tpu-accelerator: tpu-v5-lite-podslice
cloud.google.com/gke-tpu-topology: 2x4
containers:
- name: jax-tpu
image: python:3.8
ports:
- containerPort: 8471
- containerPort: 8080
securityContext:
privileged: true
command:
- bash
- -c
- |
pip install "jax[tpu]" -f https://storage.googleapis.com/jax-releases/libtpu_releases.html
python -c 'import jax; print("Global device count:", jax.device_count())'
sleep 60
resources:
limits:
google.com/tpu: 4
Future work and getting involved
We have a number of features on the JobSet roadmap planned for development this year, which can be found in the JobSet roadmap.
Please feel free to reach out with feedback of any kind. We’re also open to additional contributors, whether it is to fix or report bugs, or help add new features or write documentation.
You can get in touch with us via our repo, mailing list or on Slack.
Last but not least, thanks to all our contributors who made this project possible!
Spotlight on SIG Apps
In our ongoing SIG Spotlight series, we dive into the heart of the Kubernetes project by talking to the leaders of its various Special Interest Groups (SIGs). This time, we focus on SIG Apps, the group responsible for everything related to developing, deploying, and operating applications on Kubernetes. Sandipan Panda (DevZero) had the opportunity to interview Maciej Szulik (Defense Unicorns) and Janet Kuo (Google), the chairs and tech leads of SIG Apps. They shared their experiences, challenges, and visions for the future of application management within the Kubernetes ecosystem.
Introductions
Sandipan: Hello, could you start by telling us a bit about yourself, your role, and your journey within the Kubernetes community that led to your current roles in SIG Apps?
Maciej: Hey, my name is Maciej, and I’m one of the leads for SIG Apps. Aside from this role, you can also find me helping SIG CLI and also being one of the Steering Committee members. I’ve been contributing to Kubernetes since late 2014 in various areas, including controllers, apiserver, and kubectl.
Janet: Certainly! I'm Janet, a Staff Software Engineer at Google, and I've been deeply involved with the Kubernetes project since its early days, even before the 1.0 launch in 2015. It's been an amazing journey!
My current role within the Kubernetes community is one of the chairs and tech leads of SIG Apps. My journey with SIG Apps started organically. I started with building the Deployment API and adding rolling update functionalities. I naturally gravitated towards SIG Apps and became increasingly involved. Over time, I took on more responsibilities, culminating in my current leadership roles.
About SIG Apps
All following answers were jointly provided by Maciej and Janet.
Sandipan: For those unfamiliar, could you provide an overview of SIG Apps' mission and objectives? What key problems does it aim to solve within the Kubernetes ecosystem?
As described in our charter, we cover a broad area related to developing, deploying, and operating applications on Kubernetes. That, in short, means we’re open to each and everyone showing up at our bi-weekly meetings and discussing the ups and downs of writing and deploying various applications on Kubernetes.
Sandipan: What are some of the most significant projects or initiatives currently being undertaken by SIG Apps?
At this point in time, the main factors driving the development of our controllers are the challenges coming from running various AI-related workloads. It’s worth giving credit here to two working groups we’ve sponsored over the past years:
- The Batch Working Group, which is looking at running HPC, AI/ML, and data analytics jobs on top of Kubernetes.
- The Serving Working Group, which is focusing on hardware-accelerated AI/ML inference.
Best practices and challenges
Sandipan: SIG Apps plays a crucial role in developing application management best practices for Kubernetes. Can you share some of these best practices and how they help improve application lifecycle management?
Implementing health checks and readiness probes ensures that your applications are healthy and ready to serve traffic, leading to improved reliability and uptime. The above, combined with comprehensive logging, monitoring, and tracing solutions, will provide insights into your application's behavior, enabling you to identify and resolve issues quickly.
Auto-scale your application based on resource utilization or custom metrics, optimizing resource usage and ensuring your application can handle varying loads.
Use Deployment for stateless applications, StatefulSet for stateful applications, Job and CronJob for batch workloads, and DaemonSet for running a daemon on each node. Use Operators and CRDs to extend the Kubernetes API to automate the deployment, management, and lifecycle of complex applications, making them easier to operate and reducing manual intervention.
Sandipan: What are some of the common challenges SIG Apps faces, and how do you address them?
The biggest challenge we’re facing all the time is the need to reject a lot of features, ideas, and improvements. This requires a lot of discipline and patience to be able to explain the reasons behind those decisions.
Sandipan: How has the evolution of Kubernetes influenced the work of SIG Apps? Are there any recent changes or upcoming features in Kubernetes that you find particularly relevant or beneficial for SIG Apps?
The main benefit for both us and the whole community around SIG Apps is the ability to extend kubernetes with Custom Resource Definitions and the fact that users can build their own custom controllers leveraging the built-in ones to achieve whatever sophisticated use cases they might have and we, as the core maintainers, haven’t considered or weren’t able to efficiently resolve inside Kubernetes.
Contributing to SIG Apps
Sandipan: What opportunities are available for new contributors who want to get involved with SIG Apps, and what advice would you give them?
We get the question, "What good first issue might you recommend we start with?" a lot :-) But unfortunately, there’s no easy answer to it. We always tell everyone that the best option to start contributing to core controllers is to find one you are willing to spend some time with. Read through the code, then try running unit tests and integration tests focusing on that controller. Once you grasp the general idea, try breaking it and the tests again to verify your breakage. Once you start feeling confident you understand that particular controller, you may want to search through open issues affecting that controller and either provide suggestions, explaining the problem users have, or maybe attempt your first fix.
Like we said, there are no shortcuts on that road; you need to spend the time with the codebase to understand all the edge cases we’ve slowly built up to get to the point where we are. Once you’re successful with one controller, you’ll need to repeat that same process with others all over again.
Sandipan: How does SIG Apps gather feedback from the community, and how is this feedback integrated into your work?
We always encourage everyone to show up and present their problems and solutions during our bi-weekly meetings. As long as you’re solving an interesting problem on top of Kubernetes and you can provide valuable feedback about any of the core controllers, we’re always happy to hear from everyone.
Looking ahead
Sandipan: Looking ahead, what are the key focus areas or upcoming trends in application management within Kubernetes that SIG Apps is excited about? How is the SIG adapting to these trends?
Definitely the current AI hype is the major driving factor; as mentioned above, we have two working groups, each covering a different aspect of it.
Sandipan: What are some of your favorite things about this SIG?
Without a doubt, the people that participate in our meetings and on Slack, who tirelessly help triage issues, pull requests and invest a lot of their time (very frequently their private time) into making kubernetes great!
SIG Apps is an essential part of the Kubernetes community, helping to shape how applications are deployed and managed at scale. From its work on improving Kubernetes' workload APIs to driving innovation in AI/ML application management, SIG Apps is continually adapting to meet the needs of modern application developers and operators. Whether you’re a new contributor or an experienced developer, there’s always an opportunity to get involved and make an impact.
If you’re interested in learning more or contributing to SIG Apps, be sure to check out their SIG README and join their bi-weekly meetings.
Spotlight on SIG etcd
In this SIG etcd spotlight we talked with James Blair, Marek Siarkowicz, Wenjia Zhang, and Benjamin Wang to learn a bit more about this Kubernetes Special Interest Group.
Introducing SIG etcd
Frederico: Hello, thank you for the time! Let’s start with some introductions, could you tell us a bit about yourself, your role and how you got involved in Kubernetes.
Benjamin: Hello, I am Benjamin. I am a SIG etcd Tech Lead and one of the etcd maintainers. I work for VMware, which is part of the Broadcom group. I got involved in Kubernetes & etcd & CSI (Container Storage Interface) because of work and also a big passion for open source. I have been working on Kubernetes & etcd (and also CSI) since 2020.
James: Hey team, I’m James, a co-chair for SIG etcd and etcd maintainer. I work at Red Hat as a Specialist Architect helping people adopt cloud native technology. I got involved with the Kubernetes ecosystem in 2019. Around the end of 2022 I noticed how the etcd community and project needed help so started contributing as often as I could. There is a saying in our community that "you come for the technology, and stay for the people": for me this is absolutely real, it’s been a wonderful journey so far and I’m excited to support our community moving forward.
Marek: Hey everyone, I'm Marek, the SIG etcd lead. At Google, I lead the GKE etcd team, ensuring
a stable and reliable experience for all GKE users. My Kubernetes journey began with SIG
Instrumentation, where I
created and led the Kubernetes Structured Logging effort.
I'm still the main project lead for Kubernetes Metrics Server,
providing crucial signals for autoscaling in Kubernetes. I started working on etcd 3 years ago,
right around the 3.5 release. We faced some challenges, but I'm thrilled to see etcd now the most
scalable and reliable it's ever been, with the highest contribution numbers in the project's
history. I'm passionate about distributed systems, extreme programming, and testing.
Wenjia: Hi there, my name is Wenjia, I am the co-chair of SIG etcd and one of the etcd maintainers. I work at Google as an Engineering Manager, working on GKE (Google Kubernetes Engine) and GDC (Google Distributed Cloud). I have been working in the area of open source Kubernetes and etcd since the Kubernetes v1.10 and etcd v3.1 releases. I got involved in Kubernetes because of my job, but what keeps me in the space is the charm of the container orchestration technology, and more importantly, the awesome open source community.
Becoming a Kubernetes Special Interest Group (SIG)
Frederico: Excellent, thank you. I'd like to start with the origin of the SIG itself: SIG etcd is a very recent SIG, could you quickly go through the history and reasons behind its creation?
Marek: Absolutely! SIG etcd was formed because etcd is a critical component of Kubernetes, serving as its data store. However, etcd was facing challenges like maintainer turnover and reliability issues. Creating a dedicated SIG allowed us to focus on addressing these problems, improving development and maintenance processes, and ensuring etcd evolves in sync with the cloud-native landscape.
Frederico: And has becoming a SIG worked out as expected? Better yet, are the motivations you just described being addressed, and to what extent?
Marek: It's been a positive change overall. Becoming a SIG has brought more structure and transparency to etcd's development. We've adopted Kubernetes processes like KEPs (Kubernetes Enhancement Proposals and PRRs (Production Readiness Reviews, which has improved our feature development and release cycle.
Frederico: On top of those, what would you single out as the major benefit that has resulted from becoming a SIG?
Marek: The biggest benefits for me was adopting Kubernetes testing infrastructure, tools like Prow and TestGrid. For large projects like etcd there is just no comparison to the default GitHub tooling. Having known, easy to use, clear tools is a major boost to the etcd as it makes it much easier for Kubernetes contributors to also help etcd.
Wenjia: Totally agree, while challenges remain, the SIG structure provides a solid foundation for addressing them and ensuring etcd's continued success as a critical component of the Kubernetes ecosystem.
The positive impact on the community is another crucial aspect of SIG etcd's success that I’d like to highlight. The Kubernetes SIG structure has created a welcoming environment for etcd contributors, leading to increased participation from the broader Kubernetes community. We have had greater collaboration with other SIGs like SIG API Machinery, SIG Scalability, SIG Testing, SIG Cluster Lifecycle, etc.
This collaboration helps ensure etcd's development aligns with the needs of the wider Kubernetes ecosystem. The formation of the etcd Operator Working Group under the joint effort between SIG etcd and SIG Cluster Lifecycle exemplifies this successful collaboration, demonstrating a shared commitment to improving etcd's operational aspects within Kubernetes.
Frederico: Since you mentioned collaboration, have you seen changes in terms of contributors and community involvement in recent months?
James: Yes -- as showing in our unique PR author data we recently hit an all time high in March and are trending in a positive direction:
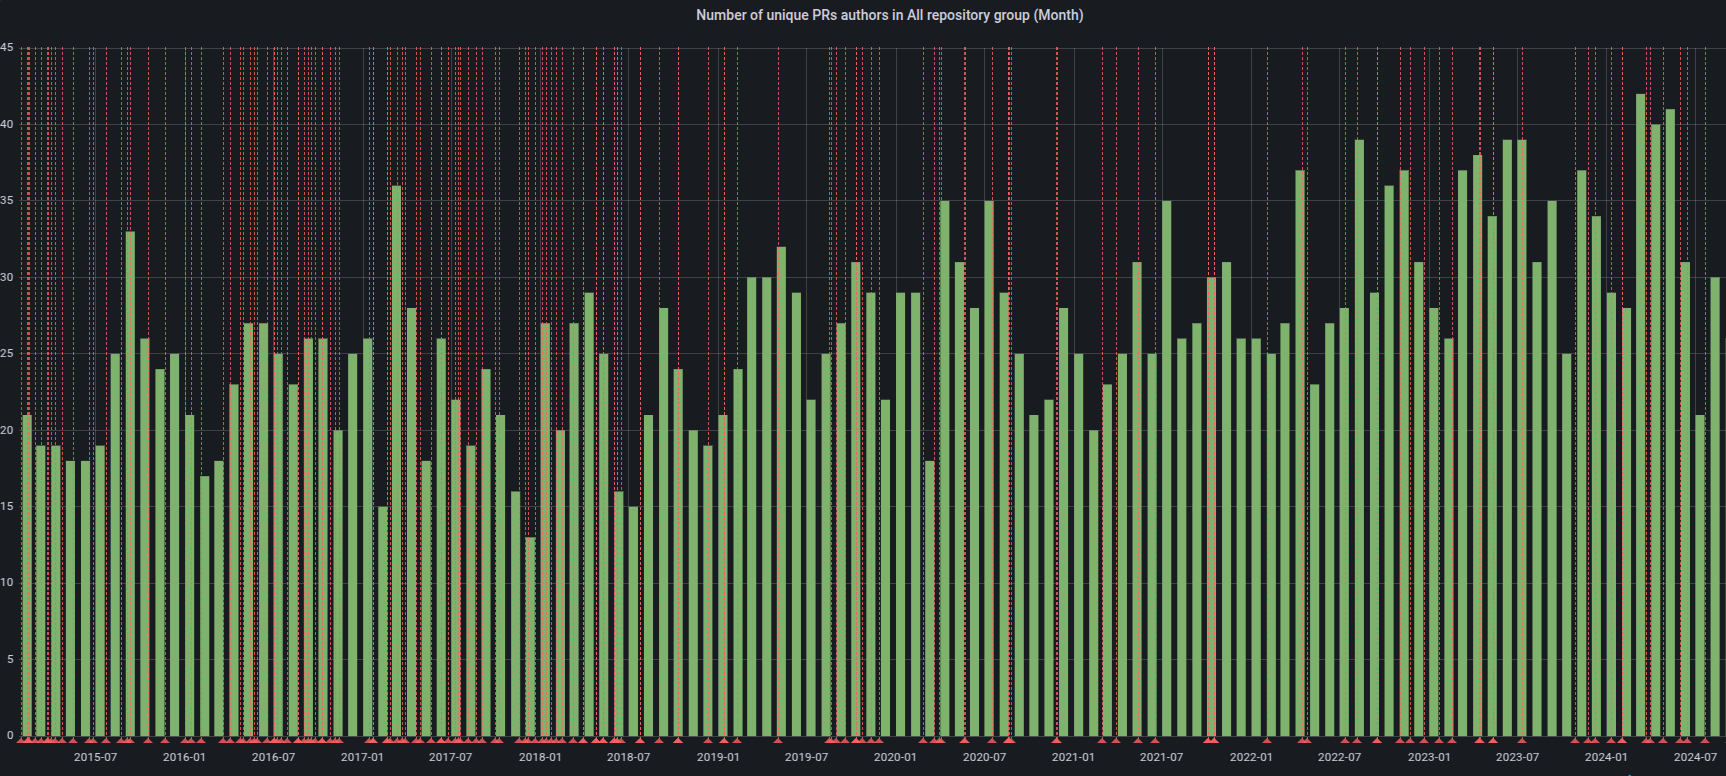
Additionally, looking at our overall contributions across all etcd project repositories we are also observing a positive trend showing a resurgence in etcd project activity:
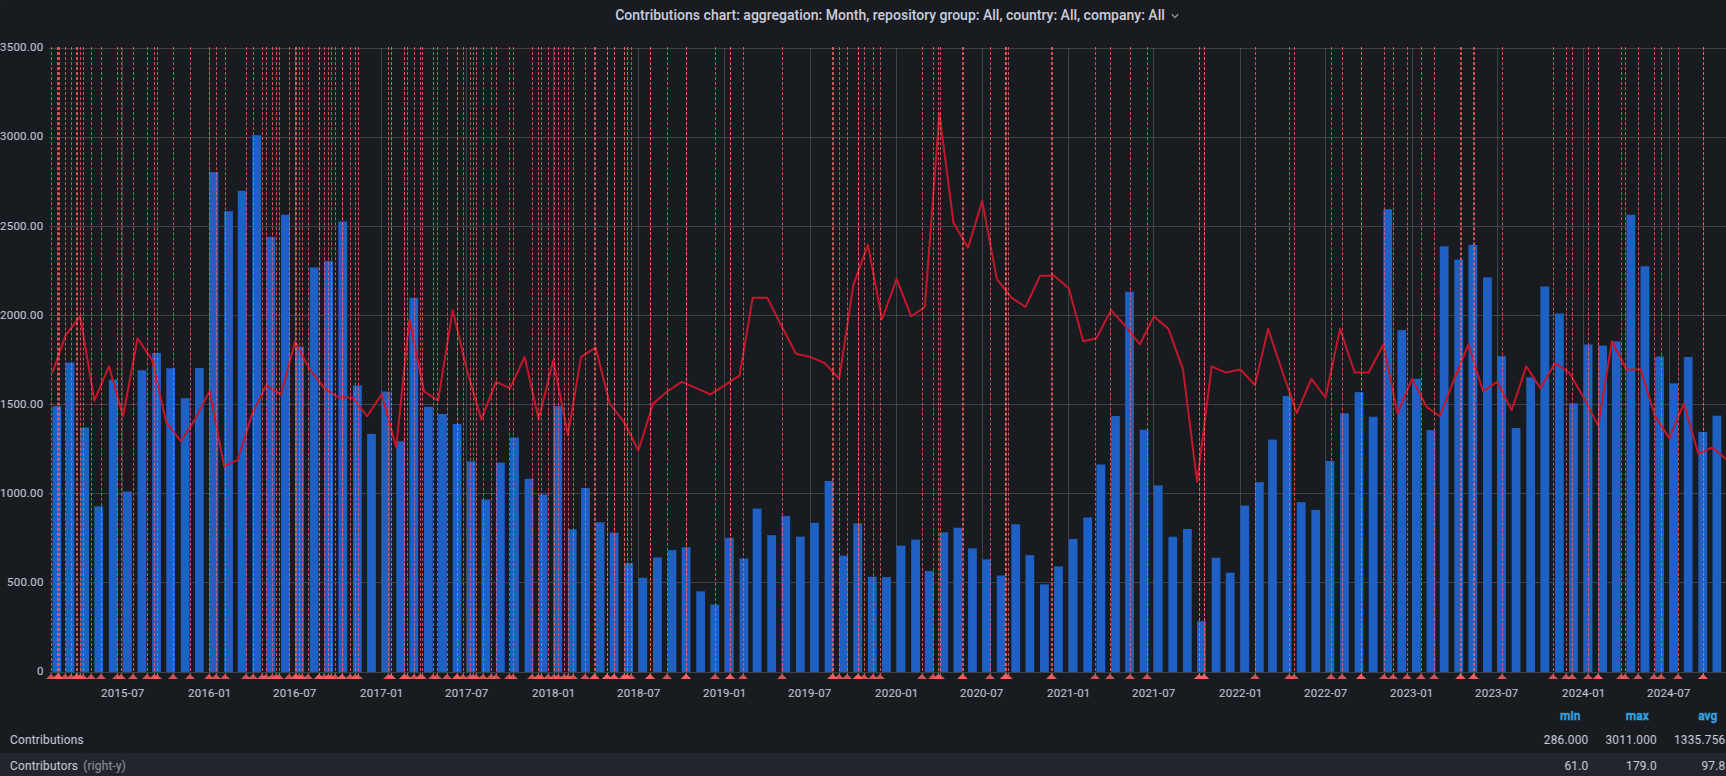
The road ahead
Frederico: That's quite telling, thank you. In terms of the near future, what are the current priorities for SIG etcd?
Marek: Reliability is always top of mind -– we need to make sure etcd is rock-solid. We're also working on making etcd easier to use and manage for operators. And we have our sights set on making etcd a viable standalone solution for infrastructure management, not just for Kubernetes. Oh, and of course, scaling -– we need to ensure etcd can handle the growing demands of the cloud-native world.
Benjamin: I agree that reliability should always be our top guiding principle. We need to ensure not only correctness but also compatibility. Additionally, we should continuously strive to improve the understandability and maintainability of etcd. Our focus should be on addressing the pain points that the community cares about the most.
Frederico: Are there any specific SIGs that you work closely with?
Marek: SIG API Machinery, for sure – they own the structure of the data etcd stores, so we're constantly working together. And SIG Cluster Lifecycle – etcd is a key part of Kubernetes clusters, so we collaborate on the newly created etcd operator Working group.
Wenjia: Other than SIG API Machinery and SIG Cluster Lifecycle that Marek mentioned above, SIG Scalability and SIG Testing is another group that we work closely with.
Frederico: In a more general sense, how would you list the key challenges for SIG etcd in the evolving cloud native landscape?
Marek: Well, reliability is always a challenge when you're dealing with critical data. The cloud-native world is evolving so fast that scaling to meet those demands is a constant effort.
Getting involved
Frederico: We're almost at the end of our conversation, but for those interested in in etcd, how can they get involved?
Marek: We'd love to have them! The best way to start is to join our SIG etcd meetings, follow discussions on the etcd-dev mailing list, and check out our GitHub issues. We're always looking for people to review proposals, test code, and contribute to documentation.
Wenjia: I love this question 😀 . There are numerous ways for people interested in contributing to SIG etcd to get involved and make a difference. Here are some key areas where you can help:
Code Contributions:
- Bug Fixes: Tackle existing issues in the etcd codebase. Start with issues labeled "good first issue" or "help wanted" to find tasks that are suitable for newcomers.
- Feature Development: Contribute to the development of new features and enhancements. Check the etcd roadmap and discussions to see what's being planned and where your skills might fit in.
- Testing and Code Reviews: Help ensure the quality of etcd by writing tests, reviewing code changes, and providing feedback.
- Documentation: Improve etcd's documentation by adding new content, clarifying existing information, or fixing errors. Clear and comprehensive documentation is essential for users and contributors.
- Community Support: Answer questions on forums, mailing lists, or Slack channels. Helping others understand and use etcd is a valuable contribution.
Getting Started:
- Join the community: Start by joining the etcd community on Slack, attending SIG meetings, and following the mailing lists. This will help you get familiar with the project, its processes, and the people involved.
- Find a mentor: If you're new to open source or etcd, consider finding a mentor who can guide you and provide support. Stay tuned! Our first cohort of mentorship program was very successful. We will have a new round of mentorship program coming up.
- Start small: Don't be afraid to start with small contributions. Even fixing a typo in the documentation or submitting a simple bug fix can be a great way to get involved.
By contributing to etcd, you'll not only be helping to improve a critical piece of the cloud-native ecosystem but also gaining valuable experience and skills. So, jump in and start contributing!
Frederico: Excellent, thank you. Lastly, one piece of advice that you'd like to give to other newly formed SIGs?
Marek: Absolutely! My advice would be to embrace the established processes of the larger community, prioritize collaboration with other SIGs, and focus on building a strong community.
Wenjia: Here are some tips I myself found very helpful in my OSS journey:
- Be patient: Open source development can take time. Don't get discouraged if your contributions aren't accepted immediately or if you encounter challenges.
- Be respectful: The etcd community values collaboration and respect. Be mindful of others' opinions and work together to achieve common goals.
- Have fun: Contributing to open source should be enjoyable. Find areas that interest you and contribute in ways that you find fulfilling.
Frederico: A great way to end this spotlight, thank you all!
For more information and resources, please take a look at :
- etcd website: https://etcd.io/
- etcd GitHub repository: https://github.com/etcd-io/etcd
- etcd community: https://etcd.io/community/
NFTables mode for kube-proxy
A new nftables mode for kube-proxy was introduced as an alpha feature in Kubernetes 1.29. Currently in beta, it is expected to be GA as of 1.33. The new mode fixes long-standing performance problems with the iptables mode and all users running on systems with reasonably-recent kernels are encouraged to try it out. (For compatibility reasons, even once nftables becomes GA, iptables will still be the default.)
Why nftables? Part 1: data plane latency
The iptables API was designed for implementing simple firewalls, and has problems scaling up to support Service proxying in a large Kubernetes cluster with tens of thousands of Services.
In general, the ruleset generated by kube-proxy in iptables mode has a number of iptables rules proportional to the sum of the number of Services and the total number of endpoints. In particular, at the top level of the ruleset, there is one rule to test each possible Service IP (and port) that a packet might be addressed to:
# If the packet is addressed to 172.30.0.41:80, then jump to the chain
# KUBE-SVC-XPGD46QRK7WJZT7O for further processing
-A KUBE-SERVICES -m comment --comment "namespace1/service1:p80 cluster IP" -m tcp -p tcp -d 172.30.0.41 --dport 80 -j KUBE-SVC-XPGD46QRK7WJZT7O
# If the packet is addressed to 172.30.0.42:443, then...
-A KUBE-SERVICES -m comment --comment "namespace2/service2:p443 cluster IP" -m tcp -p tcp -d 172.30.0.42 --dport 443 -j KUBE-SVC-GNZBNJ2PO5MGZ6GT
# etc...
-A KUBE-SERVICES -m comment --comment "namespace3/service3:p80 cluster IP" -m tcp -p tcp -d 172.30.0.43 --dport 80 -j KUBE-SVC-X27LE4BHSL4DOUIK
This means that when a packet comes in, the time it takes the kernel
to check it against all of the Service rules is O(n) in the number
of Services. As the number of Services increases, both the average and
the worst-case latency for the first packet of a new connection
increases (with the difference between best-case, average, and
worst-case being mostly determined by whether a given Service IP
address appears earlier or later in the KUBE-SERVICES chain).
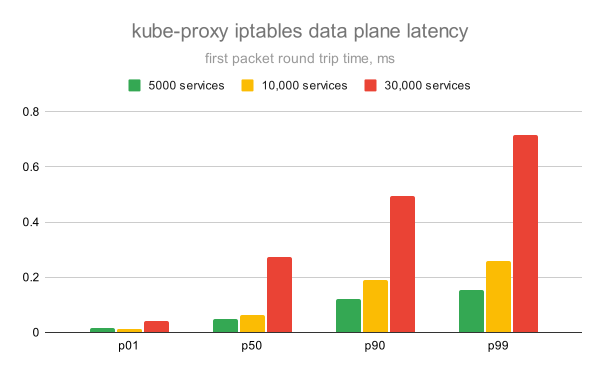
By contrast, with nftables, the normal way to write a ruleset like this is to have a single rule, using a "verdict map" to do the dispatch:
table ip kube-proxy {
# The service-ips verdict map indicates the action to take for each matching packet.
map service-ips {
type ipv4_addr . inet_proto . inet_service : verdict
comment "ClusterIP, ExternalIP and LoadBalancer IP traffic"
elements = { 172.30.0.41 . tcp . 80 : goto service-ULMVA6XW-namespace1/service1/tcp/p80,
172.30.0.42 . tcp . 443 : goto service-42NFTM6N-namespace2/service2/tcp/p443,
172.30.0.43 . tcp . 80 : goto service-4AT6LBPK-namespace3/service3/tcp/p80,
... }
}
# Now we just need a single rule to process all packets matching an
# element in the map. (This rule says, "construct a tuple from the
# destination IP address, layer 4 protocol, and destination port; look
# that tuple up in "service-ips"; and if there's a match, execute the
# associated verdict.)
chain services {
ip daddr . meta l4proto . th dport vmap @service-ips
}
...
}
Since there's only a single rule, with a roughly O(1) map lookup, packet processing time is more or less constant regardless of cluster size, and the best/average/worst cases are very similar:
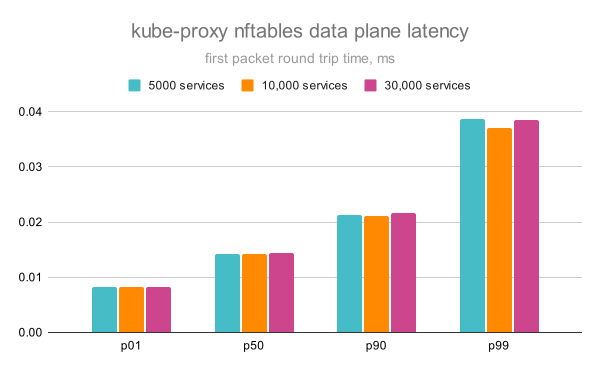
But note the huge difference in the vertical scale between the iptables and nftables graphs! In the clusters with 5000 and 10,000 Services, the p50 (average) latency for nftables is about the same as the p01 (approximately best-case) latency for iptables. In the 30,000 Service cluster, the p99 (approximately worst-case) latency for nftables manages to beat out the p01 latency for iptables by a few microseconds! Here's both sets of data together, but you may have to squint to see the nftables results!:
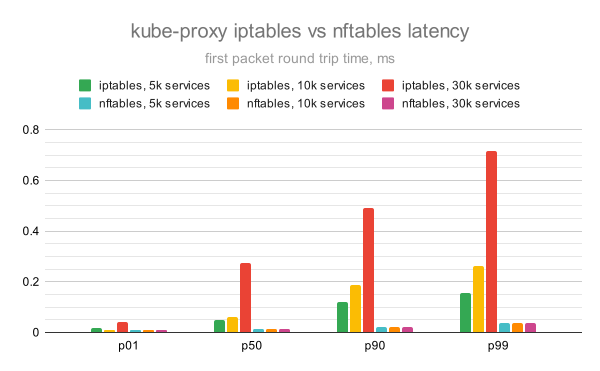
Why nftables? Part 2: control plane latency
While the improvements to data plane latency in large clusters are great, there's another problem with iptables kube-proxy that often keeps users from even being able to grow their clusters to that size: the time it takes kube-proxy to program new iptables rules when Services and their endpoints change.
With both iptables and nftables, the total size of the ruleset as a
whole (actual rules, plus associated data) is O(n) in the combined
number of Services and their endpoints. Originally, the iptables
backend would rewrite every rule on every update, and with tens of
thousands of Services, this could grow to be hundreds of thousands of
iptables rules. Starting in Kubernetes 1.26, we began improving
kube-proxy so that it could skip updating most of the unchanged
rules in each update, but the limitations of iptables-restore as an
API meant that it was still always necessary to send an update that's
O(n) in the number of Services (though with a noticeably smaller
constant than it used to be). Even with those optimizations, it can
still be necessary to make use of kube-proxy's minSyncPeriod config
option to ensure that it doesn't spend every waking second trying to
push iptables updates.
The nftables APIs allow for doing much more incremental updates, and when kube-proxy in nftables mode does an update, the size of the update is only O(n) in the number of Services and endpoints that have changed since the last sync, regardless of the total number of Services and endpoints. The fact that the nftables API allows each nftables-using component to have its own private table also means that there is no global lock contention between components like with iptables. As a result, kube-proxy's nftables updates can be done much more efficiently than with iptables.
(Unfortunately I don't have cool graphs for this part.)
Why not nftables?
All that said, there are a few reasons why you might not want to jump right into using the nftables backend for now.
First, the code is still fairly new. While it has plenty of unit tests, performs correctly in our CI system, and has now been used in the real world by multiple users, it has not seen anything close to as much real-world usage as the iptables backend has, so we can't promise that it is as stable and bug-free.
Second, the nftables mode will not work on older Linux distributions;
currently it requires a 5.13 or newer kernel. Additionally, because of
bugs in early versions of the nft command line tool, you should not
run kube-proxy in nftables mode on nodes that have an old (earlier
than 1.0.0) version of nft in the host filesystem (or else
kube-proxy's use of nftables may interfere with other uses of nftables
on the system).
Third, you may have other networking components in your cluster, such as the pod network or NetworkPolicy implementation, that do not yet support kube-proxy in nftables mode. You should consult the documentation (or forums, bug tracker, etc.) for any such components to see if they have problems with nftables mode. (In many cases they will not; as long as they don't try to directly interact with or override kube-proxy's iptables rules, they shouldn't care whether kube-proxy is using iptables or nftables.) Additionally, observability and monitoring tools that have not been updated may report less data for kube-proxy in nftables mode than they do for kube-proxy in iptables mode.
Finally, kube-proxy in nftables mode is intentionally not 100%
compatible with kube-proxy in iptables mode. There are a few old
kube-proxy features whose default behaviors are less secure, less
performant, or less intuitive than we'd like, but where we felt that
changing the default would be a compatibility break. Since the
nftables mode is opt-in, this gave us a chance to fix those bad
defaults without breaking users who weren't expecting changes. (In
particular, with nftables mode, NodePort Services are now only
reachable on their nodes' default IPs, as opposed to being reachable
on all IPs, including 127.0.0.1, with iptables mode.) The
kube-proxy documentation has more information about this, including
information about metrics you can look at to determine if you are
relying on any of the changed functionality, and what configuration
options are available to get more backward-compatible behavior.
Trying out nftables mode
Ready to try it out? In Kubernetes 1.31 and later, you just need to
pass --proxy-mode nftables to kube-proxy (or set mode: nftables in
your kube-proxy config file).
If you are using kubeadm to set up your cluster, the kubeadm
documentation explains how to pass a KubeProxyConfiguration to
kubeadm init. You can also deploy nftables-based clusters with
kind.
You can also convert existing clusters from iptables (or ipvs) mode to nftables by updating the kube-proxy configuration and restarting the kube-proxy pods. (You do not need to reboot the nodes: when restarting in nftables mode, kube-proxy will delete any existing iptables or ipvs rules, and likewise, if you later revert back to iptables or ipvs mode, it will delete any existing nftables rules.)
Future plans
As mentioned above, while nftables is now the best kube-proxy mode, it is not the default, and we do not yet have a plan for changing that. We will continue to support the iptables mode for a long time.
The future of the IPVS mode of kube-proxy is less certain: its main
advantage over iptables was that it was faster, but certain aspects of
the IPVS architecture and APIs were awkward for kube-proxy's purposes
(for example, the fact that the kube-ipvs0 device needs to have
every Service IP address assigned to it), and some parts of
Kubernetes Service proxying semantics were difficult to implement
using IPVS (particularly the fact that some Services had to have
different endpoints depending on whether you connected to them from a
local or remote client). And now, the nftables mode has the same
performance as IPVS mode (actually, slightly better), without any of
the downsides:
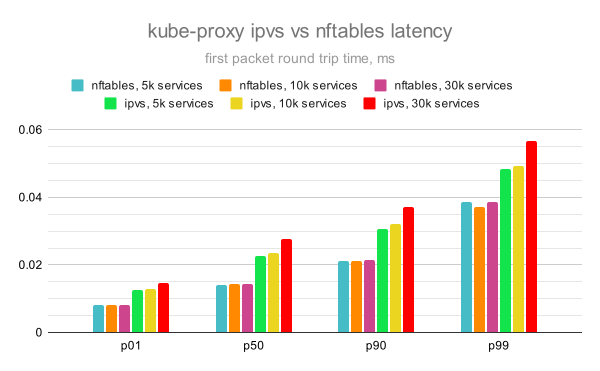
(In theory the IPVS mode also has the advantage of being able to use various other IPVS functionality, like alternative "schedulers" for balancing endpoints. In practice, this ended up not being very useful, because kube-proxy runs independently on every node, and the IPVS schedulers on each node had no way of sharing their state with the proxies on other nodes, thus thwarting the effort to balance traffic more cleverly.)
While the Kubernetes project does not have an immediate plan to drop the IPVS backend, it is probably doomed in the long run, and people who are currently using IPVS mode should try out the nftables mode instead (and file bugs if you think there is missing functionality in nftables mode that you can't work around).
Learn more
"KEP-3866: Add an nftables-based kube-proxy backend" has the history of the new feature.
"How the Tables Have Turned: Kubernetes Says Goodbye to IPTables", from KubeCon/CloudNativeCon North America 2024, talks about porting kube-proxy and Calico from iptables to nftables.
"From Observability to Performance", from KubeCon/CloudNativeCon North America 2024. (This is where the kube-proxy latency data came from; the raw data for the charts is also available.)
The Cloud Controller Manager Chicken and Egg Problem
Kubernetes 1.31 completed the largest migration in Kubernetes history, removing the in-tree cloud provider. While the component migration is now done, this leaves some additional complexity for users and installer projects (for example, kOps or Cluster API) . We will go over those additional steps and failure points and make recommendations for cluster owners. This migration was complex and some logic had to be extracted from the core components, building four new subsystems.
- Cloud controller manager (KEP-2392)
- API server network proxy (KEP-1281)
- kubelet credential provider plugins (KEP-2133)
- Storage migration to use CSI (KEP-625)
The cloud controller manager is part of the control plane. It is a critical component that replaces some functionality that existed previously in the kube-controller-manager and the kubelet.
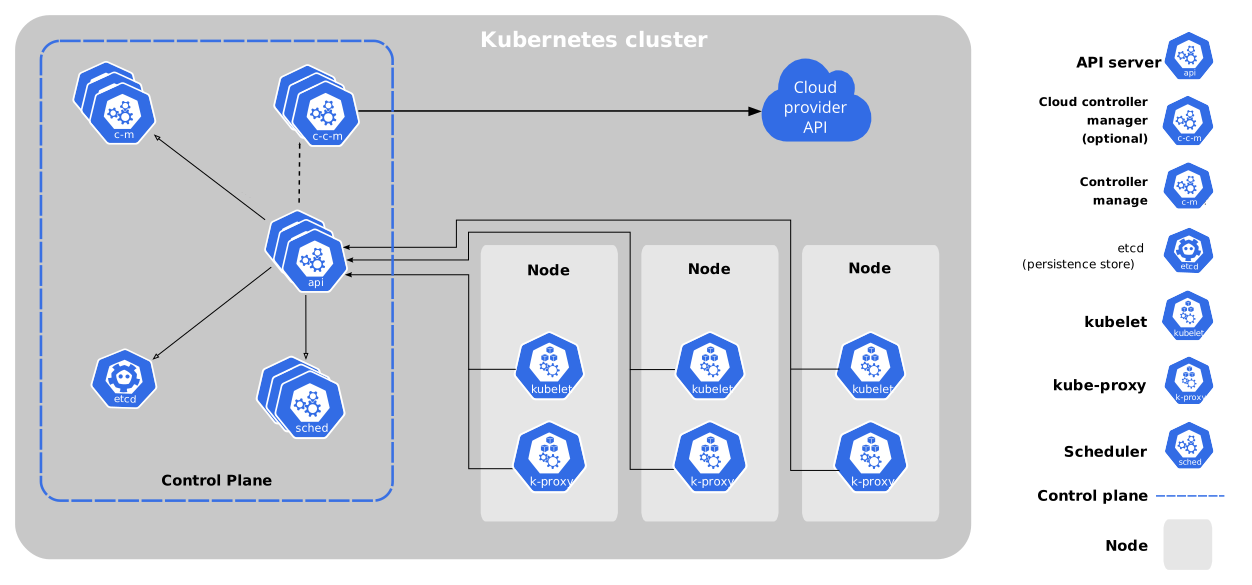
Components of Kubernetes
One of the most critical functionalities of the cloud controller manager is the node controller, which is responsible for the initialization of the nodes.
As you can see in the following diagram, when the kubelet starts, it registers the Node object with the apiserver, Tainting the node so it can be processed first by the cloud-controller-manager. The initial Node is missing the cloud-provider specific information, like the Node Addresses and the Labels with the cloud provider specific information like the Node, Region and Instance type information.
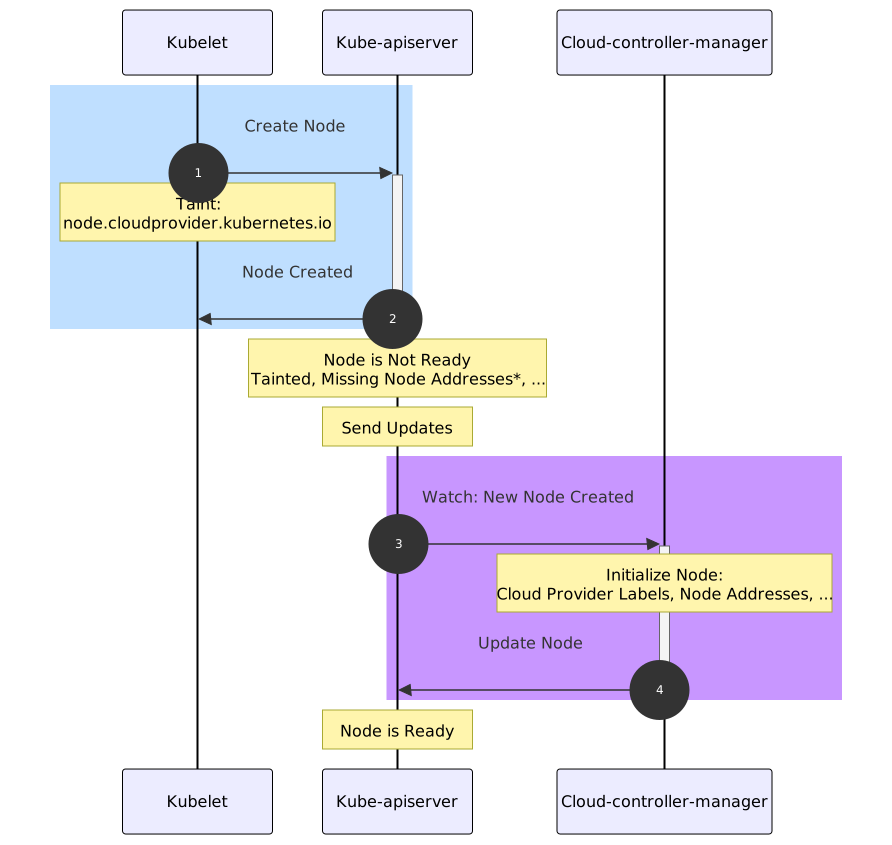
Chicken and egg problem sequence diagram
This new initialization process adds some latency to the node readiness. Previously, the kubelet
was able to initialize the node at the same time it created the node. Since the logic has moved
to the cloud-controller-manager, this can cause a chicken and egg problem
during the cluster bootstrapping for those Kubernetes architectures that do not deploy the
controller manager as the other components of the control plane, commonly as static pods,
standalone binaries or daemonsets/deployments with tolerations to the taints and using
hostNetwork (more on this below)
Examples of the dependency problem
As noted above, it is possible during bootstrapping for the cloud-controller-manager to be unschedulable and as such the cluster will not initialize properly. The following are a few concrete examples of how this problem can be expressed and the root causes for why they might occur.
These examples assume you are running your cloud-controller-manager using a Kubernetes resource (e.g. Deployment, DaemonSet, or similar) to control its lifecycle. Because these methods rely on Kubernetes to schedule the cloud-controller-manager, care must be taken to ensure it will schedule properly.
Example: Cloud controller manager not scheduling due to uninitialized taint
As noted in the Kubernetes documentation, when the kubelet is started with the command line
flag --cloud-provider=external, its corresponding Node object will have a no schedule taint
named node.cloudprovider.kubernetes.io/uninitialized added. Because the cloud-controller-manager
is responsible for removing the no schedule taint, this can create a situation where a
cloud-controller-manager that is being managed by a Kubernetes resource, such as a Deployment
or DaemonSet, may not be able to schedule.
If the cloud-controller-manager is not able to be scheduled during the initialization of the
control plane, then the resulting Node objects will all have the
node.cloudprovider.kubernetes.io/uninitialized no schedule taint. It also means that this taint
will not be removed as the cloud-controller-manager is responsible for its removal. If the no
schedule taint is not removed, then critical workloads, such as the container network interface
controllers, will not be able to schedule, and the cluster will be left in an unhealthy state.
Example: Cloud controller manager not scheduling due to not-ready taint
The next example would be possible in situations where the container network interface (CNI) is waiting for IP address information from the cloud-controller-manager (CCM), and the CCM has not tolerated the taint which would be removed by the CNI.
The Kubernetes documentation describes the node.kubernetes.io/not-ready taint as follows:
"The Node controller detects whether a Node is ready by monitoring its health and adds or removes this taint accordingly."
One of the conditions that can lead to a Node resource having this taint is when the container network has not yet been initialized on that node. As the cloud-controller-manager is responsible for adding the IP addresses to a Node resource, and the IP addresses are needed by the container network controllers to properly configure the container network, it is possible in some circumstances for a node to become stuck as not ready and uninitialized permanently.
This situation occurs for a similar reason as the first example, although in this case, the
node.kubernetes.io/not-ready taint is used with the no execute effect and thus will cause the
cloud-controller-manager not to run on the node with the taint. If the cloud-controller-manager is
not able to execute, then it will not initialize the node. It will cascade into the container
network controllers not being able to run properly, and the node will end up carrying both the
node.cloudprovider.kubernetes.io/uninitialized and node.kubernetes.io/not-ready taints,
leaving the cluster in an unhealthy state.
Our Recommendations
There is no one “correct way” to run a cloud-controller-manager. The details will depend on the specific needs of the cluster administrators and users. When planning your clusters and the lifecycle of the cloud-controller-managers please consider the following guidance:
For cloud-controller-managers running in the same cluster, they are managing.
- Use host network mode, rather than the pod network: in most cases, a cloud controller manager will need to communicate with an API service endpoint associated with the infrastructure. Setting “hostNetwork” to true will ensure that the cloud controller is using the host networking instead of the container network and, as such, will have the same network access as the host operating system. It will also remove the dependency on the networking plugin. This will ensure that the cloud controller has access to the infrastructure endpoint (always check your networking configuration against your infrastructure provider’s instructions).
- Use a scalable resource type.
DeploymentsandDaemonSetsare useful for controlling the lifecycle of a cloud controller. They allow easy access to running multiple copies for redundancy as well as using the Kubernetes scheduling to ensure proper placement in the cluster. When using these primitives to control the lifecycle of your cloud controllers and running multiple replicas, you must remember to enable leader election, or else your controllers will collide with each other which could lead to nodes not being initialized in the cluster. - Target the controller manager containers to the control plane. There might exist other
controllers which need to run outside the control plane (for example, Azure’s node manager
controller). Still, the controller managers themselves should be deployed to the control plane.
Use a node selector or affinity stanza to direct the scheduling of cloud controllers to the
control plane to ensure that they are running in a protected space. Cloud controllers are vital
to adding and removing nodes to a cluster as they form a link between Kubernetes and the
physical infrastructure. Running them on the control plane will help to ensure that they run
with a similar priority as other core cluster controllers and that they have some separation
from non-privileged user workloads.
- It is worth noting that an anti-affinity stanza to prevent cloud controllers from running on the same host is also very useful to ensure that a single node failure will not degrade the cloud controller performance.
- Ensure that the tolerations allow operation. Use tolerations on the manifest for the cloud
controller container to ensure that it will schedule to the correct nodes and that it can run
in situations where a node is initializing. This means that cloud controllers should tolerate
the
node.cloudprovider.kubernetes.io/uninitializedtaint, and it should also tolerate any taints associated with the control plane (for example,node-role.kubernetes.io/control-planeornode-role.kubernetes.io/master). It can also be useful to tolerate thenode.kubernetes.io/not-readytaint to ensure that the cloud controller can run even when the node is not yet available for health monitoring.
For cloud-controller-managers that will not be running on the cluster they manage (for example, in a hosted control plane on a separate cluster), then the rules are much more constrained by the dependencies of the environment of the cluster running the cloud-controller-manager. The advice for running on a self-managed cluster may not be appropriate as the types of conflicts and network constraints will be different. Please consult the architecture and requirements of your topology for these scenarios.
Example
This is an example of a Kubernetes Deployment highlighting the guidance shown above. It is important to note that this is for demonstration purposes only, for production uses please consult your cloud provider’s documentation.
apiVersion: apps/v1
kind: Deployment
metadata:
labels:
app.kubernetes.io/name: cloud-controller-manager
name: cloud-controller-manager
namespace: kube-system
spec:
replicas: 2
selector:
matchLabels:
app.kubernetes.io/name: cloud-controller-manager
strategy:
type: Recreate
template:
metadata:
labels:
app.kubernetes.io/name: cloud-controller-manager
annotations:
kubernetes.io/description: Cloud controller manager for my infrastructure
spec:
containers: # the container details will depend on your specific cloud controller manager
- name: cloud-controller-manager
command:
- /bin/my-infrastructure-cloud-controller-manager
- --leader-elect=true
- -v=1
image: registry/my-infrastructure-cloud-controller-manager@latest
resources:
requests:
cpu: 200m
memory: 50Mi
hostNetwork: true # these Pods are part of the control plane
nodeSelector:
node-role.kubernetes.io/control-plane: ""
affinity:
podAntiAffinity:
requiredDuringSchedulingIgnoredDuringExecution:
- topologyKey: "kubernetes.io/hostname"
labelSelector:
matchLabels:
app.kubernetes.io/name: cloud-controller-manager
tolerations:
- effect: NoSchedule
key: node-role.kubernetes.io/master
operator: Exists
- effect: NoExecute
key: node.kubernetes.io/unreachable
operator: Exists
tolerationSeconds: 120
- effect: NoExecute
key: node.kubernetes.io/not-ready
operator: Exists
tolerationSeconds: 120
- effect: NoSchedule
key: node.cloudprovider.kubernetes.io/uninitialized
operator: Exists
- effect: NoSchedule
key: node.kubernetes.io/not-ready
operator: Exists
When deciding how to deploy your cloud controller manager it is worth noting that cluster-proportional, or resource-based, pod autoscaling is not recommended. Running multiple replicas of a cloud controller manager is good practice for ensuring high-availability and redundancy, but does not contribute to better performance. In general, only a single instance of a cloud controller manager will be reconciling a cluster at any given time.
Spotlight on SIG Architecture: Enhancements
This is the fourth interview of a SIG Architecture Spotlight series that will cover the different subprojects, and we will be covering SIG Architecture: Enhancements.
In this SIG Architecture spotlight we talked with Kirsten Garrison, lead of the Enhancements subproject.
The Enhancements subproject
Frederico (FSM): Hi Kirsten, very happy to have the opportunity to talk about the Enhancements subproject. Let's start with some quick information about yourself and your role.
Kirsten Garrison (KG): I’m a lead of the Enhancements subproject of SIG-Architecture and currently work at Google. I first got involved by contributing to the service-catalog project with the help of Carolyn Van Slyck. With time, I joined the Release team, eventually becoming the Enhancements Lead and a Release Lead shadow. While on the release team, I worked on some ideas to make the process better for the SIGs and Enhancements team (the opt-in process) based on my team’s experiences. Eventually, I started attending Subproject meetings and contributing to the Subproject’s work.
FSM: You mentioned the Enhancements subproject: how would you describe its main goals and areas of intervention?
KG: The Enhancements Subproject primarily concerns itself with the Kubernetes Enhancement Proposal (KEP for short)—the "design" documents required for all features and significant changes to the Kubernetes project.
The KEP and its impact
FSM: The improvement of the KEP process was (and is) one in which SIG Architecture was heavily involved. Could you explain the process to those that aren’t aware of it?
KG: Every release, the SIGs let the Release Team know which features they intend to work on to be put into the release. As mentioned above, the prerequisite for these changes is a KEP - a standardized design document that all authors must fill out and approve in the first weeks of the release cycle. Most features will move through 3 phases: alpha, beta and finally GA so approving a feature represents a significant commitment for the SIG.
The KEP serves as the full source of truth of a feature. The KEP template has different requirements based on what stage a feature is in, but it generally requires a detailed discussion of the design and the impact as well as providing artifacts of stability and performance. The KEP takes quite a bit of iterative work between authors, SIG reviewers, api review team and the Production Readiness Review team1 before it is approved. Each set of reviewers is looking to make sure that the proposal meets their standards in order to have a stable and performant Kubernetes release. Only after all approvals are secured, can an author go forth and merge their feature in the Kubernetes code base.
FSM: I see, quite a bit of additional structure was added. Looking back, what were the most significant improvements of that approach?
KG: In general, I think that the improvements with the most impact had to do with focusing on the core intent of the KEP. KEPs exist not just to memorialize designs, but provide a structured way to discuss and come to an agreement about different facets of the change. At the core of the KEP process is communication and consideration.
To that end, some of the significant changes revolve around a more detailed and accessible KEP template. A significant amount of work was put in over time to get the k/enhancements repo into its current form -- a directory structure organized by SIG with the contours of the modern KEP template (with Proposal/Motivation/Design Details subsections). We might take that basic structure for granted today, but it really represents the work of many people trying to get the foundation of this process in place over time.
As Kubernetes matures, we’ve needed to think about more than just the end goal of getting a single feature merged. We need to think about things like: stability, performance, setting and meeting user expectations. And as we’ve thought about those things the template has grown more detailed. The addition of the Production Readiness Review was major as well as the enhanced testing requirements (varying at different stages of a KEP’s lifecycle).
Current areas of focus
FSM: Speaking of maturing, we’ve recently released Kubernetes v1.31, and work on v1.32 has started. Are there any areas that the Enhancements sub-project is currently addressing that might change the way things are done?
KG: We’re currently working on two things:
- Creating a Process KEP template. Sometimes people want to harness the KEP process for significant changes that are more process oriented rather than feature oriented. We want to support this because memorializing changes is important and giving people a better tool to do so will only encourage more discussion and transparency.
- KEP versioning. While our template changes aim to be as non-disruptive as possible, we believe that it will be easier to track and communicate those changes to the community better with a versioned KEP template and the policies that go alongside such versioning.
Both features will take some time to get right and fully roll out (just like a KEP feature) but we believe that they will both provide improvements that will benefit the community at large.
FSM: You mentioned improvements: I remember when project boards for Enhancement tracking were introduced in recent releases, to great effect and unanimous applause from release team members. Was this a particular area of focus for the subproject?
KG: The Subproject provided support to the Release Team’s Enhancement team in the migration away from using the spreadsheet to a project board. The collection and tracking of enhancements has always been a logistical challenge. During my time on the Release Team, I helped with the transition to an opt-in system of enhancements, whereby the SIG leads "opt-in" KEPs for release tracking. This helped to enhance communication between authors and SIGs before any significant work was undertaken on a KEP and removed toil from the Enhancements team. This change used the existing tools to avoid introducing too many changes at once to the community. Later, the Release Team approached the Subproject with an idea of leveraging GitHub Project Boards to further improve the collection process. This was to be a move away from the use of complicated spreadsheets to using repo-native labels on k/enhancement issues and project boards.
FSM: That surely adds an impact on simplifying the workflow...
KG: Removing sources of friction and promoting clear communication is very important to the Enhancements Subproject. At the same time, it’s important to give careful consideration to decisions that impact the community as a whole. We want to make sure that changes are balanced to give an upside and while not causing any regressions and pain in the rollout. We supported the Release Team in ideation as well as through the actual migration to the project boards. It was a great success and exciting to see the team make high impact changes that helped everyone involved in the KEP process!
Getting involved
FSM: For those reading that might be curious and interested in helping, how would you describe the required skills for participating in the sub-project?
KG: Familiarity with KEPs either via experience or taking time to look through the kubernetes/enhancements repo is helpful. All are welcome to participate if interested - we can take it from there.
FSM: Excellent! Many thanks for your time and insight -- any final comments you would like to share with our readers?
KG: The Enhancements process is one of the most important parts of Kubernetes and requires enormous amounts of coordination and collaboration of people and teams across the project to make it successful. I’m thankful and inspired by everyone’s continued hard work and dedication to making the project great. This is truly a wonderful community.
For more information, check the Production Readiness Review spotlight interview in this series. ↩︎
Kubernetes 1.32: Moving Volume Group Snapshots to Beta
Volume group snapshots were introduced as an Alpha feature with the Kubernetes 1.27 release. The recent release of Kubernetes v1.32 moved that support to beta. The support for volume group snapshots relies on a set of extension APIs for group snapshots. These APIs allow users to take crash consistent snapshots for a set of volumes. Behind the scenes, Kubernetes uses a label selector to group multiple PersistentVolumeClaims for snapshotting. A key aim is to allow you restore that set of snapshots to new volumes and recover your workload based on a crash consistent recovery point.
This new feature is only supported for CSI volume drivers.
An overview of volume group snapshots
Some storage systems provide the ability to create a crash consistent snapshot of multiple volumes. A group snapshot represents copies made from multiple volumes, that are taken at the same point-in-time. A group snapshot can be used either to rehydrate new volumes (pre-populated with the snapshot data) or to restore existing volumes to a previous state (represented by the snapshots).
Why add volume group snapshots to Kubernetes?
The Kubernetes volume plugin system already provides a powerful abstraction that automates the provisioning, attaching, mounting, resizing, and snapshotting of block and file storage.
Underpinning all these features is the Kubernetes goal of workload portability: Kubernetes aims to create an abstraction layer between distributed applications and underlying clusters so that applications can be agnostic to the specifics of the cluster they run on and application deployment requires no cluster specific knowledge.
There was already a VolumeSnapshot API that provides the ability to take a snapshot of a persistent volume to protect against data loss or data corruption. However, there are other snapshotting functionalities not covered by the VolumeSnapshot API.
Some storage systems support consistent group snapshots that allow a snapshot to be taken from multiple volumes at the same point-in-time to achieve write order consistency. This can be useful for applications that contain multiple volumes. For example, an application may have data stored in one volume and logs stored in another volume. If snapshots for the data volume and the logs volume are taken at different times, the application will not be consistent and will not function properly if it is restored from those snapshots when a disaster strikes.
It is true that you can quiesce the application first, take an individual snapshot from each volume that is part of the application one after the other, and then unquiesce the application after all the individual snapshots are taken. This way, you would get application consistent snapshots.
However, sometimes the application quiesce can be so time consuming that you want to do it less frequently, or it may not be possible to quiesce an application at all. For example, a user may want to run weekly backups with application quiesce and nightly backups without application quiesce but with consistent group support which provides crash consistency across all volumes in the group.
Kubernetes APIs for volume group snapshots
Kubernetes' support for volume group snapshots relies on three API kinds that are used for managing snapshots:
- VolumeGroupSnapshot
- Created by a Kubernetes user (or perhaps by your own automation) to request creation of a volume group snapshot for multiple persistent volume claims. It contains information about the volume group snapshot operation such as the timestamp when the volume group snapshot was taken and whether it is ready to use. The creation and deletion of this object represents a desire to create or delete a cluster resource (a group snapshot).
- VolumeGroupSnapshotContent
- Created by the snapshot controller for a dynamically created VolumeGroupSnapshot. It contains information about the volume group snapshot including the volume group snapshot ID. This object represents a provisioned resource on the cluster (a group snapshot). The VolumeGroupSnapshotContent object binds to the VolumeGroupSnapshot for which it was created with a one-to-one mapping.
- VolumeGroupSnapshotClass
- Created by cluster administrators to describe how volume group snapshots should be created, including the driver information, the deletion policy, etc.
These three API kinds are defined as CustomResourceDefinitions (CRDs). These CRDs must be installed in a Kubernetes cluster for a CSI Driver to support volume group snapshots.
What components are needed to support volume group snapshots
Volume group snapshots are implemented in the external-snapshotter repository. Implementing volume group snapshots meant adding or changing several components:
- Added new CustomResourceDefinitions for VolumeGroupSnapshot and two supporting APIs.
- Volume group snapshot controller logic is added to the common snapshot controller.
- Adding logic to make CSI calls into the snapshotter sidecar controller.
The volume snapshot controller and CRDs are deployed once per cluster, while the sidecar is bundled with each CSI driver.
Therefore, it makes sense to deploy the volume snapshot controller and CRDs as a cluster addon.
The Kubernetes project recommends that Kubernetes distributors bundle and deploy the volume snapshot controller and CRDs as part of their Kubernetes cluster management process (independent of any CSI Driver).
What's new in Beta?
The VolumeGroupSnapshot feature in CSI spec moved to GA in the v1.11.0 release.
The snapshot validation webhook was deprecated in external-snapshotter v8.0.0 and it is now removed. Most of the validation webhook logic was added as validation rules into the CRDs. Minimum required Kubernetes version is 1.25 for these validation rules. One thing in the validation webhook not moved to CRDs is the prevention of creating multiple default volume snapshot classes and multiple default volume group snapshot classes for the same CSI driver. With the removal of the validation webhook, an error will still be raised when dynamically provisioning a VolumeSnapshot or VolumeGroupSnapshot when multiple default volume snapshot classes or multiple default volume group snapshot classes for the same CSI driver exist.
The
enable-volumegroup-snapshotflag in the snapshot-controller and the CSI snapshotter sidecar has been replaced by a feature gate. Since VolumeGroupSnapshot is a new API, the feature moves to Beta but the feature gate is disabled by default. To use this feature, enable the feature gate by adding the flag--feature-gates=CSIVolumeGroupSnapshot=truewhen starting the snapshot-controller and the CSI snapshotter sidecar.The logic to dynamically create the VolumeGroupSnapshot and its corresponding individual VolumeSnapshot and VolumeSnapshotContent objects are moved from the CSI snapshotter to the common snapshot-controller. New RBAC rules are added to the common snapshot-controller and some RBAC rules are removed from the CSI snapshotter sidecar accordingly.
How do I use Kubernetes volume group snapshots
Creating a new group snapshot with Kubernetes
Once a VolumeGroupSnapshotClass object is defined and you have volumes you want to snapshot together, you may request a new group snapshot by creating a VolumeGroupSnapshot object.
The source of the group snapshot specifies whether the underlying group snapshot should be dynamically created or if a pre-existing VolumeGroupSnapshotContent should be used.
A pre-existing VolumeGroupSnapshotContent is created by a cluster administrator. It contains the details of the real volume group snapshot on the storage system which is available for use by cluster users.
One of the following members in the source of the group snapshot must be set.
selector- a label query over PersistentVolumeClaims that are to be grouped together for snapshotting. This selector will be used to match the label added to a PVC.volumeGroupSnapshotContentName- specifies the name of a pre-existing VolumeGroupSnapshotContent object representing an existing volume group snapshot.
Dynamically provision a group snapshot
In the following example, there are two PVCs.
NAME STATUS VOLUME CAPACITY ACCESS MODES STORAGECLASS VOLUMEATTRIBUTESCLASS AGE
pvc-0 Bound pvc-6e1f7d34-a5c5-4548-b104-01e72c72b9f2 100Mi RWO csi-hostpath-sc <unset> 2m15s
pvc-1 Bound pvc-abc640b3-2cc1-4c56-ad0c-4f0f0e636efa 100Mi RWO csi-hostpath-sc <unset> 2m7s
Label the PVCs.
% kubectl label pvc pvc-0 group=myGroup
persistentvolumeclaim/pvc-0 labeled
% kubectl label pvc pvc-1 group=myGroup
persistentvolumeclaim/pvc-1 labeled
For dynamic provisioning, a selector must be set so that the snapshot controller can find PVCs with the matching labels to be snapshotted together.
apiVersion: groupsnapshot.storage.k8s.io/v1beta1
kind: VolumeGroupSnapshot
metadata:
name: snapshot-daily-20241217
namespace: demo-namespace
spec:
volumeGroupSnapshotClassName: csi-groupSnapclass
source:
selector:
matchLabels:
group: myGroup
In the VolumeGroupSnapshot spec, a user can specify the VolumeGroupSnapshotClass which has the information about which CSI driver should be used for creating the group snapshot. A VolumGroupSnapshotClass is required for dynamic provisioning.
apiVersion: groupsnapshot.storage.k8s.io/v1beta1
kind: VolumeGroupSnapshotClass
metadata:
name: csi-groupSnapclass
annotations:
kubernetes.io/description: "Example group snapshot class"
driver: example.csi.k8s.io
deletionPolicy: Delete
As a result of the volume group snapshot creation, a corresponding VolumeGroupSnapshotContent object will be created with a volumeGroupSnapshotHandle pointing to a resource on the storage system.
Two individual volume snapshots will be created as part of the volume group snapshot creation.
NAME READYTOUSE SOURCEPVC RESTORESIZE SNAPSHOTCONTENT AGE
snapshot-0962a745b2bf930bb385b7b50c9b08af471f1a16780726de19429dd9c94eaca0 true pvc-0 100Mi snapcontent-0962a745b2bf930bb385b7b50c9b08af471f1a16780726de19429dd9c94eaca0 16m
snapshot-da577d76bd2106c410616b346b2e72440f6ec7b12a75156263b989192b78caff true pvc-1 100Mi snapcontent-da577d76bd2106c410616b346b2e72440f6ec7b12a75156263b989192b78caff 16m
Importing an existing group snapshot with Kubernetes
To import a pre-existing volume group snapshot into Kubernetes, you must also import the corresponding individual volume snapshots.
Identify the individual volume snapshot handles, manually construct a VolumeSnapshotContent object first, then create a VolumeSnapshot object pointing to the VolumeSnapshotContent object. Repeat this for every individual volume snapshot.
Then manually create a VolumeGroupSnapshotContent object, specifying the volumeGroupSnapshotHandle and individual volumeSnapshotHandles already existing on the storage system.
apiVersion: groupsnapshot.storage.k8s.io/v1beta1
kind: VolumeGroupSnapshotContent
metadata:
name: static-group-content
spec:
deletionPolicy: Delete
driver: hostpath.csi.k8s.io
source:
groupSnapshotHandles:
volumeGroupSnapshotHandle: e8779136-a93e-11ef-9549-66940726f2fd
volumeSnapshotHandles:
- e8779147-a93e-11ef-9549-66940726f2fd
- e8783cd0-a93e-11ef-9549-66940726f2fd
volumeGroupSnapshotRef:
name: static-group-snapshot
namespace: demo-namespace
After that create a VolumeGroupSnapshot object pointing to the VolumeGroupSnapshotContent object.
apiVersion: groupsnapshot.storage.k8s.io/v1beta1
kind: VolumeGroupSnapshot
metadata:
name: static-group-snapshot
namespace: demo-namespace
spec:
source:
volumeGroupSnapshotContentName: static-group-content
How to use group snapshot for restore in Kubernetes
At restore time, the user can request a new PersistentVolumeClaim to be created from a VolumeSnapshot object that is part of a VolumeGroupSnapshot. This will trigger provisioning of a new volume that is pre-populated with data from the specified snapshot. The user should repeat this until all volumes are created from all the snapshots that are part of a group snapshot.
apiVersion: v1
kind: PersistentVolumeClaim
metadata:
name: examplepvc-restored-2024-12-17
namespace: demo-namespace
spec:
storageClassName: example-foo-nearline
dataSource:
name: snapshot-0962a745b2bf930bb385b7b50c9b08af471f1a16780726de19429dd9c94eaca0
kind: VolumeSnapshot
apiGroup: snapshot.storage.k8s.io
accessModes:
- ReadWriteOncePod
resources:
requests:
storage: 100Mi # must be enough storage to fit the existing snapshot
As a storage vendor, how do I add support for group snapshots to my CSI driver?
To implement the volume group snapshot feature, a CSI driver must:
- Implement a new group controller service.
- Implement group controller RPCs:
CreateVolumeGroupSnapshot,DeleteVolumeGroupSnapshot, andGetVolumeGroupSnapshot. - Add group controller capability
CREATE_DELETE_GET_VOLUME_GROUP_SNAPSHOT.
See the CSI spec and the Kubernetes-CSI Driver Developer Guide for more details.
As mentioned earlier, it is strongly recommended that Kubernetes distributors bundle and deploy the volume snapshot controller and CRDs as part of their Kubernetes cluster management process (independent of any CSI Driver).
As part of this recommended deployment process, the Kubernetes team provides a number of sidecar (helper) containers, including the external-snapshotter sidecar container which has been updated to support volume group snapshot.
The external-snapshotter watches the Kubernetes API server for
VolumeGroupSnapshotContent objects, and triggers CreateVolumeGroupSnapshot and
DeleteVolumeGroupSnapshot operations against a CSI endpoint.
What are the limitations?
The beta implementation of volume group snapshots for Kubernetes has the following limitations:
- Does not support reverting an existing PVC to an earlier state represented by a snapshot (only supports provisioning a new volume from a snapshot).
- No application consistency guarantees beyond any guarantees provided by the storage system (e.g. crash consistency). See this doc for more discussions on application consistency.
What’s next?
Depending on feedback and adoption, the Kubernetes project plans to push the volume group snapshot implementation to general availability (GA) in a future release.
How can I learn more?
- The design spec for the volume group snapshot feature.
- The code repository for volume group snapshot APIs and controller.
- CSI documentation on the group snapshot feature.
How do I get involved?
This project, like all of Kubernetes, is the result of hard work by many contributors from diverse backgrounds working together. On behalf of SIG Storage, I would like to offer a huge thank you to the contributors who stepped up these last few quarters to help the project reach beta:
- Ben Swartzlander (bswartz)
- Cici Huang (cici37)
- Hemant Kumar (gnufied)
- James Defelice (jdef)
- Jan Šafránek (jsafrane)
- Madhu Rajanna (Madhu-1)
- Manish M Yathnalli (manishym)
- Michelle Au (msau42)
- Niels de Vos (nixpanic)
- Leonardo Cecchi (leonardoce)
- Rakshith R (Rakshith-R)
- Raunak Shah (RaunakShah)
- Saad Ali (saad-ali)
- Xing Yang (xing-yang)
- Yati Padia (yati1998)
For those interested in getting involved with the design and development of CSI or any part of the Kubernetes Storage system, join the Kubernetes Storage Special Interest Group (SIG). We always welcome new contributors.
We also hold regular Data Protection Working Group meetings. New attendees are welcome to join our discussions.
Enhancing Kubernetes API Server Efficiency with API Streaming
Managing Kubernetes clusters efficiently is critical, especially as their size is growing. A significant challenge with large clusters is the memory overhead caused by list requests.
In the existing implementation, the kube-apiserver processes list requests by assembling the entire response in-memory before transmitting any data to the client. But what if the response body is substantial, say hundreds of megabytes? Additionally, imagine a scenario where multiple list requests flood in simultaneously, perhaps after a brief network outage. While API Priority and Fairness has proven to reasonably protect kube-apiserver from CPU overload, its impact is visibly smaller for memory protection. This can be explained by the differing nature of resource consumption by a single API request - the CPU usage at any given time is capped by a constant, whereas memory, being uncompressible, can grow proportionally with the number of processed objects and is unbounded. This situation poses a genuine risk, potentially overwhelming and crashing any kube-apiserver within seconds due to out-of-memory (OOM) conditions. To better visualize the issue, let's consider the below graph.
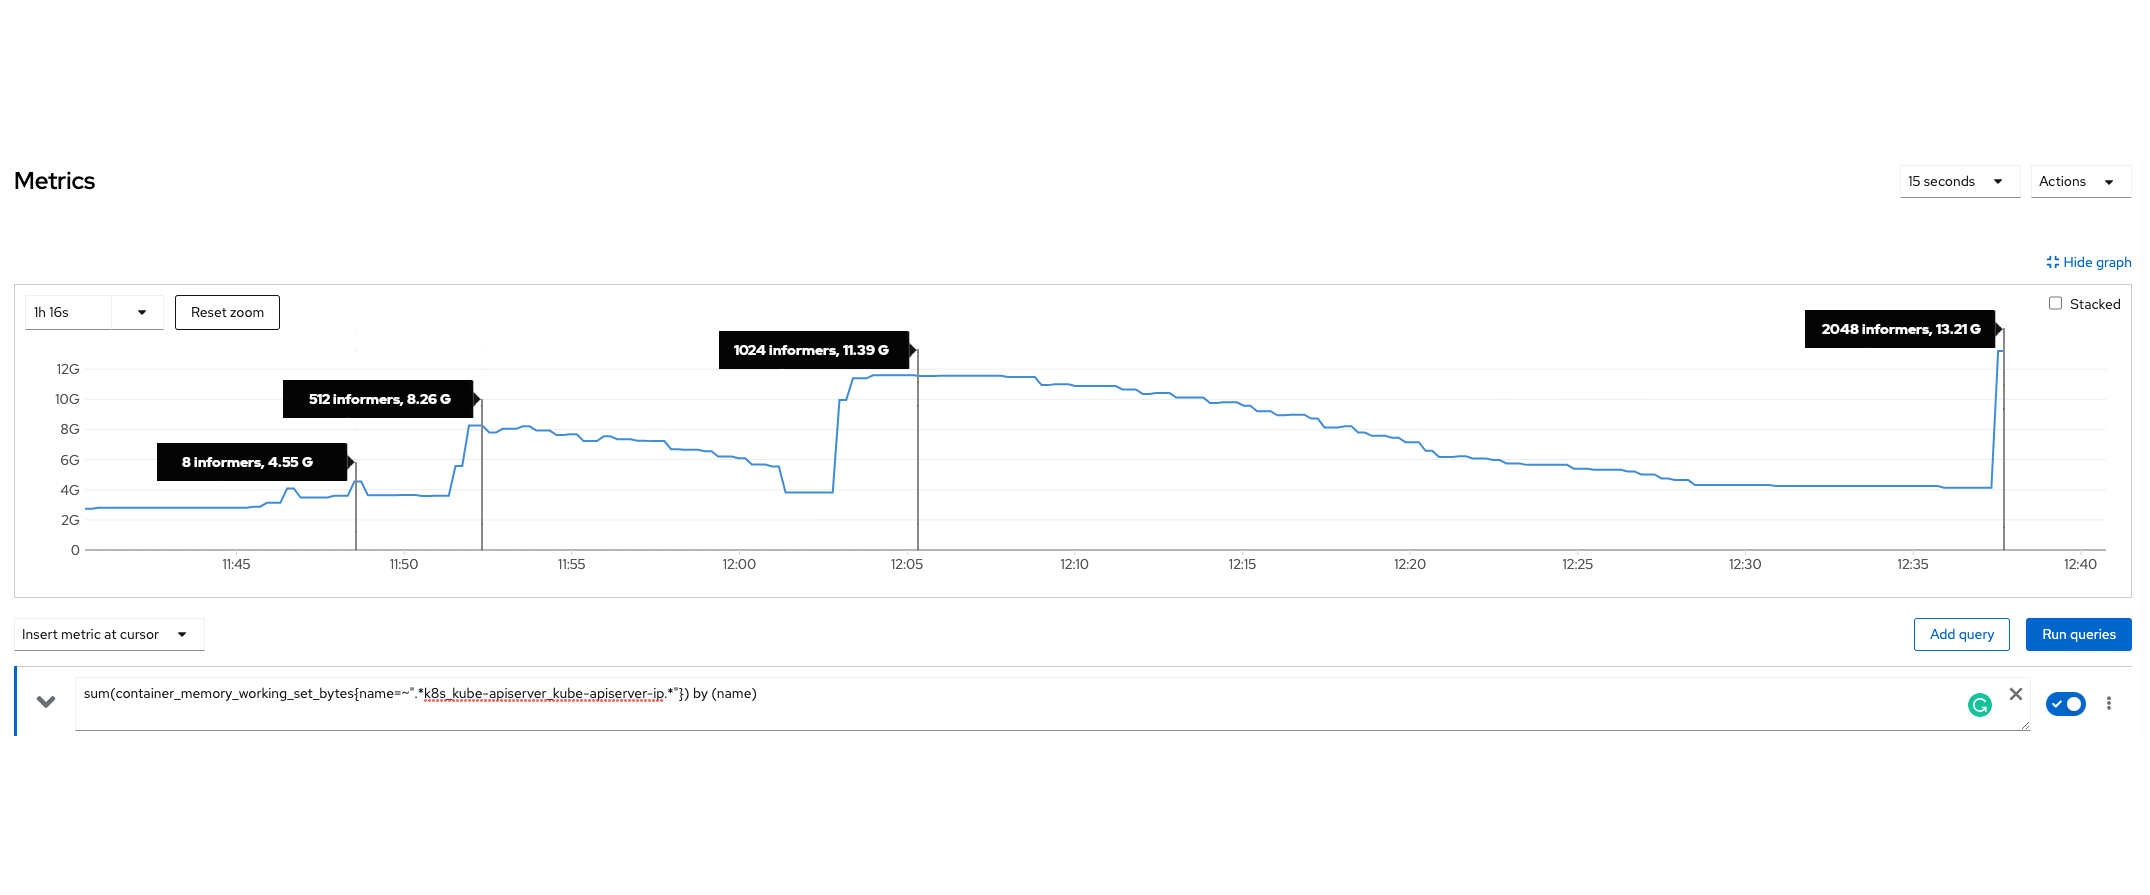
The graph shows the memory usage of a kube-apiserver during a synthetic test. (see the synthetic test section for more details). The results clearly show that increasing the number of informers significantly boosts the server's memory consumption. Notably, at approximately 16:40, the server crashed when serving only 16 informers.
Why does kube-apiserver allocate so much memory for list requests?
Our investigation revealed that this substantial memory allocation occurs because the server before sending the first byte to the client must:
- fetch data from the database,
- deserialize the data from its stored format,
- and finally construct the final response by converting and serializing the data into a client requested format
This sequence results in significant temporary memory consumption. The actual usage depends on many factors like the page size, applied filters (e.g. label selectors), query parameters, and sizes of individual objects.
Unfortunately, neither API Priority and Fairness nor Golang's garbage collection or Golang memory limits can prevent the system from exhausting memory under these conditions. The memory is allocated suddenly and rapidly, and just a few requests can quickly deplete the available memory, leading to resource exhaustion.
Depending on how the API server is run on the node, it might either be killed through OOM by the kernel when exceeding the configured memory limits during these uncontrolled spikes, or if limits are not configured it might have even worse impact on the control plane node. And worst, after the first API server failure, the same requests will likely hit another control plane node in an HA setup with probably the same impact. Potentially a situation that is hard to diagnose and hard to recover from.
Streaming list requests
Today, we're excited to announce a major improvement.
With the graduation of the watch list feature to beta in Kubernetes 1.32, client-go users can opt-in (after explicitly enabling WatchListClient feature gate)
to streaming lists by switching from list to (a special kind of) watch requests.
Watch requests are served from the watch cache, an in-memory cache designed to improve scalability of read operations. By streaming each item individually instead of returning the entire collection, the new method maintains constant memory overhead. The API server is bound by the maximum allowed size of an object in etcd plus a few additional allocations. This approach drastically reduces the temporary memory usage compared to traditional list requests, ensuring a more efficient and stable system, especially in clusters with a large number of objects of a given type or large average object sizes where despite paging memory consumption used to be high.
Building on the insight gained from the synthetic test (see the synthetic test, we developed an automated performance test to systematically evaluate the impact of the watch list feature. This test replicates the same scenario, generating a large number of Secrets with a large payload, and scaling the number of informers to simulate heavy list request patterns. The automated test is executed periodically to monitor memory usage of the server with the feature enabled and disabled.
The results showed significant improvements with the watch list feature enabled. With the feature turned on, the kube-apiserver’s memory consumption stabilized at approximately 2 GB. By contrast, with the feature disabled, memory usage increased to approximately 20GB, a 10x increase! These results confirm the effectiveness of the new streaming API, which reduces the temporary memory footprint.
Enabling API Streaming for your component
Upgrade to Kubernetes 1.32. Make sure your cluster uses etcd in version 3.4.31+ or 3.5.13+.
Change your client software to use watch lists. If your client code is written in Golang, you'll want to enable WatchListClient for client-go.
For details on enabling that feature, read Introducing Feature Gates to Client-Go: Enhancing Flexibility and Control.
What's next?
In Kubernetes 1.32, the feature is enabled in kube-controller-manager by default despite its beta state. This will eventually be expanded to other core components like kube-scheduler or kubelet; once the feature becomes generally available, if not earlier. Other 3rd-party components are encouraged to opt-in to the feature during the beta phase, especially when they are at risk of accessing a large number of resources or kinds with potentially large object sizes.
For the time being, API Priority and Fairness assigns a reasonable small cost to list requests. This is necessary to allow enough parallelism for the average case where list requests are cheap enough. But it does not match the spiky exceptional situation of many and large objects. Once the majority of the Kubernetes ecosystem has switched to watch list, the list cost estimation can be changed to larger values without risking degraded performance in the average case, and with that increasing the protection against this kind of requests that can still hit the API server in the future.
The synthetic test
In order to reproduce the issue, we conducted a manual test to understand the impact of list requests on kube-apiserver memory usage. In the test, we created 400 Secrets, each containing 1 MB of data, and used informers to retrieve all Secrets.
The results were alarming, only 16 informers were needed to cause the test server to run out of memory and crash, demonstrating how quickly memory consumption can grow under such conditions.
Special shout out to @deads2k for his help in shaping this feature.
Kubernetes 1.33 update
Since this feature was started, Marek Siarkowicz integrated a new technology into the
Kubernetes API server: streaming collection encoding.
Kubernetes v1.33 introduced two related feature gates, StreamingCollectionEncodingToJSON and StreamingCollectionEncodingToProtobuf.
These features encode via a stream and avoid allocating all the memory at once.
This functionality is bit-for-bit compatible with existing list encodings, produces even greater server-side memory savings, and doesn't require any changes to client code.
In 1.33, the WatchList feature gate is disabled by default.
Kubernetes v1.32 Adds A New CPU Manager Static Policy Option For Strict CPU Reservation
In Kubernetes v1.32, after years of community discussion, we are excited to introduce a
strict-cpu-reservation option for the CPU Manager static policy.
This feature is currently in alpha, with the associated policy hidden by default. You can only use the
policy if you explicitly enable the alpha behavior in your cluster.
Understanding the feature
The CPU Manager static policy is used to reduce latency or improve performance. The reservedSystemCPUs defines an explicit CPU set for OS system daemons and kubernetes system daemons. This option is designed for Telco/NFV type use cases where uncontrolled interrupts/timers may impact the workload performance. you can use this option to define the explicit cpuset for the system/kubernetes daemons as well as the interrupts/timers, so the rest CPUs on the system can be used exclusively for workloads, with less impact from uncontrolled interrupts/timers. More details of this parameter can be found on the Explicitly Reserved CPU List page.
If you want to protect your system daemons and interrupt processing, the obvious way is to use the reservedSystemCPUs option.
However, until the Kubernetes v1.32 release, this isolation was only implemented for guaranteed
pods that made requests for a whole number of CPUs. At pod admission time, the kubelet only
compares the CPU requests against the allocatable CPUs. In Kubernetes, limits can be higher than
the requests; the previous implementation allowed burstable and best-effort pods to use up
the capacity of reservedSystemCPUs, which could then starve host OS services of CPU - and we
know that people saw this in real life deployments.
The existing behavior also made benchmarking (for both infrastructure and workloads) results inaccurate.
When this new strict-cpu-reservation policy option is enabled, the CPU Manager static policy will not allow any workload to use the reserved system CPU cores.
Enabling the feature
To enable this feature, you need to turn on both the CPUManagerPolicyAlphaOptions feature gate and the strict-cpu-reservation policy option. And you need to remove the /var/lib/kubelet/cpu_manager_state file if it exists and restart kubelet.
With the following kubelet configuration:
kind: KubeletConfiguration
apiVersion: kubelet.config.k8s.io/v1beta1
featureGates:
...
CPUManagerPolicyOptions: true
CPUManagerPolicyAlphaOptions: true
cpuManagerPolicy: static
cpuManagerPolicyOptions:
strict-cpu-reservation: "true"
reservedSystemCPUs: "0,32,1,33,16,48"
...
When strict-cpu-reservation is not set or set to false:
# cat /var/lib/kubelet/cpu_manager_state
{"policyName":"static","defaultCpuSet":"0-63","checksum":1058907510}
When strict-cpu-reservation is set to true:
# cat /var/lib/kubelet/cpu_manager_state
{"policyName":"static","defaultCpuSet":"2-15,17-31,34-47,49-63","checksum":4141502832}
Monitoring the feature
You can monitor the feature impact by checking the following CPU Manager counters:
cpu_manager_shared_pool_size_millicores: report shared pool size, in millicores (e.g. 13500m)cpu_manager_exclusive_cpu_allocation_count: report exclusively allocated cores, counting full cores (e.g. 16)
Your best-effort workloads may starve if the cpu_manager_shared_pool_size_millicores count is zero for prolonged time.
We believe any pod that is required for operational purpose like a log forwarder should not run as best-effort, but you can review and adjust the amount of CPU cores reserved as needed.
Conclusion
Strict CPU reservation is critical for Telco/NFV use cases. It is also a prerequisite for enabling the all-in-one type of deployments where workloads are placed on nodes serving combined control+worker+storage roles.
We want you to start using the feature and looking forward to your feedback.
Further reading
Please check out the Control CPU Management Policies on the Node task page to learn more about the CPU Manager, and how it fits in relation to the other node-level resource managers.
Getting involved
This feature is driven by the SIG Node. If you are interested in helping develop this feature, sharing feedback, or participating in any other ongoing SIG Node projects, please attend the SIG Node meeting for more details.
Kubernetes v1.32: Memory Manager Goes GA
With Kubernetes 1.32, the memory manager has officially graduated to General Availability (GA), marking a significant milestone in the journey toward efficient and predictable memory allocation for containerized applications. Since Kubernetes v1.22, where it graduated to beta, the memory manager has proved itself reliable, stable and a good complementary feature for the CPU Manager.
As part of kubelet's workload admission process, the memory manager provides topology hints to optimize memory allocation and alignment. This enables users to allocate exclusive memory for Pods in the Guaranteed QoS class. More details about the process can be found in the memory manager goes to beta blog.
Most of the changes introduced since the Beta are bug fixes, internal refactoring and observability improvements, such as metrics and better logging.
Observability improvements
As part of the effort to increase the observability of memory manager, new metrics have been added to provide some statistics on memory allocation patterns.
memory_manager_pinning_requests_total - tracks the number of times the pod spec required the memory manager to pin memory pages.
memory_manager_pinning_errors_total - tracks the number of times the pod spec required the memory manager to pin memory pages, but the allocation failed.
Improving memory manager reliability and consistency
The kubelet does not guarantee pod ordering when admitting pods after a restart or reboot.
In certain edge cases, this behavior could cause the memory manager to reject some pods, and in more extreme cases, it may cause kubelet to fail upon restart.
Previously, the beta implementation lacked certain checks and logic to prevent these issues.
To stabilize the memory manager for general availability (GA) readiness, small but critical refinements have been made to the algorithm, improving its robustness and handling of edge cases.
Future development
There is more to come for the future of Topology Manager in general, and memory manager in particular. Notably, ongoing efforts are underway to extend memory manager support to Windows, enabling CPU and memory affinity on a Windows operating system.
Getting involved
This feature is driven by the SIG Node community. Please join us to connect with the community and share your ideas and feedback around the above feature and beyond. We look forward to hearing from you!
Kubernetes v1.32: QueueingHint Brings a New Possibility to Optimize Pod Scheduling
The Kubernetes scheduler is the core component that selects the nodes on which new Pods run. The scheduler processes these new Pods one by one. Therefore, the larger your clusters, the more important the throughput of the scheduler becomes.
Over the years, Kubernetes SIG Scheduling has improved the throughput of the scheduler in multiple enhancements. This blog post describes a major improvement to the scheduler in Kubernetes v1.32: a scheduling context element named QueueingHint. This page provides background knowledge of the scheduler and explains how QueueingHint improves scheduling throughput.
Scheduling queue
The scheduler stores all unscheduled Pods in an internal component called the scheduling queue.
The scheduling queue consists of the following data structures:
- ActiveQ: holds newly created Pods or Pods that are ready to be retried for scheduling.
- BackoffQ: holds Pods that are ready to be retried but are waiting for a backoff period to end. The backoff period depends on the number of unsuccessful scheduling attempts performed by the scheduler on that Pod.
- Unschedulable Pod Pool: holds Pods that the scheduler won't attempt to schedule for one of the
following reasons:
- The scheduler previously attempted and was unable to schedule the Pods. Since that attempt, the cluster hasn't changed in a way that could make those Pods schedulable.
- The Pods are blocked from entering the scheduling cycles by PreEnqueue Plugins, for example, they have a scheduling gate, and get blocked by the scheduling gate plugin.
Scheduling framework and plugins
The Kubernetes scheduler is implemented following the Kubernetes scheduling framework.
And, all scheduling features are implemented as plugins
(e.g., Pod affinity
is implemented in the InterPodAffinity plugin.)
The scheduler processes pending Pods in phases called cycles as follows:
Scheduling cycle: the scheduler takes pending Pods from the activeQ component of the scheduling queue one by one. For each Pod, the scheduler runs the filtering/scoring logic from every scheduling plugin. The scheduler then decides on the best node for the Pod, or decides that the Pod can't be scheduled at that time.
If the scheduler decides that a Pod can't be scheduled, that Pod enters the Unschedulable Pod Pool component of the scheduling queue. However, if the scheduler decides to place the Pod on a node, the Pod goes to the binding cycle.
Binding cycle: the scheduler communicates the node placement decision to the Kubernetes API server. This operation bounds the Pod to the selected node.
Aside from some exceptions, most unscheduled Pods enter the unschedulable pod pool after each scheduling cycle. The Unschedulable Pod Pool component is crucial because of how the scheduling cycle processes Pods one by one. If the scheduler had to constantly retry placing unschedulable Pods, instead of offloading those Pods to the Unschedulable Pod Pool, multiple scheduling cycles would be wasted on those Pods.
Improvements to retrying Pod scheduling with QueuingHint
Unschedulable Pods only move back into the ActiveQ or BackoffQ components of the scheduling queue if changes in the cluster might allow the scheduler to place those Pods on nodes.
Prior to v1.32, each plugin registered which cluster changes could solve their failures, an object creation, update, or deletion in the cluster (called cluster events),
with EnqueueExtensions (EventsToRegister),
and the scheduling queue retries a pod with an event that is registered by a plugin that rejected the pod in a previous scheduling cycle.
Additionally, we had an internal feature called preCheck, which helped further filtering of events for efficiency, based on Kubernetes core scheduling constraints;
For example, preCheck could filter out node-related events when the node status is NotReady.
However, we had two issues for those approaches:
- Requeueing with events was too broad, could lead to scheduling retries for no reason.
- A new scheduled Pod might solve the
InterPodAffinity's failure, but not all of them do. For example, if a new Pod is created, but without a label matchingInterPodAffinityof the unschedulable pod, the pod wouldn't be schedulable.
- A new scheduled Pod might solve the
preCheckrelied on the logic of in-tree plugins and was not extensible to custom plugins, like in issue #110175.
Here QueueingHints come into play; a QueueingHint subscribes to a particular kind of cluster event, and make a decision about whether each incoming event could make the Pod schedulable.
For example, consider a Pod named pod-a that has a required Pod affinity. pod-a was rejected in
the scheduling cycle by the InterPodAffinity plugin because no node had an existing Pod that matched
the Pod affinity specification for pod-a.

A diagram showing the scheduling queue and pod-a rejected by InterPodAffinity plugin
pod-a moves into the Unschedulable Pod Pool. The scheduling queue records which plugin caused
the scheduling failure for the Pod. For pod-a, the scheduling queue records that the InterPodAffinity
plugin rejected the Pod.
pod-a will never be schedulable until the InterPodAffinity failure is resolved.
There're some scenarios that the failure could be resolved, one example is an existing running pod gets a label update and becomes matching a Pod affinity.
For this scenario, the InterPodAffinity plugin's QueuingHint callback function checks every Pod label update that occurs in the cluster.
Then, if a Pod gets a label update that matches the Pod affinity requirement of pod-a, the InterPodAffinity,
plugin's QueuingHint prompts the scheduling queue to move pod-a back into the ActiveQ or
the BackoffQ component.

A diagram showing the scheduling queue and pod-a being moved by InterPodAffinity QueueingHint
QueueingHint's history and what's new in v1.32
At SIG Scheduling, we have been working on the development of QueueingHint since Kubernetes v1.28.
While QueuingHint isn't user-facing, we implemented the SchedulerQueueingHints feature gate as a
safety measure when we originally added this feature. In v1.28, we implemented QueueingHints with a
few in-tree plugins experimentally, and made the feature gate enabled by default.
However, users reported a memory leak, and consequently we disabled the feature gate in a patch release of v1.28. From v1.28 until v1.31, we kept working on the QueueingHint implementation within the rest of the in-tree plugins and fixing bugs.
In v1.32, we made this feature enabled by default again. We finished implementing QueueingHints in all plugins and also identified the cause of the memory leak!
We thank all the contributors who participated in the development of this feature and those who reported and investigated the earlier issues.
Getting involved
These features are managed by Kubernetes SIG Scheduling.
Please join us and share your feedback.
How can I learn more?
Kubernetes v1.32: Penelope
Editors: Matteo Bianchi, Edith Puclla, William Rizzo, Ryota Sawada, Rashan Smith
Announcing the release of Kubernetes v1.32: Penelope!
In line with previous releases, the release of Kubernetes v1.32 introduces new stable, beta, and alpha features. The consistent delivery of high-quality releases underscores the strength of our development cycle and the vibrant support from our community. This release consists of 44 enhancements in total. Of those enhancements, 13 have graduated to Stable, 12 are entering Beta, and 19 have entered in Alpha.
Release theme and logo

The Kubernetes v1.32 Release Theme is "Penelope".
If Kubernetes is Ancient Greek for "pilot", in this release we start from that origin
and reflect on the last 10 years of Kubernetes and our accomplishments:
each release cycle is a journey, and just like Penelope, in "The Odyssey",
weaved for 10 years -- each night removing parts of what she had done during the day --
so does each release add new features and removes others, albeit here with a much
clearer purpose of constantly improving Kubernetes.
With v1.32 being the last release in the year Kubernetes marks its first decade anniversary,
we wanted to honour all of those that have been part of the global Kubernetes crew
that roams the cloud-native seas through perils and challanges:
may we continue to weave the future of Kubernetes together.
Updates to recent key features
A note on DRA enhancements
In this release, like the previous one, the Kubernetes project continues proposing a number of enhancements to the Dynamic Resource Allocation (DRA), a key component of the Kubernetes resource management system. These enhancements aim to improve the flexibility and efficiency of resource allocation for workloads that require specialized hardware, such as GPUs, FPGAs and network adapters. These features are particularly useful for use-cases such as machine learning or high-performance computing applications. The core part enabling DRA Structured parameter support got promoted to beta.
Quality of life improvements on nodes and sidecar containers update
SIG Node has the following highlights that go beyond KEPs:
The systemd watchdog capability is now used to restart the kubelet when its health check fails, while also limiting the maximum number of restarts within a given time period. This enhances the reliability of the kubelet. For more details, see pull request #127566.
In cases when an image pull back-off error is encountered, the message displayed in the Pod status has been improved to be more human-friendly and to indicate details about why the Pod is in this condition. When an image pull back-off occurs, the error is appended to the
status.containerStatuses[*].state.waiting.messagefield in the Pod specification with anImagePullBackOffvalue in thereasonfield. This change provides you with more context and helps you to identify the root cause of the issue. For more details, see pull request #127918.The sidecar containers feature is targeting graduation to Stable in v1.33. To view the remaining work items and feedback from users, see comments in the issue #753.
Highlights of features graduating to Stable
This is a selection of some of the improvements that are now stable following the v1.32 release.
Custom Resource field selectors
Custom resource field selector allows developers to add field selectors to custom resources, mirroring the functionality available for built-in Kubernetes objects. This allows for more efficient and precise filtering of custom resources, promoting better API design practices.
This work was done as a part of KEP #4358, by SIG API Machinery.
Support to size memory backed volumes
This feature makes it possible to dynamically size memory-backed volumes based on Pod resource limits, improving the workload's portability and overall node resource utilization.
This work was done as a part of KEP #1967, by SIG Node.
Bound service account token improvement
The inclusion of the node name in the service account token claims allows users to use such information during authorization and admission (ValidatingAdmissionPolicy). Furthermore this improvement keeps service account credentials from being a privilege escalation path for nodes.
This work was done as part of KEP #4193 by SIG Auth.
Structured authorization configuration
Multiple authorizers can be configured in the API server to allow for structured authorization decisions, with support for CEL match conditions in webhooks. This work was done as part of KEP #3221 by SIG Auth.
Auto remove PVCs created by StatefulSet
PersistentVolumeClaims (PVCs) created by StatefulSets get automatically deleted when no longer needed, while ensuring data persistence during StatefulSet updates and node maintenance. This feature simplifies storage management for StatefulSets and reduces the risk of orphaned PVCs.
This work was done as part of KEP #1847 by SIG Apps.
Highlights of features graduating to Beta
This is a selection of some of the improvements that are now beta following the v1.32 release.
Job API managed-by mechanism
The managedBy field for Jobs was promoted to beta in the v1.32 release. This feature enables external controllers
(like Kueue) to manage Job synchronization, offering greater flexibility and integration
with advanced workload management systems.
This work was done as a part of KEP #4368, by SIG Apps.
Only allow anonymous auth for configured endpoints
This feature lets admins specify which endpoints are allowed for anonymous requests. For example, the admin
can choose to only allow anonymous access to health endpoints like /healthz, /livez, and /readyz while
making sure preventing anonymous access to other cluster endpoints or resources even if a user
misconfigures RBAC.
This work was done as a part of KEP #4633, by SIG Auth.
Per-plugin callback functions for accurate requeueing in kube-scheduler enhancements
This feature enhances scheduling throughput with more efficient scheduling retry decisions by per-plugin callback functions (QueueingHint). All plugins now have QueueingHints.
This work was done as a part of KEP #4247, by SIG Scheduling.
Recover from volume expansion failure
This feature lets users recover from volume expansion failure by retrying with a smaller size. This enhancement ensures that volume expansion is more resilient and reliable, reducing the risk of data loss or corruption during the process.
This work was done as a part of KEP #1790, by SIG Storage.
Volume group snapshot
This feature introduces a VolumeGroupSnapshot API, which lets users take a snapshot of multiple volumes together, ensuring data consistency across the volumes.
This work was done as a part of KEP #3476, by SIG Storage.
Structured parameter support
The core part of Dynamic Resource Allocation (DRA), the structured parameter support, got promoted to beta. This allows the kube-scheduler and Cluster Autoscaler to simulate claim allocation directly, without needing a third-party driver. These components can now predict whether resource requests can be fulfilled based on the cluster's current state without actually committing to the allocation. By eliminating the need for a third-party driver to validate or test allocations, this feature improves planning and decision-making for resource distribution, making the scheduling and scaling processes more efficient.
This work was done as a part of KEP #4381, by WG Device Management (a cross functional team containing SIG Node, SIG Scheduling and SIG Autoscaling).
Label and field selector authorization
Label and field selectors can be used in authorization decisions. The node authorizer automatically takes advantage of this to limit nodes to list or watch their pods only. Webhook authorizers can be updated to limit requests based on the label or field selector used.
This work was done as part of KEP #4601 by SIG Auth.
Highlights of new features in Alpha
This is a selection of key improvements introduced as alpha features in the v1.32 release.
Asynchronous preemption in the Kubernetes Scheduler
The Kubernetes scheduler has been enhanced with Asynchronous Preemption, a feature that improves scheduling throughput by handling preemption operations asynchronously. Preemption ensures higher-priority pods get the resources they need by evicting lower-priority ones, but this process previously involved heavy operations like API calls to delete pods, slowing down the scheduler. With this enhancement, such tasks are now processed in parallel, allowing the scheduler to continue scheduling other pods without delays. This improvement is particularly beneficial in clusters with high Pod churn or frequent scheduling failures, ensuring a more efficient and resilient scheduling process.
This work was done as a part of KEP #4832 by SIG Scheduling.
Mutating admission policies using CEL expressions
This feature leverages CEL's object instantiation and JSON Patch strategies, combined with Server Side Apply’s merge algorithms. It simplifies policy definition, reduces mutation conflicts, and enhances admission control performance while laying a foundation for more robust, extensible policy frameworks in Kubernetes.
The Kubernetes API server now supports Common Expression Language (CEL)-based Mutating Admission Policies, providing a lightweight, efficient alternative to mutating admission webhooks. With this enhancement, administrators can use CEL to declare mutations like setting labels, defaulting fields, or injecting sidecars with simple, declarative expressions. This approach reduces operational complexity, eliminates the need for webhooks, and integrates directly with the kube-apiserver, offering faster and more reliable in-process mutation handling.
This work was done as a part of KEP #3962 by SIG API Machinery.
Pod-level resource specifications
This enhancement simplifies resource management in Kubernetes by introducing the ability to set resource requests and limits at the Pod level, creating a shared pool that all containers in the Pod can dynamically use. This is particularly valuable for workloads with containers that have fluctuating or bursty resource needs, as it minimizes over-provisioning and improves overall resource efficiency.
By leveraging Linux cgroup settings at the Pod level, Kubernetes ensures that these resource limits are enforced while enabling tightly coupled containers to collaborate more effectively without hitting artificial constraints. Importantly, this feature maintains backward compatibility with existing container-level resource settings, allowing users to adopt it incrementally without disrupting current workflows or existing configurations.
This marks a significant improvement for multi-container pods, as it reduces the operational complexity of managing resource allocations across containers. It also provides a performance boost for tightly integrated applications, such as sidecar architectures, where containers share workloads or depend on each other’s availability to perform optimally.
This work was done as part of KEP #2837 by SIG Node.
Allow zero value for sleep action of PreStop hook
This enhancement introduces the ability to set a zero-second sleep duration for the PreStop lifecycle hook in Kubernetes, offering a more flexible and no-op option for resource validation and customization. Previously, attempting to define a zero value for the sleep action resulted in validation errors, restricting its use. With this update, users can configure a zero-second duration as a valid sleep setting, enabling immediate execution and termination behaviors where needed.
The enhancement is backward-compatible, introduced as an opt-in feature controlled by the
PodLifecycleSleepActionAllowZero feature gate. This change is particularly beneficial for scenarios requiring PreStop
hooks for validation or admission webhook processing without requiring an actual sleep duration. By aligning with the
capabilities of the time.After Go function, this update simplifies configuration and expands usability for Kubernetes
workloads.
This work was done as part of KEP #4818 by SIG Node.
DRA: Standardized network interface data for resource claim status
This enhancement adds a new field that allows drivers to report specific device status data for each allocated object in a ResourceClaim. It also establishes a standardized way to represent networking devices information.
This work was done as a part of KEP #4817, by SIG Network.
New statusz and flagz endpoints for core components
You can enable two new HTTP endpoints, /statusz and /flagz, for core components.
These enhance cluster debuggability by gaining insight into what versions (e.g. Golang version) that component is
running as, along with details about its uptime, and which command line flags that component was executed with;
making it easier to diagnose both runtime and configuration issues.
This work was done as part of KEP #4827 and KEP #4828 by SIG Instrumentation.
Windows strikes back!
Support for graceful shutdowns of Windows nodes in Kubernetes clusters has been added. Before this release, Kubernetes provided graceful node shutdown functionality for Linux nodes but lacked equivalent support for Windows. This enhancement enables the kubelet on Windows nodes to handle system shutdown events properly. Doing so, it ensures that Pods running on Windows nodes are gracefully terminated, allowing workloads to be rescheduled without disruption. This improvement enhances the reliability and stability of clusters that include Windows nodes, especially during a planned maintenance or any system updates.
Moreover CPU and memory affinity support has been added for Windows nodes with nodes, with improvements to the CPU manager, memory manager and topology manager.
This work was done respectively as part of KEP #4802 and KEP #4885 by SIG Windows.
Graduations, deprecations, and removals in 1.32
Graduations to Stable
This lists all the features that graduated to stable (also known as general availability). For a full list of updates including new features and graduations from alpha to beta, see the release notes.
This release includes a total of 13 enhancements promoted to Stable:
- Structured Authorization Configuration
- Bound service account token improvements
- Custom Resource Field Selectors
- Retry Generate Name
- Make Kubernetes aware of the LoadBalancer behaviour
- Field
status.hostIPsadded for Pod - Custom profile in kubectl debug
- Memory Manager
- Support to size memory backed volumes
- Improved multi-numa alignment in Topology Manager
- Add job creation timestamp to job annotations
- Add Pod Index Label for StatefulSets and Indexed Jobs
- Auto remove PVCs created by StatefulSet
Deprecations and removals
As Kubernetes develops and matures, features may be deprecated, removed, or replaced with better ones for the project's overall health. See the Kubernetes deprecation and removal policy for more details on this process.
Withdrawal of the old DRA implementation
The enhancement #3063 introduced Dynamic Resource Allocation (DRA) in Kubernetes 1.26.
However, in Kubernetes v1.32, this approach to DRA will be significantly changed. Code related to the original implementation will be removed, leaving KEP #4381 as the "new" base functionality.
The decision to change the existing approach originated from its incompatibility with cluster autoscaling as resource availability was non-transparent, complicating decision-making for both Cluster Autoscaler and controllers. The newly added Structured Parameter model substitutes the functionality.
This removal will allow Kubernetes to handle new hardware requirements and resource claims more predictably, bypassing the complexities of back and forth API calls to the kube-apiserver.
See the enhancement issue #3063 to find out more.
API removals
There is one API removal in Kubernetes v1.32:
- The
flowcontrol.apiserver.k8s.io/v1beta3API version of FlowSchema and PriorityLevelConfiguration has been removed. To prepare for this, you can edit your existing manifests and rewrite client software to use theflowcontrol.apiserver.k8s.io/v1 APIversion, available since v1.29. All existing persisted objects are accessible via the new API. Notable changes in flowcontrol.apiserver.k8s.io/v1beta3 include that the PriorityLevelConfigurationspec.limited.nominalConcurrencySharesfield only defaults to 30 when unspecified, and an explicit value of 0 is not changed to 30.
For more information, refer to the API deprecation guide.
Release notes and upgrade actions required
Check out the full details of the Kubernetes v1.32 release in our release notes.
Availability
Kubernetes v1.32 is available for download on GitHub or on the Kubernetes download page.
To get started with Kubernetes, check out these interactive tutorials or run local Kubernetes clusters using minikube. You can also easily install v1.32 using kubeadm.
Release team
Kubernetes is only possible with the support, commitment, and hard work of its community. Each release team is made up of dedicated community volunteers who work together to build the many pieces that make up the Kubernetes releases you rely on. This requires the specialized skills of people from all corners of our community, from the code itself to its documentation and project management.
We would like to thank the entire release team for the hours spent hard at work to deliver the Kubernetes v1.32 release to our community. The Release Team's membership ranges from first-time shadows to returning team leads with experience forged over several release cycles. A very special thanks goes out our release lead, Frederico Muñoz, for leading the release team so gracefully and handle any matter with the uttermost care, making sure this release was executed smoothly and efficiently. Last but not least a big thanks goes to all the release members - leads and shadows alike - and to the following SIGs for the terrific work and outcome achieved during these 14 weeks of release work:
- SIG Docs - for the fundamental support in docs and blog reviews and continous collaboration with release Comms and Docs;
- SIG k8s Infra and SIG Testing - for the outstanding work in keeping the testing framework in check, along with all the infra components necessary;
- SIG Release and all the release managers - for the incredible support provided throughout the orchestration of the entire release, addressing even the most challenging issues in a graceful and timely manner.
Project velocity
The CNCF K8s DevStats project aggregates a number of interesting data points related to the velocity of Kubernetes and various sub-projects. This includes everything from individual contributions to the number of companies that are contributing and is an illustration of the depth and breadth of effort that goes into evolving this ecosystem.
In the v1.32 release cycle, which ran for 14 weeks (September 9th to December 11th), we saw contributions to Kubernetes from as many as 125 different companies and 559 individuals as of writing.
In the whole Cloud Native ecosystem, the figure goes up to 433 companies counting 2441 total contributors. This sees an increase of 7% more overall contributions compared to the previous release cycle, along with 14% increase in the number of companies involved, showcasing strong interest and community behind the Cloud Native projects.
Source for this data:
By contribution we mean when someone makes a commit, code review, comment, creates an issue or PR, reviews a PR (including blogs and documentation) or comments on issues and PRs.
If you are interested in contributing visit Getting Started on our contributor website.
Check out DevStats to learn more about the overall velocity of the Kubernetes project and community.
Event updates
Explore the upcoming Kubernetes and cloud-native events from March to June 2025, featuring KubeCon and KCD Stay informed and engage with the Kubernetes community.
March 2025
- KCD - Kubernetes Community Days: Beijing, China: In March | Beijing, China
- KCD - Kubernetes Community Days: Guadalajara, Mexico: March 16, 2025 | Guadalajara, Mexico
- KCD - Kubernetes Community Days: Rio de Janeiro, Brazil: March 22, 2025 | Rio de Janeiro, Brazil
April 2025
- KubeCon + CloudNativeCon Europe 2025: April 1-4, 2025 | London, United Kingdom
- KCD - Kubernetes Community Days: Budapest, Hungary: April 23, 2025 | Budapest, Hungary
- KCD - Kubernetes Community Days: Chennai, India: April 26, 2025 | Chennai, India
- KCD - Kubernetes Community Days: Auckland, New Zealand: April 28, 2025 | Auckland, New Zealand
May 2025
- KCD - Kubernetes Community Days: Helsinki, Finland: May 6, 2025 | Helsinki, Finland
- KCD - Kubernetes Community Days: San Francisco, USA: May 8, 2025 | San Francisco, USA
- KCD - Kubernetes Community Days: Austin, USA: May 15, 2025 | Austin, USA
- KCD - Kubernetes Community Days: Seoul, South Korea: May 22, 2025 | Seoul, South Korea
- KCD - Kubernetes Community Days: Istanbul, Turkey: May 23, 2025 | Istanbul, Turkey
- KCD - Kubernetes Community Days: Heredia, Costa Rica: May 31, 2025 | Heredia, Costa Rica
- KCD - Kubernetes Community Days: New York, USA: In May | New York, USA
June 2025
- KCD - Kubernetes Community Days: Bratislava, Slovakia: June 5, 2025 | Bratislava, Slovakia
- KCD - Kubernetes Community Days: Bangalore, India: June 6, 2025 | Bangalore, India
- KubeCon + CloudNativeCon China 2025: June 10-11, 2025 | Hong Kong
- KCD - Kubernetes Community Days: Antigua Guatemala, Guatemala: June 14, 2025 | Antigua Guatemala, Guatemala
- KubeCon + CloudNativeCon Japan 2025: June 16-17, 2025 | Tokyo, Japan
- KCD - Kubernetes Community Days: Nigeria, Africa: June 19, 2025 | Nigeria, Africa
Upcoming release webinar
Join members of the Kubernetes v1.32 release team on Thursday, January 9th 2025 at 5:00 PM (UTC), to learn about the release highlights of this release, as well as deprecations and removals to help plan for upgrades. For more information and registration, visit the event page on the CNCF Online Programs site.
Get involved
The simplest way to get involved with Kubernetes is by joining one of the many Special Interest Groups (SIGs) that align with your interests. Have something you’d like to broadcast to the Kubernetes community? Share your voice at our weekly community meeting, and through the channels below. Thank you for your continued feedback and support.
- Follow us on Bluesky @Kubernetes.io for latest updates
- Join the community discussion on Discuss
- Join the community on Slack
- Post questions (or answer questions) on Stack Overflow
- Share your Kubernetes story
- Read more about what’s happening with Kubernetes on the blog
- Learn more about the Kubernetes Release Team
Gateway API v1.2: WebSockets, Timeouts, Retries, and More
Kubernetes SIG Network is delighted to announce the general availability of Gateway API v1.2! This version of the API was released on October 3, and we're delighted to report that we now have a number of conformant implementations of it for you to try out.
Gateway API v1.2 brings a number of new features to the Standard channel (Gateway API's GA release channel), introduces some new experimental features, and inaugurates our new release process — but it also brings two breaking changes that you'll want to be careful of.
Breaking changes
GRPCRoute and ReferenceGrant v1alpha2 removal
Now that the v1 versions of GRPCRoute and ReferenceGrant have graduated to
Standard, the old v1alpha2 versions have been removed from both the Standard
and Experimental channels, in order to ease the maintenance burden that
perpetually supporting the old versions would place on the Gateway API
community.
Before upgrading to Gateway API v1.2, you'll want to confirm that any implementations of Gateway API have been upgraded to support the v1 API version of these resources instead of the v1alpha2 API version. Note that even if you've been using v1 in your YAML manifests, a controller may still be using v1alpha2 which would cause it to fail during this upgrade. Additionally, Kubernetes itself goes to some effort to stop you from removing a CRD version that it thinks you're using: check out the release notes for more information about what you need to do to safely upgrade.
Change to .status.supportedFeatures (experimental)
A much smaller breaking change: .status.supportedFeatures in a Gateway is
now a list of objects instead of a list of strings. The objects have a single
name field, so the translation from the strings is straightforward, but
moving to objects permits a lot more flexibility for the future. This stanza
is not yet present in the Standard channel.
Graduations to the standard channel
Gateway API 1.2.0 graduates four features to the Standard channel, meaning that they can now be considered generally available. Inclusion in the Standard release channel denotes a high level of confidence in the API surface and provides guarantees of backward compatibility. Of course, as with any other Kubernetes API, Standard channel features can continue to evolve with backward-compatible additions over time, and we certainly expect further refinements and improvements to these new features in the future. For more information on how all of this works, refer to the Gateway API Versioning Policy.
HTTPRoute timeouts
GEP-1742 introduced the
timeouts stanza into HTTPRoute, permitting configuring basic timeouts for
HTTP traffic. This is a simple but important feature for proper resilience
when handling HTTP traffic, and it is now Standard.
For example, this HTTPRoute configuration sets a timeout of 300ms for traffic
to the /face path:
apiVersion: gateway.networking.k8s.io/v1
kind: HTTPRoute
metadata:
name: face-with-timeouts
namespace: faces
spec:
parentRefs:
- name: my-gateway
kind: Gateway
rules:
- matches:
- path:
type: PathPrefix
value: /face
backendRefs:
- name: face
port: 80
timeouts:
request: 300ms
For more information, check out the HTTP routing documentation. (Note that this applies only to HTTPRoute timeouts. GRPCRoute timeouts are not yet part of Gateway API.)
Gateway infrastructure labels and annotations
Gateway API implementations are responsible for creating the backing infrastructure needed to make each Gateway work. For example, implementations running in a Kubernetes cluster often create Services and Deployments, while cloud-based implementations may be creating cloud load balancer resources. In many cases, it can be helpful to be able to propagate labels or annotations to these generated resources.
In v1.2.0, the Gateway infrastructure stanza moves to the Standard channel,
allowing you to specify labels and annotations for the infrastructure created
by the Gateway API controller. For example, if your Gateway infrastructure is
running in-cluster, you can specify both Linkerd and Istio injection using the
following Gateway configuration, making it simpler for the infrastructure to
be incorporated into whichever service mesh you've installed:
apiVersion: gateway.networking.k8s.io/v1
kind: Gateway
metadata:
name: meshed-gateway
namespace: incoming
spec:
gatewayClassName: meshed-gateway-class
listeners:
- name: http-listener
protocol: HTTP
port: 80
infrastructure:
labels:
istio-injection: enabled
annotations:
linkerd.io/inject: enabled
For more information, check out the
infrastructure API reference.
Backend protocol support
Since Kubernetes v1.20, the Service and EndpointSlice resources have supported
a stable appProtocol field to allow users to specify the L7 protocol that
Service supports. With the adoption of
KEP 3726,
Kubernetes now supports three new appProtocol values:
kubernetes.io/h2c- HTTP/2 over cleartext as described in RFC7540
kubernetes.io/ws- WebSocket over cleartext as described in RFC6445
kubernetes.io/wss- WebSocket over TLS as described in RFC6445
With Gateway API 1.2.0, support for honoring appProtocol is now Standard.
For example, given the following Service:
apiVersion: v1
kind: Service
metadata:
name: websocket-service
namespace: my-namespace
spec:
selector:
app.kubernetes.io/name: websocket-app
ports:
- name: http
port: 80
targetPort: 9376
protocol: TCP
appProtocol: kubernetes.io/ws
then an HTTPRoute that includes this Service as a backendRef will
automatically upgrade the connection to use WebSockets rather than assuming
that the connection is pure HTTP.
For more information, check out GEP-1911.
New additions to experimental channel
Named rules for *Route resources
The rules field in HTTPRoute and GRPCRoute resources can now be named, in
order to make it easier to reference the specific rule, for example:
apiVersion: gateway.networking.k8s.io/v1
kind: HTTPRoute
metadata:
name: multi-color-route
namespace: faces
spec:
parentRefs:
- name: my-gateway
kind: Gateway
port: 80
rules:
- name: center-rule
matches:
- path:
type: PathPrefix
value: /color/center
backendRefs:
- name: color-center
port: 80
- name: edge-rule
matches:
- path:
type: PathPrefix
value: /color/edge
backendRefs:
- name: color-edge
port: 80
Logging or status messages can now refer to these two rules as center-rule
or edge-rule instead of being forced to refer to them by index. For more
information, see GEP-995.
HTTPRoute retry support
Gateway API 1.2.0 introduces experimental support for counted HTTPRoute
retries. For example, the following HTTPRoute configuration retries requests
to the /face path up to 3 times with a 500ms delay between retries:
apiVersion: gateway.networking.k8s.io/v1
kind: HTTPRoute
metadata:
name: face-with-retries
namespace: faces
spec:
parentRefs:
- name: my-gateway
kind: Gateway
port: 80
rules:
- matches:
- path:
type: PathPrefix
value: /face
backendRefs:
- name: face
port: 80
retry:
codes: [ 500, 502, 503, 504 ]
attempts: 3
backoff: 500ms
For more information, check out GEP 1731.
HTTPRoute percentage-based mirroring
Gateway API has long supported the
Request Mirroring
feature, which allows sending the same request to multiple backends. In
Gateway API 1.2.0, we're introducing percentage-based mirroring, which allows
you to specify a percentage of requests to mirror to a different backend. For
example, the following HTTPRoute configuration mirrors 42% of requests to the
color-mirror backend:
apiVersion: gateway.networking.k8s.io/v1
kind: HTTPRoute
metadata:
name: color-mirror-route
namespace: faces
spec:
parentRefs:
- name: mirror-gateway
hostnames:
- mirror.example
rules:
- backendRefs:
- name: color
port: 80
filters:
- type: RequestMirror
requestMirror:
backendRef:
name: color-mirror
port: 80
percent: 42 # This value must be an integer.
There's also a fraction stanza which can be used in place of percent, to
allow for more precise control over exactly what amount of traffic is
mirrored, for example:
...
filters:
- type: RequestMirror
requestMirror:
backendRef:
name: color-mirror
port: 80
fraction:
numerator: 1
denominator: 10000
This configuration mirrors 1 in 10,000 requests to the color-mirror backend,
which may be relevant with very high request rates. For more details, see
GEP-1731.
Additional backend TLS configuration
This release includes three additions related to TLS configuration for communications between a Gateway and a workload (a backend):
A new
backendTLSfield on GatewayThis new field allows you to specify the client certificate that a Gateway should use when connecting to backends.
A new
subjectAltNamesfield on BackendTLSPolicyPreviously, the
hostnamefield was used to configure both the SNI that a Gateway should send to a backend and the identity that should be provided by a certificate. When the newsubjectAltNamesfield is specified, any certificate matching at least one of the specified SANs will be considered valid. This is particularly critical for SPIFFE where URI-based SANs may not be valid SNIs.A new
optionsfield on BackendTLSPolicySimilar to the TLS options field on Gateway Listeners, we believe the same concept will be broadly useful for TLS-specific configuration for Backend TLS.
For more information, check out GEP-3135.
More changes
For a full list of the changes included in this release, please refer to the v1.2.0 release notes.
Project updates
Beyond the technical, the v1.2 release also marks a few milestones in the life of the Gateway API project itself.
Release process improvements
Gateway API has never been intended to be a static API, and as more projects use it as a component to build on, it's become clear that we need to bring some more predictability to Gateway API releases. To that end, we're pleased - and a little nervous! - to announce that we've formalized a new release process:
Scoping (4-6 weeks): maintainers and community determine the set of features we want to include in the release. A particular emphasis here is getting features out of the Experimental channel — ideally this involves moving them to Standard, but it can also mean removing them.
GEP Iteration and Review (5-7 weeks): contributors write or update Gateway Enhancement Proposals (GEPs) for features accepted into the release, with emphasis on getting consensus around the design and graduation criteria of the feature.
API Refinement and Documentation (3-5 weeks): contributors implement the features in the Gateway API controllers and write the necessary documentation.
SIG Network Review and Release Candidates (2-4 weeks): maintainers get the required upstream review, build release candidates, and release the new version.
Gateway API 1.2.0 was the first release to use the new process, and although there are the usual rough edges of anything new, we believe that it went well. We've already completed the Scoping phase for Gateway API 1.3, with the release expected around the end of January 2025.
gwctl moves out
The gwctl CLI tool has moved into its very own repository,
https://github.com/kubernetes-sigs/gwctl. gwctl has proven a valuable tool
for the Gateway API community; moving it into its own repository will, we
believe, make it easier to maintain and develop. As always, we welcome
contributions; while still experimental, gwctl already helps make working
with Gateway API a bit easier — especially for newcomers to the project!
Maintainer changes
Rounding out our changes to the project itself, we're pleased to announce that Mattia Lavacca has joined the ranks of Gateway API Maintainers! We're also sad to announce that Keith Mattix has stepped down as a GAMMA lead — happily, Mike Morris has returned to the role. We're grateful for everything Keith has done, and excited to have Mattia and Mike on board.
Try it out
Unlike other Kubernetes APIs, you don't need to upgrade to the latest version of Kubernetes to get the latest version of Gateway API. As long as you're running Kubernetes 1.26 or later, you'll be able to get up and running with this version of Gateway API.
To try out the API, follow our Getting Started Guide. As of this writing, five implementations are already conformant with Gateway API v1.2. In alphabetical order:
- Cilium v1.17.0-pre.1, Experimental channel
- Envoy Gateway v1.2.0-rc.1, Experimental channel
- Istio v1.24.0-alpha.0, Experimental channel
- Kong v3.2.0-244-gea4944bb0, Experimental channel
- Traefik v3.2, Experimental channel
Get involved
There are lots of opportunities to get involved and help define the future of Kubernetes routing APIs for both ingress and service mesh.
- Check out the user guides to see what use-cases can be addressed.
- Try out one of the existing Gateway controllers.
- Or join us in the community and help us build the future of Gateway API together!
The maintainers would like to thank everyone who's contributed to Gateway API, whether in the form of commits to the repo, discussion, ideas, or general support. We could never have gotten this far without the support of this dedicated and active community.
Related Kubernetes blog articles
How we built a dynamic Kubernetes API Server for the API Aggregation Layer in Cozystack
Hi there! I'm Andrei Kvapil, but you might know me as @kvaps in communities dedicated to Kubernetes and cloud-native tools. In this article, I want to share how we implemented our own extension api-server in the open-source PaaS platform, Cozystack.
Kubernetes truly amazes me with its powerful extensibility features. You're probably already familiar with the controller concept and frameworks like kubebuilder and operator-sdk that help you implement it. In a nutshell, they allow you to extend your Kubernetes cluster by defining custom resources (CRDs) and writing additional controllers that handle your business logic for reconciling and managing these kinds of resources. This approach is well-documented, with a wealth of information available online on how to develop your own operators.
However, this is not the only way to extend the Kubernetes API. For more complex scenarios such as implementing imperative logic, managing subresources, and dynamically generating responses—the Kubernetes API aggregation layer provides an effective alternative. Through the aggregation layer, you can develop a custom extension API server and seamlessly integrate it within the broader Kubernetes API framework.
In this article, I will explore the API aggregation layer, the types of challenges it is well-suited to address, cases where it may be less appropriate, and how we utilized this model to implement our own extension API server in Cozystack.
What Is the API Aggregation Layer?
First, let's get definitions straight to avoid any confusion down the road. The API aggregation layer is a feature in Kubernetes, while an extension api-server is a specific implementation of an API server for the aggregation layer. An extension API server is just like the standard Kubernetes API server, except it runs separately and handles requests for your specific resource types.
So, the aggregation layer lets you write your own extension API server, integrate it easily into Kubernetes, and directly process requests for resources in a certain group. Unlike the CRD mechanism, the extension API is registered in Kubernetes as an APIService, telling Kubernetes to consider this new API server and acknowledge that it serves certain APIs.
You can execute this command to list all registered apiservices:
kubectl get apiservices.apiregistration.k8s.io
Example APIService:
NAME SERVICE AVAILABLE AGE
v1alpha1.apps.cozystack.io cozy-system/cozystack-api True 7h29m
As soon as the Kubernetes api-server receives requests for resources in the group
v1alpha1.apps.cozystack.io, it redirects all those requests to our extension api-server,
which can handle them based on the business logic we've built into it.
When to use the API Aggregation Layer
The API Aggregation Layer helps solve several issues where the usual CRD mechanism might not enough. Let's break them down.
Imperative Logic and Subresources
Besides regular resources, Kubernetes also has something called subresources.
In Kubernetes, subresources are additional actions or operations you can perform on primary resources (like Pods, Deployments, Services) via the Kubernetes API. They provide interfaces to manage specific aspects of resources without affecting the entire object.
A simple example is status, which is traditionally exposed as a separate subresource that you can
access independently from the parent object. The status field isn't meant to be changed
But beyond /status, Pods in Kubernetes also have subresources like /exec, /portforward, and
/log. Interestingly, instead of the usual declarative resources in Kubernetes, these represent
endpoints for imperative operations like viewing logs, proxying connections, executing commands in
a running container, and so on.
To support such imperative commands on your own API, you need implement an extension API and an extension API server. Here are some well-known examples:
- KubeVirt: An add-on for Kubernetes that extends its API capabilities to run traditional virtual machines.
The extension api-server created as part of KubeVirt handles subresources
like
/restart,/console, and/vncfor virtual machines. - Knative: A Kubernetes add-on that extends its capabilities for serverless computing,
implementing the
/scalesubresource to set up autoscaling for its resource types.
By the way, even though subresource logic in Kubernetes can be imperative, you can manage access to them declaratively using Kubernetes standard RBAC model.
For example this way you can control access to the /log and /exec subresources of the Pod kind:
kind: Role
apiVersion: rbac.authorization.k8s.io/v1
metadata:
namespace: default
name: pod-and-pod-logs-reader
rules:
- apiGroups: [""]
resources: ["pods", "pods/log"]
verbs: ["get", "list"]
- apiGroups: [""]
resources: ["pods/exec"]
verbs: ["create"]
You're not tied to use etcd
Usually, the Kubernetes API server uses etcd for its backend. However, implementing your own API server doesn't lock you into using only etcd. If it doesn't make sense to store your server's state in etcd, you can store information in any other system and generate responses on the fly. Here are a few cases to illustrate:
metrics-server is a standard extension for Kubernetes which allows you to view real-time metrics of your nodes and pods. It defines alternative Pod and Node kinds in its own metrics.k8s.io API. Requests to these resources are translated into metrics directly from Kubelet. So when you run
kubectl top nodeorkubectl top pod, metrics-server fetches metrics from cAdvisor in real-time. It then returns these metrics to you. Since the information is generated in real-time and is only relevant at the moment of the request, there is no need to store it in etcd. This approach saves resources.If needed, you can use a backend other than etcd. You can even implement a Kubernetes-compatible API for it. For example, if you use Postgres, you can create a transparent representation of its entities in the Kubernetes API. Eg. databases, users, and grants within Postgres would appear as regular Kubernetes resources, thanks to your extension API server. You could manage them using
kubectlor any other Kubernetes-compatible tool. Unlike controllers, which implement business logic using custom resources and reconciliation methods, an extension API server eliminates the need for separate controllers for every kind. This means you don't have to sync state between the Kubernetes API and your backend.
One-Time resources
Kubernetes has a special API used to provide users with information about their permissions. This is implemented using the SelfSubjectAccessReview API. One unusual detail of these resources is that you can't view them using get or list verbs. You can only create them (using the create verb) and receive output with information about what you have access to at that moment.
If you try to run
kubectl get selfsubjectaccessreviewsdirectly, you'll just get an error like this:Error from server (MethodNotAllowed): the server does not allow this method on the requested resourceThe reason is that the Kubernetes API server doesn't support any other interaction with this type of resource (you can only CREATE them).
The SelfSubjectAccessReview API supports commands such as:
kubectl auth can-i create deployments --namespace devWhen you run the command above,
kubectlcreates a SelfSubjectAccessReview using the Kubernetes API. This allows Kubernetes to fetch a list of possible permissions for your user. Kubernetes then generates a personalized response to your request in real-time. This logic is different from a scenario where this resource is simply stored in etcd.Similarly, in KubeVirt's CDI (Containerized Data Importer) extension, which allows file uploads into a PVC from a local machine using the
virtctltool, a special token is required before the upload process begins. This token is generated by creating an UploadTokenRequest resource via the Kubernetes API. Kubernetes routes (proxies) all UploadTokenRequest resource creation requests to the CDI extension API server, which generates and returns the token in response.
Full control over conversion, validation, and output formatting
Your own API server can have all the capabilities of the vanilla Kubernetes API server. The resources you create in your API server can be validated immediately on the server side without additional webhooks. While CRDs also support server-side validation using Common Expression Language (CEL) for declarative validation and ValidatingAdmissionPolicies without the need for webhooks, a custom API server allows for more complex and tailored validation logic if needed.
Kubernetes allows you to serve multiple API versions for each resource type, traditionally
v1alpha1,v1beta1andv1. Only one version can be specified as the storage version. All requests to other versions must be automatically converted to the version specified as storage version. With CRDs, this mechanism is implemented using conversion webhooks. Whereas in an extension API server, you can implement your own conversion mechanism, choose to mix up different storage versions (one object might be serialized asv1, another asv2), or rely on an external backing API.Directly implementing the Kubernetes API lets you format table output however you like and doesn't force you to follow the
additionalPrinterColumnslogic in CRDs. Instead, you can write your own formatter that formats the table output and custom fields in it. For example, when usingadditionalPrinterColumns, you can display field values only following the JSONPath logic. In your own API server, you can generate and insert values on the fly, formatting the table output as you wish.
Dynamic resource registration
- The resources served by an extension api-server don't need to be pre-registered as CRDs. Once your extension API server is registered using an APIService, Kubernetes starts polling it to discover APIs and resources it can serve. After receiving a discovery response, the Kubernetes API server automatically registers all available types for this API group. Although this isn't considered common practice, you can implement logic that dynamically registers the resource types you need in your Kubernetes cluster.
When not to use the API Aggregation Layer
There are some anti-patterns where using the API Aggregation Layer isn't recommended. Let's go through them.
Unstable backend
If your API server stops responding for some reason due to an unavailable backend or other issues it may block some Kubernetes functionality. For example, when deleting namespaces, Kubernetes will wait for a response from your API server to see if there are any remaining resources. If the response doesn't come, the namespace deletion will be blocked.
Also, you might have encountered a situation where,
when the metrics-server is unavailable, an extra message appears in stderr after every API request
(even unrelated to metrics) stating that metrics.k8s.io is unavailable. This is another example
of how using the API Aggregation Layer can lead to problems when the api-server handling requests
is unavailable.
Slow requests
If you can't guarantee an instant response for user requests, it's better to consider using a CustomResourceDefinition and controller. Otherwise, you might make your cluster less stable. Many projects implement an extension API server only for a limited set of resources, particularly for imperative logic and subresources. This recommendation is also mentioned in the official Kubernetes documentation.
Why we needed it in Cozystack
As a reminder, we're developing the open-source PaaS platform Cozystack, which can also be used as a framework for building your own private cloud. Therefore, the ability to easily extend the platform is crucial for us.
Cozystack is built on top of FluxCD. Any application is packaged into its own Helm chart, ready for deployment in a tenant namespace. Deploying any application on the platform is done by creating a HelmRelease resource, specifying the chart name and parameters for the application. All the rest logic is handled by FluxCD. This pattern allows us to easily extend the platform with new applications and provide the ability to create new applications that just need to be packaged into the appropriate Helm chart.
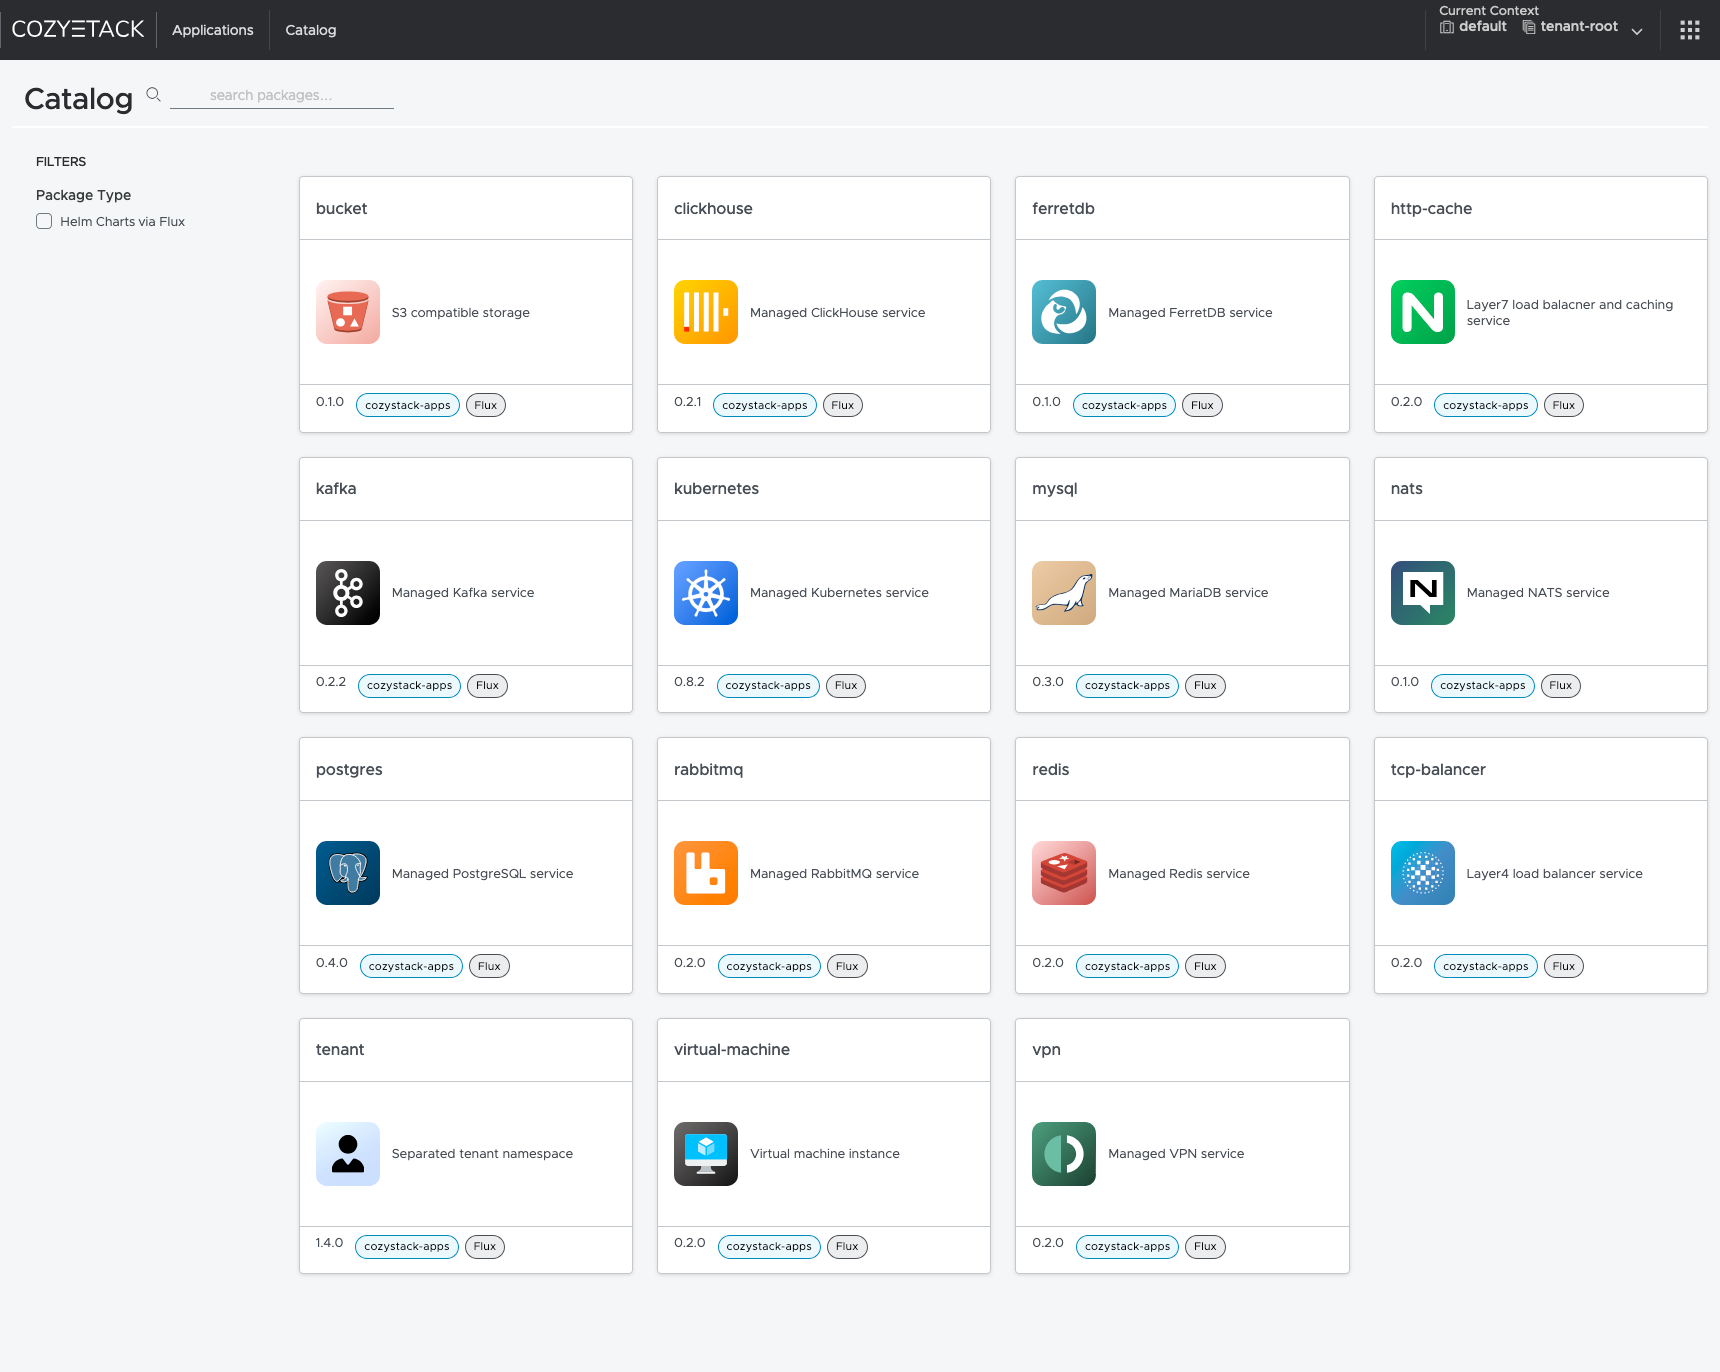
Interface of the Cozystack platform
So, in our platform, everything is configured as HelmRelease resources. However, we ran into two problems: limitations of the RBAC model and the need for a public API. Let's delve into these
Limitations of the RBAC model
The widely-deployed RBAC system in Kubernetes doesn't allow you to restrict access to a list of resources
of the same kind based on labels or specific fields in the spec. When creating a role, you can limit
access across the resources in the same kind only by specifying specific resource names in resourceNames.
For verbs like get or update it will work. However, filtering by resourceNames using list
verb doesn't work like that. Thus you can limit listing certain resources by kind but not by name.
- Kubernetes has a special API used to provide users with information about their permissions. This is implemented using the SelfSubjectAccessReview API. One unusual detail of these resources is that you can't view them using get or list verbs. You can only create them (using the create verb) and receive output with information about what you have access to at that moment.
So, we decided to introduce new resource types based on the names of the Helm charts they use and generate the list of available kinds dynamically at runtime in our extension api-server. This way, we can reuse Kubernetes standard RBAC model to manage access to specific resource types.
Need for a public API
Since our platform provides capabilities for deploying various managed services, we want to organize public access to the platform's API. However, we can't allow users to interact directly with resources like HelmRelease because that would let them specify arbitrary names and parameters for Helm charts to deploy, potentially compromising our system.
We wanted to give users the ability to deploy a specific service simply by creating the resource with corresponding kind in Kubernetes. The type of this resource should be named the same as the chart from which it's deployed. Here are some examples:
kind: Kubernetes→chart: kuberneteskind: Postgres→chart: postgreskind: Redis→chart: rediskind: VirtualMachine→chart: virtual-machine
Moreover, we don't want to have to add a new type to codegen and recompile our extension API server every time we add a new chart for it to start being served. The schema update should be done dynamically or provided via a ConfigMap by the administrator.
Two-Way conversion
Currently, we already have integrations and a dashboard that continue to use HelmRelease resources. At this stage, we didn't want to lose the ability to support this API. Considering that we're simply translating one resource into another, support is maintained and it works both ways. If you create a HelmRelease, you'll get a custom resource in Kubernetes, and if you create a custom resource in Kubernetes, it will also be available as a HelmRelease.
We don't have any additional controllers that synchronize state between these resources. All requests to resources in our extension API server are transparently proxied to HelmRelease and vice versa. This eliminates intermediate states and the need to write controllers and synchronization logic.
Implementation
To implement the Aggregation API, you might consider starting with the following projects:
- apiserver-builder: Currently in alpha and hasn't been updated for two years. It works like kubebuilder, providing a framework for creating an extension API server, allowing you to sequentially create a project structure and generate code for your resources.
- sample-apiserver: A ready-made example of an implemented API server, based on official Kubernetes libraries, which you can use as a foundation for your project.
For practical reasons, we chose the second project. Here's what we needed to do:
Disable etcd support
In our case, we don't need it since all resources are stored directly in the Kubernetes API.
You can disable etcd options by passing nil to RecommendedOptions.Etcd:
Generate a common resource kind
We called it Application, and it looks like this:
This is a generic type used for any application type, and its handling logic is the same for all charts.
Configure configuration loading
Since we want to configure our extension api-server via a config file, we formed the config structure in Go:
We also modified the resource registration logic so that the resources we create are registered in scheme with different Kind values:
As a result, we got a config where you can pass all possible types and specify what they should map to:
Implement our own registry
To store state not in etcd but translate it directly into Kubernetes HelmRelease resources (and vice versa), we wrote conversion functions from Application to HelmRelease and from HelmRelease to Application:
We implemented logic to filter resources by chart name, sourceRef, and prefix in the HelmRelease name:
Then, using this logic, we implemented the methods Get(), Delete(), List(), Create().
You can see the full example here:
At the end of each method, we set the correct Kind and return an unstructured.Unstructured{} object
so that Kubernetes serializes the object correctly. Otherwise,
it would always serialize them with kind: Application, which we don't want.
What did we achieve?
In Cozystack, all our types from the ConfigMap are now available in Kubernetes as-is:
kubectl api-resources | grep cozystack
buckets apps.cozystack.io/v1alpha1 true Bucket
clickhouses apps.cozystack.io/v1alpha1 true ClickHouse
etcds apps.cozystack.io/v1alpha1 true Etcd
ferretdb apps.cozystack.io/v1alpha1 true FerretDB
httpcaches apps.cozystack.io/v1alpha1 true HTTPCache
ingresses apps.cozystack.io/v1alpha1 true Ingress
kafkas apps.cozystack.io/v1alpha1 true Kafka
kuberneteses apps.cozystack.io/v1alpha1 true Kubernetes
monitorings apps.cozystack.io/v1alpha1 true Monitoring
mysqls apps.cozystack.io/v1alpha1 true MySQL
natses apps.cozystack.io/v1alpha1 true NATS
postgreses apps.cozystack.io/v1alpha1 true Postgres
rabbitmqs apps.cozystack.io/v1alpha1 true RabbitMQ
redises apps.cozystack.io/v1alpha1 true Redis
seaweedfses apps.cozystack.io/v1alpha1 true SeaweedFS
tcpbalancers apps.cozystack.io/v1alpha1 true TCPBalancer
tenants apps.cozystack.io/v1alpha1 true Tenant
virtualmachines apps.cozystack.io/v1alpha1 true VirtualMachine
vmdisks apps.cozystack.io/v1alpha1 true VMDisk
vminstances apps.cozystack.io/v1alpha1 true VMInstance
vpns apps.cozystack.io/v1alpha1 true VPN
We can work with them just like regular Kubernetes resources.
Listing S3 Buckets:
kubectl get buckets.apps.cozystack.io -n tenant-kvaps
Example output:
NAME READY AGE VERSION
foo True 22h 0.1.0
testaasd True 27h 0.1.0
Listing Kubernetes Clusters:
kubectl get kuberneteses.apps.cozystack.io -n tenant-kvaps
Example output:
NAME READY AGE VERSION
abc False 19h 0.14.0
asdte True 22h 0.13.0
Listing Virtual Machine Disks:
kubectl get vmdisks.apps.cozystack.io -n tenant-kvaps
Example output:
NAME READY AGE VERSION
docker True 21d 0.1.0
test True 18d 0.1.0
win2k25-iso True 21d 0.1.0
win2k25-system True 21d 0.1.0
Listing Virtual Machine Instances:
kubectl get vminstances.apps.cozystack.io -n tenant-kvaps
Example output:
NAME READY AGE VERSION
docker True 21d 0.1.0
test True 18d 0.1.0
win2k25 True 20d 0.1.0
We can create, modify, and delete each of them, and any interaction with them will be translated into HelmRelease resources, while also applying the resource structure and prefix in the name.
To see all related Helm releases:
kubectl get helmreleases -n tenant-kvaps -l cozystack.io/ui
Example output:
NAME AGE READY
bucket-foo 22h True
bucket-testaasd 27h True
kubernetes-abc 19h False
kubernetes-asdte 22h True
redis-test 18d True
redis-yttt 12d True
vm-disk-docker 21d True
vm-disk-test 18d True
vm-disk-win2k25-iso 21d True
vm-disk-win2k25-system 21d True
vm-instance-docker 21d True
vm-instance-test 18d True
vm-instance-win2k25 20d True
Next Steps
We don’t intend to stop here with our API. In the future, we plan to add new features:
- Add validation based on an OpenAPI spec generated directly from Helm charts.
- Develop a controller that collects release notes from deployed releases and shows users access information for specific services.
- Revamp our dashboard to work directly with the new API.
Conclusion
The API Aggregation Layer allowed us to quickly and efficiently solve our problem by providing a flexible mechanism for extending the Kubernetes API with dynamically registered resources and converting them on the fly. Ultimately, this made our platform even more flexible and extensible without the need to write code for each new resource.
You can test the API yourself in the open-source PaaS platform Cozystack, starting from version v0.18.
Kubernetes v1.32 sneak peek
As we get closer to the release date for Kubernetes v1.32, the project develops and matures. Features may be deprecated, removed, or replaced with better ones for the project's overall health.
This blog outlines some of the planned changes for the Kubernetes v1.32 release, that the release team feels you should be aware of, for the continued maintenance of your Kubernetes environment and keeping up to date with the latest changes. Information listed below is based on the current status of the v1.32 release and may change before the actual release date.
The Kubernetes API removal and deprecation process
The Kubernetes project has a well-documented deprecation policy for features. This policy states that stable APIs may only be deprecated when a newer, stable version of that API is available and that APIs have a minimum lifetime for each stability level. A deprecated API has been marked for removal in a future Kubernetes release will continue to function until removal (at least one year from the deprecation). Its usage will result in a warning being displayed. Removed APIs are no longer available in the current version, so you must migrate to use the replacement instead.
Generally available (GA) or stable API versions may be marked as deprecated but must not be removed within a major version of Kubernetes.
Beta or pre-release API versions must be supported for 3 releases after the deprecation.
Alpha or experimental API versions may be removed in any release without prior deprecation notice; this process can become a withdrawal in cases where a different implementation for the same feature is already in place.
Whether an API is removed due to a feature graduating from beta to stable or because that API did not succeed, all removals comply with this deprecation policy. Whenever an API is removed, migration options are communicated in the deprecation guide.
Note on the withdrawal of the old DRA implementation
The enhancement #3063 introduced Dynamic Resource Allocation (DRA) in Kubernetes 1.26.
However, in Kubernetes v1.32, this approach to DRA will be significantly changed. Code related to the original implementation will be removed, leaving KEP #4381 as the "new" base functionality.
The decision to change the existing approach originated from its incompatibility with cluster autoscaling as resource availability was non-transparent, complicating decision-making for both Cluster Autoscaler and controllers. The newly added Structured Parameter model substitutes the functionality.
This removal will allow Kubernetes to handle new hardware requirements and resource claims more predictably, bypassing the complexities of back and forth API calls to the kube-apiserver.
Please also see the enhancement issue #3063 to find out more.
API removal
There is only a single API removal planned for Kubernetes v1.32:
- The
flowcontrol.apiserver.k8s.io/v1beta3API version of FlowSchema and PriorityLevelConfiguration has been removed. To prepare for this, you can edit your existing manifests and rewrite client software to use theflowcontrol.apiserver.k8s.io/v1 APIversion, available since v1.29. All existing persisted objects are accessible via the new API. Notable changes inflowcontrol.apiserver.k8s.io/v1beta3include that the PriorityLevelConfigurationspec.limited.nominalConcurrencySharesfield only defaults to 30 when unspecified, and an explicit value of 0 is not changed to 30.
For more information, please refer to the API deprecation guide.
Sneak peek of Kubernetes v1.32
The following list of enhancements is likely to be included in the v1.32 release. This is not a commitment and the release content is subject to change.
Even more DRA enhancements!
In this release, like the previous one, the Kubernetes project continues proposing a number of enhancements to the Dynamic Resource Allocation (DRA), a key component of the Kubernetes resource management system. These enhancements aim to improve the flexibility and efficiency of resource allocation for workloads that require specialized hardware, such as GPUs, FPGAs and network adapters. This release introduces improvements, including the addition of resource health status in the Pod status, as outlined in KEP #4680.
Add resource health status to the Pod status
It isn't easy to know when a Pod uses a device that has failed or is temporarily unhealthy.
KEP #4680 proposes exposing device
health via Pod status, making troubleshooting of Pod crashes easier.
Windows strikes back!
KEP #4802 adds support for graceful shutdowns of Windows nodes in Kubernetes clusters. Before this release, Kubernetes provided graceful node shutdown functionality for Linux nodes but lacked equivalent support for Windows. This enhancement enables the kubelet on Windows nodes to handle system shutdown events properly. Doing so, it ensures that Pods running on Windows nodes are gracefully terminated, allowing workloads to be rescheduled without disruption. This improvement enhances the reliability and stability of clusters that include Windows nodes, especially during a planned maintenance or any system updates.
Allow special characters in environment variables
With the graduation of this enhancement to beta,
Kubernetes now allows almost all printable ASCII characters (excluding "=") to be used as environment variable names.
This change addresses the limitations previously imposed on variable naming, facilitating a broader adoption of
Kubernetes by accommodating various application needs. The relaxed validation will be enabled by default via the
RelaxedEnvironmentVariableValidation feature gate, ensuring that users can easily utilize environment
variables without strict constraints, enhancing flexibility for developers working with applications like
.NET Core that require special characters in their configurations.
Make Kubernetes aware of the LoadBalancer behavior
KEP #1860 graduates to GA,
introducing the ipMode field for a Service of type: LoadBalancer, which can be set to either
"VIP" or "Proxy". This enhancement is aimed at improving how cloud providers load balancers
interact with kube-proxy and it is a change transparent to the end user.
The existing behavior of kube-proxy is preserved when using "VIP",
where kube-proxy handles the load balancing. Using "Proxy" results in traffic sent directly to the load balancer,
providing cloud providers greater control over relying on kube-proxy;
this means that you could see an improvement in the performance of your load balancer for some cloud providers.
Retry generate name for resources
This enhancement
improves how name conflicts are handled for Kubernetes resources created with the generateName field.
Previously, if a name conflict occurred, the API server returned a 409 HTTP Conflict error and clients
had to manually retry the request. With this update, the API server automatically retries generating
a new name up to seven times in case of a conflict. This significantly reduces the chances of collision,
ensuring smooth generation of up to 1 million names with less than a 0.1% probability of a conflict,
providing more resilience for large-scale workloads.
Want to know more?
New features and deprecations are also announced in the Kubernetes release notes. We will formally announce what's new in Kubernetes v1.32 as part of the CHANGELOG for this release.
You can see the announcements of changes in the release notes for:
Spotlight on Kubernetes Upstream Training in Japan
We are organizers of Kubernetes Upstream Training in Japan. Our team is composed of members who actively contribute to Kubernetes, including individuals who hold roles such as member, reviewer, approver, and chair.
Our goal is to increase the number of Kubernetes contributors and foster the growth of the community. While Kubernetes community is friendly and collaborative, newcomers may find the first step of contributing to be a bit challenging. Our training program aims to lower that barrier and create an environment where even beginners can participate smoothly.
What is Kubernetes upstream training in Japan?
Our training started in 2019 and is held 1 to 2 times a year. Initially, Kubernetes Upstream Training was conducted as a co-located event of KubeCon (Kubernetes Contributor Summit), but we launched Kubernetes Upstream Training in Japan with the aim of increasing Japanese contributors by hosting a similar event in Japan.
Before the pandemic, the training was held in person, but since 2020, it has been conducted online. The training offers the following content for those who have not yet contributed to Kubernetes:
- Introduction to Kubernetes community
- Overview of Kubernetes codebase and how to create your first PR
- Tips and encouragement to lower participation barriers, such as language
- How to set up the development environment
- Hands-on session using kubernetes-sigs/contributor-playground
At the beginning of the program, we explain why contributing to Kubernetes is important and who can contribute. We emphasize that contributing to Kubernetes allows you to make a global impact and that Kubernetes community is looking forward to your contributions!
We also explain Kubernetes community, SIGs, and Working Groups. Next, we explain the roles and responsibilities of Member, Reviewer, Approver, Tech Lead, and Chair. Additionally, we introduce the communication tools we primarily use, such as Slack, GitHub, and mailing lists. Some Japanese speakers may feel that communicating in English is a barrier. Additionally, those who are new to the community need to understand where and how communication takes place. We emphasize the importance of taking that first step, which is the most important aspect we focus on in our training!
We then go over the structure of Kubernetes codebase, the main repositories, how to create a PR, and the CI/CD process using Prow. We explain in detail the process from creating a PR to getting it merged.
After several lectures, participants get to experience hands-on work using kubernetes-sigs/contributor-playground, where they can create a simple PR. The goal is for participants to get a feel for the process of contributing to Kubernetes.
At the end of the program, we also provide a detailed explanation of setting up the development environment for contributing to the kubernetes/kubernetes repository,
including building code locally, running tests efficiently, and setting up clusters.
Interview with participants
We conducted interviews with those who participated in our training program. We asked them about their reasons for joining, their impressions, and their future goals.
Keita Mochizuki (NTT DATA Group Corporation)
Keita Mochizuki is a contributor who consistently contributes to Kubernetes and related projects. Keita is also a professional in container security and has recently published a book. Additionally, he has made available a Roadmap for New Contributors, which is highly beneficial for those new to contributing.
Junya: Why did you decide to participate in Kubernetes Upstream Training?
Keita: Actually, I participated twice, in 2020 and 2022. In 2020, I had just started learning about Kubernetes and wanted to try getting involved in activities outside of work, so I signed up after seeing the event on Twitter by chance. However, I didn't have much knowledge at the time, and contributing to OSS felt like something beyond my reach. As a result, my understanding after the training was shallow, and I left with more of a "hmm, okay" feeling.
In 2022, I participated again when I was at a stage where I was seriously considering starting contributions. This time, I did prior research and was able to resolve my questions during the lectures, making it a very productive experience.
Junya: How did you feel after participating?
Keita: I felt that the significance of this training greatly depends on the participant's mindset. The training itself consists of general explanations and simple hands-on exercises, but it doesn't mean that attending the training will immediately lead to contributions.
Junya: What is your purpose for contributing?
Keita: My initial motivation was to "gain a deep understanding of Kubernetes and build a track record," meaning "contributing itself was the goal." Nowadays, I also contribute to address bugs or constraints I discover during my work. Additionally, through contributing, I've become less hesitant to analyze undocumented features directly from the source code.
Junya: What has been challenging about contributing?
Keita: The most difficult part was taking the first step. Contributing to OSS requires a certain level of knowledge, and leveraging resources like this training and support from others was essential. One phrase that stuck with me was, "Once you take the first step, it becomes easier to move forward." Also, in terms of continuing contributions as part of my job, the most challenging aspect is presenting the outcomes as achievements. To keep contributing over time, it's important to align it with business goals and strategies, but upstream contributions don't always lead to immediate results that can be directly tied to performance. Therefore, it's crucial to ensure mutual understanding with managers and gain their support.
Junya: What are your future goals?
Keita: My goal is to contribute to areas with a larger impact. So far, I've mainly contributed by fixing smaller bugs as my primary focus was building a track record, but moving forward, I'd like to challenge myself with contributions that have a greater impact on Kubernetes users or that address issues related to my work. Recently, I've also been working on reflecting the changes I've made to the codebase into the official documentation, and I see this as a step toward achieving my goals.
Junya: Thank you very much!
Yoshiki Fujikane (CyberAgent, Inc.)
Yoshiki Fujikane is one of the maintainers of PipeCD, a CNCF Sandbox project. In addition to developing new features for Kubernetes support in PipeCD, Yoshiki actively participates in community management and speaks at various technical conferences.
Junya: Why did you decide to participate in the Kubernetes Upstream Training?
Yoshiki: At the time I participated, I was still a student. I had only briefly worked with EKS, but I thought Kubernetes seemed complex yet cool, and I was casually interested in it. Back then, OSS felt like something out of reach, and upstream development for Kubernetes seemed incredibly daunting. While I had always been interested in OSS, I didn't know where to start. It was during this time that I learned about the Kubernetes Upstream Training and decided to take the challenge of contributing to Kubernetes.
Junya: What were your impressions after participating?
Yoshiki: I found it extremely valuable as a way to understand what it's like to be part of an OSS community. At the time, my English skills weren't very strong, so accessing primary sources of information felt like a big hurdle for me. Kubernetes is a very large project, and I didn't have a clear understanding of the overall structure, let alone what was necessary for contributing. The upstream training provided a Japanese explanation of the community structure and allowed me to gain hands-on experience with actual contributions. Thanks to the guidance I received, I was able to learn how to approach primary sources and use them as entry points for further investigation, which was incredibly helpful. This experience made me realize the importance of organizing and reviewing primary sources, and now I often dive into GitHub issues and documentation when something piques my interest. As a result, while I am no longer contributing to Kubernetes itself, the experience has been a great foundation for contributing to other projects.
Junya: What areas are you currently contributing to, and what are the other projects you're involved in?
Yoshiki: Right now, I'm no longer working with Kubernetes, but instead, I'm a maintainer of PipeCD, a CNCF Sandbox project. PipeCD is a CD tool that supports GitOps-style deployments for various application platforms. The tool originally started as an internal project at CyberAgent. With different teams adopting different platforms, PipeCD was developed to provide a unified CD platform with a consistent user experience. Currently, it supports Kubernetes, AWS ECS, Lambda, Cloud Run, and Terraform.
Junya: What role do you play within the PipeCD team?
Yoshiki: I work full-time on improving and developing Kubernetes-related features within the team. Since we provide PipeCD as a SaaS internally, my main focus is on adding new features and improving existing ones as part of that support. In addition to code contributions, I also contribute by giving talks at various events and managing community meetings to help grow the PipeCD community.
Junya: Could you explain what kind of improvements or developments you are working on with regards to Kubernetes?
Yoshiki: PipeCD supports GitOps and Progressive Delivery for Kubernetes, so I'm involved in the development of those features. Recently, I've been working on features that streamline deployments across multiple clusters.
Junya: Have you encountered any challenges while contributing to OSS?
Yoshiki: One challenge is developing features that maintain generality while meeting user use cases. When we receive feature requests while operating the internal SaaS, we first consider adding features to solve those issues. At the same time, we want PipeCD to be used by a broader audience as an OSS tool. So, I always think about whether a feature designed for one use case could be applied to another, ensuring the software remains flexible and widely usable.
Junya: What are your goals moving forward?
Yoshiki: I want to focus on expanding PipeCD's functionality. Currently, we are developing PipeCD under the slogan "One CD for All." As I mentioned earlier, it supports Kubernetes, AWS ECS, Lambda, Cloud Run, and Terraform, but there are many other platforms out there, and new platforms may emerge in the future. For this reason, we are currently developing a plugin system that will allow users to extend PipeCD on their own, and I want to push this effort forward. I'm also working on features for multi-cluster deployments in Kubernetes, and I aim to continue making impactful contributions.
Junya: Thank you very much!
Future of Kubernetes upstream training
We plan to continue hosting Kubernetes Upstream Training in Japan and look forward to welcoming many new contributors. Our next session is scheduled to take place at the end of November during CloudNative Days Winter 2024.
Moreover, our goal is to expand these training programs not only in Japan but also around the world. Kubernetes celebrated its 10th anniversary this year, and for the community to become even more active, it's crucial for people across the globe to continue contributing. While Upstream Training is already held in several regions, we aim to bring it to even more places.
We hope that as more people join Kubernetes community and contribute, our community will become even more vibrant!
Announcing the 2024 Steering Committee Election Results
The 2024 Steering Committee Election is now complete. The Kubernetes Steering Committee consists of 7 seats, 3 of which were up for election in 2024. Incoming committee members serve a term of 2 years, and all members are elected by the Kubernetes Community.
This community body is significant since it oversees the governance of the entire Kubernetes project. With that great power comes great responsibility. You can learn more about the steering committee’s role in their charter.
Thank you to everyone who voted in the election; your participation helps support the community’s continued health and success.
Results
Congratulations to the elected committee members whose two year terms begin immediately (listed in alphabetical order by GitHub handle):
- Antonio Ojea (@aojea), Google
- Benjamin Elder (@BenTheElder), Google
- Sascha Grunert (@saschagrunert), Red Hat
They join continuing members:
- Stephen Augustus (@justaugustus), Cisco
- Paco Xu 徐俊杰 (@pacoxu), DaoCloud
- Patrick Ohly (@pohly), Intel
- Maciej Szulik (@soltysh), Defense Unicorns
Benjamin Elder is a returning Steering Committee Member.
Big thanks!
Thank you and congratulations on a successful election to this round’s election officers:
- Bridget Kromhout (@bridgetkromhout)
- Christoph Blecker (@cblecker)
- Priyanka Saggu (@Priyankasaggu11929)
Thanks to the Emeritus Steering Committee Members. Your service is appreciated by the community:
- Bob Killen (@mrbobbytables)
- Nabarun Pal (@palnabarun)
And thank you to all the candidates who came forward to run for election.
Get involved with the Steering Committee
This governing body, like all of Kubernetes, is open to all. You can follow along with Steering Committee meeting notes and weigh in by filing an issue or creating a PR against their repo. They have an open meeting on the first Monday at 8am PT of every month. They can also be contacted at their public mailing list steering@kubernetes.io.
You can see what the Steering Committee meetings are all about by watching past meetings on the YouTube Playlist.
If you want to meet some of the newly elected Steering Committee members, join us for the Steering AMA at the Kubernetes Contributor Summit North America 2024 in Salt Lake City.
This post was adapted from one written by the Contributor Comms Subproject. If you want to write stories about the Kubernetes community, learn more about us.
Spotlight on CNCF Deaf and Hard-of-hearing Working Group (DHHWG)
In recognition of Deaf Awareness Month and the importance of inclusivity in the tech community, we are spotlighting Catherine Paganini, facilitator and one of the founding members of CNCF Deaf and Hard-of-Hearing Working Group (DHHWG). In this interview, Sandeep Kanabar, a deaf member of the DHHWG and part of the Kubernetes SIG ContribEx Communications team, sits down with Catherine to explore the impact of the DHHWG on cloud native projects like Kubernetes.
Sandeep’s journey is a testament to the power of inclusion. Through his involvement in the DHHWG, he connected with members of the Kubernetes community who encouraged him to join SIG ContribEx - the group responsible for sustaining the Kubernetes contributor experience. In an ecosystem where open-source projects are actively seeking contributors and maintainers, this story highlights how important it is to create pathways for underrepresented groups, including those with disabilities, to contribute their unique perspectives and skills.
In this interview, we delve into Catherine’s journey, the challenges and triumphs of establishing the DHHWG, and the vision for a more inclusive future in cloud native. We invite Kubernetes contributors, maintainers, and community members to reflect on the significance of empathy, advocacy, and community in fostering a truly inclusive environment for all, and to think about how they can support efforts to increase diversity and accessibility within their own projects.
Introduction
Sandeep Kanabar (SK): Hello Catherine, could you please introduce yourself, share your professional background, and explain your connection to the Kubernetes ecosystem?
Catherine Paganini (CP): I'm the Head of Marketing at Buoyant, the creator of Linkerd, the CNCF-graduated service mesh, and 5th CNCF project. Four years ago, I started contributing to open source. The initial motivation was to make cloud native concepts more accessible to newbies and non-technical people. Without a technical background, it was hard for me to understand what Kubernetes, containers, service meshes, etc. mean. All content was targeted at engineers already familiar with foundational concepts. Clearly, I couldn't be the only one struggling with wrapping my head around cloud native.
My first contribution was the CNCF Landscape Guide, which I co-authored with my former colleague Jason Morgan. Next, we started the CNCF Glossary, which explains cloud native concepts in simple terms. Today, the glossary has been (partially) localised into 14 languages!
Currently, I'm the co-chair of the TAG Contributor Strategy and the Facilitator of the Deaf and Hard of Hearing Working Group (DHHWG) and Blind and Visually Impaired WG (BVIWG), which is still in formation. I'm also working on a new Linux Foundation (LF) initiative called ABIDE (Accessibility and Belonging through Inclusion, Diversity, and Equity), so stay tuned to learn more about it!
Motivation and early milestones
SK: That's inspiring! Building on your passion for accessibility, what motivated you to facilitate the creation of the DHHWG? Was there a speecifc moment or experience that sparked this initiative?
CP: Last year at KubeCon Amsterdam, I learned about a great initiative by Jay Tihema that creates pathways for Maori youth into cloud native and open source. While telling my CODA (children of deaf adults) high school friend about it, I thought it'd be great to create something similar for deaf folks. A few months later, I posted about it in a LinkedIn post that the CNCF shared. Deaf people started to reach out, wanting to participate. And the rest is history.
SK: Speaking of history, since its launch, how has the DHHWG evolved? Could you highlight some of the key milestones or achievements the group has reached recently?
CP: Our WG is about a year old. It started with a few deaf engineers and me brainstorming how to make KubeCon more accessible. We published an initial draft of Best practices for an inclusive conference and shared it with the LF events team. KubeCon Chicago was two months later, and we had a couple of deaf attendees. It was the first KubeCon accessible to deaf signers. Destiny, one of our co-chairs, even participated in a keynote panel. It was incredible how quickly everything happened!
 DHHWG members at KubeCon Chicago
The team has grown since then, and we've been able to do much more. With a kiosk in the project pavilion, an open space discussion, a sign language crash course, and a few media interviews, KubeCon Paris had a stronger advocacy and outreach focus. Check out this video of our team in Paris to get a glimpse of all the different KubeCon activities — it was such a great event! The team also launched the first CNCF Community Group in sign language, Deaf in Cloud Native, a glossary team that creates sign language videos for each technical term to help standardize technical signs across the globe. It's crazy to think that it all happened within one year!
Overcoming challenges and addressing misconceptions
SK: That's remarkable progress in just a year! Building such momentum must have come with its challenges. What barriers have you encountered in facilitating the DHHWG, and how did you and the group work to overcome them?
CP: The support from the community, LF, and CNCF has been incredible. The fact that we achieved so much is proof of it. The challenges are more in helping some team members overcome their fear of contributing. Most are new to open source, and it can be intimidating to put your work out there for everyone to see. The fear of being criticized in public is real; however, as they will hopefully realize over time, our community is incredibly supportive. Instead of criticizing, people tend to help improve the work, leading to better outcomes.
SK: Are there any misconceptions about the deaf and hard-of-hearing community in tech that you'd like to address?
CP: Deaf and hard of hearing individuals are very diverse — there is no one-size-fits-all. Some deaf people are oral (speak), others sign, while some lip read or prefer captions. It generally depends on how people grew up. While some people come from deaf families and sign language is their native language, others were born into hearing families who may or may not have learned how to sign. Some deaf people grew up surrounded by hearing people, while others grew up deeply embedded in Deaf culture. Hard-of-hearing individuals, on the other hand, typically can communicate well with hearing peers one-on-one in quiet settings, but loud environments or conversations with multiple people can make it hard to follow the conversation. Most rely heavily on captions. Each background and experience will shape their communication style and preferences. In short, what works for one person, doesn't necessarily work for others. So never assume and always ask about accessibility needs and preferences.
Impact and the role of allies
SK: Can you share some key impacts/outcomes of the conference best practices document?
CP: Here are the two most important ones: Captions should be on the monitor, not in an app. That's especially important during technical talks with live demos. Deaf and hard of hearing attendees will miss important information switching between captions on their phone and code on the screen.
Interpreters are most valuable during networking, not in talks (with captions). Most people come to conferences for the hallway track. That is no different for deaf attendees. If they can't network, they are missing out on key professional connections, affecting their career prospects.
SK: In your view, how crucial is the role of allies within the DHHWG, and what contributions have they made to the group’s success?
CP: Deaf and hard of hearing individuals are a minority and can only do so much. Allies are the key to any diversity and inclusion initiative. As a majority, allies can help spread the word and educate their peers, playing a key role in scaling advocacy efforts. They also have the power to demand change. It's easy for companies to ignore minorities, but if the majority demands that their employers be accessible, environmentally conscious, and good citizens, they will ultimately be pushed to adapt to new societal values.
Expanding DEI efforts and future vision
SK: The importance of allies in driving change is clear. Beyond the DHHWG, are you involved in any other DEI groups or initiatives within the tech community?
CP: As mentioned above, I'm working on an initiative called ABIDE, which is still work in progress. I don't want to share too much about it yet, but what I can say is that the DHHWG will be part of it and that we just started a Blind and Visually Impaired WG (BVIWG). ABIDE will start by focusing on accessibility, so if anyone reading this has an idea for another WG, please reach out to me via the CNCF Slack @Catherine Paganini.
SK: What does the future hold for the DHHWG? Can you share details about any ongoing or upcoming initiatives?
CP: I think we've been very successful in terms of visibility and awareness so far. We can't stop, though. Awareness work is ongoing, and most people in our community haven't heard about us or met anyone on our team yet, so a lot of work still lies ahead.
 DHHWG members at KubeCon Paris
The next step is to refocus on advocacy. The same thing we did with the conference best practices but for other areas. The goal is to help educate the community about what real accessibility looks like, how projects can be more accessible, and why employers should seriously consider deaf candidates while providing them with the tools they need to conduct successful interviews and employee onboarding. We need to capture all that in documents, publish it, and then get the word out. That last part is certainly the most challenging, but it's also where everyone can get involved.
Call to action
SK: Thank you for sharing your insights, Catherine. As we wrap up, do you have any final thoughts or a call to action for our readers?
CP: As we build our accessibility page, check in regularly to see what's new. Share the docs with your team, employer, and network — anyone, really. The more people understand what accessibility really means and why it matters, the more people will recognize when something isn't accessible, and be able to call out marketing-BS, which, unfortunately, is more often the case than not. We need allies to help push for change. No minority can do this on their own. So please learn about accessibility, keep an eye out for it, and call it out when something isn't accessible. We need your help!
Wrapping up
Catherine and the DHHWG's work exemplify the power of community and advocacy. As we celebrate Deaf Awareness Month, let's reflect on her role as an ally and consider how we can all contribute to building a more inclusive tech community, particularly within open-source projects like Kubernetes.
Together, we can break down barriers, challenge misconceptions, and ensure that everyone feels welcome and valued. By advocating for accessibility, supporting initiatives like the DHHWG, and fostering a culture of empathy, we can create a truly inclusive and welcoming space for all.
Spotlight on SIG Scheduling
In this SIG Scheduling spotlight we talked with Kensei Nakada, an approver in SIG Scheduling.
Introductions
Arvind: Hello, thank you for the opportunity to learn more about SIG Scheduling! Would you like to introduce yourself and tell us a bit about your role, and how you got involved with Kubernetes?
Kensei: Hi, thanks for the opportunity! I’m Kensei Nakada (@sanposhiho), a software engineer at Tetrate.io. I have been contributing to Kubernetes in my free time for more than 3 years, and now I’m an approver of SIG Scheduling in Kubernetes. Also, I’m a founder/owner of two SIG subprojects, kube-scheduler-simulator and kube-scheduler-wasm-extension.
About SIG Scheduling
AP: That's awesome! You've been involved with the project since a long time. Can you provide a brief overview of SIG Scheduling and explain its role within the Kubernetes ecosystem?
KN: As the name implies, our responsibility is to enhance scheduling within Kubernetes. Specifically, we develop the components that determine which Node is the best place for each Pod. In Kubernetes, our main focus is on maintaining the kube-scheduler, along with other scheduling-related components as part of our SIG subprojects.
AP: I see, got it! That makes me curious--what recent innovations or developments has SIG Scheduling introduced to Kubernetes scheduling?
KN: From a feature perspective, there have been
several enhancements
to PodTopologySpread recently. PodTopologySpread is a relatively new feature in the scheduler,
and we are still in the process of gathering feedback and making improvements.
Most recently, we have been focusing on a new internal enhancement called QueueingHint which aims to enhance scheduling throughput. Throughput is one of our crucial metrics in scheduling. Traditionally, we have primarily focused on optimizing the latency of each scheduling cycle. QueueingHint takes a different approach, optimizing when to retry scheduling, thereby reducing the likelihood of wasting scheduling cycles.
A: That sounds interesting! Are there any other interesting topics or projects you are currently working on within SIG Scheduling?
KN: I’m leading the development of QueueingHint which I just shared. Given that it’s a big new
challenge for us, we’ve been facing many unexpected challenges, especially around the scalability,
and we’re trying to solve each of them to eventually enable it by default.
And also, I believe kube-scheduler-wasm-extension (a SIG subproject) that I started last year would be interesting to many people. Kubernetes has various extensions from many components. Traditionally, extensions are provided via webhooks (extender in the scheduler) or Go SDK (Scheduling Framework in the scheduler). However, these come with drawbacks - performance issues with webhooks and the need to rebuild and replace schedulers with Go SDK, posing difficulties for those seeking to extend the scheduler but lacking familiarity with it. The project is trying to introduce a new solution to this general challenge - a WebAssembly based extension. Wasm allows users to build plugins easily, without worrying about recompiling or replacing their scheduler, and sidestepping performance concerns.
Through this project, SIG Scheduling has been learning valuable insights about WebAssembly's interaction with large Kubernetes objects. And I believe the experience that we’re gaining should be useful broadly within the community, beyond SIG Scheduling.
A: Definitely! Now, there are 8 subprojects inside SIG Scheduling. Would you like to talk about them? Are there some interesting contributions by those teams you want to highlight?
KN: Let me pick up three subprojects: Kueue, KWOK and descheduler.
- Kueue
- Recently, many people have been trying to manage batch workloads with Kubernetes, and in 2022, Kubernetes community founded WG-Batch for better support for such batch workloads in Kubernetes. Kueue is a project that takes a crucial role for it. It’s a job queueing controller, deciding when a job should wait, when a job should be admitted to start, and when a job should be preempted. Kueue aims to be installed on a vanilla Kubernetes cluster while cooperating with existing matured controllers (scheduler, cluster-autoscaler, kube-controller-manager, etc).
- KWOK
- KWOK is a component in which you can create a cluster of thousands of Nodes in seconds. It’s mostly useful for simulation/testing as a lightweight cluster, and actually another SIG sub project kube-scheduler-simulator uses KWOK background.
- descheduler
- Descheduler is a component recreating pods that are running on undesired Nodes. In Kubernetes,
scheduling constraints (
PodAffinity,NodeAffinity,PodTopologySpread, etc) are honored only at Pod schedule, but it’s not guaranteed that the contrtaints are kept being satisfied afterwards. Descheduler evicts Pods violating their scheduling constraints (or other undesired conditions) so that they’re recreated and rescheduled. - Descheduling Framework
- One very interesting on-going project, similar to Scheduling Framework in the scheduler, aiming to make descheduling logic extensible and allow maintainers to focus on building a core engine of descheduler.
AP: Thank you for letting us know! And I have to ask, what are some of your favorite things about this SIG?
KN: What I really like about this SIG is how actively engaged everyone is. We come from various companies and industries, bringing diverse perspectives to the table. Instead of these differences causing division, they actually generate a wealth of opinions. Each view is respected, and this makes our discussions both rich and productive.
I really appreciate this collaborative atmosphere, and I believe it has been key to continuously improving our components over the years.
Contributing to SIG Scheduling
AP: Kubernetes is a community-driven project. Any recommendations for new contributors or beginners looking to get involved and contribute to SIG scheduling? Where should they start?
KN: Let me start with a general recommendation for contributing to any SIG: a common approach is to look for good-first-issue. However, you'll soon realize that many people worldwide are trying to contribute to the Kubernetes repository.
I suggest starting by examining the implementation of a component that interests you. If you have any questions about it, ask in the corresponding Slack channel (e.g., #sig-scheduling for the scheduler, #sig-node for kubelet, etc). Once you have a rough understanding of the implementation, look at issues within the SIG (e.g., sig-scheduling), where you'll find more unassigned issues compared to good-first-issue ones. You may also want to filter issues with the kind/cleanup label, which often indicates lower-priority tasks and can be starting points.
Specifically for SIG Scheduling, you should first understand the Scheduling Framework, which is the fundamental architecture of kube-scheduler. Most of the implementation is found in pkg/scheduler. I suggest starting with ScheduleOne function and then exploring deeper from there.
Additionally, apart from the main kubernetes/kubernetes repository, consider looking into sub-projects. These typically have fewer maintainers and offer more opportunities to make a significant impact. Despite being called "sub" projects, many have a large number of users and a considerable impact on the community.
And last but not least, remember contributing to the community isn’t just about code. While I talked a lot about the implementation contribution, there are many ways to contribute, and each one is valuable. One comment to an issue, one feedback to an existing feature, one review comment in PR, one clarification on the documentation; every small contribution helps drive the Kubernetes ecosystem forward.
AP: Those are some pretty useful tips! And if I may ask, how do you assist new contributors in getting started, and what skills are contributors likely to learn by participating in SIG Scheduling?
KN: Our maintainers are available to answer your questions in the #sig-scheduling Slack channel. By participating, you'll gain a deeper understanding of Kubernetes scheduling and have the opportunity to collaborate and network with maintainers from diverse backgrounds. You'll learn not just how to write code, but also how to maintain a large project, design and discuss new features, address bugs, and much more.
Future Directions
AP: What are some Kubernetes-specific challenges in terms of scheduling? Are there any particular pain points?
KN: Scheduling in Kubernetes can be quite challenging because of the diverse needs of different organizations with different business requirements. Supporting all possible use cases in kube-scheduler is impossible. Therefore, extensibility is a key focus for us. A few years ago, we rearchitected kube-scheduler with Scheduling Framework, which offers flexible extensibility for users to implement various scheduling needs through plugins. This allows maintainers to focus on the core scheduling features and the framework runtime.
Another major issue is maintaining sufficient scheduling throughput. Typically, a Kubernetes cluster has only one kube-scheduler, so its throughput directly affects the overall scheduling scalability and, consequently, the cluster's scalability. Although we have an internal performance test (scheduler_perf), unfortunately, we sometimes overlook performance degradation in less common scenarios. It’s difficult as even small changes, which look irrelevant to performance, can lead to degradation.
AP: What are some upcoming goals or initiatives for SIG Scheduling? How do you envision the SIG evolving in the future?
KN: Our primary goal is always to build and maintain extensible and stable scheduling runtime, and I bet this goal will remain unchanged forever.
As already mentioned, extensibility is key to solving the challenge of the diverse needs of scheduling. Rather than trying to support every different use case directly in kube-scheduler, we will continue to focus on enhancing extensibility so that it can accommodate various use cases. kube-scheduler-wasm-extension that I mentioned is also part of this initiative.
Regarding stability, introducing new optimizations like QueueHint is one of our strategies. Additionally, maintaining throughput is also a crucial goal towards the future. We’re planning to enhance our throughput monitoring (ref), so that we can notice degradation as much as possible on our own before releasing. But, realistically, we can't cover every possible scenario. We highly appreciate any attention the community can give to scheduling throughput and encourage feedback and alerts regarding performance issues!
Closing Remarks
AP: Finally, what message would you like to convey to those who are interested in learning more about SIG Scheduling?
KN: Scheduling is one of the most complicated areas in Kubernetes, and you may find it difficult at first. But, as I shared earlier, you can find many opportunities for contributions, and many maintainers are willing to help you understand things. We know your unique perspective and skills are what makes our open source so powerful 😊
Feel free to reach out to us in Slack (#sig-scheduling) or meetings. I hope this article interests everyone and we can see new contributors!
AP: Thank you so much for taking the time to do this! I'm confident that many will find this information invaluable for understanding more about SIG Scheduling and for contributing to the SIG.
Kubernetes v1.31: kubeadm v1beta4
As part of the Kubernetes v1.31 release, kubeadm is
adopting a new (v1beta4) version of
its configuration file format. Configuration in the previous v1beta3 format is now formally
deprecated, which means it's supported but you should migrate to v1beta4 and stop using
the deprecated format.
Support for v1beta3 configuration will be removed after a minimum of 3 Kubernetes minor releases.
In this article, I'll walk you through key changes; I'll explain about the kubeadm v1beta4 configuration format, and how to migrate from v1beta3 to v1beta4.
You can read the reference for the v1beta4 configuration format: kubeadm Configuration (v1beta4).
A list of changes since v1beta3
This version improves on the v1beta3 format by fixing some minor issues and adding a few new fields.
To put it simply,
- Two new configuration elements: ResetConfiguration and UpgradeConfiguration
- For InitConfiguration and JoinConfiguration,
dryRunmode andnodeRegistration.imagePullSerialare supported - For ClusterConfiguration, there are new fields including
certificateValidityPeriod,caCertificateValidityPeriod,encryptionAlgorithm,dns.disabledandproxy.disabled. - Support
extraEnvsfor all control plan components extraArgschanged from a map to structured extra arguments for duplicates- Add a
timeoutsstructure for init, join, upgrade and reset.
For details, you can see the official document below:
- Support custom environment variables in control plane components under
ClusterConfiguration. UseapiServer.extraEnvs,controllerManager.extraEnvs,scheduler.extraEnvs,etcd.local.extraEnvs. - The ResetConfiguration API type is now supported in v1beta4. Users are able to reset a node by passing
a
--configfile tokubeadm reset. dryRunmode is now configurable in InitConfiguration and JoinConfiguration.- Replace the existing string/string extra argument maps with structured extra arguments that support duplicates.
The change applies to
ClusterConfiguration-apiServer.extraArgs,controllerManager.extraArgs,scheduler.extraArgs,etcd.local.extraArgs. Also tonodeRegistrationOptions.kubeletExtraArgs. - Added
ClusterConfiguration.encryptionAlgorithmthat can be used to set the asymmetric encryption algorithm used for this cluster's keys and certificates. Can be one of "RSA-2048" (default), "RSA-3072", "RSA-4096" or "ECDSA-P256". - Added
ClusterConfiguration.dns.disabledandClusterConfiguration.proxy.disabledthat can be used to disable the CoreDNS and kube-proxy addons during cluster initialization. Skipping the related addons phases, during cluster creation will set the same fields totrue. - Added the
nodeRegistration.imagePullSerialfield inInitConfigurationandJoinConfiguration, which can be used to control if kubeadm pulls images serially or in parallel. - The UpgradeConfiguration kubeadm API is now supported in v1beta4 when passing
--configtokubeadm upgradesubcommands. For upgrade subcommands, the usage of component configuration for kubelet and kube-proxy, as well as InitConfiguration and ClusterConfiguration, is now deprecated and will be ignored when passing--config. - Added a
timeoutsstructure toInitConfiguration,JoinConfiguration,ResetConfigurationandUpgradeConfigurationthat can be used to configure various timeouts. TheClusterConfiguration.timeoutForControlPlanefield is replaced bytimeouts.controlPlaneComponentHealthCheck. TheJoinConfiguration.discovery.timeoutis replaced bytimeouts.discovery. - Added a
certificateValidityPeriodandcaCertificateValidityPeriodfields toClusterConfiguration. These fields can be used to control the validity period of certificates generated by kubeadm during sub-commands such asinit,join,upgradeandcerts. Default values continue to be 1 year for non-CA certificates and 10 years for CA certificates. Also note that only non-CA certificates are renewable bykubeadm certs renew.
These changes simplify the configuration of tools that use kubeadm and improve the extensibility of kubeadm itself.
How to migrate v1beta3 configuration to v1beta4?
If your configuration is not using the latest version, it is recommended that you migrate using the kubeadm config migrate command.
This command reads an existing configuration file that uses the old format, and writes a new file that uses the current format.
Example
Using kubeadm v1.31, run kubeadm config migrate --old-config old-v1beta3.yaml --new-config new-v1beta4.yaml
How do I get involved?
Huge thanks to all the contributors who helped with the design, implementation, and review of this feature:
- Lubomir I. Ivanov (neolit123)
- Dave Chen(chendave)
- Paco Xu (pacoxu)
- Sata Qiu(sataqiu)
- Baofa Fan(carlory)
- Calvin Chen(calvin0327)
- Ruquan Zhao(ruquanzhao)
For those interested in getting involved in future discussions on kubeadm configuration, you can reach out kubeadm or SIG-cluster-lifecycle by several means:
- v1beta4 related items are tracked in kubeadm issue #2890.
- Slack: #kubeadm or #sig-cluster-lifecycle
- Mailing list
Kubernetes 1.31: Custom Profiling in Kubectl Debug Graduates to Beta
There are many ways of troubleshooting the pods and nodes in the cluster. However, kubectl debug is one of the easiest, highly used and most prominent ones. It
provides a set of static profiles and each profile serves for a different kind of role. For instance, from the network administrator's point of view,
debugging the node should be as easy as this:
$ kubectl debug node/mynode -it --image=busybox --profile=netadmin
On the other hand, static profiles also bring about inherent rigidity, which has some implications for some pods contrary to their ease of use. Because there are various kinds of pods (or nodes) that all have their specific necessities, and unfortunately, some can't be debugged by only using the static profiles.
Take an instance of a simple pod consisting of a container whose healthiness relies on an environment variable:
apiVersion: v1
kind: Pod
metadata:
name: example-pod
spec:
containers:
- name: example-container
image: customapp:latest
env:
- name: REQUIRED_ENV_VAR
value: "value1"
Currently, copying the pod is the sole mechanism that supports debugging this pod in kubectl debug. Furthermore, what if user needs to modify the REQUIRED_ENV_VAR to something different
for advanced troubleshooting?. There is no mechanism to achieve this.
Custom Profiling
Custom profiling is a new functionality available under --custom flag, introduced in kubectl debug to provide extensibility. It expects partial Container spec in either YAML or JSON format.
In order to debug the example-container above by creating an ephemeral container, we simply have to define this YAML:
# partial_container.yaml
env:
- name: REQUIRED_ENV_VAR
value: value2
and execute:
kubectl debug example-pod -it --image=customapp --custom=partial_container.yaml
Here is another example that modifies multiple fields at once (change port number, add resource limits, modify environment variable) in JSON:
{
"ports": [
{
"containerPort": 80
}
],
"resources": {
"limits": {
"cpu": "0.5",
"memory": "512Mi"
},
"requests": {
"cpu": "0.2",
"memory": "256Mi"
}
},
"env": [
{
"name": "REQUIRED_ENV_VAR",
"value": "value2"
}
]
}
Constraints
Uncontrolled extensibility hurts the usability. So that, custom profiling is not allowed for certain fields such as command, image, lifecycle, volume devices and container name. In the future, more fields can be added to the disallowed list if required.
Limitations
The kubectl debug command has 3 aspects: Debugging with ephemeral containers, pod copying, and node debugging. The largest intersection set of these aspects is the container spec within a Pod
That's why, custom profiling only supports the modification of the fields that are defined with containers. This leads to a limitation that if user needs to modify the other fields in the Pod spec, it is not supported.
Acknowledgments
Special thanks to all the contributors who reviewed and commented on this feature, from the initial conception to its actual implementation (alphabetical order):
Kubernetes 1.31: Fine-grained SupplementalGroups control
This blog discusses a new feature in Kubernetes 1.31 to improve the handling of supplementary groups in containers within Pods.
Motivation: Implicit group memberships defined in /etc/group in the container image
Although this behavior may not be popular with many Kubernetes cluster users/admins, kubernetes, by default, merges group information from the Pod with information defined in /etc/group in the container image.
Let's see an example, below Pod specifies runAsUser=1000, runAsGroup=3000 and supplementalGroups=4000 in the Pod's security context.

apiVersion: v1
kind: Pod
metadata:
name: implicit-groups
spec:
securityContext:
runAsUser: 1000
runAsGroup: 3000
supplementalGroups: [4000]
containers:
- name: ctr
image: registry.k8s.io/e2e-test-images/agnhost:2.45
command: [ "sh", "-c", "sleep 1h" ]
securityContext:
allowPrivilegeEscalation: false
What is the result of id command in the ctr container?
# Create the Pod:
$ kubectl apply -f https://k8s.io/blog/2024-08-22-Fine-grained-SupplementalGroups-control/implicit-groups.yaml
# Verify that the Pod's Container is running:
$ kubectl get pod implicit-groups
# Check the id command
$ kubectl exec implicit-groups -- id
Then, output should be similar to this:
uid=1000 gid=3000 groups=3000,4000,50000
Where does group ID 50000 in supplementary groups (groups field) come from, even though 50000 is not defined in the Pod's manifest at all? The answer is /etc/group file in the container image.
Checking the contents of /etc/group in the container image should show below:
$ kubectl exec implicit-groups -- cat /etc/group
...
user-defined-in-image:x:1000:
group-defined-in-image:x:50000:user-defined-in-image
Aha! The container's primary user 1000 belongs to the group 50000 in the last entry.
Thus, the group membership defined in /etc/group in the container image for the container's primary user is implicitly merged to the information from the Pod. Please note that this was a design decision the current CRI implementations inherited from Docker, and the community never really reconsidered it until now.
What's wrong with it?
The implicitly merged group information from /etc/group in the container image may cause some concerns particularly in accessing volumes (see kubernetes/kubernetes#112879 for details) because file permission is controlled by uid/gid in Linux. Even worse, the implicit gids from /etc/group can not be detected/validated by any policy engines because there is no clue for the implicit group information in the manifest. This can also be a concern for Kubernetes security.
Fine-grained SupplementalGroups control in a Pod: SupplementaryGroupsPolicy
To tackle the above problem, Kubernetes 1.31 introduces new field supplementalGroupsPolicy in Pod's .spec.securityContext.
This field provies a way to control how to calculate supplementary groups for the container processes in a Pod. The available policy is below:
Merge: The group membership defined in
/etc/groupfor the container's primary user will be merged. If not specified, this policy will be applied (i.e. as-is behavior for backword compatibility).Strict: it only attaches specified group IDs in
fsGroup,supplementalGroups, orrunAsGroupfields as the supplementary groups of the container processes. This means no group membership defined in/etc/groupfor the container's primary user will be merged.
Let's see how Strict policy works.
apiVersion: v1
kind: Pod
metadata:
name: strict-supplementalgroups-policy
spec:
securityContext:
runAsUser: 1000
runAsGroup: 3000
supplementalGroups: [4000]
supplementalGroupsPolicy: Strict
containers:
- name: ctr
image: registry.k8s.io/e2e-test-images/agnhost:2.45
command: [ "sh", "-c", "sleep 1h" ]
securityContext:
allowPrivilegeEscalation: false
# Create the Pod:
$ kubectl apply -f https://k8s.io/blog/2024-08-22-Fine-grained-SupplementalGroups-control/strict-supplementalgroups-policy.yaml
# Verify that the Pod's Container is running:
$ kubectl get pod strict-supplementalgroups-policy
# Check the process identity:
kubectl exec -it strict-supplementalgroups-policy -- id
The output should be similar to this:
uid=1000 gid=3000 groups=3000,4000
You can see Strict policy can exclude group 50000 from groups!
Thus, ensuring supplementalGroupsPolicy: Strict (enforced by some policy mechanism) helps prevent the implicit supplementary groups in a Pod.
Note:
Actually, this is not enough because container with sufficient privileges / capability can change its process identity. Please see the following section for details.Attached process identity in Pod status
This feature also exposes the process identity attached to the first container process of the container
via .status.containerStatuses[].user.linux field. It would be helpful to see if implicit group IDs are attached.
...
status:
containerStatuses:
- name: ctr
user:
linux:
gid: 3000
supplementalGroups:
- 3000
- 4000
uid: 1000
...
Note:
Please note that the values instatus.containerStatuses[].user.linux field is the firstly attached
process identity to the first container process in the container. If the container has sufficient privilege
to call system calls related to process identity (e.g. setuid(2), setgid(2) or setgroups(2), etc.), the container process can change its identity. Thus, the actual process identity will be dynamic.Feature availability
To enable supplementalGroupsPolicy field, the following components have to be used:
- Kubernetes: v1.31 or later, with the
SupplementalGroupsPolicyfeature gate enabled. As of v1.31, the gate is marked as alpha. - CRI runtime:
- containerd: v2.0 or later
- CRI-O: v1.31 or later
You can see if the feature is supported in the Node's .status.features.supplementalGroupsPolicy field.
apiVersion: v1
kind: Node
...
status:
features:
supplementalGroupsPolicy: true
What's next?
Kubernetes SIG Node hope - and expect - that the feature will be promoted to beta and eventually general availability (GA) in future releases of Kubernetes, so that users no longer need to enable the feature gate manually.
Merge policy is applied when supplementalGroupsPolicy is not specified, for backwards compatibility.
How can I learn more?
- Configure a Security Context for a Pod or Container
for the further details of
supplementalGroupsPolicy - KEP-3619: Fine-grained SupplementalGroups control
How to get involved?
This feature is driven by the SIG Node community. Please join us to connect with the community and share your ideas and feedback around the above feature and beyond. We look forward to hearing from you!
Kubernetes v1.31: New Kubernetes CPUManager Static Policy: Distribute CPUs Across Cores
In Kubernetes v1.31, we are excited to introduce a significant enhancement to CPU management capabilities: the distribute-cpus-across-cores option for the CPUManager static policy. This feature is currently in alpha and hidden by default, marking a strategic shift aimed at optimizing CPU utilization and improving system performance across multi-core processors.
Understanding the feature
Traditionally, Kubernetes' CPUManager tends to allocate CPUs as compactly as possible, typically packing them onto the fewest number of physical cores. However, allocation strategy matters, CPUs on the same physical host still share some resources of the physical core, such as the cache and execution units, etc.
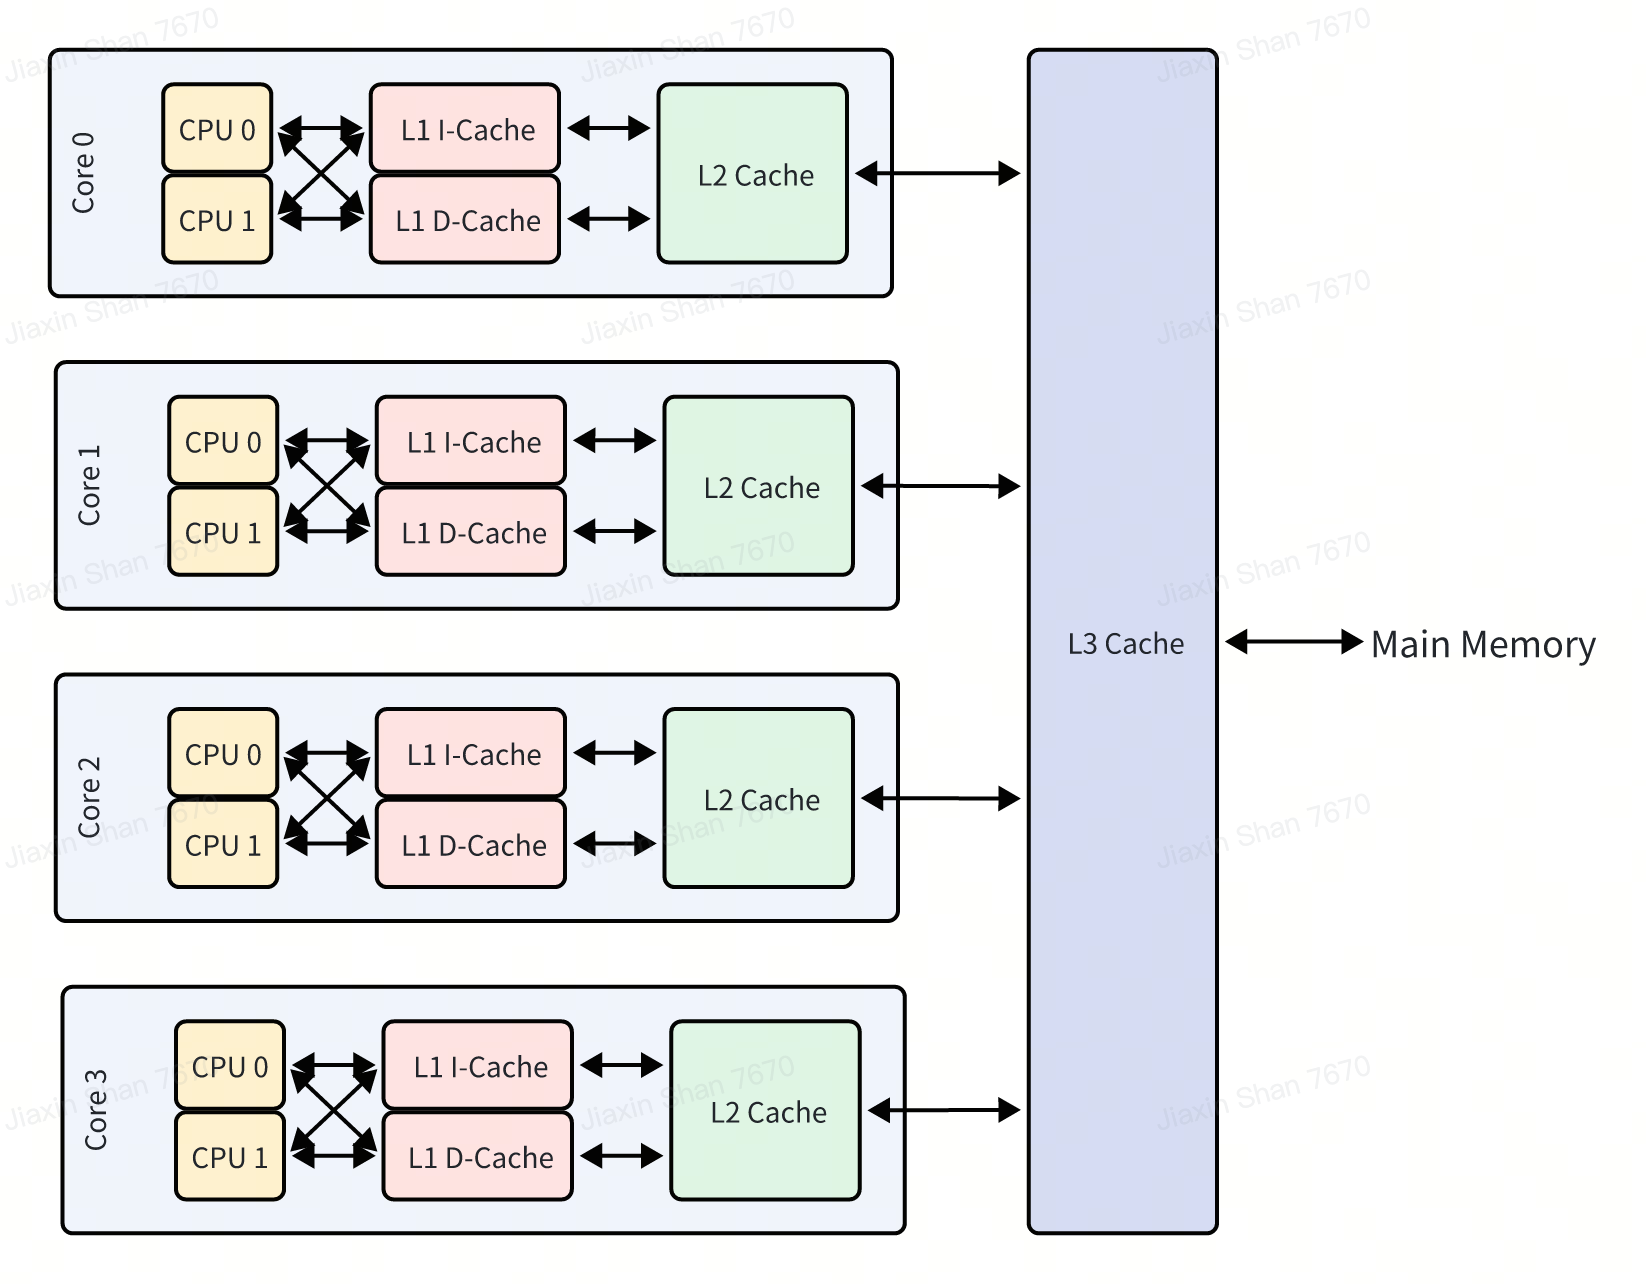
While default approach minimizes inter-core communication and can be beneficial under certain scenarios, it also poses a challenge. CPUs sharing a physical core can lead to resource contention, which in turn may cause performance bottlenecks, particularly noticeable in CPU-intensive applications.
The new distribute-cpus-across-cores feature addresses this issue by modifying the allocation strategy. When enabled, this policy option instructs the CPUManager to spread out the CPUs (hardware threads) across as many physical cores as possible. This distribution is designed to minimize contention among CPUs sharing the same physical core, potentially enhancing the performance of applications by providing them dedicated core resources.
Technically, within this static policy, the free CPU list is reordered in the manner depicted in the diagram, aiming to allocate CPUs from separate physical cores.
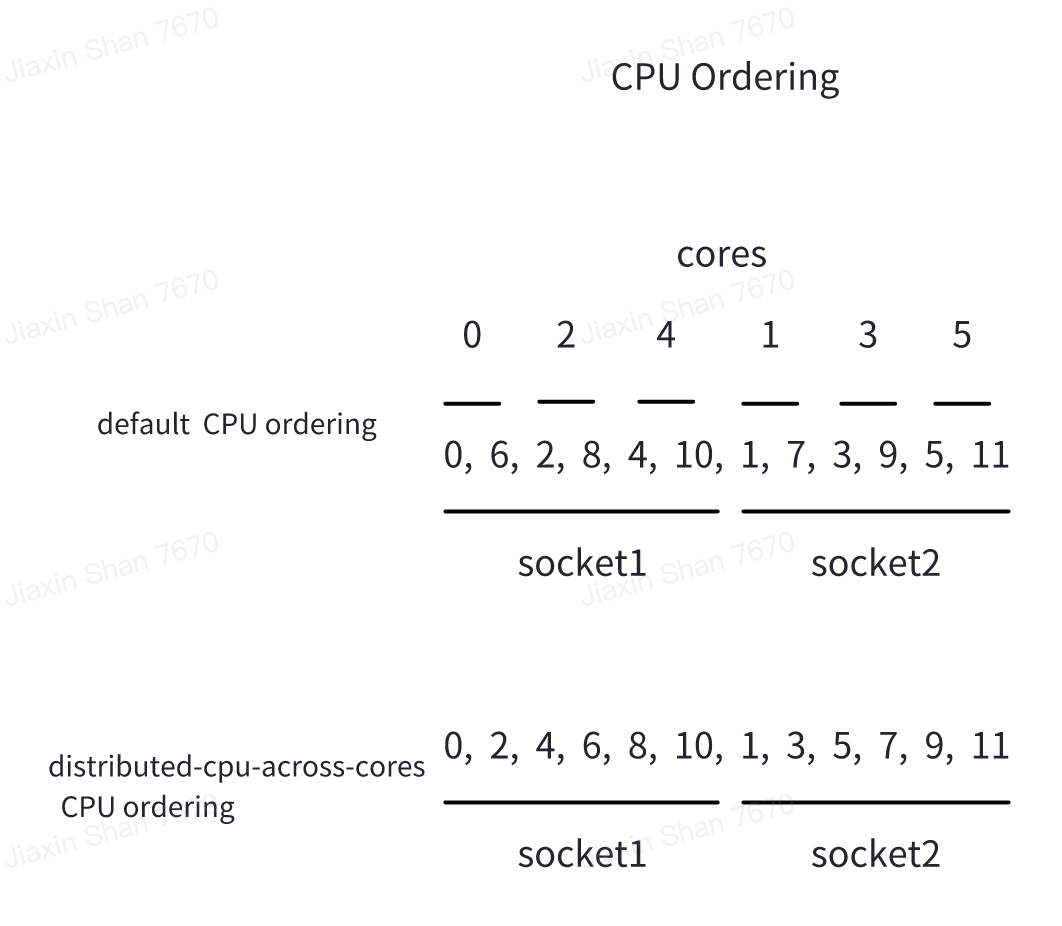
Enabling the feature
To enable this feature, users firstly need to add --cpu-manager-policy=static kubelet flag or the cpuManagerPolicy: static field in KubeletConfiuration. Then user can add --cpu-manager-policy-options distribute-cpus-across-cores=true or distribute-cpus-across-cores=true to their CPUManager policy options in the Kubernetes configuration or. This setting directs the CPUManager to adopt the new distribution strategy. It is important to note that this policy option cannot currently be used in conjunction with full-pcpus-only or distribute-cpus-across-numa options.
Current limitations and future directions
As with any new feature, especially one in alpha, there are limitations and areas for future improvement. One significant current limitation is that distribute-cpus-across-cores cannot be combined with other policy options that might conflict in terms of CPU allocation strategies. This restriction can affect compatibility with certain workloads and deployment scenarios that rely on more specialized resource management.
Looking forward, we are committed to enhancing the compatibility and functionality of the distribute-cpus-across-cores option. Future updates will focus on resolving these compatibility issues, allowing this policy to be combined with other CPUManager policies seamlessly. Our goal is to provide a more flexible and robust CPU allocation framework that can adapt to a variety of workloads and performance demands.
Conclusion
The introduction of the distribute-cpus-across-cores policy in Kubernetes CPUManager is a step forward in our ongoing efforts to refine resource management and improve application performance. By reducing the contention on physical cores, this feature offers a more balanced approach to CPU resource allocation, particularly beneficial for environments running heterogeneous workloads. We encourage Kubernetes users to test this new feature and provide feedback, which will be invaluable in shaping its future development.
This draft aims to clearly explain the new feature while setting expectations for its current stage and future improvements.
Further reading
Please check out the Control CPU Management Policies on the Node task page to learn more about the CPU Manager, and how it fits in relation to the other node-level resource managers.
Getting involved
This feature is driven by the SIG Node. If you are interested in helping develop this feature, sharing feedback, or participating in any other ongoing SIG Node projects, please attend the SIG Node meeting for more details.
Kubernetes 1.31: Autoconfiguration For Node Cgroup Driver (beta)
Historically, configuring the correct cgroup driver has been a pain point for users running new
Kubernetes clusters. On Linux systems, there are two different cgroup drivers:
cgroupfs and systemd. In the past, both the kubelet
and CRI implementation (like CRI-O or containerd) needed to be configured to use
the same cgroup driver, or else the kubelet would exit with an error. This was a
source of headaches for many cluster admins. However, there is light at the end of the tunnel!
Automated cgroup driver detection
In v1.28.0, the SIG Node community introduced the feature gate
KubeletCgroupDriverFromCRI, which instructs the kubelet to ask the CRI
implementation which cgroup driver to use. A few minor releases of Kubernetes
happened whilst we waited for support to land in the major two CRI implementations
(containerd and CRI-O), but as of v1.31.0, this feature is now beta!
In addition to setting the feature gate, a cluster admin needs to ensure their CRI implementation is new enough:
- containerd: Support was added in v2.0.0
- CRI-O: Support was added in v1.28.0
Then, they should ensure their CRI implementation is configured to the cgroup_driver they would like to use.
Future work
Eventually, support for the kubelet's cgroupDriver configuration field will be
dropped, and the kubelet will fail to start if the CRI implementation isn't new
enough to have support for this feature.
Kubernetes 1.31: Streaming Transitions from SPDY to WebSockets
In Kubernetes 1.31, by default kubectl now uses the WebSocket protocol instead of SPDY for streaming.
This post describes what these changes mean for you and why these streaming APIs matter.
Streaming APIs in Kubernetes
In Kubernetes, specific endpoints that are exposed as an HTTP or RESTful interface are upgraded to streaming connections, which require a streaming protocol. Unlike HTTP, which is a request-response protocol, a streaming protocol provides a persistent connection that's bi-directional, low-latency, and lets you interact in real-time. Streaming protocols support reading and writing data between your client and the server, in both directions, over the same connection. This type of connection is useful, for example, when you create a shell in a running container from your local workstation and run commands in the container.
Why change the streaming protocol?
Before the v1.31 release, Kubernetes used the SPDY/3.1 protocol by default when
upgrading streaming connections. SPDY/3.1 has been deprecated for eight years,
and it was never standardized. Many modern proxies, gateways, and load balancers
no longer support the protocol. As a result, you might notice that commands like
kubectl cp, kubectl attach, kubectl exec, and kubectl port-forward
stop working when you try to access your cluster through a proxy or gateway.
As of Kubernetes v1.31, SIG API Machinery has modified the streaming
protocol that a Kubernetes client (such as kubectl) uses for these commands
to the more modern WebSocket streaming protocol.
The WebSocket protocol is a currently supported standardized streaming protocol
that guarantees compatibility and interoperability with different components and
programming languages. The WebSocket protocol is more widely supported by modern
proxies and gateways than SPDY.
How streaming APIs work
Kubernetes upgrades HTTP connections to streaming connections by adding
specific upgrade headers to the originating HTTP request. For example, an HTTP
upgrade request for running the date command on an nginx container within
a cluster is similar to the following:
$ kubectl exec -v=8 nginx -- date
GET https://127.0.0.1:43251/api/v1/namespaces/default/pods/nginx/exec?command=date…
Request Headers:
Connection: Upgrade
Upgrade: websocket
Sec-Websocket-Protocol: v5.channel.k8s.io
User-Agent: kubectl/v1.31.0 (linux/amd64) kubernetes/6911225
If the container runtime supports the WebSocket streaming protocol and at least
one of the subprotocol versions (e.g. v5.channel.k8s.io), the server responds
with a successful 101 Switching Protocols status, along with the negotiated
subprotocol version:
Response Status: 101 Switching Protocols in 3 milliseconds
Response Headers:
Upgrade: websocket
Connection: Upgrade
Sec-Websocket-Accept: j0/jHW9RpaUoGsUAv97EcKw8jFM=
Sec-Websocket-Protocol: v5.channel.k8s.io
At this point the TCP connection used for the HTTP protocol has changed to a streaming connection. Subsequent STDIN, STDOUT, and STDERR data (as well as terminal resizing data and process exit code data) for this shell interaction is then streamed over this upgraded connection.
How to use the new WebSocket streaming protocol
If your cluster and kubectl are on version 1.29 or later, there are two control plane feature gates and two kubectl environment variables that govern the use of the WebSockets rather than SPDY. In Kubernetes 1.31, all of the following feature gates are in beta and are enabled by default:
- Feature gates
TranslateStreamCloseWebsocketRequests.../exec.../attach
PortForwardWebsockets.../port-forward
- kubectl feature control environment variables
KUBECTL_REMOTE_COMMAND_WEBSOCKETSkubectl execkubectl cpkubectl attach
KUBECTL_PORT_FORWARD_WEBSOCKETSkubectl port-forward
If you're connecting to an older cluster but can manage the feature gate
settings, turn on both TranslateStreamCloseWebsocketRequests (added in
Kubernetes v1.29) and PortForwardWebsockets (added in Kubernetes
v1.30) to try this new behavior. Version 1.31 of kubectl can automatically use
the new behavior, but you do need to connect to a cluster where the server-side
features are explicitly enabled.
Learn more about streaming APIs
Kubernetes 1.31: Pod Failure Policy for Jobs Goes GA
This post describes Pod failure policy, which graduates to stable in Kubernetes 1.31, and how to use it in your Jobs.
About Pod failure policy
When you run workloads on Kubernetes, Pods might fail for a variety of reasons. Ideally, workloads like Jobs should be able to ignore transient, retriable failures and continue running to completion.
To allow for these transient failures, Kubernetes Jobs include the backoffLimit
field, which lets you specify a number of Pod failures that you're willing to tolerate
during Job execution. However, if you set a large value for the backoffLimit field
and rely solely on this field, you might notice unnecessary increases in operating
costs as Pods restart excessively until the backoffLimit is met.
This becomes particularly problematic when running large-scale Jobs with thousands of long-running Pods across thousands of nodes.
The Pod failure policy extends the backoff limit mechanism to help you reduce costs in the following ways:
- Gives you control to fail the Job as soon as a non-retriable Pod failure occurs.
- Allows you to ignore retriable errors without increasing the
backoffLimitfield.
For example, you can use a Pod failure policy to run your workload on more affordable spot machines by ignoring Pod failures caused by graceful node shutdown.
The policy allows you to distinguish between retriable and non-retriable Pod failures based on container exit codes or Pod conditions in a failed Pod.
How it works
You specify a Pod failure policy in the Job specification, represented as a list of rules.
For each rule you define match requirements based on one of the following properties:
- Container exit codes: the
onExitCodesproperty. - Pod conditions: the
onPodConditionsproperty.
Additionally, for each rule, you specify one of the following actions to take when a Pod matches the rule:
Ignore: Do not count the failure towards thebackoffLimitorbackoffLimitPerIndex.FailJob: Fail the entire Job and terminate all running Pods.FailIndex: Fail the index corresponding to the failed Pod. This action works with the Backoff limit per index feature.Count: Count the failure towards thebackoffLimitorbackoffLimitPerIndex. This is the default behavior.
When Pod failures occur in a running Job, Kubernetes matches the failed Pod status against the list of Pod failure policy rules, in the specified order, and takes the corresponding actions for the first matched rule.
Note that when specifying the Pod failure policy, you must also set the Job's
Pod template with restartPolicy: Never. This prevents race conditions between
the kubelet and the Job controller when counting Pod failures.
Kubernetes-initiated Pod disruptions
To allow matching Pod failure policy rules against failures caused by
disruptions initiated by Kubernetes, this feature introduces the DisruptionTarget
Pod condition.
Kubernetes adds this condition to any Pod, regardless of whether it's managed by
a Job controller, that fails because of a retriable
disruption scenario.
The DisruptionTarget condition contains one of the following reasons that
corresponds to these disruption scenarios:
PreemptionByKubeScheduler: Preemption bykube-schedulerto accommodate a new Pod that has a higher priority.DeletionByTaintManager- the Pod is due to be deleted bykube-controller-managerdue to aNoExecutetaint that the Pod doesn't tolerate.EvictionByEvictionAPI- the Pod is due to be deleted by an API-initiated eviction.DeletionByPodGC- the Pod is bound to a node that no longer exists, and is due to be deleted by Pod garbage collection.TerminationByKubelet- the Pod was terminated by graceful node shutdown, node pressure eviction or preemption for system critical pods.
In all other disruption scenarios, like eviction due to exceeding
Pod container limits,
Pods don't receive the DisruptionTarget condition because the disruptions were
likely caused by the Pod and would reoccur on retry.
Example
The Pod failure policy snippet below demonstrates an example use:
podFailurePolicy:
rules:
- action: Ignore
onPodConditions:
- type: DisruptionTarget
- action: FailJob
onPodConditions:
- type: ConfigIssue
- action: FailJob
onExitCodes:
operator: In
values: [ 42 ]
In this example, the Pod failure policy does the following:
- Ignores any failed Pods that have the built-in
DisruptionTargetcondition. These Pods don't count towards Job backoff limits. - Fails the Job if any failed Pods have the custom user-supplied
ConfigIssuecondition, which was added either by a custom controller or webhook. - Fails the Job if any containers exited with the exit code 42.
- Counts all other Pod failures towards the default
backoffLimit(orbackoffLimitPerIndexif used).
Learn more
- For a hands-on guide to using Pod failure policy, see Handling retriable and non-retriable pod failures with Pod failure policy
- Read the documentation for Pod failure policy and Backoff limit per index
- Read the documentation for Pod disruption conditions
- Read the KEP for Pod failure policy
Related work
Based on the concepts introduced by Pod failure policy, the following additional work is in progress:
- JobSet integration: Configurable Failure Policy API
- Pod failure policy extension to add more granular failure reasons
- Support for Pod failure policy via JobSet in Kubeflow Training v2
- Proposal: Disrupted Pods should be removed from endpoints
Get involved
This work was sponsored by batch working group in close collaboration with the SIG Apps, and SIG Node, and SIG Scheduling communities.
If you are interested in working on new features in the space we recommend subscribing to our Slack channel and attending the regular community meetings.
Acknowledgments
I would love to thank everyone who was involved in this project over the years - it's been a journey and a joint community effort! The list below is my best-effort attempt to remember and recognize people who made an impact. Thank you!
- Aldo Culquicondor for guidance and reviews throughout the process
- Jordan Liggitt for KEP and API reviews
- David Eads for API reviews
- Maciej Szulik for KEP reviews from SIG Apps PoV
- Clayton Coleman for guidance and SIG Node reviews
- Sergey Kanzhelev for KEP reviews from SIG Node PoV
- Dawn Chen for KEP reviews from SIG Node PoV
- Daniel Smith for reviews from SIG API machinery PoV
- Antoine Pelisse for reviews from SIG API machinery PoV
- John Belamaric for PRR reviews
- Filip Křepinský for thorough reviews from SIG Apps PoV and bug-fixing
- David Porter for thorough reviews from SIG Node PoV
- Jensen Lo for early requirements discussions, testing and reporting issues
- Daniel Vega-Myhre for advancing JobSet integration and reporting issues
- Abdullah Gharaibeh for early design discussions and guidance
- Antonio Ojea for test reviews
- Yuki Iwai for reviews and aligning implementation of the closely related Job features
- Kevin Hannon for reviews and aligning implementation of the closely related Job features
- Tim Bannister for docs reviews
- Shannon Kularathna for docs reviews
- Paola Cortés for docs reviews
Kubernetes 1.31: MatchLabelKeys in PodAffinity graduates to beta
Kubernetes 1.29 introduced new fields matchLabelKeys and mismatchLabelKeys in podAffinity and podAntiAffinity.
In Kubernetes 1.31, this feature moves to beta and the corresponding feature gate (MatchLabelKeysInPodAffinity) gets enabled by default.
matchLabelKeys - Enhanced scheduling for versatile rolling updates
During a workload's (e.g., Deployment) rolling update, a cluster may have Pods from multiple versions at the same time.
However, the scheduler cannot distinguish between old and new versions based on the labelSelector specified in podAffinity or podAntiAffinity. As a result, it will co-locate or disperse Pods regardless of their versions.
This can lead to sub-optimal scheduling outcome, for example:
- New version Pods are co-located with old version Pods (
podAffinity), which will eventually be removed after rolling updates. - Old version Pods are distributed across all available topologies, preventing new version Pods from finding nodes due to
podAntiAffinity.
matchLabelKeys is a set of Pod label keys and addresses this problem.
The scheduler looks up the values of these keys from the new Pod's labels and combines them with labelSelector
so that podAffinity matches Pods that have the same key-value in labels.
By using label pod-template-hash in matchLabelKeys,
you can ensure that only Pods of the same version are evaluated for podAffinity or podAntiAffinity.
apiVersion: apps/v1
kind: Deployment
metadata:
name: application-server
...
affinity:
podAffinity:
requiredDuringSchedulingIgnoredDuringExecution:
- labelSelector:
matchExpressions:
- key: app
operator: In
values:
- database
topologyKey: topology.kubernetes.io/zone
matchLabelKeys:
- pod-template-hash
The above matchLabelKeys will be translated in Pods like:
kind: Pod
metadata:
name: application-server
labels:
pod-template-hash: xyz
...
affinity:
podAffinity:
requiredDuringSchedulingIgnoredDuringExecution:
- labelSelector:
matchExpressions:
- key: app
operator: In
values:
- database
- key: pod-template-hash # Added from matchLabelKeys; Only Pods from the same replicaset will match this affinity.
operator: In
values:
- xyz
topologyKey: topology.kubernetes.io/zone
matchLabelKeys:
- pod-template-hash
mismatchLabelKeys - Service isolation
mismatchLabelKeys is a set of Pod label keys, like matchLabelKeys,
which looks up the values of these keys from the new Pod's labels, and merge them with labelSelector as key notin (value)
so that podAffinity does not match Pods that have the same key-value in labels.
Suppose all Pods for each tenant get tenant label via a controller or a manifest management tool like Helm.
Although the value of tenant label is unknown when composing each workload's manifest,
the cluster admin wants to achieve exclusive 1:1 tenant to domain placement for a tenant isolation.
mismatchLabelKeys works for this usecase;
By applying the following affinity globally using a mutating webhook,
the cluster admin can ensure that the Pods from the same tenant will land on the same domain exclusively,
meaning Pods from other tenants won't land on the same domain.
affinity:
podAffinity: # ensures the pods of this tenant land on the same node pool
requiredDuringSchedulingIgnoredDuringExecution:
- matchLabelKeys:
- tenant
topologyKey: node-pool
podAntiAffinity: # ensures only Pods from this tenant lands on the same node pool
requiredDuringSchedulingIgnoredDuringExecution:
- mismatchLabelKeys:
- tenant
labelSelector:
matchExpressions:
- key: tenant
operator: Exists
topologyKey: node-pool
The above matchLabelKeys and mismatchLabelKeys will be translated to like:
kind: Pod
metadata:
name: application-server
labels:
tenant: service-a
spec:
affinity:
podAffinity: # ensures the pods of this tenant land on the same node pool
requiredDuringSchedulingIgnoredDuringExecution:
- matchLabelKeys:
- tenant
topologyKey: node-pool
labelSelector:
matchExpressions:
- key: tenant
operator: In
values:
- service-a
podAntiAffinity: # ensures only Pods from this tenant lands on the same node pool
requiredDuringSchedulingIgnoredDuringExecution:
- mismatchLabelKeys:
- tenant
labelSelector:
matchExpressions:
- key: tenant
operator: Exists
- key: tenant
operator: NotIn
values:
- service-a
topologyKey: node-pool
Getting involved
These features are managed by Kubernetes SIG Scheduling.
Please join us and share your feedback. We look forward to hearing from you!
How can I learn more?
Kubernetes 1.31: Prevent PersistentVolume Leaks When Deleting out of Order
PersistentVolume (or PVs for short) are
associated with Reclaim Policy.
The reclaim policy is used to determine the actions that need to be taken by the storage
backend on deletion of the PVC Bound to a PV.
When the reclaim policy is Delete, the expectation is that the storage backend
releases the storage resource allocated for the PV. In essence, the reclaim
policy needs to be honored on PV deletion.
With the recent Kubernetes v1.31 release, a beta feature lets you configure your cluster to behave that way and honor the configured reclaim policy.
How did reclaim work in previous Kubernetes releases?
PersistentVolumeClaim (or PVC for short) is a user's request for storage. A PV and PVC are considered Bound if a newly created PV or a matching PV is found. The PVs themselves are backed by volumes allocated by the storage backend.
Normally, if the volume is to be deleted, then the expectation is to delete the PVC for a bound PV-PVC pair. However, there are no restrictions on deleting a PV before deleting a PVC.
First, I'll demonstrate the behavior for clusters running an older version of Kubernetes.
Retrieve a PVC that is bound to a PV
Retrieve an existing PVC example-vanilla-block-pvc
kubectl get pvc example-vanilla-block-pvc
The following output shows the PVC and its bound PV; the PV is shown under the VOLUME column:
NAME STATUS VOLUME CAPACITY ACCESS MODES STORAGECLASS AGE
example-vanilla-block-pvc Bound pvc-6791fdd4-5fad-438e-a7fb-16410363e3da 5Gi RWO example-vanilla-block-sc 19s
Delete PV
When I try to delete a bound PV, the kubectl session blocks and the kubectl
tool does not return back control to the shell; for example:
kubectl delete pv pvc-6791fdd4-5fad-438e-a7fb-16410363e3da
persistentvolume "pvc-6791fdd4-5fad-438e-a7fb-16410363e3da" deleted
^C
Retrieving the PV
kubectl get pv pvc-6791fdd4-5fad-438e-a7fb-16410363e3da
It can be observed that the PV is in a Terminating state
NAME CAPACITY ACCESS MODES RECLAIM POLICY STATUS CLAIM STORAGECLASS REASON AGE
pvc-6791fdd4-5fad-438e-a7fb-16410363e3da 5Gi RWO Delete Terminating default/example-vanilla-block-pvc example-vanilla-block-sc 2m23s
Delete PVC
kubectl delete pvc example-vanilla-block-pvc
The following output is seen if the PVC gets successfully deleted:
persistentvolumeclaim "example-vanilla-block-pvc" deleted
The PV object from the cluster also gets deleted. When attempting to retrieve the PV it will be observed that the PV is no longer found:
kubectl get pv pvc-6791fdd4-5fad-438e-a7fb-16410363e3da
Error from server (NotFound): persistentvolumes "pvc-6791fdd4-5fad-438e-a7fb-16410363e3da" not found
Although the PV is deleted, the underlying storage resource is not deleted and needs to be removed manually.
To sum up, the reclaim policy associated with the PersistentVolume is currently
ignored under certain circumstances. For a Bound PV-PVC pair, the ordering of PV-PVC
deletion determines whether the PV reclaim policy is honored. The reclaim policy
is honored if the PVC is deleted first; however, if the PV is deleted prior to
deleting the PVC, then the reclaim policy is not exercised. As a result of this behavior,
the associated storage asset in the external infrastructure is not removed.
PV reclaim policy with Kubernetes v1.31
The new behavior ensures that the underlying storage object is deleted from the backend when users attempt to delete a PV manually.
How to enable new behavior?
To take advantage of the new behavior, you must have upgraded your cluster to the v1.31 release of Kubernetes
and run the CSI external-provisioner version 5.0.1 or later.
How does it work?
For CSI volumes, the new behavior is achieved by adding a finalizer external-provisioner.volume.kubernetes.io/finalizer
on new and existing PVs. The finalizer is only removed after the storage from the backend is deleted.
`
An example of a PV with the finalizer, notice the new finalizer in the finalizers list
kubectl get pv pvc-a7b7e3ba-f837-45ba-b243-dec7d8aaed53 -o yaml
apiVersion: v1
kind: PersistentVolume
metadata:
annotations:
pv.kubernetes.io/provisioned-by: csi.vsphere.vmware.com
creationTimestamp: "2021-11-17T19:28:56Z"
finalizers:
- kubernetes.io/pv-protection
- external-provisioner.volume.kubernetes.io/finalizer
name: pvc-a7b7e3ba-f837-45ba-b243-dec7d8aaed53
resourceVersion: "194711"
uid: 087f14f2-4157-4e95-8a70-8294b039d30e
spec:
accessModes:
- ReadWriteOnce
capacity:
storage: 1Gi
claimRef:
apiVersion: v1
kind: PersistentVolumeClaim
name: example-vanilla-block-pvc
namespace: default
resourceVersion: "194677"
uid: a7b7e3ba-f837-45ba-b243-dec7d8aaed53
csi:
driver: csi.vsphere.vmware.com
fsType: ext4
volumeAttributes:
storage.kubernetes.io/csiProvisionerIdentity: 1637110610497-8081-csi.vsphere.vmware.com
type: vSphere CNS Block Volume
volumeHandle: 2dacf297-803f-4ccc-afc7-3d3c3f02051e
persistentVolumeReclaimPolicy: Delete
storageClassName: example-vanilla-block-sc
volumeMode: Filesystem
status:
phase: Bound
The finalizer prevents this PersistentVolume from being removed from the cluster. As stated previously, the finalizer is only removed from the PV object after it is successfully deleted from the storage backend. To learn more about finalizers, please refer to Using Finalizers to Control Deletion.
Similarly, the finalizer kubernetes.io/pv-controller is added to dynamically provisioned in-tree plugin volumes.
What about CSI migrated volumes?
The fix applies to CSI migrated volumes as well.
Some caveats
The fix does not apply to statically provisioned in-tree plugin volumes.
References
How do I get involved?
The Kubernetes Slack channel SIG Storage communication channels are great mediums to reach out to the SIG Storage and migration working group teams.
Special thanks to the following people for the insightful reviews, thorough consideration and valuable contribution:
- Fan Baofa (carlory)
- Jan Šafránek (jsafrane)
- Xing Yang (xing-yang)
- Matthew Wong (wongma7)
Join the Kubernetes Storage Special Interest Group (SIG) if you're interested in getting involved with the design and development of CSI or any part of the Kubernetes Storage system. We’re rapidly growing and always welcome new contributors.
Kubernetes 1.31: Read Only Volumes Based On OCI Artifacts (alpha)
The Kubernetes community is moving towards fulfilling more Artificial Intelligence (AI) and Machine Learning (ML) use cases in the future. While the project has been designed to fulfill microservice architectures in the past, it’s now time to listen to the end users and introduce features which have a stronger focus on AI/ML.
One of these requirements is to support Open Container Initiative (OCI) compatible images and artifacts (referred as OCI objects) directly as a native volume source. This allows users to focus on OCI standards as well as enables them to store and distribute any content using OCI registries. A feature like this gives the Kubernetes project a chance to grow into use cases which go beyond running particular images.
Given that, the Kubernetes community is proud to present a new alpha feature introduced in v1.31: The Image Volume Source (KEP-4639). This feature allows users to specify an image reference as volume in a pod while reusing it as volume mount within containers:
…
kind: Pod
spec:
containers:
- …
volumeMounts:
- name: my-volume
mountPath: /path/to/directory
volumes:
- name: my-volume
image:
reference: my-image:tag
The above example would result in mounting my-image:tag to
/path/to/directory in the pod’s container.
Use cases
The goal of this enhancement is to stick as close as possible to the existing container image implementation within the kubelet, while introducing a new API surface to allow more extended use cases.
For example, users could share a configuration file among multiple containers in a pod without including the file in the main image, so that they can minimize security risks and the overall image size. They can also package and distribute binary artifacts using OCI images and mount them directly into Kubernetes pods, so that they can streamline their CI/CD pipeline as an example.
Data scientists, MLOps engineers, or AI developers, can mount large language model weights or machine learning model weights in a pod alongside a model-server, so that they can efficiently serve them without including them in the model-server container image. They can package these in an OCI object to take advantage of OCI distribution and ensure efficient model deployment. This allows them to separate the model specifications/content from the executables that process them.
Another use case is that security engineers can use a public image for a malware scanner and mount in a volume of private (commercial) malware signatures, so that they can load those signatures without baking their own combined image (which might not be allowed by the copyright on the public image). Those files work regardless of the OS or version of the scanner software.
But in the long term it will be up to you as an end user of this project to outline further important use cases for the new feature. SIG Node is happy to retrieve any feedback or suggestions for further enhancements to allow more advanced usage scenarios. Feel free to provide feedback by either using the Kubernetes Slack (#sig-node) channel or the SIG Node mailinglist.
Detailed example
The Kubernetes alpha feature gate ImageVolume
needs to be enabled on the API Server
as well as the kubelet
to make it functional. If that’s the case and the container runtime
has support for the feature (like CRI-O ≥ v1.31), then an example pod.yaml
like this can be created:
apiVersion: v1
kind: Pod
metadata:
name: pod
spec:
containers:
- name: test
image: registry.k8s.io/e2e-test-images/echoserver:2.3
volumeMounts:
- name: volume
mountPath: /volume
volumes:
- name: volume
image:
reference: quay.io/crio/artifact:v1
pullPolicy: IfNotPresent
The pod declares a new volume using the image.reference of
quay.io/crio/artifact:v1, which refers to an OCI object containing two files.
The pullPolicy behaves in the same way as for container images and allows the
following values:
Always: the kubelet always attempts to pull the reference and the container creation will fail if the pull fails.Never: the kubelet never pulls the reference and only uses a local image or artifact. The container creation will fail if the reference isn’t present.IfNotPresent: the kubelet pulls if the reference isn’t already present on disk. The container creation will fail if the reference isn’t present and the pull fails.
The volumeMounts field is indicating that the container with the name test
should mount the volume under the path /volume.
If you now create the pod:
kubectl apply -f pod.yaml
And exec into it:
kubectl exec -it pod -- sh
Then you’re able to investigate what has been mounted:
/ # ls /volume
dir file
/ # cat /volume/file
2
/ # ls /volume/dir
file
/ # cat /volume/dir/file
1
You managed to consume an OCI artifact using Kubernetes!
The container runtime pulls the image (or artifact), mounts it to the container and makes it finally available for direct usage. There are a bunch of details in the implementation, which closely align to the existing image pull behavior of the kubelet. For example:
- If a
:latesttag asreferenceis provided, then thepullPolicywill default toAlways, while in any other case it will default toIfNotPresentif unset. - The volume gets re-resolved if the pod gets deleted and recreated, which means that new remote content will become available on pod recreation. A failure to resolve or pull the image during pod startup will block containers from starting and may add significant latency. Failures will be retried using normal volume backoff and will be reported on the pod reason and message.
- Pull secrets will be assembled in the same way as for the container image by looking up node credentials, service account image pull secrets, and pod spec image pull secrets.
- The OCI object gets mounted in a single directory by merging the manifest layers in the same way as for container images.
- The volume is mounted as read-only (
ro) and non-executable files (noexec). - Sub-path mounts for containers are not supported
(
spec.containers[*].volumeMounts.subpath). - The field
spec.securityContext.fsGroupChangePolicyhas no effect on this volume type. - The feature will also work with the
AlwaysPullImagesadmission plugin if enabled.
Thank you for reading through the end of this blog post! SIG Node is proud and happy to deliver this feature as part of Kubernetes v1.31.
As writer of this blog post, I would like to emphasize my special thanks to all involved individuals out there! You all rock, let’s keep on hacking!
Further reading
Kubernetes 1.31: VolumeAttributesClass for Volume Modification Beta
Volumes in Kubernetes have been described by two attributes: their storage class, and their capacity. The storage class is an immutable property of the volume, while the capacity can be changed dynamically with volume resize.
This complicates vertical scaling of workloads with volumes. While cloud providers and storage vendors often offer volumes which allow specifying IO quality of service (Performance) parameters like IOPS or throughput and tuning them as workloads operate, Kubernetes has no API which allows changing them.
We are pleased to announce that the VolumeAttributesClass KEP, alpha since Kubernetes 1.29, will be beta in 1.31. This provides a generic, Kubernetes-native API for modifying volume parameters like provisioned IO.
Like all new volume features in Kubernetes, this API is implemented via the container storage interface (CSI). In addition to the VolumeAttributesClass feature gate, your provisioner-specific CSI driver must support the new ModifyVolume API which is the CSI side of this feature.
See the full documentation for all details. Here we show the common workflow.
Dynamically modifying volume attributes.
A VolumeAttributesClass is a cluster-scoped resource that specifies provisioner-specific
attributes. These are created by the cluster administrator in the same way as storage
classes. For example, a series of gold, silver and bronze volume attribute classes can be
created for volumes with greater or lessor amounts of provisioned IO.
apiVersion: storage.k8s.io/v1alpha1
kind: VolumeAttributesClass
metadata:
name: silver
driverName: your-csi-driver
parameters:
provisioned-iops: "500"
provisioned-throughput: "50MiB/s"
---
apiVersion: storage.k8s.io/v1alpha1
kind: VolumeAttributesClass
metadata:
name: gold
driverName: your-csi-driver
parameters:
provisioned-iops: "10000"
provisioned-throughput: "500MiB/s"
An attribute class is added to a PVC in much the same way as a storage class.
apiVersion: v1
kind: PersistentVolumeClaim
metadata:
name: test-pv-claim
spec:
storageClassName: any-storage-class
volumeAttributesClassName: silver
accessModes:
- ReadWriteOnce
resources:
requests:
storage: 64Gi
Unlike a storage class, the volume attributes class can be changed:
kubectl patch pvc test-pv-claim -p '{"spec": "volumeAttributesClassName": "gold"}'
Kubernetes will work with the CSI driver to update the attributes of the volume. The status of the PVC will track the current and desired attributes class. The PV resource will also be updated with the new volume attributes class which will be set to the currently active attributes of the PV.
Limitations with the beta
As a beta feature, there are still some features which are planned for GA but not yet present. The largest is quota support, see the KEP and discussion in sig-storage for details.
See the Kubernetes CSI driver list for up-to-date information of support for this feature in CSI drivers.
Kubernetes v1.31: Accelerating Cluster Performance with Consistent Reads from Cache
Kubernetes is renowned for its robust orchestration of containerized applications, but as clusters grow, the demands on the control plane can become a bottleneck. A key challenge has been ensuring strongly consistent reads from the etcd datastore, requiring resource-intensive quorum reads.
Today, the Kubernetes community is excited to announce a major improvement: consistent reads from cache, graduating to Beta in Kubernetes v1.31.
Why consistent reads matter
Consistent reads are essential for ensuring that Kubernetes components have an accurate view of the latest cluster state. Guaranteeing consistent reads is crucial for maintaining the accuracy and reliability of Kubernetes operations, enabling components to make informed decisions based on up-to-date information. In large-scale clusters, fetching and processing this data can be a performance bottleneck, especially for requests that involve filtering results. While Kubernetes can filter data by namespace directly within etcd, any other filtering by labels or field selectors requires the entire dataset to be fetched from etcd and then filtered in-memory by the Kubernetes API server. This is particularly impactful for components like the kubelet, which only needs to list pods scheduled to its node - but previously required the API Server and etcd to process all pods in the cluster.
The breakthrough: Caching with confidence
Kubernetes has long used a watch cache to optimize read operations. The watch cache stores a snapshot of the cluster state and receives updates through etcd watches. However, until now, it couldn't serve consistent reads directly, as there was no guarantee the cache was sufficiently up-to-date.
The consistent reads from cache feature addresses this by leveraging etcd's progress notifications mechanism. These notifications inform the watch cache about how current its data is compared to etcd. When a consistent read is requested, the system first checks if the watch cache is up-to-date. If the cache is not up-to-date, the system queries etcd for progress notifications until it's confirmed that the cache is sufficiently fresh. Once ready, the read is efficiently served directly from the cache, which can significantly improve performance, particularly in cases where it would require fetching a lot of data from etcd. This enables requests that filter data to be served from the cache, with only minimal metadata needing to be read from etcd.
Important Note: To benefit from this feature, your Kubernetes cluster must be running etcd version 3.4.31+ or 3.5.13+. For older etcd versions, Kubernetes will automatically fall back to serving consistent reads directly from etcd.
Performance gains you'll notice
This seemingly simple change has a profound impact on Kubernetes performance and scalability:
- Reduced etcd Load: Kubernetes v1.31 can offload work from etcd, freeing up resources for other critical operations.
- Lower Latency: Serving reads from cache is significantly faster than fetching and processing data from etcd. This translates to quicker responses for components, improving overall cluster responsiveness.
- Improved Scalability: Large clusters with thousands of nodes and pods will see the most significant gains, as the reduction in etcd load allows the control plane to handle more requests without sacrificing performance.
5k Node Scalability Test Results: In recent scalability tests on 5,000 node clusters, enabling consistent reads from cache delivered impressive improvements:
- 30% reduction in kube-apiserver CPU usage
- 25% reduction in etcd CPU usage
- Up to 3x reduction (from 5 seconds to 1.5 seconds) in 99th percentile pod LIST request latency
What's next?
With the graduation to beta, consistent reads from cache are enabled by default, offering a seamless performance boost to all Kubernetes users running a supported etcd version.
Our journey doesn't end here. Kubernetes community is actively exploring pagination support in the watch cache, which will unlock even more performance optimizations in the future.
Getting started
Upgrading to Kubernetes v1.31 and ensuring you are using etcd version 3.4.31+ or 3.5.13+ is the easiest way to experience the benefits of consistent reads from cache. If you have any questions or feedback, don't hesitate to reach out to the Kubernetes community.
Let us know how consistent reads from cache transforms your Kubernetes experience!
Special thanks to @ah8ad3 and @p0lyn0mial for their contributions to this feature!
Kubernetes 1.31: Moving cgroup v1 Support into Maintenance Mode
As Kubernetes continues to evolve and adapt to the changing landscape of container orchestration, the community has decided to move cgroup v1 support into maintenance mode in v1.31. This shift aligns with the broader industry's move towards cgroup v2, offering improved functionalities: including scalability and a more consistent interface. Before we dive into the consequences for Kubernetes, let's take a step back to understand what cgroups are and their significance in Linux.
Understanding cgroups
Control groups, or cgroups, are a Linux kernel feature that allows the allocation, prioritization, denial, and management of system resources (such as CPU, memory, disk I/O, and network bandwidth) among processes. This functionality is crucial for maintaining system performance and ensuring that no single process can monopolize system resources, which is especially important in multi-tenant environments.
There are two versions of cgroups: v1 and v2. While cgroup v1 provided sufficient capabilities for resource management, it had limitations that led to the development of cgroup v2. Cgroup v2 offers a more unified and consistent interface, on top of better resource control features.
Cgroups in Kubernetes
For Linux nodes, Kubernetes relies heavily on cgroups to manage and isolate the resources consumed by containers running in pods. Each container in Kubernetes is placed in its own cgroup, which allows Kubernetes to enforce resource limits, monitor usage, and ensure fair resource distribution among all containers.
How Kubernetes uses cgroups
- Resource Allocation
- Ensures that containers do not exceed their allocated CPU and memory limits.
- Isolation
- Isolates containers from each other to prevent resource contention.
- Monitoring
- Tracks resource usage for each container to provide insights and metrics.
Transitioning to Cgroup v2
The Linux community has been focusing on cgroup v2 for new features and improvements. Major Linux distributions and projects like systemd are transitioning towards cgroup v2. Using cgroup v2 provides several benefits over cgroupv1, such as Unified Hierarchy, Improved Interface, Better Resource Control, cgroup aware OOM killer, rootless support etc.
Given these advantages, Kubernetes is also making the move to embrace cgroup v2 more fully. However, this transition needs to be handled carefully to avoid disrupting existing workloads and to provide a smooth migration path for users.
Moving cgroup v1 support into maintenance mode
What does maintenance mode mean?
When cgroup v1 is placed into maintenance mode in Kubernetes, it means that:
- Feature Freeze: No new features will be added to cgroup v1 support.
- Security Fixes: Critical security fixes will still be provided.
- Best-Effort Bug Fixes: Major bugs may be fixed if feasible, but some issues might remain unresolved.
Why move to maintenance mode?
The move to maintenance mode is driven by the need to stay in line with the broader ecosystem and to encourage the adoption of cgroup v2, which offers better performance, security, and usability. By transitioning cgroup v1 to maintenance mode, Kubernetes can focus on enhancing support for cgroup v2 and ensure it meets the needs of modern workloads. It's important to note that maintenance mode does not mean deprecation; cgroup v1 will continue to receive critical security fixes and major bug fixes as needed.
What this means for cluster administrators
Users currently relying on cgroup v1 are highly encouraged to plan for the transition to cgroup v2. This transition involves:
- Upgrading Systems: Ensuring that the underlying operating systems and container runtimes support cgroup v2.
- Testing Workloads: Verifying that workloads and applications function correctly with cgroup v2.
Further reading
Kubernetes v1.31: PersistentVolume Last Phase Transition Time Moves to GA
Announcing the graduation to General Availability (GA) of the PersistentVolume lastTransitionTime status
field, in Kubernetes v1.31!
The Kubernetes SIG Storage team is excited to announce that the "PersistentVolumeLastPhaseTransitionTime" feature, introduced as an alpha in Kubernetes v1.28, has now reached GA status and is officially part of the Kubernetes v1.31 release. This enhancement helps Kubernetes users understand when a PersistentVolume transitions between different phases, allowing for more efficient and informed resource management.
For a v1.31 cluster, you can now assume that every PersistentVolume object has a
.status.lastTransitionTime field, that holds a timestamp of
when the volume last transitioned its phase. This change is not immediate; the new field will be populated whenever a PersistentVolume
is updated and first transitions between phases (Pending, Bound, or Released) after upgrading to Kubernetes v1.31.
What changed?
The API strategy for updating PersistentVolume objects has been modified to populate the .status.lastTransitionTime field with the
current timestamp whenever a PersistentVolume transitions phases. Users are allowed to set this field manually if needed, but it will
be overwritten when the PersistentVolume transitions phases again.
For more details, read about Phase transition timestamp in the Kubernetes documentation. You can also read the previous blog post announcing the feature as alpha in v1.28.
To provide feedback, join our Kubernetes Storage Special-Interest-Group (SIG) or participate in discussions on our public Slack channel.
Kubernetes v1.31: Elli
Editors: Matteo Bianchi, Yigit Demirbas, Abigail McCarthy, Edith Puclla, Rashan Smith
Announcing the release of Kubernetes v1.31: Elli!
Similar to previous releases, the release of Kubernetes v1.31 introduces new stable, beta, and alpha features. The consistent delivery of high-quality releases underscores the strength of our development cycle and the vibrant support from our community. This release consists of 45 enhancements. Of those enhancements, 11 have graduated to Stable, 22 are entering Beta, and 12 have graduated to Alpha.
Release theme and logo
The Kubernetes v1.31 Release Theme is "Elli".
Kubernetes v1.31's Elli is a cute and joyful dog, with a heart of gold and a nice sailor's cap, as a playful wink to the huge and diverse family of Kubernetes contributors.
Kubernetes v1.31 marks the first release after the project has successfully celebrated its first 10 years. Kubernetes has come a very long way since its inception, and it's still moving towards exciting new directions with each release. After 10 years, it is awe-inspiring to reflect on the effort, dedication, skill, wit and tiring work of the countless Kubernetes contributors who have made this a reality.
And yet, despite the herculean effort needed to run the project, there is no shortage of people who show up, time and again, with enthusiasm, smiles and a sense of pride for contributing and being part of the community. This "spirit" that we see from new and old contributors alike is the sign of a vibrant community, a "joyful" community, if we might call it that.
Kubernetes v1.31's Elli is all about celebrating this wonderful spirit! Here's to the next decade of Kubernetes!
Highlights of features graduating to Stable
This is a selection of some of the improvements that are now stable following the v1.31 release.
AppArmor support is now stable
Kubernetes support for AppArmor is now GA. Protect your containers using AppArmor by setting the appArmorProfile.type field in the container's securityContext.
Note that before Kubernetes v1.30, AppArmor was controlled via annotations; starting in v1.30 it is controlled using fields.
It is recommended that you should migrate away from using annotations and start using the appArmorProfile.type field.
To learn more read the AppArmor tutorial. This work was done as a part of KEP #24, by SIG Node.
Improved ingress connectivity reliability for kube-proxy
Kube-proxy improved ingress connectivity reliability is stable in v1.31.
One of the common problems with load balancers in Kubernetes is the synchronization between the different components involved to avoid traffic drop.
This feature implements a mechanism in kube-proxy for load balancers to do connection draining for terminating Nodes exposed by services of type: LoadBalancer and externalTrafficPolicy: Cluster and establish some best practices for cloud providers and Kubernetes load balancers implementations.
To use this feature, kube-proxy needs to run as default service proxy on the cluster and the load balancer needs to support connection draining. There are no specific changes required for using this feature, it has been enabled by default in kube-proxy since v1.30 and been promoted to stable in v1.31.
For more details about this feature please visit the Virtual IPs and Service Proxies documentation page.
This work was done as part of KEP #3836 by SIG Network.
Persistent Volume last phase transition time
Persistent Volume last phase transition time feature moved to GA in v1.31.
This feature adds a PersistentVolumeStatus field which holds a timestamp of when a PersistentVolume last transitioned to a different phase.
With this feature enabled, every PersistentVolume object will have a new field .status.lastTransitionTime, that holds a timestamp of
when the volume last transitioned its phase.
This change is not immediate; the new field will be populated whenever a PersistentVolume is updated and first transitions between phases (Pending, Bound, or Released) after upgrading to Kubernetes v1.31.
This allows you to measure time between when a PersistentVolume moves from Pending to Bound. This can be also useful for providing metrics and SLOs.
For more details about this feature please visit the PersistentVolume documentation page.
This work was done as a part of KEP #3762 by SIG Storage.
Highlights of features graduating to Beta
This is a selection of some of the improvements that are now beta following the v1.31 release.
nftables backend for kube-proxy
The nftables backend moves to beta in v1.31, behind the NFTablesProxyMode feature gate which is now enabled by default.
The nftables API is the successor to the iptables API and is designed to provide better performance and scalability than iptables.
The nftables proxy mode is able to process changes to service endpoints faster and more efficiently than the iptables mode, and is also able to more efficiently process packets in the kernel (though this only
becomes noticeable in clusters with tens of thousands of services).
As of Kubernetes v1.31, the nftables mode is still relatively new, and may not be compatible with all network plugins; consult the documentation for your network plugin.
This proxy mode is only available on Linux nodes, and requires kernel 5.13 or later.
Before migrating, note that some features, especially around NodePort services, are not implemented exactly the same in nftables mode as they are in iptables mode.
Check the migration guide to see if you need to override the default configuration.
This work was done as part of KEP #3866 by SIG Network.
Changes to reclaim policy for PersistentVolumes
The Always Honor PersistentVolume Reclaim Policy feature has advanced to beta in Kubernetes v1.31. This enhancement ensures that the PersistentVolume (PV) reclaim policy is respected even after the associated PersistentVolumeClaim (PVC) is deleted, thereby preventing the leakage of volumes.
Prior to this feature, the reclaim policy linked to a PV could be disregarded under specific conditions, depending on whether the PV or PVC was deleted first. Consequently, the corresponding storage resource in the external infrastructure might not be removed, even if the reclaim policy was set to "Delete". This led to potential inconsistencies and resource leaks.
With the introduction of this feature, Kubernetes now guarantees that the "Delete" reclaim policy will be enforced, ensuring the deletion of the underlying storage object from the backend infrastructure, regardless of the deletion sequence of the PV and PVC.
This work was done as a part of KEP #2644 and by SIG Storage.
Bound service account token improvements
The ServiceAccountTokenNodeBinding feature is promoted to beta in v1.31.
This feature allows requesting a token bound only to a node, not to a pod, which includes node information in claims in the token and validates the existence of the node when the token is used.
For more information, read the bound service account tokens documentation.
This work was done as part of KEP #4193 by SIG Auth.
Multiple Service CIDRs
Support for clusters with multiple Service CIDRs moves to beta in v1.31 (disabled by default).
There are multiple components in a Kubernetes cluster that consume IP addresses: Nodes, Pods and Services. Nodes and Pods IP ranges can be dynamically changed because depend on the infrastructure or the network plugin respectively. However, Services IP ranges are defined during the cluster creation as a hardcoded flag in the kube-apiserver. IP exhaustion has been a problem for long lived or large clusters, as admins needed to expand, shrink or even replace entirely the assigned Service CIDR range. These operations were never supported natively and were performed via complex and delicate maintenance operations, often causing downtime on their clusters. This new feature allows users and cluster admins to dynamically modify Service CIDR ranges with zero downtime.
For more details about this feature please visit the Virtual IPs and Service Proxies documentation page.
This work was done as part of KEP #1880 by SIG Network.
Traffic distribution for Services
Traffic distribution for Services moves to beta in v1.31 and is enabled by default.
After several iterations on finding the best user experience and traffic engineering capabilities for Services networking, SIG Networking implemented the trafficDistribution field in the Service specification, which serves as a guideline for the underlying implementation to consider while making routing decisions.
For more details about this feature please read the 1.30 Release Blog or visit the Service documentation page.
This work was done as part of KEP #4444 by SIG Network.
Kubernetes VolumeAttributesClass ModifyVolume
VolumeAttributesClass API is moving to beta in v1.31. The VolumeAttributesClass provides a generic, Kubernetes-native API for modifying dynamically volume parameters like provisioned IO. This allows workloads to vertically scale their volumes on-line to balance cost and performance, if supported by their provider. This feature had been alpha since Kubernetes 1.29.
This work was done as a part of KEP #3751 and lead by SIG Storage.
New features in Alpha
This is a selection of some of the improvements that are now alpha following the v1.31 release.
New DRA APIs for better accelerators and other hardware management
Kubernetes v1.31 brings an updated dynamic resource allocation (DRA) API and design. The main focus in the update is on structured parameters because they make resource information and requests transparent to Kubernetes and clients and enable implementing features like cluster autoscaling. DRA support in the kubelet was updated such that version skew between kubelet and the control plane is possible. With structured parameters, the scheduler allocates ResourceClaims while scheduling a pod. Allocation by a DRA driver controller is still supported through what is now called "classic DRA".
With Kubernetes v1.31, classic DRA has a separate feature gate named DRAControlPlaneController, which you need to enable explicitly.
With such a control plane controller, a DRA driver can implement allocation policies that are not supported yet through structured parameters.
This work was done as part of KEP #3063 by SIG Node.
Support for image volumes
The Kubernetes community is moving towards fulfilling more Artificial Intelligence (AI) and Machine Learning (ML) use cases in the future.
One of the requirements to fulfill these use cases is to support Open Container Initiative (OCI) compatible images and artifacts (referred as OCI objects) directly as a native volume source. This allows users to focus on OCI standards as well as enables them to store and distribute any content using OCI registries.
Given that, v1.31 adds a new alpha feature to allow using an OCI image as a volume in a Pod.
This feature allows users to specify an image reference as volume in a pod while reusing it as volume
mount within containers. You need to enable the ImageVolume feature gate to try this out.
This work was done as part of KEP #4639 by SIG Node and SIG Storage.
Exposing device health information through Pod status
Expose device health information through the Pod Status is added as a new alpha feature in v1.31, disabled by default.
Before Kubernetes v1.31, the way to know whether or not a Pod is associated with the failed device is to use the PodResources API.
By enabling this feature, the field allocatedResourcesStatus will be added to each container status, within the .status for each Pod. The allocatedResourcesStatus field reports health information for each device assigned to the container.
This work was done as part of KEP #4680 by SIG Node.
Finer-grained authorization based on selectors
This feature allows webhook authorizers and future (but not currently designed) in-tree authorizers to
allow list and watch requests, provided those requests use label and/or field selectors.
For example, it is now possible for an authorizer to express: this user cannot list all pods, but can list all pods where .spec.nodeName matches some specific value. Or to allow a user to watch all Secrets in a namespace
that are not labelled as confidential: true.
Combined with CRD field selectors (also moving to beta in v1.31), it is possible to write more secure
per-node extensions.
This work was done as part of KEP #4601 by SIG Auth.
Restrictions on anonymous API access
By enabling the feature gate AnonymousAuthConfigurableEndpoints users can now use the authentication configuration file to configure the endpoints that can be accessed by anonymous requests.
This allows users to protect themselves against RBAC misconfigurations that can give anonymous users broad access to the cluster.
This work was done as a part of KEP #4633 and by SIG Auth.
Graduations, deprecations, and removals in 1.31
Graduations to Stable
This lists all the features that graduated to stable (also known as general availability). For a full list of updates including new features and graduations from alpha to beta, see the release notes.
This release includes a total of 11 enhancements promoted to Stable:
- PersistentVolume last phase transition time
- Metric cardinality enforcement
- Kube-proxy improved ingress connectivity reliability
- Add CDI devices to device plugin API
- Move cgroup v1 support into maintenance mode
- AppArmor support
- PodHealthyPolicy for PodDisruptionBudget
- Retriable and non-retriable Pod failures for Jobs
- Elastic Indexed Jobs
- Allow StatefulSet to control start replica ordinal numbering
- Random Pod selection on ReplicaSet downscaling
Deprecations and Removals
As Kubernetes develops and matures, features may be deprecated, removed, or replaced with better ones for the project's overall health. See the Kubernetes deprecation and removal policy for more details on this process.
Cgroup v1 enters the maintenance mode
As Kubernetes continues to evolve and adapt to the changing landscape of container orchestration, the community has decided to move cgroup v1 support into maintenance mode in v1.31. This shift aligns with the broader industry's move towards cgroup v2, offering improved functionality, scalability, and a more consistent interface. Kubernetes maintance mode means that no new features will be added to cgroup v1 support. Critical security fixes will still be provided, however, bug-fixing is now best-effort, meaning major bugs may be fixed if feasible, but some issues might remain unresolved.
It is recommended that you start switching to use cgroup v2 as soon as possible. This transition depends on your architecture, including ensuring the underlying operating systems and container runtimes support cgroup v2 and testing workloads to verify that workloads and applications function correctly with cgroup v2.
Please report any problems you encounter by filing an issue.
This work was done as part of KEP #4569 by SIG Node.
A note about SHA-1 signature support
In go1.18 (released in March 2022), the crypto/x509 library started to reject certificates signed with a SHA-1 hash function.
While SHA-1 is established to be unsafe and publicly trusted Certificate Authorities have not issued SHA-1 certificates since 2015, there might still be cases in the context of Kubernetes where user-provided certificates are signed using a SHA-1 hash function through private authorities with them being used for Aggregated API Servers or webhooks.
If you have relied on SHA-1 based certificates, you must explicitly opt back into its support by setting GODEBUG=x509sha1=1 in your environment.
Given Go's compatibility policy for GODEBUGs, the x509sha1 GODEBUG and the support for SHA-1 certificates will fully go away in go1.24 which will be released in the first half of 2025.
If you rely on SHA-1 certificates, please start moving off them.
Please see Kubernetes issue #125689 to get a better idea of timelines around the support for SHA-1 going away, when Kubernetes releases plans to adopt go1.24, and for more details on how to detect usage of SHA-1 certificates via metrics and audit logging.
Deprecation of status.nodeInfo.kubeProxyVersion field for Nodes (KEP 4004)
The .status.nodeInfo.kubeProxyVersion field of Nodes has been deprecated in Kubernetes v1.31,
and will be removed in a later release.
It's being deprecated because the value of this field wasn't (and isn't) accurate.
This field is set by the kubelet, which does not have reliable information about the kube-proxy version or whether kube-proxy is running.
The DisableNodeKubeProxyVersion feature gate will be set to true in by default in v1.31 and the kubelet will no longer attempt to set the .status.kubeProxyVersion field for its associated Node.
Removal of all in-tree integrations with cloud providers
As highlighted in a previous article, the last remaining in-tree support for cloud provider integration has been removed as part of the v1.31 release. This doesn't mean you can't integrate with a cloud provider, however you now must use the recommended approach using an external integration. Some integrations are part of the Kubernetes project and others are third party software.
This milestone marks the completion of the externalization process for all cloud providers' integrations from the Kubernetes core (KEP-2395), a process started with Kubernetes v1.26. This change helps Kubernetes to get closer to being a truly vendor-neutral platform.
For further details on the cloud provider integrations, read our v1.29 Cloud Provider Integrations feature blog. For additional context about the in-tree code removal, we invite you to check the (v1.29 deprecation blog).
The latter blog also contains useful information for users who need to migrate to version v1.29 and later.
Removal of in-tree provider feature gates
In Kubernetes v1.31, the following alpha feature gates InTreePluginAWSUnregister, InTreePluginAzureDiskUnregister, InTreePluginAzureFileUnregister, InTreePluginGCEUnregister, InTreePluginOpenStackUnregister, and InTreePluginvSphereUnregister have been removed. These feature gates were introduced to facilitate the testing of scenarios where in-tree volume plugins were removed from the codebase, without actually removing them. Since Kubernetes 1.30 had deprecated these in-tree volume plugins, these feature gates were redundant and no longer served a purpose. The only CSI migration gate still standing is InTreePluginPortworxUnregister, which will remain in alpha until the CSI migration for Portworx is completed and its in-tree volume plugin will be ready for removal.
Removal of kubelet --keep-terminated-pod-volumes command line flag
The kubelet flag --keep-terminated-pod-volumes, which was deprecated in 2017, has been removed as
part of the v1.31 release.
You can find more details in the pull request #122082.
Removal of CephFS volume plugin
CephFS volume plugin was removed in this release and the cephfs volume type became non-functional.
It is recommended that you use the CephFS CSI driver as a third-party storage driver instead. If you were using the CephFS volume plugin before upgrading the cluster version to v1.31, you must re-deploy your application to use the new driver.
CephFS volume plugin was formally marked as deprecated in v1.28.
Removal of Ceph RBD volume plugin
The v1.31 release removes the Ceph RBD volume plugin and its CSI migration support, making the rbd volume type non-functional.
It's recommended that you use the RBD CSI driver in your clusters instead. If you were using Ceph RBD volume plugin before upgrading the cluster version to v1.31, you must re-deploy your application to use the new driver.
The Ceph RBD volume plugin was formally marked as deprecated in v1.28.
Deprecation of non-CSI volume limit plugins in kube-scheduler
The v1.31 release will deprecate all non-CSI volume limit scheduler plugins, and will remove some already deprected plugins from the default plugins, including:
AzureDiskLimitsCinderLimitsEBSLimitsGCEPDLimits
It's recommended that you use the NodeVolumeLimits plugin instead because it can handle the same functionality as the removed plugins since those volume types have been migrated to CSI.
Please replace the deprecated plugins with the NodeVolumeLimits plugin if you explicitly use them in the scheduler config.
The AzureDiskLimits, CinderLimits, EBSLimits, and GCEPDLimits plugins will be removed in a future release.
These plugins will be removed from the default scheduler plugins list as they have been deprecated since Kubernetes v1.14.
Release notes and upgrade actions required
Check out the full details of the Kubernetes v1.31 release in our release notes.
Scheduler now uses QueueingHint when SchedulerQueueingHints is enabled
Added support to the scheduler to start using a QueueingHint registered for Pod/Updated events,
to determine whether updates to previously unschedulable Pods have made them schedulable.
The new support is active when the feature gate SchedulerQueueingHints is enabled.
Previously, when unschedulable Pods were updated, the scheduler always put Pods back to into a queue
(activeQ / backoffQ). However not all updates to Pods make Pods schedulable, especially considering
many scheduling constraints nowadays are immutable. Under the new behaviour, once unschedulable Pods
are updated, the scheduling queue checks with QueueingHint(s) whether the update may make the
pod(s) schedulable, and requeues them to activeQ or backoffQ only when at least one
QueueingHint returns Queue.
Action required for custom scheduler plugin developers:
Plugins have to implement a QueueingHint for Pod/Update event if the rejection from them could be resolved by updating unscheduled Pods themselves. Example: suppose you develop a custom plugin that denies Pods that have a schedulable=false label. Given Pods with a schedulable=false label will be schedulable if the schedulable=false label is removed, this plugin would implement QueueingHint for Pod/Update event that returns Queue when such label changes are made in unscheduled Pods. You can find more details in the pull request #122234.
Removal of kubelet --keep-terminated-pod-volumes command line flag
The kubelet flag --keep-terminated-pod-volumes, which was deprecated in 2017, was removed as part of the v1.31 release.
You can find more details in the pull request #122082.
Availability
Kubernetes v1.31 is available for download on GitHub or on the Kubernetes download page.
To get started with Kubernetes, check out these interactive tutorials or run local Kubernetes clusters using minikube. You can also easily install v1.31 using kubeadm.
Release team
Kubernetes is only possible with the support, commitment, and hard work of its community. Each release team is made up of dedicated community volunteers who work together to build the many pieces that make up the Kubernetes releases you rely on. This requires the specialized skills of people from all corners of our community, from the code itself to its documentation and project management.
We would like to thank the entire release team for the hours spent hard at work to deliver the Kubernetes v1.31 release to our community. The Release Team's membership ranges from first-time shadows to returning team leads with experience forged over several release cycles. A very special thanks goes out our release lead, Angelos Kolaitis, for supporting us through a successful release cycle, advocating for us, making sure that we could all contribute in the best way possible, and challenging us to improve the release process.
Project velocity
The CNCF K8s DevStats project aggregates a number of interesting data points related to the velocity of Kubernetes and various sub-projects. This includes everything from individual contributions to the number of companies that are contributing and is an illustration of the depth and breadth of effort that goes into evolving this ecosystem.
In the v1.31 release cycle, which ran for 14 weeks (May 7th to August 13th), we saw contributions to Kubernetes from 113 different companies and 528 individuals.
In the whole Cloud Native ecosystem we have 379 companies counting 2268 total contributors - which means that respect to the previous release cycle we experienced an astounding 63% increase on individuals contributing!
Source for this data:
By contribution we mean when someone makes a commit, code review, comment, creates an issue or PR, reviews a PR (including blogs and documentation) or comments on issues and PRs.
If you are interested in contributing visit this page to get started.
Check out DevStats to learn more about the overall velocity of the Kubernetes project and community.
Event update
Explore the upcoming Kubernetes and cloud-native events from August to November 2024, featuring KubeCon, KCD, and other notable conferences worldwide. Stay informed and engage with the Kubernetes community.
August 2024
- KubeCon + CloudNativeCon + Open Source Summit China 2024: August 21-23, 2024 | Hong Kong
- KubeDay Japan: August 27, 2024 | Tokyo, Japan
September 2024
- KCD Lahore - Pakistan 2024: September 1, 2024 | Lahore, Pakistan
- KuberTENes Birthday Bash Stockholm: September 5, 2024 | Stockholm, Sweden
- KCD Sydney ’24: September 5-6, 2024 | Sydney, Australia
- KCD Washington DC 2024: September 24, 2024 | Washington, DC, United States
- KCD Porto 2024: September 27-28, 2024 | Porto, Portugal
October 2024
- KCD Austria 2024: October 8-10, 2024 | Wien, Austria
- KubeDay Australia: October 15, 2024 | Melbourne, Australia
- KCD UK - London 2024: October 22-23, 2024 | Greater London, United Kingdom
November 2024
- KubeCon + CloudNativeCon North America 2024: November 12-15, 2024 | Salt Lake City, United States
- Kubernetes on EDGE Day North America: November 12, 2024 | Salt Lake City, United States
Upcoming release webinar
Join members of the Kubernetes v1.31 release team on Thursday, Thu Sep 12, 2024 10am PT to learn about the major features of this release, as well as deprecations and removals to help plan for upgrades. For more information and registration, visit the event page on the CNCF Online Programs site.
Get involved
The simplest way to get involved with Kubernetes is by joining one of the many Special Interest Groups (SIGs) that align with your interests. Have something you’d like to broadcast to the Kubernetes community? Share your voice at our weekly community meeting, and through the channels below. Thank you for your continued feedback and support.
- Follow us on X @Kubernetesio for latest updates
- Join the community discussion on Discuss
- Join the community on Slack
- Post questions (or answer questions) on Stack Overflow
- Share your Kubernetes story
- Read more about what’s happening with Kubernetes on the blog
- Learn more about the Kubernetes Release Team
Introducing Feature Gates to Client-Go: Enhancing Flexibility and Control
Kubernetes components use on-off switches called feature gates to manage the risk of adding a new feature. The feature gate mechanism is what enables incremental graduation of a feature through the stages Alpha, Beta, and GA.
Kubernetes components, such as kube-controller-manager and kube-scheduler, use the client-go library to interact with the API. The same library is used across the Kubernetes ecosystem to build controllers, tools, webhooks, and more. client-go now includes its own feature gating mechanism, giving developers and cluster administrators more control over how they adopt client features.
To learn more about feature gates in Kubernetes, visit Feature Gates.
Motivation
In the absence of client-go feature gates, each new feature separated feature availability from enablement in its own way, if at all. Some features were enabled by updating to a newer version of client-go. Others needed to be actively configured in each program that used them. A few were configurable at runtime using environment variables. Consuming a feature-gated functionality exposed by the kube-apiserver sometimes required a client-side fallback mechanism to remain compatible with servers that don’t support the functionality due to their age or configuration. In cases where issues were discovered in these fallback mechanisms, mitigation required updating to a fixed version of client-go or rolling back.
None of these approaches offer good support for enabling a feature by default in some, but not all, programs that consume client-go. Instead of enabling a new feature at first only for a single component, a change in the default setting immediately affects the default for all Kubernetes components, which broadens the blast radius significantly.
Feature gates in client-go
To address these challenges, substantial client-go features will be phased in using the new feature gate mechanism. It will allow developers and users to enable or disable features in a way that will be familiar to anyone who has experience with feature gates in the Kubernetes components.
Out of the box, simply by using a recent version of client-go, this offers several benefits.
For people who use software built with client-go:
- Early adopters can enable a default-off client-go feature on a per-process basis.
- Misbehaving features can be disabled without building a new binary.
- The state of all known client-go feature gates is logged, allowing users to inspect it.
For people who develop software built with client-go:
- By default, client-go feature gate overrides are read from environment variables. If a bug is found in a client-go feature, users will be able to disable it without waiting for a new release.
- Developers can replace the default environment-variable-based overrides in a program to change defaults,
read overrides from another source, or disable runtime overrides completely.
The Kubernetes components use this customizability to integrate client-go feature gates with
the existing
--feature-gatescommand-line flag, feature enablement metrics, and logging.
Overriding client-go feature gates
Note: This describes the default method for overriding client-go feature gates at runtime.
It can be disabled or customized by the developer of a particular program.
In Kubernetes components, client-go feature gate overrides are controlled by the --feature-gates flag.
Features of client-go can be enabled or disabled by setting environment variables prefixed with KUBE_FEATURE.
For example, to enable a feature named MyFeature, set the environment variable as follows:
KUBE_FEATURE_MyFeature=true
To disable the feature, set the environment variable to false:
KUBE_FEATURE_MyFeature=false
Note: Environment variables are case-sensitive on some operating systems.
Therefore, KUBE_FEATURE_MyFeature and KUBE_FEATURE_MYFEATURE would be considered two different variables.
Customizing client-go feature gates
The default environment-variable based mechanism for feature gate overrides can be sufficient for many programs in the Kubernetes ecosystem, and requires no special integration. Programs that require different behavior can replace it with their own custom feature gate provider. This allows a program to do things like force-disable a feature that is known to work poorly, read feature gates directly from a remote configuration service, or accept feature gate overrides through command-line options.
The Kubernetes components replace client-go’s default feature gate provider with a shim to the existing Kubernetes feature gate provider.
For all practical purposes, client-go feature gates are treated the same as other Kubernetes
feature gates: they are wired to the --feature-gates command-line flag, included in feature enablement metrics, and logged on startup.
To replace the default feature gate provider, implement the Gates interface and call ReplaceFeatureGates at package initialization time, as in this simple example:
import (
“k8s.io/client-go/features”
)
type AlwaysEnabledGates struct{}
func (AlwaysEnabledGates) Enabled(features.Feature) bool {
return true
}
func init() {
features.ReplaceFeatureGates(AlwaysEnabledGates{})
}
Implementations that need the complete list of defined client-go features can get it by implementing the Registry interface
and calling AddFeaturesToExistingFeatureGates.
For a complete example, refer to the usage within Kubernetes.
Summary
With the introduction of feature gates in client-go v1.30, rolling out a new client-go feature has become safer and easier. Users and developers can control the pace of their own adoption of client-go features. The work of Kubernetes contributors is streamlined by having a common mechanism for graduating features that span both sides of the Kubernetes API boundary.
Special shoutout to @sttts and @deads2k for their help in shaping this feature.
Spotlight on SIG API Machinery
We recently talked with Federico Bongiovanni (Google) and David Eads (Red Hat), Chairs of SIG API Machinery, to know a bit more about this Kubernetes Special Interest Group.
Introductions
Frederico (FSM): Hello, and thank your for your time. To start with, could you tell us about yourselves and how you got involved in Kubernetes?
David: I started working on
OpenShift (the Red Hat
distribution of Kubernetes) in the fall of 2014 and got involved pretty quickly in API Machinery. My
first PRs were fixing kube-apiserver error messages and from there I branched out to kubectl
(kubeconfigs are my fault!), auth (RBAC and *Review APIs are ports
from OpenShift), apps (workqueues and sharedinformers for example). Don’t tell the others,
but API Machinery is still my favorite :)
Federico: I was not as early in Kubernetes as David, but now it's been more than six years. At my previous company we were starting to use Kubernetes for our own products, and when I came across the opportunity to work directly with Kubernetes I left everything and boarded the ship (no pun intended). I joined Google and Kubernetes in early 2018, and have been involved since.
SIG Machinery's scope
FSM: It only takes a quick look at the SIG API Machinery charter to see that it has quite a significant scope, nothing less than the Kubernetes control plane. Could you describe this scope in your own words?
David: We own the kube-apiserver and how to efficiently use it. On the backend, that includes
its contract with backend storage and how it allows API schema evolution over time. On the
frontend, that includes schema best practices, serialization, client patterns, and controller
patterns on top of all of it.
Federico: Kubernetes has a lot of different components, but the control plane has a really critical mission: it's your communication layer with the cluster and also owns all the extensibility mechanisms that make Kubernetes so powerful. We can't make mistakes like a regression, or an incompatible change, because the blast radius is huge.
FSM: Given this breadth, how do you manage the different aspects of it?
Federico: We try to organize the large amount of work into smaller areas. The working groups and subprojects are part of it. Different people on the SIG have their own areas of expertise, and if everything fails, we are really lucky to have people like David, Joe, and Stefan who really are "all terrain", in a way that keeps impressing me even after all these years. But on the other hand this is the reason why we need more people to help us carry the quality and excellence of Kubernetes from release to release.
An evolving collaboration model
FSM: Was the existing model always like this, or did it evolve with time - and if so, what would you consider the main changes and the reason behind them?
David: API Machinery has evolved over time both growing and contracting in scope. When trying to satisfy client access patterns it’s very easy to add scope both in terms of features and applying them.
A good example of growing scope is the way that we identified a need to reduce memory utilization by clients writing controllers and developed shared informers. In developing shared informers and the controller patterns use them (workqueues, error handling, and listers), we greatly reduced memory utilization and eliminated many expensive lists. The downside: we grew a new set of capability to support and effectively took ownership of that area from sig-apps.
For an example of more shared ownership: building out cooperative resource management (the goal of
server-side apply), kubectl expanded to take ownership of leveraging the server-side apply
capability. The transition isn’t yet complete, but SIG
CLI manages that usage and owns it.
FSM: And for the boundary between approaches, do you have any guidelines?
David: I think much depends on the impact. If the impact is local in immediate effect, we advise other SIGs and let them move at their own pace. If the impact is global in immediate effect without a natural incentive, we’ve found a need to press for adoption directly.
FSM: Still on that note, SIG Architecture has an API Governance subproject, is it mostly independent from SIG API Machinery or are there important connection points?
David: The projects have similar sounding names and carry some impacts on each other, but have different missions and scopes. API Machinery owns the how and API Governance owns the what. API conventions, the API approval process, and the final say on individual k8s.io APIs belong to API Governance. API Machinery owns the REST semantics and non-API specific behaviors.
Federico: I really like how David put it: "API Machinery owns the how and API Governance owns the what": we don't own the actual APIs, but the actual APIs live through us.
The challenges of Kubernetes popularity
FSM: With the growth in Kubernetes adoption we have certainly seen increased demands from the Control Plane: how is this felt and how does it influence the work of the SIG?
David: It’s had a massive influence on API Machinery. Over the years we have often responded to and many times enabled the evolutionary stages of Kubernetes. As the central orchestration hub of nearly all capability on Kubernetes clusters, we both lead and follow the community. In broad strokes I see a few evolution stages for API Machinery over the years, with constantly high activity.
Finding purpose:
pre-1.0up untilv1.3(up to our first 1000+ nodes/namespaces) or so. This time was characterized by rapid change. We went through five different versions of our schemas and rose to meet the need. We optimized for quick, in-tree API evolution (sometimes to the detriment of longer term goals), and defined patterns for the first time.Scaling to meet the need:
v1.3-1.9(up to shared informers in controllers) or so. When we started trying to meet customer needs as we gained adoption, we found severe scale limitations in terms of CPU and memory. This was where we broadened API machinery to include access patterns, but were still heavily focused on in-tree types. We built the watch cache, protobuf serialization, and shared caches.Fostering the ecosystem:
v1.8-1.21(up to CRD v1) or so. This was when we designed and wrote CRDs (the considered replacement for third-party-resources), the immediate needs we knew were coming (admission webhooks), and evolution to best practices we knew we needed (API schemas). This enabled an explosion of early adopters willing to work very carefully within the constraints to enable their use-cases for servicing pods. The adoption was very fast, sometimes outpacing our capability, and creating new problems.Simplifying deployments:
v1.22+. In the relatively recent past, we’ve been responding to pressures or running kube clusters at scale with large numbers of sometimes-conflicting ecosystem projects using our extensions mechanisms. Lots of effort is now going into making platform extensions easier to write and safer to manage by people who don't hold PhDs in kubernetes. This started with things like server-side-apply and continues today with features like webhook match conditions and validating admission policies.
Work in API Machinery has a broad impact across the project and the ecosystem. It’s an exciting area to work for those able to make a significant time investment on a long time horizon.
The road ahead
FSM: With those different evolutionary stages in mind, what would you pinpoint as the top priorities for the SIG at this time?
David: Reliability, efficiency, and capability in roughly that order.
With the increased usage of our kube-apiserver and extensions mechanisms, we find that our first
set of extensions mechanisms, while fairly complete in terms of capability, carry significant risks
in terms of potential mis-use with large blast radius. To mitigate these risks, we’re investing in
features that reduce the blast radius for accidents (webhook match conditions) and which provide
alternative mechanisms with lower risk profiles for most actions (validating admission policy).
At the same time, the increased usage has made us more aware of scaling limitations that we can improve both server and client-side. Efforts here include more efficient serialization (CBOR), reduced etcd load (consistent reads from cache), and reduced peak memory usage (streaming lists).
And finally, the increased usage has highlighted some long existing gaps that we’re closing. Things like field selectors for CRDs which the Batch Working Group is eager to leverage and will eventually form the basis for a new way to prevent trampoline pod attacks from exploited nodes.
Joining the fun
FSM: For anyone wanting to start contributing, what's your suggestions?
Federico: SIG API Machinery is not an exception to the Kubernetes motto: Chop Wood and Carry Water. There are multiple weekly meetings that are open to everybody, and there is always more work to be done than people to do it.
I acknowledge that API Machinery is not easy, and the ramp up will be steep. The bar is high, because of the reasons we've been discussing: we carry a huge responsibility. But of course with passion and perseverance many people has ramped up through the years, and we hope more will come.
In terms of concrete opportunities, there is the SIG meeting every two weeks. Everyone is welcome to attend and listen, see what the group talks about, see what's going on in this release, etc.
Also two times a week, Tuesday and Thursday, we have the public Bug Triage, where we go through everything new from the last meeting. We've been keeping this practice for more than 7 years now. It's a great opportunity to volunteer to review code, fix bugs, improve documentation, etc. Tuesday's it's at 1 PM (PST) and Thursday is on an EMEA friendly time (9:30 AM PST). We are always looking to improve, and we hope to be able to provide more concrete opportunities to join and participate in the future.
FSM: Excellent, thank you! Any final comments you would like to share with our readers?
Federico: As I mentioned, the first steps might be hard, but the reward is also larger. Working on API Machinery is working on an area of huge impact (millions of users?), and your contributions will have a direct outcome in the way that Kubernetes works and the way that it's used. For me that's enough reward and motivation!
Kubernetes Removals and Major Changes In v1.31
As Kubernetes develops and matures, features may be deprecated, removed, or replaced with better ones for the project's overall health. This article outlines some planned changes for the Kubernetes v1.31 release that the release team feels you should be aware of for the continued maintenance of your Kubernetes environment. The information listed below is based on the current status of the v1.31 release. It may change before the actual release date.
The Kubernetes API removal and deprecation process
The Kubernetes project has a well-documented deprecation policy for features. This policy states that stable APIs may only be deprecated when a newer, stable version of that API is available and that APIs have a minimum lifetime for each stability level. A deprecated API has been marked for removal in a future Kubernetes release. It will continue to function until removal (at least one year from the deprecation), but usage will display a warning. Removed APIs are no longer available in the current version, so you must migrate to using the replacement.
Generally available (GA) or stable API versions may be marked as deprecated but must not be removed within a major version of Kubernetes.
Beta or pre-release API versions must be supported for 3 releases after the deprecation.
Alpha or experimental API versions may be removed in any release without prior deprecation notice.
Whether an API is removed because a feature graduated from beta to stable or because that API did not succeed, all removals comply with this deprecation policy. Whenever an API is removed, migration options are communicated in the documentation.
A note about SHA-1 signature support
In go1.18 (released in March 2022), the crypto/x509 library started to reject certificates signed with a SHA-1 hash function.
While SHA-1 is established to be unsafe and publicly trusted Certificate Authorities have not issued SHA-1 certificates since 2015, there might still be cases in the context of Kubernetes where user-provided certificates are signed using a SHA-1 hash function through private authorities with them being used for Aggregated API Servers or webhooks.
If you have relied on SHA-1 based certificates, you must explicitly opt back into its support by setting GODEBUG=x509sha1=1 in your environment.
Given Go's compatibility policy for GODEBUGs, the x509sha1 GODEBUG and the support for SHA-1 certificates will fully go away in go1.24 which will be released in the first half of 2025.
If you rely on SHA-1 certificates, please start moving off them.
Please see Kubernetes issue #125689 to get a better idea of timelines around the support for SHA-1 going away, when Kubernetes releases plans to adopt go1.24, and for more details on how to detect usage of SHA-1 certificates via metrics and audit logging.
Deprecations and removals in Kubernetes 1.31
Deprecation of status.nodeInfo.kubeProxyVersion field for Nodes (KEP 4004)
The .status.nodeInfo.kubeProxyVersion field of Nodes is being deprecated in Kubernetes v1.31,
and will be removed in a later release.
It's being deprecated because the value of this field wasn't (and isn't) accurate.
This field is set by the kubelet, which does not have reliable information about the kube-proxy version or whether kube-proxy is running.
The DisableNodeKubeProxyVersion feature gate will be set to true in by default in v1.31 and the kubelet will no longer attempt to set the .status.kubeProxyVersion field for its associated Node.
Removal of all in-tree integrations with cloud providers
As highlighted in a previous article, the last remaining in-tree support for cloud provider integration will be removed as part of the v1.31 release. This doesn't mean you can't integrate with a cloud provider, however you now must use the recommended approach using an external integration. Some integrations are part of the Kubernetes project and others are third party software.
This milestone marks the completion of the externalization process for all cloud providers' integrations from the Kubernetes core (KEP-2395), a process started with Kubernetes v1.26. This change helps Kubernetes to get closer to being a truly vendor-neutral platform.
For further details on the cloud provider integrations, read our v1.29 Cloud Provider Integrations feature blog. For additional context about the in-tree code removal, we invite you to check the (v1.29 deprecation blog).
The latter blog also contains useful information for users who need to migrate to version v1.29 and later.
Removal of kubelet --keep-terminated-pod-volumes command line flag
The kubelet flag --keep-terminated-pod-volumes, which was deprecated in 2017, will be removed as
part of the v1.31 release.
You can find more details in the pull request #122082.
Removal of CephFS volume plugin
CephFS volume plugin was removed in this release and the cephfs volume type became non-functional.
It is recommended that you use the CephFS CSI driver as a third-party storage driver instead. If you were using the CephFS volume plugin before upgrading the cluster version to v1.31, you must re-deploy your application to use the new driver.
CephFS volume plugin was formally marked as deprecated in v1.28.
Removal of Ceph RBD volume plugin
The v1.31 release will remove the Ceph RBD volume plugin and its CSI migration support, making the rbd volume type non-functional.
It's recommended that you use the RBD CSI driver in your clusters instead. If you were using Ceph RBD volume plugin before upgrading the cluster version to v1.31, you must re-deploy your application to use the new driver.
The Ceph RBD volume plugin was formally marked as deprecated in v1.28.
Deprecation of non-CSI volume limit plugins in kube-scheduler
The v1.31 release will deprecate all non-CSI volume limit scheduler plugins, and will remove some already deprected plugins from the default plugins, including:
AzureDiskLimitsCinderLimitsEBSLimitsGCEPDLimits
It's recommended that you use the NodeVolumeLimits plugin instead because it can handle the same functionality as the removed plugins since those volume types have been migrated to CSI.
Please replace the deprecated plugins with the NodeVolumeLimits plugin if you explicitly use them in the scheduler config.
The AzureDiskLimits, CinderLimits, EBSLimits, and GCEPDLimits plugins will be removed in a future release.
These plugins will be removed from the default scheduler plugins list as they have been deprecated since Kubernetes v1.14.
Looking ahead
The official list of API removals planned for Kubernetes v1.32 include:
- The
flowcontrol.apiserver.k8s.io/v1beta3API version of FlowSchema and PriorityLevelConfiguration will be removed. To prepare for this, you can edit your existing manifests and rewrite client software to use theflowcontrol.apiserver.k8s.io/v1 APIversion, available since v1.29. All existing persisted objects are accessible via the new API. Notable changes in flowcontrol.apiserver.k8s.io/v1beta3 include that the PriorityLevelConfigurationspec.limited.nominalConcurrencySharesfield only defaults to 30 when unspecified, and an explicit value of 0 is not changed to 30.
For more information, please refer to the API deprecation guide.
Want to know more?
The Kubernetes release notes announce deprecations. We will formally announce the deprecations in Kubernetes v1.31 as part of the CHANGELOG for that release.
You can see the announcements of pending deprecations in the release notes for:
Spotlight on SIG Node
In the world of container orchestration, Kubernetes reigns supreme, powering some of the most complex and dynamic applications across the globe. Behind the scenes, a network of Special Interest Groups (SIGs) drives Kubernetes' innovation and stability.
Today, I have the privilege of speaking with Matthias Bertschy, Gunju Kim, and Sergey Kanzhelev, members of SIG Node, who will shed some light on their roles, challenges, and the exciting developments within SIG Node.
Answers given collectively by all interviewees will be marked by their initials.
Introductions
Arpit: Thank you for joining us today. Could you please introduce yourselves and provide a brief overview of your roles within SIG Node?
Matthias: My name is Matthias Bertschy, I am French and live next to Lake Geneva, near the French Alps. I have been a Kubernetes contributor since 2017, a reviewer for SIG Node and a maintainer of Prow. I work as a Senior Kubernetes Developer for a security startup named ARMO, which donated Kubescape to the CNCF.

Gunju: My name is Gunju Kim. I am a software engineer at NAVER, where I focus on developing a cloud platform for search services. I have been contributing to the Kubernetes project in my free time since 2021.
Sergey: My name is Sergey Kanzhelev. I have worked on Kubernetes and Google Kubernetes Engine for 3 years and have worked on open-source projects for many years now. I am a chair of SIG Node.
Understanding SIG Node
Arpit: Thank you! Could you provide our readers with an overview of SIG Node's responsibilities within the Kubernetes ecosystem?
M/G/S: SIG Node is one of the first if not the very first SIG in Kubernetes. The SIG is responsible for all iterations between Kubernetes and node resources, as well as node maintenance itself. This is quite a large scope, and the SIG owns a large part of the Kubernetes codebase. Because of this wide ownership, SIG Node is always in contact with other SIGs such as SIG Network, SIG Storage, and SIG Security and almost any new features and developments in Kubernetes involves SIG Node in some way.
Arpit: How does SIG Node contribute to Kubernetes' performance and stability?
M/G/S: Kubernetes works on nodes of many different sizes and shapes, from small physical VMs with cheap hardware to large AI/ML-optimized GPU-enabled nodes. Nodes may stay online for months or maybe be short-lived and be preempted at any moment as they are running on excess compute of a cloud provider.
kubelet — the
Kubernetes agent on a node — must work in all these environments reliably. As for the performance
of kubelet operations, this is becoming increasingly important today. On one hand, as Kubernetes is
being used on extra small nodes more and more often in telecom and retail environments, it needs to
scale into the smallest footprint possible. On the other hand, with AI/ML workloads where every node
is extremely expensive, every second of delayed operations can visibly change the price of
computation.
Challenges and Opportunities
Arpit: What upcoming challenges and opportunities is SIG Node keeping an eye on?
M/G/S: As Kubernetes enters the second decade of its life, we see a huge demand to support new workload types. And SIG Node will play a big role in this. The Sidecar KEP, which we will be talking about later, is one of the examples of increased emphasis on supporting new workload types.
The key challenge we will have in the next few years is how to keep innovations while maintaining high quality and backward compatibility of existing scenarios. SIG Node will continue to play a central role in Kubernetes.
Arpit: And are there any ongoing research or development areas within SIG Node that excite you?
M/G/S: Supporting new workload types is a fascinating area for us. Our recent exploration of sidecar containers is a testament to this. Sidecars offer a versatile solution for enhancing application functionality without altering the core codebase.
Arpit: What are some of the challenges you've faced while maintaining SIG Node, and how have you overcome them?
M/G/S: The biggest challenge of SIG Node is its size and the many feature requests it receives. We are encouraging more people to join as reviewers and are always open to improving processes and addressing feedback. For every release, we run the feedback session at the SIG Node meeting and identify problematic areas and action items.
Arpit: Are there specific technologies or advancements that SIG Node is closely monitoring or integrating into Kubernetes?
M/G/S: Developments in components that the SIG depends on, like
container runtimes
(e.g. containerd and CRI-O, and OS features are
something we contribute to and monitor closely. For example, there is an upcoming cgroup v1
deprecation and removal that Kubernetes and SIG Node will need to guide Kubernetes users
through. Containerd is also releasing version 2.0, which removes deprecated features, which will
affect Kubernetes users.
Arpit: Could you share a memorable experience or achievement from your time as a SIG Node maintainer that you're particularly proud of?
Mathias: I think the best moment was when my first KEP (introducing the
startupProbe)
finally graduated to GA (General Availability). I also enjoy seeing my contributions being used
daily by contributors, such as the comment containing the GitHub tree hash used to retain LGTM
despite squash commits.
Sidecar containers
Arpit: Can you provide more context on the concept of sidecar containers and their evolution in the context of Kubernetes?
M/G/S: The concept of sidecar containers dates back to 2015 when Kubernetes introduced the idea of composite containers. These additional containers, running alongside the main application container within the same pod, were seen as a way to extend and enhance application functionality without modifying the core codebase. Early adopters of sidecars employed custom scripts and configurations to manage them, but this approach presented challenges in terms of consistency and scalability.
Arpit: Can you share specific use cases or examples where sidecar containers are particularly beneficial?
M/G/S: Sidecar containers are a versatile tool that can be used to enhance the functionality of applications in a variety of ways:
- Logging and monitoring: Sidecar containers can be used to collect logs and metrics from the primary application container and send them to a centralized logging and monitoring system.
- Traffic filtering and routing: Sidecar containers can be used to filter and route traffic to and from the primary application container.
- Encryption and decryption: Sidecar containers can be used to encrypt and decrypt data as it flows between the primary application container and external services.
- Data synchronization: Sidecar containers can be used to synchronize data between the primary application container and external databases or services.
- Fault injection: Sidecar containers can be used to inject faults into the primary application container in order to test its resilience to failures.
Arpit: The proposal mentions that some companies are using a fork of Kubernetes with sidecar functionality added. Can you provide insights into the level of adoption and community interest in this feature?
M/G/S: While we lack concrete metrics to measure adoption rates, the KEP has garnered significant interest from the community, particularly among service mesh vendors like Istio, who actively participated in its alpha testing phase. The KEP's visibility through numerous blog posts, interviews, talks, and workshops further demonstrates its widespread appeal. The KEP addresses the growing demand for additional capabilities alongside main containers in Kubernetes pods, such as network proxies, logging systems, and security measures. The community acknowledges the importance of providing easy migration paths for existing workloads to facilitate widespread adoption of the feature.
Arpit: Are there any notable examples or success stories from companies using sidecar containers in production?
M/G/S: It is still too early to expect widespread adoption in production environments. The 1.29 release has only been available in Google Kubernetes Engine (GKE) since January 11, 2024, and there still needs to be comprehensive documentation on how to enable and use them effectively via universal injector. Istio, a popular service mesh platform, also lacks proper documentation for enabling native sidecars, making it difficult for developers to get started with this new feature. However, as native sidecar support matures and documentation improves, we can expect to see wider adoption of this technology in production environments.
Arpit: The proposal suggests introducing a restartPolicy field for init containers to indicate
sidecar functionality. Can you explain how this solution addresses the outlined challenges?
M/G/S: The proposal to introduce a restartPolicy field for init containers addresses the
outlined challenges by utilizing existing infrastructure and simplifying sidecar management. This
approach avoids adding new fields to the pod specification, keeping it manageable and avoiding more
clutter. By leveraging the existing init container mechanism, sidecars can be run alongside regular
init containers during pod startup, ensuring a consistent ordering of initialization. Additionally,
setting the restart policy of sidecar init containers to Always explicitly states that they continue
running even after the main application container terminates, enabling persistent services like
logging and monitoring until the end of the workload.
Arpit: How will the introduction of the restartPolicy field for init containers affect
backward compatibility with existing Kubernetes configurations?
M/G/S: The introduction of the restartPolicy field for init containers will maintain backward
compatibility with existing Kubernetes configurations. Existing init containers will continue to
function as they have before, and the new restartPolicy field will only apply to init containers
explicitly marked as sidecars. This approach ensures that existing applications and deployments will
not be disrupted by the new feature, and provides a more streamlined way to define and manage
sidecars.
Contributing to SIG Node
Arpit: What is the best place for the new members and especially beginners to contribute?
M/G/S: New members and beginners can contribute to the Sidecar KEP (Kubernetes Enhancement Proposal) by:
- Raising awareness: Create content that highlights the benefits and use cases of sidecars. This can educate others about the feature and encourage its adoption.
- Providing feedback: Share your experiences with sidecars, both positive and negative. This feedback can be used to improve the feature and make it more widely usable.
- Sharing your use cases: If you are using sidecars in production, share your experiences with others. This can help to demonstrate the real-world value of the feature and encourage others to adopt it.
- Improving the documentation: Help to clarify and expand the documentation for the feature. This can make it easier for others to understand and use sidecars.
In addition to the Sidecar KEP, there are many other areas where SIG Node needs more contributors:
- Test coverage: SIG Node is always looking for ways to improve the test coverage of Kubernetes components.
- CI maintenance: SIG Node maintains a suite of e2e tests ensuring Kubernetes components function as intended across a variety of scenarios.
Conclusion
In conclusion, SIG Node stands as a cornerstone in Kubernetes' journey, ensuring its reliability and adaptability in the ever-changing landscape of cloud-native computing. With dedicated members like Matthias, Gunju, and Sergey leading the charge, SIG Node remains at the forefront of innovation, driving Kubernetes towards new horizons.
10 Years of Kubernetes
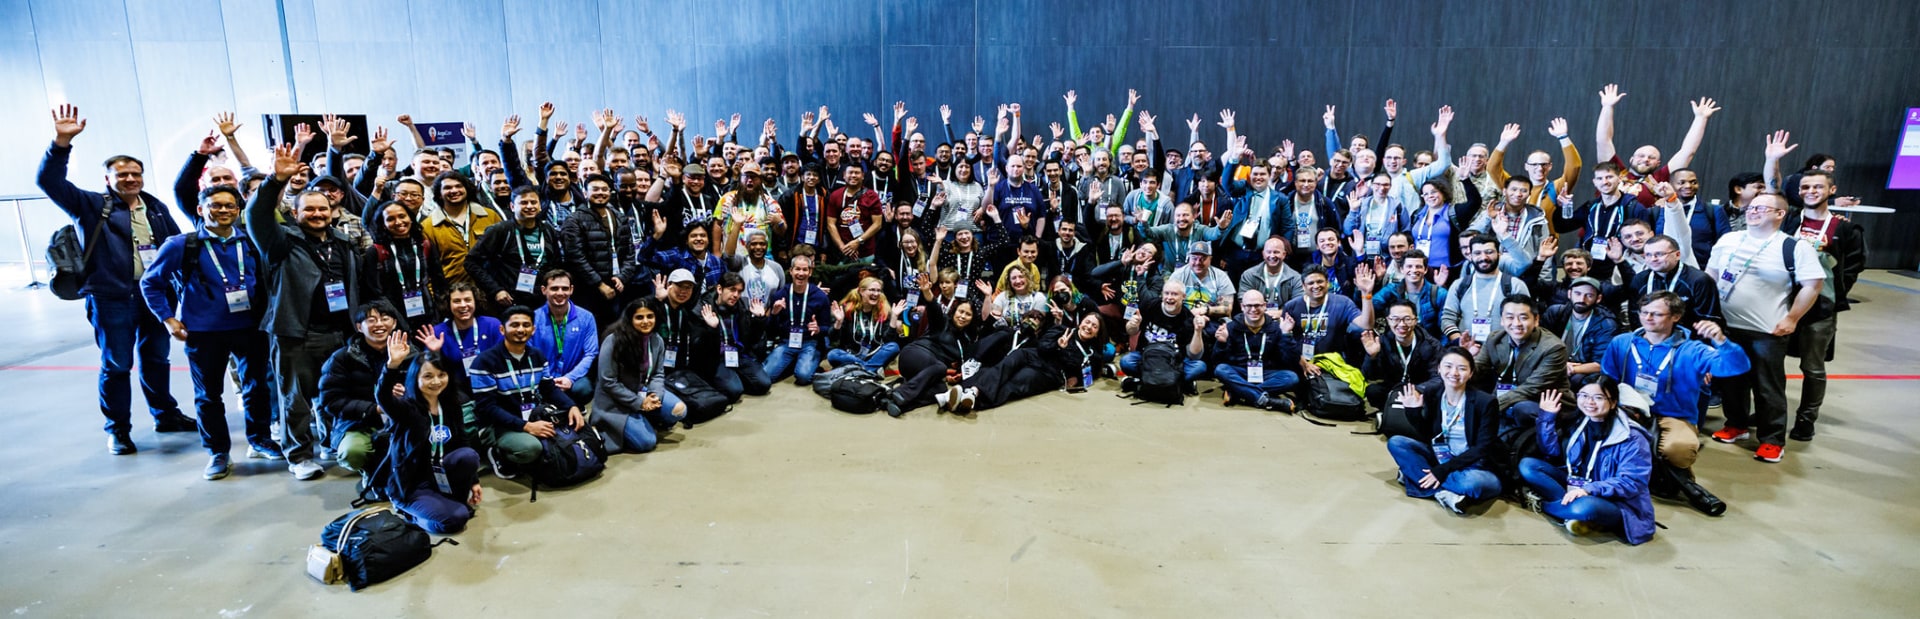
Ten (10) years ago, on June 6th, 2014, the first commit of Kubernetes was pushed to GitHub. That first commit with 250 files and 47,501 lines of go, bash and markdown kicked off the project we have today. Who could have predicted that 10 years later, Kubernetes would grow to become one of the largest Open Source projects to date with over 88,000 contributors from more than 8,000 companies, across 44 countries.

This milestone isn't just for Kubernetes but for the Cloud Native ecosystem that blossomed from it. There are close to 200 projects within the CNCF itself, with contributions from 240,000+ individual contributors and thousands more in the greater ecosystem. Kubernetes would not be where it is today without them, the 7M+ Developers, and the even larger user community that have all helped shape the ecosystem that it is today.
Kubernetes' beginnings - a converging of technologies
The ideas underlying Kubernetes started well before the first commit, or even the first prototype (which came about in 2013). In the early 2000s, Moore's Law was well in effect. Computing hardware was becoming more and more powerful at an incredibly fast rate. Correspondingly, applications were growing more and more complex. This combination of hardware commoditization and application complexity pointed to a need to further abstract software from hardware, and solutions started to emerge.
Like many companies at the time, Google was scaling rapidly, and its engineers were interested in the idea of creating a form of isolation in the Linux kernel. Google engineer Rohit Seth described the concept in an email in 2006:
We use the term container to indicate a structure against which we track and charge utilization of system resources like memory, tasks, etc. for a Workload.

In March of 2013, a 5-minute lightning talk called "The future of Linux Containers," presented by Solomon Hykes at PyCon, introduced an upcoming open source tool called "Docker" for creating and using Linux Containers. Docker introduced a level of usability to Linux Containers that made them accessible to more users than ever before, and the popularity of Docker, and thus of Linux Containers, skyrocketed. With Docker making the abstraction of Linux Containers accessible to all, running applications in much more portable and repeatable ways was suddenly possible, but the question of scale remained.
Google's Borg system for managing application orchestration at scale had adopted Linux containers as they were developed in the mid-2000s. Since then, the company had also started working on a new version of the system called "Omega." Engineers at Google who were familiar with the Borg and Omega systems saw the popularity of containerization driven by Docker. They recognized not only the need for an open source container orchestration system but its "inevitability," as described by Brendan Burns in this blog post. That realization in the fall of 2013 inspired a small team to start working on a project that would later become Kubernetes. That team included Joe Beda, Brendan Burns, Craig McLuckie, Ville Aikas, Tim Hockin, Dawn Chen, Brian Grant, and Daniel Smith.
A decade of Kubernetes

Kubernetes' history begins with that historic commit on June 6th, 2014, and the subsequent announcement of the project in a June 10th keynote by Google engineer Eric Brewer at DockerCon 2014 (and its corresponding Google blog).
Over the next year, a small community of contributors, largely from Google and Red Hat, worked hard on the project, culminating in a version 1.0 release on July 21st, 2015. Alongside 1.0, Google announced that Kubernetes would be donated to a newly formed branch of the Linux Foundation called the Cloud Native Computing Foundation (CNCF).
Despite reaching 1.0, the Kubernetes project was still very challenging to use and understand. Kubernetes contributor Kelsey Hightower took special note of the project's shortcomings in ease of use and on July 7, 2016, he pushed the first commit of his famed "Kubernetes the Hard Way" guide.
The project has changed enormously since its original 1.0 release; experiencing a number of big wins such as Custom Resource Definitions (CRD) going GA in 1.16 or full dual stack support launching in 1.23 and community "lessons learned" from the removal of widely used beta APIs in 1.22 or the deprecation of Dockershim.
Some notable updates, milestones and events since 1.0 include:
- December 2016 - Kubernetes 1.5 introduces runtime pluggability with initial CRI support and alpha Windows node support. OpenAPI also appears for the first time, paving the way for clients to be able to discover extension APIs.
- This release also introduced StatefulSets and PodDisruptionBudgets in Beta.
- April 2017 — Introduction of Role-Based Access Controls or RBAC.
- June 2017 — In Kubernetes 1.7, ThirdPartyResources or "TPRs" are replaced with CustomResourceDefinitions (CRDs).
- December 2017 — Kubernetes 1.9 sees the Workloads API becoming GA (Generally Available). The release blog states: "Deployment and ReplicaSet, two of the most commonly used objects in Kubernetes, are now stabilized after more than a year of real-world use and feedback."
- December 2018 — In 1.13, the Container Storage Interface (CSI) reaches GA, kubeadm tool for bootstrapping minimum viable clusters reaches GA, and CoreDNS becomes the default DNS server.
- September 2019 — Custom Resource Definitions go GA in Kubernetes 1.16.
- August 2020 — Kubernetes 1.19 increases the support window for releases to 1 year.
- December 2020 — Dockershim is deprecated in 1.20
- April 2021 — the Kubernetes release cadence changes from 4 releases per year to 3 releases per year.
- July 2021 — Widely used beta APIs are removed in Kubernetes 1.22.
- May 2022 — Kubernetes 1.24 sees beta APIs become disabled by default to reduce upgrade conflicts and removal of Dockershim, leading to widespread user confusion (we've since improved our communication!)
- December 2022 — In 1.26, there was a significant batch and Job API overhaul that paved the way for better support for AI /ML / batch workloads.
PS: Curious to see how far the project has come for yourself? Check out this tutorial for spinning up a Kubernetes 1.0 cluster created by community members Carlos Santana, Amim Moises Salum Knabben, and James Spurin.
Kubernetes offers more extension points than we can count. Originally designed to work with Docker and only Docker, now you can plug in any container runtime that adheres to the CRI standard. There are other similar interfaces: CSI for storage and CNI for networking. And that's far from all you can do. In the last decade, whole new patterns have emerged, such as using
Custom Resource Definitions (CRDs) to support third-party controllers - now a huge part of the Kubernetes ecosystem.
The community building the project has also expanded immensely over the last decade. Using DevStats, we can see the incredible volume of contribution over the last decade that has made Kubernetes the second-largest open source project in the world:
- 88,474 contributors
- 15,121 code committers
- 4,228,347 contributions
- 158,530 issues
- 311,787 pull requests
Kubernetes today

Since its early days, the project has seen enormous growth in technical capability, usage, and contribution. The project is still actively working to improve and better serve its users.
In the upcoming 1.31 release, the project will celebrate the culmination of an important long-term project: the removal of in-tree cloud provider code. In this largest migration in Kubernetes history, roughly 1.5 million lines of code have been removed, reducing the binary sizes of core components by approximately 40%. In the project's early days, it was clear that extensibility would be key to success. However, it wasn't always clear how that extensibility should be achieved. This migration removes a variety of vendor-specific capabilities from the core Kubernetes code base. Vendor-specific capabilities can now be better served by other pluggable extensibility features or patterns, such as Custom Resource Definitions (CRDs) or API standards like the Gateway API. Kubernetes also faces new challenges in serving its vast user base, and the community is adapting accordingly. One example of this is the migration of image hosting to the new, community-owned registry.k8s.io. The egress bandwidth and costs of providing pre-compiled binary images for user consumption have become immense. This new registry change enables the community to continue providing these convenient images in more cost- and performance-efficient ways. Make sure you check out the blog post and update any automation you have to use registry.k8s.io!
The future of Kubernetes

A decade in, the future of Kubernetes still looks bright. The community is prioritizing changes that both improve the user experiences, and enhance the sustainability of the project. The world of application development continues to evolve, and Kubernetes is poised to change along with it.
In 2024, the advent of AI changed a once-niche workload type into one of prominent importance. Distributed computing and workload scheduling has always gone hand-in-hand with the resource-intensive needs of Artificial Intelligence, Machine Learning, and High Performance Computing workloads. Contributors are paying close attention to the needs of newly developed workloads and how Kubernetes can best serve them. The new Serving Working Group is one example of how the community is organizing to address these workloads' needs. It's likely that the next few years will see improvements to Kubernetes' ability to manage various types of hardware, and its ability to manage the scheduling of large batch-style workloads which are run across hardware in chunks.
The ecosystem around Kubernetes will continue to grow and evolve. In the future, initiatives to maintain the sustainability of the project, like the migration of in-tree vendor code and the registry change, will be ever more important.
The next 10 years of Kubernetes will be guided by its users and the ecosystem, but most of all, by the people who contribute to it. The community remains open to new contributors. You can find more information about contributing in our New Contributor Course at https://k8s.dev/docs/onboarding.
We look forward to building the future of Kubernetes with you!
Completing the largest migration in Kubernetes history
Since as early as Kubernetes v1.7, the Kubernetes project has pursued the ambitious goal of removing built-in cloud provider integrations (KEP-2395). While these integrations were instrumental in Kubernetes' early development and growth, their removal was driven by two key factors: the growing complexity of maintaining native support for every cloud provider across millions of lines of Go code, and the desire to establish Kubernetes as a truly vendor-neutral platform.
After many releases, we're thrilled to announce that all cloud provider integrations have been successfully migrated from the core Kubernetes repository to external plugins. In addition to achieving our initial objectives, we've also significantly streamlined Kubernetes by removing roughly 1.5 million lines of code and reducing the binary sizes of core components by approximately 40%.
This migration was a complex and long-running effort due to the numerous impacted components and the critical code paths that relied on the built-in integrations for the five initial cloud providers: Google Cloud, AWS, Azure, OpenStack, and vSphere. To successfully complete this migration, we had to build four new subsystems from the ground up:
- Cloud controller manager (KEP-2392)
- API server network proxy (KEP-1281)
- kubelet credential provider plugins (KEP-2133)
- Storage migration to use CSI (KEP-625)
Each subsystem was critical to achieve full feature parity with built-in capabilities and required several releases to bring each subsystem to GA-level maturity with a safe and reliable migration path. More on each subsystem below.
Cloud controller manager
The cloud controller manager was the first external component introduced in this effort, replacing functionality within the kube-controller-manager and kubelet that directly interacted with cloud APIs. This essential component is responsible for initializing nodes by applying metadata labels that indicate the cloud region and zone a Node is running on, as well as IP addresses that are only known to the cloud provider. Additionally, it runs the service controller, which is responsible for provisioning cloud load balancers for Services of type LoadBalancer.
To learn more, read Cloud Controller Manager in the Kubernetes documentation.
API server network proxy
The API Server Network Proxy project, initiated in 2018 in collaboration with SIG API Machinery, aimed to replace the SSH tunneler functionality within the kube-apiserver. This tunneler had been used to securely proxy traffic between the Kubernetes control plane and nodes, but it heavily relied on provider-specific implementation details embedded in the kube-apiserver to establish these SSH tunnels.
Now, the API Server Network Proxy is a GA-level extension point within the kube-apiserver. It offers a generic proxying mechanism that can route traffic from the API server to nodes through a secure proxy, eliminating the need for the API server to have any knowledge of the specific cloud provider it is running on. This project also introduced the Konnectivity project, which has seen growing adoption in production environments.
You can learn more about the API Server Network Proxy from its README.
Credential provider plugins for the kubelet
The Kubelet credential provider plugin was developed to replace the kubelet's built-in functionality for dynamically fetching credentials for image registries hosted on Google Cloud, AWS, or Azure. The legacy capability was convenient as it allowed the kubelet to seamlessly retrieve short-lived tokens for pulling images from GCR, ECR, or ACR. However, like other areas of Kubernetes, supporting this required the kubelet to have specific knowledge of different cloud environments and APIs.
Introduced in 2019, the credential provider plugin mechanism offers a generic extension point for the kubelet to execute plugin binaries that dynamically provide credentials for images hosted on various clouds. This extensibility expands the kubelet's capabilities to fetch short-lived tokens beyond the initial three cloud providers.
To learn more, read kubelet credential provider for authenticated image pulls.
Storage plugin migration from in-tree to CSI
The Container Storage Interface (CSI) is a control plane standard for managing block and file storage systems in Kubernetes and other container orchestrators that went GA in 1.13. It was designed to replace the in-tree volume plugins built directly into Kubernetes with drivers that can run as Pods within the Kubernetes cluster. These drivers communicate with kube-controller-manager storage controllers via the Kubernetes API, and with kubelet through a local gRPC endpoint. Now there are over 100 CSI drivers available across all major cloud and storage vendors, making stateful workloads in Kubernetes a reality.
However, a major challenge remained on how to handle all the existing users of in-tree volume APIs. To retain API backwards compatibility, we built an API translation layer into our controllers that will convert the in-tree volume API into the equivalent CSI API. This allowed us to redirect all storage operations to the CSI driver, paving the way for us to remove the code for the built-in volume plugins without removing the API.
You can learn more about In-tree Storage migration in Kubernetes In-Tree to CSI Volume Migration Moves to Beta.
What's next?
This migration has been the primary focus for SIG Cloud Provider over the past few years. With this significant milestone achieved, we will be shifting our efforts towards exploring new and innovative ways for Kubernetes to better integrate with cloud providers, leveraging the external subsystems we've built over the years. This includes making Kubernetes smarter in hybrid environments where nodes in the cluster can run on both public and private clouds, as well as providing better tools and frameworks for developers of external providers to simplify and streamline their integration efforts.
With all the new features, tools, and frameworks being planned, SIG Cloud Provider is not forgetting about the other side of the equation: testing. Another area of focus for the SIG's future activities is the improvement of cloud controller testing to include more providers. The ultimate goal of this effort being to create a testing framework that will include as many providers as possible so that we give the Kubernetes community the highest levels of confidence about their Kubernetes environments.
If you're using a version of Kubernetes older than v1.29 and haven't migrated to an external cloud provider yet, we recommend checking out our previous blog post Kubernetes 1.29: Cloud Provider Integrations Are Now Separate Components.It provides detailed information on the changes we've made and offers guidance on how to migrate to an external provider. Starting in v1.31, in-tree cloud providers will be permanently disabled and removed from core Kubernetes components.
If you’re interested in contributing, come join our bi-weekly SIG meetings!
Gateway API v1.1: Service mesh, GRPCRoute, and a whole lot more
Following the GA release of Gateway API last October, Kubernetes SIG Network is pleased to announce the v1.1 release of Gateway API. In this release, several features are graduating to Standard Channel (GA), notably including support for service mesh and GRPCRoute. We're also introducing some new experimental features, including session persistence and client certificate verification.
What's new
Graduation to Standard
This release includes the graduation to Standard of four eagerly awaited features. This means they are no longer experimental concepts; inclusion in the Standard release channel denotes a high level of confidence in the API surface and provides guarantees of backward compatibility. Of course, as with any other Kubernetes API, Standard Channel features can continue to evolve with backward-compatible additions over time, and we certainly expect further refinements and improvements to these new features in the future. For more information on how all of this works, refer to the Gateway API Versioning Policy.
Service Mesh Support
Service mesh support in Gateway API allows service mesh users to use the same
API to manage ingress traffic and mesh traffic, reusing the same policy and
routing interfaces. In Gateway API v1.1, routes (such as HTTPRoute) can now have
a Service as a parentRef, to control how traffic to specific services behave.
For more information, read the
Gateway API service mesh documentation
or see the
list of Gateway API implementations.
As an example, one could do a canary deployment of a workload deep in an application's call graph with an HTTPRoute as follows:
apiVersion: gateway.networking.k8s.io/v1
kind: HTTPRoute
metadata:
name: color-canary
namespace: faces
spec:
parentRefs:
- name: color
kind: Service
group: ""
port: 80
rules:
- backendRefs:
- name: color
port: 80
weight: 50
- name: color2
port: 80
weight: 50
This would split traffic sent to the color Service in the faces namespace
50/50 between the original color Service and the color2 Service, using a
portable configuration that's easy to move from one mesh to another.
GRPCRoute
If you are already using the experimental version of GRPCRoute, we recommend holding off on upgrading to the standard channel version of GRPCRoute until the controllers you're using have been updated to support GRPCRoute v1. Until then, it is safe to upgrade to the experimental channel version of GRPCRoute in v1.1 that includes both v1alpha2 and v1 API versions.
ParentReference Port
The port field was added to ParentReference, allowing you to attach resources
to Gateway Listeners, Services, or other parent resources
(depending on the implementation). Binding to a port also allows you to attach
to multiple Listeners at once.
For example, you can attach an HTTPRoute to one or more specific Listeners of a
Gateway as specified by the Listener port, instead of the Listener name field.
For more information, see Attaching to Gateways.
Conformance Profiles and Reports
The conformance report API has been expanded with the mode field (intended to
specify the working mode of the implementation), and the gatewayAPIChannel
(standard or experimental). The gatewayAPIVersion and gatewayAPIChannel are
now filled in automatically by the suite machinery, along with a brief
description of the testing outcome. The Reports have been reorganized in a more
structured way, and the implementations can now add information on how the tests
have been run and provide reproduction steps.
New additions to Experimental channel
Gateway Client Certificate Verification
Gateways can now configure client cert verification for each Gateway Listener by
introducing a new frontendValidation field within tls. This field
supports configuring a list of CA Certificates that can be used as a trust
anchor to validate the certificates presented by the client.
The following example shows how the CACertificate stored in
the foo-example-com-ca-cert ConfigMap can be used to validate the certificates
presented by clients connecting to the foo-https Gateway Listener.
apiVersion: gateway.networking.k8s.io/v1
kind: Gateway
metadata:
name: client-validation-basic
spec:
gatewayClassName: acme-lb
listeners:
- name: foo-https
protocol: HTTPS
port: 443
hostname: foo.example.com
tls:
certificateRefs:
- kind: Secret
group: ""
name: foo-example-com-cert
frontendValidation:
caCertificateRefs:
- kind: ConfigMap
group: ""
name: foo-example-com-ca-cert
Session Persistence and BackendLBPolicy
Session Persistence is being introduced to Gateway API via a new policy (BackendLBPolicy) for Service-level configuration and as fields within HTTPRoute and GRPCRoute for route-level configuration. The BackendLBPolicy and route-level APIs provide the same session persistence configuration, including session timeouts, session name, session type, and cookie lifetime type.
Below is an example configuration of BackendLBPolicy that enables cookie-based
session persistence for the foo service. It sets the session name to
foo-session, defines absolute and idle timeouts, and configures the cookie to
be a session cookie:
apiVersion: gateway.networking.k8s.io/v1alpha2
kind: BackendLBPolicy
metadata:
name: lb-policy
namespace: foo-ns
spec:
targetRefs:
- group: core
kind: service
name: foo
sessionPersistence:
sessionName: foo-session
absoluteTimeout: 1h
idleTimeout: 30m
type: Cookie
cookieConfig:
lifetimeType: Session
Everything else
TLS Terminology Clarifications
As part of a broader goal of making our TLS terminology more consistent throughout the API, we've introduced some breaking changes to BackendTLSPolicy. This has resulted in a new API version (v1alpha3) and will require any existing implementations of this policy to properly handle the version upgrade, e.g. by backing up data and uninstalling the v1alpha2 version before installing this newer version.
Any references to v1alpha2 BackendTLSPolicy fields will need to be updated to v1alpha3. Specific changes to fields include:
targetRefbecomestargetRefsto allow a BackendTLSPolicy to attach to multiple targetstlsbecomesvalidationtls.caCertRefsbecomesvalidation.caCertificateRefstls.wellKnownCACertsbecomesvalidation.wellKnownCACertificates
For a full list of the changes included in this release, please refer to the v1.1.0 release notes.
Gateway API background
The idea of Gateway API was initially proposed at the 2019 KubeCon San Diego as the next generation of Ingress API. Since then, an incredible community has formed to develop what has likely become the most collaborative API in Kubernetes history. Over 200 people have contributed to this API so far, and that number continues to grow.
The maintainers would like to thank everyone who's contributed to Gateway API, whether in the form of commits to the repo, discussion, ideas, or general support. We literally couldn't have gotten this far without the support of this dedicated and active community.
Try it out
Unlike other Kubernetes APIs, you don't need to upgrade to the latest version of Kubernetes to get the latest version of Gateway API. As long as you're running Kubernetes 1.26 or later, you'll be able to get up and running with this version of Gateway API.
To try out the API, follow our Getting Started Guide.
Get involved
There are lots of opportunities to get involved and help define the future of Kubernetes routing APIs for both ingress and service mesh.
- Check out the user guides to see what use-cases can be addressed.
- Try out one of the existing Gateway controllers.
- Or join us in the community and help us build the future of Gateway API together!
Related Kubernetes blog articles
Container Runtime Interface streaming explained
The Kubernetes Container Runtime Interface (CRI) acts as the main connection between the kubelet and the Container Runtime. Those runtimes have to provide a gRPC server which has to fulfill a Kubernetes defined Protocol Buffer interface. This API definition evolves over time, for example when contributors add new features or fields are going to become deprecated.
In this blog post, I'd like to dive into the functionality and history of three
extraordinary Remote Procedure Calls (RPCs), which are truly outstanding in
terms of how they work: Exec, Attach and PortForward.
Exec can be used to run dedicated commands within the container and stream the output to a client like kubectl or crictl. It also allows interaction with that process using standard input (stdin), for example if users want to run a new shell instance within an existing workload.
Attach streams the output of the currently running process via standard I/O from the container to the client and also allows interaction with them. This is particularly useful if users want to see what is going on in the container and be able to interact with the process.
PortForward can be utilized to forward a port from the host to the container to be able to interact with it using third party network tools. This allows it to bypass Kubernetes services for a certain workload and interact with its network interface.
What is so special about them?
All RPCs of the CRI either use the gRPC unary calls
for communication or the server side streaming
feature (only GetContainerEvents right now). This means that mainly all RPCs
retrieve a single client request and have to return a single server response.
The same applies to Exec, Attach, and PortForward, where their protocol definition
looks like this:
// Exec prepares a streaming endpoint to execute a command in the container.
rpc Exec(ExecRequest) returns (ExecResponse) {}
// Attach prepares a streaming endpoint to attach to a running container.
rpc Attach(AttachRequest) returns (AttachResponse) {}
// PortForward prepares a streaming endpoint to forward ports from a PodSandbox.
rpc PortForward(PortForwardRequest) returns (PortForwardResponse) {}
The requests carry everything required to allow the server to do the work,
for example, the ContainerId or command (Cmd) to be run in case of Exec.
More interestingly, all of their responses only contain a url:
message ExecResponse {
// Fully qualified URL of the exec streaming server.
string url = 1;
}
message AttachResponse {
// Fully qualified URL of the attach streaming server.
string url = 1;
}
message PortForwardResponse {
// Fully qualified URL of the port-forward streaming server.
string url = 1;
}
Why is it implemented like that? Well, the original design document
for those RPCs even predates Kubernetes Enhancements Proposals (KEPs)
and was originally outlined back in 2016. The kubelet had a native
implementation for Exec, Attach, and PortForward before the
initiative to bring the functionality to the CRI started. Before that,
everything was bound to Docker or the later abandoned
container runtime rkt.
The CRI related design document also elaborates on the option to use native RPC streaming for exec, attach, and port forward. The downsides outweighed this approach: the kubelet would still create a network bottleneck and future runtimes would not be free in choosing the server implementation details. Also, another option that the Kubelet implements a portable, runtime-agnostic solution has been abandoned over the final one, because this would mean another project to maintain which nevertheless would be runtime dependent.
This means, that the basic flow for Exec, Attach and PortForward
was proposed to look like this:
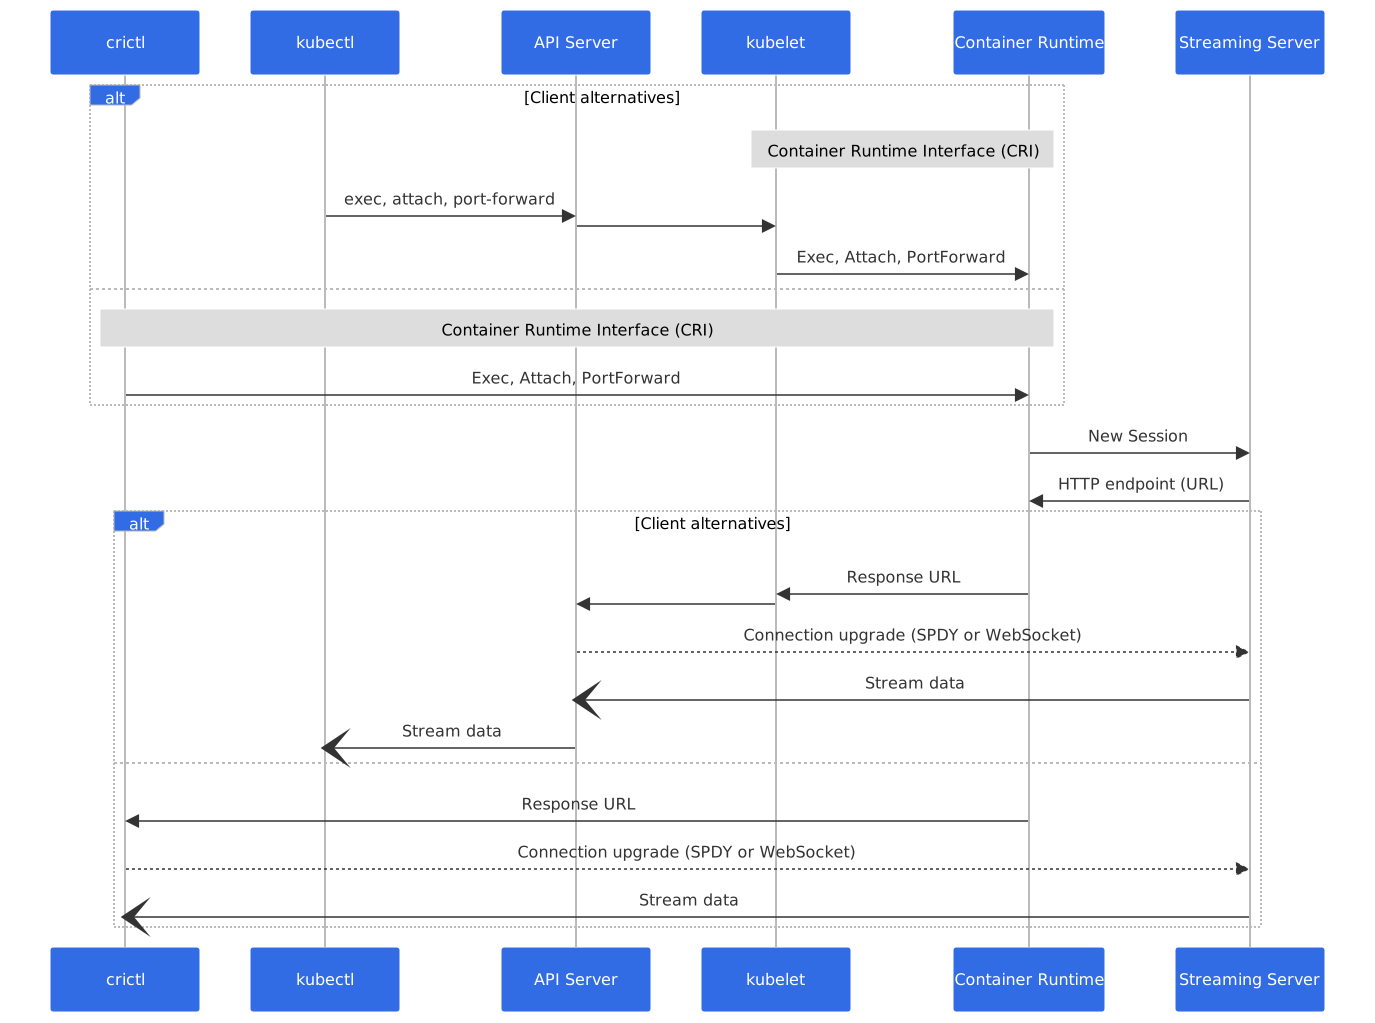
Clients like crictl or the kubelet (via kubectl) request a new exec, attach or port forward session from the runtime using the gRPC interface. The runtime implements a streaming server that also manages the active sessions. This streaming server provides an HTTP endpoint for the client to connect to. The client upgrades the connection to use the SPDY streaming protocol or (in the future) to a WebSocket connection and starts to stream the data back and forth.
This implementation allows runtimes to have the flexibility to implement
Exec, Attach and PortForward the way they want, and also allows a
simple test path. Runtimes can change the underlying implementation to support
any kind of feature without having a need to modify the CRI at all.
Many smaller enhancements to this overall approach have been merged into Kubernetes in the past years, but the general pattern has always stayed the same. The kubelet source code transformed into a reusable library, which is nowadays usable from container runtimes to implement the basic streaming capability.
How does the streaming actually work?
At a first glance, it looks like all three RPCs work the same way, but that's not the case. It's possible to group the functionality of Exec and Attach, while PortForward follows a distinct internal protocol definition.
Exec and Attach
Kubernetes defines Exec and Attach as remote commands, where its protocol definition exists in five different versions:
| # | Version | Note |
|---|---|---|
| 1 | channel.k8s.io | Initial (unversioned) SPDY sub protocol (#13394, #13395) |
| 2 | v2.channel.k8s.io | Resolves the issues present in the first version (#15961) |
| 3 | v3.channel.k8s.io | Adds support for resizing container terminals (#25273) |
| 4 | v4.channel.k8s.io | Adds support for exit codes using JSON errors (#26541) |
| 5 | v5.channel.k8s.io | Adds support for a CLOSE signal (#119157) |
On top of that, there is an overall effort to replace the SPDY transport protocol using WebSockets as part KEP #4006. Runtimes have to satisfy those protocols over their life cycle to stay up to date with the Kubernetes implementation.
Let's assume that a client uses the latest (v5) version of the protocol as
well as communicating over WebSockets. In that case, the general flow would be:
The client requests an URL endpoint for Exec or Attach using the CRI.
- The server (runtime) validates the request, inserts it into a connection tracking cache, and provides the HTTP endpoint URL for that request.
The client connects to that URL, upgrades the connection to establish a WebSocket, and starts to stream data.
- In the case of Attach, the server has to stream the main container process data to the client.
- In the case of Exec, the server has to create the subprocess command within the container and then streams the output to the client.
If stdin is required, then the server needs to listen for that as well and redirect it to the corresponding process.
Interpreting data for the defined protocol is fairly simple: The first byte of every input and output packet defines the actual stream:
| First Byte | Type | Description |
|---|---|---|
0 | standard input | Data streamed from stdin |
1 | standard output | Data streamed to stdout |
2 | standard error | Data streamed to stderr |
3 | stream error | A streaming error occurred |
4 | stream resize | A terminal resize event |
255 | stream close | Stream should be closed (for WebSockets) |
How should runtimes now implement the streaming server methods for Exec and
Attach by using the provided kubelet library? The key is that the streaming
server implementation in the kubelet outlines an interface
called Runtime which has to be fulfilled by the actual container runtime if it
wants to use that library:
// Runtime is the interface to execute the commands and provide the streams.
type Runtime interface {
Exec(ctx context.Context, containerID string, cmd []string, in io.Reader, out, err io.WriteCloser, tty bool, resize <-chan remotecommand.TerminalSize) error
Attach(ctx context.Context, containerID string, in io.Reader, out, err io.WriteCloser, tty bool, resize <-chan remotecommand.TerminalSize) error
PortForward(ctx context.Context, podSandboxID string, port int32, stream io.ReadWriteCloser) error
}
Everything related to the protocol interpretation is
already in place and runtimes only have to implement the actual Exec and
Attach logic. For example, the container runtime CRI-O
does it like this pseudo code:
func (s StreamService) Exec(
ctx context.Context,
containerID string,
cmd []string,
stdin io.Reader, stdout, stderr io.WriteCloser,
tty bool,
resizeChan <-chan remotecommand.TerminalSize,
) error {
// Retrieve the container by the provided containerID
// …
// Update the container status and verify that the workload is running
// …
// Execute the command and stream the data
return s.runtimeServer.Runtime().ExecContainer(
s.ctx, c, cmd, stdin, stdout, stderr, tty, resizeChan,
)
}
PortForward
Forwarding ports to a container works a bit differently when comparing it to streaming IO data from a workload. The server still has to provide a URL endpoint for the client to connect to, but then the container runtime has to enter the network namespace of the container, allocate the port as well as stream the data back and forth. There is no simple protocol definition available like for Exec or Attach. This means that the client will stream the plain SPDY frames (with or without an additional WebSocket connection) which can be interpreted using libraries like moby/spdystream.
Luckily, the kubelet library already provides the PortForward interface method
which has to be implemented by the runtime. CRI-O does that by (simplified):
func (s StreamService) PortForward(
ctx context.Context,
podSandboxID string,
port int32,
stream io.ReadWriteCloser,
) error {
// Retrieve the pod sandbox by the provided podSandboxID
sandboxID, err := s.runtimeServer.PodIDIndex().Get(podSandboxID)
sb := s.runtimeServer.GetSandbox(sandboxID)
// …
// Get the network namespace path on disk for that sandbox
netNsPath := sb.NetNsPath()
// …
// Enter the network namespace and stream the data
return s.runtimeServer.Runtime().PortForwardContainer(
ctx, sb.InfraContainer(), netNsPath, port, stream,
)
}
Future work
The flexibility Kubernetes provides for the RPCs Exec, Attach and
PortForward is truly outstanding compared to other methods. Nevertheless,
container runtimes have to keep up with the latest and greatest implementations
to support those features in a meaningful way. The general effort to support
WebSockets is not only a plain Kubernetes thing, it also has to be supported by
container runtimes as well as clients like crictl.
For example, crictl v1.30 features a new --transport flag for the
subcommands exec, attach and port-forward
(#1383,
#1385)
to allow choosing between websocket and spdy.
CRI-O is going an experimental path by moving the streaming server implementation into conmon-rs (a substitute for the container monitor conmon). conmon-rs is a Rust implementation of the original container monitor and allows streaming WebSockets directly using supported libraries (#2070). The major benefit of this approach is that CRI-O does not even have to be running while conmon-rs can keep active Exec, Attach and PortForward sessions open. The simplified flow when using crictl directly will then look like this:
All of those enhancements require iterative design decisions, while the original well-conceived implementation acts as the foundation for those. I really hope you've enjoyed this compact journey through the history of CRI RPCs. Feel free to reach out to me anytime for suggestions or feedback using the official Kubernetes Slack.
Kubernetes 1.30: Preventing unauthorized volume mode conversion moves to GA
With the release of Kubernetes 1.30, the feature to prevent the modification of the volume mode of a PersistentVolumeClaim that was created from an existing VolumeSnapshot in a Kubernetes cluster, has moved to GA!
The problem
The Volume Mode of a PersistentVolumeClaim refers to whether the underlying volume on the storage device is formatted into a filesystem or presented as a raw block device to the Pod that uses it.
Users can leverage the VolumeSnapshot feature, which has been stable since Kubernetes v1.20, to create a PersistentVolumeClaim (shortened as PVC) from an existing VolumeSnapshot in the Kubernetes cluster. The PVC spec includes a dataSource field, which can point to an existing VolumeSnapshot instance. Visit Create a PersistentVolumeClaim from a Volume Snapshot for more details on how to create a PVC from an existing VolumeSnapshot in a Kubernetes cluster.
When leveraging the above capability, there is no logic that validates whether the mode of the original volume, whose snapshot was taken, matches the mode of the newly created volume.
This presents a security gap that allows malicious users to potentially exploit an as-yet-unknown vulnerability in the host operating system.
There is a valid use case to allow some users to perform such conversions. Typically, storage backup vendors convert the volume mode during the course of a backup operation, to retrieve changed blocks for greater efficiency of operations. This prevents Kubernetes from blocking the operation completely and presents a challenge in distinguishing trusted users from malicious ones.
Preventing unauthorized users from converting the volume mode
In this context, an authorized user is one who has access rights to perform update
or patch operations on VolumeSnapshotContents, which is a cluster-level resource.
It is up to the cluster administrator to provide these rights only to trusted users
or applications, like backup vendors.
Users apart from such authorized ones will never be allowed to modify the volume mode
of a PVC when it is being created from a VolumeSnapshot.
To convert the volume mode, an authorized user must do the following:
- Identify the VolumeSnapshot that is to be used as the data source for a newly created PVC in the given namespace.
- Identify the VolumeSnapshotContent bound to the above VolumeSnapshot.
kubectl describe volumesnapshot -n <namespace> <name>
- Add the annotation
snapshot.storage.kubernetes.io/allow-volume-mode-change: "true"to the above VolumeSnapshotContent. The VolumeSnapshotContent annotations must include one similar to the following manifest fragment:
kind: VolumeSnapshotContent
metadata:
annotations:
- snapshot.storage.kubernetes.io/allow-volume-mode-change: "true"
...
Note: For pre-provisioned VolumeSnapshotContents, you must take an extra
step of setting spec.sourceVolumeMode field to either Filesystem or Block,
depending on the mode of the volume from which this snapshot was taken.
An example is shown below:
apiVersion: snapshot.storage.k8s.io/v1
kind: VolumeSnapshotContent
metadata:
annotations:
- snapshot.storage.kubernetes.io/allow-volume-mode-change: "true"
name: <volume-snapshot-content-name>
spec:
deletionPolicy: Delete
driver: hostpath.csi.k8s.io
source:
snapshotHandle: <snapshot-handle>
sourceVolumeMode: Filesystem
volumeSnapshotRef:
name: <volume-snapshot-name>
namespace: <namespace>
Repeat steps 1 to 3 for all VolumeSnapshotContents whose volume mode needs to be converted during a backup or restore operation. This can be done either via software with credentials of an authorized user or manually by the authorized user(s).
If the annotation shown above is present on a VolumeSnapshotContent object, Kubernetes will not prevent the volume mode from being converted. Users should keep this in mind before they attempt to add the annotation to any VolumeSnapshotContent.
Action required
The prevent-volume-mode-conversion feature flag is enabled by default in the
external-provisioner v4.0.0 and external-snapshotter v7.0.0. Volume mode change
will be rejected when creating a PVC from a VolumeSnapshot unless the steps
described above have been performed.
What's next
To determine which CSI external sidecar versions support this feature, please head over to the CSI docs page. For any queries or issues, join Kubernetes on Slack and create a thread in the #csi or #sig-storage channel. Alternately, create an issue in the CSI external-snapshotter repository.
Kubernetes 1.30: Multi-Webhook and Modular Authorization Made Much Easier
With Kubernetes 1.30, we (SIG Auth) are moving Structured Authorization Configuration to beta.
Today's article is about authorization: deciding what someone can and cannot access. Check a previous article from yesterday to find about what's new in Kubernetes v1.30 around authentication (finding out who's performing a task, and checking that they are who they say they are).
Introduction
Kubernetes continues to evolve to meet the intricate requirements of system administrators and developers alike. A critical aspect of Kubernetes that ensures the security and integrity of the cluster is the API server authorization. Until recently, the configuration of the authorization chain in kube-apiserver was somewhat rigid, limited to a set of command-line flags and allowing only a single webhook in the authorization chain. This approach, while functional, restricted the flexibility needed by cluster administrators to define complex, fine-grained authorization policies. The latest Structured Authorization Configuration feature (KEP-3221) aims to revolutionize this aspect by introducing a more structured and versatile way to configure the authorization chain, focusing on enabling multiple webhooks and providing explicit control mechanisms.
The Need for Improvement
Cluster administrators have long sought the ability to specify multiple authorization webhooks within the API Server handler chain and have control over detailed behavior like timeout and failure policy for each webhook. This need arises from the desire to create layered security policies, where requests can be validated against multiple criteria or sets of rules in a specific order. The previous limitations also made it difficult to dynamically configure the authorizer chain, leaving no room to manage complex authorization scenarios efficiently.
The Structured Authorization Configuration feature addresses these limitations by introducing a configuration file format to configure the Kubernetes API Server Authorization chain. This format allows specifying multiple webhooks in the authorization chain (all other authorization types are specified no more than once). Each webhook authorizer has well-defined parameters, including timeout settings, failure policies, and conditions for invocation with CEL rules to pre-filter requests before they are dispatched to webhooks, helping you prevent unnecessary invocations. The configuration also supports automatic reloading, ensuring changes can be applied dynamically without restarting the kube-apiserver. This feature addresses current limitations and opens up new possibilities for securing and managing Kubernetes clusters more effectively.
Sample Configurations
Here is a sample structured authorization configuration along with descriptions for all fields, their defaults, and possible values.
apiVersion: apiserver.config.k8s.io/v1beta1
kind: AuthorizationConfiguration
authorizers:
- type: Webhook
# Name used to describe the authorizer
# This is explicitly used in monitoring machinery for metrics
# Note:
# - Validation for this field is similar to how K8s labels are validated today.
# Required, with no default
name: webhook
webhook:
# The duration to cache 'authorized' responses from the webhook
# authorizer.
# Same as setting `--authorization-webhook-cache-authorized-ttl` flag
# Default: 5m0s
authorizedTTL: 30s
# The duration to cache 'unauthorized' responses from the webhook
# authorizer.
# Same as setting `--authorization-webhook-cache-unauthorized-ttl` flag
# Default: 30s
unauthorizedTTL: 30s
# Timeout for the webhook request
# Maximum allowed is 30s.
# Required, with no default.
timeout: 3s
# The API version of the authorization.k8s.io SubjectAccessReview to
# send to and expect from the webhook.
# Same as setting `--authorization-webhook-version` flag
# Required, with no default
# Valid values: v1beta1, v1
subjectAccessReviewVersion: v1
# MatchConditionSubjectAccessReviewVersion specifies the SubjectAccessReview
# version the CEL expressions are evaluated against
# Valid values: v1
# Required, no default value
matchConditionSubjectAccessReviewVersion: v1
# Controls the authorization decision when a webhook request fails to
# complete or returns a malformed response or errors evaluating
# matchConditions.
# Valid values:
# - NoOpinion: continue to subsequent authorizers to see if one of
# them allows the request
# - Deny: reject the request without consulting subsequent authorizers
# Required, with no default.
failurePolicy: Deny
connectionInfo:
# Controls how the webhook should communicate with the server.
# Valid values:
# - KubeConfigFile: use the file specified in kubeConfigFile to locate the
# server.
# - InClusterConfig: use the in-cluster configuration to call the
# SubjectAccessReview API hosted by kube-apiserver. This mode is not
# allowed for kube-apiserver.
type: KubeConfigFile
# Path to KubeConfigFile for connection info
# Required, if connectionInfo.Type is KubeConfigFile
kubeConfigFile: /kube-system-authz-webhook.yaml
# matchConditions is a list of conditions that must be met for a request to be sent to this
# webhook. An empty list of matchConditions matches all requests.
# There are a maximum of 64 match conditions allowed.
#
# The exact matching logic is (in order):
# 1. If at least one matchCondition evaluates to FALSE, then the webhook is skipped.
# 2. If ALL matchConditions evaluate to TRUE, then the webhook is called.
# 3. If at least one matchCondition evaluates to an error (but none are FALSE):
# - If failurePolicy=Deny, then the webhook rejects the request
# - If failurePolicy=NoOpinion, then the error is ignored and the webhook is skipped
matchConditions:
# expression represents the expression which will be evaluated by CEL. Must evaluate to bool.
# CEL expressions have access to the contents of the SubjectAccessReview in v1 version.
# If version specified by subjectAccessReviewVersion in the request variable is v1beta1,
# the contents would be converted to the v1 version before evaluating the CEL expression.
#
# Documentation on CEL: https://kubernetes.io/docs/reference/using-api/cel/
#
# only send resource requests to the webhook
- expression: has(request.resourceAttributes)
# only intercept requests to kube-system
- expression: request.resourceAttributes.namespace == 'kube-system'
# don't intercept requests from kube-system service accounts
- expression: "!('system:serviceaccounts:kube-system' in request.groups)"
- type: Node
name: node
- type: RBAC
name: rbac
- type: Webhook
name: in-cluster-authorizer
webhook:
authorizedTTL: 5m
unauthorizedTTL: 30s
timeout: 3s
subjectAccessReviewVersion: v1
failurePolicy: NoOpinion
connectionInfo:
type: InClusterConfig
The following configuration examples illustrate real-world scenarios that need the ability to specify multiple webhooks with distinct settings, precedence order, and failure modes.
Protecting Installed CRDs
Ensuring of Custom Resource Definitions (CRDs) availability at cluster startup has been a key demand. One of the blockers of having a controller reconcile those CRDs is having a protection mechanism for them, which can be achieved through multiple authorization webhooks. This was not possible before as specifying multiple authorization webhooks in the Kubernetes API Server authorization chain was simply not possible. Now, with the Structured Authorization Configuration feature, administrators can specify multiple webhooks, offering a solution where RBAC falls short, especially when denying permissions to 'non-system' users for certain CRDs.
Assuming the following for this scenario:
- The "protected" CRDs are installed.
- They can only be modified by users in the group
admin.
apiVersion: apiserver.config.k8s.io/v1beta1
kind: AuthorizationConfiguration
authorizers:
- type: Webhook
name: system-crd-protector
webhook:
unauthorizedTTL: 30s
timeout: 3s
subjectAccessReviewVersion: v1
matchConditionSubjectAccessReviewVersion: v1
failurePolicy: Deny
connectionInfo:
type: KubeConfigFile
kubeConfigFile: /files/kube-system-authz-webhook.yaml
matchConditions:
# only send resource requests to the webhook
- expression: has(request.resourceAttributes)
# only intercept requests for CRDs
- expression: request.resourceAttributes.resource.resource = "customresourcedefinitions"
- expression: request.resourceAttributes.resource.group = ""
# only intercept update, patch, delete, or deletecollection requests
- expression: request.resourceAttributes.verb in ['update', 'patch', 'delete','deletecollection']
- type: Node
- type: RBAC
Preventing unnecessarily nested webhooks
A system administrator wants to apply specific validations to requests before handing them off to webhooks using frameworks like Open Policy Agent. In the past, this would require running nested webhooks within the one added to the authorization chain to achieve the desired result. The Structured Authorization Configuration feature simplifies this process, offering a structured API to selectively trigger additional webhooks when needed. It also enables administrators to set distinct failure policies for each webhook, ensuring more consistent and predictable responses.
apiVersion: apiserver.config.k8s.io/v1beta1
kind: AuthorizationConfiguration
authorizers:
- type: Webhook
name: system-crd-protector
webhook:
unauthorizedTTL: 30s
timeout: 3s
subjectAccessReviewVersion: v1
matchConditionSubjectAccessReviewVersion: v1
failurePolicy: Deny
connectionInfo:
type: KubeConfigFile
kubeConfigFile: /files/kube-system-authz-webhook.yaml
matchConditions:
# only send resource requests to the webhook
- expression: has(request.resourceAttributes)
# only intercept requests for CRDs
- expression: request.resourceAttributes.resource.resource = "customresourcedefinitions"
- expression: request.resourceAttributes.resource.group = ""
# only intercept update, patch, delete, or deletecollection requests
- expression: request.resourceAttributes.verb in ['update', 'patch', 'delete','deletecollection']
- type: Node
- type: RBAC
- name: opa
type: Webhook
webhook:
unauthorizedTTL: 30s
timeout: 3s
subjectAccessReviewVersion: v1
matchConditionSubjectAccessReviewVersion: v1
failurePolicy: Deny
connectionInfo:
type: KubeConfigFile
kubeConfigFile: /files/opa-default-authz-webhook.yaml
matchConditions:
# only send resource requests to the webhook
- expression: has(request.resourceAttributes)
# only intercept requests to default namespace
- expression: request.resourceAttributes.namespace == 'default'
# don't intercept requests from default service accounts
- expression: "!('system:serviceaccounts:default' in request.groups)"
What's next?
From Kubernetes 1.30, the feature is in beta and enabled by default. For Kubernetes v1.31, we expect the feature to stay in beta while we get more feedback from users. Once it is ready for GA, the feature flag will be removed, and the configuration file version will be promoted to v1.
Learn more about this feature on the structured authorization configuration Kubernetes doc website. You can also follow along with KEP-3221 to track progress in coming Kubernetes releases.
Call to action
In this post, we have covered the benefits of the Structured Authorization
Configuration feature in Kubernetes v1.30 and a few sample configurations for
real-world scenarios. To use this feature, you must specify the path to the
authorization configuration using the --authorization-config command line
argument. From Kubernetes 1.30, the feature is in beta and enabled by default.
If you want to keep using command line flags instead of a configuration file,
those will continue to work as-is. Specifying both --authorization-config and
--authorization-modes/--authorization-webhook-* won't work. You need to drop
the older flags from your kube-apiserver command.
The following kind Cluster configuration sets that command argument on the
APIserver to load an AuthorizationConfiguration from a file
(authorization_config.yaml) in the files folder. Any needed kubeconfig and
certificate files can also be put in the files directory.
kind: Cluster
apiVersion: kind.x-k8s.io/v1alpha4
featureGates:
StructuredAuthorizationConfiguration: true # enabled by default in v1.30
kubeadmConfigPatches:
- |
kind: ClusterConfiguration
metadata:
name: config
apiServer:
extraArgs:
authorization-config: "/files/authorization_config.yaml"
extraVolumes:
- name: files
hostPath: "/files"
mountPath: "/files"
readOnly: true
nodes:
- role: control-plane
extraMounts:
- hostPath: files
containerPath: /files
We would love to hear your feedback on this feature. In particular, we would like feedback from Kubernetes cluster administrators and authorization webhook implementors as they build their integrations with this new API. Please reach out to us on the #sig-auth-authorizers-dev channel on Kubernetes Slack.
How to get involved
If you are interested in helping develop this feature, sharing feedback, or participating in any other ongoing SIG Auth projects, please reach out on the #sig-auth channel on Kubernetes Slack.
You are also welcome to join the bi-weekly SIG Auth meetings held every other Wednesday.
Acknowledgments
This feature was driven by contributors from several different companies. We would like to extend a huge thank you to everyone who contributed their time and effort to make this possible.
Kubernetes 1.30: Structured Authentication Configuration Moves to Beta
With Kubernetes 1.30, we (SIG Auth) are moving Structured Authentication Configuration to beta.
Today's article is about authentication: finding out who's performing a task, and checking that they are who they say they are. Check back in tomorrow to find about what's new in Kubernetes v1.30 around authorization (deciding what someone can and can't access).
Motivation
Kubernetes has had a long-standing need for a more flexible and extensible authentication system. The current system, while powerful, has some limitations that make it difficult to use in certain scenarios. For example, it is not possible to use multiple authenticators of the same type (e.g., multiple JWT authenticators) or to change the configuration without restarting the API server. The Structured Authentication Configuration feature is the first step towards addressing these limitations and providing a more flexible and extensible way to configure authentication in Kubernetes.
What is structured authentication configuration?
Kubernetes v1.30 builds on the experimental support for configurating authentication based on a file, that was added as alpha in Kubernetes v1.30. At this beta stage, Kubernetes only supports configuring JWT authenticators, which serve as the next iteration of the existing OIDC authenticator. JWT authenticator is an authenticator to authenticate Kubernetes users using JWT compliant tokens. The authenticator will attempt to parse a raw ID token, verify it's been signed by the configured issuer.
The Kubernetes project added configuration from a file so that it can provide more flexibility than using command line options (which continue to work, and are still supported). Supporting a configuration file also makes it easy to deliver further improvements in upcoming releases.
Benefits of structured authentication configuration
Here's why using a configuration file to configure cluster authentication is a benefit:
- Multiple JWT authenticators: You can configure multiple JWT authenticators simultaneously. This allows you to use multiple identity providers (e.g., Okta, Keycloak, GitLab) without needing to use an intermediary like Dex that handles multiplexing between multiple identity providers.
- Dynamic configuration: You can change the configuration without restarting the API server. This allows you to add, remove, or modify authenticators without disrupting the API server.
- Any JWT-compliant token: You can use any JWT-compliant token for authentication. This allows you to use tokens from any identity provider that supports JWT. The minimum valid JWT payload must contain the claims documented in structured authentication configuration page in the Kubernetes documentation.
- CEL (Common Expression Language) support: You can use CEL to determine whether the token's claims match the user's attributes in Kubernetes (e.g., username, group). This allows you to use complex logic to determine whether a token is valid.
- Multiple audiences: You can configure multiple audiences for a single
authenticator. This allows you to use the same authenticator for multiple
audiences, such as using a different OAuth client for
kubectland dashboard. - Using identity providers that don't support OpenID connect discovery: You
can use identity providers that don't support OpenID Connect
discovery. The only
requirement is to host the discovery document at a different location than the
issuer (such as locally in the cluster) and specify the
issuer.discoveryURLin the configuration file.
How to use Structured Authentication Configuration
To use structured authentication configuration, you specify
the path to the authentication configuration using the --authentication-config
command line argument in the API server. The configuration file is a YAML file
that specifies the authenticators and their configuration. Here is an example
configuration file that configures two JWT authenticators:
apiVersion: apiserver.config.k8s.io/v1beta1
kind: AuthenticationConfiguration
# Someone with a valid token from either of these issuers could authenticate
# against this cluster.
jwt:
- issuer:
url: https://issuer1.example.com
audiences:
- audience1
- audience2
audienceMatchPolicy: MatchAny
claimValidationRules:
expression: 'claims.hd == "example.com"'
message: "the hosted domain name must be example.com"
claimMappings:
username:
expression: 'claims.username'
groups:
expression: 'claims.groups'
uid:
expression: 'claims.uid'
extra:
- key: 'example.com/tenant'
expression: 'claims.tenant'
userValidationRules:
- expression: "!user.username.startsWith('system:')"
message: "username cannot use reserved system: prefix"
# second authenticator that exposes the discovery document at a different location
# than the issuer
- issuer:
url: https://issuer2.example.com
discoveryURL: https://discovery.example.com/.well-known/openid-configuration
audiences:
- audience3
- audience4
audienceMatchPolicy: MatchAny
claimValidationRules:
expression: 'claims.hd == "example.com"'
message: "the hosted domain name must be example.com"
claimMappings:
username:
expression: 'claims.username'
groups:
expression: 'claims.groups'
uid:
expression: 'claims.uid'
extra:
- key: 'example.com/tenant'
expression: 'claims.tenant'
userValidationRules:
- expression: "!user.username.startsWith('system:')"
message: "username cannot use reserved system: prefix"
Migration from command line arguments to configuration file
The Structured Authentication Configuration feature is designed to be backwards-compatible with the existing approach, based on command line options, for configuring the JWT authenticator. This means that you can continue to use the existing command-line options to configure the JWT authenticator. However, we (Kubernetes SIG Auth) recommend migrating to the new configuration file-based approach, as it provides more flexibility and extensibility.
If you specify --authentication-config along with any of the --oidc-* command line arguments, this is
a misconfiguration. In this situation, the API server reports an error and then immediately exits.
If you want to switch to using structured authentication configuration, you have to remove the --oidc-*
command line arguments, and use the configuration file instead.
Here is an example of how to migrate from the command-line flags to the configuration file:
Command-line arguments
--oidc-issuer-url=https://issuer.example.com
--oidc-client-id=example-client-id
--oidc-username-claim=username
--oidc-groups-claim=groups
--oidc-username-prefix=oidc:
--oidc-groups-prefix=oidc:
--oidc-required-claim="hd=example.com"
--oidc-required-claim="admin=true"
--oidc-ca-file=/path/to/ca.pem
There is no equivalent in the configuration file for the --oidc-signing-algs.
For Kubernetes v1.30, the authenticator supports all the asymmetric algorithms listed in
oidc.go.
Configuration file
apiVersion: apiserver.config.k8s.io/v1beta1
kind: AuthenticationConfiguration
jwt:
- issuer:
url: https://issuer.example.com
audiences:
- example-client-id
certificateAuthority: <value is the content of file /path/to/ca.pem>
claimMappings:
username:
claim: username
prefix: "oidc:"
groups:
claim: groups
prefix: "oidc:"
claimValidationRules:
- claim: hd
requiredValue: "example.com"
- claim: admin
requiredValue: "true"
What's next?
For Kubernetes v1.31, we expect the feature to stay in beta while we get more feedback. In the coming releases, we want to investigate:
- Making distributed claims work via CEL expressions.
- Egress selector configuration support for calls to
issuer.urlandissuer.discoveryURL.
You can learn more about this feature on the structured authentication configuration page in the Kubernetes documentation. You can also follow along on the KEP-3331 to track progress across the coming Kubernetes releases.
Try it out
In this post, I have covered the benefits the Structured Authentication
Configuration feature brings in Kubernetes v1.30. To use this feature, you must specify the path to the
authentication configuration using the --authentication-config command line
argument. From Kubernetes v1.30, the feature is in beta and enabled by default.
If you want to keep using command line arguments instead of a configuration file,
those will continue to work as-is.
We would love to hear your feedback on this feature. Please reach out to us on the #sig-auth-authenticators-dev channel on Kubernetes Slack (for an invitation, visit https://slack.k8s.io/).
How to get involved
If you are interested in getting involved in the development of this feature, share feedback, or participate in any other ongoing SIG Auth projects, please reach out on the #sig-auth channel on Kubernetes Slack.
You are also welcome to join the bi-weekly SIG Auth meetings held every-other Wednesday.
Kubernetes 1.30: Validating Admission Policy Is Generally Available
On behalf of the Kubernetes project, I am excited to announce that ValidatingAdmissionPolicy has reached general availability as part of Kubernetes 1.30 release. If you have not yet read about this new declarative alternative to validating admission webhooks, it may be interesting to read our previous post about the new feature. If you have already heard about ValidatingAdmissionPolicies and you are eager to try them out, there is no better time to do it than now.
Let's have a taste of a ValidatingAdmissionPolicy, by replacing a simple webhook.
Example admission webhook
First, let's take a look at an example of a simple webhook. Here is an excerpt from a webhook that
enforces runAsNonRoot, readOnlyRootFilesystem, allowPrivilegeEscalation, and privileged to be set to the least permissive values.
func verifyDeployment(deploy *appsv1.Deployment) error {
var errs []error
for i, c := range deploy.Spec.Template.Spec.Containers {
if c.Name == "" {
return fmt.Errorf("container %d has no name", i)
}
if c.SecurityContext == nil {
errs = append(errs, fmt.Errorf("container %q does not have SecurityContext", c.Name))
}
if c.SecurityContext.RunAsNonRoot == nil || !*c.SecurityContext.RunAsNonRoot {
errs = append(errs, fmt.Errorf("container %q must set RunAsNonRoot to true in its SecurityContext", c.Name))
}
if c.SecurityContext.ReadOnlyRootFilesystem == nil || !*c.SecurityContext.ReadOnlyRootFilesystem {
errs = append(errs, fmt.Errorf("container %q must set ReadOnlyRootFilesystem to true in its SecurityContext", c.Name))
}
if c.SecurityContext.AllowPrivilegeEscalation != nil && *c.SecurityContext.AllowPrivilegeEscalation {
errs = append(errs, fmt.Errorf("container %q must NOT set AllowPrivilegeEscalation to true in its SecurityContext", c.Name))
}
if c.SecurityContext.Privileged != nil && *c.SecurityContext.Privileged {
errs = append(errs, fmt.Errorf("container %q must NOT set Privileged to true in its SecurityContext", c.Name))
}
}
return errors.NewAggregate(errs)
}
Check out What are admission webhooks? Or, see the full code of this webhook to follow along with this walkthrough.
The policy
Now let's try to recreate the validation faithfully with a ValidatingAdmissionPolicy.
apiVersion: admissionregistration.k8s.io/v1
kind: ValidatingAdmissionPolicy
metadata:
name: "pod-security.policy.example.com"
spec:
failurePolicy: Fail
matchConstraints:
resourceRules:
- apiGroups: ["apps"]
apiVersions: ["v1"]
operations: ["CREATE", "UPDATE"]
resources: ["deployments"]
validations:
- expression: object.spec.template.spec.containers.all(c, has(c.securityContext) && has(c.securityContext.runAsNonRoot) && c.securityContext.runAsNonRoot)
message: 'all containers must set runAsNonRoot to true'
- expression: object.spec.template.spec.containers.all(c, has(c.securityContext) && has(c.securityContext.readOnlyRootFilesystem) && c.securityContext.readOnlyRootFilesystem)
message: 'all containers must set readOnlyRootFilesystem to true'
- expression: object.spec.template.spec.containers.all(c, !has(c.securityContext) || !has(c.securityContext.allowPrivilegeEscalation) || !c.securityContext.allowPrivilegeEscalation)
message: 'all containers must NOT set allowPrivilegeEscalation to true'
- expression: object.spec.template.spec.containers.all(c, !has(c.securityContext) || !has(c.securityContext.Privileged) || !c.securityContext.Privileged)
message: 'all containers must NOT set privileged to true'
Create the policy with kubectl. Great, no complain so far. But let's get the policy object back and take a look at its status.
kubectl get -oyaml validatingadmissionpolicies/pod-security.policy.example.com
status:
typeChecking:
expressionWarnings:
- fieldRef: spec.validations[3].expression
warning: |
apps/v1, Kind=Deployment: ERROR: <input>:1:76: undefined field 'Privileged'
| object.spec.template.spec.containers.all(c, !has(c.securityContext) || !has(c.securityContext.Privileged) || !c.securityContext.Privileged)
| ...........................................................................^
ERROR: <input>:1:128: undefined field 'Privileged'
| object.spec.template.spec.containers.all(c, !has(c.securityContext) || !has(c.securityContext.Privileged) || !c.securityContext.Privileged)
| ...............................................................................................................................^
The policy was checked against its matched type, which is apps/v1.Deployment.
Looking at the fieldRef, the problem was with the 3rd expression (index starts with 0)
The expression in question accessed an undefined Privileged field.
Ahh, looks like it was a copy-and-paste error. The field name should be in lowercase.
apiVersion: admissionregistration.k8s.io/v1
kind: ValidatingAdmissionPolicy
metadata:
name: "pod-security.policy.example.com"
spec:
failurePolicy: Fail
matchConstraints:
resourceRules:
- apiGroups: ["apps"]
apiVersions: ["v1"]
operations: ["CREATE", "UPDATE"]
resources: ["deployments"]
validations:
- expression: object.spec.template.spec.containers.all(c, has(c.securityContext) && has(c.securityContext.runAsNonRoot) && c.securityContext.runAsNonRoot)
message: 'all containers must set runAsNonRoot to true'
- expression: object.spec.template.spec.containers.all(c, has(c.securityContext) && has(c.securityContext.readOnlyRootFilesystem) && c.securityContext.readOnlyRootFilesystem)
message: 'all containers must set readOnlyRootFilesystem to true'
- expression: object.spec.template.spec.containers.all(c, !has(c.securityContext) || !has(c.securityContext.allowPrivilegeEscalation) || !c.securityContext.allowPrivilegeEscalation)
message: 'all containers must NOT set allowPrivilegeEscalation to true'
- expression: object.spec.template.spec.containers.all(c, !has(c.securityContext) || !has(c.securityContext.privileged) || !c.securityContext.privileged)
message: 'all containers must NOT set privileged to true'
Check its status again, and you should see all warnings cleared.
Next, let's create a namespace for our tests.
kubectl create namespace policy-test
Then, I bind the policy to the namespace. But at this point, I set the action to Warn
so that the policy prints out warnings instead of rejecting the requests.
This is especially useful to collect results from all expressions during development and automated testing.
apiVersion: admissionregistration.k8s.io/v1
kind: ValidatingAdmissionPolicyBinding
metadata:
name: "pod-security.policy-binding.example.com"
spec:
policyName: "pod-security.policy.example.com"
validationActions: ["Warn"]
matchResources:
namespaceSelector:
matchLabels:
"kubernetes.io/metadata.name": "policy-test"
Tests out policy enforcement.
kubectl create -n policy-test -f- <<EOF
apiVersion: apps/v1
kind: Deployment
metadata:
labels:
app: nginx
name: nginx
spec:
selector:
matchLabels:
app: nginx
template:
metadata:
labels:
app: nginx
spec:
containers:
- image: nginx
name: nginx
securityContext:
privileged: true
allowPrivilegeEscalation: true
EOF
Warning: Validation failed for ValidatingAdmissionPolicy 'pod-security.policy.example.com' with binding 'pod-security.policy-binding.example.com': all containers must set runAsNonRoot to true
Warning: Validation failed for ValidatingAdmissionPolicy 'pod-security.policy.example.com' with binding 'pod-security.policy-binding.example.com': all containers must set readOnlyRootFilesystem to true
Warning: Validation failed for ValidatingAdmissionPolicy 'pod-security.policy.example.com' with binding 'pod-security.policy-binding.example.com': all containers must NOT set allowPrivilegeEscalation to true
Warning: Validation failed for ValidatingAdmissionPolicy 'pod-security.policy.example.com' with binding 'pod-security.policy-binding.example.com': all containers must NOT set privileged to true
Error from server: error when creating "STDIN": admission webhook "webhook.example.com" denied the request: [container "nginx" must set RunAsNonRoot to true in its SecurityContext, container "nginx" must set ReadOnlyRootFilesystem to true in its SecurityContext, container "nginx" must NOT set AllowPrivilegeEscalation to true in its SecurityContext, container "nginx" must NOT set Privileged to true in its SecurityContext]
Looks great! The policy and the webhook give equivalent results. After a few other cases, when we are confident with our policy, maybe it is time to do some cleanup.
- For every expression, we repeat access to
object.spec.template.spec.containersand to eachsecurityContext; - There is a pattern of checking presence of a field and then accessing it, which looks a bit verbose.
Fortunately, since Kubernetes 1.28, we have new solutions for both issues. Variable Composition allows us to extract repeated sub-expressions into their own variables. Kubernetes enables the optional library for CEL, which are excellent to work with fields that are, you guessed it, optional.
With both features in mind, let's refactor the policy a bit.
apiVersion: admissionregistration.k8s.io/v1
kind: ValidatingAdmissionPolicy
metadata:
name: "pod-security.policy.example.com"
spec:
failurePolicy: Fail
matchConstraints:
resourceRules:
- apiGroups: ["apps"]
apiVersions: ["v1"]
operations: ["CREATE", "UPDATE"]
resources: ["deployments"]
variables:
- name: containers
expression: object.spec.template.spec.containers
- name: securityContexts
expression: 'variables.containers.map(c, c.?securityContext)'
validations:
- expression: variables.securityContexts.all(c, c.?runAsNonRoot == optional.of(true))
message: 'all containers must set runAsNonRoot to true'
- expression: variables.securityContexts.all(c, c.?readOnlyRootFilesystem == optional.of(true))
message: 'all containers must set readOnlyRootFilesystem to true'
- expression: variables.securityContexts.all(c, c.?allowPrivilegeEscalation != optional.of(true))
message: 'all containers must NOT set allowPrivilegeEscalation to true'
- expression: variables.securityContexts.all(c, c.?privileged != optional.of(true))
message: 'all containers must NOT set privileged to true'
The policy is now much cleaner and more readable. Update the policy, and you should see it function the same as before.
Now let's change the policy binding from warning to actually denying requests that fail validation.
apiVersion: admissionregistration.k8s.io/v1
kind: ValidatingAdmissionPolicyBinding
metadata:
name: "pod-security.policy-binding.example.com"
spec:
policyName: "pod-security.policy.example.com"
validationActions: ["Deny"]
matchResources:
namespaceSelector:
matchLabels:
"kubernetes.io/metadata.name": "policy-test"
And finally, remove the webhook. Now the result should include only messages from the policy.
kubectl create -n policy-test -f- <<EOF
apiVersion: apps/v1
kind: Deployment
metadata:
labels:
app: nginx
name: nginx
spec:
selector:
matchLabels:
app: nginx
template:
metadata:
labels:
app: nginx
spec:
containers:
- image: nginx
name: nginx
securityContext:
privileged: true
allowPrivilegeEscalation: true
EOF
The deployments "nginx" is invalid: : ValidatingAdmissionPolicy 'pod-security.policy.example.com' with binding 'pod-security.policy-binding.example.com' denied request: all containers must set runAsNonRoot to true
Please notice that, by design, the policy will stop evaluation after the first expression that causes the request to be denied. This is different from what happens when the expressions generate only warnings.
Set up monitoring
Unlike a webhook, a policy is not a dedicated process that can expose its own metrics. Instead, you can use metrics from the API server in their place.
Here are some examples in Prometheus Query Language of common monitoring tasks.
To find the 95th percentile execution duration of the policy shown above.
histogram_quantile(0.95, sum(rate(apiserver_validating_admission_policy_check_duration_seconds_bucket{policy="pod-security.policy.example.com"}[5m])) by (le))
To find the rate of the policy evaluation.
rate(apiserver_validating_admission_policy_check_total{policy="pod-security.policy.example.com"}[5m])
You can read the metrics reference to learn more about the metrics above. The metrics of ValidatingAdmissionPolicy are currently in alpha, and more and better metrics will come while the stability graduates in the future release.
Kubernetes 1.30: Read-only volume mounts can be finally literally read-only
Read-only volume mounts have been a feature of Kubernetes since the beginning. Surprisingly, read-only mounts are not completely read-only under certain conditions on Linux. As of the v1.30 release, they can be made completely read-only, with alpha support for recursive read-only mounts.
Read-only volume mounts are not really read-only by default
Volume mounts can be deceptively complicated.
You might expect that the following manifest makes everything under /mnt in the containers read-only:
---
apiVersion: v1
kind: Pod
spec:
volumes:
- name: mnt
hostPath:
path: /mnt
containers:
- volumeMounts:
- name: mnt
mountPath: /mnt
readOnly: true
However, any sub-mounts beneath /mnt may still be writable!
For example, consider that /mnt/my-nfs-server is writeable on the host.
Inside the container, writes to /mnt/* will be rejected but /mnt/my-nfs-server/* will still be writeable.
New mount option: recursiveReadOnly
Kubernetes 1.30 added a new mount option recursiveReadOnly so as to make submounts recursively read-only.
The option can be enabled as follows:
---
apiVersion: v1
kind: Pod
spec:
volumes:
- name: mnt
hostPath:
path: /mnt
containers:
- volumeMounts:
- name: mnt
mountPath: /mnt
readOnly: true
# NEW
# Possible values are `Enabled`, `IfPossible`, and `Disabled`.
# Needs to be specified in conjunction with `readOnly: true`.
recursiveReadOnly: EnabledThis is implemented by applying the MOUNT_ATTR_RDONLY attribute with the AT_RECURSIVE flag
using mount_setattr(2) added in
Linux kernel v5.12.
For backwards compatibility, the recursiveReadOnly field is not a replacement for readOnly,
but is used in conjunction with it.
To get a properly recursive read-only mount, you must set both fields.
Feature availability
To enable recursiveReadOnly mounts, the following components have to be used:
Kubernetes: v1.30 or later, with the
RecursiveReadOnlyMountsfeature gate enabled. As of v1.30, the gate is marked as alpha.CRI runtime:
- containerd: v2.0 or later
OCI runtime:
- runc: v1.1 or later
- crun: v1.8.6 or later
Linux kernel: v5.12 or later
What's next?
Kubernetes SIG Node hope - and expect - that the feature will be promoted to beta and eventually general availability (GA) in future releases of Kubernetes, so that users no longer need to enable the feature gate manually.
The default value of recursiveReadOnly will still remain Disabled, for backwards compatibility.
How can I learn more?
Please check out the documentation
for the further details of recursiveReadOnly mounts.
How to get involved?
This feature is driven by the SIG Node community. Please join us to connect with the community and share your ideas and feedback around the above feature and beyond. We look forward to hearing from you!
Kubernetes 1.30: Beta Support For Pods With User Namespaces
Linux provides different namespaces to isolate processes from each other. For example, a typical Kubernetes pod runs within a network namespace to isolate the network identity and a PID namespace to isolate the processes.
One Linux namespace that was left behind is the user namespace. This namespace allows us to isolate the user and group identifiers (UIDs and GIDs) we use inside the container from the ones on the host.
This is a powerful abstraction that allows us to run containers as "root": we are root inside the container and can do everything root can inside the pod, but our interactions with the host are limited to what a non-privileged user can do. This is great for limiting the impact of a container breakout.
A container breakout is when a process inside a container can break out onto the host using some unpatched vulnerability in the container runtime or the kernel and can access/modify files on the host or other containers. If we run our pods with user namespaces, the privileges the container has over the rest of the host are reduced, and the files outside the container it can access are limited too.
In Kubernetes v1.25, we introduced support for user namespaces only for stateless pods. Kubernetes 1.28 lifted that restriction, and now, with Kubernetes 1.30, we are moving to beta!
What is a user namespace?
Note: Linux user namespaces are a different concept from Kubernetes namespaces. The former is a Linux kernel feature; the latter is a Kubernetes feature.
User namespaces are a Linux feature that isolates the UIDs and GIDs of the containers from the ones on the host. The identifiers in the container can be mapped to identifiers on the host in a way where the host UID/GIDs used for different containers never overlap. Furthermore, the identifiers can be mapped to unprivileged, non-overlapping UIDs and GIDs on the host. This brings two key benefits:
Prevention of lateral movement: As the UIDs and GIDs for different containers are mapped to different UIDs and GIDs on the host, containers have a harder time attacking each other, even if they escape the container boundaries. For example, suppose container A runs with different UIDs and GIDs on the host than container B. In that case, the operations it can do on container B's files and processes are limited: only read/write what a file allows to others, as it will never have permission owner or group permission (the UIDs/GIDs on the host are guaranteed to be different for different containers).
Increased host isolation: As the UIDs and GIDs are mapped to unprivileged users on the host, if a container escapes the container boundaries, even if it runs as root inside the container, it has no privileges on the host. This greatly protects what host files it can read/write, which process it can send signals to, etc. Furthermore, capabilities granted are only valid inside the user namespace and not on the host, limiting the impact a container escape can have.
User namespace IDs allocation
Without using a user namespace, a container running as root in the case of a container breakout has root privileges on the node. If some capabilities were granted to the container, the capabilities are valid on the host too. None of this is true when using user namespaces (modulo bugs, of course 🙂).
Changes in 1.30
In Kubernetes 1.30, besides moving user namespaces to beta, the contributors working on this feature:
- Introduced a way for the kubelet to use custom ranges for the UIDs/GIDs mapping
- Have added a way for Kubernetes to enforce that the runtime supports all the features needed for user namespaces. If they are not supported, Kubernetes will show a clear error when trying to create a pod with user namespaces. Before 1.30, if the container runtime didn't support user namespaces, the pod could be created without a user namespace.
- Added more tests, including tests in the cri-tools repository.
You can check the documentation on user namespaces for how to configure custom ranges for the mapping.
Demo
A few months ago, CVE-2024-21626 was disclosed. This vulnerability score is 8.6 (HIGH). It allows an attacker to escape a container and read/write to any path on the node and other pods hosted on the same node.
Rodrigo created a demo that exploits CVE 2024-21626 and shows how the exploit, which works without user namespaces, is mitigated when user namespaces are in use.
Please note that with user namespaces, an attacker can do on the host file system what the permission bits for "others" allow. Therefore, the CVE is not completely prevented, but the impact is greatly reduced.
Node system requirements
There are requirements on the Linux kernel version and the container runtime to use this feature.
On Linux you need Linux 6.3 or greater. This is because the feature relies on a kernel feature named idmap mounts, and support for using idmap mounts with tmpfs was merged in Linux 6.3.
Suppose you are using CRI-O with crun; as always, you can expect support for Kubernetes 1.30 with CRI-O 1.30. Please note you also need crun 1.9 or greater. If you are using CRI-O with runc, this is still not supported.
Containerd support is currently targeted for containerd 2.0, and the same crun version requirements apply. If you are using containerd with runc, this is still not supported.
Please note that containerd 1.7 added experimental support for user namespaces, as implemented in Kubernetes 1.25 and 1.26. We did a redesign in Kubernetes 1.27, which requires changes in the container runtime. Those changes are not present in containerd 1.7, so it only works with user namespaces support in Kubernetes 1.25 and 1.26.
Another limitation of containerd 1.7 is that it needs to change the ownership of every file and directory inside the container image during Pod startup. This has a storage overhead and can significantly impact the container startup latency. Containerd 2.0 will probably include an implementation that will eliminate the added startup latency and storage overhead. Consider this if you plan to use containerd 1.7 with user namespaces in production.
None of these containerd 1.7 limitations apply to CRI-O.
How do I get involved?
You can reach SIG Node by several means:
You can also contact us directly:
- GitHub: @rata @giuseppe @saschagrunert
- Slack: @rata @giuseppe @sascha
Kubernetes v1.30: Uwubernetes
Editors: Amit Dsouza, Frederick Kautz, Kristin Martin, Abigail McCarthy, Natali Vlatko
Announcing the release of Kubernetes v1.30: Uwubernetes, the cutest release!
Similar to previous releases, the release of Kubernetes v1.30 introduces new stable, beta, and alpha features. The consistent delivery of top-notch releases underscores the strength of our development cycle and the vibrant support from our community.
This release consists of 45 enhancements. Of those enhancements, 17 have graduated to Stable, 18 are entering Beta, and 10 have graduated to Alpha.
Release theme and logo
Kubernetes v1.30: Uwubernetes

Kubernetes v1.30 makes your clusters cuter!
Kubernetes is built and released by thousands of people from all over the world and all walks of life. Most contributors are not being paid to do this; we build it for fun, to solve a problem, to learn something, or for the simple love of the community. Many of us found our homes, our friends, and our careers here. The Release Team is honored to be a part of the continued growth of Kubernetes.
For the people who built it, for the people who release it, and for the furries who keep all of our clusters online, we present to you Kubernetes v1.30: Uwubernetes, the cutest release to date. The name is a portmanteau of “kubernetes” and “UwU,” an emoticon used to indicate happiness or cuteness. We’ve found joy here, but we’ve also brought joy from our outside lives that helps to make this community as weird and wonderful and welcoming as it is. We’re so happy to share our work with you.
UwU ♥️
Improvements that graduated to stable in Kubernetes v1.30
This is a selection of some of the improvements that are now stable following the v1.30 release.
Robust VolumeManager reconstruction after kubelet restart (SIG Storage)
This is a volume manager refactoring that allows the kubelet to populate additional information about how existing volumes are mounted during the kubelet startup. In general, this makes volume cleanup after kubelet restart or machine reboot more robust.
This does not bring any changes for user or cluster administrators. We used the feature process and
feature gate NewVolumeManagerReconstruction to be able to fall back to the previous behavior in
case something goes wrong. Now that the feature is stable, the feature gate is locked and cannot be
disabled.
Prevent unauthorized volume mode conversion during volume restore (SIG Storage)
For Kubernetes v1.30, the control plane always prevents unauthorized changes to volume modes when restoring a snapshot into a PersistentVolume. As a cluster administrator, you'll need to grant permissions to the appropriate identity principals (for example: ServiceAccounts representing a storage integration) if you need to allow that kind of change at restore time.
Warning:
Action required before upgrading. Theprevent-volume-mode-conversion feature flag is enabled by
default in the external-provisioner v4.0.0 and external-snapshotter v7.0.0. Volume mode change
will be rejected when creating a PVC from a VolumeSnapshot unless you perform the steps described in
the "Urgent Upgrade Notes" sections for the external-provisioner
4.0.0 and the
external-snapshotter
v7.0.0.For more information on this feature also read converting the volume mode of a Snapshot.
Pod Scheduling Readiness (SIG Scheduling)
Pod scheduling readiness graduates to stable this release, after being promoted to beta in Kubernetes v1.27.
This now-stable feature lets Kubernetes avoid trying to schedule a Pod that has been defined, when the cluster doesn't yet have the resources provisioned to allow actually binding that Pod to a node. That's not the only use case; the custom control on whether a Pod can be allowed to schedule also lets you implement quota mechanisms, security controls, and more.
Crucially, marking these Pods as exempt from scheduling cuts the work that the scheduler would otherwise do, churning through Pods that can't or won't schedule onto the nodes your cluster currently has. If you have cluster autoscaling active, using scheduling gates doesn't just cut the load on the scheduler, it can also save money. Without scheduling gates, the autoscaler might otherwise launch a node that doesn't need to be started.
In Kubernetes v1.30, by specifying (or removing) a Pod's .spec.schedulingGates, you can control
when a Pod is ready to be considered for scheduling. This is a stable feature and is now formally
part of the Kubernetes API definition for Pod.
Min domains in PodTopologySpread (SIG Scheduling)
The minDomains parameter for PodTopologySpread constraints graduates to stable this release, which
allows you to define the minimum number of domains. This feature is designed to be used with Cluster
Autoscaler.
If you previously attempted use and there weren't enough domains already present, Pods would be marked as unschedulable. The Cluster Autoscaler would then provision node(s) in new domain(s), and you'd eventually get Pods spreading over enough domains.
Go workspaces for k/k (SIG Architecture)
The Kubernetes repo now uses Go workspaces. This should not impact end users at all, but does have a
impact for developers of downstream projects. Switching to workspaces caused some breaking changes
in the flags to the various k8s.io/code-generator
tools. Downstream consumers should look at
staging/src/k8s.io/code-generator/kube_codegen.sh
to see the changes.
For full details on the changes and reasons why Go workspaces was introduced, read Using Go workspaces in Kubernetes.
Improvements that graduated to beta in Kubernetes v1.30
This is a selection of some of the improvements that are now beta following the v1.30 release.
Node log query (SIG Windows)
To help with debugging issues on nodes, Kubernetes v1.27 introduced a feature that allows fetching
logs of services running on the node. To use the feature, ensure that the NodeLogQuery feature
gate is enabled for that node, and that the kubelet configuration options enableSystemLogHandler
and enableSystemLogQuery are both set to true.
Following the v1.30 release, this is now beta (you still need to enable the feature to use it, though).
On Linux the assumption is that service logs are available via journald. On Windows the assumption
is that service logs are available in the application log provider. Logs are also available by
reading files within /var/log/ (Linux) or C:\var\log\ (Windows). For more information, see the
log query documentation.
CRD validation ratcheting (SIG API Machinery)
You need to enable the CRDValidationRatcheting feature
gate to use this behavior, which then
applies to all CustomResourceDefinitions in your cluster.
Provided you enabled the feature gate, Kubernetes implements validation ratcheting for CustomResourceDefinitions. The API server is willing to accept updates to resources that are not valid after the update, provided that each part of the resource that failed to validate was not changed by the update operation. In other words, any invalid part of the resource that remains invalid must have already been wrong. You cannot use this mechanism to update a valid resource so that it becomes invalid.
This feature allows authors of CRDs to confidently add new validations to the OpenAPIV3 schema under certain conditions. Users can update to the new schema safely without bumping the version of the object or breaking workflows.
Contextual logging (SIG Instrumentation)
Contextual Logging advances to beta in this release, empowering developers and operators to inject
customizable, correlatable contextual details like service names and transaction IDs into logs
through WithValues and WithName. This enhancement simplifies the correlation and analysis of log
data across distributed systems, significantly improving the efficiency of troubleshooting efforts.
By offering a clearer insight into the workings of your Kubernetes environments, Contextual Logging
ensures that operational challenges are more manageable, marking a notable step forward in
Kubernetes observability.
Make Kubernetes aware of the LoadBalancer behaviour (SIG Network)
The LoadBalancerIPMode feature gate is now beta and is now enabled by default. This feature allows
you to set the .status.loadBalancer.ingress.ipMode for a Service with type set to
LoadBalancer. The .status.loadBalancer.ingress.ipMode specifies how the load-balancer IP
behaves. It may be specified only when the .status.loadBalancer.ingress.ip field is also
specified. See more details about specifying IPMode of load balancer
status.
Structured Authentication Configuration (SIG Auth)
Structured Authentication Configuration graduates to beta in this release.
Kubernetes has had a long-standing need for a more flexible and extensible authentication system. The current system, while powerful, has some limitations that make it difficult to use in certain scenarios. For example, it is not possible to use multiple authenticators of the same type (e.g., multiple JWT authenticators) or to change the configuration without restarting the API server. The Structured Authentication Configuration feature is the first step towards addressing these limitations and providing a more flexible and extensible way to configure authentication in Kubernetes. See more details about structured authentication configuration.
Structured Authorization Configuration (SIG Auth)
Structured Authorization Configuration graduates to beta in this release.
Kubernetes continues to evolve to meet the intricate requirements of system administrators and developers alike. A critical aspect of Kubernetes that ensures the security and integrity of the cluster is the API server authorization. Until recently, the configuration of the authorization chain in kube-apiserver was somewhat rigid, limited to a set of command-line flags and allowing only a single webhook in the authorization chain. This approach, while functional, restricted the flexibility needed by cluster administrators to define complex, fine-grained authorization policies. The latest Structured Authorization Configuration feature aims to revolutionize this aspect by introducing a more structured and versatile way to configure the authorization chain, focusing on enabling multiple webhooks and providing explicit control mechanisms. See more details about structured authorization configuration.
New alpha features
Speed up recursive SELinux label change (SIG Storage)
From the v1.27 release, Kubernetes already included an optimization that sets SELinux labels on the contents of volumes, using only constant time. Kubernetes achieves that speed up using a mount option. The slower legacy behavior requires the container runtime to recursively walk through the whole volumes and apply SELinux labelling individually to each file and directory; this is especially noticable for volumes with large amount of files and directories.
Kubernetes v1.27 graduated this feature as beta, but limited it to ReadWriteOncePod volumes. The
corresponding feature gate is SELinuxMountReadWriteOncePod. It's still enabled by default and
remains beta in v1.30.
Kubernetes v1.30 extends support for SELinux mount option to all volumes as alpha, with a
separate feature gate: SELinuxMount. This feature gate introduces a behavioral change when
multiple Pods with different SELinux labels share the same volume. See
KEP
for details.
We strongly encourage users that run Kubernetes with SELinux enabled to test this feature and provide any feedback on the KEP issue.
| Feature gate | Stage in v1.30 | Behavior change |
|---|---|---|
| SELinuxMountReadWriteOncePod | Beta | No |
| SELinuxMount | Alpha | Yes |
Both feature gates SELinuxMountReadWriteOncePod and SELinuxMount must be enabled to test this
feature on all volumes.
This feature has no effect on Windows nodes or on Linux nodes without SELinux support.
Recursive Read-only (RRO) mounts (SIG Node)
Introducing Recursive Read-Only (RRO) Mounts in alpha this release, you'll find a new layer of security for your data. This feature lets you set volumes and their submounts as read-only, preventing accidental modifications. Imagine deploying a critical application where data integrity is key—RRO Mounts ensure that your data stays untouched, reinforcing your cluster's security with an extra safeguard. This is especially crucial in tightly controlled environments, where even the slightest change can have significant implications.
Job success/completion policy (SIG Apps)
From Kubernetes v1.30, indexed Jobs support .spec.successPolicy to define when a Job can be
declared succeeded based on succeeded Pods. This allows you to define two types of criteria:
succeededIndexesindicates that the Job can be declared succeeded when these indexes succeeded, even if other indexes failed.succeededCountindicates that the Job can be declared succeeded when the number of succeeded Indexes reaches this criterion.
After the Job meets the success policy, the Job controller terminates the lingering Pods.
Traffic distribution for services (SIG Network)
Kubernetes v1.30 introduces the spec.trafficDistribution field within a Kubernetes Service as
alpha. This allows you to express preferences for how traffic should be routed to Service endpoints.
While traffic policies focus on strict
semantic guarantees, traffic distribution allows you to express preferences (such as routing to
topologically closer endpoints). This can help optimize for performance, cost, or reliability. You
can use this field by enabling the ServiceTrafficDistribution feature gate for your cluster and
all of its nodes. In Kubernetes v1.30, the following field value is supported:
PreferClose: Indicates a preference for routing traffic to endpoints that are topologically
proximate to the client. The interpretation of "topologically proximate" may vary across
implementations and could encompass endpoints within the same node, rack, zone, or even region.
Setting this value gives implementations permission to make different tradeoffs, for example
optimizing for proximity rather than equal distribution of load. You should not set this value if
such tradeoffs are not acceptable.
If the field is not set, the implementation (like kube-proxy) will apply its default routing strategy.
See Traffic Distribution for more details.
Storage Version Migration (SIG API Machinery)
Kubernetes v1.30 introduces a new built-in API for StorageVersionMigration. Kubernetes relies on API data being actively re-written, to support some maintenance activities related to at rest storage. Two prominent examples are the versioned schema of stored resources (that is, the preferred storage schema changing from v1 to v2 for a given resource) and encryption at rest (that is, rewriting stale data based on a change in how the data should be encrypted).
StorageVersionMigration is alpha API which was available out of tree before.
See storage version migration for more details.
Graduations, deprecations and removals for Kubernetes v1.30
Graduated to stable
This lists all the features that graduated to stable (also known as general availability). For a full list of updates including new features and graduations from alpha to beta, see the release notes.
This release includes a total of 17 enhancements promoted to Stable:
- Container Resource based Pod Autoscaling
- Remove transient node predicates from KCCM's service controller
- Go workspaces for k/k
- Reduction of Secret-based Service Account Tokens
- CEL for Admission Control
- CEL-based admission webhook match conditions
- Pod Scheduling Readiness
- Min domains in PodTopologySpread
- Prevent unauthorised volume mode conversion during volume restore
- API Server Tracing
- Cloud Dual-Stack --node-ip Handling
- AppArmor support
- Robust VolumeManager reconstruction after kubelet restart
- kubectl delete: Add interactive(-i) flag
- Metric cardinality enforcement
- Field
status.hostIPsadded for Pod - Aggregated Discovery
Deprecations and removals
Removed the SecurityContextDeny admission plugin, deprecated since v1.27
(SIG Auth, SIG Security, and SIG Testing) With the removal of the SecurityContextDeny admission plugin, the Pod Security Admission plugin, available since v1.25, is recommended instead.
Release notes
Check out the full details of the Kubernetes v1.30 release in our release notes.
Availability
Kubernetes v1.30 is available for download on GitHub. To get started with Kubernetes, check out these interactive tutorials or run local Kubernetes clusters using minikube. You can also easily install v1.30 using kubeadm.
Release team
Kubernetes is only possible with the support, commitment, and hard work of its community. Each release team is made up of dedicated community volunteers who work together to build the many pieces that make up the Kubernetes releases you rely on. This requires the specialized skills of people from all corners of our community, from the code itself to its documentation and project management.
We would like to thank the entire release team for the hours spent hard at work to deliver the Kubernetes v1.30 release to our community. The Release Team's membership ranges from first-time shadows to returning team leads with experience forged over several release cycles. A very special thanks goes out our release lead, Kat Cosgrove, for supporting us through a successful release cycle, advocating for us, making sure that we could all contribute in the best way possible, and challenging us to improve the release process.
Project velocity
The CNCF K8s DevStats project aggregates a number of interesting data points related to the velocity of Kubernetes and various sub-projects. This includes everything from individual contributions to the number of companies that are contributing and is an illustration of the depth and breadth of effort that goes into evolving this ecosystem.
In the v1.30 release cycle, which ran for 14 weeks (January 8 to April 17), we saw contributions from 863 companies and 1391 individuals.
Event update
- KubeCon + CloudNativeCon China 2024 will take place in Hong Kong, from 21 – 23 August 2024! You can find more information about the conference and registration on the event site.
- KubeCon + CloudNativeCon North America 2024 will take place in Salt Lake City, Utah, The United States of America, from 12 – 15 November 2024! You can find more information about the conference and registration on the eventsite.
Upcoming release webinar
Join members of the Kubernetes v1.30 release team on Thursday, May 23rd, 2024, at 9 A.M. PT to learn about the major features of this release, as well as deprecations and removals to help plan for upgrades. For more information and registration, visit the event page on the CNCF Online Programs site.
Get involved
The simplest way to get involved with Kubernetes is by joining one of the many Special Interest Groups (SIGs) that align with your interests. Have something you’d like to broadcast to the Kubernetes community? Share your voice at our weekly community meeting, and through the channels below. Thank you for your continued feedback and support.
- Follow us on 𝕏 @Kubernetesio for latest updates
- Join the community discussion on Discuss
- Join the community on Slack
- Post questions (or answer questions) on Stack Overflow
- Share your Kubernetes story
- Read more about what’s happening with Kubernetes on the blog
- Learn more about the Kubernetes Release Team
This blog was updated on April 19th, 2024 to highlight two additional changes not originally included in the release blog.
Spotlight on SIG Architecture: Code Organization
This is the third interview of a SIG Architecture Spotlight series that will cover the different subprojects. We will cover SIG Architecture: Code Organization.
In this SIG Architecture spotlight I talked with Madhav Jivrajani (VMware), a member of the Code Organization subproject.
Introducing the Code Organization subproject
Frederico (FSM): Hello Madhav, thank you for your availability. Could you start by telling us a bit about yourself, your role and how you got involved in Kubernetes?
Madhav Jivrajani (MJ): Hello! My name is Madhav Jivrajani, I serve as a technical lead for SIG Contributor Experience and a GitHub Admin for the Kubernetes project. Apart from that I also contribute to SIG API Machinery and SIG Etcd, but more recently, I’ve been helping out with the work that is needed to help Kubernetes stay on supported versions of Go, and it is through this that I am involved with the Code Organization subproject of SIG Architecture.
FSM: A project the size of Kubernetes must have unique challenges in terms of code organization -- is this a fair assumption? If so, what would you pick as some of the main challenges that are specific to Kubernetes?
MJ: That’s a fair assumption! The first interesting challenge comes from the sheer size of the Kubernetes codebase. We have ≅2.2 million lines of Go code (which is steadily decreasing thanks to dims and other folks in this sub-project!), and a little over 240 dependencies that we rely on either directly or indirectly, which is why having a sub-project dedicated to helping out with dependency management is crucial: we need to know what dependencies we’re pulling in, what versions these dependencies are at, and tooling to help make sure we are managing these dependencies across different parts of the codebase in a consistent manner.
Another interesting challenge with Kubernetes is that we publish a lot of Go modules as part of the
Kubernetes release cycles, one example of this is
client-go.However, we as a project would also like the
benefits of having everything in one repository to get the advantages of using a monorepo, like
atomic commits... so, because of this, code organization works with other SIGs (like SIG Release) to
automate the process of publishing code from the monorepo to downstream individual repositories
which are much easier to consume, and this way you won’t have to import the entire Kubernetes
codebase!
Code organization and Kubernetes
FSM: For someone just starting contributing to Kubernetes code-wise, what are the main things they should consider in terms of code organization? How would you sum up the key concepts?
MJ: I think one of the key things to keep in mind at least as you’re starting off is the concept
of staging directories. In the kubernetes/kubernetes
repository, you will come across a directory called
staging/. The sub-folders in this
directory serve as a bunch of pseudo-repositories. For example, the
kubernetes/client-go repository that publishes releases
for client-go is actually a staging
repo.
FSM: So the concept of staging directories fundamentally impact contributions?
MJ: Precisely, because if you’d like to contribute to any of the staging repos, you will need to
send in a PR to its corresponding staging directory in kubernetes/kubernetes. Once the code merges
there, we have a bot called the publishing-bot
that will sync the merged commits to the required staging repositories (like
kubernetes/client-go). This way we get the benefits of a monorepo but we also can modularly
publish code for downstream consumption. PS: The publishing-bot needs more folks to help out!
For more information on staging repositories, please see the contributor documentation.
FSM: Speaking of contributions, the very high number of contributors, both individuals and companies, must also be a challenge: how does the subproject operate in terms of making sure that standards are being followed?
MJ: When it comes to dependency management in the project, there is a dedicated
team
that helps review and approve dependency changes. These are folks who have helped lay the foundation
of much of the
tooling
that Kubernetes uses today for dependency management. This tooling helps ensure there is a
consistent way that contributors can make changes to dependencies. The project has also worked on
additional tooling to signal statistics of dependencies that is being added or removed:
depstat
Apart from dependency management, another crucial task that the project does is management of the
staging repositories. The tooling for achieving this (publishing-bot) is completely transparent to
contributors and helps ensure that the staging repos get a consistent view of contributions that are
submitted to kubernetes/kubernetes.
Code Organization also works towards making sure that Kubernetes stays on supported versions of Go. The linked KEP provides more context on why we need to do this. We collaborate with SIG Release to ensure that we are testing Kubernetes as rigorously and as early as we can on Go releases and working on changes that break our CI as a part of this. An example of how we track this process can be found here.
Release cycle and current priorities
FSM: Is there anything that changes during the release cycle?
MJ During the release cycle, specifically before code freeze, there are often changes that go in that add/update/delete dependencies, fix code that needs fixing as part of our effort to stay on supported versions of Go.
Furthermore, some of these changes are also candidates for backporting to our supported release branches.
FSM: Is there any major project or theme the subproject is working on right now that you would like to highlight?
MJ: I think one very interesting and immensely useful change that has been recently added (and I take the opportunity to specifically highlight the work of Tim Hockin on this) is the introduction of Go workspaces to the Kubernetes repo. A lot of our current tooling for dependency management and code publishing, as well as the experience of editing code in the Kubernetes repo, can be significantly improved by this change.
Wrapping up
FSM: How would someone interested in the topic start helping the subproject?
MJ: The first step, as is the first step with any project in Kubernetes, is to join our slack:
slack.k8s.io, and after that join the #k8s-code-organization channel. There is also a
code-organization office
hours that takes
place that you can choose to attend. Timezones are hard, so feel free to also look at the recordings
or meeting notes and follow up on slack!
FSM: Excellent, thank you! Any final comments you would like to share?
MJ: The Code Organization subproject always needs help! Especially areas like the publishing
bot, so don’t hesitate to get involved in the #k8s-code-organization Slack channel.
DIY: Create Your Own Cloud with Kubernetes (Part 3)
Approaching the most interesting phase, this article delves into running Kubernetes within Kubernetes. Technologies such as Kamaji and Cluster API are highlighted, along with their integration with KubeVirt.
Previous discussions have covered preparing Kubernetes on bare metal and how to turn Kubernetes into virtual machines management system. This article concludes the series by explaining how, using all of the above, you can build a full-fledged managed Kubernetes and run virtual Kubernetes clusters with just a click.
First up, let's dive into the Cluster API.
Cluster API
Cluster API is an extension for Kubernetes that allows the management of Kubernetes clusters as custom resources within another Kubernetes cluster.
The main goal of the Cluster API is to provide a unified interface for describing the basic entities of a Kubernetes cluster and managing their lifecycle. This enables the automation of processes for creating, updating, and deleting clusters, simplifying scaling, and infrastructure management.
Within the context of Cluster API, there are two terms: management cluster and tenant clusters.
- Management cluster is a Kubernetes cluster used to deploy and manage other clusters. This cluster contains all the necessary Cluster API components and is responsible for describing, creating, and updating tenant clusters. It is often used just for this purpose.
- Tenant clusters are the user clusters or clusters deployed using the Cluster API. They are created by describing the relevant resources in the management cluster. They are then used for deploying applications and services by end-users.
It's important to understand that physically, tenant clusters do not necessarily have to run on the same infrastructure with the management cluster; more often, they are running elsewhere.
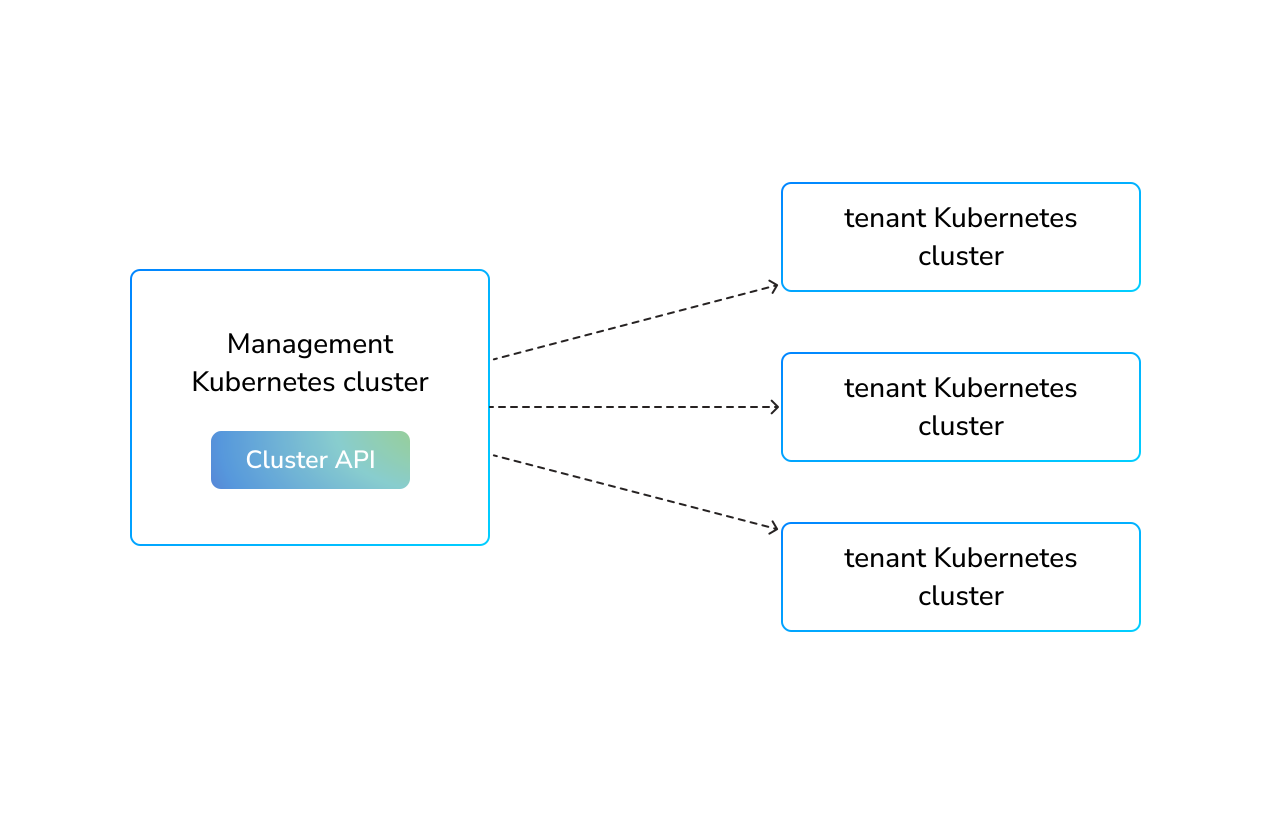
A diagram showing interaction of management Kubernetes cluster and tenant Kubernetes clusters using Cluster API
For its operation, Cluster API utilizes the concept of providers which are separate controllers responsible for specific components of the cluster being created. Within Cluster API, there are several types of providers. The major ones are:
- Infrastructure Provider, which is responsible for providing the computing infrastructure, such as virtual machines or physical servers.
- Control Plane Provider, which provides the Kubernetes control plane, namely the components kube-apiserver, kube-scheduler, and kube-controller-manager.
- Bootstrap Provider, which is used for generating cloud-init configuration for the virtual machines and servers being created.
To get started, you will need to install the Cluster API itself and one provider of each type. You can find a complete list of supported providers in the project's documentation.
For installation, you can use the clusterctl utility, or
Cluster API Operator
as the more declarative method.
Choosing providers
Infrastructure provider
To run Kubernetes clusters using KubeVirt, the KubeVirt Infrastructure Provider must be installed. It enables the deployment of virtual machines for worker nodes in the same management cluster, where the Cluster API operates.
Control plane provider
The Kamaji project offers a ready solution for running the Kubernetes control plane for tenant clusters as containers within the management cluster. This approach has several significant advantages:
- Cost-effectiveness: Running the control plane in containers avoids the use of separate control plane nodes for each cluster, thereby significantly reducing infrastructure costs.
- Stability: Simplifying architecture by eliminating complex multi-layered deployment schemes. Instead of sequentially launching a virtual machine and then installing etcd and Kubernetes components inside it, there's a simple control plane that is deployed and run as a regular application inside Kubernetes and managed by an operator.
- Security: The cluster's control plane is hidden from the end user, reducing the possibility of its components being compromised, and also eliminates user access to the cluster's certificate store. This approach to organizing a control plane invisible to the user is often used by cloud providers.
Bootstrap provider
Kubeadm as the Bootstrap Provider - as the standard method for preparing clusters in Cluster API. This provider is developed as part of the Cluster API itself. It requires only a prepared system image with kubelet and kubeadm installed and allows generating configs in the cloud-init and ignition formats.
It's worth noting that Talos Linux also supports provisioning via the Cluster API and has providers for this. Although previous articles discussed using Talos Linux to set up a management cluster on bare-metal nodes, to provision tenant clusters the Kamaji+Kubeadm approach has more advantages. It facilitates the deployment of Kubernetes control planes in containers, thus removing the need for separate virtual machines for control plane instances. This simplifies the management and reduces costs.
How it works
The primary object in Cluster API is the Cluster resource, which acts as the parent for all the others. Typically, this resource references two others: a resource describing the control plane and a resource describing the infrastructure, each managed by a separate provider.
Unlike the Cluster, these two resources are not standardized, and their kind depends on the specific provider you are using:
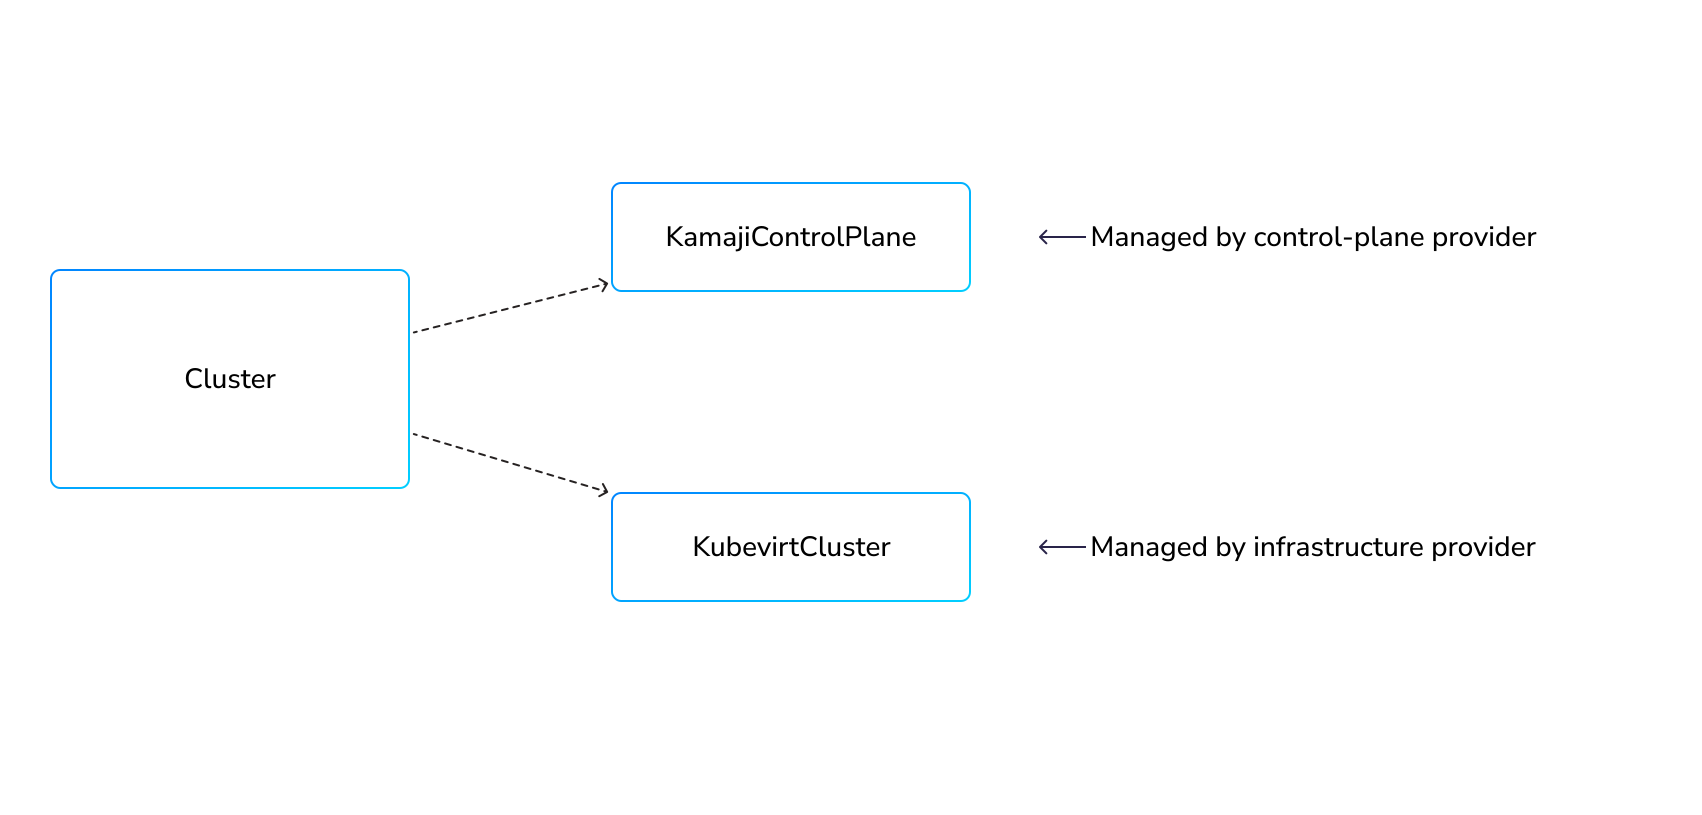
A diagram showing the relationship of a Cluster resource and the resources it links to in Cluster API
Within Cluster API, there is also a resource named MachineDeployment, which describes a group of nodes, whether they are physical servers or virtual machines. This resource functions similarly to standard Kubernetes resources such as Deployment, ReplicaSet, and Pod, providing a mechanism for the declarative description of a group of nodes and automatic scaling.
In other words, the MachineDeployment resource allows you to declaratively describe nodes for your cluster, automating their creation, deletion, and updating according to specified parameters and the requested number of replicas.
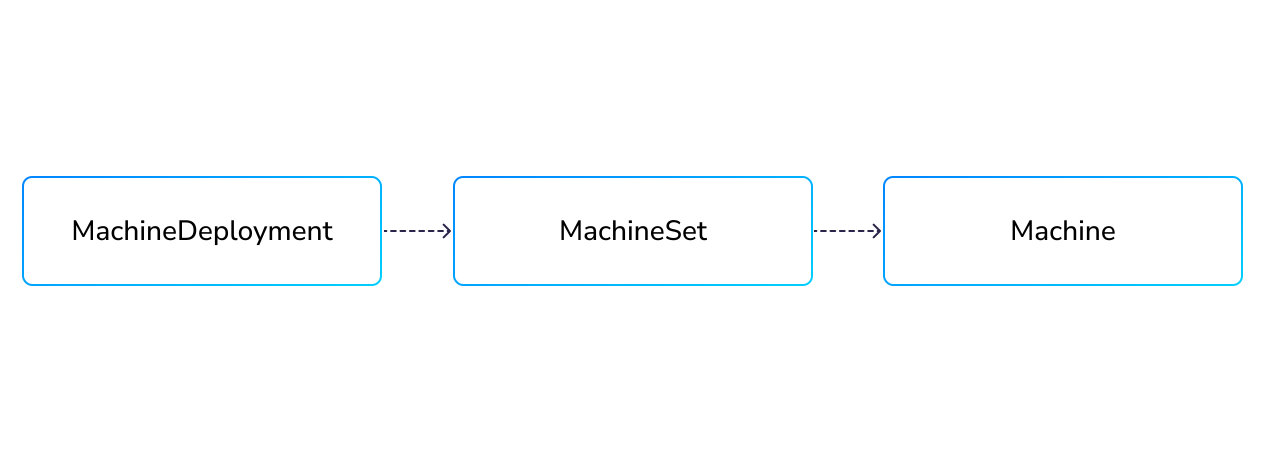
A diagram showing the relationship of a MachineDeployment resource and its children in Cluster API
To create machines, MachineDeployment refers to a template for generating the machine itself and a template for generating its cloud-init config:
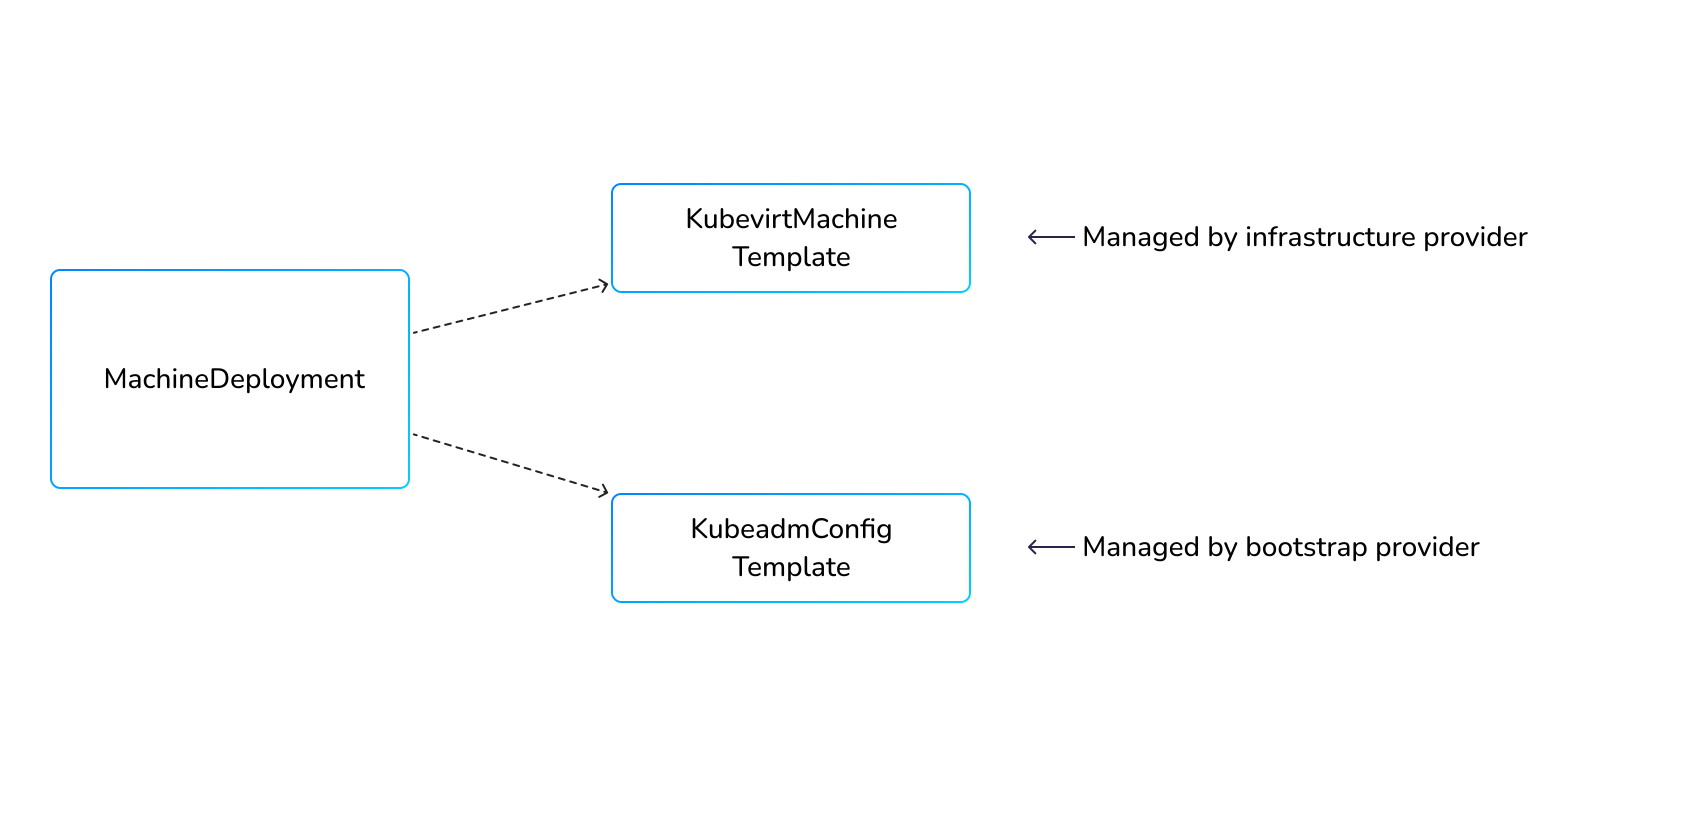
A diagram showing the relationship of a MachineDeployment resource and the resources it links to in Cluster API
To deploy a new Kubernetes cluster using Cluster API, you will need to prepare the following set of resources:
- A general Cluster resource
- A KamajiControlPlane resource, responsible for the control plane operated by Kamaji
- A KubevirtCluster resource, describing the cluster configuration in KubeVirt
- A KubevirtMachineTemplate resource, responsible for the virtual machine template
- A KubeadmConfigTemplate resource, responsible for generating tokens and cloud-init
- At least one MachineDeployment to create some workers
Polishing the cluster
In most cases, this is sufficient, but depending on the providers used, you may need other resources as well. You can find examples of the resources created for each type of provider in the Kamaji project documentation.
At this stage, you already have a ready tenant Kubernetes cluster, but so far, it contains nothing but API workers and a few core plugins that are standardly included in the installation of any Kubernetes cluster: kube-proxy and CoreDNS. For full integration, you will need to install several more components:
To install additional components, you can use a separate Cluster API Add-on Provider for Helm, or the same FluxCD discussed in previous articles.
When creating resources in FluxCD, it's possible to specify the target cluster by referring to the kubeconfig generated by Cluster API. Then, the installation will be performed directly into it. Thus, FluxCD becomes a universal tool for managing resources both in the management cluster and in the user tenant clusters.
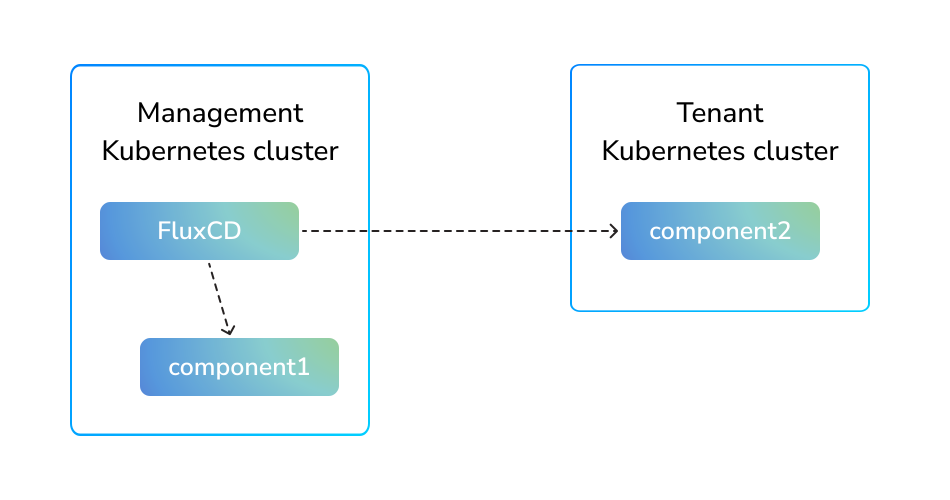
A diagram showing the interaction scheme of fluxcd, which can install components in both management and tenant Kubernetes clusters
What components are being discussed here? Generally, the set includes the following:
CNI Plugin
To ensure communication between pods in a tenant Kubernetes cluster, it's necessary to deploy a CNI plugin. This plugin creates a virtual network that allows pods to interact with each other and is traditionally deployed as a Daemonset on the cluster's worker nodes. You can choose and install any CNI plugin that you find suitable.
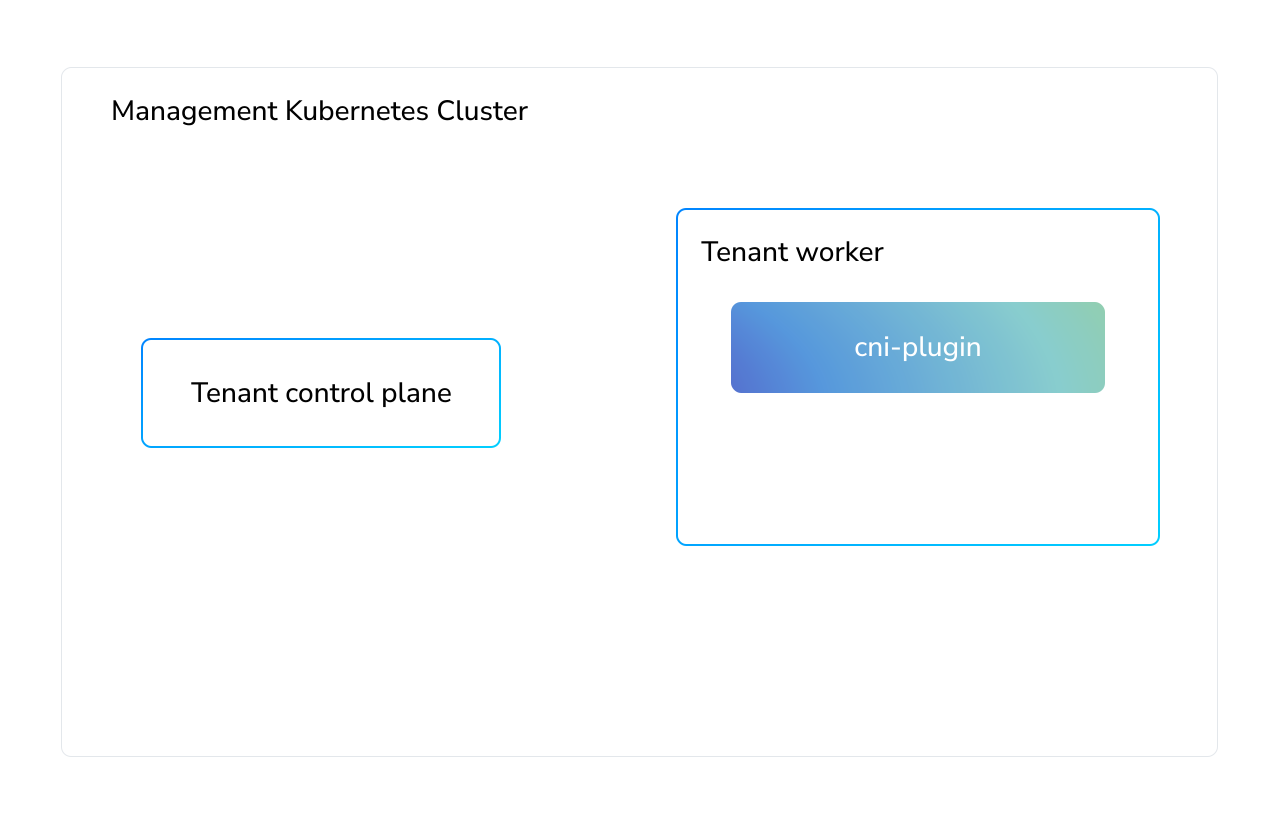
A diagram showing a CNI plugin installed inside the tenant Kubernetes cluster on a scheme of nested Kubernetes clusters
Cloud Controller Manager
The main task of the Cloud Controller Manager (CCM) is to integrate Kubernetes with the cloud infrastructure provider's environment (in your case, it is the management Kubernetes cluster in which all worksers of tenant Kubernetes are provisioned). Here are some tasks it performs:
- When a service of type LoadBalancer is created, the CCM initiates the process of creating a cloud load balancer, which directs traffic to your Kubernetes cluster.
- If a node is removed from the cloud infrastructure, the CCM ensures its removal from your cluster as well, maintaining the cluster's current state.
- When using the CCM, nodes are added to the cluster with a special taint,
node.cloudprovider.kubernetes.io/uninitialized, which allows for the processing of additional business logic if necessary. After successful initialization, this taint is removed from the node.
Depending on the cloud provider, the CCM can operate both inside and outside the tenant cluster.
The KubeVirt Cloud Provider is designed to be installed in the external parent management cluster. Thus, creating services of type LoadBalancer in the tenant cluster initiates the creation of LoadBalancer services in the parent cluster, which direct traffic into the tenant cluster.
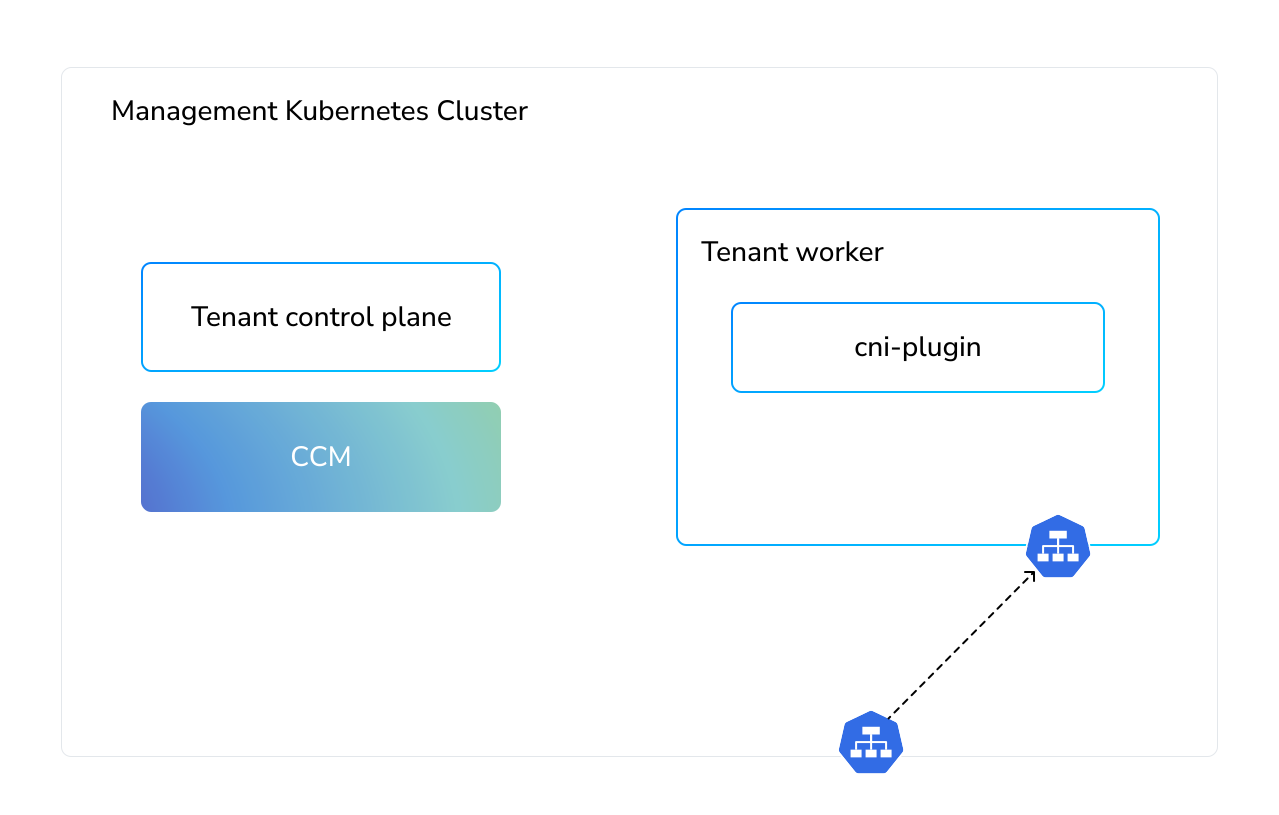
A diagram showing a Cloud Controller Manager installed outside of a tenant Kubernetes cluster on a scheme of nested Kubernetes clusters and the mapping of services it manages from the parent to the child Kubernetes cluster
CSI Driver
The Container Storage Interface (CSI) is divided into two main parts for interacting with storage in Kubernetes:
- csi-controller: This component is responsible for interacting with the cloud provider's API to create, delete, attach, detach, and resize volumes.
- csi-node: This component runs on each node and facilitates the mounting of volumes to pods as requested by kubelet.
In the context of using the KubeVirt CSI Driver, a unique opportunity arises. Since virtual machines in KubeVirt runs within the management Kubernetes cluster, where a full-fledged Kubernetes API is available, this opens the path for running the csi-controller outside of the user's tenant cluster. This approach is popular in the KubeVirt community and offers several key advantages:
- Security: This method hides the internal cloud API from the end-user, providing access to resources exclusively through the Kubernetes interface. Thus, it reduces the risk of direct access to the management cluster from user clusters.
- Simplicity and Convenience: Users don't need to manage additional controllers in their clusters, simplifying the architecture and reducing the management burden.
However, the CSI-node must necessarily run inside the tenant cluster, as it directly interacts with kubelet on each node. This component is responsible for the mounting and unmounting of volumes into pods, requiring close integration with processes occurring directly on the cluster nodes.
The KubeVirt CSI Driver acts as a proxy for ordering volumes. When a PVC is created inside the tenant cluster, a PVC is created in the management cluster, and then the created PV is connected to the virtual machine.
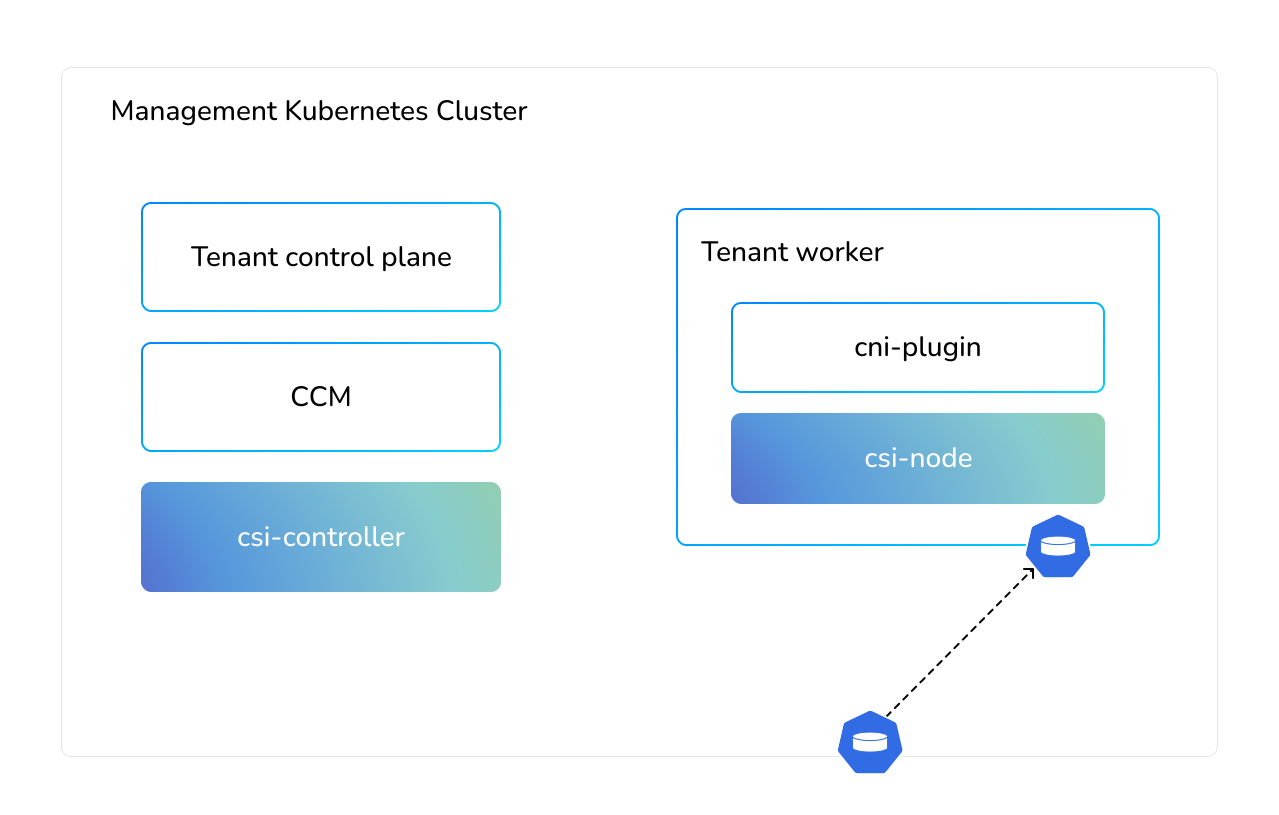
A diagram showing a CSI plugin components installed on both inside and outside of a tenant Kubernetes cluster on a scheme of nested Kubernetes clusters and the mapping of persistent volumes it manages from the parent to the child Kubernetes cluster
Cluster Autoscaler
The Cluster Autoscaler is a versatile component that can work with various cloud APIs, and its integration with Cluster-API is just one of the available functions. For proper configuration, it requires access to two clusters: the tenant cluster, to track pods and determine the need for adding new nodes, and the managing Kubernetes cluster (management kubernetes cluster), where it interacts with the MachineDeployment resource and adjusts the number of replicas.
Although Cluster Autoscaler usually runs inside the tenant Kubernetes cluster, in this situation, it is suggested to install it outside for the same reasons described before. This approach is simpler to maintain and more secure as it prevents users of tenant clusters from accessing the management API of the management cluster.
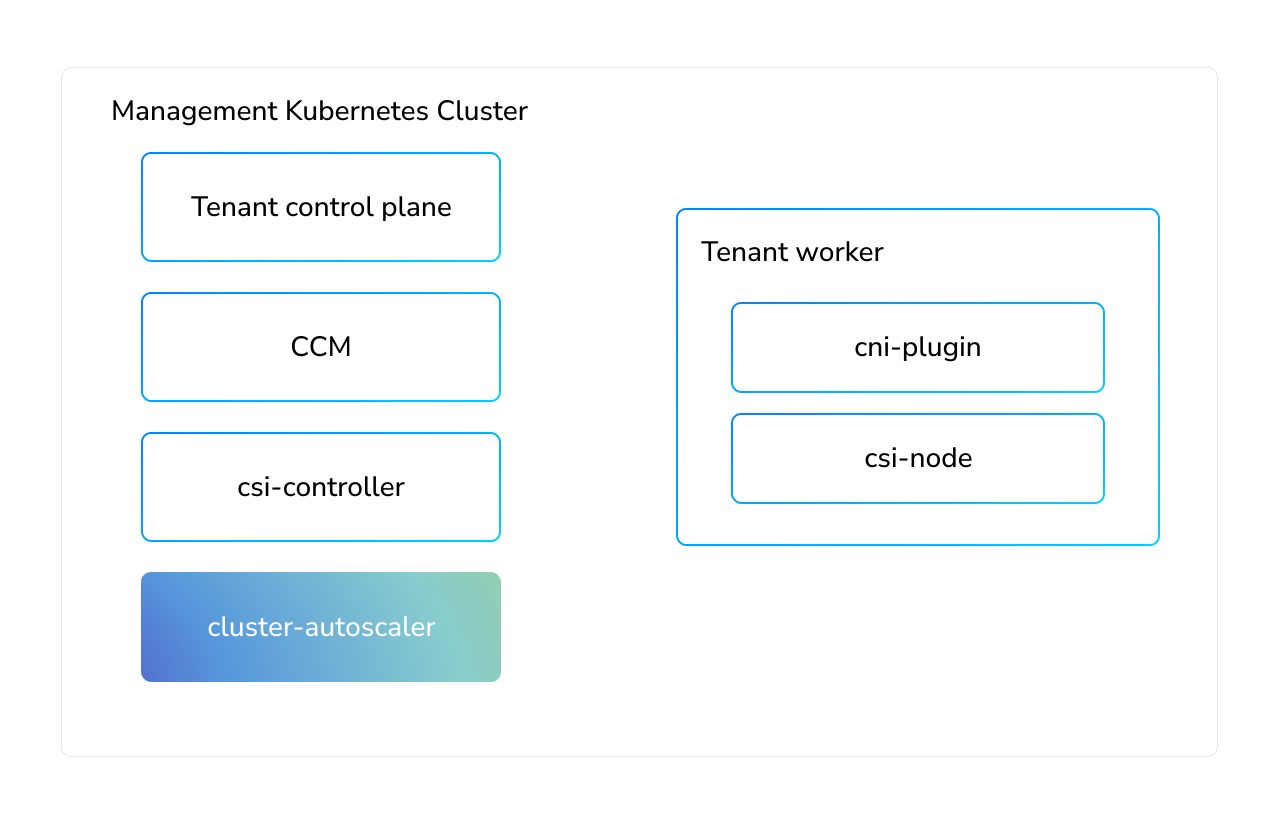
A diagram showing a Cluster Autoscaler installed outside of a tenant Kubernetes cluster on a scheme of nested Kubernetes clusters
Konnectivity
There's another additional component I'd like to mention - Konnectivity. You will likely need it later on to get webhooks and the API aggregation layer working in your tenant Kubernetes cluster. This topic is covered in detail in one of my previous article.
Unlike the components presented above, Kamaji allows you to easily enable Konnectivity and manage it as one of the core components of your tenant cluster, alongside kube-proxy and CoreDNS.
Conclusion
Now you have a fully functional Kubernetes cluster with the capability for dynamic scaling, automatic provisioning of volumes, and load balancers.
Going forward, you might consider metrics and logs collection from your tenant clusters, but that goes beyond the scope of this article.
Of course, all the components necessary for deploying a Kubernetes cluster can be packaged into a single Helm chart and deployed as a unified application. This is precisely how we organize the deployment of managed Kubernetes clusters with the click of a button on our open PaaS platform, Cozystack, where you can try all the technologies described in the article for free.
DIY: Create Your Own Cloud with Kubernetes (Part 2)
Continuing our series of posts on how to build your own cloud using just the Kubernetes ecosystem. In the previous article, we explained how we prepare a basic Kubernetes distribution based on Talos Linux and Flux CD. In this article, we'll show you a few various virtualization technologies in Kubernetes and prepare everything need to run virtual machines in Kubernetes, primarily storage and networking.
We will talk about technologies such as KubeVirt, LINSTOR, and Kube-OVN.
But first, let's explain what virtual machines are needed for, and why can't you just use docker containers for building cloud? The reason is that containers do not provide a sufficient level of isolation. Although the situation improves year by year, we often encounter vulnerabilities that allow escaping the container sandbox and elevating privileges in the system.
On the other hand, Kubernetes was not originally designed to be a multi-tenant system, meaning the basic usage pattern involves creating a separate Kubernetes cluster for every independent project and development team.
Virtual machines are the primary means of isolating tenants from each other in a cloud environment. In virtual machines, users can execute code and programs with administrative privilege, but this doesn't affect other tenants or the environment itself. In other words, virtual machines allow to achieve hard multi-tenancy isolation, and run in environments where tenants do not trust each other.
Virtualization technologies in Kubernetes
There are several different technologies that bring virtualization into the Kubernetes world: KubeVirt and Kata Containers are the most popular ones. But you should know that they work differently.
Kata Containers implements the CRI (Container Runtime Interface) and provides an additional level of isolation for standard containers by running them in virtual machines. But they work in a same single Kubernetes-cluster.
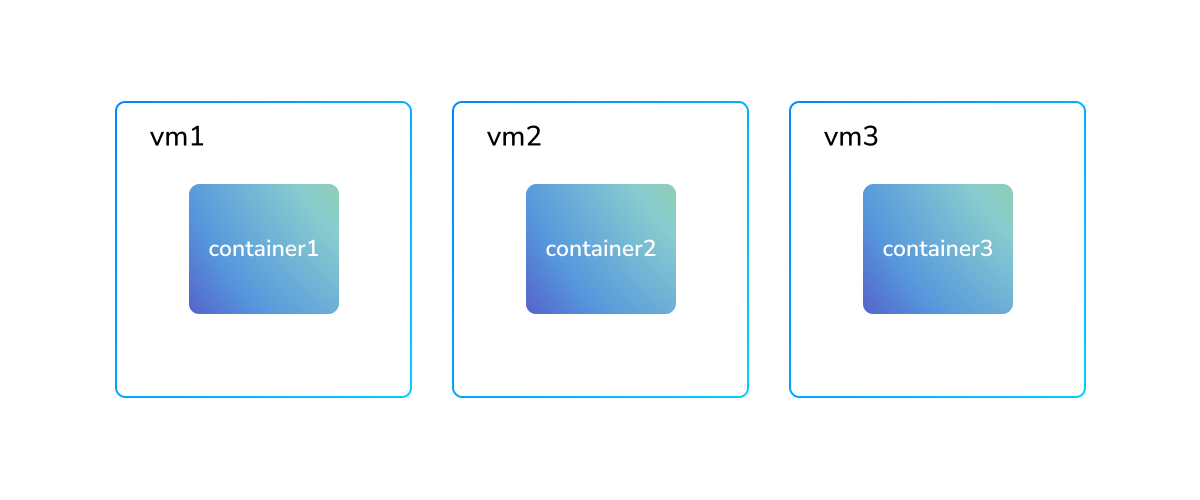
A diagram showing how container isolation is ensured by running containers in virtual machines with Kata Containers
KubeVirt allows running traditional virtual machines using the Kubernetes API. KubeVirt virtual machines are run as regular linux processes in containers. In other words, in KubeVirt, a container is used as a sandbox for running virtual machine (QEMU) processes. This can be clearly seen in the figure below, by looking at how live migration of virtual machines is implemented in KubeVirt. When migration is needed, the virtual machine moves from one container to another.
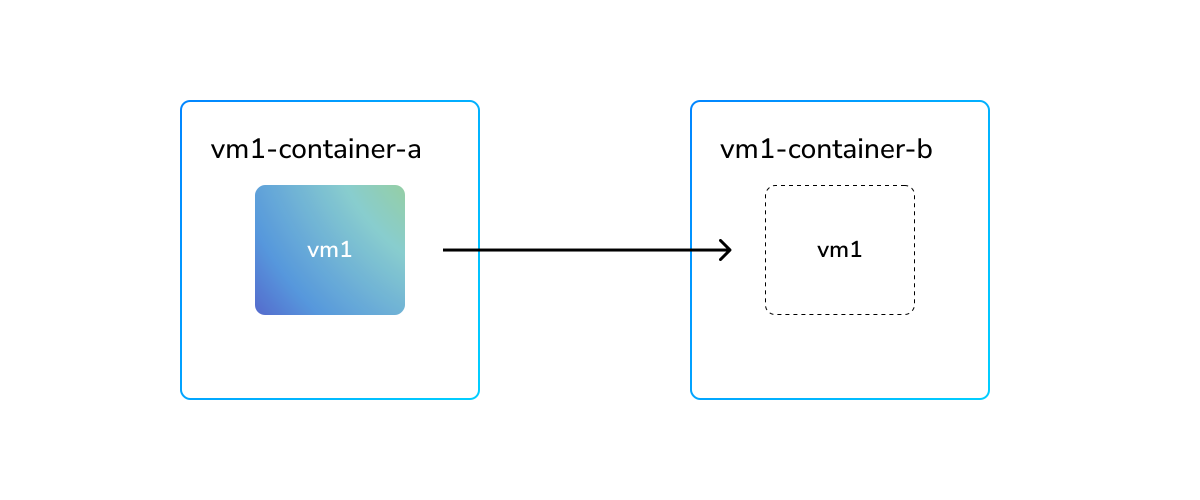
A diagram showing live migration of a virtual machine from one container to another in KubeVirt
There is also an alternative project - Virtink, which implements lightweight virtualization using Cloud-Hypervisor and is initially focused on running virtual Kubernetes clusters using the Cluster API.
Considering our goals, we decided to use KubeVirt as the most popular project in this area. Besides we have extensive expertise and already made a lot of contributions to KubeVirt.
KubeVirt is easy to install and allows you to run virtual machines out-of-the-box using containerDisk feature - this allows you to store and distribute VM images directly as OCI images from container image registry. Virtual machines with containerDisk are well suited for creating Kubernetes worker nodes and other VMs that do not require state persistence.
For managing persistent data, KubeVirt offers a separate tool, Containerized Data Importer (CDI). It allows for cloning PVCs and populating them with data from base images. The CDI is necessary if you want to automatically provision persistent volumes for your virtual machines, and it is also required for the KubeVirt CSI Driver, which is used to handle persistent volumes claims from tenant Kubernetes clusters.
But at first, you have to decide where and how you will store these data.
Storage for Kubernetes VMs
With the introduction of the CSI (Container Storage Interface), a wide range of technologies that integrate with Kubernetes has become available. In fact, KubeVirt fully utilizes the CSI interface, aligning the choice of storage for virtualization closely with the choice of storage for Kubernetes itself. However, there are nuances, which you need to consider. Unlike containers, which typically use a standard filesystem, block devices are more efficient for virtual machine.
Although the CSI interface in Kubernetes allows the request of both types of volumes: filesystems and block devices, it's important to verify that your storage backend supports this.
Using block devices for virtual machines eliminates the need for an additional abstraction layer, such as a filesystem, that makes it more performant and in most cases enables the use of the ReadWriteMany mode. This mode allows concurrent access to the volume from multiple nodes, which is a critical feature for enabling the live migration of virtual machines in KubeVirt.
The storage system can be external or internal (in the case of hyper-converged infrastructure). Using external storage in many cases makes the whole system more stable, as your data is stored separately from compute nodes.
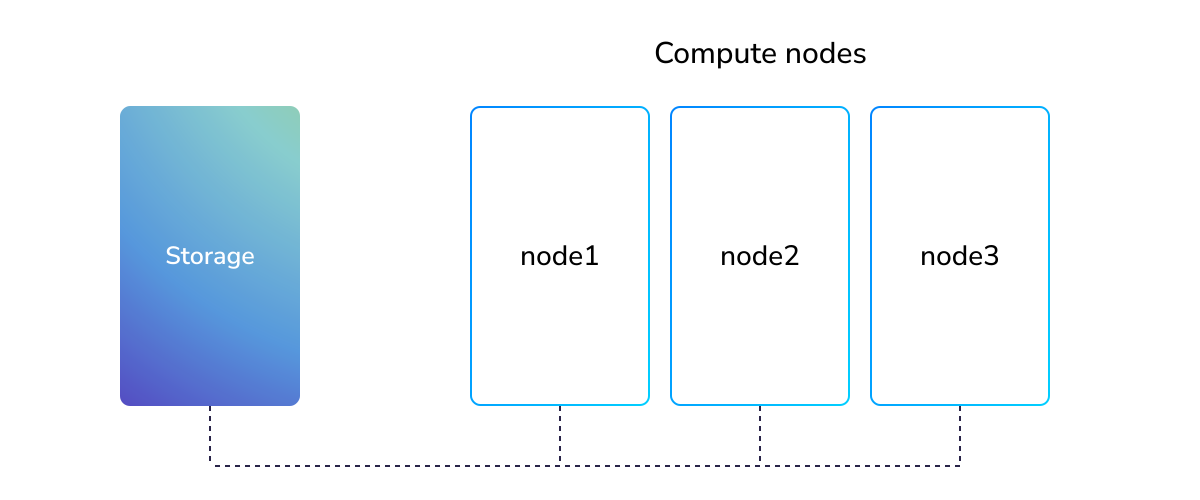
A diagram showing external data storage communication with the compute nodes
External storage solutions are often popular in enterprise systems because such storage is frequently provided by an external vendor, that takes care of its operations. The integration with Kubernetes involves only a small component installed in the cluster - the CSI driver. This driver is responsible for provisioning volumes in this storage and attaching them to pods run by Kubernetes. However, such storage solutions can also be implemented using purely open-source technologies. One of the popular solutions is TrueNAS powered by democratic-csi driver.
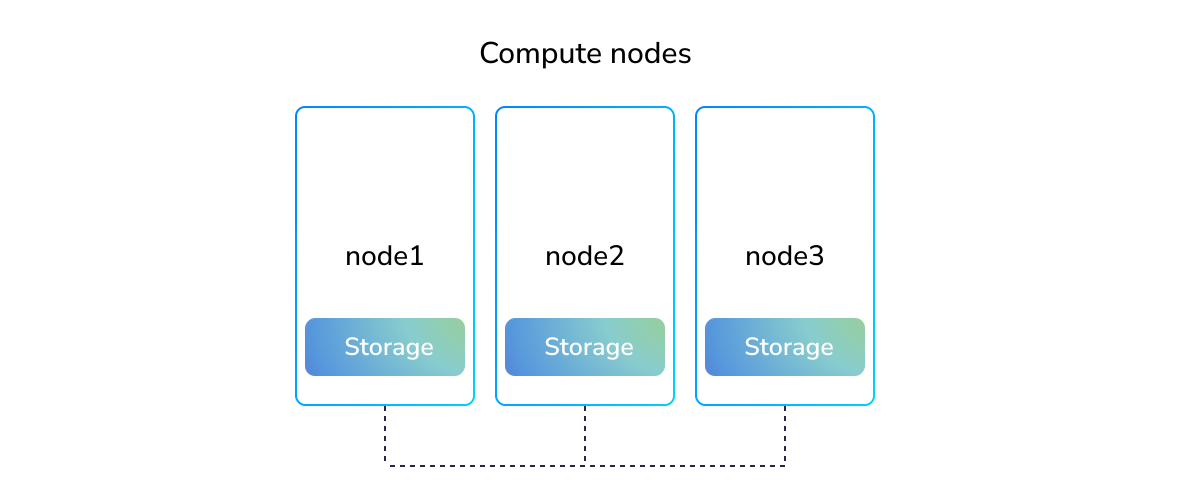
A diagram showing local data storage running on the compute nodes
On the other hand, hyper-converged systems are often implemented using local storage (when you do not need replication) and with software-defined storages, often installed directly in Kubernetes, such as Rook/Ceph, OpenEBS, Longhorn, LINSTOR, and others.
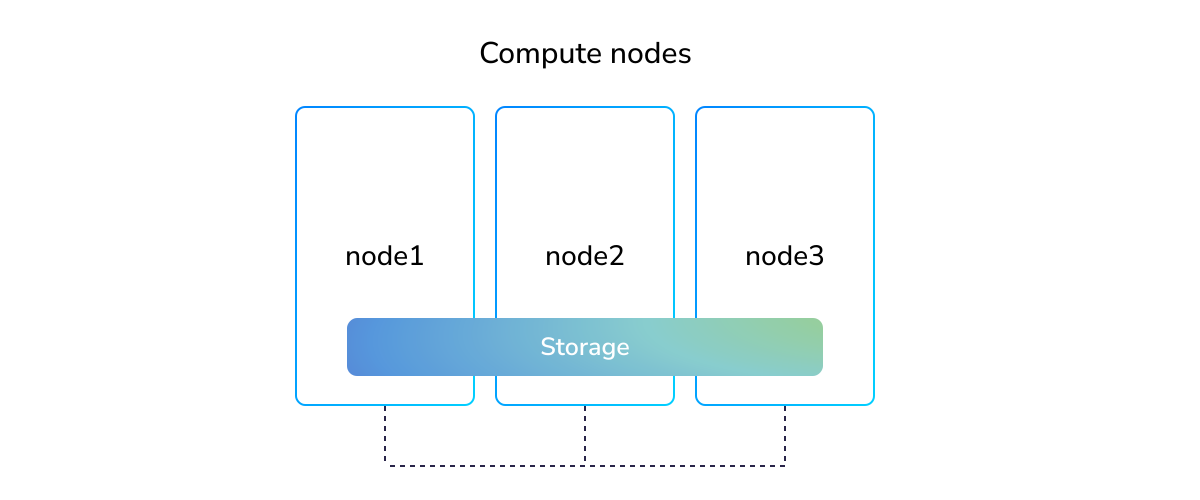
A diagram showing clustered data storage running on the compute nodes
A hyper-converged system has its advantages. For example, data locality: when your data is stored locally, access to such data is faster. But there are disadvantages as such a system is usually more difficult to manage and maintain.
At Ænix, we wanted to provide a ready-to-use solution that could be used without the need to purchase and setup an additional external storage, and that was optimal in terms of speed and resource utilization. LINSTOR became that solution. The time-tested and industry-popular technologies such as LVM and ZFS as backend gives confidence that data is securely stored. DRBD-based replication is incredible fast and consumes a small amount of computing resources.
For installing LINSTOR in Kubernetes, there is the Piraeus project, which already provides a ready-made block storage to use with KubeVirt.
Note:
In case you are using Talos Linux, as we described in the previous article, you will need to enable the necessary kernel modules in advance, and configure piraeus as described in the instruction.Networking for Kubernetes VMs
Despite having the similar interface - CNI, The network architecture in Kubernetes is actually more complex and typically consists of many independent components that are not directly connected to each other. In fact, you can split Kubernetes networking into four layers, which are described below.
Node Network (Data Center Network)
The network through which nodes are interconnected with each other. This network is usually not managed by Kubernetes, but it is an important one because, without it, nothing would work. In practice, the bare metal infrastructure usually has more than one of such networks e.g. one for node-to-node communication, second for storage replication, third for external access, etc.
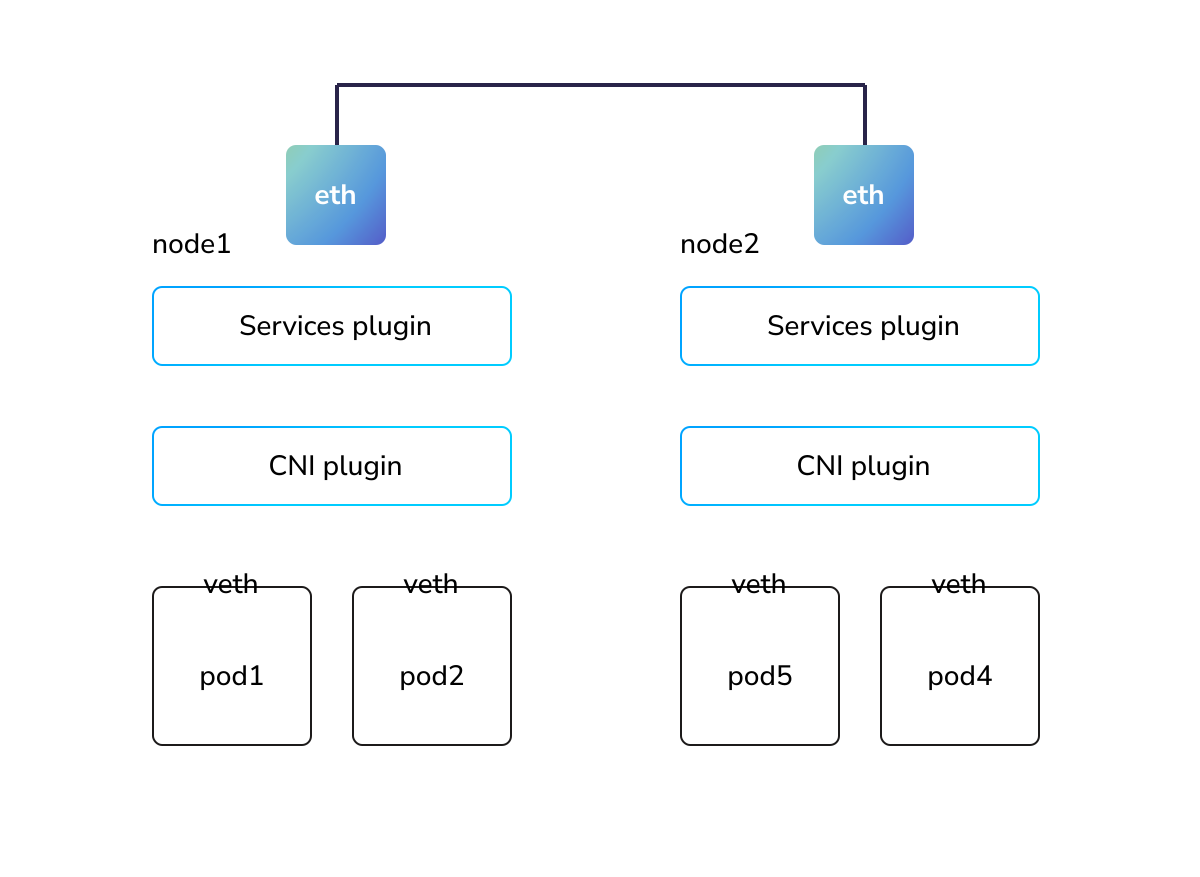
A diagram showing the role of the node network (data center network) on the Kubernetes networking scheme
Configuring the physical network interaction between nodes goes beyond the scope of this article, as in most situations, Kubernetes utilizes already existing network infrastructure.
Pod Network
This is the network provided by your CNI plugin. The task of the CNI plugin is to ensure transparent connectivity between all containers and nodes in the cluster. Most CNI plugins implement a flat network from which separate blocks of IP addresses are allocated for use on each node.
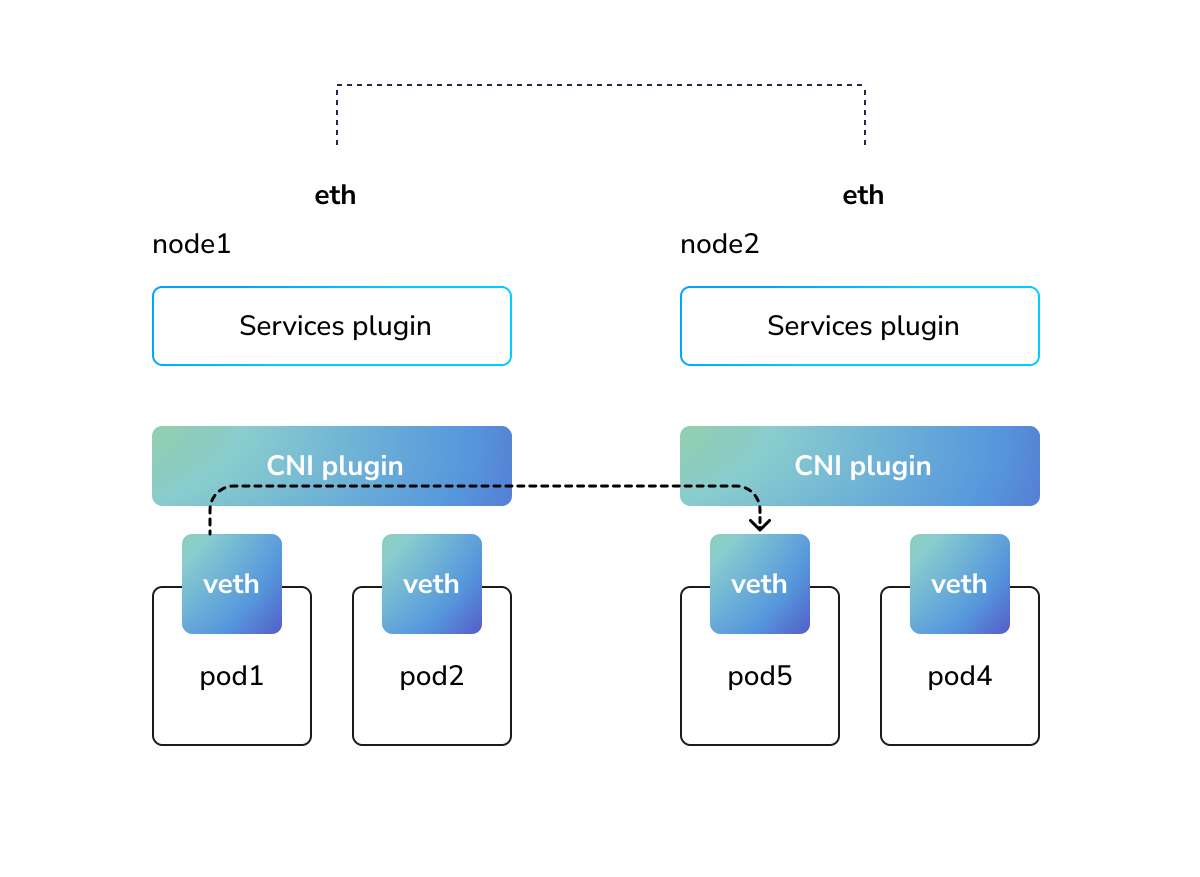
A diagram showing the role of the pod network (CNI-plugin) on the Kubernetes network scheme
In practice, your cluster can have several CNI plugins managed by Multus. This approach is often used in virtualization solutions based on KubeVirt - Rancher and OpenShift. The primary CNI plugin is used for integration with Kubernetes services, while additional CNI plugins are used to implement private networks (VPC) and integration with the physical networks of your data center.
The default CNI-plugins can be used to connect bridges or physical interfaces. Additionally, there are specialized plugins such as macvtap-cni which are designed to provide more performance.
One additional aspect to keep in mind when running virtual machines in Kubernetes is the need for IPAM (IP Address Management), especially for secondary interfaces provided by Multus. This is commonly managed by a DHCP server operating within your infrastructure. Additionally, the allocation of MAC addresses for virtual machines can be managed by Kubemacpool.
Although in our platform, we decided to go another way and fully rely on Kube-OVN. This CNI plugin is based on OVN (Open Virtual Network) which was originally developed for OpenStack and it provides a complete network solution for virtual machines in Kubernetes, features Custom Resources for managing IPs and MAC addresses, supports live migration with preserving IP addresses between the nodes, and enables the creation of VPCs for physical network separation between tenants.
In Kube-OVN you can assign separate subnets to an entire namespace or connect them as additional network interfaces using Multus.
Services Network
In addition to the CNI plugin, Kubernetes also has a services network, which is primarily needed for service discovery. Contrary to traditional virtual machines, Kubernetes is originally designed to run pods with a random address. And the services network provides a convenient abstraction (stable IP addresses and DNS names) that will always direct traffic to the correct pod. The same approach is also commonly used with virtual machines in clouds despite the fact that their IPs are usually static.
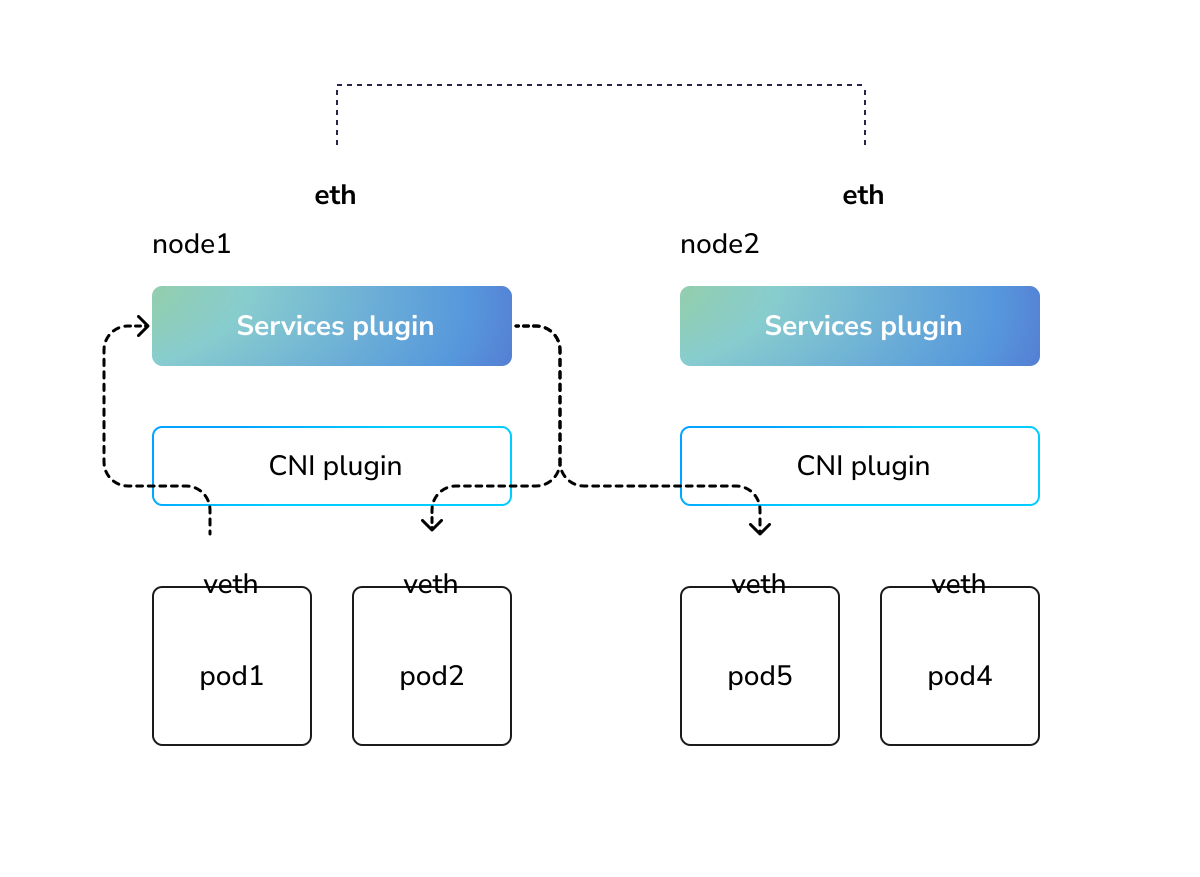
A diagram showing the role of the services network (services network plugin) on the Kubernetes network scheme
The implementation of the services network in Kubernetes is handled by the services network plugin, The standard implementation is called kube-proxy and is used in most clusters. But nowadays, this functionality might be provided as part of the CNI plugin. The most advanced implementation is offered by the Cilium project, which can be run in kube-proxy replacement mode.
Cilium is based on the eBPF technology, which allows for efficient offloading of the Linux networking stack, thereby improving performance and security compared to traditional methods based on iptables.
In practice, Cilium and Kube-OVN can be easily integrated to provide a unified solution that offers seamless, multi-tenant networking for virtual machines, as well as advanced network policies and combined services network functionality.
External Traffic Load Balancer
At this stage, you already have everything needed to run virtual machines in Kubernetes. But there is actually one more thing. You still need to access your services from outside your cluster, and an external load balancer will help you with organizing this.
For bare metal Kubernetes clusters, there are several load balancers available: MetalLB, kube-vip, LoxiLB, also Cilium and Kube-OVN provides built-in implementation.
The role of a external load balancer is to provide a stable address available externally and direct external traffic to the services network. The services network plugin will direct it to your pods and virtual machines as usual.
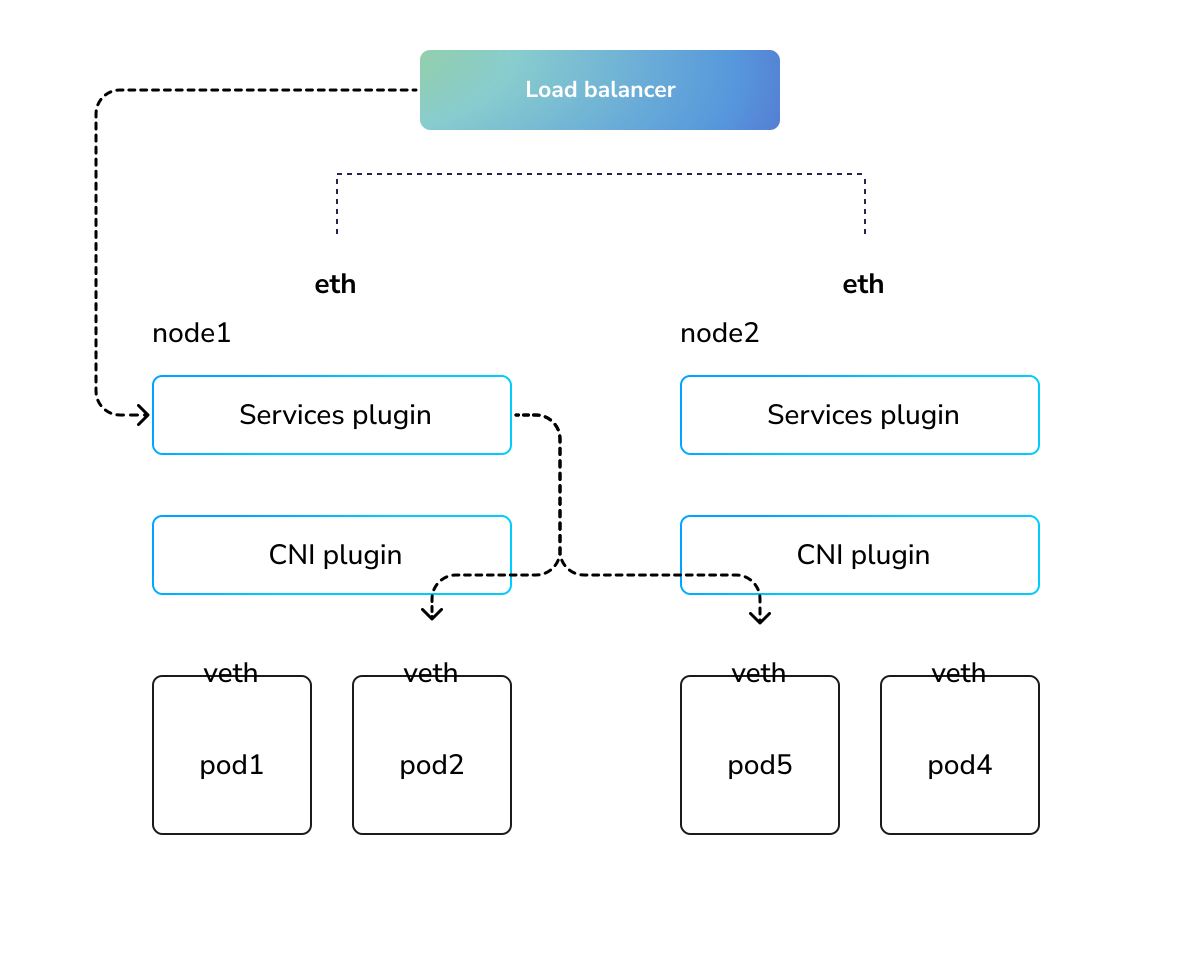
A diagram showing the role of the external load balancer on the Kubernetes network scheme
In most cases, setting up a load balancer on bare metal is achieved by creating floating IP address on the nodes within the cluster, and announce it externally using ARP/NDP or BGP protocols.
After exploring various options, we decided that MetalLB is the simplest and most reliable solution, although we do not strictly enforce the use of only it.
Another benefit is that in L2 mode, MetalLB speakers continuously check their neighbour's state by sending preforming liveness checks using a memberlist protocol. This enables failover that works independently of Kubernetes control-plane.
Conclusion
This concludes our overview of virtualization, storage, and networking in Kubernetes. The technologies mentioned here are available and already pre-configured on the Cozystack platform, where you can try them with no limitations.
In the next article, I'll detail how, on top of this, you can implement the provisioning of fully functional Kubernetes clusters with just the click of a button.
DIY: Create Your Own Cloud with Kubernetes (Part 1)
At Ænix, we have a deep affection for Kubernetes and dream that all modern technologies will soon start utilizing its remarkable patterns.
Have you ever thought about building your own cloud? I bet you have. But is it possible to do this using only modern technologies and approaches, without leaving the cozy Kubernetes ecosystem? Our experience in developing Cozystack required us to delve deeply into it.
You might argue that Kubernetes is not intended for this purpose and why not simply use OpenStack for bare metal servers and run Kubernetes inside it as intended. But by doing so, you would simply shift the responsibility from your hands to the hands of OpenStack administrators. This would add at least one more huge and complex system to your ecosystem.
Why complicate things? - after all, Kubernetes already has everything needed to run tenant Kubernetes clusters at this point.
I want to share with you our experience in developing a cloud platform based on Kubernetes, highlighting the open-source projects that we use ourselves and believe deserve your attention.
In this series of articles, I will tell you our story about how we prepare managed Kubernetes from bare metal using only open-source technologies. Starting from the basic level of data center preparation, running virtual machines, isolating networks, setting up fault-tolerant storage to provisioning full-featured Kubernetes clusters with dynamic volume provisioning, load balancers, and autoscaling.
With this article, I start a series consisting of several parts:
- Part 1: Preparing the groundwork for your cloud. Challenges faced during the preparation and operation of Kubernetes on bare metal and a ready-made recipe for provisioning infrastructure.
- Part 2: Networking, storage, and virtualization. How to turn Kubernetes into a tool for launching virtual machines and what is needed for this.
- Part 3: Cluster API and how to start provisioning Kubernetes clusters at the push of a button. How autoscaling works, dynamic provisioning of volumes, and load balancers.
I will try to describe various technologies as independently as possible, but at the same time, I will share our experience and why we came to one solution or another.
To begin with, let's understand the main advantage of Kubernetes and how it has changed the approach to using cloud resources.
It is important to understand that the use of Kubernetes in the cloud and on bare metal differs.
Kubernetes in the cloud
When you operate Kubernetes in the cloud, you don't worry about persistent volumes, cloud load balancers, or the process of provisioning nodes. All of this is handled by your cloud provider, who accepts your requests in the form of Kubernetes objects. In other words, the server side is completely hidden from you, and you don't really want to know how exactly the cloud provider implements as it's not in your area of responsibility.
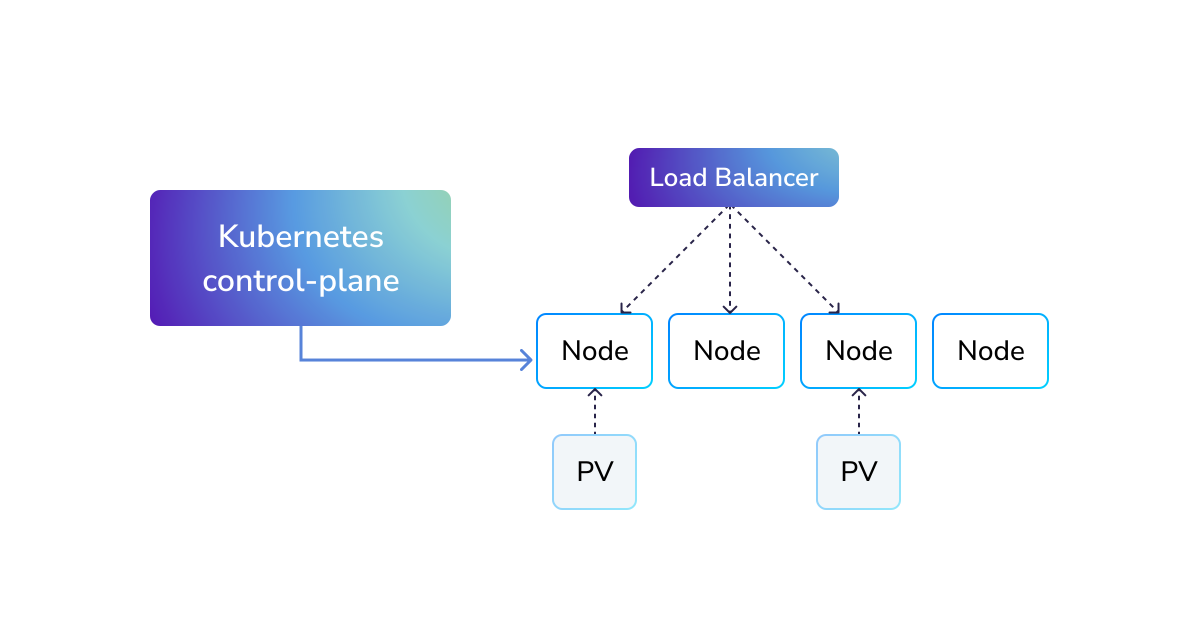
A diagram showing cloud Kubernetes, with load balancing and storage done outside the cluster
Kubernetes offers convenient abstractions that work the same everywhere, allowing you to deploy your application on any Kubernetes in any cloud.
In the cloud, you very commonly have several separate entities: the Kubernetes control plane, virtual machines, persistent volumes, and load balancers as distinct entities. Using these entities, you can create highly dynamic environments.
Thanks to Kubernetes, virtual machines are now only seen as a utility entity for utilizing cloud resources. You no longer store data inside virtual machines. You can delete all your virtual machines at any moment and recreate them without breaking your application. The Kubernetes control plane will continue to hold information about what should run in your cluster. The load balancer will keep sending traffic to your workload, simply changing the endpoint to send traffic to a new node. And your data will be safely stored in external persistent volumes provided by cloud.
This approach is fundamental when using Kubernetes in clouds. The reason for it is quite obvious: the simpler the system, the more stable it is, and for this simplicity you go buying Kubernetes in the cloud.
Kubernetes on bare metal
Using Kubernetes in the clouds is really simple and convenient, which cannot be said about bare metal installations. In the bare metal world, Kubernetes, on the contrary, becomes unbearably complex. Firstly, because the entire network, backend storage, cloud balancers, etc. are usually run not outside, but inside your cluster. As result such a system is much more difficult to update and maintain.
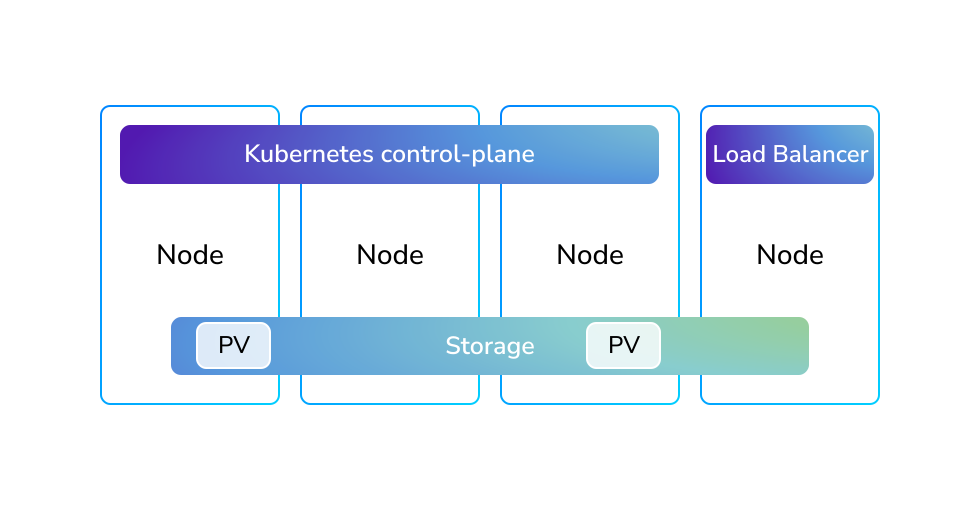
A diagram showing bare metal Kubernetes, with load balancing and storage done inside the cluster
Judge for yourself: in the cloud, to update a node, you typically delete the virtual machine
(or even use kubectl delete node) and you let your node management tooling create a new
one, based on an immutable image. The new node will join the cluster and ”just work” as a node;
following a very simple and commonly used pattern in the Kubernetes world.
Many clusters order new virtual machines every few minutes, simply because they can use
cheaper spot instances. However, when you have a physical server, you can't just delete and
recreate it, firstly because it often runs some cluster services, stores data, and its update process
is significantly more complicated.
There are different approaches to solving this problem, ranging from in-place updates, as done by kubeadm, kubespray, and k3s, to full automation of provisioning physical nodes through Cluster API and Metal3.
I like the hybrid approach offered by Talos Linux, where your entire system is described in a single configuration file. Most parameters of this file can be applied without rebooting or recreating the node, including the version of Kubernetes control-plane components. However, it still keeps the maximum declarative nature of Kubernetes. This approach minimizes unnecessary impact on cluster services when updating bare metal nodes. In most cases, you won't need to migrate your virtual machines and rebuild the cluster filesystem on minor updates.
Preparing a base for your future cloud
So, suppose you've decided to build your own cloud. To start somewhere, you need a base layer. You need to think not only about how you will install Kubernetes on your servers but also about how you will update and maintain it. Consider the fact that you will have to think about things like updating the kernel, installing necessary modules, as well packages and security patches. Now you have to think much more that you don't have to worry about when using a ready-made Kubernetes in the cloud.
Of course you can use standard distributions like Ubuntu or Debian, or you can consider specialized ones like Flatcar Container Linux, Fedora Core, and Talos Linux. Each has its advantages and disadvantages.
What about us? At Ænix, we use quite a few specific kernel modules like ZFS, DRBD, and OpenvSwitch, so we decided to go the route of forming a system image with all the necessary modules in advance. In this case, Talos Linux turned out to be the most convenient for us. For example, such a config is enough to build a system image with all the necessary kernel modules:
arch: amd64
platform: metal
secureboot: false
version: v1.6.4
input:
kernel:
path: /usr/install/amd64/vmlinuz
initramfs:
path: /usr/install/amd64/initramfs.xz
baseInstaller:
imageRef: ghcr.io/siderolabs/installer:v1.6.4
systemExtensions:
- imageRef: ghcr.io/siderolabs/amd-ucode:20240115
- imageRef: ghcr.io/siderolabs/amdgpu-firmware:20240115
- imageRef: ghcr.io/siderolabs/bnx2-bnx2x:20240115
- imageRef: ghcr.io/siderolabs/i915-ucode:20240115
- imageRef: ghcr.io/siderolabs/intel-ice-firmware:20240115
- imageRef: ghcr.io/siderolabs/intel-ucode:20231114
- imageRef: ghcr.io/siderolabs/qlogic-firmware:20240115
- imageRef: ghcr.io/siderolabs/drbd:9.2.6-v1.6.4
- imageRef: ghcr.io/siderolabs/zfs:2.1.14-v1.6.4
output:
kind: installer
outFormat: raw
Then we use the docker command line tool to build an OS image:
cat config.yaml | docker run --rm -i -v /dev:/dev --privileged "ghcr.io/siderolabs/imager:v1.6.4" -
And as a result, we get a Docker container image with everything we need, which we can use to install Talos Linux on our servers. You can do the same; this image will contain all the necessary firmware and kernel modules.
But the question arises, how do you deliver the freshly formed image to your nodes?
I have been contemplating the idea of PXE booting for quite some time. For example, the Kubefarm project that I wrote an article about two years ago was entirely built using this approach. But unfortunately, it does help you to deploy your very first parent cluster that will hold the others. So now you have prepared a solution that will help you do this the same using PXE approach.
Essentially, all you need to do is run temporary DHCP and PXE servers inside containers. Then your nodes will boot from your image, and you can use a simple Debian-flavored script to help you bootstrap your nodes.
The source for that talos-bootstrap script is
available on GitHub.
This script allows you to deploy Kubernetes on bare metal in five minutes and obtain a kubeconfig for accessing it. However, many unresolved issues still lie ahead.
Delivering system components
At this stage, you already have a Kubernetes cluster capable of running various workloads. However, it is not fully functional yet. In other words, you need to set up networking and storage, as well as install necessary cluster extensions, like KubeVirt to run virtual machines, as well the monitoring stack and other system-wide components.
Traditionally, this is solved by installing Helm charts into your cluster. You can do this by
running helm install commands locally, but this approach becomes inconvenient when you want to
track updates, and if you have multiple clusters and you want to keep them uniform. In fact, there
are plenty of ways to do this declaratively. To solve this, I recommend using best GitOps practices.
I mean tools like ArgoCD and FluxCD.
While ArgoCD is more convenient for dev purposes with its graphical interface and a central control plane, FluxCD, on the other hand, is better suited for creating Kubernetes distributions. With FluxCD, you can specify which charts with what parameters should be launched and describe dependencies. Then, FluxCD will take care of everything for you.
It is suggested to perform a one-time installation of FluxCD in your newly created cluster and provide it with the configuration. This will install everything necessary, bringing the cluster to the expected state.
By carrying out a single installation of FluxCD in your newly minted cluster and configuring it accordingly, you enable it to automatically deploy all the essentials. This will allow your cluster to upgrade itself into the desired state. For example, after installing our platform you'll see the next pre-configured Helm charts with system components:
NAMESPACE NAME AGE READY STATUS
cozy-cert-manager cert-manager 4m1s True Release reconciliation succeeded
cozy-cert-manager cert-manager-issuers 4m1s True Release reconciliation succeeded
cozy-cilium cilium 4m1s True Release reconciliation succeeded
cozy-cluster-api capi-operator 4m1s True Release reconciliation succeeded
cozy-cluster-api capi-providers 4m1s True Release reconciliation succeeded
cozy-dashboard dashboard 4m1s True Release reconciliation succeeded
cozy-fluxcd cozy-fluxcd 4m1s True Release reconciliation succeeded
cozy-grafana-operator grafana-operator 4m1s True Release reconciliation succeeded
cozy-kamaji kamaji 4m1s True Release reconciliation succeeded
cozy-kubeovn kubeovn 4m1s True Release reconciliation succeeded
cozy-kubevirt-cdi kubevirt-cdi 4m1s True Release reconciliation succeeded
cozy-kubevirt-cdi kubevirt-cdi-operator 4m1s True Release reconciliation succeeded
cozy-kubevirt kubevirt 4m1s True Release reconciliation succeeded
cozy-kubevirt kubevirt-operator 4m1s True Release reconciliation succeeded
cozy-linstor linstor 4m1s True Release reconciliation succeeded
cozy-linstor piraeus-operator 4m1s True Release reconciliation succeeded
cozy-mariadb-operator mariadb-operator 4m1s True Release reconciliation succeeded
cozy-metallb metallb 4m1s True Release reconciliation succeeded
cozy-monitoring monitoring 4m1s True Release reconciliation succeeded
cozy-postgres-operator postgres-operator 4m1s True Release reconciliation succeeded
cozy-rabbitmq-operator rabbitmq-operator 4m1s True Release reconciliation succeeded
cozy-redis-operator redis-operator 4m1s True Release reconciliation succeeded
cozy-telepresence telepresence 4m1s True Release reconciliation succeeded
cozy-victoria-metrics-operator victoria-metrics-operator 4m1s True Release reconciliation succeeded
Conclusion
As a result, you achieve a highly repeatable environment that you can provide to anyone, knowing that it operates exactly as intended. This is actually what the Cozystack project does, which you can try out for yourself absolutely free.
In the following articles, I will discuss how to prepare Kubernetes for running virtual machines and how to run Kubernetes clusters with the click of a button. Stay tuned, it'll be fun!
Introducing the Windows Operational Readiness Specification
Since Windows support graduated to stable with Kubernetes 1.14 in 2019, the capability to run Windows workloads has been much appreciated by the end user community. The level of and availability of Windows workload support has consistently been a major differentiator for Kubernetes distributions used by large enterprises. However, with more Windows workloads being migrated to Kubernetes and new Windows features being continuously released, it became challenging to test Windows worker nodes in an effective and standardized way.
The Kubernetes project values the ability to certify conformance without requiring a closed-source license for a certified distribution or service that has no intention of offering Windows.
Some notable examples brought to the attention of SIG Windows were:
- An issue with load balancer source address ranges functionality not operating correctly on Windows nodes, detailed in a GitHub issue: kubernetes/kubernetes#120033.
- Reports of functionality issues with Windows features, such as “GMSA not working with containerd, discussed in microsoft/Windows-Containers#44.
- Challenges developing networking policy tests that could objectively evaluate Container Network Interface (CNI) plugins across different operating system configurations, as discussed in kubernetes/kubernetes#97751.
SIG Windows therefore recognized the need for a tailored solution to ensure Windows nodes' operational readiness before their deployment into production environments. Thus, the idea to develop a Windows Operational Readiness Specification was born.
Can’t we just run the official Conformance tests?
The Kubernetes project contains a set of conformance tests, which are standardized tests designed to ensure that a Kubernetes cluster meets the required Kubernetes specifications.
However, these tests were originally defined at a time when Linux was the only operating system compatible with Kubernetes, and thus, they were not easily extendable for use with Windows. Given that Windows workloads, despite their importance, account for a smaller portion of the Kubernetes community, it was important to ensure that the primary conformance suite relied upon by many Kubernetes distributions to certify Linux conformance, didn't become encumbered with Windows specific features or enhancements such as GMSA or multi-operating system kube-proxy behavior.
Therefore, since there was a specialized need for Windows conformance testing, SIG Windows went down the path of offering Windows specific conformance tests through the Windows Operational Readiness Specification.
Can’t we just run the Kubernetes end-to-end test suite?
In the Linux world, tools such as Sonobuoy simplify execution of the conformance suite, relieving users from needing to be aware of Kubernetes' compilation paths or the semantics of Ginkgo tags.
Regarding needing to compile the Kubernetes tests, we realized that Windows users might similarly find the process of compiling and running the Kubernetes e2e suite from scratch similarly undesirable, hence, there was a clear need to provide a user-friendly, "push-button" solution that is ready to go. Moreover, regarding Ginkgo tags, applying conformance tests to Windows nodes through a set of Ginkgo tags would also be burdensome for any user, including Linux enthusiasts or experienced Windows system admins alike.
To bridge the gap and give users a straightforward way to confirm their clusters support a variety of features, the Kubernetes SIG for Windows found it necessary to therefore create the Windows Operational Readiness application. This application written in Go, simplifies the process to run the necessary Windows specific tests while delivering results in a clear, accessible format.
This initiative has been a collaborative effort, with contributions from different cloud providers and platforms, including Amazon, Microsoft, SUSE, and Broadcom.
A closer look at the Windows Operational Readiness Specification
The Windows Operational Readiness specification specifically targets and executes tests found within the Kubernetes repository in a more user-friendly way than simply targeting Ginkgo tags. It introduces a structured test suite that is split into sets of core and extended tests, with each set of tests containing categories directed at testing a specific area of testing, such as networking. Core tests target fundamental and critical functionalities that Windows nodes should support as defined by the Kubernetes specification. On the other hand, extended tests cover more complex features, more aligned with diving deeper into Windows-specific capabilities such as integrations with Active Directory. These goal of these tests is to be extensive, covering a wide array of Windows-specific capabilities to ensure compatibility with a diverse set of workloads and configurations, extending beyond basic requirements. Below is the current list of categories.
| Category Name | Category Description |
|---|---|
Core.Network | Tests minimal networking functionality (ability to access pod-by-pod IP.) |
Core.Storage | Tests minimal storage functionality, (ability to mount a hostPath storage volume.) |
Core.Scheduling | Tests minimal scheduling functionality, (ability to schedule a pod with CPU limits.) |
Core.Concurrent | Tests minimal concurrent functionality, (the ability of a node to handle traffic to multiple pods concurrently.) |
Extend.HostProcess | Tests features related to Windows HostProcess pod functionality. |
Extend.ActiveDirectory | Tests features related to Active Directory functionality. |
Extend.NetworkPolicy | Tests features related to Network Policy functionality. |
Extend.Network | Tests advanced networking functionality, (ability to support IPv6) |
Extend.Worker | Tests features related to Windows worker node functionality, (ability for nodes to access TCP and UDP services in the same cluster) |
How to conduct operational readiness tests for Windows nodes
To run the Windows Operational Readiness test suite, refer to the test suite's
README, which explains how to set it up and run it. The test suite offers
flexibility in how you can execute tests, either using a compiled binary or a
Sonobuoy plugin. You also have the choice to run the tests against the entire
test suite or by specifying a list of categories. Cloud providers have the
choice of uploading their conformance results, enhancing transparency and reliability.
Once you have checked out that code, you can run a test. For example, this sample
command runs the tests from the Core.Concurrent category:
./op-readiness --kubeconfig $KUBE_CONFIG --category Core.Concurrent
As a contributor to Kubernetes, if you want to test your changes against a specific pull request using the Windows Operational Readiness Specification, use the following bot command in the new pull request.
/test operational-tests-capz-windows-2019
Looking ahead
We’re looking to improve our curated list of Windows-specific tests by adding new tests to the Kubernetes repository and also identifying existing test cases that can be targetted. The long term goal for the specification is to continually enhance test coverage for Windows worker nodes and improve the robustness of Windows support, facilitating a seamless experience across diverse cloud environments. We also have plans to integrate the Windows Operational Readiness tests into the official Kubernetes conformance suite.
If you are interested in helping us out, please reach out to us! We welcome help in any form, from giving once-off feedback to making a code contribution, to having long-term owners to help us drive changes. The Windows Operational Readiness specification is owned by the SIG Windows team. You can reach out to the team on the Kubernetes Slack workspace #sig-windows channel. You can also explore the Windows Operational Readiness test suite and make contributions directly to the GitHub repository.
Special thanks to Kulwant Singh (AWS), Pramita Gautam Rana (VMWare), Xinqi Li (Google) and Marcio Morales (AWS) for their help in making notable contributions to the specification. Additionally, appreciation goes to James Sturtevant (Microsoft), Mark Rossetti (Microsoft), Claudiu Belu (Cloudbase Solutions) and Aravindh Puthiyaparambil (Softdrive Technologies Group Inc.) from the SIG Windows team for their guidance and support.
A Peek at Kubernetes v1.30
A quick look: exciting changes in Kubernetes v1.30
It's a new year and a new Kubernetes release. We're halfway through the release cycle and have quite a few interesting and exciting enhancements coming in v1.30. From brand new features in alpha, to established features graduating to stable, to long-awaited improvements, this release has something for everyone to pay attention to!
To tide you over until the official release, here's a sneak peek of the enhancements we're most excited about in this cycle!
Major changes for Kubernetes v1.30
Structured parameters for dynamic resource allocation (KEP-4381)
Dynamic resource allocation was added to Kubernetes as an alpha feature in v1.26. It defines an alternative to the traditional device-plugin API for requesting access to third-party resources. By design, dynamic resource allocation uses parameters for resources that are completely opaque to core Kubernetes. This approach poses a problem for the Cluster Autoscaler (CA) or any higher-level controller that needs to make decisions for a group of pods (e.g. a job scheduler). It cannot simulate the effect of allocating or deallocating claims over time. Only the third-party DRA drivers have the information available to do this.
Structured Parameters for dynamic resource allocation is an extension to the original implementation that addresses this problem by building a framework to support making these claim parameters less opaque. Instead of handling the semantics of all claim parameters themselves, drivers could manage resources and describe them using a specific "structured model" pre-defined by Kubernetes. This would allow components aware of this "structured model" to make decisions about these resources without outsourcing them to some third-party controller. For example, the scheduler could allocate claims rapidly without back-and-forth communication with dynamic resource allocation drivers. Work done for this release centers on defining the framework necessary to enable different "structured models" and to implement the "named resources" model. This model allows listing individual resource instances and, compared to the traditional device plugin API, adds the ability to select those instances individually via attributes.
Node memory swap support (KEP-2400)
In Kubernetes v1.30, memory swap support on Linux nodes gets a big change to how it works - with a
strong emphasis on improving system stability. In previous Kubernetes versions, the NodeSwap
feature gate was disabled by default, and when enabled, it used UnlimitedSwap behavior as the
default behavior. To achieve better stability, UnlimitedSwap behavior (which might compromise node
stability) will be removed in v1.30.
The updated, still-beta support for swap on Linux nodes will be available by default. However, the
default behavior will be to run the node set to NoSwap (not UnlimitedSwap) mode. In NoSwap
mode, the kubelet supports running on a node where swap space is active, but Pods don't use any of
the page file. You'll still need to set --fail-swap-on=false for the kubelet to run on that node.
However, the big change is the other mode: LimitedSwap. In this mode, the kubelet actually uses
the page file on that node and allows Pods to have some of their virtual memory paged out.
Containers (and their parent pods) do not have access to swap beyond their memory limit, but the
system can still use the swap space if available.
Kubernetes' Node special interest group (SIG Node) will also update the documentation to help you understand how to use the revised implementation, based on feedback from end users, contributors, and the wider Kubernetes community.
Read the previous blog post or the node swap documentation for more details on Linux node swap support in Kubernetes.
Support user namespaces in pods (KEP-127)
User namespaces is a Linux-only feature that better isolates pods to prevent or mitigate several CVEs rated high/critical, including CVE-2024-21626, published in January 2024. In Kubernetes 1.30, support for user namespaces is migrating to beta and now supports pods with and without volumes, custom UID/GID ranges, and more!
Structured authorization configuration (KEP-3221)
Support for structured authorization configuration is moving to beta and will be enabled by default. This feature enables the creation of authorization chains with multiple webhooks with well-defined parameters that validate requests in a particular order and allows fine-grained control – such as explicit Deny on failures. The configuration file approach even allows you to specify CEL rules to pre-filter requests before they are dispatched to webhooks, helping you to prevent unnecessary invocations. The API server also automatically reloads the authorizer chain when the configuration file is modified.
You must specify the path to that authorization configuration using the --authorization-config
command line argument. If you want to keep using command line flags instead of a
configuration file, those will continue to work as-is. To gain access to new authorization webhook
capabilities like multiple webhooks, failure policy, and pre-filter rules, switch to putting options
in an --authorization-config file. From Kubernetes 1.30, the configuration file format is
beta-level, and only requires specifying --authorization-config since the feature gate is enabled by
default. An example configuration with all possible values is provided in the Authorization
docs.
For more details, read the Authorization
docs.
Container resource based pod autoscaling (KEP-1610)
Horizontal pod autoscaling based on ContainerResource metrics will graduate to stable in v1.30.
This new behavior for HorizontalPodAutoscaler allows you to configure automatic scaling based on the
resource usage for individual containers, rather than the aggregate resource use over a Pod. See our
previous article for further details, or read
container resource metrics.
CEL for admission control (KEP-3488)
Integrating Common Expression Language (CEL) for admission control in Kubernetes introduces a more dynamic and expressive way of evaluating admission requests. This feature allows complex, fine-grained policies to be defined and enforced directly through the Kubernetes API, enhancing security and governance capabilities without compromising performance or flexibility.
CEL's addition to Kubernetes admission control empowers cluster administrators to craft intricate rules that can evaluate the content of API requests against the desired state and policies of the cluster without resorting to Webhook-based access controllers. This level of control is crucial for maintaining the integrity, security, and efficiency of cluster operations, making Kubernetes environments more robust and adaptable to various use cases and requirements. For more information on using CEL for admission control, see the API documentation for ValidatingAdmissionPolicy.
We hope you're as excited for this release as we are. Keep an eye out for the official release blog in a few weeks for more highlights!
CRI-O: Applying seccomp profiles from OCI registries
Seccomp stands for secure computing mode and has been a feature of the Linux kernel since version 2.6.12. It can be used to sandbox the privileges of a process, restricting the calls it is able to make from userspace into the kernel. Kubernetes lets you automatically apply seccomp profiles loaded onto a node to your Pods and containers.
But distributing those seccomp profiles is a major challenge in Kubernetes, because the JSON files have to be available on all nodes where a workload can possibly run. Projects like the Security Profiles Operator solve that problem by running as a daemon within the cluster, which makes me wonder which part of that distribution could be done by the container runtime.
Runtimes usually apply the profiles from a local path, for example:
apiVersion: v1
kind: Pod
metadata:
name: pod
spec:
containers:
- name: container
image: nginx:1.25.3
securityContext:
seccompProfile:
type: Localhost
localhostProfile: nginx-1.25.3.json
The profile nginx-1.25.3.json has to be available in the root directory of the
kubelet, appended by the seccomp directory. This means the default location
for the profile on-disk would be /var/lib/kubelet/seccomp/nginx-1.25.3.json.
If the profile is not available, then runtimes will fail on container creation
like this:
kubectl get pods
NAME READY STATUS RESTARTS AGE
pod 0/1 CreateContainerError 0 38s
kubectl describe pod/pod | tail
Tolerations: node.kubernetes.io/not-ready:NoExecute op=Exists for 300s
node.kubernetes.io/unreachable:NoExecute op=Exists for 300s
Events:
Type Reason Age From Message
---- ------ ---- ---- -------
Normal Scheduled 117s default-scheduler Successfully assigned default/pod to 127.0.0.1
Normal Pulling 117s kubelet Pulling image "nginx:1.25.3"
Normal Pulled 111s kubelet Successfully pulled image "nginx:1.25.3" in 5.948s (5.948s including waiting)
Warning Failed 7s (x10 over 111s) kubelet Error: setup seccomp: unable to load local profile "/var/lib/kubelet/seccomp/nginx-1.25.3.json": open /var/lib/kubelet/seccomp/nginx-1.25.3.json: no such file or directory
Normal Pulled 7s (x9 over 111s) kubelet Container image "nginx:1.25.3" already present on machine
The major obstacle of having to manually distribute the Localhost profiles
will lead many end-users to fall back to RuntimeDefault or even running their
workloads as Unconfined (with disabled seccomp).
CRI-O to the rescue
The Kubernetes container runtime CRI-O
provides various features using custom annotations. The v1.30 release
adds support for a new set of
annotations called seccomp-profile.kubernetes.cri-o.io/POD and
seccomp-profile.kubernetes.cri-o.io/<CONTAINER>. Those annotations allow you
to specify:
- a seccomp profile for a specific container, when used as:
seccomp-profile.kubernetes.cri-o.io/<CONTAINER>(example:seccomp-profile.kubernetes.cri-o.io/webserver: 'registry.example/example/webserver:v1') - a seccomp profile for every container within a pod, when used without the
container name suffix but the reserved name
POD:seccomp-profile.kubernetes.cri-o.io/POD - a seccomp profile for a whole container image, if the image itself contains
the annotation
seccomp-profile.kubernetes.cri-o.io/PODorseccomp-profile.kubernetes.cri-o.io/<CONTAINER>.
CRI-O will only respect the annotation if the runtime is configured to allow it,
as well as for workloads running as Unconfined. All other workloads will still
use the value from the securityContext with a higher priority.
The annotations alone will not help much with the distribution of the profiles, but the way they can be referenced will! For example, you can now specify seccomp profiles like regular container images by using OCI artifacts:
apiVersion: v1
kind: Pod
metadata:
name: pod
annotations:
seccomp-profile.kubernetes.cri-o.io/POD: quay.io/crio/seccomp:v2
spec: …
The image quay.io/crio/seccomp:v2 contains a seccomp.json file, which
contains the actual profile content. Tools like ORAS or
Skopeo can be used to inspect the
contents of the image:
oras pull quay.io/crio/seccomp:v2
Downloading 92d8ebfa89aa seccomp.json
Downloaded 92d8ebfa89aa seccomp.json
Pulled [registry] quay.io/crio/seccomp:v2
Digest: sha256:f0205dac8a24394d9ddf4e48c7ac201ca7dcfea4c554f7ca27777a7f8c43ec1b
jq . seccomp.json | head
{
"defaultAction": "SCMP_ACT_ERRNO",
"defaultErrnoRet": 38,
"defaultErrno": "ENOSYS",
"archMap": [
{
"architecture": "SCMP_ARCH_X86_64",
"subArchitectures": [
"SCMP_ARCH_X86",
"SCMP_ARCH_X32"
# Inspect the plain manifest of the image
skopeo inspect --raw docker://quay.io/crio/seccomp:v2 | jq .
{
"schemaVersion": 2,
"mediaType": "application/vnd.oci.image.manifest.v1+json",
"config":
{
"mediaType": "application/vnd.cncf.seccomp-profile.config.v1+json",
"digest": "sha256:ca3d163bab055381827226140568f3bef7eaac187cebd76878e0b63e9e442356",
"size": 3,
},
"layers":
[
{
"mediaType": "application/vnd.oci.image.layer.v1.tar",
"digest": "sha256:92d8ebfa89aa6dd752c6443c27e412df1b568d62b4af129494d7364802b2d476",
"size": 18853,
"annotations": { "org.opencontainers.image.title": "seccomp.json" },
},
],
"annotations": { "org.opencontainers.image.created": "2024-02-26T09:03:30Z" },
}
The image manifest contains a reference to a specific required config media type
(application/vnd.cncf.seccomp-profile.config.v1+json) and a single layer
(application/vnd.oci.image.layer.v1.tar) pointing to the seccomp.json file.
But now, let's give that new feature a try!
Using the annotation for a specific container or whole pod
CRI-O needs to be configured adequately before it can utilize the annotation. To
do this, add the annotation to the allowed_annotations array for the runtime.
This can be done by using a drop-in configuration
/etc/crio/crio.conf.d/10-crun.conf like this:
[crio.runtime]
default_runtime = "crun"
[crio.runtime.runtimes.crun]
allowed_annotations = [
"seccomp-profile.kubernetes.cri-o.io",
]
Now, let's run CRI-O from the latest main commit. This can be done by either
building it from source, using the static binary bundles
or the prerelease packages.
To demonstrate this, I ran the crio binary from my command line using a single
node Kubernetes cluster via local-up-cluster.sh.
Now that the cluster is up and running, let's try a pod without the annotation
running as seccomp Unconfined:
cat pod.yaml
apiVersion: v1
kind: Pod
metadata:
name: pod
spec:
containers:
- name: container
image: nginx:1.25.3
securityContext:
seccompProfile:
type: Unconfined
kubectl apply -f pod.yaml
The workload is up and running:
kubectl get pods
NAME READY STATUS RESTARTS AGE
pod 1/1 Running 0 15s
And no seccomp profile got applied if I inspect the container using
crictl:
export CONTAINER_ID=$(sudo crictl ps --name container -q)
sudo crictl inspect $CONTAINER_ID | jq .info.runtimeSpec.linux.seccomp
null
Now, let's modify the pod to apply the profile quay.io/crio/seccomp:v2 to the
container:
apiVersion: v1
kind: Pod
metadata:
name: pod
annotations:
seccomp-profile.kubernetes.cri-o.io/container: quay.io/crio/seccomp:v2
spec:
containers:
- name: container
image: nginx:1.25.3
I have to delete and recreate the Pod, because only recreation will apply a new seccomp profile:
kubectl delete pod/pod
pod "pod" deleted
kubectl apply -f pod.yaml
pod/pod created
The CRI-O logs will now indicate that the runtime pulled the artifact:
WARN[…] Allowed annotations are specified for workload [seccomp-profile.kubernetes.cri-o.io]
INFO[…] Found container specific seccomp profile annotation: seccomp-profile.kubernetes.cri-o.io/container=quay.io/crio/seccomp:v2 id=26ddcbe6-6efe-414a-88fd-b1ca91979e93 name=/runtime.v1.RuntimeService/CreateContainer
INFO[…] Pulling OCI artifact from ref: quay.io/crio/seccomp:v2 id=26ddcbe6-6efe-414a-88fd-b1ca91979e93 name=/runtime.v1.RuntimeService/CreateContainer
INFO[…] Retrieved OCI artifact seccomp profile of len: 18853 id=26ddcbe6-6efe-414a-88fd-b1ca91979e93 name=/runtime.v1.RuntimeService/CreateContainer
And the container is finally using the profile:
export CONTAINER_ID=$(sudo crictl ps --name container -q)
sudo crictl inspect $CONTAINER_ID | jq .info.runtimeSpec.linux.seccomp | head
{
"defaultAction": "SCMP_ACT_ERRNO",
"defaultErrnoRet": 38,
"architectures": [
"SCMP_ARCH_X86_64",
"SCMP_ARCH_X86",
"SCMP_ARCH_X32"
],
"syscalls": [
{
The same would work for every container in the pod, if users replace the
/container suffix with the reserved name /POD, for example:
apiVersion: v1
kind: Pod
metadata:
name: pod
annotations:
seccomp-profile.kubernetes.cri-o.io/POD: quay.io/crio/seccomp:v2
spec:
containers:
- name: container
image: nginx:1.25.3
Using the annotation for a container image
While specifying seccomp profiles as OCI artifacts on certain workloads is a cool feature, the majority of end users would like to link seccomp profiles to published container images. This can be done by using a container image annotation; instead of being applied to a Kubernetes Pod, the annotation is some metadata applied at the container image itself. For example, Podman can be used to add the image annotation directly during image build:
podman build \
--annotation seccomp-profile.kubernetes.cri-o.io=quay.io/crio/seccomp:v2 \
-t quay.io/crio/nginx-seccomp:v2 .
The pushed image then contains the annotation:
skopeo inspect --raw docker://quay.io/crio/nginx-seccomp:v2 |
jq '.annotations."seccomp-profile.kubernetes.cri-o.io"'
"quay.io/crio/seccomp:v2"
If I now use that image in an CRI-O test pod definition:
apiVersion: v1
kind: Pod
metadata:
name: pod
# no Pod annotations set
spec:
containers:
- name: container
image: quay.io/crio/nginx-seccomp:v2
Then the CRI-O logs will indicate that the image annotation got evaluated and the profile got applied:
kubectl delete pod/pod
pod "pod" deleted
kubectl apply -f pod.yaml
pod/pod created
INFO[…] Found image specific seccomp profile annotation: seccomp-profile.kubernetes.cri-o.io=quay.io/crio/seccomp:v2 id=c1f22c59-e30e-4046-931d-a0c0fdc2c8b7 name=/runtime.v1.RuntimeService/CreateContainer
INFO[…] Pulling OCI artifact from ref: quay.io/crio/seccomp:v2 id=c1f22c59-e30e-4046-931d-a0c0fdc2c8b7 name=/runtime.v1.RuntimeService/CreateContainer
INFO[…] Retrieved OCI artifact seccomp profile of len: 18853 id=c1f22c59-e30e-4046-931d-a0c0fdc2c8b7 name=/runtime.v1.RuntimeService/CreateContainer
INFO[…] Created container 116a316cd9a11fe861dd04c43b94f45046d1ff37e2ed05a4e4194fcaab29ee63: default/pod/container id=c1f22c59-e30e-4046-931d-a0c0fdc2c8b7 name=/runtime.v1.RuntimeService/CreateContainer
export CONTAINER_ID=$(sudo crictl ps --name container -q)
sudo crictl inspect $CONTAINER_ID | jq .info.runtimeSpec.linux.seccomp | head
{
"defaultAction": "SCMP_ACT_ERRNO",
"defaultErrnoRet": 38,
"architectures": [
"SCMP_ARCH_X86_64",
"SCMP_ARCH_X86",
"SCMP_ARCH_X32"
],
"syscalls": [
{
For container images, the annotation seccomp-profile.kubernetes.cri-o.io will
be treated in the same way as seccomp-profile.kubernetes.cri-o.io/POD and
applies to the whole pod. In addition to that, the whole feature also works when
using the container specific annotation on an image, for example if a container
is named container1:
skopeo inspect --raw docker://quay.io/crio/nginx-seccomp:v2-container |
jq '.annotations."seccomp-profile.kubernetes.cri-o.io/container1"'
"quay.io/crio/seccomp:v2"
The cool thing about this whole feature is that users can now create seccomp profiles for specific container images and store them side by side in the same registry. Linking the images to the profiles provides a great flexibility to maintain them over the whole application's life cycle.
Pushing profiles using ORAS
The actual creation of the OCI object that contains a seccomp profile requires a
bit more work when using ORAS. I have the hope that tools like Podman will
simplify the overall process in the future. Right now, the container registry
needs to be OCI compatible,
which is also the case for Quay.io. CRI-O expects the seccomp
profile object to have a container image media type
(application/vnd.cncf.seccomp-profile.config.v1+json), while ORAS uses
application/vnd.oci.empty.v1+json per default. To achieve all of that, the
following commands can be executed:
echo "{}" > config.json
oras push \
--config config.json:application/vnd.cncf.seccomp-profile.config.v1+json \
quay.io/crio/seccomp:v2 seccomp.json
The resulting image contains the mediaType that CRI-O expects. ORAS pushes a
single layer seccomp.json to the registry. The name of the profile does not
matter much. CRI-O will pick the first layer and check if that can act as a
seccomp profile.
Future work
CRI-O internally manages the OCI artifacts like regular files. This provides the
benefit of moving them around, removing them if not used any more or having any
other data available than seccomp profiles. This enables future enhancements in
CRI-O on top of OCI artifacts, but also allows thinking about stacking seccomp
profiles as part of having multiple layers in an OCI artifact. The limitation
that it only works for Unconfined workloads for v1.30.x releases is something
different CRI-O would like to address in the future. Simplifying the overall
user experience by not compromising security seems to be the key for a
successful future of seccomp in container workloads.
The CRI-O maintainers will be happy to listen to any feedback or suggestions on the new feature! Thank you for reading this blog post, feel free to reach out to the maintainers via the Kubernetes Slack channel #crio or create an issue in the GitHub repository.
Spotlight on SIG Cloud Provider
One of the most popular ways developers use Kubernetes-related services is via cloud providers, but have you ever wondered how cloud providers can do that? How does this whole process of integration of Kubernetes to various cloud providers happen? To answer that, let's put the spotlight on SIG Cloud Provider.
SIG Cloud Provider works to create seamless integrations between Kubernetes and various cloud providers. Their mission? Keeping the Kubernetes ecosystem fair and open for all. By setting clear standards and requirements, they ensure every cloud provider plays nicely with Kubernetes. It is their responsibility to configure cluster components to enable cloud provider integrations.
In this blog of the SIG Spotlight series, Arujjwal Negi interviews Michael McCune (Red Hat), also known as elmiko, co-chair of SIG Cloud Provider, to give us an insight into the workings of this group.
Introduction
Arujjwal: Let's start by getting to know you. Can you give us a small intro about yourself and how you got into Kubernetes?
Michael: Hi, I’m Michael McCune, most people around the community call me by my handle, elmiko. I’ve been a software developer for a long time now (Windows 3.1 was popular when I started!), and I’ve been involved with open-source software for most of my career. I first got involved with Kubernetes as a developer of machine learning and data science applications; the team I was on at the time was creating tutorials and examples to demonstrate the use of technologies like Apache Spark on Kubernetes. That said, I’ve been interested in distributed systems for many years and when an opportunity arose to join a team working directly on Kubernetes, I jumped at it!
Functioning and working
Arujjwal: Can you give us an insight into what SIG Cloud Provider does and how it functions?
Michael: SIG Cloud Provider was formed to help ensure that Kubernetes provides a neutral integration point for all infrastructure providers. Our largest task to date has been the extraction and migration of in-tree cloud controllers to out-of-tree components. The SIG meets regularly to discuss progress and upcoming tasks and also to answer questions and bugs that arise. Additionally, we act as a coordination point for cloud provider subprojects such as the cloud provider framework, specific cloud controller implementations, and the Konnectivity proxy project.
Arujjwal: After going through the project README, I learned that SIG Cloud Provider works with the integration of Kubernetes with cloud providers. How does this whole process go?
Michael: One of the most common ways to run Kubernetes is by deploying it to a cloud environment (AWS, Azure, GCP, etc). Frequently, the cloud infrastructures have features that enhance the performance of Kubernetes, for example, by providing elastic load balancing for Service objects. To ensure that cloud-specific services can be consistently consumed by Kubernetes, the Kubernetes community has created cloud controllers to address these integration points. Cloud providers can create their own controllers either by using the framework maintained by the SIG or by following the API guides defined in the Kubernetes code and documentation. One thing I would like to point out is that SIG Cloud Provider does not deal with the lifecycle of nodes in a Kubernetes cluster; for those types of topics, SIG Cluster Lifecycle and the Cluster API project are more appropriate venues.
Important subprojects
Arujjwal: There are a lot of subprojects within this SIG. Can you highlight some of the most important ones and what job they do?
Michael: I think the two most important subprojects today are the cloud provider framework and the extraction/migration project. The cloud provider framework is a common library to help infrastructure integrators build a cloud controller for their infrastructure. This project is most frequently the starting point for new people coming to the SIG. The extraction and migration project is the other big subproject and a large part of why the framework exists. A little history might help explain further: for a long time, Kubernetes needed some integration with the underlying infrastructure, not necessarily to add features but to be aware of cloud events like instance termination. The cloud provider integrations were built into the Kubernetes code tree, and thus the term "in-tree" was created (check out this article on the topic for more info). The activity of maintaining provider-specific code in the main Kubernetes source tree was considered undesirable by the community. The community’s decision inspired the creation of the extraction and migration project to remove the "in-tree" cloud controllers in favor of "out-of-tree" components.
Arujjwal: What makes [the cloud provider framework] a good place to start? Does it have consistent good beginner work? What kind?
Michael: I feel that the cloud provider framework is a good place to start as it encodes the community’s preferred practices for cloud controller managers and, as such, will give a newcomer a strong understanding of how and what the managers do. Unfortunately, there is not a consistent stream of beginner work on this component; this is due in part to the mature nature of the framework and that of the individual providers as well. For folks who are interested in getting more involved, having some Go language knowledge is good and also having an understanding of how at least one cloud API (e.g., AWS, Azure, GCP) works is also beneficial. In my personal opinion, being a newcomer to SIG Cloud Provider can be challenging as most of the code around this project deals directly with specific cloud provider interactions. My best advice to people wanting to do more work on cloud providers is to grow your familiarity with one or two cloud APIs, then look for open issues on the controller managers for those clouds, and always communicate with the other contributors as much as possible.
Accomplishments
Arujjwal: Can you share about an accomplishment(s) of the SIG that you are proud of?
Michael: Since I joined the SIG, more than a year ago, we have made great progress in advancing the extraction and migration subproject. We have moved from an alpha status on the defining KEP to a beta status and are inching ever closer to removing the old provider code from the Kubernetes source tree. I've been really proud to see the active engagement from our community members and to see the progress we have made towards extraction. I have a feeling that, within the next few releases, we will see the final removal of the in-tree cloud controllers and the completion of the subproject.
Advice for new contributors
Arujjwal: Is there any suggestion or advice for new contributors on how they can start at SIG Cloud Provider?
Michael: This is a tricky question in my opinion. SIG Cloud Provider is focused on the code pieces that integrate between Kubernetes and an underlying infrastructure. It is very common, but not necessary, for members of the SIG to be representing a cloud provider in an official capacity. I recommend that anyone interested in this part of Kubernetes should come to an SIG meeting to see how we operate and also to study the cloud provider framework project. We have some interesting ideas for future work, such as a common testing framework, that will cut across all cloud providers and will be a great opportunity for anyone looking to expand their Kubernetes involvement.
Arujjwal: Are there any specific skills you're looking for that we should highlight? To give you an example from our own [SIG ContribEx] (https://github.com/kubernetes/community/blob/master/sig-contributor-experience/README.md): if you're an expert in Hugo, we can always use some help with k8s.dev!
Michael: The SIG is currently working through the final phases of our extraction and migration process, but we are looking toward the future and starting to plan what will come next. One of the big topics that the SIG has discussed is testing. Currently, we do not have a generic common set of tests that can be exercised by each cloud provider to confirm the behaviour of their controller manager. If you are an expert in Ginkgo and the Kubetest framework, we could probably use your help in designing and implementing the new tests.
This is where the conversation ends. I hope this gave you some insights about SIG Cloud Provider's aim and working. This is just the tip of the iceberg. To know more and get involved with SIG Cloud Provider, try attending their meetings here.
A look into the Kubernetes Book Club
Learning Kubernetes and the entire ecosystem of technologies around it is not without its challenges. In this interview, we will talk with Carlos Santana (AWS) to learn a bit more about how he created the Kubernetes Book Club, how it works, and how anyone can join in to take advantage of a community-based learning experience.
Frederico Muñoz (FSM): Hello Carlos, thank you so much for your availability. To start with, could you tell us a bit about yourself?
Carlos Santana (CS): Of course. My experience in deploying Kubernetes in production six years ago opened the door for me to join Knative and then contribute to Kubernetes through the Release Team. Working on upstream Kubernetes has been one of the best experiences I've had in open-source. Over the past two years, in my role as a Senior Specialist Solutions Architect at AWS, I have been assisting large enterprises build their internal developer platforms (IDP) on top of Kubernetes. Going forward, my open source contributions are directed towards CNOE and CNCF projects like Argo, Crossplane, and Backstage.
Creating the Book Club
FSM: So your path led you to Kubernetes, and at that point what was the motivating factor for starting the Book Club?
CS: The idea for the Kubernetes Book Club sprang from a casual suggestion during a TGIK livestream. For me, it was more than just about reading a book; it was about creating a learning community. This platform has not only been a source of knowledge but also a support system, especially during the challenging times of the pandemic. It's gratifying to see how this initiative has helped members cope and grow. The first book Production Kubernetes took 36 weeks, when we started on March 5th 2021. Currently don't take that long to cover a book, one or two chapters per week.
FSM: Could you describe the way the Kubernetes Book Club works? How do you select the books and how do you go through them?
CS: We collectively choose books based on the interests and needs of the group. This practical approach helps members, especially beginners, grasp complex concepts more easily. We have two weekly series, one for the EMEA timezone, and I organize the US one. Each organizer works with their co-host and picks a book on Slack, then sets up a lineup of hosts for a couple of weeks to discuss each chapter.
FSM: If I’m not mistaken, the Kubernetes Book Club is in its 17th book, which is significant: is there any secret recipe for keeping things active?
CS: The secret to keeping the club active and engaging lies in a couple of key factors.
Firstly, consistency has been crucial. We strive to maintain a regular schedule, only cancelling meetups for major events like holidays or KubeCon. This regularity helps members stay engaged and builds a reliable community.
Secondly, making the sessions interesting and interactive has been vital. For instance, I often introduce pop-up quizzes during the meetups, which not only tests members' understanding but also adds an element of fun. This approach keeps the content relatable and helps members understand how theoretical concepts are applied in real-world scenarios.
Topics covered in the Book Club
FSM: The main topics of the books have been Kubernetes, GitOps, Security, SRE, and Observability: is this a reflection of the cloud native landscape, especially in terms of popularity?
CS: Our journey began with 'Production Kubernetes', setting the tone for our focus on practical, production-ready solutions. Since then, we've delved into various aspects of the CNCF landscape, aligning our books with a different theme. Each theme, whether it be Security, Observability, or Service Mesh, is chosen based on its relevance and demand within the community. For instance, in our recent themes on Kubernetes Certifications, we brought the book authors into our fold as active hosts, enriching our discussions with their expertise.
FSM: I know that the project had recent changes, namely being integrated into the CNCF as a Cloud Native Community Group. Could you talk a bit about this change?
CS: The CNCF graciously accepted the book club as a Cloud Native Community Group. This is a significant development that has streamlined our operations and expanded our reach. This alignment has been instrumental in enhancing our administrative capabilities, similar to those used by Kubernetes Community Days (KCD) meetups. Now, we have a more robust structure for memberships, event scheduling, mailing lists, hosting web conferences, and recording sessions.
FSM: How has your involvement with the CNCF impacted the growth and engagement of the Kubernetes Book Club over the past six months?
CS: Since becoming part of the CNCF community six months ago, we've witnessed significant quantitative changes within the Kubernetes Book Club. Our membership has surged to over 600 members, and we've successfully organized and conducted more than 40 events during this period. What's even more promising is the consistent turnout, with an average of 30 attendees per event. This growth and engagement are clear indicators of the positive influence of our CNCF affiliation on the Kubernetes Book Club's reach and impact in the community.
Joining the Book Club
FSM: For anyone wanting to join, what should they do?
CS: There are three steps to join:
- First, join the Kubernetes Book Club Community
- Then RSVP to the events on the community page
- Lastly, join the CNCF Slack channel #kubernetes-book-club.
FSM: Excellent, thank you! Any final comments you would like to share?
CS: The Kubernetes Book Club is more than just a group of professionals discussing books; it's a vibrant community and amazing volunteers that help organize and host Neependra Khare, Eric Smalling, Sevi Karakulak, Chad M. Crowell, and Walid (CNJ) Shaari. Look us up at KubeCon and get your Kubernetes Book Club sticker!
Image Filesystem: Configuring Kubernetes to store containers on a separate filesystem
A common issue in running/operating Kubernetes clusters is running out of disk space.
When the node is provisioned, you should aim to have a good amount of storage space for your container images and running containers.
The container runtime usually writes to /var.
This can be located as a separate partition or on the root filesystem.
CRI-O, by default, writes its containers and images to /var/lib/containers, while containerd writes its containers and images to /var/lib/containerd.
In this blog post, we want to bring attention to ways that you can configure your container runtime to store its content separately from the default partition.
This allows for more flexibility in configuring Kubernetes and provides support for adding a larger disk for the container storage while keeping the default filesystem untouched.
One area that needs more explaining is where/what Kubernetes is writing to disk.
Understanding Kubernetes disk usage
Kubernetes has persistent data and ephemeral data. The base path for the kubelet and local
Kubernetes-specific storage is configurable, but it is usually assumed to be /var/lib/kubelet.
In the Kubernetes docs, this is sometimes referred to as the root or node filesystem. The bulk of this data can be categorized into:
- ephemeral storage
- logs
- and container runtime
This is different from most POSIX systems as the root/node filesystem is not / but the disk that /var/lib/kubelet is on.
Ephemeral storage
Pods and containers can require temporary or transient local storage for their operation. The lifetime of the ephemeral storage does not extend beyond the life of the individual pod, and the ephemeral storage cannot be shared across pods.
Logs
By default, Kubernetes stores the logs of each running container, as files within /var/log.
These logs are ephemeral and are monitored by the kubelet to make sure that they do not grow too large while the pods are running.
You can customize the log rotation settings for each node to manage the size of these logs, and configure log shipping (using a 3rd party solution) to avoid relying on the node-local storage.
Container runtime
The container runtime has two different areas of storage for containers and images.
read-only layer: Images are usually denoted as the read-only layer, as they are not modified when containers are running. The read-only layer can consist of multiple layers that are combined into a single read-only layer. There is a thin layer on top of containers that provides ephemeral storage for containers if the container is writing to the filesystem.
writeable layer: Depending on your container runtime, local writes might be implemented as a layered write mechanism (for example,
overlayfson Linux or CimFS on Windows). This is referred to as the writable layer. Local writes could also use a writeable filesystem that is initialized with a full clone of the container image; this is used for some runtimes based on hypervisor virtualisation.
The container runtime filesystem contains both the read-only layer and the writeable layer.
This is considered the imagefs in Kubernetes documentation.
Container runtime configurations
CRI-O
CRI-O uses a storage configuration file in TOML format that lets you control how the container runtime stores persistent and temporary data.
CRI-O utilizes the storage library.
Some Linux distributions have a manual entry for storage (man 5 containers-storage.conf).
The main configuration for storage is located in /etc/containers/storage.conf and one can control the location for temporary data and the root directory.
The root directory is where CRI-O stores the persistent data.
[storage]
# Default storage driver
driver = "overlay"
# Temporary storage location
runroot = "/var/run/containers/storage"
# Primary read/write location of container storage
graphroot = "/var/lib/containers/storage"
graphroot- Persistent data stored from the container runtime
- If SELinux is enabled, this must match the
/var/lib/containers/storage
runroot- Temporary read/write access for container
- Recommended to have this on a temporary filesystem
Here is a quick way to relabel your graphroot directory to match /var/lib/containers/storage:
semanage fcontext -a -e /var/lib/containers/storage <YOUR-STORAGE-PATH>
restorecon -R -v <YOUR-STORAGE-PATH>
containerd
The containerd runtime uses a TOML configuration file to control where persistent and ephemeral data is stored.
The default path for the config file is located at /etc/containerd/config.toml.
The relevant fields for containerd storage are root and state.
root- The root directory for containerd metadata
- Default is
/var/lib/containerd - Root also requires SELinux labels if your OS requires it
state- Temporary data for containerd
- Default is
/run/containerd
Kubernetes node pressure eviction
Kubernetes will automatically detect if the container filesystem is split from the node filesystem. When one separates the filesystem, Kubernetes is responsible for monitoring both the node filesystem and the container runtime filesystem. Kubernetes documentation refers to the node filesystem and the container runtime filesystem as nodefs and imagefs. If either nodefs or the imagefs are running out of disk space, then the overall node is considered to have disk pressure. Kubernetes will first reclaim space by deleting unusued containers and images, and then it will resort to evicting pods. On a node that has a nodefs and an imagefs, the kubelet will garbage collect unused container images on imagefs and will remove dead pods and their containers from the nodefs. If there is only a nodefs, then Kubernetes garbage collection includes dead containers, dead pods and unused images.
Kubernetes allows more configurations for determining if your disk is full.
The eviction manager within the kubelet has some configuration settings that let you control
the relevant thresholds.
For filesystems, the relevant measurements are nodefs.available, nodefs.inodesfree, imagefs.available, and imagefs.inodesfree.
If there is not a dedicated disk for the container runtime then imagefs is ignored.
Users can use the existing defaults:
memory.available< 100MiBnodefs.available< 10%imagefs.available< 15%nodefs.inodesFree< 5% (Linux nodes)
Kubernetes allows you to set user defined values in EvictionHard and EvictionSoft in the kubelet configuration file.
EvictionHard- defines limits; once these limits are exceeded, pods will be evicted without any grace period.
EvictionSoft- defines limits; once these limits are exceeded, pods will be evicted with a grace period that can be set per signal.
If you specify a value for EvictionHard, it will replace the defaults.
This means it is important to set all signals in your configuration.
For example, the following kubelet configuration could be used to configure eviction signals and grace period options.
apiVersion: kubelet.config.k8s.io/v1beta1
kind: KubeletConfiguration
address: "192.168.0.8"
port: 20250
serializeImagePulls: false
evictionHard:
memory.available: "100Mi"
nodefs.available: "10%"
nodefs.inodesFree: "5%"
imagefs.available: "15%"
imagefs.inodesFree: "5%"
evictionSoft:
memory.available: "100Mi"
nodefs.available: "10%"
nodefs.inodesFree: "5%"
imagefs.available: "15%"
imagefs.inodesFree: "5%"
evictionSoftGracePeriod:
memory.available: "1m30s"
nodefs.available: "2m"
nodefs.inodesFree: "2m"
imagefs.available: "2m"
imagefs.inodesFree: "2m"
evictionMaxPodGracePeriod: 60s
Problems
The Kubernetes project recommends that you either use the default settings for eviction or you set all the fields for eviction.
You can use the default settings or specify your own evictionHard settings. If you miss a signal, then Kubernetes will not monitor that resource.
One common misconfiguration administrators or users can hit is mounting a new filesystem to /var/lib/containers/storage or /var/lib/containerd.
Kubernetes will detect a separate filesystem, so you want to make sure to check that imagefs.inodesfree and imagefs.available match your needs if you've done this.
Another area of confusion is that ephemeral storage reporting does not change if you define an image
filesystem for your node. The image filesystem (imagefs) is used to store container image layers; if a
container writes to its own root filesystem, that local write doesn't count towards the size of the container image. The place where the container runtime stores those local modifications is runtime-defined, but is often
the image filesystem.
If a container in a pod is writing to a filesystem-backed emptyDir volume, then this uses space from the
nodefs filesystem.
The kubelet always reports ephemeral storage capacity and allocations based on the filesystem represented
by nodefs; this can be confusing when ephemeral writes are actually going to the image filesystem.
Future work
To fix the ephemeral storage reporting limitations and provide more configuration options to the container runtime, SIG Node are working on KEP-4191. In KEP-4191, Kubernetes will detect if the writeable layer is separated from the read-only layer (images). This would allow us to have all ephemeral storage, including the writeable layer, on the same disk as well as allowing for a separate disk for images.
Getting involved
If you would like to get involved, you can join Kubernetes Node Special-Interest-Group (SIG).
If you would like to share feedback, you can do so on our #sig-node Slack channel. If you're not already part of that Slack workspace, you can visit https://slack.k8s.io/ for an invitation.
Special thanks to all the contributors who provided great reviews, shared valuable insights or suggested the topic idea.
- Peter Hunt
- Mrunal Patel
- Ryan Phillips
- Gaurav Singh
Spotlight on SIG Release (Release Team Subproject)
The Release Special Interest Group (SIG Release), where Kubernetes sharpens its blade with cutting-edge features and bug fixes every 4 months. Have you ever considered how such a big project like Kubernetes manages its timeline so efficiently to release its new version, or how the internal workings of the Release Team look like? If you're curious about these questions or want to know more and get involved with the work SIG Release does, read on!
SIG Release plays a crucial role in the development and evolution of Kubernetes. Its primary responsibility is to manage the release process of new versions of Kubernetes. It operates on a regular release cycle, typically every three to four months. During this cycle, the Kubernetes Release Team works closely with other SIGs and contributors to ensure a smooth and well-coordinated release. This includes planning the release schedule, setting deadlines for code freeze and testing phases, as well as creating release artefacts like binaries, documentation, and release notes.
Before you read further, it is important to note that there are two subprojects under SIG Release - Release Engineering and Release Team.
In this blog post, Nitish Kumar interviews Verónica López (PlanetScale), Technical Lead of SIG Release, with the spotlight on the Release Team subproject, how the release process looks like, and ways to get involved.
What is the typical release process for a new version of Kubernetes, from initial planning to the final release? Are there any specific methodologies and tools that you use to ensure a smooth release?
The release process for a new Kubernetes version is a well-structured and community-driven effort. There are no specific methodologies or tools as such that we follow, except a calendar with a series of steps to keep things organised. The complete release process looks like this:
Release Team Onboarding: We start with the formation of a Release Team, which includes volunteers from the Kubernetes community who will be responsible for managing different components of the new release. This is typically done before the previous release is about to wrap up. Once the team is formed, new members are onboarded while the Release Team Lead and the Branch Manager propose a calendar for the usual deliverables. As an example, you can take a look at the v1.29 team formation issue created at the SIG Release repository. For a contributor to be the part of Release Team, they typically go through the Release Shadow program, but that's not the only way to get involved with SIG Release.
Beginning Phase: In the initial weeks of each release cycle, SIG Release diligently tracks the progress of new features and enhancements outlined in Kubernetes Enhancement Proposals (KEPs). While not all of these features are entirely new, they often commence their journey in the alpha phase, subsequently advancing to the beta stage, and ultimately attaining the status of stability.
Feature Maturation Phase: We usually cut a couple of Alpha releases, containing new features in an experimental state, to gather feedback from the community, followed by a couple of Beta releases, where features are more stable and the focus is on fixing bugs. Feedback from users is critical at this stage, to the point where sometimes we need to cut an additional Beta release to address bugs or other concerns that may arise during this phase. Once this is cleared, we cut a release candidate (RC) before the actual release. Throughout the cycle, efforts are made to update and improve documentation, including release notes and user guides, a process that, in my opinion, deserves its own post.
Stabilisation Phase: A few weeks before the new release, we implement a code freeze, and no new features are allowed after this point: this allows the focus to shift towards testing and stabilisation. In parallel to the main release, we keep cutting monthly patches of old, officially supported versions of Kubernetes, so you could say that the lifecycle of a Kubernetes version extends for several months afterwards. Throughout the complete release cycle, efforts are made to update and improve documentation, including release notes and user guides, a process that, in our opinion, deserves its own post.
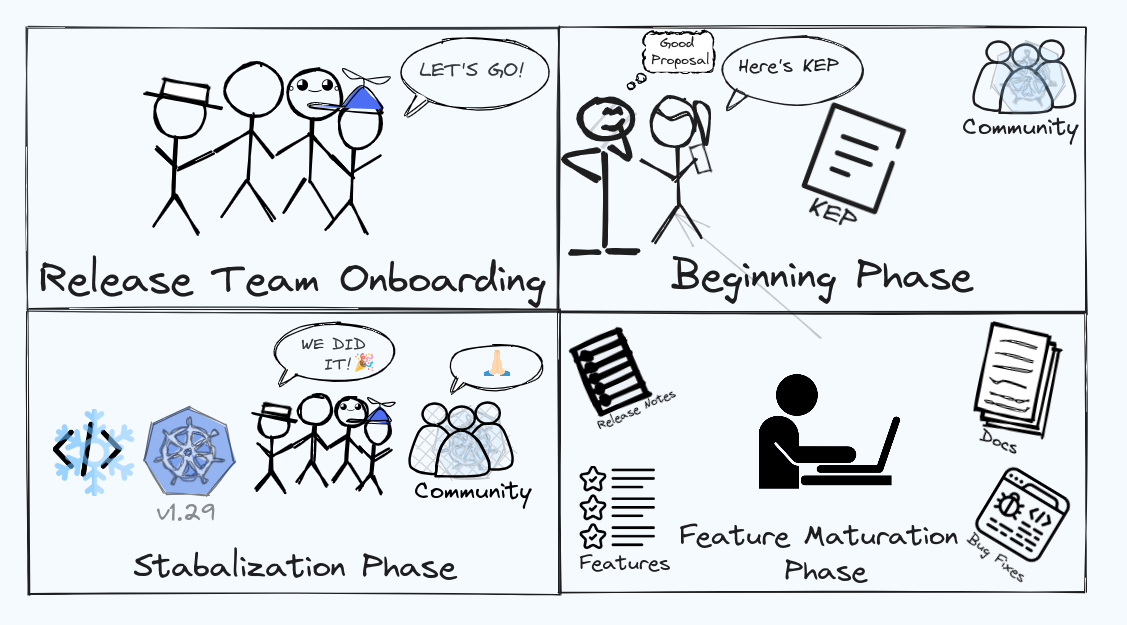
How do you handle the balance between stability and introducing new features in each release? What criteria are used to determine which features make it into a release?
It’s a neverending mission, however, we think that the key is in respecting our process and guidelines. Our guidelines are the result of hours of discussions and feedback from dozens of members of the community who bring a wealth of knowledge and experience to the project. If we didn’t have strict guidelines, we would keep having the same discussions over and over again, instead of using our time for more productive topics that needs our attention. All the critical exceptions require consensus from most of the team members, so we can ensure quality.
The process of deciding what makes it into a release starts way before the Release Teams takes over the workflows. Each individual SIG along with the most experienced contributors gets to decide whether they’d like to include a feature or change, so the planning and ultimate approval usually belongs to them. Then, the Release Team makes sure those contributions meet the requirements of documentation, testing, backwards compatibility, among others, before officially allowing them in. A similar process happens with cherry-picks for the monthly patch releases, where we have strict policies about not accepting PRs that would require a full KEP, or fixes that don’t include all the affected branches.
What are some of the most significant challenges you’ve encountered while developing and releasing Kubernetes? How have you overcome these challenges?
Every cycle of release brings its own array of challenges. It might involve tackling last-minute concerns like newly discovered Common Vulnerabilities and Exposures (CVEs), resolving bugs within our internal tools, or addressing unexpected regressions caused by features from previous releases. Another obstacle we often face is that, although our team is substantial, most of us contribute on a volunteer basis. Sometimes it can feel like we’re a bit understaffed, however we always manage to get organised and make it work.
As a new contributor, what should be my ideal path to get involved with SIG Release? In a community where everyone is busy with their own tasks, how can I find the right set of tasks to contribute effectively to it?
Everyone's way of getting involved within the Open Source community is different. SIG Release is a self-serving team, meaning that we write our own tools to be able to ship releases. We collaborate a lot with other SIGs, such as SIG K8s Infra, but all the tools that we used needs to be tailor-made for our massive technical needs, while reducing costs. This means that we are constantly looking for volunteers who’d like to help with different types of projects, beyond “just” cutting a release.
Our current project requires a mix of skills like Go programming, understanding Kubernetes internals, Linux packaging, supply chain security, technical writing, and general open-source project maintenance. This skill set is always evolving as our project grows.
For an ideal path, this is what we suggest:
- Get yourself familiar with the code, including how features are managed, the release calendar, and the overall structure of the Release Team.
- Join the Kubernetes community communication channels, such as Slack (#sig-release), where we are particularly active.
- Join the SIG Release weekly meetings which are open to all in the community. Participating in these meetings is a great way to learn about ongoing and future projects that you might find relevant for your skillset and interests.
Remember, every experienced contributor was once in your shoes, and the community is often more than willing to guide and support newcomers. Don't hesitate to ask questions, engage in discussions, and take small steps to contribute.
What is the Release Shadow Program and how is it different from other shadow programs included in various other SIGs?
The Release Shadow Program offers a chance for interested individuals to shadow experienced members of the Release Team throughout a Kubernetes release cycle. This is a unique chance to see all the hard work that a Kubernetes release requires across sub-teams. A lot of people think that all we do is cut a release every three months, but that’s just the top of the iceberg.
Our program typically aligns with a specific Kubernetes release cycle, which has a predictable timeline of approximately three months. While this program doesn’t involve writing new Kubernetes features, it still requires a high sense of responsibility since the Release Team is the last step between a new release and thousands of contributors, so it’s a great opportunity to learn a lot about modern software development cycles at an accelerated pace.
What are the qualifications that you generally look for in a person to volunteer as a release shadow/release lead for the next Kubernetes release?
While all the roles require some degree of technical ability, some require more hands-on experience with Go and familiarity with the Kubernetes API while others require people who are good at communicating technical content in a clear and concise way. It’s important to mention that we value enthusiasm and commitment over technical expertise from day 1. If you have the right attitude and show us that you enjoy working with Kubernetes and or/release engineering, even if it’s only through a personal project that you put together in your spare time, the team will make sure to guide you. Being a self-starter and not being afraid to ask questions can take you a long way in our team.
What will you suggest to someone who has got rejected from being a part of the Release Shadow Program several times?
Keep applying.
With every release cycle we have had an exponential growth in the number of applicants, so it gets harder to be selected, which can be discouraging, but please know that getting rejected doesn’t mean you’re not talented. It’s just practically impossible to accept every applicant, however here's an alternative that we suggest:
Start attending our weekly Kubernetes SIG Release meetings to introduce yourself and get familiar with the team and the projects we are working on.
The Release Team is one of the way to join SIG Release, but we are always looking for more hands to help. Again, in addition to certain technical ability, the most sought after trait that we look for is people we can trust, and that requires time.

Can you discuss any ongoing initiatives or upcoming features that the release team is particularly excited about for Kubernetes v1.28? How do these advancements align with the long-term vision of Kubernetes?
We are excited about finally publishing Kubernetes packages on community infrastructure. It has been something that we have been wanting to do for a few years now, but it’s a project with many technical implications that must be in place before doing the transition. Once that’s done, we’ll be able to increase our productivity and take control of the entire workflows.
Final thoughts
Well, this conversation ends here but not the learning. I hope this interview has given you some idea about what SIG Release does and how to get started in helping out. It is important to mention again that this article covers the first subproject under SIG Release, the Release Team. In the next Spotlight blog on SIG Release, we will provide a spotlight on the Release Engineering subproject, what it does and how to get involved. Finally, you can go through the SIG Release charter to get a more in-depth understanding of how SIG Release operates.
Contextual logging in Kubernetes 1.29: Better troubleshooting and enhanced logging
On behalf of the Structured Logging Working Group and SIG Instrumentation, we are pleased to announce that the contextual logging feature introduced in Kubernetes v1.24 has now been successfully migrated to two components (kube-scheduler and kube-controller-manager) as well as some directories. This feature aims to provide more useful logs for better troubleshooting of Kubernetes and to empower developers to enhance Kubernetes.
What is contextual logging?
Contextual logging is based on the go-logr API. The key idea is that libraries are passed a logger instance by their caller and use that for logging instead of accessing a global logger. The binary decides the logging implementation, not the libraries. The go-logr API is designed around structured logging and supports attaching additional information to a logger.
This enables additional use cases:
The caller can attach additional information to a logger:
- WithName adds a "logger" key with the names concatenated by a dot as value
- WithValues adds key/value pairs
When passing this extended logger into a function, and the function uses it instead of the global logger, the additional information is then included in all log entries, without having to modify the code that generates the log entries. This is useful in highly parallel applications where it can become hard to identify all log entries for a certain operation, because the output from different operations gets interleaved.
When running unit tests, log output can be associated with the current test. Then, when a test fails, only the log output of the failed test gets shown by go test. That output can also be more verbose by default because it will not get shown for successful tests. Tests can be run in parallel without interleaving their output.
One of the design decisions for contextual logging was to allow attaching a logger as value to a context.Context.
Since the logger encapsulates all aspects of the intended logging for the call,
it is part of the context, and not just using it. A practical advantage is that many APIs
already have a ctx parameter or can add one. This provides additional advantages, like being able to
get rid of context.TODO() calls inside the functions.
How to use it
The contextual logging feature is alpha starting from Kubernetes v1.24,
so it requires the ContextualLogging feature gate to be enabled.
If you want to test the feature while it is alpha, you need to enable this feature gate
on the kube-controller-manager and the kube-scheduler.
For the kube-scheduler, there is one thing to note, in addition to enabling
the ContextualLogging feature gate, instrumentation also depends on log verbosity.
To avoid slowing down the scheduler with the logging instrumentation for contextual logging added for 1.29,
it is important to choose carefully when to add additional information:
- At
-v3or lower, onlyWithValues("pod")is used once per scheduling cycle. This has the intended effect that all log messages for the cycle include the pod information. Once contextual logging is GA, "pod" key/value pairs can be removed from all log calls. - At
-v4or higher, richer log entries get produced whereWithValuesis also used for the node (when applicable) andWithNameis used for the current operation and plugin.
Here is an example that demonstrates the effect:
I1113 08:43:37.029524 87144 default_binder.go:53] "Attempting to bind pod to node" logger="Bind.DefaultBinder" pod="kube-system/coredns-69cbfb9798-ms4pq" node="127.0.0.1"
The immediate benefit is that the operation and plugin name are visible in logger.
pod and node are already logged as parameters in individual log calls in kube-scheduler code.
Once contextual logging is supported by more packages outside of kube-scheduler,
they will also be visible there (for example, client-go). Once it is GA,
log calls can be simplified to avoid repeating those values.
In kube-controller-manager, WithName is used to add the user-visible controller name to log output,
for example:
I1113 08:43:29.284360 87141 graph_builder.go:285] "garbage controller monitor not synced: no monitors" logger="garbage-collector-controller"
The logger=”garbage-collector-controller” was added by the kube-controller-manager core
when instantiating that controller and appears in all of its log entries - at least as long as the code
that it calls supports contextual logging. Further work is needed to convert shared packages like client-go.
Performance impact
Supporting contextual logging in a package, i.e. accepting a logger from a caller, is cheap.
No performance impact was observed for the kube-scheduler. As noted above,
adding WithName and WithValues needs to be done more carefully.
In Kubernetes 1.29, enabling contextual logging at production verbosity (-v3 or lower)
caused no measurable slowdown for the kube-scheduler and is not expected for the kube-controller-manager either.
At debug levels, a 28% slowdown for some test cases is still reasonable given that the resulting logs make debugging easier.
For details, see the discussion around promoting the feature to beta.
Impact on downstream users
Log output is not part of the Kubernetes API and changes regularly in each release, whether it is because developers work on the code or because of the ongoing conversion to structured and contextual logging.
If downstream users have dependencies on specific logs, they need to be aware of how this change affects them.
Further reading
- Read the Contextual Logging in Kubernetes 1.24 article.
- Read the KEP-3077: contextual logging.
Get involved
If you're interested in getting involved, we always welcome new contributors to join us. Contextual logging provides a fantastic opportunity for you to contribute to Kubernetes development and make a meaningful impact. By joining Structured Logging WG, you can actively participate in the development of Kubernetes and make your first contribution. It's a great way to learn and engage with the community while gaining valuable experience.
We encourage you to explore the repository and familiarize yourself with the ongoing discussions and projects. It's a collaborative environment where you can exchange ideas, ask questions, and work together with other contributors.
If you have any questions or need guidance, don't hesitate to reach out to us and you can do so on our public Slack channel. If you're not already part of that Slack workspace, you can visit https://slack.k8s.io/ for an invitation.
We would like to express our gratitude to all the contributors who provided excellent reviews, shared valuable insights, and assisted in the implementation of this feature (in alphabetical order):
- Aldo Culquicondor (alculquicondor)
- Andy Goldstein (ncdc)
- Feruzjon Muyassarov (fmuyassarov)
- Freddie (freddie400)
- JUN YANG (yangjunmyfm192085)
- Kante Yin (kerthcet)
- Kiki (carlory)
- Lucas Severo Alve (knelasevero)
- Maciej Szulik (soltysh)
- Mengjiao Liu (mengjiao-liu)
- Naman Lakhwani (Namanl2001)
- Oksana Baranova (oxxenix)
- Patrick Ohly (pohly)
- songxiao-wang87 (songxiao-wang87)
- Tim Allclai (tallclair)
- ZhangYu (Octopusjust)
- Ziqi Zhao (fatsheep9146)
- Zac (249043822)
Kubernetes 1.29: Decoupling taint manager from node lifecycle controller
This blog discusses a new feature in Kubernetes 1.29 to improve the handling of taint-based pod eviction.
Background
In Kubernetes 1.29, an improvement has been introduced to enhance the taint-based pod eviction handling on nodes. This blog discusses the changes made to node-lifecycle-controller to separate its responsibilities and improve overall code maintainability.
Summary of changes
node-lifecycle-controller previously combined two independent functions:
- Adding a pre-defined set of
NoExecutetaints to Node based on Node's condition. - Performing pod eviction on
NoExecutetaint.
With the Kubernetes 1.29 release, the taint-based eviction implementation has been moved out of node-lifecycle-controller into a separate and independent component called taint-eviction-controller. This separation aims to disentangle code, enhance code maintainability, and facilitate future extensions to either component.
As part of the change, additional metrics were introduced to help you monitor taint-based pod evictions:
pod_deletion_duration_secondsmeasures the latency between the time when a taint effect has been activated for the Pod and its deletion via taint-eviction-controller.pod_deletions_totalreports the total number of Pods deleted by taint-eviction-controller since its start.
How to use the new feature?
A new feature gate, SeparateTaintEvictionController, has been added. The feature is enabled by default as Beta in Kubernetes 1.29.
Please refer to the feature gate document.
When this feature is enabled, users can optionally disable taint-based eviction by setting --controllers=-taint-eviction-controller
in kube-controller-manager.
To disable the new feature and use the old taint-manager within node-lifecylecycle-controller , users can set the feature gate SeparateTaintEvictionController=false.
Use cases
This new feature will allow cluster administrators to extend and enhance the default taint-eviction-controller and even replace the default taint-eviction-controller with a custom implementation to meet different needs. An example is to better support stateful workloads that use PersistentVolume on local disks.
FAQ
Does this feature change the existing behavior of taint-based pod evictions?
No, the taint-based pod eviction behavior remains unchanged. If the feature gate
SeparateTaintEvictionController is turned off, the legacy node-lifecycle-controller with taint-manager will continue to be used.
Will enabling/using this feature result in an increase in the time taken by any operations covered by existing SLIs/SLOs?
No.
Will enabling/using this feature result in an increase in resource usage (CPU, RAM, disk, IO, ...)?
The increase in resource usage by running a separate taint-eviction-controller will be negligible.
Learn more
For more details, refer to the KEP.
Acknowledgments
As with any Kubernetes feature, multiple community members have contributed, from writing the KEP to implementing the new controller and reviewing the KEP and code. Special thanks to:
- Aldo Culquicondor (@alculquicondor)
- Maciej Szulik (@soltysh)
- Filip Křepinský (@atiratree)
- Han Kang (@logicalhan)
- Wei Huang (@Huang-Wei)
- Sergey Kanzhelevi (@SergeyKanzhelev)
- Ravi Gudimetla (@ravisantoshgudimetla)
- Deep Debroy (@ddebroy)
Kubernetes 1.29: PodReadyToStartContainers Condition Moves to Beta
With the recent release of Kubernetes 1.29, the PodReadyToStartContainers
condition is
available by default.
The kubelet manages the value for that condition throughout a Pod's lifecycle,
in the status field of a Pod. The kubelet will use the PodReadyToStartContainers
condition to accurately surface the initialization state of a Pod,
from the perspective of Pod sandbox creation and network configuration by a container runtime.
What's the motivation for this feature?
Cluster administrators did not have a clear and easily accessible way to view the completion of Pod's sandbox creation
and initialization. As of 1.28, the Initialized condition in Pods tracks the execution of init containers.
However, it has limitations in accurately reflecting the completion of sandbox creation and readiness to start containers for all Pods in a cluster.
This distinction is particularly important in multi-tenant clusters where tenants own the Pod specifications, including the set of init containers,
while cluster administrators manage storage plugins, networking plugins, and container runtime handlers.
Therefore, there is a need for an improved mechanism to provide cluster administrators with a clear and
comprehensive view of Pod sandbox creation completion and container readiness.
What's the benefit?
- Improved Visibility: Cluster administrators gain a clearer and more comprehensive view of Pod sandbox creation completion and container readiness. This enhanced visibility allows them to make better-informed decisions and troubleshoot issues more effectively.
- Metric Collection and Monitoring: Monitoring services can leverage the fields associated with
the
PodReadyToStartContainerscondition to report sandbox creation state and latency. Metrics can be collected at per-Pod cardinality or aggregated based on various properties of the Pod, such asvolumes,runtimeClassName, custom annotations for CNI and IPAM plugins or arbitrary labels and annotations, andstorageClassNameof PersistentVolumeClaims. This enables comprehensive monitoring and analysis of Pod readiness across the cluster. - Enhanced Troubleshooting: With a more accurate representation of Pod sandbox creation and container readiness, cluster administrators can quickly identify and address any issues that may arise during the initialization process. This leads to improved troubleshooting capabilities and reduced downtime.
What’s next?
Due to feedback and adoption, the Kubernetes team promoted PodReadyToStartContainersCondition to Beta in 1.29.
Your comments will help determine if this condition continues forward to get promoted to GA,
so please submit additional feedback on this feature!
How can I learn more?
Please check out the
documentation for the
PodReadyToStartContainersCondition to learn more about it and how it fits in relation to
other Pod conditions.
How to get involved?
This feature is driven by the SIG Node community. Please join us to connect with the community and share your ideas and feedback around the above feature and beyond. We look forward to hearing from you!
Kubernetes 1.29: New (alpha) Feature, Load Balancer IP Mode for Services
This blog introduces a new alpha feature in Kubernetes 1.29. It provides a configurable approach to define how Service implementations, exemplified in this blog by kube-proxy, handle traffic from pods to the Service, within the cluster.
Background
In older Kubernetes releases, the kube-proxy would intercept traffic that was destined for the IP
address associated with a Service of type: LoadBalancer. This happened whatever mode you used
for kube-proxy.
The interception implemented the expected behavior (traffic eventually reaching the expected
endpoints behind the Service). The mechanism to make that work depended on the mode for kube-proxy;
on Linux, kube-proxy in iptables mode would redirecting packets directly to the endpoint; in ipvs mode,
kube-proxy would configure the load balancer's IP address to one interface on the node.
The motivation for implementing that interception was for two reasons:
Traffic path optimization: Efficiently redirecting pod traffic - when a container in a pod sends an outbound packet that is destined for the load balancer's IP address - directly to the backend service by bypassing the load balancer.
Handling load balancer packets: Some load balancers send packets with the destination IP set to the load balancer's IP address. As a result, these packets need to be routed directly to the correct backend (which might not be local to that node), in order to avoid loops.
Problems
However, there are several problems with the aforementioned behavior:
Source IP: Some cloud providers use the load balancer's IP as the source IP when transmitting packets to the node. In the ipvs mode of kube-proxy, there is a problem that health checks from the load balancer never return. This occurs because the reply packets would be forward to the local interface
kube-ipvs0(where the load balancer's IP is bound to) and be subsequently ignored.Feature loss at load balancer level: Certain cloud providers offer features(such as TLS termination, proxy protocol, etc.) at the load balancer level. Bypassing the load balancer results in the loss of these features when the packet reaches the service (leading to protocol errors).
Even with the new alpha behaviour disabled (the default), there is a
workaround
that involves setting .status.loadBalancer.ingress.hostname for the Service, in order
to bypass kube-proxy binding.
But this is just a makeshift solution.
Solution
In summary, providing an option for cloud providers to disable the current behavior would be highly beneficial.
To address this, Kubernetes v1.29 introduces a new (alpha) .status.loadBalancer.ingress.ipMode
field for a Service.
This field specifies how the load balancer IP behaves and can be specified only when
the .status.loadBalancer.ingress.ip field is also specified.
Two values are possible for .status.loadBalancer.ingress.ipMode: "VIP" and "Proxy".
The default value is "VIP", meaning that traffic delivered to the node
with the destination set to the load balancer's IP and port will be redirected to the backend service by kube-proxy.
This preserves the existing behavior of kube-proxy.
The "Proxy" value is intended to prevent kube-proxy from binding the load balancer's IP address
to the node in both ipvs and iptables modes.
Consequently, traffic is sent directly to the load balancer and then forwarded to the destination node.
The destination setting for forwarded packets varies depending on how the cloud provider's load balancer delivers traffic:
- If the traffic is delivered to the node then DNATed to the pod, the destination would be set to the node's IP and node port;
- If the traffic is delivered directly to the pod, the destination would be set to the pod's IP and port.
Usage
Here are the necessary steps to enable this feature:
- Download the latest Kubernetes project (version
v1.29.0or later). - Enable the feature gate with the command line flag
--feature-gates=LoadBalancerIPMode=trueon kube-proxy, kube-apiserver, and cloud-controller-manager. - For Services with
type: LoadBalancer, setipModeto the appropriate value. This step is likely handled by your chosen cloud-controller-manager during theEnsureLoadBalancerprocess.
More information
- Read Specifying IPMode of load balancer status.
- Read KEP-1860 - Make Kubernetes aware of the LoadBalancer behaviour (sic).
Getting involved
Reach us on Slack: #sig-network, or through the mailing list.
Acknowledgments
Huge thanks to @Sh4d1 for the original KEP and initial implementation code. I took over midway and completed the work. Similarly, immense gratitude to other contributors who have assisted in the design, implementation, and review of this feature (alphabetical order):
Kubernetes 1.29: Single Pod Access Mode for PersistentVolumes Graduates to Stable
With the release of Kubernetes v1.29, the ReadWriteOncePod volume access mode
has graduated to general availability: it's part of Kubernetes' stable API. In
this blog post, I'll take a closer look at this access mode and what it does.
What is ReadWriteOncePod?
ReadWriteOncePod is an access mode for
PersistentVolumes (PVs)
and PersistentVolumeClaims (PVCs)
introduced in Kubernetes v1.22. This access mode enables you to restrict volume
access to a single pod in the cluster, ensuring that only one pod can write to
the volume at a time. This can be particularly useful for stateful workloads
that require single-writer access to storage.
For more context on access modes and how ReadWriteOncePod works read
What are access modes and why are they important?
in the Introducing Single Pod Access Mode for PersistentVolumes article from 2021.
How can I start using ReadWriteOncePod?
The ReadWriteOncePod volume access mode is available by default in Kubernetes
versions v1.27 and beyond. In Kubernetes v1.29 and later, the Kubernetes API
always recognizes this access mode.
Note that ReadWriteOncePod is
only supported for CSI volumes,
and before using this feature, you will need to update the following
CSI sidecars
to these versions or greater:
To start using ReadWriteOncePod, you need to create a PVC with the
ReadWriteOncePod access mode:
kind: PersistentVolumeClaim
apiVersion: v1
metadata:
name: single-writer-only
spec:
accessModes:
- ReadWriteOncePod # Allows only a single pod to access single-writer-only.
resources:
requests:
storage: 1Gi
If your storage plugin supports
Dynamic provisioning, then
new PersistentVolumes will be created with the ReadWriteOncePod access mode
applied.
Read Migrating existing PersistentVolumes
for details on migrating existing volumes to use ReadWriteOncePod.
How can I learn more?
Please see the blog posts alpha,
beta, and
KEP-2485
for more details on the ReadWriteOncePod access mode and motivations for CSI
spec changes.
How do I get involved?
The Kubernetes #csi Slack channel and any of the standard SIG Storage communication channels are great methods to reach out to the SIG Storage and the CSI teams.
Special thanks to the following people whose thoughtful reviews and feedback helped shape this feature:
- Abdullah Gharaibeh (ahg-g)
- Aldo Culquicondor (alculquicondor)
- Antonio Ojea (aojea)
- David Eads (deads2k)
- Jan Šafránek (jsafrane)
- Joe Betz (jpbetz)
- Kante Yin (kerthcet)
- Michelle Au (msau42)
- Tim Bannister (sftim)
- Xing Yang (xing-yang)
If you’re interested in getting involved with the design and development of CSI or any part of the Kubernetes storage system, join the Kubernetes Storage Special Interest Group (SIG). We’re rapidly growing and always welcome new contributors.
Kubernetes 1.29: CSI Storage Resizing Authenticated and Generally Available in v1.29
Kubernetes version v1.29 brings generally available support for authentication during CSI (Container Storage Interface) storage resize operations.
Let's embark on the evolution of this feature, initially introduced in alpha in Kubernetes v1.25, and unravel the changes accompanying its transition to GA.
Authenticated CSI storage resizing unveiled
Kubernetes harnesses the capabilities of CSI to seamlessly integrate with third-party storage systems, empowering your cluster to seamlessly expand storage volumes managed by the CSI driver. The recent elevation of authentication secret support for resizes from Beta to GA ushers in new horizons, enabling volume expansion in scenarios where the underlying storage operation demands credentials for backend cluster operations – such as accessing a SAN/NAS fabric. This enhancement addresses a critical limitation for CSI drivers, allowing volume expansion at the node level, especially in cases necessitating authentication for resize operations.
The challenges extend beyond node-level expansion. Within the Special Interest Group (SIG) Storage, use cases have surfaced, including scenarios where the CSI driver needs to validate the actual size of backend block storage before initiating a node-level filesystem expand operation. This validation prevents false positive returns from the backend storage cluster during file system expansion. Additionally, for PersistentVolumes representing encrypted block storage (e.g., using LUKS), a passphrase is mandated to expand the device and grow the filesystem, underscoring the necessity for authenticated resizing.
What's new for Kubernetes v1.29
With the graduation to GA, the feature remains enabled by default. Support for node-level volume expansion secrets has been seamlessly integrated into the CSI external-provisioner sidecar controller. To take advantage, ensure your external CSI storage provisioner sidecar controller is operating at v3.3.0 or above.
Navigating Authenticated CSI Storage Resizing
Assuming all requisite components, including the CSI driver, are deployed and operational
on your cluster, and you have a CSI driver supporting resizing, you can initiate a
NodeExpand operation on a CSI volume. Credentials for the CSI NodeExpand operation
can be conveniently provided as a Kubernetes Secret, specifying the Secret via the
StorageClass. Here's an illustrative manifest for a Secret holding credentials:
---
apiVersion: v1
kind: Secret
metadata:
name: test-secret
namespace: default
data:
stringData:
username: admin
password: t0p-Secret
And here's an example manifest for a StorageClass referencing those credentials:
---
apiVersion: storage.k8s.io/v1
kind: StorageClass
metadata:
name: csi-blockstorage-sc
parameters:
csi.storage.k8s.io/node-expand-secret-name: test-secret
csi.storage.k8s.io/node-expand-secret-namespace: default
provisioner: blockstorage.cloudprovider.example
reclaimPolicy: Delete
volumeBindingMode: Immediate
allowVolumeExpansion: true
Upon successful creation of the PersistentVolumeClaim (PVC), you can verify the
configuration within the .spec.csi field of the PersistentVolume. To confirm,
execute kubectl get persistentvolume <pv_name> -o yaml.
Engage with the Evolution!
For those enthusiastic about contributing or delving deeper into the technical intricacies, the enhancement proposal comprises exhaustive details about the feature's history and implementation. Explore the realms of StorageClass-based dynamic provisioning in Kubernetes by referring to the [storage class documentation] (https://kubernetes.io/docs/concepts/storage/persistent-volumes/#class) and the overarching PersistentVolumes documentation.
Join the Kubernetes Storage SIG (Special Interest Group) to actively participate in elevating this feature. Your insights are invaluable, and we eagerly anticipate welcoming more contributors to shape the future of Kubernetes storage!
Kubernetes 1.29: VolumeAttributesClass for Volume Modification
The v1.29 release of Kubernetes introduced an alpha feature to support modifying a volume
by changing the volumeAttributesClassName that was specified for a PersistentVolumeClaim (PVC).
With the feature enabled, Kubernetes can handle updates of volume attributes other than capacity.
Allowing volume attributes to be changed without managing it through different
provider's APIs directly simplifies the current flow.
You can read about VolumeAttributesClass usage details in the Kubernetes documentation or you can read on to learn about why the Kubernetes project is supporting this feature.
VolumeAttributesClass
The new storage.k8s.io/v1alpha1 API group provides two new types:
VolumeAttributesClass
Represents a specification of mutable volume attributes defined by the CSI driver. The class can be specified during dynamic provisioning of PersistentVolumeClaims, and changed in the PersistentVolumeClaim spec after provisioning.
ModifyVolumeStatus
Represents the status object of ControllerModifyVolume operation.
With this alpha feature enabled, the spec of PersistentVolumeClaim defines VolumeAttributesClassName
that is used in the PVC. At volume provisioning, the CreateVolume operation will apply the parameters in the
VolumeAttributesClass along with the parameters in the StorageClass.
When there is a change of volumeAttributesClassName in the PVC spec, the external-resizer sidecar will get an informer event. Based on the current state of the configuration, the resizer will trigger a CSI ControllerModifyVolume. More details can be found in KEP-3751.
How to use it
If you want to test the feature whilst it's alpha, you need to enable the relevant feature gate
in the kube-controller-manager and the kube-apiserver. Use the --feature-gates command line argument:
--feature-gates="...,VolumeAttributesClass=true"
It also requires that the CSI driver has implemented the ModifyVolume API.
User flow
If you would like to see the feature in action and verify it works fine in your cluster, here's what you can try:
Define a StorageClass and VolumeAttributesClass
apiVersion: storage.k8s.io/v1 kind: StorageClass metadata: name: csi-sc-example provisioner: pd.csi.storage.gke.io parameters: type: "hyperdisk-balanced" volumeBindingMode: WaitForFirstConsumerapiVersion: storage.k8s.io/v1alpha1 kind: VolumeAttributesClass metadata: name: silver driverName: pd.csi.storage.gke.io parameters: provisioned-iops: "3000" provisioned-throughput: "50"Define and create the PersistentVolumeClaim
apiVersion: v1 kind: PersistentVolumeClaim metadata: name: test-pv-claim spec: storageClassName: csi-sc-example volumeAttributesClassName: silver accessModes: - ReadWriteOnce resources: requests: storage: 64GiVerify that the PersistentVolumeClaim is now provisioned correctly with:
kubectl get pvcCreate a new VolumeAttributesClass gold:
apiVersion: storage.k8s.io/v1alpha1 kind: VolumeAttributesClass metadata: name: gold driverName: pd.csi.storage.gke.io parameters: iops: "4000" throughput: "60"Update the PVC with the new VolumeAttributesClass and apply:
apiVersion: v1 kind: PersistentVolumeClaim metadata: name: test-pv-claim spec: storageClassName: csi-sc-example volumeAttributesClassName: gold accessModes: - ReadWriteOnce resources: requests: storage: 64GiVerify that PersistentVolumeClaims has the updated VolumeAttributesClass parameters with:
kubectl describe pvc <PVC_NAME>
Next steps
- See the VolumeAttributesClass KEP for more information on the design
- You can view or comment on the project board for VolumeAttributesClass
- In order to move this feature towards beta, we need feedback from the community, so here's a call to action: add support to the CSI drivers, try out this feature, consider how it can help with problems that your users are having…
Getting involved
We always welcome new contributors. So, if you would like to get involved, you can join our Kubernetes Storage Special Interest Group (SIG).
If you would like to share feedback, you can do so on our public Slack channel.
Special thanks to all the contributors that provided great reviews, shared valuable insight and helped implement this feature (alphabetical order):
- Baofa Fan (calory)
- Ben Swartzlander (bswartz)
- Connor Catlett (ConnorJC3)
- Hemant Kumar (gnufied)
- Jan Šafránek (jsafrane)
- Joe Betz (jpbetz)
- Jordan Liggitt (liggitt)
- Matthew Cary (mattcary)
- Michelle Au (msau42)
- Xing Yang (xing-yang)
Kubernetes 1.29: Cloud Provider Integrations Are Now Separate Components
For Kubernetes v1.29, you need to use additional components to integrate your Kubernetes cluster with a cloud infrastructure provider. By default, Kubernetes v1.29 components abort if you try to specify integration with any cloud provider using one of the legacy compiled-in cloud provider integrations. If you want to use a legacy integration, you have to opt back in - and a future release will remove even that option.
In 2018, the Kubernetes community agreed to form the Cloud Provider Special Interest Group (SIG), with a mission to externalize all cloud provider integrations and remove all the existing in-tree cloud provider integrations. In January 2019, the Kubernetes community approved the initial draft of KEP-2395: Removing In-Tree Cloud Provider Code. This KEP defines a process by which we can remove cloud provider specific code from the core Kubernetes source tree. From the KEP:
Motiviation [sic] behind this effort is to allow cloud providers to develop and make releases independent from the core Kubernetes release cycle. The de-coupling of cloud provider code allows for separation of concern between "Kubernetes core" and the cloud providers within the ecosystem. In addition, this ensures all cloud providers in the ecosystem are integrating with Kubernetes in a consistent and extendable way.
After many years of development and collaboration across many contributors, the default behavior for legacy cloud provider integrations is changing. This means that users will need to confirm their Kubernetes configurations, and in some cases run external cloud controller managers. These changes are taking effect in Kubernetes version 1.29; read on to learn if you are affected and what changes you will need to make.
These updated default settings affect a large proportion of Kubernetes users, and will require changes for users who were previously using the in-tree provider integrations. The legacy integrations offered compatibility with Azure, AWS, GCE, OpenStack, and vSphere; however for AWS and OpenStack the compiled-in integrations were removed in Kubernetes versions 1.27 and 1.26, respectively.
What has changed?
At the most basic level, two feature gates are changing their default
value from false to true. Those feature gates, DisableCloudProviders and
DisableKubeletCloudCredentialProviders, control the way that the
kube-apiserver, kube-controller-manager, and kubelet
invoke the cloud provider related code that is included in those components.
When these feature gates are true (the default), the only recognized value for
the --cloud-provider command line argument is external.
Let's see what the official Kubernetes documentation says about these feature gates:
DisableCloudProviders: Disables any functionality inkube-apiserver,kube-controller-managerandkubeletrelated to the--cloud-providercomponent flag.
DisableKubeletCloudCredentialProviders: Disable the in-tree functionality in kubelet to authenticate to a cloud provider container registry for image pull credentials.
The next stage beyond beta will be full removal; for that release onwards, you won't be able to override those feature gates back to false.
What do you need to do?
If you are upgrading from Kubernetes 1.28+ and are not on Azure, GCE, or vSphere then there are no changes you will need to make. If you are on Azure, GCE, or vSphere, or you are upgrading from a version older than 1.28, then read on.
Historically, Kubernetes has included code for a set of cloud providers that included AWS, Azure, GCE, OpenStack, and vSphere. Since the inception of KEP-2395 the community has been moving towards removal of that cloud provider code. The OpenStack provider code was removed in version 1.26, and the AWS provider code was removed in version 1.27. This means that users who are upgrading from one of the affected cloud providers and versions will need to modify their deployments.
Upgrading on Azure, GCE, or vSphere
There are two options for upgrading in this configuration: migrate to external cloud controller managers, or continue using the in-tree provider code. Although migrating to external cloud controller managers is recommended, there are scenarios where continuing with the current behavior is desired. Please choose the best option for your needs.
Migrate to external cloud controller managers
Migrating to use external cloud controller managers is the recommended upgrade
path, when possible in your situation. To do this you will need to
enable the --cloud-provider=external command line flag for the
kube-apiserver, kube-controller-manager, and kubelet components. In
addition you will need to deploy a cloud controller manager for your provider.
Installing and running cloud controller managers is a larger topic than this post can address; if you would like more information on this process please read the documentation for Cloud Controller Manager Administration and Migrate Replicated Control Plane To Use Cloud Controller Manager. See below for links to specific cloud provider implementations.
Continue using in-tree provider code
If you wish to continue using Kubernetes with the in-tree cloud provider code,
you will need to modify the command line parameters for kube-apiserver,
kube-controller-manager, and kubelet to disable the feature gates for
DisableCloudProviders and DisableKubeletCloudCredentialProviders. To do
this, add the following command line flag to the arguments for the previously
listed commands:
--feature-gates=DisableCloudProviders=false,DisableKubeletCloudCredentialProviders=false
Please note that if you have other feature gate modifications on the command line, they will need to include these 2 feature gates.
Note: These feature gates will be locked to true in an upcoming
release. Setting these feature gates to false should be used as a last
resort. It is highly recommended to migrate to an external cloud controller
manager as the in-tree providers are planned for removal as early as Kubernetes
version 1.31.
Upgrading on other providers
For providers other than Azure, GCE, or vSphere, good news, the external cloud
controller manager should already be in use. You can confirm this by inspecting
the --cloud-provider flag for the kubelets in your cluster, they will have
the value external if using external providers. The code for AWS and OpenStack
providers was removed from Kubernetes before version 1.27 was released.
Other providers beyond the AWS, Azure, GCE, OpenStack, and vSphere were never
included in Kubernetes and as such they began their life as external cloud
controller managers.
Upgrading from older Kubernetes versions
If you are upgrading from a Kubernetes release older than 1.26, and you are on
AWS, Azure, GCE, OpenStack, or vSphere then you will need to enable the
--cloud-provider=external flag, and follow the advice for installing and
running a cloud controller manager for your provider.
Please read the documentation for Cloud Controller Manager Administration and Migrate Replicated Control Plane To Use Cloud Controller Manager. See below for links to specific cloud provider implementations.
Where to find a cloud controller manager?
At its core, this announcement is about the cloud provider integrations that were previously included in Kubernetes. As these components move out of the core Kubernetes code and into their own repositories, it is important to note a few things:
First, SIG Cloud Provider offers a reference framework for developers who wish to create cloud controller managers for any provider. See the cloud-provider repository for more information about how these controllers work and how to get started creating your own.
Second, there are many cloud controller managers available for Kubernetes. This post is addressing the provider integrations that have been historically included with Kubernetes but are now in the process of being removed. If you need a cloud controller manager for your provider and do not see it listed here, please reach out to the cloud provider you are integrating with or the Kubernetes SIG Cloud Provider community for help and advice. It is worth noting that while most cloud controller managers are open source today, this may not always be the case. Users should always contact their cloud provider to learn if there are preferred solutions to utilize on their infrastructure.
Cloud provider integrations provided by the Kubernetes project
- AWS - https://github.com/kubernetes/cloud-provider-aws
- Azure - https://github.com/kubernetes-sigs/cloud-provider-azure
- GCE - https://github.com/kubernetes/cloud-provider-gcp
- OpenStack - https://github.com/kubernetes/cloud-provider-openstack
- vSphere - https://github.com/kubernetes/cloud-provider-vsphere
If you are looking for an automated approach to installing cloud controller managers in your clusters, the kOps project provides a convenient solution for managing production-ready clusters.
Want to learn more?
Cloud providers and cloud controller managers serve a core function in Kubernetes. Cloud providers are often the substrate upon which Kubernetes is operated, and the cloud controller managers supply the essential lifeline between Kubernetes clusters and their physical infrastructure.
This post covers one aspect of how the Kubernetes community interacts with the world of cloud infrastructure providers. If you are curious about this topic and want to learn more, the Cloud Provider Special Interest Group (SIG) is the place to go. SIG Cloud Provider hosts bi-weekly meetings to discuss all manner of topics related to cloud providers and cloud controller managers in Kubernetes.
SIG Cloud Provider
- Regular SIG Meeting: Wednesdays at 9:00 PT (Pacific Time) (biweekly). Convert to your timezone.
- Kubernetes slack channel
#sig-cloud-provider - SIG Community page
Kubernetes v1.29: Mandala
Editors: Carol Valencia, Kristin Martin, Abigail McCarthy, James Quigley
Announcing the release of Kubernetes v1.29: Mandala (The Universe), the last release of 2023!
Similar to previous releases, the release of Kubernetes v1.29 introduces new stable, beta, and alpha features. The consistent delivery of top-notch releases underscores the strength of our development cycle and the vibrant support from our community.
This release consists of 49 enhancements. Of those enhancements, 11 have graduated to Stable, 19 are entering Beta and 19 have graduated to Alpha.
Release theme and logo
Kubernetes v1.29: Mandala (The Universe) ✨🌌

Join us on a cosmic journey with Kubernetes v1.29!
This release is inspired by the beautiful art form that is Mandala—a symbol of the universe in its perfection. Our tight-knit universe of around 40 Release Team members, backed by hundreds of community contributors, has worked tirelessly to turn challenges into joy for millions worldwide.
The Mandala theme reflects our community’s interconnectedness—a vibrant tapestry woven by enthusiasts and experts alike. Each contributor is a crucial part, adding their unique energy, much like the diverse patterns in Mandala art. Kubernetes thrives on collaboration, echoing the harmony in Mandala creations.
The release logo, made by Mario Jason Braganza (base Mandala art, courtesy - Fibrel Ojalá), symbolizes the little universe that is the Kubernetes project and all its people.
In the spirit of Mandala’s transformative symbolism, Kubernetes v1.29 celebrates our project’s evolution. Like stars in the Kubernetes universe, each contributor, user, and supporter lights the way. Together, we create a universe of possibilities—one release at a time.
Improvements that graduated to stable in Kubernetes v1.29
This is a selection of some of the improvements that are now stable following the v1.29 release.
ReadWriteOncePod PersistentVolume access mode (SIG Storage)
In Kubernetes, volume access modes are the way you can define how durable storage is consumed. These access modes are a part of the spec for PersistentVolumes (PVs) and PersistentVolumeClaims (PVCs). When using storage, there are different ways to model how that storage is consumed. For example, a storage system like a network file share can have many users all reading and writing data simultaneously. In other cases maybe everyone is allowed to read data but not write it. For highly sensitive data, maybe only one user is allowed to read and write data but nobody else.
Before v1.22, Kubernetes offered three access modes for PVs and PVCs:
- ReadWriteOnce – the volume can be mounted as read-write by a single node
- ReadOnlyMany – the volume can be mounted read-only by many nodes
- ReadWriteMany – the volume can be mounted as read-write by many nodes
The ReadWriteOnce access mode restricts volume access to a single node, which means it is possible for multiple pods on the same node to read from and write to the same volume. This could potentially be a major problem for some applications, especially if they require at most one writer for data safety guarantees.
To address this problem, a fourth access mode ReadWriteOncePod was introduced as an Alpha feature in v1.22 for CSI volumes. If you create a pod with a PVC that uses the ReadWriteOncePod access mode, Kubernetes ensures that pod is the only pod across your whole cluster that can read that PVC or write to it. In v1.29, this feature became Generally Available.
Node volume expansion Secret support for CSI drivers (SIG Storage)
In Kubernetes, a volume expansion operation may include the expansion of the volume on the node, which involves filesystem resize. Some CSI drivers require secrets, for example a credential for accessing a SAN fabric, during the node expansion for the following use cases:
- When a PersistentVolume represents encrypted block storage, for example using LUKS, you may need to provide a passphrase in order to expand the device.
- For various validations, the CSI driver needs to have credentials to communicate with the backend storage system at time of node expansion.
To meet this requirement, the CSI Node Expand Secret feature was introduced in Kubernetes v1.25. This allows an optional secret field to be sent as part of the NodeExpandVolumeRequest by the CSI drivers so that node volume expansion operation can be performed with the underlying storage system. In Kubernetes v1.29, this feature became generally available.
KMS v2 encryption at rest generally available (SIG Auth)
One of the first things to consider when securing a Kubernetes cluster is encrypting persisted API data at rest. KMS provides an interface for a provider to utilize a key stored in an external key service to perform this encryption. With the Kubernetes v1.29, KMS v2 has become a stable feature bringing numerous improvements in performance, key rotation, health check & status, and observability. These enhancements provide users with a reliable solution to encrypt all resources in their Kubernetes clusters. You can read more about this in KEP-3299.
It is recommended to use KMS v2. KMS v1 feature gate is disabled by default. You will have to opt in to continue to use it.
Improvements that graduated to beta in Kubernetes v1.29
This is a selection of some of the improvements that are now beta following the v1.29 release.
The throughput of the scheduler is our eternal challenge. This QueueingHint feature brings a new possibility to optimize the efficiency of requeueing, which could reduce useless scheduling retries significantly.
Node lifecycle separated from taint management (SIG Scheduling)
As title describes, it's to decouple TaintManager that performs taint-based pod eviction from NodeLifecycleController and make them two separate controllers: NodeLifecycleController to add taints to unhealthy nodes and TaintManager to perform pod deletion on nodes tainted with NoExecute effect.
Clean up for legacy Secret-based ServiceAccount tokens (SIG Auth)
Kubernetes switched to using more secure service account tokens, which were time-limited and bound to specific pods by 1.22. Stopped auto-generating legacy secret-based service account tokens in 1.24. Then started labeling remaining auto-generated secret-based tokens still in use with their last-used date in 1.27.
In v1.29, to reduce potential attack surface, the LegacyServiceAccountTokenCleanUp feature labels legacy auto-generated secret-based tokens as invalid if they have not been used for a long time (1 year by default), and automatically removes them if use is not attempted for a long time after being marked as invalid (1 additional year by default). KEP-2799
New alpha features
Define Pod affinity or anti-affinity using matchLabelKeys (SIG Scheduling)
One enhancement will be introduced in PodAffinity/PodAntiAffinity as alpha. It will increase the accuracy of calculation during rolling updates.
nftables backend for kube-proxy (SIG Network)
The default kube-proxy implementation on Linux is currently based on iptables. This was the preferred packet filtering and processing system in the Linux kernel for many years (starting with the 2.4 kernel in 2001). However, unsolvable problems with iptables led to the development of a successor, nftables. Development on iptables has mostly stopped, with new features and performance improvements primarily going into nftables instead.
This feature adds a new backend to kube-proxy based on nftables, since some Linux distributions already started to deprecate and remove iptables, and nftables claims to solve the main performance problems of iptables.
APIs to manage IP address ranges for Services (SIG Network)
Services are an abstract way to expose an application running on a set of Pods. Services can have a cluster-scoped virtual IP address, that is allocated from a predefined CIDR defined in the kube-apiserver flags. However, users may want to add, remove, or resize existing IP ranges allocated for Services without having to restart the kube-apiserver.
This feature implements a new allocator logic that uses 2 new API Objects: ServiceCIDR and IPAddress, allowing users to dynamically increase the number of Services IPs available by creating new ServiceCIDRs. This helps to resolve problems like IP exhaustion or IP renumbering.
Add support to containerd/kubelet/CRI to support image pull per runtime class (SIG Windows)
Kubernetes v1.29 adds support to pull container images based on the RuntimeClass of the Pod that uses them.
This feature is off by default in v1.29 under a feature gate called RuntimeClassInImageCriApi.
Container images can either be a manifest or an index. When the image being pulled is an index (image index has a list of image manifests ordered by platform), platform matching logic in the container runtime is used to pull an appropriate image manifest from the index. By default, the platform matching logic picks a manifest that matches the host that the image pull is being executed from. This can be limiting for VM-based containers where a user could pull an image with the intention of running it as a VM-based container, for example, Windows Hyper-V containers.
The image pull per runtime class feature adds support to pull different images based the runtime class specified. This is achieved by referencing an image by a tuple of (imageID, runtimeClass), instead of just the imageName or imageID. Container runtimes could choose to add support for this feature if they'd like. If they do not, the default behavior of kubelet that existed prior to Kubernetes v1.29 will be retained.
In-place updates for Pod resources, for Windows Pods (SIG Windows)
As an alpha feature, Kubernetes Pods can be mutable with respect to their resources, allowing users to change the desired resource requests and limits for a Pod without the need to restart the Pod. With v1.29, this feature is now supported for Windows containers.
Graduations, deprecations and removals for Kubernetes v1.29
Graduated to stable
This lists all the features that graduated to stable (also known as general availability). For a full list of updates including new features and graduations from alpha to beta, see the release notes.
This release includes a total of 11 enhancements promoted to Stable:
- Remove transient node predicates from KCCM's service controller
- Reserve nodeport ranges for dynamic and static allocation
- Priority and Fairness for API Server Requests
- KMS v2 Improvements
- Support paged LIST queries from the Kubernetes API
- ReadWriteOncePod PersistentVolume Access Mode
- Kubernetes Component Health SLIs
- CRD Validation Expression Language
- Introduce nodeExpandSecret in CSI PV source
- Track Ready Pods in Job status
- Kubelet Resource Metrics Endpoint
Deprecations and removals
Removal of in-tree integrations with cloud providers (SIG Cloud Provider)
Kubernetes v1.29 defaults to operating without a built-in integration to any cloud provider. If you have previously been relying on in-tree cloud provider integrations (with Azure, GCE, or vSphere) then you can either:
- enable an equivalent external cloud controller manager integration (recommended)
- opt back in to the legacy integration by setting the associated feature gates to
false; the feature gates to change areDisableCloudProvidersandDisableKubeletCloudCredentialProviders
Enabling external cloud controller managers means you must run a suitable cloud controller manager within your cluster's control plane; it also requires setting the command line argument --cloud-provider=external for the kubelet (on every relevant node), and across the control plane (kube-apiserver and kube-controller-manager).
For more information about how to enable and run external cloud controller managers, read Cloud Controller Manager Administration and Migrate Replicated Control Plane To Use Cloud Controller Manager.
If you need a cloud controller manager for one of the legacy in-tree providers, please see the following links:
- Cloud provider AWS
- Cloud provider Azure
- Cloud provider GCE
- Cloud provider OpenStack
- Cloud provider vSphere
There are more details in KEP-2395.
Removal of the v1beta2 flow control API group
The deprecated flowcontrol.apiserver.k8s.io/v1beta2 API version of FlowSchema and PriorityLevelConfiguration are no longer served in Kubernetes v1.29.
If you have manifests or client software that uses the deprecated beta API group, you should change these before you upgrade to v1.29. See the deprecated API migration guide for details and advice.
Deprecation of the status.nodeInfo.kubeProxyVersion field for Node
The .status.kubeProxyVersion field for Node objects is now deprecated, and the Kubernetes project
is proposing to remove that field in a future release. The deprecated field is not accurate and has historically
been managed by kubelet - which does not actually know the kube-proxy version, or even whether kube-proxy
is running.
If you've been using this field in client software, stop - the information isn't reliable and the field is now deprecated.
Legacy Linux package repositories
Please note that in August of 2023, the legacy package repositories (apt.kubernetes.io and
yum.kubernetes.io) were formally deprecated and the Kubernetes project announced the
general availability of the community-owned package repositories for Debian and RPM packages,
available at https://pkgs.k8s.io.
These legacy repositories were frozen in September of 2023, and will go away entirely in January of 2024. If you are currently relying on them, you must migrate.
This deprecation is not directly related to the v1.29 release. For more details, including how these changes may affect you and what to do if you are affected, please read the legacy package repository deprecation announcement.
Release notes
Check out the full details of the Kubernetes v1.29 release in our release notes.
Availability
Kubernetes v1.29 is available for download on GitHub. To get started with Kubernetes, check out these interactive tutorials or run local Kubernetes clusters using minikube. You can also easily install v1.29 using kubeadm.
Release team
Kubernetes is only possible with the support, commitment, and hard work of its community. Each release team is made up of dedicated community volunteers who work together to build the many pieces that make up the Kubernetes releases you rely on. This requires the specialized skills of people from all corners of our community, from the code itself to its documentation and project management.
We would like to thank the entire release team for the hours spent hard at work to deliver the Kubernetes v1.29 release for our community. A very special thanks is in order for our release lead, Priyanka Saggu, for supporting and guiding us through a successful release cycle, making sure that we could all contribute in the best way possible, and challenging us to improve the release process.
Project velocity
The CNCF K8s DevStats project aggregates a number of interesting data points related to the velocity of Kubernetes and various sub-projects. This includes everything from individual contributions to the number of companies that are contributing and is an illustration of the depth and breadth of effort that goes into evolving this ecosystem.
In the v1.29 release cycle, which ran for 14 weeks (September 6 to December 13), we saw contributions from 888 companies and 1422 individuals.
Ecosystem updates
- KubeCon + CloudNativeCon Europe 2024 will take in Paris, France, from 19 – 22 March 2024! You can find more information about the conference and registration on the event site.
Upcoming release webinar
Join members of the Kubernetes v1.29 release team on Friday, December 15th, 2023, at 11am PT (2pm eastern) to learn about the major features of this release, as well as deprecations and removals to help plan for upgrades. For more information and registration, visit the event page on the CNCF Online Programs site.
Get involved
The simplest way to get involved with Kubernetes is by joining one of the many Special Interest Groups (SIGs) that align with your interests. Have something you’d like to broadcast to the Kubernetes community? Share your voice at our weekly community meeting, and through the channels below. Thank you for your continued feedback and support.
- Follow us on Twitter @Kubernetesio for latest updates
- Join the community discussion on Discuss
- Join the community on Slack
- Post questions (or answer questions) on Stack Overflow
- Share your Kubernetes story
- Read more about what’s happening with Kubernetes on the blog
- Learn more about the Kubernetes Release Team
New Experimental Features in Gateway API v1.0
Recently, the Gateway API announced its v1.0 GA release, marking a huge milestone for the project.
Along with stabilizing some of the core functionality in the API, a number of exciting new experimental features have been added.
Backend TLS Policy
BackendTLSPolicy is a new Gateway API type used for specifying the TLS configuration of the connection from the Gateway to backend Pods via the Service API object.
It is specified as a Direct PolicyAttachment without defaults or overrides, applied to a Service that accesses a backend, where the BackendTLSPolicy resides in the same namespace as the Service to which it is applied.
All Gateway API Routes that point to a referenced Service should respect a configured BackendTLSPolicy.
While there were existing ways provided for TLS to be configured for edge and passthrough termination, this new API object specifically addresses the configuration of TLS in order to convey HTTPS from the Gateway dataplane to the backend. This is referred to as "backend TLS termination" and enables the Gateway to know how to connect to a backend Pod that has its own certificate.

The specification of a BackendTLSPolicy consists of:
targetRef- Defines the targeted API object of the policy. Only Service is allowed.tls- Defines the configuration for TLS, includinghostname,caCertRefs, andwellKnownCACerts. EithercaCertRefsorwellKnownCACertsmay be specified, but not both.hostname- Defines the Server Name Indication (SNI) that the Gateway uses to connect to the backend. The certificate served by the backend must match this SNI.caCertRefs- Defines one or more references to objects that contain PEM-encoded TLS certificates, which are used to establish a TLS handshake between the Gateway and backend.wellKnownCACerts- Specifies whether or not system CA certificates may be used in the TLS handshake between the Gateway and backend.
Examples
Using System Certificates
In this example, the BackendTLSPolicy is configured to use system certificates to connect with a TLS-encrypted upstream connection where Pods backing the dev Service are expected to serve a valid certificate for dev.example.com.
apiVersion: gateway.networking.k8s.io/v1alpha2
kind: BackendTLSPolicy
metadata:
name: tls-upstream-dev
spec:
targetRef:
kind: Service
name: dev-service
group: ""
tls:
wellKnownCACerts: "System"
hostname: dev.example.com
Using Explicit CA Certificates
In this example, the BackendTLSPolicy is configured to use certificates defined in the configuration map auth-cert to connect with a TLS-encrypted upstream connection where Pods backing the auth Service are expected to serve a valid certificate for auth.example.com.
apiVersion: gateway.networking.k8s.io/v1alpha2
kind: BackendTLSPolicy
metadata:
name: tls-upstream-auth
spec:
targetRef:
kind: Service
name: auth-service
group: ""
tls:
caCertRefs:
- kind: ConfigMapReference
name: auth-cert
group: ""
hostname: auth.example.com
The following illustrates a BackendTLSPolicy that configures TLS for a Service serving a backend:
Route"] style httproute fill:#02f,color:#fff service["Service"] style service fill:#02f,color:#fff pod1["Pod"] style pod1 fill:#02f,color:#fff pod2["Pod"] style pod2 fill:#02f,color:#fff client -.->|HTTP
request| gateway gateway --> httproute httproute -.->|BackendTLSPolicy|service service --> pod1 & pod2
For more information, refer to the documentation for TLS.
HTTPRoute Timeouts
A key enhancement in Gateway API's latest release (v1.0) is the introduction of the timeouts field within HTTPRoute Rules. This feature offers a dynamic way to manage timeouts for incoming HTTP requests, adding precision and reliability to your gateway setups.
With Timeouts, developers can fine-tune their Gateway API's behavior in two fundamental ways:
Request Timeout:
The request timeout is the duration within which the Gateway API implementation must send a response to a client's HTTP request. It allows flexibility in specifying when this timeout starts, either before or after the entire client request stream is received, making it implementation-specific. This timeout efficiently covers the entire request-response transaction, enhancing the responsiveness of your services.
Backend Request Timeout:
The backendRequest timeout is a game-changer for those dealing with backends. It sets a timeout for a single request sent from the Gateway to a backend service. This timeout spans from the initiation of the request to the reception of the full response from the backend. This feature is particularly helpful in scenarios where the Gateway needs to retry connections to a backend, ensuring smooth communication under various conditions.
Notably, the request timeout encompasses the backendRequest timeout. Hence, the value of backendRequest should never exceed the value of the request timeout.
The ability to configure these timeouts adds a new layer of reliability to your Kubernetes services. Whether it's ensuring client requests are processed within a specified timeframe or managing backend service communications, Gateway API's Timeouts offer the control and predictability you need.
To get started, you can define timeouts in your HTTPRoute Rules using the Timeouts field, specifying their type as Duration.
A zero-valued timeout (0s) disables the timeout, while a valid non-zero-valued timeout should be at least 1ms.
Here's an example of setting request and backendRequest timeouts in an HTTPRoute:
apiVersion: gateway.networking.k8s.io/v1
kind: HTTPRoute
metadata:
name: timeout-example
spec:
parentRefs:
- name: example-gateway
rules:
- matches:
- path:
type: PathPrefix
value: /timeout
timeouts:
request: 10s
backendRequest: 2s
backendRefs:
- name: timeout-svc
port: 8080
In this example, a request timeout of 10 seconds is defined, ensuring that client requests are processed within that timeframe.
Additionally, a 2-second backendRequest timeout is set for individual requests from the Gateway to a backend service called timeout-svc.
These new HTTPRoute Timeouts provide Kubernetes users with more control and flexibility in managing network communications, helping ensure a smoother and more predictable experience for both clients and backends. For additional details and examples, refer to the official timeouts API documentation.
Gateway Infrastructure Labels
While Gateway API providers a common API for different implementations, each implementation will have different resources created under-the-hood to apply users' intent. This could be configuring cloud load balancers, creating in-cluster Pods and Services, or more.
While the API has always provided an extension point -- parametersRef in GatewayClass -- to customize implementation specific things, there was no common core way to express common infrastructure customizations.
Gateway API v1.0 paves the way for this with a new infrastructure field on the Gateway object, allowing customization of the underlying infrastructure.
For now, this starts small with two critical fields: labels and annotations.
When these are set, any generated infrastructure will have the provided labels and annotations set on them.
For example, I may want to group all my resources for one application together:
apiVersion: gateway.networking.k8s.io/v1
kind: Gateway
metadata:
name: hello-world
spec:
infrastructure:
labels:
app.kubernetes.io/name: hello-world
In the future, we are looking into more common infrastructure configurations, such as resource sizing.
For more information, refer to the documentation for this feature.
Support for Websockets, HTTP/2 and more!
Not all implementations of Gateway API support automatic protocol selection. In some cases protocols are disabled without an explicit opt-in.
When a Route's backend references a Kubernetes Service, application developers can specify the protocol using ServicePort appProtocol field.
For example the following store Kubernetes Service is indicating the port 8080 supports HTTP/2 Prior Knowledge.
apiVersion: v1
kind: Service
metadata:
name: store
spec:
selector:
app: store
ports:
- protocol: TCP
appProtocol: kubernetes.io/h2c
port: 8080
targetPort: 8080
Currently, Gateway API has conformance testing for:
kubernetes.io/h2c- HTTP/2 Prior Knowledgekubernetes.io/ws- WebSocket over HTTP
For more information, refer to the documentation for Backend Protocol Selection.
gwctl, our new Gateway API command line tool
gwctl is a command line tool that aims to be a kubectl replacement for viewing Gateway API resources.
The initial release of gwctl that comes bundled with Gateway v1.0 release includes helpful features for managing Gateway API Policies.
Gateway API Policies serve as powerful extension mechanisms for modifying the behavior of Gateway resources.
One challenge with using policies is that it may be hard to discover which policies are affecting which Gateway resources.
gwctl helps bridge this gap by answering questions like:
- Which policies are available for use in the Kubernetes cluster?
- Which policies are attached to a particular Gateway, HTTPRoute, etc?
- If policies are applied to multiple resources in the Gateway resource hierarchy, what is the effective policy that is affecting a particular resource? (For example, if an HTTP request timeout policy is applied to both an HTTPRoute and its parent Gateway, what is the effective timeout for the HTTPRoute?)
gwctl is still in the very early phases of development and hence may be a bit rough around the edges.
Follow the instructions in the repository to install and try out gwctl.
Examples
Here are some examples of how gwctl can be used:
# List all policies in the cluster. This will also give the resource they bind
# to.
gwctl get policies -A
# List all available policy types.
gwctl get policycrds
# Describe all HTTPRoutes in namespace ns2. (Output includes effective policies)
gwctl describe httproutes -n ns2
# Describe a single HTTPRoute in the default namespace. (Output includes
# effective policies)
gwctl describe httproutes my-httproute-1
# Describe all Gateways across all namespaces. (Output includes effective
# policies)
gwctl describe gateways -A
# Describe a single GatewayClass. (Output includes effective policies)
gwctl describe gatewayclasses foo-com-external-gateway-class
Get involved
These projects, and many more, continue to be improved in Gateway API. There are lots of opportunities to get involved and help define the future of Kubernetes routing APIs for both Ingress and Mesh.
If this is interesting to you, please join us in the community and help us build the future of Gateway API together!
Spotlight on SIG Testing
Welcome to another edition of the SIG spotlight blog series, where we highlight the incredible work being done by various Special Interest Groups (SIGs) within the Kubernetes project. In this edition, we turn our attention to SIG Testing, a group interested in effective testing of Kubernetes and automating away project toil. SIG Testing focus on creating and running tools and infrastructure that make it easier for the community to write and run tests, and to contribute, analyze and act upon test results.
To gain some insights into SIG Testing, Sandipan Panda spoke with Michelle Shepardson, a senior software engineer at Google and a chair of SIG Testing, and Patrick Ohly, a software engineer and architect at Intel and a SIG Testing Tech Lead.
Meet the contributors
Sandipan: Could you tell us a bit about yourself, your role, and how you got involved in the Kubernetes project and SIG Testing?
Michelle: Hi! I'm Michelle, a senior software engineer at Google. I first got involved in Kubernetes through working on tooling for SIG Testing, like the external instance of TestGrid. I'm part of oncall for TestGrid and Prow, and am now a chair for the SIG.
Patrick: Hello! I work as a software engineer and architect in a team at Intel which focuses on open source Cloud Native projects. When I ramped up on Kubernetes to develop a storage driver, my very first question was "how do I test it in a cluster and how do I log information?" That interest led to various enhancement proposals until I had (re)written enough code that also took over official roles as SIG Testing Tech Lead (for the E2E framework) and structured logging WG lead.
Testing practices and tools
Sandipan: Testing is a field in which multiple approaches and tools exist; how did you arrive at the existing practices?
Patrick: I can’t speak about the early days because I wasn’t around yet 😆, but looking back at some of the commit history it’s pretty obvious that developers just took what was available and started using it. For E2E testing, that was Ginkgo+Gomega. Some hacks were necessary, for example around cleanup after a test run and for categorising tests. Eventually this led to Ginkgo v2 and revised best practices for E2E testing. Regarding unit testing opinions are pretty diverse: some maintainers prefer to use just the Go standard library with hand-written checks. Others use helper packages like stretchr/testify. That diversity is okay because unit tests are self-contained - contributors just have to be flexible when working on many different areas. Integration testing falls somewhere in the middle. It’s based on Go unit tests, but needs complex helper packages to bring up an apiserver and other components, then runs tests that are more like E2E tests.
Subprojects owned by SIG Testing
Sandipan: SIG Testing is pretty diverse. Can you give a brief overview of the various subprojects owned by SIG Testing?
Michelle: Broadly, we have subprojects related to testing frameworks, and infrastructure, though they definitely overlap. So for the former, there's e2e-framework (used externally), test/e2e/framework (used for Kubernetes itself) and kubetest2 for end-to-end testing, as well as boskos (resource rental for e2e tests), KIND (Kubernetes-in-Docker, for local testing and development), and the cloud provider for KIND. For the latter, there's Prow (K8s-based CI/CD and chatops), and a litany of other tools and utilities for triage, analysis, coverage, Prow/TestGrid config generation, and more in the test-infra repo.
If you are willing to learn more and get involved with any of the SIG Testing subprojects, check out the SIG Testing README.
Key challenges and accomplishments
Sandipan: What are some of the key challenges you face?
Michelle: Kubernetes is a gigantic project in every aspect, from contributors to code to users and more. Testing and infrastructure have to meet that scale, keeping up with every change from every repo under Kubernetes while facilitating developing, improving, and releasing the project as much as possible, though of course, we're not the only SIG involved in that. I think another other challenge is staffing subprojects. SIG Testing has a number of subprojects that have existed for years, but many of the original maintainers for them have moved on to other areas or no longer have the time to maintain them. We need to grow long-term expertise and owners in those subprojects.
Patrick: As Michelle said, the sheer size can be a challenge. It’s not just the infrastructure, also our processes must scale with the number of contributors. It’s good to document best practices, but not good enough: we have many new contributors, which is good, but having reviewers explain best practices doesn’t scale - assuming that the reviewers even know about them! It also doesn’t help that existing code cannot get updated immediately because there is so much of it, in particular for E2E testing. The initiative to apply stricter linting to new or modified code while accepting that existing code doesn’t pass those same linter checks helps a bit.
Sandipan: Any SIG accomplishments that you are proud of and would like to highlight?
Patrick: I am biased because I have been driving this, but I think that the E2E framework and linting are now in a much better shape than they used to be. We may soon be able to run integration tests with race detection enabled, which is important because we currently only have that for unit tests and those tend to be less complex.
Sandipan: Testing is always important, but is there anything specific to your work in terms of the Kubernetes release process?
Patrick: test flakes… if we have too many of those, development velocity goes down because PRs cannot be merged without clean test runs and those become less likely. Developers also lose trust in testing and just "retest" until they have a clean run, without checking whether failures might indeed be related to a regression in their current change.
The people and the scope
Sandipan: What are some of your favourite things about this SIG?
Michelle: The people, of course 🙂. Aside from that, I like the broad scope SIG Testing has. I feel like even small changes can make a big difference for fellow contributors, and even if my interests change over time, I'll never run out of projects to work on.
Patrick: I can work on things that make my life and the life of my fellow developers better, like the tooling that we have to use every day while working on some new feature elsewhere.
Sandipan: Are there any funny / cool / TIL anecdotes that you could tell us?
Patrick: I started working on E2E framework enhancements five years ago, then was less active there for a while. When I came back and wanted to test some new enhancement, I asked about how to write unit tests for the new code and was pointed to some existing tests which looked vaguely familiar, as if I had seen them before. I looked at the commit history and found that I had written them! I’ll let you decide whether that says something about my failing long-term memory or simply is normal… Anyway, folks, remember to write good commit messages and comments; someone will need them at some point - it might even be yourself!
Looking ahead
Sandipan: What areas and/or subprojects does your SIG need help with?
Michelle: Some subprojects aren't staffed at the moment and could use folks willing to learn more about them. boskos and kubetest2 especially stand out to me, since both are important for testing but lack dedicated owners.
Sandipan: Are there any useful skills that new contributors to SIG Testing can bring to the table? What are some things that people can do to help this SIG if they come from a background that isn’t directly linked to programming?
Michelle: I think user empathy, writing clear feedback, and recognizing patterns are really useful. Someone who uses the test framework or tooling and can outline pain points with clear examples, or who can recognize a wider issue in the project and pull data to inform solutions for it.
Sandipan: What’s next for SIG Testing?
Patrick: Stricter linting will soon become mandatory for new code. There are several E2E framework sub-packages that could be modernised, if someone wants to take on that work. I also see an opportunity to unify some of our helper code for E2E and integration testing, but that needs more thought and discussion.
Michelle: I'm looking forward to making some usability improvements for some of our tools and infra, and to supporting more long-term contributions and growth of contributors into long-term roles within the SIG. If you're interested, hit us up!
Looking ahead, SIG Testing has exciting plans in store. You can get in touch with the folks at SIG Testing in their Slack channel or attend one of their regular bi-weekly meetings on Tuesdays. If you are interested in making it easier for the community to run tests and contribute test results, to ensure Kubernetes is stable across a variety of cluster configurations and cloud providers, join the SIG Testing community today!
Kubernetes Removals, Deprecations, and Major Changes in Kubernetes 1.29
As with every release, Kubernetes v1.29 will introduce feature deprecations and removals. Our continued ability to produce high-quality releases is a testament to our robust development cycle and healthy community. The following are some of the deprecations and removals coming in the Kubernetes 1.29 release.
The Kubernetes API removal and deprecation process
The Kubernetes project has a well-documented deprecation policy for features. This policy states that stable APIs may only be deprecated when a newer, stable version of that same API is available and that APIs have a minimum lifetime for each stability level. A deprecated API is one that has been marked for removal in a future Kubernetes release; it will continue to function until removal (at least one year from the deprecation), but usage will result in a warning being displayed. Removed APIs are no longer available in the current version, at which point you must migrate to using the replacement.
- Generally available (GA) or stable API versions may be marked as deprecated, but must not be removed within a major version of Kubernetes.
- Beta or pre-release API versions must be supported for 3 releases after deprecation.
- Alpha or experimental API versions may be removed in any release without prior deprecation notice.
Whether an API is removed as a result of a feature graduating from beta to stable or because that API simply did not succeed, all removals comply with this deprecation policy. Whenever an API is removed, migration options are communicated in the documentation.
A note about the k8s.gcr.io redirect to registry.k8s.io
To host its container images, the Kubernetes project uses a community-owned image registry called registry.k8s.io. Starting last March traffic to the old k8s.gcr.io registry began being redirected to registry.k8s.io. The deprecated k8s.gcr.io registry will eventually be phased out. For more details on this change or to see if you are impacted, please read k8s.gcr.io Redirect to registry.k8s.io - What You Need to Know.
A note about the Kubernetes community-owned package repositories
Earlier in 2023, the Kubernetes project introduced pkgs.k8s.io, community-owned software repositories for Debian and RPM packages. The community-owned repositories replaced the legacy Google-owned repositories (apt.kubernetes.io and yum.kubernetes.io).
On September 13, 2023, those legacy repositories were formally deprecated and their contents frozen.
For more information on this change or to see if you are impacted, please read the deprecation announcement.
Deprecations and removals for Kubernetes v1.29
See the official list of API removals for a full list of planned deprecations for Kubernetes v1.29.
Removal of in-tree integrations with cloud providers (KEP-2395)
The feature gates DisableCloudProviders and DisableKubeletCloudCredentialProviders will both be set to true by default for Kubernetes v1.29. This change will require that users who are currently using in-tree cloud provider integrations (Azure, GCE, or vSphere) enable external cloud controller managers, or opt in to the legacy integration by setting the associated feature gates to false.
Enabling external cloud controller managers means you must run a suitable cloud controller manager within your cluster's control plane; it also requires setting the command line argument --cloud-provider=external for the kubelet (on every relevant node), and across the control plane (kube-apiserver and kube-controller-manager).
For more information about how to enable and run external cloud controller managers, read Cloud Controller Manager Administration and Migrate Replicated Control Plane To Use Cloud Controller Manager.
For general information about cloud controller managers, please see Cloud Controller Manager in the Kubernetes documentation.
Removal of the v1beta2 flow control API group
The flowcontrol.apiserver.k8s.io/v1beta2 API version of FlowSchema and PriorityLevelConfiguration will no longer be served in Kubernetes v1.29.
To prepare for this, you can edit your existing manifests and rewrite client software to use the flowcontrol.apiserver.k8s.io/v1beta3 API version, available since v1.26. All existing persisted objects are accessible via the new API. Notable changes in flowcontrol.apiserver.k8s.io/v1beta3 include
that the PriorityLevelConfiguration spec.limited.assuredConcurrencyShares field was renamed to spec.limited.nominalConcurrencyShares.
Deprecation of the status.nodeInfo.kubeProxyVersion field for Node
The .status.kubeProxyVersion field for Node objects will be marked as deprecated in v1.29 in preparation for its removal in a future release. This field is not accurate and is set by kubelet, which does not actually know the kube-proxy version, or even if kube-proxy is running.
Want to know more?
Deprecations are announced in the Kubernetes release notes. You can see the announcements of pending deprecations in the release notes for:
We will formally announce the deprecations that come with Kubernetes v1.29 as part of the CHANGELOG for that release.
For information on the deprecation and removal process, refer to the official Kubernetes deprecation policy document.
The Case for Kubernetes Resource Limits: Predictability vs. Efficiency
There’s been quite a lot of posts suggesting that not using Kubernetes resource limits might be a fairly useful thing (for example, For the Love of God, Stop Using CPU Limits on Kubernetes or Kubernetes: Make your services faster by removing CPU limits ). The points made there are totally valid – it doesn’t make much sense to pay for compute power that will not be used due to limits, nor to artificially increase latency. This post strives to argue that limits have their legitimate use as well.
As a Site Reliability Engineer on the Grafana Labs platform team, which maintains and improves internal infrastructure and tooling used by the product teams, I primarily try to make Kubernetes upgrades as smooth as possible. But I also spend a lot of time going down the rabbit hole of various interesting Kubernetes issues. This article reflects my personal opinion, and others in the community may disagree.
Let’s flip the problem upside down. Every pod in a Kubernetes cluster has inherent resource limits – the actual CPU, memory, and other resources of the machine it’s running on. If those physical limits are reached by a pod, it will experience throttling similar to what is caused by reaching Kubernetes limits.
The problem
Pods without (or with generous) limits can easily consume the extra resources on the node. This, however, has a hidden cost – the amount of extra resources available often heavily depends on pods scheduled on the particular node and their actual load. These extra resources make each pod a special snowflake when it comes to real resource allocation. Even worse, it’s fairly hard to figure out the resources that the pod had at its disposal at any given moment – certainly not without unwieldy data mining of pods running on a particular node, their resource consumption, and similar. And finally, even if we pass this obstacle, we can only have data sampled up to a certain rate and get profiles only for a certain fraction of our calls. This can be scaled up, but the amount of observability data generated might easily reach diminishing returns. Thus, there’s no easy way to tell if a pod had a quick spike and for a short period of time used twice as much memory as usual to handle a request burst.
Now, with Black Friday and Cyber Monday approaching, businesses expect a surge in traffic. Good performance data/benchmarks of the past performance allow businesses to plan for some extra capacity. But is data about pods without limits reliable? With memory or CPU instant spikes handled by the extra resources, everything might look good according to past data. But once the pod bin-packing changes and the extra resources get more scarce, everything might start looking different – ranging from request latencies rising negligibly to requests slowly snowballing and causing pod OOM kills. While almost no one actually cares about the former, the latter is a serious issue that requires instant capacity increase.
Configuring the limits
Not using limits takes a tradeoff – it opportunistically improves the performance if there are extra resources available, but lowers predictability of the performance, which might strike back in the future. There are a few approaches that can be used to increase the predictability again. Let’s pick two of them to analyze:
- Configure workload limits to be a fixed (and small) percentage more than the requests – I'll call it fixed-fraction headroom. This allows the use of some extra shared resources, but keeps the per-node overcommit bound and can be taken to guide worst-case estimates for the workload. Note that the bigger the limits percentage is, the bigger the variance in the performance that might happen across the workloads.
- Configure workloads with
requests=limits. From some point of view, this is equivalent to giving each pod its own tiny machine with constrained resources; the performance is fairly predictable. This also puts the pod into the Guaranteed QoS class, which makes it get evicted only after BestEffort and Burstable pods have been evicted by a node under resource pressure (see Quality of Service for Pods).
Some other cases might also be considered, but these are probably the two simplest ones to discuss.
Cluster resource economy
Note that in both cases discussed above, we’re effectively preventing the workloads from using some cluster resources it has at the cost of getting more predictability – which might sound like a steep price to pay for a bit more stable performance. Let’s try to quantify the impact there.
Bin-packing and cluster resource allocation
Firstly, let’s discuss bin-packing and cluster resource allocation. There’s some inherent cluster inefficiency that comes to play – it’s hard to achieve 100% resource allocation in a Kubernetes cluster. Thus, some percentage will be left unallocated.
When configuring fixed-fraction headroom limits, a proportional amount of this will be available to the pods. If the percentage of unallocated resources in the cluster is lower than the constant we use for setting fixed-fraction headroom limits (see the figure, line 2), all the pods together are able to theoretically use up all the node’s resources; otherwise there are some resources that will inevitably be wasted (see the figure, line 1). In order to eliminate the inevitable resource waste, the percentage for fixed-fraction headroom limits should be configured so that it’s at least equal to the expected percentage of unallocated resources.
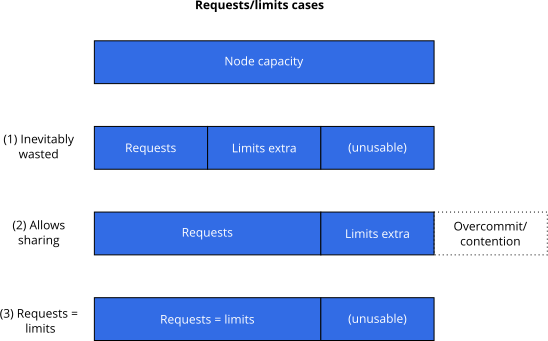
For requests = limits (see the figure, line 3), this does not hold: Unless we’re able to allocate all node’s resources, there’s going to be some inevitably wasted resources. Without any knobs to turn on the requests/limits side, the only suitable approach here is to ensure efficient bin-packing on the nodes by configuring correct machine profiles. This can be done either manually or by using a variety of cloud service provider tooling – for example Karpenter for EKS or GKE Node auto provisioning.
Optimizing actual resource utilization
Free resources also come in the form of unused resources of other pods (reserved vs. actual CPU utilization, etc.), and their availability can’t be predicted in any reasonable way. Configuring limits makes it next to impossible to utilize these. Looking at this from a different perspective, if a workload wastes a significant amount of resources it has requested, re-visiting its own resource requests might be a fair thing to do. Looking at past data and picking more fitting resource requests might help to make the packing more tight (although at the price of worsening its performance – for example increasing long tail latencies).
Conclusion
Optimizing resource requests and limits is hard. Although it’s much easier to break things when setting limits, those breakages might help prevent a catastrophe later by giving more insights into how the workload behaves in bordering conditions. There are cases where setting limits makes less sense: batch workloads (which are not latency-sensitive – for example non-live video encoding), best-effort services (don’t need that level of availability and can be preempted), clusters that have a lot of spare resources by design (various cases of specialty workloads – for example services that handle spikes by design).
On the other hand, setting limits shouldn’t be avoided at all costs – even though figuring out the "right” value for limits is harder and configuring a wrong value yields less forgiving situations. Configuring limits helps you learn about a workload’s behavior in corner cases, and there are simple strategies that can help when reasoning about the right value. It’s a tradeoff between efficient resource usage and performance predictability and should be considered as such.
There’s also an economic aspect of workloads with spiky resource usage. Having “freebie” resources always at hand does not serve as an incentive to improve performance for the product team. Big enough spikes might easily trigger efficiency issues or even problems when trying to defend a product’s SLA – and thus, might be a good candidate to mention when assessing any risks.
Introducing SIG etcd
Special Interest Groups (SIGs) are a fundamental part of the Kubernetes project, with a substantial share of the community activity happening within them. When the need arises, new SIGs can be created, and that was precisely what happened recently.
SIG etcd is the most recent addition to the list of Kubernetes SIGs. In this article we will get to know it a bit better, understand its origins, scope, and plans.
The critical role of etcd
If we look inside the control plane of a Kubernetes cluster, we will find etcd, a consistent and highly-available key value store used as Kubernetes' backing store for all cluster data -- this description alone highlights the critical role that etcd plays, and the importance of it within the Kubernetes ecosystem.
This critical role makes the health of the etcd project and community an important consideration, and concerns about the state of the project in early 2022 did not go unnoticed. The changes in the maintainer team, amongst other factors, contributed to a situation that needed to be addressed.
Why a special interest group
With the critical role of etcd in mind, it was proposed that the way forward would be to create a new special interest group. If etcd was already at the heart of Kubernetes, creating a dedicated SIG not only recognises that role, it would make etcd a first-class citizen of the Kubernetes community.
Establishing SIG etcd creates a dedicated space to make explicit the contract between etcd and Kubernetes api machinery and to prevent, on the etcd level, changes which violate this contract. Additionally, etcd will be able to adopt the processes that Kubernetes offers its SIGs (KEPs, PRR, phased feature gates, amongst others) in order to improve the consistency and reliability of the codebase. Being able to use these processes will be a substantial benefit to the etcd community.
As a SIG, etcd will also be able to draw contributor support from Kubernetes proper: active contributions to etcd from Kubernetes maintainers would decrease the likelihood of breaking Kubernetes changes, through the increased number of potential reviewers and the integration with existing testing framework. This will not only benefit Kubernetes, which will be able to better participate and shape the direction of etcd in terms of the critical role it plays, but also etcd as a whole.
About SIG etcd
The recently created SIG is already working towards its goals, defined in its Charter and Vision. The purpose is clear: to ensure etcd is a reliable, simple, and scalable production-ready store for building cloud-native distributed systems and managing cloud-native infrastructure via orchestrators like Kubernetes.
The scope of SIG etcd is not exclusively about etcd as a Kubernetes component, it also covers etcd as a standard solution. Our goal is to make etcd the most reliable key-value storage to be used anywhere, unconstrained by any Kubernetes-specific limits and scaling to meet the requirements of many diverse use-cases.
We are confident that the creation of SIG etcd constitutes an important milestone in the lifecycle of the project, simultaneously improving etcd itself, and also the integration of etcd with Kubernetes. We invite everyone interested in etcd to visit our page, join us at our Slack channel, and get involved in this new stage of etcd's life.
Kubernetes Contributor Summit: Behind-the-scenes
Every year, just before the official start of KubeCon+CloudNativeCon, there's a special event that has a very special place in the hearts of those organizing and participating in it: the Kubernetes Contributor Summit. To find out why, and to provide a behind-the-scenes perspective, we interview Noah Abrahams, whom amongst other roles was the co-lead for the Kubernetes Contributor Summit in 2023.
Frederico Muñoz (FSM): Hello Noah, and welcome. Could you start by introducing yourself and telling us how you got involved in Kubernetes?
Noah Abrahams (NA): I’ve been in this space for quite a while. I got started in IT in the mid 90's, and I’ve been working in the "Cloud" space for about 15 years. It was, frankly, through a combination of sheer luck (being in the right place at the right time) and having good mentors to pull me into those places (thanks, Tim!), that I ended up at a startup called Apprenda in 2016. While I was there, they pivoted into Kubernetes, and it was the best thing that could have happened to my career. It was around v1.2 and someone asked me if I could give a presentation on Kubernetes concepts at "my local meetup" in Las Vegas. The meetup didn’t exist yet, so I created it, and got involved in the wider community. One thing led to another, and soon I was involved in ContribEx, joined the release team, was doing booth duty for the CNCF, became an ambassador, and here we are today.
The Contributor Summit
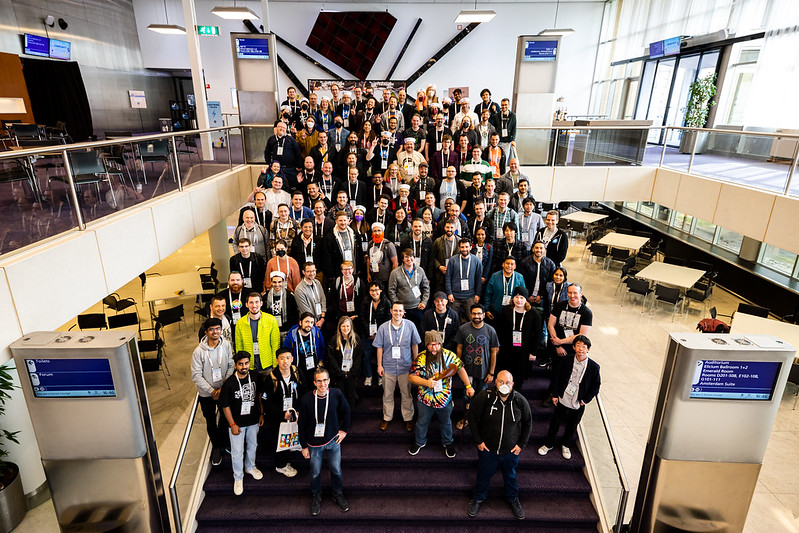
FM: Before leading the organisation of the KCSEU 2023, how many other Contributor Summits were you a part of?
NA: I was involved in four or five before taking the lead. If I'm recalling correctly, I attended the summit in Copenhagen, then sometime in 2018 I joined the wrong meeting, because the summit staff meeting was listed on the ContribEx calendar. Instead of dropping out of the call, I listened a bit, then volunteered to take on some work that didn't look like it had anybody yet dedicated to it. I ended up running Ops in Seattle and helping run the New Contributor Workshop in Shanghai, that year. Since then, I’ve been involved in all but two, since I missed both Barcelona and Valencia.
FM: Have you noticed any major changes in terms of how the conference is organized throughout the years? Namely in terms of number of participants, venues, speakers, themes...
NA: The summit changes over the years with the ebb and flow of the desires of the contributors that attend. While we can typically expect about the same number of attendees, depending on the region that the event is held in, we adapt the style and content greatly based on the feedback that we receive at the end of each event. Some years, contributors ask for more free-style or unconference type sessions, and we plan on having more of those, but some years, people ask for more planned sessions or workshops, so that's what we facilitate. We also have to continually adapt to the venue that we have, the number of rooms we're allotted, how we're going to share the space with other events and so forth. That all goes into the planning ahead of time, from how many talk tracks we’ll have, to what types of tables and how many microphones we want in a room.
There has been one very significant change over the years, though, and that is that we no longer run the New Contributor Workshop. While the content was valuable, running the session during the summit never led to any people who weren’t already contributing to the project becoming dedicated contributors to the project, so we removed it from the schedule. We'll deliver that content another way, while we’ll keep the summit focused on existing contributors.
What makes it special
FM: Going back to the introduction I made, I’ve heard several participants saying that KubeCon is great, but that the Contributor Summit is for them the main event. In your opinion, why do you think that makes it so?
NA: I think part of it ties into what I mentioned a moment ago, the flexibility in our content types. For many contributors, I think the summit is basically "How Kubecon used to be", back when it was primarily a gathering of the contributors to talk about the health of the project and the work that needed to be done. So, in that context, if the contributors want to discuss, say, a new Working Group, then they have dedicated space to do so in the summit. They also have the space to sit down and hack on a tough problem, discuss architectural philosophy, bring potential problems to more people’s attention, refine our methods, and so forth. Plus, the unconference aspect allows for some malleability on the day-of, for whatever is most important right then and there. Whatever folks want to get out of this environment is what we’ll provide, and having a space and time specifically to address your particular needs is always going to be well received.
Let's not forget the social aspect, too. Despite the fact that we're a global community and work together remotely and asynchronously, it's still easier to work together when you have a personal connection, and can put a face to a Github handle. Zoom meetings are a good start, but even a single instance of in-person time makes a big difference in how people work together. So, getting folks together a couple times a year makes the project run more smoothly.
Organizing the Summit
FM: In terms of the organization team itself, could you share with us a general overview of the staffing process? Who are the people that make it happen? How many different teams are involved?
NA: There's a bit of the "usual suspects" involved in making this happen, many of whom you'll find in the ContribEx meetings, but really it comes down to whoever is going to step up and do the work. We start with a general call out for volunteers from the org. There's a Github issue where we'll track the staffing and that will get shouted out to all the usual comms channels: slack, k-dev, etc.
From there, there's a handful of different teams, overseeing content/program committee, registration, communications, day-of operations, the awards the SIGs present to their members, the after-summit social event, and so on. The leads for each team/role are generally picked from folks who have stepped up and worked the event before, either as a shadow, or a previous lead, so we know we can rely on them, which is a recurring theme. The leads pick their shadows from whoever pipes up on the issue, and the teams move forward, operating according to their role books, which we try to update at the end of each summit, with what we've learned over the past few months. It's expected that a shadow will be in line to lead that role at some point in a future summit, so we always have a good bench of folks available to make this event happen. A couple of the roles also have some non-shadow volunteers where people can step in to help a bit, like as an on-site room monitor, and get a feel for how things are put together without having to give a serious up-front commitment, but most of the folks working the event are dedicated to both making the summit successful, and coming back to do so in the future. Of course, the roster can change over time, or even suddenly, as people gain or lose travel budget, get new jobs, only attend Europe or North America or Asia, etc. It's a constant dance, relying 100% on the people who want to make this project successful.
Last, but not least, is the Summit lead. They have to keep the entire process moving forward, be willing to step in to keep bike-shedding from derailing our deadlines, make sure the right people are talking to one another, lead all our meetings to make sure everyone gets a voice, etc. In some cases, the lead has to even be willing to take over an entirely separate role, in case someone gets sick or has any other extenuating circumstances, to make sure absolutely nothing falls through the cracks. The lead is only allowed to volunteer after they’ve been through this a few times and know what the event entails. Event planning is not for the faint of heart.
FM: The participation of volunteers is essential, but there's also the topic of CNCF support: how does this dynamic play out in practice?
NA: This event would not happen in its current form without our CNCF liaison. They provide us with space, make sure we are fed and caffeinated and cared for, bring us outside spaces to evaluate, so we have somewhere to hold the social gathering, get us the budget so we have t-shirts and patches and the like, and generally make it possible for us to put this event together. They're even responsible for the signage and arrows, so the attendees know where to go. They're the ones sitting at the front desk, keeping an eye on everything and answering people's questions. At the same time, they're along to facilitate, and try to avoid influencing our planning.
There's a ton of work that goes into making the summit happen that is easy to overlook, as an attendee, because people tend to expect things to just work. It is not exaggerating to say this event would not have happened like it has over the years, without the help from our liaisons, like Brienne and Deb. They are an integral part of the team.
A look ahead
FM: Currently, we’re preparing the NA 2023 summit, how is it going? Any changes in format compared with previous ones?
NA: I would say it's going great, though I'm sort of emeritus lead for this event, mostly picking up the things that I see need to be done and don't have someone assigned to it. We're always learning from our past experiences and making small changes to continually be better, from how many people need to be on a particular rotation to how far in advance we open and close the CFP. There's no major changes right now, just continually providing the content that the contributors want.
FM: For our readers that might be interested in joining in the Kubernetes Contributor Summit, is there anything they should know?
NA: First of all, the summit is an event by and for Org members. If you're not already an org member, you should be getting involved before trying to attend the summit, as the content is curated specifically towards the contributors and maintainers of the project. That applies to the staff, as well, as all the decisions should be made with the interests and health of kubernetes contributors being the end goal. We get a lot of people who show interest in helping out, but then aren't ready to make any sort of commitment, and that just makes more work for us. If you're not already a proven and committed member of this community, it’s difficult for us to place you in a position that requires reliability. We have made some rare exceptions when we need someone local to help us out, but those are few and far between.
If you are, however, already a member, we'd love to have you. The more people that are involved, the better the event becomes. That applies to both dedicated staff, and those in attendance bringing CFPs, unconference topics, and just contributing to the discussions. If you're part of this community and you're going to be at KubeCon, I would highly urge you to attend, and if you're not yet an org member, let's make that happen!
FM: Indeed! Any final comments you would like to share?
NA: Just that the Contributor Summit is, for me, the ultimate manifestation of the Hallway Track. By being here, you're part of the conversations that move this project forward. It's good for you, and it's good for Kubernetes. I hope to see you all in Chicago!
Spotlight on SIG Architecture: Production Readiness
This is the second interview of a SIG Architecture Spotlight series that will cover the different subprojects. In this blog, we will cover the SIG Architecture: Production Readiness subproject.
In this SIG Architecture spotlight, we talked with Wojciech Tyczynski (Google), lead of the Production Readiness subproject.
About SIG Architecture and the Production Readiness subproject
Frederico (FSM): Hello Wojciech, could you tell us a bit about yourself, your role and how you got involved in Kubernetes?
Wojciech Tyczynski (WT): I started contributing to Kubernetes in January 2015. At that time, Google (where I was and still am working) decided to start a Kubernetes team in the Warsaw office (in addition to already existing teams in California and Seattle). I was lucky enough to be one of the seeding engineers for that team.
After two months of onboarding and helping with different tasks across the project towards 1.0 launch, I took ownership of the scalability area and I was leading Kubernetes to support clusters with 5000 nodes. I’m still involved in SIG Scalability as its Technical Lead. That was the start of a journey since scalability is such a cross-cutting topic, and I started contributing to many other areas including, over time, to SIG Architecture.
FSM: In SIG Architecture, why specifically the Production Readiness subproject? Was it something you had in mind from the start, or was it an unexpected consequence of your initial involvement in scalability?
WT: After reaching that milestone of Kubernetes supporting 5000-node clusters, one of the goals was to ensure that Kubernetes would not degrade its scalability properties over time. While non-scalable implementation is always fixable, designing non-scalable APIs or contracts is problematic. I was looking for a way to ensure that people are thinking about scalability when they create new features and capabilities without introducing too much overhead.
This is when I joined forces with John Belamaric and David Eads and created a Production Readiness subproject within SIG Architecture. While setting the bar for scalability was only one of a few motivations for it, it ended up fitting quite well. At the same time, I was already involved in the overall reliability of the system internally, so other goals of Production Readiness were also close to my heart.
FSM: To anyone new to how SIG Architecture works, how would you describe the main goals and areas of intervention of the Production Readiness subproject?
WT: The goal of the Production Readiness subproject is to ensure that any feature that is added to Kubernetes can be reliably used in production clusters. This primarily means that those features are observable, scalable, supportable, can always be safely enabled and in case of production issues also disabled.
Production readiness and the Kubernetes project
FSM: Architectural consistency being one of the goals of the SIG, is this made more challenging by the distributed and open nature of Kubernetes? Do you feel this impacts the approach that Production Readiness has to take?
WT: The distributed nature of Kubernetes certainly impacts Production Readiness, because it makes thinking about aspects like enablement/disablement or scalability more challenging. To be more precise, when enabling or disabling features that span multiple components you need to think about version skew between them and design for it. For scalability, changes in one component may actually result in problems for a completely different one, so it requires a good understanding of the whole system, not just individual components. But it’s also what makes this project so interesting.
FSM: Those running Kubernetes in production will have their own perspective on things, how do you capture this feedback?
WT: Fortunately, we aren’t talking about "them" here, we’re talking about "us": all of us are working for companies that are managing large fleets of Kubernetes clusters and we’re involved in that too, so we suffer from those problems ourselves.
So while we’re trying to get feedback (our annual PRR survey is very important for us), it rarely reveals completely new problems - it rather shows the scale of them. And we try to react to it - changes like "Beta APIs off by default" happen in reaction to the data that we observe.
FSM: On the topic of reaction, that made me think of how the Kubernetes Enhancement Proposal (KEP) template has a Production Readiness Review (PRR) section, which is tied to the graduation process. Was this something born out of identified insufficiencies? How would you describe the results?
WT: As mentioned above, the overall goal of the Production Readiness subproject is to ensure that every newly added feature can be reliably used in production. It’s not possible to enforce that by a central team - we need to make it everyone's problem.
To achieve it, we wanted to ensure that everyone designing their new feature is thinking about safe enablement, scalability, observability, supportability, etc. from the very beginning. Which means not when the implementation starts, but rather during the design. Given that KEPs are effectively Kubernetes design docs, making it part of the KEP template was the way to achieve the goal.
FSM: So, in a way making sure that feature owners have thought about the implications of their proposal.
WT: Exactly. We already observed that just by forcing feature owners to think through the PRR aspects (via forcing them to fill in the PRR questionnaire) many of the original issues are going away. Sure - as PRR approvers we’re still catching gaps, but even the initial versions of KEPs are better now than they used to be a couple of years ago in what concerns thinking about productionisation aspects, which is exactly what we wanted to achieve - spreading the culture of thinking about reliability in its widest possible meaning.
FSM: We've been talking about the PRR process, could you describe it for our readers?
WT: The PRR process is fairly simple - we just want to ensure that you think through the productionisation aspects of your feature early enough. If you do your job, it’s just a matter of answering some questions in the KEP template and getting approval from a PRR approver (in addition to regular SIG approval). If you didn’t think about those aspects earlier, it may require spending more time and potentially revising some decisions, but that’s exactly what we need to make the Kubernetes project reliable.
Helping with Production Readiness
FSM: Production Readiness seems to be one area where a good deal of prior exposure is required in order to be an effective contributor. Are there also ways for someone newer to the project to contribute?
WT: PRR approvers have to have a deep understanding of the whole Kubernetes project to catch potential issues. Kubernetes is such a large project now with so many nuances that people who are new to the project can simply miss the context, no matter how senior they are.
That said, there are many ways that you may implicitly help. Increasing the reliability of particular areas of the project by improving its observability and debuggability, increasing test coverage, and building new kinds of tests (upgrade, downgrade, chaos, etc.) will help us a lot. Note that the PRR subproject is focused on keeping the bar at the design level, but we should also care equally about the implementation. For that, we’re relying on individual SIGs and code approvers, so having people there who are aware of productionisation aspects, and who deeply care about it, will help the project a lot.
FSM: Thank you! Any final comments you would like to share with our readers?
WT: I would like to highlight and thank all contributors for their cooperation. While the PRR adds some additional work for them, we see that people care about it, and what’s even more encouraging is that with every release the quality of the answers improves, and questions "do I really need a metric reflecting if my feature works" or "is downgrade really that important" don’t really appear anymore.
Gateway API v1.0: GA Release
On behalf of Kubernetes SIG Network, we are pleased to announce the v1.0 release of Gateway API! This release marks a huge milestone for this project. Several key APIs are graduating to GA (generally available), while other significant features have been added to the Experimental channel.
What's new
Graduation to v1
This release includes the graduation of Gateway, GatewayClass, and HTTPRoute to v1, which means they are now generally available (GA). This API version denotes a high level of confidence in the API surface and provides guarantees of backwards compatibility. Note that although, the version of these APIs included in the Standard channel are now considered stable, that does not mean that they are complete. These APIs will continue to receive new features via the Experimental channel as they meet graduation criteria. For more information on how all of this works, refer to the Gateway API Versioning Policy.
Logo
Gateway API now has a logo! This logo was designed through a collaborative process, and is intended to represent the idea that this is a set of Kubernetes APIs for routing traffic both north-south and east-west:
CEL Validation
Historically, Gateway API has bundled a validating webhook as part of installing the API. Starting in v1.0, webhook installation is optional and only recommended for Kubernetes 1.24. Gateway API now includes CEL validation rules as part of the CRDs. This new form of validation is supported in Kubernetes 1.25+, and thus the validating webhook is no longer required in most installations.
Standard channel
This release was primarily focused on ensuring that the existing beta APIs were well defined and sufficiently stable to graduate to GA. That led to a variety of spec clarifications, as well as some improvements to status to improve the overall UX when interacting with Gateway API.
Experimental channel
Most of the changes included in this release were limited to the experimental channel. These include HTTPRoute timeouts, TLS config from Gateways to backends, WebSocket support, Gateway infrastructure labels, and more. Stay tuned for a follow up blog post that will cover each of these new features in detail.
Everything else
For a full list of the changes included in this release, please refer to the v1.0.0 release notes.
How we got here
The idea of Gateway API was initially proposed 4 years ago at KubeCon San Diego as the next generation of Ingress API. Since then, an incredible community has formed to develop what has likely become the most collaborative API in Kubernetes history. Over 170 people have contributed to this API so far, and that number continues to grow.
A special thank you to the 20+ community members who agreed to take on an official role in the project, providing some time for reviews and sharing the load of maintaining the project!
We especially want to highlight the emeritus maintainers that played a pivotal role in the early development of this project:
Try it out
Unlike other Kubernetes APIs, you don't need to upgrade to the latest version of Kubernetes to get the latest version of Gateway API. As long as you're running one of the 5 most recent minor versions of Kubernetes (1.24+), you'll be able to get up and running with the latest version of Gateway API.
To try out the API, follow our Getting Started guide.
What's next
This release is just the beginning of a much larger journey for Gateway API, and there are still plenty of new features and new ideas in flight for future releases of the API.
One of our key goals going forward is to work to stabilize and graduate other experimental features of the API. These include support for service mesh, additional route types (GRPCRoute, TCPRoute, TLSRoute, UDPRoute), and a variety of experimental features.
We've also been working towards moving ReferenceGrant into a built-in Kubernetes API that can be used for more than just Gateway API. Within Gateway API, we've used this resource to safely enable cross-namespace references, and that concept is now being adopted by other SIGs. The new version of this API will be owned by SIG Auth and will likely include at least some modifications as it migrates to a built-in Kubernetes API.
Gateway API at KubeCon + CloudNativeCon
At KubeCon North America (Chicago) and the adjacent Contributor Summit there are several talks related to Gateway API that will go into more detail on these topics. If you're attending either of these events this year, considering adding these to your schedule.
Contributor Summit:
- Lessons Learned Building a GA API with CRDs
- Conformance Profiles: Building a generic conformance test reporting framework
- Gateway API: Beyond GA
KubeCon Main Event:
KubeCon Office Hours:
Gateway API maintainers will be holding office hours sessions at KubeCon if
you'd like to discuss or brainstorm any related topics. To get the latest
updates on these sessions, join the #sig-network-gateway-api channel on
Kubernetes Slack.
Get involved
We've only barely scratched the surface of what's in flight with Gateway API. There are lots of opportunities to get involved and help define the future of Kubernetes routing APIs for both Ingress and Mesh.
If this is interesting to you, please join us in the community and help us build the future of Gateway API together!
Introducing ingress2gateway; Simplifying Upgrades to Gateway API
Update: Ingress2Gateway v1.0 is now available!
Today we are releasing ingress2gateway, a tool that can help you migrate from Ingress to Gateway API. Gateway API is just weeks away from graduating to GA, if you haven't upgraded yet, now's the time to think about it!
Background
In the ever-evolving world of Kubernetes, networking plays a pivotal role. As more applications are deployed in Kubernetes clusters, effective exposure of these services to clients becomes a critical concern. If you've been working with Kubernetes, you're likely familiar with the Ingress API, which has been the go-to solution for managing external access to services.
The Ingress API provides a way to route external traffic to your applications within the cluster, making it an indispensable tool for many Kubernetes users. Ingress has its limitations however, and as applications become more complex and the demands on your Kubernetes clusters increase, these limitations can become bottlenecks.
Some of the limitations are:
- Insufficient common denominator - by attempting to establish a common denominator for various HTTP proxies, Ingress can only accommodate basic HTTP routing, forcing more features of contemporary proxies like traffic splitting and header matching into provider-specific, non-transferable annotations.
- Inadequate permission model - Ingress spec configures both infrastructure and application configuration in one object. With Ingress, the cluster operator and application developer operate on the same Ingress object without being aware of each other’s roles. This creates an insufficient role-based access control and has high potential for setup errors.
- Lack of protocol diversity - Ingress primarily focuses on HTTP(S) routing and does not provide native support for other protocols, such as TCP, UDP and gRPC. This limitation makes it less suitable for handling non-HTTP workloads.
Gateway API
To overcome this, Gateway API is designed to provide a more flexible, extensible, and powerful way to manage traffic to your services.
Gateway API is just weeks away from a GA (General Availability) release. It provides a standard Kubernetes API for ingress traffic control. It offers extended functionality, improved customization, and greater flexibility. By focusing on modular and expressive API resources, Gateway API makes it possible to describe a wider array of routing configurations and models.
The transition from Ingress API to Gateway API in Kubernetes is driven by advantages and advanced functionalities that Gateway API offers, with its foundation built on four core principles: a role-oriented approach, portability, expressiveness and extensibility.
A role-oriented approach
Gateway API employs a role-oriented approach that aligns with the conventional roles within organizations involved in configuring Kubernetes service networking. This approach enables infrastructure engineers, cluster operators, and application developers to collectively address different aspects of Gateway API.
For instance, infrastructure engineers play a pivotal role in deploying GatewayClasses, cluster-scoped resources that act as templates to explicitly define behavior for Gateways derived from them, laying the groundwork for robust service networking.
Subsequently, cluster operators utilize these GatewayClasses to deploy gateways. A Gateway in Kubernetes' Gateway API defines how external traffic can be directed to Services within the cluster, essentially bridging non-Kubernetes sources to Kubernetes-aware destinations. It represents a request for a load balancer configuration aligned with a GatewayClass’ specification. The Gateway spec may not be exhaustive as some details can be supplied by the GatewayClass controller, ensuring portability. Additionally, a Gateway can be linked to multiple Route references to channel specific traffic subsets to designated services.
Lastly, application developers configure route resources (such as HTTPRoutes), to manage configuration (e.g. timeouts, request matching/filter) and Service composition (e.g. path routing to backends) Route resources define protocol-specific rules for mapping requests from a Gateway to Kubernetes Services. HTTPRoute is for multiplexing HTTP or terminated HTTPS connections. It's intended for use in cases where you want to inspect the HTTP stream and use HTTP request data for either routing or modification, for example using HTTP Headers for routing, or modifying them in-flight.
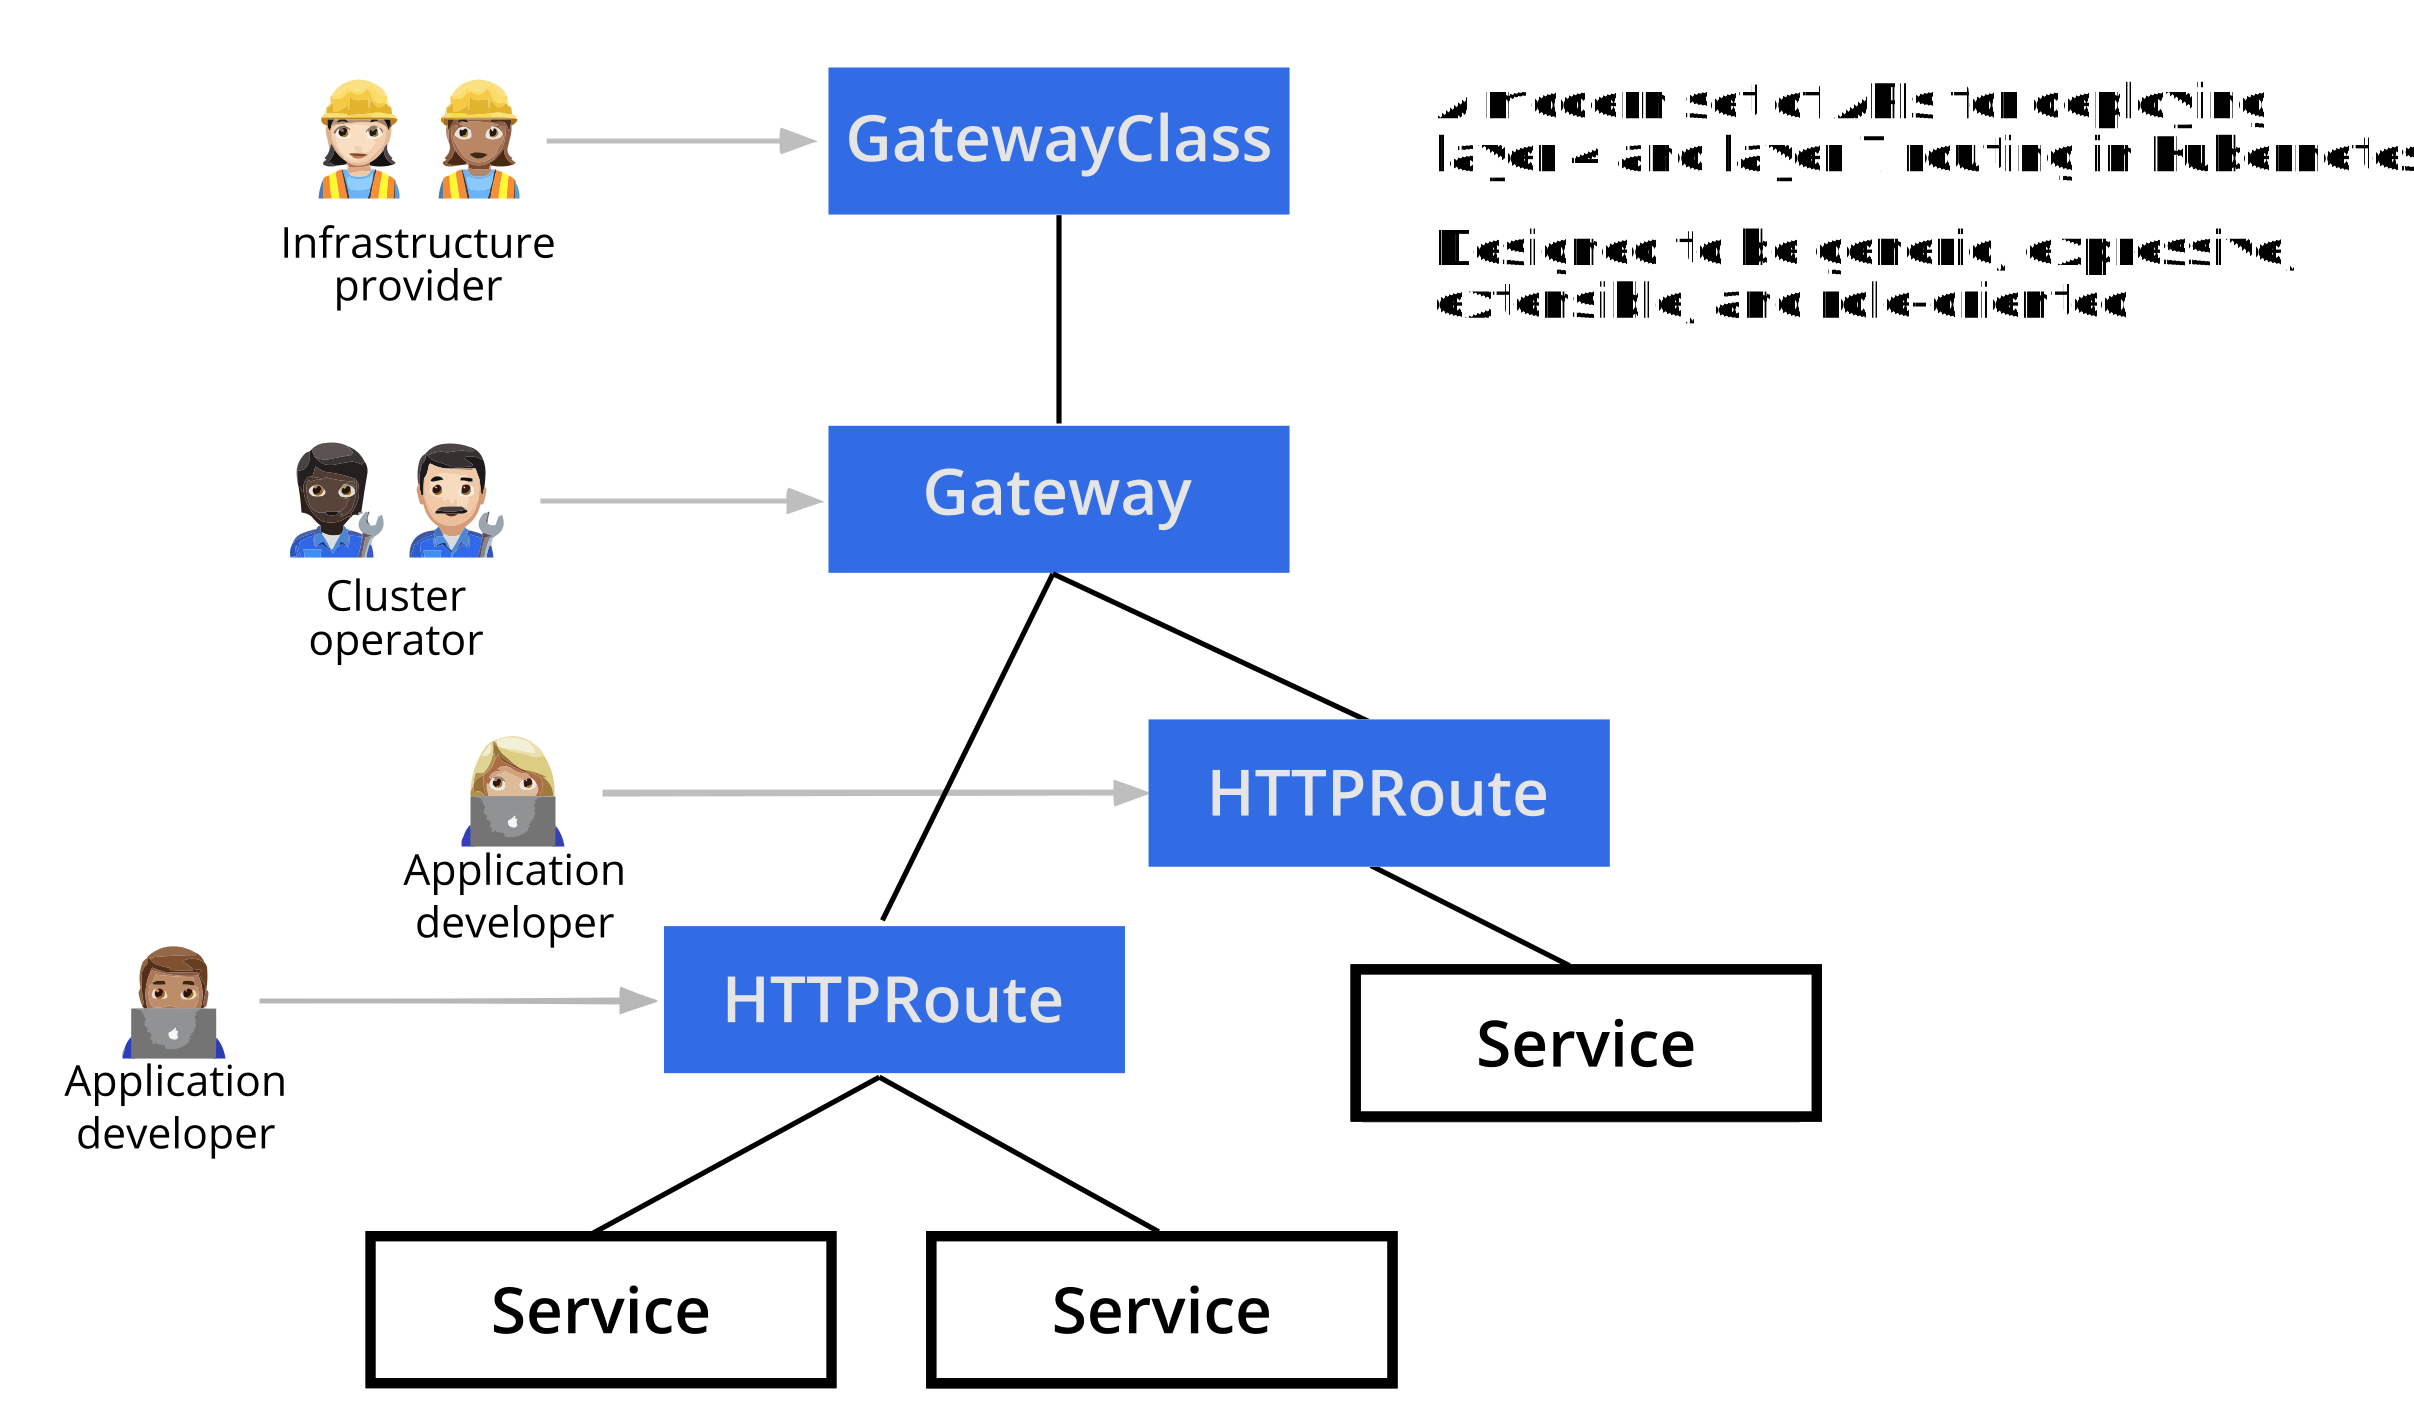
Portability
With more than 20 API implementations, Gateway API is designed to be more portable across different implementations, clusters and environments. It helps reduce Ingress' reliance on non-portable, provider-specific annotations, making your configurations more consistent and easier to manage across multiple clusters.
Gateway API commits to supporting the 5 latest Kubernetes minor versions. That means that Gateway API currently supports Kubernetes 1.24+.
Expressiveness
Gateway API provides standard, Kubernetes-backed support for a wide range of features, such as header-based matching, traffic splitting, weight-based routing, request mirroring and more. With Ingress, these features need custom provider-specific annotations.
Extensibility
Gateway API is designed with extensibility as a core feature. Rather than enforcing a one-size-fits-all model, it offers the flexibility to link custom resources at multiple layers within the API's framework. This layered approach to customization ensures that users can tailor configurations to their specific needs without overwhelming the main structure. By doing so, Gateway API facilitates more granular and context-sensitive adjustments, allowing for a fine-tuned balance between standardization and adaptability. This becomes particularly valuable in complex cloud-native environments where specific use cases require nuanced configurations. A critical difference is that Gateway API has a much broader base set of features and a standard pattern for extensions that can be more expressive than annotations were on Ingress.
Upgrading to Gateway
Migrating from Ingress to Gateway API may seem intimidating, but luckily Kubernetes just released a tool to simplify the process. ingress2gateway assists in the migration by converting your existing Ingress resources into Gateway API resources. Here is how you can get started with Gateway API and using ingress2gateway:
Install a Gateway controller OR install the Gateway API CRDs manually .
Install ingress2gateway.
If you have a Go development environment locally, you can install
ingress2gatewaywith:go install github.com/kubernetes-sigs/ingress2gateway@v0.1.0This installs
ingress2gatewayto$(go env GOPATH)/bin/ingress2gateway.Alternatively, follow the installation guide here.
Once the tool is installed, you can use it to convert the ingress resources in your cluster to Gateway API resources.
ingress2gateway printThis above command will:
- Load your current Kubernetes client config including the active context, namespace and authentication details.
- Search for ingresses and provider-specific resources in that namespace.
- Convert them to Gateway API resources (Currently only Gateways and HTTPRoutes). For other
options you can run the tool with
-h, or refer to https://github.com/kubernetes-sigs/ingress2gateway#options.
Review the converted Gateway API resources, validate them, and then apply them to your cluster.
Send test requests to your Gateway to check that it is working. You could get your gateway address using
kubectl get gateway <gateway-name> -n <namespace> -o jsonpath='{.status.addresses}{"\n"}'.Update your DNS to point to the new Gateway.
Once you've confirmed that no more traffic is going through your Ingress configuration, you can safely delete it.
Wrapping up
Achieving reliable, scalable and extensible networking has always been a challenging objective. The Gateway API is designed to improve the current Kubernetes networking standards like ingress and reduce the need for implementation specific annotations and CRDs.
It is a Kubernetes standard API, consistent across different platforms and implementations and most importantly it is future proof. Gateway API is the next generation of the Ingress API, but has a larger scope than that, expanding to tackle mesh and layer 4 routing as well. Gateway API and ingress2gateway are supported by a dedicated team under SIG Network that actively work on it and manage the ecosystem. It is also likely to receive more updates and community support.
The Road Ahead
ingress2gateway is just getting started. We're planning to onboard more providers, introduce support for more types of Gateway API routes, and make sure everything syncs up smoothly with the ongoing development of Gateway API.
Excitingly, Gateway API is also making significant strides. While v1.0 is about to launching, there's still a lot of work ahead. This release incorporates many new experimental features, with additional functionalities currently in the early stages of planning and development.
If you're interested in helping to contribute, we would love to have you! Please check out the community page which includes links to the Slack channel and community meetings. We look forward to seeing you!!
Useful Links
- Get involved with the Ingress2Gateway project on GitHub
- Open a new issue - ingress2gateway, Gateway API.
- Join our discussions.
- Gateway API Getting Started
- Gateway API Implementations
Plants, process and parties: the Kubernetes 1.28 release interview
Since 2018, one of my favourite contributions to the Kubernetes community has been to share the story of each release. Many of these stories were told on behalf of a past employer; by popular demand, I've brought them back, now under my own name. If you were a fan of the old show, I would be delighted if you would subscribe.
Back in August, we welcomed the release of Kubernetes 1.28. That release was led by Grace Nguyen, a CS student at the University of Waterloo. Grace joined me for the traditional release interview, and while you can read her story below, I encourage you to listen to it if you can.
This transcript has been lightly edited and condensed for clarity.
You're a student at the University of Waterloo, so I want to spend the first two minutes of this interview talking about the Greater Kitchener-Waterloo region. It's August, so this is one of the four months of the year when there's no snow visible on the ground?
Well, it's not that bad. I think the East Coast has it kind of good. I grew up in Calgary, but I do love summer here in Waterloo. We have a petting zoo close to our university campus, so I go and see the llamas sometimes.
Is that a new thing?
I'm not sure, it seems like it's been around five-ish years, the Waterloo Park?
I lived there in 2007, for a couple of years, just to set the scene for why we're talking about this. I think they were building a lot of the park then. I do remember, of course, that Kitchener holds the second largest Oktoberfest in the world. Is that something you've had a chance to check out?
I have not. I actually didn't know that was a fact.
The local civic organization is going to have to do a bit more work, I feel. Do you like ribs?
I have mixed feelings about ribs. It's kind of a hit or miss situation for me so far.
Again, that might be something that's changed over the last few years. The Ribfests used to have a lot of trophies with little pigs on top of them, but I feel that the shifting dining habits of the world might mean they have to offer some vegan or vegetarian options, to please the modern palette.
[LAUGHS] For sure. Do you recommend the Oktoberfest here? Have you been?
I went a couple of times. It was a lot of fun.
Okay.
It's basically just drinking. I would have recommended it back then; I'm not sure it would be quite what I'd be doing today.
All right, good to know.
The Ribfest, however, I would go back just for that.
Oh, ok.
And the great thing about Ribfests as a concept is that they have one in every little town. The Kitchener Ribfest, I looked it up, it's in July; you've just missed that. But, you could go to the Waterloo Ribfest in September.
Oh, it is in September? They have their own Ribfest?
They do. I think Guelph has one, and Cambridge has one. That's the advantage of the region — there are lots of little cities. Kitchener and Waterloo are two cities that grew into each other — they do call them the Twin Cities. I hear that they finally built the light rail link between the two of them?
It is fantastic, and makes the city so much more walkable.
Yes, you can go from one mall to the other. That's Canada for you.
Well, Uptown is really nice. I quite like it. It's quite cozy.
Do you ever cross the border over into Kitchener? Or only when you've lost a bet?
Yeah, not a lot. Only for farmer's market, I say.
It's worthwhile. There's a lot of good food there, I remember.
Yeah. Quite lovely.
Now we've got all that out of the way, let's travel back in time a little bit. You mentioned there that you went to high school in Calgary?
I did. I had not been to Ontario before I went to university. Calgary was frankly too cold and not walkable enough for me.
I basically say the same thing about Waterloo and that's why I moved to England.
Fascinating. Gets better.
How did you get into tech?
I took a computer science class in high school. I was one of maybe only three women in the class, and I kind of stuck with it since.
Was the gender distribution part of your thought process at the time?
Yeah, I think I was drawn to it partially because I didn't see a lot of people who looked like me in the class.
You followed it through to university. What is it that you're studying?
I am studying computer engineering, so a lot of hardware stuff.
You're involved in the UW Cybersecurity Club. What can you tell me about that without having to kill me?
Oh, we are very nice and friendly people! I told myself I'm going to have a nice and chill summer and then I got chosen to lead the release and also ended up running the Waterloo Cybersecurity Club. The club kind of died out during the pandemic, because we weren't on campus, but we have so many smart and amazing people who are in cybersecurity, so it's great to get them together and I learned so many things.
Is that like the modern equivalent of the LAN party? You're all getting into a dark room and trying to hack the Gibson?
[LAUGHS] Well, you'll have to explain to me again what a LAN party is. Do you bring your own PC?
You used to. Back in the day it was incomprehensible that you could communicate with a different person in a different place at a fast enough speed, so you had to physically sit next to somebody and plug a cable in between you.
Okay, well kind of the same, I guess. We bring our own laptop and we go to CTF competitions together.
They didn't have laptops back in the days of LAN parties. You'd bring a giant 19-inch square monitor, and everything. It was a badge of honor what you could carry.
Okay. Can't relate, but good to know. [LAUGHS]
One of the more unique aspects of UW is its co-op system. Tell us a little bit about that?
As part of my degree, I am required to do minimum five and maximum six co-ops. I've done all six of them. Two of them were in Kubernetes and that's how I got started.
A co-op is a placement, as opposed to something you do on campus?
Right, so co-op is basically an internship. My first one was at the Canada Revenue Agency. We didn't have wifi and I had my own cubicle, which is interesting. They don't do that anymore, they have open office space. But my second was at Ericsson, where I learned about Kubernetes. It was during the pandemic. KubeCon offered virtual attendance for students and I signed up and I poked around and I have been around since.
What was it like going through university during the COVID years? What did that mean in terms of the fact you would previously have traveled to these internships? Did you do them all from home?
I'm not totally sure what I missed out on. For sure, a lot of relationship building, but also that we do have to move a lot as part of the co-op experience. Last fall I was in San Francisco, I was in Palo Alto earlier this year. A lot of that dynamic has already been the case.
Definitely different weather systems, Palo Alto versus Waterloo.
Oh, for sure. Yes, yes. Really glad I was there over the winter.
The first snow would fall in Ontario about the end of October and it would pile up over the next few months. There were still piles that hadn't melted by June. That's why I say, there were only four months of the year, July through September, where there was no snow on the ground.
That's true. Didn't catch any snow in Palo Alto, and honestly, that's great. [CHUCKLES]
Thank you, global warming, I guess.
Oh no! [LAUGHS]
Tell me about the co-op term that you did working with Kubernetes at Ericsson?
This was such a long time ago, but we were trying to build some sort of pipeline to deploy testing. It was running inside a cluster, and I learned Helm charts and all that good stuff. And then, for the co-op after that, I worked at a Canadian startup in FinTech. It was 24/7 Kubernetes, building their secret injection system, using ArgoCD to automatically pull secrets from 1Password.
How did that lead you on to involvement with the release team?
It was over the pandemic, so I didn't have a lot to do, I went to the conference, saw so many cool talks. One that really stuck out to me was a Kubernetes hacking talk by Tabitha Sable and V Korbes. I thought it was the most amazing thing and it was so cool. One of my friends was on the release team at the time, and she showed me what she does. I applied and thankfully got in. I didn't have any open source experience. It was fully like one of those things where someone took a chance on me.
How would you characterize the experience that you've had to date? You have had involvement with pretty much every release since then.
Yeah, I think it was a really formative experience, and the community has been such a big part of it.
You started as an enhancement shadow with Kubernetes 1.22, eventually moving up to enhancements lead, then you moved on to be the release lead shadow. Obviously, you are the lead for 1.28, but for 1.27 you did something a bit different. What was that, and why did you do it?
For 1.25 and 1.26, I was release lead shadow, so I had an understanding of what that role was like. I wanted to shadow another team, and at that time I thought CI Signal was a big black box to me. I joined the team, but I also had capacity for other things, I joined as a branch manager associate as well.
What is the difference between that role and the traditional release team roles we think about?
Yeah, that's a great question. So the branch management role is a more constant role. They don't necessarily get swapped out every release. You shadow as an associate, so you do things like cut releases, distribute them, update distros, things like that. It's a really important role, and the folks that are in there are more technical. So if you have been on the release team for a long time and are looking for more permanent role, I recommend looking into that.
Congratulations again on the release of 1.28 today.
Yeah, thank you.
What is the best new feature in Kubernetes 1.28, and why is it sidecar container support?
Great question. I am as excited as you. In 1.28, we have a new feature in alpha, which is sidecar container support. We introduced a new field called restartPolicy for init containers, that allows the containers to live throughout the life cycle of the pod and not block the pod from terminating. Craig, you know a lot about this, but there are so many use cases for this. It is a very common pattern. You use it for logging, monitoring, metrics; also configs and secrets as well.
And the service mesh!
And the service mesh.
Very popular. I will say that the Sidecar pattern was called out very early on, in a blog post Brendan Burns wrote, talking about how you can achieve some of the things you just mentioned. Support for it in Kubernetes has been— it's been a while, shall we say. I've been doing these interviews since 2018, and September 2019 was when I first had a conversation with a release manager who felt they had to apologize for Sidecar containers not shipping in that release.
Well, here we are!
Thank you for not letting the side down.
[LAUGHS]
There are a bunch of other features that are going to GA in 1.28. Tell me about what's new with kubectl events?
It got a new CLI and now it is separate from kubectl get. I think that changes in the CLI are always a little bit more apparent because they are user-facing.
Are there a lot of other user-facing changes, or are most of the things in the release very much behind the scenes?
I would say it's a good mix of both; it depends on what you're interested in.
I am interested, of course, in non-graceful node shutdown support. What can you tell us about that?
Right, so for situations where you have a hardware failure or a broken OS, we have added additional support for a better graceful shutdown.
If someone trips over the power cord at your LAN party and your cluster goes offline as a result?
Right, exactly. More availability! That's always good.
And if it's not someone tripping over your power cord, it's probably DNS that broke your cluster. What's changed in terms of DNS configuration?
Oh, we introduced a new feature gate to allow more DNS search path.
Is that all there is to it?
That's pretty much it. [LAUGHING] Yeah, you can have more and longer DNS search path.
It can never be long enough. Just search everything! If .com doesn't work, try .net and try .io after that.
Surely.
Those are a few of the big features that are moving to stable. Obviously, over the course of the last few releases, features come in, moving from Alpha to Beta and so on. New features coming in today might not be available to people for a while. As you mentioned, there are feature gates that you can enable to allow people to have access to these. What are some of the newest features that have been introduced that are in Alpha, that are particularly interesting to you personally?
I have two. The first one is kubectl delete --interactive. I'm always nervous when I delete something, you know, it's going to be a typo or it's going to be on the wrong tab. So we have an --interactive flag for that now.
So you can get feedback on what you're about to delete before you do it?
Right; confirmation is good!
You mentioned two there, what was the second one?
Right; this one is close to my heart. It is a SIG Release KEP, publishing on community infrastructure. I'm not sure if you know, but as part of my branch management associate role in 1.27, I had the opportunity to cut a few releases. It takes up to 12 hours sometimes. And now, we are hoping that the process only includes release managers, so we don't have to call up the folks at Google and, you know, lengthen that process anymore.
Is 12 hours the expected length for software of this size, or is there work in place to try and bring that down?
There's so much work in place to bring that down. I think 12 hours is on the shorter end of it. Unfortunately, we have had a situation where we have to, you know, switch the release manager because it's just so late at night for them.
They've fallen asleep halfway through?
Exactly, yeah. 6 to 12 hours, I think, is our status quo.
The theme for this release is "Planternetes". That's going to need some explanation, I feel.
Okay. I had full creative control over this. It is summer in the northern hemisphere, and I am a big house plant fanatic. It's always a little sad when I have to move cities for co-op and can't take my plants with me.
Is that a border control thing? They don't let you take them over the border?
It's not even that; they're just so clunky and fragile. It's usually not worth the effort. But I think our community is very much like a garden. We have very critical roles in the ecosystem and we all have to work together.
Will you be posting seeds out to contributors and growing something together all around the world?
That would be so cool if we had merch, like a little card with seeds embedded in it. I don't think we have the budget for that though. [LAUGHS]
You say that. There are people who are inspired in many different areas. I love talking to the release managers and hearing the things that they're interested in. You should think about taking some seeds off one of your plants, and just spreading them around the world. People can take pictures, and tag you in them on Instagram.
That's cool. You know how we have a SIG Beard? We can have a SIG Plant.
You worked for a long time with the release lead for 1.27. Xander Grzywinski. One of the benefits of having done my interview with him in writing and not as a podcast is I didn't have to try and butcher pronouncing his surname. Can you help me out here?
I unfortunately cannot. I don't want to butcher it either!
Anyway, Xander told me that he suspected that in this release you would have to deal with some very last-minute PRs, as is tradition. Was that the case?
I vividly remember the last minute PRs from last release because I was trying to cut the releases, as part of the branch management team. Thankfully, that was not the case this release. We have had other challenges, of course.
Can you tell me some of those challenges?
I think improvement on documentation is always a big part. The KEP process can be very daunting to new contributors. How do you get people to review your KEPs? How do you opt in? All that stuff. We're improving documentations for that.
As someone who has been through a lot of releases, I've been feeling, like you've said, that the last minute nature has slowed down a little. The process is perhaps improving. Do you see that, or do you think there's still a long way to go for the leads to improve it?
I think we've come very far. When I started in 1.22, we were using spreadsheets to track a hundred enhancements. It was a monster; I was terrified to touch it. Now, we're on GitHub boards. As a result of that, we are actually merging the bug triage and CI Signal team in 1.29.
What's the impact of that?
The bug triage team is now using the GitHub board to track issues, which is much more efficient. We are able to merge the two teams together.
I have heard a rumor that GitHub boards are powered by spreadsheets underneath.
Honestly, even if that's true, the fact that it's on the same platform and it has better version control is just magical.
At this time, the next release lead has not yet been announced, but tradition dictates that you write down your feelings, best wishes and instructions to them in an envelope, which you'll leave in their desk drawer. What are you going to put inside that envelope?
Our 1.28 release lead is fantastic and they're so capable of handling the release—
That's you, isn't it?
1.29? [LAUGHS] No, I'm too tired. I need to catch up on my sleep. My advice for them? It's going to be okay. It's all going to be okay. I was going to echo Leo's and Cici's words, to overcommunicate, but I think that has been said enough times already.
You've communicated enough. Stop! No more communication!
Yeah, no more communication. [LAUGHS] It's going to be okay. And honestly, shout out to my emeritus advisor, Leo, for reminding me that. Sometimes there are a lot of fires and it can be overwhelming, but it will be okay.
As we've alluded to a little bit throughout our conversation, there are a lot of people in the Kubernetes community who, for want of a better term, have had "a lot of experience" at running these systems. Then there are, of course, a lot of people who are just at the beginning of their careers; like yourself, at university. How do you see the difference between how those groups interact? Is there one team throughout, or what do you think that each can learn from the other?
I think the diversity of the team is one of its strengths and I really enjoy it. I learn so much from folks who have been doing this for 20 years or folks who are new to the industry like I am.
I know the CNCF goes to a lot of effort to enable new people to take part. Is there anything that you can say about how people might get involved?
Firstly, I think SIG Release has started a wonderful tradition, or system, of helping new folks join the release team as a shadow, and helping them grow into bigger positions, like leads. I think other SIGs are also following that template as well. But a big part of me joining and sticking with the community has been the ability to go to conferences. As I said, my first conference was KubeCon, when I was not involved in the community at all. And so a big shout-out to the CNCF and the companies that sponsor the Dan Kohn and the speaker scholarships. They have been the sole reason that I was able to attend KubeCon, meet people, and feel the power of the community.
Last year's KubeCon in North America was in Detroit?
Detroit, I was there, yeah.
That's quite a long drive?
I was in SF, so I flew over.
You live right next door! If only you'd been in Waterloo.
Yeah, but who knows? Maybe I'll do a road trip from Waterloo to Chicago this year.
Grace Nguyen is a student at the University of Waterloo, and was the release team lead for Kubernetes 1.28. Subscribe to Let's Get To The News, or search for it wherever you get your podcasts.
PersistentVolume Last Phase Transition Time in Kubernetes
In the recent Kubernetes v1.28 release, we (SIG Storage) introduced a new alpha feature that aims to improve PersistentVolume (PV)
storage management and help cluster administrators gain better insights into the lifecycle of PVs.
With the addition of the lastPhaseTransitionTime field into the status of a PV,
cluster administrators are now able to track the last time a PV transitioned to a different
phase, allowing for more efficient
and informed resource management.
Why do we need new PV field?
PersistentVolumes in Kubernetes play a crucial role in providing storage resources to workloads running in the cluster.
However, managing these PVs effectively can be challenging, especially when it comes
to determining the last time a PV transitioned between different phases, such as
Pending, Bound or Released.
Administrators often need to know when a PV was last used or transitioned to certain
phases; for instance, to implement retention policies, perform cleanup, or monitor storage health.
In the past, Kubernetes users have faced data loss issues when using the Delete retain policy and had to resort to the safer Retain policy.
When we planned the work to introduce the new lastPhaseTransitionTime field, we
wanted to provide a more generic solution that can be used for various use cases,
including manual cleanup based on the time a volume was last used or producing alerts based on phase transition times.
How lastPhaseTransitionTime helps
Provided you've enabled the feature gate (see How to use it, the new .status.lastPhaseTransitionTime field of a PersistentVolume (PV)
is updated every time that PV transitions from one phase to another.
Whether it's transitioning from Pending to Bound, Bound to Released, or any other phase transition, the lastPhaseTransitionTime will be recorded.
For newly created PVs the phase will be set to Pending and the lastPhaseTransitionTime will be recorded as well.
This feature allows cluster administrators to:
Implement Retention Policies
With the
lastPhaseTransitionTime, administrators can now track when a PV was last used or transitioned to theReleasedphase. This information can be crucial for implementing retention policies to clean up resources that have been in theReleasedphase for a specific duration. For example, it is now trivial to write a script or a policy that deletes all PVs that have been in theReleasedphase for a week.Monitor Storage Health
By analyzing the phase transition times of PVs, administrators can monitor storage health more effectively. For example, they can identify PVs that have been in the
Pendingphase for an unusually long time, which may indicate underlying issues with the storage provisioner.
How to use it
The lastPhaseTransitionTime field is alpha starting from Kubernetes v1.28, so it requires
the PersistentVolumeLastPhaseTransitionTime feature gate to be enabled.
If you want to test the feature whilst it's alpha, you need to enable this feature gate on the kube-controller-manager and the kube-apiserver.
Use the --feature-gates command line argument:
--feature-gates="...,PersistentVolumeLastPhaseTransitionTime=true"
Keep in mind that the feature enablement does not have immediate effect; the new field will be populated whenever a PV is updated and transitions between phases. Administrators can then access the new field through the PV status, which can be retrieved using standard Kubernetes API calls or through Kubernetes client libraries.
Here is an example of how to retrieve the lastPhaseTransitionTime for a specific PV using the kubectl command-line tool:
kubectl get pv <pv-name> -o jsonpath='{.status.lastPhaseTransitionTime}'
Going forward
This feature was initially introduced as an alpha feature, behind a feature gate that is disabled by default. During the alpha phase, we (Kubernetes SIG Storage) will collect feedback from the end user community and address any issues or improvements identified.
Once sufficient feedback has been received, or no complaints are received the feature can move to beta. The beta phase will allow us to further validate the implementation and ensure its stability.
At least two Kubernetes releases will happen between the release where this field graduates to beta and the release that graduates the field to general availability (GA). That means that the earliest release where this field could be generally available is Kubernetes 1.32, likely to be scheduled for early 2025.
Getting involved
We always welcome new contributors so if you would like to get involved you can join our Kubernetes Storage Special-Interest-Group (SIG).
If you would like to share feedback, you can do so on our public Slack channel. If you're not already part of that Slack workspace, you can visit https://slack.k8s.io/ for an invitation.
Special thanks to all the contributors that provided great reviews, shared valuable insight and helped implement this feature (alphabetical order):
A Quick Recap of 2023 China Kubernetes Contributor Summit
On September 26, 2023, the first day of KubeCon + CloudNativeCon + Open Source Summit China 2023, nearly 50 contributors gathered in Shanghai for the Kubernetes Contributor Summit.
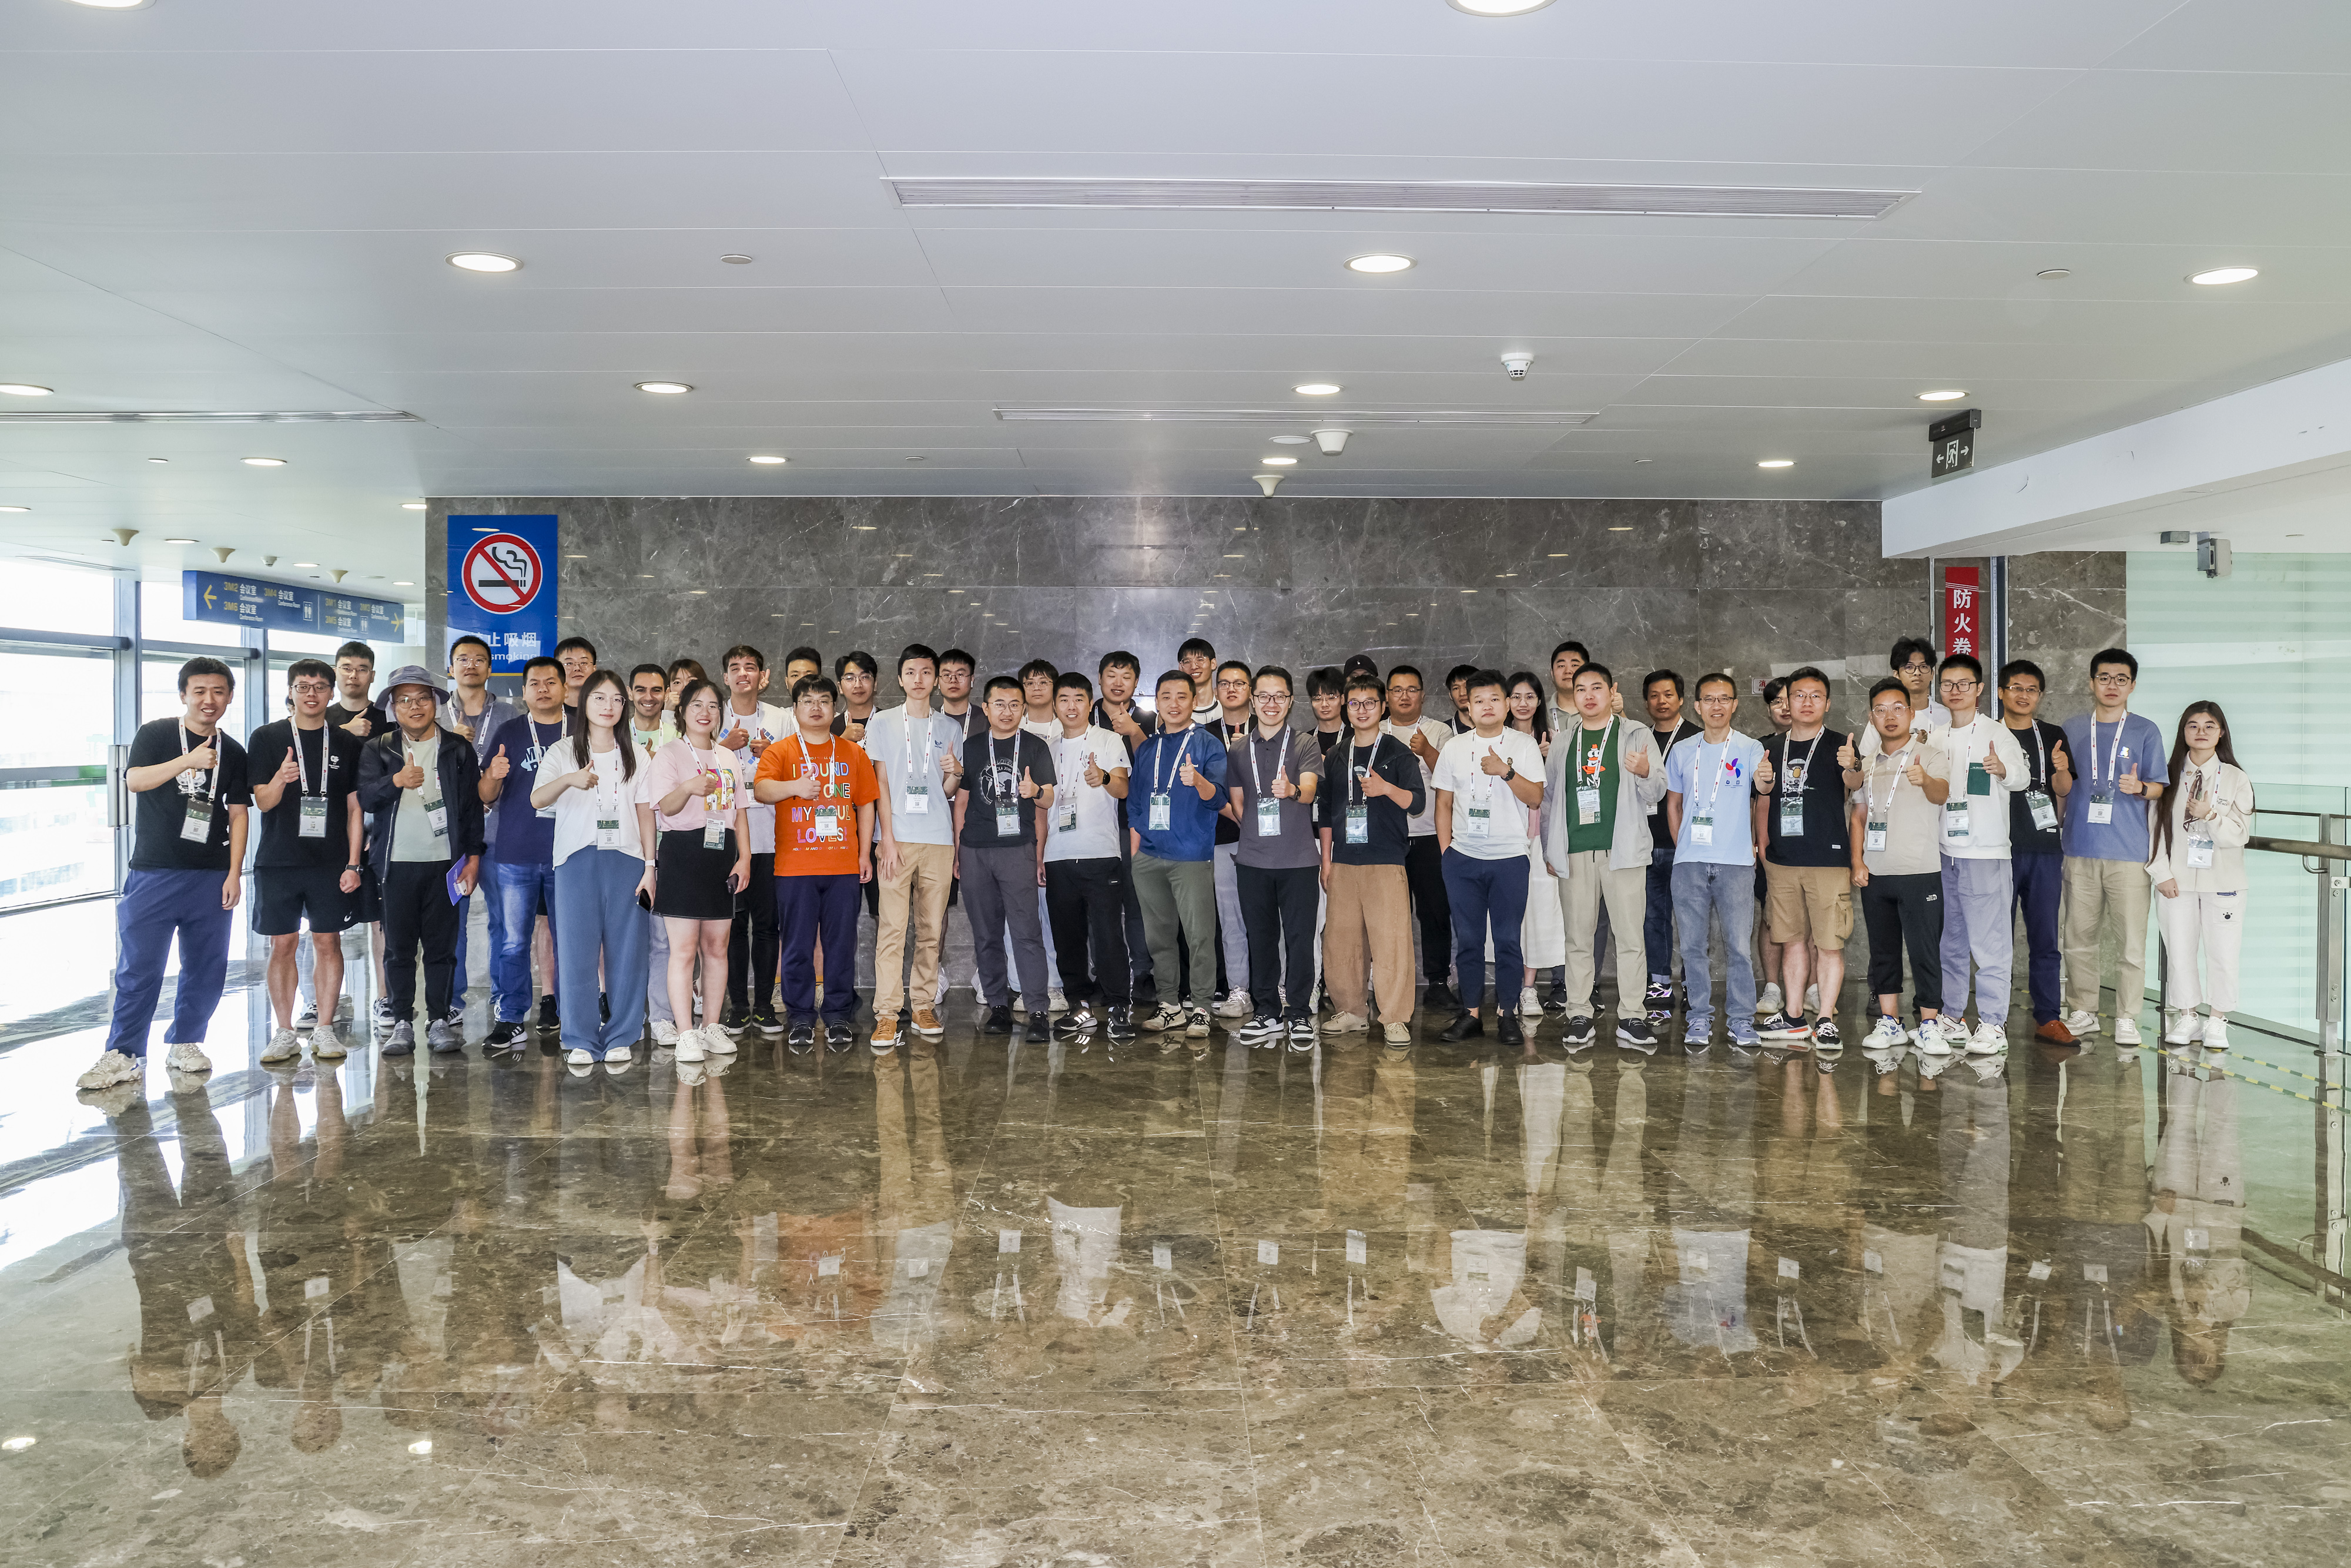
All participants in the 2023 Kubernetes Contributor Summit
This marked the first in-person offline gathering held in China after three years of the pandemic.
A joyful meetup
The event began with welcome speeches from Kevin Wang from Huawei Cloud, one of the co-chairs of KubeCon, and Puja from Giant Swarm.
Following the opening remarks, the contributors introduced themselves briefly. Most attendees were from China, while some contributors had made the journey from Europe and the United States specifically for the conference. Technical experts from companies such as Microsoft, Intel, Huawei, as well as emerging forces like DaoCloud, were present. Laughter and cheerful voices filled the room, regardless of whether English was spoken with European or American accents or if conversations were carried out in authentic Chinese language. This created an atmosphere of comfort, joy, respect, and anticipation. Past contributions brought everyone closer, and mutual recognition and accomplishments made this offline gathering possible.
Face to face meeting in Shanghai
The attending contributors were no longer just GitHub IDs; they transformed into vivid faces. From sitting together and capturing group photos to attempting to identify "Who is who," a loosely connected collective emerged. This team structure, although loosely knit and free-spirited, was established to pursue shared dreams.
As the saying goes, "You reap what you sow." Each effort has been diligently documented within the Kubernetes community contributions. Regardless of the passage of time, the community will not erase those shining traces. Brilliance can be found in your PRs, issues, or comments. It can also be seen in the smiling faces captured in meetup photos or heard through stories passed down among contributors.
Technical sharing and discussions
Next, there were three technical sharing sessions:
sig-multi-cluster: Hongcai Ren, a maintainer of Karmada, provided an introduction to the responsibilities and roles of this SIG. Their focus is on designing, discussing, implementing, and maintaining APIs, tools, and documentation related to multi-cluster management. Cluster Federation, one of Karmada's core concepts, is also part of their work.
helmfile: yxxhero from GitLab presented how to deploy Kubernetes manifests declaratively, customize configurations, and leverage the latest features of Helm, including Helmfile.
sig-scheduling: william-wang from Huawei Cloud shared the recent updates and future plans of SIG Scheduling. This SIG is responsible for designing, developing, and testing components related to Pod scheduling.
A technical session about sig-multi-cluster
Following the sessions, a video featuring a call for contributors by Sergey Kanzhelev, the SIG-Node Chair, was played. The purpose was to encourage more contributors to join the Kubernetes community, with a special emphasis on the popular SIG-Node.
Lastly, Kevin hosted an Unconference collective discussion session covering topics such as multi-cluster management, scheduling, elasticity, AI, and more. For detailed minutes of the Unconference meeting, please refer to https://docs.qq.com/doc/DY3pLWklzQkhjWHNT.
China's contributor statistics
The contributor summit took place in Shanghai, with 90% of the attendees being Chinese. Within the Cloud Native Computing Foundation (CNCF) ecosystem, contributions from China have been steadily increasing. Currently:
- Chinese contributors account for 9% of the total.
- Contributions from China make up 11.7% of the overall volume.
- China ranks second globally in terms of contributions.
Note:
The data is from KubeCon keynotes by Chris Aniszczyk, CTO of Cloud Native Computing Foundation, on September 26, 2023. This probably understates Chinese contributions. A lot of Chinese contributors use VPNs and may not show up as being from China in the stats accurately.The Kubernetes Contributor Summit is an inclusive meetup that welcomes all community contributors, including:
- New Contributors
- Current Contributors
- docs
- code
- community management
- Subproject members
- Members of Special Interest Group (SIG) / Working Group (WG)
- Active Contributors
- Casual Contributors
Acknowledgments
We would like to express our gratitude to the organizers of this event:
- Kevin Wang, the co-chair of KubeCon and the lead of the kubernetes contributor summit.
- Paco Xu, who actively coordinated the venue, meals, invited contributors from both China and international sources, and established WeChat groups to collect agenda topics. They also shared details of the event before and after its occurrence through pre and post announcements.
- Mengjiao Liu, who was responsible for organizing, coordinating, and facilitating various matters related to the summit.
We extend our appreciation to all the contributors who attended the China Kubernetes Contributor Summit in Shanghai. Your dedication and commitment to the Kubernetes community are invaluable. Together, we continue to push the boundaries of cloud native technology and shape the future of this ecosystem.
Bootstrap an Air Gapped Cluster With Kubeadm
Ever wonder how software gets deployed onto a system that is deliberately disconnected from the Internet and other networks? These systems are typically disconnected due to their sensitive nature. Sensitive as in utilities (power/water), banking, healthcare, weapons systems, other government use cases, etc. Sometimes it's technically a water gap, if you're running Kubernetes on an underwater vessel. Still, these environments need software to operate. This concept of deployment in a disconnected state is what it means to deploy to the other side of an air gap.
Again, despite this posture, software still needs to run in these environments. Traditionally, software artifacts are physically carried across the air gap on hard drives, USB sticks, CDs, or floppy disks (for ancient systems, it still happens). Kubernetes lends itself particularly well to running software behind an air gap for several reasons, largely due to its declarative nature.
In this blog article, I will walk through the process of bootstrapping a Kubernetes cluster in an air-gapped lab environment using Fedora Linux and kubeadm.
The Air Gap VM Setup
A real air-gapped network can take some effort to set up, so for this post, I will use an example VM on a laptop and do some network modifications. Below is the topology:

Local topology
This VM will have its network connectivity disabled but in a way that doesn't shut down the VM's virtual NIC. Instead, its network will be downed by injecting a default route to a dummy interface, making anything internet-hosted unreachable. However, the VM still has a connected route to the bridge interface on the host, which means that network connectivity to the host is still working. This posture means that data can be transferred from the host/laptop to the VM via scp, even with the default route on the VM black-holing all traffic that isn't destined for the local bridge subnet. This type of transfer is analogous to carrying data across the air gap and will be used throughout this post.
Other details about the lab setup:
VM OS: Fedora 37
Kubernetes Version: v1.27.3
CNI Plugins Version: v1.3.0
CNI Provider and Version: Flannel v0.22.0
While this single VM lab is a simplified example, the below diagram more approximately shows what a real air-gapped environment could look like:

Note, there is still intentional isolation between the environment and the internet. There are also some things that are not shown in order to keep the diagram simple, for example malware scanning on the secure side of the air gap.
Back to the single VM lab environment.
Identifying the required software artifacts
I have gone through the trouble of identifying all of the required software components that need to be carried across the air gap in order for this cluster to be stood up:
- Docker (to host an internal container image registry)
- Containerd
- libcgroup
- socat
- conntrack-tools
- CNI plugins
- crictl
- kubeadm
- kubelet
- kubectl and k9s (strictly speaking, these aren't required to bootstrap a cluster but they are handy to interact with one)
- kubelet.service systemd file
- kubeadm configuration file
- Docker registry container image
- Kubernetes component container images
- CNI network plugin container images (Flannel will be used for this lab)
- CNI network plugin manifests
- CNI tooling container images
The way I identified these was by trying to do the installation and working through all of the errors that are thrown around an additional dependency being required. In a real air-gapped scenario, each transport of artifacts across the air gap could represent anywhere from 20 minutes to several weeks of time spent by the installer. That is to say that the target system could be located in a data center on the same floor as your desk, at a satellite downlink facility in the middle of nowhere, or on a submarine that's out to sea. Knowing what is on that system at any given time is important so you know what you have to bring.
Prepare the Node for K8s
Before downloading and moving the artifacts to the VM, let's first prep that VM to run Kubernetes.
VM preparation
Run these steps as a normal user
Make destination directory for software artifacts
mkdir ~/tmp
Run the following steps as the superuser (root)
Write to /etc/sysctl.d/99-k8s-cri.conf:
cat > /etc/sysctl.d/99-k8s-cri.conf << EOF
net.bridge.bridge-nf-call-iptables=1
net.ipv4.ip_forward=1
net.bridge.bridge-nf-call-ip6tables=1
EOF
Write to /etc/modules-load.d/k8s.conf (enable overlay and nbr_netfilter):
echo -e overlay\\nbr_netfilter > /etc/modules-load.d/k8s.conf
Install iptables:
dnf -y install iptables-legacy
Set iptables to use legacy mode (not nft emulating iptables):
update-alternatives --set iptables /usr/sbin/iptables-legacy
Turn off swap:
touch /etc/systemd/zram-generator.conf
systemctl mask systemd-zram-setup@.service
sed -i '/ swap / s/^\(.*\)$/#\1/g' /etc/fstab
Disable firewalld (this is OK in a demo context):
systemctl disable --now firewalld
Disable systemd-resolved:
systemctl disable --now systemd-resolved
Configure DNS defaults for NetworkManager:
sed -i '/\[main\]/a dns=default' /etc/NetworkManager/NetworkManager.conf
Blank the system-level DNS resolver configuration:
unlink /etc/resolv.conf || true
touch /etc/resolv.conf
Disable SELinux (just for a demo - check before doing this in production!):
setenforce 0
Make sure all changes survive a reboot
reboot
Download all the artifacts
On the laptop/host machine, download all of the artifacts enumerated in the previous section. Since the air gapped VM is running Fedora 37, all of the dependencies shown in this part are for Fedora 37. Note, this procedure will only work on AArch64 or AMD64 CPU architectures as they are the most popular and widely available.. You can execute this procedure anywhere you have write permissions; your home directory is a perfectly suitable choice.
Note, operating system packages for the Kubernetes artifacts that need to be carried across can now be found at pkgs.k8s.io. This blog post will use a combination of Fedora repositories and GitHub in order to download all of the required artifacts. When you’re doing this on your own cluster, you should decide whether to use the official Kubernetes packages, or the official packages from your operating system distribution - both are valid choices.
# Set architecture variables
UARCH=$(uname -m)
if [["$UARCH" == "arm64" || "$UARCH" == "aarch64"]]; then
ARCH="aarch64"
K8s_ARCH="arm64"
else
ARCH="x86_64"
K8s_ARCH="amd64"
fi
Set environment variables for software versions to use:
CNI_PLUGINS_VERSION="v1.3.0"
CRICTL_VERSION="v1.27.0"
KUBE_RELEASE="v1.27.3"
RELEASE_VERSION="v0.15.1"
K9S_VERSION="v0.27.4"
Create a download directory, change into it, and download all of the RPMs and configuration files
mkdir download && cd download
curl -O https://download.docker.com/linux/fedora/37/${ARCH}/stable/Packages/docker-ce-cli-23.0.2-1.fc37.${ARCH}.rpm
curl -O https://download.docker.com/linux/fedora/37/${ARCH}/stable/Packages/containerd.io-1.6.19-3.1.fc37.${ARCH}.rpm
curl -O https://download.docker.com/linux/fedora/37/${ARCH}/stable/Packages/docker-compose-plugin-2.17.2-1.fc37.${ARCH}.rpm
curl -O https://download.docker.com/linux/fedora/37/${ARCH}/stable/Packages/docker-ce-rootless-extras-23.0.2-1.fc37.${ARCH}.rpm
curl -O https://download.docker.com/linux/fedora/37/${ARCH}/stable/Packages/docker-ce-23.0.2-1.fc37.${ARCH}.rpm
curl -O https://download-ib01.fedoraproject.org/pub/fedora/linux/releases/37/Everything/${ARCH}/os/Packages/l/libcgroup-3.0-1.fc37.${ARCH}.rpm
echo -e "\nDownload Kubernetes Binaries"
curl -L -O "https://github.com/containernetworking/plugins/releases/download/${CNI_PLUGINS_VERSION}/cni-plugins-linux-${K8s_ARCH}-${CNI_PLUGINS_VERSION}.tgz"
curl -L -O "https://github.com/kubernetes-sigs/cri-tools/releases/download/${CRICTL_VERSION}/crictl-${CRICTL_VERSION}-linux-${K8s_ARCH}.tar.gz"
curl -L --remote-name-all https://dl.k8s.io/release/${KUBE_RELEASE}/bin/linux/${K8s_ARCH}/{kubeadm,kubelet}
curl -L -O "https://raw.githubusercontent.com/kubernetes/release/${RELEASE_VERSION}/cmd/kubepkg/templates/latest/deb/kubelet/lib/systemd/system/kubelet.service"
curl -L -O "https://raw.githubusercontent.com/kubernetes/release/${RELEASE_VERSION}/cmd/kubepkg/templates/latest/deb/kubeadm/10-kubeadm.conf"
curl -L -O "https://dl.k8s.io/release/${KUBE_RELEASE}/bin/linux/${K8s_ARCH}/kubectl"
echo -e "\nDownload dependencies"
curl -O "https://dl.fedoraproject.org/pub/fedora/linux/releases/37/Everything/${ARCH}/os/Packages/s/socat-1.7.4.2-3.fc37.${ARCH}.rpm"
curl -O "https://dl.fedoraproject.org/pub/fedora/linux/releases/37/Everything/${ARCH}/os/Packages/l/libcgroup-3.0-1.fc37.${ARCH}.rpm"
curl -O "https://dl.fedoraproject.org/pub/fedora/linux/releases/37/Everything/${ARCH}/os/Packages/c/conntrack-tools-1.4.6-4.fc37.${ARCH}.rpm"
curl -LO "https://github.com/derailed/k9s/releases/download/${K9S_VERSION}/k9s_Linux_${K8s_ARCH}.tar.gz"
curl -LO "https://raw.githubusercontent.com/flannel-io/flannel/master/Documentation/kube-flannel.yml"
Download all of the necessary container images:
images=(
"registry.k8s.io/kube-apiserver:${KUBE_RELEASE}"
"registry.k8s.io/kube-controller-manager:${KUBE_RELEASE}"
"registry.k8s.io/kube-scheduler:${KUBE_RELEASE}"
"registry.k8s.io/kube-proxy:${KUBE_RELEASE}"
"registry.k8s.io/pause:3.9"
"registry.k8s.io/etcd:3.5.7-0"
"registry.k8s.io/coredns/coredns:v1.10.1"
"registry:2.8.2"
"flannel/flannel:v0.22.0"
"flannel/flannel-cni-plugin:v1.1.2"
)
for image in "${images[@]}"; do
# Pull the image from the registry
docker pull "$image"
# Save the image to a tar file on the local disk
image_name=$(echo "$image" | sed 's|/|_|g' | sed 's/:/_/g')
docker save -o "${image_name}.tar" "$image"
done
The above commands will take a look at the CPU architecture for the current host/laptop, create and change into a directory called download, and finally download all of the dependencies. Each of these files must then be transported over the air gap via scp. The exact syntax of the command will vary depending on the user on the VM, if you created an SSH key, and the IP of your air gap VM. The rough syntax is:
scp -i <<SSH_KEY>> <<FILE>> <<AIRGAP_VM_USER>>@<<AIRGAP_VM_IP>>:~/tmp/
Once all of the files have been transported to the air gapped VM, the rest of the blog post will take place from the VM. Open a terminal session to that system.
Put the artifacts in place
Everything that is needed in order to bootstrap a Kubernetes cluster now exists on the air-gapped VM. This section is a lot more complicated since various types of artifacts are now on disk on the air-gapped VM. Get a root shell on the air gap VM as the rest of this section will be executed from there. Let's start by setting the same architecture variables and environmental as were set on the host/laptop and then install all of the RPM packages:
UARCH=$(uname -m)
# Set architecture variables
if [["$UARCH" == "arm64" || "$UARCH" == "aarch64"]]; then
ARCH="aarch64"
K8s_ARCH="arm64"
else
ARCH="x86_64"
K8s_ARCH="amd64"
fi
# Set environment variables
CNI_PLUGINS_VERSION="v1.3.0"
CRICTL_VERSION="v1.27.0"
KUBE_RELEASE="v1.27.3"
RELEASE_VERSION="v0.15.1"
K9S_VERSION="v0.27.4"
cd ~/tmp/
dnf -y install ./*.rpm
Next, install the CNI plugins and crictl:
mkdir -p /opt/cni/bin
tar -C /opt/cni/bin -xz -f "cni-plugins-linux-${K8s_ARCH}-v1.3.0.tgz"
tar -C /usr/local/bin-xz -f "crictl-v1.27.0-linux-${K8s_ARCH}.tar.gz"
Make kubeadm, kubelet and kubectl executable and move them from the /tmp
directory to /usr/local/bin:
chmod +x kubeadm kubelet kubectl
mv kubeadm kubelet kubectl /usr/local/bin
Define an override for the systemd kubelet service file, and move it to the proper location:
mkdir -p /etc/systemd/system/kubelet.service.d
sed "s:/usr/bin:/usr/local/bin:g" 10-kubeadm.conf > /etc/systemd/system/kubelet.service.d/10-kubeadm.conf
The CRI plugin for containerd is disabled by default; enable it:
sed -i 's/^disabled_plugins = \["cri"\]/#&/' /etc/containerd/config.toml
Put a custom /etc/docker/daemon.json file in place:
echo '{
"exec-opts": ["native.cgroupdriver=systemd"],
"insecure-registries" : ["localhost:5000"],
"allow-nondistributable-artifacts": ["localhost:5000"],
"log-driver": "json-file",
"log-opts": {
"max-size": "100m"
},
"group": "rnd",
"storage-driver": "overlay2",
"storage-opts": [
"overlay2.override_kernel_check=true"
]
}' > /etc/docker/daemon.json
Two important items to highlight in the Docker daemon.json configuration file. The insecure-registries line means that the registry in brackets does not support TLS. Even inside an air gapped environment, this isn't a good practice but is fine for the purposes of this lab. The allow-nondistributable-artifacts line tells Docker to permit pushing nondistributable artifacts to this registry. Docker by default does not push these layers to avoid potential issues around licensing or distribution rights. A good example of this is the Windows base container image. This line will allow layers that Docker marks as "foreign" to be pushed to the registry. While not a big deal for this article, that line could be required for some air gapped environments. All layers have to exist locally since nothing inside the air gapped environment can reach out to a public container image registry to get what it needs.
(Re)start Docker and enable it so it starts at system boot:
systemctl restart docker
systemctl enable docker
Start, and enable, containerd and the kubelet:
systemctl enable --now containerd
systemctl enable --now kubelet
The container image registry that runs in Docker is only required for any CNI related containers and subsequent workload containers. This registry is not used to house the Kubernetes component containers. Note, nerdctl would have also worked here as an alternative to Docker and would have allowed for direct interaction with containerd. Docker was chosen for its familiarity.
Start a container image registry inside Docker:
docker load -i registry_2.8.2.tar
docker run -d -p 5000:5000 --restart=always --name registry registry:2.8.2
Load Flannel containers into the Docker registry
Note: Flannel was chosen for this lab due to familiarity. Chose whatever CNI works best in your environment.
docker load -i flannel_flannel_v0.22.0.tar
docker load -i flannel_flannel-cni-plugin_v1.1.2.tar
docker tag flannel/flannel:v0.22.0 localhost:5000/flannel/flannel:v0.22.0
docker tag flannel/flannel-cni-plugin:v1.1.1 localhost:5000/flannel/flannel-cni-plugin:v1.1.1
docker push localhost:5000/flannel/flannel:v0.22.0
docker push localhost:5000/flannel/flannel-cni-plugin:v1.1.1
Load container images for Kubernetes components, via ctr:
images_files=(
"registry.k8s.io/kube-apiserver:${KUBE_RELEASE}"
"registry.k8s.io/kube-controller-manager:${KUBE_RELEASE}"
"registry.k8s.io/kube-scheduler:${KUBE_RELEASE}"
"registry.k8s.io/kube-proxy:${KUBE_RELEASE}"
"registry.k8s.io/pause:3.9"
"registry.k8s.io/etcd:3.5.7-0"
"registry.k8s.io/coredns/coredns:v1.10.1"
)
for index in "${!image_files[@]}"; do
if [[-f "${image_files[$index]}" ]]; then
# The below line loads the images where they need to be on the VM
ctr -n k8s.io images import ${image_files[$index]}
else
echo "File ${image_files[$index]} not found!" 1>&2
fi
done
A totally reasonable question here could be "Why not use the Docker registry that was just stood up to house the K8s component images?" This simply didn't work even with the proper modification to the configuration file that gets passed to kubeadm.
Spin up the Kubernetes cluster
Check if a cluster is already running and tear it down if it is:
if systemctl is-active --quiet kubelet; then
# Reset the Kubernetes cluster
echo "A Kubernetes cluster is already running. Resetting the cluster..."
kubeadm reset -f
fi
Log into the Docker registry from inside the air-gapped VM:
# OK for a demo; use secure credentials in production!
DOCKER_USER=user
DOCKER_PASS=pass
echo ${DOCKER_PASS} | docker login --username=${DOCKER_USER} --password-stdin localhost:5000
Create a cluster configuration file and initialize the cluster:
echo "---
apiVersion: kubeadm.k8s.io/v1beta3
kind: ClusterConfiguration
clusterName: kubernetes
kubernetesVersion: v1.27.3
networking:
dnsDomain: cluster.local
podSubnet: 10.244.0.0/16 # --pod-network-cidr
serviceSubnet: 10.96.0.0/12
---
apiVersion: kubeadm.k8s.io/v1beta3
kind: InitConfiguration
localAPIEndpoint:
advertiseAddress: 10.10.10.10 # Update to the IP address of the air gap VM
bindPort: 6443
nodeRegistration:
criSocket: unix:///run/containerd/containerd.sock # or rely on autodetection
name: airgap # this must match the hostname of the air gap VM
# Since this is a single node cluster, this taint has to be commented out,
# otherwise the coredns pods will not come up.
# taints:
# - effect: NoSchedule
# key: node-role.kubernetes.io/master" > kubeadm_cluster.yaml
kubeadm init --config kubeadm_config.yaml
Set $KUBECONFIG and use kubectl to wait until the API server is healthy:
export KUBECONFIG=/etc/kubernetes/admin.conf
until kubectl get nodes; do
echo -e "\nWaiting for API server to respond..." 1>&2
sleep 5
done
Set up networking
Update Flannel image locations in the Flannel manifest, and apply it:
sed -i 's/image: docker\.io/image: localhost:5000/g' kube-flannel.yaml
kubectl apply -f kube-flannel.yaml
Run kubectl get pods -A --watch until all pods are up and running.
Run an example Pod
With a cluster operational, the next step is a workload. For this simple demonstration, the Podinfo application will be deployed.
Install Helm
This first part of the procedure must be executed from the host/laptop. If not already present, install Helm following Installing Helm.
Next, download the helm binary for Linux:
UARCH=$(uname -m)
# Reset the architecture variables if needed
if [["$UARCH" == "arm64" || "$UARCH" == "aarch64"]]; then
ARCH="aarch64"
K8s_ARCH="arm64"
else
ARCH="x86_64"
K8s_ARCH="amd64"
fi
curl -LO https://get.helm.sh/helm-v3.12.2-linux-${K8s_ARCH}.tar.gz
Add the Podinfo helm repository, download the Podinfo helm chart, download the Podinfo container image, and then finally save it to the local disk:
helm repo add https://stefanprodan.github.io/podinfo
helm fetch podinfo/podinfo --version 6.4.0
docker pull ghcr.io/stefanprodan/podinfo:6.4.0
Save the podinfo image to a tar file on the local disk
docker save -o podinfo_podinfo-6.4.0.tar ghcr.io/stefanprodan/podinfo
### Transfer the image across the air gap
Reuse the `~/tmp` directory created on the air gapped VM to transport these artifacts across the air gap:
```bash
scp -i <<SSH_KEY>> <<FILE>> <<AIRGAP_VM_USER>>@<<AIRGAP_VM_IP>>:~/tmp/
Continue on the isolated side
Now pivot over to the air gap VM for the rest of the installation procedure.
Switch into ~/tmp:
cd ~/tmp
Extract and move the helm binary:
tar -zxvf helm-v3.0.0-linux-amd64.tar.gz
mv linux-amd64/helm /usr/local/bin/helm
Load the Podinfo container image into the local Docker registry:
docker load -i podinfo_podinfo-6.4.0.tar
docker tag podinfo/podinfo:6.4.0 localhost:5000/podinfo/podinfo:6.4.0
docker push localhost:5000/podinfo/podinfo:6.4.0
Ensure "$KUBECONFIG` is set correctly, then install the Podinfo Helm chart:
# Outside of a demo or lab environment, use lower (or even least) privilege
# credentials to manage your workloads.
export KUBECONFIG=/etc/kubernetes/admin.conf
helm install podinfo ./podinfo-6.4.0.tgz --set image.repository=localhost:5000/podinfo/podinfo
Verify that the Podinfo application comes up:
kubectl get pods -n default
Or run k9s (a terminal user interface for Kubernetes):
k9s
Zarf
Zarf is an open-source tool that takes a declarative approach to software packaging and delivery, including air gap. This same podinfo application will be installed onto the air gap VM using Zarf in this section. The first step is to install Zarf on the host/laptop.
Alternatively, a prebuilt binary can be downloaded onto the host/laptop from GitHub for various OS/CPU architectures.
A binary is also needed across the air gap on the VM:
UARCH=$(uname -m)
# Set the architecture variables if needed
if [["$UARCH" == "arm64" || "$UARCH" == "aarch64"]]; then
ARCH="aarch64"
K8s_ARCH="arm64"
else
ARCH="x86_64"
K8s_ARCH="amd64"
fi
export ZARF_VERSION=v0.28.3
curl -LO "https://github.com/defenseunicorns/zarf/releases/download/${ZARF_VERSION}/zarf_${ZARF_VERSION}_Linux_${K8s_ARCH}"
Zarf needs to bootstrap itself into a Kubernetes cluster through the use of an init package. That also needs to be transported across the air gap so let's download it onto the host/laptop:
curl -LO "https://github.com/defenseunicorns/zarf/releases/download/${ZARF_VERSION}/zarf-init-${K8s_ARCH}-${ZARF_VERSION}.tar.zst"
The way that Zarf is declarative is through the use of a zarf.yaml file. Here is the zarf.yaml file that will be used for this Podinfo installation. Write it to whatever directory you you have write access to on your host/laptop; your home directory is fine:
echo 'kind: ZarfPackageConfig
metadata:
name: podinfo
description: "Deploy helm chart for the podinfo application in K8s via zarf"
components:
- name: podinfo
required: true
charts:
- name: podinfo
version: 6.4.0
namespace: podinfo-helm-namespace
releaseName: podinfo
url: https://stefanprodan.github.io/podinfo
images:
- ghcr.io/stefanprodan/podinfo:6.4.0' > zarf.yaml
The next step is to build the Podinfo package. This must be done from the same directory location where the zarf.yaml file is located.
zarf package create --confirm
This command will download the defined helm chart and image and put them into a single file written to disk. This single file is all that needs to be carried across the air gap:
ls zarf-package-*
Sample output:
zarf-package-podinfo-arm64.tar.zst
Transport the linux zarf binary, zarf init package and Podinfo package over to the air gapped VM:
scp -i <<SSH_KEY>> <<FILE>> <<AIRGAP_VM_USER>>@<<AIRGAP_VM_IP>>:~/tmp/
From the air gapped VM, switch into the ~/tmp directory where all of the artifacts were placed:
cd ~/tmp
Set $KUBECONFIG to a file with credentials for the local cluster; also set the Zarf version:
export KUBECONFIG=/etc/kubernetes/admin.conf
export ZARF_VERSION=$(zarf version)
Make the zarf binary executable and (as root) move it to /usr/bin:
chmod +x zarf && sudo mv zarf /usr/bin
Likewise, move the Zarf init package to /usr/bin:
mv zarf-init-arm64-${ZARF_VERSION}.tar.zst /usr/bin
Initialize Zarf into the cluster:
zarf init --confirm --components=git-server
When this command is done, a Zarf package is ready to be deployed.
zarf package deploy
This command will search the current directory for a Zarf package. Select the podinfo package (zarf-package-podinfo-${K8s_ARCH}.tar.zst) and continue. Once the package deployment is complete, run zarf tools monitor in order to bring up k9s to view the cluster.
Conclusion
This is one method that can be used to spin up an air-gapped cluster and two methods to deploy a mission application. Your mileage may vary on different operating systems regarding the exact software artifacts that need to be carried across the air gap, but conceptually this procedure is still valid.
This demo also created an artificial air-gapped environment. In the real world, every missed dependency could represent hours, if not days, or weeks of lost time to get running software in the air-gapped environment. This artificial air gap also obscured some common methods or air gap software delivery such as using a data diode. Depending on the environment, the diode can be very expensive to use. Also, none of the artifacts were scanned before being carried across the air gap. The presence of the air gap in general means that the workload running there is more sensitive, and nothing should be carried across unless it's known to be safe.
CRI-O is moving towards pkgs.k8s.io
The Kubernetes community recently announced that their legacy package repositories are frozen, and now they moved to introduced community-owned package repositories powered by the OpenBuildService (OBS). CRI-O has a long history of utilizing OBS for their package builds, but all of the packaging efforts have been done manually so far.
The CRI-O community absolutely loves Kubernetes, which means that they're delighted to announce that:
All future CRI-O packages will be shipped as part of the officially supported Kubernetes infrastructure hosted on pkgs.k8s.io!
There will be a deprecation phase for the existing packages, which is currently
being discussed in the CRI-O community.
The new infrastructure will only support releases of CRI-O >= v1.28.2 as well as
release branches newer than release-1.28.
How to use the new packages
In the same way as the Kubernetes community, CRI-O provides deb and rpm
packages as part of a dedicated subproject in OBS, called
isv:kubernetes:addons:cri-o.
This project acts as an umbrella and provides stable (for CRI-O tags) as well as
prerelease (for CRI-O release-1.y and main branches) package builds.
Stable Releases:
isv:kubernetes:addons:cri-o:stable: Stable Packagesisv:kubernetes:addons:cri-o:stable:v1.29:v1.29.ztagsisv:kubernetes:addons:cri-o:stable:v1.28:v1.28.ztags
Prereleases:
isv:kubernetes:addons:cri-o:prerelease: Prerelease Packages
There are no stable releases available in the v1.29 repository yet, because
v1.29.0 will be released in December. The CRI-O community will also not
support release branches older than release-1.28, because there have been CI
requirements merged into main which could be only backported to release-1.28
with appropriate efforts.
For example, If an end-user would like to install the latest available version
of the CRI-O main branch, then they can add the repository in the same way as
they do for Kubernetes.
rpm Based Distributions
For rpm based distributions, you can run the following commands as a root user
to install CRI-O together with Kubernetes:
Add the Kubernetes repo
cat <<EOF | tee /etc/yum.repos.d/kubernetes.repo
[kubernetes]
name=Kubernetes
baseurl=https://pkgs.k8s.io/core:/stable:/v1.28/rpm/
enabled=1
gpgcheck=1
gpgkey=https://pkgs.k8s.io/core:/stable:/v1.28/rpm/repodata/repomd.xml.key
EOF
Add the CRI-O repo
cat <<EOF | tee /etc/yum.repos.d/cri-o.repo
[cri-o]
name=CRI-O
baseurl=https://pkgs.k8s.io/addons:/cri-o:/prerelease:/main/rpm/
enabled=1
gpgcheck=1
gpgkey=https://pkgs.k8s.io/addons:/cri-o:/prerelease:/main/rpm/repodata/repomd.xml.key
EOF
Install official package dependencies
dnf install -y \
conntrack \
container-selinux \
ebtables \
ethtool \
iptables \
socat
Install the packages from the added repos
dnf install -y --repo cri-o --repo kubernetes \
cri-o \
kubeadm \
kubectl \
kubelet
deb Based Distributions
For deb based distributions, you can run the following commands as a root
user:
Install dependencies for adding the repositories
apt-get update
apt-get install -y software-properties-common curl
Add the Kubernetes repository
curl -fsSL https://pkgs.k8s.io/core:/stable:/v1.28/deb/Release.key |
gpg --dearmor -o /etc/apt/keyrings/kubernetes-apt-keyring.gpg
echo "deb [signed-by=/etc/apt/keyrings/kubernetes-apt-keyring.gpg] https://pkgs.k8s.io/core:/stable:/v1.28/deb/ /" |
tee /etc/apt/sources.list.d/kubernetes.list
Add the CRI-O repository
curl -fsSL https://pkgs.k8s.io/addons:/cri-o:/prerelease:/main/deb/Release.key |
gpg --dearmor -o /etc/apt/keyrings/cri-o-apt-keyring.gpg
echo "deb [signed-by=/etc/apt/keyrings/cri-o-apt-keyring.gpg] https://pkgs.k8s.io/addons:/cri-o:/prerelease:/main/deb/ /" |
tee /etc/apt/sources.list.d/cri-o.list
Install the packages
apt-get update
apt-get install -y cri-o kubelet kubeadm kubectl
Start CRI-O
systemctl start crio.service
The Project's prerelease:/main prefix at the CRI-O's package path, can be replaced with
stable:/v1.28, stable:/v1.29, prerelease:/v1.28 or prerelease:/v1.29
if another stream package is used.
Bootstrapping a cluster using kubeadm
can be done by running kubeadm init command, which automatically detects that
CRI-O is running in the background. There are also Vagrantfile examples
available for Fedora 38
as well as Ubuntu 22.04
for testing the packages together with kubeadm.
How it works under the hood
Everything related to these packages lives in the new
CRI-O packaging repository.
It contains a daily reconciliation
GitHub action workflow, for all supported release branches as well as tags of
CRI-O. A test pipeline
in the OBS workflow ensures that the packages can be correctly installed and
used before being published. All of the staging and publishing of the
packages is done with the help of the Kubernetes Release Toolbox (krel),
which is also used for the official Kubernetes deb and rpm packages.
The package build inputs will undergo daily reconciliation and will be supplied by
CRI-O's static binary bundles.
These bundles are built and signed for each commit in the CRI-O CI,
and contain everything CRI-O requires to run on a certain architecture.
The static builds are reproducible, powered by nixpkgs
and available only for x86_64, aarch64 and ppc64le architecture.
The CRI-O maintainers will be happy to listen to any feedback or suggestions on the new packaging efforts! Thank you for reading this blog post, feel free to reach out to the maintainers via the Kubernetes Slack channel #crio or create an issue in the packaging repository.
Spotlight on SIG Architecture: Conformance
This is the first interview of a SIG Architecture Spotlight series that will cover the different subprojects. We start with the SIG Architecture: Conformance subproject
In this SIG Architecture spotlight, we talked with Riaan Kleinhans (ii.nz), Lead for the Conformance sub-project.
About SIG Architecture and the Conformance subproject
Frederico (FSM): Hello Riaan, and welcome! For starters, tell us a bit about yourself, your role and how you got involved in Kubernetes.
Riaan Kleinhans (RK): Hi! My name is Riaan Kleinhans and I live in South Africa. I am the Project manager for the ii.nz team in New Zealand. When I joined ii the plan was to move to New Zealand in April 2020 and then Covid happened. Fortunately, being a flexible and dynamic team we were able to make it work remotely and in very different time zones.
The ii team have been tasked with managing the Kubernetes Conformance testing technical debt and writing tests to clear the technical debt. I stepped into the role of project manager to be the link between monitoring, test writing and the community. Through that work I had the privilege of meeting Dan Kohn in those first months, his enthusiasm about the work we were doing was a great inspiration.
FSM: Thank you - so, your involvement in SIG Architecture started because of the conformance work?
RK: SIG Architecture is the home for the Kubernetes Conformance subproject. Initially, most of my interactions were directly with SIG Architecture through the Conformance sub-project. However, as we began organizing the work by SIG, we started engaging directly with each individual SIG. These engagements with the SIGs that own the untested APIs have helped us accelerate our work.
FSM: How would you describe the main goals and areas of intervention of the Conformance sub-project?
RM: The Kubernetes Conformance sub-project focuses on guaranteeing compatibility and adherence to the Kubernetes specification by developing and maintaining a comprehensive conformance test suite. Its main goals include assuring compatibility across different Kubernetes implementations, verifying adherence to the API specification, supporting the ecosystem by encouraging conformance certification, and fostering collaboration within the Kubernetes community. By providing standardised tests and promoting consistent behaviour and functionality, the Conformance subproject ensures a reliable and compatible Kubernetes ecosystem for developers and users alike.
More on the Conformance Test Suite
FSM: A part of providing those standardised tests is, I believe, the Conformance Test Suite. Could you explain what it is and its importance?
RK: The Kubernetes Conformance Test Suite checks if Kubernetes distributions meet the project's specifications, ensuring compatibility across different implementations. It covers various features like APIs, networking, storage, scheduling, and security. Passing the tests confirms proper implementation and promotes a consistent and portable container orchestration platform.
FSM: Right, the tests are important in the way they define the minimum features that any Kubernetes cluster must support. Could you describe the process around determining which features are considered for inclusion? Is there any tension between a more minimal approach, and proposals from the other SIGs?
RK: The requirements for each endpoint that undergoes conformance testing are clearly defined by SIG Architecture. Only API endpoints that are generally available and non-optional features are eligible for conformance. Over the years, there have been several discussions regarding conformance profiles, exploring the possibility of including optional endpoints like RBAC, which are widely used by most end users, in specific profiles. However, this aspect is still a work in progress.
Endpoints that do not meet the conformance criteria are listed in ineligible_endpoints.yaml, which is publicly accessible in the Kubernetes repo. This file can be updated to add or remove endpoints as their status or requirements change. These ineligible endpoints are also visible on APISnoop.
Ensuring transparency and incorporating community input regarding the eligibility or ineligibility of endpoints is of utmost importance to SIG Architecture.
FSM: Writing tests for new features is something generally requires some kind of enforcement. How do you see the evolution of this in Kubernetes? Was there a specific effort to improve the process in a way that required tests would be a first-class citizen, or was that never an issue?
RK: When discussions surrounding the Kubernetes conformance programme began in 2018, only approximately 11% of endpoints were covered by tests. At that time, the CNCF's governing board requested that if funding were to be provided for the work to cover missing conformance tests, the Kubernetes Community should adopt a policy of not allowing new features to be added unless they include conformance tests for their stable APIs.
SIG Architecture is responsible for stewarding this requirement, and APISnoop has proven to be an invaluable tool in this regard. Through automation, APISnoop generates a pull request every weekend to highlight any discrepancies in Conformance coverage. If any endpoints are promoted to General Availability without a conformance test, it will be promptly identified. This approach helps prevent the accumulation of new technical debt.
Additionally, there are plans in the near future to create a release informing job, which will add an additional layer to prevent any new technical debt.
FSM: I see, tooling and automation play an important role there. What are, in your opinion, the areas that, conformance-wise, still require some work to be done? In other words, what are the current priority areas marked for improvement?
RK: We have reached the “100% Conformance Tested” milestone in release 1.27!
At that point, the community took another look at all the endpoints that were listed as ineligible for conformance. The list was populated through community input over several years. Several endpoints that were previously deemed ineligible for conformance have been identified and relocated to a new dedicated list, which is currently receiving focused attention for conformance test development. Again, that list can also be checked on apisnoop.cncf.io.
To ensure the avoidance of new technical debt in the conformance project, there are upcoming plans to establish a release informing job as an additional preventive measure.
While APISnoop is currently hosted on CNCF infrastructure, the project has been generously donated to the Kubernetes community. Consequently, it will be transferred to community-owned infrastructure before the end of 2023.
FSM: That's great news! For anyone wanting to help, what are the venues for collaboration that you would highlight? Do all of them require solid knowledge of Kubernetes as a whole, or are there ways someone newer to the project can contribute?
RK: Contributing to conformance testing is akin to the task of "washing the dishes" – it may not be highly visible, but it remains incredibly important. It necessitates a strong understanding of Kubernetes, particularly in the areas where the endpoints need to be tested. This is why working with each SIG that owns the API endpoint being tested is so important.
As part of our commitment to making test writing accessible to everyone, the ii team is currently engaged in the development of a "click and deploy" solution. This solution aims to enable anyone to swiftly create a working environment on real hardware within minutes. We will share updates regarding this development as soon as we are ready.
FSM: That's very helpful, thank you. Any final comments you would like to share with our readers?
RK: Conformance testing is a collaborative community endeavour that involves extensive cooperation among SIGs. SIG Architecture has spearheaded the initiative and provided guidance. However, the progress of the work relies heavily on the support of all SIGs in reviewing, enhancing, and endorsing the tests.
I would like to extend my sincere appreciation to the ii team for their unwavering commitment to resolving technical debt over the years. In particular, Hippie Hacker's guidance and stewardship of the vision has been invaluable. Additionally, I want to give special recognition to Stephen Heywood for shouldering the majority of the test writing workload in recent releases, as well as to Zach Mandeville for his contributions to APISnoop.
FSM: Many thanks for your availability and insightful comments, I've personally learned quite a bit with it and I'm sure our readers will as well.
Announcing the 2023 Steering Committee Election Results
The 2023 Steering Committee Election is now complete. The Kubernetes Steering Committee consists of 7 seats, 4 of which were up for election in 2023. Incoming committee members serve a term of 2 years, and all members are elected by the Kubernetes Community.
This community body is significant since it oversees the governance of the entire Kubernetes project. With that great power comes great responsibility. You can learn more about the steering committee’s role in their charter.
Thank you to everyone who voted in the election; your participation helps support the community’s continued health and success.
Results
Congratulations to the elected committee members whose two year terms begin immediately (listed in alphabetical order by GitHub handle):
- Stephen Augustus (@justaugustus), Cisco
- Paco Xu 徐俊杰 (@pacoxu), DaoCloud
- Patrick Ohly (@pohly), Intel
- Maciej Szulik (@soltysh), Red Hat
They join continuing members:
- Benjamin Elder (@bentheelder), Google
- Bob Killen (@mrbobbytables), Google
- Nabarun Pal (@palnabarun), VMware
Stephen Augustus is a returning Steering Committee Member.
Big Thanks!
Thank you and congratulations on a successful election to this round’s election officers:
- Bridget Kromhout (@bridgetkromhout)
- Davanum Srinavas (@dims)
- Kaslin Fields (@kaslin)
Thanks to the Emeritus Steering Committee Members. Your service is appreciated by the community:
And thank you to all the candidates who came forward to run for election.
Get Involved with the Steering Committee
This governing body, like all of Kubernetes, is open to all. You can follow along with Steering Committee backlog items and weigh in by filing an issue or creating a PR against their repo. They have an open meeting on the first Monday at 9:30am PT of every month. They can also be contacted at their public mailing list steering@kubernetes.io.
You can see what the Steering Committee meetings are all about by watching past meetings on the YouTube Playlist.
If you want to meet some of the newly elected Steering Committee members, join us for the Steering AMA at the Kubernetes Contributor Summit in Chicago.
This post was written by the Contributor Comms Subproject. If you want to write stories about the Kubernetes community, learn more about us.
Happy 7th Birthday kubeadm!
What a journey so far!
Starting from the initial blog post “How we made Kubernetes insanely easy to install” in September 2016, followed by an exciting growth that lead to general availability / “Production-Ready Kubernetes Cluster Creation with kubeadm” two years later.
And later on a continuous, steady and reliable flow of small improvements that is still going on as of today.
What is kubeadm? (quick refresher)
kubeadm is focused on bootstrapping Kubernetes clusters on existing infrastructure and performing an essential set of maintenance tasks. The core of the kubeadm interface is quite simple: new control plane nodes
are created by running kubeadm init and
worker nodes are joined to the control plane by running
kubeadm join.
Also included are utilities for managing already bootstrapped clusters, such as control plane upgrades
and token and certificate renewal.
To keep kubeadm lean, focused, and vendor/infrastructure agnostic, the following tasks are out of its scope:
- Infrastructure provisioning
- Third-party networking
- Non-critical add-ons, e.g. for monitoring, logging, and visualization
- Specific cloud provider integrations
Infrastructure provisioning, for example, is left to other SIG Cluster Lifecycle projects, such as the Cluster API. Instead, kubeadm covers only the common denominator in every Kubernetes cluster: the control plane. The user may install their preferred networking solution and other add-ons on top of Kubernetes after cluster creation.
Behind the scenes, kubeadm does a lot. The tool makes sure you have all the key components: etcd, the API server, the scheduler, the controller manager. You can join more control plane nodes for improving resiliency or join worker nodes for running your workloads. You get cluster DNS and kube-proxy set up for you. TLS between components is enabled and used for encryption in transit.
Let's celebrate! Past, present and future of kubeadm
In all and for all kubeadm's story is tightly coupled with Kubernetes' story, and with this amazing community.
Therefore celebrating kubeadm is first of all celebrating this community, a set of people, who joined forces in finding a common ground, a minimum viable tool, for bootstrapping Kubernetes clusters.
This tool, was instrumental to the Kubernetes success back in time as well as it is today, and the silver line of kubeadm's value proposition can be summarized in two points
An obsession in making things deadly simple for the majority of the users: kubeadm init & kubeadm join, that's all you need!
A sharp focus on a well-defined problem scope: bootstrapping Kubernetes clusters on existing infrastructure. As our slogan says: keep it simple, keep it extensible!
This silver line, this clear contract, is the foundation the entire kubeadm user base relies on, and this post is a celebration for kubeadm's users as well.
We are deeply thankful for any feedback from our users, for the enthusiasm that they are continuously showing for this tool via Slack, GitHub, social media, blogs, in person at every KubeCon or at the various meet ups around the world. Keep going!
What continues to amaze me after all those years is the great things people are building on top of kubeadm, and as of today there is a strong and very active list of projects doing so:
- minikube
- kind
- Cluster API
- Kubespray
- and many more; if you are using Kubernetes today, there is a good chance that you are using kubeadm even without knowing it 😜
This community, the kubeadm’s users, the projects building on top of kubeadm are the highlights of kubeadm’s 7th birthday celebration and the foundation for what will come next!
Stay tuned, and feel free to reach out to us!
- Try kubeadm to install Kubernetes today
- Get involved with the Kubernetes project on GitHub
- Connect with the community on Slack
- Follow us on Twitter @Kubernetesio for latest updates
kubeadm: Use etcd Learner to Join a Control Plane Node Safely
The kubeadm tool now supports etcd learner mode, which
allows you to enhance the resilience and stability
of your Kubernetes clusters by leveraging the learner mode
feature introduced in etcd version 3.4.
This guide will walk you through using etcd learner mode with kubeadm. By default, kubeadm runs
a local etcd instance on each control plane node.
In v1.27, kubeadm introduced a new feature gate EtcdLearnerMode. With this feature gate enabled,
when joining a new control plane node, a new etcd member will be created as a learner and
promoted to a voting member only after the etcd data are fully aligned.
What are the advantages of using etcd learner mode?
etcd learner mode offers several compelling reasons to consider its adoption in Kubernetes clusters:
- Enhanced Resilience: etcd learner nodes are non-voting members that catch up with the leader's logs before becoming fully operational. This prevents new cluster members from disrupting the quorum or causing leader elections, making the cluster more resilient during membership changes.
- Reduced Cluster Unavailability: Traditional approaches to adding new members often result in cluster unavailability periods, especially in slow infrastructure or misconfigurations. etcd learner mode minimizes such disruptions.
- Simplified Maintenance: Learner nodes provide a safer and reversible way to add or replace cluster members. This reduces the risk of accidental cluster outages due to misconfigurations or missteps during member additions.
- Improved Network Tolerance: In scenarios involving network partitions, learner mode allows for more graceful handling. Depending on the partition a new member lands, it can seamlessly integrate with the existing cluster without causing disruptions.
In summary, the etcd learner mode improves the reliability and manageability of Kubernetes clusters during member additions and changes, making it a valuable feature for cluster operators.
How nodes join a cluster that's using the new mode
Create a Kubernetes cluster backed by etcd in learner mode
For a general explanation about creating highly available clusters with kubeadm, you can refer to Creating Highly Available Clusters with kubeadm.
To create a Kubernetes cluster, backed by etcd in learner mode, using kubeadm, follow these steps:
# kubeadm init --feature-gates=EtcdLearnerMode=true ...
kubeadm init --config=kubeadm-config.yaml
The kubeadm configuration file is like below:
apiVersion: kubeadm.k8s.io/v1beta3
kind: ClusterConfiguration
featureGates:
EtcdLearnerMode: true
The kubeadm tool deploys a single-node Kubernetes cluster with etcd set to use learner mode.
Join nodes to the Kubernetes cluster
Before joining a control-plane node to the new Kubernetes cluster, ensure that the existing control plane nodes and all etcd members are healthy.
Check the cluster health with etcdctl. If etcdctl isn't available, you can run this tool inside a container image.
You would do that directly with your container runtime using a tool such as crictl run and not through Kubernetes
Here is an example on a client command that uses secure communication to check the cluster health of the etcd cluster:
ETCDCTL_API=3 etcdctl --endpoints 127.0.0.1:2379 \
--cert=/etc/kubernetes/pki/etcd/server.crt \
--key=/etc/kubernetes/pki/etcd/server.key \
--cacert=/etc/kubernetes/pki/etcd/ca.crt \
member list
...
dc543c4d307fadb9, started, node1, https://10.6.177.40:2380, https://10.6.177.40:2379, false
To check if the Kubernetes control plane is healthy, run kubectl get node -l node-role.kubernetes.io/control-plane=
and check if the nodes are ready.
Note:
It is recommended to have an odd number of members in an etcd cluster.Before joining a worker node to the new Kubernetes cluster, ensure that the control plane nodes are healthy.
What's next
- The feature gate
EtcdLearnerModeis alpha in v1.27 and we expect it to graduate to beta in the next minor release of Kubernetes (v1.29). - etcd has an open issue that may make the process more automatic: Support auto-promoting a learner member to a voting member.
- Learn more about the kubeadm configuration format.
Feedback
Was this guide helpful? If you have any feedback or encounter any issues, please let us know. Your feedback is always welcome! Join the bi-weekly SIG Cluster Lifecycle meeting or weekly kubeadm office hours. Or reach us via Slack (channel #kubeadm), or the SIG's mailing list.
User Namespaces: Now Supports Running Stateful Pods in Alpha!
Kubernetes v1.25 introduced support for user namespaces for only stateless pods. Kubernetes 1.28 lifted that restriction, after some design changes were done in 1.27.
The beauty of this feature is that:
- it is trivial to adopt (you just need to set a bool in the pod spec)
- doesn't need any changes for most applications
- improves security by drastically enhancing the isolation of containers and mitigating CVEs rated HIGH and CRITICAL.
This post explains the basics of user namespaces and also shows:
- the changes that arrived in the recent Kubernetes v1.28 release
- a demo of a vulnerability rated as HIGH that is not exploitable with user namespaces
- the runtime requirements to use this feature
- what you can expect in future releases regarding user namespaces.
What is a user namespace?
A user namespace is a Linux feature that isolates the user and group identifiers (UIDs and GIDs) of the containers from the ones on the host. The indentifiers in the container can be mapped to indentifiers on the host in a way where the host UID/GIDs used for different containers never overlap. Even more, the identifiers can be mapped to unprivileged non-overlapping UIDs and GIDs on the host. This basically means two things:
As the UIDs and GIDs for different containers are mapped to different UIDs and GIDs on the host, containers have a harder time to attack each other even if they escape the container boundaries. For example, if container A is running with different UIDs and GIDs on the host than container B, the operations it can do on container B's files and process are limited: only read/write what a file allows to others, as it will never have permission for the owner or group (the UIDs/GIDs on the host are guaranteed to be different for different containers).
As the UIDs and GIDs are mapped to unprivileged users on the host, if a container escapes the container boundaries, even if it is running as root inside the container, it has no privileges on the host. This greatly protects what host files it can read/write, which process it can send signals to, etc.
Furthermore, capabilities granted are only valid inside the user namespace and not on the host.
Without using a user namespace a container running as root, in the case of a container breakout, has root privileges on the node. And if some capabilities were granted to the container, the capabilities are valid on the host too. None of this is true when using user namespaces (modulo bugs, of course 🙂).
Changes in 1.28
As already mentioned, starting from 1.28, Kubernetes supports user namespaces with stateful pods. This means that pods with user namespaces can use any type of volume, they are no longer limited to only some volume types as before.
The feature gate to activate this feature was renamed, it is no longer
UserNamespacesStatelessPodsSupport but from 1.28 onwards you should use
UserNamespacesSupport. There were many changes done and the requirements on
the node hosts changed. So with Kubernetes 1.28 the feature flag was renamed to
reflect this.
Demo
Rodrigo created a demo which exploits CVE 2022-0492 and shows how the exploit can occur without user namespaces. He also shows how it is not possible to use this exploit from a Pod where the containers are using this feature.
This vulnerability is rated HIGH and allows a container with no special privileges to read/write to any path on the host and launch processes as root on the host too.
Most applications in containers run as root today, or as a semi-predictable non-root user (user ID 65534 is a somewhat popular choice). When you run a Pod with containers using a userns, Kubernetes runs those containers as unprivileged users, with no changes needed in your app.
This means two containers running as user 65534 will effectively be mapped to different users on the host, limiting what they can do to each other in case of an escape, and if they are running as root, the privileges on the host are reduced to the one of an unprivileged user.
Node system requirements
There are requirements on the Linux kernel version as well as the container runtime to use this feature.
On Linux you need Linux 6.3 or greater. This is because the feature relies on a kernel feature named idmap mounts, and support to use idmap mounts with tmpfs was merged in Linux 6.3.
If you are using CRI-O with crun, this is supported in CRI-O 1.28.1 and crun 1.9 or greater. If you are using CRI-O with runc, this is still not supported.
containerd support is currently targeted for containerd 2.0; it is likely that it won't matter if you use it with crun or runc.
Please note that containerd 1.7 added experimental support for user namespaces as implemented in Kubernetes 1.25 and 1.26. The redesign done in 1.27 is not supported by containerd 1.7, therefore it only works, in terms of user namespaces support, with Kubernetes 1.25 and 1.26.
One limitation present in containerd 1.7 is that it needs to change the ownership of every file and directory inside the container image, during Pod startup. This means it has a storage overhead and can significantly impact the container startup latency. Containerd 2.0 will probably include a implementation that will eliminate the startup latency added and the storage overhead. Take this into account if you plan to use containerd 1.7 with user namespaces in production.
None of these containerd limitations apply to CRI-O 1.28.
What’s next?
Looking ahead to Kubernetes 1.29, the plan is to work with SIG Auth to integrate user
namespaces to Pod Security Standards (PSS) and the Pod Security Admission. For
the time being, the plan is to relax checks in PSS policies when user namespaces are
in use. This means that the fields spec[.*].securityContext runAsUser,
runAsNonRoot, allowPrivilegeEscalation and capabilities will not trigger a
violation if user namespaces are in use. The behavior will probably be controlled by
utilizing a API Server feature gate, like UserNamespacesPodSecurityStandards
or similar.
How do I get involved?
You can reach SIG Node by several means:
You can also contact us directly:
- GitHub: @rata @giuseppe @saschagrunert
- Slack: @rata @giuseppe @sascha
Comparing Local Kubernetes Development Tools: Telepresence, Gefyra, and mirrord
The Kubernetes development cycle is an evolving landscape with a myriad of tools seeking to streamline the process. Each tool has its unique approach, and the choice often comes down to individual project requirements, the team's expertise, and the preferred workflow.
Among the various solutions, a category we dubbed “Local K8S Development tools” has emerged, which seeks to enhance the Kubernetes development experience by connecting locally running components to the Kubernetes cluster. This facilitates rapid testing of new code in cloud conditions, circumventing the traditional cycle of Dockerization, CI, and deployment.
In this post, we compare three solutions in this category: Telepresence, Gefyra, and our own contender, mirrord.
Telepresence
The oldest and most well-established solution in the category, Telepresence uses a VPN (or more specifically, a tun device) to connect the user's machine (or a locally running container) and the cluster's network. It then supports the interception of incoming traffic to a specific service in the cluster, and its redirection to a local port. The traffic being redirected can also be filtered to avoid completely disrupting the remote service. It also offers complementary features to support file access (by locally mounting a volume mounted to a pod) and importing environment variables.
Telepresence requires the installation of a local daemon on the user's machine (which requires root privileges) and a Traffic Manager component on the cluster. Additionally, it runs an Agent as a sidecar on the pod to intercept the desired traffic.
Gefyra
Gefyra, similar to Telepresence, employs a VPN to connect to the cluster. However, it only supports connecting locally running Docker containers to the cluster. This approach enhances portability across different OSes and local setups. However, the downside is that it does not support natively run uncontainerized code.
Gefyra primarily focuses on network traffic, leaving file access and environment variables unsupported. Unlike Telepresence, it doesn't alter the workloads in the cluster, ensuring a straightforward clean-up process if things go awry.
mirrord
The newest of the three tools, mirrord adopts a different approach by injecting itself
into the local binary (utilizing LD_PRELOAD on Linux or DYLD_INSERT_LIBRARIES on macOS),
and overriding libc function calls, which it then proxies a temporary agent it runs in the cluster.
For example, when the local process tries to read a file mirrord intercepts that call and sends it
to the agent, which then reads the file from the remote pod. This method allows mirrord to cover
all inputs and outputs to the process – covering network access, file access, and
environment variables uniformly.
By working at the process level, mirrord supports running multiple local processes simultaneously, each in the context of their respective pod in the cluster, without requiring them to be containerized and without needing root permissions on the user’s machine.
Summary
| Telepresence | Gefyra | mirrord | |
|---|---|---|---|
| Cluster connection scope | Entire machine or container | Container | Process |
| Developer OS support | Linux, macOS, Windows | Linux, macOS, Windows | Linux, macOS, Windows (WSL) |
| Incoming traffic features | Interception | Interception | Interception or mirroring |
| File access | Supported | Unsupported | Supported |
| Environment variables | Supported | Unsupported | Supported |
| Requires local root | Yes | No | No |
| How to use |
|
|
|
Conclusion
Telepresence, Gefyra, and mirrord each offer unique approaches to streamline the Kubernetes development cycle, each having its strengths and weaknesses. Telepresence is feature-rich but comes with complexities, mirrord offers a seamless experience and supports various functionalities, while Gefyra aims for simplicity and robustness.
Your choice between them should depend on the specific requirements of your project, your team's familiarity with the tools, and the desired development workflow. Whichever tool you choose, we believe the local Kubernetes development approach can provide an easy, effective, and cheap solution to the bottlenecks of the Kubernetes development cycle, and will become even more prevalent as these tools continue to innovate and evolve.
Kubernetes Legacy Package Repositories Will Be Frozen On September 13, 2023
On August 15, 2023, the Kubernetes project announced the general availability of
the community-owned package repositories for Debian and RPM packages available
at pkgs.k8s.io. The new package repositories are replacement for the legacy
Google-hosted package repositories: apt.kubernetes.io and yum.kubernetes.io.
The
announcement blog post for pkgs.k8s.io
highlighted that we will stop publishing packages to the legacy repositories in
the future.
Today, we're formally deprecating the legacy package repositories (apt.kubernetes.io
and yum.kubernetes.io), and we're announcing our plans to freeze the contents of
the repositories as of September 13, 2023.
Please continue reading in order to learn what does this mean for you as an user or distributor, and what steps you may need to take.
ℹ️ Update (March 26, 2024): the legacy Google-hosted repositories went away on March 4, 2024. It's not possible to install Kubernetes packages from the legacy Google-hosted package repositories any longer.
How does this affect me as a Kubernetes end user?
This change affects users directly installing upstream versions of Kubernetes, either manually by following the official installation and upgrade instructions, or by using a Kubernetes installer that's using packages provided by the Kubernetes project.
This change also affects you if you run Linux on your own PC and have installed kubectl using the legacy package repositories.
We'll explain later on how to check if you're affected.
If you use fully managed Kubernetes, for example through a service from a cloud
provider, you would only be affected by this change if you also installed kubectl
on your Linux PC using packages from the legacy repositories. Cloud providers are
generally using their own Kubernetes distributions and therefore they don't use
packages provided by the Kubernetes project; more importantly, if someone else is
managing Kubernetes for you, then they would usually take responsibility for that check.
If you have a managed control plane but you are responsible for managing the nodes yourself, and any of those nodes run Linux, you should check whether you are affected.
If you're managing your clusters on your own by following the official installation and upgrade instructions, please follow the instructions in this blog post to migrate to the (new) community-owned package repositories.
If you're using a Kubernetes installer that's using packages provided by the Kubernetes project, please check the installer tool's communication channels for information about what steps you need to take, and eventually if needed, follow up with maintainers to let them know about this change.
The following diagram shows who's affected by this change in a visual form (click on diagram for the larger version):
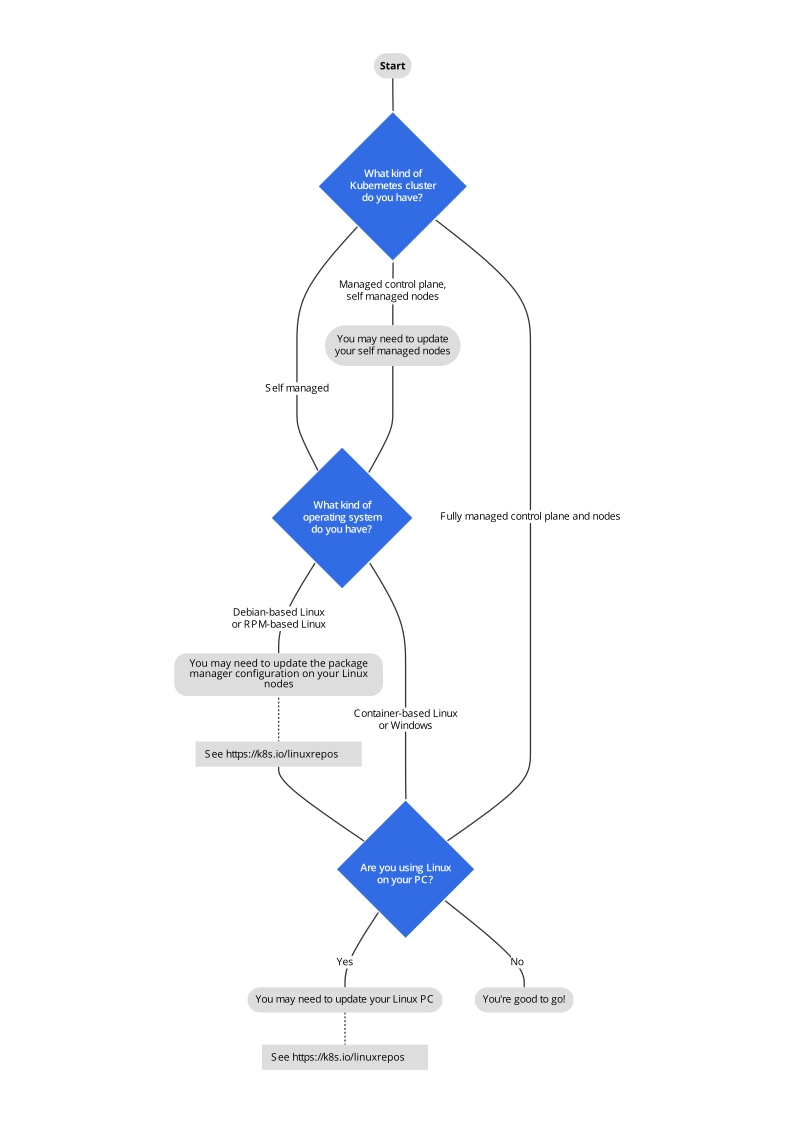
How does this affect me as a Kubernetes distributor?
If you're using the legacy repositories as part of your project (e.g. a Kubernetes installer tool), you should migrate to the community-owned repositories as soon as possible and inform your users about this change and what steps they need to take.
Timeline of changes
(updated on March 26, 2024)
- 15th August 2023:
Kubernetes announces a new, community-managed source for Linux software packages of Kubernetes components - 31st August 2023:
(this announcement) Kubernetes formally deprecates the legacy package repositories - 13th September 2023 (approximately):
Kubernetes will freeze the legacy package repositories, (apt.kubernetes.ioandyum.kubernetes.io). The freeze will happen immediately following the patch releases that are scheduled for September, 2023. - 12th January 2024:
Kubernetes announced intentions to remove the legacy package repositories in January 2024 - 4th March 2024:
The legacy package repositories have been removed. It's not possible to install Kubernetes packages from the legacy package repositories any longer
The Kubernetes patch releases scheduled for September 2023 (v1.28.2, v1.27.6, v1.26.9, v1.25.14) will have packages published both to the community-owned and the legacy repositories.
We'll freeze the legacy repositories after cutting the patch releases for September which means that we'll completely stop publishing packages to the legacy repositories at that point.
For the v1.28, v1.27, v1.26, and v1.25 patch releases from October 2023 and onwards,
we'll only publish packages to the new package repositories (pkgs.k8s.io).
What about future minor releases?
Kubernetes 1.29 and onwards will have packages published only to the
community-owned repositories (pkgs.k8s.io).
What releases are available in the new community-owned package repositories?
Linux packages for releases starting from Kubernetes v1.24.0 are available in the
Kubernetes package repositories (pkgs.k8s.io). Kubernetes does not have official
Linux packages available for earlier releases of Kubernetes; however, your Linux
distribution may provide its own packages.
Can I continue to use the legacy package repositories?
(updated on March 26, 2024)
The legacy Google-hosted repositories went away on March 4, 2024. It's not possible to install Kubernetes packages from the legacy Google-hosted package repositories any longer.
The existing packages in the legacy repositories will be available for the foreseeable
future. However, the Kubernetes project can't provide any guarantees on how long
is that going to be. The deprecated legacy repositories, and their contents, might
be removed at any time in the future and without a further notice period.
The Kubernetes project strongly recommends migrating to the new community-owned
repositories as soon as possible. Migrating to the new package repositories is
required to consume the official Kubernetes packages.
Given that no new releases will be published to the legacy repositories after the September 13, 2023 cut-off point, you will not be able to upgrade to any patch or minor release made from that date onwards.
Whilst the project makes every effort to release secure software, there may one day be a high-severity vulnerability in Kubernetes, and consequently an important release to upgrade to. The advice we're announcing will help you be as prepared for any future security update, whether trivial or urgent.
How can I check if I'm using the legacy repositories?
The steps to check if you're using the legacy repositories depend on whether you're using Debian-based distributions (Debian, Ubuntu, and more) or RPM-based distributions (CentOS, RHEL, Rocky Linux, and more) in your cluster.
Run these instructions on one of your nodes in the cluster.
Debian-based Linux distributions
The repository definitions (sources) are located in /etc/apt/sources.list and /etc/apt/sources.list.d/
on Debian-based distributions. Inspect these two locations and try to locate a
package repository definition that looks like:
deb [signed-by=/etc/apt/keyrings/kubernetes-archive-keyring.gpg] https://apt.kubernetes.io/ kubernetes-xenial main
If you find a repository definition that looks like this, you're using the legacy repository and you need to migrate.
If the repository definition uses pkgs.k8s.io, you're already using the
community-hosted repositories and you don't need to take any action.
On most systems, this repository definition should be located in
/etc/apt/sources.list.d/kubernetes.list (as recommended by the Kubernetes
documentation), but on some systems it might be in a different location.
If you can't find a repository definition related to Kubernetes, it's likely that you don't use package managers to install Kubernetes and you don't need to take any action.
RPM-based Linux distributions
The repository definitions are located in /etc/yum.repos.d if you're using the
yum package manager, or /etc/dnf/dnf.conf and /etc/dnf/repos.d/ if you're using
dnf package manager. Inspect those locations and try to locate a package repository
definition that looks like this:
[kubernetes]
name=Kubernetes
baseurl=https://packages.cloud.google.com/yum/repos/kubernetes-el7-\$basearch
enabled=1
gpgcheck=1
gpgkey=https://packages.cloud.google.com/yum/doc/rpm-package-key.gpg
exclude=kubelet kubeadm kubectl
If you find a repository definition that looks like this, you're using the legacy repository and you need to migrate.
If the repository definition uses pkgs.k8s.io, you're already using the
community-hosted repositories and you don't need to take any action.
On most systems, that repository definition should be located in /etc/yum.repos.d/kubernetes.repo
(as recommended by the Kubernetes documentation), but on some systems it might be
in a different location.
If you can't find a repository definition related to Kubernetes, it's likely that you don't use package managers to install Kubernetes and you don't need to take any action.
How can I migrate to the new community-operated repositories?
For more information on how to migrate to the new community
managed packages, please refer to the
announcement blog post for pkgs.k8s.io.
Why is the Kubernetes project making this change?
Kubernetes has been publishing packages solely to the Google-hosted repository
since Kubernetes v1.5, or the past seven years! Following in the footsteps of
migrating to our community-managed registry, registry.k8s.io, we are now migrating the
Kubernetes package repositories to our own community-managed infrastructure. We’re
thankful to Google for their continuous hosting and support all these years, but
this transition marks another big milestone for the project’s goal of migrating
to complete community-owned infrastructure.
Is there a Kubernetes tool to help me migrate?
We don't have any announcement to make about tooling there. As a Kubernetes user, you have to manually modify your configuration to use the new repositories. Automating the migration from the legacy to the community-owned repositories is technically challenging and we want to avoid any potential risks associated with this.
Acknowledgments
First of all, we want to acknowledge the contributions from Alphabet. Staff at Google have provided their time; Google as a business has provided both the infrastructure to serve packages, and the security context for giving those packages trustworthy digital signatures. These have been important to the adoption and growth of Kubernetes.
Releasing software might not be glamorous but it's important. Many people within the Kubernetes contributor community have contributed to the new way that we, as a project, have for building and publishing packages.
And finally, we want to once again acknowledge the help from SUSE. OpenBuildService, from SUSE, is the technology that the powers the new community-managed package repositories.
Gateway API v0.8.0: Introducing Service Mesh Support
We are thrilled to announce the v0.8.0 release of Gateway API! With this release, Gateway API support for service mesh has reached Experimental status. We look forward to your feedback!
We're especially delighted to announce that Kuma 2.3+, Linkerd 2.14+, and Istio 1.16+ are all fully-conformant implementations of Gateway API service mesh support.
Service mesh support in Gateway API
While the initial focus of Gateway API was always ingress (north-south) traffic, it was clear almost from the beginning that the same basic routing concepts should also be applicable to service mesh (east-west) traffic. In 2022, the Gateway API subproject started the GAMMA initiative, a dedicated vendor-neutral workstream, specifically to examine how best to fit service mesh support into the framework of the Gateway API resources, without requiring users of Gateway API to relearn everything they understand about the API.
Over the last year, GAMMA has dug deeply into the challenges and possible solutions around using Gateway API for service mesh. The end result is a small number of enhancement proposals that subsume many hours of thought and debate, and provide a minimum viable path to allow Gateway API to be used for service mesh.
How will mesh routing work when using Gateway API?
You can find all the details in the Gateway API Mesh routing
documentation and GEP-1426, but the short version for Gateway
API v0.8.0 is that an HTTPRoute can now have a parentRef that is a Service,
rather than just a Gateway. We anticipate future GEPs in this area as we gain
more experience with service mesh use cases -- binding to a Service makes it
possible to use the Gateway API with a service mesh, but there are several
interesting use cases that remain difficult to cover.
As an example, you might use an HTTPRoute to do an A-B test in the mesh as follows:
apiVersion: gateway.networking.k8s.io/v1beta1
kind: HTTPRoute
metadata:
name: bar-route
spec:
parentRefs:
- group: ""
kind: Service
name: demo-app
port: 5000
rules:
- matches:
- headers:
- type: Exact
name: env
value: v1
backendRefs:
- name: demo-app-v1
port: 5000
- backendRefs:
- name: demo-app-v2
port: 5000
Any request to port 5000 of the demo-app Service that has the header env: v1 will be routed to demo-app-v1, while any request without that header
will be routed to demo-app-v2 -- and since this is being handled by the
service mesh, not the ingress controller, the A/B test can happen anywhere in
the application's call graph.
How do I know this will be truly portable?
Gateway API has been investing heavily in conformance tests across all features it supports, and mesh is no exception. One of the challenges that the GAMMA initiative ran into is that many of these tests were strongly tied to the idea that a given implementation provides an ingress controller. Many service meshes don't, and requiring a GAMMA-conformant mesh to also implement an ingress controller seemed impractical at best. This resulted in work restarting on Gateway API conformance profiles, as discussed in GEP-1709.
The basic idea of conformance profiles is that we can define subsets of the
Gateway API, and allow implementations to choose (and document) which subsets
they conform to. GAMMA is adding a new profile, named Mesh and described in
GEP-1686, which checks only the mesh functionality as defined by GAMMA. At
this point, Kuma 2.3+, Linkerd 2.14+, and Istio 1.16+ are all conformant with
the Mesh profile.
What else is in Gateway API v0.8.0?
This release is all about preparing Gateway API for the upcoming v1.0 release where HTTPRoute, Gateway, and GatewayClass will graduate to GA. There are two main changes related to this: CEL validation and API version changes.
CEL Validation
The first major change is that Gateway API v0.8.0 is the start of a transition from webhook validation to CEL validation using information built into the CRDs. That will mean different things depending on the version of Kubernetes you're using:
Kubernetes 1.25+
CEL validation is fully supported, and almost all validation is implemented in CEL. (The sole exception is that header names in header modifier filters can only do case-insensitive validation. There is more information in issue 2277.)
We recommend not using the validating webhook on these Kubernetes versions.
Kubernetes 1.23 and 1.24
CEL validation is not supported, but Gateway API v0.8.0 CRDs can still be installed. When you upgrade to Kubernetes 1.25+, the validation included in these CRDs will automatically take effect.
We recommend continuing to use the validating webhook on these Kubernetes versions.
Kubernetes 1.22 and older
Gateway API only commits to support for 5 most recent versions of Kubernetes. As such, these versions are no longer supported by Gateway API, and unfortunately Gateway API v0.8.0 cannot be installed on them, since CRDs containing CEL validation will be rejected.
API Version Changes
As we prepare for a v1.0 release that will graduate Gateway, GatewayClass, and
HTTPRoute to the v1 API Version from v1beta1, we are continuing the process
of moving away from v1alpha2 for resources that have graduated to v1beta1.
For more information on this change and everything else included in this
release, refer to the v0.8.0 release notes.
How can I get started with Gateway API?
Gateway API represents the future of load balancing, routing, and service mesh APIs in Kubernetes. There are already more than 20 implementations available (including both ingress controllers and service meshes) and the list keeps growing.
If you're interested in getting started with Gateway API, take a look at the API concepts documentation and check out some of the Guides to try it out. Because this is a CRD-based API, you can install the latest version on any Kubernetes 1.23+ cluster.
If you're specifically interested in helping to contribute to Gateway API, we would love to have you! Please feel free to open a new issue on the repository, or join in the discussions. Also check out the community page which includes links to the Slack channel and community meetings. We look forward to seeing you!!
Further Reading:
- GEP-1324 provides an overview of the GAMMA goals and some important definitions. This GEP is well worth a read for its discussion of the problem space.
- GEP-1426 defines how to use Gateway API route resources, such as HTTPRoute, to manage traffic within a service mesh.
- GEP-1686 builds on the work of GEP-1709 to define a conformance profile for service meshes to be declared conformant with Gateway API.
Although these are Experimental patterns, note that they are available
in the standard release channel, since the GAMMA initiative has not
needed to introduce new resources or fields to date.
Kubernetes 1.28: A New (alpha) Mechanism For Safer Cluster Upgrades
This blog describes the mixed version proxy, a new alpha feature in Kubernetes 1.28. The mixed version proxy enables an HTTP request for a resource to be served by the correct API server in cases where there are multiple API servers at varied versions in a cluster. For example, this is useful during a cluster upgrade, or when you're rolling out the runtime configuration of the cluster's control plane.
What problem does this solve?
When a cluster undergoes an upgrade, the kube-apiservers existing at different versions in that scenario can serve different sets (groups, versions, resources) of built-in resources. A resource request made in this scenario may be served by any of the available apiservers, potentially resulting in the request ending up at an apiserver that may not be aware of the requested resource; consequently it being served a 404 not found error which is incorrect. Furthermore, incorrect serving of the 404 errors can lead to serious consequences such as namespace deletion being blocked incorrectly or objects being garbage collected mistakenly.
How do we solve the problem?
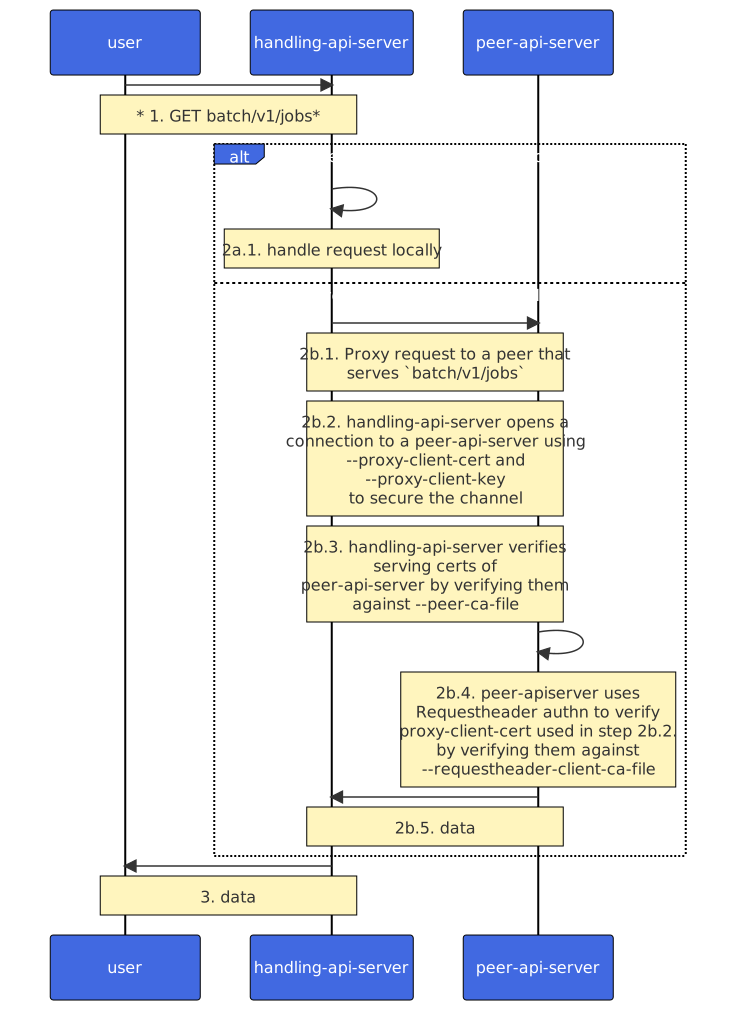
The new feature “Mixed Version Proxy” provides the kube-apiserver with the capability to proxy a request to a peer kube-apiserver which is aware of the requested resource and hence can serve the request. To do this, a new filter has been added to the handler chain in the API server's aggregation layer.
- The new filter in the handler chain checks if the request is for a group/version/resource that the apiserver doesn't know about (using the existing StorageVersion API). If so, it proxies the request to one of the apiservers that is listed in the ServerStorageVersion object. If the identified peer apiserver fails to respond (due to reasons like network connectivity, race between the request being received and the controller registering the apiserver-resource info in ServerStorageVersion object), then error 503("Service Unavailable") is served.
- To prevent indefinite proxying of the request, a (new for v1.28) HTTP header
X-Kubernetes-APIServer-Rerouted: trueis added to the original request once it is determined that the request cannot be served by the original API server. Setting that to true marks that the original API server couldn't handle the request and it should therefore be proxied. If a destination peer API server sees this header, it never proxies the request further. - To set the network location of a kube-apiserver that peers will use to proxy requests, the value passed in
--advertise-addressor (when--advertise-addressis unspecified) the--bind-addressflag is used. For users with network configurations that would not allow communication between peer kube-apiservers using the addresses specified in these flags, there is an option to pass in the correct peer address as--peer-advertise-ipand--peer-advertise-portflags that are introduced in this feature.
How do I enable this feature?
Following are the required steps to enable the feature:
- Download the latest Kubernetes project (version
v1.28.0or later) - Switch on the feature gate with the command line flag
--feature-gates=UnknownVersionInteroperabilityProxy=trueon the kube-apiservers - Pass the CA bundle that will be used by source kube-apiserver to authenticate destination kube-apiserver's serving certs using the flag
--peer-ca-fileon the kube-apiservers. Note: this is a required flag for this feature to work. There is no default value enabled for this flag. - Pass the correct ip and port of the local kube-apiserver that will be used by peers to connect to this kube-apiserver while proxying a request. Use the flags
--peer-advertise-ipandpeer-advertise-portto the kube-apiservers upon startup. If unset, the value passed to either--advertise-addressor--bind-addressis used. If those too, are unset, the host's default interface will be used.
What’s missing?
Currently we only proxy resource requests to a peer kube-apiserver when its determined to do so. Next we need to address how to work discovery requests in such scenarios. Right now we are planning to have the following capabilities for beta
- Merged discovery across all kube-apiservers
- Use an egress dialer for network connections made to peer kube-apiservers
How can I learn more?
How can I get involved?
Reach us on Slack: #sig-api-machinery, or through the mailing list.
Huge thanks to the contributors that have helped in the design, implementation, and review of this feature: Daniel Smith, Han Kang, Joe Betz, Jordan Liggit, Antonio Ojea, David Eads and Ben Luddy!
Kubernetes v1.28: Introducing native sidecar containers
This post explains how to use the new sidecar feature, which enables restartable init containers and is available in alpha in Kubernetes 1.28. We want your feedback so that we can graduate this feature as soon as possible.
The concept of a “sidecar” has been part of Kubernetes since nearly the very beginning. In 2015, sidecars were described in a blog post about composite containers as additional containers that “extend and enhance the ‘main’ container”. Sidecar containers have become a common Kubernetes deployment pattern and are often used for network proxies or as part of a logging system. Until now, sidecars were a concept that Kubernetes users applied without native support. The lack of native support has caused some usage friction, which this enhancement aims to resolve.
What are sidecar containers in 1.28?
Kubernetes 1.28 adds a new restartPolicy field to init containers that is available when the SidecarContainers feature gate is enabled.
apiVersion: v1
kind: Pod
spec:
initContainers:
- name: secret-fetch
image: secret-fetch:1.0
- name: network-proxy
image: network-proxy:1.0
restartPolicy: Always
containers:
...
The field is optional and, if set, the only valid value is Always. Setting this field changes the behavior of init containers as follows:
- The container restarts if it exits
- Any subsequent init container starts immediately after the startupProbe has successfully completed instead of waiting for the restartable init container to exit
- The resource usage calculation changes for the pod as restartable init container resources are now added to the sum of the resource requests by the main containers
Pod termination continues to only depend on the main containers. An init container with a restartPolicy of Always (named a sidecar) won't prevent the pod from terminating after the main containers exit.
The following properties of restartable init containers make them ideal for the sidecar deployment pattern:
- Init containers have a well-defined startup order regardless of whether you set a
restartPolicy, so you can ensure that your sidecar starts before any container declarations that come after the sidecar declaration in your manifest. - Sidecar containers don't extend the lifetime of the Pod, so you can use them in short-lived Pods with no changes to the Pod lifecycle.
- Sidecar containers are restarted on exit, which improves resilience and lets you use sidecars to provide services that your main containers can more reliably consume.
When to use sidecar containers
You might find built-in sidecar containers useful for workloads such as the following:
- Batch or AI/ML workloads, or other Pods that run to completion. These workloads will experience the most significant benefits.
- Network proxies that start up before any other container in the manifest. Every other container that runs can use the proxy container's services. For instructions, see the Kubernetes Native sidecars in Istio blog post.
- Log collection containers, which can now start before any other container and run until the Pod terminates. This improves the reliability of log collection in your Pods.
- Jobs, which can use sidecars for any purpose without Job completion being blocked by the running sidecar. No additional configuration is required to ensure this behavior.
How did users get sidecar behavior before 1.28?
Prior to the sidecar feature, the following options were available for implementing sidecar behavior depending on the desired lifetime of the sidecar container:
- Lifetime of sidecar less than Pod lifetime: Use an init container, which provides well-defined startup order. However, the sidecar has to exit for other init containers and main Pod containers to start.
- Lifetime of sidecar equal to Pod lifetime: Use a main container that runs alongside your workload containers in the Pod. This method doesn't give you control over startup order, and lets the sidecar container potentially block Pod termination after the workload containers exit.
The built-in sidecar feature solves for the use case of having a lifetime equal to the Pod lifetime and has the following additional benefits:
- Provides control over startup order
- Doesn’t block Pod termination
Transitioning existing sidecars to the new model
We recommend only using the sidecars feature gate in short lived testing clusters at the alpha stage. If you have an existing sidecar that is configured as a main container so it can run for the lifetime of the pod, it can be moved to the initContainers section of the pod spec and given a restartPolicy of Always. In many cases, the sidecar should work as before with the added benefit of having a defined startup ordering and not prolonging the pod lifetime.
Known issues
The alpha release of built-in sidecar containers has the following known issues, which we'll resolve before graduating the feature to beta:
- The CPU, memory, device, and topology manager are unaware of the sidecar container lifetime and additional resource usage, and will operate as if the Pod had lower resource requests than it actually does.
- The output of
kubectl describe nodeis incorrect when sidecars are in use. The output shows resource usage that's lower than the actual usage because it doesn't use the new resource usage calculation for sidecar containers.
We need your feedback!
In the alpha stage, we want you to try out sidecar containers in your environments and open issues if you encounter bugs or friction points. We're especially interested in feedback about the following:
- The shutdown sequence, especially with multiple sidecars running
- The backoff timeout adjustment for crashing sidecars
- The behavior of Pod readiness and liveness probes when sidecars are running
To open an issue, see the Kubernetes GitHub repository.
What’s next?
In addition to the known issues that will be resolved, we're working on adding termination ordering for sidecar and main containers. This will ensure that sidecar containers only terminate after the Pod's main containers have exited.
We’re excited to see the sidecar feature come to Kubernetes and are interested in feedback.
Acknowledgements
Many years have passed since the original KEP was written, so we apologize if we omit anyone who worked on this feature over the years. This is a best-effort attempt to recognize the people involved in this effort.
- mrunalp for design discussions and reviews
- thockin for API discussions and support thru years
- bobbypage for reviews
- smarterclayton for detailed review and feedback
- howardjohn for feedback over years and trying it early during implementation
- derekwaynecarr and dchen1107 for leadership
- jpbetz for API and termination ordering designs as well as code reviews
- Joseph-Irving and rata for the early iterations design and reviews years back
- swatisehgal and ffromani for early feedback on resource managers impact
- alculquicondor for feedback on addressing the version skew of the scheduler
- wojtek-t for PRR review of a KEP
- ahg-g for reviewing the scheduler portion of a KEP
- adisky for the Job completion issue
More Information
- Read API for sidecar containers in the Kubernetes documentation
- Read the Sidecar KEP
Kubernetes 1.28: Beta support for using swap on Linux
The 1.22 release introduced Alpha support for configuring swap memory usage for Kubernetes workloads running on Linux on a per-node basis. Now, in release 1.28, support for swap on Linux nodes has graduated to Beta, along with many new improvements.
Prior to version 1.22, Kubernetes did not provide support for swap memory on Linux systems. This was due to the inherent difficulty in guaranteeing and accounting for pod memory utilization when swap memory was involved. As a result, swap support was deemed out of scope in the initial design of Kubernetes, and the default behavior of a kubelet was to fail to start if swap memory was detected on a node.
In version 1.22, the swap feature for Linux was initially introduced in its Alpha stage. This represented a significant advancement, providing Linux users with the opportunity to experiment with the swap feature for the first time. However, as an Alpha version, it was not fully developed and had several issues, including inadequate support for cgroup v2, insufficient metrics and summary API statistics, inadequate testing, and more.
Swap in Kubernetes has numerous use cases for a wide range of users. As a result, the node special interest group within the Kubernetes project has invested significant effort into supporting swap on Linux nodes for beta. Compared to the alpha, the kubelet's support for running with swap enabled is more stable and robust, more user-friendly, and addresses many known shortcomings. This graduation to beta represents a crucial step towards achieving the goal of fully supporting swap in Kubernetes.
How do I use it?
The utilization of swap memory on a node where it has already been provisioned can be
facilitated by the activation of the NodeSwap feature gate on the kubelet.
Additionally, you must disable the failSwapOn configuration setting, or the deprecated
--fail-swap-on command line flag must be deactivated.
It is possible to configure the memorySwap.swapBehavior option to define the manner in which a node utilizes swap memory. For instance,
# this fragment goes into the kubelet's configuration file
memorySwap:
swapBehavior: UnlimitedSwap
The available configuration options for swapBehavior are:
UnlimitedSwap(default): Kubernetes workloads can use as much swap memory as they request, up to the system limit.LimitedSwap: The utilization of swap memory by Kubernetes workloads is subject to limitations. Only Pods of Burstable QoS are permitted to employ swap.
If configuration for memorySwap is not specified and the feature gate is
enabled, by default the kubelet will apply the same behaviour as the
UnlimitedSwap setting.
Note that NodeSwap is supported for cgroup v2 only. For Kubernetes v1.28,
using swap along with cgroup v1 is no longer supported.
Install a swap-enabled cluster with kubeadm
Before you begin
It is required for this demo that the kubeadm tool be installed, following the steps outlined in the kubeadm installation guide. If swap is already enabled on the node, cluster creation may proceed. If swap is not enabled, please refer to the provided instructions for enabling swap.
Create a swap file and turn swap on
I'll demonstrate creating 4GiB of unencrypted swap.
dd if=/dev/zero of=/swapfile bs=128M count=32
chmod 600 /swapfile
mkswap /swapfile
swapon /swapfile
swapon -s # enable the swap file only until this node is rebooted
To start the swap file at boot time, add line like /swapfile swap swap defaults 0 0 to /etc/fstab file.
Set up a Kubernetes cluster that uses swap-enabled nodes
To make things clearer, here is an example kubeadm configuration file kubeadm-config.yaml for the swap enabled cluster.
---
apiVersion: "kubeadm.k8s.io/v1beta3"
kind: InitConfiguration
---
apiVersion: kubelet.config.k8s.io/v1beta1
kind: KubeletConfiguration
failSwapOn: false
featureGates:
NodeSwap: true
memorySwap:
swapBehavior: LimitedSwap
Then create a single-node cluster using kubeadm init --config kubeadm-config.yaml.
During init, there is a warning that swap is enabled on the node and in case the kubelet
failSwapOn is set to true. We plan to remove this warning in a future release.
How is the swap limit being determined with LimitedSwap?
The configuration of swap memory, including its limitations, presents a significant challenge. Not only is it prone to misconfiguration, but as a system-level property, any misconfiguration could potentially compromise the entire node rather than just a specific workload. To mitigate this risk and ensure the health of the node, we have implemented Swap in Beta with automatic configuration of limitations.
With LimitedSwap, Pods that do not fall under the Burstable QoS classification (i.e.
BestEffort/Guaranteed Qos Pods) are prohibited from utilizing swap memory.
BestEffort QoS Pods exhibit unpredictable memory consumption patterns and lack
information regarding their memory usage, making it difficult to determine a safe
allocation of swap memory. Conversely, Guaranteed QoS Pods are typically employed for
applications that rely on the precise allocation of resources specified by the workload,
with memory being immediately available. To maintain the aforementioned security and node
health guarantees, these Pods are not permitted to use swap memory when LimitedSwap is
in effect.
Prior to detailing the calculation of the swap limit, it is necessary to define the following terms:
nodeTotalMemory: The total amount of physical memory available on the node.totalPodsSwapAvailable: The total amount of swap memory on the node that is available for use by Pods (some swap memory may be reserved for system use).containerMemoryRequest: The container's memory request.
Swap limitation is configured as:
(containerMemoryRequest / nodeTotalMemory) × totalPodsSwapAvailable
In other words, the amount of swap that a container is able to use is proportionate to its memory request, the node's total physical memory and the total amount of swap memory on the node that is available for use by Pods.
It is important to note that, for containers within Burstable QoS Pods, it is possible to opt-out of swap usage by specifying memory requests that are equal to memory limits. Containers configured in this manner will not have access to swap memory.
How does it work?
There are a number of possible ways that one could envision swap use on a node. When swap is already provisioned and available on a node, SIG Node have proposed the kubelet should be able to be configured so that:
- It can start with swap on.
- It will direct the Container Runtime Interface to allocate zero swap memory to Kubernetes workloads by default.
Swap configuration on a node is exposed to a cluster admin via the
memorySwap in the KubeletConfiguration.
As a cluster administrator, you can specify the node's behaviour in the
presence of swap memory by setting memorySwap.swapBehavior.
The kubelet employs the CRI
(container runtime interface) API to direct the CRI to
configure specific cgroup v2 parameters (such as memory.swap.max) in a manner that will
enable the desired swap configuration for a container. The CRI is then responsible to
write these settings to the container-level cgroup.
How can I monitor swap?
A notable deficiency in the Alpha version was the inability to monitor and introspect swap usage. This issue has been addressed in the Beta version introduced in Kubernetes 1.28, which now provides the capability to monitor swap usage through several different methods.
The beta version of kubelet now collects
node-level metric statistics,
which can be accessed at the /metrics/resource and /stats/summary kubelet HTTP endpoints.
This allows clients who can directly interrogate the kubelet to
monitor swap usage and remaining swap memory when using LimitedSwap. Additionally, a
machine_swap_bytes metric has been added to cadvisor to show the total physical swap capacity of the
machine.
Caveats
Having swap available on a system reduces predictability. Swap's performance is worse than regular memory, sometimes by many orders of magnitude, which can cause unexpected performance regressions. Furthermore, swap changes a system's behaviour under memory pressure. Since enabling swap permits greater memory usage for workloads in Kubernetes that cannot be predictably accounted for, it also increases the risk of noisy neighbours and unexpected packing configurations, as the scheduler cannot account for swap memory usage.
The performance of a node with swap memory enabled depends on the underlying physical storage. When swap memory is in use, performance will be significantly worse in an I/O operations per second (IOPS) constrained environment, such as a cloud VM with I/O throttling, when compared to faster storage mediums like solid-state drives or NVMe.
As such, we do not advocate the utilization of swap memory for workloads or
environments that are subject to performance constraints. Furthermore, it is
recommended to employ LimitedSwap, as this significantly mitigates the risks
posed to the node.
Cluster administrators and developers should benchmark their nodes and applications before using swap in production scenarios, and we need your help with that!
Security risk
Enabling swap on a system without encryption poses a security risk, as critical information, such as volumes that represent Kubernetes Secrets, may be swapped out to the disk. If an unauthorized individual gains access to the disk, they could potentially obtain these confidential data. To mitigate this risk, the Kubernetes project strongly recommends that you encrypt your swap space. However, handling encrypted swap is not within the scope of kubelet; rather, it is a general OS configuration concern and should be addressed at that level. It is the administrator's responsibility to provision encrypted swap to mitigate this risk.
Furthermore, as previously mentioned, with LimitedSwap the user has the option to completely
disable swap usage for a container by specifying memory requests that are equal to memory limits.
This will prevent the corresponding containers from accessing swap memory.
Looking ahead
The Kubernetes 1.28 release introduced Beta support for swap memory on Linux nodes, and we will continue to work towards general availability for this feature. I hope that this will include:
- Add the ability to set a system-reserved quantity of swap from what kubelet detects on the host.
- Adding support for controlling swap consumption at the Pod level via cgroups.
- This point is still under discussion.
- Collecting feedback from test user cases.
- We will consider introducing new configuration modes for swap, such as a node-wide swap limit for workloads.
How can I learn more?
You can review the current documentation for using swap with Kubernetes.
For more information, and to assist with testing and provide feedback, please see KEP-2400 and its design proposal.
How do I get involved?
Your feedback is always welcome! SIG Node meets regularly and can be reached via Slack (channel #sig-node), or the SIG's mailing list. A Slack channel dedicated to swap is also available at #sig-node-swap.
Feel free to reach out to me, Itamar Holder (@iholder101 on Slack and GitHub) if you'd like to help or ask further questions.
Kubernetes 1.28: Node podresources API Graduates to GA
The podresources API is an API served by the kubelet locally on the node, which exposes the compute resources exclusively allocated to containers. With the release of Kubernetes 1.28, that API is now Generally Available.
What problem does it solve?
The kubelet can allocate exclusive resources to containers, like CPUs, granting exclusive access to full cores or memory, either regions or hugepages. Workloads which require high performance, or low latency (or both) leverage these features. The kubelet also can assign devices to containers. Collectively, these features which enable exclusive assignments are known as "resource managers".
Without an API like podresources, the only possible option to learn about resource assignment was to read the state files the resource managers use. While done out of necessity, the problem with this approach is the path and the format of these file are both internal implementation details. Albeit very stable, the project reserves the right to change them freely. Consuming the content of the state files is thus fragile and unsupported, and projects doing this are recommended to consider moving to podresources API or to other supported APIs.
Overview of the API
The podresources API was initially proposed to enable device monitoring.
In order to enable monitoring agents, a key prerequisite is to enable introspection of device assignment, which is performed by the kubelet.
Serving this purpose was the initial goal of the API. The first iteration of the API only had a single function implemented, List,
to return information about the assignment of devices to containers.
The API is used by multus CNI and by
GPU monitoring tools.
Since its inception, the podresources API increased its scope to cover other resource managers than device manager.
Starting from Kubernetes 1.20, the List API reports also CPU cores and memory regions (including hugepages); the API also
reports the NUMA locality of the devices, while the locality of CPUs and memory can be inferred from the system.
In Kubernetes 1.21, the API gained
the GetAllocatableResources function.
This newer API complements the existing List API and enables monitoring agents to determine the unallocated resources,
thus enabling new features built on top of the podresources API like a
NUMA-aware scheduler plugin.
Finally, in Kubernetes 1.27, another function, Get was introduced to be more friendly with CNI meta-plugins, to make it simpler to access resources
allocated to a specific pod, rather than having to filter through resources for all pods on the node. The Get function is currently alpha level.
Consuming the API
The podresources API is served by the kubelet locally, on the same node on which is running.
On unix flavors, the endpoint is served over a unix domain socket; the default path is /var/lib/kubelet/pod-resources/kubelet.sock.
On windows, the endpoint is served over a named pipe; the default path is npipe://\\.\pipe\kubelet-pod-resources.
In order for the containerized monitoring application consume the API, the socket should be mounted inside the container. A good practice is to mount the directory on which the podresources socket endpoint sits rather than the socket directly. This will ensure that after a kubelet restart, the containerized monitor application will be able to re-connect to the socket.
An example manifest for a hypothetical monitoring agent consuming the podresources API and deployed as a DaemonSet could look like:
apiVersion: apps/v1
kind: DaemonSet
metadata:
name: podresources-monitoring-app
namespace: monitoring
spec:
selector:
matchLabels:
name: podresources-monitoring
template:
metadata:
labels:
name: podresources-monitoring
spec:
containers:
- args:
- --podresources-socket=unix:///host-podresources/kubelet.sock
command:
- /bin/podresources-monitor
image: podresources-monitor:latest # just for an example
volumeMounts:
- mountPath: /host-podresources
name: host-podresources
serviceAccountName: podresources-monitor
volumes:
- hostPath:
path: /var/lib/kubelet/pod-resources
type: Directory
name: host-podresources
I hope you find it straightforward to consume the podresources API programmatically. The kubelet API package provides the protocol file and the go type definitions; however, a client package is not yet available from the project, and the existing code should not be used directly. The recommended approach is to reimplement the client in your projects, copying and pasting the related functions like for example the multus project is doing.
When operating the containerized monitoring application consuming the podresources API, few points are worth highlighting to prevent "gotcha" moments:
- Even though the API only exposes data, and doesn't allow by design clients to mutate the kubelet state, the gRPC request/response model requires
read-write access to the podresources API socket. In other words, it is not possible to limit the container mount to
ReadOnly. - Multiple clients are allowed to connect to the podresources socket and consume the API, since it is stateless.
- The kubelet has built-in rate limits to mitigate local Denial of Service attacks from misbehaving or malicious consumers. The consumers of the API must tolerate rate limit errors returned by the server. The rate limit is currently hardcoded and global, so misbehaving clients can consume all the quota and potentially starve correctly behaving clients.
Future enhancements
For historical reasons, the podresources API has a less precise specification than typical kubernetes APIs (such as the Kubernetes HTTP API, or the container runtime interface). This leads to unspecified behavior in corner cases. An effort is ongoing to rectify this state and to have a more precise specification.
The Dynamic Resource Allocation (DRA) infrastructure is a major overhaul of the resource management. The integration with the podresources API is already ongoing.
An effort is ongoing to recommend or create a reference client package ready to be consumed.
Getting involved
This feature is driven by SIG Node. Please join us to connect with the community and share your ideas and feedback around the above feature and beyond. We look forward to hearing from you!
Kubernetes 1.28: Improved failure handling for Jobs
This blog discusses two new features in Kubernetes 1.28 to improve Jobs for batch users: Pod replacement policy and Backoff limit per index.
These features continue the effort started by the Pod failure policy to improve the handling of Pod failures in a Job.
Pod replacement policy
By default, when a pod enters a terminating state (e.g. due to preemption or
eviction), Kubernetes immediately creates a replacement Pod. Therefore, both Pods are running
at the same time. In API terms, a pod is considered terminating when it has a
deletionTimestamp and it has a phase Pending or Running.
The scenario when two Pods are running at a given time is problematic for some popular machine learning frameworks, such as TensorFlow and JAX, which require at most one Pod running at the same time, for a given index. Tensorflow gives the following error if two pods are running for a given index.
/job:worker/task:4: Duplicate task registration with task_name=/job:worker/replica:0/task:4
See more details in the (issue).
Creating the replacement Pod before the previous one fully terminates can also cause problems in clusters with scarce resources or with tight budgets, such as:
- cluster resources can be difficult to obtain for Pods pending to be scheduled, as Kubernetes might take a long time to find available nodes until the existing Pods are fully terminated.
- if cluster autoscaler is enabled, the replacement Pods might produce undesired scale ups.
How can you use it?
This is an alpha feature, which you can enable by turning on JobPodReplacementPolicy
feature gate in
your cluster.
Once the feature is enabled in your cluster, you can use it by creating a new Job that specifies a
podReplacementPolicy field as shown here:
kind: Job
metadata:
name: new
...
spec:
podReplacementPolicy: Failed
...
In that Job, the Pods would only be replaced once they reached the Failed phase,
and not when they are terminating.
Additionally, you can inspect the .status.terminating field of a Job. The value
of the field is the number of Pods owned by the Job that are currently terminating.
kubectl get jobs/myjob -o=jsonpath='{.items[*].status.terminating}'
3 # three Pods are terminating and have not yet reached the Failed phase
This can be particularly useful for external queueing controllers, such as Kueue, that tracks quota from running Pods of a Job until the resources are reclaimed from the currently terminating Job.
Note that the podReplacementPolicy: Failed is the default when using a custom
Pod failure policy.
Backoff limit per index
By default, Pod failures for Indexed Jobs
are counted towards the global limit of retries, represented by .spec.backoffLimit.
This means, that if there is a consistently failing index, it is restarted
repeatedly until it exhausts the limit. Once the limit is reached the entire
Job is marked failed and some indexes may never be even started.
This is problematic for use cases where you want to handle Pod failures for every index independently. For example, if you use Indexed Jobs for running integration tests where each index corresponds to a testing suite. In that case, you may want to account for possible flake tests allowing for 1 or 2 retries per suite. There might be some buggy suites, making the corresponding indexes fail consistently. In that case you may prefer to limit retries for the buggy suites, yet allowing other suites to complete.
The feature allows you to:
- complete execution of all indexes, despite some indexes failing.
- better utilize the computational resources by avoiding unnecessary retries of consistently failing indexes.
How can you use it?
This is an alpha feature, which you can enable by turning on the
JobBackoffLimitPerIndex
feature gate
in your cluster.
Once the feature is enabled in your cluster, you can create an Indexed Job with the
.spec.backoffLimitPerIndex field specified.
Example
The following example demonstrates how to use this feature to make sure the
Job executes all indexes (provided there is no other reason for the early Job
termination, such as reaching the activeDeadlineSeconds timeout, or being
manually deleted by the user), and the number of failures is controlled per index.
apiVersion: batch/v1
kind: Job
metadata:
name: job-backoff-limit-per-index-execute-all
spec:
completions: 8
parallelism: 2
completionMode: Indexed
backoffLimitPerIndex: 1
template:
spec:
restartPolicy: Never
containers:
- name: example # this example container returns an error, and fails,
# when it is run as the second or third index in any Job
# (even after a retry)
image: python
command:
- python3
- -c
- |
import os, sys, time
id = int(os.environ.get("JOB_COMPLETION_INDEX"))
if id == 1 or id == 2:
sys.exit(1)
time.sleep(1)
Now, inspect the Pods after the job is finished:
kubectl get pods -l job-name=job-backoff-limit-per-index-execute-all
Returns output similar to this:
NAME READY STATUS RESTARTS AGE
job-backoff-limit-per-index-execute-all-0-b26vc 0/1 Completed 0 49s
job-backoff-limit-per-index-execute-all-1-6j5gd 0/1 Error 0 49s
job-backoff-limit-per-index-execute-all-1-6wd82 0/1 Error 0 37s
job-backoff-limit-per-index-execute-all-2-c66hg 0/1 Error 0 32s
job-backoff-limit-per-index-execute-all-2-nf982 0/1 Error 0 43s
job-backoff-limit-per-index-execute-all-3-cxmhf 0/1 Completed 0 33s
job-backoff-limit-per-index-execute-all-4-9q6kq 0/1 Completed 0 28s
job-backoff-limit-per-index-execute-all-5-z9hqf 0/1 Completed 0 28s
job-backoff-limit-per-index-execute-all-6-tbkr8 0/1 Completed 0 23s
job-backoff-limit-per-index-execute-all-7-hxjsq 0/1 Completed 0 22s
Additionally, you can take a look at the status for that Job:
kubectl get jobs job-backoff-limit-per-index-fail-index -o yaml
The output ends with a status similar to:
status:
completedIndexes: 0,3-7
failedIndexes: 1,2
succeeded: 6
failed: 4
conditions:
- message: Job has failed indexes
reason: FailedIndexes
status: "True"
type: Failed
Here, indexes 1 and 2 were both retried once. After the second failure,
in each of them, the specified .spec.backoffLimitPerIndex was exceeded, so
the retries were stopped. For comparison, if the per-index backoff was disabled,
then the buggy indexes would retry until the global backoffLimit was exceeded,
and then the entire Job would be marked failed, before some of the higher
indexes are started.
How can you learn more?
- Read the user-facing documentation for Pod replacement policy, Backoff limit per index, and Pod failure policy
- Read the KEPs for Pod Replacement Policy, Backoff limit per index, and Pod failure policy.
Getting Involved
These features were sponsored by SIG Apps. Batch use cases are actively being improved for Kubernetes users in the batch working group. Working groups are relatively short-lived initiatives focused on specific goals. The goal of the WG Batch is to improve experience for batch workload users, offer support for batch processing use cases, and enhance the Job API for common use cases. If that interests you, please join the working group either by subscriping to our mailing list or on Slack.
Acknowledgments
As with any Kubernetes feature, multiple people contributed to getting this done, from testing and filing bugs to reviewing code.
We would not have been able to achieve either of these features without Aldo Culquicondor (Google) providing excellent domain knowledge and expertise throughout the Kubernetes ecosystem.
Kubernetes v1.28: Retroactive Default StorageClass move to GA
Announcing graduation to General Availability (GA) - Retroactive Default StorageClass Assignment in Kubernetes v1.28!
Kubernetes SIG Storage team is thrilled to announce that the "Retroactive Default StorageClass Assignment" feature, introduced as an alpha in Kubernetes v1.25, has now graduated to GA and is officially part of the Kubernetes v1.28 release. This enhancement brings a significant improvement to how default StorageClasses are assigned to PersistentVolumeClaims (PVCs).
With this feature enabled, you no longer need to create a default StorageClass first and then a PVC to assign the class. Instead, any PVCs without a StorageClass assigned will now be retroactively updated to include the default StorageClass. This enhancement ensures that PVCs no longer get stuck in an unbound state, and storage provisioning works seamlessly, even when a default StorageClass is not defined at the time of PVC creation.
What changed?
The PersistentVolume (PV) controller has been modified to automatically assign a default StorageClass to any unbound
PersistentVolumeClaim with the storageClassName not set. Additionally, the PersistentVolumeClaim
admission validation mechanism within
the API server has been adjusted to allow changing values from an unset state to an actual StorageClass name.
How to use it?
As this feature has graduated to GA, there's no need to enable a feature gate anymore. Simply make sure you are running Kubernetes v1.28 or later, and the feature will be available for use.
For more details, read about default StorageClass assignment in the Kubernetes documentation. You can also read the previous blog post announcing beta graduation in v1.26.
To provide feedback, join our Kubernetes Storage Special-Interest-Group (SIG) or participate in discussions on our public Slack channel.
Kubernetes 1.28: Non-Graceful Node Shutdown Moves to GA
The Kubernetes Non-Graceful Node Shutdown feature is now GA in Kubernetes v1.28. It was introduced as alpha in Kubernetes v1.24, and promoted to beta in Kubernetes v1.26. This feature allows stateful workloads to restart on a different node if the original node is shutdown unexpectedly or ends up in a non-recoverable state such as the hardware failure or unresponsive OS.
What is a Non-Graceful Node Shutdown
In a Kubernetes cluster, a node can be shutdown in a planned graceful way or unexpectedly because of reasons such as power outage or something else external. A node shutdown could lead to workload failure if the node is not drained before the shutdown. A node shutdown can be either graceful or non-graceful.
The Graceful Node Shutdown feature allows Kubelet to detect a node shutdown event, properly terminate the pods, and release resources, before the actual shutdown.
When a node is shutdown but not detected by Kubelet's Node Shutdown Manager, this becomes a non-graceful node shutdown. Non-graceful node shutdown is usually not a problem for stateless apps, however, it is a problem for stateful apps. The stateful application cannot function properly if the pods are stuck on the shutdown node and are not restarting on a running node.
In the case of a non-graceful node shutdown, you can manually add an out-of-service taint on the Node.
kubectl taint nodes <node-name> node.kubernetes.io/out-of-service=nodeshutdown:NoExecute
This taint triggers pods on the node to be forcefully deleted if there are no matching tolerations on the pods. Persistent volumes attached to the shutdown node will be detached, and new pods will be created successfully on a different running node.
Note: Before applying the out-of-service taint, you must verify that a node is already in shutdown or power-off state (not in the middle of restarting).
Once all the workload pods that are linked to the out-of-service node are moved to a new running node, and the shutdown node has been recovered, you should remove that taint on the affected node after the node is recovered.
What’s new in stable
With the promotion of the Non-Graceful Node Shutdown feature to stable, the
feature gate NodeOutOfServiceVolumeDetach is locked to true on
kube-controller-manager and cannot be disabled.
Metrics force_delete_pods_total and force_delete_pod_errors_total in the
Pod GC Controller are enhanced to account for all forceful pods deletion.
A reason is added to the metric to indicate whether the pod is forcefully deleted
because it is terminated, orphaned, terminating with the out-of-service taint,
or terminating and unscheduled.
A "reason" is also added to the metric attachdetach_controller_forced_detaches
in the Attach Detach Controller to indicate whether the force detach is caused by
the out-of-service taint or a timeout.
What’s next?
This feature requires a user to manually add a taint to the node to trigger workloads failover and remove the taint after the node is recovered. In the future, we plan to find ways to automatically detect and fence nodes that are shutdown/failed and automatically failover workloads to another node.
How can I learn more?
Check out additional documentation on this feature here.
How to get involved?
We offer a huge thank you to all the contributors who helped with design, implementation, and review of this feature and helped move it from alpha, beta, to stable:
- Michelle Au (msau42)
- Derek Carr (derekwaynecarr)
- Danielle Endocrimes (endocrimes)
- Baofa Fan (carlory)
- Tim Hockin (thockin)
- Ashutosh Kumar (sonasingh46)
- Hemant Kumar (gnufied)
- Yuiko Mouri (YuikoTakada)
- Mrunal Patel (mrunalp)
- David Porter (bobbypage)
- Yassine Tijani (yastij)
- Jing Xu (jingxu97)
- Xing Yang (xing-yang)
This feature is a collaboration between SIG Storage and SIG Node. For those interested in getting involved with the design and development of any part of the Kubernetes Storage system, join the Kubernetes Storage Special Interest Group (SIG). For those interested in getting involved with the design and development of the components that support the controlled interactions between pods and host resources, join the Kubernetes Node SIG.
pkgs.k8s.io: Introducing Kubernetes Community-Owned Package Repositories
On behalf of Kubernetes SIG Release, I am very excited to introduce the
Kubernetes community-owned software
repositories for Debian and RPM packages: pkgs.k8s.io! The new package
repositories are replacement for the Google-hosted package repositories
(apt.kubernetes.io and yum.kubernetes.io) that we've been using since
Kubernetes v1.5.
This blog post contains information about these new package repositories, what does it mean to you as an end user, and how to migrate to the new repositories.
ℹ️ Update (March 26, 2024): the legacy Google-hosted repositories went away on March 4, 2024. It's not possible to install Kubernetes packages from the legacy Google-hosted package repositories any longer. Check out the deprecation announcement for more details about this change.
What you need to know about the new package repositories?
(updated on January 12, 2024 and March 26, 2024)
- This is an opt-in change; you're required to manually migrate from the Google-hosted repository to the Kubernetes community-owned repositories. See how to migrate later in this announcement for migration information and instructions.
- The legacy Google-hosted package repositories went away on March 4, 2024. It's not possible to install Kubernetes packages from the legacy Google-hosted package repositories any longer. These repositories have been deprecated as of August 31, 2023, and frozen as of September 13, 2023. Check out the deprecation announcement for more details about this change.
The legacy Google-hosted package repositories are going away in January 2024. These repositories have been deprecated as of August 31, 2023, and frozen as of September 13, 2023. Check out the deprecation announcement for more details about this change.The existing packages in the legacy repositories will be available for the foreseeable future. However, the Kubernetes project can't provide any guarantees on how long is that going to be. The deprecated legacy repositories, and their contents, might be removed at any time in the future and without a further notice period. The legacy package repositories are going away in January 2024.The legacy Google-hosted package repositories went away on March 4, 2024.- Given that no new releases will be published to the legacy repositories after
the September 13, 2023 cut-off point, you will not be able to upgrade to any patch or minor
release made from that date onwards if you don't migrate to the new Kubernetes package repositories.
That said, we recommend migrating to the new Kubernetes package repositories as soon as possible.Migrating to the new Kubernetes package repositories is required to consume the official Kubernetes packages. - The new Kubernetes package repositories contain packages beginning with those Kubernetes versions that were still under support when the community took over the package builds. This means that the new package repositories have Linux packages for all Kubernetes releases starting with v1.24.0.
- Kubernetes does not have official Linux packages available for earlier releases of Kubernetes; however, your Linux distribution may provide its own packages.
- There's a dedicated package repository for each Kubernetes minor version. When upgrading to a different minor release, you must bear in mind that the package repository details also change. Check out Changing The Kubernetes Package Repository guide for information about steps that you need to take upon upgrading the Kubernetes minor version.
Why are we introducing new package repositories?
As the Kubernetes project is growing, we want to ensure the best possible experience for the end users. The Google-hosted repository has been serving us well for many years, but we started facing some problems that require significant changes to how we publish packages. Another goal that we have is to use community-owned infrastructure for all critical components and that includes package repositories.
Publishing packages to the Google-hosted repository is a manual process that can be done only by a team of Google employees called Google Build Admins. The Kubernetes Release Managers team is a very diverse team especially in terms of timezones that we work in. Given this constraint, we have to do very careful planning for every release to ensure that we have both Release Manager and Google Build Admin available to carry out the release.
Another problem is that we only have a single package repository. Because of
this, we were not able to publish packages for prerelease versions (alpha,
beta, and rc). This made testing Kubernetes prereleases harder for anyone who
is interested to do so. The feedback that we receive from people testing these
releases is critical to ensure the best quality of releases, so we want to make
testing these releases as easy as possible. On top of that, having only one
repository limited us when it comes to publishing dependencies like cri-tools
and kubernetes-cni.
Regardless of all these issues, we're very thankful to Google and Google Build Admins for their involvement, support, and help all these years!
How the new package repositories work?
The new package repositories are hosted at pkgs.k8s.io for both Debian and
RPM packages. At this time, this domain points to a CloudFront CDN backed by S3
bucket that contains repositories and packages. However, we plan on onboarding
additional mirrors in the future, giving possibility for other companies to
help us with serving packages.
Packages are built and published via the OpenBuildService (OBS) platform. After a long period of evaluating different solutions, we made a decision to use OpenBuildService as a platform to manage our repositories and packages. First of all, OpenBuildService is an open source platform used by a large number of open source projects and companies, like openSUSE, VideoLAN, Dell, Intel, and more. OpenBuildService has many features making it very flexible and easy to integrate with our existing release tooling. It also allows us to build packages in a similar way as for the Google-hosted repository making the migration process as seamless as possible.
SUSE sponsors the Kubernetes project with access to their reference
OpenBuildService setup (build.opensuse.org) and
with technical support to integrate OBS with our release processes.
We use SUSE's OBS instance for building and publishing packages. Upon building
a new release, our tooling automatically pushes needed artifacts and
package specifications to build.opensuse.org. That will trigger the build
process that's going to build packages for all supported architectures (AMD64,
ARM64, PPC64LE, S390X). At the end, generated packages will be automatically
pushed to our community-owned S3 bucket making them available to all users.
We want to take this opportunity to thank SUSE for allowing us to use
build.opensuse.org and their generous support to make this integration
possible!
What are significant differences between the Google-hosted and Kubernetes package repositories?
There are three significant differences that you should be aware of:
- There's a dedicated package repository for each Kubernetes minor release.
For example, repository called
core:/stable:/v1.28only hosts packages for stable Kubernetes v1.28 releases. This means you can install v1.28.0 from this repository, but you can't install v1.27.0 or any other minor release other than v1.28. Upon upgrading to another minor version, you have to add a new repository and optionally remove the old one - There's a difference in what
cri-toolsandkubernetes-cnipackage versions are available in each Kubernetes repository- These two packages are dependencies for
kubeletandkubeadm - Kubernetes repositories for v1.24 to v1.27 have same versions of these packages as the Google-hosted repository
- Kubernetes repositories for v1.28 and onwards are going to have published
only versions that are used by that Kubernetes minor release
- Speaking of v1.28, only kubernetes-cni 1.2.0 and cri-tools v1.28 are going to be available in the repository for Kubernetes v1.28
- Similar for v1.29, we only plan on publishing cri-tools v1.29 and whatever kubernetes-cni version is going to be used by Kubernetes v1.29
- These two packages are dependencies for
- The revision part of the package version (the
-00part in1.28.0-00) is now autogenerated by the OpenBuildService platform and has a different format. The revision is now in the format of-x.y, e.g.1.28.0-1.1
Does this in any way affect existing Google-hosted repositories?
(updated on March 26, 2024)
The legacy Google-hosted repositories went away on March 4, 2024. It's not possible to install Kubernetes packages from the legacy Google-hosted package repositories any longer. Check out the deprecation announcement for more details about this change.
The Google-hosted repository and all packages published to it will continue
working in the same way as before. There are no changes in how we build and
publish packages to the Google-hosted repository, all newly-introduced changes
are only affecting packages publish to the community-owned repositories.
However, as mentioned at the beginning of this blog post, we plan to stop
publishing packages to the Google-hosted repository in the future.
How to migrate to the Kubernetes community-owned repositories?
Debian, Ubuntu, and operating systems using apt/apt-get
Replace the
aptrepository definition so thataptpoints to the new repository instead of the Google-hosted repository. Make sure to replace the Kubernetes minor version in the command below with the minor version that you're currently using:echo "deb [signed-by=/etc/apt/keyrings/kubernetes-apt-keyring.gpg] https://pkgs.k8s.io/core:/stable:/v1.28/deb/ /" | sudo tee /etc/apt/sources.list.d/kubernetes.listDownload the public signing key for the Kubernetes package repositories. The same signing key is used for all repositories, so you can disregard the version in the URL:
curl -fsSL https://pkgs.k8s.io/core:/stable:/v1.28/deb/Release.key | sudo gpg --dearmor -o /etc/apt/keyrings/kubernetes-apt-keyring.gpgUpdate: In releases older than Debian 12 and Ubuntu 22.04, the folder
/etc/apt/keyringsdoes not exist by default, and it should be created before the curl command.Update the
aptpackage index:sudo apt-get update
CentOS, Fedora, RHEL, and operating systems using rpm/dnf
Replace the
yumrepository definition so thatyumpoints to the new repository instead of the Google-hosted repository. Make sure to replace the Kubernetes minor version in the command below with the minor version that you're currently using:cat <<EOF | sudo tee /etc/yum.repos.d/kubernetes.repo [kubernetes] name=Kubernetes baseurl=https://pkgs.k8s.io/core:/stable:/v1.28/rpm/ enabled=1 gpgcheck=1 gpgkey=https://pkgs.k8s.io/core:/stable:/v1.28/rpm/repodata/repomd.xml.key exclude=kubelet kubeadm kubectl cri-tools kubernetes-cni EOF
Where can I get packages for Kubernetes versions prior to v1.24.0?
(updated on March 26, 2024)
For Kubernetes v1.24 and onwards, Linux packages of Kubernetes components are available for
download via the official Kubernetes package repositories. Kubernetes does not publish any
software packages for releases of Kubernetes older than v1.24.0; however, your Linux
distribution may provide its own packages. Alternatively, you can directly download binaries
instead of using packages. As an example, see Without a package manager instructions in
"Installing kubeadm"
document.
Can I rollback to the Google-hosted repository after migrating to the Kubernetes repositories?
(updated on March 26, 2024)
The legacy Google-hosted repositories went away on March 4, 2024 and therefore it's not possible to rollback to the legacy Google-hosted repositories any longer.
In general, yes. Just do the same steps as when migrating, but use parameters
for the Google-hosted repository. You can find those parameters in a document
like "Installing kubeadm".
Why isn’t there a stable list of domains/IPs? Why can’t I restrict package downloads?
Our plan for pkgs.k8s.io is to make it work as a redirector to a set of
backends (package mirrors) based on user's location. The nature of this change
means that a user downloading a package could be redirected to any mirror at
any time. Given the architecture and our plans to onboard additional mirrors in
the near future, we can't provide a list of IP addresses or domains that you
can add to an allow list.
Restrictive control mechanisms like man-in-the-middle proxies or network policies that restrict access to a specific list of IPs/domains will break with this change. For these scenarios, we encourage you to mirror the release packages to a local package repository that you have strict control over.
What should I do if I detect some abnormality with the new repositories?
If you encounter any issue with new Kubernetes package repositories, please
file an issue in the
kubernetes/release repository.
Kubernetes v1.28: Planternetes
Announcing the release of Kubernetes v1.28 Planternetes, the second release of 2023!
This release consists of 45 enhancements. Of those enhancements, 19 are entering Alpha, 14 have graduated to Beta, and 12 have graduated to Stable.
Release Theme And Logo
Kubernetes v1.28: Planternetes
The theme for Kubernetes v1.28 is Planternetes.
Each Kubernetes release is the culmination of the hard work of thousands of individuals from our community. The people behind this release come from a wide range of backgrounds, some of us industry veterans, parents, others students and newcomers to open-source. We combine our unique experience to create a collective artifact with global impact.
Much like a garden, our release has ever-changing growth, challenges and opportunities. This theme celebrates the meticulous care, intention and efforts to get the release to where we are today. Harmoniously together, we grow better.
What's New (Major Themes)
Changes to supported skew between control plane and node versions
Kubernetes v1.28 expands the supported skew between core node and control plane components by one minor version, from n-2 to n-3, so that node components (kubelet and kube-proxy) for the oldest supported minor version work with control plane components (kube-apiserver, kube-scheduler, kube-controller-manager, cloud-controller-manager) for the newest supported minor version.
Some cluster operators avoid node maintenance and especially changes to node behavior, because nodes are where the workloads run. For minor version upgrades to a kubelet, the supported process includes draining that node, and hence disruption to any Pods that had been executing there. For Kubernetes end users with very long running workloads, and where Pods should stay running wherever possible, reducing the time lost to node maintenance is a benefit.
The Kubernetes yearly support period already made annual upgrades possible. Users can upgrade to the latest patch versions to pick up security fixes and do 3 sequential minor version upgrades once a year to "catch up" to the latest supported minor version.
Previously, to stay within the supported skew, a cluster operator planning an annual upgrade would have needed to upgrade their nodes twice (perhaps only hours apart). Now, with Kubernetes v1.28, you have the option of making a minor version upgrade to nodes just once in each calendar year and still staying within upstream support.
If you'd like to stay current and upgrade your clusters more often, that's fine and is still completely supported.
Generally available: recovery from non-graceful node shutdown
If a node shuts down unexpectedly or ends up in a non-recoverable state (perhaps due to hardware failure or unresponsive OS), Kubernetes allows you to clean up afterward and allow stateful workloads to restart on a different node. For Kubernetes v1.28, that's now a stable feature.
This allows stateful workloads to fail over to a different node successfully after the original node is shut down or in a non-recoverable state, such as the hardware failure or broken OS.
Versions of Kubernetes earlier than v1.20 lacked handling for node shutdown on Linux, the kubelet integrates with systemd and implements graceful node shutdown (beta, and enabled by default). However, even an intentional shutdown might not get handled well that could be because:
- the node runs Windows
- the node runs Linux, but uses a different
init(notsystemd) - the shutdown does not trigger the system inhibitor locks mechanism
- because of a node-level configuration error
(such as not setting appropriate values for
shutdownGracePeriodandshutdownGracePeriodCriticalPods).
When a node shutdowns or fails, and that shutdown was not detected by the kubelet, the pods that are part
of a StatefulSet will be stuck in terminating status on the shutdown node. If the stopped node restarts, the
kubelet on that node can clean up (DELETE) the Pods that the Kubernetes API still sees as bound to that node.
However, if the node stays stopped - or if the kubelet isn't able to start after a reboot - then Kubernetes may
not be able to create replacement Pods. When the kubelet on the shut-down node is not available to delete
the old pods, an associated StatefulSet cannot create a new pod (which would have the same name).
There's also a problem with storage. If there are volumes used by the pods, existing VolumeAttachments will
not be disassociated from the original - and now shut down - node so the PersistentVolumes used by these
pods cannot be attached to a different, healthy node. As a result, an application running on an
affected StatefulSet may not be able to function properly. If the original, shut down node does come up, then
their pods will be deleted by its kubelet and new pods can be created on a different running node.
If the original node does not come up (common with an immutable infrastructure design), those pods would be stuck in a Terminating status on the shut-down node forever.
For more information on how to trigger cleanup after a non-graceful node shutdown, read non-graceful node shutdown.
Improvements to CustomResourceDefinition validation rules
The Common Expression Language (CEL) can be used to validate custom resources. The primary goal is to allow the majority of the validation use cases that might once have needed you, as a CustomResourceDefinition (CRD) author, to design and implement a webhook. Instead, and as a beta feature, you can add validation expressions directly into the schema of a CRD.
CRDs need direct support for non-trivial validation. While admission webhooks do support CRDs validation, they significantly complicate the development and operability of CRDs.
In 1.28, two optional fields reason and fieldPath were added to allow user to specify the failure reason and fieldPath when validation failed.
For more information, read validation rules in the CRD documentation.
ValidatingAdmissionPolicies graduate to beta
Common Expression language for admission control is customizable, in-process validation of requests to the Kubernetes API server as an alternative to validating admission webhooks.
This builds on the capabilities of the CRD Validation Rules feature that graduated to beta in 1.25 but with a focus on the policy enforcement capabilities of validating admission control.
This will lower the infrastructure barrier to enforcing customizable policies as well as providing primitives that help the community establish and adhere to the best practices of both K8s and its extensions.
To use ValidatingAdmissionPolicies, you need to enable both the admissionregistration.k8s.io/v1beta1 API group and the ValidatingAdmissionPolicy feature gate in your cluster's control plane.
Match conditions for admission webhooks
Kubernetes v1.27 lets you specify match conditions for admission webhooks,
which lets you narrow the scope of when Kubernetes makes a remote HTTP call at admission time.
The matchCondition field for ValidatingWebhookConfiguration and MutatingWebhookConfiguration
is a CEL expression that must evaluate to true for the admission request to be sent to the webhook.
In Kubernetes v1.28, that field moved to beta, and it's enabled by default.
To learn more, see matchConditions in the Kubernetes documentation.
Beta support for enabling swap space on Linux
This adds swap support to nodes in a controlled, predictable manner so that Kubernetes users can perform testing and provide data to continue building cluster capabilities on top of swap.
There are two distinct types of users for swap, who may overlap:
Node administrators, who may want swap available for node-level performance tuning and stability/reducing noisy neighbor issues.
Application developers, who have written applications that would benefit from using swap memory.
Mixed version proxy (alpha)
When a cluster has multiple API servers at mixed versions (such as during an upgrade/downgrade or when runtime-config changes and a rollout happens), not every apiserver can serve every resource at every version.
For Kubernetes v1.28, you can enable the mixed version proxy within the API server's aggregation layer. The mixed version proxy finds requests that the local API server doesn't recognize but another API server inside the control plan is able to support. Having found a suitable peer, the aggregation layer proxies the request to a compatible API server; this is transparent from the client's perspective.
When an upgrade or downgrade is performed on a cluster, for some period of time the API servers within the control plane may be at differing versions; when that happens, different subsets of the API servers are able to serve different sets of built-in resources (different groups, versions, and resources are all possible). This new alpha mechanism lets you hide that skew from clients.
Source code reorganization for control plane components
Kubernetes contributors have begun to reorganize the code for the kube-apiserver to build on a new staging repository that consumes k/apiserver but has a bigger, carefully chosen subset of the functionality of kube-apiserver such that it is reusable.
This is a gradual reorganization; eventually there will be a new git repository with generic functionality abstracted from Kubernetes' API server.
Support for CDI injection into containers (alpha)
CDI provides a standardized way of injecting complex devices into a container (i.e. devices that logically require more than just a single /dev node to be injected for them to work). This new feature enables plugin developers to utilize the CDIDevices field added to the CRI in 1.27 to pass CDI devices directly to CDI enabled runtimes (of which containerd and crio-o are in recent releases).
API awareness of sidecar containers (alpha)
Kubernetes 1.28 introduces an alpha restartPolicy field for init containers,
and uses that to indicate when an init container is also a sidecar container.
The kubelet will start init containers with restartPolicy: Always in the order
they are defined, along with other init containers.
Instead of waiting for that sidecar container to complete before starting the main
container(s) for the Pod, the kubelet only waits for the sidecar init container to have started.
The kubelet will consider the startup for the sidecar container as being completed if the startup probe succeeds and the postStart handler is completed. This condition is represented with the field Started of ContainerStatus type. If you do not define a startup probe, the kubelet will consider the container startup to be completed immediately after the postStart handler completion.
For init containers, you can either omit the restartPolicy field, or set it to Always. Omitting the field
means that you want a true init container that runs to completion before application startup.
Sidecar containers do not block Pod completion: if all regular containers are complete, sidecar containers in that Pod will be terminated.
Once the sidecar container has started (process running, postStart was successful, and
any configured startup probe is passing), and then there's a failure, that sidecar container will be
restarted even when the Pod's overall restartPolicy is Never or OnFailure.
Furthermore, sidecar containers will be restarted (on failure or on normal exit)
even during Pod termination.
To learn more, read API for sidecar containers.
Automatic, retroactive assignment of a default StorageClass graduates to stable
Kubernetes automatically sets a storageClassName for a PersistentVolumeClaim (PVC) if you don't provide
a value. The control plane also sets a StorageClass for any existing PVC that doesn't have a storageClassName
defined.
Previous versions of Kubernetes also had this behavior; for Kubernetes v1.28 it is automatic and always
active; the feature has graduated to stable (general availability).
To learn more, read about StorageClass in the Kubernetes documentation.
Pod replacement policy for Jobs (alpha)
Kubernetes 1.28 adds a new field for the Job API that allows you to specify if you want the control plane to make new Pods as soon as the previous Pods begin termination (existing behavior), or only once the existing pods are fully terminated (new, optional behavior).
Many common machine learning frameworks, such as Tensorflow and JAX, require unique pods per index.
With the older behaviour, if a pod that belongs to an Indexed Job enters a terminating state (due to preemption, eviction or other external factors), a replacement pod is created but then immediately fails to start due
to the clash with the old pod that has not yet shut down.
Having a replacement Pod appear before the previous one fully terminates can also cause problems in clusters with scarce resources or with tight budgets. These resources can be difficult to obtain so pods may only be able to find nodes once the existing pods have been terminated. If cluster autoscaler is enabled, early creation of replacement Pods might produce undesired scale-ups.
To learn more, read Delayed creation of replacement pods in the Job documentation.
Job retry backoff limit, per index (alpha)
This extends the Job API to support indexed jobs where the backoff limit is per index, and the Job can continue execution despite some of its indexes failing.
Currently, the indexes of an indexed job share a single backoff limit. When the job reaches this shared backoff limit, the job controller marks the entire job as failed, and the resources are cleaned up, including indexes that have yet to run to completion.
As a result, the existing implementation did not cover the situation where the workload is truly embarrassingly parallel: each index is fully independent of other indexes.
For instance, if indexed jobs were used as the basis for a suite of long-running integration tests, then each test run would only be able to find a single test failure.
For more information, read Handling Pod and container failures in the Kubernetes documentation.
Correction: the feature CRI container and pod statistics without cAdvisor has been removed as it did not make the release. The original release announcement stated that Kubernetes 1.28 included the new feature.
Feature graduations and deprecations in Kubernetes v1.28
Graduations to stable
This release includes a total of 12 enhancements promoted to Stable:
kubectl events- Retroactive default StorageClass assignment
- Non-graceful node shutdown
- Support 3rd party device monitoring plugins
- Auth API to get self-user attributes
- Proxy Terminating Endpoints
- Expanded DNS Configuration
- Cleaning up IPTables Chain Ownership
- Minimizing iptables-restore input size
- Graduate the kubelet pod resources endpoint to GA
- Extend podresources API to report allocatable resources
- Move EndpointSlice Reconciler into Staging
Deprecations and removals
Removals:
Deprecations:
Release Notes
The complete details of the Kubernetes v1.28 release are available in our release notes.
Availability
Kubernetes v1.28 is available for download on GitHub. To get started with Kubernetes, you can run local Kubernetes clusters using minikube, kind, etc. You can also easily install v1.28 using kubeadm.
Release Team
Kubernetes is only possible with the support, commitment, and hard work of its community. Each release team is comprised of dedicated community volunteers who work together to build the many pieces that make up the Kubernetes releases you rely on. This requires the specialized skills of people from all corners of our community, from the code itself to its documentation and project management.
We would like to thank the entire release team for the hours spent hard at work to ensure we deliver a solid Kubernetes v1.28 release for our community.
Special thanks to our release lead, Grace Nguyen, for guiding us through a smooth and successful release cycle.
Ecosystem Updates
- KubeCon + CloudNativeCon China 2023 will take place in Shanghai, China, from 26 – 28 September 2023! You can find more information about the conference and registration on the event site.
- KubeCon + CloudNativeCon North America 2023 will take place in Chicago, Illinois, The United States of America, from 6 – 9 November 2023! You can find more information about the conference and registration on the event site.
Project Velocity
The CNCF K8s DevStats project aggregates a number of interesting data points related to the velocity of Kubernetes and various sub-projects. This includes everything from individual contributions to the number of companies that are contributing and is an illustration of the depth and breadth of effort that goes into evolving this ecosystem.
In the v1.28 release cycle, which ran for 14 weeks (May 15 to August 15), we saw contributions from 911 companies and 1440 individuals.
Upcoming Release Webinar
Join members of the Kubernetes v1.28 release team on Wednesday, September 6th, 2023, at 9 A.M. PDT to learn about the major features of this release, as well as deprecations and removals to help plan for upgrades. For more information and registration, visit the event page on the CNCF Online Programs site.
Get Involved
The simplest way to get involved with Kubernetes is by joining one of the many Special Interest Groups (SIGs) that align with your interests.
Have something you’d like to broadcast to the Kubernetes community? Share your voice at our weekly community meeting, and through the channels below:
Find out more about contributing to Kubernetes at the Kubernetes Contributors website.
Follow us on Twitter @Kubernetesio for the latest updates.
Join the community discussion on Discuss.
Join the community on Slack.
Post questions (or answer questions) on Server Fault.
Share your Kubernetes story.
Read more about what’s happening with Kubernetes on the blog.
Learn more about the Kubernetes Release Team.
Spotlight on SIG ContribEx
Welcome to the world of Kubernetes and its vibrant contributor community! In this blog post, we'll be shining a spotlight on the Special Interest Group for Contributor Experience (SIG ContribEx), an essential component of the Kubernetes project.
SIG ContribEx in Kubernetes is responsible for developing and maintaining a healthy and productive community of contributors to the project. This involves identifying and addressing bottlenecks that may hinder the project's growth and feature velocity, such as pull request latency and the number of open pull requests and issues.
SIG ContribEx works to improve the overall contributor experience by creating and maintaining guidelines, tools, and processes that facilitate collaboration and communication among contributors. They also focus on community building and support, including outreach programs and mentorship initiatives to onboard and retain new contributors.
Ultimately, the role of SIG ContribEx is to foster a welcoming and inclusive environment that encourages contribution and supports the long-term sustainability of the Kubernetes project.
In this blog post, Fyka Ansari interviews Kaslin Fields, a DevRel Engineer at Google, who is a chair of SIG ContribEx, and Madhav Jivrajani, a Software Engineer at VMWare who serves as a SIG ContribEx Tech Lead. This interview covers various aspects of SIG ContribEx, including current initiatives, exciting developments, and how interested individuals can get involved and contribute to the group. It provides valuable insights into the workings of SIG ContribEx and highlights the importance of its role in the Kubernetes ecosystem.
Introductions
Fyka: Let's start by diving into your background and how you got involved in the Kubernetes ecosystem. Can you tell us more about that journey?
Kaslin: I first got involved in the Kubernetes ecosystem through my mentor, Jonathan Rippy, who introduced me to containers during my early days in tech. Eventually, I transitioned to a team working with containers, which sparked my interest in Kubernetes when it was announced. While researching Kubernetes in that role, I eagerly sought opportunities to engage with the containers/Kubernetes community. It was not until my subsequent job that I found a suitable role to contribute consistently. I joined SIG ContribEx, specifically in the Contributor Comms subproject, to both deepen my knowledge of Kubernetes and support the community better.
Madhav: My journey with Kubernetes began when I was a student, searching for interesting and exciting projects to work on. With my peers, I discovered open source and attended The New Contributor Workshop organized by the Kubernetes community. The workshop not only provided valuable insights into the community structure but also gave me a sense of warmth and welcome, which motivated me to join and remain involved. I realized that collaboration is at the heart of open-source communities, and to get answers and support, I needed to contribute and do my part. I started working on issues in ContribEx, particularly focusing on GitHub automation, despite not fully understanding the task at first. I continued to contribute for various technical and non-technical aspects of the project, finding it to be one of the most professionally rewarding experiences in my life.
Fyka: That's such an inspiration in itself! I'm sure beginners who are reading this got the ultimate motivation to take their first steps. Embracing the Learning journey, seeking mentorship, and engaging with the Kubernetes community can pave the way for exciting opportunities in the tech industry. Your stories proved the importance of starting small and being proactive, just like Madhav said Don't be afraid to take on tasks, even if you're uncertain at first.
Primary goals and scope
Fyka: Given your experience as a member of SIG ContribEx, could you tell us a bit about the group's primary goals and initiatives? Its current focus areas? What do you see as the scope of SIG ContribEx and the impact it has on the Kubernetes community?
Kaslin: SIG ContribEx's primary goals are to simplify the contributions of Kubernetes contributors and foster a welcoming community. It collaborates with other Kubernetes SIGs, such as planning the Contributor Summit at KubeCon, ensuring it meets the needs of various groups. The group's impact is evident in projects like updating org membership policies and managing critical platforms like Zoom, YouTube, and Slack. Its scope encompasses making the contributor experience smoother and supporting the overall Kubernetes community.
Madhav: The Kubernetes project has vertical SIGs and cross-cutting SIGs, ContribEx is a deeply cross-cutting SIG, impacting virtually every area of the Kubernetes community. Adding to Kaslin, sustainability in the Kubernetes project and community is critical now more than ever, it plays a central role in addressing critical issues, such as maintainer succession, by facilitating cohorts for SIGs to train experienced community members to take on leadership roles. Excellent examples include SIG CLI and SIG Apps, leading to the onboarding of new reviewers. Additionally, SIG ContribEx is essential in managing GitHub automation tools, including bots and commands used by contributors for interacting with Prow and other automation (label syncing, group and GitHub team management, etc).
Beginner's guide!
Fyka: I'll never forget talking to Kaslin when I joined the community and needed help with contributing. Kaslin, your quick and clear answers were a huge help in getting me started. Can you both give some tips for people new to contributing to Kubernetes? What makes SIG ContribEx a great starting point? Why should beginners and current contributors consider it? And what cool opportunities are there for newbies to jump in?
Kaslin: If you want to contribute to Kubernetes for the first time, it can be overwhelming to know where to start. A good option is to join SIG ContribEx as it offers great opportunities to know and serve the community. Within SIG ContribEx, various subprojects allow you to explore different parts of the Kubernetes project while you learn how contributions work. Once you know a bit more, it’s common for you to move to other SIGs within the project, and we think that’s wonderful. While many newcomers look for "good first issues" to start with, these opportunities can be scarce and get claimed quickly. Instead, the real benefit lies in attending meetings and getting to know the community. As you learn more about the project and the people involved, you'll be better equipped to offer your help, and the community will be more inclined to seek your assistance when needed. As a co-lead for the Contributor Comms subproject, I can confidently say that it's an excellent place for beginners to get involved. We have supportive leads and particularly beginner-friendly projects too.
Madhav: To begin, read the SIG README on GitHub, which provides an overview of the projects the SIG manages. While attending meetings is beneficial for all SIGs, it's especially recommended for SIG ContribEx, as each subproject gets dedicated slots for updates and areas that need help. If you can't attend in real-time due to time zone differences, you can catch the meeting recordings or Notes later.
Skills you learn!
Fyka: What skills do you look for when bringing in new contributors to SIG ContribEx, from passion to expertise? Additionally, what skills can contributors expect to develop while working with SIG ContribEx?
Kaslin: Skills folks need to have or will acquire vary depending on what area of ContribEx they work upon. Even within a subproject, a range of skills can be useful and/or developed. For example, the tech lead role involves technical tasks and overseeing automation, while the social media lead role requires excellent communication skills. Working with SIG ContribEx allows contributors to acquire various skills based on their chosen subproject. By participating in meetings, listening, learning, and taking on tasks related to their interests, they can develop and hone these skills. Some subprojects may require more specialized skills, like program management for the mentoring project, but all contributors can benefit from offering their talents to help teach others and contribute to the community.
Sub-projects under SIG ContribEx
Fyka: SIG ContribEx has several smaller projects. Can you tell me about the aims of these projects and how they've impacted the Kubernetes community?
Kaslin: Some SIGs have one or two subprojects and some have none at all, but in SIG ContribEx, we have ELEVEN!
Here’s a list of them and their respective mission statements
- Community: Manages the community repository, documentation, and operations.
- Community management: Handles communication platforms and policies for the community.
- Contributor-comms: Focuses on promoting the success of Kubernetes contributors through marketing.
- Contributors-documentation: Writes and maintains documentation for contributing to Kubernetes.
- Devstats: Maintains and updates the Kubernetes statistics website.
- Elections: Oversees community elections and maintains related documentation and software.
- Events: Organizes contributor-focused events like the Contributor Summit.
- Github management: Manages permissions, repositories, and groups on GitHub.
- Mentoring: Develop programs to help contributors progress in their contributions.
- Sigs-GitHub-actions: Repository for GitHub actions related to all SIGs in Kubernetes.
- Slack-infra: Creates and maintains tools and automation for Kubernetes Slack.
Madhav: Also, Devstats is critical from a sustainability standpoint!
(If you are willing to learn more and get involved with any of these sub-projects, check out the SIG ContribEx README)._
Accomplishments
Fyka: With that said, any SIG-related accomplishment that you’re proud of?
Kaslin: I'm proud of the accomplishments made by SIG ContribEx and its contributors in supporting the community. Some of the recent achievements include:
- Establishment of the elections subproject: Kubernetes is a massive project, and ensuring smooth leadership transitions is crucial. The contributors in this subproject organize fair and consistent elections, which helps keep the project running effectively.
- New issue triage proces: With such a large open-source project like Kubernetes, there's always a lot of work to be done. To ensure things progress safely, we implemented new labels and updated functionality for issue triage using our PROW tool. This reduces bottlenecks in the workflow and allows leaders to accomplish more.
- New org membership requirements: Becoming an org member in Kubernetes can be overwhelming for newcomers. We view org membership as a significant milestone for contributors aiming to take on leadership roles. We recently updated the rules to automatically remove privileges from inactive members, making sure that the right people have access to the necessary tools and responsibilities.
Overall, these accomplishments have greatly benefited our fellow contributors and strengthened the Kubernetes community.
Upcoming initiatives
Fyka: Could you give us a sneak peek into what's next for the group? We're excited to hear about upcoming projects and initiatives from this dynamic team.
Madhav: We’d love for more groups to sign up for mentoring cohorts! We’re probably going to have to spend some time polishing the process around that.
Final thoughts
Fyka: As we wrap up our conversation, would you like to share some final thoughts for those interested in contributing to SIG ContribEx or getting involved with Kubernetes?
Madhav: Kubernetes is meant to be overwhelming and difficult initially! You’re coming into something that’s taken multiple people, from multiple countries, multiple years to build. Embrace that diversity! Use the high entropy initially to collide around and gain as much knowledge about the project and community as possible before you decide to settle in your niche.
Fyka: Thank You Madhav and Kaslin, it was an absolute pleasure chatting about SIG ContribEx and your experiences as a member. It's clear that the role of SIG ContribEx in Kubernetes is significant and essential, ensuring scalability, growth and productivity, and I hope this interview inspires more people to get involved and contribute to Kubernetes. I wish SIG ContribEx all the best, and can't wait to see what exciting things lie ahead!
What next?
We love meeting new contributors and helping them in investigating different Kubernetes project spaces. If you are interested in getting more involved with SIG ContribEx, here are some resources for you to get started:
- GitHub
- Mailing list
- Open Community Issues/PRs
- Slack
- Slack channel #sig-contribex
- SIG Contribex also hosted a KubeCon talk about studying Kubernetes Contributor experiences.
Spotlight on SIG CLI
In the world of Kubernetes, managing containerized applications at scale requires powerful and efficient tools. The command-line interface (CLI) is an integral part of any developer or operator’s toolkit, offering a convenient and flexible way to interact with a Kubernetes cluster.
SIG CLI plays a crucial role in improving the Kubernetes
CLI
experience by focusing on the development and enhancement of
kubectl, the primary command-line tool for Kubernetes.
In this SIG CLI Spotlight, Arpit Agrawal, SIG ContribEx-Comms team member, talked with Katrina Verey, Tech Lead & Chair of SIG CLI,and Maciej Szulik, SIG CLI Batch Lead, about SIG CLI, current projects, challenges and how anyone can get involved.
So, whether you are a seasoned Kubernetes enthusiast or just getting started, understanding the significance of SIG CLI will undoubtedly enhance your Kubernetes journey.
Introductions
Arpit: Could you tell us a bit about yourself, your role, and how you got involved in SIG CLI?
Maciej: I’m one of the technical leads for SIG-CLI. I was working on Kubernetes in multiple areas since 2014, and in 2018 I got appointed a lead.
Katrina: I’ve been working with Kubernetes as an end-user since 2016, but it was only in late 2019 that I discovered how well SIG CLI aligned with my experience from internal projects. I started regularly attending meetings and made a few small PRs, and by 2021 I was working more deeply with the Kustomize team specifically. Later that year, I was appointed to my current roles as subproject owner for Kustomize and KRM Functions, and as SIG CLI Tech Lead and Chair.
About SIG CLI
Arpit: Thank you! Could you share with us the purpose and goals of SIG CLI?
Maciej: Our charter has the most detailed description, but in few words, we handle all CLI tooling that helps you manage your Kubernetes manifests and interact with your Kubernetes clusters.
Arpit: I see. And how does SIG CLI work to promote best-practices for CLI development and usage in the cloud native ecosystem?
Maciej: Within kubectl, we have several on-going efforts that
try to encourage new contributors to align existing commands to new
standards. We publish several libraries which hopefully make it easier
to write CLIs that interact with Kubernetes APIs, such as cli-runtime
and
kyaml.
Katrina: We also maintain some interoperability specifications for CLI tooling, such as the KRM Functions Specification (GA) and the new ApplySet Specification (alpha).
Current projects and challenges
Arpit: Going through the README file, it’s clear SIG CLI has a number of subprojects, could you highlight some important ones?
Maciej: The four most active subprojects that are, in my opinion, worthy of your time investment would be:
kubectl: the canonical Kubernetes CLI.- Kustomize: a template-free customization tool for Kubernetes yaml manifest files.
- KUI - a GUI interface to Kubernetes, think
kubectlon steroids. krew: a plugin manager forkubectl.
Arpit: Are there any upcoming initiatives or developments that SIG CLI is working on?
Maciej: There are always several initiatives we’re working on at any given point in time. It’s best to join one of our calls to learn about the current ones.
Katrina: For major features, you can check out our open
KEPs. For instance, in
1.27 we introduced alphas for a new pruning mode in kubectl
apply,
and for kubectl create plugins. Exciting ideas that are currently
under discussion include an interactive mode for kubectl delete
(KEP
3895)
and the kuberc user preferences file (KEP
3104).
Arpit: Could you discuss any challenges that SIG CLI faces in its efforts to improve CLIs for cloud-native technologies? What are the future efforts to solve them?
Katrina: The biggest challenge we’re facing with every decision is
backwards compatibility and ensuring we don’t break existing users. It
frequently happens that fixing what's on the surface may seem
straightforward, but even fixing a bug could constitute a breaking
change for some users, which means we need to go through an extended
deprecation process to change it, or in some cases we can’t change it
at all. Another challenge is the need to balance customization with
usability in the flag sets we expose on our tools. For example, we get
many proposals for new flags that would certainly be useful to some
users, but not a large enough subset to justify the increased
complexity having them in the tool entails for everyone. The kuberc
proposal may help with some of these problems by giving individual
users the ability to set or override default values we can’t change,
and even create custom subcommands via aliases
Arpit: With every new version release of Kubernetes, maintaining consistency and integrity is surely challenging: how does the SIG CLI team tackle it?
Maciej: This is mostly similar to the topic mentioned in the previous question: every new change, especially to existing commands goes through a lot of scrutiny to ensure we don’t break existing users. At any point in time we have to keep a reasonable balance between features and not breaking users.
Future plans and contribution
Arpit: How do you see the role of CLI tools in the cloud-native ecosystem evolving in the future?
Maciej: I think that CLI tools were and will always be an important piece of the ecosystem. Whether used by administrators on remote machines that don’t have GUI or in every CI/CD pipeline, they are irreplaceable.
Arpit: Kubernetes is a community-driven project. Any recommendation for anyone looking into getting involved in SIG CLI work? Where should they start? Are there any prerequisites?
Maciej: There are no prerequisites other than a little bit of free time on your hands and willingness to learn something new :-)
Katrina: A working knowledge of Go often helps, but we also have areas in need of non-code contributions, such as the Kustomize docs consolidation project.
Confidential Kubernetes: Use Confidential Virtual Machines and Enclaves to improve your cluster security
In this blog post, we will introduce the concept of Confidential Computing (CC) to improve any computing environment's security and privacy properties. Further, we will show how the Cloud-Native ecosystem, particularly Kubernetes, can benefit from the new compute paradigm.
Confidential Computing is a concept that has been introduced previously in the cloud-native world. The Confidential Computing Consortium (CCC) is a project community in the Linux Foundation that already worked on Defining and Enabling Confidential Computing. In the Whitepaper, they provide a great motivation for the use of Confidential Computing:
Data exists in three states: in transit, at rest, and in use. …Protecting sensitive data in all of its states is more critical than ever. Cryptography is now commonly deployed to provide both data confidentiality (stopping unauthorized viewing) and data integrity (preventing or detecting unauthorized changes). While techniques to protect data in transit and at rest are now commonly deployed, the third state - protecting data in use - is the new frontier.
Confidential Computing aims to primarily solve the problem of protecting data in use by introducing a hardware-enforced Trusted Execution Environment (TEE).
Trusted Execution Environments
For more than a decade, Trusted Execution Environments (TEEs) have been available in commercial computing hardware in the form of Hardware Security Modules (HSMs) and Trusted Platform Modules (TPMs). These technologies provide trusted environments for shielded computations. They can store highly sensitive cryptographic keys and carry out critical cryptographic operations such as signing or encrypting data.
TPMs are optimized for low cost, allowing them to be integrated into mainboards and act as a system's physical root of trust. To keep the cost low, TPMs are limited in scope, i.e., they provide storage for only a few keys and are capable of just a small subset of cryptographic operations.
In contrast, HSMs are optimized for high performance, providing secure storage for far more keys and offering advanced physical attack detection mechanisms. Additionally, high-end HSMs can be programmed so that arbitrary code can be compiled and executed. The downside is that they are very costly. A managed CloudHSM from AWS costs around $1.50 / hour or ~$13,500 / year.
In recent years, a new kind of TEE has gained popularity. Technologies like AMD SEV, Intel SGX, and Intel TDX provide TEEs that are closely integrated with userspace. Rather than low-power or high-performance devices that support specific use cases, these TEEs shield normal processes or virtual machines and can do so with relatively low overhead. These technologies each have different design goals, advantages, and limitations, and they are available in different environments, including consumer laptops, servers, and mobile devices.
Additionally, we should mention ARM TrustZone, which is optimized for embedded devices such as smartphones, tablets, and smart TVs, as well as AWS Nitro Enclaves, which are only available on Amazon Web Services and have a different threat model compared to the CPU-based solutions by Intel and AMD.
IBM Secure Execution for Linux lets you run your Kubernetes cluster's nodes as KVM guests within a trusted execution environment on IBM Z series hardware. You can use this hardware-enhanced virtual machine isolation to provide strong isolation between tenants in a cluster, with hardware attestation about the (virtual) node's integrity.
Security properties and feature set
In the following sections, we will review the security properties and additional features these new technologies bring to the table. Only some solutions will provide all properties; we will discuss each technology in further detail in their respective section.
The Confidentiality property ensures that information cannot be viewed while it is in use in the TEE. This provides us with the highly desired feature to secure data in use. Depending on the specific TEE used, both code and data may be protected from outside viewers. The differences in TEE architectures and how their use in a cloud native context are important considerations when designing end-to-end security for sensitive workloads with a minimal Trusted Computing Base (TCB) in mind. CCC has recently worked on a common vocabulary and supporting material that helps to explain where confidentiality boundaries are drawn with the different TEE architectures and how that impacts the TCB size.
Confidentiality is a great feature, but an attacker can still manipulate or inject arbitrary code and data for the TEE to execute and, therefore, easily leak critical information. Integrity guarantees a TEE owner that neither code nor data can be tampered with while running critical computations.
Availability is a basic property often discussed in the context of information security. However, this property is outside the scope of most TEEs. Usually, they can be controlled (shut down, restarted, …) by some higher level abstraction. This could be the CPU itself, the hypervisor, or the kernel. This is to preserve the overall system's availability, not the TEE itself. When running in the cloud, availability is usually guaranteed by the cloud provider in terms of Service Level Agreements (SLAs) and is not cryptographically enforceable.
Confidentiality and Integrity by themselves are only helpful in some cases. For example, consider a TEE running in a remote cloud. How would you know the TEE is genuine and running your intended software? It could be an imposter stealing your data as soon as you send it over. This fundamental problem is addressed by Attestability. Attestation allows us to verify the identity, confidentiality, and integrity of TEEs based on cryptographic certificates issued from the hardware itself. This feature can also be made available to clients outside of the confidential computing hardware in the form of remote attestation.
TEEs can hold and process information that predates or outlives the trusted environment. That could mean across restarts, different versions, or platform migrations. Therefore Recoverability is an important feature. Data and the state of a TEE need to be sealed before they are written to persistent storage to maintain confidentiality and integrity guarantees. The access to such sealed data needs to be well-defined. In most cases, the unsealing is bound to a TEE's identity. Hence, making sure the recovery can only happen in the same confidential context.
This does not have to limit the flexibility of the overall system. AMD SEV-SNP's migration agent (MA) allows users to migrate a confidential virtual machine to a different host system while keeping the security properties of the TEE intact.
Feature comparison
These sections of the article will dive a little bit deeper into the specific implementations, compare supported features and analyze their security properties.
AMD SEV
AMD's Secure Encrypted Virtualization (SEV) technologies are a set of features to enhance the security of virtual machines on AMD's server CPUs. SEV transparently encrypts the memory of each VM with a unique key. SEV can also calculate a signature of the memory contents, which can be sent to the VM's owner as an attestation that the initial guest memory was not manipulated.
The second generation of SEV, known as Encrypted State or SEV-ES, provides additional protection from the hypervisor by encrypting all CPU register contents when a context switch occurs.
The third generation of SEV, Secure Nested Paging or SEV-SNP, is designed to prevent software-based integrity attacks and reduce the risk associated with compromised memory integrity. The basic principle of SEV-SNP integrity is that if a VM can read a private (encrypted) memory page, it must always read the value it last wrote.
Additionally, by allowing the guest to obtain remote attestation statements dynamically, SNP enhances the remote attestation capabilities of SEV.
AMD SEV has been implemented incrementally. New features and improvements have been added with each new CPU generation. The Linux community makes these features available as part of the KVM hypervisor and for host and guest kernels. The first SEV features were discussed and implemented in 2016 - see AMD x86 Memory Encryption Technologies from the 2016 Usenix Security Symposium. The latest big addition was SEV-SNP guest support in Linux 5.19.
Confidential VMs based on AMD SEV-SNP are available in Microsoft Azure since July 2022. Similarly, Google Cloud Platform (GCP) offers confidential VMs based on AMD SEV-ES.
Intel SGX
Intel's Software Guard Extensions has been available since 2015 and were introduced with the Skylake architecture.
SGX is an instruction set that enables users to create a protected and isolated process called an enclave. It provides a reverse sandbox that protects enclaves from the operating system, firmware, and any other privileged execution context.
The enclave memory cannot be read or written from outside the enclave, regardless of the current privilege level and CPU mode. The only way to call an enclave function is through a new instruction that performs several protection checks. Its memory is encrypted. Tapping the memory or connecting the DRAM modules to another system will yield only encrypted data. The memory encryption key randomly changes every power cycle. The key is stored within the CPU and is not accessible.
Since the enclaves are process isolated, the operating system's libraries are not usable as is; therefore, SGX enclave SDKs are required to compile programs for SGX. This also implies applications need to be designed and implemented to consider the trusted/untrusted isolation boundaries. On the other hand, applications get built with very minimal TCB.
An emerging approach to easily transition to process-based confidential computing and avoid the need to build custom applications is to utilize library OSes. These OSes facilitate running native, unmodified Linux applications inside SGX enclaves. A library OS intercepts all application requests to the host OS and processes them securely without the application knowing it's running a TEE.
The 3rd generation Xeon CPUs (aka Ice Lake Server - "ICX") and later generations did switch to using a technology called Total Memory Encryption - Multi-Key (TME-MK) that uses AES-XTS, moving away from the Memory Encryption Engine that the consumer and Xeon E CPUs used. This increased the possible enclave page cache (EPC) size (up to 512GB/CPU) and improved performance. More info about SGX on multi-socket platforms can be found in the Whitepaper.
A list of supported platforms is available from Intel.
SGX is available on Azure, Alibaba Cloud, IBM, and many more.
Intel TDX
Where Intel SGX aims to protect the context of a single process, Intel's Trusted Domain Extensions protect a full virtual machine and are, therefore, most closely comparable to AMD SEV.
As with SEV-SNP, guest support for TDX was merged in Linux Kernel 5.19. However, hardware support will land with Sapphire Rapids during 2023: Alibaba Cloud provides invitational preview instances, and Azure has announced its TDX preview opportunity.
Overhead analysis
The benefits that Confidential Computing technologies provide via strong isolation and enhanced security to customer data and workloads are not for free. Quantifying this impact is challenging and depends on many factors: The TEE technology, the benchmark, the metrics, and the type of workload all have a huge impact on the expected performance overhead.
Intel SGX-based TEEs are hard to benchmark, as shown by different papers. The chosen SDK/library OS, the application itself, as well as the resource requirements (especially large memory requirements) have a huge impact on performance. A single-digit percentage overhead can be expected if an application is well suited to run inside an enclave.
Confidential virtual machines based on AMD SEV-SNP require no changes to the executed program and operating system and are a lot easier to benchmark. A benchmark from Azure and AMD shows that SEV-SNP VM overhead is <10%, sometimes as low as 2%.
Although there is a performance overhead, it should be low enough to enable real-world workloads to run in these protected environments and improve the security and privacy of our data.
Confidential Computing compared to FHE, ZKP, and MPC
Fully Homomorphic Encryption (FHE), Zero Knowledge Proof/Protocol (ZKP), and Multi-Party Computations (MPC) are all a form of encryption or cryptographic protocols that offer similar security guarantees to Confidential Computing but do not require hardware support.
Fully (also partially and somewhat) homomorphic encryption allows one to perform computations, such as addition or multiplication, on encrypted data. This provides the property of encryption in use but does not provide integrity protection or attestation like confidential computing does. Therefore, these two technologies can complement to each other.
Zero Knowledge Proofs or Protocols are a privacy-preserving technique (PPT) that allows one party to prove facts about their data without revealing anything else about the data. ZKP can be used instead of or in addition to Confidential Computing to protect the privacy of the involved parties and their data. Similarly, Multi-Party Computation enables multiple parties to work together on a computation, i.e., each party provides their data to the result without leaking it to any other parties.
Use cases of Confidential Computing
The presented Confidential Computing platforms show that both the isolation of a single container process and, therefore, minimization of the trusted computing base and the isolation of a `` full virtual machine are possible. This has already enabled a lot of interesting and secure projects to emerge:
Confidential Containers
Confidential Containers (CoCo) is a CNCF sandbox project that isolates Kubernetes pods inside of confidential virtual machines.
CoCo can be installed on a Kubernetes cluster with an operator. The operator will create a set of runtime classes that can be used to deploy pods inside an enclave on several different platforms, including AMD SEV, Intel TDX, Secure Execution for IBM Z, and Intel SGX.
CoCo is typically used with signed and/or encrypted container images which are pulled, verified, and decrypted inside the enclave. Secrets, such as image decryption keys, are conditionally provisioned to the enclave by a trusted Key Broker Service that validates the hardware evidence of the TEE prior to releasing any sensitive information.
CoCo has several deployment models. Since the Kubernetes control plane is outside the TCB, CoCo is suitable for managed environments. CoCo can be run in virtual environments that don't support nesting with the help of an API adaptor that starts pod VMs in the cloud. CoCo can also be run on bare metal, providing strong isolation even in multi-tenant environments.
Managed confidential Kubernetes
Azure and GCP both support the use of confidential virtual machines as worker nodes for their managed Kubernetes offerings.
Both services aim for better workload protection and security guarantees by enabling memory encryption for container workloads. However, they don't seek to fully isolate the cluster or workloads against the service provider or infrastructure. Specifically, they don't offer a dedicated confidential control plane or expose attestation capabilities for the confidential cluster/nodes.
Azure also enables Confidential Containers in their managed Kubernetes offering. They support the creation based on Intel SGX enclaves and AMD SEV-based VMs.
Constellation
Constellation is a Kubernetes engine that aims to provide the best possible data security. Constellation wraps your entire Kubernetes cluster into a single confidential context that is shielded from the underlying cloud infrastructure. Everything inside is always encrypted, including at runtime in memory. It shields both the worker and control plane nodes. In addition, it already integrates with popular CNCF software such as Cilium for secure networking and provides extended CSI drivers to write data securely.
Occlum and Gramine
Occlum and Gramine are examples of open source library OS projects that can be used to run unmodified applications in SGX enclaves. They are member projects under the CCC, but similar projects and products maintained by companies also exist. With these libOS projects, existing containerized applications can be easily converted into confidential computing enabled containers. Many curated prebuilt containers are also available.
Where are we today? Vendors, limitations, and FOSS landscape
As we hope you have seen from the previous sections, Confidential Computing is a powerful new concept to improve security, but we are still in the (early) adoption phase. New products are starting to emerge to take advantage of the unique properties.
Google and Microsoft are the first major cloud providers to have confidential offerings that can run unmodified applications inside a protected boundary. Still, these offerings are limited to compute, while end-to-end solutions for confidential databases, cluster networking, and load balancers have to be self-managed.
These technologies provide opportunities to bring even the most sensitive workloads into the cloud and enables them to leverage all the tools in the CNCF landscape.
Call to action
If you are currently working on a high-security product that struggles to run in the public cloud due to legal requirements or are looking to bring the privacy and security of your cloud-native project to the next level: Reach out to all the great projects we have highlighted! Everyone is keen to improve the security of our ecosystem, and you can play a vital role in that journey.
Verifying Container Image Signatures Within CRI Runtimes
The Kubernetes community has been signing their container image-based artifacts
since release v1.24. While the graduation of the corresponding enhancement
from alpha to beta in v1.26 introduced signatures for the binary artifacts,
other projects followed the approach by providing image signatures for their
releases, too. This means that they either create the signatures within their
own CI/CD pipelines, for example by using GitHub actions, or rely on the
Kubernetes image promotion process to automatically sign the images by
proposing pull requests to the k/k8s.io repository. A requirement for
using this process is that the project is part of the kubernetes or
kubernetes-sigs GitHub organization, so that they can utilize the community
infrastructure for pushing images into staging buckets.
Assuming that a project now produces signed container image artifacts, how can one actually verify the signatures? It is possible to do it manually like outlined in the official Kubernetes documentation. The problem with this approach is that it involves no automation at all and should be only done for testing purposes. In production environments, tools like the sigstore policy-controller can help with the automation. These tools provide a higher level API by using Custom Resource Definitions (CRD) as well as an integrated admission controller and webhook to verify the signatures.
The general usage flow for an admission controller based verification is:

A key benefit of this architecture is simplicity: A single instance within the cluster validates the signatures before any image pull can happen in the container runtime on the nodes, which gets initiated by the kubelet. This benefit also brings along the issue of separation: The node which should pull the container image is not necessarily the same node that performs the admission. This means that if the controller is compromised, then a cluster-wide policy enforcement can no longer be possible.
One way to solve this issue is doing the policy evaluation directly within the Container Runtime Interface (CRI) compatible container runtime. The runtime is directly connected to the kubelet on a node and does all the tasks like pulling images. CRI-O is one of those available runtimes and will feature full support for container image signature verification in v1.28.
How does it work? CRI-O reads a file called policy.json, which
contains all the rules defined for container images. For example, you can define a
policy which only allows signed images quay.io/crio/signed for any tag or
digest like this:
{
"default": [{ "type": "reject" }],
"transports": {
"docker": {
"quay.io/crio/signed": [
{
"type": "sigstoreSigned",
"signedIdentity": { "type": "matchRepository" },
"fulcio": {
"oidcIssuer": "https://github.com/login/oauth",
"subjectEmail": "sgrunert@redhat.com",
"caData": "LS0tLS1CRUdJTiBDRVJUSUZJQ0FURS0tLS0tCk1JSUI5ekNDQVh5Z0F3SUJBZ0lVQUxaTkFQRmR4SFB3amVEbG9Ed3lZQ2hBTy80d0NnWUlLb1pJemowRUF3TXcKS2pFVk1CTUdBMVVFQ2hNTWMybG5jM1J2Y21VdVpHVjJNUkV3RHdZRFZRUURFd2h6YVdkemRHOXlaVEFlRncweQpNVEV3TURjeE16VTJOVGxhRncwek1URXdNRFV4TXpVMk5UaGFNQ294RlRBVEJnTlZCQW9UREhOcFozTjBiM0psCkxtUmxkakVSTUE4R0ExVUVBeE1JYzJsbmMzUnZjbVV3ZGpBUUJnY3Foa2pPUFFJQkJnVXJnUVFBSWdOaUFBVDcKWGVGVDRyYjNQUUd3UzRJYWp0TGszL09sbnBnYW5nYUJjbFlwc1lCcjVpKzR5bkIwN2NlYjNMUDBPSU9aZHhleApYNjljNWlWdXlKUlErSHowNXlpK1VGM3VCV0FsSHBpUzVzaDArSDJHSEU3U1hyazFFQzVtMVRyMTlMOWdnOTJqCll6QmhNQTRHQTFVZER3RUIvd1FFQXdJQkJqQVBCZ05WSFJNQkFmOEVCVEFEQVFIL01CMEdBMVVkRGdRV0JCUlkKd0I1ZmtVV2xacWw2ekpDaGt5TFFLc1hGK2pBZkJnTlZIU01FR0RBV2dCUll3QjVma1VXbFpxbDZ6SkNoa3lMUQpLc1hGK2pBS0JnZ3Foa2pPUFFRREF3TnBBREJtQWpFQWoxbkhlWFpwKzEzTldCTmErRURzRFA4RzFXV2cxdENNCldQL1dIUHFwYVZvMGpoc3dlTkZaZ1NzMGVFN3dZSTRxQWpFQTJXQjlvdDk4c0lrb0YzdlpZZGQzL1Z0V0I1YjkKVE5NZWE3SXgvc3RKNVRmY0xMZUFCTEU0Qk5KT3NRNHZuQkhKCi0tLS0tRU5EIENFUlRJRklDQVRFLS0tLS0="
},
"rekorPublicKeyData": "LS0tLS1CRUdJTiBQVUJMSUMgS0VZLS0tLS0KTUZrd0V3WUhLb1pJemowQ0FRWUlLb1pJemowREFRY0RRZ0FFMkcyWSsydGFiZFRWNUJjR2lCSXgwYTlmQUZ3cgprQmJtTFNHdGtzNEwzcVg2eVlZMHp1ZkJuaEM4VXIvaXk1NUdoV1AvOUEvYlkyTGhDMzBNOStSWXR3PT0KLS0tLS1FTkQgUFVCTElDIEtFWS0tLS0tCg=="
}
]
}
}
}
CRI-O has to be started to use that policy as the global source of truth:
> sudo crio --log-level debug --signature-policy ./policy.json
CRI-O is now able to pull the image while verifying its signatures. This can be
done by using crictl (cri-tools), for example:
> sudo crictl -D pull quay.io/crio/signed
DEBU[…] get image connection
DEBU[…] PullImageRequest: &PullImageRequest{Image:&ImageSpec{Image:quay.io/crio/signed,Annotations:map[string]string{},},Auth:nil,SandboxConfig:nil,}
DEBU[…] PullImageResponse: &PullImageResponse{ImageRef:quay.io/crio/signed@sha256:18b42e8ea347780f35d979a829affa178593a8e31d90644466396e1187a07f3a,}
Image is up to date for quay.io/crio/signed@sha256:18b42e8ea347780f35d979a829affa178593a8e31d90644466396e1187a07f3a
The CRI-O debug logs will also indicate that the signature got successfully validated:
DEBU[…] IsRunningImageAllowed for image docker:quay.io/crio/signed:latest
DEBU[…] Using transport "docker" specific policy section quay.io/crio/signed
DEBU[…] Reading /var/lib/containers/sigstore/crio/signed@sha256=18b42e8ea347780f35d979a829affa178593a8e31d90644466396e1187a07f3a/signature-1
DEBU[…] Looking for sigstore attachments in quay.io/crio/signed:sha256-18b42e8ea347780f35d979a829affa178593a8e31d90644466396e1187a07f3a.sig
DEBU[…] GET https://quay.io/v2/crio/signed/manifests/sha256-18b42e8ea347780f35d979a829affa178593a8e31d90644466396e1187a07f3a.sig
DEBU[…] Content-Type from manifest GET is "application/vnd.oci.image.manifest.v1+json"
DEBU[…] Found a sigstore attachment manifest with 1 layers
DEBU[…] Fetching sigstore attachment 1/1: sha256:8276724a208087e73ae5d9d6e8f872f67808c08b0acdfdc73019278807197c45
DEBU[…] Downloading /v2/crio/signed/blobs/sha256:8276724a208087e73ae5d9d6e8f872f67808c08b0acdfdc73019278807197c45
DEBU[…] GET https://quay.io/v2/crio/signed/blobs/sha256:8276724a208087e73ae5d9d6e8f872f67808c08b0acdfdc73019278807197c45
DEBU[…] Requirement 0: allowed
DEBU[…] Overall: allowed
All of the defined fields like oidcIssuer and subjectEmail in the policy
have to match, while fulcio.caData and rekorPublicKeyData are the public
keys from the upstream fulcio (OIDC PKI) and rekor
(transparency log) instances.
This means that if you now invalidate the subjectEmail of the policy, for example to
wrong@mail.com:
> jq '.transports.docker."quay.io/crio/signed"[0].fulcio.subjectEmail = "wrong@mail.com"' policy.json > new-policy.json
> mv new-policy.json policy.json
Then remove the image, since it already exists locally:
> sudo crictl rmi quay.io/crio/signed
Now when you pull the image, CRI-O complains that the required email is wrong:
> sudo crictl pull quay.io/crio/signed
FATA[…] pulling image: rpc error: code = Unknown desc = Source image rejected: Required email wrong@mail.com not found (got []string{"sgrunert@redhat.com"})
It is also possible to test an unsigned image against the policy. For that you
have to modify the key quay.io/crio/signed to something like
quay.io/crio/unsigned:
> sed -i 's;quay.io/crio/signed;quay.io/crio/unsigned;' policy.json
If you now pull the container image, CRI-O will complain that no signature exists for it:
> sudo crictl pull quay.io/crio/unsigned
FATA[…] pulling image: rpc error: code = Unknown desc = SignatureValidationFailed: Source image rejected: A signature was required, but no signature exists
It is important to mention that CRI-O will match the
.critical.identity.docker-reference field within the signature to match with
the image repository. For example, if you verify the image
registry.k8s.io/kube-apiserver-amd64:v1.28.0-alpha.3, then the corresponding
docker-reference should be registry.k8s.io/kube-apiserver-amd64:
> cosign verify registry.k8s.io/kube-apiserver-amd64:v1.28.0-alpha.3 \
--certificate-identity krel-trust@k8s-releng-prod.iam.gserviceaccount.com \
--certificate-oidc-issuer https://accounts.google.com \
| jq -r '.[0].critical.identity."docker-reference"'
…
registry.k8s.io/kubernetes/kube-apiserver-amd64
The Kubernetes community introduced registry.k8s.io as proxy mirror for
various registries. Before the release of kpromo v4.0.2, images
had been signed with the actual mirror rather than registry.k8s.io:
> cosign verify registry.k8s.io/kube-apiserver-amd64:v1.28.0-alpha.2 \
--certificate-identity krel-trust@k8s-releng-prod.iam.gserviceaccount.com \
--certificate-oidc-issuer https://accounts.google.com \
| jq -r '.[0].critical.identity."docker-reference"'
…
asia-northeast2-docker.pkg.dev/k8s-artifacts-prod/images/kubernetes/kube-apiserver-amd64
The change of the docker-reference to registry.k8s.io makes it easier for
end users to validate the signatures, because they cannot know anything about the
underlying infrastructure being used. The feature to set the identity on image
signing has been added to cosign via the flag sign --sign-container-identity as well and will be part of its upcoming release.
The Kubernetes image pull error code SignatureValidationFailed got recently added to
Kubernetes and will be available from v1.28. This error code allows
end-users to understand image pull failures directly from the kubectl CLI. For
example, if you run CRI-O together with Kubernetes using the policy which requires
quay.io/crio/unsigned to be signed, then a pod definition like this:
apiVersion: v1
kind: Pod
metadata:
name: pod
spec:
containers:
- name: container
image: quay.io/crio/unsigned
Will cause the SignatureValidationFailed error when applying the pod manifest:
> kubectl apply -f pod.yaml
pod/pod created
> kubectl get pods
NAME READY STATUS RESTARTS AGE
pod 0/1 SignatureValidationFailed 0 4s
> kubectl describe pod pod | tail -n8
Type Reason Age From Message
---- ------ ---- ---- -------
Normal Scheduled 58s default-scheduler Successfully assigned default/pod to 127.0.0.1
Normal BackOff 22s (x2 over 55s) kubelet Back-off pulling image "quay.io/crio/unsigned"
Warning Failed 22s (x2 over 55s) kubelet Error: ImagePullBackOff
Normal Pulling 9s (x3 over 58s) kubelet Pulling image "quay.io/crio/unsigned"
Warning Failed 6s (x3 over 55s) kubelet Failed to pull image "quay.io/crio/unsigned": SignatureValidationFailed: Source image rejected: A signature was required, but no signature exists
Warning Failed 6s (x3 over 55s) kubelet Error: SignatureValidationFailed
This overall behavior provides a more Kubernetes native experience and does not rely on third party software to be installed in the cluster.
There are still a few corner cases to consider: For example, what if you want to
allow policies per namespace in the same way the policy-controller supports it?
Well, there is an upcoming CRI-O feature in v1.28 for that! CRI-O will support
the --signature-policy-dir / signature_policy_dir option, which defines the
root path for pod namespace-separated signature policies. This means that CRI-O
will lookup that path and assemble a policy like <SIGNATURE_POLICY_DIR>/<NAMESPACE>.json,
which will be used on image pull if existing. If no pod namespace is
provided on image pull (via the sandbox config), or the
concatenated path is non-existent, then CRI-O's global policy will be used as
fallback.
Another corner case to consider is critical for the correct signature verification within container runtimes: The kubelet only invokes container image pulls if the image does not already exist on disk. This means that an unrestricted policy from Kubernetes namespace A can allow pulling an image, while namespace B is not able to enforce the policy because it already exits on the node. Finally, CRI-O has to verify the policy not only on image pull, but also on container creation. This fact makes things even a bit more complicated, because the CRI does not really pass down the user specified image reference on container creation, but an already resolved image ID, or digest. A small change to the CRI can help with that.
Now that everything happens within the container runtime, someone has to maintain and define the policies to provide a good user experience around that feature. The CRDs of the policy-controller are great, while we could imagine that a daemon within the cluster can write the policies for CRI-O per namespace. This would make any additional hook obsolete and moves the responsibility of verifying the image signature to the actual instance which pulls the image. I evaluated other possible paths toward a better container image signature verification within plain Kubernetes, but I could not find a great fit for a native API. This means that I believe that a CRD is the way to go, but users still need an instance which actually serves it.
Thank you for reading this blog post! If you're interested in more, providing feedback or asking for help, then feel free to get in touch with me directly via Slack (#crio) or the SIG Node mailing list.
dl.k8s.io to adopt a Content Delivery Network
We're happy to announce that dl.k8s.io, home of the official Kubernetes binaries, will soon be powered by Fastly.
Fastly is known for its high-performance content delivery network (CDN) designed to deliver content quickly and reliably around the world. With its powerful network, Fastly will help us deliver official Kubernetes binaries to users faster and more reliably than ever before.
The decision to use Fastly was made after an extensive evaluation process in which we carefully evaluated several potential content delivery network providers. Ultimately, we chose Fastly because of their commitment to the open internet and proven track record of delivering fast and secure digital experiences to some of the most known open source projects (through their Fast Forward program).
What you need to know about this change
- On Monday, July 24th, the IP addresses and backend storage associated with the dl.k8s.io domain name will change.
- The change will not impact the vast majority of users since the domain name will remain the same.
- If you restrict access to specific IP ranges, access to the dl.k8s.io domain could stop working.
If you think you may be impacted or want to know more about this change, please keep reading.
Why are we making this change
The official Kubernetes binaries site, dl.k8s.io, is used by thousands of users all over the world, and currently serves more than 5 petabytes of binaries each month. This change will allow us to improve access to those resources by leveraging a world-wide CDN.
Does this affect dl.k8s.io only, or are other domains also affected?
Only dl.k8s.io will be affected by this change.
My company specifies the domain names that we are allowed to be accessed. Will this change affect the domain name?
No, the domain name (dl.k8s.io) will remain the same: no change will be
necessary, and access to the Kubernetes release binaries site should not be
affected.
My company uses some form of IP filtering. Will this change affect access to the site?
If IP-based filtering is in place, it’s possible that access to the site will be affected when the new IP addresses become active.
If my company doesn’t use IP addresses to restrict network traffic, do we need to do anything?
No, the switch to the CDN should be transparent.
Will there be a dual running period?
No, it is a cutover. You can, however, test your networks right now to check
if they can route to the new public IP addresses from Fastly. You should add
the new IPs to your network's allowlist before July 24th. Once the transfer is
complete, ensure your networks use the new IP addresses to connect to
the dl.k8s.io service.
What are the new IP addresses?
If you need to manage an allow list for downloads, you can get the ranges to match from the Fastly API, in JSON: public IP address ranges. You don't need any credentials to download that list of ranges.
What next steps would you recommend?
If you have IP-based filtering in place, we recommend the following course of action before July, 24th:
- Add the new IP addresses to your allowlist.
- Conduct tests with your networks/firewall to ensure your networks can route to the new IP addresses.
After the change is made, we recommend double-checking that HTTP calls are accessing dl.k8s.io with the new IP addresses.
What should I do if I detect some abnormality after the cutover date?
If you encounter any weirdness during binaries download, please open an issue.
Using OCI artifacts to distribute security profiles for seccomp, SELinux and AppArmor
The Security Profiles Operator (SPO) makes managing seccomp, SELinux and AppArmor profiles within Kubernetes easier than ever. It allows cluster administrators to define the profiles in a predefined custom resource YAML, which then gets distributed by the SPO into the whole cluster. Modification and removal of the security profiles are managed by the operator in the same way, but that’s a small subset of its capabilities.
Another core feature of the SPO is being able to stack seccomp profiles. This
means that users can define a baseProfileName in the YAML specification, which
then gets automatically resolved by the operator and combines the syscall rules.
If a base profile has another baseProfileName, then the operator will
recursively resolve the profiles up to a certain depth. A common use case is to
define base profiles for low level container runtimes (like runc or
crun) which then contain syscalls which are required in any case to run
the container. Alternatively, application developers can define seccomp base
profiles for their standard distribution containers and stack dedicated profiles
for the application logic on top. This way developers can focus on maintaining
seccomp profiles which are way simpler and scoped to the application logic,
without having a need to take the whole infrastructure setup into account.
But how to maintain those base profiles? For example, the amount of required syscalls for a runtime can change over its release cycle in the same way it can change for the main application. Base profiles have to be available in the same cluster, otherwise the main seccomp profile will fail to deploy. This means that they’re tightly coupled to the main application profiles, which acts against the main idea of base profiles. Distributing and managing them as plain files feels like an additional burden to solve.
OCI artifacts to the rescue
The v0.8.0 release of the Security Profiles Operator supports managing base profiles as OCI artifacts! Imagine OCI artifacts as lightweight container images, storing files in layers in the same way images do, but without a process to be executed. Those artifacts can be used to store security profiles like regular container images in compatible registries. This means they can be versioned, namespaced and annotated similar to regular container images.
To see how that works in action, specify a baseProfileName prefixed with
oci:// within a seccomp profile CRD, for example:
apiVersion: security-profiles-operator.x-k8s.io/v1beta1
kind: SeccompProfile
metadata:
name: test
spec:
defaultAction: SCMP_ACT_ERRNO
baseProfileName: oci://ghcr.io/security-profiles/runc:v1.1.5
syscalls:
- action: SCMP_ACT_ALLOW
names:
- uname
The operator will take care of pulling the content by using oras, as
well as verifying the sigstore (cosign) signatures of the artifact. If
the artifacts are not signed, then the SPO will reject them. The resulting
profile test will then contain all base syscalls from the remote runc
profile plus the additional allowed uname one. It is also possible to
reference the base profile by its digest (SHA256) making the artifact to be
pulled more specific, for example by referencing
oci://ghcr.io/security-profiles/runc@sha256:380….
The operator internally caches pulled artifacts up to 24 hours for 1000 profiles, meaning that they will be refreshed after that time period, if the cache is full or the operator daemon gets restarted.
Because the overall resulting syscalls are hidden from the user (I only have the
baseProfileName listed in the SeccompProfile, and not the syscalls themselves), I'll additionally
annotate that SeccompProfile with the final syscalls.
Here's how the SeccompProfile looks after I annotate it:
> kubectl describe seccompprofile test
Name: test
Namespace: security-profiles-operator
Labels: spo.x-k8s.io/profile-id=SeccompProfile-test
Annotations: syscalls:
[{"names":["arch_prctl","brk","capget","capset","chdir","clone","close",...
API Version: security-profiles-operator.x-k8s.io/v1beta1
The SPO maintainers provide all public base profiles as part of the “Security Profiles” GitHub organization.
Managing OCI security profiles
Alright, now the official SPO provides a bunch of base profiles, but how can I define my own? Well, first of all we have to choose a working registry. There are a bunch of registries that already supports OCI artifacts:
- CNCF Distribution
- Azure Container Registry
- Amazon Elastic Container Registry
- Google Artifact Registry
- GitHub Packages container registry
- Docker Hub
- Zot Registry
The Security Profiles Operator ships a new command line interface called spoc,
which is a little helper tool for managing OCI profiles among doing various other
things which are out of scope of this blog post. But, the command spoc push
can be used to push a security profile to a registry:
> export USERNAME=my-user
> export PASSWORD=my-pass
> spoc push -f ./examples/baseprofile-crun.yaml ghcr.io/security-profiles/crun:v1.8.3
16:35:43.899886 Pushing profile ./examples/baseprofile-crun.yaml to: ghcr.io/security-profiles/crun:v1.8.3
16:35:43.899939 Creating file store in: /tmp/push-3618165827
16:35:43.899947 Adding profile to store: ./examples/baseprofile-crun.yaml
16:35:43.900061 Packing files
16:35:43.900282 Verifying reference: ghcr.io/security-profiles/crun:v1.8.3
16:35:43.900310 Using tag: v1.8.3
16:35:43.900313 Creating repository for ghcr.io/security-profiles/crun
16:35:43.900319 Using username and password
16:35:43.900321 Copying profile to repository
16:35:46.976108 Signing container image
Generating ephemeral keys...
Retrieving signed certificate...
Note that there may be personally identifiable information associated with this signed artifact.
This may include the email address associated with the account with which you authenticate.
This information will be used for signing this artifact and will be stored in public transparency logs and cannot be removed later.
By typing 'y', you attest that you grant (or have permission to grant) and agree to have this information stored permanently in transparency logs.
Your browser will now be opened to:
https://oauth2.sigstore.dev/auth/auth?access_type=…
Successfully verified SCT...
tlog entry created with index: 16520520
Pushing signature to: ghcr.io/security-profiles/crun
You can see that the tool automatically signs the artifact and pushes the
./examples/baseprofile-crun.yaml to the registry, which is then directly ready
for usage within the SPO. If username and password authentication is required,
either use the --username, -u flag or export the USERNAME environment
variable. To set the password, export the PASSWORD environment variable.
It is possible to add custom annotations to the security profile by using the
--annotations / -a flag multiple times in KEY:VALUE format. Those have no
effect for now, but at some later point additional features of the operator may
rely them.
The spoc client is also able to pull security profiles from OCI artifact
compatible registries. To do that, just run spoc pull:
> spoc pull ghcr.io/security-profiles/runc:v1.1.5
16:32:29.795597 Pulling profile from: ghcr.io/security-profiles/runc:v1.1.5
16:32:29.795610 Verifying signature
Verification for ghcr.io/security-profiles/runc:v1.1.5 --
The following checks were performed on each of these signatures:
- Existence of the claims in the transparency log was verified offline
- The code-signing certificate was verified using trusted certificate authority certificates
[{"critical":{"identity":{"docker-reference":"ghcr.io/security-profiles/runc"},…}}]
16:32:33.208695 Creating file store in: /tmp/pull-3199397214
16:32:33.208713 Verifying reference: ghcr.io/security-profiles/runc:v1.1.5
16:32:33.208718 Creating repository for ghcr.io/security-profiles/runc
16:32:33.208742 Using tag: v1.1.5
16:32:33.208743 Copying profile from repository
16:32:34.119652 Reading profile
16:32:34.119677 Trying to unmarshal seccomp profile
16:32:34.120114 Got SeccompProfile: runc-v1.1.5
16:32:34.120119 Saving profile in: /tmp/profile.yaml
The profile can be now found in /tmp/profile.yaml or the specified output file
--output-file / -o. We can specify an username and password in the same way
as for spoc push.
spoc makes it easy to manage security profiles as OCI artifacts, which can be
then consumed directly by the operator itself.
That was our compact journey through the latest possibilities of the Security Profiles Operator! If you're interested in more, providing feedback or asking for help, then feel free to get in touch with us directly via Slack (#security-profiles-operator) or the mailing list.
Having fun with seccomp profiles on the edge
The Security Profiles Operator (SPO) is a feature-rich operator for Kubernetes to make managing seccomp, SELinux and AppArmor profiles easier than ever. Recording those profiles from scratch is one of the key features of this operator, which usually involves the integration into large CI/CD systems. Being able to test the recording capabilities of the operator in edge cases is one of the recent development efforts of the SPO and makes it excitingly easy to play around with seccomp profiles.
Recording seccomp profiles with spoc record
The v0.8.0 release of the Security Profiles Operator shipped a new
command line interface called spoc, a little helper tool for recording and
replaying seccomp profiles among various other things that are out of scope of
this blog post.
Recording a seccomp profile requires a binary to be executed, which can be a
simple golang application which just calls uname(2):
package main
import (
"syscall"
)
func main() {
utsname := syscall.Utsname{}
if err := syscall.Uname(&utsname); err != nil {
panic(err)
}
}
Building a binary from that code can be done by:
> go build -o main main.go
> ldd ./main
not a dynamic executable
Now it's possible to download the latest binary of spoc from
GitHub and run the application on Linux with it:
> sudo ./spoc record ./main
10:08:25.591945 Loading bpf module
10:08:25.591958 Using system btf file
libbpf: loading object 'recorder.bpf.o' from buffer
…
libbpf: prog 'sys_enter': relo #3: patched insn #22 (ALU/ALU64) imm 16 -> 16
10:08:25.610767 Getting bpf program sys_enter
10:08:25.610778 Attaching bpf tracepoint
10:08:25.611574 Getting syscalls map
10:08:25.611582 Getting pid_mntns map
10:08:25.613097 Module successfully loaded
10:08:25.613311 Processing events
10:08:25.613693 Running command with PID: 336007
10:08:25.613835 Received event: pid: 336007, mntns: 4026531841
10:08:25.613951 No container ID found for PID (pid=336007, mntns=4026531841, err=unable to find container ID in cgroup path)
10:08:25.614856 Processing recorded data
10:08:25.614975 Found process mntns 4026531841 in bpf map
10:08:25.615110 Got syscalls: read, close, mmap, rt_sigaction, rt_sigprocmask, madvise, nanosleep, clone, uname, sigaltstack, arch_prctl, gettid, futex, sched_getaffinity, exit_group, openat
10:08:25.615195 Adding base syscalls: access, brk, capget, capset, chdir, chmod, chown, close_range, dup2, dup3, epoll_create1, epoll_ctl, epoll_pwait, execve, faccessat2, fchdir, fchmodat, fchown, fchownat, fcntl, fstat, fstatfs, getdents64, getegid, geteuid, getgid, getpid, getppid, getuid, ioctl, keyctl, lseek, mkdirat, mknodat, mount, mprotect, munmap, newfstatat, openat2, pipe2, pivot_root, prctl, pread64, pselect6, readlink, readlinkat, rt_sigreturn, sched_yield, seccomp, set_robust_list, set_tid_address, setgid, setgroups, sethostname, setns, setresgid, setresuid, setsid, setuid, statfs, statx, symlinkat, tgkill, umask, umount2, unlinkat, unshare, write
10:08:25.616293 Wrote seccomp profile to: /tmp/profile.yaml
10:08:25.616298 Unloading bpf module
I have to execute spoc as root because it will internally run an ebpf
program by reusing the same code parts from the Security Profiles Operator
itself. I can see that the bpf module got loaded successfully and spoc
attached the required tracepoint to it. Then it will track the main application
by using its mount namespace and process the recorded syscall data. The
nature of ebpf programs is that they see the whole context of the Kernel, which
means that spoc tracks all syscalls of the system, but does not interfere with
their execution.
The logs indicate that spoc found the syscalls read, close,
mmap and so on, including uname. All other syscalls than uname are coming
from the golang runtime and its garbage collection, which already adds overhead
to a basic application like in our demo. I can also see from the log line
Adding base syscalls: … that spoc adds a bunch of base syscalls to the
resulting profile. Those are used by the OCI runtime (like runc or
crun) in order to be able to run a container. This means that spoc
can be used to record seccomp profiles which then can be containerized directly.
This behavior can be disabled in spoc by using the --no-base-syscalls/-n
or customized via the --base-syscalls/-b command line flags. This can be
helpful in cases where different OCI runtimes other than crun and runc are used,
or if I just want to record the seccomp profile for the application and stack
it with another base profile.
The resulting profile is now available in /tmp/profile.yaml, but the default
location can be changed using the --output-file value/-o flag:
> cat /tmp/profile.yaml
apiVersion: security-profiles-operator.x-k8s.io/v1beta1
kind: SeccompProfile
metadata:
creationTimestamp: null
name: main
spec:
architectures:
- SCMP_ARCH_X86_64
defaultAction: SCMP_ACT_ERRNO
syscalls:
- action: SCMP_ACT_ALLOW
names:
- access
- arch_prctl
- brk
- …
- uname
- …
status: {}
The seccomp profile Custom Resource Definition (CRD) can be directly used
together with the Security Profiles Operator for managing it within Kubernetes.
spoc is also capable of producing raw seccomp profiles (as JSON), by using the
--type/-t raw-seccomp flag:
> sudo ./spoc record --type raw-seccomp ./main
…
52.628827 Wrote seccomp profile to: /tmp/profile.json
> jq . /tmp/profile.json
{
"defaultAction": "SCMP_ACT_ERRNO",
"architectures": ["SCMP_ARCH_X86_64"],
"syscalls": [
{
"names": ["access", "…", "write"],
"action": "SCMP_ACT_ALLOW"
}
]
}
The utility spoc record allows us to record complex seccomp profiles directly
from binary invocations in any Linux system which is capable of running the ebpf
code within the Kernel. But it can do more: How about modifying the seccomp
profile and then testing it by using spoc run.
Running seccomp profiles with spoc run
spoc is also able to run binaries with applied seccomp profiles, making it
easy to test any modification to it. To do that, just run:
> sudo ./spoc run ./main
10:29:58.153263 Reading file /tmp/profile.yaml
10:29:58.153311 Assuming YAML profile
10:29:58.154138 Setting up seccomp
10:29:58.154178 Load seccomp profile
10:29:58.154189 Starting audit log enricher
10:29:58.154224 Enricher reading from file /var/log/audit/audit.log
10:29:58.155356 Running command with PID: 437880
>
It looks like that the application exited successfully, which is anticipated
because I did not modify the previously recorded profile yet. I can also
specify a custom location for the profile by using the --profile/-p flag,
but this was not necessary because I did not modify the default output location
from the record. spoc will automatically determine if it's a raw (JSON) or CRD
(YAML) based seccomp profile and then apply it to the process.
The Security Profiles Operator supports a log enricher feature,
which provides additional seccomp related information by parsing the audit logs.
spoc run uses the enricher in the same way to provide more data to the end
users when it comes to debugging seccomp profiles.
Now I have to modify the profile to see anything valuable in the output. For
example, I could remove the allowed uname syscall:
> jq 'del(.syscalls[0].names[] | select(. == "uname"))' /tmp/profile.json > /tmp/no-uname-profile.json
And then try to run it again with the new profile /tmp/no-uname-profile.json:
> sudo ./spoc run -p /tmp/no-uname-profile.json ./main
10:39:12.707798 Reading file /tmp/no-uname-profile.json
10:39:12.707892 Setting up seccomp
10:39:12.707920 Load seccomp profile
10:39:12.707982 Starting audit log enricher
10:39:12.707998 Enricher reading from file /var/log/audit/audit.log
10:39:12.709164 Running command with PID: 480512
panic: operation not permitted
goroutine 1 [running]:
main.main()
/path/to/main.go:10 +0x85
10:39:12.713035 Unable to run: launch runner: wait for command: exit status 2
Alright, that was expected! The applied seccomp profile blocks the uname
syscall, which results in an "operation not permitted" error. This error is
pretty generic and does not provide any hint on what got blocked by seccomp.
It is generally extremely difficult to predict how applications behave if single
syscalls are forbidden by seccomp. It could be possible that the application
terminates like in our simple demo, but it could also lead to a strange
misbehavior and the application does not stop at all.
If I now change the default seccomp action of the profile from SCMP_ACT_ERRNO
to SCMP_ACT_LOG like this:
> jq '.defaultAction = "SCMP_ACT_LOG"' /tmp/no-uname-profile.json > /tmp/no-uname-profile-log.json
Then the log enricher will give us a hint that the uname syscall got blocked
when using spoc run:
> sudo ./spoc run -p /tmp/no-uname-profile-log.json ./main
10:48:07.470126 Reading file /tmp/no-uname-profile-log.json
10:48:07.470234 Setting up seccomp
10:48:07.470245 Load seccomp profile
10:48:07.470302 Starting audit log enricher
10:48:07.470339 Enricher reading from file /var/log/audit/audit.log
10:48:07.470889 Running command with PID: 522268
10:48:07.472007 Seccomp: uname (63)
The application will not terminate any more, but seccomp will log the behavior
to /var/log/audit/audit.log and spoc will parse the data to correlate it
directly to our program. Generating the log messages to the audit subsystem
comes with a large performance overhead and should be handled with care in
production systems. It also comes with a security risk when running untrusted
apps in audit mode in production environments.
This demo should give you an impression how to debug seccomp profile issues with
applications, probably by using our shiny new helper tool powered by the
features of the Security Profiles Operator. spoc is a flexible and portable
binary suitable for edge cases where resources are limited and even Kubernetes
itself may not be available with its full capabilities.
Thank you for reading this blog post! If you're interested in more, providing feedback or asking for help, then feel free to get in touch with us directly via Slack (#security-profiles-operator) or the mailing list.
Kubernetes 1.27: KMS V2 Moves to Beta
With Kubernetes 1.27, we (SIG Auth) are moving Key Management Service (KMS) v2 API to beta.
What is KMS?
One of the first things to consider when securing a Kubernetes cluster is encrypting etcd data at rest. KMS provides an interface for a provider to utilize a key stored in an external key service to perform this encryption.
KMS v1 has been a feature of Kubernetes since version 1.10, and is currently in beta as of version v1.12. KMS v2 was introduced as alpha in v1.25.
The KMS v2 API and implementation changed in incompatible ways in-between the alpha release in v1.25 and the beta release in v1.27. The design of KMS v2 has changed since the previous blog post was written and it is not compatible with the design in this blog post. Attempting to upgrade from old versions with the alpha feature enabled will result in data loss.
What’s new in v2beta1?
The KMS encryption provider uses an envelope encryption scheme to encrypt data in etcd. The data is encrypted using a data encryption key (DEK). The DEKs are encrypted with a key encryption key (KEK) that is stored and managed in a remote KMS. With KMS v1, a new DEK is generated for each encryption. With KMS v2, a new DEK is only generated on server startup and when the KMS plugin informs the API server that a KEK rotation has occurred.
If you are running virtual machine (VM) based nodes that leverage VM state store with this feature, you must not use KMS v2.
With KMS v2, the API server uses AES-GCM with a 12 byte nonce (8 byte atomic counter and 4 bytes random data) for encryption. The following issues could occur if the VM is saved and restored:
- The counter value may be lost or corrupted if the VM is saved in an inconsistent state or restored improperly. This can lead to a situation where the same counter value is used twice, resulting in the same nonce being used for two different messages.
- If the VM is restored to a previous state, the counter value may be set back to its previous value, resulting in the same nonce being used again.
Although both of these cases are partially mitigated by the 4 byte random nonce, this can compromise the security of the encryption.
Sequence Diagram
Encrypt Request
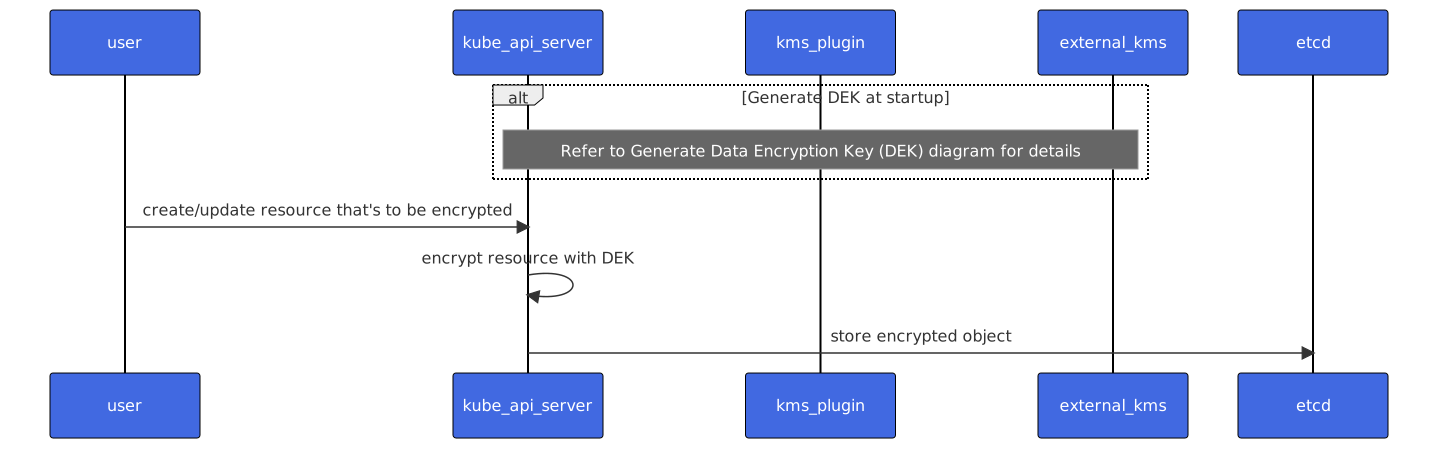
Decrypt Request
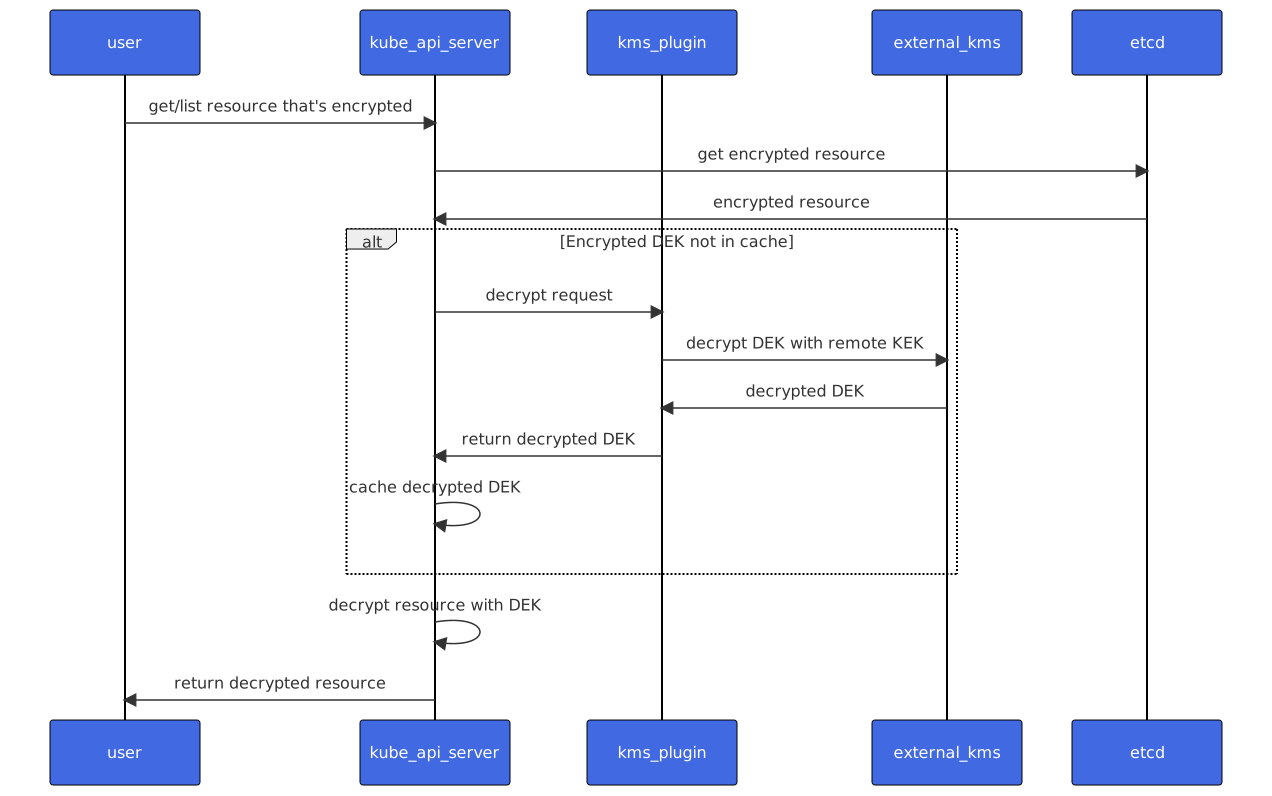
Status Request
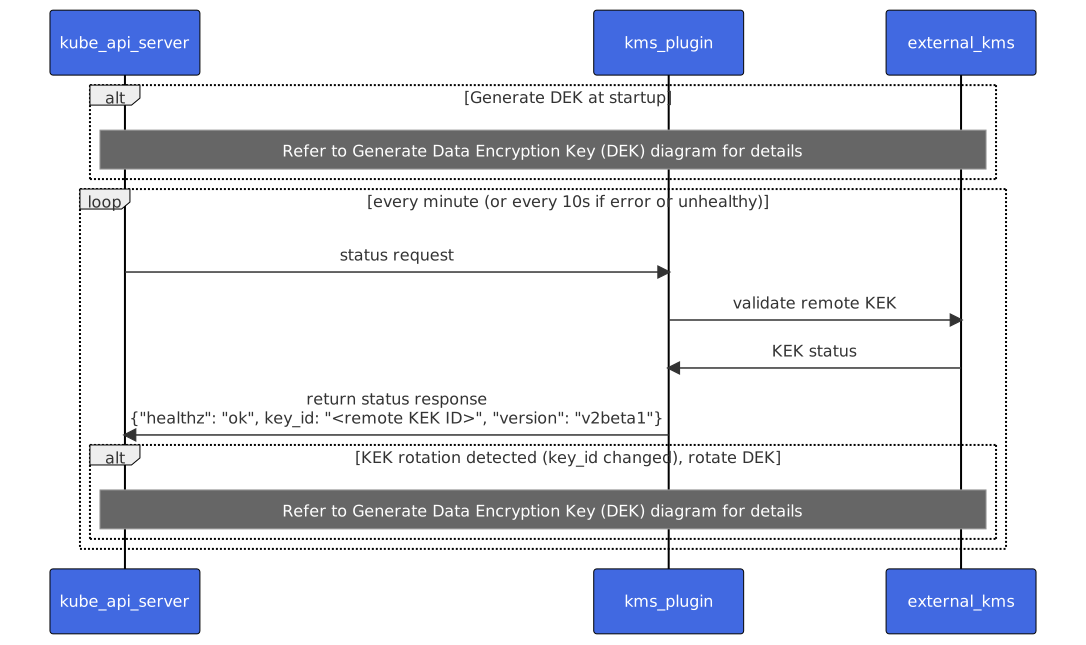
Generate Data Encryption Key (DEK)
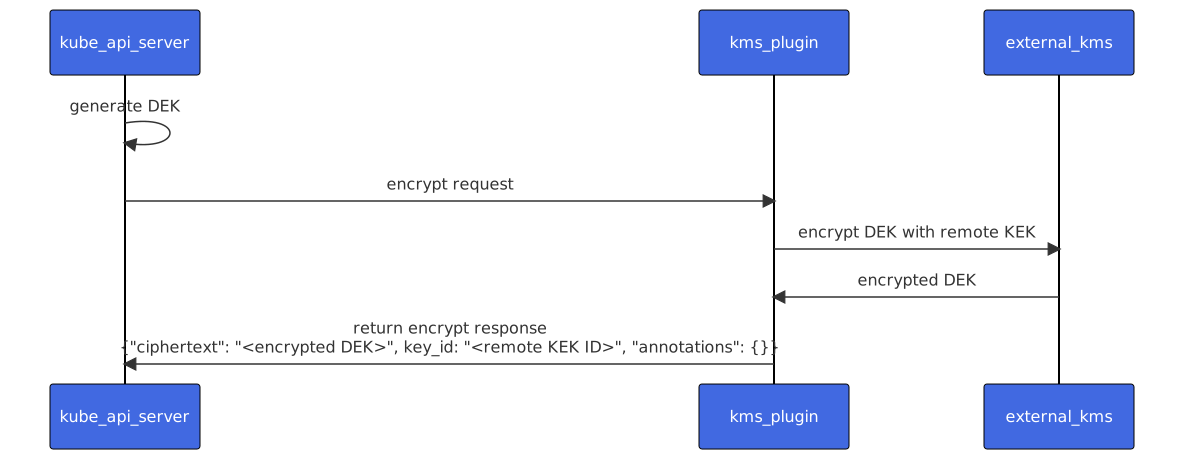
Performance Improvements
With KMS v2, we have made significant improvements to the performance of the KMS encryption provider. In case of KMS v1, a new DEK is generated for every encryption. This means that for every write request, the API server makes a call to the KMS plugin to encrypt the DEK using the remote KEK. The API server also has to cache the DEKs to avoid making a call to the KMS plugin for every read request. When the API server restarts, it has to populate the cache by making a call to the KMS plugin for every DEK in the etcd store based on the cache size. This is a significant overhead for the API server. With KMS v2, the API server generates a DEK at startup and caches it. The API server also makes a call to the KMS plugin to encrypt the DEK using the remote KEK. This is a one-time call at startup and on KEK rotation. The API server then uses the cached DEK to encrypt the resources. This reduces the number of calls to the KMS plugin and improves the overall latency of the API server requests.
We conducted a test that created 12k secrets and measured the time taken for the API server to
encrypt the resources. The metric used was
apiserver_storage_transformation_duration_seconds.
For KMS v1, the test was run on a managed Kubernetes v1.25 cluster with 2 nodes. There was no
additional load on the cluster during the test. For KMS v2, the test was run in the Kubernetes CI
environment with the following cluster
configuration.
| KMS Provider | Time taken by 95 percentile |
|---|---|
| KMS v1 | 160ms |
| KMS v2 | 80μs |
The results show that the KMS v2 encryption provider is three orders of magnitude faster than the KMS v1 encryption provider.
What's next?
For Kubernetes v1.28, we expect the feature to stay in beta. In the coming releases we want to investigate:
- Cryptographic changes to remove the limitation on VM state store.
- Kubernetes REST API changes to enable a more robust story around key rotation.
- Handling undecryptable resources. Refer to the KEP for details.
You can learn more about KMS v2 by reading Using a KMS provider for data encryption. You can also follow along on the KEP to track progress across the coming Kubernetes releases.
Call to action
In this blog post, we have covered the improvements made to the KMS encryption provider in Kubernetes v1.27. We have also discussed the new KMS v2 API and how it works. We would love to hear your feedback on this feature. In particular, we would like feedback from Kubernetes KMS plugin implementors as they go through the process of building their integrations with this new API. Please reach out to us on the #sig-auth-kms-dev channel on Kubernetes Slack.
How to get involved
If you are interested in getting involved in the development of this feature, share feedback, or participate in any other ongoing SIG Auth projects, please reach out on the #sig-auth channel on Kubernetes Slack.
You are also welcome to join the bi-weekly SIG Auth meetings, held every-other Wednesday.
Acknowledgements
This feature has been an effort driven by contributors from several different companies. We would like to extend a huge thank you to everyone that contributed their time and effort to help make this possible.
Kubernetes 1.27: updates on speeding up Pod startup
How can Pod start-up be accelerated on nodes in large clusters? This is a common issue that cluster administrators may face.
This blog post focuses on methods to speed up pod start-up from the kubelet side. It does not involve the creation time of pods by controller-manager through kube-apiserver, nor does it include scheduling time for pods or webhooks executed on it.
We have mentioned some important factors here to consider from the kubelet's perspective, but this is not an exhaustive list. As Kubernetes v1.27 is released, this blog highlights significant changes in v1.27 that aid in speeding up pod start-up.
Parallel container image pulls
Pulling images always takes some time and what's worse is that image pulls are done serially by default. In other words, kubelet will send only one image pull request to the image service at a time. Other image pull requests have to wait until the one being processed is complete.
To enable parallel image pulls, set the serializeImagePulls field to false in the kubelet
configuration. When serializeImagePulls is disabled, requests for image pulls are immediately
sent to the image service and multiple images can be pulled concurrently.
Maximum parallel image pulls will help secure your node from overloading on image pulling
We introduced a new feature in kubelet that sets a limit on the number of parallel image pulls at the node level. This limit restricts the maximum number of images that can be pulled simultaneously. If there is an image pull request beyond this limit, it will be blocked until one of the ongoing image pulls finishes. Before enabling this feature, please ensure that your container runtime's image service can handle parallel image pulls effectively.
To limit the number of simultaneous image pulls, you can configure the maxParallelImagePulls
field in kubelet. By setting maxParallelImagePulls to a value of n, only n images will
be pulled concurrently. Any additional image pulls beyond this limit will wait until at least
one ongoing pull is complete.
You can find more details in the associated KEP: Kubelet limit of Parallel Image Pulls (KEP-3673).
Raised default API query-per-second limits for kubelet
To improve pod startup in scenarios with multiple pods on a node, particularly sudden scaling situations, it is necessary for Kubelet to synchronize the pod status and prepare configmaps, secrets, or volumes. This requires a large bandwidth to access kube-apiserver.
In versions prior to v1.27, the default kubeAPIQPS was 5 and kubeAPIBurst was 10. However,
the kubelet in v1.27 has increased these defaults to 50 and 100 respectively for better performance during
pod startup. It's worth noting that this isn't the only reason why we've bumped up the API QPS
limits for Kubelet.
- It has a potential to be hugely throttled now (default QPS = 5)
- In large clusters they can generate significant load anyway as there are a lot of them
- They have a dedicated PriorityLevel and FlowSchema that we can easily control
Previously, we often encountered volume mount timeout on kubelet in node with more than 50 pods
during pod start up. We suggest that cluster operators bump kubeAPIQPS to 20 and kubeAPIBurst to 40,
especially if using bare metal nodes.
More detials can be found in the KEP https://kep.k8s.io/1040 and the pull request #116121.
Event triggered updates to container status
Evented PLEG (PLEG is short for "Pod Lifecycle Event Generator") is set to be in beta for v1.27,
Kubernetes offers two ways for the kubelet to detect Pod lifecycle events, such as the last
process in a container shutting down.
In Kubernetes v1.27, the event based mechanism has graduated to beta but remains
disabled by default. If you do explicitly switch to event-based lifecycle change detection,
the kubelet is able to start Pods more quickly than with the default approach that relies on polling.
The default mechanism, polling for lifecycle changes, adds a noticeable overhead; this affects
the kubelet's ability to handle different tasks in parallel, and leads to poor performance and
reliability issues. For these reasons, we recommend that you switch your nodes to use
event-based pod lifecycle change detection.
Further details can be found in the KEP https://kep.k8s.io/3386 and Switching From Polling to CRI Event-based Updates to Container Status.
Raise your pod resource limit if needed
During start-up, some pods may consume a considerable amount of CPU or memory. If the CPU limit is low, this can significantly slow down the pod start-up process. To improve the memory management, Kubernetes v1.22 introduced a feature gate called MemoryQoS to kubelet. This feature enables kubelet to set memory QoS at container, pod, and QoS levels for better protection and guaranteed quality of memory when running with cgroups v2. Although it has benefits, it is possible that enabling this feature gate may affect the start-up speed of the pod if the pod startup consumes a large amount of memory.
Kubelet configuration now includes memoryThrottlingFactor. This factor is multiplied by
the memory limit or node allocatable memory to set the cgroupv2 memory.high value for enforcing
MemoryQoS. Decreasing this factor sets a lower high limit for container cgroups, increasing reclaim
pressure. Increasing this factor will put less reclaim pressure. The default value is 0.8 initially
and will change to 0.9 in Kubernetes v1.27. This parameter adjustment can reduce the potential
impact of this feature on pod startup speed.
Further details can be found in the KEP https://kep.k8s.io/2570.
What's more?
In Kubernetes v1.26, a new histogram metric pod_start_sli_duration_seconds was added for Pod
startup latency SLI/SLO details. Additionally, the kubelet log will now display more information
about pod start-related timestamps, as shown below:
Dec 30 15:33:13.375379 e2e-022435249c-674b9-minion-group-gdj4 kubelet[8362]: I1230 15:33:13.375359 8362 pod_startup_latency_tracker.go:102] "Observed pod startup duration" pod="kube-system/konnectivity-agent-gnc9k" podStartSLOduration=-9.223372029479458e+09 pod.CreationTimestamp="2022-12-30 15:33:06 +0000 UTC" firstStartedPulling="2022-12-30 15:33:09.258791695 +0000 UTC m=+13.029631711" lastFinishedPulling="0001-01-01 00:00:00 +0000 UTC" observedRunningTime="2022-12-30 15:33:13.375009262 +0000 UTC m=+17.145849275" watchObservedRunningTime="2022-12-30 15:33:13.375317944 +0000 UTC m=+17.146157970"
The SELinux Relabeling with Mount Options feature moved to Beta in v1.27. This feature speeds up container startup by mounting volumes with the correct SELinux label instead of changing each file on the volumes recursively. Further details can be found in the KEP https://kep.k8s.io/1710.
To identify the cause of slow pod startup, analyzing metrics and logs can be helpful. Other factors that may impact pod startup include container runtime, disk speed, CPU and memory resources on the node.
SIG Node is responsible for ensuring fast Pod startup times, while addressing issues in large clusters falls under the purview of SIG Scalability as well.
Kubernetes 1.27: In-place Resource Resize for Kubernetes Pods (alpha)
If you have deployed Kubernetes pods with CPU and/or memory resources specified, you may have noticed that changing the resource values involves restarting the pod. This has been a disruptive operation for running workloads... until now.
In Kubernetes v1.27, we have added a new alpha feature that allows users
to resize CPU/memory resources allocated to pods without restarting the
containers. To facilitate this, the resources field in a pod's containers
now allow mutation for cpu and memory resources. They can be changed
simply by patching the running pod spec.
This also means that resources field in the pod spec can no longer be
relied upon as an indicator of the pod's actual resources. Monitoring tools
and other such applications must now look at new fields in the pod's status.
Kubernetes queries the actual CPU and memory requests and limits enforced on
the running containers via a CRI (Container Runtime Interface) API call to the
runtime, such as containerd, which is responsible for running the containers.
The response from container runtime is reflected in the pod's status.
In addition, a new restartPolicy for resize has been added. It gives users
control over how their containers are handled when resources are resized.
What's new in v1.27?
Besides the addition of resize policy in the pod's spec, a new field named
allocatedResources has been added to containerStatuses in the pod's status.
This field reflects the node resources allocated to the pod's containers.
In addition, a new field called resources has been added to the container's
status. This field reflects the actual resource requests and limits configured
on the running containers as reported by the container runtime.
Lastly, a new field named resize has been added to the pod's status to show the
status of the last requested resize. A value of Proposed is an acknowledgement
of the requested resize and indicates that request was validated and recorded. A
value of InProgress indicates that the node has accepted the resize request
and is in the process of applying the resize request to the pod's containers.
A value of Deferred means that the requested resize cannot be granted at this
time, and the node will keep retrying. The resize may be granted when other pods
leave and free up node resources. A value of Infeasible is a signal that the
node cannot accommodate the requested resize. This can happen if the requested
resize exceeds the maximum resources the node can ever allocate for a pod.
When to use this feature
Here are a few examples where this feature may be useful:
- Pod is running on node but with either too much or too little resources.
- Pods are not being scheduled due to lack of sufficient CPU or memory in a cluster that is underutilized by running pods that were overprovisioned.
- Evicting certain stateful pods that need more resources to schedule them on bigger nodes is an expensive or disruptive operation when other lower priority pods in the node can be resized down or moved.
How to use this feature
In order to use this feature in v1.27, the InPlacePodVerticalScaling
feature gate must be enabled. A local cluster with this feature enabled
can be started as shown below:
root@vbuild:~/go/src/k8s.io/kubernetes# FEATURE_GATES=InPlacePodVerticalScaling=true ./hack/local-up-cluster.sh
go version go1.20.2 linux/arm64
+++ [0320 13:52:02] Building go targets for linux/arm64
k8s.io/kubernetes/cmd/kubectl (static)
k8s.io/kubernetes/cmd/kube-apiserver (static)
k8s.io/kubernetes/cmd/kube-controller-manager (static)
k8s.io/kubernetes/cmd/cloud-controller-manager (non-static)
k8s.io/kubernetes/cmd/kubelet (non-static)
...
...
Logs:
/tmp/etcd.log
/tmp/kube-apiserver.log
/tmp/kube-controller-manager.log
/tmp/kube-proxy.log
/tmp/kube-scheduler.log
/tmp/kubelet.log
To start using your cluster, you can open up another terminal/tab and run:
export KUBECONFIG=/var/run/kubernetes/admin.kubeconfig
cluster/kubectl.sh
Alternatively, you can write to the default kubeconfig:
export KUBERNETES_PROVIDER=local
cluster/kubectl.sh config set-cluster local --server=https://localhost:6443 --certificate-authority=/var/run/kubernetes/server-ca.crt
cluster/kubectl.sh config set-credentials myself --client-key=/var/run/kubernetes/client-admin.key --client-certificate=/var/run/kubernetes/client-admin.crt
cluster/kubectl.sh config set-context local --cluster=local --user=myself
cluster/kubectl.sh config use-context local
cluster/kubectl.sh
Once the local cluster is up and running, Kubernetes users can schedule pods with resources, and resize the pods via kubectl. An example of how to use this feature is illustrated in the following demo video.
Example Use Cases
Cloud-based Development Environment
In this scenario, developers or development teams write their code locally but build and test their code in Kubernetes pods with consistent configs that reflect production use. Such pods need minimal resources when the developers are writing code, but need significantly more CPU and memory when they build their code or run a battery of tests. This use case can leverage in-place pod resize feature (with a little help from eBPF) to quickly resize the pod's resources and avoid kernel OOM (out of memory) killer from terminating their processes.
This KubeCon North America 2022 conference talk illustrates the use case.
Java processes initialization CPU requirements
Some Java applications may need significantly more CPU during initialization than what is needed during normal process operation time. If such applications specify CPU requests and limits suited for normal operation, they may suffer from very long startup times. Such pods can request higher CPU values at the time of pod creation, and can be resized down to normal running needs once the application has finished initializing.
Known Issues
This feature enters v1.27 at alpha stage. Below are a few known issues users may encounter:
- containerd versions below v1.6.9 do not have the CRI support needed for full
end-to-end operation of this feature. Attempts to resize pods will appear
to be stuck in the
InProgressstate, andresourcesfield in the pod's status are never updated even though the new resources may have been enacted on the running containers. - Pod resize may encounter a race condition with other pod updates, causing delayed enactment of pod resize.
- Reflecting the resized container resources in pod's status may take a while.
- Static CPU management policy is not supported with this feature.
Credits
This feature is a result of the efforts of a very collaborative Kubernetes community. Here's a little shoutout to just a few of the many many people that contributed countless hours of their time and helped make this happen.
- @thockin for detail-oriented API design and air-tight code reviews.
- @derekwaynecarr for simplifying the design and thorough API and node reviews.
- @dchen1107 for bringing vast knowledge from Borg and helping us avoid pitfalls.
- @ruiwen-zhao for adding containerd support that enabled full E2E implementation.
- @wangchen615 for implementing comprehensive E2E tests and driving scheduler fixes.
- @bobbypage for invaluable help getting CI ready and quickly investigating issues, covering for me on my vacation.
- @Random-Liu for thorough kubelet reviews and identifying problematic race conditions.
- @Huang-Wei, @ahg-g, @alculquicondor for helping get scheduler changes done.
- @mikebrow @marosset for reviews on short notice that helped CRI changes make it into v1.25.
- @endocrimes, @ehashman for helping ensure that the oft-overlooked tests are in good shape.
- @mrunalp for reviewing cgroupv2 changes and ensuring clean handling of v1 vs v2.
- @liggitt, @gjkim42 for tracking down, root-causing important missed issues post-merge.
- @SergeyKanzhelev for supporting and shepherding various issues during the home stretch.
- @pdgetrf for making the first prototype a reality.
- @dashpole for bringing me up to speed on 'the Kubernetes way' of doing things.
- @bsalamat, @kgolab for very thoughtful insights and suggestions in the early stages.
- @sftim, @tengqm for ensuring docs are easy to follow.
- @dims for being omnipresent and helping make merges happen at critical hours.
- Release teams for ensuring that the project stayed healthy.
And a big thanks to my very supportive management Dr. Xiaoning Ding and Dr. Ying Xiong for their patience and encouragement.
References
For app developers
For cluster administrators
Kubernetes 1.27: Avoid Collisions Assigning Ports to NodePort Services
In Kubernetes, a Service can be used to provide a unified traffic endpoint for
applications running on a set of Pods. Clients can use the virtual IP address (or VIP) provided
by the Service for access, and Kubernetes provides load balancing for traffic accessing
different back-end Pods, but a ClusterIP type of Service is limited to providing access to
nodes within the cluster, while traffic from outside the cluster cannot be routed.
One way to solve this problem is to use a type: NodePort Service, which sets up a mapping
to a specific port of all nodes in the cluster, thus redirecting traffic from the
outside to the inside of the cluster.
How Kubernetes allocates node ports to Services?
When a type: NodePort Service is created, its corresponding port(s) are allocated in one
of two ways:
Dynamic : If the Service type is
NodePortand you do not set anodePortvalue explicitly in thespecfor that Service, the Kubernetes control plane will automatically allocate an unused port to it at creation time.Static : In addition to the dynamic auto-assignment described above, you can also explicitly assign a port that is within the nodeport port range configuration.
The value of nodePort that you manually assign must be unique across the whole cluster.
Attempting to create a Service of type: NodePort where you explicitly specify a node port that
was already allocated results in an error.
Why do you need to reserve ports of NodePort Service?
Sometimes, you may want to have a NodePort Service running on well-known ports so that other components and users inside o r outside the cluster can use them.
In some complex cluster deployments with a mix of Kubernetes nodes and other servers on the same network,
it may be necessary to use some pre-defined ports for communication. In particular, some fundamental
components cannot rely on the VIPs that back type: LoadBalancer Services
because the virtual IP address mapping implementation for that cluster also relies on
these foundational components.
Now suppose you need to expose a Minio object storage service on Kubernetes to clients
running outside the Kubernetes cluster, and the agreed port is 30009, we need to
create a Service as follows:
apiVersion: v1
kind: Service
metadata:
name: minio
spec:
ports:
- name: api
nodePort: 30009
port: 9000
protocol: TCP
targetPort: 9000
selector:
app: minio
type: NodePort
However, as mentioned before, if the port (30009) required for the minio Service is not reserved,
and another type: NodePort (or possibly type: LoadBalancer) Service is created and dynamically
allocated before or concurrently with the minio Service, TCP port 30009 might be allocated to that
other Service; if so, creation of the minio Service will fail due to a node port collision.
How can you avoid NodePort Service port conflicts?
Kubernetes 1.24 introduced changes for type: ClusterIP Services, dividing the CIDR range for cluster
IP addresses into two blocks that use different allocation policies to reduce the risk of conflicts.
In Kubernetes 1.27, as an alpha feature, you can adopt a similar policy for type: NodePort Services.
You can enable a new feature gate
ServiceNodePortStaticSubrange. Turning this on allows you to use a different port allocation strategy
for type: NodePort Services, and reduce the risk of collision.
The port range for NodePort will be divided, based on the formula min(max(16, nodeport-size / 32), 128).
The outcome of the formula will be a number between 16 and 128, with a step size that increases as the
size of the nodeport range increases. The outcome of the formula determine that the size of static port
range. When the port range is less than 16, the size of static port range will be set to 0,
which means that all ports will be dynamically allocated.
Dynamic port assignment will use the upper band by default, once this has been exhausted it will use the lower range. This will allow users to use static allocations on the lower band with a low risk of collision.
Examples
default range: 30000-32767
| Range properties | Values |
|---|---|
| service-node-port-range | 30000-32767 |
| Band Offset | min(max(16, 2768/32), 128)= min(max(16, 86), 128)= min(86, 128)= 86 |
| Static band start | 30000 |
| Static band end | 30085 |
| Dynamic band start | 30086 |
| Dynamic band end | 32767 |
very small range: 30000-30015
| Range properties | Values |
|---|---|
| service-node-port-range | 30000-30015 |
| Band Offset | 0 |
| Static band start | - |
| Static band end | - |
| Dynamic band start | 30000 |
| Dynamic band end | 30015 |
small(lower boundary) range: 30000-30127
| Range properties | Values |
|---|---|
| service-node-port-range | 30000-30127 |
| Band Offset | min(max(16, 128/32), 128)= min(max(16, 4), 128)= min(16, 128)= 16 |
| Static band start | 30000 |
| Static band end | 30015 |
| Dynamic band start | 30016 |
| Dynamic band end | 30127 |
large(upper boundary) range: 30000-34095
| Range properties | Values |
|---|---|
| service-node-port-range | 30000-34095 |
| Band Offset | min(max(16, 4096/32), 128)= min(max(16, 128), 128)= min(128, 128)= 128 |
| Static band start | 30000 |
| Static band end | 30127 |
| Dynamic band start | 30128 |
| Dynamic band end | 34095 |
very large range: 30000-38191
| Range properties | Values |
|---|---|
| service-node-port-range | 30000-38191 |
| Band Offset | min(max(16, 8192/32), 128)= min(max(16, 256), 128)= min(256, 128)= 128 |
| Static band start | 30000 |
| Static band end | 30127 |
| Dynamic band start | 30128 |
| Dynamic band end | 38191 |
Kubernetes 1.27: Safer, More Performant Pruning in kubectl apply
Declarative configuration management with the kubectl apply command is the gold standard approach
to creating or modifying Kubernetes resources. However, one challenge it presents is the deletion
of resources that are no longer needed. In Kubernetes version 1.5, the --prune flag was
introduced to address this issue, allowing kubectl apply to automatically clean up previously
applied resources removed from the current configuration.
Unfortunately, that existing implementation of --prune has design flaws that diminish its
performance and can result in unexpected behaviors. The main issue stems from the lack of explicit
encoding of the previously applied set by the preceding apply operation, necessitating
error-prone dynamic discovery. Object leakage, inadvertent over-selection of resources, and limited
compatibility with custom resources are a few notable drawbacks of this implementation. Moreover,
its coupling to client-side apply hinders user upgrades to the superior server-side apply
mechanism.
Version 1.27 of kubectl introduces an alpha version of a revamped pruning implementation that
addresses these issues. This new implementation, based on a concept called ApplySet, promises
better performance and safety.
An ApplySet is a group of resources associated with a parent object on the cluster, as identified and configured through standardized labels and annotations. Additional standardized metadata allows for accurate identification of ApplySet member objects within the cluster, simplifying operations like pruning.
To leverage ApplySet-based pruning, set the KUBECTL_APPLYSET=true environment variable and include
the flags --prune and --applyset in your kubectl apply invocation:
KUBECTL_APPLYSET=true kubectl apply -f <directory/> --prune --applyset=<name>
By default, ApplySet uses a Secret as the parent object. However, you can also use
a ConfigMap with the format --applyset=configmaps/<name>. If your desired Secret or
ConfigMap object does not yet exist, kubectl will create it for you. Furthermore, custom
resources can be enabled for use as ApplySet parent objects.
The ApplySet implementation is based on a new low-level specification that can support higher-level
ecosystem tools by improving their interoperability. The lightweight nature of this specification
enables these tools to continue to use existing object grouping systems while opting in to
ApplySet's metadata conventions to prevent inadvertent changes by other tools (such as kubectl).
ApplySet-based pruning offers a promising solution to the shortcomings of the previous --prune
implementation in kubectl and can help streamline your Kubernetes resource management. Please
give this new feature a try and share your experiences with the community—ApplySet is under active
development, and your feedback is invaluable!
Additional resources
- For more information how to use ApplySet-based pruning, read Declarative Management of Kubernetes Objects Using Configuration Files in the Kubernetes documentation.
- For a deeper dive into the technical design of this feature or to learn how to implement the
ApplySet specification in your own tools, refer to KEP 3659:
ApplySet:
kubectl apply --pruneredesign and graduation strategy.
How do I get involved?
If you want to get involved in ApplySet development, you can get in touch with the developers at
SIG CLI. To provide feedback on the feature, please
file a bug
or request an enhancement
on the kubernetes/kubectl repository.
Kubernetes 1.27: Introducing An API For Volume Group Snapshots
Volume group snapshot is introduced as an Alpha feature in Kubernetes v1.27.
This feature introduces a Kubernetes API that allows users to take crash consistent
snapshots for multiple volumes together. It uses a label selector to group multiple
PersistentVolumeClaims for snapshotting.
This new feature is only supported for CSI volume drivers.
An overview of volume group snapshots
Some storage systems provide the ability to create a crash consistent snapshot of multiple volumes. A group snapshot represents “copies” from multiple volumes that are taken at the same point-in-time. A group snapshot can be used either to rehydrate new volumes (pre-populated with the snapshot data) or to restore existing volumes to a previous state (represented by the snapshots).
Why add volume group snapshots to Kubernetes?
The Kubernetes volume plugin system already provides a powerful abstraction that automates the provisioning, attaching, mounting, resizing, and snapshotting of block and file storage.
Underpinning all these features is the Kubernetes goal of workload portability: Kubernetes aims to create an abstraction layer between distributed applications and underlying clusters so that applications can be agnostic to the specifics of the cluster they run on and application deployment requires no cluster specific knowledge.
There is already a VolumeSnapshot API that provides the ability to take a snapshot of a persistent volume to protect against data loss or data corruption. However, there are other snapshotting functionalities not covered by the VolumeSnapshot API.
Some storage systems support consistent group snapshots that allow a snapshot to be taken from multiple volumes at the same point-in-time to achieve write order consistency. This can be useful for applications that contain multiple volumes. For example, an application may have data stored in one volume and logs stored in another volume. If snapshots for the data volume and the logs volume are taken at different times, the application will not be consistent and will not function properly if it is restored from those snapshots when a disaster strikes.
It is true that you can quiesce the application first, take an individual snapshot from each volume that is part of the application one after the other, and then unquiesce the application after all the individual snapshots are taken. This way, you would get application consistent snapshots.
However, sometimes it may not be possible to quiesce an application or the application quiesce can be too expensive so you want to do it less frequently. Taking individual snapshots one after another may also take longer time compared to taking a consistent group snapshot. Some users may not want to do application quiesce very often for these reasons. For example, a user may want to run weekly backups with application quiesce and nightly backups without application quiesce but with consistent group support which provides crash consistency across all volumes in the group.
Kubernetes Volume Group Snapshots API
Kubernetes Volume Group Snapshots introduce three new API objects for managing snapshots:
VolumeGroupSnapshot- Created by a Kubernetes user (or perhaps by your own automation) to request creation of a volume group snapshot for multiple persistent volume claims. It contains information about the volume group snapshot operation such as the timestamp when the volume group snapshot was taken and whether it is ready to use. The creation and deletion of this object represents a desire to create or delete a cluster resource (a group snapshot).
VolumeGroupSnapshotContent- Created by the snapshot controller for a dynamically created VolumeGroupSnapshot. It contains information about the volume group snapshot including the volume group snapshot ID. This object represents a provisioned resource on the cluster (a group snapshot). The VolumeGroupSnapshotContent object binds to the VolumeGroupSnapshot for which it was created with a one-to-one mapping.
VolumeGroupSnapshotClass- Created by cluster administrators to describe how volume group snapshots should be created. including the driver information, the deletion policy, etc.
These three API kinds are defined as CustomResourceDefinitions (CRDs). These CRDs must be installed in a Kubernetes cluster for a CSI Driver to support volume group snapshots.
How do I use Kubernetes Volume Group Snapshots
Volume group snapshots are implemented in the external-snapshotter repository. Implementing volume group snapshots meant adding or changing several components:
- Added new CustomResourceDefinitions for VolumeGroupSnapshot and two supporting APIs.
- Volume group snapshot controller logic is added to the common snapshot controller.
- Volume group snapshot validation webhook logic is added to the common snapshot validation webhook.
- Adding logic to make CSI calls into the snapshotter sidecar controller.
The volume snapshot controller, CRDs, and validation webhook are deployed once per cluster, while the sidecar is bundled with each CSI driver.
Therefore, it makes sense to deploy the volume snapshot controller, CRDs, and validation webhook as a cluster addon. I strongly recommend that Kubernetes distributors bundle and deploy the volume snapshot controller, CRDs, and validation webhook as part of their Kubernetes cluster management process (independent of any CSI Driver).
Creating a new group snapshot with Kubernetes
Once a VolumeGroupSnapshotClass object is defined and you have volumes you want to snapshot together, you may request a new group snapshot by creating a VolumeGroupSnapshot object.
The source of the group snapshot specifies whether the underlying group snapshot should be dynamically created or if a pre-existing VolumeGroupSnapshotContent should be used.
A pre-existing VolumeGroupSnapshotContent is created by a cluster administrator. It contains the details of the real volume group snapshot on the storage system which is available for use by cluster users.
One of the following members in the source of the group snapshot must be set.
selector- a label query over PersistentVolumeClaims that are to be grouped together for snapshotting. This labelSelector will be used to match the label added to a PVC.volumeGroupSnapshotContentName- specifies the name of a pre-existing VolumeGroupSnapshotContent object representing an existing volume group snapshot.
In the following example, there are two PVCs.
NAME STATUS VOLUME CAPACITY ACCESSMODES AGE
pvc-0 Bound pvc-a42d7ea2-e3df-11ed-b5ea-0242ac120002 1Gi RWO 48s
pvc-1 Bound pvc-a42d81b8-e3df-11ed-b5ea-0242ac120002 1Gi RWO 48s
Label the PVCs.
% kubectl label pvc pvc-0 group=myGroup
persistentvolumeclaim/pvc-0 labeled
% kubectl label pvc pvc-1 group=myGroup
persistentvolumeclaim/pvc-1 labeled
For dynamic provisioning, a selector must be set so that the snapshot controller can find PVCs with the matching labels to be snapshotted together.
apiVersion: groupsnapshot.storage.k8s.io/v1alpha1
kind: VolumeGroupSnapshot
metadata:
name: new-group-snapshot-demo
namespace: demo-namespace
spec:
volumeGroupSnapshotClassName: csi-groupSnapclass
source:
selector:
matchLabels:
group: myGroup
In the VolumeGroupSnapshot spec, a user can specify the VolumeGroupSnapshotClass which has the information about which CSI driver should be used for creating the group snapshot.
Two individual volume snapshots will be created as part of the volume group snapshot creation.
snapshot-62abb5db7204ac6e4c1198629fec533f2a5d9d60ea1a25f594de0bf8866c7947-2023-04-26-2.20.4
snapshot-2026811eb9f0787466171fe189c805a22cdb61a326235cd067dc3a1ac0104900-2023-04-26-2.20.4
How to use group snapshot for restore in Kubernetes
At restore time, the user can request a new PersistentVolumeClaim to be created from a VolumeSnapshot object that is part of a VolumeGroupSnapshot. This will trigger provisioning of a new volume that is pre-populated with data from the specified snapshot. The user should repeat this until all volumes are created from all the snapshots that are part of a group snapshot.
apiVersion: v1
kind: PersistentVolumeClaim
metadata:
name: pvc0-restore
namespace: demo-namespace
spec:
storageClassName: csi-hostpath-sc
dataSource:
name: snapshot-62abb5db7204ac6e4c1198629fec533f2a5d9d60ea1a25f594de0bf8866c7947-2023-04-26-2.20.4
kind: VolumeSnapshot
apiGroup: snapshot.storage.k8s.io
accessModes:
- ReadWriteOnce
resources:
requests:
storage: 1Gi
As a storage vendor, how do I add support for group snapshots to my CSI driver?
To implement the volume group snapshot feature, a CSI driver must:
- Implement a new group controller service.
- Implement group controller RPCs:
CreateVolumeGroupSnapshot,DeleteVolumeGroupSnapshot, andGetVolumeGroupSnapshot. - Add group controller capability
CREATE_DELETE_GET_VOLUME_GROUP_SNAPSHOT.
See the CSI spec and the Kubernetes-CSI Driver Developer Guide for more details.
a CSI Volume Driver as possible, it provides a suggested mechanism to deploy a containerized CSI driver to simplify the process.
As part of this recommended deployment process, the Kubernetes team provides a number of sidecar (helper) containers, including the external-snapshotter sidecar container which has been updated to support volume group snapshot.
The external-snapshotter watches the Kubernetes API server for the
VolumeGroupSnapshotContent object and triggers CreateVolumeGroupSnapshot and
DeleteVolumeGroupSnapshot operations against a CSI endpoint.
What are the limitations?
The alpha implementation of volume group snapshots for Kubernetes has the following limitations:
- Does not support reverting an existing PVC to an earlier state represented by a snapshot (only supports provisioning a new volume from a snapshot).
- No application consistency guarantees beyond any guarantees provided by the storage system (e.g. crash consistency). See this doc for more discussions on application consistency.
What’s next?
Depending on feedback and adoption, the Kubernetes team plans to push the CSI Group Snapshot implementation to Beta in either 1.28 or 1.29. Some of the features we are interested in supporting include volume replication, replication group, volume placement, application quiescing, changed block tracking, and more.
How can I learn more?
- The design spec for the volume group snapshot feature.
- The code repository for volume group snapshot APIs and controller.
- CSI documentation on the group snapshot feature.
How do I get involved?
This project, like all of Kubernetes, is the result of hard work by many contributors from diverse backgrounds working together. On behalf of SIG Storage, I would like to offer a huge thank you to the contributors who stepped up these last few quarters to help the project reach alpha:
- Alex Meade (ameade)
- Ben Swartzlander (bswartz)
- Humble Devassy Chirammal (humblec)
- James Defelice (jdef)
- Jan Šafránek (jsafrane)
- Jing Xu (jingxu97)
- Michelle Au (msau42)
- Niels de Vos (nixpanic)
- Rakshith R (Rakshith-R)
- Raunak Shah (RaunakShah)
- Saad Ali (saad-ali)
- Thomas Watson (rbo54)
- Xing Yang (xing-yang)
- Yati Padia (yati1998)
We also want to thank everyone else who has contributed to the project, including others who helped review the KEP and the CSI spec PR.
For those interested in getting involved with the design and development of CSI or any part of the Kubernetes Storage system, join the Kubernetes Storage Special Interest Group (SIG). We always welcome new contributors.
We also hold regular Data Protection Working Group meetings. New attendees are welcome to join our discussions.
Kubernetes 1.27: Quality-of-Service for Memory Resources (alpha)
Kubernetes v1.27, released in April 2023, introduced changes to Memory QoS (alpha) to improve memory management capabilites in Linux nodes.
Support for Memory QoS was initially added in Kubernetes v1.22, and later some
limitations
around the formula for calculating memory.high were identified. These limitations are
addressed in Kubernetes v1.27.
Background
Kubernetes allows you to optionally specify how much of each resources a container needs in the Pod specification. The most common resources to specify are CPU and Memory.
For example, a Pod manifest that defines container resource requirements could look like:
apiVersion: v1
kind: Pod
metadata:
name: example
spec:
containers:
- name: nginx
resources:
requests:
memory: "64Mi"
cpu: "250m"
limits:
memory: "64Mi"
cpu: "500m"
spec.containers[].resources.requestsWhen you specify the resource request for containers in a Pod, the Kubernetes scheduler uses this information to decide which node to place the Pod on. The scheduler ensures that for each resource type, the sum of the resource requests of the scheduled containers is less than the total allocatable resources on the node.
spec.containers[].resources.limitsWhen you specify the resource limit for containers in a Pod, the kubelet enforces those limits so that the running containers are not allowed to use more of those resources than the limits you set.
When the kubelet starts a container as a part of a Pod, kubelet passes the container's requests and limits for CPU and memory to the container runtime. The container runtime assigns both CPU request and CPU limit to a container. Provided the system has free CPU time, the containers are guaranteed to be allocated as much CPU as they request. Containers cannot use more CPU than the configured limit i.e. containers CPU usage will be throttled if they use more CPU than the specified limit within a given time slice.
Prior to Memory QoS feature, the container runtime only used the memory
limit and discarded the memory request (requests were, and still are,
also used to influence scheduling).
If a container uses more memory than the configured limit,
the Linux Out Of Memory (OOM) killer will be invoked.
Let's compare how the container runtime on Linux typically configures memory request and limit in cgroups, with and without Memory QoS feature:
Memory request
The memory request is mainly used by kube-scheduler during (Kubernetes) Pod scheduling. In cgroups v1, there are no controls to specify the minimum amount of memory the cgroups must always retain. Hence, the container runtime did not use the value of requested memory set in the Pod spec.
cgroups v2 introduced a
memory.minsetting, used to specify the minimum amount of memory that should remain available to the processes within a given cgroup. If the memory usage of a cgroup is within its effective min boundary, the cgroup’s memory won’t be reclaimed under any conditions. If the kernel cannot maintain at leastmemory.minbytes of memory for the processes within the cgroup, the kernel invokes its OOM killer. In other words, the kernel guarantees at least this much memory is available or terminates processes (which may be outside the cgroup) in order to make memory more available. Memory QoS mapsmemory.mintospec.containers[].resources.requests.memoryto ensure the availability of memory for containers in Kubernetes Pods.Memory limit
The
memory.limitspecifies the memory limit, beyond which if the container tries to allocate more memory, Linux kernel will terminate a process with an OOM (Out of Memory) kill. If the terminated process was the main (or only) process inside the container, the container may exit.In cgroups v1,
memory.limit_in_bytesinterface is used to set the memory usage limit. However, unlike CPU, it was not possible to apply memory throttling: as soon as a container crossed the memory limit, it would be OOM killed.In cgroups v2,
memory.maxis analogous tomemory.limit_in_bytesin cgroupv1. Memory QoS mapsmemory.maxtospec.containers[].resources.limits.memoryto specify the hard limit for memory usage. If the memory consumption goes above this level, the kernel invokes its OOM Killer.cgroups v2 also added
memory.highconfiguration. Memory QoS usesmemory.highto set memory usage throttle limit. If thememory.highlimit is breached, the offending cgroups are throttled, and the kernel tries to reclaim memory which may avoid an OOM kill.
How it works
Cgroups v2 memory controller interfaces & Kubernetes container resources mapping
Memory QoS uses the memory controller of cgroups v2 to guarantee memory resources in Kubernetes. cgroupv2 interfaces that this feature uses are:
memory.maxmemory.minmemory.high.
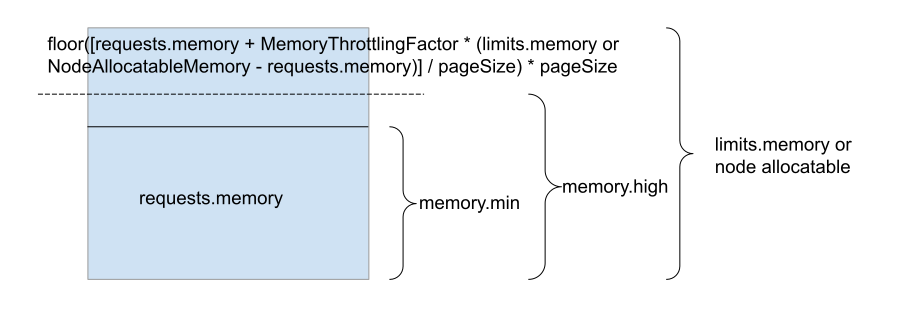
Memory QoS Levels
memory.max is mapped to limits.memory specified in the Pod spec. The kubelet and
the container runtime configure the limit in the respective cgroup. The kernel
enforces the limit to prevent the container from using more than the configured
resource limit. If a process in a container tries to consume more than the
specified limit, kernel terminates a process(es) with an Out of Memory (OOM) error.

memory.max maps to limits.memory
memory.min is mapped to requests.memory, which results in reservation of memory resources
that should never be reclaimed by the kernel. This is how Memory QoS ensures the availability of
memory for Kubernetes pods. If there's no unprotected reclaimable memory available, the OOM
killer is invoked to make more memory available.

memory.min maps to requests.memory
For memory protection, in addition to the original way of limiting memory usage, Memory QoS
throttles workload approaching its memory limit, ensuring that the system is not overwhelmed
by sporadic increases in memory usage. A new field, memoryThrottlingFactor, is available in
the KubeletConfiguration when you enable MemoryQoS feature. It is set to 0.9 by default.
memory.high is mapped to throttling limit calculated by using memoryThrottlingFactor,
requests.memory and limits.memory as in the formula below, and rounding down the
value to the nearest page size:

memory.high formula
Note:
If a container has no memory limits specified,limits.memory is substituted for node allocatable memory.Summary:
| File | Description |
|---|---|
| memory.max | memory.max specifies the maximum memory limit,
a container is allowed to use. If a process within the container
tries to consume more memory than the configured limit,
the kernel terminates the process with an Out of Memory (OOM) error.It is mapped to the container's memory limit specified in Pod manifest. |
| memory.min | memory.min specifies a minimum amount of memory
the cgroups must always retain, i.e., memory that should never be
reclaimed by the system.
If there's no unprotected reclaimable memory available, OOM kill is invoked.It is mapped to the container's memory request specified in the Pod manifest. |
| memory.high | memory.high specifies the memory usage throttle limit.
This is the main mechanism to control a cgroup's memory use. If
cgroups memory use goes over the high boundary specified here,
the cgroups processes are throttled and put under heavy reclaim pressure.Kubernetes uses a formula to calculate memory.high,
depending on container's memory request, memory limit or node allocatable memory
(if container's memory limit is empty) and a throttling factor.
Please refer to the KEP
for more details on the formula. |
Note:
memory.high is set only on container level cgroups while memory.min is set on
container, pod, and node level cgroups.memory.min calculations for cgroups heirarchy
When container memory requests are made, kubelet passes memory.min to the back-end
CRI runtime (such as containerd or CRI-O) via the Unified field in CRI during
container creation. For every ith container in a pod, the memory.min
in container level cgroups will be set to:
memory.min = pod.spec.containers[i].resources.requests[memory]
Since the memory.min interface requires that the ancestor cgroups directories are all
set, the pod and node cgroups directories need to be set correctly.
For every ith container in a pod, memory.min in pod level cgroup:
memory.min = \sum_{i=0}^{no. of pods}pod.spec.containers[i].resources.requests[memory]
For every jth container in every ith pod on a node, memory.min in node level cgroup:
memory.min = \sum_{i}^{no. of nodes}\sum_{j}^{no. of pods}pod[i].spec.containers[j].resources.requests[memory]
Kubelet will manage the cgroups hierarchy of the pod level and node level cgroups directly using the libcontainer library (from the runc project), while container cgroups limits are managed by the container runtime.
Support for Pod QoS classes
Based on user feedback for the Alpha feature in Kubernetes v1.22, some users would like to opt out of MemoryQoS on a per-pod basis to ensure there is no early memory throttling. Therefore, in Kubernetes v1.27 Memory QOS also supports memory.high to be set as per Quality of Service(QoS) for Pod classes. Following are the different cases for memory.high as per QOS classes:
Guaranteed pods by their QoS definition require memory requests=memory limits and are not overcommitted. Hence MemoryQoS feature is disabled on those pods by not setting memory.high. This ensures that Guaranteed pods can fully use their memory requests up to their set limit, and not hit any throttling.
Burstable pods by their QoS definition require at least one container in the Pod with CPU or memory request or limit set.
When requests.memory and limits.memory are set, the formula is used as-is:

memory.high when requests and limits are set
When requests.memory is set and limits.memory is not set, limits.memory is substituted for node allocatable memory in the formula:

memory.high when requests and limits are not set
BestEffort by their QoS definition do not require any memory or CPU limits or requests. For this case, kubernetes sets requests.memory = 0 and substitute limits.memory for node allocatable memory in the formula:

memory.high for BestEffort Pod
Summary: Only Pods in Burstable and BestEffort QoS classes will set memory.high.
Guaranteed QoS pods do not set memory.high as their memory is guaranteed.
How do I use it?
The prerequisites for enabling Memory QoS feature on your Linux node are:
- Verify the requirements related to Kubernetes support for cgroups v2 are met.
- Ensure CRI Runtime supports Memory QoS. At the time of writing, only containerd and CRI-O provide support compatible with Memory QoS (alpha). This was implemented in the following PRs:
Memory QoS remains an alpha feature for Kubernetes v1.27. You can enable the feature by setting
MemoryQoS=true in the kubelet configuration file:
apiVersion: kubelet.config.k8s.io/v1beta1
kind: KubeletConfiguration
featureGates:
MemoryQoS: true
How do I get involved?
Huge thank you to all the contributors who helped with the design, implementation, and review of this feature:
- Dixita Narang (ndixita)
- Tim Xu (xiaoxubeii)
- Paco Xu (pacoxu)
- David Porter(bobbypage)
- Mrunal Patel(mrunalp)
For those interested in getting involved in future discussions on Memory QoS feature, you can reach out SIG Node by several means:
Kubernetes 1.27: StatefulSet PVC Auto-Deletion (beta)
Kubernetes v1.27 graduated to beta a new policy mechanism for
StatefulSets that controls the lifetime of
their PersistentVolumeClaims (PVCs). The new PVC
retention policy lets users specify if the PVCs generated from the StatefulSet spec template should
be automatically deleted or retrained when the StatefulSet is deleted or replicas in the StatefulSet
are scaled down.
What problem does this solve?
A StatefulSet spec can include Pod and PVC templates. When a replica is first created, the
Kubernetes control plane creates a PVC for that replica if one does not already exist. The behavior
before the PVC retention policy was that the control plane never cleaned up the PVCs created for
StatefulSets - this was left up to the cluster administrator, or to some add-on automation that
you’d have to find, check suitability, and deploy. The common pattern for managing PVCs, either
manually or through tools such as Helm, is that the PVCs are tracked by the tool that manages them,
with explicit lifecycle. Workflows that use StatefulSets must determine on their own what PVCs are
created by a StatefulSet and what their lifecycle should be.
Before this new feature, when a StatefulSet-managed replica disappears, either because the
StatefulSet is reducing its replica count, or because its StatefulSet is deleted, the PVC and its
backing volume remains and must be manually deleted. While this behavior is appropriate when the
data is critical, in many cases the persistent data in these PVCs is either temporary, or can be
reconstructed from another source. In those cases, PVCs and their backing volumes remaining after
their StatefulSet or replicas have been deleted are not necessary, incur cost, and require manual
cleanup.
The new StatefulSet PVC retention policy
The new StatefulSet PVC retention policy is used to control if and when PVCs created from a
StatefulSet’s volumeClaimTemplate are deleted. There are two contexts when this may occur.
The first context is when the StatefulSet resource is deleted (which implies that all replicas are
also deleted). This is controlled by the whenDeleted policy. The second context, controlled by
whenScaled is when the StatefulSet is scaled down, which removes some but not all of the replicas
in a StatefulSet. In both cases the policy can either be Retain, where the corresponding PVCs are
not touched, or Delete, which means that PVCs are deleted. The deletion is done with a normal
object deletion, so that, for example, all
retention policies for the underlying PV are respected.
This policy forms a matrix with four cases. I’ll walk through and give an example for each one.
whenDeletedandwhenScaledare bothRetain.This matches the existing behavior for
StatefulSets, where no PVCs are deleted. This is also the default retention policy. It’s appropriate to use when data onStatefulSetvolumes may be irreplaceable and should only be deleted manually.whenDeletedisDeleteandwhenScaledisRetain.In this case, PVCs are deleted only when the entire
StatefulSetis deleted. If theStatefulSetis scaled down, PVCs are not touched, meaning they are available to be reattached if a scale-up occurs with any data from the previous replica. This might be used for a temporaryStatefulSet, such as in a CI instance or ETL pipeline, where the data on theStatefulSetis needed only during the lifetime of theStatefulSetlifetime, but while the task is running the data is not easily reconstructible. Any retained state is needed for any replicas that scale down and then up.whenDeletedandwhenScaledare bothDelete.PVCs are deleted immediately when their replica is no longer needed. Note this does not include when a
Podis deleted and a new version rescheduled, for example when a node is drained andPodsneed to migrate elsewhere. The PVC is deleted only when the replica is no longer needed as signified by a scale-down orStatefulSetdeletion. This use case is for when data does not need to live beyond the life of its replica. Perhaps the data is easily reconstructable and the cost savings of deleting unused PVCs is more important than quick scale-up, or perhaps that when a new replica is created, any data from a previous replica is not usable and must be reconstructed anyway.whenDeletedisRetainandwhenScaledisDelete.This is similar to the previous case, when there is little benefit to keeping PVCs for fast reuse during scale-up. An example of a situation where you might use this is an Elasticsearch cluster. Typically you would scale that workload up and down to match demand, whilst ensuring a minimum number of replicas (for example: 3). When scaling down, data is migrated away from removed replicas and there is no benefit to retaining those PVCs. However, it can be useful to bring the entire Elasticsearch cluster down temporarily for maintenance. If you need to take the Elasticsearch system offline, you can do this by temporarily deleting the
StatefulSet, and then bringing the Elasticsearch cluster back by recreating theStatefulSet. The PVCs holding the Elasticsearch data will still exist and the new replicas will automatically use them.
Visit the documentation to see all the details.
What’s next?
Try it out! The StatefulSetAutoDeletePVC feature gate is beta and enabled by default on
cluster running Kubernetes 1.27. Create a StatefulSet using the new policy, test it out and tell
us what you think!
I'm very curious to see if this owner reference mechanism works well in practice. For example, I
realized there is no mechanism in Kubernetes for knowing who set a reference, so it’s possible that
the StatefulSet controller may fight with custom controllers that set their own
references. Fortunately, maintaining the existing retention behavior does not involve any new owner
references, so default behavior will be compatible.
Please tag any issues you report with the label sig/apps and assign them to Matthew Cary
(@mattcary at GitHub).
Enjoy!
Kubernetes 1.27: HorizontalPodAutoscaler ContainerResource type metric moves to beta
Kubernetes 1.20 introduced the ContainerResource type metric
in HorizontalPodAutoscaler (HPA).
In Kubernetes 1.27, this feature moves to beta and the corresponding feature gate (HPAContainerMetrics) gets enabled by default.
What is the ContainerResource type metric
The ContainerResource type metric allows us to configure the autoscaling based on resource usage of individual containers.
In the following example, the HPA controller scales the target so that the average utilization of the cpu in the application container of all the pods is around 60%. (See the algorithm details to know how the desired replica number is calculated exactly)
type: ContainerResource
containerResource:
name: cpu
container: application
target:
type: Utilization
averageUtilization: 60
The difference from the Resource type metric
HPA already had a Resource type metric.
You can define the target resource utilization like the following, and then HPA will scale up/down the replicas based on the current utilization.
type: Resource
resource:
name: cpu
target:
type: Utilization
averageUtilization: 60
But, this Resource type metric refers to the average utilization of the Pods.
In case a Pod has multiple containers, the utilization calculation would be:
sum{the resource usage of each container} / sum{the resource request of each container}
The resource utilization of each container may not have a direct correlation or may grow at different rates as the load changes.
For example:
- A sidecar container is only providing an auxiliary service such as log shipping. If the application does not log very frequently or does not produce logs in its hotpath then the usage of the log shipper will not grow.
- A sidecar container which provides authentication. Due to heavy caching the usage will only increase slightly when the load on the main container increases. In the current blended usage calculation approach this usually results in the HPA not scaling up the deployment because the blended usage is still low.
- A sidecar may be injected without resources set which prevents scaling based on utilization. In the current logic the HPA controller can only scale on absolute resource usage of the pod when the resource requests are not set.
And, in such case, if only one container's resource utilization goes high, the Resource type metric may not suggest scaling up.
So, for the accurate autoscaling, you may want to use the ContainerResource type metric for such Pods instead.
What's new for the beta?
For Kubernetes v1.27, the ContainerResource type metric is available by default as described at the beginning
of this article.
(You can still disable it by the HPAContainerMetrics feature gate.)
Also, we've improved the observability of HPA controller by exposing some metrics from the kube-controller-manager:
metric_computation_total: Number of metric computations.metric_computation_duration_seconds: The time that the HPA controller takes to calculate one metric.reconciliations_total: Number of reconciliation of HPA controller.reconciliation_duration_seconds: The time that the HPA controller takes to reconcile a HPA object once.
These metrics have labels action (scale_up, scale_down, none) and error (spec, internal, none).
And, in addition to them, the first two metrics have the metric_type label
which corresponds to .spec.metrics[*].type for a HorizontalPodAutoscaler.
All metrics are useful for general monitoring of HPA controller, you can get deeper insight into which part has a problem, where it takes time, how much scaling tends to happen at which time on your cluster etc.
Another minor stuff, we've changed the SuccessfulRescale event's messages
so that everyone can check whether the events came from the resource metric or
the container resource metric (See the related PR).
Getting involved
This feature is managed by SIG Autoscaling. Please join us and share your feedback. We look forward to hearing from you!
How can I learn more?
Kubernetes 1.27: StatefulSet Start Ordinal Simplifies Migration
Kubernetes v1.26 introduced a new, alpha-level feature for StatefulSets that controls the ordinal numbering of Pod replicas. As of Kubernetes v1.27, this feature is now beta. Ordinals can start from arbitrary non-negative numbers. This blog post will discuss how this feature can be used.
Background
StatefulSets ordinals provide sequential identities for pod replicas. When using
OrderedReady Pod management
Pods are created from ordinal index 0 up to N-1.
With Kubernetes today, orchestrating a StatefulSet migration across clusters is challenging. Backup and restore solutions exist, but these require the application to be scaled down to zero replicas prior to migration. In today's fully connected world, even planned application downtime may not allow you to meet your business goals. You could use Cascading Delete or On Delete to migrate individual pods, however this is error prone and tedious to manage. You lose the self-healing benefit of the StatefulSet controller when your Pods fail or are evicted.
Kubernetes v1.26 enables a StatefulSet to be responsible for a range of ordinals within a range {0..N-1} (the ordinals 0, 1, ... up to N-1). With it, you can scale down a range {0..k-1} in a source cluster, and scale up the complementary range {k..N-1} in a destination cluster, while maintaining application availability. This enables you to retain at most one semantics (meaning there is at most one Pod with a given identity running in a StatefulSet) and Rolling Update behavior when orchestrating a migration across clusters.
Why would I want to use this feature?
Say you're running your StatefulSet in one cluster, and need to migrate it out to a different cluster. There are many reasons why you would need to do this:
- Scalability: Your StatefulSet has scaled too large for your cluster, and has started to disrupt the quality of service for other workloads in your cluster.
- Isolation: You're running a StatefulSet in a cluster that is accessed by multiple users, and namespace isolation isn't sufficient.
- Cluster Configuration: You want to move your StatefulSet to a different cluster to use some environment that is not available on your current cluster.
- Control Plane Upgrades: You want to move your StatefulSet to a cluster running an upgraded control plane, and can't handle the risk or downtime of in-place control plane upgrades.
How do I use it?
Enable the StatefulSetStartOrdinal feature gate on a cluster, and create a
StatefulSet with a customized .spec.ordinals.start.
Try it out
In this demo, I'll use the new mechanism to migrate a StatefulSet from one Kubernetes cluster to another. The redis-cluster Bitnami Helm chart will be used to install Redis.
Tools Required:
Pre-requisites
To do this, I need two Kubernetes clusters that can both access common
networking and storage; I've named my clusters source and destination.
Specifically, I need:
- The
StatefulSetStartOrdinalfeature gate enabled on both clusters. - Client configuration for
kubectlthat lets me access both clusters as an administrator. - The same
StorageClassinstalled on both clusters, and set as the default StorageClass for both clusters. ThisStorageClassshould provision underlying storage that is accessible from either or both clusters. - A flat network topology that allows for pods to send and receive packets to and from Pods in either clusters. If you are creating clusters on a cloud provider, this configuration may be called private cloud or private network.
Create a demo namespace on both clusters:
kubectl create ns kep-3335Deploy a Redis cluster with six replicas in the source cluster:
helm repo add bitnami https://charts.bitnami.com/bitnami helm install redis --namespace kep-3335 \ bitnami/redis-cluster \ --set persistence.size=1Gi \ --set cluster.nodes=6Check the replication status in the source cluster:
kubectl exec -it redis-redis-cluster-0 -- /bin/bash -c \ "redis-cli -c -h redis-redis-cluster -a $(kubectl get secret redis-redis-cluster -o jsonpath="{.data.redis-password}" | base64 -d) CLUSTER NODES;"2ce30362c188aabc06f3eee5d92892d95b1da5c3 10.104.0.14:6379@16379 myself,master - 0 1669764411000 3 connected 10923-16383 7743661f60b6b17b5c71d083260419588b4f2451 10.104.0.16:6379@16379 slave 2ce30362c188aabc06f3eee5d92892d95b1da5c3 0 1669764410000 3 connected 961f35e37c4eea507cfe12f96e3bfd694b9c21d4 10.104.0.18:6379@16379 slave a8765caed08f3e185cef22bd09edf409dc2bcc61 0 1669764411000 1 connected 7136e37d8864db983f334b85d2b094be47c830e5 10.104.0.15:6379@16379 slave 2cff613d763b22c180cd40668da8e452edef3fc8 0 1669764412595 2 connected a8765caed08f3e185cef22bd09edf409dc2bcc61 10.104.0.19:6379@16379 master - 0 1669764411592 1 connected 0-5460 2cff613d763b22c180cd40668da8e452edef3fc8 10.104.0.17:6379@16379 master - 0 1669764410000 2 connected 5461-10922Deploy a Redis cluster with zero replicas in the destination cluster:
helm install redis --namespace kep-3335 \ bitnami/redis-cluster \ --set persistence.size=1Gi \ --set cluster.nodes=0 \ --set redis.extraEnvVars\[0\].name=REDIS_NODES,redis.extraEnvVars\[0\].value="redis-redis-cluster-headless.kep-3335.svc.cluster.local" \ --set existingSecret=redis-redis-clusterScale down the
redis-redis-clusterStatefulSet in the source cluster by 1, to remove the replicaredis-redis-cluster-5:kubectl patch sts redis-redis-cluster -p '{"spec": {"replicas": 5}}'Migrate dependencies from the source cluster to the destination cluster:
The following commands copy resources from
sourcetodestionation. Details that are not relevant indestinationcluster are removed (eg:uid,resourceVersion,status).Steps for the source cluster
Note: If using a
StorageClasswithreclaimPolicy: Deleteconfigured, you should patch the PVs insourcewithreclaimPolicy: Retainprior to deletion to retain the underlying storage used indestination. See Change the Reclaim Policy of a PersistentVolume for more details.kubectl get pvc redis-data-redis-redis-cluster-5 -o yaml | yq 'del(.metadata.uid, .metadata.resourceVersion, .metadata.annotations, .metadata.finalizers, .status)' > /tmp/pvc-redis-data-redis-redis-cluster-5.yaml kubectl get pv $(yq '.spec.volumeName' /tmp/pvc-redis-data-redis-redis-cluster-5.yaml) -o yaml | yq 'del(.metadata.uid, .metadata.resourceVersion, .metadata.annotations, .metadata.finalizers, .spec.claimRef, .status)' > /tmp/pv-redis-data-redis-redis-cluster-5.yaml kubectl get secret redis-redis-cluster -o yaml | yq 'del(.metadata.uid, .metadata.resourceVersion)' > /tmp/secret-redis-redis-cluster.yamlSteps for the destination cluster
Note: For the PV/PVC, this procedure only works if the underlying storage system that your PVs use can support being copied into
destination. Storage that is associated with a specific node or topology may not be supported. Additionally, some storage systems may store addtional metadata about volumes outside of a PV object, and may require a more specialized sequence to import a volume.kubectl create -f /tmp/pv-redis-data-redis-redis-cluster-5.yaml kubectl create -f /tmp/pvc-redis-data-redis-redis-cluster-5.yaml kubectl create -f /tmp/secret-redis-redis-cluster.yamlScale up the
redis-redis-clusterStatefulSet in the destination cluster by 1, with a start ordinal of 5:kubectl patch sts redis-redis-cluster -p '{"spec": {"ordinals": {"start": 5}, "replicas": 1}}'Check the replication status in the destination cluster:
kubectl exec -it redis-redis-cluster-5 -- /bin/bash -c \ "redis-cli -c -h redis-redis-cluster -a $(kubectl get secret redis-redis-cluster -o jsonpath="{.data.redis-password}" | base64 -d) CLUSTER NODES;"I should see that the new replica (labeled
myself) has joined the Redis cluster (the IP address belongs to a different CIDR block than the replicas in the source cluster).2cff613d763b22c180cd40668da8e452edef3fc8 10.104.0.17:6379@16379 master - 0 1669766684000 2 connected 5461-10922 7136e37d8864db983f334b85d2b094be47c830e5 10.108.0.22:6379@16379 myself,slave 2cff613d763b22c180cd40668da8e452edef3fc8 0 1669766685609 2 connected 2ce30362c188aabc06f3eee5d92892d95b1da5c3 10.104.0.14:6379@16379 master - 0 1669766684000 3 connected 10923-16383 961f35e37c4eea507cfe12f96e3bfd694b9c21d4 10.104.0.18:6379@16379 slave a8765caed08f3e185cef22bd09edf409dc2bcc61 0 1669766683600 1 connected a8765caed08f3e185cef22bd09edf409dc2bcc61 10.104.0.19:6379@16379 master - 0 1669766685000 1 connected 0-5460 7743661f60b6b17b5c71d083260419588b4f2451 10.104.0.16:6379@16379 slave 2ce30362c188aabc06f3eee5d92892d95b1da5c3 0 1669766686613 3 connectedRepeat steps #5 to #7 for the remainder of the replicas, until the Redis StatefulSet in the source cluster is scaled to 0, and the Redis StatefulSet in the destination cluster is healthy with 6 total replicas.
What's Next?
This feature provides a building block for a StatefulSet to be split up across clusters, but does not prescribe the mechanism as to how the StatefulSet should be migrated. Migration requires coordination of StatefulSet replicas, along with orchestration of the storage and network layer. This is dependent on the storage and connectivity requirements of the application installed by the StatefulSet. Additionally, many StatefulSets are managed by operators, which adds another layer of complexity to migration.
If you're interested in building enhancements to make these processes easier, get involved with SIG Multicluster to contribute!
Updates to the Auto-refreshing Official CVE Feed
Since launching the Auto-refreshing Official CVE feed as an alpha feature in the 1.25 release, we have made significant improvements and updates. We are excited to announce the release of the beta version of the feed. This blog post will outline the feedback received, the changes made, and talk about how you can help as we prepare to make this a stable feature in a future Kubernetes Release.
Feedback from end-users
SIG Security received some feedback from end-users:
- The JSON CVE Feed did not comply with the JSON Feed specification as its name would suggest.
- The feed could also support RSS in addition to JSON Feed format.
- Some metadata could be added to indicate the freshness of the feed overall, or specific CVEs. Another suggestion was to indicate which Prow job recently updated the feed. See more ideas directly on the the umbrella issue.
- The feed Markdown table on the website should be ordered from the most recent to the least recently announced CVE.
Summary of changes
In response, the SIG did a rework of the script generating the JSON feed
to comply with the JSON Feed specification from generation and add a
last_updated root field to indicate overall freshness. This redesign needed a
corresponding fix on the Kubernetes website side
for the CVE feed page to continue to work with the new format.
After that, RSS feed support could be added transparently so that end-users can consume the feed in their preferred format.
Overall, the redesign based on the JSON Feed specification, which this time broke backward compatibility, will allow updates in the future to address the rest of the issue while being more transparent and less disruptive to end-users.
Updates
| Title | Issue | Status |
|---|---|---|
| CVE Feed: JSON feed should pass jsonfeed spec validator | kubernetes/webite#36808 | closed, addressed by kubernetes/sig-security#76 |
| CVE Feed: Add lastUpdatedAt as a metadata field | kubernetes/sig-security#72 | closed, addressed by kubernetes/sig-security#76 |
| Support RSS feeds by generating data in Atom format | kubernetes/sig-security#77 | closed, addressed by kubernetes/website#39513 |
| CVE Feed: Sort Markdown Table from most recent to least recently announced CVE | kubernetes/sig-security#73 | closed, addressed by kubernetes/sig-security#76 |
| CVE Feed: Include a timestamp field for each CVE indicating when it was last updated | kubernetes/sig-security#63 | closed, addressed by kubernetes/sig-security#76 |
| CVE Feed: Add Prow job link as a metadata field | kubernetes/sig-security#71 | closed, addressed by kubernetes/sig-security#83 |
What's next?
In preparation to graduate the feed
to stable i.e. General Availability stage, SIG Security is still gathering feedback from end users who are using the updated beta feed.
To help us continue to improve the feed in future Kubernetes Releases please share feedback by adding a comment to this tracking issue or let us know on #sig-security-tooling Kubernetes Slack channel, join Kubernetes Slack here.
Kubernetes 1.27: Server Side Field Validation and OpenAPI V3 move to GA
Before Kubernetes v1.8 (!), typos, mis-indentations or minor errors in
YAMLs could have catastrophic consequences (e.g. a typo like
forgetting the trailing s in replica: 1000 could cause an outage,
because the value would be ignored and missing, forcing a reset of
replicas back to 1). This was solved back then by fetching the OpenAPI
v2 in kubectl and using it to verify that fields were correct and
present before applying. Unfortunately, at that time, Custom Resource
Definitions didn’t exist, and the code was written under that
assumption. When CRDs were later introduced, the lack of flexibility
in the validation code forced some hard decisions in the way CRDs
exposed their schema, leaving us in a cycle of bad validation causing
bad OpenAPI and vice-versa. With the new OpenAPI v3 and Server Field
Validation being GA in 1.27, we’ve now solved both of these problems.
Server Side Field Validation offers resource validation on create, update and patch requests to the apiserver and was added to Kubernetes in v1.25, beta in v1.26 and is now GA in v1.27. It provides all the functionality of kubectl validate on the server side.
OpenAPI is a standard, language agnostic interface for discovering the set of operations and types that a Kubernetes cluster supports. OpenAPI V3 is the latest standard of the OpenAPI and is an improvement upon OpenAPI V2 which has been supported since Kubernetes 1.5. OpenAPI V3 support was added in Kubernetes in v1.23, moved to beta in v1.24 and is now GA in v1.27.
OpenAPI V3
What does OpenAPI V3 offer over V2
Built-in types
Kubernetes offers certain annotations on fields that are not representable in OpenAPI V2, or sometimes not represented in the OpenAPI v2 that Kubernetes generate. Most notably, the "default" field is published in OpenAPI V3 while omitted in OpenAPI V2. A single type that can represent multiple types is also expressed correctly in OpenAPI V3 with the oneOf field. This includes proper representations for IntOrString and Quantity.
Custom Resource Definitions
In Kubernetes, Custom Resource Definitions use a structural OpenAPI V3 schema that cannot be represented as OpenAPI V2 without a loss of certain fields. Some of these include nullable, default, anyOf, oneOf, not, etc. OpenAPI V3 is a completely lossless representation of the CustomResourceDefinition structural schema.
How do I use it?
The OpenAPI V3 root discovery can be found at the /openapi/v3
endpoint of a Kubernetes API server. OpenAPI V3 documents are grouped
by group-version to reduce the size of the data transported, the
separate documents can be accessed at
/openapi/v3/apis/<group>/<version> and /openapi/v3/api/v1
representing the legacy group version. Please refer to the Kubernetes
API Documentation for more
information around this endpoint.
Various consumers of the OpenAPI have already been updated to consume v3, including the entirety of kubectl, and server side apply. An OpenAPI V3 Golang client is available in client-go.
Server Side Field Validation
The query parameter fieldValidation may be used to indicate the
level of field validation the server should perform. If the parameter
is not passed, server side field validation is in Warn mode by
default.
- Strict: Strict field validation, errors on validation failure
- Warn: Field validation is performed, but errors are exposed as warnings rather than failing the request
- Ignore: No server side field validation is performed
kubectl will skip client side validation and will automatically use
server side field validation in Strict mode. Controllers by default
use server side field validation in Warn mode.
With client side validation, we had to be extra lenient because some fields were missing from OpenAPI V2 and we didn’t want to reject possibly valid objects. This is all fixed in server side validation. Additional documentation may be found here
What's next?
With Server Side Field Validation and OpenAPI V3 released as GA, we introduce more accurate representations of Kubernetes resources. It is recommended to use server side field validation over client side, but with OpenAPI V3, clients are free to implement their own validation if necessary (to “shift things left”) and we guarantee a full lossless schema published by OpenAPI.
Some existing efforts will further improve the information available through OpenAPI including CEL validation and admission, along with OpenAPI annotations on built-in types.
Many other tools can be built for authoring and transforming resources using the type information found in the OpenAPI v3.
How to get involved?
These two features are driven by the SIG API Machinery community, available on the slack channel #sig-api-machinery, through the mailing list and we meet every other Wednesday at 11:00 AM PT on Zoom.
We offer a huge thanks to all the contributors who helped design, implement, and review these two features.
- Alexander Zielenski
- Antoine Pelisse
- Daniel Smith
- David Eads
- Jeffrey Ying
- Jordan Liggitt
- Kevin Delgado
- Sean Sullivan
Kubernetes 1.27: Query Node Logs Using The Kubelet API
Kubernetes 1.27 introduced a new feature called Node log query that allows viewing logs of services running on the node.
What problem does it solve?
Cluster administrators face issues when debugging malfunctioning services running on the node. They usually have to SSH or RDP into the node to view the logs of the service to debug the issue. The Node log query feature helps with this scenario by allowing the cluster administrator to view the logs using kubectl. This is especially useful with Windows nodes where you run into the issue of the node going to the ready state but containers not coming up due to CNI misconfigurations and other issues that are not easily identifiable by looking at the Pod status.
How does it work?
The kubelet already has a /var/log/ viewer that is accessible via the node
proxy endpoint. The feature supplements this endpoint with a shim that shells
out to journalctl, on Linux nodes, and the Get-WinEvent cmdlet on Windows
nodes. It then uses the existing filters provided by the commands to allow
filtering the logs. The kubelet also uses heuristics to retrieve the logs.
If the user is not aware if a given system services logs to a file or to the
native system logger, the heuristics first checks the native operating system
logger and if that is not available it attempts to retrieve the first logs
from /var/log/<servicename> or /var/log/<servicename>.log or
/var/log/<servicename>/<servicename>.log.
On Linux we assume that service logs are available via journald, and that
journalctl is installed. On Windows we assume that service logs are available
in the application log provider. Also note that fetching node logs is only
available if you are authorized to do so (in RBAC, that's get and
create access to nodes/proxy).
Warning:
Granting permissions tonodes/proxy (even just get permission) also authorizes access to powerful kubelet
APIs that can be used to execute commands in any container running on the node, so be careful about how you manage them.
See Kubelet authentication/authorization
for more information.(this warning message was added to the article in early 2026)
How do I use it?
To use the feature, ensure that the NodeLogQuery
feature gate is
enabled for that node, and that the kubelet configuration options
enableSystemLogHandler and enableSystemLogQuery are both set to true. You can
then query the logs from all your nodes or just a subset. Here is an example to
retrieve the kubelet service logs from a node:
# Fetch kubelet logs from a node named node-1.example
kubectl get --raw "/api/v1/nodes/node-1.example/proxy/logs/?query=kubelet"
You can further filter the query to narrow down the results:
# Fetch kubelet logs from a node named node-1.example that have the word "error"
kubectl get --raw "/api/v1/nodes/node-1.example/proxy/logs/?query=kubelet&pattern=error"
You can also fetch files from /var/log/ on a Linux node:
kubectl get --raw "/api/v1/nodes/<insert-node-name-here>/proxy/logs/?query=/<insert-log-file-name-here>"
You can read the documentation for all the available options.
How do I help?
Please use the feature and provide feedback by opening GitHub issues or reaching out to us on the #sig-windows channel on the Kubernetes Slack or the SIG Windows mailing list.
Kubernetes 1.27: Single Pod Access Mode for PersistentVolumes Graduates to Beta
With the release of Kubernetes v1.27 the ReadWriteOncePod feature has graduated to beta. In this blog post, we'll take a closer look at this feature, what it does, and how it has evolved in the beta release.
What is ReadWriteOncePod?
ReadWriteOncePod is a new access mode for PersistentVolumes (PVs) and PersistentVolumeClaims (PVCs) introduced in Kubernetes v1.22. This access mode enables you to restrict volume access to a single pod in the cluster, ensuring that only one pod can write to the volume at a time. This can be particularly useful for stateful workloads that require single-writer access to storage.
For more context on access modes and how ReadWriteOncePod works read What are access modes and why are they important? in the Introducing Single Pod Access Mode for PersistentVolumes article from 2021.
Changes in the ReadWriteOncePod beta
The ReadWriteOncePod beta adds support for scheduler preemption of pods using ReadWriteOncePod PVCs.
Scheduler preemption allows higher-priority pods to preempt lower-priority pods, so that they can start running on the same node. With this release, pods using ReadWriteOncePod PVCs can also be preempted if a higher-priority pod requires the same PVC.
How can I start using ReadWriteOncePod?
With ReadWriteOncePod now in beta, it will be enabled by default in cluster versions v1.27 and beyond.
Note that ReadWriteOncePod is only supported for CSI volumes. Before using this feature you will need to update the following CSI sidecars to these versions or greater:
To start using ReadWriteOncePod, create a PVC with the ReadWriteOncePod access mode:
kind: PersistentVolumeClaim
apiVersion: v1
metadata:
name: single-writer-only
spec:
accessModes:
- ReadWriteOncePod # Allow only a single pod to access single-writer-only.
resources:
requests:
storage: 1Gi
If your storage plugin supports dynamic provisioning, new PersistentVolumes will be created with the ReadWriteOncePod access mode applied.
Read Migrating existing PersistentVolumes for details on migrating existing volumes to use ReadWriteOncePod.
How can I learn more?
Please see the alpha blog post and KEP-2485 for more details on the ReadWriteOncePod access mode and motivations for CSI spec changes.
How do I get involved?
The Kubernetes #csi Slack channel and any of the standard SIG Storage communication channels are great mediums to reach out to the SIG Storage and the CSI teams.
Special thanks to the following people whose thoughtful reviews and feedback helped shape this feature:
- Abdullah Gharaibeh (ahg-g)
- Aldo Culquicondor (alculquicondor)
- Antonio Ojea (aojea)
- David Eads (deads2k)
- Jan Šafránek (jsafrane)
- Joe Betz (jpbetz)
- Kante Yin (kerthcet)
- Michelle Au (msau42)
- Tim Bannister (sftim)
- Xing Yang (xing-yang)
If you’re interested in getting involved with the design and development of CSI or any part of the Kubernetes storage system, join the Kubernetes Storage Special Interest Group (SIG). We’re rapidly growing and always welcome new contributors.
Kubernetes 1.27: Efficient SELinux volume relabeling (Beta)
The problem
On Linux with Security-Enhanced Linux (SELinux) enabled, it's traditionally
the container runtime that applies SELinux labels to a Pod and all its volumes.
Kubernetes only passes the SELinux label from a Pod's securityContext fields
to the container runtime.
The container runtime then recursively changes SELinux label on all files that are visible to the Pod's containers. This can be time-consuming if there are many files on the volume, especially when the volume is on a remote filesystem.
If a container uses subPath of a volume, only that subPath of the whole
volume is relabeled. This allows two pods that have two different SELinux labels
to use the same volume, as long as they use different subpaths of it.
If a Pod does not have any SELinux label assigned in Kubernetes API, the container runtime assigns a unique random one, so a process that potentially escapes the container boundary cannot access data of any other container on the host. The container runtime still recursively relabels all pod volumes with this random SELinux label.
Improvement using mount options
If a Pod and its volume meet all of the following conditions, Kubernetes will mount the volume directly with the right SELinux label. Such mount will happen in a constant time and the container runtime will not need to recursively relabel any files on it.
The operating system must support SELinux.
Without SELinux support detected, kubelet and the container runtime do not do anything with regard to SELinux.
The feature gates
ReadWriteOncePodandSELinuxMountReadWriteOncePodmust be enabled. These feature gates are Beta in Kubernetes 1.27 and Alpha in 1.25.With any of these feature gates disabled, SELinux labels will be always applied by the container runtime by a recursive walk through the volume (or its subPaths).
The Pod must have at least
seLinuxOptions.levelassigned in its Pod Security Context or all Pod containers must have it set in their Security Contexts. Kubernetes will read the defaultuser,roleandtypefrom the operating system defaults (typicallysystem_u,system_randcontainer_t).Without Kubernetes knowing at least the SELinux
level, the container runtime will assign a random one after the volumes are mounted. The container runtime will still relabel the volumes recursively in that case.The volume must be a Persistent Volume with Access Mode
ReadWriteOncePod.This is a limitation of the initial implementation. As described above, two Pods can have a different SELinux label and still use the same volume, as long as they use a different
subPathof it. This use case is not possible when the volumes are mounted with the SELinux label, because the whole volume is mounted and most filesystems don't support mounting a single volume multiple times with multiple SELinux labels.If running two Pods with two different SELinux contexts and using different
subPathsof the same volume is necessary in your deployments, please comment in the KEP issue (or upvote any existing comment - it's best not to duplicate). Such pods may not run when the feature is extended to cover all volume access modes.The volume plugin or the CSI driver responsible for the volume supports mounting with SELinux mount options.
These in-tree volume plugins support mounting with SELinux mount options:
fc,iscsi, andrbd.CSI drivers that support mounting with SELinux mount options must announce that in their CSIDriver instance by setting
seLinuxMountfield.Volumes managed by other volume plugins or CSI drivers that don't set
seLinuxMount: truewill be recursively relabelled by the container runtime.
Mounting with SELinux context
When all aforementioned conditions are met, kubelet will
pass -o context=<SELinux label> mount option to the volume plugin or CSI
driver. CSI driver vendors must ensure that this mount option is supported
by their CSI driver and, if necessary, the CSI driver appends other mount
options that are needed for -o context to work.
For example, NFS may need -o context=<SELinux label>,nosharecache, so each
volume mounted from the same NFS server can have a different SELinux label
value. Similarly, CIFS may need -o context=<SELinux label>,nosharesock.
It's up to the CSI driver vendor to test their CSI driver in a SELinux enabled
environment before setting seLinuxMount: true in the CSIDriver instance.
How can I learn more?
SELinux in containers: see excellent visual SELinux guide by Daniel J Walsh. Note that the guide is older than Kubernetes, it describes Multi-Category Security (MCS) mode using virtual machines as an example, however, a similar concept is used for containers.
See a series of blog posts for details how exactly SELinux is applied to containers by container runtimes:
- How SELinux separates containers using Multi-Level Security
- Why you should be using Multi-Category Security for your Linux containers
Read the KEP: Speed up SELinux volume relabeling using mounts
Kubernetes 1.27: More fine-grained pod topology spread policies reached beta
In Kubernetes v1.19, Pod topology spread constraints went to general availability (GA).
As time passed, we - SIG Scheduling - received feedback from users, and, as a result, we're actively working on improving the Topology Spread feature via three KEPs. All of these features have reached beta in Kubernetes v1.27 and are enabled by default.
This blog post introduces each feature and the use case behind each of them.
KEP-3022: min domains in Pod Topology Spread
Pod Topology Spread has the maxSkew parameter to define the degree to which Pods may be unevenly distributed.
But, there wasn't a way to control the number of domains over which we should spread. Some users want to force spreading Pods over a minimum number of domains, and if there aren't enough already present, make the cluster-autoscaler provision them.
Kubernetes v1.24 introduced the minDomains parameter for pod topology spread constraints,
as an alpha feature.
Via minDomains parameter, you can define the minimum number of domains.
For example, assume there are 3 Nodes with the enough capacity,
and a newly created ReplicaSet has the following topologySpreadConstraints in its Pod template.
...
topologySpreadConstraints:
- maxSkew: 1
minDomains: 5 # requires 5 Nodes at least (because each Node has a unique hostname).
whenUnsatisfiable: DoNotSchedule # minDomains is valid only when DoNotSchedule is used.
topologyKey: kubernetes.io/hostname
labelSelector:
matchLabels:
foo: bar
In this case, 3 Pods will be scheduled to those 3 Nodes, but other 2 Pods from this replicaset will be unschedulable until more Nodes join the cluster.
You can imagine that the cluster autoscaler provisions new Nodes based on these unschedulable Pods, and as a result, the replicas are finally spread over 5 Nodes.
KEP-3094: Take taints/tolerations into consideration when calculating podTopologySpread skew
Before this enhancement, when you deploy a pod with podTopologySpread configured, kube-scheduler would
take the Nodes that satisfy the Pod's nodeAffinity and nodeSelector into consideration
in filtering and scoring, but would not care about whether the node taints are tolerated by the incoming pod or not.
This may lead to a node with untolerated taint as the only candidate for spreading, and as a result,
the pod will stuck in Pending if it doesn't tolerate the taint.
To allow more fine-gained decisions about which Nodes to account for when calculating spreading skew,
Kubernetes 1.25 introduced two new fields within topologySpreadConstraints to define node inclusion policies:
nodeAffinityPolicy and nodeTaintPolicy.
A manifest that applies these policies looks like the following:
apiVersion: v1
kind: Pod
metadata:
name: example-pod
spec:
# Configure a topology spread constraint
topologySpreadConstraints:
- maxSkew: <integer>
# ...
nodeAffinityPolicy: [Honor|Ignore]
nodeTaintsPolicy: [Honor|Ignore]
# other Pod fields go here
The nodeAffinityPolicy field indicates how Kubernetes treats a Pod's nodeAffinity or nodeSelector for
pod topology spreading.
If Honor, kube-scheduler filters out nodes not matching nodeAffinity/nodeSelector in the calculation of
spreading skew.
If Ignore, all nodes will be included, regardless of whether they match the Pod's nodeAffinity/nodeSelector
or not.
For backwards compatibility, nodeAffinityPolicy defaults to Honor.
The nodeTaintsPolicy field defines how Kubernetes considers node taints for pod topology spreading.
If Honor, only tainted nodes for which the incoming pod has a toleration, will be included in the calculation of spreading skew.
If Ignore, kube-scheduler will not consider the node taints at all in the calculation of spreading skew, so a node with
pod untolerated taint will also be included.
For backwards compatibility, nodeTaintsPolicy defaults to Ignore.
The feature was introduced in v1.25 as alpha. By default, it was disabled, so if you want to use this feature in v1.25,
you had to explictly enable the feature gate NodeInclusionPolicyInPodTopologySpread. In the following v1.26
release, that associated feature graduated to beta and is enabled by default.
KEP-3243: Respect Pod topology spread after rolling upgrades
Pod Topology Spread uses the field labelSelector to identify the group of pods over which
spreading will be calculated. When using topology spreading with Deployments, it is common
practice to use the labelSelector of the Deployment as the labelSelector in the topology
spread constraints. However, this implies that all pods of a Deployment are part of the spreading
calculation, regardless of whether they belong to different revisions. As a result, when a new revision
is rolled out, spreading will apply across pods from both the old and new ReplicaSets, and so by the
time the new ReplicaSet is completely rolled out and the old one is rolled back, the actual spreading
we are left with may not match expectations because the deleted pods from the older ReplicaSet will cause
skewed distribution for the remaining pods. To avoid this problem, in the past users needed to add a
revision label to Deployment and update it manually at each rolling upgrade (both the label on the
pod template and the labelSelector in the topologySpreadConstraints).
To solve this problem with a simpler API, Kubernetes v1.25 introduced a new field named
matchLabelKeys to topologySpreadConstraints. matchLabelKeys is a list of pod label keys to select
the pods over which spreading will be calculated. The keys are used to lookup values from the labels of
the Pod being scheduled, those key-value labels are ANDed with labelSelector to select the group of
existing pods over which spreading will be calculated for the incoming pod.
With matchLabelKeys, you don't need to update the pod.spec between different revisions.
The controller or operator managing rollouts just needs to set different values to the same label key for different revisions.
The scheduler will assume the values automatically based on matchLabelKeys.
For example, if you are configuring a Deployment, you can use the label keyed with
pod-template-hash,
which is added automatically by the Deployment controller, to distinguish between different
revisions in a single Deployment.
topologySpreadConstraints:
- maxSkew: 1
topologyKey: kubernetes.io/hostname
whenUnsatisfiable: DoNotSchedule
labelSelector:
matchLabels:
app: foo
matchLabelKeys:
- pod-template-hash
Getting involved
These features are managed by Kubernetes SIG Scheduling.
Please join us and share your feedback. We look forward to hearing from you!
How can I learn more?
Kubernetes v1.27: Chill Vibes
Announcing the release of Kubernetes v1.27, the first release of 2023!
This release consist of 60 enhancements. 18 of those enhancements are entering Alpha, 29 are graduating to Beta, and 13 are graduating to Stable.
Release theme and logo
Kubernetes v1.27: Chill Vibes
The theme for Kubernetes v1.27 is Chill Vibes.

It's a little silly, but there were some important shifts in this release that helped inspire the theme. Throughout a typical Kubernetes release cycle, there are several deadlines that features need to meet to remain included. If a feature misses any of these deadlines, there is an exception process they can go through. Handling these exceptions is a very normal part of the release. But v1.27 is the first release that anyone can remember where we didn't receive a single exception request after the enhancements freeze. Even as the release progressed, things remained much calmer than any of us are used to.
There's a specific reason we were able to enjoy a more calm release this time around, and that's all the work that folks put in behind the scenes to improve how we manage the release. That's what this theme celebrates, people putting in the work to make things better for the community.
Special thanks to Britnee Laverack for creating the logo. Britnee also designed the logo for Kubernetes 1.24: Stargazer.
What's New (Major Themes)
Freeze k8s.gcr.io image registry
Replacing the old image registry, k8s.gcr.io with registry.k8s.io which has been generally available for several months. The Kubernetes project created and runs the registry.k8s.io image registry, which is fully controlled by the community.
This means that the old registry k8s.gcr.io will be frozen and no further images for Kubernetes and related sub-projects will be published to the old registry.
What does this change mean for contributors?
- If you are a maintainer of a sub-project, you will need to update your manifests and Helm charts to use the new registry. For more information, checkout this project.
What does this change mean for end users?
Kubernetes
v1.27release will not be published to thek8s.gcr.ioregistry.Patch releases for
v1.24,v1.25, andv1.26will no longer be published to the old registry after April.Starting in v1.25, the default image registry has been set to
registry.k8s.io. This value is overridable in kubeadm and kubelet but setting it tok8s.gcr.iowill fail for new releases after April as they won’t be present in the old registry.If you want to increase the reliability of your cluster and remove dependency on the community-owned registry or you are running Kubernetes in networks where external traffic is restricted, you should consider hosting local image registry mirrors. Some cloud vendors may offer hosted solutions for this.
SeccompDefault graduates to stable
To use seccomp profile defaulting, you must run the kubelet with the --seccomp-default command line flag enabled for each node where you want to use it.
If enabled, the kubelet will use the RuntimeDefault seccomp profile by default, which is defined by the container runtime, instead of using the Unconfined (seccomp disabled) mode. The default profiles aim to provide a strong set of security defaults while preserving the functionality of the workload. It is possible that the default profiles differ between container runtimes and their release versions.
You can find detailed information about a possible upgrade and downgrade strategy in the related Kubernetes Enhancement Proposal (KEP): Enable seccomp by default.
Mutable scheduling directives for Jobs graduates to GA
This was introduced in v1.22 and started as a beta level, now it's stable. In most cases a parallel job will want the pods to run with constraints, like all in the same zone, or all either on GPU model x or y but not a mix of both. The suspend field is the first step towards achieving those semantics. suspend allows a custom queue controller to decide when a job should start. However, once a job is unsuspended, a custom queue controller has no influence on where the pods of a job will actually land.
This feature allows updating a Job's scheduling directives before it starts, which gives custom queue controllers the ability to influence pod placement while at the same time offloading actual pod-to-node assignment to kube-scheduler. This is allowed only for suspended Jobs that have never been unsuspended before. The fields in a Job's pod template that can be updated are node affinity, node selector, tolerations, labels ,annotations, and scheduling gates. Find more details in the KEP: Allow updating scheduling directives of jobs.
DownwardAPIHugePages graduates to stable
In Kubernetes v1.20, support for requests.hugepages-<pagesize> and limits.hugepages-<pagesize> was added
to the downward API to be consistent with other resources like cpu, memory, and ephemeral storage.
This feature graduates to stable in this release. You can find more details in the KEP:
Downward API HugePages.
Pod Scheduling Readiness goes to beta
Upon creation, Pods are ready for scheduling. Kubernetes scheduler does its due diligence to find nodes to place all pending Pods. However, in a real-world case, some Pods may stay in a missing-essential-resources state for a long period. These Pods actually churn the scheduler (and downstream integrators like Cluster Autoscaler) in an unnecessary manner.
By specifying/removing a Pod's .spec.schedulingGates, you can control when a Pod is ready to be considered for scheduling.
The schedulingGates field contains a list of strings, and each string literal is perceived as a criteria that must be satisfied before a Pod is considered schedulable. This field can be initialized only when a Pod is created (either by the client, or mutated during admission). After creation, each schedulingGate can be removed in an arbitrary order, but addition of a new scheduling gate is disallowed.
Node log access via Kubernetes API
This feature helps cluster administrators debug issues with services running on nodes by allowing them to query service logs. To use this feature, ensure that the NodeLogQuery feature gate is enabled on that node, and that the kubelet configuration options enableSystemLogHandler and enableSystemLogQuery are both set to true.
On Linux, we assume that service logs are available via journald. On Windows, we assume that service logs are available in the application log provider. You can also fetch logs from the /var/log/ and C:\var\log directories on Linux and Windows, respectively.
A cluster administrator can try out this alpha feature across all nodes of their cluster, or on a subset of them.
ReadWriteOncePod PersistentVolume access mode goes to beta
Kubernetes v1.22 introduced a new access mode ReadWriteOncePod for PersistentVolumes (PVs) and PersistentVolumeClaims (PVCs). This access mode enables you to restrict volume access to a single pod in the cluster, ensuring that only one pod can write to the volume at a time. This can be particularly useful for stateful workloads that require single-writer access to storage.
The ReadWriteOncePod beta adds support for scheduler preemption
of pods that use ReadWriteOncePod PVCs.
Scheduler preemption allows higher-priority pods to preempt lower-priority pods. For example when a pod (A) with a ReadWriteOncePod PVC is scheduled, if another pod (B) is found using the same PVC and pod (A) has higher priority, the scheduler will return an Unschedulable status and attempt to preempt pod (B).
For more context, see the KEP: ReadWriteOncePod PersistentVolume AccessMode.
Respect PodTopologySpread after rolling upgrades
matchLabelKeys is a list of pod label keys used to select the pods over which spreading will be calculated. The keys are used to lookup values from the pod labels. Those key-value labels are ANDed with labelSelector to select the group of existing pods over which spreading will be calculated for the incoming pod. Keys that don't exist in the pod labels will be ignored. A null or empty list means only match against the labelSelector.
With matchLabelKeys, users don't need to update the pod.spec between different revisions. The controller/operator just needs to set different values to the same label key for different revisions. The scheduler will assume the values automatically based on matchLabelKeys. For example, if users use Deployment, they can use the label keyed with pod-template-hash, which is added automatically by the Deployment controller, to distinguish between different revisions in a single Deployment.
Faster SELinux volume relabeling using mounts
In this release, how SELinux labels are applied to volumes used by Pods is graduating to beta. This feature speeds up container startup by mounting volumes with the correct SELinux label instead of changing each file on the volumes recursively. Linux kernel with SELinux support allows the first mount of a volume to set SELinux label on the whole volume using -o context= mount option. This way, all files will have assigned the given label in a constant time, without recursively walking through the whole volumes.
The context mount option cannot be applied to bind mounts or re-mounts of already mounted volumes.
For CSI storage, a CSI driver does the first mount of a volume, and so it must be the CSI driver that actually
applies this mount option. We added a new field SELinuxMount to CSIDriver objects, so that drivers can
announce whether they support the -o context mount option.
If Kubernetes knows the SELinux label of a Pod and the CSI driver responsible for a pod's volume
announces SELinuxMount: true and the volume has Access Mode ReadWriteOncePod, then it
will ask the CSI driver to mount the volume with mount option context= and it will tell the container
runtime not to relabel content of the volume (because all files already have the right label).
Get more information on this from the KEP: Speed up SELinux volume relabeling using mounts.
Robust VolumeManager reconstruction goes to beta
This is a volume manager refactoring that allows the kubelet to populate additional information about how
existing volumes are mounted during the kubelet startup. In general, this makes volume cleanup more robust.
If you enable the NewVolumeManagerReconstruction feature gate on a node, you'll get enhanced discovery of mounted volumes during kubelet startup.
Before Kubernetes v1.25, the kubelet used different default behavior for discovering mounted volumes during the kubelet startup. If you disable this feature gate (it's enabled by default), you select the legacy discovery behavior.
In Kubernetes v1.25 and v1.26, this behavior toggle was part of the SELinuxMountReadWriteOncePod feature gate.
Mutable Pod Scheduling Directives goes to beta
This allows mutating a pod that is blocked on a scheduling readiness gate with a more constrained node affinity/selector. It gives the ability to mutate a pods scheduling directives before it is allowed to be scheduled and gives an external resource controller the ability to influence pod placement while at the same time offload actual pod-to-node assignment to kube-scheduler.
This opens the door for a new pattern of adding scheduling features to Kubernetes. Specifically, building lightweight schedulers that implement features not supported by kube-scheduler, while relying on the existing kube-scheduler to support all upstream features and handle the pod-to-node binding. This pattern should be the preferred one if the custom feature doesn't require implementing a schedule plugin, which entails re-building and maintaining a custom kube-scheduler binary.
Feature graduations and deprecations in Kubernetes v1.27
Graduations to stable
This release includes a total of 9 enhancements promoted to Stable:
- Default container annotation that to be used by kubectl
- TimeZone support in CronJob
- Expose metrics about resource requests and limits that represent the pod model
- Server Side Unknown Field Validation
- Node Topology Manager
- Add gRPC probe to Pod.Spec.Container.{Liveness,Readiness,Startup} Probe
- Add configurable grace period to probes
- OpenAPI v3
- Stay on supported Go versions
Deprecations and removals
This release saw several removals:
- Removal of
storage.k8s.io/v1beta1from CSIStorageCapacity - Removal of support for deprecated seccomp annotations
- Removal of
--master-service-namespacecommand line argument - Removal of the
ControllerManagerLeaderMigrationfeature gate - Removal of
--enable-taint-managercommand line argument - Removal of
--pod-eviction-timeoutcommand line argument - Removal of the
CSI Migrationfeature gate - Removal of
CSIInlineVolumefeature gate - Removal of
EphemeralContainersfeature gate - Removal of
LocalStorageCapacityIsolationfeature gate - Removal of
NetworkPolicyEndPortfeature gate - Removal of
StatefulSetMinReadySecondsfeature gate - Removal of
IdentifyPodOSfeature gate - Removal of
DaemonSetUpdateSurgefeature gate
Release notes
The complete details of the Kubernetes v1.27 release are available in our release notes.
Availability
Kubernetes v1.27 is available for download on GitHub. To get started with Kubernetes, you can run local Kubernetes clusters using minikube, kind, etc. You can also easily install v1.27 using kubeadm.
Release team
Kubernetes is only possible with the support, commitment, and hard work of its community. Each release team is made up of dedicated community volunteers who work together to build the many pieces that make up the Kubernetes releases you rely on. This requires people with specialised skills from all corners of our community, from the code itself to its documentation and project management.
Special thanks to our Release Lead Xander Grzywinski for guiding us through a smooth and successful release cycle and to all members of the release team for supporting one another and working so hard to produce the v1.27 release for the community.
Ecosystem updates
- KubeCon + CloudNativeCon Europe 2023 will take place in Amsterdam, The Netherlands, from 17 – 21 April 2023! You can find more information about the conference and registration on the event site.
- cdCon + GitOpsCon will be held in Vancouver, Canada, on May 8th and 9th, 2023! More information about the conference and registration can be found on the event site.
Project velocity
The CNCF K8s DevStats project aggregates a number of interesting data points related to the velocity of Kubernetes and various sub-projects. This includes everything from individual contributions to the number of companies that are contributing, and is an illustration of the depth and breadth of effort that goes into evolving this ecosystem.
In the v1.27 release cycle, which ran for 14 weeks (January 9 to April 11), we saw contributions from 1020 companies and 1603 individuals.
Upcoming release webinar
Join members of the Kubernetes v1.27 release team on Friday, April 14, 2023, at 10 a.m. PDT to learn about the major features of this release, as well as deprecations and removals to help plan for upgrades. For more information and registration, visit the event page on the CNCF Online Programs site.
Get Involved
The simplest way to get involved with Kubernetes is by joining one of the many Special Interest Groups (SIGs) that align with your interests.
Have something you’d like to broadcast to the Kubernetes community? Share your voice at our weekly community meeting, and through the channels below:
Find out more about contributing to Kubernetes at the Kubernetes Contributors website.
Follow us on Twitter @Kubernetesio for the latest updates.
Join the community discussion on Discuss.
Join the community on Slack.
Post questions (or answer questions) on Server Fault.
Share your Kubernetes story.
Read more about what’s happening with Kubernetes on the blog.
Learn more about the Kubernetes Release Team.
Keeping Kubernetes Secure with Updated Go Versions
The problem
Since v1.19 (released in 2020), the Kubernetes project provides 12-14 months of patch releases for each minor version. This enables users to qualify and adopt Kubernetes versions in an annual upgrade cycle and receive security fixes for a year.
The Go project releases new minor versions twice a year, and provides security fixes for the last two minor versions, resulting in about a year of support for each Go version. Even though each new Kubernetes minor version is built with a supported Go version when it is first released, that Go version falls out of support before the Kubernetes minor version does, and the lengthened Kubernetes patch support since v1.19 only widened that gap.
At the time this was written, just over half of all Go patch releases (88/171) have contained fixes for issues with possible security implications. Even though many of these issues were not relevant to Kubernetes, some were, so it remained important to use supported Go versions that received those fixes.
An obvious solution would be to simply update Kubernetes release branches to new minor versions of Go. However, Kubernetes avoids destabilizing changes in patch releases, and historically, this prevented updating existing release branches to new minor versions of Go, due to changes that were considered prohibitively complex, risky, or breaking to include in a patch release. Examples include:
- Go 1.6: enabling http/2 by default
- Go 1.14: EINTR handling issues
- Go 1.17: dropping x509 CN support, ParseIP changes
- Go 1.18: disabling x509 SHA-1 certificate support by default
- Go 1.19: dropping current-dir LookPath behavior
Some of these changes could be easily mitigated in Kubernetes code,
some could only be opted out of via a user-specified GODEBUG envvar,
and others required invasive code changes or could not be avoided at all.
Because of this inconsistency, Kubernetes release branches have typically remained on a single Go minor version,
and risked being unable to pick up relevant Go security fixes for the last several months of each Kubernetes minor version's support lifetime.
When a relevant Go security fix was only available in newer Kubernetes minor versions, users would have to upgrade away from older Kubernetes minor versions before their 12-14 month support period ended, just to pick up those fixes. If a user was not prepared to do that upgrade, it could result in vulnerable Kubernetes clusters. Even if a user could accommodate the unexpected upgrade, the uncertainty made Kubernetes' annual support less reliable for planning.
The solution
We're happy to announce that the gap between supported Kubernetes versions and supported Go versions has been resolved as of January 2023.
We worked closely with the Go team over the past year to address the difficulties adopting new Go versions. This prompted a discussion, proposal, talk at GopherCon, and a design for improving backward compatibility in Go, ensuring new Go versions can maintain compatible runtime behavior with previous Go versions for a minimum of two years (four Go releases). This allows projects like Kubernetes to update release branches to supported Go versions without exposing users to behavior changes.
The proposed improvements are on track to be included in Go 1.21, and the Go team already delivered targeted compatibility improvements in a Go 1.19 patch release in late 2022. Those changes enabled Kubernetes 1.23+ to update to Go 1.19 in January of 2023, while avoiding any user-facing configuration or behavior changes. All supported Kubernetes release branches now use supported Go versions, and can pick up new Go patch releases with available security fixes.
Going forward, Kubernetes maintainers remain committed to making Kubernetes patch releases as safe and non-disruptive as possible, so there are several requirements a new Go minor version must meet before existing Kubernetes release branches will update to use it:
- The new Go version must be available for at least 3 months. This gives time for adoption by the Go community, and for reports of issues or regressions.
- The new Go version must be used in a new Kubernetes minor release for at least 1 month. This ensures all Kubernetes release-blocking tests pass on the new Go version, and gives time for feedback from the Kubernetes community on release candidates and early adoption of the new minor release.
- There must be no regressions from the previous Go version known to impact Kubernetes.
- Runtime behavior must be preserved by default, without requiring any action by Kubernetes users / administrators.
- Kubernetes libraries like
k8s.io/client-gomust remain compatible with the original Go version used for each minor release, so consumers won't have to update Go versions to pick up a library patch release (though they are encouraged to build with supported Go versions, which is made even easier with the compatibility improvements planned in Go 1.21).
The goal of all of this work is to unobtrusively make Kubernetes patch releases safer and more secure, and to make Kubernetes minor versions safe to use for the entire duration of their support lifetime.
Many thanks to the Go team, especially Russ Cox, for helping drive these improvements in ways that will benefit all Go users, not just Kubernetes.
Kubernetes Validating Admission Policies: A Practical Example
Admission control is an important part of the Kubernetes control plane, with several internal features depending on the ability to approve or change an API object as it is submitted to the server. It is also useful for an administrator to be able to define business logic, or policies, regarding what objects can be admitted into a cluster. To better support that use case, Kubernetes introduced external admission control in v1.7.
In addition to countless custom, internal implementations, many open source projects and commercial solutions implement admission controllers with user-specified policy, including Kyverno and Open Policy Agent’s Gatekeeper.
While admission controllers for policy have seen adoption, there are blockers for their widespread use. Webhook infrastructure must be maintained as a production service, with all that entails. The failure case of an admission control webhook must either be closed, reducing the availability of the cluster; or open, negating the use of the feature for policy enforcement. The network hop and evaluation time makes admission control a notable component of latency when dealing with, for example, pods being spun up to respond to a network request in a "serverless" environment.
Validating admission policies and the Common Expression Language
Version 1.26 of Kubernetes introduced, in alpha, a compromise solution. Validating admission policies are a declarative, in-process alternative to admission webhooks. They use the Common Expression Language (CEL) to declare validation rules.
CEL was developed by Google for security and policy use cases, based on learnings from the Firebase real-time database. Its design allows it to be safely embedded into applications and executed in microseconds, with limited compute and memory impact. Validation rules for CRDs introduced CEL to the Kubernetes ecosystem in v1.23, and at the time it was noted that the language would suit a more generic implementation of validation by admission control.
Giving CEL a roll - a practical example
Kubescape is a CNCF project which has become one of the most popular ways for users to improve the security posture of a Kubernetes cluster and validate its compliance. Its controls — groups of tests against API objects — are built in Rego, the policy language of Open Policy Agent.
Rego has a reputation for complexity, based largely on the fact that it is a declarative query language (like SQL). It was considered for use in Kubernetes, but it does not offer the same sandbox constraints as CEL.
A common feature request for the project is to be able to implement policies based on Kubescape’s findings and output. For example, after scanning pods for known paths to cloud credential files, users would like the ability to enforce policy that these pods should not be admitted at all. The Kubescape team thought this would be the perfect opportunity to try and port our existing controls to CEL and apply them as admission policies.
Show me the policy
It did not take us long to convert many of our controls and build a library of validating admission policies. Let’s look at one as an example.
Kubescape’s control C-0017 covers the requirement for containers to have an immutable (read-only) root filesystem. This is a best practice according to the NSA Kubernetes hardening guidelines, but is not currently required as a part of any of the pod security standards.
Here's how we implemented it in CEL:
apiVersion: admissionregistration.k8s.io/v1alpha1
kind: ValidatingAdmissionPolicy
metadata:
name: "kubescape-c-0017-deny-resources-with-mutable-container-filesystem"
spec:
failurePolicy: Fail
matchConstraints:
resourceRules:
- apiGroups: [""]
apiVersions: ["v1"]
operations: ["CREATE", "UPDATE"]
resources: ["pods"]
- apiGroups: ["apps"]
apiVersions: ["v1"]
operations: ["CREATE", "UPDATE"]
resources: ["deployments","replicasets","daemonsets","statefulsets"]
- apiGroups: ["batch"]
apiVersions: ["v1"]
operations: ["CREATE", "UPDATE"]
resources: ["jobs","cronjobs"]
validations:
- expression: "object.kind != 'Pod' || object.spec.containers.all(container, has(container.securityContext) && has(container.securityContext.readOnlyRootFilesystem) && container.securityContext.readOnlyRootFilesystem == true)"
message: "Pods having containers with mutable filesystem not allowed! (see more at https://hub.armosec.io/docs/c-0017)"
- expression: "['Deployment','ReplicaSet','DaemonSet','StatefulSet','Job'].all(kind, object.kind != kind) || object.spec.template.spec.containers.all(container, has(container.securityContext) && has(container.securityContext.readOnlyRootFilesystem) && container.securityContext.readOnlyRootFilesystem == true)"
message: "Workloads having containers with mutable filesystem not allowed! (see more at https://hub.armosec.io/docs/c-0017)"
- expression: "object.kind != 'CronJob' || object.spec.jobTemplate.spec.template.spec.containers.all(container, has(container.securityContext) && has(container.securityContext.readOnlyRootFilesystem) && container.securityContext.readOnlyRootFilesystem == true)"
message: "CronJob having containers with mutable filesystem not allowed! (see more at https://hub.armosec.io/docs/c-0017)"
Match constraints are provided for three possible API groups: the core/v1 group for Pods, the
apps/v1 workload controllers, and the batch/v1 job controllers.
Note:
matchConstraints will convert the API object to the matched version for you. If, for
example, an API request was for apps/v1beta1 and you match apps/v1 in matchConstraints, the API
request will be converted from apps/v1beta1 to apps/v1 and then validated. This has the useful
property of making validation rules secure against the introduction of new versions of APIs, which
would otherwise allow API requests to sneak past the validation rule by using the newly introduced
version.The validations include the CEL rules for the objects. There are three different expressions,
catering for the fact that a Pod spec can be at the root of the object (a naked
pod,
under template (a workload controller or a Job), or under jobTemplate (a CronJob).
In the event that any spec does not have readOnlyRootFilesystem set to true, the object will not
be admitted.
Note:
In our initial release, we have grouped the three expressions into the same policy object. This means they can be enabled and disabled atomically, and thus there is no chance that a user will accidentally leave a compliance gap by enabling policy for one API group and not the others. Breaking them into separate policies would allow us access to improvements targeted for the 1.27 release, including type checking. We are talking to SIG API Machinery about how to best address this before the APIs reachv1.Using the CEL library in your cluster
Policies are provided as Kubernetes objects, which are then bound to certain resources by a selector.
Minikube is a quick and easy way to install and configure a
Kubernetes cluster for testing. To install Kubernetes v1.26 with the ValidatingAdmissionPolicy
feature gate enabled:
minikube start --kubernetes-version=1.26.1 --extra-config=apiserver.runtime-config=admissionregistration.k8s.io/v1alpha1 --feature-gates='ValidatingAdmissionPolicy=true'
To install the policies in your cluster:
# Install configuration CRD
kubectl apply -f https://github.com/kubescape/cel-admission-library/releases/latest/download/policy-configuration-definition.yaml
# Install basic configuration
kubectl apply -f https://github.com/kubescape/cel-admission-library/releases/latest/download/basic-control-configuration.yaml
# Install policies
kubectl apply -f https://github.com/kubescape/cel-admission-library/releases/latest/download/kubescape-validating-admission-policies.yaml
To apply policies to objects, create a ValidatingAdmissionPolicyBinding resource. Let’s apply the
above Kubescape C-0017 control to any namespace with the label policy=enforced:
# Create a binding
kubectl apply -f - <<EOT
apiVersion: admissionregistration.k8s.io/v1alpha1
kind: ValidatingAdmissionPolicyBinding
metadata:
name: c0017-binding
spec:
policyName: kubescape-c-0017-deny-mutable-container-filesystem
matchResources:
namespaceSelector:
matchLabels:
policy: enforced
EOT
# Create a namespace for running the example
kubectl create namespace policy-example
kubectl label namespace policy-example 'policy=enforced'
Now, if you attempt to create an object without specifying a readOnlyRootFilesystem, it will not
be created.
# The next line should fail
kubectl -n policy-example run nginx --image=nginx --restart=Never
The output shows our error:
The pods "nginx" is invalid: : ValidatingAdmissionPolicy 'kubescape-c-0017-deny-mutable-container-filesystem' with binding 'c0017-binding' denied request: Pods having containers with mutable filesystem not allowed! (see more at https://hub.armosec.io/docs/c-0017)
Configuration
Policy objects can include configuration, which is provided in a different object. Many of the Kubescape controls require a configuration: which labels to require, which capabilities to allow or deny, which registries to allow containers to be deployed from, etc. Default values for those controls are defined in the ControlConfiguration object.
To use this configuration object, or your own object in the same format, add a paramRef.name value
to your binding object:
apiVersion: admissionregistration.k8s.io/v1alpha1
kind: ValidatingAdmissionPolicyBinding
metadata:
name: c0001-binding
spec:
policyName: kubescape-c-0001-deny-forbidden-container-registries
paramRef:
name: basic-control-configuration
matchResources:
namespaceSelector:
matchLabels:
policy: enforced
Summary
Converting our controls to CEL was simple, in most cases. We cannot port the whole Kubescape library, as some controls check for things outside a Kubernetes cluster, and some require data that is not available in the admission request object. Overall, we are happy to contribute this library to the Kubernetes community and will continue to develop it for Kubescape and Kubernetes users alike. We hope it becomes useful, either as something you use yourself, or as examples for you to write your own policies.
As for the validating admission policy feature itself, we are very excited to see this native functionality introduced to Kubernetes. We look forward to watching it move to Beta and then GA, hopefully by the end of the year. It is important to note this feature is currently in Alpha, which means this is the perfect opportunity to play around with it in environments like Minikube and give a test drive. However, it is not yet considered production-ready and stable, and will not be enabled on most managed Kubernetes environments. We will not recommend Kubescape users use these policies in production until the underlying functionality becomes stable. Keep an eye on the KEP, and of course this blog, for an eventual release announcement.
Kubernetes Removals and Major Changes In v1.27
As Kubernetes develops and matures, features may be deprecated, removed, or replaced with better ones for the project's overall health. Based on the information available at this point in the v1.27 release process, which is still ongoing and can introduce additional changes, this article identifies and describes some of the planned changes for the Kubernetes v1.27 release.
A note about the k8s.gcr.io redirect to registry.k8s.io
To host its container images, the Kubernetes project uses a community-owned image registry called registry.k8s.io. On March 20th, all traffic from the out-of-date k8s.gcr.io registry will be redirected to registry.k8s.io. The deprecated k8s.gcr.io registry will eventually be phased out.
What does this change mean?
If you are a subproject maintainer, you must update your manifests and Helm charts to use the new registry.
The v1.27 Kubernetes release will not be published to the old registry.
From April, patch releases for v1.24, v1.25, and v1.26 will no longer be published to the old registry.
We have a blog post with all the information about this change and what to do if it impacts you.
The Kubernetes API Removal and Deprecation process
The Kubernetes project has a well-documented deprecation policy for features. This policy states that stable APIs may only be deprecated when a newer, stable version of that same API is available and that APIs have a minimum lifetime for each stability level. A deprecated API has been marked for removal in a future Kubernetes release, it will continue to function until removal (at least one year from the deprecation), but usage will result in a warning being displayed. Removed APIs are no longer available in the current version, at which point you must migrate to using the replacement.
Generally available (GA) or stable API versions may be marked as deprecated but must not be removed within a major version of Kubernetes.
Beta or pre-release API versions must be supported for 3 releases after the deprecation.
Alpha or experimental API versions may be removed in any release without prior deprecation notice.
Whether an API is removed as a result of a feature graduating from beta to stable or because that API simply did not succeed, all removals comply with this deprecation policy. Whenever an API is removed, migration options are communicated in the documentation.
API removals, and other changes for Kubernetes v1.27
Removal of storage.k8s.io/v1beta1 from CSIStorageCapacity
The CSIStorageCapacity
API supports exposing currently available storage capacity via CSIStorageCapacity
objects and enhances the scheduling of pods that use CSI volumes with late binding.
The storage.k8s.io/v1beta1 API version of CSIStorageCapacity was deprecated in v1.24,
and it will no longer be served in v1.27.
Migrate manifests and API clients to use the storage.k8s.io/v1 API version,
available since v1.24. All existing persisted objects are accessible via the new API.
Refer to the Storage Capacity Constraints for Pod Scheduling KEP for more information.
Kubernetes v1.27 is not removing any other APIs; however several other aspects are going to be removed. Read on for details.
Support for deprecated seccomp annotations
In Kubernetes v1.19, the seccomp (secure computing mode) support graduated to General Availability (GA). This feature can be used to increase the workload security by restricting the system calls for a Pod (applies to all containers) or single containers.
The support for the alpha seccomp annotations seccomp.security.alpha.kubernetes.io/pod
and container.seccomp.security.alpha.kubernetes.io were deprecated since v1.19, now
have been completely removed. The seccomp fields are no longer auto-populated when pods
with seccomp annotations are created. Pods should use the corresponding pod or container
securityContext.seccompProfile field instead.
Removal of several feature gates for volume expansion
The following feature gates for
volume expansion GA features
will be removed and must no longer be referenced in --feature-gates flags:
ExpandCSIVolumes- Enable expanding of CSI volumes.
ExpandInUsePersistentVolumes- Enable expanding in-use PVCs.
ExpandPersistentVolumes- Enable expanding of persistent volumes.
Removal of --master-service-namespace command line argument
The kube-apiserver accepts a deprecated command line argument, --master-service-namespace,
that specified where to create the Service named kubernetes to represent the API server.
Kubernetes v1.27 will remove that argument, which has been deprecated since the v1.26 release.
Removal of the ControllerManagerLeaderMigration feature gate
Leader Migration provides
a mechanism in which HA clusters can safely migrate "cloud-specific" controllers
between the kube-controller-manager and the cloud-controller-manager via a shared
resource lock between the two components while upgrading the replicated control plane.
The ControllerManagerLeaderMigration feature, GA since v1.24, is unconditionally
enabled and for the v1.27 release the feature gate option will be removed. If you're
setting this feature gate explicitly, you'll need to remove that from command line
arguments or configuration files.
Removal of --enable-taint-manager command line argument
The kube-controller-manager command line argument --enable-taint-manager is
deprecated, and will be removed in Kubernetes v1.27. The feature that it supports,
taint based eviction,
is already enabled by default and will continue to be implicitly enabled when the flag is removed.
Removal of --pod-eviction-timeout command line argument
The deprecated command line argument --pod-eviction-timeout will be removed from the
kube-controller-manager.
Removal of the CSI Migration feature gate
The CSI migration
programme allows moving from in-tree volume plugins to out-of-tree CSI drivers.
CSI migration is generally available since Kubernetes v1.16, and the associated
CSIMigration feature gate will be removed in v1.27.
Removal of CSIInlineVolume feature gate
The CSI Ephemeral Volume
feature allows CSI volumes to be specified directly in the pod specification for
ephemeral use cases. They can be used to inject arbitrary states, such as
configuration, secrets, identity, variables or similar information, directly
inside pods using a mounted volume. This feature graduated to GA in v1.25.
Hence, the feature gate CSIInlineVolume will be removed in the v1.27 release.
Removal of EphemeralContainers feature gate
Ephemeral containers
graduated to GA in v1.25. These are containers with a temporary duration that
executes within namespaces of an existing pod. Ephemeral containers are
typically initiated by a user in order to observe the state of other pods
and containers for troubleshooting and debugging purposes. For Kubernetes v1.27,
API support for ephemeral containers is unconditionally enabled; the
EphemeralContainers feature gate will be removed.
Removal of LocalStorageCapacityIsolation feature gate
The Local Ephemeral Storage Capacity Isolation
feature moved to GA in v1.25. The feature provides support for capacity isolation
of local ephemeral storage between pods, such as emptyDir volumes, so that a pod
can be hard limited in its consumption of shared resources. The kubelet will
evicting Pods if consumption of local ephemeral storage exceeds the configured limit.
The feature gate, LocalStorageCapacityIsolation, will be removed in the v1.27 release.
Removal of NetworkPolicyEndPort feature gate
The v1.25 release of Kubernetes promoted endPort in NetworkPolicy to GA.
NetworkPolicy providers that support the endPort field that can be used to
specify a range of ports to apply a NetworkPolicy. Previously, each NetworkPolicy
could only target a single port. So the feature gate NetworkPolicyEndPort
will be removed in this release.
Please be aware that endPort field must be supported by the Network Policy
provider. If your provider does not support endPort, and this field is
specified in a Network Policy, the Network Policy will be created covering
only the port field (single port).
Removal of StatefulSetMinReadySeconds feature gate
For a pod that is part of a StatefulSet, Kubernetes can mark the Pod ready only
if Pod is available (and passing checks) for at least the period you specify in
minReadySeconds.
The feature became generally available in Kubernetes v1.25, and the StatefulSetMinReadySeconds
feature gate will be locked to true and removed in the v1.27 release.
Removal of IdentifyPodOS feature gate
You can specify the operating system for a Pod, and the feature support for that
is stable since the v1.25 release. The IdentifyPodOS feature gate will be
removed for Kubernetes v1.27.
Removal of DaemonSetUpdateSurge feature gate
The v1.25 release of Kubernetes also stabilised surge support for DaemonSet pods,
implemented in order to minimize DaemonSet downtime during rollouts.
The DaemonSetUpdateSurge feature gate will be removed in Kubernetes v1.27.
Removal of --container-runtime command line argument
The kubelet accepts a deprecated command line argument, --container-runtime, and the only
valid value would be remote after dockershim code is removed. Kubernetes v1.27 will remove
that argument, which has been deprecated since the v1.24 release.
Looking ahead
The official list of API removals planned for Kubernetes v1.29 includes:
- The
flowcontrol.apiserver.k8s.io/v1beta2API version of FlowSchema and PriorityLevelConfiguration will no longer be served in v1.29.
Want to know more?
Deprecations are announced in the Kubernetes release notes. You can see the announcements of pending deprecations in the release notes for:
We will formally announce the deprecations that come with Kubernetes v1.27 as part of the CHANGELOG for that release.
For information on the process of deprecation and removal, check out the official Kubernetes deprecation policy document.
k8s.gcr.io Redirect to registry.k8s.io - What You Need to Know
On Monday, March 20th, the k8s.gcr.io registry will be redirected to the community owned registry, registry.k8s.io .
TL;DR: What you need to know about this change
- On Monday, March 20th, traffic from the older k8s.gcr.io registry will be redirected to registry.k8s.io with the eventual goal of sunsetting k8s.gcr.io.
- If you run in a restricted environment, and apply strict domain name or IP address access policies limited to k8s.gcr.io, the image pulls will not function after k8s.gcr.io starts redirecting to the new registry.
- A small subset of non-standard clients do not handle HTTP redirects by image registries, and will need to be pointed directly at registry.k8s.io.
- The redirect is a stopgap to assist users in making the switch. The deprecated k8s.gcr.io registry will be phased out at some point. Please update your manifests as soon as possible to point to registry.k8s.io.
- If you host your own image registry, you can copy images you need there as well to reduce traffic to community owned registries.
If you think you may be impacted, or would like to know more about this change, please keep reading.
How can I check if I am impacted?
To test connectivity to registry.k8s.io and being able to pull images from there, here is a sample command that can be executed in the namespace of your choosing:
kubectl run hello-world -ti --rm --image=registry.k8s.io/busybox:latest --restart=Never -- date
When you run the command above, here’s what to expect when things work correctly:
$ kubectl run hello-world -ti --rm --image=registry.k8s.io/busybox:latest --restart=Never -- date
Fri Feb 31 07:07:07 UTC 2023
pod "hello-world" deleted
What kind of errors will I see if I’m impacted?
Errors may depend on what kind of container runtime you are using, and what endpoint you are routed
to, but it should present such as ErrImagePull, ImagePullBackOff, or a container failing to be
created with the warning FailedCreatePodSandBox.
Below is an example error message showing a proxied deployment failing to pull due to an unknown certificate:
FailedCreatePodSandBox: Failed to create pod sandbox: rpc error: code = Unknown desc = Error response from daemon: Head “https://us-west1-docker.pkg.dev/v2/k8s-artifacts-prod/images/pause/manifests/3.8”: x509: certificate signed by unknown authority
What images will be impacted?
ALL images on k8s.gcr.io will be impacted by this change. k8s.gcr.io hosts many images beyond
Kubernetes releases. A large number of Kubernetes subprojects host their images there as well. Some
examples include the dns/k8s-dns-node-cache, ingress-nginx/controller, and
node-problem-detector/node-problem-detector images.
I am impacted. What should I do?
For impacted users that run in a restricted environment, the best option is to copy over the required images to a private registry or configure a pull-through cache in their registry.
There are several tools to copy images between registries;
crane is one
of those tools, and images can be copied to a private registry by using crane copy SRC DST. There
are also vendor-specific tools, like e.g. Google’s
gcrane, that
perform a similar function but are streamlined for their platform.
How can I find which images are using the legacy registry, and fix them?
Option 1: See the one line kubectl command in our earlier blog post:
kubectl get pods --all-namespaces -o jsonpath="{.items[*].spec.containers[*].image}" |\
tr -s '[[:space:]]' '\n' |\
sort |\
uniq -c
Option 2: A kubectl krew plugin has been developed called
community-images,
that will scan and report any images using the k8s.gcr.io endpoint.
If you have krew installed, you can install it with:
kubectl krew install community-images
and generate a report with:
kubectl community-images
For alternate methods of install and example output, check out the repo: kubernetes-sigs/community-images.
Option 3: If you do not have access to a cluster directly, or manage many clusters - the best way is to run a search over your manifests and charts for "k8s.gcr.io".
Option 4: If you wish to prevent k8s.gcr.io based images from running in your cluster, example policies for Gatekeeper and Kyverno are available in the AWS EKS Best Practices repository that will block them from being pulled. You can use these third-party policies with any Kubernetes cluster.
Option 5: As a LAST possible option, you can use a Mutating Admission Webhook to change the image address dynamically. This should only be considered a stopgap till your manifests have been updated. You can find a (third party) Mutating Webhook and Kyverno policy in k8s-gcr-quickfix.
Why did Kubernetes change to a different image registry?
k8s.gcr.io is hosted on a custom Google Container Registry (GCR) domain that was set up solely for the Kubernetes project. This has worked well since the inception of the project, and we thank Google for providing these resources, but today, there are other cloud providers and vendors that would like to host images to provide a better experience for the people on their platforms. In addition to Google’s renewed commitment to donate $3 million to support the project's infrastructure last year, Amazon Web Services announced a matching donation during their Kubecon NA 2022 keynote in Detroit. This will provide a better experience for users (closer servers = faster downloads) and will reduce the egress bandwidth and costs from GCR at the same time.
For more details on this change, check out registry.k8s.io: faster, cheaper and Generally Available (GA).
Why is a redirect being put in place?
The project switched to registry.k8s.io last year with the 1.25 release; however, most of the image pull traffic is still directed at the old endpoint k8s.gcr.io. This has not been sustainable for us as a project, as it is not utilizing the resources that have been donated to the project from other providers, and we are in the danger of running out of funds due to the cost of serving this traffic.
A redirect will enable the project to take advantage of these new resources, significantly reducing our egress bandwidth costs. We only expect this change to impact a small subset of users running in restricted environments or using very old clients that do not respect redirects properly.
What will happen to k8s.gcr.io?
Separate from the redirect, k8s.gcr.io will be frozen and will not be updated with new images
after April 3rd, 2023. k8s.gcr.io
will not get any new releases, patches, or security updates. It will continue to remain available to
help people migrate, but it WILL be phased out entirely in the future.
I still have questions, where should I go?
For more information on registry.k8s.io and why it was developed, see registry.k8s.io: faster, cheaper and Generally Available.
If you would like to know more about the image freeze and the last images that will be available there, see the blog post: k8s.gcr.io Image Registry Will Be Frozen From the 3rd of April 2023.
Information on the architecture of registry.k8s.io and its request handling decision tree can be found in the kubernetes/registry.k8s.io repo.
If you believe you have encountered a bug with the new registry or the redirect, please open an issue in the kubernetes/registry.k8s.io repo. Please check if there is an issue already open similar to what you are seeing before you create a new issue.
Forensic container analysis
In my previous article, Forensic container checkpointing in Kubernetes, I introduced checkpointing in Kubernetes and how it has to be setup and how it can be used. The name of the feature is Forensic container checkpointing, but I did not go into any details how to do the actual analysis of the checkpoint created by Kubernetes. In this article I want to provide details how the checkpoint can be analyzed.
Checkpointing is still an alpha feature in Kubernetes and this article wants to provide a preview how the feature might work in the future.
Preparation
Details about how to configure Kubernetes and the underlying CRI implementation to enable checkpointing support can be found in my Forensic container checkpointing in Kubernetes article.
As an example I prepared a container image (quay.io/adrianreber/counter:blog)
which I want to checkpoint and then analyze in this article. This container allows
me to create files in the container and also store information in memory which
I later want to find in the checkpoint.
To run that container I need a pod, and for this example I am using the following Pod manifest:
apiVersion: v1
kind: Pod
metadata:
name: counters
spec:
containers:
- name: counter
image: quay.io/adrianreber/counter:blog
This results in a container called counter running in a pod called counters.
Once the container is running I am performing following actions with that container:
$ kubectl get pod counters --template '{{.status.podIP}}'
10.88.0.25
$ curl 10.88.0.25:8088/create?test-file
$ curl 10.88.0.25:8088/secret?RANDOM_1432_KEY
$ curl 10.88.0.25:8088
The first access creates a file called test-file with the content test-file
in the container and the second access stores my secret information
(RANDOM_1432_KEY) somewhere in the container's memory. The last access just
adds an additional line to the internal log file.
The last step before I can analyze the checkpoint it to tell Kubernetes to create
the checkpoint. As described in the previous article this requires access to the
kubelet only checkpoint API endpoint.
For a container named counter in a pod named counters in a namespace named default the kubelet API endpoint is reachable at:
# run this on the node where that Pod is executing
curl -X POST "https://localhost:10250/checkpoint/default/counters/counter"
For completeness the following curl command-line options are necessary to
have curl accept the kubelet's self signed certificate and authorize the
use of the kubelet checkpoint API:
--insecure --cert /var/run/kubernetes/client-admin.crt --key /var/run/kubernetes/client-admin.key
Once the checkpointing has finished the checkpoint should be available at
/var/lib/kubelet/checkpoints/checkpoint-<pod-name>_<namespace-name>-<container-name>-<timestamp>.tar
In the following steps of this article I will use the name checkpoint.tar
when analyzing the checkpoint archive.
Checkpoint archive analysis using checkpointctl
To get some initial information about the checkpointed container I am using the tool checkpointctl like this:
$ checkpointctl show checkpoint.tar --print-stats
+-----------+----------------------------------+--------------+---------+---------------------+--------+------------+------------+-------------------+
| CONTAINER | IMAGE | ID | RUNTIME | CREATED | ENGINE | IP | CHKPT SIZE | ROOT FS DIFF SIZE |
+-----------+----------------------------------+--------------+---------+---------------------+--------+------------+------------+-------------------+
| counter | quay.io/adrianreber/counter:blog | 059a219a22e5 | runc | 2023-03-02T06:06:49 | CRI-O | 10.88.0.23 | 8.6 MiB | 3.0 KiB |
+-----------+----------------------------------+--------------+---------+---------------------+--------+------------+------------+-------------------+
CRIU dump statistics
+---------------+-------------+--------------+---------------+---------------+---------------+
| FREEZING TIME | FROZEN TIME | MEMDUMP TIME | MEMWRITE TIME | PAGES SCANNED | PAGES WRITTEN |
+---------------+-------------+--------------+---------------+---------------+---------------+
| 100809 us | 119627 us | 11602 us | 7379 us | 7800 | 2198 |
+---------------+-------------+--------------+---------------+---------------+---------------+
This gives me already some information about the checkpoint in that checkpoint
archive. I can see the name of the container, information about the container
runtime and container engine. It also lists the size of the checkpoint (CHKPT SIZE). This is mainly the size of the memory pages included in the checkpoint,
but there is also information about the size of all changed files in the
container (ROOT FS DIFF SIZE).
The additional parameter --print-stats decodes information in the checkpoint
archive and displays them in the second table (CRIU dump statistics). This
information is collected during checkpoint creation and gives an overview how much
time CRIU needed to checkpoint the processes in the container and how many
memory pages were analyzed and written during checkpoint creation.
Digging deeper
With the help of checkpointctl I am able to get some high level information
about the checkpoint archive. To be able to analyze the checkpoint archive
further I have to extract it. The checkpoint archive is a tar archive and can
be extracted with the help of tar xf checkpoint.tar.
Extracting the checkpoint archive will result in following files and directories:
bind.mounts- this file contains information about bind mounts and is needed during restore to mount all external files and directories at the right locationcheckpoint/- this directory contains the actual checkpoint as created by CRIUconfig.dumpandspec.dump- these files contain metadata about the container which is needed during restoredump.log- this file contains the debug output of CRIU created during checkpointingstats-dump- this file contains the data which is used bycheckpointctlto display dump statistics (--print-stats)rootfs-diff.tar- this file contains all changed files on the container's file-system
File-system changes - rootfs-diff.tar
The first step to analyze the container's checkpoint further is to look at
the files that have changed in my container. This can be done by looking at the
file rootfs-diff.tar:
$ tar xvf rootfs-diff.tar
home/counter/logfile
home/counter/test-file
Now the files that changed in the container can be studied:
$ cat home/counter/logfile
10.88.0.1 - - [02/Mar/2023 06:07:29] "GET /create?test-file HTTP/1.1" 200 -
10.88.0.1 - - [02/Mar/2023 06:07:40] "GET /secret?RANDOM_1432_KEY HTTP/1.1" 200 -
10.88.0.1 - - [02/Mar/2023 06:07:43] "GET / HTTP/1.1" 200 -
$ cat home/counter/test-file
test-file
Compared to the container image (quay.io/adrianreber/counter:blog) this
container is based on, I can see that the file logfile contains information
about all access to the service the container provides and the file test-file
was created just as expected.
With the help of rootfs-diff.tar it is possible to inspect all files that
were created or changed compared to the base image of the container.
Analyzing the checkpointed processes - checkpoint/
The directory checkpoint/ contains data created by CRIU while checkpointing
the processes in the container. The content in the directory checkpoint/
consists of different image files which can be analyzed with the
help of the tool CRIT which is distributed as part of CRIU.
First lets get an overview of the processes inside of the container:
$ crit show checkpoint/pstree.img | jq .entries[].pid
1
7
8
This output means that I have three processes inside of the container's PID namespace with the PIDs: 1, 7, 8
This is only the view from the inside of the container's PID namespace. During restore exactly these PIDs will be recreated. From the outside of the container's PID namespace the PIDs will change after restore.
The next step is to get some additional information about these three processes:
$ crit show checkpoint/core-1.img | jq .entries[0].tc.comm
"bash"
$ crit show checkpoint/core-7.img | jq .entries[0].tc.comm
"counter.py"
$ crit show checkpoint/core-8.img | jq .entries[0].tc.comm
"tee"
This means the three processes in my container are bash, counter.py (a Python
interpreter) and tee. For details about the parent child relations of these processes there
is more data to be analyzed in checkpoint/pstree.img.
Let's compare the so far collected information to the still running container:
$ crictl inspect --output go-template --template "{{(index .info.pid)}}" 059a219a22e56
722520
$ ps auxf | grep -A 2 722520
fedora 722520 \_ bash -c /home/counter/counter.py 2>&1 | tee /home/counter/logfile
fedora 722541 \_ /usr/bin/python3 /home/counter/counter.py
fedora 722542 \_ /usr/bin/coreutils --coreutils-prog-shebang=tee /usr/bin/tee /home/counter/logfile
$ cat /proc/722520/comm
bash
$ cat /proc/722541/comm
counter.py
$ cat /proc/722542/comm
tee
In this output I am first retrieving the PID of the first process in the
container and then I am looking for that PID and child processes on the system
where the container is running. I am seeing three processes and the first one is
"bash" which is PID 1 inside of the containers PID namespace. Then I am looking
at /proc/<PID>/comm and I can find the exact same value
as in the checkpoint image.
Important to remember is that the checkpoint will contain the view from within the container's PID namespace because that information is important to restore the processes.
One last example of what crit can tell us about the container is the information
about the UTS namespace:
$ crit show checkpoint/utsns-12.img
{
"magic": "UTSNS",
"entries": [
{
"nodename": "counters",
"domainname": "(none)"
}
]
}
This tells me that the hostname inside of the UTS namespace is counters.
For every resource CRIU collected during checkpointing the checkpoint/
directory contains corresponding image files which can be analyzed with the help
of crit.
Looking at the memory pages
In addition to the information from CRIU that can be decoded with the help of CRIT, there are also files containing the raw memory pages written by CRIU to disk:
$ ls checkpoint/pages-*
checkpoint/pages-1.img checkpoint/pages-2.img checkpoint/pages-3.img
When I initially used the container I stored a random key (RANDOM_1432_KEY)
somewhere in the memory. Let see if I can find it:
$ grep -ao RANDOM_1432_KEY checkpoint/pages-*
checkpoint/pages-2.img:RANDOM_1432_KEY
And indeed, there is my data. This way I can easily look at the content of all memory pages of the processes in the container, but it is also important to remember that anyone that can access the checkpoint archive has access to all information that was stored in the memory of the container's processes.
Using gdb for further analysis
Another possibility to look at the checkpoint images is gdb. The CRIU repository
contains the script coredump which can convert a checkpoint
into a coredump file:
$ /home/criu/coredump/coredump-python3
$ ls -al core*
core.1 core.7 core.8
Running the coredump-python3 script will convert the checkpoint images into
one coredump file for each process in the container. Using gdb I can also look
at the details of the processes:
$ echo info registers | gdb --core checkpoint/core.1 -q
[New LWP 1]
Core was generated by `bash -c /home/counter/counter.py 2>&1 | tee /home/counter/logfile'.
#0 0x00007fefba110198 in ?? ()
(gdb)
rax 0x3d 61
rbx 0x8 8
rcx 0x7fefba11019a 140667595587994
rdx 0x0 0
rsi 0x7fffed9c1110 140737179816208
rdi 0xffffffff 4294967295
rbp 0x1 0x1
rsp 0x7fffed9c10e8 0x7fffed9c10e8
r8 0x1 1
r9 0x0 0
r10 0x0 0
r11 0x246 582
r12 0x0 0
r13 0x7fffed9c1170 140737179816304
r14 0x0 0
r15 0x0 0
rip 0x7fefba110198 0x7fefba110198
eflags 0x246 [ PF ZF IF ]
cs 0x33 51
ss 0x2b 43
ds 0x0 0
es 0x0 0
fs 0x0 0
gs 0x0 0
In this example I can see the value of all registers as they were during
checkpointing and I can also see the complete command-line of my container's PID
1 process: bash -c /home/counter/counter.py 2>&1 | tee /home/counter/logfile
Summary
With the help of container checkpointing, it is possible to create a
checkpoint of a running container without stopping the container and without the
container knowing that it was checkpointed. The result of checkpointing a
container in Kubernetes is a checkpoint archive; using different tools like
checkpointctl, tar, crit and gdb the checkpoint can be analyzed. Even
with simple tools like grep it is possible to find information in the
checkpoint archive.
The different examples I have shown in this article how to analyze a checkpoint are just the starting point. Depending on your requirements it is possible to look at certain things in much more detail, but this article should give you an introduction how to start the analysis of your checkpoint.
How do I get involved?
You can reach SIG Node by several means:
- Slack: #sig-node
- Slack: #sig-security
- Mailing list
Introducing KWOK: Kubernetes WithOut Kubelet

Have you ever wondered how to set up a cluster of thousands of nodes just in seconds, how to simulate real nodes with a low resource footprint, and how to test your Kubernetes controller at scale without spending much on infrastructure?
If you answered "yes" to any of these questions, then you might be interested in KWOK, a toolkit that enables you to create a cluster of thousands of nodes in seconds.
What is KWOK?
KWOK stands for Kubernetes WithOut Kubelet. So far, it provides two tools:
kwokkwokis the cornerstone of this project, responsible for simulating the lifecycle of fake nodes, pods, and other Kubernetes API resources.kwokctlkwokctlis a CLI tool designed to streamline the creation and management of clusters, with nodes simulated bykwok.
Why use KWOK?
KWOK has several advantages:
- Speed: You can create and delete clusters and nodes almost instantly, without waiting for boot or provisioning.
- Compatibility: KWOK works with any tools or clients that are compliant with Kubernetes APIs, such as kubectl, helm, kui, etc.
- Portability: KWOK has no specific hardware or software requirements. You can run it using pre-built images, once Docker or Nerdctl is installed. Alternatively, binaries are also available for all platforms and can be easily installed.
- Flexibility: You can configure different node types, labels, taints, capacities, conditions, etc., and you can configure different pod behaviors, status, etc. to test different scenarios and edge cases.
- Performance: You can simulate thousands of nodes on your laptop without significant consumption of CPU or memory resources.
What are the use cases?
KWOK can be used for various purposes:
- Learning: You can use KWOK to learn about Kubernetes concepts and features without worrying about resource waste or other consequences.
- Development: You can use KWOK to develop new features or tools for Kubernetes without accessing to a real cluster or requiring other components.
- Testing:
- You can measure how well your application or controller scales with different numbers of nodes and(or) pods.
- You can generate high loads on your cluster by creating many pods or services with different resource requests or limits.
- You can simulate node failures or network partitions by changing node conditions or randomly deleting nodes.
- You can test how your controller interacts with other components or features of Kubernetes by enabling different feature gates or API versions.
What are the limitations?
KWOK is not intended to replace others completely. It has some limitations that you should be aware of:
- Functionality: KWOK is not a kubelet and may exhibit different behaviors in areas such as pod lifecycle management, volume mounting, and device plugins. Its primary function is to simulate updates of node and pod status.
- Accuracy: It's important to note that KWOK doesn't accurately reflect the performance or behavior of real nodes under various workloads or environments. Instead, it approximates some behaviors using simple formulas.
- Security: KWOK does not enforce any security policies or mechanisms on simulated nodes. It assumes that all requests from the kube-apiserver are authorized and valid.
Getting started
If you are interested in trying out KWOK, please check its documents for more details.

Using kwokctl to manage simulated clusters
Getting Involved
If you're interested in participating in future discussions or development related to KWOK, there are several ways to get involved:
- Slack: #kwok for general usage discussion, #kwok-dev for development discussion. (visit slack.k8s.io for a workspace invitation)
- Open Issues/PRs/Discussions in sigs.k8s.io/kwok
We welcome feedback and contributions from anyone who wants to join us in this exciting project.
Free Katacoda Kubernetes Tutorials Are Shutting Down
Katacoda, the popular learning platform from O’Reilly that has been helping people learn all about Java, Docker, Kubernetes, Python, Go, C++, and more, shut down for public use in June 2022. However, tutorials specifically for Kubernetes, linked from the Kubernetes website for our project’s users and contributors, remained available and active after this change. Unfortunately, this will no longer be the case, and Katacoda tutorials for learning Kubernetes will cease working after March 31st, 2023.
The Kubernetes Project wishes to thank O'Reilly Media for the many years it has supported the community via the Katacoda learning platform. You can read more about the decision to shutter katacoda.com on O'Reilly's own site. With this change, we’ll be focusing on the work needed to remove links to their various tutorials. We have a general issue tracking this topic at #33936 and GitHub discussion. We’re also interested in researching what other learning platforms could be beneficial for the Kubernetes community, replacing Katacoda with a link to a platform or service that has a similar user experience. However, this research will take time, so we’re actively looking for volunteers to help with this work. If a replacement is found, it will need to be supported by Kubernetes leadership, specifically, SIG Contributor Experience, SIG Docs, and the Kubernetes Steering Committee.
The Katacoda shutdown affects 25 tutorial pages, their localizations, as well as the Katacoda Scenario repository: github.com/katacoda-scenarios/kubernetes-bootcamp-scenarios. We recommend that any links, guides, or documentation you have that points to the Katacoda learning platform be updated immediately to reflect this change. While we have yet to find a replacement learning solution, the Kubernetes website contains a lot of helpful documentation to support your continued learning and growth. You can find all of our available documentation tutorials for Kubernetes at https://k8s.io/docs/tutorials/.
If you have any questions regarding the Katacoda shutdown, or subsequent link removal from Kubernetes tutorial pages, please feel free to comment on the general issue tracking the shutdown, or visit the #sig-docs channel on the Kubernetes Slack.
k8s.gcr.io Image Registry Will Be Frozen From the 3rd of April 2023
The Kubernetes project runs a community-owned image registry called registry.k8s.io
to host its container images. On the 3rd of April 2023, the old registry k8s.gcr.io
will be frozen and no further images for Kubernetes and related subprojects will be
pushed to the old registry.
This registry registry.k8s.io replaced the old one and has been generally available
for several months. We have published a blog post
about its benefits to the community and the Kubernetes project. This post also
announced that future versions of Kubernetes will not be available in the old
registry. Now that time has come.
What does this change mean for contributors:
- If you are a maintainer of a subproject, you will need to update your manifests and Helm charts to use the new registry.
What does this change mean for end users:
- 1.27 Kubernetes release will not be published to the old registry.
- Patch releases for 1.24, 1.25, and 1.26 will no longer be published to the old registry from April. Please read the timelines below for details of the final patch releases in the old registry.
- Starting in 1.25, the default image registry has been set to
registry.k8s.io. This value is overridable inkubeadmandkubeletbut setting it tok8s.gcr.iowill fail for new releases after April as they won’t be present in the old registry. - If you want to increase the reliability of your cluster and remove dependency on the community-owned registry or you are running Kubernetes in networks where external traffic is restricted, you should consider hosting local image registry mirrors. Some cloud vendors may offer hosted solutions for this.
Timeline of the changes
k8s.gcr.iowill be frozen on the 3rd of April 2023- 1.27 is expected to be released on the 12th of April 2023
- The last 1.23 release on
k8s.gcr.iowill be 1.23.18 (1.23 goes end-of-life before the freeze) - The last 1.24 release on
k8s.gcr.iowill be 1.24.12 - The last 1.25 release on
k8s.gcr.iowill be 1.25.8 - The last 1.26 release on
k8s.gcr.iowill be 1.26.3
What's next
Please make sure your cluster does not have dependencies on old image registry. For example, you can run this command to list the images used by pods:
kubectl get pods --all-namespaces -o jsonpath="{.items[*].spec.containers[*].image}" |\
tr -s '[[:space:]]' '\n' |\
sort |\
uniq -c
There may be other dependencies on the old image registry. Make sure you review any potential dependencies to keep your cluster healthy and up to date.
Acknowledgments
Change is hard, and evolving our image-serving platform is needed to ensure a sustainable future for the project. We strive to make things better for everyone using Kubernetes. Many contributors from all corners of our community have been working long and hard to ensure we are making the best decisions possible, executing plans, and doing our best to communicate those plans.
Thanks to Aaron Crickenberger, Arnaud Meukam, Benjamin Elder, Caleb Woodbine, Davanum Srinivas, Mahamed Ali, and Tim Hockin from SIG K8s Infra, Brian McQueen, and Sergey Kanzhelev from SIG Node, Lubomir Ivanov from SIG Cluster Lifecycle, Adolfo García Veytia, Jeremy Rickard, Sascha Grunert, and Stephen Augustus from SIG Release, Bob Killen and Kaslin Fields from SIG Contribex, Tim Allclair from the Security Response Committee. Also a big thank you to our friends acting as liaisons with our cloud provider partners: Jay Pipes from Amazon and Jon Johnson Jr. from Google.
Spotlight on SIG Instrumentation
Observability requires the right data at the right time for the right consumer (human or piece of software) to make the right decision. In the context of Kubernetes, having best practices for cluster observability across all Kubernetes components is crucial.
SIG Instrumentation helps to address this issue by providing best practices and tools that all other SIGs use to instrument Kubernetes components-like the API server, scheduler, kubelet and kube-controller-manager.
In this SIG Instrumentation spotlight, Imran Noor Mohamed, SIG ContribEx-Comms tech lead talked with Elana Hashman, and Han Kang, chairs of SIG Instrumentation, on how the SIG is organized, what are the current challenges and how anyone can get involved and contribute.
About SIG Instrumentation
Imran (INM): Hello, thank you for the opportunity of learning more about SIG Instrumentation. Could you tell us a bit about yourself, your role, and how you got involved in SIG Instrumentation?
Han (HK): I started in SIG Instrumentation in 2018, and became a chair in 2020. I primarily got involved with SIG instrumentation due to a number of upstream issues with metrics which ended up affecting GKE in bad ways. As a result, we ended up launching an initiative to stabilize our metrics and make metrics a proper API.
Elana (EH): I also joined SIG Instrumentation in 2018 and became a chair at the same time as Han. I was working as a site reliability engineer (SRE) on bare metal Kubernetes clusters and was working to build out our observability stack. I encountered some issues with label joins where Kubernetes metrics didn’t match kube-state-metrics (KSM) and started participating in SIG meetings to improve things. I helped test performance improvements to kube-state-metrics and ultimately coauthored a KEP for overhauling metrics in the 1.14 release to improve usability.
Imran (INM): Interesting! Does that mean SIG Instrumentation involves a lot of plumbing?
Han (HK): I wouldn’t say it involves a ton of plumbing, though it does touch basically every code base. We have our own dedicated directories for our metrics, logs, and tracing frameworks which we tend to work out of primarily. We do have to interact with other SIGs in order to propagate our changes which makes us more of a horizontal SIG.
Imran (INM): Speaking about interaction and coordination with other SIG could you describe how the SIGs is organized?
Elana (EH): In SIG Instrumentation, we have two chairs, Han and myself, as well as two tech leads, David Ashpole and Damien Grisonnet. We all work together as the SIG’s leads in order to run meetings, triage issues and PRs, review and approve KEPs, plan for each release, present at KubeCon and community meetings, and write our annual report. Within the SIG we also have a number of important subprojects, each of which is stewarded by its subproject owners. For example, Marek Siarkowicz is a subproject owner of metrics-server.
Because we’re a horizontal SIG, some of our projects have a wide scope and require coordination from a dedicated group of contributors. For example, in order to guide the Kubernetes migration to structured logging, we chartered the Structured Logging Working Group (WG), organized by Marek and Patrick Ohly. The WG doesn’t own any code, but helps with various components such as the kubelet, scheduler, etc. in migrating their code to use structured logs.
Imran (INM): Walking through the charter alone it’s clear that SIG Instrumentation has a lot of sub-projects. Could you highlight some important ones?
Han (HK): We have many different sub-projects and we are in dire need of people who can come and help shepherd them. Our most important projects in-tree (that is, within the kubernetes/kubernetes repo) are metrics, tracing, and, structured logging. Our most important projects out-of-tree are (a) KSM (kube-state-metrics) and (b) metrics-server.
Elana (EH): Echoing this, we would love to bring on more maintainers for kube-state-metrics and metrics-server. Our friends at WG Structured Logging are also looking for contributors. Other subprojects include klog, prometheus-adapter, and a new subproject that we just launched for collecting high-fidelity, scalable utilization metrics called usage-metrics-collector. All are seeking new contributors!
Current status and ongoing challenges
Imran (INM): For release 1.26 we can see that there are a relevant number of metrics, logs, and tracing KEPs in the pipeline. Would you like to point out important things for last release (maybe alpha & stable milestone candidates?)
Han (HK): We can now generate documentation for every single metric in the main Kubernetes code base! We have a pretty fancy static analysis pipeline that enables this functionality. We’ve also added feature metrics so that you can look at your metrics to determine which features are enabled in your cluster at a given time. Lastly, we added a component-sli endpoint, which should make it easy for people to create availability SLOs for control-plane components.
Elana (EH): We’ve also been working on tracing KEPs for both the API server and kubelet, though neither graduated in 1.26. I’m also really excited about the work Han is doing with WG Reliability to extend and improve our metrics stability framework.
Imran (INM): What do you think are the Kubernetes-specific challenges tackled by the SIG Instrumentation? What are the future efforts to solve them?
Han (HK): SIG instrumentation suffered a bit in the past from being a horizontal SIG. We did not have an obvious location to put our code and did not have a good mechanism to audit metrics that people would randomly add. We’ve fixed this over the years and now we have dedicated spots for our code and a reliable mechanism for auditing new metrics. We also now offer stability guarantees for metrics. We hope to have full-blown tracing up and down the kubernetes stack, and metric support via exemplars.
Elana (EH): I think SIG Instrumentation is a really interesting SIG because it poses different kinds of opportunities to get involved than in other SIGs. You don’t have to be a software developer to contribute to our SIG! All of our components and subprojects are focused on better understanding Kubernetes and its performance in production, which allowed me to get involved as one of the few SIG Chairs working as an SRE at that time. I like that we provide opportunities for newcomers to contribute through using, testing, and providing feedback on our subprojects, which is a lower barrier to entry. Because many of these projects are out-of-tree, I think one of our challenges is to figure out what’s in scope for core Kubernetes SIGs instrumentation subprojects, what’s missing, and then fill in the gaps.
Community and contribution
Imran (INM): Kubernetes values community over products. Any recommendation for anyone looking into getting involved in SIG Instrumentation work? Where should they start (new contributor-friendly areas within SIG?)
Han(HK) and Elana (EH): Come to our bi-weekly triage meetings! They aren’t recorded and are a great place to ask questions and learn about our ongoing work. We strive to be a friendly community and one of the easiest SIGs to get started with. You can check out our latest KubeCon NA 2022 SIG Instrumentation Deep Dive to get more insight into our work. We also invite you to join our Slack channel #sig-instrumentation and feel free to reach out to any of our SIG leads or subproject owners directly.
Thank you so much for your time and insights into the workings of SIG Instrumentation!
Consider All Microservices Vulnerable — And Monitor Their Behavior
This post warns Devops from a false sense of security. Following security best practices when developing and configuring microservices do not result in non-vulnerable microservices. The post shows that although all deployed microservices are vulnerable, there is much that can be done to ensure microservices are not exploited. It explains how analyzing the behavior of clients and services from a security standpoint, named here "Security-Behavior Analytics", can protect the deployed vulnerable microservices. It points to Guard, an open source project offering security-behavior monitoring and control of Kubernetes microservices presumed vulnerable.
As cyber attacks continue to intensify in sophistication, organizations deploying cloud services continue to grow their cyber investments aiming to produce safe and non-vulnerable services. However, the year-by-year growth in cyber investments does not result in a parallel reduction in cyber incidents. Instead, the number of cyber incidents continues to grow annually. Evidently, organizations are doomed to fail in this struggle - no matter how much effort is made to detect and remove cyber weaknesses from deployed services, it seems offenders always have the upper hand.
Considering the current spread of offensive tools, sophistication of offensive players, and ever-growing cyber financial gains to offenders, any cyber strategy that relies on constructing a non-vulnerable, weakness-free service in 2023 is clearly too naïve. It seems the only viable strategy is to:
➥ Admit that your services are vulnerable!
In other words, consciously accept that you will never create completely invulnerable services. If your opponents find even a single weakness as an entry-point, you lose! Admitting that in spite of your best efforts, all your services are still vulnerable is an important first step. Next, this post discusses what you can do about it...
How to protect microservices from being exploited
Being vulnerable does not necessarily mean that your service will be exploited. Though your services are vulnerable in some ways unknown to you, offenders still need to identify these vulnerabilities and then exploit them. If offenders fail to exploit your service vulnerabilities, you win! In other words, having a vulnerability that can’t be exploited, represents a risk that can’t be realized.
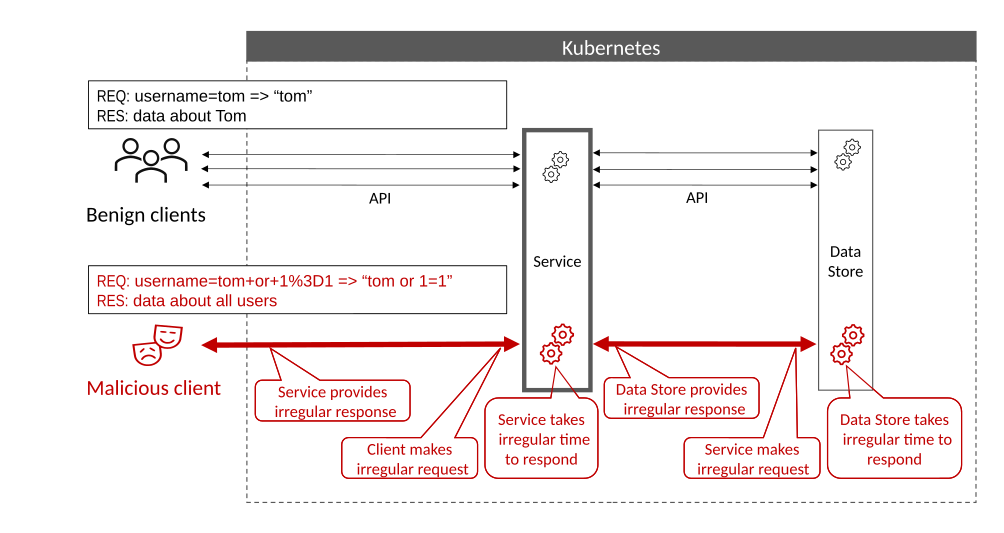
Figure 1. An Offender gaining foothold in a vulnerable service
The above diagram shows an example in which the offender does not yet have a foothold in the service; that is, it is assumed that your service does not run code controlled by the offender on day 1. In our example the service has vulnerabilities in the API exposed to clients. To gain an initial foothold the offender uses a malicious client to try and exploit one of the service API vulnerabilities. The malicious client sends an exploit that triggers some unplanned behavior of the service.
More specifically, let’s assume the service is vulnerable to an SQL injection. The developer failed to sanitize the user input properly, thereby allowing clients to send values that would change the intended behavior. In our example, if a client sends a query string with key “username” and value of “tom or 1=1”, the client will receive the data of all users. Exploiting this vulnerability requires the client to send an irregular string as the value. Note that benign users will not be sending a string with spaces or with the equal sign character as a username, instead they will normally send legal usernames which for example may be defined as a short sequence of characters a-z. No legal username can trigger service unplanned behavior.
In this simple example, one can already identify several opportunities to detect and block an attempt to exploit the vulnerability (un)intentionally left behind by the developer, making the vulnerability unexploitable. First, the malicious client behavior differs from the behavior of benign clients, as it sends irregular requests. If such a change in behavior is detected and blocked, the exploit will never reach the service. Second, the service behavior in response to the exploit differs from the service behavior in response to a regular request. Such behavior may include making subsequent irregular calls to other services such as a data store, taking irregular time to respond, and/or responding to the malicious client with an irregular response (for example, containing much more data than normally sent in case of benign clients making regular requests). Service behavioral changes, if detected, will also allow blocking the exploit in different stages of the exploitation attempt.
More generally:
Monitoring the behavior of clients can help detect and block exploits against service API vulnerabilities. In fact, deploying efficient client behavior monitoring makes many vulnerabilities unexploitable and others very hard to achieve. To succeed, the offender needs to create an exploit undetectable from regular requests.
Monitoring the behavior of services can help detect services as they are being exploited regardless of the attack vector used. Efficient service behavior monitoring limits what an attacker may be able to achieve as the offender needs to ensure the service behavior is undetectable from regular service behavior.
Combining both approaches may add a protection layer to the deployed vulnerable services, drastically decreasing the probability for anyone to successfully exploit any of the deployed vulnerable services. Next, let us identify four use cases where you need to use security-behavior monitoring.
Use cases
One can identify the following four different stages in the life of any service from a security standpoint. In each stage, security-behavior monitoring is required to meet different challenges:
| Service State | Use case | What do you need in order to cope with this use case? |
|---|---|---|
| Normal | No known vulnerabilities: The service owner is normally not aware of any known vulnerabilities in the service image or configuration. Yet, it is reasonable to assume that the service has weaknesses. | Provide generic protection against any unknown, zero-day, service vulnerabilities - Detect/block irregular patterns sent as part of incoming client requests that may be used as exploits. |
| Vulnerable | An applicable CVE is published: The service owner is required to release a new non-vulnerable revision of the service. Research shows that in practice this process of removing a known vulnerability may take many weeks to accomplish (2 months on average). | Add protection based on the CVE analysis - Detect/block incoming requests that include specific patterns that may be used to exploit the discovered vulnerability. Continue to offer services, although the service has a known vulnerability. |
| Exploitable | A known exploit is published: The service owner needs a way to filter incoming requests that contain the known exploit. | Add protection based on a known exploit signature - Detect/block incoming client requests that carry signatures identifying the exploit. Continue to offer services, although the presence of an exploit. |
| Misused | An offender misuses pods backing the service: The offender can follow an attack pattern enabling him/her to misuse pods. The service owner needs to restart any compromised pods while using non compromised pods to continue offering the service. Note that once a pod is restarted, the offender needs to repeat the attack pattern before he/she may again misuse it. | Identify and restart instances of the component that is being misused - At any given time, some backing pods may be compromised and misused, while others behave as designed. Detect/remove the misused pods while allowing other pods to continue servicing client requests. |
Fortunately, microservice architecture is well suited to security-behavior monitoring as discussed next.
Security-Behavior of microservices versus monoliths
Kubernetes is often used to support workloads designed with microservice architecture. By design, microservices aim to follow the UNIX philosophy of "Do One Thing And Do It Well". Each microservice has a bounded context and a clear interface. In other words, you can expect the microservice clients to send relatively regular requests and the microservice to present a relatively regular behavior as a response to these requests. Consequently, a microservice architecture is an excellent candidate for security-behavior monitoring.
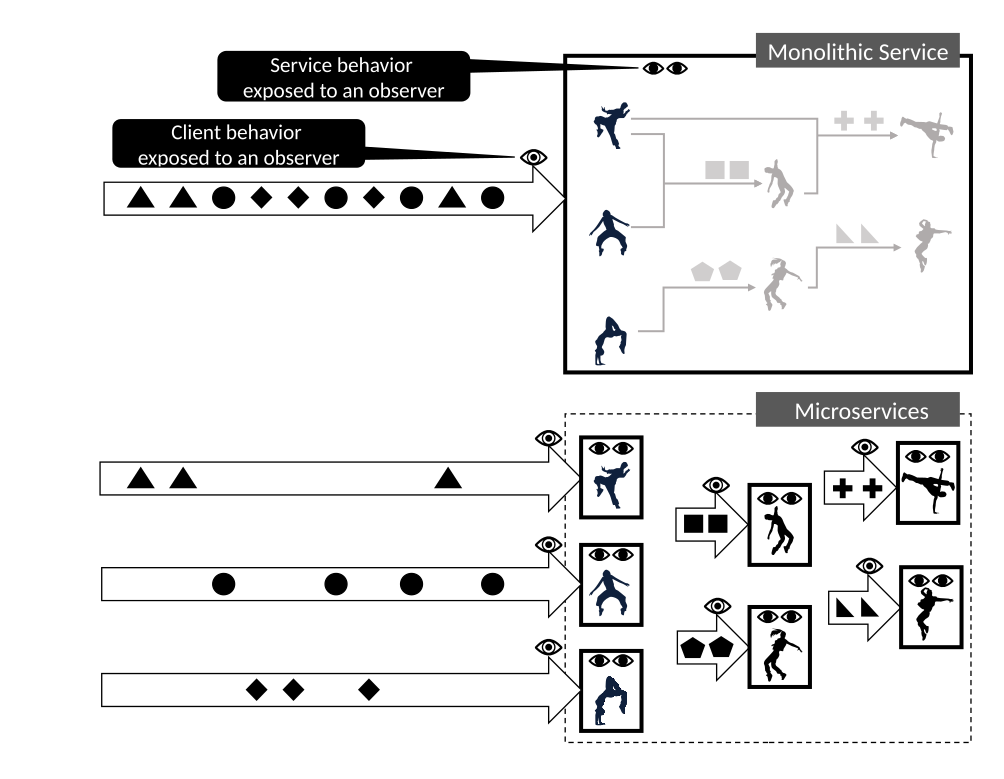
Figure 2. Microservices are well suited for security-behavior monitoring
The diagram above clarifies how dividing a monolithic service to a set of microservices improves our ability to perform security-behavior monitoring and control. In a monolithic service approach, different client requests are intertwined, resulting in a diminished ability to identify irregular client behaviors. Without prior knowledge, an observer of the intertwined client requests will find it hard to distinguish between types of requests and their related characteristics. Further, internal client requests are not exposed to the observer. Lastly, the aggregated behavior of the monolithic service is a compound of the many different internal behaviors of its components, making it hard to identify irregular service behavior.
In a microservice environment, each microservice is expected by design to offer a more well-defined service and serve better defined type of requests. This makes it easier for an observer to identify irregular client behavior and irregular service behavior. Further, a microservice design exposes the internal requests and internal services which offer more security-behavior data to identify irregularities by an observer. Overall, this makes the microservice design pattern better suited for security-behavior monitoring and control.
Security-Behavior monitoring on Kubernetes
Kubernetes deployments seeking to add Security-Behavior may use Guard, developed under the CNCF project Knative. Guard is integrated into the full Knative automation suite that runs on top of Kubernetes. Alternatively, you can deploy Guard as a standalone tool to protect any HTTP-based workload on Kubernetes.
See:
- Guard on Github, for using Guard as a standalone tool.
- The Knative automation suite - Read about Knative, in the blog post Opinionated Kubernetes which describes how Knative simplifies and unifies the way web services are deployed on Kubernetes.
- You may contact Guard maintainers on the
SIG Security Slack channel
or on the Knative community security
Slack channel. The Knative community channel will move soon to the
CNCF Slack under the name
#knative-security.
The goal of this post is to invite the Kubernetes community to action and introduce Security-Behavior monitoring and control to help secure Kubernetes based deployments. Hopefully, the community as a follow up will:
- Analyze the cyber challenges presented for different Kubernetes use cases
- Add appropriate security documentation for users on how to introduce Security-Behavior monitoring and control.
- Consider how to integrate with tools that can help users monitor and control their vulnerable services.
Getting involved
You are welcome to get involved and join the effort to develop security behavior monitoring and control for Kubernetes; to share feedback and contribute to code or documentation; and to make or suggest improvements of any kind.
Protect Your Mission-Critical Pods From Eviction With PriorityClass
Kubernetes has been widely adopted, and many organizations use it as their de-facto orchestration engine for running workloads that need to be created and deleted frequently.
Therefore, proper scheduling of the pods is key to ensuring that application pods are up and running within the Kubernetes cluster without any issues. This article delves into the use cases around resource management by leveraging the PriorityClass object to protect mission-critical or high-priority pods from getting evicted and making sure that the application pods are up, running, and serving traffic.
Resource management in Kubernetes
The control plane consists of multiple components, out of which the scheduler (usually the built-in kube-scheduler) is one of the components which is responsible for assigning a node to a pod.
Whenever a pod is created, it enters a "pending" state, after which the scheduler determines which node is best suited for the placement of the new pod.
In the background, the scheduler runs as an infinite loop looking for pods without
a nodeName set that are ready for scheduling.
For each Pod that needs scheduling, the scheduler tries to decide which node should run that Pod.
If the scheduler cannot find any node, the pod remains in the pending state, which is not ideal.
Note:
To name a few,nodeSelector, taints and tolerations, nodeAffinity, the rank
of nodes based on available resources (for example, CPU and memory), and several
other criteria are used to determine the pod's placement.The below diagram, from point number 1 through 4, explains the request flow:

Scheduling in Kubernetes
Typical use cases
Below are some real-life scenarios where control over the scheduling and eviction of pods may be required.
Let's say the pod you plan to deploy is critical, and you have some resource constraints. An example would be the DaemonSet of an infrastructure component like Grafana Loki. The Loki pods must run before other pods can on every node. In such cases, you could ensure resource availability by manually identifying and deleting the pods that are not required or by adding a new node to the cluster. Both these approaches are unsuitable since the former would be tedious to execute, and the latter could involve an expenditure of time and money.
Another use case could be a single cluster that holds the pods for the below environments with associated priorities:
- Production (
prod): top priority - Preproduction (
preprod): intermediate priority - Development (
dev): least priority
In the event of high resource consumption in the cluster, there is competition for CPU and memory resources on the nodes. While cluster-level autoscaling may add more nodes, it takes time. In the interim, if there are no further nodes to scale the cluster, some Pods could remain in a Pending state, or the service could be degraded as they compete for resources. If the kubelet does evict a Pod from the node, that eviction would be random because the kubelet doesn’t have any special information about which Pods to evict and which to keep.
- Production (
A third example could be a microservice backed by a queuing application or a database running into a resource crunch and the queue or database getting evicted. In such a case, all the other services would be rendered useless until the database can serve traffic again.
There can also be other scenarios where you want to control the order of scheduling or order of eviction of pods.
PriorityClasses in Kubernetes
PriorityClass is a cluster-wide API object in Kubernetes and part of the
scheduling.k8s.io/v1 API group. It contains a mapping of the PriorityClass
name (defined in .metadata.name) and an integer value (defined in .value).
This represents the value that the scheduler uses to determine Pod's relative priority.
Additionally, when you create a cluster using kubeadm or a managed Kubernetes service (for example, Azure Kubernetes Service), Kubernetes uses PriorityClasses to safeguard the pods that are hosted on the control plane nodes. This ensures that critical cluster components such as CoreDNS and kube-proxy can run even if resources are constrained.
This availability of pods is achieved through the use of a special PriorityClass that ensures the pods are up and running and that the overall cluster is not affected.
$ kubectl get priorityclass
NAME VALUE GLOBAL-DEFAULT AGE
system-cluster-critical 2000000000 false 82m
system-node-critical 2000001000 false 82m
The diagram below shows exactly how it works with the help of an example, which will be detailed in the upcoming section.

Pod scheduling and preemption
Pod priority and preemption
Pod preemption is a Kubernetes feature that allows the cluster to preempt pods (removing an existing Pod in favor of a new Pod) on the basis of priority. Pod priority indicates the importance of a pod relative to other pods while scheduling. If there aren't enough resources to run all the current pods, the scheduler tries to evict lower-priority pods over high-priority ones.
Also, when a healthy cluster experiences a node failure, typically, lower-priority pods get preempted to create room for higher-priority pods on the available node. This happens even if the cluster can bring up a new node automatically since pod creation is usually much faster than bringing up a new node.
PriorityClass requirements
Before you set up PriorityClasses, there are a few things to consider.
- Decide which PriorityClasses are needed. For instance, based on environment, type of pods, type of applications, etc.
- The default PriorityClass resource for your cluster. The pods without a
priorityClassNamewill be treated as priority 0. - Use a consistent naming convention for all PriorityClasses.
- Make sure that the pods for your workloads are running with the right PriorityClass.
PriorityClass hands-on example
Let’s say there are 3 application pods: one for prod, one for preprod, and one for development. Below are three sample YAML manifest files for each of those.
---
# development
apiVersion: v1
kind: Pod
metadata:
name: dev-nginx
labels:
env: dev
spec:
containers:
- name: dev-nginx
image: nginx
resources:
requests:
memory: "256Mi"
cpu: "0.2"
limits:
memory: ".5Gi"
cpu: "0.5"
---
# preproduction
apiVersion: v1
kind: Pod
metadata:
name: preprod-nginx
labels:
env: preprod
spec:
containers:
- name: preprod-nginx
image: nginx
resources:
requests:
memory: "1.5Gi"
cpu: "1.5"
limits:
memory: "2Gi"
cpu: "2"
---
# production
apiVersion: v1
kind: Pod
metadata:
name: prod-nginx
labels:
env: prod
spec:
containers:
- name: prod-nginx
image: nginx
resources:
requests:
memory: "2Gi"
cpu: "2"
limits:
memory: "2Gi"
cpu: "2"
You can create these pods with the kubectl create -f <FILE.yaml> command, and then check their status
using the kubectl get pods command. You can see if they are up and look ready to serve traffic:
$ kubectl get pods --show-labels
NAME READY STATUS RESTARTS AGE LABELS
dev-nginx 1/1 Running 0 55s env=dev
preprod-nginx 1/1 Running 0 55s env=preprod
prod-nginx 0/1 Pending 0 55s env=prod
Bad news. The pod for the Production environment is still Pending and isn't serving any traffic.
Let's see why this is happening:
$ kubectl get events
...
...
5s Warning FailedScheduling pod/prod-nginx 0/2 nodes are available: 1 Insufficient cpu, 2 Insufficient memory.
In this example, there is only one worker node, and that node has a resource crunch.
Now, let's look at how PriorityClass can help in this situation since prod should be given higher priority than the other environments.
PriorityClass API
Before creating PriorityClasses based on these requirements, let's see what a basic manifest for a PriorityClass looks like and outline some prerequisites:
apiVersion: scheduling.k8s.io/v1
kind: PriorityClass
metadata:
name: PRIORITYCLASS_NAME
value: 0 # any integer value between -1000000000 to 1000000000
description: >-
(Optional) description goes here!
globalDefault: false # or true. Only one PriorityClass can be the global default.
Below are some prerequisites for PriorityClasses:
- The name of a PriorityClass must be a valid DNS subdomain name.
- When you make your own PriorityClass, the name should not start with
system-, as those names are reserved by Kubernetes itself (for example, they are used for two built-in PriorityClasses). - Its absolute value should be between -1000000000 to 1000000000 (1 billion).
- Larger numbers are reserved by PriorityClasses such as
system-cluster-critical(this Pod is critically important to the cluster) andsystem-node-critical(the node critically relies on this Pod).system-node-criticalis a higher priority thansystem-cluster-critical, because a cluster-critical Pod can only work well if the node where it is running has all its node-level critical requirements met. - There are two optional fields:
globalDefault: When true, this PriorityClass is used for pods where apriorityClassNameis not specified. Only one PriorityClass withglobalDefaultset to true can exist in a cluster.
If there is no PriorityClass defined with globalDefault set to true, all the pods with no priorityClassName defined will be treated with 0 priority (i.e. the least priority).description: A string with a meaningful value so that people know when to use this PriorityClass.
Note:
Adding a PriorityClass withglobalDefault set to true does not mean it will
apply the same to the existing pods that are already running. This will be
applicable only to the pods that came into existence after the PriorityClass was created.PriorityClass in action
Here's an example. Next, create some environment-specific PriorityClasses:
apiVersion: scheduling.k8s.io/v1
kind: PriorityClass
metadata:
name: dev-pc
value: 1000000
globalDefault: false
description: >-
(Optional) This priority class should only be used for all development pods.
apiVersion: scheduling.k8s.io/v1
kind: PriorityClass
metadata:
name: preprod-pc
value: 2000000
globalDefault: false
description: >-
(Optional) This priority class should only be used for all preprod pods.
apiVersion: scheduling.k8s.io/v1
kind: PriorityClass
metadata:
name: prod-pc
value: 4000000
globalDefault: false
description: >-
(Optional) This priority class should only be used for all prod pods.
Use kubectl create -f <FILE.YAML> command to create a pc and kubectl get pc to check its status.
$ kubectl get pc
NAME VALUE GLOBAL-DEFAULT AGE
dev-pc 1000000 false 3m13s
preprod-pc 2000000 false 2m3s
prod-pc 4000000 false 7s
system-cluster-critical 2000000000 false 82m
system-node-critical 2000001000 false 82m
The new PriorityClasses are in place now. A small change is needed in the pod
manifest or pod template (in a ReplicaSet or Deployment). In other words, you
need to specify the priority class name at .spec.priorityClassName (which is a string value).
First update the previous production pod manifest file to have a PriorityClass assigned, then delete the Production pod and recreate it. You can't edit the priority class for a Pod that already exists.
In my cluster, when I tried this, here's what happened. First, that change seems successful; the status of pods has been updated:
$ kubectl get pods --show-labels
NAME READY STATUS RESTARTS AGE LABELS
dev-nginx 1/1 Terminating 0 55s env=dev
preprod-nginx 1/1 Running 0 55s env=preprod
prod-nginx 0/1 Pending 0 55s env=prod
The dev-nginx pod is getting terminated. Once that is successfully terminated and there are enough resources for the prod pod, the control plane can schedule the prod pod:
Warning FailedScheduling pod/prod-nginx 0/2 nodes are available: 1 Insufficient cpu, 2 Insufficient memory.
Normal Preempted pod/dev-nginx by default/prod-nginx on node node01
Normal Killing pod/dev-nginx Stopping container dev-nginx
Normal Scheduled pod/prod-nginx Successfully assigned default/prod-nginx to node01
Normal Pulling pod/prod-nginx Pulling image "nginx"
Normal Pulled pod/prod-nginx Successfully pulled image "nginx"
Normal Created pod/prod-nginx Created container prod-nginx
Normal Started pod/prod-nginx Started container prod-nginx
Enforcement
When you set up PriorityClasses, they exist just how you defined them. However, people (and tools) that make changes to your cluster are free to set any PriorityClass, or to not set any PriorityClass at all. However, you can use other Kubernetes features to make sure that the priorities you wanted are actually applied.
As an alpha feature, you can define a
ValidatingAdmissionPolicy
and a ValidatingAdmissionPolicyBinding so that, for example,
Pods that go into the prod namespace must use the prod-pc PriorityClass.
With another ValidatingAdmissionPolicyBinding you ensure that the preprod namespace
uses the preprod-pc PriorityClass, and so on.
In any cluster, you can enforce similar controls using external projects such as
Kyverno or Gatekeeper,
through validating admission webhooks.
However you do it, Kubernetes gives you options to make sure that the PriorityClasses are used how you wanted them to be, or perhaps just to warn users when they pick an unsuitable option.
Summary
The above example and its events show you what this feature of Kubernetes brings to the table, along with several scenarios where you can use this feature. To reiterate, this helps ensure that mission-critical pods are up and available to serve the traffic and, in the case of a resource crunch, determines cluster behavior.
It gives you some power to decide the order of scheduling and order of
preemption
for Pods. Therefore, you need to define the PriorityClasses sensibly.
For example, if you have a cluster autoscaler to add nodes on demand,
make sure to run it with the system-cluster-critical PriorityClass. You don't want to
get in a situation where the autoscaler has been preempted and there are no new nodes
coming online.
If you have any queries or feedback, feel free to reach out to me on LinkedIn.
Kubernetes 1.26: Eviction policy for unhealthy pods guarded by PodDisruptionBudgets
Ensuring the disruptions to your applications do not affect its availability isn't a simple task. Last month's release of Kubernetes v1.26 lets you specify an unhealthy pod eviction policy for PodDisruptionBudgets (PDBs) to help you maintain that availability during node management operations. In this article, we will dive deeper into what modifications were introduced for PDBs to give application owners greater flexibility in managing disruptions.
What problems does this solve?
API-initiated eviction of pods respects PodDisruptionBudgets (PDBs). This means that a requested voluntary disruption
via an eviction to a Pod, should not disrupt a guarded application and .status.currentHealthy of a PDB should not fall
below .status.desiredHealthy. Running pods that are Unhealthy
do not count towards the PDB status, but eviction of these is only possible in case the application
is not disrupted. This helps disrupted or not yet started application to achieve availability
as soon as possible without additional downtime that would be caused by evictions.
Unfortunately, this poses a problem for cluster administrators that would like to drain nodes
without any manual interventions. Misbehaving applications with pods in CrashLoopBackOff
state (due to a bug or misconfiguration) or pods that are simply failing to become ready
make this task much harder. Any eviction request will fail due to violation of a PDB,
when all pods of an application are unhealthy. Draining of a node cannot make any progress
in that case.
On the other hand there are users that depend on the existing behavior, in order to:
- prevent data-loss that would be caused by deleting pods that are guarding an underlying resource or storage
- achieve the best availability possible for their application
Kubernetes 1.26 introduced a new experimental field to the PodDisruptionBudget API: .spec.unhealthyPodEvictionPolicy.
When enabled, this field lets you support both of those requirements.
How does it work?
API-initiated eviction is the process that triggers graceful pod termination.
The process can be initiated either by calling the API directly,
by using a kubectl drain command, or other actors in the cluster.
During this process every pod removal is consulted with appropriate PDBs,
to ensure that a sufficient number of pods is always running in the cluster.
The following policies allow PDB authors to have a greater control how the process deals with unhealthy pods.
There are two policies IfHealthyBudget and AlwaysAllow to choose from.
The former, IfHealthyBudget, follows the existing behavior to achieve the best availability
that you get by default. Unhealthy pods can be disrupted only if their application
has a minimum available .status.desiredHealthy number of pods.
By setting the spec.unhealthyPodEvictionPolicy field of your PDB to AlwaysAllow,
you are choosing the best effort availability for your application.
With this policy it is always possible to evict unhealthy pods.
This will make it easier to maintain and upgrade your clusters.
We think that AlwaysAllow will often be a better choice, but for some critical workloads you may
still prefer to protect even unhealthy Pods from node drains or other forms of API-initiated
eviction.
How do I use it?
This is an alpha feature, which means you have to enable the PDBUnhealthyPodEvictionPolicy
feature gate,
with the command line argument --feature-gates=PDBUnhealthyPodEvictionPolicy=true
to the kube-apiserver.
Here's an example. Assume that you've enabled the feature gate in your cluster, and that you
already defined a Deployment that runs a plain webserver. You labelled the Pods for that
Deployment with app: nginx.
You want to limit avoidable disruption, and you know that best effort availability is
sufficient for this app.
You decide to allow evictions even if those webserver pods are unhealthy.
You create a PDB to guard this application, with the AlwaysAllow policy for evicting
unhealthy pods:
apiVersion: policy/v1
kind: PodDisruptionBudget
metadata:
name: nginx-pdb
spec:
selector:
matchLabels:
app: nginx
maxUnavailable: 1
unhealthyPodEvictionPolicy: AlwaysAllow
How can I learn more?
- Read the KEP: Unhealthy Pod Eviction Policy for PDBs
- Read the documentation: Unhealthy Pod Eviction Policy for PodDisruptionBudgets
- Review the Kubernetes documentation for PodDisruptionBudgets, draining of Nodes and evictions
How do I get involved?
If you have any feedback, please reach out to us in the #sig-apps channel on Slack (visit https://slack.k8s.io/ for an invitation if you need one), or on the SIG Apps mailing list: kubernetes-sig-apps@googlegroups.com
Kubernetes v1.26: Retroactive Default StorageClass
The v1.25 release of Kubernetes introduced an alpha feature to change how a default StorageClass was assigned to a PersistentVolumeClaim (PVC). With the feature enabled, you no longer need to create a default StorageClass first and PVC second to assign the class. Additionally, any PVCs without a StorageClass assigned can be updated later. This feature was graduated to beta in Kubernetes v1.26.
You can read retroactive default StorageClass assignment in the Kubernetes documentation for more details about how to use that, or you can read on to learn about why the Kubernetes project is making this change.
Why did StorageClass assignment need improvements
Users might already be familiar with a similar feature that assigns default StorageClasses to new PVCs at the time of creation. This is currently handled by the admission controller.
But what if there wasn't a default StorageClass defined at the time of PVC creation? Users would end up with a PVC that would never be assigned a class. As a result, no storage would be provisioned, and the PVC would be somewhat "stuck" at this point. Generally, two main scenarios could result in "stuck" PVCs and cause problems later down the road. Let's take a closer look at each of them.
Changing default StorageClass
With the alpha feature enabled, there were two options admins had when they wanted to change the default StorageClass:
Creating a new StorageClass as default before removing the old one associated with the PVC. This would result in having two defaults for a short period. At this point, if a user were to create a PersistentVolumeClaim with storageClassName set to
null(implying default StorageClass), the newest default StorageClass would be chosen and assigned to this PVC.Removing the old default first and creating a new default StorageClass. This would result in having no default for a short time. Subsequently, if a user were to create a PersistentVolumeClaim with storageClassName set to
null(implying default StorageClass), the PVC would be inPendingstate forever. The user would have to fix this by deleting the PVC and recreating it once the default StorageClass was available.
Resource ordering during cluster installation
If a cluster installation tool needed to create resources that required storage, for example, an image registry, it was difficult to get the ordering right. This is because any Pods that required storage would rely on the presence of a default StorageClass and would fail to be created if it wasn't defined.
What changed
We've changed the PersistentVolume (PV) controller to assign a default StorageClass
to any unbound PersistentVolumeClaim that has the storageClassName set to null.
We've also modified the PersistentVolumeClaim admission within the API server to allow
the change of values from an unset value to an actual StorageClass name.
Null storageClassName versus storageClassName: "" - does it matter?
Before this feature was introduced, those values were equal in terms of behavior.
Any PersistentVolumeClaim with the storageClassName set to null or ""
would bind to an existing PersistentVolume resource with storageClassName also set to
null or "".
With this new feature enabled we wanted to maintain this behavior but also be able to update the StorageClass name.
With these constraints in mind, the feature changes the semantics of null.
If a default StorageClass is present, null would translate to "Give me a default" and
"" would mean "Give me PersistentVolume that also has "" StorageClass name."
In the absence of a StorageClass, the behavior would remain unchanged.
Summarizing the above, we've changed the semantics of null so that
its behavior depends on the presence or absence of a definition of default StorageClass.
The tables below show all these cases to better describe when PVC binds and when its StorageClass gets updated.
PVC storageClassName = "" | PVC storageClassName = null | ||
|---|---|---|---|
| Without default class | PV storageClassName = "" | binds | binds |
| PV without storageClassName | binds | binds | |
| With default class | PV storageClassName = "" | binds | class updates |
| PV without storageClassName | binds | class updates | |
How to use it
If you want to test the feature whilst it's alpha, you need to enable the relevant
feature gate in the kube-controller-manager and the kube-apiserver.
Use the --feature-gates command line argument:
--feature-gates="...,RetroactiveDefaultStorageClass=true"
Test drive
If you would like to see the feature in action and verify it works fine in your cluster here's what you can try:
Define a basic PersistentVolumeClaim:
apiVersion: v1 kind: PersistentVolumeClaim metadata: name: pvc-1 spec: accessModes: - ReadWriteOnce resources: requests: storage: 1GiCreate the PersistentVolumeClaim when there is no default StorageClass. The PVC won't provision or bind (unless there is an existing, suitable PV already present) and will remain in
Pendingstate.kubectl get pvcThe output is similar to this:
NAME STATUS VOLUME CAPACITY ACCESS MODES STORAGECLASS AGE pvc-1 PendingConfigure one StorageClass as default.
kubectl patch sc -p '{"metadata":{"annotations":{"storageclass.kubernetes.io/is-default-class":"true"}}}'The output is similar to this:
storageclass.storage.k8s.io/my-storageclass patchedVerify that PersistentVolumeClaims is now provisioned correctly and was updated retroactively with new default StorageClass.
kubectl get pvcThe output is similar to this:
NAME STATUS VOLUME CAPACITY ACCESS MODES STORAGECLASS AGE pvc-1 Bound pvc-06a964ca-f997-4780-8627-b5c3bf5a87d8 1Gi RWO my-storageclass 87m
New metrics
To help you see that the feature is working as expected we also introduced a new
retroactive_storageclass_total metric to show how many times that the
PV controller attempted to update PersistentVolumeClaim, and
retroactive_storageclass_errors_total to show how many of those attempts failed.
Getting involved
We always welcome new contributors so if you would like to get involved you can join our Kubernetes Storage Special-Interest-Group (SIG).
If you would like to share feedback, you can do so on our public Slack channel.
Special thanks to all the contributors that provided great reviews, shared valuable insight and helped implement this feature (alphabetical order):
- Deep Debroy (ddebroy)
- Divya Mohan (divya-mohan0209)
- Jan Šafránek (jsafrane)
- Joe Betz (jpbetz)
- Jordan Liggitt (liggitt)
- Michelle Au (msau42)
- Seokho Son (seokho-son)
- Shannon Kularathna (shannonxtreme)
- Tim Bannister (sftim)
- Tim Hockin (thockin)
- Wojciech Tyczynski (wojtek-t)
- Xing Yang (xing-yang)
Kubernetes v1.26: Alpha support for cross-namespace storage data sources
Kubernetes v1.26, released last month, introduced an alpha feature that
lets you specify a data source for a PersistentVolumeClaim, even where the source
data belong to a different namespace.
With the new feature enabled, you specify a namespace in the dataSourceRef field of
a new PersistentVolumeClaim. Once Kubernetes checks that access is OK, the new
PersistentVolume can populate its data from the storage source specified in that other
namespace.
Before Kubernetes v1.26, provided your cluster had the AnyVolumeDataSource feature enabled,
you could already provision new volumes from a data source in the same
namespace.
However, that only worked for the data source in the same namespace,
therefore users couldn't provision a PersistentVolume with a claim
in one namespace from a data source in other namespace.
To solve this problem, Kubernetes v1.26 added a new alpha namespace field
to dataSourceRef field in PersistentVolumeClaim the API.
How it works
Once the csi-provisioner finds that a data source is specified with a dataSourceRef that
has a non-empty namespace name,
it checks all reference grants within the namespace that's specified by the.spec.dataSourceRef.namespace
field of the PersistentVolumeClaim, in order to see if access to the data source is allowed.
If any ReferenceGrant allows access, the csi-provisioner provisions a volume from the data source.
Trying it out
The following things are required to use cross namespace volume provisioning:
- Enable the
AnyVolumeDataSourceandCrossNamespaceVolumeDataSourcefeature gates for the kube-apiserver and kube-controller-manager - Install a CRD for the specific
VolumeSnapShotcontroller - Install the CSI Provisioner controller and enable the
CrossNamespaceVolumeDataSourcefeature gate - Install the CSI driver
- Install a CRD for ReferenceGrants
Putting it all together
To see how this works, you can install the sample and try it out. This sample do to create PVC in dev namespace from VolumeSnapshot in prod namespace. That is a simple example. For real world use, you might want to use a more complex approach.
Assumptions for this example
- Your Kubernetes cluster was deployed with
AnyVolumeDataSourceandCrossNamespaceVolumeDataSourcefeature gates enabled - There are two namespaces, dev and prod
- CSI driver is being deployed
- There is an existing VolumeSnapshot named
new-snapshot-demoin the prod namespace - The ReferenceGrant CRD (from the Gateway API project) is already deployed
Grant ReferenceGrants read permission to the CSI Provisioner
Access to ReferenceGrants is only needed when the CSI driver
has the CrossNamespaceVolumeDataSource controller capability.
For this example, the external-provisioner needs get, list, and watch
permissions for referencegrants (API group gateway.networking.k8s.io).
- apiGroups: ["gateway.networking.k8s.io"]
resources: ["referencegrants"]
verbs: ["get", "list", "watch"]
Enable the CrossNamespaceVolumeDataSource feature gate for the CSI Provisioner
Add --feature-gates=CrossNamespaceVolumeDataSource=true to the csi-provisioner command line.
For example, use this manifest snippet to redefine the container:
- args:
- -v=5
- --csi-address=/csi/csi.sock
- --feature-gates=Topology=true
- --feature-gates=CrossNamespaceVolumeDataSource=true
image: csi-provisioner:latest
imagePullPolicy: IfNotPresent
name: csi-provisioner
Create a ReferenceGrant
Here's a manifest for an example ReferenceGrant.
apiVersion: gateway.networking.k8s.io/v1beta1
kind: ReferenceGrant
metadata:
name: allow-prod-pvc
namespace: prod
spec:
from:
- group: ""
kind: PersistentVolumeClaim
namespace: dev
to:
- group: snapshot.storage.k8s.io
kind: VolumeSnapshot
name: new-snapshot-demo
Create a PersistentVolumeClaim by using cross namespace data source
Kubernetes creates a PersistentVolumeClaim on dev and the CSI driver populates the PersistentVolume used on dev from snapshots on prod.
apiVersion: v1
kind: PersistentVolumeClaim
metadata:
name: example-pvc
namespace: dev
spec:
storageClassName: example
accessModes:
- ReadWriteOnce
resources:
requests:
storage: 1Gi
dataSourceRef:
apiGroup: snapshot.storage.k8s.io
kind: VolumeSnapshot
name: new-snapshot-demo
namespace: prod
volumeMode: Filesystem
How can I learn more?
The enhancement proposal, Provision volumes from cross-namespace snapshots, includes lots of detail about the history and technical implementation of this feature.
Please get involved by joining the Kubernetes Storage Special Interest Group (SIG) to help us enhance this feature. There are a lot of good ideas already and we'd be thrilled to have more!
Acknowledgments
It takes a wonderful group to make wonderful software. Special thanks to the following people for the insightful reviews, thorough consideration and valuable contribution to the CrossNamespaceVolumeDataSouce feature:
- Michelle Au (msau42)
- Xing Yang (xing-yang)
- Masaki Kimura (mkimuram)
- Tim Hockin (thockin)
- Ben Swartzlander (bswartz)
- Rob Scott (robscott)
- John Griffith (j-griffith)
- Michael Henriksen (mhenriks)
- Mustafa Elbehery (Elbehery)
It’s been a joy to work with y'all on this.
Kubernetes v1.26: Advancements in Kubernetes Traffic Engineering
Kubernetes v1.26 includes significant advancements in network traffic engineering with the graduation of two features (Service internal traffic policy support, and EndpointSlice terminating conditions) to GA, and a third feature (Proxy terminating endpoints) to beta. The combination of these enhancements aims to address short-comings in traffic engineering that people face today, and unlock new capabilities for the future.
Traffic Loss from Load Balancers During Rolling Updates
Prior to Kubernetes v1.26, clusters could experience loss of traffic
from Service load balancers during rolling updates when setting the externalTrafficPolicy field to Local.
There are a lot of moving parts at play here so a quick overview of how Kubernetes manages load balancers might help!
In Kubernetes, you can create a Service with type: LoadBalancer to expose an application externally with a load balancer.
The load balancer implementation varies between clusters and platforms, but the Service provides a generic abstraction
representing the load balancer that is consistent across all Kubernetes installations.
apiVersion: v1
kind: Service
metadata:
name: my-service
spec:
selector:
app.kubernetes.io/name: my-app
ports:
- protocol: TCP
port: 80
targetPort: 9376
type: LoadBalancer
Under the hood, Kubernetes allocates a NodePort for the Service, which is then used by kube-proxy to provide a network data path from the NodePort to the Pod. A controller will then add all available Nodes in the cluster to the load balancer’s backend pool, using the designated NodePort for the Service as the backend target port.
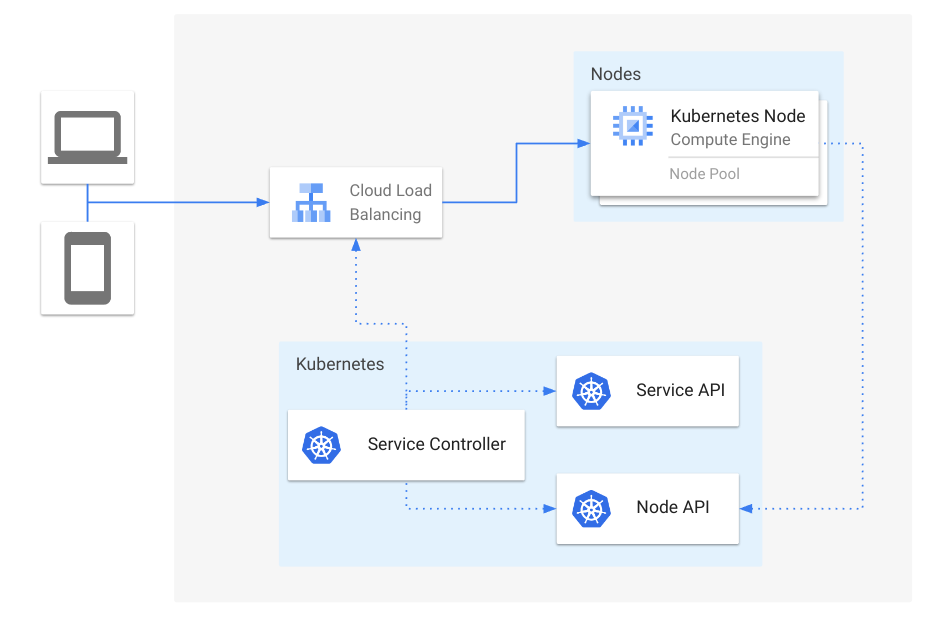
Figure 1: Overview of Service load balancers
Oftentimes it is beneficial to set externalTrafficPolicy: Local for Services, to avoid extra hops between
Nodes that are not running healthy Pods backing that Service. When using externalTrafficPolicy: Local,
an additional NodePort is allocated for health checking purposes, such that Nodes that do not contain healthy
Pods are excluded from the backend pool for a load balancer.
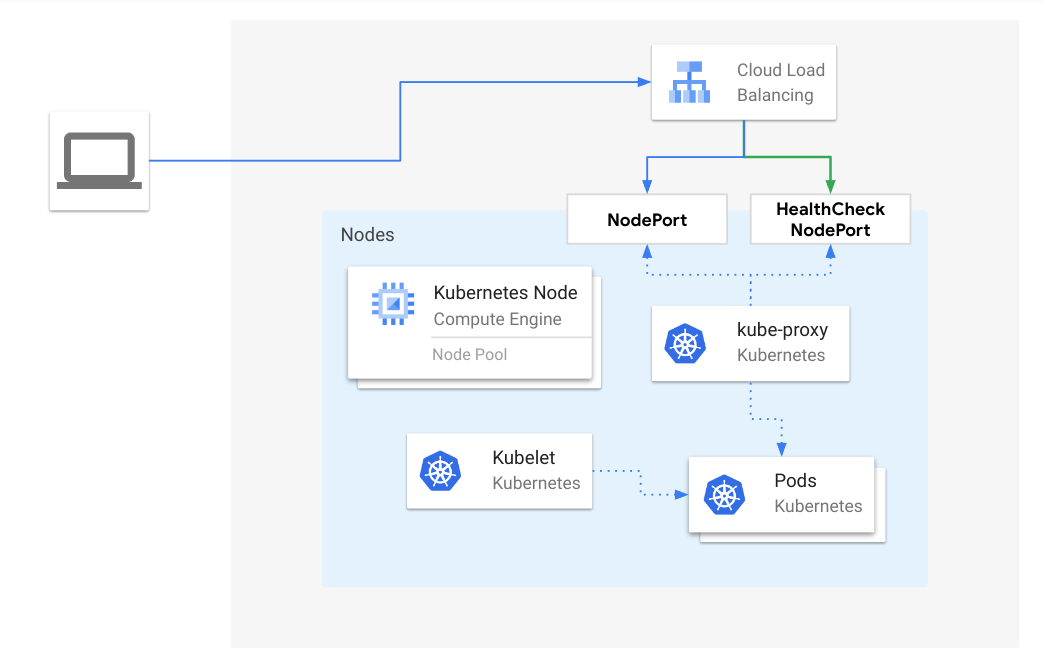
Figure 2: Load balancer traffic to a healthy Node, when externalTrafficPolicy is Local
One such scenario where traffic can be lost is when a Node loses all Pods for a Service, but the external load balancer has not probed the health check NodePort yet. The likelihood of this situation is largely dependent on the health checking interval configured on the load balancer. The larger the interval, the more likely this will happen, since the load balancer will continue to send traffic to a node even after kube-proxy has removed forwarding rules for that Service. This also occurrs when Pods start terminating during rolling updates. Since Kubernetes does not consider terminating Pods as “Ready”, traffic can be loss when there are only terminating Pods on any given Node during a rolling update.
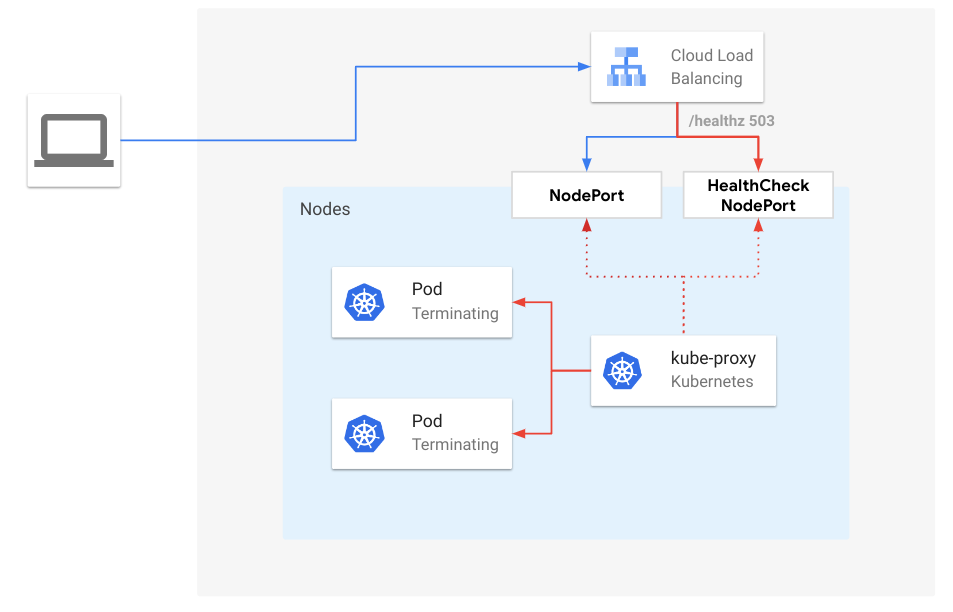
Figure 3: Load balancer traffic to terminating endpoints, when externalTrafficPolicy is Local
Starting in Kubernetes v1.26, kube-proxy enables the ProxyTerminatingEndpoints feature by default, which
adds automatic failover and routing to terminating endpoints in scenarios where the traffic would otherwise
be dropped. More specifically, when there is a rolling update and a Node only contains terminating Pods,
kube-proxy will route traffic to the terminating Pods based on their readiness. In addition, kube-proxy will
actively fail the health check NodePort if there are only terminating Pods available. By doing so,
kube-proxy alerts the external load balancer that new connections should not be sent to that Node but will
gracefully handle requests for existing connections.
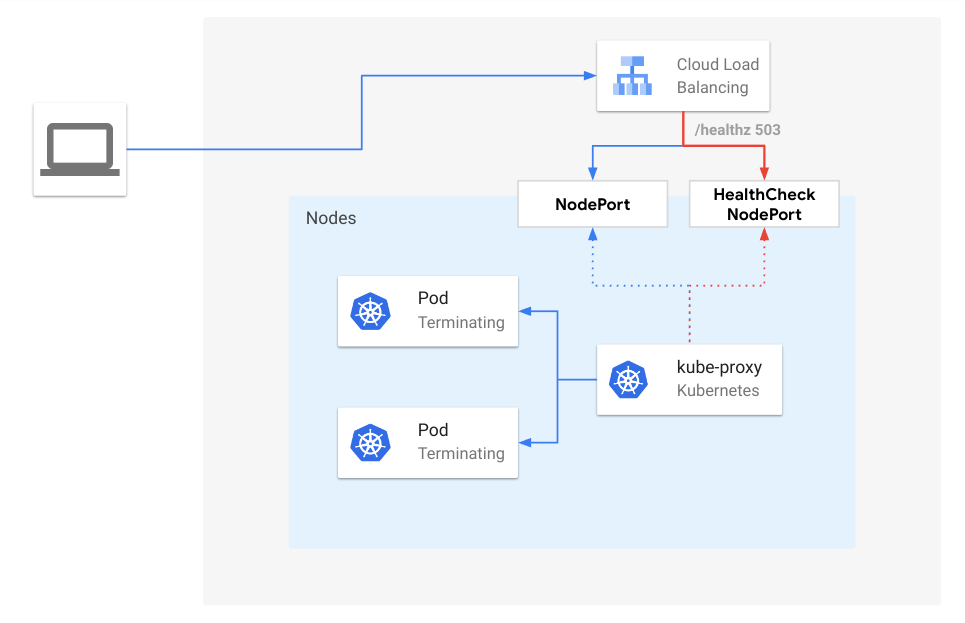
Figure 4: Load Balancer traffic to terminating endpoints with ProxyTerminatingEndpoints enabled, when externalTrafficPolicy is Local
EndpointSlice Conditions
In order to support this new capability in kube-proxy, the EndpointSlice API introduced new conditions for endpoints:
serving and terminating.
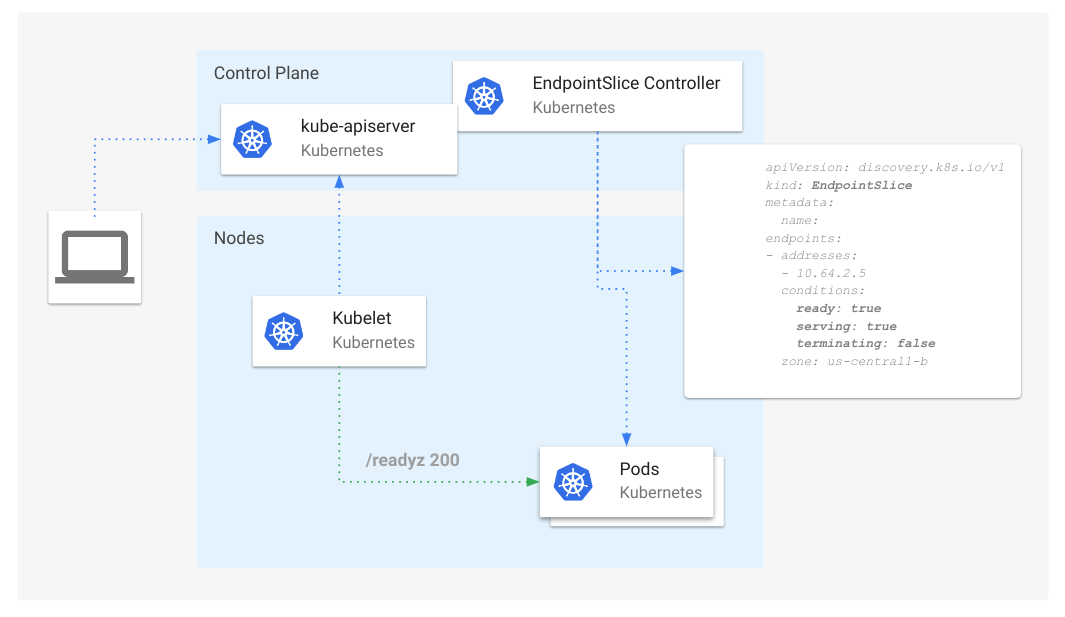
Figure 5: Overview of EndpointSlice conditions
The serving condition is semantically identical to ready, except that it can be true or false
while a Pod is terminating, unlike ready which will always be false for terminating Pods for compatibility reasons.
The terminating condition is true for Pods undergoing termination (non-empty deletionTimestamp), false otherwise.
The addition of these two conditions enables consumers of this API to understand Pod states that were previously not possible. For example, we can now track "ready" and "not ready" Pods that are also terminating.
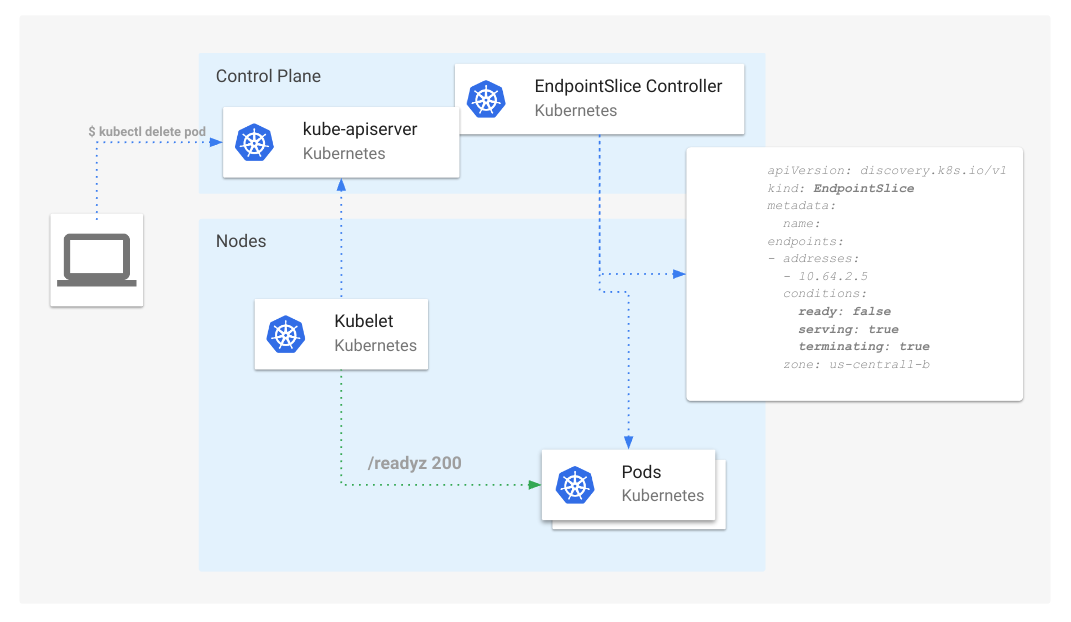
Figure 6: EndpointSlice conditions with a terminating Pod
Consumers of the EndpointSlice API, such as Kube-proxy and Ingress Controllers, can now use these conditions to coordinate connection draining events, by continuing to forward traffic for existing connections but rerouting new connections to other non-terminating endpoints.
Optimizing Internal Node-Local Traffic
Similar to how Services can set externalTrafficPolicy: Local to avoid extra hops for externally sourced traffic, Kubernetes
now supports internalTrafficPolicy: Local, to enable the same optimization for traffic originating within the cluster, specifically
for traffic using the Service Cluster IP as the destination address. This feature graduated to Beta in Kubernetes v1.24 and is graduating to GA in v1.26.
Services default the internalTrafficPolicy field to Cluster, where traffic is randomly distributed to all endpoints.
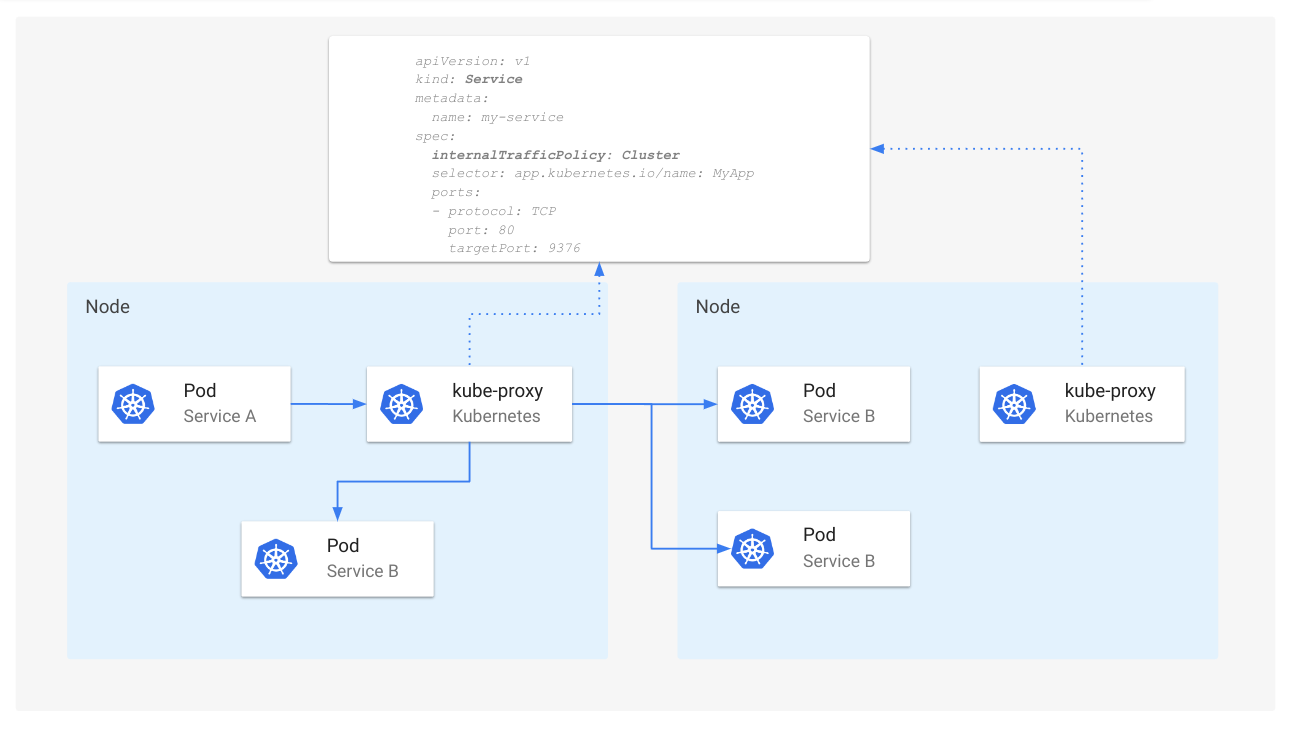
Figure 7: Service routing when internalTrafficPolicy is Cluster
When internalTrafficPolicy is set to Local, kube-proxy will forward internal traffic for a Service only if there is an available endpoint
that is local to the same Node.
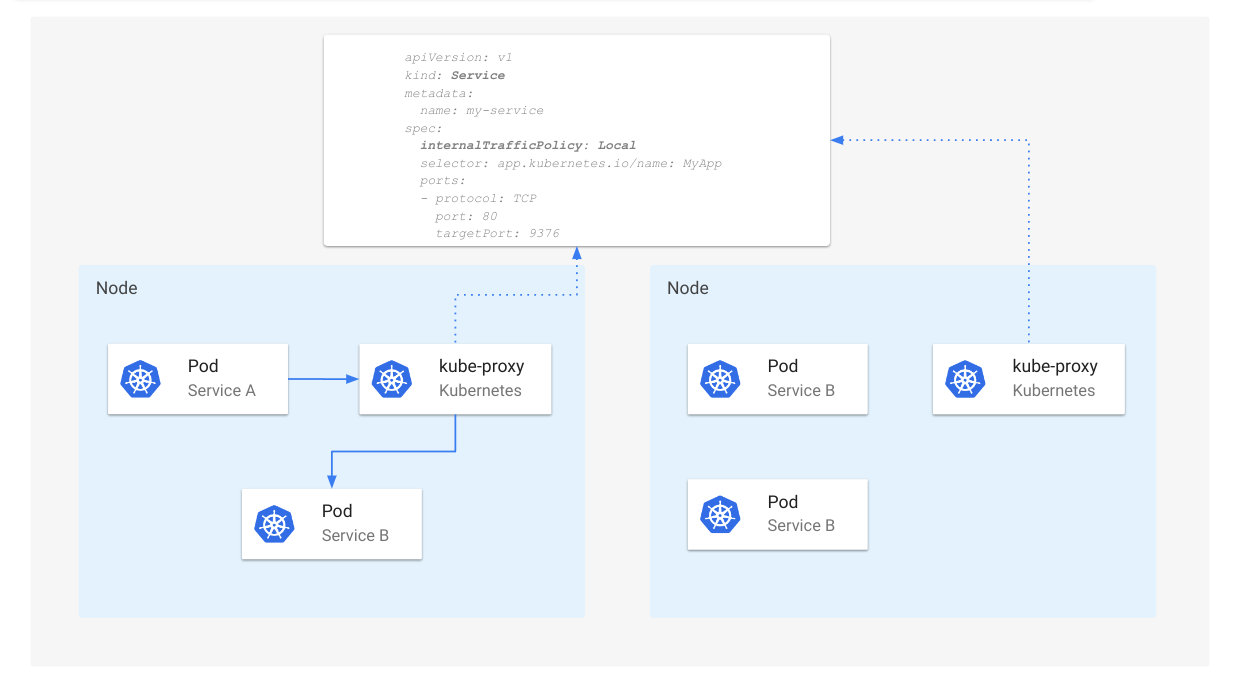
Figure 8: Service routing when internalTrafficPolicy is Local
Caution:
When usinginternalTrafficPoliy: Local, traffic will be dropped by kube-proxy when no local endpoints are available.Getting Involved
If you're interested in future discussions on Kubernetes traffic engineering, you can get involved in SIG Network through the following ways:
Kubernetes 1.26: Job Tracking, to Support Massively Parallel Batch Workloads, Is Generally Available
The Kubernetes 1.26 release includes a stable implementation of the Job controller that can reliably track a large amount of Jobs with high levels of parallelism. SIG Apps and WG Batch have worked on this foundational improvement since Kubernetes 1.22. After multiple iterations and scale verifications, this is now the default implementation of the Job controller.
Paired with the Indexed completion mode, the Job controller can handle massively parallel batch Jobs, supporting up to 100k concurrent Pods.
The new implementation also made possible the development of Pod failure policy, which is in beta in the 1.26 release.
How do I use this feature?
To use Job tracking with finalizers, upgrade to Kubernetes 1.25 or newer and
create new Jobs. You can also use this feature in v1.23 and v1.24, if you have the
ability to enable the JobTrackingWithFinalizers feature gate.
If your cluster runs Kubernetes 1.26, Job tracking with finalizers is a stable feature. For v1.25, it's behind that feature gate, and your cluster administrators may have explicitly disabled it - for example, if you have a policy of not using beta features.
Jobs created before the upgrade will still be tracked using the legacy behavior. This is to avoid retroactively adding finalizers to running Pods, which might introduce race conditions.
For maximum performance on large Jobs, the Kubernetes project recommends using the Indexed completion mode. In this mode, the control plane is able to track Job progress with less API calls.
If you are a developer of operator(s) for batch, HPC, AI, ML or related workloads, we encourage you to use the Job API to delegate accurate progress tracking to Kubernetes. If there is something missing in the Job API that forces you to manage plain Pods, the Working Group Batch welcomes your feedback and contributions.
Deprecation notices
During the development of the feature, the control plane added the annotation
batch.kubernetes.io/job-tracking
to the Jobs that were created when the feature was enabled.
This allowed a safe transition for older Jobs, but it was never meant to stay.
In the 1.26 release, we deprecated the annotation batch.kubernetes.io/job-tracking
and the control plane will stop adding it in Kubernetes 1.27.
Along with that change, we will remove the legacy Job tracking implementation.
As a result, the Job controller will track all Jobs using finalizers and it will
ignore Pods that don't have the aforementioned finalizer.
Before you upgrade your cluster to 1.27, we recommend that you verify that there are no running Jobs that don't have the annotation, or you wait for those jobs to complete. Otherwise, you might observe the control plane recreating some Pods. We expect that this shouldn't affect any users, as the feature is enabled by default since Kubernetes 1.25, giving enough buffer for old jobs to complete.
What problem does the new implementation solve?
Generally, Kubernetes workload controllers, such as ReplicaSet or StatefulSet,
rely on the existence of Pods or other objects in the API to determine the
status of the workload and whether replacements are needed.
For example, if a Pod that belonged to a ReplicaSet terminates or ceases to
exist, the ReplicaSet controller needs to create a replacement Pod to satisfy
the desired number of replicas (.spec.replicas).
Since its inception, the Job controller also relied on the existence of Pods in the API to track Job status. A Job has completion and failure handling policies, requiring the end state of a finished Pod to determine whether to create a replacement Pod or mark the Job as completed or failed. As a result, the Job controller depended on Pods, even terminated ones, to remain in the API in order to keep track of the status.
This dependency made the tracking of Job status unreliable, because Pods can be deleted from the API for a number of reasons, including:
- The garbage collector removing orphan Pods when a Node goes down.
- The garbage collector removing terminated Pods when they reach a threshold.
- The Kubernetes scheduler preempting a Pod to accommodate higher priority Pods.
- The taint manager evicting a Pod that doesn't tolerate a
NoExecutetaint. - External controllers, not included as part of Kubernetes, or humans deleting Pods.
The new implementation
When a controller needs to take an action on objects before they are removed, it should add a finalizer to the objects that it manages. A finalizer prevents the objects from being deleted from the API until the finalizers are removed. Once the controller is done with the cleanup and accounting for the deleted object, it can remove the finalizer from the object and the control plane removes the object from the API.
This is what the new Job controller is doing: adding a finalizer during Pod creation, and removing the finalizer after the Pod has terminated and has been accounted for in the Job status. However, it wasn't that simple.
The main challenge is that there are at least two objects involved: the Pod and the Job. While the finalizer lives in the Pod object, the accounting lives in the Job object. There is no mechanism to atomically remove the finalizer in the Pod and update the counters in the Job status. Additionally, there could be more than one terminated Pod at a given time.
To solve this problem, we implemented a three staged approach, each translating to an API call.
- For each terminated Pod, add the unique ID (UID) of the Pod into short-lived
lists stored in the
.statusof the owning Job (.status.uncountedTerminatedPods). - Remove the finalizer from the Pods(s).
- Atomically do the following operations:
- remove UIDs from the short-lived lists
- increment the overall
succeededandfailedcounters in thestatusof the Job.
Additional complications come from the fact that the Job controller might receive the results of the API changes in steps 1 and 2 out of order. We solved this by adding an in-memory cache for removed finalizers.
Still, we faced some issues during the beta stage, leaving some pods stuck with finalizers in some conditions (#108645, #109485, and #111646). As a result, we decided to switch that feature gate to be disabled by default for the 1.23 and 1.24 releases.
Once resolved, we re-enabled the feature for the 1.25 release. Since then, we have received reports from our customers running tens of thousands of Pods at a time in their clusters through the Job API. Seeing this success, we decided to graduate the feature to stable in 1.26, as part of our long term commitment to make the Job API the best way to run large batch Jobs in a Kubernetes cluster.
To learn more about the feature, you can read the KEP.
Acknowledgments
As with any Kubernetes feature, multiple people contributed to getting this done, from testing and filing bugs to reviewing code.
On behalf of SIG Apps, I would like to especially thank Jordan Liggitt (Google) for helping me debug and brainstorm solutions for more than one race condition and Maciej Szulik (Red Hat) for his thorough reviews.
Kubernetes v1.26: CPUManager goes GA
The CPU Manager is a part of the kubelet, the Kubernetes node agent, which enables the user to allocate exclusive CPUs to containers. Since Kubernetes v1.10, where it graduated to Beta, the CPU Manager proved itself reliable and fulfilled its role of allocating exclusive CPUs to containers, so adoption has steadily grown making it a staple component of performance-critical and low-latency setups. Over time, most changes were about bugfixes or internal refactoring, with the following noteworthy user-visible changes:
- support explicit reservation of CPUs: it was already possible to request to reserve a given number of CPUs for system resources, including the kubelet itself, which will not be used for exclusive CPU allocation. Now it is possible to also explicitly select which CPUs to reserve instead of letting the kubelet pick them up automatically.
- report the exclusively allocated CPUs to containers, much like is already done for devices, using the kubelet-local PodResources API.
- optimize the usage of system resources, eliminating unnecessary sysfs changes.
The CPU Manager reached the point on which it "just works", so in Kubernetes v1.26 it has graduated to generally available (GA).
Customization options for CPU Manager
The CPU Manager supports two operation modes, configured using its policies. With the none policy, the CPU Manager allocates CPUs to containers
without any specific constraint except the (optional) quota set in the Pod spec.
With the static policy, then provided that the pod is in the Guaranteed QoS class and every container in that Pod requests an integer amount of vCPU cores,
then the CPU Manager allocates CPUs exclusively. Exclusive assignment means that other containers (whether from the same Pod, or from a different Pod) do not
get scheduled onto that CPU.
This simple operational model served the user base pretty well, but as the CPU Manager matured more and more, users started to look at more elaborate use cases and how to better support them.
Rather than add more policies, the community realized that pretty much all the novel use cases are some variation of the behavior enabled by the static
CPU Manager policy. Hence, it was decided to add options to tune the behavior of the static policy.
The options have a varying degree of maturity, like any other Kubernetes feature, and in order to be accepted, each new option provides a backward
compatible behavior when disabled, and to document how to interact with each other, should they interact at all.
This enabled the Kubernetes project to graduate to GA the CPU Manager core component and core CPU allocation algorithms to GA, while also enabling a new age of experimentation in this area. In Kubernetes v1.26, the CPU Manager supports three different policy options:
full-pcpus-only- restrict the CPU Manager core allocation algorithm to full physical cores only, reducing noisy neighbor issues from hardware technologies that allow sharing cores.
distribute-cpus-across-numa- drive the CPU Manager to evenly distribute CPUs across NUMA nodes, for cases where more than one NUMA node is required to satisfy the allocation.
align-by-socket- change how the CPU Manager allocates CPUs to a container: consider CPUs to be aligned at the socket boundary, instead of NUMA node boundary.
Further development
After graduating the main CPU Manager feature, each existing policy option will follow their graduation process, independent from CPU Manager and from each other option. There is room for new options to be added, but there's also a growing demand for even more flexibility than what the CPU Manager, and its policy options, currently grant.
Conversations are in progress in the community about splitting the CPU Manager and the other resource managers currently part of the kubelet executable into pluggable, independent kubelet plugins. If you are interested in this effort, please join the conversation on SIG Node communication channels (Slack, mailing list, weekly meeting).
Further reading
Please check out the Control CPU Management Policies on the Node task page to learn more about the CPU Manager, and how it fits in relation to the other node-level resource managers.
Getting involved
This feature is driven by the SIG Node community. Please join us to connect with the community and share your ideas and feedback around the above feature and beyond. We look forward to hearing from you!
Kubernetes 1.26: Pod Scheduling Readiness
Kubernetes 1.26 introduced a new Pod feature: scheduling gates. In Kubernetes, scheduling gates are keys that tell the scheduler when a Pod is ready to be considered for scheduling.
What problem does it solve?
When a Pod is created, the scheduler will continuously attempt to find a node that fits it. This infinite loop continues until the scheduler either finds a node for the Pod, or the Pod gets deleted.
Pods that remain unschedulable for long periods of time (e.g., ones that are blocked on some external event) waste scheduling cycles. A scheduling cycle may take ≅20ms or more depending on the complexity of the Pod's scheduling constraints. Therefore, at scale, those wasted cycles significantly impact the scheduler's performance. See the arrows in the "scheduler" box below.
Scheduling gates helps address this problem. It allows declaring that newly created Pods are not ready for scheduling. When scheduling gates are present on a Pod, the scheduler ignores the Pod and therefore saves unnecessary scheduling attempts. Those Pods will also be ignored by Cluster Autoscaler if you have it installed in the cluster.
Clearing the gates is the responsibility of external controllers with knowledge of when the Pod should be considered for scheduling (e.g., a quota manager).
How does it work?
Scheduling gates in general works very similar to Finalizers. Pods with a non-empty
spec.schedulingGates field will show as status SchedulingGated and be blocked from
scheduling. Note that more than one gate can be added, but they all should be added upon Pod
creation (e.g., you can add them as part of the spec or via a mutating webhook).
NAME READY STATUS RESTARTS AGE
test-pod 0/1 SchedulingGated 0 10s
To clear the gates, you update the Pod by removing all of the items from the Pod's schedulingGates
field. The gates do not need to be removed all at once, but only when all the gates are removed the
scheduler will start to consider the Pod for scheduling.
Under the hood, scheduling gates are implemented as a PreEnqueue scheduler plugin, a new scheduler framework extension point that is invoked at the beginning of each scheduling cycle.
Use Cases
An important use case this feature enables is dynamic quota management. Kubernetes supports ResourceQuota, however the API Server enforces quota at the time you attempt Pod creation. For example, if a new Pod exceeds the CPU quota, it gets rejected. The API Server doesn't queue the Pod; therefore, whoever created the Pod needs to continuously attempt to recreate it again. This either means a delay between resources becoming available and the Pod actually running, or it means load on the API server and Scheduler due to constant attempts.
Scheduling gates allows an external quota manager to address the above limitation of ResourceQuota.
Specifically, the manager could add a example.com/quota-check scheduling gate to all Pods created in the
cluster (using a mutating webhook). The manager would then remove the gate when there is quota to
start the Pod.
Whats next?
To use this feature, the PodSchedulingReadiness feature gate must be enabled in the API Server
and scheduler. You're more than welcome to test it out and tell us (SIG Scheduling) what you think!
Additional resources
- Pod Scheduling Readiness in the Kubernetes documentation
- Kubernetes Enhancement Proposal
Kubernetes 1.26: Support for Passing Pod fsGroup to CSI Drivers At Mount Time
Delegation of fsGroup to CSI drivers was first introduced as alpha in Kubernetes 1.22,
and graduated to beta in Kubernetes 1.25.
For Kubernetes 1.26, we are happy to announce that this feature has graduated to
General Availability (GA).
In this release, if you specify a fsGroup in the
security context,
for a (Linux) Pod, all processes in the pod's containers are part of the additional group
that you specified.
In previous Kubernetes releases, the kubelet would always apply the
fsGroup ownership and permission changes to files in the volume according to the policy
you specified in the Pod's .spec.securityContext.fsGroupChangePolicy field.
Starting with Kubernetes 1.26, CSI drivers have the option to apply the fsGroup settings during
volume mount time, which frees the kubelet from changing the permissions of files and directories
in those volumes.
How does it work?
CSI drivers that support this feature should advertise the
VOLUME_MOUNT_GROUP node capability.
After recognizing this information, the kubelet passes the fsGroup information to
the CSI driver during pod startup. This is done through the
NodeStageVolumeRequest and
NodePublishVolumeRequest
CSI calls.
Consequently, the CSI driver is expected to apply the fsGroup to the files in the volume using a
mount option. As an example, Azure File CSIDriver utilizes the gid mount option to map
the fsGroup information to all the files in the volume.
It should be noted that in the example above the kubelet refrains from directly
applying the permission changes into the files and directories in that volume files.
Additionally, two policy definitions no longer have an effect: neither
.spec.fsGroupPolicy for the CSIDriver object, nor
.spec.securityContext.fsGroupChangePolicy for the Pod.
For more details about the inner workings of this feature, check out the
enhancement proposal
and the CSI Driver fsGroup Support
in the CSI developer documentation.
Why is it important?
Without this feature, applying the fsGroup information to files is not possible in certain storage environments.
For instance, Azure File does not support a concept of POSIX-style ownership and permissions of files. The CSI driver is only able to set the file permissions at the volume level.
How do I use it?
This feature should be mostly transparent to users. If you maintain a CSI driver that should
support this feature, read
CSI Driver fsGroup Support
for more information on how to support this feature in your CSI driver.
Existing CSI drivers that do not support this feature will continue to work as usual:
they will not receive any fsGroup information from the kubelet. In addition to that,
the kubelet will continue to perform the ownership and permissions changes to files
for those volumes, according to the policies specified in .spec.fsGroupPolicy for the
CSIDriver and .spec.securityContext.fsGroupChangePolicy for the relevant Pod.
Kubernetes v1.26: GA Support for Kubelet Credential Providers
Kubernetes v1.26 introduced generally available (GA) support for kubelet credential provider plugins, offering an extensible plugin framework to dynamically fetch credentials for any container image registry.
Background
Kubernetes supports the ability to dynamically fetch credentials for a container registry service. Prior to Kubernetes v1.20, this capability was compiled into the kubelet and only available for Amazon Elastic Container Registry, Azure Container Registry, and Google Cloud Container Registry.
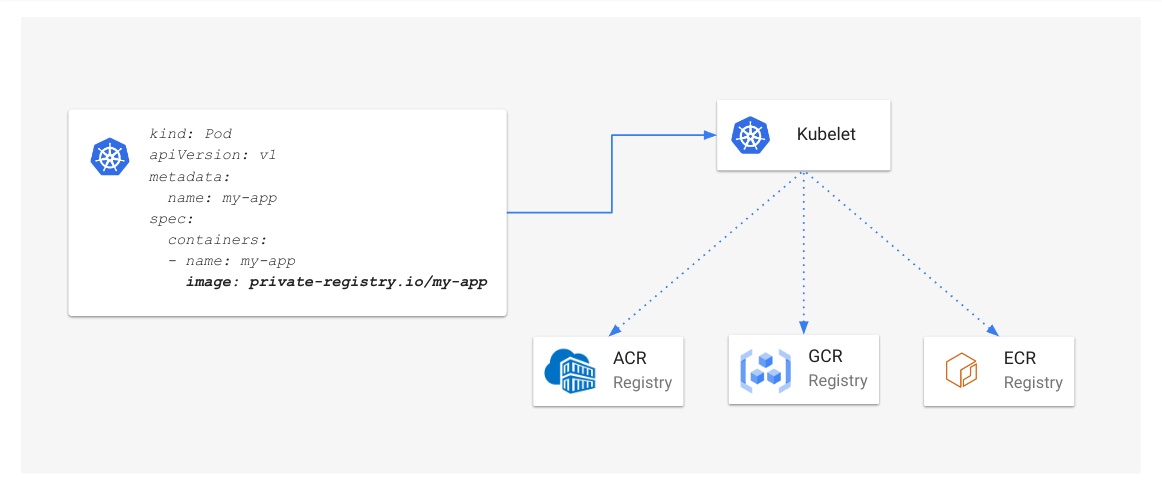
Figure 1: Kubelet built-in credential provider support for Amazon Elastic Container Registry, Azure Container Registry, and Google Cloud Container Registry.
Kubernetes v1.20 introduced alpha support for kubelet credential providers plugins, which provides a mechanism for the kubelet to dynamically authenticate and pull images for arbitrary container registries - whether these are public registries, managed services, or even a self-hosted registry. In Kubernetes v1.26, this feature is now GA
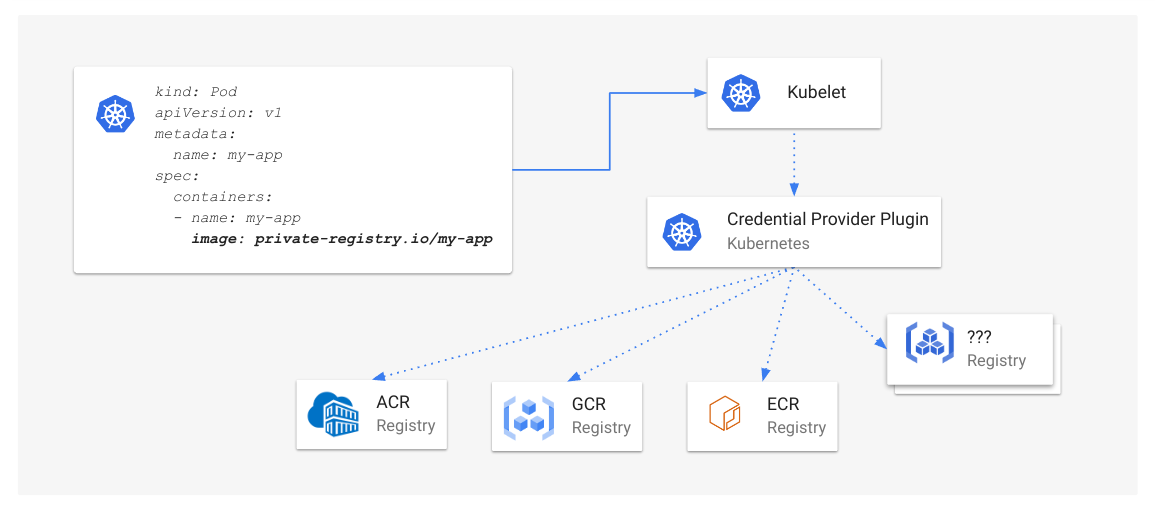
Figure 2: Kubelet credential provider overview
Why is it important?
Prior to Kubernetes v1.20, if you wanted to dynamically fetch credentials for image registries other than ACR (Azure Container Registry), ECR (Elastic Container Registry), or GCR (Google Container Registry), you needed to modify the kubelet code. The new plugin mechanism can be used in any cluster, and lets you authenticate to new registries without any changes to Kubernetes itself. Any cloud provider or vendor can publish a plugin that lets you authenticate with their image registry.
How it works
The kubelet and the exec plugin binary communicate through stdio (stdin, stdout, and stderr) by sending and receiving
json-serialized api-versioned types. If the exec plugin is enabled and the kubelet requires authentication information for an image
that matches against a plugin, the kubelet will execute the plugin binary, passing the CredentialProviderRequest API via stdin. Then
the exec plugin communicates with the container registry to dynamically fetch the credentials and returns the credentials in an
encoded response of the CredentialProviderResponse API to the kubelet via stdout.
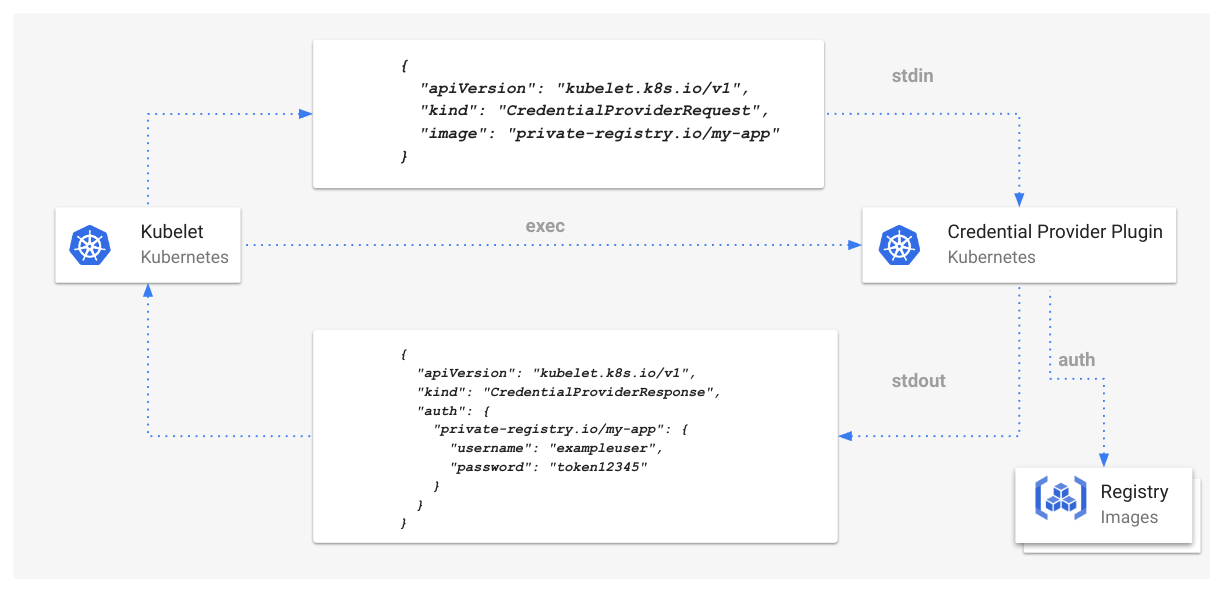
Figure 3: Kubelet credential provider plugin flow
On receiving credentials from the kubelet, the plugin can also indicate how long credentials can be cached for, to prevent unnecessary execution of the plugin by the kubelet for subsequent image pull requests to the same registry. In cases where the cache duration is not specified by the plugin, a default cache duration can be specified by the kubelet (more details below).
{
"apiVersion": "kubelet.k8s.io/v1",
"kind": "CredentialProviderResponse",
"auth": {
"cacheDuration": "6h",
"private-registry.io/my-app": {
"username": "exampleuser",
"password": "token12345"
}
}
}
In addition, the plugin can specify the scope in which cached credentials are valid for. This is specified through the cacheKeyType field
in CredentialProviderResponse. When the value is Image, the kubelet will only use cached credentials for future image pulls that exactly
match the image of the first request. When the value is Registry, the kubelet will use cached credentials for any subsequent image pulls
destined for the same registry host but using different paths (for example, gcr.io/foo/bar and gcr.io/bar/foo refer to different images
from the same registry). Lastly, when the value is Global, the kubelet will use returned credentials for all images that match against
the plugin, including images that can map to different registry hosts (for example, gcr.io vs registry.k8s.io (previously k8s.gcr.io)). The cacheKeyType field is required by plugin
implementations.
{
"apiVersion": "kubelet.k8s.io/v1",
"kind": "CredentialProviderResponse",
"auth": {
"cacheKeyType": "Registry",
"private-registry.io/my-app": {
"username": "exampleuser",
"password": "token12345"
}
}
}
Using kubelet credential providers
You can configure credential providers by installing the exec plugin(s) into a local directory accessible by the kubelet on every node. Then you set two command line arguments for the kubelet:
--image-credential-provider-config: the path to the credential provider plugin config file.--image-credential-provider-bin-dir: the path to the directory where credential provider plugin binaries are located.
The configuration file passed into --image-credential-provider-config is read by the kubelet to determine which exec plugins should be invoked for a container image used by a Pod.
Note that the name of each provider must match the name of the binary located in the local directory specified in --image-credential-provider-bin-dir, otherwise the kubelet
cannot locate the path of the plugin to invoke.
kind: CredentialProviderConfig
apiVersion: kubelet.config.k8s.io/v1
providers:
- name: auth-provider-gcp
apiVersion: credentialprovider.kubelet.k8s.io/v1
matchImages:
- "container.cloud.google.com"
- "gcr.io"
- "*.gcr.io"
- "*.pkg.dev"
args:
- get-credentials
- --v=3
defaultCacheDuration: 1m
Below is an overview of how the Kubernetes project is using kubelet credential providers for end-to-end testing.
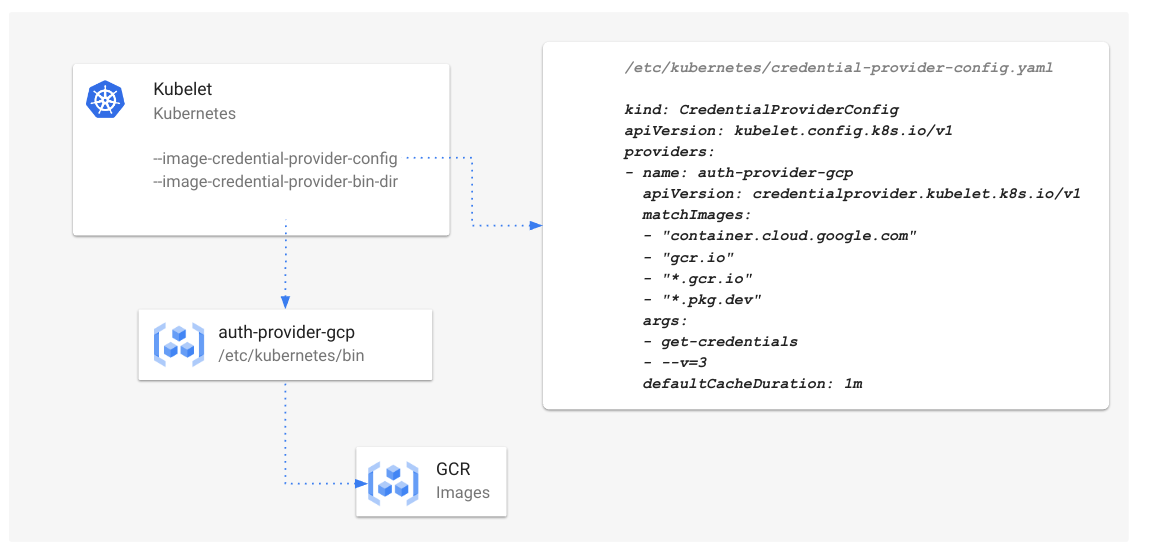
Figure 4: Kubelet credential provider configuration used for Kubernetes e2e testing
For more configuration details, see Kubelet Credential Providers.
Getting Involved
Come join SIG Node if you want to report bugs or have feature requests for the Kubelet Credential Provider. You can reach us through the following ways:
Kubernetes 1.26: Introducing Validating Admission Policies
In Kubernetes 1.26, the 1st alpha release of validating admission policies is available!
Validating admission policies use the Common Expression Language (CEL) to offer a declarative, in-process alternative to validating admission webhooks.
CEL was first introduced to Kubernetes for the Validation rules for CustomResourceDefinitions. This enhancement expands the use of CEL in Kubernetes to support a far wider range of admission use cases.
Admission webhooks can be burdensome to develop and operate. Webhook developers must implement and maintain a webhook binary to handle admission requests. Also, admission webhooks are complex to operate. Each webhook must be deployed, monitored and have a well defined upgrade and rollback plan. To make matters worse, if a webhook times out or becomes unavailable, the Kubernetes control plane can become unavailable. This enhancement avoids much of this complexity of admission webhooks by embedding CEL expressions into Kubernetes resources instead of calling out to a remote webhook binary.
For example, to set a limit on how many replicas a Deployment can have. Start by defining a validation policy:
apiVersion: admissionregistration.k8s.io/v1alpha1
kind: ValidatingAdmissionPolicy
metadata:
name: "demo-policy.example.com"
spec:
matchConstraints:
resourceRules:
- apiGroups: ["apps"]
apiVersions: ["v1"]
operations: ["CREATE", "UPDATE"]
resources: ["deployments"]
validations:
- expression: "object.spec.replicas <= 5"
The expression field contains the CEL expression that is used to validate
admission requests. matchConstraints declares what types of requests this
ValidatingAdmissionPolicy is may validate.
Next bind the policy to the appropriate resources:
apiVersion: admissionregistration.k8s.io/v1alpha1
kind: ValidatingAdmissionPolicyBinding
metadata:
name: "demo-binding-test.example.com"
spec:
policyName: "demo-policy.example.com"
matchResources:
namespaceSelector:
matchExpressions:
- key: environment
operator: In
values:
- test
This ValidatingAdmissionPolicyBinding resource binds the above policy only to
namespaces where the environment label is set to test. Once this binding
is created, the kube-apiserver will begin enforcing this admission policy.
To emphasize how much simpler this approach is than admission webhooks, if this example
were instead implemented with a webhook, an entire binary would need to be
developed and maintained just to perform a <= check. In our review of a wide
range of admission webhooks used in production, the vast majority performed
relatively simple checks, all of which can easily be expressed using CEL.
Validation admission policies are highly configurable, enabling policy authors to define policies that can be parameterized and scoped to resources as needed by cluster administrators.
For example, the above admission policy can be modified to make it configurable:
apiVersion: admissionregistration.k8s.io/v1alpha1
kind: ValidatingAdmissionPolicy
metadata:
name: "demo-policy.example.com"
spec:
paramKind:
apiVersion: rules.example.com/v1 # You also need a CustomResourceDefinition for this API
kind: ReplicaLimit
matchConstraints:
resourceRules:
- apiGroups: ["apps"]
apiVersions: ["v1"]
operations: ["CREATE", "UPDATE"]
resources: ["deployments"]
validations:
- expression: "object.spec.replicas <= params.maxReplicas"
Here, paramKind defines the resources used to configure the policy and the
expression uses the params variable to access the parameter resource.
This allows multiple bindings to be defined, each configured differently. For example:
apiVersion: admissionregistration.k8s.io/v1alpha1
kind: ValidatingAdmissionPolicyBinding
metadata:
name: "demo-binding-production.example.com"
spec:
policyName: "demo-policy.example.com"
paramRef:
name: "demo-params-production.example.com"
matchResources:
namespaceSelector:
matchExpressions:
- key: environment
operator: In
values:
- production
apiVersion: rules.example.com/v1 # defined via a CustomResourceDefinition
kind: ReplicaLimit
metadata:
name: "demo-params-production.example.com"
maxReplicas: 1000
This binding and parameter resource pair limit deployments in namespaces with the
environment label set to production to a max of 1000 replicas.
You can then use a separate binding and parameter pair to set a different limit
for namespaces in the test environment.
I hope this has given you a glimpse of what is possible with validating admission policies! There are many features that we have not yet touched on.
To learn more, read Validating Admission Policy.
We are working hard to add more features to admission policies and make the enhancement easier to use. Try it out, send us your feedback and help us build a simpler alternative to admission webhooks!
How do I get involved?
If you want to get involved in development of admission policies, discuss enhancement roadmaps, or report a bug, you can get in touch with developers at SIG API Machinery.
Kubernetes 1.26: Device Manager graduates to GA
The Device Plugin framework was introduced in the Kubernetes v1.8 release as a vendor independent framework to enable discovery, advertisement and allocation of external devices without modifying core Kubernetes. The feature graduated to Beta in v1.10. With the recent release of Kubernetes v1.26, Device Manager is now generally available (GA).
Within the kubelet, the Device Manager facilitates communication with device plugins
using gRPC through Unix sockets. Device Manager and Device plugins both act as gRPC
servers and clients by serving and connecting to the exposed gRPC services respectively.
Device plugins serve a gRPC service that kubelet connects to for device discovery,
advertisement (as extended resources) and allocation. Device Manager connects to
the Registration gRPC service served by kubelet to register itself with kubelet.
Please refer to the documentation for an example on how a pod can request a device exposed to the cluster by a device plugin.
Here are some example implementations of device plugins:
- AMD GPU device plugin
- Collection of Intel device plugins for Kubernetes
- NVIDIA device plugin for Kubernetes
- SRIOV network device plugin for Kubernetes
Noteworthy developments since Device Plugin framework introduction
Kubelet APIs moved to kubelet staging repo
External facing deviceplugin API packages moved from k8s.io/kubernetes/pkg/kubelet/apis/
to k8s.io/kubelet/pkg/apis/ in v1.17. Refer to Move external facing kubelet apis to staging for more details on the rationale behind this change.
Device Plugin API updates
Additional gRPC endpoints introduced:
GetDevicePluginOptionsis used by device plugins to communicate options to theDeviceManagerin order to indicate ifPreStartContainer,GetPreferredAllocationor other future optional calls are supported and can be called before making devices available to the container.GetPreferredAllocationallows a device plugin to forward allocation preferrence to theDeviceManagerso it can incorporate this information into its allocation decisions. TheDeviceManagerwill call out to a plugin at pod admission time asking for a preferred device allocation of a given size from a list of available devices to make a more informed decision. E.g. Specifying inter-device constraints to indicate preferrence on best-connected set of devices when allocating devices to a container.PreStartContaineris called before each container start if indicated by device plugins during registration phase. It allows Device Plugins to run device specific operations on the Devices requested. E.g. reconfiguring or reprogramming FPGAs before the container starts running.
Pull Requests that introduced these changes are here:
- Invoke preStart RPC call before container start, if desired by plugin
- Add GetPreferredAllocation() call to the v1beta1 device plugin API
With introduction of the above endpoints the interaction between Device Manager in kubelet and Device Manager can be shown as below:

Device Plugin framework Overview
Change in semantics of device plugin registration process
Device plugin code was refactored to separate 'plugin' package under the devicemanager
package to lay the groundwork for introducing a v1beta2 device plugin API. This would
allow adding support in devicemanager to service multiple device plugin APIs at the
same time.
With this refactoring work, it is now mandatory for a device plugin to start serving its gRPC service before registering itself with kubelet. Previously, these two operations were asynchronous and device plugin could register itself before starting its gRPC server which is no longer the case. For more details, refer to PR #109016 and Issue #112395.
Dynamic resource allocation
In Kubernetes 1.26, inspired by how Persistent Volumes are handled in Kubernetes, Dynamic Resource Allocation has been introduced to cater to devices that have more sophisticated resource requirements like:
- Decouple device initialization and allocation from the pod lifecycle.
- Facilitate dynamic sharing of devices between containers and pods.
- Support custom resource-specific parameters
- Enable resource-specific setup and cleanup actions
- Enable support for Network-attached resources, not just node-local resources
Is the Device Plugin API stable now?
No, the Device Plugin API is still not stable; the latest Device Plugin API version
available is v1beta1. There are plans in the community to introduce v1beta2 API
to service multiple plugin APIs at once. A per-API call with request/response types
would allow adding support for newer API versions without explicitly bumping the API.
In addition to that, there are existing proposals in the community to introduce additional endpoints KEP-3162: Add Deallocate and PostStopContainer to Device Manager API.
Kubernetes 1.26: Non-Graceful Node Shutdown Moves to Beta
Kubernetes v1.24 introduced an alpha quality implementation of improvements for handling a non-graceful node shutdown. In Kubernetes v1.26, this feature moves to beta. This feature allows stateful workloads to failover to a different node after the original node is shut down or in a non-recoverable state, such as the hardware failure or broken OS.
What is a node shutdown in Kubernetes?
In a Kubernetes cluster, it is possible for a node to shut down. This could happen either in a planned way or it could happen unexpectedly. You may plan for a security patch, or a kernel upgrade and need to reboot the node, or it may shut down due to preemption of VM instances. A node may also shut down due to a hardware failure or a software problem.
To trigger a node shutdown, you could run a shutdown or poweroff command in a shell,
or physically press a button to power off a machine.
A node shutdown could lead to workload failure if the node is not drained before the shutdown.
In the following, we will describe what is a graceful node shutdown and what is a non-graceful node shutdown.
What is a graceful node shutdown?
The kubelet's handling for a graceful node shutdown allows the kubelet to detect a node shutdown event, properly terminate the pods on that node, and release resources before the actual shutdown. Critical pods are terminated after all the regular pods are terminated, to ensure that the essential functions of an application can continue to work as long as possible.
What is a non-graceful node shutdown?
A Node shutdown can be graceful only if the kubelet's node shutdown manager can
detect the upcoming node shutdown action. However, there are cases where a kubelet
does not detect a node shutdown action. This could happen because the shutdown
command does not trigger the Inhibitor Locks mechanism used by the kubelet on Linux, or because of a user error. For example, if
the shutdownGracePeriod and shutdownGracePeriodCriticalPods details are not
configured correctly for that node.
When a node is shut down (or crashes), and that shutdown was not detected by the kubelet
node shutdown manager, it becomes a non-graceful node shutdown. Non-graceful node shutdown
is a problem for stateful apps.
If a node containing a pod that is part of a StatefulSet is shut down in a non-graceful way, the Pod
will be stuck in Terminating status indefinitely, and the control plane cannot create a replacement
Pod for that StatefulSet on a healthy node.
You can delete the failed Pods manually, but this is not ideal for a self-healing cluster.
Similarly, pods that ReplicaSets created as part of a Deployment will be stuck in Terminating status, and
that were bound to the now-shutdown node, stay as Terminating indefinitely.
If you have set a horizontal scaling limit, even those terminating Pods count against the limit,
so your workload may struggle to self-heal if it was already at maximum scale.
(By the way: if the node that had done a non-graceful shutdown comes back up, the kubelet does delete
the old Pod, and the control plane can make a replacement.)
What's new for the beta?
For Kubernetes v1.26, the non-graceful node shutdown feature is beta and enabled by default.
The NodeOutOfServiceVolumeDetach
feature gate is enabled by default
on kube-controller-manager instead of being opt-in; you can still disable it if needed
(please also file an issue to explain the problem).
On the instrumentation side, the kube-controller-manager reports two new metrics.
force_delete_pods_total- number of pods that are being forcibly deleted (resets on Pod garbage collection controller restart)
force_delete_pod_errors_total- number of errors encountered when attempting forcible Pod deletion (also resets on Pod garbage collection controller restart)
How does it work?
In the case of a node shutdown, if a graceful shutdown is not working or the node is in a
non-recoverable state due to hardware failure or broken OS, you can manually add an out-of-service
taint on the Node. For example, this can be node.kubernetes.io/out-of-service=nodeshutdown:NoExecute
or node.kubernetes.io/out-of-service=nodeshutdown:NoSchedule. This taint trigger pods on the node to
be forcefully deleted if there are no matching tolerations on the pods. Persistent volumes attached to the shutdown node will be detached, and new pods will be created successfully on a different running node.
kubectl taint nodes <node-name> node.kubernetes.io/out-of-service=nodeshutdown:NoExecute
Note: Before applying the out-of-service taint, you must verify that a node is already in shutdown or power-off state (not in the middle of restarting), either because the user intentionally shut it down or the node is down due to hardware failures, OS issues, etc.
Once all the workload pods that are linked to the out-of-service node are moved to a new running node, and the shutdown node has been recovered, you should remove that taint on the affected node after the node is recovered.
What’s next?
Depending on feedback and adoption, the Kubernetes team plans to push the Non-Graceful Node Shutdown implementation to GA in either 1.27 or 1.28.
This feature requires a user to manually add a taint to the node to trigger the failover of workloads and remove the taint after the node is recovered.
The cluster operator can automate this process by automatically applying the out-of-service taint
if there is a programmatic way to determine that the node is really shut down and there isn’t IO between
the node and storage. The cluster operator can then automatically remove the taint after the workload
fails over successfully to another running node and that the shutdown node has been recovered.
In the future, we plan to find ways to automatically detect and fence nodes that are shut down or in a non-recoverable state and fail their workloads over to another node.
How can I learn more?
To learn more, read Non Graceful node shutdown in the Kubernetes documentation.
How to get involved?
We offer a huge thank you to all the contributors who helped with design, implementation, and review of this feature:
- Michelle Au (msau42)
- Derek Carr (derekwaynecarr)
- Danielle Endocrimes (endocrimes)
- Tim Hockin (thockin)
- Ashutosh Kumar (sonasingh46)
- Hemant Kumar (gnufied)
- Yuiko Mouri(YuikoTakada)
- Mrunal Patel (mrunalp)
- David Porter (bobbypage)
- Yassine Tijani (yastij)
- Jing Xu (jingxu97)
- Xing Yang (xing-yang)
There are many people who have helped review the design and implementation along the way. We want to thank everyone who has contributed to this effort including the about 30 people who have reviewed the KEP and implementation over the last couple of years.
This feature is a collaboration between SIG Storage and SIG Node. For those interested in getting involved with the design and development of any part of the Kubernetes Storage system, join the Kubernetes Storage Special Interest Group (SIG). For those interested in getting involved with the design and development of the components that support the controlled interactions between pods and host resources, join the Kubernetes Node SIG.
Kubernetes 1.26: Alpha API For Dynamic Resource Allocation
Dynamic resource allocation is a new API for requesting resources. It is a generalization of the persistent volumes API for generic resources, making it possible to:
- access the same resource instance in different pods and containers,
- attach arbitrary constraints to a resource request to get the exact resource you are looking for,
- initialize a resource according to parameters provided by the user.
Third-party resource drivers are responsible for interpreting these parameters as well as tracking and allocating resources as requests come in.
Dynamic resource allocation is an alpha feature and only enabled when the
DynamicResourceAllocation
feature gate and the
resource.k8s.io/v1alpha1
API group are enabled. For details,
see the --feature-gates and --runtime-config kube-apiserver
parameters.
The kube-scheduler, kube-controller-manager and kubelet components all need
the feature gate enabled as well.
The default configuration of kube-scheduler enables the DynamicResources
plugin if and only if the feature gate is enabled. Custom configurations may
have to be modified to include it.
Once dynamic resource allocation is enabled, resource drivers can be installed to manage certain kinds of hardware. Kubernetes has a test driver that is used for end-to-end testing, but also can be run manually. See below for step-by-step instructions.
API
The new resource.k8s.io/v1alpha1 API group
provides four new types:
- ResourceClass
- Defines which resource driver handles a certain kind of resource and provides common parameters for it. ResourceClasses are created by a cluster administrator when installing a resource driver.
- ResourceClaim
- Defines a particular resource instances that is required by a workload. Created by a user (lifecycle managed manually, can be shared between different Pods) or for individual Pods by the control plane based on a ResourceClaimTemplate (automatic lifecycle, typically used by just one Pod).
- ResourceClaimTemplate
- Defines the spec and some meta data for creating ResourceClaims. Created by a user when deploying a workload.
- PodScheduling
- Used internally by the control plane and resource drivers to coordinate pod scheduling when ResourceClaims need to be allocated for a Pod.
Parameters for ResourceClass and ResourceClaim are stored in separate objects, typically using the type defined by a CRD that was created when installing a resource driver.
With this alpha feature enabled, the spec of Pod defines ResourceClaims that are needed for a Pod
to run: this information goes into a new
resourceClaims field. Entries in that list reference either a ResourceClaim
or a ResourceClaimTemplate. When referencing a ResourceClaim, all Pods using
this .spec (for example, inside a Deployment or StatefulSet) share the same
ResourceClaim instance. When referencing a ResourceClaimTemplate, each Pod gets
its own ResourceClaim instance.
For a container defined within a Pod, the resources.claims list
defines whether that container gets
access to these resource instances, which makes it possible to share resources
between one or more containers inside the same Pod. For example, an init container could
set up the resource before the application uses it.
Here is an example of a fictional resource driver. Two ResourceClaim objects will get created for this Pod and each container gets access to one of them.
Assuming a resource driver called resource-driver.example.com was installed
together with the following resource class:
apiVersion: resource.k8s.io/v1alpha1
kind: ResourceClass
name: resource.example.com
driverName: resource-driver.example.com
An end-user could then allocate two specific resources of type
resource.example.com as follows:
---
apiVersion: cats.resource.example.com/v1
kind: ClaimParameters
name: large-black-cats
spec:
color: black
size: large
---
apiVersion: resource.k8s.io/v1alpha1
kind: ResourceClaimTemplate
metadata:
name: large-black-cats
spec:
spec:
resourceClassName: resource.example.com
parametersRef:
apiGroup: cats.resource.example.com
kind: ClaimParameters
name: large-black-cats
–--
apiVersion: v1
kind: Pod
metadata:
name: pod-with-cats
spec:
containers: # two example containers; each container claims one cat resource
- name: first-example
image: ubuntu:22.04
command: ["sleep", "9999"]
resources:
claims:
- name: cat-0
- name: second-example
image: ubuntu:22.04
command: ["sleep", "9999"]
resources:
claims:
- name: cat-1
resourceClaims:
- name: cat-0
source:
resourceClaimTemplateName: large-black-cats
- name: cat-1
source:
resourceClaimTemplateName: large-black-cats
Scheduling
In contrast to native resources (such as CPU or RAM) and extended resources (managed by a device plugin, advertised by kubelet), the scheduler has no knowledge of what dynamic resources are available in a cluster or how they could be split up to satisfy the requirements of a specific ResourceClaim. Resource drivers are responsible for that. Drivers mark ResourceClaims as allocated once resources for it are reserved. This also then tells the scheduler where in the cluster a claimed resource is actually available.
ResourceClaims can get resources allocated as soon as the ResourceClaim is created (immediate allocation), without considering which Pods will use the resource. The default (wait for first consumer) is to delay allocation until a Pod that relies on the ResourceClaim becomes eligible for scheduling. This design with two allocation options is similar to how Kubernetes handles storage provisioning with PersistentVolumes and PersistentVolumeClaims.
In the wait for first consumer mode, the scheduler checks all ResourceClaims needed by a Pod. If the Pods has any ResourceClaims, the scheduler creates a PodScheduling (a special object that requests scheduling details on behalf of the Pod). The PodScheduling has the same name and namespace as the Pod and the Pod as its as owner. Using its PodScheduling, the scheduler informs the resource drivers responsible for those ResourceClaims about nodes that the scheduler considers suitable for the Pod. The resource drivers respond by excluding nodes that don't have enough of the driver's resources left.
Once the scheduler has that resource information, it selects one node and stores that choice in the PodScheduling object. The resource drivers then allocate resources based on the relevant ResourceClaims so that the resources will be available on that selected node. Once that resource allocation is complete, the scheduler attempts to schedule the Pod to a suitable node. Scheduling can still fail at this point; for example, a different Pod could be scheduled to the same node in the meantime. If this happens, already allocated ResourceClaims may get deallocated to enable scheduling onto a different node.
As part of this process, ResourceClaims also get reserved for the Pod. Currently ResourceClaims can either be used exclusively by a single Pod or an unlimited number of Pods.
One key feature is that Pods do not get scheduled to a node unless all of their resources are allocated and reserved. This avoids the scenario where a Pod gets scheduled onto one node and then cannot run there, which is bad because such a pending Pod also blocks all other resources like RAM or CPU that were set aside for it.
Limitations
The scheduler plugin must be involved in scheduling Pods which use
ResourceClaims. Bypassing the scheduler by setting the nodeName field leads
to Pods that the kubelet refuses to start because the ResourceClaims are not
reserved or not even allocated. It may be possible to remove this
limitation in the
future.
Writing a resource driver
A dynamic resource allocation driver typically consists of two separate-but-coordinating
components: a centralized controller, and a DaemonSet of node-local kubelet
plugins. Most of the work required by the centralized controller to coordinate
with the scheduler can be handled by boilerplate code. Only the business logic
required to actually allocate ResourceClaims against the ResourceClasses owned
by the plugin needs to be customized. As such, Kubernetes provides
the following package, including APIs for invoking this boilerplate code as
well as a Driver interface that you can implement to provide their custom
business logic:
Likewise, boilerplate code can be used to register the node-local plugin with the kubelet, as well as start a gRPC server to implement the kubelet plugin API. For drivers written in Go, the following package is recommended:
It is up to the driver developer to decide how these two components communicate. The KEP outlines an approach using CRDs.
Within SIG Node, we also plan to provide a complete example driver that can serve as a template for other drivers.
Running the test driver
The following steps bring up a local, one-node cluster directly from the Kubernetes source code. As a prerequisite, your cluster must have nodes with a container runtime that supports the Container Device Interface (CDI). For example, you can run CRI-O v1.23.2 or later. Once containerd v1.7.0 is released, we expect that you can run that or any later version. In the example below, we use CRI-O.
First, clone the Kubernetes source code. Inside that directory, run:
$ hack/install-etcd.sh
...
$ RUNTIME_CONFIG=resource.k8s.io/v1alpha1 \
FEATURE_GATES=DynamicResourceAllocation=true \
DNS_ADDON="coredns" \
CGROUP_DRIVER=systemd \
CONTAINER_RUNTIME_ENDPOINT=unix:///var/run/crio/crio.sock \
LOG_LEVEL=6 \
ENABLE_CSI_SNAPSHOTTER=false \
API_SECURE_PORT=6444 \
ALLOW_PRIVILEGED=1 \
PATH=$(pwd)/third_party/etcd:$PATH \
./hack/local-up-cluster.sh -O
...
To start using your cluster, you can open up another terminal/tab and run:
$ export KUBECONFIG=/var/run/kubernetes/admin.kubeconfig
Once the cluster is up, in another terminal run the test driver controller.
KUBECONFIG must be set for all of the following commands.
$ go run ./test/e2e/dra/test-driver --feature-gates ContextualLogging=true -v=5 controller
In another terminal, run the kubelet plugin:
$ sudo mkdir -p /var/run/cdi && \
sudo chmod a+rwx /var/run/cdi /var/lib/kubelet/plugins_registry /var/lib/kubelet/plugins/
$ go run ./test/e2e/dra/test-driver --feature-gates ContextualLogging=true -v=6 kubelet-plugin
Changing the permissions of the directories makes it possible to run and (when
using delve) debug the kubelet plugin as a normal user, which is convenient
because it uses the already populated Go cache. Remember to restore permissions
with sudo chmod go-w when done. Alternatively, you can also build the binary
and run that as root.
Now the cluster is ready to create objects:
$ kubectl create -f test/e2e/dra/test-driver/deploy/example/resourceclass.yaml
resourceclass.resource.k8s.io/example created
$ kubectl create -f test/e2e/dra/test-driver/deploy/example/pod-inline.yaml
configmap/test-inline-claim-parameters created
resourceclaimtemplate.resource.k8s.io/test-inline-claim-template created
pod/test-inline-claim created
$ kubectl get resourceclaims
NAME RESOURCECLASSNAME ALLOCATIONMODE STATE AGE
test-inline-claim-resource example WaitForFirstConsumer allocated,reserved 8s
$ kubectl get pods
NAME READY STATUS RESTARTS AGE
test-inline-claim 0/2 Completed 0 21s
The test driver doesn't do much, it only sets environment variables as defined in the ConfigMap. The test pod dumps the environment, so the log can be checked to verify that everything worked:
$ kubectl logs test-inline-claim with-resource | grep user_a
user_a='b'
Next steps
- See the Dynamic Resource Allocation KEP for more information on the design.
- Read Dynamic Resource Allocation in the official Kubernetes documentation.
- You can participate in SIG Node and / or the CNCF Container Orchestrated Device Working Group.
- You can view or comment on the project board for dynamic resource allocation.
- In order to move this feature towards beta, we need feedback from hardware vendors, so here's a call to action: try out this feature, consider how it can help with problems that your users are having, and write resource drivers…
Kubernetes 1.26: Windows HostProcess Containers Are Generally Available
The long-awaited day has arrived: HostProcess containers, the Windows equivalent to Linux privileged containers, has finally made it to GA in Kubernetes 1.26!
What are HostProcess containers and why are they useful?
Cluster operators are often faced with the need to configure their nodes upon provisioning such as installing Windows services, configuring registry keys, managing TLS certificates, making network configuration changes, or even deploying monitoring tools such as a Prometheus's node-exporter. Previously, performing these actions on Windows nodes was usually done by running PowerShell scripts over SSH or WinRM sessions and/or working with your cloud provider's virtual machine management tooling. HostProcess containers now enable you to do all of this and more with minimal effort using Kubernetes native APIs.
With HostProcess containers you can now package any payload into the container image, map volumes into containers at runtime, and manage them like any other Kubernetes workload. You get all the benefits of containerized packaging and deployment methods combined with a reduction in both administrative and development cost. Gone are the days where cluster operators would need to manually log onto Windows nodes to perform administrative duties.
HostProcess containers differ quite significantly from regular Windows Server containers. They are run directly as processes on the host with the access policies of a user you specify. HostProcess containers run as either the built-in Windows system accounts or ephemeral users within a user group defined by you. HostProcess containers also share the host's network namespace and access/configure storage mounts visible to the host. On the other hand, Windows Server containers are highly isolated and exist in a separate execution namespace. Direct access to the host from a Windows Server container is explicitly disallowed by default.
How does it work?
Windows HostProcess containers are implemented with Windows Job Objects, a break from the previous container model which use server silos. Job Objects are components of the Windows OS which offer the ability to manage a group of processes as a group (also known as a job) and assign resource constraints to the group as a whole. Job objects are specific to the Windows OS and are not associated with the Kubernetes Job API. They have no process or file system isolation, enabling the privileged payload to view and edit the host file system with the desired permissions, among other host resources. The init process, and any processes it launches (including processes explicitly launched by the user) are all assigned to the job object of that container. When the init process exits or is signaled to exit, all the processes in the job will be signaled to exit, the job handle will be closed and the storage will be unmounted.
HostProcess and Linux privileged containers enable similar scenarios but differ greatly in their implementation (hence the naming difference). HostProcess containers have their own PodSecurityContext fields. Those used to configure Linux privileged containers do not apply. Enabling privileged access to a Windows host is a fundamentally different process than with Linux so the configuration and capabilities of each differ significantly. Below is a diagram detailing the overall architecture of Windows HostProcess containers:
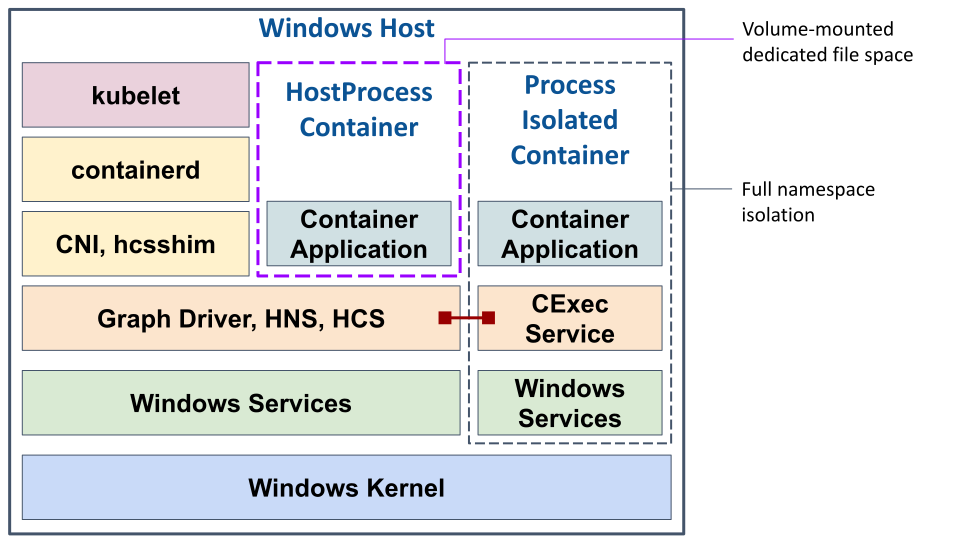
Two major features were added prior to moving to stable: the ability to run as local user accounts, and a simplified method of accessing volume mounts. To learn more, read Create a Windows HostProcess Pod.
HostProcess containers in action
Kubernetes SIG Windows has been busy putting HostProcess containers to use - even before GA! They've been very excited to use HostProcess containers for a number of important activities that were a pain to perform in the past.
Here are just a few of the many use use cases with example deployments:
How do I use it?
A HostProcess container can be built using any base image of your choosing, however, for convenience we have created a HostProcess container base image. This image is only a few KB in size and does not inherit any of the same compatibility requirements as regular Windows server containers which allows it to run on any Windows server version.
To use that Microsoft image, put this in your Dockerfile:
FROM mcr.microsoft.com/oss/kubernetes/windows-host-process-containers-base-image:v1.0.0
You can run HostProcess containers from within a HostProcess Pod.
To get started with running Windows containers, see the general guidance for deploying Windows nodes. If you have a compatible node (for example: Windows as the operating system with containerd v1.7 or later as the container runtime), you can deploy a Pod with one or more HostProcess containers. See the Create a Windows HostProcess Pod - Prerequisites for more information.
Please note that within a Pod, you can't mix HostProcess containers with normal Windows containers.
How can I learn more?
Work through Create a Windows HostProcess Pod
Read about Kubernetes Pod Security Standards and Pod Security Admission
Read the enhancement proposal Windows Privileged Containers and Host Networking Mode (KEP-1981)
Watch the Windows HostProcess for Configuration and Beyond KubeCon NA 2022 talk
How do I get involved?
Get involved with SIG Windows to contribute!
Kubernetes 1.26: We're now signing our binary release artifacts!
The Kubernetes Special Interest Group (SIG) Release is proud to announce that we are digitally signing all release artifacts, and that this aspect of Kubernetes has now reached beta.
Signing artifacts provides end users a chance to verify the integrity of the downloaded resource. It allows to mitigate man-in-the-middle attacks directly on the client side and therefore ensures the trustfulness of the remote serving the artifacts. The overall goal of out past work was to define the used tooling for signing all Kubernetes related artifacts as well as providing a standard signing process for related projects (for example for those in kubernetes-sigs).
We already signed all officially released container images (from Kubernetes v1.24 onwards).
Image signing was alpha for v1.24 and v1.25. For v1.26, we've added all
binary artifacts to the signing process as well! This means that now all
client, server and source tarballs, binary artifacts,
Software Bills of Material (SBOMs) as well as the build
provenance will be signed using cosign. Technically
speaking, we now ship additional *.sig (signature) and *.cert (certificate)
files side by side to the artifacts for verifying their integrity.
To verify an artifact, for example kubectl, you can download the
signature and certificate alongside with the binary. I use the release candidate
rc.1 of v1.26 for demonstration purposes because the final has not been released yet:
curl -sSfL https://dl.k8s.io/release/v1.26.0-rc.1/bin/linux/amd64/kubectl -o kubectl
curl -sSfL https://dl.k8s.io/release/v1.26.0-rc.1/bin/linux/amd64/kubectl.sig -o kubectl.sig
curl -sSfL https://dl.k8s.io/release/v1.26.0-rc.1/bin/linux/amd64/kubectl.cert -o kubectl.cert
Then you can verify kubectl using cosign:
COSIGN_EXPERIMENTAL=1 cosign verify-blob kubectl --signature kubectl.sig --certificate kubectl.cert
tlog entry verified with uuid: 5d54b39222e3fa9a21bcb0badd8aac939b4b0d1d9085b37f1f10b18a8cd24657 index: 8173886
Verified OK
The UUID can be used to query the rekor transparency log:
rekor-cli get --uuid 5d54b39222e3fa9a21bcb0badd8aac939b4b0d1d9085b37f1f10b18a8cd24657
LogID: c0d23d6ad406973f9559f3ba2d1ca01f84147d8ffc5b8445c224f98b9591801d
Index: 8173886
IntegratedTime: 2022-11-30T18:59:07Z
UUID: 24296fb24b8ad77a5d54b39222e3fa9a21bcb0badd8aac939b4b0d1d9085b37f1f10b18a8cd24657
Body: {
"HashedRekordObj": {
"data": {
"hash": {
"algorithm": "sha256",
"value": "982dfe7eb5c27120de6262d30fa3e8029bc1da9e632ce70570e9c921d2851fc2"
}
},
"signature": {
"content": "MEQCIH0e1/0svxMoLzjeyhAaLFSHy5ZaYy0/2iQl2t3E0Pj4AiBsWmwjfLzrVyp9/v1sy70Q+FHE8miauOOVkAW2lTYVug==",
"publicKey": {
"content": "LS0tLS1CRUdJTiBDRVJUSUZJQ0FURS0tLS0tCk1JSUN2akNDQWthZ0F3SUJBZ0lVRldab0pLSUlFWkp3LzdsRkFrSVE2SHBQdi93d0NnWUlLb1pJemowRUF3TXcKTnpFVk1CTUdBMVVFQ2hNTWMybG5jM1J2Y21VdVpHVjJNUjR3SEFZRFZRUURFeFZ6YVdkemRHOXlaUzFwYm5SbApjbTFsWkdsaGRHVXdIaGNOTWpJeE1UTXdNVGcxT1RBMldoY05Nakl4TVRNd01Ua3dPVEEyV2pBQU1Ga3dFd1lICktvWkl6ajBDQVFZSUtvWkl6ajBEQVFjRFFnQUVDT3h5OXBwTFZzcVFPdHJ6RFgveTRtTHZSeU1scW9sTzBrS0EKTlJDM3U3bjMreHorYkhvWVkvMUNNRHpJQjBhRTA3NkR4ZWVaSkhVaWFjUXU4a0dDNktPQ0FXVXdnZ0ZoTUE0RwpBMVVkRHdFQi93UUVBd0lIZ0RBVEJnTlZIU1VFRERBS0JnZ3JCZ0VGQlFjREF6QWRCZ05WSFE0RUZnUVV5SmwxCkNlLzIzNGJmREJZQ2NzbXkreG5qdnpjd0h3WURWUjBqQkJnd0ZvQVUzOVBwejFZa0VaYjVxTmpwS0ZXaXhpNFkKWkQ4d1FnWURWUjBSQVFIL0JEZ3dOb0UwYTNKbGJDMXpkR0ZuYVc1blFHczRjeTF5Wld4bGJtY3RjSEp2WkM1cApZVzB1WjNObGNuWnBZMlZoWTJOdmRXNTBMbU52YlRBcEJnb3JCZ0VFQVlPL01BRUJCQnRvZEhSd2N6b3ZMMkZqClkyOTFiblJ6TG1kdmIyZHNaUzVqYjIwd2dZb0dDaXNHQVFRQjFua0NCQUlFZkFSNkFIZ0FkZ0RkUFRCcXhzY1IKTW1NWkhoeVpaemNDb2twZXVONDhyZitIaW5LQUx5bnVqZ0FBQVlUSjZDdlJBQUFFQXdCSE1FVUNJRXI4T1NIUQp5a25jRFZpNEJySklXMFJHS0pqNkQyTXFGdkFMb0I5SmNycXlBaUVBNW4xZ283cmQ2U3ZVeXNxeldhMUdudGZKCllTQnVTZHF1akVySFlMQTUrZTR3Q2dZSUtvWkl6ajBFQXdNRFpnQXdZd0l2Tlhub3pyS0pWVWFESTFiNUlqa1oKUWJJbDhvcmlMQ1M4MFJhcUlBSlJhRHNCNTFUeU9iYTdWcGVYdThuTHNjVUNNREU4ZmpPZzBBc3ZzSXp2azNRUQo0c3RCTkQrdTRVV1UrcjhYY0VxS0YwNGJjTFQwWEcyOHZGQjRCT2x6R204K093PT0KLS0tLS1FTkQgQ0VSVElGSUNBVEUtLS0tLQo="
}
}
}
}
The HashedRekordObj.signature.content should match the content of the file
kubectl.sig and HashedRekordObj.signature.publicKey.content should be
identical with the contents of kubectl.cert. It is also possible to specify
the remote certificate and signature locations without downloading them:
COSIGN_EXPERIMENTAL=1 cosign verify-blob kubectl \
--signature https://dl.k8s.io/release/v1.26.0-rc.1/bin/linux/amd64/kubectl.sig \
--certificate https://dl.k8s.io/release/v1.26.0-rc.1/bin/linux/amd64/kubectl.cert
tlog entry verified with uuid: 5d54b39222e3fa9a21bcb0badd8aac939b4b0d1d9085b37f1f10b18a8cd24657 index: 8173886
Verified OK
All of the mentioned steps as well as how to verify container images are outlined in the official documentation about how to Verify Signed Kubernetes Artifacts. In one of the next upcoming Kubernetes releases we will working making the global story more mature by ensuring that truly all Kubernetes artifacts are signed. Beside that, we are considering using Kubernetes owned infrastructure for the signing (root trust) and verification (transparency log) process.
Getting involved
If you're interested in contributing to SIG Release, then consider applying for the upcoming v1.27 shadowing program (watch for the announcement on k-dev) or join our weekly meeting to say hi.
We're looking forward to making even more of those awesome changes for future
Kubernetes releases. For example, we're working on the SLSA Level 3 Compliance
in the Kubernetes Release Process or the Renaming of the kubernetes/kubernetes
default branch name to main.
Thank you for reading this blog post! I'd like to use this opportunity to give all involved SIG Release folks a special shout-out for shipping this feature in time!
Feel free to reach out to us by using the SIG Release mailing list or the #sig-release Slack channel.
Additional resources
Kubernetes v1.26: Electrifying
It's with immense joy that we announce the release of Kubernetes v1.26!
This release includes a total of 37 enhancements: eleven of them are graduating to Stable, ten are graduating to Beta, and sixteen of them are entering Alpha. We also have twelve features being deprecated or removed, three of which we better detail in this announcement.
Release theme and logo
Kubernetes 1.26: Electrifying
The theme for Kubernetes v1.26 is Electrifying.
Each Kubernetes release is the result of the coordinated effort of dedicated volunteers, and only made possible due to the use of a diverse and complex set of computing resources, spread out through multiple datacenters and regions worldwide. The end result of a release - the binaries, the image containers, the documentation - are then deployed on a growing number of personal, on-premises, and cloud computing resources.
In this release we want to recognise the importance of all these building blocks on which Kubernetes is developed and used, while at the same time raising awareness on the importance of taking the energy consumption footprint into account: environmental sustainability is an inescapable concern of creators and users of any software solution, and the environmental footprint of software, like Kubernetes, an area which we believe will play a significant role in future releases.
As a community, we always work to make each new release process better than before (in this release, we have started to use Projects for tracking enhancements, for example). If v1.24 "Stargazer" had us looking upwards, to what is possible when our community comes together, and v1.25 "Combiner" what the combined efforts of our community are capable of, this v1.26 "Electrifying" is also dedicated to all of those whose individual motion, integrated into the release flow, made all of this possible.
Major themes
Kubernetes v1.26 is composed of many changes, brought to you by a worldwide team of volunteers. For this release, we have identified several major themes.
Change in container image registry
In the previous release, Kubernetes changed the container registry, allowing the spread of the load across multiple Cloud Providers and Regions, a change that reduced the reliance on a single entity and provided a faster download experience for a large number of users.
This release of Kubernetes is the first that is exclusively published in the new registry.k8s.io
container image registry. In the (now legacy) k8s.gcr.io image registry, no container images tags
for v1.26 will be published, and only tags from releases before v1.26 will continue to be
updated. Refer to registry.k8s.io: faster, cheaper and Generally
Available for more information on the
motivation, advantages, and implications of this significant change.
CRI v1alpha2 removed
With the adoption of the Container Runtime Interface (CRI) and the removal of dockershim in v1.24, the CRI is the only supported and documented way through which Kubernetes interacts with different container runtimes. Each kubelet negotiates which version of CRI to use with the container runtime on that node.
In the previous release, the Kubernetes project recommended using CRI version v1, but kubelet
could still negotiate the use of CRI v1alpha2, which was deprecated.
Kubernetes v1.26 drops support for CRI v1alpha2. That
removal will result in the kubelet not
registering the node if the container runtime doesn't support CRI v1. This means that containerd
minor version 1.5 and older are not supported in Kubernetes 1.26; if you use containerd, you will
need to upgrade to containerd version 1.6.0 or later before you upgrade that node to Kubernetes
v1.26. This applies equally to any other container runtimes that only support the v1alpha2: if
that affects you, you should contact the container runtime vendor for advice or check their website
for additional instructions in how to move forward.
Storage improvements
Following the GA of the core Container Storage Interface (CSI) Migration feature in the previous release, CSI migration is an on-going effort that we've been working on for a few releases now, and this release continues to add (and remove) features aligned with the migration's goals, as well as other improvements to Kubernetes storage.
CSI migration for Azure File and vSphere graduated to stable
Both the vSphere and Azure in-tree driver migration to CSI have graduated to Stable. You can find more information about them in the vSphere CSI driver and Azure File CSI driver repositories.
Delegate FSGroup to CSI Driver graduated to stable
This feature allows Kubernetes to supply the pod's fsGroup to the CSI driver when a volume is
mounted so that the driver can utilize
mount options to control volume permissions. Previously, the kubelet would always apply the
fsGroupownership and permission change to files in the volume according to the policy specified in
the Pod's .spec.securityContext.fsGroupChangePolicy field. Starting with this release, CSI
drivers have the option to apply the fsGroup settings during attach or mount time of the volumes.
In-tree GlusterFS driver removal
Already deprecated in the v1.25 release, the in-tree GlusterFS driver was removed in this release.
In-tree OpenStack Cinder driver removal
This release removed the deprecated in-tree storage integration for OpenStack (the cinder volume
type). You should migrate to external cloud provider and CSI driver from
https://github.com/kubernetes/cloud-provider-openstack instead. For more information, visit Cinder
in-tree to CSI driver migration.
Signing Kubernetes release artifacts graduates to beta
Introduced in Kubernetes v1.24, this feature constitutes a significant milestone in improving the security of the Kubernetes release process. All release artifacts are signed keyless using cosign, and both binary artifacts and images can be verified.
Support for Windows privileged containers graduates to stable
Privileged container support allows containers to run with similar access to the host as processes that run on the host directly. Support for this feature in Windows nodes, called HostProcess containers, will now graduate to Stable, enabling access to host resources (including network resources) from privileged containers.
Improvements to Kubernetes metrics
This release has several noteworthy improvements on metrics.
Metrics framework extension graduates to alpha
The metrics framework extension graduates to
Alpha, and
documentation is now published for every metric in the
Kubernetes codebase.This enhancement adds two additional metadata
fields to Kubernetes metrics: Internal and Beta, representing different stages of metric maturity.
Component Health Service Level Indicators graduates to alpha
Also improving on the ability to consume Kubernetes metrics, component health Service Level
Indicators (SLIs) have graduated to
Alpha: by enabling the ComponentSLIs
feature flag there will be an additional metrics endpoint which allows the calculation of Service
Level Objectives (SLOs) from raw healthcheck data converted into metric format.
Feature metrics are now available
Feature metrics are now available for each Kubernetes component, making it possible to track
whether each active feature gate is enabled
by checking the component's metric endpoint for kubernetes_feature_enabled.
Dynamic Resource Allocation graduates to alpha
Dynamic Resource
Allocation
is a new feature
that puts resource scheduling in the hands of third-party developers: it offers an
alternative to the limited "countable" interface for requesting access to resources
(e.g. nvidia.com/gpu: 2), providing an API more akin to that of persistent volumes. Under the
hood, it uses the Container Device
Interface (CDI) to do
its device injection. This feature is blocked by the DynamicResourceAllocation feature gate.
CEL in Admission Control graduates to alpha
This feature introduces a v1alpha1 API for validating admission
policies, enabling extensible admission
control via Common Expression Language expressions. Currently,
custom policies are enforced via admission
webhooks,
which, while flexible, have a few drawbacks when compared to in-process policy enforcement. To use,
enable the ValidatingAdmissionPolicy feature gate and the admissionregistration.k8s.io/v1alpha1
API via --runtime-config.
Pod scheduling improvements
Kubernetes v1.26 introduces some relevant enhancements to the ability to better control scheduling behavior.
PodSchedulingReadiness graduates to alpha
This feature introduces a .spec.schedulingGates
field to Pod's API, to indicate whether the Pod is allowed to be scheduled or not. External users/controllers can use this field to hold a Pod from scheduling based on their policies and
needs.
NodeInclusionPolicyInPodTopologySpread graduates to beta
By specifying a nodeInclusionPolicy in topologySpreadConstraints, you can control whether to
take taints/tolerations into consideration
when calculating Pod Topology Spread skew.
Other Updates
Graduations to stable
This release includes a total of eleven enhancements promoted to Stable:
- Support for Windows privileged containers
- vSphere in-tree to CSI driver migration
- Allow Kubernetes to supply pod's fsgroup to CSI driver on mount
- Azure file in-tree to CSI driver migration
- Job tracking without lingering Pods
- Service Internal Traffic Policy
- Kubelet Credential Provider
- Support of mixed protocols in Services with type=LoadBalancer
- Reserve Service IP Ranges For Dynamic and Static IP Allocation
- CPUManager
- DeviceManager
Deprecations and removals
12 features were deprecated or removed from Kubernetes with this release.
- CRI
v1alpha2API is removed - Removal of the
v1beta1flow control API group - Removal of the
v2beta2HorizontalPodAutoscaler API - GlusterFS plugin removed from available in-tree drivers
- Removal of legacy command line arguments relating to logging
- Removal of
kube-proxyuserspace modes - Removal of in-tree credential management code
- The in-tree OpenStack cloud provider is removed
- Removal of dynamic kubelet configuration
- Deprecation of non-inclusive
kubectlflag - Deprecations for
kube-apiservercommand line arguments - Deprecations for
kubectl runcommand line arguments
Release notes
The complete details of the Kubernetes v1.26 release are available in our release notes.
Availability
Kubernetes v1.26 is available for download on the Kubernetes site. To get started with Kubernetes, check out these interactive tutorials or run local Kubernetes clusters using containers as "nodes", with kind. You can also easily install v1.26 using kubeadm.
Release team
Kubernetes is only possible with the support, commitment, and hard work of its community. Each release team is made up of dedicated community volunteers who work together to build the many pieces that make up the Kubernetes releases you rely on. This requires the specialized skills of people from all corners of our community, from the code itself to its documentation and project management.
We would like to thank the entire release team for the hours spent hard at work to ensure we deliver a solid Kubernetes v1.26 release for our community.
A very special thanks is in order for our Release Lead, Leonard Pahlke, for successfully steering the entire release team throughout the entire release cycle, by making sure that we could all contribute in the best way possible to this release through his constant support and attention to the many and diverse details that make up the path to a successful release.
User highlights
- Wortell faced increasingly higher ammounts of developer expertise and time for daily infrastructure management. They used Dapr to reduce the complexity and amount of required infrastructure-related code, allowing them to focus more time on new features.
- Utmost handles sensitive personal data and needed SOC 2 Type II attestation, ISO 27001 certification, and zero trust networking. Using Cilium, they created automated pipelines that allowed developers to create new policies, supporting over 4,000 flows per second.
- Global cybersecurity company Ericom’s solutions depend on hyper-low latency and data security. With Ridge's managed Kubernetes service they were able to deploy, through a single API, to a network of service providers worldwide.
- Lunar, a Scandinavian online bank, wanted to implement quarterly production cluster failover testing to prepare for disaster recovery, and needed a better way to managed their platform services.They started by centralizing their log management system, and followed-up with the centralization of all platform services, using Linkerd to connect the clusters.
- Datadog runs 10s of clusters with 10,000+ of nodes and 100,000+ pods across multiple cloud providers.They turned to Cilium as their CNI and kube-proxy replacement to take advantage of the power of eBPF and provide a consistent networking experience for their users across any cloud.
- Insiel wanted to update their software production methods and introduce a cloud native paradigm in their software production. Their digital transformation project with Kiratech and Microsoft Azure allowed them to develop a cloud-first culture.
Ecosystem updates
- KubeCon + CloudNativeCon Europe 2023 will take place in Amsterdam, The Netherlands, from 17 – 21 April 2023! You can find more information about the conference and registration on the event site.
- CloudNativeSecurityCon North America, a two-day event designed to foster collaboration, discussion and knowledge sharing of cloud native security projects and how to best use these to address security challenges and opportunities, will take place in Seattle, Washington (USA), from 1-2 February 2023. See the event page for more information.
- The CNCF announced the 2022 Community Awards Winners: the Community Awards recognize CNCF community members that are going above and beyond to advance cloud native technology.
Project velocity
The CNCF K8s DevStats project aggregates a number of interesting data points related to the velocity of Kubernetes and various sub-projects. This includes everything from individual contributions to the number of companies that are contributing, and is an illustration of the depth and breadth of effort that goes into evolving this ecosystem.
In the v1.26 release cycle, which ran for 14 weeks (September 5 to December 9), we saw contributions from 976 companies and 6877 individuals.
Upcoming Release Webinar
Join members of the Kubernetes v1.26 release team on Tuesday January 17, 2023 10am - 11am EST (3pm - 4pm UTC) to learn about the major features of this release, as well as deprecations and removals to help plan for upgrades. For more information and registration, visit the event page.
Get Involved
The simplest way to get involved with Kubernetes is by joining one of the many Special Interest Groups (SIGs) that align with your interests.
Have something you’d like to broadcast to the Kubernetes community? Share your voice at our weekly community meeting, and through the channels below:
- Find out more about contributing to Kubernetes at the Kubernetes Contributors website
- Follow us on Twitter @Kubernetesio for the latest updates
- Join the community discussion on Discuss
- Join the community on Slack
- Post questions (or answer questions) on Server Fault
- Share your Kubernetes story
- Read more about what’s happening with Kubernetes on the blog
- Learn more about the Kubernetes Release Team
Forensic container checkpointing in Kubernetes
Forensic container checkpointing is based on Checkpoint/Restore In Userspace (CRIU) and allows the creation of stateful copies of a running container without the container knowing that it is being checkpointed. The copy of the container can be analyzed and restored in a sandbox environment multiple times without the original container being aware of it. Forensic container checkpointing was introduced as an alpha feature in Kubernetes v1.25.
How does it work?
With the help of CRIU it is possible to checkpoint and restore containers. CRIU is integrated in runc, crun, CRI-O and containerd and forensic container checkpointing as implemented in Kubernetes uses these existing CRIU integrations.
Why is it important?
With the help of CRIU and the corresponding integrations it is possible to get all information and state about a running container on disk for later forensic analysis. Forensic analysis might be important to inspect a suspicious container without stopping or influencing it. If the container is really under attack, the attacker might detect attempts to inspect the container. Taking a checkpoint and analysing the container in a sandboxed environment offers the possibility to inspect the container without the original container and maybe attacker being aware of the inspection.
In addition to the forensic container checkpointing use case, it is also possible to migrate a container from one node to another node without loosing the internal state. Especially for stateful containers with long initialization times restoring from a checkpoint might save time after a reboot or enable much faster startup times.
How do I use container checkpointing?
The feature is behind a feature gate, so
make sure to enable the ContainerCheckpoint gate before you can use the new
feature.
The runtime must also support container checkpointing:
containerd: support is currently under discussion. See containerd pull request #6965 for more details.
CRI-O: v1.25 has support for forensic container checkpointing.
Usage example with CRI-O
To use forensic container checkpointing in combination with CRI-O, the runtime
needs to be started with the command-line option --enable-criu-support=true.
For Kubernetes, you need to run your cluster with the ContainerCheckpoint
feature gate enabled. As the checkpointing functionality is provided by CRIU it
is also necessary to install CRIU. Usually runc or crun depend on CRIU and
therefore it is installed automatically.
It is also important to mention that at the time of writing the checkpointing functionality is to be considered as an alpha level feature in CRI-O and Kubernetes and the security implications are still under consideration.
Once containers and pods are running it is possible to create a checkpoint.
Checkpointing
is currently only exposed on the kubelet level. To checkpoint a container,
you can run curl on the node where that container is running, and trigger a
checkpoint:
curl -X POST "https://localhost:10250/checkpoint/namespace/podId/container"
For a container named counter in a pod named counters in a namespace named default the kubelet API endpoint is reachable at:
curl -X POST "https://localhost:10250/checkpoint/default/counters/counter"
For completeness the following curl command-line options are necessary to
have curl accept the kubelet's self signed certificate and authorize the
use of the kubelet checkpoint API:
--insecure --cert /var/run/kubernetes/client-admin.crt --key /var/run/kubernetes/client-admin.key
Triggering this kubelet API will request the creation of a checkpoint from
CRI-O. CRI-O requests a checkpoint from your low-level runtime (for example,
runc). Seeing that request, runc invokes the criu tool
to do the actual checkpointing.
Once the checkpointing has finished the checkpoint should be available at
/var/lib/kubelet/checkpoints/checkpoint-<pod-name>_<namespace-name>-<container-name>-<timestamp>.tar
You could then use that tar archive to restore the container somewhere else.
Restore a checkpointed container outside of Kubernetes (with CRI-O)
With the checkpoint tar archive it is possible to restore the container outside of Kubernetes in a sandboxed instance of CRI-O. For better user experience during restore, I recommend that you use the latest version of CRI-O from the main CRI-O GitHub branch. If you're using CRI-O v1.25, you'll need to manually create certain directories Kubernetes would create before starting the container.
The first step to restore a container outside of Kubernetes is to create a pod sandbox using crictl:
crictl runp pod-config.json
Then you can restore the previously checkpointed container into the newly created pod sandbox:
crictl create <POD_ID> container-config.json pod-config.json
Instead of specifying a container image in a registry in container-config.json
you need to specify the path to the checkpoint archive that you created earlier:
{
"metadata": {
"name": "counter"
},
"image":{
"image": "/var/lib/kubelet/checkpoints/<checkpoint-archive>.tar"
}
}
Next, run crictl start <CONTAINER_ID> to start that container, and then a
copy of the previously checkpointed container should be running.
Restore a checkpointed container within of Kubernetes
To restore the previously checkpointed container directly in Kubernetes it is necessary to convert the checkpoint archive into an image that can be pushed to a registry.
One possible way to convert the local checkpoint archive consists of the following steps with the help of buildah:
newcontainer=$(buildah from scratch)
buildah add $newcontainer /var/lib/kubelet/checkpoints/checkpoint-<pod-name>_<namespace-name>-<container-name>-<timestamp>.tar /
buildah config --annotation=io.kubernetes.cri-o.annotations.checkpoint.name=<container-name> $newcontainer
buildah commit $newcontainer checkpoint-image:latest
buildah rm $newcontainer
The resulting image is not standardized and only works in combination with
CRI-O. Please consider this image format as pre-alpha. There are ongoing
discussions to standardize the format of checkpoint
images like this. Important to remember is that this not yet standardized image
format only works if CRI-O has been started with --enable-criu-support=true.
The security implications of starting CRI-O with CRIU support are not yet clear
and therefore the functionality as well as the image format should be used with
care.
Now, you'll need to push that image to a container image registry. For example:
buildah push localhost/checkpoint-image:latest container-image-registry.example/user/checkpoint-image:latest
To restore this checkpoint image (container-image-registry.example/user/checkpoint-image:latest), the
image needs to be listed in the specification for a Pod. Here's an example
manifest:
apiVersion: v1
kind: Pod
metadata:
namePrefix: example-
spec:
containers:
- name: <container-name>
image: container-image-registry.example/user/checkpoint-image:latest
nodeName: <destination-node>
Kubernetes schedules the new Pod onto a node. The kubelet on that node
instructs the container runtime (CRI-O in this example) to create and start a
container based on an image specified as registry/user/checkpoint-image:latest.
CRI-O detects that registry/user/checkpoint-image:latest
is a reference to checkpoint data rather than a container image. Then,
instead of the usual steps to create and start a container,
CRI-O fetches the checkpoint data and restores the container from that
specified checkpoint.
The application in that Pod would continue running as if the checkpoint had not been taken; within the container, the application looks and behaves like any other container that had been started normally and not restored from a checkpoint.
With these steps, it is possible to replace a Pod running on one node with a new equivalent Pod that is running on a different node, and without losing the state of the containers in that Pod.
How do I get involved?
You can reach SIG Node by several means:
- Slack: #sig-node
- Mailing list
Further reading
Please see the follow-up article Forensic container analysis for details on how a container checkpoint can be analyzed.
Finding suspicious syscalls with the seccomp notifier
Debugging software in production is one of the biggest challenges we have to face in our containerized environments. Being able to understand the impact of the available security options, especially when it comes to configuring our deployments, is one of the key aspects to make the default security in Kubernetes stronger. We have all those logging, tracing and metrics data already at hand, but how do we assemble the information they provide into something human readable and actionable?
Seccomp is one of the standard mechanisms to protect a Linux based Kubernetes application from malicious actions by interfering with its system calls. This allows us to restrict the application to a defined set of actionable items, like modifying files or responding to HTTP requests. Linking the knowledge of which set of syscalls is required to, for example, modify a local file, to the actual source code is in the same way non-trivial. Seccomp profiles for Kubernetes have to be written in JSON and can be understood as an architecture specific allow-list with superpowers, for example:
{
"defaultAction": "SCMP_ACT_ERRNO",
"defaultErrnoRet": 38,
"defaultErrno": "ENOSYS",
"syscalls": [
{
"names": ["chmod", "chown", "open", "write"],
"action": "SCMP_ACT_ALLOW"
}
]
}
The above profile errors by default specifying the defaultAction of
SCMP_ACT_ERRNO. This means we have to allow a set of syscalls via
SCMP_ACT_ALLOW, otherwise the application would not be able to do anything at
all. Okay cool, for being able to allow file operations, all we have to do is
adding a bunch of file specific syscalls like open or write, and probably
also being able to change the permissions via chmod and chown, right?
Basically yes, but there are issues with the simplicity of that approach:
Seccomp profiles need to include the minimum set of syscalls required to start the application. This also includes some syscalls from the lower level Open Container Initiative (OCI) container runtime, for example runc or crun. Beside that, we can only guarantee the required syscalls for a very specific version of the runtimes and our application, because the code parts can change between releases. The same applies to the termination of the application as well as the target architecture we're deploying on. Features like executing commands within containers also require another subset of syscalls. Not to mention that there are multiple versions for syscalls doing slightly different things and the seccomp profiles are able to modify their arguments. It's also not always clearly visible to the developers which syscalls are used by their own written code parts, because they rely on programming language abstractions or frameworks.
How can we know which syscalls are even required then? Who should create and maintain those profiles during its development life-cycle?
Well, recording and distributing seccomp profiles is one of the problem domains of the Security Profiles Operator, which is already solving that. The operator is able to record seccomp, SELinux and even AppArmor profiles into a Custom Resource Definition (CRD), reconciles them to each node and makes them available for usage.
The biggest challenge about creating security profiles is to catch all code paths which execute syscalls. We could achieve that by having 100% logical coverage of the application when running an end-to-end test suite. You get the problem with the previous statement: It's too idealistic to be ever fulfilled, even without taking all the moving parts during application development and deployment into account.
Missing a syscall in the seccomp profiles' allow list can have tremendously
negative impact on the application. It's not only that we can encounter crashes,
which are trivially detectable. It can also happen that they slightly change
logical paths, change the business logic, make parts of the application
unusable, slow down performance or even expose security vulnerabilities. We're
simply not able to see the whole impact of that, especially because blocked
syscalls via SCMP_ACT_ERRNO do not provide any additional audit
logging on the system.
Does that mean we're lost? Is it just not realistic to dream about a Kubernetes where everyone uses the default seccomp profile? Should we stop striving towards maximum security in Kubernetes and accept that it's not meant to be secure by default?
Definitely not. Technology evolves over time and there are many folks working behind the scenes of Kubernetes to indirectly deliver features to address such problems. One of the mentioned features is the seccomp notifier, which can be used to find suspicious syscalls in Kubernetes.
The seccomp notify feature consists of a set of changes introduced in Linux 5.9. It makes the kernel capable of communicating seccomp related events to the user space. That allows applications to act based on the syscalls and opens for a wide range of possible use cases. We not only need the right kernel version, but also at least runc v1.1.0 (or crun v0.19) to be able to make the notifier work at all. The Kubernetes container runtime CRI-O gets support for the seccomp notifier in v1.26.0. The new feature allows us to identify possibly malicious syscalls in our application, and therefore makes it possible to verify profiles for consistency and completeness. Let's give that a try.
First of all we need to run the latest main version of CRI-O, because v1.26.0
has not been released yet at time of writing. You can do that by either
compiling it from the source code or by using the pre-built binary
bundle via the get-script. The seccomp notifier feature of CRI-O is
guarded by an annotation, which has to be explicitly allowed, for example by
using a configuration drop-in like this:
> cat /etc/crio/crio.conf.d/02-runtimes.conf
[crio.runtime]
default_runtime = "runc"
[crio.runtime.runtimes.runc]
allowed_annotations = [ "io.kubernetes.cri-o.seccompNotifierAction" ]
If CRI-O is up and running, then it should indicate that the seccomp notifier is available as well:
> sudo ./bin/crio --enable-metrics
…
INFO[…] Starting seccomp notifier watcher
INFO[…] Serving metrics on :9090 via HTTP
…
We also enable the metrics, because they provide additional telemetry data about
the notifier. Now we need a running Kubernetes cluster for demonstration
purposes. For this demo, we mainly stick to the
hack/local-up-cluster.sh approach to locally spawn a single node
Kubernetes cluster.
If everything is up and running, then we would have to define a seccomp profile
for testing purposes. But we do not have to create our own, we can just use the
RuntimeDefault profile which gets shipped with each container runtime. For
example the RuntimeDefault profile for CRI-O can be found in the
containers/common library.
Now we need a test container, which can be a simple nginx pod like this:
apiVersion: v1
kind: Pod
metadata:
name: nginx
annotations:
io.kubernetes.cri-o.seccompNotifierAction: "stop"
spec:
restartPolicy: Never
containers:
- name: nginx
image: nginx:1.23.2
securityContext:
seccompProfile:
type: RuntimeDefault
Please note the annotation io.kubernetes.cri-o.seccompNotifierAction, which
enables the seccomp notifier for this workload. The value of the annotation can
be either stop for stopping the workload or anything else for doing nothing
else than logging and throwing metrics. Because of the termination we also use
the restartPolicy: Never to not automatically recreate the container on
failure.
Let's run the pod and check if it works:
> kubectl apply -f nginx.yaml
> kubectl get pods -o wide
NAME READY STATUS RESTARTS AGE IP NODE NOMINATED NODE READINESS GATES
nginx 1/1 Running 0 3m39s 10.85.0.3 127.0.0.1 <none> <none>
We can also test if the web server itself works as intended:
> curl 10.85.0.3
<!DOCTYPE html>
<html>
<head>
<title>Welcome to nginx!</title>
…
While everything is now up and running, CRI-O also indicates that it has started the seccomp notifier:
…
INFO[…] Injecting seccomp notifier into seccomp profile of container 662a3bb0fdc7dd1bf5a88a8aa8ef9eba6296b593146d988b4a9b85822422febb
…
If we would now run a forbidden syscall inside of the container, then we can
expect that the workload gets terminated. Let's give that a try by running
chroot in the containers namespaces:
> kubectl exec -it nginx -- bash
root@nginx:/# chroot /tmp
chroot: cannot change root directory to '/tmp': Function not implemented
root@nginx:/# command terminated with exit code 137
The exec session got terminated, so it looks like the container is not running any more:
> kubectl get pods
NAME READY STATUS RESTARTS AGE
nginx 0/1 seccomp killed 0 96s
Alright, the container got killed by seccomp, do we get any more information about what was going on?
> kubectl describe pod nginx
Name: nginx
…
Containers:
nginx:
…
State: Terminated
Reason: seccomp killed
Message: Used forbidden syscalls: chroot (1x)
Exit Code: 137
Started: Mon, 14 Nov 2022 12:19:46 +0100
Finished: Mon, 14 Nov 2022 12:20:26 +0100
…
The seccomp notifier feature of CRI-O correctly set the termination reason and
message, including which forbidden syscall has been used how often (1x). How
often? Yes, the notifier gives the application up to 5 seconds after the last
seen syscall until it starts the termination. This means that it's possible to
catch multiple forbidden syscalls within one test by avoiding time-consuming
trial and errors.
> kubectl exec -it nginx -- chroot /tmp
chroot: cannot change root directory to '/tmp': Function not implemented
command terminated with exit code 125
> kubectl exec -it nginx -- chroot /tmp
chroot: cannot change root directory to '/tmp': Function not implemented
command terminated with exit code 125
> kubectl exec -it nginx -- swapoff -a
command terminated with exit code 32
> kubectl exec -it nginx -- swapoff -a
command terminated with exit code 32
> kubectl describe pod nginx | grep Message
Message: Used forbidden syscalls: chroot (2x), swapoff (2x)
The CRI-O metrics will also reflect that:
> curl -sf localhost:9090/metrics | grep seccomp_notifier
# HELP container_runtime_crio_containers_seccomp_notifier_count_total Amount of containers stopped because they used a forbidden syscalls by their name
# TYPE container_runtime_crio_containers_seccomp_notifier_count_total counter
container_runtime_crio_containers_seccomp_notifier_count_total{name="…",syscalls="chroot (1x)"} 1
container_runtime_crio_containers_seccomp_notifier_count_total{name="…",syscalls="chroot (2x), swapoff (2x)"} 1
How does it work in detail? CRI-O uses the chosen seccomp profile and injects
the action SCMP_ACT_NOTIFY instead of SCMP_ACT_ERRNO, SCMP_ACT_KILL,
SCMP_ACT_KILL_PROCESS or SCMP_ACT_KILL_THREAD. It also sets a local listener
path which will be used by the lower level OCI runtime (runc or crun) to create
the seccomp notifier socket. If the connection between the socket and CRI-O has
been established, then CRI-O will receive notifications for each syscall being
interfered by seccomp. CRI-O stores the syscalls, allows a bit of timeout for
them to arrive and then terminates the container if the chosen
seccompNotifierAction=stop. Unfortunately, the seccomp notifier is not able to
notify on the defaultAction, which means that it's required to have
a list of syscalls to test for custom profiles. CRI-O does also state that
limitation in the logs:
INFO[…] The seccomp profile default action SCMP_ACT_ERRNO cannot be overridden to SCMP_ACT_NOTIFY,
which means that syscalls using that default action can't be traced by the notifier
As a conclusion, the seccomp notifier implementation in CRI-O can be used to
verify if your applications behave correctly when using RuntimeDefault or any
other custom profile. Alerts can be created based on the metrics to create long
running test scenarios around that feature. Making seccomp understandable and
easier to use will increase adoption as well as help us to move towards a more
secure Kubernetes by default!
Thank you for reading this blog post. If you'd like to read more about the seccomp notifier, checkout the following resources:
- The Seccomp Notifier - New Frontiers in Unprivileged Container Development: https://brauner.io/2020/07/23/seccomp-notify.html
- Bringing Seccomp Notify to Runc and Kubernetes: https://kinvolk.io/blog/2022/03/bringing-seccomp-notify-to-runc-and-kubernetes
- Seccomp Agent reference implementation: https://github.com/opencontainers/runc/tree/6b16d00/contrib/cmd/seccompagent
Boosting Kubernetes container runtime observability with OpenTelemetry
When speaking about observability in the cloud native space, then probably everyone will mention OpenTelemetry (OTEL) at some point in the conversation. That's great, because the community needs standards to rely on for developing all cluster components into the same direction. OpenTelemetry enables us to combine logs, metrics, traces and other contextual information (called baggage) into a single resource. Cluster administrators or software engineers can use this resource to get a viewport about what is going on in the cluster over a defined period of time. But how can Kubernetes itself make use of this technology stack?
Kubernetes consists of multiple components where some are independent and others are stacked together. Looking at the architecture from a container runtime perspective, then there are from the top to the bottom:
- kube-apiserver: Validates and configures data for the API objects
- kubelet: Agent running on each node
- CRI runtime: Container Runtime Interface (CRI) compatible container runtime like CRI-O or containerd
- OCI runtime: Lower level Open Container Initiative (OCI) runtime like runc or crun
- Linux kernel or Microsoft Windows: Underlying operating system
That means if we encounter a problem with running containers in Kubernetes, then we start looking at one of those components. Finding the root cause for problems is one of the most time consuming actions we face with the increased architectural complexity from today's cluster setups. Even if we know the component which seems to cause the issue, we still have to take the others into account to maintain a mental timeline of events which are going on. How do we achieve that? Well, most folks will probably stick to scraping logs, filtering them and assembling them together over the components borders. We also have metrics, right? Correct, but bringing metrics values in correlation with plain logs makes it even harder to track what is going on. Some metrics are also not made for debugging purposes. They have been defined based on the end user perspective of the cluster for linking usable alerts and not for developers debugging a cluster setup.
OpenTelemetry to the rescue: the project aims to combine signals such as traces, metrics and logs together to maintain the right viewport on the cluster state.
What is the current state of OpenTelemetry tracing in Kubernetes? From an API server perspective, we have alpha support for tracing since Kubernetes v1.22, which will graduate to beta in one of the upcoming releases. Unfortunately the beta graduation has missed the v1.26 Kubernetes release. The design proposal can be found in the API Server Tracing Kubernetes Enhancement Proposal (KEP) which provides more information about it.
The kubelet tracing part is tracked in another KEP, which was implemented in an alpha state in Kubernetes v1.25. A beta graduation is not planned as time of writing, but more may come in the v1.27 release cycle. There are other side-efforts going on beside both KEPs, for example klog is considering OTEL support, which would boost the observability by linking log messages to existing traces. Within SIG Instrumentation and SIG Node, we're also discussing how to link the kubelet traces together, because right now they're focused on the gRPC calls between the kubelet and the CRI container runtime.
CRI-O features OpenTelemetry tracing support since v1.23.0 and is working on continuously improving them, for example by attaching the logs to the traces or extending the spans to logical parts of the application. This helps users of the traces to gain the same information like parsing the logs, but with enhanced capabilities of scoping and filtering to other OTEL signals. The CRI-O maintainers are also working on a container monitoring replacement for conmon, which is called conmon-rs and is purely written in Rust. One benefit of having a Rust implementation is to be able to add features like OpenTelemetry support, because the crates (libraries) for those already exist. This allows a tight integration with CRI-O and lets consumers see the most low level tracing data from their containers.
The containerd folks added tracing support since v1.6.0, which is available by using a plugin. Lower level OCI runtimes like runc or crun feature no support for OTEL at all and it does not seem to exist a plan for that. We always have to consider that there is a performance overhead when collecting the traces as well as exporting them to a data sink. I still think it would be worth an evaluation on how extended telemetry collection could look like in OCI runtimes. Let's see if the Rust OCI runtime youki is considering something like that in the future.
I'll show you how to give it a try. For my demo I'll stick to a stack with a single local node
that has runc, conmon-rs, CRI-O, and a kubelet. To enable tracing in the kubelet, I need to
apply the following KubeletConfiguration:
apiVersion: kubelet.config.k8s.io/v1beta1
kind: KubeletConfiguration
featureGates:
KubeletTracing: true
tracing:
samplingRatePerMillion: 1000000
A samplingRatePerMillion equally to one million will internally translate to
sampling everything. A similar configuration has to be applied to CRI-O; I can
either start the crio binary with --enable-tracing and
--tracing-sampling-rate-per-million 1000000 or we use a drop-in configuration
like this:
cat /etc/crio/crio.conf.d/99-tracing.conf
[crio.tracing]
enable_tracing = true
tracing_sampling_rate_per_million = 1000000
To configure CRI-O to use conmon-rs, you require at least the latest CRI-O v1.25.x and conmon-rs v0.4.0. Then a configuration drop-in like this can be used to make CRI-O use conmon-rs:
cat /etc/crio/crio.conf.d/99-runtimes.conf
[crio.runtime]
default_runtime = "runc"
[crio.runtime.runtimes.runc]
runtime_type = "pod"
monitor_path = "/path/to/conmonrs" # or will be looked up in $PATH
That's it, the default configuration will point to an OpenTelemetry
collector gRPC endpoint of localhost:4317, which has to be up and
running as well. There are multiple ways to run OTLP as described in the
docs, but it's also possible to kubectl proxy into an existing
instance running within Kubernetes.
If everything is set up, then the collector should log that there are incoming traces:
ScopeSpans #0
ScopeSpans SchemaURL:
InstrumentationScope go.opentelemetry.io/otel/sdk/tracer
Span #0
Trace ID : 71896e69f7d337730dfedb6356e74f01
Parent ID : a2a7714534c017e6
ID : 1d27dbaf38b9da8b
Name : github.com/cri-o/cri-o/server.(*Server).filterSandboxList
Kind : SPAN_KIND_INTERNAL
Start time : 2022-11-15 09:50:20.060325562 +0000 UTC
End time : 2022-11-15 09:50:20.060326291 +0000 UTC
Status code : STATUS_CODE_UNSET
Status message :
Span #1
Trace ID : 71896e69f7d337730dfedb6356e74f01
Parent ID : a837a005d4389579
ID : a2a7714534c017e6
Name : github.com/cri-o/cri-o/server.(*Server).ListPodSandbox
Kind : SPAN_KIND_INTERNAL
Start time : 2022-11-15 09:50:20.060321973 +0000 UTC
End time : 2022-11-15 09:50:20.060330602 +0000 UTC
Status code : STATUS_CODE_UNSET
Status message :
Span #2
Trace ID : fae6742709d51a9b6606b6cb9f381b96
Parent ID : 3755d12b32610516
ID : 0492afd26519b4b0
Name : github.com/cri-o/cri-o/server.(*Server).filterContainerList
Kind : SPAN_KIND_INTERNAL
Start time : 2022-11-15 09:50:20.0607746 +0000 UTC
End time : 2022-11-15 09:50:20.060795505 +0000 UTC
Status code : STATUS_CODE_UNSET
Status message :
Events:
SpanEvent #0
-> Name: log
-> Timestamp: 2022-11-15 09:50:20.060778668 +0000 UTC
-> DroppedAttributesCount: 0
-> Attributes::
-> id: Str(adf791e5-2eb8-4425-b092-f217923fef93)
-> log.message: Str(No filters were applied, returning full container list)
-> log.severity: Str(DEBUG)
-> name: Str(/runtime.v1.RuntimeService/ListContainers)
I can see that the spans have a trace ID and typically have a parent attached.
Events such as logs are part of the output as well. In the above case, the kubelet is
periodically triggering a ListPodSandbox RPC to CRI-O caused by the Pod
Lifecycle Event Generator (PLEG). Displaying those traces can be done via,
for example, Jaeger. When running the tracing stack locally, then a Jaeger
instance should be exposed on http://localhost:16686 per default.
The ListPodSandbox requests are directly visible within the Jaeger UI:
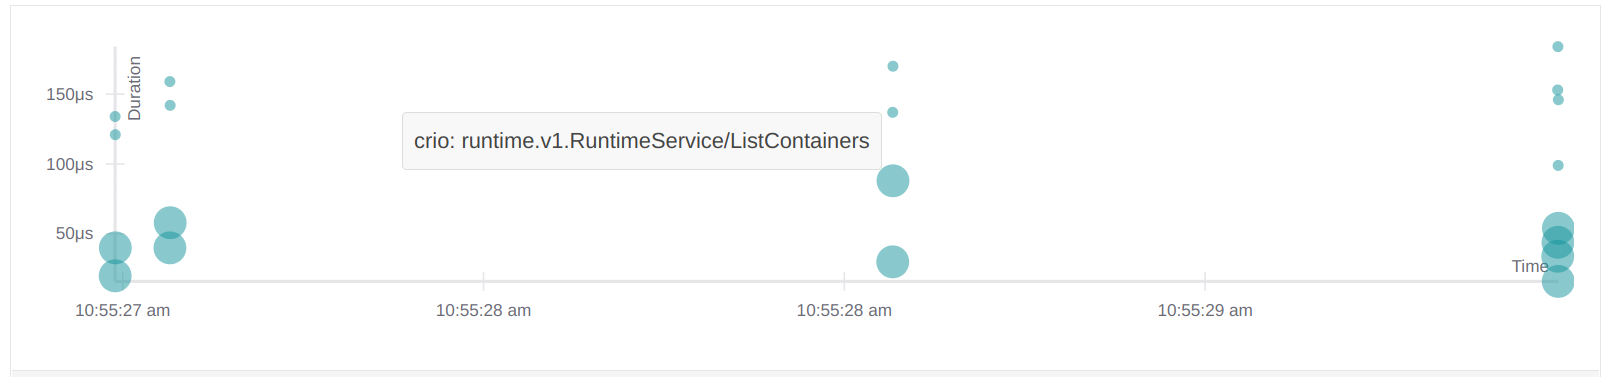
That's not too exciting, so I'll run a workload directly via kubectl:
kubectl run -it --rm --restart=Never --image=alpine alpine -- echo hi
hi
pod "alpine" deleted
Looking now at Jaeger, we can see that we have traces for conmonrs, crio as
well as the kubelet for the RunPodSandbox and CreateContainer CRI RPCs:
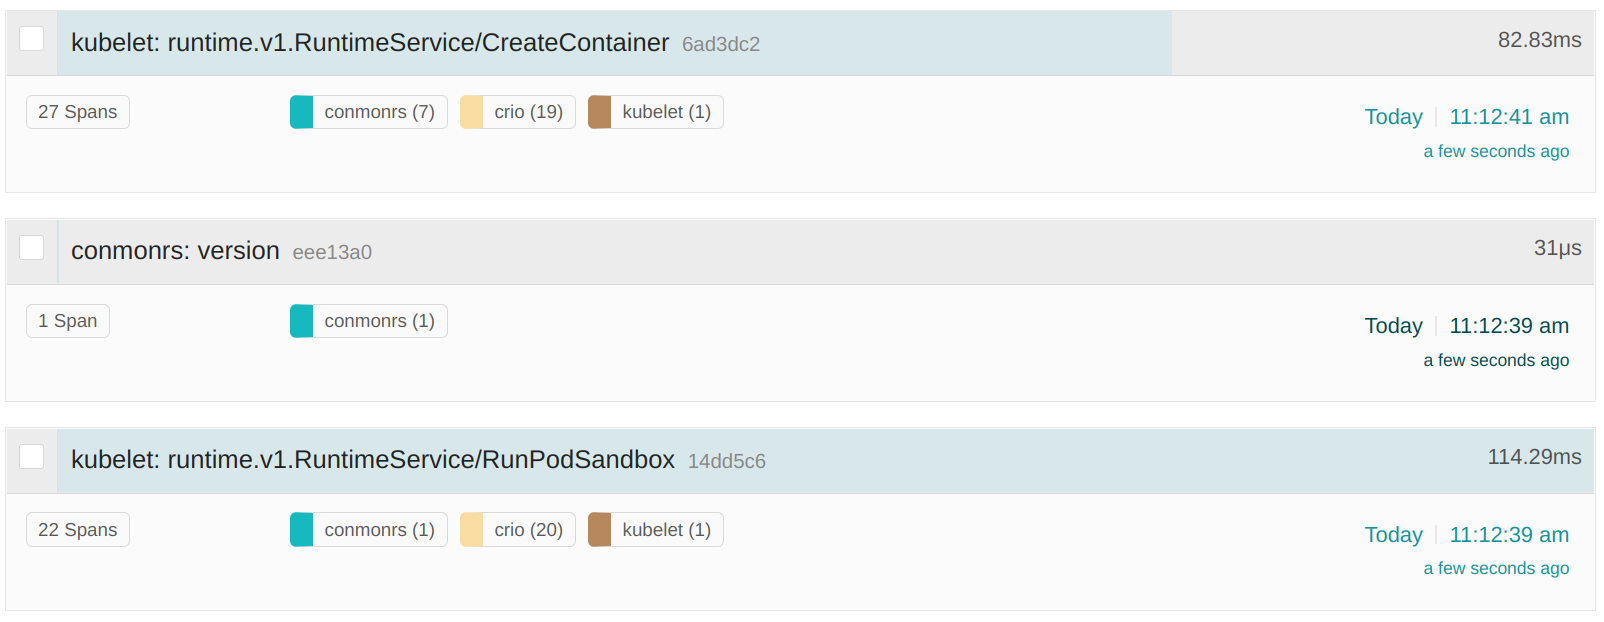
The kubelet and CRI-O spans are connected to each other to make investigation easier. If we now take a closer look at the spans, then we can see that CRI-O's logs are correctly accosted with the corresponding functionality. For example we can extract the container user from the traces like this:
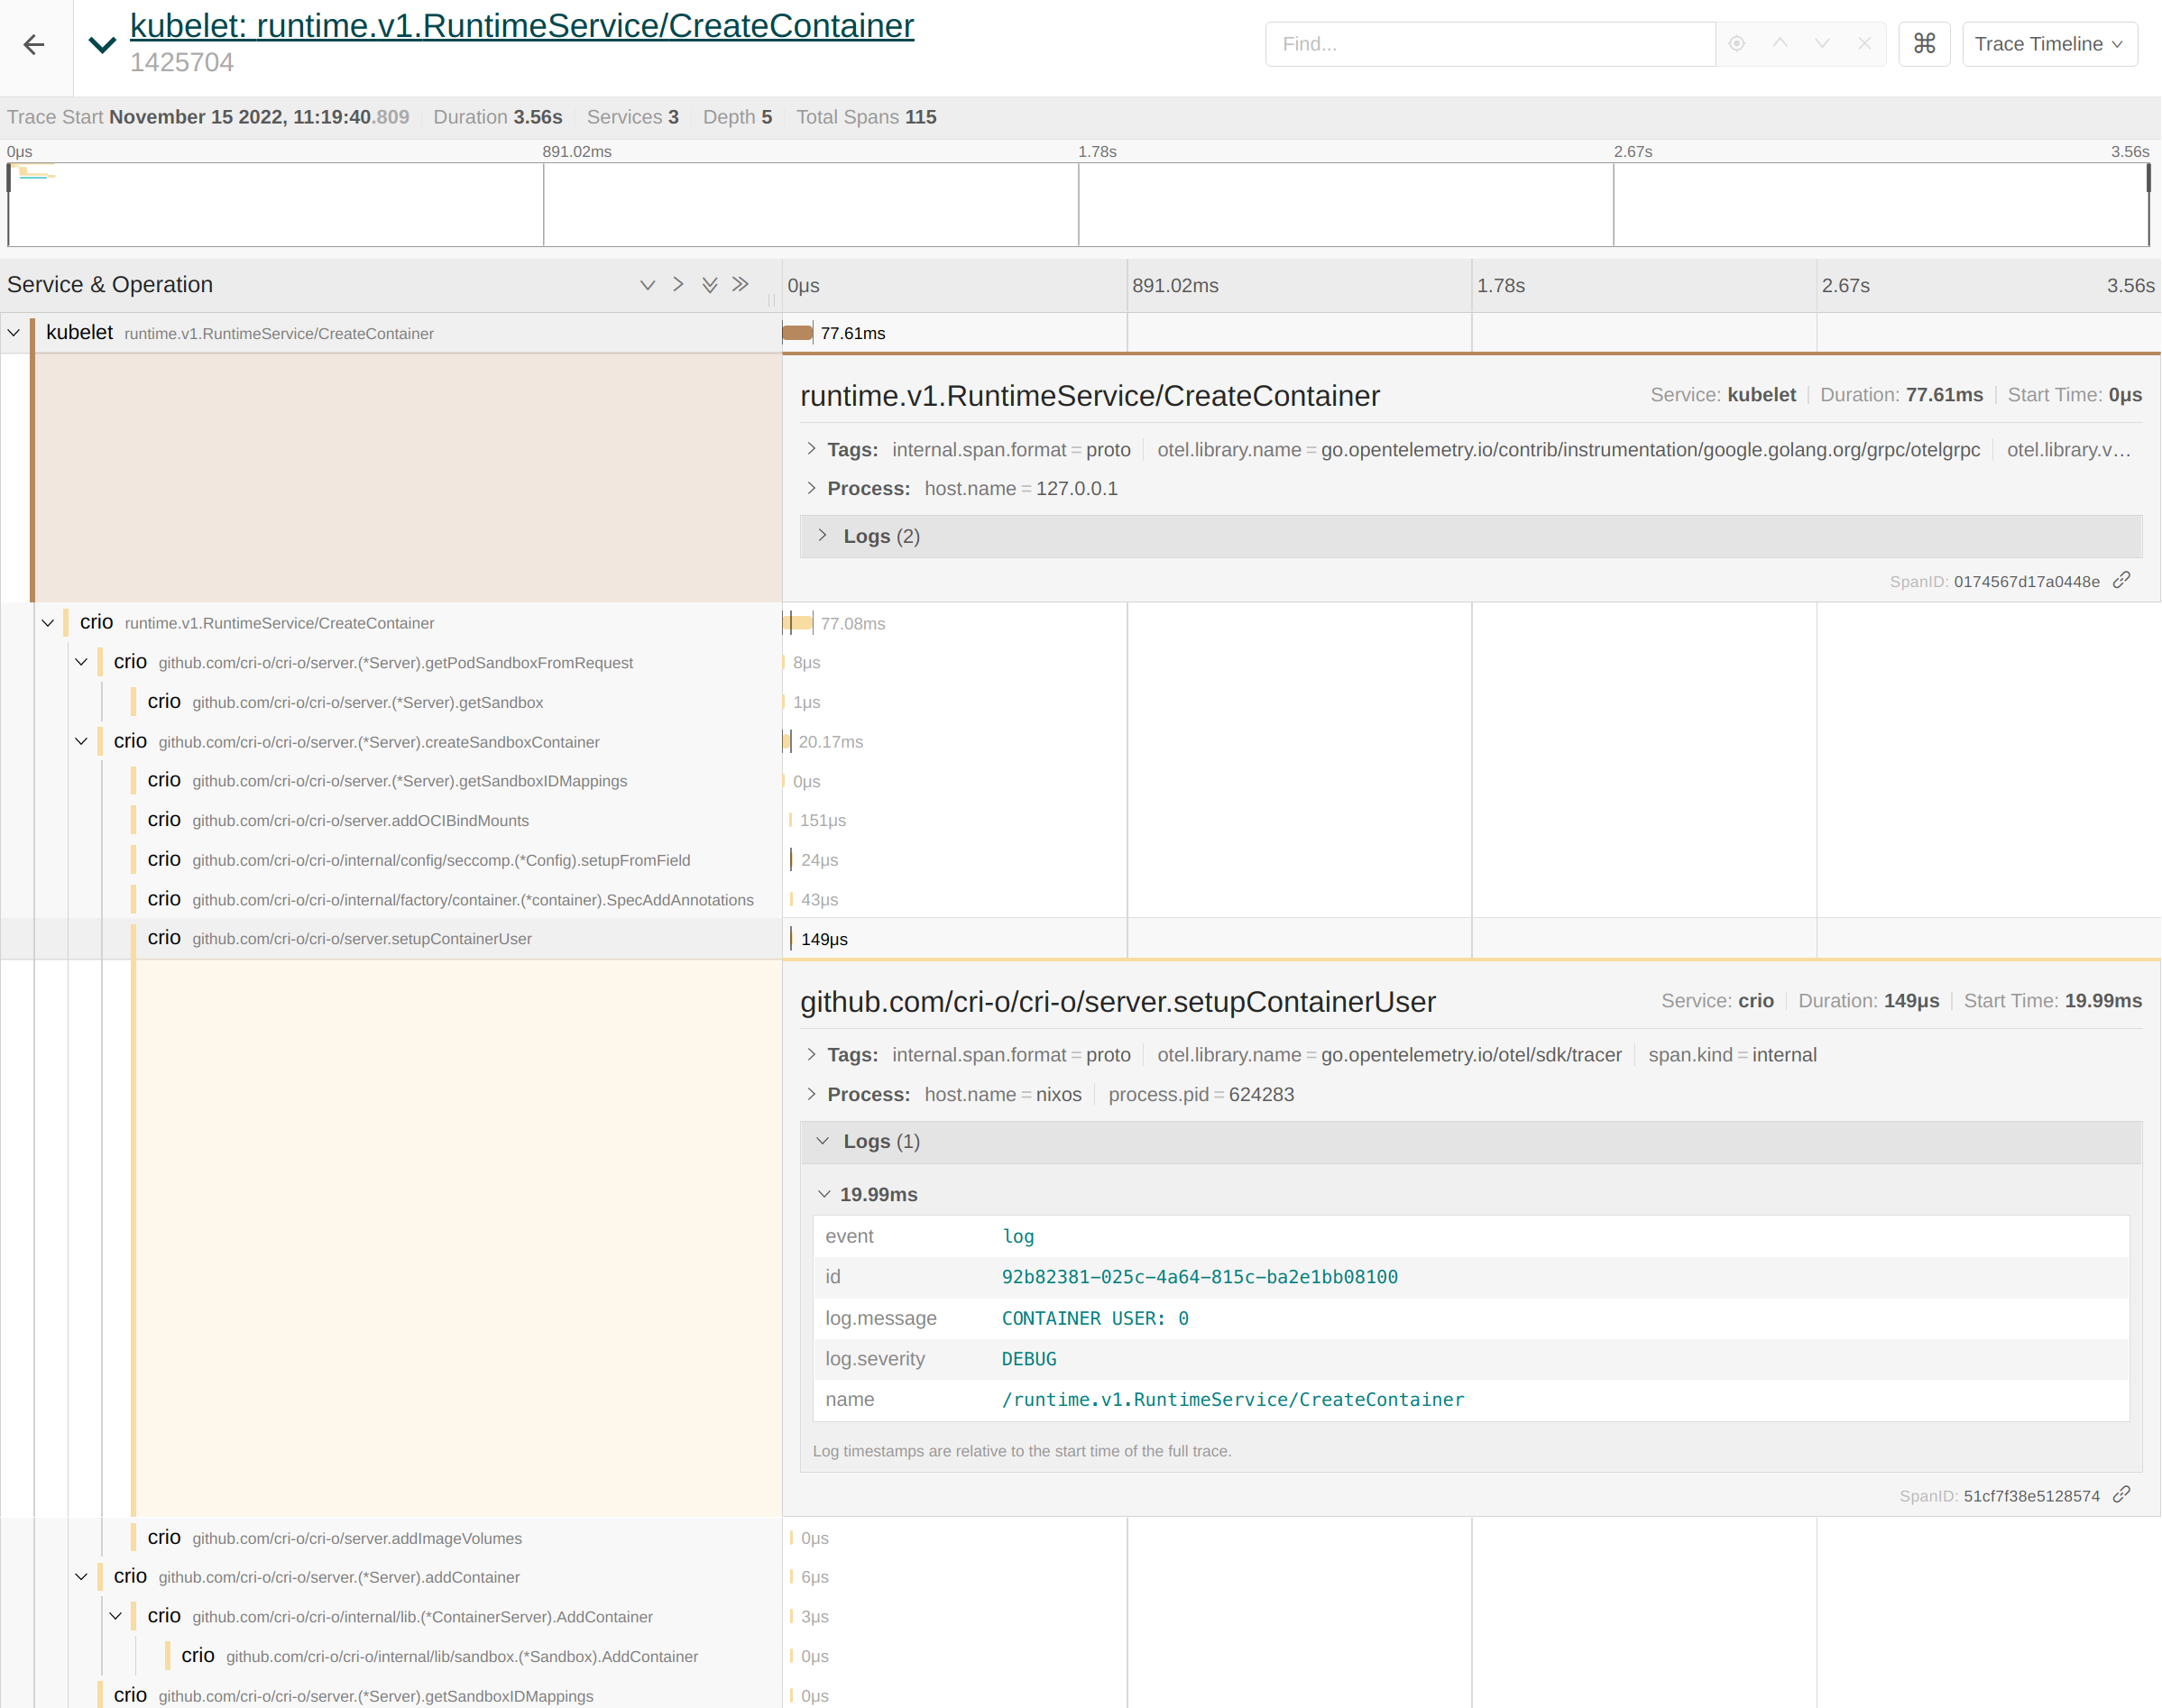
The lower level spans of conmon-rs are also part of this trace. For example
conmon-rs maintains an internal read_loop for handling IO between the
container and the end user. The logs for reading and writing bytes are part of
the span. The same applies to the wait_for_exit_code span, which tells us that
the container exited successfully with code 0:
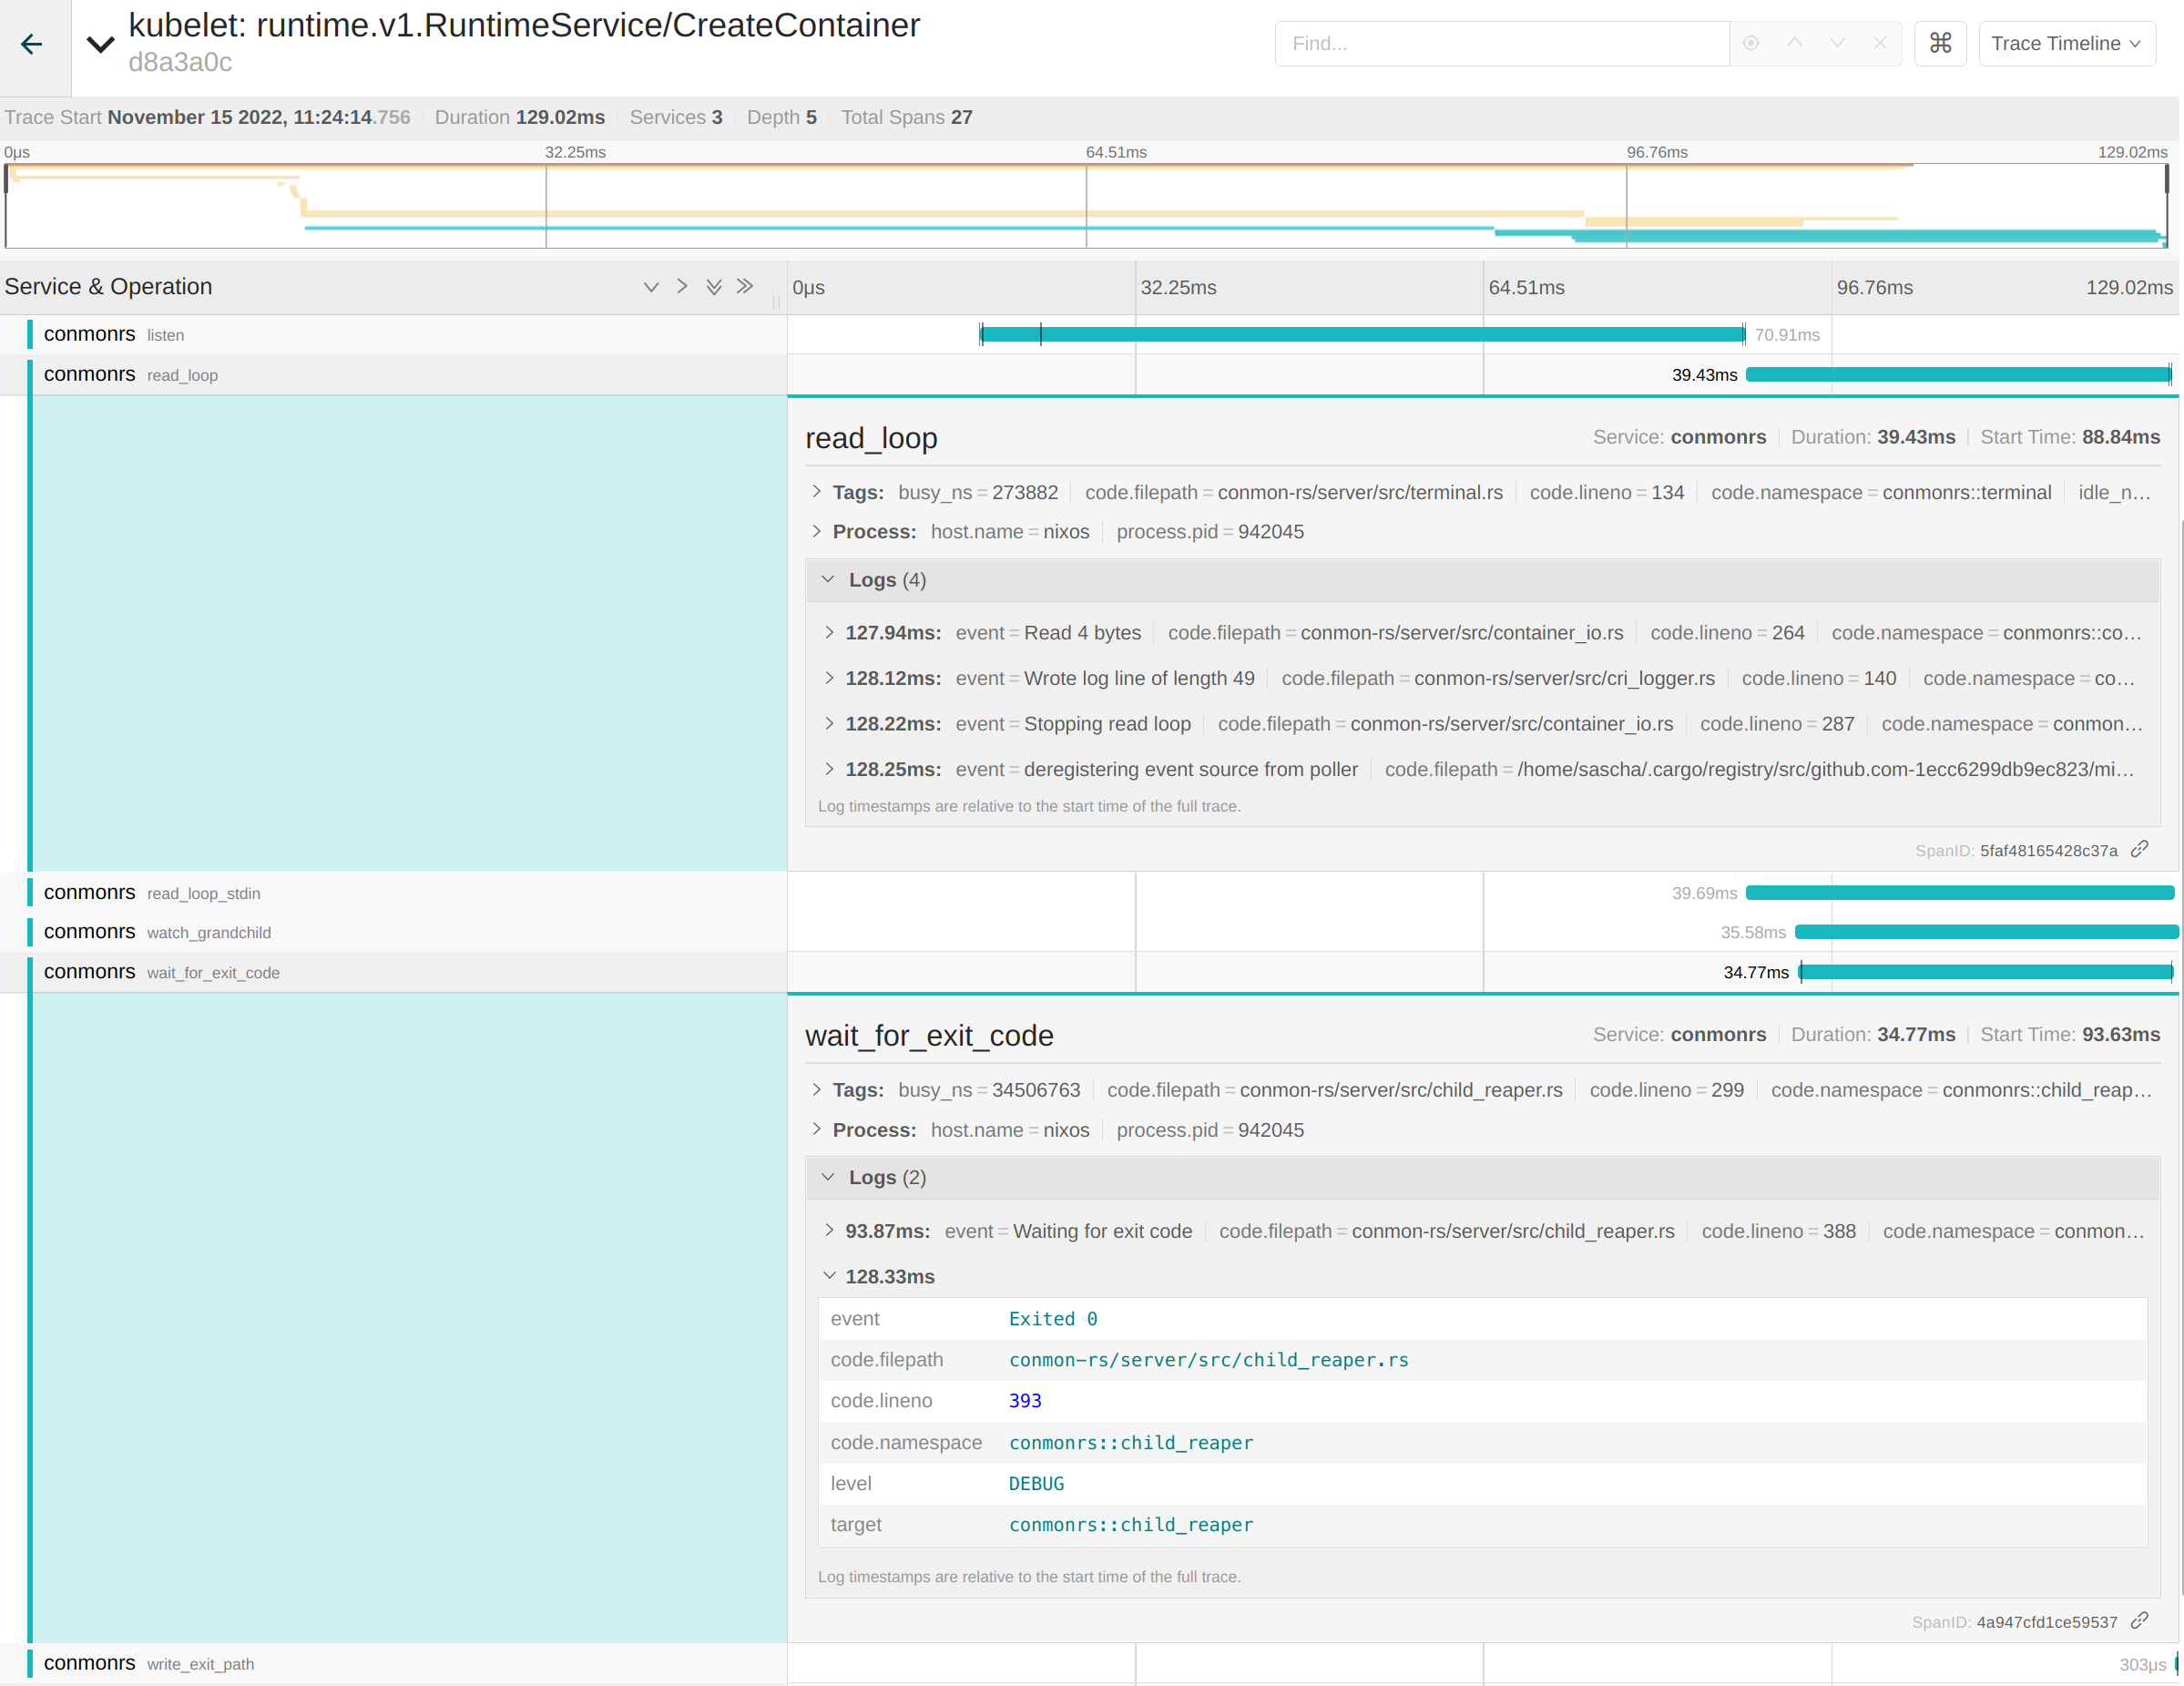
Having all that information at hand side by side to the filtering capabilities of Jaeger makes the whole stack a great solution for debugging container issues! Mentioning the "whole stack" also shows the biggest downside of the overall approach: Compared to parsing logs it adds a noticeable overhead on top of the cluster setup. Users have to maintain a sink like Elasticsearch to persist the data, expose the Jaeger UI and possibly take the performance drawback into account. Anyways, it's still one of the best ways to increase the observability aspect of Kubernetes.
Thank you for reading this blog post, I'm pretty sure we're looking into a bright future for OpenTelemetry support in Kubernetes to make troubleshooting simpler.
registry.k8s.io: faster, cheaper and Generally Available (GA)
Starting with Kubernetes 1.25, our container image registry has changed from k8s.gcr.io to registry.k8s.io. This new registry spreads the load across multiple Cloud Providers & Regions, functioning as a sort of content delivery network (CDN) for Kubernetes container images. This change reduces the project’s reliance on a single entity and provides a faster download experience for a large number of users.
TL;DR: What you need to know about this change
- Container images for Kubernetes releases from
1.251.27 onward are not published to k8s.gcr.io, only to registry.k8s.io. - In the upcoming December patch releases, the new registry domain default will be backported to all branches still in support (1.22, 1.23, 1.24).
- If you run in a restricted environment and apply strict domain/IP address access policies limited to k8s.gcr.io, the image pulls will not function after the migration to this new registry. For these users, the recommended method is to mirror the release images to a private registry.
If you’d like to know more about why we made this change, or some potential issues you might run into, keep reading.
Why has Kubernetes changed to a different image registry?
k8s.gcr.io is hosted on a custom Google Container Registry (GCR) domain that was setup solely for the Kubernetes project. This has worked well since the inception of the project, and we thank Google for providing these resources, but today there are other cloud providers and vendors that would like to host images to provide a better experience for the people on their platforms. In addition to Google’s renewed commitment to donate $3 million to support the project's infrastructure, Amazon announced a matching donation during their Kubecon NA 2022 keynote in Detroit. This will provide a better experience for users (closer servers = faster downloads) and will reduce the egress bandwidth and costs from GCR at the same time. registry.k8s.io will spread the load between Google and Amazon, with other providers to follow in the future.
Why isn’t there a stable list of domains/IPs? Why can’t I restrict image pulls?
registry.k8s.io is a secure blob redirector that connects clients to the closest cloud provider. The nature of this change means that a client pulling an image could be redirected to any one of a large number of backends. We expect the set of backends to keep changing and will only increase as more and more cloud providers and vendors come on board to help mirror the release images.
Restrictive control mechanisms like man-in-the-middle proxies or network policies that restrict access to a specific list of IPs/domains will break with this change. For these scenarios, we encourage you to mirror the release images to a local registry that you have strict control over.
For more information on this policy, please see the stability section of the registry.k8s.io documentation.
What kind of errors will I see? How will I know if I’m still using the old address?
Errors may depend on what kind of container runtime you are using, and what endpoint you are routed to, but it should present as a container failing to be created with the warning FailedCreatePodSandBox.
Below is an example error message showing a proxied deployment failing to pull due to an unknown certificate:
FailedCreatePodSandBox: Failed to create pod sandbox: rpc error: code = Unknown desc = Error response from daemon: Head “https://us-west1-docker.pkg.dev/v2/k8s-artifacts-prod/images/pause/manifests/3.8”: x509: certificate signed by unknown authority
I’m impacted by this change, how do I revert to the old registry address?
If using the new registry domain name is not an option, you can revert to the old domain name for cluster versions less than 1.25. Keep in mind that, eventually, you will have to switch to the new registry, as new image tags will no longer be pushed to GCR.
Reverting the registry name in kubeadm
The registry used by kubeadm to pull its images can be controlled by two methods:
Setting the --image-repository flag.
kubeadm init --image-repository=k8s.gcr.io
Or in kubeadm config ClusterConfiguration:
apiVersion: kubeadm.k8s.io/v1beta3
kind: ClusterConfiguration
imageRepository: "k8s.gcr.io"
Reverting the Registry Name in kubelet
The image used by kubelet for the pod sandbox (pause) can be overridden
by configuring your container runtime or by setting the --pod-infra-container-image
flag depending on the version of Kubernetes you are using.
Other runtimes: containerd, CRI-O, cri-dockerd.
When using dockershim before v1.23:
kubelet --pod-infra-container-image=k8s.gcr.io/pause:3.5
Legacy container registry freeze
k8s.gcr.io Image Registry Will Be Frozen From the 3rd of April 2023 announces the freeze of the legacy k8s.gcr.io image registry. Read that article for more details.
Acknowledgments
Change is hard, and evolving our image-serving platform is needed to ensure a sustainable future for the project. We strive to make things better for everyone using Kubernetes. Many contributors from all corners of our community have been working long and hard to ensure we are making the best decisions possible, executing plans, and doing our best to communicate those plans.
Thanks to Aaron Crickenberger, Arnaud Meukam, Benjamin Elder, Caleb Woodbine, Davanum Srinivas, Mahamed Ali, and Tim Hockin from SIG K8s Infra, Brian McQueen, and Sergey Kanzhelev from SIG Node, Lubomir Ivanov from SIG Cluster Lifecycle, Adolfo García Veytia, Jeremy Rickard, Sascha Grunert, and Stephen Augustus from SIG Release, Bob Killen and Kaslin Fields from SIG Contribex, Tim Allclair from the Security Response Committee. Also a big thank you to our friends acting as liaisons with our cloud provider partners: Jay Pipes from Amazon and Jon Johnson Jr. from Google.
This article was updated on the 28th of February 2023.
Kubernetes Removals, Deprecations, and Major Changes in 1.26
Change is an integral part of the Kubernetes life-cycle: as Kubernetes grows and matures, features may be deprecated, removed, or replaced with improvements for the health of the project. For Kubernetes v1.26 there are several planned: this article identifies and describes some of them, based on the information available at this mid-cycle point in the v1.26 release process, which is still ongoing and can introduce additional changes.
The Kubernetes API Removal and Deprecation process
The Kubernetes project has a well-documented deprecation policy for features. This policy states that stable APIs may only be deprecated when a newer, stable version of that same API is available and that APIs have a minimum lifetime for each stability level. A deprecated API is one that has been marked for removal in a future Kubernetes release; it will continue to function until removal (at least one year from the deprecation), but usage will result in a warning being displayed. Removed APIs are no longer available in the current version, at which point you must migrate to using the replacement.
- Generally available (GA) or stable API versions may be marked as deprecated but must not be removed within a major version of Kubernetes.
- Beta or pre-release API versions must be supported for 3 releases after deprecation.
- Alpha or experimental API versions may be removed in any release without prior deprecation notice.
Whether an API is removed as a result of a feature graduating from beta to stable or because that API simply did not succeed, all removals comply with this deprecation policy. Whenever an API is removed, migration options are communicated in the documentation.
A note about the removal of the CRI v1alpha2 API and containerd 1.5 support
Following the adoption of the Container Runtime Interface (CRI) and the [removal of dockershim] in v1.24 , the CRI is the supported and documented way through which Kubernetes interacts with different container runtimes. Each kubelet negotiates which version of CRI to use with the container runtime on that node.
The Kubernetes project recommends using CRI version v1; in Kubernetes v1.25 the kubelet can also negotiate the use of CRI v1alpha2 (which was deprecated along at the same time as adding support for the stable v1 interface).
Kubernetes v1.26 will not support CRI v1alpha2. That removal will result in the kubelet not registering the node if the container runtime doesn't support CRI v1. This means that containerd minor version 1.5 and older will not be supported in Kubernetes 1.26; if you use containerd, you will need to upgrade to containerd version 1.6.0 or later before you upgrade that node to Kubernetes v1.26. Other container runtimes that only support the v1alpha2 are equally affected: if that affects you, you should contact the container runtime vendor for advice or check their website for additional instructions in how to move forward.
If you want to benefit from v1.26 features and still use an older container runtime, you can run an older kubelet. The supported skew for the kubelet allows you to run a v1.25 kubelet, which still is still compatible with v1alpha2 CRI support, even if you upgrade the control plane to the 1.26 minor release of Kubernetes.
As well as container runtimes themselves, that there are tools like stargz-snapshotter that act as a proxy between kubelet and container runtime and those also might be affected.
Deprecations and removals in Kubernetes v1.26
In addition to the above, Kubernetes v1.26 is targeted to include several additional removals and deprecations.
Removal of the v1beta1 flow control API group
The flowcontrol.apiserver.k8s.io/v1beta1 API version of FlowSchema and PriorityLevelConfiguration will no longer be served in v1.26. Users should migrate manifests and API clients to use the flowcontrol.apiserver.k8s.io/v1beta2 API version, available since v1.23.
Removal of the v2beta2 HorizontalPodAutoscaler API
The autoscaling/v2beta2 API version of HorizontalPodAutoscaler will no longer be served in v1.26. Users should migrate manifests and API clients to use the autoscaling/v2 API version, available since v1.23.
Removal of in-tree credential management code
In this upcoming release, legacy vendor-specific authentication code that is part of Kubernetes
will be removed from both
client-go and kubectl.
The existing mechanism supports authentication for two specific cloud providers:
Azure and Google Cloud.
In its place, Kubernetes already offers a vendor-neutral
authentication plugin mechanism -
you can switch over right now, before the v1.26 release happens.
If you're affected, you can find additional guidance on how to proceed for
Azure and for
Google Cloud.
Removal of kube-proxy userspace modes
The userspace proxy mode, deprecated for over a year, is no longer supported on either Linux or Windows and will be removed in this release. Users should use iptables or ipvs on Linux, or kernelspace on Windows: using --mode userspace will now fail.
Removal of in-tree OpenStack cloud provider
Kubernetes is switching from in-tree code for storage integrations, in favor of the Container Storage Interface (CSI).
As part of this, Kubernetes v1.26 will remove the deprecated in-tree storage integration for OpenStack
(the cinder volume type). You should migrate to external cloud provider and CSI driver from
https://github.com/kubernetes/cloud-provider-openstack instead.
For more information, visit Cinder in-tree to CSI driver migration.
Removal of the GlusterFS in-tree driver
The in-tree GlusterFS driver was deprecated in v1.25, and will be removed from Kubernetes v1.26.
Deprecation of non-inclusive kubectl flag
As part of the implementation effort of the Inclusive Naming Initiative,
the --prune-whitelist flag will be deprecated, and replaced with --prune-allowlist.
Users that use this flag are strongly advised to make the necessary changes prior to the final removal of the flag, in a future release.
Removal of dynamic kubelet configuration
Dynamic kubelet configuration allowed new kubelet configurations to be rolled out via the Kubernetes API, even in a live cluster. A cluster operator could reconfigure the kubelet on a Node by specifying a ConfigMap that contained the configuration data that the kubelet should use. Dynamic kubelet configuration was removed from the kubelet in v1.24, and will be removed from the API server in the v1.26 release.
Deprecations for kube-apiserver command line arguments
The --master-service-namespace command line argument to the kube-apiserver doesn't have
any effect, and was already informally deprecated.
That command line argument will be formally marked as deprecated in v1.26, preparing for its
removal in a future release.
The Kubernetes project does not expect any impact from this deprecation and removal.
Deprecations for kubectl run command line arguments
Several unused option arguments for the kubectl run subcommand will be marked as deprecated, including:
--cascade--filename--force--grace-period--kustomize--recursive--timeout--wait
These arguments are already ignored so no impact is expected: the explicit deprecation sets a warning message and prepares the removal of the arguments in a future release.
Removal of legacy command line arguments relating to logging
Kubernetes v1.26 will remove some command line arguments relating to logging. These command line arguments were already deprecated. For more information, see Deprecate klog specific flags in Kubernetes Components.
Looking ahead
The official list of API removals planned for Kubernetes 1.27 includes:
- All beta versions of the CSIStorageCapacity API; specifically:
storage.k8s.io/v1beta1
Want to know more?
Deprecations are announced in the Kubernetes release notes. You can see the announcements of pending deprecations in the release notes for:
We will formally announce the deprecations that come with Kubernetes 1.26 as part of the CHANGELOG for that release.
Live and let live with Kluctl and Server Side Apply
This blog post was inspired by a previous Kubernetes blog post about Advanced Server Side Apply. The author of said blog post listed multiple benefits for applications and controllers when switching to server-side apply (from now on abbreviated with SSA). Especially the chapter about CI/CD systems motivated me to respond and write down my thoughts and experiences.
These thoughts and experiences are the results of me working on Kluctl for the past 2 years. I describe Kluctl as "The missing glue to put together large Kubernetes deployments, composed of multiple smaller parts (Helm/Kustomize/...) in a manageable and unified way."
To get a basic understanding of Kluctl, I suggest to visit the kluctl.io website and read through the documentation and tutorials, for example the microservices demo tutorial. As an alternative, you can watch Hands-on Introduction to kluctl from the Rawkode Academy YouTube channel which shows a hands-on demo session.
There is also a Kluctl delivery scenario for the podtato-head demo project.
Live and let live
One of the main philosophies that Kluctl follows is "live and let live", meaning that it will try its best to work in conjunction with any other tool or controller running outside or inside your clusters. Kluctl will not overwrite any fields that it lost ownership of, unless you explicitly tell it to do so.
Achieving this would not have been possible (or at least several magnitudes harder) without the use of SSA. Server-side apply allows Kluctl to detect when ownership for a field got lost, for example when another controller or operator updates that field to another value. Kluctl can then decide on a field-by-field basis if force-applying is required before retrying based on these decisions.
The days before SSA
The first versions of Kluctl were based on shelling out to kubectl and thus
implicitly relied on client-side apply. At that time, SSA was
still alpha and quite buggy. And to be honest, I didn't even know it was a
thing at that time.
The way client-side apply worked had some serious drawbacks. The most obvious one
(it was guaranteed that you'd stumble on this by yourself if enough time passed)
is that it relied on an annotation (kubectl.kubernetes.io/last-applied-configuration)
being added to the object, bringing in all the limitations and issues with huge
annotation values. A good example of such issues are
CRDs being so large,
that they don't fit into the annotation's value anymore.
Another drawback can be seen just by looking at the name (client-side apply).
Being client side means that each client has to provide the apply-logic on
its own, which at that time was only properly implemented inside kubectl,
making it hard to be replicated inside controllers.
This added kubectl as a dependency (either as an executable or in the form of
Go packages) to all controllers that wanted to leverage the apply-logic.
However, even if one managed to get client-side apply running from inside a controller, you ended up with a solution that gave no control over how it worked internally. As an example, there was no way to individually decide which fields to overwrite in case of external changes and which ones to let go.
Discovering SSA apply
I was never happy with the solution described above and then somehow stumbled
across server-side apply,
which was still in beta at that time. Experimenting with it via
kubectl apply --server-side revealed immediately that the true power of
SSA can not be easily leveraged by shelling out to kubectl.
The way SSA is implemented in kubectl does not allow enough
control over conflict resolution as it can only switch between
"not force-applying anything and erroring out" and "force-applying everything
without showing any mercy!".
The API documentation however made it clear that SSA is able to control conflict resolution on field level, simply by choosing which fields to include and which fields to omit from the supplied object.
Moving away from kubectl
This meant that Kluctl had to move away from shelling out to kubectl first. Only
after that was done, I would have been able to properly implement SSA
with its powerful conflict resolution.
To achieve this, I first implemented access to the target clusters via a Kubernetes client library. This had the nice side effect of dramatically speeding up Kluctl as well. It also improved the security and usability of Kluctl by ensuring that a running Kluctl command could not be messed around with by externally modifying the kubeconfig while it was running.
Implementing SSA
After switching to a Kubernetes client library, leveraging SSA
felt easy. Kluctl now has to send each manifest to the API server as part of a
PATCH request, which signals
that Kluctl wants to perform a SSA operation. The API server then
responds with an OK response (HTTP status code 200), or with a Conflict response
(HTTP status 409).
In case of a Conflict response, the body of that response includes machine-readable details about the conflicts. Kluctl can then use these details to figure out which fields are in conflict and which actors (field managers) have taken ownership of the conflicted fields.
Then, for each field, Kluctl will decide if the conflict should be ignored or
if it should be force-applied. If any field needs to be force-applied, Kluctl
will retry the apply operation with the ignored fields omitted and the force
flag being set on the API call.
In case a conflict is ignored, Kluctl will issue a warning to the user so that the user can react properly (or ignore it forever...).
That's basically it. That is all that is required to leverage SSA. Big thanks and thumbs-up to the Kubernetes developers who made this possible!
Conflict Resolution
Kluctl has a few simple rules to figure out if a conflict should be ignored or force-applied.
It first checks the field's actor (the field manager) against a list of known
field manager strings from tools that are frequently used to perform manual modifications. These
are for example kubectl and k9s. Any modifications performed with these tools
are considered "temporary" and will be overwritten by Kluctl.
If you're using Kluctl along with kubectl where you don't want the changes from
kubectl to be overwritten (for example, using in a script) then you can specify
--field-manager=<manager-name> on the command line to kubectl, and Kluctl
doesn't apply its special heuristic.
If the field manager is not known by Kluctl, it will check if force-applying is requested for that field. Force-applying can be requested in different ways:
- By passing
--force-applyto Kluctl. This will cause ALL fields to be force-applied on conflicts. - By adding the
kluctl.io/force-apply=trueannotation to the object in question. This will cause all fields of that object to be force-applied on conflicts. - By adding the
kluctl.io/force-apply-field=my.json.pathannotation to the object in question. This causes only fields matching the JSON path to be force-applied on conflicts.
Marking a field to be force-applied is required whenever some other actor is known to erroneously claim fields (the ECK operator does this to the nodeSets field for example), you can ensure that Kluctl always overwrites these fields to the original or a new value.
In the future, Kluctl will allow even more control about conflict resolution. For example, the CLI will allow to control force-applying on field level.
DevOps vs Controllers
So how does SSA in Kluctl lead to "live and let live"?
It allows the co-existence of classical pipelines (e.g. Github Actions or Gitlab CI), controllers (e.g. the HPA controller or GitOps style controllers) and even admins running deployments from their local machines.
Wherever you are on your infrastructure automation journey, Kluctl has a place for you. From running deployments using a script on your PC, all the way to fully automated CI/CD with the pipelines themselves defined in code, Kluctl aims to complement the workflow that's right for you.
And even after fully automating everything, you can intervene with your admin
permissions if required and run a kubectl command that will modify a field
and prevent Kluctl from overwriting it. You'd just have to switch to a
field-manager (e.g. "admin-override") that is not overwritten by Kluctl.
A few takeaways
Server-side apply is a great feature and essential for the future of controllers and tools in Kubernetes. The amount of controllers involved will only get more and proper modes of working together are a must.
I believe that CI/CD-related controllers and tools should leverage SSA to perform proper conflict resolution. I also believe that other controllers (e.g. Flux and ArgoCD) would benefit from the same kind of conflict resolution control on field-level.
It might even be a good idea to come together and work on a standardized set of annotations to control conflict resolution for CI/CD-related tooling.
On the other side, non CI/CD-related controllers should ensure that they don't cause unnecessary conflicts when modifying objects. As of the server-side apply documentation, it is strongly recommended for controllers to always perform force-applying. When following this recommendation, controllers should really make sure that only fields related to the controller are included in the applied object. Otherwise, unnecessary conflicts are guaranteed.
In many cases, controllers are meant to only modify the status subresource of the objects they manage. In this case, controllers should only patch the status subresource and not touch the actual object. If this is followed, conflicts become impossible to occur.
If you are a developer of such a controller and unsure about your controller
adhering to the above, simply try to retrieve an object managed by your
controller and look at the managedFields (you'll need to pass
--show-managed-fields -oyaml to kubectl get) to see if some field got
claimed unexpectedly.
Server Side Apply Is Great And You Should Be Using It
Server-side apply (SSA) has now been GA for a few releases, and I have found myself in a number of conversations, recommending that people / teams in various situations use it. So I’d like to write down some of those reasons.
Obvious (and not-so-obvious) benefits of SSA
A list of improvements / niceties you get from switching from various things to Server-side apply!
- Versus client-side-apply (that is, plain
kubectl apply):- The system gives you conflicts when you accidentally fight with another actor over the value of a field!
- When combined with
--dry-run, there’s no chance of accidentally running a client-side dry run instead of a server side dry run.
- Versus hand-rolling patches:
- The SSA patch format is extremely natural to write, with no weird syntax. It’s just a regular object, but you can (and should) omit any field you don’t care about.
- The old patch format (“strategic merge patch”) was ad-hoc and still has some bugs; JSON-patch and JSON merge-patch fail to handle some cases that are common in the Kubernetes API, namely lists with items that should be recursively merged based on a “name” or other identifying field.
- There’s also now great go-language library support for building apply calls programmatically!
- You can use SSA to explicitly delete fields you don’t “own” by setting them
to
null, which makes it a feature-complete replacement for all of the old patch formats.
- Versus shelling out to kubectl:
- You can use the apply API call from any language without shelling out to kubectl!
- As stated above, the Go library has dedicated mechanisms to make this easy now.
- Versus GET-modify-PUT:
- (This one is more complicated and you can skip it if you've never written a controller!)
- To use GET-modify-PUT correctly, you have to handle and retry a write failure in the case that someone else has modified the object in any way between your GET and PUT. This is an “optimistic concurrency failure” when it happens.
- SSA offloads this task to the server– you only have to retry if there’s a conflict, and the conflicts you can get are all meaningful, like when you’re actually trying to take a field away from another actor in the system.
- To put it another way, if 10 actors do a GET-modify-PUT cycle at the same time, 9 will get an optimistic concurrency failure and have to retry, then 8, etc, for up to 50 total GET-PUT attempts in the worst case (that’s .5N^2 GET and PUT calls for N actors making simultaneous changes). If the actors are using SSA instead, and the changes don’t actually conflict over specific fields, then all the changes can go in in any order. Additionally, SSA changes can often be done without a GET call at all. That’s only N apply requests for N actors, which is a drastic improvement!
How can I use SSA?
Users
Use kubectl apply --server-side! Soon we (SIG API Machinery) hope to make this
the default and remove the “client side” apply completely!
Controller authors
There’s two main categories here, but for both of them, you should probably force conflicts when using SSA. This is because your controller probably doesn’t know what to do when some other entity in the system has a different desire than your controller about a particular field. (See the CI/CD section, though!)
Controllers that use either a GET-modify-PUT sequence or a PATCH
This kind of controller GETs an object (possibly from a watch), modifies it, and then PUTs it back to write its changes. Sometimes it constructs a custom PATCH, but the semantics are the same. Most existing controllers (especially those in-tree) work like this.
If your controller is perfect, great! You don’t need to change it. But if you do want to change it, you can take advantage of the new client library’s extract workflow– that is, get the existing object, extract your existing desires, make modifications, and re-apply. For many controllers that were computing the smallest API changes possible, this will be a minor update to the existing implementation.
This workflow avoids the failure mode of accidentally trying to own every field in the object, which is what happens if you just GET the object, make changes, and then apply. (Note that the server will notice you did this and reject your change!)
Reconstructive controllers
This kind of controller wasn't really possible prior to SSA. The idea here is to (whenever something changes etc) reconstruct from scratch the fields of the object as the controller wishes them to be, and then apply the change to the server, letting it figure out the result. I now recommend that new controllers start out this way–it's less fiddly to say what you want an object to look like than it is to say how you want it to change.
The client library supports this method of operation by default.
The only downside is that you may end up sending unneeded apply requests to the API server, even if actually the object already matches your controller’s desires. This doesn't matter if it happens once in a while, but for extremely high-throughput controllers, it might cause a performance problem for the cluster–specifically, the API server. No-op writes are not written to storage (etcd) or broadcast to any watchers, so it’s not really that big of a deal. If you’re worried about this anyway, today you could use the method explained in the previous section, or you could still do it this way for now, and wait for an additional client-side mechanism to suppress zero-change applies.
To get around this downside, why not GET the object and only send your apply if the object needs it? Surprisingly, it doesn't help much – a no-op apply is not very much more work for the API server than an extra GET; and an apply that changes things is cheaper than that same apply with a preceding GET. Worse, since it is a distributed system, something could change between your GET and apply, invalidating your computation. Instead, you can use this optimization on an object retrieved from a cache–then it legitimately will reduce load on the system (at the cost of a delay when a change is needed and the cache is a bit behind).
CI/CD systems
Continuous integration (CI) and/or continuous deployment (CD) systems are a special kind of controller which is doing something like reading manifests from source control (such as a Git repo) and automatically pushing them into the cluster. Perhaps the CI / CD process first generates manifests from a template, then runs some tests, and then deploys a change. Typically, users are the entities pushing changes into source control, although that’s not necessarily always the case.
Some systems like this continuously reconcile with the cluster, others may only operate when a change is pushed to the source control system. The following considerations are important for both, but more so for the continuously reconciling kind.
CI/CD systems are literally controllers, but for the purpose of apply, they are more like users, and unlike other controllers, they need to pay attention to conflicts. Reasoning:
- Abstractly, CI/CD systems can change anything, which means they could conflict with any controller out there. The recommendation that controllers force conflicts is assuming that controllers change a limited number of things and you can be reasonably sure that they won’t fight with other controllers about those things; that’s clearly not the case for CI/CD controllers.
- Concrete example: imagine the CI/CD system wants
.spec.replicasfor some Deployment to be 3, because that is the value that is checked into source code; however there is also a HorizontalPodAutoscaler (HPA) that targets the same deployment. The HPA computes a target scale and decides that there should be 10 replicas. Which should win? I just said that most controllers–including the HPA–should ignore conflicts. The HPA has no idea if it has been enabled incorrectly, and the HPA has no convenient way of informing users of errors. - The other common cause of a CI/CD system getting a conflict is probably when it is trying to overwrite a hot-fix (hand-rolled patch) placed there by a system admin / SRE / dev-on-call. You almost certainly don’t want to override that automatically.
- Of course, sometimes SRE makes an accidental change, or a dev makes an unauthorized change – those you do want to notice and overwrite; however, the CI/CD system can’t tell the difference between these last two cases.
Hopefully this convinces you that CI/CD systems need error paths–a way to back-propagate these conflict errors to humans; in fact, they should have this already, certainly continuous integration systems need some way to report that tests are failing. But maybe I can also say something about how humans can deal with errors:
Reject the hotfix: the (human) administrator of the CI/CD system observes the error, and manually force-applies the manifest in question. Then the CI/CD system will be able to apply the manifest successfully and become a co-owner.
Optional: then the administrator applies a blank manifest (just the object type / namespace / name) to relinquish any fields they became a manager for. if this step is omitted, there's some chance the administrator will end up owning fields and causing an unwanted future conflict.
Note: why an administrator? I'm assuming that developers which ordinarily push to the CI/CD system and / or its source control system may not have permissions to push directly to the cluster.
Accept the hotfix: the author of the change in question sees the conflict, and edits their change to accept the value running in production.
Accept then reject: as in the accept option, but after that manifest is applied, and the CI/CD queue owns everything again (so no conflicts), re-apply the original manifest.
I can also imagine the CI/CD system permitting you to mark a manifest as “force conflicts” somehow– if there’s demand for this we could consider making a more standardized way to do this. A rigorous version of this which lets you declare exactly which conflicts you intend to force would require support from the API server; in lieu of that, you can make a second manifest with only that subset of fields.
Future work: we could imagine an especially advanced CI/CD system that could parse
metadata.managedFieldsdata to see who or what they are conflicting with, over what fields, and decide whether or not to ignore the conflict. In fact, this information is also presented in any conflict errors, though perhaps not in an easily machine-parseable format. We (SIG API Machinery) mostly didn't expect that people would want to take this approach — so we would love to know if in fact people want/need the features implied by this approach, such as the ability, when applying to request to override certain conflicts but not others.If this sounds like an approach you'd want to take for your own controller, come talk to SIG API Machinery!
Happy applying!
Current State: 2019 Third Party Security Audit of Kubernetes
We expect the brand new Third Party Security Audit of Kubernetes will be published later this month (Oct 2022).
In preparation for that, let's look at the state of findings that were made public as part of the last third party security audit of 2019 that was based on Kubernetes v1.13.4.
Motivation
Craig Ingram has graciously attempted over the years to keep track of the status of the findings reported in the last audit in this issue: kubernetes/kubernetes#81146. This blog post will attempt to dive deeper into this, address any gaps in tracking and become a point in time summary of the state of the findings reported from 2019.
This article should also help readers gain confidence through transparent communication, of work done by the community to address these findings and bubble up any findings that need help from community contributors.
Current State
The status of each issue / finding here is represented in a best effort manner. Authors do not claim to be 100% accurate on the status and welcome any corrections or feedback if the current state is not reflected accurately by commenting directly on the relevant issue.
| # | Title | Issue | Status |
|---|---|---|---|
| 1 | hostPath PersistentVolumes enable PodSecurityPolicy bypass | #81110 | closed, addressed by kubernetes/website#15756 and kubernetes/kubernetes#109798 |
| 2 | Kubernetes does not facilitate certificate revocation | #81111 | duplicate of #18982 and needs a KEP |
| 3 | HTTPS connections are not authenticated | #81112 | Largely left as an end user exercise in setting up the right configuration |
| 4 | TOCTOU when moving PID to manager's cgroup via kubelet | #81113 | Requires Node access for successful exploitation. Fix needed |
| 5 | Improperly patched directory traversal in kubectl cp | #76788 | closed, assigned CVE-2019-11249, fixed in #80436 |
| 6 | Bearer tokens are revealed in logs | #81114 | closed, assigned CVE-2019-11250, fixed in #81330 |
| 7 | Seccomp is disabled by default | #81115 | closed, addressed by #101943 |
| 8 | Pervasive world-accessible file permissions | #81116 | #112384 ( in progress) |
| 9 | Environment variables expose sensitive data | #81117 | closed, addressed by #84992 and #84677 |
| 10 | Use of InsecureIgnoreHostKey in SSH connections | #81118 | This feature was removed in v1.22: #102297 |
| 11 | Use of InsecureSkipVerify and other TLS weaknesses | #81119 | Needs a KEP |
| 12 | kubeadm performs potentially-dangerous reset operations | #81120 | closed, fixed by #81495, #81494, and kubernetes/website#15881 |
| 13 | Overflows when using strconv.Atoi and downcasting the result | #81121 | closed, fixed by #89120 |
| 14 | kubelet can cause an Out of Memory error with a malicious manifest | #81122 | closed, fixed by #76518 |
| 15 | kubectl can cause an Out Of Memory error with a malicious Pod specification | #81123 | Fix needed |
| 16 | Improper fetching of PIDs allows incorrect cgroup movement | #81124 | Fix needed |
| 17 | Directory traversal of host logs running kube-apiserver and kubelet | #81125 | closed, fixed by #87273 |
| 18 | Non-constant time password comparison | #81126 | closed, fixed by #81152 |
| 19 | Encryption recommendations not in accordance with best practices | #81127 | Work in Progress |
| 20 | Adding credentials to containers by default is unsafe | #81128 | Closed, fixed by #89193 |
| 21 | kubelet liveness probes can be used to enumerate host network | #81129 | Needs a KEP |
| 22 | iSCSI volume storage cleartext secrets in logs | #81130 | closed, fixed by #81215 |
| 23 | Hard coded credential paths | #81131 | closed, awaiting more evidence |
| 24 | Log rotation is not atomic | #81132 | Fix needed |
| 25 | Arbitrary file paths without bounding | #81133 | Fix needed. |
| 26 | Unsafe JSON construction | #81134 | Partially fixed |
| 27 | kubelet crash due to improperly handled errors | #81135 | Closed. Fixed by #81135 |
| 28 | Legacy tokens do not expire | #81136 | closed, fixed as part of #70679 |
| 29 | CoreDNS leaks internal cluster information across namespaces | #81137 | Closed, resolved with CoreDNS v1.6.2. #81137 (comment) |
| 30 | Services use questionable default functions | #81138 | Fix needed |
| 31 | Incorrect docker daemon process name in container manager | #81139 | closed, fixed by #81083 |
| 32 | Use standard formats everywhere | #81140 | Needs a KEP |
| 33 | Superficial health check provides false sense of safety | #81141 | closed, fixed by #81319 |
| 34 | Hardcoded use of insecure gRPC transport | #81142 | Needs a KEP |
| 35 | Incorrect handling of Retry-After | #81143 | closed, fixed by #91048 |
| 36 | Incorrect isKernelPid check | #81144 | closed, fixed by #81086 |
| 37 | Kubelet supports insecure TLS ciphersuites | #81145 | closed but fix needed for #91444 (see this comment) |
Inspired outcomes
Apart from fixes to the specific issues, the 2019 third party security audit
also motivated security focussed enhancements in the next few releases of
Kubernetes. One such example is
Kubernetes Enhancement Proposal (KEP) 1933 Defend Against Logging Secrets via Static Analysis to prevent exposing
secrets to logs with Patrick Rhomberg driving the
implementation. As a result of this KEP,
go-flow-levee, a taint propagation
analysis tool configured to detect logging of secrets, is executed in a
script
as a Prow presubmit job. This KEP was introduced in v1.20.0 as an alpha
feature, then graduated to beta in v1.21.0, and graduated to stable in
v1.23.0. As stable, the analysis runs as a blocking presubmit test. This
KEP also helped resolve the following issues from the 2019 third party security audit:
- #81114 Bearer tokens are revealed in logs
- #81117 Environment variables expose sensitive data
- #81130 iSCSI volume storage cleartext secrets in logs
Remaining Work
Many of the 37 findings identified were fixed by work from our community members over the last 3 years. However, we still have some work left to do. Here's a breakdown of remaining work with rough estimates on time commitment, complexity and benefits to the ecosystem on fixing these pending issues.
Note:
Anything requiring a KEP (Kubernetes Enhancement Proposal) is considered high time commitment and high complexity. Benefits to Ecosystem are roughly equivalent to risk of keeping the finding unfixed which is determined by Severity Level + Likelihood of a successful vulnerability exploit. These estimates and values in the table below are the authors' personal opinion. An individual or end users' threat model may rate the benefits to fix a particular issue higher or lower.| Title | Issue | Time Commitment | Complexity | Benefit to Ecosystem |
|---|---|---|---|---|
| Kubernetes does not facilitate certificate revocation | #81111 | High | High | Medium |
| Use of InsecureSkipVerify and other TLS weaknesses | #81119 | High | High | Medium |
kubectl can cause a local Out Of Memory error with a malicious Pod specification | #81123 | Medium | Medium | Medium |
| Improper fetching of PIDs allows incorrect cgroup movement | #81124 | Medium | Medium | Medium |
| kubelet liveness probes can be used to enumerate host network | #81129 | High | High | Medium |
| API Server supports insecure TLS ciphersuites | #81145 | Medium | Medium | Low |
| TOCTOU when moving PID to manager's cgroup via kubelet | #81113 | Medium | Medium | Low |
| Log rotation is not atomic | #81132 | Medium | Medium | Low |
| Arbitrary file paths without bounding | #81133 | Medium | Medium | Low |
| Services use questionable default functions | #81138 | Medium | Medium | Low |
| Use standard formats everywhere | #81140 | High | High | Very Low |
| Hardcoded use of insecure gRPC transport | #81142 | High | High | Very Low |
To get started on fixing any of these findings that need help, please consider getting involved in Kubernetes SIG Security by joining our bi-weekly meetings or hanging out with us on our Slack Channel.
Introducing Kueue
Whether on-premises or in the cloud, clusters face real constraints for resource usage, quota, and cost management reasons. Regardless of the autoscalling capabilities, clusters have finite capacity. As a result, users want an easy way to fairly and efficiently share resources.
In this article, we introduce Kueue, an open source job queueing controller designed to manage batch jobs as a single unit. Kueue leaves pod-level orchestration to existing stable components of Kubernetes. Kueue natively supports the Kubernetes Job API and offers hooks for integrating other custom-built APIs for batch jobs.
Why Kueue?
Job queueing is a key feature to run batch workloads at scale in both on-premises and cloud environments. The main goal of job queueing is to manage access to a limited pool of resources shared by multiple tenants. Job queueing decides which jobs should wait, which can start immediately, and what resources they can use.
Some of the most desired job queueing requirements include:
- Quota and budgeting to control who can use what and up to what limit. This is not only needed in clusters with static resources like on-premises, but it is also needed in cloud environments to control spend or usage of scarce resources.
- Fair sharing of resources between tenants. To maximize the usage of available resources, any unused quota assigned to inactive tenants should be allowed to be shared fairly between active tenants.
- Flexible placement of jobs across different resource types based on availability. This is important in cloud environments which have heterogeneous resources such as different architectures (GPU or CPU models) and different provisioning modes (spot vs on-demand).
- Support for autoscaled environments where resources can be provisioned on demand.
Plain Kubernetes doesn't address the above requirements. In normal circumstances, once a Job is created, the job-controller instantly creates the pods and kube-scheduler continuously attempts to assign the pods to nodes. At scale, this situation can work the control plane to death. There is also currently no good way to control at the job level which jobs should get which resources first, and no way to express order or fair sharing. The current ResourceQuota model is not a good fit for these needs because quotas are enforced on resource creation, and there is no queueing of requests. The intent of ResourceQuotas is to provide a builtin reliability mechanism with policies needed by admins to protect clusters from failing over.
In the Kubernetes ecosystem, there are several solutions for job scheduling. However, we found that these alternatives have one or more of the following problems:
- They replace existing stable components of Kubernetes, like kube-scheduler or the job-controller. This is problematic not only from an operational point of view, but also the duplication in the job APIs causes fragmentation of the ecosystem and reduces portability.
- They don't integrate with autoscaling, or
- They lack support for resource flexibility.
How Kueue works
With Kueue we decided to take a different approach to job queueing on Kubernetes that is anchored around the following aspects:
- Not duplicating existing functionalities already offered by established Kubernetes components for pod scheduling, autoscaling and job lifecycle management.
- Adding key features that are missing to existing components. For example, we invested in the Job API to cover more use cases like IndexedJob and fixed long standing issues related to pod tracking. While this path takes longer to land features, we believe it is the more sustainable long term solution.
- Ensuring compatibility with cloud environments where compute resources are elastic and heterogeneous.
For this approach to be feasible, Kueue needs knobs to influence the behavior of those established components so it can effectively manage when and where to start a job. We added those knobs to the Job API in the form of two features:
- Suspend field, which allows Kueue to signal to the job-controller when to start or stop a Job.
- Mutable scheduling directives, which allows Kueue to
update a Job's
.spec.template.spec.nodeSelectorbefore starting the Job. This way, Kueue can control Pod placement while still delegating to kube-scheduler the actual pod-to-node scheduling.
Note that any custom job API can be managed by Kueue if that API offers the above two capabilities.
Resource model
Kueue defines new APIs to address the requirements mentioned at the beginning of this post. The three main APIs are:
- ResourceFlavor: a cluster-scoped API to define resource flavor available for consumption, like a GPU model. At its core, a ResourceFlavor is a set of labels that mirrors the labels on the nodes that offer those resources.
- ClusterQueue: a cluster-scoped API to define resource pools by setting quotas for one or more ResourceFlavor.
- LocalQueue: a namespaced API for grouping and managing single tenant jobs. In its simplest form, a LocalQueue is a pointer to the ClusterQueue that the tenant (modeled as a namespace) can use to start their jobs.
For more details, take a look at the API concepts documentation. While the three APIs may look overwhelming, most of Kueue’s operations are centered around ClusterQueue; the ResourceFlavor and LocalQueue APIs are mainly organizational wrappers.
Example use case
Imagine the following setup for running batch workloads on a Kubernetes cluster on the cloud:
- You have cluster-autoscaler installed in the cluster to automatically adjust the size of your cluster.
- There are two types of autoscaled node groups that differ on their provisioning policies: spot and on-demand. The nodes of each group are
differentiated by the label
instance-type=spotorinstance-type=ondemand. Moreover, since not all Jobs can tolerate running on spot nodes, the nodes are tainted withspot=true:NoSchedule. - To strike a balance between cost and resource availability, imagine you want Jobs to use up to 1000 cores of on-demand nodes, then use up to 2000 cores of spot nodes.
As an admin for the batch system, you define two ResourceFlavors that represent the two types of nodes:
---
apiVersion: kueue.x-k8s.io/v1alpha2
kind: ResourceFlavor
metadata:
name: ondemand
labels:
instance-type: ondemand
---
apiVersion: kueue.x-k8s.io/v1alpha2
kind: ResourceFlavor
metadata:
name: spot
labels:
instance-type: spot
taints:
- effect: NoSchedule
key: spot
value: "true"
Then you define the quotas by creating a ClusterQueue as follows:
apiVersion: kueue.x-k8s.io/v1alpha2
kind: ClusterQueue
metadata:
name: research-pool
spec:
namespaceSelector: {}
resources:
- name: "cpu"
flavors:
- name: ondemand
quota:
min: 1000
- name: spot
quota:
min: 2000
Note that the order of flavors in the ClusterQueue resources matters: Kueue will attempt to fit jobs in the available quotas according to the order unless the job has an explicit affinity to specific flavors.
For each namespace, you define a LocalQueue that points to the ClusterQueue above:
apiVersion: kueue.x-k8s.io/v1alpha2
kind: LocalQueue
metadata:
name: training
namespace: team-ml
spec:
clusterQueue: research-pool
Admins create the above setup once. Batch users are able to find the queues they are allowed to
submit to by listing the LocalQueues in their namespace(s). The command is similar to the following: kubectl get -n my-namespace localqueues
To submit work, create a Job and set the kueue.x-k8s.io/queue-name annotation as follows:
apiVersion: batch/v1
kind: Job
metadata:
generateName: sample-job-
annotations:
kueue.x-k8s.io/queue-name: training
spec:
parallelism: 3
completions: 3
template:
spec:
tolerations:
- key: spot
operator: "Exists"
effect: "NoSchedule"
containers:
- name: example-batch-workload
image: registry.example/batch/calculate-pi:3.14
args: ["30s"]
resources:
requests:
cpu: 1
restartPolicy: Never
Kueue intervenes to suspend the Job as soon as it is created. Once the Job is at the head of the ClusterQueue, Kueue evaluates if it can start by checking if the resources requested by the job fit the available quota.
In the above example, the Job tolerates spot resources. If there are previously admitted Jobs consuming all existing on-demand quota but not all of spot’s, Kueue admits the Job using the spot quota. Kueue does this by issuing a single update to the Job object that:
- Changes the
.spec.suspendflag to false - Adds the term
instance-type: spotto the job's.spec.template.spec.nodeSelectorso that when the pods are created by the job controller, those pods can only schedule onto spot nodes.
Finally, if there are available empty nodes with matching node selector terms, then kube-scheduler will directly schedule the pods. If not, then kube-scheduler will initially mark the pods as unschedulable, which will trigger the cluster-autoscaler to provision new nodes.
Future work and getting involved
The example above offers a glimpse of some of Kueue's features including support for quota, resource flexibility, and integration with cluster autoscaler. Kueue also supports fair-sharing, job priorities, and different queueing strategies. Take a look at the Kueue documentation to learn more about those features and how to use Kueue.
We have a number of features that we plan to add to Kueue, such as hierarchical quota, budgets, and support for dynamically sized jobs. In the more immediate future, we are focused on adding support for job preemption.
The latest Kueue release is available on Github; try it out if you run batch workloads on Kubernetes (requires v1.22 or newer). We are in the early stages of this project and we are seeking feedback of all levels, major or minor, so please don’t hesitate to reach out. We’re also open to additional contributors, whether it is to fix or report bugs, or help add new features or write documentation. You can get in touch with us via our repo, mailing list or on Slack.
Last but not least, thanks to all our contributors who made this project possible!
Kubernetes 1.25: alpha support for running Pods with user namespaces
Kubernetes v1.25 introduces the support for user namespaces.
This is a major improvement for running secure workloads in Kubernetes. Each pod will have access only to a limited subset of the available UIDs and GIDs on the system, thus adding a new security layer to protect from other pods running on the same system.
How does it work?
A process running on Linux can use up to 4294967296 different UIDs and GIDs.
User namespaces is a Linux feature that allows mapping a set of users in the container to different users in the host, thus restricting what IDs a process can effectively use. Furthermore, the capabilities granted in a new user namespace do not apply in the host initial namespaces.
Why is it important?
There are mainly two reasons why user namespaces are important:
improve security since they restrict the IDs a pod can use, so each pod can run in its own separate environment with unique IDs.
enable running workloads as root in a safer manner.
In a user namespace we can map the root user inside the pod to a non-zero ID outside the container, containers believe in running as root while they are a regular unprivileged ID from the host point of view.
The process can keep capabilities that are usually restricted to privileged pods and do it in a safe way since the capabilities granted in a new user namespace do not apply in the host initial namespaces.
How do I enable user namespaces?
At the moment, user namespaces support is opt-in, so you must enable
it for a pod setting hostUsers to false under the pod spec stanza:
apiVersion: v1
kind: Pod
spec:
hostUsers: false
containers:
- name: nginx
image: docker.io/nginx
The feature is behind a feature gate, so make sure to enable
the UserNamespacesStatelessPodsSupport gate before you can use
the new feature.
The runtime must also support user namespaces:
containerd: support is planned for the 1.7 release. See containerd issue #7063 for more details.
CRI-O: v1.25 has support for user namespaces.
Support for this in cri-dockerd is not planned yet.
How do I get involved?
You can reach SIG Node by several means:
You can also contact us directly:
- GitHub / Slack: @rata @giuseppe
Enforce CRD Immutability with CEL Transition Rules
Immutable fields can be found in a few places in the built-in Kubernetes types.
For example, you can't change the .metadata.name of an object. Specific objects
have fields where changes to existing objects are constrained; for example, the
.spec.selector of a Deployment.
Aside from simple immutability, there are other common design patterns such as lists which are append-only, or a map with mutable values and immutable keys.
Until recently the best way to restrict field mutability for CustomResourceDefinitions has been to create a validating admission webhook: this means a lot of complexity for the common case of making a field immutable.
Beta since Kubernetes 1.25, CEL Validation Rules allow CRD authors to express validation constraints on their fields using a rich expression language, CEL. This article explores how you can use validation rules to implement a few common immutability patterns directly in the manifest for a CRD.
Basics of validation rules
The new support for CEL validation rules in Kubernetes allows CRD authors to add complicated admission logic for their resources without writing any code!
For example, A CEL rule to constrain a field maximumSize to be greater than a
minimumSize for a CRD might look like the following:
rule: |
self.maximumSize > self.minimumSize
message: 'Maximum size must be greater than minimum size.'
The rule field contains an expression written in CEL. self is a special keyword
in CEL which refers to the object whose type contains the rule.
The message field is an error message which will be sent to Kubernetes clients whenever this particular rule is not satisfied.
For more details about the capabilities and limitations of Validation Rules using CEL, please refer to validation rules. The CEL specification is also a good reference for information specifically related to the language.
Immutability patterns with CEL validation rules
This section implements several common use cases for immutability in Kubernetes CustomResourceDefinitions, using validation rules expressed as kubebuilder marker comments. Resultant OpenAPI generated by the kubebuilder marker comments will also be included so that if you are writing your CRD manifests by hand you can still follow along.
Project setup
To use CEL rules with kubebuilder comments, you first need to set up a Golang project structure with the CRD defined in Go.
You may skip this step if you are not using kubebuilder or are only interested in the resultant OpenAPI extensions.
Begin with a folder structure of a Go module set up like the following. If you have your own project already set up feel free to adapt this tutorial to your liking:
This is the typical folder structure used by Kubernetes projects for defining new API resources.
doc.go contains package-level metadata such as the group and the version:
// +groupName=stable.example.com
// +versionName=v1
package v1
types.go contains all type definitions in stable.example.com/v1
package v1
import (
metav1 "k8s.io/apimachinery/pkg/apis/meta/v1"
)
// An empty CRD as an example of defining a type using controller tools
// +kubebuilder:storageversion
// +kubebuilder:subresource:status
type TestCRD struct {
metav1.TypeMeta `json:",inline"`
metav1.ObjectMeta `json:"metadata,omitempty"`
Spec TestCRDSpec `json:"spec,omitempty"`
Status TestCRDStatus `json:"status,omitempty"`
}
type TestCRDStatus struct {}
type TestCRDSpec struct {
// You will fill this in as you go along
}
tools.go contains a dependency on controller-gen which will be used to generate the CRD definition:
//go:build tools
package celimmutabilitytutorial
// Force direct dependency on code-generator so that it may be executed with go run
import (
_ "sigs.k8s.io/controller-tools/cmd/controller-gen"
)
Finally, generate.gocontains a go:generate directive to make use of
controller-gen. controller-gen parses our types.go and creates generates
CRD yaml files into a crd folder:
package celimmutabilitytutorial
//go:generate go run sigs.k8s.io/controller-tools/cmd/controller-gen crd paths=./pkg/apis/... output:dir=./crds
You may now want to add dependencies for our definitions and test the code generation:
cd cel-immutability-tutorial
go mod init <your-org>/<your-module-name>
go mod tidy
go generate ./...
After running these commands you now have completed the basic project structure. Your folder tree should look like the following:
The manifest for the example CRD is now available in crds/stable.example.com_testcrds.yaml.
Immutablility after first modification
A common immutability design pattern is to make the field immutable once it has been first set. This example will throw a validation error if the field after changes after being first initialized.
// +kubebuilder:validation:XValidation:rule="!has(oldSelf.value) || has(self.value)", message="Value is required once set"
type ImmutableSinceFirstWrite struct {
metav1.TypeMeta `json:",inline"`
metav1.ObjectMeta `json:"metadata,omitempty"`
// +kubebuilder:validation:Optional
// +kubebuilder:validation:XValidation:rule="self == oldSelf",message="Value is immutable"
// +kubebuilder:validation:MaxLength=512
Value string `json:"value"`
}
The +kubebuilder directives in the comments inform controller-gen how to
annotate the generated OpenAPI. The XValidation rule causes the rule to appear
among the x-kubernetes-validations OpenAPI extension. Kubernetes then
respects the OpenAPI spec to enforce our constraints.
To enforce a field's immutability after its first write, you need to apply the following constraints:
- Field must be allowed to be initially unset
+kubebuilder:validation:Optional - Once set, field must not be allowed to be removed:
!has(oldSelf.value) | has(self.value)(type-scoped rule) - Once set, field must not be allowed to change value
self == oldSelf(field-scoped rule)
Also note the additional directive +kubebuilder:validation:MaxLength. CEL
requires that all strings have attached max length so that it may estimate the
computation cost of the rule. Rules that are too expensive will be rejected.
For more information on CEL cost budgeting, check out the other tutorial.
Example usage
Generating and installing the CRD should succeed:
# Ensure the CRD yaml is generated by controller-gen
go generate ./...
kubectl apply -f crds/stable.example.com_immutablesincefirstwrites.yaml
customresourcedefinition.apiextensions.k8s.io/immutablesincefirstwrites.stable.example.com created
Creating initial empty object with no value is permitted since value is optional:
kubectl apply -f - <<EOF
---
apiVersion: stable.example.com/v1
kind: ImmutableSinceFirstWrite
metadata:
name: test1
EOF
immutablesincefirstwrite.stable.example.com/test1 created
The initial modification of value succeeds:
kubectl apply -f - <<EOF
---
apiVersion: stable.example.com/v1
kind: ImmutableSinceFirstWrite
metadata:
name: test1
value: Hello, world!
EOF
immutablesincefirstwrite.stable.example.com/test1 configured
An attempt to change value is blocked by the field-level validation rule. Note
the error message shown to the user comes from the validation rule.
kubectl apply -f - <<EOF
---
apiVersion: stable.example.com/v1
kind: ImmutableSinceFirstWrite
metadata:
name: test1
value: Hello, new world!
EOF
The ImmutableSinceFirstWrite "test1" is invalid: value: Invalid value: "string": Value is immutable
An attempt to remove the value field altogether is blocked by the other validation rule
on the type. The error message also comes from the rule.
kubectl apply -f - <<EOF
---
apiVersion: stable.example.com/v1
kind: ImmutableSinceFirstWrite
metadata:
name: test1
EOF
The ImmutableSinceFirstWrite "test1" is invalid: <nil>: Invalid value: "object": Value is required once set
Generated schema
Note that in the generated schema there are two separate rule locations.
One is directly attached to the property immutable_since_first_write.
The other rule is associated with the crd type itself.
openAPIV3Schema:
properties:
value:
maxLength: 512
type: string
x-kubernetes-validations:
- message: Value is immutable
rule: self == oldSelf
type: object
x-kubernetes-validations:
- message: Value is required once set
rule: '!has(oldSelf.value) || has(self.value)'
Immutability upon object creation
A field which is immutable upon creation time is implemented similarly to the earlier example. The difference is that that field is marked required, and the type-scoped rule is no longer necessary.
type ImmutableSinceCreation struct {
metav1.TypeMeta `json:",inline"`
metav1.ObjectMeta `json:"metadata,omitempty"`
// +kubebuilder:validation:Required
// +kubebuilder:validation:XValidation:rule="self == oldSelf",message="Value is immutable"
// +kubebuilder:validation:MaxLength=512
Value string `json:"value"`
}
This field will be required when the object is created, and after that point will
not be allowed to be modified. Our CEL Validation Rule self == oldSelf
Usage example
Generating and installing the CRD should succeed:
# Ensure the CRD yaml is generated by controller-gen
go generate ./...
kubectl apply -f crds/stable.example.com_immutablesincecreations.yaml
customresourcedefinition.apiextensions.k8s.io/immutablesincecreations.stable.example.com created
Applying an object without the required field should fail:
kubectl apply -f - <<EOF
apiVersion: stable.example.com/v1
kind: ImmutableSinceCreation
metadata:
name: test1
EOF
The ImmutableSinceCreation "test1" is invalid:
* value: Required value
* <nil>: Invalid value: "null": some validation rules were not checked because the object was invalid; correct the existing errors to complete validation
Now that the field has been added, the operation is permitted:
kubectl apply -f - <<EOF
apiVersion: stable.example.com/v1
kind: ImmutableSinceCreation
metadata:
name: test1
value: Hello, world!
EOF
immutablesincecreation.stable.example.com/test1 created
If you attempt to change the value, the operation is blocked due to the
validation rules in the CRD. Note that the error message is as it was defined
in the validation rule.
kubectl apply -f - <<EOF
apiVersion: stable.example.com/v1
kind: ImmutableSinceCreation
metadata:
name: test1
value: Hello, new world!
EOF
The ImmutableSinceCreation "test1" is invalid: value: Invalid value: "string": Value is immutable
Also if you attempted to remove value altogether after adding it, you will
see an error as expected:
kubectl apply -f - <<EOF
apiVersion: stable.example.com/v1
kind: ImmutableSinceCreation
metadata:
name: test1
EOF
The ImmutableSinceCreation "test1" is invalid:
* value: Required value
* <nil>: Invalid value: "null": some validation rules were not checked because the object was invalid; correct the existing errors to complete validation
Generated schema
openAPIV3Schema:
properties:
value:
maxLength: 512
type: string
x-kubernetes-validations:
- message: Value is immutable
rule: self == oldSelf
required:
- value
type: object
Append-only list of containers
In the case of ephemeral containers on Pods, Kubernetes enforces that the elements in the list are immutable, and can’t be removed. The following example shows how you could use CEL to achieve the same behavior.
// +kubebuilder:validation:XValidation:rule="!has(oldSelf.value) || has(self.value)", message="Value is required once set"
type AppendOnlyList struct {
metav1.TypeMeta `json:",inline"`
metav1.ObjectMeta `json:"metadata,omitempty"`
// +kubebuilder:validation:Optional
// +kubebuilder:validation:MaxItems=100
// +kubebuilder:validation:XValidation:rule="oldSelf.all(x, x in self)",message="Values may only be added"
Values []v1.EphemeralContainer `json:"value"`
}
- Once set, field must not be deleted:
!has(oldSelf.value) || has(self.value)(type-scoped) - Once a value is added it is not removed:
oldSelf.all(x, x in self)(field-scoped) - Value may be initially unset:
+kubebuilder:validation:Optional
Note that for cost-budgeting purposes, MaxItems is also required to be specified.
Example usage
Generating and installing the CRD should succeed:
# Ensure the CRD yaml is generated by controller-gen
go generate ./...
kubectl apply -f crds/stable.example.com_appendonlylists.yaml
customresourcedefinition.apiextensions.k8s.io/appendonlylists.stable.example.com created
Creating an initial list with one element inside should succeed without problem:
kubectl apply -f - <<EOF
---
apiVersion: stable.example.com/v1
kind: AppendOnlyList
metadata:
name: testlist
value:
- name: container1
image: nginx/nginx
EOF
appendonlylist.stable.example.com/testlist created
Adding an element to the list should also proceed without issue as expected:
kubectl apply -f - <<EOF
---
apiVersion: stable.example.com/v1
kind: AppendOnlyList
metadata:
name: testlist
value:
- name: container1
image: nginx/nginx
- name: container2
image: mongodb/mongodb
EOF
appendonlylist.stable.example.com/testlist configured
But if you now attempt to remove an element, the error from the validation rule is triggered:
kubectl apply -f - <<EOF
---
apiVersion: stable.example.com/v1
kind: AppendOnlyList
metadata:
name: testlist
value:
- name: container1
image: nginx/nginx
EOF
The AppendOnlyList "testlist" is invalid: value: Invalid value: "array": Values may only be added
Additionally, to attempt to remove the field once it has been set is also disallowed by the type-scoped validation rule.
kubectl apply -f - <<EOF
---
apiVersion: stable.example.com/v1
kind: AppendOnlyList
metadata:
name: testlist
EOF
The AppendOnlyList "testlist" is invalid: <nil>: Invalid value: "object": Value is required once set
Generated schema
openAPIV3Schema:
properties:
value:
items: ...
maxItems: 100
type: array
x-kubernetes-validations:
- message: Values may only be added
rule: oldSelf.all(x, x in self)
type: object
x-kubernetes-validations:
- message: Value is required once set
rule: '!has(oldSelf.value) || has(self.value)'
Map with append-only keys, immutable values
// A map which does not allow keys to be removed or their values changed once set. New keys may be added, however.
// +kubebuilder:validation:XValidation:rule="!has(oldSelf.values) || has(self.values)", message="Value is required once set"
type MapAppendOnlyKeys struct {
metav1.TypeMeta `json:",inline"`
metav1.ObjectMeta `json:"metadata,omitempty"`
// +kubebuilder:validation:Optional
// +kubebuilder:validation:MaxProperties=10
// +kubebuilder:validation:XValidation:rule="oldSelf.all(key, key in self && self[key] == oldSelf[key])",message="Keys may not be removed and their values must stay the same"
Values map[string]string `json:"values,omitempty"`
}
- Once set, field must not be deleted:
!has(oldSelf.values) || has(self.values)(type-scoped) - Once a key is added it is not removed nor is its value modified:
oldSelf.all(key, key in self && self[key] == oldSelf[key])(field-scoped) - Value may be initially unset:
+kubebuilder:validation:Optional
Example usage
Generating and installing the CRD should succeed:
# Ensure the CRD yaml is generated by controller-gen
go generate ./...
kubectl apply -f crds/stable.example.com_mapappendonlykeys.yaml
customresourcedefinition.apiextensions.k8s.io/mapappendonlykeys.stable.example.com created
Creating an initial object with one key within values should be permitted:
kubectl apply -f - <<EOF
---
apiVersion: stable.example.com/v1
kind: MapAppendOnlyKeys
metadata:
name: testmap
values:
key1: value1
EOF
mapappendonlykeys.stable.example.com/testmap created
Adding new keys to the map should also be permitted:
kubectl apply -f - <<EOF
---
apiVersion: stable.example.com/v1
kind: MapAppendOnlyKeys
metadata:
name: testmap
values:
key1: value1
key2: value2
EOF
mapappendonlykeys.stable.example.com/testmap configured
But if a key is removed, the error messagr from the validation rule should be returned:
kubectl apply -f - <<EOF
---
apiVersion: stable.example.com/v1
kind: MapAppendOnlyKeys
metadata:
name: testmap
values:
key1: value1
EOF
The MapAppendOnlyKeys "testmap" is invalid: values: Invalid value: "object": Keys may not be removed and their values must stay the same
If the entire field is removed, the other validation rule is triggered and the operation is prevented. Note that the error message for the validation rule is shown to the user.
kubectl apply -f - <<EOF
---
apiVersion: stable.example.com/v1
kind: MapAppendOnlyKeys
metadata:
name: testmap
EOF
The MapAppendOnlyKeys "testmap" is invalid: <nil>: Invalid value: "object": Value is required once set
Generated schema
openAPIV3Schema:
description: A map which does not allow keys to be removed or their values
changed once set. New keys may be added, however.
properties:
values:
additionalProperties:
type: string
maxProperties: 10
type: object
x-kubernetes-validations:
- message: Keys may not be removed and their values must stay the same
rule: oldSelf.all(key, key in self && self[key] == oldSelf[key])
type: object
x-kubernetes-validations:
- message: Value is required once set
rule: '!has(oldSelf.values) || has(self.values)'
Going further
The above examples showed how CEL rules can be added to kubebuilder types. The same rules can be added directly to OpenAPI if writing a manifest for a CRD by hand.
For native types, the same behavior can be achieved using kube-openapi’s marker
+validations.
Usage of CEL within Kubernetes Validation Rules is so much more powerful than what has been shown in this article. For more information please check out validation rules in the Kubernetes documentation and CRD Validation Rules Beta blog post.
Kubernetes 1.25: Kubernetes In-Tree to CSI Volume Migration Status Update
The Kubernetes in-tree storage plugin to Container Storage Interface (CSI) migration infrastructure has already been beta since v1.17. CSI migration was introduced as alpha in Kubernetes v1.14. Since then, SIG Storage and other Kubernetes special interest groups are working to ensure feature stability and compatibility in preparation for CSI Migration feature to go GA.
SIG Storage is excited to announce that the core CSI Migration feature is generally available in Kubernetes v1.25 release!
SIG Storage wrote a blog post in v1.23 for CSI Migration status update which discussed the CSI migration status for each storage driver. It has been a while and this article is intended to give a latest status update on each storage driver for their CSI Migration status in Kubernetes v1.25.
Quick recap: What is CSI Migration, and why migrate?
The Container Storage Interface (CSI) was designed to help Kubernetes replace its existing, in-tree storage driver mechanisms - especially vendor specific plugins. Kubernetes support for the Container Storage Interface has been generally available since Kubernetes v1.13. Support for using CSI drivers was introduced to make it easier to add and maintain new integrations between Kubernetes and storage backend technologies. Using CSI drivers allows for better maintainability (driver authors can define their own release cycle and support lifecycle) and reduce the opportunity for vulnerabilities (with less in-tree code, the risks of a mistake are reduced, and cluster operators can select only the storage drivers that their cluster requires).
As more CSI Drivers were created and became production ready, SIG Storage wanted all Kubernetes users to benefit from the CSI model. However, we could not break API compatibility with the existing storage API types due to k8s architecture conventions. The solution we came up with was CSI migration: a feature that translates in-tree APIs to equivalent CSI APIs and delegates operations to a replacement CSI driver.
The CSI migration effort enables the replacement of existing in-tree storage plugins such as kubernetes.io/gce-pd or kubernetes.io/aws-ebs with a corresponding CSI driver from the storage backend.
If CSI Migration is working properly, Kubernetes end users shouldn’t notice a difference. Existing StorageClass, PersistentVolume and PersistentVolumeClaim objects should continue to work.
When a Kubernetes cluster administrator updates a cluster to enable CSI migration, existing workloads that utilize PVCs which are backed by in-tree storage plugins will continue to function as they always have.
However, behind the scenes, Kubernetes hands control of all storage management operations (previously targeting in-tree drivers) to CSI drivers.
For example, suppose you are a kubernetes.io/gce-pd user; after CSI migration, you can still use kubernetes.io/gce-pd to provision new volumes, mount existing GCE-PD volumes or delete existing volumes. All existing APIs and Interface will still function correctly. However, the underlying function calls are all going through the GCE PD CSI driver instead of the in-tree Kubernetes function.
This enables a smooth transition for end users. Additionally as storage plugin developers, we can reduce the burden of maintaining the in-tree storage plugins and eventually remove them from the core Kubernetes binary.
What is the timeline / status?
The current and targeted releases for each individual driver is shown in the table below:
| Driver | Alpha | Beta (in-tree deprecated) | Beta (on-by-default) | GA | Target "in-tree plugin" removal |
|---|---|---|---|---|---|
| AWS EBS | 1.14 | 1.17 | 1.23 | 1.25 | 1.27 (Target) |
| Azure Disk | 1.15 | 1.19 | 1.23 | 1.24 | 1.26 (Target) |
| Azure File | 1.15 | 1.21 | 1.24 | 1.26 (Target) | 1.28 (Target) |
| Ceph FS | 1.26 (Target) | ||||
| Ceph RBD | 1.23 | 1.26 (Target) | 1.27 (Target) | 1.28 (Target) | 1.30 (Target) |
| GCE PD | 1.14 | 1.17 | 1.23 | 1.25 | 1.27 (Target) |
| OpenStack Cinder | 1.14 | 1.18 | 1.21 | 1.24 | 1.26 (Target) |
| Portworx | 1.23 | 1.25 | 1.26 (Target) | 1.27 (Target) | 1.29 (Target) |
| vSphere | 1.18 | 1.19 | 1.25 | 1.26 (Target) | 1.28 (Target) |
The following storage drivers will not have CSI migration support.
The scaleio, flocker, quobyte and storageos drivers were removed; the others are deprecated and will be removed from core Kubernetes in the coming releases.
| Driver | Deprecated | Code Removal |
|---|---|---|
| Flocker | 1.22 | 1.25 |
| GlusterFS | 1.25 | 1.26 (Target) |
| Quobyte | 1.22 | 1.25 |
| ScaleIO | 1.16 | 1.22 |
| StorageOS | 1.22 | 1.25 |
What does it mean for the core CSI Migration feature to go GA?
Core CSI Migration goes to GA means that the general framework, core library and API for CSI migration is stable for Kubernetes v1.25 and will be part of future Kubernetes releases as well.
- If you are a Kubernetes distribution maintainer, this means if you disabled
CSIMigrationfeature gate previously, you are no longer allowed to do so because the feature gate has been locked. - If you are a Kubernetes storage driver developer, this means you can expect no backwards incompatibility changes in the CSI migration library.
- If you are a Kubernetes maintainer, expect nothing changes from your day to day development flows.
- If you are a Kubernetes user, expect nothing to change from your day-to-day usage flows. If you encounter any storage related issues, contact the people who operate your cluster (if that's you, contact the provider of your Kubernetes distribution, or get help from the community).
What does it mean for the storage driver CSI migration to go GA?
Storage Driver CSI Migration goes to GA means that the specific storage driver supports CSI Migration. Expect feature parity between the in-tree plugin with the CSI driver.
- If you are a Kubernetes distribution maintainer, make sure you install the corresponding
CSI driver on the distribution. And make sure you are not disabling the specific
CSIMigration{provider}flag, as they are locked. - If you are a Kubernetes storage driver maintainer, make sure the CSI driver can ensure feature parity if it supports CSI migration.
- If you are a Kubernetes maintainer/developer, expect nothing to change from your day-to-day development flows.
- If you are a Kubernetes user, the CSI Migration feature should be completely transparent to you, the only requirement is to install the corresponding CSI driver.
What's next?
We are expecting cloud provider in-tree storage plugins code removal to start to happen as part of the v1.26 and v1.27 releases of Kubernetes. More and more drivers that support CSI migration will go GA in the upcoming releases.
How do I get involved?
The Kubernetes Slack channel #csi-migration along with any of the standard SIG Storage communication channels are great ways to reach out to the SIG Storage and migration working group teams.
This project, like all of Kubernetes, is the result of hard work by many contributors from diverse backgrounds working together. We offer a huge thank you to the contributors who stepped up these last quarters to help move the project forward:
- Xing Yang (xing-yang)
- Hemant Kumar (gnufied)
Special thanks to the following people for the insightful reviews, thorough consideration and valuable contribution to the CSI migration feature:
- Andy Zhang (andyzhangz)
- Divyen Patel (divyenpatel)
- Deep Debroy (ddebroy)
- Humble Devassy Chirammal (humblec)
- Ismail Alidzhikov (ialidzhikov)
- Jordan Liggitt (liggitt)
- Matthew Cary (mattcary)
- Matthew Wong (wongma7)
- Neha Arora (nearora-msft)
- Oksana Naumov (trierra)
- Saad Ali (saad-ali)
- Michelle Au (msau42)
Those interested in getting involved with the design and development of CSI or any part of the Kubernetes Storage system, join the Kubernetes Storage Special Interest Group (SIG). We’re rapidly growing and always welcome new contributors.
Kubernetes 1.25: CustomResourceDefinition Validation Rules Graduate to Beta
In Kubernetes 1.25, Validation rules for CustomResourceDefinitions (CRDs) have graduated to Beta!
Validation rules make it possible to declare how custom resources are validated using the Common Expression Language (CEL). For example:
apiVersion: apiextensions.k8s.io/v1
kind: CustomResourceDefinition
...
openAPIV3Schema:
type: object
properties:
spec:
type: object
x-kubernetes-validations:
- rule: "self.minReplicas <= self.replicas && self.replicas <= self.maxReplicas"
message: "replicas should be in the range minReplicas..maxReplicas."
properties:
replicas:
type: integer
...
Validation rules support a wide range of use cases. To get a sense of some of the capabilities, let's look at a few examples:
| Validation Rule | Purpose |
|---|---|
self.minReplicas <= self.replicas | Validate an integer field is less than or equal to another integer field |
'Available' in self.stateCounts | Validate an entry with the 'Available' key exists in a map |
self.set1.all(e, !(e in self.set2)) | Validate that the elements of two sets are disjoint |
self == oldSelf | Validate that a required field is immutable once it is set |
self.created + self.ttl < self.expired | Validate that 'expired' date is after a 'create' date plus a 'ttl' duration |
Validation rules are expressive and flexible. See the Validation Rules documentation to learn more about what validation rules are capable of.
Why CEL?
CEL was chosen as the language for validation rules for a couple reasons:
- CEL expressions can easily be inlined into CRD schemas. They are sufficiently expressive to replace the vast majority of CRD validation checks currently implemented in admission webhooks. This results in CRDs that are self-contained and are easier to understand.
- CEL expressions are compiled and type checked against a CRD's schema "ahead-of-time" (when CRDs are created and updated) allowing them to be evaluated efficiently and safely "runtime" (when custom resources are validated). Even regex string literals in CEL are validated and pre-compiled when CRDs are created or updated.
Why not use validation webhooks?
Benefits of using validation rules when compared with validation webhooks:
- CRD authors benefit from a simpler workflow since validation rules eliminate the need to develop and maintain a webhook.
- Cluster administrators benefit by no longer having to install, upgrade and operate webhooks for the purposes of CRD validation.
- Cluster operability improves because CRD validation no longer requires a remote call to a webhook endpoint, eliminating a potential point of failure in the request-serving-path of the Kubernetes API server. This allows clusters to retain high availability while scaling to larger amounts of installed CRD extensions, since expected control plane availability would otherwise decrease with each additional webhook installed.
Getting started with validation rules
Writing validation rules in OpenAPIv3 schemas
You can define validation rules for any level of a CRD's OpenAPIv3 schema. Validation rules are automatically scoped to their location in the schema where they are declared.
Good practices for CRD validation rules:
- Scope validation rules as close as possible to the fields(s) they validate.
- Use multiple rules when validating independent constraints.
- Do not use validation rules for validations already
- Use OpenAPIv3 value validations (
maxLength,maxItems,maxProperties,required,enum,minimum,maximum, ..) and string formats where available. - Use
x-kubernetes-int-or-string,x-kubernetes-embedded-typeandx-kubernetes-list-type=(set|map)were appropriate.
Examples of good practice:
| Validation | Best Practice | Example(s) |
|---|---|---|
| Validate an integer is between 0 and 100. | Use OpenAPIv3 value validations. | type: integer |
| Constraint the max size limits on maps (objects with additionalProperties), arrays and string. | Use OpenAPIv3 value validations. Recommended for all maps, arrays and strings. This best practice is essential for rule cost estimation (explained below). | type: |
| Require a date-time be more recent than a particular timestamp. | Use OpenAPIv3 string formats to declare that the field is a date-time. Use validation rules to compare it to a particular timestamp. | type: string |
| Require two sets to be disjoint. | Use x-kubernetes-list-type to validate that the arrays are sets. Use validation rules to validate the sets are disjoint. | type: object |
CRD transition rules
Transition Rules make it possible to compare the new state against the old state of a resource in validation rules. You use transition rules to make sure that the cluster's API server does not accept invalid state transitions. A transition rule is a validation rule that references 'oldSelf'. The API server only evaluates transition rules when both an old value and new value exist.
Transition rule examples:
| Transition Rule | Purpose |
|---|---|
self == oldSelf | For a required field, make that field immutable once it is set. For an optional field, only allow transitioning from unset to set, or from set to unset. |
(on parent of field) has(self.field) == has(oldSelf.field)on field: self == oldSelf | Make a field immutable: validate that a field, even if optional, never changes after the resource is created (for a required field, the previous rule is simpler). |
self.all(x, x in oldSelf) | Only allow adding items to a field that represents a set (prevent removals). |
self >= oldSelf | Validate that a number is monotonically increasing. |
Using the Functions Libraries
Validation rules have access to a couple different function libraries:
- CEL standard functions, defined in the list of standard definitions
- CEL standard macros
- CEL extended string function library
- Kubernetes CEL extension library which includes supplemental functions for lists, regex, and URLs.
Examples of function libraries in use:
| Validation Rule | Purpose |
|---|---|
!(self.getDayOfWeek() in [0, 6]) | Validate that a date is not a Sunday or Saturday. |
isUrl(self) && url(self).getHostname() in [a.example.com', 'b.example.com'] | Validate that a URL has an allowed hostname. |
self.map(x, x.weight).sum() == 1 | Validate that the weights of a list of objects sum to 1. |
int(self.find('^[0-9]*')) < 100 | Validate that a string starts with a number less than 100. |
self.isSorted() | Validates that a list is sorted. |
Resource use and limits
To prevent CEL evaluation from consuming excessive compute resources, validation rules impose some limits. These limits are based on CEL cost units, a platform and machine independent measure of execution cost. As a result, the limits are the same regardless of where they are enforced.
Estimated cost limit
CEL is, by design, non-Turing-complete in such a way that the halting problem isn’t a concern. CEL takes advantage of this design choice to include an "estimated cost" subsystem that can statically compute the worst case run time cost of any CEL expression. Validation rules are integrated with the estimated cost system and disallow CEL expressions from being included in CRDs if they have a sufficiently poor (high) estimated cost. The estimated cost limit is set quite high and typically requires an O(n^2) or worse operation, across something of unbounded size, to be exceeded. Fortunately the fix is usually quite simple: because the cost system is aware of size limits declared in the CRD's schema, CRD authors can add size limits to the CRD's schema (maxItems for arrays, maxProperties for maps, maxLength for strings) to reduce the estimated cost.
Good practice:
Set maxItems, maxProperties and maxLength on all array, map (object with additionalProperties) and string types in CRD schemas! This results in lower and more accurate estimated costs and generally makes a CRD safer to use.
Runtime cost limits for CRD validation rules
In addition to the estimated cost limit, CEL keeps track of actual cost while evaluating a CEL expression and will halt execution of the expression if a limit is exceeded.
With the estimated cost limit already in place, the runtime cost limit is rarely encountered. But it is possible. For example, it might be encountered for a large resource composed entirely of a single large list and a validation rule that is either evaluated on each element in the list, or traverses the entire list.
CRD authors can ensure the runtime cost limit will not be exceeded in much the same way the estimated cost limit is avoided: by setting maxItems, maxProperties and maxLength on array, map and string types.
Future work
We look forward to working with the community on the adoption of CRD Validation Rules, and hope to see this feature promoted to general availability in an upcoming Kubernetes release!
There is a growing community of Kubernetes contributors thinking about how to make it possible to write extensible admission controllers using CEL as a substitute for admission webhooks for policy enforcement use cases. Anyone interested should reach out to us on the usual SIG API Machinery channels or via slack at #sig-api-machinery-cel-dev.
Acknowledgements
Special thanks to Cici Huang, Ben Luddy, Jordan Liggitt, David Eads, Daniel Smith, Dr. Stefan Schimanski, Leila Jalali and everyone who contributed to Validation Rules!
Kubernetes 1.25: Use Secrets for Node-Driven Expansion of CSI Volumes
Kubernetes v1.25, released earlier this month, introduced a new feature
that lets your cluster expand storage volumes, even when access to those
volumes requires a secret (for example: a credential for accessing a SAN fabric)
to perform node expand operation. This new behavior is in alpha and you
must enable a feature gate (CSINodeExpandSecret) to make use of it.
You must also be using CSI
storage; this change isn't relevant to storage drivers that are built in to Kubernetes.
To turn on this new, alpha feature, you enable the CSINodeExpandSecret feature
gate for the kube-apiserver and kubelet, which turns on a mechanism to send secretRef
configuration as part of NodeExpansion by the CSI drivers thus make use of
the same to perform node side expansion operation with the underlying
storage system.
What is this all about?
Before Kubernetes v1.24, you were able to define a cluster-level StorageClass that made use of StorageClass Secrets, but you didn't have any mechanism to specify the credentials that would be used for operations that take place when the storage was mounted onto a node and when the volume has to be expanded at node side.
The Kubernetes CSI already implemented a similar mechanism specific kinds of
volume resizes; namely, resizes of PersistentVolumes where the resizes take place
independently from any node referred as Controller Expansion. In that case, you
associate a PersistentVolume with a Secret that contains credentials for volume resize
actions, so that controller expansion can take place. CSI also supports a nodeExpandVolume
operation which CSI drivers can make use independent of Controller Expansion or along with
Controller Expansion on which, where the resize is driven from a node in your cluster where
the volume is attached. Please read Kubernetes 1.24: Volume Expansion Now A Stable Feature
At times, the CSI driver needs to check the actual size of the backend block storage (or image) before proceeding with a node-level filesystem expand operation. This avoids false positive returns from the backend storage cluster during filesystem expands.
When a PersistentVolume represents encrypted block storage (for example using LUKS) you need to provide a passphrase in order to expand the device, and also to make it possible to grow the filesystem on that device.
For various validations at time of node expansion, the CSI driver has to be connected to the backend storage cluster. If the
nodeExpandVolumerequest includes asecretRefthen the CSI driver can make use of the same and connect to the storage cluster to perform the cluster operations.
How does it work?
To enable this functionality from this version of Kubernetes, SIG Storage have introduced
a new feature gate called CSINodeExpandSecret. Once the feature gate is enabled
in the cluster, NodeExpandVolume requests can include a secretRef field. The NodeExpandVolume request
is part of CSI; for example, in a request which has been sent from the Kubernetes
control plane to the CSI driver.
As a cluster operator, you admin can specify these secrets as an opaque parameter in a StorageClass, the same way that you can already specify other CSI secret data. The StorageClass needs to have some CSI-specific parameters set. Here's an example of those parameters:
csi.storage.k8s.io/node-expand-secret-name: test-secret
csi.storage.k8s.io/node-expand-secret-namespace: default
If feature gates are enabled and storage class carries the above secret configuration, the CSI provisioner receives the credentials from the Secret as part of the NodeExpansion request.
CSI volumes that require secrets for online expansion will have NodeExpandSecretRef field set. If not set, the NodeExpandVolume CSI RPC call will be made without a secret.
Trying it out
Enable the
CSINodeExpandSecretfeature gate (please refer to Feature Gates).Create a Secret, and then a StorageClass that uses that Secret.
Here's an example manifest for a Secret that holds credentials:
apiVersion: v1
kind: Secret
metadata:
name: test-secret
namespace: default
data:
stringData:
username: admin
password: t0p-Secret
Here's an example manifest for a StorageClass that refers to those credentials:
apiVersion: storage.k8s.io/v1
kind: StorageClass
metadata:
name: csi-blockstorage-sc
parameters:
csi.storage.k8s.io/node-expand-secret-name: test-secret # the name of the Secret
csi.storage.k8s.io/node-expand-secret-namespace: default # the namespace that the Secret is in
provisioner: blockstorage.cloudprovider.example
reclaimPolicy: Delete
volumeBindingMode: Immediate
allowVolumeExpansion: true
Example output
If the PersistentVolumeClaim (PVC) was created successfully, you can see that
configuration within the spec.csi field of the PersistentVolume (look for
spec.csi.nodeExpandSecretRef).
Check that it worked by running kubectl get persistentvolume <pv_name> -o yaml.
You should see something like.
apiVersion: v1
kind: PersistentVolume
metadata:
annotations:
pv.kubernetes.io/provisioned-by: blockstorage.cloudprovider.example
creationTimestamp: "2022-08-26T15:14:07Z"
finalizers:
- kubernetes.io/pv-protection
name: pvc-95eb531a-d675-49f6-940b-9bc3fde83eb0
resourceVersion: "420263"
uid: 6fa824d7-8a06-4e0c-b722-d3f897dcbd65
spec:
accessModes:
- ReadWriteOnce
capacity:
storage: 6Gi
claimRef:
apiVersion: v1
kind: PersistentVolumeClaim
name: csi-pvc
namespace: default
resourceVersion: "419862"
uid: 95eb531a-d675-49f6-940b-9bc3fde83eb0
csi:
driver: blockstorage.cloudprovider.example
nodeExpandSecretRef:
name: test-secret
namespace: default
volumeAttributes:
storage.kubernetes.io/csiProvisionerIdentity: 1648042783218-8081-blockstorage.cloudprovider.example
volumeHandle: e21c7809-aabb-11ec-917a-2e2e254eb4cf
nodeAffinity:
required:
nodeSelectorTerms:
- matchExpressions:
- key: topology.hostpath.csi/node
operator: In
values:
- racknode01
persistentVolumeReclaimPolicy: Delete
storageClassName: csi-blockstorage-sc
volumeMode: Filesystem
status:
phase: Bound
If you then trigger online storage expansion, the kubelet passes the appropriate credentials to the CSI driver, by loading that Secret and passing the data to the storage driver.
Here's an example debug log:
I0330 03:29:51.966241 1 server.go:101] GRPC call: /csi.v1.Node/NodeExpandVolume
I0330 03:29:51.966261 1 server.go:105] GRPC request: {"capacity_range":{"required_bytes":7516192768},"secrets":"***stripped***","staging_target_path":"/var/lib/kubelet/plugins/kubernetes.io/csi/blockstorage.cloudprovider.example/f7c62e6e08ce21e9b2a95c841df315ed4c25a15e91d8fcaf20e1c2305e5300ab/globalmount","volume_capability":{"AccessType":{"Mount":{}},"access_mode":{"mode":7}},"volume_id":"e21c7809-aabb-11ec-917a-2e2e254eb4cf","volume_path":"/var/lib/kubelet/pods/bcb1b2c4-5793-425c-acf1-47163a81b4d7/volumes/kubernetes.io~csi/pvc-95eb531a-d675-49f6-940b-9bc3fde83eb0/mount"}
I0330 03:29:51.966360 1 nodeserver.go:459] req:volume_id:"e21c7809-aabb-11ec-917a-2e2e254eb4cf" volume_path:"/var/lib/kubelet/pods/bcb1b2c4-5793-425c-acf1-47163a81b4d7/volumes/kubernetes.io~csi/pvc-95eb531a-d675-49f6-940b-9bc3fde83eb0/mount" capacity_range:<required_bytes:7516192768 > staging_target_path:"/var/lib/kubelet/plugins/kubernetes.io/csi/blockstorage.cloudprovider.example/f7c62e6e08ce21e9b2a95c841df315ed4c25a15e91d8fcaf20e1c2305e5300ab/globalmount" volume_capability:<mount:<> access_mode:<mode:SINGLE_NODE_MULTI_WRITER > > secrets:<key:"XXXXXX" value:"XXXXX" > secrets:<key:"XXXXX" value:"XXXXXX" >
The future
As this feature is still in alpha, Kubernetes Storage SIG expect to update or get feedback from CSI driver authors with more tests and implementation. The community plans to eventually promote the feature to Beta in upcoming releases.
Get involved or learn more?
The enhancement proposal includes lots of detail about the history and technical implementation of this feature.
To learn more about StorageClass based dynamic provisioning in Kubernetes, please refer to Storage Classes and Persistent Volumes.
Please get involved by joining the Kubernetes Storage SIG (Special Interest Group) to help us enhance this feature. There are a lot of good ideas already and we'd be thrilled to have more!
Kubernetes 1.25: Local Storage Capacity Isolation Reaches GA
Local ephemeral storage capacity isolation was introduced as a alpha feature in Kubernetes 1.7 and it went beta in 1.9. With Kubernetes 1.25 we are excited to announce general availability(GA) of this feature.
Pods use ephemeral local storage for scratch space, caching, and logs. The lifetime of local ephemeral storage does not extend beyond the life of the individual pod. It is exposed to pods using the container’s writable layer, logs directory, and EmptyDir volumes. Before this feature was introduced, there were issues related to the lack of local storage accounting and isolation, such as Pods not knowing how much local storage is available and being unable to request guaranteed local storage. Local storage is a best-effort resource and pods can be evicted due to other pods filling the local storage.
The local storage capacity isolation feature allows users to manage local ephemeral storage in the same way as managing CPU and memory. It provides support for capacity isolation of shared storage between pods, such that a pod can be hard limited in its consumption of shared resources by evicting Pods if its consumption of shared storage exceeds that limit. It also allows setting ephemeral storage requests for resource reservation. The limits and requests for shared ephemeral-storage are similar to those for memory and CPU consumption.
How to use local storage capacity isolation
A typical configuration for local ephemeral storage is to place all different kinds of ephemeral local data (emptyDir volumes, writeable layers, container images, logs) into one filesystem. Typically, both /var/lib/kubelet and /var/log are on the system's root filesystem. If users configure the local storage in different ways, kubelet might not be able to correctly measure disk usage and use this feature.
Setting requests and limits for local ephemeral storage
You can specify ephemeral-storage for managing local ephemeral storage. Each container of a Pod can specify either or both of the following:
spec.containers[].resources.limits.ephemeral-storagespec.containers[].resources.requests.ephemeral-storage
In the following example, the Pod has two containers. The first container has a request of 8GiB of local ephemeral storage and a limit of 12GiB. The second container requests 2GiB of local storage, but no limit setting. Therefore, the Pod requests a total of 10GiB (8GiB+2GiB) of local ephemeral storage and enforces a limit of 12GiB of local ephemeral storage. It also sets emptyDir sizeLimit to 5GiB. With this setting in pod spec, it will affect how the scheduler makes a decision on scheduling pods and also how kubelet evict pods.
apiVersion: v1
kind: Pod
metadata:
name: frontend
spec:
containers:
- name: app
image: images.my-company.example/app:v4
resources:
requests:
ephemeral-storage: "8Gi"
limits:
ephemeral-storage: "12Gi"
volumeMounts:
- name: ephemeral
mountPath: "/tmp"
- name: log-aggregator
image: images.my-company.example/log-aggregator:v6
resources:
requests:
ephemeral-storage: "2Gi"
volumeMounts:
- name: ephemeral
mountPath: "/tmp"
volumes:
- name: ephemeral
emptyDir: {}
sizeLimit: 5Gi
First of all, the scheduler ensures that the sum of the resource requests of the scheduled containers is less than the capacity of the node. In this case, the pod can be assigned to a node only if its available ephemeral storage (allocatable resource) has more than 10GiB.
Secondly, at container level, since one of the container sets resource limit, kubelet eviction manager will measure the disk usage of this container and evict the pod if the storage usage of the first container exceeds its limit (12GiB). At pod level, kubelet works out an overall Pod storage limit by
adding up the limits of all the containers in that Pod. In this case, the total storage usage at pod level is the sum of the disk usage from all containers plus the Pod's emptyDir volumes. If this total usage exceeds the overall Pod storage limit (12GiB), then the kubelet also marks the Pod for eviction.
Last, in this example, emptyDir volume sets its sizeLimit to 5Gi. It means that if this pod's emptyDir used up more local storage than 5GiB, the pod will be evicted from the node.
Setting resource quota and limitRange for local ephemeral storage
This feature adds two more resource quotas for storage. The request and limit set constraints on the total requests/limits of all containers’ in a namespace.
requests.ephemeral-storagelimits.ephemeral-storage
apiVersion: v1
kind: ResourceQuota
metadata:
name: storage-resources
spec:
hard:
requests.ephemeral-storage: "10Gi"
limits.ephemeral-storage: "20Gi"
Similar to CPU and memory, admin could use LimitRange to set default container’s local storage request/limit, and/or minimum/maximum resource constraints for a namespace.
apiVersion: v1
kind: LimitRange
metadata:
name: storage-limit-range
spec:
limits:
- default:
ephemeral-storage: 10Gi
defaultRequest:
ephemeral-storage: 5Gi
type: Container
Also, ephemeral-storage may be specified to reserve for kubelet or system. example, --system-reserved=[cpu=100m][,][memory=100Mi][,][ephemeral-storage=10Gi][,][pid=1000] --kube-reserved=[cpu=100m][,][memory=100Mi][,][ephemeral-storage=5Gi][,][pid=1000]. If your cluster node root disk capacity is 100Gi, after setting system-reserved and kube-reserved value, the available allocatable ephemeral storage would become 85Gi. The schedule will use this information to assign pods based on request and allocatable resources from each node. The eviction manager will also use allocatable resource to determine pod eviction. See more details from Reserve Compute Resources for System Daemons.
How do I get involved?
This project, like all of Kubernetes, is the result of hard work by many contributors from diverse backgrounds working together.
We offer a huge thank you to all the contributors in Kubernetes Storage SIG and CSI community who helped review the design and implementation of the project, including but not limited to the following:
- Benjamin Elder (BenTheElder)
- Michelle Au (msau42)
- Tim Hockin (thockin)
- Jordan Liggitt (liggitt)
- Xing Yang (xing-yang)
Kubernetes 1.25: Two Features for Apps Rollouts Graduate to Stable
This blog describes the two features namely minReadySeconds for StatefulSets and maxSurge for DaemonSets that SIG Apps is happy to graduate to stable in Kubernetes 1.25.
Specifying minReadySeconds slows down a rollout of a StatefulSet, when using a RollingUpdate value in .spec.updateStrategy field, by waiting for each pod for a desired time.
This time can be used for initializing the pod (e.g. warming up the cache) or as a delay before acknowledging the pod.
maxSurge allows a DaemonSet workload to run multiple instances of the same pod on a node during a rollout when using a RollingUpdate value in .spec.updateStrategy field.
This helps to minimize the downtime of the DaemonSet for consumers.
These features were already available in a Deployment and other workloads. This graduation helps to align this functionality across the workloads.
What problems do these features solve?
minReadySeconds for StatefulSets
minReadySeconds ensures that the StatefulSet workload is Ready for the given number of seconds before reporting the
pod as Available. The notion of being Ready and Available is quite important for workloads. For example, some workloads, like Prometheus with multiple instances of Alertmanager, should be considered Available only when the Alertmanager's state transfer is complete. minReadySeconds also helps when using loadbalancers with cloud providers. Since the pod should be Ready for the given number of seconds, it provides buffer time to prevent killing pods in rotation before new pods show up.
maxSurge for DaemonSets
Kubernetes system-level components like CNI, CSI are typically run as DaemonSets. These components can have impact on the availability of the workloads if those DaemonSets go down momentarily during the upgrades. The feature allows DaemonSet pods to temporarily increase their number, thereby ensuring zero-downtime for the DaemonSets.
Please note that the usage of hostPort in conjunction with maxSurge in DaemonSets is not allowed as DaemonSet pods are tied to a single node and two active pods cannot share the same port on the same node.
How does it work?
minReadySeconds for StatefulSets
The StatefulSet controller watches for the StatefulSet pods and counts how long a particular pod has been in the Running state, if this value is greater than or equal to the time specified in .spec.minReadySeconds field of the StatefulSet, the StatefulSet controller updates the AvailableReplicas field in the StatefulSet's status.
maxSurge for DaemonSets
The DaemonSet controller creates the additional pods (above the desired number resulting from DaemonSet spec) based on the value given in .spec.strategy.rollingUpdate.maxSurge. The additional pods would run on the same node where the old DaemonSet pod is running till the old pod gets killed.
- The default value is 0.
- The value cannot be
0whenMaxUnavailableis 0. - The value can be specified either as an absolute number of pods, or a percentage (rounded up) of desired pods.
How do I use it?
minReadySeconds for StatefulSets
Specify a value for minReadySeconds for any StatefulSet and check if pods are available or not by inspecting
AvailableReplicas field using:
kubectl get statefulset/<name_of_the_statefulset> -o yaml
Please note that the default value of minReadySeconds is 0.
maxSurge for DaemonSets
Specify a value for .spec.updateStrategy.rollingUpdate.maxSurge and set .spec.updateStrategy.rollingUpdate.maxUnavailable to 0.
Then observe a faster rollout and higher number of pods running at the same time in the next rollout.
kubectl rollout restart daemonset <name_of_the_daemonset>
kubectl get pods -w
How can I learn more?
minReadySeconds for StatefulSets
- Documentation: https://k8s.io/docs/concepts/workloads/controllers/statefulset/#minimum-ready-seconds
- KEP: https://github.com/kubernetes/enhancements/issues/2599
- API Changes: https://github.com/kubernetes/kubernetes/pull/100842
maxSurge for DaemonSets
- Documentation: https://k8s.io/docs/tasks/manage-daemon/update-daemon-set/
- KEP: https://github.com/kubernetes/enhancements/issues/1591
- API Changes: https://github.com/kubernetes/kubernetes/pull/96375
How do I get involved?
Please reach out to us on #sig-apps channel on Slack, or through the SIG Apps mailing list kubernetes-sig-apps@googlegroups.com.
Kubernetes 1.25: PodHasNetwork Condition for Pods
Kubernetes 1.25 introduces Alpha support for a new kubelet-managed pod condition
in the status field of a pod: PodHasNetwork. The kubelet, for a worker node,
will use the PodHasNetwork condition to accurately surface the initialization
state of a pod from the perspective of pod sandbox creation and network
configuration by a container runtime (typically in coordination with CNI
plugins). The kubelet starts to pull container images and start individual
containers (including init containers) after the status of the PodHasNetwork
condition is set to "True". Metrics collection services that report latency of
pod initialization from a cluster infrastructural perspective (i.e. agnostic of
per container characteristics like image size or payload) can utilize the
PodHasNetwork condition to accurately generate Service Level Indicators
(SLIs). Certain operators or controllers that manage underlying pods may utilize
the PodHasNetwork condition to optimize the set of actions performed when pods
repeatedly fail to come up.
Updates for Kubernetes 1.28
The PodHasNetwork condition has been renamed to PodReadyToStartContainers.
Alongside that change, the feature gate PodHasNetworkCondition has been replaced by
PodReadyToStartContainersCondition. You need to set PodReadyToStartContainersCondition
to true in order to use the new feature in v1.28.0 and later.
How is this different from the existing Initialized condition reported for pods?
The kubelet sets the status of the existing Initialized condition reported in
the status field of a pod depending on the presence of init containers in a pod.
If a pod specifies init containers, the status of the Initialized condition in
the pod status will not be set to "True" until all init containers for the pod
have succeeded. However, init containers, configured by users, may have errors
(payload crashing, invalid image, etc) and the number of init containers
configured in a pod may vary across different workloads. Therefore,
cluster-wide, infrastructural SLIs around pod initialization cannot depend on
the Initialized condition of pods.
If a pod does not specify init containers, the status of the Initialized
condition in the pod status is set to "True" very early in the lifecycle of
the pod. This occurs before the kubelet initiates any pod runtime sandbox
creation and network configuration steps. As a result, a pod without init
containers will report the status of the Initialized condition as "True"
even if the container runtime is not able to successfully initialize the pod
sandbox environment.
Relative to either situation above, the PodHasNetwork condition surfaces more
accurate data around when the pod runtime sandbox was initialized with
networking configured so that the kubelet can proceed to launch user-configured
containers (including init containers) in the pod.
Special Cases
If a pod specifies hostNetwork as "True", the PodHasNetwork condition is
set to "True" based on successful creation of the pod sandbox while the
network configuration state of the pod sandbox is ignored. This is because the
CRI implementation typically skips any pod sandbox network configuration when
hostNetwork is set to "True" for a pod.
A node agent may dynamically re-configure network interface(s) for a pod by
watching changes in pod annotations that specify additional networking
configuration (e.g. k8s.v1.cni.cncf.io/networks). Dynamic updates of pod
networking configuration after the pod sandbox is initialized by Kubelet (in
coordination with a container runtime) are not reflected by the PodHasNetwork
condition.
Try out the PodHasNetwork condition for pods
In order to have the kubelet report the PodHasNetwork condition in the status
field of a pod, please enable the PodHasNetworkCondition feature gate on the
kubelet.
For a pod whose runtime sandbox has been successfully created and has networking
configured, the kubelet will report the PodHasNetwork condition with status set to "True":
$ kubectl describe pod nginx1
Name: nginx1
Namespace: default
...
Conditions:
Type Status
PodHasNetwork True
Initialized True
Ready True
ContainersReady True
PodScheduled True
For a pod whose runtime sandbox has not been created yet (and networking not
configured either), the kubelet will report the PodHasNetwork condition with
status set to "False":
$ kubectl describe pod nginx2
Name: nginx2
Namespace: default
...
Conditions:
Type Status
PodHasNetwork False
Initialized True
Ready False
ContainersReady False
PodScheduled True
What’s next?
Depending on feedback and adoption, the Kubernetes team plans to push the
reporting of the PodHasNetwork condition to Beta in 1.26 or 1.27.
How can I learn more?
Please check out the
documentation for the
PodHasNetwork condition to learn more about it and how it fits in relation to
other pod conditions.
How to get involved?
This feature is driven by the SIG Node community. Please join us to connect with the community and share your ideas and feedback around the above feature and beyond. We look forward to hearing from you!
Acknowledgements
We want to thank the following people for their insightful and helpful reviews of the KEP and PRs around this feature: Derek Carr (@derekwaynecarr), Mrunal Patel (@mrunalp), Dawn Chen (@dchen1107), Qiutong Song (@qiutongs), Ruiwen Zhao (@ruiwen-zhao), Tim Bannister (@sftim), Danielle Lancashire (@endocrimes) and Agam Dua (@agamdua).
Announcing the Auto-refreshing Official Kubernetes CVE Feed
A long-standing request from the Kubernetes community has been to have a
programmatic way for end users to keep track of Kubernetes security issues
(also called "CVEs", after the database that tracks public security issues across
different products and vendors). Accompanying the release of Kubernetes v1.25,
we are excited to announce availability of such
a feed as an alpha
feature. This blog will cover the background and scope of this new service.
Motivation
With the growing number of eyes on Kubernetes, the number of CVEs related to Kubernetes have increased. Although most CVEs that directly, indirectly, or transitively impact Kubernetes are regularly fixed, there is no single place for the end users of Kubernetes to programmatically subscribe or pull the data of fixed CVEs. Current options are either broken or incomplete.
Scope
What This Does
Create a periodically auto-refreshing, human and machine-readable list of official Kubernetes CVEs
What This Doesn't Do
- Triage and vulnerability disclosure will continue to be done by SRC (Security Response Committee).
- Listing CVEs that are identified in build time dependencies and container images are out of scope.
- Only official CVEs announced by the Kubernetes SRC will be published in the feed.
Who It's For
- End Users: Persons or teams who use Kubernetes to deploy applications they own
- Platform Providers: Persons or teams who manage Kubernetes clusters
- Maintainers: Persons or teams who create and support Kubernetes releases through their work in Kubernetes Community - via various Special Interest Groups and Committees.
Implementation Details
A supporting contributor blog was published that describes in depth on how this CVE feed was implemented to ensure the feed was reasonably protected against tampering and was automatically updated after a new CVE was announced.
What's Next?
In order to graduate this feature, SIG Security is gathering feedback from end users who are using this alpha feed.
So in order to improve the feed in future Kubernetes Releases, if you have any feedback, please let us know by adding a comment to this tracking issue or let us know on #sig-security-tooling Kubernetes Slack channel. (Join Kubernetes Slack here)
A special shout out and massive thanks to Neha Lohia (@nehalohia27) and Tim Bannister (@sftim) for their stellar collaboration for many months from "ideation to implementation" of this feature.
Kubernetes 1.25: KMS V2 Improvements
With Kubernetes v1.25, SIG Auth is introducing a new v2alpha1 version of the Key Management Service (KMS) API. There are a lot of improvements in the works, and we're excited to be able to start down the path of a new and improved KMS!
What is KMS?
One of the first things to consider when securing a Kubernetes cluster is encrypting persisted API data at rest. KMS provides an interface for a provider to utilize a key stored in an external key service to perform this encryption.
Encryption at rest using KMS v1 has been a feature of Kubernetes since version v1.10, and is currently in beta as of version v1.12.
What’s new in v2alpha1?
While the original v1 implementation has been successful in helping Kubernetes users encrypt etcd data, it did fall short in a few key ways:
- Performance: When starting a cluster, all resources are serially fetched and decrypted to fill the
kube-apiservercache. When using a KMS plugin, this can cause slow startup times due to the large number of requests made to the remote vault. In addition, there is the potential to hit API rate limits on external key services depending on how many encrypted resources exist in the cluster. - Key Rotation: With KMS v1, rotation of a key-encrypting key is a manual and error-prone process. It can be difficult to determine what encryption keys are in-use on a cluster.
- Health Check & Status: Before the KMS v2 API, the
kube-apiserverwas forced to make encrypt and decrypt calls as a proxy to determine if the KMS plugin is healthy. With cloud services these operations usually cost actual money with cloud service. Whatever the cost, those operations on their own do not provide a holistic view of the service's health. - Observability: Without some kind of trace ID, it's has been difficult to correlate events found in the various logs across
kube-apiserver, KMS, and KMS plugins.
The KMS v2 enhancement attempts to address all of these shortcomings, though not all planned features are implemented in the initial alpha release. Here are the improvements that arrived in Kubernetes v1.25:
- Support for KMS plugins that use a key hierarchy to reduce network requests made to the remote vault. To learn more, check out the design details for how a KMS plugin can leverage key hierarchy.
- Extra metadata is now tracked to allow a KMS plugin to communicate what key it is currently using with the
kube-apiserver, allowing for rotation without API server restart. Data stored in etcd follows a more standard proto format to allow external tools to observe its state. To learn more, check out the details for metadata. - A dedicated status API is used to communicate the health of the KMS plugin with the API server. To learn more, check out the details for status API.
- To improve observability, a new
UIDfield is included inEncryptRequestandDecryptRequestof the v2 API. The UID is generated for each envelope operation. To learn more, check out the details for observability.
Sequence Diagram
Encrypt Request
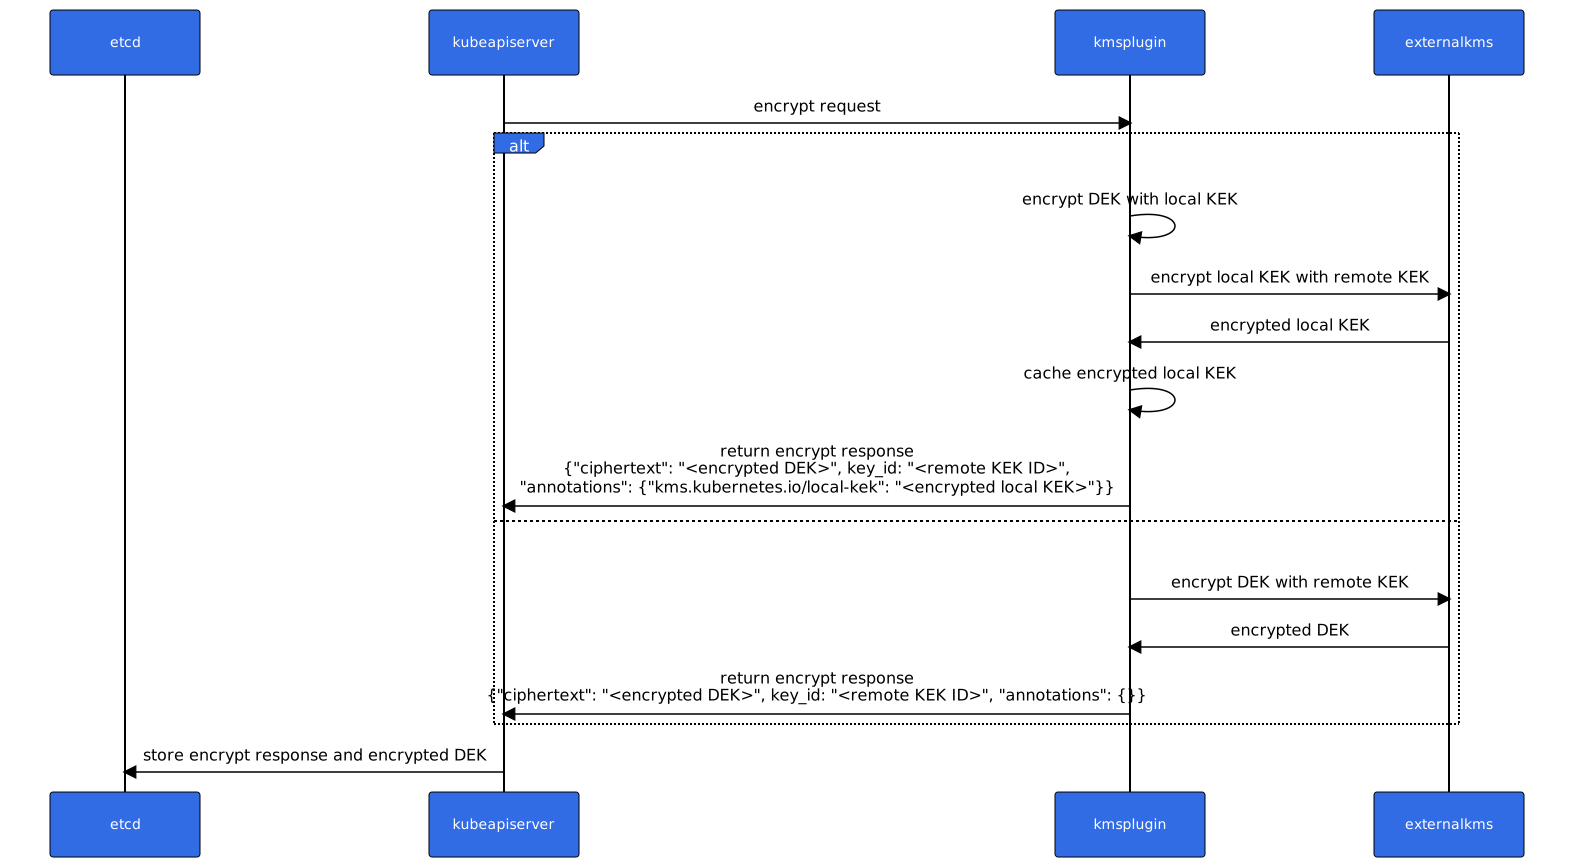
Decrypt Request
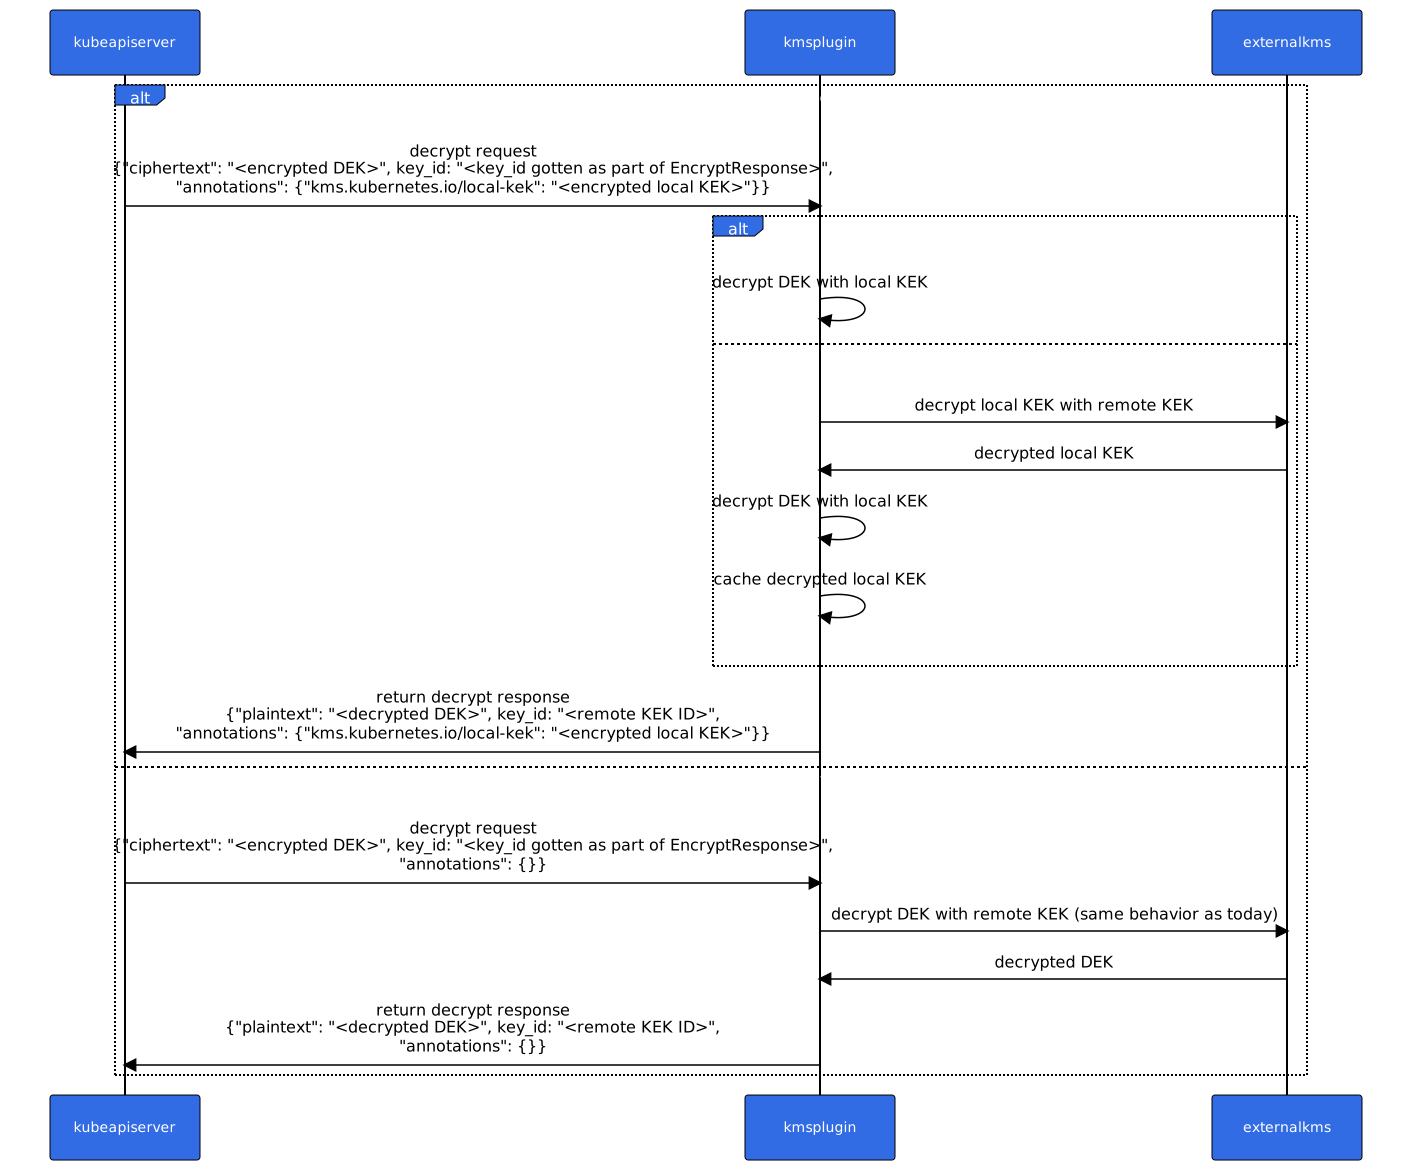
What’s next?
For Kubernetes v1.26, we expect to ship another alpha version. As of right now, the alpha API will be ready to be used by KMS plugin authors. We hope to include a reference plugin implementation with the next release, and you'll be able to try out the feature at that time.
You can learn more about KMS v2 by reading Using a KMS provider for data encryption. You can also follow along on the KEP to track progress across the coming Kubernetes releases.
How to get involved
If you are interested in getting involved in the development of this feature or would like to share feedback, please reach out on the #sig-auth-kms-dev channel on Kubernetes Slack.
You are also welcome to join the bi-weekly SIG Auth meetings, held every-other Wednesday.
Acknowledgements
This feature has been an effort driven by contributors from several different companies. We would like to extend a huge thank you to everyone that contributed their time and effort to help make this possible.
Kubernetes’s IPTables Chains Are Not API
Some Kubernetes components (such as kubelet and kube-proxy) create
iptables chains and rules as part of their operation. These chains
were never intended to be part of any Kubernetes API/ABI guarantees,
but some external components nonetheless make use of some of them (in
particular, using KUBE-MARK-MASQ to mark packets as needing to be
masqueraded).
As a part of the v1.25 release, SIG Network made this declaration explicit: that (with one exception), the iptables chains that Kubernetes creates are intended only for Kubernetes’s own internal use, and third-party components should not assume that Kubernetes will create any specific iptables chains, or that those chains will contain any specific rules if they do exist.
Then, in future releases, as part of KEP-3178, we will begin phasing
out certain chains that Kubernetes itself no longer needs. Components
outside of Kubernetes itself that make use of KUBE-MARK-MASQ,
KUBE-MARK-DROP, or other Kubernetes-generated iptables chains should
start migrating away from them now.
Background
In addition to various service-specific iptables chains, kube-proxy
creates certain general-purpose iptables chains that it uses as part
of service proxying. In the past, kubelet also used iptables for a few
features (such as setting up hostPort mapping for pods) and so it
also redundantly created some of the same chains.
However, with the removal of dockershim in Kubernetes in 1.24, kubelet now no longer ever uses any iptables rules for its own purposes; the things that it used to use iptables for are now always the responsibility of the container runtime or the network plugin, and there is no reason for kubelet to be creating any iptables rules.
Meanwhile, although iptables is still the default kube-proxy backend
on Linux, it is unlikely to remain the default forever, since the
associated command-line tools and kernel APIs are essentially
deprecated, and no longer receiving improvements. (RHEL 9
logs a warning if you use the iptables API, even via
iptables-nft.)
Although as of Kubernetes 1.25 iptables kube-proxy remains popular, and kubelet continues to create the iptables rules that it historically created (despite no longer using them), third party software cannot assume that core Kubernetes components will keep creating these rules in the future.
Upcoming changes
Starting a few releases from now, kubelet will no longer create the
following iptables chains in the nat table:
KUBE-MARK-DROPKUBE-MARK-MASQKUBE-POSTROUTING
Additionally, the KUBE-FIREWALL chain in the filter table will no
longer have the functionality currently associated with
KUBE-MARK-DROP (and it may eventually go away entirely).
This change will be phased in via the IPTablesOwnershipCleanup
feature gate. That feature gate is available and can be manually
enabled for testing in Kubernetes 1.25. The current plan is that it
will become enabled-by-default in Kubernetes 1.27, though this may be
delayed to a later release. (It will not happen sooner than Kubernetes
1.27.)
What to do if you use Kubernetes’s iptables chains
(Although the discussion below focuses on short-term fixes that are still based on iptables, you should probably also start thinking about eventually migrating to nftables or another API).
If you use KUBE-MARK-MASQ...
If you are making use of the KUBE-MARK-MASQ chain to cause packets
to be masqueraded, you have two options: (1) rewrite your rules to use
-j MASQUERADE directly, (2) create your own alternative “mark for
masquerade” chain.
The reason kube-proxy uses KUBE-MARK-MASQ is because there are lots
of cases where it needs to call both -j DNAT and -j MASQUERADE on
a packet, but it’s not possible to do both of those at the same time
in iptables; DNAT must be called from the PREROUTING (or OUTPUT)
chain (because it potentially changes where the packet will be routed
to) while MASQUERADE must be called from POSTROUTING (because the
masqueraded source IP that it picks depends on what the final routing
decision was).
In theory, kube-proxy could have one set of rules to match packets in
PREROUTING/OUTPUT and call -j DNAT, and then have a second set
of rules to match the same packets in POSTROUTING and call -j MASQUERADE. But instead, for efficiency, it only matches them once,
during PREROUTING/OUTPUT, at which point it calls -j DNAT and
then calls -j KUBE-MARK-MASQ to set a bit on the kernel packet mark
as a reminder to itself. Then later, during POSTROUTING, it has a
single rule that matches all previously-marked packets, and calls -j MASQUERADE on them.
If you have a lot of rules where you need to apply both DNAT and
masquerading to the same packets like kube-proxy does, then you may
want a similar arrangement. But in many cases, components that use
KUBE-MARK-MASQ are only doing it because they copied kube-proxy’s
behavior without understanding why kube-proxy was doing it that way.
Many of these components could easily be rewritten to just use
separate DNAT and masquerade rules. (In cases where no DNAT is
occurring then there is even less point to using KUBE-MARK-MASQ;
just move your rules from PREROUTING to POSTROUTING and call -j MASQUERADE directly.)
If you use KUBE-MARK-DROP...
The rationale for KUBE-MARK-DROP is similar to the rationale for
KUBE-MARK-MASQ: kube-proxy wanted to make packet-dropping decisions
alongside other decisions in the nat KUBE-SERVICES chain, but you
can only call -j DROP from the filter table. So instead, it uses
KUBE-MARK-DROP to mark packets to be dropped later on.
In general, the approach for removing a dependency on KUBE-MARK-DROP
is the same as for removing a dependency on KUBE-MARK-MASQ. In
kube-proxy’s case, it is actually quite easy to replace the usage of
KUBE-MARK-DROP in the nat table with direct calls to DROP in the
filter table, because there are no complicated interactions between
DNAT rules and drop rules, and so the drop rules can simply be moved
from nat to filter.
In more complicated cases, it might be necessary to “re-match” the
same packets in both nat and filter.
If you use Kubelet’s iptables rules to figure out iptables-legacy vs iptables-nft...
Components that manipulate host-network-namespace iptables rules from
inside a container need some way to figure out whether the host is
using the old iptables-legacy binaries or the newer iptables-nft
binaries (which talk to a different kernel API underneath).
The iptables-wrappers module provides a way for such components to
autodetect the system iptables mode, but in the past it did this by
assuming that Kubelet will have created “a bunch” of iptables rules
before any containers start, and so it can guess which mode the
iptables binaries in the host filesystem are using by seeing which
mode has more rules defined.
In future releases, Kubelet will no longer create many iptables rules, so heuristics based on counting the number of rules present may fail.
However, as of 1.24, Kubelet always creates a chain named
KUBE-IPTABLES-HINT in the mangle table of whichever iptables
subsystem it is using. Components can now look for this specific chain
to know which iptables subsystem Kubelet (and thus, presumably, the
rest of the system) is using.
(Additionally, since Kubernetes 1.17, kubelet has created a chain
called KUBE-KUBELET-CANARY in the mangle table. While this chain
may go away in the future, it will of course still be there in older
releases, so in any recent version of Kubernetes, at least one of
KUBE-IPTABLES-HINT or KUBE-KUBELET-CANARY will be present.)
The iptables-wrappers package has already been updated with this new
heuristic, so if you were previously using that, you can rebuild your
container images with an updated version of that.
Further reading
The project to clean up iptables chain ownership and deprecate the old chains is tracked by KEP-3178.
Introducing COSI: Object Storage Management using Kubernetes APIs
This article introduces the Container Object Storage Interface (COSI), a standard for provisioning and consuming object storage in Kubernetes. It is an alpha feature in Kubernetes v1.25.
File and block storage are treated as first class citizens in the Kubernetes ecosystem via Container Storage Interface (CSI). Workloads using CSI volumes enjoy the benefits of portability across vendors and across Kubernetes clusters without the need to change application manifests. An equivalent standard does not exist for Object storage.
Object storage has been rising in popularity in recent years as an alternative form of storage to filesystems and block devices. Object storage paradigm promotes disaggregation of compute and storage. This is done by making data available over the network, rather than locally. Disaggregated architectures allow compute workloads to be stateless, which consequently makes them easier to manage, scale and automate.
COSI
COSI aims to standardize consumption of object storage to provide the following benefits:
- Kubernetes Native - Use the Kubernetes API to provision, configure and manage buckets
- Self Service - A clear delineation between administration and operations (DevOps) to enable self-service capability for DevOps personnel
- Portability - Vendor neutrality enabled through portability across Kubernetes Clusters and across Object Storage vendors
Portability across vendors is only possible when both vendors support a common datapath-API. Eg. it is possible to port from AWS S3 to Ceph, or AWS S3 to MinIO and back as they all use S3 API. In contrast, it is not possible to port from AWS S3 and Google Cloud’s GCS or vice versa.
Architecture
COSI is made up of three components:
- COSI Controller Manager
- COSI Sidecar
- COSI Driver
The COSI Controller Manager acts as the main controller that processes changes to COSI API objects. It is responsible for fielding requests for bucket creation, updates, deletion and access management. One instance of the controller manager is required per kubernetes cluster. Only one is needed even if multiple object storage providers are used in the cluster.
The COSI Sidecar acts as a translator between COSI API requests and vendor-specific COSI Drivers. This component uses a standardized gRPC protocol that vendor drivers are expected to satisfy.
The COSI Driver is the vendor specific component that receives requests from the sidecar and calls the appropriate vendor APIs to create buckets, manage their lifecycle and manage access to them.
API
The COSI API is centered around buckets, since bucket is the unit abstraction for object storage. COSI defines three Kubernetes APIs aimed at managing them
- Bucket
- BucketClass
- BucketClaim
In addition, two more APIs for managing access to buckets are also defined:
- BucketAccess
- BucketAccessClass
In a nutshell, Bucket and BucketClaim can be considered to be similar to PersistentVolume and PersistentVolumeClaim respectively. The BucketClass’ counterpart in the file/block device world is StorageClass.
Since Object Storage is always authenticated, and over the network, access credentials are required to access buckets. The two APIs, namely, BucketAccess and BucketAccessClass are used to denote access credentials and policies for authentication. More info about these APIs can be found in the official COSI proposal - https://github.com/kubernetes/enhancements/tree/master/keps/sig-storage/1979-object-storage-support
Self-Service
Other than providing kubernetes-API driven bucket management, COSI also aims to empower DevOps personnel to provision and manage buckets on their own, without admin intervention. This, further enabling dev teams to realize faster turn-around times and faster time-to-market.
COSI achieves this by dividing bucket provisioning steps among two different stakeholders, namely the administrator (admin), and the cluster operator. The administrator will be responsible for setting broad policies and limits on how buckets are provisioned, and how access is obtained for them. The cluster operator will be free to create and utilize buckets within the limits set by the admin.
For example, a cluster operator could use an admin policy could be used to restrict maximum provisioned capacity to 100GB, and developers would be allowed to create buckets and store data upto that limit. Similarly for access credentials, admins would be able to restrict who can access which buckets, and developers would be able to access all the buckets available to them.
Portability
The third goal of COSI is to achieve vendor neutrality for bucket management. COSI enables two kinds of portability:
- Cross Cluster
- Cross Provider
Cross Cluster portability is allowing buckets provisioned in one cluster to be available in another cluster. This is only valid when the object storage backend itself is accessible from both clusters.
Cross-provider portability is about allowing organizations or teams to move from one object storage provider to another seamlessly, and without requiring changes to application definitions (PodTemplates, StatefulSets, Deployment and so on). This is only possible if the source and destination providers use the same data.
COSI does not handle data migration as it is outside of its scope. In case porting between providers requires data to be migrated as well, then other measures need to be taken to ensure data availability.
What’s next
The amazing sig-storage-cosi community has worked hard to bring the COSI standard to alpha status. We are looking forward to onboarding a lot of vendors to write COSI drivers and become COSI compatible!
We want to add more authentication mechanisms for COSI buckets, we are designing advanced bucket sharing primitives, multi-cluster bucket management and much more. Lots of great ideas and opportunities ahead!
Stay tuned for what comes next, and if you have any questions, comments or suggestions
- Chat with us on the Kubernetes Slack:#sig-storage-cosi
- Join our Zoom meeting, every Thursday at 10:00 Pacific Time
- Participate in the bucket API proposal PR to add your ideas, suggestions and more.
Kubernetes 1.25: cgroup v2 graduates to GA
Kubernetes 1.25 brings cgroup v2 to GA (general availability), letting the kubelet use the latest container resource management capabilities.
What are cgroups?
Effective resource management is a critical aspect of Kubernetes. This involves managing the finite resources in your nodes, such as CPU, memory, and storage.
cgroups are a Linux kernel capability that establish resource management functionality like limiting CPU usage or setting memory limits for running processes.
When you use the resource management capabilities in Kubernetes, such as configuring requests and limits for Pods and containers, Kubernetes uses cgroups to enforce your resource requests and limits.
The Linux kernel offers two versions of cgroups: cgroup v1 and cgroup v2.
What is cgroup v2?
cgroup v2 is the latest version of the Linux cgroup API. cgroup v2 provides a unified control system with enhanced resource management capabilities.
cgroup v2 has been in development in the Linux Kernel since 2016 and in recent years has matured across the container ecosystem. With Kubernetes 1.25, cgroup v2 support has graduated to general availability.
Many recent releases of Linux distributions have switched over to cgroup v2 by default so it's important that Kubernetes continues to work well on these new updated distros.
cgroup v2 offers several improvements over cgroup v1, such as the following:
- Single unified hierarchy design in API
- Safer sub-tree delegation to containers
- Newer features like Pressure Stall Information
- Enhanced resource allocation management and isolation across multiple resources
- Unified accounting for different types of memory allocations (network and kernel memory, etc)
- Accounting for non-immediate resource changes such as page cache write backs
Some Kubernetes features exclusively use cgroup v2 for enhanced resource management and isolation. For example, the MemoryQoS feature improves memory utilization and relies on cgroup v2 functionality to enable it. New resource management features in the kubelet will also take advantage of the new cgroup v2 features moving forward.
How do you use cgroup v2?
Many Linux distributions are switching to cgroup v2 by default; you might start using it the next time you update the Linux version of your control plane and nodes!
Using a Linux distribution that uses cgroup v2 by default is the recommended method. Some of the popular Linux distributions that use cgroup v2 include the following:
- Container Optimized OS (since M97)
- Ubuntu (since 21.10)
- Debian GNU/Linux (since Debian 11 Bullseye)
- Fedora (since 31)
- Arch Linux (since April 2021)
- RHEL and RHEL-like distributions (since 9)
To check if your distribution uses cgroup v2 by default, refer to Check your cgroup version or consult your distribution's documentation.
If you're using a managed Kubernetes offering, consult your provider to determine how they're adopting cgroup v2, and whether you need to take action.
To use cgroup v2 with Kubernetes, you must meet the following requirements:
- Your Linux distribution enables cgroup v2 on kernel version 5.8 or later
- Your container runtime supports cgroup v2. For example:
- containerd v1.4 or later
- cri-o v1.20 or later
- The kubelet and the container runtime are configured to use the systemd cgroup driver
The kubelet and container runtime use a cgroup driver to set cgroup parameters. When using cgroup v2, it's strongly recommended that both the kubelet and your container runtime use the systemd cgroup driver, so that there's a single cgroup manager on the system. To configure the kubelet and the container runtime to use the driver, refer to the systemd cgroup driver documentation.
Migrate to cgroup v2
When you run Kubernetes with a Linux distribution that enables cgroup v2, the kubelet should automatically adapt without any additional configuration required, as long as you meet the requirements.
In most cases, you won't see a difference in the user experience when you switch to using cgroup v2 unless your users access the cgroup file system directly.
If you have applications that access the cgroup file system directly, either on the node or from inside a container, you must update the applications to use the cgroup v2 API instead of the cgroup v1 API.
Scenarios in which you might need to update to cgroup v2 include the following:
- If you run third-party monitoring and security agents that depend on the cgroup file system, update the agents to versions that support cgroup v2.
- If you run cAdvisor as a stand-alone DaemonSet for monitoring pods and containers, update it to v0.43.0 or later.
- If you deploy Java applications, prefer to use versions which fully support cgroup v2:
- OpenJDK / HotSpot: jdk8u372, 11.0.16, 15 and later
- IBM Semeru Runtimes: 8.0.382.0, 11.0.20.0, 17.0.8.0, and later
- IBM Java: 8.0.8.6 and later
Learn more
- Read the Kubernetes cgroup v2 documentation
- Read the enhancement proposal, KEP 2254
- Learn more about cgroups on Linux Manual Pages and cgroup v2 on the Linux Kernel documentation
Get involved
Your feedback is always welcome! SIG Node meets regularly and are available in
the #sig-node channel in the Kubernetes Slack, or
using the SIG mailing list.
cgroup v2 has had a long journey and is a great example of open source community collaboration across the industry because it required work across the stack, from the Linux Kernel to systemd to various container runtimes, and (of course) Kubernetes.
Acknowledgments
We would like to thank Giuseppe Scrivano who initiated cgroup v2 support in Kubernetes, and reviews and leadership from the SIG Node community including chairs Dawn Chen and Derek Carr.
We'd also like to thank the maintainers of container runtimes like Docker, containerd and CRI-O, and the maintainers of components like cAdvisor and runc, libcontainer, which underpin many container runtimes. Finally, this wouldn't have been possible without support from systemd and upstream Linux Kernel maintainers.
It's a team effort!
Kubernetes 1.25: CSI Inline Volumes have graduated to GA
CSI Inline Volumes were introduced as an alpha feature in Kubernetes 1.15 and have been beta since 1.16. We are happy to announce that this feature has graduated to General Availability (GA) status in Kubernetes 1.25.
CSI Inline Volumes are similar to other ephemeral volume types, such as configMap, downwardAPI and secret. The important difference is that the storage is provided by a CSI driver, which allows the use of ephemeral storage provided by third-party vendors. The volume is defined as part of the pod spec and follows the lifecycle of the pod, meaning the volume is created once the pod is scheduled and destroyed when the pod is destroyed.
What's new in 1.25?
There are a couple of new bug fixes related to this feature in 1.25, and the CSIInlineVolume feature gate has been locked to True with the graduation to GA. There are no new API changes, so users of this feature during beta should not notice any significant changes aside from these bug fixes.
- #89290 - CSI inline volumes should support fsGroup
- #79980 - CSI volume reconstruction does not work for ephemeral volumes
When to use this feature
CSI inline volumes are meant for simple local volumes that should follow the lifecycle of the pod. They may be useful for providing secrets, configuration data, or other special-purpose storage to the pod from a CSI driver.
A CSI driver is not suitable for inline use when:
- The volume needs to persist longer than the lifecycle of a pod
- Volume snapshots, cloning, or volume expansion are required
- The CSI driver requires
volumeAttributesthat should be restricted to an administrator
How to use this feature
In order to use this feature, the CSIDriver spec must explicitly list Ephemeral as one of the supported volumeLifecycleModes. Here is a simple example from the Secrets Store CSI Driver.
apiVersion: storage.k8s.io/v1
kind: CSIDriver
metadata:
name: secrets-store.csi.k8s.io
spec:
podInfoOnMount: true
attachRequired: false
volumeLifecycleModes:
- Ephemeral
Any pod spec may then reference that CSI driver to create an inline volume, as in this example.
kind: Pod
apiVersion: v1
metadata:
name: my-csi-app-inline
spec:
containers:
- name: my-frontend
image: busybox
volumeMounts:
- name: secrets-store-inline
mountPath: "/mnt/secrets-store"
readOnly: true
command: [ "sleep", "1000000" ]
volumes:
- name: secrets-store-inline
csi:
driver: secrets-store.csi.k8s.io
readOnly: true
volumeAttributes:
secretProviderClass: "my-provider"
If the driver supports any volume attributes, you can provide these as part of the spec for the Pod as well:
csi:
driver: block.csi.vendor.example
volumeAttributes:
foo: bar
Example Use Cases
Two existing CSI drivers that support the Ephemeral volume lifecycle mode are the Secrets Store CSI Driver and the Cert-Manager CSI Driver.
The Secrets Store CSI Driver allows users to mount secrets from external secret stores into a pod as an inline volume. This can be useful when the secrets are stored in an external managed service or Vault instance.
The Cert-Manager CSI Driver works along with cert-manager to seamlessly request and mount certificate key pairs into a pod. This allows the certificates to be renewed and updated in the application pod automatically.
Security Considerations
Special consideration should be given to which CSI drivers may be used as inline volumes. volumeAttributes are typically controlled through the StorageClass, and may contain attributes that should remain restricted to the cluster administrator. Allowing a CSI driver to be used for inline ephmeral volumes means that any user with permission to create pods may also provide volumeAttributes to the driver through a pod spec.
Cluster administrators may choose to omit (or remove) Ephemeral from volumeLifecycleModes in the CSIDriver spec to prevent the driver from being used as an inline ephemeral volume, or use an admission webhook to restrict how the driver is used.
References
For more information on this feature, see:
Kubernetes v1.25: Pod Security Admission Controller in Stable
The release of Kubernetes v1.25 marks a major milestone for Kubernetes out-of-the-box pod security controls: Pod Security admission (PSA) graduated to stable, and Pod Security Policy (PSP) has been removed. PSP was deprecated in Kubernetes v1.21, and no longer functions in Kubernetes v1.25 and later.
The Pod Security admission controller replaces PodSecurityPolicy, making it easier to enforce predefined Pod Security Standards by simply adding a label to a namespace. The Pod Security Standards are maintained by the K8s community, which means you automatically get updated security policies whenever new security-impacting Kubernetes features are introduced.
What’s new since Beta?
Pod Security Admission hasn’t changed much since the Beta in Kubernetes v1.23. The focus has been on improving the user experience, while continuing to maintain a high quality bar.
Improved violation messages
We improved violation messages so that you get fewer duplicate messages. For example, instead of the following message when the Baseline and Restricted policies check the same capability:
pods "admin-pod" is forbidden: violates PodSecurity "restricted:latest": non-default capabilities (container "admin" must not include "SYS_ADMIN" in securityContext.capabilities.add), unrestricted capabilities (container "admin" must not include "SYS_ADMIN" in securityContext.capabilities.add)
You get this message:
pods "admin-pod" is forbidden: violates PodSecurity "restricted:latest": unrestricted capabilities (container "admin" must not include "SYS_ADMIN" in securityContext.capabilities.add)
Improved namespace warnings
When you modify the enforce Pod Security labels on a namespace, the Pod Security
admission controller checks all existing pods for
violations and surfaces a warning if any are out of compliance. These
warnings are now aggregated for pods with
identical violations, making large namespaces with many replicas much more manageable. For example:
Warning: frontend-h23gf2: allowPrivilegeEscalation != false
Warning: myjob-g342hj (and 6 other pods): host namespaces, allowPrivilegeEscalation != false Warning: backend-j23h42 (and 1 other pod): non-default capabilities, unrestricted capabilities
Additionally, when you apply a non-privileged label to a namespace that has been configured to be exempt, you will now get a warning alerting you to this fact:
Warning: namespace 'kube-system' is exempt from Pod Security, and the policy (enforce=baseline:latest) will be ignored
Changes to the Pod Security Standards
The Pod Security Standards,
which Pod Security admission enforces, have been updated with support for the new Pod OS
field. In v1.25 and later, if you use the Restricted policy, the following Linux-specific restrictions will no
longer be required if you explicitly set the pod's .spec.os.name field to windows:
- Seccomp - The
seccompProfile.typefield for Pod and container security contexts - Privilege escalation - The
allowPrivilegeEscalationfield on container security contexts - Capabilities - The requirement to drop
ALLcapabilities in thecapabilitiesfield on containers
In Kubernetes v1.23 and earlier, the kubelet didn't enforce the Pod OS field. If your cluster includes nodes running a v1.23 or older kubelet, you should explicitly pin Restricted policies to a version prior to v1.25.
Migrating from PodSecurityPolicy to the Pod Security admission controller
For instructions to migrate from PodSecurityPolicy to the Pod Security admission controller, and for help choosing a migration strategy, refer to the migration guide. We're also developing a tool called pspmigrator to automate parts of the migration process.
We'll be talking about PSP migration in more detail at our upcoming KubeCon 2022 NA talk, Migrating from Pod Security Policy. Use the KubeCon NA schedule to learn more.
PodSecurityPolicy: The Historical Context
The PodSecurityPolicy (PSP) admission controller has been removed, as of Kubernetes v1.25. Its deprecation was announced and detailed in the blog post PodSecurityPolicy Deprecation: Past, Present, and Future, published for the Kubernetes v1.21 release.
This article aims to provide historical context on the birth and evolution of PSP, explain why the feature never made it to stable, and show why it was removed and replaced by Pod Security admission control.
PodSecurityPolicy, like other specialized admission control plugins, provided fine-grained permissions on specific fields concerning the pod security settings as a built-in policy API. It acknowledged that cluster administrators and cluster users are usually not the same people, and that creating workloads in the form of a Pod or any resource that will create a Pod should not equal being "root on the cluster". It could also encourage best practices by configuring more secure defaults through mutation and decoupling low-level Linux security decisions from the deployment process.
The birth of PodSecurityPolicy
PodSecurityPolicy originated from OpenShift's SecurityContextConstraints (SCC) that were in the very first release of the Red Hat OpenShift Container Platform, even before Kubernetes 1.0. PSP was a stripped-down version of the SCC.
The origin of the creation of PodSecurityPolicy is difficult to track, notably because it was mainly added before Kubernetes Enhancements Proposal (KEP) process, when design proposals were still a thing. Indeed, the archive of the final design proposal is still available. Nevertheless, a KEP issue number five was created after the first pull requests were merged.
Before adding the first piece of code that created PSP, two main pull
requests were merged into Kubernetes, a SecurityContext subresource
that defined new fields on pods' containers, and the first iteration of the ServiceAccount
API.
Kubernetes 1.0 was released on 10 July 2015 without any mechanism to restrict the
security context and sensitive options of workloads, other than an alpha-quality
SecurityContextDeny admission plugin (then known as scdeny).
The SecurityContextDeny plugin
is still in Kubernetes today (as an alpha feature) and creates an admission controller that
prevents the usage of some fields in the security context.
The roots of the PodSecurityPolicy were added with the very first pull request on security policy, which added the design proposal with the new PSP object, based on the SCC (Security Context Constraints). It was a long discussion of nine months, with back and forth from OpenShift's SCC, many rebases, and the rename to PodSecurityPolicy that finally made it to upstream Kubernetes in February 2016. Now that the PSP object had been created, the next step was to add an admission controller that could enforce these policies. The first step was to add the admission without taking into account the users or groups. A specific issue to bring PodSecurityPolicy to a usable state was added to keep track of the progress and a first version of the admission controller was merged in pull request named PSP admission in May 2016. Then around two months later, Kubernetes 1.3 was released.
Here is a timeline that recaps the main pull requests of the birth of the PodSecurityPolicy and its admission controller with 1.0 and 1.3 releases as reference points.

After that, the PSP admission controller was enhanced by adding what was initially left aside. The authorization mechanism, merged in early November 2016 allowed administrators to use multiple policies in a cluster to grant different levels of access for different types of users. Later, a pull request merged in October 2017 fixed a design issue on ordering PodSecurityPolicies between mutating and alphabetical order, and continued to build the PSP admission as we know it. After that, many improvements and fixes followed to build the PodSecurityPolicy feature of recent Kubernetes releases.
The rise of Pod Security Admission
Despite the crucial issue it was trying to solve, PodSecurityPolicy presented some major flaws:
- Flawed authorization model - users can create a pod if they have the use verb on the PSP that allows that pod or the pod's service account has the use permission on the allowing PSP.
- Difficult to roll out - PSP fail-closed. That is, in the absence of a policy, all pods are denied. It mostly means that it cannot be enabled by default and that users have to add PSPs for all workloads before enabling the feature, thus providing no audit mode to discover which pods would not be allowed by the new policy. The opt-in model also leads to insufficient test coverage and frequent breakage due to cross-feature incompatibility. And unlike RBAC, there was no strong culture of shipping PSP manifests with projects.
- Inconsistent unbounded API - the API has grown with lots of inconsistencies notably because of many requests for niche use cases: e.g. labels, scheduling, fine-grained volume controls, etc. It has poor composability with a weak prioritization model, leading to unexpected mutation priority. It made it really difficult to combine PSP with other third-party admission controllers.
- Require security knowledge - effective usage still requires an understanding of Linux security primitives. e.g. MustRunAsNonRoot + AllowPrivilegeEscalation.
The experience with PodSecurityPolicy concluded that most users care for two or three policies, which led to the creation of the Pod Security Standards, that define three policies:
- Privileged - unrestricted policy.
- Baseline - minimally restrictive policy, allowing the default pod configuration.
- Restricted - security best practice policy.
The replacement for PSP, the new Pod Security Admission is an in-tree, stable for Kubernetes v1.25, admission plugin to enforce these standards at the namespace level. It makes it easier to enforce basic pod security without deep security knowledge. For more sophisticated use cases, you might need a third-party solution that can be easily combined with Pod Security Admission.
What's next
For further details on the SIG Auth processes, covering PodSecurityPolicy removal and creation of Pod Security admission, the SIG auth update at KubeCon NA 2019 and the PodSecurityPolicy Replacement: Past, Present, and Future presentation at KubeCon NA 2021 records are available.
Particularly on the PSP removal, the PodSecurityPolicy Deprecation: Past, Present, and Future blog post is still accurate.
And for the new Pod Security admission, documentation is available. In addition, the blog post Kubernetes 1.23: Pod Security Graduates to Beta along with the KubeCon EU 2022 presentation The Hitchhiker's Guide to Pod Security give great hands-on tutorials to learn.
Kubernetes v1.25: Combiner
Announcing the release of Kubernetes v1.25!
This release includes a total of 40 enhancements. Fifteen of those enhancements are entering Alpha, ten are graduating to Beta, and thirteen are graduating to Stable. We also have two features being deprecated or removed.
Release theme and logo
Kubernetes 1.25: Combiner
The theme for Kubernetes v1.25 is Combiner.
The Kubernetes project itself is made up of many, many individual components that, when combined, take the form of the project you see today. It is also built and maintained by many individuals, all of them with different skills, experiences, histories, and interests, who join forces not just as the release team but as the many SIGs that support the project and the community year-round.
With this release, we wish to honor the collaborative, open spirit that takes us from isolated developers, writers, and users spread around the globe to a combined force capable of changing the world. Kubernetes v1.25 includes a staggering 40 enhancements, none of which would exist without the incredible power we have when we work together.
Inspired by our release lead's son, Albert Song, Kubernetes v1.25 is named for each and every one of you, no matter how you choose to contribute your unique power to the combined force that becomes Kubernetes.
What's New (Major Themes)
PodSecurityPolicy is removed; Pod Security Admission graduates to Stable
PodSecurityPolicy was initially deprecated in v1.21, and with the release of v1.25, it has been removed. The updates required to improve its usability would have introduced breaking changes, so it became necessary to remove it in favor of a more friendly replacement. That replacement is Pod Security Admission, which graduates to Stable with this release. If you are currently relying on PodSecurityPolicy, please follow the instructions for migration to Pod Security Admission.
Ephemeral Containers Graduate to Stable
Ephemeral Containers are containers that exist for only a limited time within an existing pod. This is particularly useful for troubleshooting when you need to examine another container but cannot use kubectl exec because that container has crashed or its image lacks debugging utilities. Ephemeral containers graduated to Beta in Kubernetes v1.23, and with this release, the feature graduates to Stable.
Support for cgroups v2 Graduates to Stable
It has been more than two years since the Linux kernel cgroups v2 API was declared stable. With some distributions now defaulting to this API, Kubernetes must support it to continue operating on those distributions. cgroups v2 offers several improvements over cgroups v1, for more information see the cgroups v2 documentation. While cgroups v1 will continue to be supported, this enhancement puts us in a position to be ready for its eventual deprecation and replacement.
Improved Windows support
- Performance dashboards added support for Windows
- Unit tests added support for Windows
- Conformance tests added support for Windows
- New GitHub repository created for Windows Operational Readiness
Moved container registry service from k8s.gcr.io to registry.k8s.io
Moving container registry from k8s.gcr.io to registry.k8s.io got merged. For more details, see the wiki page, announcement was sent to the kubernetes development mailing list.
Promoted SeccompDefault to Beta
SeccompDefault promoted to beta, see the tutorial Restrict a Container's Syscalls with seccomp for more details.
Promoted endPort in Network Policy to Stable
Promoted endPort in Network Policy to GA. Network Policy providers that support endPort field now can use it to specify a range of ports to apply a Network Policy. Previously, each Network Policy could only target a single port.
Please be aware that endPort field must be supported by the Network Policy provider. If your provider does not support endPort, and this field is specified in a Network Policy, the Network Policy will be created covering only the port field (single port).
Promoted Local Ephemeral Storage Capacity Isolation to Stable
The Local Ephemeral Storage Capacity Isolation feature moved to GA. This was introduced as alpha in 1.8, moved to beta in 1.10, and it is now a stable feature. It provides support for capacity isolation of local ephemeral storage between pods, such as EmptyDir, so that a pod can be hard limited in its consumption of shared resources by evicting Pods if its consumption of local ephemeral storage exceeds that limit.
Promoted core CSI Migration to Stable
CSI Migration is an ongoing effort that SIG Storage has been working on for a few releases. The goal is to move in-tree volume plugins to out-of-tree CSI drivers and eventually remove the in-tree volume plugins. The core CSI Migration feature moved to GA. CSI Migration for GCE PD and AWS EBS also moved to GA. CSI Migration for vSphere remains in beta (but is on by default). CSI Migration for Portworx moved to Beta (but is off-by-default).
Promoted CSI Ephemeral Volume to Stable
The CSI Ephemeral Volume feature allows CSI volumes to be specified directly in the pod specification for ephemeral use cases. They can be used to inject arbitrary states, such as configuration, secrets, identity, variables or similar information, directly inside pods using a mounted volume. This was initially introduced in 1.15 as an alpha feature, and it moved to GA. This feature is used by some CSI drivers such as the secret-store CSI driver.
Promoted CRD Validation Expression Language to Beta
CRD Validation Expression Language is promoted to beta, which makes it possible to declare how custom resources are validated using the Common Expression Language (CEL). Please see the validation rules guide.
Promoted Server Side Unknown Field Validation to Beta
Promoted the ServerSideFieldValidation feature gate to beta (on by default). This allows optionally triggering schema validation on the API server that errors when unknown fields are detected. This allows the removal of client-side validation from kubectl while maintaining the same core functionality of erroring out on requests that contain unknown or invalid fields.
Introduced KMS v2 API
Introduce KMS v2alpha1 API to add performance, rotation, and observability improvements. Encrypt data at rest (ie Kubernetes Secrets) with DEK using AES-GCM instead of AES-CBC for kms data encryption. No user action is required. Reads with AES-GCM and AES-CBC will continue to be allowed. See the guide Using a KMS provider for data encryption for more information.
Kube-proxy images are now based on distroless images
In previous releases, kube-proxy container images were built using Debian as the base image. Starting with this release, the images are now built using distroless. This change reduced image size by almost 50% and decreased the number of installed packages and files to only those strictly required for kube-proxy to do its job.
Other Updates
Graduations to Stable
This release includes a total of thirteen enhancements promoted to stable:
- Ephemeral Containers
- Local Ephemeral Storage Resource Management
- CSI Ephemeral Volumes
- CSI Migration - Core
- Graduate the kube-scheduler ComponentConfig to GA
- CSI Migration - AWS
- CSI Migration - GCE
- DaemonSets Support MaxSurge
- NetworkPolicy Port Range
- cgroups v2
- Pod Security Admission
- Add
minReadySecondsto Statefulsets - Identify Windows pods at API admission level authoritatively
Deprecations and Removals
Two features were deprecated or removed from Kubernetes with this release.
Release Notes
The complete details of the Kubernetes v1.25 release are available in our release notes.
Availability
Kubernetes v1.25 is available for download on GitHub. To get started with Kubernetes, check out these interactive tutorials or run local Kubernetes clusters using containers as “nodes”, with kind. You can also easily install 1.25 using kubeadm.
Release Team
Kubernetes is only possible with the support, commitment, and hard work of its community. Each release team is made up of dedicated community volunteers who work together to build the many pieces that, when combined, make up the Kubernetes releases you rely on. This requires the specialized skills of people from all corners of our community, from the code itself to its documentation and project management.
We would like to thank the entire release team for the hours spent hard at work to ensure we deliver a solid Kubernetes v1.25 release for our community. Every one of you had a part to play in building this, and you all executed beautifully. We would like to extend special thanks to our fearless release lead, Cici Huang, for all she did to guarantee we had what we needed to succeed.
User Highlights
- Finleap Connect operates in a highly regulated environment. In 2019, they had five months to implement mutual TLS (mTLS) across all services in their clusters for their business code to comply with the new European PSD2 payment directive.
- PNC sought to develop a way to ensure new code would meet security standards and audit compliance requirements automatically—replacing the cumbersome 30-day manual process they had in place. Using Knative, PNC developed internal tools to automatically check new code and changes to existing code.
- Nexxiot needed highly-reliable, secure, performant, and cost efficient Kubernetes clusters. They turned to Cilium as the CNI to lock down their clusters and enable resilient networking with reliable day two operations.
- Because the process of creating cyber insurance policies is a complicated multi-step process, At-Bay sought to improve operations by using asynchronous message-based communication patterns/facilities. They determined that Dapr fulfilled its desired list of requirements and much more.
Ecosystem Updates
- KubeCon + CloudNativeCon North America 2022 will take place in Detroit, Michigan from 24 – 28 October 2022! You can find more information about the conference and registration on the event site.
- KubeDay event series kicks off with KubeDay Japan on December 7! Register or submit a proposal on the event site
- In the 2021 Cloud Native Survey, the CNCF saw record Kubernetes and container adoption. Take a look at the results of the survey.
Project Velocity
The CNCF K8s DevStats project aggregates a number of interesting data points related to the velocity of Kubernetes and various sub-projects. This includes everything from individual contributions to the number of companies that are contributing, and is an illustration of the depth and breadth of effort that goes into evolving this ecosystem.
In the v1.25 release cycle, which ran for 14 weeks (May 23 to August 23), we saw contributions from 1065 companies and 1620 individuals.
Upcoming Release Webinar
Join members of the Kubernetes v1.25 release team on Thursday September 22, 2022 10am – 11am PT to learn about the major features of this release, as well as deprecations and removals to help plan for upgrades. For more information and registration, visit the event page.
Get Involved
The simplest way to get involved with Kubernetes is by joining one of the many Special Interest Groups (SIGs) that align with your interests. Have something you’d like to broadcast to the Kubernetes community? Share your voice at our weekly community meeting, and through the channels below:
- Find out more about contributing to Kubernetes at the Kubernetes Contributors website
- Follow us on Twitter @Kubernetesio for the latest updates
- Join the community discussion on Discuss
- Join the community on Slack
- Post questions (or answer questions) on Server Fault.
- Share your Kubernetes story
- Read more about what’s happening with Kubernetes on the blog
- Learn more about the Kubernetes Release Team
Spotlight on SIG Storage
Since the very beginning of Kubernetes, the topic of persistent data and how to address the requirement of stateful applications has been an important topic. Support for stateless deployments was natural, present from the start, and garnered attention, becoming very well-known. Work on better support for stateful applications was also present from early on, with each release increasing the scope of what could be run on Kubernetes.
Message queues, databases, clustered filesystems: these are some examples of the solutions that have different storage requirements and that are, today, increasingly deployed in Kubernetes. Dealing with ephemeral and persistent storage, local or remote, file or block, from many different vendors, while considering how to provide the needed resiliency and data consistency that users expect, all of this is under SIG Storage's umbrella.
In this SIG Storage spotlight, Frederico Muñoz (Cloud & Architecture Lead at SAS) talked with Xing Yang, Tech Lead at VMware and co-chair of SIG Storage, on how the SIG is organized, what are the current challenges and how anyone can get involved and contribute.
About SIG Storage
Frederico (FSM): Hello, thank you for the opportunity of learning more about SIG Storage. Could you tell us a bit about yourself, your role, and how you got involved in SIG Storage.
Xing Yang (XY): I am a Tech Lead at VMware, working on Cloud Native Storage. I am also a Co-Chair of SIG Storage. I started to get involved in K8s SIG Storage at the end of 2017, starting with contributing to the VolumeSnapshot project. At that time, the VolumeSnapshot project was still in an experimental, pre-alpha stage. It needed contributors. So I volunteered to help. Then I worked with other community members to bring VolumeSnapshot to Alpha in K8s 1.12 release in 2018, Beta in K8s 1.17 in 2019, and eventually GA in 1.20 in 2020.
FSM: Reading the SIG Storage charter alone it’s clear that SIG Storage covers a lot of ground, could you describe how the SIG is organised?
XY: In SIG Storage, there are two Co-Chairs and two Tech Leads. Saad Ali from Google and myself are Co-Chairs. Michelle Au from Google and Jan Šafránek from Red Hat are Tech Leads.
We have bi-weekly meetings where we go through features we are working on for each particular release, getting the statuses, making sure each feature has dev owners and reviewers working on it, and reminding people about the release deadlines, etc. More information on the SIG is on the community page. People can also add PRs that need attention, design proposals that need discussion, and other topics to the meeting agenda doc. We will go over them after project tracking is done.
We also have other regular meetings, i.e., CSI Implementation meeting, Object Bucket API design meeting, and one-off meetings for specific topics if needed. There is also a K8s Data Protection Workgroup that is sponsored by SIG Storage and SIG Apps. SIG Storage owns or co-owns features that are being discussed at the Data Protection WG.
Storage and Kubernetes
FSM: Storage is such a foundational component in so many things, not least in Kubernetes: what do you think are the Kubernetes-specific challenges in terms of storage management?
XY: In Kubernetes, there are multiple components involved for a volume operation. For example, creating a Pod to use a PVC has multiple components involved. There are the Attach Detach Controller and the external-attacher working on attaching the PVC to the pod. There’s the Kubelet that works on mounting the PVC to the pod. Of course the CSI driver is involved as well. There could be race conditions sometimes when coordinating between multiple components.
Another challenge is regarding core vs Custom Resource Definitions (CRD), not really storage specific. CRD is a great way to extend Kubernetes capabilities while not adding too much code to the Kubernetes core itself. However, this also means there are many external components that are needed when running a Kubernetes cluster.
From the SIG Storage side, one most notable example is Volume Snapshot. Volume Snapshot APIs are defined as CRDs. API definitions and controllers are out-of-tree. There is a common snapshot controller and a snapshot validation webhook that should be deployed on the control plane, similar to how kube-controller-manager is deployed. Although Volume Snapshot is a CRD, it is a core feature of SIG Storage. It is recommended for the K8s cluster distros to deploy Volume Snapshot CRDs, the snapshot controller, and the snapshot validation webhook, however, most of the time we don’t see distros deploy them. So this becomes a problem for the storage vendors: now it becomes their responsibility to deploy these non-driver specific common components. This could cause conflicts if a customer wants to use more than one storage system and deploy more than one CSI driver.
FSM: Not only the complexity of a single storage system, you have to consider how they will be used together in Kubernetes?
XY: Yes, there are many different storage systems that can provide storage to containers in Kubernetes. They don’t work the same way. It is challenging to find a solution that works for everyone.
FSM: Storage in Kubernetes also involves interacting with external solutions, perhaps more so than other parts of Kubernetes. Is this interaction with vendors and external providers challenging? Has it evolved with time in any way?
XY: Yes, it is definitely challenging. Initially Kubernetes storage had in-tree volume plugin interfaces. Multiple storage vendors implemented in-tree interfaces and have volume plugins in the Kubernetes core code base. This caused lots of problems. If there is a bug in a volume plugin, it affects the entire Kubernetes code base. All volume plugins must be released together with Kubernetes. There was no flexibility if storage vendors need to fix a bug in their plugin or want to align with their own product release.
FSM: That’s where CSI enters the game?
XY: Exactly, then there comes Container Storage Interface (CSI). This is an industry standard trying to design common storage interfaces so that a storage vendor can write one plugin and have it work across a range of container orchestration systems (CO). Now Kubernetes is the main CO, but back when CSI just started, there were Docker, Mesos, Cloud Foundry, in addition to Kubernetes. CSI drivers are out-of-tree so bug fixes and releases can happen at their own pace.
CSI is definitely a big improvement compared to in-tree volume plugins. Kubernetes implementation of CSI has been GA since the 1.13 release. It has come a long way. SIG Storage has been working on moving in-tree volume plugins to out-of-tree CSI drivers for several releases now.
FSM: Moving drivers away from the Kubernetes main tree and into CSI was an important improvement.
XY: CSI interface is an improvement over the in-tree volume plugin interface, however, there are still challenges. There are lots of storage systems. Currently there are more than 100 CSI drivers listed in CSI driver docs. These storage systems are also very diverse. So it is difficult to design a common API that works for all. We introduced capabilities at CSI driver level, but we also have challenges when volumes provisioned by the same driver have different behaviors. The other day we just had a meeting discussing Per Volume CSI Driver Capabilities. We have a problem differentiating some CSI driver capabilities when the same driver supports both block and file volumes. We are going to have follow up meetings to discuss this problem.
Ongoing challenges
FSM: Specifically for the 1.25 release we can see that there are a relevant number of storage-related KEPs in the pipeline, would you say that this release is particularly important for the SIG?
XY: I wouldn’t say one release is more important than other releases. In any given release, we are working on a few very important things.
FSM: Indeed, but are there any 1.25 specific specificities and highlights you would like to point out though?
XY: Yes. For the 1.25 release, I want to highlight the following:
- CSI Migration is an on-going effort that SIG Storage has been working on for a few releases now. The goal is to move in-tree volume plugins to out-of-tree CSI drivers and eventually remove the in-tree volume plugins. There are 7 KEPs that we are targeting in 1.25 are related to CSI migration. There is one core KEP for the general CSI Migration feature. That is targeting GA in 1.25. CSI Migration for GCE PD and AWS EBS are targeting GA. CSI Migration for vSphere is targeting to have the feature gate on by default while staying in 1.25 that are in Beta. Ceph RBD and PortWorx are targeting Beta, with feature gate off by default. Ceph FS is targeting Alpha.
- The second one I want to highlight is COSI, the Container Object Storage Interface. This is a sub-project under SIG Storage. COSI proposes object storage Kubernetes APIs to support orchestration of object store operations for Kubernetes workloads. It also introduces gRPC interfaces for object storage providers to write drivers to provision buckets. The COSI team has been working on this project for more than two years now. The COSI feature is targeting Alpha in 1.25. The KEP just got merged. The COSI team is working on updating the implementation based on the updated KEP.
- Another feature I want to mention is CSI Ephemeral Volume support. This feature allows CSI volumes to be specified directly in the pod specification for ephemeral use cases. They can be used to inject arbitrary states, such as configuration, secrets, identity, variables or similar information, directly inside pods using a mounted volume. This was initially introduced in 1.15 as an alpha feature, and it is now targeting GA in 1.25.
FSM: If you had to single something out, what would be the most pressing areas the SIG is working on?
XY: CSI migration is definitely one area that the SIG has put in lots of effort and it has been on-going for multiple releases now. It involves work from multiple cloud providers and storage vendors as well.
Community involvement
FSM: Kubernetes is a community-driven project. Any recommendation for anyone looking into getting involved in SIG Storage work? Where should they start?
XY: Take a look at the SIG Storage community page, it has lots of information on how to get started. There are SIG annual reports that tell you what we did each year. Take a look at the Contributing guide. It has links to presentations that can help you get familiar with Kubernetes storage concepts.
Join our bi-weekly meetings on Thursdays. Learn how the SIG operates and what we are working on for each release. Find a project that you are interested in and help out. As I mentioned earlier, I got started in SIG Storage by contributing to the Volume Snapshot project.
FSM: Any closing thoughts you would like to add?
XY: SIG Storage always welcomes new contributors. We need contributors to help with building new features, fixing bugs, doing code reviews, writing tests, monitoring test grid health, and improving documentation, etc.
FSM: Thank you so much for your time and insights into the workings of SIG Storage!
Meet Our Contributors - APAC (China region)
Authors & Interviewers: Avinesh Tripathi, Debabrata Panigrahi, Jayesh Srivastava, Priyanka Saggu, Purneswar Prasad, Vedant Kakde
Hello, everyone 👋
Welcome back to the third edition of the "Meet Our Contributors" blog post series for APAC.
This post features four outstanding contributors from China, who have played diverse leadership and community roles in the upstream Kubernetes project.
So, without further ado, let's get straight to the article.
Andy Zhang
Andy Zhang currently works for Microsoft China at the Shanghai site. His main focus is on Kubernetes storage drivers. Andy started contributing to Kubernetes about 5 years ago.
He states that as he is working in Azure Kubernetes Service team and spends most of his time contributing to the Kubernetes community project. Now he is the main contributor of quite a lot Kubernetes subprojects such as Kubernetes cloud provider code.
His open source contributions are mainly self-motivated. In the last two years he has mentored a few students contributing to Kubernetes through the LFX Mentorship program, some of whom got jobs due to their expertise and contributions on Kubernetes projects.
Andy is an active member of the China Kubernetes community. He adds that the Kubernetes community has a good guide about how to become members, code reviewers, approvers and finally when he found out that some open source projects are in the very early stage, he actively contributed to those projects and became the project maintainer.
Shiming Zhang
Shiming Zhang is a Software Engineer working on Kubernetes for DaoCloud in Shanghai, China.
He has mostly been involved with SIG Node as a reviewer. His major contributions have mainly been bug fixes and feature improvements in an ongoing KEP, all revolving around SIG Node.
Some of his major PRs are fixing watchForLockfileContention memory leak, fixing startupProbe behaviour, adding Field status.hostIPs for Pod.
Paco Xu
Paco Xu works at DaoCloud, a Shanghai-based cloud-native firm. He works with the infra and the open source team, focusing on enterprise cloud native platforms based on Kubernetes.
He started with Kubernetes in early 2017 and his first contribution was in March 2018. He started with a bug that he found, but his solution was not that graceful, hence wasn't accepted. He then started with some good first issues, which helped him to a great extent. In addition to this, from 2016 to 2017, he made some minor contributions to Docker.
Currently, Paco is a reviewer for kubeadm (a SIG Cluster Lifecycle product), and for SIG Node.
Paco says that you should contribute to open source projects you use. For him, an open source project is like a book to learn, getting inspired through discussions with the project maintainers.
In my opinion, the best way for me is learning how owners work on the project.
Jintao Zhang
Jintao Zhang is presently employed at API7, where he focuses on ingress and service mesh.
In 2017, he encountered an issue which led to a community discussion and his contributions to Kubernetes started. Before contributing to Kubernetes, Jintao was a long-time contributor to Docker-related open source projects.
Currently Jintao is a maintainer for the ingress-nginx project.
He suggests keeping track of job opportunities at open source companies so that you can find one that allows you to contribute full time. For new contributors Jintao says that if anyone wants to make a significant contribution to an open source project, then they should choose the project based on their interests and should generously invest time.
If you have any recommendations/suggestions for who we should interview next, please let us know in the #sig-contribex channel channel on the Kubernetes Slack. Your suggestions would be much appreciated. We're thrilled to have additional folks assisting us in reaching out to even more wonderful individuals of the community.
We'll see you all in the next one. Everyone, till then, have a happy contributing! 👋
Enhancing Kubernetes one KEP at a Time
Did you know that Kubernetes v1.24 has 46 enhancements? That's a lot of new functionality packed into a 4-month release cycle. The Kubernetes release team coordinates the logistics of the release, from remediating test flakes to publishing updated docs. It's a ton of work, but they always deliver.
The release team comprises around 30 people across six subteams - Bug Triage, CI Signal, Enhancements, Release Notes, Communications, and Docs. Each of these subteams manages a component of the release. This post will focus on the role of the enhancements subteam and how you can get involved.
What's the enhancements subteam?
Great question. We'll get to that in a second but first, let's talk about how features are managed in Kubernetes.
Each new feature requires a Kubernetes Enhancement Proposal - KEP for short. KEPs are small structured design documents that provide a way to propose and coordinate new features. The KEP author describes the motivation, design (and alternatives), risks, and tests - then community members provide feedback to build consensus.
KEPs are submitted and updated through a pull request (PR) workflow on the k/enhancements repo. Features start in alpha and move through a graduation process to beta and stable as they mature. For example, here's a cool KEP about privileged container support on Windows Server. It was introduced as alpha in Kubernetes v1.22 and graduated to beta in v1.23.
Now getting back to the question - the enhancements subteam coordinates the lifecycle tracking of the KEPs for each release. Each KEP is required to meet a set of requirements to be cleared for inclusion in a release. The enhancements subteam verifies each requirement for each KEP and tracks the status.
At the start of a release, Kubernetes Special Interest Groups (SIGs) submit their enhancements to opt into a release. A typical release might have from 60 to 90 enhancements at the beginning. During the release, many enhancements will drop out. Some do not quite meet the KEP requirements, and others do not complete their implementation in code. About 60%-70% of the opted-in KEPs will make it into the final release.
What does the enhancements subteam do?
Another great question, keep them coming! The enhancements team is involved in two crucial milestones during each release: enhancements freeze and code freeze.
Enhancements Freeze
Enhancements freeze is the deadline for a KEP to be complete in order for the enhancement to be included in a release. It's a quality gate to enforce alignment around maintaining and updating KEPs. The most notable requirements are a (1) production readiness review (PRR) and a (2) KEP file with a complete test plan and graduation criteria.
The enhancements subteam communicates to each KEP author through comments on the KEP issue on Github. As a first step, they'll verify the status and check if it meets the requirements. The KEP gets marked as tracked after satisfying the requirements; otherwise, it's considered at risk. If a KEP is still at risk when enhancement freeze is in effect, the KEP is removed from the release.
This part of the cycle is typically the busiest for the enhancements subteam because of the large number of KEPs to groom, and each KEP might need to be visited multiple times to verify whether it meets requirements.
Code Freeze
Code freeze is the implementation deadline for all enhancements. The code must be implemented, reviewed, and merged by this point if a code change or update is needed for the enhancement. The latter third of the release is focused on stabilizing the codebase - fixing flaky tests, resolving various regressions, and preparing docs - and all the code needs to be in place before those steps can happen.
The enhancements subteam verifies that all PRs for an enhancement are merged into the Kubernetes codebase (k/k). During this period, the subteam reaches out to KEP authors to understand what PRs are part of the KEP, verifies that those PRs get merged, and then updates the status of the KEP. The enhancement is removed from the release if the code isn't all merged before the code freeze deadline.
How can I get involved with the release team?
I'm glad you asked. The most direct way is to apply to be a release team shadow. The shadow role is a hands-on apprenticeship intended to prepare individuals for leadership positions on the release team. Many shadow roles are non-technical and do not require prior contributions to the Kubernetes codebase.
With 3 Kubernetes releases every year and roughly 25 shadows per release, the release team is always in need of individuals wanting to contribute. Before each release cycle, the release team opens the application for the shadow program. When the application goes live, it's posted in the Kubernetes Dev Mailing List. You can subscribe to notifications from that list (or check it regularly!) to watch when the application opens. The announcement will typically go out in mid-April, mid-July, and mid-December - or roughly a month before the start of each release.
How can I find out more?
Check out the role handbooks if you're curious about the specifics of all the Kubernetes release subteams. The handbooks capture the logistics of each subteam, including a week-by-week breakdown of the subteam activities. It's an excellent reference for getting to know each team better.
You can also check out the release-related Kubernetes slack channels - particularly #release, #sig-release, and #sig-arch. These channels have discussions and updates surrounding many aspects of the release.
Kubernetes Removals and Major Changes In 1.25
As Kubernetes grows and matures, features may be deprecated, removed, or replaced with improvements for the health of the project. Kubernetes v1.25 includes several major changes and one major removal.
The Kubernetes API Removal and Deprecation process
The Kubernetes project has a well-documented deprecation policy for features. This policy states that stable APIs may only be deprecated when a newer, stable version of that same API is available and that APIs have a minimum lifetime for each stability level. A deprecated API is one that has been marked for removal in a future Kubernetes release; it will continue to function until removal (at least one year from the deprecation), but usage will result in a warning being displayed. Removed APIs are no longer available in the current version, at which point you must migrate to using the replacement.
- Generally available (GA) or stable API versions may be marked as deprecated but must not be removed within a major version of Kubernetes.
- Beta or pre-release API versions must be supported for 3 releases after deprecation.
- Alpha or experimental API versions may be removed in any release without prior deprecation notice.
Whether an API is removed as a result of a feature graduating from beta to stable or because that API simply did not succeed, all removals comply with this deprecation policy. Whenever an API is removed, migration options are communicated in the documentation.
A note about PodSecurityPolicy
In Kubernetes v1.25, we will be removing PodSecurityPolicy after its deprecation in v1.21. PodSecurityPolicy has served us honorably, but its complex and often confusing usage necessitated changes, which unfortunately would have been breaking changes. To address this, it is being removed in favor of a replacement, Pod Security Admission, which is graduating to stable in this release as well. If you are currently relying on PodSecurityPolicy, follow the instructions for migration to Pod Security Admission.
Major Changes for Kubernetes v1.25
Kubernetes v1.25 will include several major changes, in addition to the removal of PodSecurityPolicy.
CSI Migration
The effort to move the in-tree volume plugins to out-of-tree CSI drivers continues, with the core CSI Migration feature going GA in v1.25. This is an important step towards removing the in-tree volume plugins entirely.
Deprecations and removals for storage drivers
Several volume plugins are being deprecated or removed.
GlusterFS will be deprecated in v1.25. While a CSI driver was built for it, it has not been maintained. The possibility of migration to a compatible CSI driver was discussed, but a decision was ultimately made to begin the deprecation of the GlusterFS plugin from in-tree drivers. The Portworx in-tree volume plugin is also being deprecated with this release. The Flocker, Quobyte, and StorageOS in-tree volume plugins are being removed.
Flocker, Quobyte, and StorageOS in-tree volume plugins will be removed in v1.25. Users of these plugins need to switch to an equivalent CSI driver or an alternate storage provider.
Change to vSphere version support
From Kubernetes v1.25, the in-tree vSphere volume driver will not support any vSphere release before 7.0u2. Once Kubernetes v1.25 is released, check the v1.25 detailed release notes for more advice on how to handle this.
Cleaning up IPTables Chain Ownership
On Linux, Kubernetes (usually) creates iptables chains to ensure that network packets reach
Although these chains and their names have been an internal implementation detail, some tooling
has relied upon that behavior.
will only support for internal Kubernetes use cases. Starting with v1.25, the Kubelet will gradually move towards not creating the following iptables chains in the nat table:
KUBE-MARK-DROPKUBE-MARK-MASQKUBE-POSTROUTING
This change will be phased in via the IPTablesCleanup feature gate. Although this is not formally a deprecation, some end users have come to rely on specific internal behavior of kube-proxy. The Kubernetes project overall wants to make it clear that depending on these internal details is not supported, and that future implementations will change their behavior here.
Looking ahead
The official list of API removals planned for Kubernetes 1.26 is:
- The beta FlowSchema and PriorityLevelConfiguration APIs (flowcontrol.apiserver.k8s.io/v1beta1)
- The beta HorizontalPodAutoscaler API (autoscaling/v2beta2)
Want to know more?
Deprecations are announced in the Kubernetes release notes. You can see the announcements of pending deprecations in the release notes for:
- Kubernetes 1.21
- Kubernetes 1.22
- Kubernetes 1.23
- Kubernetes 1.24
- We will formally announce the deprecations that come with Kubernetes 1.25 as part of the CHANGELOG for that release.
For information on the process of deprecation and removal, check out the official Kubernetes deprecation policy document.
Spotlight on SIG Docs
Introduction
The official documentation is the go-to source for any open source project. For Kubernetes, it's an ever-evolving Special Interest Group (SIG) with people constantly putting in their efforts to make details about the project easier to consume for new contributors and users. SIG Docs publishes the official documentation on kubernetes.io which includes, but is not limited to, documentation of the core APIs, core architectural details, and CLI tools shipped with the Kubernetes release.
To learn more about the work of SIG Docs and its future ahead in shaping the community, I have summarised my conversation with the co-chairs, Divya Mohan (DM), Rey Lejano (RL) and Natali Vlatko (NV), who ran through the SIG's goals and how fellow contributors can help.
A summary of the conversation
Could you tell us a little bit about what SIG Docs does?
SIG Docs is the special interest group for documentation for the Kubernetes project on kubernetes.io, generating reference guides for the Kubernetes API, kubeadm and kubectl as well as maintaining the official website’s infrastructure and analytics. The remit of their work also extends to docs releases, translation of docs, improvement and adding new features to existing documentation, pushing and reviewing content for the official Kubernetes blog and engaging with the Release Team for each cycle to get docs and blogs reviewed.
There are 2 subprojects under Docs: blogs and localization. How has the community benefited from it and are there some interesting contributions by those teams you want to highlight?
Blogs: This subproject highlights new or graduated Kubernetes enhancements, community reports, SIG updates or any relevant news to the Kubernetes community such as thought leadership, tutorials and project updates, such as the Dockershim removal and removal of PodSecurityPolicy, which is upcoming in the 1.25 release. Tim Bannister, one of the SIG Docs tech leads, does awesome work and is a major force when pushing contributions through to the docs and blogs.
Localization: With this subproject, the Kubernetes community has been able to achieve greater inclusivity and diversity among both users and contributors. This has also helped the project gain more contributors, especially students, since a couple of years ago. One of the major highlights and up-and-coming localizations are Hindi and Bengali. The efforts for Hindi localization are currently being spearheaded by students in India.
In addition to that, there are two other subprojects: reference-docs and the website, which is built with Hugo and is an important ownership area.
Recently there has been a lot of buzz around the Kubernetes ecosystem as well as the industry regarding the removal of dockershim in the latest 1.24 release. How has SIG Docs helped the project to ensure a smooth change among the end-users?
Documenting the removal of Dockershim was a mammoth task, requiring the revamping of existing documentation and communicating to the various stakeholders regarding the deprecation efforts. It needed a community effort, so ahead of the 1.24 release, SIG Docs partnered with Docs and Comms verticals, the Release Lead from the Release Team, and also the CNCF to help put the word out. Weekly meetings and a GitHub project board were set up to track progress, review issues and approve PRs and keep the Kubernetes website updated. This has also helped new contributors know about the depreciation, so that if any good-first-issue pops up, they could chip in. A dedicated Slack channel was used to communicate meeting updates, invite feedback or to solicit help on outstanding issues and PRs. The weekly meeting also continued for a month after the 1.24 release to review related issues and fix them. A huge shoutout to Celeste Horgan, who kept the ball rolling on this conversation throughout the deprecation process.
Why should new and existing contributors consider joining this SIG?
Kubernetes is a vast project and can be intimidating at first for a lot of folks to find a place to start. Any open source project is defined by its quality of documentation and SIG Docs aims to be a welcoming, helpful place for new contributors to get onboard. One gets the perks of working with the project docs as well as learning by reading it. They can also bring their own, new perspective to create and improve the documentation. In the long run if they stick to SIG Docs, they can rise up the ladder to be maintainers. This will help make a big project like Kubernetes easier to parse and navigate.
How do you help new contributors get started? Are there any prerequisites to join?
There are no such prerequisites to get started with contributing to Docs. But there is certainly a fantastic Contribution to Docs guide which is always kept as updated and relevant as possible and new contributors are urged to read it and keep it handy. Also, there are a lot of useful pins and bookmarks in the community Slack channel #sig-docs. GitHub issues with the good-first-issue labels in the kubernetes/website repo is a great place to create your first PR. Now, SIG Docs has a monthly New Contributor Meet and Greet on the first Tuesday of the month with the first occupant of the New Contributor Ambassador role, Arsh Sharma. This has helped in making a more accessible point of contact within the SIG for new contributors.
Any SIG related accomplishment that you’re really proud of?
DM & RL : The formalization of the localization subproject in the last few months has been a big win for SIG Docs, given all the great work put in by contributors from different countries. Earlier the localization efforts didn’t have any streamlined process and focus was given to provide a structure by drafting a KEP over the past couple of months for localization to be formalized as a subproject, which is planned to be pushed through by the end of third quarter.
DM : Another area where there has been a lot of success is the New Contributor Ambassador role, which has helped in making a more accessible point of contact for the onboarding of new contributors into the project.
NV : For each release cycle, SIG Docs have to review release docs and feature blogs highlighting release updates within a short window. This is always a big effort for the docs and blogs reviewers.
Is there something exciting coming up for the future of SIG Docs that you want the community to know?
SIG Docs is now looking forward to establishing a roadmap, having a steady pipeline of folks being able to push improvements to the documentation and streamlining community involvement in triaging issues and reviewing PRs being filed. To build one such contributor and reviewership base, a mentorship program is being set up to help current contributors become reviewers. This definitely is a space to watch out for more!
Wrap Up
SIG Docs hosted a deep dive talk during on KubeCon + CloudNativeCon North America 2021, covering their awesome SIG. They are very welcoming and have been the starting ground into Kubernetes for a lot of new folks who want to contribute to the project. Join the SIG's meetings to find out about the most recent research results, their plans for the forthcoming year, and how to get involved in the upstream Docs team as a contributor!
Kubernetes Gateway API Graduates to Beta
We are excited to announce the v0.5.0 release of Gateway API. For the first time, several of our most important Gateway API resources are graduating to beta. Additionally, we are starting a new initiative to explore how Gateway API can be used for mesh and introducing new experimental concepts such as URL rewrites. We'll cover all of this and more below.
What is Gateway API?
Gateway API is a collection of resources centered around Gateway resources (which represent the underlying network gateways / proxy servers) to enable robust Kubernetes service networking through expressive, extensible and role-oriented interfaces that are implemented by many vendors and have broad industry support.
Originally conceived as a successor to the well known Ingress API, the
benefits of Gateway API include (but are not limited to) explicit support for
many commonly used networking protocols (e.g. HTTP, TLS, TCP, UDP) as
well as tightly integrated support for Transport Layer Security (TLS). The
Gateway resource in particular enables implementations to manage the lifecycle
of network gateways as a Kubernetes API.
If you're an end-user interested in some of the benefits of Gateway API we invite you to jump in and find an implementation that suits you. At the time of this release there are over a dozen implementations for popular API gateways and service meshes and guides are available to start exploring quickly.
Getting started
Gateway API is an official Kubernetes API like Ingress. Gateway API represents a superset of Ingress functionality, enabling more advanced concepts. Similar to Ingress, there is no default implementation of Gateway API built into Kubernetes. Instead, there are many different implementations available, providing significant choice in terms of underlying technologies while providing a consistent and portable experience.
Take a look at the API concepts documentation and check out some of the Guides to start familiarizing yourself with the APIs and how they work. When you're ready for a practical application open the implementations page and select an implementation that belongs to an existing technology you may already be familiar with or the one your cluster provider uses as a default (if applicable). Gateway API is a Custom Resource Definition (CRD) based API so you'll need to install the CRDs onto a cluster to use the API.
If you're specifically interested in helping to contribute to Gateway API, we would love to have you! Please feel free to open a new issue on the repository, or join in the discussions. Also check out the community page which includes links to the Slack channel and community meetings.
Release highlights
Graduation to beta
The v0.5.0 release is particularly historic because it marks the growth in
maturity to a beta API version (v1beta1) release for some of the key APIs:
This achievement was marked by the completion of several graduation criteria:
- API has been widely implemented.
- Conformance tests provide basic coverage for all resources and have multiple implementations passing tests.
- Most of the API surface is actively being used.
- Kubernetes SIG Network API reviewers have approved graduation to beta.
For more information on Gateway API versioning, refer to the official documentation. To see what's in store for future releases check out the next steps section.
Release channels
This release introduces the experimental and standard release channels
which enable a better balance of maintaining stability while still enabling
experimentation and iterative development.
The standard release channel includes:
- resources that have graduated to beta
- fields that have graduated to standard (no longer considered experimental)
The experimental release channel includes everything in the standard release
channel, plus:
alphaAPI resources- fields that are considered experimental and have not graduated to
standardchannel
Release channels are used internally to enable iterative development with quick turnaround, and externally to indicate feature stability to implementors and end-users.
For this release we've added the following experimental features:
Other improvements
For an exhaustive list of changes included in the v0.5.0 release, please see
the v0.5.0 release notes.
Gateway API for service mesh: the GAMMA Initiative
Some service mesh projects have already implemented support for the Gateway API. Significant overlap between the Service Mesh Interface (SMI) APIs and the Gateway API has inspired discussion in the SMI community about possible integration.
We are pleased to announce that the service mesh community, including representatives from Cilium Service Mesh, Consul, Istio, Kuma, Linkerd, NGINX Service Mesh and Open Service Mesh, is coming together to form the GAMMA Initiative, a dedicated workstream within the Gateway API subproject focused on Gateway API for Mesh Management and Administration.
This group will deliver enhancement proposals consisting of resources, additions, and modifications to the Gateway API specification for mesh and mesh-adjacent use-cases.
This work has begun with an exploration of using Gateway API for service-to-service traffic and will continue with enhancement in areas such as authentication and authorization policy.
Next steps
As we continue to mature the API for production use cases, here are some of the highlights of what we'll be working on for the next Gateway API releases:
- GRPCRoute for gRPC traffic routing
- Route delegation
- Layer 4 API maturity: Graduating TCPRoute, UDPRoute and TLSRoute to beta
- GAMMA Initiative - Gateway API for Service Mesh
If there's something on this list you want to get involved in, or there's something not on this list that you want to advocate for to get on the roadmap please join us in the #sig-network-gateway-api channel on Kubernetes Slack or our weekly community calls.
Annual Report Summary 2021
Last year, we published our first Annual Report Summary for 2020 and it's already time for our second edition!
This summary reflects the work that has been done in 2021 and the initiatives on deck for the rest of 2022. Please forward to organizations and indidviduals participating in upstream activities, planning cloud native strategies, and/or those looking to help out. To find a specific community group's complete report, go to the kubernetes/community repo under the groups folder. Example: sig-api-machinery/annual-report-2021.md
You’ll see that this report summary is a growth area in itself. It takes us roughly 6 months to prepare and execute, which isn’t helpful or valuable to anyone as a fast moving project with short and long term needs. How can we make this better? Provide your feedback here: https://github.com/kubernetes/steering/issues/242
Reference: Annual Report Documentation
Kubernetes 1.24: Maximum Unavailable Replicas for StatefulSet
Kubernetes StatefulSets, since their introduction in
1.5 and becoming stable in 1.9, have been widely used to run stateful applications. They provide stable pod identity, persistent
per pod storage and ordered graceful deployment, scaling and rolling updates. You can think of StatefulSet as the atomic building
block for running complex stateful applications. As the use of Kubernetes has grown, so has the number of scenarios requiring
StatefulSets. Many of these scenarios, require faster rolling updates than the currently supported one-pod-at-a-time updates, in the
case where you're using the OrderedReady Pod management policy for a StatefulSet.
Here are some examples:
I am using a StatefulSet to orchestrate a multi-instance, cache based application where the size of the cache is large. The cache starts cold and requires some significant amount of time before the container can start. There could be more initial startup tasks that are required. A RollingUpdate on this StatefulSet would take a lot of time before the application is fully updated. If the StatefulSet supported updating more than one pod at a time, it would result in a much faster update.
My stateful application is composed of leaders and followers or one writer and multiple readers. I have multiple readers or followers and my application can tolerate multiple pods going down at the same time. I want to update this application more than one pod at a time so that i get the new updates rolled out quickly, especially if the number of instances of my application are large. Note that my application still requires unique identity per pod.
In order to support such scenarios, Kubernetes 1.24 includes a new alpha feature to help. Before you can use the new feature you must
enable the MaxUnavailableStatefulSet feature flag. Once you enable that, you can specify a new field called maxUnavailable, part
of the spec for a StatefulSet. For example:
apiVersion: apps/v1
kind: StatefulSet
metadata:
name: web
namespace: default
spec:
podManagementPolicy: OrderedReady # you must set OrderedReady
replicas: 5
selector:
matchLabels:
app: nginx
template:
metadata:
labels:
app: nginx
spec:
containers:
# image changed since publication (previously used registry "k8s.gcr.io")
- image: registry.k8s.io/nginx-slim:0.8
imagePullPolicy: IfNotPresent
name: nginx
updateStrategy:
rollingUpdate:
maxUnavailable: 2 # this is the new alpha field, whose default value is 1
partition: 0
type: RollingUpdate
If you enable the new feature and you don't specify a value for maxUnavailable in a StatefulSet, Kubernetes applies a default
maxUnavailable: 1. This matches the behavior you would see if you don't enable the new feature.
I'll run through a scenario based on that example manifest to demonstrate how this feature works. I will deploy a StatefulSet that
has 5 replicas, with maxUnavailable set to 2 and partition set to 0.
I can trigger a rolling update by changing the image to registry.k8s.io/nginx-slim:0.9. Once I initiate the rolling update, I can
watch the pods update 2 at a time as the current value of maxUnavailable is 2. The below output shows a span of time and is not
complete. The maxUnavailable can be an absolute number (for example, 2) or a percentage of desired Pods (for example, 10%). The
absolute number is calculated from percentage by rounding up to the nearest integer.
kubectl get pods --watch
NAME READY STATUS RESTARTS AGE
web-0 1/1 Running 0 85s
web-1 1/1 Running 0 2m6s
web-2 1/1 Running 0 106s
web-3 1/1 Running 0 2m47s
web-4 1/1 Running 0 2m27s
web-4 1/1 Terminating 0 5m43s ----> start terminating 4
web-3 1/1 Terminating 0 6m3s ----> start terminating 3
web-3 0/1 Terminating 0 6m7s
web-3 0/1 Pending 0 0s
web-3 0/1 Pending 0 0s
web-4 0/1 Terminating 0 5m48s
web-4 0/1 Terminating 0 5m48s
web-3 0/1 ContainerCreating 0 2s
web-3 1/1 Running 0 2s
web-4 0/1 Pending 0 0s
web-4 0/1 Pending 0 0s
web-4 0/1 ContainerCreating 0 0s
web-4 1/1 Running 0 1s
web-2 1/1 Terminating 0 5m46s ----> start terminating 2 (only after both 4 and 3 are running)
web-1 1/1 Terminating 0 6m6s ----> start terminating 1
web-2 0/1 Terminating 0 5m47s
web-1 0/1 Terminating 0 6m7s
web-1 0/1 Pending 0 0s
web-1 0/1 Pending 0 0s
web-1 0/1 ContainerCreating 0 1s
web-1 1/1 Running 0 2s
web-2 0/1 Pending 0 0s
web-2 0/1 Pending 0 0s
web-2 0/1 ContainerCreating 0 0s
web-2 1/1 Running 0 1s
web-0 1/1 Terminating 0 6m6s ----> start terminating 0 (only after 2 and 1 are running)
web-0 0/1 Terminating 0 6m7s
web-0 0/1 Pending 0 0s
web-0 0/1 Pending 0 0s
web-0 0/1 ContainerCreating 0 0s
web-0 1/1 Running 0 1s
Note that as soon as the rolling update starts, both 4 and 3 (the two highest ordinal pods) start terminating at the same time. Pods with ordinal 4 and 3 may become ready at their own pace. As soon as both pods 4 and 3 are ready, pods 2 and 1 start terminating at the same time. When pods 2 and 1 are both running and ready, pod 0 starts terminating.
In Kubernetes, updates to StatefulSets follow a strict ordering when updating Pods. In this example, the update starts at replica 4, then
replica 3, then replica 2, and so on, one pod at a time. When going one pod at a time, its not possible for 3 to be running and ready
before 4. When maxUnavailable is more than 1 (in the example scenario I set maxUnavailable to 2), it is possible that replica 3 becomes
ready and running before replica 4 is ready—and that is ok. If you're a developer and you set maxUnavailable to more than 1, you should
know that this outcome is possible and you must ensure that your application is able to handle such ordering issues that occur
if any. When you set maxUnavailable greater than 1, the ordering is guaranteed in between each batch of pods being updated. That guarantee
means that pods in update batch 2 (replicas 2 and 1) cannot start updating until the pods from batch 0 (replicas 4 and 3) are ready.
Although Kubernetes refers to these as replicas, your stateful application may have a different view and each pod of the StatefulSet may be holding completely different data than other pods. The important thing here is that updates to StatefulSets happen in batches, and you can now have a batch size larger than 1 (as an alpha feature).
Also note, that the above behavior is with podManagementPolicy: OrderedReady. If you defined a StatefulSet as podManagementPolicy: Parallel,
not only maxUnavailable number of replicas are terminated at the same time; maxUnavailable number of replicas start in ContainerCreating
phase at the same time as well. This is called bursting.
So, now you may have a lot of questions about:-
- What is the behavior when you set
podManagementPolicy: Parallel? - What is the behavior when
partitionto a value other than0?
It might be better to try and see it for yourself. This is an alpha feature, and the Kubernetes contributors are looking for feedback on this feature. Did this help you achieve your stateful scenarios Did you find a bug or do you think the behavior as implemented is not intuitive or can break applications or catch them by surprise? Please open an issue to let us know.
Further reading and next steps
Contextual Logging in Kubernetes 1.24
The Structured Logging Working Group has added new capabilities to the logging infrastructure in Kubernetes 1.24. This blog post explains how developers can take advantage of those to make log output more useful and how they can get involved with improving Kubernetes.
Structured logging
The goal of structured logging is to replace C-style formatting and the resulting opaque log strings with log entries that have a well-defined syntax for storing message and parameters separately, for example as a JSON struct.
When using the traditional klog text output format for structured log calls,
strings were originally printed with \n escape sequences, except when
embedded inside a struct. For structs, log entries could still span multiple
lines, with no clean way to split the log stream into individual entries:
I1112 14:06:35.783529 328441 structured_logging.go:51] "using InfoS" longData={Name:long Data:Multiple
lines
with quite a bit
of text. internal:0}
I1112 14:06:35.783549 328441 structured_logging.go:52] "using InfoS with\nthe message across multiple lines" int=1 stringData="long: Multiple\nlines\nwith quite a bit\nof text." str="another value"
Now, the < and > markers along with indentation are used to ensure that splitting at a
klog header at the start of a line is reliable and the resulting output is human-readable:
I1126 10:31:50.378204 121736 structured_logging.go:59] "using InfoS" longData=<
{Name:long Data:Multiple
lines
with quite a bit
of text. internal:0}
>
I1126 10:31:50.378228 121736 structured_logging.go:60] "using InfoS with\nthe message across multiple lines" int=1 stringData=<
long: Multiple
lines
with quite a bit
of text.
> str="another value"
Note that the log message itself is printed with quoting. It is meant to be a fixed string that identifies a log entry, so newlines should be avoided there.
Before Kubernetes 1.24, some log calls in kube-scheduler still used klog.Info
for multi-line strings to avoid the unreadable output. Now all log calls have
been updated to support structured logging.
Contextual logging
Contextual logging is based on the go-logr API. The key idea is that libraries are passed a logger instance by their caller and use that for logging instead of accessing a global logger. The binary decides about the logging implementation, not the libraries. The go-logr API is designed around structured logging and supports attaching additional information to a logger.
This enables additional use cases:
The caller can attach additional information to a logger:
WithNameadds a prefixWithValuesadds key/value pairs
When passing this extended logger into a function and a function uses it instead of the global logger, the additional information is then included in all log entries, without having to modify the code that generates the log entries. This is useful in highly parallel applications where it can become hard to identify all log entries for a certain operation because the output from different operations gets interleaved.
When running unit tests, log output can be associated with the current test. Then when a test fails, only the log output of the failed test gets shown by
go test. That output can also be more verbose by default because it will not get shown for successful tests. Tests can be run in parallel without interleaving their output.
One of the design decisions for contextual logging was to allow attaching a
logger as value to a context.Context. Since the logger encapsulates all
aspects of the intended logging for the call, it is part of the context and
not just using it. A practical advantage is that many APIs already have a
ctx parameter or adding one has additional advantages, like being able to get
rid of context.TODO() calls inside the functions.
Another decision was to not break compatibility with klog v2:
Libraries that use the traditional klog logging calls in a binary that has set up contextual logging will work and log through the logging backend chosen by the binary. However, such log output will not include the additional information and will not work well in unit tests, so libraries should be modified to support contextual logging. The migration guide for structured logging has been extended to also cover contextual logging.
When a library supports contextual logging and retrieves a logger from its context, it will still work in a binary that does not initialize contextual logging because it will get a logger that logs through klog.
In Kubernetes 1.24, contextual logging is a new alpha feature with
ContextualLogging as feature gate. When disabled (the default), the new klog
API calls for contextual logging (see below) become no-ops to avoid performance
or functional regressions.
No Kubernetes component has been converted yet. An example program in the Kubernetes repository demonstrates how to enable contextual logging in a binary and how the output depends on the binary's parameters:
$ cd $GOPATH/src/k8s.io/kubernetes/staging/src/k8s.io/component-base/logs/example/cmd/
$ go run . --help
...
--feature-gates mapStringBool A set of key=value pairs that describe feature gates for alpha/experimental features. Options are:
AllAlpha=true|false (ALPHA - default=false)
AllBeta=true|false (BETA - default=false)
ContextualLogging=true|false (ALPHA - default=false)
$ go run . --feature-gates ContextualLogging=true
...
I0404 18:00:02.916429 451895 logger.go:94] "example/myname: runtime" foo="bar" duration="1m0s"
I0404 18:00:02.916447 451895 logger.go:95] "example: another runtime" foo="bar" duration="1m0s"
The example prefix and foo="bar" were added by the caller of the function
which logs the runtime message and duration="1m0s" value.
The sample code for klog includes an example for a unit test with per-test output.
klog enhancements
Contextual logging API
The following calls manage the lookup of a logger:
FromContext- from a
contextparameter, with fallback to the global logger Background- the global fallback, with no intention to support contextual logging
TODO- the global fallback, but only as a temporary solution until the function gets extended to accept a logger through its parameters
SetLoggerWithOptions- changes the fallback logger; when called with
ContextualLogger(true), the logger is ready to be called directly, in which case logging will be done without going through klog
To support the feature gate mechanism in Kubernetes, klog has wrapper calls for the corresponding go-logr calls and a global boolean controlling their behavior:
Usage of those functions in Kubernetes code is enforced with a linter
check. The klog default for contextual logging is to enable the functionality
because it is considered stable in klog. It is only in Kubernetes binaries
where that default gets overridden and (in some binaries) controlled via the
--feature-gate parameter.
ktesting logger
The new ktesting package
implements logging through testing.T using klog's text output format. It has
a single API call for
instrumenting a test case and support for command line flags.
klogr
klog/klogr continues to be
supported and it's default behavior is unchanged: it formats structured log
entries using its own, custom format and prints the result via klog.
However, this usage is discouraged because that format is neither machine-readable (in contrast to real JSON output as produced by zapr, the go-logr implementation used by Kubernetes) nor human-friendly (in contrast to the klog text format).
Instead, a klogr instance should be created with
WithFormat(FormatKlog)
which chooses the klog text format. A simpler construction method with the same
result is the new
klog.NewKlogr. That is the
logger that klog returns as fallback when nothing else is configured.
Reusable output test
A lot of go-logr implementations have very similar unit tests where they check
the result of certain log calls. If a developer didn't know about certain
caveats like for example a String function that panics when called, then it
is likely that both the handling of such caveats and the unit test are missing.
klog.test is a reusable set
of test cases that can be applied to a go-logr implementation.
Output flushing
klog used to start a goroutine unconditionally during init which flushed
buffered data at a hard-coded interval. Now that goroutine is only started on
demand (i.e. when writing to files with buffering) and can be controlled with
StopFlushDaemon and
StartFlushDaemon.
When a go-logr implementation buffers data, flushing that data can be
integrated into klog.Flush by
registering the logger with the
FlushLogger option.
Various other changes
For a description of all other enhancements see in the release notes.
logcheck
Originally designed as a linter for structured log calls, the
logcheck
tool has been enhanced to support also contextual logging and traditional klog
log calls. These enhanced checks already found bugs in Kubernetes, like calling
klog.Info instead of klog.Infof with a format string and parameters.
It can be included as a plugin in a golangci-lint invocation, which is how
Kubernetes uses it now,
or get invoked stand-alone.
We are in the process of moving the tool into a new repository because it isn't really related to klog and its releases should be tracked and tagged properly.
Next steps
The Structured Logging WG is always looking for new contributors. The migration away from C-style logging is now going to target structured, contextual logging in one step to reduce the overall code churn and number of PRs. Changing log calls is good first contribution to Kubernetes and an opportunity to get to know code in various different areas.
Kubernetes 1.24: Avoid Collisions Assigning IP Addresses to Services
In Kubernetes, Services are an abstract way to expose
an application running on a set of Pods. Services
can have a cluster-scoped virtual IP address (using a Service of type: ClusterIP).
Clients can connect using that virtual IP address, and Kubernetes then load-balances traffic to that
Service across the different backing Pods.
How Service ClusterIPs are allocated?
A Service ClusterIP can be assigned:
- dynamically
- the cluster's control plane automatically picks a free IP address from within the configured IP range for
type: ClusterIPServices. - statically
- you specify an IP address of your choice, from within the configured IP range for Services.
Across your whole cluster, every Service ClusterIP must be unique.
Trying to create a Service with a specific ClusterIP that has already
been allocated will return an error.
Why do you need to reserve Service Cluster IPs?
Sometimes you may want to have Services running in well-known IP addresses, so other components and users in the cluster can use them.
The best example is the DNS Service for the cluster. Some Kubernetes installers assign the 10th address from the Service IP range to the DNS service. Assuming you configured your cluster with Service IP range 10.96.0.0/16 and you want your DNS Service IP to be 10.96.0.10, you'd have to create a Service like this:
apiVersion: v1
kind: Service
metadata:
labels:
k8s-app: kube-dns
kubernetes.io/cluster-service: "true"
kubernetes.io/name: CoreDNS
name: kube-dns
namespace: kube-system
spec:
clusterIP: 10.96.0.10
ports:
- name: dns
port: 53
protocol: UDP
targetPort: 53
- name: dns-tcp
port: 53
protocol: TCP
targetPort: 53
selector:
k8s-app: kube-dns
type: ClusterIP
but as I explained before, the IP address 10.96.0.10 has not been reserved; if other Services are created before or in parallel with dynamic allocation, there is a chance they can allocate this IP, hence, you will not be able to create the DNS Service because it will fail with a conflict error.
How can you avoid Service ClusterIP conflicts?
In Kubernetes 1.24, you can enable a new feature gate ServiceIPStaticSubrange.
Turning this on allows you to use a different IP
allocation strategy for Services, reducing the risk of collision.
The ClusterIP range will be divided, based on the formula min(max(16, cidrSize / 16), 256),
described as never less than 16 or more than 256 with a graduated step between them.
Dynamic IP assignment will use the upper band by default, once this has been exhausted it will use the lower range. This will allow users to use static allocations on the lower band with a low risk of collision.
Examples:
Service IP CIDR block: 10.96.0.0/24
Range Size: 28 - 2 = 254
Band Offset: min(max(16, 256/16), 256) = min(16, 256) = 16
Static band start: 10.96.0.1
Static band end: 10.96.0.16
Range end: 10.96.0.254
Service IP CIDR block: 10.96.0.0/20
Range Size: 212 - 2 = 4094
Band Offset: min(max(16, 4096/16), 256) = min(256, 256) = 256
Static band start: 10.96.0.1
Static band end: 10.96.1.0
Range end: 10.96.15.254
Service IP CIDR block: 10.96.0.0/16
Range Size: 216 - 2 = 65534
Band Offset: min(max(16, 65536/16), 256) = min(4096, 256) = 256
Static band start: 10.96.0.1
Static band ends: 10.96.1.0
Range end: 10.96.255.254
Get involved with SIG Network
The current SIG-Network KEPs and issues on GitHub illustrate the SIG’s areas of emphasis.
SIG Network meetings are a friendly, welcoming venue for you to connect with the community and share your ideas. Looking forward to hearing from you!
Kubernetes 1.24: Introducing Non-Graceful Node Shutdown Alpha
Kubernetes v1.24 introduces alpha support for Non-Graceful Node Shutdown. This feature allows stateful workloads to failover to a different node after the original node is shutdown or in a non-recoverable state such as hardware failure or broken OS.
How is this different from Graceful Node Shutdown
You might have heard about the Graceful Node Shutdown capability of Kubernetes,
and are wondering how the Non-Graceful Node Shutdown feature is different from that. Graceful Node Shutdown
allows Kubernetes to detect when a node is shutting down cleanly, and handles that situation appropriately.
A Node Shutdown can be "graceful" only if the node shutdown action can be detected by the kubelet ahead
of the actual shutdown. However, there are cases where a node shutdown action may not be detected by
the kubelet. This could happen either because the shutdown command does not trigger the systemd inhibitor
locks mechanism that kubelet relies upon, or because of a configuration error
(the ShutdownGracePeriod and ShutdownGracePeriodCriticalPods are not configured properly).
Graceful node shutdown relies on Linux-specific support. The kubelet does not watch for upcoming shutdowns on Windows nodes (this may change in a future Kubernetes release).
When a node is shutdown but without the kubelet detecting it, pods on that node also shut down ungracefully. For stateless apps, that's often not a problem (a ReplicaSet adds a new pod once the cluster detects that the affected node or pod has failed). For stateful apps, the story is more complicated. If you use a StatefulSet and have a pod from that StatefulSet on a node that fails uncleanly, that affected pod will be marked as terminating; the StatefulSet cannot create a replacement pod because the pod still exists in the cluster. As a result, the application running on the StatefulSet may be degraded or even offline. If the original, shut down node comes up again, the kubelet on that original node reports in, deletes the existing pods, and the control plane makes a replacement pod for that StatefulSet on a different running node. If the original node has failed and does not come up, those stateful pods would be stuck in a terminating status on that failed node indefinitely.
$ kubectl get pod -o wide
NAME READY STATUS RESTARTS AGE IP NODE NOMINATED NODE READINESS GATES
web-0 1/1 Running 0 100m 10.244.2.4 k8s-node-876-1639279816 <none> <none>
web-1 1/1 Terminating 0 100m 10.244.1.3 k8s-node-433-1639279804 <none> <none>
Try out the new non-graceful shutdown handling
To use the non-graceful node shutdown handling, you must enable the NodeOutOfServiceVolumeDetach
feature gate for the kube-controller-manager
component.
In the case of a node shutdown, you can manually taint that node as out of service. You should make certain that
the node is truly shutdown (not in the middle of restarting) before you add that taint. You could add that
taint following a shutdown that the kubelet did not detect and handle in advance; another case where you
can use that taint is when the node is in a non-recoverable state due to a hardware failure or a broken OS.
The values you set for that taint can be node.kubernetes.io/out-of-service=nodeshutdown: "NoExecute"
or node.kubernetes.io/out-of-service=nodeshutdown:" NoSchedule".
Provided you have enabled the feature gate mentioned earlier, setting the out-of-service taint on a Node
means that pods on the node will be deleted unless if there are matching tolerations on the pods.
Persistent volumes attached to the shutdown node will be detached, and for StatefulSets, replacement pods will
be created successfully on a different running node.
$ kubectl taint nodes <node-name> node.kubernetes.io/out-of-service=nodeshutdown:NoExecute
$ kubectl get pod -o wide
NAME READY STATUS RESTARTS AGE IP NODE NOMINATED NODE READINESS GATES
web-0 1/1 Running 0 150m 10.244.2.4 k8s-node-876-1639279816 <none> <none>
web-1 1/1 Running 0 10m 10.244.1.7 k8s-node-433-1639279804 <none> <none>
Note: Before applying the out-of-service taint, you must verify that a node is already in shutdown or power off state (not in the middle of restarting), either because the user intentionally shut it down or the node is down due to hardware failures, OS issues, etc.
Once all the workload pods that are linked to the out-of-service node are moved to a new running node, and the shutdown node has been recovered, you should remove that taint on the affected node after the node is recovered. If you know that the node will not return to service, you could instead delete the node from the cluster.
What’s next?
Depending on feedback and adoption, the Kubernetes team plans to push the Non-Graceful Node Shutdown implementation to Beta in either 1.25 or 1.26.
This feature requires a user to manually add a taint to the node to trigger workloads failover and remove the taint after the node is recovered. In the future, we plan to find ways to automatically detect and fence nodes that are shutdown/failed and automatically failover workloads to another node.
How can I learn more?
Check out the documentation for non-graceful node shutdown.
How to get involved?
This feature has a long story. Yassine Tijani (yastij) started the KEP more than two years ago. Xing Yang (xing-yang) continued to drive the effort. There were many discussions among SIG Storage, SIG Node, and API reviewers to nail down the design details. Ashutosh Kumar (sonasingh46) did most of the implementation and brought it to Alpha in Kubernetes 1.24.
We want to thank the following people for their insightful reviews: Tim Hockin (thockin) for his guidance on the design, Jing Xu (jingxu97), Hemant Kumar (gnufied), and Michelle Au (msau42) for reviews from SIG Storage side, and Mrunal Patel (mrunalp), David Porter (bobbypage), Derek Carr (derekwaynecarr), and Danielle Endocrimes (endocrimes) for reviews from SIG Node side.
There are many people who have helped review the design and implementation along the way. We want to thank everyone who has contributed to this effort including the about 30 people who have reviewed the KEP and implementation over the last couple of years.
This feature is a collaboration between SIG Storage and SIG Node. For those interested in getting involved with the design and development of any part of the Kubernetes Storage system, join the Kubernetes Storage Special Interest Group (SIG). For those interested in getting involved with the design and development of the components that support the controlled interactions between pods and host resources, join the Kubernetes Node SIG.
Kubernetes 1.24: Prevent unauthorised volume mode conversion
Kubernetes v1.24 introduces a new alpha-level feature that prevents unauthorised users
from modifying the volume mode of a PersistentVolumeClaim created from an
existing VolumeSnapshot in the Kubernetes cluster.
The problem
The Volume Mode determines whether a volume is formatted into a filesystem or presented as a raw block device.
Users can leverage the VolumeSnapshot feature, which has been stable since Kubernetes v1.20,
to create a PersistentVolumeClaim (shortened as PVC) from an existing VolumeSnapshot in
the Kubernetes cluster. The PVC spec includes a dataSource field, which can point to an
existing VolumeSnapshot instance.
Visit Create a PersistentVolumeClaim from a Volume Snapshot for more details.
When leveraging the above capability, there is no logic that validates whether the mode of the original volume, whose snapshot was taken, matches the mode of the newly created volume.
This presents a security gap that allows malicious users to potentially exploit an as-yet-unknown vulnerability in the host operating system.
Many popular storage backup vendors convert the volume mode during the course of a backup operation, for efficiency purposes, which prevents Kubernetes from blocking the operation completely and presents a challenge in distinguishing trusted users from malicious ones.
Preventing unauthorised users from converting the volume mode
In this context, an authorised user is one who has access rights to perform Update
or Patch operations on VolumeSnapshotContents, which is a cluster-level resource.
It is upto the cluster administrator to provide these rights only to trusted users
or applications, like backup vendors.
If the alpha feature is enabled in
snapshot-controller, snapshot-validation-webhook and external-provisioner,
then unauthorised users will not be allowed to modify the volume mode of a PVC
when it is being created from a VolumeSnapshot.
To convert the volume mode, an authorised user must do the following:
- Identify the
VolumeSnapshotthat is to be used as the data source for a newly created PVC in the given namespace. - Identify the
VolumeSnapshotContentbound to the aboveVolumeSnapshot.
kubectl get volumesnapshot -n <namespace>
Add the annotation
snapshot.storage.kubernetes.io/allowVolumeModeChangeto theVolumeSnapshotContent.This annotation can be added either via software or manually by the authorised user. The
VolumeSnapshotContentannotation must look like following manifest fragment:
kind: VolumeSnapshotContent
metadata:
annotations:
- snapshot.storage.kubernetes.io/allowVolumeModeChange: "true"
...
Note: For pre-provisioned VolumeSnapshotContents, you must take an extra
step of setting spec.sourceVolumeMode field to either Filesystem or Block,
depending on the mode of the volume from which this snapshot was taken.
An example is shown below:
apiVersion: snapshot.storage.k8s.io/v1
kind: VolumeSnapshotContent
metadata:
annotations:
- snapshot.storage.kubernetes.io/allowVolumeModeChange: "true"
name: new-snapshot-content-test
spec:
deletionPolicy: Delete
driver: hostpath.csi.k8s.io
source:
snapshotHandle: 7bdd0de3-aaeb-11e8-9aae-0242ac110002
sourceVolumeMode: Filesystem
volumeSnapshotRef:
name: new-snapshot-test
namespace: default
Repeat steps 1 to 3 for all VolumeSnapshotContents whose volume mode needs to be
converted during a backup or restore operation.
If the annotation shown in step 4 above is present on a VolumeSnapshotContent
object, Kubernetes will not prevent the volume mode from being converted.
Users should keep this in mind before they attempt to add the annotation
to any VolumeSnapshotContent.
What's next
Enable this feature and let us know what you think!
We hope this feature causes no disruption to existing workflows while preventing malicious users from exploiting security vulnerabilities in their clusters.
For any queries or issues, join Kubernetes on Slack and create a thread in the #sig-storage channel. Alternately, create an issue in the CSI external-snapshotter repository.
Kubernetes 1.24: Volume Populators Graduate to Beta
The volume populators feature is now two releases old and entering beta! The AnyVolumeDataSource feature
gate defaults to enabled in Kubernetes v1.24, which means that users can specify any custom resource
as the data source of a PVC.
An earlier blog article detailed how the volume populators feature works. In short, a cluster administrator can install a CRD and associated populator controller in the cluster, and any user who can create instances of the CR can create pre-populated volumes by taking advantage of the populator.
Multiple populators can be installed side by side for different purposes. The SIG storage community is already seeing some implementations in public, and more prototypes should appear soon.
Cluster administrations are strongly encouraged to install the
volume-data-source-validator controller and associated VolumePopulator CRD before installing
any populators so that users can get feedback about invalid PVC data sources.
New Features
The lib-volume-populator library on which populators are built now includes metrics to help operators monitor and detect problems. This library is now beta and latest release is v1.0.1.
The volume data source validator
controller also has metrics support added, and is in beta. The VolumePopulator CRD is
beta and the latest release is v1.0.1.
Trying it out
To see how this works, you can install the sample "hello" populator and try it out.
First install the volume-data-source-validator controller.
kubectl apply -f https://raw.githubusercontent.com/kubernetes-csi/volume-data-source-validator/v1.0.1/client/config/crd/populator.storage.k8s.io_volumepopulators.yaml
kubectl apply -f https://raw.githubusercontent.com/kubernetes-csi/volume-data-source-validator/v1.0.1/deploy/kubernetes/rbac-data-source-validator.yaml
kubectl apply -f https://raw.githubusercontent.com/kubernetes-csi/volume-data-source-validator/v1.0.1/deploy/kubernetes/setup-data-source-validator.yaml
Next install the example populator.
kubectl apply -f https://raw.githubusercontent.com/kubernetes-csi/lib-volume-populator/v1.0.1/example/hello-populator/crd.yaml
kubectl apply -f https://raw.githubusercontent.com/kubernetes-csi/lib-volume-populator/87a47467b86052819e9ad13d15036d65b9a32fbb/example/hello-populator/deploy.yaml
Your cluster now has a new CustomResourceDefinition that provides a test API named Hello.
Create an instance of the Hello custom resource, with some text:
apiVersion: hello.example.com/v1alpha1
kind: Hello
metadata:
name: example-hello
spec:
fileName: example.txt
fileContents: Hello, world!
Create a PVC that refers to that CR as its data source.
apiVersion: v1
kind: PersistentVolumeClaim
metadata:
name: example-pvc
spec:
accessModes:
- ReadWriteOnce
resources:
requests:
storage: 10Mi
dataSourceRef:
apiGroup: hello.example.com
kind: Hello
name: example-hello
volumeMode: Filesystem
Next, run a Job that reads the file in the PVC.
apiVersion: batch/v1
kind: Job
metadata:
name: example-job
spec:
template:
spec:
containers:
- name: example-container
image: busybox:latest
command:
- cat
- /mnt/example.txt
volumeMounts:
- name: vol
mountPath: /mnt
restartPolicy: Never
volumes:
- name: vol
persistentVolumeClaim:
claimName: example-pvc
Wait for the job to complete (including all of its dependencies).
kubectl wait --for=condition=Complete job/example-job
And last examine the log from the job.
kubectl logs job/example-job
The output should be:
Hello, world!
Note that the volume already contained a text file with the string contents from the CR. This is only the simplest example. Actual populators can set up the volume to contain arbitrary contents.
How to write your own volume populator
Developers interested in writing new poplators are encouraged to use the lib-volume-populator library and to only supply a small controller wrapper around the library, and a pod image capable of attaching to volumes and writing the appropriate data to the volume.
Individual populators can be extremely generic such that they work with every type of PVC, or they can do vendor specific things to rapidly fill a volume with data if the volume was provisioned by a specific CSI driver from the same vendor, for example, by communicating directly with the storage for that volume.
How can I learn more?
The enhancement proposal, Volume Populators, includes lots of detail about the history and technical implementation of this feature.
Volume populators and data sources, within the documentation topic about persistent volumes, explains how to use this feature in your cluster.
Please get involved by joining the Kubernetes storage SIG to help us enhance this feature. There are a lot of good ideas already and we'd be thrilled to have more!
Kubernetes 1.24: gRPC container probes in beta
_Update: Since this article was posted, the feature was graduated to GA in v1.27 and doesn't require any feature gates to be enabled.
With Kubernetes 1.24 the gRPC probes functionality entered beta and is available by default. Now you can configure startup, liveness, and readiness probes for your gRPC app without exposing any HTTP endpoint, nor do you need an executable. Kubernetes can natively connect to your workload via gRPC and query its status.
Some history
It's useful to let the system managing your workload check that the app is healthy, has started OK, and whether the app considers itself good to accept traffic. Before the gRPC support was added, Kubernetes already allowed you to check for health based on running an executable from inside the container image, by making an HTTP request, or by checking whether a TCP connection succeeded.
For most apps, those checks are enough. If your app provides a gRPC endpoint
for a health (or readiness) check, it is easy
to repurpose the exec probe to use it for gRPC health checking.
In the blog article Health checking gRPC servers on Kubernetes,
Ahmet Alp Balkan described how you can do that — a mechanism that still works today.
There is a commonly used tool to enable this that was created on August 21, 2018, and with the first release at Sep 19, 2018.
This approach for gRPC apps health checking is very popular. There are 3,626 Dockerfiles
with the grpc_health_probe and 6,621 yaml files that are discovered with the
basic search on GitHub (at the moment of writing). This is a good indication of the tool popularity
and the need to support this natively.
Kubernetes v1.23 introduced an alpha-quality implementation of native support for querying a workload status using gRPC. Because it was an alpha feature, this was disabled by default for the v1.23 release.
Using the feature
We built gRPC health checking in similar way with other probes and believe
it will be easy to use
if you are familiar with other probe types in Kubernetes.
The natively supported health probe has many benefits over the workaround involving grpc_health_probe executable.
With the native gRPC support you don't need to download and carry 10MB of an additional executable with your image.
Exec probes are generally slower than a gRPC call as they require instantiating a new process to run an executable.
It also makes the checks less sensible for edge cases when the pod is running at maximum resources and has troubles
instantiating new processes.
There are a few limitations though. Since configuring a client certificate for probes is hard, services that require client authentication are not supported. The built-in probes are also not checking the server certificates and ignore related problems.
Built-in checks also cannot be configured to ignore certain types of errors
(grpc_health_probe returns different exit codes for different errors),
and cannot be "chained" to run the health check on multiple services in a single probe.
But all these limitations are quite standard for gRPC and there are easy workarounds for those.
Try it for yourself
Cluster-level setup
You can try this feature today. To try native gRPC probes, you can spin up a Kubernetes cluster
yourself with the GRPCContainerProbe feature gate enabled, there are many tools available.
Since the feature gate GRPCContainerProbe is enabled by default in 1.24,
many vendors will have this functionality working out of the box.
So you may just create an 1.24 cluster on platform of your choice. Some vendors
allow to enable alpha features on 1.23 clusters.
For example, at the moment of writing, you can spin up the test cluster on GKE for a quick test. Other vendors may also have similar capabilities, especially if you are reading this blog post long after the Kubernetes 1.24 release.
On GKE use the following command (note, version is 1.23 and enable-kubernetes-alpha are specified).
gcloud container clusters create test-grpc \
--enable-kubernetes-alpha \
--no-enable-autorepair \
--no-enable-autoupgrade \
--release-channel=rapid \
--cluster-version=1.23
You will also need to configure kubectl to access the cluster:
gcloud container clusters get-credentials test-grpc
Trying the feature out
Let's create the pod to test how gRPC probes work. For this test we will use the agnhost image.
This is a k8s maintained image with that can be used for all sorts of workload testing.
For example, it has a useful grpc-health-checking module
that exposes two ports - one is serving health checking service,
another - http port to react on commands make-serving and make-not-serving.
Here is an example pod definition. It starts the grpc-health-checking module,
exposes ports 5000 and 8080, and configures gRPC readiness probe:
---
apiVersion: v1
kind: Pod
metadata:
name: test-grpc
spec:
containers:
- name: agnhost
# image changed since publication (previously used registry "k8s.gcr.io")
image: registry.k8s.io/e2e-test-images/agnhost:2.35
command: ["/agnhost", "grpc-health-checking"]
ports:
- containerPort: 5000
- containerPort: 8080
readinessProbe:
grpc:
port: 5000
In the manifest file called test.yaml, you can create the pod and check its status.
The pod will be in ready state as indicated by the snippet of the output.
kubectl apply -f test.yaml
kubectl describe test-grpc
The output will contain something like this:
Conditions:
Type Status
Initialized True
Ready True
ContainersReady True
PodScheduled True
Now let's change the health checking endpoint status to NOT_SERVING. In order to call the http port of the Pod, let's create a port forward:
kubectl port-forward test-grpc 8080:8080
You can curl to call the command...
curl http://localhost:8080/make-not-serving
... and in a few seconds the port status will switch to not ready.
kubectl describe pod test-grpc
The output now will have:
Conditions:
Type Status
Initialized True
Ready False
ContainersReady False
PodScheduled True
...
Warning Unhealthy 2s (x6 over 42s) kubelet Readiness probe failed: service unhealthy (responded with "NOT_SERVING")
Once it is switched back, in about one second the Pod will get back to ready status:
curl http://localhost:8080/make-serving
kubectl describe test-grpc
The output indicates that the Pod went back to being Ready:
Conditions:
Type Status
Initialized True
Ready True
ContainersReady True
PodScheduled True
This new built-in gRPC health probing on Kubernetes makes implementing a health-check via gRPC
much easier than the older approach that relied on using a separate exec probe. Read through
the official
documentation
to learn more and provide feedback before the feature will be promoted to GA.
Summary
Kubernetes is a popular workload orchestration platform and we add features based on feedback and demand. Features like gRPC probes support is a minor improvement that will make life of many app developers easier and apps more resilient. Try it today and give feedback, before the feature went into GA.
Kubernetes 1.24: Storage Capacity Tracking Now Generally Available
The v1.24 release of Kubernetes brings storage capacity tracking as a generally available feature.
Problems we have solved
As explained in more detail in the previous blog post about this feature, storage capacity tracking allows a CSI driver to publish information about remaining capacity. The kube-scheduler then uses that information to pick suitable nodes for a Pod when that Pod has volumes that still need to be provisioned.
Without this information, a Pod may get stuck without ever being scheduled onto a suitable node because kube-scheduler has to choose blindly and always ends up picking a node for which the volume cannot be provisioned because the underlying storage system managed by the CSI driver does not have sufficient capacity left.
Because CSI drivers publish storage capacity information that gets used at a later time when it might not be up-to-date anymore, it can still happen that a node is picked that doesn't work out after all. Volume provisioning recovers from that by informing the scheduler that it needs to try again with a different node.
Load tests that were done again for promotion to GA confirmed that all storage in a cluster can be consumed by Pods with storage capacity tracking whereas Pods got stuck without it.
Problems we have not solved
Recovery from a failed volume provisioning attempt has one known limitation: if a Pod uses two volumes and only one of them could be provisioned, then all future scheduling decisions are limited by the already provisioned volume. If that volume is local to a node and the other volume cannot be provisioned there, the Pod is stuck. This problem pre-dates storage capacity tracking and while the additional information makes it less likely to occur, it cannot be avoided in all cases, except of course by only using one volume per Pod.
An idea for solving this was proposed in a KEP draft: volumes that were provisioned and haven't been used yet cannot have any valuable data and therefore could be freed and provisioned again elsewhere. SIG Storage is looking for interested developers who want to continue working on this.
Also not solved is support in Cluster Autoscaler for Pods with volumes. For CSI drivers with storage capacity tracking, a prototype was developed and discussed in a PR. It was meant to work with arbitrary CSI drivers, but that flexibility made it hard to configure and slowed down scale up operations: because autoscaler was unable to simulate volume provisioning, it only scaled the cluster by one node at a time, which was seen as insufficient.
Therefore that PR was not merged and a different approach with tighter coupling between autoscaler and CSI driver will be needed. For this a better understanding is needed about which local storage CSI drivers are used in combination with cluster autoscaling. Should this lead to a new KEP, then users will have to try out an implementation in practice before it can move to beta or GA. So please reach out to SIG Storage if you have an interest in this topic.
Acknowledgements
Thanks a lot to the members of the community who have contributed to this feature or given feedback including members of SIG Scheduling, SIG Autoscaling, and of course SIG Storage!
Kubernetes 1.24: Volume Expansion Now A Stable Feature
Volume expansion was introduced as a alpha feature in Kubernetes 1.8 and it went beta in 1.11 and with Kubernetes 1.24 we are excited to announce general availability(GA) of volume expansion.
This feature allows Kubernetes users to simply edit their PersistentVolumeClaim objects and specify new size in PVC Spec and Kubernetes will automatically expand the volume
using storage backend and also expand the underlying file system in-use by the Pod without requiring any downtime at all if possible.
How to use volume expansion
You can trigger expansion for a PersistentVolume by editing the spec field of a PVC, specifying a different
(and larger) storage request. For example, given following PVC:
kind: PersistentVolumeClaim
apiVersion: v1
metadata:
name: myclaim
spec:
accessModes:
- ReadWriteOnce
resources:
requests:
storage: 1Gi # specify new size here
You can request expansion of the underlying PersistentVolume by specifying a new value instead of old 1Gi size.
Once you've changed the requested size, watch the status.conditions field of the PVC to see if the
resize has completed.
When Kubernetes starts expanding the volume - it will add Resizing condition to the PVC, which will be removed once expansion completes. More information about progress of
expansion operation can also be obtained by monitoring events associated with the PVC:
kubectl describe pvc <pvc>
Storage driver support
Not every volume type however is expandable by default. Some volume types such as - intree hostpath volumes are not expandable at all. For CSI volumes - the CSI driver
must have capability EXPAND_VOLUME in controller or node service (or both if appropriate). Please refer to documentation of your CSI driver, to find out
if it supports volume expansion.
Please refer to volume expansion documentation for intree volume types which support volume expansion - Expanding Persistent Volumes.
In general to provide some degree of control over volumes that can be expanded, only dynamically provisioned PVCs whose storage class has allowVolumeExpansion parameter set to true are expandable.
A Kubernetes cluster administrator must edit the appropriate StorageClass object and set
the allowVolumeExpansion field to true. For example:
apiVersion: storage.k8s.io/v1
kind: StorageClass
metadata:
name: gp2-default
provisioner: kubernetes.io/aws-ebs
parameters:
secretNamespace: ""
secretName: ""
allowVolumeExpansion: true
Online expansion compared to offline expansion
By default, Kubernetes attempts to expand volumes immediately after user requests a resize. If one or more Pods are using the volume, Kubernetes tries to expands the volume using an online resize; as a result volume expansion usually requires no application downtime. Filesystem expansion on the node is also performed online and hence does not require shutting down any Pod that was using the PVC.
If you expand a PersistentVolume that is not in use, Kubernetes does an offline resize (and, because the volume isn't in use, there is again no workload disruption).
In some cases though - if underlying Storage Driver can only support offline expansion, users of the PVC must take down their Pod before expansion can succeed. Please refer to documentation of your storage provider to find out - what mode of volume expansion it supports.
When volume expansion was introduced as an alpha feature, Kubernetes only supported offline filesystem expansion on the node and hence required users to restart their pods for file system resizing to finish. His behaviour has been changed and Kubernetes tries its best to fulfil any resize request regardless of whether the underlying PersistentVolume volume is online or offline. If your storage provider supports online expansion then no Pod restart should be necessary for volume expansion to finish.
Next steps
Although volume expansion is now stable as part of the recent v1.24 release, SIG Storage are working to make it even simpler for users of Kubernetes to expand their persistent storage. Kubernetes 1.23 introduced features for triggering recovery from failed volume expansion, allowing users to attempt self-service healing after a failed resize. See Recovering from volume expansion failure for more details.
The Kubernetes contributor community is also discussing the potential for StatefulSet-driven storage expansion. This proposed feature would let you trigger expansion for all underlying PVs that are providing storage to a StatefulSet, by directly editing the StatefulSet object. See the Support Volume Expansion Through StatefulSets enhancement proposal for more details.
Dockershim: The Historical Context
Dockershim has been removed as of Kubernetes v1.24, and this is a positive move for the project. However, context is important for fully understanding something, be it socially or in software development, and this deserves a more in-depth review. Alongside the dockershim removal in Kubernetes v1.24, we’ve seen some confusion (sometimes at a panic level) and dissatisfaction with this decision in the community, largely due to a lack of context around this removal. The decision to deprecate and eventually remove dockershim from Kubernetes was not made quickly or lightly. Still, it’s been in the works for so long that many of today’s users are newer than that decision, and certainly newer than the choices that led to the dockershim being necessary in the first place.
So what is the dockershim, and why is it going away?
In the early days of Kubernetes, we only supported one container runtime. That runtime was Docker Engine. Back then, there weren’t really a lot of other options out there and Docker was the dominant tool for working with containers, so this was not a controversial choice. Eventually, we started adding more container runtimes, like rkt and hypernetes, and it became clear that Kubernetes users want a choice of runtimes working best for them. So Kubernetes needed a way to allow cluster operators the flexibility to use whatever runtime they choose.
The Container Runtime Interface (CRI) was released to allow that flexibility. The introduction of CRI was great for the project and users alike, but it did introduce a problem: Docker Engine’s use as a container runtime predates CRI, and Docker Engine is not CRI-compatible. To solve this issue, a small software shim (dockershim) was introduced as part of the kubelet component specifically to fill in the gaps between Docker Engine and CRI, allowing cluster operators to continue using Docker Engine as their container runtime largely uninterrupted.
However, this little software shim was never intended to be a permanent solution. Over the course of years, its existence has introduced a lot of unnecessary complexity to the kubelet itself. Some integrations are inconsistently implemented for Docker because of this shim, resulting in an increased burden on maintainers, and maintaining vendor-specific code is not in line with our open source philosophy. To reduce this maintenance burden and move towards a more collaborative community in support of open standards, KEP-2221 was introduced, proposing the removal of the dockershim. With the release of Kubernetes v1.20, the deprecation was official.
We didn’t do a great job communicating this, and unfortunately, the deprecation announcement led to some panic within the community. Confusion around what this meant for Docker as a company, if container images built by Docker would still run, and what Docker Engine actually is led to a conflagration on social media. This was our fault; we should have more clearly communicated what was happening and why at the time. To combat this, we released a blog and accompanying FAQ to allay the community’s fears and correct some misconceptions about what Docker is and how containers work within Kubernetes. As a result of the community’s concerns, Docker and Mirantis jointly agreed to continue supporting the dockershim code in the form of cri-dockerd, allowing you to continue using Docker Engine as your container runtime if need be. For the interest of users who want to try other runtimes, like containerd or cri-o, migration documentation was written.
We later surveyed the community and discovered that there are still many users with questions and concerns. In response, Kubernetes maintainers and the CNCF committed to addressing these concerns by extending documentation and other programs. In fact, this blog post is a part of this program. With so many end users successfully migrated to other runtimes, and improved documentation, we believe that everyone has a paved way to migration now.
Docker is not going away, either as a tool or as a company. It’s an important part of the cloud native community and the history of the Kubernetes project. We wouldn’t be where we are without them. That said, removing dockershim from kubelet is ultimately good for the community, the ecosystem, the project, and open source at large. This is an opportunity for all of us to come together to support open standards, and we’re glad to be doing so with the help of Docker and the community.
Kubernetes 1.24: Stargazer
We are excited to announce the release of Kubernetes 1.24, the first release of 2022!
This release consists of 46 enhancements: fourteen enhancements have graduated to stable, fifteen enhancements are moving to beta, and thirteen enhancements are entering alpha. Also, two features have been deprecated, and two features have been removed.
Major Themes
Dockershim Removed from kubelet
After its deprecation in v1.20, the dockershim component has been removed from the kubelet in Kubernetes v1.24. From v1.24 onwards, you will need to either use one of the other supported runtimes (such as containerd or CRI-O) or use cri-dockerd if you are relying on Docker Engine as your container runtime. For more information about ensuring your cluster is ready for this removal, please see this guide.
Beta APIs Off by Default
New beta APIs will not be enabled in clusters by default. Existing beta APIs and new versions of existing beta APIs will continue to be enabled by default.
Signing Release Artifacts
Release artifacts are signed using cosign signatures, and there is experimental support for verifying image signatures. Signing and verification of release artifacts is part of increasing software supply chain security for the Kubernetes release process.
OpenAPI v3
Kubernetes 1.24 offers beta support for publishing its APIs in the OpenAPI v3 format.
Storage Capacity and Volume Expansion Are Generally Available
Storage capacity tracking supports exposing currently available storage capacity via CSIStorageCapacity objects and enhances scheduling of pods that use CSI volumes with late binding.
Volume expansion adds support for resizing existing persistent volumes.
NonPreemptingPriority to Stable
This feature adds a new option to PriorityClasses, which can enable or disable pod preemption.
Storage Plugin Migration
Work is underway to migrate the internals of in-tree storage plugins to call out to CSI Plugins while maintaining the original API. The Azure Disk and OpenStack Cinder plugins have both been migrated.
gRPC Probes Graduate to Beta
With Kubernetes 1.24, the gRPC probes functionality has entered beta and is available by default. You can now configure startup, liveness, and readiness probes for your gRPC app natively within Kubernetes without exposing an HTTP endpoint or using an extra executable.
Kubelet Credential Provider Graduates to Beta
Originally released as Alpha in Kubernetes 1.20, the kubelet's support for image credential providers has now graduated to Beta. This allows the kubelet to dynamically retrieve credentials for a container image registry using exec plugins rather than storing credentials on the node's filesystem.
Contextual Logging in Alpha
Kubernetes 1.24 has introduced contextual logging that enables the caller of a function to control all aspects of logging (output formatting, verbosity, additional values, and names).
Avoiding Collisions in IP allocation to Services
Kubernetes 1.24 introduces a new opt-in feature that allows you to soft-reserve a range for static IP address assignments to Services. With the manual enablement of this feature, the cluster will prefer automatic assignment from the pool of Service IP addresses, thereby reducing the risk of collision.
A Service ClusterIP can be assigned:
- dynamically, which means the cluster will automatically pick a free IP within the configured Service IP range.
- statically, which means the user will set one IP within the configured Service IP range.
Service ClusterIP are unique; hence, trying to create a Service with a ClusterIP that has already been allocated will return an error.
Dynamic Kubelet Configuration is Removed from the Kubelet
After being deprecated in Kubernetes 1.22, Dynamic Kubelet Configuration has been removed from the kubelet. The feature will be removed from the API server in Kubernetes 1.26.
CNI Version-Related Breaking Change
Before you upgrade to Kubernetes 1.24, please verify that you are using/upgrading to a container runtime that has been tested to work correctly with this release.
For example, the following container runtimes are being prepared, or have already been prepared, for Kubernetes:
- containerd v1.6.4 and later, v1.5.11 and later
- CRI-O 1.24 and later
Service issues exist for pod CNI network setup and tear down in containerd v1.6.0–v1.6.3 when the CNI plugins have not been upgraded and/or the CNI config version is not declared in the CNI config files. The containerd team reports, "these issues are resolved in containerd v1.6.4."
With containerd v1.6.0–v1.6.3, if you do not upgrade the CNI plugins and/or declare the CNI config version, you might encounter the following "Incompatible CNI versions" or "Failed to destroy network for sandbox" error conditions.
CSI Snapshot
This information was added after initial publication.
VolumeSnapshot v1beta1 CRD has been removed. Volume snapshot and restore functionality for Kubernetes and the Container Storage Interface (CSI), which provides standardized APIs design (CRDs) and adds PV snapshot/restore support for CSI volume drivers, moved to GA in v1.20. VolumeSnapshot v1beta1 was deprecated in v1.20 and is now unsupported. Refer to KEP-177: CSI Snapshot and Volume Snapshot GA blog for more information.
Other Updates
Graduations to Stable
This release saw fourteen enhancements promoted to stable:
- Container Storage Interface (CSI) Volume Expansion
- Pod Overhead: Account for resources tied to the pod sandbox but not specific containers.
- Add non-preempting option to PriorityClasses
- Storage Capacity Tracking
- OpenStack Cinder In-Tree to CSI Driver Migration
- Azure Disk In-Tree to CSI Driver Migration
- Efficient Watch Resumption: Watch can be efficiently resumed after kube-apiserver reboot.
- Service Type=LoadBalancer Class Field: Introduce a new Service annotation
service.kubernetes.io/load-balancer-classthat allows multiple implementations oftype: LoadBalancerServices in the same cluster. - Indexed Job: Add a completion index to Pods of Jobs with a fixed completion count.
- Add Suspend Field to Jobs API: Add a suspend field to the Jobs API to allow orchestrators to create jobs with more control over when pods are created.
- Pod Affinity NamespaceSelector: Add a
namespaceSelectorfield for to pod affinity/anti-affinity spec. - Leader Migration for Controller Managers: kube-controller-manager and cloud-controller-manager can apply new controller-to-controller-manager assignment in HA control plane without downtime.
- CSR Duration: Extend the CertificateSigningRequest API with a mechanism to allow clients to request a specific duration for the issued certificate.
Major Changes
This release saw two major changes:
Release Notes
Check out the full details of the Kubernetes 1.24 release in our release notes.
Availability
Kubernetes 1.24 is available for download on GitHub. To get started with Kubernetes, check out these interactive tutorials or run local Kubernetes clusters using containers as “nodes”, with kind. You can also easily install 1.24 using kubeadm.
Release Team
This release would not have been possible without the combined efforts of committed individuals comprising the Kubernetes 1.24 release team. This team came together to deliver all of the components that go into each Kubernetes release, including code, documentation, release notes, and more.
Special thanks to James Laverack, our release lead, for guiding us through a successful release cycle, and to all of the release team members for the time and effort they put in to deliver the v1.24 release for the Kubernetes community.
Release Theme and Logo
Kubernetes 1.24: Stargazer

The theme for Kubernetes 1.24 is Stargazer.
Generations of people have looked to the stars in awe and wonder, from ancient astronomers to the scientists who built the James Webb Space Telescope. The stars have inspired us, set our imagination alight, and guided us through long nights on difficult seas.
With this release we gaze upwards, to what is possible when our community comes together. Kubernetes is the work of hundreds of contributors across the globe and thousands of end-users supporting applications that serve millions. Every one is a star in our sky, helping us chart our course.
The release logo is made by Britnee Laverack, and depicts a telescope set upon starry skies and the Pleiades, often known in mythology as the “Seven Sisters”. The number seven is especially auspicious for the Kubernetes project, and is a reference back to our original “Project Seven” name.
This release of Kubernetes is named for those that would look towards the night sky and wonder — for all the stargazers out there. ✨
User Highlights
- Check out how leading retail e-commerce company La Redoute used Kubernetes, alongside other CNCF projects, to transform and streamline its software delivery lifecycle - from development to operations.
- Trying to ensure no change to an API call would cause any breaks, Salt Security built its microservices entirely on Kubernetes, and it communicates via gRPC while Linkerd ensures messages are encrypted.
- In their effort to migrate from private to public cloud, Allainz Direct engineers redesigned its CI/CD pipeline in just three months while managing to condense 200 workflows down to 10-15.
- Check out how Bink, a UK based fintech company, updated its in-house Kubernetes distribution with Linkerd to build a cloud-agnostic platform that scales as needed whilst allowing them to keep a close eye on performance and stability.
- Using Kubernetes, the Dutch organization Stichting Open Nederland created a testing portal in just one-and-a-half months to help safely reopen events in the Netherlands. The Testing for Entry (Testen voor Toegang) platform leveraged the performance and scalability of Kubernetes to help individuals book over 400,000 COVID-19 testing appointments per day.
- Working alongside SparkFabrik and utilizing Backstage, Santagostino created the developer platform Samaritan to centralize services and documentation, manage the entire lifecycle of services, and simplify the work of Santagostino developers.
Ecosystem Updates
- KubeCon + CloudNativeCon Europe 2022 will take place in Valencia, Spain, from 16 – 20 May 2022! You can find more information about the conference and registration on the event site.
- In the 2021 Cloud Native Survey, the CNCF saw record Kubernetes and container adoption. Take a look at the results of the survey.
- The Linux Foundation and The Cloud Native Computing Foundation (CNCF) announced the availability of a new Cloud Native Developer Bootcamp to provide participants with the knowledge and skills to design, build, and deploy cloud native applications. Check out the announcement to learn more.
Project Velocity
The CNCF K8s DevStats project aggregates a number of interesting data points related to the velocity of Kubernetes and various sub-projects. This includes everything from individual contributions to the number of companies that are contributing, and is an illustration of the depth and breadth of effort that goes into evolving this ecosystem.
In the v1.24 release cycle, which ran for 17 weeks (January 10 to May 3), we saw contributions from 1029 companies and 1179 individuals.
Upcoming Release Webinar
Join members of the Kubernetes 1.24 release team on Tue May 24, 2022 9:45am – 11am PT to learn about the major features of this release, as well as deprecations and removals to help plan for upgrades. For more information and registration, visit the event page on the CNCF Online Programs site.
Get Involved
The simplest way to get involved with Kubernetes is by joining one of the many Special Interest Groups (SIGs) that align with your interests. Have something you’d like to broadcast to the Kubernetes community? Share your voice at our weekly community meeting, and through the channels below:
- Find out more about contributing to Kubernetes at the Kubernetes Contributors website
- Follow us on Twitter @Kubernetesio for the latest updates
- Join the community discussion on Discuss
- Join the community on Slack
- Post questions (or answer questions) on Server Fault.
- Share your Kubernetes story
- Read more about what’s happening with Kubernetes on the blog
- Learn more about the Kubernetes Release Team
Increasing the security bar in Ingress-NGINX v1.2.0
The Ingress may be one of the most targeted components of Kubernetes. An Ingress typically defines an HTTP reverse proxy, exposed to the Internet, containing multiple websites, and with some privileged access to Kubernetes API (such as to read Secrets relating to TLS certificates and their private keys).
While it is a risky component in your architecture, it is still the most popular way to properly expose your services.
Ingress-NGINX has been part of security assessments that figured out we have a big problem: we don't
do all proper sanitization before turning the configuration into an nginx.conf file, which may lead to information
disclosure risks.
While we understand this risk and the real need to fix this, it's not an easy process to do, so we took another approach to reduce (but not remove!) this risk in the current (v1.2.0) release.
Meet Ingress NGINX v1.2.0 and the chrooted NGINX process
One of the main challenges is that Ingress-NGINX runs the web proxy server (NGINX) alongside the Ingress
controller (the component that has access to Kubernetes API that and that creates the nginx.conf file).
So, NGINX does have the same access to the filesystem of the controller (and Kubernetes service account token, and other configurations from the container). While splitting those components is our end goal, the project needed a fast response; that lead us to the idea of using chroot().
Let's take a look into what an Ingress-NGINX container looked like before this change:
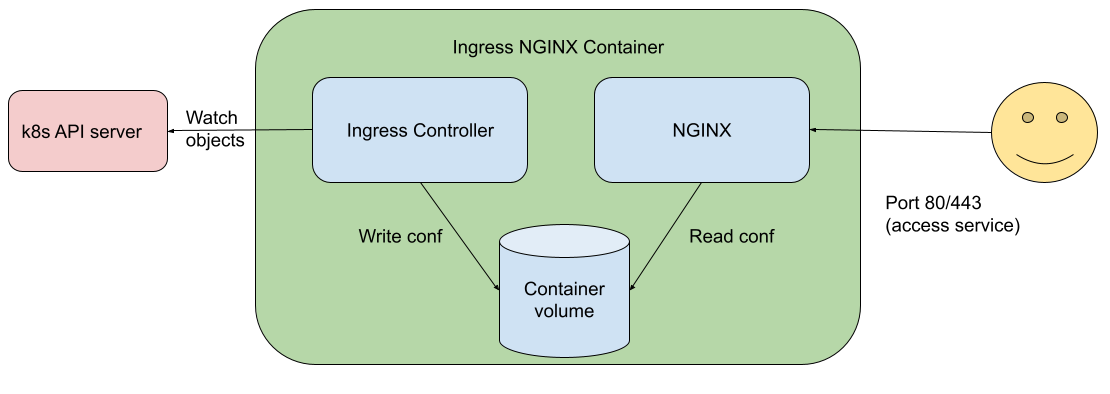
As we can see, the same container (not the Pod, the container!) that provides HTTP Proxy is the one that watches Ingress objects and writes the Container Volume
Now, meet the new architecture:
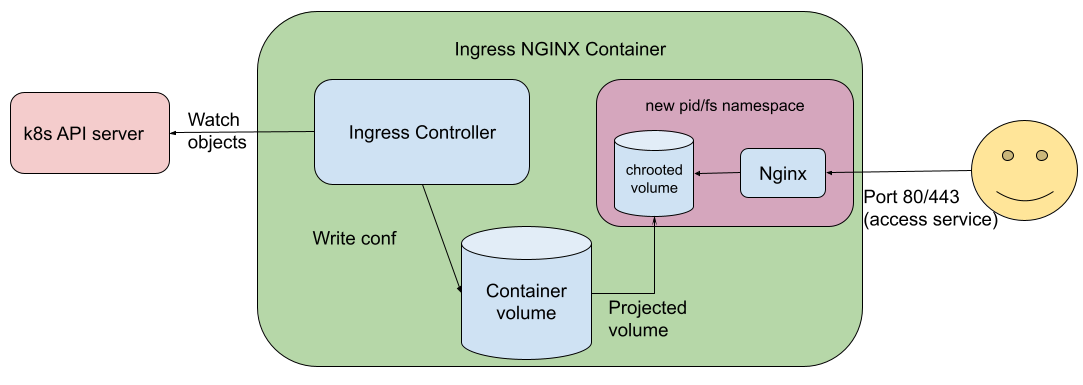
What does all of this mean? A basic summary is: that we are isolating the NGINX service as a container inside the controller container.
While this is not strictly true, to understand what was done here, it's good to understand how
Linux containers (and underlying mechanisms such as kernel namespaces) work.
You can read about cgroups in the Kubernetes glossary: cgroup and learn more about cgroups interact with namespaces in the NGINX project article
What Are Namespaces and cgroups, and How Do They Work?.
(As you read that, bear in mind that Linux kernel namespaces are a different thing from
Kubernetes namespaces).
Skip the talk, what do I need to use this new approach?
While this increases the security, we made this feature an opt-in in this release so you can have time to make the right adjustments in your environment(s). This new feature is only available from release v1.2.0 of the Ingress-NGINX controller.
There are two required changes in your deployments to use this feature:
- Append the suffix "-chroot" to the container image name. For example:
gcr.io/k8s-staging-ingress-nginx/controller-chroot:v1.2.0 - In your Pod template for the Ingress controller, find where you add the capability
NET_BIND_SERVICEand add the capabilitySYS_CHROOT. After you edit the manifest, you'll see a snippet like:
capabilities:
drop:
- ALL
add:
- NET_BIND_SERVICE
- SYS_CHROOT
If you deploy the controller using the official Helm chart then change the following setting in
values.yaml:
controller:
image:
chroot: true
Ingress controllers are normally set up cluster-wide (the IngressClass API is cluster scoped). If you manage the
Ingress-NGINX controller but you're not the overall cluster operator, then check with your cluster admin about
whether you can use the SYS_CHROOT capability, before you enable it in your deployment.
OK, but how does this increase the security of my Ingress controller?
Take the following configuration snippet and imagine, for some reason it was added to your nginx.conf:
location /randomthing/ {
alias /;
autoindex on;
}
If you deploy this configuration, someone can call http://website.example/randomthing and get some listing (and access) to the whole filesystem of the Ingress controller.
Now, can you spot the difference between chrooted and non chrooted Nginx on the listings below?
Without extra chroot() | With extra chroot() |
|---|---|
bin | bin |
dev | dev |
etc | etc |
home | |
lib | lib |
media | |
mnt | |
opt | opt |
proc | proc |
root | |
run | run |
sbin | |
srv | |
sys | |
tmp | tmp |
usr | usr |
var | var |
dbg | |
nginx-ingress-controller | |
wait-shutdown |
The one in left side is not chrooted. So NGINX has full access to the filesystem. The one in right side is chrooted, so a new filesystem with only the required files to make NGINX work is created.
What about other security improvements in this release?
We know that the new chroot() mechanism helps address some portion of the risk, but still, someone
can try to inject commands to read, for example, the nginx.conf file and extract sensitive information.
So, another change in this release (this is opt-out!) is the deep inspector. We know that some directives or regular expressions may be dangerous to NGINX, so the deep inspector checks all fields from an Ingress object (during its reconciliation, and also with a validating admission webhook) to verify if any fields contains these dangerous directives.
The ingress controller already does this for annotations, and our goal is to move this existing validation to happen inside deep inspection as part of a future release.
You can take a look into the existing rules in https://github.com/kubernetes/ingress-nginx/blob/main/internal/ingress/inspector/rules.go.
Due to the nature of inspecting and matching all strings within relevant Ingress objects, this new feature may consume a bit more CPU. You can disable it by running the ingress controller with the command line argument --deep-inspect=false.
What's next?
This is not our final goal. Our final goal is to split the control plane and the data plane processes. In fact, doing so will help us also achieve a Gateway API implementation, as we may have a different controller as soon as it "knows" what to provide to the data plane (we need some help here!!)
Some other projects in Kubernetes already take this approach
(like KPNG, the proposed replacement for kube-proxy),
and we plan to align with them and get the same experience for Ingress-NGINX.
Further reading
If you want to take a look into how chrooting was done in Ingress NGINX, take a look into https://github.com/kubernetes/ingress-nginx/pull/8337 The release v1.2.0 containing all the changes can be found at https://github.com/kubernetes/ingress-nginx/releases/tag/controller-v1.2.0
Kubernetes Removals and Deprecations In 1.24
As Kubernetes evolves, features and APIs are regularly revisited and removed. New features may offer an alternative or improved approach to solving existing problems, motivating the team to remove the old approach.
We want to make sure you are aware of the changes coming in the Kubernetes 1.24 release. The release will deprecate several (beta) APIs in favor of stable versions of the same APIs. The major change coming in the Kubernetes 1.24 release is the removal of Dockershim. This is discussed below and will be explored in more depth at release time. For an early look at the changes coming in Kubernetes 1.24, take a look at the in-progress CHANGELOG.
A note about Dockershim
It's safe to say that the removal receiving the most attention with the release of Kubernetes 1.24 is Dockershim. Dockershim was deprecated in v1.20. As noted in the Kubernetes 1.20 changelog: "Docker support in the kubelet is now deprecated and will be removed in a future release. The kubelet uses a module called "dockershim" which implements CRI support for Docker and it has seen maintenance issues in the Kubernetes community." With the upcoming release of Kubernetes 1.24, the Dockershim will finally be removed.
In the article Don't Panic: Kubernetes and Docker, the authors succinctly captured the change's impact and encouraged users to remain calm:
Docker as an underlying runtime is being deprecated in favor of runtimes that use the Container Runtime Interface (CRI) created for Kubernetes. Docker-produced images will continue to work in your cluster with all runtimes, as they always have.
Several guides have been created with helpful information about migrating from dockershim to container runtimes that are directly compatible with Kubernetes. You can find them on the Migrating from dockershim page in the Kubernetes documentation.
For more information about why Kubernetes is moving away from dockershim, check out the aptly named: Kubernetes is Moving on From Dockershim and the updated dockershim removal FAQ.
Take a look at the Is Your Cluster Ready for v1.24? post to learn about how to ensure your cluster continues to work after upgrading from v1.23 to v1.24.
The Kubernetes API removal and deprecation process
Kubernetes contains a large number of components that evolve over time. In some cases, this evolution results in APIs, flags, or entire features, being removed. To prevent users from facing breaking changes, Kubernetes contributors adopted a feature deprecation policy. This policy ensures that stable APIs may only be deprecated when a newer stable version of that same API is available and that APIs have a minimum lifetime as indicated by the following stability levels:
- Generally available (GA) or stable API versions may be marked as deprecated but must not be removed within a major version of Kubernetes.
- Beta or pre-release API versions must be supported for 3 releases after deprecation.
- Alpha or experimental API versions may be removed in any release without prior deprecation notice.
Removals follow the same deprecation policy regardless of whether an API is removed due to a beta feature graduating to stable or because that API was not proven to be successful. Kubernetes will continue to make sure migration options are documented whenever APIs are removed.
Deprecated APIs are those that have been marked for removal in a future Kubernetes release. Removed APIs are those that are no longer available for use in current, supported Kubernetes versions after having been deprecated. These removals have been superseded by newer, stable/generally available (GA) APIs.
API removals, deprecations, and other changes for Kubernetes 1.24
- Dynamic kubelet configuration:
DynamicKubeletConfigis used to enable the dynamic configuration of the kubelet. TheDynamicKubeletConfigflag was deprecated in Kubernetes 1.22. In v1.24, this feature gate will be removed from the kubelet. Refer to the "Dynamic kubelet config is removed" KEP for more information. - Dynamic log sanitization: The experimental dynamic log sanitization feature is deprecated and will be removed in v1.24. This feature introduced a logging filter that could be applied to all Kubernetes system components logs to prevent various types of sensitive information from leaking via logs. Refer to KEP-1753: Kubernetes system components logs sanitization for more information and an alternative approach.
- Removing Dockershim from kubelet: the Container Runtime Interface (CRI) for Docker (i.e. Dockershim) is currently a built-in container runtime in the kubelet code base. It was deprecated in v1.20. As of v1.24, the kubelet will no longer have dockershim. Check out this blog on what you need to do be ready for v1.24.
- Storage capacity tracking for pod scheduling: The CSIStorageCapacity API supports exposing currently available storage capacity via CSIStorageCapacity objects and enhances scheduling of pods that use CSI volumes with late binding. In v1.24, the CSIStorageCapacity API will be stable. The API graduating to stable initates the deprecation of the v1beta1 CSIStorageCapacity API. Refer to the Storage Capacity Constraints for Pod Scheduling KEP for more information.
- The
masterlabel is no longer present on kubeadm control plane nodes. For new clusters, the label 'node-role.kubernetes.io/master' will no longer be added to control plane nodes, only the label 'node-role.kubernetes.io/control-plane' will be added. For more information, refer to KEP-2067: Rename the kubeadm "master" label and taint. - VolumeSnapshot v1beta1 CRD will be removed. Volume snapshot and restore functionality for Kubernetes and the Container Storage Interface (CSI), which provides standardized APIs design (CRDs) and adds PV snapshot/restore support for CSI volume drivers, moved to GA in v1.20. VolumeSnapshot v1beta1 was deprecated in v1.20 and will become unsupported with the v1.24 release. Refer to KEP-177: CSI Snapshot and the Volume Snapshot GA blog blog article for more information.
What to do
Dockershim removal
As stated earlier, there are several guides about Migrating from dockershim. You can start with Finding what container runtime are on your nodes. If your nodes are using dockershim, there are other possible Docker Engine dependencies such as Pods or third-party tools executing Docker commands or private registries in the Docker configuration file. You can follow the Check whether Dockershim removal affects you guide to review possible Docker Engine dependencies. Before upgrading to v1.24, you decide to either remain using Docker Engine and Migrate Docker Engine nodes from dockershim to cri-dockerd or migrate to a CRI-compatible runtime. Here's a guide to change the container runtime on a node from Docker Engine to containerd.
kubectl convert
The kubectl convert plugin for kubectl
can be helpful to address migrating off deprecated APIs. The plugin facilitates the conversion of
manifests between different API versions, for example, from a deprecated to a non-deprecated API
version. More general information about the API migration process can be found in the Deprecated API Migration Guide.
Follow the install kubectl convert plugin
documentation to download and install the kubectl-convert binary.
Looking ahead
The Kubernetes 1.25 and 1.26 releases planned for later this year will stop serving beta versions of several currently stable Kubernetes APIs. The v1.25 release will also remove PodSecurityPolicy, which was deprecated with Kubernetes 1.21 and will not graduate to stable. See PodSecurityPolicy Deprecation: Past, Present, and Future for more information.
The official list of API removals planned for Kubernetes 1.25 is:
- The beta CronJob API (batch/v1beta1)
- The beta EndpointSlice API (discovery.k8s.io/v1beta1)
- The beta Event API (events.k8s.io/v1beta1)
- The beta HorizontalPodAutoscaler API (autoscaling/v2beta1)
- The beta PodDisruptionBudget API (policy/v1beta1)
- The beta PodSecurityPolicy API (policy/v1beta1)
- The beta RuntimeClass API (node.k8s.io/v1beta1)
The official list of API removals planned for Kubernetes 1.26 is:
- The beta FlowSchema and PriorityLevelConfiguration APIs (flowcontrol.apiserver.k8s.io/v1beta1)
- The beta HorizontalPodAutoscaler API (autoscaling/v2beta2)
Want to know more?
Deprecations are announced in the Kubernetes release notes. You can see the announcements of pending deprecations in the release notes for:
- Kubernetes 1.21
- Kubernetes 1.22
- Kubernetes 1.23
- We will formally announce the deprecations that come with Kubernetes 1.24 as part of the CHANGELOG for that release.
For information on the process of deprecation and removal, check out the official Kubernetes deprecation policy document.
Is Your Cluster Ready for v1.24?
Way back in December of 2020, Kubernetes announced the deprecation of Dockershim. In Kubernetes, dockershim is a software shim that allows you to use the entire Docker engine as your container runtime within Kubernetes. In the upcoming v1.24 release, we are removing Dockershim - the delay between deprecation and removal in line with the project’s policy of supporting features for at least one year after deprecation. If you are a cluster operator, this guide includes the practical realities of what you need to know going into this release. Also, what do you need to do to ensure your cluster doesn’t fall over!
First, does this even affect you?
If you are rolling your own cluster or are otherwise unsure whether or not this removal affects you, stay on the safe side and check to see if you have any dependencies on Docker Engine. Please note that using Docker Desktop to build your application containers is not a Docker dependency for your cluster. Container images created by Docker are compliant with the Open Container Initiative (OCI), a Linux Foundation governance structure that defines industry standards around container formats and runtimes. They will work just fine on any container runtime supported by Kubernetes.
If you are using a managed Kubernetes service from a cloud provider, and you haven’t explicitly changed the container runtime, there may be nothing else for you to do. Amazon EKS, Azure AKS, and Google GKE all default to containerd now, though you should make sure they do not need updating if you have any node customizations. To check the runtime of your nodes, follow Find Out What Container Runtime is Used on a Node.
Regardless of whether you are rolling your own cluster or using a managed Kubernetes service from a cloud provider, you may need to migrate telemetry or security agents that rely on Docker Engine.
I have a Docker dependency. What now?
If your Kubernetes cluster depends on Docker Engine and you intend to upgrade to Kubernetes v1.24 (which you should eventually do for security and similar reasons), you will need to change your container runtime from Docker Engine to something else or use cri-dockerd. Since containerd is a graduated CNCF project and the runtime within Docker itself, it’s a safe bet as an alternative container runtime. Fortunately, the Kubernetes project has already documented the process of changing a node’s container runtime, using containerd as an example. Instructions are similar for switching to one of the other supported runtimes.
I want to upgrade Kubernetes, and I need to maintain compatibility with Docker as a runtime. What are my options?
Fear not, you aren’t being left out in the cold and you don’t have to take the security risk of staying on an old version of Kubernetes. Mirantis and Docker have jointly released, and are maintaining, a replacement for dockershim. That replacement is called cri-dockerd. If you do need to maintain compatibility with Docker as a runtime, install cri-dockerd following the instructions in the project’s documentation.
Is that it?
Yes. As long as you go into this release aware of the changes being made and the details of your own clusters, and you make sure to communicate clearly with your development teams, it will be minimally dramatic. You may have some changes to make to your cluster, application code, or scripts, but all of these requirements are documented. Switching from using Docker Engine as your runtime to using one of the other supported container runtimes effectively means removing the middleman, since the purpose of dockershim is to access the container runtime used by Docker itself. From a practical perspective, this removal is better both for you and for Kubernetes maintainers in the long-run.
If you still have questions, please first check the Dockershim Removal FAQ.
Meet Our Contributors - APAC (Aus-NZ region)
Authors & Interviewers: Anubhav Vardhan, Atharva Shinde, Avinesh Tripathi, Brad McCoy, Debabrata Panigrahi, Jayesh Srivastava, Kunal Verma, Pranshu Srivastava, Priyanka Saggu, Purneswar Prasad, Vedant Kakde
Good day, everyone 👋
Welcome back to the second episode of the "Meet Our Contributors" blog post series for APAC.
This post will feature four outstanding contributors from the Australia and New Zealand regions, who have played diverse leadership and community roles in the Upstream Kubernetes project.
So, without further ado, let's get straight to the blog.
Caleb Woodbine
Caleb Woodbine is currently a member of the ii.nz organisation.
He began contributing to the Kubernetes project in 2018 as a member of the Kubernetes Conformance working group. His experience was positive, and he benefited from early guidance from Hippie Hacker, a fellow contributor from New Zealand.
He has made major contributions to Kubernetes project since then through SIG k8s-infra and k8s-conformance working group.
Caleb is also a co-organizer of the CloudNative NZ community events, which aim to expand the reach of Kubernetes project throughout New Zealand in order to encourage technical education and improved employment opportunities.
There need to be more outreach in APAC and the educators and universities must pick up Kubernetes, as they are very slow and about 8+ years out of date. NZ tends to rather pay overseas than educate locals on the latest cloud tech Locally.
Dylan Graham
Dylan Graham is a cloud engineer from Adelaide, Australia. He has been contributing to the upstream Kubernetes project since 2018.
He stated that being a part of such a large-scale project was initially overwhelming, but that the community's friendliness and openness assisted him in getting through it.
He began by contributing to the project documentation and is now mostly focused on the community support for the APAC region.
He believes that consistent attendance at community/project meetings, taking on project tasks, and seeking community guidance as needed can help new aspiring developers become effective contributors.
The feeling of being a part of a large community is really special. I've met some amazing people, even some before the pandemic in real life :)
Hippie Hacker
Hippie has worked for the CNCF.io as a Strategic Initiatives contractor from New Zealand for almost 5+ years. He is an active contributor to k8s-infra, API conformance testing, Cloud provider conformance submissions, and apisnoop.cncf.io domains of the upstream Kubernetes & CNCF projects.
He recounts their early involvement with the Kubernetes project, which began roughly 5 years ago when their firm, ii.nz, demonstrated network booting from a Raspberry Pi using PXE and running Gitlab in-cluster to install Kubernetes on servers.
He describes their own contributing experience as someone who, at first, tried to do all of the hard lifting on their own, but eventually saw the benefit of group contributions which reduced burnout and task division which allowed folks to keep moving forward on their own momentum.
He recommends that new contributors use pair programming.
The cross pollination of approaches and two pairs of eyes on the same work can often yield a much more amplified effect than a PR comment / approval alone can afford.
Nick Young
Nick Young works at VMware as a technical lead for Contour, a CNCF ingress controller. He was active with the upstream Kubernetes project from the beginning, and eventually became the chair of the LTS working group, where he advocated user concerns. He is currently the SIG Network Gateway API subproject's maintainer.
His contribution path was notable in that he began working on major areas of the Kubernetes project early on, skewing his trajectory.
He asserts the best thing a new contributor can do is to "start contributing". Naturally, if it is relevant to their employment, that is excellent; however, investing non-work time in contributing can pay off in the long run in terms of work. He believes that new contributors, particularly those who are currently Kubernetes users, should be encouraged to participate in higher-level project discussions.
Just being active and contributing will get you a long way. Once you've been active for a while, you'll find that you're able to answer questions, which will mean you're asked questions, and before you know it you are an expert.
If you have any recommendations/suggestions for who we should interview next, please let us know in #sig-contribex. Your suggestions would be much appreciated. We're thrilled to have additional folks assisting us in reaching out to even more wonderful individuals of the community.
We'll see you all in the next one. Everyone, till then, have a happy contributing! 👋
Updated: Dockershim Removal FAQ
This supersedes the original Dockershim Deprecation FAQ article, published in late 2020. The article includes updates from the v1.24 release of Kubernetes.
This document goes over some frequently asked questions regarding the removal of dockershim from Kubernetes. The removal was originally announced as a part of the Kubernetes v1.20 release. The Kubernetes v1.24 release actually removed the dockershim from Kubernetes.
For more on what that means, check out the blog post Don't Panic: Kubernetes and Docker.
To determine the impact that the removal of dockershim would have for you or your organization, you can read Check whether dockershim removal affects you.
In the months and days leading up to the Kubernetes 1.24 release, Kubernetes contributors worked hard to try to make this a smooth transition.
- A blog post detailing our commitment and next steps.
- Checking if there were major blockers to migration to other container runtimes.
- Adding a migrating from dockershim guide.
- Creating a list of articles on dockershim removal and on using CRI-compatible runtimes. That list includes some of the already mentioned docs, and also covers selected external sources (including vendor guides).
Why was the dockershim removed from Kubernetes?
Early versions of Kubernetes only worked with a specific container runtime: Docker Engine. Later, Kubernetes added support for working with other container runtimes. The CRI standard was created to enable interoperability between orchestrators (like Kubernetes) and many different container runtimes. Docker Engine doesn't implement that interface (CRI), so the Kubernetes project created special code to help with the transition, and made that dockershim code part of Kubernetes itself.
The dockershim code was always intended to be a temporary solution (hence the name: shim). You can read more about the community discussion and planning in the Dockershim Removal Kubernetes Enhancement Proposal. In fact, maintaining dockershim had become a heavy burden on the Kubernetes maintainers.
Additionally, features that were largely incompatible with the dockershim, such as cgroups v2 and user namespaces are being implemented in these newer CRI runtimes. Removing the dockershim from Kubernetes allows further development in those areas.
Are Docker and containers the same thing?
Docker popularized the Linux containers pattern and has been instrumental in developing the underlying technology, however containers in Linux have existed for a long time. The container ecosystem has grown to be much broader than just Docker. Standards like OCI and CRI have helped many tools grow and thrive in our ecosystem, some replacing aspects of Docker while others enhance existing functionality.
Will my existing container images still work?
Yes, the images produced from docker build will work with all CRI implementations.
All your existing images will still work exactly the same.
What about private images?
Yes. All CRI runtimes support the same pull secrets configuration used in Kubernetes, either via the PodSpec or ServiceAccount.
Can I still use Docker Engine in Kubernetes 1.23?
Yes, the only thing changed in 1.20 is a single warning log printed at kubelet startup if using Docker Engine as the runtime. You'll see this warning in all versions up to 1.23. The dockershim removal occurred in Kubernetes 1.24.
If you're running Kubernetes v1.24 or later, see Can I still use Docker Engine as my container runtime?. (Remember, you can switch away from the dockershim if you're using any supported Kubernetes release; from release v1.24, you must switch as Kubernetes no longer includes the dockershim).
Which CRI implementation should I use?
That’s a complex question and it depends on a lot of factors. If Docker Engine is working for you, moving to containerd should be a relatively easy swap and will have strictly better performance and less overhead. However, we encourage you to explore all the options from the CNCF landscape in case another would be an even better fit for your environment.
Can I still use Docker Engine as my container runtime?
First off, if you use Docker on your own PC to develop or test containers: nothing changes. You can still use Docker locally no matter what container runtime(s) you use for your Kubernetes clusters. Containers make this kind of interoperability possible.
Mirantis and Docker have committed to maintaining a replacement adapter for
Docker Engine, and to maintain that adapter even after the in-tree dockershim is removed
from Kubernetes. The replacement adapter is named cri-dockerd.
You can install cri-dockerd and use it to connect the kubelet to Docker Engine. Read Migrate Docker Engine nodes from dockershim to cri-dockerd to learn more.
Are there examples of folks using other runtimes in production today?
All Kubernetes project produced artifacts (Kubernetes binaries) are validated with each release.
Additionally, the kind project has been using containerd for some time and has seen an improvement in stability for its use case. Kind and containerd are leveraged multiple times every day to validate any changes to the Kubernetes codebase. Other related projects follow a similar pattern as well, demonstrating the stability and usability of other container runtimes. As an example, OpenShift 4.x has been using the CRI-O runtime in production since June 2019.
For other examples and references you can look at the adopters of containerd and CRI-O, two container runtimes under the Cloud Native Computing Foundation (CNCF).
People keep referencing OCI, what is that?
OCI stands for the Open Container Initiative, which standardized many of the interfaces between container tools and technologies. They maintain a standard specification for packaging container images (OCI image-spec) and running containers (OCI runtime-spec). They also maintain an actual implementation of the runtime-spec in the form of runc, which is the underlying default runtime for both containerd and CRI-O. The CRI builds on these low-level specifications to provide an end-to-end standard for managing containers.
What should I look out for when changing CRI implementations?
While the underlying containerization code is the same between Docker and most CRIs (including containerd), there are a few differences around the edges. Some common things to consider when migrating are:
- Logging configuration
- Runtime resource limitations
- Node provisioning scripts that call docker or use Docker Engine via its control socket
- Plugins for
kubectlthat require thedockerCLI or the Docker Engine control socket - Tools from the Kubernetes project that require direct access to Docker Engine
(for example: the deprecated
kube-imagepullertool) - Configuration of functionality like
registry-mirrorsand insecure registries - Other support scripts or daemons that expect Docker Engine to be available and are run outside of Kubernetes (for example, monitoring or security agents)
- GPUs or special hardware and how they integrate with your runtime and Kubernetes
If you use Kubernetes resource requests/limits or file-based log collection
DaemonSets then they will continue to work the same, but if you've customized
your dockerd configuration, you’ll need to adapt that for your new container
runtime where possible.
Another thing to look out for is anything expecting to run for system maintenance
or nested inside a container when building images will no longer work. For the
former, you can use the crictl tool as a drop-in replacement (see
mapping from docker cli to crictl)
and for the latter you can use newer container build options like img, buildah,
kaniko, or buildkit-cli-for-kubectl that don’t require Docker.
For containerd, you can start with their documentation to see what configuration options are available as you migrate things over.
For instructions on how to use containerd and CRI-O with Kubernetes, see the Kubernetes documentation on Container Runtimes.
What if I have more questions?
If you use a vendor-supported Kubernetes distribution, you can ask them about upgrade plans for their products. For end-user questions, please post them to our end user community forum: https://discuss.kubernetes.io/.
You can discuss the decision to remove dockershim via a dedicated GitHub issue.
You can also check out the excellent blog post Wait, Docker is deprecated in Kubernetes now? a more in-depth technical discussion of the changes.
Is there any tooling that can help me find dockershim in use?
Yes! The Detector for Docker Socket (DDS) is a kubectl plugin that you can
install and then use to check your cluster. DDS can detect if active Kubernetes workloads
are mounting the Docker Engine socket (docker.sock) as a volume.
Find more details and usage patterns in the DDS project's README.
Can I have a hug?
Yes, we're still giving hugs as requested. 🤗🤗🤗
SIG Node CI Subproject Celebrates Two Years of Test Improvements
Ensuring the reliability of SIG Node upstream code is a continuous effort that takes a lot of behind-the-scenes effort from many contributors. There are frequent releases of Kubernetes, base operating systems, container runtimes, and test infrastructure that result in a complex matrix that requires attention and steady investment to "keep the lights on." In May 2020, the Kubernetes node special interest group ("SIG Node") organized a new subproject for continuous integration (CI) for node-related code and tests. Since its inauguration, the SIG Node CI subproject has run a weekly meeting, and even the full hour is often not enough to complete triage of all bugs, test-related PRs and issues, and discuss all related ongoing work within the subgroup.
Over the past two years, we've fixed merge-blocking and release-blocking tests, reducing time to merge Kubernetes contributors' pull requests thanks to reduced test flakes. When we started, Node test jobs only passed 42% of the time, and through our efforts, we now ensure a consistent >90% job pass rate. We've closed 144 test failure issues and merged 176 pull requests just in kubernetes/kubernetes. And we've helped subproject participants ascend the Kubernetes contributor ladder, with 3 new org members, 6 new reviewers, and 2 new approvers.
The Node CI subproject is an approachable first stop to help new contributors get started with SIG Node. There is a low barrier to entry for new contributors to address high-impact bugs and test fixes, although there is a long road before contributors can climb the entire contributor ladder: it took over a year to establish two new approvers for the group. The complexity of all the different components that power Kubernetes nodes and its test infrastructure requires a sustained investment over a long period for developers to deeply understand the entire system, both at high and low levels of detail.
We have several regular contributors at our meetings, however; our reviewers and approvers pool is still small. It is our goal to continue to grow contributors to ensure a sustainable distribution of work that does not just fall to a few key approvers.
It's not always obvious how subprojects within SIGs are formed, operate, and work. Each is unique to its sponsoring SIG and tailored to the projects that the group is intended to support. As a group that has welcomed many first-time SIG Node contributors, we'd like to share some of the details and accomplishments over the past two years, helping to demystify our inner workings and celebrate the hard work of all our dedicated contributors!
Timeline
May 2020. SIG Node CI group was formed on May 11, 2020, with more than 30 volunteers signed up, to improve SIG Node CI signal and overall observability. Victor Pickard focused on getting testgrid jobs passing when Ning Liao suggested forming a group around this effort and came up with the original group charter document. The SIG Node chairs sponsored group creation with Victor as a subproject lead. Sergey Kanzhelev joined Victor shortly after as a co-lead.
At the kick-off meeting, we discussed which tests to concentrate on fixing first and discussed merge-blocking and release-blocking tests, many of which were failing due to infrastructure issues or buggy test code.
The subproject launched weekly hour-long meetings to discuss ongoing work discussion and triage.
June 2020. Morgan Bauer, Karan Goel, and Jorge Alarcon Ochoa were recognized as reviewers for the SIG Node CI group for their contributions, helping significantly with the early stages of the subproject. David Porter and Roy Yang also joined the SIG test failures GitHub team.
August 2020. All merge-blocking and release-blocking tests were passing, with some flakes. However, only 42% of all SIG Node test jobs were green, as there were many flakes and failing tests.
October 2020. Amim Knabben becomes a Kubernetes org member for his contributions to the subproject.
January 2021. With healthy presubmit and critical periodic jobs passing, the subproject discussed its goal for cleaning up the rest of periodic tests and ensuring they passed without flakes.
Elana Hashman joined the subproject, stepping up to help lead it after Victor's departure.
February 2021. Artyom Lukianov becomes a Kubernetes org member for his contributions to the subproject.
August 2021. After SIG Node successfully ran a bug scrub to clean up its bug backlog, the scope of the meeting was extended to include bug triage to increase overall reliability, anticipating issues before they affect the CI signal.
Subproject leads Elana Hashman and Sergey Kanzhelev are both recognized as approvers on all node test code, supported by SIG Node and SIG Testing.
September 2021. After significant deflaking progress with serial tests in the 1.22 release spearheaded by Francesco Romani, the subproject set a goal for getting the serial job fully passing by the 1.23 release date.
Mike Miranda becomes a Kubernetes org member for his contributions to the subproject.
November 2021. Throughout 2021, SIG Node had no merge or release-blocking test failures. Many flaky tests from past releases are removed from release-blocking dashboards as they had been fully cleaned up.
Danielle Lancashire was recognized as a reviewer for SIG Node's subgroup, test code.
The final node serial tests were completely fixed. The serial tests consist of many disruptive and slow tests which tend to be flakey and are hard to troubleshoot. By the 1.23 release freeze, the last serial tests were fixed and the job was passing without flakes.
The 1.23 release got a special shout out for the tests quality and CI signal. The SIG Node CI subproject was proud to have helped contribute to such a high-quality release, in part due to our efforts in identifying and fixing flakes in Node and beyond.
December 2021. An estimated 90% of test jobs were passing at the time of the 1.23 release (up from 42% in August 2020).
Dockershim code was removed from Kubernetes. This affected nearly half of SIG Node's test jobs and the SIG Node CI subproject reacted quickly and retargeted all the tests. SIG Node was the first SIG to complete test migrations off dockershim, providing examples for other affected SIGs. The vast majority of new jobs passed at the time of introduction without further fixes required. The effort of removing dockershim) from Kubernetes is ongoing. There are still some wrinkles from the dockershim removal as we uncover more dependencies on dockershim, but we plan to stabilize all test jobs by the 1.24 release.
Statistics
Our regular meeting attendees and subproject participants for the past few months:
- Aditi Sharma
- Artyom Lukianov
- Arnaud Meukam
- Danielle Lancashire
- David Porter
- Davanum Srinivas
- Elana Hashman
- Francesco Romani
- Matthias Bertschy
- Mike Miranda
- Paco Xu
- Peter Hunt
- Ruiwen Zhao
- Ryan Phillips
- Sergey Kanzhelev
- Skyler Clark
- Swati Sehgal
- Wenjun Wu
The kubernetes/test-infra source code repository contains test definitions. The number of Node PRs just in that repository:
Triaged issues and PRs on CI board (including triaging away from the subgroup scope):
Future
Just "keeping the lights on" is a bold task and we are committed to improving this experience. We are working to simplify the triage and review processes for SIG Node.
Specifically, we are working on better test organization, naming, and tracking:
- https://github.com/kubernetes/enhancements/pull/3042
- https://github.com/kubernetes/test-infra/issues/24641
- Kubernetes SIG-Node CI Testgrid Tracker
We are also constantly making progress on improved tests debuggability and de-flaking.
If any of this interests you, we'd love for you to join us! There's plenty to learn in debugging test failures, and it will help you gain familiarity with the code that SIG Node maintains.
You can always find information about the group on the SIG Node page. We give group updates at our maintainer track sessions, such as KubeCon + CloudNativeCon Europe 2021 and KubeCon + CloudNative North America 2021. Join us in our mission to keep the kubelet and other SIG Node components reliable and ensure smooth and uneventful releases!
Spotlight on SIG Multicluster
Introduction
SIG Multicluster is the SIG focused on how Kubernetes concepts are expanded and used beyond the cluster boundary. Historically, Kubernetes resources only interacted within that boundary - KRU or Kubernetes Resource Universe (not an actual Kubernetes concept). Kubernetes clusters, even now, don't really know anything about themselves or, about other clusters. Absence of cluster identifiers is a case in point. With the growing adoption of multicloud and multicluster deployments, the work SIG Multicluster doing is gaining a lot of attention. In this blog, Jeremy Olmsted-Thompson, Google and Chris Short, AWS discuss the interesting problems SIG Multicluster is solving and how you can get involved. Their initials JOT and CS will be used for brevity.
A summary of their conversation
CS: How long has the SIG Multicluster existed and how was the SIG in its infancy? How long have you been with this SIG?
JOT: I've been around for almost two years in the SIG Multicluster. All I know about the infancy years is from the lore but even in the early days, it was always about solving this same problem. Early efforts have been things like KubeFed. I think there are still folks using KubeFed but it's a smaller slice. Back then, I think people out there deploying large numbers of Kubernetes clusters were really not at a point where we had a ton of real concrete use cases. Projects like KubeFed and Cluster Registry were developed around that time and the need back then can be associated to these projects. The motivation for these projects were how do we solve the problems that we think people are going to have, when they start expanding to multiple clusters. Honestly, in some ways, it was trying to do too much at that time.
CS: How does KubeFed differ from the current state of SIG Multicluster? How does the lore differ from the now?
JOT: Yeah, it was like trying to get ahead of potential problems instead of addressing specific problems. I think towards the end of 2019, there was a slow down in SIG multicluster work and we kind of picked it back up with one of the most active recent projects that is the SIG Multicluster services (MCS).
Now this is the shift to solving real specific problems. For example,
I've got workloads that are spread across multiple clusters and I need them to talk to each other.
Okay, that's very straightforward and we know that we need to solve that. To get started, let's make sure that these projects can work together on a common API so you get the same kind of portability that you get with Kubernetes.
There's a few implementations of the MCS API out there and more are being developed. But, we didn't build an implementation because depending on how you're deploying things there could be hundreds of implementations. As long as you only need the basic Multicluster service functionality, it'll just work on whatever background you want, whether it's Submariner, GKE, or a service mesh.
My favorite example of "then vs. now" is cluster ID. A few years ago, there was an effort to define a cluster ID. A lot of really good thought went into this concept, for example, how do we make a cluster ID is unique across multiple clusters. How do we make this ID globally unique so it'll work in every contact? Let's say, there's an acquisition or merger of teams - does the cluster IDs still remain unique for those teams?
With Multicluster services, we found the need for an actual cluster ID, and it has a very specific need. To address this specific need, we're no longer considering every single Kubernetes cluster out there rather the ClusterSets - a grouping of clusters that work together in some kind of bounds. That's a much narrower scope than considering clusters everywhere in time and space. It also leaves flexibility for an implementer to define the boundary (a ClusterSet) beyond which this cluster ID will no longer be unique.
CS: How do you feel about the current state of SIG Multicluster versus where you're hoping to be in future?
JOT: There's a few projects that are kind of getting started, for example, Work API. In the future, I think that some common practices around how do we deploy things across clusters are going to develop.
If I have clusters deployed in a bunch of different regions; what's the best way to actually do that?
The answer is, almost always, "it depends". Why are you doing this? Is it because there's some kind of compliance that makes you care about locality? Is it performance? Is it availability?
I think revisiting registry patterns will probably be a natural step after we have cluster IDs, that is, how do you actually associate these clusters together? Maybe you've got a distributed deployment that you run in your own data centers all over the world. I imagine that expanding the API in that space is going to be important as more multi cluster features develop. It really depends on what the community starts doing with these tools.
CS: In the early days of Kubernetes, we used to have a few large Kubernetes clusters and now we're dealing with many small Kubernetes clusters - even multiple clusters for our own dev environments. How has this shift from a few large clusters to many small clusters affected the SIG? Has it accelerated the work or make it challenging in any way?
JOT: I think that it has created a lot of ambiguity that needs solving. Originally, you'd have a dev cluster, a staging cluster, and a prod cluster. When the multi region thing came in, we started needing dev/staging/prod clusters, per region. And then, sometimes clusters really need more isolation due to compliance or some regulations issues. Thus, we're ending up with a lot of clusters. I think figuring out the right balance on how many clusters should you actually have is important. The power of Kubernetes is being able to deploy a lot of things managed by a single control plane. So, it's not like every single workload that gets deployed should be in its own cluster. But I think it's pretty clear that we can't put every single workload in a single cluster.
CS: What are some of your favorite things about this SIG?
JOT: The complexity of the problems, the people and the newness of the space. We don't have right answers and we have to figure this out. At the beginning, we couldn't even think about multi clusters because there was no way to connect services across clusters. Now there is and we're starting to go tackle those problems, I think that this is a really fun place to be in because I expect that the SIG is going to get a lot busier the next couple of years. It's a very collaborative group and we definitely would like more people to come join us, get involved, raise their problems and bring their ideas.
CS: What do you think keeps people in this group? How has the pandemic affected you?
JOT: I think it definitely got a little bit quieter during the pandemic. But for the most part; it's a very distributed group so whether you're calling in to our weekly meetings from a conference room or from your home, it doesn't make that huge of a difference. During the pandemic, a lot of people had time to focus on what's next for their scale and growth. I think that's what keeps people in the group - we have real problems that need to be solved which are very new in this space. And it's fun :)
Wrap up
CS: That's all we have for today. Thanks Jeremy for your time.
JOT: Thanks Chris. Everybody is welcome at our bi-weekly meetings. We love as many people to come as possible and welcome all questions and all ideas. It's a new space and it'd be great to grow the community.
Securing Admission Controllers
Admission control is a key part of Kubernetes security, alongside authentication and authorization. Webhook admission controllers are extensively used to help improve the security of Kubernetes clusters in a variety of ways including restricting the privileges of workloads and ensuring that images deployed to the cluster meet organization’s security requirements.
However, as with any additional component added to a cluster, security risks can present themselves. A security risk example is if the deployment and management of the admission controller are not handled correctly. To help admission controller users and designers manage these risks appropriately, the security documentation subgroup of SIG Security has spent some time developing a threat model for admission controllers. This threat model looks at likely risks which may arise from the incorrect use of admission controllers, which could allow security policies to be bypassed, or even allow an attacker to get unauthorised access to the cluster.
From the threat model, we developed a set of security best practices that should be adopted to ensure that cluster operators can get the security benefits of admission controllers whilst avoiding any risks from using them.
Admission controllers and good practices for security
From the threat model, a couple of themes emerged around how to ensure the security of admission controllers.
Secure webhook configuration
It’s important to ensure that any security component in a cluster is well configured and admission controllers are no different here. There are a couple of security best practices to consider when using admission controllers
- Correctly configured TLS for all webhook traffic. Communications between the API server and the admission controller webhook should be authenticated and encrypted to ensure that attackers who may be in a network position to view or modify this traffic cannot do so. To achieve this access the API server and webhook must be using certificates from a trusted certificate authority so that they can validate their mutual identities
- Only authenticated access allowed. If an attacker can send an admission controller large numbers of requests, they may be able to overwhelm the service causing it to fail. Ensuring all access requires strong authentication should mitigate that risk.
- Admission controller fails closed. This is a security practice that has a tradeoff, so whether a cluster operator wants to configure it will depend on the cluster’s threat model. If an admission controller fails closed, when the API server can’t get a response from it, all deployments will fail. This stops attackers bypassing the admission controller by disabling it, but, can disrupt the cluster’s operation. As clusters can have multiple webhooks, one approach to hit a middle ground might be to have critical controls on a fail closed setups and less critical controls allowed to fail open.
- Regular reviews of webhook configuration. Configuration mistakes can lead to security issues, so it’s important that the admission controller webhook configuration is checked to make sure the settings are correct. This kind of review could be done automatically by an Infrastructure As Code scanner or manually by an administrator.
Secure cluster configuration for admission control
In most cases, the admission controller webhook used by a cluster will be installed as a workload in the cluster. As a result, it’s important to ensure that Kubernetes' security features that could impact its operation are well configured.
- Restrict RBAC rights. Any user who has rights which would allow them to modify the configuration of the webhook objects or the workload that the admission controller uses could disrupt its operation. So it’s important to make sure that only cluster administrators have those rights.
- Prevent privileged workloads. One of the realities of container systems is that if a workload is given certain privileges, it will be possible to break out to the underlying cluster node and impact other containers on that node. Where admission controller services run in the cluster they’re protecting, it’s important to ensure that any requirement for privileged workloads is carefully reviewed and restricted as much as possible.
- Strictly control external system access. As a security service in a cluster admission controller systems will have access to sensitive information like credentials. To reduce the risk of this information being sent outside the cluster, network policies should be used to restrict the admission controller services access to external networks.
- Each cluster has a dedicated webhook. Whilst it may be possible to have admission controller webhooks that serve multiple clusters, there is a risk when using that model that an attack on the webhook service would have a larger impact where it’s shared. Also where multiple clusters use an admission controller there will be increased complexity and access requirements, making it harder to secure.
Admission controller rules
A key element of any admission controller used for Kubernetes security is the rulebase it uses. The rules need to be able to accurately meet their goals avoiding false positive and false negative results.
- Regularly test and review rules. Admission controller rules need to be tested to ensure their accuracy. They also need to be regularly reviewed as the Kubernetes API will change with each new version, and rules need to be assessed with each Kubernetes release to understand any changes that may be required to keep them up to date.
Meet Our Contributors - APAC (India region)
Authors & Interviewers: Anubhav Vardhan, Atharva Shinde, Avinesh Tripathi, Debabrata Panigrahi, Kunal Verma, Pranshu Srivastava, Pritish Samal, Purneswar Prasad, Vedant Kakde
Editor: Priyanka Saggu
Good day, everyone 👋
Welcome to the first episode of the APAC edition of the "Meet Our Contributors" blog post series.
In this post, we'll introduce you to five amazing folks from the India region who have been actively contributing to the upstream Kubernetes projects in a variety of ways, as well as being the leaders or maintainers of numerous community initiatives.
💫 Let's get started, so without further ado…
Arsh Sharma
Arsh is currently employed with Okteto as a Developer Experience engineer. As a new contributor, he realised that 1:1 mentorship opportunities were quite beneficial in getting him started with the upstream project.
He is presently a CI Signal shadow on the Kubernetes 1.23 release team. He is also contributing to the SIG Testing and SIG Docs projects, as well as to the cert-manager tools development work that is being done under the aegis of SIG Architecture.
To the newcomers, Arsh helps plan their early contributions sustainably.
I would encourage folks to contribute in a way that's sustainable. What I mean by that is that it's easy to be very enthusiastic early on and take up more stuff than one can actually handle. This can often lead to burnout in later stages. It's much more sustainable to work on things iteratively.
Kunal Kushwaha
Kunal Kushwaha is a core member of the Kubernetes marketing council. He is also a CNCF ambassador and one of the founders of the CNCF Students Program.. He also served as a Communications role shadow during the 1.22 release cycle.
At the end of his first year, Kunal began contributing to the fabric8io kubernetes-client project. He was then selected to work on the same project as part of Google Summer of Code. Kunal mentored people on the same project, first through Google Summer of Code then through Google Code-in.
As an open-source enthusiast, he believes that diverse participation in the community is beneficial since it introduces new perspectives and opinions and respect for one's peers. He has worked on various open-source projects, and his participation in communities has considerably assisted his development as a developer.
I believe if you find yourself in a place where you do not know much about the project, that's a good thing because now you can learn while contributing and the community is there to help you. It has helped me a lot in gaining skills, meeting people from around the world and also helping them. You can learn on the go, you don't have to be an expert. Make sure to also check out no code contributions because being a beginner is a skill and you can bring new perspectives to the organisation.
Madhav Jivarajani
Madhav Jivarajani works on the VMware Upstream Kubernetes stability team. He began contributing to the Kubernetes project in January 2021 and has since made significant contributions to several areas of work under SIG Architecture, SIG API Machinery, and SIG ContribEx (contributor experience).
Among several significant contributions are his recent efforts toward the Archival of design proposals, refactoring the "groups" codebase under k8s-infra repository to make it mockable and testable, and improving the functionality of the GitHub k8s bot.
In addition to his technical efforts, Madhav oversees many projects aimed at assisting new contributors. He organises bi-weekly "KEP reading club" sessions to help newcomers understand the process of adding new features, deprecating old ones, and making other key changes to the upstream project. He has also worked on developing Katacoda scenarios to assist new contributors to become acquainted with the process of contributing to k/k. In addition to his current efforts to meet with community members every week, he has organised several new contributors workshops (NCW).
I initially did not know much about Kubernetes. I joined because the community was super friendly. But what made me stay was not just the people, but the project itself. My solution to not feeling overwhelmed in the community was to gain as much context and knowledge into the topics that I was interested in and were being discussed. And as a result I continued to dig deeper into Kubernetes and the design of it. I am a systems nut & thus Kubernetes was an absolute goldmine for me.
Rajas Kakodkar
Rajas Kakodkar currently works at VMware as a Member of Technical Staff. He has been engaged in many aspects of the upstream Kubernetes project since 2019.
He is now a key contributor to the Testing special interest group. He is also active in the SIG Network community. Lately, Rajas has contributed significantly to the NetworkPolicy++ and kpng sub-projects.
One of the first challenges he ran across was that he was in a different time zone than the upstream project's regular meeting hours. However, async interactions on community forums progressively corrected that problem.
I enjoy contributing to Kubernetes not just because I get to work on cutting edge tech but more importantly because I get to work with awesome people and help in solving real world problems.
Rajula Vineet Reddy
Rajula Vineet Reddy, a Junior Engineer at CERN, is a member of the Marketing Council team under SIG ContribEx . He also served as a release shadow for SIG Release during the 1.22 and 1.23 Kubernetes release cycles.
He started looking at the Kubernetes project as part of a university project with the help of one of his professors. Over time, he spent a significant amount of time reading the project's documentation, Slack discussions, GitHub issues, and blogs, which helped him better grasp the Kubernetes project and piqued his interest in contributing upstream. One of his key contributions was his assistance with automation in the SIG ContribEx Upstream Marketing subproject.
According to Rajula, attending project meetings and shadowing various project roles are vital for learning about the community.
I find the community very helpful and it's always “you get back as much as you contribute”. The more involved you are, the more you will understand, get to learn and contribute new things.
The first step to “come forward and start” is hard. But it's all gonna be smooth after that. Just take that jump.
If you have any recommendations/suggestions for who we should interview next, please let us know in #sig-contribex. We're thrilled to have other folks assisting us in reaching out to even more wonderful individuals of the community. Your suggestions would be much appreciated.
We'll see you all in the next one. Everyone, till then, have a happy contributing! 👋
Kubernetes is Moving on From Dockershim: Commitments and Next Steps
Kubernetes is removing dockershim in the upcoming v1.24 release. We're excited to reaffirm our community values by supporting open source container runtimes, enabling a smaller kubelet, and increasing engineering velocity for teams using Kubernetes. If you use Docker Engine as a container runtime for your Kubernetes cluster, get ready to migrate in 1.24! To check if you're affected, refer to Check whether dockershim removal affects you.
Why we’re moving away from dockershim
Docker was the first container runtime used by Kubernetes. This is one of the reasons why Docker is so familiar to many Kubernetes users and enthusiasts. Docker support was hardcoded into Kubernetes – a component the project refers to as dockershim. As containerization became an industry standard, the Kubernetes project added support for additional runtimes. This culminated in the implementation of the container runtime interface (CRI), letting system components (like the kubelet) talk to container runtimes in a standardized way. As a result, dockershim became an anomaly in the Kubernetes project. Dependencies on Docker and dockershim have crept into various tools and projects in the CNCF ecosystem ecosystem, resulting in fragile code.
By removing the dockershim CRI, we're embracing the first value of CNCF: "Fast is better than slow". Stay tuned for future communications on the topic!
Deprecation timeline
We formally announced the dockershim deprecation in December 2020. Full removal is targeted in Kubernetes 1.24, in April 2022. This timeline aligns with our deprecation policy, which states that deprecated behaviors must function for at least 1 year after their announced deprecation.
We'll support Kubernetes version 1.23, which includes dockershim, for another year in the Kubernetes project. For managed Kubernetes providers, vendor support is likely to last even longer, but this is dependent on the companies themselves. Regardless, we're confident all cluster operations will have time to migrate. If you have more questions about the dockershim removal, refer to the Dockershim Deprecation FAQ.
We asked you whether you feel prepared for the migration from dockershim in this survey: Are you ready for Dockershim removal. We had over 600 responses. To everybody who took time filling out the survey, thank you.
The results show that we still have a lot of ground to cover to help you to migrate smoothly. Other container runtimes exist, and have been promoted extensively. However, many users told us they still rely on dockershim, and sometimes have dependencies that need to be re-worked. Some of these dependencies are outside of your control. Based on your feedback, here are some of the steps we are taking to help.
Our next steps
Based on the feedback you provided:
- CNCF and the 1.24 release team are committed to delivering documentation in time for the 1.24 release. This includes more informative blog posts like this one, updating existing code samples, tutorials, and tasks, and producing a migration guide for cluster operators.
- We are reaching out to the rest of the CNCF community to help prepare them for this change.
If you're part of a project with dependencies on dockershim, or if you're interested in helping with the migration effort, please join us! There's always room for more contributors, whether to our transition tools or to our documentation. To get started, say hello in the #sig-node channel on Kubernetes Slack!
Final thoughts
As a project, we've already seen cluster operators increasingly adopt other container runtimes through 2021. We believe there are no major blockers to migration. The steps we're taking to improve the migration experience will light the path more clearly for you.
We understand that migration from dockershim is yet another action you may need to do to keep your Kubernetes infrastructure up to date. For most of you, this step will be straightforward and transparent. In some cases, you will encounter hiccups or issues. The community has discussed at length whether postponing the dockershim removal would be helpful. For example, we recently talked about it in the SIG Node discussion on November 11th and in the Kubernetes Steering committee meeting held on December 6th. We already postponed it once in 2021 because the adoption rate of other runtimes was lower than we wanted, which also gave us more time to identify potential blocking issues.
At this point, we believe that the value that you (and Kubernetes) gain from dockershim removal makes up for the migration effort you'll have. Start planning now to avoid surprises. We'll have more updates and guides before Kubernetes 1.24 is released.
Kubernetes-in-Kubernetes and the WEDOS PXE bootable server farm
When you own two data centers, thousands of physical servers, virtual machines and hosting for hundreds of thousands sites, Kubernetes can actually simplify the management of all these things. As practice has shown, by using Kubernetes, you can declaratively describe and manage not only applications, but also the infrastructure itself. I work for the largest Czech hosting provider WEDOS Internet a.s and today I'll show you two of my projects — Kubernetes-in-Kubernetes and Kubefarm.
With their help you can deploy a fully working Kubernetes cluster inside another Kubernetes using Helm in just a couple of commands. How and why?
Let me introduce you to how our infrastructure works. All our physical servers can be divided into two groups: control-plane and compute nodes. Control plane nodes are usually set up manually, have a stable OS installed, and designed to run all cluster services including Kubernetes control-plane. The main task of these nodes is to ensure the smooth operation of the cluster itself. Compute nodes do not have any operating system installed by default, instead they are booting the OS image over the network directly from the control plane nodes. Their work is to carry out the workload.

Once nodes have downloaded their image, they can continue to work without keeping connection to the PXE server. That is, a PXE server is just keeping rootfs image and does not hold any other complex logic. After our nodes have booted, we can safely restart the PXE server, nothing critical will happen to them.

After booting, the first thing our nodes do is join to the existing Kubernetes cluster, namely, execute the kubeadm join command so that kube-scheduler could schedule some pods on them and launch various workloads afterwards. From the beginning we used the scheme when nodes were joined into the same cluster used for the control-plane nodes.

This scheme worked stably for over two years. However later we decided to add containerized Kubernetes to it. And now we can spawn new Kubernetes-clusters very easily right on our control-plane nodes which are now member special admin-clusters. Now, compute nodes can be joined directly to their own clusters - depending on the configuration.

Kubefarm
This project came with the goal of enabling anyone to deploy such an infrastructure in just a couple of commands using Helm and get about the same in the end.
At this time, we moved away from the idea of a monocluster. Because it turned out to be not very convenient for managing work of several development teams in the same cluster. The fact is that Kubernetes was never designed as a multi-tenant solution and at the moment it does not provide sufficient means of isolation between projects. Therefore, running separate clusters for each team turned out to be a good idea. However, there should not be too many clusters, to let them be convenient to manage. Nor is it too small to have sufficient independence between development teams.
The scalability of our clusters became noticeably better after that change. The more clusters you have per number of nodes, the smaller the failure domain and the more stable they work. And as a bonus, we got a fully declaratively described infrastructure. Thus, now you can deploy a new Kubernetes cluster in the same way as deploying any other application in Kubernetes.
It uses Kubernetes-in-Kubernetes as a basis, LTSP as PXE-server from which the nodes are booted, and automates the DHCP server configuration using dnsmasq-controller:
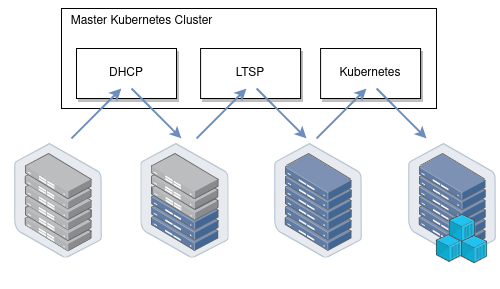
How it works
Now let's see how it works. In general, if you look at Kubernetes as from an application perspective, you can note that it follows all the principles of The Twelve-Factor App, and is actually written very well. Thus, it means running Kubernetes as an app in a different Kubernetes shouldn't be a big deal.
Running Kubernetes in Kubernetes
Now let's take a look at the Kubernetes-in-Kubernetes project, which provides a ready-made Helm chart for running Kubernetes in Kubernetes.
Here is the parameters that you can pass to Helm in the values file:

Beside persistence (storage parameters for the cluster), the Kubernetes control-plane components are described here: namely: etcd cluster, apiserver, controller-manager and scheduler. These are pretty much standard Kubernetes components. There is a light-hearted saying that “Kubernetes is just five binaries”. So here is where the configuration for these binaries is located.
If you ever tried to bootstrap a cluster using kubeadm, then this config will remind you it's configuration. But in addition to Kubernetes entities, you also have an admin container. In fact, it is a container which holds two binaries inside: kubectl and kubeadm. They are used to generate kubeconfig for the above components and to perform the initial configuration for the cluster. Also, in an emergency, you can always exec into it to check and manage your cluster.
After the release has been deployed, you can see a list of pods: admin-container, apiserver in two replicas, controller-manager, etcd-cluster, scheduller and the initial job that initializes the cluster. In the end you have a command, which allows you to get shell into the admin container, you can use it to see what is happening inside:
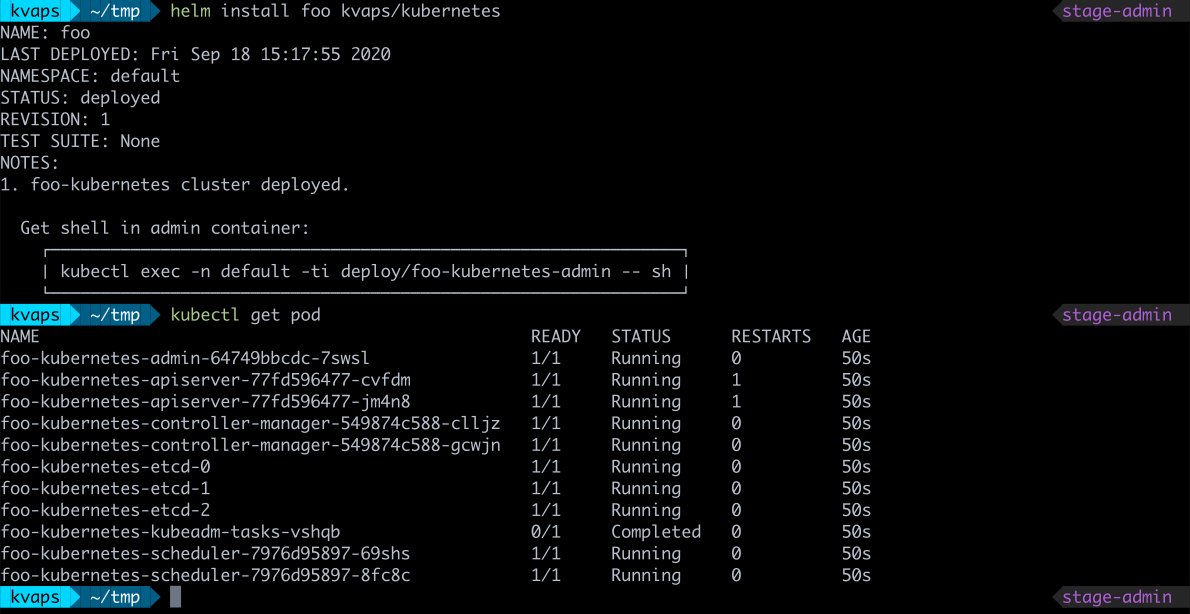
Also, let's take look at the certificates. If you've ever installed Kubernetes, then you know that it has a scary directory /etc/kubernetes/pki with a bunch of some certificates. In case of Kubernetes-in-Kubernetes, you have fully automated management of them with cert-manager. Thus, it is enough to pass all certificates parameters to Helm during installation, and all the certificates will automatically be generated for your cluster.
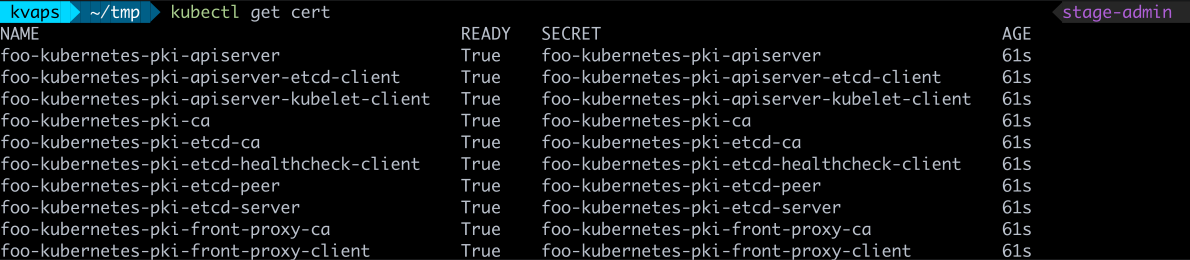
Looking at one of the certificates, eg. apiserver, you can see that it has a list of DNS names and IP addresses. If you want to make this cluster accessible outside, then just describe the additional DNS names in the values file and update the release. This will update the certificate resource, and cert-manager will regenerate the certificate. You'll no longer need to think about this. If kubeadm certificates need to be renewed at least once a year, here the cert-manager will take care and automatically renew them.
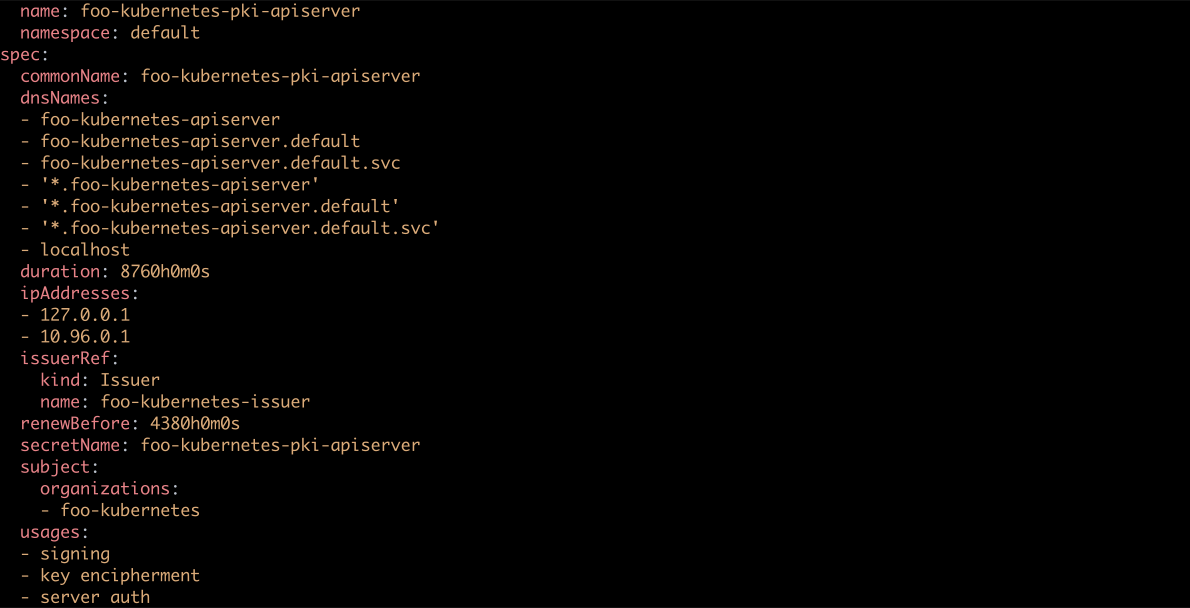
Now let's log into the admin container and look at the cluster and nodes. Of course, there are no nodes, yet, because at the moment you have deployed just the blank control-plane for Kubernetes. But in kube-system namespace you can see some coredns pods waiting for scheduling and configmaps already appeared. That is, you can conclude that the cluster is working:
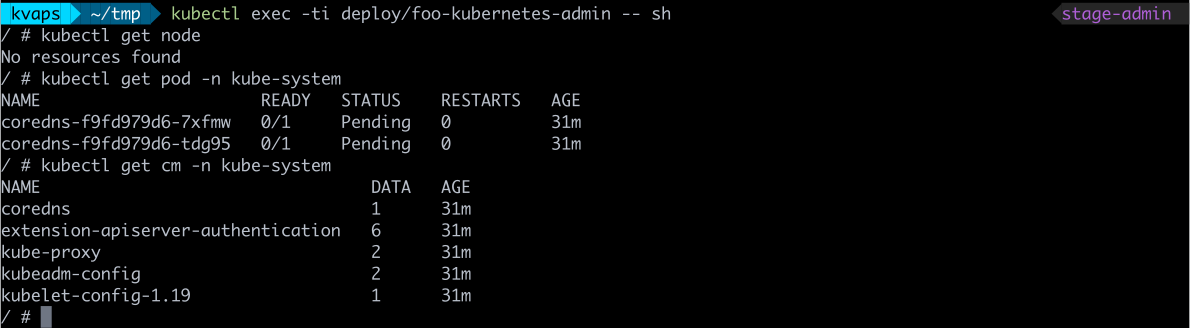
Here is the diagram of the deployed cluster. You can see services for all Kubernetes components: apiserver, controller-manager, etcd-cluster and scheduler. And the pods on right side to which they forward traffic.
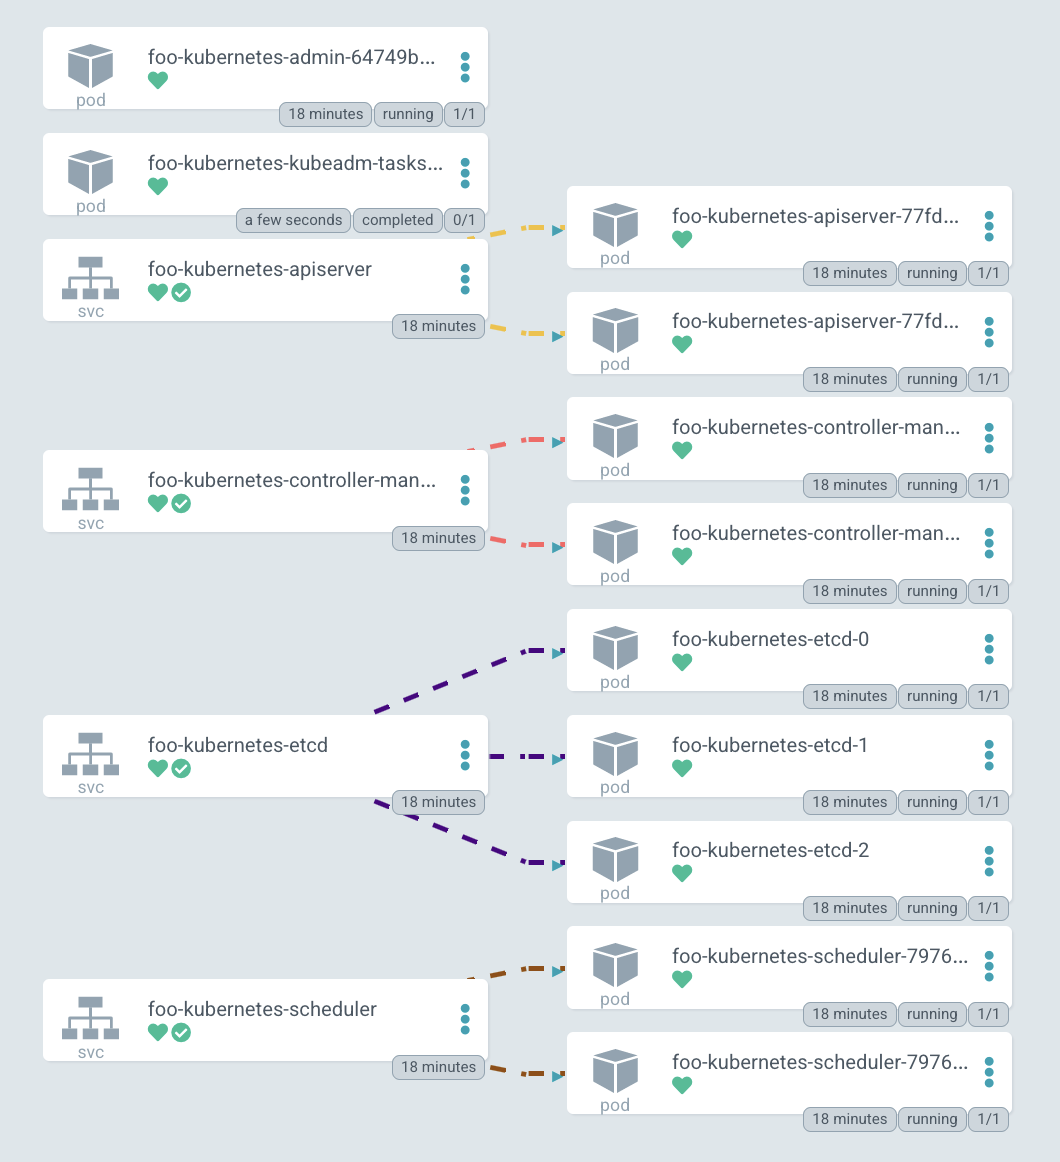
By the way, the diagram, is drawn in ArgoCD — the GitOps tool we use to manage our clusters, and cool diagrams are one of its features.
Orchestrating physical servers
OK, now you can see the way how is our Kubernetes control-plane deployed, but what about worker nodes, how are we adding them? As I already said, all our servers are bare metal. We do not use virtualization to run Kubernetes, but we orchestrate all physical servers by ourselves.
Also, we do use Linux network boot feature very actively. Moreover, this is exactly the booting, not some kind of automation of the installation. When the nodes are booting, they just run a ready-made system image for them. That is, to update any node, we just need to reboot it - and it will download a new image. It is very easy, simple and convenient.
For this, the Kubefarm project was created, which allows you to automate this. The most commonly used examples can be found in the examples directory. The most standard of them named generic. Let's take a look at values.yaml:
Here you can specify the parameters which are passed into the upstream Kubernetes-in-Kubernetes chart. In order for you control-plane to be accessible from the outside, it is enough to specify the IP address here, but if you wish, you can specify some DNS name here.
In the PXE server configuration you can specify a timezone. You can also add an SSH key for logging in without a password (but you can also specify a password), as well as kernel modules and parameters that should be applied during booting the system.
Next comes the nodePools configuration, i.e. the nodes themselves. If you've ever used a terraform module for gke, then this logic will remind you of it. Here you statically describe all nodes with a set of parameters:
Name (hostname);
MAC-addresses — we have nodes with two network cards, and each one can boot from any of the MAC addresses specified here.
IP-address, which the DHCP server should issue to this node.
In this example, you have two pools: the first has five nodes, the second has only one, the second pool has also two tags assigned. Tags are the way to describe configuration for specific nodes. For example, you can add specific DHCP options for some pools, options for the PXE server for booting (e.g. here is debug option enabled) and set of kubernetesLabels and kubernetesTaints options. What does that mean?
For example, in this configuration you have a second nodePool with one node. The pool has debug and foo tags assigned. Now see the options for foo tag in kubernetesLabels. This means that the m1c43 node will boot with these two labels and taint assigned. Everything seems to be simple. Now let's try this in practice.
Demo
Go to examples and update previously deployed chart to Kubefarm. Just use the generic parameters and look at the pods. You can see that a PXE server and one more job were added. This job essentially goes to the deployed Kubernetes cluster and creates a new token. Now it will run repeatedly every 12 hours to generate a new token, so that the nodes can connect to your cluster.
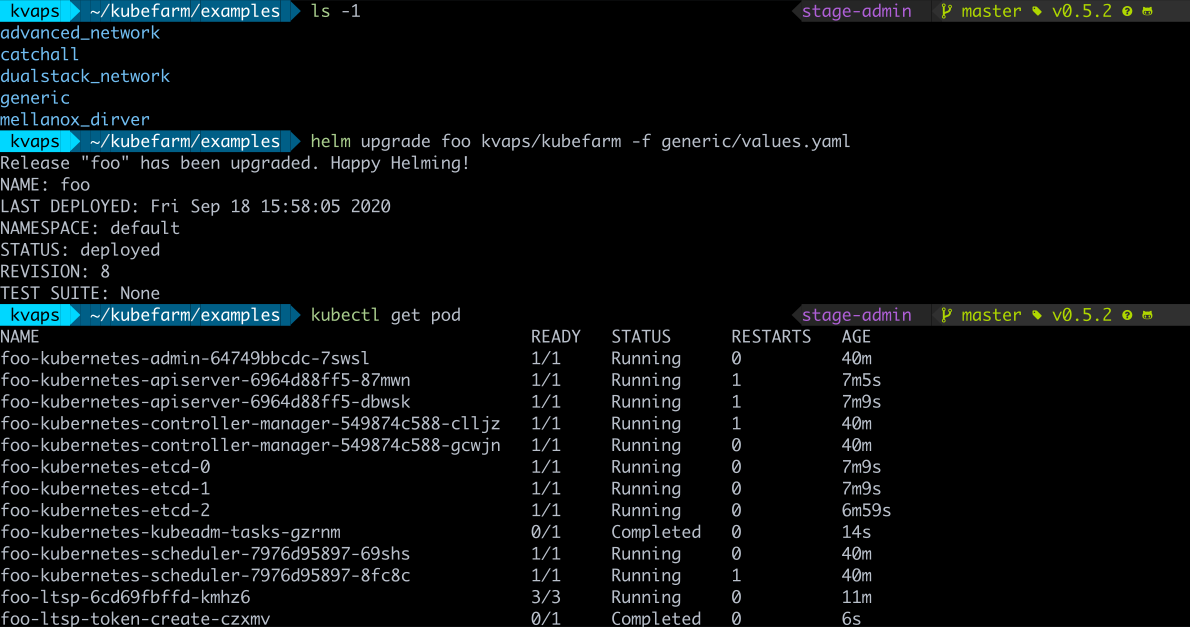
In a graphical representation, it looks about the same, but now apiserver started to be exposed outside.
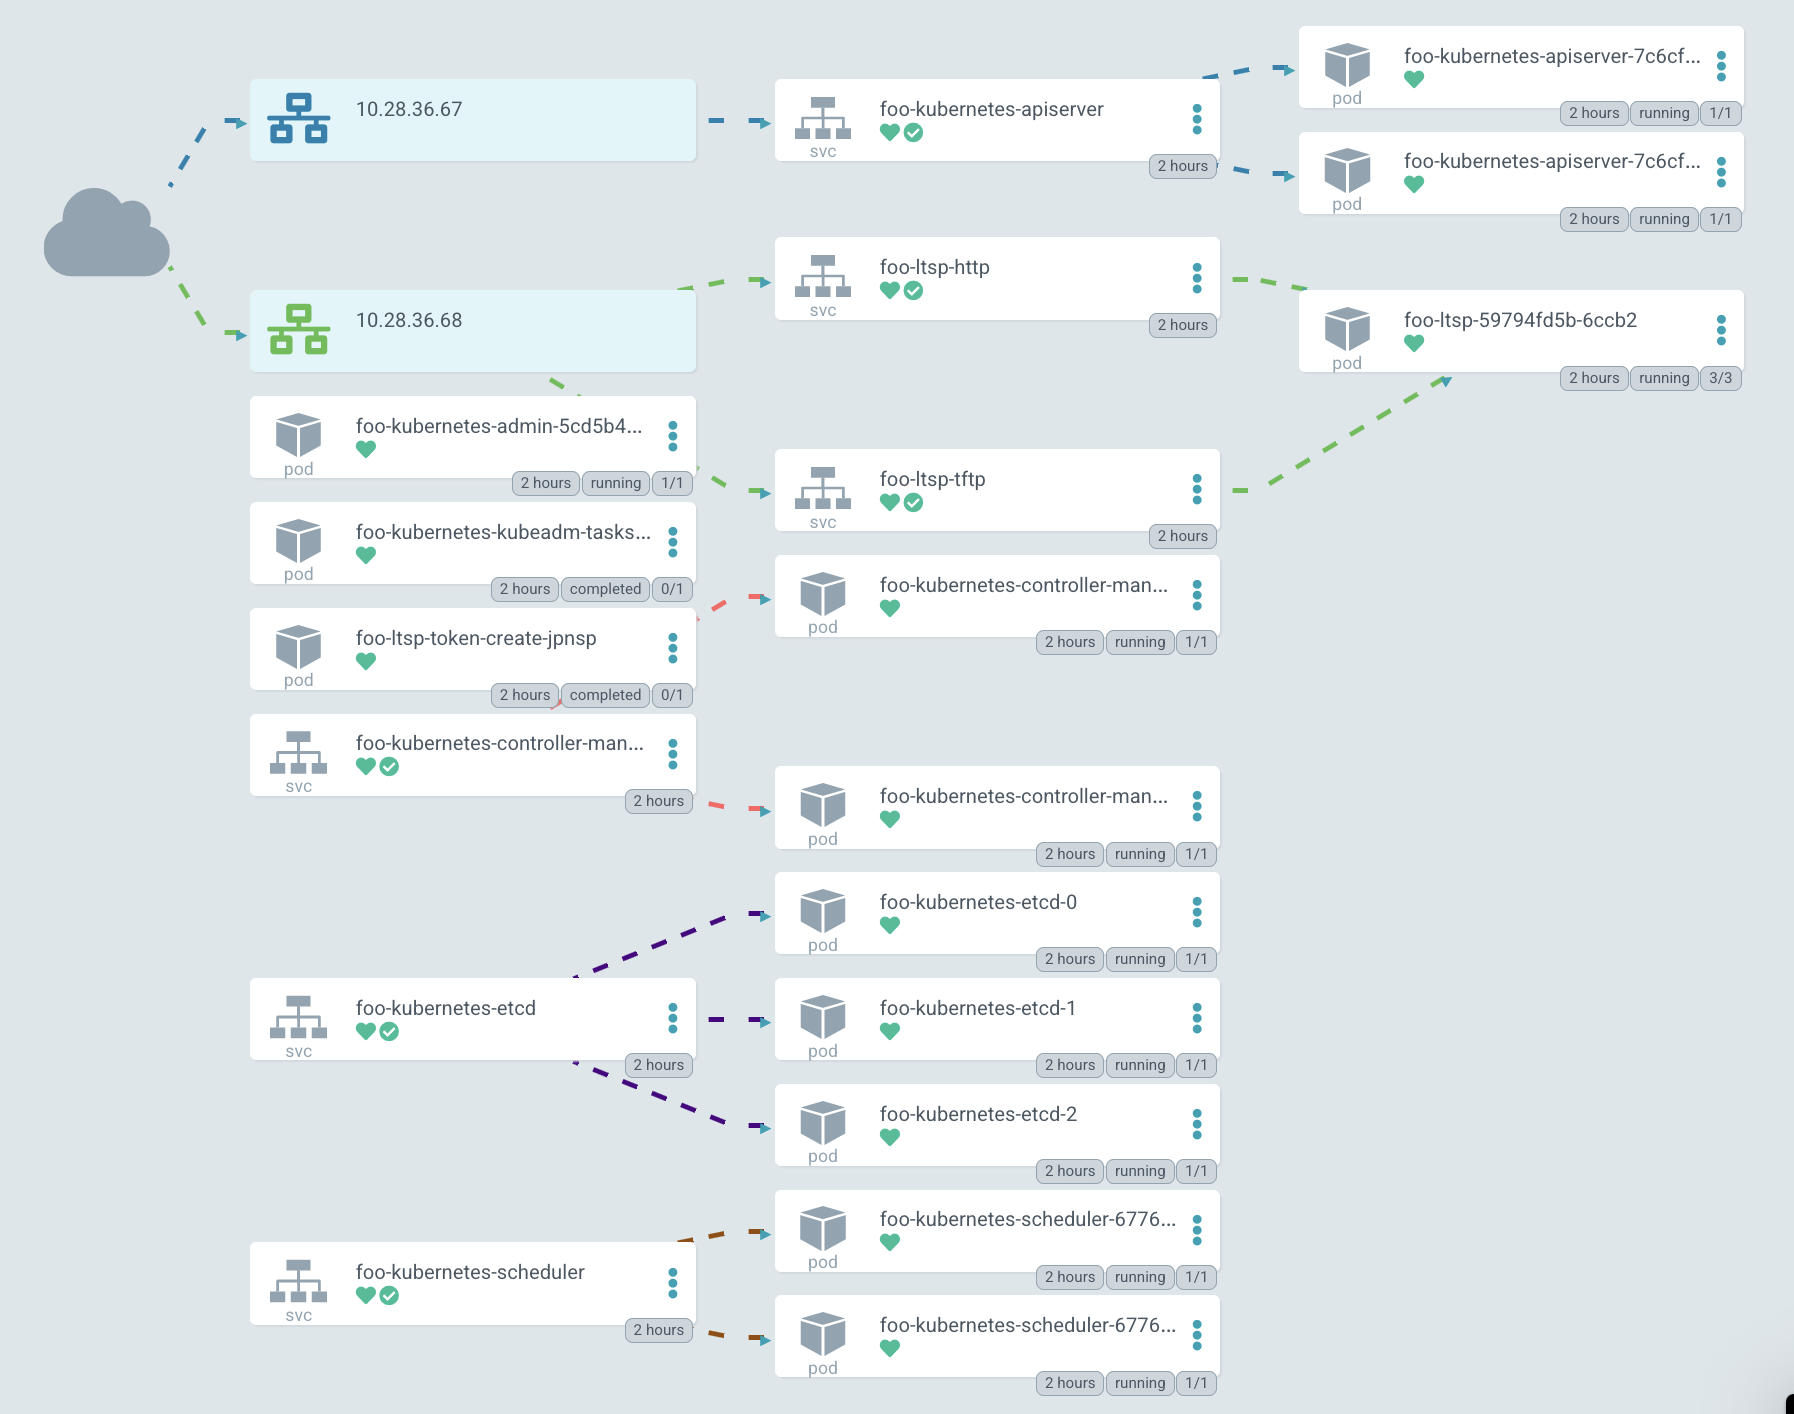
In the diagram, the IP is highlighted in green, the PXE server can be reached through it. At the moment, Kubernetes does not allow creating a single LoadBalancer service for TCP and UDP protocols by default, so you have to create two different services with the same IP address. One is for TFTP, and the second for HTTP, through which the system image is downloaded.
But this simple example is not always enough, sometimes you might need to modify the logic at boot. For example, here is a directory advanced_network, inside which there is a values file with a simple shell script. Let's call it network.sh:
All this script does is take environment variables at boot time, and generates a network configuration based on them. It creates a directory and puts the netplan config inside. For example, a bonding interface is created here. Basically, this script can contain everything you need. It can hold the network configuration or generate the system services, add some hooks or describe any other logic. Anything that can be described in bash or shell languages will work here, and it will be executed at boot time.
Let's see how it can be deployed. Let's pass the generic values file as the first parameter, and an additional values file as the second parameter. This is a standard Helm feature. This way you can also pass the secrets, but in this case, the configuration is just expanded by the second file:
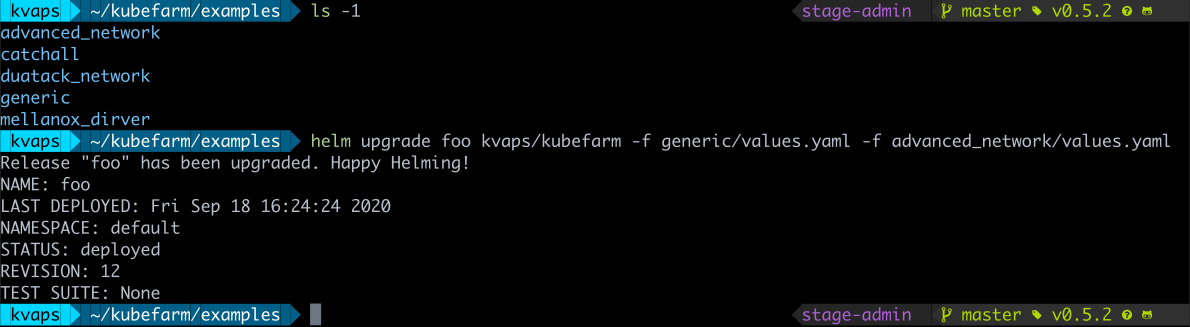
Let's look at the configmap foo-kubernetes-ltsp for the netboot server and make sure that network.sh script is really there. These commands used to configure the network at boot time:
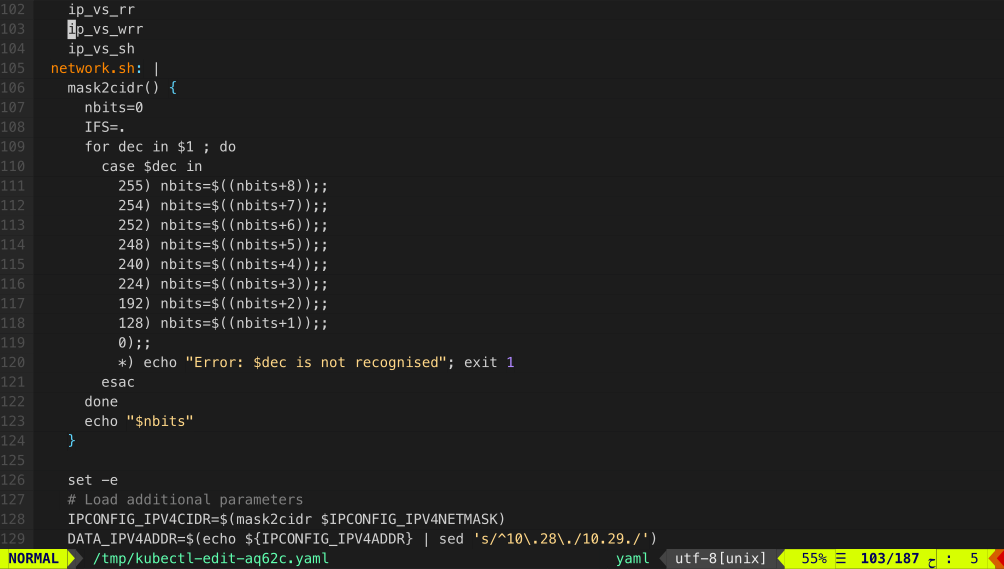
Here you can see how it works in principle. The chassis interface (we use HPE Moonshots 1500) have the nodes, you can enter show node list command to get a list of all the nodes. Now you can see the booting process.
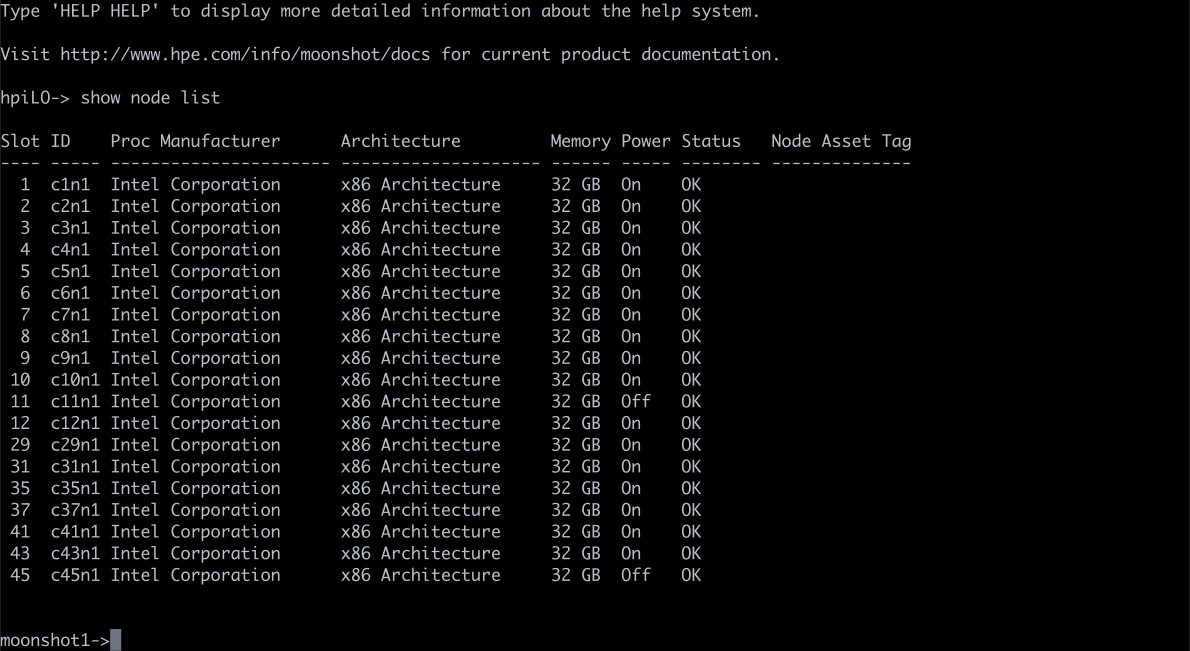
You can also get their MAC addresses by show node macaddr all command. We have a clever operator that collects MAC-addresses from chassis automatically and passes them to the DHCP server. Actually, it's just creating custom configuration resources for dnsmasq-controller which is running in same admin Kubernetes cluster. Also, trough this interface you can control the nodes themselves, e.g. turn them on and off.
If you have no such opportunity to enter the chassis through iLO and collect a list of MAC addresses for your nodes, you can consider using catchall cluster pattern. Purely speaking, it is just a cluster with a dynamic DHCP pool. Thus, all nodes that are not described in the configuration to other clusters will automatically join to this cluster.
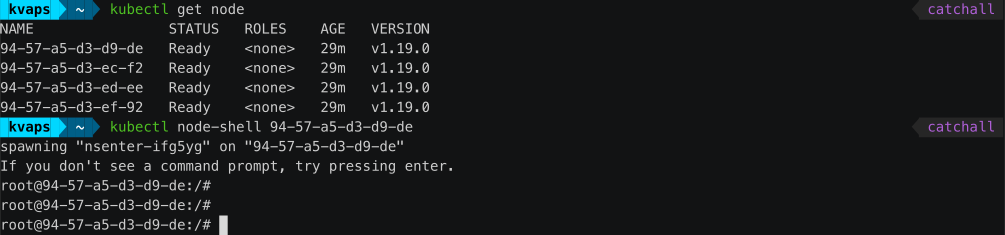
For example, you can see a special cluster with some nodes. They are joined to the cluster with an auto-generated name based on their MAC address. Starting from this point you can connect to them and see what happens there. Here you can somehow prepare them, for example, set up the file system and then rejoin them to another cluster.
Now let's try connecting to the node terminal and see how it is booting. After the BIOS, the network card is configured, here it sends a request to the DHCP server from a specific MAC address, which redirects it to a specific PXE server. Later the kernel and initrd image are downloaded from the server using the standard HTTP protocol:
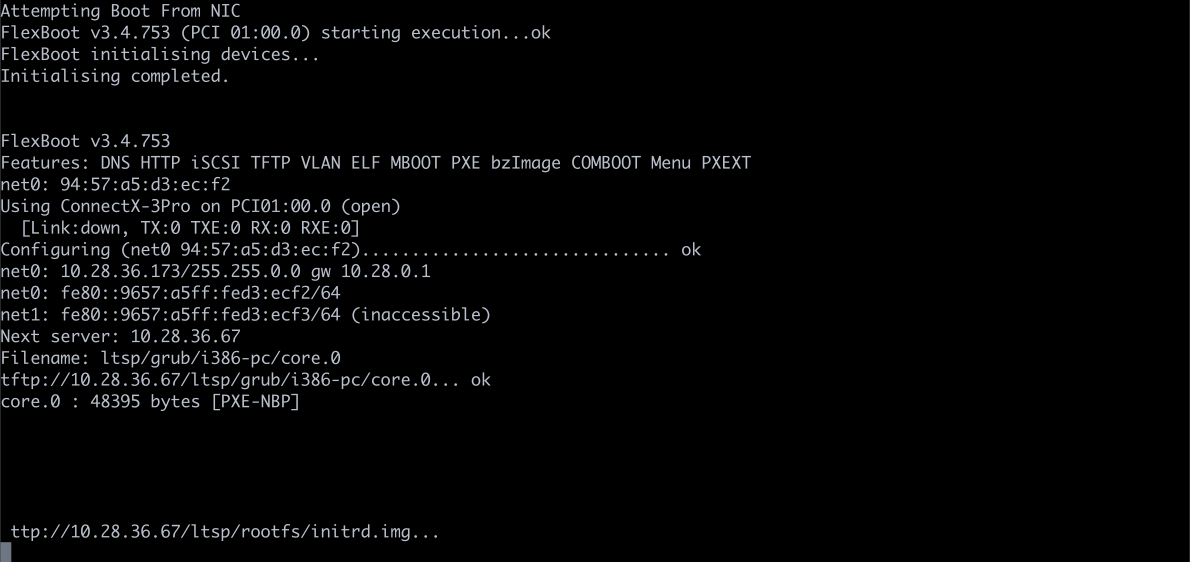
After loading the kernel, the node downloads the rootfs image and transfers control to systemd. Then the booting proceeds as usual, and after that the node joins Kubernetes:
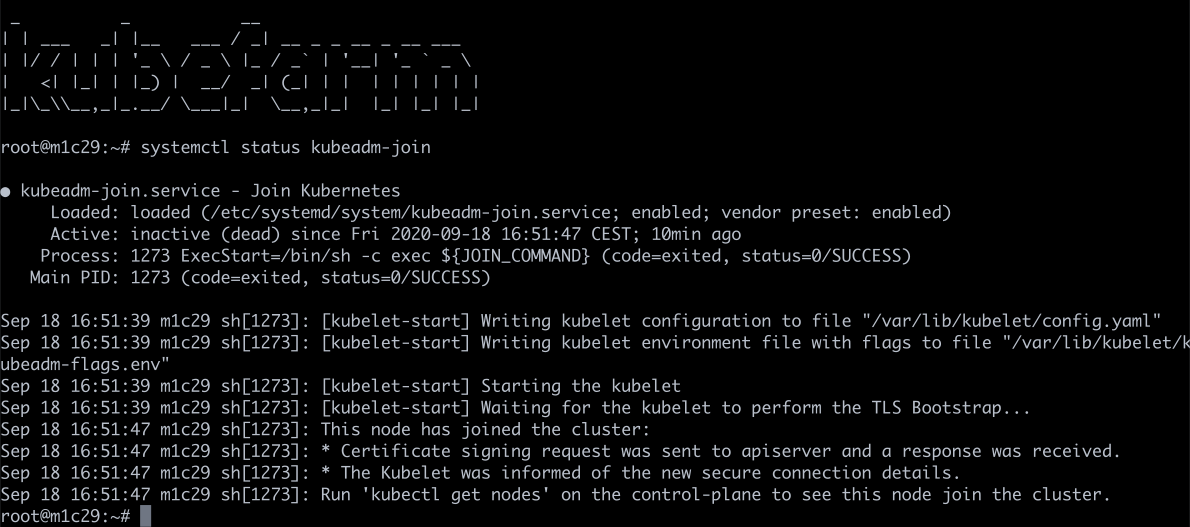
If you take a look at fstab, you can see only two entries there: /var/lib/docker and /var/lib/kubelet, they are mounted as tmpfs (in fact, from RAM). At the same time, the root partition is mounted as overlayfs, so all changes that you make here on the system will be lost on the next reboot.
Looking into the block devices on the node, you can see some nvme disk, but it has not yet been mounted anywhere. There is also a loop device - this is the exact rootfs image downloaded from the server. At the moment it is located in RAM, occupies 653 MB and mounted with the loop option.
If you look in /etc/ltsp, you find the network.sh file that was executed at boot. From containers, you can see running kube-proxy and pause container for it.
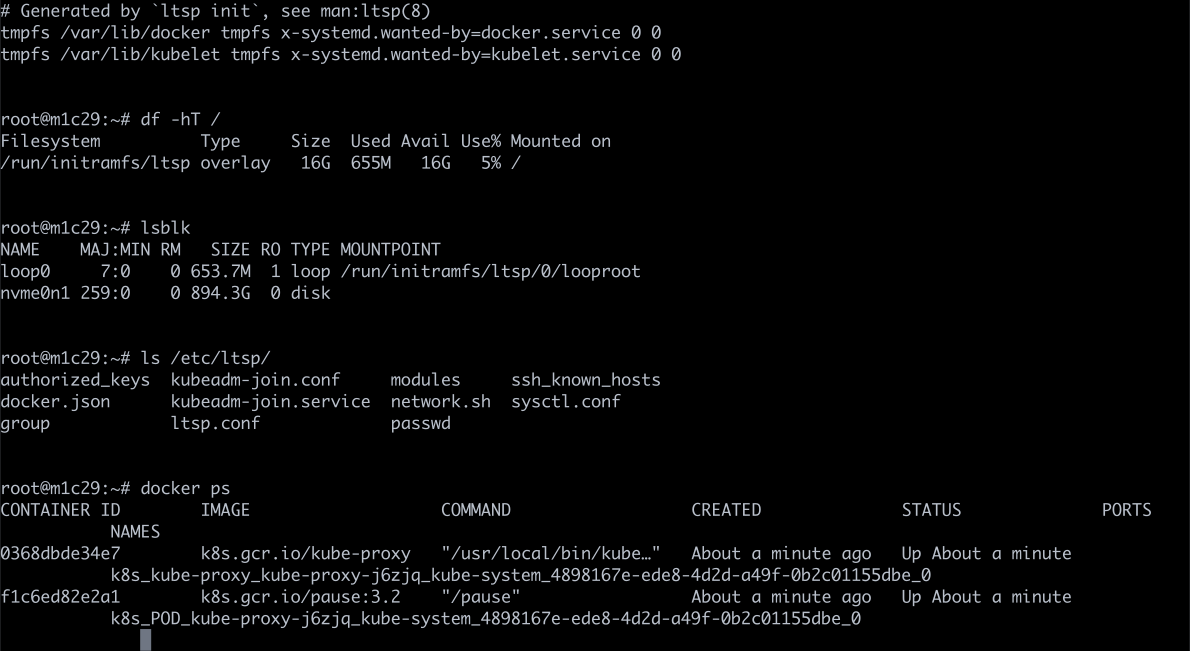
Details
Network Boot Image
But where does the main image come from? There is a little trick here. The image for the nodes is built through the Dockerfile along with the server. The Docker multi-stage build feature allows you to easily add any packages and kernel modules exactly at the stage of the image build. It looks like this:
What's going on here? First, we take a regular Ubuntu 20.04 and install all the packages we need. First of all we install the kernel, lvm, systemd, ssh. In general, everything that you want to see on the final node should be described here. Here we also install docker with kubelet and kubeadm, which are used to join the node to the cluster.
And then we perform an additional configuration. In the last stage, we simply install tftp and nginx (which serves our image to clients), grub (bootloader). Then root of the previous stages copied into the final image and generate squashed image from it. That is, in fact, we get a docker image, which has both the server and the boot image for our nodes. At the same time, it can be easily updated by changing the Dockerfile.
Webhooks and API aggregation layer
I want to pay special attention to the problem of webhooks and aggregation layer. In general, webhooks is a Kubernetes feature that allows you to respond to the creation or modification of any resources. Thus, you can add a handler so that when resources are applied, Kubernetes must send request to some pod and check if configuration of this resource is correct, or make additional changes to it.
But the point is, in order for the webhooks to work, the apiserver must have direct access to the cluster for which it is running. And if it is started in a separate cluster, like our case, or even separately from any cluster, then Konnectivity service can help us here. Konnectivity is one of the optional but officially supported Kubernetes components.
Let's take cluster of four nodes for example, each of them is running a kubelet and we have other Kubernetes components running outside: kube-apiserver, kube-scheduler and kube-controller-manager. By default, all these components interact with the apiserver directly - this is the most known part of the Kubernetes logic. But in fact, there is also a reverse connection. For example, when you want to view the logs or run a kubectl exec command, the API server establishes a connection to the specific kubelet independently:

But the problem is that if we have a webhook, then it usually runs as a standard pod with a service in our cluster. And when apiserver tries to reach it, it will fail because it will try to access an in-cluster service named webhook.namespace.svc being outside of the cluster where it is actually running:

And here Konnectivity comes to our rescue. Konnectivity is a tricky proxy server developed especially for Kubernetes. It can be deployed as a server next to the apiserver. And Konnectivity-agent is deployed in several replicas directly in the cluster you want to access. The agent establishes a connection to the server and sets up a stable channel to make apiserver able to access all webhooks and all kubelets in the cluster. Thus, now all communication with the cluster will take place through the Konnectivity-server:

Our plans
Of course, we are not going to stop at this stage. People interested in the project often write to me. And if there will be a sufficient number of interested people, I hope to move Kubernetes-in-Kubernetes project under Kubernetes SIGs, by representing it in form of the official Kubernetes Helm chart. Perhaps, by making this project independent we'll gather an even larger community.
I am also thinking of integrating it with the Machine Controller Manager, which would allow creating worker nodes, not only of physical servers, but also, for example, for creating virtual machines using kubevirt and running them in the same Kubernetes cluster. By the way, it also allows to spawn virtual machines in the clouds, and have a control-plane deployed locally.
I am also considering the option of integrating with the Cluster-API so that you can create physical Kubefarm clusters directly through the Kubernetes environment. But at the moment I'm not completely sure about this idea. If you have any thoughts on this matter, I'll be happy to listen to them.
Using Admission Controllers to Detect Container Drift at Runtime
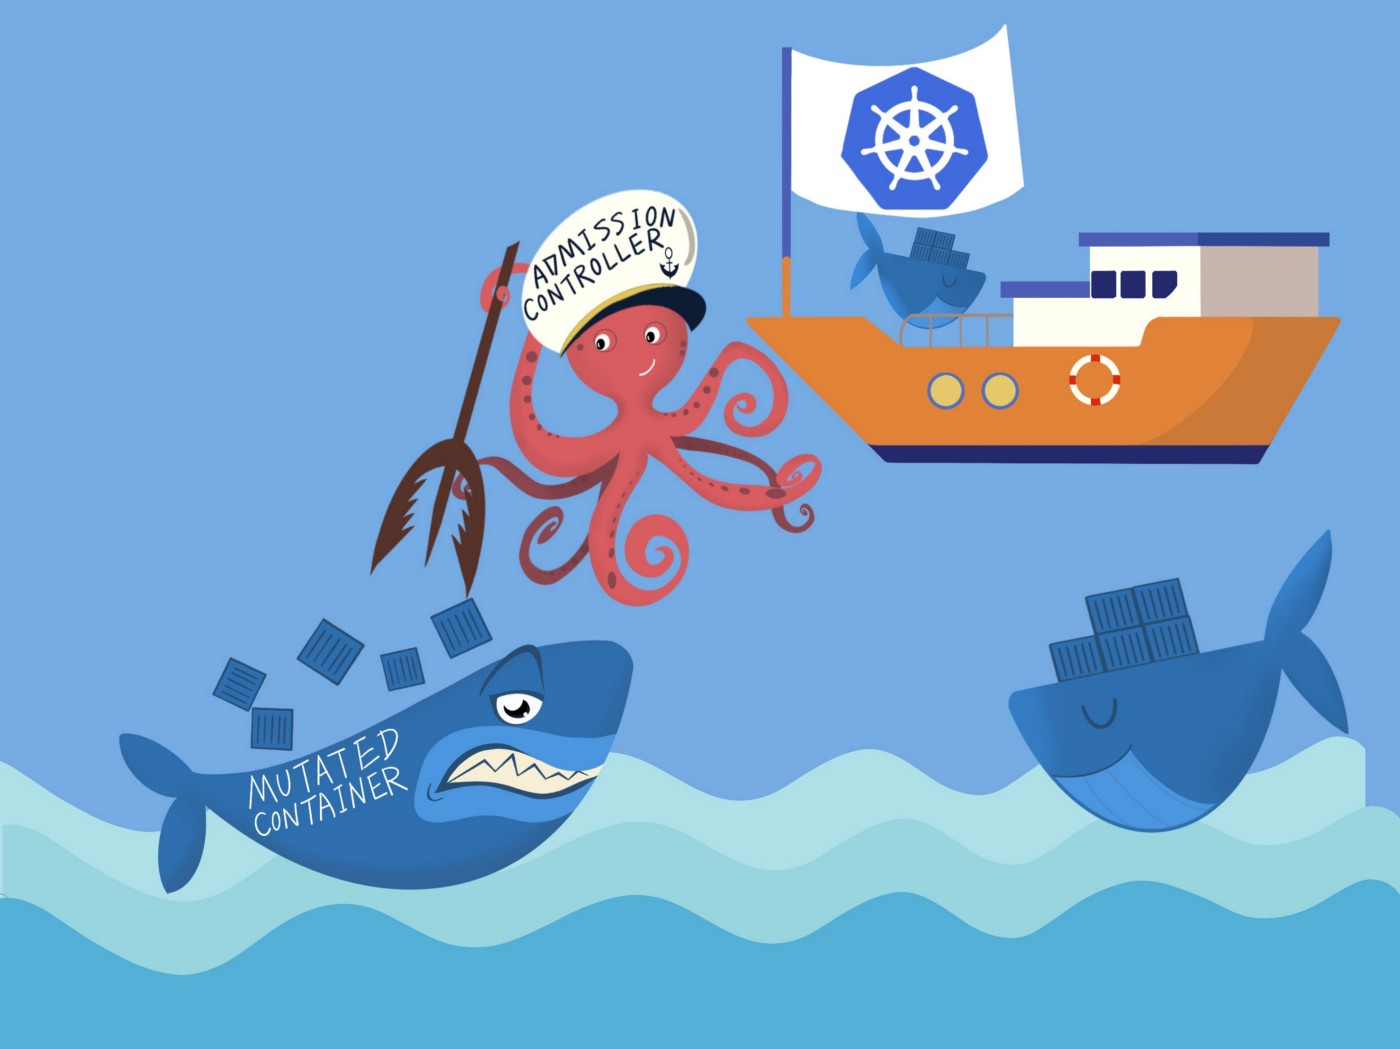
Illustration by Munire Aireti
At Box, we use Kubernetes (K8s) to manage hundreds of micro-services that enable Box to stream data at a petabyte scale. When it comes to the deployment process, we run kube-applier as part of the GitOps workflows with declarative configuration and automated deployment. Developers declare their K8s apps manifest into a Git repository that requires code reviews and automatic checks to pass, before any changes can get merged and applied inside our K8s clusters. With kubectl exec and other similar commands, however, developers are able to directly interact with running containers and alter them from their deployed state. This interaction could then subvert the change control and code review processes that are enforced in our CI/CD pipelines. Further, it allows such impacted containers to continue receiving traffic long-term in production.
To solve this problem, we developed our own K8s component called kube-exec-controller along with its corresponding kubectl plugin. They function together in detecting and terminating potentially mutated containers (caused by interactive kubectl commands), as well as revealing the interaction events directly to the target Pods for better visibility.
Admission control for interactive kubectl commands
Once a request is sent to K8s, it needs to be authenticated and authorized by the API server to proceed. Additionally, K8s has a separate layer of protection called admission controllers, which can intercept the request before an object is persisted in etcd. There are various predefined admission controls compiled into the API server binary (e.g. ResourceQuota to enforce hard resource usage limits per namespace). Besides, there are two dynamic admission controls named MutatingAdmissionWebhook and ValidatingAdmissionWebhook, used for mutating or validating K8s requests respectively. The latter is what we adopted to detect container drift at runtime caused by interactive kubectl commands. This whole process can be divided into three steps as explained in detail below.
1. Admit interactive kubectl command requests
First of all, we needed to enable a validating webhook that sends qualified requests to kube-exec-controller. To add the new validation mechanism applying to interactive kubectl commands specifically, we configured the webhook’s rules with resources as [pods/exec, pods/attach], and operations as CONNECT. These rules tell the cluster's API server that all exec and attach requests should be subject to our admission control webhook. In the ValidatingAdmissionWebhook that we configured, we specified a service reference (could also be replaced with url that gives the location of the webhook) and caBundle to allow validating its X.509 certificate, both under the clientConfig stanza.
Here is a short example of what our ValidatingWebhookConfiguration object looks like:
apiVersion: admissionregistration.k8s.io/v1
kind: ValidatingWebhookConfiguration
metadata:
name: example-validating-webhook-config
webhooks:
- name: validate-pod-interaction.example.com
sideEffects: None
rules:
- apiGroups: ["*"]
apiVersions: ["*"]
operations: ["CONNECT"]
resources: ["pods/exec", "pods/attach"]
failurePolicy: Fail
clientConfig:
service:
# reference to kube-exec-controller service deployed inside the K8s cluster
name: example-service
namespace: kube-exec-controller
path: "/admit-pod-interaction"
caBundle: "{{VALUE}}" # PEM encoded CA bundle to validate kube-exec-controller's certificate
admissionReviewVersions: ["v1", "v1beta1"]
2. Label the target Pod with potentially mutated containers
Once a request of kubectl exec comes in, kube-exec-controller makes an internal note to label the associated Pod. The added labels mean that we can not only query all the affected Pods, but also enable the security mechanism to retrieve previously identified Pods, in case the controller service itself gets restarted.
The admission control process cannot directly modify the targeted in its admission response. This is because the pods/exec request is against a subresource of the Pod API, and the API kind for that subresource is PodExecOptions. As a result, there is a separate process in kube-exec-controller that patches the labels asynchronously. The admission control always permits the exec request, then acts as a client of the K8s API to label the target Pod and to log related events. Developers can check whether their Pods are affected or not using kubectl or similar tools. For example:
$ kubectl get pod --show-labels
NAME READY STATUS RESTARTS AGE LABELS
test-pod 1/1 Running 0 2s box.com/podInitialInteractionTimestamp=1632524400,box.com/podInteractorUsername=username-1,box.com/podTTLDuration=1h0m0s
$ kubectl describe pod test-pod
...
Events:
Type Reason Age From Message
---- ------ ---- ---- -------
Warning PodInteraction 5s admission-controller-service Pod was interacted with 'kubectl exec' command by user 'username-1' initially at time 2021-09-24 16:00:00 -0800 PST
Warning PodInteraction 5s admission-controller-service Pod will be evicted at time 2021-09-24 17:00:00 -0800 PST (in about 1h0m0s).
3. Evict the target Pod after a predefined period
As you can see in the above event messages, the affected Pod is not evicted immediately. At times, developers might have to get into their running containers necessarily for debugging some live issues. Therefore, we define a time to live (TTL) of affected Pods based on the environment of clusters they are running. In particular, we allow a longer time in our dev clusters as it is more common to run kubectl exec or other interactive commands for active development.
For our production clusters, we specify a lower time limit so as to avoid the impacted Pods serving traffic abidingly. The kube-exec-controller internally sets and tracks a timer for each Pod that matches the associated TTL. Once the timer is up, the controller evicts that Pod using K8s API. The eviction (rather than deletion) is to ensure service availability, since the cluster respects any configured PodDisruptionBudget (PDB). Let's say if a user has defined x number of Pods as critical in their PDB, the eviction (as requested by kube-exec-controller) does not continue when the target workload has fewer than x Pods running.
Here comes a sequence diagram of the entire workflow mentioned above:
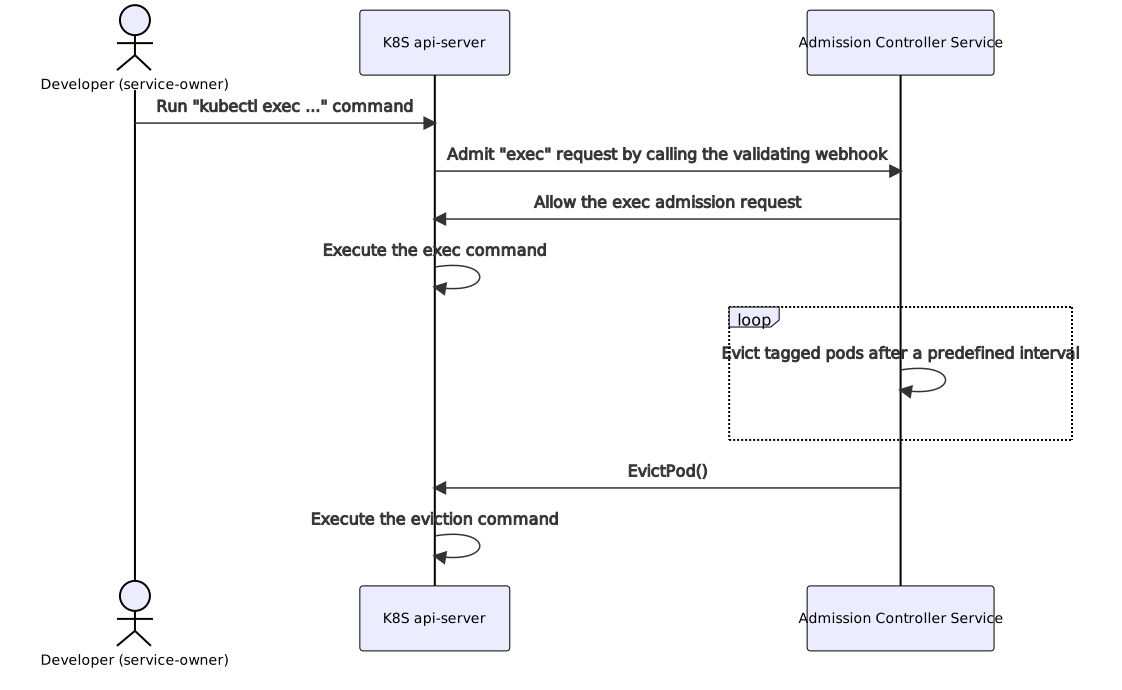
A new kubectl plugin for better user experience
Our admission controller component works great for solving the container drift issue we had on the platform. It is also able to submit all related Events to the target Pod that has been affected. However, K8s clusters don't retain Events very long (the default retention period is one hour). We need to provide other ways for developers to get their Pod interaction activity. A kubectl plugin is a perfect choice for us to expose this information. We named our plugin kubectl pi (short for pod-interaction) and provide two subcommands: get and extend.
When the get subcommand is called, the plugin checks the metadata attached by our admission controller and transfers it to human-readable information. Here is an example output from running kubectl pi get:
$ kubectl pi get test-pod
POD-NAME INTERACTOR POD-TTL EXTENSION EXTENSION-REQUESTER EVICTION-TIME
test-pod username-1 1h0m0s / / 2021-09-24 17:00:00 -0800 PST
The plugin can also be used to extend the TTL for a Pod that is marked for future eviction. This is useful in case developers need extra time to debug ongoing issues. To achieve this, a developer uses the kubectl pi extend subcommand, where the plugin patches the relevant annotations for the given Pod. These annotations include the duration and username who made the extension request for transparency (displayed in the table returned from the kubectl pi get command).
Correspondingly, there is another webhook defined in kube-exec-controller which admits valid annotation updates. Once admitted, those updates reset the eviction timer of the target Pod as requested. An example of requesting the extension from the developer side would be:
$ kubectl pi extend test-pod --duration=30m
Successfully extended the termination time of pod/test-pod with a duration=30m
$ kubectl pi get test-pod
POD-NAME INTERACTOR POD-TTL EXTENSION EXTENSION-REQUESTER EVICTION-TIME
test-pod username-1 1h0m0s 30m username-2 2021-09-24 17:30:00 -0800 PST
Future improvement
Although our admission controller service works great in handling interactive requests to a Pod, it could as well evict the Pod while the actual commands are no-op in these requests. For instance, developers sometimes run kubectl exec merely to check their service logs stored on hosts. Nevertheless, the target Pods would still get bounced despite the state of their containers not changing at all. One of the improvements here could be adding the ability to distinguish the commands that are passed to the interactive requests, so that no-op commands should not always force a Pod eviction. However, this becomes challenging when developers get a shell to a running container and execute commands inside the shell, since they will no longer be visible to our admission controller service.
Another item worth pointing out here is the choice of using K8s labels and annotations. In our design, we decided to have all immutable metadata attached as labels for better enforcing the immutability in our admission control. Yet some of these metadata could fit better as annotations. For instance, we had a label with the key box.com/podInitialInteractionTimestamp used to list all affected Pods in kube-exec-controller code, although its value would be unlikely to query for. As a more ideal design in the K8s world, a single label could be preferable in our case for identification with other metadata applied as annotations instead.
Summary
With the power of admission controllers, we are able to secure our K8s clusters by detecting potentially mutated containers at runtime, and evicting their Pods without affecting service availability. We also utilize kubectl plugins to provide flexibility of the eviction time and hence, bringing a better and more self-independent experience to service owners. We are proud to announce that we have open-sourced the whole project for the community to leverage in their own K8s clusters. Any contribution is more than welcomed and appreciated. You can find this project hosted on GitHub at https://github.com/box/kube-exec-controller
Special thanks to Ayush Sobti and Ethan Goldblum for their technical guidance on this project.
What's new in Security Profiles Operator v0.4.0
The Security Profiles Operator (SPO) is an out-of-tree Kubernetes enhancement to make the management of seccomp, SELinux and AppArmor profiles easier and more convenient. We're happy to announce that we recently released v0.4.0 of the operator, which contains a ton of new features, fixes and usability improvements.
What's new
It has been a while since the last v0.3.0 release of the operator. We added new features, fine-tuned existing ones and reworked our documentation in 290 commits over the past half year.
One of the highlights is that we're now able to record seccomp and SELinux
profiles using the operators log enricher.
This allows us to reduce the dependencies required for profile recording to have
auditd or
syslog (as fallback) running on the
nodes. All profile recordings in the operator work in the same way by using the
ProfileRecording CRD as well as their corresponding label
selectors. The log
enricher itself can be also used to gather meaningful insights about seccomp and
SELinux messages of a node. Checkout the official
documentation
to learn more about it.
seccomp related improvements
Beside the log enricher based recording we now offer an alternative to record
seccomp profiles by utilizing ebpf. This optional feature can
be enabled by setting enableBpfRecorder to true. This results in running a
dedicated container, which ships a custom bpf module on every node to collect
the syscalls for containers. It even supports older Kernel versions which do not
expose the BPF Type Format (BTF) per
default as well as the amd64 and arm64 architectures. Checkout
our documentation
to see it in action. By the way, we now add the seccomp profile architecture of
the recorder host to the recorded profile as well.
We also graduated the seccomp profile API from v1alpha1 to v1beta1. This
aligns with our overall goal to stabilize the CRD APIs over time. The only thing
which has changed is that the seccomp profile type Architectures now points to
[]Arch instead of []*Arch.
SELinux enhancements
Managing SELinux policies (an equivalent to using semodule that
you would normally call on a single server) is not done by SPO
itself, but by another container called selinuxd to provide better
isolation. This release switched to using selinuxd containers from
a personal repository to images located under our team's quay.io
repository.
The selinuxd repository has moved as well to the containers GitHub
organization.
Please note that selinuxd links dynamically to libsemanage and mounts the
SELinux directories from the nodes, which means that the selinuxd container
must be running the same distribution as the cluster nodes. SPO defaults
to using CentOS-8 based containers, but we also build Fedora based ones.
If you are using another distribution and would like us to add support for
it, please file an issue against selinuxd.
Profile Recording
This release adds support for recording of SELinux profiles.
The recording itself is managed via an instance of a ProfileRecording Custom
Resource as seen in an
example
in our repository. From the user's point of view it works pretty much the same
as recording of seccomp profiles.
Under the hood, to know what the workload is doing SPO installs a special
permissive policy called selinuxrecording
on startup which allows everything and logs all AVCs to audit.log.
These AVC messages are scraped by the log enricher component and when
the recorded workload exits, the policy is created.
SELinuxProfile CRD graduation
An v1alpha2 version of the SelinuxProfile object has been introduced. This
removes the raw Common Intermediate Language (CIL) from the object itself and
instead adds a simple policy language to ease the writing and parsing
experience.
Alongside, a RawSelinuxProfile object was also introduced. This contains a
wrapped and raw representation of the policy. This was intended for folks to be
able to take their existing policies into use as soon as possible. However, on
validations are done here.
AppArmor support
This version introduces the initial support for AppArmor, allowing users to load and unload AppArmor profiles into cluster nodes by using the new AppArmorProfile CRD.
To enable AppArmor support use the enableAppArmor feature gate switch of your SPO configuration. Then use our apparmor example to deploy your first profile across your cluster.
Metrics
The operator now exposes metrics, which are described in detail in
our new metrics documentation.
We decided to secure the metrics retrieval process by using
kube-rbac-proxy, while we ship an
additional spo-metrics-client cluster role (and binding) to retrieve the
metrics from within the cluster. If you're using
OpenShift,
then we provide an out of the box working
ServiceMonitor
to access the metrics.
Debuggability and robustness
Beside all those new features, we decided to restructure parts of the Security
Profiles Operator internally to make it better to debug and more robust. For
example, we now maintain an internal gRPC API to communicate
within the operator across different features. We also improved the performance
of the log enricher, which now caches results for faster retrieval of the log
data. The operator can be put into a more verbose log mode
by setting verbosity from 0 to 1.
We also print the used libseccomp and libbpf versions on startup, as well as
expose CPU and memory profiling endpoints for each container via the
enableProfiling option.
Dedicated liveness and startup probes inside of the operator daemon will now
additionally improve the life cycle of the operator.
Conclusion
Thank you for reading this update. We're looking forward to future enhancements of the operator and would love to get your feedback about the latest release. Feel free to reach out to us via the Kubernetes slack #security-profiles-operator for any feedback or question.
Kubernetes 1.23: StatefulSet PVC Auto-Deletion (alpha)
Kubernetes v1.23 introduced a new, alpha-level policy for StatefulSets that controls the lifetime of PersistentVolumeClaims (PVCs) generated from the StatefulSet spec template for cases when they should be deleted automatically when the StatefulSet is deleted or pods in the StatefulSet are scaled down.
What problem does this solve?
A StatefulSet spec can include Pod and PVC templates. When a replica is first created, the Kubernetes control plane creates a PVC for that replica if one does not already exist. The behavior before Kubernetes v1.23 was that the control plane never cleaned up the PVCs created for StatefulSets - this was left up to the cluster administrator, or to some add-on automation that you’d have to find, check suitability, and deploy. The common pattern for managing PVCs, either manually or through tools such as Helm, is that the PVCs are tracked by the tool that manages them, with explicit lifecycle. Workflows that use StatefulSets must determine on their own what PVCs are created by a StatefulSet and what their lifecycle should be.
Before this new feature, when a StatefulSet-managed replica disappears, either because the StatefulSet is reducing its replica count, or because its StatefulSet is deleted, the PVC and its backing volume remains and must be manually deleted. While this behavior is appropriate when the data is critical, in many cases the persistent data in these PVCs is either temporary, or can be reconstructed from another source. In those cases, PVCs and their backing volumes remaining after their StatefulSet or replicas have been deleted are not necessary, incur cost, and require manual cleanup.
The new StatefulSet PVC retention policy
If you enable the alpha feature, a StatefulSet spec includes a PersistentVolumeClaim retention
policy. This is used to control if and when PVCs created from a StatefulSet’s volumeClaimTemplate
are deleted. This first iteration of the retention policy contains two situations where PVCs may be
deleted.
The first situation is when the StatefulSet resource is deleted (which implies that all replicas are
also deleted). This is controlled by the whenDeleted policy. The second situation, controlled by
whenScaled is when the StatefulSet is scaled down, which removes some but not all of the replicas
in a StatefulSet. In both cases the policy can either be Retain, where the corresponding PVCs are
not touched, or Delete, which means that PVCs are deleted. The deletion is done with a normal
object deletion, so that, for example, all
retention policies for the underlying PV are respected.
This policy forms a matrix with four cases. I’ll walk through and give an example for each one.
whenDeletedandwhenScaledare bothRetain. This matches the existing behavior for StatefulSets, where no PVCs are deleted. This is also the default retention policy. It’s appropriate to use when data on StatefulSet volumes may be irreplaceable and should only be deleted manually.whenDeletedisDeleteandwhenScaledisRetain. In this case, PVCs are deleted only when the entire StatefulSet is deleted. If the StatefulSet is scaled down, PVCs are not touched, meaning they are available to be reattached if a scale-up occurs with any data from the previous replica. This might be used for a temporary StatefulSet, such as in a CI instance or ETL pipeline, where the data on the StatefulSet is needed only during the lifetime of the StatefulSet lifetime, but while the task is running the data is not easily reconstructible. Any retained state is needed for any replicas that scale down and then up.whenDeletedandwhenScaledare bothDelete. PVCs are deleted immediately when their replica is no longer needed. Note this does not include when a Pod is deleted and a new version rescheduled, for example when a node is drained and Pods need to migrate elsewhere. The PVC is deleted only when the replica is no longer needed as signified by a scale-down or StatefulSet deletion. This use case is for when data does not need to live beyond the life of its replica. Perhaps the data is easily reconstructable and the cost savings of deleting unused PVCs is more important than quick scale-up, or perhaps that when a new replica is created, any data from a previous replica is not usable and must be reconstructed anyway.whenDeletedisRetainandwhenScaledisDelete. This is similar to the previous case, when there is little benefit to keeping PVCs for fast reuse during scale-up. An example of a situation where you might use this is an Elasticsearch cluster. Typically you would scale that workload up and down to match demand, whilst ensuring a minimum number of replicas (for example: 3). When scaling down, data is migrated away from removed replicas and there is no benefit to retaining those PVCs. However, it can be useful to bring the entire Elasticsearch cluster down temporarily for maintenance. If you need to take the Elasticsearch system offline, you can do this by temporarily deleting the StatefulSet, and then bringing the Elasticsearch cluster back by recreating the StatefulSet. The PVCs holding the Elasticsearch data will still exist and the new replicas will automatically use them.
Visit the documentation to see all the details.
What’s next?
Enable the feature and try it out! Enable the StatefulSetAutoDeletePVC feature gate on a cluster,
then create a StatefulSet using the new policy. Test it out and tell us what you think!
I'm very curious to see if this owner reference mechanism works well in practice. For example, we realized there is no mechanism in Kubernetes for knowing who set a reference, so it’s possible that the StatefulSet controller may fight with custom controllers that set their own references. Fortunately, maintaining the existing retention behavior does not involve any new owner references, so default behavior will be compatible.
Please tag any issues you report with the label sig/apps and assign them to Matthew Cary
(@mattcary at GitHub).
Enjoy!
Kubernetes 1.23: Prevent PersistentVolume leaks when deleting out of order
PersistentVolume (or PVs for short) are
associated with Reclaim Policy.
The Reclaim Policy is used to determine the actions that need to be taken by the storage
backend on deletion of the PV.
Where the reclaim policy is Delete, the expectation is that the storage backend
releases the storage resource that was allocated for the PV. In essence, the reclaim
policy needs to honored on PV deletion.
With the recent Kubernetes v1.23 release, an alpha feature lets you configure your cluster to behave that way and honor the configured reclaim policy.
How did reclaim work in previous Kubernetes releases?
PersistentVolumeClaim (or PVC for short) is a request for storage by a user. A PV and PVC are considered Bound if there is a newly created PV or a matching PV is found. The PVs themselves are backed by a volume allocated by the storage backend.
Normally, if the volume is to be deleted, then the expectation is to delete the PVC for a bound PV-PVC pair. However, there are no restrictions to delete a PV prior to deleting a PVC.
First, I'll demonstrate the behavior for clusters that are running an older version of Kubernetes.
Retrieve an PVC that is bound to a PV
Retrieve an existing PVC example-vanilla-block-pvc
kubectl get pvc example-vanilla-block-pvc
The following output shows the PVC and it's Bound PV, the PV is shown under the VOLUME column:
NAME STATUS VOLUME CAPACITY ACCESS MODES STORAGECLASS AGE
example-vanilla-block-pvc Bound pvc-6791fdd4-5fad-438e-a7fb-16410363e3da 5Gi RWO example-vanilla-block-sc 19s
Delete PV
When I try to delete a bound PV, the cluster blocks and the kubectl tool does
not return back control to the shell; for example:
kubectl delete pv pvc-6791fdd4-5fad-438e-a7fb-16410363e3da
persistentvolume "pvc-6791fdd4-5fad-438e-a7fb-16410363e3da" deleted
^C
Retrieving the PV:
kubectl get pv pvc-6791fdd4-5fad-438e-a7fb-16410363e3da
It can be observed that the PV is in Terminating state
NAME CAPACITY ACCESS MODES RECLAIM POLICY STATUS CLAIM STORAGECLASS REASON AGE
pvc-6791fdd4-5fad-438e-a7fb-16410363e3da 5Gi RWO Delete Terminating default/example-vanilla-block-pvc example-vanilla-block-sc 2m23s
Delete PVC
kubectl delete pvc example-vanilla-block-pvc
The following output is seen if the PVC gets successfully deleted:
persistentvolumeclaim "example-vanilla-block-pvc" deleted
The PV object from the cluster also gets deleted. When attempting to retrieve the PV it will be observed that the PV is no longer found:
kubectl get pv pvc-6791fdd4-5fad-438e-a7fb-16410363e3da
Error from server (NotFound): persistentvolumes "pvc-6791fdd4-5fad-438e-a7fb-16410363e3da" not found
Although the PV is deleted the underlying storage resource is not deleted, and needs to be removed manually.
To sum it up, the reclaim policy associated with the Persistent Volume is currently
ignored under certain circumstance. For a Bound PV-PVC pair the ordering of PV-PVC
deletion determines whether the PV reclaim policy is honored. The reclaim policy
is honored if the PVC is deleted first, however, if the PV is deleted prior to
deleting the PVC then the reclaim policy is not exercised. As a result of this behavior,
the associated storage asset in the external infrastructure is not removed.
PV reclaim policy with Kubernetes v1.23
The new behavior ensures that the underlying storage object is deleted from the backend when users attempt to delete a PV manually.
How to enable new behavior?
To make use of the new behavior, you must have upgraded your cluster to the v1.23 release of Kubernetes.
You need to make sure that you are running the CSI external-provisioner version 4.0.0, or later.
You must also enable the HonorPVReclaimPolicy feature gate for the
external-provisioner and for the kube-controller-manager.
If you're not using a CSI driver to integrate with your storage backend, the fix isn't available. The Kubernetes project doesn't have a current plan to fix the bug for in-tree storage drivers: the future of those in-tree drivers is deprecation and migration to CSI.
How does it work?
The new behavior is achieved by adding a finalizer external-provisioner.volume.kubernetes.io/finalizer on new and existing PVs, the finalizer is only removed after the storage from backend is deleted.
An example of a PV with the finalizer, notice the new finalizer in the finalizers list
kubectl get pv pvc-a7b7e3ba-f837-45ba-b243-dec7d8aaed53 -o yaml
apiVersion: v1
kind: PersistentVolume
metadata:
annotations:
pv.kubernetes.io/provisioned-by: csi.vsphere.vmware.com
creationTimestamp: "2021-11-17T19:28:56Z"
finalizers:
- kubernetes.io/pv-protection
- external-provisioner.volume.kubernetes.io/finalizer
name: pvc-a7b7e3ba-f837-45ba-b243-dec7d8aaed53
resourceVersion: "194711"
uid: 087f14f2-4157-4e95-8a70-8294b039d30e
spec:
accessModes:
- ReadWriteOnce
capacity:
storage: 1Gi
claimRef:
apiVersion: v1
kind: PersistentVolumeClaim
name: example-vanilla-block-pvc
namespace: default
resourceVersion: "194677"
uid: a7b7e3ba-f837-45ba-b243-dec7d8aaed53
csi:
driver: csi.vsphere.vmware.com
fsType: ext4
volumeAttributes:
storage.kubernetes.io/csiProvisionerIdentity: 1637110610497-8081-csi.vsphere.vmware.com
type: vSphere CNS Block Volume
volumeHandle: 2dacf297-803f-4ccc-afc7-3d3c3f02051e
persistentVolumeReclaimPolicy: Delete
storageClassName: example-vanilla-block-sc
volumeMode: Filesystem
status:
phase: Bound
The presence of the finalizer prevents the PV object from being removed from the cluster. As stated previously, the finalizer is only removed from the PV object after it is successfully deleted from the storage backend. To learn more about finalizers, please refer to Using Finalizers to Control Deletion.
What about CSI migrated volumes?
The fix is applicable to CSI migrated volumes as well. However, when the feature
HonorPVReclaimPolicy is enabled on 1.23, and CSI Migration is disabled, the finalizer
is removed from the PV object if it exists.
Some caveats
- The fix is applicable only to CSI volumes and migrated volumes. In-tree volumes will exhibit older behavior.
- The fix is introduced as an alpha feature in the external-provisioner under the feature gate
HonorPVReclaimPolicy. The feature is disabled by default, and needs to be enabled explicitly.
References
How do I get involved?
The Kubernetes Slack channel SIG Storage communication channels are great mediums to reach out to the SIG Storage and migration working group teams.
Special thanks to the following people for the insightful reviews, thorough consideration and valuable contribution:
- Jan Šafránek (jsafrane)
- Xing Yang (xing-yang)
- Matthew Wong (wongma7)
Those interested in getting involved with the design and development of CSI or any part of the Kubernetes Storage system, join the Kubernetes Storage Special Interest Group (SIG). We’re rapidly growing and always welcome new contributors.
Kubernetes 1.23: Kubernetes In-Tree to CSI Volume Migration Status Update
The Kubernetes in-tree storage plugin to Container Storage Interface (CSI) migration infrastructure has already been beta since v1.17. CSI migration was introduced as alpha in Kubernetes v1.14.
Since then, SIG Storage and other Kubernetes special interest groups are working to ensure feature stability and compatibility in preparation for GA. This article is intended to give a status update to the feature as well as changes between Kubernetes 1.17 and 1.23. In addition, I will also cover the future roadmap for the CSI migration feature GA for each storage plugin.
Quick recap: What is CSI Migration, and why migrate?
The Container Storage Interface (CSI) was designed to help Kubernetes replace its existing, in-tree storage driver mechanisms - especially vendor specific plugins. Kubernetes support for the Container Storage Interface has been generally available since Kubernetes v1.13. Support for using CSI drivers was introduced to make it easier to add and maintain new integrations between Kubernetes and storage backend technologies. Using CSI drivers allows for for better maintainability (driver authors can define their own release cycle and support lifecycle) and reduce the opportunity for vulnerabilities (with less in-tree code, the risks of a mistake are reduced, and cluster operators can select only the storage drivers that their cluster requires).
As more CSI Drivers were created and became production ready, SIG Storage group wanted all Kubernetes users to benefit from the CSI model. However, we cannot break API compatibility with the existing storage API types. The solution we came up with was CSI migration: a feature that translates in-tree APIs to equivalent CSI APIs and delegates operations to a replacement CSI driver.
The CSI migration effort enables the replacement of existing in-tree storage plugins such as kubernetes.io/gce-pd or kubernetes.io/aws-ebs with a corresponding CSI driver from the storage backend.
If CSI Migration is working properly, Kubernetes end users shouldn’t notice a difference. Existing StorageClass, PersistentVolume and PersistentVolumeClaim objects should continue to work.
When a Kubernetes cluster administrator updates a cluster to enable CSI migration, existing workloads that utilize PVCs which are backed by in-tree storage plugins will continue to function as they always have.
However, behind the scenes, Kubernetes hands control of all storage management operations (previously targeting in-tree drivers) to CSI drivers.
For example, suppose you are a kubernetes.io/gce-pd user, after CSI migration, you can still use kubernetes.io/gce-pd to provision new volumes, mount existing GCE-PD volumes or delete existing volumes. All existing API/Interface will still function correctly. However, the underlying function calls are all going through the GCE PD CSI driver instead of the in-tree Kubernetes function.
This enables a smooth transition for end users. Additionally as storage plugin developers, we can reduce the burden of maintaining the in-tree storage plugins and eventually remove them from the core Kubernetes binary.
What has been changed, and what's new?
Building on the work done in Kubernetes v1.17 and earlier, the releases since then have made a series of changes:
New feature gates
The Kubernetes v1.21 release deprecated the CSIMigration{provider}Complete feature flags, and stopped honoring them. In their place came new feature flags named InTreePlugin{vendor}Unregister, that replace the old feature flag and retain all the functionality that CSIMigration{provider}Complete provided.
CSIMigration{provider}Complete was introduced before as a supplementary feature gate once CSI migration is enabled on all of the nodes. This flag unregisters the in-tree storage plugin you specify with the {provider} part of the flag name.
When you enable that feature gate, then instead of using the in-tree driver code, your cluster directly selects and uses the relevant CSI driver. This happens without any check for whether CSI migration is enabled on the node, or whether you have in fact deployed that CSI driver.
While this feature gate is a great helper, SIG Storage (and, I'm sure, lots of cluster operators) also wanted a feature gate that lets you disable an in-tree storage plugin, even without also enabling CSI migration. For example, you might want to disable the EBS storage plugin on a GCE cluster, because EBS volumes are specific to a different vendor's cloud (AWS).
To make this possible, Kubernetes v1.21 introduced a new feature flag set: InTreePlugin{vendor}Unregister.
InTreePlugin{vendor}Unregister is a standalone feature gate that can be enabled and disabled independently from CSI Migration. When enabled, the component will not register the specific in-tree storage plugin to the supported list. If the cluster operator only enables this flag, end users will get an error from PVC saying it cannot find the plugin when the plugin is used. The cluster operator may want to enable this regardless of CSI Migration if they do not want to support the legacy in-tree APIs and only support CSI moving forward.
Observability
Kubernetes v1.21 introduced metrics for tracking CSI migration. You can use these metrics to observe how your cluster is using storage services and whether access to that storage is using the legacy in-tree driver or its CSI-based replacement.
| Components | Metrics | Notes |
|---|---|---|
| Kube-Controller-Manager | storage_operation_duration_seconds | A new label migrated is added to the metric to indicate whether this storage operation is a CSI migration operation(string value true for enabled and false for not enabled). |
| Kubelet | csi_operations_seconds | The new metric exposes labels including driver_name, method_name, grpc_status_code and migrated. The meaning of these labels is identical to csi_sidecar_operations_seconds. |
| CSI Sidecars(provisioner, attacher, resizer) | csi_sidecar_operations_seconds | A new label migrated is added to the metric to indicate whether this storage operation is a CSI migration operation(string value true for enabled and false for not enabled). |
Bug fixes and feature improvement
We have fixed numerous bugs like dangling attachment, garbage collection, incorrect topology label through the help of our beta testers.
Cloud Provider && Cluster Lifecycle Collaboration
SIG Storage has been working closely with SIG Cloud Provider and SIG Cluster Lifecycle on the rollout of CSI migration.
If you are a user of a managed Kubernetes service, check with your provider if anything needs to be done. In many cases, the provider will manage the migration and no additional work is required.
If you use a distribution of Kubernetes, check its official documentation for information about support for this feature. For the CSI Migration feature graduation to GA, SIG Storage and SIG Cluster Lifecycle are collaborating towards making the migration mechanisms available in tooling (such as kubeadm) as soon as they're available in Kubernetes itself.
What is the timeline / status?
The current and targeted releases for each individual driver is shown in the table below:
| Driver | Alpha | Beta (in-tree deprecated) | Beta (on-by-default) | GA | Target "in-tree plugin" removal |
|---|---|---|---|---|---|
| AWS EBS | 1.14 | 1.17 | 1.23 | 1.24 (Target) | 1.26 (Target) |
| GCE PD | 1.14 | 1.17 | 1.23 | 1.24 (Target) | 1.26 (Target) |
| OpenStack Cinder | 1.14 | 1.18 | 1.21 | 1.24 (Target) | 1.26 (Target) |
| Azure Disk | 1.15 | 1.19 | 1.23 | 1.24 (Target) | 1.26 (Target) |
| Azure File | 1.15 | 1.21 | 1.24 (Target) | 1.25 (Target) | 1.27 (Target) |
| vSphere | 1.18 | 1.19 | 1.24 (Target) | 1.25 (Target) | 1.27 (Target) |
| Ceph RBD | 1.23 | ||||
| Portworx | 1.23 |
The following storage drivers will not have CSI migration support. The ScaleIO driver was already removed; the others are deprecated and will be removed from core Kubernetes.
| Driver | Deprecated | Code Removal |
|---|---|---|
| ScaleIO | 1.16 | 1.22 |
| Flocker | 1.22 | 1.25 (Target) |
| Quobyte | 1.22 | 1.25 (Target) |
| StorageOS | 1.22 | 1.25 (Target) |
What's next?
With more CSI drivers graduating to GA, we hope to soon mark the overall CSI Migration feature as GA. We are expecting cloud provider in-tree storage plugins code removal to happen by Kubernetes v1.26 and v1.27.
What should I do as a user?
Note that all new features for the Kubernetes storage system (such as volume snapshotting) will only be added to the CSI interface. Therefore, if you are starting up a new cluster, creating stateful applications for the first time, or require these new features we recommend using CSI drivers natively (instead of the in-tree volume plugin API). Follow the updated user guides for CSI drivers and use the new CSI APIs.
However, if you choose to roll a cluster forward or continue using specifications with the legacy volume APIs, CSI Migration will ensure we continue to support those deployments with the new CSI drivers. However, if you want to leverage new features like snapshot, it will require a manual migration to re-import an existing intree PV as a CSI PV.
How do I get involved?
The Kubernetes Slack channel #csi-migration along with any of the standard SIG Storage communication channels are great mediums to reach out to the SIG Storage and migration working group teams.
This project, like all of Kubernetes, is the result of hard work by many contributors from diverse backgrounds working together. We offer a huge thank you to the contributors who stepped up these last quarters to help move the project forward:
- Michelle Au (msau42)
- Jan Šafránek (jsafrane)
- Hemant Kumar (gnufied)
Special thanks to the following people for the insightful reviews, thorough consideration and valuable contribution to the CSI migration feature:
- Andy Zhang (andyzhangz)
- Divyen Patel (divyenpatel)
- Deep Debroy (ddebroy)
- Humble Devassy Chirammal (humblec)
- Jing Xu (jingxu97)
- Jordan Liggitt (liggitt)
- Matthew Cary (mattcary)
- Matthew Wong (wongma7)
- Neha Arora (nearora-msft)
- Oksana Naumov (trierra)
- Saad Ali (saad-ali)
- Tim Bannister (sftim)
- Xing Yang (xing-yang)
Those interested in getting involved with the design and development of CSI or any part of the Kubernetes Storage system, join the Kubernetes Storage Special Interest Group (SIG). We’re rapidly growing and always welcome new contributors.
Kubernetes 1.23: Pod Security Graduates to Beta
With the release of Kubernetes v1.23, Pod Security admission has now entered beta. Pod Security is a built-in admission controller that evaluates pod specifications against a predefined set of Pod Security Standards and determines whether to admit or deny the pod from running.
Pod Security is the successor to PodSecurityPolicy which was deprecated in the v1.21 release, and will be removed in Kubernetes v1.25. In this article, we cover the key concepts of Pod Security along with how to use it. We hope that cluster administrators and developers alike will use this new mechanism to enforce secure defaults for their workloads.
Why Pod Security
The overall aim of Pod Security is to let you isolate workloads. You can run a cluster that runs different workloads and, without adding extra third-party tooling, implement controls that require Pods for a workload to restrict their own privileges to a defined bounding set.
Pod Security overcomes key shortcomings of Kubernetes' existing, but deprecated, PodSecurityPolicy (PSP) mechanism:
- Policy authorization model — challenging to deploy with controllers.
- Risks around switching — a lack of dry-run/audit capabilities made it hard to enable PodSecurityPolicy.
- Inconsistent and Unbounded API — the large configuration surface and evolving constraints led to a complex and confusing API.
The shortcomings of PSP made it very difficult to use which led the community to reevaluate whether or not a better implementation could achieve the same goals. One of those goals was to provide an out-of-the-box solution to apply security best practices. Pod Security ships with predefined Pod Security levels that a cluster administrator can configure to meet the desired security posture.
It's important to note that Pod Security doesn't have complete feature parity with the deprecated PodSecurityPolicy. Specifically, it doesn't have the ability to mutate or change Kubernetes resources to auto-remediate a policy violation on behalf of the user. Additionally, it doesn't provide fine-grained control over each allowed field and value within a pod specification or any other Kubernetes resource that you may wish to evaluate. If you need more fine-grained policy control then take a look at these other projects which support such use cases.
Pod Security also adheres to Kubernetes best practices of declarative object management by denying resources that violate the policy. This requires resources to be updated in source repositories, and tooling to be updated prior to being deployed to Kubernetes.
How Does Pod Security Work?
Pod Security is a built-in admission controller starting with Kubernetes v1.22, but can also be run as a standalone webhook. Admission controllers function by intercepting requests in the Kubernetes API server prior to persistence to storage. They can either admit or deny a request. In the case of Pod Security, pod specifications will be evaluated against a configured policy in the form of a Pod Security Standard. This means that security sensitive fields in a pod specification will only be allowed to have specific values.
Configuring Pod Security
Pod Security Standards
In order to use Pod Security we first need to understand Pod Security Standards. These standards define three different policy levels that range from permissive to restrictive. These levels are as follows:
privileged— open and unrestrictedbaseline— Covers known privilege escalations while minimizing restrictionsrestricted— Highly restricted, hardening against known and unknown privilege escalations. May cause compatibility issues
Each of these policy levels define which fields are restricted within a pod specification and the allowed values. Some of the fields restricted by these policies include:
spec.securityContext.sysctlsspec.hostNetworkspec.volumes[*].hostPathspec.containers[*].securityContext.privileged
Policy levels are applied via labels on Namespace resources, which allows for granular per-namespace policy selection. The AdmissionConfiguration in the API server can also be configured to set cluster-wide default levels and exemptions.
Policy modes
Policies are applied in a specific mode. Multiple modes (with different policy levels) can be set on the same namespace. Here is a list of modes:
enforce— Any Pods that violate the policy will be rejectedaudit— Violations will be recorded as an annotation in the audit logs, but don't affect whether the pod is allowed.warn— Violations will send a warning message back to the user, but don't affect whether the pod is allowed.
In addition to modes you can also pin the policy to a specific version (for example v1.22). Pinning to a specific version allows the behavior to remain consistent if the policy definition changes in future Kubernetes releases.
Hands on demo
Prerequisites
Deploy a kind cluster
kind create cluster --image kindest/node:v1.23.0
It might take a while to start and once it's started it might take a minute or so before the node becomes ready.
kubectl cluster-info --context kind-kind
Wait for the node STATUS to become ready.
kubectl get nodes
The output is similar to this:
NAME STATUS ROLES AGE VERSION
kind-control-plane Ready control-plane,master 54m v1.23.0
Confirm Pod Security is enabled
The best way to confirm the API's default enabled plugins is to check the Kubernetes API container's help arguments.
kubectl -n kube-system exec kube-apiserver-kind-control-plane -it -- kube-apiserver -h | grep "default enabled ones"
The output is similar to this:
...
--enable-admission-plugins strings
admission plugins that should be enabled in addition
to default enabled ones (NamespaceLifecycle, LimitRanger,
ServiceAccount, TaintNodesByCondition, PodSecurity, Priority,
DefaultTolerationSeconds, DefaultStorageClass,
StorageObjectInUseProtection, PersistentVolumeClaimResize,
RuntimeClass, CertificateApproval, CertificateSigning,
CertificateSubjectRestriction, DefaultIngressClass,
MutatingAdmissionWebhook, ValidatingAdmissionWebhook,
ResourceQuota).
...
PodSecurity is listed in the group of default enabled admission plugins.
If using a cloud provider, or if you don't have access to the API server, the best way to check would be to run a quick end-to-end test:
kubectl create namespace verify-pod-security
kubectl label namespace verify-pod-security pod-security.kubernetes.io/enforce=restricted
# The following command does NOT create a workload (--dry-run=server)
kubectl -n verify-pod-security run test --dry-run=server --image=busybox --privileged
kubectl delete namespace verify-pod-security
The output is similar to this:
Error from server (Forbidden): pods "test" is forbidden: violates PodSecurity "restricted:latest": privileged (container "test" must not set securityContext.privileged=true), allowPrivilegeEscalation != false (container "test" must set securityContext.allowPrivilegeEscalation=false), unrestricted capabilities (container "test" must set securityContext.capabilities.drop=["ALL"]), runAsNonRoot != true (pod or container "test" must set securityContext.runAsNonRoot=true), seccompProfile (pod or container "test" must set securityContext.seccompProfile.type to "RuntimeDefault" or "Localhost")
Configure Pod Security
Policies are applied to a namespace via labels. These labels are as follows:
pod-security.kubernetes.io/<MODE>: <LEVEL>(required to enable pod security)pod-security.kubernetes.io/<MODE>-version: <VERSION>(optional, defaults to latest)
A specific version can be supplied for each enforcement mode. The version pins the policy to the version that was shipped as part of the Kubernetes release. Pinning to a specific Kubernetes version allows for deterministic policy behavior while allowing flexibility for future updates to Pod Security Standards. The possible <MODE(S)> are enforce, audit and warn.
When to use warn?
The typical uses for warn are to get ready for a future change where you want to enforce a different policy. The most two common cases would be:
warnat the same level but a different version (e.g. pinenforceto restricted+v1.23 andwarnat restricted+latest)warnat a stricter level (e.g.enforcebaseline,warnrestricted)
It's not recommended to use warn for the exact same level+version of the policy as enforce. In the admission sequence, if enforce fails, the entire sequence fails before evaluating the warn.
First, create a namespace called verify-pod-security if not created earlier. For the demo, --overwrite is used when labeling to allow repurposing a single namespace for multiple examples.
kubectl create namespace verify-pod-security
Deploy demo workloads
Each workload represents a higher level of security that would not pass the profile that comes after it.
For the following examples, use the busybox container runs a sleep command for 1 million seconds (≅11 days) or until deleted. Pod Security is not interested in which container image you chose, but rather the Pod level settings and their implications for security.
Privileged level and workload
For the privileged pod, use the privileged policy. This allows the process inside a container to gain new processes (also known as "privilege escalation") and can be dangerous if untrusted.
First, let's apply a restricted Pod Security level for a test.
# enforces a "restricted" security policy and audits on restricted
kubectl label --overwrite ns verify-pod-security \
pod-security.kubernetes.io/enforce=restricted \
pod-security.kubernetes.io/audit=restricted
Next, try to deploy a privileged workload in the namespace.
cat <<EOF | kubectl -n verify-pod-security apply -f -
apiVersion: v1
kind: Pod
metadata:
name: busybox-privileged
spec:
containers:
- name: busybox
image: busybox
args:
- sleep
- "1000000"
securityContext:
allowPrivilegeEscalation: true
EOF
The output is similar to this:
Error from server (Forbidden): error when creating "STDIN": pods "busybox-privileged" is forbidden: violates PodSecurity "restricted:latest": allowPrivilegeEscalation != false (container "busybox" must set securityContext.allowPrivilegeEscalation=false), unrestricted capabilities (container "busybox" must set securityContext.capabilities.drop=["ALL"]), runAsNonRoot != true (pod or container "busybox" must set securityContext.runAsNonRoot=true), seccompProfile (pod or container "busybox" must set securityContext.seccompProfile.type to "RuntimeDefault" or "Localhost")
Now let's apply the privileged Pod Security level and try again.
# enforces a "privileged" security policy and warns / audits on baseline
kubectl label --overwrite ns verify-pod-security \
pod-security.kubernetes.io/enforce=privileged \
pod-security.kubernetes.io/warn=baseline \
pod-security.kubernetes.io/audit=baseline
cat <<EOF | kubectl -n verify-pod-security apply -f -
apiVersion: v1
kind: Pod
metadata:
name: busybox-privileged
spec:
containers:
- name: busybox
image: busybox
args:
- sleep
- "1000000"
securityContext:
allowPrivilegeEscalation: true
EOF
The output is similar to this:
pod/busybox-privileged created
We can run kubectl -n verify-pod-security get pods to verify it is running. Clean up with:
kubectl -n verify-pod-security delete pod busybox-privileged
Baseline level and workload
The baseline policy demonstrates sensible defaults while preventing common container exploits.
Let's revert back to a restricted Pod Security level for a quick test.
# enforces a "restricted" security policy and audits on restricted
kubectl label --overwrite ns verify-pod-security \
pod-security.kubernetes.io/enforce=restricted \
pod-security.kubernetes.io/audit=restricted
Apply the workload.
cat <<EOF | kubectl -n verify-pod-security apply -f -
apiVersion: v1
kind: Pod
metadata:
name: busybox-baseline
spec:
containers:
- name: busybox
image: busybox
args:
- sleep
- "1000000"
securityContext:
allowPrivilegeEscalation: false
capabilities:
add:
- NET_BIND_SERVICE
- CHOWN
EOF
The output is similar to this:
Error from server (Forbidden): error when creating "STDIN": pods "busybox-baseline" is forbidden: violates PodSecurity "restricted:latest": unrestricted capabilities (container "busybox" must set securityContext.capabilities.drop=["ALL"]; container "busybox" must not include "CHOWN" in securityContext.capabilities.add), runAsNonRoot != true (pod or container "busybox" must set securityContext.runAsNonRoot=true), seccompProfile (pod or container "busybox" must set securityContext.seccompProfile.type to "RuntimeDefault" or "Localhost")
Let's apply the baseline Pod Security level and try again.
# enforces a "baseline" security policy and warns / audits on restricted
kubectl label --overwrite ns verify-pod-security \
pod-security.kubernetes.io/enforce=baseline \
pod-security.kubernetes.io/warn=restricted \
pod-security.kubernetes.io/audit=restricted
cat <<EOF | kubectl -n verify-pod-security apply -f -
apiVersion: v1
kind: Pod
metadata:
name: busybox-baseline
spec:
containers:
- name: busybox
image: busybox
args:
- sleep
- "1000000"
securityContext:
allowPrivilegeEscalation: false
capabilities:
add:
- NET_BIND_SERVICE
- CHOWN
EOF
The output is similar to the following. Note that the warnings match the error message from the test above, but the pod is still successfully created.
Warning: would violate PodSecurity "restricted:latest": unrestricted capabilities (container "busybox" must set securityContext.capabilities.drop=["ALL"]; container "busybox" must not include "CHOWN" in securityContext.capabilities.add), runAsNonRoot != true (pod or container "busybox" must set securityContext.runAsNonRoot=true), seccompProfile (pod or container "busybox" must set securityContext.seccompProfile.type to "RuntimeDefault" or "Localhost")
pod/busybox-baseline created
Remember, we set the verify-pod-security namespace to warn based on the restricted profile. We can run kubectl -n verify-pod-security get pods to verify it is running. Clean up with:
kubectl -n verify-pod-security delete pod busybox-baseline
Restricted level and workload
The restricted policy requires rejection of all privileged parameters. It is the most secure with a trade-off for complexity.
The restricted policy allows containers to add the NET_BIND_SERVICE capability only.
While we've already tested restricted as a blocking function, let's try to get something running that meets all the criteria.
First we need to reapply the restricted profile, for the last time.
# enforces a "restricted" security policy and audits on restricted
kubectl label --overwrite ns verify-pod-security \
pod-security.kubernetes.io/enforce=restricted \
pod-security.kubernetes.io/audit=restricted
cat <<EOF | kubectl -n verify-pod-security apply -f -
apiVersion: v1
kind: Pod
metadata:
name: busybox-restricted
spec:
containers:
- name: busybox
image: busybox
args:
- sleep
- "1000000"
securityContext:
allowPrivilegeEscalation: false
capabilities:
add:
- NET_BIND_SERVICE
EOF
The output is similar to this:
Error from server (Forbidden): error when creating "STDIN": pods "busybox-restricted" is forbidden: violates PodSecurity "restricted:latest": unrestricted capabilities (container "busybox" must set securityContext.capabilities.drop=["ALL"]), runAsNonRoot != true (pod or container "busybox" must set securityContext.runAsNonRoot=true), seccompProfile (pod or container "busybox" must set securityContext.seccompProfile.type to "RuntimeDefault" or "Localhost")
This is because the restricted profile explicitly requires that certain values are set to the most secure parameters.
By requiring explicit values, manifests become more declarative and your entire security model can shift left. With the restricted level of enforcement, a company could audit their cluster's compliance based on permitted manifests.
Let's fix each warning resulting in the following file:
cat <<EOF | kubectl -n verify-pod-security apply -f -
apiVersion: v1
kind: Pod
metadata:
name: busybox-restricted
spec:
containers:
- name: busybox
image: busybox
args:
- sleep
- "1000000"
securityContext:
seccompProfile:
type: RuntimeDefault
runAsNonRoot: true
allowPrivilegeEscalation: false
capabilities:
drop:
- ALL
add:
- NET_BIND_SERVICE
EOF
The output is similar to this:
pod/busybox-restricted created
Run kubectl -n verify-pod-security get pods to verify it is running. The output is similar to this:
NAME READY STATUS RESTARTS AGE
busybox-restricted 0/1 CreateContainerConfigError 0 2m26s
Let's figure out why the container is not starting with kubectl -n verify-pod-security describe pod busybox-restricted. The output is similar to this:
Events:
Type Reason Age From Message
---- ------ ---- ---- -------
Warning Failed 2m29s (x8 over 3m55s) kubelet Error: container has runAsNonRoot and image will run as root (pod: "busybox-restricted_verify-pod-security(a4c6a62d-2166-41a9-b288-20df17cf5c90)", container: busybox)
To solve this, set the effective UID (runAsUser) to a non-zero (root) value or use the nobody UID (65534).
# delete the original pod
kubectl -n verify-pod-security delete pod busybox-restricted
# create the pod again with new runAsUser
cat <<EOF | kubectl -n verify-pod-security apply -f -
apiVersion: v1
kind: Pod
metadata:
name: busybox-restricted
spec:
securityContext:
runAsUser: 65534
containers:
- name: busybox
image: busybox
args:
- sleep
- "1000000"
securityContext:
seccompProfile:
type: RuntimeDefault
runAsNonRoot: true
allowPrivilegeEscalation: false
capabilities:
drop:
- ALL
add:
- NET_BIND_SERVICE
EOF
Run kubectl -n verify-pod-security get pods to verify it is running. The output is similar to this:
NAME READY STATUS RESTARTS AGE
busybox-restricted 1/1 Running 0 25s
Clean up the demo (restricted pod and namespace) with:
kubectl delete namespace verify-pod-security
At this point, if you wanted to dive deeper into linux permissions or what is permitted for a certain container, exec into the control plane and play around with containerd and crictl inspect.
# if using docker, shell into the control plane
docker exec -it kind-control-plane bash
# list running containers
crictl ps
# inspect each one by container ID
crictl inspect <CONTAINER ID>
Applying a cluster-wide policy
In addition to applying labels to namespaces to configure policy you can also configure cluster-wide policies and exemptions using the AdmissionConfiguration resource.
Using this resource, policy definitions are applied cluster-wide by default and any policy that is applied via namespace labels will take precedence.
There is no runtime configurable API for the AdmissionConfiguration configuration file so a cluster administrator would need to specify a path to the file below via the --admission-control-config-file flag on the API server.
In the following resource we are enforcing the baseline policy and warning and auditing the baseline policy. We are also making the kube-system namespace exempt from this policy.
It's not recommended to alter control plane / clusters after install, so let's build a new cluster with a default policy on all namespaces.
First, delete the current cluster.
kind delete cluster
Create a Pod Security configuration that enforce and audit baseline policies while using a restricted profile to warn the end user.
cat <<EOF > pod-security.yaml
apiVersion: apiserver.config.k8s.io/v1
kind: AdmissionConfiguration
plugins:
- name: PodSecurity
configuration:
apiVersion: pod-security.admission.config.k8s.io/v1beta1
kind: PodSecurityConfiguration
defaults:
enforce: "baseline"
enforce-version: "latest"
audit: "baseline"
audit-version: "latest"
warn: "restricted"
warn-version: "latest"
exemptions:
# Array of authenticated usernames to exempt.
usernames: []
# Array of runtime class names to exempt.
runtimeClasses: []
# Array of namespaces to exempt.
namespaces: [kube-system]
EOF
For additional options, check out the official standards admission controller docs.
We now have a default baseline policy. Next pass it to the kind configuration to enable the --admission-control-config-file API server argument and pass the policy file. To pass a file to a kind cluster, use a configuration file to pass additional setup instructions. Kind uses kubeadm to provision the cluster and the configuration file has the ability to pass kubeadmConfigPatches for further customization. In our case, the local file is mounted into the control plane node as /etc/kubernetes/policies/pod-security.yaml which is then mounted into the apiServer container. We also pass the --admission-control-config-file argument pointing to the policy's location.
cat <<EOF > kind-config.yaml
kind: Cluster
apiVersion: kind.x-k8s.io/v1alpha4
nodes:
- role: control-plane
kubeadmConfigPatches:
- |
kind: ClusterConfiguration
apiServer:
# enable admission-control-config flag on the API server
extraArgs:
admission-control-config-file: /etc/kubernetes/policies/pod-security.yaml
# mount new file / directories on the control plane
extraVolumes:
- name: policies
hostPath: /etc/kubernetes/policies
mountPath: /etc/kubernetes/policies
readOnly: true
pathType: "DirectoryOrCreate"
# mount the local file on the control plane
extraMounts:
- hostPath: ./pod-security.yaml
containerPath: /etc/kubernetes/policies/pod-security.yaml
readOnly: true
EOF
Create a new cluster using the kind configuration file defined above.
kind create cluster --image kindest/node:v1.23.0 --config kind-config.yaml
Let's look at the default namespace.
kubectl describe namespace default
The output is similar to this:
Name: default
Labels: kubernetes.io/metadata.name=default
Annotations: <none>
Status: Active
No resource quota.
No LimitRange resource.
Let's create a new namespace and see if the labels apply there.
kubectl create namespace test-defaults
kubectl describe namespace test-defaults
Same.
Name: test-defaults
Labels: kubernetes.io/metadata.name=test-defaults
Annotations: <none>
Status: Active
No resource quota.
No LimitRange resource.
Can a privileged workload be deployed?
cat <<EOF | kubectl -n test-defaults apply -f -
apiVersion: v1
kind: Pod
metadata:
name: busybox-privileged
spec:
containers:
- name: busybox
image: busybox
args:
- sleep
- "1000000"
securityContext:
allowPrivilegeEscalation: true
EOF
Hmm... yep. The default warn level is working at least.
Warning: would violate PodSecurity "restricted:latest": allowPrivilegeEscalation != false (container "busybox" must set securityContext.allowPrivilegeEscalation=false), unrestricted capabilities (container "busybox" must set securityContext.capabilities.drop=["ALL"]), runAsNonRoot != true (pod or container "busybox" must set securityContext.runAsNonRoot=true), seccompProfile (pod or container "busybox" must set securityContext.seccompProfile.type to "RuntimeDefault" or "Localhost")
pod/busybox-privileged created
Let's delete the pod with kubectl -n test-defaults delete pod/busybox-privileged.
Is my config even working?
# if using docker, shell into the control plane
docker exec -it kind-control-plane bash
# cat out the file we mounted
cat /etc/kubernetes/policies/pod-security.yaml
# check the api server logs
cat /var/log/containers/kube-apiserver*.log
# check the api server config
cat /etc/kubernetes/manifests/kube-apiserver.yaml
UPDATE: The baseline policy permits allowPrivilegeEscalation. While I cannot see the Pod Security default levels of enforcement, they are there. Let's try to provide a manifest that violates the baseline by requesting hostNetwork access.
# delete the original pod
kubectl -n test-defaults delete pod busybox-privileged
cat <<EOF | kubectl -n test-defaults apply -f -
apiVersion: v1
kind: Pod
metadata:
name: busybox-privileged
spec:
containers:
- name: busybox
image: busybox
args:
- sleep
- "1000000"
hostNetwork: true
EOF
The output is similar to this:
Error from server (Forbidden): error when creating "STDIN": pods "busybox-privileged" is forbidden: violates PodSecurity "baseline:latest": host namespaces (hostNetwork=true)
Yes!!! It worked! 🎉🎉🎉
I later found out, another way to check if things are operating as intended is to check the raw API server metrics endpoint.
Run the following command:
kubectl get --raw /metrics | grep pod_security_evaluations_total
The output is similar to this:
# HELP pod_security_evaluations_total [ALPHA] Number of policy evaluations that occurred, not counting ignored or exempt requests.
# TYPE pod_security_evaluations_total counter
pod_security_evaluations_total{decision="allow",mode="enforce",policy_level="baseline",policy_version="latest",request_operation="create",resource="pod",subresource=""} 2
pod_security_evaluations_total{decision="allow",mode="enforce",policy_level="privileged",policy_version="latest",request_operation="create",resource="pod",subresource=""} 0
pod_security_evaluations_total{decision="allow",mode="enforce",policy_level="privileged",policy_version="latest",request_operation="update",resource="pod",subresource=""} 0
pod_security_evaluations_total{decision="deny",mode="audit",policy_level="baseline",policy_version="latest",request_operation="create",resource="pod",subresource=""} 1
pod_security_evaluations_total{decision="deny",mode="enforce",policy_level="baseline",policy_version="latest",request_operation="create",resource="pod",subresource=""} 1
pod_security_evaluations_total{decision="deny",mode="warn",policy_level="restricted",policy_version="latest",request_operation="create",resource="controller",subresource=""} 2
pod_security_evaluations_total{decision="deny",mode="warn",policy_level="restricted",policy_version="latest",request_operation="create",resource="pod",subresource=""} 2
A monitoring tool could ingest these metrics too for reporting, assessments, or measuring trends.
Clean up
When finished, delete the kind cluster.
kind delete cluster
Auditing
Auditing is another way to track what policies are being enforced in your cluster. To set up auditing with kind, review the official docs for enabling auditing. As of version 1.11, Kubernetes audit logs include two annotations that indicate whether or not a request was authorized (authorization.k8s.io/decision) and the reason for the decision (authorization.k8s.io/reason). Audit events can be streamed to a webhook for monitoring, tracking, or alerting.
The audit events look similar to the following:
{"authorization.k8s.io/decision":"allow","authorization.k8s.io/reason":"","pod-security.kubernetes.io/audit":"allowPrivilegeEscalation != false (container \"busybox\" must set securityContext.allowPrivilegeEscalation=false), unrestricted capabilities (container \"busybox\" must set securityContext.capabilities.drop=[\"ALL\"]), runAsNonRoot != true (pod or container \"busybox\" must set securityContext.runAsNonRoot=true), seccompProfile (pod or container \"busybox\" must set securityContext.seccompProfile.type to \"RuntimeDefault\" or \"Localhost\")"}}
Auditing is also a good first step in evaluating your cluster's current compliance with Pod Security. The Kubernetes Enhancement Proposal (KEP) hints at a future where baseline could be the default for unlabeled namespaces.
Example audit-policy.yaml configuration tuned for Pod Security events:
apiVersion: audit.k8s.io/v1
kind: Policy
rules:
- level: RequestResponse
resources:
- group: "" # core API group
resources: ["pods", "pods/ephemeralcontainers", "podtemplates", "replicationcontrollers"]
- group: "apps"
resources: ["daemonsets", "deployments", "replicasets", "statefulsets"]
- group: "batch"
resources: ["cronjobs", "jobs"]
verbs: ["create", "update"]
omitStages:
- "RequestReceived"
- "ResponseStarted"
- "Panic"
Once auditing is enabled, look at the configured local file if using --audit-log-path or the destination of a webhook if using --audit-webhook-config-file.
If using a file (--audit-log-path), run cat /PATH/TO/API/AUDIT.log | grep "is forbidden:" to see all rejected workloads audited.
PSP migrations
If you're already using PSP, SIG Auth has created a guide and published the steps to migrate off of PSP.
To summarize the process:
- Update all existing PSPs to be non-mutating
- Apply Pod Security policies in
warnorauditmode - Upgrade Pod Security policies to
enforcemode - Remove
PodSecurityPolicyfrom--enable-admission-plugins
Listed as "optional future extensions" and currently out of scope, SIG Auth has kicked around the idea of providing a tool to assist with migrations. More details in the KEP.
Wrap up
Pod Security is a promising new feature that provides an out-of-the-box way to allow users to improve the security posture of their workloads. Like any new enhancement that has matured to beta, we ask that you try it out, provide feedback, or share your experience via either raising a Github issue or joining SIG Auth community meetings. It's our hope that Pod Security will be deployed on every cluster in our ongoing pursuit as a community to make Kubernetes security a priority.
For a step by step guide on how to enable "baseline" Pod Security Standards with Pod Security Admission feature please refer to these dedicated tutorials that cover the configuration needed at cluster level and namespace level.
Additional resources
Kubernetes 1.23: Dual-stack IPv4/IPv6 Networking Reaches GA
"When will Kubernetes have IPv6?" This question has been asked with increasing frequency ever since alpha support for IPv6 was first added in k8s v1.9. While Kubernetes has supported IPv6-only clusters since v1.18, migration from IPv4 to IPv6 was not yet possible at that point. At long last, dual-stack IPv4/IPv6 networking has reached general availability (GA) in Kubernetes v1.23.
What does dual-stack networking mean for you? Let’s take a look…
Service API updates
Services were single-stack before 1.20, so using both IP families meant creating one Service per IP family. The user experience was simplified in 1.20, when Services were re-implemented to allow both IP families, meaning a single Service can handle both IPv4 and IPv6 workloads. Dual-stack load balancing is possible between services running any combination of IPv4 and IPv6.
The Service API now has new fields to support dual-stack, replacing the single ipFamily field.
- You can select your choice of IP family by setting
ipFamilyPolicyto one of three options: SingleStack, PreferDualStack, or RequireDualStack. A service can be changed between single-stack and dual-stack (within some limits). - Setting
ipFamiliesto a list of families assigned allows you to set the order of families used. clusterIPsis inclusive of the previousclusterIPbut allows for multiple entries, so it’s no longer necessary to run duplicate services, one in each of the two IP families. Instead, you can assign cluster IP addresses in both IP families.
Note that Pods are also dual-stack. For a given pod, there is no possibility of setting multiple IP addresses in the same family.
Default behavior remains single-stack
Starting in 1.20 with the re-implementation of dual-stack services as alpha, the underlying networking for Kubernetes has included dual-stack whether or not a cluster was configured with the feature flag to enable dual-stack.
Kubernetes 1.23 removed that feature flag as part of graduating the feature to stable. Dual-stack networking is always available if you want to configure it. You can set your cluster network to operate as single-stack IPv4, as single-stack IPv6, or as dual-stack IPv4/IPv6.
While Services are set according to what you configure, Pods default to whatever the CNI plugin sets. If your CNI plugin assigns single-stack IPs, you will have single-stack unless ipFamilyPolicy specifies PreferDualStack or RequireDualStack. If your CNI plugin assigns dual-stack IPs, pod.status.PodIPs defaults to dual-stack.
Even though dual-stack is possible, it is not mandatory to use it. Examples in the documentation show the variety possible in dual-stack service configurations.
Try dual-stack right now
While upstream Kubernetes now supports dual-stack networking as a GA or stable feature, each provider’s support of dual-stack Kubernetes may vary. Nodes need to be provisioned with routable IPv4/IPv6 network interfaces. Pods need to be dual-stack. The network plugin is what assigns the IP addresses to the Pods, so it's the network plugin being used for the cluster that needs to support dual-stack. Some Container Network Interface (CNI) plugins support dual-stack, as does kubenet.
Ecosystem support of dual-stack is increasing; you can create dual-stack clusters with kubeadm, try a dual-stack cluster locally with KIND, and deploy dual-stack clusters in cloud providers (after checking docs for CNI or kubenet availability).
Get involved with SIG Network
SIG-Network wants to learn from community experiences with dual-stack networking to find out more about evolving needs and your use cases. The SIG-network update video from KubeCon NA 2021 summarizes the SIG’s recent updates, including dual-stack going to stable in 1.23.
The current SIG-Network KEPs and issues on GitHub illustrate the SIG’s areas of emphasis. The dual-stack API server is one place to consider contributing.
SIG-Network meetings are a friendly, welcoming venue for you to connect with the community and share your ideas. Looking forward to hearing from you!
Acknowledgments
The dual-stack networking feature represents the work of many Kubernetes contributors. Thanks to all who contributed code, experience reports, documentation, code reviews, and everything in between. Bridget Kromhout details this community effort in Dual-Stack Networking in Kubernetes. KubeCon keynotes by Tim Hockin & Khaled (Kal) Henidak in 2019 (The Long Road to IPv4/IPv6 Dual-stack Kubernetes) and by Lachlan Evenson in 2021 (And Here We Go: Dual-stack Networking in Kubernetes) talk about the dual-stack journey, spanning five years and a great many lines of code.
Kubernetes 1.23: The Next Frontier
We’re pleased to announce the release of Kubernetes 1.23, the last release of 2021!
This release consists of 47 enhancements: 11 enhancements have graduated to stable, 17 enhancements are moving to beta, and 19 enhancements are entering alpha. Also, 1 feature has been deprecated.
Major Themes
Deprecation of FlexVolume
FlexVolume is deprecated. The out-of-tree CSI driver is the recommended way to write volume drivers in Kubernetes. See this doc for more information. Maintainers of FlexVolume drivers should implement a CSI driver and move users of FlexVolume to CSI. Users of FlexVolume should move their workloads to the CSI driver.
Deprecation of klog specific flags
To simplify the code base, several logging flags were marked as deprecated in Kubernetes 1.23. The code which implements them will be removed in a future release, so users of those need to start replacing the deprecated flags with some alternative solutions.
Software Supply Chain SLSA Level 1 Compliance in the Kubernetes Release Process
Kubernetes releases now generate provenance attestation files describing the staging and release phases of the release process. Artifacts are now verified as they are handed over from one phase to the next. This final piece completes the work needed to comply with Level 1 of the SLSA security framework (Supply-chain Levels for Software Artifacts).
IPv4/IPv6 Dual-stack Networking graduates to GA
IPv4/IPv6 dual-stack networking graduates to GA. Since 1.21, Kubernetes clusters have been enabled to support dual-stack networking by default. In 1.23, the IPv6DualStack feature gate is removed. The use of dual-stack networking is not mandatory. Although clusters are enabled to support dual-stack networking, Pods and Services continue to default to single-stack. To use dual-stack networking Kubernetes nodes must have routable IPv4/IPv6 network interfaces, a dual-stack capable CNI network plugin must be used, Pods must be configured to be dual-stack and Services must have their .spec.ipFamilyPolicy field set to either PreferDualStack or RequireDualStack.
HorizontalPodAutoscaler v2 graduates to GA
The HorizontalPodAutoscaler autoscaling/v2 stable API moved to GA in 1.23. The HorizontalPodAutoscaler autoscaling/v2beta2 API has been deprecated.
Generic Ephemeral Volume feature graduates to GA
The generic ephemeral volume feature moved to GA in 1.23. This feature allows any existing storage driver that supports dynamic provisioning to be used as an ephemeral volume with the volume’s lifecycle bound to the Pod. All StorageClass parameters for volume provisioning and all features supported with PersistentVolumeClaims are supported.
Skip Volume Ownership change graduates to GA
The feature to configure volume permission and ownership change policy for Pods moved to GA in 1.23. This allows users to skip recursive permission changes on mount and speeds up the pod start up time.
Allow CSI drivers to opt-in to volume ownership and permission change graduates to GA
The feature to allow CSI Drivers to declare support for fsGroup based permissions graduates to GA in 1.23.
PodSecurity graduates to Beta
PodSecurity moves to Beta. PodSecurity replaces the deprecated PodSecurityPolicy admission controller. PodSecurity is an admission controller that enforces Pod Security Standards on Pods in a Namespace based on specific namespace labels that set the enforcement level. In 1.23, the PodSecurity feature gate is enabled by default.
Container Runtime Interface (CRI) v1 is default
The Kubelet now supports the CRI v1 API, which is now the project-wide default.
If a container runtime does not support the v1 API, Kubernetes will fall back to the v1alpha2 implementation. There is no intermediate action required by end-users, because v1 and v1alpha2 do not differ in their implementation. It is likely that v1alpha2 will be removed in one of the future Kubernetes releases to be able to develop v1.
Structured logging graduate to Beta
Structured logging reached its Beta milestone. Most log messages from kubelet and kube-scheduler have been converted. Users are encouraged to try out JSON output or parsing of the structured text format and provide feedback on possible solutions for the open issues, such as handling of multi-line strings in log values.
Simplified Multi-point plugin configuration for scheduler
The kube-scheduler is adding a new, simplified config field for Plugins to allow multiple extension points to be enabled in one spot. The new multiPoint plugin field is intended to simplify most scheduler setups for administrators. Plugins that are enabled via multiPoint will automatically be registered for each individual extension point that they implement. For example, a plugin that implements Score and Filter extensions can be simultaneously enabled for both. This means entire plugins can be enabled and disabled without having to manually edit individual extension point settings. These extension points can now be abstracted away due to their irrelevance for most users.
CSI Migration updates
CSI Migration enables the replacement of existing in-tree storage plugins such as kubernetes.io/gce-pd or kubernetes.io/aws-ebs with a corresponding CSI driver.
If CSI Migration is working properly, Kubernetes end users shouldn’t notice a difference.
After migration, Kubernetes users may continue to rely on all the functionality of in-tree storage plugins using the existing interface.
- CSI Migration feature is turned on by default but stays in Beta for GCE PD, AWS EBS, and Azure Disk in 1.23.
- CSI Migration is introduced as an Alpha feature for Ceph RBD and Portworx in 1.23.
Expression language validation for CRD is alpha
Expression language validation for CRD is in alpha starting in 1.23. If the CustomResourceValidationExpressions feature gate is enabled, custom resources will be validated by validation rules using the Common Expression Language (CEL).
Server Side Field Validation is Alpha
If the ServerSideFieldValidation feature gate is enabled starting 1.23, users will receive warnings from the server when they send Kubernetes objects in the request that contain unknown or duplicate fields. Previously unknown fields and all but the last duplicate fields would be dropped by the server.
With the feature gate enabled, we also introduce the fieldValidation query parameter so that users can specify the desired behavior of the server on a per request basis. Valid values for the fieldValidation query parameter are:
- Ignore (default when feature gate is disabled, same as pre-1.23 behavior of dropping/ignoring unknown fields)
- Warn (default when feature gate is enabled).
- Strict (this will fail the request with an Invalid Request error)
OpenAPI v3 is Alpha
If the OpenAPIV3 feature gate is enabled starting 1.23, users will be able to request the OpenAPI v3.0 spec for all Kubernetes types. OpenAPI v3 aims to be fully transparent and includes support for a set of fields that are dropped when publishing OpenAPI v2: default, nullable, oneOf, anyOf. A separate spec is published per Kubernetes group version (at the $cluster/openapi/v3/apis/<group>/<version> endpoint) for improved performance and discovery, for all group versions can be found at the $cluster/openapi/v3 path.
Other Updates
Graduated to Stable
- IPv4/IPv6 Dual-Stack Support
- Skip Volume Ownership Change
- TTL After Finished Controller
- Config FSGroup Policy in CSI Driver object
- Generic Ephemeral Inline Volumes
- Defend Against Logging Secrets via Static Analysis
- Namespace Scoped Ingress Class Parameters
- Reducing Kubernetes Build Maintenance
- Graduate HPA API to GA
Major Changes
Release Notes
Check out the full details of the Kubernetes 1.23 release in our release notes.
Availability
Kubernetes 1.23 is available for download on GitHub. To get started with Kubernetes, check out these interactive tutorials or run local Kubernetes clusters using Docker container “nodes” with kind. You can also easily install 1.23 using kubeadm.
Release Team
This release was made possible by a very dedicated group of individuals, who came together as a team to deliver technical content, documentation, code, and a host of other components that go into every Kubernetes release.
A huge thank you to the release lead Rey Lejano for leading us through a successful release cycle, and to everyone else on the release team for supporting each other, and working so hard to deliver the 1.23 release for the community.
Release Theme and Logo
Kubernetes 1.23: The Next Frontier
"The Next Frontier" theme represents the new and graduated enhancements in 1.23, Kubernetes' history of Star Trek references, and the growth of community members in the release team.
Kubernetes has a history of Star Trek references. The original codename for Kubernetes within Google is Project 7, a reference to Seven of Nine from Star Trek Voyager. And of course Borg was the name for the predecessor to Kubernetes. "The Next Frontier" theme continues the Star Trek references. "The Next Frontier" is a fusion of two Star Trek titles, Star Trek V: The Final Frontier and Star Trek the Next Generation.
"The Next Frontier" represents a line in the SIG Release charter, "Ensure there is a consistent group of community members in place to support the release process across time." With each release team, we grow the community with new release team members and for many it's their first contribution in their open source frontier.
Reference: https://kubernetes.io/blog/2015/04/borg-predecessor-to-kubernetes/ Reference: https://github.com/kubernetes/community/blob/master/sig-release/charter.md
The Kubernetes 1.23 release logo continues with the theme's Star Trek reference. Every star is a helm from the Kubernetes logo. The ship represents the collective teamwork of the release team.
Rey Lejano designed the logo.
User Highlights
- Findings of the latest CNCF End User Technology Radar were themed around DevSecOps. Check out the Radar Page for the full details and findings.
- Learn about how end user Aegon Life India migrated core processes from its traditional monolith to a microservice-based architecture in its effort to transform into a leading digital service company.
- Utilizing multiple cloud native projects, Seagate engineered edgerX to run Real-time Analytics at the Edge.
- Check out how Zambon worked with SparkFabrik to develop 16 websites, with cloud native technologies, to enable stakeholders to easily update content while maintaining a consistent brand identity.
- Using Kubernetes, InfluxData was able to deliver on the promise of multi-cloud, multi-region service availability by creating a true cloud abstraction layer that allows for the seamless delivery of InfluxDB as a single application to multiple global clusters across three major cloud providers.
Ecosystem Updates
- KubeCon + CloudNativeCon NA 2021 was held in October 2021, both online and in person. All talks are now available on-demand for anyone that would like to catch up!
- Kubernetes and Cloud Native Essentials Training and KCNA Certification are now generally available for enrollment and scheduling. Additionally, a new online training course, Kubernetes and Cloud Native Essentials (LFS250), has been released to both prepare individuals for entry-level cloud roles and to sit for the KCNA exam.
- New resources are now available from the Inclusive Naming Initiative, including an Inclusive Strategies for Open Source (LFC103) course, Language Evaluation Framework, and Implementation Path.
Project Velocity
The CNCF K8s DevStats project aggregates a number of interesting data points related to the velocity of Kubernetes and various sub-projects. This includes everything from individual contributions to the number of companies that are contributing, and is an illustration of the depth and breadth of effort that goes into evolving this ecosystem.
In the v1.23 release cycle, which ran for 16 weeks (August 23 to December 7), we saw contributions from 1032 companies and 1084 individuals.
Event Update
- KubeCon + CloudNativeCon China 2021 is happening this month from December 9 - 11. After taking a break last year, the event will be virtual this year and includes 105 sessions. Check out the event schedule here.
- KubeCon + CloudNativeCon Europe 2022 will take place in Valencia, Spain, May 4 – 7, 2022! You can find more information about the conference and registration on the event site.
- Kubernetes Community Days has upcoming events scheduled in Pakistan, Brazil, Chengdu, and in Australia.
Upcoming Release Webinar
Join members of the Kubernetes 1.23 release team on January 4, 2022 to learn about the major features of this release, as well as deprecations and removals to help plan for upgrades. For more information and registration, visit the event page on the CNCF Online Programs site.
Get Involved
The simplest way to get involved with Kubernetes is by joining one of the many Special Interest Groups (SIGs) that align with your interests. Have something you’d like to broadcast to the Kubernetes community? Share your voice at our weekly community meeting, and through the channels below:
- Find out more about contributing to Kubernetes at the Kubernetes Contributors website
- Follow us on Twitter @Kubernetesio for the latest updates
- Join the community discussion on Discuss
- Join the community on Slack
- Post questions (or answer questions) on Stack Overflow
- Share your Kubernetes story
- Read more about what’s happening with Kubernetes on the blog
- Learn more about the Kubernetes Release Team
Contribution, containers and cricket: the Kubernetes 1.22 release interview
The Kubernetes release train rolls on, and we look ahead to the release of 1.23 next week. As is our tradition, I'm pleased to bring you a look back at the process that brought us the previous version.
The release team for 1.22 was led by Savitha Raghunathan, who was, at the time, a Senior Platform Engineer at MathWorks. I spoke to Savitha on the Kubernetes Podcast from Google, the weekly
Our release conversations shine a light on the team that puts together each Kubernetes release. Make sure you subscribe, wherever you get your podcasts so you catch the story of 1.23.
And in case you're interested in why the show has been on a hiatus the last few weeks, all will be revealed in the next episode!
This transcript has been lightly edited and condensed for clarity.
CRAIG BOX: Welcome to the show, Savitha.
SAVITHA RAGHUNATHAN: Hey, Craig. Thanks for having me on the show. How are you today?
CRAIG BOX: I'm very well, thank you. I've interviewed a lot of people on the show, and you're actually the first person who's asked that of me.
SAVITHA RAGHUNATHAN: I'm glad. It's something that I always do. I just want to make sure the other person is good and happy.
CRAIG BOX: That's very kind of you. Thank you for kicking off on a wonderful foot there. I want to ask first of all — you grew up in Chennai. My association with Chennai is the Super Kings cricket team. Was cricket part of your upbringing?
SAVITHA RAGHUNATHAN: Yeah. Actually, a lot. My mom loves watching cricket. I have a younger brother, and when we were growing up, we used to play cricket on the terrace. Everyone surrounding me, my best friends — and even now, my partner — loves watching cricket, too. Cricket is a part of my life.
I stopped watching it a while ago, but I still enjoy a good game.
CRAIG BOX: It's probably a bit harder in the US. Everything's in a different time zone. I find, with my cricket team being on the other side of the world, that it's a lot easier when they're playing near me, as opposed to trying to keep up with what they're doing when they're playing at 3:00 in the morning.
SAVITHA RAGHUNATHAN: That is actually one of the things that made me lose touch with cricket. I'm going to give you a piece of interesting information. I never supported Chennai Super Kings. I always supported Royal Challengers of Bangalore.
I once went to the stadium, and it was a match between the Chennai Super Kings and the RCB. I was the only one who was cheering whenever the RCB hit a 6, or when they were scoring. I got the stares of thousands of people looking at me. I'm like, "what are you doing?" My friends are like, "you're going to get us killed! Just stop screaming!"
CRAIG BOX: I hear you. As a New Zealander in the UK, there are a lot of international cricket matches I've been to where I am one of the few people dressed in the full beige kit. But I have to ask, why an affiliation with a different team?
SAVITHA RAGHUNATHAN: I'm not sure. When the IPL came out, I really liked Virat Kohli. He was playing for RCB at that time, and I think pretty much that's it.
CRAIG BOX: Well, what I know about the Chennai Super Kings is that their coach is New Zealand's finest batsmen and air conditioning salesman, Stephen Fleming.
SAVITHA RAGHUNATHAN: Oh, really?
CRAIG BOX: Yeah, he's a dead ringer for the guy who played the yellow Wiggle back in the day.
SAVITHA RAGHUNATHAN: Oh, interesting. I remember the name, but I cannot put the picture and the name together. I stopped watching cricket once I moved to the States. Then, all my focus was on studies and extracurriculars. I have always been an introvert. The campus — it was a new thing for me — they had international festivals.
And every week, they'd have some kind of new thing going on, so I'd go check them out. I wouldn't participate, but I did go out and check them out. That was a big feat for me around that time because a lot of people — and still, even now, a lot of people — they kind of scare me. I don't know how to make a conversation with everyone.
I'll just go and say, "hi, how are you? OK, I'm good. I'm just going to move on". And I'll just go to the next person. And after two hours, I'm out of that place.
CRAIG BOX: Perhaps a pleasant side effect of the last 12 months — a lot fewer gatherings of people.
SAVITHA RAGHUNATHAN: Could be that, but I'm so excited about KubeCon. But when I think about it, I'm like "oh my God. There's going to be a lot of people. What am I going to do? I'm going to meet all my friends over there".
Sometimes I have social anxiety like, what's going to happen?
CRAIG BOX: What's going to happen is you're going to ask them how they are at the beginning, and they're immediately going to be set at ease.
SAVITHA RAGHUNATHAN: laughs I hope so.
CRAIG BOX: Let's talk a little bit, then, about your transition from India to the US. You did your undergraduate degree in computer science at the SSN College of Engineering. How did you end up at Arizona State?
SAVITHA RAGHUNATHAN: I always wanted to pursue higher studies when I was in India, and I didn't have the opportunity immediately. Once I graduated from my school there, I went and I worked for a couple of years. My aim was always to get out of there and come here, do my graduate studies.
Eventually, I want to do a PhD. I have an idea of what I want to do. I always wanted to keep studying. If there's an option that I could just keep studying and not do work or anything of that sort, I'd just pick that other one — I'll just keep studying.
But unfortunately, you need money and other things to live and sustain in this world. So I'm like, OK, I'll take a break from studies, and I will work for a while.
CRAIG BOX: The road to success is littered with dreams of PhDs. I have a lot of friends who thought that that was the path they were going to take, and they've had a beautiful career and probably aren't going to go back to study. Did you use the Matlab software at all while you were going through your schooling?
SAVITHA RAGHUNATHAN: No, unfortunately. That is a question that everyone asks. I have not used Matlab. I haven't used it even now. I don't use it for work. I didn't have any necessity for my school work. I didn't have anything to do with Matlab. I never analysed, or did data processing, or anything, with Matlab. So unfortunately, no.
Everyone asks me like, you're working at MathWorks. Have you used Matlab? I'm like, no.
CRAIG BOX: Fair enough. Nor have I. But it's been around since the late 1970s, so I imagine there are a lot of people who will have come across it at some point. Do you work with a lot of people who have been working on it that whole time?
SAVITHA RAGHUNATHAN: Kind of. Not all the time, but I get to meet some folks who work on the product itself. Most of my interactions are with the infrastructure team and platform engineering teams at MathWorks. One other interesting fact is that when I joined the company — MathWorks has an extensive internal curriculum for training and learning, which I really love. They have an "Intro to Matlab" course, and that's on my bucket of things to do.
It was like 500 years ago. I added it, and I never got to it. I'm like, OK, maybe this year at least I want to get to it and I want to learn something new. My partner used Matlab extensively. He misses it right now at his current employer. And he's like, "you have the entire licence! You have access to the entire suite and you haven't used it?" I'm like, "no!"
CRAIG BOX: Well, I have bad news for the idea of you doing a PhD, I'm sorry.
SAVITHA RAGHUNATHAN: Another thing is that none of my family knew about the company MathWorks and Matlab. The only person who knew was my younger brother. He was so proud. He was like, "oh my God".
When he was 12 years old, he started getting involved in robotics and all that stuff. That's how he got introduced to Matlab. He goes absolutely bananas for the swag. So all the t-shirts, all the hoodies — any swag that I get from MathWorks goes to him, without saying.
Over the five, six years, the things that I've got — there was only one sweatshirt that I kept for myself. Everything else I've just given to him. And he cherishes it. He's the only one in my family who knew about Matlab and MathWorks.
Now, everyone knows, because I'm working there. They were initially like, I don't even know that company name. Is it like Amazon? I'm like, no, we make software that can send people to the moon. And we also make software that can do amazing robotic surgeries and even make a car drive on its own. That's something that I take immense pride in.
I know I don't directly work on the product, but I'm enabling the people who are creating the product. I'm really, really proud of that.
CRAIG BOX: I think Jeff Bezos is working on at least two out of three of those disciplines that you mentioned before, so it's maybe a little bit like Amazon. One thing I've always thought about Matlab is that, because it's called Matlab, it solves that whole problem where Americans call it math, and the rest of the world call it maths. Why do Americans think there's only one math?
SAVITHA RAGHUNATHAN: Definitely. I had trouble — growing up in India, it's always British English. And I had so much trouble when I moved here. So many things changed.
One of the things is maths. I always got used to writing maths, physics, and everything.
CRAIG BOX: They don't call it "physic" in the US, do they?
SAVITHA RAGHUNATHAN: No, no, they don't. Luckily, they don't. That still stays "physics". But math — I had trouble. It's maths. Even when you do the full abbreviations like mathematics and you are still calling it math, I'm like, mm.
CRAIG BOX: They can do the computer science abbreviation thing and call it math-7-S or whatever the number of letters is.
SAVITHA RAGHUNATHAN: Just like Kubernetes. K-8-s.
CRAIG BOX: Your path to Kubernetes is through MathWorks. They started out as a company making software which was distributed in a physical sense — boxed copies, if you will. I understand now there is a cloud version. Can I assume that that is where the two worlds intersect?
SAVITHA RAGHUNATHAN: Kind of. I have interaction with the team that supports Matlab on the cloud, but I don't get to work with them on a day-to-day basis. They use Docker containers, and they are building the platform using Kubernetes. So yeah, a little bit of that.
CRAIG BOX: So what exactly is the platform that you are engineering day to day?
SAVITHA RAGHUNATHAN: Providing Kubernetes as a platform, obviously — that goes without saying — to some of the internal development teams. In the future we might expand it to more teams within the company. That is a focus area right now, so that's what we are doing. In the process, we might even get to work with the people who are deploying Matlab on the cloud, which is exciting.
CRAIG BOX: Now, your path to contribution to Kubernetes, you've said before, was through fixing a 404 error on the Kubernetes.io website. Do you remember what the page was?
SAVITHA RAGHUNATHAN: I do. I was going to something for work, and I came across this changelog. In Kubernetes there's a nice page — once you got to the release page, there would be a long list of changelogs.
One of the things that I fixed was, the person who worked on the feature had changed their GitHub handle, and that wasn't reflected on this page. So that was my first. I got curious and clicked on the links. One of the links was the handle, and that went to a 404. And I was like "Yeah, I'll just fix that. They have done all the hard work. They can get the credit that's due".
It was easy. It wasn't overwhelming for me to pick it up as my first issue. Before that I logged on around Kubernetes for about six to eight months without doing anything because it was just a lot.
CRAIG BOX: One of the other things that you said about your initial contribution is that you had to learn how to use Git. As a very powerful tool, I find Git is a high barrier to entry for even contributing code to a project. When you want to contribute a blog post or documentation or a fix like you did before, I find it almost impossible to think how a new user would come along and do that. What was your process? Do you think that there's anything we can do to make that barrier lower for new contributors?
SAVITHA RAGHUNATHAN: Of course. There are more and more tutorials available these days. There is a new contributor workshop. They actually have a GitHub workflow section, how to do a pull request and stuff like that. I know a couple of folks from SIG Docs that are working on which Git commands that you need, or how to get to writing something small and getting it committed. But more tutorials or more links to intro to Git would definitely help.
The thing is also, someone like a documentation writer — they don't actually want to know the entirety of Git. Honestly, it's an ocean. I don't know how to do it. Most of the time, I still ask for help even though I work with Git on a day to day basis. There are several articles and a lot of help is available already within the community. Maybe we could just add a couple more to kubernetes.dev. That is an amazing site for all the new contributors and existing contributors who want to build code, who want to write documentation.
We could just add a tutorial there like, "hey, don't know Git, you are new to Git? You just need to know these main things".
CRAIG BOX: I find it a shame, to be honest, that people need to use Git for that, by comparison to Wikipedia where you can come along, and even though it might be written in Markdown or something like it, it seems like the barrier is a lot lower. Similar to you, I always have to look up anything more complicated than the five or six Git commands that I use on a day to day basis. Even to do simple things, I basically just go and follow a recipe which I find on the internet.
SAVITHA RAGHUNATHAN: This is how I got introduced to one of the amazing mentors in Kubernetes. Everyone knows him by his handle, Dims. It was my second PR to the Kubernetes website, and I made a mistake. I destroyed the Git history. I could not push my reviews and comments — I addressed them. I couldn't push them back.
My immediate thought was to delete it and recreate, do another pull request. But then I was like, "what happens to others who have already put effort into reviewing them?" I asked for help, and Dims was there.
I would say I just got lucky he was there. And he was like, "OK, let me walk you through". We did troubleshooting through Slack messages. I copied and pasted all the errors. Every single command that he said, I copied and pasted. And then he was like, "OK, run this one. Try this one. And do this one".
Finally, I got it fixed. So you know what I did? I went and I stored the command history somewhere local for the next time when I run into this problem. Luckily, I haven't. But I find the contributors so helpful. They are busy. They have a lot of things to do, but they take moments to stop and help someone who's new.
That is also another part of the reason why I stay — I want to contribute more. It's mainly the community. It's the Kubernetes community. I know you asked me about Git, and I just took the conversation to the Kubernetes community. That's how my brain works.
CRAIG BOX: A lot of people in the community do that and think that's fantastic, obviously, people like Dims who are just floating around on Slack and seem to have endless time. I don't know how they do it.
SAVITHA RAGHUNATHAN: I really want to know the secret for endless time. If I only had 48 hours in a day. I would sleep for 16 hours, and I would use the rest of the time for doing the things that I want.
CRAIG BOX: If I had a chance to sleep up to 48 hours a day, I think it'd be a lot more than 16.
Now, one of the areas that you've been contributing to Kubernetes is in the release team. In 1.18, you were a shadow for the docs role. You led that role in 1.19. And you were a release lead shadow for versions 1,20 and 1.21 before finally leading this release, 1.22, which we will talk about soon.
How did you get involved? And how did you decide which roles to take as you went through that process?
SAVITHA RAGHUNATHAN: That is a topic I love to talk about. This was fresh when I started learning about Kubernetes and using Kubernetes at work. And I got so much help from the community, I got interested in contributing back.
At the first KubeCon that I attended in 2018, in Seattle, they had a speed mentoring session. Now they call it "pod mentoring". I went to the session, and said, "hey, I want to contribute. I don't know where to start". And I got a lot of information on how to get started.
One of the places was SIG Release and the release team. I came back and diligently attended all the SIG Release meetings for four to six months. And in between, I applied to the Kubernetes release team — 1.14 and 1.15. I didn't get through. So I took a little bit of a break, and I focused on doing some documentation work. Then I applied for 1.18.
Since I was already working on some kinds of — not like full fledged "documentation" documentation, I still don't write. I eventually want to write something really nice and full fledged documentation like other awesome folks.
CRAIG BOX: You'll need a lot more than 48 hours in your day to do that.
SAVITHA RAGHUNATHAN: laughing That's how I applied for the docs role, because I know a little bit about the website. I've done a few pull requests and commits. That's how I got started. I applied for that one role, and I got selected for the 1.18 team. That's how my journey just took off.
And the next release, I was leading the documentation team. And as everyone knows, the pandemic hit. It was one of the longest releases. I could lean back on the community. I would just wait for the release team meetings.
It was my way of coping with the pandemic. It took my mind off. It was actually more than a release team, they were people. They were all people first, and we took care of each other. So it felt good.
And then, I became a release lead shadow for 1.20 and 1.21 because I wanted to know more. I wanted to learn more. I wasn't ready. I still don't feel ready, but I have led 1.22. So if I could do it, anyone could do it.
CRAIG BOX: How much of this work is day job?
SAVITHA RAGHUNATHAN: I am lucky to be blessed with an awesome team. I do most of my work after work, but there have been times where I have to take meetings and attend to immediate urgent stuff. During the time of exception requests and stuff like that, I take a little bit of time from my work.
My team has been wonderful: they support me in all possible ways, and the management as well. Other than the meetings, I don't do much of the work during the day job. It just takes my focus and attention away too much, and I end up having to spend a lot of time sitting in front of the computer, which I don't like.
Before the pandemic I had a good work life balance. I'd just go to work at 7:00, 7:30, and I'd be back by 4 o'clock. I never touched my laptop ever again. I left all work behind when I came home. So right now, I'm still learning how to get through.
I try to limit the amount of open source work that I do during work time. The release lead shadow and the release lead job — they require a lot of time, effort. So on average, I'd be spending two to three hours post work time on the release activities.
CRAIG BOX: Before the pandemic, everyone was worried that if we let people work from home, they wouldn't work enough. I think the opposite has actually happened, is that now we're worried that if we let people work from home, they will just get on the computer in the morning and you'll have to pry it out of their hands at midnight.
SAVITHA RAGHUNATHAN: Yeah, I think the productivity has increased at least twofold, I would say, for everyone, once they started working from home.
CRAIG BOX: But at the expense of work-life balance, though, because as you say, when you're sitting in the same chair in front of, perhaps, the same computer doing your MathWorks work and then your open source work, they kind of can blur into one perhaps?
SAVITHA RAGHUNATHAN: That is a challenge. I face it every day. But so many others are also facing it. I implemented a few little tricks to help me. When I used to come back home from work, the first thing I would do is remove my watch. That was an indication that OK, I'm done.
That's the thing that I still do. I just remove my watch, and I just keep it right where my workstation is. And I just close the door so that I never look back. Even going past the room, I don't get a glimpse of my work office. I start implementing tiny little things like that to avoid burnout.
I think I'm still facing a little bit of burnout. I don't know if I have fully recovered from it. I constantly feel like I need a vacation. And I could just take a vacation for like a month or two. If it's possible, I will just do it.
CRAIG BOX: I do hope that travel opens up for everyone as an opportunity because I know that, for a lot of people, it's not so much they've been working from home but they've been living at work. The idea of taking vacation effectively means, well, I've been stuck in the same place, if I've been under a lockdown. It's hard to justify that. It will be good as things improve worldwide for us to be able to start focusing more on mental health and perhaps getting away from the "everything room," as I sometimes call it.
SAVITHA RAGHUNATHAN: I'm totally looking forward to it. I hope that travel opens up and I could go home and I could meet my siblings and my aunt and my parents.
CRAIG BOX: Catch a cricket match?
SAVITHA RAGHUNATHAN: Yeah. Probably yes, if I have company and if there is anything interesting happening around the time. I don't mind going back to the Chepauk Stadium and catching a match or two.
CRAIG BOX: Let's turn now to the recently released Kubernetes 1.22. Congratulations on the launch.
SAVITHA RAGHUNATHAN: Thank you.
CRAIG BOX: Each launch comes with a theme and a mascot or a logo. What is the theme for this release?
SAVITHA RAGHUNATHAN: The theme for the release is reaching new peaks. I am fascinated with a lot of space travel and chasing stars, the Milky Way. The best place to do that is over the top of a mountain. So that is the release logo, basically. It's a mountain — Mount Rainier. On top of that, there is a Kubernetes flag, and it's overlooking the Milky Way.
It's also symbolic that with every release, that we are achieving something new, bigger, and better, and we are making the release awesome. So I just wanted to incorporate that into the team as to say, we are achieving new things with every release. That's the "reaching new peaks" theme.
CRAIG BOX: The last couple of releases have both been incrementally larger — as a result, perhaps, of the fact there are now only three releases per year rather than four. There were also changes to the process, where the work has been driven a lot more by the SIGs than by the release team having to go and ask the SIGs what was going on. What can you say about the size and scope of the 1.22 release?
SAVITHA RAGHUNATHAN: The 1.22 release is the largest release to date. We have 56 enhancements if I'm not wrong, and we have a good amount of features that's graduated as stable. You can now say that Kubernetes as a project has become more mature because you see new features coming in. At the same time, you see the features that weren't used getting deprecated — we have like three deprecations in this release.
Aside from that fact, we also have a big team that's supporting one of the longest releases. This is the first official release cycle after the cadence KEP got approved. Officially, we are at four months, even though 1.19 was six months, and 1.21 was like 3 and 1/2 months, I think, this is the first one after the official KEP approval.
CRAIG BOX: What changes did you make to the process knowing that you had that extra month?
SAVITHA RAGHUNATHAN: One of the things the community had asked for is more time for development. We tried to incorporate that in the release schedule. We had about six weeks between the enhancements freeze and the code freeze. That's one.
It might not be visible to everyone, but one of the things that I wanted to make sure of was the health of the team — since it was a long, long release, we had time to plan out, and not have everyone work during the weekends or during their evenings or time off. That actually helped everyone keep their sanity, and also in making good progress and delivering good results at the end of the release. That's one of the process improvements that I'd call out.
We got better by making a post during the exception request process. Everyone works around the world. People from the UK start a little earlier than the people in the US East Coast. The West Coast starts three hours later than the East Coast. We used to make a post every Friday evening saying "hey, we actually received this many requests. We have addressed a number of them. We are waiting on a couple, or whatever. All the release team members are done for the day. We will see you around on Monday. Have a good weekend." Something like that.
We set the expectations from the community as well. We understand things are really important and urgent, but we are done. This gave everyone their time back. They don't have to worry over the weekend thinking like, hey, what's happening? What's happening in the release? They could spend time with their family, or they could do whatever they want to do, like go on a hike, or just sit and watch TV.
There have been weekends that I just did that. I just binge-watched a series. That's what I did.
CRAIG BOX: Any recommendations?
SAVITHA RAGHUNATHAN: I'm a big fan of Marvel, so I have watched the new Loki, which I really love. Loki is one of my favourite characters in Marvel. And I also liked WandaVision. That was good, too.
CRAIG BOX: I've not seen Loki yet, but I've heard it described as the best series of Doctor Who in the last few years.
SAVITHA RAGHUNATHAN: Really?
CRAIG BOX: There must be an element of time-travelling in there if that's how people are describing it.
SAVITHA RAGHUNATHAN: You should really go and watch it whenever you have time. It's really amazing. I might go back and watch it again because I might have missed bits and pieces. That always happens in Marvel movies and the episodes; you need to watch them a couple of times to catch, "oh, this is how they relate".
CRAIG BOX: Yes, the mark of good media that you want to immediately go back and watch it again once you've seen it.
Let's look now at some of the new features in Kubernetes 1.22. A couple of things that have graduated to general availability — server-side apply, external credential providers, a couple of new security features — the replacement for pod security policy has been announced, and seccomp is now available by default.
Do you have any favourite features in 1.22 that you'd like to discuss?
SAVITHA RAGHUNATHAN: I have a lot of them. All my favourite features are related to security. OK, one of them is not security, but a major theme of my favourite KEPs is security. I'll start with the default seccomp. I think it will help make clusters secure by default, and may assist in preventing more vulnerabilities, which means less headaches for the cluster administrators.
This is close to my heart because the base of the MathWorks platform is provisioning Kubernetes clusters. Knowing that they are secure by default will definitely provide me with some good sleep. And also, I'm paranoid about security most of the time. I'm super interested in making everything secure. It might get in the way of making the users of the platform angry because it's not usable in any way.
My next one is rootless Kubelet. That feature's going to enable the cluster admin, the platform developers to deploy Kubernetes components to run in a user namespace. And I think that is also a great addition.
Like you mention, the most awaited drop in for the PSP replacement is here. It's pod admission control. It lets cluster admins apply the pod security standards. And I think it's just not related to the cluster admins. I might have to go back and check on that. Anyone can probably use it — the developers and the admins alike.
It also supports various modes, which is most welcome. There are times where you don't want to just cut the users off because they are trying to do something which is not securely correct. You just want to warn them, hey, this is what you are doing. This might just cause a security issue later, so you might want to correct it. But you just don't want to cut them off from using the platform, or them trying to attempt to do something — deploy their workload and get their day-to-day job done. That is something that I really like, that it also supports a warning mechanism.
Another one which is not security is node swap support. Kubernetes didn't have support for swap before, but it is taken into consideration now. This is an alpha feature. With this, you can take advantage of the swap, which is provisioned on the Linux VMs.
Some of the workloads — when they are deployed, they might need a lot of swap for the start-up — example, like Node and Java applications, which I just took out of their KEP user stories. So if anyone's interested, they can go and look in the KEP. That's useful. And it also increases the node stability and whatnot. So I think it's going to be beneficial for a lot of folks.
We know how Java and containers work. I think it has gotten better, but five years ago, it was so hard to get a Java application to fit in a small container. It always needed a lot of memory, swap, and everything to start up and run. I think this will help the users and help the admins and keep the cost low, and it will tie into so many other things as well. I'm excited about that feature.
Another feature that I want to just call out — I don't use Windows that much, but I just want to give a shout out to the folks who are doing an amazing job bringing all the Kubernetes features to Windows as well, to give a seamless experience.
One of the things is Windows privileged containers. I think it went alpha this release. And that is a wonderful addition, if you ask me. It can take advantage of whatever that's happening on the Linux side. And they can also port it over and see, OK, I can now run Windows containers in a privileged mode.
So whatever they are trying to achieve, they can do it. So that's a noteworthy mention. I need to give a shout out for the folks who work and make things happen in the Windows ecosystem as well.
CRAIG BOX: One of the things that's great about the release process is the continuity between groups and teams. There's always an emeritus advisor who was a lead from a previous release. One thing that I always ask when I do these interviews is, what is the advice that you give to the next person? When we talked to Nabarun for the 1.21 interview, he said that his advice to you would be "do, delegate, and defer". Figure out what you can do, figure out what you can ask other people to do, and figure out what doesn't need to be done. Were you able to take that advice on board?
SAVITHA RAGHUNATHAN: Yeah, you won't believe it. I have it right here stuck to my monitor.
CRAIG BOX: Next to your Git cheat sheet?
SAVITHA RAGHUNATHAN: laughs Absolutely. I just have it stuck there. I just took a look at it.
CRAIG BOX: Someone that you will have been able to delegate and defer to is Rey Lejano from Rancher Labs and SUSE, who is the release lead to be for 1.23.
SAVITHA RAGHUNATHAN: I want to tell Rey to beware of the team's mental health. Schedule in such a way that it avoids burnout. Check in, and make sure that everyone is doing good. If they need some kind of help, create a safe space where they can actually ask for help, if they want to step back, if they need someone to cover.
I think that is most important. The releases are successful based on the thousands and thousands of contributors. But when it comes to a release team, you need to have a healthy team where people feel they are in a good place and they just want to make good contributions, which means they want to be heard. That's one thing that I want to tell Rey.
Also collaborate and learn from each other. I constantly learn. I think the team was 39 folks, including me. Every day I learned something or the other, even starting from how to interact.
Sometimes I have learned more leadership skills from my release lead shadows. They are awesome, and they are mature. I constantly learn from them, and I admire them a lot.
It also helps to have good, strong individuals in the team who can step up and help when needed. For example, unfortunately, we lost one of our teammates after the start of the release cycle. That was tragic. His name was Peeyush Gupta. He was an awesome and wonderful human — very warm.
I didn't get more of a chance to interact with him. I had exchanged a few Slack messages, but I got his warm personality. I just want to take a couple of seconds to remember him. He was awesome.
After we lost him, we had this strong person from the team step up and lead the communications, who had never been a part of the release team before at all. He was a shadow for the first time. His name is Jesse Butler. So he stepped up, and he just took it away. He ran the comms show for 1.22.
That's what the community is about. You take care of team members, and the team will take care of you. So that's one other thing that I want to let Rey know, and maybe whoever — I think it's applicable overall.
CRAIG BOX: There's a link to a family education fund for Peeyush Gupta, which you can find in the show notes.
Five releases in a row now you've been a member of the release team. Will you be putting your feet up now for 1.23?
SAVITHA RAGHUNATHAN: I am going to take a break for a while. In the future, I want to be contributing, if not the release team, the SIG Release and the release management effort. But right now, I have been there for five releases. And I feel like, OK, I just need a little bit of fresh air.
And also the pandemic and the burnout has caught up, so I'm going to take a break from certain contributions. You will see me in the future. I will be around, but I might not be actively participating in the release team activities. I will be around the community. Anyone can reach out to me. They all know my Slack, so they can just reach out to me via Slack or Twitter.
CRAIG BOX: Yes, your Twitter handle is CoffeeArtGirl. Does that mean that you'll be spending some time working on your lattes?
SAVITHA RAGHUNATHAN: I am very bad at making lattes. The coffee art means that I used to make art with coffee. You get instant coffee powder and just mix it with water. You get the colours, very beautiful brown colours. I used to make art using that.
And I love coffee. So I just combined all the words together. And I had to come up with it in a span of one hour or so because I was joining this 'meet our contributors' panel. And Paris asked me, "do you have a Twitter handle?" I was planning to create one, but I didn't have the time.
I'm like, well, let me just think what I could just come up with real quick. So I just came up with that. So that's the story behind my Twitter handle. Everyone's interested in it. You are not the first person you have asked me or mentioned about it. So many others are like, why coffee art?
CRAIG BOX: And you are also interested in art with perhaps other materials?
SAVITHA RAGHUNATHAN: Yes. My interests keep changing. I used to do pebble art. It's just collecting pebbles from wherever I go, and I used to paint on them. I used to use watercolour, but I want to come back to watercolour sometime.
My recent interests are coloured pencils, which came back. When I was very young, I used to do a lot of coloured pencils. And then I switched to watercolours and oil painting. So I just go around in circles.
One of the hobbies that I picked up during a pandemic is crochet. I made a scarf for Mother's Day. My mum and my dad were here last year. They got stuck because of the pandemic, and they couldn't go back home. So they stayed with me for 10 months. That is the jackpot that I had, that I got to spend so much time with my parents after I moved to the US.
CRAIG BOX: And they got rewarded with a scarf.
SAVITHA RAGHUNATHAN: Yeah.
CRAIG BOX: One to share between them.
SAVITHA RAGHUNATHAN: I started making a blanket for my dad. And it became so heavy, I might have to just pick up some lighter yarn. I still don't know the differences between different kinds of yarns, but I'm getting better.
I started out because I wanted to make these little toys. They call them amigurumi in the crochet world. I wanted to make them. That's why I started out. I'm trying. I made a little cat which doesn't look like a cat, but it is a cat. I have to tell everyone that it's a cat so that they don't mock me later, but.
CRAIG BOX: It's an artistic interpretation of a cat.
SAVITHA RAGHUNATHAN: It definitely is!
Savitha Raghunathan, now a Senior Software Engineer at Red Hat, served as the Kubernetes 1.22 release team lead.
You can find the Kubernetes Podcast from Google at @KubernetesPod on Twitter, and you can subscribe so you never miss an episode.
Quality-of-Service for Memory Resources
Kubernetes v1.22, released in August 2021, introduced a new alpha feature that improves how Linux nodes implement memory resource requests and limits.
In prior releases, Kubernetes did not support memory quality guarantees. For example, if you set container resources as follows:
apiVersion: v1
kind: Pod
metadata:
name: example
spec:
containers:
- name: nginx
resources:
requests:
memory: "64Mi"
cpu: "250m"
limits:
memory: "64Mi"
cpu: "500m"
spec.containers[].resources.requests(e.g. cpu, memory) is designed for scheduling. When you create a Pod, the Kubernetes scheduler selects a node for the Pod to run on. Each node has a maximum capacity for each of the resource types: the amount of CPU and memory it can provide for Pods. The scheduler ensures that, for each resource type, the sum of the resource requests of the scheduled Containers is less than the capacity of the node.
spec.containers[].resources.limits is passed to the container runtime when the kubelet starts a container. CPU is considered a "compressible" resource. If your app starts hitting your CPU limits, Kubernetes starts throttling your container, giving your app potentially worse performance. However, it won’t be terminated. That is what "compressible" means.
In cgroup v1, and prior to this feature, the container runtime never took into account and effectively ignored spec.containers[].resources.requests["memory"]. This is unlike CPU, in which the container runtime consider both requests and limits. Furthermore, memory actually can't be compressed in cgroup v1. Because there is no way to throttle memory usage, if a container goes past its memory limit it will be terminated by the kernel with an OOM (Out of Memory) kill.
Fortunately, cgroup v2 brings a new design and implementation to achieve full protection on memory. The new feature relies on cgroups v2 which most current operating system releases for Linux already provide. With this experimental feature, quality-of-service for pods and containers extends to cover not just CPU time but memory as well.
How does it work?
Memory QoS uses the memory controller of cgroup v2 to guarantee memory resources in Kubernetes. Memory requests and limits of containers in pod are used to set specific interfaces memory.min and memory.high provided by the memory controller. When memory.min is set to memory requests, memory resources are reserved and never reclaimed by the kernel; this is how Memory QoS ensures the availability of memory for Kubernetes pods. And if memory limits are set in the container, this means that the system needs to limit container memory usage, Memory QoS uses memory.high to throttle workload approaching it's memory limit, ensuring that the system is not overwhelmed by instantaneous memory allocation.
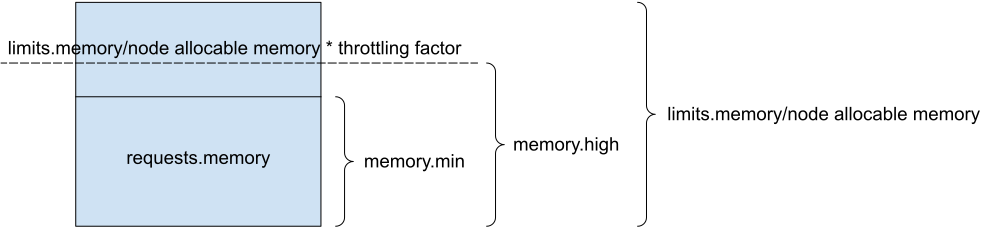
The following table details the specific functions of these two parameters and how they correspond to Kubernetes container resources.
| File | Description |
|---|---|
| memory.min | memory.min specifies a minimum amount of memory the cgroup must always retain, i.e., memory that can never be reclaimed by the system. If the cgroup's memory usage reaches this low limit and can’t be increased, the system OOM killer will be invoked.We map it to the container's memory request |
| memory.high | memory.high is the memory usage throttle limit. This is the main mechanism to control a cgroup's memory use. If a cgroup's memory use goes over the high boundary specified here, the cgroup’s processes are throttled and put under heavy reclaim pressure. The default is max, meaning there is no limit.We use a formula to calculate memory.high, depending on container's memory limit or node allocatable memory (if container's memory limit is empty) and a throttling factor. Please refer to the KEP for more details on the formula. |
When container memory requests are made, kubelet passes memory.min to the back-end CRI runtime (possibly containerd, cri-o) via the Unified field in CRI during container creation. The memory.min in container level cgroup will be set to:

i: the ith container in one pod
Since the memory.min interface requires that the ancestor cgroup directories are all set, the pod and node cgroup directories need to be set correctly.
memory.min in pod level cgroup:
i: the ith container in one pod
memory.min in node level cgroup:
i: the ith pod in one node, j: the jth container in one pod
Kubelet will manage the cgroup hierarchy of the pod level and node level cgroups directly using runc libcontainer library, while container cgroup limits are managed by the container runtime.
For memory limits, in addition to the original way of limiting memory usage, Memory QoS adds an additional feature of throttling memory allocation. A throttling factor is introduced as a multiplier (default is 0.8). If the result of multiplying memory limits by the factor is greater than memory requests, kubelet will set memory.high to the value and use Unified via CRI. And if the container does not specify memory limits, kubelet will use node allocatable memory instead. The memory.high in container level cgroup is set to:

i: the ith container in one pod
This can can help improve stability when pod memory usage increases, ensuring that memory is throttled as it approaches the memory limit.
How do I use it?
Here are the prerequisites for enabling Memory QoS on your Linux node, some of these are related to Kubernetes support for cgroup v2.
- Kubernetes since v1.22
- runc since v1.0.0-rc93; containerd since 1.4; cri-o since 1.20
- Linux kernel minimum version: 4.15, recommended version: 5.2+
- Linux image with cgroupv2 enabled or enabling cgroupv2 unified_cgroup_hierarchy manually
OCI runtimes such as runc and crun already support cgroups v2 Unified, and Kubernetes CRI has also made the desired changes to support passing Unified. However, CRI Runtime support is required as well. Memory QoS in Alpha phase is designed to support containerd and cri-o. Related PR Feature: containerd-cri support LinuxContainerResources.Unified #5627 has been merged and will be released in containerd 1.6. CRI-O implement kube alpha features for 1.22 #5207 is still in WIP.
With those prerequisites met, you can enable the memory QoS feature gate (see Set kubelet parameters via a config file).
How can I learn more?
You can find more details as follows:
How do I get involved?
You can reach SIG Node by several means:
You can also contact me directly:
- GitHub / Slack: @xiaoxubeii
- Email: xiaoxubeii@gmail.com
Dockershim removal is coming. Are you ready?
Reviewers: Davanum Srinivas, Elana Hashman, Noah Kantrowitz, Rey Lejano.
This poll closed on January 7, 2022.
Last year we announced that Kubernetes' dockershim component (which provides a built-in integration for Docker Engine) is deprecated.
Update: There's a Dockershim Deprecation FAQ with more information, and you can also discuss the deprecation via a dedicated GitHub issue.
Our current plan is to remove dockershim from the Kubernetes codebase soon. We are looking for feedback from you whether you are ready for dockershim removal and to ensure that you are ready when the time comes.
Please fill out this survey: https://forms.gle/svCJmhvTv78jGdSx8
The dockershim component that enables Docker as a Kubernetes container runtime is being deprecated in favor of runtimes that directly use the Container Runtime Interface created for Kubernetes. Many Kubernetes users have migrated to other container runtimes without problems. However we see that dockershim is still very popular. You may see some public numbers in recent Container Report from DataDog. Some Kubernetes hosting vendors just recently enabled other runtimes support (especially for Windows nodes). And we know that many third party tools vendors are still not ready: migrating telemetry and security agents.
At this point, we believe that there is feature parity between Docker and the other runtimes. Many end-users have used our migration guide and are running production workload using these different runtimes. The plan of record today is that dockershim will be removed in version 1.24, slated for release around April of next year. For those developing or running alpha and beta versions, dockershim will be removed in December at the beginning of the 1.24 release development cycle.
There is only one month left to give us feedback. We want you to tell us how ready you are.
We are collecting opinions through this survey: https://forms.gle/svCJmhvTv78jGdSx8
To better understand preparedness for the dockershim removal, our survey is
asking the version of Kubernetes you are currently using, and an estimate of
when you think you will adopt Kubernetes 1.24. All the aggregated information
on dockershim removal readiness will be published.
Free form comments will be reviewed by SIG Node leadership. If you want to
discuss any details of migrating from dockershim, report bugs or adoption
blockers, you can use one of the SIG Node contact options any time:
https://github.com/kubernetes/community/tree/master/sig-node#contact
Kubernetes is a mature project. This deprecation is another step in the effort to get away from permanent beta features and providing more stability and compatibility guarantees. With the migration from dockershim you will get more flexibility and choice of container runtime features as well as less dependencies of your apps on specific underlying technology. Please take time to review the dockershim migration documentation and consult your Kubernetes hosting vendor (if you have one) what container runtime options are available for you. Read up container runtime documentation with instructions on how to use containerd and CRI-O to help prepare you when you're ready to upgrade to 1.24. CRI-O, containerd, and Docker with Mirantis cri-dockerd are not the only container runtime options, we encourage you to explore the CNCF landscape on container runtimes in case another suits you better.
Thank you!
Non-root Containers And Devices
The user/group ID related security settings in Pod's securityContext trigger a problem when users want to
deploy containers that use accelerator devices (via Kubernetes Device Plugins) on Linux. In this blog
post I talk about the problem and describe the work done so far to address it. It's not meant to be a long story about getting the k/k issue fixed.
Instead, this post aims to raise awareness of the issue and to highlight important device use-cases too. This is needed as Kubernetes works on new related features such as support for user namespaces.
Why non-root containers can't use devices and why it matters
One of the key security principles for running containers in Kubernetes is the
principle of least privilege. The Pod/container securityContext specifies the config
options to set, e.g., Linux capabilities, MAC policies, and user/group ID values to achieve this.
Furthermore, the cluster admins are supported with tools like PodSecurityPolicy (deprecated) or
Pod Security Admission (alpha) to enforce the desired security settings for pods that are being deployed in
the cluster. These settings could, for instance, require that containers must be runAsNonRoot or
that they are forbidden from running with root's group ID in runAsGroup or supplementalGroups.
In Kubernetes, the kubelet builds the list of Device resources to be made available to a container
(based on inputs from the Device Plugins) and the list is included in the CreateContainer CRI message
sent to the CRI container runtime. Each Device contains little information: host/container device
paths and the desired devices cgroups permissions.
The OCI Runtime Spec for Linux Container Configuration expects that in addition to the devices cgroup fields, more detailed information about the devices must be provided:
{
"type": "<string>",
"path": "<string>",
"major": <int64>,
"minor": <int64>,
"fileMode": <uint32>,
"uid": <uint32>,
"gid": <uint32>
},
The CRI container runtimes (containerd, CRI-O) are responsible for obtaining this information
from the host for each Device. By default, the runtimes copy the host device's user and group IDs:
uid(uint32, OPTIONAL) - id of device owner in the container namespace.gid(uint32, OPTIONAL) - id of device group in the container namespace.
Similarly, the runtimes prepare other mandatory config.json sections based on the CRI fields,
including the ones defined in securityContext: runAsUser/runAsGroup, which become part of the POSIX
platforms user structure via:
uid(int, REQUIRED) specifies the user ID in the container namespace.gid(int, REQUIRED) specifies the group ID in the container namespace.additionalGids(array of ints, OPTIONAL) specifies additional group IDs in the container namespace to be added to the process.
However, the resulting config.json triggers a problem when trying to run containers with
both devices added and with non-root uid/gid set via runAsUser/runAsGroup: the container user process
has no permission to use the device even when its group id (gid, copied from host) was permissive to
non-root groups. This is because the container user does not belong to that host group (e.g., via additionalGids).
Being able to run applications that use devices as non-root user is normal and expected to work so that the security principles can be met. Therefore, several alternatives were considered to get the gap filled with what the PodSec/CRI/OCI supports today.
What was done to solve the issue?
You might have noticed from the problem definition that it would at least be possible to workaround
the problem by manually adding the device gid(s) to supplementalGroups, or in
the case of just one device, set runAsGroup to the device's group id. However, this is problematic because the device gid(s) may have
different values depending on the nodes' distro/version in the cluster. For example, with GPUs the following commands for different distros and versions return different gids:
Fedora 33:
$ ls -l /dev/dri/
total 0
drwxr-xr-x. 2 root root 80 19.10. 10:21 by-path
crw-rw----+ 1 root video 226, 0 19.10. 10:42 card0
crw-rw-rw-. 1 root render 226, 128 19.10. 10:21 renderD128
$ grep -e video -e render /etc/group
video:x:39:
render:x:997:
Ubuntu 20.04:
$ ls -l /dev/dri/
total 0
drwxr-xr-x 2 root root 80 19.10. 17:36 by-path
crw-rw---- 1 root video 226, 0 19.10. 17:36 card0
crw-rw---- 1 root render 226, 128 19.10. 17:36 renderD128
$ grep -e video -e render /etc/group
video:x:44:
render:x:133:
Which number to choose in your securityContext? Also, what if the runAsGroup/runAsUser values cannot be hard-coded because
they are automatically assigned during pod admission time via external security policies?
Unlike volumes with fsGroup, the devices have no official notion of deviceGroup/deviceUser that the CRI runtimes (or kubelet)
would be able to use. We considered using container annotations set by the device plugins (e.g., io.kubernetes.cri.hostDeviceSupplementalGroup/) to get custom OCI config.json uid/gid values.
This would have required changes to all existing device plugins which was not ideal.
Instead, a solution that is seamless to end-users without getting the device plugin vendors involved was preferred. The selected approach was
to re-use runAsUser and runAsGroup values in config.json for devices:
{
"type": "c",
"path": "/dev/foo",
"major": 123,
"minor": 4,
"fileMode": 438,
"uid": <runAsUser>,
"gid": <runAsGroup>
},
With runc OCI runtime (in non-rootless mode), the device is created (mknod(2)) in
the container namespace and the ownership is changed to runAsUser/runAsGroup using chmod(2).
Note:
Rootless mode and devices is not supported.runAsUser/runAsGroup
are taken into account, and, e.g., the USER setting in the container is currently ignored.While it is likely that the "faulty" deployments (i.e., non-root securityContext + devices) do not exist, to be absolutely sure no
deployments break, an opt-in config entry in both containerd and CRI-O to enable the new behavior was added. The following:
device_ownership_from_security_context (bool)
defaults to false and must be enabled to use the feature.
See non-root containers using devices after the fix
To demonstrate the new behavior, let's use a Data Plane Development Kit (DPDK) application using hardware accelerators, Kubernetes CPU manager, and HugePages as an example. The cluster runs containerd with:
[plugins]
[plugins."io.containerd.grpc.v1.cri"]
device_ownership_from_security_context = true
or CRI-O with:
[crio.runtime]
device_ownership_from_security_context = true
and the Guaranteed QoS Class Pod that runs DPDK's crypto-perf test utility with this YAML:
...
metadata:
name: qat-dpdk
spec:
securityContext:
runAsUser: 1000
runAsGroup: 2000
fsGroup: 3000
containers:
- name: crypto-perf
image: intel/crypto-perf:devel
...
resources:
requests:
cpu: "3"
memory: "128Mi"
qat.intel.com/generic: '4'
hugepages-2Mi: "128Mi"
limits:
cpu: "3"
memory: "128Mi"
qat.intel.com/generic: '4'
hugepages-2Mi: "128Mi"
...
To verify the results, check the user and group ID that the container runs as:
$ kubectl exec -it qat-dpdk -c crypto-perf -- id
They are set to non-zero values as expected:
uid=1000 gid=2000 groups=2000,3000
Next, check the device node permissions (qat.intel.com/generic exposes /dev/vfio/ devices) are accessible to runAsUser/runAsGroup:
$ kubectl exec -it qat-dpdk -c crypto-perf -- ls -la /dev/vfio
total 0
drwxr-xr-x 2 root root 140 Sep 7 10:55 .
drwxr-xr-x 7 root root 380 Sep 7 10:55 ..
crw------- 1 1000 2000 241, 0 Sep 7 10:55 58
crw------- 1 1000 2000 241, 2 Sep 7 10:55 60
crw------- 1 1000 2000 241, 10 Sep 7 10:55 68
crw------- 1 1000 2000 241, 11 Sep 7 10:55 69
crw-rw-rw- 1 1000 2000 10, 196 Sep 7 10:55 vfio
Finally, check the non-root container is also allowed to create HugePages:
$ kubectl exec -it qat-dpdk -c crypto-perf -- ls -la /dev/hugepages/
fsGroup gives a runAsUser writable HugePages emptyDir mountpoint:
total 0
drwxrwsr-x 2 root 3000 0 Sep 7 10:55 .
drwxr-xr-x 7 root root 380 Sep 7 10:55 ..
Help us test it and provide feedback!
The functionality described here is expected to help with cluster security and the configurability of device permissions. To allow
non-root containers to use devices requires cluster admins to opt-in to the functionality by setting
device_ownership_from_security_context = true. To make it a default setting, please test it and provide your feedback (via SIG-Node meetings or issues)!
The flag is available in CRI-O v1.22 release and queued for containerd v1.6.
More work is needed to get it properly supported. It is known to work with runc but it also needs to be made to function
with other OCI runtimes too, where applicable. For instance, Kata Containers supports device passthrough and allows it to make devices
available to containers in VM sandboxes too.
Moreover, the additional challenge comes with support of user names and devices. This problem is still open and requires more brainstorming.
Finally, it needs to be understood whether runAsUser/runAsGroup are enough or if device specific settings similar to fsGroups are needed in PodSpec/CRI v2.
Thanks
My thanks goes to Mike Brown (IBM, containerd), Peter Hunt (Redhat, CRI-O), and Alexander Kanevskiy (Intel) for providing all the feedback and good conversations.
Announcing the 2021 Steering Committee Election Results
The 2021 Steering Committee Election is now complete. The Kubernetes Steering Committee consists of 7 seats, 4 of which were up for election in 2021. Incoming committee members serve a term of 2 years, and all members are elected by the Kubernetes Community.
This community body is significant since it oversees the governance of the entire Kubernetes project. With that great power comes great responsibility. You can learn more about the steering committee’s role in their charter.
Results
Congratulations to the elected committee members whose two year terms begin immediately (listed in alphabetical order by GitHub handle):
- Christoph Blecker (@cblecker), Red Hat
- Stephen Augustus (@justaugustus), Cisco
- Paris Pittman (@parispittman), Apple
- Tim Pepper (@tpepper), VMware
They join continuing members:
- Davanum Srinivas (@dims), VMware
- Jordan Liggitt (@liggitt), Google
- Bob Killen (@mrbobbytables), Google
Paris Pittman and Christoph Blecker are returning Steering Committee Members.
Big Thanks
Thank you and congratulations on a successful election to this round’s election officers:
- Alison Dowdney, (@alisondy)
- Noah Kantrowitz (@coderanger)
- Josh Berkus (@jberkus)
Special thanks to Arnaud Meukam (@ameukam), k8s-infra liaison, who enabled our voting software on community-owned infrastructure.
Thanks to the Emeritus Steering Committee Members. Your prior service is appreciated by the community:
- Derek Carr (@derekwaynecarr)
- Nikhita Raghunath (@nikhita)
And thank you to all the candidates who came forward to run for election.
Get Involved with the Steering Committee
This governing body, like all of Kubernetes, is open to all. You can follow along with Steering Committee backlog items and weigh in by filing an issue or creating a PR against their repo. They have an open meeting on the first Monday at 9:30am PT of every month and regularly attend Meet Our Contributors. They can also be contacted at their public mailing list steering@kubernetes.io.
You can see what the Steering Committee meetings are all about by watching past meetings on the YouTube Playlist.
This post was written by the Upstream Marketing Working Group. If you want to write stories about the Kubernetes community, learn more about us.
Use KPNG to Write Specialized kube-proxiers
The post will show you how to create a specialized service kube-proxy style network proxier using Kubernetes Proxy NG kpng without interfering with the existing kube-proxy. The kpng project aims at renewing the the default Kubernetes Service implementation, the "kube-proxy". An important feature of kpng is that it can be used as a library to create proxiers outside K8s. While this is useful for CNI-plugins that replaces the kube-proxy it also opens the possibility for anyone to create a proxier for a special purpose.
Define a service that uses a specialized proxier
apiVersion: v1
kind: Service
metadata:
name: kpng-example
labels:
service.kubernetes.io/service-proxy-name: kpng-example
spec:
clusterIP: None
ipFamilyPolicy: RequireDualStack
externalIPs:
- 10.0.0.55
- 1000::55
selector:
app: kpng-alpine
ports:
- port: 6000
If the service.kubernetes.io/service-proxy-name label is defined the
kube-proxy will ignore the service. A custom controller can watch
services with the label set to its own name, "kpng-example" in
this example, and setup specialized load-balancing.
The service.kubernetes.io/service-proxy-name label is not
new,
but so far is has been quite hard to write a specialized proxier.
The common use for a specialized proxier is assumed to be handling
external traffic for some use-case not supported by K8s. In that
case ClusterIP is not needed, so we use a "headless" service in this
example.
Specialized proxier using kpng
A kpng based proxier
consists of the kpng controller handling all the K8s api related
functions, and a "backend" implementing the load-balancing. The
backend can be linked with the kpng controller binary or be a
separate program communicating with the controller using gRPC.
kpng kube --service-proxy-name=kpng-example to-api
This starts the kpng controller and tell it to watch only services
with the "kpng-example" service proxy name. The "to-api" parameter
will open a gRPC server for backends.
You can test this yourself outside your cluster. Please see the example below.
Now we start a backend that simply prints the updates from the controller.
$ kubectl apply -f kpng-example.yaml
$ kpng-json | jq # (this is the backend)
{
"Service": {
"Namespace": "default",
"Name": "kpng-example",
"Type": "ClusterIP",
"IPs": {
"ClusterIPs": {},
"ExternalIPs": {
"V4": [
"10.0.0.55"
],
"V6": [
"1000::55"
]
},
"Headless": true
},
"Ports": [
{
"Protocol": 1,
"Port": 6000,
"TargetPort": 6000
}
]
},
"Endpoints": [
{
"IPs": {
"V6": [
"1100::202"
]
},
"Local": true
},
{
"IPs": {
"V4": [
"11.0.2.2"
]
},
"Local": true
},
{
"IPs": {
"V4": [
"11.0.1.2"
]
}
},
{
"IPs": {
"V6": [
"1100::102"
]
}
}
]
}
A real backend would use some mechanism to load-balance traffic from the external IPs to the endpoints.
Writing a backend
The kpng-json backend looks like this:
package main
import (
"os"
"encoding/json"
"sigs.k8s.io/kpng/client"
)
func main() {
client.Run(jsonPrint)
}
func jsonPrint(items []*client.ServiceEndpoints) {
enc := json.NewEncoder(os.Stdout)
for _, item := range items {
_ = enc.Encode(item)
}
}
(yes, that is the entire program)
A real backend would of course be much more complex, but this
illustrates how kpng let you focus on load-balancing.
You can have several backends connected to a kpng controller, so
during development or debug it can be useful to let something like the
kpng-json backend run in parallel with your real backend.
Example
The complete example can be found here.
As an example we implement an "all-ip" backend. It direct all traffic for the externalIPs to a local endpoint, regardless of ports and upper layer protocols. There is a KEP for this function and this example is a much simplified version.
To direct all traffic from an external address to a local POD only one iptables rule is needed, for instance;
ip6tables -t nat -A PREROUTING -d 1000::55/128 -j DNAT --to-destination 1100::202
As you can see the addresses are in the call to the backend and all it have to do is:
- Extract the addresses with
Local: true - Setup iptables rules for the
ExternalIPs
A script doing that may look like:
xip=$(cat /tmp/out | jq -r .Service.IPs.ExternalIPs.V6[0])
podip=$(cat /tmp/out | jq -r '.Endpoints[]|select(.Local == true)|select(.IPs.V6 != null)|.IPs.V6[0]')
ip6tables -t nat -A PREROUTING -d $xip/128 -j DNAT --to-destination $podip
Assuming the JSON output above is stored in /tmp/out (jq is an awesome program!).
As this is an example we make it really simple for ourselves by using
a minor variation of the kpng-json backend above. Instead of just
printing, a program is called and the JSON output is passed as stdin
to that program. The backend can be tested stand-alone:
CALLOUT=jq kpng-callout
Where jq can be replaced with your own program or script. A script
may look like the example above. For more info and the complete
example please see https://github.com/kubernetes-sigs/kpng/tree/master/examples/pipe-exec.
Summary
While kpng is in early
stage of development this post wants to show how you may build your
own specialized K8s proxiers in the future. The only thing your
applications need to do is to add the
service.kubernetes.io/service-proxy-name label in the Service
manifest.
It is a tedious process to get new features into the kube-proxy and
it is not unlikely that they will be rejected, so to write a
specialized proxier may be the only option.
Introducing ClusterClass and Managed Topologies in Cluster API
The Cluster API community is happy to announce the implementation of ClusterClass and Managed Topologies, a new feature that will greatly simplify how you can provision, upgrade, and operate multiple Kubernetes clusters in a declarative way.
A little bit of context…
Before getting into the details, let's take a step back and look at the history of Cluster API.
The Cluster API project started three years ago, and the first releases focused on extensibility and implementing a declarative API that allows a seamless experience across infrastructure providers. This was a success with many cloud providers: AWS, Azure, Digital Ocean, GCP, Metal3, vSphere and still counting.
With extensibility addressed, the focus shifted to features, like automatic control plane and etcd management, health-based machine remediation, machine rollout strategies and more.
Fast forwarding to 2021, with lots of companies using Cluster API to manage fleets of Kubernetes clusters running workloads in production, the community focused its effort on stabilization of both code, APIs, documentation, and on extensive test signals which inform Kubernetes releases.
With solid foundations in place, and a vibrant and welcoming community that still continues to grow, it was time to plan another iteration on our UX for both new and advanced users.
Enter ClusterClass and Managed Topologies, tada!
ClusterClass
As the name suggests, ClusterClass and managed topologies are built in two parts.
The idea behind ClusterClass is simple: define the shape of your cluster once, and reuse it many times, abstracting the complexities and the internals of a Kubernetes cluster away.

ClusterClass, at its heart, is a collection of Cluster and Machine templates. You can use it as a “stamp” that can be leveraged to create many clusters of a similar shape.
---
apiVersion: cluster.x-k8s.io/v1beta1
kind: ClusterClass
metadata:
name: my-amazing-cluster-class
spec:
controlPlane:
ref:
apiVersion: controlplane.cluster.x-k8s.io/v1beta1
kind: KubeadmControlPlaneTemplate
name: high-availability-control-plane
machineInfrastructure:
ref:
apiVersion: infrastructure.cluster.x-k8s.io/v1beta1
kind: DockerMachineTemplate
name: control-plane-machine
workers:
machineDeployments:
- class: type1-workers
template:
bootstrap:
ref:
apiVersion: bootstrap.cluster.x-k8s.io/v1beta1
kind: KubeadmConfigTemplate
name: type1-bootstrap
infrastructure:
ref:
apiVersion: infrastructure.cluster.x-k8s.io/v1beta1
kind: DockerMachineTemplate
name: type1-machine
- class: type2-workers
template:
bootstrap:
ref:
apiVersion: bootstrap.cluster.x-k8s.io/v1beta1
kind: KubeadmConfigTemplate
name: type2-bootstrap
infrastructure:
ref:
kind: DockerMachineTemplate
apiVersion: infrastructure.cluster.x-k8s.io/v1beta1
name: type2-machine
infrastructure:
ref:
apiVersion: infrastructure.cluster.x-k8s.io/v1beta1
kind: DockerClusterTemplate
name: cluster-infrastructure
The possibilities are endless; you can get a default ClusterClass from the community, “off-the-shelf” classes from your vendor of choice, “certified” classes from the platform admin in your company, or even create custom ones for advanced scenarios.
Managed Topologies
Managed Topologies let you put the power of ClusterClass into action.
Given a ClusterClass, you can create many Clusters of a similar shape by providing a single resource, the Cluster.

Here is an example:
---
apiVersion: cluster.x-k8s.io/v1beta1
kind: Cluster
metadata:
name: my-amazing-cluster
namespace: bar
spec:
topology: # define a managed topology
class: my-amazing-cluster-class # use the ClusterClass mentioned earlier
version: v1.21.2
controlPlane:
replicas: 3
workers:
machineDeployments:
- class: type1-workers
name: big-pool-of-machines
replicas: 5
- class: type2-workers
name: small-pool-of-machines
replicas: 1
But there is more than simplified cluster creation. Now the Cluster acts as a single control point for your entire topology.
All the power of Cluster API, extensibility, lifecycle automation, stability, all the features required for managing an enterprise grade Kubernetes cluster on the infrastructure provider of your choice are now at your fingertips: you can create your Cluster, add new machines, upgrade to the next Kubernetes version, and all from a single place.
It is just as simple as it looks!
What’s next
While the amazing Cluster API community is working hard to deliver the first version of ClusterClass and managed topologies later this year, we are already looking forward to what comes next for the project and its ecosystem.
There are a lot of great ideas and opportunities ahead!
We want to make managed topologies even more powerful and flexible, allowing users to dynamically change bits of a ClusterClass according to the specific needs of a Cluster; this will ensure the same simple and intuitive UX for solving complex problems like e.g. selecting machine image for a specific Kubernetes version and for a specific region of your infrastructure provider, or injecting proxy configurations in the entire Cluster, and so on.
Stay tuned for what comes next, and if you have any questions, comments or suggestions:
- Chat with us on the Kubernetes Slack:#cluster-api
- Join the SIG Cluster Lifecycle Google Group to receive calendar invites and gain access to documents
- Join our Zoom meeting, every Wednesday at 10:00 Pacific Time
- Check out the ClusterClass quick-start for the Docker provider (CAPD) in the Cluster API book.
- UPDATE: Check out the ClusterClass experimental feature documentation in the Cluster API book.
A Closer Look at NSA/CISA Kubernetes Hardening Guidance
The open source tools listed in this article are to serve as examples only and are in no way a direct recommendation from the Kubernetes community or authors.
Background
USA's National Security Agency (NSA) and the Cybersecurity and Infrastructure Security Agency (CISA) released Kubernetes Hardening Guidance on August 3rd, 2021. The guidance details threats to Kubernetes environments and provides secure configuration guidance to minimize risk.
The following sections of this blog correlate to the sections in the NSA/CISA guidance. Any missing sections are skipped because of limited opportunities to add anything new to the existing content.
Note: This blog post is not a substitute for reading the guide. Reading the published guidance is recommended before proceeding as the following content is complementary.
Update, November 2023:
The National Security Agency (NSA) and the Cybersecurity and Infrastructure Security Agency (CISA) released the 1.0 version of the Kubernetes hardening guide in August 2021 and updated it based on industry feedback in March 2022 (version 1.1).
The most recent version of the Kubernetes hardening guidance was released in August 2022 with corrections and clarifications. Version 1.2 outlines a number of recommendations for hardening Kubernetes clusters.
Introduction and Threat Model
Note that the threats identified as important by the NSA/CISA, or the intended audience of this guidance, may be different from the threats that other enterprise users of Kubernetes consider important. This section is still useful for organizations that care about data, resource theft and service unavailability.
The guidance highlights the following three sources of compromises:
- Supply chain risks
- Malicious threat actors
- Insider threats (administrators, users, or cloud service providers)
The threat model tries to take a step back and review threats that not only exist within the boundary of a Kubernetes cluster but also include the underlying infrastructure and surrounding workloads that Kubernetes does not manage.
For example, when a workload outside the cluster shares the same physical network, it has access to the kubelet and to control plane components: etcd, controller manager, scheduler and API server. Therefore, the guidance recommends having network level isolation separating Kubernetes clusters from other workloads that do not need connectivity to Kubernetes control plane nodes. Specifically, scheduler, controller-manager, etcd only need to be accessible to the API server. Any interactions with Kubernetes from outside the cluster can happen by providing access to API server port.
List of ports and protocols for each of these components are defined in Ports and Protocols within the Kubernetes documentation.
Special note: kube-scheduler and kube-controller-manager uses different ports than the ones mentioned in the guidance
The Threat modelling section from the CNCF Cloud Native Security Whitepaper + Map provides another perspective on approaching threat modelling Kubernetes, from a cloud native lens.
Kubernetes Pod security
Kubernetes by default does not guarantee strict workload isolation between pods running in the same node in a cluster. However, the guidance provides several techniques to enhance existing isolation and reduce the attack surface in case of a compromise.
"Non-root" containers and "rootless" container engines
Several best practices related to basic security principle of least privilege i.e. provide only the permissions are needed; no more, no less, are worth a second look.
The guide recommends setting non-root user at build time instead of relying on
setting runAsUser at runtime in your Pod spec. This is a good practice and provides
some level of defense in depth. For example, if the container image is built with user 10001
and the Pod spec misses adding the runAsuser field in its Deployment object. In this
case there are certain edge cases that are worth exploring for awareness:
- Pods can fail to start, if the user defined at build time is different from the one defined in pod spec and some files are as a result inaccessible.
- Pods can end up sharing User IDs unintentionally. This can be problematic even if the User IDs are non-zero in a situation where a container escape to host file system is possible. Once the attacker has access to the host file system, they get access to all the file resources that are owned by other unrelated pods that share the same UID.
- Pods can end up sharing User IDs, with other node level processes not managed by Kubernetes e.g. node level daemons for auditing, vulnerability scanning, telemetry. The threat is similar to the one above where host file system access can give attacker full access to these node level daemons without needing to be root on the node.
However, none of these cases will have as severe an impact as a container running as root being able to escape as a root user on the host, which can provide an attacker with complete control of the worker node, further allowing lateral movement to other worker or control plane nodes.
Kubernetes 1.22 introduced an alpha feature that specifically reduces the impact of such a control plane component running as root user to a non-root user through user namespaces.
That (alpha stage) support for user namespaces / rootless mode is available with the following container runtimes:
Some distributions support running in rootless mode, like the following:
Immutable container filesystems
The NSA/CISA Kubernetes Hardening Guidance highlights an often overlooked feature readOnlyRootFileSystem, with a
working example in Appendix B. This example limits execution and tampering of
containers at runtime. Any read/write activity can then be limited to few
directories by using tmpfs volume mounts.
However, some applications that modify the container filesystem at runtime, like exploding a WAR or JAR file at container startup, could face issues when enabling this feature. To avoid this issue, consider making minimal changes to the filesystem at runtime when possible.
Building secure container images
Kubernetes Hardening Guidance also recommends running a scanner at deploy time as an admission controller, to prevent vulnerable or misconfigured pods from running in the cluster. Theoretically, this sounds like a good approach but there are several caveats to consider before this can be implemented in practice:
- Depending on network bandwidth, available resources and scanner of choice, scanning for vulnerabilities for an image can take an indeterminate amount of time. This could lead to slower or unpredictable pod start up times, which could result in spikes of unavailability when apps are serving peak load.
- If the policy that allows or denies pod startup is made using incorrect or
incomplete data it could result in several false positive or false negative
outcomes like the following:
- inside a container image, the
opensslpackage is detected as vulnerable. However, the application is written in Golang and uses the Gocryptopackage for TLS. Therefore, this vulnerability is not in the code execution path and as such has minimal impact if it remains unfixed. - A vulnerability is detected in the
opensslpackage for a Debian base image. However, the upstream Debian community considers this as a Minor impact vulnerability and as a result does not release a patch fix for this vulnerability. The owner of this image is now stuck with a vulnerability that cannot be fixed and a cluster that does not allow the image to run because of predefined policy that does not take into account whether the fix for a vulnerability is available or not - A Golang app is built on top of a distroless image, but it is compiled with a Golang version that uses a vulnerable standard library. The scanner has no visibility into golang version but only on OS level packages. So it allows the pod to run in the cluster in spite of the image containing an app binary built on vulnerable golang.
- inside a container image, the
To be clear, relying on vulnerability scanners is absolutely a good idea but policy definitions should be flexible enough to allow:
- Creation of exception lists for images or vulnerabilities through labelling
- Overriding the severity with a risk score based on impact of a vulnerability
- Applying the same policies at build time to catch vulnerable images with fixable vulnerabilities before they can be deployed into Kubernetes clusters
Special considerations like offline vulnerability database fetch, may also be needed, if the clusters run in an air-gapped environment and the scanners require internet access to update the vulnerability database.
Pod Security Policies
Since Kubernetes v1.21, the PodSecurityPolicy API and related features are deprecated, but some of the guidance in this section will still apply for the next few years, until cluster operators upgrade their clusters to newer Kubernetes versions.
The Kubernetes project is working on a replacement for PodSecurityPolicy. Kubernetes v1.22 includes an alpha feature called Pod Security Admission that is intended to allow enforcing a minimum level of isolation between pods.
The built-in isolation levels for Pod Security Admission are derived from Pod Security Standards, which is a superset of all the components mentioned in Table I page 10 of the guidance.
Information about migrating from PodSecurityPolicy to the Pod Security Admission feature is available in Migrate from PodSecurityPolicy to the Built-In PodSecurity Admission Controller.
One important behavior mentioned in the guidance that remains the same between Pod Security Policy and its replacement is that enforcing either of them does not affect pods that are already running. With both PodSecurityPolicy and Pod Security Admission, the enforcement happens during the pod creation stage.
Hardening container engines
Some container workloads are less trusted than others but may need to run in the same cluster. In those cases, running them on dedicated nodes that include hardened container runtimes that provide stricter pod isolation boundaries can act as a useful security control.
Kubernetes supports an API called RuntimeClass that is stable / GA (and, therefore, enabled by default) stage as of Kubernetes v1.20. RuntimeClass allows you to ensure that Pods requiring strong isolation are scheduled onto nodes that can offer it.
Some third-party projects that you can use in conjunction with RuntimeClass are:
As discussed here and in the guidance, many features and tooling exist in and around Kubernetes that can enhance the isolation boundaries between pods. Based on relevant threats and risk posture, you should pick and choose between them, instead of trying to apply all the recommendations. Having said that, cluster level isolation i.e. running workloads in dedicated clusters, remains the strictest workload isolation mechanism, in spite of improvements mentioned earlier here and in the guide.
Network Separation and Hardening
Kubernetes Networking can be tricky and this section focuses on how to secure and harden the relevant configurations. The guide identifies the following as key takeaways:
- Using NetworkPolicies to create isolation between resources,
- Securing the control plane
- Encrypting traffic and sensitive data
Network Policies
Network policies can be created with the help of network plugins. In order to make the creation and visualization easier for users, Cilium supports a web GUI tool. That web GUI lets you create Kubernetes NetworkPolicies (a generic API that nevertheless requires a compatible CNI plugin), and / or Cilium network policies (CiliumClusterwideNetworkPolicy and CiliumNetworkPolicy, which only work in clusters that use the Cilium CNI plugin). You can use these APIs to restrict network traffic between pods, and therefore minimize the attack vector.
Another scenario that is worth exploring is the usage of external IPs. Some services, when misconfigured, can create random external IPs. An attacker can take advantage of this misconfiguration and easily intercept traffic. This vulnerability has been reported in CVE-2020-8554. Using externalip-webhook can mitigate this vulnerability by preventing the services from using random external IPs. externalip-webhook only allows creation of services that don't require external IPs or whose external IPs are within the range specified by the administrator.
CVE-2020-8554 - Kubernetes API server in all versions allow an attacker who is able to create a ClusterIP service and set the
spec.externalIPsfield, to intercept traffic to that IP address. Additionally, an attacker who is able to patch thestatus(which is considered a privileged operation and should not typically be granted to users) of a LoadBalancer service can set thestatus.loadBalancer.ingress.ipto similar effect.
Resource Policies
In addition to configuring ResourceQuotas and limits, consider restricting how many process IDs (PIDs) a given Pod can use, and also to reserve some PIDs for node-level use to avoid resource exhaustion. More details to apply these limits can be found in Process ID Limits And Reservations.
Control Plane Hardening
In the next section, the guide covers control plane hardening. It is worth noting that from Kubernetes 1.20, insecure port from API server, has been removed.
Etcd
As a general rule, the etcd server should be configured to only trust certificates assigned to the API server. It limits the attack surface and prevents a malicious attacker from gaining access to the cluster. It might be beneficial to use a separate CA for etcd, as it by default trusts all the certificates issued by the root CA.
Kubeconfig Files
In addition to specifying the token and certificates directly, .kubeconfig
supports dynamic retrieval of temporary tokens using auth provider plugins.
Beware of the possibility of malicious
shell code execution in a
kubeconfig file. Once attackers gain access to the cluster, they can steal ssh
keys/secrets or more.
Secrets
Kubernetes Secrets is the native way of managing secrets as a Kubernetes API object. However, in some scenarios such as a desire to have a single source of truth for all app secrets, irrespective of whether they run on Kubernetes or not, secrets can be managed loosely coupled with Kubernetes and consumed by pods through side-cars or init-containers with minimal usage of Kubernetes Secrets API.
External secrets providers and csi-secrets-store are some of these alternatives to Kubernetes Secrets
Log Auditing
The NSA/CISA guidance stresses monitoring and alerting based on logs. The key points include logging at the host level, application level, and on the cloud. When running Kubernetes in production, it's important to understand who's responsible, and who's accountable, for each layer of logging.
Kubernetes API auditing
One area that deserves more focus is what exactly should alert or be logged. The document outlines a sample policy in Appendix L: Audit Policy that logs all RequestResponse's including metadata and request / response bodies. While helpful for a demo, it may not be practical for production.
Each organization needs to evaluate their
own threat model and build an audit policy that complements or helps troubleshooting incident response. Think
about how someone would attack your organization and what audit trail could identify it. Review more advanced options for tuning audit logs in the official audit logging documentation.
It's crucial to tune your audit logs to only include events that meet your threat model. A minimal audit policy that logs everything at metadata level can also be a good starting point.
Audit logging configurations can also be tested with kind following these instructions.
Streaming logs and auditing
Logging is important for threat and anomaly detection. As the document outlines, it's a best practice to scan and alert on logs as close to real time as possible and to protect logs from tampering if a compromise occurs. It's important to reflect on the various levels of logging and identify the critical areas such as API endpoints.
Kubernetes API audit logging can stream to a webhook and there's an example in Appendix N: Webhook configuration. Using a webhook could be a method that stores logs off cluster and/or centralizes all audit logs. Once logs are centrally managed, look to enable alerting based on critical events. Also ensure you understand what the baseline is for normal activities.
Alert identification
While the guide stressed the importance of notifications, there is not a blanket event list to alert from. The alerting requirements vary based on your own requirements and threat model. Examples include the following events:
- Changes to the
securityContextof a Pod - Updates to admission controller configs
- Accessing certain files / URLs
Additional logging resources
- Seccomp Security Profiles and You: A Practical Guide - Duffie Cooley
- TGI Kubernetes 119: Gatekeeper and OPA
- Abusing The Lack of Kubernetes Auditing Policies
- Enable seccomp for all workloads with a new v1.22 alpha feature
- This Week in Cloud Native: Auditing / Pod Security
Upgrading and Application Security practices
Kubernetes releases three times per year, so upgrade-related toil is a common problem for people running production clusters. In addition to this, operators must regularly upgrade the underlying node's operating system and running applications. This is a best practice to ensure continued support and to reduce the likelihood of bugs or vulnerabilities.
Kubernetes supports the three most recent stable releases. While each Kubernetes release goes through a large number of tests before being published, some teams aren't comfortable running the latest stable release until some time has passed. No matter what version you're running, ensure that patch upgrades happen frequently or automatically. More information can be found in the version skew policy pages.
When thinking about how you'll manage node OS upgrades, consider ephemeral nodes. Having the ability to destroy and add nodes allows your team to respond quicker to node issues. In addition, having deployments that tolerate node instability (and a culture that encourages frequent deployments) allows for easier cluster upgrades.
Additionally, it's worth reiterating from the guidance that periodic vulnerability scans and penetration tests can be performed on the various system components to proactively look for insecure configurations and vulnerabilities.
Finding release & security information
To find the most recent Kubernetes supported versions, refer to https://k8s.io/releases, which includes minor versions. It's good to stay up to date with your minor version patches.
If you're running a managed Kubernetes offering, look for their release documentation and find their various security channels.
Subscribe to the Kubernetes Announce mailing list. The Kubernetes Announce mailing list is searchable for terms such as "Security Advisories". You can set up alerts and email notifications as long as you know what key words to alert on.
Conclusion
In summary, it is fantastic to see security practitioners sharing this level of detailed guidance in public. This guidance further highlights Kubernetes going mainstream and how securing Kubernetes clusters and the application containers running on Kubernetes continues to need attention and focus of practitioners. Only a few weeks after the guidance was published, an open source tool kubescape to validate cluster against this guidance became available.
This tool can be a great starting point to check the current state of your clusters, after which you can use the information in this blog post and in the guidance to assess where improvements can be made.
Finally, it is worth reiterating that not all controls in this guidance will make sense for all practitioners. The best way to know which controls matter is to rely on the threat model of your own Kubernetes environment.
A special shout out and thanks to Rory McCune (@raesene) for his inputs to this blog post
How to Handle Data Duplication in Data-Heavy Kubernetes Environments
Why Duplicate Data?
It’s convenient to create a copy of your application with a copy of its state for each team. For example, you might want a separate database copy to test some significant schema changes or develop other disruptive operations like bulk insert/delete/update...
Duplicating data takes a lot of time. That’s because you need first to download all the data from a source block storage provider to compute and then send it back to a storage provider again. There’s a lot of network traffic and CPU/RAM used in this process. Hardware acceleration by offloading certain expensive operations to dedicated hardware is always a huge performance boost. It reduces the time required to complete an operation by orders of magnitude.
Volume Snapshots to the rescue
Kubernetes introduced VolumeSnapshots as alpha in 1.12, beta in 1.17, and the Generally Available version in 1.20. VolumeSnapshots use specialized APIs from storage providers to duplicate volume of data.
Since data is already in the same storage device (array of devices), duplicating data is usually a metadata operation for storage providers with local snapshots (majority of on-premise storage providers). All you need to do is point a new disk to an immutable snapshot and only save deltas (or let it do a full-disk copy). As an operation that is inside the storage back-end, it’s much quicker and usually doesn’t involve sending traffic over the network. Public Clouds storage providers under the hood work a bit differently. They save snapshots to Object Storage and then copy back from Object storage to Block storage when "duplicating" disk. Technically there is a lot of Compute and network resources spent on Cloud providers side, but from Kubernetes user perspective VolumeSnapshots work the same way whether is it local or remote snapshot storage provider and no Compute and Network resources are involved in this operation.
Sounds like we have our solution, right?
Actually, VolumeSnapshots are namespaced, and Kubernetes protects namespaced data from being shared between tenants (Namespaces). This Kubernetes limitation is a conscious design decision so that a Pod running in a different namespace can’t mount another application’s PersistentVolumeClaim (PVC).
One way around it would be to create multiple volumes with duplicate data in one namespace. However, you could easily reference the wrong copy.
So the idea is to separate teams/initiatives by namespaces to avoid that and generally limit access to the production namespace.
Solution? Creating a Golden Snapshot externally
Another way around this design limitation is to create Snapshot externally (not through Kubernetes). This is also called pre-provisioning a snapshot manually. Next, I will import it as a multi-tenant golden snapshot that can be used for many namespaces. Below illustration will be for AWS EBS (Elastic Block Storage) and GCE PD (Persistent Disk) services.
High-level plan for preparing the Golden Snapshot
- Identify Disk (EBS/Persistent Disk) that you want to clone with data in the cloud provider
- Make a Disk Snapshot (in cloud provider console)
- Get Disk Snapshot ID
High-level plan for cloning data for each team
- Create Namespace “sandbox01”
- Import Disk Snapshot (ID) as VolumeSnapshotContent to Kubernetes
- Create VolumeSnapshot in the Namespace "sandbox01" mapped to VolumeSnapshotContent
- Create the PersistentVolumeClaim from VolumeSnapshot
- Install Deployment or StatefulSet with PVC
Step 1: Identify Disk
First, you need to identify your golden source. In my case, it’s a PostgreSQL database on PersistentVolumeClaim “postgres-pv-claim” in the “production” namespace.
kubectl -n <namespace> get pvc <pvc-name> -o jsonpath='{.spec.volumeName}'
The output will look similar to:
pvc-3096b3ba-38b6-4fd1-a42f-ec99176ed0d90
Step 2: Prepare your golden source
You need to do this once or every time you want to refresh your golden data.
Make a Disk Snapshot
Go to AWS EC2 or GCP Compute Engine console and search for an EBS volume
(on AWS) or Persistent Disk (on GCP), that has a label matching the last output.
In this case I saw: pvc-3096b3ba-38b6-4fd1-a42f-ec99176ed0d9.
Click on Create snapshot and give it a name. You can do it in Console manually,
in AWS CloudShell / Google Cloud Shell, or in the terminal. To create a snapshot in the
terminal you must have the AWS CLI tool (aws) or Google's CLI (gcloud)
installed and configured.
Here’s the command to create snapshot on GCP:
gcloud compute disks snapshot <cloud-disk-id> --project=<gcp-project-id> --snapshot-names=<set-new-snapshot-name> --zone=<availability-zone> --storage-location=<region>

GCP snapshot creation
GCP identifies the disk by its PVC name, so it’s direct mapping. In AWS, you need to find volume by the CSIVolumeName AWS tag with PVC name value first that will be used for snapshot creation.
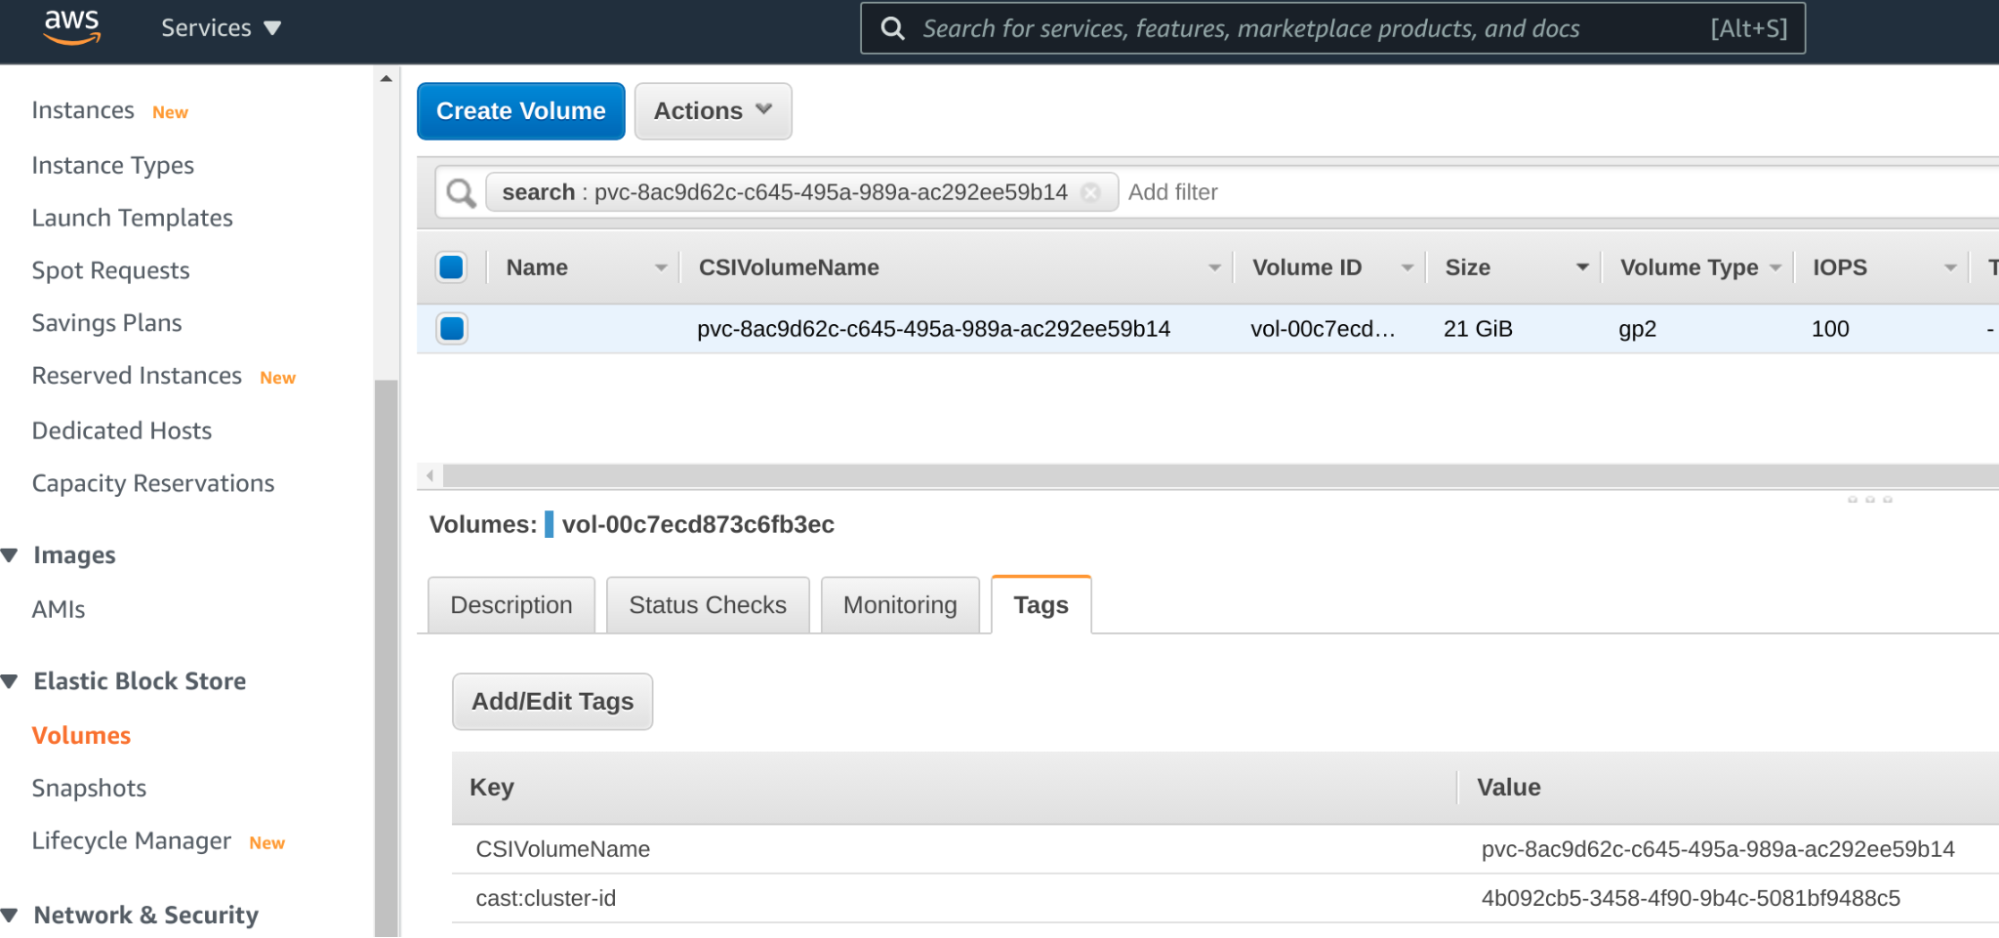
Identify disk ID on AWS
Mark done Volume (volume-id) vol-00c7ecd873c6fb3ec and ether create EBS snapshot in AWS Console, or use aws cli.
aws ec2 create-snapshot --volume-id '<volume-id>' --description '<set-new-snapshot-name>' --tag-specifications 'ResourceType=snapshot'
Step 3: Get your Disk Snapshot ID
In AWS, the command above will output something similar to:
"SnapshotId": "snap-09ed24a70bc19bbe4"
If you’re using the GCP cloud, you can get the snapshot ID from the gcloud command by querying for the snapshot’s given name:
gcloud compute snapshots --project=<gcp-project-id> describe <new-snapshot-name> | grep id:
You should get similar output to:
id: 6645363163809389170
Step 4: Create a development environment for each team
Now I have my Golden Snapshot, which is immutable data. Each team will get a copy of this data, and team members can modify it as they see fit, given that a new EBS/persistent disk will be created for each team.
Below I will define a manifest for each namespace. To save time, you can replace
the namespace name (such as changing “sandbox01” → “sandbox42”) using tools
such as sed or yq, with Kubernetes-aware templating tools like
Kustomize,
or using variable substitution in a CI/CD pipeline.
Here's an example manifest:
---
apiVersion: snapshot.storage.k8s.io/v1
kind: VolumeSnapshotContent
metadata:
name: postgresql-orders-db-sandbox01
namespace: sandbox01
spec:
deletionPolicy: Retain
driver: pd.csi.storage.gke.io
source:
snapshotHandle: 'gcp/projects/staging-eu-castai-vt5hy2/global/snapshots/6645363163809389170'
volumeSnapshotRef:
kind: VolumeSnapshot
name: postgresql-orders-db-snap
namespace: sandbox01
---
apiVersion: snapshot.storage.k8s.io/v1
kind: VolumeSnapshot
metadata:
name: postgresql-orders-db-snap
namespace: sandbox01
spec:
source:
volumeSnapshotContentName: postgresql-orders-db-sandbox01
In Kubernetes, VolumeSnapshotContent (VSC) objects are not namespaced.
However, I need a separate VSC for each different namespace to use, so the
metadata.name of each VSC must also be different. To make that straightfoward,
I used the target namespace as part of the name.
Now it’s time to replace the driver field with the CSI (Container Storage Interface) driver installed in your K8s cluster. Major cloud providers have CSI driver for block storage that support VolumeSnapshots but quite often CSI drivers are not installed by default, consult with your Kubernetes provider.
That manifest above defines a VSC that works on GCP. On AWS, driver and SnashotHandle values might look like:
driver: ebs.csi.aws.com
source:
snapshotHandle: "snap-07ff83d328c981c98"
At this point, I need to use the Retain policy, so that the CSI driver doesn’t try to delete my manually created EBS disk snapshot.
For GCP, you will have to build this string by hand - add a full project ID and snapshot ID. For AWS, it’s just a plain snapshot ID.
VSC also requires specifying which VolumeSnapshot (VS) will use it, so VSC and VS are referencing each other.
Now I can create PersistentVolumeClaim from VS above. It’s important to set this first:
---
apiVersion: v1
kind: PersistentVolumeClaim
metadata:
name: postgres-pv-claim
namespace: sandbox01
spec:
dataSource:
kind: VolumeSnapshot
name: postgresql-orders-db-snap
apiGroup: snapshot.storage.k8s.io
accessModes:
- ReadWriteOnce
resources:
requests:
storage: 21Gi
If default StorageClass has WaitForFirstConsumer policy, then the actual Cloud Disk will be created from the Golden Snapshot only when some Pod bounds that PVC.
Now I assign that PVC to my Pod (in my case, it’s Postgresql) as I would with any other PVC.
kubectl -n <namespace> get volumesnapshotContent,volumesnapshot,pvc,pod
Both VS and VSC should be READYTOUSE true, PVC bound, and the Pod (from Deployment or StatefulSet) running.
To keep on using data from my Golden Snapshot, I just need to repeat this for the next namespace and voilà! No need to waste time and compute resources on the duplication process.
Spotlight on SIG Node
Introduction
In Kubernetes, a Node is a representation of a single machine in your cluster. SIG Node owns that very important Node component and supports various subprojects such as Kubelet, Container Runtime Interface (CRI) and more to support how the pods and host resources interact. In this blog, we have summarized our conversation with Elana Hashman (EH) & Sergey Kanzhelev (SK), who walk us through the various aspects of being a part of the SIG and share some insights about how others can get involved.
A summary of our conversation
Could you tell us a little about what SIG Node does?
SK: SIG Node is a vertical SIG responsible for the components that support the controlled interactions between the pods and host resources. We manage the lifecycle of pods that are scheduled to a node. This SIG's focus is to enable a broad set of workload types, including workloads with hardware specific or performance sensitive requirements. All while maintaining isolation boundaries between pods on a node, as well as the pod and the host. This SIG maintains quite a few components and has many external dependencies (like container runtimes or operating system features), which makes the complexity we deal with huge. We tame the complexity and aim to continuously improve node reliability.
"SIG Node is a vertical SIG" could you explain a bit more?
EH: There are two kinds of SIGs: horizontal and vertical. Horizontal SIGs are concerned with a particular function of every component in Kubernetes: for example, SIG Security considers security aspects of every component in Kubernetes, or SIG Instrumentation looks at the logs, metrics, traces and events of every component in Kubernetes. Such SIGs don't tend to own a lot of code.
Vertical SIGs, on the other hand, own a single component, and are responsible for approving and merging patches to that code base. SIG Node owns the "Node" vertical, pertaining to the kubelet and its lifecycle. This includes the code for the kubelet itself, as well as the node controller, the container runtime interface, and related subprojects like the node problem detector.
How did the CI subproject start? Is this specific to SIG Node and how does it help the SIG?
SK: The subproject started as a follow up after one of the releases was blocked by numerous test failures of critical tests. These tests haven’t started falling all at once, rather continuous lack of attention led to slow degradation of tests quality. SIG Node was always prioritizing quality and reliability, and forming of the subproject was a way to highlight this priority.
As the 3rd largest SIG in terms of number of issues and PRs, how does your SIG juggle so much work?
EH: It helps to be organized. When I increased my contributions to the SIG in January of 2021, I found myself overwhelmed by the volume of pull requests and issues and wasn't sure where to start. We were already tracking test-related issues and pull requests on the CI subproject board, but that was missing a lot of our bugfixes and feature work. So I began putting together a triage board for the rest of our pull requests, which allowed me to sort each one by status and what actions to take, and documented its use for other contributors. We closed or merged over 500 issues and pull requests tracked by our two boards in each of the past two releases. The Kubernetes devstats showed that we have significantly increased our velocity as a result.
In June, we ran our first bug scrub event to work through the backlog of issues filed against SIG Node, ensuring they were properly categorized. We closed over 130 issues over the course of this 48 hour global event, but as of writing we still have 333 open issues.
Why should new and existing contributors consider joining SIG Node?
SK: Being a SIG Node contributor gives you skills and recognition that are rewarding and useful. Understanding under the hood of a kubelet helps architecting better apps, tune and optimize those apps, and gives leg up in issues troubleshooting. If you are a new contributor, SIG Node gives you the foundational knowledge that is key to understanding why other Kubernetes components are designed the way they are. Existing contributors may benefit as many features will require SIG Node changes one way or another. So being a SIG Node contributor helps building features in other SIGs faster.
SIG Node maintains numerous components, many of which have dependency on external projects or OS features. This makes the onboarding process quite lengthy and demanding. But if you are up for a challenge, there is always a place for you, and a group of people to support.
What do you do to help new contributors get started?
EH: Getting started in SIG Node can be intimidating, since there is so much work to be done, our SIG meetings are very large, and it can be hard to find a place to start.
I always encourage new contributors to work on things that they have some investment in already. In SIG Node, that might mean volunteering to help fix a bug that you have personally been affected by, or helping to triage bugs you care about by priority.
To come up to speed on any open source code base, there are two strategies you can take: start by exploring a particular issue deeply, and follow that to expand the edges of your knowledge as needed, or briefly review as many issues and change requests as you possibly can to get a higher level picture of how the component works. Ultimately, you will need to do both if you want to become a Node reviewer or approver.
Davanum Srinivas and I each ran a cohort of group mentoring to help teach new contributors the skills to become Node reviewers, and if there's interest we can work to find a mentor to run another session. I also encourage new contributors to attend our Node CI Subproject meeting: it's a smaller audience and we don't record the triage sessions, so it can be a less intimidating way to get started with the SIG.
Are there any particular skills you’d like to recruit for? What skills are contributors to SIG Usability likely to learn?
SK: SIG Node works on many workstreams in very different areas. All of these areas are on system level. For the typical code contributions you need to have a passion for building and utilizing low level APIs and writing performant and reliable components. Being a contributor you will learn how to debug and troubleshoot, profile, and monitor these components, as well as user workload that is run by these components. Often, with the limited to no access to Nodes, as they are running production workloads.
The other way of contribution is to help document SIG node features. This type of contribution requires a deep understanding of features, and ability to explain them in simple terms.
Finally, we are always looking for feedback on how best to run your workload. Come and explain specifics of it, and what features in SIG Node components may help to run it better.
What are you getting positive feedback on, and what’s coming up next for SIG Node?
EH: Over the past year SIG Node has adopted some new processes to help manage our feature development and Kubernetes enhancement proposals, and other SIGs have looked to us for inspiration in managing large workloads. I hope that this is an area we can continue to provide leadership in and further iterate on.
We have a great balance of new features and deprecations in flight right now. Deprecations of unused or difficult to maintain features help us keep technical debt and maintenance load under control, and examples include the dockershim and DynamicKubeletConfiguration deprecations. New features will unlock additional functionality in end users' clusters, and include exciting features like support for cgroups v2, swap memory, graceful node shutdowns, and device management policies.
Any closing thoughts/resources you’d like to share?
SK/EH: It takes time and effort to get to any open source community. SIG Node may overwhelm you at first with the number of participants, volume of work, and project scope. But it is totally worth it. Join our welcoming community! SIG Node GitHub Repo contains many useful resources including Slack, mailing list and other contact info.
Wrap Up
SIG Node hosted a KubeCon + CloudNativeCon Europe 2021 talk with an intro and deep dive to their awesome SIG. Join the SIG's meetings to find out about the most recent research results, what the plans are for the forthcoming year, and how to get involved in the upstream Node team as a contributor!
Introducing Single Pod Access Mode for PersistentVolumes
Last month's release of Kubernetes v1.22 introduced a new ReadWriteOncePod access mode for PersistentVolumes and PersistentVolumeClaims. With this alpha feature, Kubernetes allows you to restrict volume access to a single pod in the cluster.
What are access modes and why are they important?
When using storage, there are different ways to model how that storage is consumed.
For example, a storage system like a network file share can have many users all reading and writing data simultaneously. In other cases maybe everyone is allowed to read data but not write it. For highly sensitive data, maybe only one user is allowed to read and write data but nobody else.
In the world of Kubernetes, access modes are the way you can define how durable storage is consumed. These access modes are a part of the spec for PersistentVolumes (PVs) and PersistentVolumeClaims (PVCs).
kind: PersistentVolumeClaim
apiVersion: v1
metadata:
name: shared-cache
spec:
accessModes:
- ReadWriteMany # Allow many nodes to access shared-cache simultaneously.
resources:
requests:
storage: 1Gi
Before v1.22, Kubernetes offered three access modes for PVs and PVCs:
- ReadWriteOnce – the volume can be mounted as read-write by a single node
- ReadOnlyMany – the volume can be mounted read-only by many nodes
- ReadWriteMany – the volume can be mounted as read-write by many nodes
These access modes are enforced by Kubernetes components like the kube-controller-manager and kubelet to ensure only certain pods are allowed to access a given PersistentVolume.
What is this new access mode and how does it work?
Kubernetes v1.22 introduced a fourth access mode for PVs and PVCs, that you can use for CSI volumes:
- ReadWriteOncePod – the volume can be mounted as read-write by a single pod
If you create a pod with a PVC that uses the ReadWriteOncePod access mode, Kubernetes ensures that pod is the only pod across your whole cluster that can read that PVC or write to it.
If you create another pod that references the same PVC with this access mode, the pod will fail to start because the PVC is already in use by another pod. For example:
Events:
Type Reason Age From Message
---- ------ ---- ---- -------
Warning FailedScheduling 1s default-scheduler 0/1 nodes are available: 1 node has pod using PersistentVolumeClaim with the same name and ReadWriteOncePod access mode.
How is this different than the ReadWriteOnce access mode?
The ReadWriteOnce access mode restricts volume access to a single node, which means it is possible for multiple pods on the same node to read from and write to the same volume. This could potentially be a major problem for some applications, especially if they require at most one writer for data safety guarantees.
With ReadWriteOncePod these issues go away. Set the access mode on your PVC, and Kubernetes guarantees that only a single pod has access.
How do I use it?
The ReadWriteOncePod access mode is in alpha for Kubernetes v1.22 and is only supported for CSI volumes.
As a first step you need to enable the ReadWriteOncePod feature gate for kube-apiserver, kube-scheduler, and kubelet.
You can enable the feature by setting command line arguments:
--feature-gates="...,ReadWriteOncePod=true"
You also need to update the following CSI sidecars to these versions or greater:
Creating a PersistentVolumeClaim
In order to use the ReadWriteOncePod access mode for your PVs and PVCs, you will need to create a new PVC with the access mode:
kind: PersistentVolumeClaim
apiVersion: v1
metadata:
name: single-writer-only
spec:
accessModes:
- ReadWriteOncePod # Allow only a single pod to access single-writer-only.
resources:
requests:
storage: 1Gi
If your storage plugin supports dynamic provisioning, new PersistentVolumes will be created with the ReadWriteOncePod access mode applied.
Migrating existing PersistentVolumes
If you have existing PersistentVolumes, they can be migrated to use ReadWriteOncePod.
In this example, we already have a "cat-pictures-pvc" PersistentVolumeClaim that is bound to a "cat-pictures-pv" PersistentVolume, and a "cat-pictures-writer" Deployment that uses this PersistentVolumeClaim.
As a first step, you need to edit your PersistentVolume's spec.persistentVolumeReclaimPolicy and set it to Retain.
This ensures your PersistentVolume will not be deleted when we delete the corresponding PersistentVolumeClaim:
kubectl patch pv cat-pictures-pv -p '{"spec":{"persistentVolumeReclaimPolicy":"Retain"}}'
Next you need to stop any workloads that are using the PersistentVolumeClaim bound to the PersistentVolume you want to migrate, and then delete the PersistentVolumeClaim.
Once that is done, you need to clear your PersistentVolume's spec.claimRef.uid to ensure PersistentVolumeClaims can bind to it upon recreation:
kubectl scale --replicas=0 deployment cat-pictures-writer
kubectl delete pvc cat-pictures-pvc
kubectl patch pv cat-pictures-pv -p '{"spec":{"claimRef":{"uid":""}}}'
After that you need to replace the PersistentVolume's access modes with ReadWriteOncePod:
kubectl patch pv cat-pictures-pv -p '{"spec":{"accessModes":["ReadWriteOncePod"]}}'
Note:
The ReadWriteOncePod access mode cannot be combined with other access modes. Make sure ReadWriteOncePod is the only access mode on the PersistentVolume when updating, otherwise the request will fail.Next you need to modify your PersistentVolumeClaim to set ReadWriteOncePod as the only access mode.
You should also set your PersistentVolumeClaim's spec.volumeName to the name of your PersistentVolume.
Once this is done, you can recreate your PersistentVolumeClaim and start up your workloads:
# IMPORTANT: Make sure to edit your PVC in cat-pictures-pvc.yaml before applying. You need to:
# - Set ReadWriteOncePod as the only access mode
# - Set spec.volumeName to "cat-pictures-pv"
kubectl apply -f cat-pictures-pvc.yaml
kubectl apply -f cat-pictures-writer-deployment.yaml
Lastly you may edit your PersistentVolume's spec.persistentVolumeReclaimPolicy and set to it back to Delete if you previously changed it.
kubectl patch pv cat-pictures-pv -p '{"spec":{"persistentVolumeReclaimPolicy":"Delete"}}'
You can read Configure a Pod to Use a PersistentVolume for Storage for more details on working with PersistentVolumes and PersistentVolumeClaims.
What volume plugins support this?
The only volume plugins that support this are CSI drivers. SIG Storage does not plan to support this for in-tree plugins because they are being deprecated as part of CSI migration. Support may be considered for beta for users that prefer to use the legacy in-tree volume APIs with CSI migration enabled.
As a storage vendor, how do I add support for this access mode to my CSI driver?
The ReadWriteOncePod access mode will work out of the box without any required updates to CSI drivers, but does require updates to CSI sidecars. With that being said, if you would like to stay up to date with the latest changes to the CSI specification (v1.5.0+), read on.
Two new access modes were introduced to the CSI specification in order to disambiguate the legacy SINGLE_NODE_WRITER access mode.
They are SINGLE_NODE_SINGLE_WRITER and SINGLE_NODE_MULTI_WRITER.
In order to communicate to sidecars (like the external-provisioner) that your driver understands and accepts these two new CSI access modes, your driver will also need to advertise the SINGLE_NODE_MULTI_WRITER capability for the controller service and node service.
If you'd like to read up on the motivation for these access modes and capability bits, you can also read the CSI Specification Changes, Volume Capabilities section of KEP-2485 (ReadWriteOncePod PersistentVolume Access Mode).
Update your CSI driver to use the new interface
As a first step you will need to update your driver's container-storage-interface dependency to v1.5.0+, which contains support for these new access modes and capabilities.
Accept new CSI access modes
If your CSI driver contains logic for validating CSI access modes for requests , it may need updating.
If it currently accepts SINGLE_NODE_WRITER, it should be updated to also accept SINGLE_NODE_SINGLE_WRITER and SINGLE_NODE_MULTI_WRITER.
Using the GCP PD CSI driver validation logic as an example, here is how it can be extended:
diff --git a/pkg/gce-pd-csi-driver/utils.go b/pkg/gce-pd-csi-driver/utils.go
index 281242c..b6c5229 100644
--- a/pkg/gce-pd-csi-driver/utils.go
+++ b/pkg/gce-pd-csi-driver/utils.go
@@ -123,6 +123,8 @@ func validateAccessMode(am *csi.VolumeCapability_AccessMode) error {
case csi.VolumeCapability_AccessMode_SINGLE_NODE_READER_ONLY:
case csi.VolumeCapability_AccessMode_MULTI_NODE_READER_ONLY:
case csi.VolumeCapability_AccessMode_MULTI_NODE_MULTI_WRITER:
+ case csi.VolumeCapability_AccessMode_SINGLE_NODE_SINGLE_WRITER:
+ case csi.VolumeCapability_AccessMode_SINGLE_NODE_MULTI_WRITER:
default:
return fmt.Errorf("%v access mode is not supported for for PD", am.GetMode())
}
Advertise new CSI controller and node service capabilities
Your CSI driver will also need to return the new SINGLE_NODE_MULTI_WRITER capability as part of the ControllerGetCapabilities and NodeGetCapabilities RPCs.
Using the GCP PD CSI driver capability advertisement logic as an example, here is how it can be extended:
diff --git a/pkg/gce-pd-csi-driver/gce-pd-driver.go b/pkg/gce-pd-csi-driver/gce-pd-driver.go
index 45903f3..0d7ea26 100644
--- a/pkg/gce-pd-csi-driver/gce-pd-driver.go
+++ b/pkg/gce-pd-csi-driver/gce-pd-driver.go
@@ -56,6 +56,8 @@ func (gceDriver *GCEDriver) SetupGCEDriver(name, vendorVersion string, extraVolu
csi.VolumeCapability_AccessMode_SINGLE_NODE_WRITER,
csi.VolumeCapability_AccessMode_MULTI_NODE_READER_ONLY,
csi.VolumeCapability_AccessMode_MULTI_NODE_MULTI_WRITER,
+ csi.VolumeCapability_AccessMode_SINGLE_NODE_SINGLE_WRITER,
+ csi.VolumeCapability_AccessMode_SINGLE_NODE_MULTI_WRITER,
}
gceDriver.AddVolumeCapabilityAccessModes(vcam)
csc := []csi.ControllerServiceCapability_RPC_Type{
@@ -67,12 +69,14 @@ func (gceDriver *GCEDriver) SetupGCEDriver(name, vendorVersion string, extraVolu
csi.ControllerServiceCapability_RPC_EXPAND_VOLUME,
csi.ControllerServiceCapability_RPC_LIST_VOLUMES,
csi.ControllerServiceCapability_RPC_LIST_VOLUMES_PUBLISHED_NODES,
+ csi.ControllerServiceCapability_RPC_SINGLE_NODE_MULTI_WRITER,
}
gceDriver.AddControllerServiceCapabilities(csc)
ns := []csi.NodeServiceCapability_RPC_Type{
csi.NodeServiceCapability_RPC_STAGE_UNSTAGE_VOLUME,
csi.NodeServiceCapability_RPC_EXPAND_VOLUME,
csi.NodeServiceCapability_RPC_GET_VOLUME_STATS,
+ csi.NodeServiceCapability_RPC_SINGLE_NODE_MULTI_WRITER,
}
gceDriver.AddNodeServiceCapabilities(ns)
Implement NodePublishVolume behavior
The CSI spec outlines expected behavior for the NodePublishVolume RPC when called more than once for the same volume but with different arguments (like the target path).
Please refer to the second table in the NodePublishVolume section of the CSI spec for more details on expected behavior when implementing in your driver.
Update your CSI sidecars
When deploying your CSI drivers, you must update the following CSI sidecars to versions that depend on CSI spec v1.5.0+ and the Kubernetes v1.22 API. The minimum required versions are:
What’s next?
As part of the beta graduation for this feature, SIG Storage plans to update the Kubernetes scheduler to support pod preemption in relation to ReadWriteOncePod storage. This means if two pods request a PersistentVolumeClaim with ReadWriteOncePod, the pod with highest priority will gain access to the PersistentVolumeClaim and any pod with lower priority will be preempted from the node and be unable to access the PersistentVolumeClaim.
How can I learn more?
Please see KEP-2485 for more details on the ReadWriteOncePod access mode and motivations for CSI spec changes.
How do I get involved?
The Kubernetes #csi Slack channel and any of the standard SIG Storage communication channels are great mediums to reach out to the SIG Storage and the CSI teams.
Special thanks to the following people for their insightful reviews and design considerations:
- Abdullah Gharaibeh (ahg-g)
- Aldo Culquicondor (alculquicondor)
- Ben Swartzlander (bswartz)
- Deep Debroy (ddebroy)
- Hemant Kumar (gnufied)
- Humble Devassy Chirammal (humblec)
- James DeFelice (jdef)
- Jan Šafránek (jsafrane)
- Jing Xu (jingxu97)
- Jordan Liggitt (liggitt)
- Michelle Au (msau42)
- Saad Ali (saad-ali)
- Tim Hockin (thockin)
- Xing Yang (xing-yang)
If you’re interested in getting involved with the design and development of CSI or any part of the Kubernetes storage system, join the Kubernetes Storage Special Interest Group (SIG). We’re rapidly growing and always welcome new contributors.
Alpha in Kubernetes v1.22: API Server Tracing
In distributed systems, it can be hard to figure out where problems are. You grep through one component's logs just to discover that the source of your problem is in another component. You search there only to discover that you need to enable debug logs to figure out what really went wrong... And it goes on. The more complex the path your request takes, the harder it is to answer questions about where it went. I've personally spent many hours doing this dance with a variety of Kubernetes components. Distributed tracing is a tool which is designed to help in these situations, and the Kubernetes API Server is, perhaps, the most important Kubernetes component to be able to debug. At Kubernetes' Sig Instrumentation, our mission is to make it easier to understand what's going on in your cluster, and we are happy to announce that distributed tracing in the Kubernetes API Server reached alpha in 1.22.
What is Tracing?
Distributed tracing links together a bunch of super-detailed information from multiple different sources, and structures that telemetry into a single tree for that request. Unlike logging, which limits the quantity of data ingested by using log levels, tracing collects all of the details and uses sampling to collect only a small percentage of requests. This means that once you have a trace which demonstrates an issue, you should have all the information you need to root-cause the problem--no grepping for object UID required! My favorite aspect, though, is how useful the visualizations of traces are. Even if you don't understand the inner workings of the API Server, or don't have a clue what an etcd "Transaction" is, I'd wager you (yes, you!) could tell me roughly what the order of events was, and which components were involved in the request. If some step takes a long time, it is easy to tell where the problem is.
Why OpenTelemetry?
It's important that Kubernetes works well for everyone, regardless of who manages your infrastructure, or which vendors you choose to integrate with. That is particularly true for Kubernetes' integrations with telemetry solutions. OpenTelemetry, being a CNCF project, shares these core values, and is creating exactly what we need in Kubernetes: A set of open standards for Tracing client library APIs and a standard trace format. By using OpenTelemetry, we can ensure users have the freedom to choose their backend, and ensure vendors have a level playing field. The timing couldn't be better: the OpenTelemetry golang API and SDK are very close to their 1.0 release, and will soon offer backwards-compatibility for these open standards.
Why instrument the API Server?
The Kubernetes API Server is a great candidate for tracing for a few reasons:
- It follows the standard "RPC" model (serve a request by making requests to downstream components), which makes it easy to instrument.
- Users are latency-sensitive: If a request takes more than 10 seconds to complete, many clients will time-out.
- It has a complex service topology: A single request could require consulting a dozen webhooks, or involve multiple requests to etcd.
Trying out APIServer Tracing with a webhook
Enabling API Server Tracing
Enable the APIServerTracing feature-gate.
Set our configuration for tracing by pointing the
--tracing-config-fileflag on the kube-apiserver at our config file, which contains:
apiVersion: apiserver.config.k8s.io/v1alpha1
kind: TracingConfiguration
# 1% sampling rate
samplingRatePerMillion: 10000
Enabling Etcd Tracing
Update: the following was added after the blog was published
Add --experimental-enable-distributed-tracing, --experimental-distributed-tracing-address=0.0.0.0:4317, --experimental-distributed-tracing-service-name=etcd flags to etcd to enable tracing. Note that this traces every request, so it will probably generate a lot of traces if you enable it. Required etcd version is 3.5 up to 3.5.4.
Starting from version 3.5.5 until version 3.5.10, the default sampling rate for traces is set to 0%, meaning no traces were collected by default. Unfortunately, there is no option provided to configure a higher sampling rate. (See details)
In version 3.5.11, the number of samples to collect per million spans can be configured using the newly introduced --experimental-distributed-tracing-sampling-rate=1000000 flag.
Example Trace: List Nodes
I could've used any trace backend, but decided to use Jaeger, since it is one of the most popular open-source tracing projects. I deployed the Jaeger All-in-one container in my cluster, deployed the OpenTelemetry collector on my control-plane node (example), and captured traces like this one:
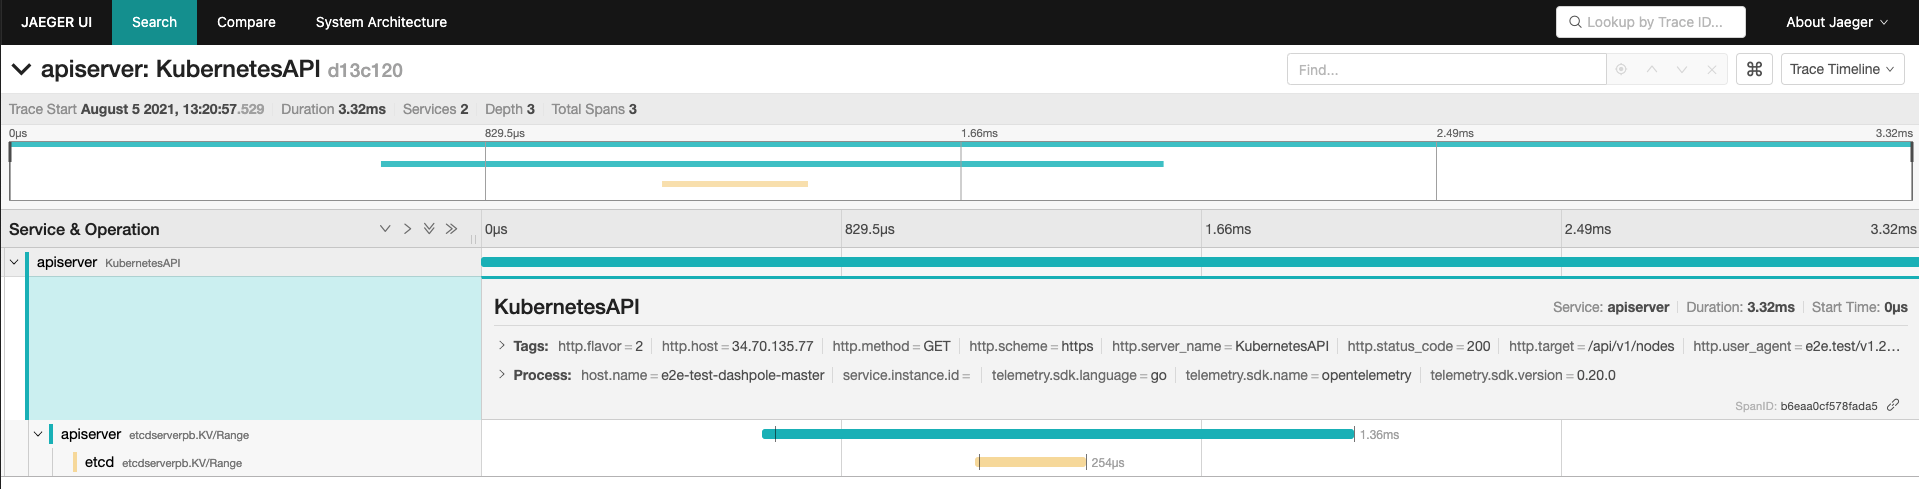
The teal lines are from the API Server, and includes it serving a request to /api/v1/nodes, and issuing a grpc Range RPC to ETCD. The yellow-ish line is from ETCD handling the Range RPC.
Example Trace: Create Pod with Mutating Webhook
I instrumented the example webhook with OpenTelemetry (I had to patch controller-runtime, but it makes a neat demo), and routed traces to Jaeger as well. I collected traces like this one:
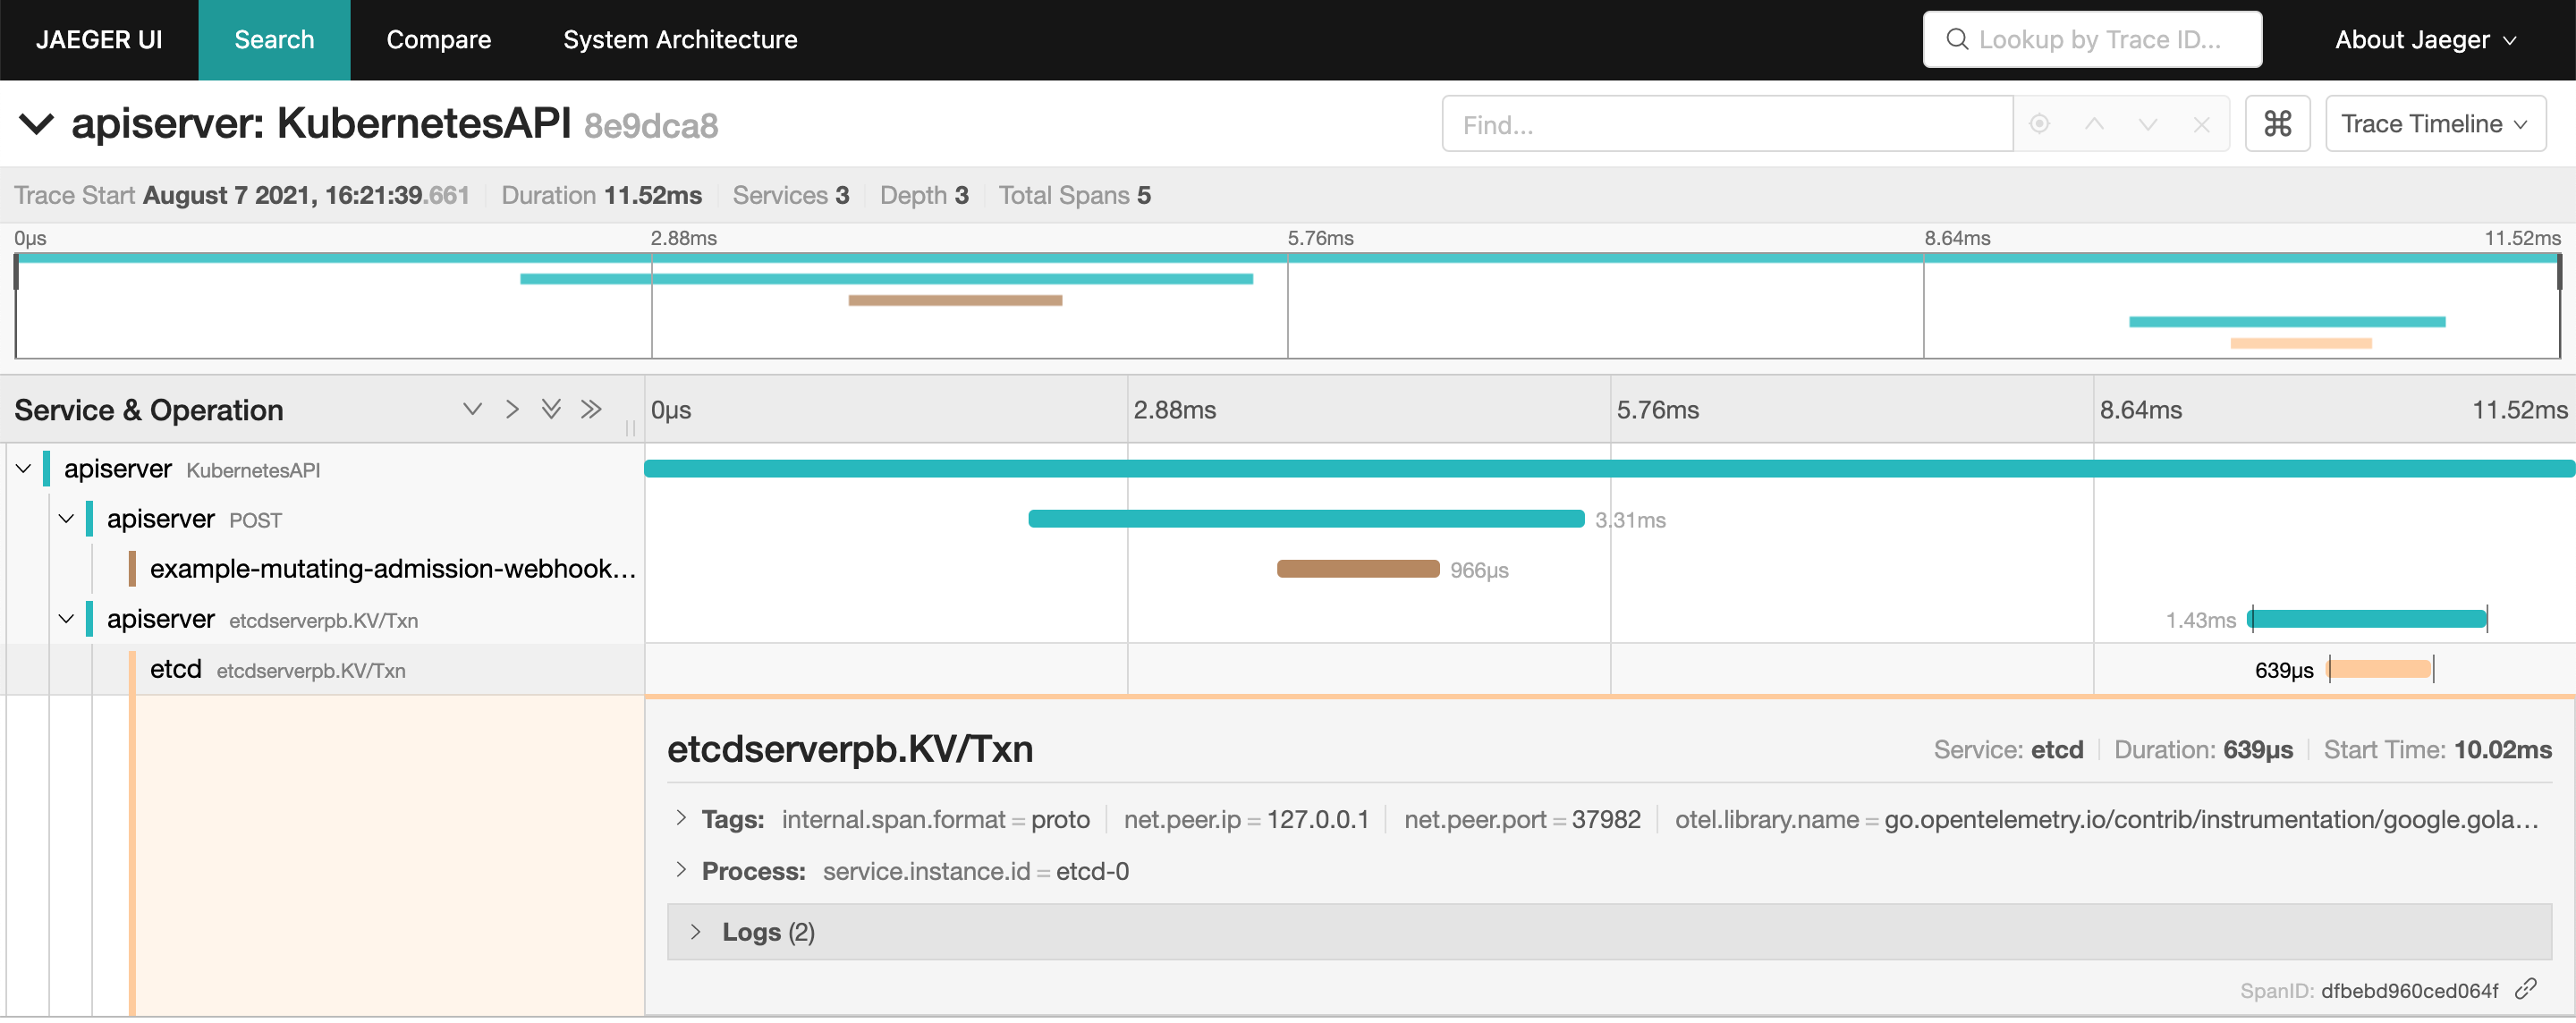
Compared with the previous trace, there are two new spans: A teal span from the API Server making a request to the admission webhook, and a brown span from the admission webhook serving the request. Even if you didn't instrument your webhook, you would still get the span from the API Server making the request to the webhook.
Get involved!
As this is our first attempt at adding distributed tracing to a Kubernetes component, there is probably a lot we can improve! If my struggles resonated with you, or if you just want to try out the latest Kubernetes has to offer, please give the feature a try and open issues with any problem you encountered and ways you think the feature could be improved.
This is just the very beginning of what we can do with distributed tracing in Kubernetes. If there are other components you think would benefit from distributed tracing, or want to help bring API Server Tracing to GA, join sig-instrumentation at our regular meetings and get involved!
Kubernetes 1.22: A New Design for Volume Populators
Kubernetes v1.22, released earlier this month, introduced a redesigned approach for volume
populators. Originally implemented
in v1.18, the API suffered from backwards compatibility issues. Kubernetes v1.22 includes a new API
field called dataSourceRef that fixes these problems.
Data sources
Earlier Kubernetes releases already added a dataSource field into the
PersistentVolumeClaim API,
used for cloning volumes and creating volumes from snapshots. You could use the dataSource field when
creating a new PVC, referencing either an existing PVC or a VolumeSnapshot in the same namespace.
That also modified the normal provisioning process so that instead of yielding an empty volume, the
new PVC contained the same data as either the cloned PVC or the cloned VolumeSnapshot.
Volume populators embrace the same design idea, but extend it to any type of object, as long
as there exists a custom resource
to define the data source, and a populator controller to implement the logic. Initially,
the dataSource field was directly extended to allow arbitrary objects, if the AnyVolumeDataSource
feature gate was enabled on a cluster. That change unfortunately caused backwards compatibility
problems, and so the new dataSourceRef field was born.
In v1.22 if the AnyVolumeDataSource feature gate is enabled, the dataSourceRef field is
added, which behaves similarly to the dataSource field except that it allows arbitrary
objects to be specified. The API server ensures that the two fields always have the same
contents, and neither of them are mutable. The differences is that at creation time
dataSource allows only PVCs or VolumeSnapshots, and ignores all other values, while
dataSourceRef allows most types of objects, and in the few cases it doesn't allow an
object (core objects other than PVCs) a validation error occurs.
When this API change graduates to stable, we would deprecate using dataSource and recommend
using dataSourceRef field for all use cases.
In the v1.22 release, dataSourceRef is available (as an alpha feature) specifically for cases
where you want to use for custom volume populators.
Using populators
Every volume populator must have one or more CRDs that it supports. Administrators may
install the CRD and the populator controller and then PVCs with a dataSourceRef specifies
a CR of the type that the populator supports will be handled by the populator controller
instead of the CSI driver directly.
Underneath the covers, the CSI driver is still invoked to create an empty volume, which the populator controller fills with the appropriate data. The PVC doesn't bind to the PV until it's fully populated, so it's safe to define a whole application manifest including pod and PVC specs and the pods won't begin running until everything is ready, just as if the PVC was a clone of another PVC or VolumeSnapshot.
How it works
PVCs with data sources are still noticed by the external-provisioner sidecar for the related storage class (assuming a CSI provisioner is used), but because the sidecar doesn't understand the data source kind, it doesn't do anything. The populator controller is also watching for PVCs with data sources of a kind that it understands and when it sees one, it creates a temporary PVC of the same size, volume mode, storage class, and even on the same topology (if topology is used) as the original PVC. The populator controller creates a worker pod that attaches to the volume and writes the necessary data to it, then detaches from the volume and the populator controller rebinds the PV from the temporary PVC to the orignal PVC.
Trying it out
The following things are required to use volume populators:
- Enable the
AnyVolumeDataSourcefeature gate - Install a CRD for the specific data source / populator
- Install the populator controller itself
Populator controllers may use the lib-volume-populator library to do most of the Kubernetes API level work. Individual populators only need to provide logic for actually writing data into the volume based on a particular CR instance. This library provides a sample populator implementation.
These optional components improve user experience:
- Install the VolumePopulator CRD
- Create a VolumePopulator custom respource for each specific data source
- Install the volume data source validator controller (alpha)
The purpose of these components is to generate warning events on PVCs with data sources for which there is no populator.
Putting it all together
To see how this works, you can install the sample "hello" populator and try it out.
First install the volume-data-source-validator controller.
kubectl apply -f https://raw.githubusercontent.com/kubernetes-csi/volume-data-source-validator/master/client/config/crd/populator.storage.k8s.io_volumepopulators.yaml
kubectl apply -f https://raw.githubusercontent.com/kubernetes-csi/volume-data-source-validator/master/deploy/kubernetes/rbac-data-source-validator.yaml
kubectl apply -f https://raw.githubusercontent.com/kubernetes-csi/volume-data-source-validator/master/deploy/kubernetes/setup-data-source-validator.yaml
Next install the example populator.
kubectl apply -f https://raw.githubusercontent.com/kubernetes-csi/lib-volume-populator/master/example/hello-populator/crd.yaml
kubectl apply -f https://raw.githubusercontent.com/kubernetes-csi/lib-volume-populator/master/example/hello-populator/deploy.yaml
Create an instance of the Hello CR, with some text.
apiVersion: hello.k8s.io/v1alpha1
kind: Hello
metadata:
name: example-hello
spec:
fileName: example.txt
fileContents: Hello, world!
Create a PVC that refers to that CR as its data source.
apiVersion: v1
kind: PersistentVolumeClaim
metadata:
name: example-pvc
spec:
accessModes:
- ReadWriteOnce
resources:
requests:
storage: 10Mi
dataSourceRef:
apiGroup: hello.k8s.io
kind: Hello
name: example-hello
volumeMode: Filesystem
Next, run a job that reads the file in the PVC.
apiVersion: batch/v1
kind: Job
metadata:
name: example-job
spec:
template:
spec:
containers:
- name: example-container
image: busybox:latest
command:
- cat
- /mnt/example.txt
volumeMounts:
- name: vol
mountPath: /mnt
restartPolicy: Never
volumes:
- name: vol
persistentVolumeClaim:
claimName: example-pvc
Wait for the job to complete (including all of its dependencies).
kubectl wait --for=condition=Complete job/example-job
And last examine the log from the job.
kubectl logs job/example-job
Hello, world!
Note that the volume already contained a text file with the string contents from the CR. This is only the simplest example. Actual populators can set up the volume to contain arbitrary contents.
How to write your own volume populator
Developers interested in writing new poplators are encouraged to use the lib-volume-populator library and to only supply a small controller wrapper around the library, and a pod image capable of attaching to volumes and writing the appropriate data to the volume.
Individual populators can be extremely generic such that they work with every type of PVC, or they can do vendor specific things to rapidly fill a volume with data if the volume was provisioned by a specific CSI driver from the same vendor, for example, by communicating directly with the storage for that volume.
The future
As this feature is still in alpha, we expect to update the out of tree controllers with more tests and documentation. The community plans to eventually re-implement the populator library as a sidecar, for ease of operations.
We hope to see some official community-supported populators for some widely-shared use cases. Also, we expect that volume populators will be used by backup vendors as a way to "restore" backups to volumes, and possibly a standardized API to do this will evolve.
How can I learn more?
The enhancement proposal, Volume Populators, includes lots of detail about the history and technical implementation of this feature.
Volume populators and data sources, within the documentation topic about persistent volumes, explains how to use this feature in your cluster.
Please get involved by joining the Kubernetes storage SIG to help us enhance this feature. There are a lot of good ideas already and we'd be thrilled to have more!
Minimum Ready Seconds for StatefulSets
This blog describes the notion of Availability for StatefulSet workloads, and a new alpha feature in Kubernetes 1.22 which adds minReadySeconds configuration for StatefulSets.
What problems does this solve?
Prior to Kubernetes 1.22 release, once a StatefulSet Pod is in the Ready state it is considered Available to receive traffic. For some of the StatefulSet workloads, it may not be the case. For example, a workload like Prometheus with multiple instances of Alertmanager, it should be considered Available only when Alertmanager's state transfer is complete, not when the Pod is in Ready state. Since minReadySeconds adds buffer, the state transfer may be complete before the Pod becomes Available. While this is not a fool proof way of identifying if the state transfer is complete or not, it gives a way to the end user to express their intention of waiting for sometime before the Pod is considered Available and it is ready to serve requests.
Another case, where minReadySeconds helps is when using LoadBalancer Services with cloud providers. Since minReadySeconds adds latency after a Pod is Ready, it provides buffer time to prevent killing pods in rotation before new pods show up. Imagine a load balancer in unhappy path taking 10-15s to propagate. If you have 2 replicas then, you'd kill the second replica only after the first one is up but in reality, first replica cannot be seen because it is not yet ready to serve requests.
So, in general, the notion of Availability in StatefulSets is pretty useful and this feature helps in solving the above problems. This is a feature that already exists for Deployments and DaemonSets and we now have them for StatefulSets too to give users consistent workload experience.
How does it work?
The statefulSet controller watches for both StatefulSets and the Pods associated with them. When the feature gate associated with this feature is enabled, the statefulSet controller identifies how long a particular Pod associated with a StatefulSet has been in the Running state.
If this value is greater than or equal to the time specified by the end user in .spec.minReadySeconds field, the statefulSet controller updates a field called availableReplicas in the StatefulSet's status subresource to include this Pod. The status.availableReplicas in StatefulSet's status is an integer field which tracks the number of pods that are Available.
How do I use it?
You are required to prepare the following things in order to try out the feature:
- Download and install a kubectl greater than v1.22.0 version
- Switch on the feature gate with the command line flag
--feature-gates=StatefulSetMinReadySeconds=trueonkube-apiserverandkube-controller-manager
After successfully starting kube-apiserver and kube-controller-manager, you will see AvailableReplicas in the status and minReadySeconds of spec (with a default value of 0).
Specify a value for minReadySeconds for any StatefulSet and you can check if Pods are available or not by checking AvailableReplicas field using:
kubectl get statefulset/<name_of_the_statefulset> -o yaml
How can I learn more?
- Read the KEP: minReadySeconds for StatefulSets
- Read the documentation: Minimum ready seconds for StatefulSet
- Review the API definition for StatefulSet
How do I get involved?
Please reach out to us in the #sig-apps channel on Slack (visit https://slack.k8s.io/ for an invitation if you need one), or on the SIG Apps mailing list: kubernetes-sig-apps@googlegroups.com
Enable seccomp for all workloads with a new v1.22 alpha feature
This blog post is about a new Kubernetes feature introduced in v1.22, which adds an additional security layer on top of the existing seccomp support. Seccomp is a security mechanism for Linux processes to filter system calls (syscalls) based on a set of defined rules. Applying seccomp profiles to containerized workloads is one of the key tasks when it comes to enhancing the security of the application deployment. Developers, site reliability engineers and infrastructure administrators have to work hand in hand to create, distribute and maintain the profiles over the applications life-cycle.
You can use the securityContext field of Pods and their
containers can be used to adjust security related configurations of the
workload. Kubernetes introduced dedicated seccomp related API
fields in this SecurityContext with the graduation of seccomp to
General Availability (GA) in v1.19.0. This enhancement allowed an easier
way to specify if the whole pod or a specific container should run as:
Unconfined: seccomp will not be enabledRuntimeDefault: the container runtimes default profile will be usedLocalhost: a node local profile will be applied, which is being referenced by a relative path to the seccomp profile root (<kubelet-root-dir>/seccomp) of the kubelet
With the graduation of seccomp, nothing has changed from an overall security
perspective, because Unconfined is still the default. This is totally fine if
you consider this from the upgrade path and backwards compatibility perspective of
Kubernetes releases. But it also means that it is more likely that a workload
runs without seccomp at all, which should be fixed in the long term.
SeccompDefault to the rescue
Kubernetes v1.22.0 introduces a new kubelet feature gate
SeccompDefault, which has been added in alpha state as every other new
feature. This means that it is disabled by default and can be enabled manually
for every single Kubernetes node.
What does the feature do? Well, it just changes the default seccomp profile from
Unconfined to RuntimeDefault. If not specified differently in the pod
manifest, then the feature will add a higher set of security constraints by
using the default profile of the container runtime. These profiles may differ
between runtimes like CRI-O or containerd. They also differ for
its used hardware architectures. But generally speaking, those default profiles
allow a common amount of syscalls while blocking the more dangerous ones, which
are unlikely or unsafe to be used in a containerized application.
Enabling the feature
Two kubelet configuration changes have to be made to enable the feature:
- Enable the feature gate by setting the
SeccompDefault=truevia the command line (--feature-gates) or the kubelet configuration file. - Turn on the feature by enabling the feature by adding the
--seccomp-defaultcommand line flag or via the kubelet configuration file (seccompDefault: true).
The kubelet will error on startup if only one of the above steps have been done.
Trying it out
If the feature is enabled on a node, then you can create a new workload like this:
apiVersion: v1
kind: Pod
metadata:
name: test-pod
spec:
containers:
- name: test-container
image: nginx:1.21
Now it is possible to inspect the used seccomp profile by using
crictl while investigating the containers runtime
specification:
CONTAINER_ID=$(sudo crictl ps -q --name=test-container)
sudo crictl inspect $CONTAINER_ID | jq .info.runtimeSpec.linux.seccomp
{
"defaultAction": "SCMP_ACT_ERRNO",
"architectures": ["SCMP_ARCH_X86_64", "SCMP_ARCH_X86", "SCMP_ARCH_X32"],
"syscalls": [
{
"names": ["_llseek", "_newselect", "accept", …, "write", "writev"],
"action": "SCMP_ACT_ALLOW"
},
…
]
}
You can see that the lower level container runtime (CRI-O and
runc in our case), successfully applied the default seccomp profile.
This profile denies all syscalls per default, while allowing commonly used ones
like accept or write.
Please note that the feature will not influence any Kubernetes API for now.
Therefore, it is not possible to retrieve the used seccomp profile via kubectl
get or describe if the SeccompProfile field is unset within the
SecurityContext.
The feature also works when using multiple containers within a pod, for example if you create a pod like this:
apiVersion: v1
kind: Pod
metadata:
name: test-pod
spec:
containers:
- name: test-container-nginx
image: nginx:1.21
securityContext:
seccompProfile:
type: Unconfined
- name: test-container-redis
image: redis:6.2
then you should see that the test-container-nginx runs without a seccomp profile:
sudo crictl inspect $(sudo crictl ps -q --name=test-container-nginx) |
jq '.info.runtimeSpec.linux.seccomp == null'
true
Whereas the container test-container-redis runs with RuntimeDefault:
sudo crictl inspect $(sudo crictl ps -q --name=test-container-redis) |
jq '.info.runtimeSpec.linux.seccomp != null'
true
The same applies to the pod itself, which also runs with the default profile:
sudo crictl inspectp (sudo crictl pods -q --name test-pod) |
jq '.info.runtimeSpec.linux.seccomp != null'
true
Upgrade strategy
It is recommended to enable the feature in multiple steps, whereas different risks and mitigations exist for each one.
Feature gate enabling
Enabling the feature gate at the kubelet level will not turn on the feature, but
will make it possible by using the SeccompDefault kubelet configuration or the
--seccomp-default CLI flag. This can be done by an administrator for the whole
cluster or only a set of nodes.
Testing the Application
If you're trying this within a dedicated test environment, you have to ensure
that the application code does not trigger syscalls blocked by the
RuntimeDefault profile before enabling the feature on a node. This can be done
by:
Recommended: Analyzing the code (manually or by running the application with strace) for any executed syscalls which may be blocked by the default profiles. If that's the case, then you can override the default by explicitly setting the pod or container to run as
Unconfined. Alternatively, you can create a custom seccomp profile (see optional step below). profile based on the default by adding the additional syscalls to the"action": "SCMP_ACT_ALLOW"section.Recommended: Manually set the profile to the target workload and use a rolling upgrade to deploy into production. Rollback the deployment if the application does not work as intended.
Optional: Run the application against an end-to-end test suite to trigger all relevant code paths with
RuntimeDefaultenabled. If a test fails, use the same mitigation as mentioned above.Optional: Create a custom seccomp profile based on the default and change its default action from
SCMP_ACT_ERRNOtoSCMP_ACT_LOG. This means that the seccomp filter for unknown syscalls will have no effect on the application at all, but the system logs will now indicate which syscalls may be blocked. This requires at least a Kernel version 4.14 as well as a recent runc release. Monitor the application hosts audit logs (defaults to/var/log/audit/audit.log) or syslog entries (defaults to/var/log/syslog) for syscalls viatype=SECCOMP(for audit) ortype=1326(for syslog). Compare the syscall ID with those listed in the Linux Kernel sources and add them to the custom profile. Be aware that custom audit policies may lead into missing syscalls, depending on the configuration of auditd.Optional: Use cluster additions like the Security Profiles Operator for profiling the application via its log enrichment capabilities or recording a profile by using its recording feature. This makes the above mentioned manual log investigation obsolete.
Deploying the modified application
Based on the outcome of the application tests, it may be required to change the
application deployment by either specifying Unconfined or a custom seccomp
profile. This is not the case if the application works as intended with
RuntimeDefault.
Enable the kubelet configuration
If everything went well, then the feature is ready to be enabled by the kubelet configuration or its corresponding CLI flag. This should be done on a per-node basis to reduce the overall risk of missing a syscall during the investigations when running the application tests. If it's possible to monitor audit logs within the cluster, then it's recommended to do this for eventually missed seccomp events. If the application works as intended then the feature can be enabled for further nodes within the cluster.
Conclusion
Thank you for reading this blog post! I hope you enjoyed to see how the usage of
seccomp profiles has been evolved in Kubernetes over the past releases as much
as I do. On your own cluster, change the default seccomp profile to
RuntimeDefault (using this new feature) and see the security benefits, and, of
course, feel free to reach out any time for feedback or questions.
Editor's note: If you have any questions or feedback about this blog post, feel free to reach out via the Kubernetes slack in #sig-node.
Alpha in v1.22: Windows HostProcess Containers
Kubernetes v1.22 introduced a new alpha feature for clusters that include Windows nodes: HostProcess containers.
HostProcess containers aim to extend the Windows container model to enable a wider range of Kubernetes cluster management scenarios. HostProcess containers run directly on the host and maintain behavior and access similar to that of a regular process. With HostProcess containers, users can package and distribute management operations and functionalities that require host access while retaining versioning and deployment methods provided by containers. This allows Windows containers to be used for a variety of device plugin, storage, and networking management scenarios in Kubernetes. With this comes the enablement of host network mode—allowing HostProcess containers to be created within the host's network namespace instead of their own. HostProcess containers can also be built on top of existing Windows server 2019 (or later) base images, managed through the Windows container runtime, and run as any user that is available on or in the domain of the host machine.
Linux privileged containers are currently used for a variety of key scenarios in Kubernetes, including kube-proxy (via kubeadm), storage, and networking scenarios. Support for these scenarios in Windows previously required workarounds via proxies or other implementations. Using HostProcess containers, cluster operators no longer need to log onto and individually configure each Windows node for administrative tasks and management of Windows services. Operators can now utilize the container model to deploy management logic to as many clusters as needed with ease.
How does it work?
Windows HostProcess containers are implemented with Windows Job Objects, a break from the previous container model using server silos. Job objects are components of the Windows OS which offer the ability to manage a group of processes as a group (a.k.a. jobs) and assign resource constraints to the group as a whole. Job objects are specific to the Windows OS and are not associated with the Kubernetes Job API. They have no process or file system isolation, enabling the privileged payload to view and edit the host file system with the correct permissions, among other host resources. The init process, and any processes it launches or that are explicitly launched by the user, are all assigned to the job object of that container. When the init process exits or is signaled to exit, all the processes in the job will be signaled to exit, the job handle will be closed and the storage will be unmounted.
HostProcess and Linux privileged containers enable similar scenarios but differ greatly in their implementation (hence the naming difference). HostProcess containers have their own pod security policies. Those used to configure Linux privileged containers do not apply. Enabling privileged access to a Windows host is a fundamentally different process than with Linux so the configuration and capabilities of each differ significantly. Below is a diagram detailing the overall architecture of Windows HostProcess containers:
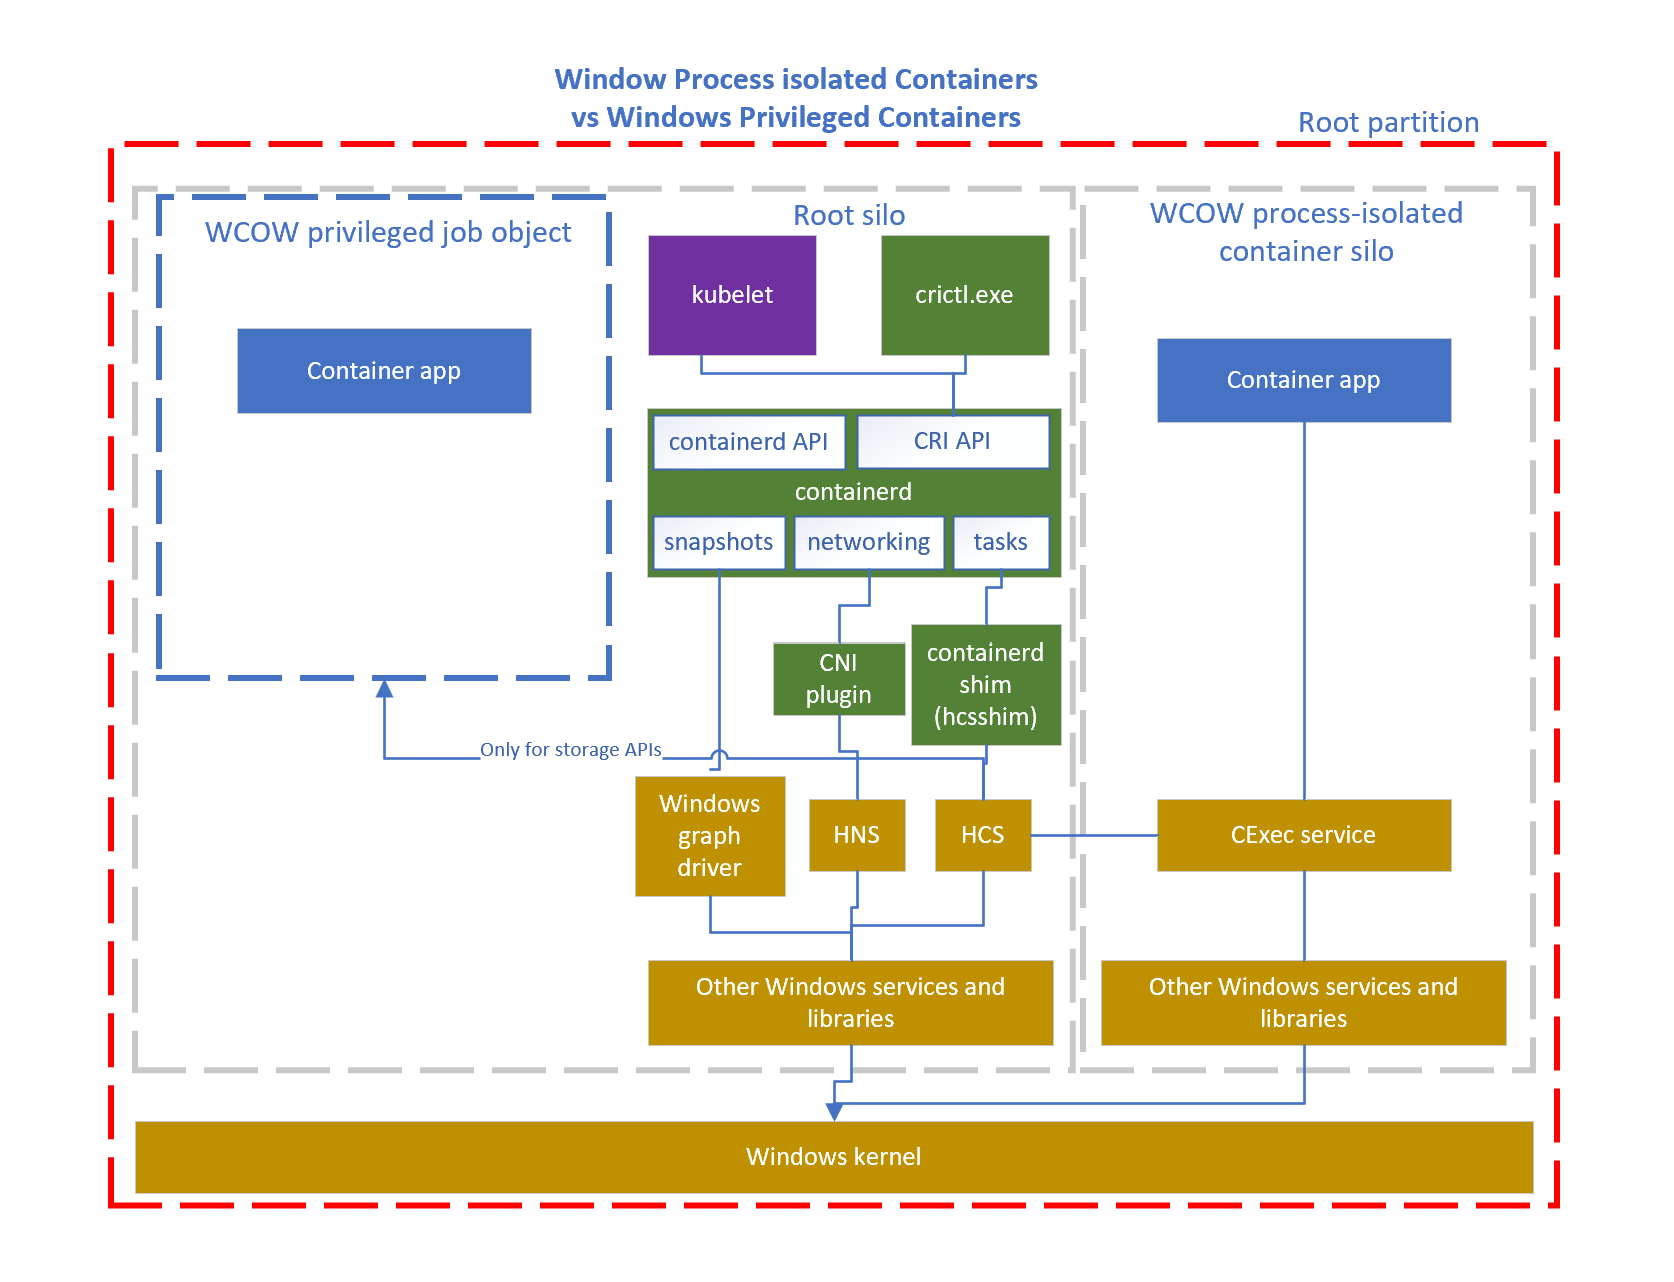
How do I use it?
HostProcess containers can be run from within a HostProcess Pod. With the feature enabled on Kubernetes version 1.22, a containerd container runtime of 1.5.4 or higher, and the latest version of hcsshim, deploying a pod spec with the correct HostProcess configuration will enable you to run HostProcess containers. To get started with running Windows containers see the general guidance for Windows in Kubernetes
How can I learn more?
Work through Create a Windows HostProcess Pod
Read about Kubernetes Pod Security Standards
Read the enhancement proposal Windows Privileged Containers and Host Networking Mode (KEP-1981)
How do I get involved?
HostProcess containers are in active development. SIG Windows welcomes suggestions from the community. Get involved with SIG Windows to contribute!
Kubernetes Memory Manager moves to beta
The blog post explains some of the internals of the Memory manager, a beta feature
of Kubernetes 1.22. In Kubernetes, the Memory Manager is a
kubelet subcomponent.
The memory manage provides guaranteed memory (and hugepages)
allocation for pods in the Guaranteed QoS class.
This blog post covers:
- Why do you need it?
- The internal details of how the MemoryManager works
- Current limitations of the MemoryManager
- Future work for the MemoryManager
Why do you need it?
Some Kubernetes workloads run on nodes with non-uniform memory access (NUMA). Suppose you have NUMA nodes in your cluster. In that case, you'll know about the potential for extra latency when compute resources need to access memory on the different NUMA locality.
To get the best performance and latency for your workload, container CPUs, peripheral devices, and memory should all be aligned to the same NUMA locality. Before Kubernetes v1.22, the kubelet already provided a set of managers to align CPUs and PCI devices, but you did not have a way to align memory. The Linux kernel was able to make best-effort attempts to allocate memory for tasks from the same NUMA node where the container is executing are placed, but without any guarantee about that placement.
How does it work?
The memory manager is doing two main things:
- provides the topology hint to the Topology Manager
- allocates the memory for containers and updates the state
The overall sequence of the Memory Manager under the Kubelet

During the Admission phase:
- When first handling a new pod, the kubelet calls the TopologyManager's
Admit()method. - The Topology Manager is calling
GetTopologyHints()for every hint provider including the Memory Manager. - The Memory Manager calculates all possible NUMA nodes combinations for every container inside the pod and returns hints to the Topology Manager.
- The Topology Manager calls to
Allocate()for every hint provider including the Memory Manager. - The Memory Manager allocates the memory under the state according to the hint that the Topology Manager chose.
During Pod creation:
- The kubelet calls
PreCreateContainer(). - For each container, the Memory Manager looks the NUMA nodes where it allocated the memory for the container and then returns that information to the kubelet.
- The kubelet creates the container, via CRI, using a container specification that incorporates information from the Memory Manager information.
Let's talk about the configuration
By default, the Memory Manager runs with the None policy, meaning it will just
relax and not do anything. To make use of the Memory Manager, you should set
two command line options for the kubelet:
--memory-manager-policy=Static--reserved-memory="<numaNodeID>:<resourceName>=<quantity>"
The value for --memory-manager-policy is straightforward: Static. Deciding what to specify for --reserved-memory takes more thought. To configure it correctly, you should follow two main rules:
- The amount of reserved memory for the
memoryresource must be greater than zero. - The amount of reserved memory for the resource type must be equal
to NodeAllocatable
(
kube-reserved + system-reserved + eviction-hard) for the resource. You can read more about memory reservations in Reserve Compute Resources for System Daemons.

Current limitations
The 1.22 release and promotion to beta brings along enhancements and fixes, but the Memory Manager still has several limitations.
Single vs Cross NUMA node allocation
The NUMA node can not have both single and cross NUMA node allocations. When the container memory is pinned to two or more NUMA nodes, we can not know from which NUMA node the container will consume the memory.

- The
container1started on the NUMA node 0 and requests 5Gi of the memory but currently is consuming only 3Gi of the memory. - For container2 the memory request is 10Gi, and no single NUMA node can satisfy it.
- The
container2consumes 3.5Gi of the memory from the NUMA node 0, but once thecontainer1will require more memory, it will not have it, and the kernel will kill one of the containers with the OOM error.
To prevent such issues, the Memory Manager will fail the admission of the container2 until the machine has two NUMA nodes without a single NUMA node allocation.
Works only for Guaranteed pods
The Memory Manager can not guarantee memory allocation for Burstable pods, also when the Burstable pod has specified equal memory limit and request.
Let's assume you have two Burstable pods: pod1 has containers with
equal memory request and limits, and pod2 has containers only with a
memory request set. You want to guarantee memory allocation for the pod1.
To the Linux kernel, processes in either pod have the same OOM score,
once the kernel finds that it does not have enough memory, it can kill
processes that belong to pod pod1.
Memory fragmentation
The sequence of Pods and containers that start and stop can fragment the memory on NUMA nodes. The alpha implementation of the Memory Manager does not have any mechanism to balance pods and defragment memory back.
Future work for the Memory Manager
We do not want to stop with the current state of the Memory Manager and are looking to make improvements, including in the following areas.
Make the Memory Manager allocation algorithm smarter
The current algorithm ignores distances between NUMA nodes during the calculation of the allocation. If same-node placement isn't available, we can still provide better performance compared to the current implementation, by changing the Memory Manager to prefer the closest NUMA nodes for cross-node allocation.
Reduce the number of admission errors
The default Kubernetes scheduler is not aware of the node's NUMA topology, and it can be a reason for many admission errors during the pod start. We're hoping to add a KEP (Kubernetes Enhancement Proposal) to cover improvements in this area. Follow Topology aware scheduler plugin in kube-scheduler to see how this idea progresses.
Conclusion
With the promotion of the Memory Manager to beta in 1.22, we encourage everyone to give it a try and look forward to any feedback you may have. While there are still several limitations, we have a set of enhancements planned to address them and look forward to providing you with many new features in upcoming releases. If you have ideas for additional enhancements or a desire for certain features, please let us know. The team is always open to suggestions to enhance and improve the Memory Manager. We hope you have found this blog informative and helpful! Let us know if you have any questions or comments.
You can contact us via:
- The Kubernetes #sig-node channel in Slack (visit https://slack.k8s.io/ for an invitation if you need one)
- The SIG Node mailing list, kubernetes-sig-node@googlegroups.com
Kubernetes 1.22: CSI Windows Support (with CSI Proxy) reaches GA
The stable version of CSI Proxy for Windows has been released alongside Kubernetes 1.22. CSI Proxy enables CSI Drivers running on Windows nodes to perform privileged storage operations.
Background
Container Storage Interface (CSI) for Kubernetes went GA in the Kubernetes 1.13 release. CSI has become the standard for exposing block and file storage to containerized workloads on Container Orchestration systems (COs) like Kubernetes. It enables third-party storage providers to write and deploy plugins without the need to alter the core Kubernetes codebase. Legacy in-tree drivers are deprecated and new storage features are introduced in CSI, therefore it is important to get CSI Drivers to work on Windows.
A CSI Driver in Kubernetes has two main components: a controller plugin which runs in the control plane and a node plugin which runs on every node.
The controller plugin generally does not need direct access to the host and can perform all its operations through the Kubernetes API and external control plane services.
The node plugin, however, requires direct access to the host for making block devices and/or file systems available to the Kubernetes kubelet. Due to the missing capability of running privileged operations from containers on Windows nodes CSI Proxy was introduced as alpha in Kubernetes 1.18 as a way to enable containers to perform privileged storage operations. This enables containerized CSI Drivers to run on Windows nodes.
What's CSI Proxy and how do CSI drivers interact with it?
When a workload that uses persistent volumes is scheduled, it'll go through a sequence of steps defined in the CSI Spec. First, the workload will be scheduled to run on a node. Then the controller component of a CSI Driver will attach the persistent volume to the node. Finally the node component of a CSI Driver will mount the persistent volume on the node.
The node component of a CSI Driver needs to run on Windows nodes to support Windows workloads. Various privileged operations like scanning of disk devices, mounting of file systems, etc. cannot be done from a containerized application running on Windows nodes yet (Windows HostProcess containers introduced in Kubernetes 1.22 as alpha enable functionalities that require host access like the operations mentioned before). However, we can perform these operations through a binary (CSI Proxy) that's pre-installed on the Window nodes. CSI Proxy has a client-server architecture and allows CSI drivers to issue privileged storage operations through a gRPC interface exposed over named pipes created during the startup of CSI Proxy.
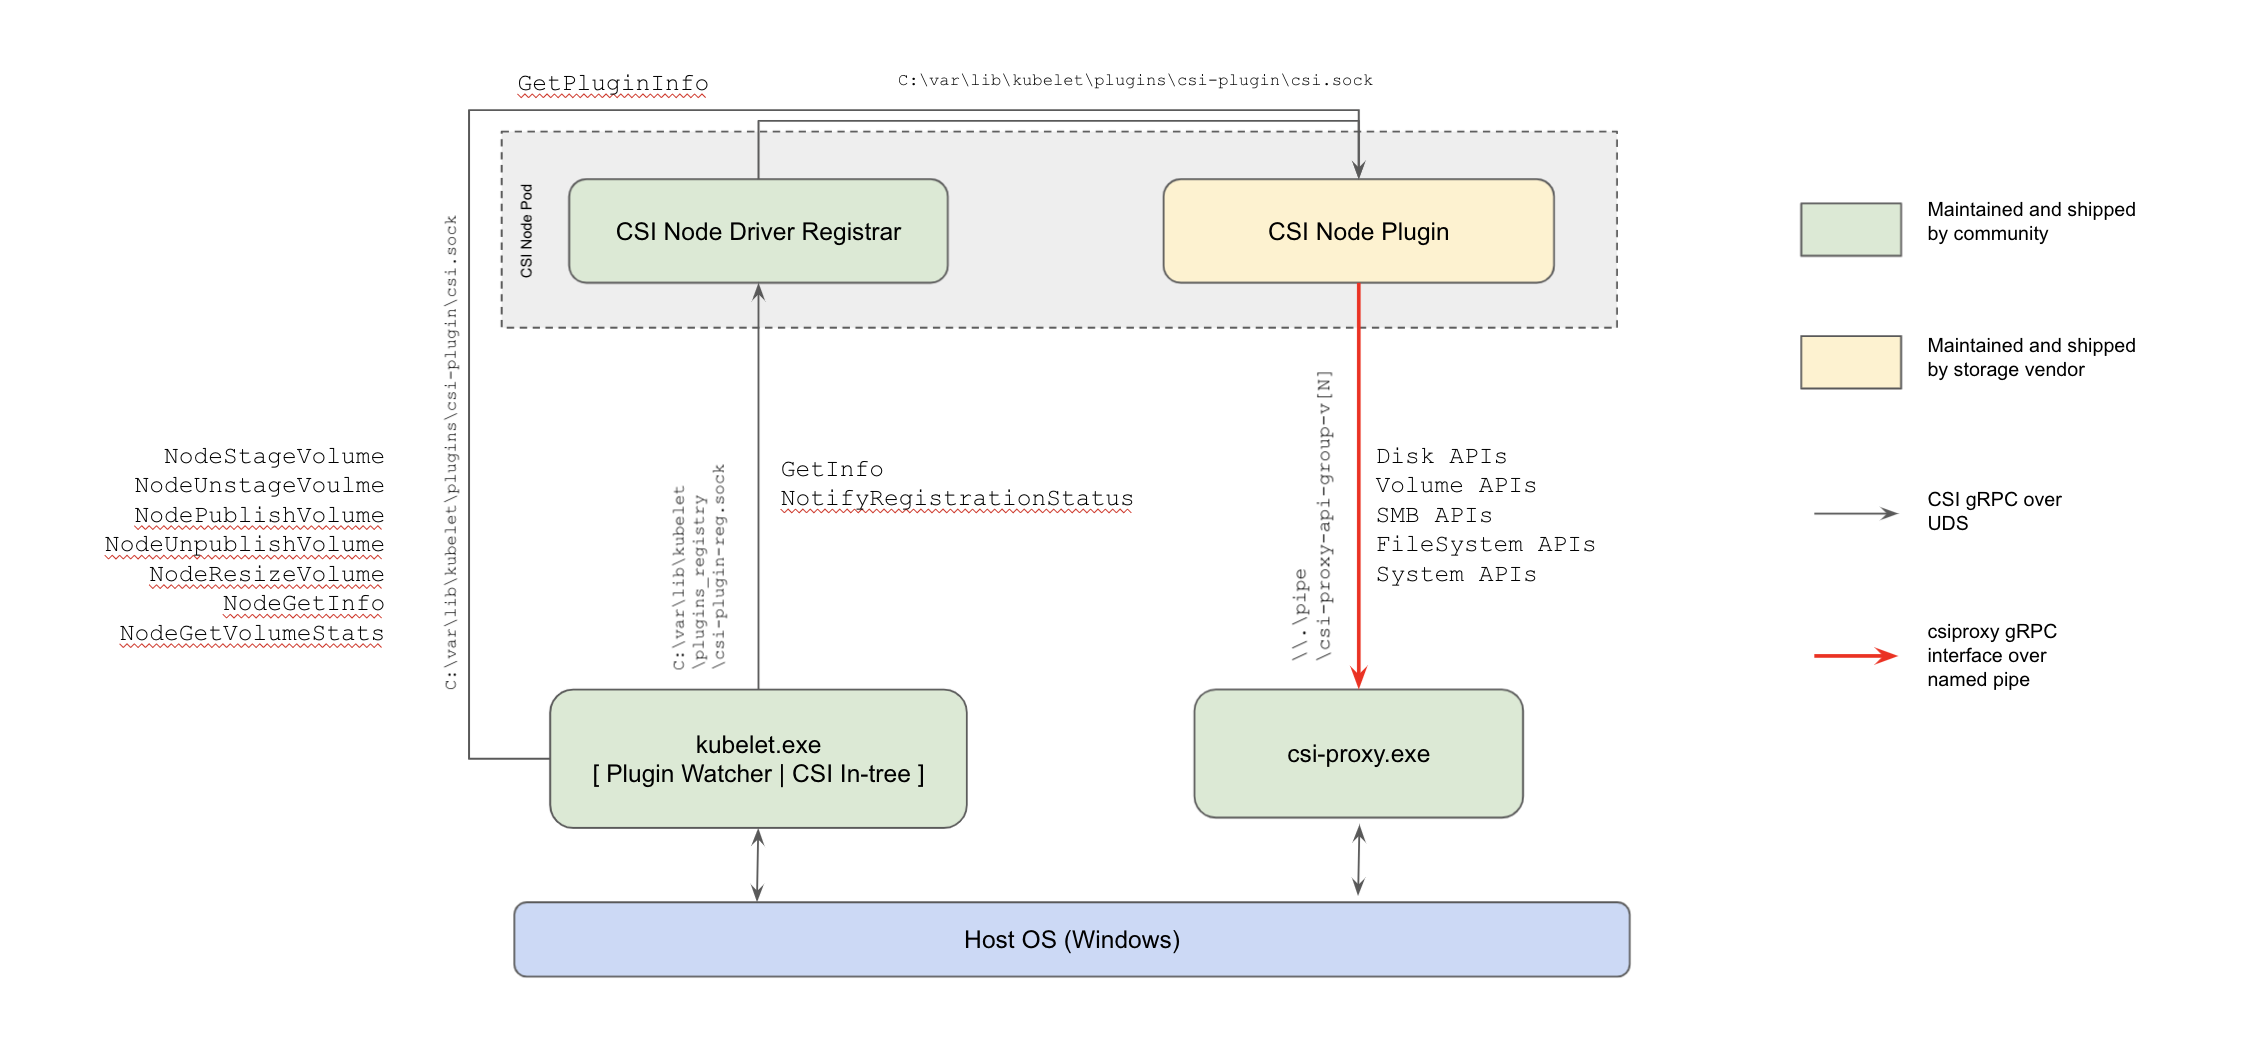
CSI Proxy reaches GA
The CSI Proxy development team has worked closely with storage vendors, many of whom started integrating CSI Proxy into their CSI Drivers and provided feedback as early as CSI Proxy design proposal. This cooperation uncovered use cases where additional APIs were needed, found bugs, and identified areas for documentation improvement.
The CSI Proxy design KEP has been updated to reflect the current CSI Proxy architecture. Additional development documentation is included for contributors interested in helping with new features or bug fixes.
Before we reached GA we wanted to make sure that our API is simple and consistent. We went through an extensive API review of the v1beta API groups where we made sure that the CSI Proxy API methods and messages are consistent with the naming conventions defined in the CSI Spec. As part of this effort we're graduating the Disk, Filesystem, SMB and Volume API groups to v1.
Additional Windows system APIs to get information from the Windows nodes and support to mount iSCSI targets in Windows nodes, are available as alpha APIs in the System API and the iSCSI API. These APIs will continue to be improved before we graduate them to v1.
CSI Proxy v1 is compatible with all the previous v1betaX releases. The GA csi-proxy.exe binary can handle requests from v1betaX clients thanks to the autogenerated conversion layer that transforms any versioned client request to a version-agnostic request that the server can process. Several integration tests were added for all the API versions of the API groups that are graduating to v1 to ensure that CSI Proxy is backwards compatible.
Version drift between CSI Proxy and the CSI Drivers that interact with it was also carefully considered. A connection fallback mechanism has been provided for CSI Drivers to handle multiple versions of CSI Proxy for a smooth upgrade to v1. This allows CSI Drivers, like the GCE PD CSI Driver, to recognize which version of the CSI Proxy binary is running and handle multiple versions of the CSI Proxy binary deployed on the node.
CSI Proxy v1 is already being used by many CSI Drivers, including the AWS EBS CSI Driver, Azure Disk CSI Driver, GCE PD CSI Driver, and SMB CSI Driver.
Future plans
We're very excited for the future of CSI Proxy. With the upcoming Windows HostProcess containers, we are considering converting the CSI Proxy in to a library consumed by CSI Drivers in addition to the current client/server design. This will allow us to iterate faster on new features because the csi-proxy.exe binary will no longer be needed.
How to get involved?
This project, like all of Kubernetes, is the result of hard work by many contributors from diverse backgrounds working together. Those interested in getting involved with the design and development of CSI Proxy, or any part of the Kubernetes Storage system, may join the Kubernetes Storage Special Interest Group (SIG). We’re rapidly growing and always welcome new contributors.
For those interested in more details about CSI support in Windows please reach out in the #csi-windows Kubernetes slack channel.
Acknowledgments
CSI-Proxy received many contributions from members of the Kubernetes community. We thank all of the people that contributed to CSI Proxy with design reviews, bug reports, bug fixes, and for their continuous support in reaching this milestone:
New in Kubernetes v1.22: alpha support for using swap memory
The 1.22 release introduced alpha support for configuring swap memory usage for Kubernetes workloads on a per-node basis.
In prior releases, Kubernetes did not support the use of swap memory on Linux, as it is difficult to provide guarantees and account for pod memory utilization when swap is involved. As part of Kubernetes' earlier design, swap support was considered out of scope, and a kubelet would by default fail to start if swap was detected on a node.
However, there are a number of use cases that would benefit from Kubernetes nodes supporting swap, including improved node stability, better support for applications with high memory overhead but smaller working sets, the use of memory-constrained devices, and memory flexibility.
Hence, over the past two releases, SIG Node has been working to gather appropriate use cases and feedback, and propose a design for adding swap support to nodes in a controlled, predictable manner so that Kubernetes users can perform testing and provide data to continue building cluster capabilities on top of swap. The alpha graduation of swap memory support for nodes is our first milestone towards this goal!
How does it work?
There are a number of possible ways that one could envision swap use on a node. To keep the scope manageable for this initial implementation, when swap is already provisioned and available on a node, we have proposed the kubelet should be able to be configured such that:
- It can start with swap on.
- It will direct the Container Runtime Interface to allocate zero swap memory to Kubernetes workloads by default.
- You can configure the kubelet to specify swap utilization for the entire node.
Swap configuration on a node is exposed to a cluster admin via the
memorySwap in the KubeletConfiguration.
As a cluster administrator, you can specify the node's behaviour in the
presence of swap memory by setting memorySwap.swapBehavior.
This is possible through the addition of a memory_swap_limit_in_bytes field
to the container runtime interface (CRI). The kubelet's config will control how
much swap memory the kubelet instructs the container runtime to allocate to
each container via the CRI. The container runtime will then write the swap
settings to the container level cgroup.
How do I use it?
On a node where swap memory is already provisioned, Kubernetes use of swap on a
node can be enabled by enabling the NodeSwap feature gate on the kubelet, and
disabling the failSwapOn configuration setting
or the --fail-swap-on command line flag.
You can also optionally configure memorySwap.swapBehavior in order to
specify how a node will use swap memory. For example,
memorySwap:
swapBehavior: LimitedSwap
The available configuration options for swapBehavior are:
LimitedSwap(default): Kubernetes workloads are limited in how much swap they can use. Workloads on the node not managed by Kubernetes can still swap.UnlimitedSwap: Kubernetes workloads can use as much swap memory as they request, up to the system limit.
If configuration for memorySwap is not specified and the feature gate is
enabled, by default the kubelet will apply the same behaviour as the
LimitedSwap setting.
The behaviour of the LimitedSwap setting depends if the node is running with
v1 or v2 of control groups (also known as "cgroups"):
- cgroups v1: Kubernetes workloads can use any combination of memory and swap, up to the pod's memory limit, if set.
- cgroups v2: Kubernetes workloads cannot use swap memory.
Caveats
Having swap available on a system reduces predictability. Swap's performance is worse than regular memory, sometimes by many orders of magnitude, which can cause unexpected performance regressions. Furthermore, swap changes a system's behaviour under memory pressure, and applications cannot directly control what portions of their memory usage are swapped out. Since enabling swap permits greater memory usage for workloads in Kubernetes that cannot be predictably accounted for, it also increases the risk of noisy neighbours and unexpected packing configurations, as the scheduler cannot account for swap memory usage.
The performance of a node with swap memory enabled depends on the underlying physical storage. When swap memory is in use, performance will be significantly worse in an I/O operations per second (IOPS) constrained environment, such as a cloud VM with I/O throttling, when compared to faster storage mediums like solid-state drives or NVMe.
Hence, we do not recommend the use of swap for certain performance-constrained workloads or environments. Cluster administrators and developers should benchmark their nodes and applications before using swap in production scenarios, and we need your help with that!
Looking ahead
The Kubernetes 1.22 release introduces alpha support for swap memory on nodes, and we will continue to work towards beta graduation in the 1.23 release. This will include:
- Adding support for controlling swap consumption at the Pod level via cgroups.
- This will include the ability to set a system-reserved quantity of swap from what kubelet detects on the host.
- Determining a set of metrics for node QoS in order to evaluate the performance and stability of nodes with and without swap enabled.
- Collecting feedback from test user cases.
- We will consider introducing new configuration modes for swap, such as a node-wide swap limit for workloads.
How can I learn more?
You can review the current documentation on the Kubernetes website.
For more information, and to assist with testing and provide feedback, please see KEP-2400 and its design proposal.
How do I get involved?
Your feedback is always welcome! SIG Node meets regularly and can be reached via Slack (channel #sig-node), or the SIG's mailing list. Feel free to reach out to me, Elana Hashman (@ehashman on Slack and GitHub) if you'd like to help.
Kubernetes 1.22: Server Side Apply moves to GA
Server-side Apply (SSA) has been promoted to GA in the Kubernetes v1.22 release. The GA milestone means you can depend on the feature and its API, without fear of future backwards-incompatible changes. GA features are protected by the Kubernetes deprecation policy.
What is Server-side Apply?
Server-side Apply helps users and controllers manage their resources through declarative configurations. Server-side Apply replaces the client side apply feature implemented by “kubectl apply” with a server-side implementation, permitting use by tools/clients other than kubectl. Server-side Apply is a new merging algorithm, as well as tracking of field ownership, running on the Kubernetes api-server. Server-side Apply enables new features like conflict detection, so the system knows when two actors are trying to edit the same field. Refer to the Server-side Apply Documentation and Beta 2 release announcement for more information.
What’s new since Beta?
Since the Beta 2 release subresources support has been added, and both client-go and Kubebuilder have added comprehensive support for Server-side Apply. This completes the Server-side Apply functionality required to make controller development practical.
Support for subresources
Server-side Apply now fully supports subresources like status and scale. This is particularly important for controllers, which are often responsible for writing to subresources.
Server-side Apply support in client-go
Previously, Server-side Apply could only be called from the client-go typed client using the Patch function, with PatchType set to ApplyPatchType. Now, Apply functions are included in the client to allow for a more direct and typesafe way of calling Server-side Apply. Each Apply function takes an "apply configuration" type as an argument, which is a structured representation of an Apply request. For example:
import (
...
v1ac "k8s.io/client-go/applyconfigurations/autoscaling/v1"
)
hpaApplyConfig := v1ac.HorizontalPodAutoscaler(autoscalerName, ns).
WithSpec(v1ac.HorizontalPodAutoscalerSpec().
WithMinReplicas(0)
)
return hpav1client.Apply(ctx, hpaApplyConfig, metav1.ApplyOptions{FieldManager: "mycontroller", Force: true})
Note in this example that HorizontalPodAutoscaler is imported from an "applyconfigurations" package. Each "apply configuration" type represents the same Kubernetes object kind as the corresponding go struct, but where all fields are pointers to make them optional, allowing apply requests to be accurately represented. For example, when the apply configuration in the above example is marshalled to YAML, it produces:
apiVersion: autoscaling/v1
kind: HorizontalPodAutoscaler
metadata:
name: myHPA
namespace: myNamespace
spec:
minReplicas: 0
To understand why this is needed, the above YAML cannot be produced by the v1.HorizontalPodAutoscaler go struct. Take for example:
hpa := v1.HorizontalPodAutoscaler{
TypeMeta: metav1.TypeMeta{
APIVersion: "autoscaling/v1",
Kind: "HorizontalPodAutoscaler",
},
ObjectMeta: ObjectMeta{
Namespace: ns,
Name: autoscalerName,
},
Spec: v1.HorizontalPodAutoscalerSpec{
MinReplicas: pointer.Int32Ptr(0),
},
}
The above code attempts to declare the same apply configuration as shown in the previous examples, but when marshalled to YAML, produces:
kind: HorizontalPodAutoscaler
apiVersion: autoscaling/v1
metadata
name: myHPA
namespace: myNamespace
creationTimestamp: null
spec:
scaleTargetRef:
kind: ""
name: ""
minReplicas: 0
maxReplicas: 0
Which, among other things, contains spec.maxReplicas set to 0. This is almost certainly not what the caller intended (the intended apply configuration says nothing about the maxReplicas field), and could have serious consequences on a production system: it directs the autoscaler to downscale to zero pods. The problem here originates from the fact that the go structs contain required fields that are zero valued if not set explicitly. The go structs work as intended for create and update operations, but are fundamentally incompatible with apply, which is why we have introduced the generated "apply configuration" types.
The "apply configurations" also have convenience With<FieldName> functions that make it easier to build apply requests. This allows developers to set fields without having to deal with the fact that all the fields in the "apply configuration" types are pointers, and are inconvenient to set using go. For example MinReplicas: &0 is not legal go code, so without the With functions, developers would work around this problem by using a library, e.g. MinReplicas: pointer.Int32Ptr(0), but string enumerations like corev1.Protocol are still a problem since they cannot be supported by a general purpose library. In addition to the convenience, the With functions also isolate developers from the underlying representation, which makes it safer for the underlying representation to be changed to support additional features in the future.
Using Server-side Apply in a controller
You can use the new support for Server-side Apply no matter how you implemented your controller. However, the new client-go support makes it easier to use Server-side Apply in controllers.
When authoring new controllers to use Server-side Apply, a good approach is to have the controller recreate the apply configuration for an object each time it reconciles that object. This ensures that the controller fully reconciles all the fields that it is responsible for. Controllers typically should unconditionally set all the fields they own by setting Force: true in the ApplyOptions. Controllers must also provide a FieldManager name that is unique to the reconciliation loop that apply is called from.
When upgrading existing controllers to use Server-side Apply the same approach often works well--migrate the controllers to recreate the apply configuration each time it reconciles any object. Unfortunately, the controller might have multiple code paths that update different parts of an object depending on various conditions. Migrating a controller like this to Server-side Apply can be risky because if the controller forgets to include any fields in an apply configuration that is included in a previous apply request, a field can be accidently deleted. To ease this type of migration, client-go apply support provides a way to replace any controller reconciliation code that performs a "read/modify-in-place/update" (or patch) workflow with a "extract/modify-in-place/apply" workflow. Here's an example of the new workflow:
fieldMgr := "my-field-manager"
deploymentClient := clientset.AppsV1().Deployments("default")
// read, could also be read from a shared informer
deployment, err := deploymentClient.Get(ctx, "example-deployment", metav1.GetOptions{})
if err != nil {
// handle error
}
// extract
deploymentApplyConfig, err := appsv1ac.ExtractDeployment(deployment, fieldMgr)
if err != nil {
// handle error
}
// modify-in-place
deploymentApplyConfig.Spec.Template.Spec.WithContainers(corev1ac.Container().
WithName("modify-slice").
WithImage("nginx:1.14.2"),
)
// apply
applied, err := deploymentClient.Apply(ctx, deploymentApplyConfig, metav1.ApplyOptions{FieldManager: fieldMgr})
For developers using Custom Resource Definitions (CRDs), the Kubebuilder apply support will provide the same capabilities. Documentation will be included in the Kubebuilder book when available.
Server-side Apply and CustomResourceDefinitions
It is strongly recommended that all Custom Resource Definitions (CRDs) have a schema. CRDs without a schema are treated as unstructured data by Server-side Apply. Keys are treated as fields in a struct and lists are assumed to be atomic.
CRDs that specify a schema are able to specify additional annotations in the schema. Please refer to the documentation on the full list of available annotations.
New annotations since beta:
Defaulting: Values for fields that appliers do not express explicit interest in should be defaulted. This prevents an applier from unintentionally owning a defaulted field that might cause conflicts with other appliers. If unspecified, the default value is nil or the nil equivalent for the corresponding type.
- Usage: see the CRD Defaulting documentation for more details.
- Golang:
+default=<value> - OpenAPI extension:
default: <value>
Atomic for maps and structs:
Maps: By default maps are granular. A different manager is able to manage each map entry. They can also be configured to be atomic such that a single manager owns the entire map.
- Usage: Refer to Merge Strategy for a more detailed overview
- Golang:
+mapType=granular/atomic - OpenAPI extension:
x-kubernetes-map-type: granular/atomic
Structs: By default structs are granular and a separate applier may own each field. For certain kinds of structs, atomicity may be desired. This is most commonly seen in small coordinate-like structs such as Field/Object/Namespace Selectors, Object References, RGB values, Endpoints (Protocol/Port pairs), etc.
- Usage: Refer to Merge Strategy for a more detailed overview
- Golang:
+structType=granular/atomic - OpenAPI extension:
x-kubernetes-map-type:atomic/granular
What's Next?
After Server Side Apply, the next focus for the API Expression working-group is around improving the expressiveness and size of the published Kubernetes API schema. To see the full list of items we are working on, please join our working group and refer to the work items document.
How to get involved?
The working-group for apply is wg-api-expression. It is available on slack #wg-api-expression, through the mailing list and we also meet every other Tuesday at 9.30 PT on Zoom.
We would also like to use the opportunity to thank the hard work of all the contributors involved in making this promotion to GA possible:
- Andrea Nodari
- Antoine Pelisse
- Daniel Smith
- Jeffrey Ying
- Jenny Buckley
- Joe Betz
- Julian Modesto
- Kevin Delgado
- Kevin Wiesmüller
- Maria Ntalla
Kubernetes 1.22: Reaching New Peaks
We’re pleased to announce the release of Kubernetes 1.22, the second release of 2021!
This release consists of 53 enhancements: 13 enhancements have graduated to stable, 24 enhancements are moving to beta, and 16 enhancements are entering alpha. Also, three features have been deprecated.
In April of this year, the Kubernetes release cadence was officially changed from four to three releases yearly. This is the first longer-cycle release related to that change. As the Kubernetes project matures, the number of enhancements per cycle grows. This means more work, from version to version, for the contributor community and Release Engineering team, and it can put pressure on the end-user community to stay up-to-date with releases containing increasingly more features.
Changing the release cadence from four to three releases yearly balances many aspects of the project, both in how contributions and releases are managed, and also in the community's ability to plan for upgrades and stay up to date.
You can read more in the official blog post Kubernetes Release Cadence Change: Here’s What You Need To Know.
Major Themes
Server-side Apply graduates to GA
Server-side Apply is a new field ownership and object merge algorithm running on the Kubernetes API server. Server-side Apply helps users and controllers manage their resources via declarative configurations. It allows them to create and/or modify their objects declaratively, simply by sending their fully specified intent. After being in beta for a couple releases, Server-side Apply is now generally available.
External credential providers now stable
Support for Kubernetes client credential plugins has been in beta since 1.11, and with the release of Kubernetes 1.22 now graduates to stable. The GA feature set includes improved support for plugins that provide interactive login flows, as well as a number of bug fixes. Aspiring plugin authors can look at sample-exec-plugin to get started.
etcd moves to 3.5.0
Kubernetes' default backend storage, etcd, has a new release: 3.5.0. The new release comes with improvements to the security, performance, monitoring, and developer experience. There are numerous bug fixes and some critical new features like the migration to structured logging and built-in log rotation. The release comes with a detailed future roadmap to implement a solution to traffic overload. You can read a full and detailed list of changes in the 3.5.0 release announcement.
Quality of Service for memory resources
Originally, Kubernetes used the v1 cgroups API. With that design, the QoS class for a Pod only applied to CPU resources (such as cpu_shares). As an alpha feature, Kubernetes v1.22 can now use the cgroups v2 API to control memory allocation and isolation. This feature is designed to improve workload and node availability when there is contention for memory resources, and to improve the predictability of container lifecycle.
Node system swap support
Every system administrator or Kubernetes user has been in the same boat regarding setting up and using Kubernetes: disable swap space. With the release of Kubernetes 1.22, alpha support is available to run nodes with swap memory. This change lets administrators opt in to configuring swap on Linux nodes, treating a portion of block storage as additional virtual memory.
Windows enhancements and capabilities
Continuing to support the growing developer community, SIG Windows has released their Development Environment. These new tools support multiple CNI providers and can run on multiple platforms. There is also a new way to run bleeding-edge Windows features from scratch by compiling the Windows kubelet and kube-proxy, then using them along with daily builds of other Kubernetes components.
CSI support for Windows nodes moves to GA in the 1.22 release. In Kubernetes v1.22, Windows privileged containers are an alpha feature. To allow using CSI storage on Windows nodes, CSIProxy enables CSI node plugins to be deployed as unprivileged pods, using the proxy to perform privileged storage operations on the node.
Default profiles for seccomp
An alpha feature for default seccomp profiles has been added to the kubelet, along with a new command line flag and configuration. When in use, this new feature provides cluster-wide seccomp defaults, using the RuntimeDefault seccomp profile rather than Unconfined by default. This enhances the default security of the Kubernetes Deployment. Security administrators will now sleep better knowing that workloads are more secure by default. To learn more about the feature, please refer to the official seccomp tutorial.
More secure control plane with kubeadm
A new alpha feature allows running the kubeadm control plane components as non-root users. This is a long requested security measure in kubeadm. To try it you must enable the kubeadm specific RootlessControlPlane feature gate. When you deploy a cluster using this alpha feature, your control plane runs with lower privileges.
For kubeadm, Kubernetes 1.22 also brings a new v1beta3 configuration API. This iteration adds some long requested features and deprecates some existing ones. The v1beta3 version is now the preferred API version; the v1beta2 API also remains available and is not yet deprecated.
Major Changes
Removal of several deprecated beta APIs
A number of deprecated beta APIs have been removed in 1.22 in favor of the GA version of those same APIs. All existing objects can be interacted with via stable APIs. This removal includes beta versions of the Ingress, IngressClass, Lease, APIService, ValidatingWebhookConfiguration, MutatingWebhookConfiguration, CustomResourceDefinition, TokenReview, SubjectAccessReview, and CertificateSigningRequest APIs.
For the full list, check out the Deprecated API Migration Guide as well as the blog post Kubernetes API and Feature Removals In 1.22: Here’s What You Need To Know.
API changes and improvements for ephemeral containers
The API used to create Ephemeral Containers changes in 1.22. The Ephemeral Containers feature is alpha and disabled by default, and the new API does not work with clients that attempt to use the old API.
For stable features, the kubectl tool follows the Kubernetes version skew policy; however, kubectl v1.21 and older do not support the new API for ephemeral containers. If you plan to use kubectl debug to create ephemeral containers, and your cluster is running Kubernetes v1.22, you cannot do so with kubectl v1.21 or earlier. Please update kubectl to 1.22 if you wish to use kubectl debug with a mix of cluster versions.
Other Updates
Graduated to Stable
- Bound Service Account Token Volumes
- CSI Service Account Token
- Windows Support for CSI Plugins
- Warning mechanism for deprecated API use
- PodDisruptionBudget Eviction
Notable Feature Updates
- A new PodSecurity admission alpha feature is introduced, intended as a replacement for PodSecurityPolicy
- The Memory Manager moves to beta
- A new alpha feature to enable API Server Tracing
- A new v1beta3 version of the kubeadm configuration format
- Generic data populators for PersistentVolumes are now available in alpha
- The Kubernetes control plane will now always use the CronJobs v2 controller
- As an alpha feature, all Kubernetes node components (including the kubelet, kube-proxy, and container runtime) can be run as a non-root user
Release notes
You can check out the full details of the 1.22 release in the release notes.
Availability of release
Kubernetes 1.22 is available for download and also on the GitHub project.
There are some great resources out there for getting started with Kubernetes. You can check out some interactive tutorials on the main Kubernetes site, or run a local cluster on your machine using Docker containers with kind. If you’d like to try building a cluster from scratch, check out the Kubernetes the Hard Way tutorial by Kelsey Hightower.
Release Team
This release was made possible by a very dedicated group of individuals, who came together as a team to deliver technical content, documentation, code, and a host of other components that go into every Kubernetes release.
A huge thank you to the release lead Savitha Raghunathan for leading us through a successful release cycle, and to everyone else on the release team for supporting each other, and working so hard to deliver the 1.22 release for the community.
We would also like to take this opportunity to remember Peeyush Gupta, a member of our team that we lost earlier this year. Peeyush was actively involved in SIG ContribEx and the Kubernetes Release Team, most recently serving as the 1.22 Communications lead. His contributions and efforts will continue to reflect in the community he helped build. A CNCF memorial page has been created where thoughts and memories can be shared by the community.
Release Logo

Amidst the ongoing pandemic, natural disasters, and ever-present shadow of burnout, the 1.22 release of Kubernetes includes 53 enhancements. This makes it the largest release to date. This accomplishment was only made possible due to the hard-working and passionate Release Team members and the amazing contributors of the Kubernetes ecosystem. The release logo is our reminder to keep reaching for new milestones and setting new records. And it is dedicated to all the Release Team members, hikers, and stargazers!
The logo is designed by Boris Zotkin. Boris is a Mac/Linux Administrator at the MathWorks. He enjoys simple things in life and loves spending time with his family. This tech-savvy individual is always up for a challenge and happy to help a friend!
User Highlights
- In May, the CNCF welcomed 27 new organizations across the globe as members of the diverse cloud native ecosystem. These new members will participate in CNCF events, including the upcoming KubeCon + CloudNativeCon NA in Los Angeles from October 12 – 15, 2021.
- The CNCF granted Spotify the Top End User Award during KubeCon + CloudNativeCon EU – Virtual 2021.
Project Velocity
The CNCF K8s DevStats project aggregates a number of interesting data points related to the velocity of Kubernetes and various sub-projects. This includes everything from individual contributions to the number of companies that are contributing, and is an illustration of the depth and breadth of effort that goes into evolving this ecosystem.
In the v1.22 release cycle, which ran for 15 weeks (April 26 to August 4), we saw contributions from 1063 companies and 2054 individuals.
Ecosystem Updates
- KubeCon + CloudNativeCon Europe 2021 was held in May, the third such event to be virtual. All talks are now available on-demand for anyone that would like to catch up!
- Spring Term LFX Program had the largest graduating class with 28 successful CNCF interns!
- CNCF launched livestreaming on Twitch at the beginning of the year targeting definitive interactive media experience for anyone wanting to learn, grow, and collaborate with others in the Cloud Native community from anywhere in the world.
Event Updates
- KubeCon + CloudNativeCon North America 2021 will take place in Los Angeles, October 12 – 15, 2021! You can find more information about the conference and registration on the event site.
- Kubernetes Community Days has upcoming events scheduled in Italy, the UK, and in Washington DC.
Upcoming release webinar
Join members of the Kubernetes 1.22 release team on October 5, 2021 to learn about the major features of this release, as well as deprecations and removals to help plan for upgrades. For more information and registration, visit the event page on the CNCF Online Programs site.
Get Involved
If you’re interested in contributing to the Kubernetes community, Special Interest Groups (SIGs) are a great starting point. Many of them may align with your interests! If there are things you’d like to share with the community, you can join the weekly community meeting, or use any of the following channels:
- Find out more about contributing to Kubernetes at the Kubernetes Contributors website.
- Follow us on Twitter @Kubernetesio for latest updates
- Join the community discussion on Discuss
- Join the community on Slack
- Share your Kubernetes story
- Read more about what’s happening with Kubernetes on the blog
- Learn more about the Kubernetes Release Team
Roorkee robots, releases and racing: the Kubernetes 1.21 release interview
With Kubernetes 1.22 due out next week, now is a great time to look back on 1.21. The release team for that version was led by Nabarun Pal from VMware.
Back in April I interviewed Nabarun on the weekly Kubernetes Podcast from Google; the latest in a series of release lead conversations that started back with 1.11, not long after the show started back in 2018.
In these interviews we learn a little about the release, but also about the process behind it, and the story behind the person chosen to lead it. Getting to know a community member is my favourite part of the show each week, and so I encourage you to subscribe wherever you get your podcasts. With a release coming next week, you can probably guess what our next topic will be!
This transcript has been edited and condensed for clarity.
CRAIG BOX: You have a Bachelor of Technology in Metallurgical and Materials Engineering. How are we doing at turning lead into gold?
NABARUN PAL: Well, last I checked, we have yet to find the philosopher's stone!
CRAIG BOX: One of the more important parts of the process?
NABARUN PAL: We're not doing that well in terms of getting alchemists up and running. There is some improvement in nuclear technology, where you can turn lead into gold, but I would guess buying gold would be much more efficient.
CRAIG BOX: Or Bitcoin? It depends what you want to do with the gold.
NABARUN PAL: Yeah, seeing the increasing prices of Bitcoin, you'd probably prefer to bet on that. But, don't take this as a suggestion. I'm not a registered investment advisor, and I don't give investment advice!
CRAIG BOX: But you are, of course, a trained materials engineer. How did you get into that line of education?
NABARUN PAL: We had a graded and equated exam structure, where you sit a single exam, and then based on your performance in that exam, you can try any of the universities which take those scores into account. I went to the Indian Institute of Technology, Roorkee.
Materials engineering interested me a lot. I had a passion for computer science since childhood, but I also liked material science, so I wanted to explore that field. I did a lot of exploration around material science and metallurgy in my freshman and sophomore years, but then computing, since it was a passion, crept into the picture.
CRAIG BOX: Let's dig in there a little bit. What did computing look like during your childhood?
NABARUN PAL: It was a very interesting journey. I started exploring computers back when I was seven or eight. For my first programming language, if you call it a programming language, I explored LOGO.
You have a turtle on the screen, and you issue commands to it, like move forward or rotate or pen up or pen down. You basically draw geometric figures. I could visually see how I could draw a square and how I could draw a triangle. It was an interesting journey after that. I learned BASIC, then went to some amount of HTML, JavaScript.
CRAIG BOX: It's interesting to me because Logo and BASIC were probably my first two programming languages, but I think there was probably quite a gap in terms of when HTML became a thing after those two! Did your love of computing always lead you down the path towards programming, or were you interested as a child in using computers for games or application software? What led you specifically into programming?
NABARUN PAL: Programming came in late. Not just in computing, but in life, I'm curious with things. When my parents got me my first computer, I was curious. I was like, "how does this operating system work?" What even is running it? Using a television and using a computer is a different experience, but usability is kind of the same thing. The HCI device for a television is a remote, whereas with a computer, I had a keyboard and a mouse. I used to tinker with the box and reinstall operating systems.
We used to get magazines back then. They used to bundle OpenSuse or Debian, and I used to install them. It was an interesting experience, 15 years back, how Linux used to be. I have been a tinkerer all around, and that's what eventually led me to programming.
CRAIG BOX: With an interest in both the physical and ethereal aspects of technology, you did a lot of robotics challenges during university. That's something that I am not surprised to hear from someone who has a background in Logo, to be honest. There's Mindstorms, and a lot of other technology that is based around robotics that a lot of LOGO people got into. How was that something that came about for you?
NABARUN PAL: When I joined my university, apart from studying materials, one of the things they used to really encourage was to get involved in a lot of extracurricular activities. One which interested me was robotics. I joined my college robotics team and participated in a lot of challenges.
Predominantly, we used to participate in this competition called ABU Robocon, which is an event conducted by the Asia-Pacific Broadcasting Union. What they used to do was, every year, one of the participating countries in the contest would provide a problem statement. For example, one year, they asked us to build a badminton-playing robot. They asked us to build a rugby playing robot or a Frisbee thrower, and there are some interesting problem statements around the challenge: you can't do this. You can't do that. Weight has to be like this. Dimensions have to be like that.
I got involved in that, and most of my time at university, I used to spend there. Material science became kind of a backburner for me, and my hobby became my full time thing.
CRAIG BOX: And you were not only involved there in terms of the project and contributions to it, but you got involved as a secretary of the team, effectively, doing a lot of the organization, which is a thread that will come up as we speak about Kubernetes.
NABARUN PAL: Over the course of time, when I gained more knowledge into how the team works, it became very natural that I graduated up the ladder and then managed juniors. I became the joint secretary of the robotics club in our college. This was more of a broad, engaging role in evangelizing robotics at the university, to promote events, to help students to see the value in learning robotics - what you gain out of that mechanically or electronically, or how do you develop your logic by programming robots.
CRAIG BOX: Your first job after graduation was working at a company called Algoshelf, but you were also an intern there while you were at school?
NABARUN PAL: Algoshelf was known as Rorodata when I joined them as an intern. This was also an interesting opportunity for me in the sense that I was always interested in writing programs which people would use. One of the things that I did there was build an open source Function as a Service framework, if I may call it that - it was mostly turning Python functions into web servers without even writing any code. The interesting bit there was that it was targeted toward data scientists, and not towards programmers. We had to understand the pain of data scientists, that they had to learn a lot of programming in order to even deploy their machine learning models, and we wanted to solve that problem.
They offered me a job after my internship, and I kept on working for them after I graduated from university. There, I got introduced to Kubernetes, so we pivoted into a product structure where the very same thing I told you, the Functions as a Service thing, could be deployed in Kubernetes. I was exploring Kubernetes to use it as a scalable platform. Instead of managing pets, we wanted to manage cattle, as in, we wanted to have a very highly distributed architecture.
CRAIG BOX: Not actual cattle. I've been to India. There are a lot of cows around.
NABARUN PAL: Yeah, not actual cattle. That is a bit tough.
CRAIG BOX: When Algoshelf we're looking at picking up Kubernetes, what was the evaluation process like? Were you looking at other tools at the time? Or had enough time passed that Kubernetes was clearly the platform that everyone was going to use?
NABARUN PAL: Algoshelf was a natural evolution. Before Kubernetes, we used to deploy everything on a single big AWS server, using systemd. Everything was a systemd service, and everything was deployed using Fabric. Fabric is a Python package which essentially is like Ansible, but much leaner, as it does not have all the shims and things that Ansible has.
Then we asked "what if we need to scale out to different machines?" Kubernetes was in the hype. We hopped onto the hype train to see whether Kubernetes was worth it for us. And that's where my journey started, exploring the ecosystem, exploring the community. How can we improve the community in essence?
CRAIG BOX: A couple of times now you've mentioned as you've grown in a role, becoming part of the organization and the arranging of the group. You've talked about working in Python. You had submitted some talks to Pycon India. And I understand you're now a tech lead for that conference. What does the tech community look like in India and how do you describe your involvement in it?
NABARUN PAL: My involvement with the community began when I was at university. When I was working as an intern at Algoshelf, I was introduced to this-- I never knew about PyCon India, or tech conferences in general.
The person that I was working with just asked me, like hey, did you submit a talk to PyCon India? It's very useful, the library that we were making. So I submitted a talk to PyCon India in 2017. Eventually the talk got selected. That was not my first speaking opportunity, it was my second. I also spoke at PyData Delhi on a similar thing that I worked on in my internship.
It has been a journey since then. I talked about the same thing at FOSSASIA Summit in Singapore, and got really involved with the Python community because it was what I used to work on back then.
After giving all those talks at conferences, I got also introduced to this amazing group called dgplug, which is an acronym for the Durgapur Linux Users Group. It is a group started in-- I don't remember the exact year, but it was around 12 to 13 years back, by someone called Kushal Das, with the ideology of training students into being better open source contributors.
I liked the idea and got involved with in teaching last year. It is not limited to students. Professionals can also join in. It's about making anyone better at upstream contributions, making things sustainable. I started training people on Vim, on how to use text editors. so they are more efficient and productive. In general life, text editors are a really good tool.
The other thing was the shell. How do you navigate around the Linux shell and command line? That has been a fun experience.
CRAIG BOX: It's very interesting to think about that, because my own involvement with a Linux User Group was probably around the year 2000. And back then we were teaching people how to install things-- Linux on CD was kinda new at that point in time. There was a lot more of, what is this new thing and how do we get involved? When the internet took off around that time, all of that stuff moved online - you no longer needed to go meet a group of people in a room to talk about Linux. And I haven't really given much thought to the concept of a LUG since then, but it's great to see it having turned into something that's now about contributing, rather than just about how you get things going for yourself.
NABARUN PAL: Exactly. So as I mentioned earlier, my journey into Linux was installing SUSE from DVDs that came bundled with magazines. Back then it was a pain installing things because you did not get any instructions. There has certainly been a paradigm shift now. People are more open to reading instructions online, downloading ISOs, and then just installing them. So we really don't need to do that as part of LUGs.
We have shifted more towards enabling people to contribute to whichever project that they use. For example, if you're using Fedora, contribute to Fedora; make things better. It's just about giving back to the community in any way possible.
CRAIG BOX: You're also involved in the Kubernetes Bangalore meetup group. Does that group have a similar mentality?
NABARUN PAL: The Kubernetes Bangalore meetup group is essentially focused towards spreading the knowledge of Kubernetes and the aligned products in the ecosystem, whatever there is in the Cloud Native Landscape, in various ways. For example, to evangelize about using them in your company or how people use them in existing ways.
So a few months back in February, we did something like a Kubernetes contributor workshop. It was one of its kind in India. It was the first one if I recall correctly. We got a lot of traction and community members interested in contributing to Kubernetes and a lot of other projects. And this is becoming a really valuable thing.
I'm not much involved in the organization of the group. There are really great people already organizing it. I keep on being around and attending the meetups and trying to answer any questions if people have any.
CRAIG BOX: One way that it is possible to contribute to the Kubernetes ecosystem is through the release process. You've written a blog which talks about your journey through that. It started in Kubernetes 1.17, where you took a shadow role for that release. Tell me about what it was like to first take that plunge.
NABARUN PAL: Taking the plunge was a big step, I would say. It should not have been that way. After getting into the team, I saw that it is really encouraged that you should just apply to the team - but then write truthfully about yourself. What do you want? Write your passionate goal, why you want to be in the team.
So even right now the shadow applications are open for the next release. I wanted to give that a small shoutout. If you want to contribute to the Kubernetes release team, please do apply. The form is pretty simple. You just need to say why do you want to contribute to the release team.
CRAIG BOX: What was your answer to that question?
NABARUN PAL: It was a bit tricky. I have this philosophy of contributing to projects that I use in my day-to-day life. I use a lot of open source projects daily, and I started contributing to Kubernetes primarily because I was using the Kubernetes Python client. That was one of my first contributions.
When I was contributing to that, I explored the release team and it interested me a lot, particularly how interesting and varied the mechanics of releasing Kubernetes are. For most software projects, it's usually whenever you decide that you have made meaningful progress in terms of features, you release it. But Kubernetes is not like that. We follow a regular release cadence. And all those aspects really interested me. I actually applied for the first time in Kubernetes 1.16, but got rejected.
But I still applied to Kubernetes 1.17, and I got into the enhancements team. That team was led by MrBobbyTables, Bob Killen, back then, and Jeremy Rickard was one of my co-shadows in the team. I shadowed enhancements again. Then I lead enhancements in 1.19. I then shadowed the lead in 1.20 and eventually led the 1.21 team. That's what my journey has been.
My suggestion to people is don't be afraid of failure. Even if you don't get selected, it's perfectly fine. You can still contribute to the release team. Just hop on the release calls, raise your hand, and introduce yourself.
CRAIG BOX: Between the 1.20 and 1.21 releases, you moved to work on the upstream contribution team at VMware. I've noticed that VMware is hiring a lot of great upstream contributors at the moment. Is this something that Stephen Augustus had his fingerprints all over? Is there something in the water?
NABARUN PAL: A lot of people have fingerprints on this process. Stephen certainly had his fingerprints on it, I would say. We are expanding the team of upstream contributors primarily because the product that we are working for is based on Kubernetes. It helps us a lot in driving processes upstream and helping out the community as a whole, because everyone then gets enabled and benefits from what we contribute to the community.
CRAIG BOX: I understand that the Tanzu team is being built out in India at the moment, but I guess you probably haven't been able to meet them in person yet?
NABARUN PAL: Yes and no. I did not meet any of them after joining VMware, but I met a lot of my teammates, before I joined VMware, at KubeCons. For example, I met Nikhita, I met Dims, I met Stephen at KubeCon. I am yet to meet other members of the team and I'm really excited to catch up with them once everything comes out of lockdown and we go back to our normal lives.
CRAIG BOX: Yes, everyone that I speak to who has changed jobs in the pandemic says it's a very odd experience, just nothing really being different. And the same perhaps for people who are working on open source moving companies as well. They're doing the same thing, perhaps just for a different employer.
NABARUN PAL: As we say in the community, see you in another Slack in some time.
CRAIG BOX: We now turn to the recent release of Kubernetes 1.21. First of all, congratulations on that.
NABARUN PAL: Thank you.
CRAIG BOX: The announcement says the release consists of 51 enhancements, 13 graduating to stable, 16 moving to beta, 20 entering alpha, and then two features that have been deprecated. How would you summarize this release?
NABARUN PAL: One of the big points for this release is that it is the largest release of all time.
CRAIG BOX: Really?
NABARUN PAL: Yep. 1.20 was the largest release back then, but 1.21 got more enhancements, primarily due to a lot of changes that we did to the process.
In the 1.21 release cycle, we did a few things differently compared to other release cycles-- for example, in the enhancement process. An enhancement, in the Kubernetes context, is basically a feature proposal. You will hear the terminology Kubernetes Enhancement Proposals, or KEP, a lot in the community. An enhancement is a broad thing encapsulated in a specific document.
CRAIG BOX: I like to think of it as a thing that's worth having a heading in the release notes.
NABARUN PAL: Indeed. Until the 1.20 release cycle, what we used to do was-- the release team has a vertical called enhancements. The enhancements team members used to ping each of the enhancement issues and ask whether they want to be part of the release cycle or not. The authors would decide, or talk to their SIG, and then come back with the answer, as to whether they wanted to be part of the cycle.
In this release, what we did was we eliminated that process and asked the SIGs proactively to discuss amongst themselves, what they wanted to pitch in for this release cycle. What set of features did they want to graduate this release? They may introduce things in alpha, graduate things to beta or stable, or they may also deprecate features.
What this did was promote a lot of async processes, and at the same time, give power back to the community. The community decides what they want in the release and then comes back collectively. It also reduces a lot of stress on the release team who previously had to ask people consistently what they wanted to pitch in for the release. You now have a deadline. You discuss amongst your SIG what your roadmap is and what it looks like for the near future. Maybe this release, and the next two. And you put all of those answers into a Google spreadsheet. Spreadsheets are still a thing.
CRAIG BOX: The Kubernetes ecosystem runs entirely on Google Spreadsheets.
NABARUN PAL: It does, and a lot of Google Docs for meeting notes! We did a lot of process improvements, which essentially led to a better release. This release cycle we had 13 enhancements graduating to stable, 16 which moved to beta, and 20 enhancements which were net new features into the ecosystem, and came in as alpha.
Along with that are features set for deprecation. One of them was PodSecurityPolicy. That has been a point of discussion in the Kubernetes user base and we also published a blog post about it. All credit to SIG Security who have been on top of things as to find a replacement for PodSecurityPolicy even before this release cycle ended, so that they could at least have a proposal of what will happen next.
CRAIG BOX: Let's talk about some old things and some new things. You mentioned PodSecurityPolicy there. That's a thing that's been around a long time and is being deprecated. Two things that have been around a long time and that are now being promoted to stable are CronJobs and PodDisruptionBudgets, both of which were introduced in Kubernetes 1.4, which came out in 2016. Why do you think it took so long for them both to go stable?
NABARUN PAL: I might not have a definitive answer to your question. One of the things that I feel is they might be already so good that nobody saw that they were beta features, and just kept on using them.
One of the things that I noticed when reading for the CronJobs graduation from beta to stable was the new controller. Users might not see this, but there has been a drastic change in the CronJob controller v2. What it essentially does is goes from a poll-based method of checking what users have defined as CronJobs to a queue architecture, which is the modern method of defining controllers. That has been one of the really good improvements in the case of CronJobs. Instead of the controller working in O(N) time, you now have constant time complexity.
CRAIG BOX: A lot of these features that have been in beta for a long time, like you say, people have an expectation that they are complete. With PodSecurityPolicy, it's being deprecated, which is allowed because it's a feature that never made it out of beta. But how do you think people will react to it going away? And does that say something about the need for the process to make sure that features don't just languish in beta forever, which has been introduced recently?
NABARUN PAL: That's true. One of the driving factors, when contributors are thinking of graduating beta features has been the "prevention of perma-beta" KEP. Back in 1.19 we introduced this process where each of the beta resources were marked for deprecation and removal in a certain time frame-- three releases for deprecation and another release for removal. That's also a motivating factor for eventually rethinking as to how beta resources work for us in the community. That is also very effective, I would say.
CRAIG BOX: Do remember that Gmail was in beta for eight years.
NABARUN PAL: I did not know that!
CRAIG BOX: Nothing in Kubernetes is quite that old yet, but we'll get there. Of the 20 new enhancements, do you have a favorite or any that you'd like to call out?
NABARUN PAL: There are two specific features in 1.21 that I'm really interested in, and are coming as net new features. One of them is the persistent volume health monitor, which gives the users the capability to actually see whether the backing volumes, which power persistent volumes in Kubernetes, are deleted or not. For example, the volumes may get deleted due to an inadvertent event, or they may get corrupted. That information is basically surfaced out as a field so that the user can leverage it in any way.
The other feature is the proposal for adding headers with the command name to kubectl requests. We have always set the user-agent information when doing those kind of requests, but the proposal is to add what command the user put in so that we can enable more telemetry, and cluster administrators can determine the usage patterns of how people are using the cluster. I'm really excited about these kind of features coming into play.
CRAIG BOX: You're the first release lead from the Asia-Pacific region, or more accurately, outside of the US and Europe. Most meetings in the Kubernetes ecosystem are traditionally in the window of overlap between the US and Europe, in the morning in California and the evening here in the UK. What's it been like to work outside of the time zones that the community had previously been operating in?
NABARUN PAL: It has been a fun and a challenging proposition, I would say. In the last two-ish years that I have been contributing to Kubernetes, the community has also transformed from a lot of early morning Pacific calls to more towards async processes. For example, we in the release team have transformed our processes so we don't do updates in the calls anymore. What we do is ask for updates ahead of time, and then in the call, we just discuss things which need to be discussed synchronously in the team.
We leverage the meetings right now more for discussions. But we also don't come to decisions in those discussions, because if any stakeholder is not present on the call, it puts them at a disadvantage. We are trying to talk more on Slack, publicly, or talk on mailing lists. That's where most of the discussion should happen, and also to gain lazy consensus. What I mean by lazy consensus is come up with a pre-decision kind of thing, but then also invite feedback from the broader community about what people would like them to see about that specific thing being discussed. This is where we as a community are also transforming a lot, but there is a lot more headroom to grow.
The release team also started to have EU/APAC burndown meetings. In addition to having one meeting focused towards the US and European time zones, we also do a meeting which is more suited towards European and Asia-Pacific time zones. One of the driving factors for those decisions was that the release team is seeing a lot of participation from a variety of time zones. To give you one metric, we had release team members this cycle from UTC+8 all through UTC-8 - 16 hours of span. It's really difficult to accommodate all of those zones in a single meeting. And it's not just those 16 hours of span - what about the other eight hours?
CRAIG BOX: Yeah, you're missing New Zealand. You could add another 5 hours of span right there.
NABARUN PAL: Exactly. So we will always miss people in meetings, and that's why we should also innovate more, have different kinds of meetings. But that also may not be very sustainable in the future. Will people attend duplicate meetings? Will people follow both of the meetings? More meetings is one of the solutions.
The other solution is you have threaded discussions on some medium, be it Slack or be it a mailing list. Then, people can just pitch in whenever it is work time for them. Then, at the end of the day, a 24-hour rolling period, you digest it, and then push it out as meeting notes. That's what the Contributor Experience Special Interest Group is doing - shout-out to them for moving to that process. I may be wrong here, but I think once every two weeks, they do async updates on Slack. And that is a really nice thing to have, improving variety of geographies that people can contribute from.
CRAIG BOX: Once you've put everything together that you hope to be in your release, you create a release candidate build. How do you motivate people to test those?
NABARUN PAL: That's a very interesting question. It is difficult for us to motivate people into trying out these candidates. It's mostly people who are passionate about Kubernetes who try out the release candidates and see for themselves what the bugs are. I remember Dims tweeting out a call that if somebody tries out the release candidate and finds a good bug or caveat, they could get a callout in the KubeCon keynote. That's one of the incentives - if you want to be called out in a KubeCon keynote, please try our release candidates.
CRAIG BOX: Or get a new pair of Kubernetes socks?
NABARUN PAL: We would love to give out goodies to people who try out our release candidates and find bugs. For example, if you want the brand new release team logo as a sticker, just hit me up. If you find a bug in a 1.22 release candidate, I would love to be able to send you some coupon codes for the store. Don't quote me on this, but do reach out.
CRAIG BOX: Now the release is out, is it time for you to put your feet up? What more things do you have to do, and how do you feel about the path ahead for yourself?
NABARUN PAL: I was discussing this with the team yesterday. Even after the release, we had kind of a water-cooler conversation. I just pasted in a Zoom link to all the release team members and said, hey, do you want to chat? One of the things that I realized that I'm really missing is the daily burndowns right now. I will be around in the release team and the SIG Release meetings, helping out the new lead in transitioning. And even my job, right now, is not over. I'm working with Taylor, who is the emeritus advisor for 1.21, on figuring out some of the mechanics for the next release cycle. I'm also documenting what all we did as part of the process and as part of the process changes, and making sure the next release cycle is up and running.
CRAIG BOX: We've done a lot of these release lead interviews now, and there's a question which we always like to ask, which is, what will you write down in the transition envelope? Savitha Raghunathan is the release lead for 1.22. What is the advice that you will pass on to her?
NABARUN PAL: Three words-- Do, Delegate, and Defer. Categorize things into those three buckets as to what you should do right away, what you need to defer, and things that you can delegate to your shadows or other release team members. That's one of the mantras that works really well when leading a team. It is not just in the context of the release team, but it's in the context of managing any team.
The other bit is over-communicate. No amount of communication is enough. What I've realized is the community is always willing to help you. One of the big examples that I can give is the day before release was supposed to happen, we were seeing a lot of test failures, and then one of the community members had an idea-- why don't you just send an email? I was like, "that sounds good. We can send an email mentioning all the flakes and call out for help to the broader Kubernetes developer community." And eventually, once we sent out the email, lots of people came in to help us in de-flaking the tests and trying to find out the root cause as to why those tests were failing so often. Big shout out to Antonio and all the SIG Network folks who came to pitch in.
No matter how many names I mention, it will never be enough. A lot of people, even outside the release team, have helped us a lot with this release. And that's where the release theme comes in - Power to the Community. I'm really stoked by how this community behaves and how people are willing to help you all the time. It's not about what they're telling you to do, but it's what they're also interested in, they're passionate about.
CRAIG BOX: One of the things you're passionate about is Formula One. Do you think Lewis Hamilton is going to take it away this year?
NABARUN PAL: It's a fair probability that Lewis will win the title this year as well.
CRAIG BOX: Which would take him to eight all time career wins. And thus-- he's currently tied with Michael Schumacher-- would pull him ahead.
NABARUN PAL: Yes. Michael Schumacher was my first favorite F1 driver, I would say. It feels a bit heartbreaking to see someone break Michael's record.
CRAIG BOX: How do you feel about Michael Schumacher's son joining the contest?
NABARUN PAL: I feel good. Mick Schumacher is in the fray right now. And I wish we could see him, in a few years, in a Ferrari. The Schumacher family back to Ferrari would be really great to see. But then, my fan favorite has always been McLaren, partly because I like the chemistry of Lando and Carlos over the last two years. It was heartbreaking to see Carlos go to Ferrari. But then we have Lando and Daniel Ricciardo in the team. They're also fun people.
Nabarun Pal is on the Tanzu team at VMware and served as the Kubernetes 1.21 release team lead.
You can find the Kubernetes Podcast from Google at @KubernetesPod on Twitter, and you can subscribe so you never miss an episode.
Updating NGINX-Ingress to use the stable Ingress API
With all Kubernetes APIs, there is a process to creating, maintaining, and ultimately deprecating them once they become GA. The networking.k8s.io API group is no different. The upcoming Kubernetes 1.22 release will remove several deprecated APIs that are relevant to networking:
- the
networking.k8s.io/v1beta1API version of IngressClass - all beta versions of Ingress:
extensions/v1beta1andnetworking.k8s.io/v1beta1
On a v1.22 Kubernetes cluster, you'll be able to access Ingress and IngressClass objects through the stable (v1) APIs, but access via their beta APIs won't be possible. This change has been in in discussion since 2017, 2019 with 1.16 Kubernetes API deprecations, and most recently in KEP-1453: Graduate Ingress API to GA.
During community meetings, the networking Special Interest Group has decided to continue supporting Kubernetes versions older than 1.22 with Ingress-NGINX version 0.47.0. Support for Ingress-NGINX will continue for six months after Kubernetes 1.22 is released. Any additional bug fixes and CVEs for Ingress-NGINX will be addressed on a need-by-need basis.
Ingress-NGINX will have separate branches and releases of Ingress-NGINX to support this model, mirroring the Kubernetes project process. Future releases of the Ingress-NGINX project will track and support the latest versions of Kubernetes.
| Kubernetes version | Ingress-NGINX version | Notes |
|---|---|---|
| v1.22 | v1.0.0-alpha.2 | New features, plus bug fixes. |
| v1.21 | v0.47.x | Bugfixes only, and just for security issues or crashes. No end-of-support date announced. |
| v1.20 | v0.47.x | Bugfixes only, and just for security issues or crashes. No end-of-support date announced. |
| v1.19 | v0.47.x | Bugfixes only, and just for security issues or crashes. Fixes only provided until 6 months after Kubernetes v1.22.0 is released. |
Because of the updates in Kubernetes 1.22, v0.47.0 will not work with Kubernetes 1.22.
What you need to do
The team is currently in the process of upgrading ingress-nginx to support
the v1 migration, you can track the progress
here.
We're not making feature improvements to ingress-nginx until after the support for
Ingress v1 is complete.
In the meantime to ensure no compatibility issues:
- Update to the latest version of Ingress-NGINX; currently v0.47.0
- After Kubernetes 1.22 is released, ensure you are using the latest version of Ingress-NGINX that supports the stable APIs for Ingress and IngressClass.
- Test Ingress-NGINX version v1.0.0-alpha.2 with Cluster versions >= 1.19 and report any issues to the projects Github page.
The community’s feedback and support in this effort is welcome. The Ingress-NGINX Sub-project regularly holds community meetings where we discuss this and other issues facing the project. For more information on the sub-project, please see SIG Network.
Kubernetes Release Cadence Change: Here’s What You Need To Know
On April 23, 2021, the Release Team merged a Kubernetes Enhancement Proposal (KEP) changing the Kubernetes release cycle from four releases a year (once a quarter) to three releases a year.
This blog post provides a high level overview about what this means for the Kubernetes community's contributors and maintainers.
What's changing and when
Starting with the Kubernetes 1.22 release, a lightweight policy will drive the creation of each release schedule. This policy states:
- The first Kubernetes release of a calendar year should start at the second or third week of January to provide people more time for contributors coming back from the end of year holidays.
- The last Kubernetes release of a calendar year should be finished by the middle of December.
- A Kubernetes release cycle has a length of approximately 15 weeks.
- The week of KubeCon + CloudNativeCon is not considered a 'working week' for SIG Release. The Release Team will not hold meetings or make decisions in this period.
- An explicit SIG Release break of at least two weeks between each cycle will be enforced.
As a result, Kubernetes will follow a three releases per year cadence. Kubernetes 1.23 will be the final release of the 2021 calendar year. This new policy results in a very predictable release schedule, allowing us to forecast upcoming release dates:
Proposed Kubernetes Release Schedule for the remainder of 2021
| Week Number in Year | Release Number | Release Week | Note |
|---|---|---|---|
| 35 | 1.23 | 1 (August 23) | |
| 50 | 1.23 | 16 (December 07) | KubeCon + CloudNativeCon NA Break (Oct 11-15) |
Proposed Kubernetes Release Schedule for 2022
| Week Number in Year | Release Number | Release Week | Note |
|---|---|---|---|
| 1 | 1.24 | 1 (January 03) | |
| 15 | 1.24 | 15 (April 12) | |
| 17 | 1.25 | 1 (April 26) | KubeCon + CloudNativeCon EU likely to occur |
| 32 | 1.25 | 15 (August 09) | |
| 34 | 1.26 | 1 (August 22 | KubeCon + CloudNativeCon NA likely to occur |
| 49 | 1.26 | 14 (December 06) |
These proposed dates reflect only the start and end dates, and they are subject to change. The Release Team will select dates for enhancement freeze, code freeze, and other milestones at the start of each release. For more information on these milestones, please refer to the release phases documentation. Feedback from prior releases will feed into this process.
What this means for end users
The major change end users will experience is a slower release cadence and a slower rate of enhancement graduation. Kubernetes release artifacts, release notes, and all other aspects of any given release will stay the same.
Prior to this change an enhancement could graduate from alpha to stable in 9 months. With the change in cadence, this will stretch to 12 months. Additionally, graduation of features over the last few releases has in some part been driven by release team activities.
With fewer releases, users can expect to see the rate of feature graduation slow. Users can also expect releases to contain a larger number of enhancements that they need to be aware of during upgrades. However, with fewer releases to consume per year, it's intended that end user organizations will spend less time on upgrades and gain more time on supporting their Kubernetes clusters. It also means that Kubernetes releases are in support for a slightly longer period of time, so bug fixes and security patches will be available for releases for a longer period of time.
What this means for Kubernetes contributors
With a lower release cadence, contributors have more time for project enhancements, feature development, planning, and testing. A slower release cadence also provides more room for maintaining their mental health, preparing for events like KubeCon + CloudNativeCon or work on downstream integrations.
Why we decided to change the release cadence
The Kubernetes 1.19 cycle was far longer than usual. SIG Release extended it to lessen the burden on both Kubernetes contributors and end users due the COVID-19 pandemic. Following this extended release, the Kubernetes 1.20 release became the third, and final, release for 2020.
As the Kubernetes project matures, the number of enhancements per cycle grows, along with the burden on contributors, the Release Engineering team. Downstream consumers and integrators also face increased challenges keeping up with ever more feature-packed releases. A wider project adoption means the complexity of supporting a rapidly evolving platform affects a bigger downstream chain of consumers.
Changing the release cadence from four to three releases per year balances a variety of factors for stakeholders: while it's not strictly an LTS policy, consumers and integrators will get longer support terms for each minor version as the extended release cycles lead to the previous three releases being supported for a longer period. Contributors get more time to mature enhancements and get them ready for production.
Finally, the management overhead for SIG Release and the Release Engineering team diminishes allowing the team to spend more time on improving the quality of the software releases and the tooling that drives them.
How you can help
Join the discussion about communicating future release dates and be sure to be on the lookout for post release surveys.
Where you can find out more
- Read the KEP here
- Join the kubernetes-dev mailing list
- Join Kubernetes Slack and follow the #announcements channel
Spotlight on SIG Usability
Note:
SIG Usability, which is featured in this Spotlight blog, has been deprecated and is no longer active. As a result, the links and information provided in this blog post may no longer be valid or relevant. Should there be renewed interest and increased participation in the future, the SIG may be revived. However, as of August 2023 the SIG is inactive per the Kubernetes community policy. The Kubernetes project encourages you to explore other SIGs and resources available on the Kubernetes website to stay up-to-date with the latest developments and enhancements in Kubernetes.Introduction
Are you interested in learning about what SIG Usability does and how you can get involved? Well, you're at the right place. SIG Usability is all about making Kubernetes more accessible to new folks, and its main activity is conducting user research for the community. In this blog, we have summarized our conversation with Gaby Moreno, who walks us through the various aspects of being a part of the SIG and shares some insights about how others can get involved.
Gaby is a co-lead for SIG Usability. She works as a Product Designer at IBM and enjoys working on the user experience of open, hybrid cloud technologies like Kubernetes, OpenShift, Terraform, and Cloud Foundry.
A summary of our conversation
Q. Could you tell us a little about what SIG Usability does?
A. SIG Usability at a high level started because there was no dedicated user experience team for Kubernetes. The extent of SIG Usability is focussed on the end-client ease of use of the Kubernetes project. The main activity is user research for the community, which includes speaking to Kubernetes users.
This covers points like user experience and accessibility. The objectives of the SIG are to guarantee that the Kubernetes project is maximally usable by people of a wide range of foundations and capacities, such as incorporating internationalization and ensuring the openness of documentation.
Q. Why should new and existing contributors consider joining SIG Usability?
A. There are plenty of territories where new contributors can begin. For example:
- User research projects, where people can help understand the usability of the end-user experiences, including error messages, end-to-end tasks, etc.
- Accessibility guidelines for Kubernetes community artifacts, examples include: internationalization of documentation, color choices for people with color blindness, ensuring compatibility with screen reader technology, user interface design for core components with user interfaces, and more.
Q. What do you do to help new contributors get started?
A. New contributors can get started by shadowing one of the user interviews, going through user interview transcripts, analyzing them, and designing surveys.
SIG Usability is also open to new project ideas. If you have an idea, we’ll do what we can to support it. There are regular SIG Meetings where people can ask their questions live. These meetings are also recorded for those who may not be able to attend. As always, you can reach out to us on Slack as well.
Q. What does the survey include?
A. In simple terms, the survey gathers information about how people use Kubernetes, such as trends in learning to deploy a new system, error messages they receive, and workflows.
One of our goals is to standardize the responses accordingly. The ultimate goal is to analyze survey responses for important user stories whose needs aren't being met.
Q. Are there any particular skills you’d like to recruit for? What skills are contributors to SIG Usability likely to learn?
A. Although contributing to SIG Usability does not have any pre-requisites as such, experience with user research, qualitative research, or prior experience with how to conduct an interview would be great plus points. Quantitative research, like survey design and screening, is also helpful and something that we expect contributors to learn.
Q. What are you getting positive feedback on, and what’s coming up next for SIG Usability?
A. We have had new members joining and coming to monthly meetings regularly and showing interests in becoming a contributor and helping the community. We have also had a lot of people reach out to us via Slack showcasing their interest in the SIG.
Currently, we are focused on finishing the study mentioned in our talk, also our project for this year. We are always happy to have new contributors join us.
Q: Any closing thoughts/resources you’d like to share?
A. We love meeting new contributors and assisting them in investigating different Kubernetes project spaces. We will work with and team up with other SIGs to facilitate engaging with end-users, running studies, and help them integrate accessible design practices into their development practices.
Here are some resources for you to get started:
Wrap Up
SIG Usability hosted a KubeCon talk about studying Kubernetes users' experiences. The talk focuses on updates to the user study projects, understanding who is using Kubernetes, what they are trying to achieve, how the project is addressing their needs, and where we need to improve the project and the client experience. Join the SIG's update to find out about the most recent research results, what the plans are for the forthcoming year, and how to get involved in the upstream usability team as a contributor!
Kubernetes API and Feature Removals In 1.22: Here’s What You Need To Know
As the Kubernetes API evolves, APIs are periodically reorganized or upgraded. When APIs evolve, the old APIs they replace are deprecated, and eventually removed. See Kubernetes API removals to read more about Kubernetes' policy on removing APIs.
We want to make sure you're aware of some upcoming removals. These are beta APIs that you can use in current, supported Kubernetes versions, and they are already deprecated. The reason for all of these removals is that they have been superseded by a newer, stable (“GA”) API.
Kubernetes 1.22, due for release in August 2021, will remove a number of deprecated APIs. Update: Kubernetes 1.22: Reaching New Peaks has details on the v1.22 release.
API removals for Kubernetes v1.22
The v1.22 release will stop serving the API versions we've listed immediately below. These are all beta APIs that were previously deprecated in favor of newer and more stable API versions.
- Beta versions of the
ValidatingWebhookConfigurationandMutatingWebhookConfigurationAPI (the admissionregistration.k8s.io/v1beta1 API versions) - The beta
CustomResourceDefinitionAPI (apiextensions.k8s.io/v1beta1) - The beta
APIServiceAPI (apiregistration.k8s.io/v1beta1) - The beta
TokenReviewAPI (authentication.k8s.io/v1beta1) - Beta API versions of
SubjectAccessReview,LocalSubjectAccessReview,SelfSubjectAccessReview(API versions from authorization.k8s.io/v1beta1) - The beta
CertificateSigningRequestAPI (certificates.k8s.io/v1beta1) - The beta
LeaseAPI (coordination.k8s.io/v1beta1) - All beta
IngressAPIs (the extensions/v1beta1 and networking.k8s.io/v1beta1 API versions)
The Kubernetes documentation covers these API removals for v1.22 and explains how each of those APIs change between beta and stable.
What to do
We're going to run through each of the resources that are affected by these removals and explain the steps you'll need to take.
Ingress- Migrate to use the networking.k8s.io/v1
Ingress API,
available since v1.19.
The related API IngressClass is designed to complement the Ingress concept, allowing you to configure multiple kinds of Ingress within one cluster. If you're currently using the deprecatedkubernetes.io/ingress.classannotation, plan to switch to using the.spec.ingressClassNamefield instead.
On any cluster running Kubernetes v1.19 or later, you can use the v1 API to retrieve or update existing Ingress objects, even if they were created using an older API version.When you convert an Ingress to the v1 API, you should review each rule in that Ingress. Older Ingresses use the legacy
ImplementationSpecificpath type. Instead ofImplementationSpecific, switch path matching to eitherPrefixorExact. One of the benefits of moving to these alternative path types is that it becomes easier to migrate between different Ingress classes.ⓘ As well as upgrading your own use of the Ingress API as a client, make sure that every ingress controller that you use is compatible with the v1 Ingress API. Read Ingress Prerequisites for more context about Ingress and ingress controllers.
ValidatingWebhookConfigurationandMutatingWebhookConfiguration- Migrate to use the admissionregistration.k8s.io/v1 API versions of
ValidatingWebhookConfiguration
and MutatingWebhookConfiguration,
available since v1.16.
You can use the v1 API to retrieve or update existing objects, even if they were created using an older API version. CustomResourceDefinition- Migrate to use the CustomResourceDefinition
apiextensions.k8s.io/v1 API, available since v1.16.
You can use the v1 API to retrieve or update existing objects, even if they were created using an older API version. If you defined any custom resources in your cluster, those are still served after you upgrade.If you're using external CustomResourceDefinitions, you can use
kubectl convertto translate existing manifests to use the newer API. Because there are some functional differences between beta and stable CustomResourceDefinitions, our advice is to test out each one to make sure it works how you expect after the upgrade. APIService- Migrate to use the apiregistration.k8s.io/v1 APIService
API, available since v1.10.
You can use the v1 API to retrieve or update existing objects, even if they were created using an older API version. If you already have API aggregation using an APIService object, this aggregation continues to work after you upgrade. TokenReview- Migrate to use the authentication.k8s.io/v1 TokenReview
API, available since v1.10.
As well as serving this API via HTTP, the Kubernetes API server uses the same format to send TokenReviews to webhooks. The v1.22 release continues to use the v1beta1 API for TokenReviews sent to webhooks by default. See Looking ahead for some specific tips about switching to the stable API.
SubjectAccessReview,SelfSubjectAccessReviewandLocalSubjectAccessReview- Migrate to use the authorization.k8s.io/v1 versions of those authorization APIs, available since v1.6.
CertificateSigningRequest- Migrate to use the certificates.k8s.io/v1
CertificateSigningRequest
API, available since v1.19.
You can use the v1 API to retrieve or update existing objects, even if they were created using an older API version. Existing issued certificates retain their validity when you upgrade. Lease- Migrate to use the coordination.k8s.io/v1 Lease
API, available since v1.14.
You can use the v1 API to retrieve or update existing objects, even if they were created using an older API version.
kubectl convert
There is a plugin to kubectl that provides the kubectl convert subcommand.
It's an official plugin that you can download as part of Kubernetes.
See Download Kubernetes for more details.
You can use kubectl convert to update manifest files to use a different API
version. For example, if you have a manifest in source control that uses the beta
Ingress API, you can check that definition out,
and run
kubectl convert -f <manifest> --output-version <group>/<version>.
You can use the kubectl convert command to automatically convert an
existing manifest.
For example, to convert an older Ingress definition to
networking.k8s.io/v1, you can run:
kubectl convert -f ./legacy-ingress.yaml --output-version networking.k8s.io/v1
The automatic conversion uses a similar technique to how the Kubernetes control plane updates objects that were originally created using an older API version. Because it's a mechanical conversion, you might need to go in and change the manifest to adjust defaults etc.
Rehearse for the upgrade
If you manage your cluster's API server component, you can try out these API removals before you upgrade to Kubernetes v1.22.
To do that, add the following to the kube-apiserver command line arguments:
--runtime-config=admissionregistration.k8s.io/v1beta1=false,apiextensions.k8s.io/v1beta1=false,apiregistration.k8s.io/v1beta1=false,authentication.k8s.io/v1beta1=false,authorization.k8s.io/v1beta1=false,certificates.k8s.io/v1beta1=false,coordination.k8s.io/v1beta1=false,extensions/v1beta1/ingresses=false,networking.k8s.io/v1beta1=false
(as a side effect, this also turns off v1beta1 of EndpointSlice - watch out for that when you're testing).
Once you've switched all the kube-apiservers in your cluster to use that setting,
those beta APIs are removed. You can test that API clients (kubectl, deployment
tools, custom controllers etc) still work how you expect, and you can revert if
you need to without having to plan a more disruptive downgrade.
Advice for software authors
Maybe you're reading this because you're a developer of an addon or other component that integrates with Kubernetes?
If you develop an Ingress controller, webhook authenticator, an API aggregation, or any other tool that relies on these deprecated APIs, you should already have started to switch your software over.
You can use the tips in Rehearse for the upgrade to run your own Kubernetes cluster that only uses the new APIs, and make sure that your code works OK. For your documentation, make sure readers are aware of any steps they should take for the Kubernetes v1.22 upgrade.
Where possible, give your users a hand to adopt the new APIs early - perhaps in a test environment - so they can give you feedback about any problems.
There are some more deprecations coming in Kubernetes v1.25, so plan to have those covered too.
Kubernetes API removals
Here's some background about why Kubernetes removes some APIs, and also a promise about stable APIs in Kubernetes.
Kubernetes follows a defined deprecation policy for its features, including the Kubernetes API. That policy allows for replacing stable (“GA”) APIs from Kubernetes. Importantly, this policy means that a stable API only be deprecated when a newer stable version of that same API is available.
That stability guarantee matters: if you're using a stable Kubernetes API, there won't ever be a new version released that forces you to switch to an alpha or beta feature.
Earlier stages are different. Alpha features are under test and potentially incomplete. Almost always, alpha features are disabled by default. Kubernetes releases can and do remove alpha features that haven't worked out.
After alpha, comes beta. These features are typically enabled by default; if the testing works out, the feature can graduate to stable. If not, it might need a redesign.
Last year, Kubernetes officially adopted a policy for APIs that have reached their beta phase:
For Kubernetes REST APIs, when a new feature's API reaches beta, that starts a countdown. The beta-quality API now has three releases … to either:
- reach GA, and deprecate the beta, or
- have a new beta version (and deprecate the previous beta).
At the time of that article, three Kubernetes releases equated to roughly nine calendar months. Later that same month, Kubernetes adopted a new release cadence of three releases per calendar year, so the countdown period is now roughly twelve calendar months.
Whether an API removal is because of a beta feature graduating to stable, or because that API hasn't proved successful, Kubernetes will continue to remove APIs by following its deprecation policy and making sure that migration options are documented.
Looking ahead
There's a setting that's relevant if you use webhook authentication checks.
A future Kubernetes release will switch to sending TokenReview objects
to webhooks using the authentication.k8s.io/v1 API by default. At the moment,
the default is to send authentication.k8s.io/v1beta1 TokenReviews to webhooks,
and that's still the default for Kubernetes v1.22.
However, you can switch over to the stable API right now if you want:
add --authentication-token-webhook-version=v1 to the command line options for
the kube-apiserver, and check that webhooks for authentication still work how you
expected.
Once you're happy it works OK, you can leave the --authentication-token-webhook-version=v1
option set across your control plane.
The v1.25 release that's planned for next year will stop serving beta versions of several Kubernetes APIs that are stable right now and have been for some time. The same v1.25 release will remove PodSecurityPolicy, which is deprecated and won't graduate to stable. See PodSecurityPolicy Deprecation: Past, Present, and Future for more information.
The official list of API removals planned for Kubernetes 1.25 is:
- The beta
CronJobAPI (batch/v1beta1) - The beta
EndpointSliceAPI (networking.k8s.io/v1beta1) - The beta
PodDisruptionBudgetAPI (policy/v1beta1) - The beta
PodSecurityPolicyAPI (policy/v1beta1)
Want to know more?
Deprecations are announced in the Kubernetes release notes. You can see the announcements of pending deprecations in the release notes for 1.19, 1.20, and 1.21.
For information on the process of deprecation and removal, check out the official Kubernetes deprecation policy document.
Announcing Kubernetes Community Group Annual Reports
Given the growth and scale of the Kubernetes project, the existing reporting mechanisms were proving to be inadequate and challenging. Kubernetes is a large open source project. With over 100000 commits just to the main k/kubernetes repository, hundreds of other code repositories in the project, and thousands of contributors, there's a lot going on. In fact, there are 37 contributor groups at the time of writing. We also value all forms of contribution and not just code changes.
With that context in mind, the challenge of reporting on all this activity was a call to action for exploring better options. Therefore inspired by the Apache Software Foundation’s open guide to PMC Reporting and the CNCF project Annual Reporting, the Kubernetes project is proud to announce the Kubernetes Community Group Annual Reports for Special Interest Groups (SIGs) and Working Groups (WGs). In its flagship edition, the 2020 Summary report focuses on bettering the Kubernetes ecosystem by assessing and promoting the healthiness of the groups within the upstream community.
Previously, the mechanisms for the Kubernetes project overall to report on groups and their activities were devstats, GitHub data, issues, to measure the healthiness of a given UG/WG/SIG/Committee. As a project spanning several diverse communities, it was essential to have something that captured the human side of things. With 50,000+ contributors, it’s easy to assume that the project has enough help and this report surfaces more information than /help-wanted and /good-first-issue for end users. This is how we sustain the project. Paraphrasing one of the Steering Committee members, Paris Pittman, “There was a requirement for tighter feedback loops - ones that involved more than just GitHub data and issues. Given that Kubernetes, as a project, has grown in scale and number of contributors over the years, we have outgrown the existing reporting mechanisms."
The existing communication channels between the Steering committee members and the folks leading the groups and committees were also required to be made as open and as bi-directional as possible. Towards achieving this very purpose, every group and committee has been assigned a liaison from among the steering committee members for kick off, help, or guidance needed throughout the process. According to Davanum Srinivas a.k.a. dims, “... That was one of the main motivations behind this report. People (leading the groups/committees) know that they can reach out to us and there’s a vehicle for them to reach out to us… This is our way of setting up a two-way feedback for them." The progress on these action items would be updated and tracked on the monthly Steering Committee meetings ensuring that this is not a one-off activity. Quoting Nikhita Raghunath, one of the Steering Committee members, “... Once we have a base, the liaisons will work with these groups to ensure that the problems are resolved. When we have a report next year, we’ll have a look at the progress made and how we could still do better. But the idea is definitely to not stop at the report.”
With this report, we hope to empower our end user communities with information that they can use to identify ways in which they can support the project as well as a sneak peek into the roadmap for upcoming features. As a community, we thrive on feedback and would love to hear your views about the report. You can get in touch with the Steering Committee via Slack or via the mailing list.
Writing a Controller for Pod Labels
Operators are proving to be an excellent solution to running stateful distributed applications in Kubernetes. Open source tools like the Operator SDK provide ways to build reliable and maintainable operators, making it easier to extend Kubernetes and implement custom scheduling.
Kubernetes operators run complex software inside your cluster. The open source community has already built many operators for distributed applications like Prometheus, Elasticsearch, or Argo CD. Even outside of open source, operators can help to bring new functionality to your Kubernetes cluster.
An operator is a set of custom resources and a set of controllers. A controller watches for changes to specific resources in the Kubernetes API and reacts by creating, updating, or deleting resources.
The Operator SDK is best suited for building fully-featured operators.
Nonetheless, you can use it to write a single controller. This post will walk
you through writing a Kubernetes controller in Go that will add a pod-name
label to pods that have a specific annotation.
Why do we need a controller for this?
I recently worked on a project where we needed to create a Service that routed traffic to a specific Pod in a ReplicaSet. The problem is that a Service can only select pods by label, and all pods in a ReplicaSet have the same labels. There are two ways to solve this problem:
- Create a Service without a selector and manage the Endpoints or EndpointSlices for that Service directly. We would need to write a custom controller to insert our Pod's IP address into those resources.
- Add a label to the Pod with a unique value. We could then use this label in our Service's selector. Again, we would need to write a custom controller to add this label.
A controller is a control loop that tracks one or more Kubernetes resource
types. The controller from option n°2 above only needs to track pods, which
makes it simpler to implement. This is the option we are going to walk through
by writing a Kubernetes controller that adds a pod-name label to our pods.
StatefulSets do this natively by adding a
pod-name label to each Pod in the set. But what if we don't want to or can't
use StatefulSets?
We rarely create pods directly; most often, we use a Deployment, ReplicaSet, or
another high-level resource. We can specify labels to add to each Pod in the
PodSpec, but not with dynamic values, so no way to replicate a StatefulSet's
pod-name label.
We tried using a mutating admission webhook. When
anyone creates a Pod, the webhook patches the Pod with a label containing the
Pod's name. Disappointingly, this does not work: not all pods have a name before
being created. For instance, when the ReplicaSet controller creates a Pod, it
sends a namePrefix to the Kubernetes API server and not a name. The API
server generates a unique name before persisting the new Pod to etcd, but only
after calling our admission webhook. So in most cases, we can't know a Pod's
name with a mutating webhook.
Once a Pod exists in the Kubernetes API, it is mostly immutable, but we can still add a label. We can even do so from the command line:
kubectl label my-pod my-label-key=my-label-value
We need to watch for changes to any pods in the Kubernetes API and add the label we want. Rather than do this manually, we are going to write a controller that does it for us.
Bootstrapping a controller with the Operator SDK
A controller is a reconciliation loop that reads the desired state of a resource from the Kubernetes API and takes action to bring the cluster's actual state closer to the desired state.
In order to write this controller as quickly as possible, we are going to use the Operator SDK. If you don't have it installed, follow the official documentation.
$ operator-sdk version
operator-sdk version: "v1.4.2", commit: "4b083393be65589358b3e0416573df04f4ae8d9b", kubernetes version: "v1.19.4", go version: "go1.15.8", GOOS: "darwin", GOARCH: "amd64"
Let's create a new directory to write our controller in:
mkdir label-operator && cd label-operator
Next, let's initialize a new operator, to which we will add a single controller. To do this, you will need to specify a domain and a repository. The domain serves as a prefix for the group your custom Kubernetes resources will belong to. Because we are not going to be defining custom resources, the domain does not matter. The repository is going to be the name of the Go module we are going to write. By convention, this is the repository where you will be storing your code.
As an example, here is the command I ran:
# Feel free to change the domain and repo values.
operator-sdk init --domain=padok.fr --repo=github.com/busser/label-operator
Next, we need a create a new controller. This controller will handle pods and not a custom resource, so no need to generate the resource code. Let's run this command to scaffold the code we need:
operator-sdk create api --group=core --version=v1 --kind=Pod --controller=true --resource=false
We now have a new file: controllers/pod_controller.go. This file contains a
PodReconciler type with two methods that we need to implement. The first is
Reconcile, and it looks like this for now:
func (r *PodReconciler) Reconcile(ctx context.Context, req ctrl.Request) (ctrl.Result, error) {
_ = r.Log.WithValues("pod", req.NamespacedName)
// your logic here
return ctrl.Result{}, nil
}
The Reconcile method is called whenever a Pod is created, updated, or deleted.
The name and namespace of the Pod are in the ctrl.Request the method receives
as a parameter.
The second method is SetupWithManager and for now it looks like this:
func (r *PodReconciler) SetupWithManager(mgr ctrl.Manager) error {
return ctrl.NewControllerManagedBy(mgr).
// Uncomment the following line adding a pointer to an instance of the controlled resource as an argument
// For().
Complete(r)
}
The SetupWithManager method is called when the operator starts. It serves to
tell the operator framework what types our PodReconciler needs to watch. To
use the same Pod type used by Kubernetes internally, we need to import some of
its code. All of the Kubernetes source code is open source, so you can import
any part you like in your own Go code. You can find a complete list of available
packages in the Kubernetes source code or here on pkg.go.dev. To
use pods, we need the k8s.io/api/core/v1 package.
package controllers
import (
// other imports...
corev1 "k8s.io/api/core/v1"
// other imports...
)
Lets use the Pod type in SetupWithManager to tell the operator framework we
want to watch pods:
func (r *PodReconciler) SetupWithManager(mgr ctrl.Manager) error {
return ctrl.NewControllerManagedBy(mgr).
For(&corev1.Pod{}).
Complete(r)
}
Before moving on, we should set the RBAC permissions our controller needs. Above
the Reconcile method, we have some default permissions:
// +kubebuilder:rbac:groups=core,resources=pods,verbs=get;list;watch;create;update;patch;delete
// +kubebuilder:rbac:groups=core,resources=pods/status,verbs=get;update;patch
// +kubebuilder:rbac:groups=core,resources=pods/finalizers,verbs=update
We don't need all of those. Our controller will never interact with a Pod's status or its finalizers. It only needs to read and update pods. Lets remove the unnecessary permissions and keep only what we need:
// +kubebuilder:rbac:groups=core,resources=pods,verbs=get;list;watch;update;patch
We are now ready to write our controller's reconciliation logic.
Implementing reconciliation
Here is what we want our Reconcile method to do:
- Use the Pod's name and namespace from the
ctrl.Requestto fetch the Pod from the Kubernetes API. - If the Pod has an
add-pod-name-labelannotation, add apod-namelabel to the Pod; if the annotation is missing, don't add the label. - Update the Pod in the Kubernetes API to persist the changes made.
Lets define some constants for the annotation and label:
const (
addPodNameLabelAnnotation = "padok.fr/add-pod-name-label"
podNameLabel = "padok.fr/pod-name"
)
The first step in our reconciliation function is to fetch the Pod we are working on from the Kubernetes API:
// Reconcile handles a reconciliation request for a Pod.
// If the Pod has the addPodNameLabelAnnotation annotation, then Reconcile
// will make sure the podNameLabel label is present with the correct value.
// If the annotation is absent, then Reconcile will make sure the label is too.
func (r *PodReconciler) Reconcile(ctx context.Context, req ctrl.Request) (ctrl.Result, error) {
log := r.Log.WithValues("pod", req.NamespacedName)
/*
Step 0: Fetch the Pod from the Kubernetes API.
*/
var pod corev1.Pod
if err := r.Get(ctx, req.NamespacedName, &pod); err != nil {
log.Error(err, "unable to fetch Pod")
return ctrl.Result{}, err
}
return ctrl.Result{}, nil
}
Our Reconcile method will be called when a Pod is created, updated, or
deleted. In the deletion case, our call to r.Get will return a specific error.
Let's import the package that defines this error:
package controllers
import (
// other imports...
apierrors "k8s.io/apimachinery/pkg/api/errors"
// other imports...
)
We can now handle this specific error and — since our controller does not care about deleted pods — explicitly ignore it:
/*
Step 0: Fetch the Pod from the Kubernetes API.
*/
var pod corev1.Pod
if err := r.Get(ctx, req.NamespacedName, &pod); err != nil {
if apierrors.IsNotFound(err) {
// we'll ignore not-found errors, since we can get them on deleted requests.
return ctrl.Result{}, nil
}
log.Error(err, "unable to fetch Pod")
return ctrl.Result{}, err
}
Next, lets edit our Pod so that our dynamic label is present if and only if our annotation is present:
/*
Step 1: Add or remove the label.
*/
labelShouldBePresent := pod.Annotations[addPodNameLabelAnnotation] == "true"
labelIsPresent := pod.Labels[podNameLabel] == pod.Name
if labelShouldBePresent == labelIsPresent {
// The desired state and actual state of the Pod are the same.
// No further action is required by the operator at this moment.
log.Info("no update required")
return ctrl.Result{}, nil
}
if labelShouldBePresent {
// If the label should be set but is not, set it.
if pod.Labels == nil {
pod.Labels = make(map[string]string)
}
pod.Labels[podNameLabel] = pod.Name
log.Info("adding label")
} else {
// If the label should not be set but is, remove it.
delete(pod.Labels, podNameLabel)
log.Info("removing label")
}
Finally, let's push our updated Pod to the Kubernetes API:
/*
Step 2: Update the Pod in the Kubernetes API.
*/
if err := r.Update(ctx, &pod); err != nil {
log.Error(err, "unable to update Pod")
return ctrl.Result{}, err
}
When writing our updated Pod to the Kubernetes API, there is a risk that the Pod has been updated or deleted since we first read it. When writing a Kubernetes controller, we should keep in mind that we are not the only actors in the cluster. When this happens, the best thing to do is start the reconciliation from scratch, by requeuing the event. Lets do exactly that:
/*
Step 2: Update the Pod in the Kubernetes API.
*/
if err := r.Update(ctx, &pod); err != nil {
if apierrors.IsConflict(err) {
// The Pod has been updated since we read it.
// Requeue the Pod to try to reconciliate again.
return ctrl.Result{Requeue: true}, nil
}
if apierrors.IsNotFound(err) {
// The Pod has been deleted since we read it.
// Requeue the Pod to try to reconciliate again.
return ctrl.Result{Requeue: true}, nil
}
log.Error(err, "unable to update Pod")
return ctrl.Result{}, err
}
Let's remember to return successfully at the end of the method:
return ctrl.Result{}, nil
}
And that's it! We are now ready to run the controller on our cluster.
Run the controller on your cluster
To run our controller on your cluster, we need to run the operator. For that,
all you will need is kubectl. If you don't have a Kubernetes cluster at hand,
I recommend you start one locally with KinD (Kubernetes in Docker).
All it takes to run the operator from your machine is this command:
make run
After a few seconds, you should see the operator's logs. Notice that our
controller's Reconcile method was called for all pods already running in the
cluster.
Let's keep the operator running and, in another terminal, create a new Pod:
kubectl run --image=nginx my-nginx
The operator should quickly print some logs, indicating that it reacted to the Pod's creation and subsequent changes in status:
INFO controllers.Pod no update required {"pod": "default/my-nginx"}
INFO controllers.Pod no update required {"pod": "default/my-nginx"}
INFO controllers.Pod no update required {"pod": "default/my-nginx"}
INFO controllers.Pod no update required {"pod": "default/my-nginx"}
Lets check the Pod's labels:
$ kubectl get pod my-nginx --show-labels
NAME READY STATUS RESTARTS AGE LABELS
my-nginx 1/1 Running 0 11m run=my-nginx
Let's add an annotation to the Pod so that our controller knows to add our dynamic label to it:
kubectl annotate pod my-nginx padok.fr/add-pod-name-label=true
Notice that the controller immediately reacted and produced a new line in its logs:
INFO controllers.Pod adding label {"pod": "default/my-nginx"}
$ kubectl get pod my-nginx --show-labels
NAME READY STATUS RESTARTS AGE LABELS
my-nginx 1/1 Running 0 13m padok.fr/pod-name=my-nginx,run=my-nginx
Bravo! You just successfully wrote a Kubernetes controller capable of adding labels with dynamic values to resources in your cluster.
Controllers and operators, both big and small, can be an important part of your Kubernetes journey. Writing operators is easier now than it has ever been. The possibilities are endless.
What next?
If you want to go further, I recommend starting by deploying your controller or
operator inside a cluster. The Makefile generated by the Operator SDK will do
most of the work.
When deploying an operator to production, it is always a good idea to implement robust testing. The first step in that direction is to write unit tests. This documentation will guide you in writing tests for your operator. I wrote tests for the operator we just wrote; you can find all of my code in this GitHub repository.
How to learn more?
The Operator SDK documentation goes into detail on how you can go further and implement more complex operators.
When modeling a more complex use-case, a single controller acting on built-in Kubernetes types may not be enough. You may need to build a more complex operator with Custom Resource Definitions (CRDs) and multiple controllers. The Operator SDK is a great tool to help you do this.
If you want to discuss building an operator, join the #kubernetes-operator channel in the Kubernetes Slack workspace!
Using Finalizers to Control Deletion
Deleting objects in Kubernetes can be challenging. You may think you’ve deleted something, only to find it still persists. While issuing a kubectl delete command and hoping for the best might work for day-to-day operations, understanding how Kubernetes delete commands operate will help you understand why some objects linger after deletion.
In this post, I’ll look at:
- What properties of a resource govern deletion
- How finalizers and owner references impact object deletion
- How the propagation policy can be used to change the order of deletions
- How deletion works, with examples
For simplicity, all examples will use ConfigMaps and basic shell commands to demonstrate the process. We’ll explore how the commands work and discuss repercussions and results from using them in practice.
The basic delete
Kubernetes has several different commands you can use that allow you to create, read, update, and delete objects. For the purpose of this blog post, we’ll focus on four kubectl commands: create, get, patch, and delete.
Here are examples of the basic kubectl delete command:
kubectl create configmap mymap
configmap/mymap created
kubectl get configmap/mymap
NAME DATA AGE
mymap 0 12s
kubectl delete configmap/mymap
configmap "mymap" deleted
kubectl get configmap/mymap
Error from server (NotFound): configmaps "mymap" not found
Shell commands preceded by $ are followed by their output. You can see that we begin with a kubectl create configmap mymap, which will create the empty configmap mymap. Next, we need to get the configmap to prove it exists. We can then delete that configmap. Attempting to get it again produces an HTTP 404 error, which means the configmap is not found.
The state diagram for the basic delete command is very simple:

State diagram for delete
Although this operation is straightforward, other factors may interfere with the deletion, including finalizers and owner references.
Understanding Finalizers
When it comes to understanding resource deletion in Kubernetes, knowledge of how finalizers work is helpful and can help you understand why some objects don’t get deleted.
Finalizers are keys on resources that signal pre-delete operations. They control the garbage collection on resources, and are designed to alert controllers what cleanup operations to perform prior to removing a resource. However, they don’t necessarily name code that should be executed; finalizers on resources are basically just lists of keys much like annotations. Like annotations, they can be manipulated.
Some common finalizers you’ve likely encountered are:
kubernetes.io/pv-protectionkubernetes.io/pvc-protection
The finalizers above are used on volumes to prevent accidental deletion. Similarly, some finalizers can be used to prevent deletion of any resource but are not managed by any controller.
Below with a custom configmap, which has no properties but contains a finalizer:
cat <<EOF | kubectl create -f -
apiVersion: v1
kind: ConfigMap
metadata:
name: mymap
finalizers:
- kubernetes
EOF
The configmap resource controller doesn't understand what to do with the kubernetes finalizer key. I term these “dead” finalizers for configmaps as it is normally used on namespaces. Here’s what happen upon attempting to delete the configmap:
kubectl delete configmap/mymap &
configmap "mymap" deleted
jobs
[1]+ Running kubectl delete configmap/mymap
Kubernetes will report back that the object has been deleted, however, it hasn’t been deleted in a traditional sense. Rather, it’s in the process of deletion. When we attempt to get that object again, we discover the object has been modified to include the deletion timestamp.
kubectl get configmap/mymap -o yaml
apiVersion: v1
kind: ConfigMap
metadata:
creationTimestamp: "2020-10-22T21:30:18Z"
deletionGracePeriodSeconds: 0
deletionTimestamp: "2020-10-22T21:30:34Z"
finalizers:
- kubernetes
name: mymap
namespace: default
resourceVersion: "311456"
selfLink: /api/v1/namespaces/default/configmaps/mymap
uid: 93a37fed-23e3-45e8-b6ee-b2521db81638
In short, what’s happened is that the object was updated, not deleted. That’s because Kubernetes saw that the object contained finalizers and blocked removal of the object from etcd. The deletion timestamp signals that deletion was requested, but the deletion will not be complete until we edit the object and remove the finalizer.
Here's a demonstration of using the patch command to remove finalizers. If we want to delete an object, we can simply patch it on the command line to remove the finalizers. In this way, the deletion that was running in the background will complete and the object will be deleted. When we attempt to get that configmap, it will be gone.
kubectl patch configmap/mymap \
--type json \
--patch='[ { "op": "remove", "path": "/metadata/finalizers" } ]'
configmap/mymap patched
[1]+ Done kubectl delete configmap/mymap
kubectl get configmap/mymap -o yaml
Error from server (NotFound): configmaps "mymap" not found
Here's a state diagram for finalization:

State diagram for finalize
So, if you attempt to delete an object that has a finalizer on it, it will remain in finalization until the controller has removed the finalizer keys or the finalizers are removed using Kubectl. Once that finalizer list is empty, the object can actually be reclaimed by Kubernetes and put into a queue to be deleted from the registry.
Owner References
Owner references describe how groups of objects are related. They are properties on resources that specify the relationship to one another, so entire trees of resources can be deleted.
Finalizer rules are processed when there are owner references. An owner reference consists of a name and a UID. Owner references link resources within the same namespace, and it also needs a UID for that reference to work. Pods typically have owner references to the owning replica set. So, when deployments or stateful sets are deleted, then the child replica sets and pods are deleted in the process.
Here are some examples of owner references and how they work. In the first example, we create a parent object first, then the child. The result is a very simple configmap that contains an owner reference to its parent:
cat <<EOF | kubectl create -f -
apiVersion: v1
kind: ConfigMap
metadata:
name: mymap-parent
EOF
CM_UID=$(kubectl get configmap mymap-parent -o jsonpath="{.metadata.uid}")
cat <<EOF | kubectl create -f -
apiVersion: v1
kind: ConfigMap
metadata:
name: mymap-child
ownerReferences:
- apiVersion: v1
kind: ConfigMap
name: mymap-parent
uid: $CM_UID
EOF
Deleting the child object when an owner reference is involved does not delete the parent:
kubectl get configmap
NAME DATA AGE
mymap-child 0 12m4s
mymap-parent 0 12m4s
kubectl delete configmap/mymap-child
configmap "mymap-child" deleted
kubectl get configmap
NAME DATA AGE
mymap-parent 0 12m10s
In this example, we re-created the parent-child configmaps from above. Now, when deleting from the parent (instead of the child) with an owner reference from the child to the parent, when we get the configmaps, none are in the namespace:
kubectl get configmap
NAME DATA AGE
mymap-child 0 10m2s
mymap-parent 0 10m2s
kubectl delete configmap/mymap-parent
configmap "mymap-parent" deleted
kubectl get configmap
No resources found in default namespace.
To sum things up, when there's an override owner reference from a child to a parent, deleting the parent deletes the children automatically. This is called cascade. The default for cascade is true, however, you can use the --cascade=orphan option for kubectl delete to delete an object and orphan its children. Update: starting with kubectl v1.20, the default for cascade is background.
In the following example, there is a parent and a child. Notice the owner references are still included. If I delete the parent using --cascade=orphan, the parent is deleted but the child still exists:
kubectl get configmap
NAME DATA AGE
mymap-child 0 13m8s
mymap-parent 0 13m8s
kubectl delete --cascade=orphan configmap/mymap-parent
configmap "mymap-parent" deleted
kubectl get configmap
NAME DATA AGE
mymap-child 0 13m21s
The --cascade option links to the propagation policy in the API, which allows you to change the order in which objects are deleted within a tree. In the following example uses API access to craft a custom delete API call with the background propagation policy:
kubectl proxy --port=8080 &
Starting to serve on 127.0.0.1:8080
curl -X DELETE \
localhost:8080/api/v1/namespaces/default/configmaps/mymap-parent \
-d '{ "kind":"DeleteOptions", "apiVersion":"v1", "propagationPolicy":"Background" }' \
-H "Content-Type: application/json"
{
"kind": "Status",
"apiVersion": "v1",
"metadata": {},
"status": "Success",
"details": { ... }
}
Note that the propagation policy cannot be specified on the command line using kubectl. You have to specify it using a custom API call. Simply create a proxy, so you have access to the API server from the client, and execute a curl command with just a URL to execute that delete command.
There are three different options for the propagation policy:
Foreground: Children are deleted before the parent (post-order)Background: Parent is deleted before the children (pre-order)Orphan: Owner references are ignored
Keep in mind that when you delete an object and owner references have been specified, finalizers will be honored in the process. This can result in trees of objects persisting, and you end up with a partial deletion. At that point, you have to look at any existing owner references on your objects, as well as any finalizers, to understand what’s happening.
Forcing a Deletion of a Namespace
There's one situation that may require forcing finalization for a namespace. If you've deleted a namespace and you've cleaned out all of the objects under it, but the namespace still exists, deletion can be forced by updating the namespace subresource, finalize. This informs the namespace controller that it needs to remove the finalizer from the namespace and perform any cleanup:
cat <<EOF | curl -X PUT \
localhost:8080/api/v1/namespaces/test/finalize \
-H "Content-Type: application/json" \
--data-binary @-
{
"kind": "Namespace",
"apiVersion": "v1",
"metadata": {
"name": "test"
},
"spec": {
"finalizers": null
}
}
EOF
This should be done with caution as it may delete the namespace only and leave orphan objects within the, now non-exiting, namespace - a confusing state for Kubernetes. If this happens, the namespace can be re-created manually and sometimes the orphaned objects will re-appear under the just-created namespace which will allow manual cleanup and recovery.
Key Takeaways
As these examples demonstrate, finalizers can get in the way of deleting resources in Kubernetes, especially when there are parent-child relationships between objects. Often, there is a reason for adding a finalizer into the code, so you should always investigate before manually deleting it. Owner references allow you to specify and remove trees of resources, although finalizers will be honored in the process. Finally, the propagation policy can be used to specify the order of deletion via a custom API call, giving you control over how objects are deleted. Now that you know a little more about how deletions work in Kubernetes, we recommend you try it out on your own, using a test cluster.
Kubernetes 1.21: Metrics Stability hits GA
Kubernetes 1.21 marks the graduation of the metrics stability framework and along with it, the first officially supported stable metrics. Not only do stable metrics come with supportability guarantees, the metrics stability framework brings escape hatches that you can use if you encounter problematic metrics.
See the list of stable Kubernetes metrics here
What are stable metrics and why do we need them?
A stable metric is one which, from a consumption point of view, can be reliably consumed across a number of Kubernetes versions without risk of ingestion failure.
Metrics stability is an ongoing community concern. Cluster monitoring infrastructure often assumes the stability of some control plane metrics, so we have introduced a mechanism for versioning metrics as a proper API, with stability guarantees around a formal metrics deprecation process.
What are the stability levels for metrics?
Metrics can currently have one of two stability levels: alpha or stable.
Alpha metrics have no stability guarantees; as such they can be modified or deleted at any time. At this time, all Kubernetes metrics implicitly fall into this category.
Stable metrics can be guaranteed to not change, except that the metric may become marked deprecated for a future Kubernetes version. By not change, we mean three things:
- the metric itself will not be deleted or renamed
- the type of metric will not be modified
- no labels can be added or removed from this metric
From an ingestion point of view, it is backwards-compatible to add or remove possible values for labels which already do exist, but not labels themselves. Therefore, adding or removing values from an existing label is permitted. Stable metrics can also be marked as deprecated for a future Kubernetes version, since this is tracked in a metadata field and does not actually change the metric itself.
Removing or adding labels from stable metrics is not permitted. In order to add or remove a label from an existing stable metric, one would have to introduce a new metric and deprecate the stable one; otherwise this would violate compatibility agreements.
How are metrics deprecated?
While deprecation policies only affect stability guarantees for stable metrics (and not alpha ones), deprecation information may be optionally provided on alpha metrics to help component owners inform users of future intent and assist with transition plans.
A stable metric undergoing the deprecation process signals that the metric will eventually be deleted. The metrics deprecation lifecycle looks roughly like this (with each stage representing a Kubernetes release):

Deprecated metrics have the same stability guarantees of their stable counterparts. If a stable metric is deprecated, then a deprecated stable metric is guaranteed to not change. When deprecating a stable metric, a future Kubernetes release is specified as the point from which the metric will be considered deprecated.
Deprecated metrics will have their description text prefixed with a deprecation notice string “(Deprecated from x.y)” and a warning log will be emitted during metric registration, in the spirit of the official Kubernetes deprecation policy.
Like their stable metric counterparts, deprecated metrics will be automatically registered to the metrics endpoint. On a subsequent release (when the metric's deprecatedVersion is equal to current_kubernetes_version - 4)), a deprecated metric will become a hidden metric. Hidden metrics are not automatically registered, and hence are hidden by default from end users. These hidden metrics can be explicitly re-enabled for one release after they reach the hidden state, to provide a migration path for cluster operators.
As an owner of a Kubernetes component, how do I add stable metrics?
During metric instantiation, stability can be specified by setting the metadata field, StabilityLevel, to “Stable”. When a StabilityLevel is not explicitly set, metrics default to “Alpha” stability. Note that metrics which have fields determined at runtime cannot be marked as Stable. Stable metrics will be detected during static analysis during the pre-commit phase, and must be reviewed by sig-instrumentation.
var metricDefinition = kubemetrics.CounterOpts{
Name: "some_metric",
Help: "some description",
StabilityLevel: kubemetrics.STABLE,
}
For more examples of setting metrics stability and deprecation, see the Metrics Stability KEP.
How do I get involved?
This project, like all of Kubernetes, is the result of hard work by many contributors from diverse backgrounds working together. We offer a huge thank you to all the contributors in Kubernetes community who helped review the design and implementation of the project, including but not limited to the following:
- Han Kang (logicalhan)
- Frederic Branczyk (brancz)
- Marek Siarkowicz (serathius)
- Elana Hashman (ehashman)
- Solly Ross (DirectXMan12)
- Stefan Schimanski (sttts)
- David Ashpole (dashpole)
- Yuchen Zhou (yoyinzyc)
- Yu Yi (erain)
If you’re interested in getting involved with the design and development of instrumentation or any part of the Kubernetes metrics system, join the Kubernetes Instrumentation Special Interest Group (SIG). We’re rapidly growing and always welcome new contributors.
Evolving Kubernetes networking with the Gateway API
The Ingress resource is one of the many Kubernetes success stories. It created a diverse ecosystem of Ingress controllers which were used across hundreds of thousands of clusters in a standardized and consistent way. This standardization helped users adopt Kubernetes. However, five years after the creation of Ingress, there are signs of fragmentation into different but strikingly similar CRDs and overloaded annotations. The same portability that made Ingress pervasive also limited its future.
It was at Kubecon 2019 San Diego when a passionate group of contributors gathered to discuss the evolution of Ingress. The discussion overflowed to the hotel lobby across the street and what came out of it would later be known as the Gateway API. This discussion was based on a few key assumptions:
- The API standards underlying route matching, traffic management, and service exposure are commoditized and provide little value to their implementers and users as custom APIs
- It’s possible to represent L4/L7 routing and traffic management through common core API resources
- It’s possible to provide extensibility for more complex capabilities in a way that does not sacrifice the user experience of the core API
Introducing the Gateway API
This led to design principles that allow the Gateway API to improve upon Ingress:
- Expressiveness - In addition to HTTP host/path matching and TLS, Gateway API can express capabilities like HTTP header manipulation, traffic weighting & mirroring, TCP/UDP routing, and other capabilities that were only possible in Ingress through custom annotations.
- Role-oriented design - The API resource model reflects the separation of responsibilities that is common in routing and Kubernetes service networking.
- Extensibility - The resources allow arbitrary configuration attachment at various layers within the API. This makes granular customization possible at the most appropriate places.
- Flexible conformance - The Gateway API defines varying conformance levels - core (mandatory support), extended (portable if supported), and custom (no portability guarantee), known together as flexible conformance. This promotes a highly portable core API (like Ingress) that still gives flexibility for Gateway controller implementers.
What does the Gateway API look like?
The Gateway API introduces a few new resource types:
- GatewayClasses are cluster-scoped resources that act as templates to explicitly define behavior for Gateways derived from them. This is similar in concept to StorageClasses, but for networking data-planes.
- Gateways are the deployed instances of GatewayClasses. They are the logical representation of the data-plane which performs routing, which may be in-cluster proxies, hardware LBs, or cloud LBs.
- Routes are not a single resource, but represent many different protocol-specific Route resources. The HTTPRoute has matching, filtering, and routing rules that get applied to Gateways that can process HTTP and HTTPS traffic. Similarly, there are TCPRoutes, UDPRoutes, and TLSRoutes which also have protocol-specific semantics. This model also allows the Gateway API to incrementally expand its protocol support in the future.
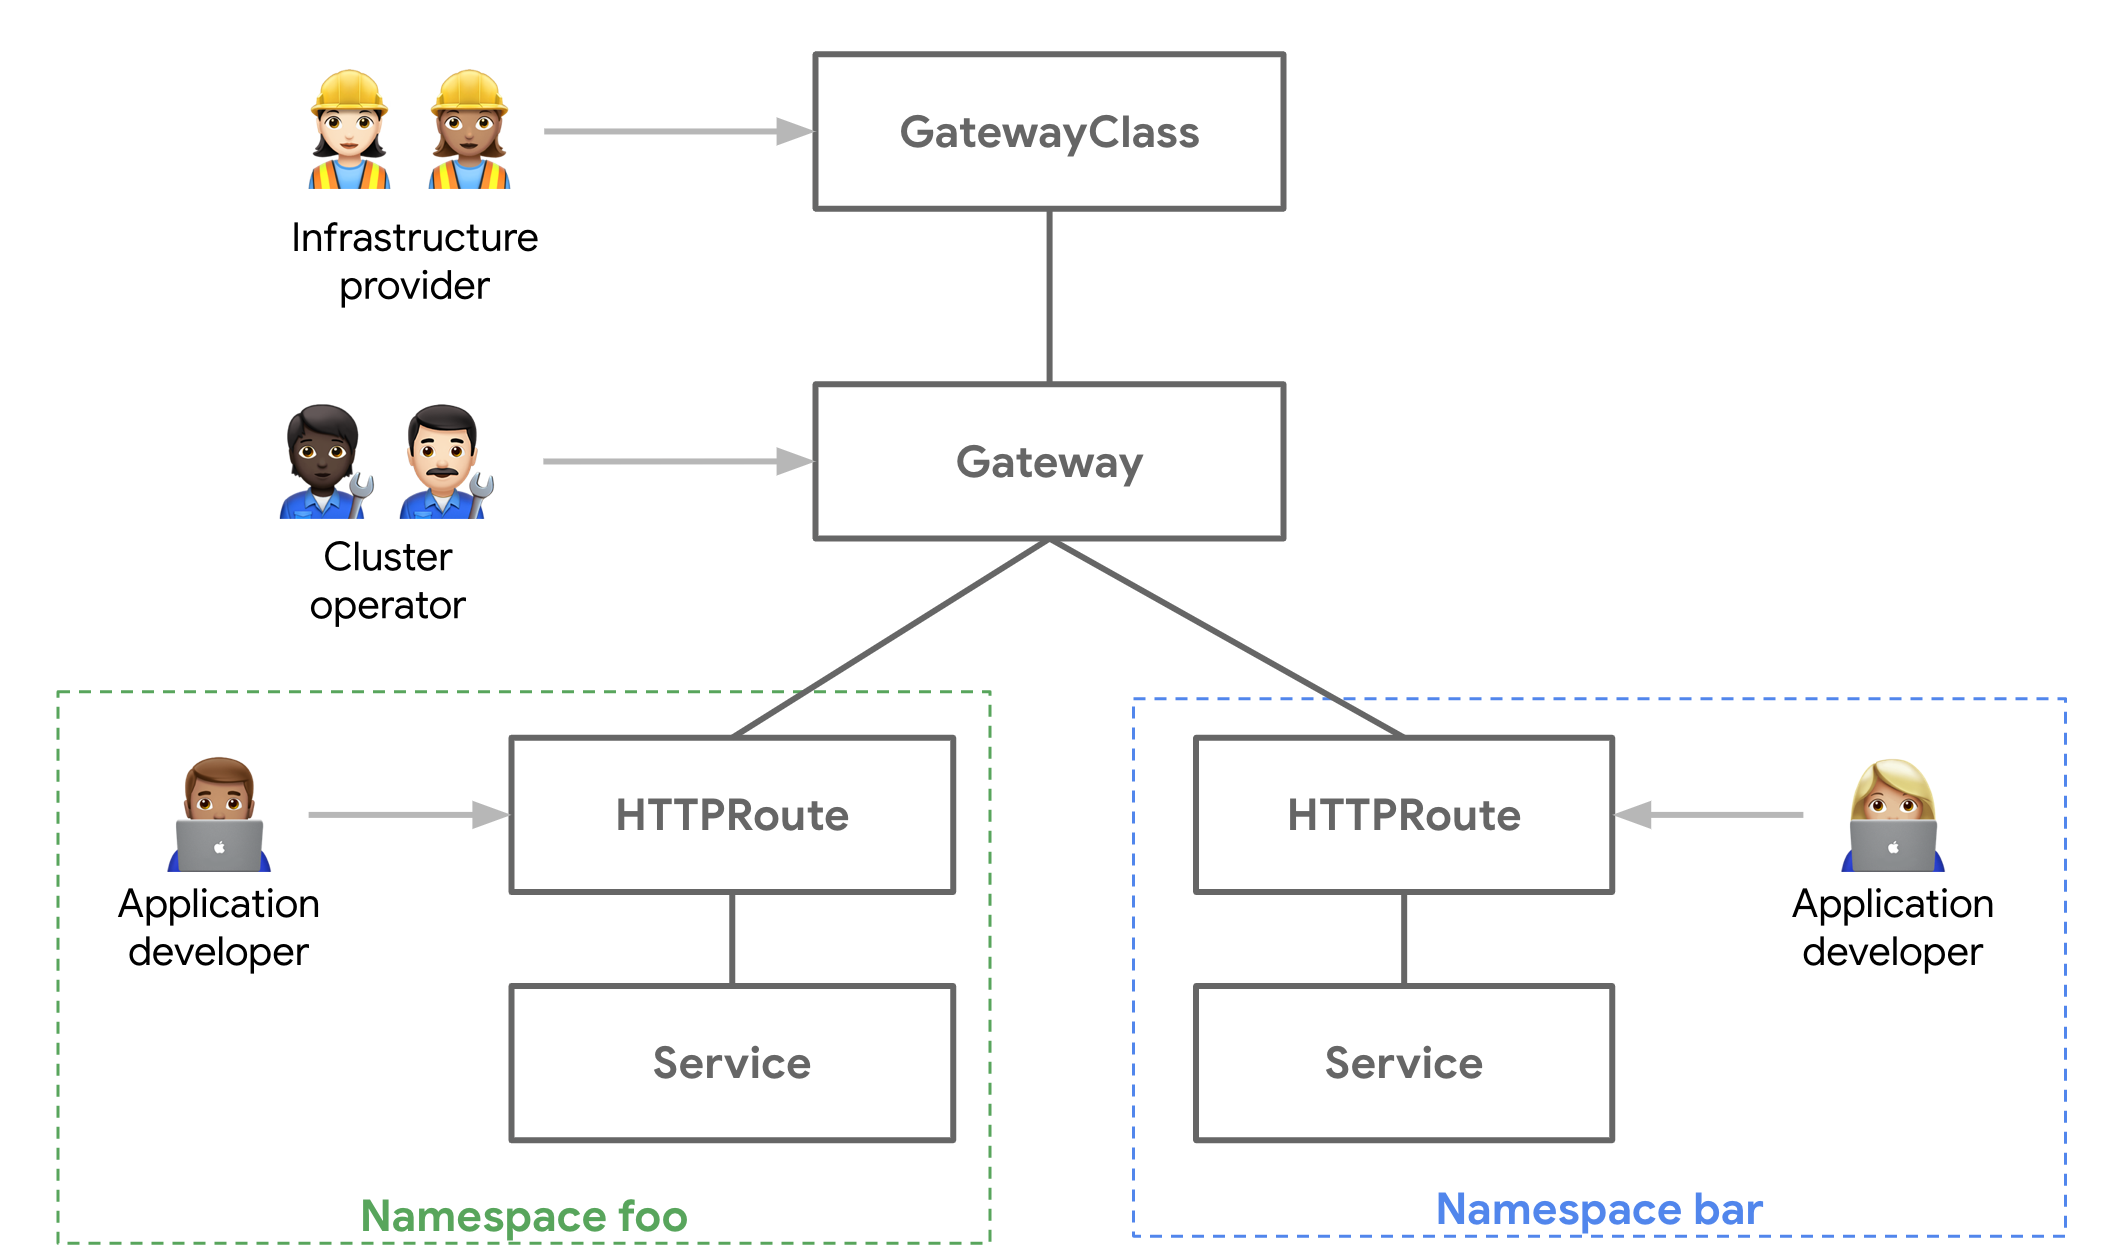
Gateway Controller Implementations
The good news is that although Gateway is in Alpha, there are already several Gateway controller implementations that you can run. Since it’s a standardized spec, the following example could be run on any of them and should function the exact same way. Check out getting started to see how to install and use one of these Gateway controllers.
Getting Hands-on with the Gateway API
In the following example, we’ll demonstrate the relationships between the different API Resources and walk you through a common use case:
- Team foo has their app deployed in the foo Namespace. They need to control the routing logic for the different pages of their app.
- Team bar is running in the bar Namespace. They want to be able to do blue-green rollouts of their application to reduce risk.
- The platform team is responsible for managing the load balancer and network security of all the apps in the Kubernetes cluster.
The following foo-route does path matching to various Services in the foo Namespace and also has a default route to a 404 server. This exposes foo-auth and foo-home Services via foo.example.com/login and foo.example.com/home respectively.:
kind: HTTPRoute
apiVersion: networking.x-k8s.io/v1alpha1
metadata:
name: foo-route
namespace: foo
labels:
gateway: external-https-prod
spec:
hostnames:
- "foo.example.com"
rules:
- matches:
- path:
type: Prefix
value: /login
forwardTo:
- serviceName: foo-auth
port: 8080
- matches:
- path:
type: Prefix
value: /home
forwardTo:
- serviceName: foo-home
port: 8080
- matches:
- path:
type: Prefix
value: /
forwardTo:
- serviceName: foo-404
port: 8080
The bar team, operating in the bar Namespace of the same Kubernetes cluster, also wishes to expose their application to the internet, but they also want to control their own canary and blue-green rollouts. The following HTTPRoute is configured for the following behavior:
For traffic to
bar.example.com:- Send 90% of the traffic to bar-v1
- Send 10% of the traffic to bar-v2
For traffic to
bar.example.comwith the HTTP headerenv: canary:- Send all the traffic to bar-v2
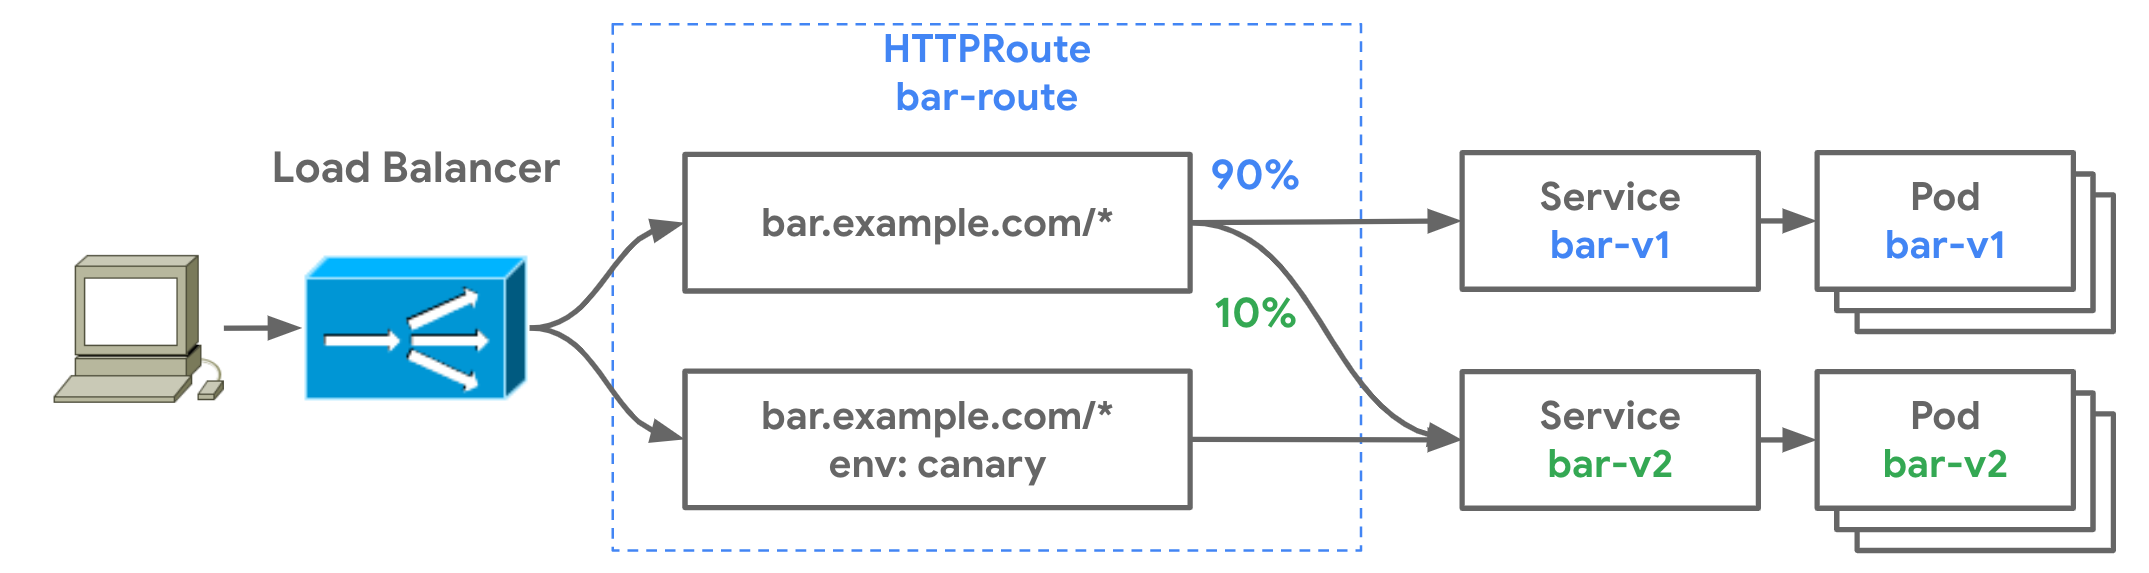
kind: HTTPRoute
apiVersion: networking.x-k8s.io/v1alpha1
metadata:
name: bar-route
namespace: bar
labels:
gateway: external-https-prod
spec:
hostnames:
- "bar.example.com"
rules:
- forwardTo:
- serviceName: bar-v1
port: 8080
weight: 90
- serviceName: bar-v2
port: 8080
weight: 10
- matches:
- headers:
values:
env: canary
forwardTo:
- serviceName: bar-v2
port: 8080
Route and Gateway Binding
So we have two HTTPRoutes matching and routing traffic to different Services. You might be wondering, where are these Services accessible? Through which networks or IPs are they exposed?
How Routes are exposed to clients is governed by Route binding, which describes how Routes and Gateways create a bidirectional relationship between each other. When Routes are bound to a Gateway it means their collective routing rules are configured on the underlying load balancers or proxies and the Routes are accessible through the Gateway. Thus, a Gateway is a logical representation of a networking data plane that can be configured through Routes.
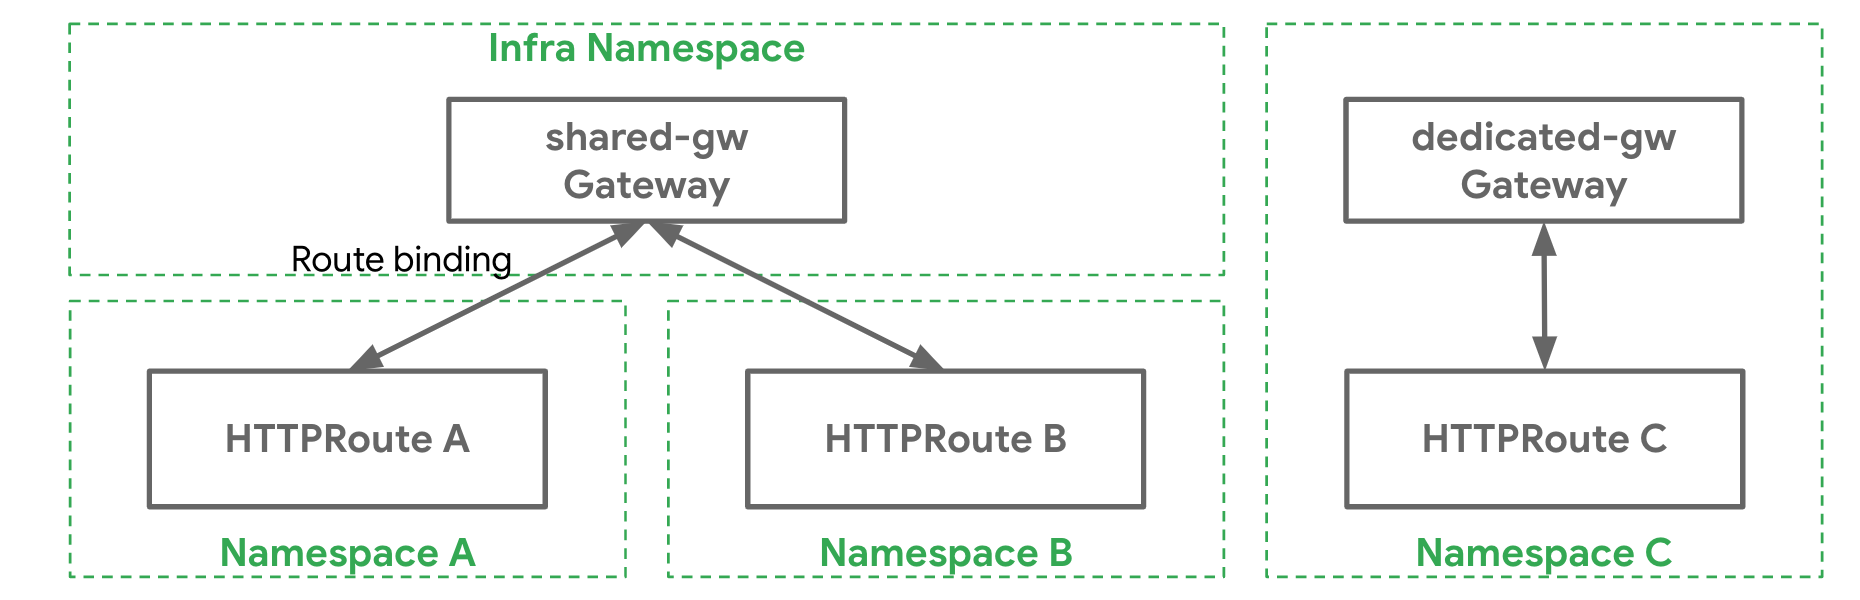
Administrative Delegation
The split between Gateway and Route resources allows the cluster administrator to delegate some of the routing configuration to individual teams while still retaining centralized control. The following Gateway resource exposes HTTPS on port 443 and terminates all traffic on the port with a certificate controlled by the cluster administrator.
kind: Gateway
apiVersion: networking.x-k8s.io/v1alpha1
metadata:
name: prod-web
spec:
gatewayClassName: acme-lb
listeners:
- protocol: HTTPS
port: 443
routes:
kind: HTTPRoute
selector:
matchLabels:
gateway: external-https-prod
namespaces:
from: All
tls:
certificateRef:
name: admin-controlled-cert
The following HTTPRoute shows how the Route can ensure it matches the Gateway's selector via it’s kind (HTTPRoute) and resource labels (gateway=external-https-prod).
# Matches the required kind selector on the Gateway
kind: HTTPRoute
apiVersion: networking.x-k8s.io/v1alpha1
metadata:
name: foo-route
namespace: foo-ns
labels:
# Matches the required label selector on the Gateway
gateway: external-https-prod
...
Role Oriented Design
When you put it all together, you have a single load balancing infrastructure that can be safely shared by multiple teams. The Gateway API is not only a more expressive API for advanced routing, but is also a role-oriented API, designed for multi-tenant infrastructure. Its extensibility ensures that it will evolve for future use-cases while preserving portability. Ultimately these characteristics will allow the Gateway API to adapt to different organizational models and implementations well into the future.
Try it out and get involved
There are many resources to check out to learn more.
- Check out the user guides to see what use-cases can be addressed.
- Try out one of the existing Gateway controllers
- Or get involved and help design and influence the future of Kubernetes service networking!
Graceful Node Shutdown Goes Beta
Graceful node shutdown, beta in 1.21, enables kubelet to gracefully evict pods during a node shutdown.
Kubernetes is a distributed system and as such we need to be prepared for inevitable failures — nodes will fail, containers might crash or be restarted, and - ideally - your workloads will be able to withstand these catastrophic events.
One of the common classes of issues are workload failures on node shutdown or restart. The best practice prior to bringing your node down is to safely drain and cordon your node. This will ensure that all pods running on this node can safely be evicted. An eviction will ensure your pods can follow the expected pod termination lifecycle meaning receiving a SIGTERM in your container and/or running preStopHooks.
Prior to Kubernetes 1.20 (when graceful node shutdown was introduced as an alpha feature), safe node draining was not easy: it required users to manually take action and drain the node beforehand. If someone or something shut down your node without draining it first, most likely your pods would not be safely evicted from your node and shutdown abruptly. Other services talking to those pods might see errors due to the pods exiting abruptly. Some examples of this situation may be caused by a reboot due to security patches or preemption of short lived cloud compute instances.
Kubernetes 1.21 brings graceful node shutdown to beta. Graceful node shutdown gives you more control over some of those unexpected shutdown situations. With graceful node shutdown, the kubelet is aware of underlying system shutdown events and can propagate these events to pods, ensuring containers can shut down as gracefully as possible. This gives the containers a chance to checkpoint their state or release back any resources they are holding.
Note, that for the best availability, even with graceful node shutdown, you should still design your deployments to be resilient to node failures.
How does it work?
On Linux, your system can shut down in many different situations. For example:
- A user or script running
shutdown -h noworsystemctl powerofforsystemctl reboot. - Physically pressing a power button on the machine.
- Stopping a VM instance on a cloud provider, e.g.
gcloud compute instances stopon GCP. - A Preemptible VM or Spot Instance that your cloud provider can terminate unexpectedly, but with a brief warning.
Many of these situations can be unexpected and there is no guarantee that a cluster administrator drained the node prior to these events. With the graceful node shutdown feature, kubelet uses a systemd mechanism called "Inhibitor Locks" to allow draining in most cases. Using Inhibitor Locks, kubelet instructs systemd to postpone system shutdown for a specified duration, giving a chance for the node to drain and evict pods on the system.
Kubelet makes use of this mechanism to ensure your pods will be terminated cleanly. When the kubelet starts, it acquires a systemd delay-type inhibitor lock. When the system is about to shut down, the kubelet can delay that shutdown for a configurable, short duration utilizing the delay-type inhibitor lock it acquired earlier. This gives your pods extra time to terminate. As a result, even during unexpected shutdowns, your application will receive a SIGTERM, preStop hooks will execute, and kubelet will properly update Ready node condition and respective pod statuses to the api-server.
For example, on a node with graceful node shutdown enabled, you can see that the inhibitor lock is taken by the kubelet:
kubelet-node ~ # systemd-inhibit --list
Who: kubelet (UID 0/root, PID 1515/kubelet)
What: shutdown
Why: Kubelet needs time to handle node shutdown
Mode: delay
1 inhibitors listed.
One important consideration we took when designing this feature is that not all pods are created equal. For example, some of the pods running on a node such as a logging related daemonset should stay running as long as possible to capture important logs during the shutdown itself. As a result, pods are split into two categories: "regular" and "critical". Critical pods are those that have priorityClassName set to system-cluster-critical or system-node-critical; all other pods are considered regular.
In our example, the logging DaemonSet would run as a critical pod. During the graceful node shutdown, regular pods are terminated first, followed by critical pods. As an example, this would allow a critical pod associated with a logging daemonset to continue functioning, and collecting logs during the termination of regular pods.
We will evaluate during the beta phase if we need more flexibility for different pod priority classes and add support if needed, please let us know if you have some scenarios in mind.
How do I use it?
Graceful node shutdown is controlled with the GracefulNodeShutdown feature gate and is enabled by default in Kubernetes 1.21.
You can configure the graceful node shutdown behavior using two kubelet configuration options: ShutdownGracePeriod and ShutdownGracePeriodCriticalPods. To configure these options, you edit the kubelet configuration file that is passed to kubelet via the --config flag; for more details, refer to Set kubelet parameters via a configuration file.
During a shutdown, kubelet terminates pods in two phases. You can configure how long each of these phases lasts.
- Terminate regular pods running on the node.
- Terminate critical pods running on the node.
The settings that control the duration of shutdown are:
ShutdownGracePeriod- Specifies the total duration that the node should delay the shutdown by. This is the total grace period for pod termination for both regular and critical pods.
ShutdownGracePeriodCriticalPods- Specifies the duration used to terminate critical pods during a node shutdown. This should be less than
ShutdownGracePeriod.
- Specifies the duration used to terminate critical pods during a node shutdown. This should be less than
For example, if ShutdownGracePeriod=30s, and ShutdownGracePeriodCriticalPods=10s, kubelet will delay the node shutdown by 30 seconds. During this time, the first 20 seconds (30-10) would be reserved for gracefully terminating normal pods, and the last 10 seconds would be reserved for terminating critical pods.
Note that by default, both configuration options described above, ShutdownGracePeriod and ShutdownGracePeriodCriticalPods are set to zero, so you will need to configure them as appropriate for your environment to activate graceful node shutdown functionality.
How can I learn more?
- Read the documentation
- Read the enhancement proposal, KEP 2000
- View the code
How do I get involved?
Your feedback is always welcome! SIG Node meets regularly and can be reached via Slack (channel #sig-node), or the SIG's mailing list
Annotating Kubernetes Services for Humans
Have you ever been asked to troubleshoot a failing Kubernetes service and struggled to find basic information about the service such as the source repository and owner?
One of the problems as Kubernetes applications grow is the proliferation of services. As the number of services grows, developers start to specialize working with specific services. When it comes to troubleshooting, however, developers need to be able to find the source, understand the service and dependencies, and chat with the owning team for any service.
Human service discovery
Troubleshooting always begins with information gathering. While much attention has been paid to centralizing machine data (e.g., logs, metrics), much less attention has been given to the human aspect of service discovery. Who owns a particular service? What Slack channel does the team work on? Where is the source for the service? What issues are currently known and being tracked?
Kubernetes annotations
Kubernetes annotations are designed to solve exactly this problem. Oft-overlooked, Kubernetes annotations are designed to add metadata to Kubernetes objects. The Kubernetes documentation says annotations can “attach arbitrary non-identifying metadata to objects.” This means that annotations should be used for attaching metadata that is external to Kubernetes (i.e., metadata that Kubernetes won’t use to identify objects. As such, annotations can contain any type of data. This is a contrast to labels, which are designed for uses internal to Kubernetes. As such, label structure and values are constrained so they can be efficiently used by Kubernetes.
Kubernetes annotations in action
Here is an example. Imagine you have a Kubernetes service for quoting, called the quote service. You can do the following:
kubectl annotate service quote a8r.io/owner=”@sally”
In this example, we've just added an annotation called a8r.io/owner with the value of @sally. Now, we can use kubectl describe to get the information.
Name: quote
Namespace: default
Labels: <none>
Annotations: a8r.io/owner: @sally
Selector: app=quote
Type: ClusterIP
IP: 10.109.142.131
Port: http 80/TCP
TargetPort: 8080/TCP
Endpoints: <none>
Session Affinity: None
Events: <none>
If you’re practicing GitOps (and you should be!) you’ll want to code these values directly into your Kubernetes manifest, e.g.,
apiVersion: v1
kind: Service
metadata:
name: quote
annotations:
a8r.io/owner: “@sally”
spec:
ports:
- name: http
port: 80
targetPort: 8080
selector:
app: quote
A Convention for Annotations
Adopting a common convention for annotations ensures consistency and understandability. Typically, you’ll want to attach the annotation to the service object, as services are the high-level resource that maps most clearly to a team’s responsibility. Namespacing your annotations is also very important. Here is one set of conventions, documented at a8r.io, and reproduced below:
| Annotation | Description |
|---|---|
a8r.io/description | Unstructured text description of the service for humans. |
a8r.io/owner | SSO username (GitHub), email address (linked to GitHub account), or unstructured owner description. |
a8r.io/chat | Slack channel, or link to external chat system. |
a8r.io/bugs | Link to external bug tracker. |
a8r.io/logs | Link to external log viewer. |
a8r.io/documentation | Link to external project documentation. |
a8r.io/repository | Link to external VCS repository. |
a8r.io/support | Link to external support center. |
a8r.io/runbook | Link to external project runbook. |
a8r.io/incidents | Link to external incident dashboard. |
a8r.io/uptime | Link to external uptime dashboard. |
a8r.io/performance | Link to external performance dashboard. |
a8r.io/dependencies | Unstructured text describing the service dependencies for humans. |
Visualizing annotations: Service Catalogs
As the number of microservices and annotations proliferate, running kubectl describe can get tedious. Moreover, using kubectl describe requires every developer to have some direct access to the Kubernetes cluster. Over the past few years, service catalogs have gained greater visibility in the Kubernetes ecosystem. Popularized by tools such as Shopify's ServicesDB and Spotify's System Z, service catalogs are internally-facing developer portals that present critical information about microservices.
Note that these service catalogs should not be confused with the Kubernetes Service Catalog project. Built on the Open Service Broker API, the Kubernetes Service Catalog enables Kubernetes operators to plug in different services (e.g., databases) to their cluster.
Annotate your services now and thank yourself later
Much like implementing observability within microservice systems, you often don’t realize that you need human service discovery until it’s too late. Don't wait until something is on fire in production to start wishing you had implemented better metrics and also documented how to get in touch with the part of your organization that looks after it.
There's enormous benefits to building an effective “version 0” service: a dancing skeleton application with a thin slice of complete functionality that can be deployed to production with a minimal yet effective continuous delivery pipeline.
Adding service annotations should be an essential part of your “version 0” for all of your services. Add them now, and you’ll thank yourself later.
Defining Network Policy Conformance for Container Network Interface (CNI) providers
Special thanks to Tim Hockin and Bowie Du (Google), Dan Winship and Antonio Ojea (Red Hat), Casey Davenport and Shaun Crampton (Tigera), and Abhishek Raut and Antonin Bas (VMware) for being supportive of this work, and working with us to resolve issues in different Container Network Interfaces (CNIs) over time.
A brief conversation around "node local" Network Policies in April of 2020 inspired the creation of a NetworkPolicy subproject from SIG Network. It became clear that as a community, we need a rock-solid story around how to do pod network security on Kubernetes, and this story needed a community around it, so as to grow the cultural adoption of enterprise security patterns in K8s.
In this post we'll discuss:
- Why we created a subproject for Network Policies
- How we changed the Kubernetes e2e framework to
visualizeNetworkPolicy implementation of your CNI provider - The initial results of our comprehensive NetworkPolicy conformance validator, Cyclonus, built around these principles
- Improvements subproject contributors have made to the NetworkPolicy user experience
Why we created a subproject for NetworkPolicies
In April of 2020 it was becoming clear that many CNIs were emerging, and many vendors implement these CNIs in subtly different ways. Users were beginning to express a little bit of confusion around how to implement policies for different scenarios, and asking for new features. It was clear that we needed to begin unifying the way we think about Network Policies in Kubernetes, to avoid API fragmentation and unnecessary complexity.
For example:
- In order to be flexible to the user’s environment, Calico as a CNI provider can be run using IPIP or VXLAN mode, or without encapsulation overhead. CNIs such as Antrea and Cilium offer similar configuration options as well.
- Some CNI plugins offer iptables for NetworkPolicies amongst other options, whereas other CNIs use a completely different technology stack (for example, the Antrea project uses Open vSwitch rules).
- Some CNI plugins only implement a subset of the Kubernetes NetworkPolicy API, and some a superset. For example, certain plugins don't support the ability to target a named port; others don't work with certain IP address types, and there are diverging semantics for similar policy types.
- Some CNI plugins combine with OTHER CNI plugins in order to implement NetworkPolicies (canal), some CNI's might mix implementations (multus), and some clouds do routing separately from NetworkPolicy implementation.
Although this complexity is to some extent necessary to support different environments, end-users find that they need to follow a multistep process to implement Network Policies to secure their applications:
- Confirm that their network plugin supports NetworkPolicies (some don't, such as Flannel)
- Confirm that their cluster's network plugin supports the specific NetworkPolicy features that they are interested in (again, the named port or port range examples come to mind here)
- Confirm that their application's Network Policy definitions are doing the right thing
- Find out the nuances of a vendor's implementation of policy, and check whether or not that implementation has a CNI neutral implementation (which is sometimes adequate for users)
The NetworkPolicy project in upstream Kubernetes aims at providing a community where people can learn about, and contribute to, the Kubernetes NetworkPolicy API and the surrounding ecosystem.
The First step: A validation framework for NetworkPolicies that was intuitive to use and understand
The Kubernetes end to end suite has always had NetworkPolicy tests, but these weren't run in CI, and the way they were implemented didn't provide holistic, easily consumable information about how a policy was working in a cluster. This is because the original tests didn't provide any kind of visual summary of connectivity across a cluster. We thus initially set out to make it easy to confirm CNI support for NetworkPolicies by making the end to end tests (which are often used by administrators or users to diagnose cluster conformance) easy to interpret.
To solve the problem of confirming that CNIs support the basic features most users care about for a policy, we built a new NetworkPolicy validation tool into the Kubernetes e2e framework which allows for visual inspection of policies and their effect on a standard set of pods in a cluster. For example, take the following test output. We found a bug in OVN Kubernetes. This bug has now been resolved. With this tool the bug was really easy to characterize, wherein certain policies caused a state-modification that, later on, caused traffic to incorrectly be blocked (even after all Network Policies were deleted from the cluster).
This is the network policy for the test in question:
metadata:
creationTimestamp: null
name: allow-ingress-port-80
spec:
ingress:
- ports:
- port: serve-80-tcp
podSelector: {}
These are the expected connectivity results. The test setup is 9 pods (3 namespaces: x, y, and z; and 3 pods in each namespace: a, b, and c); each pod runs a server on the same port and protocol that can be reached through HTTP calls in the absence of network policies. Connectivity is verified by using the agnhost network utility to issue HTTP calls on a port and protocol that other pods are expected to be serving. A test scenario first runs a connectivity check to ensure that each pod can reach each other pod, for 81 (= 9 x 9) data points. This is the "control". Then perturbations are applied, depending on the test scenario: policies are created, updated, and deleted; labels are added and removed from pods and namespaces, and so on. After each change, the connectivity matrix is recollected and compared to the expected connectivity.
These results give a visual indication of connectivity in a simple matrix. Going down the leftmost column is the "source"
pod, or the pod issuing the request; going across the topmost row is the "destination" pod, or the pod
receiving the request. A . means that the connection was allowed; an X means the connection was
blocked. For example:
Nov 4 16:58:43.449: INFO: expected:
- x/a x/b x/c y/a y/b y/c z/a z/b z/c
x/a . . . . . . . . .
x/b . . . . . . . . .
x/c . . . . . . . . .
y/a . . . . . . . . .
y/b . . . . . . . . .
y/c . . . . . . . . .
z/a . . . . . . . . .
z/b . . . . . . . . .
z/c . . . . . . . . .
Below are the observed connectivity results in the case of the OVN Kubernetes bug. Notice how the top three rows indicate that all requests from namespace x regardless of pod and destination were blocked. Since these experimental results do not match the expected results, a failure will be reported. Note how the specific pattern of failure provides clear insight into the nature of the problem -- since all requests from a specific namespace fail, we have a clear clue to start our investigation.
Nov 4 16:58:43.449: INFO: observed:
- x/a x/b x/c y/a y/b y/c z/a z/b z/c
x/a X X X X X X X X X
x/b X X X X X X X X X
x/c X X X X X X X X X
y/a . . . . . . . . .
y/b . . . . . . . . .
y/c . . . . . . . . .
z/a . . . . . . . . .
z/b . . . . . . . . .
z/c . . . . . . . . .
This was one of our earliest wins in the Network Policy group, as we were able to identify and work with the OVN Kubernetes group to fix a bug in egress policy processing.
However, even though this tool has made it easy to validate roughly 30 common scenarios, it doesn't validate all Network Policy scenarios - because there are an enormous number of possible permutations that one might create (technically, we might say this number is infinite given that there's an infinite number of possible namespace/pod/port/protocol variations one can create).
Once these tests were in play, we worked with the Upstream SIG Network and SIG Testing communities (thanks to Antonio Ojea and Ben Elder) to put a testgrid Network Policy job in place. This job continuously runs the entire suite of Network Policy tests against GCE with Calico as a Network Policy provider.
Part of our role as a subproject is to help make sure that, when these tests break, we can help triage them effectively.
Cyclonus: The next step towards Network Policy conformance
Around the time that we were finishing the validation work, it became clear from the community that, in general, we needed to solve the overall problem of testing ALL possible Network Policy implementations. For example, a KEP was recently written which introduced the concept of micro versioning to Network Policies to accommodate describing this at the API level, by Dan Winship.
In response to this increasingly obvious need to comprehensively evaluate Network Policy implementations from all vendors, Matt Fenwick decided to evolve our approach to Network Policy validation again by creating Cyclonus.
Cyclonus is a comprehensive Network Policy fuzzing tool which verifies a CNI provider against hundreds of different Network Policy scenarios, by defining similar truth table/policy combinations as demonstrated in the end to end tests, while also providing a hierarchical representation of policy "categories". We've found some interesting nuances and issues in almost every CNI we've tested so far, and have even contributed some fixes back.
To perform a Cyclonus validation run, you create a Job manifest similar to:
apiVersion: batch/v1
kind: Job
metadata:
name: cyclonus
spec:
template:
spec:
restartPolicy: Never
containers:
- command:
- ./cyclonus
- generate
- --perturbation-wait-seconds=15
- --server-protocol=tcp,udp
name: cyclonus
imagePullPolicy: IfNotPresent
image: mfenwick100/cyclonus:latest
serviceAccount: cyclonus
Cyclonus outputs a report of all the test cases it will run:
test cases to run by tag:
- target: 6
- peer-ipblock: 4
- udp: 16
- delete-pod: 1
- conflict: 16
- multi-port/protocol: 14
- ingress: 51
- all-pods: 14
- egress: 51
- all-namespaces: 10
- sctp: 10
- port: 56
- miscellaneous: 22
- direction: 100
- multi-peer: 0
- any-port-protocol: 2
- set-namespace-labels: 1
- upstream-e2e: 0
- allow-all: 6
- namespaces-by-label: 6
- deny-all: 10
- pathological: 6
- action: 6
- rule: 30
- policy-namespace: 4
- example: 0
- tcp: 16
- target-namespace: 3
- named-port: 24
- update-policy: 1
- any-peer: 2
- target-pod-selector: 3
- IP-block-with-except: 2
- pods-by-label: 6
- numbered-port: 28
- protocol: 42
- peer-pods: 20
- create-policy: 2
- policy-stack: 0
- any-port: 14
- delete-namespace: 1
- delete-policy: 1
- create-pod: 1
- IP-block-no-except: 2
- create-namespace: 1
- set-pod-labels: 1
testing 112 cases
Note that Cyclonus tags its tests based on the type of policy being created, because the policies themselves are auto-generated, and thus have no meaningful names to be recognized by.
For each test, Cyclonus outputs a truth table, which is again similar to that of the E2E tests, along with the policy being validated:
apiVersion: networking.k8s.io/v1
kind: NetworkPolicy
metadata:
creationTimestamp: null
name: base
namespace: x
spec:
egress:
- ports:
- port: 81
to:
- namespaceSelector:
matchExpressions:
- key: ns
operator: In
values:
- "y"
- z
podSelector:
matchExpressions:
- key: pod
operator: In
values:
- a
- b
- ports:
- port: 53
protocol: UDP
ingress:
- from:
- namespaceSelector:
matchExpressions:
- key: ns
operator: In
values:
- x
- "y"
podSelector:
matchExpressions:
- key: pod
operator: In
values:
- b
- c
ports:
- port: 80
protocol: TCP
podSelector:
matchLabels:
pod: a
policyTypes:
- Ingress
- Egress
0 wrong, 0 ignored, 81 correct
+--------+-----+-----+-----+-----+-----+-----+-----+-----+-----+
| TCP/80 | X/A | X/B | X/C | Y/A | Y/B | Y/C | Z/A | Z/B | Z/C |
| TCP/81 | | | | | | | | | |
| UDP/80 | | | | | | | | | |
| UDP/81 | | | | | | | | | |
+--------+-----+-----+-----+-----+-----+-----+-----+-----+-----+
| x/a | X | X | X | X | X | X | X | X | X |
| | X | X | X | . | . | X | . | . | X |
| | X | X | X | X | X | X | X | X | X |
| | X | X | X | X | X | X | X | X | X |
+--------+-----+-----+-----+-----+-----+-----+-----+-----+-----+
| x/b | . | . | . | . | . | . | . | . | . |
| | X | . | . | . | . | . | . | . | . |
| | X | . | . | . | . | . | . | . | . |
| | X | . | . | . | . | . | . | . | . |
+--------+-----+-----+-----+-----+-----+-----+-----+-----+-----+
| x/c | . | . | . | . | . | . | . | . | . |
| | X | . | . | . | . | . | . | . | . |
| | X | . | . | . | . | . | . | . | . |
| | X | . | . | . | . | . | . | . | . |
+--------+-----+-----+-----+-----+-----+-----+-----+-----+-----+
| y/a | X | . | . | . | . | . | . | . | . |
| | X | . | . | . | . | . | . | . | . |
| | X | . | . | . | . | . | . | . | . |
| | X | . | . | . | . | . | . | . | . |
+--------+-----+-----+-----+-----+-----+-----+-----+-----+-----+
| y/b | . | . | . | . | . | . | . | . | . |
| | X | . | . | . | . | . | . | . | . |
| | X | . | . | . | . | . | . | . | . |
| | X | . | . | . | . | . | . | . | . |
+--------+-----+-----+-----+-----+-----+-----+-----+-----+-----+
| y/c | . | . | . | . | . | . | . | . | . |
| | X | . | . | . | . | . | . | . | . |
| | X | . | . | . | . | . | . | . | . |
| | X | . | . | . | . | . | . | . | . |
+--------+-----+-----+-----+-----+-----+-----+-----+-----+-----+
| z/a | X | . | . | . | . | . | . | . | . |
| | X | . | . | . | . | . | . | . | . |
| | X | . | . | . | . | . | . | . | . |
| | X | . | . | . | . | . | . | . | . |
+--------+-----+-----+-----+-----+-----+-----+-----+-----+-----+
| z/b | X | . | . | . | . | . | . | . | . |
| | X | . | . | . | . | . | . | . | . |
| | X | . | . | . | . | . | . | . | . |
| | X | . | . | . | . | . | . | . | . |
+--------+-----+-----+-----+-----+-----+-----+-----+-----+-----+
| z/c | X | . | . | . | . | . | . | . | . |
| | X | . | . | . | . | . | . | . | . |
| | X | . | . | . | . | . | . | . | . |
| | X | . | . | . | . | . | . | . | . |
+--------+-----+-----+-----+-----+-----+-----+-----+-----+-----+
Both Cyclonus and the e2e tests use the same strategy to validate a Network Policy - probing pods over TCP or UDP, with SCTP support available as well for CNIs that support it (such as Calico).
As examples of how we use Cyclonus to help make CNI implementations better from a Network Policy perspective, you can see the following issues:
- Antrea: NetworkPolicy: unable to allow ingress by CIDR
- Calico: default missing protocol to TCP; don't let single port overwrite all ports
- Cilium: Egress Network Policy allows traffic that should be denied
The good news is that Antrea and Calico have already merged fixes for all the issues found and other CNI providers are working on it, with the support of SIG Network and the Network Policy subproject.
Are you interested in verifying NetworkPolicy functionality on your cluster? (if you care about security or offer multi-tenant SaaS, you should be) If so, you can run the upstream end to end tests, or Cyclonus, or both.
- If you're just getting started with NetworkPolicies and want to simply verify the "common" NetworkPolicy cases that most CNIs should be implementing correctly, in a way that is quick to diagnose, then you're better off running the e2e tests only.
- If you are deeply curious about your CNI provider's NetworkPolicy implementation, and want to verify it: use Cyclonus.
- If you want to test hundreds of policies, and evaluate your CNI plugin for comprehensive functionality, for deep discovery of potential security holes: use Cyclonus, and also consider running end-to-end cluster tests.
- If you're thinking of getting involved with the upstream NetworkPolicy efforts: use Cyclonus, and read at least an outline of which e2e tests are relevant.
Where to start with NetworkPolicy testing?
- Cyclonus is easy to run on your cluster, check out the instructions on github, and determine whether your specific CNI configuration is fully conformant to the hundreds of different Kubernetes Network Policy API constructs.
- Alternatively, you can use a tool like sonobuoy
to run the existing E2E tests in Kubernetes, with the
--ginkgo.focus=NetworkPolicyflag. Make sure that you use the K8s conformance image for K8s 1.21 or above (for example, by using the--kube-conformance-image-version v1.21.0flag), as older images will not have the new Network Policy tests in them.
Improvements to the NetworkPolicy API and user experience
In addition to cleaning up the validation story for CNI plugins that implement NetworkPolicies, subproject contributors have also spent some time improving the Kubernetes NetworkPolicy API for a few commonly requested features. After months of deliberation, we eventually settled on a few core areas for improvement:
Port Range policies: We now allow you to specify a range of ports for a policy. This allows users interested in scenarios like FTP or virtualization to enable advanced policies. The port range option for network policies will be available to use in Kubernetes 1.21. Read more in targeting a range of ports.
Namespace as name policies: Allowing users in Kubernetes >= 1.21 to target namespaces using names, when building Network Policy objects. This was done in collaboration with Jordan Liggitt and Tim Hockin on the API Machinery side. This change allowed us to improve the Network Policy user experience without actually changing the API! For more details, you can read Automatic labelling in the page about Namespaces. The TL,DR; is that for Kubernetes 1.21 and later, all namespaces have the following label added by default:
kubernetes.io/metadata.name: <name-of-namespace>
This means you can write a namespace policy against this namespace, even if you can't edit its labels.
For example, this policy, will 'just work', without needing to run a command such as kubectl edit namespace.
In fact, it will even work if you can't edit or view this namespace's data at all, because of the magic of API server defaulting.
apiVersion: networking.k8s.io/v1
kind: NetworkPolicy
metadata:
name: test-network-policy
namespace: default
spec:
podSelector:
matchLabels:
role: db
policyTypes:
- Ingress
# Allow inbound traffic to Pods labelled role=db, in the namespace 'default'
# provided that the source is a Pod in the namespace 'my-namespace'
ingress:
- from:
- namespaceSelector:
matchLabels:
kubernetes.io/metadata.name: my-namespace
Results
In our tests, we found that:
- Antrea and Calico are at a point where they support all of cyclonus's scenarios, modulo a few very minor tweaks which we've made.
- Cilium also conformed to the majority of the policies, outside known features that aren't fully supported (for example, related to the way Cilium deals with pod CIDR policies).
If you are a CNI provider and interested in helping us to do a better job curating large tests of network policies, please reach out! We are continuing to curate the Network Policy conformance results from Cyclonus here, but we are not capable of maintaining all of the subtleties in NetworkPolicy testing data on our own. For now, we use github actions and Kind to test in CI.
The Future
We're also working on some improvements for the future of Network Policies, including:
- Fully qualified Domain policies: The Google Cloud team created a prototype (which we are really excited about) of FQDN policies. This tool uses the Network Policy API to enforce policies against L7 URLs, by finding their IPs and blocking them proactively when requests are made.
- Cluster Administrative policies: We're working hard at enabling administrative or cluster scoped Network Policies for the future. These are being presented iteratively to the NetworkPolicy subproject. You can read about them here in Cluster Scoped Network Policy.
The Network Policy subproject meets on mondays at 4PM EST. For details, check out the SIG Network community repo. We'd love to hang out with you, hack on stuff, and help you adopt K8s Network Policies for your cluster wherever possible.
A quick note on User Feedback
We've gotten a lot of ideas and feedback from users on Network Policies. A lot of people have interesting ideas about Network Policies, but we've found that as a subproject, very few people were deeply interested in implementing these ideas to the full extent.
Almost every change to the NetworkPolicy API includes weeks or months of discussion to cover different cases, and ensure no CVEs are being introduced. Thus, long term ownership is the biggest impediment in improving the NetworkPolicy user experience for us, over time.
- We've documented a lot of the history of the Network Policy dialogue here.
- We've also taken a poll of users, for what they'd like to see in the Network Policy API here.
We encourage anyone to provide us with feedback, but our most pressing issues right now involve finding long term owners to help us drive changes.
This doesn't require a lot of technical knowledge, but rather, just a long term commitment to helping us stay organized, do paperwork, and iterate through the many stages of the K8s feature process. If you want to help us and get involved, please reach out on the SIG Network mailing list, or in the SIG Network room in the k8s.io slack channel!
Anyone can put an oar in the water and help make NetworkPolices better!
Introducing Indexed Jobs
Once you have containerized a non-parallel Job, it is quite easy to get it up and running on Kubernetes without modifications to the binary. In most cases, when running parallel distributed Jobs, you had to set a separate system to partition the work among the workers. For example, you could set up a task queue to assign one work item to each Pod or multiple items to each Pod until the queue is emptied.
The Kubernetes 1.21 release introduces a new field to control Job completion mode, a configuration option that allows you to control how Pod completions affect the overall progress of a Job, with two possible options (for now):
NonIndexed(default): the Job is considered complete when there has been a number of successfully completed Pods equal to the specified number in.spec.completions. In other words, each Pod completion is homologous to each other. Any Job you might have created before the introduction of completion modes is implicitly NonIndexed.Indexed: the Job is considered complete when there is one successfully completed Pod associated with each index from 0 to.spec.completions-1. The index is exposed to each Pod in thebatch.kubernetes.io/job-completion-indexannotation and theJOB_COMPLETION_INDEXenvironment variable.
You can start using Jobs with Indexed completion mode, or Indexed Jobs, for short, to easily start parallel Jobs. Then, each worker Pod can have a statically assigned partition of the data based on the index. This saves you from having to set up a queuing system or even having to modify your binary!
Creating an Indexed Job
To create an Indexed Job, you just have to add completionMode: Indexed to the
Job spec and make use of the JOB_COMPLETION_INDEX environment variable.
apiVersion: batch/v1
kind: Job
metadata:
name: 'sample-job'
spec:
completions: 3
parallelism: 3
completionMode: Indexed
template:
spec:
restartPolicy: Never
containers:
- command:
- 'bash'
- '-c'
- 'echo "My partition: ${JOB_COMPLETION_INDEX}"'
image: 'docker.io/library/bash'
name: 'sample-load'
Note that completion mode is an alpha feature in the 1.21 release. To be able to
use it in your cluster, make sure to enable the IndexedJob feature
gate on the
API server and
the controller manager.
When you run the example, you will see that each of the three created Pods gets a
different completion index. For the user's convenience, the control plane sets the
JOB_COMPLETION_INDEX environment variable, but you can choose to set your
own
or expose the index as a file.
See Indexed Job for parallel processing with static work assignment for a step-by-step guide, and a few more examples.
Future plans
SIG Apps envisions that there might be more completion modes that enable more use cases for the Job API. We welcome you to open issues in kubernetes/kubernetes with your suggestions.
In particular, we are considering an IndexedAndUnique mode where the indexes
are not just available as annotation, but they are part of the Pod names,
similar to StatefulSet.
This should facilitate inter-Pod communication for tightly coupled Pods.
You can join the discussion in the open issue.
Wrap-up
Indexed Jobs allows you to statically partition work among the workers of your parallel Jobs. SIG Apps hopes that this feature facilitates the migration of more batch workloads to Kubernetes.
Volume Health Monitoring Alpha Update
The CSI Volume Health Monitoring feature, originally introduced in 1.19 has undergone a large update for the 1.21 release.
Why add Volume Health Monitoring to Kubernetes?
Without Volume Health Monitoring, Kubernetes has no knowledge of the state of the underlying volumes of a storage system after a PVC is provisioned and used by a Pod. Many things could happen to the underlying storage system after a volume is provisioned in Kubernetes. For example, the volume could be deleted by accident outside of Kubernetes, the disk that the volume resides on could fail, it could be out of capacity, the disk may be degraded which affects its performance, and so on. Even when the volume is mounted on a pod and used by an application, there could be problems later on such as read/write I/O errors, file system corruption, accidental unmounting of the volume outside of Kubernetes, etc. It is very hard to debug and detect root causes when something happened like this.
Volume health monitoring can be very beneficial to Kubernetes users. It can communicate with the CSI driver to retrieve errors detected by the underlying storage system. PVC events can be reported up to the user to take action. For example, if the volume is out of capacity, they could request a volume expansion to get more space.
What is Volume Health Monitoring?
CSI Volume Health Monitoring allows CSI Drivers to detect abnormal volume conditions from the underlying storage systems and report them as events on PVCs or Pods.
The Kubernetes components that monitor the volumes and report events with volume health information include the following:
- Kubelet, in addition to gathering the existing volume stats will watch the volume health of the PVCs on that node. If a PVC has an abnormal health condition, an event will be reported on the pod object using the PVC. If multiple pods are using the same PVC, events will be reported on all pods using that PVC.
- An External Volume Health Monitor Controller watches volume health of the PVCs and reports events on the PVCs.
Note that the node side volume health monitoring logic was an external agent when this feature was first introduced in the Kubernetes 1.19 release. In Kubernetes 1.21, the node side volume health monitoring logic was moved from the external agent into the Kubelet, to avoid making duplicate CSI function calls. With this change in 1.21, a new alpha feature gate CSIVolumeHealth was introduced for the volume health monitoring logic in Kubelet.
Currently the Volume Health Monitoring feature is informational only as it only reports abnormal volume health events on PVCs or Pods. Users will need to check these events and manually fix the problems. This feature serves as a stepping stone towards programmatic detection and resolution of volume health issues by Kubernetes in the future.
How do I use Volume Health on my Kubernetes Cluster?
To use the Volume Health feature, first make sure the CSI driver you are using supports this feature. Refer to this CSI drivers doc to find out which CSI drivers support this feature.
To enable Volume Health Monitoring from the node side, the alpha feature gate CSIVolumeHealth needs to be enabled.
If a CSI driver supports the Volume Health Monitoring feature from the controller side, events regarding abnormal volume conditions will be recorded on PVCs.
If a CSI driver supports the Volume Health Monitoring feature from the controller side, user can also get events regarding node failures if the enable-node-watcher flag is set to true when deploying the External Health Monitor Controller. When a node failure event is detected, an event will be reported on the PVC to indicate that pods using this PVC are on a failed node.
If a CSI driver supports the Volume Health Monitoring feature from the node side, events regarding abnormal volume conditions will be recorded on pods using the PVCs.
As a storage vendor, how do I add support for volume health to my CSI driver?
Volume Health Monitoring includes two parts:
- An External Volume Health Monitoring Controller monitors volume health from the controller side.
- Kubelet monitors volume health from the node side.
For details, see the CSI spec and the Kubernetes-CSI Driver Developer Guide.
There is a sample implementation for volume health in CSI host path driver.
Controller Side Volume Health Monitoring
To learn how to deploy the External Volume Health Monitoring controller, see CSI external-health-monitor-controller in the CSI documentation.
The External Health Monitor Controller calls either ListVolumes or ControllerGetVolume CSI RPC and reports VolumeConditionAbnormal events with messages on PVCs if abnormal volume conditions are detected. Only CSI drivers with LIST_VOLUMES and VOLUME_CONDITION controller capability or GET_VOLUME and VOLUME_CONDITION controller capability support Volume Health Monitoring in the external controller.
To implement the volume health feature from the controller side, a CSI driver must add support for the new controller capabilities.
If a CSI driver supports LIST_VOLUMES and VOLUME_CONDITION controller capabilities, it must implement controller RPC ListVolumes and report the volume condition in the response.
If a CSI driver supports GET_VOLUME and VOLUME_CONDITION controller capability, it must implement controller PRC ControllerGetVolume and report the volume condition in the response.
If a CSI driver supports LIST_VOLUMES, GET_VOLUME, and VOLUME_CONDITION controller capabilities, only ListVolumes CSI RPC will be invoked by the External Health Monitor Controller.
Node Side Volume Health Monitoring
Kubelet calls NodeGetVolumeStats CSI RPC and reports VolumeConditionAbnormal events with messages on Pods if abnormal volume conditions are detected. Only CSI drivers with VOLUME_CONDITION node capability support Volume Health Monitoring in Kubelet.
To implement the volume health feature from the node side, a CSI driver must add support for the new node capabilities.
If a CSI driver supports VOLUME_CONDITION node capability, it must report the volume condition in node RPC NodeGetVoumeStats.
What’s next?
Depending on feedback and adoption, the Kubernetes team plans to push the CSI volume health implementation to beta in either 1.22 or 1.23.
We are also exploring how to use volume health information for programmatic detection and automatic reconcile in Kubernetes.
How can I learn more?
To learn the design details for Volume Health Monitoring, read the Volume Health Monitor enhancement proposal.
The Volume Health Monitor controller source code is at https://github.com/kubernetes-csi/external-health-monitor.
There are also more details about volume health checks in the Container Storage Interface Documentation.
How do I get involved?
The Kubernetes Slack channel #csi and any of the standard SIG Storage communication channels are great mediums to reach out to the SIG Storage and the CSI team.
We offer a huge thank you to the contributors who helped release this feature in 1.21. We want to thank Yuquan Ren (NickrenREN) who implemented the initial volume health monitor controller and agent in the external health monitor repo, thank Ran Xu (fengzixu) who moved the volume health monitoring logic from the external agent to Kubelet in 1.21, and we offer special thanks to the following people for their insightful reviews: David Ashpole (dashpole), Michelle Au (msau42), David Eads (deads2k), Elana Hashman (ehashman), Seth Jennings (sjenning), and Jiawei Wang (Jiawei0227).
Those interested in getting involved with the design and development of CSI or any part of the Kubernetes Storage system, join the Kubernetes Storage Special Interest Group (SIG). We’re rapidly growing and always welcome new contributors.
Three Tenancy Models For Kubernetes
Kubernetes clusters are typically used by several teams in an organization. In other cases, Kubernetes may be used to deliver applications to end users requiring segmentation and isolation of resources across users from different organizations. Secure sharing of Kubernetes control plane and worker node resources allows maximizing productivity and saving costs in both cases.
The Kubernetes Multi-Tenancy Working Group is chartered with defining tenancy models for Kubernetes and making it easier to operationalize tenancy related use cases. This blog post, from the working group members, describes three common tenancy models and introduces related working group projects.
We will also be presenting on this content and discussing different use cases at our Kubecon EU 2021 panel session, Multi-tenancy vs. Multi-cluster: When Should you Use What?.
Namespaces as a Service
With the namespaces-as-a-service model, tenants share a cluster and tenant workloads are restricted to a set of Namespaces assigned to the tenant. The cluster control plane resources like the API server and scheduler, and worker node resources like CPU, memory, etc. are available for use across all tenants.
To isolate tenant workloads, each namespace must also contain:
- role bindings: for controlling access to the namespace
- network policies: to prevent network traffic across tenants
- resource quotas: to limit usage and ensure fairness across tenants
With this model, tenants share cluster-wide resources like ClusterRoles and CustomResourceDefinitions (CRDs) and hence cannot create or update these cluster-wide resources.
The Hierarchical Namespace Controller (HNC) project makes it easier to manage namespace based tenancy by allowing users to create additional namespaces under a namespace, and propagating resources within the namespace hierarchy. This allows self-service namespaces for tenants, without requiring cluster-wide permissions.
The Multi-Tenancy Benchmarks (MTB) project provides benchmarks and a command-line tool that performs several configuration and runtime checks to report if tenant namespaces are properly isolated and the necessary security controls are implemented.
Clusters as a Service
With the clusters-as-a-service usage model, each tenant gets their own cluster. This model allows tenants to have different versions of cluster-wide resources such as CRDs, and provides full isolation of the Kubernetes control plane.
The tenant clusters may be provisioned using projects like Cluster API (CAPI) where a management cluster is used to provision multiple workload clusters. A workload cluster is assigned to a tenant and tenants have full control over cluster resources. Note that in most enterprises a central platform team may be responsible for managing required add-on services such as security and monitoring services, and for providing cluster lifecycle management services such as patching and upgrades. A tenant administrator may be restricted from modifying the centrally managed services and other critical cluster information.
Control planes as a Service
In a variation of the clusters-as-a-service model, the tenant cluster may be a virtual cluster where each tenant gets their own dedicated Kubernetes control plane but share worker node resources. As with other forms of virtualization, users of a virtual cluster see no significant differences between a virtual cluster and other Kubernetes clusters. This is sometimes referred to as Control Planes as a Service (CPaaS).
A virtual cluster of this type shares worker node resources and workload state independent control plane components, like the scheduler. Other workload aware control-plane components, like the API server, are created on a per-tenant basis to allow overlaps, and additional components are used to synchronize and manage state across the per-tenant control plane and the underlying shared cluster resources. With this model users can manage their own cluster-wide resources.
The Virtual Cluster project implements this model, where a supercluster is shared by multiple virtual clusters. The Cluster API Nested project is extending this work to conform to the CAPI model, allowing use of familiar API resources to provision and manage virtual clusters.
Security considerations
Cloud native security involves different system layers and lifecycle phases as described in the Cloud Native Security Whitepaper from CNCF SIG Security. Without proper security measures implemented across all layers and phases, Kubernetes tenant isolation can be compromised and a security breach with one tenant can threaten other tenants.
It is important for any new user to Kubernetes to realize that the default installation of a new upstream Kubernetes cluster is not secure, and you are going to need to invest in hardening it in order to avoid security issues.
At a minimum, the following security measures are required:
- image scanning: container image vulnerabilities can be exploited to execute commands and access additional resources.
- RBAC: for namespaces-as-a-service user roles and permissions must be properly configured at a per-namespace level; for other models tenants may need to be restricted from accessing centrally managed add-on services and other cluster-wide resources.
- network policies: for namespaces-as-a-service default network policies that deny all ingress and egress traffic are recommended to prevent cross-tenant network traffic and may also be used as a best practice for other tenancy models.
- Kubernetes Pod Security Standards: to enforce Pod hardening best practices the
Restrictedpolicy is recommended as the default for tenant workloads with exclusions configured only as needed. - CIS Benchmarks for Kubernetes: the CIS Benchmarks for Kubernetes guidelines should be used to properly configure Kubernetes control-plane and worker node components.
Additional recommendations include using:
- policy engines: for configuration security best practices, such as only allowing trusted registries.
- runtime scanners: to detect and report runtime security events.
- VM-based container sandboxing: for stronger data plane isolation.
While proper security is required independently of tenancy models, not having essential security controls like pod security in a shared cluster provides attackers with means to compromise tenancy models and possibly access sensitive information across tenants increasing the overall risk profile.
Summary
A 2020 CNCF survey showed that production Kubernetes usage has increased by over 300% since 2016. As an increasing number of Kubernetes workloads move to production, organizations are looking for ways to share Kubernetes resources across teams for agility and cost savings.
The namespaces as a service tenancy model allows sharing clusters and hence enables resource efficiencies. However, it requires proper security configurations and has limitations as all tenants share the same cluster-wide resources.
The clusters as a service tenancy model addresses these limitations, but with higher management and resource overhead.
The control planes as a service model provides a way to share resources of a single Kubernetes cluster and also let tenants manage their own cluster-wide resources. Sharing worker node resources increases resource effeciencies, but also exposes cross tenant security and isolation concerns that exist for shared clusters.
In many cases, organizations will use multiple tenancy models to address different use cases and as different product and development teams will have varying needs. Following security and management best practices, such as applying Pod Security Standards and not using the default namespace, makes it easer to switch from one model to another.
The Kubernetes Multi-Tenancy Working Group has created several projects like Hierarchical Namespaces Controller, Virtual Cluster / CAPI Nested, and Multi-Tenancy Benchmarks to make it easier to provision and manage multi-tenancy models.
If you are interested in multi-tenancy topics, or would like to share your use cases, please join us in an upcoming community meeting or reach out on the wg-multitenancy channel on the Kubernetes slack.
Local Storage: Storage Capacity Tracking, Distributed Provisioning and Generic Ephemeral Volumes hit Beta
The "generic ephemeral volumes" and "storage capacity tracking" features in Kubernetes are getting promoted to beta in Kubernetes 1.21. Together with the distributed provisioning support in the CSI external-provisioner, development and deployment of Container Storage Interface (CSI) drivers which manage storage locally on a node become a lot easier.
This blog post explains how such drivers worked before and how these features can be used to make drivers simpler.
Problems we are solving
There are drivers for local storage, like TopoLVM for traditional disks and PMEM-CSI for persistent memory. They work and are ready for usage today also on older Kubernetes releases, but making that possible was not trivial.
Central component required
The first problem is volume provisioning: it is handled through the Kubernetes control plane. Some component must react to PersistentVolumeClaims (PVCs) and create volumes. Usually, that is handled by a central deployment of the CSI external-provisioner and a CSI driver component that then connects to the storage backplane. But for local storage, there is no such backplane.
TopoLVM solved this by having its different components communicate with each other through the Kubernetes API server by creating and reacting to custom resources. So although TopoLVM is based on CSI, a standard that is independent of a particular container orchestrator, TopoLVM only works on Kubernetes.
PMEM-CSI created its own storage backplane with communication through gRPC calls. Securing that communication depends on TLS certificates, which made driver deployment more complicated.
Informing Pod scheduler about capacity
The next problem is scheduling. When volumes get created independently
of pods ("immediate binding"), the CSI driver must pick a node without
knowing anything about the pod(s) that are going to use it. Topology
information then forces those pods to run on the node where the volume
was created. If other resources like RAM or CPU are exhausted there,
the pod cannot start. This can be avoided by configuring in the
StorageClass that volume creation is meant to wait for the first pod
that uses a volume (volumeBinding: WaitForFirstConsumer). In that
mode, the Kubernetes scheduler tentatively picks a node based on other
constraints and then the external-provisioner is asked to create a
volume such that it is usable there. If local storage is exhausted,
the provisioner can
ask
for another scheduling round. But without information about available
capacity, the scheduler might always pick the same unsuitable node.
Both TopoLVM and PMEM-CSI solved this with scheduler extenders. This works, but it is hard to configure when deploying the driver because communication between kube-scheduler and the driver is very dependent on how the cluster was set up.
Rescheduling
A common use case for local storage is scratch space. A better fit for that use case than persistent volumes are ephemeral volumes that get created for a pod and destroyed together with it. The initial API for supporting ephemeral volumes with CSI drivers (hence called "CSI ephemeral volumes") was designed for light-weight volumes where volume creation is unlikely to fail. Volume creation happens after pods have been permanently scheduled onto a node, in contrast to the traditional provisioning where volume creation is tried before scheduling a pod onto a node. CSI drivers must be modified to support "CSI ephemeral volumes", which was done for TopoLVM and PMEM-CSI. But due to the design of the feature in Kubernetes, pods can get stuck permanently if storage capacity runs out on a node. The scheduler extenders try to avoid that, but cannot be 100% reliable.
Enhancements in Kubernetes 1.21
Distributed provisioning
Starting with external-provisioner v2.1.0, released for Kubernetes 1.20, provisioning can be handled by external-provisioner instances that get deployed together with the CSI driver on each node and then cooperate to provision volumes ("distributed provisioning"). There is no need any more to have a central component and thus no need for communication between nodes, at least not for provisioning.
Storage capacity tracking
A scheduler extender still needs some way to find out about capacity
on each node. When PMEM-CSI switched to distributed provisioning in
v0.9.0, this was done by querying the metrics data exposed by the
local driver containers. But it is better also for users to eliminate
the need for a scheduler extender completely because the driver
deployment becomes simpler. Storage capacity
tracking, introduced in
1.19
and promoted to beta in Kubernetes 1.21, achieves that. It works by
publishing information about capacity in CSIStorageCapacity
objects. The scheduler itself then uses that information to filter out
unsuitable nodes. Because information might be not quite up-to-date,
pods may still get assigned to nodes with insufficient storage, it's
just less likely and the next scheduling attempt for a pod should work
better once the information got refreshed.
Generic ephemeral volumes
So CSI drivers still need the ability to recover from a bad scheduling decision, something that turned out to be impossible to implement for "CSI ephemeral volumes". "Generic ephemeral volumes", another feature that got promoted to beta in 1.21, don't have that limitation. This feature adds a controller that will create and manage PVCs with the lifetime of the Pod and therefore the normal recovery mechanism also works for them. Existing storage drivers will be able to process these PVCs without any new logic to handle this new scenario.
Known limitations
Both generic ephemeral volumes and storage capacity tracking increase the load on the API server. Whether that is a problem depends a lot on the kind of workload, in particular how many pods have volumes and how often those need to be created and destroyed.
No attempt was made to model how scheduling decisions affect storage capacity. That's because the effect can vary considerably depending on how the storage system handles storage. The effect is that multiple pods with unbound volumes might get assigned to the same node even though there is only sufficient capacity for one pod. Scheduling should recover, but it would be more efficient if the scheduler knew more about storage.
Because storage capacity gets published by a running CSI driver and the cluster autoscaler needs information about a node that hasn't been created yet, it will currently not scale up a cluster for pods that need volumes. There is an idea how to provide that information, but more work is needed in that area.
Distributed snapshotting and resizing are not currently supported. It should be doable to adapt the respective sidecar and there are tracking issues for external-snapshotter and external-resizer open already, they just need some volunteer.
The recovery from a bad scheduling decising can fail for pods with multiple volumes, in particular when those volumes are local to nodes: if one volume can be created and then storage is insufficient for another volume, the first volume continues to exist and forces the scheduler to put the pod onto the node of that volume. There is an idea how do deal with this, rolling back the provision of the volume, but this is only in the very early stages of brainstorming and not even a merged KEP yet. For now it is better to avoid creating pods with more than one persistent volume.
Enabling the new features and next steps
With the feature entering beta in the 1.21 release, no additional actions are needed to enable it. Generic ephemeral volumes also work without changes in CSI drivers. For more information, see the documentation and the previous blog post about it. The API has not changed at all between alpha and beta.
For the other two features, the external-provisioner documentation explains how CSI driver developers must change how their driver gets deployed to support storage capacity tracking and distributed provisioning. These two features are independent, therefore it is okay to enable only one of them.
SIG
Storage
would like to hear from you if you are using these new features. We
can be reached through
email,
Slack (channel #sig-storage) and in the
regular SIG
meeting.
A description of your workload would be very useful to validate design
decisions, set up performance tests and eventually promote these
features to GA.
Acknowledgements
Thanks a lot to the members of the community who have contributed to these features or given feedback including members of SIG Scheduling, SIG Auth, and of course SIG Storage!
kube-state-metrics goes v2.0
What?
kube-state-metrics, a project under the Kubernetes organization, generates Prometheus format metrics based on the current state of the Kubernetes native resources. It does this by listening to the Kubernetes API and gathering information about resources and objects, e.g. Deployments, Pods, Services, and StatefulSets. A full list of resources is available in the documentation of kube-state-metrics.
Why?
There are numerous useful metrics and insights provided by kube-state-metrics right out of the box! These metrics can be used to serve as an insight into your cluster: Either through metrics alone, in the form of dashboards, or through an alerting pipeline. To provide a few examples:
kube_pod_container_status_restarts_totalcan be used to alert on a crashing pod.kube_deployment_status_replicaswhich together withkube_deployment_status_replicas_availablecan be used to alert on whether a deployment is rolled out successfully or stuck.kube_pod_container_resource_requestsandkube_pod_container_resource_limitscan be used in capacity planning dashboards.
And there are many more metrics available! To learn more about the other metrics and their details, please check out the documentation.
What is new in v2.0?
So now that we know what kube-state-metrics is, we are excited to announce the next release: kube-state-metrics v2.0! This release was long-awaited and started with an alpha release in September 2020. To ease maintenance we removed tech debt and also adjusted some confusing wording around user-facing flags and APIs. We also removed some metrics that caused unnecessarily high cardinality in Prometheus! For the 2.0 release, we took the time to set up scale and performance testing. This allows us to better understand if we hit any issues in large clusters and also to document resource request recommendations for your clusters. In this release (and v1.9.8) container builds providing support for multiple architectures were introduced allowing you to run kube-state-metrics on ARM, ARM64, PPC64 and S390x as well!
So without further ado, here is the list of more noteworthy user-facing breaking changes. A full list of changes, features and bug fixes is available in the changelog at the end of this post.
- Flag
--namespacewas renamed to--namespaces. If you are using the former, please make sure to update the flag before deploying the latest release. - Flag
--collectorswas renamed to--resources. - Flags
--metric-blacklistand--metric-whitelistwere renamed to--metric-denylistand--metric-allowlist. - Flag
--metric-labels-allowlistallows you to specify a list of Kubernetes labels that get turned into the dimensions of thekube_<resource-name>_labelsmetrics. By default, the metric contains only name and namespace labels. - All metrics with a prefix of
kube_hpa_*were renamed tokube_horizontalpodautoscaler_*. - Metric labels that relate to Kubernetes were converted to snake_case.
- If you are importing kube-state-metrics as a library, we have updated our go module path to
k8s.io/kube-state-metrics/v2 - All deprecated stable metrics were removed as per the notice in the v1.9 release.
quay.io/coreos/kube-state-metricsimages will no longer be updated.k8s.gcr.io/kube-state-metrics/kube-state-metricsis the new canonical location (update:k8s.gcr.iohas been deprecated in favor ofregistry.k8s.io).- The helm chart that is part of the kubernetes/kube-state-metrics repository is deprecated. https://github.com/prometheus-community/helm-charts will be its new location.
For the full list of v2.0 release changes includes features, bug fixes and other breaking changes see the full CHANGELOG.
Found a problem?
Thanks to all our users for testing so far and thank you to all our contributors for your issue reports as well as code and documentation changes! If you find any problems, we the maintainers are more than happy to look into them, so please report them by opening a GitHub issue.
Introducing Suspended Jobs
Jobs are a crucial part of Kubernetes' API. While other kinds of workloads such as Deployments, ReplicaSets, StatefulSets, and DaemonSets solve use-cases that require Pods to run forever, Jobs are useful when Pods need to run to completion. Commonly used in parallel batch processing, Jobs can be used in a variety of applications ranging from video rendering and database maintenance to sending bulk emails and scientific computing.
While the amount of parallelism and the conditions for Job completion are configurable, the Kubernetes API lacked the ability to suspend and resume Jobs. This is often desired when cluster resources are limited and a higher priority Job needs to execute in the place of another Job. Deleting the lower priority Job is a poor workaround as Pod completion history and other metrics associated with the Job will be lost.
With the recent Kubernetes 1.21 release, you will be able to suspend a Job by
updating its spec. The feature is currently in alpha and requires you to
enable the SuspendJob feature gate
on the API server
and the controller manager
in order to use it.
API changes
We introduced a new boolean field suspend into the .spec of Jobs. Let's say
I create the following Job:
apiVersion: batch/v1
kind: Job
metadata:
name: my-job
spec:
suspend: true
parallelism: 2
completions: 10
template:
spec:
containers:
- name: my-container
image: busybox
command: ["sleep", "5"]
restartPolicy: Never
Jobs are not suspended by default, so I'm explicitly setting the suspend field
to true in the .spec of the above Job manifest. In the above example, the
Job controller will refrain from creating Pods until I'm ready to start the Job,
which I can do by updating suspend to false.
As another example, consider a Job that was created with the suspend field
omitted. The Job controller will happily create Pods to work towards Job
completion. However, before the Job completes, if I explicitly set the field to
true with a Job update, the Job controller will terminate all active Pods that
are running and will wait indefinitely for the flag to be flipped back to false.
Typically, Pod termination is done by sending a SIGTERM signal to all container
processes in the Pod; the graceful termination period
defined in the Pod spec will be honoured. Pods terminated this way will not be
counted as failures by the Job controller.
It is important to understand that succeeded and failed Pods from the past will continue to exist after you suspend a Job. That is, that they will count towards Job completion once you resume it. You can verify this by looking at Job's status before and after suspension.
Read the documentation for a full overview of this new feature.
Where is this useful?
Let's say I'm the operator of a large cluster. I have many users submitting Jobs to the cluster, but not all Jobs are created equal — some Jobs are more important than others. Cluster resources aren't infinite either, so all users must share resources. If all Jobs were created in the suspended state and placed in a pending queue, I can achieve priority-based Job scheduling by resuming Jobs in the right order.
As another motivational use-case, consider a cloud provider where compute resources are cheaper at night than in the morning. If I have a long-running Job that takes multiple days to complete, being able to suspend the Job in the morning and then resume it in the evening every day can reduce costs.
Since this field is a part of the Job spec, CronJobs automatically get this feature for free too.
References and next steps
If you're interested in a deeper dive into the rationale behind this feature and the decisions we have taken, consider reading the enhancement proposal. There's more detail on suspending and resuming jobs in the documentation for Job.
As previously mentioned, this feature is currently in alpha and is available
only if you explicitly opt-in through the SuspendJob feature gate.
If this is a feature you're interested in, please consider testing suspended
Jobs in your cluster and providing feedback. You can discuss this enhancement on GitHub.
The SIG Apps community also meets regularly
and can be reached through Slack or the mailing list.
Barring any unexpected changes to the API, we intend to graduate the feature to
beta in Kubernetes 1.22, so that the feature becomes available by default.
Kubernetes 1.21: CronJob Reaches GA
In Kubernetes v1.21, the CronJob resource reached general availability (GA). We've also substantially improved the performance of CronJobs since Kubernetes v1.19, by implementing a new controller.
In Kubernetes v1.20 we launched a revised v2 controller for CronJobs,
initially as an alpha feature. Kubernetes 1.21 uses the newer controller by
default, and the CronJob resource itself is now GA (group version: batch/v1).
In this article, we'll take you through the driving forces behind this new development, give you a brief description of controller design for core Kubernetes, and we'll outline what you will gain from this improved controller.
The driving force behind promoting the API was Kubernetes' policy choice to ensure APIs move beyond beta. That policy aims to prevent APIs from being stuck in a “permanent beta” state. Over the years the old CronJob controller implementation had received healthy feedback from the community, with reports of several widely recognized issues.
If the beta API for CronJob was to be supported as GA, the existing controller code would need substantial rework. Instead, the SIG Apps community decided to introduce a new controller and gradually replace the old one.
How do controllers work?
Kubernetes controllers are control loops that watch the state of resource(s) in your cluster, then make or request changes where needed. Each controller tries to move part of the current cluster state closer to the desired state.
The v1 CronJob controller works by performing a periodic poll and sweep of all the CronJob objects in your cluster, in order to act on them. It is a single worker implementation that gets all CronJobs every 10 seconds, iterates over each one of them, and syncs them to their desired state. This was the default way of doing things almost 5 years ago when the controller was initially written. In hindsight, we can certainly say that such an approach can overload the API server at scale.
These days, every core controller in kubernetes must follow the guidelines described in Writing Controllers. Among many details, that document prescribes using shared informers to “receive notifications of adds, updates, and deletes for a particular resource”. Upon any such events, the related object(s) is placed in a queue. Workers pull items from the queue and process them one at a time. This approach ensures consistency and scalability.
The picture below shows the flow of information from kubernetes API server, through shared informers and queue, to the main part of a controller - a reconciliation loop which is responsible for performing the core functionality.
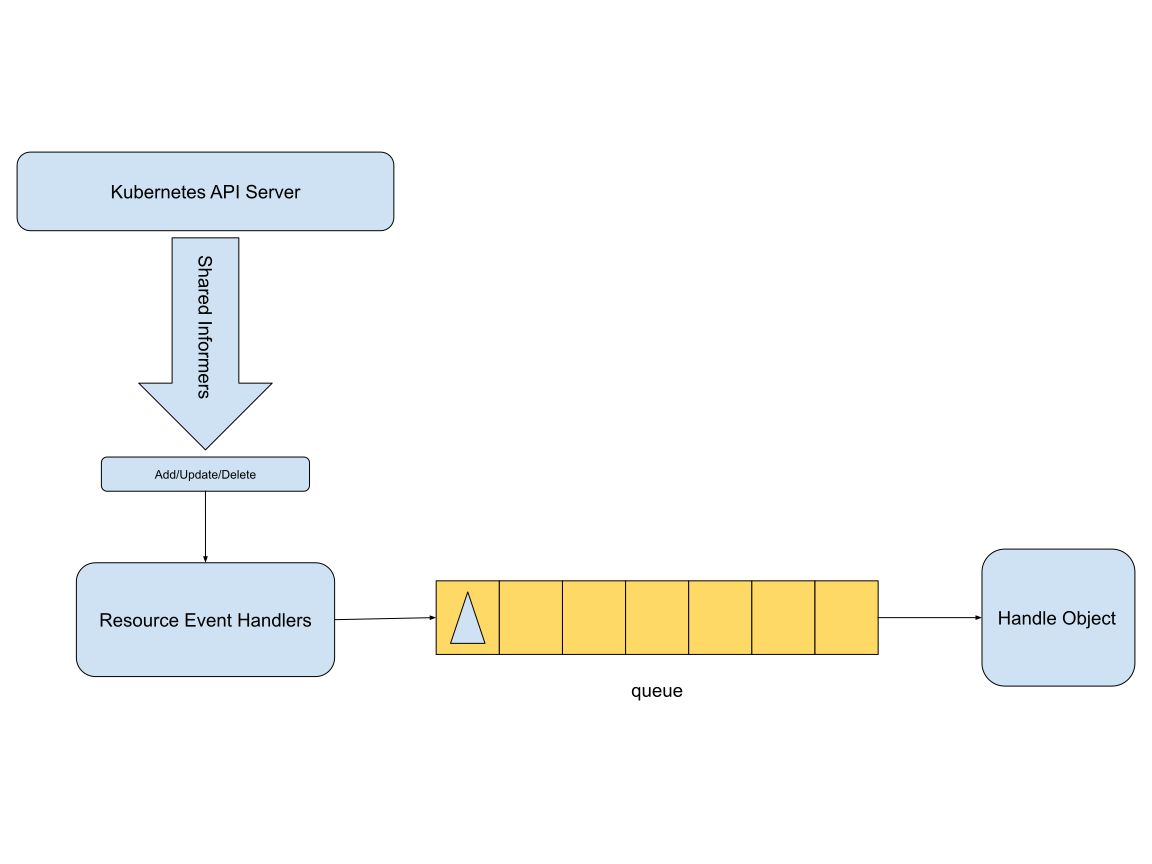
The CronJob controller V2 uses a queue that implements the DelayingInterface to handle the scheduling aspect. This queue allows processing an element after a specific time interval. Every time there is a change in a CronJob or its related Jobs, the key that represents the CronJob is pushed to the queue. The main handler pops the key, processes the CronJob, and after completion pushes the key back into the queue for the next scheduled time interval. This is immediately a more performant implementation, as it no longer requires a linear scan of all the CronJobs. On top of that, this controller can be scaled by increasing the number of workers processing the CronJobs in parallel.
Performance impact of the new controller
In order to test the performance difference of the two controllers a VM instance with 128 GiB RAM and 64 vCPUs was used to set up a single node Kubernetes cluster. Initially, a sample workload was created with 20 CronJob instances with a schedule to run every minute, and 2100 CronJobs running every 20 hours. Additionally, over the next few minutes we added 1000 CronJobs with a schedule to run every 20 hours, until we reached a total of 5120 CronJobs.
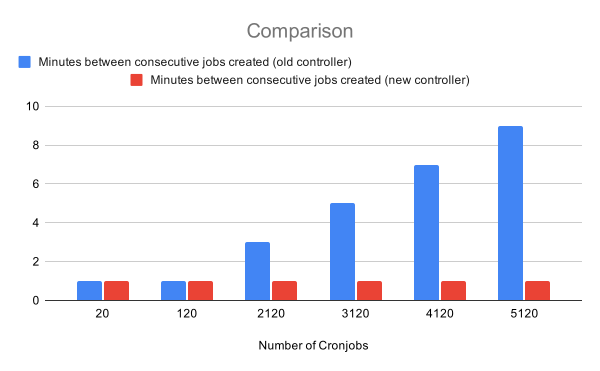
We observed that for every 1000 CronJobs added, the old controller used around 90 to 120 seconds more wall-clock time to schedule 20 Jobs every cycle. That is, at 5120 CronJobs, the old controller took approximately 9 minutes to create 20 Jobs. Hence, during each cycle, about 8 schedules were missed. The new controller, implemented with architectural change explained above, created 20 Jobs without any delay, even when we created an additional batch of 1000 CronJobs reaching a total of 6120.
As a closing remark, the new controller exposes a histogram metric
cronjob_controller_cronjob_job_creation_skew_duration_seconds which helps
monitor the time difference between when a CronJob is meant to run and when
the actual Job is created.
Hopefully the above description is a sufficient argument to follow the
guidelines and standards set in the Kubernetes project, even for your own
controllers. As mentioned before, the new controller is on by default starting
from Kubernetes v1.21; if you want to check it out in the previous release (1.20),
you can enable the CronJobControllerV2
feature gate
for the kube-controller-manager: --feature-gate="CronJobControllerV2=true".
Kubernetes 1.21: Power to the Community
We’re pleased to announce the release of Kubernetes 1.21, our first release of 2021! This release consists of 51 enhancements: 13 enhancements have graduated to stable, 16 enhancements are moving to beta, 20 enhancements are entering alpha, and 2 features have been deprecated.
This release cycle, we saw a major shift in ownership of processes around the release team. We moved from a synchronous mode of communication, where we periodically asked the community for inputs, to a mode where the community opts-in to contribute features and/or blogs to the release. These changes have resulted in an increase in collaboration and teamwork across the community. The result of all that is reflected in Kubernetes 1.21 having the most number of features in the recent times.
Major Themes
CronJobs Graduate to Stable!
CronJobs (previously ScheduledJobs) has been a beta feature since Kubernetes 1.8! With 1.21 we get to finally see this widely used API graduate to stable.
CronJobs are meant for performing regular scheduled actions such as backups, report generation, and so on. Each of those tasks should be configured to recur indefinitely (for example: once a day / week / month); you can define the point in time within that interval when the job should start.
Immutable Secrets and ConfigMaps
Immutable Secrets and ConfigMaps add a new field to those resource types that will reject changes to those objects if set. Secrets and ConfigMaps by default are mutable which is beneficial for pods that are able to consume changes. Mutating Secrets and ConfigMaps can also cause problems if a bad configuration is pushed for pods that use them.
By marking Secrets and ConfigMaps as immutable you can be sure your application configuration won't change. If you want to make changes you'll need to create a new, uniquly named Secret or ConfigMap and deploy a new pod to consume that resource. Immutable resources also have scaling benefits because controllers do not need to poll the API server to watch for changes.
This feature has graduated to stable in Kubernetes 1.21.
IPv4/IPv6 dual-stack support
IP addresses are a consumable resource that cluster operators and administrators need to make sure are not exhausted. In particular, public IPv4 addresses are now scarce. Having dual-stack support enables native IPv6 routing to pods and services, whilst still allowing your cluster to talk IPv4 where needed. Dual-stack cluster networking also improves a possible scaling limitation for workloads.
Dual-stack support in Kubernetes means that pods, services, and nodes can get IPv4 addresses and IPv6 addresses. In Kubernetes 1.21 dual-stack networking has graduated from alpha to beta, and is now enabled by default.
Graceful Node Shutdown
Graceful Node shutdown also graduated to beta with this release (and will now be available to a much larger group of users)! This is a hugely beneficial feature that allows the kubelet to be aware of node shutdown, and gracefully terminate pods that are scheduled to that node.
Currently, when a node shuts down, pods do not follow the expected termination lifecycle and are not shut down gracefully. This can introduce problems with a lot of different workloads. Going forward, the kubelet will be able to detect imminent system shutdown through systemd, then inform running pods so they can terminate as gracefully as possible.
PersistentVolume Health Monitor
Persistent Volumes (PV) are commonly used in applications to get local, file-based storage. They can be used in many different ways and help users migrate applications without needing to re-write storage backends.
Kubernetes 1.21 has a new alpha feature which allows PVs to be monitored for health of the volume and marked accordingly if the volume becomes unhealthy. Workloads will be able to react to the health state to protect data from being written or read from a volume that is unhealthy.
Reducing Kubernetes Build Maintenance
Previously Kubernetes has maintained multiple build systems. This has often been a source of friction and complexity for new and current contributors.
Over the last release cycle, a lot of work has been put in to simplify the build process, and standardize on the native Golang build tools. This should empower broader community maintenance, and lower the barrier to entry for new contributors.
Major Changes
PodSecurityPolicy Deprecation
In Kubernetes 1.21, PodSecurityPolicy is deprecated. As with all Kubernetes feature deprecations, PodSecurityPolicy will continue to be available and fully-functional for several more releases. PodSecurityPolicy, previously in the beta stage, is planned for removal in Kubernetes 1.25.
What's next? We're developing a new built-in mechanism to help limit Pod privileges, with a working title of “PSP Replacement Policy.” Our plan is for this new mechanism to cover the key PodSecurityPolicy use cases, with greatly improved ergonomics and maintainability. To learn more, read PodSecurityPolicy Deprecation: Past, Present, and Future.
TopologyKeys Deprecation
The Service field topologyKeys is now deprecated; all the component features that used this field were previously alpha, and are now also deprecated.
We've replaced topologyKeys with a way to implement topology-aware routing, called topology-aware hints. Topology-aware hints are an alpha feature in Kubernetes 1.21. You can read more details about the replacement feature in Topology Aware Hints; the related KEP explains the context for why we switched.
Other Updates
Graduated to Stable
Notable Feature Updates
- External client-go credential providers - beta in 1.21
- Structured logging - graduating to beta in 1.22
- TTL after finish cleanup for Jobs and Pods - graduated to beta
Release notes
You can check out the full details of the 1.21 release in the release notes.
Availability of release
Kubernetes 1.21 is available for download on GitHub. There are some great resources out there for getting started with Kubernetes. You can check out some interactive tutorials on the main Kubernetes site, or run a local cluster on your machine using Docker containers with kind. If you’d like to try building a cluster from scratch, check out the Kubernetes the Hard Way tutorial by Kelsey Hightower.
Release Team
This release was made possible by a very dedicated group of individuals, who came together as a team in the midst of a lot of things happening out in the world. A huge thank you to the release lead Nabarun Pal, and to everyone else on the release team for supporting each other, and working so hard to deliver the 1.21 release for the community.
Release Logo
The Kubernetes 1.21 Release Logo portrays the global nature of the Release Team, with release team members residing in timezones from UTC+8 all the way to UTC-8. The diversity of the release team brought in a lot of challenges, but the team tackled them all by adopting more asynchronous communication practices. The heptagonal globe in the release logo signifies the sheer determination of the community to overcome the challenges as they come. It celebrates the amazing teamwork of the release team over the last 3 months to bring in a fun packed Kubernetes release!
The logo is designed by Aravind Sekar, an independent designer based out of India. Aravind helps open source communities like PyCon India in their design efforts.
User Highlights
- CNCF welcomes 47 new organizations across the globe as members to advance Cloud Native technology further at the start of 2021! These new members will join CNCF at the upcoming 2021 KubeCon + CloudNativeCon events, including KubeCon + CloudNativeCom EU – Virtual from May 4 – 7, 2021, and KubeCon + CloudNativeCon NA in Los Angeles from October 12 – 15, 2021.
Project Velocity
The CNCF K8s DevStats project aggregates a number of interesting data points related to the velocity of Kubernetes and various sub-projects. This includes everything from individual contributions to the number of companies that are contributing, and is a neat illustration of the depth and breadth of effort that goes into evolving this ecosystem.
In the v1.21 release cycle, which ran for 12 weeks (January 11 to April 8), we saw contributions from 999 companies and 1279 individuals.
Ecosystem Updates
- In the wake of rising racism & attacks on global Asian communities, read the statement from CNCF General Priyanka Sharma on the CNCF blog reinstating the community's commitment towards inclusive values & diversity-powered resilience.
- We now have a process in place for migration of the default branch from master → main. Learn more about the guidelines here
- CNCF and the Linux Foundation have announced the availability of their new training course, LFS260 – Kubernetes Security Essentials. In addition to providing skills and knowledge on a broad range of best practices for securing container-based applications and Kubernetes platforms, the course is also a great way to prepare for the recently launched Certified Kubernetes Security Specialist certification exam.
Event Updates
- KubeCon + CloudNativeCon Europe 2021 will take place May 4 - 7, 2021! You can find more information about the conference here.
- Kubernetes Community Days are being relaunched! Q2 2021 will start with Africa and Bengaluru.
Upcoming release webinar
Join the members of the Kubernetes 1.21 release team on May 13th, 2021 to learn about the major features in this release including IPv4/IPv6 dual-stack support, PersistentVolume Health Monitor, Immutable Secrets and ConfigMaps, and many more. Register here: https://community.cncf.io/events/details/cncf-cncf-online-programs-presents-cncf-live-webinar-kubernetes-121-release/
Get Involved
If you’re interested in contributing to the Kubernetes community, Special Interest Groups (SIGs) are a great starting point. Many of them may align with your interests! If there are things you’d like to share with the community, you can join the weekly community meeting, or use any of the following channels:
- Find out more about contributing to Kubernetes at the Kubernetes Contributor website
- Follow us on Twitter @Kubernetesio for latest updates
- Join the community discussion on Discuss
- Join the community on Slack
- Share your Kubernetes story
- Read more about what’s happening with Kubernetes on the blog
- Learn more about the Kubernetes Release Team
PodSecurityPolicy Deprecation: Past, Present, and Future
Update: With the release of Kubernetes v1.25, PodSecurityPolicy has been removed. You can read more information about the removal of PodSecurityPolicy in the Kubernetes 1.25 release notes.
PodSecurityPolicy (PSP) is being deprecated in Kubernetes 1.21, to be released later this week. This starts the countdown to its removal, but doesn’t change anything else. PodSecurityPolicy will continue to be fully functional for several more releases before being removed completely. In the meantime, we are developing a replacement for PSP that covers key use cases more easily and sustainably.
What are Pod Security Policies? Why did we need them? Why are they going away, and what’s next? How does this affect you? These key questions come to mind as we prepare to say goodbye to PSP, so let’s walk through them together. We’ll start with an overview of how features get removed from Kubernetes.
What does deprecation mean in Kubernetes?
Whenever a Kubernetes feature is set to go away, our deprecation policy is our guide. First the feature is marked as deprecated, then after enough time has passed, it can finally be removed.
Kubernetes 1.21 starts the deprecation process for PodSecurityPolicy. As with all feature deprecations, PodSecurityPolicy will continue to be fully functional for several more releases. The current plan is to remove PSP from Kubernetes in the 1.25 release.
Until then, PSP is still PSP. There will be at least a year during which the newest Kubernetes releases will still support PSP, and nearly two years until PSP will pass fully out of all supported Kubernetes versions.
What is PodSecurityPolicy?
PodSecurityPolicy is a built-in admission controller that allows a cluster administrator to control security-sensitive aspects of the Pod specification.
First, one or more PodSecurityPolicy resources are created in a cluster to define the requirements Pods must meet. Then, RBAC rules are created to control which PodSecurityPolicy applies to a given pod. If a pod meets the requirements of its PSP, it will be admitted to the cluster as usual. In some cases, PSP can also modify Pod fields, effectively creating new defaults for those fields. If a Pod does not meet the PSP requirements, it is rejected, and cannot run.
One more important thing to know about PodSecurityPolicy: it’s not the same as PodSecurityContext.
A part of the Pod specification, PodSecurityContext (and its per-container counterpart SecurityContext)
is the collection of fields that specify many of the security-relevant settings for a Pod.
The security context dictates to the kubelet and container runtime how the Pod should actually be run.
In contrast, the PodSecurityPolicy only constrains (or defaults) the values that may be set on the security context.
The deprecation of PSP does not affect PodSecurityContext in any way.
Why did we need PodSecurityPolicy?
In Kubernetes, we define resources such as Deployments, StatefulSets, and Services that represent the building blocks of software applications. The various controllers inside a Kubernetes cluster react to these resources, creating further Kubernetes resources or configuring some software or hardware to accomplish our goals.
In most Kubernetes clusters,
RBAC (Role-Based Access Control) rules
control access to these resources. list, get, create, edit, and delete are
the sorts of API operations that RBAC cares about,
but RBAC does not consider what settings are being put into the resources it controls.
For example, a Pod can be almost anything from a simple webserver to
a privileged command prompt offering full access to the underlying server node and all the data.
It’s all the same to RBAC: a Pod is a Pod is a Pod.
To control what sorts of settings are allowed in the resources defined in your cluster, you need Admission Control in addition to RBAC. Since Kubernetes 1.3, PodSecurityPolicy has been the built-in way to do that for security-related Pod fields. Using PodSecurityPolicy, you can prevent “create Pod” from automatically meaning “root on every cluster node,” without needing to deploy additional external admission controllers.
Why is PodSecurityPolicy going away?
In the years since PodSecurityPolicy was first introduced, we have realized that PSP has some serious usability problems that can’t be addressed without making breaking changes.
The way PSPs are applied to Pods has proven confusing to nearly everyone that has attempted to use them. It is easy to accidentally grant broader permissions than intended, and difficult to inspect which PSP(s) apply in a given situation. The “changing Pod defaults” feature can be handy, but is only supported for certain Pod settings and it’s not obvious when they will or will not apply to your Pod. Without a “dry run” or audit mode, it’s impractical to retrofit PSP to existing clusters safely, and it’s impossible for PSP to ever be enabled by default.
For more information about these and other PSP difficulties, check out SIG Auth’s KubeCon NA 2019 Maintainer Track session video:
Today, you’re not limited only to deploying PSP or writing your own custom admission controller. Several external admission controllers are available that incorporate lessons learned from PSP to provide a better user experience. K-Rail, Kyverno, and OPA/Gatekeeper are all well-known, and each has its fans.
Although there are other good options available now, we believe there is still value in having a built-in admission controller available as a choice for users. With this in mind, we turn toward building what’s next, inspired by the lessons learned from PSP.
What’s next?
Kubernetes SIG Security, SIG Auth, and a diverse collection of other community members have been working together for months to ensure that what’s coming next is going to be awesome. We have developed a Kubernetes Enhancement Proposal (KEP 2579) and a prototype for a new feature, currently being called by the temporary name "PSP Replacement Policy." We are targeting an Alpha release in Kubernetes 1.22.
PSP Replacement Policy starts with the realization that since there is a robust ecosystem of external admission controllers already available, PSP’s replacement doesn’t need to be all things to all people. Simplicity of deployment and adoption is the key advantage a built-in admission controller has compared to an external webhook, so we have focused on how to best utilize that advantage.
PSP Replacement Policy is designed to be as simple as practically possible while providing enough flexibility to really be useful in production at scale. It has soft rollout features to enable retrofitting it to existing clusters, and is configurable enough that it can eventually be active by default. It can be deactivated partially or entirely, to coexist with external admission controllers for advanced use cases.
What does this mean for you?
What this all means for you depends on your current PSP situation. If you’re already using PSP, there’s plenty of time to plan your next move. Please review the PSP Replacement Policy KEP and think about how well it will suit your use case.
If you’re making extensive use of the flexibility of PSP with numerous PSPs and complex binding rules, you will likely find the simplicity of PSP Replacement Policy too limiting. Use the next year to evaluate the other admission controller choices in the ecosystem. There are resources available to ease this transition, such as the Gatekeeper Policy Library.
If your use of PSP is relatively simple, with a few policies and straightforward binding to service accounts in each namespace, you will likely find PSP Replacement Policy to be a good match for your needs. Evaluate your PSPs compared to the Kubernetes Pod Security Standards to get a feel for where you’ll be able to use the Restricted, Baseline, and Privileged policies. Please follow along with or contribute to the KEP and subsequent development, and try out the Alpha release of PSP Replacement Policy when it becomes available.
If you’re just beginning your PSP journey, you will save time and effort by keeping it simple.
You can approximate the functionality of PSP Replacement Policy today by using the Pod Security Standards’ PSPs.
If you set the cluster default by binding a Baseline or Restricted policy to the system:serviceaccounts group,
and then make a more-permissive policy available as needed in certain
Namespaces using ServiceAccount bindings,
you will avoid many of the PSP pitfalls and have an easy migration to PSP Replacement Policy.
If your needs are much more complex than this, your effort is probably better spent adopting
one of the more fully-featured external admission controllers mentioned above.
We’re dedicated to making Kubernetes the best container orchestration tool we can, and sometimes that means we need to remove longstanding features to make space for better things to come. When that happens, the Kubernetes deprecation policy ensures you have plenty of time to plan your next move. In the case of PodSecurityPolicy, several options are available to suit a range of needs and use cases. Start planning ahead now for PSP’s eventual removal, and please consider contributing to its replacement! Happy securing!
Acknowledgment: It takes a wonderful group to make wonderful software. Thanks are due to everyone who has contributed to the PSP replacement effort, especially (in alphabetical order) Tim Allclair, Ian Coldwater, and Jordan Liggitt. It’s been a joy to work with y’all on this.
The Evolution of Kubernetes Dashboard
In October 2020, the Kubernetes Dashboard officially turned five. As main project maintainers, we can barely believe that so much time has passed since our very first commits to the project. However, looking back with a bit of nostalgia, we realize that quite a lot has happened since then. Now it’s due time to celebrate “our baby” with a short recap.
How It All Began
The initial idea behind the Kubernetes Dashboard project was to provide a web interface for Kubernetes. We wanted to reflect the kubectl functionality through an intuitive web UI. The main benefit from using the UI is to be able to quickly see things that do not work as expected (monitoring and troubleshooting). Also, the Kubernetes Dashboard is a great starting point for users that are new to the Kubernetes ecosystem.
The very first commit to the Kubernetes Dashboard was made by Filip Grządkowski from Google on 16th October 2015 – just a few months from the initial commit to the Kubernetes repository. Our initial commits go back to November 2015 (Sebastian committed on 16 November 2015; Marcin committed on 23 November 2015). Since that time, we’ve become regular contributors to the project. For the next two years, we worked closely with the Googlers, eventually becoming main project maintainers ourselves.
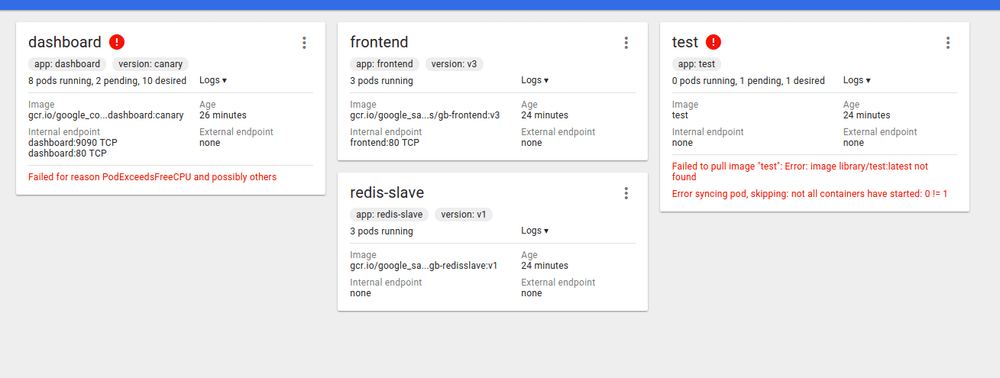
The First Version of the User Interface
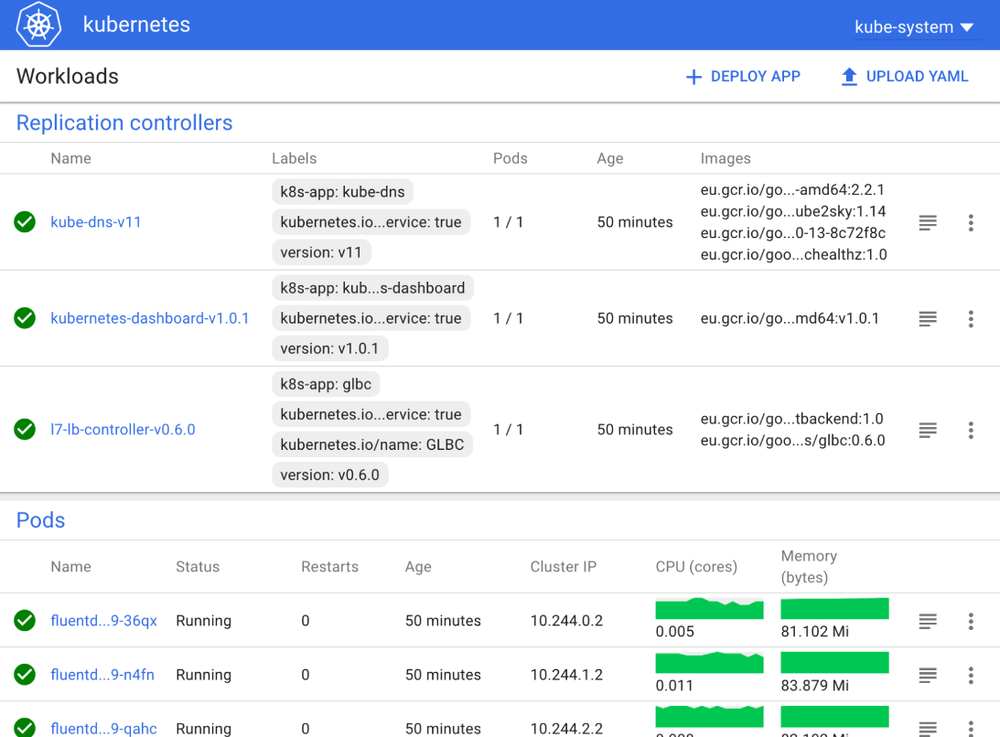
Prototype of the New User Interface
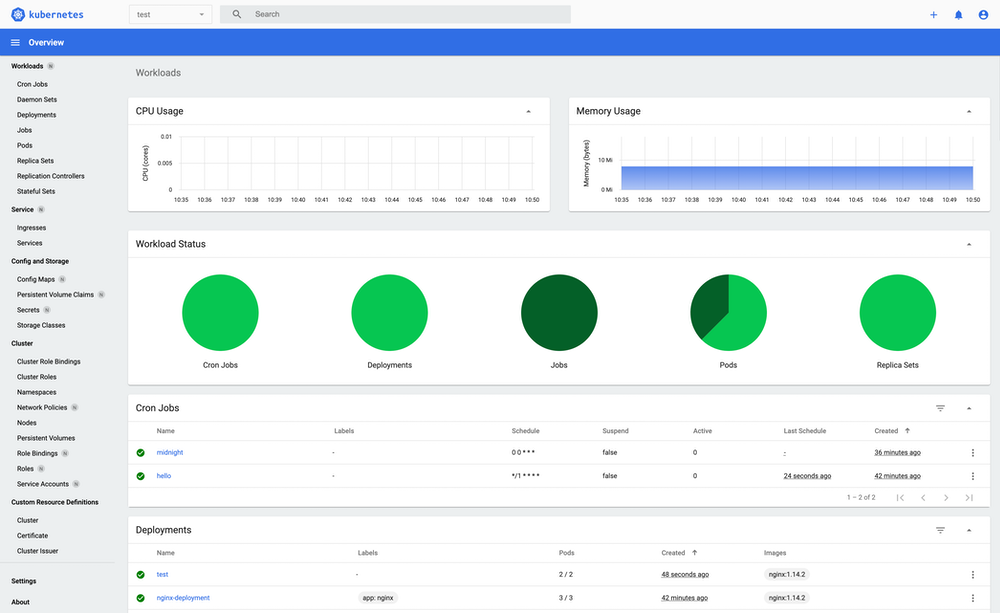
The Current User Interface
As you can see, the initial look and feel of the project were completely different from the current one. We have changed the design multiple times. The same has happened with the code itself.
Growing Up - The Big Migration
At the beginning of 2018, we reached a point where AngularJS was getting closer to the end of its life, while the new Angular versions were published quite often. A lot of the libraries and the modules that we were using were following the trend. That forced us to spend a lot of the time rewriting the frontend part of the project to make it work with newer technologies.
The migration came with many benefits like being able to refactor a lot of the code, introduce design patterns, reduce code complexity, and benefit from the new modules. However, you can imagine that the scale of the migration was huge. Luckily, there were a number of contributions from the community helping us with the resource support, new Kubernetes version support, i18n, and much more. After many long days and nights, we finally released the first beta version in July 2019, followed by the 2.0 release in April 2020 — our baby had grown up.
Where Are We Standing in 2021?
Due to limited resources, unfortunately, we were not able to offer extensive support for many different Kubernetes versions. So, we’ve decided to always try and support the latest Kubernetes version available at the time of the Kubernetes Dashboard release. The latest release, Dashboard v2.2.0 provides support for Kubernetes v1.20.
On top of that, we put in a great deal of effort into improving resource support. Meanwhile, we do offer support for most of the Kubernetes resources. Also, the Kubernetes Dashboard supports multiple languages: English, German, French, Japanese, Korean, Chinese (Traditional, Simplified, Traditional Hong Kong). Persian and Russian localizations are currently in progress. Moreover, we are working on the support for 3rd party themes and the design of the app in general. As you can see, quite a lot of things are going on.
Luckily, we do have regular contributors with domain knowledge who are taking care of the project, updating the Helm charts, translations, Go modules, and more. But as always, there could be many more hands on deck. So if you are thinking about contributing to Kubernetes, keep us in mind ;)
What’s Next
The Kubernetes Dashboard has been growing and prospering for more than 5 years now. It provides the community with an intuitive Web UI, thereby decreasing the complexity of Kubernetes and increasing its accessibility to new community members. We are proud of what the project has achieved so far, but this is by far not the end. These are our priorities for the future:
- Keep providing support for the new Kubernetes versions
- Keep improving the support for the existing resources
- Keep working on auth system improvements
- Rewrite the API to use gRPC and shared informers: This will allow us to improve the performance of the application but, most importantly, to support live updates coming from the Kubernetes project. It is one of the most requested features from the community.
- Split the application into two containers, one with the UI and the second with the API running inside.
The Kubernetes Dashboard in Numbers
- Initial commit made on October 16, 2015
- Over 100 million pulls from Dockerhub since the v2 release
- 8 supported languages and the next 2 in progress
- Over 3360 closed PRs
- Over 2260 closed issues
- 100% coverage of the supported core Kubernetes resources
- Over 9000 stars on GitHub
- Over 237 000 lines of code
Join Us
As mentioned earlier, we are currently looking for more people to help us further develop and grow the project. We are open to contributions in multiple areas, i.e., issues with help wanted label. Please feel free to reach out via GitHub or the #sig-ui channel in the Kubernetes Slack.
A Custom Kubernetes Scheduler to Orchestrate Highly Available Applications
As long as you're willing to follow the rules, deploying on Kubernetes and air travel can be quite pleasant. More often than not, things will "just work". However, if one is interested in travelling with an alligator that must remain alive or scaling a database that must remain available, the situation is likely to become a bit more complicated. It may even be easier to build one's own plane or database for that matter. Travelling with reptiles aside, scaling a highly available stateful system is no trivial task.
Scaling any system has two main components:
- Adding or removing infrastructure that the system will run on, and
- Ensuring that the system knows how to handle additional instances of itself being added and removed.
Most stateless systems, web servers for example, are created without the need to be aware of peers. Stateful systems, which includes databases like CockroachDB, have to coordinate with their peer instances and shuffle around data. As luck would have it, CockroachDB handles data redistribution and replication. The tricky part is being able to tolerate failures during these operations by ensuring that data and instances are distributed across many failure domains (availability zones).
One of Kubernetes' responsibilities is to place "resources" (e.g, a disk or container) into the cluster and satisfy the constraints they request. For example: "I must be in availability zone A" (see Running in multiple zones), or "I can't be placed onto the same node as this other Pod" (see Affinity and anti-affinity).
As an addition to those constraints, Kubernetes offers Statefulsets that provide identity to Pods as well as persistent storage that "follows" these identified pods. Identity in a StatefulSet is handled by an increasing integer at the end of a pod's name. It's important to note that this integer must always be contiguous: in a StatefulSet, if pods 1 and 3 exist then pod 2 must also exist.
Under the hood, CockroachCloud deploys each region of CockroachDB as a StatefulSet in its own Kubernetes cluster - see Orchestrate CockroachDB in a Single Kubernetes Cluster. In this article, I'll be looking at an individual region, one StatefulSet and one Kubernetes cluster which is distributed across at least three availability zones.
A three-node CockroachCloud cluster would look something like this:
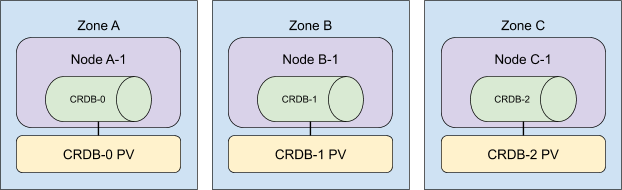
When adding additional resources to the cluster we also distribute them across zones. For the speediest user experience, we add all Kubernetes nodes at the same time and then scale up the StatefulSet.
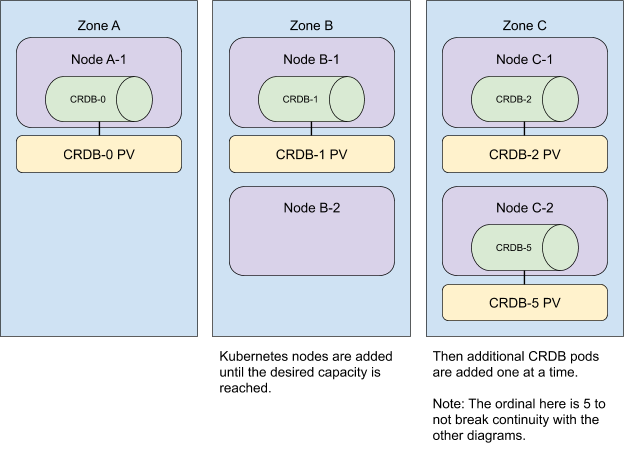
Note that anti-affinities are satisfied no matter the order in which pods are assigned to Kubernetes nodes. In the example, pods 0, 1 and 2 were assigned to zones A, B, and C respectively, but pods 3 and 4 were assigned in a different order, to zones B and A respectively. The anti-affinity is still satisfied because the pods are still placed in different zones.
To remove resources from a cluster, we perform these operations in reverse order.
We first scale down the StatefulSet and then remove from the cluster any nodes lacking a CockroachDB pod.
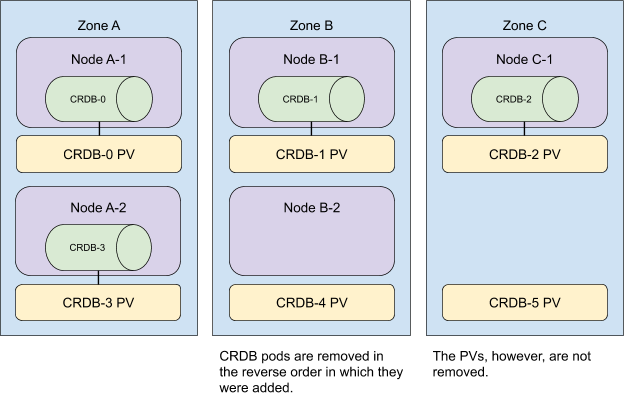
Now, remember that pods in a StatefulSet of size n must have ids in the range [0,n). When scaling down a StatefulSet by m, Kubernetes removes m pods, starting from the highest ordinals and moving towards the lowest, the reverse in which they were added.
Consider the cluster topology below:
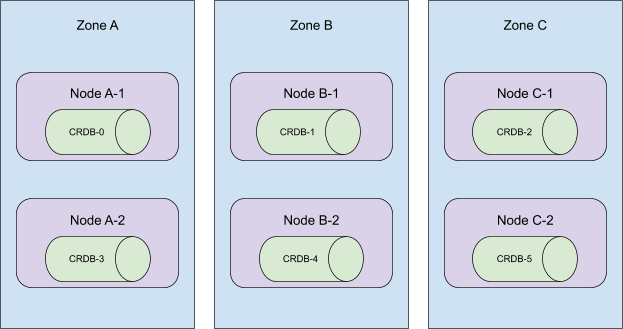
As ordinals 5 through 3 are removed from this cluster, the statefulset continues to have a presence across all 3 availability zones.
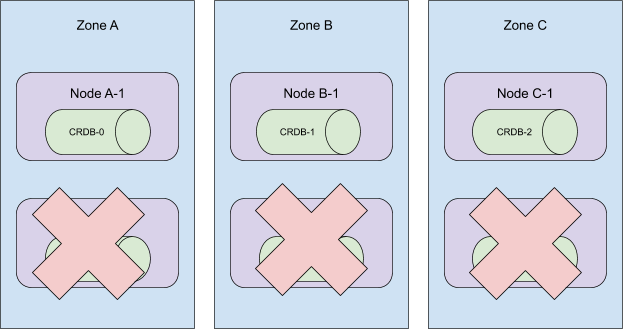
However, Kubernetes' scheduler doesn't guarantee the placement above as we expected at first.
Our combined knowledge of the following is what lead to this misconception.
- Kubernetes' ability to automatically spread Pods across zone
- The behavior that a StatefulSet with n replicas, when Pods are being deployed, they are created sequentially, in order from
{0..n-1}. See StatefulSet for more details.
Consider the following topology:
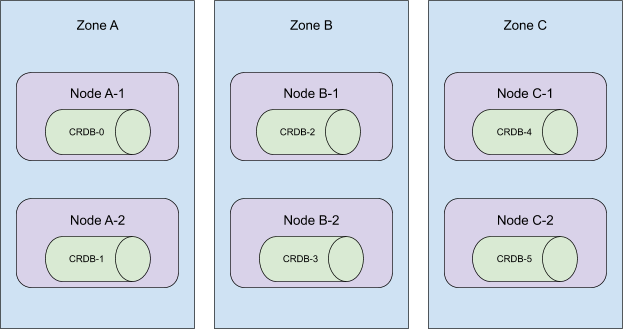
These pods were created in order and they are spread across all availability zones in the cluster. When ordinals 5 through 3 are terminated, this cluster will lose its presence in zone C!
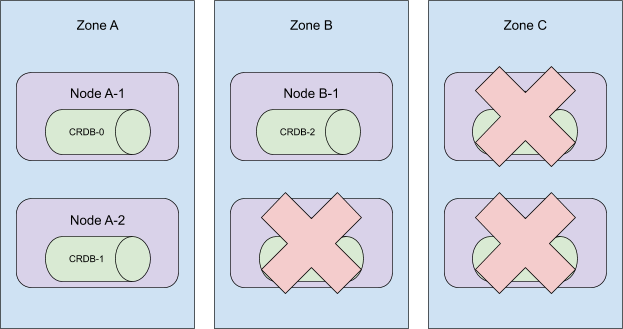
Worse yet, our automation, at the time, would remove Nodes A-2, B-2, and C-2. Leaving CRDB-1 in an unscheduled state as persistent volumes are only available in the zone they are initially created in.
To correct the latter issue, we now employ a "hunt and peck" approach to removing machines from a cluster. Rather than blindly removing Kubernetes nodes from the cluster, only nodes without a CockroachDB pod would be removed. The much more daunting task was to wrangle the Kubernetes scheduler.
A session of brainstorming left us with 3 options:
1. Upgrade to kubernetes 1.18 and make use of Pod Topology Spread Constraints
While this seems like it could have been the perfect solution, at the time of writing Kubernetes 1.18 was unavailable on the two most common managed Kubernetes services in public cloud, EKS and GKE. Furthermore, pod topology spread constraints were still a beta feature in 1.18 which meant that it wasn't guaranteed to be available in managed clusters even when v1.18 became available. The entire endeavour was concerningly reminiscent of checking caniuse.com when Internet Explorer 8 was still around.
2. Deploy a statefulset per zone.
Rather than having one StatefulSet distributed across all availability zones, a single StatefulSet with node affinities per zone would allow manual control over our zonal topology. Our team had considered this as an option in the past which made it particularly appealing. Ultimately, we decided to forego this option as it would have required a massive overhaul to our codebase and performing the migration on existing customer clusters would have been an equally large undertaking.
3. Write a custom Kubernetes scheduler.
Thanks to an example from Kelsey Hightower and a blog post from Banzai Cloud, we decided to dive in head first and write our own custom Kubernetes scheduler.
Once our proof-of-concept was deployed and running, we quickly discovered that the Kubernetes' scheduler is also responsible for mapping persistent volumes to the Pods that it schedules.
The output of kubectl get events had led us to believe there was another system at play.
In our journey to find the component responsible for storage claim mapping, we discovered the kube-scheduler plugin system. Our next POC was a Filter plugin that determined the appropriate availability zone by pod ordinal, and it worked flawlessly!
Our custom scheduler plugin is open source and runs in all of our CockroachCloud clusters.
Having control over how our StatefulSet pods are being scheduled has let us scale out with confidence.
We may look into retiring our plugin once pod topology spread constraints are available in GKE and EKS, but the maintenance overhead has been surprisingly low.
Better still: the plugin's implementation is orthogonal to our business logic. Deploying it, or retiring it for that matter, is as simple as changing the schedulerName field in our StatefulSet definitions.
Chris Seto is a software engineer at Cockroach Labs and works on their Kubernetes automation for CockroachCloud, CockroachDB.
Kubernetes 1.20: Pod Impersonation and Short-lived Volumes in CSI Drivers
Typically when a CSI driver mounts credentials such as secrets and certificates, it has to authenticate against storage providers to access the credentials. However, the access to those credentials are controlled on the basis of the pods' identities rather than the CSI driver's identity. CSI drivers, therefore, need some way to retrieve pod's service account token.
Currently there are two suboptimal approaches to achieve this, either by granting CSI drivers the permission to use TokenRequest API or by reading tokens directly from the host filesystem.
Both of them exhibit the following drawbacks:
- Violating the principle of least privilege
- Every CSI driver needs to re-implement the logic of getting the pod’s service account token
The second approach is more problematic due to:
- The audience of the token defaults to the kube-apiserver
- The token is not guaranteed to be available (e.g.
AutomountServiceAccountToken=false) - The approach does not work for CSI drivers that run as a different (non-root) user from the pods. See file permission section for service account token
- The token might be legacy Kubernetes service account token which doesn’t expire if
BoundServiceAccountTokenVolume=false
Kubernetes 1.20 introduces an alpha feature, CSIServiceAccountToken, to improve the security posture. The new feature allows CSI drivers to receive pods' bound service account tokens.
This feature also provides a knob to re-publish volumes so that short-lived volumes can be refreshed.
Pod Impersonation
Using GCP APIs
Using Workload Identity, a Kubernetes service account can authenticate as a Google service account when accessing Google Cloud APIs. If a CSI driver needs to access GCP APIs on behalf of the pods that it is mounting volumes for, it can use the pod's service account token to exchange for GCP tokens. The pod's service account token is plumbed through the volume context in NodePublishVolume RPC calls when the feature CSIServiceAccountToken is enabled. For example: accessing Google Secret Manager via a secret store CSI driver.
Using Vault
If users configure Kubernetes as an auth method, Vault uses the TokenReview API to validate the Kubernetes service account token. For CSI drivers using Vault as resources provider, they need to present the pod's service account to Vault. For example, secrets store CSI driver and cert manager CSI driver.
Short-lived Volumes
To keep short-lived volumes such as certificates effective, CSI drivers can specify RequiresRepublish=true in theirCSIDriver object to have the kubelet periodically call NodePublishVolume on mounted volumes. These republishes allow CSI drivers to ensure that the volume content is up-to-date.
Next steps
This feature is alpha and projected to move to beta in 1.21. See more in the following KEP and CSI documentation:
Your feedback is always welcome!
- SIG-Auth meets regularly and can be reached via Slack and the mailing list
- SIG-Storage meets regularly and can be reached via Slack and the mailing list.
Third Party Device Metrics Reaches GA
With Kubernetes 1.20, infrastructure teams who manage large scale Kubernetes clusters, are seeing the graduation of two exciting and long awaited features:
- The Pod Resources API (introduced in 1.13) is finally graduating to GA. This allows Kubernetes plugins to obtain information about the node’s resource usage and assignment; for example: which pod/container consumes which device.
- The
DisableAcceleratorMetricsfeature (introduced in 1.19) is graduating to beta and will be enabled by default. This removes device metrics reported by the kubelet in favor of the new plugin architecture.
Many of the features related to fundamental device support (device discovery, plugin, and monitoring) are reaching a strong level of stability. Kubernetes users should see these features as stepping stones to enable more complex use cases (networking, scheduling, storage, etc.)!
One such example is Non Uniform Memory Access (NUMA) placement where, when selecting a device, an application typically wants to ensure that data transfer between CPU Memory and Device Memory is as fast as possible. In some cases, incorrect NUMA placement can nullify the benefit of offloading compute to an external device.
If these are topics of interest to you, consider joining the Kubernetes Node Special Insterest Group (SIG) for all topics related to the Kubernetes node, the COD (container orchestrated device) workgroup for topics related to runtimes, or the resource management forum for topics related to resource management!
The Pod Resources API - Why does it need to exist?
Kubernetes is a vendor neutral platform. If we want it to support device monitoring, adding vendor-specific code in the Kubernetes code base is not an ideal solution. Ultimately, devices are a domain where deep expertise is needed and the best people to add and maintain code in that area are the device vendors themselves.
The Pod Resources API was built as a solution to this issue. Each vendor can build and maintain their own out-of-tree monitoring plugin. This monitoring plugin, often deployed as a separate pod within a cluster, can then associate the metrics a device emits with the associated pod that's using it.
For example, use the NVIDIA GPU dcgm-exporter to scrape metrics in Prometheus format:
$ curl -sL http://127.0.01:8080/metrics
# HELP DCGM_FI_DEV_SM_CLOCK SM clock frequency (in MHz).
# TYPE DCGM_FI_DEV_SM_CLOCK gauge
# HELP DCGM_FI_DEV_MEM_CLOCK Memory clock frequency (in MHz).
# TYPE DCGM_FI_DEV_MEM_CLOCK gauge
# HELP DCGM_FI_DEV_MEMORY_TEMP Memory temperature (in C).
# TYPE DCGM_FI_DEV_MEMORY_TEMP gauge
...
DCGM_FI_DEV_SM_CLOCK{gpu="0", UUID="GPU-604ac76c-d9cf-fef3-62e9-d92044ab6e52",container="foo",namespace="bar",pod="baz"} 139
DCGM_FI_DEV_MEM_CLOCK{gpu="0", UUID="GPU-604ac76c-d9cf-fef3-62e9-d92044ab6e52",container="foo",namespace="bar",pod="baz"} 405
DCGM_FI_DEV_MEMORY_TEMP{gpu="0", UUID="GPU-604ac76c-d9cf-fef3-62e9-d92044ab6e52",container="foo",namespace="bar",pod="baz"} 9223372036854775794
Each agent is expected to adhere to the node monitoring guidelines. In other words, plugins are expected to generate metrics in Prometheus format, and new metrics should not have any dependency on the Kubernetes base directly.
This allows consumers of the metrics to use a compatible monitoring pipeline to collect and analyze metrics from a variety of agents, even if they are maintained by different vendors.
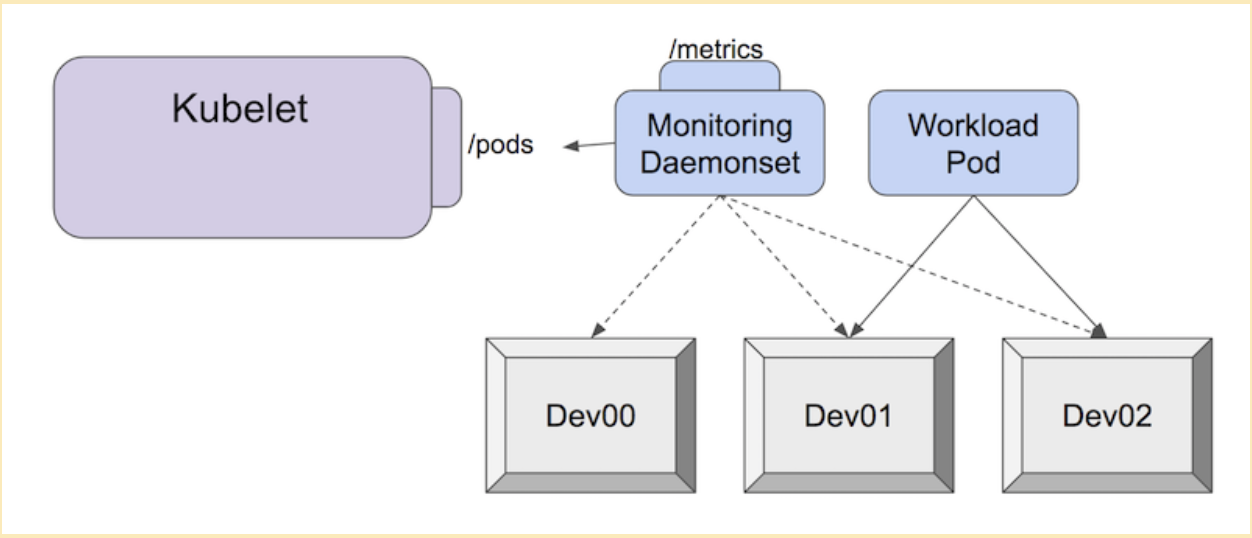
Disabling the NVIDIA GPU metrics - Warning
With the graduation of the plugin monitoring system, Kubernetes is deprecating the NVIDIA GPU metrics that are being reported by the kubelet.
With the DisableAcceleratorMetrics feature being enabled by default in Kubernetes 1.20, NVIDIA GPUs are no longer special citizens in Kubernetes. This is a good thing in the spirit of being vendor-neutral, and enables the most suited people to maintain their plugin on their own release schedule!
Users will now need to either install the NVIDIA GDGM exporter or use bindings to gather more accurate and complete metrics about NVIDIA GPUs. This deprecation means that you can no longer rely on metrics that were reported by kubelet, such as container_accelerator_duty_cycle or container_accelerator_memory_used_bytes which were used to gather NVIDIA GPU memory utilization.
This means that users who used to rely on the NVIDIA GPU metrics reported by the kubelet, will need to update their reference and deploy the NVIDIA plugin. Namely the different metrics reported by Kubernetes map to the following metrics:
| Kubernetes Metrics | NVIDIA dcgm-exporter metric |
|---|---|
container_accelerator_duty_cycle | DCGM_FI_DEV_GPU_UTIL |
container_accelerator_memory_used_bytes | DCGM_FI_DEV_FB_USED |
container_accelerator_memory_total_bytes | DCGM_FI_DEV_FB_FREE + DCGM_FI_DEV_FB_USED |
You might also be interested in other metrics such as DCGM_FI_DEV_GPU_TEMP (the GPU temperature) or DCGM_FI_DEV_POWER_USAGE (the power usage). The default set is available in Nvidia's Data Center GPU Manager documentation.
Note that for this release you can still set the DisableAcceleratorMetrics feature gate to false, effectively re-enabling the ability for the kubelet to report NVIDIA GPU metrics.
Paired with the graduation of the Pod Resources API, these tools can be used to generate GPU telemetry that can be used in visualization dashboards, below is an example:
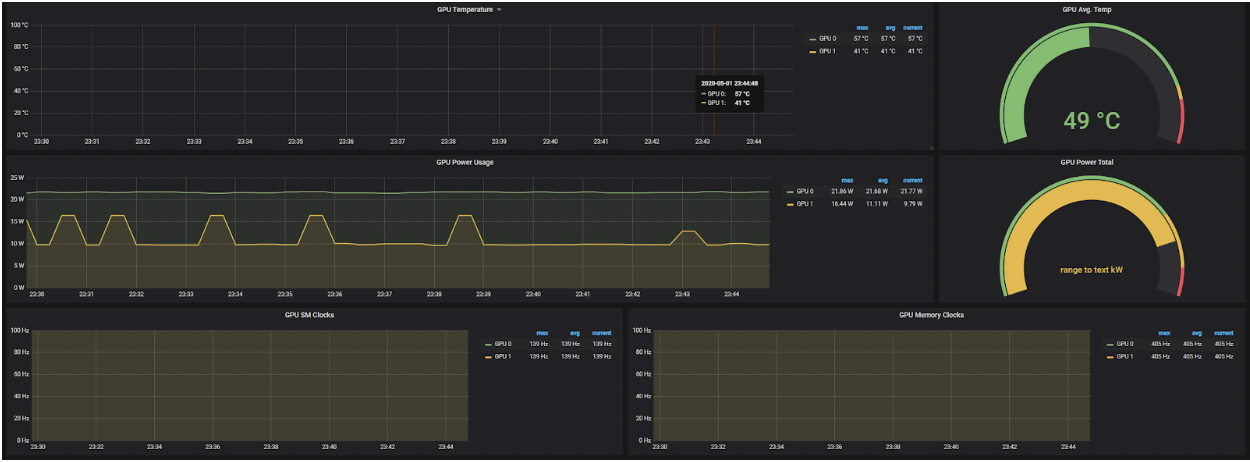
The Pod Resources API - What can I go on to do with this?
As soon as this interface was introduced, many vendors started using it for widely different use cases! To list a few examples:
The kuryr-kubernetes CNI plugin in tandem with intel-sriov-device-plugin. This allowed the CNI plugin to know which allocation of SR-IOV Virtual Functions (VFs) the kubelet made and use that information to correctly setup the container network namespace and use a device with the appropriate NUMA node. We also expect this interface to be used to track the allocated and available resources with information about the NUMA topology of the worker node.
Another use-case is GPU telemetry, where GPU metrics can be associated with the containers and pods that the GPU is assigned to. One such example is the NVIDIA dcgm-exporter, but others can be easily built in the same paradigm.
The Pod Resources API is a simple gRPC service which informs clients of the pods the kubelet knows. The information concerns the devices assignment the kubelet made and the assignment of CPUs. This information is obtained from the internal state of the kubelet's Device Manager and CPU Manager respectively.
You can see below a sample example of the API and how a go client could use that information in a few lines:
service PodResourcesLister {
rpc List(ListPodResourcesRequest) returns (ListPodResourcesResponse) {}
rpc GetAllocatableResources(AllocatableResourcesRequest) returns (AllocatableResourcesResponse) {}
// Kubernetes 1.21
rpc Watch(WatchPodResourcesRequest) returns (stream WatchPodResourcesResponse) {}
}
func main() {
ctx, cancel := context.WithTimeout(context.Background(), connectionTimeout)
defer cancel()
socket := "/var/lib/kubelet/pod-resources/kubelet.sock"
conn, err := grpc.DialContext(ctx, socket, grpc.WithInsecure(), grpc.WithBlock(),
grpc.WithDialer(func(addr string, timeout time.Duration) (net.Conn, error) {
return net.DialTimeout("unix", addr, timeout)
}),
)
if err != nil {
panic(err)
}
client := podresourcesapi.NewPodResourcesListerClient(conn)
resp, err := client.List(ctx, &podresourcesapi.ListPodResourcesRequest{})
if err != nil {
panic(err)
}
net.Printf("%+v\n", resp)
}
Finally, note that you can watch the number of requests made to the Pod Resources endpoint by watching the new kubelet metric called pod_resources_endpoint_requests_total on the kubelet's /metrics endpoint.
Is device monitoring suitable for production? Can I extend it? Can I contribute?
Yes! This feature released in 1.13, almost 2 years ago, has seen broad adoption, is already used by different cloud managed services, and with its graduation to G.A in Kubernetes 1.20 is production ready!
If you are a device vendor, you can start using it today! If you just want to monitor the devices in your cluster, go get the latest version of your monitoring plugin!
If you feel passionate about that area, join the kubernetes community, help improve the API or contribute the device monitoring plugins!
Acknowledgements
We thank the members of the community who have contributed to this feature or given feedback including members of WG-Resource-Management, SIG-Node and the Resource management forum!
Kubernetes 1.20: Granular Control of Volume Permission Changes
Kubernetes 1.20 brings two important beta features, allowing Kubernetes admins and users alike to have more adequate control over how volume permissions are applied when a volume is mounted inside a Pod.
Allow users to skip recursive permission changes on mount
Traditionally if your pod is running as a non-root user (which you should), you must specify a fsGroup inside the pod’s security context so that the volume can be readable and writable by the Pod. This requirement is covered in more detail in here.
But one side-effect of setting fsGroup is that, each time a volume is mounted, Kubernetes must recursively chown() and chmod() all the files and directories inside the volume - with a few exceptions noted below. This happens even if group ownership of the volume already matches the requested fsGroup, and can be pretty expensive for larger volumes with lots of small files, which causes pod startup to take a long time. This scenario has been a known problem for a while, and in Kubernetes 1.20 we are providing knobs to opt-out of recursive permission changes if the volume already has the correct permissions.
When configuring a pod’s security context, set fsGroupChangePolicy to "OnRootMismatch" so if the root of the volume already has the correct permissions, the recursive permission change can be skipped. Kubernetes ensures that permissions of the top-level directory are changed last the first time it applies permissions.
securityContext:
runAsUser: 1000
runAsGroup: 3000
fsGroup: 2000
fsGroupChangePolicy: "OnRootMismatch"
You can learn more about this in Configure volume permission and ownership change policy for Pods.
Allow CSI Drivers to declare support for fsGroup based permissions
Although the previous section implied that Kubernetes always recursively changes permissions of a volume if a Pod has a fsGroup, this is not strictly true. For certain multi-writer volume types, such as NFS or Gluster, the cluster doesn’t perform recursive permission changes even if the pod has a fsGroup. Other volume types may not even support chown()/chmod(), which rely on Unix-style permission control primitives.
So how do we know when to apply recursive permission changes and when we shouldn't? For in-tree storage drivers, this was relatively simple. For CSI drivers that could span a multitude of platforms and storage types, this problem can be a bigger challenge.
Previously, whenever a CSI volume was mounted to a Pod, Kubernetes would attempt to automatically determine if the permissions and ownership should be modified. These methods were imprecise and could cause issues as we already mentioned, depending on the storage type.
The CSIDriver custom resource now has a .spec.fsGroupPolicy field, allowing storage drivers to explicitly opt in or out of these recursive modifications. By having the CSI driver specify a policy for the backing volumes, Kubernetes can avoid needless modification attempts. This optimization helps to reduce volume mount time and also cuts own reporting errors about modifications that would never succeed.
CSIDriver FSGroupPolicy API
Three FSGroupPolicy values are available as of Kubernetes 1.20, with more planned for future releases.
- ReadWriteOnceWithFSType - This is the default policy, applied if no
fsGroupPolicyis defined; this preserves the behavior from previous Kubernetes releases. Each volume is examined at mount time to determine if permissions should be recursively applied. - File - Always attempt to apply permission modifications, regardless of the filesystem type or PersistentVolumeClaim’s access mode.
- None - Never apply permission modifications.
How do I use it?
The only configuration needed is defining fsGroupPolicy inside of the .spec for a CSIDriver. Once that element is defined, any subsequently mounted volumes will automatically use the defined policy. There’s no additional deployment required!
What’s next?
Depending on feedback and adoption, the Kubernetes team plans to push these implementations to GA in either 1.21 or 1.22.
How can I learn more?
This feature is explained in more detail in Kubernetes project documentation: CSI Driver fsGroup Support and Configure volume permission and ownership change policy for Pods .
How do I get involved?
The Kubernetes Slack channel #csi and any of the standard SIG Storage communication channels are great mediums to reach out to the SIG Storage and the CSI team.
Those interested in getting involved with the design and development of CSI or any part of the Kubernetes Storage system, join the Kubernetes Storage Special Interest Group (SIG). We’re rapidly growing and always welcome new contributors.
Kubernetes 1.20: Kubernetes Volume Snapshot Moves to GA
The Kubernetes Volume Snapshot feature is now GA in Kubernetes v1.20. It was introduced as alpha in Kubernetes v1.12, followed by a second alpha with breaking changes in Kubernetes v1.13, and promotion to beta in Kubernetes 1.17. This blog post summarizes the changes releasing the feature from beta to GA.
What is a volume snapshot?
Many storage systems (like Google Cloud Persistent Disks, Amazon Elastic Block Storage, and many on-premise storage systems) provide the ability to create a “snapshot” of a persistent volume. A snapshot represents a point-in-time copy of a volume. A snapshot can be used either to rehydrate a new volume (pre-populated with the snapshot data) or to restore an existing volume to a previous state (represented by the snapshot).
Why add volume snapshots to Kubernetes?
Kubernetes aims to create an abstraction layer between distributed applications and underlying clusters so that applications can be agnostic to the specifics of the cluster they run on and application deployment requires no “cluster-specific” knowledge.
The Kubernetes Storage SIG identified snapshot operations as critical functionality for many stateful workloads. For example, a database administrator may want to snapshot a database’s volumes before starting a database operation.
By providing a standard way to trigger volume snapshot operations in Kubernetes, this feature allows Kubernetes users to incorporate snapshot operations in a portable manner on any Kubernetes environment regardless of the underlying storage.
Additionally, these Kubernetes snapshot primitives act as basic building blocks that unlock the ability to develop advanced enterprise-grade storage administration features for Kubernetes, including application or cluster level backup solutions.
What’s new since beta?
With the promotion of Volume Snapshot to GA, the feature is enabled by default on standard Kubernetes deployments and cannot be turned off.
Many enhancements have been made to improve the quality of this feature and to make it production-grade.
The Volume Snapshot APIs and client library were moved to a separate Go module.
A snapshot validation webhook has been added to perform necessary validation on volume snapshot objects. More details can be found in the Volume Snapshot Validation Webhook Kubernetes Enhancement Proposal.
Along with the validation webhook, the volume snapshot controller will start labeling invalid snapshot objects that already existed. This allows users to identify, remove any invalid objects, and correct their workflows. Once the API is switched to the v1 type, those invalid objects will not be deletable from the system.
To provide better insights into how the snapshot feature is performing, an initial set of operation metrics has been added to the volume snapshot controller.
There are more end-to-end tests, running on GCP, that validate the feature in a real Kubernetes cluster. Stress tests (based on Google Persistent Disk and
hostPathCSI Drivers) have been introduced to test the robustness of the system.
Other than introducing tightening validation, there is no difference between the v1beta1 and v1 Kubernetes volume snapshot API. In this release (with Kubernetes 1.20), both v1 and v1beta1 are served while the stored API version is still v1beta1. Future releases will switch the stored version to v1 and gradually remove v1beta1 support.
Which CSI drivers support volume snapshots?
Snapshots are only supported for CSI drivers, not for in-tree or FlexVolume drivers. Ensure the deployed CSI driver on your cluster has implemented the snapshot interfaces. For more information, see Container Storage Interface (CSI) for Kubernetes GA.
Currently more than 50 CSI drivers support the Volume Snapshot feature. The GCE Persistent Disk CSI Driver has gone through the tests for upgrading from volume snapshots beta to GA. GA level support for other CSI drivers should be available soon.
Who builds products using volume snapshots?
As of the publishing of this blog, the following participants from the Kubernetes Data Protection Working Group are building products or have already built products using Kubernetes volume snapshots.
- Dell-EMC: PowerProtect
- Druva
- Kasten K10
- NetApp: Project Astra
- Portworx (PX-Backup)
- Pure Storage (Pure Service Orchestrator)
- Red Hat OpenShift Container Storage
- Robin Cloud Native Storage
- TrilioVault for Kubernetes
- Velero plugin for CSI
How to deploy volume snapshots?
Volume Snapshot feature contains the following components:
- Kubernetes Volume Snapshot CRDs
- Volume snapshot controller
- Snapshot validation webhook
- CSI Driver along with CSI Snapshotter sidecar
It is strongly recommended that Kubernetes distributors bundle and deploy the volume snapshot controller, CRDs, and validation webhook as part of their Kubernetes cluster management process (independent of any CSI Driver).
Warning:
The snapshot validation webhook serves as a critical component to transition smoothly from using v1beta1 to v1 API. Not installing the snapshot validation webhook makes prevention of invalid volume snapshot objects from creation/updating impossible, which in turn will block deletion of invalid volume snapshot objects in coming upgrades.If your cluster does not come pre-installed with the correct components, you may manually install them. See the CSI Snapshotter README for details.
How to use volume snapshots?
Assuming all the required components (including CSI driver) have been already deployed and running on your cluster, you can create volume snapshots using the VolumeSnapshot API object, or use an existing VolumeSnapshot to restore a PVC by specifying the VolumeSnapshot data source on it. For more details, see the volume snapshot documentation.
Note:
The Kubernetes Snapshot API does not provide any application consistency guarantees. You have to prepare your application (pause application, freeze filesystem etc.) before taking the snapshot for data consistency either manually or using higher level APIs/controllers.Dynamically provision a volume snapshot
To dynamically provision a volume snapshot, create a VolumeSnapshotClass API object first.
apiVersion: snapshot.storage.k8s.io/v1
kind: VolumeSnapshotClass
metadata:
name: test-snapclass
driver: testdriver.csi.k8s.io
deletionPolicy: Delete
parameters:
csi.storage.k8s.io/snapshotter-secret-name: mysecret
csi.storage.k8s.io/snapshotter-secret-namespace: mysecretnamespace
Then create a VolumeSnapshot API object from a PVC by specifying the volume snapshot class.
apiVersion: snapshot.storage.k8s.io/v1
kind: VolumeSnapshot
metadata:
name: test-snapshot
namespace: ns1
spec:
volumeSnapshotClassName: test-snapclass
source:
persistentVolumeClaimName: test-pvc
Importing an existing volume snapshot with Kubernetes
To import a pre-existing volume snapshot into Kubernetes, manually create a VolumeSnapshotContent object first.
apiVersion: snapshot.storage.k8s.io/v1
kind: VolumeSnapshotContent
metadata:
name: test-content
spec:
deletionPolicy: Delete
driver: testdriver.csi.k8s.io
source:
snapshotHandle: 7bdd0de3-xxx
volumeSnapshotRef:
name: test-snapshot
namespace: default
Then create a VolumeSnapshot object pointing to the VolumeSnapshotContent object.
apiVersion: snapshot.storage.k8s.io/v1
kind: VolumeSnapshot
metadata:
name: test-snapshot
spec:
source:
volumeSnapshotContentName: test-content
Rehydrate volume from snapshot
A bound and ready VolumeSnapshot object can be used to rehydrate a new volume with data pre-populated from snapshotted data as shown here:
apiVersion: v1
kind: PersistentVolumeClaim
metadata:
name: pvc-restore
namespace: demo-namespace
spec:
storageClassName: test-storageclass
dataSource:
name: test-snapshot
kind: VolumeSnapshot
apiGroup: snapshot.storage.k8s.io
accessModes:
- ReadWriteOnce
resources:
requests:
storage: 1Gi
How to add support for snapshots in a CSI driver?
See the CSI spec and the Kubernetes-CSI Driver Developer Guide for more details on how to implement the snapshot feature in a CSI driver.
What are the limitations?
The GA implementation of volume snapshots for Kubernetes has the following limitations:
- Does not support reverting an existing PVC to an earlier state represented by a snapshot (only supports provisioning a new volume from a snapshot).
How to learn more?
The code repository for snapshot APIs and controller is here: https://github.com/kubernetes-csi/external-snapshotter
Check out additional documentation on the snapshot feature here: http://k8s.io/docs/concepts/storage/volume-snapshots and https://kubernetes-csi.github.io/docs/
How to get involved?
This project, like all of Kubernetes, is the result of hard work by many contributors from diverse backgrounds working together.
We offer a huge thank you to the contributors who stepped up these last few quarters to help the project reach GA. We want to thank Saad Ali, Michelle Au, Tim Hockin, and Jordan Liggitt for their insightful reviews and thorough consideration with the design, thank Andi Li for his work on adding the support of the snapshot validation webhook, thank Grant Griffiths on implementing metrics support in the snapshot controller and handling password rotation in the validation webhook, thank Chris Henzie, Raunak Shah, and Manohar Reddy for writing critical e2e tests to meet the scalability and stability requirements for graduation, thank Kartik Sharma for moving snapshot APIs and client lib to a separate go module, and thank Raunak Shah and Prafull Ladha for their help with upgrade testing from beta to GA.
There are many more people who have helped to move the snapshot feature from beta to GA. We want to thank everyone who has contributed to this effort:
- Andi Li
- Ben Swartzlander
- Chris Henzie
- Christian Huffman
- Grant Griffiths
- Humble Devassy Chirammal
- Jan Šafránek
- Jiawei Wang
- Jing Xu
- Jordan Liggitt
- Kartik Sharma
- Madhu Rajanna
- Manohar Reddy
- Michelle Au
- Patrick Ohly
- Prafull Ladha
- Prateek Pandey
- Raunak Shah
- Saad Ali
- Saikat Roychowdhury
- Tim Hockin
- Xiangqian Yu
- Xing Yang
- Zhu Can
For those interested in getting involved with the design and development of CSI or any part of the Kubernetes Storage system, join the Kubernetes Storage Special Interest Group (SIG). We’re rapidly growing and always welcome new contributors.
We also hold regular Data Protection Working Group meetings. New attendees are welcome to join in discussions.
Kubernetes 1.20: The Raddest Release
We’re pleased to announce the release of Kubernetes 1.20, our third and final release of 2020! This release consists of 42 enhancements: 11 enhancements have graduated to stable, 15 enhancements are moving to beta, and 16 enhancements are entering alpha.
The 1.20 release cycle returned to its normal cadence of 11 weeks following the previous extended release cycle. This is one of the most feature dense releases in a while: the Kubernetes innovation cycle is still trending upward. This release has more alpha than stable enhancements, showing that there is still much to explore in the cloud native ecosystem.
Major Themes
Volume Snapshot Operations Goes Stable
This feature provides a standard way to trigger volume snapshot operations and allows users to incorporate snapshot operations in a portable manner on any Kubernetes environment and supported storage providers.
Additionally, these Kubernetes snapshot primitives act as basic building blocks that unlock the ability to develop advanced, enterprise-grade, storage administration features for Kubernetes, including application or cluster level backup solutions.
Note that snapshot support requires Kubernetes distributors to bundle the Snapshot controller, Snapshot CRDs, and validation webhook. A CSI driver supporting the snapshot functionality must also be deployed on the cluster.
Kubectl Debug Graduates to Beta
The kubectl alpha debug features graduates to beta in 1.20, becoming kubectl debug. The feature provides support for common debugging workflows directly from kubectl. Troubleshooting scenarios supported in this release of kubectl include:
- Troubleshoot workloads that crash on startup by creating a copy of the pod that uses a different container image or command.
- Troubleshoot distroless containers by adding a new container with debugging tools, either in a new copy of the pod or using an ephemeral container. (Ephemeral containers are an alpha feature that are not enabled by default.)
- Troubleshoot on a node by creating a container running in the host namespaces and with access to the host’s filesystem.
Note that as a new built-in command, kubectl debug takes priority over any kubectl plugin named “debug”. You must rename the affected plugin.
Invocations using kubectl alpha debug are now deprecated and will be removed in a subsequent release. Update your scripts to use kubectl debug. For more information about kubectl debug, see Debugging Running Pods.
Beta: API Priority and Fairness
Introduced in 1.18, Kubernetes 1.20 now enables API Priority and Fairness (APF) by default. This allows kube-apiserver to categorize incoming requests by priority levels.
Alpha with updates: IPV4/IPV6
The IPv4/IPv6 dual stack has been reimplemented to support dual stack services based on user and community feedback. This allows both IPv4 and IPv6 service cluster IP addresses to be assigned to a single service, and also enables a service to be transitioned from single to dual IP stack and vice versa.
GA: Process PID Limiting for Stability
Process IDs (pids) are a fundamental resource on Linux hosts. It is trivial to hit the task limit without hitting any other resource limits and cause instability to a host machine.
Administrators require mechanisms to ensure that user pods cannot induce pid exhaustion that prevents host daemons (runtime, kubelet, etc) from running. In addition, it is important to ensure that pids are limited among pods in order to ensure they have limited impact to other workloads on the node.
After being enabled-by-default for a year, SIG Node graduates PID Limits to GA on both SupportNodePidsLimit (node-to-pod PID isolation) and SupportPodPidsLimit (ability to limit PIDs per pod).
Alpha: Graceful node shutdown
Users and cluster administrators expect that pods will adhere to expected pod lifecycle including pod termination. Currently, when a node shuts down, pods do not follow the expected pod termination lifecycle and are not terminated gracefully which can cause issues for some workloads.
The GracefulNodeShutdown feature is now in Alpha. GracefulNodeShutdown makes the kubelet aware of node system shutdowns, enabling graceful termination of pods during a system shutdown.
Major Changes
Dockershim Deprecation
Dockershim, the container runtime interface (CRI) shim for Docker is being deprecated. Support for Docker is deprecated and will be removed in a future release. Docker-produced images will continue to work in your cluster with all CRI compliant runtimes as Docker images follow the Open Container Initiative (OCI) image specification. The Kubernetes community has written a detailed blog post about deprecation with a dedicated FAQ page for it.
Exec Probe Timeout Handling
A longstanding bug regarding exec probe timeouts that may impact existing pod definitions has been fixed. Prior to this fix, the field timeoutSeconds was not respected for exec probes. Instead, probes would run indefinitely, even past their configured deadline, until a result was returned. With this change, the default value of 1 second will be applied if a value is not specified and existing pod definitions may no longer be sufficient if a probe takes longer than one second. A feature gate, called ExecProbeTimeout, has been added with this fix that enables cluster operators to revert to the previous behavior, but this will be locked and removed in subsequent releases. In order to revert to the previous behavior, cluster operators should set this feature gate to false.
Please review the updated documentation regarding configuring probes for more details.
Other Updates
Graduated to Stable
- RuntimeClass
- Built-in API Types Defaults
- Add Pod-Startup Liveness-Probe Holdoff
- Support CRI-ContainerD On Windows
- SCTP Support for Services
- Adding AppProtocol To Services And Endpoints
Notable Feature Updates
Release notes
You can check out the full details of the 1.20 release in the release notes.
Availability of release
Kubernetes 1.20 is available for download on GitHub. There are some great resources out there for getting started with Kubernetes. You can check out some interactive tutorials on the main Kubernetes site, or run a local cluster on your machine using Docker containers with kind. If you’d like to try building a cluster from scratch, check out the Kubernetes the Hard Way tutorial by Kelsey Hightower.
Release Team
This release was made possible by a very dedicated group of individuals, who came together as a team in the midst of a lot of things happening out in the world. A huge thank you to the release lead Jeremy Rickard, and to everyone else on the release team for supporting each other, and working so hard to deliver the 1.20 release for the community.
Release Logo
raddest: adjective, Slang. excellent; wonderful; cool:
The Kubernetes 1.20 Release has been the raddest release yet.
2020 has been a challenging year for many of us, but Kubernetes contributors have delivered a record-breaking number of enhancements in this release. That is a great accomplishment, so the release lead wanted to end the year with a little bit of levity and pay homage to Kubernetes 1.14 - Caturnetes with a "rad" cat named Humphrey.
Humphrey is the release lead's cat and has a permanent blep. Rad was pretty common slang in the 1990s in the United States, and so were laser backgrounds. Humphrey in a 1990s style school picture felt like a fun way to end the year. Hopefully, Humphrey and his blep bring you a little joy at the end of 2020!
The release logo was created by Henry Hsu - @robotdancebattle.
User Highlights
- Apple is operating multi-thousand node Kubernetes clusters in data centers all over the world. Watch Alena Prokharchyk's KubeCon NA Keynote to learn more about their cloud native journey.
Project Velocity
The CNCF K8s DevStats project aggregates a number of interesting data points related to the velocity of Kubernetes and various sub-projects. This includes everything from individual contributions to the number of companies that are contributing, and is a neat illustration of the depth and breadth of effort that goes into evolving this ecosystem.
In the v1.20 release cycle, which ran for 11 weeks (September 25 to December 9), we saw contributions from 967 companies and 1335 individuals (44 of whom made their first Kubernetes contribution) from 26 countries.
Ecosystem Updates
- KubeCon North America just wrapped up three weeks ago, the second such event to be virtual! All talks are now available to all on-demand for anyone still needing to catch up!
- In June, the Kubernetes community formed a new working group as a direct response to the Black Lives Matter protests occurring across America. WG Naming's goal is to remove harmful and unclear language in the Kubernetes project as completely as possible and to do so in a way that is portable to other CNCF projects. A great introductory talk on this important work and how it is conducted was given at KubeCon 2020 North America, and the initial impact of this labor can actually be seen in the v1.20 release.
- Previously announced this summer, The Certified Kubernetes Security Specialist (CKS) Certification was released during Kubecon NA for immediate scheduling! Following the model of CKA and CKAD, the CKS is a performance-based exam, focused on security-themed competencies and domains. This exam is targeted at current CKA holders, particularly those who want to round out their baseline knowledge in securing cloud workloads (which is all of us, right?).
Event Updates
KubeCon + CloudNativeCon Europe 2021 will take place May 4 - 7, 2021! Registration will open on January 11. You can find more information about the conference here. Remember that the CFP closes on Sunday, December 13, 11:59pm PST!
Upcoming release webinar
Stay tuned for the upcoming release webinar happening this January.
Get Involved
If you’re interested in contributing to the Kubernetes community, Special Interest Groups (SIGs) are a great starting point. Many of them may align with your interests! If there are things you’d like to share with the community, you can join the weekly community meeting, or use any of the following channels:
- Find out more about contributing to Kubernetes at the new Kubernetes Contributor website
- Follow us on Twitter @Kubernetesio for latest updates
- Join the community discussion on Discuss
- Join the community on Slack
- Share your Kubernetes story
- Read more about what’s happening with Kubernetes on the blog
- Learn more about the Kubernetes Release Team
GSoD 2020: Improving the API Reference Experience
Editor's note: Better API references have been my goal since I joined Kubernetes docs three and a half years ago. Philippe has succeeded fantastically. More than a better API reference, though, Philippe embodied the best of the Kubernetes community in this project: excellence through collaboration, and a process that made the community itself better. Thanks, Google Season of Docs, for making Philippe's work possible. —Zach Corleissen
Introduction
The Google Season of Docs project brings open source organizations and technical writers together to work closely on a specific documentation project.
I was selected by the CNCF to work on Kubernetes documentation, specifically to make the API Reference documentation more accessible.
I'm a software developer with a great interest in documentation systems. In the late 90's I started translating Linux-HOWTO documents into French. From one thing to another, I learned about documentation systems. Eventually, I wrote a Linux-HOWTO to help documentarians learn the language used at that time for writing documents, LinuxDoc/SGML.
Shortly afterward, Linux documentation adopted the DocBook language. I helped some writers rewrite their documents in this format; for example, the Advanced Bash-Scripting Guide. I also worked on the GNU makeinfo program to add DocBook output, making it possible to transform GNU Info documentation into Docbook format.
Background
The Kubernetes website is built with Hugo from documentation written in Markdown format in the website repository, using the Docsy Hugo theme.
The existing API reference documentation is a large HTML file generated from the Kubernetes OpenAPI specification.
On my side, I wanted for some time to make the API Reference more accessible, by:
- building individual and autonomous pages for each Kubernetes resource
- adapting the format to mobile reading
- reusing the website's assets and theme to build, integrate, and display the reference pages
- allowing the search engines to reference the content of the pages
Around one year ago, I started to work on the generator building the current unique HTML page, to add a DocBook output, so the API Reference could be generated first in DocBook format, and after that in PDF or other formats supported by DocBook processors. The first result has been some Ebook files for the API Reference and an auto-edited paper book.
I decided later to add another output to this generator, to generate Markdown files and create a website with the API Reference.
When the CNCF proposed a project for the Google Season of Docs to work on the API Reference, I applied, and the match occurred.
The Project
swagger-ui
The first idea of the CNCF members that proposed this project was to test the swagger-ui tool, to try and document the Kubernetes API Reference with this standard tool.
Because the Kubernetes API is much larger than many other APIs, it has been necessary to write a tool to split the complete API Reference by API Groups, and insert in the Documentation website several swagger-ui components, one for each API Group.
Generally, APIs are used by developers by calling endpoints with a specific HTTP verb, with specific parameters and waiting for a response. The swagger-ui interface is built for this usage: the interface displays a list of endpoints and their associated verbs, and for each the parameters and responses formats.
The Kubernetes API is most of the time used differently: users create manifest files containing resources definitions in YAML format, and use the kubectl CLI to apply these manifests to the cluster. In this case, the most important information is the description of the structures used as parameters and responses (the Kubernetes Resources).
Because of this specificity, we realized that it would be difficult to adapt the swagger-ui interface to satisfy the users of the Kubernetes API and this direction has been abandoned.
Markdown pages
The second stage of the project has been to adapt the work I had done to create the k8sref.io website, to include it in the official documentation website.
The main changes have been to:
- use go-templates to represent the output pages, so non-developers can adapt the generated pages without having to edit the generator code
- create a new custom shortcode, to easily create links from inside the website to specific pages of the API reference
- improve the navigation between the sections of the API reference
- add the code of the generator to the Kubernetes GitHub repository containing the different reference generators
All the discussions and work done can be found in website pull request #23294.
Adding the generator code to the Kubernetes project happened in kubernetes-sigs/reference-docs#179.
Here are the features of the new API Reference to be included in the official documentation website:
- the resources are categorized, in the categories Workloads, Services, Config & Storage, Authentication, Authorization, Policies, Extend, Cluster. This structure is configurable with a simple
toc.yamlfile - each page displays associated resources at the first level ; for example: Pod, PodSpec, PodStatus, PodList
- most resource pages inline relevant definitions ; the exceptions are when those definitions are common to several resources, or are too complex to be displayed inline. With the old approach, you had to follow a hyperlink to read each extra detail.
- some widely used definitions, such as
ObjectMeta, are documented in a specific page - required fields are indicated, and placed first
- fields of a resource can be categorized and ordered, with the help of a
fields.yamlfile mapfields are indicated. For example the.spec.nodeSelectorfor aPodismap[string]string, instead ofobject, using the value ofx-kubernetes-list-type- patch strategies are indicated
apiVersionandkinddisplay the value, not thestringtype- At the top of a reference page, the page displays the Go import necessary to use these resources from a Go program.
The work is currently on hold pending the 1.20 release. When the release finishes and the work is integrated, the API reference will be available at https://kubernetes.io/docs/reference/.
Future Work
There are points to improve, particularly:
- Some Kubernetes resources are deeply nested. Inlining the definition of these resources makes them difficult to understand.
- The created
shortcodeuses the URL of the page to reference a Resource page. It would be easier for documentarians if they could reference a Resource by its group and name.
Appreciation
I would like to thank my mentor Zach Corleissen and the lead writers Karen Bradshaw, Celeste Horgan, Tim Bannister and Qiming Teng who supervised me during all the season. They all have been very encouraging and gave me tons of great advice.
Dockershim Deprecation FAQ
Update: There is a newer version of this article available.
This document goes over some frequently asked questions regarding the Dockershim deprecation announced as a part of the Kubernetes v1.20 release. For more detail on the deprecation of Docker as a container runtime for Kubernetes kubelets, and what that means, check out the blog post Don't Panic: Kubernetes and Docker.
Also, you can read check whether Dockershim removal affects you to check whether it does.
Why is dockershim being deprecated?
Maintaining dockershim has become a heavy burden on the Kubernetes maintainers. The CRI standard was created to reduce this burden and allow smooth interoperability of different container runtimes. Docker itself doesn't currently implement CRI, thus the problem.
Dockershim was always intended to be a temporary solution (hence the name: shim). You can read more about the community discussion and planning in the Dockershim Removal Kubernetes Enhancement Proposal.
Additionally, features that were largely incompatible with the dockershim, such as cgroups v2 and user namespaces are being implemented in these newer CRI runtimes. Removing support for the dockershim will allow further development in those areas.
Can I still use Docker in Kubernetes 1.20?
Yes, the only thing changing in 1.20 is a single warning log printed at kubelet startup if using Docker as the runtime.
When will dockershim be removed?
Given the impact of this change, we are using an extended deprecation timeline. It will not be removed before Kubernetes 1.22, meaning the earliest release without dockershim would be 1.23 in late 2021. Update: removal of dockershim is scheduled for Kubernetes v1.24, see Dockershim Removal Kubernetes Enhancement Proposal. We will be working closely with vendors and other ecosystem groups to ensure a smooth transition and will evaluate things as the situation evolves.
Can I still use dockershim after it is removed from Kubernetes?
Update: Mirantis and Docker have committed to maintaining the dockershim after it is removed from Kubernetes.
Will my existing Docker images still work?
Yes, the images produced from docker build will work with all CRI implementations.
All your existing images will still work exactly the same.
What about private images?
Yes. All CRI runtimes support the same pull secrets configuration used in Kubernetes, either via the PodSpec or ServiceAccount.
Are Docker and containers the same thing?
Docker popularized the Linux containers pattern and has been instrumental in developing the underlying technology, however containers in Linux have existed for a long time. The container ecosystem has grown to be much broader than just Docker. Standards like OCI and CRI have helped many tools grow and thrive in our ecosystem, some replacing aspects of Docker while others enhance existing functionality.
Are there examples of folks using other runtimes in production today?
All Kubernetes project produced artifacts (Kubernetes binaries) are validated with each release.
Additionally, the kind project has been using containerd for some time and has seen an improvement in stability for its use case. Kind and containerd are leveraged multiple times every day to validate any changes to the Kubernetes codebase. Other related projects follow a similar pattern as well, demonstrating the stability and usability of other container runtimes. As an example, OpenShift 4.x has been using the CRI-O runtime in production since June 2019.
For other examples and references you can look at the adopters of containerd and CRI-O, two container runtimes under the Cloud Native Computing Foundation (CNCF).
People keep referencing OCI, what is that?
OCI stands for the Open Container Initiative, which standardized many of the interfaces between container tools and technologies. They maintain a standard specification for packaging container images (OCI image-spec) and running containers (OCI runtime-spec). They also maintain an actual implementation of the runtime-spec in the form of runc, which is the underlying default runtime for both containerd and CRI-O. The CRI builds on these low-level specifications to provide an end-to-end standard for managing containers.
Which CRI implementation should I use?
That’s a complex question and it depends on a lot of factors. If Docker is working for you, moving to containerd should be a relatively easy swap and will have strictly better performance and less overhead. However, we encourage you to explore all the options from the CNCF landscape in case another would be an even better fit for your environment.
What should I look out for when changing CRI implementations?
While the underlying containerization code is the same between Docker and most CRIs (including containerd), there are a few differences around the edges. Some common things to consider when migrating are:
- Logging configuration
- Runtime resource limitations
- Node provisioning scripts that call docker or use docker via it's control socket
- Kubectl plugins that require docker CLI or the control socket
- Kubernetes tools that require direct access to Docker (e.g. kube-imagepuller)
- Configuration of functionality like
registry-mirrorsand insecure registries - Other support scripts or daemons that expect Docker to be available and are run outside of Kubernetes (e.g. monitoring or security agents)
- GPUs or special hardware and how they integrate with your runtime and Kubernetes
If you use Kubernetes resource requests/limits or file-based log collection DaemonSets then they will continue to work the same, but if you’ve customized your dockerd configuration, you’ll need to adapt that for your new container runtime where possible.
Another thing to look out for is anything expecting to run for system maintenance
or nested inside a container when building images will no longer work. For the
former, you can use the crictl tool as a drop-in replacement (see mapping from dockercli to crictl) and for the
latter you can use newer container build options like img, buildah,
kaniko, or buildkit-cli-for-kubectl that don’t require Docker.
For containerd, you can start with their documentation to see what configuration options are available as you migrate things over.
For instructions on how to use containerd and CRI-O with Kubernetes, see the Kubernetes documentation on Container Runtimes
What if I have more questions?
If you use a vendor-supported Kubernetes distribution, you can ask them about upgrade plans for their products. For end-user questions, please post them to our end user community forum: https://discuss.kubernetes.io/.
You can also check out the excellent blog post Wait, Docker is deprecated in Kubernetes now? a more in-depth technical discussion of the changes.
Can I have a hug?
Always and whenever you want! 🤗🤗
Don't Panic: Kubernetes and Docker
Update: Kubernetes support for Docker via dockershim is now removed.
For more information, read the removal FAQ.
You can also discuss the deprecation via a dedicated GitHub issue.
Kubernetes is deprecating Docker as a container runtime after v1.20.
You do not need to panic. It’s not as dramatic as it sounds.
TL;DR Docker as an underlying runtime is being deprecated in favor of runtimes that use the Container Runtime Interface (CRI) created for Kubernetes. Docker-produced images will continue to work in your cluster with all runtimes, as they always have.
If you’re an end-user of Kubernetes, not a whole lot will be changing for you.
This doesn’t mean the death of Docker, and it doesn’t mean you can’t, or
shouldn’t, use Docker as a development tool anymore. Docker is still a useful
tool for building containers, and the images that result from running docker build can still run in your Kubernetes cluster.
If you’re using a managed Kubernetes service like AKS, EkS or GKE, you will need to make sure your worker nodes are using a supported container runtime before Docker support is removed in a future version of Kubernetes. If you have node customizations you may need to update them based on your environment and runtime requirements. Please work with your service provider to ensure proper upgrade testing and planning.
If you’re rolling your own clusters, you will also need to make changes to avoid
your clusters breaking. At v1.20, you will get a deprecation warning for Docker.
When Docker runtime support is removed in a future release (currently planned
for the 1.22 release in late 2021) of Kubernetes it will no longer be supported
and you will need to switch to one of the other compliant container runtimes,
like containerd or CRI-O. Just make sure that the runtime you choose supports
the docker daemon configurations you currently use (e.g. logging).
So why the confusion and what is everyone freaking out about?
We’re talking about two different environments here, and that’s creating confusion. Inside of your Kubernetes cluster, there’s a thing called a container runtime that’s responsible for pulling and running your container images. Docker is a popular choice for that runtime (other common options include containerd and CRI-O), but Docker was not designed to be embedded inside Kubernetes, and that causes a problem.
You see, the thing we call “Docker” isn’t actually one thing—it’s an entire tech stack, and one part of it is a thing called “containerd,” which is a high-level container runtime by itself. Docker is cool and useful because it has a lot of UX enhancements that make it really easy for humans to interact with while we’re doing development work, but those UX enhancements aren’t necessary for Kubernetes, because it isn’t a human.
As a result of this human-friendly abstraction layer, your Kubernetes cluster has to use another tool called Dockershim to get at what it really needs, which is containerd. That’s not great, because it gives us another thing that has to be maintained and can possibly break. What’s actually happening here is that Dockershim is being removed from Kubelet as early as v1.23 release, which removes support for Docker as a container runtime as a result. You might be thinking to yourself, but if containerd is included in the Docker stack, why does Kubernetes need the Dockershim?
Docker isn’t compliant with CRI, the Container Runtime Interface. If it were, we wouldn’t need the shim, and this wouldn’t be a thing. But it’s not the end of the world, and you don’t need to panic—you just need to change your container runtime from Docker to another supported container runtime.
One thing to note: If you are relying on the underlying docker socket
(/var/run/docker.sock) as part of a workflow within your cluster today, moving
to a different runtime will break your ability to use it. This pattern is often
called Docker in Docker. There are lots of options out there for this specific
use case including things like
kaniko,
img, and
buildah.
What does this change mean for developers, though? Do we still write Dockerfiles? Do we still build things with Docker?
This change addresses a different environment than most folks use to interact with Docker. The Docker installation you’re using in development is unrelated to the Docker runtime inside your Kubernetes cluster. It’s confusing, we understand. As a developer, Docker is still useful to you in all the ways it was before this change was announced. The image that Docker produces isn’t really a Docker-specific image—it’s an OCI (Open Container Initiative) image. Any OCI-compliant image, regardless of the tool you use to build it, will look the same to Kubernetes. Both containerd and CRI-O know how to pull those images and run them. This is why we have a standard for what containers should look like.
So, this change is coming. It’s going to cause issues for some, but it isn’t catastrophic, and generally it’s a good thing. Depending on how you interact with Kubernetes, this could mean nothing to you, or it could mean a bit of work. In the long run, it’s going to make things easier. If this is still confusing for you, that’s okay—there’s a lot going on here; Kubernetes has a lot of moving parts, and nobody is an expert in 100% of it. We encourage any and all questions regardless of experience level or complexity! Our goal is to make sure everyone is educated as much as possible on the upcoming changes. We hope this has answered most of your questions and soothed some anxieties! ❤️
Looking for more answers? Check out our accompanying Dockershim Removal FAQ (updated February 2022).
Cloud native security for your clusters
Over the last few years a small, security focused community has been working diligently to deepen our understanding of security, given the evolving cloud native infrastructure and corresponding iterative deployment practices. To enable sharing of this knowledge with the rest of the community, members of CNCF SIG Security (a group which reports into CNCF TOC and who are friends with Kubernetes SIG Security) led by Emily Fox, collaborated on a whitepaper outlining holistic cloud native security concerns and best practices. After over 1200 comments, changes, and discussions from 35 members across the world, we are proud to share cloud native security whitepaper v1.0 that serves as essential reading for security leadership in enterprises, financial and healthcare industries, academia, government, and non-profit organizations.
The paper attempts to not focus on any specific cloud native project. Instead, the intent is to model and inject security into four logical phases of cloud native application lifecycle: Develop, Distribute, Deploy, and Runtime.

Kubernetes native security controls
When using Kubernetes as a workload orchestrator, some of the security controls this version of the whitepaper recommends are:
- Pod Security Policies: Implement a single source of truth for “least privilege” workloads across the entire cluster
- Resource requests and limits: Apply requests (soft constraint) and limits (hard constraint) for shared resources such as memory and CPU
- Audit log analysis: Enable Kubernetes API auditing and filtering for security relevant events
- Control plane authentication and certificate root of trust: Enable mutual TLS authentication with a trusted CA for communication within the cluster
- Secrets management: Integrate with a built-in or external secrets store
Cloud native complementary security controls
Kubernetes has direct involvement in the deploy phase and to a lesser extent in the runtime phase. Ensuring the artifacts are securely developed and distributed is necessary for, enabling workloads in Kubernetes to run “secure by default”. Throughout all phases of the Cloud native application life cycle, several complementary security controls exist for Kubernetes orchestrated workloads, which includes but are not limited to:
- Develop:
- Image signing and verification
- Image vulnerability scanners
- Distribute:
- Pre-deployment checks for detecting excessive privileges
- Enabling observability and logging
- Deploy:
- Using a service mesh for workload authentication and authorization
- Enforcing “default deny” network policies for inter-workload communication via network plugins
- Runtime:
- Deploying security monitoring agents for workloads
- Isolating applications that run on the same node using SELinux, AppArmor, etc.
- Scanning configuration against recognized secure baselines for node, workload and orchestrator
Understand first, secure next
The cloud native way, including containers, provides great security benefits for its users: immutability, modularity, faster upgrades and consistent state across the environment. Realizing this fundamental change in “the way things are done”, motivates us to look at security with a cloud native lens. One of the things that was evident for all the authors of the paper was the fact that it’s tough to make smarter decisions on how and what to secure in a cloud native ecosystem if you do not understand the tools, patterns, and frameworks at hand (in addition to knowing your own critical assets). Hence, for all the security practitioners out there who want to be partners rather than a gatekeeper for your friends in Operations, Product Development, and Compliance, let’s make an attempt to learn more so we can secure better.
We recommend following this 7 step R.U.N.T.I.M.E. path to get started on cloud native security:
- Read the paper and any linked material in it
- Understand challenges and constraints for your environment
- Note the content and controls that apply to your environment
- Talk about your observations with your peers
- Involve your leadership and ask for help
- Make a risk profile based on existing and missing security controls
- Expend time, money, and resources that improve security posture and reduce risk where appropriate.
Acknowledgements
Huge shout out to Emily Fox, Tim Bannister (The Scale Factory), Chase Pettet (Mirantis), and Wayne Haber (GitLab) for contributing with their wonderful suggestions for this blog post.
Remembering Dan Kohn
Dan Kohn was instrumental in getting Kubernetes and CNCF community to where it is today. He shared our values, motivations, enthusiasm, community spirit, and helped the Kubernetes community to become the best that it could be. Dan loved getting people together to solve problems big and small. He enabled people to grow their individual scope in the community which often helped launch their career in open source software.
Dan built a coalition around the nascent Kubernetes project and turned that into a cornerstone to build the larger cloud native space. He loved challenges, especially ones where the payoff was great like building worldwide communities, spreading the love of open source, and helping diverse, underprivileged communities and students to get a head start in technology.
Our heart goes out to his family. Thank you, Dan, for bringing your boys to events in India and elsewhere as we got to know how great you were as a father. Dan, your thoughts and ideas will help us make progress in our journey as a community. Thank you for your life's work!
If Dan has made an impact on you in some way, please consider adding a memory of him in his CNCF memorial.
Announcing the 2020 Steering Committee Election Results
The 2020 Steering Committee Election is now complete. In 2019, the committee arrived at its final allocation of 7 seats, 3 of which were up for election in 2020. Incoming committee members serve a term of 2 years, and all members are elected by the Kubernetes Community.
This community body is significant since it oversees the governance of the entire Kubernetes project. With that great power comes great responsibility. You can learn more about the steering committee’s role in their charter.
Results
Congratulations to the elected committee members whose two year terms begin immediately (listed in alphabetical order by GitHub handle):
- Davanum Srinivas (@dims), VMware
- Jordan Liggitt (@liggitt), Google
- Bob Killen (@mrbobbytables), Google
They join continuing members Christoph Blecker (@cblecker), Red Hat; Derek Carr (@derekwaynecarr), Red Hat; Nikhita Raghunath (@nikhita), VMware; and Paris Pittman (@parispittman), Apple. Davanum Srinivas is returning for his second term on the committee.
Big Thanks!
- Thank you and congratulations on a successful election to this round’s election officers:
- Jaice Singer DuMars (@jdumars), Apple
- Ihor Dvoretskyi (@idvoretskyi), CNCF
- Josh Berkus (@jberkus), Red Hat
- Thanks to the Emeritus Steering Committee Members. Your prior service is appreciated by the community:
- Aaron Crickenberger (@spiffxp), Google
- and Lachlan Evenson(@lachie83)), Microsoft
- And thank you to all the candidates who came forward to run for election. As Jorge Castro put it: we are spoiled with capable, kind, and selfless volunteers who put the needs of the project first.
Get Involved with the Steering Committee
This governing body, like all of Kubernetes, is open to all. You can follow along with Steering Committee backlog items and weigh in by filing an issue or creating a PR against their repo. They have an open meeting on the first Monday of the month at 6pm UTC and regularly attend Meet Our Contributors. They can also be contacted at their public mailing list steering@kubernetes.io.
You can see what the Steering Committee meetings are all about by watching past meetings on the YouTube Playlist.
This post was written by the Upstream Marketing Working Group. If you want to write stories about the Kubernetes community, learn more about us.
Contributing to the Development Guide
When most people think of contributing to an open source project, I suspect they probably think of contributing code changes, new features, and bug fixes. As a software engineer and a long-time open source user and contributor, that's certainly what I thought. Although I have written a good quantity of documentation in different workflows, the massive size of the Kubernetes community was a new kind of "client." I just didn't know what to expect when Google asked my compatriots and me at Lion's Way to make much-needed updates to the Kubernetes Development Guide.
This article originally appeared on the Kubernetes Contributor Community blog.
The Delights of Working With a Community
As professional writers, we are used to being hired to write very specific pieces. We specialize in marketing, training, and documentation for technical services and products, which can range anywhere from relatively fluffy marketing emails to deeply technical white papers targeted at IT and developers. With this kind of professional service, every deliverable tends to have a measurable return on investment. I knew this metric wouldn't be present when working on open source documentation, but I couldn't predict how it would change my relationship with the project.
One of the primary traits of the relationship between our writing and our traditional clients is that we always have one or two primary points of contact inside a company. These contacts are responsible for reviewing our writing and making sure it matches the voice of the company and targets the audience they're looking for. It can be stressful -- which is why I'm so glad that my writing partner, eagle-eyed reviewer, and bloodthirsty editor Joel handles most of the client contact.
I was surprised and delighted that all of the stress of client contact went out the window when working with the Kubernetes community.
"How delicate do I have to be? What if I screw up? What if I make a developer angry? What if I make
enemies?" These were all questions that raced through my mind and made me feel like I was
approaching a field of eggshells when I first joined the #sig-contribex channel on the Kubernetes
Slack and announced that I would be working on the
Development Guide.
"The Kubernetes Code of Conduct is in effect, so please be excellent to each other." — Jorge Castro, SIG ContribEx co-chair
My fears were unfounded. Immediately, I felt welcome. I like to think this isn't just because I was working on a much needed task, but rather because the Kubernetes community is filled with friendly, welcoming people. During the weekly SIG ContribEx meetings, our reports on progress with the Development Guide were included immediately. In addition, the leader of the meeting would always stress that the Kubernetes Code of Conduct was in effect, and that we should, like Bill and Ted, be excellent to each other.
This Doesn't Mean It's All Easy
The Development Guide needed a pretty serious overhaul. When we got our hands on it, it was already packed with information and lots of steps for new developers to go through, but it was getting dusty with age and neglect. Documentation can really require a global look, not just point fixes. As a result, I ended up submitting a gargantuan pull request to the Community repo: 267 additions and 88 deletions.
The life cycle of a pull request requires a certain number of Kubernetes organization members to review and approve changes before they can be merged. This is a great practice, as it keeps both documentation and code in pretty good shape, but it can be tough to cajole the right people into taking the time for such a hefty review. As a result, that massive PR took 26 days from my first submission to final merge. But in the end, it was successful.
Since Kubernetes is a pretty fast-moving project, and since developers typically aren't really excited about writing documentation, I also ran into the problem that sometimes, the secret jewels that describe the workings of a Kubernetes subsystem are buried deep within the labyrinthine mind of a brilliant engineer, and not in plain English in a Markdown file. I ran headlong into this issue when it came time to update the getting started documentation for end-to-end (e2e) testing.
This portion of my journey took me out of documentation-writing territory and into the role of a
brand new user of some unfinished software. I ended up working with one of the developers of the new
kubetest2 framework to document the latest process of
getting up-and-running for e2e testing, but it required a lot of head scratching on my part. You can
judge the results for yourself by checking out my
completed pull request.
Nobody Is the Boss, and Everybody Gives Feedback
But while I secretly expected chaos, the process of contributing to the Kubernetes Development Guide and interacting with the amazing Kubernetes community went incredibly smoothly. There was no contention. I made no enemies. Everybody was incredibly friendly and welcoming. It was enjoyable.
With an open source project, there is no one boss. The Kubernetes project, which approaches being gargantuan, is split into many different special interest groups (SIGs), working groups, and communities. Each has its own regularly scheduled meetings, assigned duties, and elected chairpersons. My work intersected with the efforts of both SIG ContribEx (who watch over and seek to improve the contributor experience) and SIG Testing (who are in charge of testing). Both of these SIGs proved easy to work with, eager for contributions, and populated with incredibly friendly and welcoming people.
In an active, living project like Kubernetes, documentation continues to need maintenance, revision, and testing alongside the code base. The Development Guide will continue to be crucial to onboarding new contributors to the Kubernetes code base, and as our efforts have shown, it is important that this guide keeps pace with the evolution of the Kubernetes project.
Joel and I really enjoy interacting with the Kubernetes community and contributing to the Development Guide. I really look forward to continuing to not only contributing more, but to continuing to build the new friendships I've made in this vast open source community over the past few months.
GSoC 2020 - Building operators for cluster addons
Introduction
Google Summer of Code is a global program that is geared towards introducing students to open source. Students are matched with open-source organizations to work with them for three months during the summer.
My name is Somtochi Onyekwere from the Federal University of Technology, Owerri (Nigeria) and this year, I was given the opportunity to work with Kubernetes (under the CNCF organization) and this led to an amazing summer spent learning, contributing and interacting with the community.
Specifically, I worked on the Cluster Addons: Package all the things! project. The project focused on building operators for better management of various cluster addons, extending the tooling for building these operators and making the creation of these operators a smooth process.
Background
Kubernetes has progressed greatly in the past few years with a flourishing community and a large number of contributors. The codebase is gradually moving away from the monolith structure where all the code resides in the kubernetes/kubernetes repository to being split into multiple sub-projects. Part of the focus of cluster-addons is to make some of these sub-projects work together in an easy to assemble, self-monitoring, self-healing and Kubernetes-native way. It enables them to work seamlessly without human intervention.
The community is exploring the use of operators as a mechanism to monitor various resources in the cluster and properly manage these resources. In addition to this, it provides self-healing and it is a kubernetes-native pattern that can encode how best these addons work and manage them properly.
What are cluster addons? Cluster addons are a collection of resources (like Services and deployment) that are used to give a Kubernetes cluster additional functionalities. They range from things as simple as the Kubernetes dashboards (for visualization) to more complex ones like Calico (for networking). These addons are essential to different applications running in the cluster and the cluster itself. The addon operator provides a nicer way of managing these addons and understanding the health and status of the various resources that comprise the addon. You can get a deeper overview in this article.
Operators are custom controllers with custom resource definitions that encode application-specific knowledge and are used for managing complex stateful applications. It is a widely accepted pattern. Managing addons via operators, with these operators encoding knowledge of how best the addons work, introduces a lot of advantages while setting standards that will be easy to follow and scale. This article does a good job of explaining operators.
The addon operators can solve a lot of problems, but they have their challenges. Those under the cluster-addons project had missing pieces and were still a proof of concept. Generating the RBAC configuration for the operators was a pain and sometimes the operators were given too much privilege. The operators weren’t very extensible as it only pulled manifests from local filesystems or HTTP(s) servers and a lot of simple addons were generating the same code. I spent the summer working on these issues, looking at them with fresh eyes and coming up with solutions for both the known and unknown issues.
Various additions to kubebuilder-declarative-pattern
The kubebuilder-declarative-pattern (from here on referred to as KDP) repo is an extra layer of addon specific tooling on top of the kubebuilder SDK that is enabled by passing the experimental --pattern=addon flag to kubebuilder create command. Together, they create the base code for the addon operator. During the internship, I worked on a couple of features in KDP and cluster-addons.
Operator version checking
Enabling version checks for operators helped in making upgrades/downgrades safer to different versions of the addon, even though the operator had complex logic. It is a way of matching the version of an addon to the version of the operator that knows how to manage it well. Most addons have different versions and these versions might need to be managed differently. This feature checks the custom resource for the addons.k8s.io/min-operator-version annotation which states the minimum operator version that is needed to manage the version against the version of the operator. If the operator version is below the minimum version required, the operator pauses with an error telling the user that the version of the operator is too low. This helps to ensure that the correct operator is being used for the addon.
Git repository for storing the manifests
Previously, there was support for only local file directories and HTTPS repositories for storing manifests. Giving creators of addon operators the ability to store manifest in GitHub repository enables faster development and version control. When starting the controller, you can pass a flag to specify the location of your channels directory. The channels directory contains the manifests for different versions, the controller pulls the manifest from this directory and applies it to the cluster. During the internship period, I extended it to include Git repositories.
Annotations to temporarily disable reconciliation
The reconciliation loop that ensures that the desired state matches the actual state prevents modification of objects in the cluster. This makes it hard to experiment or investigate what might be wrong in the cluster as any changes made are promptly reverted. I resolved this by allowing users to place an addons.k8s.io/ignore annotation on the resource that they don’t want the controller to reconcile. The controller checks for this annotation and doesn’t reconcile that object. To resume reconciliation, the annotation can be removed from the resource.
Unstructured support in kubebuilder-declarative-pattern
One of the operators that I worked on is a generic controller that could manage more than one cluster addon that did not require extra configuration. To do this, the operator couldn’t use a particular type and needed the kubebuilder-declarative-repo to support using the unstructured.Unstructured type. There were various functions in the kubebuilder-declarative-pattern that couldn’t handle this type and returned an error if the object passed in was not of type addonsv1alpha1.CommonObject. The functions were modified to handle both unstructured.Unstructured and addonsv1alpha.CommonObject.
Tools and CLI programs
There were also some command-line programs I wrote that could be used to make working with addon operators easier. Most of them have uses outside the addon operators as they try to solve a specific problem that could surface anywhere while working with Kubernetes. I encourage you to check them out when you have the chance!
RBAC Generator
One of the biggest concerns with the operator was RBAC. You had to manually look through the manifest and add the RBAC rule for each resource as it needs to have RBAC permissions to create, get, update and delete the resources in the manifest when running in-cluster. Building the RBAC generator automated the process of writing the RBAC roles and role bindings. The function of the RBAC generator is simple. It accepts the file name of the manifest as a flag. Then, it parses the manifest and gets the API group and resource name of the resources and adds it to a role. It outputs the role and role binding to stdout or a file if the --out flag is parsed.
Additionally, the tool enables you to split the RBAC by separating the cluster roles in the manifest. This lessened the security concern of an operator being over-privileged as it needed to have all the permissions that the clusterrole has. If you want to apply the clusterrole yourself and not give the operator these permissions, you can pass in a --supervisory boolean flag so that the generator does not add these permissions to the role. The CLI program resides here.
Kubectl Ownerref
It is hard to find out at a glance which objects were created by an addon custom resource. This kubectl plugin alleviates that pain by displaying all the objects in the cluster that a resource has ownerrefs on. You simply pass the kind and the name of the resource as arguments to the program and it checks the cluster for the objects and gives the kind, name, the namespace of such an object. It could be useful to get a general overview of all the objects that the controller is reconciling by passing in the name and kind of custom resource. The CLI program resides here.
Addon Operators
To fully understand addons operators and make changes to how they are being created, you have to try creating and using them. Part of the summer was spent building operators for some popular addons like the Kubernetes dashboard, flannel, NodeLocalDNS and so on. Please check the cluster-addons repository for the different addon operators. In this section, I will just highlight one that is a little different from the others.
Generic Controller
The generic controller can be shared between addons that don’t require much configuration. This minimizes resource consumption on the cluster as it reduces the number of controllers that need to be run. Also instead of building your own operator, you can just use the generic controller and whenever you feel that your needs have grown and you need a more complex operator, you can always scaffold the code with kubebuilder and continue from where the generic operator stopped. To use the generic controller, you can generate the CustomResourceDefinition(CRD) using this tool (generic-addon). You pass in the kind, group, and the location of your channels directory (it could be a Git repository too!). The tool generates the - CRD, RBAC manifest and two custom resources for you.
The process is as follows:
- Create the Generic CRD
- Generate all the manifests needed with the
generic-addon tool.
This tool creates:
- The CRD for your addon
- The RBAC rules for the CustomResourceDefinitions
- The RBAC rules for applying the manifests
- The custom resource for your addon
- A Generic custom resource
The Generic custom resource looks like this:
apiVersion: addons.x-k8s.io/v1alpha1
kind: Generic
metadata:
name: generic-sample
spec:
objectKind:
kind: NodeLocalDNS
version: "v1alpha1"
group: addons.x-k8s.io
channel: "../nodelocaldns/channels"
Apply these manifests but ensure to apply the CRD before the CR. Then, run the Generic controller, either on your machine or in-cluster.
If you are interested in building an operator, Please check out this guide.
Relevant Links
- Detailed breakdown of work done during the internship
- Addon Operator (KEP)
- Original GSoC Issue
- Proposal Submitted for GSoC
- All commits to kubernetes-sigs/cluster-addons
- All commits to kubernetes-sigs/kubebuidler-declarative-pattern
Further Work
A lot of work was definitely done on the cluster addons during the GSoC period. But we need more people building operators and using them in the cluster. We need wider adoption in the community. Build operators for your favourite addons and tell us how it went and if you had any issues. Check out this README.md to get started.
Appreciation
I really want to appreciate my mentors Justin Santa Barbara (Google) and Leigh Capili (Weaveworks). My internship was awesome because they were awesome. They set a golden standard for what mentorship should be. They were accessible and always available to clear any confusion. I think what I liked best was that they didn’t just dish out tasks, instead, we had open discussions about what was wrong and what could be improved. They are really the best and I hope I get to work with them again! Also, I want to say a huge thanks to Lubomir I. Ivanov for reviewing this blog post!
Conclusion
So far I have learnt a lot about Go, the internals of Kubernetes, and operators. I want to conclude by encouraging people to contribute to open-source (especially Kubernetes :)) regardless of your level of experience. It has been a well-rounded experience for me and I have come to love the community. It is a great initiative and it is a great way to learn and meet awesome people. Special shoutout to Google for organizing this program.
If you are interested in cluster addons and finding out more on addon operators, you are welcome to join our slack channel on the Kubernetes #cluster-addons.
Somtochi Onyekwere is a software engineer that loves contributing to open-source and exploring cloud native solutions.
Introducing Structured Logs
Logs are an essential aspect of observability and a critical tool for debugging. But Kubernetes logs have traditionally been unstructured strings, making any automated parsing difficult and any downstream processing, analysis, or querying challenging to do reliably.
In Kubernetes 1.19, we are adding support for structured logs, which natively support (key, value) pairs and object references. We have also updated many logging calls such that over 99% of logging volume in a typical deployment are now migrated to the structured format.
To maintain backwards compatibility, structured logs will still be outputted as a string where the string contains representations of those "key"="value" pairs. Starting in alpha in 1.19, logs can also be outputted in JSON format using the --logging-format=json flag.
Using Structured Logs
We've added two new methods to the klog library: InfoS and ErrorS. For example, this invocation of InfoS:
klog.InfoS("Pod status updated", "pod", klog.KObj(pod), "status", status)
will result in this log:
I1025 00:15:15.525108 1 controller_utils.go:116] "Pod status updated" pod="kube-system/kubedns" status="ready"
Or, if the --logging-format=json flag is set, it will result in this output:
{
"ts": 1580306777.04728,
"msg": "Pod status updated",
"pod": {
"name": "coredns",
"namespace": "kube-system"
},
"status": "ready"
}
This means downstream logging tools can easily ingest structured logging data and instead of using regular expressions to parse unstructured strings. This also makes processing logs easier, querying logs more robust, and analyzing logs much faster.
With structured logs, all references to Kubernetes objects are structured the same way, so you can filter the output and only log entries referencing the particular pod. You can also find logs indicating how the scheduler was scheduling the pod, how the pod was created, the health probes of the pod, and all other changes in the lifecycle of the pod.
Suppose you are debugging an issue with a pod. With structured logs, you can filter to only those log entries referencing the pod of interest, rather than needing to scan through potentially thousands of log lines to find the relevant ones.
Not only are structured logs more useful when manual debugging of issues, they also enable richer features like automated pattern recognition within logs or tighter correlation of log and trace data.
Finally, structured logs can help reduce storage costs for logs because most storage systems are more efficiently able to compress structured key=value data than unstructured strings.
Get Involved
While we have updated over 99% of the log entries by log volume in a typical deployment, there are still thousands of logs to be updated. Pick a file or directory that you would like to improve and migrate existing log calls to use structured logs. It's a great and easy way to make your first contribution to Kubernetes!
Warning: Helpful Warnings Ahead
As Kubernetes maintainers, we're always looking for ways to improve usability while preserving compatibility. As we develop features, triage bugs, and answer support questions, we accumulate information that would be helpful for Kubernetes users to know. In the past, sharing that information was limited to out-of-band methods like release notes, announcement emails, documentation, and blog posts. Unless someone knew to seek out that information and managed to find it, they would not benefit from it.
In Kubernetes v1.19, we added a feature that allows the Kubernetes API server to
send warnings to API clients.
The warning is sent using a standard Warning response header,
so it does not change the status code or response body in any way.
This allows the server to send warnings easily readable by any API client, while remaining compatible with previous client versions.
Warnings are surfaced by kubectl v1.19+ in stderr output, and by the k8s.io/client-go client library v0.19.0+ in log output.
The k8s.io/client-go behavior can be overridden per-process or per-client.
Deprecation Warnings
The first way we are using this new capability is to send warnings for use of deprecated APIs.
Kubernetes is a big, fast-moving project. Keeping up with the changes in each release can be daunting, even for people who work on the project full-time. One important type of change is API deprecations. As APIs in Kubernetes graduate to GA versions, pre-release API versions are deprecated and eventually removed.
Even though there is an extended deprecation period, and deprecations are included in release notes, they can still be hard to track. During the deprecation period, the pre-release API remains functional, allowing several releases to transition to the stable API version. However, we have found that users often don't even realize they are depending on a deprecated API version until they upgrade to the release that stops serving it.
Starting in v1.19, whenever a request is made to a deprecated REST API, a warning is returned along with the API response. This warning includes details about the release in which the API will no longer be available, and the replacement API version.
Because the warning originates at the server, and is intercepted at the client level, it works for all kubectl commands,
including high-level commands like kubectl apply, and low-level commands like kubectl get --raw:

This helps people affected by the deprecation to know the request they are making is deprecated, how long they have to address the issue, and what API they should use instead. This is especially helpful when the user is applying a manifest they didn't create, so they have time to reach out to the authors to ask for an updated version.
We also realized that the person using a deprecated API is often not the same person responsible for upgrading the cluster, so we added two administrator-facing tools to help track use of deprecated APIs and determine when upgrades are safe.
Metrics
Starting in Kubernetes v1.19, when a request is made to a deprecated REST API endpoint,
an apiserver_requested_deprecated_apis gauge metric is set to 1 in the kube-apiserver process.
This metric has labels for the API group, version, resource, and subresource,
and a removed_release label that indicates the Kubernetes release in which the API will no longer be served.
This is an example query using kubectl, prom2json,
and jq to determine which deprecated APIs have been requested
from the current instance of the API server:
kubectl get --raw /metrics | prom2json | jq '
.[] | select(.name=="apiserver_requested_deprecated_apis").metrics[].labels
'
Output:
{
"group": "extensions",
"removed_release": "1.22",
"resource": "ingresses",
"subresource": "",
"version": "v1beta1"
}
{
"group": "rbac.authorization.k8s.io",
"removed_release": "1.22",
"resource": "clusterroles",
"subresource": "",
"version": "v1beta1"
}
This shows the deprecated extensions/v1beta1 Ingress and rbac.authorization.k8s.io/v1beta1 ClusterRole APIs
have been requested on this server, and will be removed in v1.22.
We can join that information with the apiserver_request_total metrics to get more details about the requests being made to these APIs:
kubectl get --raw /metrics | prom2json | jq '
# set $deprecated to a list of deprecated APIs
[
.[] |
select(.name=="apiserver_requested_deprecated_apis").metrics[].labels |
{group,version,resource}
] as $deprecated
|
# select apiserver_request_total metrics which are deprecated
.[] | select(.name=="apiserver_request_total").metrics[] |
select(.labels | {group,version,resource} as $key | $deprecated | index($key))
'
Output:
{
"labels": {
"code": "0",
"component": "apiserver",
"contentType": "application/vnd.kubernetes.protobuf;stream=watch",
"dry_run": "",
"group": "extensions",
"resource": "ingresses",
"scope": "cluster",
"subresource": "",
"verb": "WATCH",
"version": "v1beta1"
},
"value": "21"
}
{
"labels": {
"code": "200",
"component": "apiserver",
"contentType": "application/vnd.kubernetes.protobuf",
"dry_run": "",
"group": "extensions",
"resource": "ingresses",
"scope": "cluster",
"subresource": "",
"verb": "LIST",
"version": "v1beta1"
},
"value": "1"
}
{
"labels": {
"code": "200",
"component": "apiserver",
"contentType": "application/json",
"dry_run": "",
"group": "rbac.authorization.k8s.io",
"resource": "clusterroles",
"scope": "cluster",
"subresource": "",
"verb": "LIST",
"version": "v1beta1"
},
"value": "1"
}
The output shows that only read requests are being made to these APIs, and the most requests have been made to watch the deprecated Ingress API.
You can also find that information through the following Prometheus query, which returns information about requests made to deprecated APIs which will be removed in v1.22:
apiserver_requested_deprecated_apis{removed_release="1.22"} * on(group,version,resource,subresource)
group_right() apiserver_request_total
Audit Annotations
Metrics are a fast way to check whether deprecated APIs are being used, and at what rate,
but they don't include enough information to identify particular clients or API objects.
Starting in Kubernetes v1.19, audit events
for requests to deprecated APIs include an audit annotation of "k8s.io/deprecated":"true".
Administrators can use those audit events to identify specific clients or objects that need to be updated.
Custom Resource Definitions
Along with the API server ability to warn about deprecated API use, starting in v1.19, a CustomResourceDefinition can indicate a particular version of the resource it defines is deprecated. When API requests to a deprecated version of a custom resource are made, a warning message is returned, matching the behavior of built-in APIs.
The author of the CustomResourceDefinition can also customize the warning for each version if they want to. This allows them to give a pointer to a migration guide or other information if needed.
apiVersion: apiextensions.k8s.io/v1
kind: CustomResourceDefinition
name: crontabs.example.com
spec:
versions:
- name: v1alpha1
# This indicates the v1alpha1 version of the custom resource is deprecated.
# API requests to this version receive a warning in the server response.
deprecated: true
# This overrides the default warning returned to clients making v1alpha1 API requests.
deprecationWarning: "example.com/v1alpha1 CronTab is deprecated; use example.com/v1 CronTab (see http://example.com/v1alpha1-v1)"
...
- name: v1beta1
# This indicates the v1beta1 version of the custom resource is deprecated.
# API requests to this version receive a warning in the server response.
# A default warning message is returned for this version.
deprecated: true
...
- name: v1
...
Admission Webhooks
Admission webhooks are the primary way to integrate custom policies or validation with Kubernetes. Starting in v1.19, admission webhooks can return warning messages that are passed along to the requesting API client. Warnings can be returned with allowed or rejected admission responses.
As an example, to allow a request but warn about a configuration known not to work well, an admission webhook could send this response:
{
"apiVersion": "admission.k8s.io/v1",
"kind": "AdmissionReview",
"response": {
"uid": "<value from request.uid>",
"allowed": true,
"warnings": [
".spec.memory: requests >1GB do not work on Fridays"
]
}
}
If you are implementing a webhook that returns a warning message, here are some tips:
- Don't include a "Warning:" prefix in the message (that is added by clients on output)
- Use warning messages to describe problems the client making the API request should correct or be aware of
- Be brief; limit warnings to 120 characters if possible
There are many ways admission webhooks could use this new feature, and I'm looking forward to seeing what people come up with. Here are a couple ideas to get you started:
- webhook implementations adding a "complain" mode, where they return warnings instead of rejections, to allow trying out a policy to verify it is working as expected before starting to enforce it
- "lint" or "vet"-style webhooks, inspecting objects and surfacing warnings when best practices are not followed
Customize Client Handling
Applications that use the k8s.io/client-go library to make API requests can customize
how warnings returned from the server are handled. By default, warnings are logged to
stderr as they are received, but this behavior can be customized
per-process
or per-client.
This example shows how to make your application behave like kubectl,
overriding message handling process-wide to deduplicate warnings
and highlighting messages using colored output where supported:
import (
"os"
"k8s.io/client-go/rest"
"k8s.io/kubectl/pkg/util/term"
...
)
func main() {
rest.SetDefaultWarningHandler(
rest.NewWarningWriter(os.Stderr, rest.WarningWriterOptions{
// only print a given warning the first time we receive it
Deduplicate: true,
// highlight the output with color when the output supports it
Color: term.AllowsColorOutput(os.Stderr),
},
),
)
...
The next example shows how to construct a client that ignores warnings. This is useful for clients that operate on metadata for all resource types (found dynamically at runtime using the discovery API) and do not benefit from warnings about a particular resource being deprecated. Suppressing deprecation warnings is not recommended for clients that require use of particular APIs.
import (
"k8s.io/client-go/rest"
"k8s.io/client-go/kubernetes"
)
func getClientWithoutWarnings(config *rest.Config) (kubernetes.Interface, error) {
// copy to avoid mutating the passed-in config
config = rest.CopyConfig(config)
// set the warning handler for this client to ignore warnings
config.WarningHandler = rest.NoWarnings{}
// construct and return the client
return kubernetes.NewForConfig(config)
}
Kubectl Strict Mode
If you want to be sure you notice deprecations as soon as possible and get a jump start on addressing them,
kubectl added a --warnings-as-errors option in v1.19. When invoked with this option,
kubectl treats any warnings it receives from the server as errors and exits with a non-zero exit code:

This could be used in a CI job to apply manifests to a current server, and required to pass with a zero exit code in order for the CI job to succeed.
Future Possibilities
Now that we have a way to communicate helpful information to users in context, we're already considering other ways we can use this to improve people's experience with Kubernetes. A couple areas we're looking at next are warning about known problematic values we cannot reject outright for compatibility reasons, and warning about use of deprecated fields or field values (like selectors using beta os/arch node labels, deprecated in v1.14). I'm excited to see progress in this area, continuing to make it easier to use Kubernetes.
Scaling Kubernetes Networking With EndpointSlices
EndpointSlices are an exciting new API that provides a scalable and extensible alternative to the Endpoints API. EndpointSlices track IP addresses, ports, readiness, and topology information for Pods backing a Service.
In Kubernetes 1.19 this feature is enabled by default with kube-proxy reading from EndpointSlices instead of Endpoints. Although this will mostly be an invisible change, it should result in noticeable scalability improvements in large clusters. It also enables significant new features in future Kubernetes releases like Topology Aware Routing.
Scalability Limitations of the Endpoints API
With the Endpoints API, there was only one Endpoints resource for a Service. That meant that it needed to be able to store IP addresses and ports (network endpoints) for every Pod that was backing the corresponding Service. This resulted in huge API resources. To compound this problem, kube-proxy was running on every node and watching for any updates to Endpoints resources. If even a single network endpoint changed in an Endpoints resource, the whole object would have to be sent to each of those instances of kube-proxy.
A further limitation of the Endpoints API is that it limits the number of network endpoints that can be tracked for a Service. The default size limit for an object stored in etcd is 1.5MB. In some cases that can limit an Endpoints resource to 5,000 Pod IPs. This is not an issue for most users, but it becomes a significant problem for users with Services approaching this size.
To show just how significant these issues become at scale it helps to have a simple example. Think about a Service which has 5,000 Pods, it might end up with a 1.5MB Endpoints resource. If even a single network endpoint in that list changes, the full Endpoints resource will need to be distributed to each Node in the cluster. This becomes quite an issue in a large cluster with 3,000 Nodes. Each update would involve sending 4.5GB of data (1.5MB Endpoints * 3,000 Nodes) across the cluster. That's nearly enough to fill up a DVD, and it would happen for each Endpoints change. Imagine a rolling update that results in all 5,000 Pods being replaced - that's more than 22TB (or 5,000 DVDs) worth of data transferred.
Splitting endpoints up with the EndpointSlice API
The EndpointSlice API was designed to address this issue with an approach similar to sharding. Instead of tracking all Pod IPs for a Service with a single Endpoints resource, we split them into multiple smaller EndpointSlices.
Consider an example where a Service is backed by 15 pods. We'd end up with a single Endpoints resource that tracked all of them. If EndpointSlices were configured to store 5 endpoints each, we'd end up with 3 different EndpointSlices:
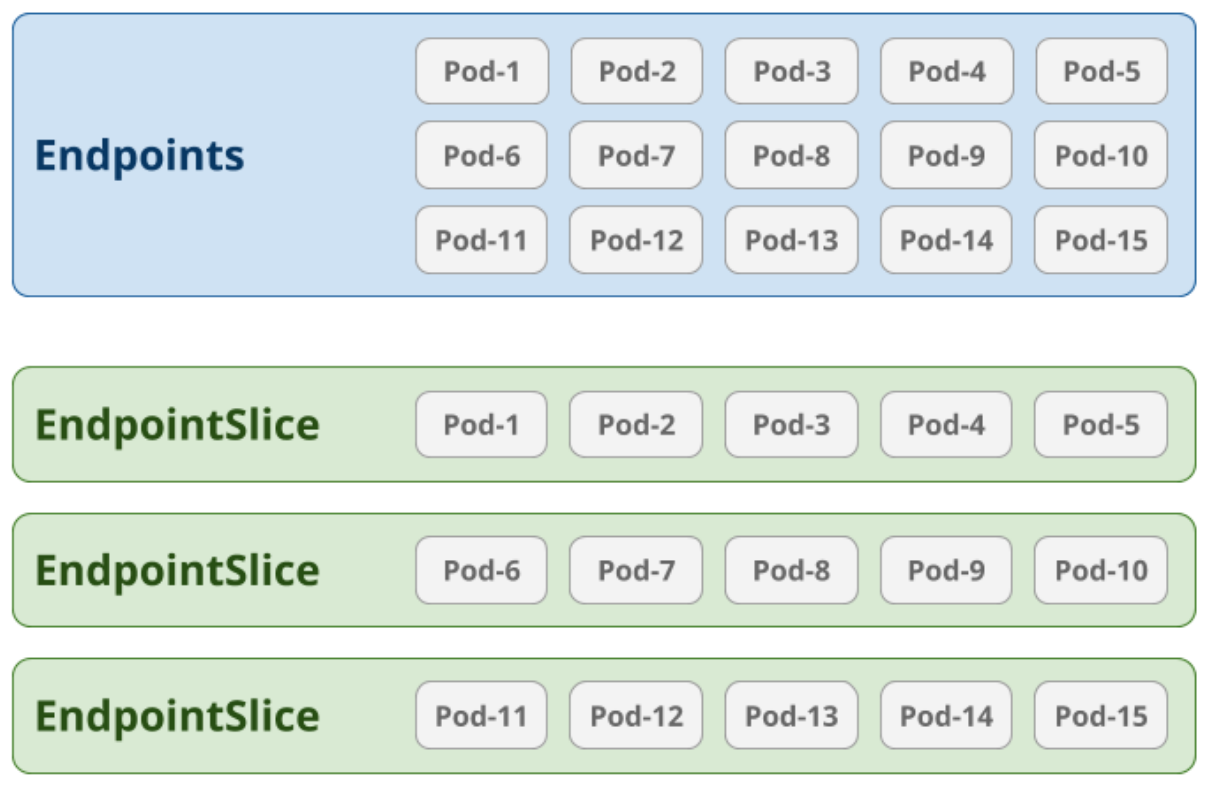
By default, EndpointSlices store as many as 100 endpoints each, though this can be configured with the --max-endpoints-per-slice flag on kube-controller-manager.
EndpointSlices provide 10x scalability improvements
This API dramatically improves networking scalability. Now when a Pod is added or removed, only 1 small EndpointSlice needs to be updated. This difference becomes quite noticeable when hundreds or thousands of Pods are backing a single Service.
Potentially more significant, now that all Pod IPs for a Service don't need to be stored in a single resource, we don't have to worry about the size limit for objects stored in etcd. EndpointSlices have already been used to scale Services beyond 100,000 network endpoints.
All of this is brought together with some significant performance improvements that have been made in kube-proxy. When using EndpointSlices at scale, significantly less data will be transferred for endpoints updates and kube-proxy should be faster to update iptables or ipvs rules. Beyond that, Services can now scale to at least 10 times beyond any previous limitations.
EndpointSlices enable new functionality
Introduced as an alpha feature in Kubernetes v1.16, EndpointSlices were built to enable some exciting new functionality in future Kubernetes releases. This could include dual-stack Services, topology aware routing, and endpoint subsetting.
Dual-Stack Services are an exciting new feature that has been in development alongside EndpointSlices. They will utilize both IPv4 and IPv6 addresses for Services and rely on the addressType field on EndpointSlices to track these addresses by IP family.
Topology aware routing will update kube-proxy to prefer routing requests within the same zone or region. This makes use of the topology fields stored for each endpoint in an EndpointSlice. As a further refinement of that, we're exploring the potential of endpoint subsetting. This would allow kube-proxy to only watch a subset of EndpointSlices. For example, this might be combined with topology aware routing so that kube-proxy would only need to watch EndpointSlices containing endpoints within the same zone. This would provide another very significant scalability improvement.
What does this mean for the Endpoints API?
Although the EndpointSlice API is providing a newer and more scalable alternative to the Endpoints API, the Endpoints API will continue to be considered generally available and stable. The most significant change planned for the Endpoints API will involve beginning to truncate Endpoints that would otherwise run into scalability issues.
The Endpoints API is not going away, but many new features will rely on the EndpointSlice API. To take advantage of the new scalability and functionality that EndpointSlices provide, applications that currently consume Endpoints will likely want to consider supporting EndpointSlices in the future.
Ephemeral volumes with storage capacity tracking: EmptyDir on steroids
Some applications need additional storage but don't care whether that data is stored persistently across restarts. For example, caching services are often limited by memory size and can move infrequently used data into storage that is slower than memory with little impact on overall performance. Other applications expect some read-only input data to be present in files, like configuration data or secret keys.
Kubernetes already supports several kinds of such ephemeral volumes, but the functionality of those is limited to what is implemented inside Kubernetes.
CSI ephemeral volumes made it possible to extend Kubernetes with CSI drivers that provide light-weight, local volumes. These inject arbitrary states, such as configuration, secrets, identity, variables or similar information. CSI drivers must be modified to support this Kubernetes feature, i.e. normal, standard-compliant CSI drivers will not work, and by design such volumes are supposed to be usable on whatever node is chosen for a pod.
This is problematic for volumes which consume significant resources on
a node or for special storage that is only available on some nodes.
Therefore, Kubernetes 1.19 introduces two new alpha features for
volumes that are conceptually more like the EmptyDir volumes:
The advantages of the new approach are:
- Storage can be local or network-attached.
- Volumes can have a fixed size that applications are never able to exceed.
- Works with any CSI driver that supports provisioning of persistent
volumes and (for capacity tracking) implements the CSI
GetCapacitycall. - Volumes may have some initial data, depending on the driver and parameters.
- All of the typical volume operations (snapshotting, resizing, the future storage capacity tracking, etc.) are supported.
- The volumes are usable with any app controller that accepts a Pod or volume specification.
- The Kubernetes scheduler itself picks suitable nodes, i.e. there is no need anymore to implement and configure scheduler extenders and mutating webhooks.
This makes generic ephemeral volumes a suitable solution for several use cases:
Use cases
Persistent Memory as DRAM replacement for memcached
Recent releases of memcached added support for using Persistent Memory (PMEM) instead of standard DRAM. When deploying memcached through one of the app controllers, generic ephemeral volumes make it possible to request a PMEM volume of a certain size from a CSI driver like PMEM-CSI.
Local LVM storage as scratch space
Applications working with data sets that exceed the RAM size can
request local storage with performance characteristics or size that is
not met by the normal Kubernetes EmptyDir volumes. For example,
TopoLVM was written for that
purpose.
Read-only access to volumes with data
Provisioning a volume might result in a non-empty volume:
Such volumes can be mounted read-only.
How it works
Generic ephemeral volumes
The key idea behind generic ephemeral volumes is that a new volume
source, the so-called
EphemeralVolumeSource
contains all fields that are needed to created a volume claim
(historically called persistent volume claim, PVC). A new controller
in the kube-controller-manager waits for Pods which embed such a
volume source and then creates a PVC for that pod. To a CSI driver
deployment, that PVC looks like any other, so no special support is
needed.
As long as these PVCs exist, they can be used like any other volume claim. In particular, they can be referenced as data source in volume cloning or snapshotting. The PVC object also holds the current status of the volume.
Naming of the automatically created PVCs is deterministic: the name is
a combination of Pod name and volume name, with a hyphen (-) in the
middle. This deterministic naming makes it easier to
interact with the PVC because one does not have to search for it once
the Pod name and volume name are known. The downside is that the name might
be in use already. This is detected by Kubernetes and then blocks Pod
startup.
To ensure that the volume gets deleted together with the pod, the controller makes the Pod the owner of the volume claim. When the Pod gets deleted, the normal garbage-collection mechanism also removes the claim and thus the volume.
Claims select the storage driver through the normal storage class
mechanism. Although storage classes with both immediate and late
binding (aka WaitForFirstConsumer) are supported, for ephemeral
volumes it makes more sense to use WaitForFirstConsumer: then Pod
scheduling can take into account both node utilization and
availability of storage when choosing a node. This is where the other
new feature comes in.
Storage capacity tracking
Normally, the Kubernetes scheduler has no information about where a CSI driver might be able to create a volume. It also has no way of talking directly to a CSI driver to retrieve that information. It therefore tries different nodes until it finds one where all volumes can be made available (late binding) or leaves it entirely to the driver to choose a location (immediate binding).
The new CSIStorageCapacity alpha
API
allows storing the necessary information in etcd where it is available to the
scheduler. In contrast to support for generic ephemeral volumes,
storage capacity tracking must be enabled when deploying a CSI
driver:
the external-provisioner must be told to publish capacity
information that it then retrieves from the CSI driver through the normal
GetCapacity call.
When the Kubernetes scheduler needs to choose a node for a Pod with an
unbound volume that uses late binding and the CSI driver deployment
has opted into the feature by setting the CSIDriver.storageCapacity
flag
flag, the scheduler automatically filters out nodes that do not have
access to enough storage capacity. This works for generic ephemeral
and persistent volumes but not for CSI ephemeral volumes because the
parameters of those are opaque for Kubernetes.
As usual, volumes with immediate binding get created before scheduling pods, with their location chosen by the storage driver. Therefore, the external-provisioner's default configuration skips storage classes with immediate binding as the information wouldn't be used anyway.
Because the Kubernetes scheduler must act on potentially outdated information, it cannot be ensured that the capacity is still available when a volume is to be created. Still, the chances that it can be created without retries should be higher.
Security
CSIStorageCapacity
CSIStorageCapacity objects are namespaced. When deploying each CSI drivers in its own namespace and, as recommended, limiting the RBAC permissions for CSIStorageCapacity to that namespace, it is always obvious where the data came from. However, Kubernetes does not check that and typically drivers get installed in the same namespace anyway, so ultimately drivers are expected to behave and not publish incorrect data.
Generic ephemeral volumes
If users have permission to create a Pod (directly or indirectly), then they can also create generic ephemeral volumes even when they do not have permission to create a volume claim. That's because RBAC permission checks are applied to the controller which creates the PVC, not the original user. This is a fundamental change that must be taken into account before enabling the feature in clusters where untrusted users are not supposed to have permission to create volumes.
Example
A special branch in PMEM-CSI contains all the necessary changes to bring up a Kubernetes 1.19 cluster inside QEMU VMs with both alpha features enabled. The PMEM-CSI driver code is used unchanged, only the deployment was updated.
On a suitable machine (Linux, non-root user can use Docker - see the QEMU and Kubernetes section in the PMEM-CSI documentation), the following commands bring up a cluster and install the PMEM-CSI driver:
git clone --branch=kubernetes-1-19-blog-post https://github.com/intel/pmem-csi.git
cd pmem-csi
export TEST_KUBERNETES_VERSION=1.19 TEST_FEATURE_GATES=CSIStorageCapacity=true,GenericEphemeralVolume=true TEST_PMEM_REGISTRY=intel
make start && echo && test/setup-deployment.sh
If all goes well, the output contains the following usage instructions:
The test cluster is ready. Log in with [...]/pmem-csi/_work/pmem-govm/ssh.0, run
kubectl once logged in. Alternatively, use kubectl directly with the
following env variable:
KUBECONFIG=[...]/pmem-csi/_work/pmem-govm/kube.config
secret/pmem-csi-registry-secrets created
secret/pmem-csi-node-secrets created
serviceaccount/pmem-csi-controller created
...
To try out the pmem-csi driver ephemeral volumes:
cat deploy/kubernetes-1.19/pmem-app-ephemeral.yaml |
[...]/pmem-csi/_work/pmem-govm/ssh.0 kubectl create -f -
The CSIStorageCapacity objects are not meant to be human-readable, so some post-processing is needed. The following Golang template filters all objects by the storage class that the example uses and prints the name, topology and capacity:
kubectl get \
-o go-template='{{range .items}}{{if eq .storageClassName "pmem-csi-sc-late-binding"}}{{.metadata.name}} {{.nodeTopology.matchLabels}} {{.capacity}}
{{end}}{{end}}' \
csistoragecapacities
csisc-2js6n map[pmem-csi.intel.com/node:pmem-csi-pmem-govm-worker2] 30716Mi
csisc-sqdnt map[pmem-csi.intel.com/node:pmem-csi-pmem-govm-worker1] 30716Mi
csisc-ws4bv map[pmem-csi.intel.com/node:pmem-csi-pmem-govm-worker3] 30716Mi
One individual object has the following content:
kubectl describe csistoragecapacities/csisc-6cw8j
Name: csisc-sqdnt
Namespace: default
Labels: <none>
Annotations: <none>
API Version: storage.k8s.io/v1alpha1
Capacity: 30716Mi
Kind: CSIStorageCapacity
Metadata:
Creation Timestamp: 2020-08-11T15:41:03Z
Generate Name: csisc-
Managed Fields:
...
Owner References:
API Version: apps/v1
Controller: true
Kind: StatefulSet
Name: pmem-csi-controller
UID: 590237f9-1eb4-4208-b37b-5f7eab4597d1
Resource Version: 2994
Self Link: /apis/storage.k8s.io/v1alpha1/namespaces/default/csistoragecapacities/csisc-sqdnt
UID: da36215b-3b9d-404a-a4c7-3f1c3502ab13
Node Topology:
Match Labels:
pmem-csi.intel.com/node: pmem-csi-pmem-govm-worker1
Storage Class Name: pmem-csi-sc-late-binding
Events: <none>
Now let's create the example app with one generic ephemeral
volume. The pmem-app-ephemeral.yaml file contains:
# This example Pod definition demonstrates
# how to use generic ephemeral inline volumes
# with a PMEM-CSI storage class.
kind: Pod
apiVersion: v1
metadata:
name: my-csi-app-inline-volume
spec:
containers:
- name: my-frontend
image: intel/pmem-csi-driver-test:v0.7.14
command: [ "sleep", "100000" ]
volumeMounts:
- mountPath: "/data"
name: my-csi-volume
volumes:
- name: my-csi-volume
ephemeral:
volumeClaimTemplate:
spec:
accessModes:
- ReadWriteOnce
resources:
requests:
storage: 4Gi
storageClassName: pmem-csi-sc-late-binding
After creating that as shown in the usage instructions above, we have one additional Pod and PVC:
kubectl get pods/my-csi-app-inline-volume -o wide
NAME READY STATUS RESTARTS AGE IP NODE NOMINATED NODE READINESS GATES
my-csi-app-inline-volume 1/1 Running 0 6m58s 10.36.0.2 pmem-csi-pmem-govm-worker1 <none> <none>
kubectl get pvc/my-csi-app-inline-volume-my-csi-volume
NAME STATUS VOLUME CAPACITY ACCESS MODES STORAGECLASS AGE
my-csi-app-inline-volume-my-csi-volume Bound pvc-c11eb7ab-a4fa-46fe-b515-b366be908823 4Gi RWO pmem-csi-sc-late-binding 9m21s
That PVC is owned by the Pod:
kubectl get -o yaml pvc/my-csi-app-inline-volume-my-csi-volume
apiVersion: v1
kind: PersistentVolumeClaim
metadata:
annotations:
pv.kubernetes.io/bind-completed: "yes"
pv.kubernetes.io/bound-by-controller: "yes"
volume.beta.kubernetes.io/storage-provisioner: pmem-csi.intel.com
volume.kubernetes.io/selected-node: pmem-csi-pmem-govm-worker1
creationTimestamp: "2020-08-11T15:44:57Z"
finalizers:
- kubernetes.io/pvc-protection
managedFields:
...
name: my-csi-app-inline-volume-my-csi-volume
namespace: default
ownerReferences:
- apiVersion: v1
blockOwnerDeletion: true
controller: true
kind: Pod
name: my-csi-app-inline-volume
uid: 75c925bf-ca8e-441a-ac67-f190b7a2265f
...
Eventually, the storage capacity information for pmem-csi-pmem-govm-worker1 also gets updated:
csisc-2js6n map[pmem-csi.intel.com/node:pmem-csi-pmem-govm-worker2] 30716Mi
csisc-sqdnt map[pmem-csi.intel.com/node:pmem-csi-pmem-govm-worker1] 26620Mi
csisc-ws4bv map[pmem-csi.intel.com/node:pmem-csi-pmem-govm-worker3] 30716Mi
If another app needs more than 26620Mi, the Kubernetes
scheduler will not pick pmem-csi-pmem-govm-worker1 anymore.
Next steps
Both features are under development. Several open questions were already raised during the alpha review process. The two enhancement proposals document the work that will be needed for migration to beta and what alternatives were already considered and rejected:
Your feedback is crucial for driving that development. SIG-Storage meets regularly and can be reached via Slack and a mailing list.
Increasing the Kubernetes Support Window to One Year
Starting with Kubernetes 1.19, the support window for Kubernetes versions will increase from 9 months to one year. The longer support window is intended to allow organizations to perform major upgrades at a time of the year that works the best for them.
This is a big change. For many years, the Kubernetes project has delivered a new minor release (e.g.: 1.13 or 1.14) every 3 months. The project provides bugfix support via patch releases (e.g.: 1.13.Y) for three parallel branches of the codebase. Combined, this led to each minor release (e.g.: 1.13) having a patch release stream of support for approximately 9 months. In the end, a cluster operator had to upgrade at least every 9 months to remain supported.
A survey conducted in early 2019 by the WG LTS showed that a significant subset of Kubernetes end-users fail to upgrade within the 9-month support period.
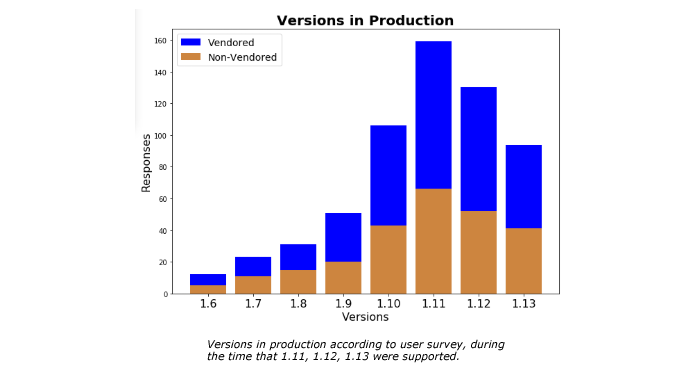
This, and other responses from the survey, suggest that a considerable portion of our community would better be able to manage their deployments on supported versions if the patch support period were extended to 12-14 months. It appears to be true regardless of whether the users are on DIY builds or commercially vendored distributions. An extension in the patch support length of time would thus lead to a larger percentage of our user base running supported versions compared to what we have now.
A yearly support period provides the cushion end-users appear to desire, and is more aligned with familiar annual planning cycles. There are many unknowns about changing the support windows for a project with as many moving parts as Kubernetes. Keeping the change relatively small (relatively being the important word), gives us the chance to find out what those unknowns are in detail and address them. From Kubernetes version 1.19 on, the support window will be extended to one year. For Kubernetes versions 1.16, 1.17, and 1.18, the story is more complicated.
All of these versions still fall under the older “three releases support” model, and will drop out of support when 1.19, 1.20 and 1.21 are respectively released. However, because the 1.19 release has been delayed due to the events of 2020, they will end up with close to a year of support (depending on their exact release dates).
For example, 1.19 was released on the 26th of August 2020, which is 11 months since the release of 1.16. Since 1.16 is still under the old release policy, this means that it is now out of support.
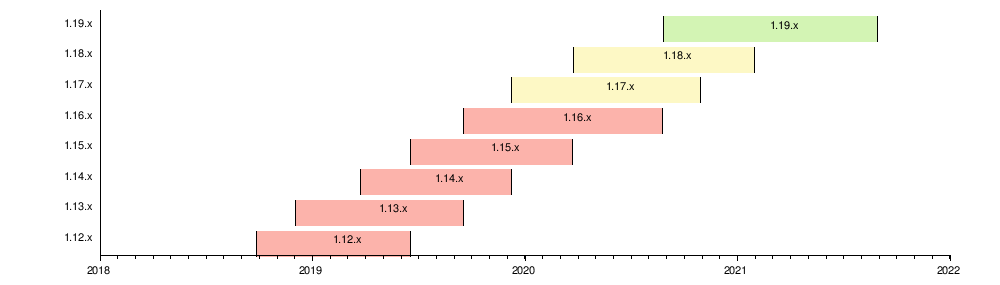
If you’ve got thoughts or feedback, we’d love to hear them. Please contact us on #wg-lts on the Kubernetes Slack, or to the kubernetes-wg-lts mailing list.
Kubernetes 1.19: Accentuate the Paw-sitive
Finally, we have arrived with Kubernetes 1.19, the second release for 2020, and by far the longest release cycle lasting 20 weeks in total. It consists of 34 enhancements: 10 enhancements are moving to stable, 15 enhancements in beta, and 9 enhancements in alpha.
The 1.19 release was quite different from a regular release due to COVID-19, the George Floyd protests, and several other global events that we experienced as a release team. Due to these events, we made the decision to adjust our timeline and allow the SIGs, Working Groups, and contributors more time to get things done. The extra time also allowed for people to take time to focus on their lives outside of the Kubernetes project, and ensure their mental wellbeing was in a good place.
Contributors are the heart of Kubernetes, not the other way around. The Kubernetes code of conduct asks that people be excellent to one another and despite the unrest in our world, we saw nothing but greatness and humility from the community.
Major Themes
Increase Kubernetes support window to one year
A survey conducted in early 2019 by the Long Term Support (LTS) working group showed that a significant subset of Kubernetes end-users fail to upgrade within the current 9-month support period. This, and other responses from the survey, suggest that 30% of users would be able to keep their deployments on supported versions if the patch support period were extended to 12-14 months. This appears to be true regardless of whether the users are on self build or commercially vendored distributions. An extension would thus lead to more than 80% of users being on supported versions, instead of the 50-60% we have now. A yearly support period provides the cushion end-users appear to desire, and is more in harmony with familiar annual planning cycles. From Kubernetes version 1.19 on, the support window will be extended to one year.
Storage capacity tracking
Traditionally, the Kubernetes scheduler was based on the assumptions that additional persistent storage is available everywhere in the cluster and has infinite capacity. Topology constraints addressed the first point, but up to now pod scheduling was still done without considering that the remaining storage capacity may not be enough to start a new pod. Storage capacity tracking, a new alpha feature, addresses that by adding an API for a CSI driver to report storage capacity and uses that information in the Kubernetes scheduler when choosing a node for a pod. This feature serves as a stepping stone for supporting dynamic provisioning for local volumes and other volume types that are more capacity constrained.
Generic ephemeral volumes
Kubernetes provides volume plugins whose lifecycle is tied to a pod and can be used as scratch space (e.g. the builtin emptydir volume type) or to load some data in to a pod (e.g. the builtin configmap and secret volume types, or “CSI inline volumes”). The new generic ephemeral volumes alpha feature allows any existing storage driver that supports dynamic provisioning to be used as an ephemeral volume with the volume’s lifecycle bound to the Pod.
It can be used to provide scratch storage that is different from the root disk, for example persistent memory, or a separate local disk on that node.
All StorageClass parameters for volume provisioning are supported.
All features supported with PersistentVolumeClaims are supported, such as storage capacity tracking, snapshots and restore, and volume resizing.
CSI Volume Health Monitoring
The alpha version of CSI health monitoring is being released with Kubernetes 1.19. This feature enables CSI Drivers to share abnormal volume conditions from the underlying storage systems with Kubernetes so that they can be reported as events on PVCs or Pods. This feature serves as a stepping stone towards programmatic detection and resolution of individual volume health issues by Kubernetes.
Ingress graduates to General Availability
In terms of moving the Ingress API towards GA, the API itself has been available in beta for so long that it has attained de facto GA status through usage and adoption (both by users and by load balancer / ingress controller providers). Abandoning it without a full replacement is not a viable approach. It is clearly a useful API and captures a non-trivial set of use cases. At this point, it seems more prudent to declare the current API as something the community will support as a V1, codifying its status, while working on either a V2 Ingress API or an entirely different API with a superset of features.
Structured logging
Before v1.19, logging in the Kubernetes control plane couldn't guarantee any uniform structure for log messages and references to Kubernetes objects in those logs. This makes parsing, processing, storing, querying and analyzing logs hard and forces administrators and developers to rely on ad-hoc solutions in most cases based on some regular expressions. Due to those problems any analytical solution based on those logs is hard to implement and maintain.
New klog methods
This Kubernetes release introduces new methods to the klog library that provide a more structured interface for formatting log messages. Each existing formatted log method (Infof, Errorf) is now matched by a structured method (InfoS, ErrorS). The new logging methods accept log messages as a first argument and a list of key-values pairs as a variadic second argument. This approach allows incremental adoption of structured logging without converting all of Kubernetes to a new API at one time.
Client TLS certificate rotation for kubelet
A kubelet authenticates the kubelet to the kube-apiserver using a private key and certificate. The certificate is supplied to the kubelet when it is first booted, via an out-of-cluster mechanism. Since Kubernetes v1.8, clusters have included a (beta) process for obtaining the initial cert/key pair and rotating it as expiration of the certificate approaches. In Kubernetes v1.19 this graduates to stable.
During the kubelet start-up sequence, the filesystem is scanned for an existing cert/key pair, which is managed by the certificate manager. In the case that a cert/key is available it will be loaded. If not, the kubelet checks its config file for an encoded certificate value or a file reference in the kubeconfig. If the certificate is a bootstrap certificate, this will be used to generate a key, create a certificate signing request and request a signed certificate from the API server.
When an expiration approaches the cert manager takes care of providing the correct certificate, generating new private keys and requesting new certificates. With the kubelet requesting certificates be signed as part of its boot sequence, and on an ongoing basis, certificate signing requests from the kubelet need to be auto approved to make cluster administration manageable.
Other Updates
Graduated to Stable
- Seccomp
- Kubelet client TLS certificate rotation
- Limit node access to API
- Redesign Event API
- Graduate Ingress to V1
- CertificateSigningRequest API
- Building Kubelet without Docker
Major Changes
Other Notable Features
Release Notes
Check out the full details of the Kubernetes 1.19 release in our release notes.
Availability
Kubernetes 1.19 is available for download on GitHub. To get started with Kubernetes, check out these interactive tutorials or run local Kubernetes clusters using Docker container “nodes” with kind (Kubernetes in Docker). You can also easily install 1.19 using kubeadm.
Release Team
This release is made possible through the efforts of hundreds of individuals who contributed both technical and non-technical content. Special thanks to the release team led by Taylor Dolezal, Senior Developer Advocate at HashiCorp. The 34 release team members coordinated many aspects of the release, from documentation to testing, validation, and feature completeness.
As the Kubernetes community has grown, our release process represents an amazing demonstration of collaboration in open source software development. Kubernetes continues to gain new users at a rapid pace. This growth creates a positive feedback cycle where more contributors commit code creating a more vibrant ecosystem. Kubernetes has had over 49,000 individual contributors to date and an active community of more than 3,000 people.
Release Logo
All of you inspired this Kubernetes 1.19 release logo! This release was a bit more of a marathon and a testament to when the world is a wild place, we can come together and do unbelievable things.
"Accentuate the Paw-sitive" was chosen as the release theme because it captures the positive outlook that the release team had, despite the state of the world. The characters pictured in the 1.19 logo represent everyone's personalities on our release team, from emo to peppy, and beyond!
About the designer: Hannabeth Lagerlof is a Visual Designer based in Los Angeles, California, and she has an extensive background in Environments and Graphic Design. Hannabeth creates art and user experiences that inspire connection. You can find Hannabeth on Twitter as @emanate_design.
The Long Run
The release was also different from the enhancements side of things. Traditionally, we have had 3-4 weeks between the call for enhancements and Enhancements Freeze, which ends the phase in which contributors can acknowledge whether a particular feature will be part of the cycle. This release cycle, being unique, we had five weeks for the same milestone. The extended duration gave the contributors more time to plan and decide about the graduation of their respective features.
The milestone until which contributors implement the features was extended from the usual five weeks to 7 weeks. Contributors were provided with 40% more time to work on their features, resulting in reduced fatigue and more to think through about the implementation. We also noticed a considerable reduction in last-minute hustles. There were also a lesser number of exception requests this cycle - 6 compared to 14 the previous release cycle.
User Highlights
- The CNCF grants Zalando, Europe’s leading online platform for fashion and lifestyle, the Top End User Award. Zalando leverages numerous CNCF projects and open sourced multiple of their own development.
Ecosystem Updates
- The CNCF just concluded its very first Virtual KubeCon. All talks are on-demand for anyone registered, it's not too late!
- The Certified Kubernetes Security Specialist (CKS) coming in November! CKS focuses on cluster & system hardening, minimizing microservice vulnerabilities and the security of the supply chain.
- CNCF published the second State of Cloud Native Development, showing the massively growing number of cloud native developer using container and serverless technology.
- Kubernetes.dev, a Kubernetes contributor focused website has been launched. It brings the contributor documentation, resources and project event information into one central location.
Project Velocity
The Kubernetes DevStats dashboard illustrates the breakdown of contributions from major company contributors, as well as an impressive set of preconfigured reports on everything from individual contributors to pull request lifecycle times. If you want to gather numbers, facts and figures from Kubernetes and the CNCF community it is the best place to start.
During this release cycle from April till August, 382 different companies and over 2,464 individuals contributed to Kubernetes. Check out DevStats to learn more about the overall velocity of the Kubernetes project and community.
Upcoming release webinar
Join the members of the Kubernetes 1.19 release team on September 25th, 2020 to learn about the major features in this release including storage capacity tracking, structured logging, Ingress V1 GA, and many more. Register here: https://www.cncf.io/webinars/kubernetes-1-19/.
Get Involved
The simplest way to get involved with Kubernetes is by joining one of the many Special Interest Groups (SIGs) that align with your interests. Have something you’d like to broadcast to the Kubernetes community? Share your voice at our monthly community meeting, and through the channels below. Thank you for your continued feedback and support.
- Find out more about contributing to Kubernetes at the new Kubernetes Contributor website
- Follow us on Twitter @Kubernetesio for latest updates
- Join the community discussion on Discuss
- Join the community on Slack
- Share your Kubernetes story
- Read more about what’s happening with Kubernetes on the blog
- Learn more about the Kubernetes Release Team
Moving Forward From Beta
In Kubernetes, features follow a defined lifecycle. First, as the twinkle of an eye in an interested developer. Maybe, then, sketched in online discussions, drawn on the online equivalent of a cafe napkin. This rough work typically becomes a Kubernetes Enhancement Proposal (KEP), and from there it usually turns into code.
For Kubernetes v1.20 and onwards, we're focusing on helping that code graduate into stable features.
That lifecycle I mentioned runs as follows:
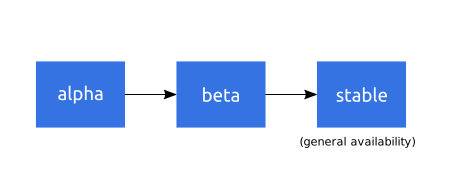
Usually, alpha features aren't enabled by default. You turn them on by setting a feature gate; usually, by setting a command line flag on each of the components that use the feature.
(If you use Kubernetes through a managed service offering such as AKS, EKS, GKE, etc then the vendor who runs that service may have decided what feature gates are enabled for you).
There's a defined process for graduating an existing, alpha feature into the beta phase. This is important because beta features are enabled by default, with the feature flag still there so cluster operators can opt out if they want.
A similar but more thorough set of graduation criteria govern the transition to general availability (GA), also known as "stable". GA features are part of Kubernetes, with a commitment that they are staying in place throughout the current major version.
Having beta features on by default lets Kubernetes and its contributors get valuable real-world feedback. However, there's a mismatch of incentives. Once a feature is enabled by default, people will use it. Even if there might be a few details to shake out, the way Kubernetes' REST APIs and conventions work mean that any future stable API is going to be compatible with the most recent beta API: your API objects won't stop working when a beta feature graduates to GA.
For the API and its resources in particular, there's a much less strong incentive to move features from beta to GA than from alpha to beta. Vendors who want a particular feature have had good reason to help get code to the point where features are enabled by default, and beyond that the journey has been less clear.
KEPs track more than code improvements. Essentially, anything that would need communicating to the wider community merits a KEP. That said, most KEPs cover Kubernetes features (and the code to implement them).
You might know that Ingress has been in Kubernetes for a while, but did you realize that it actually went beta in 2015? To help drive things forward, Kubernetes' Architecture Special Interest Group (SIG) have a new approach in mind.
Avoiding permanent beta
For Kubernetes REST APIs, when a new feature's API reaches beta, that starts a countdown. The beta-quality API now has three releases (about nine calendar months) to either:
- reach GA, and deprecate the beta, or
- have a new beta version (and deprecate the previous beta).
To be clear, at this point only REST APIs are affected. For example, APIListChunking is a beta feature but isn't itself a REST API. Right now there are no plans to automatically deprecate APIListChunking nor any other features that aren't REST APIs.
If a beta API has not graduated to GA after three Kubernetes releases, then the next Kubernetes release will deprecate that API version. There's no option for the REST API to stay at the same beta version beyond the first Kubernetes release to come out after the release window.
What this means for you
If you're using Kubernetes, there's a good chance that you're using a beta feature. Like I said, there are lots of them about. As well as Ingress, you might be using CronJob, or PodSecurityPolicy, or others. There's an even bigger chance that you're running on a control plane with at least one beta feature enabled.
If you're using or generating Kubernetes manifests that use beta APIs like Ingress, you'll need to plan to revise those. The current APIs are going to be deprecated following a schedule (the 9 months I mentioned earlier) and after a further 9 months those deprecated APIs will be removed. At that point, to stay current with Kubernetes, you should already have migrated.
What this means for Kubernetes contributors
The motivation here seems pretty clear: get features stable. Guaranteeing that beta features will be deprecated adds a pretty big incentive so that people who want the feature continue their effort until the code, documentation and tests are ready for this feature to graduate to stable, backed by several Kubernetes' releases of evidence in real-world use.
What this means for the ecosystem
In my opinion, these harsh-seeming measures make a lot of sense, and are going to be good for Kubernetes. Deprecating existing APIs, through a rule that applies across all the different Special Interest Groups (SIGs), helps avoid stagnation and encourages fixes.
Let's say that an API goes to beta and then real-world experience shows that it just isn't right - that, fundamentally, the API has shortcomings. With that 9 month countdown ticking, the people involved have the means and the justification to revise and release an API that deals with the problem cases. Anyone who wants to live with the deprecated API is welcome to - Kubernetes is open source - but their needs do not have to hold up progress on the feature.
Introducing Hierarchical Namespaces
Safely hosting large numbers of users on a single Kubernetes cluster has always been a troublesome task. One key reason for this is that different organizations use Kubernetes in different ways, and so no one tenancy model is likely to suit everyone. Instead, Kubernetes offers you building blocks to create your own tenancy solution, such as Role Based Access Control (RBAC) and NetworkPolicies; the better these building blocks, the easier it is to safely build a multitenant cluster.
Namespaces for tenancy
By far the most important of these building blocks is the namespace, which forms the backbone of almost all Kubernetes control plane security and sharing policies. For example, RBAC, NetworkPolicies and ResourceQuotas all respect namespaces by default, and objects such as Secrets, ServiceAccounts and Ingresses are freely usable within any one namespace, but fully segregated from other namespaces.
Namespaces have two key properties that make them ideal for policy enforcement. Firstly, they can be used to represent ownership. Most Kubernetes objects must be in a namespace, so if you use namespaces to represent ownership, you can always count on there being an owner.
Secondly, namespaces have authorized creation and use. Only highly-privileged users can create namespaces, and other users require explicit permission to use those namespaces - that is, create, view or modify objects in those namespaces. This allows them to be carefully created with appropriate policies, before unprivileged users can create “regular” objects like pods and services.
The limits of namespaces
However, in practice, namespaces are not flexible enough to meet some common use cases. For example, let’s say that one team owns several microservices with different secrets and quotas. Ideally, they should place these services into different namespaces in order to isolate them from each other, but this presents two problems.
Firstly, these namespaces have no common concept of ownership, even though they’re both owned by the same team. This means that if the team controls multiple namespaces, not only does Kubernetes not have any record of their common owner, but namespaced-scoped policies cannot be applied uniformly across them.
Secondly, teams generally work best if they can operate autonomously, but since namespace creation is highly privileged, it’s unlikely that any member of the dev team is allowed to create namespaces. This means that whenever a team wants a new namespace, they must raise a ticket to the cluster administrator. While this is probably acceptable for small organizations, it generates unnecessary toil as the organization grows.
Introducing hierarchical namespaces
Hierarchical namespaces are a new concept developed by the Kubernetes Working Group for Multi-Tenancy (wg-multitenancy) in order to solve these problems. In its simplest form, a hierarchical namespace is a regular Kubernetes namespace that contains a small custom resource that identifies a single, optional, parent namespace. This establishes the concept of ownership across namespaces, not just within them.
This concept of ownership enables two additional types of behaviours:
- Policy inheritance: if one namespace is a child of another, policy objects such as RBAC RoleBindings are copied from the parent to the child.
- Delegated creation: you usually need cluster-level privileges to create a namespace, but hierarchical namespaces adds an alternative: subnamespaces, which can be manipulated using only limited permissions in the parent namespace.
This solves both of the problems for our dev team. The cluster administrator can create a single “root” namespace for the team, along with all necessary policies, and then delegate permission to create subnamespaces to members of that team. Those team members can then create subnamespaces for their own use, without violating the policies that were imposed by the cluster administrators.
Hands-on with hierarchical namespaces
Hierarchical namespaces are provided by a Kubernetes extension known as the Hierarchical Namespace Controller, or HNC. The HNC consists of two components:
- The manager runs on your cluster, manages subnamespaces, propagates policy objects, ensures that your hierarchies are legal and manages extension points.
- The kubectl plugin, called
kubectl-hns, makes it easy for users to interact with the manager.
Both can be easily installed from the releases page of our repo.
Let’s see HNC in action. Imagine that I do not have namespace creation
privileges, but I can view the namespace team-a and create subnamespaces
within it1. Using the plugin, I can now say:
$ kubectl hns create svc1-team-a -n team-a
This creates a subnamespace called svc1-team-a. Note that since subnamespaces
are just regular Kubernetes namespaces, all subnamespace names must still be
unique.
I can view the structure of these namespaces by asking for a tree view:
$ kubectl hns tree team-a
# Output:
team-a
└── svc1-team-a
And if there were any policies in the parent namespace, these now appear in the
child as well2. For example, let’s say that team-a had
an RBAC RoleBinding called sres. This rolebinding will also be present in the
subnamespace:
$ kubectl describe rolebinding sres -n svc1-team-a
# Output:
Name: sres
Labels: hnc.x-k8s.io/inheritedFrom=team-a # inserted by HNC
Annotations: <none>
Role:
Kind: ClusterRole
Name: admin
Subjects: ...
Finally, HNC adds labels to these namespaces with useful information about the hierarchy which you can use to apply other policies. For example, you can create the following NetworkPolicy:
kind: NetworkPolicy
apiVersion: networking.k8s.io/v1
metadata:
name: allow-team-a
namespace: team-a
spec:
ingress:
- from:
- namespaceSelector:
matchExpressions:
- key: 'team-a.tree.hnc.x-k8s.io/depth' # Label created by HNC
operator: Exists
This policy will both be propagated to all descendants of team-a, and will
also allow ingress traffic between all of those namespaces. The “tree” label
can only be applied by HNC, and is guaranteed to reflect the latest hierarchy.
You can learn all about the features of HNC from the user guide.
Next steps and getting involved
If you think that hierarchical namespaces can work for your organization, HNC v0.5.1 is available on GitHub. We’d love to know what you think of it, what problems you’re using it to solve and what features you’d most like to see added. As with all early software, you should be cautious about using HNC in production environments, but the more feedback we get, the sooner we’ll be able to drive to HNC 1.0.
We’re also open to additional contributors, whether it’s to fix or report bugs, or help prototype new features such as exceptions, improved monitoring, hierarchical resource quotas or fine-grained configuration.
Please get in touch with us via our repo, mailing list or on Slack - we look forward to hearing from you!
Adrian Ludwin is a software engineer and the tech lead for the Hierarchical Namespace Controller.
Note 1: technically, you create a small object called a "subnamespace anchor" in the parent namespace, and then HNC creates the subnamespace for you.
Note 2: By default, only RBAC Roles and RoleBindings are propagated, but you can configure HNC to propagate any namespaced Kubernetes object.
Physics, politics and Pull Requests: the Kubernetes 1.18 release interview
The start of the COVID-19 pandemic couldn't delay the release of Kubernetes 1.18, but unfortunately a small bug could — thankfully only by a day. This was the last cat that needed to be herded by 1.18 release lead Jorge Alarcón before the release on March 25.
One of the best parts about co-hosting the weekly Kubernetes Podcast from Google is the conversations we have with the people who help bring Kubernetes releases together. Jorge was our guest on episode 96 back in March, and just like last week we are delighted to bring you the transcript of this interview.
If you'd rather enjoy the "audiobook version", including another interview when 1.19 is released later this month, subscribe to the show wherever you get your podcasts.
In the last few weeks, we've talked to long-time Kubernetes contributors and SIG leads David Oppenheimer, David Ashpole and Wojciech Tyczynski. All are worth taking the dog for a longer walk to listen to!
ADAM GLICK: You're a former physicist. I have to ask, what kind of physics did you work on?
JORGE ALARCÓN: Back in my days of math and all that, I used to work in computational biology and a little bit of high energy physics. Computational biology was, for the most part, what I spent most of my time on. And it was essentially exploring the big idea of we have the structure of proteins. We know what they're made of. Now, based on that structure, we want to be able to predict how they're going to fold and how they're going to behave, which essentially translates into the whole idea of designing pharmaceuticals, designing vaccines, or anything that you can possibly think of that has any connection whatsoever to a living organism.
ADAM GLICK: That would seem to ladder itself well into maybe going to something like bioinformatics. Did you take a tour into that, or did you decide to go elsewhere directly?
JORGE ALARCÓN: It is related, and I worked a little bit with some people that did focus on bioinformatics on the field specifically, but I never took a detour into it. Really, my big idea with computational biology, to be honest, it wasn't even the biology. That's usually what sells it, what people are really interested in, because protein engineering, all the cool and amazing things that you can do.
Which is definitely good, and I don't want to take away from it. But my big thing is because biology is such a real thing, it is amazingly complicated. And the math— the models that you have to design to study those systems, to be able to predict something that people can actually experiment and measure, it just captivated me. The level of complexity, the beauty, the mechanisms, all the structures that you see once you got through the math and look at things, it just kind of got to me.
ADAM GLICK: How did you go from that world into the world of Kubernetes?
JORGE ALARCÓN: That's both a really boring story and an interesting one.
[LAUGHING]
I did my thing with physics, and it was good. It was fun. But at some point, I wanted— working in academia— at least my feeling for it is that generally all the people that you're surrounded with are usually academics. Just another bunch of physics, a bunch of mathematicians.
But very seldom do you actually get the opportunity to take what you're working on and give it to someone else to use. Even with the mathematicians and physicists, the things that we're working on are super specialized, and you can probably find three, four, five people that can actually understand everything that you're saying. A lot of people are going to get the gist of it, but understanding the details, it's somewhat rare.
One of the things that I absolutely love about tech, about software engineering, coding, all that, is how open and transparent everything is. You can write your library in Python, you can publish it, and suddenly the world is going to actually use it, actually consume it. And because normally, I've seen that it has a large avenue where you can work in something really complicated, you can communicate it, and people can actually go ahead and take it and run with it in their given direction. And that is kind of what happened.
At some point, by pure accident and chance, I came across this group of people on the internet, and they were in the stages of making up this new group that's called Data for Democracy, a non-profit. And the whole idea was the internet, especially Twitter— that's how we congregated— Twitter, the internet. We have a ton of data scientists, people who work as software engineers, and the like. What if we all come together and try to solve some issues that actually affect the daily lives of people. And there were a ton of projects. Helping the ACLU gather data for something interesting that they were doing, gather data and analyze it for local governments— where do you have potholes, how much water is being consumed.
Try to apply all the science that we knew, combined with all the code that we could write, and offer a good and digestible idea for people to say, OK, this makes sense, let's do something about it— policy, action, whatever. And I started working with this group, Data for Democracy— wonderful set of people. And the person who I believe we can blame for Data for Democracy— the one who got the idea and got it up and running, his name is Jonathan Morgan. And eventually, we got to work together. He started a startup, and I went to work with the startup. And that was essentially the thing that took me away from physics and into the world of software engineering— Data for Democracy, definitely.
ADAM GLICK: Were you using Kubernetes as part of that work there?
JORGE ALARCÓN: No, it was simple as it gets. You just try to get some data. You create a couple IPython notebooks, some setting up of really simple MySQL databases, and that was it.
ADAM GLICK: Where did you get started using Kubernetes? And was it before you started contributing to it and being a part, or did you decide to jump right in?
JORGE ALARCÓN: When I first started using Kubernetes, it was also on my first job. So there wasn't a lot of specific training in regards to software engineering or anything of the sort that I did before I actually started working as a software engineer. I just went from physicist to engineer. And in my days of physics, at least on the computer side, I was completely trained in the super old school system administrator, where you have your 10, 20 computers. You know physically where they are, and you have to connect the cables.
ADAM GLICK: All pets— all pets all the time.
JORGE ALARCÓN: [LAUGHING] You have to have your huge Python, bash scripts, three, five major versions, all because doing an upgrade will break something really important and you have no idea how to work on it. And that was my training. That was the way that I learned how to do things. Those were the kind of things that I knew how to do.
And when I got to this company— startup— we were pretty much starting from scratch. We were building a couple applications. We work testing them, we were deploying them on a couple of managed instances. But like everything, there was a lot of toil that we wanted to automate. The whole issue of, OK, after days of work, we finally managed to get this version of the application up and running in these machines.
It's open to the internet. People can test it out. But it turns out that it is now two weeks behind the latest on all the master branches for this repo, so now we want to update. And we have to go through the process of bringing it back up, creating new machines, do that whole thing. And I had no idea what Kubernetes was, to be honest. My boss at the moment mentioned it to me like, hey, we should use Kubernetes because apparently, Kubernetes is something that might be able to help us here. And we did some— I want to call it research and development.
It was actually just making— again, startup, small company, small team, so really me just playing around with Kubernetes trying to get it to work, trying to get it to run. I was so lost. I had no idea what I was doing— not enough. I didn't have an idea of how Kubernetes was supposed to help me. And at that point, I did the best Googling that I could manage. Didn't really find a lot of examples. Didn't find a lot of blog posts. It was early.
ADAM GLICK: What time frame was this?
JORGE ALARCÓN: Three, four years ago, so definitely not 1.13. That's the best guesstimate that I can give at this point. But I wasn't able to find any good examples, any tutorials. The only book that I was able to get my hands on was the one written by Joe Beda, Kelsey Hightower, and I forget the other author. But what is it? "Kubernetes— Up and Running"?
And in general, right now I use it as reference— it's really good. But as a beginner, I still was lost. They give all these amazing examples, they provide the applications, but I had no idea why someone might need a Pod, why someone might need a Deployment. So my last resort was to try and find someone who actually knew Kubernetes.
By accident, during my eternal Googling, I actually found a link to the Kubernetes Slack. I jumped into the Kubernetes Slack hoping that someone might be able to help me out. And that was my entry point into the Kubernetes community. I just kept on exploring the Slack, tried to see what people were talking about, what they were asking to try to make sense of it, and just kept on iterating. And at some point, I think I got the hang of it.
ADAM GLICK: What made you decide to be a release lead?
JORGE ALARCÓN: The answer to this is my answer to why I have been contributing to Kubernetes. I really just want to be able to help out the community. Kubernetes is something that I absolutely adore.
Comparing Kubernetes to old school system administration, a handful of years ago, it took me like a week to create a node for an application to run. It took me months to get something that vaguely looked like an Ingress resource— just setting up the Nginx, and allowing someone else to actually use my application. And the fact that I could do all of that in five minutes, it really captivated me. Plus I've got to blame it on the physics. The whole idea with physics, I really like the patterns, and I really like the design of Kubernetes.
Once I actually got the hang of it, I loved the idea of how everything was designed, and I just wanted to learn a lot more about it. And I wanted to help the contributors. I wanted to help the people who actually build it. I wanted to help maintain it, and help provide the information for new contributors or new users. So instead of taking months for them to be up and running, let's just chat about what your issue is, and let's try to get a fix within the next hour or so.
ADAM GLICK: You work for a stealth startup right now. Is it fair to assume that they're using Kubernetes?
JORGE ALARCÓN: Yes—
[LAUGHING]
—for everything.
ADAM GLICK: Are you able to say what Searchable does?
JORGE ALARCÓN: The thing that we are trying to build is kind of like a search engine for your documents. Usually, if people have a question, they jump on Google. And for the most part, you're going to be able to get a good answer. You can ask something really random, like 'what is the weight of an elephant?'
Which, if you think about it, it's kind of random, but Google is going to give you an answer. And the thing that we are trying to build is something similar to that, but for files. So essentially, a search engine for your files. And most people, you have your local machine loaded up with— at least mine, I have a couple tens of gigabytes of different files.
I have Google Drive. I have a lot of documents that live in my email and the like. So the idea is to kind of build a search engine that is going to be able to connect all of those pieces. And besides doing simple word searches— for example, 'Kubernetes interview', and bring me the documents that we're looking at with all the questions— I can also ask things like what issue did I find last week while testing Prometheus. And it's going to be able to read my files, like through natural language processing, understand it, and be able to give me an answer.
ADAM GLICK: It is a Google for your personal and non-public information, essentially?
JORGE ALARCÓN: Hopefully.
ADAM GLICK: Is the work that you do with Kubernetes as the release lead— is that part of your day job, or is that something that you're doing kind of nights and weekends separate from your day job?
JORGE ALARCÓN: Both. Strictly speaking, my day job is just keep working on the application, build the things that it needs, maintain the infrastructure, and all that. When I started working at the company— which by the way, the person who brought me into the company was also someone that I met from my days in Data for Democracy— we started talking about the work.
I mentioned that I do a lot of work with the Kubernetes community and if it was OK that I continue doing it. And to my surprise, the answer was not only a yes, but yeah, you can do it during your day work. And at least for the time being, I just balance— I try to keep things organized.
Some days I just focus on Kubernetes. Some mornings I do Kubernetes. And then afternoon, I do Searchable, vice-versa, or just go back and forth, and try to balance the work as much as possible. But being release lead, definitely, it is a lot, so nights and weekends.
ADAM GLICK: How much time does it take to be the release lead?
JORGE ALARCÓN: It varies, but probably, if I had to give an estimate, at the very least you have to be able to dedicate four hours most days.
ADAM GLICK: Four hours a day?
JORGE ALARCÓN: Yeah, most days. It varies a lot. For example, at the beginning of the release cycle, you don't need to put in that much work because essentially, you're just waiting and helping people get set up, and people are writing their Kubernetes Enhancement Proposals, they are implementing it, and you can answer some questions. It's relatively easy, but for the most part, a lot of the time the four hours go into talking with people, just making sure that, hey, are people actually writing their enhancements, do we have all the enhancements that we want. And most of those fours hours, going around, chatting with people, and making sure that things are being done. And if, for some reason, someone needs help, just directing them to the right place to get their answer.
ADAM GLICK: What does Searchable get out of you doing this work?
JORGE ALARCÓN: Physically, nothing. The thing that we're striving for is to give back to the community. My manager/boss/homeslice— I told him I was going to call him my homeslice— both of us have experience working in open source. At some point, he was also working on a project that I'm probably going to mispronounce, but Mahout with Apache.
And he also has had this experience. And both of us have this general idea and strive to build something for Searchable that's going to be useful for people, but also build knowledge, build guides, build applications that are going to be useful for the community. And at least one of the things that I was able to do right now is be the lead for the Kubernetes team. And this is a way of giving back to the community. We're using Kubernetes to run our things, so let's try to balance how things work.
ADAM GLICK: Lachlan Evenson was the release lead on 1.16 as well as our guest back in episode 72, and he's returned on this release as the emeritus advisor. What did you learn from him?
JORGE ALARCÓN: Oh, everything. And it actually all started back on 1.16. So like you said, an amazing person— he's an amazing individual. And it's truly an opportunity to be able to work with him. During 1.16, I was the CI Signal lead, and Lachie is very hands on.
He's not the kind of person to just give you a list of things and say, do them. He actually comes to you, has a conversation, and he works with you more than anything. And when we were working together on 1.16, I got to learn a lot from him in terms of CI Signal. And especially because we talked about everything just to make sure that 1.16 was ready to go, I also got to pick up a couple of things that a release lead has to know, has to be able to do, has to work on to get a release out the door.
And now, during this release, there is a lot of information that's really useful, and there's a lot of advice and general wisdom that comes in handy. For most of the things that impact a lot of things, we are always in communication. Like, I'm doing this, you're doing that, advice. And essentially, every single thing that we do is pretty much a code review. You do it, and then you wait for someone else to give you comments. And that's been a strong part of our relationship working.
ADAM GLICK: What would you say the theme for this release is?
JORGE ALARCÓN: I think one of the themes is "fit and finish". There are a lot of features that we are bumping from alpha to beta, from beta to stable. And we want to make sure that people have a good user experience. Operators and developers alike just want to get rid of as many bugs as possible, improve the flow of things.
But the other really cool thing is we have about an equal distribution between alpha, beta, and stable. We are also bringing up a lot of new features. So besides making Kubernetes more stable for all the users that are already using it, we are working on bringing up new things that people can try out for the next release and see how it goes in the future.
ADAM GLICK: Did you have a release team mascot?
JORGE ALARCÓN: Kind of.
ADAM GLICK: Who/what was it?
JORGE ALARCÓN: [LAUGHING] I say kind of because I'm using the mascot in the logo, and the logo is inspired by the Large Hadron Collider.
ADAM GLICK: Oh, fantastic.
JORGE ALARCÓN: Being the release lead, I really had to take a chance on this opportunity to use the LHC as the mascot.
ADAM GLICK: We've had some of the folks from the LHC on the show, and I know they listen, and they will be thrilled with that.
JORGE ALARCÓN: [LAUGHING] Hopefully, they like the logo.
ADAM GLICK: If you look at this release, what part of this release, what thing that has been added to it are you personally most excited about?
JORGE ALARCÓN: Like a parent can't choose which child is his or her favorite, you really can't choose a specific thing.
ADAM GLICK: We have been following online and in the issues an enhancement that's called sidecar containers. You'd be able to mark the order of containers starting in a pod. Tim Hockin posted a long comment on behalf of a number of SIG Node contributors citing social, procedural, and technical concerns about what's going on with that— in particular, that it moved out of 1.18 and is now moving to 1.19. Did you have any thoughts on that?
JORGE ALARCÓN: The sidecar enhancement has definitely been an interesting one. First off, thank you very much to Joseph Irving, the author of the KEP. And thank you very much to Tim Hockin, who voiced out the point of view of the approvers, maintainers of SIG Node. And I guess a little bit of context before we move on is, in the Kubernetes community, we have contributors, we have reviewers, and we have approvers.
Contributors are people who write PRs, who file issues, who troubleshoot issues. Reviewers are contributors who focus on one or multiple specific areas within the project, and then approvers are maintainers for the specific area, for one or multiple specific areas, of the project. So you can think of approvers as people who have write access in a repo or someplace within a repo.
The issue with the sidecar enhancement is that it has been deferred for multiple releases now, and that's been because there hasn't been a lot of collaboration between the KEP authors and the approvers for specific parts of the project. Something worthwhile to mention— and this was brought up during the original discussion— is this can obviously be frustrating for both contributors and for approvers. From the contributor's side of things, you are working on something. You are doing your best to make sure that it works.
And to build something that's going to be used by people, both from the approver side of things and, I think, for the most part, every single person in the Kubernetes community, we are all really excited to see this project grow. We want to help improve it, and we love when new people come in and work on new enhancements, bug fixes, and the like.
But one of the limitations is the day only has so many hours, and there are only so many things that we can work on at a time. So people prioritize in whatever way works best, and some things just fall behind. And a lot of the time, the things that fall behind are not because people don't want them to continue moving forward, but it's just a limited amount of resources, a limited amount of people.
And I think this discussion around the sidecar enhancement proposal has been very useful, and it points us to the need for more standardized mentoring programs. This is something that multiple SIGs are working on. For example, SIG Contribex, SIG Cluster Lifecycle, SIG Release. The idea is to standardize some sort of mentoring experience so that we can better prepare new contributors to become reviewers and ultimately approvers.
Because ultimately at the end of the day, if we have more people who are knowledgeable about Kubernetes, or even some specific area of Kubernetes, we can better distribute the load, and we can better collaborate on whatever new things come up. I think the sidecar enhancement has shown us mentoring is something worthwhile, and we need a lot more of it. Because as much work as we do, more things are going to continue popping in throughout the project. And the more people we have who are comfortable working in these really complicated areas of Kubernetes, the better off that we are going to be.
ADAM GLICK: Was there any talk of delaying 1.18 due to the current worldwide health situation?
JORGE ALARCÓN: We thought about it, and the plan was to just wait and see how people felt. Tried make sure that people were comfortable continuing to work and all the people were landing in new enhancements, or fixing tests, or members of the release team who were making sure that things were happening. We wanted to see that people were comfortable, that they could continue doing their job. And for a moment, I actually thought about delaying just outright— we're going to give it more time, and hopefully at some point, things are going to work out.
But people just continue doing their amazing work. There was no delay. There was no hitch throughout the process. So at some point, I just figured we stay with the current timeline and see how we went. And at this point, things are more or less set.
ADAM GLICK: Amazing power of a distributed team.
JORGE ALARCÓN: Yeah, definitely.
[LAUGHING]
ADAM GLICK: Taylor Dolezal was announced as the 1.19 release lead. Do you know how that choice was made, and by whom?
JORGE ALARCÓN: I actually got to choose the lead. The practice is the current lead for the release team is going to look at people and see, first off, who's interested and out of the people interested, who can do the job, who's comfortable enough with the release team, with the Kubernetes community at large who can actually commit the amount of hours throughout the next, hopefully, three months.
And for one, I think Taylor has been part of my team. So there is the release team. Then the release team has multiple subgroups. One of those subgroups is actually just for me and my shadows. So for this release, it was mrbobbytables and Taylor. And Taylor volunteered to take over 1.19, and I'm sure that he will do an amazing job.
ADAM GLICK: I am as well. What advice will you give Taylor?
JORGE ALARCÓN: Over-communicate as much as possible. Normally, if you made it to the point that you are the lead for a release, or even the shadow for a release, you more or less are familiar with a lot of the work— CI Signal, enhancements, documentation, and the like. And a lot of people, if they know how to do their job, they might tell themselves, yeah, I could do it— no need to worry about it. I'm just going to go ahead and sign this PR, debug this test, whatever.
But one of the interesting aspects is whenever we are actually working in a release, 50% of the work has to go into actually making the release happen. The other 50% of the work has to go into mentoring people, and making sure the newcomers, new members are able to learn everything that they need to learn to do your job, you being in the lead for a subgroup or the entire team. And whenever you actually see that things need to happen, just over-communicate.
Try to provide the opportunity for someone else to do the work, and over-communicate with them as much as possible to make sure that they are learning whatever it is that they need to learn. If neither you or the other person knows what's going on, then I can over-communicate, so someone hopefully will see your messages and come to the rescue. That happens a lot. There's a lot of really nice and kind people who will come out and tell you how something works, help you fix it.
ADAM GLICK: If you were to sum up your experience running this release, what would it be?
JORGE ALARCÓN: It's been super fun and a little bit stressing, to be honest. Being the release lead is definitely amazing. You're kind of sitting at the center of Kubernetes.
You not only see the people who are working on things— the things that are broken, and the users filling out issues, and saying what broke, and the like. But you also get the opportunity to work with a lot of people who do a lot of non-code related work. Docs is one of the most obvious things. There's a lot of work that goes into communications, contributor experience, public relations.
And being connected, getting to talk with those people mostly every other day, it's really fun. It's a really good experience in terms of becoming a better contributor to the community, but also taking some of that knowledge home with you and applying it somewhere else. If you are a software engineer, if you are a project manager, whatever, it's amazing how much you can learn.
ADAM GLICK: I know the community likes to rotate around who are the release leads. But if you were given the opportunity to be a release lead for a future release of Kubernetes, would you do it again?
JORGE ALARCÓN: Yeah, it's a fun job. To be honest, it can be really stressing. Especially, as I mentioned, at some point, most of that work is just going to be talking with people, and talking requires a lot more thought and effort than just sitting down and thinking about things sometimes. And some of that can be really stressful.
But the job itself, it is definitely fun. And at some distant point in the future, if for some reason it was a possibility, I will think about it. But definitely, as you mentioned, one thing that we try to do is cycle out, because I can have fun in it, and that's all good and nice. And hopefully I can help another release go out the door. But providing the opportunity for other people to learn I think is a lot more important than just being the lead itself.
Jorge Alarcón is a site reliability engineer with Searchable AI and served as the Kubernetes 1.18 release team lead.
You can find the Kubernetes Podcast from Google at @KubernetesPod on Twitter, and you can subscribe so you never miss an episode.
Music and math: the Kubernetes 1.17 release interview
Every time the Kubernetes release train stops at the station, we like to ask the release lead to take a moment to reflect on their experience. That takes the form of an interview on the weekly Kubernetes Podcast from Google that I co-host with Craig Box. If you're not familiar with the show, every week we summarise the new in the Cloud Native ecosystem, and have an insightful discussion with an interesting guest from the broader Kubernetes community.
At the time of the 1.17 release in December, we talked to release team lead Guinevere Saenger. We have shared the transcripts of previous interviews on the Kubernetes blog, and we're very happy to share another today.
Next week we will bring you up to date with the story of Kubernetes 1.18, as we gear up for the release of 1.19 next month. Subscribe to the show wherever you get your podcasts to make sure you don't miss that chat!
ADAM GLICK: You have a nontraditional background for someone who works as a software engineer. Can you explain that background?
GUINEVERE SAENGER: My first career was as a collaborative pianist, which is an academic way of saying "piano accompanist". I was a classically trained pianist who spends most of her time onstage, accompanying other people and making them sound great.
ADAM GLICK: Is that the piano equivalent of pair-programming?
GUINEVERE SAENGER: No one has said it to me like that before, but all sorts of things are starting to make sense in my head right now. I think that's a really great way of putting it.
ADAM GLICK: That's a really interesting background, as someone who also has a background with music. What made you decide to get into software development?
GUINEVERE SAENGER: I found myself in a life situation where I needed more stable source of income, and teaching music, and performing for various gig opportunities, was really just not cutting it anymore. And I found myself to be working really, really hard with not much to show for it. I had a lot of friends who were software engineers. I live in Seattle. That's sort of a thing that happens to you when you live in Seattle — you get to know a bunch of software engineers, one way or the other.
The ones I met were all lovely people, and they said, hey, I'm happy to show you how to program in Python. And so I did that for a bit, and then I heard about this program called Ada Developers Academy. That's a year long coding school, targeted at women and non-binary folks that are looking for a second career in tech. And so I applied for that.
CRAIG BOX: What can you tell us about that program?
GUINEVERE SAENGER: It's incredibly selective, for starters. It's really popular in Seattle and has gotten quite a good reputation. It took me three tries to get in. They do two classes a year, and so it was a while before I got my response saying 'congratulations, we are happy to welcome you into Cohort 6'. I think what sets Ada Developers Academy apart from other bootcamp style coding programs are three things, I think? The main important one is that if you get in, you pay no tuition. The entire program is funded by company sponsors.
CRAIG BOX: Right.
GUINEVERE SAENGER: The other thing that really convinced me is that five months of the 11-month program are an industry internship, which means you get both practical experience, mentorship, and potential job leads at the end of it.
CRAIG BOX: So very much like a condensed version of the University of Waterloo degree, where you do co-op terms.
GUINEVERE SAENGER: Interesting. I didn't know about that.
CRAIG BOX: Having lived in Waterloo for a while, I knew a lot of people who did that. But what would you say the advantages were of going through such a condensed schooling process in computer science?
GUINEVERE SAENGER: I'm not sure that the condensed process is necessarily an advantage. I think it's a necessity, though. People have to quit their jobs to go do this program. It's not an evening school type of thing.
CRAIG BOX: Right.
GUINEVERE SAENGER: And your internship is basically a full-time job when you do it. One thing that Ada was really, really good at is giving us practical experience that directly relates to the workplace. We learned how to use Git. We learned how to design websites using Rails. And we also learned how to collaborate, how to pair-program. We had a weekly retrospective, so we sort of got a soft introduction to workflows at a real workplace. Adding to that, the internship, and I think the overall experience is a little bit more 'practical workplace oriented' and a little bit less academic.
When you're done with it, you don't have to relearn how to be an adult in a working relationship with other people. You come with a set of previous skills. There are Ada graduates who have previously been campaign lawyers, and veterinarians, and nannies, cooks, all sorts of people. And it turns out these skills tend to translate, and they tend to matter.
ADAM GLICK: With your background in music, what do you think that that allows you to bring to software development that could be missing from, say, standard software development training that people go through?
GUINEVERE SAENGER: People tend to really connect the dots when I tell them I used to be a musician. Of course, I still consider myself a musician, because you don't really ever stop being a musician. But they say, 'oh, yeah, music and math', and that's just a similar sort of brain. And that makes so much sense. And I think there's a little bit of a point to that. When you learn a piece of music, you have to start recognizing patterns incredibly quickly, almost intuitively.
And I think that is the main skill that translates into programming— recognizing patterns, finding the things that work, finding the things that don't work. And for me, especially as a collaborative pianist, it's the communicating with people, the finding out what people really want, where something is going, how to figure out what the general direction is that we want to take, before we start writing the first line of code.
CRAIG BOX: In your experience at Ada or with other experiences you've had, have you been able to identify patterns in other backgrounds for people that you'd recommend, 'hey, you're good at music, so therefore you might want to consider doing something like a course in computer science'?
GUINEVERE SAENGER: Overall, I think ultimately writing code is just giving a set of instructions to a computer. And we do that in daily life all the time. We give instructions to our kids, we give instructions to our students. We do math, we write textbooks. We give instructions to a room full of people when you're in court as a lawyer.
Actually, the entrance exam to Ada Developers Academy used to have questions from the LSAT on it to see if you were qualified to join the program. They changed that when I applied, but I think that's a thing that happened at one point. So, overall, I think software engineering is a much more varied field than we give it credit for, and that there are so many ways in which you can apply your so-called other skills and bring them under the umbrella of software engineering.
CRAIG BOX: I do think that programming is effectively half art and half science. There's creativity to be applied. There is perhaps one way to solve a problem most efficiently. But there are many different ways that you can choose to express how you compiled something down to that way.
GUINEVERE SAENGER: Yeah, I mean, that's definitely true. I think one way that you could probably prove that is that if you write code at work and you're working on something with other people, you can probably tell which one of your co-workers wrote which package, just by the way it's written, or how it is documented, or how it is styled, or any of those things. I really do think that the human character shines through.
ADAM GLICK: What got you interested in Kubernetes and open source?
GUINEVERE SAENGER: The honest answer is absolutely nothing. Going back to my programming school— and remember that I had to do a five-month internship as part of my training— the way that the internship works is that sponsor companies for the program get interns in according to how much they sponsored a specific cohort of students.
So at the time, Samsung and SDS offered to host two interns for five months on their Cloud Native Computing team and have that be their practical experience. So I go out of a Ruby on Rails full stack web development bootcamp and show up at my internship, and they said, "Welcome to Kubernetes. Try to bring up a cluster." And I said, "Kuber what?"
CRAIG BOX: We've all said that on occasion.
ADAM GLICK: Trial by fire, wow.
GUINEVERE SAENGER: I will say that that entire team was absolutely wonderful, delightful to work with, incredibly helpful. And I will forever be grateful for all of the help and support that I got in that environment. It was a great place to learn.
CRAIG BOX: You now work on GitHub's Kubernetes infrastructure. Obviously, there was GitHub before there was a Kubernetes, so a migration happened. What can you tell us about the transition that GitHub made to running on Kubernetes?
GUINEVERE SAENGER: A disclaimer here— I was not at GitHub at the time that the transition to Kubernetes was made. However, to the best of my knowledge, the decision to transition to Kubernetes was made and people decided, yes, we want to try Kubernetes. We want to use Kubernetes. And mostly, the only decision left was, which one of our applications should we move over to Kubernetes?
CRAIG BOX: I thought GitHub was written on Rails, so there was only one application.
GUINEVERE SAENGER: [LAUGHING] We have a lot of supplementary stuff under the covers.
CRAIG BOX: I'm sure.
GUINEVERE SAENGER: But yes, GitHub is written in Rails. It is still written in Rails. And most of the supplementary things are currently running on Kubernetes. We have a fair bit of stuff that currently does not run on Kubernetes. Mainly, that is GitHub Enterprise related things. I would know less about that because I am on the platform team that helps people use the Kubernetes infrastructure. But back to your question, leadership at the time decided that it would be a good idea to start with GitHub the Rails website as the first project to move to Kubernetes.
ADAM GLICK: High stakes!
GUINEVERE SAENGER: The reason for this was that they decided if they were going to not start big, it really wasn't going to transition ever. It was really not going to happen. So they just decided to go all out, and it was successful, for which I think the lesson would probably be commit early, commit big.
CRAIG BOX: Are there any other lessons that you would take away or that you've learned kind of from the transition that the company made, and might be applicable to other people who are looking at moving their companies from a traditional infrastructure to a Kubernetes infrastructure?
GUINEVERE SAENGER: I'm not sure this is a lesson specifically, but I was on support recently, and it turned out that, due to unforeseen circumstances and a mix of human error, a bunch of the namespaces on one of our Kubernetes clusters got deleted.
ADAM GLICK: Oh, my.
GUINEVERE SAENGER: It should not have affected any customers, I should mention, at this point. But all in all, it took a few of us a few hours to almost completely recover from this event. I think that, without Kubernetes, this would not have been possible.
CRAIG BOX: Generally, deleting something like that is quite catastrophic. We've seen a number of other vendors suffer large outages when someone's done something to that effect, which is why we get #hugops on Twitter all the time.
GUINEVERE SAENGER: People did send me #hugops, that is a thing that happened. But overall, something like this was an interesting stress test and sort of proved that it wasn't nearly as catastrophic as a worst case scenario.
CRAIG BOX: GitHub runs its own data centers. Kubernetes was largely built for running on the cloud, but a lot of people do choose to run it on their own, bare metal. How do you manage clusters and provisioning of the machinery you run?
GUINEVERE SAENGER: When I started, my onboarding project was to deprovision an old cluster, make sure all the traffic got moved to somewhere where it would keep running, provision a new cluster, and then move website traffic onto the new cluster. That was a really exciting onboarding project. At the time, we provisioned bare metal machines using Puppet. We still do that to a degree, but I believe the team that now runs our computing resources actually inserts virtual machines as an extra layer between the bare metal and the Kubernetes nodes.
Again, I was not intrinsically part of that decision, but my understanding is that it just makes for a greater reliability and reproducibility across the board. We've had some interesting hardware dependency issues come up, and the virtual machines basically avoid those.
CRAIG BOX: You've been working with Kubernetes for a couple of years now. How did you get involved in the release process?
GUINEVERE SAENGER: When I first started in the project, I started at the special interest group for contributor experience, namely because one of my co-workers at the time, Aaron Crickenberger, was a big Kubernetes community person. Still is.
CRAIG BOX: We've had him on the show for one of these very release interviews!
GUINEVERE SAENGER: In fact, this is true! So Aaron and I actually go way back to Samsung SDS. Anyway, Aaron suggested that I should write up a contribution to the Kubernetes project, and I said, me? And he said, yes, of course. You will be speaking at KubeCon, so you should probably get started with a PR or something. So I tried, and it was really, really hard. And I complained about it in a public GitHub issue, and people said, yeah. Yeah, we know it's hard. Do you want to help with that?
And so I started getting really involved with the process for new contributors to get started and have successes, kind of getting a foothold into a project that's as large and varied as Kubernetes. From there on, I began to talk to people, get to know people. The great thing about the Kubernetes community is that there is so much mentorship to go around.
ADAM GLICK: Right.
GUINEVERE SAENGER: There are so many friendly people willing to help. It's really funny when I talk to other people about it. They say, what do you mean, your coworker? And I said, well, he's really a colleague. He really works for another company.
CRAIG BOX: He's sort-of officially a competitor.
GUINEVERE SAENGER: Yeah.
CRAIG BOX: But we're friends.
GUINEVERE SAENGER: But he totally helped me when I didn't know how to git patch my borked pull request. So that happened. And eventually, somebody just suggested that I start following along in the release process and shadow someone on their release team role. And that, at the time, was Tim Pepper, who was bug triage lead, and I shadowed him for that role.
CRAIG BOX: Another podcast guest on the interview train.
GUINEVERE SAENGER: This is a pattern that probably will make more sense once I explain to you about the shadow process of the release team.
ADAM GLICK: Well, let's turn to the Kubernetes release and the release process. First up, what's new in this release of 1.17?
GUINEVERE SAENGER: We have only a very few new things. The one that I'm most excited about is that we have moved IPv4 and IPv6 dual stack support to alpha. That is the most major change, and it has been, I think, a year and a half in coming. So this is the very first cut of that feature, and I'm super excited about that.
CRAIG BOX: The people who have been promised IPv6 for many, many years and still don't really see it, what will this mean for them?
ADAM GLICK: And most importantly, why did we skip IPv5 support?
GUINEVERE SAENGER: I don't know!
CRAIG BOX: Please see the appendix to this podcast for technical explanations.
GUINEVERE SAENGER: Having a dual stack configuration obviously enables people to have a much more flexible infrastructure and not have to worry so much about making decisions that will become outdated or that may be over-complicated. This basically means that pods can have dual stack addresses, and nodes can have dual stack addresses. And that basically just makes communication a lot easier.
CRAIG BOX: What about features that didn't make it into the release? We had a conversation with Lachie in the 1.16 interview, where he mentioned sidecar containers. They unfortunately didn't make it into that release. And I see now that they haven't made this one either.
GUINEVERE SAENGER: They have not, and we are actually currently undergoing an effort of tracking features that flip multiple releases.
As a community, we need everyone's help. There are a lot of features that people want. There is also a lot of cleanup that needs to happen. And we have started talking at previous KubeCons repeatedly about problems with maintainer burnout, reviewer burnout, have a hard time finding reviews for your particular contributions, especially if you are not an entrenched member of the community. And it has become very clear that this is an area where the entire community needs to improve.
So the unfortunate reality is that sometimes life happens, and people are busy. This is an open source project. This is not something that has company mandated OKRs. Particularly during the fourth quarter of the year in North America, but around the world, we have a lot of holidays. It is the end of the year. Kubecon North America happened as well. This makes it often hard to find a reviewer in time or to rally the support that you need for your enhancement proposal. Unfortunately, slipping releases is fairly common and, at this point, expected. We started out with having 42 enhancements and landed with roughly half of that.
CRAIG BOX: I was going to ask about the truncated schedule due to the fourth quarter of the year, where there are holidays in large parts of the world. Do you find that the Q4 release on the whole is smaller than others, if not for the fact that it's some week shorter?
GUINEVERE SAENGER: Q4 releases are shorter by necessity because we are trying to finish the final release of the year before the end of the year holidays. Often, releases are under pressure of KubeCons, during which finding reviewers or even finding the time to do work can be hard to do, if you are attending. And even if you're not attending, your reviewers might be attending.
It has been brought up last year to make the final release more of a stability release, meaning no new alpha features. In practice, for this release, this is actually quite close to the truth. We have four features graduating to beta and most of our features are graduating to stable. I am hoping to use this as a precedent to change our process to make the final release a stability release from here on out. The timeline fits. The past experience fits this model.
ADAM GLICK: On top of all of the release work that was going on, there was also KubeCon that happened. And you were involved in the contributor summit. How was the summit?
GUINEVERE SAENGER: This was the first contributor summit where we had an organized events team with events organizing leads, and handbooks, and processes. And I have heard from multiple people— this is just word of mouth— that it was their favorite contributor summit ever.
CRAIG BOX: Was someone allocated to hat production? Everyone had sailor hats.
GUINEVERE SAENGER: Yes, the entire event staff had sailor hats with their GitHub handle on them, and it was pretty fantastic. You can probably see me wearing one in some of the pictures from the contributor summit. That literally was something that was pulled out of a box the morning of the contributor summit, and no one had any idea. But at first, I was a little skeptical, but then I put it on and looked at myself in the mirror. And I was like, yes. Yes, this is accurate. We should all wear these.
ADAM GLICK: Did getting everyone together for the contributor summit help with the release process?
GUINEVERE SAENGER: It did not. It did quite the opposite, really. Well, that's too strong.
ADAM GLICK: Is that just a matter of the time taken up?
GUINEVERE SAENGER: It's just a completely different focus. Honestly, it helped getting to know people face-to-face that I had currently only interacted with on video. But we did have to cancel the release team meeting the day of the contributor summit because there was kind of no sense in having it happen. We moved it to the Tuesday, I believe.
CRAIG BOX: The role of the release team leader has been described as servant leadership. Do you consider the position proactive or reactive?
GUINEVERE SAENGER: Honestly, I think that depends on who's the release team lead, right? There are some people who are very watchful and look for trends, trying to detect problems before they happen. I tend to be in that camp, but I also know that sometimes it's not possible to predict things. There will be last minute bugs sometimes, sometimes not. If there is a last minute bug, you have to be ready to be on top of that. So for me, the approach has been I want to make sure that I have my priorities in order and also that I have backups in case I can't be available.
ADAM GLICK: What was the most interesting part of the release process for you?
GUINEVERE SAENGER: A release lead has to have served in other roles on the release team prior to being release team lead. To me, it was very interesting to see what other roles were responsible for, ones that I hadn't seen from the inside before, such as docs, CI signal. I had helped out with CI signal for a bit, but I want to give a big shout out to CI signal lead, Alena Varkockova, who was able to communicate effectively and kindly with everyone who was running into broken tests, failing tests. And she was very effective in getting all of our tests up and running.
So that was actually really cool to see. And yeah, just getting to see more of the workings of the team, for me, it was exciting. The other big exciting thing, of course, was to see all the changes that were going in and all the efforts that were being made.
CRAIG BOX: The release lead for 1.18 has just been announced as Jorge Alarcon. What are you going to put in the proverbial envelope as advice for him?
GUINEVERE SAENGER: I would want Jorge to be really on top of making sure that every Special Interest Group that enters a change, that has an enhancement for 1.18, is on top of the timelines and is responsive. Communication tends to be a problem. And I had hinted at this earlier, but some enhancements slipped simply because there wasn't enough reviewer bandwidth.
Greater communication of timelines and just giving people more time and space to be able to get in their changes, or at least, seemingly give them more time and space by sending early warnings, is going to be helpful. Of course, he's going to have a slightly longer release, too, than I did. This might be related to a unique Q4 challenge. Overall, I would encourage him to take more breaks, to rely more on his release shadows, and split out the work in a fashion that allows everyone to have a turn and everyone to have a break as well.
ADAM GLICK: What would your advice be to someone who is hearing your experience and is inspired to get involved with the Kubernetes release or contributor process?
GUINEVERE SAENGER: Those are two separate questions. So let me tackle the Kubernetes release question first. Kubernetes SIG Release has, in my opinion, a really excellent onboarding program for new members. We have what is called the Release Team Shadow Program. We also have the Release Engineering Shadow Program, or the Release Management Shadow Program. Those are two separate subprojects within SIG Release. And each subproject has a team of roles, and each role can have two to four shadows that are basically people who are part of that role team, and they are learning that role as they are doing it.
So for example, if I am the lead for bug triage on the release team, I may have two, three or four people that I closely work with on the bug triage tasks. These people are my shadows. And once they have served one release cycle as a shadow, they are now eligible to be lead in that role. We have an application form for this process, and it should probably be going up in January. It usually happens the first week of the release once all the release leads are put together.
CRAIG BOX: Do you think being a member of the release team is something that is a good first contribution to the Kubernetes project overall?
GUINEVERE SAENGER: It depends on what your goals are, right? I believe so. I believe, for me, personally, it has been incredibly helpful looking into corners of the project that I don't know very much about at all, like API machinery, storage. It's been really exciting to look over all the areas of code that I normally never touch.
It depends on what you want to get out of it. In general, I think that being a release team shadow is a really, really great on-ramp to being a part of the community because it has a paved path solution to contributing. All you have to do is show up to the meetings, ask questions of your lead, who is required to answer those questions.
And you also do real work. You really help, you really contribute. If you go across the issues and pull requests in the repo, you will see, 'Hi, my name is so-and-so. I am shadowing the CI signal lead for the current release. Can you help me out here?' And that's a valuable contribution, and it introduces people to others. And then people will recognize your name. They'll see a pull request by you, and they're like oh yeah, I know this person. They're legit.
Guinevere Saenger is a software engineer for GitHub and served as the Kubernetes 1.17 release team lead.
You can find the Kubernetes Podcast from Google at @KubernetesPod on Twitter, and you can subscribe so you never miss an episode.
SIG-Windows Spotlight
This post tells the story of how Kubernetes contributors work together to provide a container orchestrator that works for both Linux and Windows.

Most people who are familiar with Kubernetes are probably used to associating it with Linux. The connection makes sense, since Kubernetes ran on Linux from its very beginning. However, many teams and organizations working on adopting Kubernetes need the ability to orchestrate containers on Windows. Since the release of Docker and rise to popularity of containers, there have been efforts both from the community and from Microsoft itself to make container technology as accessible in Windows systems as it is in Linux systems.
Within the Kubernetes community, those who are passionate about making Kubernetes accessible to the Windows community can find a home in the Windows Special Interest Group. To learn more about SIG-Windows and the future of Kubernetes on Windows, I spoke to co-chairs Mark Rossetti and Michael Michael about the SIG's goals and how others can contribute.
Intro to Windows Containers & Kubernetes
Kubernetes is the most popular tool for orchestrating container workloads, so to understand the Windows Special Interest Group (SIG) within the Kubernetes project, it's important to first understand what we mean when we talk about running containers on Windows.
"When looking at Windows support in Kubernetes," says SIG (Special Interest Group) Co-chairs Mark Rossetti and Michael Michael, "many start drawing comparisons to Linux containers. Although some of the comparisons that highlight limitations are fair, it is important to distinguish between operational limitations and differences between the Windows and Linux operating systems. Windows containers run the Windows operating system and Linux containers run Linux."
In essence, any "container" is simply a process being run on its host operating system, with some key tooling in place to isolate that process and its dependencies from the rest of the environment. The goal is to make that running process safely isolated, while taking up minimal resources from the system to perform that isolation. On Linux, the tooling used to isolate processes to create "containers" commonly boils down to cgroups and namespaces (among a few others), which are themselves tools built in to the Linux Kernel.

If dogs were processes: containerization would be like giving each dog their own resources like toys and food using cgroups, and isolating troublesome dogs using namespaces.
Native Windows processes are processes that are or must be run on a Windows operating system. This makes them fundamentally different from a process running on a Linux operating system. Since Linux containers are Linux processes being isolated by the Linux kernel tools known as cgroups and namespaces, containerizing native Windows processes meant implementing similar isolation tools within the Windows kernel itself. Thus, "Windows Containers" and "Linux Containers" are fundamentally different technologies, even though they have the same goals (isolating processes) and in some ways work similarly (using kernel level containerization).
So when it comes to running containers on Windows, there are actually two very important concepts to consider:
- Native Windows processes running as native Windows Server style containers,
- and traditional Linux containers running on a Linux Kernel, generally hosted on a lightweight Hyper-V Virtual Machine.
You can learn more about Linux and Windows containers in this tutorial from Microsoft.
Kubernetes on Windows
Kubernetes was initially designed with Linux containers in mind and was itself designed to run on Linux systems. Because of that, much of the functionality of Kubernetes involves unique Linux functionality. The Linux-specific work is intentional--we all want Kubernetes to run optimally on Linux--but there is a growing demand for similar optimization for Windows servers. For cases where users need container orchestration on Windows, the Kubernetes contributor community of SIG-Windows has incorporated functionality for Windows-specific use cases.
"A common question we get is, will I be able to have a Windows-only cluster. The answer is NO. Kubernetes control plane components will continue to be based on Linux, while SIG-Windows is concentrating on the experience of having Windows worker nodes in a Kubernetes cluster."
Rather than separating out the concepts of "Windows Kubernetes," and "Linux Kubernetes," the community of SIG-Windows works toward adding functionality to the main Kubernetes project which allows it to handle use cases for Windows. These Windows capabilities mirror, and in some cases add unique functionality to, the Linux use cases Kubernetes has served since its release in 2014 (want to learn more history? Scroll through this original design document.
What Does SIG-Windows Do?
"SIG-Windows is really the center for all things Windows in Kubernetes," SIG chairs Mark and Michael said, "We mainly focus on the compute side of things, but really anything related to running Kubernetes on Windows is in scope for SIG-Windows."
In order to best serve users, SIG-Windows works to make the Kubernetes user experience as consistent as possible for users of Windows and Linux. However some use cases simply only apply to one Operating System, and as such, the SIG-Windows group also works to create functionality that is unique to Windows-only workloads.
Many SIGs, or "Special Interest Groups" within Kubernetes have a narrow focus, allowing members to dive deep on a certain facet of the technology. While specific expertise is welcome, those interested in SIG-Windows will find it to be a great community to build broad understanding across many focus areas of Kubernetes. "Members from our SIG interface with storage, network, testing, cluster-lifecycle and others groups in Kubernetes."
Who are SIG-Windows' Users?
The best way to understand the technology a group makes, is often to understand who their customers or users are.
"A majority of the users we've interacted with have business-critical infrastructure running on Windows developed over many years and can't move those workloads to Linux for various reasons (cost, time, compliance, etc)," the SIG chairs shared. "By transporting those workloads into Windows containers and running them in Kubernetes they are able to quickly modernize their infrastructure and help migrate it to the cloud."
As anyone in the Kubernetes space can attest, companies around the world, in many different industries, see Kubernetes as their path to modernizing their infrastructure. Often this involves re-architecting or event totally re-inventing many of the ways they've been doing business. With the goal being to make their systems more scalable, more robust, and more ready for anything the future may bring. But not every application or workload can or should change the core operating system it runs on, so many teams need the ability to run containers at scale on Windows, or Linux, or both.
"Sometimes the driver to Windows containers is a modernization effort and sometimes it’s because of expiring hardware warranties or end-of-support cycles for the current operating system. Our efforts in SIG-Windows enable Windows developers to take advantage of cloud native tools and Kubernetes to build and deploy distributed applications faster. That’s exciting! In essence, users can retain the benefits of application availability while decreasing costs."
Who are SIG-Windows?
Who are these contributors working on enabling Windows workloads for Kubernetes? It could be you!
Like with other Kubernetes SIGs, contributors to SIG-Windows can be anyone from independent hobbyists to professionals who work at many different companies. They come from many different parts of the world and bring to the table many different skill sets.

"Like most other Kubernetes SIGs, we are a very welcome and open community," explained the SIG co-chairs Michael Michael and Mark Rosetti.
Becoming a contributor
For anyone interested in getting started, the co-chairs added, "New contributors can view old community meetings on GitHub (we record every single meeting going back three years), read our documentation, attend new community meetings, ask questions in person or on Slack, and file some issues on Github. We also attend all KubeCon conferences and host 1-2 sessions, a contributor session, and meet-the-maintainer office hours."
The co-chairs also shared a glimpse into what the path looks like to becoming a member of the SIG-Windows community:
"We encourage new contributors to initially just join our community and listen, then start asking some questions and get educated on Windows in Kubernetes. As they feel comfortable, they could graduate to improving our documentation, file some bugs/issues, and eventually they can be a code contributor by fixing some bugs. If they have long-term and sustained substantial contributions to Windows, they could become a technical lead or a chair of SIG-Windows. You won't know if you love this area unless you get started :) To get started, visit this getting-started page. It's a one stop shop with links to everything related to SIG-Windows in Kubernetes."
When asked if there were any useful skills for new contributors, the co-chairs said,
"We are always looking for expertise in Go and Networking and Storage, along with a passion for Windows. Those are huge skills to have. However, we don’t require such skills, and we welcome any and all contributors, with varying skill sets. If you don’t know something, we will help you acquire it."
You can get in touch with the folks at SIG-Windows in their Slack channel or attend one of their regular meetings - currently 30min long on Tuesdays at 12:30PM EST! You can find links to their regular meetings as well as past meeting notes and recordings from the SIG-Windows README on GitHub.
As a closing message from SIG-Windows:
"We welcome you to get involved and join our community to share feedback and deployment stories, and contribute to code, docs, and improvements of any kind."
Working with Terraform and Kubernetes
Maintaining Kubestack, an open-source Terraform GitOps Framework for Kubernetes, I unsurprisingly spend a lot of time working with Terraform and Kubernetes. Kubestack provisions managed Kubernetes services like AKS, EKS and GKE using Terraform but also integrates cluster services from Kustomize bases into the GitOps workflow. Think of cluster services as everything that's required on your Kubernetes cluster, before you can deploy application workloads.
Hashicorp recently announced better integration between Terraform and Kubernetes. I took this as an opportunity to give an overview of how Terraform can be used with Kubernetes today and what to be aware of.
In this post I will however focus only on using Terraform to provision Kubernetes API resources, not Kubernetes clusters.
Terraform is a popular infrastructure as code solution, so I will only introduce it very briefly here. In a nutshell, Terraform allows declaring a desired state for resources as code, and will determine and execute a plan to take the infrastructure from its current state, to the desired state.
To be able to support different resources, Terraform requires providers that integrate the respective API. So, to create Kubernetes resources we need a Kubernetes provider. Here are our options:
Terraform kubernetes provider (official)
First, the official Kubernetes provider. This provider is undoubtedly the most mature of the three. However, it comes with a big caveat that's probably the main reason why using Terraform to maintain Kubernetes resources is not a popular choice.
Terraform requires a schema for each resource and this means the maintainers have to translate the schema of each Kubernetes resource into a Terraform schema. This is a lot of effort and was the reason why for a long time the supported resources where pretty limited. While this has improved over time, still not everything is supported. And especially custom resources are not possible to support this way.
This schema translation also results in some edge cases to be aware of. For example, metadata in the Terraform schema is a list of maps. Which means you have to refer to the metadata.name of a Kubernetes resource like this in Terraform: kubernetes_secret.example.metadata.0.name.
On the plus side however, having a Terraform schema means full integration between Kubernetes and other Terraform resources. Like for example, using Terraform to create a Kubernetes service of type LoadBalancer and then use the returned ELB hostname in a Route53 record to configure DNS.
The biggest benefit when using Terraform to maintain Kubernetes resources is integration into the Terraform plan/apply life-cycle. So you can review planned changes before applying them. Also, using kubectl, purging of resources from the cluster is not trivial without manual intervention. Terraform does this reliably.
Terraform kubernetes-alpha provider
Second, the new alpha Kubernetes provider. As a response to the limitations of the current Kubernetes provider the Hashicorp team recently released an alpha version of a new provider.
This provider uses dynamic resource types and server-side-apply to support all Kubernetes resources. I personally think this provider has the potential to be a game changer - even if managing Kubernetes resources in HCL may still not be for everyone. Maybe the Kustomize provider below will help with that.
The only downside really is, that it's explicitly discouraged to use it for anything but testing. But the more people test it, the sooner it should be ready for prime time. So I encourage everyone to give it a try.
Terraform kustomize provider
Last, we have the kustomize provider. Kustomize provides a way to do customizations of Kubernetes resources using inheritance instead of templating. It is designed to output the result to stdout, from where you can apply the changes using kubectl. This approach means that kubectl edge cases like no purging or changes to immutable attributes still make full automation difficult.
Kustomize is a popular way to handle customizations. But I was looking for a more reliable way to automate applying changes. Since this is exactly what Terraform is great at the Kustomize provider was born.
Not going into too much detail here, but from Terraform's perspective, this provider treats every Kubernetes resource as a JSON string. This way it can handle any Kubernetes resource resulting from the Kustomize build. But it has the big disadvantage that Kubernetes resources can not easily be integrated with other Terraform resources. Remember the load balancer example from above.
Under the hood, similarly to the new Kubernetes alpha provider, the Kustomize provider also uses the dynamic Kubernetes client and server-side-apply. Going forward, I plan to deprecate this part of the Kustomize provider that overlaps with the new Kubernetes provider and only keep the Kustomize integration.
Conclusion
For teams that are already invested into Terraform, or teams that are looking for ways to replace kubectl in automation, Terraform's plan/apply life-cycle has always been a promising option to automate changes to Kubernetes resources. However, the limitations of the official Kubernetes provider resulted in this not seeing significant adoption.
The new alpha provider removes the limitations and has the potential to make Terraform a prime option to automate changes to Kubernetes resources.
Teams that have already adopted Kustomize, may find integrating Kustomize and Terraform using the Kustomize provider beneficial over kubectl because it avoids common edge cases. Even if in this set up, Terraform can only easily be used to plan and apply the changes, not to adapt the Kubernetes resources. In the future, this issue may be resolved by combining the Kustomize provider with the new Kubernetes provider.
If you have any questions regarding these three options, feel free to reach out to me on the Kubernetes Slack in either the #kubestack or the #kustomize channel. If you happen to give any of the providers a try and encounter a problem, please file a GitHub issue to help the maintainers fix it.
A Better Docs UX With Docsy
Editor's note: Zach is one of the chairs for the Kubernetes documentation special interest group (SIG Docs).
I'm pleased to announce that the Kubernetes website now features the Docsy Hugo theme.
The Docsy theme improves the site's organization and navigability, and opens a path to improved API references. After over 4 years with few meaningful UX improvements, Docsy implements some best practices for technical content. The theme makes the Kubernetes site easier to read and makes individual pages easier to navigate. It gives the site a much-needed facelift.
For example: adding a right-hand rail for navigating topics on the page. No more scrolling up to navigate!
The theme opens a path for future improvements to the website. The Docsy functionality I'm most excited about is the theme's swaggerui shortcode, which provides native support for generating API references from an OpenAPI spec. The CNCF is partnering with Google Season of Docs (GSoD) for staffing to make better API references a reality in Q4 this year. We're hopeful to be chosen, and we're looking forward to Google's list of announced projects on August 16th. Better API references have been a personal goal since I first started working with SIG Docs in 2017. It's exciting to see the goal within reach.
One of SIG Docs' tech leads, Karen Bradshaw did a lot of heavy lifting to fix a wide range of site compatibility issues, including a fix to the last of our legacy pieces when we migrated from Jekyll to Hugo in 2018. Our other tech leads, Tim Bannister and Taylor Dolezal provided extensive reviews.
Thanks also to Björn-Erik Pedersen, who provided invaluable advice about how to navigate a Hugo upgrade beyond version 0.60.0.
The CNCF contracted with Gearbox in Victoria, BC to apply the theme to the site. Thanks to Aidan, Troy, and the rest of the team for all their work!
Supporting the Evolving Ingress Specification in Kubernetes 1.18
Earlier this year, the Kubernetes team released Kubernetes 1.18, which extended Ingress. In this blog post, we’ll walk through what’s new in the new Ingress specification, what it means for your applications, and how to upgrade to an ingress controller that supports this new specification.
What is Kubernetes Ingress
When deploying your applications in Kubernetes, one of the first challenges many people encounter is how to get traffic into their cluster. Kubernetes ingress is a collection of routing rules that govern how external users access services running in a Kubernetes cluster. There are three general approaches for exposing your application:
- Using a
NodePortto expose your application on a port across each of your nodes - Using a
LoadBalancerservice to create an external load balancer that points to a Kubernetes service in your cluster - Using a Kubernetes Ingress resource
What’s new in Kubernetes 1.18 Ingress
There are three significant additions to the Ingress API in Kubernetes 1.18:
- A new
pathTypefield - A new
IngressClassresource - Support for wildcards in hostnames
The new pathType field allows you to specify how Ingress paths should match.
The field supports three types: ImplementationSpecific (default), exact, and prefix. Explicitly defining the expected behavior of path matching will allow every ingress-controller to support a user’s needs and will increase portability between ingress-controller implementation solutions.
The IngressClass resource specifies how Ingresses should be implemented by controllers. This was added to formalize the commonly used but never standardized kubernetes.io/ingress.class annotation and allow for implementation-specific extensions and configuration.
You can read more about these changes, as well as the support for wildcards in hostnames in more detail in a previous blog post.
Supporting Kubernetes ingress
Ambassador is an open-source Envoy-based ingress controller. We believe strongly in supporting common standards such as Kubernetes ingress, which we adopted and announced our initial support for back in 2019.
Every Ambassador release goes through rigorous testing. Therefore, we also contributed an open conformance test suite, supporting Kubernetes ingress. We wrote the initial bits of test code and will keep iterating over the newly added features and different versions of the Ingress specification as it evolves to a stable v1 GA release. Documentation and usage samples, is one of our top priorities. We understand how complex usage can be, especially when transitioning from a previous version of an API.
Following a test-driven development approach, the first step we took in supporting Ingress improvements in Ambassador was to translate the revised specification -- both in terms of API and behavior -- into a comprehensible test suite. The test suite, although still under heavy development and going through multiple iterations, was rapidly added to the Ambassador CI infrastructure and acceptance criteria. This means every change to the Ambassador codebase going forward will be compliant with the Ingress API and be tested end-to-end in a lightweight KIND cluster. Using KIND allowed us to make rapid improvements while limiting our cloud provider infrastructure bill and testing out unreleased Kubernetes features with pre-release builds.
Adopting a new specification
With a global comprehension of additions to Ingress introduced in Kubernetes 1.18 and a test suite on hand, we tackled the task of adapting the Ambassador code so that it would support translating the high-level Ingress API resources into Envoy configurations and constructs. Luckily Ambassador already supported previous versions of ingress functionalities so the development effort was incremental.
We settled on a controller name of getambassador.io/ingress-controller. This value, consistent with Ambassador's domain and CRD versions, must be used to tie in an IngressClass spec.controller with an Ambassador deployment. The new IngressClass resource allows for extensibility by setting a spec.parameters field. At the moment Ambassador makes no use of this field and its usage is reserved for future development.
Paths can now define different matching behaviors using the pathType field. The field will default to a value of ImplementationSpecific, which uses the same matching rules as the Ambassador Mappings prefix field and previous Ingress specification for backward compatibility reasons.
Kubernetes Ingress Controllers
A comprehensive list of Kubernetes ingress controllers is available in the Kubernetes documentation. Currently, Ambassador is the only ingress controller that supports these new additions to the ingress specification. Powered by the Envoy Proxy, Ambassador is the fastest way for you to try out the new ingress specification today.
Check out the following resources:
- Ambassador on GitHub
- The Ambassador documentation
- Improvements to the Ingress API
Or join the community on Slack!
K8s KPIs with Kuberhealthy
Building Onward from Kuberhealthy v2.0.0
Last November at KubeCon San Diego 2019, we announced the release of Kuberhealthy 2.0.0 - transforming Kuberhealthy into a Kubernetes operator for synthetic monitoring. This new ability granted developers the means to create their own Kuberhealthy check containers to synthetically monitor their applications and clusters. The community was quick to adopt this new feature and we're grateful for everyone who implemented and tested Kuberhealthy 2.0.0 in their clusters. Thanks to all of you who reported issues and contributed to discussions on the #kuberhealthy Slack channel. We quickly set to work to address all your feedback with a newer version of Kuberhealthy. Additionally, we created a guide on how to easily install and use Kuberhealthy in order to capture some helpful synthetic KPIs.
Deploying Kuberhealthy
To install Kuberhealthy, make sure you have Helm 3 installed. If not, you can use the generated flat spec files located in this deploy folder. You should use kuberhealthy-prometheus.yaml if you don't use the Prometheus Operator, and kuberhealthy-prometheus-operator.yaml if you do. If you don't use Prometheus at all, you can still use Kuberhealthy with a JSON status page and/or InfluxDB integration using this spec.
To install using Helm 3:
1. Create namespace "kuberhealthy" in the desired Kubernetes cluster/context:
kubectl create namespace kuberhealthy
2. Set your current namespace to "kuberhealthy":
kubectl config set-context --current --namespace=kuberhealthy
3. Add the kuberhealthy repo to Helm:
helm repo add kuberhealthy https://comcast.github.io/kuberhealthy/helm-repos
4. Depending on your Prometheus implementation, install Kuberhealthy using the appropriate command for your cluster:
- If you use the Prometheus Operator:
helm install kuberhealthy kuberhealthy/kuberhealthy --set prometheus.enabled=true,prometheus.enableAlerting=true,prometheus.enableScraping=true,prometheus.serviceMonitor=true
- If you use Prometheus, but NOT Prometheus Operator:
helm install kuberhealthy kuberhealthy/kuberhealthy --set prometheus.enabled=true,prometheus.enableAlerting=true,prometheus.enableScraping=true
See additional details about configuring the appropriate scrape annotations in the section Prometheus Integration Details below.
- Finally, if you don't use Prometheus:
helm install kuberhealthy kuberhealthy/kuberhealthy
Running the Helm command should automatically install the newest version of Kuberhealthy (v2.2.0) along with a few basic checks. If you run kubectl get pods, you should see two Kuberhealthy pods. These are the pods that create, coordinate, and track test pods. These two Kuberhealthy pods also serve a JSON status page as well as a /metrics endpoint. Every other pod you see created is a checker pod designed to execute and shut down when done.
Configuring Additional Checks
Next, you can run kubectl get khchecks. You should see three Kuberhealthy checks installed by default:
- daemonset: Deploys and tears down a daemonset to ensure all nodes in the cluster are functional.
- deployment: Creates a deployment and then triggers a rolling update. Tests that the deployment is reachable via a service and then deletes everything. Any problem in this process will cause this check to report a failure.
- dns-status-internal: Validates that internal cluster DNS is functioning as expected.
To view other available external checks, check out the external checks registry where you can find other yaml files you can apply to your cluster to enable various checks.
Kuberhealthy check pods should start running shortly after Kuberhealthy starts running (1-2 minutes). Additionally, the check-reaper cronjob runs every few minutes to ensure there are no more than 5 completed checker pods left lying around at a time.
To get status page view of these checks, you'll need to either expose the kuberhealthy service externally by editing the service kuberhealthy and setting Type: LoadBalancer or use kubectl port-forward service/kuberhealthy 8080:80. When viewed, the service endpoint will display a JSON status page that looks like this:
{
"OK": true,
"Errors": [],
"CheckDetails": {
"kuberhealthy/daemonset": {
"OK": true,
"Errors": [],
"RunDuration": "22.512278967s",
"Namespace": "kuberhealthy",
"LastRun": "2020-04-06T23:20:31.7176964Z",
"AuthoritativePod": "kuberhealthy-67bf8c4686-mbl2j",
"uuid": "9abd3ec0-b82f-44f0-b8a7-fa6709f759cd"
},
"kuberhealthy/deployment": {
"OK": true,
"Errors": [],
"RunDuration": "29.142295647s",
"Namespace": "kuberhealthy",
"LastRun": "2020-04-06T23:20:31.7176964Z",
"AuthoritativePod": "kuberhealthy-67bf8c4686-mbl2j",
"uuid": "5f0d2765-60c9-47e8-b2c9-8bc6e61727b2"
},
"kuberhealthy/dns-status-internal": {
"OK": true,
"Errors": [],
"RunDuration": "2.43940936s",
"Namespace": "kuberhealthy",
"LastRun": "2020-04-06T23:20:44.6294547Z",
"AuthoritativePod": "kuberhealthy-67bf8c4686-mbl2j",
"uuid": "c85f95cb-87e2-4ff5-b513-e02b3d25973a"
}
},
"CurrentMaster": "kuberhealthy-7cf79bdc86-m78qr"
}
This JSON page displays all Kuberhealthy checks running in your cluster. If you have Kuberhealthy checks running in different namespaces, you can filter them by adding the GET variable namespace parameter: ?namespace=kuberhealthy,kube-system onto the status page URL.
Writing Your Own Checks
Kuberhealthy is designed to be extended with custom check containers that can be written by anyone to check anything. These checks can be written in any language as long as they are packaged in a container. This makes Kuberhealthy an excellent platform for creating your own synthetic checks!
Creating your own check is a great way to validate your client library, simulate real user workflow, and create a high level of confidence in your service or system uptime.
To learn more about writing your own checks, along with simple examples, check the custom check creation documentation.
Prometheus Integration Details
When enabling Prometheus (not the operator), the Kuberhealthy service gets the following annotations added:
prometheus.io/path: /metrics
prometheus.io/port: "80"
prometheus.io/scrape: "true"
In your prometheus configuration, add the following example scrape_config that scrapes the Kuberhealthy service given the added prometheus annotation:
- job_name: 'kuberhealthy'
scrape_interval: 1m
honor_labels: true
metrics_path: /metrics
kubernetes_sd_configs:
- role: service
namespaces:
names:
- kuberhealthy
relabel_configs:
- source_labels: [__meta_kubernetes_service_annotation_prometheus_io_scrape]
action: keep
regex: true
You can also specify the target endpoint to be scraped using this example job:
- job_name: kuberhealthy
scrape_interval: 1m
honor_labels: true
metrics_path: /metrics
static_configs:
- targets:
- kuberhealthy.kuberhealthy.svc.cluster.local:80
Once the appropriate prometheus configurations are applied, you should be able to see the following Kuberhealthy metrics:
kuberhealthy_checkkuberhealthy_check_duration_secondskuberhealthy_cluster_stateskuberhealthy_running
Creating Key Performance Indicators
Using these Kuberhealthy metrics, our team has been able to collect KPIs based on the following definitions, calculations, and PromQL queries.
Availability
We define availability as the K8s cluster control plane being up and functioning as expected. This is measured by our ability to create a deployment, do a rolling update, and delete the deployment within a set period of time.
We calculate this by measuring Kuberhealthy's deployment check successes and failures.
Availability = Uptime / (Uptime * Downtime)
Uptime = Number of Deployment Check Passes * Check Run Interval
Downtime = Number of Deployment Check Fails * Check Run Interval
Check Run Interval = how often the check runs (
runIntervalset in your KuberhealthyCheck Spec)PromQL Query (Availability % over the past 30 days):
1 - (sum(count_over_time(kuberhealthy_check{check="kuberhealthy/deployment", status="0"}[30d])) OR vector(0)) / sum(count_over_time(kuberhealthy_check{check="kuberhealthy/deployment", status="1"}[30d]))
Utilization
We define utilization as user uptake of product (k8s) and its resources (pods, services, etc.). This is measured by how many nodes, deployments, statefulsets, persistent volumes, services, pods, and jobs are being utilized by our customers. We calculate this by counting the total number of nodes, deployments, statefulsets, persistent volumes, services, pods, and jobs.
Duration (Latency)
We define duration as the control plane's capacity and utilization of throughput. We calculate this by capturing the average run duration of a Kuberhealthy deployment check run.
- PromQL Query (Deployment check average run duration):
avg(kuberhealthy_check_duration_seconds{check="kuberhealthy/deployment"})
Errors / Alerts
We define errors as all k8s cluster and Kuberhealthy related alerts. Every time one of our Kuberhealthy check fails, we are alerted of this failure.
Thank You!
Thanks again to everyone in the community for all of your contributions and help! We are excited to see what you build. As always, if you find an issue, have a feature request, or need to open a pull request, please open an issue on the Github project.
My exciting journey into Kubernetes’ history
Editor's note: Sascha is part of SIG Release and is working on many other different container runtime related topics. Feel free to reach him out on Twitter @saschagrunert.
A story of data science-ing 90,000 GitHub issues and pull requests by using Kubeflow, TensorFlow, Prow and a fully automated CI/CD pipeline.
- Introduction
- Getting the Data
- Exploring the Data
- Building the Machine Learning Model
- Automate Everything
- Automatic Labeling of new PRs
- Summary
Introduction
Choosing the right steps when working in the field of data science is truly no silver bullet. Most data scientists might have their custom workflow, which could be more or less automated, depending on their area of work. Using Kubernetes can be a tremendous enhancement when trying to automate workflows on a large scale. In this blog post, I would like to take you on my journey of doing data science while integrating the overall workflow into Kubernetes.
The target of the research I did in the past few months was to find any useful information about all those thousands of GitHub issues and pull requests (PRs) we have in the Kubernetes repository. What I ended up with was a fully automated, in Kubernetes running Continuous Integration (CI) and Deployment (CD) data science workflow powered by Kubeflow and Prow. You may not know both of them, but we get to the point where I explain what they’re doing in detail. The source code of my work can be found in the kubernetes-analysis GitHub repository, which contains everything source code-related as well as the raw data. But how to retrieve this data I’m talking about? Well, this is where the story begins.
Getting the Data
The foundation for my experiments is the raw GitHub API data in plain JSON
format. The necessary data can be retrieved via the GitHub issues
endpoint, which returns all pull requests as well as regular issues in the
REST API. I exported roughly 91000 issues and pull requests in
the first iteration into a massive 650 MiB data blob. This took me about 8
hours of data retrieval time because for sure, the GitHub API is rate
limited. To be able to put this data into a GitHub repository, I’d chosen
to compress it via xz(1). The result was a roundabout 25 MiB sized
tarball, which fits well into the repository.
I had to find a way to regularly update the dataset because the Kubernetes issues and pull requests are updated by the users over time as well as new ones are created. To achieve the continuous update without having to wait 8 hours over and over again, I now fetch the delta GitHub API data between the last update and the current time. This way, a Continuous Integration job can update the data on a regular basis, whereas I can continue my research with the latest available set of data.
From a tooling perspective, I’ve written an all-in-one Python executable, which allows us to trigger the different steps during the data science experiments separately via dedicated subcommands. For example, to run an export of the whole data set, we can call:
> export GITHUB_TOKEN=<MY-SECRET-TOKEN>
> ./main export
INFO | Getting GITHUB_TOKEN from environment variable
INFO | Dumping all issues
INFO | Pulling 90929 items
INFO | 1: Unit test coverage in Kubelet is lousy. (~30%)
INFO | 2: Better error messages if go isn't installed, or if gcloud is old.
INFO | 3: Need real cluster integration tests
INFO | 4: kubelet should know which containers it is managing
… [just wait 8 hours] …
To update the data between the last time stamp stored in the repository we can run:
> ./main export --update-api
INFO | Getting GITHUB_TOKEN from environment variable
INFO | Retrieving issues and PRs
INFO | Updating API
INFO | Got update timestamp: 2020-05-09T10:57:40.854151
INFO | 90786: Automated cherry pick of #90749: fix: azure disk dangling attach issue
INFO | 90674: Switch core master base images from debian to distroless
INFO | 90086: Handling error returned by request.Request.ParseForm()
INFO | 90544: configurable weight on the CPU and memory
INFO | 87746: Support compiling Kubelet w/o docker/docker
INFO | Using already extracted data from data/data.pickle
INFO | Loading pickle dataset
INFO | Parsed 34380 issues and 55832 pull requests (90212 items)
INFO | Updating data
INFO | Updating issue 90786 (updated at 2020-05-09T10:59:43Z)
INFO | Updating issue 90674 (updated at 2020-05-09T10:58:27Z)
INFO | Updating issue 90086 (updated at 2020-05-09T10:58:26Z)
INFO | Updating issue 90544 (updated at 2020-05-09T10:57:51Z)
INFO | Updating issue 87746 (updated at 2020-05-09T11:01:51Z)
INFO | Saving data
This gives us an idea of how fast the project is actually moving: On a Saturday at noon (European time), 5 issues and pull requests got updated within literally 5 minutes!
Funnily enough, Joe Beda, one of the founders of Kubernetes, created the first GitHub issue mentioning that the unit test coverage is too low. The issue has no further description than the title, and no enhanced labeling applied, like we know from more recent issues and pull requests. But now we have to explore the exported data more deeply to do something useful with it.
Exploring the Data
Before we can start creating machine learning models and train them, we have to get an idea about how our data is structured and what we want to achieve in general.
To get a better feeling about the amount of data, let’s look at how many issues and pull requests have been created over time inside the Kubernetes repository:
> ./main analyze --created
INFO | Using already extracted data from data/data.pickle
INFO | Loading pickle dataset
INFO | Parsed 34380 issues and 55832 pull requests (90212 items)
The Python matplotlib module should pop up a graph which looks like this:
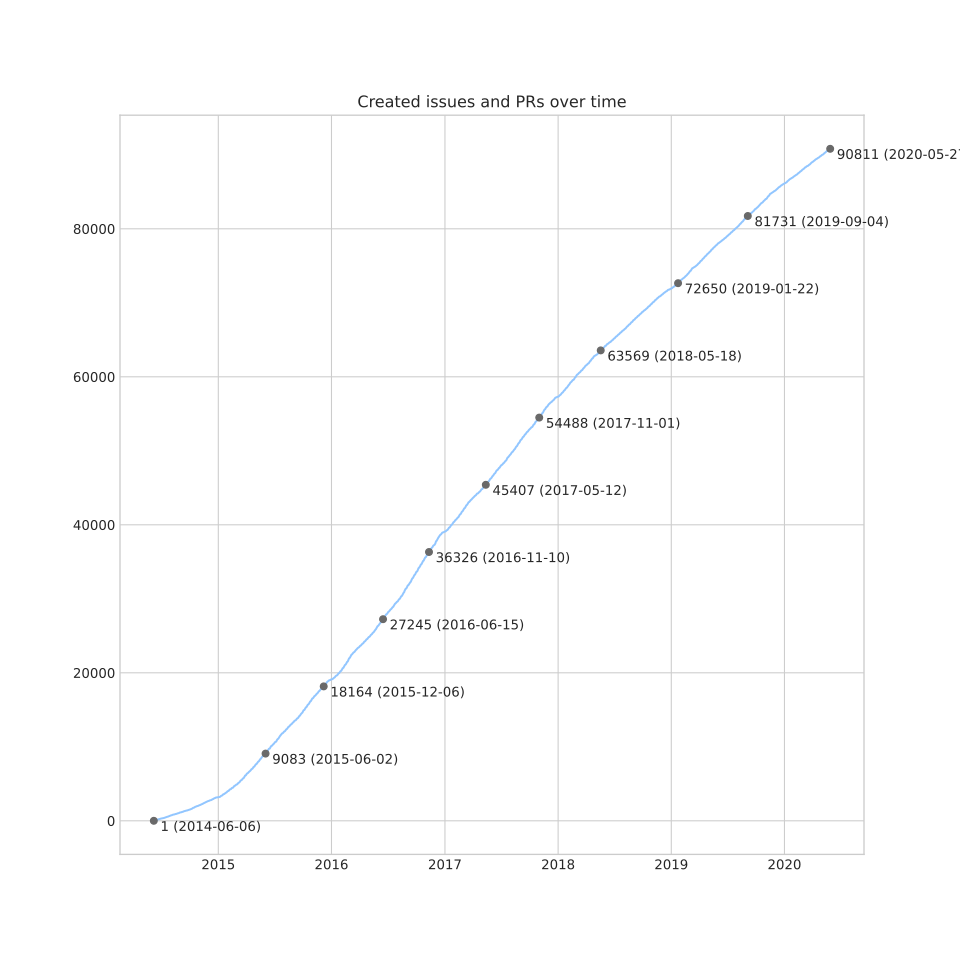
Okay, this looks not that spectacular but gives us an impression on how the project has grown over the past 6 years. To get a better idea about the speed of development of the project, we can look at the created-vs-closed metric. This means on our timeline, we add one to the y-axis if an issue or pull request got created and subtracts one if closed. Now the chart looks like this:
> ./main analyze --created-vs-closed
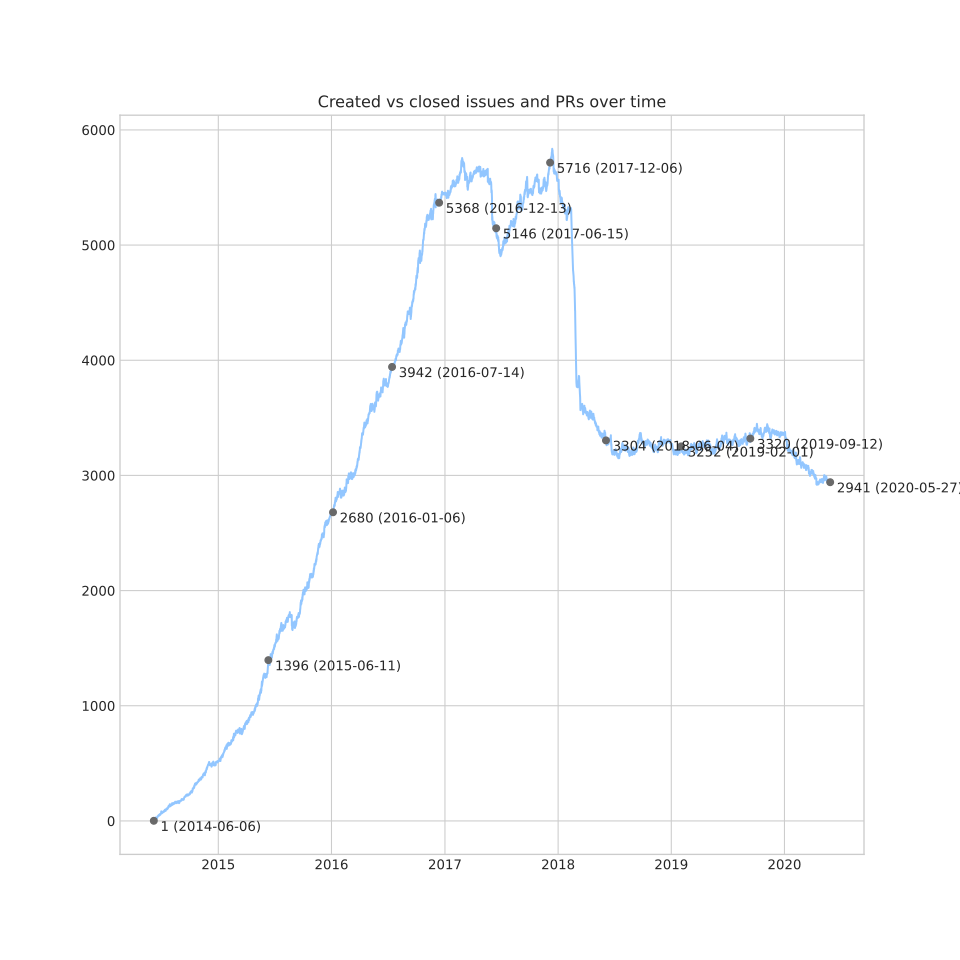
At the beginning of 2018, the Kubernetes projects introduced some more enhanced life-cycle management via the glorious fejta-bot. This automatically closes issues and pull requests after they got stale over a longer period of time. This resulted in a massive closing of issues, which does not apply to pull requests in the same amount. For example, if we look at the created-vs-closed metric only for pull requests.
> ./main analyze --created-vs-closed --pull-requests
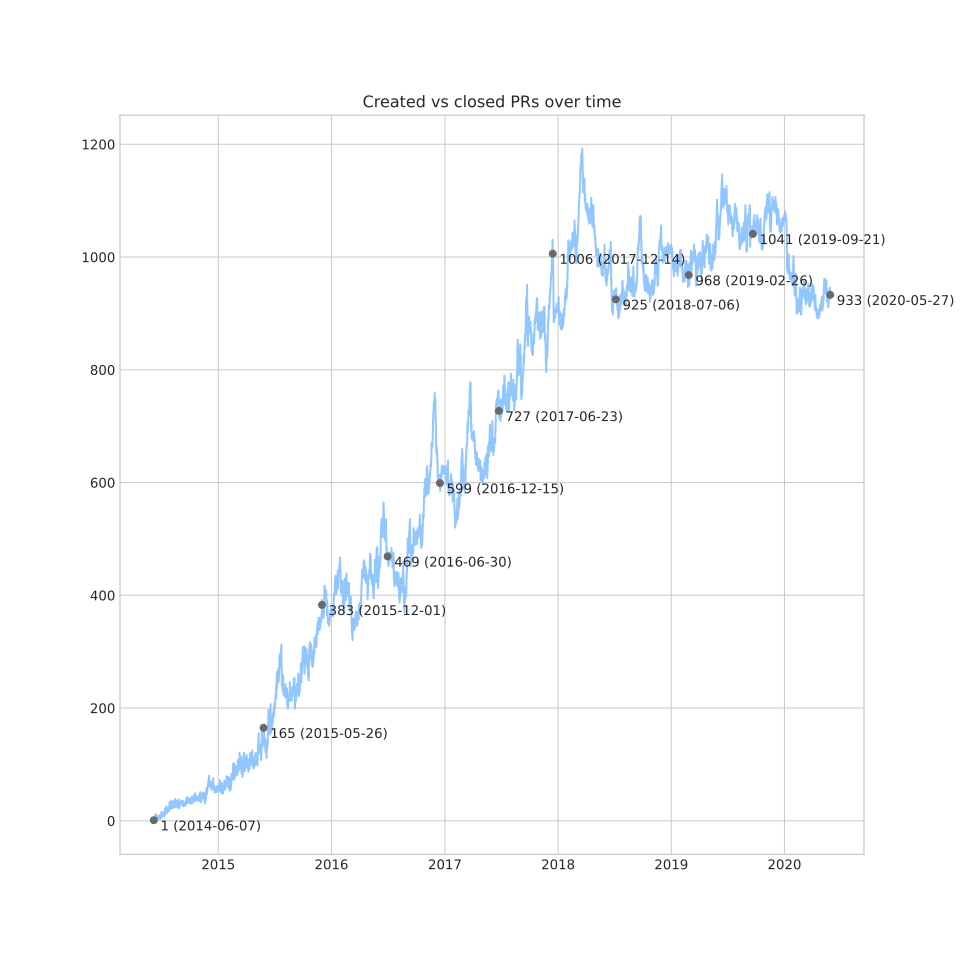
The overall impact is not that obvious. What we can see is that the increasing number of peaks in the PR chart indicates that the project is moving faster over time. Usually, a candlestick chart would be a better choice for showing this kind of volatility-related information. I’d also like to highlight that it looks like the development of the project slowed down a bit in the beginning of 2020.
Parsing raw JSON in every analysis iteration is not the fastest approach to do in Python. This means that I decided to parse the more important information, for example the content, title and creation time into dedicated issue and PR classes. This data will be pickle serialized into the repository as well, which allows an overall faster startup independently of the JSON blob.
A pull request is more or less the same as an issue in my analysis, except that it contains a release note.
Release notes in Kubernetes are written in the PRs description into a separate
release-note block like this:
```release-note
I changed something extremely important and you should note that.
```
Those release notes are parsed by dedicated Release Engineering Tools like
krel during the release creation process and will be part of the various
CHANGELOG.md files and the Release Notes Website. That seems like a
lot of magic, but in the end, the quality of the overall release notes is much
higher because they’re easy to edit, and the PR reviewers can ensure that we
only document real user-facing changes and nothing else.
The quality of the input data is a key aspect when doing data science. I decided to focus on the release notes because they seem to have the highest amount of overall quality when comparing them to the plain descriptions in issues and PRs. Besides that, they’re easy to parse, and we would not need to strip away the various issue and PR template text noise.
Labels, Labels, Labels
Issues and pull requests in Kubernetes get different labels applied during its
life-cycle. They are usually grouped via a single slash (/). For example, we
have kind/bug and kind/api-change or sig/node and sig/network. An easy
way to understand which label groups exist and how they’re distributed across
the repository is to plot them into a bar chart:
> ./main analyze --labels-by-group
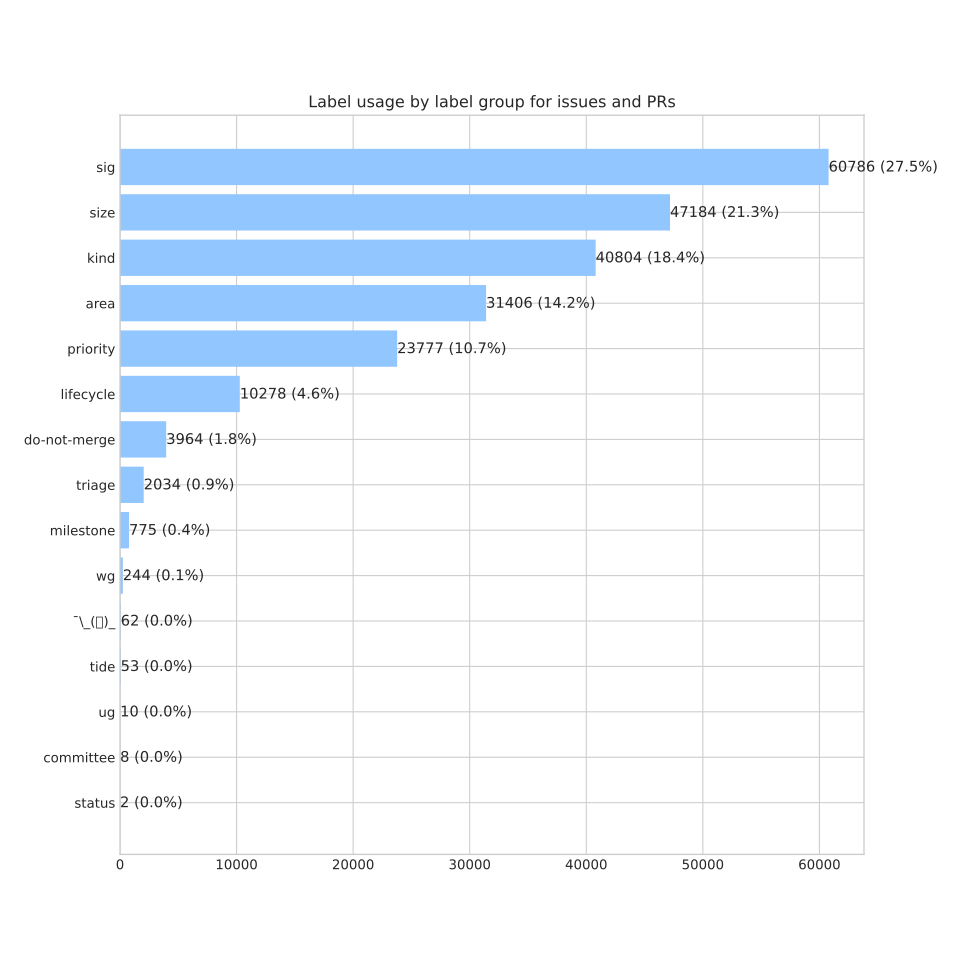
It looks like that sig/, kind/ and area/ labels are pretty common.
Something like size/ can be ignored for now because these labels are
automatically applied based on the amount of the code changes for a pull
request. We said that we want to focus on release notes as input data, which
means that we have to check out the distribution of the labels for the PRs. This
means that the top 25 labels on pull requests are:
> ./main analyze --labels-by-name --pull-requests
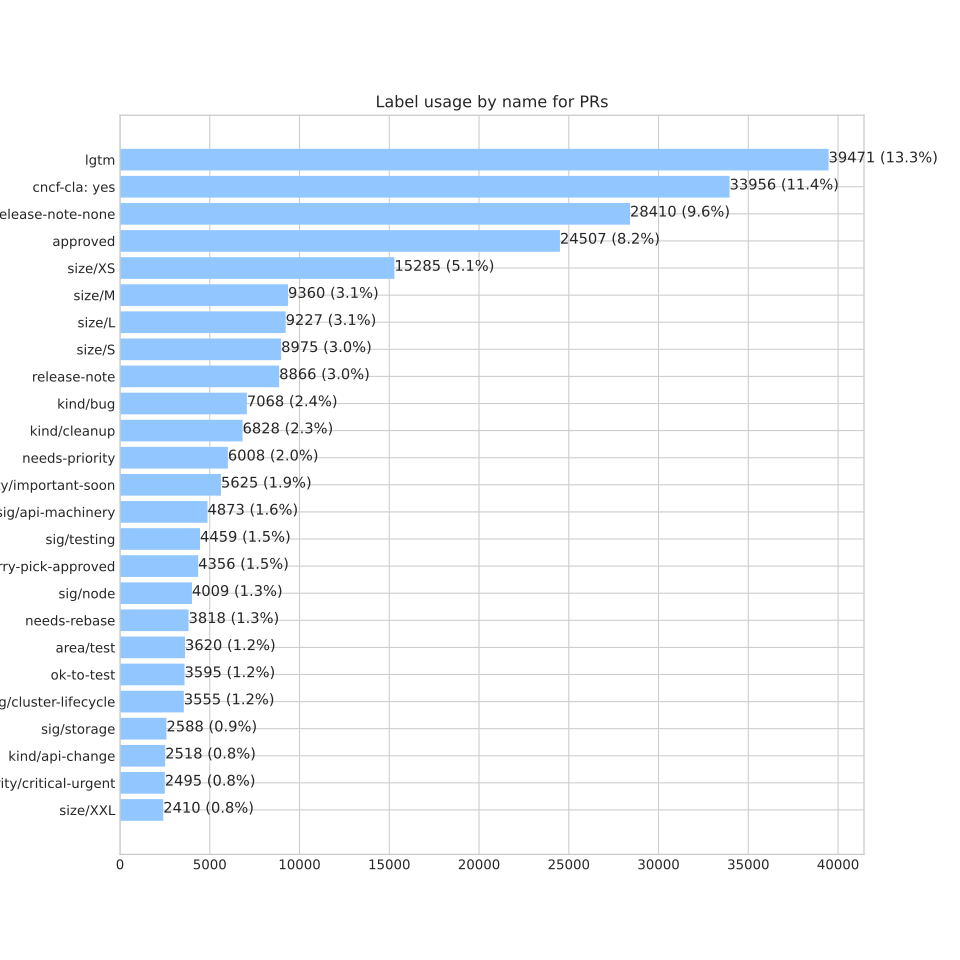
Again, we can ignore labels like lgtm (looks good to me), because every PR
which now should get merged has to look good. Pull requests containing release
notes automatically get the release-note label applied, which enables further
filtering more easily. This does not mean that every PR containing that label
also contains the release notes block. The label could have been applied
manually and the parsing of the release notes block did not exist since the
beginning of the project. This means we will probably loose a decent amount of
input data on one hand. On the other hand we can focus on the highest possible
data quality, because applying labels the right way needs some enhanced maturity
of the project and its contributors.
From a label group perspective I have chosen to focus on the kind/ labels.
Those labels are something which has to be applied manually by the author of the
PR, they are available on a good amount of pull requests and they’re related to
user-facing changes as well. Besides that, the kind/ choice has to be done for
every pull request because it is part of the PR template.
Alright, how does the distribution of those labels look like when focusing only on pull requests which have release notes?
> ./main analyze --release-notes-stats
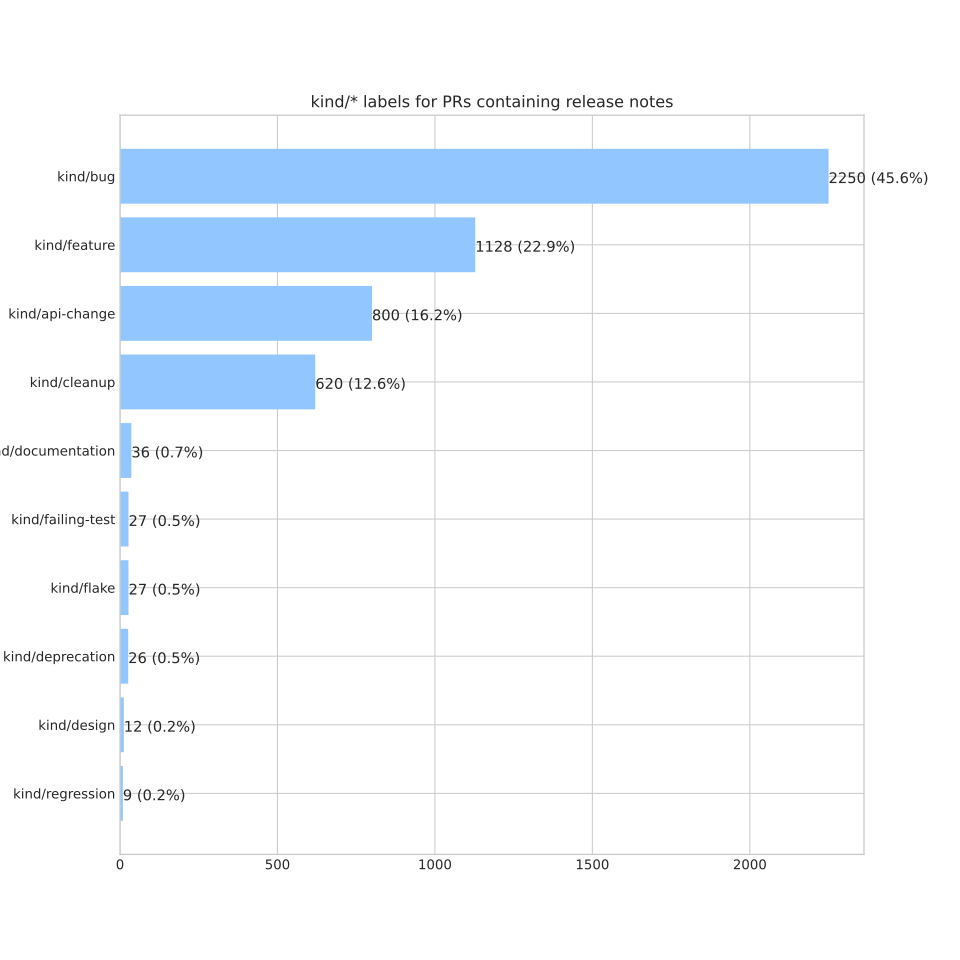
Interestingly, we have approximately 7,000 overall pull requests containing
release notes, but only ~5,000 have a kind/ label applied. The distribution of
the labels is not equal, and one-third of them are labeled as kind/bug. This
brings me to the next decision in my data science journey: I will build a binary
classifier which, for the sake of simplicity, is only able to distinguish between
bugs (via kind/bug) and non-bugs (where the label is not applied).
The main target is now to be able to classify newly incoming release notes if they are related to a bug or not, based on the historical data we already have from the community.
Before doing that, I recommend that you play around with the ./main analyze -h
subcommand as well to explore the latest set of data. You can also check out all
the continuously updated assets I provide within the analysis repository.
For example, those are the top 25 PR creators inside the Kubernetes repository:
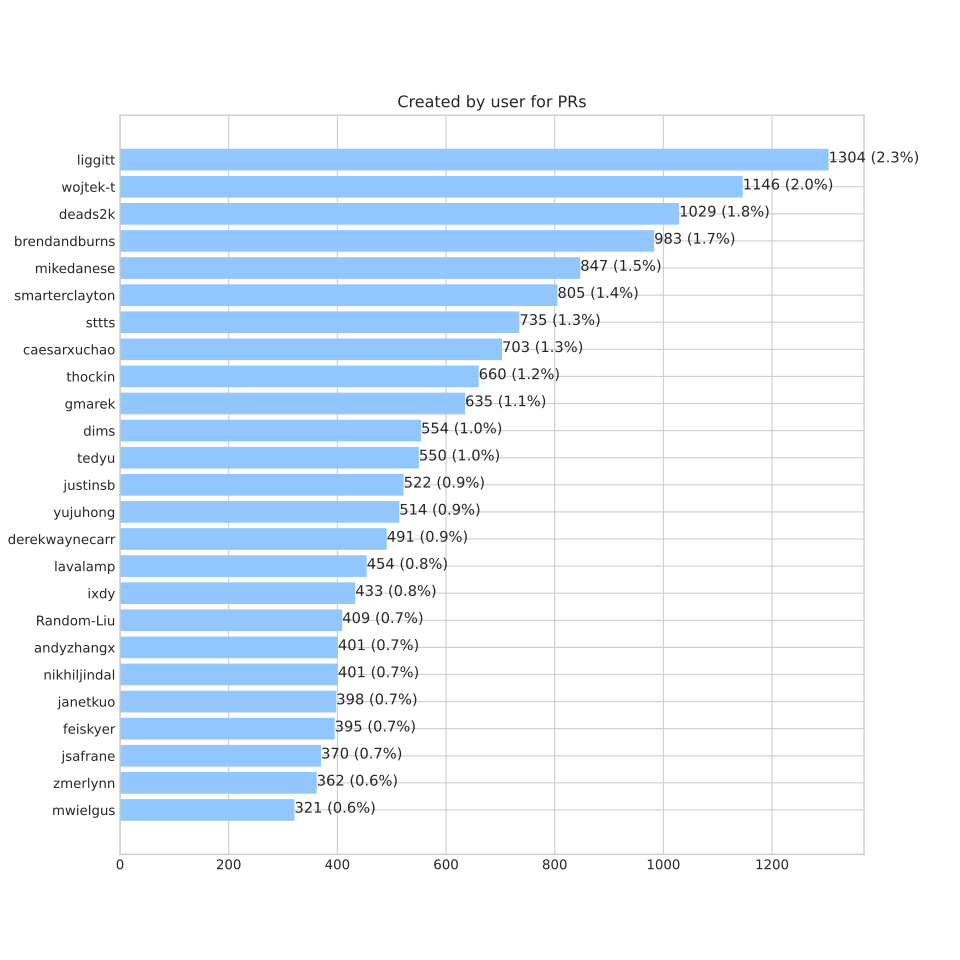
Building the Machine Learning Model
Now we have an idea what the data set is about, and we can start building a first machine learning model. Before actually building the model, we have to pre-process all the extracted release notes from the PRs. Otherwise, the model would not be able to understand our input.
Doing some first Natural Language Processing (NLP)
In the beginning, we have to define a vocabulary for which we want to train. I
decided to choose the TfidfVectorizer from the Python scikit-learn machine
learning library. This vectorizer is able to take our input texts and create a
single huge vocabulary out of it. This is our so-called bag-of-words,
which has a chosen n-gram range of (1, 2) (unigrams and bigrams). Practically
this means that we always use the first word and the next one as a single
vocabulary entry (bigrams). We also use the single word as vocabulary entry
(unigram). The TfidfVectorizer is able to skip words that occur multiple times
(max_df), and requires a minimum amount (min_df) to add a word to the
vocabulary. I decided not to change those values in the first place, just
because I had the intuition that release notes are something unique to a
project.
Parameters like min_df, max_df and the n-gram range can be seen as some of
our hyperparameters. Those parameters have to be optimized in a dedicated step
after the machine learning model has been built. This step is called
hyperparameter tuning and basically means that we train multiple times with
different parameters and compare the accuracy of the model. Afterwards, we choose
the parameters with the best accuracy.
During the training, the vectorizer will produce a data/features.json which
contains the whole vocabulary. This gives us a good understanding of how such a
vocabulary may look like:
[
…
"hostname",
"hostname address",
"hostname and",
"hostname as",
"hostname being",
"hostname bug",
…
]
This produces round about 50,000 entries in the overall bag-of-words, which is pretty much. Previous analyses between different data sets showed that it is simply not necessary to take so many features into account. Some general data sets state that an overall vocabulary of 20,000 is enough and higher amounts do not influence the accuracy any more. To do so we can use the SelectKBest feature selector to strip down the vocabulary to only choose the top features. Anyway, I still decided to stick to the top 50,000 to not negatively influence the model accuracy. We have a relatively low amount of data (appr. 7,000 samples) and a low number of words per sample (~15) which already made me wonder if we have enough data at all.
The vectorizer is not only able to create our bag-of-words, but it is also able to encode the features in term frequency–inverse document frequency (tf-idf) format. That is where the vectorizer got its name, whereas the output of that encoding is something the machine learning model can directly consume. All the details of the vectorization process can be found in the source code.
Creating the Multi-Layer Perceptron (MLP) Model
I decided to choose a simple MLP based model which is built with the help of the popular TensorFlow framework. Because we do not have that much input data, we just use two hidden layers, so that the model basically looks like this:
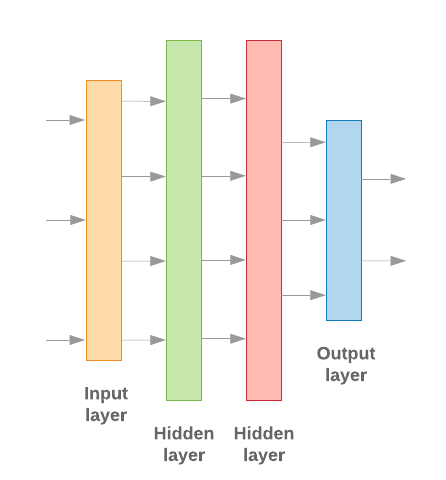
There have to be multiple other hyperparameters to be taken into account when creating the model. I will not discuss them in detail here, but they’re important to be optimized also in relation to the number of classes we want to have in the model (only two in our case).
Training the Model
Before starting the actual training, we have to split up our input data into training and validation data sets. I’ve chosen to use ~80% of the data for training and 20% for validation purposes. We have to shuffle our input data as well to ensure that the model is not affected by ordering issues. The technical details of the training process can be found in the GitHub sources. So now we’re ready to finally start the training:
> ./main train
INFO | Using already extracted data from data/data.pickle
INFO | Loading pickle dataset
INFO | Parsed 34380 issues and 55832 pull requests (90212 items)
INFO | Training for label 'kind/bug'
INFO | 6980 items selected
INFO | Using 5584 training and 1395 testing texts
INFO | Number of classes: 2
INFO | Vocabulary len: 51772
INFO | Wrote features to file data/features.json
INFO | Using units: 1
INFO | Using activation function: sigmoid
INFO | Created model with 2 layers and 64 units
INFO | Compiling model
INFO | Starting training
Train on 5584 samples, validate on 1395 samples
Epoch 1/1000
5584/5584 - 3s - loss: 0.6895 - acc: 0.6789 - val_loss: 0.6856 - val_acc: 0.6860
Epoch 2/1000
5584/5584 - 2s - loss: 0.6822 - acc: 0.6827 - val_loss: 0.6782 - val_acc: 0.6860
Epoch 3/1000
…
Epoch 68/1000
5584/5584 - 2s - loss: 0.2587 - acc: 0.9257 - val_loss: 0.4847 - val_acc: 0.7728
INFO | Confusion matrix:
[[920 32]
[291 152]]
INFO | Confusion matrix normalized:
[[0.966 0.034]
[0.657 0.343]]
INFO | Saving model to file data/model.h5
INFO | Validation accuracy: 0.7727598547935486, loss: 0.48470408514836355
The output of the Confusion Matrix shows us that we’re pretty good on
training accuracy, but the validation accuracy could be a bit higher. We now
could start a hyperparameter tuning to see if we can optimize the output of the
model even further. I will leave that experiment up to you with the hint to the
./main train --tune flag.
We saved the model (data/model.h5), the vectorizer (data/vectorizer.pickle)
and the feature selector (data/selector.pickle) to disk to be able to use them
later on for prediction purposes without having a need for additional training
steps.
A first Prediction
We are now able to test the model by loading it from disk and predicting some input text:
> ./main predict --test
INFO | Testing positive text:
Fix concurrent map access panic
Don't watch .mount cgroups to reduce number of inotify watches
Fix NVML initialization race condition
Fix brtfs disk metrics when using a subdirectory of a subvolume
INFO | Got prediction result: 0.9940581321716309
INFO | Matched expected positive prediction result
INFO | Testing negative text:
action required
1. Currently, if users were to explicitly specify CacheSize of 0 for
KMS provider, they would end-up with a provider that caches up to
1000 keys. This PR changes this behavior.
Post this PR, when users supply 0 for CacheSize this will result in
a validation error.
2. CacheSize type was changed from int32 to *int32. This allows
defaulting logic to differentiate between cases where users
explicitly supplied 0 vs. not supplied any value.
3. KMS Provider's endpoint (path to Unix socket) is now validated when
the EncryptionConfiguration files is loaded. This used to be handled
by the GRPCService.
INFO | Got prediction result: 0.1251964420080185
INFO | Matched expected negative prediction result
Both tests are real-world examples which already exist. We could also try something completely different, like this random tweet I found a couple of minutes ago:
./main predict "My dudes, if you can understand SYN-ACK, you can understand consent"
INFO | Got prediction result: 0.1251964420080185
ERROR | Result is lower than selected threshold 0.6
Looks like it is not classified as bug for a release note, which seems to work. Selecting a good threshold is also not that easy, but sticking to something > 50% should be the bare minimum.
Automate Everything
The next step is to find some way of automation to continuously update the model with new data. If I change any source code within my repository, then I’d like to get feedback about the test results of the model without having a need to run the training on my own machine. I would like to utilize the GPUs in my Kubernetes cluster to train faster and automatically update the data set if a PR got merged.
With the help of Kubeflow pipelines we can fulfill most of these requirements. The pipeline I built looks like this:
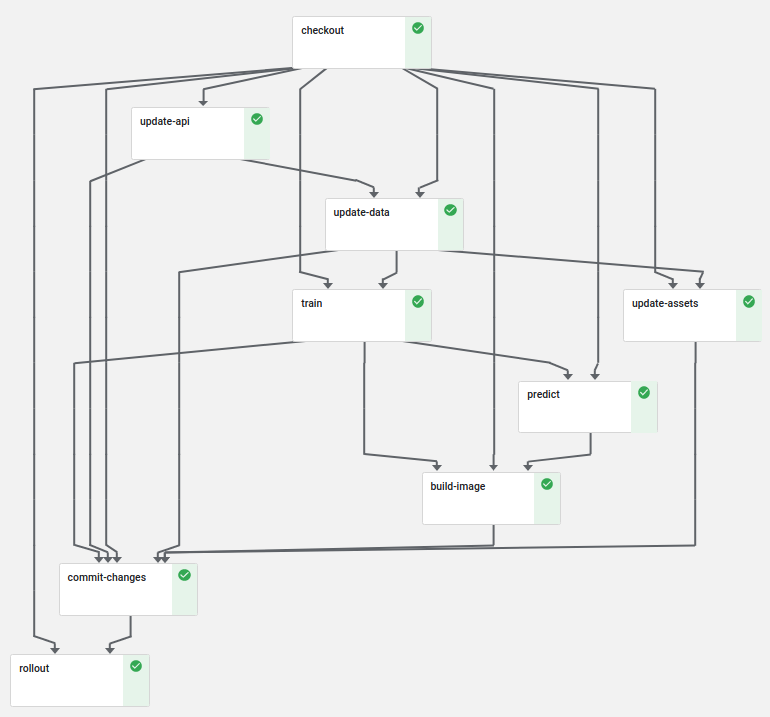
First, we check out the source code of the PR, which will be passed on as output artifact to all other steps. Then we incrementally update the API and internal data before we run the training on an always up-to-date data set. The prediction test verifies after the training that we did not badly influence the model with our changes.
We also built a container image within our pipeline. This container image
copies the previously built model, vectorizer, and selector into a container and
runs ./main serve. When doing this, we spin up a kfserving web server,
which can be used for prediction purposes. Do you want to try it out by yourself? Simply
do a JSON POST request like this and run the prediction against the endpoint:
> curl https://kfserving.k8s.saschagrunert.de/v1/models/kubernetes-analysis:predict \
-d '{"text": "my test text"}'
{"result": 0.1251964420080185}
The custom kfserving implementation is pretty straightforward, whereas the deployment utilizes Knative Serving and an Istio ingress gateway under the hood to correctly route the traffic into the cluster and provide the right set of services.
The commit-changes and rollout step will only run if the pipeline runs on
the master branch. Those steps make sure that we always have the latest data
set available on the master branch as well as in the kfserving deployment. The
rollout step creates a new canary deployment, which only accepts 50% of the
incoming traffic in the first place. After the canary got deployed successfully,
it will be promoted as the new main instance of the service. This is a great way
to ensure that the deployment works as intended and allows additional testing
after rolling out the canary.
But how to trigger Kubeflow pipelines when creating a pull request? Kubeflow has no feature for that right now. That’s why I decided to use Prow, Kubernetes test-infrastructure project for CI/CD purposes.
First of all, a 24h periodic job ensures that we have at least daily up-to-date data available within the repository. Then, if we create a pull request, Prow will run the whole Kubeflow pipeline without committing or rolling out any changes. If we merge the pull request via Prow, another job runs on the master and updates the data as well as the deployment. That’s pretty neat, isn’t it?
Automatic Labeling of new PRs
The prediction API is nice for testing, but now we need a real-world use case. Prow supports external plugins which can be used to take action on any GitHub event. I wrote a plugin which uses the kfserving API to make predictions based on new pull requests. This means if we now create a new pull request in the kubernetes-analysis repository, we will see the following:
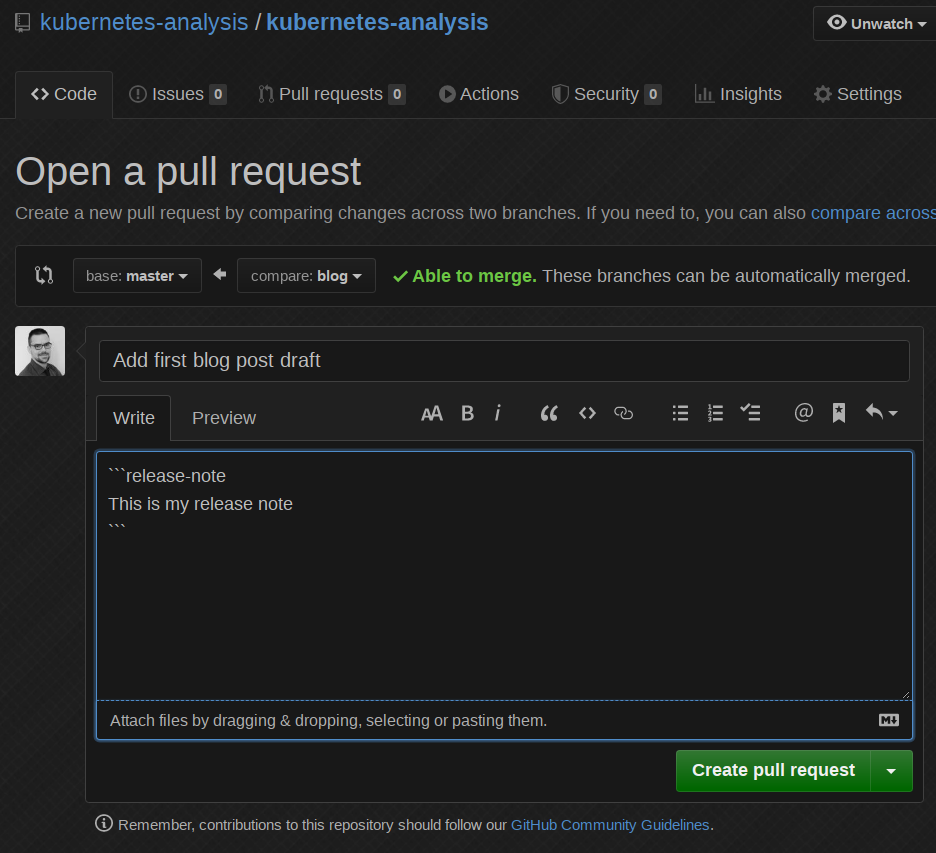
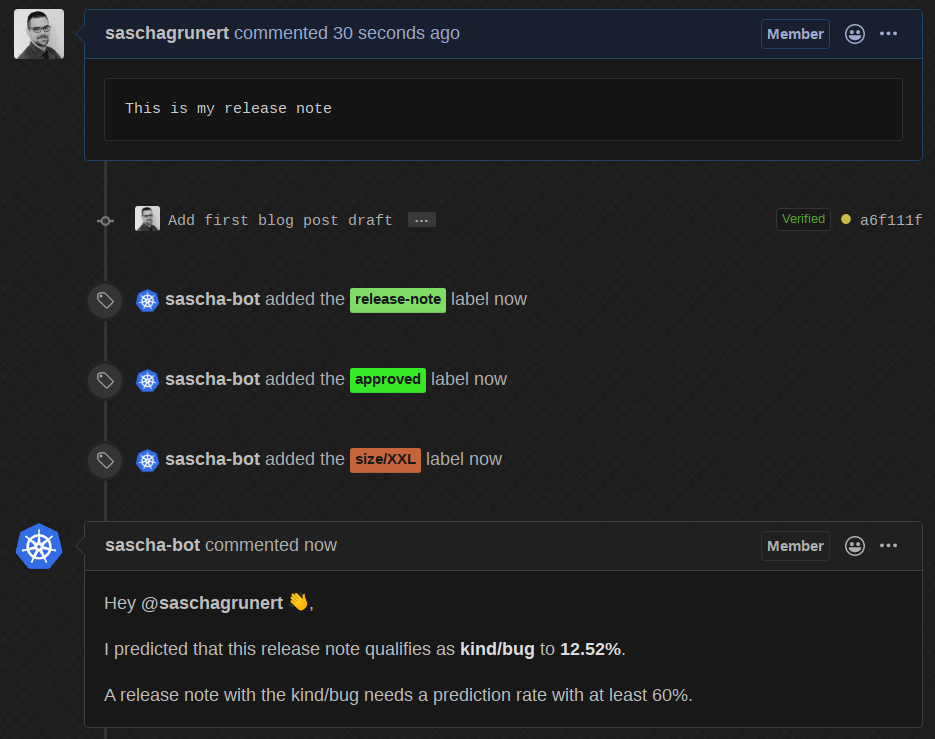
Okay cool, so now let’s change the release note based on a real bug from the already existing dataset:
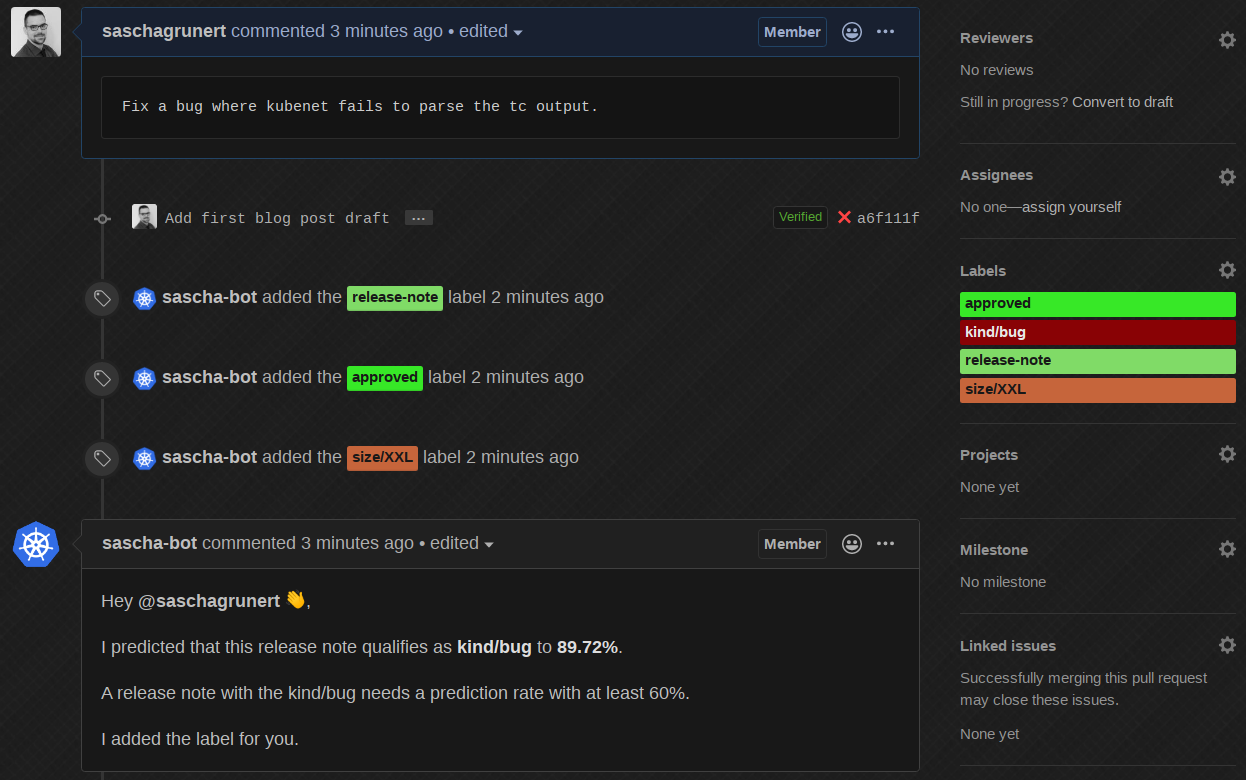
The bot edits its own comment, predicts it with round about 90% as kind/bug
and automatically adds the correct label! Now, if we change it back to some
different - obviously wrong - release note:
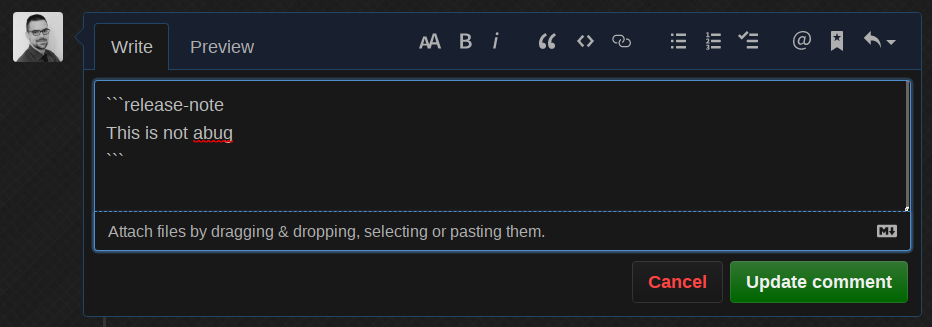
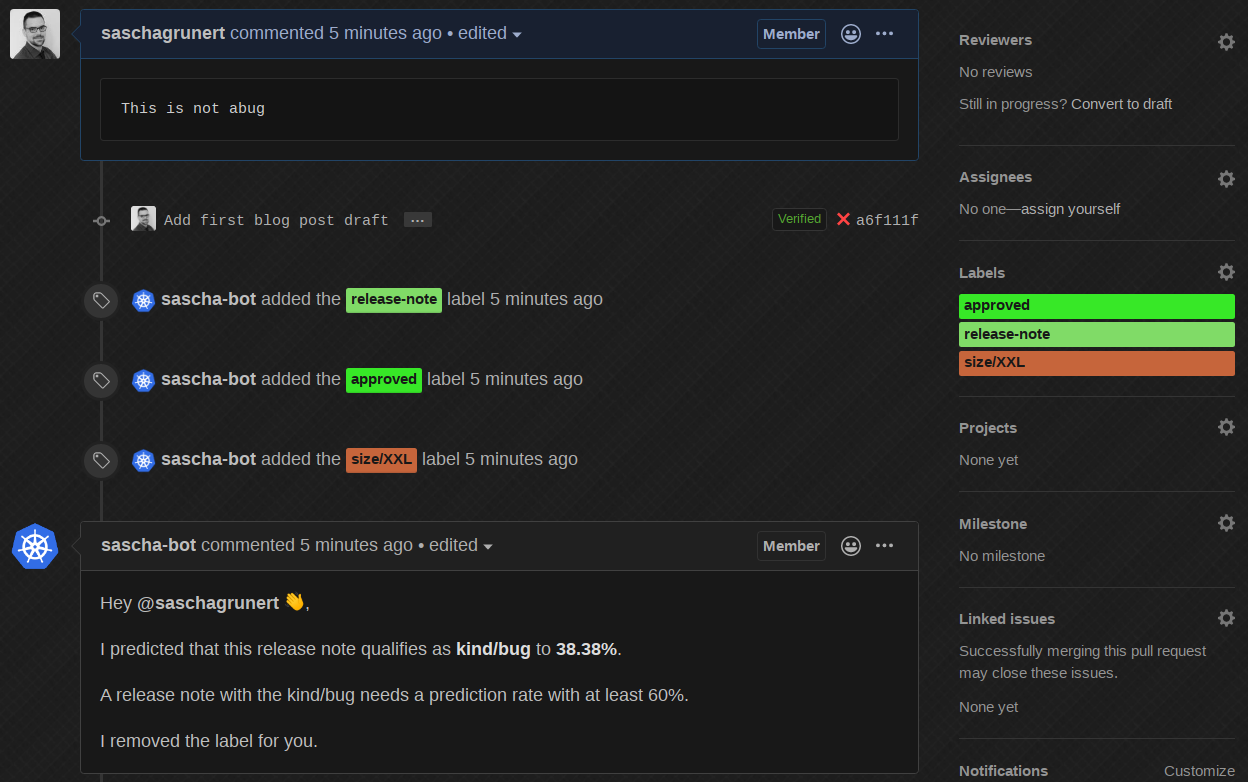
The bot does the work for us, removes the label and informs us what it did!
Finally, if we change the release note to None:
The bot removed the comment, which is nice and reduces the text noise on the PR. Everything I demonstrated is running inside a single Kubernetes cluster, which would make it unnecessary at all to expose the kfserving API to the public. This introduces an indirect API rate limiting because the only usage would be possible via the Prow bot user.
If you want to try it out for yourself, feel free to open a new test
issue in kubernetes-analysis. This works because I enabled the plugin
also for issues rather than only for pull requests.
So then, we have a running CI bot which is able to classify new release notes based on a machine learning model. If the bot would run in the official Kubernetes repository, then we could correct wrong label predictions manually. This way, the next training iteration would pick up the correction and result in a continuously improved model over time. All totally automated!
Summary
Thank you for reading down to here! This was my little data science journey
through the Kubernetes GitHub repository. There are a lot of other things to
optimize, for example introducing more classes (than just kind/bug or nothing)
or automatic hyperparameter tuning with Kubeflows Katib. If you have any
questions or suggestions, then feel free to get in touch with me anytime. See you
soon!
An Introduction to the K8s-Infrastructure Working Group
Author: Kiran "Rin" Oliver Storyteller, Kubernetes Upstream Marketing Team
An Introduction to the K8s-Infrastructure Working Group
Welcome to part one of a new series introducing the K8s-Infrastructure working group!
When Kubernetes was formed in 2014, Google undertook the task of building and maintaining the infrastructure necessary for keeping the project running smoothly. The tools itself were open source, but the Google Cloud Platform project used to run the infrastructure was internal-only, preventing contributors from being able to help out. In August 2018, Google granted the Cloud Native Computing Foundation $9M in credits for the operation of Kubernetes. The sentiment behind this was that a project such as Kubernetes should be both maintained and operated by the community itself rather than by a single vendor.
A group of community members enthusiastically undertook the task of collaborating on the path forward, realizing that there was a more formal infrastructure necessary. They joined together as a cross-team working group with ownership spanning across multiple Kubernetes SIGs (Architecture, Contributor Experience, Release, and Testing). Aaron Crickenberger worked with the Kubernetes Steering Committee to enable the formation of the working group, co-drafting a charter alongside long-time collaborator Davanum Srinivas, and by 2019 the working group was official.
What Issues Does the K8s-Infrastructure Working Group Tackle?
The team took on the complex task of managing the many moving parts of the infrastructure that sustains Kubernetes as a project.
The need started with necessity: the first problem they took on was a complete migration of all of the project's infrastructure from Google-owned infrastructure to the Cloud Native Computing Foundation (CNCF). This is being done so that the project is self-sustainable without the need of any direct assistance from individual vendors. This breaks down in the following ways:
- Identifying what infrastructure the Kubernetes project depends on.
- What applications are running?
- Where does it run?
- Where is its source code?
- What is custom built?
- What is off-the-shelf?
- What services depend on each other?
- How is it administered?
- Documenting guidelines and policies for how to run the infrastructure as a community.
- What are our access policies?
- How do we keep track of billing?
- How do we ensure privacy and security?
- Migrating infrastructure over to the CNCF as-is.
- What is the path of least resistance to migration?
- Improving the state of the infrastructure for sustainability.
- Moving from humans running scripts to a more automated GitOps model (YAML all the things!)
- Supporting community members who wish to develop new infrastructure
- Documenting the state of our efforts, better defining goals, and completeness indicators.
- The project and program management necessary to communicate this work to our massive community of contributors
The challenge of K8s-Infrastructure is documentation
The most crucial problem the working group is trying to tackle is that the project is all volunteer-led. This leads to contributors, chairs, and others involved in the project quickly becoming overscheduled. As a result of this, certain areas such as documentation and organization often lack information, and efforts to progress are taking longer than the group would like to complete.
Some of the infrastructure that is being migrated over hasn't been updated in a while, and its original authors or directly responsible individuals have moved on from working on Kubernetes. While this is great from the perspective of the fact that the code was able to run untouched for a long period of time, from the perspective of trying to migrate, this makes it difficult to identify how to operate these components, and how to move these infrastructure pieces where they need to be effectively.
The lack of documentation is being addressed head-on by group member Bart Smykla, but there is a definite need for others to support. If you're looking for a way to get involved and learn the infrastructure, you can become a new contributor to the working group!
Celebrating some Working Group wins
The team has made progress in the last few months that is well worth celebrating.
- The K8s-Infrastructure Working Group released an automated billing report that they start every meeting off by reviewing as a group.
- DNS for k8s.io and kubernetes.io are also fully community-owned, with community members able to file issues to manage records.
- The container registry registry.k8s.io is also fully community-owned and available for all Kubernetes subprojects to use. Note: The container registry has changed to registry.k8s.io. Updated on August 25, 2022.
- The Kubernetes publishing-bot responsible for keeping k8s.io/kubernetes/staging repositories published to their own top-level repos (For example: kubernetes/api) runs on a community-owned cluster.
- The gcsweb.k8s.io service used to provide anonymous access to GCS buckets for kubernetes artifacts runs on a community-owned cluster.
- There is also an automated process of promoting all our container images. This includes a fully documented infrastructure, managed by the Kubernetes community, with automated processes for provisioning permissions.
These are just a few of the things currently happening in the K8s Infrastructure working group.
If you're interested in getting involved, be sure to join the #wg-K8s-infra Slack Channel. Meetings are 60 minutes long, and are held every other Wednesday at 8:30 AM PT/16:30 UTC.
Join to help with the documentation, stay to learn about the amazing infrastructure supporting the Kubernetes community.
WSL+Docker: Kubernetes on the Windows Desktop
Introduction
New to Windows 10 and WSL2, or new to Docker and Kubernetes? Welcome to this blog post where we will install from scratch Kubernetes in Docker KinD and Minikube.
Why Kubernetes on Windows?
For the last few years, Kubernetes became a de-facto standard platform for running containerized services and applications in distributed environments. While a wide variety of distributions and installers exist to deploy Kubernetes in the cloud environments (public, private or hybrid), or within the bare metal environments, there is still a need to deploy and run Kubernetes locally, for example, on the developer's workstation.
Kubernetes has been originally designed to be deployed and used in the Linux environments. However, a good number of users (and not only application developers) use Windows OS as their daily driver. When Microsoft revealed WSL - the Windows Subsystem for Linux, the line between Windows and Linux environments became even less visible.
Also, WSL brought an ability to run Kubernetes on Windows almost seamlessly!
Below, we will cover in brief how to install and use various solutions to run Kubernetes locally.
Prerequisites
Since we will explain how to install KinD, we won't go into too much detail around the installation of KinD's dependencies.
However, here is the list of the prerequisites needed and their version/lane:
- OS: Windows 10 version 2004, Build 19041
- WSL2 enabled
- In order to install the distros as WSL2 by default, once WSL2 installed, run the command
wsl.exe --set-default-version 2in Powershell
- In order to install the distros as WSL2 by default, once WSL2 installed, run the command
- WSL2 distro installed from the Windows Store - the distro used is Ubuntu-18.04
- Docker Desktop for Windows, stable channel - the version used is 2.2.0.4
- [Optional] Microsoft Terminal installed from the Windows Store
- Open the Windows store and type "Terminal" in the search, it will be (normally) the first option
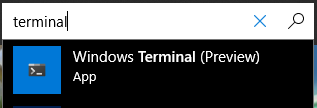
And that's actually it. For Docker Desktop for Windows, no need to configure anything yet as we will explain it in the next section.
WSL2: First contact
Once everything is installed, we can launch the WSL2 terminal from the Start menu, and type "Ubuntu" for searching the applications and documents:
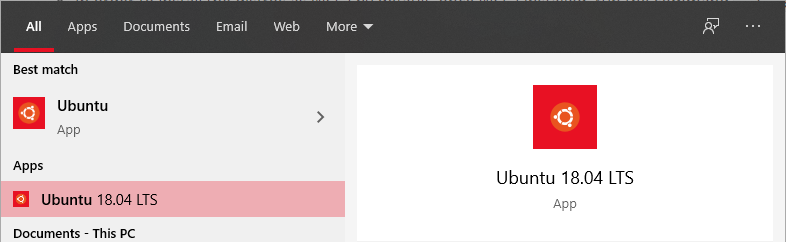
Once found, click on the name and it will launch the default Windows console with the Ubuntu bash shell running.
Like for any normal Linux distro, you need to create a user and set a password:
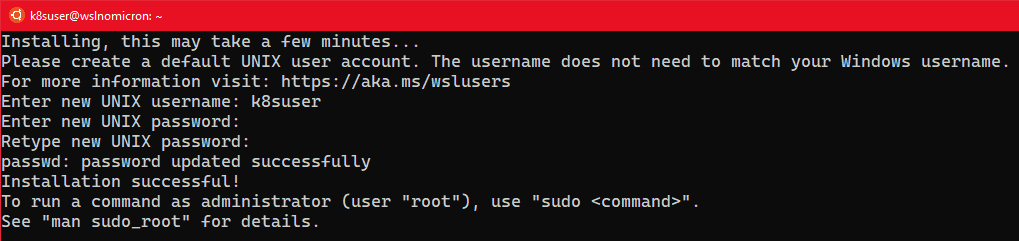
[Optional] Update the sudoers
As we are working, normally, on our local computer, it might be nice to update the sudoers and set the group %sudo to be password-less:
# Edit the sudoers with the visudo command
sudo visudo
# Change the %sudo group to be password-less
%sudo ALL=(ALL:ALL) NOPASSWD: ALL
# Press CTRL+X to exit
# Press Y to save
# Press Enter to confirm
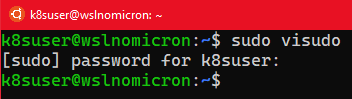
Update Ubuntu
Before we move to the Docker Desktop settings, let's update our system and ensure we start in the best conditions:
# Update the repositories and list of the packages available
sudo apt update
# Update the system based on the packages installed > the "-y" will approve the change automatically
sudo apt upgrade -y
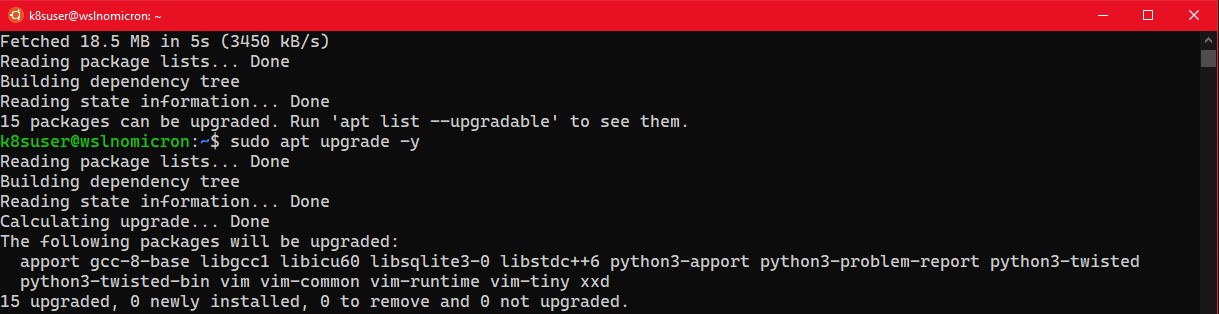
Docker Desktop: faster with WSL2
Before we move into the settings, let's do a small test, it will display really how cool the new integration with Docker Desktop is:
# Try to see if the docker cli and daemon are installed
docker version
# Same for kubectl
kubectl version
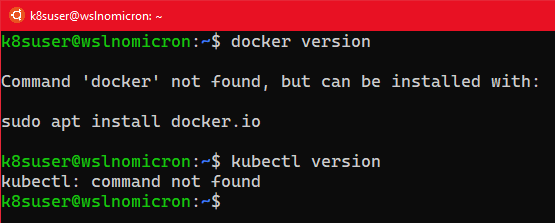
You got an error? Perfect! It's actually good news, so let's now move on to the settings.
Docker Desktop settings: enable WSL2 integration
First let's start Docker Desktop for Windows if it's not still the case. Open the Windows start menu and type "docker", click on the name to start the application:
You should now see the Docker icon with the other taskbar icons near the clock:

Now click on the Docker icon and choose settings. A new window will appear:
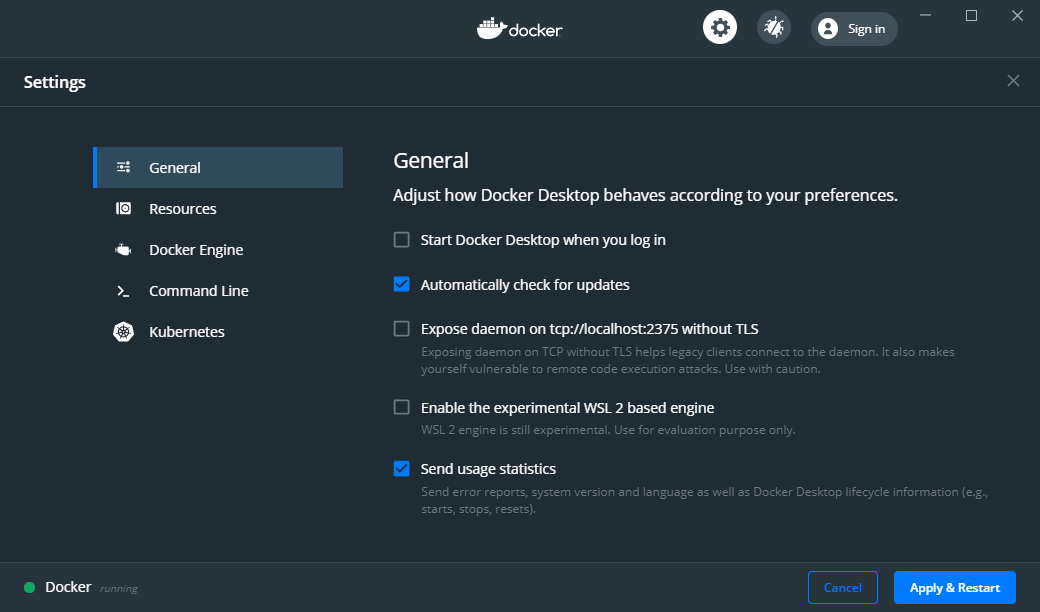
By default, the WSL2 integration is not active, so click the "Enable the experimental WSL 2 based engine" and click "Apply & Restart":
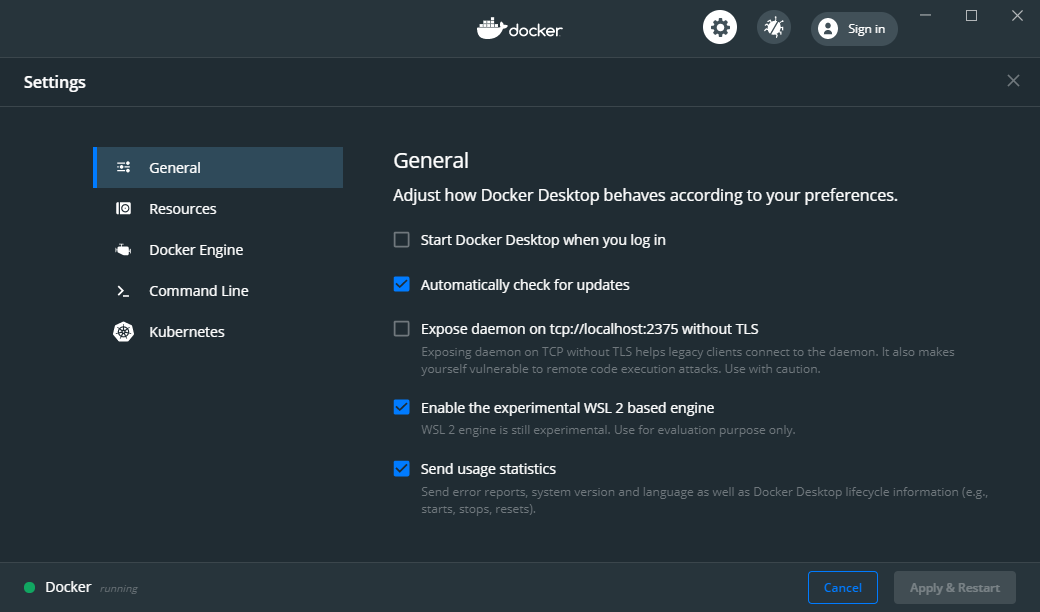
What this feature did behind the scenes was to create two new distros in WSL2, containing and running all the needed backend sockets, daemons and also the CLI tools (read: docker and kubectl command).
Still, this first setting is still not enough to run the commands inside our distro. If we try, we will have the same error as before.
In order to fix it, and finally be able to use the commands, we need to tell the Docker Desktop to "attach" itself to our distro also:
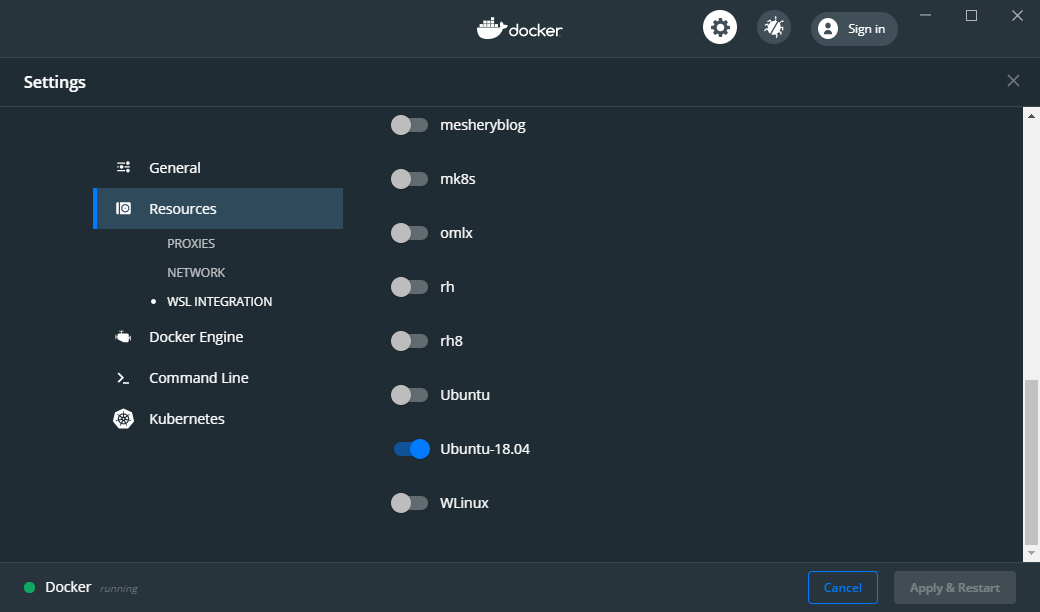
Let's now switch back to our WSL2 terminal and see if we can (finally) launch the commands:
# Try to see if the docker cli and daemon are installed
docker version
# Same for kubectl
kubectl version
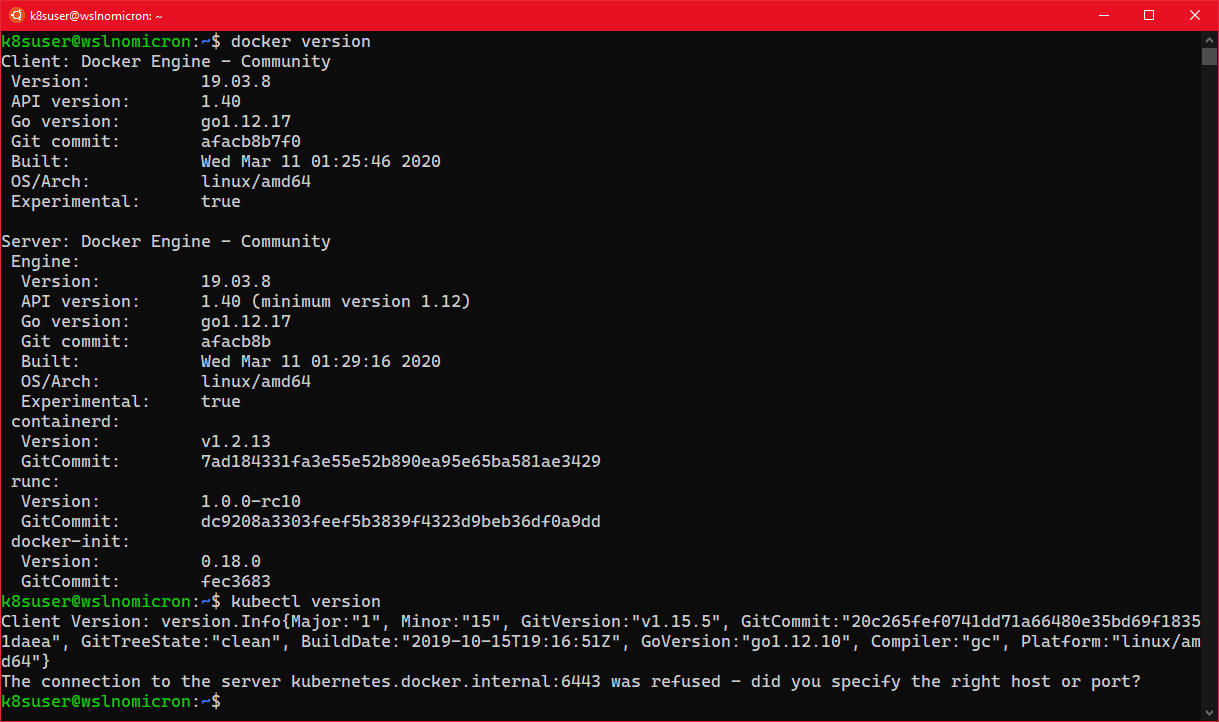
Tip: if nothing happens, restart Docker Desktop and restart the WSL process in Powershell:
Restart-Service LxssManagerand launch a new Ubuntu session
And success! The basic settings are now done and we move to the installation of KinD.
KinD: Kubernetes made easy in a container
Right now, we have Docker that is installed, configured and the last test worked fine.
However, if we look carefully at the kubectl command, it found the "Client Version" (1.15.5), but it didn't find any server.
This is normal as we didn't enable the Docker Kubernetes cluster. So let's install KinD and create our first cluster.
And as sources are always important to mention, we will follow (partially) the how-to on the official KinD website:
# Download the latest version of KinD
curl -Lo ./kind https://github.com/kubernetes-sigs/kind/releases/download/v0.7.0/kind-linux-amd64
# Make the binary executable
chmod +x ./kind
# Move the binary to your executable path
sudo mv ./kind /usr/local/bin/

KinD: the first cluster
We are ready to create our first cluster:
# Check if the KUBECONFIG is not set
echo $KUBECONFIG
# Check if the .kube directory is created > if not, no need to create it
ls $HOME/.kube
# Create the cluster and give it a name (optional)
kind create cluster --name wslkind
# Check if the .kube has been created and populated with files
ls $HOME/.kube
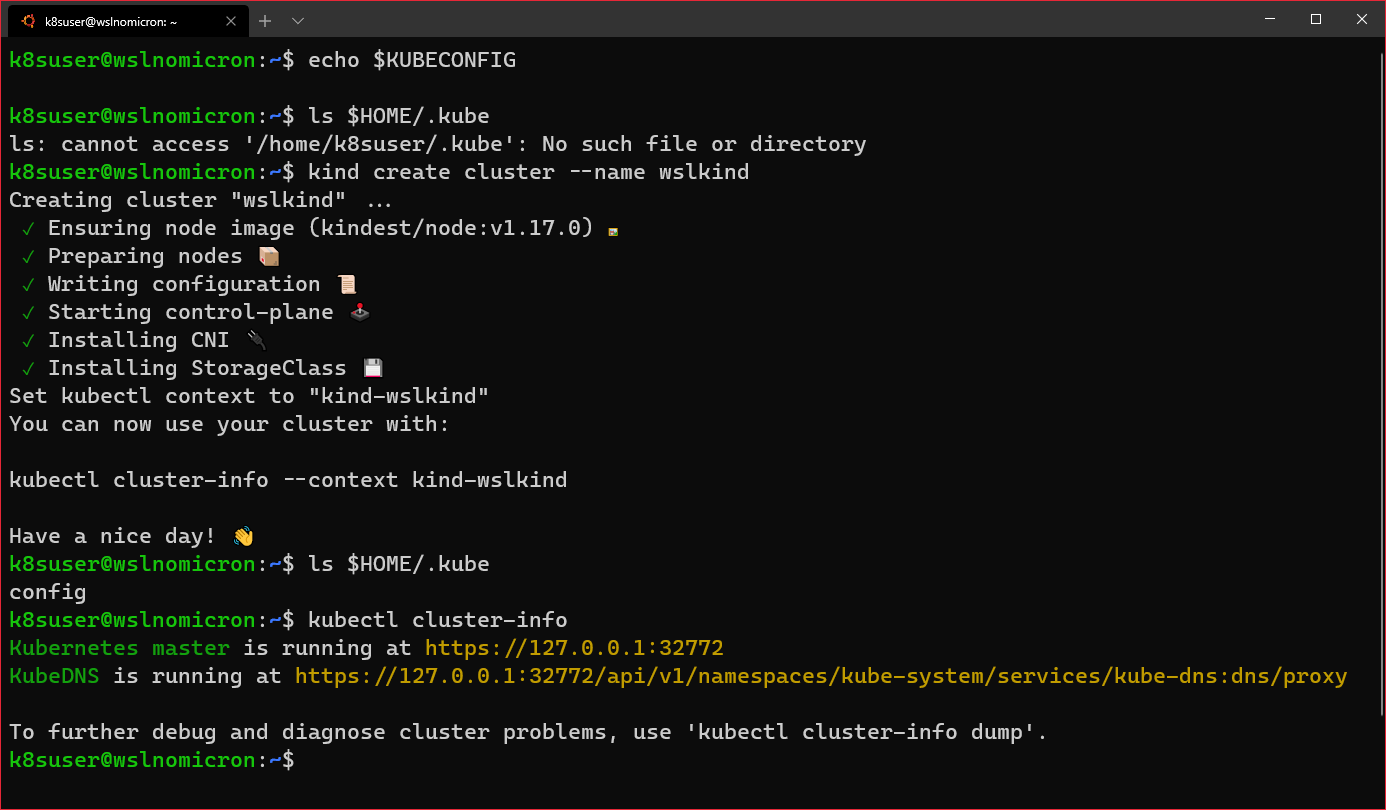
Tip: as you can see, the Terminal was changed so the nice icons are all displayed
The cluster has been successfully created, and because we are using Docker Desktop, the network is all set for us to use "as is".
So we can open the Kubernetes master URL in our Windows browser:
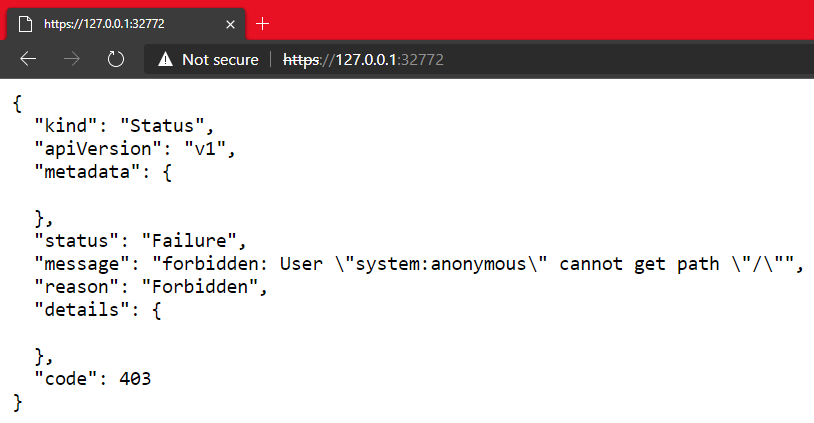
And this is the real strength from Docker Desktop for Windows with the WSL2 backend. Docker really did an amazing integration.
KinD: counting 1 - 2 - 3
Our first cluster was created and it's the "normal" one node cluster:
# Check how many nodes it created
kubectl get nodes
# Check the services for the whole cluster
kubectl get all --all-namespaces
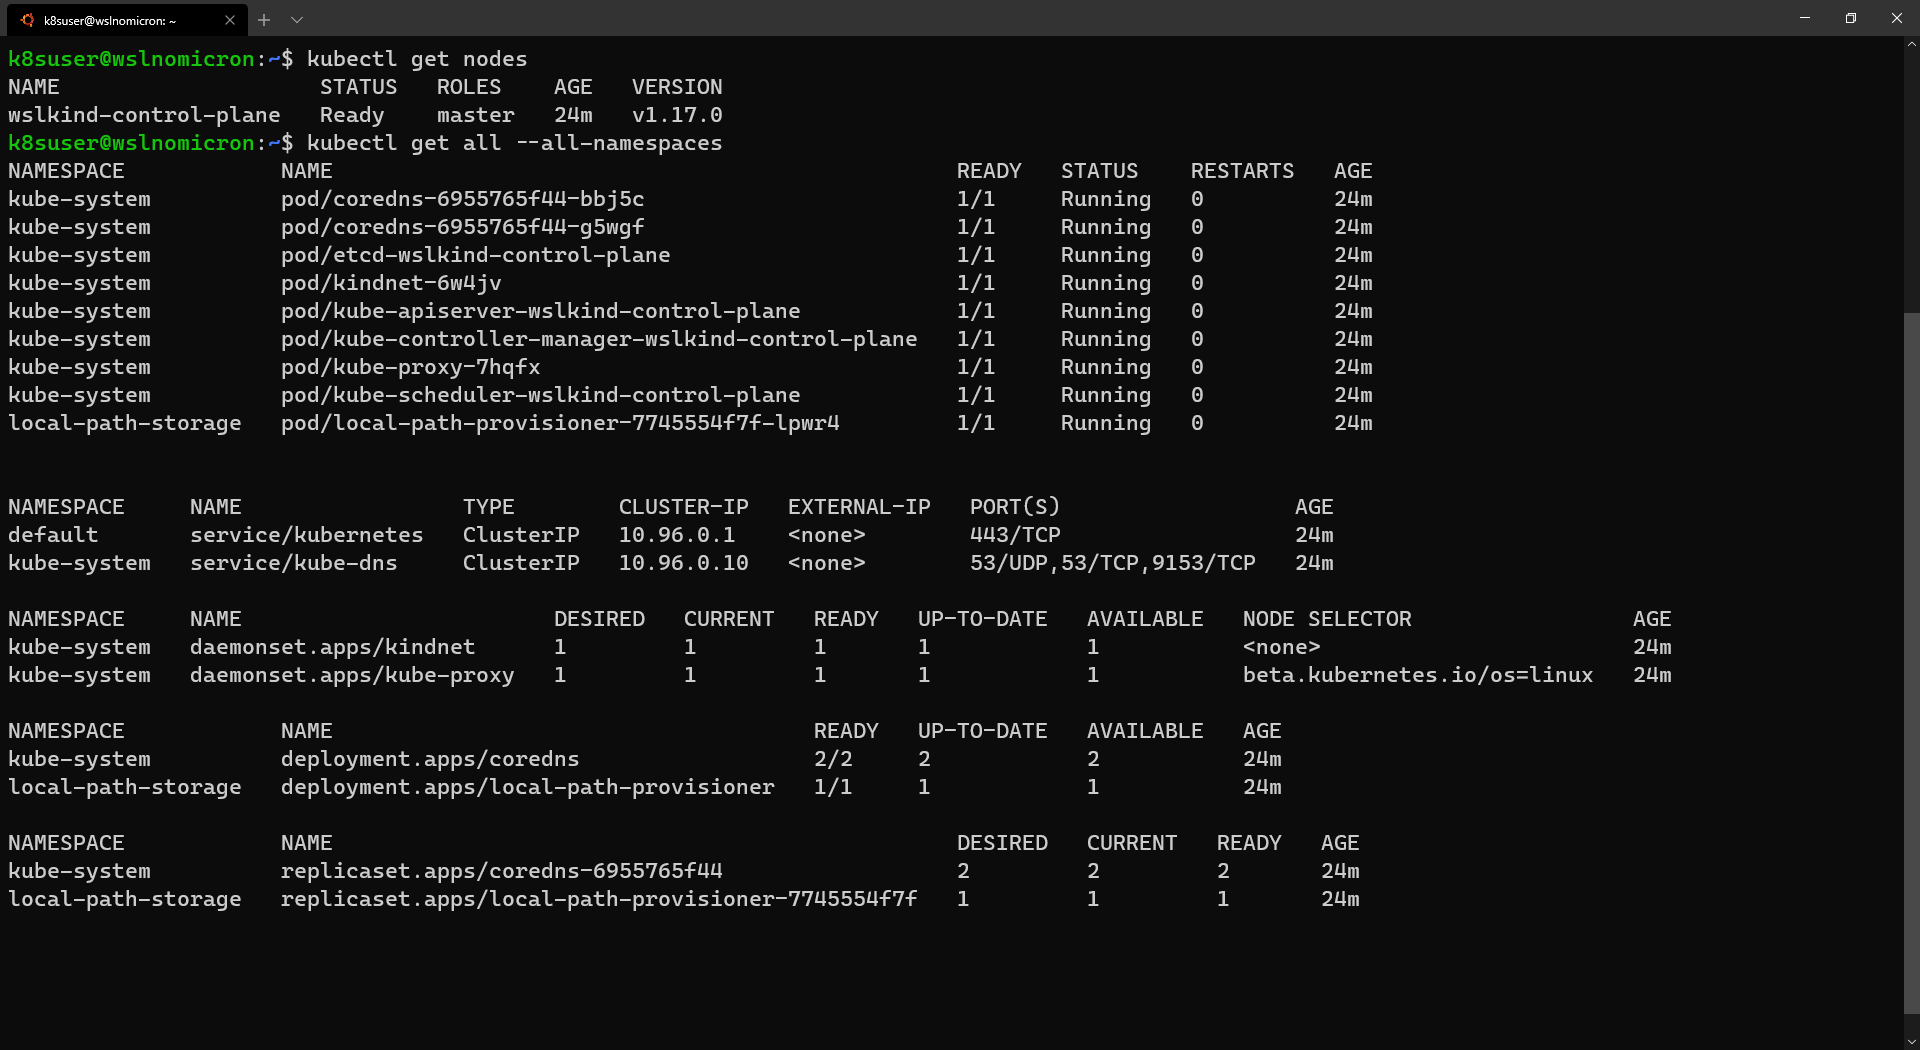
While this will be enough for most people, let's leverage one of the coolest feature, multi-node clustering:
# Delete the existing cluster
kind delete cluster --name wslkind
# Create a config file for a 3 nodes cluster
cat << EOF > kind-3nodes.yaml
kind: Cluster
apiVersion: kind.x-k8s.io/v1alpha4
nodes:
- role: control-plane
- role: worker
- role: worker
EOF
# Create a new cluster with the config file
kind create cluster --name wslkindmultinodes --config ./kind-3nodes.yaml
# Check how many nodes it created
kubectl get nodes
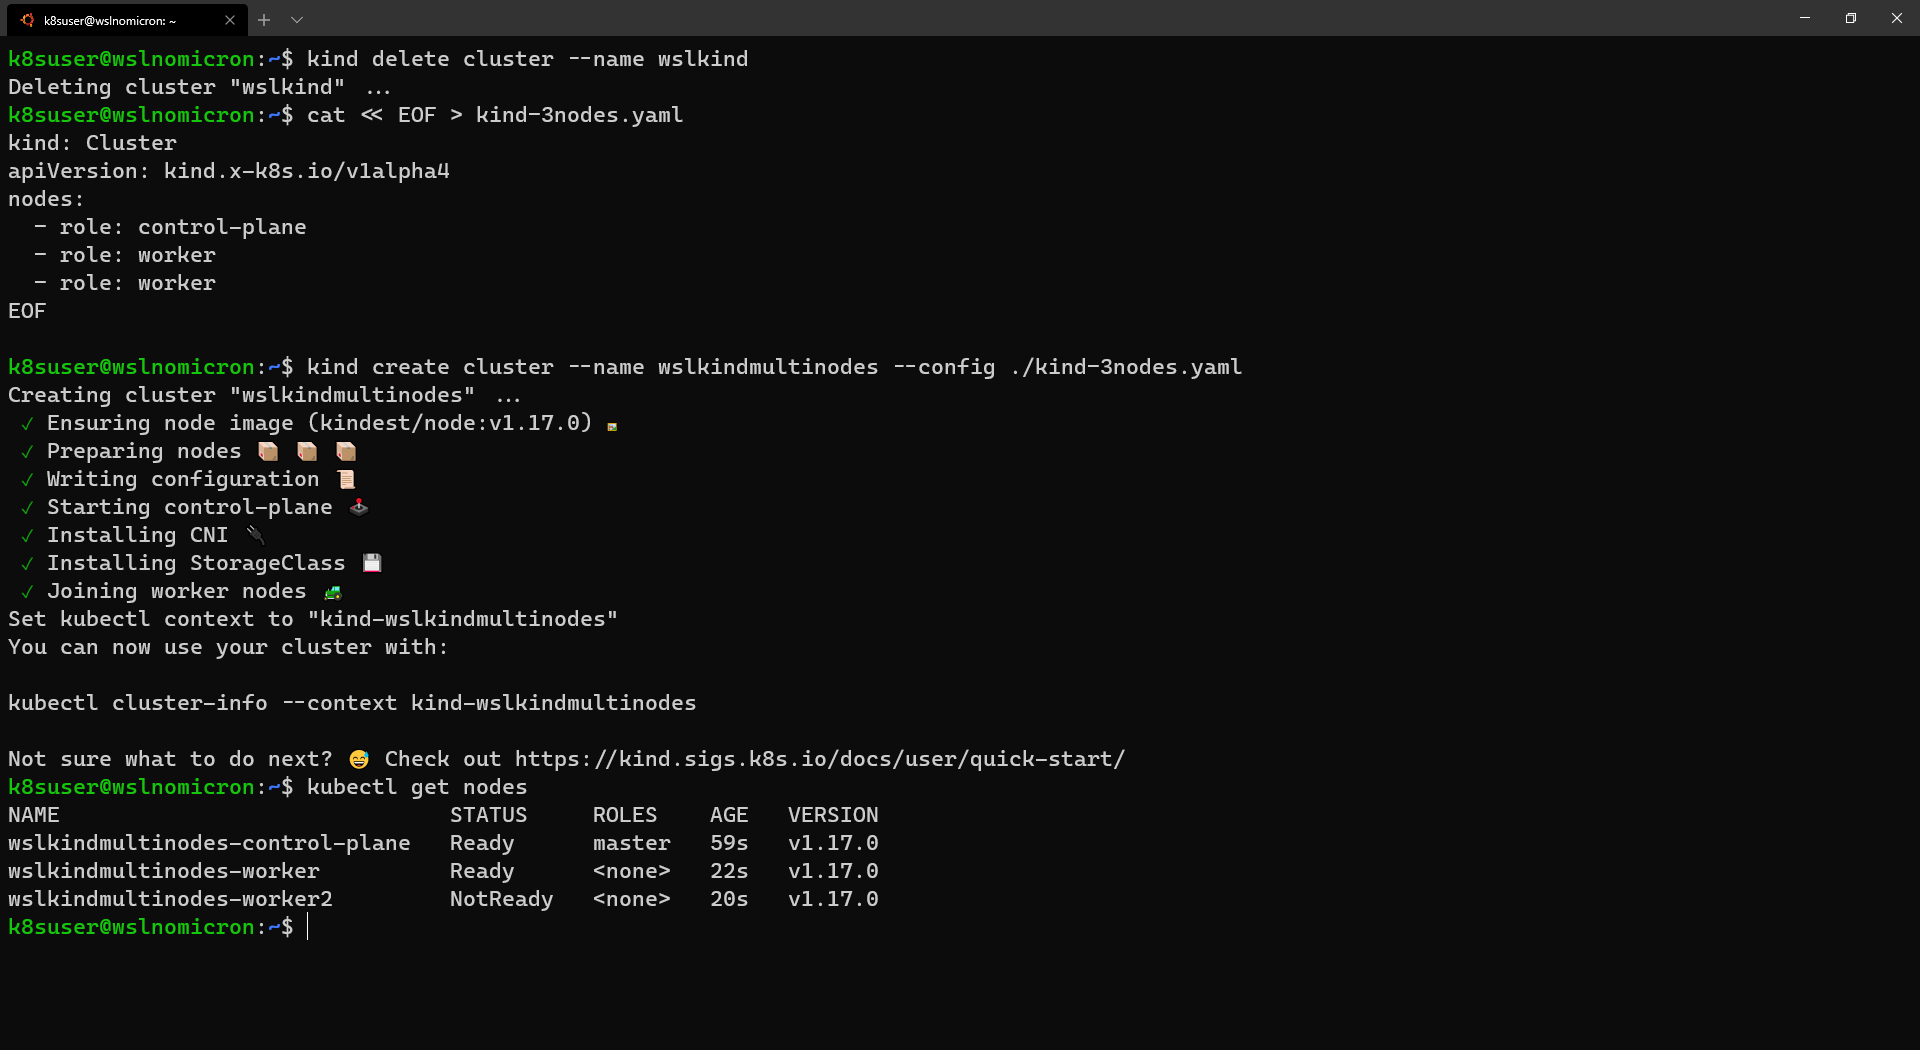
Tip: depending on how fast we run the "get nodes" command, it can be that not all the nodes are ready, wait few seconds and run it again, everything should be ready
And that's it, we have created a three-node cluster, and if we look at the services one more time, we will see several that have now three replicas:
# Check the services for the whole cluster
kubectl get all --all-namespaces
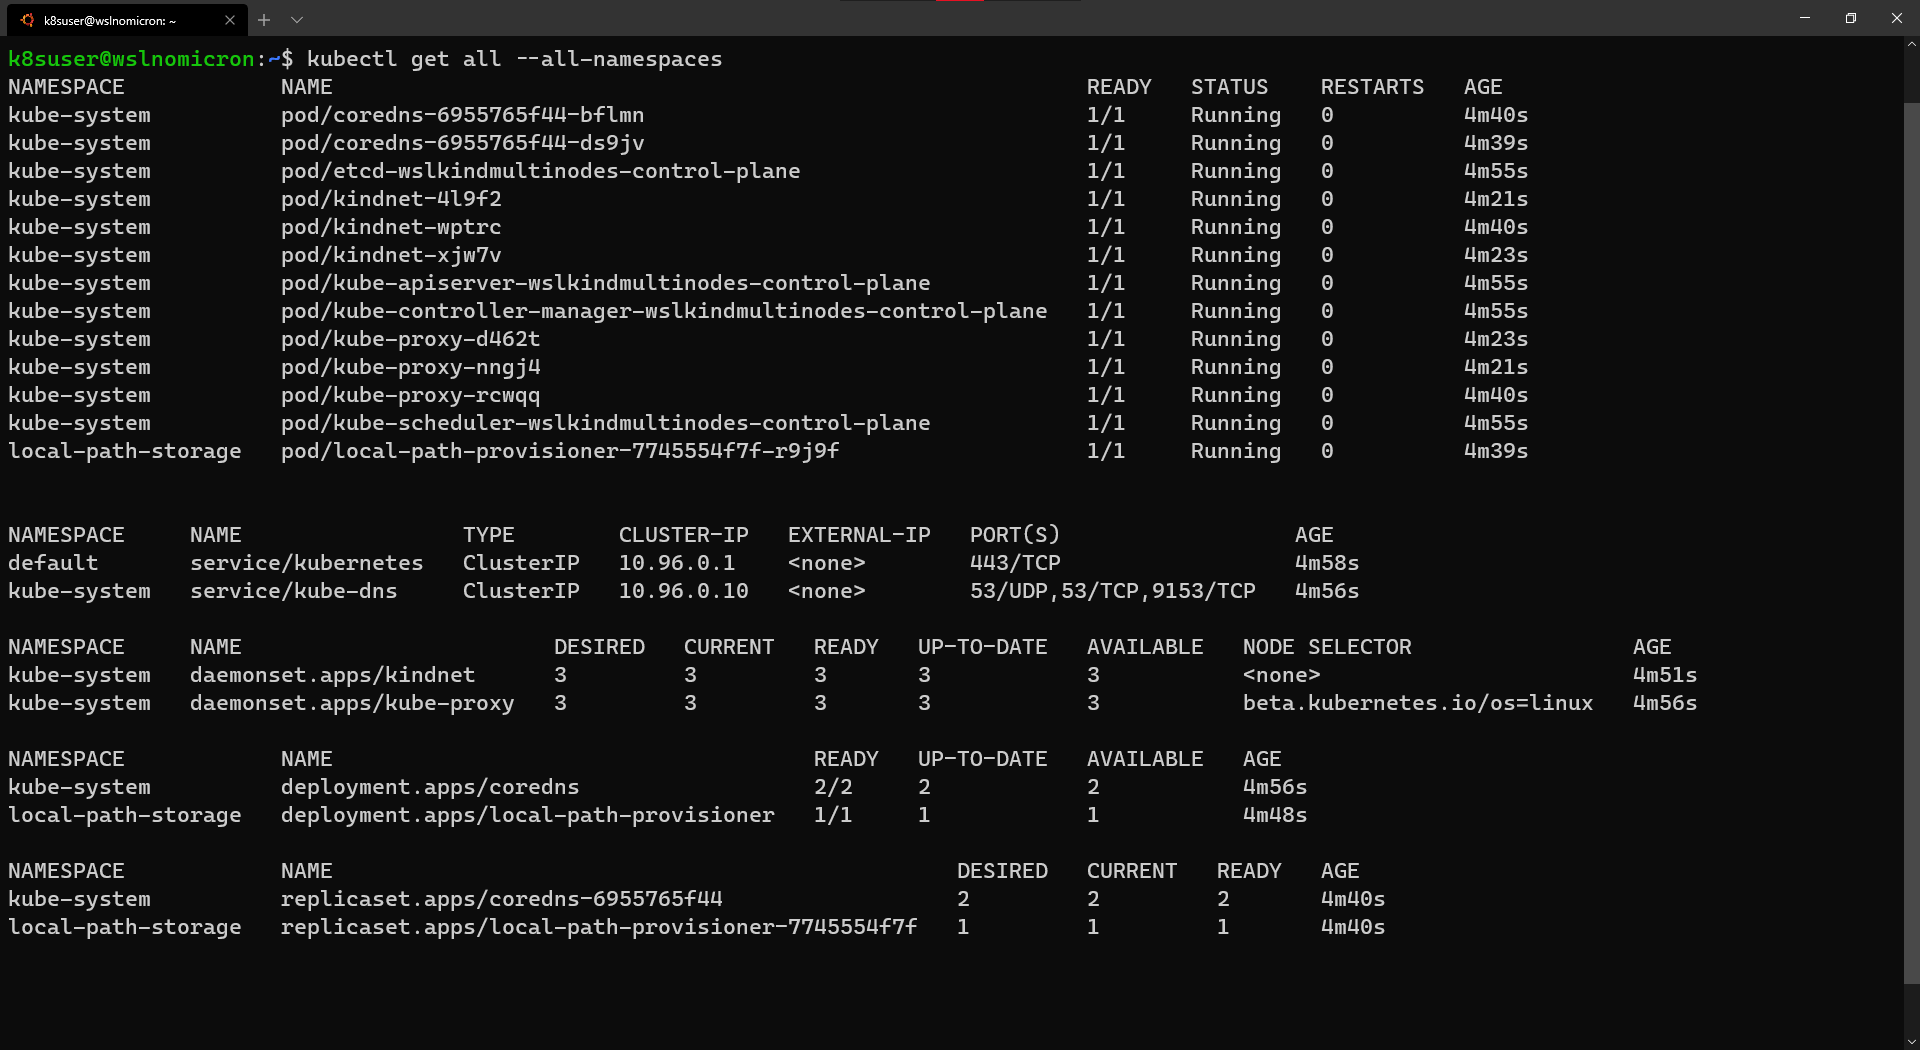
KinD: can I see a nice dashboard?
Working on the command line is always good and very insightful. However, when dealing with Kubernetes we might want, at some point, to have a visual overview.
For that, the Kubernetes Dashboard project has been created. The installation and first connection test is quite fast, so let's do it:
# Install the Dashboard application into our cluster
kubectl apply -f https://raw.githubusercontent.com/kubernetes/dashboard/v2.0.0-rc6/aio/deploy/recommended.yaml
# Check the resources it created based on the new namespace created
kubectl get all -n kubernetes-dashboard
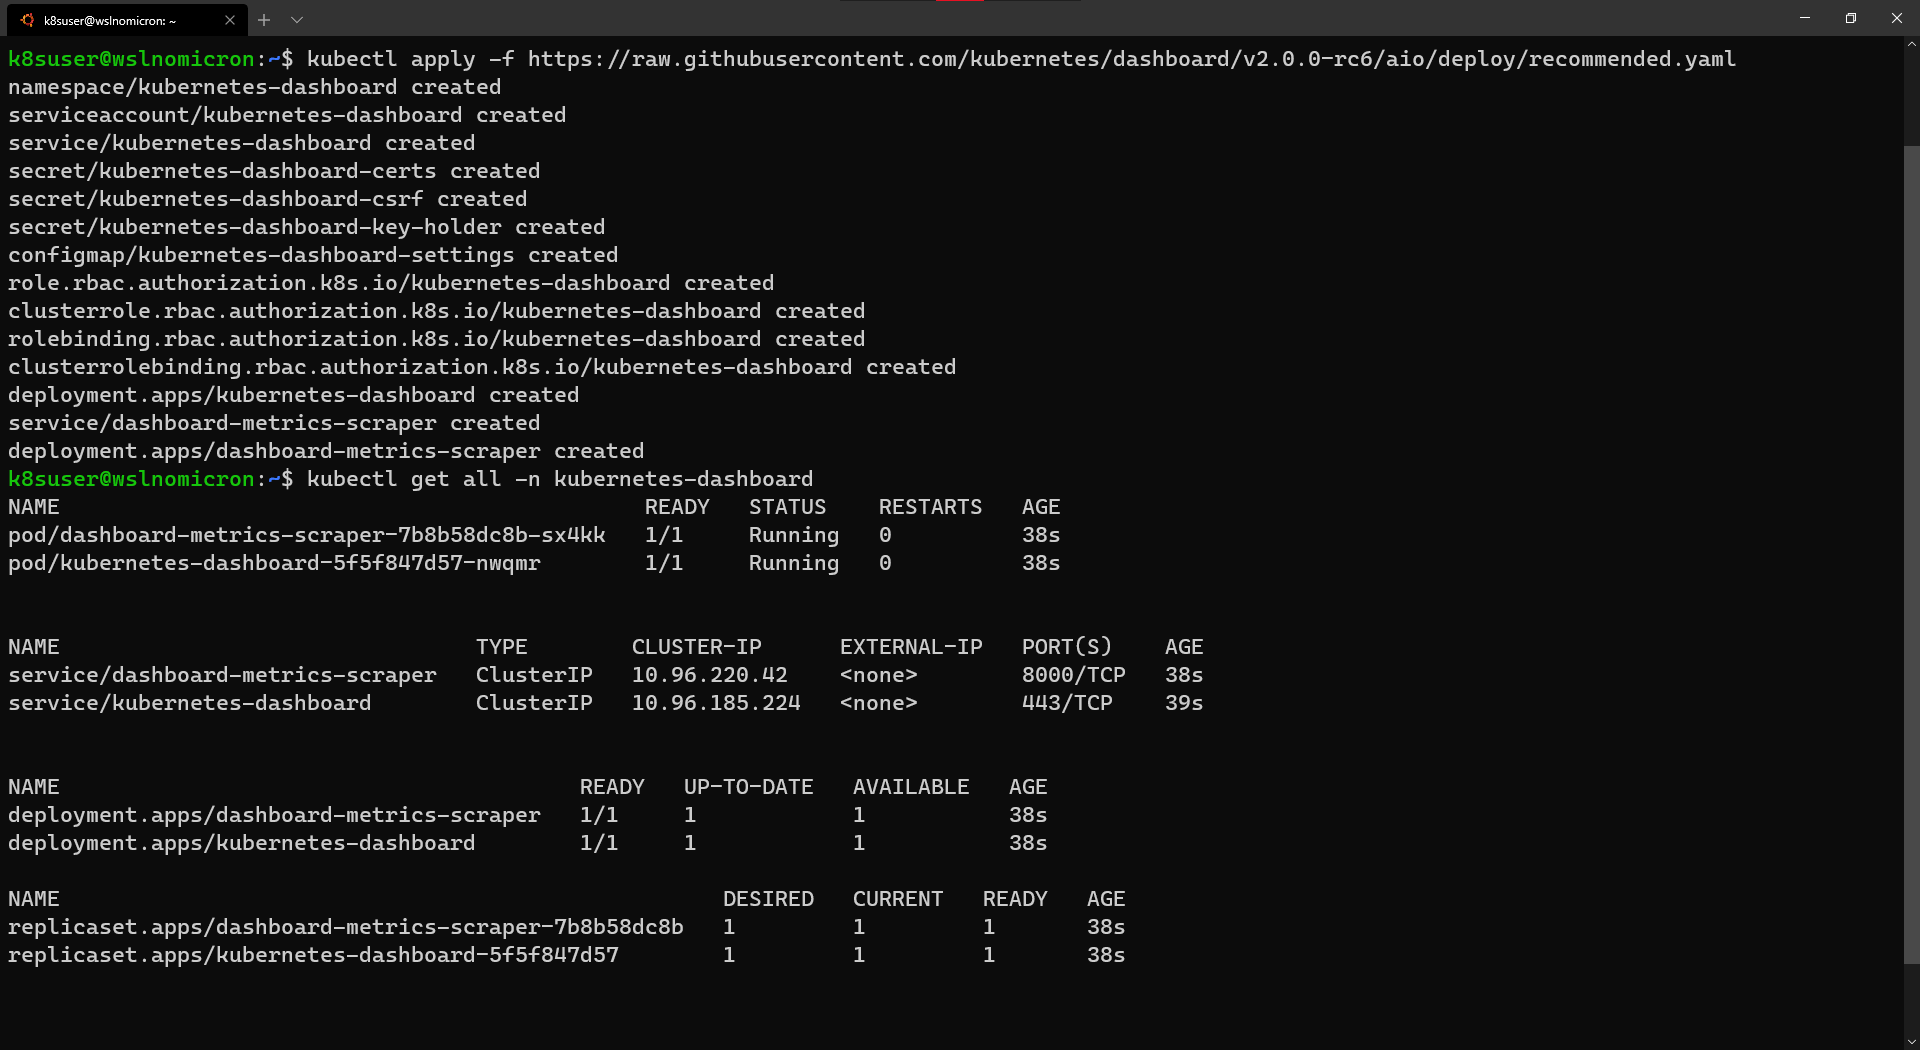
As it created a service with a ClusterIP (read: internal network address), we cannot reach it if we type the URL in our Windows browser:
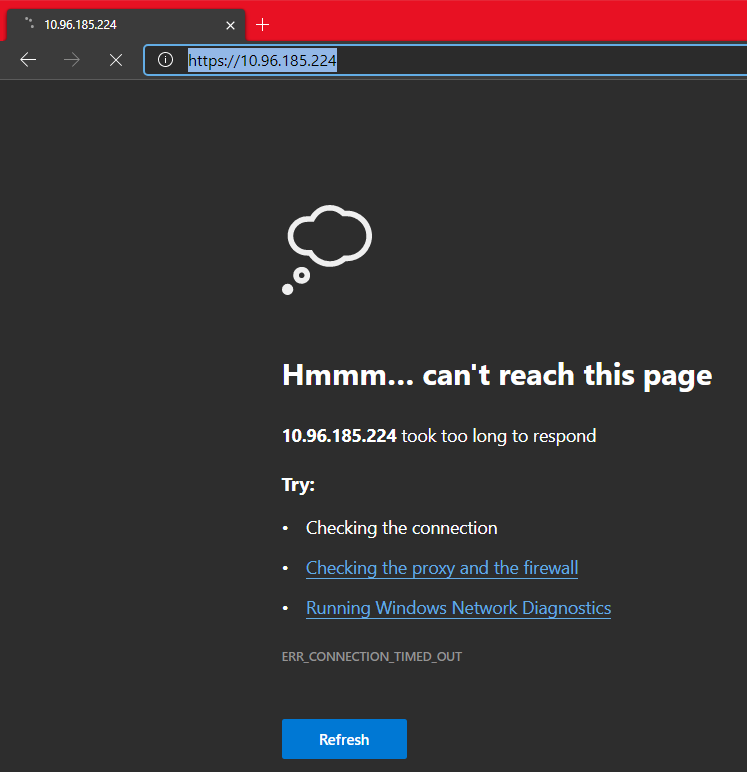
That's because we need to create a temporary proxy:
# Start a kubectl proxy
kubectl proxy
# Enter the URL on your browser: http://localhost:8001/api/v1/namespaces/kubernetes-dashboard/services/https:kubernetes-dashboard:/proxy/
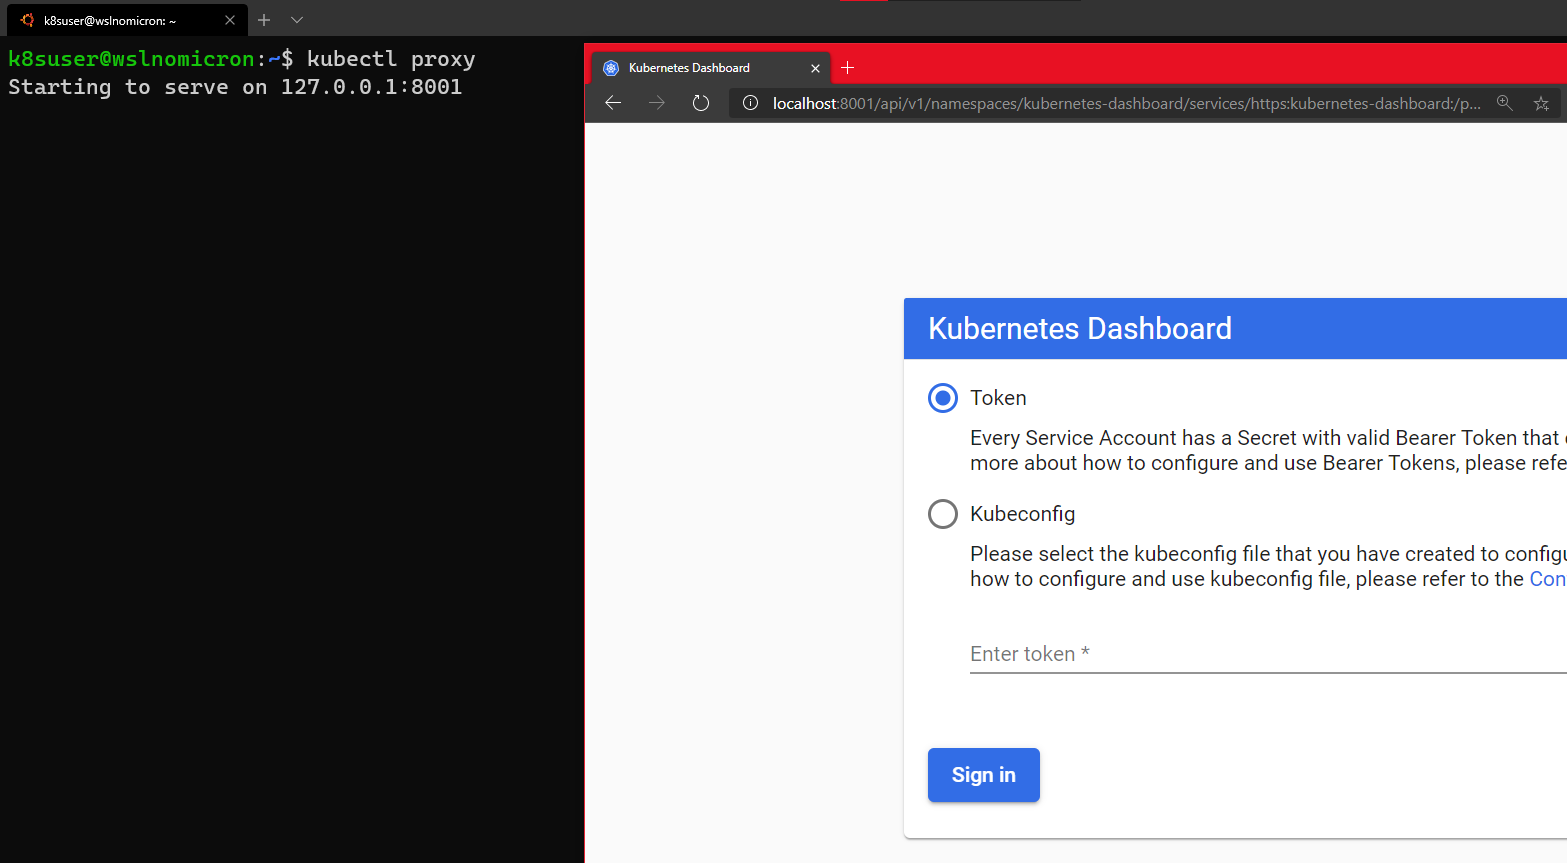
Finally to login, we can either enter a Token, which we didn't create, or enter the kubeconfig file from our Cluster.
If we try to login with the kubeconfig, we will get the error "Internal error (500): Not enough data to create auth info structure". This is due to the lack of credentials in the kubeconfig file.
So to avoid you ending with the same error, let's follow the recommended RBAC approach.
Let's open a new WSL2 session:
# Create a new ServiceAccount
kubectl apply -f - <<EOF
apiVersion: v1
kind: ServiceAccount
metadata:
name: admin-user
namespace: kubernetes-dashboard
EOF
# Create a ClusterRoleBinding for the ServiceAccount
kubectl apply -f - <<EOF
apiVersion: rbac.authorization.k8s.io/v1
kind: ClusterRoleBinding
metadata:
name: admin-user
roleRef:
apiGroup: rbac.authorization.k8s.io
kind: ClusterRole
name: cluster-admin
subjects:
- kind: ServiceAccount
name: admin-user
namespace: kubernetes-dashboard
EOF
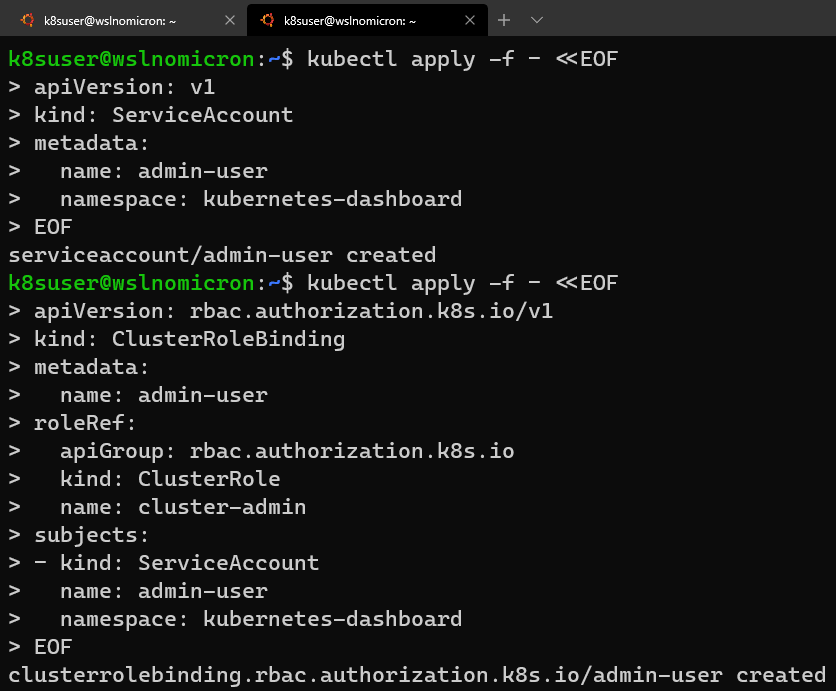
# Get the Token for the ServiceAccount
kubectl -n kubernetes-dashboard describe secret $(kubectl -n kubernetes-dashboard get secret | grep admin-user | awk '{print $1}')
# Copy the token and copy it into the Dashboard login and press "Sign in"
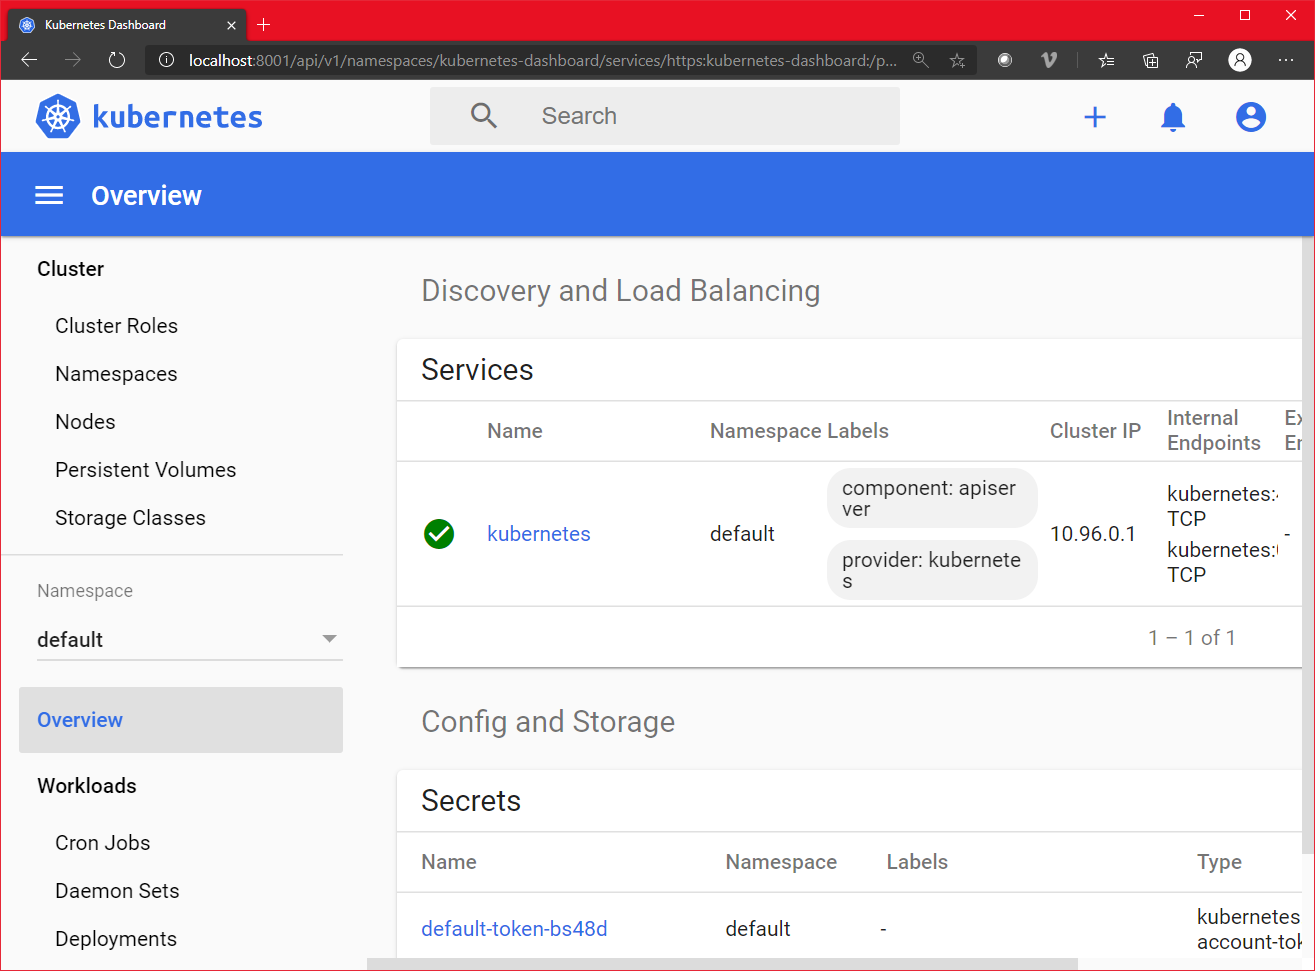
Success! And let's see our nodes listed also:
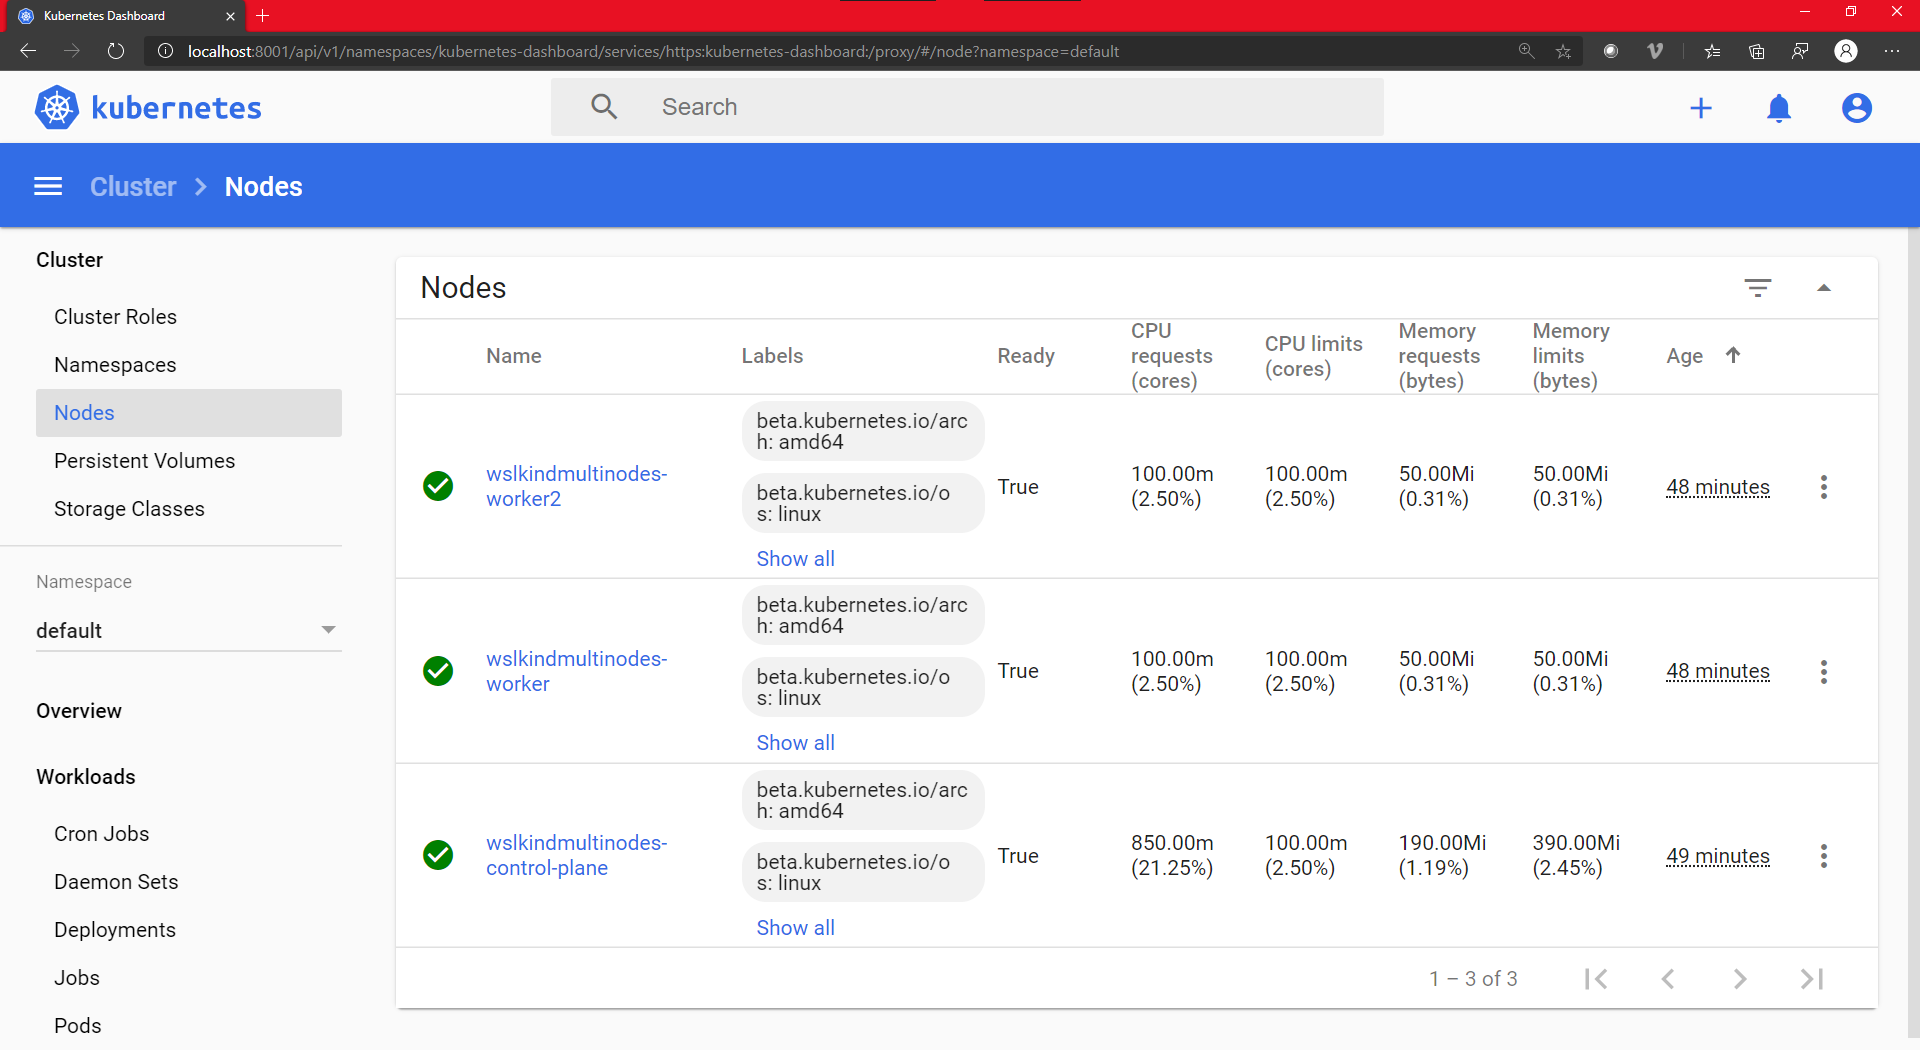
A nice and shiny three nodes appear.
Minikube: Kubernetes from everywhere
Right now, we have Docker that is installed, configured and the last test worked fine.
However, if we look carefully at the kubectl command, it found the "Client Version" (1.15.5), but it didn't find any server.
This is normal as we didn't enable the Docker Kubernetes cluster. So let's install Minikube and create our first cluster.
And as sources are always important to mention, we will follow (partially) the how-to from the Kubernetes.io website:
# Download the latest version of Minikube
curl -Lo minikube https://storage.googleapis.com/minikube/releases/latest/minikube-linux-amd64
# Make the binary executable
chmod +x ./minikube
# Move the binary to your executable path
sudo mv ./minikube /usr/local/bin/

Minikube: updating the host
If we follow the how-to, it states that we should use the --driver=none flag in order to run Minikube directly on the host and Docker.
Unfortunately, we will get an error about "conntrack" being required to run Kubernetes v 1.18:
# Create a minikube one node cluster
minikube start --driver=none

Tip: as you can see, the Terminal was changed so the nice icons are all displayed
So let's fix the issue by installing the missing package:
# Install the conntrack package
sudo apt install -y conntrack
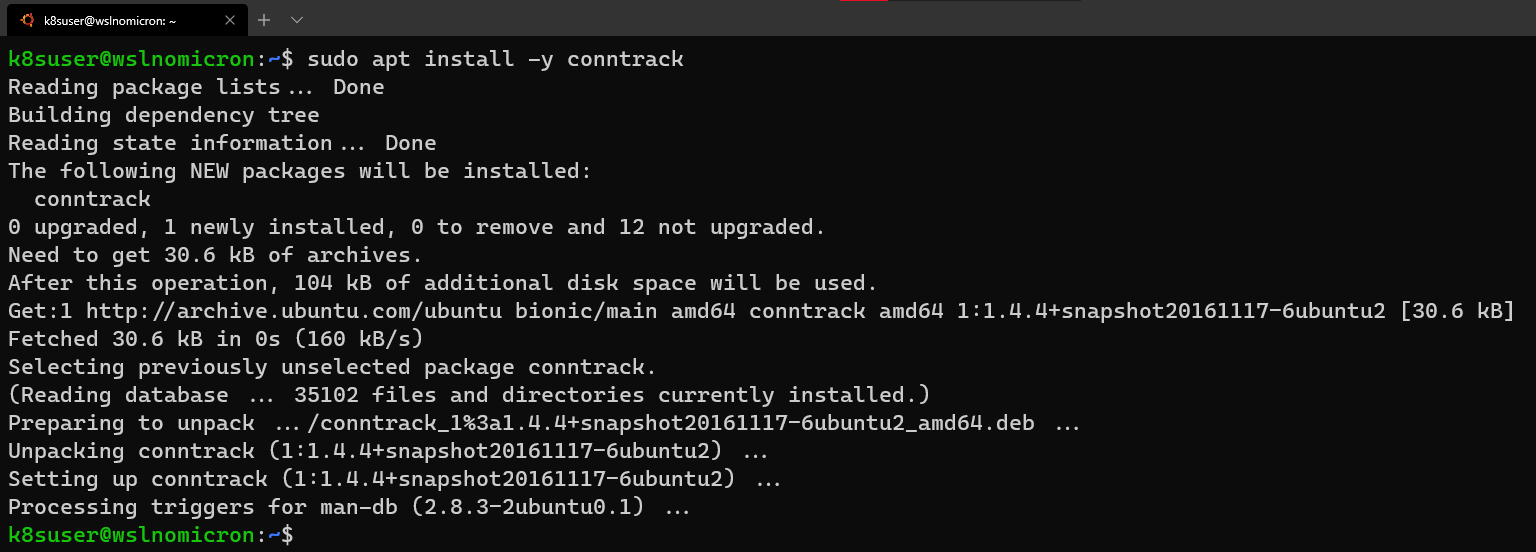
Let's try to launch it again:
# Create a minikube one node cluster
minikube start --driver=none
# We got a permissions error > try again with sudo
sudo minikube start --driver=none
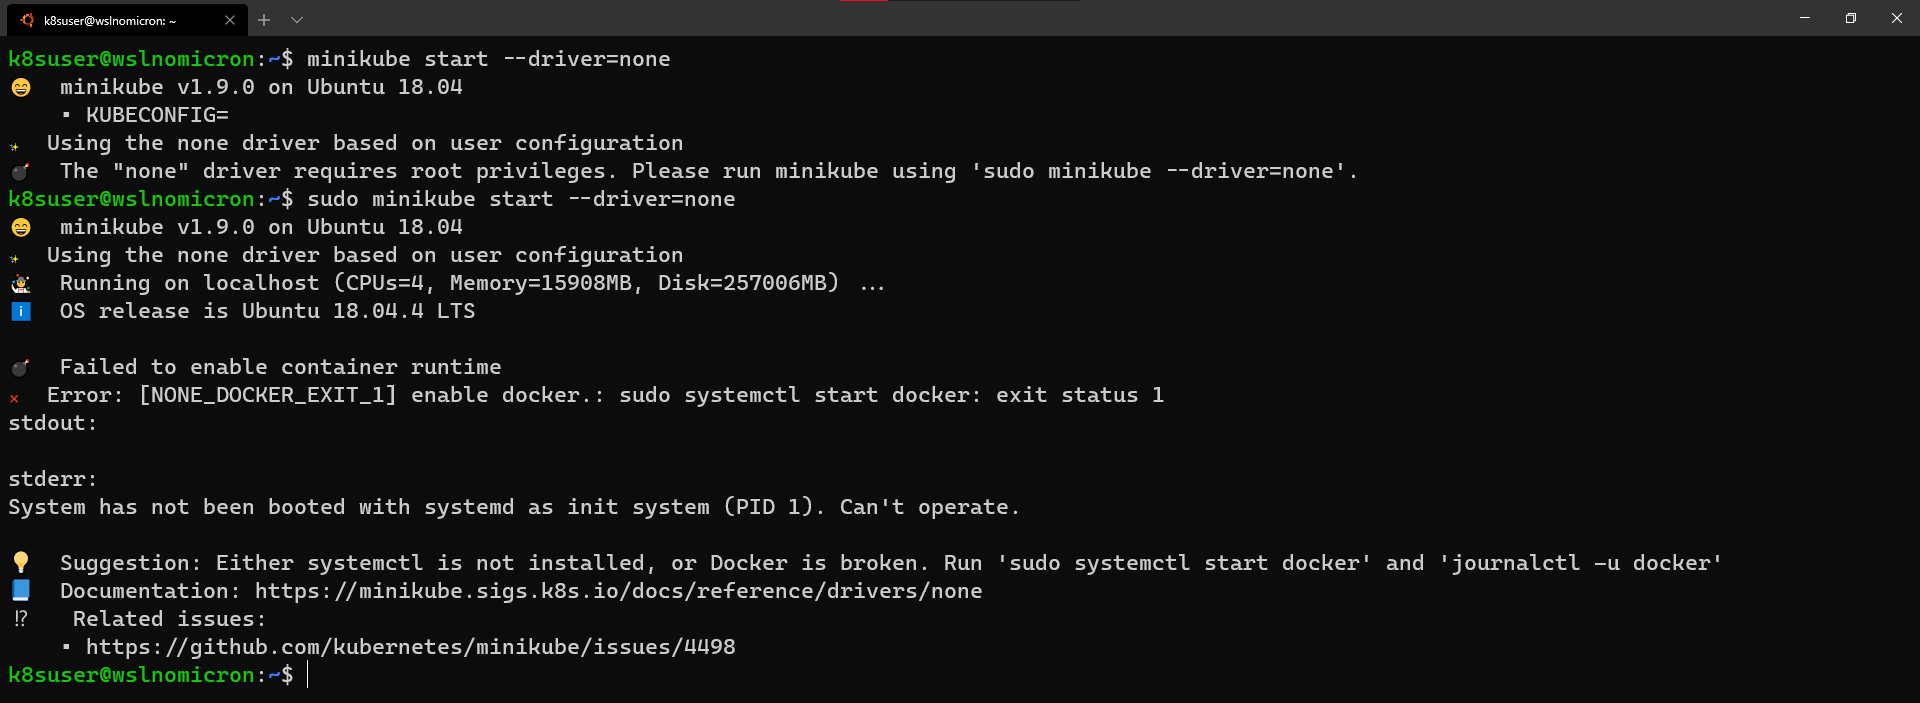
Ok, this error cloud be problematic ... in the past. Luckily for us, there's a solution
Minikube: enabling SystemD
In order to enable SystemD on WSL2, we will apply the scripts from Daniel Llewellyn.
I invite you to read the full blog post and how he came to the solution, and the various iterations he did to fix several issues.
So in a nutshell, here are the commands:
# Install the needed packages
sudo apt install -yqq daemonize dbus-user-session fontconfig
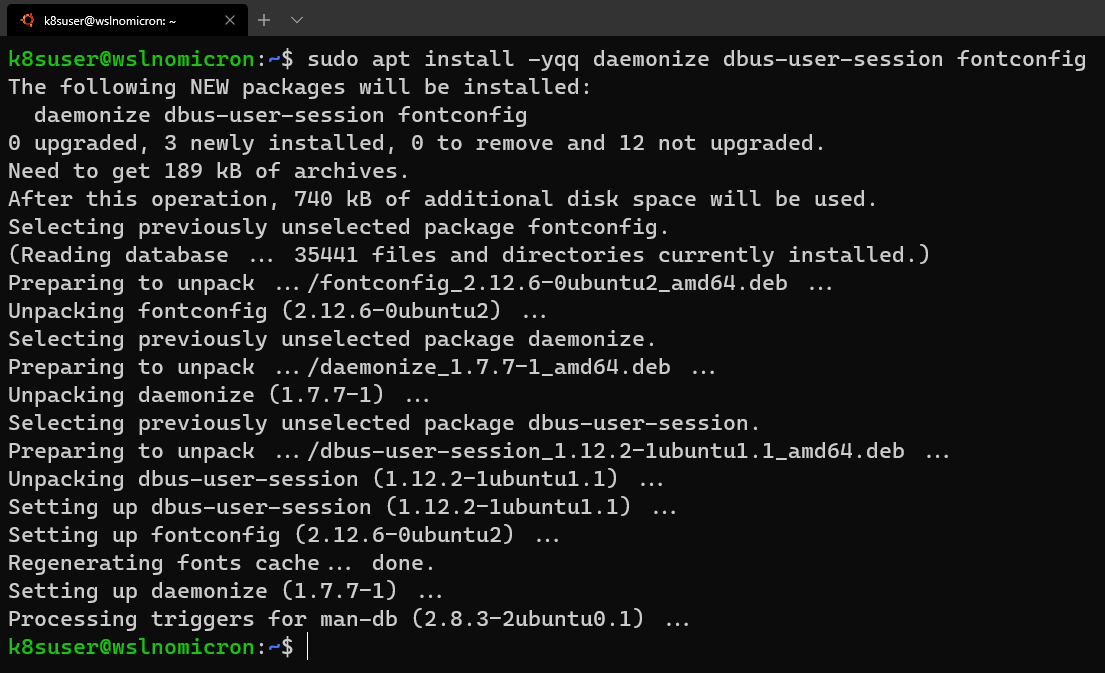
# Create the start-systemd-namespace script
sudo vi /usr/sbin/start-systemd-namespace
#!/bin/bash
SYSTEMD_PID=$(ps -ef | grep '/lib/systemd/systemd --system-unit=basic.target$' | grep -v unshare | awk '{print $2}')
if [ -z "$SYSTEMD_PID" ] || [ "$SYSTEMD_PID" != "1" ]; then
export PRE_NAMESPACE_PATH="$PATH"
(set -o posix; set) | \
grep -v "^BASH" | \
grep -v "^DIRSTACK=" | \
grep -v "^EUID=" | \
grep -v "^GROUPS=" | \
grep -v "^HOME=" | \
grep -v "^HOSTNAME=" | \
grep -v "^HOSTTYPE=" | \
grep -v "^IFS='.*"$'\n'"'" | \
grep -v "^LANG=" | \
grep -v "^LOGNAME=" | \
grep -v "^MACHTYPE=" | \
grep -v "^NAME=" | \
grep -v "^OPTERR=" | \
grep -v "^OPTIND=" | \
grep -v "^OSTYPE=" | \
grep -v "^PIPESTATUS=" | \
grep -v "^POSIXLY_CORRECT=" | \
grep -v "^PPID=" | \
grep -v "^PS1=" | \
grep -v "^PS4=" | \
grep -v "^SHELL=" | \
grep -v "^SHELLOPTS=" | \
grep -v "^SHLVL=" | \
grep -v "^SYSTEMD_PID=" | \
grep -v "^UID=" | \
grep -v "^USER=" | \
grep -v "^_=" | \
cat - > "$HOME/.systemd-env"
echo "PATH='$PATH'" >> "$HOME/.systemd-env"
exec sudo /usr/sbin/enter-systemd-namespace "$BASH_EXECUTION_STRING"
fi
if [ -n "$PRE_NAMESPACE_PATH" ]; then
export PATH="$PRE_NAMESPACE_PATH"
fi
# Create the enter-systemd-namespace
sudo vi /usr/sbin/enter-systemd-namespace
#!/bin/bash
if [ "$UID" != 0 ]; then
echo "You need to run $0 through sudo"
exit 1
fi
SYSTEMD_PID="$(ps -ef | grep '/lib/systemd/systemd --system-unit=basic.target$' | grep -v unshare | awk '{print $2}')"
if [ -z "$SYSTEMD_PID" ]; then
/usr/sbin/daemonize /usr/bin/unshare --fork --pid --mount-proc /lib/systemd/systemd --system-unit=basic.target
while [ -z "$SYSTEMD_PID" ]; do
SYSTEMD_PID="$(ps -ef | grep '/lib/systemd/systemd --system-unit=basic.target$' | grep -v unshare | awk '{print $2}')"
done
fi
if [ -n "$SYSTEMD_PID" ] && [ "$SYSTEMD_PID" != "1" ]; then
if [ -n "$1" ] && [ "$1" != "bash --login" ] && [ "$1" != "/bin/bash --login" ]; then
exec /usr/bin/nsenter -t "$SYSTEMD_PID" -a \
/usr/bin/sudo -H -u "$SUDO_USER" \
/bin/bash -c 'set -a; source "$HOME/.systemd-env"; set +a; exec bash -c '"$(printf "%q" "$@")"
else
exec /usr/bin/nsenter -t "$SYSTEMD_PID" -a \
/bin/login -p -f "$SUDO_USER" \
$(/bin/cat "$HOME/.systemd-env" | grep -v "^PATH=")
fi
echo "Existential crisis"
fi
# Edit the permissions of the enter-systemd-namespace script
sudo chmod +x /usr/sbin/enter-systemd-namespace
# Edit the bash.bashrc file
sudo sed -i 2a"# Start or enter a PID namespace in WSL2\nsource /usr/sbin/start-systemd-namespace\n" /etc/bash.bashrc
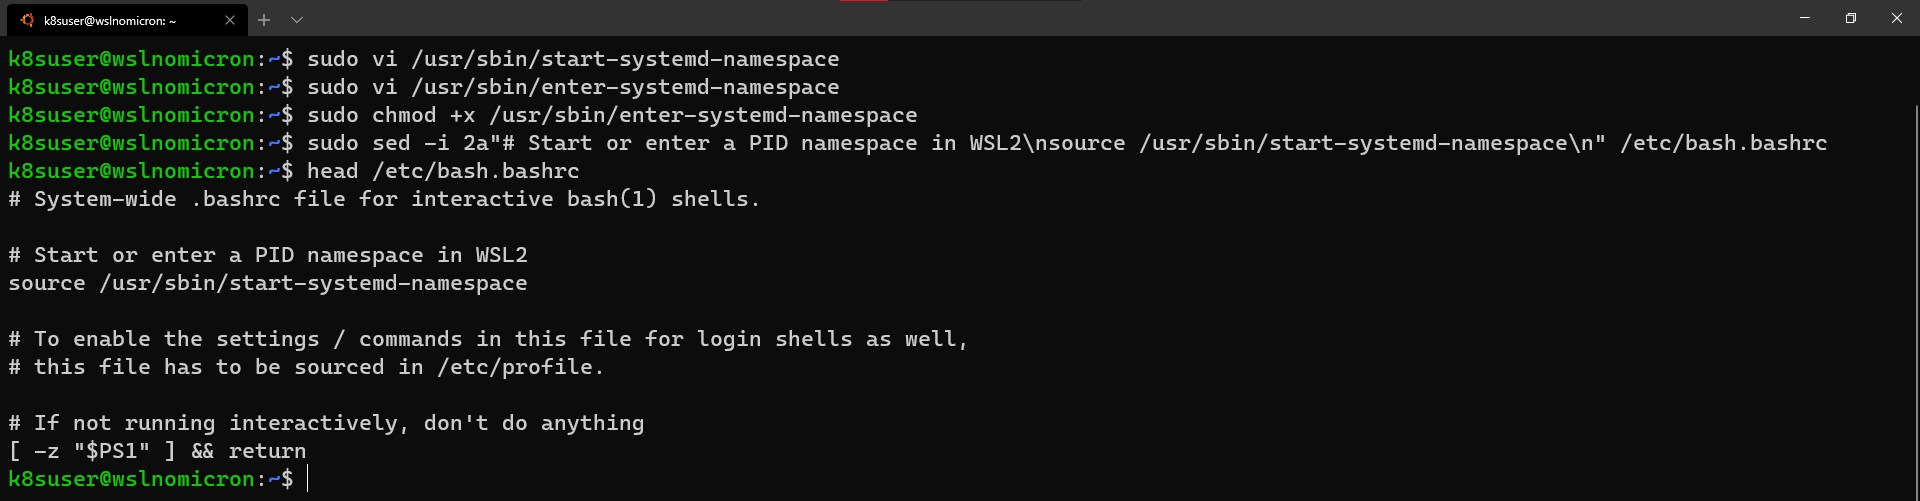
Finally, exit and launch a new session. You do not need to stop WSL2, a new session is enough:
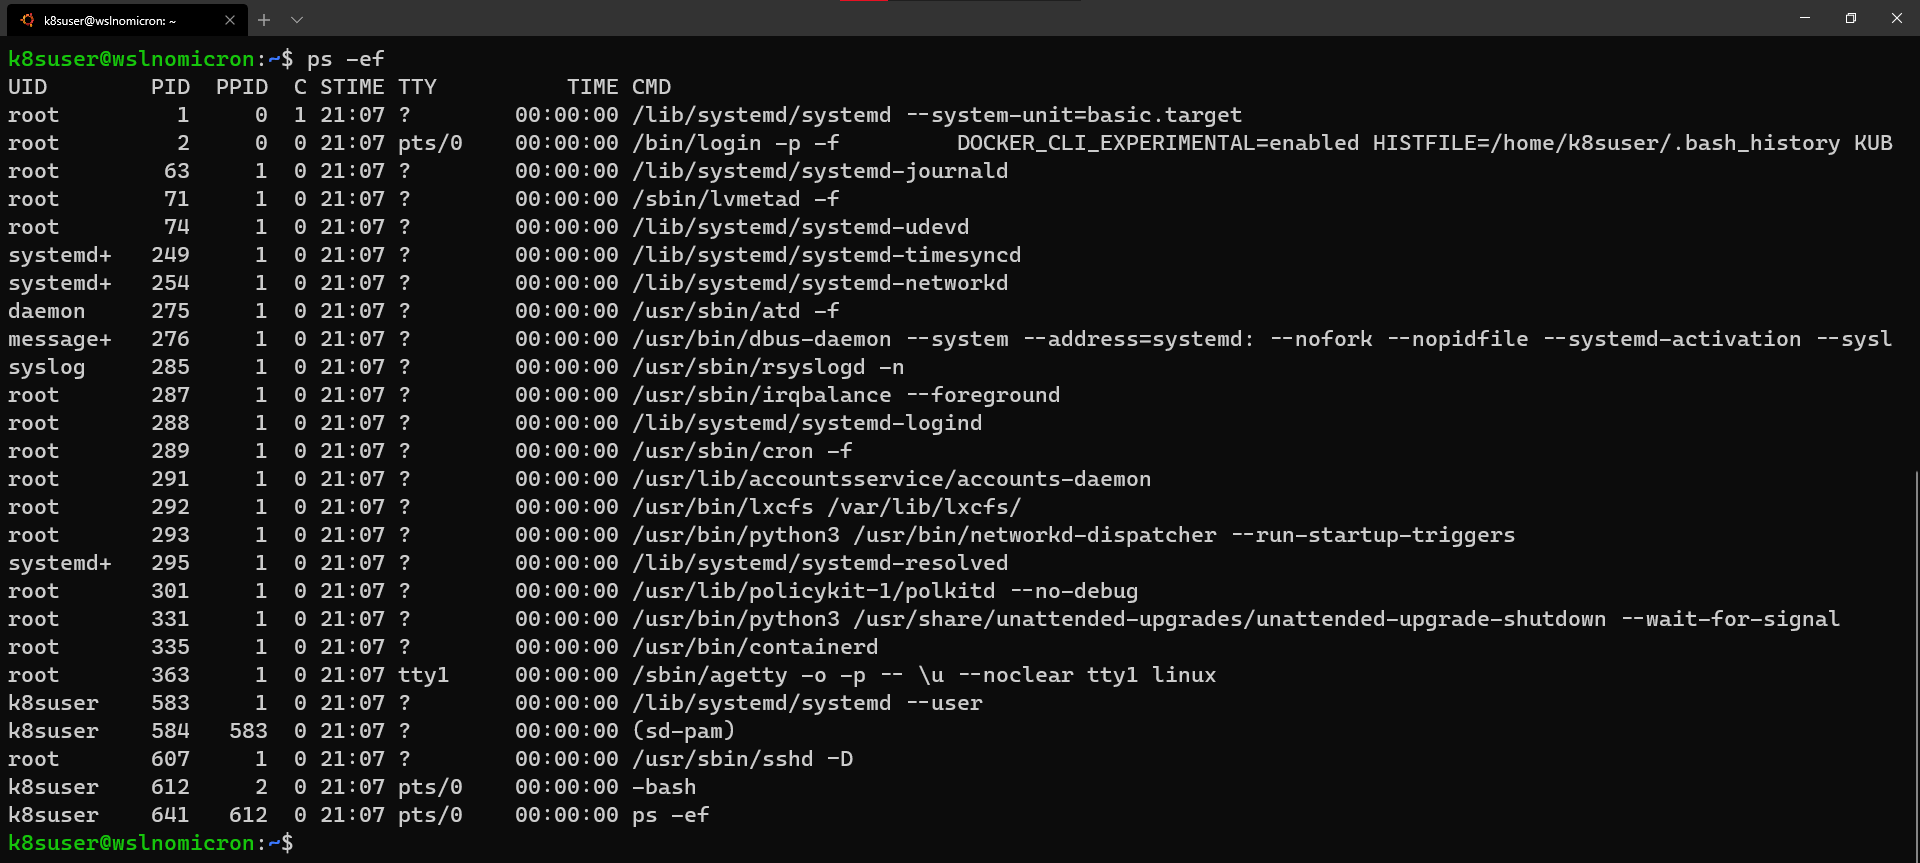
Minikube: the first cluster
We are ready to create our first cluster:
# Check if the KUBECONFIG is not set
echo $KUBECONFIG
# Check if the .kube directory is created > if not, no need to create it
ls $HOME/.kube
# Check if the .minikube directory is created > if yes, delete it
ls $HOME/.minikube
# Create the cluster with sudo
sudo minikube start --driver=none
In order to be able to use kubectl with our user, and not sudo, Minikube recommends running the chown command:
# Change the owner of the .kube and .minikube directories
sudo chown -R $USER $HOME/.kube $HOME/.minikube
# Check the access and if the cluster is running
kubectl cluster-info
# Check the resources created
kubectl get all --all-namespaces
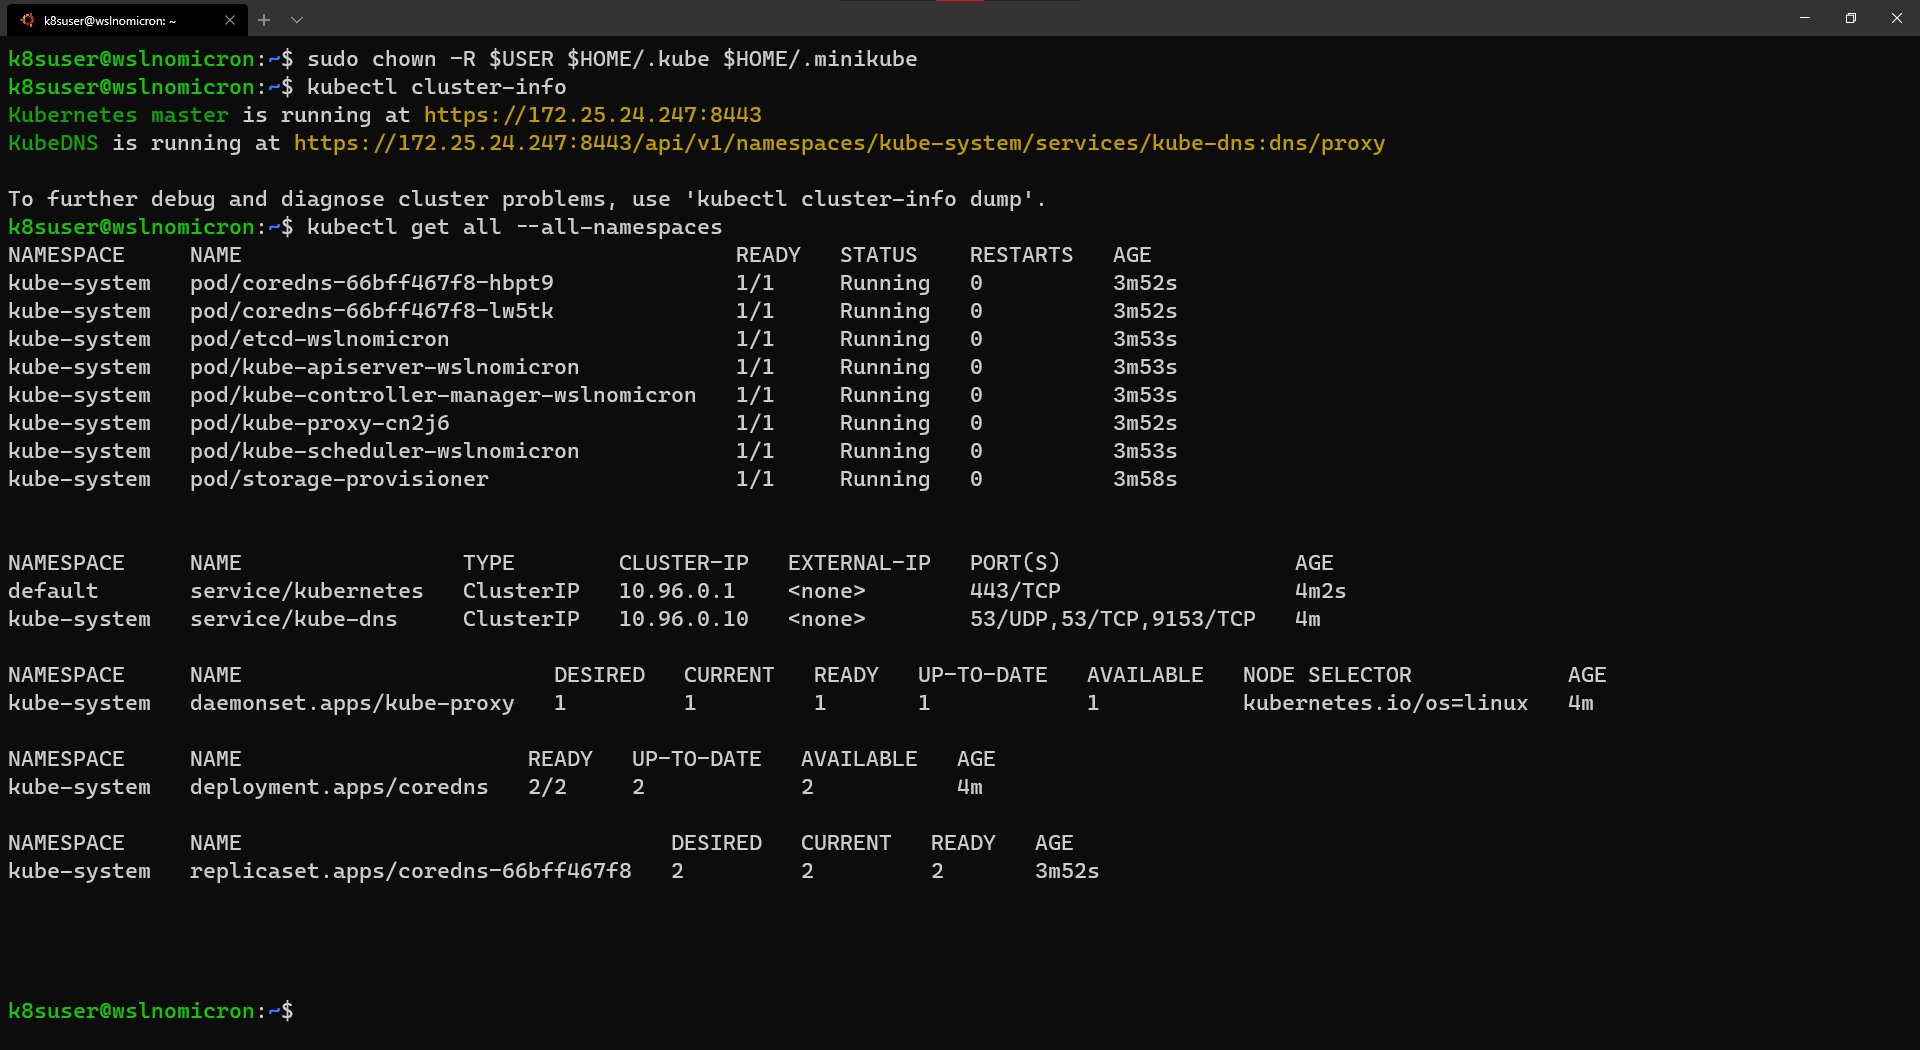
The cluster has been successfully created, and Minikube used the WSL2 IP, which is great for several reasons, and one of them is that we can open the Kubernetes master URL in our Windows browser:
And the real strength of WSL2 integration, the port 8443 once open on WSL2 distro, it actually forwards it to Windows, so instead of the need to remind the IP address, we can also reach the Kubernetes master URL via localhost:
Minikube: can I see a nice dashboard?
Working on the command line is always good and very insightful. However, when dealing with Kubernetes we might want, at some point, to have a visual overview.
For that, Minikube embedded the Kubernetes Dashboard. Thanks to it, running and accessing the Dashboard is very simple:
# Enable the Dashboard service
sudo minikube dashboard
# Access the Dashboard from a browser on Windows side
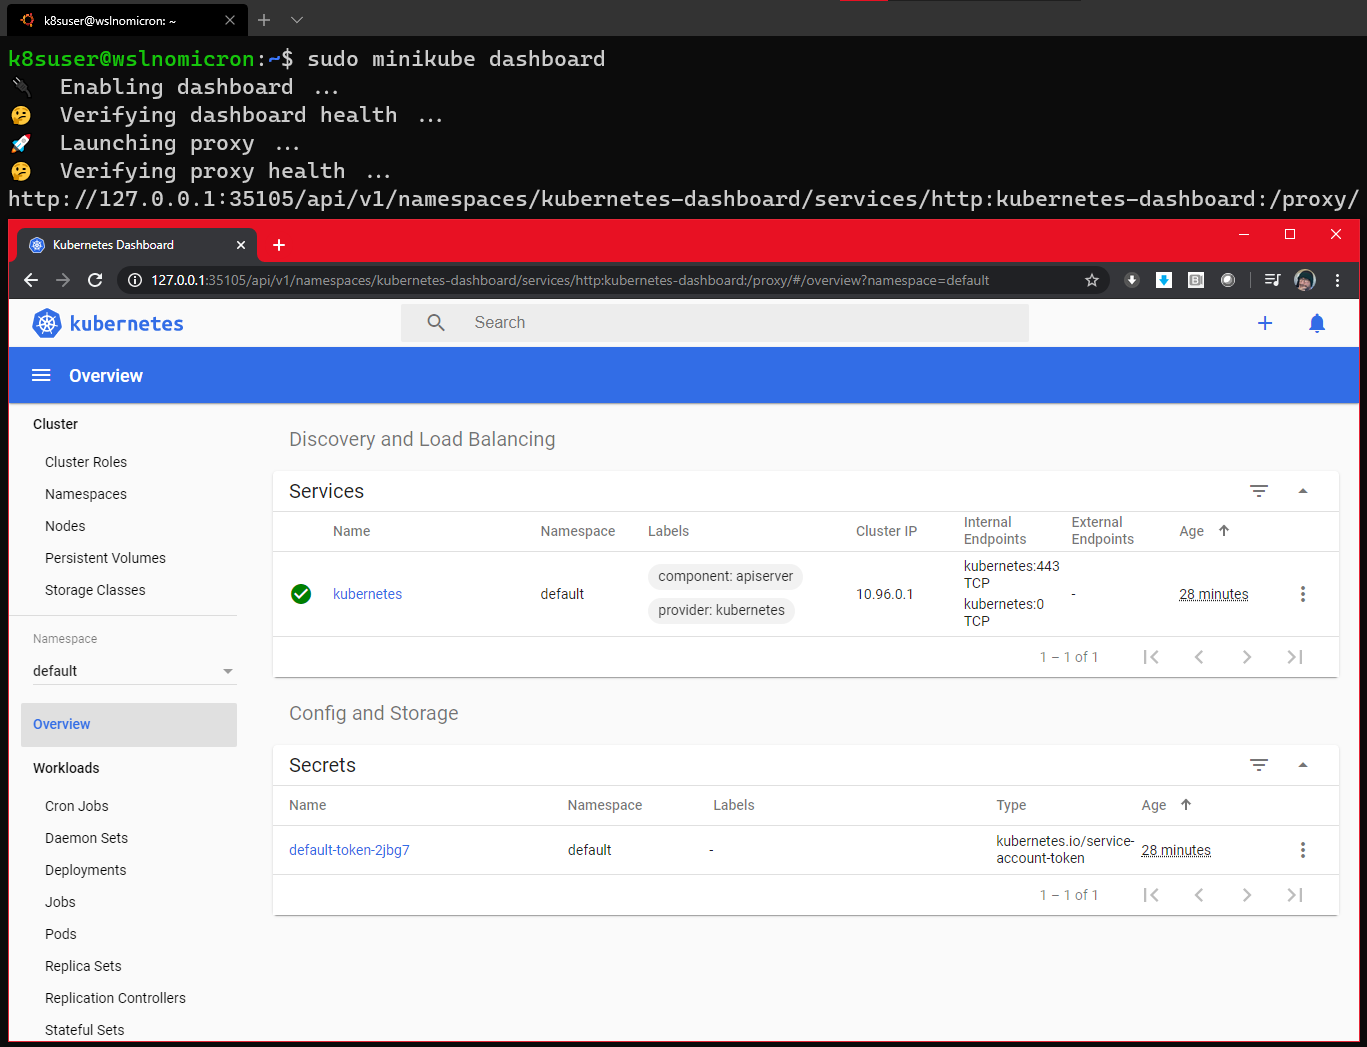
The command creates also a proxy, which means that once we end the command, by pressing CTRL+C, the Dashboard will no more be accessible.
Still, if we look at the namespace kubernetes-dashboard, we will see that the service is still created:
# Get all the services from the dashboard namespace
kubectl get all --namespace kubernetes-dashboard
Let's edit the service and change it's type to LoadBalancer:
# Edit the Dashoard service
kubectl edit service/kubernetes-dashboard --namespace kubernetes-dashboard
# Go to the very end and remove the last 2 lines
status:
loadBalancer: {}
# Change the type from ClusterIO to LoadBalancer
type: LoadBalancer
# Save the file
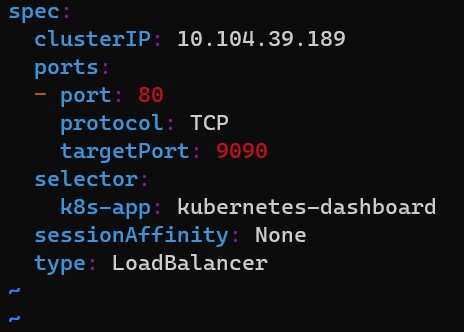
Check again the Dashboard service and let's access the Dashboard via the LoadBalancer:
# Get all the services from the dashboard namespace
kubectl get all --namespace kubernetes-dashboard
# Access the Dashboard from a browser on Windows side with the URL: localhost:<port exposed>
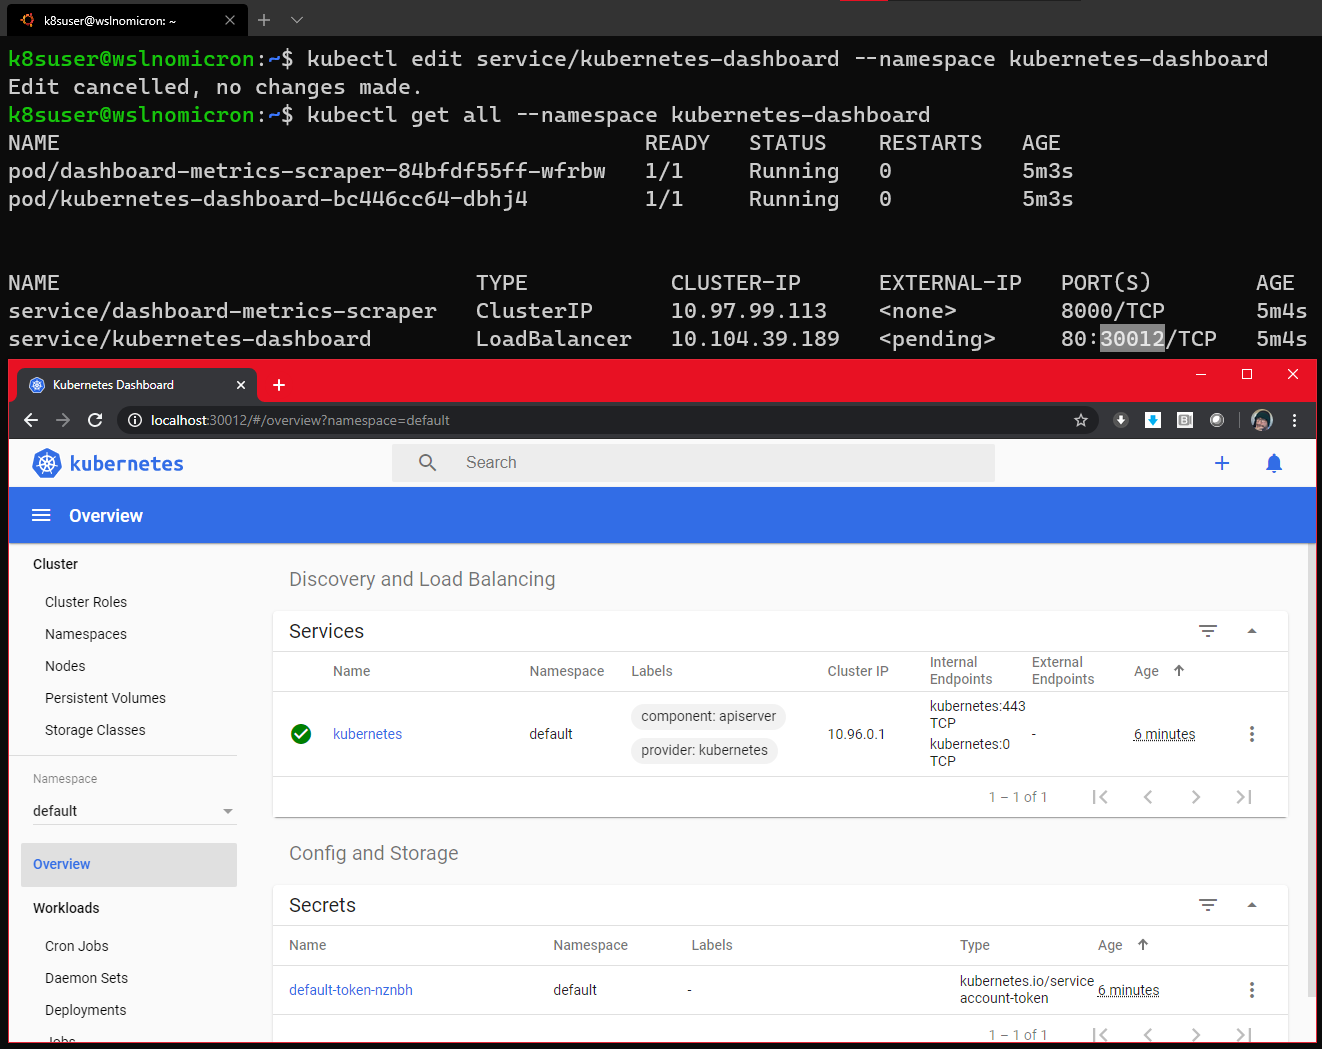
Conclusion
It's clear that we are far from done as we could have some LoadBalancing implemented and/or other services (storage, ingress, registry, etc...).
Concerning Minikube on WSL2, as it needed to enable SystemD, we can consider it as an intermediate level to be implemented.
So with two solutions, what could be the "best for you"? Both bring their own advantages and inconveniences, so here an overview from our point of view solely:
| Criteria | KinD | Minikube |
|---|---|---|
| Installation on WSL2 | Very Easy | Medium |
| Multi-node | Yes | No |
| Plugins | Manual install | Yes |
| Persistence | Yes, however not designed for | Yes |
| Alternatives | K3d | Microk8s |
We hope you could have a real taste of the integration between the different components: WSL2 - Docker Desktop - KinD/Minikube. And that gave you some ideas or, even better, some answers to your Kubernetes workflows with KinD and/or Minikube on Windows and WSL2.
See you soon for other adventures in the Kubernetes ocean.
How Docs Handle Third Party and Dual Sourced Content
Editor's note: Zach is one of the chairs for the Kubernetes documentation special interest group (SIG Docs).
Late last summer, SIG Docs started a community conversation about third party content in Kubernetes docs. This conversation became a Kubernetes Enhancement Proposal (KEP) and, after five months for review and comment, SIG Architecture approved the KEP as a content guide for Kubernetes docs.
Here's how Kubernetes docs handle third party content now:
Links to active content in the Kubernetes project (projects in the kubernetes and kubernetes-sigs GitHub orgs) are always allowed.
Kubernetes requires some third party content to function. Examples include container runtimes (containerd, CRI-O, Docker), networking policy (CNI plugins), Ingress controllers, and logging.
Docs can link to third party open source software (OSS) outside the Kubernetes project if it’s necessary for Kubernetes to function.
These common sense guidelines make sure that Kubernetes docs document Kubernetes.
Keeping the docs focused
Our goal is for Kubernetes docs to be a trustworthy guide to Kubernetes features. To achieve this goal, SIG Docs is tracking third party content and removing any third party content that isn't both in the Kubernetes project and required for Kubernetes to function.
Re-homing content
Some content will be removed that readers may find helpful. To make sure readers have continuous access to information, we're giving stakeholders until the 1.19 release deadline for docs, July 9th, 2020 to re-home any content slated for removal.
Over the next few months you'll see less third party content in the docs as contributors open PRs to remove content.
Background
Over time, SIG Docs observed increasing vendor content in the docs. Some content took the form of vendor-specific implementations that aren't required for Kubernetes to function in-project. Other content was thinly-disguised advertising with minimal to no feature content. Some vendor content was new; other content had been in the docs for years. It became clear that the docs needed clear, well-bounded guidelines for what kind of third party content is and isn't allowed. The content guide emerged from an extensive period for review and comment from the community.
Docs work best when they're accurate, helpful, trustworthy, and remain focused on features. In our experience, vendor content dilutes trust and accuracy.
Put simply: feature docs aren't a place for vendors to advertise their products. Our content policy keeps the docs focused on helping developers and cluster admins, not on marketing.
Dual sourced content
Less impactful but also important is how Kubernetes docs handle dual-sourced content. Dual-sourced content is content published in more than one location, or from a non-canonical source.
From the Kubernetes content guide:
Wherever possible, Kubernetes docs link to canonical sources instead of hosting dual-sourced content.
Minimizing dual-sourced content streamlines the docs and makes content across the Web more searchable. We're working to consolidate and redirect dual-sourced content in the Kubernetes docs as well.
Ways to contribute
We're tracking third-party content in an issue in the Kubernetes website repository. If you see third party content that's out of project and isn't required for Kubernetes to function, please comment on the tracking issue.
Feel free to open a PR that removes non-conforming content once you've identified it!
Want to know more?
For more information, read the issue description for tracking third party content.
Introducing PodTopologySpread
Managing Pods distribution across a cluster is hard. The well-known Kubernetes features for Pod affinity and anti-affinity, allow some control of Pod placement in different topologies. However, these features only resolve part of Pods distribution use cases: either place unlimited Pods to a single topology, or disallow two Pods to co-locate in the same topology. In between these two extreme cases, there is a common need to distribute the Pods evenly across the topologies, so as to achieve better cluster utilization and high availability of applications.
The PodTopologySpread scheduling plugin (originally proposed as EvenPodsSpread) was designed to fill that gap. We promoted it to beta in 1.18.
API changes
A new field topologySpreadConstraints is introduced in the Pod's spec API:
spec:
topologySpreadConstraints:
- maxSkew: <integer>
topologyKey: <string>
whenUnsatisfiable: <string>
labelSelector: <object>
As this API is embedded in Pod's spec, you can use this feature in all the high-level workload APIs, such as Deployment, DaemonSet, StatefulSet, etc.
Let's see an example of a cluster to understand this API.
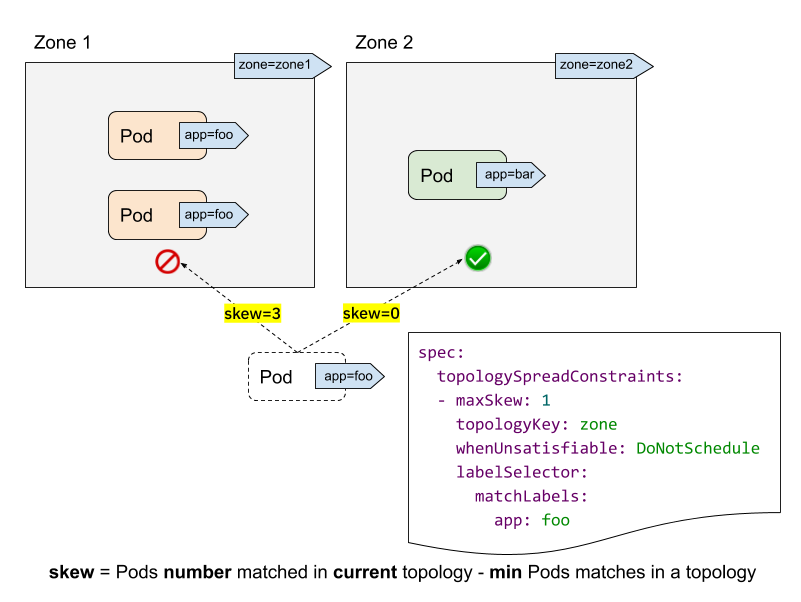
- labelSelector is used to find matching Pods. For each topology, we count the number of Pods that match this label selector. In the above example, given the labelSelector as "app: foo", the matching number in "zone1" is 2; while the number in "zone2" is 0.
- topologyKey is the key that defines a topology in the Nodes' labels. In the above example, some Nodes are grouped into "zone1" if they have the label "zone=zone1" label; while other ones are grouped into "zone2".
- maxSkew describes the maximum degree to which Pods can be unevenly
distributed. In the above example:
- if we put the incoming Pod to "zone1", the skew on "zone1" will become 3 (3 Pods matched in "zone1"; global minimum of 0 Pods matched on "zone2"), which violates the "maxSkew: 1" constraint.
- if the incoming Pod is placed to "zone2", the skew on "zone2" is 0 (1 Pod matched in "zone2"; global minimum of 1 Pod matched on "zone2" itself), which satisfies the "maxSkew: 1" constraint. Note that the skew is calculated per each qualified Node, instead of a global skew.
- whenUnsatisfiable specifies, when "maxSkew" can't be satisfied, what
action should be taken:
DoNotSchedule(default) tells the scheduler not to schedule it. It's a hard constraint.ScheduleAnywaytells the scheduler to still schedule it while prioritizing Nodes that reduce the skew. It's a soft constraint.
Advanced usage
As the feature name "PodTopologySpread" implies, the basic usage of this feature is to run your workload with an absolute even manner (maxSkew=1), or relatively even manner (maxSkew>=2). See the official document for more details.
In addition to this basic usage, there are some advanced usage examples that enable your workloads to benefit on high availability and cluster utilization.
Usage along with NodeSelector / NodeAffinity
You may have found that we didn't have a "topologyValues" field to limit which topologies the Pods are going to be scheduled to. By default, it is going to search all Nodes and group them by "topologyKey". Sometimes this may not be the ideal case. For instance, suppose there is a cluster with Nodes tagged with "env=prod", "env=staging" and "env=qa", and now you want to evenly place Pods to the "qa" environment across zones, is it possible?
The answer is yes. You can leverage the NodeSelector or NodeAffinity API spec. Under the hood, the PodTopologySpread feature will honor that and calculate the spread constraints among the nodes that satisfy the selectors.
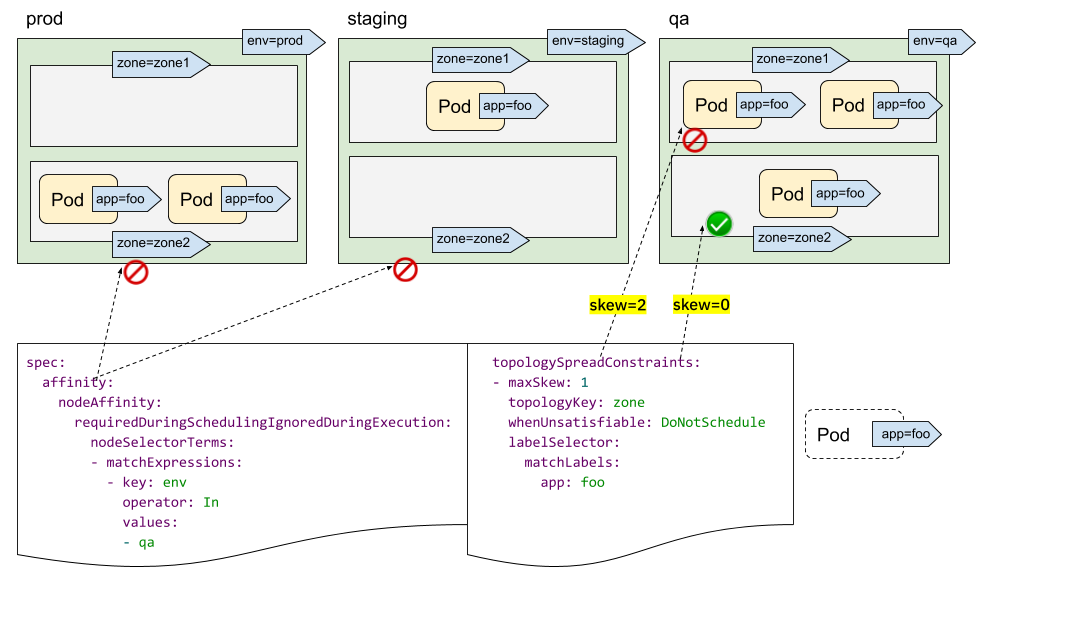
As illustrated above, you can specify spec.affinity.nodeAffinity to limit the
"searching scope" to be "qa" environment, and within that scope, the Pod will be
scheduled to one zone which satisfies the topologySpreadConstraints. In this
case, it's "zone2".
Multiple TopologySpreadConstraints
It's intuitive to understand how one single TopologySpreadConstraint works. What's the case for multiple TopologySpreadConstraints? Internally, each TopologySpreadConstraint is calculated independently, and the result sets will be merged to generate the eventual result set - i.e., suitable Nodes.
In the following example, we want to schedule a Pod to a cluster with 2 requirements at the same time:
- place the Pod evenly with Pods across zones
- place the Pod evenly with Pods across nodes
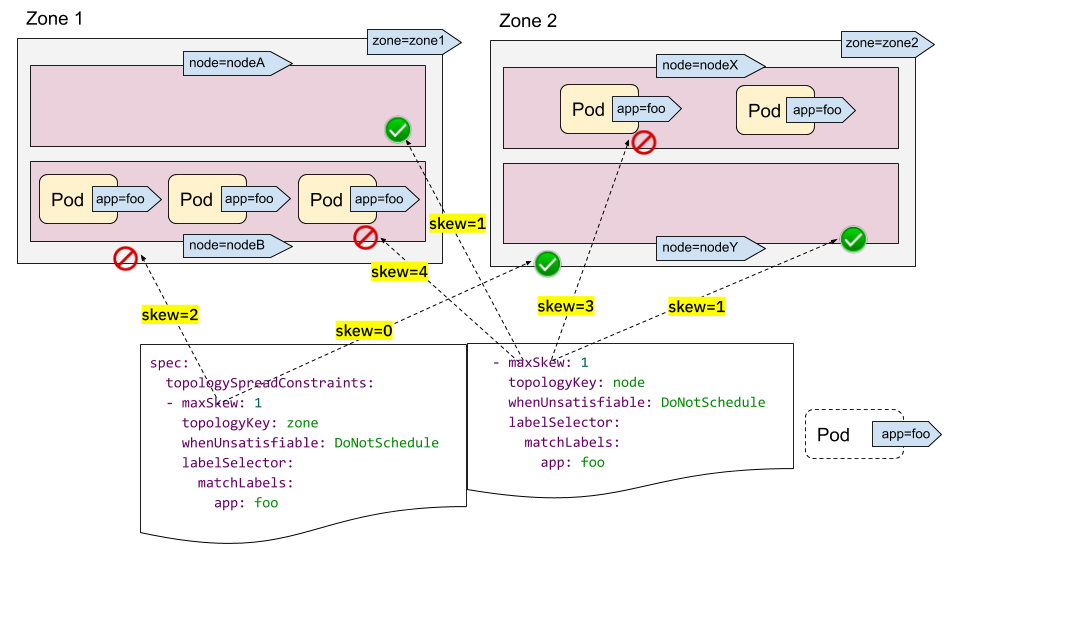
For the first constraint, there are 3 Pods in zone1 and 2 Pods in zone2, so the incoming Pod can be only put to zone2 to satisfy the "maxSkew=1" constraint. In other words, the result set is nodeX and nodeY.
For the second constraint, there are too many Pods in nodeB and nodeX, so the incoming Pod can be only put to nodeA and nodeY.
Now we can conclude the only qualified Node is nodeY - from the intersection of the sets {nodeX, nodeY} (from the first constraint) and {nodeA, nodeY} (from the second constraint).
Multiple TopologySpreadConstraints is powerful, but be sure to understand the difference with the preceding "NodeSelector/NodeAffinity" example: one is to calculate result set independently and then interjoined; while the other is to calculate topologySpreadConstraints based on the filtering results of node constraints.
Instead of using "hard" constraints in all topologySpreadConstraints, you can also combine using "hard" constraints and "soft" constraints to adhere to more diverse cluster situations.
Note:
If two TopologySpreadConstraints are being applied for the same {topologyKey, whenUnsatisfiable} tuple, the Pod creation will be blocked returning a validation error.PodTopologySpread defaults
PodTopologySpread is a Pod level API. As such, to use the feature, workload
authors need to be aware of the underlying topology of the cluster, and then
specify proper topologySpreadConstraints in the Pod spec for every workload.
While the Pod-level API gives the most flexibility it is also possible to
specify cluster-level defaults.
The default PodTopologySpread constraints allow you to specify spreading for all the workloads in the cluster, tailored for its topology. The constraints can be specified by an operator/admin as PodTopologySpread plugin arguments in the scheduling profile configuration API when starting kube-scheduler.
A sample configuration could look like this:
apiVersion: kubescheduler.config.k8s.io/v1alpha2
kind: KubeSchedulerConfiguration
profiles:
pluginConfig:
- name: PodTopologySpread
args:
defaultConstraints:
- maxSkew: 1
topologyKey: example.com/rack
whenUnsatisfiable: ScheduleAnyway
When configuring default constraints, label selectors must be left empty. kube-scheduler will deduce the label selectors from the membership of the Pod to Services, ReplicationControllers, ReplicaSets or StatefulSets. Pods can always override the default constraints by providing their own through the PodSpec.
Note:
When using default PodTopologySpread constraints, it is recommended to disable the old DefaultTopologySpread plugin.Wrap-up
PodTopologySpread allows you to define spreading constraints for your workloads with a flexible and expressive Pod-level API. In the past, workload authors used Pod AntiAffinity rules to force or hint the scheduler to run a single Pod per topology domain. In contrast, the new PodTopologySpread constraints allow Pods to specify skew levels that can be required (hard) or desired (soft). The feature can be paired with Node selectors and Node affinity to limit the spreading to specific domains. Pod spreading constraints can be defined for different topologies such as hostnames, zones, regions, racks, etc.
Lastly, cluster operators can define default constraints to be applied to all Pods. This way, Pods don't need to be aware of the underlying topology of the cluster.
Two-phased Canary Rollout with Open Source Gloo
Author: Rick Ducott | GitHub | Twitter
Every day, my colleagues and I are talking to platform owners, architects, and engineers who are using Gloo as an API gateway to expose their applications to end users. These applications may span legacy monoliths, microservices, managed cloud services, and Kubernetes clusters. Fortunately, Gloo makes it easy to set up routes to manage, secure, and observe application traffic while supporting a flexible deployment architecture to meet the varying production needs of our users.
Beyond the initial set up, platform owners frequently ask us to help design the operational workflows within their organization: How do we bring a new application online? How do we upgrade an application? How do we divide responsibilities across our platform, ops, and development teams?
In this post, we're going to use Gloo to design a two-phased canary rollout workflow for application upgrades:
- In the first phase, we'll do canary testing by shifting a small subset of traffic to the new version. This allows you to safely perform smoke and correctness tests.
- In the second phase, we'll progressively shift traffic to the new version, allowing us to monitor the new version under load, and eventually, decommission the old version.
To keep it simple, we're going to focus on designing the workflow using open source Gloo, and we're going to deploy the gateway and application to Kubernetes. At the end, we'll talk about a few extensions and advanced topics that could be interesting to explore in a follow up.
Initial setup
To start, we need a Kubernetes cluster. This example doesn't take advantage of any cloud specific
features, and can be run against a local test cluster such as minikube.
This post assumes a basic understanding of Kubernetes and how to interact with it using kubectl.
We'll install the latest open source Gloo to the gloo-system namespace and deploy
version v1 of an example application to the echo namespace. We'll expose this application outside the cluster
by creating a route in Gloo, to end up with a picture like this:
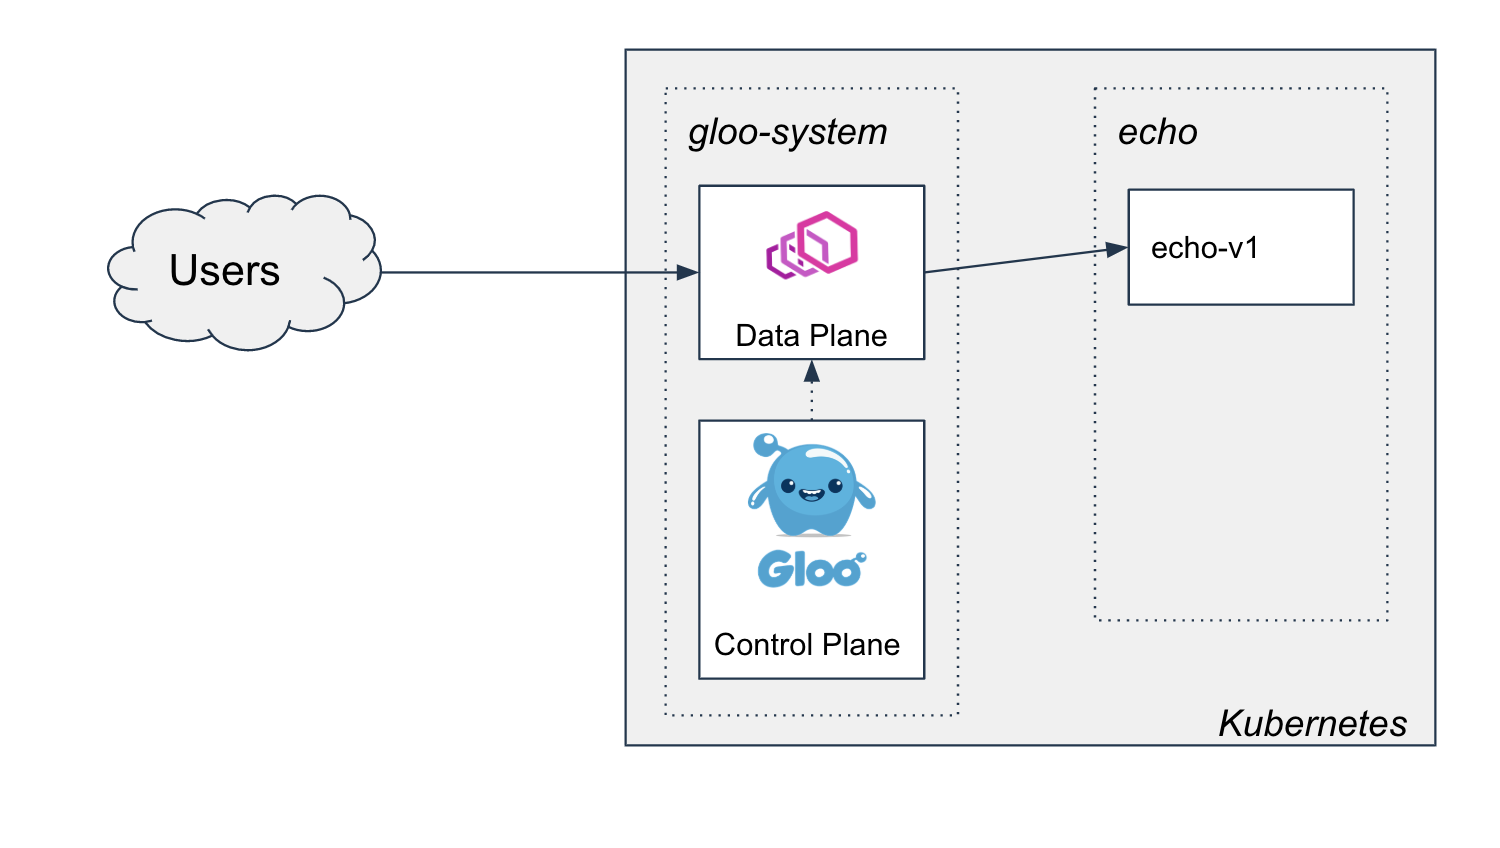
Deploying Gloo
We'll install gloo with the glooctl command line tool, which we can download and add to the PATH with the following
commands:
curl -sL https://run.solo.io/gloo/install | sh
export PATH=$HOME/.gloo/bin:$PATH
Now, you should be able to run glooctl version to see that it is installed correctly:
➜ glooctl version
Client: {"version":"1.3.15"}
Server: version undefined, could not find any version of gloo running
Now we can install the gateway to our cluster with a simple command:
glooctl install gateway
The console should indicate the install finishes successfully:
Creating namespace gloo-system... Done.
Starting Gloo installation...
Gloo was successfully installed!
Before long, we can see all the Gloo pods running in the gloo-system namespace:
➜ kubectl get pod -n gloo-system
NAME READY STATUS RESTARTS AGE
discovery-58f8856bd7-4fftg 1/1 Running 0 13s
gateway-66f86bc8b4-n5crc 1/1 Running 0 13s
gateway-proxy-5ff99b8679-tbp65 1/1 Running 0 13s
gloo-66b8dc8868-z5c6r 1/1 Running 0 13s
Deploying the application
Our echo application is a simple container (thanks to our friends at HashiCorp) that will
respond with the application version, to help demonstrate our canary workflows as we start testing and
shifting traffic to a v2 version of the application.
Kubernetes gives us a lot of flexibility in terms of modeling this application. We'll adopt the following conventions:
- We'll include the version in the deployment name so we can run two versions of the application side-by-side and manage their lifecycle differently.
- We'll label pods with an app label (
app: echo) and a version label (version: v1) to help with our canary rollout. - We'll deploy a single Kubernetes
Servicefor the application to set up networking. Instead of updating this or using multiple services to manage routing to different versions, we'll manage the rollout with Gloo configuration.
The following is our v1 echo application:
apiVersion: apps/v1
kind: Deployment
metadata:
name: echo-v1
spec:
replicas: 1
selector:
matchLabels:
app: echo
version: v1
template:
metadata:
labels:
app: echo
version: v1
spec:
containers:
# Shout out to our friends at Hashi for this useful test server
- image: hashicorp/http-echo
args:
- "-text=version:v1"
- -listen=:8080
imagePullPolicy: Always
name: echo-v1
ports:
- containerPort: 8080
And here is the echo Kubernetes Service object:
apiVersion: v1
kind: Service
metadata:
name: echo
spec:
ports:
- port: 80
targetPort: 8080
protocol: TCP
selector:
app: echo
For convenience, we've published this yaml in a repo so we can deploy it with the following command:
kubectl apply -f https://raw.githubusercontent.com/solo-io/gloo-ref-arch/blog-30-mar-20/platform/prog-delivery/two-phased-with-os-gloo/1-setup/echo.yaml
We should see the following output:
namespace/echo created
deployment.apps/echo-v1 created
service/echo created
And we should be able to see all the resources healthy in the echo namespace:
➜ kubectl get all -n echo
NAME READY STATUS RESTARTS AGE
pod/echo-v1-66dbfffb79-287s5 1/1 Running 0 6s
NAME TYPE CLUSTER-IP EXTERNAL-IP PORT(S) AGE
service/echo ClusterIP 10.55.252.216 <none> 80/TCP 6s
NAME READY UP-TO-DATE AVAILABLE AGE
deployment.apps/echo-v1 1/1 1 1 7s
NAME DESIRED CURRENT READY AGE
replicaset.apps/echo-v1-66dbfffb79 1 1 1 7s
Exposing outside the cluster with Gloo
We can now expose this service outside the cluster with Gloo. First, we'll model the application as a Gloo Upstream, which is Gloo's abstraction for a traffic destination:
apiVersion: gloo.solo.io/v1
kind: Upstream
metadata:
name: echo
namespace: gloo-system
spec:
kube:
selector:
app: echo
serviceName: echo
serviceNamespace: echo
servicePort: 8080
subsetSpec:
selectors:
- keys:
- version
Here, we're setting up subsets based on the version label. We don't have to use this in our routes, but later
we'll start to use it to support our canary workflow.
We can now create a route to this upstream in Gloo by defining a Virtual Service:
apiVersion: gateway.solo.io/v1
kind: VirtualService
metadata:
name: echo
namespace: gloo-system
spec:
virtualHost:
domains:
- "*"
routes:
- matchers:
- prefix: /
routeAction:
single:
upstream:
name: echo
namespace: gloo-system
We can apply these resources with the following commands:
kubectl apply -f https://raw.githubusercontent.com/solo-io/gloo-ref-arch/blog-30-mar-20/platform/prog-delivery/two-phased-with-os-gloo/1-setup/upstream.yaml
kubectl apply -f https://raw.githubusercontent.com/solo-io/gloo-ref-arch/blog-30-mar-20/platform/prog-delivery/two-phased-with-os-gloo/1-setup/vs.yaml
Once we apply these two resources, we can start to send traffic to the application through Gloo:
➜ curl $(glooctl proxy url)/
version:v1
Our setup is complete, and our cluster now looks like this:
Two-Phased Rollout Strategy
Now we have a new version v2 of the echo application that we wish to roll out. We know that when the
rollout is complete, we are going to end up with this picture:
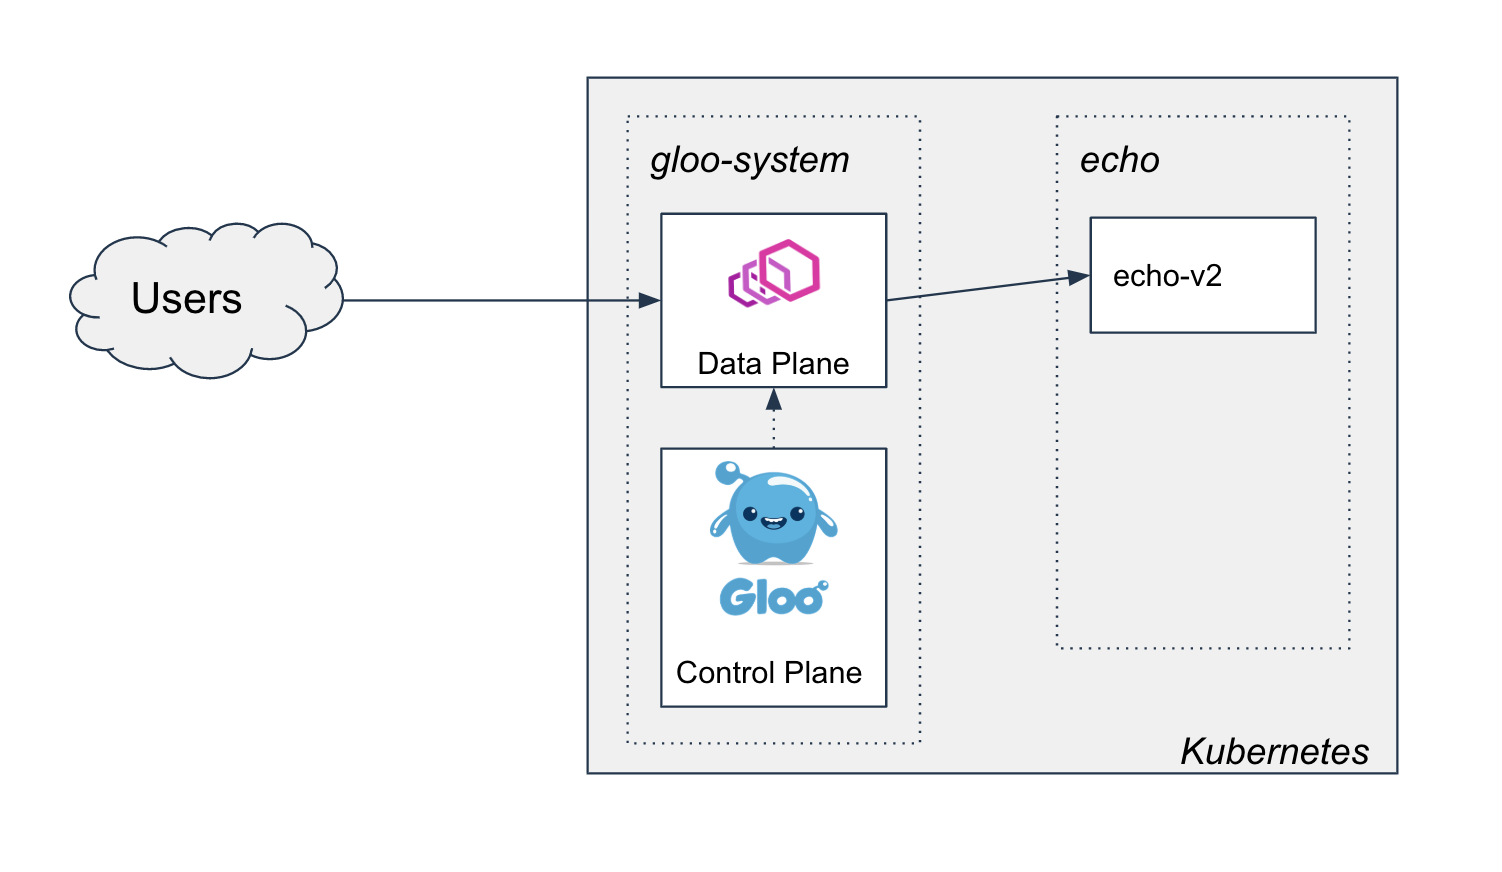
However, to get there, we may want to perform a few rounds of testing to ensure the new version of the application meets certain correctness and/or performance acceptance criteria. In this post, we'll introduce a two-phased approach to canary rollout with Gloo, that could be used to satisfy the vast majority of acceptance tests.
In the first phase, we'll perform smoke and correctness tests by routing a small segment of the traffic to the new version
of the application. In this demo, we'll use a header stage: canary to trigger routing to the new service, though in
practice it may be desirable to make this decision based on another part of the request, such as a claim in a verified JWT.
In the second phase, we've already established correctness, so we are ready to shift all of the traffic over to the new version of the application. We'll configure weighted destinations, and shift the traffic while monitoring certain business metrics to ensure the service quality remains at acceptable levels. Once 100% of the traffic is shifted to the new version, the old version can be decommissioned.
In practice, it may be desirable to only use one of the phases for testing, in which case the other phase can be skipped.
Phase 1: Initial canary rollout of v2
In this phase, we'll deploy v2, and then use a header stage: canary to start routing a small amount of specific
traffic to the new version. We'll use this header to perform some basic smoke testing and make sure v2 is working the
way we'd expect:
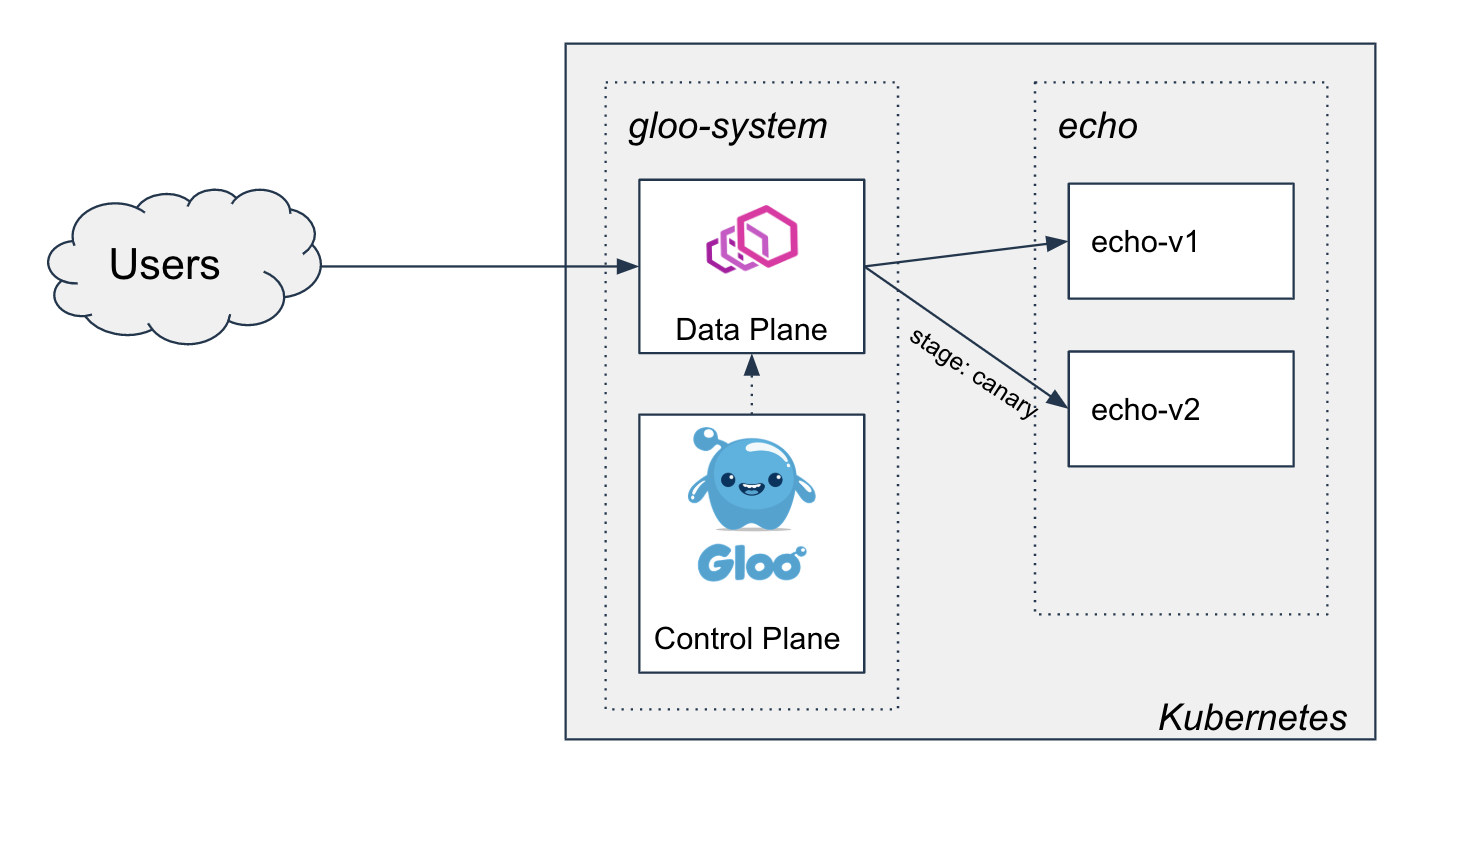
Setting up subset routing
Before deploying our v2 service, we'll update our virtual service to only route to pods that have the subset label
version: v1, using a Gloo feature called subset routing.
apiVersion: gateway.solo.io/v1
kind: VirtualService
metadata:
name: echo
namespace: gloo-system
spec:
virtualHost:
domains:
- "*"
routes:
- matchers:
- prefix: /
routeAction:
single:
upstream:
name: echo
namespace: gloo-system
subset:
values:
version: v1
We can apply them to the cluster with the following commands:
kubectl apply -f https://raw.githubusercontent.com/solo-io/gloo-ref-arch/blog-30-mar-20/platform/prog-delivery/two-phased-with-os-gloo/2-initial-subset-routing-to-v2/vs-1.yaml
The application should continue to function as before:
➜ curl $(glooctl proxy url)/
version:v1
Deploying echo v2
Now we can safely deploy v2 of the echo application:
apiVersion: apps/v1
kind: Deployment
metadata:
name: echo-v2
spec:
replicas: 1
selector:
matchLabels:
app: echo
version: v2
template:
metadata:
labels:
app: echo
version: v2
spec:
containers:
- image: hashicorp/http-echo
args:
- "-text=version:v2"
- -listen=:8080
imagePullPolicy: Always
name: echo-v2
ports:
- containerPort: 8080
We can deploy with the following command:
kubectl apply -f https://raw.githubusercontent.com/solo-io/gloo-ref-arch/blog-30-mar-20/platform/prog-delivery/two-phased-with-os-gloo/2-initial-subset-routing-to-v2/echo-v2.yaml
Since our gateway is configured to route specifically to the v1 subset, this should have no effect. However, it does enable
v2 to be routable from the gateway if the v2 subset is configured for a route.
Make sure v2 is running before moving on:
➜ kubectl get pod -n echo
NAME READY STATUS RESTARTS AGE
echo-v1-66dbfffb79-2qw86 1/1 Running 0 5m25s
echo-v2-86584fbbdb-slp44 1/1 Running 0 93s
The application should continue to function as before:
➜ curl $(glooctl proxy url)/
version:v1
Adding a route to v2 for canary testing
We'll route to the v2 subset when the stage: canary header is supplied on the request. If the header isn't
provided, we'll continue to route to the v1 subset as before.
apiVersion: gateway.solo.io/v1
kind: VirtualService
metadata:
name: echo
namespace: gloo-system
spec:
virtualHost:
domains:
- "*"
routes:
- matchers:
- headers:
- name: stage
value: canary
prefix: /
routeAction:
single:
upstream:
name: echo
namespace: gloo-system
subset:
values:
version: v2
- matchers:
- prefix: /
routeAction:
single:
upstream:
name: echo
namespace: gloo-system
subset:
values:
version: v1
We can deploy with the following command:
kubectl apply -f https://raw.githubusercontent.com/solo-io/gloo-ref-arch/blog-30-mar-20/platform/prog-delivery/two-phased-with-os-gloo/2-initial-subset-routing-to-v2/vs-2.yaml
Canary testing
Now that we have this route, we can do some testing. First let's ensure that the existing route is working as expected:
➜ curl $(glooctl proxy url)/
version:v1
And now we can start to canary test our new application version:
➜ curl $(glooctl proxy url)/ -H "stage: canary"
version:v2
Advanced use cases for subset routing
We may decide that this approach, using user-provided request headers, is too open. Instead, we may want to restrict canary testing to a known, authorized user.
A common implementation of this that we've seen is for the canary route to require a valid JWT that contains a specific claim to indicate the subject is authorized for canary testing. Enterprise Gloo has out of the box support for verifying JWTs, updating the request headers based on the JWT claims, and recomputing the routing destination based on the updated headers. We'll save that for a future post covering more advanced use cases in canary testing.
Phase 2: Shifting all traffic to v2 and decommissioning v1
At this point, we've deployed v2, and created a route for canary testing. If we are satisfied with the
results of the testing, we can move on to phase 2 and start shifting the load from v1 to v2. We'll use
weighted destinations
in Gloo to manage the load during the migration.
Setting up the weighted destinations
We can change the Gloo route to route to both of these destinations, with weights to decide how much of the traffic should
go to the v1 versus the v2 subset. To start, we're going to set it up so 100% of the traffic continues to get routed to the
v1 subset, unless the stage: canary header was provided as before.
apiVersion: gateway.solo.io/v1
kind: VirtualService
metadata:
name: echo
namespace: gloo-system
spec:
virtualHost:
domains:
- "*"
routes:
# We'll keep our route from before if we want to continue testing with this header
- matchers:
- headers:
- name: stage
value: canary
prefix: /
routeAction:
single:
upstream:
name: echo
namespace: gloo-system
subset:
values:
version: v2
# Now we'll route the rest of the traffic to the upstream, load balanced across the two subsets.
- matchers:
- prefix: /
routeAction:
multi:
destinations:
- destination:
upstream:
name: echo
namespace: gloo-system
subset:
values:
version: v1
weight: 100
- destination:
upstream:
name: echo
namespace: gloo-system
subset:
values:
version: v2
weight: 0
We can apply this virtual service update to the cluster with the following commands:
kubectl apply -f https://raw.githubusercontent.com/solo-io/gloo-ref-arch/blog-30-mar-20/platform/prog-delivery/two-phased-with-os-gloo/3-progressive-traffic-shift-to-v2/vs-1.yaml
Now the cluster looks like this, for any request that doesn't have the stage: canary header:
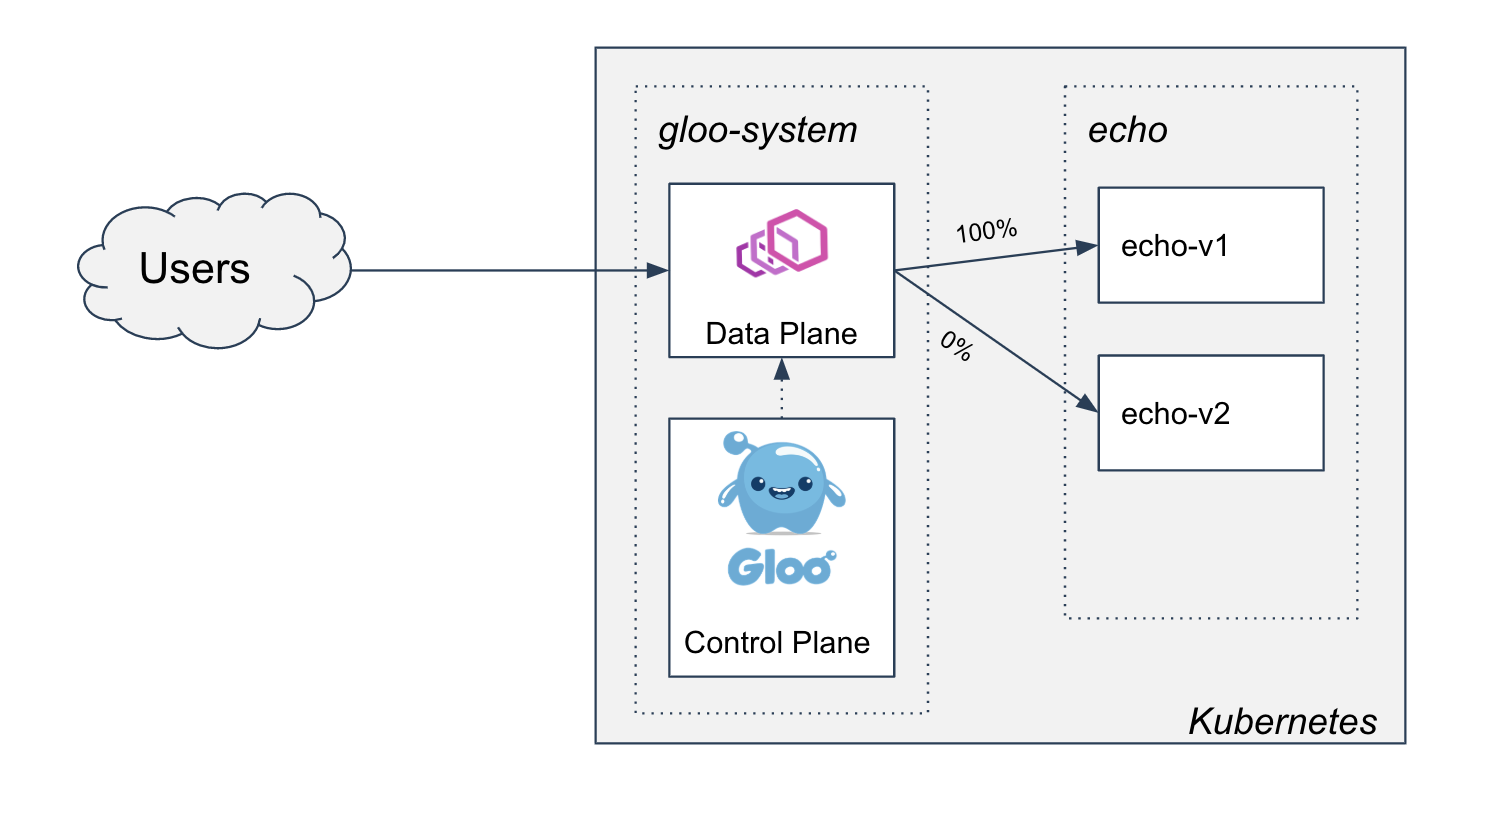
With the initial weights, we should see the gateway continue to serve v1 for all traffic.
➜ curl $(glooctl proxy url)/
version:v1
Commence rollout
To simulate a load test, let's shift half the traffic to v2:
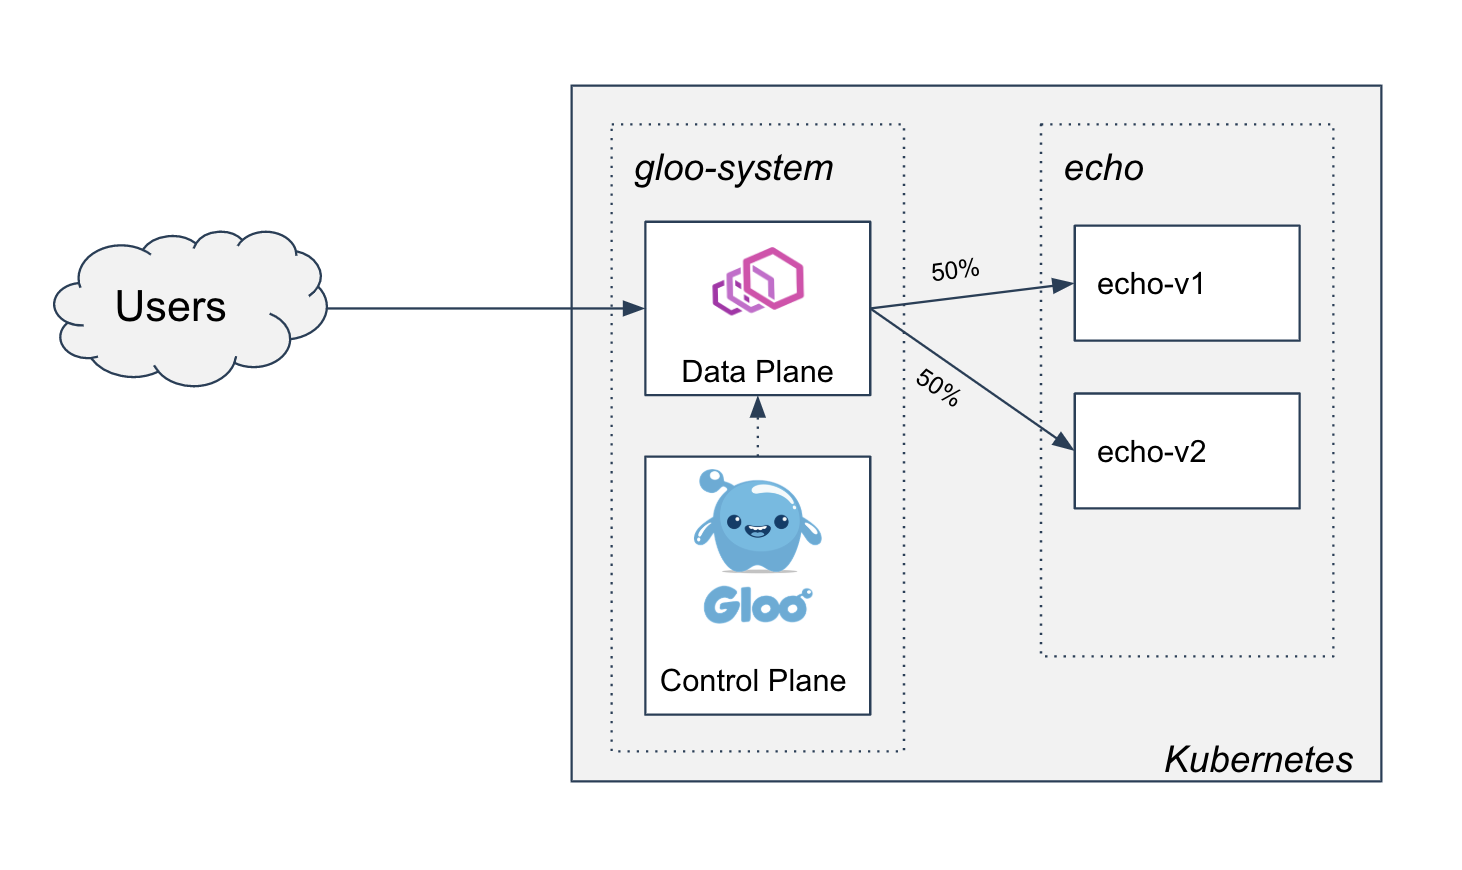
This can be expressed on our virtual service by adjusting the weights:
apiVersion: gateway.solo.io/v1
kind: VirtualService
metadata:
name: echo
namespace: gloo-system
spec:
virtualHost:
domains:
- "*"
routes:
- matchers:
- headers:
- name: stage
value: canary
prefix: /
routeAction:
single:
upstream:
name: echo
namespace: gloo-system
subset:
values:
version: v2
- matchers:
- prefix: /
routeAction:
multi:
destinations:
- destination:
upstream:
name: echo
namespace: gloo-system
subset:
values:
version: v1
# Update the weight so 50% of the traffic hits v1
weight: 50
- destination:
upstream:
name: echo
namespace: gloo-system
subset:
values:
version: v2
# And 50% is routed to v2
weight: 50
We can apply this to the cluster with the following command:
kubectl apply -f https://raw.githubusercontent.com/solo-io/gloo-ref-arch/blog-30-mar-20/platform/prog-delivery/two-phased-with-os-gloo/3-progressive-traffic-shift-to-v2/vs-2.yaml
Now when we send traffic to the gateway, we should see half of the requests return version:v1 and the
other half return version:v2.
➜ curl $(glooctl proxy url)/
version:v1
➜ curl $(glooctl proxy url)/
version:v2
➜ curl $(glooctl proxy url)/
version:v1
In practice, during this process it's likely you'll be monitoring some performance and business metrics to ensure the traffic shift isn't resulting in a decline in the overall quality of service. We can even leverage operators like Flagger to help automate this Gloo workflow. Gloo Enterprise integrates with your metrics backend and provides out of the box and dynamic, upstream-based dashboards that can be used to monitor the health of the rollout. We will save these topics for a future post on advanced canary testing use cases with Gloo.
Finishing the rollout
We will continue adjusting weights until eventually, all of the traffic is now being routed to v2:
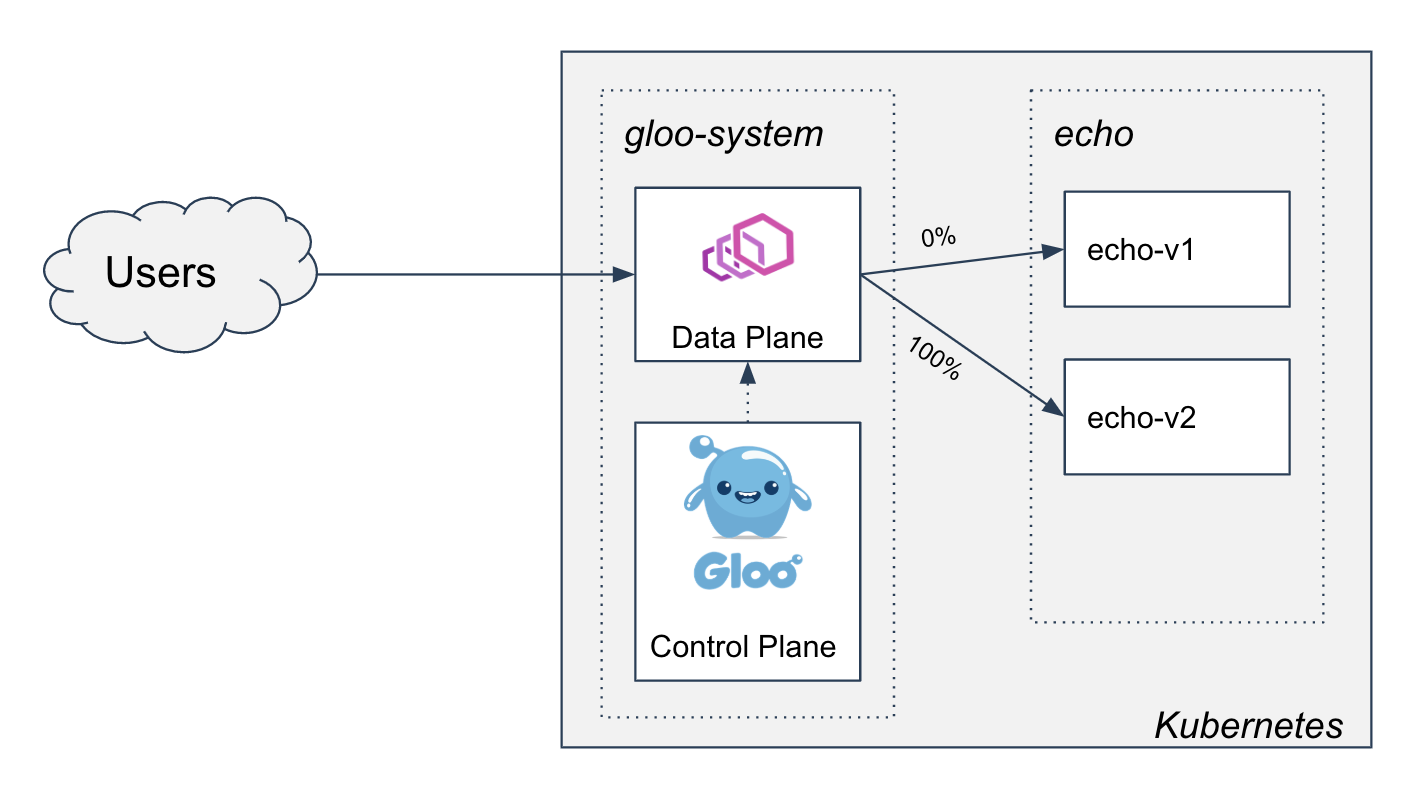
Our virtual service will look like this:
apiVersion: gateway.solo.io/v1
kind: VirtualService
metadata:
name: echo
namespace: gloo-system
spec:
virtualHost:
domains:
- "*"
routes:
- matchers:
- headers:
- name: stage
value: canary
prefix: /
routeAction:
single:
upstream:
name: echo
namespace: gloo-system
subset:
values:
version: v2
- matchers:
- prefix: /
routeAction:
multi:
destinations:
- destination:
upstream:
name: echo
namespace: gloo-system
subset:
values:
version: v1
# No traffic will be sent to v1 anymore
weight: 0
- destination:
upstream:
name: echo
namespace: gloo-system
subset:
values:
version: v2
# Now all the traffic will be routed to v2
weight: 100
We can apply that to the cluster with the following command:
kubectl apply -f https://raw.githubusercontent.com/solo-io/gloo-ref-arch/blog-30-mar-20/platform/prog-delivery/two-phased-with-os-gloo/3-progressive-traffic-shift-to-v2/vs-3.yaml
Now when we send traffic to the gateway, we should see all of the requests return version:v2.
➜ curl $(glooctl proxy url)/
version:v2
➜ curl $(glooctl proxy url)/
version:v2
➜ curl $(glooctl proxy url)/
version:v2
Decommissioning v1
At this point, we have deployed the new version of our application, conducted correctness tests using subset routing,
conducted load and performance tests by progressively shifting traffic to the new version, and finished
the rollout. The only remaining task is to clean up our v1 resources.
First, we'll clean up our routes. We'll leave the subset specified on the route so we are all setup for future upgrades.
apiVersion: gateway.solo.io/v1
kind: VirtualService
metadata:
name: echo
namespace: gloo-system
spec:
virtualHost:
domains:
- "*"
routes:
- matchers:
- prefix: /
routeAction:
single:
upstream:
name: echo
namespace: gloo-system
subset:
values:
version: v2
We can apply this update with the following command:
kubectl apply -f https://raw.githubusercontent.com/solo-io/gloo-ref-arch/blog-30-mar-20/platform/prog-delivery/two-phased-with-os-gloo/4-decommissioning-v1/vs.yaml
And we can delete the v1 deployment, which is no longer serving any traffic.
kubectl delete deploy -n echo echo-v1
Now our cluster looks like this:
And requests to the gateway return this:
➜ curl $(glooctl proxy url)/
version:v2
We have now completed our two-phased canary rollout of an application update using Gloo!
Other Advanced Topics
Over the course of this post, we collected a few topics that could be a good starting point for advanced exploration:
- Using the JWT filter to verify JWTs, extract claims onto headers, and route to canary versions depending on a claim value.
- Looking at Prometheus metrics and Grafana dashboards created by Gloo to monitor the health of the rollout.
- Automating the rollout by integrating Flagger with Gloo.
A few other topics that warrant further exploration:
- Supporting self-service upgrades by giving teams ownership over their upstream and route configuration
- Utilizing Gloo's delegation feature and Kubernetes RBAC to decentralize the configuration management safely
- Fully automating the continuous delivery process by applying GitOps principles and using tools like Flux to push config to the cluster
- Supporting hybrid or non-Kubernetes application use-cases by setting up Gloo with a different deployment pattern
- Utilizing traffic shadowing to begin testing the new version with realistic data before shifting production traffic to it
Get Involved in the Gloo Community
Gloo has a large and growing community of open source users, in addition to an enterprise customer base. To learn more about Gloo:
- Check out the repo, where you can see the code and file issues
- Check out the docs, which have an extensive collection of guides and examples
- Join the slack channel and start chatting with the Solo engineering team and user community
If you'd like to get in touch with me (feedback is always appreciated!), you can find me on the Solo slack or email me at rick.ducott@solo.io.
Cluster API v1alpha3 Delivers New Features and an Improved User Experience
The Cluster API is a Kubernetes project to bring declarative, Kubernetes-style APIs to cluster creation, configuration, and management. It provides optional, additive functionality on top of core Kubernetes to manage the lifecycle of a Kubernetes cluster.
Following the v1alpha2 release in October 2019, many members of the Cluster API community met in San Francisco, California, to plan the next release. The project had just gone through a major transformation, delivering a new architecture that promised to make the project easier for users to adopt, and faster for the community to build. Over the course of those two days, we found our common goals: To implement the features critical to managing production clusters, to make its user experience more intuitive, and to make it a joy to develop.
The v1alpha3 release of Cluster API brings significant features for anyone running Kubernetes in production and at scale. Among the highlights:
- Declarative Control Plane Management
- Support for Distributing Control Plane Nodes Across Failure Domains To Reduce Risk
- Automated Replacement of Unhealthy Nodes
- Support for Infrastructure-Managed Node Groups
For anyone who wants to understand the API, or prizes a simple, but powerful, command-line interface, the new release brings:
- Redesigned clusterctl, a command-line tool (and go library) for installing and managing the lifecycle of Cluster API
- Extensive and up-to-date documentation in The Cluster API Book
Finally, for anyone extending the Cluster API for their custom infrastructure or software needs:
- New End-to-End (e2e) Test Framework
- Documentation for integrating Cluster API into your cluster lifecycle stack
All this was possible thanks to the hard work of many contributors.
Declarative Control Plane Management
Special thanks to Jason DeTiberus, Naadir Jeewa, and Chuck Ha
The Kubeadm-based Control Plane (KCP) provides a declarative API to deploy and scale the Kubernetes control plane, including etcd. This is the feature many Cluster API users have been waiting for! Until now, to deploy and scale up the control plane, users had to create specially-crafted Machine resources. To scale down the control plane, they had to manually remove members from the etcd cluster. KCP automates deployment, scaling, and upgrades.
What is the Kubernetes Control Plane? The Kubernetes control plane is, at its core, kube-apiserver and etcd. If either of these are unavailable, no API requests can be handled. This impacts not only core Kubernetes APIs, but APIs implemented with CRDs. Other components, like kube-scheduler and kube-controller-manager, are also important, but do not have the same impact on availability.
The control plane was important in the beginning because it scheduled workloads. However, some workloads could continue to run during a control plane outage. Today, workloads depend on operators, service meshes, and API gateways, which all use the control plane as a platform. Therefore, the control plane's availability is more important than ever.
Managing the control plane is one of the most complex parts of cluster operation. Because the typical control plane includes etcd, it is stateful, and operations must be done in the correct sequence. Control plane replicas can and do fail, and maintaining control plane availability means being able to replace failed nodes.
The control plane can suffer a complete outage (e.g. permanent loss of quorum in etcd), and recovery (along with regular backups) is sometimes the only feasible option.
For more details, read about Kubernetes Components in the Kubernetes documentation.
Here's an example of a 3-replica control plane for the Cluster API Docker Infrastructure, which the project maintains for testing and development. For brevity, other required resources, like Cluster, and Infrastructure Template, referenced by its name and namespace, are not shown.
apiVersion: controlplane.cluster.x-k8s.io/v1alpha3
kind: KubeadmControlPlane
metadata:
name: example
spec:
infrastructureTemplate:
apiVersion: infrastructure.cluster.x-k8s.io/v1alpha3
kind: DockerMachineTemplate
name: example
namespace: default
kubeadmConfigSpec:
clusterConfiguration:
replicas: 3
version: 1.16.3
Deploy this control plane with kubectl:
kubectl apply -f example-docker-control-plane.yaml
Scale the control plane the same way you scale other Kubernetes resources:
kubectl scale kubeadmcontrolplane example --replicas=5
kubeadmcontrolplane.controlplane.cluster.x-k8s.io/example scaled
Upgrade the control plane to a newer patch of the Kubernetes release:
kubectl patch kubeadmcontrolplane example --type=json -p '[{"op": "replace", "path": "/spec/version", "value": "1.16.4"}]'
Number of Control Plane Replicas By default, KCP is configured to manage etcd, and requires an odd number of replicas. If KCP is configured to not manage etcd, an odd number is recommended, but not required. An odd number of replicas ensures optimal etcd configuration. To learn why your etcd cluster should have an odd number of members, see the etcd FAQ.
Because it is a core Cluster API component, KCP can be used with any v1alpha3-compatible Infrastructure Provider that provides a fixed control plane endpoint, i.e., a load balancer or virtual IP. This endpoint enables requests to reach multiple control plane replicas.
What is an Infrastructure Provider? A source of computational resources (e.g. machines, networking, etc.). The community maintains providers for AWS, Azure, Google Cloud, and VMWare. For details, see the list of providers in the Cluster API Book.
Distributing Control Plane Nodes To Reduce Risk
Special thanks to Vince Prignano, and Chuck Ha
Cluster API users can now deploy nodes in different failure domains, reducing the risk of a cluster failing due to a domain outage. This is especially important for the control plane: If nodes in one domain fail, the cluster can continue to operate as long as the control plane is available to nodes in other domains.
What is a Failure Domain? A failure domain is a way to group the resources that would be made unavailable by some failure. For example, in many public clouds, an "availability zone" is the default failure domain. A zone corresponds to a data center. So, if a specific data center is brought down by a power outage or natural disaster, all resources in that zone become unavailable. If you run Kubernetes on your own hardware, your failure domain might be a rack, a network switch, or power distribution unit.
The Kubeadm-based ControlPlane distributes nodes across failure domains. To minimize the chance of losing multiple nodes in the event of a domain outage, it tries to distribute them evenly: it deploys a new node in the failure domain with the fewest existing nodes, and it removes an existing node in the failure domain with the most existing nodes.
MachineDeployments and MachineSets do not distribute nodes across failure domains. To deploy your worker nodes across multiple failure domains, create a MachineDeployment or MachineSet for each failure domain.
The Failure Domain API works on any infrastructure. That's because every Infrastructure Provider maps failure domains in its own way. The API is optional, so if your infrastructure is not complex enough to need failure domains, you do not need to support it. This example is for the Cluster API Docker Infrastructure Provider. Note that two of the domains are marked as suitable for control plane nodes, while a third is not. The Kubeadm-based ControlPlane will only deploy nodes to domains marked suitable.
apiVersion: infrastructure.cluster.x-k8s.io/v1alpha3
kind: DockerCluster
metadata:
name: example
spec:
controlPlaneEndpoint:
host: 172.17.0.4
port: 6443
failureDomains:
domain-one:
controlPlane: true
domain-two:
controlPlane: true
domain-three:
controlPlane: false
The AWS Infrastructure Provider (CAPA), maintained by the Cluster API project, maps failure domains to AWS Availability Zones. Using CAPA, you can deploy a cluster across multiple Availability Zones. First, define subnets for multiple Availability Zones. The CAPA controller will define a failure domain for each Availability Zone. Deploy the control plane with the KubeadmControlPlane: it will distribute replicas across the failure domains. Finally, create a separate MachineDeployment for each failure domain.
Automated Replacement of Unhealthy Nodes
Special thanks to Alberto García Lamela, and Joel Speed
There are many reasons why a node might be unhealthy. The kubelet process may stop. The container runtime might have a bug. The kernel might have a memory leak. The disk may run out of space. CPU, disk, or memory hardware may fail. A power outage may happen. Failures like these are especially common in larger clusters.
Kubernetes is designed to tolerate them, and to help your applications tolerate them as well. Nevertheless, only a finite number of nodes can be unhealthy before the cluster runs out of resources, and Pods are evicted or not scheduled in the first place. Unhealthy nodes should be repaired or replaced at the earliest opportunity.
The Cluster API now includes a MachineHealthCheck resource, and a controller that monitors node health. When it detects an unhealthy node, it removes it. (Another Cluster API controller detects the node has been removed and replaces it.) You can configure the controller to suit your needs. You can configure how long to wait before removing the node. You can also set a threshold for the number of unhealthy nodes. When the threshold is reached, no more nodes are removed. The wait can be used to tolerate short-lived outages, and the threshold to prevent too many nodes from being replaced at the same time.
The controller will remove only nodes managed by a Cluster API MachineSet. The controller does not remove control plane nodes, whether managed by the Kubeadm-based Control Plane, or by the user, as in v1alpha2. For more, see Limits and Caveats of a MachineHealthCheck.
Here is an example of a MachineHealthCheck. For more details, see Configure a MachineHealthCheck in the Cluster API book.
apiVersion: cluster.x-k8s.io/v1alpha3
kind: MachineHealthCheck
metadata:
name: example-node-unhealthy-5m
spec:
clusterName: example
maxUnhealthy: 33%
nodeStartupTimeout: 10m
selector:
matchLabels:
nodepool: nodepool-0
unhealthyConditions:
- type: Ready
status: Unknown
timeout: 300s
- type: Ready
status: "False"
timeout: 300s
Infrastructure-Managed Node Groups
Special thanks to Juan-Lee Pang and Cecile Robert-Michon
If you run large clusters, you need to create and destroy hundreds of nodes, sometimes in minutes. Although public clouds make it possible to work with large numbers of nodes, having to make a separate API request to create or delete every node may scale poorly. For example, API requests may have to be delayed to stay within rate limits.
Some public clouds offer APIs to manage groups of nodes as one single entity. For example, AWS has AutoScaling Groups, Azure has Virtual Machine Scale Sets, and GCP has Managed Instance Groups. With this release of Cluster API, Infrastructure Providers can add support for these APIs, and users can deploy groups of Cluster API Machines by using the MachinePool Resource. For more information, see the proposal in the Cluster API repository.
Experimental Feature The MachinePool API is an experimental feature that is not enabled by default. Users are encouraged to try it and report on how well it meets their needs.
The Cluster API User Experience, Reimagined
clusterctl
Special thanks to Fabrizio Pandini
If you are new to Cluster API, your first experience will probably be with the project's command-line tool, clusterctl. And with the new Cluster API release, it has been re-designed to be more pleasing to use than before. The tool is all you need to deploy your first workload cluster in just a few steps.
First, use clusterctl init to fetch the configuration for your Infrastructure and Bootstrap Providers and deploy all of the components that make up the Cluster API. Second, use clusterctl config cluster to create the workload cluster manifest. This manifest is just a collection of Kubernetes objects. To create the workload cluster, just kubectl apply the manifest. Don't be surprised if this workflow looks familiar: Deploying a workload cluster with Cluster API is just like deploying an application workload with Kubernetes!
Clusterctl also helps with the "day 2" operations. Use clusterctl move to migrate Cluster API custom resources, such as Clusters, and Machines, from one Management Cluster to another. This step--also known as a pivot--is necessary to create a workload cluster that manages itself with Cluster API. Finally, use clusterctl upgrade to upgrade all of the installed components when a new Cluster API release becomes available.
One more thing! Clusterctl is not only a command-line tool. It is also a Go library! Think of the library as an integration point for projects that build on top of Cluster API. All of clusterctl's command-line functionality is available in the library, making it easy to integrate into your stack. To get started with the library, please read its documentation.
The Cluster API Book
Thanks to many contributors!
The project's documentation is extensive. New users should get some background on the architecture, and then create a cluster of their own with the Quick Start. The clusterctl tool has its own reference. The Developer Guide has plenty of information for anyone interested in contributing to the project.
Above and beyond the content itself, the project's documentation site is a pleasure to use. It is searchable, has an outline, and even supports different color themes. If you think the site a lot like the documentation for a different community project, Kubebuilder, that is no coincidence! Many thanks to Kubebuilder authors for creating a great example of documentation. And many thanks to the mdBook authors for creating a great tool for building documentation.
Integrate & Customize
End-to-End Test Framework
Special thanks to Chuck Ha
The Cluster API project is designed to be extensible. For example, anyone can develop their own Infrastructure and Bootstrap Providers. However, it's important that Providers work in a uniform way. And, because the project is still evolving, it takes work to make sure that Providers are up-to-date with new releases of the core.
The End-to-End Test Framework provides a set of standard tests for developers to verify that their Providers integrate correctly with the current release of Cluster API, and help identify any regressions that happen after a new release of the Cluster API, or the Provider.
For more details on the Framework, see Testing in the Cluster API Book, and the README in the repository.
Provider Implementer's Guide
Thanks to many contributors!
The community maintains Infrastructure Providers for a many popular infrastructures. However, if you want to build your own Infrastructure or Bootstrap Provider, the Provider Implementer's guide explains the entire process, from creating a git repository, to creating CustomResourceDefinitions for your Providers, to designing, implementing, and testing the controllers.
Under Active Development The Provider Implementer's Guide is actively under development, and may not yet reflect all of the changes in the v1alpha3 release.
Join Us!
The Cluster API project is a very active project, and covers many areas of interest. If you are an infrastructure expert, you can contribute to one of the Infrastructure Providers. If you like building controllers, you will find opportunities to innovate. If you're curious about testing distributed systems, you can help develop the project's end-to-end test framework. Whatever your interests and background, you can make a real impact on the project.
Come introduce yourself to the community at our weekly meeting, where we dedicate a block of time for a Q&A session. You can also find maintainers and users on the Kubernetes Slack, and in the Kubernetes forum. Please check out the links below. We look forward to seeing you!
- Chat with us on the Kubernetes Slack: #cluster-api
- Join the sig-cluster-lifecycle Google Group to receive calendar invites and gain access to documents
- Join our Zoom meeting, every Wednesday at 10:00 Pacific Time
- Post to the Cluster API community forum
How Kubernetes contributors are building a better communication process
"Perhaps we just need to use a different word. We may need to use community development or project advocacy as a word in the open source realm as opposed to marketing, and perhaps then people will realize that they need to do it." ~ Nithya Ruff (from TODO Group)
A common way to participate in the Kubernetes contributor community is to be everywhere.
We have an active Slack, many mailing lists, Twitter account(s), and dozens of community-driven podcasts and newsletters that highlight all end-user, contributor, and ecosystem topics. And to add on to that, we also have repositories of amazing documentation, tons of meetings that drive the project forward, and recorded code deep dives. All of this information is incredibly valuable, but it can be too much.
Keeping up with thousands of contributors can be a challenge for anyone, but this task of consuming information straight from the firehose is particularly challenging for new community members. It's no secret that the project is vast for contributors and users alike.
To paint a picture with numbers:
- 43,000 contributors
- 6,579 members in #kubernetes-dev slack channel
- 52 mailing lists (kubernetes-dev@ has thousands of members; sig-networking@ has 1000 alone)
- 40 community groups
- 30 upstream meetings this week alone
All of these numbers are only growing in scale, and with that comes the need to simplify how contributors get the information right information front-and-center.
How we got here
Kubernetes (K8s for short) communication grew out of a need for people to connect in our growing community. With the best of intentions, the community spun up channels for people to connect. This energy was part of what helped Kubernetes grow so fast, and it also had us in sprawling out far and wide. As adoption grew, contributors knew there was a need for standardization.
This new attention to how the community communicates led to the discovery of a complex web of options. There were so many options, and it was a challenge for anyone to be sure they were in the right place to receive the right information. We started taking immediate action combining communication streams and thinking about how to reach out best to serve our community. We also asked for feedback from all our contributors directly via annual surveys to see where folks were actually reading the news that influences their experiences here in our community.
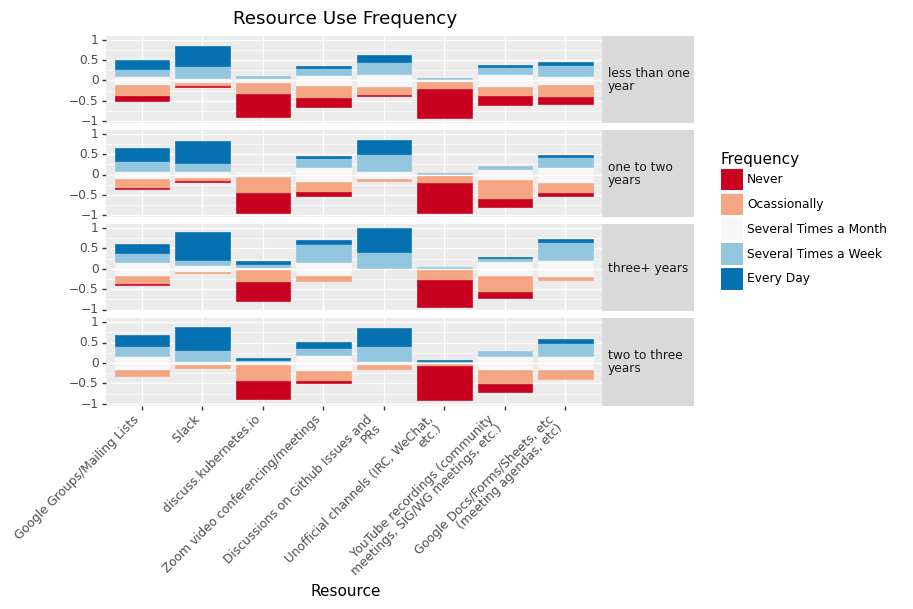
With over 43,000 contributors, our contributor base is larger than many enterprise companies. You can imagine what it's like getting important messages across to make sure they are landing and folks are taking action.
Contributing to better communication
Think about how your company/employer solves for this kind of communication challenge. Many have done so by building internal marketing and communication focus areas in marketing departments. So that's what we are doing. This has also been applied at Fedora and at a smaller scale in our very own release and contributor summit planning teams as roles.
We have hit the accelerator on an upstream marketing group under SIG Contributor Experience and we want to tackle this challenge straight on. We've learned in other contributor areas that creating roles for contributors is super helpful - onboarding, breaking down work, and ownership. Here's our team charting the course.
Journey your way through our other documents like our charter if you are interested in our mission and scope.
Many of you close to the ecosystem might be scratching your head - isn't this what CNCF does?
Yes and no. The CNCF has 40+ other projects that need to be marketed to a countless number of different types of community members in distinct ways and they aren't responsible for the day to day operations of their projects. They absolutely do partner with us to highlight what we need and when we need it, and they do a fantastic job of it (one example is the @kubernetesio Twitter account and its 200,000 followers).
Where this group differs is in its scope: we are entirely focused on elevating the hard work being done throughout the Kubernetes community by its contributors.
What to expect from us
You can expect to see us on the Kubernetes communication channels supporting you by:
- Finding ways of adding our human touch to potentially overwhelming quantities of info by storytelling and other methods - we want to highlight the work you are doing and provide useful information!
- Keeping you in the know of the comings and goings of contributor community events, activities, mentoring initiatives, KEPs, and more.
- Creating a presence on Twitter specifically for contributors via @k8scontributors that is all about being a contributor in all its forms.
What does this look like in the wild? Our first post in a series about our 36 community groups landed recently. Did you see it? More articles like this and additional themes of stories to flow through our storytellers.
We will deliver this with an ethos behind us aligned to the Kubernetes project as a whole, and we're committed to using the same tools as all the other SIGs to do so. Check out our project board to view our roadmap of upcoming work.
Join us and be part of the story
This initiative is in an early phase and we still have important roles to fill to make it successful.
If you are interested in open sourcing marketing functions – it's a fun ride – join us! Specific immediate roles include storytelling through blogs and as a designer. We also have plenty of work in progress on our project board. Add a comment to any open issue to let us know you're interested in getting involved.
Also, if you're reading this, you're exactly the type of person we are here to support. We would love to hear about how to improve, feedback, or how we can work together.
Reach out at one of the contact methods listed on our README. We would love to hear from you.
API Priority and Fairness Alpha
This blog describes “API Priority And Fairness”, a new alpha feature in Kubernetes 1.18. API Priority And Fairness permits cluster administrators to divide the concurrency of the control plane into different weighted priority levels. Every request arriving at a kube-apiserver will be categorized into one of the priority levels and get its fair share of the control plane’s throughput.
What problem does this solve?
Today the apiserver has a simple mechanism for protecting itself against CPU and memory overloads: max-in-flight limits for mutating and for readonly requests. Apart from the distinction between mutating and readonly, no other distinctions are made among requests; consequently, there can be undesirable scenarios where one subset of the requests crowds out other requests.
In short, it is far too easy for Kubernetes workloads to accidentally DoS the apiservers, causing other important traffic--like system controllers or leader elections---to fail intermittently. In the worst cases, a few broken nodes or controllers can push a busy cluster over the edge, turning a local problem into a control plane outage.
How do we solve the problem?
The new feature “API Priority and Fairness” is about generalizing the existing max-in-flight request handler in each apiserver, to make the behavior more intelligent and configurable. The overall approach is as follows.
- Each request is matched by a Flow Schema. The Flow Schema states the Priority Level for requests that match it, and assigns a “flow identifier” to these requests. Flow identifiers are how the system determines whether requests are from the same source or not.
- Priority Levels may be configured to behave in several ways. Each Priority Level gets its own isolated concurrency pool. Priority levels also introduce the concept of queuing requests that cannot be serviced immediately.
- To prevent any one user or namespace from monopolizing a Priority Level, they may be configured to have multiple queues. “Shuffle Sharding” is used to assign each flow of requests to a subset of the queues.
- Finally, when there is capacity to service a request, a “Fair Queuing” algorithm is used to select the next request. Within each priority level the queues compete with even fairness.
Early results have been very promising! Take a look at this analysis.
How do I try this out?
You are required to prepare the following things in order to try out the feature:
- Download and install a kubectl greater than v1.18.0 version
- Enabling the new API groups with the command line flag
--runtime-config="flowcontrol.apiserver.k8s.io/v1alpha1=true"on the kube-apiservers - Switch on the feature gate with the command line flag
--feature-gates=APIPriorityAndFairness=trueon the kube-apiservers
After successfully starting your kube-apiservers, you will see a few default FlowSchema and PriorityLevelConfiguration resources in the cluster. These default configurations are designed for a general protection and traffic management for your cluster. You can examine and customize the default configuration by running the usual tools, e.g.:
kubectl get flowschemaskubectl get prioritylevelconfigurations
How does this work under the hood?
Upon arrival at the handler, a request is assigned to exactly one priority level and exactly one flow within that priority level. Hence understanding how FlowSchema and PriorityLevelConfiguration works will be helping you manage the request traffic going through your kube-apiservers.
FlowSchema: FlowSchema will identify a PriorityLevelConfiguration object and the way to compute the request’s “flow identifier”. Currently we support matching requests according to: the identity making the request, the verb, and the target object. The identity can match in terms of: a username, a user group name, or a ServiceAccount. And as for the target objects, we can match by apiGroup, resource[/subresource], and namespace.
- The flow identifier is used for shuffle sharding, so it’s important that requests have the same flow identifier if they are from the same source! We like to consider scenarios with “elephants” (which send many/heavy requests) vs “mice” (which send few/light requests): it is important to make sure the elephant’s requests all get the same flow identifier, otherwise they will look like many different mice to the system!
- See the API Documentation here!
PriorityLevelConfiguration: Defines a priority level.
- For apiserver self requests, and any reentrant traffic (e.g., admission webhooks which themselves make API requests), a Priority Level can be marked “exempt”, which means that no queueing or limiting of any sort is done. This is to prevent priority inversions.
- Each non-exempt Priority Level is configured with a number of "concurrency shares" and gets an isolated pool of concurrency to use. Requests of that Priority Level run in that pool when it is not full, never anywhere else. Each apiserver is configured with a total concurrency limit (taken to be the sum of the old limits on mutating and readonly requests), and this is then divided among the Priority Levels in proportion to their concurrency shares.
- A non-exempt Priority Level may select a number of queues and a "hand size" to use for the shuffle sharding. Shuffle sharding maps flows to queues in a way that is better than consistent hashing. A given flow has access to a small collection of queues, and for each incoming request the shortest queue is chosen. When a Priority Level has queues, it also sets a limit on queue length. There is also a limit placed on how long a request can wait in its queue; this is a fixed fraction of the apiserver's request timeout. A request that cannot be executed and cannot be queued (any longer) is rejected.
- Alternatively, a non-exempt Priority Level may select immediate rejection instead of waiting in a queue.
- See the API documentation for this feature.
What’s missing? When will there be a beta?
We’re already planning a few enhancements based on alpha and there will be more as users send feedback to our community. Here’s a list of them:
- Traffic management for WATCH and EXEC requests
- Adjusting and improving the default set of FlowSchema/PriorityLevelConfiguration
- Enhancing observability on how this feature works
- Join the discussion here
Possibly treat LIST requests differently depending on an estimate of how big their result will be.
How can I get involved?
As always! Reach us on slack #sig-api-machinery, or through the mailing list. We have lots of exciting features to build and can use all sorts of help.
Many thanks to the contributors that have gotten this feature this far: Aaron Prindle, Daniel Smith, Jonathan Tomer, Mike Spreitzer, Min Kim, Bruce Ma, Yu Liao, Mengyi Zhou!
Introducing Windows CSI support alpha for Kubernetes
The alpha version of CSI Proxy for Windows is being released with Kubernetes 1.18. CSI proxy enables CSI Drivers on Windows by allowing containers in Windows to perform privileged storage operations.
Background
Container Storage Interface (CSI) for Kubernetes went GA in the Kubernetes 1.13 release. CSI has become the standard for exposing block and file storage to containerized workloads on Container Orchestration systems (COs) like Kubernetes. It enables third-party storage providers to write and deploy plugins without the need to alter the core Kubernetes codebase. All new storage features will utilize CSI, therefore it is important to get CSI drivers to work on Windows.
A CSI driver in Kubernetes has two main components: a controller plugin and a node plugin. The controller plugin generally does not need direct access to the host and can perform all its operations through the Kubernetes API and external control plane services (e.g. cloud storage service). The node plugin, however, requires direct access to the host for making block devices and/or file systems available to the Kubernetes kubelet. This was previously not possible for containers on Windows. With the release of CSIProxy, CSI drivers can now perform storage operations on the node. This inturn enables containerized CSI Drivers to run on Windows.
CSI support for Windows clusters
CSI drivers (e.g. AzureDisk, GCE PD, etc.) are recommended to be deployed as containers. CSI driver’s node plugin typically runs on every worker node in the cluster (as a DaemonSet). Node plugin containers need to run with elevated privileges to perform storage related operations. However, Windows currently does not support privileged containers. To solve this problem, CSIProxy makes it so that node plugins can now be deployed as unprivileged pods and then use the proxy to perform privileged storage operations on the node.
Node plugin interactions with CSIProxy
The design of the CSI proxy is captured in this KEP. The following diagram depicts the interactions with the CSI node plugin and CSI proxy.
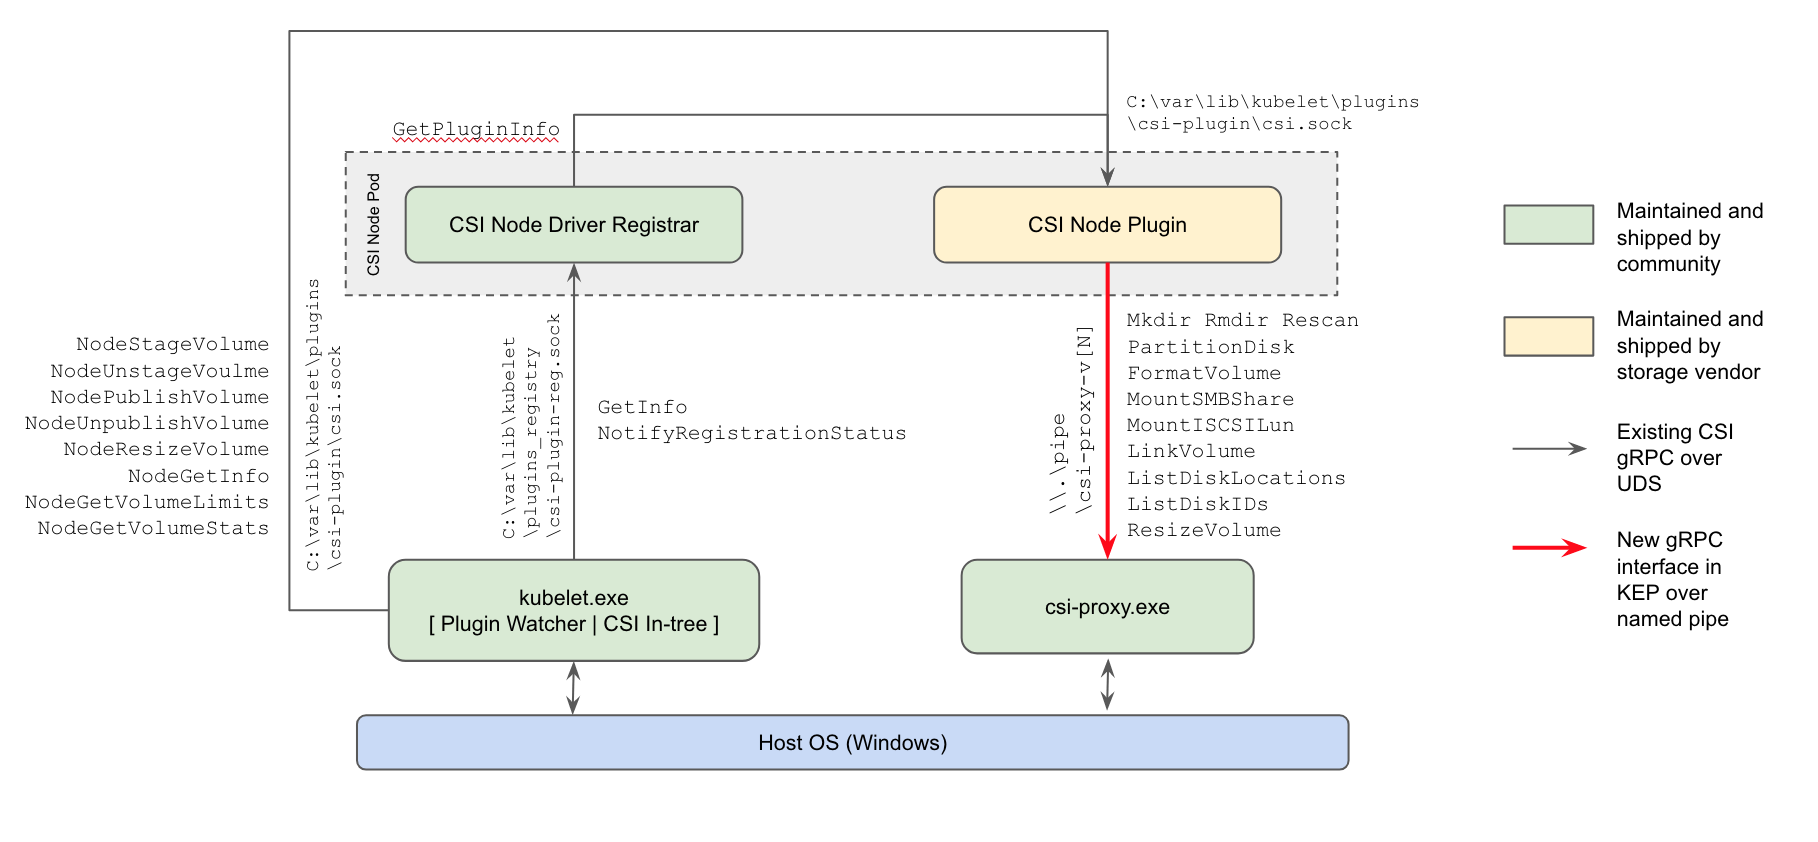
The CSI proxy runs as a process directly on the host on every windows node - very similar to kubelet. The CSI code in kubelet interacts with the node driver registrar component and the CSI node plugin. The node driver registrar is a community maintained CSI project which handles the registration of vendor specific node plugins. The kubelet initiates CSI gRPC calls like NodeStageVolume/NodePublishVolume on the node plugin as described in the figure. Node plugins interface with the CSIProxy process to perform local host OS storage related operations such as creation/enumeration of volumes, mounting/unmounting, etc.
CSI proxy architecture and implementation
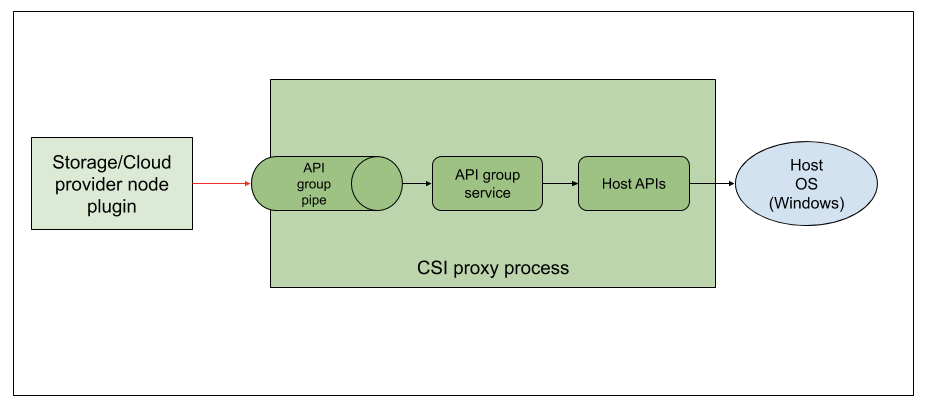
In the alpha release, CSIProxy supports the following API groups:
- Filesystem
- Disk
- Volume
- SMB
CSI proxy exposes each API group via a Windows named pipe. The communication is performed using gRPC over these pipes. The client library from the CSI proxy project uses these pipes to interact with the CSI proxy APIs. For example, the filesystem APIs are exposed via a pipe like \.\pipe\csi-proxy-filesystem-v1alpha1 and volume APIs under the \.\pipe\csi-proxy-volume-v1alpha1, and so on.
From each API group service, the calls are routed to the host API layer. The host API calls into the host Windows OS by either Powershell or Go standard library calls. For example, when the filesystem API Rmdir is called the API group service would decode the grpc structure RmdirRequest and find the directory to be removed and call into the Host APIs layer. This would result in a call to os.Remove, a Go standard library call, to perform the remove operation.
Control flow details
The following figure uses CSI call NodeStageVolume as an example to explain the interaction between kubelet, CSI plugin, and CSI proxy for provisioning a fresh volume. After the node plugin receives a CSI RPC call, it makes a few calls to CSIproxy accordingly. As a result of the NodeStageVolume call, first the required disk is identified using either of the Disk API calls: ListDiskLocations (in AzureDisk driver) or GetDiskNumberByName (in GCE PD driver). If the disk is not partitioned, then the PartitionDisk (Disk API group) is called. Subsequently, Volume API calls such as ListVolumesOnDisk, FormatVolume and MountVolume are called to perform the rest of the required operations. Similar operations are performed in case of NodeUnstageVolume, NodePublishVolume, NodeUnpublishedVolume, etc.
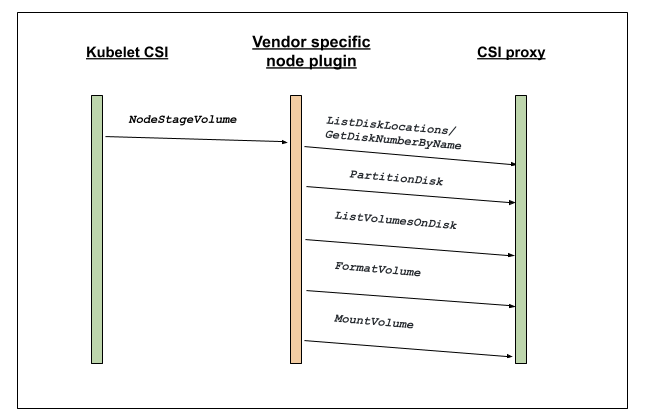
Current support
CSI proxy is now available as alpha. You can find more details on the CSIProxy GitHub repository. There are currently two cloud providers that provide alpha support for CSI drivers on Windows: Azure and GCE.
Future plans
One key area of focus in beta is going to be Windows based build and CI/CD setup to improve the stability and quality of the code base. Another area is using Go based calls directly instead of Powershell commandlets to improve performance. Enhancing debuggability and adding more tests are other areas which the team will be looking into.
How to get involved?
This project, like all of Kubernetes, is the result of hard work by many contributors from diverse backgrounds working together. Those interested in getting involved with the design and development of CSI Proxy, or any part of the Kubernetes Storage system, may join the Kubernetes Storage Special Interest Group (SIG). We’re rapidly growing and always welcome new contributors.
For those interested in more details, the CSIProxy GitHub repository is a good place to start. In addition, the #csi-windows channel on kubernetes slack is available for discussions specific to the CSI on Windows.
Acknowledgments
We would like to thank Michelle Au for guiding us throughout this journey to alpha. We would like to thank Jean Rougé for contributions during the initial CSI proxy effort. We would like to thank Saad Ali for all the guidance with respect to the project and review/feedback on a draft of this blog. We would like to thank Patrick Lang and Mark Rossetti for helping us with Windows specific questions and details. Special thanks to Andy Zhang for reviews and guidance with respect to Azuredisk and Azurefile work. A big thank you to Paul Burt and Karen Chu for the review and suggestions on improving this blog post.
Last but not the least, we would like to thank the broader Kubernetes community who contributed at every step of the project.
Improvements to the Ingress API in Kubernetes 1.18
The Ingress API in Kubernetes has enabled a large number of controllers to provide simple and powerful ways to manage inbound network traffic to Kubernetes workloads. In Kubernetes 1.18, we've made 3 significant additions to this API:
- A new
pathTypefield that can specify how Ingress paths should be matched. - A new
IngressClassresource that can specify how Ingresses should be implemented by controllers. - Support for wildcards in hostnames.
Better Path Matching With Path Types
The new concept of a path type allows you to specify how a path should be matched. There are three supported types:
- ImplementationSpecific (default): With this path type, matching is up to the controller implementing the
IngressClass. Implementations can treat this as a separatepathTypeor treat it identically to thePrefixorExactpath types. - Exact: Matches the URL path exactly and with case sensitivity.
- Prefix: Matches based on a URL path prefix split by
/. Matching is case sensitive and done on a path element by element basis.
Extended Configuration With Ingress Classes
The Ingress resource was designed with simplicity in mind, providing a simple set of fields that would be applicable in all use cases. Over time, as use cases evolved, implementations began to rely on a long list of custom annotations for further configuration. The new IngressClass resource provides a way to replace some of those annotations.
Each IngressClass specifies which controller should implement Ingresses of the class and can reference a custom resource with additional parameters.
apiVersion: "networking.k8s.io/v1beta1"
kind: "IngressClass"
metadata:
name: "external-lb"
spec:
controller: "example.com/ingress-controller"
parameters:
apiGroup: "k8s.example.com/v1alpha"
kind: "IngressParameters"
name: "external-lb"
Specifying the Class of an Ingress
A new ingressClassName field has been added to the Ingress spec that is used to reference the IngressClass that should be used to implement this Ingress.
Deprecating the Ingress Class Annotation
Before the IngressClass resource was added in Kubernetes 1.18, a similar concept of Ingress class was often specified with a kubernetes.io/ingress.class annotation on the Ingress. Although this annotation was never formally defined, it was widely supported by Ingress controllers, and should now be considered formally deprecated.
Setting a Default IngressClass
It’s possible to mark a specific IngressClass as default in a cluster. Setting the
ingressclass.kubernetes.io/is-default-class annotation to true on an
IngressClass resource will ensure that new Ingresses without an ingressClassName specified will be assigned this default IngressClass.
Support for Hostname Wildcards
Many Ingress providers have supported wildcard hostname matching like *.foo.com matching app1.foo.com, but until now the spec assumed an exact FQDN match of the host. Hosts can now be precise matches (for example “foo.bar.com”) or a wildcard (for example “*.foo.com”). Precise matches require that the http host header matches the Host setting. Wildcard matches require the http host header is equal to the suffix of the wildcard rule.
| Host | Host header | Match? |
|---|---|---|
*.foo.com | bar.foo.com | Matches based on shared suffix |
*.foo.com | baz.bar.foo.com | No match, wildcard only covers a single DNS label |
*.foo.com | foo.com | No match, wildcard only covers a single DNS label |
Putting it All Together
These new Ingress features allow for much more configurability. Here’s an example of an Ingress that makes use of pathType, ingressClassName, and a hostname wildcard:
apiVersion: "networking.k8s.io/v1beta1"
kind: "Ingress"
metadata:
name: "example-ingress"
spec:
ingressClassName: "external-lb"
rules:
- host: "*.example.com"
http:
paths:
- path: "/example"
pathType: "Prefix"
backend:
serviceName: "example-service"
servicePort: 80
Ingress Controller Support
Since these features are new in Kubernetes 1.18, each Ingress controller implementation will need some time to develop support for these new features. Check the documentation for your preferred Ingress controllers to see when they will support this new functionality.
The Future of Ingress
The Ingress API is on pace to graduate from beta to a stable API in Kubernetes 1.19. It will continue to provide a simple way to manage inbound network traffic for Kubernetes workloads. This API has intentionally been kept simple and lightweight, but there has been a desire for greater configurability for more advanced use cases.
Work is currently underway on a new highly configurable set of APIs that will provide an alternative to Ingress in the future. These APIs are being referred to as the new “Service APIs”. They are not intended to replace any existing APIs, but instead provide a more configurable alternative for complex use cases. For more information, check out the Service APIs repo on GitHub.
Kubernetes 1.18 Feature Server-side Apply Beta 2
What is Server-side Apply?
Server-side Apply is an important effort to migrate “kubectl apply” to the apiserver. It was started in 2018 by the Apply working group.
The use of kubectl to declaratively apply resources has exposed the following challenges:
One needs to use the kubectl go code, or they have to shell out to kubectl.
Strategic merge-patch, the patch format used by kubectl, grew organically and was challenging to fix while maintaining compatibility with various api-server versions.
Some features are hard to implement directly on the client, for example, unions.
Server-side Apply is a new merging algorithm, as well as tracking of field ownership, running on the Kubernetes api-server. Server-side Apply enables new features like conflict detection, so the system knows when two actors are trying to edit the same field.
How does it work, what’s managedFields?
Server-side Apply works by keeping track of which actor of the system has changed each field of an object. It does so by diffing all updates to objects, and recording all the fields that have changed as well the time of the operation. All this information is stored in the managedFields in the metadata of objects. Since objects can have many fields, this field can be quite large.
When someone applies, we can then use the information stored within managedFields to report relevant conflicts and help the merge algorithm to do the right thing.
Wasn’t it already Beta before 1.18?
Yes, Server-side Apply has been Beta since 1.16, but it didn’t track the owner for fields associated with objects that had not been applied. This means that most objects didn’t have the managedFields metadata stored, and conflicts for these objects cannot be resolved. With Kubernetes 1.18, all new objects will have the managedFields attached to them and provide accurate information on conflicts.
How do I use it?
The most common way to use this is through kubectl: kubectl apply --server-side. This is likely to show conflicts with other actors, including client-side apply. When that happens, conflicts can be forced by using the --force-conflicts flag, which will grab the ownership for the fields that have changed.
Current limitations
We have two important limitations right now, especially with sub-resources. The first is that if you apply with a status, the status is going to be ignored. We are still going to try and acquire the fields, which may lead to invalid conflicts. The other is that we do not update the managedFields on some sub-resources, including scale, so you may not see information about a horizontal pod autoscaler changing the number of replicas.
What’s next?
We are working hard to improve the experience of using server-side apply with kubectl, and we are trying to make it the default. As part of that, we want to improve the migration from client-side to server-side.
Can I help?
Of course! The working-group apply is available on slack #wg-apply, through the mailing list and we also meet every other Tuesday at 9.30 PT on Zoom. We have lots of exciting features to build and can use all sorts of help.
We would also like to use the opportunity to thank the hard work of all the contributors involved in making this new beta possible:
- Daniel Smith
- Jenny Buckley
- Joe Betz
- Julian Modesto
- Kevin Wiesmüller
- Maria Ntalla
Kubernetes Topology Manager Moves to Beta - Align Up!
This blog post describes the TopologyManager, a beta feature of Kubernetes in release 1.18. The TopologyManager feature enables NUMA alignment of CPUs and peripheral devices (such as SR-IOV VFs and GPUs), allowing your workload to run in an environment optimized for low-latency.
Prior to the introduction of the TopologyManager, the CPU and Device Manager would make resource allocation decisions independent of each other. This could result in undesirable allocations on multi-socket systems, causing degraded performance on latency critical applications. With the introduction of the TopologyManager, we now have a way to avoid this.
This blog post covers:
- A brief introduction to NUMA and why it is important
- The policies available to end-users to ensure NUMA alignment of CPUs and devices
- The internal details of how the
TopologyManagerworks - Current limitations of the
TopologyManager - Future directions of the
TopologyManager
So, what is NUMA and why do I care?
The term NUMA stands for Non-Uniform Memory Access. It is a technology available on multi-cpu systems that allows different CPUs to access different parts of memory at different speeds. Any memory directly connected to a CPU is considered "local" to that CPU and can be accessed very fast. Any memory not directly connected to a CPU is considered "non-local" and will have variable access times depending on how many interconnects must be passed through in order to reach it. On modern systems, the idea of having "local" vs. "non-local" memory can also be extended to peripheral devices such as NICs or GPUs. For high performance, CPUs and devices should be allocated such that they have access to the same local memory.
All memory on a NUMA system is divided into a set of "NUMA nodes", with each node representing the local memory for a set of CPUs or devices. We talk about an individual CPU as being part of a NUMA node if its local memory is associated with that NUMA node.
We talk about a peripheral device as being part of a NUMA node based on the shortest number of interconnects that must be passed through in order to reach it.
For example, in Figure 1, CPUs 0-3 are said to be part of NUMA node 0, whereas CPUs 4-7 are part of NUMA node 1. Likewise GPU 0 and NIC 0 are said to be part of NUMA node 0 because they are attached to Socket 0, whose CPUs are all part of NUMA node 0. The same is true for GPU 1 and NIC 1 on NUMA node 1.
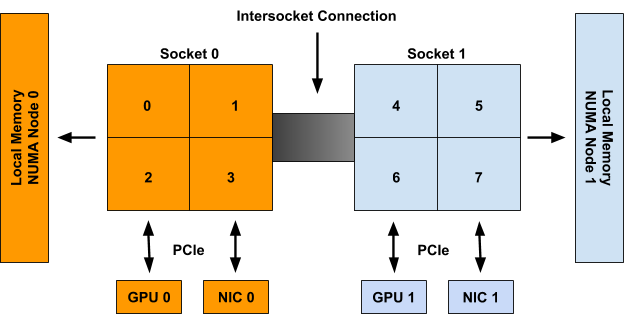
Figure 1: An example system with 2 NUMA nodes, 2 Sockets with 4 CPUs each, 2 GPUs, and 2 NICs. CPUs on Socket 0, GPU 0, and NIC 0 are all part of NUMA node 0. CPUs on Socket 1, GPU 1, and NIC 1 are all part of NUMA node 1.
Although the example above shows a 1-1 mapping of NUMA Node to Socket, this is not necessarily true in the general case. There may be multiple sockets on a single NUMA node, or individual CPUs of a single socket may be connected to different NUMA nodes. Moreover, emerging technologies such as Sub-NUMA Clustering (available on recent intel CPUs) allow single CPUs to be associated with multiple NUMA nodes so long as their memory access times to both nodes are the same (or have a negligible difference).
The TopologyManager has been built to handle all of these scenarios.
Align Up! It's a TeaM Effort!
As previously stated, the TopologyManager allows users to align their CPU and peripheral device allocations by NUMA node. There are several policies available for this:
none:this policy will not attempt to do any alignment of resources. It will act the same as if theTopologyManagerwere not present at all. This is the default policy.best-effort:with this policy, theTopologyManagerwill attempt to align allocations on NUMA nodes as best it can, but will always allow the pod to start even if some of the allocated resources are not aligned on the same NUMA node.restricted:this policy is the same as thebest-effortpolicy, except it will fail pod admission if allocated resources cannot be aligned properly. Unlike with thesingle-numa-nodepolicy, some allocations may come from multiple NUMA nodes if it is impossible to ever satisfy the allocation request on a single NUMA node (e.g. 2 devices are requested and the only 2 devices on the system are on different NUMA nodes).single-numa-node:this policy is the most restrictive and will only allow a pod to be admitted if all requested CPUs and devices can be allocated from exactly one NUMA node.
It is important to note that the selected policy is applied to each container in a pod spec individually, rather than aligning resources across all containers together.
Moreover, a single policy is applied to all pods on a node via a global kubelet flag, rather than allowing users to select different policies on a pod-by-pod basis (or a container-by-container basis). We hope to relax this restriction in the future.
The kubelet flag to set one of these policies can be seen below:
--topology-manager-policy=
[none | best-effort | restricted | single-numa-node]
Additionally, the TopologyManager is protected by a feature gate. This feature gate has been available since Kubernetes 1.16, but has only been enabled by default since 1.18.
The feature gate can be enabled or disabled as follows (as described in more detail here):
--feature-gates="...,TopologyManager=<true|false>"
In order to trigger alignment according to the selected policy, a user must request CPUs and peripheral devices in their pod spec, according to a certain set of requirements.
For peripheral devices, this means requesting devices from the available resources provided by a device plugin (e.g. intel.com/sriov, nvidia.com/gpu, etc.). This will only work if the device plugin has been extended to integrate properly with the TopologyManager. Currently, the only plugins known to have this extension are the Nvidia GPU device plugin, and the Intel SRIOV network device plugin. Details on how to extend a device plugin to integrate with the TopologyManager can be found here.
For CPUs, this requires that the CPUManager has been configured with its --static policy enabled and that the pod is running in the Guaranteed QoS class (i.e. all CPU and memory limits are equal to their respective CPU and memory requests). CPUs must also be requested in whole number values (e.g. 1, 2, 1000m, etc). Details on how to set the CPUManager policy can be found here.
For example, assuming the CPUManager is running with its --static policy enabled and the device plugins for gpu-vendor.com, and nic-vendor.com have been extended to integrate with the TopologyManager properly, the pod spec below is sufficient to trigger the TopologyManager to run its selected policy:
spec:
containers:
- name: numa-aligned-container
image: alpine
resources:
limits:
cpu: 2
memory: 200Mi
gpu-vendor.com/gpu: 1
nic-vendor.com/nic: 1
Following Figure 1 from the previous section, this would result in one of the following aligned allocations:
{cpu: {0, 1}, gpu: 0, nic: 0}
{cpu: {0, 2}, gpu: 0, nic: 0}
{cpu: {0, 3}, gpu: 0, nic: 0}
{cpu: {1, 2}, gpu: 0, nic: 0}
{cpu: {1, 3}, gpu: 0, nic: 0}
{cpu: {2, 3}, gpu: 0, nic: 0}
{cpu: {4, 5}, gpu: 1, nic: 1}
{cpu: {4, 6}, gpu: 1, nic: 1}
{cpu: {4, 7}, gpu: 1, nic: 1}
{cpu: {5, 6}, gpu: 1, nic: 1}
{cpu: {5, 7}, gpu: 1, nic: 1}
{cpu: {6, 7}, gpu: 1, nic: 1}
And that’s it! Just follow this pattern to have the TopologyManager ensure NUMA alignment across containers that request topology-aware devices and exclusive CPUs.
NOTE: if a pod is rejected by one of the TopologyManager policies, it will be placed in a Terminated state with a pod admission error and a reason of "TopologyAffinityError". Once a pod is in this state, the Kubernetes scheduler will not attempt to reschedule it. It is therefore recommended to use a Deployment with replicas to trigger a redeploy of the pod on such a failure. An external control loop can also be implemented to trigger a redeployment of pods that have a TopologyAffinityError.
This is great, so how does it work under the hood?
Pseudocode for the primary logic carried out by the TopologyManager can be seen below:
for container := range append(InitContainers, Containers...) {
for provider := range HintProviders {
hints += provider.GetTopologyHints(container)
}
bestHint := policy.Merge(hints)
for provider := range HintProviders {
provider.Allocate(container, bestHint)
}
}
The following diagram summarizes the steps taken during this loop:
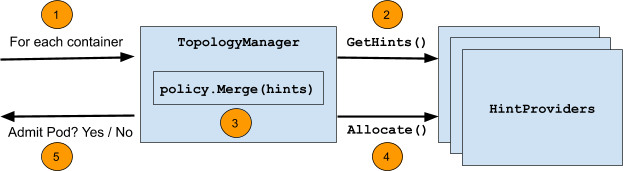
The steps themselves are:
- Loop over all containers in a pod.
- For each container, gather "
TopologyHints" from a set of "HintProviders" for each topology-aware resource type requested by the container (e.g.gpu-vendor.com/gpu,nic-vendor.com/nic,cpu, etc.). - Using the selected policy, merge the gathered
TopologyHintsto find the "best" hint that aligns resource allocations across all resource types. - Loop back over the set of hint providers, instructing them to allocate the resources they control using the merged hint as a guide.
- This loop runs at pod admission time and will fail to admit the pod if any of these steps fail or alignment cannot be satisfied according to the selected policy. Any resources allocated before the failure are cleaned up accordingly.
The following sections go into more detail on the exact structure of TopologyHints and HintProviders, as well as some details on the merge strategies used by each policy.
TopologyHints
A TopologyHint encodes a set of constraints from which a given resource request can be satisfied. At present, the only constraint we consider is NUMA alignment. It is defined as follows:
type TopologyHint struct {
NUMANodeAffinity bitmask.BitMask
Preferred bool
}
The NUMANodeAffinity field contains a bitmask of NUMA nodes where a resource request can be satisfied. For example, the possible masks on a system with 2 NUMA nodes include:
{00}, {01}, {10}, {11}
The Preferred field contains a boolean that encodes whether the given hint is "preferred" or not. With the best-effort policy, preferred hints will be given preference over non-preferred hints when generating a "best" hint. With the restricted and single-numa-node policies, non-preferred hints will be rejected.
In general, HintProviders generate TopologyHints by looking at the set of currently available resources that can satisfy a resource request. More specifically, they generate one TopologyHint for every possible mask of NUMA nodes where that resource request can be satisfied. If a mask cannot satisfy the request, it is omitted. For example, a HintProvider might provide the following hints on a system with 2 NUMA nodes when being asked to allocate 2 resources. These hints encode that both resources could either come from a single NUMA node (either 0 or 1), or they could each come from different NUMA nodes (but we prefer for them to come from just one).
{01: True}, {10: True}, {11: False}
At present, all HintProviders set the Preferred field to True if and only if the NUMANodeAffinity encodes a minimal set of NUMA nodes that can satisfy the resource request. Normally, this will only be True for TopologyHints with a single NUMA node set in their bitmask. However, it may also be True if the only way to ever satisfy the resource request is to span multiple NUMA nodes (e.g. 2 devices are requested and the only 2 devices on the system are on different NUMA nodes):
{0011: True}, {0111: False}, {1011: False}, {1111: False}
NOTE: Setting of the Preferred field in this way is not based on the set of currently available resources. It is based on the ability to physically allocate the number of requested resources on some minimal set of NUMA nodes.
In this way, it is possible for a HintProvider to return a list of hints with all Preferred fields set to False if an actual preferred allocation cannot be satisfied until other containers release their resources. For example, consider the following scenario from the system in Figure 1:
- All but 2 CPUs are currently allocated to containers
- The 2 remaining CPUs are on different NUMA nodes
- A new container comes along asking for 2 CPUs
In this case, the only generated hint would be {11: False} and not {11: True}. This happens because it is possible to allocate 2 CPUs from the same NUMA node on this system (just not right now, given the current allocation state). The idea being that it is better to fail pod admission and retry the deployment when the minimal alignment can be satisfied than to allow a pod to be scheduled with sub-optimal alignment.
HintProviders
A HintProvider is a component internal to the kubelet that coordinates aligned resource allocations with the TopologyManager. At present, the only HintProviders in Kubernetes are the CPUManager and the DeviceManager. We plan to add support for HugePages soon.
As discussed previously, the TopologyManager both gathers TopologyHints from HintProviders as well as triggers aligned resource allocations on them using a merged "best" hint. As such, HintProviders implement the following interface:
type HintProvider interface {
GetTopologyHints(*v1.Pod, *v1.Container) map[string][]TopologyHint
Allocate(*v1.Pod, *v1.Container) error
}
Notice that the call to GetTopologyHints() returns a map[string][]TopologyHint. This allows a single HintProvider to provide hints for multiple resource types instead of just one. For example, the DeviceManager requires this in order to pass hints back for every resource type registered by its plugins.
As HintProviders generate their hints, they only consider how alignment could be satisfied for currently available resources on the system. Any resources already allocated to other containers are not considered.
For example, consider the system in Figure 1, with the following two containers requesting resources from it:
Container0 | Container1 |
spec:
containers:
- name: numa-aligned-container0
image: alpine
resources:
limits:
cpu: 2
memory: 200Mi
gpu-vendor.com/gpu: 1
nic-vendor.com/nic: 1
|
spec:
containers:
- name: numa-aligned-container1
image: alpine
resources:
limits:
cpu: 2
memory: 200Mi
gpu-vendor.com/gpu: 1
nic-vendor.com/nic: 1
|
If Container0 is the first container considered for allocation on the system, the following set of hints will be generated for the three topology-aware resource types in the spec.
cpu: {{01: True}, {10: True}, {11: False}}
gpu-vendor.com/gpu: {{01: True}, {10: True}}
nic-vendor.com/nic: {{01: True}, {10: True}}
With a resulting aligned allocation of:
{cpu: {0, 1}, gpu: 0, nic: 0}
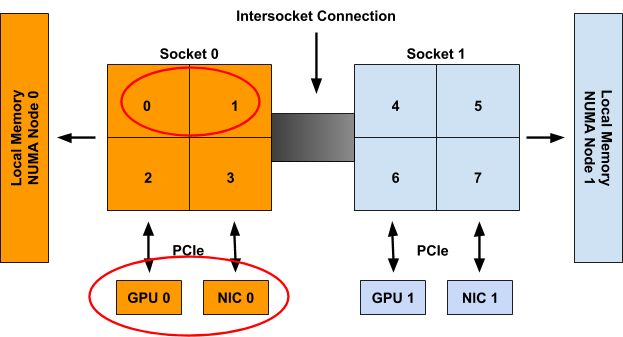
When considering Container1 these resources are then presumed to be unavailable, and thus only the following set of hints will be generated:
cpu: {{01: True}, {10: True}, {11: False}}
gpu-vendor.com/gpu: {{10: True}}
nic-vendor.com/nic: {{10: True}}
With a resulting aligned allocation of:
{cpu: {4, 5}, gpu: 1, nic: 1}
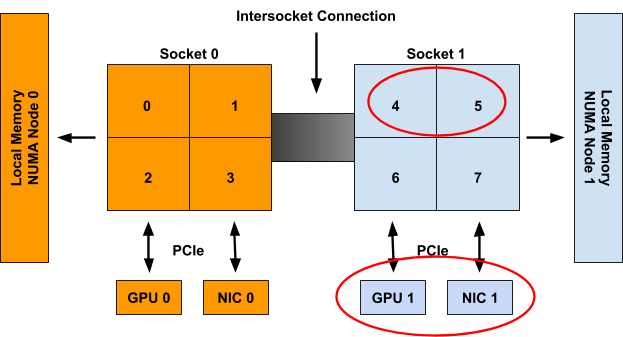
NOTE: Unlike the pseudocode provided at the beginning of this section, the call to Allocate() does not actually take a parameter for the merged "best" hint directly. Instead, the TopologyManager implements the following Store interface that HintProviders can query to retrieve the hint generated for a particular container once it has been generated:
type Store interface {
GetAffinity(podUID string, containerName string) TopologyHint
}
Separating this out into its own API call allows one to access this hint outside of the pod admission loop. This is useful for debugging as well as for reporting generated hints in tools such as kubectl(not yet available).
Policy.Merge
The merge strategy defined by a given policy dictates how it combines the set of TopologyHints generated by all HintProviders into a single TopologyHint that can be used to inform aligned resource allocations.
The general merge strategy for all supported policies begins the same:
- Take the cross-product of
TopologyHintsgenerated for each resource type - For each entry in the cross-product,
bitwise-andthe NUMA affinities of eachTopologyHinttogether. Set this as the NUMA affinity in a resulting "merged" hint. - If all of the hints in an entry have
Preferredset toTrue, setPreferredtoTruein the resulting "merged" hint. - If even one of the hints in an entry has
Preferredset toFalse, setPreferredtoFalsein the resulting "merged" hint. Also setPreferredtoFalsein the "merged" hint if its NUMA affinity contains all 0s.
Following the example from the previous section with hints for Container0 generated as:
cpu: {{01: True}, {10: True}, {11: False}}
gpu-vendor.com/gpu: {{01: True}, {10: True}}
nic-vendor.com/nic: {{01: True}, {10: True}}
The above algorithm results in the following set of cross-product entries and "merged" hints:
| cross-product entry
| "merged" hint |
{{01: True}, {01: True}, {01: True}} | {01: True} |
{{01: True}, {01: True}, {10: True}} | {00: False} |
{{01: True}, {10: True}, {01: True}} | {00: False} |
{{01: True}, {10: True}, {10: True}} | {00: False} |
{{10: True}, {01: True}, {01: True}} | {00: False} |
{{10: True}, {01: True}, {10: True}} | {00: False} |
{{10: True}, {10: True}, {01: True}} | {00: False} |
{{10: True}, {10: True}, {10: True}} | {01: True} |
{{11: False}, {01: True}, {01: True}} | {01: False} |
{{11: False}, {01: True}, {10: True}} | {00: False} |
{{11: False}, {10: True}, {01: True}} | {00: False} |
{{11: False}, {10: True}, {10: True}} | {10: False} |
Once this list of "merged" hints has been generated, it is the job of the specific TopologyManager policy in use to decide which one to consider as the "best" hint.
In general, this involves:
- Sorting merged hints by their "narrowness". Narrowness is defined as the number of bits set in a hint’s NUMA affinity mask. The fewer bits set, the narrower the hint. For hints that have the same number of bits set in their NUMA affinity mask, the hint with the most low order bits set is considered narrower.
- Sorting merged hints by their
Preferredfield. Hints that havePreferredset toTrueare considered more likely candidates than hints withPreferredset toFalse. - Selecting the narrowest hint with the best possible setting for
Preferred.
In the case of the best-effort policy this algorithm will always result in some hint being selected as the "best" hint and the pod being admitted. This "best" hint is then made available to HintProviders so they can make their resource allocations based on it.
However, in the case of the restricted and single-numa-node policies, any selected hint with Preferred set to False will be rejected immediately, causing pod admission to fail and no resources to be allocated. Moreover, the single-numa-node will also reject a selected hint that has more than one NUMA node set in its affinity mask.
In the example above, the pod would be admitted by all policies with a hint of {01: True}.
Upcoming enhancements
While the 1.18 release and promotion to Beta brings along some great enhancements and fixes, there are still a number of limitations, described here. We are already underway working to address these limitations and more.
This section walks through the set of enhancements we plan to implement for the TopologyManager in the near future. This list is not exhaustive, but it gives a good idea of the direction we are moving in. It is ordered by the timeframe in which we expect to see each enhancement completed.
If you would like to get involved in helping with any of these enhancements, please join the weekly Kubernetes SIG-node meetings to learn more and become part of the community effort!
Supporting device-specific constraints
Currently, NUMA affinity is the only constraint considered by the TopologyManager for resource alignment. Moreover, the only scalable extensions that can be made to a TopologyHint involve node-level constraints, such as PCIe bus alignment across device types. It would be intractable to try and add any device-specific constraints to this struct (e.g. the internal NVLINK topology among a set of GPU devices).
As such, we propose an extension to the device plugin interface that will allow a plugin to state its topology-aware allocation preferences, without having to expose any device-specific topology information to the kubelet. In this way, the TopologyManager can be restricted to only deal with common node-level topology constraints, while still having a way of incorporating device-specific topology constraints into its allocation decisions.
Details of this proposal can be found here, and should be available as soon as Kubernetes 1.19.
NUMA alignment for hugepages
As stated previously, the only two HintProviders currently available to the TopologyManager are the CPUManager and the DeviceManager. However, work is currently underway to add support for hugepages as well. With the completion of this work, the TopologyManager will finally be able to allocate memory, hugepages, CPUs and PCI devices all on the same NUMA node.
A KEP for this work is currently under review, and a prototype is underway to get this feature implemented very soon.
Scheduler awareness
Currently, the TopologyManager acts as a Pod Admission controller. It is not directly involved in the scheduling decision of where a pod will be placed. Rather, when the kubernetes scheduler (or whatever scheduler is running in the deployment), places a pod on a node to run, the TopologyManager will decide if the pod should be "admitted" or "rejected". If the pod is rejected due to lack of available NUMA aligned resources, things can get a little interesting. This kubernetes issue highlights and discusses this situation well.
So how do we go about addressing this limitation? We have the Kubernetes Scheduling Framework to the rescue! This framework provides a new set of plugin APIs that integrate with the existing Kubernetes Scheduler and allow scheduling features, such as NUMA alignment, to be implemented without having to resort to other, perhaps less appealing alternatives, including writing your own scheduler, or even worse, creating a fork to add your own scheduler secret sauce.
The details of how to implement these extensions for integration with the TopologyManager have not yet been worked out. We still need to answer questions like:
- Will we require duplicated logic to determine device affinity in the
TopologyManagerand the scheduler? - Do we need a new API to get
TopologyHintsfrom theTopologyManagerto the scheduler plugin?
Work on this feature should begin in the next couple of months, so stay tuned!
Per-pod alignment policy
As stated previously, a single policy is applied to all pods on a node via a global kubelet flag, rather than allowing users to select different policies on a pod-by-pod basis (or a container-by-container basis).
While we agree that this would be a great feature to have, there are quite a few hurdles that need to be overcome before it is achievable. The biggest hurdle being that this enhancement will require an API change to be able to express the desired alignment policy in either the Pod spec or its associated RuntimeClass.
We are only now starting to have serious discussions around this feature, and it is still a few releases away, at the best, from being available.
Conclusion
With the promotion of the TopologyManager to Beta in 1.18, we encourage everyone to give it a try and look forward to any feedback you may have. Many fixes and enhancements have been worked on in the past several releases, greatly improving the functionality and reliability of the TopologyManager and its HintProviders. While there are still a number of limitations, we have a set of enhancements planned to address them, and look forward to providing you with a number of new features in upcoming releases.
If you have ideas for additional enhancements or a desire for certain features, don’t hesitate to let us know. The team is always open to suggestions to enhance and improve the TopologyManager.
We hope you have found this blog informative and useful! Let us know if you have any questions or comments. And, happy deploying…..Align Up!
Kubernetes 1.18: Fit & Finish
We're pleased to announce the delivery of Kubernetes 1.18, our first release of 2020! Kubernetes 1.18 consists of 38 enhancements: 15 enhancements are moving to stable, 11 enhancements in beta, and 12 enhancements in alpha.
Kubernetes 1.18 is a "fit and finish" release. Significant work has gone into improving beta and stable features to ensure users have a better experience. An equal effort has gone into adding new developments and exciting new features that promise to enhance the user experience even more. Having almost as many enhancements in alpha, beta, and stable is a great achievement. It shows the tremendous effort made by the community on improving the reliability of Kubernetes as well as continuing to expand its existing functionality.
Major Themes
Kubernetes Topology Manager Moves to Beta - Align Up!
A beta feature of Kubernetes in release 1.18, the Topology Manager feature enables NUMA alignment of CPU and devices (such as SR-IOV VFs) that will allow your workload to run in an environment optimized for low-latency. Prior to the introduction of the Topology Manager, the CPU and Device Manager would make resource allocation decisions independent of each other. This could result in undesirable allocations on multi-socket systems, causing degraded performance on latency critical applications.
Serverside Apply Introduces Beta 2
Server-side Apply was promoted to Beta in 1.16, but is now introducing a second Beta in 1.18. This new version will track and manage changes to fields of all new Kubernetes objects, allowing you to know what changed your resources and when.
Extending Ingress with and replacing a deprecated annotation with IngressClass
In Kubernetes 1.18, there are two significant additions to Ingress: A new pathType field and a new IngressClass resource. The pathType field allows specifying how paths should be matched. In addition to the default ImplementationSpecific type, there are new Exact and Prefix path types.
The IngressClass resource is used to describe a type of Ingress within a Kubernetes cluster. Ingresses can specify the class they are associated with by using a new ingressClassName field on Ingresses. This new resource and field replace the deprecated kubernetes.io/ingress.class annotation.
SIG-CLI introduces kubectl alpha debug
SIG-CLI was debating the need for a debug utility for quite some time already. With the development of ephemeral containers, it became more obvious how we can support developers with tooling built on top of kubectl exec. The addition of the kubectl alpha debug command (it is alpha but your feedback is more than welcome), allows developers to easily debug their Pods inside the cluster. We think this addition is invaluable. This command allows one to create a temporary container which runs next to the Pod one is trying to examine, but also attaches to the console for interactive troubleshooting.
Introducing Windows CSI support alpha for Kubernetes
The alpha version of CSI Proxy for Windows is being released with Kubernetes 1.18. CSI proxy enables CSI Drivers on Windows by allowing containers in Windows to perform privileged storage operations.
Other Updates
Graduated to Stable 💯
- Taint Based Eviction
kubectl diff- CSI Block storage support
- API Server dry run
- Pass Pod information in CSI calls
- Support Out-of-Tree vSphere Cloud Provider
- Support GMSA for Windows workloads
- Skip attach for non-attachable CSI volumes
- PVC cloning
- Moving kubectl package code to staging
- RunAsUserName for Windows
- AppProtocol for Services and Endpoints
- Extending Hugepage Feature
- client-go signature refactor to standardize options and context handling
- Node-local DNS cache
Major Changes
- EndpointSlice API
- Moving kubectl package code to staging
- CertificateSigningRequest API
- Extending Hugepage Feature
- client-go signature refactor to standardize options and context handling
Release Notes
Check out the full details of the Kubernetes 1.18 release in our release notes.
Availability
Kubernetes 1.18 is available for download on GitHub. To get started with Kubernetes, check out these interactive tutorials or run local Kubernetes clusters using Docker container “nodes” with kind. You can also easily install 1.18 using kubeadm.
Release Team
This release is made possible through the efforts of hundreds of individuals who contributed both technical and non-technical content. Special thanks to the release team led by Jorge Alarcon Ochoa, Site Reliability Engineer at Searchable AI. The 34 release team members coordinated many aspects of the release, from documentation to testing, validation, and feature completeness.
As the Kubernetes community has grown, our release process represents an amazing demonstration of collaboration in open source software development. Kubernetes continues to gain new users at a rapid pace. This growth creates a positive feedback cycle where more contributors commit code creating a more vibrant ecosystem. Kubernetes has had over 40,000 individual contributors to date and an active community of more than 3,000 people.
Release Logo
Why the LHC?
The LHC is the world’s largest and most powerful particle accelerator. It is the result of the collaboration of thousands of scientists from around the world, all for the advancement of science. In a similar manner, Kubernetes has been a project that has united thousands of contributors from hundreds of organizations – all to work towards the same goal of improving cloud computing in all aspects! "A Bit Quarky" as the release name is meant to remind us that unconventional ideas can bring about great change and keeping an open mind to diversity will lead help us innovate.
About the designer
Maru Lango is a designer currently based in Mexico City. While her area of expertise is Product Design, she also enjoys branding, illustration and visual experiments using CSS + JS and contributing to diversity efforts within the tech and design communities. You may find her in most social media as @marulango or check her website: https://marulango.com
User Highlights
- Ericsson is using Kubernetes and other cloud native technology to deliver a highly demanding 5G network that resulted in up to 90 percent CI/CD savings.
- Zendesk is using Kubernetes to run around 70% of its existing applications. It’s also building all new applications to also run on Kubernetes, which has brought time savings, greater flexibility, and increased velocity to its application development.
- LifeMiles has reduced infrastructure spending by 50% because of its move to Kubernetes. It has also allowed them to double its available resource capacity.
Ecosystem Updates
- The CNCF published the results of its annual survey showing that Kubernetes usage in production is skyrocketing. The survey found that 78% of respondents are using Kubernetes in production compared to 58% last year.
- The “Introduction to Kubernetes” course hosted by the CNCF surpassed 100,000 registrations.
Project Velocity
The CNCF has continued refining DevStats, an ambitious project to visualize the myriad contributions that go into the project. K8s DevStats illustrates the breakdown of contributions from major company contributors, as well as an impressive set of preconfigured reports on everything from individual contributors to pull request lifecycle times.
This past quarter, 641 different companies and over 6,409 individuals contributed to Kubernetes. Check out DevStats to learn more about the overall velocity of the Kubernetes project and community.
Event Update
Kubecon + CloudNativeCon EU 2020 is being pushed back – for the more most up-to-date information, please check the Novel Coronavirus Update page.
Upcoming Release Webinar
Join members of the Kubernetes 1.18 release team on April 23rd, 2020 to learn about the major features in this release including kubectl debug, Topography Manager, Ingress to V1 graduation, and client-go. Register here: https://www.cncf.io/webinars/kubernetes-1-18/.
Get Involved
The simplest way to get involved with Kubernetes is by joining one of the many Special Interest Groups (SIGs) that align with your interests. Have something you’d like to broadcast to the Kubernetes community? Share your voice at our weekly community meeting, and through the channels below. Thank you for your continued feedback and support.
- Follow us on Twitter @Kubernetesio for latest updates
- Join the community discussion on Discuss
- Join the community on Slack
- Post questions (or answer questions) on Stack Overflow
- Share your Kubernetes story
- Read more about what’s happening with Kubernetes on the blog
- Learn more about the Kubernetes Release Team
Join SIG Scalability and Learn Kubernetes the Hard Way
Contributing to SIG Scalability is a great way to learn Kubernetes in all its depth and breadth, and the team would love to have you join as a contributor. I took a look at the value of learning the hard way and interviewed the current SIG chairs to give you an idea of what contribution feels like.
The value of Learning The Hard Way
There is a belief in the software development community that pushes for the most challenging and rigorous possible method of learning a new language or system. These tend to go by the moniker of "Learn __ the Hard Way." Examples abound: Learn Code the Hard Way, Learn Python the Hard Way, and many others originating with Zed Shaw's courses in the topic.
While there are folks out there who offer you a "Learn Kubernetes the Hard Way" type experience (most notably Kelsey Hightower's), any "Hard Way" project should attempt to cover every aspect of the core topic's principles.
Therefore, the real way to "Learn Kubernetes the Hard Way," is to join the CNCF and get involved in the project itself. And there is only one SIG that could genuinely offer a full-stack learning experience for Kubernetes: SIG Scalability.
The team behind SIG Scalability is responsible for detecting and dealing with issues that arise when Kubernetes clusters are working with upwards of a thousand nodes. Said Wojiciech Tyczynski, a staff software engineer at Google and a member of SIG Scalability, the standard size for a test cluster for this SIG is over 5,000 nodes.
And yet, this SIG is not composed of Ph.D.'s in highly scalable systems designs. Many of the folks working with Tyczynski, for example, joined the SIG knowing very little about these types of issues, and often, very little about Kubernetes.
Working on SIG Scalability is like jumping into the deep end of the pool to learn to swim, and the SIG is inherently concerned with the entire Kubernetes project. SIG Scalability focuses on how Kubernetes functions as a whole and at scale. The SIG Scalability team members have an impetus to learn about every system and to understand how all systems interact with one another.
A complex and rewarding contributor experience
While that may sound complicated (and it is!), that doesn't mean it's outside the reach of an average developer, tester, or administrator. Google software developer Matt Matejczyk has only been on the team since the beginning of 2019, and he's been a valued member of the team since then, ferreting out bugs.
"I am new here," said Matejczyk. "I joined the team in January [2019]. Before that, I worked on AdWords at Google in New York. Why did I join? I knew some people there, so that was one of the decisions for me to move. I thought at that time that Kubernetes is a unique, cutting edge technology. I thought it'd be cool to work on that."
Matejczyk was correct about the coolness. "It's cool," he said. "So actually, ramping up on scalability is not easy. There are many things you need to understand. You need to understand Kubernetes very well. It can use every part of Kubernetes. I am still ramping up after these 8 months. I think it took me maybe 3 months to get up to decent speed."
When Matejczyk spoke to what he had worked on during those 8 months, he answered, "An interesting example is a regression I have been working on recently. We noticed the overall slowness of Kubernetes control plane in specific scenarios, and we couldn't attribute it to any particular component. In the end, we realized that everything boiled down to the memory allocation on the golang level. It was very counterintuitive to have two completely separate pieces of code (running as a part of the same binary) affecting the performance of each other only because one of them was allocating memory too fast. But connecting all the dots and getting to the bottom of regression like this gives great satisfaction."
Tyczynski said that "It's not only debugging regressions, but it's also debugging and finding bottlenecks. In general, those can be regressions, but those can be things we can improve. The other significant area is extending what we want to guarantee to users. Extending SLA and SLO coverage of the system so users can rely on what they can expect from the system in terms of performance and scalability. Matt is doing much work in extending our tests to be more representative and cover more Kubernetes concepts."
Give SIG Scalability a try
The SIG Scalability team is always in need of new members, and if you're the sort of developer or tester who loves taking on new complex challenges, and perhaps loves learning things the hard way, consider joining this SIG. As the team points out, adding Kubernetes expertise to your resume is never a bad idea, and this is the one SIG where you can learn it all from top to bottom.
See the SIG's documentation to learn about upcoming meetings, its charter, and more. You can also join the #sig-scalability Slack channel to see what it's like. We hope to see you join in to take advantage of this great opportunity to learn Kubernetes and contribute back at the same time.
Kong Ingress Controller and Service Mesh: Setting up Ingress to Istio on Kubernetes
Kubernetes has become the de facto way to orchestrate containers and the services within services. But how do we give services outside our cluster access to what is within? Kubernetes comes with the Ingress API object that manages external access to services within a cluster.
Ingress is a group of rules that will proxy inbound connections to endpoints defined by a backend. However, Kubernetes does not know what to do with Ingress resources without an Ingress controller, which is where an open source controller can come into play. In this post, we are going to use one option for this: the Kong Ingress Controller. The Kong Ingress Controller was open-sourced a year ago and recently reached one million downloads. In the recent 0.7 release, service mesh support was also added. Other features of this release include:
- Built-In Kubernetes Admission Controller, which validates Custom Resource Definitions (CRD) as they are created or updated and rejects any invalid configurations.
- In-memory Mode - Each pod’s controller actively configures the Kong container in its pod, which limits the blast radius of failure of a single container of Kong or controller container to that pod only.
- Native gRPC Routing - gRPC traffic can now be routed via Kong Ingress Controller natively with support for method-based routing.
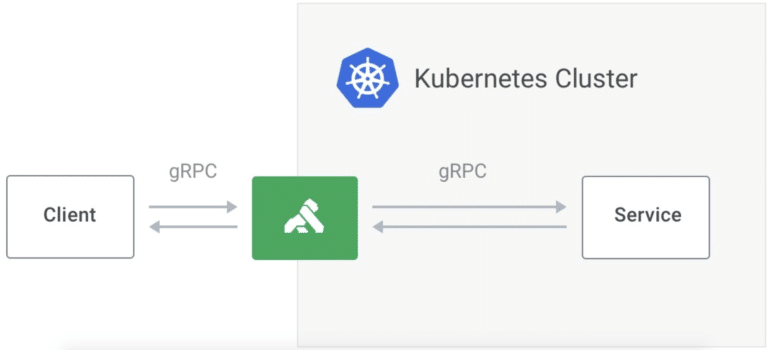
If you would like a deeper dive into Kong Ingress Controller 0.7, please check out the GitHub repository.
But let’s get back to the service mesh support since that will be the main focal point of this blog post. Service mesh allows organizations to address microservices challenges related to security, reliability, and observability by abstracting inter-service communication into a mesh layer. But what if our mesh layer sits within Kubernetes and we still need to expose certain services beyond our cluster? Then you need an Ingress controller such as the Kong Ingress Controller. In this blog post, we’ll cover how to deploy Kong Ingress Controller as your Ingress layer to an Istio mesh. Let’s dive right in:
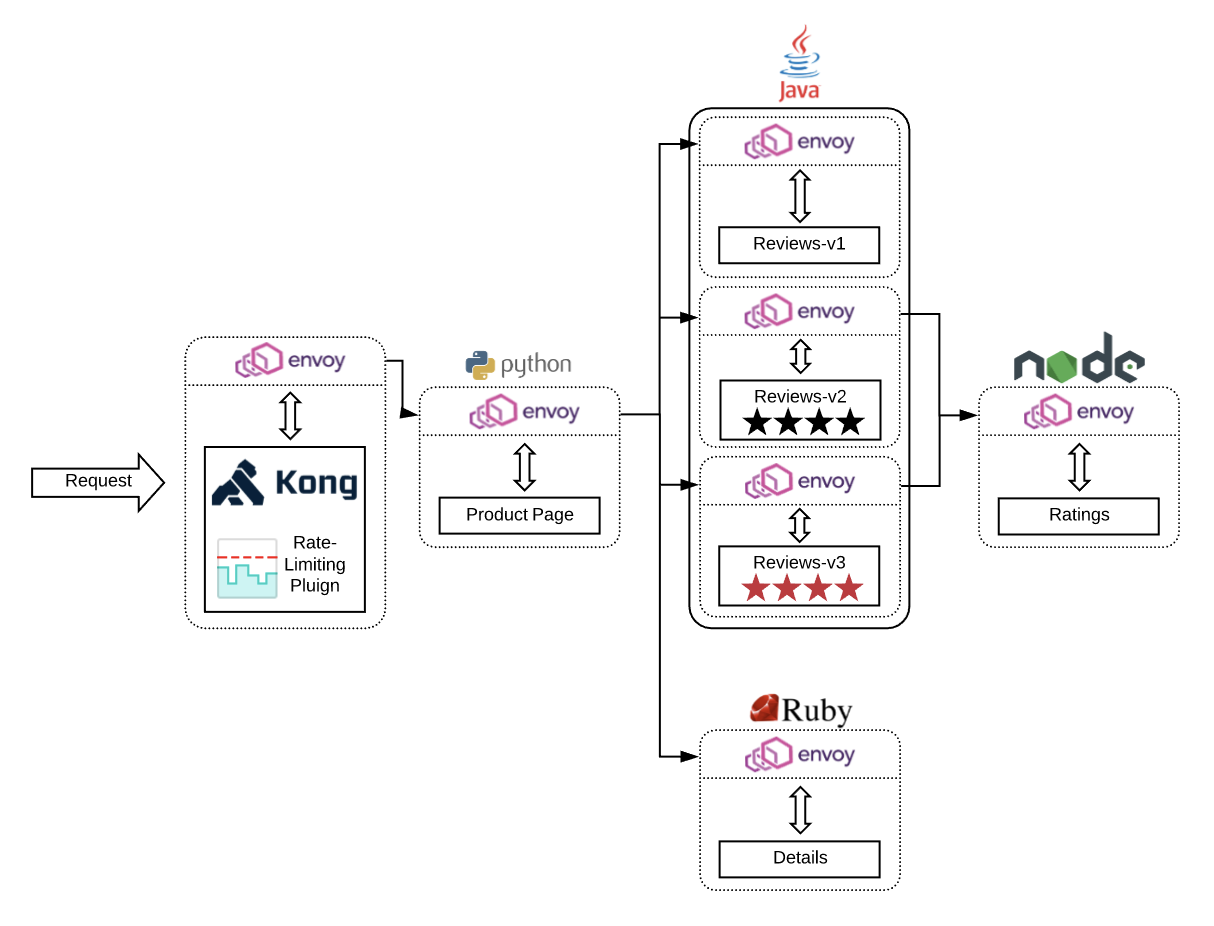
Part 0: Set up Istio on Kubernetes
This blog will assume you have Istio set up on Kubernetes. If you need to catch up to this point, please check out the Istio documentation. It will walk you through setting up Istio on Kubernetes.
1. Install the Bookinfo Application
First, we need to label the namespaces that will host our application and Kong proxy. To label our default namespace where the bookinfo app sits, run this command:
$ kubectl label namespace default istio-injection=enabled
namespace/default labeled
Then create a new namespace that will be hosting our Kong gateway and the Ingress controller:
$ kubectl create namespace kong
namespace/kong created
Because Kong will be sitting outside the default namespace, be sure you also label the Kong namespace with istio-injection enabled as well:
$ kubectl label namespace kong istio-injection=enabled
namespace/kong labeled
Having both namespaces labeled istio-injection=enabled is necessary. Or else the default configuration will not inject a sidecar container into the pods of your namespaces.
Now deploy your BookInfo application with the following command:
$ kubectl apply -f http://bit.ly/bookinfoapp
service/details created
serviceaccount/bookinfo-details created
deployment.apps/details-v1 created
service/ratings created
serviceaccount/bookinfo-ratings created
deployment.apps/ratings-v1 created
service/reviews created
serviceaccount/bookinfo-reviews created
deployment.apps/reviews-v1 created
deployment.apps/reviews-v2 created
deployment.apps/reviews-v3 created
service/productpage created
serviceaccount/bookinfo-productpage created
deployment.apps/productpage-v1 created
Let’s double-check our Services and Pods to make sure that we have it all set up correctly:
$ kubectl get services
NAME TYPE CLUSTER-IP EXTERNAL-IP PORT(S) AGE
details ClusterIP 10.97.125.254 <none> 9080/TCP 29s
kubernetes ClusterIP 10.96.0.1 <none> 443/TCP 29h
productpage ClusterIP 10.97.62.68 <none> 9080/TCP 28s
ratings ClusterIP 10.96.15.180 <none> 9080/TCP 28s
reviews ClusterIP 10.104.207.136 <none> 9080/TCP 28s
You should see four new services: details, productpage, ratings, and reviews. None of them have an external IP so we will use the Kong gateway to expose the necessary services. And to check pods, run the following command:
$ kubectl get pods
NAME READY STATUS RESTARTS AGE
details-v1-c5b5f496d-9wm29 2/2 Running 0 101s
productpage-v1-7d6cfb7dfd-5mc96 2/2 Running 0 100s
ratings-v1-f745cf57b-hmkwf 2/2 Running 0 101s
reviews-v1-85c474d9b8-kqcpt 2/2 Running 0 101s
reviews-v2-ccffdd984-9jnsj 2/2 Running 0 101s
reviews-v3-98dc67b68-nzw97 2/2 Running 0 101s
This command outputs useful data, so let’s take a second to understand it. If you examine the READY column, each pod has two containers running: the service and an Envoy sidecar injected alongside it. Another thing to highlight is that there are three review pods but only 1 review service. The Envoy sidecar will load balance the traffic to three different review pods that contain different versions, giving us the ability to A/B test our changes. We have one step before we can access the deployed application. We need to add an additional annotation to the productpage service. To do so, run:
$ kubectl annotate service productpage ingress.kubernetes.io/service-upstream=true
service/productpage annotated
Both the API gateway (Kong) and the service mesh (Istio) can handle the load-balancing. Without the additional ingress.kubernetes.io/service-upstream: "true" annotation, Kong will try to load-balance by selecting its own endpoint/target from the productpage service. This causes Envoy to receive that pod’s IP as the upstream local address, instead of the service’s cluster IP. But we want the service's cluster IP so that Envoy can properly load balance.
With that added, you should now be able to access your product page!
$ kubectl exec -it $(kubectl get pod -l app=ratings -o jsonpath='{.items[0].metadata.name}') -c ratings -- curl productpage:9080/productpage | grep -o "<title>.*</title>"
<title>Simple Bookstore App</title>
2. Kong Kubernetes Ingress Controller Without Database
To expose your services to the world, we will deploy Kong as the north-south traffic gateway. Kong 1.1 released with declarative configuration and DB-less mode. Declarative configuration allows you to specify the desired system state through a YAML or JSON file instead of a sequence of API calls. Using declarative config provides several key benefits to reduce complexity, increase automation and enhance system performance. And with the Kong Ingress Controller, any Ingress rules you apply to the cluster will automatically be configured on the Kong proxy. Let’s set up the Kong Ingress Controller and the actual Kong proxy first like this:
$ kubectl apply -f https://bit.ly/k4k8s
namespace/kong configured
customresourcedefinition.apiextensions.k8s.io/kongconsumers.configuration.konghq.com created
customresourcedefinition.apiextensions.k8s.io/kongcredentials.configuration.konghq.com created
customresourcedefinition.apiextensions.k8s.io/kongingresses.configuration.konghq.com created
customresourcedefinition.apiextensions.k8s.io/kongplugins.configuration.konghq.com created
serviceaccount/kong-serviceaccount created
clusterrole.rbac.authorization.k8s.io/kong-ingress-clusterrole created
clusterrolebinding.rbac.authorization.k8s.io/kong-ingress-clusterrole-nisa-binding created
configmap/kong-server-blocks created
service/kong-proxy created
service/kong-validation-webhook created
deployment.apps/ingress-kong created
To check if the Kong pod is up and running, run:
$ kubectl get pods -n kong
NAME READY STATUS RESTARTS AGE
pod/ingress-kong-8b44c9856-9s42v 3/3 Running 0 2m26s
There will be three containers within this pod. The first container is the Kong Gateway that will be the Ingress point to your cluster. The second container is the Ingress controller. It uses Ingress resources and updates the proxy to follow rules defined in the resource. And lastly, the third container is the Envoy proxy injected by Istio. Kong will route traffic through the Envoy sidecar proxy to the appropriate service. To send requests into the cluster via our newly deployed Kong Gateway, setup an environment variable with the a URL based on the IP address at which Kong is accessible.
$ export PROXY_URL="$(minikube service -n kong kong-proxy --url | head -1)"
$ echo $PROXY_URL
http://192.168.99.100:32728
Next, we need to change some configuration so that the side-car Envoy process can route the request correctly based on the host/authority header of the request. Run the following to stop the route from preserving host:
$ echo "
apiVersion: configuration.konghq.com/v1
kind: KongIngress
metadata:
name: do-not-preserve-host
route:
preserve_host: false
upstream:
host_header: productpage.default.svc
" | kubectl apply -f -
kongingress.configuration.konghq.com/do-not-preserve-host created
And annotate the existing productpage service to set service-upstream as true:
$ kubectl annotate svc productpage Ingress.kubernetes.io/service-upstream="true"
service/productpage annotated
Now that we have everything set up, we can look at how to use the Ingress resource to help route external traffic to the services within your Istio mesh. We’ll create an Ingress rule that routes all traffic with the path of / to our productpage service:
$ echo "
apiVersion: extensions/v1beta1
kind: Ingress
metadata:
name: productpage
annotations:
configuration.konghq.com: do-not-preserve-host
spec:
rules:
- http:
paths:
- path: /
backend:
serviceName: productpage
servicePort: 9080
" | kubectl apply -f -
ingress.extensions/productpage created
And just like that, the Kong Ingress Controller is able to understand the rules you defined in the Ingress resource and routes it to the productpage service! To view the product page service’s GUI, go to $PROXY_URL/productpage in your browser. Or to test it in your command line, try:
$ curl $PROXY_URL/productpage
That is all I have for this walk-through. If you enjoyed the technologies used in this post, please check out their repositories since they are all open source and would love to have more contributors! Here are their links for your convenience:
- Kong: [GitHub] [Twitter]
- Kubernetes: [GitHub] [Twitter]
- Istio: [GitHub] [Twitter]
- Envoy: [GitHub] [Twitter]
Thank you for following along!
Contributor Summit Amsterdam Postponed
The CNCF has announced that KubeCon + CloudNativeCon EU has been delayed until July/August of 2020. As a result the Contributor Summit planning team is weighing options for how to proceed. Here’s the current plan:
- There will be an in-person Contributor Summit as planned when KubeCon + CloudNativeCon is rescheduled.
- We are looking at options for having additional virtual contributor activities in the meantime.
We will communicate via this blog and the usual communications channels on the final plan. Please bear with us as we adapt when we get more information. Thank you for being patient as the team pivots to bring you a great Contributor Summit!
Bring your ideas to the world with kubectl plugins
kubectl is the most critical tool to interact with Kubernetes and has to address multiple user personas, each with their own needs and opinions.
One way to make kubectl do what you need is to build new functionality into kubectl.
Challenges with building commands into kubectl
However, that's easier said than done. Being such an important cornerstone of
Kubernetes, any meaningful change to kubectl needs to undergo a Kubernetes
Enhancement Proposal (KEP) where the intended change is discussed beforehand.
When it comes to implementation, you'll find that kubectl is an ingenious and
complex piece of engineering. It might take a long time to get used to
the processes and style of the codebase to get done what you want to achieve. Next
comes the review process which may go through several rounds until it meets all
the requirements of the Kubernetes maintainers -- after all, they need to take
over ownership of this feature and maintain it from the day it's merged.
When everything goes well, you can finally rejoice. Your code will be shipped
with the next Kubernetes release. Well, that could mean you need to wait
another 3 months to ship your idea in kubectl if you are unlucky.
So this was the happy path where everything goes well. But there are good
reasons why your new functionality may never make it into kubectl. For one,
kubectl has a particular look and feel and violating that style will not be
acceptable by the maintainers. For example, an interactive command that
produces output with colors would be inconsistent with the rest of kubectl.
Also, when it comes to tools or commands useful only to a minuscule proportion
of users, the maintainers may simply reject your proposal as kubectl needs to
address common needs.
But this doesn’t mean you can’t ship your ideas to kubectl users.
What if you didn’t have to change kubectl to add functionality?
This is where kubectl plugins shine.
Since kubectl v1.12, you can simply
drop executables into your PATH, which follows the naming pattern
kubectl-myplugin. Then you can execute this plugin as kubectl myplugin, and
it will just feel like a normal sub-command of kubectl.
Plugins give you the opportunity to try out new experiences like terminal UIs, colorful output, specialized functionality, or other innovative ideas. You can go creative, as you’re the owner of your own plugin.
Further, plugins offer safe experimentation space for commands you’d like to
propose to kubectl. By pre-releasing as a plugin, you can push your
functionality faster to the end-users and quickly gather feedback. For example,
the kubectl-debug plugin is proposed
to become a built-in command in kubectl in a
KEP).
In the meanwhile, the plugin author can ship the functionality and collect
feedback using the plugin mechanism.
How to get started with developing plugins
If you already have an idea for a plugin, how do you best make it happen?
First you have to ask yourself if you can implement it as a wrapper around
existing kubectl functionality. If so, writing the plugin as a shell script
is often the best way forward, because the resulting plugin will be small,
works cross-platform, and has a high level of trust because it is not
compiled.
On the other hand, if the plugin logic is complex, a general-purpose language
is usually better. The canonical choice here is Go, because you can use the
excellent client-go library to interact with the Kubernetes API. The Kubernetes
maintained sample-cli-plugin
demonstrates some best practices and can be used as a template for new plugin
projects.
When the development is done, you just need to ship your plugin to the
Kubernetes users. For the best plugin installation experience and discoverability,
you should consider doing so via the
krew plugin manager. For an in-depth
discussion about the technical details around kubectl plugins, refer to the
documentation on kubernetes.io.
Contributor Summit Amsterdam Schedule Announced
Hello everyone and Happy 2020! It’s hard to believe that KubeCon EU 2020 is less than six weeks away, and with that another contributor summit! This year we have the pleasure of being in Amsterdam in early spring, so be sure to pack some warmer clothing. This summit looks to be exciting with a lot of fantastic community-driven content. We received 26 submissions from the CFP. From that, the events team selected 12 sessions. Each of the sessions falls into one of four categories:
- Community
- Contributor Improvement
- Sustainability
- In-depth Technical
On top of the presentations, there will be a dedicated Docs Sprint as well as the New Contributor Workshop 101 and 201 Sessions. All told, we will have five separate rooms of content throughout the day on Monday. Please see the full schedule to see what sessions you’d be interested in. We hope between the content provided and the inevitable hallway track, everyone has a fun and enriching experience.
Speaking of fun, the social Sunday night should be a blast! We’re hosting this summit’s social close to the conference center, at ZuidPool. There will be games, bingo, and unconference sign-up throughout the evening. It should be a relaxed way to kick off the week.
Registration is open! Space is limited so it’s always a good idea to register early.
If you have any questions, reach out to the Amsterdam Team on Slack in the #contributor-summit channel.
Hope to see you there!
Kubernetes Contributor Summit schedule
Sunday, March 29, 2020
- Evening Contributor Celebration: ZuidPool
- Address: Europaplein 22, 1078 GZ Amsterdam, Netherlands
- Time: 18:00 - 21:00
Monday, March 30, 2020
- All Day Contributor Summit:
- Amsterdam RAI
- Address: Europaplein 24, 1078 GZ Amsterdam, Netherlands
- Time: 09:00 - 17:00 (Breakfast at 08:00)
Deploying External OpenStack Cloud Provider with Kubeadm
This document describes how to install a single control-plane Kubernetes cluster v1.15 with kubeadm on CentOS, and then deploy an external OpenStack cloud provider and Cinder CSI plugin to use Cinder volumes as persistent volumes in Kubernetes.
Preparation in OpenStack
This cluster runs on OpenStack VMs, so let's create a few things in OpenStack first.
- A project/tenant for this Kubernetes cluster
- A user in this project for Kubernetes, to query node information and attach volumes etc
- A private network and subnet
- A router for this private network and connect it to a public network for floating IPs
- A security group for all Kubernetes VMs
- A VM as a control-plane node and a few VMs as worker nodes
The security group will have the following rules to open ports for Kubernetes.
Control-Plane Node
| Protocol | Port Number | Description |
|---|---|---|
| TCP | 6443 | Kubernetes API Server |
| TCP | 2379-2380 | etcd server client API |
| TCP | 10250 | Kubelet API |
| TCP | 10251 | kube-scheduler |
| TCP | 10252 | kube-controller-manager |
| TCP | 10255 | Read-only Kubelet API |
Worker Nodes
| Protocol | Port Number | Description |
|---|---|---|
| TCP | 10250 | Kubelet API |
| TCP | 10255 | Read-only Kubelet API |
| TCP | 30000-32767 | NodePort Services |
CNI ports on both control-plane and worker nodes
| Protocol | Port Number | Description |
|---|---|---|
| TCP | 179 | Calico BGP network |
| TCP | 9099 | Calico felix (health check) |
| UDP | 8285 | Flannel |
| UDP | 8472 | Flannel |
| TCP | 6781-6784 | Weave Net |
| UDP | 6783-6784 | Weave Net |
CNI specific ports are only required to be opened when that particular CNI plugin is used. In this guide, we will use Weave Net. Only the Weave Net ports (TCP 6781-6784 and UDP 6783-6784), will need to be opened in the security group.
The control-plane node needs at least 2 cores and 4GB RAM. After the VM is launched, verify its hostname and make sure it is the same as the node name in Nova.
If the hostname is not resolvable, add it to /etc/hosts.
For example, if the VM is called master1, and it has an internal IP 192.168.1.4. Add that to /etc/hosts and set hostname to master1.
echo "192.168.1.4 master1" >> /etc/hosts
hostnamectl set-hostname master1
Install Docker and Kubernetes
Next, we'll follow the official documents to install docker and Kubernetes using kubeadm.
Install Docker following the steps from the container runtime documentation.
Note that it is a best practice to use systemd as the cgroup driver for Kubernetes. If you use an internal container registry, add them to the docker config.
# Install Docker CE
## Set up the repository
### Install required packages.
yum install yum-utils device-mapper-persistent-data lvm2
### Add Docker repository.
yum-config-manager \
--add-repo \
https://download.docker.com/linux/centos/docker-ce.repo
## Install Docker CE.
yum update && yum install docker-ce-18.06.2.ce
## Create /etc/docker directory.
mkdir /etc/docker
# Configure the Docker daemon
cat > /etc/docker/daemon.json <<EOF
{
"exec-opts": ["native.cgroupdriver=systemd"],
"log-driver": "json-file",
"log-opts": {
"max-size": "100m"
},
"storage-driver": "overlay2",
"storage-opts": [
"overlay2.override_kernel_check=true"
]
}
EOF
mkdir -p /etc/systemd/system/docker.service.d
# Restart Docker
systemctl daemon-reload
systemctl restart docker
systemctl enable docker
Install kubeadm following the steps from the Installing Kubeadm documentation.
cat <<EOF > /etc/yum.repos.d/kubernetes.repo
[kubernetes]
name=Kubernetes
baseurl=https://packages.cloud.google.com/yum/repos/kubernetes-el7-x86_64
enabled=1
gpgcheck=1
repo_gpgcheck=1
gpgkey=https://packages.cloud.google.com/yum/doc/yum-key.gpg https://packages.cloud.google.com/yum/doc/rpm-package-key.gpg
EOF
# Set SELinux in permissive mode (effectively disabling it)
# Caveat: In a production environment you may not want to disable SELinux, please refer to Kubernetes documents about SELinux
setenforce 0
sed -i 's/^SELINUX=enforcing$/SELINUX=permissive/' /etc/selinux/config
yum install -y kubelet kubeadm kubectl --disableexcludes=kubernetes
systemctl enable --now kubelet
cat <<EOF > /etc/sysctl.d/k8s.conf
net.bridge.bridge-nf-call-ip6tables = 1
net.bridge.bridge-nf-call-iptables = 1
EOF
sysctl --system
# check if br_netfilter module is loaded
lsmod | grep br_netfilter
# if not, load it explicitly with
modprobe br_netfilter
The official document about how to create a single control-plane cluster can be found from the Creating a single control-plane cluster with kubeadm documentation.
We'll largely follow that document but also add additional things for the cloud provider.
To make things more clear, we'll use a kubeadm-config.yml for the control-plane node.
In this config we specify to use an external OpenStack cloud provider, and where to find its config.
We also enable storage API in API server's runtime config so we can use OpenStack volumes as persistent volumes in Kubernetes.
apiVersion: kubeadm.k8s.io/v1beta1
kind: InitConfiguration
nodeRegistration:
kubeletExtraArgs:
cloud-provider: "external"
---
apiVersion: kubeadm.k8s.io/v1beta2
kind: ClusterConfiguration
kubernetesVersion: "v1.15.1"
apiServer:
extraArgs:
enable-admission-plugins: NodeRestriction
runtime-config: "storage.k8s.io/v1=true"
controllerManager:
extraArgs:
external-cloud-volume-plugin: openstack
extraVolumes:
- name: "cloud-config"
hostPath: "/etc/kubernetes/cloud-config"
mountPath: "/etc/kubernetes/cloud-config"
readOnly: true
pathType: File
networking:
serviceSubnet: "10.96.0.0/12"
podSubnet: "10.224.0.0/16"
dnsDomain: "cluster.local"
Now we'll create the cloud config, /etc/kubernetes/cloud-config, for OpenStack.
Note that the tenant here is the one we created for all Kubernetes VMs in the beginning.
All VMs should be launched in this project/tenant.
In addition you need to create a user in this tenant for Kubernetes to do queries.
The ca-file is the CA root certificate for OpenStack's API endpoint, for example https://openstack.cloud:5000/v3
At the time of writing the cloud provider doesn't allow insecure connections (skip CA check).
[Global]
region=RegionOne
username=username
password=password
auth-url=https://openstack.cloud:5000/v3
tenant-id=14ba698c0aec4fd6b7dc8c310f664009
domain-id=default
ca-file=/etc/kubernetes/ca.pem
[LoadBalancer]
subnet-id=b4a9a292-ea48-4125-9fb2-8be2628cb7a1
floating-network-id=bc8a590a-5d65-4525-98f3-f7ef29c727d5
[BlockStorage]
bs-version=v2
[Networking]
public-network-name=public
ipv6-support-disabled=false
Next run kubeadm to initiate the control-plane node
kubeadm init --config=kubeadm-config.yml
With the initialization completed, copy admin config to .kube
mkdir -p $HOME/.kube
sudo cp -i /etc/kubernetes/admin.conf $HOME/.kube/config
sudo chown $(id -u):$(id -g) $HOME/.kube/config
At this stage, the control-plane node is created but not ready. All the nodes have the taint node.cloudprovider.kubernetes.io/uninitialized=true:NoSchedule and are waiting to be initialized by the cloud-controller-manager.
# kubectl describe no master1
Name: master1
Roles: master
......
Taints: node-role.kubernetes.io/master:NoSchedule
node.cloudprovider.kubernetes.io/uninitialized=true:NoSchedule
node.kubernetes.io/not-ready:NoSchedule
......
Now deploy the OpenStack cloud controller manager into the cluster, following using controller manager with kubeadm.
Create a secret with the cloud-config for the openstack cloud provider.
kubectl create secret -n kube-system generic cloud-config --from-literal=cloud.conf="$(cat /etc/kubernetes/cloud-config)" --dry-run -o yaml > cloud-config-secret.yaml
kubectl apply -f cloud-config-secret.yaml
Get the CA certificate for OpenStack API endpoints and put that into /etc/kubernetes/ca.pem.
Create RBAC resources.
kubectl apply -f https://github.com/kubernetes/cloud-provider-openstack/raw/release-1.15/cluster/addons/rbac/cloud-controller-manager-roles.yaml
kubectl apply -f https://github.com/kubernetes/cloud-provider-openstack/raw/release-1.15/cluster/addons/rbac/cloud-controller-manager-role-bindings.yaml
We'll run the OpenStack cloud controller manager as a DaemonSet rather than a pod.
The manager will only run on the control-plane node, so if there are multiple control-plane nodes, multiple pods will be run for high availability.
Create openstack-cloud-controller-manager-ds.yaml containing the following manifests, then apply it.
---
apiVersion: v1
kind: ServiceAccount
metadata:
name: cloud-controller-manager
namespace: kube-system
---
apiVersion: apps/v1
kind: DaemonSet
metadata:
name: openstack-cloud-controller-manager
namespace: kube-system
labels:
k8s-app: openstack-cloud-controller-manager
spec:
selector:
matchLabels:
k8s-app: openstack-cloud-controller-manager
updateStrategy:
type: RollingUpdate
template:
metadata:
labels:
k8s-app: openstack-cloud-controller-manager
spec:
nodeSelector:
node-role.kubernetes.io/master: ""
securityContext:
runAsUser: 1001
tolerations:
- key: node.cloudprovider.kubernetes.io/uninitialized
value: "true"
effect: NoSchedule
- key: node-role.kubernetes.io/master
effect: NoSchedule
- effect: NoSchedule
key: node.kubernetes.io/not-ready
serviceAccountName: cloud-controller-manager
containers:
- name: openstack-cloud-controller-manager
image: docker.io/k8scloudprovider/openstack-cloud-controller-manager:v1.15.0
args:
- /bin/openstack-cloud-controller-manager
- --v=1
- --cloud-config=$(CLOUD_CONFIG)
- --cloud-provider=openstack
- --use-service-account-credentials=true
- --address=127.0.0.1
volumeMounts:
- mountPath: /etc/kubernetes/pki
name: k8s-certs
readOnly: true
- mountPath: /etc/ssl/certs
name: ca-certs
readOnly: true
- mountPath: /etc/config
name: cloud-config-volume
readOnly: true
- mountPath: /usr/libexec/kubernetes/kubelet-plugins/volume/exec
name: flexvolume-dir
- mountPath: /etc/kubernetes
name: ca-cert
readOnly: true
resources:
requests:
cpu: 200m
env:
- name: CLOUD_CONFIG
value: /etc/config/cloud.conf
hostNetwork: true
volumes:
- hostPath:
path: /usr/libexec/kubernetes/kubelet-plugins/volume/exec
type: DirectoryOrCreate
name: flexvolume-dir
- hostPath:
path: /etc/kubernetes/pki
type: DirectoryOrCreate
name: k8s-certs
- hostPath:
path: /etc/ssl/certs
type: DirectoryOrCreate
name: ca-certs
- name: cloud-config-volume
secret:
secretName: cloud-config
- name: ca-cert
secret:
secretName: openstack-ca-cert
When the controller manager is running, it will query OpenStack to get information about the nodes and remove the taint. In the node info you'll see the VM's UUID in OpenStack.
# kubectl describe no master1
Name: master1
Roles: master
......
Taints: node-role.kubernetes.io/master:NoSchedule
node.kubernetes.io/not-ready:NoSchedule
......
sage:docker: network plugin is not ready: cni config uninitialized
......
PodCIDR: 10.224.0.0/24
ProviderID: openstack:///548e3c46-2477-4ce2-968b-3de1314560a5
Now install your favourite CNI and the control-plane node will become ready.
For example, to install Weave Net, run this command:
kubectl apply -f "https://cloud.weave.works/k8s/net?k8s-version=$(kubectl version | base64 | tr -d '\n')"
Next we'll set up worker nodes.
Firstly, install docker and kubeadm in the same way as how they were installed in the control-plane node. To join them to the cluster we need a token and ca cert hash from the output of control-plane node installation. If it is expired or lost we can recreate it using these commands.
# check if token is expired
kubeadm token list
# re-create token and show join command
kubeadm token create --print-join-command
Create kubeadm-config.yml for worker nodes with the above token and ca cert hash.
apiVersion: kubeadm.k8s.io/v1beta2
discovery:
bootstrapToken:
apiServerEndpoint: 192.168.1.7:6443
token: 0c0z4p.dnafh6vnmouus569
caCertHashes: ["sha256:fcb3e956a6880c05fc9d09714424b827f57a6fdc8afc44497180905946527adf"]
kind: JoinConfiguration
nodeRegistration:
kubeletExtraArgs:
cloud-provider: "external"
apiServerEndpoint is the control-plane node, token and caCertHashes can be taken from the join command printed in the output of 'kubeadm token create' command.
Run kubeadm and the worker nodes will be joined to the cluster.
kubeadm join --config kubeadm-config.yml
At this stage we'll have a working Kubernetes cluster with an external OpenStack cloud provider. The provider tells Kubernetes about the mapping between Kubernetes nodes and OpenStack VMs. If Kubernetes wants to attach a persistent volume to a pod, it can find out which OpenStack VM the pod is running on from the mapping, and attach the underlying OpenStack volume to the VM accordingly.
Deploy Cinder CSI
The integration with Cinder is provided by an external Cinder CSI plugin, as described in the Cinder CSI documentation.
We'll perform the following steps to install the Cinder CSI plugin. Firstly, create a secret with CA certs for OpenStack's API endpoints. It is the same cert file as what we use in cloud provider above.
kubectl create secret -n kube-system generic openstack-ca-cert --from-literal=ca.pem="$(cat /etc/kubernetes/ca.pem)" --dry-run -o yaml > openstack-ca-cert.yaml
kubectl apply -f openstack-ca-cert.yaml
Then create RBAC resources.
kubectl apply -f https://raw.githubusercontent.com/kubernetes/cloud-provider-openstack/release-1.15/manifests/cinder-csi-plugin/cinder-csi-controllerplugin-rbac.yaml
kubectl apply -f https://github.com/kubernetes/cloud-provider-openstack/raw/release-1.15/manifests/cinder-csi-plugin/cinder-csi-nodeplugin-rbac.yaml
The Cinder CSI plugin includes a controller plugin and a node plugin.
The controller communicates with Kubernetes APIs and Cinder APIs to create/attach/detach/delete Cinder volumes. The node plugin in-turn runs on each worker node to bind a storage device (attached volume) to a pod, and unbind it during deletion.
Create cinder-csi-controllerplugin.yaml and apply it to create csi controller.
kind: Service
apiVersion: v1
metadata:
name: csi-cinder-controller-service
namespace: kube-system
labels:
app: csi-cinder-controllerplugin
spec:
selector:
app: csi-cinder-controllerplugin
ports:
- name: dummy
port: 12345
---
kind: StatefulSet
apiVersion: apps/v1
metadata:
name: csi-cinder-controllerplugin
namespace: kube-system
spec:
serviceName: "csi-cinder-controller-service"
replicas: 1
selector:
matchLabels:
app: csi-cinder-controllerplugin
template:
metadata:
labels:
app: csi-cinder-controllerplugin
spec:
serviceAccount: csi-cinder-controller-sa
containers:
- name: csi-attacher
image: quay.io/k8scsi/csi-attacher:v1.0.1
args:
- "--v=5"
- "--csi-address=$(ADDRESS)"
env:
- name: ADDRESS
value: /var/lib/csi/sockets/pluginproxy/csi.sock
imagePullPolicy: "IfNotPresent"
volumeMounts:
- name: socket-dir
mountPath: /var/lib/csi/sockets/pluginproxy/
- name: csi-provisioner
image: quay.io/k8scsi/csi-provisioner:v1.0.1
args:
- "--provisioner=csi-cinderplugin"
- "--csi-address=$(ADDRESS)"
env:
- name: ADDRESS
value: /var/lib/csi/sockets/pluginproxy/csi.sock
imagePullPolicy: "IfNotPresent"
volumeMounts:
- name: socket-dir
mountPath: /var/lib/csi/sockets/pluginproxy/
- name: csi-snapshotter
image: quay.io/k8scsi/csi-snapshotter:v1.0.1
args:
- "--connection-timeout=15s"
- "--csi-address=$(ADDRESS)"
env:
- name: ADDRESS
value: /var/lib/csi/sockets/pluginproxy/csi.sock
imagePullPolicy: Always
volumeMounts:
- mountPath: /var/lib/csi/sockets/pluginproxy/
name: socket-dir
- name: cinder-csi-plugin
image: docker.io/k8scloudprovider/cinder-csi-plugin:v1.15.0
args :
- /bin/cinder-csi-plugin
- "--v=5"
- "--nodeid=$(NODE_ID)"
- "--endpoint=$(CSI_ENDPOINT)"
- "--cloud-config=$(CLOUD_CONFIG)"
- "--cluster=$(CLUSTER_NAME)"
env:
- name: NODE_ID
valueFrom:
fieldRef:
fieldPath: spec.nodeName
- name: CSI_ENDPOINT
value: unix://csi/csi.sock
- name: CLOUD_CONFIG
value: /etc/config/cloud.conf
- name: CLUSTER_NAME
value: kubernetes
imagePullPolicy: "IfNotPresent"
volumeMounts:
- name: socket-dir
mountPath: /csi
- name: secret-cinderplugin
mountPath: /etc/config
readOnly: true
- mountPath: /etc/kubernetes
name: ca-cert
readOnly: true
volumes:
- name: socket-dir
hostPath:
path: /var/lib/csi/sockets/pluginproxy/
type: DirectoryOrCreate
- name: secret-cinderplugin
secret:
secretName: cloud-config
- name: ca-cert
secret:
secretName: openstack-ca-cert
Create cinder-csi-nodeplugin.yaml and apply it to create csi node.
kind: DaemonSet
apiVersion: apps/v1
metadata:
name: csi-cinder-nodeplugin
namespace: kube-system
spec:
selector:
matchLabels:
app: csi-cinder-nodeplugin
template:
metadata:
labels:
app: csi-cinder-nodeplugin
spec:
serviceAccount: csi-cinder-node-sa
hostNetwork: true
containers:
- name: node-driver-registrar
image: quay.io/k8scsi/csi-node-driver-registrar:v1.1.0
args:
- "--v=5"
- "--csi-address=$(ADDRESS)"
- "--kubelet-registration-path=$(DRIVER_REG_SOCK_PATH)"
lifecycle:
preStop:
exec:
command: ["/bin/sh", "-c", "rm -rf /registration/cinder.csi.openstack.org /registration/cinder.csi.openstack.org-reg.sock"]
env:
- name: ADDRESS
value: /csi/csi.sock
- name: DRIVER_REG_SOCK_PATH
value: /var/lib/kubelet/plugins/cinder.csi.openstack.org/csi.sock
- name: KUBE_NODE_NAME
valueFrom:
fieldRef:
fieldPath: spec.nodeName
imagePullPolicy: "IfNotPresent"
volumeMounts:
- name: socket-dir
mountPath: /csi
- name: registration-dir
mountPath: /registration
- name: cinder-csi-plugin
securityContext:
privileged: true
capabilities:
add: ["SYS_ADMIN"]
allowPrivilegeEscalation: true
image: docker.io/k8scloudprovider/cinder-csi-plugin:v1.15.0
args :
- /bin/cinder-csi-plugin
- "--nodeid=$(NODE_ID)"
- "--endpoint=$(CSI_ENDPOINT)"
- "--cloud-config=$(CLOUD_CONFIG)"
env:
- name: NODE_ID
valueFrom:
fieldRef:
fieldPath: spec.nodeName
- name: CSI_ENDPOINT
value: unix://csi/csi.sock
- name: CLOUD_CONFIG
value: /etc/config/cloud.conf
imagePullPolicy: "IfNotPresent"
volumeMounts:
- name: socket-dir
mountPath: /csi
- name: pods-mount-dir
mountPath: /var/lib/kubelet/pods
mountPropagation: "Bidirectional"
- name: kubelet-dir
mountPath: /var/lib/kubelet
mountPropagation: "Bidirectional"
- name: pods-cloud-data
mountPath: /var/lib/cloud/data
readOnly: true
- name: pods-probe-dir
mountPath: /dev
mountPropagation: "HostToContainer"
- name: secret-cinderplugin
mountPath: /etc/config
readOnly: true
- mountPath: /etc/kubernetes
name: ca-cert
readOnly: true
volumes:
- name: socket-dir
hostPath:
path: /var/lib/kubelet/plugins/cinder.csi.openstack.org
type: DirectoryOrCreate
- name: registration-dir
hostPath:
path: /var/lib/kubelet/plugins_registry/
type: Directory
- name: kubelet-dir
hostPath:
path: /var/lib/kubelet
type: Directory
- name: pods-mount-dir
hostPath:
path: /var/lib/kubelet/pods
type: Directory
- name: pods-cloud-data
hostPath:
path: /var/lib/cloud/data
type: Directory
- name: pods-probe-dir
hostPath:
path: /dev
type: Directory
- name: secret-cinderplugin
secret:
secretName: cloud-config
- name: ca-cert
secret:
secretName: openstack-ca-cert
When they are both running, create a storage class for Cinder.
apiVersion: storage.k8s.io/v1
kind: StorageClass
metadata:
name: csi-sc-cinderplugin
provisioner: csi-cinderplugin
Then we can create a PVC with this class.
apiVersion: v1
kind: PersistentVolumeClaim
metadata:
name: myvol
spec:
accessModes:
- ReadWriteOnce
resources:
requests:
storage: 1Gi
storageClassName: csi-sc-cinderplugin
When the PVC is created, a Cinder volume is created correspondingly.
# kubectl get pvc
NAME STATUS VOLUME CAPACITY ACCESS MODES STORAGECLASS AGE
myvol Bound pvc-14b8bc68-6c4c-4dc6-ad79-4cb29a81faad 1Gi RWO csi-sc-cinderplugin 3s
In OpenStack the volume name will match the Kubernetes persistent volume generated name. In this example it would be: pvc-14b8bc68-6c4c-4dc6-ad79-4cb29a81faad
Now we can create a pod with the PVC.
apiVersion: v1
kind: Pod
metadata:
name: web
spec:
containers:
- name: web
image: nginx
ports:
- name: web
containerPort: 80
hostPort: 8081
protocol: TCP
volumeMounts:
- mountPath: "/usr/share/nginx/html"
name: mypd
volumes:
- name: mypd
persistentVolumeClaim:
claimName: myvol
When the pod is running, the volume will be attached to the pod. If we go back to OpenStack, we can see the Cinder volume is mounted to the worker node where the pod is running on.
# openstack volume show 6b5f3296-b0eb-40cd-bd4f-2067a0d6287f
+--------------------------------+--------------------------------------------------------------------------------------------------------------------------------------------------------------------------------------------------------------------------------------------------------------------------------------------------------------------------------+
| Field | Value |
+--------------------------------+--------------------------------------------------------------------------------------------------------------------------------------------------------------------------------------------------------------------------------------------------------------------------------------------------------------------------------+
| attachments | [{u'server_id': u'1c5e1439-edfa-40ed-91fe-2a0e12bc7eb4', u'attachment_id': u'11a15b30-5c24-41d4-86d9-d92823983a32', u'attached_at': u'2019-07-24T05:02:34.000000', u'host_name': u'compute-6', u'volume_id': u'6b5f3296-b0eb-40cd-bd4f-2067a0d6287f', u'device': u'/dev/vdb', u'id': u'6b5f3296-b0eb-40cd-bd4f-2067a0d6287f'}] |
| availability_zone | nova |
| bootable | false |
| consistencygroup_id | None |
| created_at | 2019-07-24T05:02:18.000000 |
| description | Created by OpenStack Cinder CSI driver |
| encrypted | False |
| id | 6b5f3296-b0eb-40cd-bd4f-2067a0d6287f |
| migration_status | None |
| multiattach | False |
| name | pvc-14b8bc68-6c4c-4dc6-ad79-4cb29a81faad |
| os-vol-host-attr:host | rbd:volumes@rbd#rbd |
| os-vol-mig-status-attr:migstat | None |
| os-vol-mig-status-attr:name_id | None |
| os-vol-tenant-attr:tenant_id | 14ba698c0aec4fd6b7dc8c310f664009 |
| properties | attached_mode='rw', cinder.csi.openstack.org/cluster='kubernetes' |
| replication_status | None |
| size | 1 |
| snapshot_id | None |
| source_volid | None |
| status | in-use |
| type | rbd |
| updated_at | 2019-07-24T05:02:35.000000 |
| user_id | 5f6a7a06f4e3456c890130d56babf591 |
+--------------------------------+--------------------------------------------------------------------------------------------------------------------------------------------------------------------------------------------------------------------------------------------------------------------------------------------------------------------------------+
Summary
In this walk-through, we deployed a Kubernetes cluster on OpenStack VMs and integrated it with OpenStack using an external OpenStack cloud provider. Then on this Kubernetes cluster we deployed Cinder CSI plugin which can create Cinder volumes and expose them in Kubernetes as persistent volumes.
KubeInvaders - Gamified Chaos Engineering Tool for Kubernetes
Some months ago, I released my latest project called KubeInvaders. The first time I shared it with the community was during an Openshift Commons Briefing session. Kubenvaders is a Gamified Chaos Engineering tool for Kubernetes and Openshift and helps test how resilient your Kubernetes cluster is, in a fun way.
It is like Space Invaders, but the aliens are pods.

During my presentation at Codemotion Milan 2019, I started saying "of course you can do it with few lines of Bash, but it is boring."

Using the code above you can kill random pods across a Kubernetes cluster, but I think it is much more fun with the spaceship of KubeInvaders.
I published the code at https://github.com/lucky-sideburn/KubeInvaders and there is a little community that is growing gradually. Some people love to use it for demo sessions killing pods on a big screen.

How to install KubeInvaders
I defined multiples modes to install it:
Helm Chart https://github.com/lucky-sideburn/KubeInvaders/tree/master/helm-charts/kubeinvaders
Manual Installation for Openshift using a template https://github.com/lucky-sideburn/KubeInvaders#install-kubeinvaders-on-openshift
Manual Installation for Kubernetes https://github.com/lucky-sideburn/KubeInvaders#install-kubeinvaders-on-kubernetes
The preferred way, of course, is with a Helm chart:
# Please set target_namespace to set your target namespace!
helm install --set-string target_namespace="namespace1,namespace2" \
--name kubeinvaders --namespace kubeinvaders ./helm-charts/kubeinvaders
How to use KubeInvaders
Once it is installed on your cluster you can use the following functionalities:
- Key 'a' — Switch to automatic pilot
- Key 'm' — Switch to manual pilot
- Key 'i' — Show pod's name. Move the ship towards an alien
- Key 'h' — Print help
- Key 'n' — Jump between different namespaces (my favorite feature!)
Tuning KubeInvaders
At Codemotion Milan 2019, my colleagues and I organized a desk with a game station for playing KubeInvaders. People had to fight with Kubernetes to win a t-shirt.
If you have pods that require a few seconds to start, you may lose. It is possible to set the complexity of the game with these parameters as environmment variables in the Kubernetes deployment:
- ALIENPROXIMITY — Reduce this value to increase the distance between aliens;
- HITSLIMIT — Seconds of CPU time to wait before shooting;
- UPDATETIME — Seconds to wait before updating pod status (you can set also 0.x Es: 0.5);
The result is a harder game experience against the machine.
Use cases
Adopting chaos engineering strategies for your production environment is really useful, because it is the only way to test if a system supports unexpected destructive events.
KubeInvaders is a game — so please do not take it too seriously! — but it demonstrates some important use cases:
- Test how resilient Kubernetes clusters are on unexpected pod deletion
- Collect metrics like pod restart time
- Tune readiness probes
Next steps
I want to continue to add some cool features and integrate it into a Kubernetes dashboard because I am planning to transform it into a "Gamified Chaos Engineering and Development Tool for Kubernetes", to help developer to interact with deployments in a Kubernetes environment. For example:
- Point to the aliens to get pod logs
- Deploy Helm charts by shooting some particular objects
- Read messages stored in a specific label present in a deployment
Please feel free to contribute to https://github.com/lucky-sideburn/KubeInvaders and stay updated following #kubeinvaders news on Twitter.
CSI Ephemeral Inline Volumes
Typically, volumes provided by an external storage driver in Kubernetes are persistent, with a lifecycle that is completely independent of pods or (as a special case) loosely coupled to the first pod which uses a volume (late binding mode). The mechanism for requesting and defining such volumes in Kubernetes are Persistent Volume Claim (PVC) and Persistent Volume (PV) objects. Originally, volumes that are backed by a Container Storage Interface (CSI) driver could only be used via this PVC/PV mechanism.
But there are also use cases for data volumes whose content and lifecycle is tied to a pod. For example, a driver might populate a volume with dynamically created secrets that are specific to the application running in the pod. Such volumes need to be created together with a pod and can be deleted as part of pod termination (ephemeral). They get defined as part of the pod spec (inline).
Since Kubernetes 1.15, CSI drivers can also be used for such ephemeral inline volumes. The CSIInlineVolume feature gate had to be set to enable it in 1.15 because support was still in alpha state. In 1.16, the feature reached beta state, which typically means that it is enabled in clusters by default.
CSI drivers have to be adapted to support this because although two
existing CSI gRPC calls are used (NodePublishVolume and NodeUnpublishVolume),
the way how they are
used is different and not covered by the CSI spec: for ephemeral
volumes, only NodePublishVolume is invoked by kubelet when asking
the CSI driver for a volume. All other calls
(like CreateVolume, NodeStageVolume, etc.) are skipped. The volume
parameters are provided in the pod spec and from there copied into the
NodePublishVolumeRequest.volume_context field. There are currently
no standardized parameters; even common ones like size must be
provided in a format that is defined by the CSI driver. Likewise, only
NodeUnpublishVolume gets called after the pod has terminated and the
volume needs to be removed.
Initially, the assumption was that CSI drivers would be specifically written to provide either persistent or ephemeral volumes. But there are also drivers which provide storage that is useful in both modes: for example, PMEM-CSI manages persistent memory (PMEM), a new kind of local storage that is provided by Intel® Optane™ DC Persistent Memory. Such memory is useful both as persistent data storage (faster than normal SSDs) and as ephemeral scratch space (higher capacity than DRAM).
Therefore the support in Kubernetes 1.16 was extended:
- Kubernetes and users can determine which kind of volumes a driver
supports via the
volumeLifecycleModesfield in theCSIDriverobject. - Drivers can get information about the volume mode by enabling the
"pod info on
mount" feature
which then will add the new
csi.storage.k8s.io/ephemeralentry to theNodePublishRequest.volume_context.
For more information about implementing support of ephemeral inline volumes in a CSI driver, see the Kubernetes-CSI documentation and the original design document.
What follows in this blog post are usage examples based on real drivers and a summary at the end.
Examples
PMEM-CSI
Support for ephemeral inline volumes was added in release v0.6.0. The driver can be used on hosts with real Intel® Optane™ DC Persistent Memory, on special machines in GCE or with hardware emulated by QEMU. The latter is fully integrated into the makefile and only needs Go, Docker and KVM, so that approach was used for this example:
git clone --branch release-0.6 https://github.com/intel/pmem-csi
cd pmem-csi
TEST_DISTRO=clear TEST_DISTRO_VERSION=32080 TEST_PMEM_REGISTRY=intel make start
Bringing up the four-node cluster can take a while but eventually should end with:
The test cluster is ready. Log in with /work/pmem-csi/_work/pmem-govm/ssh-pmem-govm, run kubectl once logged in.
Alternatively, KUBECONFIG=/work/pmem-csi/_work/pmem-govm/kube.config can also be used directly.
To try out the pmem-csi driver persistent volumes:
...
To try out the pmem-csi driver ephemeral volumes:
cat deploy/kubernetes-1.17/pmem-app-ephemeral.yaml | /work/pmem-csi/_work/pmem-govm/ssh-pmem-govm kubectl create -f -
deploy/kubernetes-1.17/pmem-app-ephemeral.yaml specifies one volume:
kind: Pod
apiVersion: v1
metadata:
name: my-csi-app-inline-volume
spec:
containers:
- name: my-frontend
image: busybox
command: [ "sleep", "100000" ]
volumeMounts:
- mountPath: "/data"
name: my-csi-volume
volumes:
- name: my-csi-volume
csi:
driver: pmem-csi.intel.com
fsType: "xfs"
volumeAttributes:
size: "2Gi"
nsmode: "fsdax"
Once we have created that pod, we can inspect the result:
kubectl describe pods/my-csi-app-inline-volume
Name: my-csi-app-inline-volume
...
Volumes:
my-csi-volume:
Type: CSI (a Container Storage Interface (CSI) volume source)
Driver: pmem-csi.intel.com
FSType: xfs
ReadOnly: false
VolumeAttributes: nsmode=fsdax
size=2Gi
kubectl exec my-csi-app-inline-volume -- df -h /data
Filesystem Size Used Available Use% Mounted on
/dev/ndbus0region0fsdax/d7eb073f2ab1937b88531fce28e19aa385e93696
1.9G 34.2M 1.8G 2% /data
Image Populator
The image populator automatically unpacks a container image and makes its content available as an ephemeral volume. It's still in development, but canary images are already available which can be installed with:
kubectl create -f https://github.com/kubernetes-csi/csi-driver-image-populator/raw/master/deploy/kubernetes-1.16/csi-image-csidriverinfo.yaml
kubectl create -f https://github.com/kubernetes-csi/csi-driver-image-populator/raw/master/deploy/kubernetes-1.16/csi-image-daemonset.yaml
This example pod will run nginx and have it serve data that
comes from the kfox1111/misc:test image:
kubectl create -f - <<EOF
apiVersion: v1
kind: Pod
metadata:
name: nginx
spec:
containers:
- name: nginx
image: nginx:1.16-alpine
ports:
- containerPort: 80
volumeMounts:
- name: data
mountPath: /usr/share/nginx/html
volumes:
- name: data
csi:
driver: image.csi.k8s.io
volumeAttributes:
image: kfox1111/misc:test
EOF
kubectl exec nginx -- cat /usr/share/nginx/html/test
That test file just contains a single word:
testing
Such data containers can be built with Dockerfiles such as:
FROM scratch
COPY index.html /index.html
cert-manager-csi
cert-manager-csi works together with cert-manager. The goal for this driver is to facilitate requesting and mounting certificate key pairs to pods seamlessly. This is useful for facilitating mTLS, or otherwise securing connections of pods with guaranteed present certificates whilst having all of the features that cert-manager provides. This project is experimental.
Next steps
One of the issues with ephemeral inline volumes is that pods get scheduled by Kubernetes onto nodes without knowing anything about the currently available storage on that node. Once the pod has been scheduled, the CSI driver must make the volume available one that node. If that is currently not possible, the pod cannot start. This will be retried until eventually the volume becomes ready. The storage capacity tracking KEP is an attempt to address this problem.
A related KEP introduces a standardized size parameter.
Currently, CSI ephemeral inline volumes stay in beta while issues like these are getting discussed. Your feedback is needed to decide how to proceed with this feature. For the KEPs, the two PRs linked to above is a good place to comment. The SIG Storage also meets regularly and can be reached via Slack and a mailing list.
Reviewing 2019 in Docs
Hi, folks! I'm one of the co-chairs for the Kubernetes documentation special interest group (SIG Docs). This blog post is a review of SIG Docs in 2019. Our contributors did amazing work last year, and I want to highlight their successes.
Although I review 2019 in this post, my goal is to point forward to 2020. I observe some trends in SIG Docs–some good, others troubling. I want to raise visibility before those challenges increase in severity.
The good
There was much to celebrate in SIG Docs in 2019.
Kubernetes docs started the year with three localizations in progress. By the end of the year, we ended with ten localizations available, four of which (Chinese, French, Japanese, Korean) are reasonably complete. The Korean and French teams deserve special mentions for their contributions to git best practices across all localizations (Korean team) and help bootstrapping other localizations (French team).
Despite significant transition over the year, SIG Docs improved its review velocity, with a median review time from PR open to merge of just over 24 hours.
Issue triage improved significantly in both volume and speed, largely due to the efforts of GitHub users @sftim, @tengqm, and @kbhawkey.
Doc sprints remain valuable at KubeCon contributor days, introducing new contributors to Kubernetes documentation.
The docs component of Kubernetes quarterly releases improved over 2019, thanks to iterative playbook improvements from release leads and their teams.
Site traffic increased over the year. The website ended the year with ~6 million page views per month in December, up from ~5M page views in January. The kubernetes.io website had 851k site visitors in October, a new all-time high. Reader satisfaction remains general.
We onboarded a new SIG chair: @jimangel, a Cloud Architect at General Motors. Jim was a docs contributor for a year, during which he led the 1.14 docs release, before stepping up as chair.
The not so good
While reader satisfaction is decent, most respondents indicated dissatisfaction with stale content in every area: concepts, tasks, tutorials, and reference. Additionally, readers requested more diagrams, advanced conceptual content, and code samples—things that technical writers excel at providing.
SIG Docs continues to solve how best to handle third-party content. There's too much vendor content on kubernetes.io, and guidelines for adding or rejecting third-party content remain unclear. The discussion so far has been powerful, including pushback demanding greater collaborative input—a powerful reminder that Kubernetes is in all ways a communal effort.
We're in the middle of our third chair transition in 18 months. Each chair transition has been healthy and collegial, but it's still a lot of turnover in a short time. Chairing any open source project is difficult, but especially so with SIG Docs. Chairship of SIG Docs requires a steep learning curve across multiple domains: docs (both written and generated from spec), information architecture, specialized contribution paths (for example, localization), how to run a release cycle, website development, CI/CD, community management, on and on. It's a role that requires multiple people to function successfully without burning people out. Training replacements is time-intensive.
Perhaps most pressing in the Not So Good category is that SIG Docs currently has only one technical writer dedicated full-time to Kubernetes docs. This has impacts on Kubernetes docs: some obvious, some less so.
Impacts of understaffing on Kubernetes docs
Me today: pic.twitter.com/cDpHOWEsjf
— Benjamin Elder (@BenTheElder) January 10, 2020
If Kubernetes continues through 2020 without more technical writers dedicated to the docs, here's what I see as the most likely possibilities.
But first, a disclaimer
Caution:
It is very hard to predict, especially the future. -Niels BohrSome of my predictions are almost certainly wrong. Any errors are mine alone.
That said...
Effects in 2020
Current levels of function aren't self-sustaining. Even with a strong playbook, the release cycle still requires expert support from at least one (and usually two) chairs during every cycle. Without fail, each release breaks in new and unexpected ways, and it requires familiarity and expertise to diagnose and resolve. As chairs continue to cycle—and to be clear, regular transitions are part of a healthy project—we accrue the risks associated with a pool lacking sufficient professional depth and employer support.
Oddly enough, one of the challenges to staffing is that the docs appear good enough. Based on site analytics and survey responses, readers are pleased with the quality of the docs. When folks visit the site, they generally find what they need and behave like satisfied visitors.
The danger is that this will change over time: slowly with occasional losses of function, annoying at first, then increasingly critical. The more time passes without adequate staffing, the more difficult and costly fixes will become.
I suspect this is true because the challenges we face now at decent levels of reader satisfaction are already difficult to fix. API reference generation is complex and brittle; the site's UI is outdated; and our most consistent requests are for more tutorials, advanced concepts, diagrams, and code samples, all of which require ongoing, dedicated time to create.
Release support remains strong.
The release team continues a solid habit of leaving each successive team with better support than the previous release. This mostly takes the form of iterative improvements to the docs release playbook, producing better documentation and reducing siloed knowledge.
Staleness accelerates.
Conceptual content becomes less accurate or relevant as features change or deprecate. Tutorial content degrades for the same reason.
The content structure will also degrade: the categories of concepts, tasks, and tutorials are legacy categories that may not best fit the needs of current readers, let alone future ones.
Cruft accumulates for both readers and contributors. Reference docs become increasingly brittle without intervention.
Critical knowledge vanishes.
As I mentioned previously, SIG Docs has a wide range of functions, some with a steep learning curve. As contributors change roles or jobs, their expertise and availability will diminish or reduce to zero. Contributors with specific knowledge may not be available for consultation, exposing critical vulnerabilities in docs function. Specific examples include reference generation and chair leadership.
That's a lot to take in
It's difficult to strike a balance between the importance of SIG Docs' work to the community and our users, the joy it brings me personally, and the fact that things can't remain as they are without significant negative impacts (eventually). SIG Docs is by no means dying; it's a vibrant community with active contributors doing cool things. It's also a community with some critical knowledge and capacity shortages that can only be remedied with trained, paid staff dedicated to documentation.
What the community can do for healthy docs
Hire technical writers dedicated to Kubernetes docs. Support advanced content creation, not just release docs and incremental feature updates.
Thanks, and Happy 2020.
Kubernetes on MIPS
Background
MIPS (Microprocessor without Interlocked Pipelined Stages) is a reduced instruction set computer (RISC) instruction set architecture (ISA), appeared in 1981 and developed by MIPS Technologies. Now MIPS architecture is widely used in many electronic products.
Kubernetes has officially supported a variety of CPU architectures such as x86, arm/arm64, ppc64le, s390x. However, it's a pity that Kubernetes doesn't support MIPS. With the widespread use of cloud native technology, users under MIPS architecture also have an urgent demand for Kubernetes on MIPS.
Achievements
For many years, to enrich the ecology of the open-source community, we have been working on adjusting MIPS architecture for Kubernetes use cases. With the continuous iterative optimization and the performance improvement of the MIPS CPU, we have made some breakthrough progresses on the mips64el platform.
Over the years, we have been actively participating in the Kubernetes community and have rich experience in the using and optimization of Kubernetes technology. Recently, we tried to adapt the MIPS architecture platform for Kubernetes and achieved a new a stage on that journey. The team has completed migration and adaptation of Kubernetes and related components, built not only a stable and highly available MIPS cluster but also completed the conformance test for Kubernetes v1.16.2.
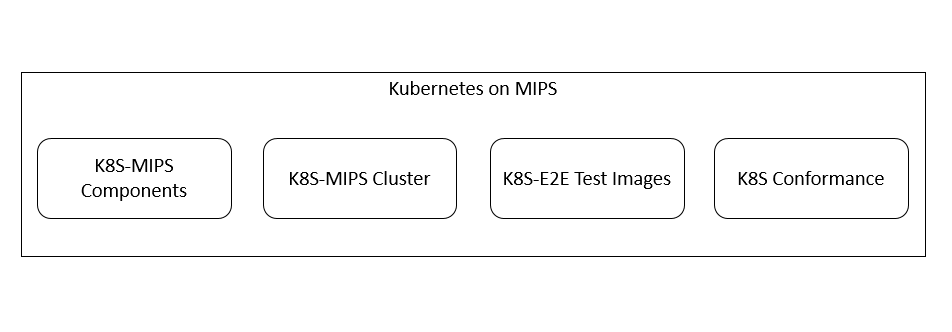
Figure 1 Kubernetes on MIPS
K8S-MIPS component build
Almost all native cloud components related to Kubernetes do not provide a MIPS version installation package or image. The prerequisite of deploying Kubernetes on the MIPS platform is to compile and build all required components on the mips64el platform. These components include:
- golang
- docker-ce
- hyperkube
- pause
- etcd
- calico
- coredns
- metrics-server
Thanks to the excellent design of Golang and its good support for the MIPS platform, the compilation processes of the above cloud native components are greatly simplified. First of all, we compiled Golang on the latest stable version for the mips64el platform, and then we compiled most of the above components with source code.
During the compilation processes, we inevitably encountered many platform compatibility problems, such as a Golang system call compatibility problem (syscall), typecasting of syscall. Stat_t from uint32 to uint64, patching for EpollEvent, and so on.
To build K8S-MIPS components, we used cross-compilation technology. Our process involved integrating a QEMU tool to translate MIPS CPU instructions and modifying the build script of Kubernetes and E2E image script of Kubernetes, Hyperkube, and E2E test images on MIPS architecture.
After successfully building the above components, we use tools such as kubespray and kubeadm to complete kubernetes cluster construction.
| Name | Version | MIPS Repository |
|---|---|---|
| golang on MIPS | 1.12.5 | - |
| docker-ce on MIPS | 18.09.8 | - |
| metrics-server for CKE on MIPS | 0.3.2 | registry.inspurcloud.cn/library/cke/kubernetes/metrics-server-mips64el:v0.3.2 |
| etcd for CKE on MIPS | 3.2.26 | registry.inspurcloud.cn/library/cke/etcd/etcd-mips64el:v3.2.26 |
| pause for CKE on MIPS | 3.1 | registry.inspurcloud.cn/library/cke/kubernetes/pause-mips64el:3.1 |
| hyperkube for CKE on MIPS | 1.14.3 | registry.inspurcloud.cn/library/cke/kubernetes/hyperkube-mips64el:v1.14.3 |
| coredns for CKE on MIPS | 1.6.5 | registry.inspurcloud.cn/library/cke/kubernetes/coredns-mips64el:v1.6.5 |
| calico for CKE on MIPS | 3.8.0 | registry.inspurcloud.cn/library/cke/calico/cni-mips64el:v3.8.0 registry.inspurcloud.cn/library/cke/calico/ctl-mips64el:v3.8.0 registry.inspurcloud.cn/library/cke/calico/node-mips64el:v3.8.0 registry.inspurcloud.cn/library/cke/calico/kube-controllers-mips64el:v3.8.0 |
Note: CKE is a Kubernetes-based cloud container engine launched by Inspur
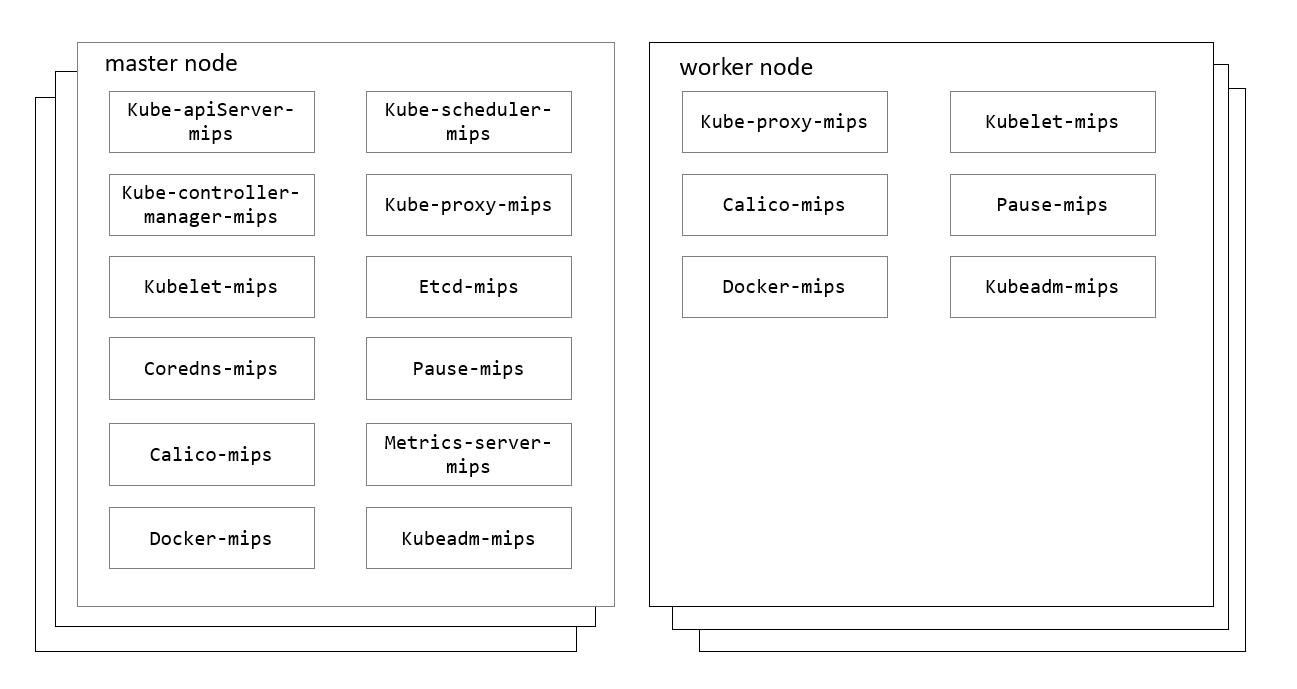
Figure 2 K8S-MIPS Cluster Components

Figure 3 CPU Architecture
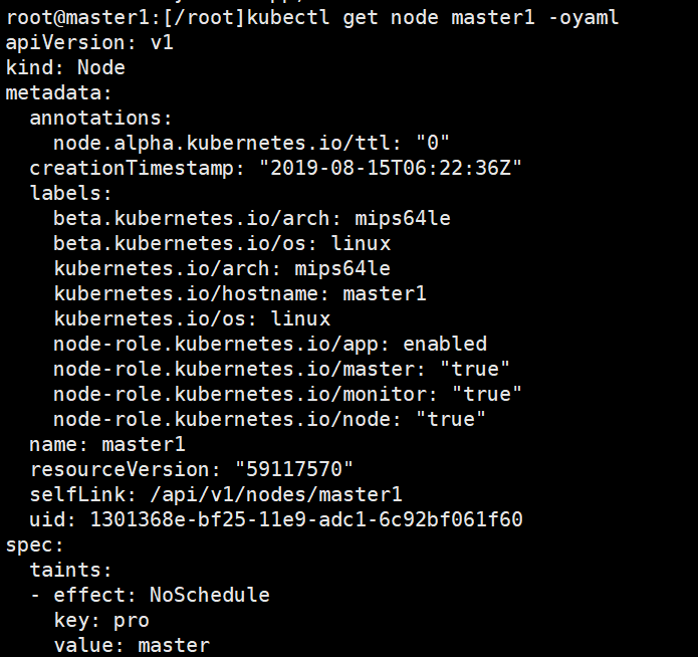
Figure 4 Cluster Node Information
Run K8S Conformance Test
The most straightforward way to verify the stability and availability of the K8S-MIPS cluster is to run a Kubernetes conformance test.
Conformance is a standalone container to launch Kubernetes end-to-end tests for conformance testing.
Once the test has started, it launches several pods for various end-to-end tests. The source code of those images used by these pods is mostly from kubernetes/test/images, and the built images are at gcr.io/kubernetes-e2e-test-images. Since there are no MIPS images in the repository, we must first build all needed images to run the test.
Build needed images for test
The first step is to find all needed images for the test. We can run sonobuoy images-p e2e command to list all images, or we can find those images in /test/utils/image/manifest.go. Although Kubernetes officially has a complete Makefile and shell-script that provides commands for building test images, there are still a number of architecture-related issues that have not been resolved, such as the incompatibilities of base images and dependencies. So we cannot directly build mips64el architecture images by executing these commands.
Most test images are in golang, then compiled into binaries and built as Docker image based on the corresponding Dockerfile. These images are easy to build. But note that most images are using alpine as their base image, which does not officially support mips64el architecture for now. For this moment, we are unable to make mips64el version of alpine, so we have to replace the alpine to existing MIPS images, such as Debian-stretch, fedora, ubuntu. Replacing the base image also requires replacing the command to install the dependencies, even the version of these dependencies.
Some images are not in kubernetes/test/images, such as gcr.io/google-samples/gb-frontend:v6. There is no clear documentation explaining where these images are locaated, though we found the source code in repository github.com/GoogleCloudPlatform/kubernetes-engine-samples. We soon ran into new problems: to build these google sample images, we have to build the base image it uses, even the base image of the base images, such as php:5-apache, redis, and perl.
After a long process of building an image, we finished with about four dozen images, including the images used by the test pod, and the base images. The last step before we run the tests is to place all those images into every node in the cluster and make sure the Pod image pull policy is imagePullPolicy: ifNotPresent.
Here are some of the images we built:
docker.io/library/busybox:1.29docker.io/library/nginx:1.14-alpinedocker.io/library/nginx:1.15-alpinedocker.io/library/perl:5.26docker.io/library/httpd:2.4.38-alpinedocker.io/library/redis:5.0.5-alpinegcr.io/google-containers/conformance:v1.16.2gcr.io/google-containers/hyperkube:v1.16.2gcr.io/google-samples/gb-frontend:v6gcr.io/kubernetes-e2e-test-images/agnhost:2.6gcr.io/kubernetes-e2e-test-images/apparmor-loader:1.0gcr.io/kubernetes-e2e-test-images/dnsutils:1.1gcr.io/kubernetes-e2e-test-images/echoserver:2.2gcr.io/kubernetes-e2e-test-images/ipc-utils:1.0gcr.io/kubernetes-e2e-test-images/jessie-dnsutils:1.0gcr.io/kubernetes-e2e-test-images/kitten:1.0gcr.io/kubernetes-e2e-test-images/metadata-concealment:1.2gcr.io/kubernetes-e2e-test-images/mounttest-user:1.0gcr.io/kubernetes-e2e-test-images/mounttest:1.0gcr.io/kubernetes-e2e-test-images/nautilus:1.0gcr.io/kubernetes-e2e-test-images/nonewprivs:1.0gcr.io/kubernetes-e2e-test-images/nonroot:1.0gcr.io/kubernetes-e2e-test-images/resource-consumer-controller:1.0gcr.io/kubernetes-e2e-test-images/resource-consumer:1.5gcr.io/kubernetes-e2e-test-images/sample-apiserver:1.10gcr.io/kubernetes-e2e-test-images/test-webserver:1.0gcr.io/kubernetes-e2e-test-images/volume/gluster:1.0gcr.io/kubernetes-e2e-test-images/volume/iscsi:2.0gcr.io/kubernetes-e2e-test-images/volume/nfs:1.0gcr.io/kubernetes-e2e-test-images/volume/rbd:1.0.1registry.k8s.io/etcd:3.3.15(image changed since publication - previously used registry "k8s.gcr.io")registry.k8s.io/pause:3.1(image changed since publication - previously used registry "k8s.gcr.io")
Finally, we ran the tests and got the test result, include e2e.log, which showed that all test cases passed. Additionally, we submitted our test result to k8s-conformance as a pull request.
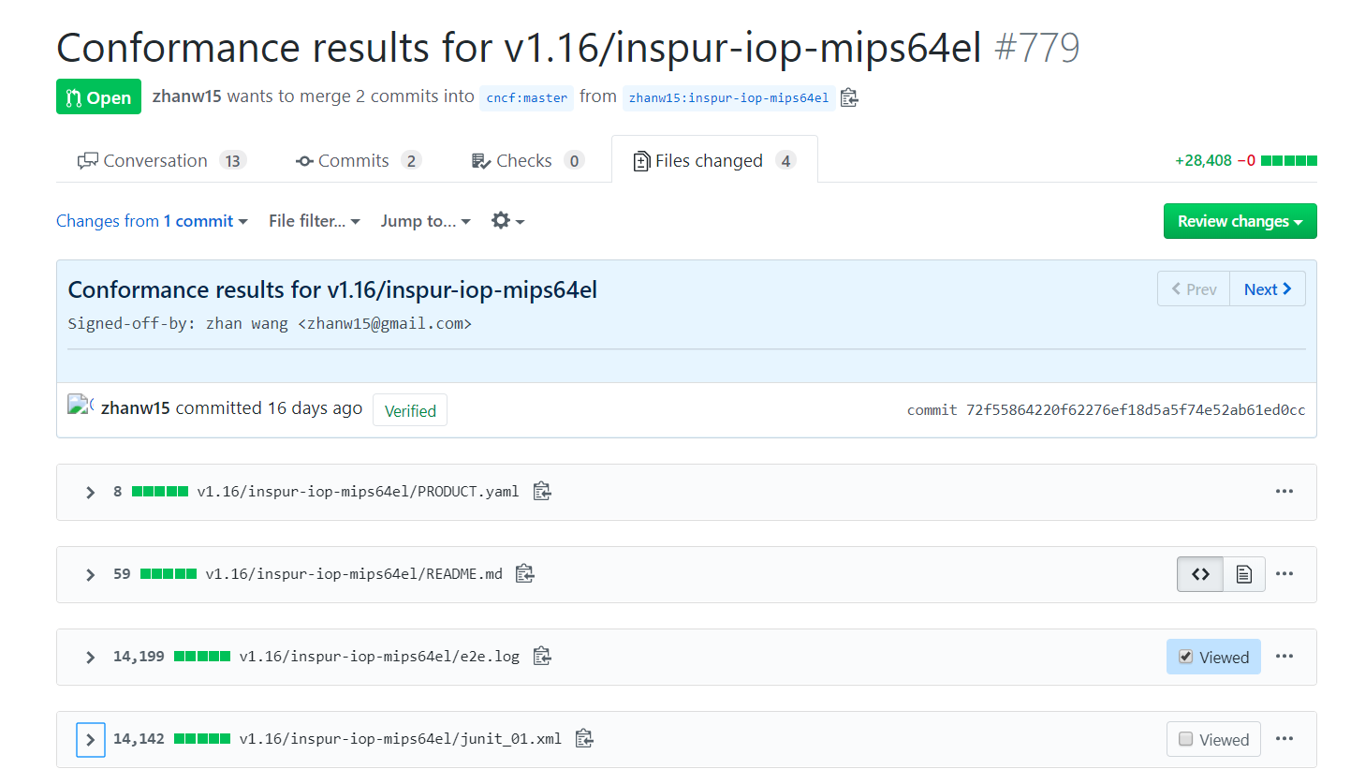
Figure 5 Pull request for conformance test results
What's next
We built the kubernetes-MIPS component manually and finished the conformance test, which verified the feasibility of Kubernetes On the MIPS platform and greatly enhanced our confidence in promoting the support of the MIPS architecture by Kubernetes.
In the future, we plan to actively contribute our experience and achievements to the community, submit PR, and patch for MIPS. We hope that more developers and companies in the community join us and promote Kubernetes on MIPS.
Contribution plan:
- contribute the source of e2e test images for MIPS
- contribute the source of hyperkube for MIPS
- contribute the source of deploy tools like kubeadm for MIPS
Announcing the Kubernetes bug bounty program
Authors: Maya Kaczorowski and Tim Allclair, Google, on behalf of the Kubernetes Product Security Committee
Today, the Kubernetes Product Security Committee is launching a new bug bounty program, funded by the CNCF, to reward researchers finding security vulnerabilities in Kubernetes.
Setting up a new bug bounty program
We aimed to set up this bug bounty program as transparently as possible, with an initial proposal, evaluation of vendors, and working draft of the components in scope. Once we onboarded the selected bug bounty program vendor, HackerOne, these documents were further refined based on the feedback from HackerOne, as well as what was learned in the recent Kubernetes security audit. The bug bounty program has been in a private release for several months now, with invited researchers able to submit bugs and help us test the triage process. After almost two years since the initial proposal, the program is now ready for all security researchers to contribute!
What’s exciting is that this is rare: a bug bounty for an open-source infrastructure tool. Some open-source bug bounty programs exist, such as the Internet Bug Bounty, this mostly covers core components that are consistently deployed across environments; but most bug bounties are still for hosted web apps. In fact, with more than 100 certified distributions of Kubernetes, the bug bounty program needs to apply to the Kubernetes code that powers all of them. By far, the most time-consuming challenge here has been ensuring that the program provider (HackerOne) and their researchers who do the first line triage have the awareness of Kubernetes and the ability to easily test the validity of a reported bug. As part of the bootstrapping process, HackerOne had their team pass the Certified Kubernetes Administrator (CKA) exam.
What’s in scope
The bug bounty scope covers code from the main Kubernetes organizations on GitHub, as well as continuous integration, release, and documentation artifacts. Basically, most content you’d think of as ‘core’ Kubernetes, included at https://github.com/kubernetes, is in scope. We’re particularly interested in cluster attacks, such as privilege escalations, authentication bugs, and remote code execution in the kubelet or API server. Any information leak about a workload, or unexpected permission changes is also of interest. Stepping back from the cluster admin’s view of the world, you’re also encouraged to look at the Kubernetes supply chain, including the build and release processes, which would allow any unauthorized access to commits, or the ability to publish unauthorized artifacts.
Notably out of scope is the community management tooling, e.g., the Kubernetes mailing lists or Slack channel. Container escapes, attacks on the Linux kernel, or other dependencies, such as etcd, are also out of scope and should be reported to the appropriate party. We would still appreciate that any Kubernetes vulnerability, even if not in scope for the bug bounty, be disclosed privately to the Kubernetes Product Security Committee. See the full scope on the program reporting page.
How Kubernetes handles vulnerabilities and disclosures
Kubernetes’ Product Security Committee is a group of security-focused maintainers who are responsible for receiving and responding to reports of security issues in Kubernetes. This follows the documented security vulnerability response process, which includes initial triage, assessing impact, generating and rolling out a fix.
With our bug bounty program, initial triage and initial assessment are handled by the bug bounty provider, in this case, HackerOne, enabling us better scale our limited Kubernetes security experts to handle only valid reports. Nothing else in this process is changing - the Product Security Committee will continue to develop fixes, build private patches, and coordinate special security releases. New releases with security patches will be announced at kubernetes-security-announce@googlegroups.com.
If you want to report a bug, you don’t need to use the bug bounty - you can still follow the existing process and report what you’ve found at security@kubernetes.io.
Get started
Just as many organizations support open source by hiring developers, paying bug bounties directly supports security researchers. This bug bounty is a critical step for Kubernetes to build up its community of security researchers and reward their hard work.
If you’re a security researcher, and new to Kubernetes, check out these resources to learn more and get started bug hunting:
- Hardening guides
- Frameworks
- Talks
- The Devil in the Details: Kubernetes’ First Security Assessment (KubeCon NA 2019): https://www.youtube.com/watch?v=vknE5XEa_Do
- Crafty Requests: Deep Dive into Kubernetes CVE-2018-1002105 (KubeCon EU 2019): https://www.youtube.com/watch?v=VjSJqc13PNk
- A Hacker’s Guide to Kubernetes and the Cloud (KubeCon EU 2018): https://www.youtube.com/watch?v=dxKpCO2dAy8
- Shipping in pirate-infested waters (KubeCon NA 2017): https://www.youtube.com/watch?v=ohTq0no0ZVU
- Hacking and Hardening Kubernetes clusters by example (KubeCon NA 2017): https://www.youtube.com/watch?v=vTgQLzeBfRU
If you find something, please report a security bug to the Kubernetes bug bounty at https://hackerone.com/kubernetes.
Remembering Brad Childs
Last year, the Kubernetes family lost one of its own. Brad Childs was a SIG Storage chair and long time contributor to the project. Brad worked on a number of features in storage and was known as much for his friendliness and sense of humor as for his technical contributions and leadership.
We recently spent time remembering Brad at Kubecon NA:
Our hearts go out to Brad’s friends and family and others whose lives he touched inside and outside the Kubernetes community.
Thank you for everything, Brad. We’ll miss you.
Testing of CSI drivers
When developing a Container Storage Interface (CSI) driver, it is useful to leverage as much prior work as possible. This includes source code (like the sample CSI hostpath driver) but also existing tests. Besides saving time, using tests written by someone else has the advantage that it can point out aspects of the specification that might have been overlooked otherwise.
An earlier blog post about end-to-end testing already showed how to use the Kubernetes storage tests for testing of a third-party CSI driver. That approach makes sense when the goal to also add custom E2E tests, but depends on quite a bit of effort for setting up and maintaining a test suite.
When the goal is to merely run the existing tests, then there are simpler approaches. This blog post introduces those.
Sanity testing
csi-test sanity ensures that a CSI driver conforms to the CSI specification by calling the gRPC methods in various ways and checking that the outcome is as required. Despite its current hosting under the Kubernetes-CSI organization, it is completely independent of Kubernetes. Tests connect to a running CSI driver through its Unix domain socket, so although the tests are written in Go, the driver itself can be implemented in any language.
The main README explains how to include those tests into an existing Go test suite. The simpler alternative is to just invoke the csi-sanity command.
Installation
Starting with csi-test v3.0.0, you can build the csi-sanity command
with go get github.com/kubernetes-csi/csi-test/cmd/csi-sanity and
you'll find the compiled binary in $GOPATH/bin/csi-sanity.
go get always builds the latest revision from the master branch. To
build a certain release, get the source
code and run
make -C cmd/csi-sanity. This produces cmd/csi-sanity/csi-sanity.
Usage
The csi-sanity binary is a full Ginkgo test
suite and thus has the usual -gingko
command line flags. In particular, -ginkgo.focus and
-ginkgo.skip can be used to select which tests are run resp. not
run.
During a test run, csi-sanity simulates the behavior of a container
orchestrator (CO) by creating staging and target directories as required by the CSI spec
and calling a CSI driver via gRPC. The driver must be started before
invoking csi-sanity. Although the tests currently only check the gRPC
return codes, that might change and so the driver really should make
the changes requested by a call, like mounting a filesystem. That may
mean that it has to run as root.
At least one gRPC
endpoint must
be specified via the -csi.endpoint parameter when invoking
csi-sanity, either as absolute path (unix:/tmp/csi.sock) for a Unix
domain socket or as host name plus port (dns:///my-machine:9000) for
TCP. csi-sanity then uses that endpoint for both node and controller
operations. A separate endpoint for controller operations can be
specified with -csi.controllerendpoint. Directories are created in
/tmp by default. This can be changed via -csi.mountdir and
-csi.stagingdir.
Some drivers cannot be deployed such that everything is guaranteed to run on the same host. In such a case, custom scripts have to be used to handle directories: they log into the host where the CSI node controller runs and create or remove the directories there.
For example, during CI testing the CSI hostpath example
driver gets
deployed on a real Kubernetes cluster before invoking csi-sanity and then
csi-sanity connects to it through port forwarding provided by
socat.
Scripts
are used to create and remove the directories.
Here's how one can replicate that, using the v1.2.0 release of the CSI hostpath driver:
$ cd csi-driver-host-path
$ git describe --tags HEAD
v1.2.0
$ kubectl get nodes
NAME STATUS ROLES AGE VERSION
127.0.0.1 Ready <none> 42m v1.16.0
$ deploy/kubernetes-1.16/deploy-hostpath.sh
applying RBAC rules
kubectl apply -f https://raw.githubusercontent.com/kubernetes-csi/external-provisioner/v1.4.0/deploy/kubernetes/rbac.yaml
...
deploying hostpath components
deploy/kubernetes-1.16/hostpath/csi-hostpath-attacher.yaml
using image: quay.io/k8scsi/csi-attacher:v2.0.0
service/csi-hostpath-attacher created
statefulset.apps/csi-hostpath-attacher created
deploy/kubernetes-1.16/hostpath/csi-hostpath-driverinfo.yaml
csidriver.storage.k8s.io/hostpath.csi.k8s.io created
deploy/kubernetes-1.16/hostpath/csi-hostpath-plugin.yaml
using image: quay.io/k8scsi/csi-node-driver-registrar:v1.2.0
using image: quay.io/k8scsi/hostpathplugin:v1.2.0
using image: quay.io/k8scsi/livenessprobe:v1.1.0
...
service/hostpath-service created
statefulset.apps/csi-hostpath-socat created
07:38:46 waiting for hostpath deployment to complete, attempt #0
deploying snapshotclass
volumesnapshotclass.snapshot.storage.k8s.io/csi-hostpath-snapclass created
$ cat >mkdir_in_pod.sh <<EOF
#!/bin/sh
kubectl exec csi-hostpathplugin-0 -c hostpath -- mktemp -d /tmp/csi-sanity.XXXXXX
EOF
$ cat >rmdir_in_pod.sh <<EOF
#!/bin/sh
kubectl exec csi-hostpathplugin-0 -c hostpath -- rmdir "\$@"
EOF
$ chmod u+x *_in_pod.sh
$ csi-sanity -ginkgo.v \
-csi.endpoint dns:///127.0.0.1:$(kubectl get "services/hostpath-service" -o "jsonpath={..nodePort}") \
-csi.createstagingpathcmd ./mkdir_in_pod.sh \
-csi.createmountpathcmd ./mkdir_in_pod.sh \
-csi.removestagingpathcmd ./rmdir_in_pod.sh \
-csi.removemountpathcmd ./rmdir_in_pod.sh
Running Suite: CSI Driver Test Suite
====================================
Random Seed: 1570540138
Will run 72 of 72 specs
...
Controller Service [Controller Server] ControllerGetCapabilities
should return appropriate capabilities
/nvme/gopath/src/github.com/kubernetes-csi/csi-test/pkg/sanity/controller.go:111
STEP: connecting to CSI driver
STEP: creating mount and staging directories
STEP: checking successful response
•
------------------------------
Controller Service [Controller Server] GetCapacity
should return capacity (no optional values added)
/nvme/gopath/src/github.com/kubernetes-csi/csi-test/pkg/sanity/controller.go:149
STEP: reusing connection to CSI driver at dns:///127.0.0.1:30056
STEP: creating mount and staging directories
...
Ran 53 of 72 Specs in 148.206 seconds
SUCCESS! -- 53 Passed | 0 Failed | 0 Pending | 19 Skipped
PASS
Some comments:
- The source code of these tests is in the
pkg/sanitypackage. - How to determine the external IP address of the node depends on the
cluster. In this example, the cluster was brought up with
hack/local-up-cluster.shand thus runs on the local host (127.0.0.1). It uses a port allocated by Kubernetes, obtained above withkubectl get "services/hostpath-service". The Kubernetes-CSI CI uses kind and there a Docker command can be used. - The create script must print the final directory. Using a unique directory for each test case has the advantage that if something goes wrong in one test case, others still start with a clean slate.
- The "staging directory", aka
NodePublishVolumeRequest.target_pathin the CSI spec, must be created and deleted by the CSI driver while the CO is responsible for the parent directory.csi-sanityhandles that by creating a directory and then giving the CSI driver that directory path with/targetappended at the end. Kubernetes got this wrong and creates the actualtarget_pathdirectory, so CSI drivers which want to work with Kubernetes currently have to be lenient and must not fail when that directory already exists. - The "mount directory" corresponds to
NodeStageVolumeRequest.staging_target_pathand really gets created by the CO, i.e.csi-sanity.
End-to-end testing
In contrast to csi-sanity, end-to-end testing interacts with the CSI
driver through the Kubernetes API, i.e. it simulates operations from a
normal user, like creating a PersistentVolumeClaim. Support for testing external CSI
drivers was
added
in Kubernetes 1.14.0.
Installation
For each Kubernetes release, a test tar archive is published. It's not
listed in the release notes (for example, the ones for
1.16),
so one has to know that the full URL is
https://dl.k8s.io/<version>/kubernetes-test-linux-amd64.tar.gz (like
for
v1.16.0).
These include a e2e.test binary for Linux on x86-64. Archives for
other platforms are also available, see this
KEP. The
e2e.test binary is completely self-contained, so one can "install"
it and the ginkgo test runner with:
curl --location https://dl.k8s.io/v1.16.0/kubernetes-test-linux-amd64.tar.gz | \
tar --strip-components=3 -zxf - kubernetes/test/bin/e2e.test kubernetes/test/bin/ginkgo
Each e2e.test binary contains tests that match the features
available in the corresponding release. In particular, the [Feature: xyz] tags change between releases: they separate tests of alpha
features from tests of non-alpha features. Also, the tests from an
older release might rely on APIs that were removed in more recent
Kubernetes releases. To avoid problems, it's best to simply use the
e2e.test binary that matches the Kubernetes release that is used for
testing.
Usage
Not all features of a CSI driver can be discovered through the Kubernetes API. Therefore a configuration file in YAML or JSON format is needed which describes the driver that is to be tested. That file is used to populate the driverDefinition struct and the DriverInfo struct that is embedded inside it. For detailed usage instructions of individual fields refer to these structs.
A word of warning: tests are often only run when setting some fields and the file parser does not warn about unknown fields, so always check that the file really matches those structs.
Here is an example that tests the
csi-driver-host-path:
$ cat >test-driver.yaml <<EOF
StorageClass:
FromName: true
SnapshotClass:
FromName: true
DriverInfo:
Name: hostpath.csi.k8s.io
Capabilities:
block: true
controllerExpansion: true
exec: true
multipods: true
persistence: true
pvcDataSource: true
snapshotDataSource: true
InlineVolumes:
- Attributes: {}
EOF
At a minimum, you need to define the storage class you want to use in
the test, the name of your driver, and what capabilities you want to
test.
As with csi-sanity, the driver has to be running in the cluster
before testing it.
The actual e2e.test invocation then enables tests for this driver
with -storage.testdriver and selects the storage tests for it with
-ginkgo.focus:
$ ./e2e.test -ginkgo.v \
-ginkgo.focus='External.Storage' \
-storage.testdriver=test-driver.yaml
Oct 8 17:17:42.230: INFO: The --provider flag is not set. Continuing as if --provider=skeleton had been used.
I1008 17:17:42.230210 648569 e2e.go:92] Starting e2e run "90b9adb0-a3a2-435f-80e0-640742d56104" on Ginkgo node 1
Running Suite: Kubernetes e2e suite
===================================
Random Seed: 1570547861 - Will randomize all specs
Will run 163 of 5060 specs
Oct 8 17:17:42.237: INFO: >>> kubeConfig: /var/run/kubernetes/admin.kubeconfig
Oct 8 17:17:42.241: INFO: Waiting up to 30m0s for all (but 0) nodes to be schedulable
...
------------------------------
SSSSSSSSSSSSSSSSSSSS
------------------------------
External Storage [Driver: hostpath.csi.k8s.io] [Testpattern: Dynamic PV (filesystem volmode)] multiVolume [Slow]
should access to two volumes with different volume mode and retain data across pod recreation on the same node
/workspace/anago-v1.16.0-rc.2.1+2bd9643cee5b3b/src/k8s.io/kubernetes/_output/dockerized/go/src/k8s.io/kubernetes/test/e2e/storage/testsuites/multivolume.go:191
[BeforeEach] [Testpattern: Dynamic PV (filesystem volmode)] multiVolume [Slow]
...
You can use ginkgo to run some kinds of test in parallel.
Alpha feature tests or those that by design have to be run
sequentially then need to be run separately:
$ ./ginkgo -p -v \
-focus='External.Storage' \
-skip='\[Feature:|\[Disruptive\]|\[Serial\]' \
./e2e.test \
-- \
-storage.testdriver=test-driver.yaml
$ ./ginkgo -v \
-focus='External.Storage.*(\[Feature:|\[Disruptive\]|\[Serial\])' \
./e2e.test \
-- \
-storage.testdriver=test-driver.yaml
Getting involved
Both the Kubernetes storage tests and the sanity tests are meant to be applicable to arbitrary CSI drivers. But perhaps tests are based on additional assumptions and your driver does not pass the testing although it complies with the CSI specification. If that happens then please file issues (links below).
These are open source projects which depend on the help of those using them, so once a problem has been acknowledged, a pull request addressing it will be highly welcome.
The same applies to writing new tests. The following searches in the issue trackers select issues that have been marked specifically as something that needs someone's help:
Happy testing! May the issues it finds be few and easy to fix.
Kubernetes 1.17: Stability
We’re pleased to announce the delivery of Kubernetes 1.17, our fourth and final release of 2019! Kubernetes v1.17 consists of 22 enhancements: 14 enhancements have graduated to stable, 4 enhancements are moving to beta, and 4 enhancements are entering alpha.
Major Themes
Cloud Provider Labels reach General Availability
Added as a beta feature way back in v1.2, v1.17 sees the general availability of cloud provider labels.
Volume Snapshot Moves to Beta
The Kubernetes Volume Snapshot feature is now beta in Kubernetes v1.17. It was introduced as alpha in Kubernetes v1.12, with a second alpha with breaking changes in Kubernetes v1.13.
CSI Migration Beta
The Kubernetes in-tree storage plugin to Container Storage Interface (CSI) migration infrastructure is now beta in Kubernetes v1.17. CSI migration was introduced as alpha in Kubernetes v1.14.
Cloud Provider Labels reach General Availability
When nodes and volumes are created, a set of standard labels are applied based on the underlying cloud provider of the Kubernetes cluster. Nodes get a label for the instance type. Both nodes and volumes get two labels describing the location of the resource in the cloud provider topology, usually organized in zones and regions.
Standard labels are used by Kubernetes components to support some features. For example, the scheduler would ensure that pods are placed on the same zone as the volumes they claim; and when scheduling pods belonging to a deployment, the scheduler would prioritize spreading them across zones. You can also use the labels in your pod specs to configure things as such node affinity. Standard labels allow you to write pod specs that are portable among different cloud providers.
The labels are reaching general availability in this release. Kubernetes components have been updated to populate the GA and beta labels and to react to both. However, if you are using the beta labels in your pod specs for features such as node affinity, or in your custom controllers, we recommend that you start migrating them to the new GA labels. You can find the documentation for the new labels here:
Volume Snapshot Moves to Beta
The Kubernetes Volume Snapshot feature is now beta in Kubernetes v1.17. It was introduced as alpha in Kubernetes v1.12, with a second alpha with breaking changes in Kubernetes v1.13. This post summarizes the changes in the beta release.
What is a Volume Snapshot?
Many storage systems (like Google Cloud Persistent Disks, Amazon Elastic Block Storage, and many on-premise storage systems) provide the ability to create a “snapshot” of a persistent volume. A snapshot represents a point-in-time copy of a volume. A snapshot can be used either to provision a new volume (pre-populated with the snapshot data) or to restore an existing volume to a previous state (represented by the snapshot).
Why add Volume Snapshots to Kubernetes?
The Kubernetes volume plugin system already provides a powerful abstraction that automates the provisioning, attaching, and mounting of block and file storage.
Underpinning all these features is the Kubernetes goal of workload portability: Kubernetes aims to create an abstraction layer between distributed systems applications and underlying clusters so that applications can be agnostic to the specifics of the cluster they run on and application deployment requires no “cluster specific” knowledge.
The Kubernetes Storage SIG identified snapshot operations as critical functionality for many stateful workloads. For example, a database administrator may want to snapshot a database volume before starting a database operation.
By providing a standard way to trigger snapshot operations in the Kubernetes API, Kubernetes users can now handle use cases like this without having to go around the Kubernetes API (and manually executing storage system specific operations).
Instead, Kubernetes users are now empowered to incorporate snapshot operations in a cluster agnostic way into their tooling and policy with the comfort of knowing that it will work against arbitrary Kubernetes clusters regardless of the underlying storage.
Additionally these Kubernetes snapshot primitives act as basic building blocks that unlock the ability to develop advanced, enterprise grade, storage administration features for Kubernetes: including application or cluster level backup solutions.
You can read more in the blog entry about releasing CSI volume snapshots to beta.
CSI Migration Beta
Why are we migrating in-tree plugins to CSI?
Prior to CSI, Kubernetes provided a powerful volume plugin system. These volume plugins were “in-tree” meaning their code was part of the core Kubernetes code and shipped with the core Kubernetes binaries. However, adding support for new volume plugins to Kubernetes was challenging. Vendors that wanted to add support for their storage system to Kubernetes (or even fix a bug in an existing volume plugin) were forced to align with the Kubernetes release process. In addition, third-party storage code caused reliability and security issues in core Kubernetes binaries and the code was often difficult (and in some cases impossible) for Kubernetes maintainers to test and maintain. Using the Container Storage Interface in Kubernetes resolves these major issues.
As more CSI Drivers were created and became production ready, we wanted all Kubernetes users to reap the benefits of the CSI model. However, we did not want to force users into making workload/configuration changes by breaking the existing generally available storage APIs. The way forward was clear - we would have to replace the backend of the “in-tree plugin” APIs with CSI. What is CSI migration?
The CSI migration effort enables the replacement of existing in-tree storage plugins such as kubernetes.io/gce-pd or kubernetes.io/aws-ebs with a corresponding CSI driver. If CSI Migration is working properly, Kubernetes end users shouldn’t notice a difference. After migration, Kubernetes users may continue to rely on all the functionality of in-tree storage plugins using the existing interface.
When a Kubernetes cluster administrator updates a cluster to enable CSI migration, existing stateful deployments and workloads continue to function as they always have; however, behind the scenes Kubernetes hands control of all storage management operations (previously targeting in-tree drivers) to CSI drivers.
The Kubernetes team has worked hard to ensure the stability of storage APIs and for the promise of a smooth upgrade experience. This involves meticulous accounting of all existing features and behaviors to ensure backwards compatibility and API stability. You can think of it like changing the wheels on a racecar while it’s speeding down the straightaway.
You can read more in the blog entry about CSI migration going to beta.
Other Updates
Graduated to Stable 💯
- Taint Node by Condition
- Configurable Pod Process Namespace Sharing
- Schedule DaemonSet Pods by kube-scheduler
- Dynamic Maximum Volume Count
- Kubernetes CSI Topology Support
- Provide Environment Variables Expansion in SubPath Mount
- Defaulting of Custom Resources
- Move Frequent Kubelet Heartbeats To Lease Api
- Break Apart The Kubernetes Test Tarball
- Add Watch Bookmarks Support
- Behavior-Driven Conformance Testing
- Finalizer Protection For Service Loadbalancers
- Avoid Serializing The Same Object Independently For Every Watcher
Major Changes
Other Notable Features
Availability
Kubernetes 1.17 is available for download on GitHub. To get started with Kubernetes, check out these interactive tutorials. You can also easily install 1.17 using kubeadm.
Release Team
This release is made possible through the efforts of hundreds of individuals who contributed both technical and non-technical content. Special thanks to the release team led by Guinevere Saenger. The 35 individuals on the release team coordinated many aspects of the release, from documentation to testing, validation, and feature completeness.
As the Kubernetes community has grown, our release process represents an amazing demonstration of collaboration in open source software development. Kubernetes continues to gain new users at a rapid pace. This growth creates a positive feedback cycle where more contributors commit code creating a more vibrant ecosystem. Kubernetes has had over 39,000 individual contributors to date and an active community of more than 66,000 people.
Webinar
Join members of the Kubernetes 1.17 release team on Jan 7th, 2020 to learn about the major features in this release. Register here.
Get Involved
The simplest way to get involved with Kubernetes is by joining one of the many Special Interest Groups (SIGs) that align with your interests. Have something you’d like to broadcast to the Kubernetes community? Share your voice at our weekly community meeting, and through the channels below. Thank you for your continued feedback and support.
- Follow us on Twitter @Kubernetesio for latest updates
- Join the community discussion on Discuss
- Join the community on Slack
- Post questions (or answer questions) on Stack Overflow
- Share your Kubernetes story
Kubernetes 1.17 Feature: Kubernetes Volume Snapshot Moves to Beta
The Kubernetes Volume Snapshot feature is now beta in Kubernetes v1.17. It was introduced as alpha in Kubernetes v1.12, with a second alpha with breaking changes in Kubernetes v1.13. This post summarizes the changes in the beta release.
What is a Volume Snapshot?
Many storage systems (like Google Cloud Persistent Disks, Amazon Elastic Block Storage, and many on-premise storage systems) provide the ability to create a “snapshot” of a persistent volume. A snapshot represents a point-in-time copy of a volume. A snapshot can be used either to provision a new volume (pre-populated with the snapshot data) or to restore an existing volume to a previous state (represented by the snapshot).
Why add Volume Snapshots to Kubernetes?
The Kubernetes volume plugin system already provides a powerful abstraction that automates the provisioning, attaching, and mounting of block and file storage.
Underpinning all these features is the Kubernetes goal of workload portability: Kubernetes aims to create an abstraction layer between distributed applications and underlying clusters so that applications can be agnostic to the specifics of the cluster they run on and application deployment requires no “cluster specific” knowledge.
The Kubernetes Storage SIG identified snapshot operations as critical functionality for many stateful workloads. For example, a database administrator may want to snapshot a database volume before starting a database operation.
By providing a standard way to trigger snapshot operations in the Kubernetes API, Kubernetes users can now handle use cases like this without having to go around the Kubernetes API (and manually executing storage system specific operations).
Instead, Kubernetes users are now empowered to incorporate snapshot operations in a cluster agnostic way into their tooling and policy with the comfort of knowing that it will work against arbitrary Kubernetes clusters regardless of the underlying storage.
Additionally these Kubernetes snapshot primitives act as basic building blocks that unlock the ability to develop advanced, enterprise grade, storage administration features for Kubernetes: including application or cluster level backup solutions.
What’s new in Beta?
With the promotion of Volume Snapshot to beta, the feature is now enabled by default on standard Kubernetes deployments instead of being opt-in.
The move of the Kubernetes Volume Snapshot feature to beta also means:
- A revamp of volume snapshot APIs.
- The CSI external-snapshotter sidecar is split into two controllers, a common snapshot controller and a CSI external-snapshotter sidecar.
- Deletion secret is added as an annotation to the volume snapshot content.
- A new finalizer is added to the volume snapshot API object to prevent it from being deleted when it is bound to a volume snapshot content API object.
Kubernetes Volume Snapshots Requirements
As mentioned above, with the promotion of Volume Snapshot to beta, the feature is now enabled by default on standard Kubernetes deployments instead of being opt-in.
In order to use the Kubernetes Volume Snapshot feature, you must ensure the following components have been deployed on your Kubernetes cluster:
- Kubernetes Volume Snapshot CRDs
- Volume snapshot controller
- CSI Driver supporting Kubernetes volume snapshot beta
See the deployment section below for details.
Which drivers support Kubernetes Volume Snapshots?
Kubernetes supports three types of volume plugins: in-tree, Flex, and CSI. See Kubernetes Volume Plugin FAQ for details.
Snapshots are only supported for CSI drivers (not for in-tree or Flex). To use the Kubernetes snapshots feature, ensure that a CSI Driver that implements snapshots is deployed on your cluster.
Read the “Container Storage Interface (CSI) for Kubernetes GA” blog post to learn more about CSI and how to deploy CSI drivers.
As of the publishing of this blog, the following CSI drivers have been updated to support volume snapshots beta:
Beta level Volume Snapshot support for other CSI drivers is pending, and should be available soon.
Kubernetes Volume Snapshot Beta API
A number of changes were made to the Kubernetes volume snapshot API between alpha to beta. These changes are not backward compatible. The purpose of these changes was to make API definitions clear and easier to use.
The following changes are made:
DeletionPolicyis now a required field rather than optional in bothVolumeSnapshotClassandVolumeSnapshotContent. This way the user has to explicitly specify it, leaving no room for confusion.VolumeSnapshotSpechas a new requiredSourcefield.Sourcemay be either aPersistentVolumeClaimName(if dynamically provisioning a snapshot) orVolumeSnapshotContentName(if pre-provisioning a snapshot).VolumeSnapshotContentSpecalso has a new requiredSourcefield. ThisSourcemay be either aVolumeHandle(if dynamically provisioning a snapshot) or aSnapshotHandle(if pre-provisioning volume snapshots).VolumeSnapshotStatusnow contains aBoundVolumeSnapshotContentNameto indicate theVolumeSnapshotobject is bound to aVolumeSnapshotContent.VolumeSnapshotContentnow contains aStatusto indicate the current state of the content. It has a fieldSnapshotHandleto indicate that theVolumeSnapshotContentrepresents a snapshot on the storage system.
The beta Kubernetes VolumeSnapshot API object:
type VolumeSnapshot struct {
metav1.TypeMeta
metav1.ObjectMeta
Spec VolumeSnapshotSpec
Status *VolumeSnapshotStatus
}
type VolumeSnapshotSpec struct {
Source VolumeSnapshotSource
VolumeSnapshotClassName *string
}
// Exactly one of its members MUST be specified
type VolumeSnapshotSource struct {
// +optional
PersistentVolumeClaimName *string
// +optional
VolumeSnapshotContentName *string
}
type VolumeSnapshotStatus struct {
BoundVolumeSnapshotContentName *string
CreationTime *metav1.Time
ReadyToUse *bool
RestoreSize *resource.Quantity
Error *VolumeSnapshotError
}
The beta Kubernetes VolumeSnapshotContent API object:
type VolumeSnapshotContent struct {
metav1.TypeMeta
metav1.ObjectMeta
Spec VolumeSnapshotContentSpec
Status *VolumeSnapshotContentStatus
}
type VolumeSnapshotContentSpec struct {
VolumeSnapshotRef core_v1.ObjectReference
Source VolumeSnapshotContentSource
DeletionPolicy DeletionPolicy
Driver string
VolumeSnapshotClassName *string
}
type VolumeSnapshotContentSource struct {
// +optional
VolumeHandle *string
// +optional
SnapshotHandle *string
}
type VolumeSnapshotContentStatus struct {
CreationTime *int64
ReadyToUse *bool
RestoreSize *int64
Error *VolumeSnapshotError
SnapshotHandle *string
}
The beta Kubernetes VolumeSnapshotClass API object:
type VolumeSnapshotClass struct {
metav1.TypeMeta
metav1.ObjectMeta
Driver string
Parameters map[string]string
DeletionPolicy DeletionPolicy
}
How do I deploy support for Volume Snapshots on my Kubernetes Cluster?
Please note that the Volume Snapshot feature now depends on a new, common volume snapshot controller in addition to the volume snapshot CRDs. Both the volume snapshot controller and the CRDs are independent of any CSI driver. Regardless of the number of CSI drivers deployed on the cluster, there must be only one instance of the volume snapshot controller running and one set of volume snapshot CRDs installed per cluster.
Therefore, it is strongly recommended that Kubernetes distributors bundle and deploy the controller and CRDs as part of their Kubernetes cluster management process (independent of any CSI Driver).
If your cluster does not come pre-installed with the correct components, you may manually install these components by executing the following steps.
Install Snapshot Beta CRDs
kubectl create -f config/crd- https://github.com/kubernetes-csi/external-snapshotter/tree/53469c21962339229dd150cbba50c34359acec73/config/crd
- Do this once per cluster
Install Common Snapshot Controller
kubectl create -f deploy/kubernetes/snapshot-controller- https://github.com/kubernetes-csi/external-snapshotter/tree/master/deploy/kubernetes/snapshot-controller
- Do this once per cluster
Install CSI Driver
Follow instructions provided by your CSI Driver vendor.
How do I use Kubernetes Volume Snapshots?
Assuming all the required components (including CSI driver) are already deployed and running on your cluster, you can create volume snapshots using the VolumeSnapshot API object, and restore them by specifying a VolumeSnapshot data source on a PVC.
Creating a New Volume Snapshot with Kubernetes
You can enable creation/deletion of volume snapshots in a Kubernetes cluster, by creating a VolumeSnapshotClass API object pointing to a CSI Driver that support volume snapshots.
The following VolumeSnapshotClass, for example, tells the Kubernetes cluster that a CSI driver, testdriver.csi.k8s.io, can handle volume snapshots, and that when these snapshots are created, their deletion policy should be to delete.
apiVersion: snapshot.storage.k8s.io/v1beta1
kind: VolumeSnapshotClass
metadata:
name: test-snapclass
driver: testdriver.csi.k8s.io
deletionPolicy: Delete
parameters:
csi.storage.k8s.io/snapshotter-secret-name: mysecret
csi.storage.k8s.io/snapshotter-secret-namespace: mysecretnamespace
The common snapshot controller reserves the parameter keys csi.storage.k8s.io/snapshotter-secret-name and csi.storage.k8s.io/snapshotter-secret-namespace. If specified, it fetches the referenced Kubernetes secret and sets it as an annotation on the volume snapshot content object. The CSI external-snapshotter sidecar retrieves it from the content annotation and passes it to the CSI driver during snapshot creation.
Creation of a volume snapshot is triggered by the creation of a VolumeSnapshot API object.
The VolumeSnapshot object must specify the following source type:
persistentVolumeClaimName - The name of the PVC to snapshot. Please note that the source PVC, PV, and VolumeSnapshotClass for a VolumeSnapshot object must point to the same CSI driver.
The following VolumeSnapshot, for example, triggers the creation of a snapshot for a PVC called test-pvc using the VolumeSnapshotClass above.
apiVersion: snapshot.storage.k8s.io/v1beta1
kind: VolumeSnapshot
metadata:
name: test-snapshot
spec:
volumeSnapshotClassName: test-snapclass
source:
persistentVolumeClaimName: test-pvc
When volume snapshot creation is invoked, the common snapshot controller first creates a VolumeSnapshotContent object with the volumeSnapshotRef, source volumeHandle, volumeSnapshotClassName if specified, driver, and deletionPolicy.
The CSI external-snapshotter sidecar then passes the VolumeSnapshotClass parameters, the source volume ID, and any referenced secret(s) to the CSI driver (in this case testdriver.csi.k8s.io) via a CSI CreateSnapshot call. In response, the CSI driver creates a new snapshot for the specified volume, and returns the ID for that snapshot. The CSI external-snapshotter sidecar then updates the snapshotHandle, creationTime, restoreSize, and readyToUse in the status field of the VolumeSnapshotContent object that represents the new snapshot. For a storage system that needs to upload the snapshot after it has been cut, the CSI external-snapshotter sidecar will keep calling the CSI CreateSnapshot to check the status until upload is complete and set readyToUse to true.
The common snapshot controller binds the VolumeSnapshotContent object to the VolumeSnapshot (sets BoundVolumeSnapshotContentName), and updates the creationTime, restoreSize, and readyToUse in the status field of the VolumeSnapshot object based on the status field of the VolumeSnapshotContent object.
If no volumeSnapshotClassName is specified, one is automatically selected as follows:
The StorageClass from PVC or PV of the source volume is fetched. The default VolumeSnapshotClass is fetched, if available. A default VolumeSnapshotClass is a snapshot class created by the admin with the snapshot.storage.kubernetes.io/is-default-class annotation. If the Driver field of the default VolumeSnapshotClass is the same as the Provisioner field in the StorageClass, the default VolumeSnapshotClass is used. If there is no default VolumeSnapshotClass or more than one default VolumeSnapshotClass for a snapshot, an error will be returned.
Please note that the Kubernetes Snapshot API does not provide any consistency guarantees. You have to prepare your application (pause application, freeze filesystem etc.) before taking the snapshot for data consistency either manually or using some other higher level APIs/controllers.
You can verify that the VolumeSnapshot object is created and bound with VolumeSnapshotContent by running kubectl describe volumesnapshot:
Bound Volume Snapshot Content Name - field in the Status indicates the volume is bound to the specified VolumeSnapshotContent.
Ready To Use - field in the Status indicates this volume snapshot is ready for use.
Creation Time - field in the Status indicates when the snapshot was actually created (cut).
Restore Size - field in the Status indicates the minimum volume size required when restoring a volume from this snapshot.
Name: test-snapshot
Namespace: default
Labels: <none>
Annotations: <none>
API Version: snapshot.storage.k8s.io/v1beta1
Kind: VolumeSnapshot
Metadata:
Creation Timestamp: 2019-11-16T00:36:04Z
Finalizers:
snapshot.storage.kubernetes.io/volumesnapshot-as-source-protection
snapshot.storage.kubernetes.io/volumesnapshot-bound-protection
Generation: 1
Resource Version: 1294
Self Link: /apis/snapshot.storage.k8s.io/v1beta1/namespaces/default/volumesnapshots/new-snapshot-demo
UID: 32ceaa2a-3802-4edd-a808-58c4f1bd7869
Spec:
Source:
Persistent Volume Claim Name: test-pvc
Volume Snapshot Class Name: test-snapclass
Status:
Bound Volume Snapshot Content Name: snapcontent-32ceaa2a-3802-4edd-a808-58c4f1bd7869
Creation Time: 2019-11-16T00:36:04Z
Ready To Use: true
Restore Size: 1Gi
As a reminder to any developers building controllers using volume snapshot APIs: before using a VolumeSnapshot API object, validate the bi-directional binding between the VolumeSnpashot and the VolumeSnapshotContent it is bound to, to ensure the binding is complete and correct (not doing so may result in security issues).
kubectl describe volumesnapshotcontent
Name: snapcontent-32ceaa2a-3802-4edd-a808-58c4f1bd7869
Namespace:
Labels: <none>
Annotations: <none>
API Version: snapshot.storage.k8s.io/v1beta1
Kind: VolumeSnapshotContent
Metadata:
Creation Timestamp: 2019-11-16T00:36:04Z
Finalizers:
snapshot.storage.kubernetes.io/volumesnapshotcontent-bound-protection
Generation: 1
Resource Version: 1292
Self Link: /apis/snapshot.storage.k8s.io/v1beta1/volumesnapshotcontents/snapcontent-32ceaa2a-3802-4edd-a808-58c4f1bd7869
UID: 7dfdf22e-0b0c-4b71-9ddf-2f1612ca2aed
Spec:
Deletion Policy: Delete
Driver: testdriver.csi.k8s.io
Source:
Volume Handle: d1b34a5f-0808-11ea-808a-0242ac110003
Volume Snapshot Class Name: test-snapclass
Volume Snapshot Ref:
API Version: snapshot.storage.k8s.io/v1beta1
Kind: VolumeSnapshot
Name: test-snapshot
Namespace: default
Resource Version: 1286
UID: 32ceaa2a-3802-4edd-a808-58c4f1bd7869
Status:
Creation Time: 1573864564608810101
Ready To Use: true
Restore Size: 1073741824
Snapshot Handle: 127c5798-0809-11ea-808a-0242ac110003
Events: <none>
Importing an existing volume snapshot with Kubernetes
You can always expose a pre-existing volume snapshot in Kubernetes by manually creating a VolumeSnapshotContent object to represent the existing volume snapshot. Because VolumeSnapshotContent is a non-namespace API object, only a cluster admin may have the permission to create it. By specifying the volumeSnapshotRef the cluster admin specifies exactly which user can use the snapshot.
The following VolumeSnapshotContent, for example exposes a volume snapshot with the name 7bdd0de3-aaeb-11e8-9aae-0242ac110002 belonging to a CSI driver called testdriver.csi.k8s.io.
A VolumeSnapshotContent object should be created by a cluster admin with the following fields to represent an existing snapshot:
driver- CSI driver used to handle this volume. This field is required.source- Snapshot identifying informationsnapshotHandle- name/identifier of the snapshot. This field is required.volumeSnapshotRef- Pointer to the VolumeSnapshot object this content should bind to.nameandnamespace- Specifies the name and namespace of the VolumeSnapshot object which the content is bound to.deletionPolicy- Valid values areDeleteandRetain. If thedeletionPolicyisDelete, then the underlying storage snapshot will be deleted along with the VolumeSnapshotContent object. If the -deletionPolicyisRetain, then both the underlying snapshot and VolumeSnapshotContent remain.
apiVersion: snapshot.storage.k8s.io/v1beta1
kind: VolumeSnapshotContent
metadata:
name: manually-created-snapshot-content
spec:
deletionPolicy: Delete
driver: testdriver.csi.k8s.io
source:
snapshotHandle: 7bdd0de3-aaeb-11e8-9aae-0242ac110002
volumeSnapshotRef:
name: test-snapshot
namespace: default
Once a VolumeSnapshotContent object is created, a user can create a VolumeSnapshot object pointing to the VolumeSnapshotContent object. The name and namespace of the VolumeSnapshot object must match the name/namespace specified in the volumeSnapshotRef of the VolumeSnapshotContent. It specifies the following fields:
volumeSnapshotContentName - name of the volume snapshot content specified above. This field is required.
volumeSnapshotClassName - name of the volume snapshot class. This field is optional.
apiVersion: snapshot.storage.k8s.io/v1beta1
kind: VolumeSnapshot
metadata:
name: manually-created-snapshot
spec:
source:
volumeSnapshotContentName: test-content
Once both objects are created, the common snapshot controller verifies the binding between VolumeSnapshot and VolumeSnapshotContent objects is correct and marks the VolumeSnapshot as ready (if the CSI driver supports the ListSnapshots call, the controller also validates that the referenced snapshot exists). The CSI external-snapshotter sidecar checks if the snapshot exists if ListSnapshots CSI method is implemented, otherwise it assumes the snapshot exists. The external-snapshotter sidecar sets readyToUse to true in the status field of VolumeSnapshotContent. The common snapshot controller marks the snapshot as ready accordingly.
Create Volume From Snapshot
Once you have a bound and ready VolumeSnapshot object, you can use that object to provision a new volume that is pre-populated with data from the snapshot.
To provision a new volume pre-populated with data from a snapshot, use the dataSource field in the PersistentVolumeClaim. It has three parameters:
name - name of the VolumeSnapshot object representing the snapshot to use as source
kind - must be VolumeSnapshot
apiGroup - must be snapshot.storage.k8s.io
The namespace of the source VolumeSnapshot object is assumed to be the same as the namespace of the PersistentVolumeClaim object.
apiVersion: v1
kind: PersistentVolumeClaim
metadata:
name: pvc-restore
namespace: demo-namespace
spec:
storageClassName: testdriver.csi.k8s.io
dataSource:
name: manually-created-snapshot
kind: VolumeSnapshot
apiGroup: snapshot.storage.k8s.io
accessModes:
- ReadWriteOnce
resources:
requests:
storage: 1Gi
When the PersistentVolumeClaim object is created, it will trigger provisioning of a new volume that is pre-populated with data from the specified snapshot.
As a storage vendor, how do I add support for snapshots to my CSI driver?
To implement the snapshot feature, a CSI driver MUST add support for additional controller capabilities CREATE_DELETE_SNAPSHOT and LIST_SNAPSHOTS, and implement additional controller RPCs: CreateSnapshot, DeleteSnapshot, and ListSnapshots. For details, see the CSI spec and the Kubernetes-CSI Driver Developer Guide.
Although Kubernetes is as minimally prescriptive on the packaging and deployment of a CSI Volume Driver as possible, it provides a suggested mechanism for deploying an arbitrary containerized CSI driver on Kubernetes to simplify deployment of containerized CSI compatible volume drivers.
As part of this recommended deployment process, the Kubernetes team provides a number of sidecar (helper) containers, including the external-snapshotter sidecar container.
The external-snapshotter watches the Kubernetes API server for VolumeSnapshotContent object and triggers CreateSnapshot and DeleteSnapshot operations against a CSI endpoint. The CSI external-provisioner sidecar container has also been updated to support restoring volume from snapshot using the dataSource PVC field.
In order to support snapshot feature, it is recommended that storage vendors deploy the external-snapshotter sidecar containers in addition to the external provisioner, along with their CSI driver.
What are the limitations of beta?
The beta implementation of volume snapshots for Kubernetes has the following limitations:
- Does not support reverting an existing volume to an earlier state represented by a snapshot (beta only supports provisioning a new volume from a snapshot).
- No snapshot consistency guarantees beyond any guarantees provided by storage system (e.g. crash consistency). These are the responsibility of higher level APIs/controllers
What’s next?
Depending on feedback and adoption, the Kubernetes team plans to push the CSI Snapshot implementation to GA in either 1.18 or 1.19. Some of the features we are interested in supporting include consistency groups, application consistent snapshots, workload quiescing, in-place restores, volume backups, and more.
How can I learn more?
You can also have a look at the external-snapshotter source code repository.
Check out additional documentation on the snapshot feature here and here.
How do I get involved?
This project, like all of Kubernetes, is the result of hard work by many contributors from diverse backgrounds working together.
We offer a huge thank you to the contributors who stepped up these last few quarters to help the project reach Beta:
- Xing Yang (xing-yang)
- Xiangqian Yu (yuxiangqian)
- Jing Xu (jingxu97)
- Grant Griffiths (ggriffiths)
- Can Zhu (zhucan)
With special thanks to the following people for their insightful reviews and thorough consideration with the design:
- Michelle Au (msau42)
- Saad Ali (saadali)
- Patrick Ohly (pohly)
- Tim Hockin (thockin)
- Jordan Liggitt (liggitt).
Those interested in getting involved with the design and development of CSI or any part of the Kubernetes Storage system, join the Kubernetes Storage Special Interest Group (SIG). We’re rapidly growing and always welcome new contributors.
We also hold regular SIG-Storage Snapshot Working Group meetings. New attendees are welcome to join for design and development discussions.
Kubernetes 1.17 Feature: Kubernetes In-Tree to CSI Volume Migration Moves to Beta
The Kubernetes in-tree storage plugin to Container Storage Interface (CSI) migration infrastructure is now beta in Kubernetes v1.17. CSI migration was introduced as alpha in Kubernetes v1.14.
Kubernetes features are generally introduced as alpha and moved to beta (and eventually to stable/GA) over subsequent Kubernetes releases. This process allows Kubernetes developers to get feedback, discover and fix issues, iterate on the designs, and deliver high quality, production grade features.
Why are we migrating in-tree plugins to CSI?
Prior to CSI, Kubernetes provided a powerful volume plugin system. These volume plugins were “in-tree” meaning their code was part of the core Kubernetes code and shipped with the core Kubernetes binaries. However, adding support for new volume plugins to Kubernetes was challenging. Vendors that wanted to add support for their storage system to Kubernetes (or even fix a bug in an existing volume plugin) were forced to align with the Kubernetes release process. In addition, third-party storage code caused reliability and security issues in core Kubernetes binaries and the code was often difficult (and in some cases impossible) for Kubernetes maintainers to test and maintain. Using the Container Storage Interface in Kubernetes resolves these major issues.
As more CSI Drivers were created and became production ready, we wanted all Kubernetes users to reap the benefits of the CSI model. However, we did not want to force users into making workload/configuration changes by breaking the existing generally available storage APIs. The way forward was clear - we would have to replace the backend of the “in-tree plugin” APIs with CSI.
What is CSI migration?
The CSI migration effort enables the replacement of existing in-tree storage plugins such as kubernetes.io/gce-pd or kubernetes.io/aws-ebs with a corresponding CSI driver. If CSI Migration is working properly, Kubernetes end users shouldn’t notice a difference. After migration, Kubernetes users may continue to rely on all the functionality of in-tree storage plugins using the existing interface.
When a Kubernetes cluster administrator updates a cluster to enable CSI migration, existing stateful deployments and workloads continue to function as they always have; however, behind the scenes Kubernetes hands control of all storage management operations (previously targeting in-tree drivers) to CSI drivers.
The Kubernetes team has worked hard to ensure the stability of storage APIs and for the promise of a smooth upgrade experience. This involves meticulous accounting of all existing features and behaviors to ensure backwards compatibility and API stability. You can think of it like changing the wheels on a racecar while it’s speeding down the straightaway.
How to try out CSI migration for existing plugins?
If you are Kubernetes distributor that deploys in one of the environments listed below, now would be a good time to start testing the CSI migration and figuring out how to deploy/manage the appropriate CSI driver.
To try out CSI migration in beta for an existing plugin you must be using Kubernetes v1.17 or higher. First, you must update/create a Kubernetes cluster with the feature flags CSIMigration (on by default in 1.17) and CSIMigration{provider} (off by default) enabled on all Kubernetes components (master and node). Where {provider} is the in-tree cloud provider storage type that is used in your cluster. Please note that during a cluster upgrade you must drain each node (remove running workloads) before updating or changing configuration of your Kubelet. You may also see an optional CSIMigration{provider}Complete flag that you may enable if all of your nodes have CSI migration enabled.
You must also install the requisite CSI driver on your cluster - instructions for this can generally be found from you provider of choice. CSI migration is available for GCE Persistent Disk and AWS Elastic Block Store in beta as well as for Azure File/Disk and Openstack Cinder in alpha. Kubernetes distributors should look at automating the deployment and management (upgrade, downgrade, etc.) of the CSI Drivers they will depend on.
To verify the feature flag is enabled and driver installed on a particular node you can get the CSINode object. You should see the in-tree plugin name of the migrated plugin as well as your [installed] driver in the drivers list.
kubectl get csinodes -o yaml
- apiVersion: storage.k8s.io/v1
kind: CSINode
metadata:
annotations:
storage.alpha.kubernetes.io/migrated-plugins: kubernetes.io/gce-pd
name: test-node
...
spec:
drivers:
name: pd.csi.storage.gke.io
...
After the above set up is complete you can confirm that your cluster has functioning CSI migration by deploying a stateful workload using the legacy APIs.
apiVersion: v1
kind: PersistentVolumeClaim
metadata:
name: test-disk
spec:
storageClassName: standard
accessModes:
- ReadWriteOnce
resources:
requests:
storage: 10Gi
---
apiVersion: v1
kind: Pod
metadata:
name: web-server
spec:
containers:
- name: web-server
image: nginx
volumeMounts:
- mountPath: /var/lib/www/html
name: mypvc
volumes:
- name: mypvc
persistentVolumeClaim:
claimName: test-disk
Verify that the pod is RUNNING after some time
kubectl get pods web-server
NAME READY STATUS RESTARTS AGE
web-server 1/1 Running 0 39s
To confirm that the CSI driver is actually serving your requests it may be prudent to check the container logs of the CSI Driver after exercising the storage management operations. Note that your container logs may look different depending on the provider used.
kubectl logs {CSIdriverPodName} --container={CSIdriverContainerName}
/csi.v1.Controller/ControllerPublishVolume called with request: ...
Attaching disk ... to ...
ControllerPublishVolume succeeded for disk ... to instance ...
Current limitations
Although CSI migration is now beta there is one major limitation that prevents us from turning it on by default. Turning on migration still requires a cluster administrator to install a CSI driver before storage functionality is seamlessly handed over. We are currently working with SIG-CloudProvider to provide a frictionless experience of bundling the required CSI Drivers with cloud distributions.
What is the timeline/status?
The timeline for CSI migration is actually set by the cloud provider extraction project. It is part of the effort to remove all cloud provider code from Kubernetes. By migrating cloud storage plugins to external CSI drivers we are able to extract out all the cloud provider dependencies.
Although the overall feature is beta and not on by default, there is still work to be done on a per-plugin basis. Currently only GCE PD and AWS EBS have gone beta with Migration and yet both are still off by default since they depend on a manual installation of their respective CSI Drivers. Azure File/Disk, OpenStack, and VMWare plugins are currently in less mature states and non-cloud plugins such as NFS, Portworx, RBD etc are still in the planning stages.
The current and targeted releases for each individual cloud driver is shown in the table below:
| Driver | Alpha | Beta (in-tree deprecated) | GA | Target "in-tree plugin" removal |
|---|---|---|---|---|
| AWS EBS | 1.14 | 1.17 | 1.19 (Target) | 1.21 |
| GCE PD | 1.14 | 1.17 | 1.19 (Target) | 1.21 |
| OpenStack Cinder | 1.14 | 1.18 (Target) | 1.19 (Target) | 1.21 |
| Azure Disk + File | 1.15 | 1.18 (Target) | 1.19 (Target) | 1.21 |
| VSphere | 1.18 (Target) | 1.19 (Target) | 1.20 (Target) | 1.22 |
What's next?
Major upcoming work includes implementing and hardening CSI migration for the remaining in-tree plugins, installing CSI Drivers by default in distributions, turning on CSI migration by default, and finally removing all in-tree plugin code as a part of cloud provider extraction. We expect to complete this project including the full switch to “on-by-default” migration by Kubernetes v1.21.
What should I do as a user?
Note that all new features for the Kubernetes storage system (like volume snapshotting) will only be added to the CSI interface. Therefore, if you are starting up a new cluster, creating stateful applications for the first time, or require these new features we recommend using CSI drivers natively (instead of the in-tree volume plugin API). Follow the updated user guides for CSI drivers and use the new CSI APIs.
However, if you choose to roll a cluster forward or continue using specifications with the legacy volume APIs, CSI Migration will ensure we continue to support those deployments with the new CSI drivers.
How do I get involved?
The Kubernetes Slack channel csi-migration along with any of the standard SIG Storage communication channels are great mediums to reach out to the SIG Storage and migration working group teams.
This project, like all of Kubernetes, is the result of hard work by many contributors from diverse backgrounds working together. We offer a huge thank you to the contributors who stepped up these last quarters to help the project reach Beta:
- David Zhu
- Deep Debroy
- Cheng Pan
- Jan Šafránek
With special thanks to:
- Michelle Au
- Saad Ali
- Jonathan Basseri
- Fabio Bertinatto
- Ben Elder
- Andrew Sy Kim
- Hemant Kumar
For fruitful dialogues, insightful reviews, and thorough consideration of CSI migration in other features.
When you're in the release team, you're family: the Kubernetes 1.16 release interview
It is a pleasure to co-host the weekly Kubernetes Podcast from Google with Adam Glick. We get to talk to friends old and new from the community, as well as give people a download on the Cloud Native news every week.
It was also a pleasure to see Lachlan Evenson, the release team lead for Kubernetes 1.16, win the CNCF "Top Ambassador" award at KubeCon. We talked with Lachie when 1.16 was released, and as is becoming a tradition, we are delighted to share an abridged version of that interview with the readers of the Kubernetes Blog.
If you're paying attention to the release calendar, you'll see 1.17 is due out soon. Subscribe to our show in your favourite podcast player for another release interview!
CRAIG BOX: Lachie, I've been looking forward to chatting to you for some time. We first met at KubeCon Berlin in 2017 when you were with Deis. Let's start with a question on everyone's ears-- which part of England are you from?
LACHLAN EVENSON: The prison part! See, we didn't have a choice about going to Australia, but I'd like to say we got the upper hand in the long run. We got that beautiful country, so yes, from Australia, the southern part of England-- the southern tip.
CRAIG BOX: We did set that question up a little bit. I'm actually in Australia this week, and I'll let you know it's quite a nice place. I can't imagine why you would have left.
LACHLAN EVENSON: Yeah, it seems fitting that you're interviewing an Australian from Australia, and that Australian is in San Francisco.
CRAIG BOX: Oh, well, thank you very much for joining us and making it work. This is the third in our occasional series of release lead interviews. We talked to Josh and Tim from Red Hat and VMware, respectively, in episode 10, and we talked to Aaron from Google in episode 46. And we asked all three how their journey in cloud-native started. What was your start in cloud-native?
LACHLAN EVENSON: I remember back in early 2014, I was working for a company called Lithium Technologies. We'd been using containers for quite some time, and my boss at the time had put a challenge out to me-- go and find a way to orchestrate these containers, because they seem to be providing quite a bit of value to our developer velocity.
He gave me a week, and he said, go and check out both Mesos and Kubernetes. And at the end of that week, I had Kubernetes up and running, and I had workloads scheduled. I was a little bit more challenged on the Mesos side, but Kubernetes was there, and I had it up and running. And from there, I actually went and was offered to speak at the Kubernetes 1.0 launch in OSCOM in Portland in 2014, I believe.
CRAIG BOX: So, a real early adopter?
LACHLAN EVENSON: Really, really early. I remember, I think, I started in 0.8, before CrashLoopBackOff was a thing. I remember writing that thing myself.
[LAUGHING]
CRAIG BOX: You were contributing to the code at that point as well?
LACHLAN EVENSON: I was just a user. I was part of the community at that point, but from a user perspective. I showed up to things like the community meeting. I remember meeting Sarah Novotny in the very early years of the community meeting, and I spent some time in SIG Apps, so really looking at how people were putting workloads onto Kubernetes-- so going through that whole process.
It turned out we built some tools like Helm, before Helm existed, to facilitate rollout and putting applications onto Kubernetes. And then, once Helm existed, that's when I met the folks from Deis, and I said, hey, I think you want to get rid of this code that we've built internally and then go and use the open-source code that Helm provided.
So we got into the Helm ecosystem there, and I subsequently went and worked for Deis, specifically on professional services-- helping people out in the community with their Kubernetes journey. And that was when we actually met, Craig, back in Berlin. It seems, you know, I say container years are like dog years; it's 7:1.
CRAIG BOX: Right.
LACHLAN EVENSON: Seven years ago, we were about 50 years-- much younger.
CRAIG BOX: That sounds like the same ratio as kangaroos to people in Australia.
LACHLAN EVENSON: It's much the same arithmetic, yes.
ADAM GLICK: What was the most interesting implementation that you ran into at that time?
LACHLAN EVENSON: There wasn't a lot of the workload APIs. Back in 1.0, there wasn't even Deployments. There wasn't Ingress. Back in the day, there were a lot of people in those points trying to build those workload APIs on top of Kubernetes, but they didn't actually have any way to extend Kubernetes itself. There were no third-party resources. There were no operators, no custom resources.
A lot of people are actually trying to figure out how to interact with the Kubernetes API and deliver things like deployments, because you just had-- in those days, you didn't have replica sets. You had a ReplicationController that we called the RC, back in the day. You didn't have a lot of these things that we take for granted today. There wasn't RBAC. There wasn't a lot of the things that we have today.
So it's great to have seen and been a part of the Kubernetes community from 0.8 to 1.16, and actually leading that release. So I've seen a lot, and it's been a wonderful part of my adventures in open-source.
ADAM GLICK: You were also part of the Deis team that transitioned and became a part of the Microsoft team. What was that transition like, from small startup to joining a large player in the cloud and technology community?
LACHLAN EVENSON: It was fantastic. When we came on board with Microsoft, they didn't have a managed Kubernetes offering, and we were brought on to try and seed that. There was also a bigger part that we were actually building open-source tools to help people in the community integrate. We had the autonomy with-- Brendan Burns was on the team. We had Gabe Monroy. And we really had that top-down autonomy that was believing and placing a bet on open-source and helping us build tools and give us that autonomy to go and solve problems in open-source, along with contributing to things like Kubernetes.
I'm part of the upstream team from a PM perspective, and we have a bunch of engineers, a bunch of PMs that are actually working on these things in the Cloud Native Compute Foundation to help folks integrate their workloads into things like Kubernetes and build and aid their cloud-native journeys.
CRAIG BOX: There are a number of new tools, and specifications, and so on that are still coming out from Microsoft under the Deis brand. That must be exciting to you as one of the people who joined from Deis initially.
LACHLAN EVENSON: Yeah, absolutely. We really took that Deis brand-- it's now Deis Labs-- but we really wanted this a home to signal to the community that we were building things in the hope to put them out into foundation. You may see things like CNAB, Cloud Native Application Bundles. I know you've had both Ralph and Jeremy on the show before talking about CNAB, SMI - Service Mesh Interface, other tooling in the ecosystem where we want to signal to the community that we want to go give that to a foundation. We really want a neutral place to begin that nascent work, but then things, for example, Virtual Kubelet started there as well, and it went out into the Cloud Native Compute Foundation.
ADAM GLICK: Is there any consternation about the fact that Phippy has become the character people look to rather than the actual "Captain Kube" owl, in the family of donated characters?
LACHLAN EVENSON: Yes, so it's interesting because I didn't actually work on that project back at Deis, but the Deis folks, Karen Chu and Matt Butcher actually created "The Children's Guide to Kubernetes," which I thought was fantastic.
ADAM GLICK: Totally.
LACHLAN EVENSON: Because I could sit down and read it to my parents, as well, and tell them-- it wasn't for children. It was more for the adults in my life, I like to say. And so when I give out a copy of that book, I'm like, take it home and read it to mum. She might actually understand what you do by the end of that book.
But it was really a creative way, because this was back in that nascent Kubernetes where people were trying to get their head around those concepts-- what is a pod? What is a secret? What is a namespace? Having that vehicle of a fun set of characters--
ADAM GLICK: Yep.
LACHLAN EVENSON: And Phippy is a PHP app. Remember them? So yeah, it's totally in line with the things that we're seeing people want to containerize and put onto Kubernetes at that. But Phippy is still cute. I was questioned last week about Captain Kube, as well, on the release logo, so we could talk about that a little bit more. But there's a swag of characters in there that are quite cute and illustrate the fun concept behind the Kubernetes community.
CRAIG BOX: 1.16 has just been released. You were the release team lead for that-- congratulations.
LACHLAN EVENSON: Thank you very much. It was a pleasure to serve the community.
CRAIG BOX: What are the headline announcements in Kubernetes 1.16?
LACHLAN EVENSON: Well, I think there are a few. Custom Resources hit GA. Now, that is a big milestone for extensibility and Kubernetes. I know we've spoken about them for some time-- custom resources were introduced in 1.7, and we've been trying to work through that ecosystem to bring the API up to a GA standard. So it hit GA, and I think a lot of the features that went in as part of the GA release will help people in the community that are writing operators.
There's a lot of lifecycle management, a lot of tooling that you can put into the APIs themselves. Doing strict dependency checks-- you can do typing, you can do validation, you can do pruning superfluous fields, and allowing for that ecosystem of operators and extensibility in the community to exist on top of Kubernetes.
It's been a long road to get to GA for Custom Resources, but it's great now that they're here and people can really bank on that being an API they can use to extend Kubernetes. So I'd say that's a large headline feature. The metrics overhaul, as well-- I know this was on the release blog.
The metrics team have actually tried to standardize the metrics in Kubernetes and put them through the same paces as all other enhancements that go into Kubernetes. So they're really trying to put through, what are the criteria? How do we make them standard? How do we test them? How to make sure that they're extensible? So it was great to see that team actually step up and create stable metrics that everybody can build and stack on.
Finally, there were some other additions to CSI, as well. Volume resizing was added. This is a maturity story around the Container Storage Interface, which was introduced several releases ago in GA. But really, you've seen volume providers actually build on that interface and that interface get a little bit more broader to adopt things like "I want to resize dynamically at runtime on my storage volume". That's a great story as well, for those providers out there.
I think they're the big headline features for 1.16, but there are a slew. There were 31 enhancements that went into Kubernetes 1.16. And I know there have been questions out there in the community saying, well, how do we decide what's stable? Eight of those were stable, eight of those were beta, and the rest of those features, the 15 remaining, were actually in alpha. There were quite a few things that went from alpha into beta and beta into stable, so I think that's a good progression for the release, as well.
ADAM GLICK: As you've looked at all these, which of them is your personal favorite?
LACHLAN EVENSON: I probably have two. One is a little bit biased, but I personally worked on, with the dual-stack team in the community. Dual-stack is the ability to give IPv4 and IPv6 addresses to both pods and services. And I think where this is interesting in the community is Kubernetes is becoming a runtime that is going to new spaces. Think IoT, think edge, think cloud edge.
When you're pushing Kubernetes into these new operational environments, things like addressing may become a problem, where you might want to run thousands and thousands of pods which all need IP addresses. So, having that same crossover point where I can have v4 and v6 at the same time, get comfortable with v6, I think Kubernetes may be an accelerator to v6 adoption through things like IoT workloads on top of Kubernetes.
The other one is Endpoint Slices. Endpoint slices is about scaling. As you may know, services have endpoints attached to them, and endpoints are all the pod IPs that actually match that label selector on a service. Now, when you have large clusters, you can imagine the number of pod IPs being attached to that service growing to tens of thousands. And when you update that, everything that actually watches those service endpoints needs to get an update, which is the delta change over time, which gets rather large as things are being attached, added, and removed, as is the dynamic nature of Kubernetes.
But what endpoint slices makes available is you can actually slice those endpoints up into groups of 100 and then only update the ones that you really need to worry about, which means as a scaling factor, we don't need to update everybody listening into tens of thousands of updates. We only need to update a subsection. So I'd say they're my two highlights, yeah.
CRAIG BOX: Are there any early stage or alpha features that you're excited to see where they go personally?
LACHLAN EVENSON: Personally, ephemeral containers. The tooling that you have available at runtime in a pod is dependent on the constituents or the containers that are part of that pod. And what we've seen in containers being built by scratch and tools like distroless from the folks out of Google, where you can build scratch containers that don't actually have any tooling inside them but just the raw compiled binaries, if you want to go in and debug that at runtime, it's incredibly difficult to insert something in.
And this is where ephemeral containers come in. I can actually insert a container into a running pod-- and let's just call that a debug container-- that has all my slew of tools that I need to debug that running workload, and I can insert that into a pod at runtime. So I think ephemeral containers is a really interesting feature that's been included in 1.16 in alpha, which allows a greater debugging story for the Kubernetes community.
ADAM GLICK: What feature that slipped do you wish would have made it into the release?
LACHLAN EVENSON: The feature that slipped that I was a little disappointed about was sidecar containers.
ADAM GLICK: Right.
LACHLAN EVENSON: In the world of service meshes, you may want to order the start of some containers, and it's very specific to things like service meshes in the case of the data plane. I need the Envoy sidecar to start before everything else so that it can wire up the networking.
The inverse is true as well. I need it to stop last. Sidecar containers gave you that ordered start. And what we see a lot of people doing in the ecosystem is just laying down one sidecar per node as a DaemonSet, and they want that to start before all the other pods on the machine. Or if it's inside the pod, or the context of one pod, they want to say that sidecar needs to stop before all the other containers in a pod. So giving you that ordered guarantee, I think, is really interesting and is really hot, especially given the service mesh ecosystem heating up.
CRAIG BOX: This release deprecates a few beta API groups, for things like ReplicaSets and Deployments. That will break deployment for the group of people who have just taken example code off the web and don't really understand it. The GA version of these APIs were released in 1.9, so it's obviously a long time ago. There's been a lot of preparation going into this. But what considerations and concerns have we had about the fact that these are now being deprecated in this particular release?
LACHLAN EVENSON: Let me start by saying that this is the first release that we've had a big API deprecation, so the proof is going to be in the pudding. And we do have an API deprecation policy. So as you mentioned, Craig, the apps/v1 group has been around since 1.9. If you go and read the API deprecation policy, you can see that we have a three-release announcement. Around the 1.12, 1.13 time frame, we actually went and announced this deprecation, and over the last few releases, we've been reiterating that.
But really, what we want to do is get the whole community on those stable APIs because it really starts to become a problem when we're supporting all these many now-deprecated APIs, and people are building tooling around them and trying to build reliable tooling. So this is the first test for us to move people, and I'm sure it will break a lot of tools that depend on things. But I think in the long run, once we get onto those stable APIs, people can actually guarantee that their tools work, and it's going to become easier in the long run.
So we've put quite a bit of work in announcing this. There was a blog sent out about six months ago by Valerie Lancey in the Kubernetes community which said, hey, go use 'kubectl convert', where you can actually say, I want to convert this resource from this API version to that API version, and it actually makes that really easy. But I think there'll be some problems in the ecosystem, but we need to do this going forward, pruning out the old APIs and making sure that people are on the stable ones.
ADAM GLICK: Congratulations on the release of 1.16. Obviously, that's a big thing. It must have been a lot of work for you. Can you talk a little bit about what went into leading this release?
LACHLAN EVENSON: The job of the release lead is to oversee throughout the process of the release and make sure that the release gets out the door on a specific schedule. So really, what that is is wrangling a lot of different resources and a lot of different people in the community, and making sure that they show up and do the things that they are committed to as part of their duties as either SIG chairs or other roles in the community, and making sure that enhancements are in the right state, and code shows up at the right time, and that things are looking green.
A lot of it is just making sure you know who to contact and how to contact them, and ask them to actually show up. But when I was asked at the end of the 1.15 release cycle if I would lead, you have to consider how much time it's going to take and the scheduling, where hours a week are dedicated to making sure that this release actually hits the shelves on time and is of a certain quality. So there is lots of pieces to that.
ADAM GLICK: Had you been on the path through the shadow program for release management?
LACHLAN EVENSON: Yeah, I had. I actually joined the shadow program-- so the shadow program for the release team. The Kubernetes release team is tasked with staffing a specific release, and I came in the 1.14 release under the lead of Aaron Crickenberger. And I was an enhancement shadow at that point. I was really interested in how KEPs worked, so the Kubernetes Enhancement Proposal work. I wanted to make sure that I understood that part of the release team, and I came in and helped in that release.
And then, in 1.15, I was asked if I could be a lead shadow. And the lead shadow is to stand alongside the lead and help the lead fill their duties. So if they're out, if they need people to wrangle different parts of the community, I would go out and do that. I've served on three releases at this point-- 1.14, 1.15, and 1.16.
CRAIG BOX: Thank you for your service.
LACHLAN EVENSON: Absolutely, it's my pleasure.
ADAM GLICK: Release lead emeritus is the next role for you, I assume?
LACHLAN EVENSON: [LAUGHS] Yes. We also have a new role on the release lead team called Emeritus Advisors, which are actually to go back and help answer the questions of, why was this decision made? How can we do better? What was this like in the previous release? So we do have that continuity, and in 1.17, we have the old release lead from 1.15. Claire Lawrence is coming back to fill in as emeritus advisor. So that is something we do take.
And I think for the shadow program in general, the release team is a really good example of how you can actually build continuity across releases in an open-source fashion. We actually have a session at KubeCon San Diego on how that shadowing program works. But it's really to get people excited about how we can do mentoring in open-source communities and make sure that the project goes on after all of us have rolled on and off the team.
ADAM GLICK: Speaking of the team, there were 32 people involved, including yourself, in this release. What is it like to coordinate that group? That sounds like a full time job.
LACHLAN EVENSON: It is a full time job. And let me say that this release team in 1.16 represented five different continents. We can count Antarctica as not having anybody, but we didn't have anybody from South America for that release, which was unfortunate. But we had people from Australia, China, India, Tanzania. We have a good spread-- Europe, North America. It's great to have that spread and that continuity, which allowed for us to get things done throughout the day.
CRAIG BOX: Until you want to schedule a meeting.
LACHLAN EVENSON: Scheduling a meeting was extremely difficult. Typically, on the release team, we run one Europe, Western Europe, and North American-friendly meeting, and then we ask the team if they would like to hold another meeting. Now, in the case of 1.16, they didn't want to hold another meeting. We actually put it out to survey. But in previous releases, we held an EU in the morning so that people in India, as well, or maybe even late-night in China, could be involved.
ADAM GLICK: Any interesting facts about the team, besides the incredible geographic diversity that you had, to work around that?
LACHLAN EVENSON: I really appreciate about the release team that we're from all different backgrounds, from all different parts of the world and all different companies. There are people who are doing this on their own time, There are people who are doing this on company time, but we all come together with that shared common goal of shipping that release.
This release was we had the five continents. It was really exciting in 1.17 that we have in the lead roles, it was represented mainly by women. So 1.17, watch out-- most of the leads for 1.17 are women, which is a great result, and that's through that shadow program that we can foster different types of talent. I'm excited to see future releases benefiting from different diverse groups of people from the Kubernetes community.
CRAIG BOX: What are you going to put in the proverbial envelope for the 1.17 team?
LACHLAN EVENSON: We've had this theme of a lot of roles in the release team being cut and dry, right? We have these release handbooks, so for each of the members of the team, they're cut into different roles. There's seven different roles on the team. There's the lead. There's the CI signal role. There's bug triage. There's comms. There's docs. And there's release notes. And there's also the release branch managers who actually cut the code and make sure that they have shipped and it ends up in all the repositories.
What we did in the previous 1.15, we actually had a role call the test-infra role. And thanks to the wonderful work of the folks of the test-infra team out of Google-- Katharine Berry, and Ben Elder, and other folks-- they actually automated this role completely that we could get rid of it in the 1.16 release and still have our same-- and be able to get a release out the door.
I think a lot of these things are ripe for automation, and therefore, we can have a lot less of a footprint going forward. Let's automate the bits of the process that we can and actually refine the process to make sure that the people that are involved are not doing the repetitive tasks over and over again. In the era of enhancements, we could streamline that process. CI signal and bug triage, there are places we could actually go in and automate that as well. I think one place that's been done really well in 1.16 was in the release notes.
I don't know if you've seen relnotes.k8s.io, but you can go and check out the release notes and now, basically, annotated PRs show up as release notes that are searchable and sortable, all through an automated means, whereas that was previously some YAML jockeying to make sure that that would actually happen and be digestible to the users.
CRAIG BOX: Come on, Lachie, all Kubernetes is just YAML jockeying.
[LAUGHING]
LACHLAN EVENSON: Yeah, but it's great to have an outcome where we can actually make that searchable and get people out of the mundaneness of things like, let's make sure we're copying and pasting YAML from left to right.
ADAM GLICK: After the release, you had a retrospective meeting. What was the takeaway from that meeting?
LACHLAN EVENSON: At the end of each release, we do have a retrospective. It's during the community meeting. That retrospective, it was good. I was just really excited to see that there were so many positives. It's a typical retrospective where we go, what did we say we were going to do last release? Did we do that? What was great? What can we do better? And some actions out of that.
It was great to see people giving other people on the team so many compliments. It was really, really deep and rich, saying, thank you for doing this, thank you for doing that. People showed up and pulled their weight in the release team, and other people were acknowledging that. That was great.
I think one thing we want to do is-- we have a code freeze as part of the release process, which is where we make sure that code basically stops going into master in Kubernetes. Only things destined for the release can actually be put in there. But we don't actually stop the test infrastructure from changing, so the test infrastructure has a lifecycle of its own.
One of the things that was proposed was that we actually code freeze the test infrastructure as well, to make sure that we're not actually looking at changes in the test-infra causing jobs to fail while we're trying to stabilize the code. I think that's something we have some high level agreement about, but getting down into the low-level nitty-gritty would be great in 1.17 and beyond.
ADAM GLICK: We talked about sidecar containers slipping out of this release. Most of the features are on a release train, and are put in when they're ready. What does it mean for the process of managing a release when those things happen?
LACHLAN EVENSON: Basically, we have an enhancements freeze, and that says that enhancements-- so the KEPs that are backing these enhancements-- so the sidecar containers would have had an enhancement proposal. And the SIG that owns that code would then need to sign off and say that this is in a state called "implementable." When we've agreed on the high-level details, you can go and proceed and implement that.
Now, that had actually happened in the case of sidecar containers. The challenge was you still need to write the code and get the code actually implemented, and there's a month gap between enhancement freeze and code freeze. If the code doesn't show up, or the code shows up and needs to be reviewed a little bit more, you may miss that deadline.
I think that's what happened in the case of this specific feature. It went all the way through to code freeze, the code wasn't complete at that time, and we basically had to make a call-- do we want to grant it an exception? In this case, they didn't ask for an exception. They said, let's just move it to 1.17.
There's still a lot of people and SIGs show up at the start of a new release and put forward the whole release of all the things they want to ship, and obviously, throughout the release, a lot of those things get plucked off. I think we started with something like 60 enhancements, and then what we got out the door was 31. They either fall off as part of the enhancement freeze or as part of the code freeze, and that is absolutely typical of any release.
ADAM GLICK: Do you think that a three-month wait is acceptable for something that might have had a one- or two-week slip, or would you like to see enhancements be able to be released in point releases between the three-month releases?
LACHLAN EVENSON: Yeah, there's back and forth about this in the community, about how can we actually roll things at different cadences, I think, is the high-level question. Tim Hockin actually put out, how about we do stability cycles as well? Because there are a lot of new features going in, and there are a lot of stability features going in. But if you look at it, half of the features were beta or stable, and the other half were alpha, which means we're still introducing a lot more complexity and largely untested code into alpha state-- which, as much as we wouldn't like to admit, it does affect the stability of the system.
There's talk of LTS. There's talk of stability releases as well. I think they're all things that are interesting now that Kubernetes has that momentum, and you are seeing a lot of things go to GA. People are like, "I don't need to be drinking from the firehose as fast. I have CRDs in GA. I have all these other things in GA. Do I actually need to consume this at the rate?" So I think-- stay tuned. If you're interested in those discussions, the upstream community is having those. Show up there and voice your opinion.
CRAIG BOX: Is this the first release with its own release mascot?
LACHLAN EVENSON: I think that release mascot goes back to-- I would like to say 1.11? If you go back to 1.11, you can actually see the different mascots. I remember 1.11 being "The Hobbit." So it's the Hobbiton front door of Bilbo Baggins with the Kubernetes Helm on the front of it, and that was called 11ty-one--
CRAIG BOX: Uh-huh.
LACHLAN EVENSON: A long-expected release. So they go through from each release, and you can actually go check them out on the SIG release repository upstream.
CRAIG BOX: I do think this is the first time that's managed to make it into a blog post, though.
LACHLAN EVENSON: I do think it is the case. I wanted to have a little bit of fun with the release team, so typically you will see the release teams have a t-shirt. I have, from 1.14, the Caternetes, which Aaron designed, which has a bunch of cats kind of trying to look at a Kubernetes logo.
CRAIG BOX: We had a fun conversation with Aaron about his love of cats.
LACHLAN EVENSON: [LAUGHS] And it becomes a token of, hey, remember this hard work that you put together? It becomes a badge of honor for everybody that participated in the release. I wanted to highlight it as a release mascot. I don't think a lot of people knew that we did have those across the last few releases. But it's just a bit of fun, and I wanted to put my own spin on things just so that the team could come together. A lot of it was around the laughs that we had as a team throughout this release-- and my love of Olive Garden.
CRAIG BOX: Your love of Olive Garden feels like it may have become a meme to a community which might need a little explanation for our audience. For those who are not familiar with American fine dining, can we start with-- what exactly is Olive Garden?
LACHLAN EVENSON: Olive Garden is the finest Italian dining experience you will have in the continental United States. I see everybody's faces saying, is he sure about that? I'm sure.
CRAIG BOX: That might require a slight justification on behalf of some of our Italian-American listeners.
ADAM GLICK: Is it the unlimited breadsticks and salad that really does it for you, or is the plastic boat that it comes in?
LACHLAN EVENSON: I think it's a combination of all three things. You know, the tour of Italy, you can't go past. The free breadsticks are fantastic. But Olive Garden just represents the large chain restaurant and that kind of childhood I had growing up and thinking about these large-scale chain restaurants. You don't get to choose your meme. And the legacy-- I would have liked to have had a different mascot.
But I just had a run with the meme of Olive Garden. And this came about, I would like to say, about three or four months ago. Paris Pittman from Google, who is another member of the Kubernetes community, kind of put out there, what's your favorite sit-down large-scale restaurant? And of course, I pitched in very early and said, it's got to be the Olive Garden.
And then everybody kind of jumped onto that. And my inbox is full of free Olive Garden gift certificates now, and it's taken on a life of its own. And at this point, I'm just embracing it-- so much so that we might even have the 1.16 release party at an Olive Garden in San Diego, if it can accommodate 10,000 people.
ADAM GLICK: When you're there, are you family?
LACHLAN EVENSON: Yes. Absolutely, absolutely. And I would have loved to put that. I think the release name was "unlimited breadsticks for all." I would have liked to have done, "When you're here, you're family," but that is, sadly, trademarked.
ADAM GLICK: Aww. What's next for you in the community?
LACHLAN EVENSON: I've really been looking at Cluster API a lot-- so building Kubernetes clusters on top of a declarative approach. I've been taking a look at what we can do in the Cluster API ecosystem. I'm also a chair of SIG PM, so helping foster the KEP process as well-- making sure that that continues to happen and continues to be fruitful for the community.
Lachlan Evenson is a Principal Program Manager at Microsoft and an Australian living in the US, and most recently served as the Kubernetes 1.16 release team lead.
You can find the Kubernetes Podcast from Google at @kubernetespod on Twitter, and you can subscribe so you never miss an episode.
Gardener Project Update
Last year, we introduced Gardener in the Kubernetes Community Meeting and in a post on the Kubernetes Blog. At SAP, we have been running Gardener for more than two years, and are successfully managing thousands of conformant clusters in various versions on all major hyperscalers as well as in numerous infrastructures and private clouds that typically join an enterprise via acquisitions.
We are often asked why a handful of dynamically scalable clusters would not suffice. We also started our journey into Kubernetes with a similar mindset. But we realized that applying the architecture and principles of Kubernetes to productive scenarios, our internal and external customers very quickly required the rational separation of concerns and ownership, which in most circumstances led to the use of multiple clusters. Therefore, a scalable and managed Kubernetes as a service solution is often also the basis for adoption. Particularly, when a larger organization runs multiple products on different providers and in different regions, the number of clusters will quickly rise to the hundreds or even thousands.
Today, we want to give an update on what we have implemented in the past year regarding extensibility and customizability, and what we plan to work on for our next milestone.
Short Recap: What Is Gardener?
Gardener's main principle is to leverage Kubernetes primitives for all of its
operations, commonly described as inception or kubeception. The feedback from
the community was that initially our architecture
diagram looks
"overwhelming", but after some little digging into the material, everything we
do is the "Kubernetes way". One can re-use all learnings with respect to APIs,
control loops, etc.
The essential idea is that so-called seed clusters are used to host the
control planes of end-user clusters (botanically named shoots).
Gardener provides vanilla Kubernetes clusters as a service independent of the
underlying infrastructure provider in a homogenous way, utilizing the upstream
provided k8s.gcr.io/* images as open distribution (update: k8s.gcr.io has been deprecated in favor of registry.k8s.io). The project is built
entirely on top of Kubernetes extension concepts, and as such adds a custom API
server, a controller-manager, and a scheduler to create and manage the lifecycle
of Kubernetes clusters. It extends the Kubernetes API with custom resources,
most prominently the Gardener cluster specification (Shoot resource), that can
be used to "order" a Kubernetes cluster in a declarative way (for day-1, but
also reconcile all management activities for day-2).
By leveraging Kubernetes as base infrastructure, we were able to devise a combined Horizontal and Vertical Pod Autoscaler (HVPA) that, when configured with custom heuristics, scales all control plane components up/down or out/in automatically. This enables a fast scale-out, even beyond the capacity of typically some fixed number of master nodes. This architectural feature is one of the main differences compared to many other Kubernetes cluster provisioning tools. But in our production, Gardener does not only effectively reduce the total costs of ownership by bin-packing control planes. It also simplifies implementation of "day-2 operations" (like cluster updates or robustness qualities). Again, essentially by relying on all the mature Kubernetes features and capabilities.
The newly introduced extension concepts for Gardener now enable providers to only maintain their specific extension without the necessity to develop inside the core source tree.
Extensibility
As result of its growth over the past years, the Kubernetes code base contained a numerous amount of provider-specific code that is now being externalized from its core source tree. The same has happened with Project Gardener: over time, lots of specifics for cloud providers, operating systems, network plugins, etc. have been accumulated. Generally, this leads to a significant increase of efforts when it comes to maintainability, testability, or to new releases. Our community member Packet contributed Gardener support for their infrastructure in-tree, and suffered from the mentioned downsides.
Consequently, similar to how the Kubernetes community decided to move their cloud-controller-managers out-of-tree, or volumes plugins to CSI, etc., the Gardener community proposed and implemented likewise extension concepts. The Gardener core source-tree is now devoid of any provider specifics, allowing vendors to solely focus on their infrastructure specifics, and enabling core contributors becoming more agile again.
Typically, setting up a cluster requires a flow of interdependent steps, beginning with the generation of certificates and preparation of the infrastructure, continuing with the provisioning of the control plane and the worker nodes, and ending with the deployment of system components. We would like to emphasize here that all these steps are necessary (cf. Kubernetes the Hard Way) and all Kubernetes cluster creation tools implement the same steps (automated to some degree) in one way or another.
The general idea of Gardener's extensibility concept was to make this flow more generic and to carve out custom resources for each step which can serve as ideal extension points.
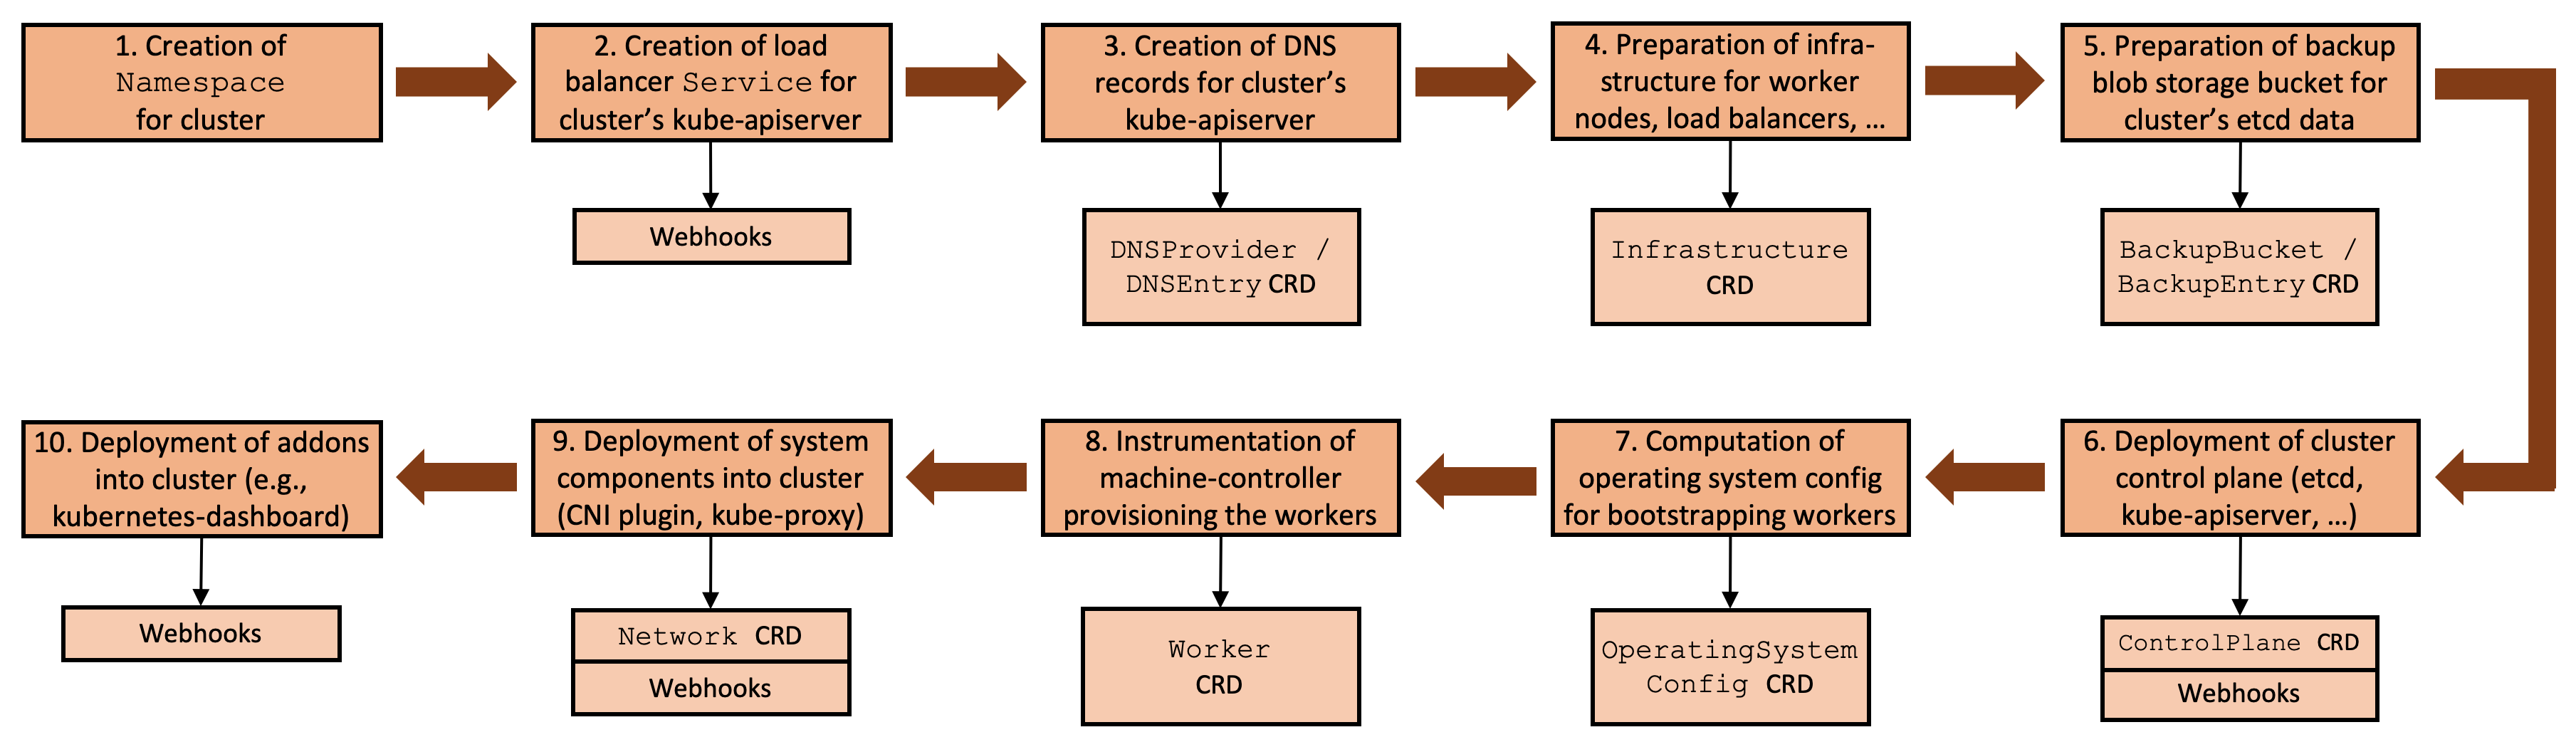
Figure 1 Cluster reconciliation flow with extension points.
With Gardener's flow framework we implicitly have a reproducible state machine for all infrastructures and all possible states of a cluster.
The Gardener extensibility approach defines custom resources that serve as ideal extension points for the following categories:
- DNS providers (e.g., Route53, CloudDNS, ...),
- Blob storage providers (e.g., S3, GCS, ABS,...),
- Infrastructure providers (e.g., AWS, GCP, Azure, ...),
- Operating systems (e.g., CoreOS Container Linux, Ubuntu, FlatCar Linux, ...),
- Network plugins (e.g., Calico, Flannel, Cilium, ...),
- Non-essential extensions (e.g., Let's Encrypt certificate service).
Extension Points
Besides leveraging custom resource definitions, we also effectively use mutating
/ validating webhooks in the seed clusters. Extension controllers themselves run
in these clusters and react on CRDs and workload resources (like Deployment,
StatefulSet, etc.) they are responsible for. Similar to the Cluster
API's approach, these CRDs may also contain
provider specific information.
The steps 2. - 10. [cf. Figure 1] involve infrastructure specific meta data
referring to infrastructure specific implementations, e.g. for DNS records there
might be aws-route53, google-clouddns, or for isolated networks even
openstack-designate, and many more. We are going to examine the steps 4 and 6
in the next paragraphs as examples for the general concepts (based on the
implementation for AWS). If you're interested you can read up the fully
documented API contract in our extensibility
documents.
Example: Infrastructure CRD
Kubernetes clusters on AWS require a certain infrastructure preparation before
they can be used. This includes, for example, the creation of a VPC, subnets,
etc. The purpose of the Infrastructure CRD is to trigger this preparation:
apiVersion: extensions.gardener.cloud/v1alpha1
kind: Infrastructure
metadata:
name: infrastructure
namespace: shoot--foobar--aws
spec:
type: aws
region: eu-west-1
secretRef:
name: cloudprovider
namespace: shoot--foobar—aws
sshPublicKey: c3NoLXJzYSBBQUFBQ...
providerConfig:
apiVersion: aws.provider.extensions.gardener.cloud/v1alpha1
kind: InfrastructureConfig
networks:
vpc:
cidr: 10.250.0.0/16
zones:
- name: eu-west-1a
internal: 10.250.112.0/22
public: 10.250.96.0/22
workers: 10.250.0.0/19
Based on the Shoot resource, Gardener creates this Infrastructure resource
as part of its reconciliation flow. The AWS-specific providerConfig is part of
the end-user's configuration in the Shoot resource and not evaluated by
Gardener but just passed to the extension controller in the seed cluster.
In its current implementation, the AWS extension creates a new VPC and three
subnets in the eu-west-1a zones. Also, it creates a NAT and an internet
gateway, elastic IPs, routing tables, security groups, IAM roles, instances
profiles, and an EC2 key pair.
After it has completed its tasks it will report the status and some provider-specific output:
apiVersion: extensions.gardener.cloud/v1alpha1
kind: Infrastructure
metadata:
name: infrastructure
namespace: shoot--foobar--aws
spec: ...
status:
lastOperation:
type: Reconcile
state: Succeeded
providerStatus:
apiVersion: aws.provider.extensions.gardener.cloud/v1alpha1
kind: InfrastructureStatus
ec2:
keyName: shoot--foobar--aws-ssh-publickey
iam:
instanceProfiles:
- name: shoot--foobar--aws-nodes
purpose: nodes
roles:
- arn: "arn:aws:iam::<accountID>:role/shoot..."
purpose: nodes
vpc:
id: vpc-0815
securityGroups:
- id: sg-0246
purpose: nodes
subnets:
- id: subnet-1234
purpose: nodes
zone: eu-west-1b
- id: subnet-5678
purpose: public
zone: eu-west-1b
The information inside the providerStatus can be used in subsequent steps,
e.g. to configure the cloud-controller-manager or to instrument the
machine-controller-manager.
Example: Deployment of the Cluster Control Plane
One of the major features of Gardener is the homogeneity of the clusters it
manages across different infrastructures. Consequently, it is still in charge of
deploying the provider-independent control plane components into the seed
cluster (like etcd, kube-apiserver). The deployment of provider-specific control
plane components like cloud-controller-manager or CSI controllers is triggered
by a dedicated ControlPlane CRD. In this paragraph, however, we want to focus
on the customization of the standard components.
Let's focus on both the kube-apiserver and the kube-controller-manager
Deployments. Our AWS extension for Gardener is not yet using CSI but relying
on the in-tree EBS volume plugin. Hence, it needs to enable the
PersistentVolumeLabel admission plugin and to provide the cloud provider
config to the kube-apiserver. Similarly, the kube-controller-manager will be
instructed to use its in-tree volume plugin.
The kube-apiserver Deployment incorporates the kube-apiserver container and
is deployed by Gardener like this:
containers:
- command:
- /hyperkube
- apiserver
- --enable-admission-plugins=Priority,...,NamespaceLifecycle
- --allow-privileged=true
- --anonymous-auth=false
...
Using a MutatingWebhookConfiguration the AWS extension injects the mentioned
flags and modifies the spec as follows:
containers:
- command:
- /hyperkube
- apiserver
- --enable-admission-plugins=Priority,...,NamespaceLifecycle,PersistentVolumeLabel
- --allow-privileged=true
- --anonymous-auth=false
...
- --cloud-provider=aws
- --cloud-config=/etc/kubernetes/cloudprovider/cloudprovider.conf
- --endpoint-reconciler-type=none
...
volumeMounts:
- mountPath: /etc/kubernetes/cloudprovider
name: cloud-provider-config
volumes:
- configMap:
defaultMode: 420
name: cloud-provider-config
name: cloud-provider-config
The kube-controller-manager Deployment is handled in a similar way.
Webhooks in the seed cluster can be used to mutate anything related to the shoot cluster control plane deployed by Gardener or any other extension. There is a similar webhook concept for resources in shoot clusters in case extension controllers need to customize system components deployed by Gardener.
Registration of Extension Controllers
The Gardener API uses two special resources to register and install extensions.
The registration itself is declared via the ControllerRegistration resource.
The easiest option is to define the Helm chart as well as some values to render
the chart, however, any other deployment mechanism is supported via custom code
as well.
Gardener determines whether an extension controller is required in a specific
seed cluster, and creates a ControllerInstallation that is used to trigger the
deployment.
To date, every registered extension controller is deployed to every seed cluster which is not necessary in general. In the future, Gardener will become more selective to only deploy those extensions required on the specific seed clusters.
Our dynamic registration approach allows to add or remove extensions in the running system - without the necessity to rebuild or restart any component.
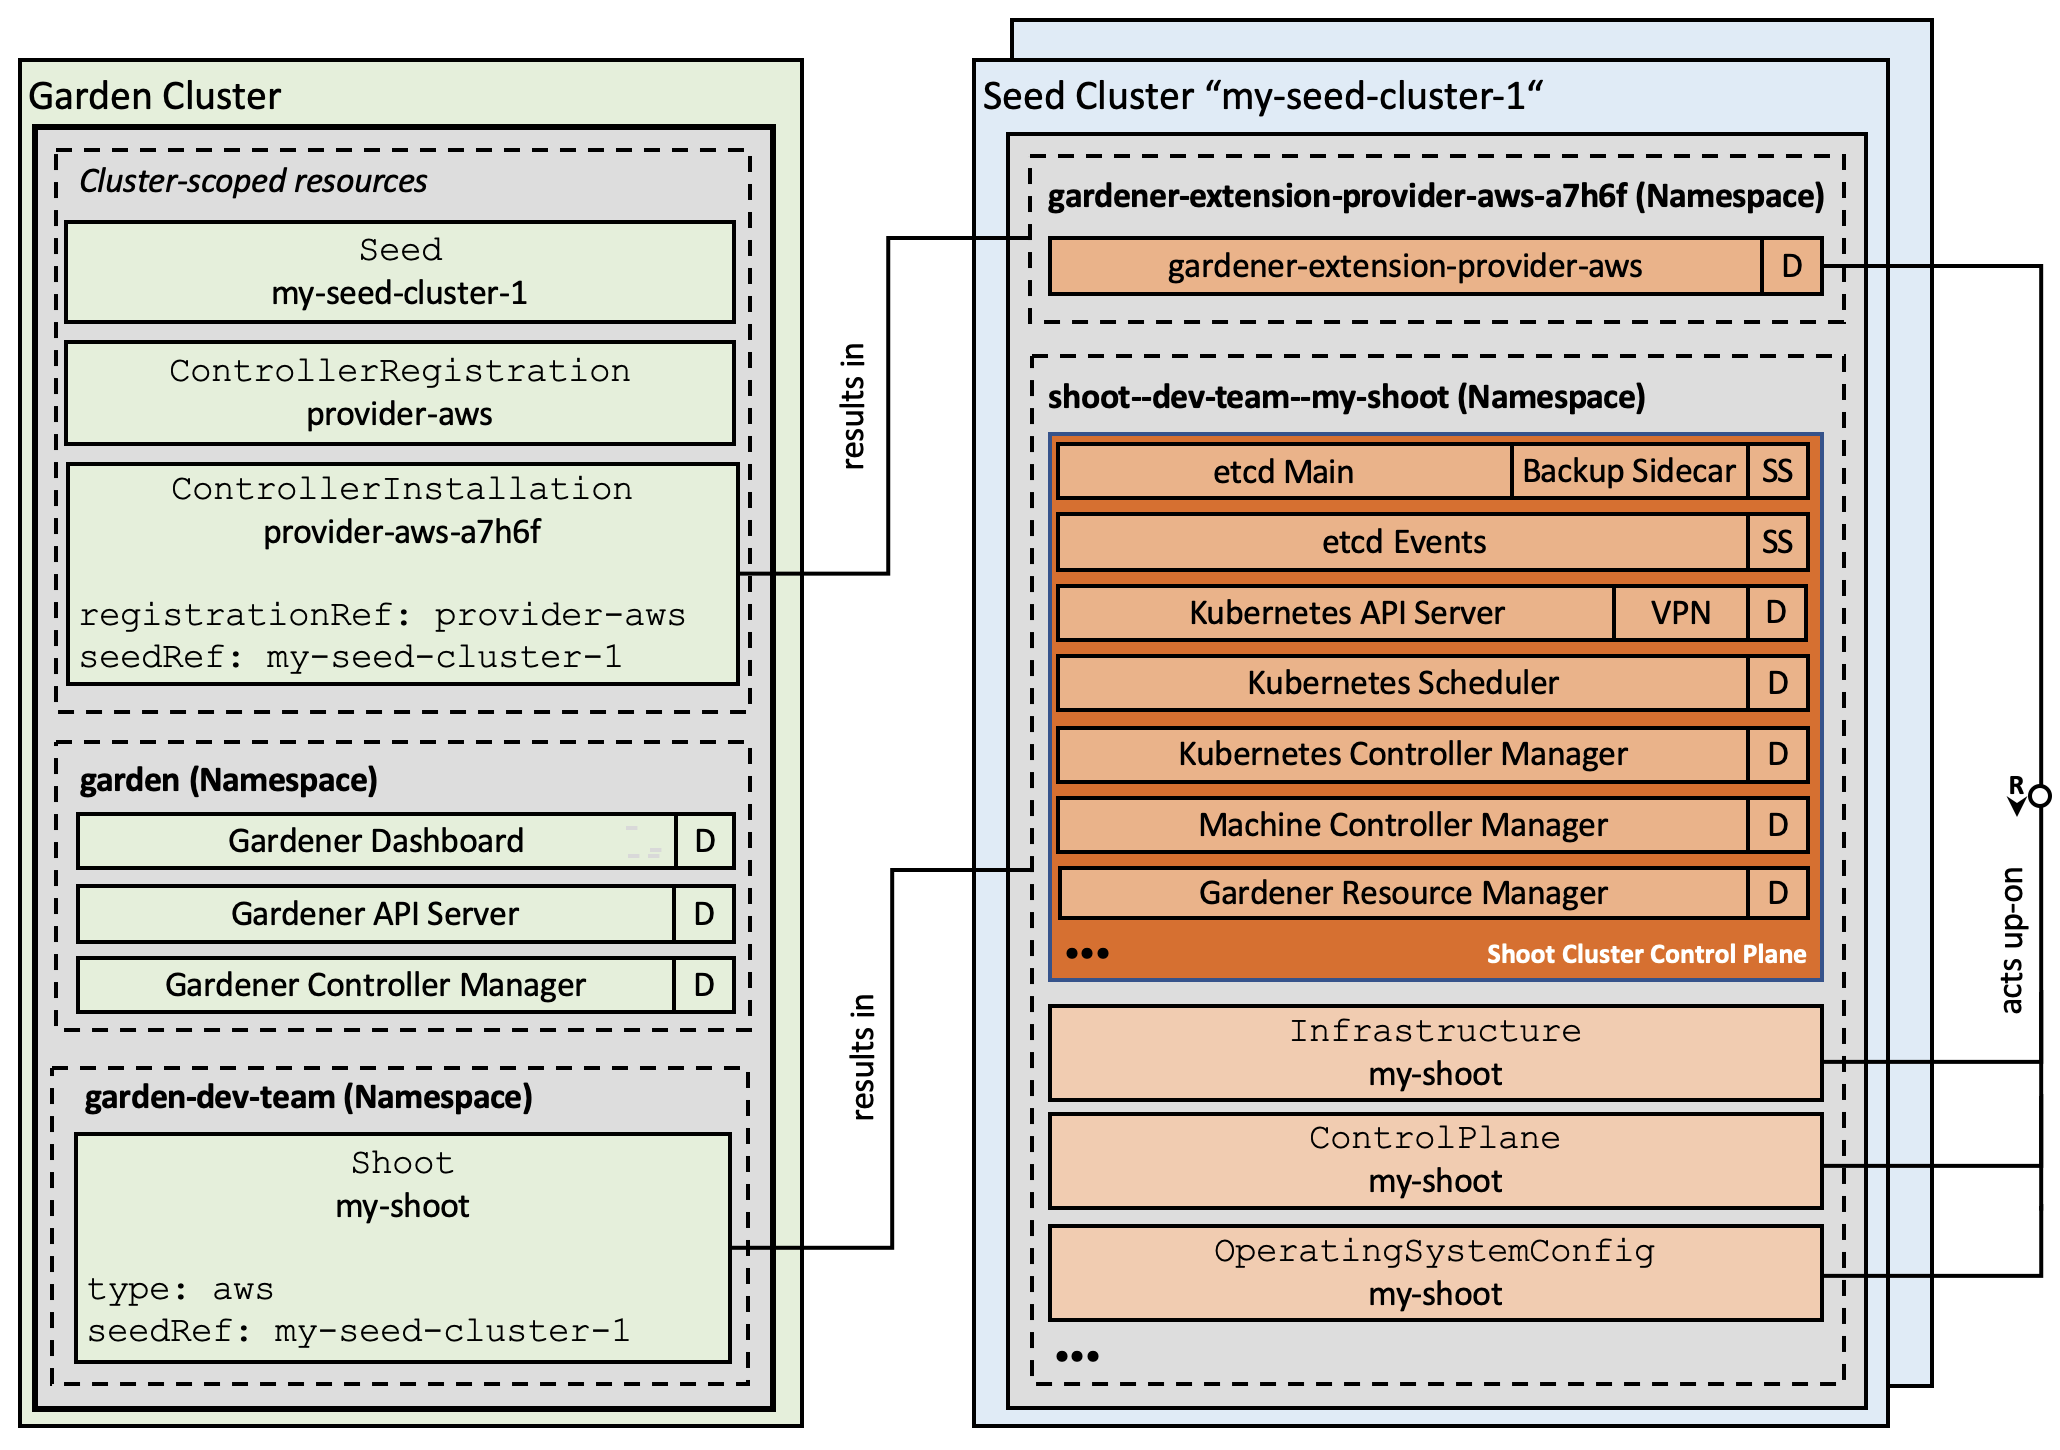
Figure 2 Gardener architecture with extension controllers.
Status Quo
We have recently introduced the new core.gardener.cloud API group that
incorporates fully forwards and backwards compatible Shoot resources, and that
allows providers to use Gardener without modifying anything in its core source
tree.
We have already adapted all controllers to use this new API group and have deprecated the old API. Eventually, after a few months we will remove it, so end-users are advised to start migrating to the new API soon.
Apart from that, we have enabled all relevant extensions to contribute to the
shoot health status and implemented the respective contract. The basic idea is
that the CRDs may have .status.conditions that are picked up by Gardener and
merged with its standard health checks into the Shoot status field.
Also, we want to implement some easy-to-use library functions facilitating
defaulting and validation webhooks for the CRDs in order to validate the
providerConfig field controlled by end-users.
Finally, we will split the
gardener/gardener-extensions
repository into separate repositories and keep it only for the generic library
functions that can be used to write extension controllers.
Next Steps
Kubernetes has externalized many of the infrastructural management challenges. The inception design solves most of them by delegating lifecycle operations to a separate management plane (seed clusters). But what if the garden cluster or a seed cluster goes down? How do we scale beyond tens of thousands of managed clusters that need to be reconciled in parallel? We are further investing into hardening the Gardener scalability and disaster recovery features. Let's briefly highlight three of the features in more detail:
Gardenlet
Right from the beginning of the Gardener Project we started implementing the operator pattern: We have a custom controller-manager that acts on our own custom resources. Now, when you start thinking about the Gardener architecture, you will recognize some interesting similarity with respect to the Kubernetes architecture: Shoot clusters can be compared with pods, and seed clusters can be seen as worker nodes. Guided by this observation we introduced the gardener-scheduler. Its main task is to find an appropriate seed cluster to host the control-plane for newly ordered clusters, similar to how the kube-scheduler finds an appropriate node for newly created pods. By providing multiple seed clusters for a region (or provider) and distributing the workload, we reduce the blast-radius of potential hick-ups as well.
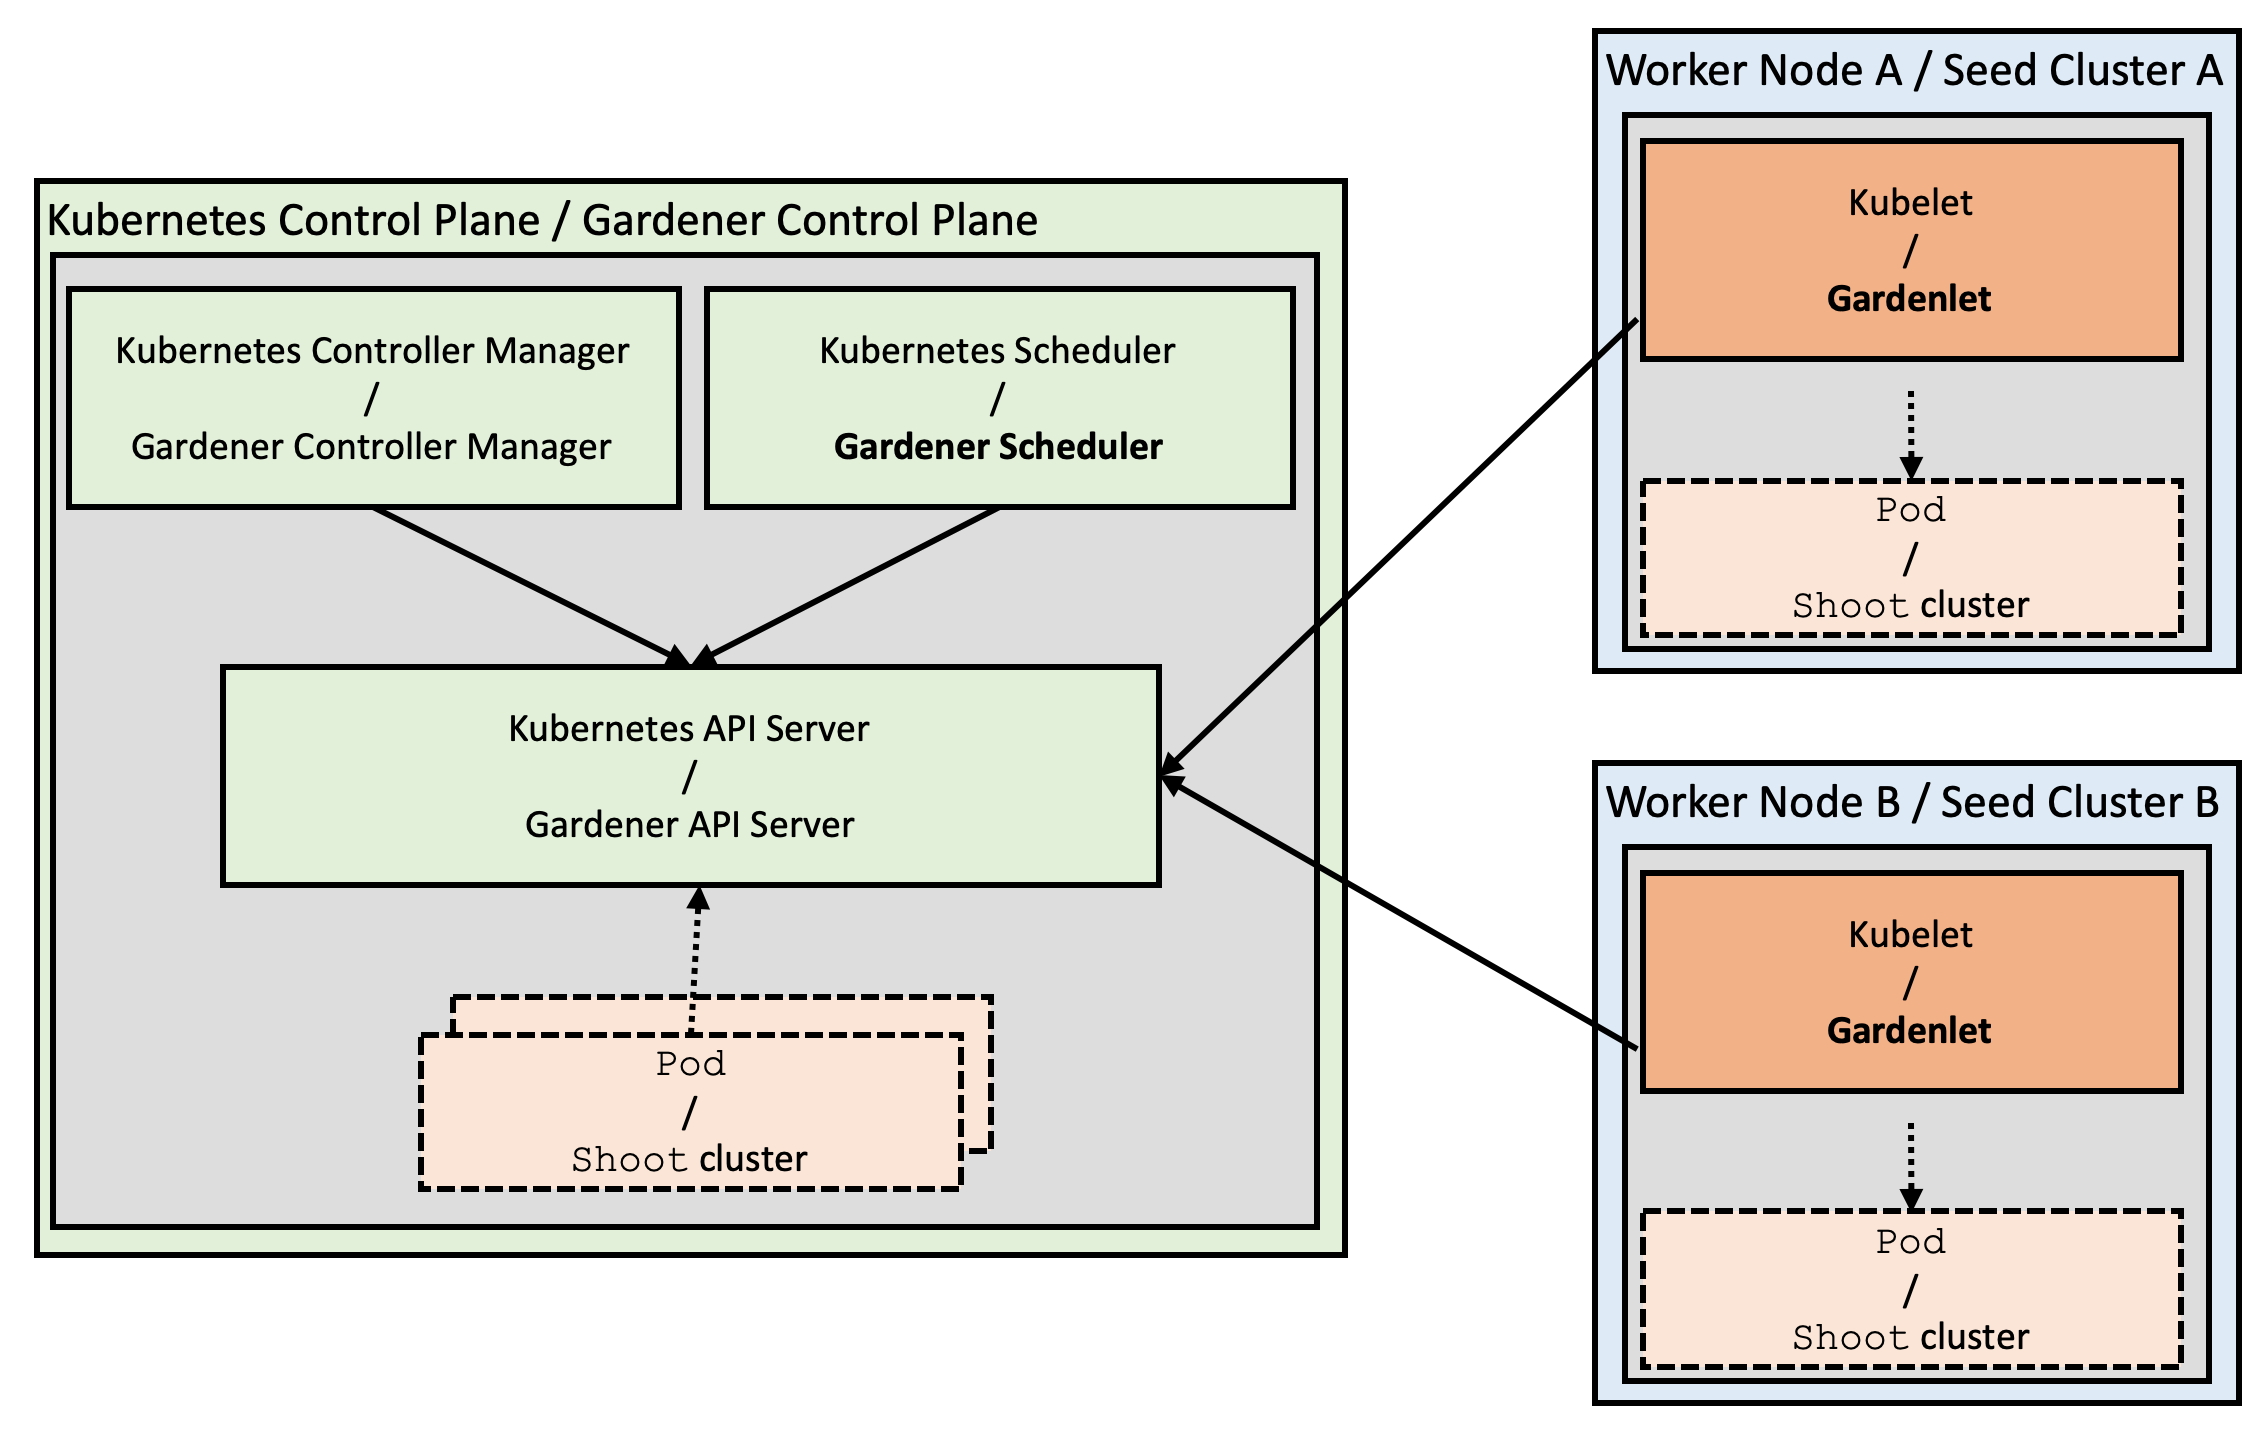
Figure 3 Similarities between Kubernetes and Gardener architecture.
Yet, there is still a significant difference between the Kubernetes and the Gardener architectures: Kubernetes runs a primary "agent" on every node, the kubelet, which is mainly responsible for managing pods and containers on its particular node. Gardener uses its controller-manager which is responsible for all shoot clusters on all seed clusters, and it is performing its reconciliation loops centrally from the garden cluster.
While this works well at scale for thousands of clusters today, our goal is to enable true scalability following the Kubernetes principles (beyond the capacity of a single controller-manager): We are now working on distributing the logic (or the Gardener operator) into the seed cluster and will introduce a corresponding component, adequately named the gardenlet. It will be Gardener's primary "agent" on every seed cluster and will be only responsible for shoot clusters located in its particular seed cluster.
The gardener-controller-manager will still keep its control loops for other resources of the Gardener API, however, it will no longer talk to seed/shoot clusters.
Reversing the control flow will even allow placing seed/shoot clusters behind firewalls without the necessity of direct accessibility (via VPN tunnels) anymore.
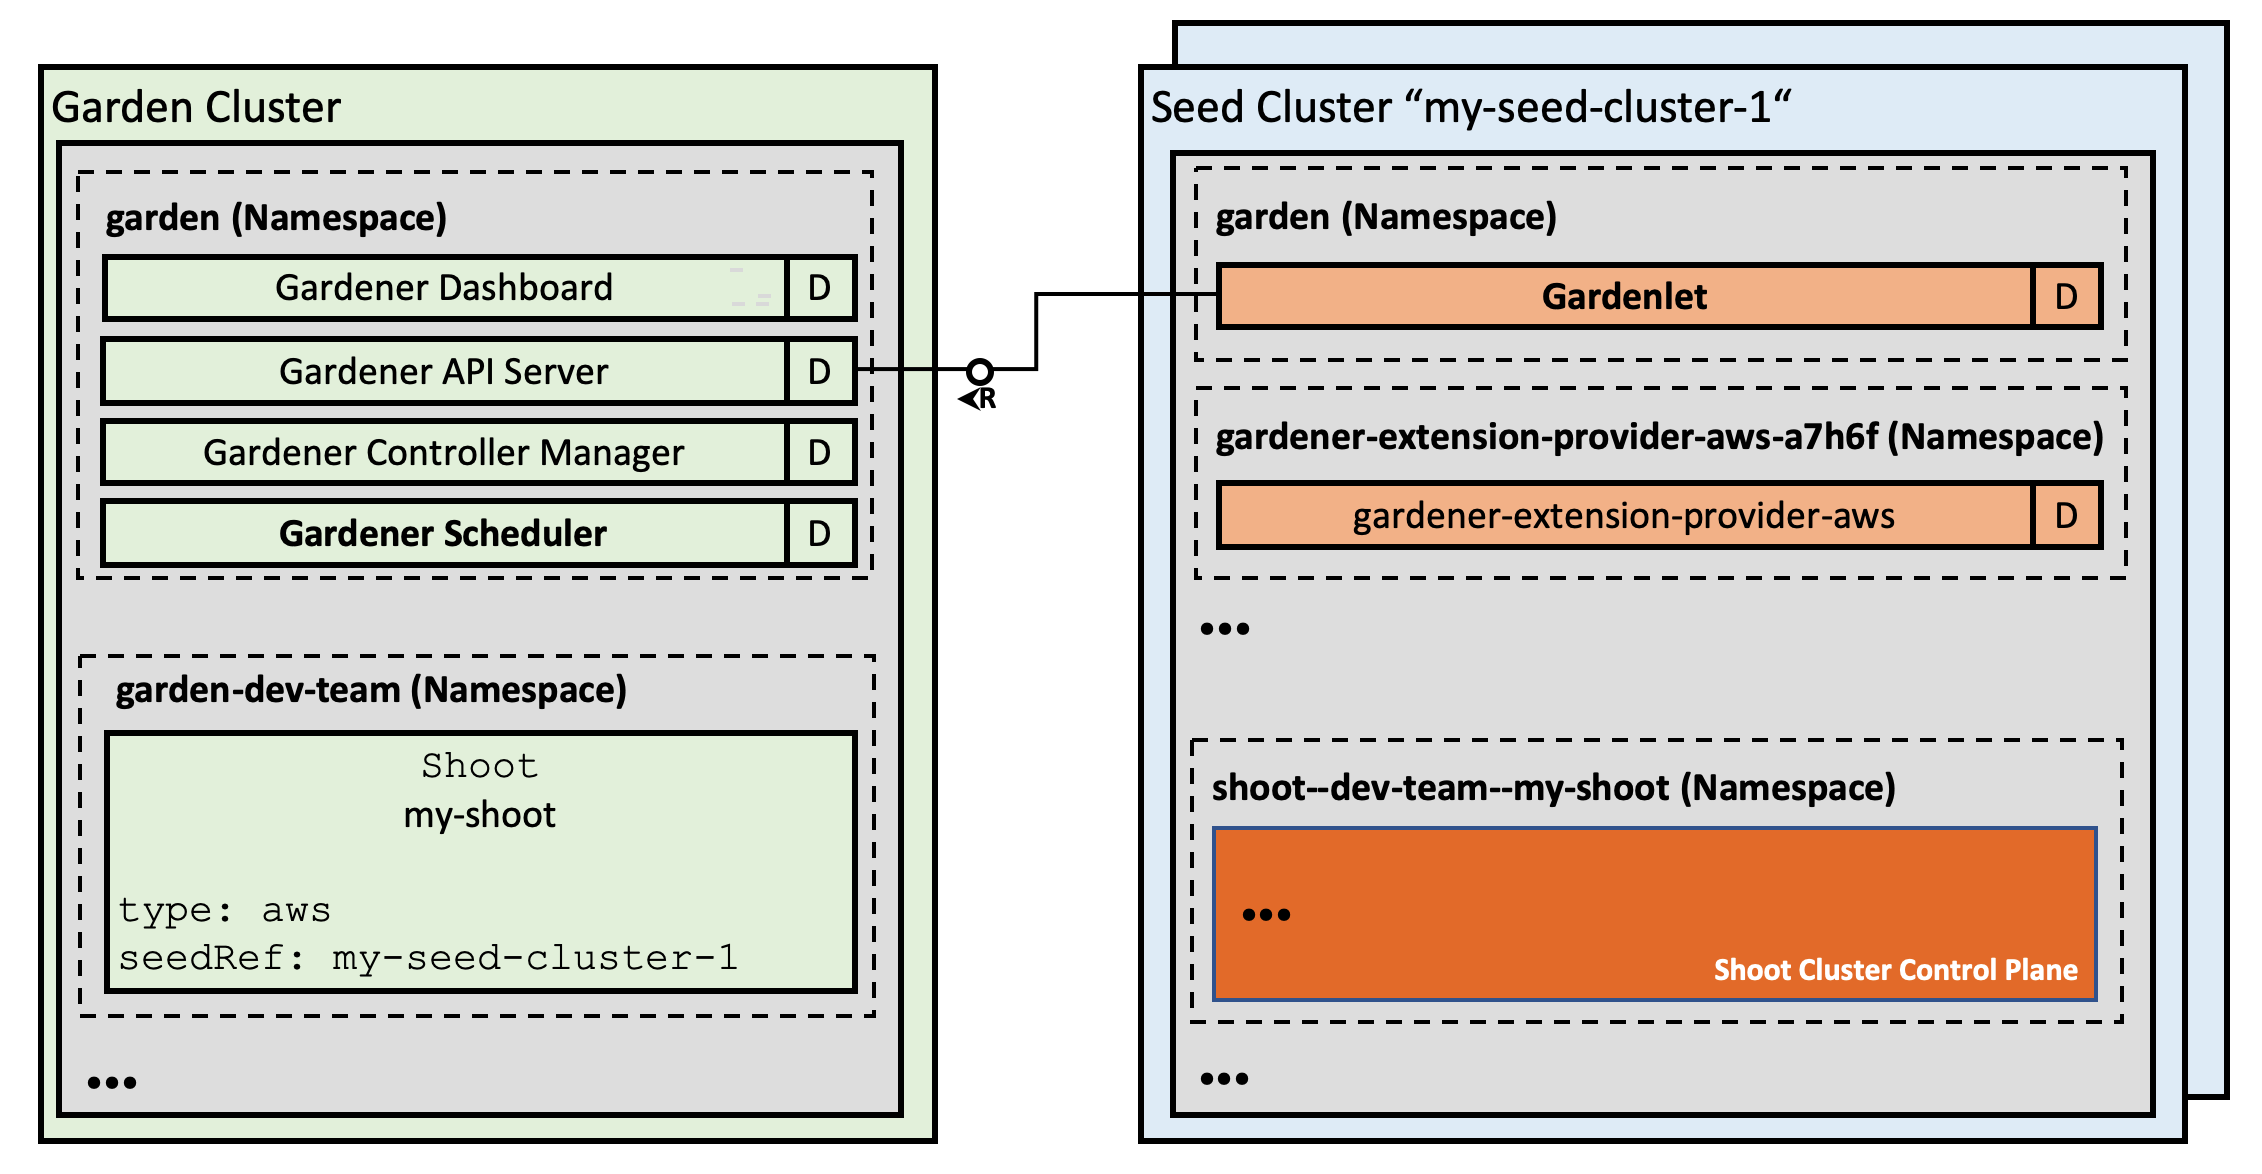
Figure 4 Detailed architecture with Gardenlet.
Control Plane Migration between Seed Clusters
When a seed cluster fails, the user's static workload will continue to operate. However, administrating the cluster won't be possible anymore because the shoot cluster's API server running in the failed seed is no longer reachable.
We have implemented the relocation of failed control planes hit by some seed disaster to another seed and are now working on fully automating this unique capability. In fact, this approach is not only feasible, we have performed the fail-over procedure multiple times in our production.
The automated failover capability will enable us to implement even more comprehensive disaster recovery and scalability qualities, e.g., the automated provisioning and re-balancing of seed clusters or automated migrations for all non-foreseeable cases. Again, think about the similarities with Kubernetes with respect to pod eviction and node drains.
Gardener Ring
The Gardener Ring is our novel approach for provisioning and managing Kubernetes clusters without relying on an external provision tool for the initial cluster. By using Kubernetes in a recursive manner, we can drastically reduce the management complexity by avoiding imperative tool sets, while creating new qualities with a self-stabilizing circular system.
The Ring approach is conceptually different from self-hosting and static pod based deployments. The idea is to create a ring of three (or more) shoot clusters that each host the control plane of its successor.
An outage of one cluster will not affect the stability and availability of the
Ring, and as the control plane is externalized the failed cluster can be
automatically recovered by Gardener's self-healing capabilities. As long as
there is a quorum of at least n/2+1 available clusters the Ring will always
stabilize itself. Running these clusters on different cloud providers (or at
least in different regions / data centers) reduces the potential for quorum
losses.
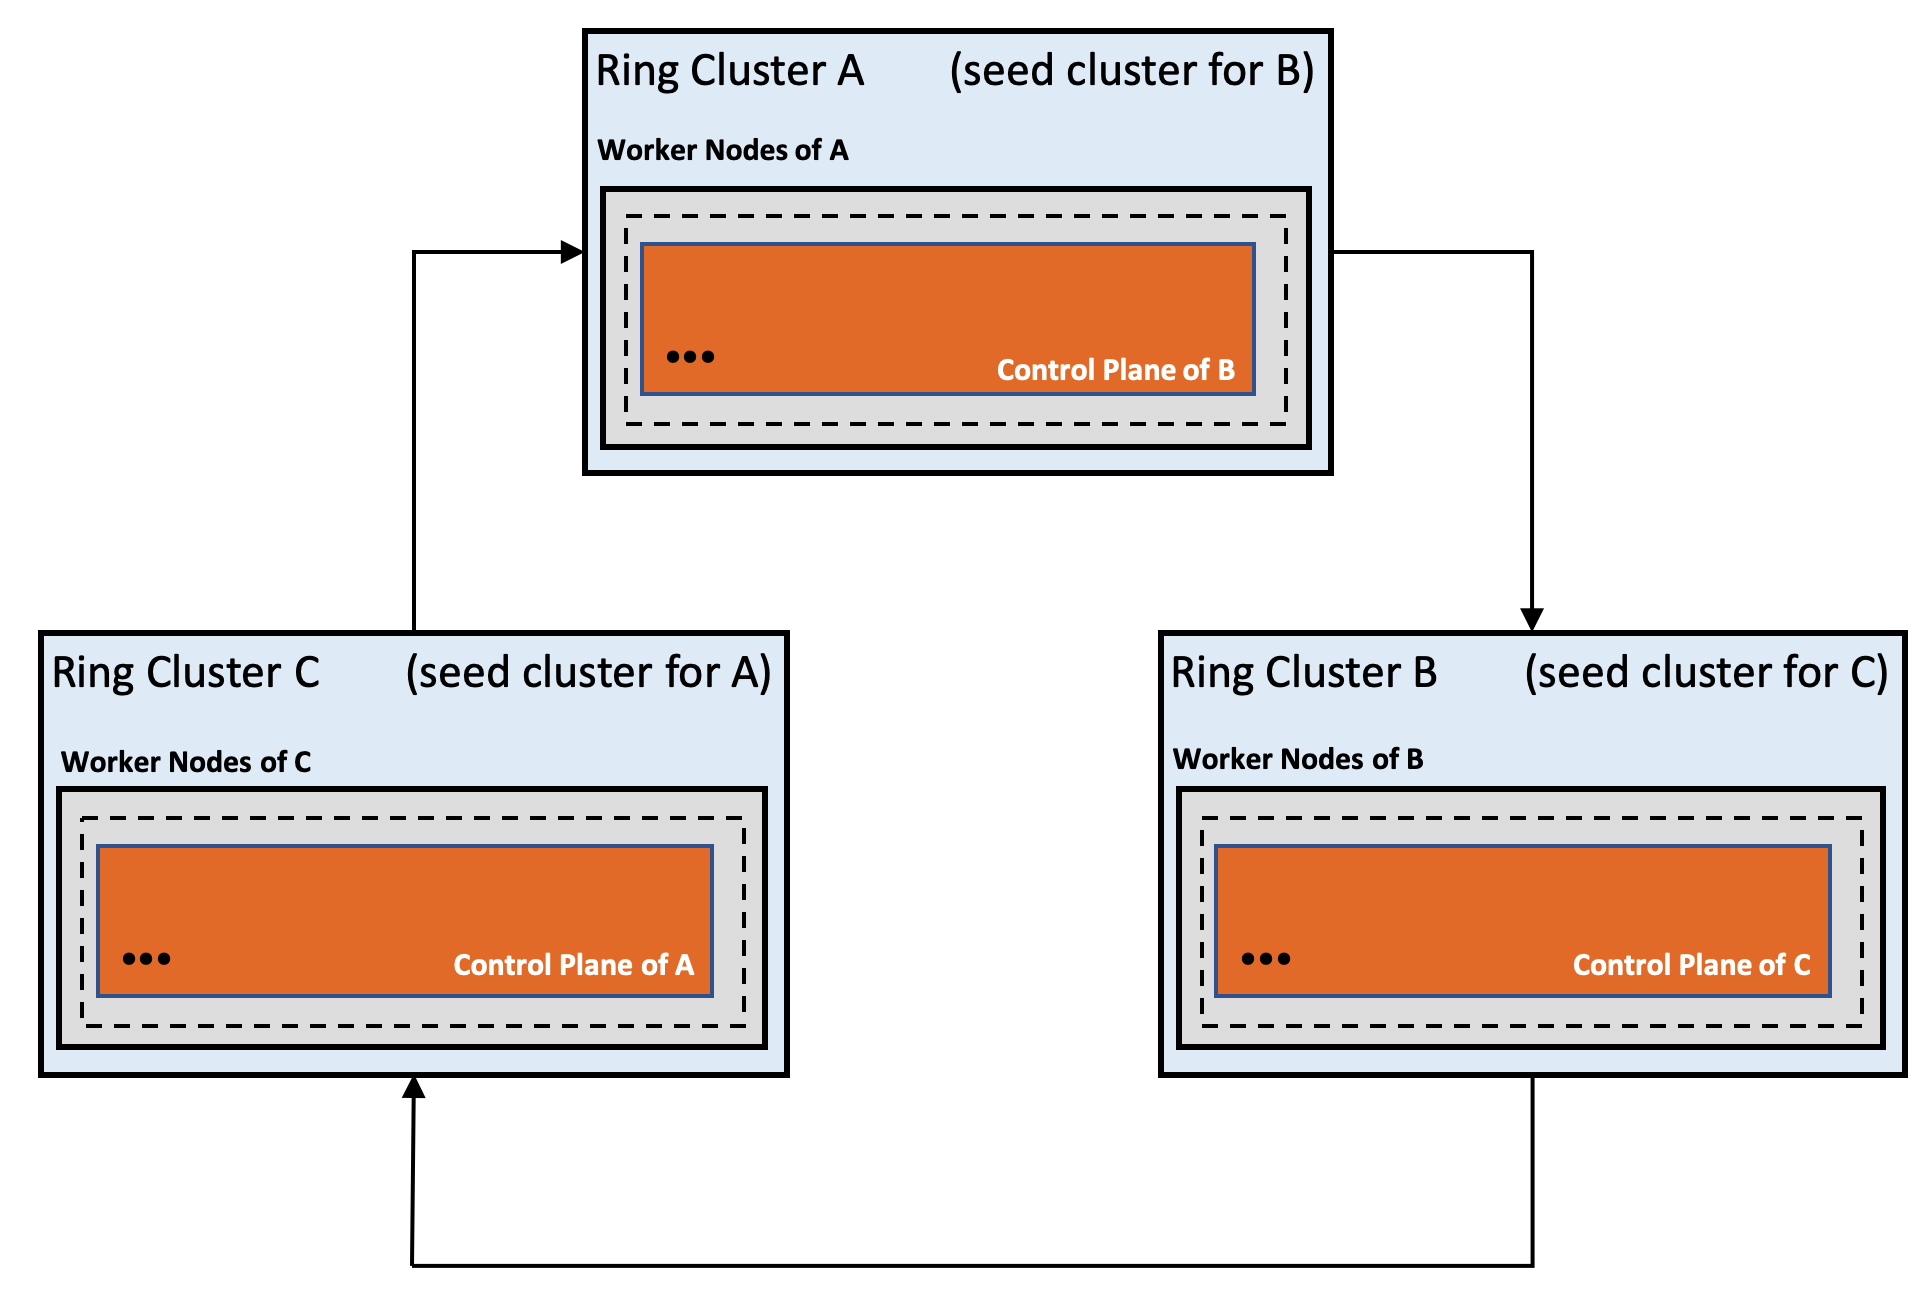
Figure 5 Self-stabilizing ring of Kubernetes clusters.
The way how the distributed instances of Gardener can share the same data is by deploying separate kube-apiserver instances talking to the same etcd cluster. These kube-apiservers are forming a node-less Kubernetes cluster that can be used as "data container" for Gardener and its associated applications.
We are running test landscapes internally protected by the ring and it has saved us from manual interventions. With the automated control plane migration in place we can easily bootstrap the Ring and will solve the "initial cluster problem" as well as improve the overall robustness.
Getting Started!
If you are interested in writing an extension, you might want to check out the following resources:
- GEP-1: Extensibility proposal document
- GEP-4: New
core.gardener.cloud/v1alpha1API - Example extension controller implementation for AWS
- Gardener Extensions Golang library
- Extension contract documentation
- Gardener API Reference
Of course, any other contribution to our project is very welcome as well! We are always looking for new community members.
If you want to try out Gardener, please check out our quick installation guide. This installer will setup a complete Gardener environment ready to be used for testing and evaluation within just a few minutes.
Contributions Welcome!
The Gardener project is developed as Open Source and hosted on GitHub: https://github.com/gardener
If you see the potential of the Gardener project, please join us via GitHub.
We are having a weekly public community meeting scheduled every Friday 10-11 a.m. CET, and a public #gardener Slack channel in the Kubernetes workspace. Also, we are planning a Gardener Hackathon in Q1 2020 and are looking forward meeting you there!
Develop a Kubernetes controller in Java
The official Kubernetes Java SDK project recently released their latest work on providing the Java Kubernetes developers a handy Kubernetes controller-builder SDK which is helpful for easily developing advanced workloads or systems.
Overall
Java is no doubt one of the most popular programming languages in the world but it's been difficult for a period time for those non-Golang developers to build up their customized controller/operator due to the lack of library resources in the community. In the world of Golang, there're already some excellent controller frameworks, for example, controller runtime, operator SDK. These existing Golang frameworks are relying on the various utilities from the Kubernetes Golang SDK proven to be stable over years. Driven by the emerging need of further integration into the platform of Kubernetes, we not only ported many essential toolings from the Golang SDK into the kubernetes Java SDK including informers, work-queues, leader-elections, etc. but also developed a controller-builder SDK which wires up everything into a runnable controller without hiccups.
Backgrounds
Why use Java to implement Kubernetes tooling? You might pick Java for:
Integrating legacy enterprise Java systems: Many companies have their legacy systems or frameworks written in Java in favor of stability. We are not able to move everything to Golang easily.
More open-source community resources: Java is mature and has accumulated abundant open-source libraries over decades, even though Golang is getting more and more fancy and popular for developers. Additionally, nowadays developers are able to develop their aggregated-apiservers over SQL-storage and Java has way better support on SQLs.
How to use?
Take maven project as example, adding the following dependencies into your dependencies:
<dependency>
<groupId>io.kubernetes</groupId>
<artifactId>client-java-extended</artifactId>
<version>6.0.1</version>
</dependency>
Then we can make use of the provided builder libraries to write your own controller. For example, the following one is a simple controller prints out node information on watch notification, see complete example here:
...
Reconciler reconciler = new Reconciler() {
@Override
public Result reconcile(Request request) {
V1Node node = nodeLister.get(request.getName());
System.out.println("triggered reconciling " + node.getMetadata().getName());
return new Result(false);
}
};
Controller controller =
ControllerBuilder.defaultBuilder(informerFactory)
.watch(
(workQueue) -> ControllerBuilder.controllerWatchBuilder(V1Node.class, workQueue).build())
.withReconciler(nodeReconciler) // required, set the actual reconciler
.withName("node-printing-controller") // optional, set name for controller for logging, thread-tracing
.withWorkerCount(4) // optional, set worker thread count
.withReadyFunc( nodeInformer::hasSynced) // optional, only starts controller when the cache has synced up
.build();
If you notice, the new Java controller framework learnt a lot from the design of controller-runtime which successfully encapsulates the complex components inside controller into several clean interfaces. With the help of Java Generics, we even move on a bit and simply the encapsulation in a better way.
As for more advanced usage, we can wrap multiple controllers into a controller-manager or a leader-electing controller which helps deploying in HA setup. In a word, we can basically find most of the equivalence implementations here from Golang SDK and more advanced features are under active development by us.
Future steps
The community behind the official Kubernetes Java SDK project will be focusing on providing more useful utilities for developers who hope to program cloud native Java applications to extend Kubernetes. If you are interested in more details, please look at our repo kubernetes-client/java. Feel free to share also your feedback with us, through Issues or Slack.
Running Kubernetes locally on Linux with Microk8s
This article, the second in a series about local deployment options on Linux, and covers MicroK8s. Microk8s is the click-and-run solution for deploying a Kubernetes cluster locally, originally developed by Canonical, the publisher of Ubuntu.
While Minikube usually spins up a local virtual machine (VM) for the Kubernetes cluster, MicroK8s doesn’t require a VM. It uses snap packages, an application packaging and isolation technology.
This difference has its pros and cons. Here we’ll discuss a few of the interesting differences, and comparing the benefits of a VM based approach with the benefits of a non-VM approach. One of the first factors is cross-platform portability. While a Minikube VM is portable across operating systems - it supports not only Linux, but Windows, macOS, and even FreeBSD - Microk8s requires Linux, and only on those distributions that support snaps. Most popular Linux distributions are supported.
Another factor to consider is resource consumption. While a VM appliance gives you greater portability, it does mean you’ll consume more resources to run the VM, primarily because the VM ships a complete operating system, and runs on top of a hypervisor. You’ll consume more disk space when the VM is dormant. You’ll consume more RAM and CPU while it is running. Since Microk8s doesn’t require spinning up a virtual machine you’ll have more resources to run your workloads and other applications. Given its smaller footprint, MicroK8s is ideal for IoT devices - you can even use it on a Raspberry Pi device!
Finally, the projects appear to follow a different release cadence and strategy. MicroK8s, and snaps in general provide channels that allow you to consume beta and release candidate versions of new releases of Kubernetes, as well as the previous stable release. Microk8s generally releases the stable release of upstream Kubernetes almost immediately.
But wait, there’s more! Minikube and MicroK8s both started as single-node clusters. Essentially, they allow you to create a Kubernetes cluster with a single worker node. That is about to change - there’s an early alpha release of MicroK8s that includes clustering. With this capability, you can create Kubernetes clusters with as many worker nodes as you wish. This is effectively an un-opinionated option for creating a cluster - the developer must create the network connectivity between the nodes, as well as integrate with other infrastructure that may be required, like an external load-balancer. In summary, MicroK8s offers a quick and easy way to turn a handful of computers or VMs into a multi-node Kubernetes cluster. We’ll write more about this kind of architecture in a future article.
Disclaimer
This is not an official guide to MicroK8s. You may find detailed information on running and using MicroK8s on it's official webpage, where different use cases, operating systems, environments, etc. are covered. Instead, the purpose of this post is to provide clear and easy guidelines for running MicroK8s on Linux.
Prerequisites
A Linux distribution that supports snaps, is required. In this guide, we’ll use Ubuntu 18.04 LTS, it supports snaps out-of-the-box. If you are interested in running Microk8s on Windows or Mac, you should check out Multipass to stand up a quick Ubuntu VM as the official way to run virtual Ubuntu on your system.
MicroK8s installation
MicroK8s installation is straightforward:
sudo snap install microk8s --classic
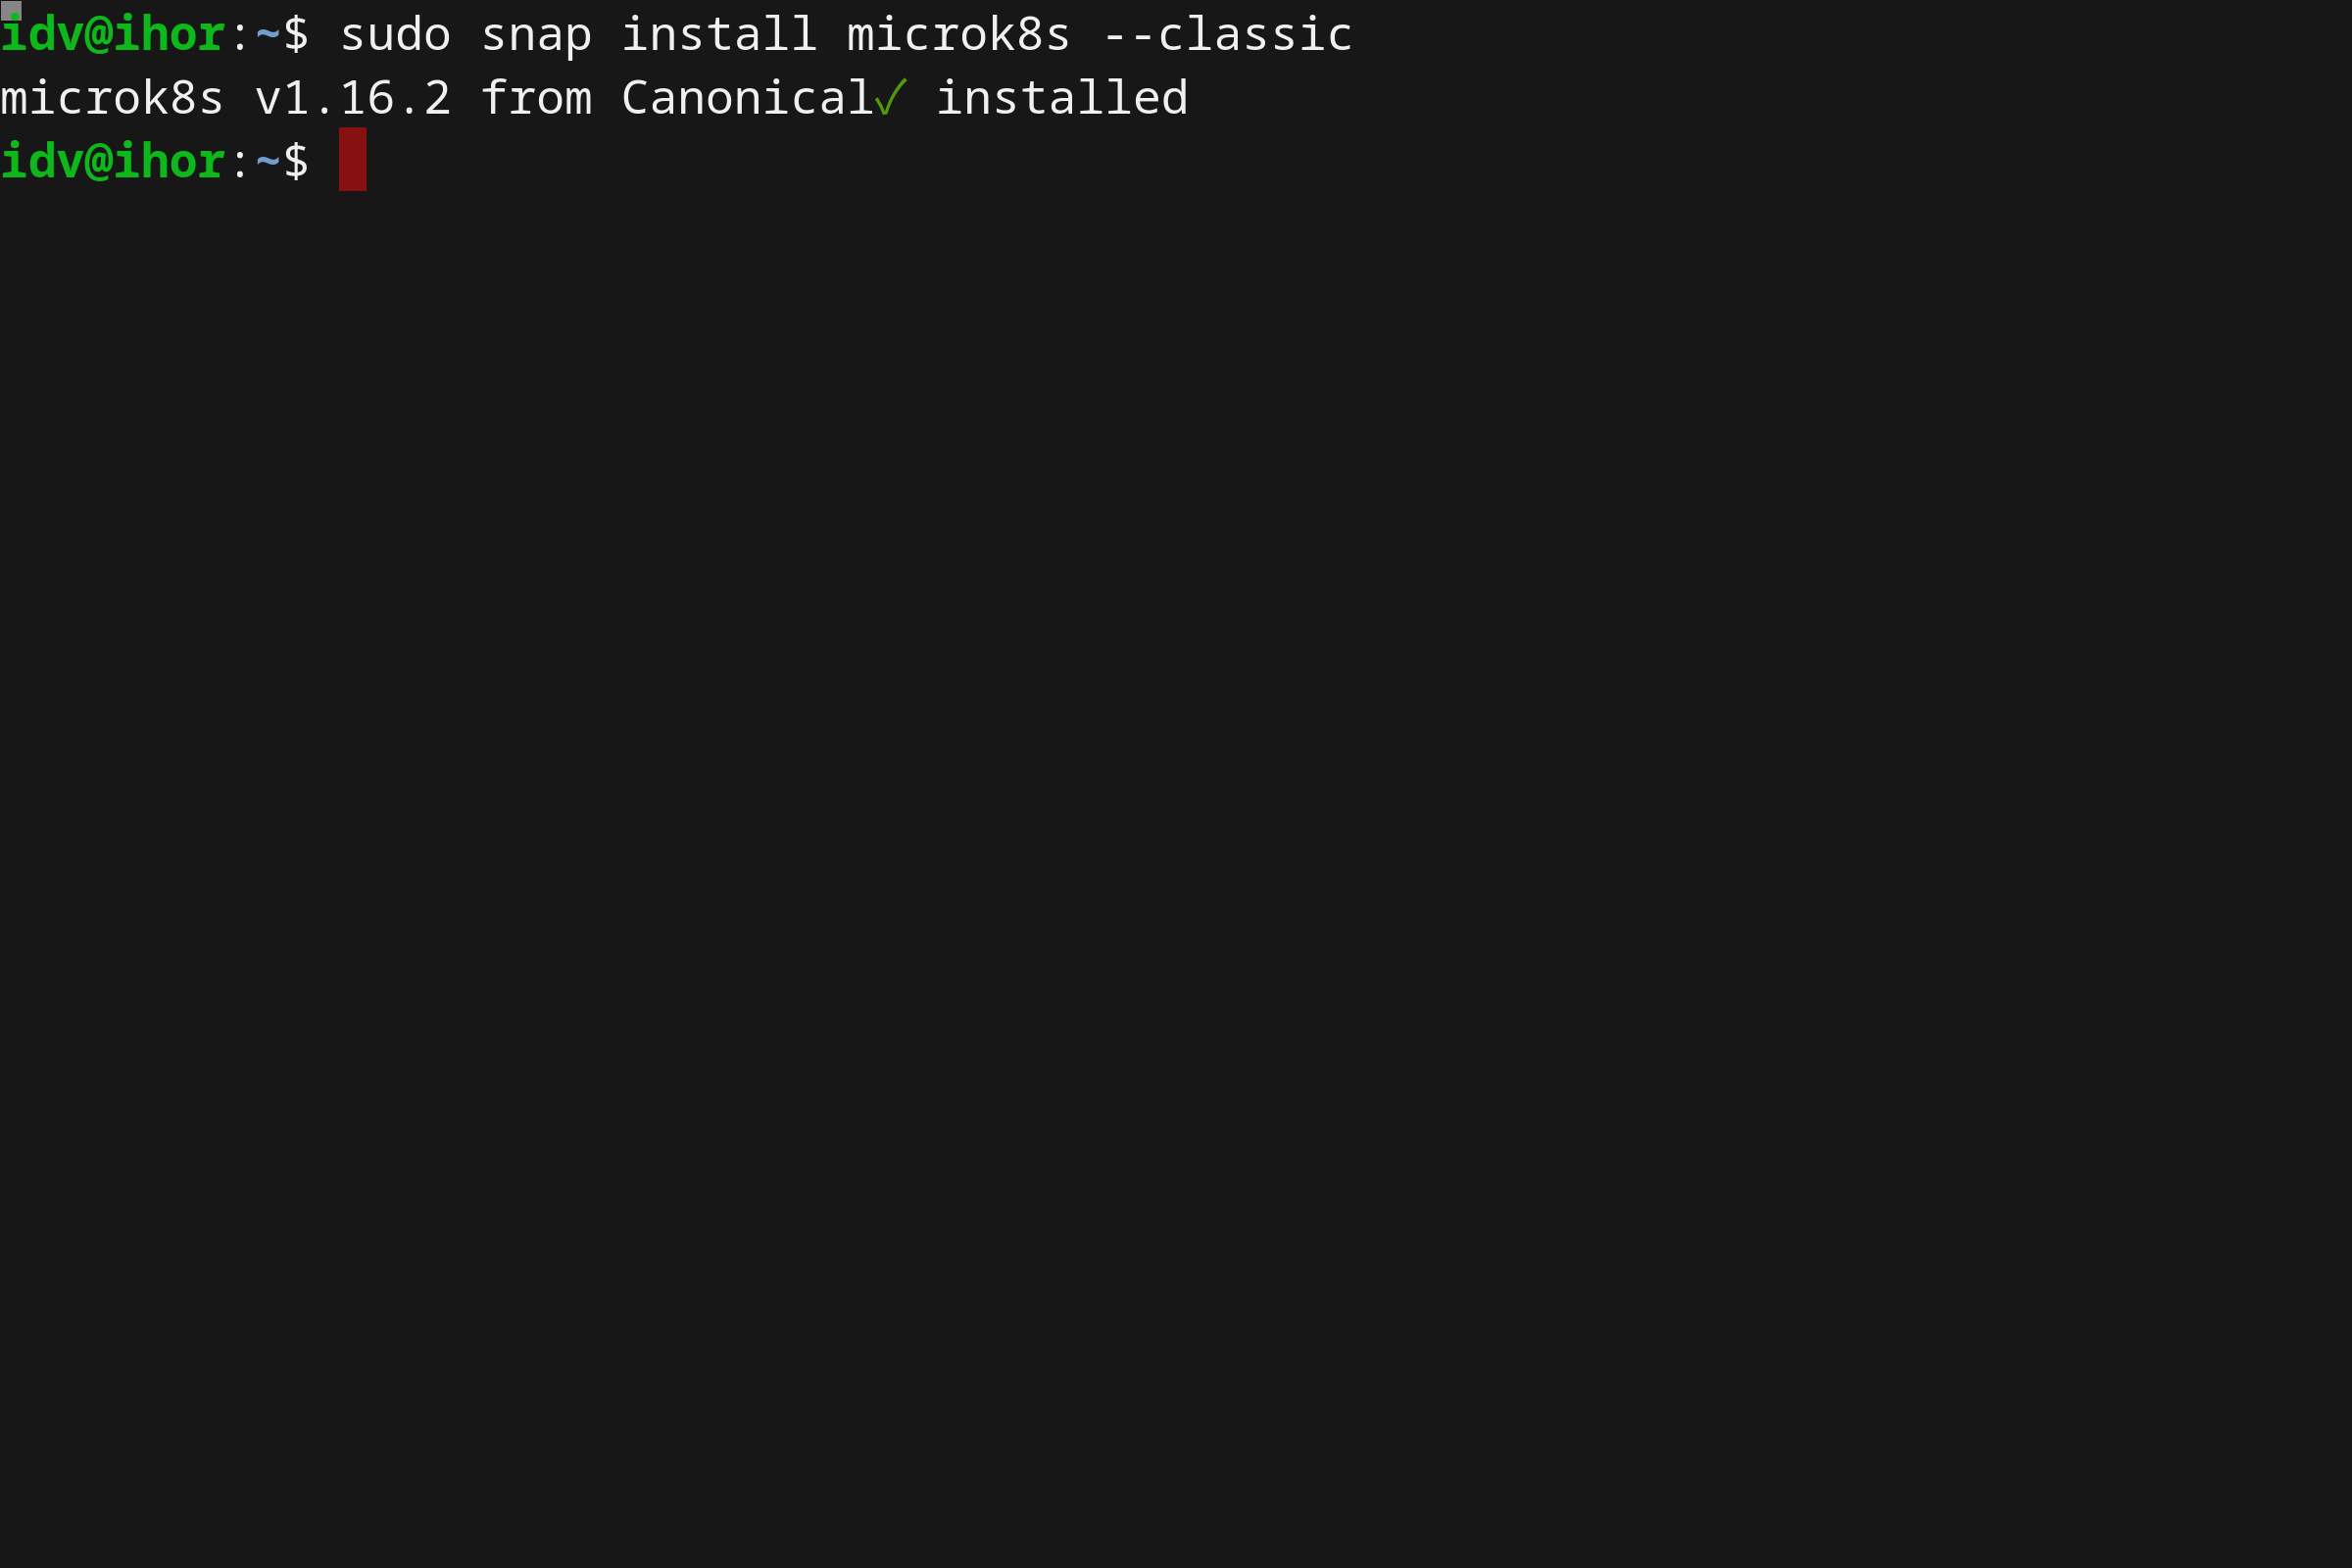
The command above installs a local single-node Kubernetes cluster in seconds. Once the command execution is finished, your Kubernetes cluster is up and running.
You may verify the MicroK8s status with the following command:
sudo microk8s.status
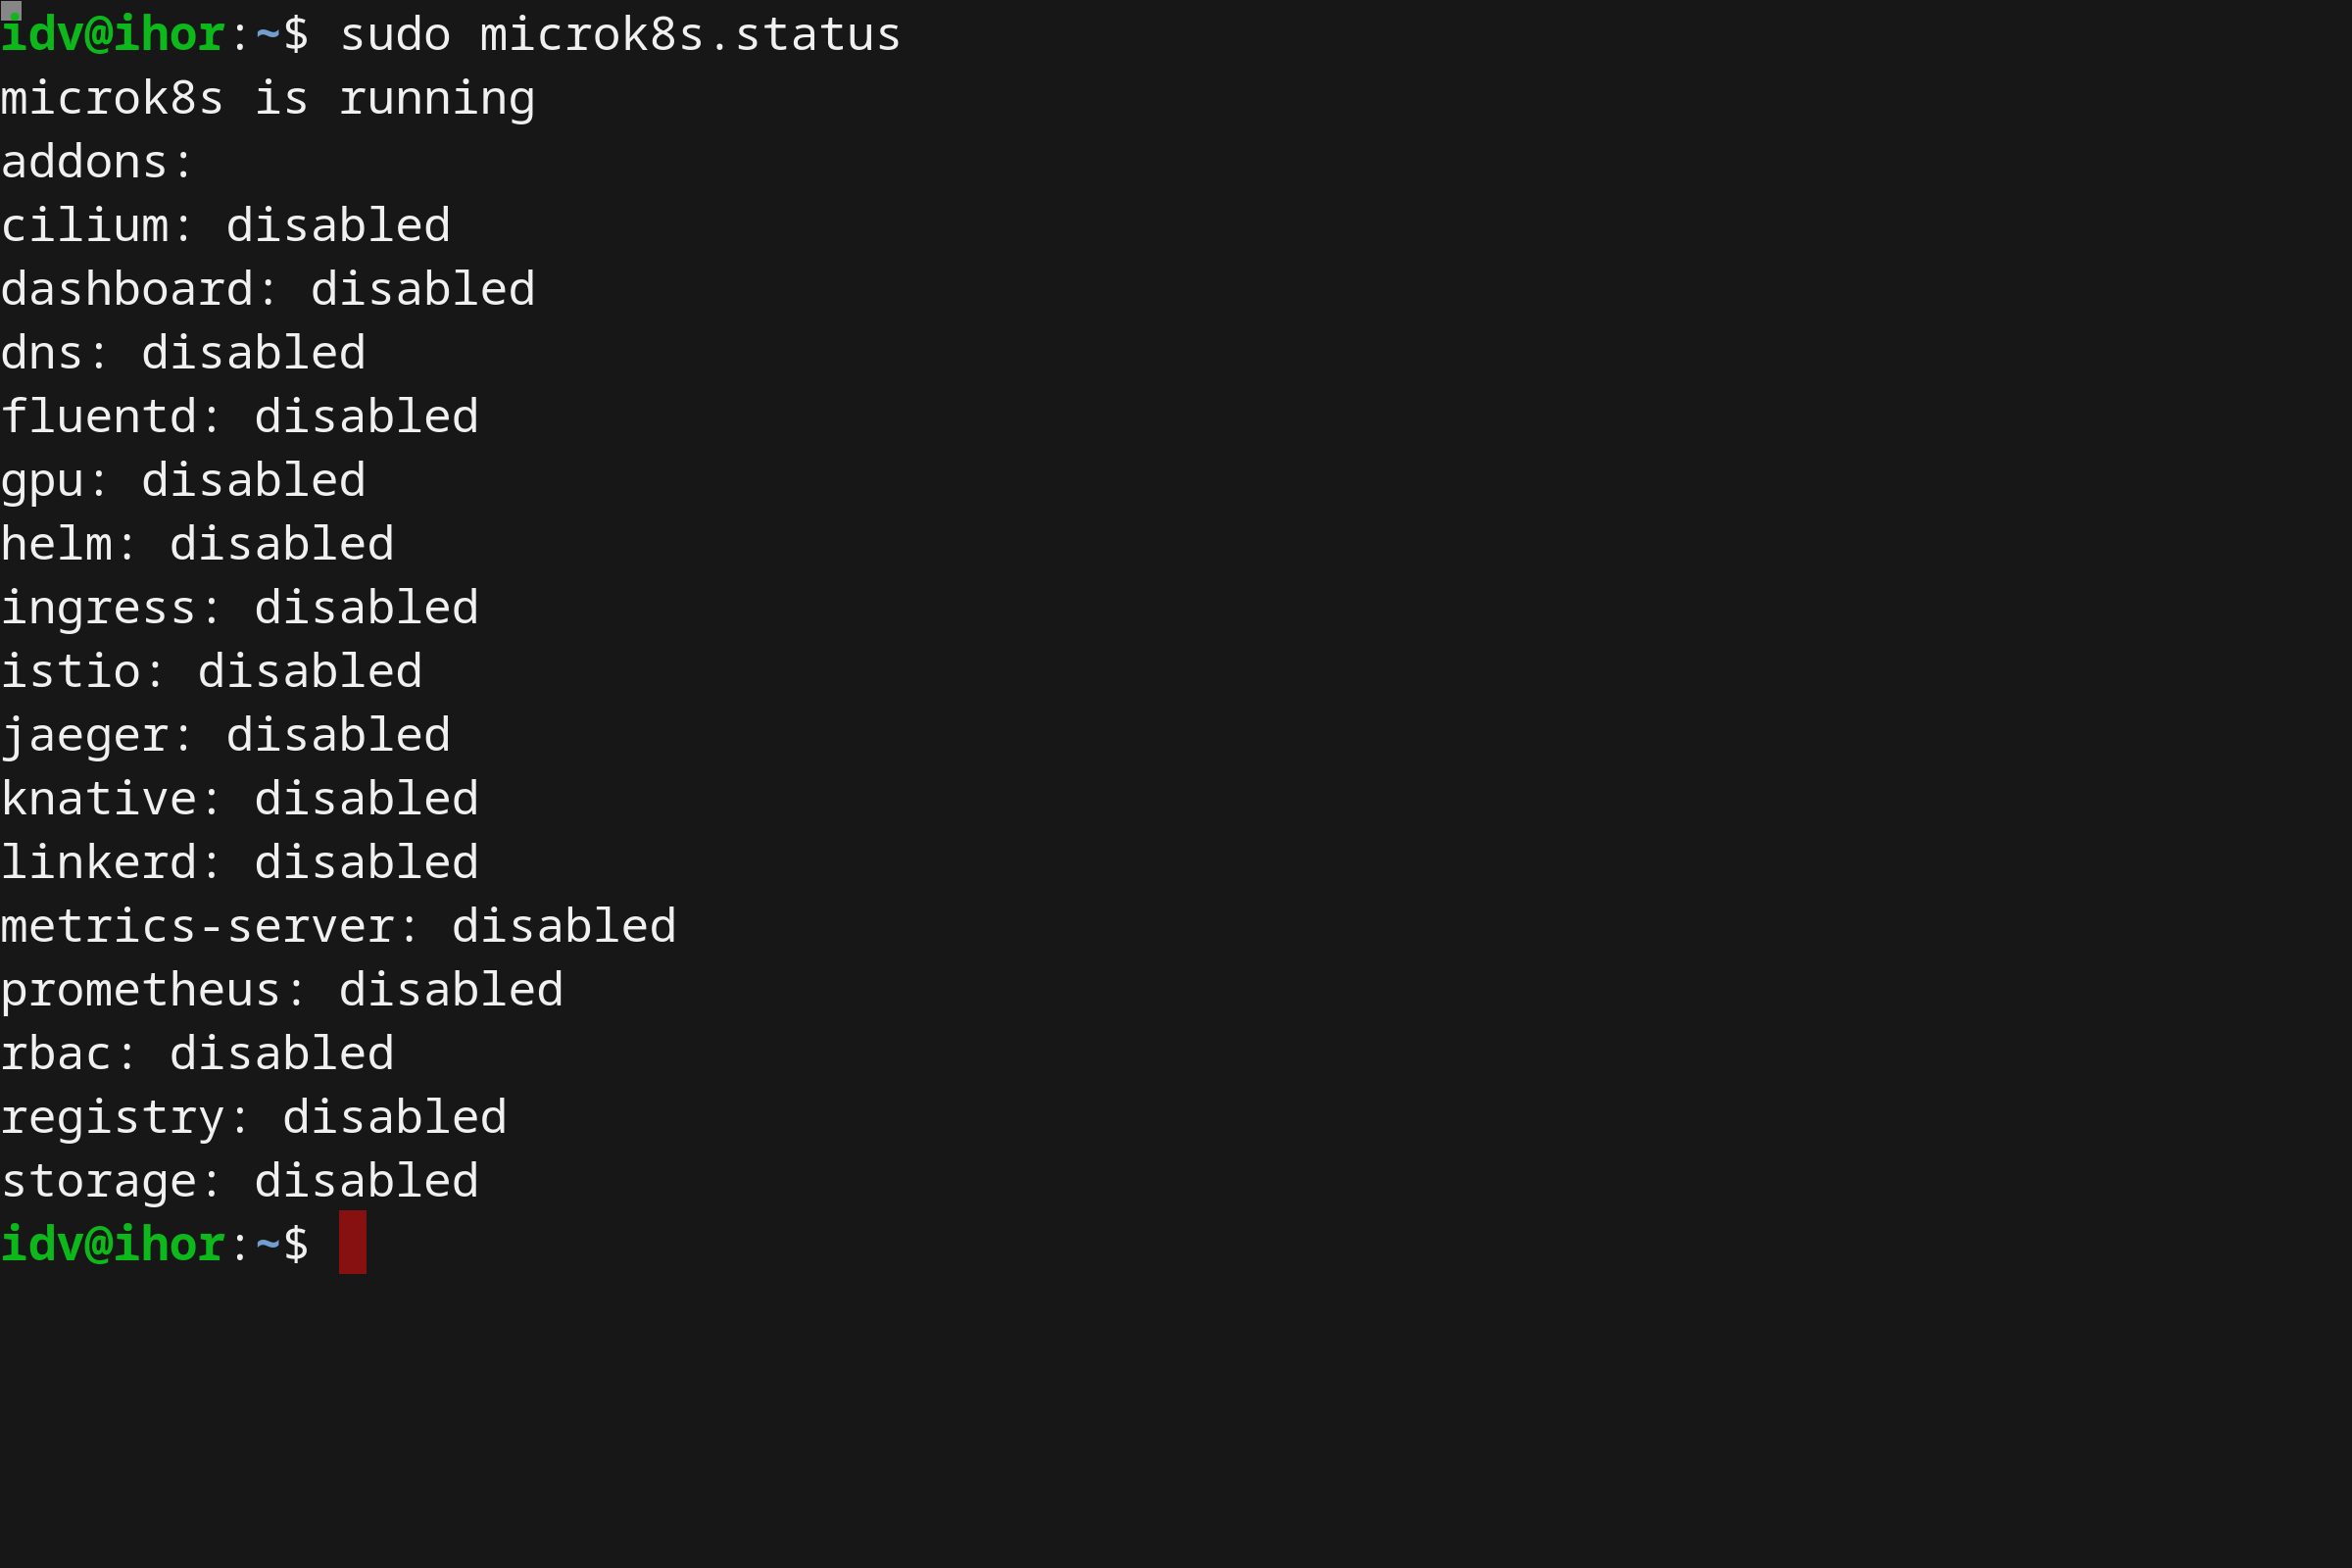
Using microk8s
Using MicroK8s is as straightforward as installing it. MicroK8s itself includes a kubectl binary, which can be accessed by running the microk8s.kubectl command. As an example:
microk8s.kubectl get nodes
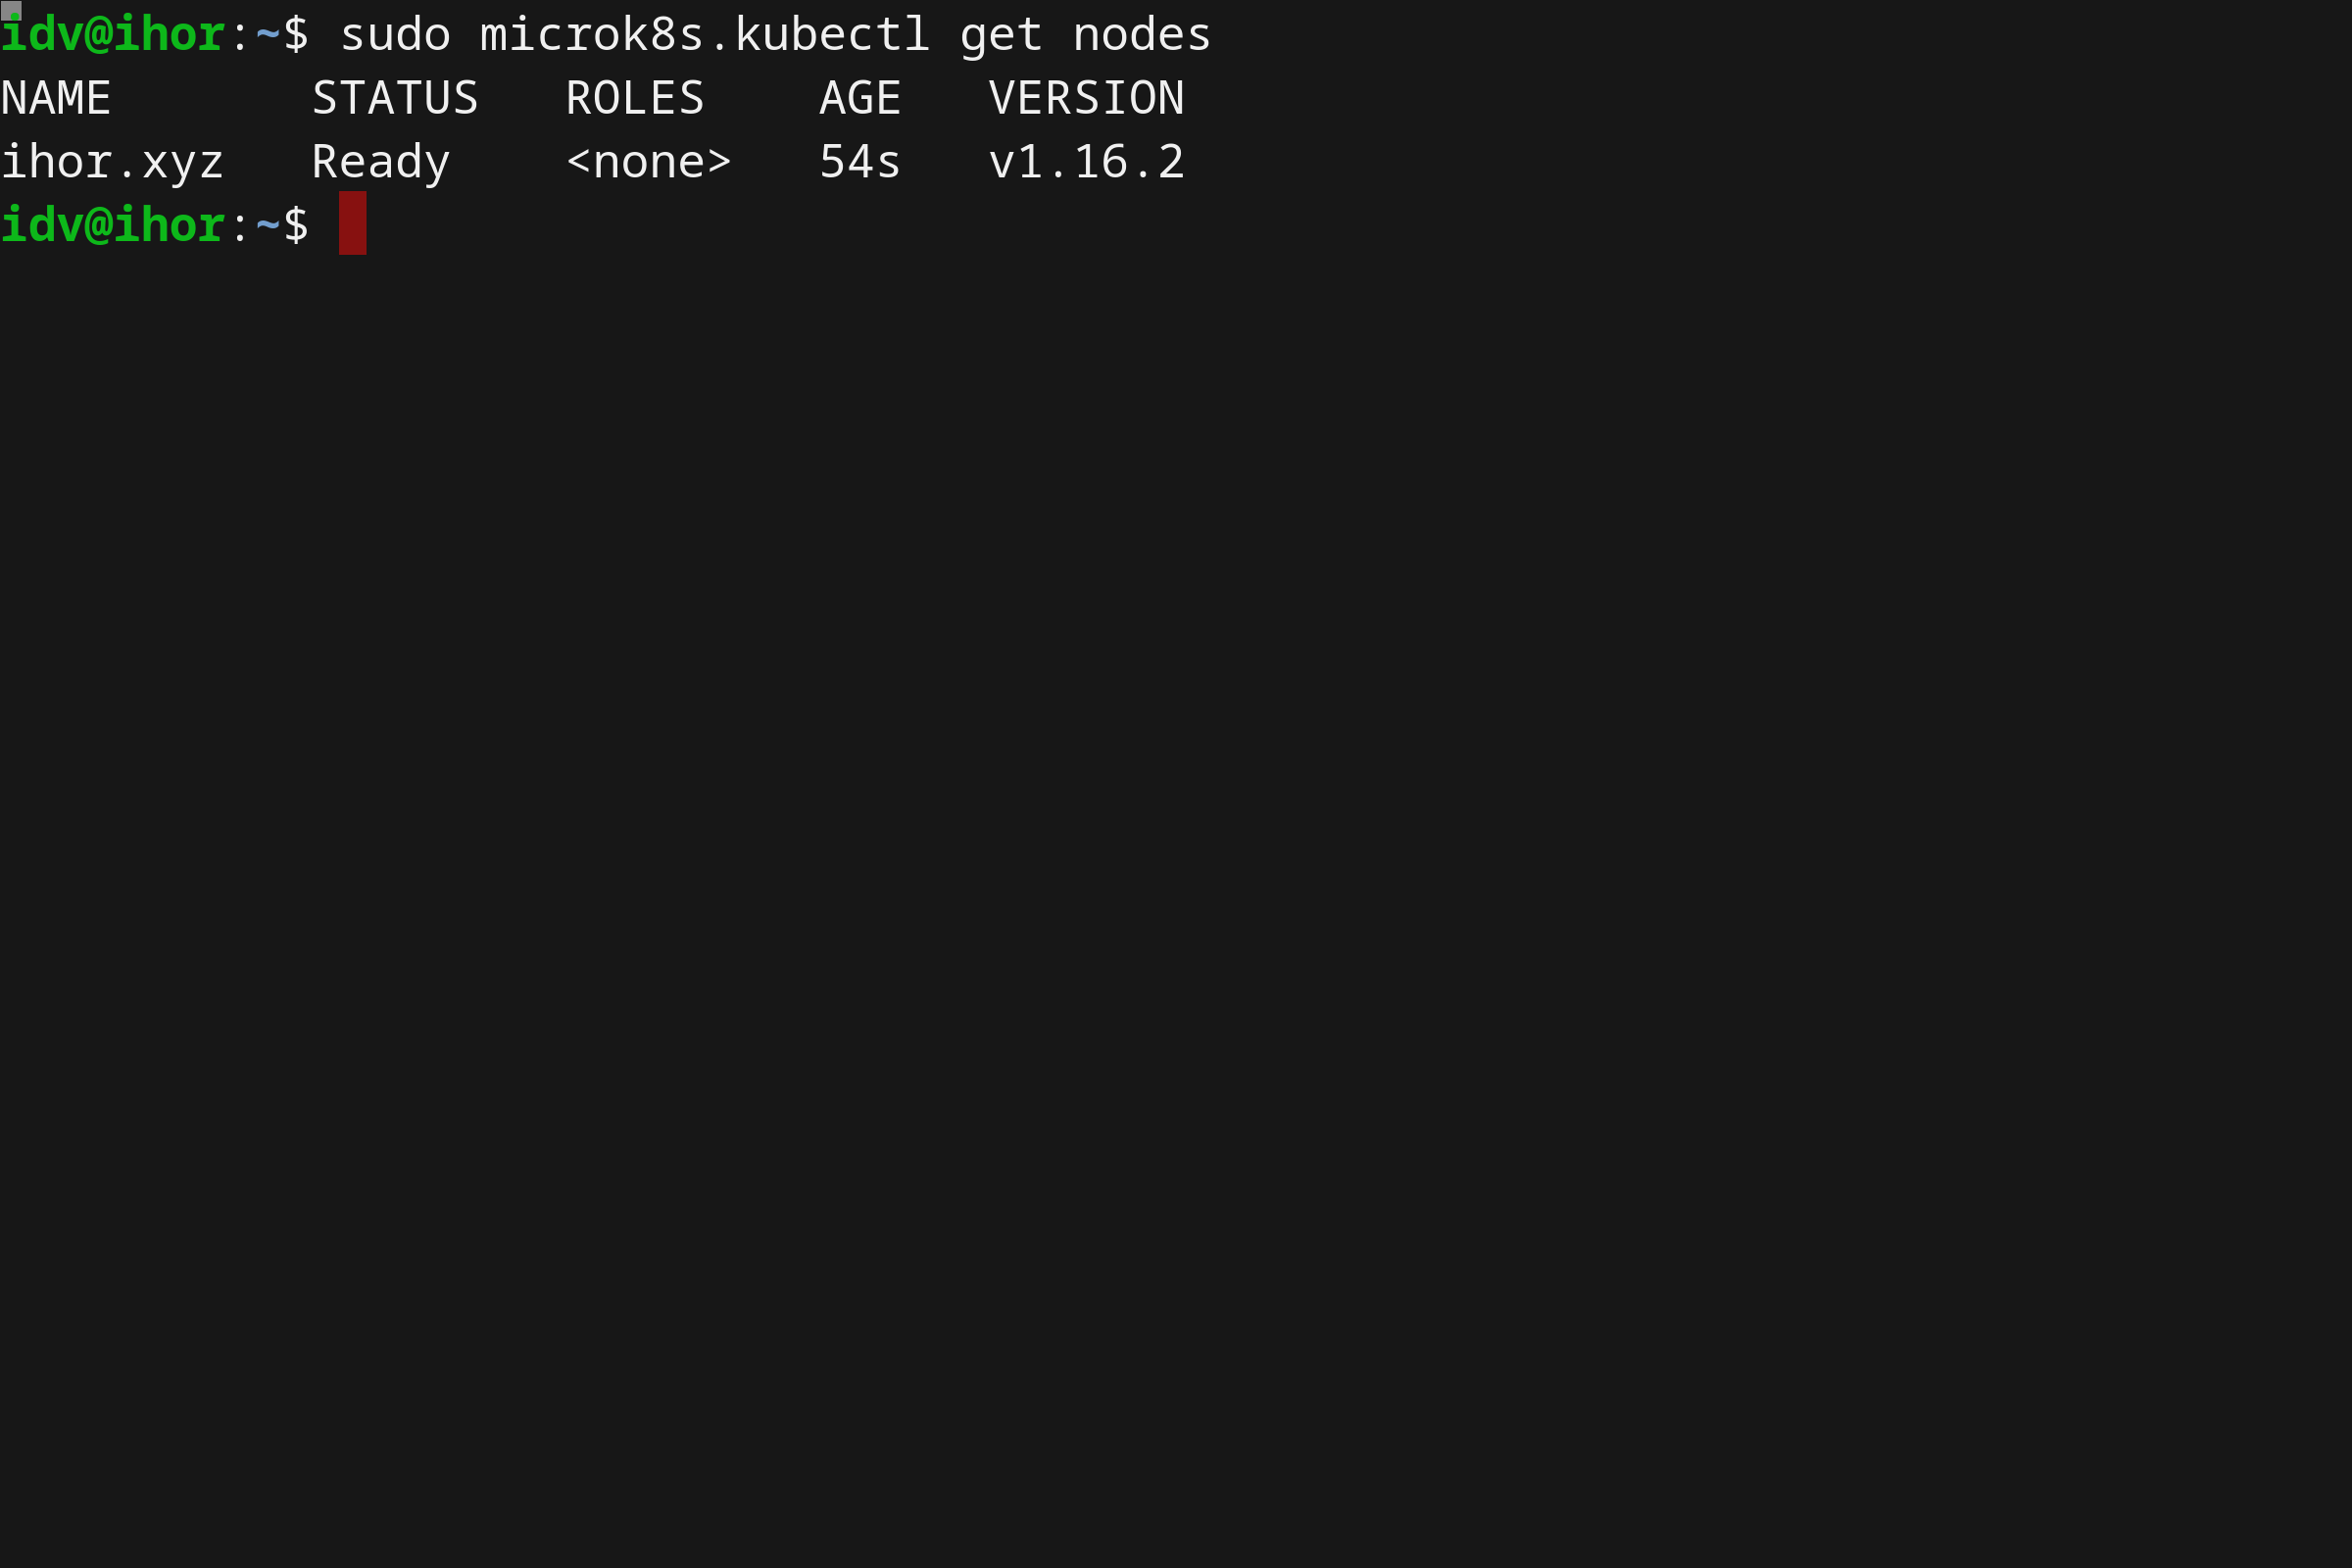
While using the prefix microk8s.kubectl allows for a parallel install of another system-wide kubectl without impact, you can easily get rid of it by using the snap alias command:
sudo snap alias microk8s.kubectl kubectl
This will allow you to simply use kubectl after. You can revert this change using the snap unalias command.
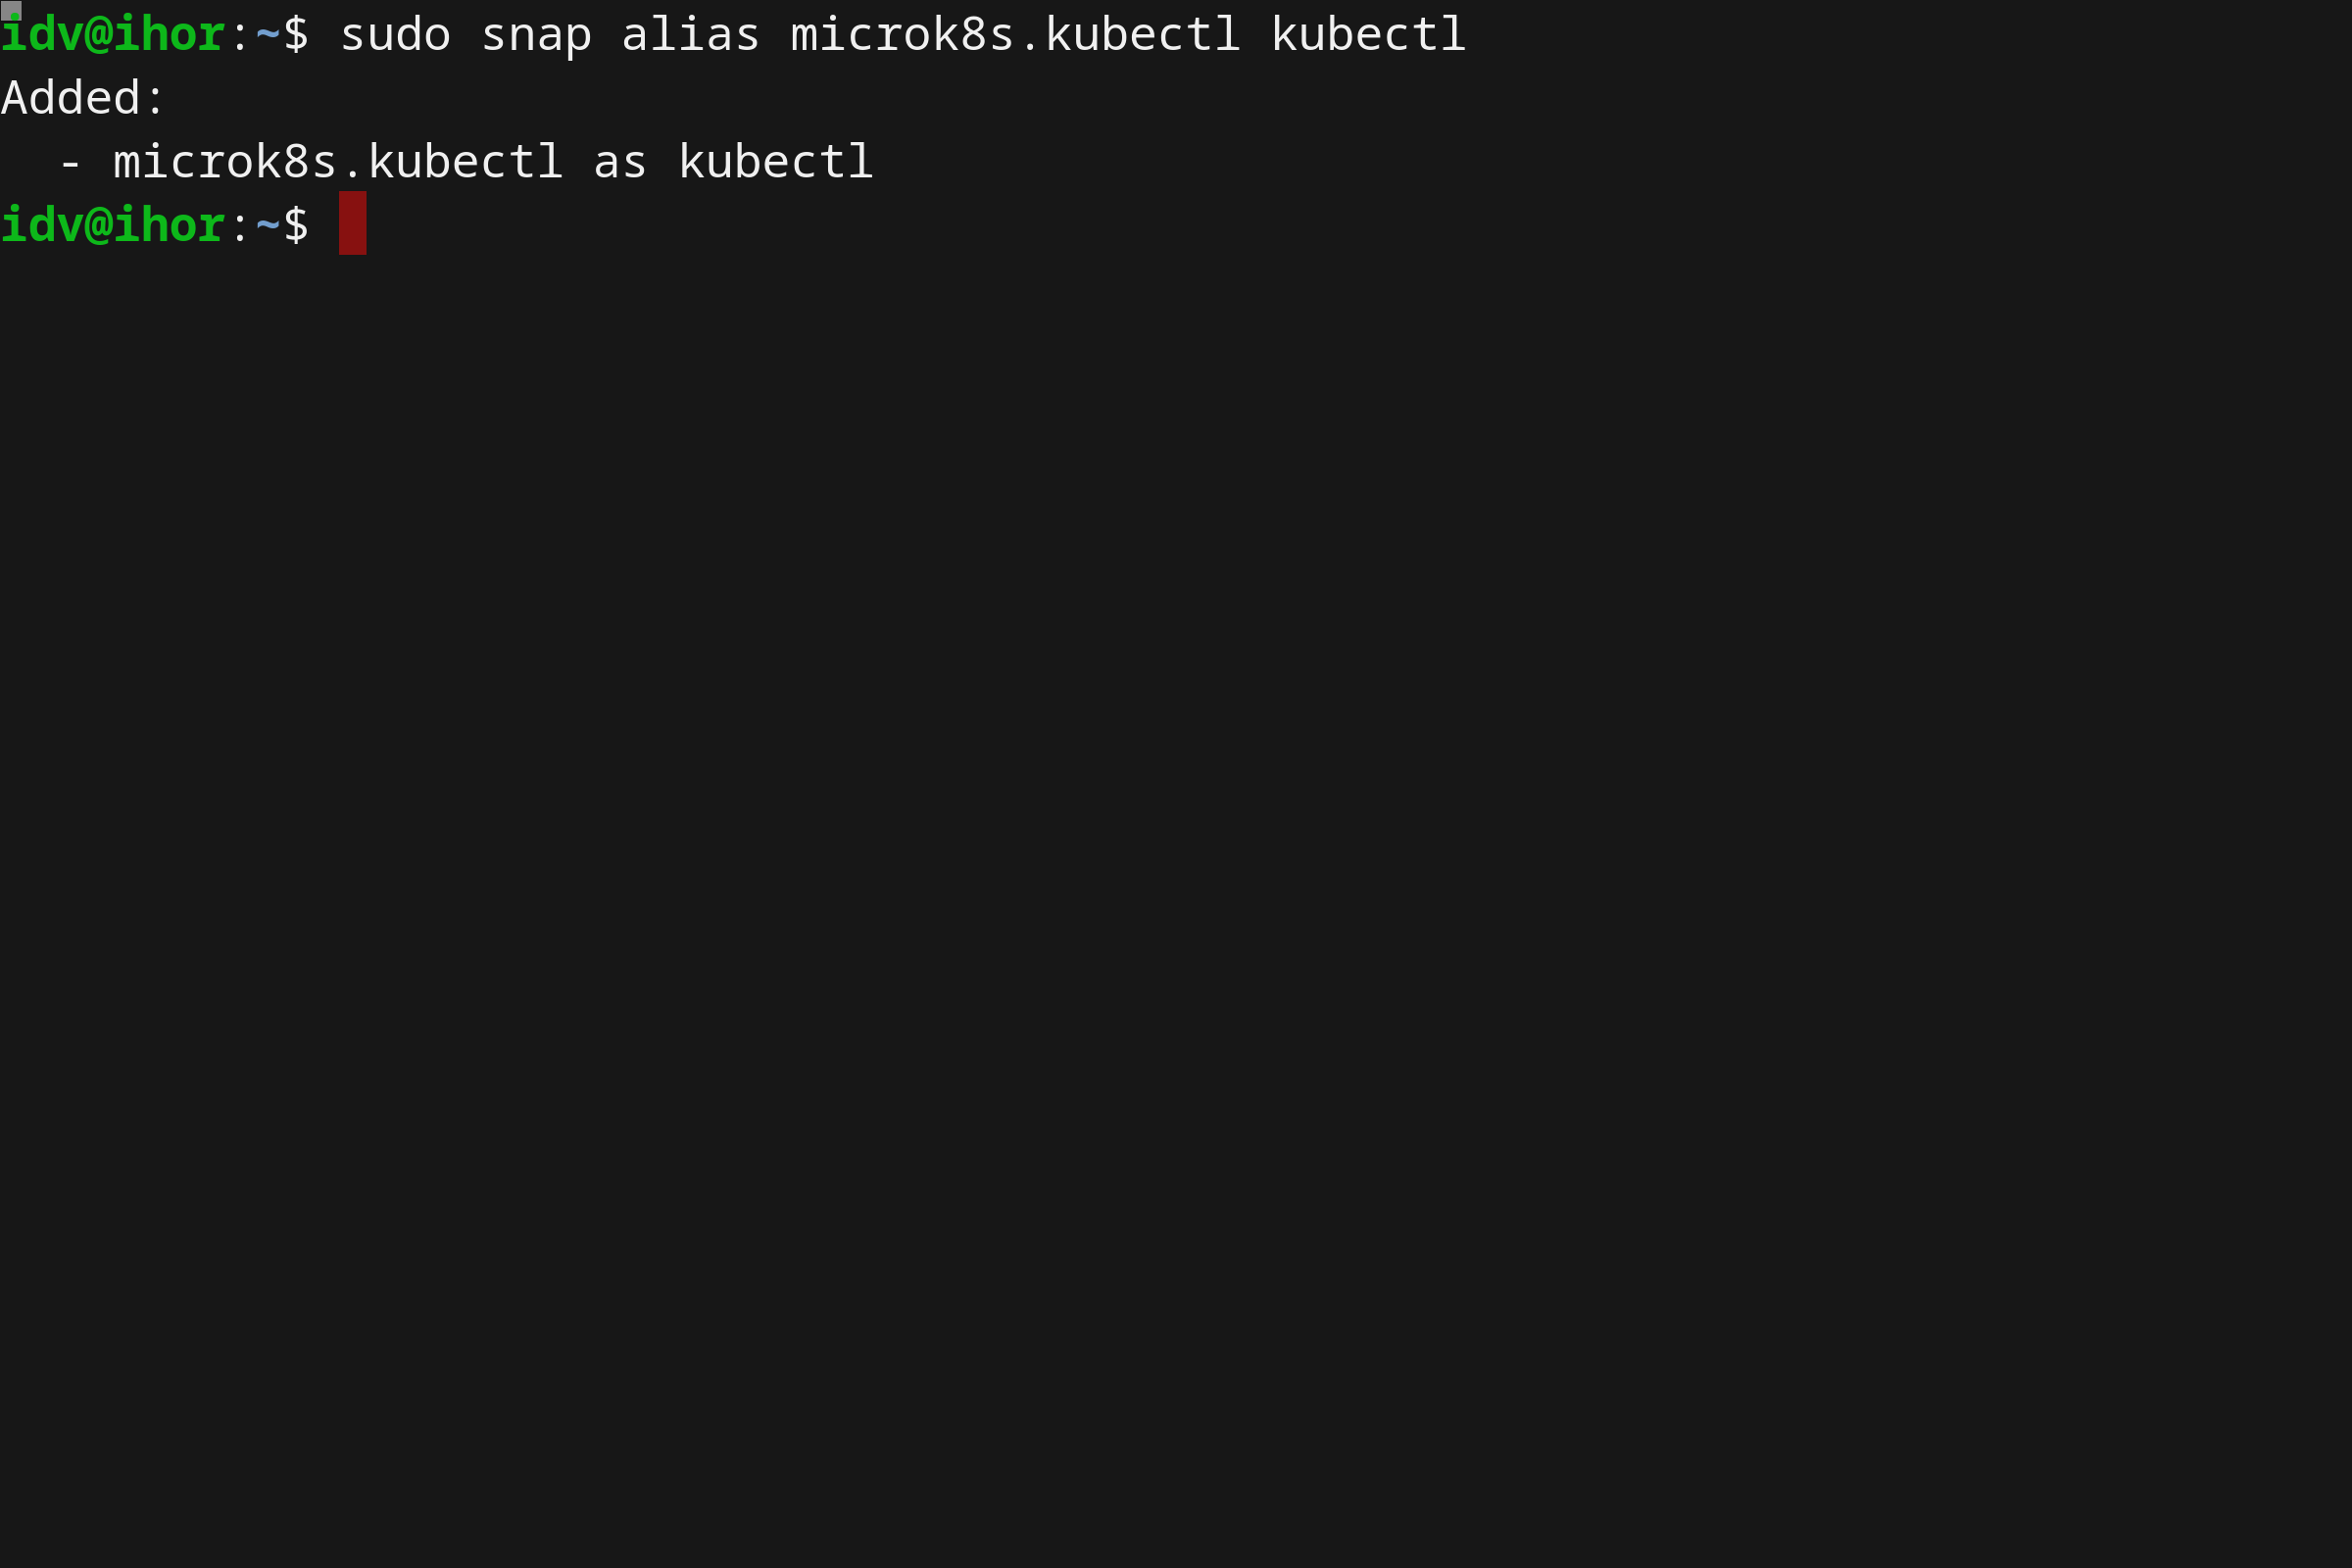
kubectl get nodes
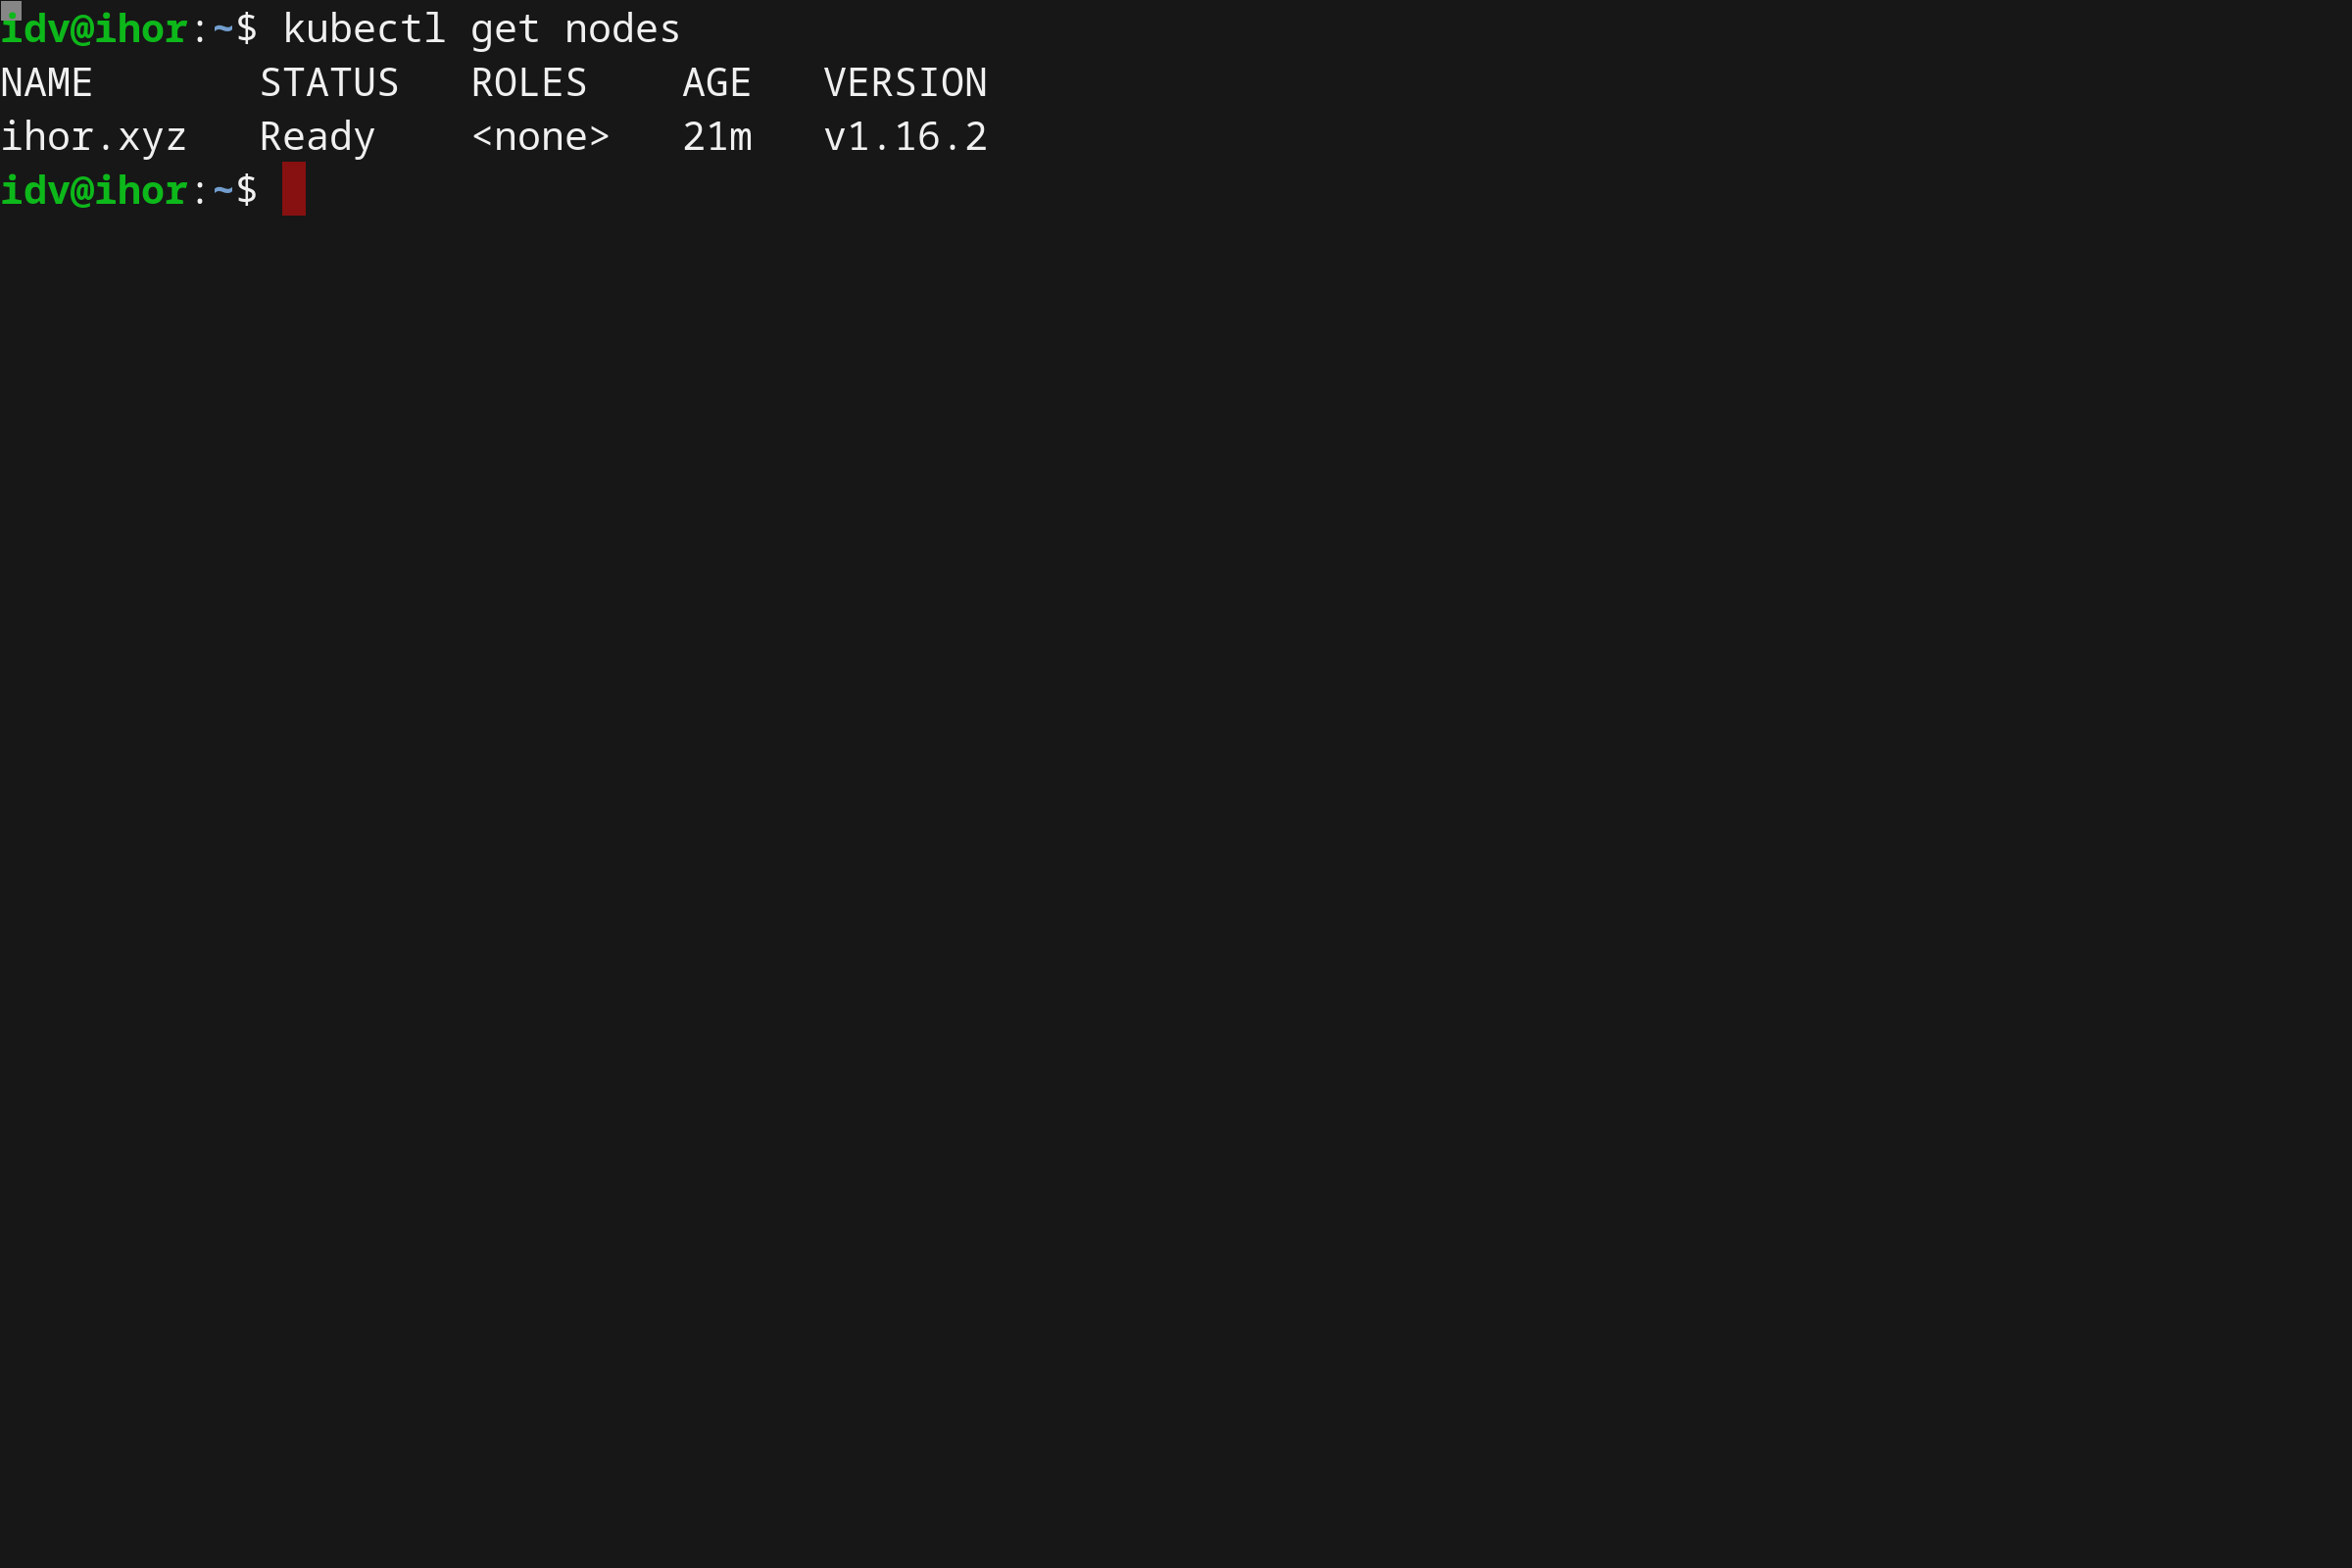
MicroK8s addons
One of the biggest benefits of using Microk8s is the fact that it also supports various add-ons and extensions. What is even more important is they are shipped out of the box, the user just has to enable them.
The full list of extensions can be checked by running the microk8s.status command:
sudo microk8s.status
As of the time of writing this article, the following add-ons are supported:
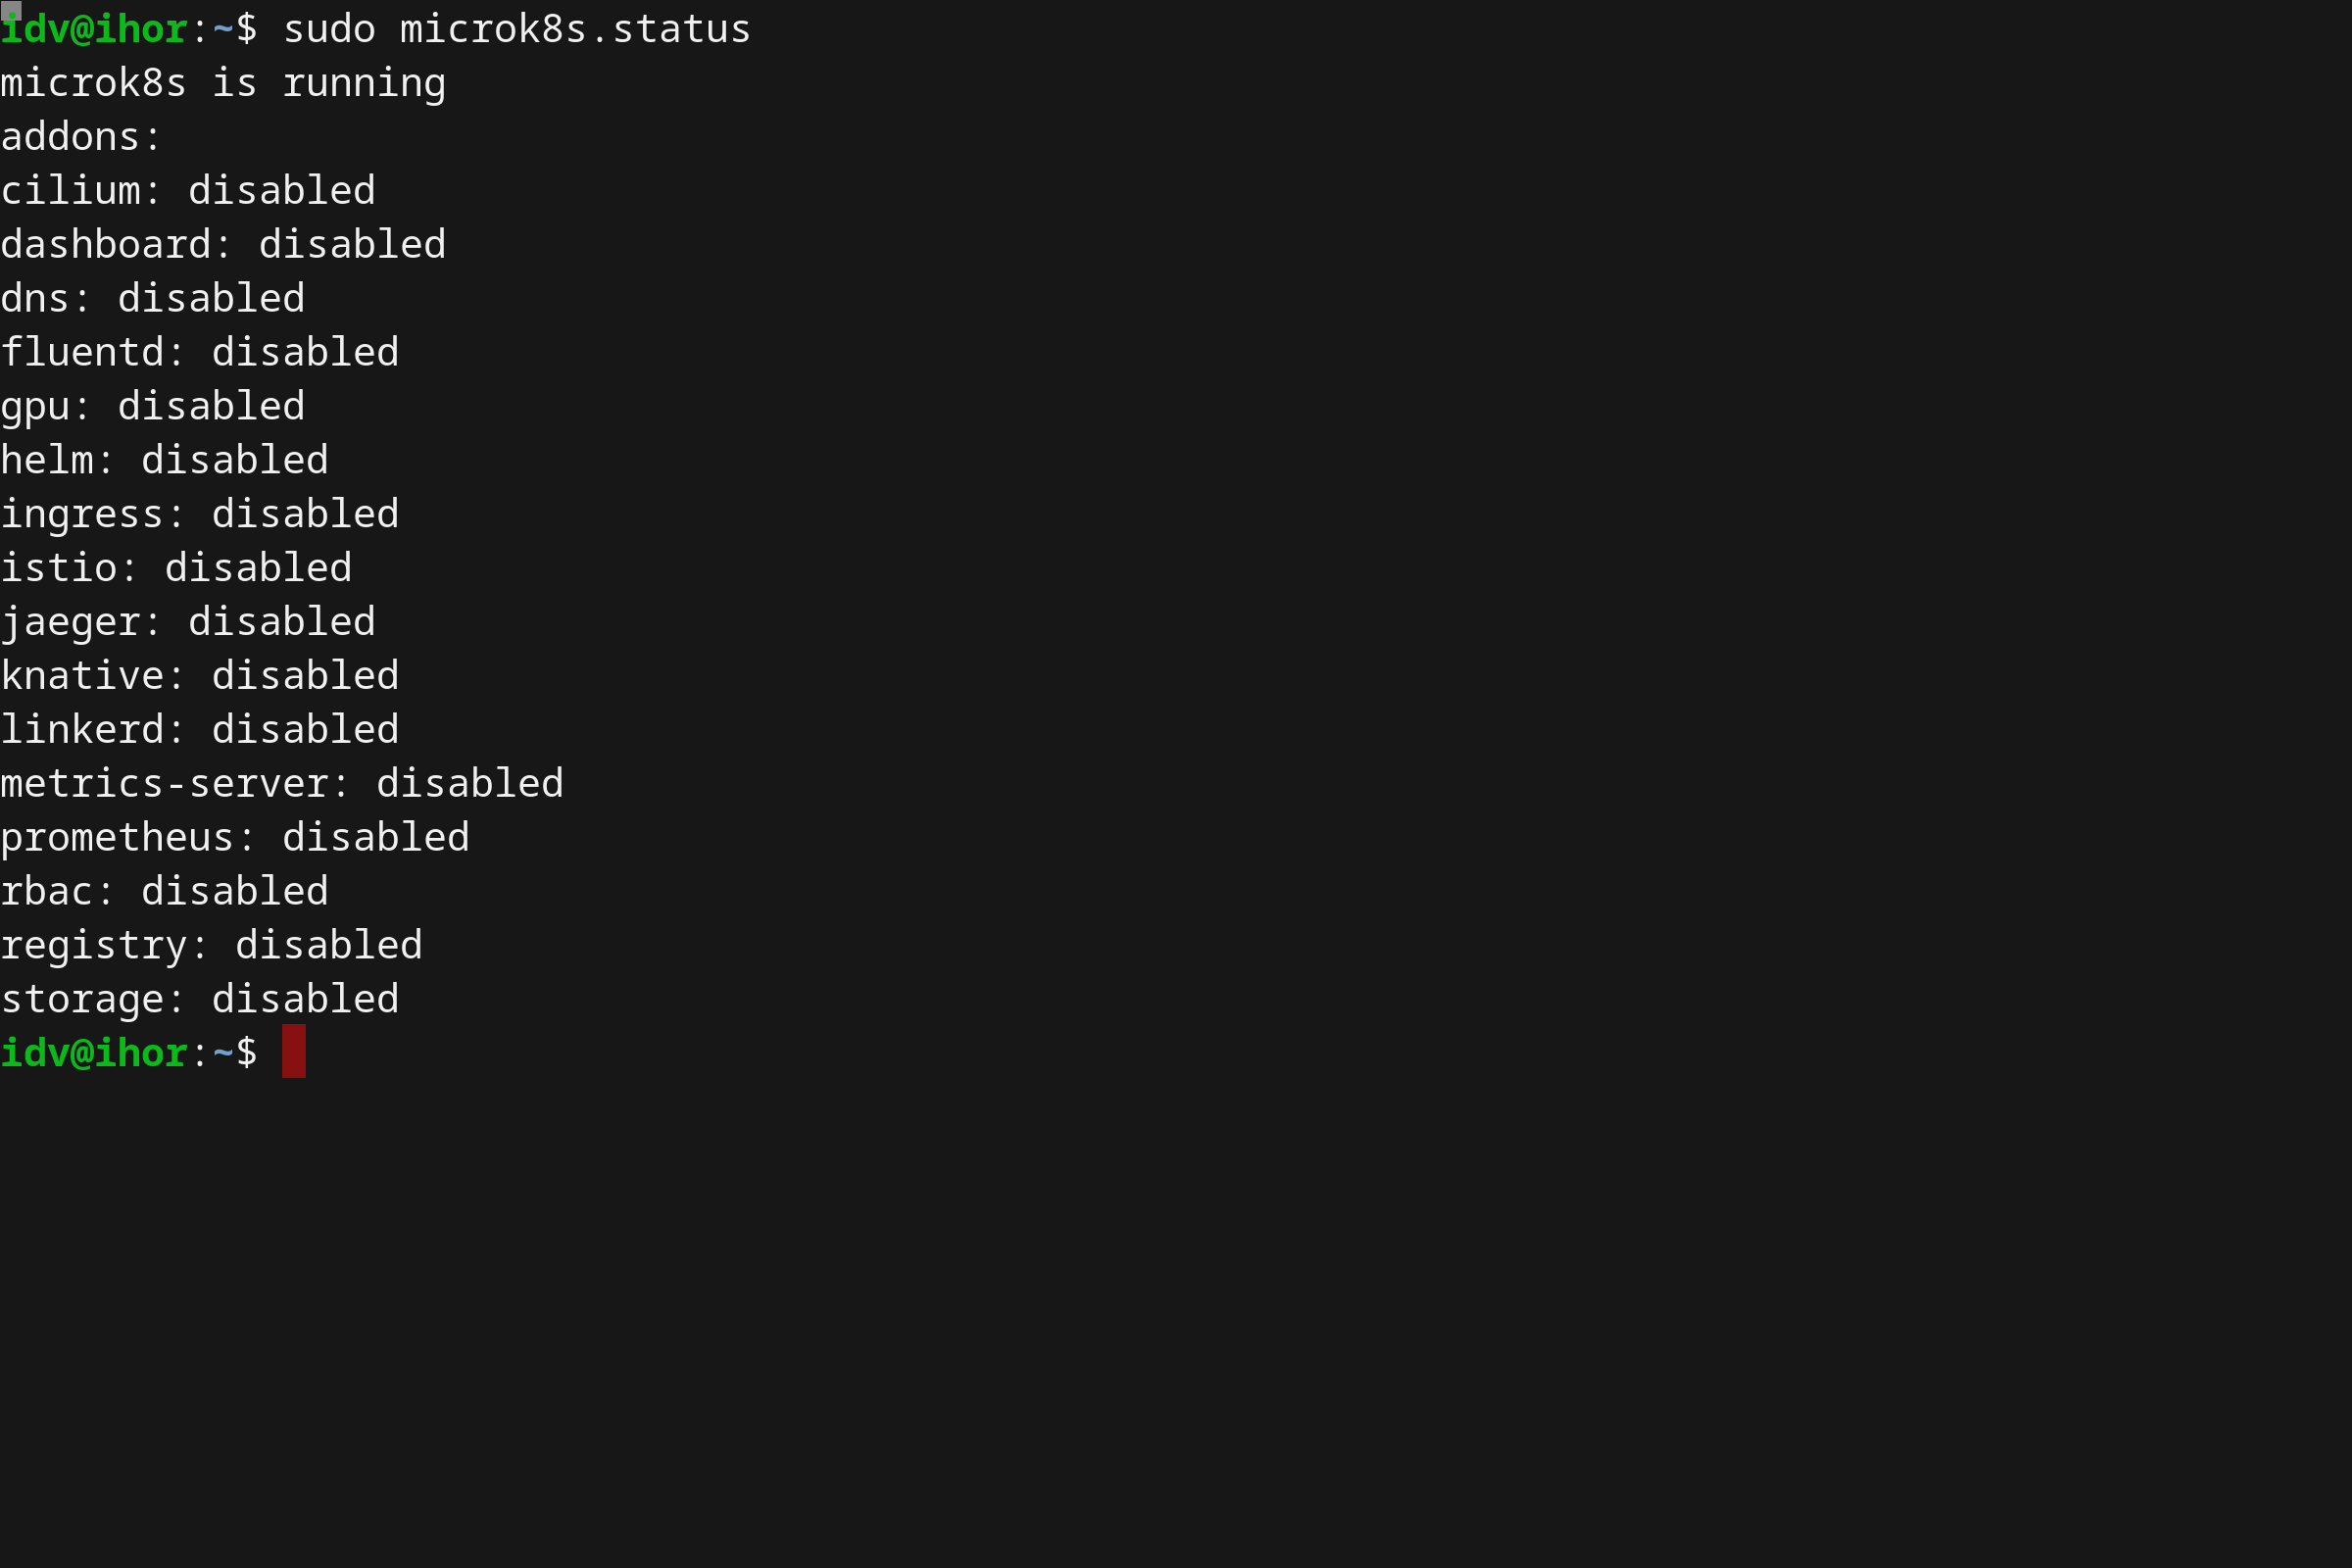
More add-ons are being created and contributed by the community all the time, it definitely helps to check often!
Release channels
sudo snap info microk8s
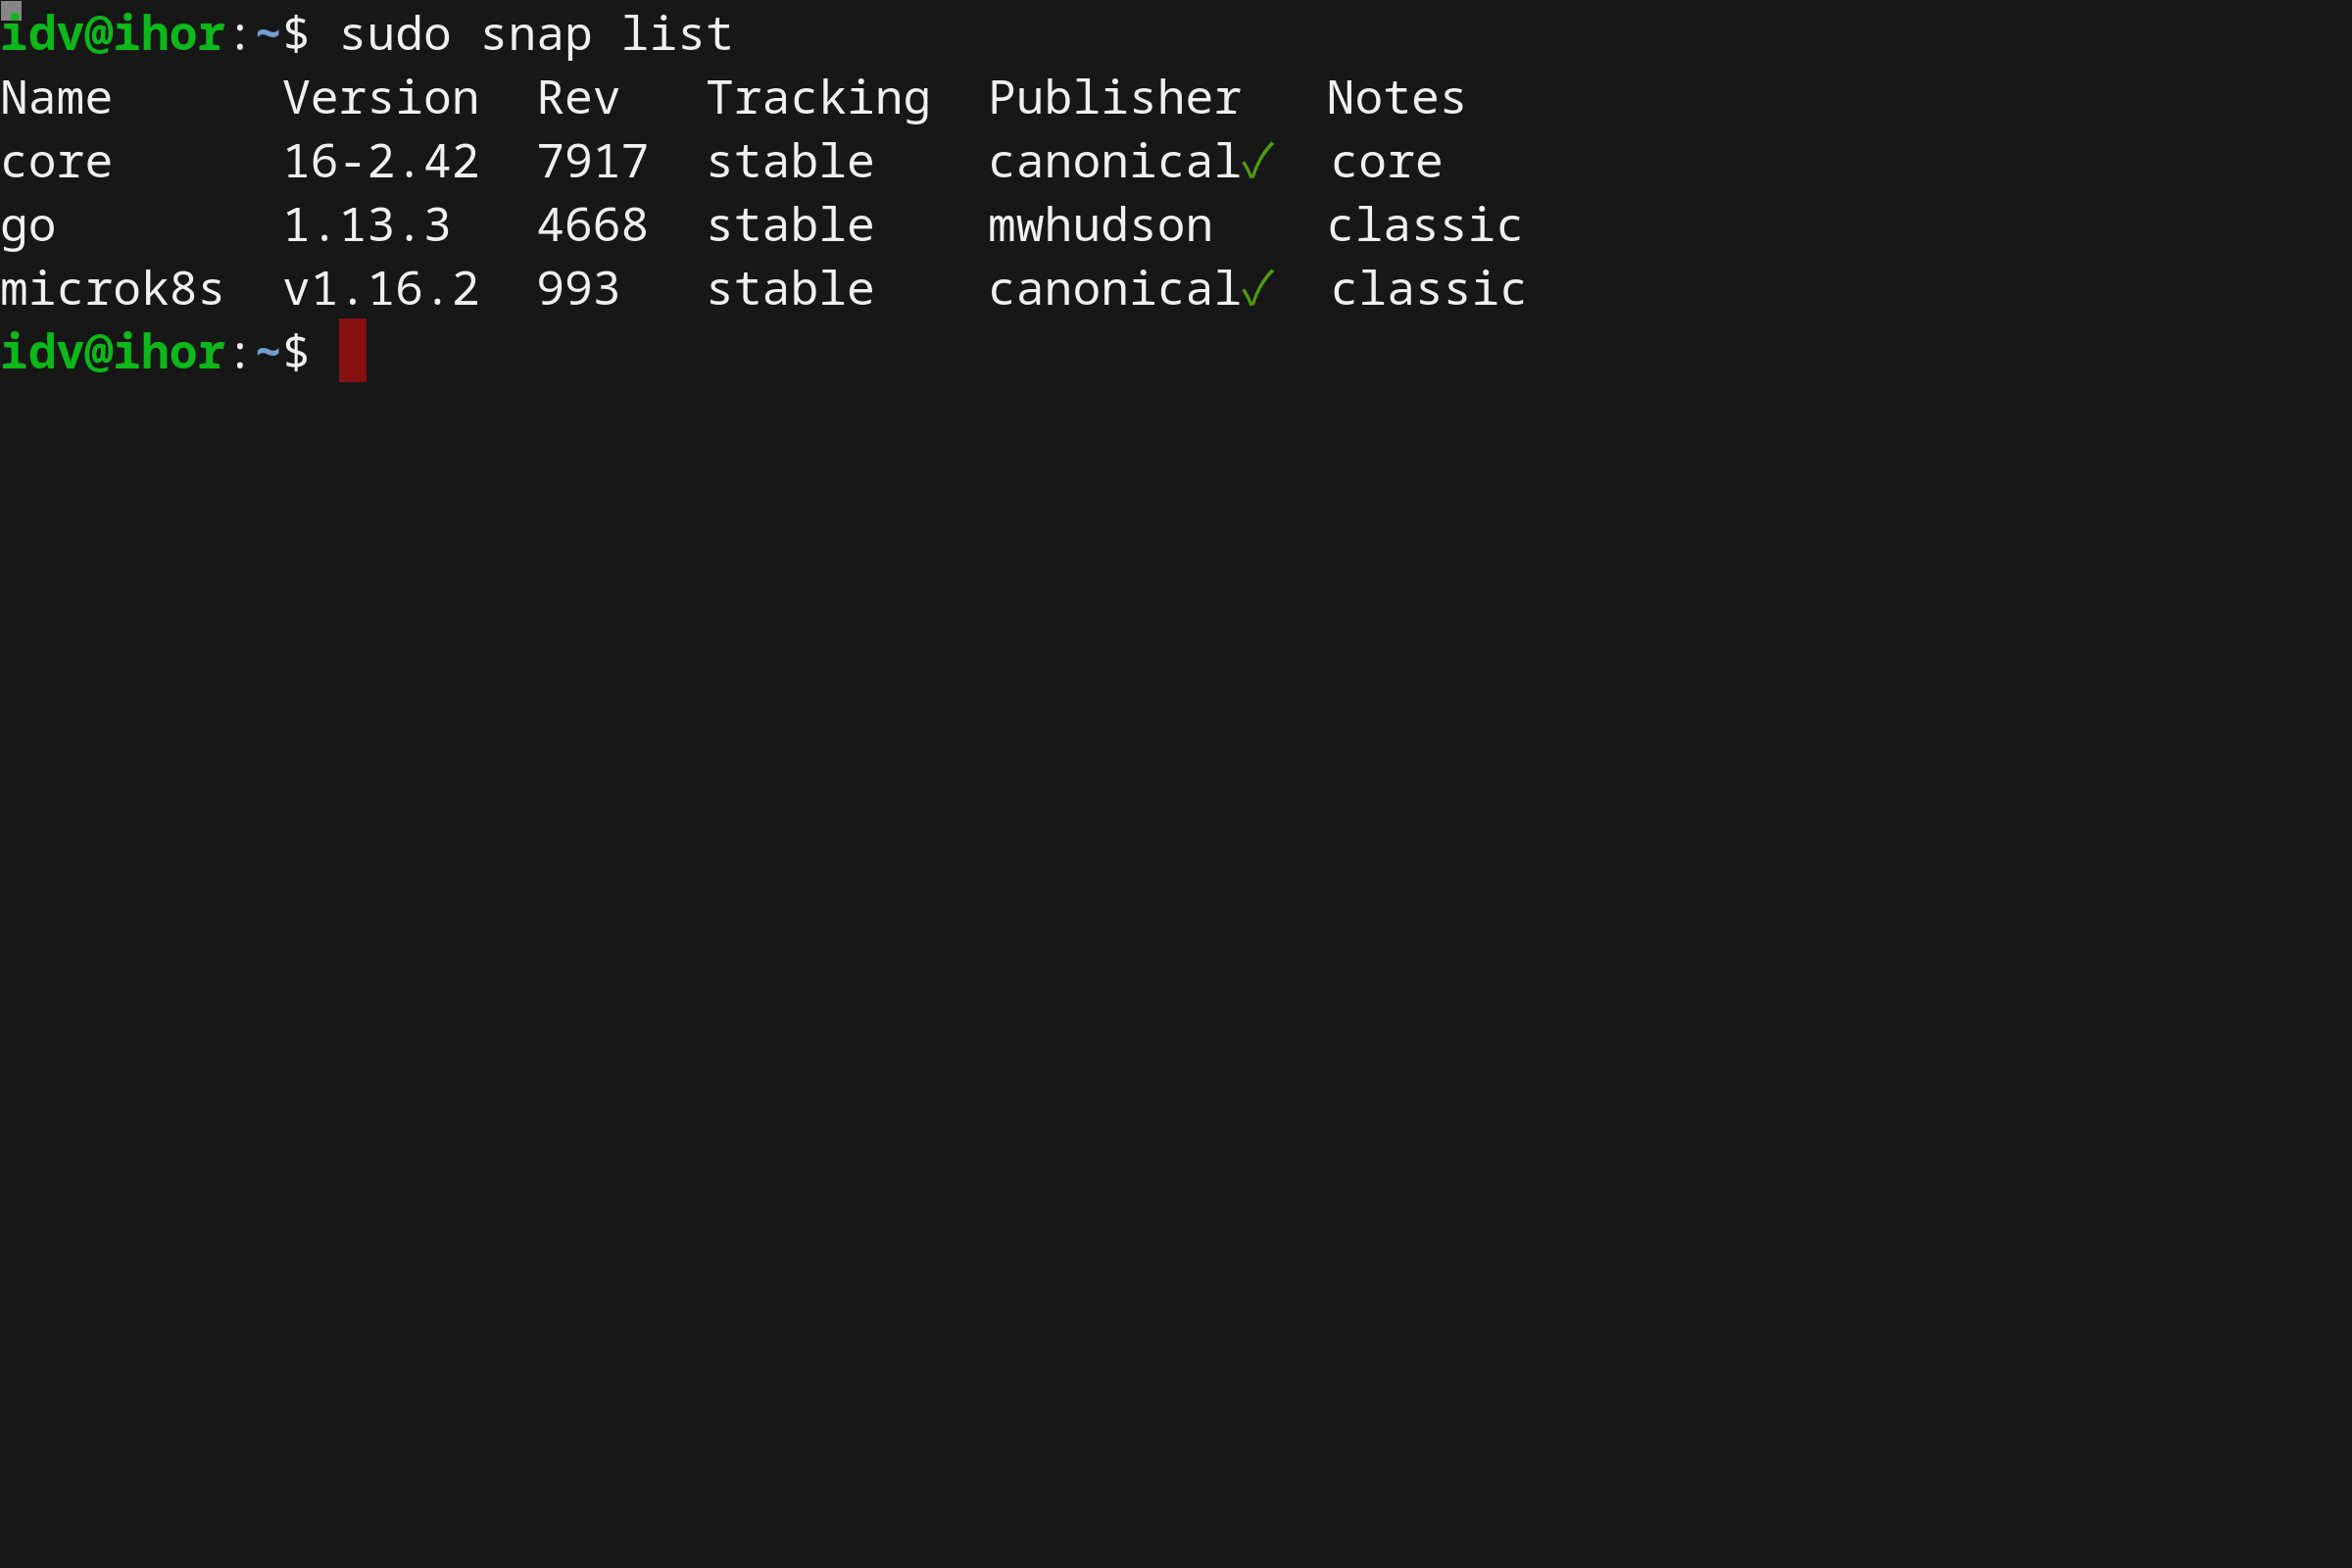
Installing the sample application
In this tutorial we’ll use NGINX as a sample application (the official Docker Hub image).
It will be installed as a Kubernetes deployment:
kubectl create deployment nginx --image=nginx
To verify the installation, let’s run the following:
kubectl get deployments
kubectl get pods
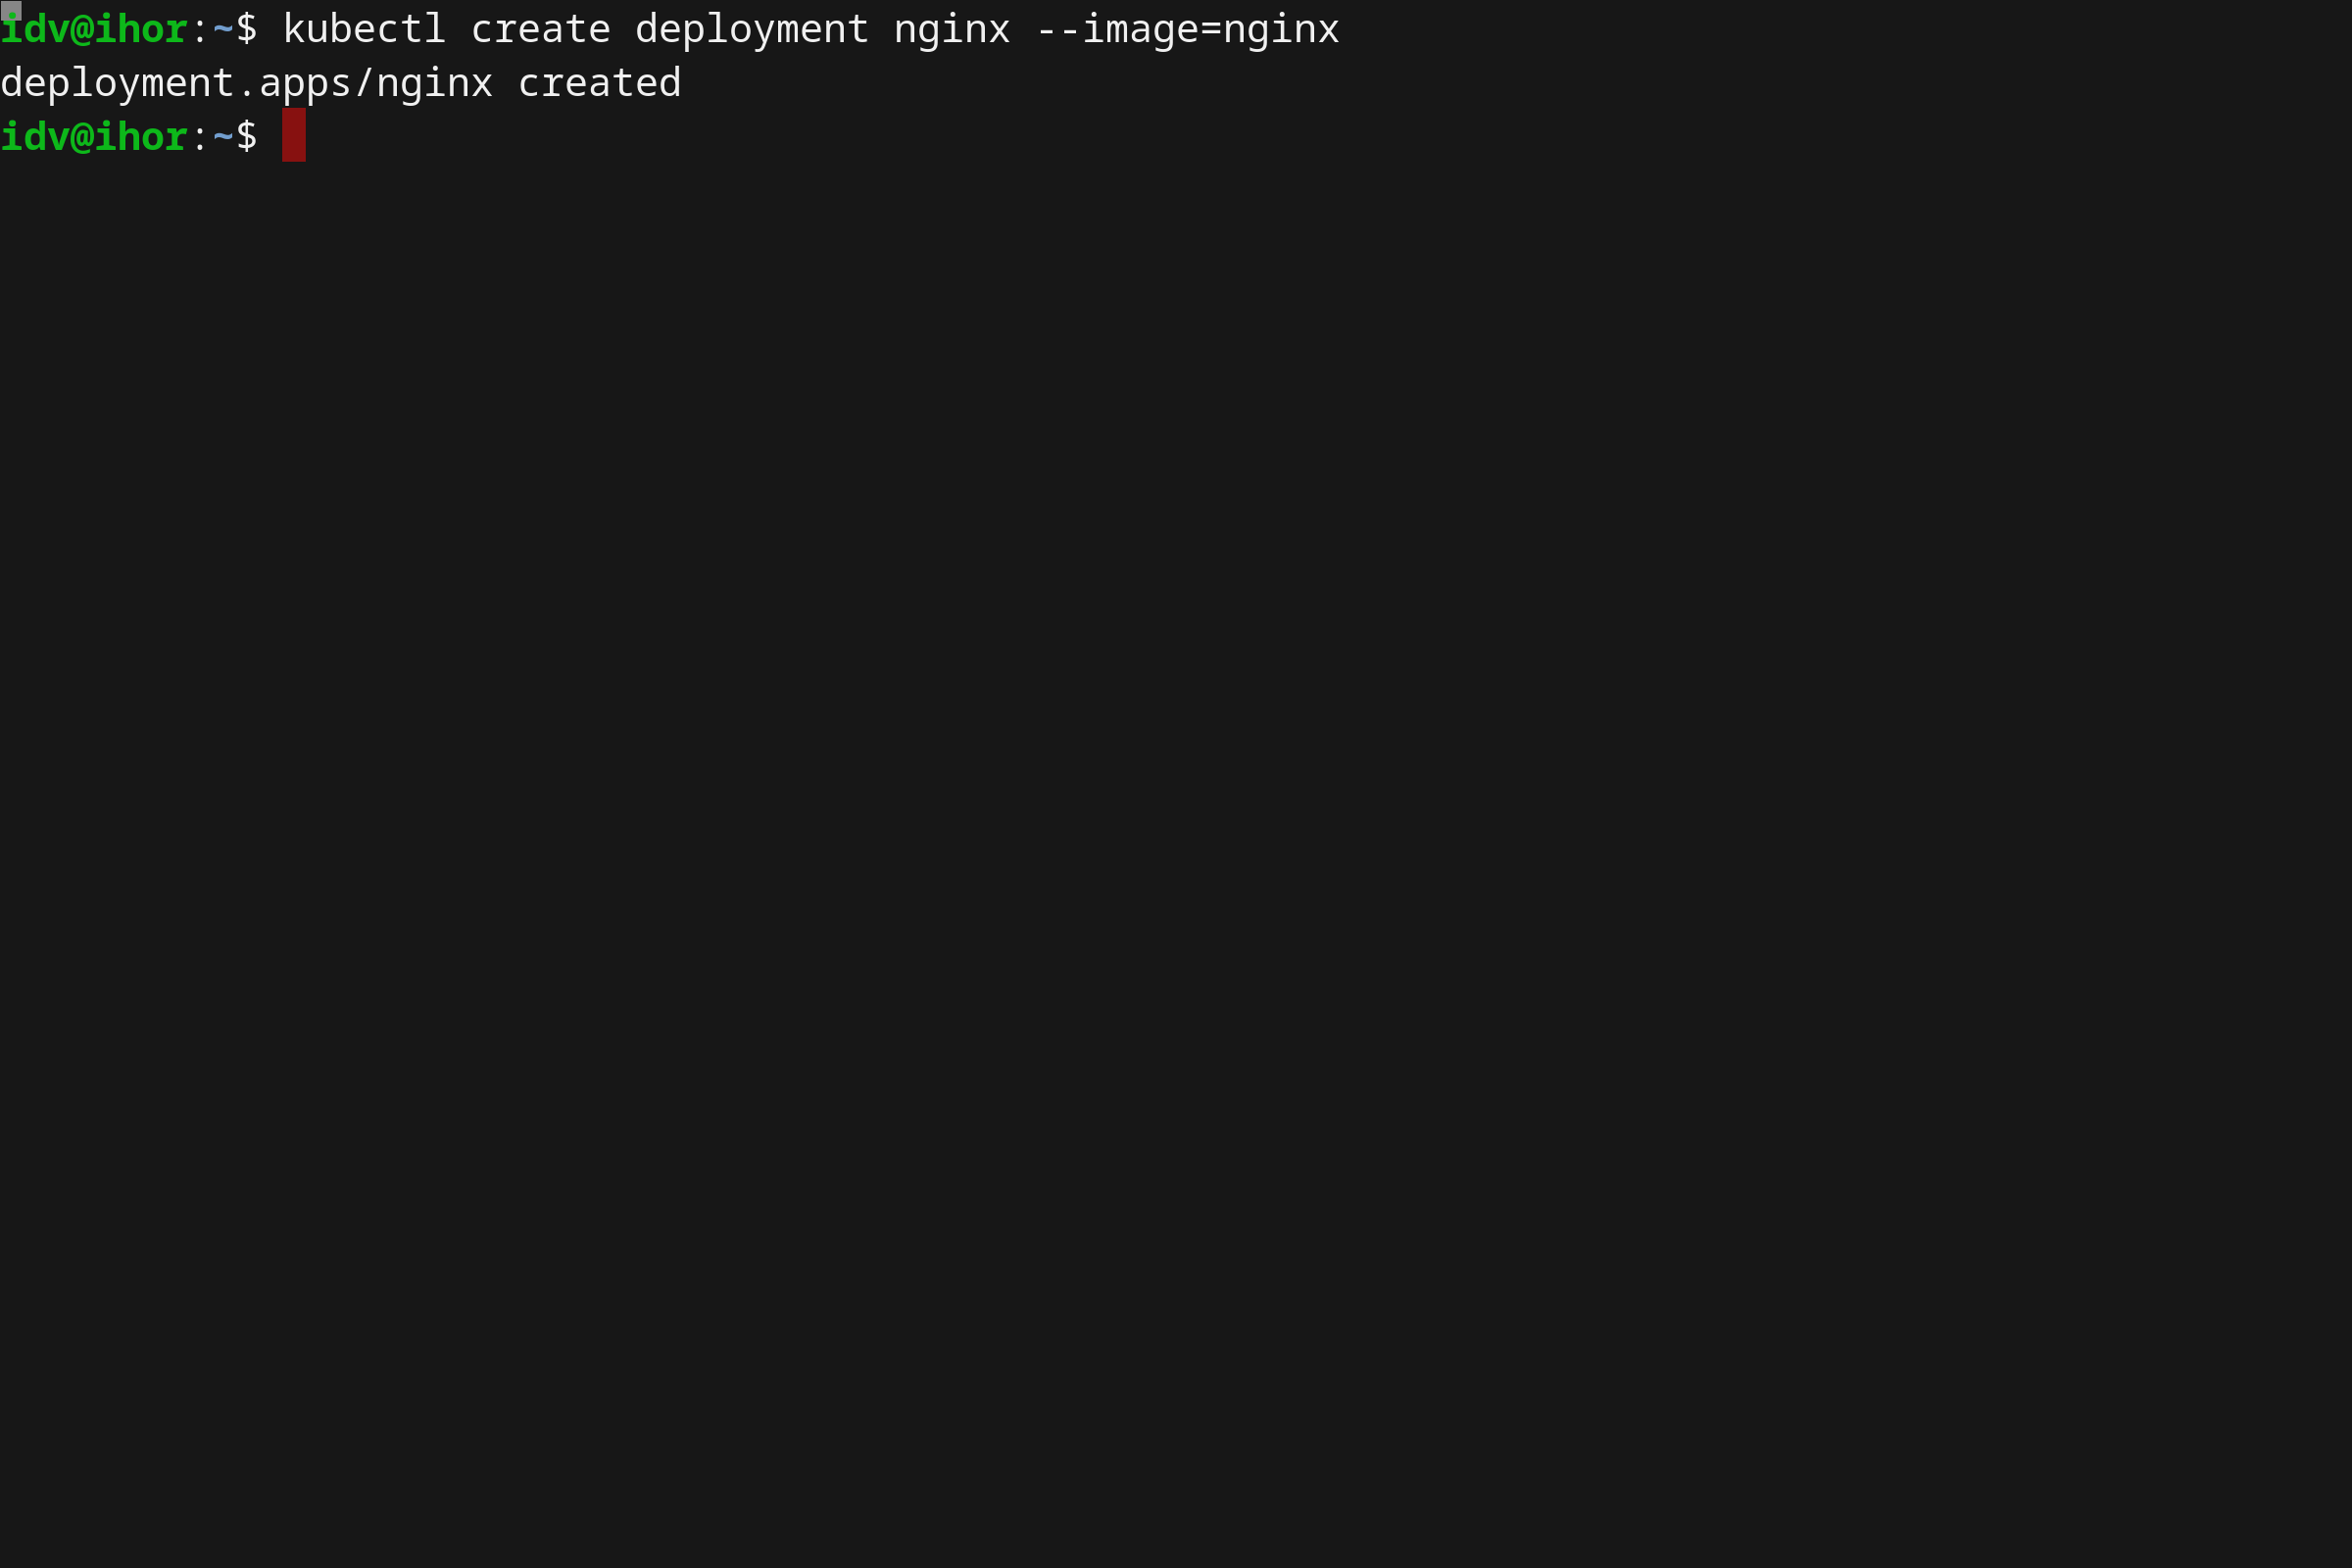
Also, we can retrieve the full output of all available objects within our Kubernetes cluster:
kubectl get all --all-namespaces
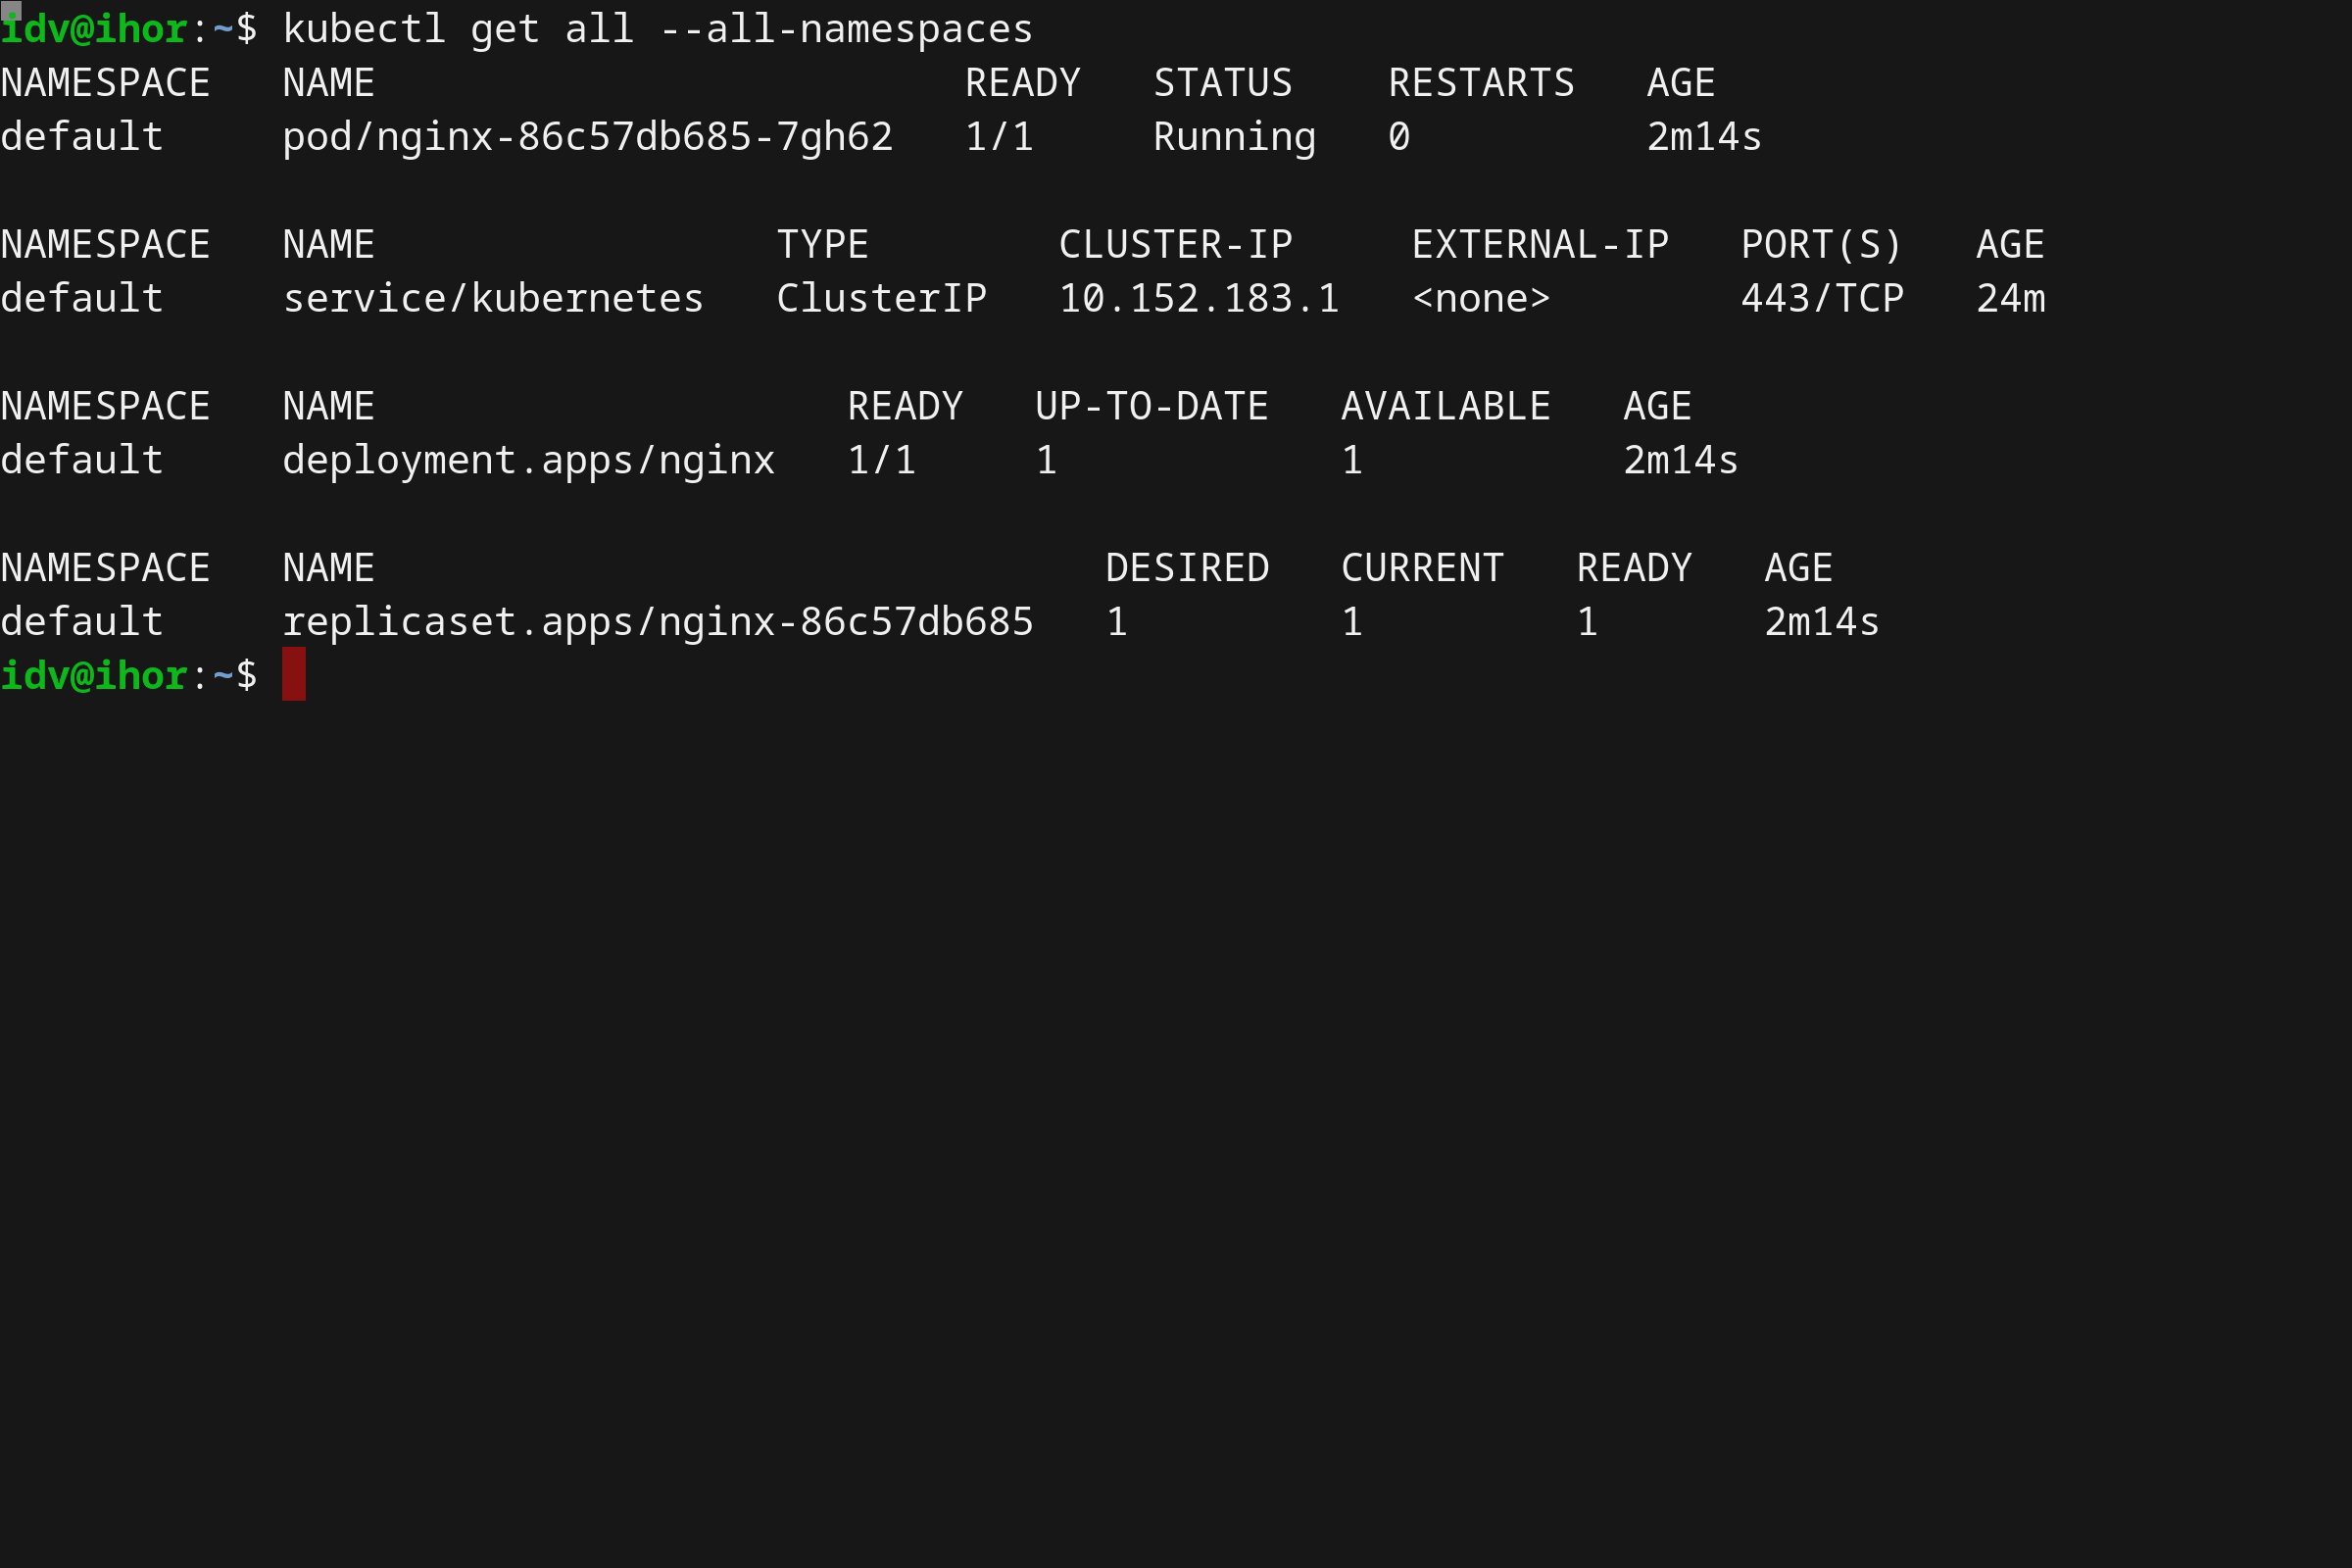
Uninstalling MicroK8s
Uninstalling your microk8s cluster is so easy as uninstalling the snap:
sudo snap remove microk8s
Screencast

Grokkin' the Docs
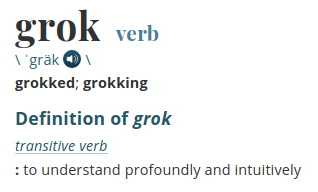
Definition courtesy of Merriam Webster online dictionary
Intro - Observations of a new SIG Docs contributor
I began contributing to the SIG Docs community in August 2019. Sometimes I feel like I am a stranger in a strange land adapting to a new community: investigating community organization, understanding contributor society, learning new lessons, and incorporating new jargon. I'm an observer as well as a contributor.
Observation 01: Read the Contribute pages!
I contributed code and documentation to OpenStack, OPNFV, and Acumos, so I thought contributing to the Kubernetes documentation would be the same. I was wrong. I should have thoroughly read the Contribute to Kubernetes docs pages instead of skimming them.
I am very familiar with the git/gerrit workflow. With those tools, a contributor clones
the master repo and then creates a local branch. Kubernetes uses a different
approach, called Fork and Pull. Each contributor forks the master repo, and
then the contributor pushes work to their fork before creating a pull request. I
created a simple pull request (PR), following the instructions in the Start
contributing page's Submit a pull
request
section. This section describes how to make a documentation change using the
GitHub UI. I learned that this method is fine for a change that requires a
single commit to fix. However, this method becomes complicated when you have to
make additional updates to your PR. GitHub creates a new commit for each change
made using the GitHub UI. The Kubernetes GitHub org requires squashing commits.
The Start contributing page didn't mention squashing commits, so I looked at
the GitHub and git documentation. I could not squash my commits using the GitHub
UI. I had to git fetch and git checkout my pull request locally, squash the
commits using the command line, and then push my changes. If the Start
contributing had mentioned squashing commits, I would have worked from a local
clone instead of using the GitHub UI.
Observation 02: Reach out and ping someone
While working on my first PRs, I had questions about working from a local clone
and about keeping my fork updated from upstream master. I turned to searching
the internet instead of asking on the Kubernetes Slack
#sig-docs channel. I used the wrong process to update my fork, so I had to git rebase my PRs, which did not go well at all. As a result, I closed those PRs
and submitted new ones. When I asked for help on the #sig-docs channel,
contributors posted useful links, what my local git config file should look
like, and the exact set of git commands to run. The process used by contributors
was different than the one defined in the Intermediate contributing page.
I would have saved myself so much time if I had asked what GitHub workflow to
use. The more community knowledge that is documented, the easier it is for new
contributors to be productive quickly.
Observation 03: Don't let conflicting information ruin your day
The Kubernetes community has a contributor guide for
code
and another one for documentation. The
guides contain conflicting information on the same topic. For example, the SIG
Docs GitHub process recommends creating a local branch based on
upstream/master. The Kubernetes Community Contributor
Guide
advocates updating your fork from upstream and then creating a local branch
based on your fork. Which process should a new contributor follow? Are the two
processes interchangeable? The best place to ask questions about conflicting
information is the #sig-docs or #sig-contribex channels. I asked for
clarification about the GitHub workflows in the #sig-contribex channel.
@cblecker provided an extremely detailed response, which I used to update the
Intermediate contributing page.
Observation 04: Information may be scattered
It's common for large open source projects to have information scattered around various repos or duplicated between repos. Sometimes groups work in silos, and information is not shared. Other times, a person leaves to work on a different project without passing on specialized knowledge. Documentation gaps exist and may never be rectified because of higher priority items. So new contributors may have difficulty finding basic information, such as meeting details.
Attending SIG Docs meetings is a great way to become involved. However, people have had a hard time locating the meeting URL. Most new contributors ask in the #sig-docs channel, but I decided to locate the meeting information in the docs. This required several clicks over multiple pages. How many new contributors miss meetings because they can't locate the meeting details?
Observation 05: Patience is a virtue
A contributor may wait days for feedback on a larger PR. The process from submission to final approval may take weeks instead of days. There are two reasons for this: 1) most reviewers work part-time on SIG Docs; and 2) reviewers want to provide meaningful reviews. "Drive-by reviewing" doesn't happen in SIG Docs! Reviewers check for the following:
Do the commit message and PR description adequately describe the change?
Does the PR follow the guidelines in the style and content guides?
- Overall, is the grammar and punctuation correct?
- Is the content clear, concise, and appropriate for non-native speakers?
- Does the content stylistically fit in with the rest of the documentation?
- Does the flow of the content make sense?
- Can anything be changed to make the content better, such as using a Hugo shortcode?
- Does the content render correctly?
Is the content technically correct?
Sometimes the review process made me feel defensive, annoyed, and frustrated. I'm sure other contributors have felt the same way. Contributors need to be patient! Writing excellent documentation is an iterative process. Reviewers scrutinize PRs because they want to maintain a high level of quality in the documentation, not because they want to annoy contributors!
Observation 06: Make every word count
Non-native English speakers read and contribute to the Kubernetes documentation. When you are writing content, use simple, direct language in clear, concise sentences. Every sentence you write may be translated into another language, so remove words that don't add substance. I admit that implementing these guidelines is challenging at times.
Issues and pull requests aren't translated into other languages. However, you
should still follow the aforementioned guidelines when you write the description
for an issue or pull request. You should add details and background
information to an issue so the person doing triage doesn't have to apply the
triage/needs-information label. Likewise, when you create a pull request, you
should add enough information about the content change that reviewers don't have
to figure out the reason for the pull request. Providing details in clear,
concise language speeds up the process.
Observation 07: Triaging issues is more difficult than it should be
In SIG Docs, triaging issues requires the ability to distinguish between support, bug, and feature requests not only for the documentation but also for Kubernetes code projects. How to route, label, and prioritize issues has become easier week by week. I'm still not 100% clear on which SIG and/or project is responsible for which parts of the documentation. The SIGs and Working Groups page helps, but it is not enough. At a page level in the documentation, it's not always obvious which SIG or project has domain expertise. The page's front matter sometimes list reviewers but never lists a SIG or project. Each page should indicate who is responsible for content, so that SIG Docs triagers know where to route issues.
Observation 08: SIG Docs is understaffed
Documentation is the number one driver of software adoption1.
Many contributors devote a small amount of time to SIG Docs but only a handful are trained technical writers. Few companies have hired tech writers to work on Kubernetes docs at least half-time. That's very disheartening for online documentation that has had over 53 million unique page views from readers in 229 countries year to date in 2019.
SIG Docs faces challenges due to lack of technical writers:
- Maintaining a high quality in the Kubernetes documentation:
There are over 750 pages of documentation. That's 750 pages to check for
stale content on a regular basis. This involves more than running a link
checker against the
kubernetes/websiterepo. This involves people having a technical understanding of Kubernetes, knowing which code release changes impact documentation, and knowing where content is located in the documentation so that all impacted pages and example code files are updated in a timely fashion. Other SIGs help with this, but based on the number of issues created by readers, enough people aren't working on keeping the content fresh. - Reducing the time to review and merge a PR:
The larger the size of the PR, the longer it takes to get the
lgtmlabel and eventual approval. Mysize/Mand larger PRs took from five to thirty days to approve. Sometimes I politely poked reviewers to review again after I had pushed updates. Other times I asked on the #sig-docs channel for any approver to take a look and approve. People are busy. People go on vacation. People also move on to new roles that don't involve SIG Docs and forget to remove themselves from the reviewer and approver assignment file. A large part of the time-to-merge problem is not having enough reviewers and approvers. The other part is the high barrier to becoming a reviewer or approver, much higher than what I've seen on other open source projects. Experienced open source tech writers who want to contribute to SIG Docs aren't fast-tracked into approver and reviewer roles. On one hand, that high barrier ensures that those roles are filled by folks with a minimum level of Kubernetes documentation knowledge; on the other hand, it might deter experienced tech writers from contributing at all, or from a company allocating a tech writer to SIG Docs. Maybe SIG Docs should consider deviating from the Kubernetes community requirements by lowering the barrier to becoming a reviewer or approver, on a case-by-case basis, of course. - Ensuring consistent naming across all pages: Terms should be identical to what is used in the Standardized Glossary. Being consistent reduces confusion. Tracking down and fixing these occurrences is time-consuming but worthwhile for readers.
- Working with the Steering Committee to create project documentation guidelines:
The Kubernetes Repository Guidelines don't mention documentation at all. Between a
project's GitHub docs and the Kubernetes docs, some projects have almost
duplicate content, whereas others have conflicting content. Create clear
guidelines so projects know to put roadmaps, milestones, and comprehensive
feature details in the
kubernetes/<project>repo and to put installation, configuration, usage details, and tutorials in the Kubernetes docs. - Removing duplicate content: Kubernetes users install Docker, so a good example of duplicate content is Docker installation instructions. Rather than repeat what's in the Docker docs, state which version of Docker works with which version of Kubernetes and link to the Docker docs for installation. Then detail any Kubernetes-specific configuration. That idea is the same for the container runtimes that Kubernetes supports.
- Removing third-party vendor content: This is tightly coupled to removing duplicate content. Some third-party content consists of lists or tables detailing external products. Other third-party content is found in the Tasks and Tutorials sections. SIG Docs should not be responsible for verifying that third-party products work with the latest version of Kubernetes. Nor should SIG Docs be responsible for maintaining lists of training courses or cloud providers. Additionally, the Kubernetes documentation isn't the place to pitch vendor products. If SIG Docs is forced to reverse its policy on not allowing third-party content, there could be a tidal wave of vendor-or-commercially-oriented pull requests. Maintaining that content places an undue burden on SIG Docs.
- Indicating which version of Kubernetes works with each task and tutorial: This means reviewing each task and tutorial for every release. Readers assume if a task or tutorial is in the latest version of the docs, it works with the latest version of Kubernetes.
- Addressing issues:
There are 470 open issues in the
kubernetes/websiterepo. It's hard to keep up with all the issues that are created. We encourage those creating simpler issues to submit PRs: some do; most do not. - Creating more detailed content: Readers indicated they would like to see more detailed content across all sections of the documentation, including tutorials.
Kubernetes has seen unparalleled growth since its first release in 2015. Like any fast-growing project, it has growing pains. Providing consistently high-quality documentation is one of those pains, and one incredibly important to an open source project. SIG Docs needs a larger core team of tech writers who are allocated at least 50%. SIG Docs can then better achieve goals, move forward with new content, update existing content, and address open issues in a timely fashion.
Observation 09: Contributing to technical documentation projects requires, on average, more skills than developing software
When I said that to my former colleagues, the response was a healthy dose of skepticism and lots of laughter. It seems that many developers, as well as managers, don't fully know what tech writers contributing to open source projects actually do. Having done both development and technical writing for the better part of 22 years, I've noticed that tech writers are valued far less than software developers of comparative standing.
SIG Docs core team members do far more than write content based on requirements:
- We use some of the same processes and tools as developers, such as the terminal, git workflow, GitHub, and IDEs like Atom, Golang, and Visual Studio Code; we also use documentation-specific plugins and tools.
- We possess a good eye for detail as well as design and organization: the big picture and the little picture.
- We provide documentation which has a logical flow; it is not merely content on a page but the way pages fit into sections and sections fit into the overall structure.
- We write content that is comprehensive and uses language that readers not fluent in English can understand.
- We have a firm grasp of English composition using various markup languages.
- We are technical, sometimes to the level of a Kubernetes admin.
- We read, understand, and occasionally write code.
- We are project managers, able to plan new work as well as assign issues to releases.
- We are educators and diplomats with every review we do and with every comment we leave on an issue.
- We use site analytics to plan work based on which pages readers access most often as well as which pages readers say are unhelpful.
- We are surveyors, soliciting feedback from the community on a regular basis.
- We analyze the documentation as a whole, deciding what content should stay and what content should be removed based on available resources and reader needs.
- We have a working knowledge of Hugo and other frameworks used for online documentation; we know how to create, use, and debug Hugo shortcodes that enable content to be more robust than pure Markdown.
- We troubleshoot performance issues not only with Hugo but with Netlify.
- We grapple with the complex problem of API documentation.
- We are dedicated to providing the highest quality documentation that we can.
If you have any doubts about the complexity of the Kubernetes documentation project, watch presentations given by SIG Docs Chair Zach Corleissen:
- Multilingual Kubernetes - the kubernetes.io stack, how we got there, and what it took to get there
- Found in Translation: Lessons from a Year of Open Source Localization
Additionally, Docs as Code: The Missing Manual (Jennifer Rondeau, Margaret Eker; 2016) is an excellent presentation on the complexity of documentation projects in general.
The Write the Docs website and YouTube channel are fantastic places to delve into the good, the bad, and the ugly of technical writing.
Think what an open source project would be without talented, dedicated tech writers!
Observation 10: Community is everything
The SIG Docs community, and the larger Kubernetes community, is dedicated, intelligent, friendly, talented, fun, helpful, and a whole bunch of other positive adjectives! People welcomed me with open arms, and not only because SIG Docs needs more technical writers. I have never felt that my ideas and contributions were dismissed because I was the newbie. Humility and respect go a long way. Community members have a wealth of knowledge to share. Attend meetings, ask questions, propose improvements, thank people, and contribute in every way that you can!
Big shout out to those who helped me, and put up with me (LOL), during my break-in period: @zacharaysarah, @sftim, @kbhawkey, @jaypipes, @jrondeau, @jmangel, @bradtopol, @cody_clark, @thecrudge, @jaredb, @tengqm, @steveperry-53, @mrbobbytables, @cblecker, and @kbarnard10.
Outro
Do I grok SIG Docs? Not quite yet, but I do understand that SIG Docs needs more dedicated resources to continue to be successful.
Citations
1 @linuxfoundation. "Megan Byrd-Sanicki, Open Source Strategist, Google @megansanicki - documentation is the #1 driver of software adoption. #ossummit." Twitter, Oct 29, 2019, 3:54 a.m., twitter.com/linuxfoundation/status/1189103201439637510.
Kubernetes Documentation Survey
In September, SIG Docs conducted its first survey about the Kubernetes documentation. We'd like to thank the CNCF's Kim McMahon for helping us create the survey and access the results.
Key takeaways
Respondents would like more example code, more detailed content, and more diagrams in the Concepts, Tasks, and Reference sections.
74% of respondents would like the Tutorials section to contain advanced content.
69.70% said the Kubernetes documentation is the first place they look for information about Kubernetes.
Survey methodology and respondents
We conducted the survey in English. The survey was only available for 4 days due to time constraints. We announced the survey on Kubernetes mailing lists, in Kubernetes Slack channels, on Twitter, and in Kube Weekly. There were 23 questions, and respondents took an average of 4 minutes to complete the survey.
Quick facts about respondents:
- 48.48% are experienced Kubernetes users, 26.26% expert, and 25.25% beginner
- 57.58% use Kubernetes in both administrator and developer roles
- 64.65% have been using the Kubernetes documentation for more than 12 months
- 95.96% read the documentation in English
Question and response highlights
Why people access the Kubernetes documentation
The majority of respondents stated that they access the documentation for the Concepts.
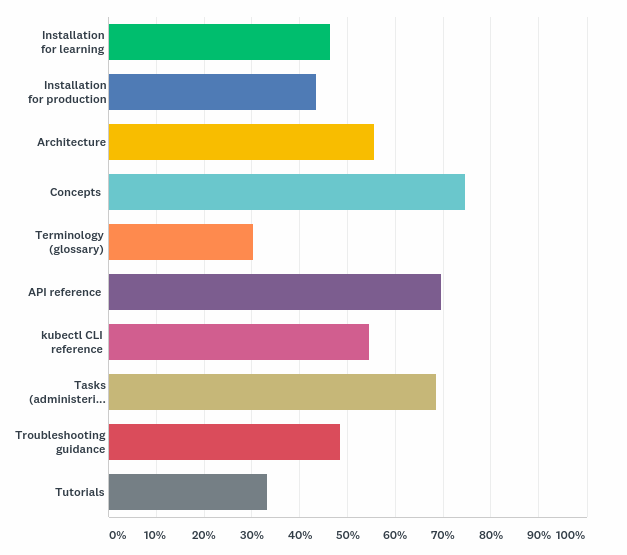
This deviates only slightly from what we see in Google Analytics: of the top 10 most viewed pages this year, #1 is the kubectl cheatsheet in the Reference section, followed overwhelmingly by pages in the Concepts section.
Satisfaction with the documentation
We asked respondents to record their level of satisfaction with the detail in the Concepts, Tasks, Reference, and Tutorials sections:
- Concepts: 47.96% Moderately Satisfied
- Tasks: 50.54% Moderately Satisfied
- Reference: 40.86% Very Satisfied
- Tutorial: 47.25% Moderately Satisfied
How SIG Docs can improve each documentation section
We asked how we could improve each section, providing respondents with selectable answers as well as a text field. The clear majority would like more example code, more detailed content, more diagrams, and advanced tutorials:
- Personally, would like to see more analogies to help further understanding.
- Would be great if corresponding sections of code were explained too
- Expand on the concepts to bring them together - they're a bucket of separate eels moving in different directions right now
- More diagrams, and more example code
Respondents used the "Other" text box to record areas causing frustration:
- Keep concepts up to date and accurate
- Keep task topics up to date and accurate. Human testing.
- Overhaul the examples. Many times the output of commands shown is not actual.
- I've never understood how to navigate or interpret the reference section
- Keep the tutorials up to date, or remove them
How SIG Docs can improve the documentation overall
We asked respondents how we can improve the Kubernetes documentation overall. Some took the opportunity to tell us we are doing a good job:
- For me, it is the best documented open source project.
- Keep going!
- I find the documentation to be excellent.
- You [are] doing a great job. For real.
Other respondents provided feedback on the content:
- ...But since we're talking about docs, more is always better. More
advanced configuration examples would be, to me, the way to go. Like a Use Case page for each
configuration topic with beginner to advanced example scenarios. Something like that would be
awesome....
- More in-depth examples and use cases would be great. I often feel that the Kubernetes
documentation scratches the surface of a topic, which might be great for new users, but it leaves
more experienced users without much "official" guidance on how to implement certain things.
- More production like examples in the resource sections (notably secrets) or links to production like
examples
- It would be great to see a very clear "Quick Start" A->Z up and running like many other tech
projects. There are a handful of almost-quick-starts, but no single guidance. The result is
information overkill.
A few respondents provided technical suggestions:
- Make table columns sortable and filterable using a ReactJS or Angular component.
- For most, I think creating documentation with Hugo - a system for static site generation - is not
appropriate. There are better systems for documenting large software project. Specifically, I would
like to see k8s switch to Sphinx for documentation. It has an excellent built-in search, it is easy to
learn if you know markdown, it is widely adopted by other projects (e.g. every software project in
readthedocs.io, linux kernel, docs.python.org etc).
Overall, respondents provided constructive criticism focusing on the need for advanced use cases as well as more in-depth examples, guides, and walkthroughs.
Where to see more
Survey results summary, charts, and raw data are available in kubernetes/community sig-docs survey directory.
Contributor Summit San Diego Schedule Announced!
There are many great sessions planned for the Contributor Summit, spread across five rooms of current contributor content in addition to the new contributor workshops. Since this is an upstream contributor summit and we don't often meet, being a globally distributed team, most of these sessions are discussions or hands-on labs, not just presentations. We want folks to learn and have a good time meeting their OSS teammates.
Unconference tracks are returning from last year with sessions to be chosen Monday morning. These are ideal for the latest hot topics and specific discussions that contributors want to have. In previous years, we've covered flaky tests, cluster lifecycle, KEPs (Kubernetes Enhancement Proposals), mentoring, security, and more.
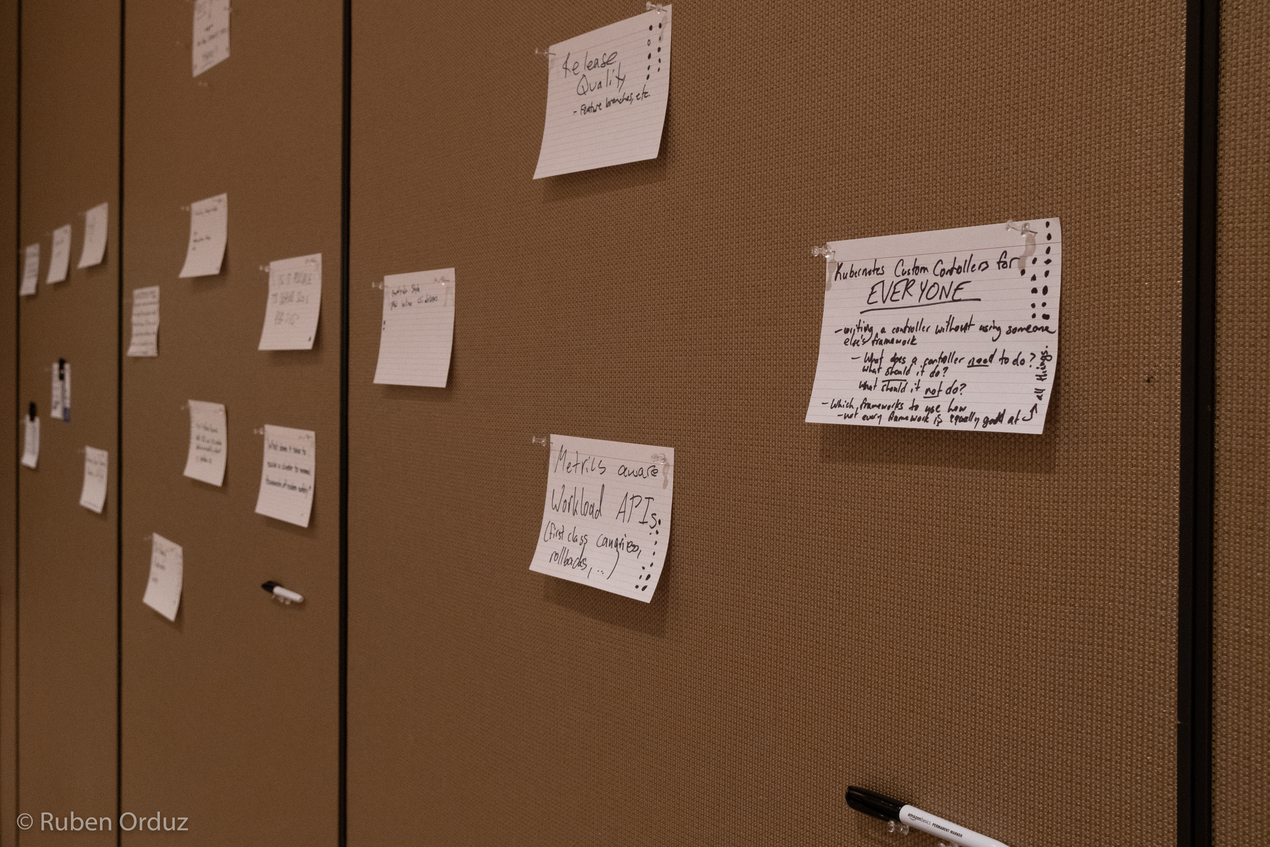
While the schedule contains difficult decisions in every timeslot, we've picked a few below to give you a taste of what you'll hear, see, and participate in, at the summit:
- Vision: SIG Architecture will be sharing their vision of where we're going with Kubernetes development for the next year and beyond.
- Security: Tim Allclair and CJ Cullen will present on the current state of Kubernetes security. In another security talk, Vallery Lancey will lead a discussion about making our platform secure by default.
- Prow: Interested in working with Prow and contributing to Test-Infra, but not sure where to start? Rob Keilty will help you get a Prow test environment running on your laptop.
- Git: Staff from GitHub will be collaborating with Christoph Blecker to share practical Git tips for Kubernetes contributors.
- Reviewing: Tim Hockin will share the secrets of becoming a great code reviewer, and Jordan Liggitt will conduct a live API review so that you can do one, or at least pass one.
- End Users: Several end users from the CNCF partner ecosystem, invited by Cheryl Hung, will hold a Q&A with contributors to strengthen our feedback loop.
- Docs: As always, SIG Docs will run a three-hour contributing-to-documentation workshop.
We're also giving out awards to contributors who distinguished themselves in 2019, and there will be a huge Meet & Greet for new contributors to find their SIG (and for existing contributors to ask about their PRs) at the end of the day on Monday.
Hope to see you all there, and make sure you register! San Diego team
2019 Steering Committee Election Results
The 2019 Steering Committee Election is a landmark milestone for the Kubernetes project. The initial bootstrap committee is graduating to emeritus and the committee has now shrunk to its final allocation of seven seats. All members of the Steering Committee are now fully elected by the Kubernetes Community.
Moving forward elections will elect either 3 or 4 people to the committee for two-year terms.
Results
The Kubernetes Steering Committee Election is now complete and the following candidates came ahead to secure two-year terms that start immediately (in alphabetical order by GitHub handle):
- Christoph Blecker (@cblecker), Red Hat
- Derek Carr (@derekwaynecarr), Red Hat
- Nikhita Raghunath (@nikhita), Loodse
- Paris Pittman (@parispittman), Google
They join Aaron Crickenberger (@spiffxp), Google; Davanum Srinivas (@dims), VMware; and Timothy St. Clair (@timothysc), VMware, to round out the committee. The seats held by Aaron, Davanum, and Timothy will be up for election around this time next year.
Big Thanks!
- Thanks to the initial bootstrap committee for establishing the initial
project governance and overseeing a multi-year transition period:
- Joe Beda (@jbeda), VMware
- Brendan Burns (@brendandburns), Microsoft
- Clayton Coleman (@smarterclayton), Red Hat
- Brian Grant (@bgrant0607), Google
- Tim Hockin (@thockin), Google
- Sarah Novotny (@sarahnovotny), Microsoft
- Brandon Philips (@philips), Red Hat
- And also thanks to the other Emeritus Steering Committee Members. Your
prior service is appreciated by the community:
- Quinton Hoole (@quinton-hoole), Huawei
- Michelle Noorali (@michelleN), Microsoft
- Phillip Wittrock (@pwittrock), Google
- Thanks to the candidates that came forward to run for election. May we always have a strong set of people who want to push the community forward like yours in every election.
- Thanks to all 377 voters who cast a ballot.
- And last but not least…Thanks to Cornell University for hosting CIVS!
Get Involved with the Steering Committee
You can follow along with Steering Committee backlog items and weigh in by filing an issue or creating a PR against their repo. They meet bi-weekly on Wednesdays at 8pm UTC and regularly attend Meet Our Contributors. They can also be contacted at their public mailing list steering@kubernetes.io.
Steering Committee Meetings:
Contributor Summit San Diego Registration Open!
Contributor Summit San Diego 2019 Event Page
In record time, we’ve hit capacity for the new contributor workshop session of
the event!
Sunday, November 17
Evening Contributor Celebration:
QuartYard†
Address: 1301 Market Street, San Diego, CA 92101
Time: 6:00PM - 9:00PM
Monday, November 18
All Day Contributor Summit:
Marriott Marquis San Diego Marina
Address: 333 W Harbor Dr, San Diego, CA 92101
Time: 9:00AM - 5:00PM
While the Kubernetes project is only five years old, we’re already going into our 9th Contributor Summit this November in San Diego before KubeCon + CloudNativeCon. The rapid increase is thanks to adding European and Asian Contributor Summits to the North American events we’ve done previously. We will continue to run Contributor Summits across the globe, as it is important that our contributor base grows in all forms of diversity.
Kubernetes has a large distributed remote contributing team, from individuals and organizations all over the world. The Contributor Summits give the community three chances a year to get together, work on community topics, and have hallway track time. The upcoming San Diego summit is expected to bring over 450 attendees, and will contain multiple tracks with something for everyone. The focus will be around contributor growth and sustainability. We're going to stop here with capacity for future summits; we want this event to offer value to individuals and the project. We've heard from past summit attendee feedback that getting work done, learning, and meeting folks face to face is a priority. By capping attendance and offering the contributor gatherings in more locations, it will help us achieve those goals.
This summit is unique as we’ve taken big moves on sustaining ourselves, the contributor experience events team. Taking a page from the release team’s playbook, we have added additional core team and shadow roles making it a natural mentoring (watching+doing) relationship. The shadows are expected to fill another role at one of the three events in 2020, and core team members to take the lead. In preparation for this team, we’ve open sourced our rolebooks, guidelines, best practices and opened up our meetings and project board. Our team makes up many parts of the Kubernetes project and takes care of making sure all voices are represented.
Are you at KubeCon + CloudNativeCon but can’t make it to the summit? Check out the SIG Intro and Deep Dive sessions during KubeCon + CloudNativeCon to participate in Q&A and hear what’s up with each Special interest Group (SIG). We’ll also record all of Contributor Summit’s presentation sessions, take notes in discussions, and share it back with you, after the event is complete.
We hope to see you all at Kubernetes Contributor Summit San Diego, make sure you head over and register right now! This event will sell out - here’s your warning. :smiley:
Check out past blogs on persona building around our events and the Barcelona summit story.
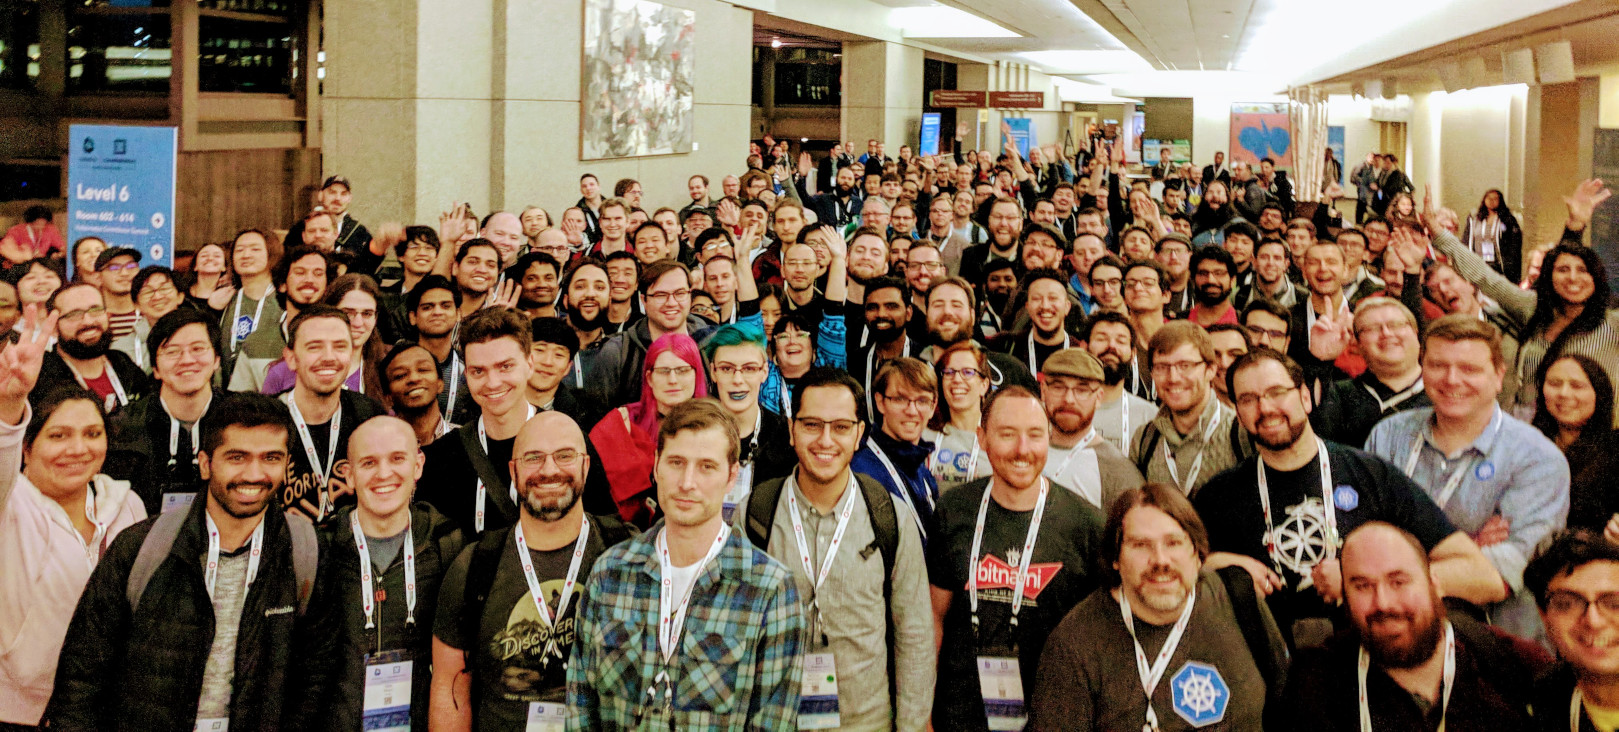
†=QuartYard has a huge stage! Want to perform something in front of your contributor peers? Reach out to us! community@kubernetes.io
Kubernetes 1.16: Custom Resources, Overhauled Metrics, and Volume Extensions
We’re pleased to announce the delivery of Kubernetes 1.16, our third release of 2019! Kubernetes 1.16 consists of 31 enhancements: 8 enhancements moving to stable, 8 enhancements in beta, and 15 enhancements in alpha.
Major Themes
Custom resources
CRDs are in widespread use as a Kubernetes extensibility mechanism and have been available in beta since the 1.7 release. The 1.16 release marks the graduation of CRDs to general availability (GA).
Overhauled metrics
Kubernetes has previously made extensive use of a global metrics registry to register metrics to be exposed. By implementing a metrics registry, metrics are registered in more transparent means. Previously, Kubernetes metrics have been excluded from any kind of stability requirements.
Volume Extension
There are quite a few enhancements in this release that pertain to volumes and volume modifications. Volume resizing support in CSI specs is moving to beta which allows for any CSI spec volume plugin to be resizable.
Significant Changes to the Kubernetes API
As the Kubernetes API has evolved, we have promoted some API resources to stable, others have been reorganized to different groups. We deprecate older versions of a resource and make newer versions available in accordance with the API versioning policy.
An example of this is the Deployment resource. This was introduced under the extensions/v1beta1 group in 1.6 and as the project changed has been promoted to extensions/v1beta2, apps/v1beta2 and finally promoted to stable and moved to apps/v1 in 1.9.
It's important to note that until this release the project has not stopped serving any of the previous versions of the any of the deprecated resources.
This means that folks interacting with the Kubernetes API have not been required to move to the new version of any of the deprecated API objects.
In 1.16 if you submit a Deployment to the API server and specify extensions/v1beta1 as the API group it will be rejected with:
error: unable to recognize "deployment": no matches for kind "Deployment" in version "extensions/v1beta1"
With this release we are taking a very important step in the maturity of the Kubernetes API, and are no longer serving the deprecated APIs. Our earlier post Deprecated APIs Removed In 1.16: Here’s What You Need To Know tells you more, including which resources are affected.
Additional Enhancements
Custom Resources Reach General Availability
CRDs have become the basis for extensions in the Kubernetes ecosystem. Started as a ground-up redesign of the ThirdPartyResources prototype, they have finally reached GA in 1.16 with apiextensions.k8s.io/v1, as the hard-won lessons of API evolution in Kubernetes have been integrated. As we transition to GA, the focus is on data consistency for API clients.
As you upgrade to the GA API, you’ll notice that several of the previously optional guard rails have become required and/or default behavior. Things like structural schemas, pruning unknown fields, validation, and protecting the *.k8s.io group are important for ensuring the longevity of your APIs and are now much harder to accidentally miss. Defaulting is another important part of API evolution and that support will be on by default for CRD.v1. The combination of these, along with CRD conversion mechanisms are enough to build stable APIs that evolve over time, the same way that native Kubernetes resources have changed without breaking backward-compatibility.
Updates to the CRD API won’t end here. We have ideas for features like arbitrary subresources, API group migration, and maybe a more efficient serialization protocol, but the changes from here are expected to be optional and complementary in nature to what’s already here in the GA API. Happy operator writing!
Details on how to work with custom resources can be found in the Kubernetes documentation.
Opening Doors With Windows Enhancements
Beta: Enhancing the workload identity options for Windows containers
Active Directory Group Managed Service Account (GMSA) support is graduating to beta and certain annotations that were introduced with the alpha support are being deprecated. GMSA is a specific type of Active Directory account that enables Windows containers to carry an identity across the network and communicate with other resources. Windows containers can now gain authenticated access to external resources. In addition, GMSA provides automatic password management, simplified service principal name (SPN) management, and the ability to delegate the management to other administrators across multiple servers.
Adding support for RunAsUserName as an alpha release. The RunAsUserName is a string specifying the windows identity (or username) in Windows to run the entrypoint of the container and is a part of the newly introduced windowsOptions component of the securityContext (WindowsSecurityContextOptions).
Alpha: Improvements to setup & node join experience with kubeadm
Introducing alpha support for kubeadm, enabling Kubernetes users to easily join (and reset) Windows worker nodes to an existing cluster the same way they do for Linux nodes. Users can utilize kubeadm to prepare and add a Windows node to cluster. When the operations are complete, the node will be in a Ready state and able to run Windows containers. In addition, we will also provide a set of Windows-specific scripts to enable the installation of prerequisites and CNIs ahead of joining the node to the cluster.
Alpha: Introducing support for Container Storage Interface (CSI)
Introducing CSI plugin support for out-of-tree providers, enabling Windows nodes in a Kubernetes cluster to leverage persistent storage capabilities for Windows-based workloads. This significantly expands the storage options of Windows workloads, adding onto a list that included FlexVolume and in-tree storage plugins. This capability is achieved through a host OS proxy that enables the execution of privileged operations on the Windows node on behalf of containers.
Introducing Endpoint Slices
The release of Kubernetes 1.16 includes an exciting new alpha feature: the EndpointSlice API. This API provides a scalable and extensible alternative to the Endpoints resource, which dates back to the very first versions of Kubernetes. Behind the scenes, Endpoints play a big role in network routing within Kubernetes. Each Service endpoint is tracked within these resources - kube-proxy uses them for generating proxy rules that allow pods to communicate with each other so easily in Kubernetes, and many ingress controllers use them to route HTTP traffic directly to pods.
Providing Greater Scalability
A key goal for EndpointSlices is to enable greater scalability for Kubernetes Services. With the existing Endpoints API, a single instance must include network endpoints representing all pods matching a Service. As Services start to scale to thousands of pods, the corresponding Endpoints resources become quite large. Simply adding or removing one endpoint from a Service at this scale can be quite costly. As the Endpoints instance is updated, every piece of code watching Endpoints will need to be sent a full copy of the resource. With kube-proxy running on every node in a cluster, a copy needs to be sent to every single node. At a small scale, this is not an issue, but it becomes increasingly noticeable as clusters get larger.
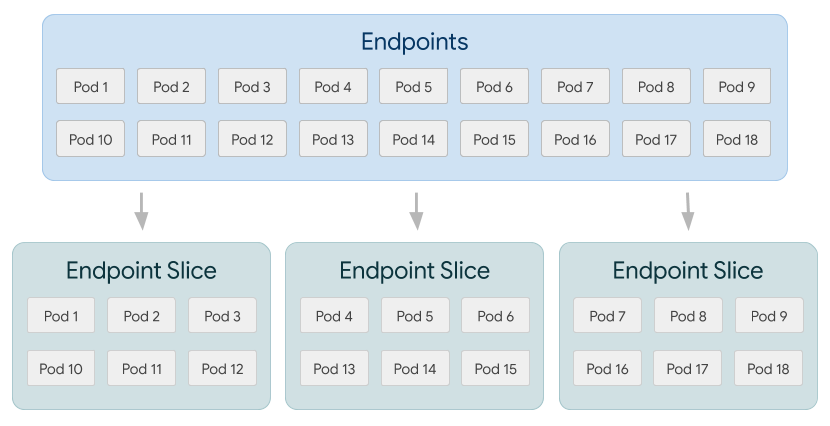
With EndpointSlices, network endpoints for a Service are split into multiple instances, significantly decreasing the amount of data required for updates at scale. By default, EndpointSlices are limited to 100 endpoints each.
For example, let’s take a cluster with 10,000 Service endpoints spread over 5,000 nodes. A single Pod update would result in approximately 5GB transmitted with the Endpoints API (that’s enough to fill a DVD). This becomes increasingly significant given how frequently Endpoints can change during events like rolling updates on Deployments. The same update will be much more efficient with EndpointSlices since each one includes only a tiny portion of the total number of Service endpoints. Instead of transferring a big Endpoints object to each node, only the small EndpointSlice that’s been changed has to be transferred. In this example, EndpointSlices would decrease data transferred by approximately 100x.
| Endpoints | Endpoint Slices | |
| # of resources | 1 | 20k / 100 = 200 |
| # of network endpoints stored | 1 * 20k = 20k | 200 * 100 = 20k |
| size of each resource | 20k * const = ~2.0 MB | 100 * const = ~10 kB |
| watch event data transferred | ~2.0MB * 5k = 10GB | ~10kB * 5k = 50MB |
Providing Greater Extensibility
A second goal for EndpointSlices was to provide a resource that would be highly extensible and useful across a wide variety of use cases. One of the key additions with EndpointSlices involves a new topology attribute. By default, this will be populated with the existing topology labels used throughout Kubernetes indicating attributes such as region and zone. Of course, this field can be populated with custom labels as well for more specialized use cases.
EndpointSlices also include greater flexibility for address types. Each contains a list of addresses. An initial use case for multiple addresses would be to support dual-stack endpoints with both IPv4 and IPv6 addresses. As an example, here’s a simple EndpointSlice showing how one could be represented:
apiVersion: discovery.k8s.io/v1alpha
kind: EndpointSlice
metadata:
name: example-abc
labels:
kubernetes.io/service-name: example
addressType: IP
ports:
- name: http
protocol: TCP
port: 80
endpoints:
- addresses:
- "10.1.2.3"
- "2001:db8::1234:5678"
topology:
kubernetes.io/hostname: node-1
topology.kubernetes.io/zone: us-west2-a
More About Endpoint Slices
EndpointSlices are an alpha feature in Kubernetes 1.16 and not enabled by default. The Endpoints API will continue to be enabled by default, but we’re working to move the largest Endpoints consumers to the new EndpointSlice API. Notably, kube-proxy in Kubernetes 1.16 includes alpha support for EndpointSlices.
The official Kubernetes documentation contains more information about EndpointSlices as well as how to enable them in your cluster. There’s also a great KubeCon talk that provides more background on the initial rationale for developing this API.
Notable Feature Updates
- Topology Manager, a new Kubelet component, aims to co-ordinate resource assignment decisions to provide optimized resource allocations.
- IPv4/IPv6 dual-stack enables the allocation of both IPv4 and IPv6 addresses to Pods and Services.
- Extensions for Cloud Controller Manager Migration.
Availability
Kubernetes 1.16 is available for download on GitHub. To get started with Kubernetes, check out these interactive tutorials. You can also easily install 1.16 using kubeadm.
Release Team
This release is made possible through the efforts of hundreds of individuals who contributed both technical and non-technical content. Special thanks to the release team led by Lachlan Evenson, Principal Program Manager at Microsoft. The 32 individuals on the release team coordinated many aspects of the release, from documentation to testing, validation, and feature completeness.
As the Kubernetes community has grown, our release process represents an amazing demonstration of collaboration in open source software development. Kubernetes continues to gain new users at a rapid pace. This growth creates a positive feedback cycle where more contributors commit code creating a more vibrant ecosystem. Kubernetes has had over 32,000 individual contributors to date and an active community of more than 66,000 people.
Release Mascot
The Kubernetes 1.16 release crest was loosely inspired by the Apollo 16 mission crest. It represents the hard work of the release-team and the community alike and is an ode to the challenges and fun times we shared as a team throughout the release cycle. Many thanks to Ronan Flynn-Curran of Microsoft for creating this magnificent piece.
Kubernetes Updates
Project Velocity
The CNCF has continued refining DevStats, an ambitious project to visualize the myriad contributions that go into the project. K8s DevStats illustrates the breakdown of contributions from major company contributors, as well as an impressive set of preconfigured reports on everything from individual contributors to pull request lifecycle times. This past year, 1,147 different companies and over 3,149 individuals contribute to Kubernetes each month. Check out DevStats to learn more about the overall velocity of the Kubernetes project and community.
Ecosystem
- The Kubernetes project leadership created the Security Audit Working Group to oversee the very first third-part Kubernetes security audit, in an effort to improve the overall security of the ecosystem.
- The Kubernetes Certified Service Providers program (KCSP) reached 100 member companies, ranging from the largest multinational cloud, enterprise software, and consulting companies to tiny startups.
- The first Kubernetes Project Journey Report was released, showcasing the massive growth of the project.
KubeCon + CloudNativeCon
The Cloud Native Computing Foundation’s flagship conference gathers adopters and technologists from leading open source and cloud native communities in San Diego, California from November 18-21, 2019. Join Kubernetes, Prometheus, Envoy, CoreDNS, containerd, Fluentd, OpenTracing, gRPC, CNI, Jaeger, Notary, TUF, Vitess, NATS, Linkerd, Helm, Rook, Harbor, etcd, Open Policy Agent, CRI-O, and TiKV as the community gathers for four days to further the education and advancement of cloud native computing. Register today!
Webinar
Join members of the Kubernetes 1.16 release team on Oct 22, 2019 to learn about the major features in this release. Register here.
Get Involved
The simplest way to get involved with Kubernetes is by joining one of the many Special Interest Groups (SIGs) that align with your interests. Have something you’d like to broadcast to the Kubernetes community? Share your voice at our weekly community meeting, and through the channels below. Thank you for your continued feedback and support.
- Follow us on Twitter @Kubernetesio for latest updates
- Join the community discussion on Discuss
- Join the community on Slack
- Post questions (or answer questions) on Stack Overflow
- Share your Kubernetes story
Announcing etcd 3.4
etcd 3.4 focuses on stability, performance and ease of operation, with features like pre-vote and non-voting member and improvements to storage backend and client balancer.
Please see CHANGELOG for full lists of changes.
Better Storage Backend
etcd v3.4 includes a number of performance improvements for large scale Kubernetes workloads.
In particular, etcd experienced performance issues with a large number of concurrent read transactions even when there is no write (e.g. “read-only range request ... took too long to execute”). Previously, the storage backend commit operation on pending writes blocks incoming read transactions, even when there was no pending write. Now, the commit does not block reads which improve long-running read transaction performance.
We further made backend read transactions fully concurrent. Previously, ongoing long-running read transactions block writes and upcoming reads. With this change, write throughput is increased by 70% and P99 write latency is reduced by 90% in the presence of long-running reads. We also ran Kubernetes 5000-node scalability test on GCE with this change and observed similar improvements. For example, in the very beginning of the test where there are a lot of long-running “LIST pods”, the P99 latency of “POST clusterrolebindings” is reduced by 97.4%.
More improvements have been made to lease storage. We enhanced lease expire/revoke performance by storing lease objects more efficiently, and made lease look-up operation non-blocking with current lease grant/revoke operation. And etcd v3.4 introduces lease checkpoint as an experimental feature to persist remaining time-to-live values through consensus. This ensures short-lived lease objects are not auto-renewed after leadership election. This also prevents lease object pile-up when the time-to-live value is relatively large (e.g. 1-hour TTL never expired in Kubernetes use case).
Improved Raft Voting Process
etcd server implements Raft consensus algorithm for data replication. Raft is a leader-based protocol. Data is replicated from leader to follower; a follower forwards proposals to a leader, and the leader decides what to commit or not. Leader persists and replicates an entry, once it has been agreed by the quorum of cluster. The cluster members elect a single leader, and all other members become followers. The elected leader periodically sends heartbeats to its followers to maintain its leadership, and expects responses from each follower to keep track of its progress.
In its simplest form, a Raft leader steps down to a follower when it receives a message with higher terms without any further cluster-wide health checks. This behavior can affect the overall cluster availability.
For instance, a flaky (or rejoining) member drops in and out, and starts campaign. This member ends up with higher terms, ignores all incoming messages with lower terms, and sends out messages with higher terms. When the leader receives this message of a higher term, it reverts back to follower.
This becomes more disruptive when there’s a network partition. Whenever the partitioned node regains its connectivity, it can possibly trigger the leader re-election. To address this issue, etcd Raft introduces a new node state pre-candidate with the pre-vote feature. The pre-candidate first asks other servers whether it's up-to-date enough to get votes. Only if it can get votes from the majority, it increments its term and starts an election. This extra phase improves the robustness of leader election in general. And helps the leader remain stable as long as it maintains its connectivity with the quorum of its peers.
Similarly, etcd availability can be affected when a restarting node has not received the leader heartbeats in time (e.g. due to slow network), which triggers the leader election. Previously, etcd fast-forwards election ticks on server start, with only one tick left for leader election. For example, when the election timeout is 1-second, the follower only waits 100ms for leader contacts before starting an election. This speeds up initial server start, by not having to wait for the election timeouts (e.g. election is triggered in 100ms instead of 1-second). Advancing election ticks is also useful for cross datacenter deployments with larger election timeouts. However, in many cases, the availability is more critical than the speed of initial leader election. To ensure better availability with rejoining nodes, etcd now adjusts election ticks with more than one tick left, thus more time for the leader to prevent a disruptive restart.
Raft Non-Voting Member, Learner
The challenge with membership reconfiguration is that it often leads to quorum size changes, which are prone to cluster unavailabilities. Even if it does not alter the quorum, clusters with membership change are more likely to experience other underlying problems. To improve the reliability and confidence of reconfiguration, a new role - learner is introduced in etcd 3.4 release.
A new etcd member joins the cluster with no initial data, requesting all historical updates from the leader until it catches up to the leader’s logs. This means the leader’s network is more likely to be overloaded, blocking or dropping leader heartbeats to followers. In such cases, a follower may experience election-timeout and start a new leader election. That is, a cluster with a new member is more vulnerable to leader election. Both leader election and the subsequent update propagation to the new member are prone to causing periods of cluster unavailability (see Figure 1).
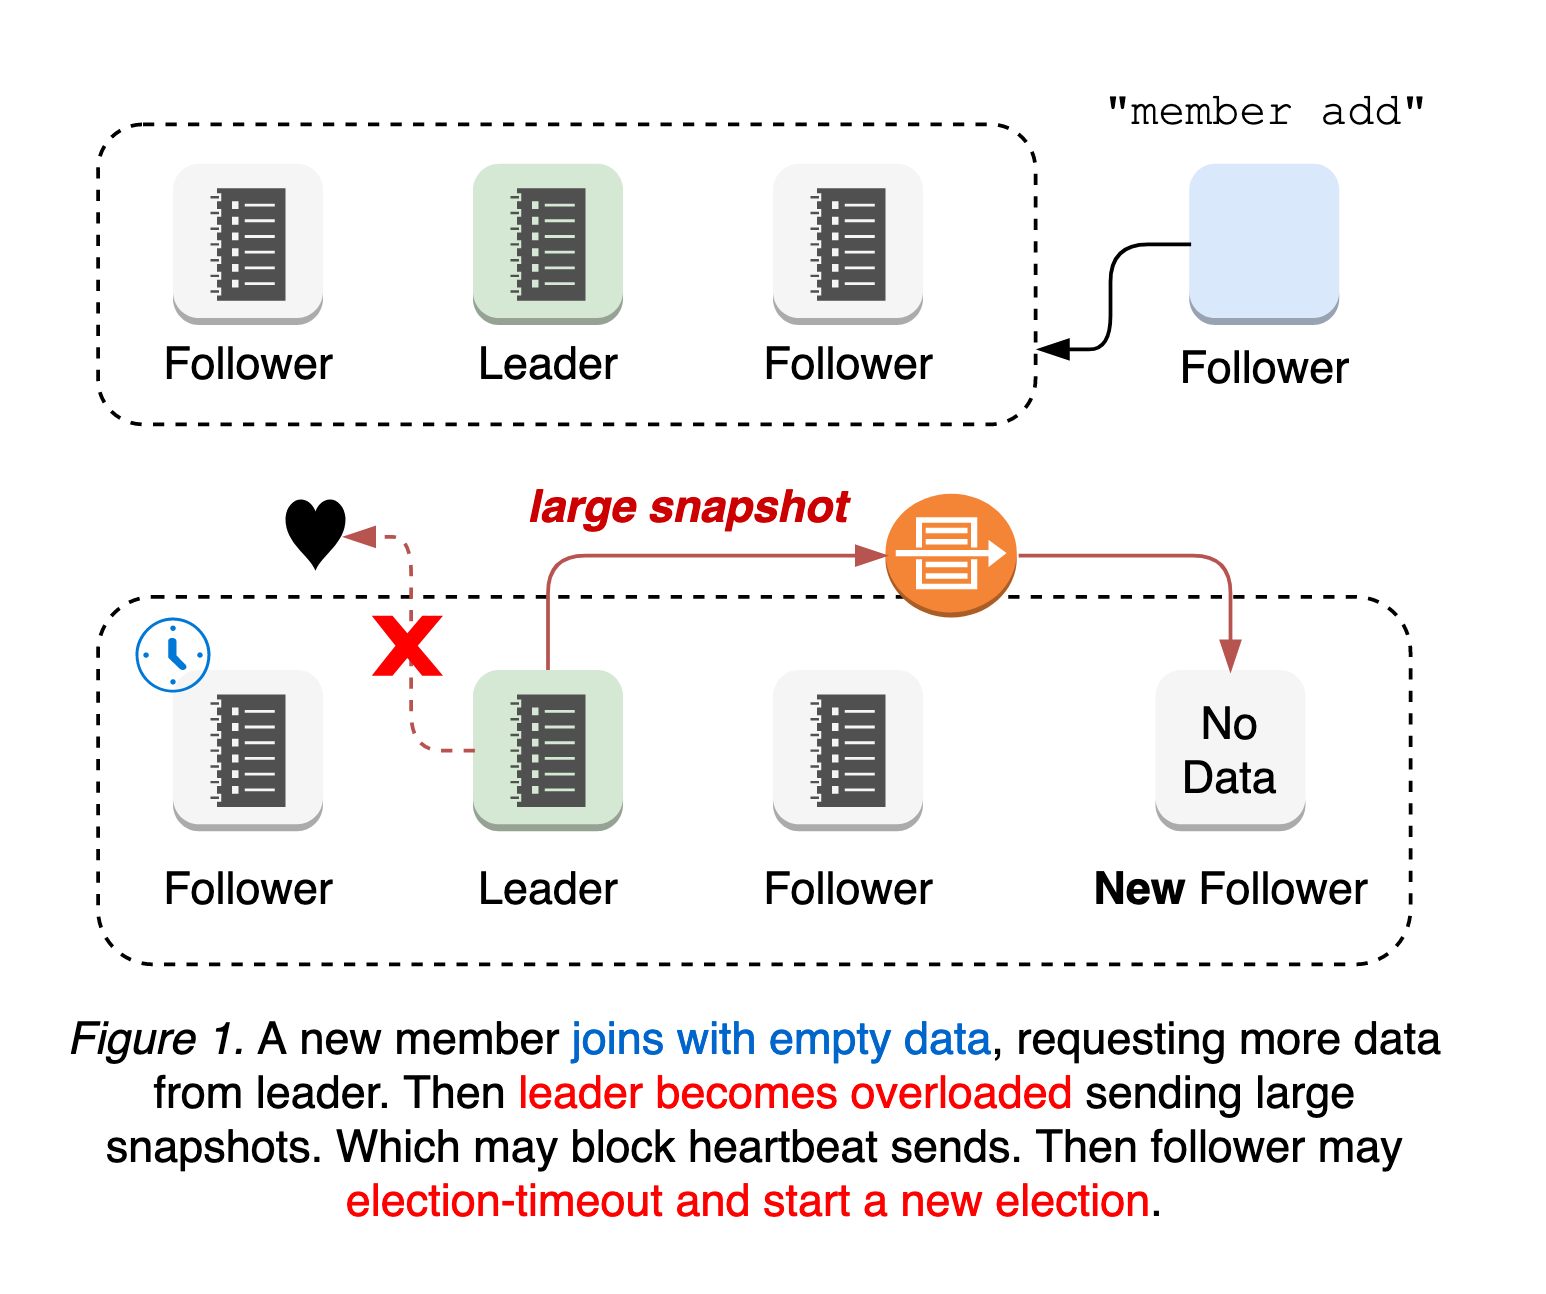
The worst case is a misconfigured membership add. Membership reconfiguration in etcd is a two-step process: etcdctl member add with peer URLs, and starting a new etcd to join the cluster. That is, member add command is applied whether the peer URL value is invalid or not. If the first step is to apply the invalid URLs and change the quorum size, it is possible that the cluster already loses the quorum until the new node connects. Since the node with invalid URLs will never become online and there’s no leader, it is impossible to revert the membership change (see Figure 2).
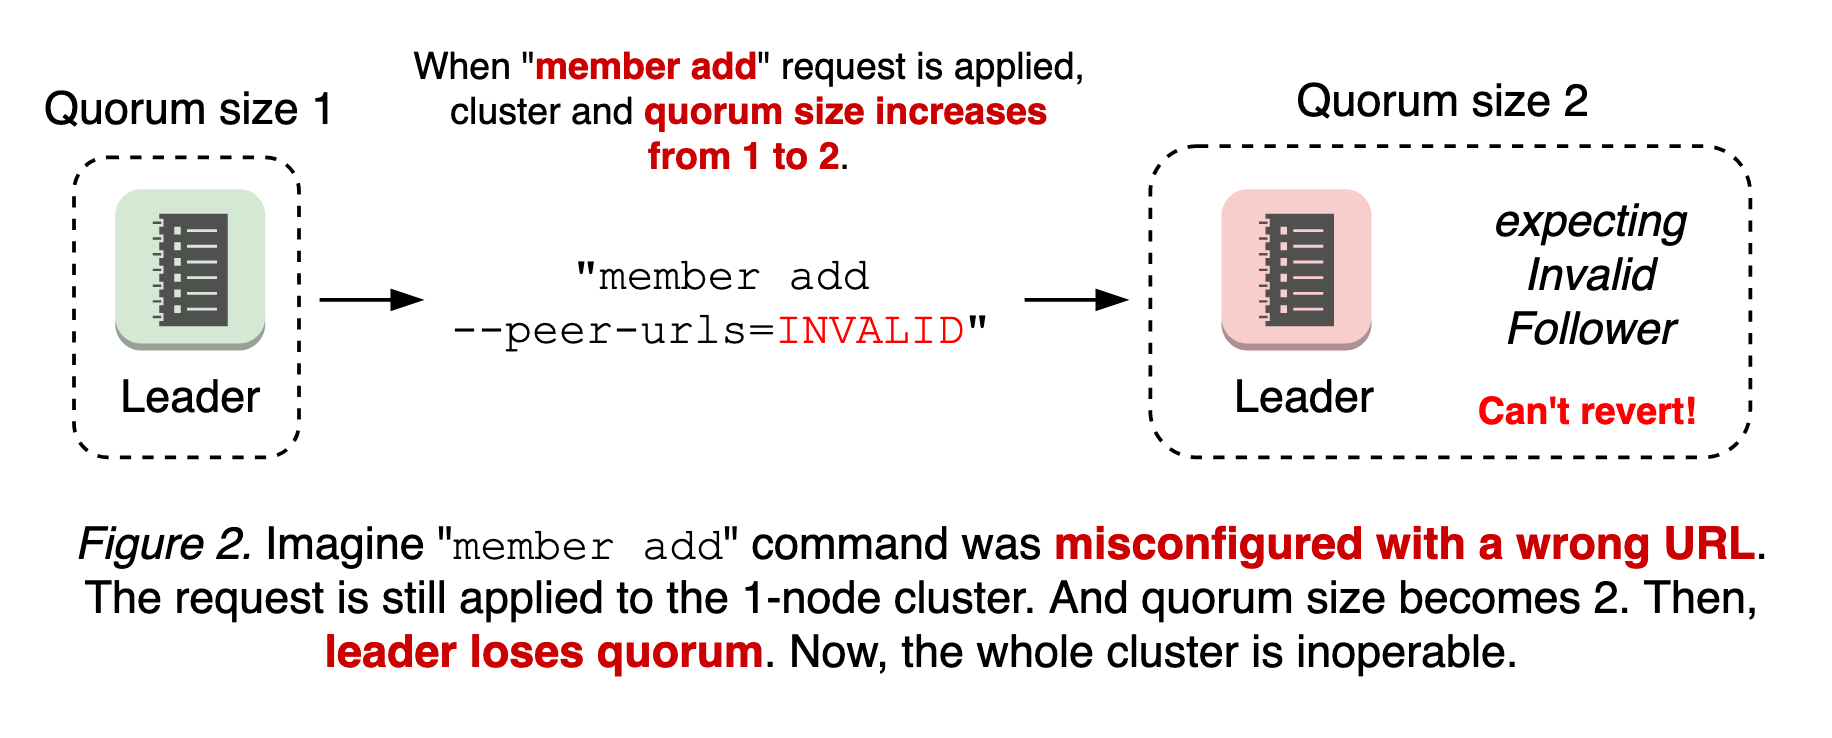
This becomes more complicated when there are partitioned nodes (see the design document for more).
In order to address such failure modes, etcd introduces a new node state “Learner”, which joins the cluster as a non-voting member until it catches up to leader’s logs. This means the learner still receives all updates from leader, while it does not count towards the quorum, which is used by the leader to evaluate peer activeness. The learner only serves as a standby node until promoted. This relaxed requirements for quorum provides the better availability during membership reconfiguration and operational safety (see Figure 3).
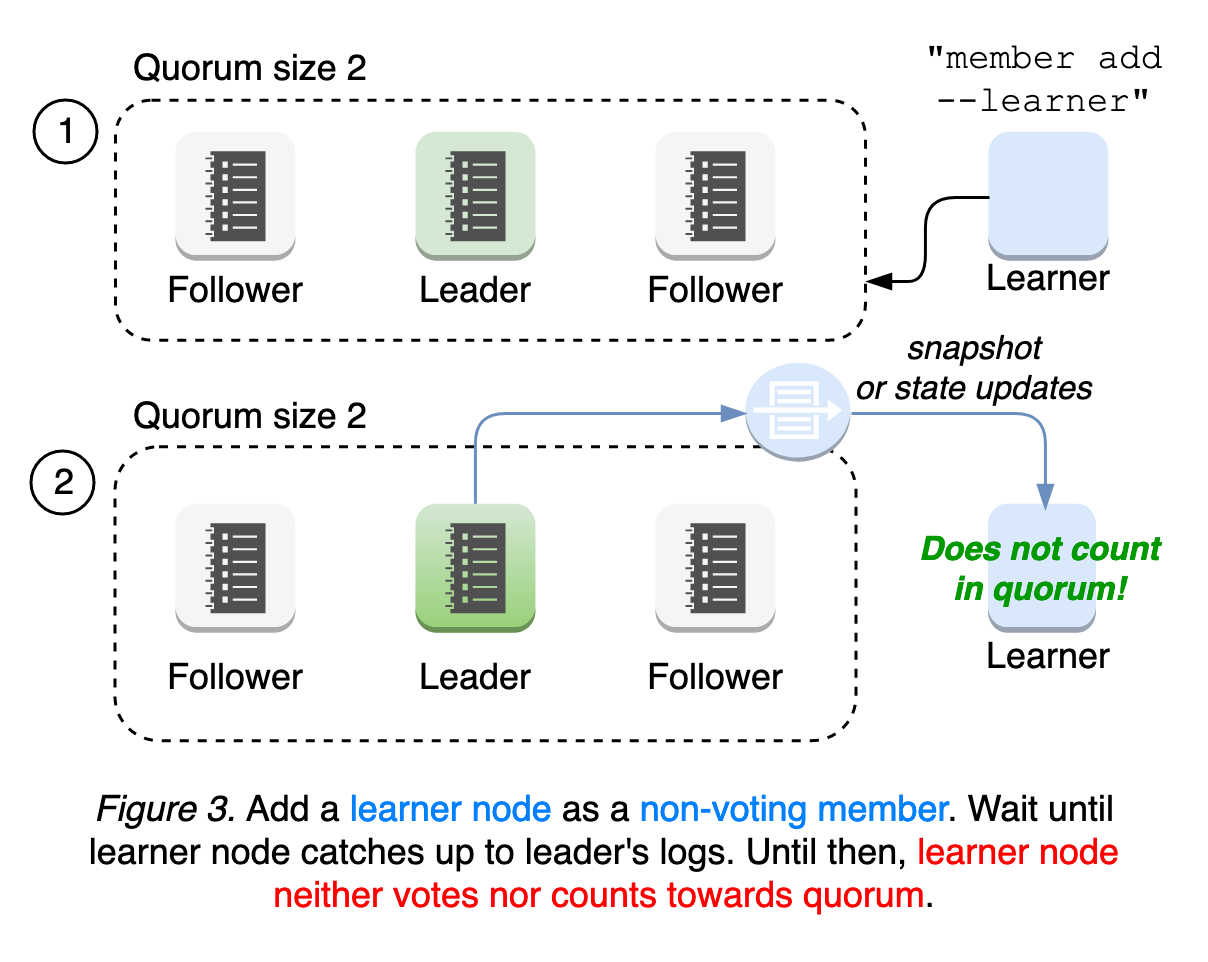
We will further improve learner robustness, and explore auto-promote mechanisms for easier and more reliable operation. Please read our learner design documentation and runtime-configuration document for user guides.
New Client Balancer
etcd is designed to tolerate various system and network faults. By design, even if one node goes down, the cluster “appears” to be working normally, by providing one logical cluster view of multiple servers. But, this does not guarantee the liveness of the client. Thus, etcd client has implemented a different set of intricate protocols to guarantee its correctness and high availability under faulty conditions.
Historically, etcd client balancer heavily relied on old gRPC interface: every gRPC dependency upgrade broke client behavior. A majority of development and debugging efforts were devoted to fixing those client behavior changes. As a result, its implementation has become overly complicated with bad assumptions on server connectivity. The primary goal was to simplify balancer failover logic in etcd v3.4 client; instead of maintaining a list of unhealthy endpoints, which may be stale, simply roundrobin to the next endpoint whenever client gets disconnected from the current endpoint. It does not assume endpoint status. Thus, no more complicated status tracking is needed.
Furthermore, the new client now creates its own credential bundle to fix balancer failover against secure endpoints. This resolves the year-long bug, where kube-apiserver loses its connectivity to etcd cluster when the first etcd server becomes unavailable.
Please see client balancer design documentation for more.
OPA Gatekeeper: Policy and Governance for Kubernetes
The Open Policy Agent Gatekeeper project can be leveraged to help enforce policies and strengthen governance in your Kubernetes environment. In this post, we will walk through the goals, history, and current state of the project.
The following recordings from the Kubecon EU 2019 sessions are a great starting place in working with Gatekeeper:
Motivations
If your organization has been operating Kubernetes, you probably have been looking for ways to control what end-users can do on the cluster and ways to ensure that clusters are in compliance with company policies. These policies may be there to meet governance and legal requirements or to enforce best practices and organizational conventions. With Kubernetes, how do you ensure compliance without sacrificing development agility and operational independence?
For example, you can enforce policies like:
- All images must be from approved repositories
- All ingress hostnames must be globally unique
- All pods must have resource limits
- All namespaces must have a label that lists a point-of-contact
Kubernetes allows decoupling policy decisions from the API server by means of admission controller webhooks to intercept admission requests before they are persisted as objects in Kubernetes. Gatekeeper was created to enable users to customize admission control via configuration, not code and to bring awareness of the cluster’s state, not just the single object under evaluation at admission time. Gatekeeper is a customizable admission webhook for Kubernetes that enforces policies executed by the Open Policy Agent (OPA), a policy engine for Cloud Native environments hosted by CNCF.
Evolution
Before we dive into the current state of Gatekeeper, let’s take a look at how the Gatekeeper project has evolved.
- Gatekeeper v1.0 - Uses OPA as the admission controller with the kube-mgmt sidecar enforcing configmap-based policies. It provides validating and mutating admission control. Donated by Styra.
- Gatekeeper v2.0 - Uses Kubernetes policy controller as the admission controller with OPA and kube-mgmt sidecars enforcing configmap-based policies. It provides validating and mutating admission control and audit functionality. Donated by Microsoft.
- Gatekeeper v3.0 - The admission controller is integrated with the OPA Constraint Framework to enforce CRD-based policies and allow declaratively configured policies to be reliably shareable. Built with kubebuilder, it provides validating and, eventually, mutating (to be implemented) admission control and audit functionality. This enables the creation of policy templates for Rego policies, creation of policies as CRDs, and storage of audit results on policy CRDs. This project is a collaboration between Google, Microsoft, Red Hat, and Styra.
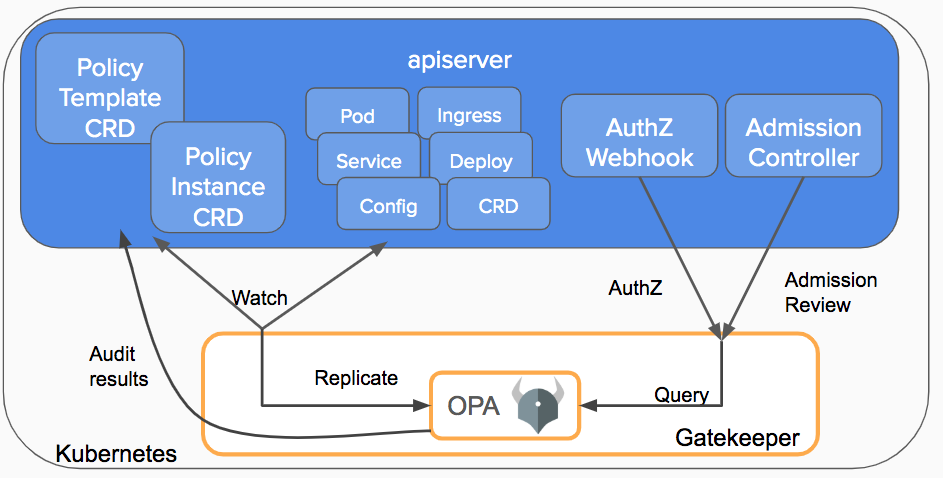
Gatekeeper v3.0 Features
Now let’s take a closer look at the current state of Gatekeeper and how you can leverage all the latest features. Consider an organization that wants to ensure all objects in a cluster have departmental information provided as part of the object’s labels. How can you do this with Gatekeeper?
Validating Admission Control
Once all the Gatekeeper components have been installed in your cluster, the API server will trigger the Gatekeeper admission webhook to process the admission request whenever a resource in the cluster is created, updated, or deleted.
During the validation process, Gatekeeper acts as a bridge between the API server and OPA. The API server will enforce all policies executed by OPA.
Policies and Constraints
With the integration of the OPA Constraint Framework, a Constraint is a declaration that its author wants a system to meet a given set of requirements. Each Constraint is written with Rego, a declarative query language used by OPA to enumerate instances of data that violate the expected state of the system. All Constraints are evaluated as a logical AND. If one Constraint is not satisfied, then the whole request is rejected.
Before defining a Constraint, you need to create a Constraint Template that allows people to declare new Constraints. Each template describes both the Rego logic that enforces the Constraint and the schema for the Constraint, which includes the schema of the CRD and the parameters that can be passed into a Constraint, much like arguments to a function.
For example, here is a Constraint template CRD that requires certain labels to be present on an arbitrary object.
apiVersion: templates.gatekeeper.sh/v1beta1
kind: ConstraintTemplate
metadata:
name: k8srequiredlabels
spec:
crd:
spec:
names:
kind: K8sRequiredLabels
listKind: K8sRequiredLabelsList
plural: k8srequiredlabels
singular: k8srequiredlabels
validation:
# Schema for the `parameters` field
openAPIV3Schema:
properties:
labels:
type: array
items: string
targets:
- target: admission.k8s.gatekeeper.sh
rego: |
package k8srequiredlabels
deny[{"msg": msg, "details": {"missing_labels": missing}}] {
provided := {label | input.review.object.metadata.labels[label]}
required := {label | label := input.parameters.labels[_]}
missing := required - provided
count(missing) > 0
msg := sprintf("you must provide labels: %v", [missing])
}
Once a Constraint template has been deployed in the cluster, an admin can now create individual Constraint CRDs as defined by the Constraint template. For example, here is a Constraint CRD that requires the label hr to be present on all namespaces.
apiVersion: constraints.gatekeeper.sh/v1beta1
kind: K8sRequiredLabels
metadata:
name: ns-must-have-hr
spec:
match:
kinds:
- apiGroups: [""]
kinds: ["Namespace"]
parameters:
labels: ["hr"]
Similarly, another Constraint CRD that requires the label finance to be present on all namespaces can easily be created from the same Constraint template.
apiVersion: constraints.gatekeeper.sh/v1beta1
kind: K8sRequiredLabels
metadata:
name: ns-must-have-finance
spec:
match:
kinds:
- apiGroups: [""]
kinds: ["Namespace"]
parameters:
labels: ["finance"]
As you can see, with the Constraint framework, we can reliably share Regos via the Constraint templates, define the scope of enforcement with the match field, and provide user-defined parameters to the Constraints to create customized behavior for each Constraint.
Audit
The audit functionality enables periodic evaluations of replicated resources against the Constraints enforced in the cluster to detect pre-existing misconfigurations. Gatekeeper stores audit results as violations listed in the status field of the relevant Constraint.
apiVersion: constraints.gatekeeper.sh/v1beta1
kind: K8sRequiredLabels
metadata:
name: ns-must-have-hr
spec:
match:
kinds:
- apiGroups: [""]
kinds: ["Namespace"]
parameters:
labels: ["hr"]
status:
auditTimestamp: "2019-08-06T01:46:13Z"
byPod:
- enforced: true
id: gatekeeper-controller-manager-0
violations:
- enforcementAction: deny
kind: Namespace
message: 'you must provide labels: {"hr"}'
name: default
- enforcementAction: deny
kind: Namespace
message: 'you must provide labels: {"hr"}'
name: gatekeeper-system
- enforcementAction: deny
kind: Namespace
message: 'you must provide labels: {"hr"}'
name: kube-public
- enforcementAction: deny
kind: Namespace
message: 'you must provide labels: {"hr"}'
name: kube-system
Data Replication
Audit requires replication of Kubernetes resources into OPA before they can be evaluated against the enforced Constraints. Data replication is also required by Constraints that need access to objects in the cluster other than the object under evaluation. For example, a Constraint that enforces uniqueness of ingress hostname must have access to all other ingresses in the cluster.
To configure Kubernetes data to be replicated, create a sync config resource with the resources to be replicated into OPA. For example, the below configuration replicates all namespace and pod resources to OPA.
apiVersion: config.gatekeeper.sh/v1alpha1
kind: Config
metadata:
name: config
namespace: "gatekeeper-system"
spec:
sync:
syncOnly:
- group: ""
version: "v1"
kind: "Namespace"
- group: ""
version: "v1"
kind: "Pod"
Planned for Future
The community behind the Gatekeeper project will be focusing on providing mutating admission control to support mutation scenarios (for example: annotate objects automatically with departmental information when creating a new resource), support external data to inject context external to the cluster into the admission decisions, support dry run to see impact of a policy on existing resources in the cluster before enforcing it, and more audit functionalities.
If you are interested in learning more about the project, check out the Gatekeeper repo. If you are interested in helping define the direction of Gatekeeper, join the #kubernetes-policy channel on OPA Slack, and join our weekly meetings to discuss development, issues, use cases, etc.
Get started with Kubernetes (using Python)
So, you know you want to run your application in Kubernetes but don’t know where to start. Or maybe you’re getting started but still don’t know what you don’t know. In this blog you’ll walk through how to containerize an application and get it running in Kubernetes.
This walk-through assumes you are a developer or at least comfortable with the command line (preferably bash shell).
What we’ll do
- Get the code and run the application locally
- Create an image and run the application in Docker
- Create a deployment and run the application in Kubernetes
Prerequisites
- A Kubernetes service - I'm using Docker Desktop with Kubernetes in this walkthrough, but you can use one of the others. See Getting Started for a full listing.
- Python 3.7 installed
- Git installed
Containerizing an application
In this section you’ll take some source code, verify it runs locally, and then create a Docker image of the application. The sample application used is a very simple Flask web application; if you want to test it locally, you’ll need Python installed. Otherwise, you can skip to the "Create a Dockerfile" section.
Get the application code
Use git to clone the repository to your local machine:
git clone https://github.com/JasonHaley/hello-python.git
Change to the app directory:
cd hello-python/app
There are only two files in this directory. If you look at the main.py file, you’ll see the application prints out a hello message. You can learn more about Flask on the Flask website.
from flask import Flask
app = Flask(__name__)
@app.route("/")
def hello():
return "Hello from Python!"
if __name__ == "__main__":
app.run(host='0.0.0.0')
The requirements.txt file contains the list of packages needed by the main.py and will be used by pip to install the Flask library.
Note:
When you start writing more advanced Python, you'll find it's not always recommended to usepip install and may want to use virtualenv (or pyenv) to install your dependencies in a virtual environment.Run locally
Manually run the installer and application using the following commands:
pip install -r requirements.txt
python main.py
This will start a development web server hosting your application, which you will be able to see by navigating to http://localhost:5000. Because port 5000 is the default port for the development server, we didn’t need to specify it.
Create a Dockerfile
Now that you have verified the source code works, the first step in containerizing the application is to create a Dockerfile.
In the hello-python/app directory, create a file named Dockerfile with the following contents and save it:
FROM python:3.7
RUN mkdir /app
WORKDIR /app
ADD . /app/
RUN pip install -r requirements.txt
EXPOSE 5000
CMD ["python", "/app/main.py"]
This file is a set of instructions Docker will use to build the image. For this simple application, Docker is going to:
- Get the official Python Base Image for version 3.7 from Docker Hub.
- In the image, create a directory named app.
- Set the working directory to that new app directory.
- Copy the local directory’s contents to that new folder into the image.
- Run the pip installer (just like we did earlier) to pull the requirements into the image.
- Inform Docker the container listens on port 5000.
- Configure the starting command to use when the container starts.
Create an image
At your command line or shell, in the hello-python/app directory, build the image with the following command:
docker build -f Dockerfile -t hello-python:latest .
Note:
I'm using the :latest tag in this example, if you are not familiar with what it is you may want to read Docker: The latest Confusion.This will perform those seven steps listed above and create the image. To verify the image was created, run the following command:
docker image ls

The application is now containerized, which means it can now run in Docker and Kubernetes!
Running in Docker
Before jumping into Kubernetes, let’s verify it works in Docker. Run the following command to have Docker run the application in a container and map it to port 5001:
docker run -p 5001:5000 hello-python
Now navigate to http://localhost:5001, and you should see the “Hello from Python!” message.
More info
Running in Kubernetes
You are finally ready to get the application running in Kubernetes. Because you have a web application, you will create a service and a deployment.
First verify your kubectl is configured. At the command line, type the following:
kubectl version
If you don’t see a reply with a Client and Server version, you’ll need to install and configure it.
If you are running on Windows or Mac, make sure it is using the Docker for Desktop context by running the following:
kubectl config use-context docker-for-desktop
Now you are working with Kubernetes! You can see the node by typing:
kubectl get nodes
Now let’s have it run the application. Create a file named deployment.yaml and add the following contents to it and then save it:
apiVersion: v1
kind: Service
metadata:
name: hello-python-service
spec:
selector:
app: hello-python
ports:
- protocol: "TCP"
port: 6000
targetPort: 5000
type: LoadBalancer
---
apiVersion: apps/v1
kind: Deployment
metadata:
name: hello-python
spec:
selector:
matchLabels:
app: hello-python
replicas: 4
template:
metadata:
labels:
app: hello-python
spec:
containers:
- name: hello-python
image: hello-python:latest
imagePullPolicy: Never
ports:
- containerPort: 5000
This YAML file is the instructions to Kubernetes for what you want running. It is telling Kubernetes the following:
- You want a load-balanced service exposing port 6000
- You want four instances of the hello-python container running
Use kubectl to send the YAML file to Kubernetes by running the following command:
kubectl apply -f deployment.yaml
You can see the pods are running if you execute the following command:
kubectl get pods
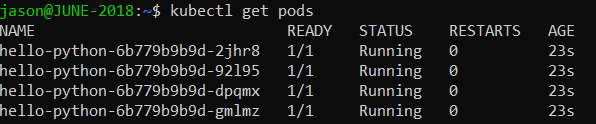
Now navigate to http://localhost:6000, and you should see the “Hello from Python!” message.
That’s it! The application is now running in Kubernetes!
More Info
Summary
In this walk-through, we containerized an application, and got it running in Docker and in Kubernetes. This simple application only scratches the surface of what’s possible (and what you’ll need to learn).
Next steps
If you are just getting started and this walk-through was useful to you, then the following resources should be good next steps for you to further expand your Kubernetes knowledge:
- Introduction to Microservices, Docker, and Kubernetes - 55-minute video by James Quigley
- This is a great place to start because it provides more information than I could here.
- Containerize your Apps with Docker and Kubernetes - free e-book by Dr Gabriel N Schenker
- This is my favorite book on Docker and Kubernetes.
- Kubernetes Learning Path: 50 days from zero to hero with Kubernetes - on Microsoft’s site
- This is a 10-page pdf that has tons of links to videos (with Brendan Burns), documentation sites, and a really good workshop for Azure Kubernetes Service.
How to enable Kubernetes in Docker Desktop
Once you have Docker Desktop installed, open the Settings:
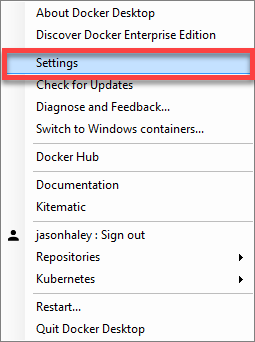
Select the Kubernetes menu item on the left and verify that the Enable Kubernetes is checked. If it isn’t, check it and click the Apply button at the bottom right:
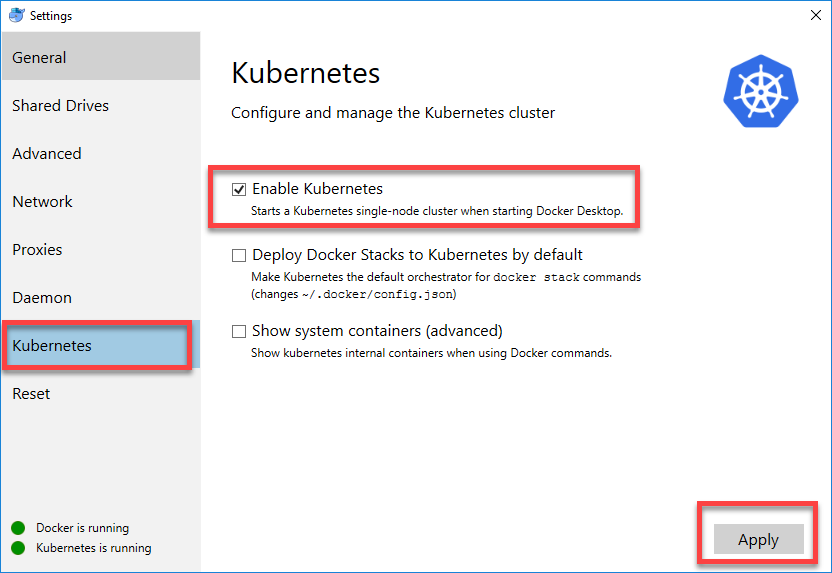
Deprecated APIs Removed In 1.16: Here’s What You Need To Know
As the Kubernetes API evolves, APIs are periodically reorganized or upgraded. When APIs evolve, the old API is deprecated and eventually removed.
The v1.16 release will stop serving the following deprecated API versions in favor of newer and more stable API versions:
- NetworkPolicy in the extensions/v1beta1 API version is no longer served
- Migrate to use the networking.k8s.io/v1 API version, available since v1.8. Existing persisted data can be retrieved/updated via the new version.
- PodSecurityPolicy in the extensions/v1beta1 API version
- Migrate to use the policy/v1beta1 API, available since v1.10. Existing persisted data can be retrieved/updated via the new version.
- DaemonSet in the extensions/v1beta1 and apps/v1beta2 API versions is no longer served
- Migrate to use the apps/v1 API version, available since v1.9. Existing persisted data can be retrieved/updated via the new version.
- Notable changes:
spec.templateGenerationis removedspec.selectoris now required and immutable after creation; use the existing template labels as the selector for seamless upgradesspec.updateStrategy.typenow defaults toRollingUpdate(the default inextensions/v1beta1wasOnDelete)
- Deployment in the extensions/v1beta1, apps/v1beta1, and apps/v1beta2 API versions is no longer served
- Migrate to use the apps/v1 API version, available since v1.9. Existing persisted data can be retrieved/updated via the new version.
- Notable changes:
spec.rollbackTois removedspec.selectoris now required and immutable after creation; use the existing template labels as the selector for seamless upgradesspec.progressDeadlineSecondsnow defaults to600seconds (the default inextensions/v1beta1was no deadline)spec.revisionHistoryLimitnow defaults to10(the default inapps/v1beta1was2, the default inextensions/v1beta1was to retain all)maxSurgeandmaxUnavailablenow default to25%(the default inextensions/v1beta1was1)
- StatefulSet in the apps/v1beta1 and apps/v1beta2 API versions is no longer served
- Migrate to use the apps/v1 API version, available since v1.9. Existing persisted data can be retrieved/updated via the new version.
- Notable changes:
spec.selectoris now required and immutable after creation; use the existing template labels as the selector for seamless upgradesspec.updateStrategy.typenow defaults toRollingUpdate(the default inapps/v1beta1wasOnDelete)
- ReplicaSet in the extensions/v1beta1, apps/v1beta1, and apps/v1beta2 API versions is no longer served
- Migrate to use the apps/v1 API version, available since v1.9. Existing persisted data can be retrieved/updated via the new version.
- Notable changes:
spec.selectoris now required and immutable after creation; use the existing template labels as the selector for seamless upgrades
The v1.22 release will stop serving the following deprecated API versions in favor of newer and more stable API versions:
- Ingress in the extensions/v1beta1 API version will no longer be served
- Migrate to use the networking.k8s.io/v1beta1 API version, available since v1.14. Existing persisted data can be retrieved/updated via the new version.
What To Do
Kubernetes 1.16 is due to be released in September 2019, so be sure to audit your configuration and integrations now!
- Change YAML files to reference the newer APIs
- Update custom integrations and controllers to call the newer APIs
- Update third party tools (ingress controllers, continuous delivery systems) to call the newer APIs
Migrating to the new Ingress API will only require changing the API path - the
API fields remain the same. However, migrating other resources (EG Deployments)
will require some updates based on changed fields. You can use the
kubectl convert command to automatically convert an existing object:
kubectl convert -f <file> --output-version <group>/<version>.
For example, to convert
an older Deployment to apps/v1, you can run:
kubectl convert -f ./my-deployment.yaml --output-version apps/v1
Note that this may use non-ideal default values. To learn more about a specific
resource, check the Kubernetes api reference.
You can test your clusters by starting an apiserver with the above resources disabled, to simulate the upcoming removal. Add the following flag to the apiserver startup arguments:
--runtime-config=apps/v1beta1=false,apps/v1beta2=false,extensions/v1beta1/daemonsets=false,extensions/v1beta1/deployments=false,extensions/v1beta1/replicasets=false,extensions/v1beta1/networkpolicies=false,extensions/v1beta1/podsecuritypolicies=false
Want To Know More?
Deprecations are announced in the Kubernetes release notes. You can see these announcements in 1.14 and 1.15.
You can read more in our deprecation policy document about the deprecation policies for Kubernetes APIs, and other Kubernetes components. Deprecation policies vary by component (for example, the primary APIs vs. admin CLIs) and by maturity (alpha, beta, or GA).
These details were also previously announced on the kubernetes-dev mailing list, along with the releases of Kubernetes 1.14 and 1.15. From Jordan Liggitt:
In case you missed it in the 1.15.0 release notes, the timelines for deprecated resources in the extensions/v1beta1, apps/v1beta1, and apps/v1beta2 API groups to no longer be served by default have been updated:
* NetworkPolicy resources will no longer be served from extensions/v1beta1 by default in v1.16. Migrate to the networking.k8s.io/v1 API, available since v1.8. Existing persisted data can be retrieved/updated via the networking.k8s.io/v1 API.
* PodSecurityPolicy resources will no longer be served from extensions/v1beta1 by default in v1.16. Migrate to the policy/v1beta1 API, available since v1.10. Existing persisted data can be retrieved/updated via the policy/v1beta1 API.
* DaemonSet, Deployment, StatefulSet, and ReplicaSet resources will no longer be served from extensions/v1beta1, apps/v1beta1, or apps/v1beta2 by default in v1.16. Migrate to the apps/v1 API, available since v1.9. Existing persisted data can be retrieved/updated via the apps/v1 API.
To start a v1.15.0 API server with these resources disabled to flush out dependencies on these deprecated APIs, and ensure your application/manifests will work properly against the v1.16 release, use the following --runtime-config argument:
--runtime-config=apps/v1beta1=false,apps/v1beta2=false,extensions/v1beta1/daemonsets=false,extensions/v1beta1/deployments=false,extensions/v1beta1/replicasets=false,extensions/v1beta1/networkpolicies=false,extensions/v1beta1/podsecuritypolicies=false
Recap of Kubernetes Contributor Summit Barcelona 2019
First of all, THANK YOU to everyone who made the Kubernetes Contributor Summit in Barcelona possible. We had an amazing team of volunteers tasked with planning and executing the event, and it was so much fun meeting and talking to all new and current contributors during the main event and the pre-event celebration.
Contributor Summit in Barcelona kicked off KubeCon + CloudNativeCon in a big way as it was the largest contributor summit to date with 331 people signed up, and only 9 didn't pick up their badges!
Contributor Celebration
Sunday evening before the main event we held a Contributor Celebration, which was very well attended. We hope that all new and current contributors felt welcome and enjoyed the food, the music, and the company.

New Contributor Workshops
We had over 130 people registered for the New Contributor Workshops. This year the workshops were divided into 101-level content for people who were not familiar with contributing to an open source project, and 201-level content for those who were.
The workshops contained overviews of what SIGs are, deep-dives into the codebase, test builds of the Kubernetes project, and real contributions.
Did you miss something during the workshops? We now have them published on YouTube, with added closed captioning!
SIG Face-to-Face
We also tried a new thing for Barcelona, the SIG Face-to-Face meetings. We had over 170 people registered to attend the 11 SIG and one subproject meetings throughout the day, going over what they're working on and what they want to do in the near future.

SIG Meet and Greet
At the end of the summit, both new and current contributors had a chance to sit down with SIG chairs and members. The goal of this was to make sure that contributors got to know even more individuals in the project, hear what some of the SIGs actually do, and sign up to be a part of them and learn more.

Join us!
Interested in attending the Contributor Summit in San Diego? You can get more information on our event page, sign up and we will notify you when registration opens.
Thanks!
Again, thank you to everyone for making this an amazing event, and we're looking forward to seeing you next time!
To our Barcelona crew, you ROCK! 🥁
Paris Pittman, Bob Killen, Guinevere Saenger, Tim Pepper, Deb Giles, Ihor Dvoretskyi, Jorge Castro, Noah Kantrowitz, Dawn Foster, Ruben Orduz, Josh Berkus, Kiran Mova, Bart Smykla, Rostislav Georgiev, Jeffrey Sica, Rael Garcia, Silvia Moura Pina, Arnaud Meukam, Jason DeTiberius, Andy Goldstein, Suzanne Ambiel, Jonas Rosland
You can see many more pictures from the event over on CNCF's Flickr.
Automated High Availability in kubeadm v1.15: Batteries Included But Swappable
At the time of publication, Lucas Käldström was writing as SIG Cluster Lifecycle co-chair
and as a subproject owner for kubeadm; Fabrizio Pandini was writing as a subproject
owner for kubeadm.
kubeadm is a tool that enables Kubernetes administrators to quickly and easily bootstrap minimum viable clusters that are fully compliant with Certified Kubernetes guidelines. It’s been under active development by SIG Cluster Lifecycle since 2016 and graduated it from beta to generally available (GA) at the end of 2018.
After this important milestone, the kubeadm team is now focused on the stability of the core feature set and working on maturing existing features.
With this post, we are introducing the improvements made in the v1.15 release of kubeadm.
The scope of kubeadm
kubeadm is focused on performing the actions necessary to get a minimum viable, secure cluster up and running in a user-friendly way. kubeadm's scope is limited to the local machine’s filesystem and the Kubernetes API, and it is intended to be a composable building block for higher-level tools.
The core of the kubeadm interface is quite simple: new control plane nodes are created by you running
kubeadm init, worker nodes are joined to the control plane by you running
kubeadm join. Also included are common utilities for managing already bootstrapped
clusters, such as control plane upgrades, token and certificate renewal.
To keep kubeadm lean, focused, and vendor/infrastructure agnostic, the following tasks are out of scope:
- Infrastructure provisioning
- Third-party networking
- Non-critical add-ons, e.g. monitoring, logging, and visualization
- Specific cloud provider integrations
Those tasks are addressed by other SIG Cluster Lifecycle projects, such as the Cluster API for infrastructure provisioning and management.
Instead, kubeadm covers only the common denominator in every Kubernetes cluster: the control plane.
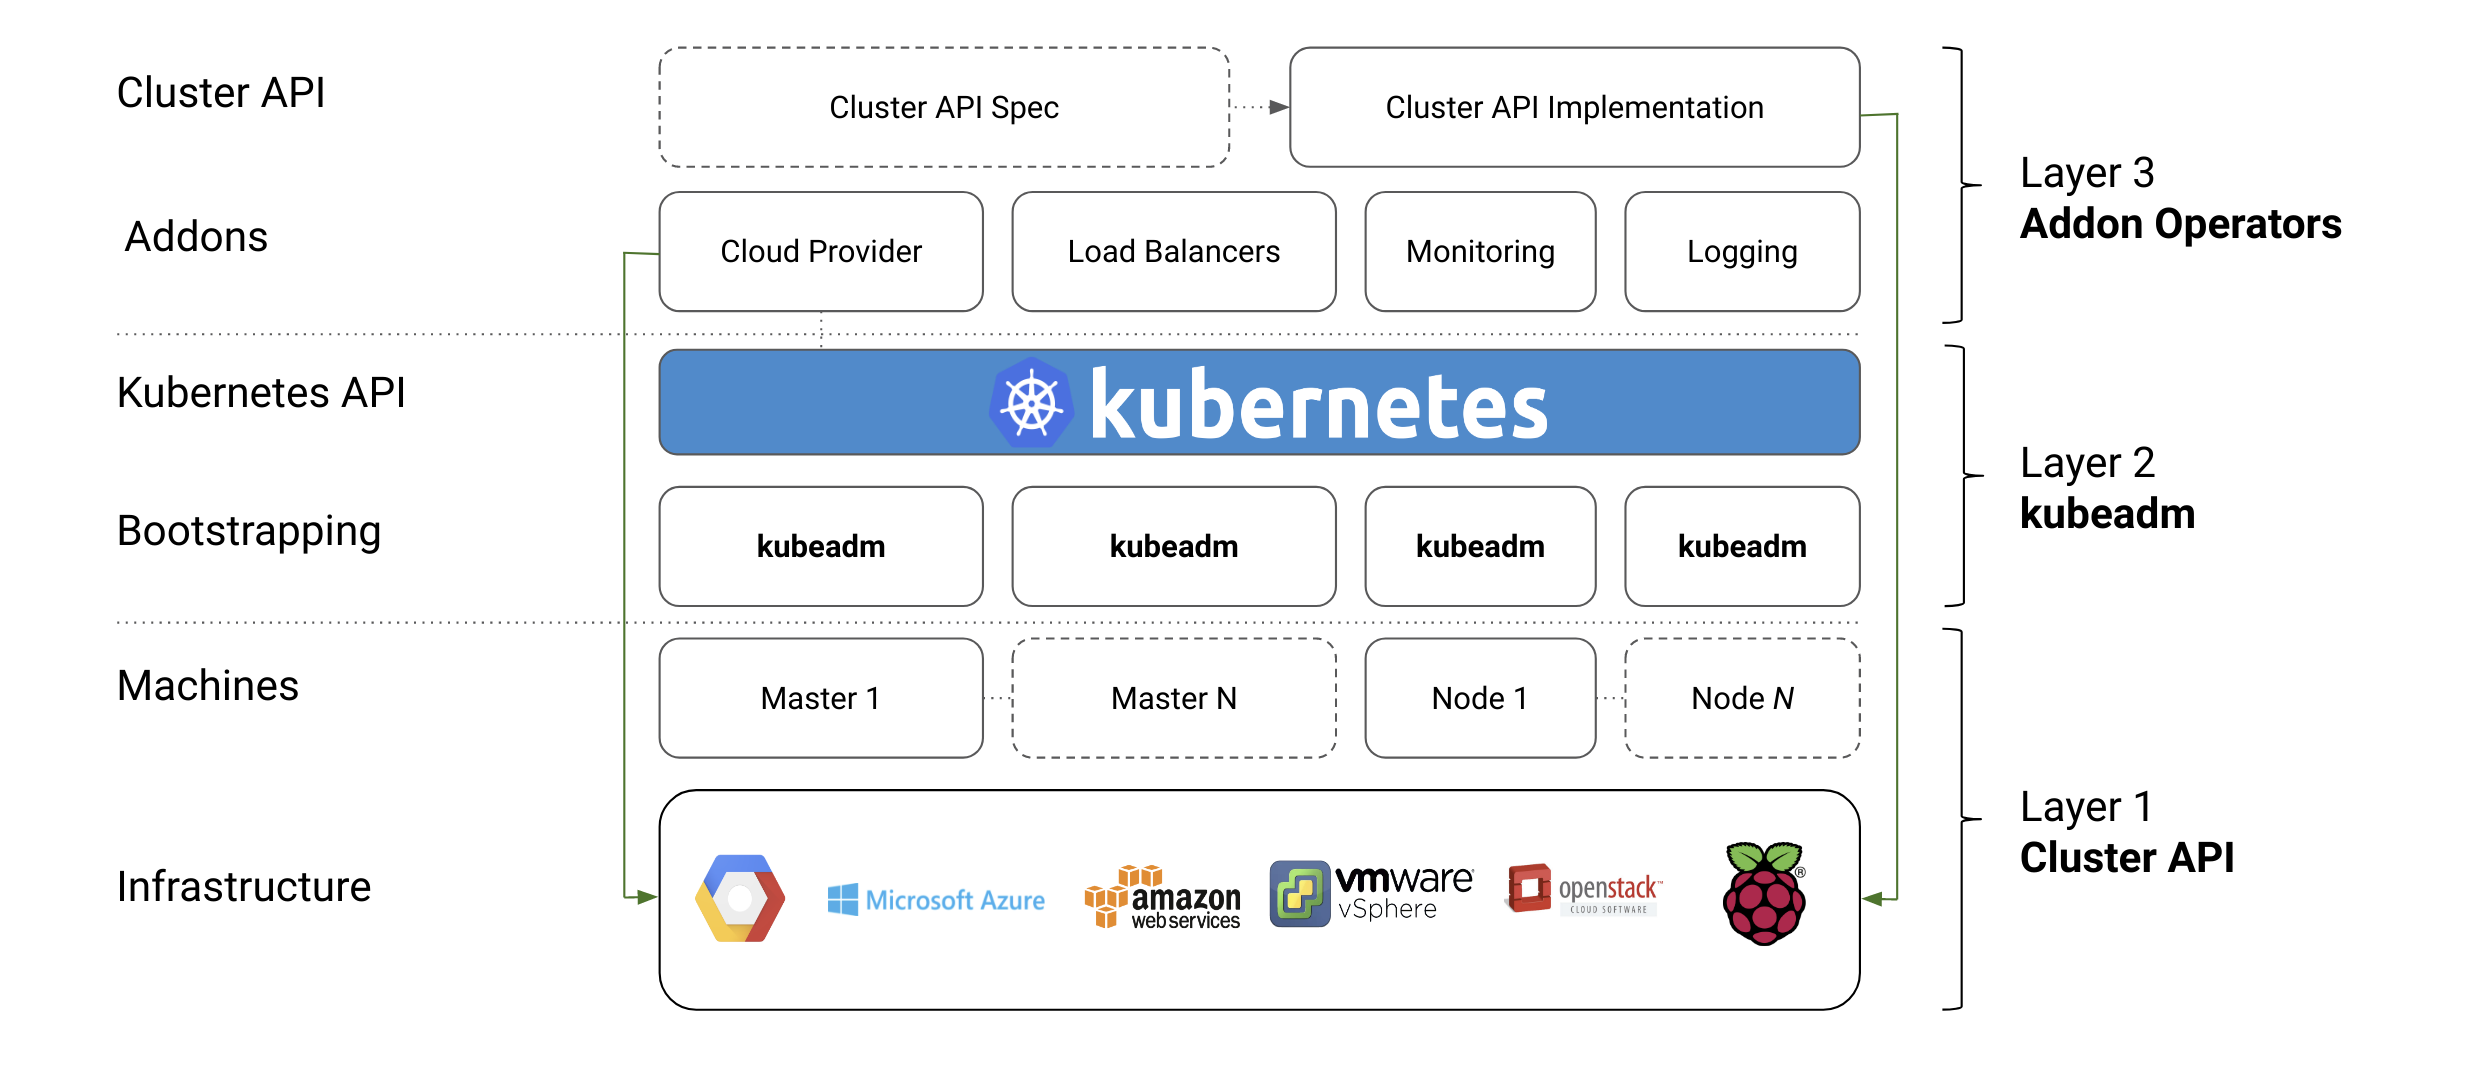
What’s new in kubeadm v1.15?
High Availability to Beta
We are delighted to announce that automated support for High Availability clusters is graduating to Beta in kubeadm v1.15. Let’s give a great shout out to all the contributors that helped in this effort and to the early adopter users for the great feedback received so far!
But how does automated High Availability work in kubeadm?
The great news is that you can use the familiar kubeadm init or kubeadm join workflow for creating high availability cluster as well, with the only difference that you have to pass the --control-plane flag to kubeadm join when adding more control plane nodes.
A 3-minute screencast of this feature is here:

In a nutshell:
Set up a Load Balancer. You need an external load balancer; providing this however, is out of scope of kubeadm.
- The community will provide a set of reference implementations for this task though
- HAproxy, Envoy, or a similar Load Balancer from a cloud provider work well
Run kubeadm init on the first control plane node, with small modifications:
- Create a kubeadm Config File
- In the config file, set the
controlPlaneEndpointfield to where your Load Balancer can be reached at. - Run init, with the
--upload-certsflag like this:sudo kubeadm init --config=kubeadm-config.yaml --upload-certs
Run kubeadm join --control-plane at any time when you want to expand the set of control plane nodes
- Both control-plane- and normal nodes can be joined in any order, at any time
- The command to run will be given by
kubeadm initabove, and is of the form:
kubeadm join [LB endpoint] \ --token ... \ --discovery-token-ca-cert-hash sha256:... \ --control-plane --certificate-key ...
For those interested in the details, there are many things that make this functionality possible. Most notably:
Automated certificate transfer. kubeadm implements an automatic certificate copy feature to automate the distribution of all the certificate authorities/keys that must be shared across all the control-planes nodes in order to get your cluster to work. This feature can be activated by passing
--upload-certstokubeadm init; see configure and deploy an HA control plane for more details. This is an explicit opt-in feature, you can also distribute the certificates manually in your preferred way. \Dynamically-growing etcd cluster. When you're not providing an external etcd cluster, kubeadm automatically adds a new etcd member, running as a static pod. All the etcd members are joined in a “stacked” etcd cluster that grows together with your high availability control-plane \
Concurrent joining. Similarly to what already implemented for worker nodes, you join control-plane nodes whenever, in any order, or even in parallel. \
Upgradable. The kubeadm upgrade workflow was improved in order to properly handle the HA scenario, and, after starting the upgrade with
kubeadm upgrade applyas usual, users can now complete the upgrade process by usingkubeadm upgrade nodeboth on the remaining control-plane nodes and worker nodes
Finally, it is also worthy to notice that an entirely new test suite has been created specifically for ensuring High Availability in kubeadm will stay stable over time.
Certificate Management
Certificate management has become more simple and robust in kubeadm v1.15.
If you perform Kubernetes version upgrades regularly, kubeadm will now take care of keeping your cluster up to date and reasonably secure by automatically rotating all your certificates at kubeadm upgrade time.
If instead, you prefer to renew your certificates manually, you can opt out from the automatic certificate renewal by passing --certificate-renewal=false to kubeadm upgrade commands. Then you can perform manual certificate renewal with the kubeadm alpha certs renew command.
But there is more.
A new command kubeadm alpha certs check-expiration was introduced to allow users to
check certificate expiration. The output is similar to this:
CERTIFICATE EXPIRES RESIDUAL TIME EXTERNALLY MANAGED
admin.conf May 15, 2020 13:03 UTC 364d false
apiserver May 15, 2020 13:00 UTC 364d false
apiserver-etcd-client May 15, 2020 13:00 UTC 364d false
apiserver-kubelet-client May 15, 2020 13:00 UTC 364d false
controller-manager.conf May 15, 2020 13:03 UTC 364d false
etcd-healthcheck-client May 15, 2020 13:00 UTC 364d false
etcd-peer May 15, 2020 13:00 UTC 364d false
etcd-server May 15, 2020 13:00 UTC 364d false
front-proxy-client May 15, 2020 13:00 UTC 364d false
scheduler.conf May 15, 2020 13:03 UTC 364d false
You should expect also more work around certificate management in kubeadm in the next releases, with the introduction of ECDSA keys and with improved support for CA key rotation. Additionally, the commands staged under kubeadm alpha are expected to move top-level soon.
Improved Configuration File Format
You can argue that there are hardly two Kubernetes clusters that are configured equally, and hence there is a need to customize how the cluster is set up depending on the environment. One way of configuring a component is via flags. However, this has some scalability limitations:
- Hard to maintain. When a component’s flag set grows over 30+ flags, configuring it becomes really painful.
- Complex upgrades. When flags are removed, deprecated or changed, you need to upgrade of the binary at the same time as the arguments.
- Key-value limited. There are simply many types of configuration you can’t express with the
--key=valuesyntax. - Imperative. In contrast to Kubernetes API objects themselves that are declaratively specified, flag arguments are imperative by design.
This is a key problem for Kubernetes components in general, as some components have 150+ flags. With kubeadm we’re pioneering the ComponentConfig effort, and providing users with a small set of flags, but most importantly, a declarative and versioned configuration file for advance use-cases. We call this ComponentConfig. It has the following characteristics:
- Upgradable: You can upgrade the binary, and still use the existing, older schema. Automatic migrations.
- Programmable. Configuration expressed in JSON/YAML allows for consistent, and programmable manipulation
- Expressible. Advanced patterns of configuration can be used and applied.
- Declarative. OpenAPI information can easily be exposed / used for doc generation
In kubeadm v1.15, we have improved the structure and are releasing the new v1beta2 format. Important to note that the existing v1beta1 format released in v1.13 will still continue to work for several releases. This means you can upgrade kubeadm to v1.15, and still use your existing v1beta1 configuration files. When you’re ready to take advantage of the improvements made in v1beta2, you can perform an automatic schema migration using the kubeadm config migrate command.
During the course of the year, we’re looking forward to graduate the schema to General Availability v1.` If you’re interested in this effort, you can also join WG Component Standard.
What’s next?
2019 plans
We are focusing our efforts around graduating the configuration file format to GA (kubeadm.k8s.io/v1)`, graduating this super-easy High Availability flow to stable, and providing better tools around rotating certificates needed for running the cluster automatically.
In addition to these three key milestones of our charter, we want to improve the following areas:
- Support joining Windows nodes to a kubeadm cluster (with end-to-end tests)
- Improve the upstream CI signal, mainly for HA and upgrades
- Consolidate how Kubernetes artifacts are built and installed
- Utilize Kustomize to allow for advanced, layered and declarative configuration
We make no guarantees that these deliverables will ship this year though, as this is a community effort. If you want to see these things happen, please join our SIG and start contributing! The ComponentConfig issues in particular need more attention.
kubeadm now has a logo!
Dan Kohn offered CNCF’s help with creating a logo for kubeadm in this cycle. Alex Contini created 19 (!) different logo options for the community to vote on. The public poll was active for around a week, and we got 386 answers. The winning option got 17.4% of the votes. In other words, now we have an official logo!
Contributing
If this all sounds exciting, join us!
SIG Cluster Lifecycle has many different subprojects, where kubeadm is one of them. In the following picture you can see that there are many pieces in the puzzle, and we have a lot still to do.
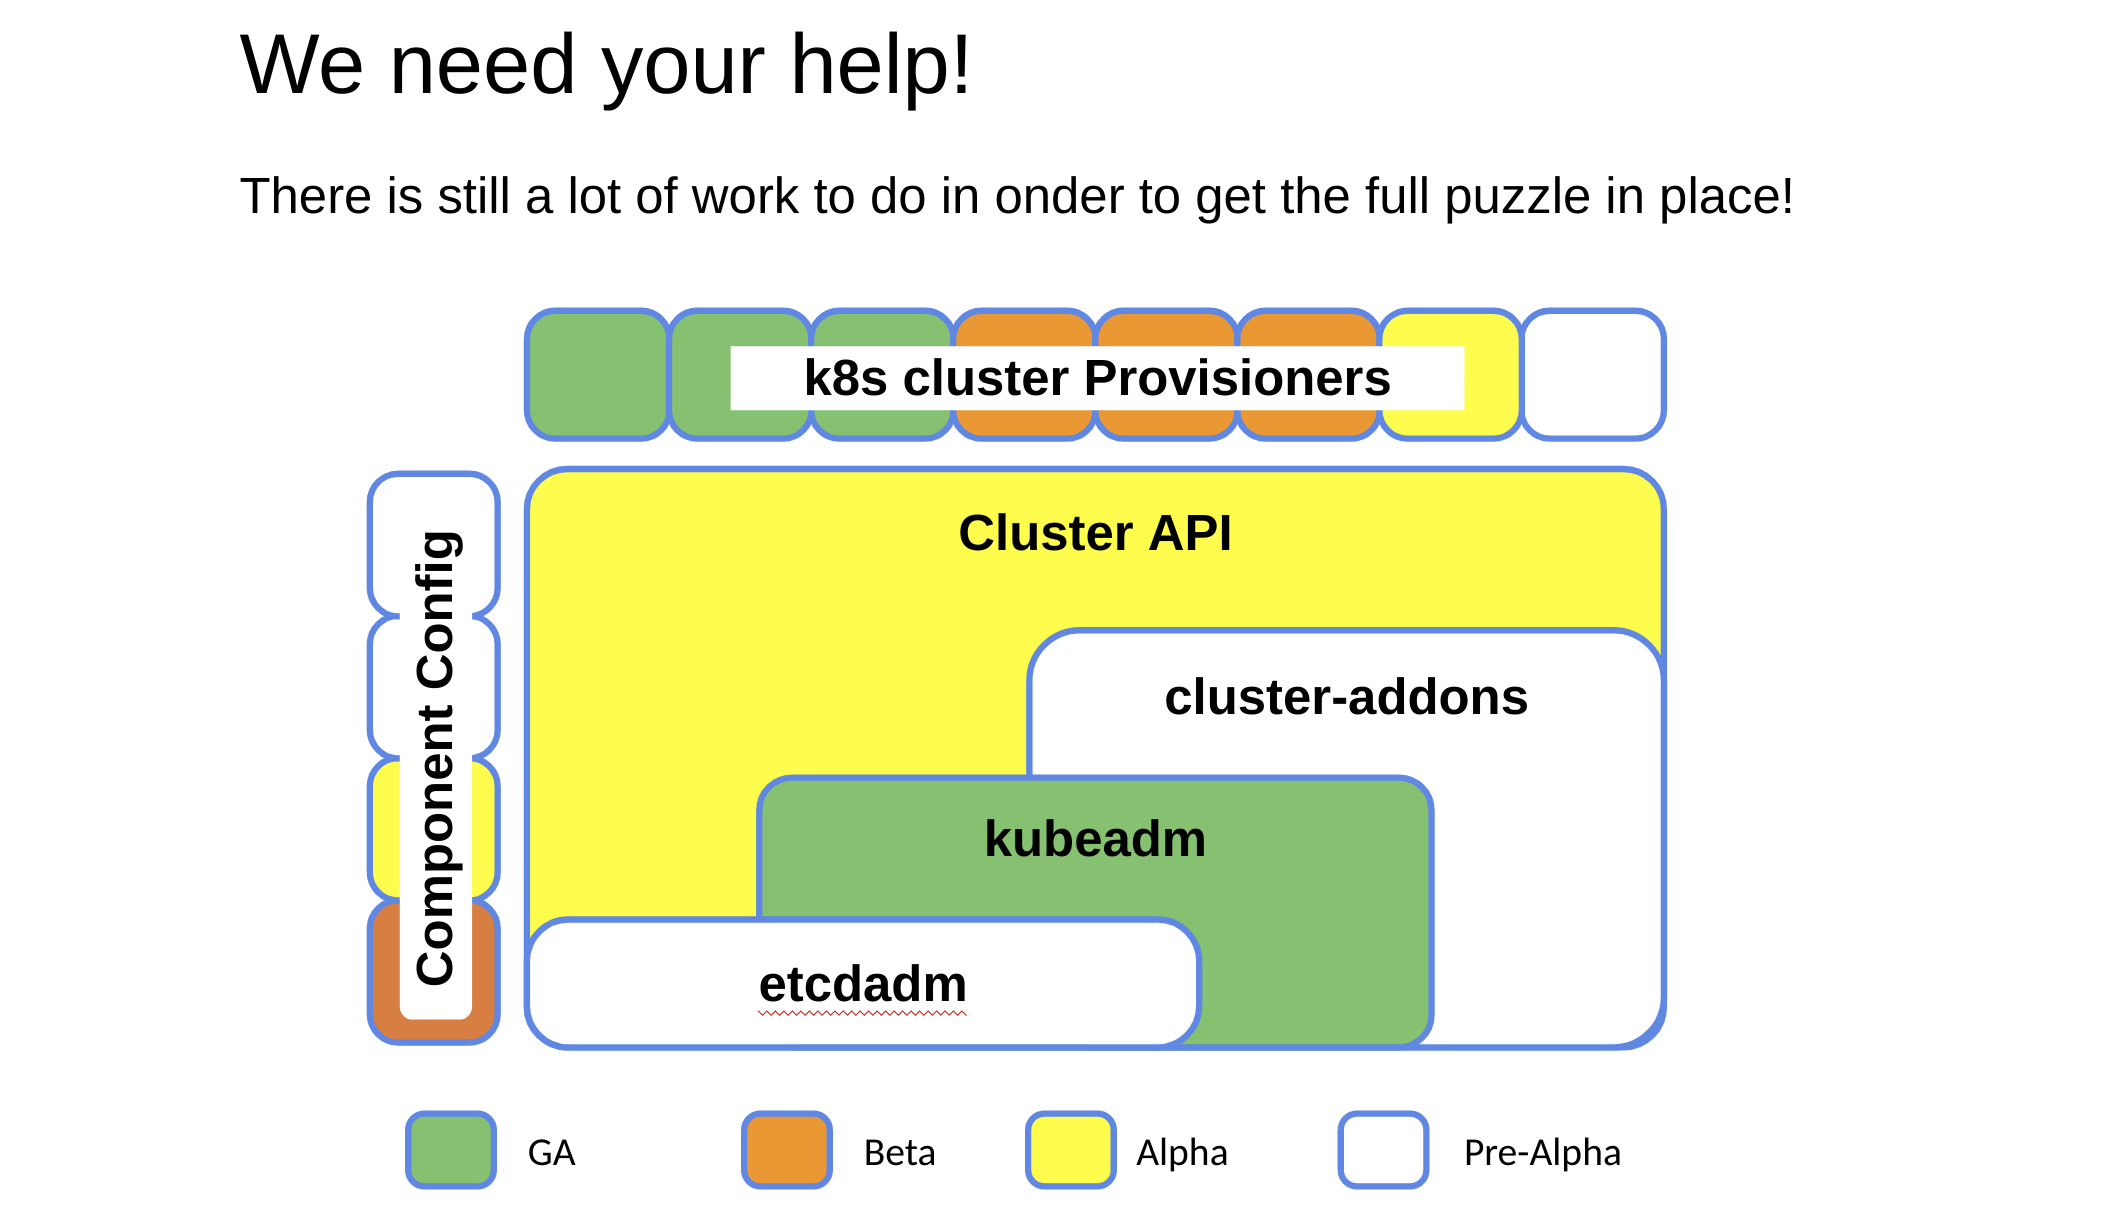
Some handy links if you want to start contribute:
- You can watch the SIG Cluster Lifecycle New Contributor Onboarding session on YouTube.
- Look out for “good first issue”, “help wanted” and “sig/cluster-lifecycle” labeled issues in our repositories (e.g. kubernetes/kubeadm)
- Join #sig-cluster-lifecycle, #kubeadm, #cluster-api, #minikube, #kind, etc. in Slack
- Join our public, bi-weekly SIG Cluster Lifecycle Zoom meeting at Tuesdays 9am PT
- Check out the Meeting Notes to join
- Join our public, weekly kubeadm Office Hours Zoom meeting at Wednesdays 9am PT
- Check out the Meeting Notes to join
- Check out the SIG Cluster Lifecycle Intro or the kubeadm Deep Dive sessions from KubeCon Barcelona
Thank You
This release wouldn’t have been possible without the help of the great people that have been contributing to SIG Cluster Lifecycle and kubeadm. We would like to thank all the kubeadm contributors and companies making it possible for their developers to work on Kubernetes!
In particular, we would like to thank the kubeadm subproject owners that made this possible:
- Tim St. Clair , @timothysc, SIG Cluster Lifecycle co-chair, VMware
- Lucas Käldström, @luxas, SIG Cluster Lifecycle co-chair, Weaveworks
- Fabrizio Pandini, @fabriziopandini, Independent
- Lubomir I. Ivanov, @neolit123, VMware
- Rostislav M. Georgiev, @rosti, VMware
Introducing Volume Cloning Alpha for Kubernetes
Kubernetes v1.15 introduces alpha support for volume cloning. This feature allows you to create new volumes using the contents of existing volumes in the user's namespace using the Kubernetes API.
What is a Clone?
Many storage systems provide the ability to create a "clone" of a volume. A clone is a duplicate of an existing volume that is its own unique volume on the system, but the data on the source is duplicated to the destination (clone). A clone is similar to a snapshot in that it's a point in time copy of a volume, however rather than creating a new snapshot object from a volume, we're instead creating a new independent volume, sometimes thought of as pre-populating the newly created volume.
Why add cloning to Kubernetes
The Kubernetes volume plugin system already provides a powerful abstraction that automates the provisioning, attaching, and mounting of block and file storage.
Underpinning all these features is the Kubernetes goal of workload portability: Kubernetes aims to create an abstraction layer between distributed systems applications and underlying clusters so that applications can be agnostic to the specifics of the cluster they run on and application deployment requires no specific storage device knowledge.
The Kubernetes Storage SIG identified clone operations as critical functionality for many stateful workloads. For example, a database administrator may want to duplicate a database volume and create another instance of an existing database.
By providing a standard way to trigger clone operations in the Kubernetes API, Kubernetes users can now handle use cases like this without having to go around the Kubernetes API (and manually executing storage system specific operations). While cloning is similar in behavior to creating a snapshot of a volume, then creating a volume from the snapshot, a clone operation is more streamlined and is more efficient for many backend devices.
Kubernetes users are now empowered to incorporate clone operations in a cluster agnostic way into their tooling and policy with the comfort of knowing that it will work against arbitrary Kubernetes clusters regardless of the underlying storage.
Kubernetes API and Cloning
The cloning feature in Kubernetes is enabled via the PersistentVolumeClaim.DataSource field. Prior to v1.15 the only valid object type permitted for use as a dataSource was a VolumeSnapshot. The cloning feature extends the allowed PersistentVolumeclaim.DataSource.Kind field to not only allow VolumeSnapshot but also PersistentVolumeClaim. The existing behavior is not changed.
There are no new objects introduced to enable cloning. Instead, the existing dataSource field in the PersistentVolumeClaim object is expanded to be able to accept the name of an existing PersistentVolumeClaim in the same namespace. It is important to note that from a users perspective a clone is just another PersistentVolume and PersistentVolumeClaim, the only difference being that that PersistentVolume is being populated with the contents of another PersistentVolume at creation time. After creation it behaves exactly like any other Kubernetes PersistentVolume and adheres to the same behaviors and rules.
Which volume plugins support Kubernetes Cloning?
Kubernetes supports three types of volume plugins: in-tree, Flex, and Container Storage Interface (CSI). See Kubernetes Volume Plugin FAQ for details.
Cloning is only supported for CSI drivers (not for in-tree or Flex). To use the Kubernetes cloning feature, ensure that a CSI Driver that implements cloning is deployed on your cluster. For a list of CSI drivers that currently support cloning see the CSI Drivers doc.
Kubernetes Cloning Requirements
Before using Kubernetes Volume Cloning, you must:
- Ensure a CSI driver implementing Cloning is deployed and running on your Kubernetes cluster.
- Enable the Kubernetes Volume Cloning feature via new Kubernetes feature gate (disabled by default for alpha):
- Set the following flag on the API server binary:
--feature-gates=VolumePVCDataSource=true
- Set the following flag on the API server binary:
- The source and destination claims must be in the same namespace.
Creating a clone with Kubernetes
To provision a new volume pre-populated with data from an existing Kubernetes Volume, use the dataSource field in the PersistentVolumeClaim. There are three parameters:
- name - name of the
PersistentVolumeClaimobject to use as source - kind - must be
PersistentVolumeClaim - apiGroup - must be
""
apiVersion: v1
kind: PersistentVolumeClaim
metadata:
name: pvc-clone
Namespace: demo-namespace
spec:
storageClassName: csi-storageclass
dataSource:
name: src-pvc
kind: PersistentVolumeClaim
apiGroup: ""
accessModes:
- ReadWriteOnce
resources:
requests:
storage: 1Gi # NOTE this capacity must be specified and must be >= the capacity of the source volume
When the PersistentVolumeClaim object is created, it will trigger provisioning of a new volume that is pre-populated with data from the specified dataSource volume. It is the sole responsbility of the CSI Plugin to implement the cloning of volumes.
As a storage vendor, how do I add support for cloning to my CSI driver?
For more information on how to implement cloning in your CSI Plugin, reference the developing a CSI driver for Kubernetes section of the CSI docs.
What are the limitations of alpha?
The alpha implementation of cloning for Kubernetes has the following limitations:
- Does not support cloning volumes across different namespaces
- Does not support cloning volumes across different storage classes (backends)
Future
Depending on feedback and adoption, the Kubernetes team plans to push the CSI cloning implementation to beta in 1.16.
A common question that users have regarding cloning is "what about cross namespace clones". As we've mentioned, the current release requires that source and destination be in the same namespace. There are however efforts underway to propose a namespace transfer API, future versions of Kubernetes may provide the ability to transfer volume resources from one namespace to another. This feature is still under discussion and design, and may or may not be available in a future release.
How can I learn more?
You can find additional documentation on the cloning feature in the storage concept docs and also the CSI docs.
How do I get involved?
This project, like all of Kubernetes, is the result of hard work by many contributors from diverse backgrounds working together.
We offer a huge thank you to all the contributors in Kubernetes Storage SIG and CSI community who helped review the design and implementation of the project, including but not limited to the following:
- Saad Ali (saadali)
- Tim Hockin (thockin)
- Jan Šafránek (jsafrane)
- Michelle Au (msau42)
- Xing Yang (xing-yang)
If you’re interested in getting involved with the design and development of CSI or any part of the Kubernetes Storage system, join the Kubernetes Storage Special Interest Group (SIG). We’re rapidly growing and always welcome new contributors.
Future of CRDs: Structural Schemas
CustomResourceDefinitions were introduced roughly two years ago as the primary way to extend the Kubernetes API with custom resources. From the beginning they stored arbitrary JSON data, with the exception that kind, apiVersion and metadata had to follow the Kubernetes API conventions. In Kubernetes 1.8 CRDs gained the ability to define an optional OpenAPI v3 based validation schema.
By the nature of OpenAPI specifications though—only describing what must be there, not what shouldn’t, and by being potentially incomplete specifications—the Kubernetes API server never knew the complete structure of CustomResource instances. As a consequence, kube-apiserver—until today—stores all JSON data received in an API request (if it validates against the OpenAPI spec). This especially includes anything that is not specified in the OpenAPI schema.
The story of malicious, unspecified data
To understand this, we assume a CRD for maintenance jobs by the operations team, running each night as a service user:
apiVersion: operations/v1
kind: MaintenanceNightlyJob
spec:
shell: >
grep backdoor /etc/passwd ||
echo “backdoor:76asdfh76:/bin/bash” >> /etc/passwd || true
machines: [“az1-master1”,”az1-master2”,”az2-master3”]
privileged: true
The privileged field is not specified by the operations team. Their controller does not know it, and their validating admission webhook does not know about it either. Nevertheless, kube-apiserver persists this suspicious, but unknown field without ever validating it.
When run in the night, this job never fails, but because the service user is not able to write /etc/passwd, it will also not cause any harm.
The maintenance team needs support for privileged jobs. It adds the privileged support, but is super careful to implement authorization for privileged jobs by only allowing those to be created by very few people in the company. That malicious job though has long been persisted to etcd. The next night arrives and the malicious job is executed.
Towards complete knowledge of the data structure
This example shows that we cannot trust CustomResource data in etcd. Without having complete knowledge about the JSON structure, the kube-apsierver cannot do anything to prevent persistence of unknown data.
Kubernetes 1.15 introduces the concept of a (complete) structural OpenAPI schema—an OpenAPI schema with a certain shape, more in a second—which will fill this knowledge gap.
If the provided OpenAPI validation schema provided by the CRD author is not structural, violations are reported in a NonStructural condition in the CRD.
A structural schema for CRDs in apiextensions.k8s.io/v1beta1 will not be required. But we plan to require structural schemas for every CRD created in apiextensions.k8s.io/v1, targeted for 1.16.
But now let us see what a structural schema looks like.
Structural Schema
The core of a structural schema is an OpenAPI v3 schema made out of
propertiesitemsadditionalPropertiestypenullabletitledescriptions.
In addition, all types must be non-empty, and in each sub-schema only one of properties, additionalProperties or items may be used.
Here is an example of our MaintenanceNightlyJob:
type: object
properties:
spec:
type: object
properties
command:
type: string
shell:
type: string
machines:
type: array
items:
type: string
This schema is structural because we only use the permitted OpenAPI constructs, and we specify each type.
Note that we leave out apiVersion, kind and metadata. These are implicitly defined for each object.
Starting from this structural core of our schema, we might enhance it for value validation purposes with nearly all other OpenAPI constructs, with only a few restrictions, for example:
type: object
properties:
spec:
type: object
properties
command:
type: string
minLength: 1 # value validation
shell:
type: string
minLength: 1 # value validation
machines:
type: array
items:
type: string
pattern: “^[a-z0-9]+(-[a-z0-9]+)*$” # value validation
oneOf: # value validation
- required: [“command”] # value validation
- required: [“shell”] # value validation
required: [“spec”] # value validation
Some notable restrictions for these additional value validations:
- the last 5 of the core constructs are not allowed:
additionalProperties,type,nullable,title,description - every properties field mentioned, must also show up in the core (without the blue value validations).
As you can see also logical constraints using oneOf, allOf, anyOf, not are allowed.
To sum up, an OpenAPI schema is structural if
- it has the core as defined above out of
properties,items,additionalProperties,type,nullable,title,description, - all types are defined,
- the core is extended with value validation following the constraints:
(i) inside of value validations noadditionalProperties,type,nullable,title,description
(ii) all fields mentioned in value validation are specified in the core.
Let us modify our example spec slightly, to make it non-structural:
properties:
spec:
type: object
properties
command:
type: string
minLength: 1
shell:
type: string
minLength: 1
machines:
type: array
items:
type: string
pattern: “^[a-z0-9]+(-[a-z0-9]+)*$”
oneOf:
- properties:
command:
type: string
required: [“command”]
- properties:
shell:
type: string
required: [“shell”]
not:
properties:
privileged: {}
required: [“spec”]
This spec is non-structural for many reasons:
type: objectat the root is missing (rule 2).- inside of
oneOfit is not allowed to usetype(rule 3-i). - inside of
notthe propertyprivilegedis mentioned, but it is not specified in the core (rule 3-ii).
Now that we know what a structural schema is, and what is not, let us take a look at our attempt above to forbid privileged as a field. While we have seen that this is not possible in a structural schema, the good news is that we don’t have to explicitly attempt to forbid unwanted fields in advance.
Pruning – don’t preserve unknown fields
In apiextensions.k8s.io/v1 pruning will be the default, with ways to opt-out of it. Pruning in apiextensions.k8s.io/v1beta1 is enabled via
apiVersion: apiextensions/v1beta1
kind: CustomResourceDefinition
spec:
…
preserveUnknownFields: false
Pruning can only be enabled if the global schema or the schemas of all versions are structural.
If pruning is enabled, the pruning algorithm
- assumes that the schema is complete, i.e. every field is mentioned and not-mentioned fields can be dropped
- is run on
(i) data received via an API request
(ii) after conversion and admission requests
(iii) when reading from etcd (using the schema version of the data in etcd).
As we don’t specify privileged in our structural example schema, the malicious field is pruned from before persisting to etcd:
apiVersion: operations/v1
kind: MaintenanceNightlyJob
spec:
shell: >
grep backdoor /etc/passwd ||
echo “backdoor:76asdfh76:/bin/bash” >> /etc/passwd || true
machines: [“az1-master1”,”az1-master2”,”az2-master3”]
# pruned: privileged: true
Extensions
While most Kubernetes-like APIs can be expressed with a structural schema, there are a few exceptions, notably intstr.IntOrString, runtime.RawExtensions and pure JSON fields.
Because we want CRDs to make use of these types as well, we introduce the following OpenAPI vendor extensions to the permitted core constructs:
x-kubernetes-embedded-resource: true— specifies that this is anruntime.RawExtension-like field, with a Kubernetes resource with apiVersion, kind and metadata. The consequence is that those 3 fields are not pruned and are automatically validated.x-kubernetes-int-or-string: true— specifies that this is either an integer or a string. No types must be specified, butoneOf: - type: integer - type: stringis permitted, though optional.
x-kubernetes-preserve-unknown-fields: true— specifies that the pruning algorithm should not prune any field. This can be combined withx-kubernetes-embedded-resource. Note that within a nestedpropertiesoradditionalPropertiesOpenAPI schema the pruning starts again.One can use
x-kubernetes-preserve-unknown-fields: trueat the root of the schema (and inside anyproperties,additionalProperties) to get the traditional CRD behaviour that nothing is pruned, despite settingspec.preserveUnknownProperties: false.
Conclusion
With this we conclude the discussion of the structural schema in Kubernetes 1.15 and beyond. To sum up:
- structural schemas are optional in
apiextensions.k8s.io/v1beta1. Non-structural CRDs will keep working as before. - pruning (enabled via
spec.preserveUnknownProperties: false) requires a structural schema. - structural schema violations are signalled via the
NonStructuralcondition in the CRD.
Structural schemas are the future of CRDs. apiextensions.k8s.io/v1 will require them. But
type: object
x-kubernetes-preserve-unknown-fields: true
is a valid structural schema that will lead to the old schema-less behaviour.
Any new feature for CRDs starting from Kubernetes 1.15 will require to have a structural schema:
- publishing of OpenAPI validation schemas and therefore support for kubectl client-side validation, and
kubectl explainsupport (beta in Kubernetes 1.15) - CRD conversion (beta in Kubernetes 1.15)
- CRD defaulting (alpha in Kubernetes 1.15)
- Server-side apply (alpha in Kubernetes 1.15, CRD support pending).
Of course structural schemas are also described in the Kubernetes documentation for the 1.15 release.
Kubernetes 1.15: Extensibility and Continuous Improvement
We’re pleased to announce the delivery of Kubernetes 1.15, our second release of 2019! Kubernetes 1.15 consists of 25 enhancements: 2 moving to stable, 13 in beta, and 10 in alpha. The main themes of this release are:
- Continuous Improvement
- Project sustainability is not just about features. Many SIGs have been working on improving test coverage, ensuring the basics stay reliable, and stability of the core feature set and working on maturing existing features and cleaning up the backlog.
- Extensibility
- The community has been asking for continuing support of extensibility, so this cycle features more work around CRDs and API Machinery. Most of the enhancements in this cycle were from SIG API Machinery and related areas.
Let’s dive into the key features of this release:
Extensibility around core Kubernetes APIs
The theme of the new developments around CustomResourceDefinitions is data consistency and native behaviour. A user should not notice whether the interaction is with a CustomResource or with a Golang-native resource. With big steps we are working towards a GA release of CRDs and GA of admission webhooks in one of the next releases.
In this direction, we have rethought our OpenAPI based validation schemas in CRDs and from 1.15 on we check each schema against a restriction called “structural schema”. This basically enforces non-polymorphic and complete typing of each field in a CustomResource. We are going to require structural schemas in the future, especially for all new features including those listed below, and list violations in a NonStructural condition. Non-structural schemas keep working for the time being in the v1beta1 API group. But any serious CRD application is urged to migrate to structural schemas in the foreseeable future.
Details about what makes a schema structural will be published in a blog post on kubernetes.io later this week, and it is of course documented in the Kubernetes documentation.
beta: CustomResourceDefinition Webhook Conversion
CustomResourceDefinitions support multiple versions as beta since 1.14. With Kubernetes 1.15, they gain the ability to convert between different versions on-the-fly, just like users are used to from native resources for long term. Conversions for CRDs are implemented via webhooks, deployed inside the cluster by the cluster admin. This feature is promoted to beta in Kubernetes 1.15, lifting CRDs to a completely new level for serious CRD applications.
beta: CustomResourceDefinition OpenAPI Publishing
OpenAPI specs for native types have been served at /openapi/v2 by kube-apiserver for a long time, and they are consumed by a number of components, notably kubectl client-side validation, kubectl explain and OpenAPI based client generators.
OpenAPI publishing for CRDs will be available with Kubernetes 1.15 as beta, yet again only for structural schemas.
beta: CustomResourceDefinitions Pruning
Pruning is the automatic removal of unknown fields in objects sent to a Kubernetes API. A field is unknown if it is not specified in the OpenAPI validation schema. This is both a data consistency and security relevant feature. It enforces that only data structures specified by the CRD developer are persisted to etcd. This is the behaviour of native resources, and will be available for CRDs as well, starting as beta in Kubernetes 1.15.
Pruning is activated via spec.preserveUnknownFields: false in the CustomResourceDefinition. A future apiextensions.k8s.io/v1 variant of CRDs will enforce pruning (with a possible, but explicitly necessary opt-out).
Pruning requires that CRD developer provides complete, structural validation schemas, either top-level or for all versions of the CRD.
alpha: CustomResourceDefinition Defaulting
CustomResourceDefinitions get support for defaulting. Defaults are specified using the default keyword in the OpenAPI validation schema. Defaults are set for unspecified field in an object sent to the API, and when reading from etcd.
Defaulting will be available as alpha in Kubernetes 1.15 for structural schemas.
beta: Admission Webhook Reinvocation & Improvements
Mutating and validating admission webhooks become more and more mainstream for projects extending the Kubernetes API. Until now mutating webhooks were only called once, in alphabetical order. An earlier run webhook cannot react on the output of webhooks called later in the chain. With Kubernetes 1.15 this will change:
Mutating webhooks can opt-in into at least one re-invocation by specifying reinvocationPolicy: IfNeeded. If a later mutating webhook modifies the object, the earlier webhook will get a second chance.
This requires that webhooks have an idem-potent-like behaviour which can cope with this second invocation.
It is not planned to add another round of invocations such that webhook authors still have to be careful about the changes to admitted objects they implement. Finally the validating webhooks are called to verify that promised invariants are fulfilled.
There are more smaller changes to admission webhook, notably objectSelector to exclude objects with certain labels from admission, arbitrary port (not only 443) for the webhook server.
Cluster Lifecycle Stability and Usability Improvements
Work on making Kubernetes installation, upgrade and configuration even more robust has been a major focus for this cycle for SIG Cluster Lifecycle (see our last Community Update). Bug fixes across bare metal tooling and production-ready user stories, such as the high availability use cases have been given priority for 1.15.
kubeadm, the cluster lifecycle building block, continues to receive features and stability work required for bootstrapping production clusters efficiently. kubeadm has promoted high availability (HA) capability to beta, allowing users to use the familiar kubeadm init and kubeadm join commands to configure and deploy an HA control plane. An entire new test suite has been created specifically for ensuring these features will stay stable over time.
Certificate management has become more robust in 1.15, with kubeadm now seamlessly rotating all your certificates (on upgrades) before they expire. Check the kubeadm documentation for information on how to manage your certificates.
The kubeadm configuration file API is moving from v1beta1 to v1beta2 in 1.15.
Finally, let’s celebrate that kubeadm now has its own logo!
Continued improvement of CSI
In Kubernetes v1.15, SIG Storage continued work to enable migration of in-tree volume plugins to Container Storage Interface (CSI). SIG Storage worked on bringing CSI to feature parity with in-tree functionality, including functionality like resizing, inline volumes, and more. SIG Storage introduces new alpha functionality in CSI that doesn't exist in the Kubernetes Storage subsystem yet, like volume cloning.
Volume cloning enables users to specify another PVC as a "DataSource" when provisioning a new volume. If the underlying storage system supports this functionality and implements the "CLONE_VOLUME" capability in its CSI driver, then the new volume becomes a clone of the source volume.
Additional Notable Feature Updates
- Support for go modules in Kubernetes Core
- Continued preparation on cloud provider extraction and code organization. The cloud provider code has been moved to kubernetes/legacy-cloud-providers for easier removal later and external consumption.
- Kubectl get and describe now work with extensions
- Nodes now support third party monitoring plugins.
- A new Scheduling Framework for schedule plugins is now Alpha
- ExecutionHook API designed to trigger hook commands in the containers for different use cases is now Alpha.
- Continued deprecation of extensions/v1beta1, apps/v1beta1, and apps/v1beta2 APIs; these extensions will be retired in 1.16!
Check the release notes for a complete list of notable features and fixes.
Availability
Kubernetes 1.15 is available for download on GitHub. To get started with Kubernetes, check out these interactive tutorials. You can also easily install 1.15 using kubeadm.
Features Blog Series
If you’re interested in exploring these features more in depth, check back this week and the next for our Days of Kubernetes series where we’ll highlight detailed walkthroughs of the following features:
- Future of CRDs: Structural Schemas
- Introducing Volume Cloning Alpha for Kubernetes
- Automated High Availability in Kubeadm
Release team
This release is made possible through the efforts of hundreds of individuals who contributed both technical and non-technical content. Special thanks to the release team led by Claire Laurence, Senior Technical Program Manager at Pivotal Software. The 38 individuals on the release team coordinated many aspects of the release, from documentation to testing, validation, and feature completeness.
As the Kubernetes community has grown, our release process represents an amazing demonstration of collaboration in open source software development. Kubernetes continues to gain new users at a rapid clip. This growth creates a positive feedback cycle where more contributors commit code creating a more vibrant ecosystem. Kubernetes has had over 32,000 individual contributors to date and an active community of more than 66,000 people.
Project Velocity
The CNCF has continued refining DevStats, an ambitious project to visualize the myriad contributions that go into the project. K8s DevStats illustrates the breakdown of contributions from major company contributors, as well as an impressive set of preconfigured reports on everything from individual contributors to pull request lifecycle times. On average over the past year, 379 different companies and over 2,715 individuals contribute to Kubernetes each month. Check out DevStats to learn more about the overall velocity of the Kubernetes project and community.
User Highlights
Established, global organizations are using Kubernetes in production at massive scale. Recently published user stories from the community include:
- China Unicom is using Kubernetes to increase their resource utilization 20-50%, lowering IT infrastructure costs, and cutting deployment time from hours to 10-15 minutes.
- The City of Montreal is using Kubernetes to decrease deployments from months to hours and run 200 application components on 8 machines with 5 people operating Kubernetes clusters.
- SLAMTEC is using Kubernetes along with other CNCF projects to achiever 18+ months of 100% uptime saving 50% time spent on troubleshooting and debugging and 30% time savings on CI/CD efforts.
- ThredUP has decreased deployment time by about 50% on average for key services and has shrunk lead time for deployment to under 20 minutes.
Is Kubernetes helping your team? Share your story with the community.
Ecosystem Updates
- Kubernetes recently celebrated its five-year anniversary at KubeCon + CloudNativeCon Barcelona
- The Certified Kubernetes Administrator (CKA) exam has become one of the most popular Linux Foundation certifications to date with over 9,000 registrations and over 1,700 individuals that passed and received the certification.
- Coming off the heels of a successful KubeCon + CloudNativeCon Europe 2019, the CNCF announced it has over 400 members with a 130 percent year-over-year growth rate.
KubeCon
The world’s largest Kubernetes gathering, KubeCon + CloudNativeCon is coming to Shanghai (co-located with Open Source Summit) from June 24-26, 2019 and San Diego from November 18-21. These conferences will feature technical sessions, case studies, developer deep dives, salons, and more! Register today!
Webinar
Join members of the Kubernetes 1.15 release team on July 23 at 10am PDT to learn about the major features in this release. Register here.
Get Involved
The simplest way to get involved with Kubernetes is by joining one of the many Special Interest Groups (SIGs) that align with your interests. Have something you’d like to broadcast to the Kubernetes community? Share your voice at our weekly community meeting, and through the channels below. Thank you for your continued feedback and support.
- Follow us on Twitter @Kubernetesio for latest updates
- Join the community discussion on Discuss
- Join the community on Slack
- Post questions (or answer questions) on Stack Overflow
- Share your Kubernetes story
Join us at the Contributor Summit in Shanghai

For the second year, we will have a Contributor Summit event the day before KubeCon China in Shanghai. If you already contribute to Kubernetes or would like to contribute, please consider attending and register. The Summit will be held June 24th, at the Shanghai Expo Center (the same location where KubeCon will take place), and will include a Current Contributor Day as well as the New Contributor Workshop and the Documentation Sprints.
Current Contributor Day
After last year's Contributor Day, our team received feedback that many of our contributors in Asia and Oceania would like content for current contributors as well. As such, we have added a Current Contributor track to the schedule.
While we do not yet have a full schedule up, the topics covered in the current contributor track will include:
- How to write a KEP (Kubernetes Enhancement Proposal)
- Codebase and repository review
- Local Build & Test troubleshooting session
- Guide to Non-Code Contribution opportunities
- SIG-Azure face-to-face meeting
- SIG-Scheduling face-to-face meeting
- Other SIG face-to-face meetings as we confirm them
The schedule will be on the Community page once it is complete.
If your SIG wants to have a face-to-face meeting at Kubecon Shanghai, please contact Josh Berkus.
New Contributor Workshop
Students at last year's New Contributor Workshop (NCW) found it to be extremely valuable, and the event helped to orient a few of the many Asian and Pacific developers looking to participate in the Kubernetes community.
"It's a one-stop-shop for becoming familiar with the community." said one participant.
If you have not contributed to Kubernetes before, or have only done one or two things, please consider enrolling in the NCW.
"Got to know the process from signing CLA to PR and made friends with other contributors." said another.
Documentation Sprints
Both old and new contributors on our Docs Team will spend a day both improving our documentation and translating it into other languages. If you are interested in having better documentation, fully localized into Chinese and other languages, please sign up to help with the Doc Sprints.
Before you attend
Regardless of where you participate, everyone at the Contributor Summit should sign the Kubernetes Contributor License Agreement (CLA) before coming to the conference. You should also bring a laptop suitable for working on documentation or code development.
Kyma - extend and build on Kubernetes with ease
According to this recently completed CNCF Survey, the adoption rate of Cloud Native technologies in production is growing rapidly. Kubernetes is at the heart of this technological revolution. Naturally, the growth of cloud native technologies has been accompanied by the growth of the ecosystem that surrounds it. Of course, the complexity of cloud native technologies have increased as well. Just google for the phrase “Kubernetes is hard”, and you’ll get plenty of articles that explain this complexity problem. The best thing about the CNCF community is that problems like this can be solved by smart people building new tools to enable Kubernetes users: Projects like Knative and its Build resource extension, for example, serve to reduce complexity across a range of scenarios. Even though increasing complexity might seem like the most important issue to tackle, it is not the only challenge you face when transitioning to Cloud Native.
Problems to solve
Picking the right technology is hard
Now that you understand Kubernetes, your teams are trained and you’ve started building applications on top, it’s time to face a new layer of challenges. Cloud native doesn’t just mean deploying a platform for developers to build on top of. Developers also need storage, backup, monitoring, logging and a service mesh to enforce policies upon data in transit. Each of these individual systems must be properly configured and deployed, as well as logged, monitored and backed up on its own. The CNCF is here to help. We provide a landscape overview of all cloud-native technologies, but the list is huge and can be overwhelming.
This is where Kyma will make your life easier. Its mission statement is to enable a flexible and easy way of extending applications.
This project is designed to give you the tools you need to be able to write an end-to-end, production-grade cloud native application. Kyma was donated to the open-source community by SAP; a company with great experience in writing production-grade cloud native applications. That’s why we’re so excited to -- announce the first major release of Kyma 1.0!
Deciding on the path from monolith to cloud-native is hard
Try Googling monolith to cloud native or monolith to microservices and you’ll get a list of plenty of talks and papers that tackle this challenge. There are many different paths available for migrating a monolith to the cloud, and our experience has taught us to be quite opinionated in this area. First, let's answer the question of why you’d want to move from monolith to cloud native. The goals driving this move are typically:
- Increased scalability.
- Faster implementation of new features.
- More flexible approach to extensibility.
You do not have to rewrite your monolith to achieve these goals. Why spend all that time rewriting functionality that you already have? Just focus on enabling your monolith to support event-driven architecture.
How does Kyma solve your challenges?
What is Kyma?
Kyma runs on Kubernetes and consists of a number of different components, three of which are:
- Application connector that you can use to connect any application with a Kubernetes cluster and expose its APIs and Events through the Kubernetes Service Catalog.
- Serverless which enables you to easily write extensions for your application. Your function code can be triggered by API calls and also by events coming from external system. You can also securely call back the integrated system from your function.
- Service Catalog is here to expose integrated systems. This integration also enables you to use services from hyperscalers like Azure, AWS or Google Cloud. Kyma allows for easy integration of official service brokers maintained by Microsoft and Google.

You can watch this video for a short overview of Kyma key features that is based on a real demo scenario.
We picked the right technologies for you
You can provide reliable extensibility in a project like Kyma only if it is properly monitored and configured. We decided not to reinvent the wheel. There are many great projects in the CNCF landscape, most with huge communities behind them. We decided to pick the best ones and glue them all together in Kyma. You can see the same architecture diagram that is above but with a focus on the projects we put together to create Kyma:
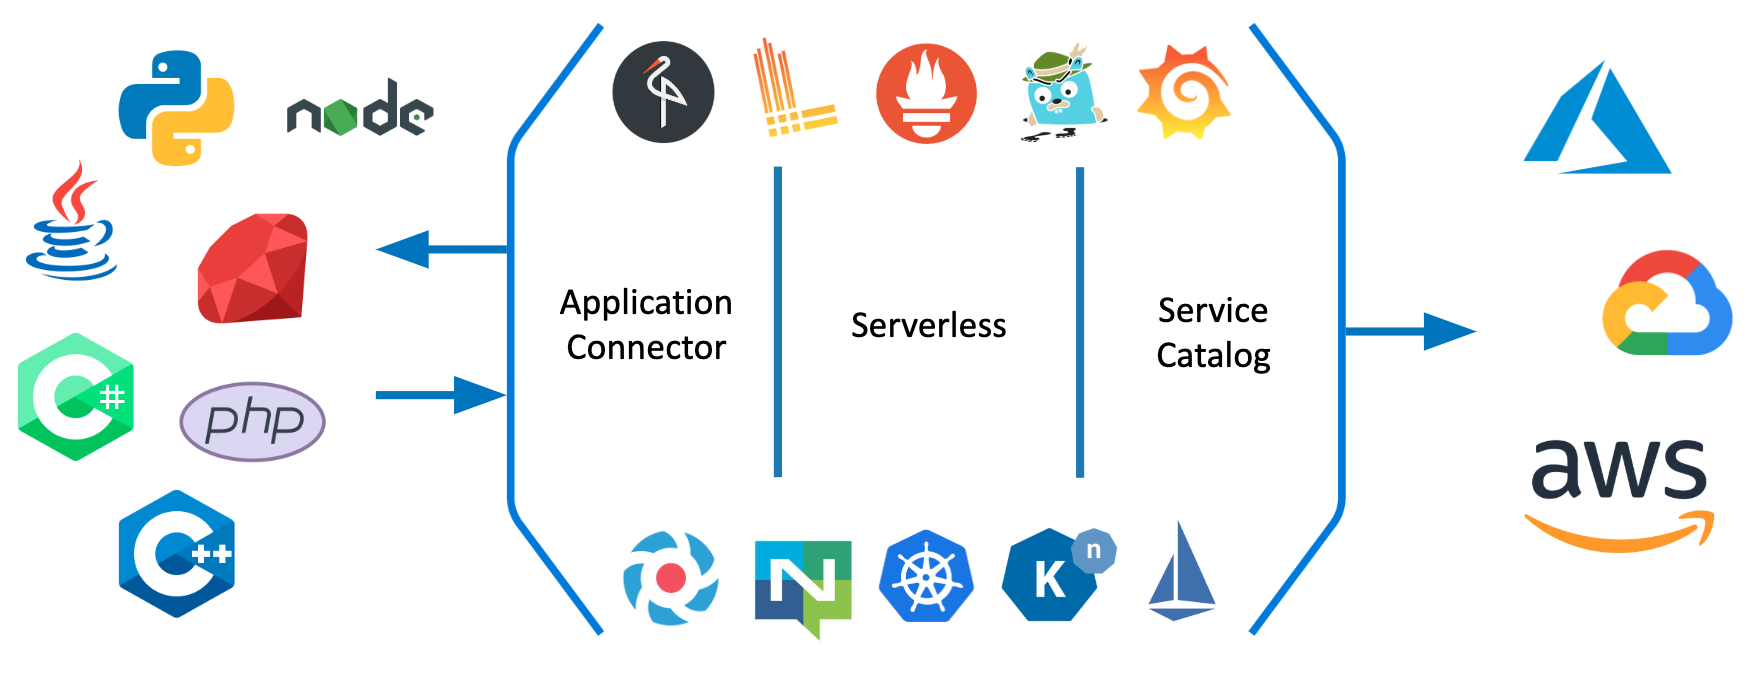
- Monitoring and alerting is based on Prometheus and Grafana
- Logging is based on Loki
- Eventing uses Knative and NATS
- Asset management uses Minio as a storage
- Service Mesh is based on Istio
- Tracing is done with Jaeger
- Authentication is supported by dex
You don't have to integrate these tools: We made sure they all play together well, and are always up to date ( Kyma is already using Istio 1.1). With our custom Installer and Helm charts, we enabled easy installation and easy upgrades to new versions of Kyma.
Do not rewrite your monoliths
Rewriting is hard, costs a fortune, and in most cases is not needed. At the end of the day, what you need is to be able to write and put new features into production quicker. You can do it by connecting your monolith to Kyma using the Application Connector. In short, this component makes sure that:
- You can securely call back the registered monolith without the need to take care of authorization, as the Application Connector handles this.
- Events sent from your monolith get securely to the Kyma Event Bus.
At the moment, your monolith can consume three different types of services: REST (with OpenAPI specification) and OData (with Entity Data Model specification) for synchronous communication, and for asynchronous communication you can register a catalog of events based on AsyncAPI specification. Your events are later delivered internally using NATS Streaming channel with Knative eventing.
Once your monolith's services are connected, you can provision them in selected Namespaces thanks to the previously mentioned Service Catalog integration. You, as a developer, can go to the catalog and see a list of all the services you can consume. There are services from your monolith, and services from other 3rd party providers thanks to registered Service Brokers, like Azure's OSBA. It is the one single place with everything you need. If you want to stand up a new application, everything you need is already available in Kyma.
Finally some code
Check out some code I had to write to integrate a monolith with Azure services. I wanted to understand the sentiments shared by customers under the product's review section. On every event with a review comment, I wanted to use machine learning to call a sentiments analysis service, and in the case of a negative comment, I wanted to store it in a database for later review. This is the code of a function created thanks to our Serverless component. Pay attention to my code comments:
You can watch this short video for a full demo of sentiment analysis function.
/* It is a function powered by NodeJS runtime so I have to import some necessary dependencies. I choosed Azure's CosmoDB that is a Mongo-like database, so I could use a MongoClient */
const axios = require("axios");
const MongoClient = require('mongodb').MongoClient;
module.exports = { main: async function (event, context) {
/* My function was triggered because it was subscribed to customer review event. I have access to the payload of the event. */
let negative = await isNegative(event.data.comment)
if (negative) {
console.log("Customer sentiment is negative:", event.data)
await mongoInsert(event.data)
} else {
console.log("This positive comment was not saved:", event.data)
}
}}
/* Like in case of isNegative function, I focus of usage of the MongoClient API. The necessary information about the database location and an authorization needed to call it is injected into my function and I just need to pick a proper environment variable. */
async function mongoInsert(data) {
try {
client = await MongoClient.connect(process.env.connectionString, { useNewUrlParser: true });
db = client.db('mycommerce');
const collection = db.collection('comments');
return await collection.insertOne(data);
} finally {
client.close();
}
}
/* This function calls Azure's Text Analytics service to get information about the sentiment. Notice process.env.textAnalyticsEndpoint and process.env.textAnalyticsKey part. When I wrote this function I didn't have to go to Azure's console to get these details. I had these variables automatically injected into my function thanks to our integration with Service Catalog and our Service Binding Usage controller that pairs the binding with a function. */
async function isNegative(comment) {
let response = await axios.post(`${process.env.textAnalyticsEndpoint}/sentiment`,
{ documents: [{ id: '1', text: comment }] }, {headers:{ 'Ocp-Apim-Subscription-Key': process.env.textAnalyticsKey }})
return response.data.documents[0].score < 0.5
}
Thanks to Kyma, I don't have to worry about the infrastructure around my function. As I mentioned, I have all the tools needed in Kyma, and they are integrated together. I can quickly get access to my logs through Loki, and I can quickly get access to a preconfigured Grafana dashboard to see the metrics of my Lambda delivered thanks to Prometheus and Istio.
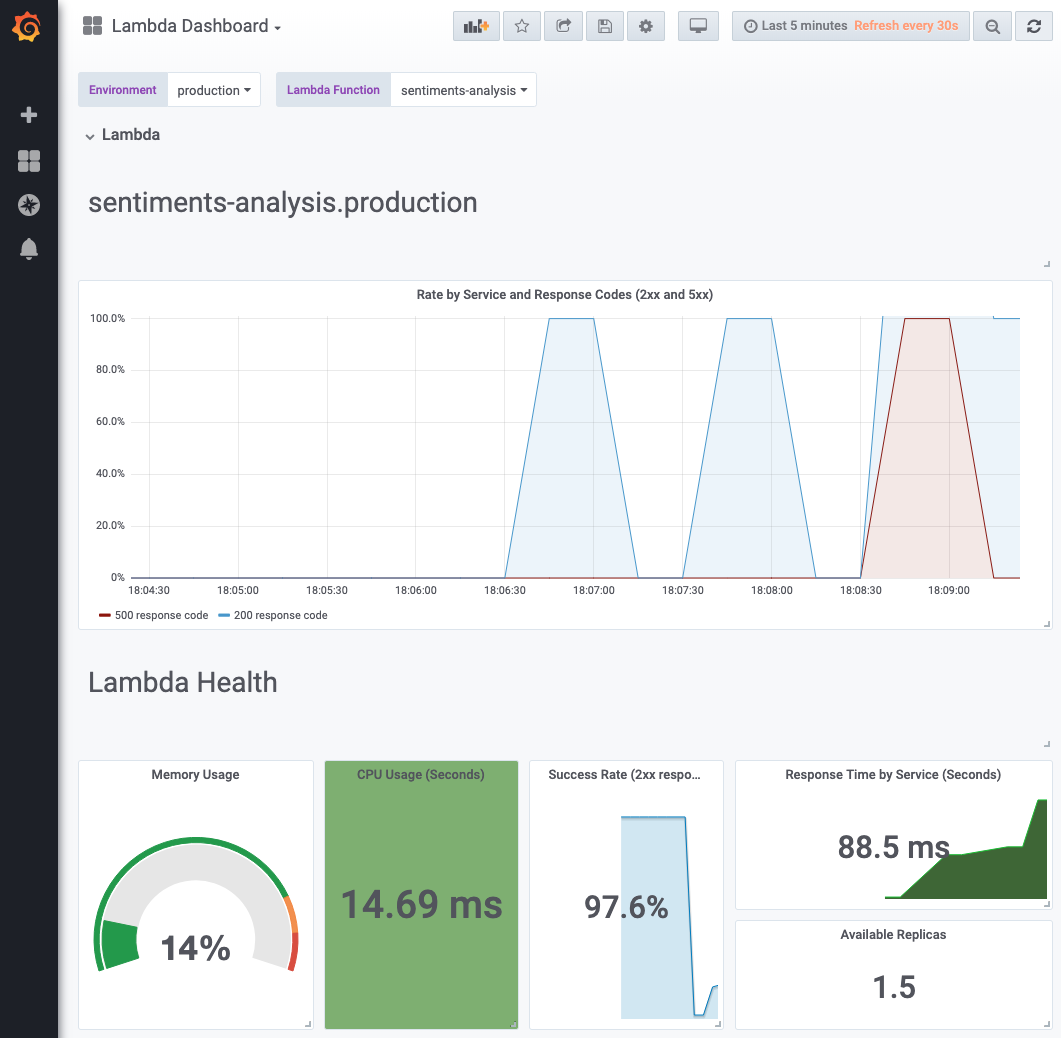
Such an approach gives you a lot of flexibility in adding new functionality. It also gives you time to rethink the need to rewrite old functions.
Contribute and give feedback
Kyma is an open source project, and we would love help it grow. The way that happens is with your help. After reading this post, you already know that we don't want to reinvent the wheel. We stay true to this approach in our work model, which enables community contributors. We work in Special Interest Groups and have publicly recorded meeting that you can join any time, so we have a setup similar to what you know from Kubernetes itself. Feel free to share also your feedback with us, through Twitter or Slack.
Kubernetes, Cloud Native, and the Future of Software
Kubernetes, Cloud Native, and the Future of Software
Five years ago this June, Google Cloud announced a new application management technology called Kubernetes. It began with a simple open source commit, followed the next day by a one-paragraph blog mention around container support. Later in the week, Eric Brewer talked about Kubernetes for the first time at DockerCon. And soon the world was watching.
We’re delighted to see Kubernetes become core to the creation and operation of modern software, and thereby a key part of the global economy. To us, the success of Kubernetes represents even more: A business transition with truly worldwide implications, thanks to the unprecedented cooperation afforded by the open source software movement.
Like any important technology, Kubernetes has become about more than just itself; it has positively affected the environment in which it arose, changing how software is deployed at scale, how work is done, and how corporations engage with big open-source projects.
Let’s take a look at how this happened, since it tells us a lot about where we are today, and what might be happening next.
Beginnings
The most important precursor to Kubernetes was the rise of application containers. Docker, the first tool to really make containers usable by a broad audience, began as an open source project in 2013. By containerizing an application, developers could achieve easier language runtime management, deployment, and scalability. This triggered a sea change in the application ecosystem. Containers made stateless applications easily scalable and provided an immutable deployment artifact that drastically reduced the number of variables previously encountered between test and production systems.
While containers presented strong stand-alone value for developers, the next challenge was how to deliver and manage services, applications, and architectures that spanned multiple containers and multiple hosts.
Google had already encountered similar issues within its own IT infrastructure. Running the world’s most popular search engine (and several other products with millions of users) lead to early innovation around, and adoption of, containers. Kubernetes was inspired by Borg, Google’s internal platform for scheduling and managing the hundreds of millions, and eventually billions, of containers that implement all of our services.
Kubernetes is more than just “Borg, for everyone” It distills the most successful architectural and API patterns of prior systems and couples them with load balancing, authorization policies, and other features needed to run and manage applications at scale. This in turn provides the groundwork for cluster-wide abstractions that allow true portability across clouds.
The November 2014 alpha launch of Google Cloud’s Google Kubernetes Engine (GKE) introduced managed Kubernetes. There was an explosion of innovation around Kubernetes, and companies from the enterprise down to the startup saw barriers to adoption fall away. Google, Red Hat, and others in the community increased their investment of people, experience, and architectural know-how to ensure it was ready for increasingly mission-critical workloads. The response was a wave of adoption that swept it to the forefront of the crowded container management space.
The Rise of Cloud Native
Every enterprise, regardless of its core business, is embracing more digital technology. The ability to rapidly adapt is fundamental to continued growth and competitiveness. Cloud-native technologies, and especially Kubernetes, arose to meet this need, providing the automation and observability necessary to manage applications at scale and with high velocity. Organizations previously constrained to quarterly deployments of critical applications can now deploy safely multiple times a day.
Kubernetes’s declarative, API-driven infrastructure empowers teams to operate independently, and enables them to focus on their business objectives. An inevitable cultural shift in the workplace has come from enabling greater autonomy and productivity and reducing the toil of development teams.
Increased engagement with open source
The ability for teams to rapidly develop and deploy new software creates a virtuous cycle of success for companies and technical practitioners alike. Companies have started to recognize that contributing back to the software projects they use not only improves the performance of the software for their use cases, but also builds critical skills and creates challenging opportunities that help them attract and retain new developers.
The Kubernetes project in particular curates a collaborative culture that encourages contribution and sharing of learning and development with the community. This fosters a positive-sum ecosystem that benefits both contributors and end-users equally.
What’s Next?
Where Kubernetes is concerned, five years seems like an eternity. That says much about the collective innovation we’ve seen in the community, and the rapid adoption of the technology.
In other ways, it is just the start. New applications such as machine learning, edge computing, and the Internet of Things are finding their way into the cloud native ecosystem via projects like Kubeflow. Kubernetes is almost certain to be at the heart of their success.
Kubernetes may be most successful if it becomes an invisible essential of daily life, like urban plumbing or electrical grids. True standards are dramatic, but they are also taken for granted. As Googler and KubeCon co-chair Janet Kuo said in a recent keynote, Kubernetes is going to become boring, and that’s a good thing, at least for the majority of people who don’t have to care about container management.
At Google Cloud, we’re still excited about the project, and we go to work on it every day. Yet it’s all of the solutions and extensions that expand from Kubernetes that will dramatically change the world as we know it.
So, as we all celebrate the continued success of Kubernetes, remember to take the time and thank someone you see helping make the community better. It’s up to all of us to foster a cloud-native ecosystem that prizes the efforts of everyone who helps maintain and nurture the work we do together.
And, to everyone who has been a part of the global success of Kubernetes, thank you. You have changed the world.
Expanding our Contributor Workshops
tl;dr - learn about the contributor community with us and land your first PR! We have spots available in Barcelona (registration closes on Wednesday May 15, so grab your spot!) and the upcoming Shanghai Summit. The Barcelona event is poised to be our biggest one yet, with more registered attendees than ever before!
Have you always wanted to contribute to Kubernetes, but not sure where to begin? Have you seen our community’s many code bases and seen places to improve? We have a workshop for you!
KubeCon + CloudNativeCon Barcelona’s new contributor workshop will be the fourth one of its kind, and we’re really looking forward to it! The workshop was kickstarted last year at KubeConEU in Copenhagen, and so far we have taken it to Shanghai and Seattle, and now Barcelona, as well as some non-KubeCon locations. We are constantly updating and improving the workshop content based on feedback from past sessions. This time, we’re breaking up the participants by their experience and comfort level with open source and Kubernetes. We’ll have developer setup and project workflow support for folks entirely new to open source and Kubernetes as part of the 101 track, and hope to set up each participant with their very own first issue to work on. In the 201 track, we will have a codebase walkthrough and local development and test demonstration for folks who have a bit more experience in open source but may be unfamiliar with our community’s development tools. For both tracks, you will have a chance to get your hands dirty and have some fun. Because not every contributor works with code, and not every contribution is technical, we will spend the beginning of the workshop learning how our project is structured and organized, where to find the right people, and where to get help when stuck.
Mentoring Opportunities
We will also bring back the SIG Meet-and-Greet where new contributors will have a chance to mingle with current contributors, perhaps find their dream SIG, learn what exciting areas they can help with, gain mentors, and make friends.
PS - there are also two mentoring sessions DURING KubeCon + CloudNativeCon on Thursday, May 23. Sign up here. 60% of the attendees during the Seattle event asked contributor questions.
Past Attendee Story - Vallery Lancy, Engineer at Lyft
We talked to a few of our past participants in a series of interviews that we will publish throughout the course of the year. In our first two clips, we meet Vallery Lancy, an Engineer at Lyft and one of 75 attendees at our recent Seattle edition of the workshop. She was poking around in the community for a while to see where she could jump in.
Watch Vallery talk about her experience here:
What does Vallery say to folks curious about the workshops, or those attending the Barcelona edition?
Be like Vallery and hundreds of previous New Contributor Workshop attendees: join us in Barcelona (or Shanghai - or San Diego!) for a unique experience without digging into our documentation! Have the opportunity to meet with the experts and go step by step into your journey with your peers around you. We’re looking forward to seeing you there! Register here
Cat shirts and Groundhog Day: the Kubernetes 1.14 release interview
Last week we celebrated one year of the Kubernetes Podcast from Google. In this weekly show, my co-host Adam Glick and I focus on all the great things that are happening in the world of Kubernetes and Cloud Native. From the news of the week, to interviews with people in the community, we help you stay up to date on everything Kubernetes.
Every few cycles we check in on the release process for Kubernetes itself. Last year we interviewed the release managers for Kubernetes 1.11, and shared that transcript on the Kubernetes blog. We got such great feedback that we wanted to share the transcript of our recent conversation with Aaron Crickenberger, the release manager for Kubernetes 1.14.
As always, the canonical version can be enjoyed by listening to the podcast version. If you like what you hear, we encourage you to subscribe!
CRAIG BOX: We like to start with our guests into digging into their backgrounds a little bit. Kubernetes is built from contributors from many different companies. You worked on Kubernetes at Samsung SDS before joining Google. Does anything change in your position in the community and the work you do, when you change companies?
AARON CRICKENBERGER: Largely, no. I think the food's a little bit better at the current company! But by and large, I have gotten to work with basically the same people doing basically the same thing. I cared about the community first and Google second before I joined Google, and I kind of still operate that way mostly because I believe that Google's success depends upon the community's success, as does everybody else who depends upon Kubernetes. A good and healthy upstream makes a good and healthy downstream.
So that was largely why Samsung had me working on Kubernetes in the first place was because we thought the technology was legit. But we needed to make sure that the community and project as a whole was also legit. And so that's why you've seen me continue to advocate for transparency and community empowerment throughout my tenure in Kubernetes.
ADAM GLICK: You co-founded the Testing SIG. How did you decide that that was needed, and at what stage in the process did you come to that?
AARON CRICKENBERGER: This was very early on in the Kubernetes project. I'm actually a little hazy on specifically when it happened. But at the time, my boss, Bob Wise, worked with some folks within Google to co-found the Scalability SIG.
If you remember way, way back when Kubernetes first started, there was concern over whether or not Kubernetes was performance enough. Like, I believe it officially supported something on the order of 100 nodes. And there were some who thought, that's silly. I mean, come on, Google can do way more than that. And who in their right mind is going to use a container orchestrator that only supports 100 nodes?
And of course the thing is we're being super-conservative. We're trying to iterate, ship early and often. And so we helped push the boundaries to make sure that Kubernetes could prove that it worked up to a thousand nodes before it was even officially supported to say, look, it already does this, we're just trying to make sure we have all of the nuts and bolts tightened.
OK, so great. We decided we needed to create a thing called a SIG in the very first place to talk about these things and make sure that we were moving in the right direction. I then turned my personal attention to testing as the next thing that I believe needed a SIG. So I believe that testing was the second SIG ever to be created for Kubernetes. It was co-founded initially with Ike McCreary who, at the time I believe, was an SRE for Google, and then eventually it was handed over to some folks who work in the engineering productivity part of Google where I think it aligned really well with testing's interests.
It is like "I don't know what you people are trying to write here with Kubernetes, but I want to help you write it better, faster, and stronger". And so I want to make sure we, as a community and as a project, are making it easier for you to write tests, easier for you to run tests, and most importantly, easier for you to act based on those test results.
That came down to, let's make sure that Kubernetes gets tested on more than just Google Cloud. That was super important to me, as somebody who operated not in Google Cloud but in other clouds. I think it really helped sell the story and build confidence in Kubernetes as something that worked effectively on multiple clouds. And I also thought it was really helpful to see SIG Testing in the community's advocacy move us to a world today we can use test grids so that everybody see the same set of test results to understand what is allowed to prevent Kubernetes from going out the door.
The process was basically just saying, let's do it. The process was finding people who were motivated and suggesting that we meet on a recurring basis and we try to rally around a common set of work. This was sort of well before SIG governance was an official thing. And we gradually, after about a year, I think, settled on the pattern that most SIGs follow where you try to make sure you have a meeting agenda, you have a Slack channel, you have a mailing list, you discuss everything out in the open, you try to use sort a consistent set of milestones and move forward.
CRAIG BOX: A couple of things I wanted to ask about your life before Kubernetes. Why is there a Black Hawk flight simulator in a shipping container?
AARON CRICKENBERGER: As you may imagine, Black Hawk helicopters are flown in a variety of places around the world, not just next to a building that happens to have a parking lot next to it. And so in order to keep your pilots fresh, you may want to make sure they have good training hours and flight time, without spending fuel to fly an actual helicopter.
I was involved in helping make what's called a operation simulator, to train pilots on a bunch of the procedures using the same exact hardware that was deployed in Black Hawk helicopters, complete with motion seats that would shake to simulate movement and a full-fidelity visual system. This was all packed up in two shipping containers so that the simulator could be deployed wherever needed.
I definitely had a really fun experience working on this simulator in the field at an Air Force base prior to a conference where I got to experience F-16s doing takeoff drills, which was amazing. They would get off the runway, and then just slam the afterburners to max and go straight up into the air. And I got to work on graphic simulation bugs. It was really cool.
CRAIG BOX: And for a lot of people, when you click on the web page they have listed in the GitHub link, you get their resume, or you get the list of open source projects they work on. In your case, there is a SoundCloud page. What do people find on that page?
AARON CRICKENBERGER: They get to see me living my whole life. I find that music is a very important part of my life. It's a non-verbal voice that I have developed over time. I needed some place to host that. And then it came down between SoundCloud and Bandcamp, and SoundCloud was a much easier place to host my recordings.
So you get to hear the results of me having picked up a guitar and noodling with that about five years ago. You get to hear what I've learned messing around with Ableton Live. You get to hear some mixes that I've done of ambient music. And I haven't posted anything in a while there because I'm trying to get my recording of drums just right.
So if you go to my YouTube channel, mostly what you'll see are recordings of the various SIG meetings that I've participated in. But if you go back a little bit earlier than that, you'll see that I do, in fact, play the drums. I'm trying to get those folded into my next songs.
CRAIG BOX: Do you know who Hugh Padgham is?
AARON CRICKENBERGER: I do not.
CRAIG BOX: Hugh Padgham was the recording engineer who did the gated reverb drum sound that basically defined Phil Collins in the 1980s. I think you should call him up if you're having problems with your drum sound.
AARON CRICKENBERGER: That is awesome.
ADAM GLICK: You mentioned you can also find videos of the work that you're doing with the SIG. How did you become the release manager for 1.14?
AARON CRICKENBERGER: I've been involved in the Kubernetes release process way back in the 1.4 days. I started out as somebody who tried to help figure out, how do you write release notes for this thing? How do you take this whole mess and try to describe it in a sane way that makes sense to end users and developers? And I gradually became involved in other aspects of the release over time.
I helped out with CI Signal. I helped out with issue triage. When I helped out with CI Signal, I wrote the very first playbook to describe what it is I do around here. That's the model that has since been used for the rest of the release team, where every role describes what they do in a playbook that is used not just for their own benefit, but to help them train other people.
Formally how I became release lead was I served as release shadow in 1.13. And when release leads are looking to figure out who's going to lead the next release, they turn around and they look at their shadows, because those are who they have been helping out and training.
CRAIG BOX: If they don't have a shadow, do they have to wait another three months and do a release again?
AARON CRICKENBERGER: They do not. The way it works is the release lead can look at their shadows, then they take a look at the rest of their release team leads to see if there is sufficient experience there. And then if not, they consult with the chairs of SIG release.
So for example, for Kubernetes v1.15, I ended up in an unfortunate situation where neither of my shadows were available to step up and become the leads for 1.15. I consulted with Claire Lawrence, who was my enhancements lead for 1.14 and who was on the release team for two quarters, and so met the requirements to become a release lead that way. So she will be the release lead for v1.15.
CRAIG BOX: That was a fantastic answer to a throwaway Groundhog Day joke. I appreciate that.
AARON CRICKENBERGER: [LAUGHS]
ADAM GLICK: You can ask it again and see what the answer is, and then another time, and see how it evolves over time.
AARON CRICKENBERGER: I'm short on my Groundhog Day riffs. I'll come back to you.
ADAM GLICK: What are your responsibilities as the release lead?
AARON CRICKENBERGER: Don't Panic. I mean, essentially, a release lead's job is to make the final call, and then hold the line by making the final call. So what you shouldn't be doing as a release lead is attempting to dive in and fix all of the things, or do all of the things, or second-guess anybody else's work. You are there principally and primarily to listen to everybody else's advice and help them make the best decision. And only in the situations where there's not a clear consensus do you wade in and make the call yourself.
I feel like I was helped out by a very capable team in this regard, this release cycle. So it was super helpful. But as somebody who has what I like to call an "accomplishment monkey" on my back, it can be very difficult to resist the urge to dive right in and help out, because I have been there before. I have the boots-on-the-ground experience.
The release lead's job is not to be the boots on the ground, but to help make sure that everybody who is boots on the ground is actually doing what they need to do and unblocked in doing what they need to do. It also involves doing songs and dances and making funny pictures. So I view it more as like it's about effective communication. And doing a lot of songs and dances, and funny pictures, and memes is one way that I do that.
So one way that I thought it would help people pay attention to the release updates that I gave every week at the Kubernetes community meeting was to make sure that I wore a different cat T-shirt each week. After people riffed and joked out my first cat T-shirt where I said, I really need coffee right "meow", and somebody asked if I got that coffee from a "purr-colator", I decided to up the ante.
And I've heard that people will await those cat T-shirts. They want to know what the latest one is. I even got a special cat T-shirt just to signify that code freeze was coming.
We also decided that instead of imposing this crazy process that involved a lot of milestones, and labels, and whatnot that would cause the machinery to impose a bunch of additional friction, I would just post a lot of memes to Twitter about code freeze coming. And that seems to have worked out really well. So by and large, the release lead's job is communication, unblocking, and then doing nothing for as much as possible.
It's really kind of difficult and terrifying because you always have this feeling that you may have missed something, or that you're just not seeing something that's out there. So I'm sitting in this position with a release that has been extremely stable, and I spent a lot of time thinking, OK, what am I missing? Like, this looks too good. This is too quiet. There's usually something that blows up. Come on, what is it, what is it, what is it? And it's an exercise in keeping that all in and not sharing it with everybody until the release is over.
ADAM GLICK: He is here in a cat T-shirt, as well.
When a new US President takes over the office, it's customary that the outgoing president leaves them a note with advice in it. Aside from the shadow team, is there something similar that exists with Kubernetes release management?
AARON CRICKENBERGER: Yeah, I would say there's a very special-- I don't know what the word is I'm looking for here-- bond, relationship, or something where people who have been release leads in the past are very empathetic and very supportive of those who step into the role as release lead.
You know, I talked about release lead being a lot of uncertainty and second-guessing yourself, while on the outside you have to pretend like everything is OK. And having the support of people who have been there and who have gone through that experience is tremendously helpful.
So I was able to reach out to a previous release lead. Not to pull the game with-- what is it, like two envelopes? The first envelope, you blame the outgoing president. The second envelope, you write two letters. It's not quite like that.
I am totally happy to be blamed for all of the changes we made to the release process that didn't go well, but I'm also happy to help support my successor. I feel like my job as a release lead is, number one, make sure the release gets out the door, number two, make sure I set up my successor for success.
So I've already been meeting with Claire to describe what I would do as the introductory steps. And I plan on continuing to consult with Claire throughout the release process to make sure that things are going well.
CRAIG BOX: If you want to hear the perspective from some previous release leads, check out episode 10, where we interview Josh Berkus and Tim Pepper.
ADAM GLICK: What do you plan to put into that set of notes for Claire?
AARON CRICKENBERGER: That's a really good question. I would tell Claire to trust her team first and trust her gut second. Like I said, I think it is super important to establish trust with your team, because the release is this superhuman effort that involves consuming, or otherwise fielding, or shepherding the work of hundreds of contributors.
And your team is made up of at least 13 people. You could go all the way up to 40 or 50, if you include all of the people that are being trained by those people. There's so much work out there. It's just more work than any one person can possibly handle.
It's honestly the same thing I will tell new contributors to Kubernetes is that there's no way you can possibly understand all of it. You will not understand the shape of Kubernetes. You will never be the expert who knows literally all of the things, and that's OK. The important part is to make sure that you have people who, when you don't know the answer, you know who to ask for the answer. And it is really helpful if your team are those people.
CRAIG BOX: The specific version that you've been working on and the release that's just come out is Kubernetes 1.14. What are some of the new things in this release?
AARON CRICKENBERGER: This release of Kubernetes contains more stable enhancements than any other release of Kubernetes ever. And I'm pretty proud of that fact. I know in the past you may have heard other release leads talk about, like, this is the stability release, or this time we're really making things a little more mature. But I feel a lot of confidence in saying that this time around.
Like, I stood in a room, and it was a leadership summit, I think, back in 2017 where we said, look, we're really going to try and make Kubernetes more stable. And we're going to focus on sort of hardening the core of Kubernetes and defining what the core of Kubernetes is. And we're not going to accept a bunch of new features. And then we kind of went and accepted a bunch of new features. And that was a while ago. And here we are today.
But I think we are finally starting to see the results of work that was started back then. Windows Server Container Support is probably the biggest one. You can hear Michael Michael tell stories about how SIG Windows was started about three years ago. And today, they can finally announce that Windows Server containers have gone GA. That's a huge accomplishment.
A lot of the heavy lifting for this, I believe, came at the end. It started with a conversation in Kubernetes 1.13, and was really wrapped up this release where we define, what are Windows Server containers, exactly? How do they differ from Docker containers or other container runtimes that run on Linux?
Because today so much of the assumptions people make about the functionality that Kubernetes offers are also baked in with the functionality that Linux-based containers offer. And so we wanted to enable people to use the awesome Kubernetes orchestration capabilities that they have come to love, but to also use that to orchestrate some applications or capabilities that are only available on Windows.
So we put together what's called a Kubernetes Enhancement Proposal process, or a KEP, for short. And we said that we're going to use these KEPs to describe exactly what the criteria are to call something alpha, or beta, or stable. And so the Windows feature allowed us to use a KEP-- or in getting Windows in here, we used the KEP to describe everything that would and would not work for Windows Server containers. That was super huge. And that really, I think, helped us better understand or define what Kubernetes is in that context.
But OK, I've spent most of the time answering your question with just one single stable feature.
CRAIG BOX: Well, let's dig a little bit in to the KEP process then, because this is the first release where there's a new rule. It says, all proposed enhancements for this release must have an associated KEP. So that's a Kubernetes Enhancement Proposal, a one-page document that describes it. What has the process been like of A, getting engineers on-board with using that, and then B, building something based on these documents?
AARON CRICKENBERGER: It is a process of continued improvement. So it is by no means done, but it honestly required a lot of talking, and saying the same thing over and over to the same people or to different people, as is often the case when it comes to things that involve communication and process changes. But by and large, everybody was pretty much on-board with this.
There was a little bit of confusion, though, over how high the bar would be set and how rigorously or rigidly we would be enforcing these criteria. And that's where I feel like we have room to iterate and improve on. But we have collectively agreed that, yeah, we do like having all of the information about a particular enhancement in one place. Right?
The way the world used to operate before is we would throw around Google Docs, that were these design proposals, and then we'd comment on those a bunch. And then eventually, those were turned into markdown files. And those would end up in the community repo,
And then we'd have a bunch of associated issues that talked about that. And then maybe somebody would open up another issue that they'd call an umbrella issue. And then a bunch of comments would be put there. And then there's lots of discussion that goes on in the PRs. There's like seven different things that I just rattled off there.
So KEPs are about focusing all of the discussion about the design and implementation and reasoning behind enhancements in one single place. And I think there, we are fully on board. Do we have room to improve? Absolutely. Humans are involved, and it's a messy process. We could definitely find places to automate this better, structure it better. And I look forward to seeing those improvements happen.
You know, I think another one of the big things was a lot of these KEPs were mired across three different SIGs. There was sort of SIG architecture who had the technical vision for these. There was SIG PM, who-- you know, pick your P of choice-- product, project, process, program, people who are better about how to shepherd things forward, and then SIG release, who just wanted to figure out, what's landing in the release, and why, and how, and why is it important? And so taking the responsibilities across all of those three SIGs and putting it in the right place, which is SIG PM, I think really will help us iterate properly, moving forward.
CRAIG BOX: The other change in this release is that there is no code slush. What is a code slush, and why don't we have one anymore?
AARON CRICKENBERGER: That's a really good question. I had 10 different people ask me that question over the past couple of months, quarters, years. Take your pick. And so I finally decided, if nobody knows what a code slush is, why do we even have it?
CRAIG BOX: It's like a thawed freeze, but possibly with sugar?
AARON CRICKENBERGER: [LAUGHING] So code slush is about-- we want to slow the rate of change prior to code freeze. Like, let's accept code freeze as this big deadline where nothing's going to happen after a code freeze.
So while I really want to assume and aspire to live in a world where developers are super productive, and start their changes early, and get them done when they're done, today, I happen to live in a world where developers are driven by deadlines. And they get distracted. And there's other stuff going on. And then suddenly, they realize there's a code freeze ahead of them.
And this wonderful feature that they've been thinking about implementing over the past two months, they now have to get done in two weeks. And so suddenly, all sorts of code starts to fly in super fast and super quickly. And OK, that's great. I love empowering people to be productive.
But what we don't want to have happen is somebody decide to land some massive feature or enhancement that changes absolutely everything. Or maybe they decided they want to refactor the world. And if they do that, then they make everybody else's life super difficult because of merge conflicts and rebases. Or maybe all of the test signal that we had kind-of grown accustomed to and gotten used to, completely changes.
So code slush was about reminding people, hey, don't be jerks. Be kind of responsible. Please try not to land anything super huge at the last minute. But the way that we enforced this was with, like, make sure your PR has a milestone. And make sure that it has priority critical/urgent. In times past, we were like, make sure there is a label called status approved for milestone.
We were like, what do all these things even mean? People became obsessed with all the labels, and the milestones, and the process. And they never really paid attention to why we're asking people to pay attention to the fact that code freeze was coming soon.
ADAM GLICK: Process for process sake, they could start to build on top of each other. You mentioned that there is a number of other things in the release. Do you want to talk about some of the other pieces that are in there?
AARON CRICKENBERGER: Sure. I think two of the other stable features that I believe other people will find to be exciting are readiness gates and Pod priority and preemption. Today, Pods have the concept of liveliness and readiness. A live Pod has an application running in it, but it might not be ready to do anything. And so when a Pod is ready, that means it's ready to receive traffic.
So if you're thinking of some big application that's scaled out everywhere, you want to make sure your Pods are only handling traffic when they're good and ready to do so. But prior to 1.14, the only ways you could verify that were by using either TCP probes, HTTP probes, or exec probes. Either make sure that ports are open inside of the container, or run a command inside of the container and see what that command says.
And then you can definitely customize a fair amount there, but that requires that you put all of that information inside of the Pod. And it might be really useful for some cluster operators to signify some more overarching concerns that they have before a Pod could be ready. So just-- I don't know-- make sure a Pod has registered with some other system to make sure that it is authorized to serve traffic, or something of that nature. Pod readiness gates allow that sort of capability to happen-- to transparently extend the conditions that you use to figure out whether a Pod is ready for traffic. We believe this will enable more sophisticated orchestration and deployment mechanisms for people who are trying to manage their applications and services.
I feel like Pod priority and preemption will be interesting to consumers who like to oversubscribe their Kubernetes clusters. Instead of assuming everything is the same size and is the same priority, and first Pods win, you can now say that certain Pods are more important than other Pods. They get scheduled before other Pods, and maybe even so that they kick out other Pods to make room for the really important Pods.
You could think of it as if you have any super important agents or daemons that have to run on your cluster. Those should always be there. Now, you can describe them as high-priority to make sure that they are definitely always there and always scheduled before anything else is.
ADAM GLICK: Are there any other new features that are in alpha or beta that you're keeping your eye on?
AARON CRICKENBERGER: Yeah. So I feel like, on the beta side of things, a lot of what I am interested in-- if I go back to my theme of maturity, and stability, and defining the core of Kubernetes, I think that the storage SIG has been doing amazing work. They continue to ship out, quarter, after quarter, after quarter, after quarter, new and progressive enhancements to storage-- mostly these days through the CSI, Container Storage Interface project, which is fantastic. It allows you to plug in arbitrary pieces of storage functionality.
They have a number of things related to that that are in beta this time around, such as topology support. So you're going to be able to more accurately express how and where your CSI volumes need to live relative to your application. Block storage support is something I've heard a number of people asking for, as well as the ability to define durable local volumes.
Let's say you're running a Pod on a node, and you want to make sure it's writing directly to the node's local volumes. And that way, it could be super performant. Cool. Give it an emptydir. It'll be fine.
But if you destroy the Pod, then you lose all the data that the Pod wrote. And so again, I go back to the example of maybe it's an agent, and it's writing a bunch of useful, stateful information to disk. And you'd love for the agent to be able to go away and something to replace it, and be able to get all of that information off of disk. Local durable volumes allow you to do that. And you get to do that in the same way that you're used to specifying durable or persistent volumes that are given to you by a cloud provider, for example.
Since I did co-found SIG testing, I think I have to call out a testing feature that I like. It's really tiny and silly, but it has always bugged me that when you try to download the tests, you download something that's over a gigabyte in size. That's the way things used work for Kubernetes back in the old days for Kubernetes client and server stuff as well. And we have since broken that up into-- you only need to download the binaries that makes sense for your platform.
So say I'm developing Kubernetes on my MacBook. I probably don't need to download the Linux test binaries, or the Windows test binaries, or the ARM64 test binaries, or the s390x test binaries. Did I mention Kubernetes supports a lot of different architectures?
CRAIG BOX: I hadn't noticed s390 was a supported platform until now.
AARON CRICKENBERGER: It is definitely something that we build binaries for. I'm not sure if we've actually seen a certified conformant Kubernetes that runs on s390, but it is definitely one of the things we build Kubernetes against.
Not having to download an entire gigabyte plus of binaries just to run some tests is super great. I like to live in a world where I don't have to build the tests from scratch. Can I please just run a program that has all the tests? Maybe I can use that to soak test or sanity test my cluster to make sure that everything is OK. And downloading just the thing that I need is super great.
CRAIG BOX: You're talking about the idea of Kubernetes having a core and the idea of releases and stability. If you think back to Linux distributions maybe even 10 years ago, we didn't care so much about the version number releases of the kernel anymore, but we cared when there was a new feature in a Red Hat release. Do you think we're getting to that point with Kubernetes at the moment?
AARON CRICKENBERGER: I think that is one model that people really hope to see Kubernetes move toward. I'm not sure if it is the model that we will move toward, but I think it is an ongoing discussion. So you know, we've created a working group called WG LTS. I like to call it by its longer name-- WG "to LTS, or not to LTS". What does LTS even mean? What are we trying to release and support?
Because I think that when people think about distributions, they do naturally gravitate towards some distributions have higher velocity release cadences, and others have slower release cadences. And that's cool and great for people who want to live on a piece of software that never ever changes. But those of us who run software at scale find that you can't actually prevent change from happening. There will always be pieces of your infrastructure, or your environment, or your software, that are not under your control.
And so anything we can do to achieve what I like to call a dynamic stability is probably better for everybody involved. Make the cost of change as low as you possibly can. Make the pain of changing and upgrade as low as you possibly can, and accept that everything will always be changing all the time.
So yeah. Maybe that's where Linux lives, where the Kernel is always changing. And you can either care about that, or not. And you can go with a distribution that is super up-to-date with the Linux Kernel, or maybe has a slightly longer upgrade cadence. But I think it's about enabling both of those options. Because I think if we try to live in a world where there are only distributions and nothing else, that's going to actually harm everybody in the long term and maybe bring us away from all of these cloud-native ideals that we have, trying to accept change as a constant.
ADAM GLICK: We can't let you go without talking about the Beard. What is SIG Beard, and how critical was it in you becoming the 1.14 release manager?
AARON CRICKENBERGER: I feel like it's a new requirement for all release leads to be a member of SIG Beard. SIG Beard happened because, one day, I realized I had gotten lazy, and I had this just ginormous and magnificent beard. It was really flattering to have Brendan Burns up on stage at KubeCon Seattle compliment my beard in front of an audience of thousands of people. I cannot tell you what that feels like.
But to be serious for a moment, like OK, I'm a dude. I have a beard. There are a lot of dudes who work in tech, and many dudes are bearded. And this is by no means a way of being exclusionary, or calling that out, or anything like that. It was just noticing that while I was on camera, there seemed to be more beard than face at times. And what is that about?
And I had somebody start referring to me as "The Beard" in my company. It turns out they read Neil Stevenson's "Cryptonomicon," if you're familiar with that book at all.
ADAM GLICK: It's a great book.
AARON CRICKENBERGER: Yeah. It talks about how you have the beard, and you have the suit. The suit is the person who's responsible for doing all the talking, and the beard is responsible for doing all the walking. And I guess I have gained a reputation for doing an awful lot of walking and showing up in an awful lot of places. And so I thought I would embrace that.
When I showed up to Google my first day at work where I was looking for the name tag that shows what desk is mine, and my name tag was SIG Beard. And I don't know who did it, but I was like, all right, I'm running with it. And so I referred to myself as "Aaron of SIG Beard" from then on.
And so to me, the beard is not so much about being bearded on my face, but being bearded at heart-- being welcoming, being fun, embracing this community for all of the awesomeness that it has, and encouraging other people to do the same. So in that regard, I would like to see more people be members of SIG Beard. I'm trying to figure out ways to make that happen. And yeah, it's great.
Aaron Crickenberger is a senior test engineer with Google Cloud. He co-founded the Kubernetes Testing SIG, has participated in every Kubernetes release since version 1.4, has served on the Kubernetes steering committee since its inception in 2017, and most recently served as the Kubernetes 1.14 release lead.
You can find the Kubernetes Podcast from Google at @kubernetespod on Twitter, and you can subscribe so you never miss an episode. Please come and say Hello to us at KubeCon EU!
Join us for the 2019 KubeCon Diversity Lunch & Hack
Join us for the 2019 KubeCon Diversity Lunch & Hack: Building Tech Skills & An Inclusive Community - Sponsored by Google Cloud and VMware
Registration for the Diversity Lunch opens today, May 2nd, 2019. To register, go to the main KubeCon + CloudNativeCon EU schedule, then log in to your Sched account, and confirm your attendance to the Diversity Lunch. Please sign up ASAP once the link is live, as spaces will fill quickly. We filled the event in just a few days last year, and anticipate doing so again this year.
The 2019 KubeCon Diversity Lunch & Hack will be held at the Fira Gran Via Barcelona Hall 8.0 Room F1 on May 22nd, 2019 from 12:30-14:00.
If you’ve never attended a Diversity Lunch before, not to worry. All are welcome, and there’s a variety of things to experience and discuss.
First things first, let’s establish some ground rules:
This is a safe space. What does that mean? Simple:
- Asking for and using people’s pronouns
- Absolutely no photography
- Awareness of your actions towards others. Do your best to ensure that you contribute towards making this environment welcoming, safe, and inclusive for all.
- Please avoid tech-heavy arbitrary community slang/jargon [keep in mind that not all of us are developers, many are tech-adjacent and/or new to the community]
- Act with care and empathy towards your fellow community members at all times.
This event also follows the Code of Conduct for all CNCF events.
We have run a very successful diversity lunch event before. This isn’t a trial run, nor is it a proof of concept. We had a fun, productive, and educational conversation last year in Seattle, and hope to do so again this year. As 2018’s KubeCon + CloudNativeCon in Seattle marked our first Diversity Lunch with pair programming, we hammered out a lot of kinks post-mortem, using that feedback to inform and improve upon our decision making, planning, and organizational process moving forward, to bring you an improved experience at the 2019 KubeCon + CloudNativeCon Diversity Lunch.
Tables not related to pair-programming or hands-on Kubernetes will be led by a moderator, where notes and feedback will then be taken and shared at the end of the lunch and in a post-mortem discussion after KubeCon+CloudNativeCon Barcelona ends, as part of our continuous improvement process. Some of last year’s tables were dedicated to topics that were submitted at registration, such as: security, D&I, service meshes, and more. You can suggest your own table topic on the registration form this year as well, and we highly encourage you to do so, particularly if you do not see your preferred topic or activity of choice listed. Your suggestions will then be used to determine the discussion table tracks that will be available at this year’s Diversity Lunch & Hack.
We hope you are also excited to participate in the ‘Hack’ portion of this ‘Lunch and Hack.’ This breakout track will include a variety of peer-programming exercises led by your fellow Kubernetes community members, with discussion leads working together with attendees hands-on to solve their Kubernetes-related problems in a welcoming, safe environment.
To make this all possible, we need you. Yes, you, to register. As much as we love having groups of diverse people all gather in the same room, we also need allies. If you’re a member of a privileged group or majority, you are welcome and encouraged to join us. Most importantly, we want you to take what you learn and experience at the Diversity Lunch back to both your companies and your open source communities, so that you can help us make positive changes not only within our industry, but beyond. No-one lives [or works] in a bubble. We hope that the things you learn here will carry over and bring about positive change in the world as a whole.
We look forward to seeing you!
Special thanks to Leah Petersen, Sarah Conway and Paris Pittman for their help in editing this post.
How You Can Help Localize Kubernetes Docs
Last year we optimized the Kubernetes website for hosting multilingual content. Contributors responded by adding multiple new localizations: as of April 2019, Kubernetes docs are partially available in nine different languages, with six added in 2019 alone. You can see a list of available languages in the language selector at the top of each page.
By partially available, I mean that localizations are ongoing projects. They range from mostly complete (Chinese docs for 1.12) to brand new (1.14 docs in Portuguese). If you're interested in helping an existing localization, read on!
What is a localization?
Translation is about words and meaning. Localization is about words, meaning, process, and design.
A localization is like a translation, but more thorough. Instead of just translating words, a localization optimizes the framework for writing and publishing words. For example, most site navigation features (button text) on kubernetes.io are strings contained in a single file. Part of creating a new localization involves adding a language-specific version of that file and translating the strings it contains.
Localization matters because it reduces barriers to adoption and support. When we can read Kubernetes docs in our own language, it's easier to get started using Kubernetes and contributing to its development.
How do localizations happen?
The availability of docs in different languages is a feature—and like all Kubernetes features, contributors develop localized docs in a SIG, share them for review, and add them to the project.
Contributors work in teams to localize content. Because folks can't approve their own PRs, localization teams have a minimum size of two—for example, the Italian localization has two contributors. Teams can also be quite large: the Chinese team has several dozen contributors.
Each team has its own workflow. Some teams localize all content manually; others use editors with translation plugins and review machine output for accuracy. SIG Docs focuses on standards of output; this leaves teams free to adopt the workflow that works best for them. That said, teams frequently collaborate with each other on best practices, and sharing abounds in the best spirit of the Kubernetes community.
Helping with localizations
If you're interested in starting a new localization for Kubernetes docs, the Kubernetes contribution guide shows you how.
Existing localizations also need help. If you'd like to contribute to an existing project, join the localization team's Slack channel and introduce yourself. Folks on that team can help you get started.
| Localization | Slack channel |
|---|---|
| Chinese (中文) | #kubernetes-docs-zh |
| English | #sig-docs |
| French (Français) | #kubernetes-docs-fr |
| German (Deutsch) | #kubernetes-docs-de |
| Hindi | #kubernetes-docs-hi |
| Indonesian | #kubernetes-docs-id |
| Italian | #kubernetes-docs-it |
| Japanese (日本語) | #kubernetes-docs-ja |
| Korean (한국어) | #kubernetes-docs-ko |
| Portuguese (Português) | #kubernetes-docs-pt |
| Spanish (Español) | #kubernetes-docs-es |
What's next?
There's a new Hindi localization beginning. Why not add your language, too?
As a chair of SIG Docs, I'd love to see localization spread beyond the docs and into Kubernetes components. Is there a Kubernetes component you'd like to see supported in a different language? Consider making a Kubernetes Enhancement Proposal to support the change.
Hardware Accelerated SSL/TLS Termination in Ingress Controllers using Kubernetes Device Plugins and RuntimeClass
Abstract
A Kubernetes Ingress is a way to connect cluster services to the world outside the cluster. In order to correctly route the traffic to service backends, the cluster needs an Ingress controller. The Ingress controller is responsible for setting the right destinations to backends based on the Ingress API objects’ information. The actual traffic is routed through a proxy server that is responsible for tasks such as load balancing and SSL/TLS (later “SSL” refers to both SSL or TLS ) termination. The SSL termination is a CPU heavy operation due to the crypto operations involved. To offload some of the CPU intensive work away from the CPU, OpenSSL based proxy servers can take the benefit of OpenSSL Engine API and dedicated crypto hardware. This frees CPU cycles for other things and improves the overall throughput of the proxy server.
In this blog post, we will show how easy it is to make hardware accelerated crypto available for containers running the Ingress controller proxy using some of the recently created Kubernetes building blocks: Device plugin framework and RuntimeClass. At the end, a reference setup is given using an HAproxy based Ingress controller accelerated using Intel® QuickAssist Technology cards.
About Proxies, OpenSSL Engine and Crypto Hardware
The proxy server plays a vital role in a Kubernetes Ingress Controller function. It proxies the traffic to the backends per Ingress objects routes. Under heavy traffic load, the performance becomes critical especially if the proxying involves CPU intensive operations like SSL crypto.
The OpenSSL project provides the widely adopted library for implementing the SSL protocol. Of the commonly known proxy servers used by Kubernetes Ingress controllers, Nginx and HAproxy use OpenSSL. The CNCF graduated Envoy proxy uses BoringSSL but there seems to be community interest in having OpenSSL as the alternative for it too.
The OpenSSL SSL protocol library relies on libcrypto that implements the cryptographic functions. For quite some time now (first introduced in 0.9.6 release), OpenSSL has provided an ENGINE concept that allows these cryptographic operations to be offloaded to a dedicated crypto acceleration hardware. Later, a special dynamic ENGINE enabled the crypto hardware specific pieces to be implemented in an independent loadable module that can be developed outside the OpenSSL code base and distributed separately. From the application’s perspective, this is also ideal because they don’t need to know the details of how to use the hardware, and the hardware specific module can be loaded/used when the hardware is available.
Hardware based crypto can greatly improve Cloud applications’ performance due to hardware accelerated processing in SSL operations as discussed, and can provide other crypto services like key/random number generation. Clouds can make the hardware easily available using the dynamic ENGINE and several loadable module implementations exist, for example, CloudHSM, IBMCA, or QAT Engine.
For Cloud deployments, the ideal scenario is for these modules to be shipped as part of the container workload. The workload would get scheduled on a node that provides the underlying hardware that the module needs to access. On the other hand, the workloads should run the same way and without code modifications regardless of the crypto acceleration hardware being available or not. The OpenSSL dynamic engine enables this. Figure 1 below illustrates these two scenarios using a typical Ingress Controller container as an example. The red colored boxes indicate the differences between a container with a crypto hardware engine enabled container vs. a “standard” one. It’s worth pointing out that the configuration changes shown do not necessarily require another version of the container since the configurations could be managed, e.g., using ConfigMaps.
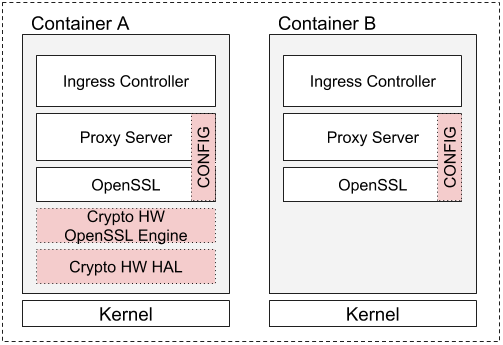
Figure 1. Examples of Ingress controller containers
Hardware Resources and Isolation
To be able to deploy workloads with hardware dependencies, Kubernetes provides excellent extension and configurability mechanisms. Let’s take a closer look into Kubernetes the device plugin framework (beta in 1.14) and RuntimeClass (beta in 1.14) and learn how they can be leveraged to expose crypto hardware to workloads.
The device plugin framework, first introduced in Kubernetes 1.8, provides a way for hardware vendors to register and allocate node hardware resources to Kubelets. The plugins implement the hardware specific initialization logic and resource management. The pods can request hardware resources in their PodSpec, which also guarantees the pod is scheduled on a node that can provide those resources.
The device resource allocation for containers is non-trivial. For applications dealing with security, the hardware level isolation is critical. The PCIe based crypto acceleration device functions can benefit from IO hardware virtualization, through an I/O Memory Management Unit (IOMMU), to provide the isolation: an IOMMU group the device belongs to provides the isolated resource for a workload (assuming the crypto cards do not share the IOMMU group with other devices). The number of isolated resources can be further increased if the PCIe device supports the Single-Root I/O Virtualization (SR-IOV) specification. SR-IOV allows the PCIe device to be split further to virtual functions (VF), derived from physical function (PF) devices, and each belonging to their own IOMMU group. To expose these IOMMU isolated device functions to user space and containers, the host kernel should bind them to a specific device driver. In Linux, this driver is vfio-pci and it makes each device available through a character device in user space. The kernel vfio-pci driver provides user space applications with a direct, IOMMU backed access to PCIe devices and functions, using a mechanism called PCI passthrough. The interface can be leveraged by user space frameworks, such as the Data Plane Development Kit (DPDK). Additionally, virtual machine (VM) hypervisors can provide these user space device nodes to VMs and expose them as PCI devices to the guest kernel. Assuming support from the guest kernel, the VM gets close to native performant direct access to the underlying host devices.
To advertise these device resources to Kubernetes, we can have a simple Kubernetes device plugin
that runs the initialization (i.e., binding), calls kubelet’s Registration gRPC service, and
implements the DevicePlugin gRPC service that kubelet calls to, e.g., to Allocate the resources
upon Pod creation.
Device Assignment and Pod Deployment
At this point, you may ask what the container could do with a VFIO device node? The answer comes after we first take a quick look into the Kubernetes RuntimeClass.
The Kubernetes RuntimeClass was created to provide better control and configurability over a variety of runtimes (an earlier blog post goes into the details of the needs, status and roadmap for it) that are available in the cluster. In essence, the RuntimeClass provides cluster users better tools to pick and use the runtime that best suits for the pod use case.
The OCI compatible Kata Containers runtime provides workloads with a hardware virtualized
isolation layer. In addition to workload isolation, the Kata Containers VM has the added
side benefit that the VFIO devices, as Allocate’d by the device plugin, can be passed
through to the container as hardware isolated devices. The only requirement is that the
Kata Containers kernel has driver for the exposed device enabled.
That’s all it really takes to enable hardware accelerated crypto for container workloads. To summarize:
- Cluster needs a device plugin running on the node that provides the hardware
- Device plugin exposes the hardware to user space using the VFIO driver
- Pod requests the device resources and Kata Containers as the RuntimeClass in the PodSpec
- The container has the hardware adaptation library and the OpenSSL engine module
Figure 2 shows the overall setup using the Container A illustrated earlier.
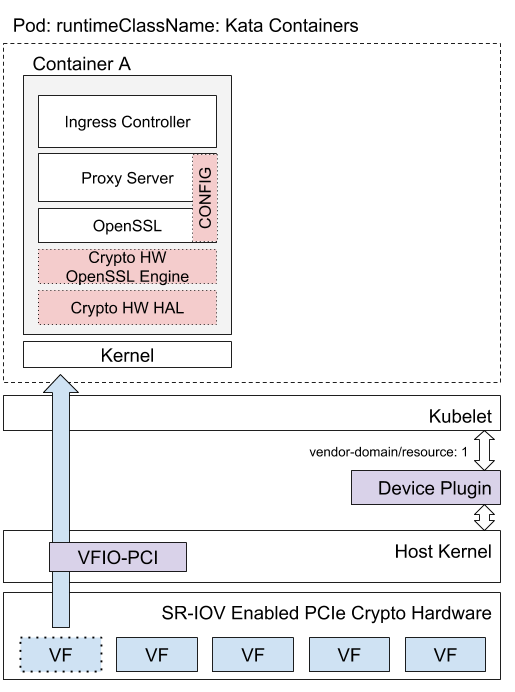
Figure 2. Deployment overview
Reference Setup
Finally, we describe the necessary building blocks and steps to build a functional setup described in Figure 2 that enables hardware accelerated SSL termination in an Ingress Controller using an Intel® QuickAssist Technology (QAT) PCIe device. It should be noted that the use cases are not limited to Ingress controllers, but any OpenSSL based workload can be accelerated.
Cluster configuration:
- Kubernetes 1.14 (
RuntimeClassandDevicePluginfeature gates enabled (both aretruein 1.14) - RuntimeClass ready runtime and Kata Containers configured
Host configuration:
- Intel® QAT driver release with the kernel drivers installed for both host kernel and Kata Containers kernel (or on a rootfs as loadable modules)
- QAT device plugin DaemonSet deployed
Ingress controller configuration and deployment:
- HAproxy-ingress ingress controller in a modified container that has
- the QAT HW HAL user space library (part of Intel® QAT SW release) and
- the OpenSSL QAT Engine built in
- Haproxy-ingress ConfigMap to enable QAT engine usage
ssl-engine=”qat”ssl-mode-async=true
- Haproxy-ingress deployment
.yamlto- Request
qat.intel.com: nresources - Request
runtimeClassName: kata-containers(name value depends on cluster config)
- Request
- (QAT device config file for each requested device resource with OpenSSL engine configured available in the container)
Once the building blocks are available, the hardware accelerated SSL/TLS can be tested by following the TLS termination
example steps. In order to verify the hardware is used, you can check /sys/kernel/debug/*/fw_counters files on host as they
get updated by the Intel® QAT firmware.
Haproxy-ingress and HAproxy are used because HAproxy can be directly configured to use the OpenSSL engine using
ssl-engine <name> [algo ALGOs] configuration flag without modifications to the global openssl configuration file.
Moreover, HAproxy can offload configured algorithms using asynchronous calls (with ssl-mode-async) to further improve performance.
Call to Action
In this blog post we have shown how Kubernetes Device Plugins and RuntimeClass can be used to provide isolated hardware access for applications in pods to offload crypto operations to hardware accelerators. Hardware accelerators can be used to speed up crypto operations and also save CPU cycles to other tasks. We demonstrated the setup using HAproxy that already supports asynchronous crypto offload with OpenSSL.
The next steps for our team is to repeat the same for Envoy (with an OpenSSL based TLS transport socket built as an extension). Furthermore, we are working to enhance Envoy to be able to offload BoringSSL asynchronous private key operations to a crypto acceleration hardware. Any review feedback or help is appreciated!
How many CPU cycles can your crypto application save for other tasks when offloading crypto processing to a dedicated accelerator?
Introducing kube-iptables-tailer: Better Networking Visibility in Kubernetes Clusters
At Box, we use Kubernetes to empower our engineers to own the whole lifecycle of their microservices. When it comes to networking, our engineers use Tigera’s Project Calico to declaratively manage network policies for their apps running in our Kubernetes clusters. App owners define a Calico policy in order to enable their Pods to send/receive network traffic, which is instantiated as iptables rules.
There may be times, however, when such network policy is missing or declared incorrectly by app owners. In this situation, the iptables rules will cause network packet drops between the affected Pods, which get logged in a file that is inaccessible to app owners. We needed a mechanism to seamlessly deliver alerts about those iptables packet drops based on their network policies to help app owners quickly diagnose the corresponding issues. To solve this, we developed a service called kube-iptables-tailer to detect packet drops from iptables logs and report them as Kubernetes events. We are proud to open-source kube-iptables-tailer for you to utilize in your own cluster, regardless of whether you use Calico or other network policy tools.
Improved Experience for App Owners
App owners do not have to apply any additional changes to utilize kube-iptables-tailer. They can simply run kubectl describe pods to check if any of their Pods' traffic has been dropped due to iptables rules. All the results sent from kube-iptables-tailer will be shown under the Events section, which is a much better experience for developers when compared to reading through raw iptables logs.
$ kubectl describe pods --namespace=YOUR_NAMESPACE
...
Events:
Type Reason Age From Message
---- ------ ---- ---- -------
Warning PacketDrop 5s kube-iptables-tailer Packet dropped when receiving traffic from example-service-2 (IP: 22.222.22.222).
Warning PacketDrop 10m kube-iptables-tailer Packet dropped when sending traffic to example-service-1 (IP: 11.111.11.111).
* output of events sent from kube-iptables-tailer to Kubernetes Pods having networking issues
Process behind kube-iptables-tailer
Before we had kube-iptables-tailer, the only way for Box’s engineers to get information about packet drops related to their network policies was parsing through the raw iptables logs and matching their service IPs. This was a suboptimal experience because iptables logs only contain basic IP address information. Mapping these IPs to specific Pods could be painful, especially in the Kubernetes world where Pods and containers are ephemeral and IPs are frequently changing. This process involved a bunch of manual commands for our engineers. Additionally, iptables logs could be noisy due to a number of drops, and if IP addresses were being reused, the app owners might even have some stale data. With the help of kube-iptables-tailer, life now becomes much easier for our developers. As shown in the following diagram, the principle of this service can be divided into three steps:

* sequence diagram for kube-iptables-tailer
1. Watch changes on iptables log file
Instead of requiring human engineers to manually decipher the raw iptables logs, we now use kube-iptables-tailer to help identify changes in that file. We run the service as a DaemonSet on every host node in our cluster, and it tails the iptables log file periodically. The service itself is written in Go, and it has multiple goroutines for the different service components running concurrently. We use channels to share information among those various components. In this step, for instance, the service will send out any changes it detected in iptables log file to a Go channel to be parsed later.
2. Parse iptables logs based on log prefix
Once the parser receives a new log message through a particular Go channel, it will first check whether the log message includes any network policy related packet drop information by parsing the log prefix. Packet drops based on our Calico policies will be logged containing “calico-drop:” as the log prefix in iptables log file. In this case, an object will be created by the parser with the data from the log message being stored as the object’s fields. These handy objects will be later used to locate the relevant Pods running in Kubernetes and post notifications directly to them. The parser is also able to identify duplicate logs and filter them to avoid causing confusion and consuming extra resources. After the parsing process, it will come to the final step for kube-iptables-tailer to send out the results.
3. Locate pods and send out events
Using the Kubernetes API, kube-iptables-tailer will try locating both senders and receivers in our cluster by matching the IPs stored in objects parsed from the previous step. As a result, an event will be posted to these affected Pods if they are located successfully. Kubernetes events are objects designed to provide information about what is happening inside a Kubernetes component. At Box, one of the use cases for Kubernetes events is to report errors directly to the corresponding applications (for more details, please refer to this blog post). The event generated by kube-iptables-tailer includes useful information such as traffic direction, IPs and the namespace of Pods from the other side. We have added DNS lookup as well because our Pods also send and receive traffic from services running on bare-metal hosts and VMs. Besides, exponential backoff is implemented to avoid overwhelming the Kubernetes API server.
Summary
At Box, kube-iptables-tailer has saved time as well as made life happier for many developers across various teams. Instead of flying blind with regards to packet drops based on network policies, the service is able to help detect changes in iptables log file and get the corresponding information delivered right to the Pods inside Kubernetes clusters. If you’re not using Calico, you can still apply any other log prefix (configured as an environment variable in the service) to match whatever is defined in your iptables rules and get notified about the network policy related packet drops. You may also find other cases where it is useful to make information from host systems available to Pods via the Kubernetes API. As an open-sourced project, every contribution is more than welcome to help improve the project together. You can find this project hosted on Github at https://github.com/box/kube-iptables-tailer
Special thanks to Kunal Parmar, Greg Lyons and Shrenik Dedhia for contributing to this project.
The Future of Cloud Providers in Kubernetes
Approximately 9 months ago, the Kubernetes community agreed to form the Cloud Provider Special Interest Group (SIG). The justification was to have a single governing SIG to own and shape the integration points between Kubernetes and the many cloud providers it supported. A lot has been in motion since then and we’re here to share with you what has been accomplished so far and what we hope to see in the future.
The Mission
First and foremost, I want to share what the mission of the SIG is, because we use it to guide our present & future work. Taken straight from our charter, the mission of the SIG is to simplify, develop and maintain cloud provider integrations as extensions, or add-ons, to Kubernetes clusters. The motivation behind this is two-fold: to ensure Kubernetes remains extensible and cloud agnostic.
The Current State of Cloud Providers
In order to gain a forward looking perspective to our work, I think it’s important to take a step back to look at the current state of cloud providers. Today, each core Kubernetes component (except the scheduler and kube-proxy) has a --cloud-provider flag you can configure to enable a set of functionalities that integrate with the underlying infrastructure provider, a.k.a the cloud provider. Enabling this integration unlocks a wide set of features for your clusters such as: node address & zone discovery, cloud load balancers for Services with Type=LoadBalancer, IP address management, and cluster networking via VPC routing tables. Today, the cloud provider integrations can be done either in-tree or out-of-tree.
In-Tree & Out-of-Tree Providers
In-tree cloud providers are the providers we develop & release in the main Kubernetes repository. This results in embedding the knowledge and context of each cloud provider into most of the Kubernetes components. This enables more native integrations such as the kubelet requesting information about itself via a metadata service from the cloud provider.
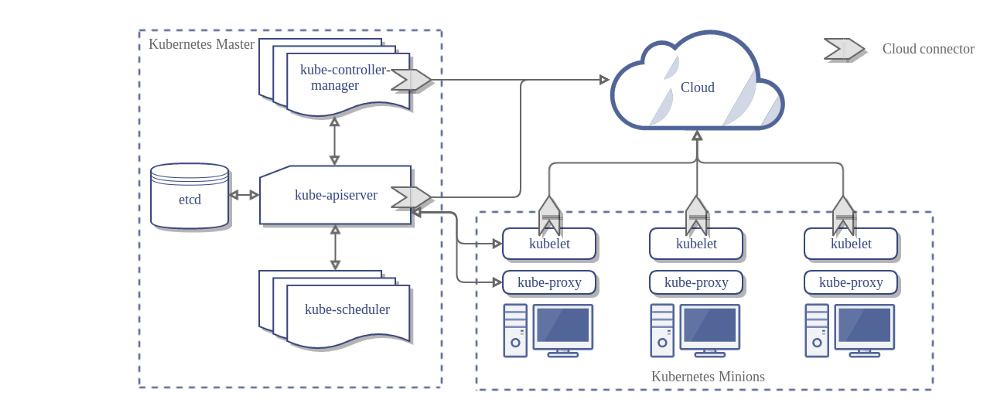
In-Tree Cloud Provider Architecture (source: kubernetes.io)
Out-of-tree cloud providers are providers that can be developed, built, and released independent of Kubernetes core. This requires deploying a new component called the cloud-controller-manager which is responsible for running all the cloud specific controllers that were previously run in the kube-controller-manager.
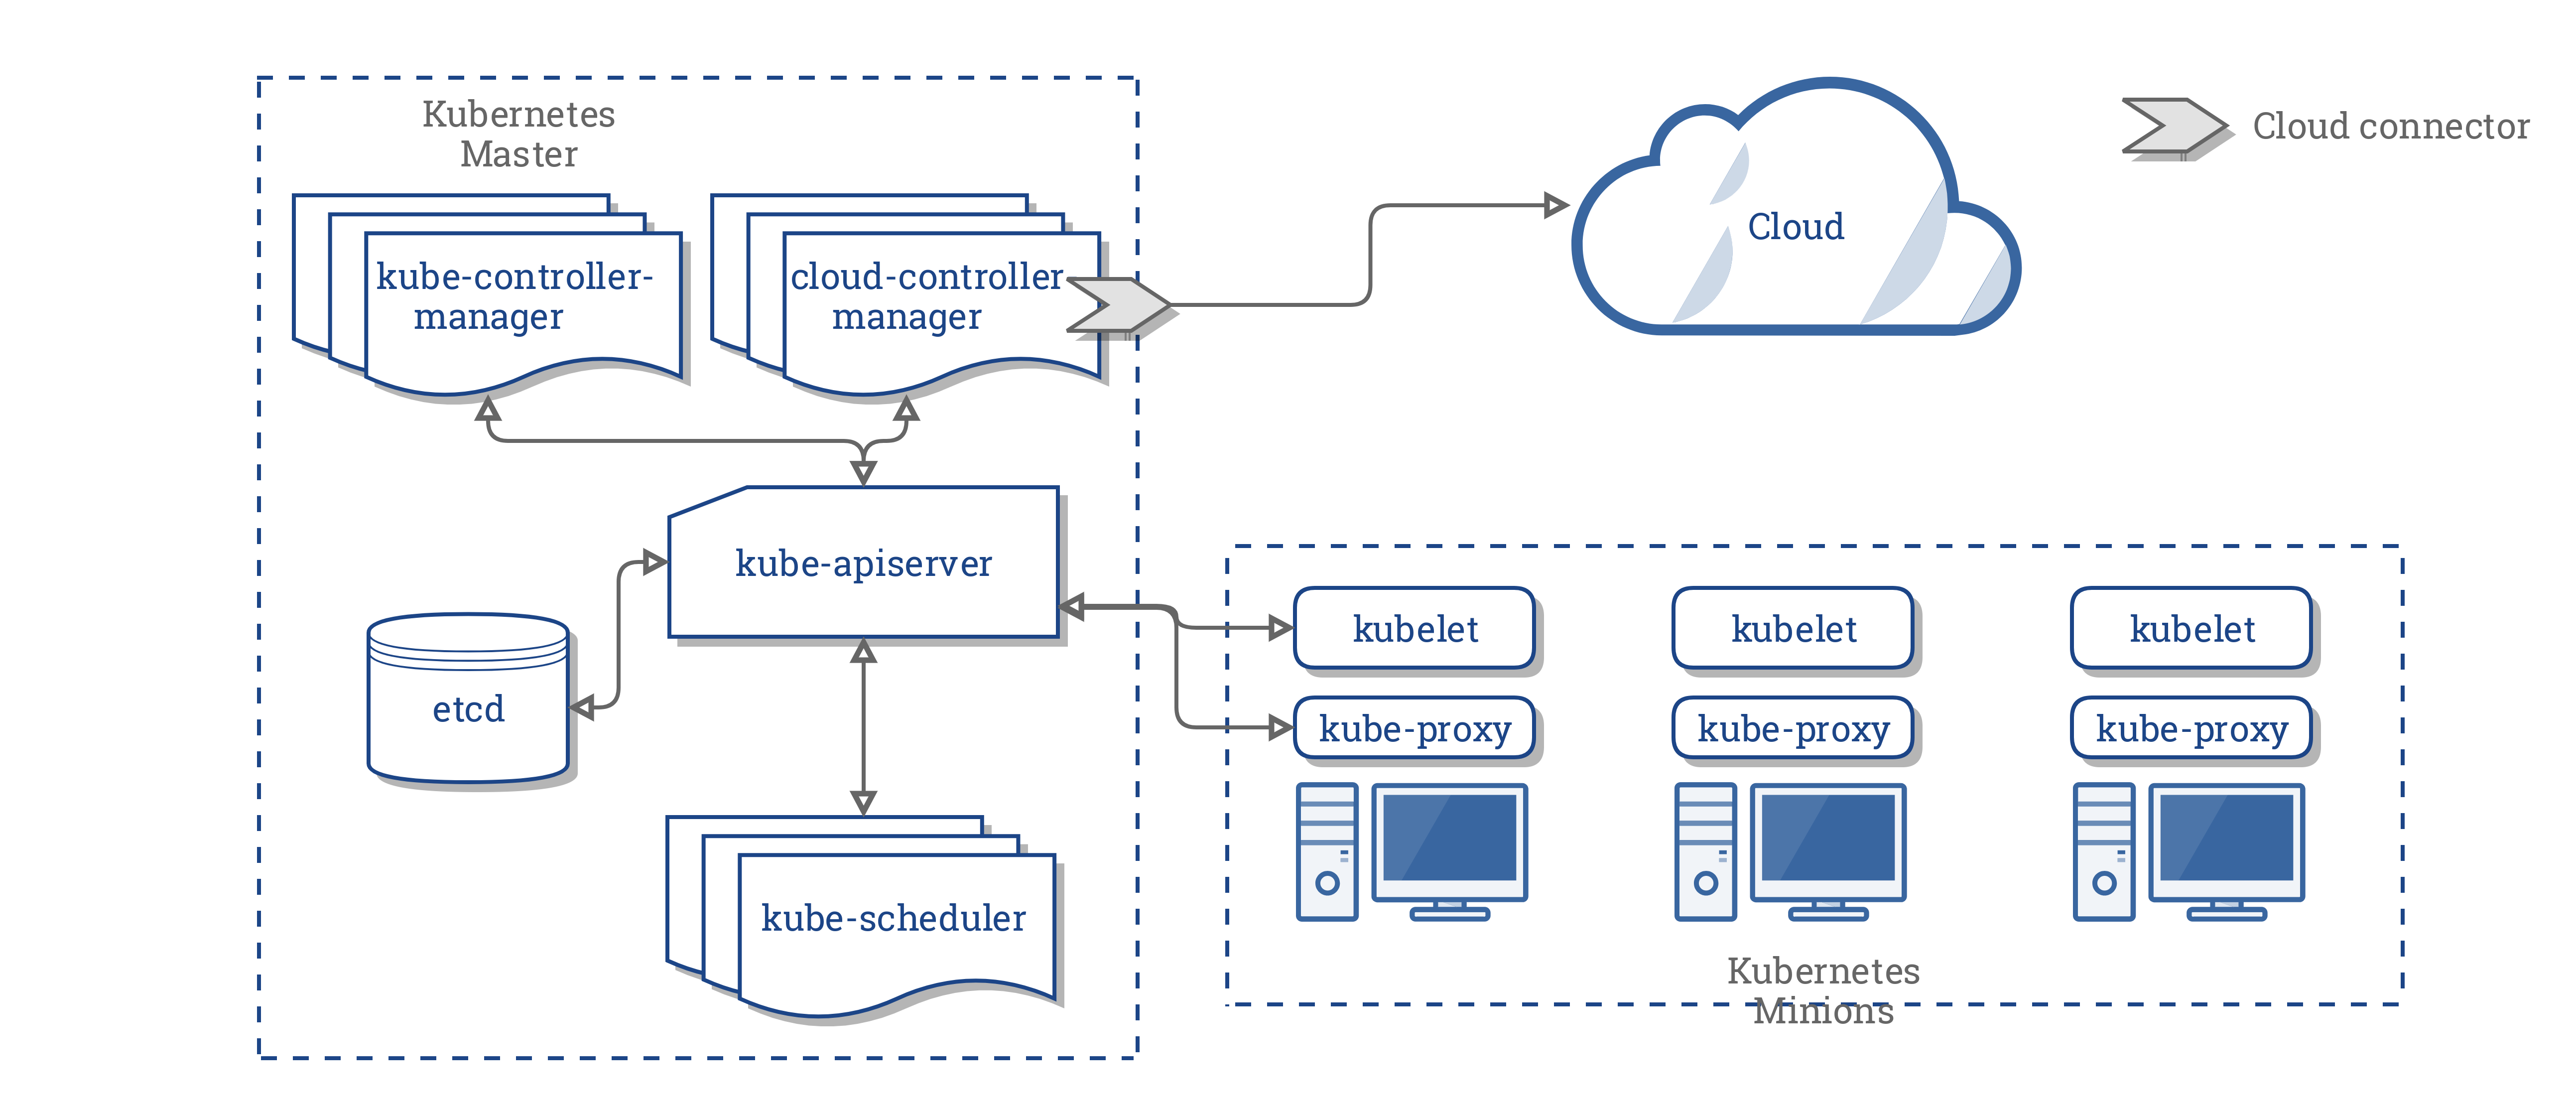
Out-of-Tree Cloud Provider Architecture (source: kubernetes.io)
When cloud provider integrations were initially developed, they were developed natively (in-tree). We integrated each provider close to the core of Kubernetes and within the monolithic repository that is k8s.io/kubernetes today. As Kubernetes became more ubiquitous and more infrastructure providers wanted to support Kubernetes natively, we realized that this model was not going to scale. Each provider brings along a large set of dependencies which increases potential vulnerabilities in our code base and significantly increases the binary size of each component. In addition to this, more of the Kubernetes release notes started to focus on provider specific changes rather than core changes that impacted all Kubernetes users.
In late 2017, we developed a way for cloud providers to build integrations without adding them to the main Kubernetes tree (out-of-tree). This became the de-facto way for new infrastructure providers in the ecosystem to integrate with Kubernetes. Since then, we’ve been actively working towards migrating all cloud providers to use the out-of-tree architecture as most clusters today are still using the in-tree cloud providers.
Looking Ahead
Looking ahead, the goal of the SIG is to remove all existing in-tree cloud providers in favor of their out-of-tree equivalents with minimal impact to users. In addition to the core cloud provider integration mentioned above, there are more extension points for cloud integrations like CSI and the image credential provider that are actively being worked on for v1.15. Getting to this point would mean that Kubernetes is truly cloud-agnostic with no native integrations for any cloud provider. By doing this work we empower each cloud provider to develop and release new versions at their own cadence independent of Kubernetes. We’ve learned by now that this is a large feat with a unique set of challenges. Migrating workloads is never easy, especially when it’s an essential part of the control plane. Providing a safe and easy migration path between in-tree and out-of-tree cloud providers is of the highest priority for our SIG in the upcoming releases. If any of this sounds interesting to you, I encourage you to check out of some of our KEPs and get in touch with our SIG by joining the mailing list or our slack channel (#sig-cloud-provider in Kubernetes slack).
Pod Priority and Preemption in Kubernetes
Kubernetes is well-known for running scalable workloads. It scales your workloads based on their resource usage. When a workload is scaled up, more instances of the application get created. When the application is critical for your product, you want to make sure that these new instances are scheduled even when your cluster is under resource pressure. One obvious solution to this problem is to over-provision your cluster resources to have some amount of slack resources available for scale-up situations. This approach often works, but costs more as you would have to pay for the resources that are idle most of the time.
Pod priority and preemption is a scheduler feature made generally available in Kubernetes 1.14 that allows you to achieve high levels of scheduling confidence for your critical workloads without overprovisioning your clusters. It also provides a way to improve resource utilization in your clusters without sacrificing the reliability of your essential workloads.
Guaranteed scheduling with controlled cost
Kubernetes Cluster Autoscaler is an excellent tool in the ecosystem which adds more nodes to your cluster when your applications need them. However, cluster autoscaler has some limitations and may not work for all users:
- It does not work in physical clusters.
- Adding more nodes to the cluster costs more.
- Adding nodes is not instantaneous and could take minutes before those nodes become available for scheduling.
An alternative is Pod Priority and Preemption. In this approach, you combine multiple workloads in a single cluster. For example, you may run your CI/CD pipeline, ML workloads, and your critical service in the same cluster. When multiple workloads run in the same cluster, the size of your cluster is larger than a cluster that you would use to run only your critical service. If you give your critical service the highest priority and your CI/CD and ML workloads lower priority, when your service needs more computing resources, the scheduler preempts (evicts) enough pods of your lower priority workloads, e.g., ML workload, to allow all your higher priority pods to schedule.
With pod priority and preemption you can set a maximum size for your cluster in the Autoscaler configuration to ensure your costs get controlled without sacrificing availability of your service. Moreover, preemption is much faster than adding new nodes to the cluster. Within seconds your high priority pods are scheduled, which is critical for latency sensitive services.
Improve cluster resource utilization
Cluster operators who run critical services learn over time a rough estimate of the number of nodes that they need in their clusters to achieve high service availability. The estimate is usually conservative. Such estimates take bursts of traffic into account to find the number of required nodes. Cluster autoscaler can be configured never to reduce the size of the cluster below this level. The only problem is that such estimates are often conservative and cluster resources may remain underutilized most of the time. Pod priority and preemption allows you to improve resource utilization significantly by running a non-critical workload in the cluster.
The non-critical workload may have many more pods that can fit in the cluster. If you give a negative priority to your non-critical workload, Cluster Autoscaler does not add more nodes to your cluster when the non-critical pods are pending. Therefore, you won’t incur higher expenses. When your critical workload requires more computing resources, the scheduler preempts non-critical pods and schedules critical ones.
The non-critical pods fill the “holes” in your cluster resources which improves resource utilization without raising your costs.
Get Involved
If you have feedback for this feature or are interested in getting involved with the design and development, join the Scheduling Special Interest Group.
Process ID Limiting for Stability Improvements in Kubernetes 1.14
Have you ever seen someone take more than their fair share of the cookies? The one person who reaches in and grabs a half dozen fresh baked chocolate chip chunk morsels and skitters off like Cookie Monster exclaiming “Om nom nom nom.”
In some rare workloads, a similar occurrence was taking place inside Kubernetes clusters. With each Pod and Node, there comes a finite number of possible process IDs (PIDs) for all applications to share. While it is rare for any one process or pod to reach in and grab all the PIDs, some users were experiencing resource starvation due to this type of behavior. So in Kubernetes 1.14, we introduced an enhancement to mitigate the risk of a single pod monopolizing all of the PIDs available.
Can You Spare Some PIDs?
Here, we’re talking about the greed of certain containers. Outside the ideal, runaway processes occur from time to time, particularly in clusters where testing is taking place. Thus, some wildly non-production-ready activity is happening.
In such a scenario, it’s possible for something akin to a fork bomb taking place inside a node. As resources slowly erode, being taken over by some zombie-like process that continually spawns children, other legitimate workloads begin to get bumped in favor of this inflating balloon of wasted processing power. This could result in other processes on the same pod being starved of their needed PIDs. It could also lead to interesting side effects as a node could fail and a replica of that pod is scheduled to a new machine where the process repeats across your entire cluster.
Fixing the Problem
Thus, in Kubernetes 1.14, we have added a feature that allows for the configuration of a kubelet to limit the number of PIDs a given pod can consume. If that machine supports 32,768 PIDs and 100 pods, one can give each pod a budget of 300 PIDs to prevent total exhaustion of PIDs. If the admin wants to overcommit PIDs similar to cpu or memory, they may do so as well with some additional risks. Either way, no one pod can bring the whole machine down. This will generally prevent against simple fork bombs from taking over your cluster.
This change allows administrators to protect one pod from another, but does not ensure if all pods on the machine can protect the node, and the node agents themselves from falling over. Thus, we’ve introduced a feature in this release in alpha form that provides isolation of PIDs from end user workloads on a pod from the node agents (kubelet, runtime, etc.). The admin is able to reserve a specific number of PIDs--similar to how one reserves CPU or memory today--and ensure they are never consumed by pods on that machine. Once that graduates from alpha, to beta, then stable in future releases of Kubernetes, we’ll have protection against an easily starved Linux resource.
Get started with Kubernetes 1.14.
Get Involved
If you have feedback for this feature or are interested in getting involved with the design and development, join the Node Special Interest Group.
About the author:
Derek Carr is Senior Principal Software Engineer at Red Hat. He is a Kubernetes contributor and member of the Kubernetes Community Steering Committee.
Kubernetes 1.14: Local Persistent Volumes GA
The Local Persistent Volumes feature has been promoted to GA in Kubernetes 1.14. It was first introduced as alpha in Kubernetes 1.7, and then beta in Kubernetes 1.10. The GA milestone indicates that Kubernetes users may depend on the feature and its API for production use. GA features are protected by the Kubernetes deprecation policy.
What is a Local Persistent Volume?
A local persistent volume represents a local disk directly-attached to a single Kubernetes Node.
Kubernetes provides a powerful volume plugin system that enables Kubernetes workloads to use a wide variety of block and file storage to persist data. Most of these plugins enable remote storage -- these remote storage systems persist data independent of the Kubernetes node where the data originated. Remote storage usually can not offer the consistent high performance guarantees of local directly-attached storage. With the Local Persistent Volume plugin, Kubernetes workloads can now consume high performance local storage using the same volume APIs that app developers have become accustomed to.
How is it different from a HostPath Volume?
To better understand the benefits of a Local Persistent Volume, it is useful to compare it to a HostPath volume. HostPath volumes mount a file or directory from the host node’s filesystem into a Pod. Similarly a Local Persistent Volume mounts a local disk or partition into a Pod.
The biggest difference is that the Kubernetes scheduler understands which node a Local Persistent Volume belongs to. With HostPath volumes, a pod referencing a HostPath volume may be moved by the scheduler to a different node resulting in data loss. But with Local Persistent Volumes, the Kubernetes scheduler ensures that a pod using a Local Persistent Volume is always scheduled to the same node.
While HostPath volumes may be referenced via a Persistent Volume Claim (PVC) or directly inline in a pod definition, Local Persistent Volumes can only be referenced via a PVC. This provides additional security benefits since Persistent Volume objects are managed by the administrator, preventing Pods from being able to access any path on the host.
Additional benefits include support for formatting of block devices during mount, and volume ownership using fsGroup.
What's New With GA?
Since 1.10, we have mainly focused on improving stability and scalability of the feature so that it is production ready.
The only major feature addition is the ability to specify a raw block device and have Kubernetes automatically format and mount the filesystem. This reduces the previous burden of having to format and mount devices before giving it to Kubernetes.
Limitations of GA
At GA, Local Persistent Volumes do not support dynamic volume provisioning. However there is an external controller available to help manage the local PersistentVolume lifecycle for individual disks on your nodes. This includes creating the PersistentVolume objects, cleaning up and reusing disks once they have been released by the application.
How to Use a Local Persistent Volume?
Workloads can request a local persistent volume using the same PersistentVolumeClaim interface as remote storage backends. This makes it easy to swap out the storage backend across clusters, clouds, and on-prem environments.
First, a StorageClass should be created that sets volumeBindingMode: WaitForFirstConsumer to enable volume topology-aware
scheduling.
This mode instructs Kubernetes to wait to bind a PVC until a Pod using it is scheduled.
kind: StorageClass
apiVersion: storage.k8s.io/v1
metadata:
name: local-storage
provisioner: kubernetes.io/no-provisioner
volumeBindingMode: WaitForFirstConsumer
Then, the external static provisioner can be configured and run to create PVs for all the local disks on your nodes.
$ kubectl get pv
NAME CAPACITY ACCESS MODES RECLAIM POLICY STATUS CLAIM STORAGECLASS REASON AGE
local-pv-27c0f084 368Gi RWO Delete Available local-storage 8s
local-pv-3796b049 368Gi RWO Delete Available local-storage 7s
local-pv-3ddecaea 368Gi RWO Delete Available local-storage 7s
Afterwards, workloads can start using the PVs by creating a PVC and Pod or a StatefulSet with volumeClaimTemplates.
apiVersion: apps/v1
kind: StatefulSet
metadata:
name: local-test
spec:
serviceName: "local-service"
replicas: 3
selector:
matchLabels:
app: local-test
template:
metadata:
labels:
app: local-test
spec:
containers:
- name: test-container
image: registry.k8s.io/busybox # updated after publication (previously used k8s.gcr.io/busybox)
command:
- "/bin/sh"
args:
- "-c"
- "sleep 100000"
volumeMounts:
- name: local-vol
mountPath: /usr/test-pod
volumeClaimTemplates:
- metadata:
name: local-vol
spec:
accessModes: [ "ReadWriteOnce" ]
storageClassName: "local-storage"
resources:
requests:
storage: 368Gi
Once the StatefulSet is up and running, the PVCs are all bound:
$ kubectl get pvc
NAME STATUS VOLUME CAPACITY ACCESS MODES STORAGECLASS AGE
local-vol-local-test-0 Bound local-pv-27c0f084 368Gi RWO local-storage 3m45s
local-vol-local-test-1 Bound local-pv-3ddecaea 368Gi RWO local-storage 3m40s
local-vol-local-test-2 Bound local-pv-3796b049 368Gi RWO local-storage 3m36s
When the disk is no longer needed, the PVC can be deleted. The external static provisioner will clean up the disk and make the PV available for use again.
$ kubectl patch sts local-test -p '{"spec":{"replicas":2}}'
statefulset.apps/local-test patched
$ kubectl delete pvc local-vol-local-test-2
persistentvolumeclaim "local-vol-local-test-2" deleted
$ kubectl get pv
NAME CAPACITY ACCESS MODES RECLAIM POLICY STATUS CLAIM STORAGECLASS REASON AGE
local-pv-27c0f084 368Gi RWO Delete Bound default/local-vol-local-test-0 local-storage 11m
local-pv-3796b049 368Gi RWO Delete Available local-storage 7s
local-pv-3ddecaea 368Gi RWO Delete Bound default/local-vol-local-test-1 local-storage 19m
You can find full documentation for the feature on the Kubernetes website.
What Are Suitable Use Cases?
The primary benefit of Local Persistent Volumes over remote persistent storage is performance: local disks usually offer higher IOPS and throughput and lower latency compared to remote storage systems.
However, there are important limitations and caveats to consider when using Local Persistent Volumes:
- Using local storage ties your application to a specific node, making your application harder to schedule. Applications which use local storage should specify a high priority so that lower priority pods, that don’t require local storage, can be preempted if necessary.
- If that node or local volume encounters a failure and becomes inaccessible, then that pod also becomes inaccessible. Manual intervention, external controllers, or operators may be needed to recover from these situations.
- While most remote storage systems implement synchronous replication, most local disk offerings do not provide data durability guarantees. Meaning loss of the disk or node may result in loss of all the data on that disk
For these reasons, local persistent storage should only be considered for workloads that handle data replication and backup at the application layer, thus making the applications resilient to node or data failures and unavailability despite the lack of such guarantees at the individual disk level.
Examples of good workloads include software defined storage systems and replicated databases. Other types of applications should continue to use highly available, remotely accessible, durable storage.
How Uber Uses Local Storage
M3, Uber’s in-house metrics platform, piloted Local Persistent Volumes at scale in an effort to evaluate M3DB — an open-source, distributed timeseries database created by Uber. One of M3DB’s notable features is its ability to shard its metrics into partitions, replicate them by a factor of three, and then evenly disperse the replicas across separate failure domains.
Prior to the pilot with local persistent volumes, M3DB ran exclusively in Uber-managed environments. Over time, internal use cases arose that required the ability to run M3DB in environments with fewer dependencies. So the team began to explore options. As an open-source project, we wanted to provide the community with a way to run M3DB as easily as possible, with an open-source stack, while meeting M3DB’s requirements for high throughput, low-latency storage, and the ability to scale itself out.
The Kubernetes Local Persistent Volume interface, with its high-performance, low-latency guarantees, quickly emerged as the perfect abstraction to build on top of. With Local Persistent Volumes, individual M3DB instances can comfortably handle up to 600k writes per-second. This leaves plenty of headroom for spikes on clusters that typically process a few million metrics per-second.
Because M3DB also gracefully handles losing a single node or volume, the limited data durability guarantees of Local Persistent Volumes are not an issue. If a node fails, M3DB finds a suitable replacement and the new node begins streaming data from its two peers.
Thanks to the Kubernetes scheduler’s intelligent handling of volume topology, M3DB is able to programmatically evenly disperse its replicas across multiple local persistent volumes in all available cloud zones, or, in the case of on-prem clusters, across all available server racks.
Uber's Operational Experience
As mentioned above, while Local Persistent Volumes provide many benefits, they also require careful planning and careful consideration of constraints before committing to them in production. When thinking about our local volume strategy for M3DB, there were a few things Uber had to consider.
For one, we had to take into account the hardware profiles of the nodes in our Kubernetes cluster. For example, how many local disks would each node cluster have? How would they be partitioned?
The local static provisioner provides guidance to help answer these questions. It’s best to be able to dedicate a full disk to each local volume (for IO isolation) and a full partition per-volume (for capacity isolation). This was easier in our cloud environments where we could mix and match local disks. However, if using local volumes on-prem, hardware constraints may be a limiting factor depending on the number of disks available and their characteristics.
When first testing local volumes, we wanted to have a thorough understanding of the effect disruptions (voluntary and involuntary) would have on pods using local storage, and so we began testing some failure scenarios. We found that when a local volume becomes unavailable while the node remains available (such as when performing maintenance on the disk), a pod using the local volume will be stuck in a ContainerCreating state until it can mount the volume. If a node becomes unavailable, for example if it is removed from the cluster or is drained, then pods using local volumes on that node are stuck in an Unknown or Pending state depending on whether or not the node was removed gracefully.
Recovering pods from these interim states means having to delete the PVC binding the pod to its local volume and then delete the pod in order for it to be rescheduled (or wait until the node and disk are available again). We took this into account when building our operator for M3DB, which makes changes to the cluster topology when a pod is rescheduled such that the new one gracefully streams data from the remaining two peers. Eventually we plan to automate the deletion and rescheduling process entirely.
Alerts on pod states can help call attention to stuck local volumes, and workload-specific controllers or operators can remediate them automatically. Because of these constraints, it’s best to exclude nodes with local volumes from automatic upgrades or repairs, and in fact some cloud providers explicitly mention this as a best practice.
Portability Between On-Prem and Cloud
Local Volumes played a big role in Uber’s decision to build orchestration for M3DB using Kubernetes, in part because it is a storage abstraction that works the same across on-prem and cloud environments. Remote storage solutions have different characteristics across cloud providers, and some users may prefer not to use networked storage at all in their own data centers. On the other hand, local disks are relatively ubiquitous and provide more predictable performance characteristics.
By orchestrating M3DB using local disks in the cloud, where it was easier to get up and running with Kubernetes, we gained confidence that we could still use our operator to run M3DB in our on-prem environment without any modifications. As we continue to work on how we’d run Kubernetes on-prem, having solved such an important pending question is a big relief.
What's Next for Local Persistent Volumes?
As we’ve seen with Uber’s M3DB, local persistent volumes have successfully been used in production environments. As adoption of local persistent volumes continues to increase, SIG Storage continues to seek feedback for ways to improve the feature.
One of the most frequent asks has been for a controller that can help with recovery from failed nodes or disks, which is currently a manual process (or something that has to be built into an operator). SIG Storage is investigating creating a common controller that can be used by workloads with simple and similar recovery processes.
Another popular ask has been to support dynamic provisioning using lvm. This can simplify disk management, and improve disk utilization. SIG Storage is evaluating the performance tradeoffs for the viability of this feature.
Getting Involved
If you have feedback for this feature or are interested in getting involved with the design and development, join the Kubernetes Storage Special-Interest-Group (SIG). We’re rapidly growing and always welcome new contributors.
Special thanks to all the contributors that helped bring this feature to GA, including Chuqiang Li (lichuqiang), Dhiraj Hedge (dhirajh), Ian Chakeres (ianchakeres), Jan Šafránek (jsafrane), Michelle Au (msau42), Saad Ali (saad-ali), Yecheng Fu (cofyc) and Yuquan Ren (nickrenren).
Kubernetes v1.14 delivers production-level support for Windows nodes and Windows containers
The first release of Kubernetes in 2019 brings a highly anticipated feature - production-level support for Windows workloads. Up until now Windows node support in Kubernetes has been in beta, allowing many users to experiment and see the value of Kubernetes for Windows containers. While in beta, developers in the Kubernetes community and Windows Server team worked together to improve the container runtime, build a continuous testing process, and complete features needed for a good user experience. Kubernetes now officially supports adding Windows nodes as worker nodes and scheduling Windows containers, enabling a vast ecosystem of Windows applications to leverage the power of our platform.
As Windows developers and devops engineers have been adopting containers over the last few years, they've been looking for a way to manage all their workloads with a common interface. Kubernetes has taken the lead for container orchestration, and this gives users a consistent way to manage their container workloads whether they need to run on Linux or Windows.
The journey to a stable release of Windows in Kubernetes was not a walk in the park. The community has been working on Windows support for 3 years, delivering an alpha release with v1.5, a beta with v1.9, and now a stable release with v1.14. We would not be here today without rallying broad support and getting significant contributions from companies including Microsoft, Docker, VMware, Pivotal, Cloudbase Solutions, Google and Apprenda. During this journey, there were 3 critical points in time that significantly advanced our progress.
- Advancements in Windows Server container networking that provided the infrastructure to create CNI (Container Network Interface) plugins
- Enhancements shipped in Windows Server semi-annual channel releases enabled Kubernetes development to move forward - culminating with Windows Server 2019 on the Long-Term Servicing Channel. This is the best release of Windows Server for running containers.
- The adoption of the KEP (Kubernetes Enhancement Proposals) process. The Windows KEP outlined a clear and agreed upon set of goals, expectations, and deliverables based on review and feedback from stakeholders across multiple SIGs. This created a clear plan that SIG-Windows could follow, paving the path towards this stable release.
With v1.14, we're declaring that Windows node support is stable, well-tested, and ready for adoption in production scenarios. This is a huge milestone for many reasons. For Kubernetes, it strengthens its position in the industry, enabling a vast ecosystem of Windows-based applications to be deployed on the platform. For Windows operators and developers, this means they can use the same tools and processes to manage their Windows and Linux workloads, taking full advantage of the efficiencies of the cloud-native ecosystem powered by Kubernetes. Let’s dig in a little bit into these.
Operator Advantages
- Gain operational efficiencies by leveraging existing investments in solutions, tools, and technologies to manage Windows containers the same way as Linux containers
- Knowledge, training and expertise on container orchestration transfers to Windows container support
- IT can deliver a scalable self-service container platform to Linux and Windows developers
Developer Advantages
- Containers simplify packaging and deploying applications during development and test. Now you also get to take advantage of Kubernetes’ benefits in creating reliable, secure, and scalable distributed applications.
- Windows developers can now take advantage of the growing ecosystem of cloud and container-native tools to build and deploy faster, resulting in a faster time to market for their applications
- Taking advantage of Kubernetes as the leader in container orchestration, developers only need to learn how to use Kubernetes and that skillset will transfer across development environments and across clouds
CIO Advantages
- Leverage the operational and cost efficiencies that are introduced with Kubernetes
- Containerize existing.NET applications or Windows-based workloads to eliminate old hardware or underutilized virtual machines, and streamline migration from end-of-support OS versions. You retain the benefit your application brings to the business, but decrease the cost of keeping it running
“Using Kubernetes on Windows allows us to run our internal web applications as microservices. This provides quick scaling in response to load, smoother upgrades, and allows for different development groups to build without worry of other group's version dependencies. We save money because development times are shorter and operation's time is not spent maintaining multiple virtual machine environments,” said Jeremy, a lead devops engineer working for a top multinational legal firm, one of the early adopters of Windows on Kubernetes.
There are many features that are surfaced with this release. We want to turn your attention to a few key features and enablers of Windows support in Kubernetes. For a detailed list of supported functionality, you can read our documentation.
- You can now add Windows Server 2019 worker nodes
- You can now schedule Windows containers utilizing deployments, pods, services, and workload controllers
- Out of tree CNI plugins are provided for Azure, OVN-Kubernetes, and Flannel
- Containers can utilize a variety of in and out-of-tree storage plugins
- Improved support for metrics/quotas closely matches the capabilities offered for Linux containers
When looking at Windows support in Kubernetes, many start drawing comparisons to Linux containers. Although some of the comparisons that highlight limitations are fair, it is important to distinguish between operational limitations and differences between the Windows and Linux operating systems. From a container management standpoint, we must strike a balance between preserving OS-specific behaviors required for application compatibility, and reaching operational consistency in Kubernetes across multiple operating systems. For example, some Linux-specific file system features, user IDs and permissions exposed through Kubernetes will not work on Windows today, and users are familiar with these fundamental differences. We will also be adding support for Windows-specific configurations to meet the needs of Windows customers that may not exist on Linux. The alpha support for Windows Group Managed Service Accounts is one example. Other areas such as memory reservations for Windows pods and the Windows kubelet are a work in progress and highlight an operational limitation. We will continue working on operational limitations based on what’s important to our community in future releases.
Today, Kubernetes master components will continue to run on Linux. That way users can add Windows nodes without having to create a separate Kubernetes cluster. As always, our future direction is set by the community, so more components, features and deployment methods will come over time. Users should understand the differences between Windows and Linux and utilize the advantages of each platform. Our goal with this release is not to make Windows interchangeable with Linux or to answer the question of Windows vs Linux. We offer consistency in management. Managing workloads without automation is tedious and expensive. Rewriting or re-architecting workloads is even more expensive. Containers provide a clear path forward whether your app runs on Linux or Windows, and Kubernetes brings an IT organization operational consistency.
As a community, our work is not complete. As already mentioned , we still have a fair bit of limitations and a healthy roadmap. We will continue making progress and enhancing Windows container support in Kubernetes, with some notable upcoming features including:
- Support for CRI-ContainerD and Hyper-V isolation, bringing hypervisor-level isolation between pods for additional security and extending our container-to-node compatibility matrix
- Additional network plugins, including the stable release of Flannel overlay support
- Simple heterogeneous cluster creation using kubeadm on Windows
We welcome you to get involved and join our community to share feedback and deployment stories, and contribute to code, docs, and improvements of any kind.
- Read our getting started and contributor guides, which include links to the community meetings and past recordings, at https://github.com/kubernetes/community/tree/master/sig-windows
- Explore our documentation at https://kubernetes.io/docs/setup/production-environment/windows/
- Join us on Slack or the Kubernetes Community Forums to chat about Windows containers on Kubernetes.
Thank you and feel free to reach us individually if you have any questions.
Michael Michael
SIG-Windows Chair
Director of Product Management, VMware
@michmike77 on Twitter
@m2 on Slack
Patrick Lang
SIG-Windows Chair
Senior Software Engineer, Microsoft
@PatrickLang on Slack
kube-proxy Subtleties: Debugging an Intermittent Connection Reset
I recently came across a bug that causes intermittent connection resets. After some digging, I found it was caused by a subtle combination of several different network subsystems. It helped me understand Kubernetes networking better, and I think it’s worthwhile to share with a wider audience who are interested in the same topic.
The symptom
We received a user report claiming they were getting connection resets while using a Kubernetes service of type ClusterIP to serve large files to pods running in the same cluster. Initial debugging of the cluster did not yield anything interesting: network connectivity was fine and downloading the files did not hit any issues. However, when we ran the workload in parallel across many clients, we were able to reproduce the problem. Adding to the mystery was the fact that the problem could not be reproduced when the workload was run using VMs without Kubernetes. The problem, which could be easily reproduced by a simple app, clearly has something to do with Kubernetes networking, but what?
Kubernetes networking basics
Before digging into this problem, let’s talk a little bit about some basics of Kubernetes networking, as Kubernetes handles network traffic from a pod very differently depending on different destinations.
Pod-to-Pod
In Kubernetes, every pod has its own IP address. The benefit is that the applications running inside pods could use their canonical port, instead of remapping to a different random port. Pods have L3 connectivity between each other. They can ping each other, and send TCP or UDP packets to each other. CNI is the standard that solves this problem for containers running on different hosts. There are tons of different plugins that support CNI.
Pod-to-external
For the traffic that goes from pod to external addresses, Kubernetes simply uses SNAT. What it does is replace the pod’s internal source IP:port with the host’s IP:port. When the return packet comes back to the host, it rewrites the pod’s IP:port as the destination and sends it back to the original pod. The whole process is transparent to the original pod, who doesn’t know the address translation at all.
Pod-to-Service
Pods are mortal. Most likely, people want reliable service. Otherwise, it’s pretty much useless. So Kubernetes has this concept called "service" which is simply a L4 load balancer in front of pods. There are several different types of services. The most basic type is called ClusterIP. For this type of service, it has a unique VIP address that is only routable inside the cluster.
The component in Kubernetes that implements this feature is called kube-proxy.
It sits on every node, and programs complicated iptables rules to do all kinds
of filtering and NAT between pods and services. If you go to a Kubernetes node
and type iptables-save, you’ll see the rules that are inserted by Kubernetes
or other programs. The most important chains are KUBE-SERVICES, KUBE-SVC-*
and KUBE-SEP-*.
KUBE-SERVICESis the entry point for service packets. What it does is to match the destination IP:port and dispatch the packet to the correspondingKUBE-SVC-*chain.KUBE-SVC-*chain acts as a load balancer, and distributes the packet toKUBE-SEP-*chain equally. EveryKUBE-SVC-*has the same number ofKUBE-SEP-*chains as the number of endpoints behind it.KUBE-SEP-*chain represents a Service EndPoint. It simply does DNAT, replacing service IP:port with pod's endpoint IP:Port.
For DNAT, conntrack kicks in and tracks the connection state using a state machine. The state is needed because it needs to remember the destination address it changed to, and changed it back when the returning packet came back. Iptables could also rely on the conntrack state (ctstate) to decide the destiny of a packet. Those 4 conntrack states are especially important:
- NEW: conntrack knows nothing about this packet, which happens when the SYN packet is received.
- ESTABLISHED: conntrack knows the packet belongs to an established connection, which happens after handshake is complete.
- RELATED: The packet doesn’t belong to any connection, but it is affiliated to another connection, which is especially useful for protocols like FTP.
- INVALID: Something is wrong with the packet, and conntrack doesn’t know how to deal with it. This state plays a centric role in this Kubernetes issue.
Here is a diagram of how a TCP connection works between pod and service. The sequence of events are:
- Client pod from left hand side sends a packet to a service: 192.168.0.2:80
- The packet is going through iptables rules in client node and the destination is changed to pod IP, 10.0.1.2:80
- Server pod handles the packet and sends back a packet with destination 10.0.0.2
- The packet is going back to the client node, conntrack recognizes the packet and rewrites the source address back to 192.169.0.2:80
- Client pod receives the response packet
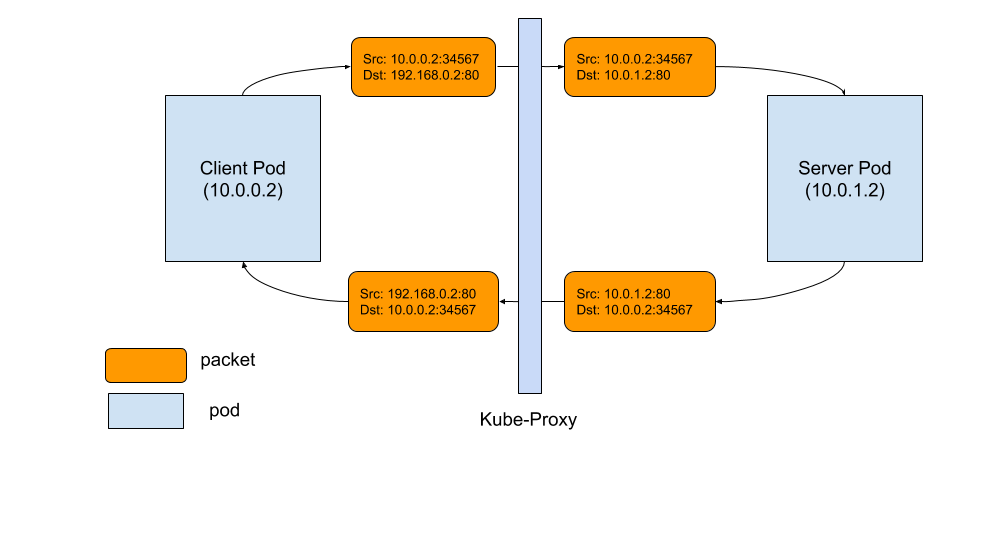
Good packet flow
What caused the connection reset?
Enough of the background, so what really went wrong and caused the unexpected connection reset?
As the diagram below shows, the problem is packet 3. When conntrack cannot recognize a returning packet, and mark it as INVALID. The most common reasons include: conntrack cannot keep track of a connection because it is out of capacity, the packet itself is out of a TCP window, etc. For those packets that have been marked as INVALID state by conntrack, we don’t have the iptables rule to drop it, so it will be forwarded to client pod, with source IP address not rewritten (as shown in packet 4)! Client pod doesn’t recognize this packet because it has a different source IP, which is pod IP, not service IP. As a result, client pod says, "Wait a second, I don't recall this connection to this IP ever existed, why does this dude keep sending this packet to me?" Basically, what the client does is simply send a RST packet to the server pod IP, which is packet 5. Unfortunately, this is a totally legit pod-to-pod packet, which can be delivered to server pod. Server pod doesn’t know all the address translations that happened on the client side. From its view, packet 5 is a totally legit packet, like packet 2 and 3. All server pod knows is, "Well, client pod doesn’t want to talk to me, so let’s close the connection!" Boom! Of course, in order for all these to happen, the RST packet has to be legit too, with the right TCP sequence number, etc. But when it happens, both parties agree to close the connection.
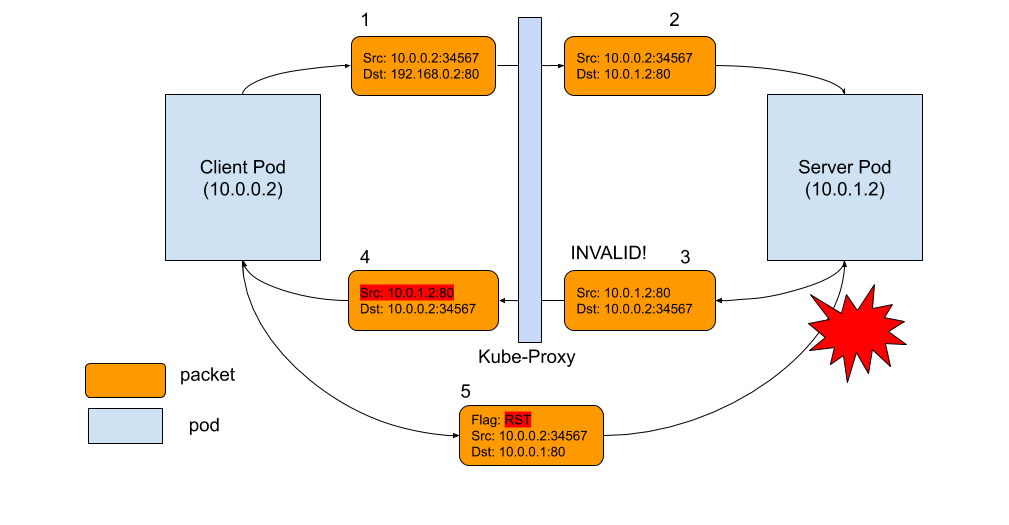
Connection reset packet flow
How to address it?
Once we understand the root cause, the fix is not hard. There are at least 2 ways to address it.
- Make conntrack more liberal on packets, and don’t mark the packets as
INVALID. In Linux, you can do this by
echo 1 > /proc/sys/net/ipv4/netfilter/ip_conntrack_tcp_be_liberal. - Specifically add an iptables rule to drop the packets that are marked as INVALID, so it won’t reach to client pod and cause harm.
The fix is available in v1.15+. However, for the users that are affected by this bug, there is a way to mitigate the problem by applying the following rule in your cluster.
apiVersion: extensions/v1beta1
kind: DaemonSet
metadata:
name: startup-script
labels:
app: startup-script
spec:
template:
metadata:
labels:
app: startup-script
spec:
hostPID: true
containers:
- name: startup-script
image: gcr.io/google-containers/startup-script:v1
imagePullPolicy: IfNotPresent
securityContext:
privileged: true
env:
- name: STARTUP_SCRIPT
value: |
#! /bin/bash
echo 1 > /proc/sys/net/ipv4/netfilter/ip_conntrack_tcp_be_liberal
echo done
Summary
Obviously, the bug has existed almost forever. I am surprised that it hasn’t been noticed until recently. I believe the reasons could be: (1) this happens more in a congested server serving large payloads, which might not be a common use case; (2) the application layer handles the retry to be tolerant of this kind of reset. Anyways, regardless of how fast Kubernetes has been growing, it’s still a young project. There are no other secrets than listening closely to customers’ feedback, not taking anything for granted but digging deep, we can make it the best platform to run applications.
Special thanks to bowei for the consulting for both debugging process and the blog, to tcarmet for reporting the issue and providing a reproduction.
Running Kubernetes locally on Linux with Minikube - now with Kubernetes 1.14 support
A few days ago, the Kubernetes community announced Kubernetes 1.14, the most recent version of Kubernetes. Alongside it, Minikube, a part of the Kubernetes project, recently hit the 1.0 milestone, which supports Kubernetes 1.14 by default.
Kubernetes is a real winner (and a de facto standard) in the world of distributed Cloud Native computing. While it can handle up to 5000 nodes in a single cluster, local deployment on a single machine (e.g. a laptop, a developer workstation, etc.) is an increasingly common scenario for using Kubernetes.
A few weeks ago I ran a poll on Twitter asking the community to specify their preferred option for running Kubernetes locally on Linux:
Ok, Twitter ✋
— ihor dvoretskyi (@idvoretskyi) February 6, 2019
Your local Kubernetes cluster on Linux is deployed by:
This is post #1 in a series about the local deployment options on Linux, and it will cover Minikube, the most popular community-built solution for running Kubernetes on a local machine.
Minikube is a cross-platform, community-driven Kubernetes distribution, which is targeted to be used primarily in local environments. It deploys a single-node cluster, which is an excellent option for having a simple Kubernetes cluster up and running on localhost.
Minikube is designed to be used as a virtual machine (VM), and the default VM runtime is VirtualBox. At the same time, extensibility is one of the critical benefits of Minikube, so it's possible to use it with drivers outside of VirtualBox.
By default, Minikube uses Virtualbox as a runtime for running the virtual machine. Virtualbox is a cross-platform solution, which can be used on a variety of operating systems, including GNU/Linux, Windows, and macOS.
At the same time, QEMU/KVM is a Linux-native virtualization solution, which may offer benefits compared to Virtualbox. For example, it's much easier to use KVM on a GNU/Linux server, so you can run a single-node Minikube cluster not only on a Linux workstation or laptop with GUI, but also on a remote headless server.
Unfortunately, Virtualbox and KVM can't be used simultaneously, so if you are already running KVM workloads on a machine and want to run Minikube there as well, using the KVM minikube driver is the preferred way to go.
In this guide, we'll focus on running Minikube with the KVM driver on Ubuntu 18.04 (I am using a bare metal machine running on packet.com.)
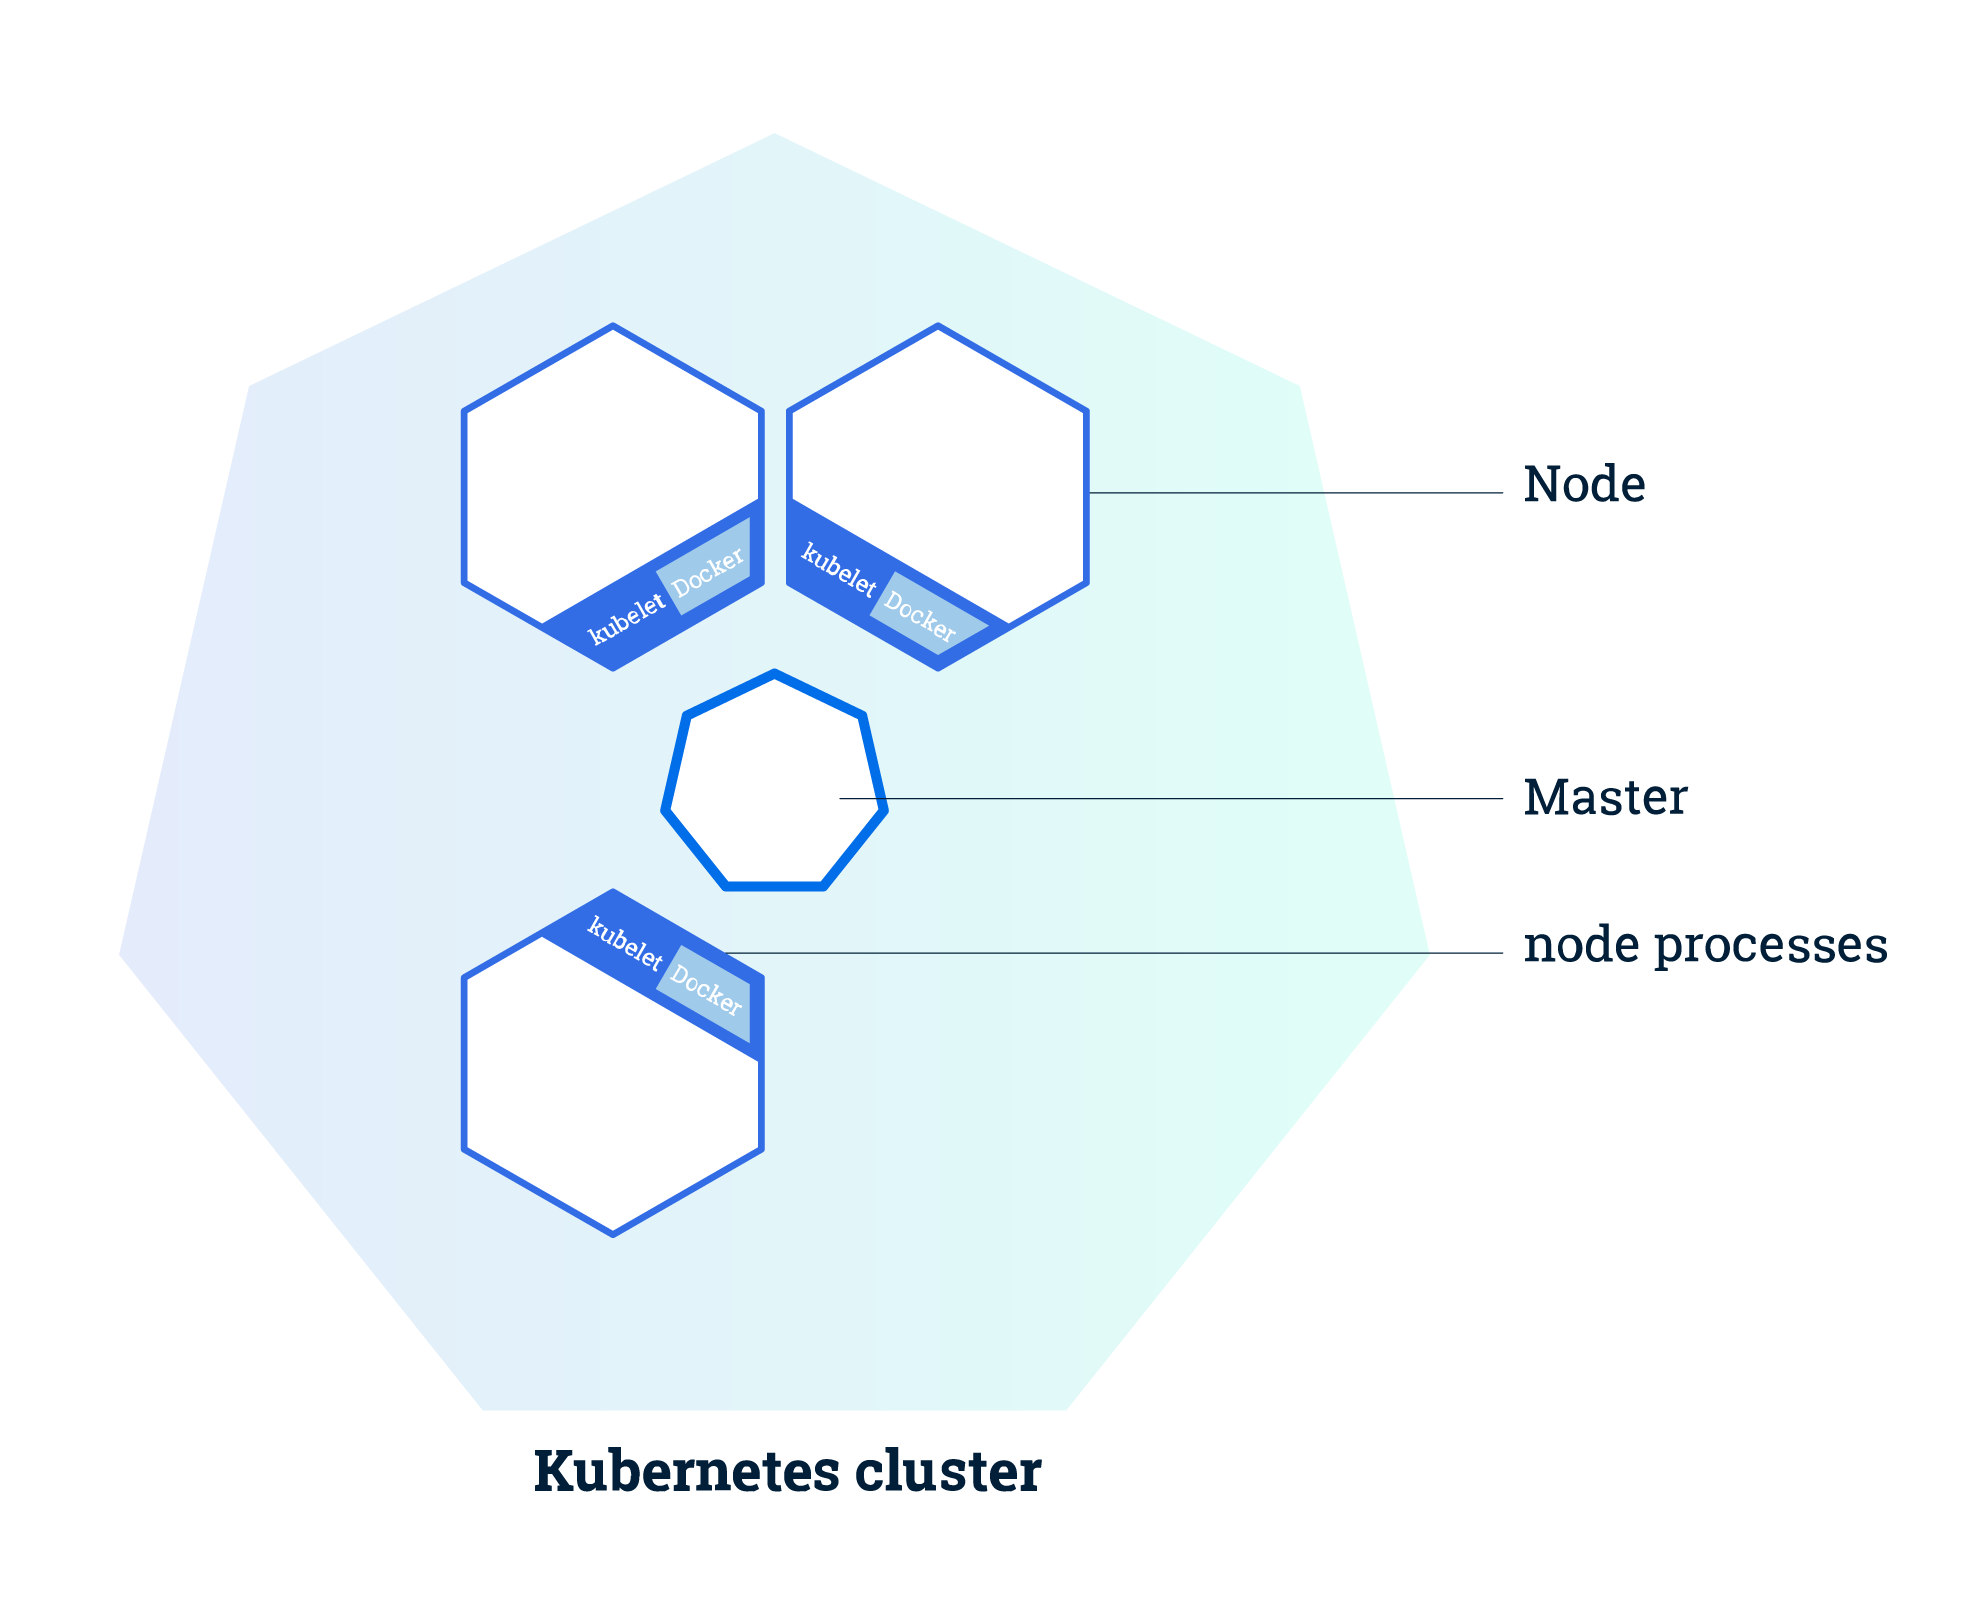
Minikube architecture (source: kubernetes.io)
Disclaimer
This is not an official guide to Minikube. You may find detailed information on running and using Minikube on it's official webpage, where different use cases, operating systems, environments, etc. are covered. Instead, the purpose of this guide is to provide clear and easy guidelines for running Minikube with KVM on Linux.
Prerequisites
- Any Linux you like (in this tutorial we'll use Ubuntu 18.04 LTS, and all the instructions below are applicable to it. If you prefer using a different Linux distribution, please check out the relevant documentation)
libvirtand QEMU-KVM installed and properly configured- The Kubernetes CLI (
kubectl) for operating the Kubernetes cluster
QEMU/KVM and libvirt installation
NOTE: skip if already installed
Before we proceed, we have to verify if our host can run KVM-based virtual machines. This can be easily checked using the kvm-ok tool, available on Ubuntu.
sudo apt install cpu-checker && sudo kvm-ok
If you receive the following output after running kvm-ok, you can use KVM on your machine (otherwise, please check out your configuration):
$ sudo kvm-ok
INFO: /dev/kvm exists
KVM acceleration can be used
Now let's install KVM and libvirt and add our current user to the libvirt group to grant sufficient permissions:
sudo apt install libvirt-clients libvirt-daemon-system qemu-kvm \
&& sudo usermod -a -G libvirt $(whoami) \
&& newgrp libvirt
After installing libvirt, you may verify the host validity to run the virtual machines with virt-host-validate tool, which is a part of libvirt.
sudo virt-host-validate
kubectl (Kubernetes CLI) installation
NOTE: skip if already installed
In order to manage the Kubernetes cluster, we need to install kubectl, the Kubernetes CLI tool.
The recommended way to install it on Linux is to download the pre-built binary and move it to a directory under the $PATH.
curl -LO https://dl.k8s.io/release/$(curl -L -s https://dl.k8s.io/release/stable.txt)/bin/linux/amd64/kubectl \
&& sudo install kubectl /usr/local/bin && rm kubectl
Alternatively, kubectl can be installed with a big variety of different methods (eg. as a .deb or snap package - check out the kubectl documentation to find the best one for you).
Minikube installation
Minikube KVM driver installation
A VM driver is an essential requirement for local deployment of Minikube. As we've chosen to use KVM as the Minikube driver in this tutorial, let's install the KVM driver with the following command:
curl -LO https://storage.googleapis.com/minikube/releases/latest/docker-machine-driver-kvm2 \
&& sudo install docker-machine-driver-kvm2 /usr/local/bin/ && rm docker-machine-driver-kvm2
Minikube installation
Now let's install Minikube itself:
curl -LO https://storage.googleapis.com/minikube/releases/latest/minikube-linux-amd64 \
&& sudo install minikube-linux-amd64 /usr/local/bin/minikube && rm minikube-linux-amd64
Verify the Minikube installation
Before we proceed, we need to verify that Minikube is correctly installed. The simplest way to do this is to check Minikube’s status.
minikube version
To use the KVM2 driver:
Now let's run the local Kubernetes cluster with Minikube and KVM:
minikube start --vm-driver kvm2
Set KVM2 as a default VM driver for Minikube
If KVM is used as the single driver for Minikube on our machine, it's more convenient to set it as a default driver and run Minikube with fewer command-line arguments. The following command sets the KVM driver as the default:
minikube config set vm-driver kvm2
So now let's run Minikube as usual:
minikube start
Verify the Kubernetes installation
Let's check if the Kubernetes cluster is up and running:
kubectl get nodes
Now let's run a simple sample app (nginx in our case):
kubectl create deployment nginx --image=nginx
Let’s also check that the Kubernetes pods are correctly provisioned:
kubectl get pods
Screencast
Next steps
At this point, a Kubernetes cluster with Minikube and KVM is adequately set up and configured on your local machine.
To proceed, you may check out the Kubernetes tutorials on the project website:
It’s also worth checking out the "Introduction to Kubernetes" course by The Linux Foundation/Cloud Native Computing Foundation, available for free on EDX:
Kubernetes 1.14: Production-level support for Windows Nodes, Kubectl Updates, Persistent Local Volumes GA
We’re pleased to announce the delivery of Kubernetes 1.14, our first release of 2019!
Kubernetes 1.14 consists of 31 enhancements: 10 moving to stable, 12 in beta, and 7 net new. The main themes of this release are extensibility and supporting more workloads on Kubernetes with three major features moving to general availability, and an important security feature moving to beta.
More enhancements graduated to stable in this release than any prior Kubernetes release. This represents an important milestone for users and operators in terms of setting support expectations. In addition, there are notable Pod and RBAC enhancements in this release, which are discussed in the “additional notable features” section below.
Let’s dive into the key features of this release:
Production-level Support for Windows Nodes
Up until now Windows Node support in Kubernetes has been in beta, allowing many users to experiment and see the value of Kubernetes for Windows containers. Kubernetes now officially supports adding Windows nodes as worker nodes and scheduling Windows containers, enabling a vast ecosystem of Windows applications to leverage the power of our platform. Enterprises with investments in Windows-based applications and Linux-based applications don’t have to look for separate orchestrators to manage their workloads, leading to increased operational efficiencies across their deployments, regardless of operating system.
Some of the key features of enabling Windows containers in Kubernetes include:
- Support for Windows Server 2019 for worker nodes and containers
- Support for out of tree networking with Azure-CNI, OVN-Kubernetes, and Flannel
- Improved support for pods, service types, workload controllers, and metrics/quotas to closely match the capabilities offered for Linux containers
Notable Kubectl Updates
New Kubectl Docs and Logo
The documentation for kubectl has been rewritten from the ground up with a focus on managing Resources using declarative Resource Config. The documentation has been published as a standalone site with the format of a book, and it is linked from the main k8s.io documentation (available at https://kubectl.docs.kubernetes.io).
The new kubectl logo and mascot (pronounced kubee-cuddle) are shown on the new docs site logo.
Kustomize Integration
The declarative Resource Config authoring capabilities of kustomize are now available in kubectl through the -k flag (e.g. for commands like apply, get) and the kustomize subcommand. Kustomize helps users author and reuse Resource Config using Kubernetes native concepts. Users can now apply directories with kustomization.yaml to a cluster using kubectl apply -k dir/. Users can also emit customized Resource Config to stdout without applying them via kubectl kustomize dir/. The new capabilities are documented in the new docs at https://kubectl.docs.kubernetes.io
The kustomize subcommand will continue to be developed in the Kubernetes owned kustomize repo. The latest kustomize features will be available from a standalone kustomize binary (published to the kustomize repo) at a frequent release cadence, and will be updated in kubectl prior to each Kubernetes releases.
kubectl Plugin Mechanism Graduating to Stable
The kubectl plugin mechanism allows developers to publish their own custom kubectl subcommands in the form of standalone binaries. This may be used to extend kubectl with new higher-level functionality and with additional porcelain (e.g. adding a set-ns command).
Plugins must have the kubectl- name prefix and exist on the user’s $PATH. The plugin mechanics have been simplified significantly for GA, and are similar to the git plugin system.
Persistent Local Volumes are Now GA
This feature, graduating to stable, makes locally attached storage available as a persistent volume source. Distributed file systems and databases are the primary use cases for persistent local storage due performance and cost. On cloud providers, local SSDs give better performance than remote disks. On bare metal, in addition to performance, local storage is typically cheaper and using it is a necessity to provision distributed file systems.
PID Limiting is Moving to Beta
Process IDs (PIDs) are a fundamental resource on Linux hosts. It is trivial to hit the task limit without hitting any other resource limits and cause instability to a host machine. Administrators require mechanisms to ensure that user pods cannot induce PID exhaustion that prevents host daemons (runtime, kubelet, etc) from running. In addition, it is important to ensure that PIDs are limited among pods in order to ensure they have limited impact to other workloads on the node.
Administrators are able to provide pod-to-pod PID isolation by defaulting the number of PIDs per pod as a beta feature. In addition, administrators can enable node-to-pod PID isolation as an alpha feature by reserving a number of allocatable PIDs to user pods via node allocatable. The community hopes to graduate this feature to beta in the next release.
Additional Notable Feature Updates
Pod priority and preemption enables Kubernetes scheduler to schedule more important Pods first and when cluster is out of resources, it removes less important pods to create room for more important ones. The importance is specified by priority.
Pod Readiness Gates introduce an extension point for external feedback on pod readiness.
Harden the default RBAC discovery clusterrolebindings removes discovery from the set of APIs which allow for unauthenticated access by default, improving privacy for CRDs and the default security posture of default clusters in general.
Availability
Kubernetes 1.14 is available for download on GitHub. To get started with Kubernetes, check out these interactive tutorials. You can also easily install 1.14 using kubeadm.
Features Blog Series
If you’re interested in exploring these features more in depth, check back next week for our 5 Days of Kubernetes series where we’ll highlight detailed walkthroughs of the following features:
- Day 1 - Windows Server Containers
- Day 2 - Harden the default RBAC discovery clusterrolebindings
- Day 3 - Pod Priority and Preemption in Kubernetes
- Day 4 - PID Limiting
- Day 5 - Persistent Local Volumes
Release Team
This release is made possible through the efforts of hundreds of individuals who contributed both technical and non-technical content. Special thanks to the release team led by Aaron Crickenberger, Senior Test Engineer at Google. The 43 individuals on the release team coordinated many aspects of the release, from documentation to testing, validation, and feature completeness.
As the Kubernetes community has grown, our release process represents an amazing demonstration of collaboration in open source software development. Kubernetes continues to gain new users at a rapid clip. This growth creates a positive feedback cycle where more contributors commit code creating a more vibrant ecosystem. Kubernetes has had over 28,000 individual contributors to date and an active community of more than 57,000 people.
Project Velocity
The CNCF has continued refining DevStats, an ambitious project to visualize the myriad contributions that go into the project. K8s DevStats illustrates the breakdown of contributions from major company contributors, as well as an impressive set of preconfigured reports on everything from individual contributors to pull request lifecycle times. On average over the past year, 381 different companies and over 2,458 individuals contribute to Kubernetes each month. Check out DevStats to learn more about the overall velocity of the Kubernetes project and community.
User Highlights
Established, global organizations are using Kubernetes in production at massive scale. Recently published user stories from the community include:
- NetEase moving to Kubernetes has increased their R&D efficiency by more than 100% and deployment efficiency by 280%.
- VSCO found that moving to continuous integration, containerization, and Kubernetes, velocity was increased dramatically. The time from code-complete to deployment in production on real infrastructure went from 1-2 weeks to 2-4 hours for a typical service.
- NAV’s move to Kubernetes saved the company 50% in infrastructure costs, deployments increased 5x from 10 a day to 50 a day and resource utilization increased from 1% to 40%.
Is Kubernetes helping your team? Share your story with the community.
Ecosystem Updates
- Kubernetes is participating in GSoC 2019 under the CNCF. Check out the full list of project ideas for 2019 on CNCF’s GitHub page.
- The CNCF Annual report 2018 provides a look back at the growth of the Kubernetes and the foundation, community engagement, ecosystem tools, test conformance projects, KubeCon and more.
- Out of 8,000 attendees at KubeCon + CloudNativeCon North America 2018, 73% were first-time KubeCon-ers, highlighting massive growth and new interest in Kubernetes and cloud native technologies. Conference transparency report.
KubeCon
The world’s largest Kubernetes gathering, KubeCon + CloudNativeCon is coming to Barcelona from May 20-23, 2019 and Shanghai (co-located with Open Source Summit) from June 24-26, 2019. These conferences will feature technical sessions, case studies, developer deep dives, salons, and more! Register today!
Webinar
Join members of the Kubernetes 1.14 release team on April 23rd at 10am PDT to learn about the major features in this release. Register here.
Get Involved
The simplest way to get involved with Kubernetes is by joining one of the many Special Interest Groups (SIGs) that align with your interests. Have something you’d like to broadcast to the Kubernetes community? Share your voice at our weekly community meeting, and through the channels below.
Thank you for your continued feedback and support.
- Post questions (or answer questions) on Stack Overflow
- Join the community discussion on Discuss
- Follow us on Twitter @Kubernetesio for latest updates
- Join the community on Slack
- Share your Kubernetes story
Kubernetes End-to-end Testing for Everyone
More and more components that used to be part of Kubernetes are now being developed outside of Kubernetes. For example, storage drivers used to be compiled into Kubernetes binaries, then were moved into stand-alone FlexVolume binaries on the host, and now are delivered as Container Storage Interface (CSI) drivers that get deployed in pods inside the Kubernetes cluster itself.
This poses a challenge for developers who work on such components: how can end-to-end (E2E) testing on a Kubernetes cluster be done for such external components? The E2E framework that is used for testing Kubernetes itself has all the necessary functionality. However, trying to use it outside of Kubernetes was difficult and only possible by carefully selecting the right versions of a large number of dependencies. E2E testing has become a lot simpler in Kubernetes 1.13.
This blog post summarizes the changes that went into Kubernetes 1.13. For CSI driver developers, it will cover the ongoing effort to also make the storage tests available for testing of third-party CSI drivers. How to use them will be shown based on two Intel CSI drivers:
Testing those drivers was the main motivation behind most of these enhancements.
E2E overview
E2E testing consists of several phases:
- Implementing a test suite. This is the main focus of this blog
post. The Kubernetes E2E framework is written in Go. It relies on
Ginkgo for managing tests and
Gomega for assertions. These tools
support “behavior driven development”, which describes expected
behavior in “specs”. In this blog post, “test” is used to reference
an individual
Ginkgo.Itspec. Tests interact with the Kubernetes cluster using client-go. - Bringing up a test cluster. Tools like kubetest can help here.
- Running an E2E test suite against that cluster. Ginkgo test suites
can be run with the
ginkgotool or as a normal Go test withgo test. Without any parameters, a Kubernetes E2E test suite will connect to the default cluster based on environment variables like KUBECONFIG, exactly like kubectl. Kubetest also knows how to run the Kubernetes E2E suite.
E2E framework enhancements in Kubernetes 1.13
All of the following enhancements follow the same basic pattern: they make the E2E framework more useful and easier to use outside of Kubernetes, without changing the behavior of the original Kubernetes e2e.test binary.
Splitting out provider support
The main reason why using the E2E framework from Kubernetes <= 1.12 was difficult were the dependencies on provider-specific SDKs, which pulled in a large number of packages. Just getting it compiled was non-trivial.
Many of these packages are only needed for certain tests. For example, testing the mounting of a pre-provisioned volume must first provision such a volume the same way as an administrator would, by talking directly to a specific storage backend via some non-Kubernetes API.
There is an effort to remove cloud provider-specific tests from core Kubernetes. The approach taken in PR #68483 can be seen as an incremental step towards that goal: instead of ripping out the code immediately and breaking all tests that depend on it, all cloud provider-specific code was moved into optional packages under test/e2e/framework/providers. The E2E framework then accesses it via an interface that gets implemented separately by each vendor package.
The author of a E2E test suite decides which of these packages get
imported into the test suite. The vendor support is then activated via
the --provider command line flag. The Kubernetes e2e.test binary in
1.13 and 1.14 still contains support for the same providers as in
1.12. It is also okay to include no packages, which means that only
the generic providers will be available:
- “skeleton”: cluster is accessed via the Kubernetes API and nothing else
- “local”: like “skeleton”, but in addition the scripts in kubernetes/kubernetes/cluster can retrieve logs via ssh after a test suite is run
External files
Tests may have to read additional files at runtime, like .yaml
manifests. But the Kubernetes e2e.test binary is supposed to be usable
and entirely stand-alone because that simplifies shipping and running
it. The solution in the Kubernetes build system is to link all files
under test/e2e/testing-manifests into the binary with
go-bindata. The
E2E framework used to have a hard dependency on the output of
go-bindata, now bindata support is
optional. When
accessing a file via the testfiles
package,
files will be retrieved from different sources:
- relative to the directory specified with
--repo-rootparameter - zero or more bindata chunks
Test parameters
The e2e.test binary takes additional parameters which control test execution. In 2016, an effort was started to replace all E2E command line parameters with a Viper configuration file. But that effort stalled, which left developers without clear guidance how they should handle test-specific parameters.
The approach in v1.12 was to add all flags to the central
test/e2e/framework/test_context.go,
which does not work for tests developed independently from the
framework. Since PR
#69105 the
recommendation has been to use the normal flag package to
define its parameters, in its own source code. Flag names must be
hierarchical with dots separating different levels, for example
my.test.parameter, and must be unique. Uniqueness is enforced by the
flag package which panics when registering a flag a second time. The
new
config
package simplifies the definition of multiple options, which are
stored in a single struct.
To summarize, this is how parameters are handled now:
- The init code in test packages defines tests and parameters. The actual parameter values are not available yet, so test definitions cannot use them.
- The init code of the test suite parses parameters and (optionally) the configuration file.
- The tests run and now can use parameter values.
However, recently it was pointed out that it is desirable and was possible to not expose test settings as command line flags and only set them via a configuration file. There is an open bug and a pending PR about this.
Viper support has been enhanced. Like the provider support, it is
completely optional. It gets pulled into a e2e.test binary by
importing the viperconfig package and calling
it
after parsing the normal command line flags. This has been implemented
so that all variables which can be set via command line flags are also
set when the flag appears in a Viper config file. For example, the
Kubernetes v1.13 e2e.test binary accepts
--viper-config=/tmp/my-config.yaml and that file will set the
my.test.parameter to value when it has this content: my: test:
parameter: value
In older Kubernetes releases, that option could only load a file from the current directory, the suffix had to be left out, and only a few parameters actually could be set this way. Beware that one limitation of Viper still exists: it works by matching config file entries against known flags, without warning about unknown config file entries and thus leaving typos undetected. A better config file parser for Kubernetes is still work in progress.
Creating items from .yaml manifests
In Kubernetes 1.12, there was some support for loading individual items from a .yaml file, but then creating that item had to be done by hand-written code. Now the framework has new methods for loading a .yaml file that has multiple items, patching those items (for example, setting the namespace created for the current test), and creating them. This is currently used to deploy CSI drivers anew for each test from exactly the same .yaml files that are also used for deployment via kubectl. If the CSI driver supports running under different names, then tests are completely independent and can run in parallel.
However, redeploying a driver slows down test execution and it does not cover concurrent operations against the driver. A more realistic test scenario is to deploy a driver once when bringing up the test cluster, then run all tests against that deployment. Eventually the Kubernetes E2E testing will move to that model, once it is clearer how test cluster bringup can be extended such that it also includes installing additional entities like CSI drivers.
Upcoming enhancements in Kubernetes 1.14
Reusing storage tests
Being able to use the framework outside of Kubernetes enables building a custom test suite. But a test suite without tests is still useless. Several of the existing tests, in particular for storage, can also be applied to out-of-tree components. Thanks to the work done by Masaki Kimura, storage tests in Kubernetes 1.13 are defined such that they can be instantiated multiple times for different drivers.
But history has a habit of repeating itself. As with providers, the package defining these tests also pulled in driver definitions for all in-tree storage backends, which in turn pulled in more additional packages than were needed. This has been fixed for the upcoming Kubernetes 1.14.
Skipping unsupported tests
Some of the storage tests depend on features of the cluster (like running on a host that supports XFS) or of the driver (like supporting block volumes). These conditions are checked while the test runs, leading to skipped tests when they are not satisfied. The good thing is that this records an explanation why the test did not run.
Starting a test is slow, in particular when it must first deploy the CSI driver, but also in other scenarios. Creating the namespace for a test has been measured at 5 seconds on a fast cluster, and it produces a lot of noisy test output. It would have been possible to address that by skipping the definition of unsupported tests, but then reporting why a test isn’t even part of the test suite becomes tricky. This approach has been dropped in favor of reorganizing the storage test suite such that it first checks conditions before doing the more expensive test setup steps.
More readable test definitions
The same PR also rewrites the tests to operate like conventional Ginkgo tests, with test cases and their local variables in a single function.
Testing external drivers
Building a custom E2E test suite is still quite a bit of work. The e2e.test binary that will get distributed in the Kubernetes 1.14 test archive will have the ability to test already installed storage drivers without rebuilding the test suite. See this README for further instructions.
E2E test suite HOWTO
Test suite initialization
The first step is to set up the necessary boilerplate code that
defines the test suite. In Kubernetes
E2E,
this is done in the e2e.go and e2e_test.go files. It could also be
done in a single e2e_test.go file. Kubernetes imports all of the
various providers, in-tree tests, Viper configuration support, and
bindata file lookup in e2e_test.go. e2e.go controls the actual
execution, including some cluster preparations and metrics collection.
A simpler starting point are the e2e_[test].go files from
PMEM-CSI. It
doesn’t use any providers, no Viper, no bindata, and imports just the
storage tests.
Like PMEM-CSI, OIM drops all of the extra features, but is a bit more
complex because it integrates a custom cluster startup directly into
the test
suite,
which was useful in this case because some additional components have
to run on the host side. By running them directly in the E2E binary,
interactive debugging with dlv becomes easier.
Both CSI drivers follow the Kubernetes example and use the test/e2e
directory for their test suites, but any other directory and other
file names would also work.
Adding E2E storage tests
Tests are defined by packages that get imported into a test suite. The
only thing specific to E2E tests is that they instantiate a
framework.Framework pointer (usually called f) with
framework.NewDefaultFramework. This variable gets initialized anew
in a BeforeEach for each test and freed in an AfterEach. It has a
f.ClientSet and f.Namespace at runtime (and only at runtime!)
which can be used by a test.
The PMEM-CSI storage test imports the Kubernetes storage test suite and sets up one instance of the provisioning tests for a PMEM-CSI driver which must be already installed in the test cluster. The storage test suite changes the storage class to run tests with different filesystem types. Because of this requirement, the storage class is created from a .yaml file.
Explaining all the various utility methods available in the framework is out of scope for this blog post. Reading existing tests and the source code of the framework is a good way to get started.
Vendoring
Vendoring Kubernetes code is still not trivial, even after eliminating
many of the unnecessary dependencies. k8s.io/kubernetes is not meant
to be included in other projects and does not define its dependencies
in a way that is understood by tools like dep. The other k8s.io
packages are meant to be included, but don’t follow semantic
versioning
yet or don’t
tag any releases (k8s.io/kube-openapi, k8s.io/utils).
PMEM-CSI uses dep. It’s
Gopkg.toml
file is a good starting point. It enables pruning (not enabled in dep
by default) and locks certain projects onto versions that are
compatible with the Kubernetes version that is used. When dep
doesn’t pick a compatible version, then checking Kubernetes’
Godeps.json
helps to determine which revision might be the right one.
Compiling and running the test suite
go test ./test/e2e -args -help is the fastest way to test that the
test suite compiles.
Once it does compile and a cluster has been set up, the command go test -timeout=0 -v ./test/e2e -ginkgo.v runs all tests. In order to
run tests in parallel, use the ginkgo -p ./test/e2e command instead.
Getting involved
The Kubernetes E2E framework is owned by the testing-commons sub-project in SIG-testing. See that page for contact information.
There are various tasks that could be worked on, including but not limited to:
- Moving test/e2e/framework into a staging repo and restructuring it so that it is more modular (#74352).
- Simplifying
e2e.goby moving more of its code intotest/e2e/framework(#74353). - Removing provider-specific code from the Kubernetes E2E test suite (#70194).
Special thanks to the reviewers of this article:
- Olev Kartau (https://github.com/okartau)
- Mary Camp (https://github.com/MCamp859)
A Guide to Kubernetes Admission Controllers
Kubernetes has greatly improved the speed and manageability of backend clusters in production today. Kubernetes has emerged as the de facto standard in container orchestrators thanks to its flexibility, scalability, and ease of use. Kubernetes also provides a range of features that secure production workloads. A more recent introduction in security features is a set of plugins called “admission controllers.” Admission controllers must be enabled to use some of the more advanced security features of Kubernetes, such as pod security policies that enforce a security configuration baseline across an entire namespace. The following must-know tips and tricks will help you leverage admission controllers to make the most of these security capabilities in Kubernetes.
What are Kubernetes admission controllers?
In a nutshell, Kubernetes admission controllers are plugins that govern and enforce how the cluster is used. They can be thought of as a gatekeeper that intercept (authenticated) API requests and may change the request object or deny the request altogether. The admission control process has two phases: the mutating phase is executed first, followed by the validating phase. Consequently, admission controllers can act as mutating or validating controllers or as a combination of both. For example, the LimitRanger admission controller can augment pods with default resource requests and limits (mutating phase), as well as verify that pods with explicitly set resource requirements do not exceed the per-namespace limits specified in the LimitRange object (validating phase).
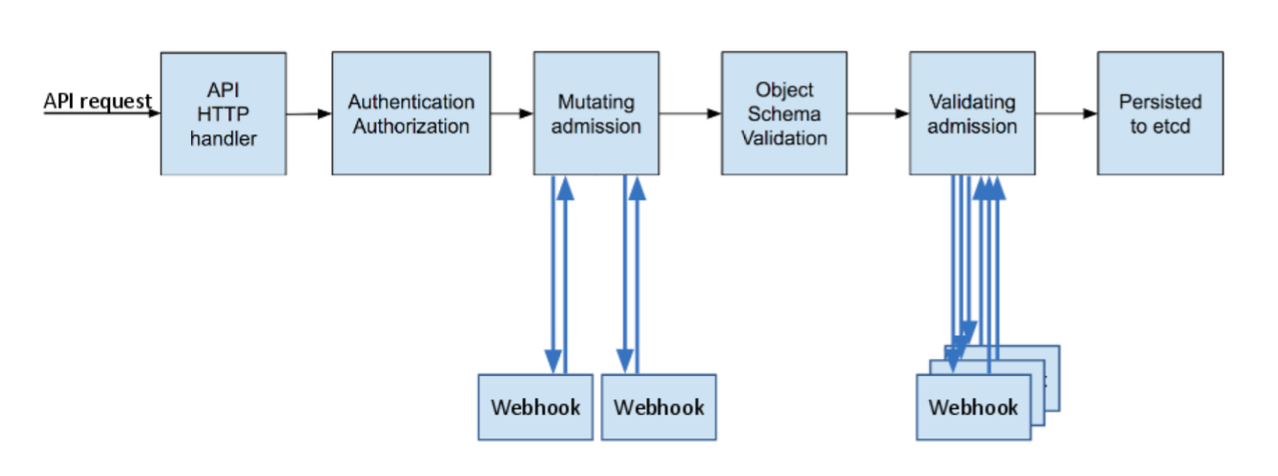
Admission Controller Phases
It is worth noting that some aspects of Kubernetes’ operation that many users would consider built-in are in fact governed by admission controllers. For example, when a namespace is deleted and subsequently enters the Terminating state, the NamespaceLifecycle admission controller is what prevents any new objects from being created in this namespace.
Among the more than 30 admission controllers shipped with Kubernetes, two take a special role because of their nearly limitless flexibility - ValidatingAdmissionWebhooks and MutatingAdmissionWebhooks, both of which are in beta status as of Kubernetes 1.13. We will examine these two admission controllers closely, as they do not implement any policy decision logic themselves. Instead, the respective action is obtained from a REST endpoint (a webhook) of a service running inside the cluster. This approach decouples the admission controller logic from the Kubernetes API server, thus allowing users to implement custom logic to be executed whenever resources are created, updated, or deleted in a Kubernetes cluster.
The difference between the two kinds of admission controller webhooks is pretty much self-explanatory: mutating admission webhooks may mutate the objects, while validating admission webhooks may not. However, even a mutating admission webhook can reject requests and thus act in a validating fashion. Validating admission webhooks have two main advantages over mutating ones: first, for security reasons it might be desirable to disable the MutatingAdmissionWebhook admission controller (or apply stricter RBAC restrictions as to who may create MutatingWebhookConfiguration objects) because of its potentially confusing or even dangerous side effects. Second, as shown in the previous diagram, validating admission controllers (and thus webhooks) are run after any mutating ones. As a result, whatever request object a validating webhook sees is the final version that would be persisted to etcd.
The set of enabled admission controllers is configured by passing a flag to the Kubernetes API server. Note that the old --admission-control flag was deprecated in 1.10 and replaced with --enable-admission-plugins.
--enable-admission-plugins=ValidatingAdmissionWebhook,MutatingAdmissionWebhook
Kubernetes recommends the following admission controllers to be enabled by default.
--enable-admission-plugins=NamespaceLifecycle,LimitRanger,ServiceAccount,DefaultStorageClass,DefaultTolerationSeconds,MutatingAdmissionWebhook,ValidatingAdmissionWebhook,Priority,ResourceQuota,PodSecurityPolicy
The complete list of admission controllers with their descriptions can be found in the official Kubernetes reference. This discussion will focus only on the webhook-based admission controllers.
Why do I need admission controllers?
Admission controllers serve multiple purposes in Kubernetes, mainly around Security, Governance, and Configuration management.
Security
Admission controllers can increase security by mandating a reasonable security baseline across an entire namespace or cluster. The built-in PodSecurityPolicy admission controller is perhaps the most prominent example; it can be used for disallowing containers from running as root or making sure the container’s root filesystem is always mounted read-only, for example. Further use cases that can be realized by custom, webhook-based admission controllers include:
- Allow pulling images only from specific registries known to the enterprise, while denying unknown image registries.
- Reject deployments that do not meet security standards. For example, containers using the
privilegedflag can circumvent a lot of security checks. This risk could be mitigated by a webhook-based admission controller that either rejects such deployments (validating) or overrides theprivilegedflag, setting it tofalse.
Governance
Admission controllers allow you to enforce the adherence to certain practices such as having good labels, annotations, resource limits, or other settings. Some of the common scenarios include:
- Enforce label validation on different objects to ensure proper labels are being used for various objects, such as every object being assigned to a team or project, or every deployment specifying an app label.
- Automatically add annotations to objects, such as attributing the correct cost center for a “dev” deployment resource.
Configuration Management
Admission controllers allow you to validate the configuration of the objects running in the cluster and prevent any obvious misconfigurations from hitting your cluster. Admission controllers can be useful in detecting and fixing images deployed without semantic tags, such as by:
- automatically adding resource limits or validating resource limits,
- ensuring reasonable labels are added to pods, or
- ensuring image references used in production deployments are not using the
latesttags, or tags with a-devsuffix.
In this way, admission controllers and policy management help make sure that applications stay in compliance within an ever-changing landscape of controls.
Example: Writing and Deploying an Admission Controller Webhook
To illustrate how admission controller webhooks can be leveraged to establish custom security policies, let’s consider an example that addresses one of the shortcomings of Kubernetes: a lot of its defaults are optimized for ease of use and reducing friction, sometimes at the expense of security. One of these settings is that containers are by default allowed to run as root (and, without further configuration and no USER directive in the Dockerfile, will also do so). Even though containers are isolated from the underlying host to a certain extent, running containers as root does increase the risk profile of your deployment— and should be avoided as one of many security best practices. The recently exposed runC vulnerability (CVE-2019-5736), for example, could be exploited only if the container ran as root.
You can use a custom mutating admission controller webhook to apply more secure defaults: unless explicitly requested, our webhook will ensure that pods run as a non-root user (we assign the user ID 1234 if no explicit assignment has been made). Note that this setup does not prevent you from deploying any workloads in your cluster, including those that legitimately require running as root. It only requires you to explicitly enable this riskier mode of operation in the deployment configuration, while defaulting to non-root mode for all other workloads.
The full code along with deployment instructions can be found in our accompanying GitHub repository. Here, we will highlight a few of the more subtle aspects about how webhooks work.
Mutating Webhook Configuration
A mutating admission controller webhook is defined by creating a MutatingWebhookConfiguration object in Kubernetes. In our example, we use the following configuration:
apiVersion: admissionregistration.k8s.io/v1beta1
kind: MutatingWebhookConfiguration
metadata:
name: demo-webhook
webhooks:
- name: webhook-server.webhook-demo.svc
clientConfig:
service:
name: webhook-server
namespace: webhook-demo
path: "/mutate"
caBundle: ${CA_PEM_B64}
rules:
- operations: [ "CREATE" ]
apiGroups: [""]
apiVersions: ["v1"]
resources: ["pods"]
This configuration defines a webhook webhook-server.webhook-demo.svc, and instructs the Kubernetes API server to consult the service webhook-server in namespace webhook-demo whenever a pod is created by making a HTTP POST request to the /mutate URL. For this configuration to work, several prerequisites have to be met.
Webhook REST API
The Kubernetes API server makes an HTTPS POST request to the given service and URL path, with a JSON-encoded AdmissionReview (with the Request field set) in the request body. The response should in turn be a JSON-encoded AdmissionReview, this time with the Response field set.
Our demo repository contains a function that takes care of the serialization/deserialization boilerplate code and allows you to focus on implementing the logic operating on Kubernetes API objects. In our example, the function implementing the admission controller logic is called applySecurityDefaults, and an HTTPS server serving this function under the /mutate URL can be set up as follows:
mux := http.NewServeMux()
mux.Handle("/mutate", admitFuncHandler(applySecurityDefaults))
server := &http.Server{
Addr: ":8443",
Handler: mux,
}
log.Fatal(server.ListenAndServeTLS(certPath, keyPath))
Note that for the server to run without elevated privileges, we have the HTTP server listen on port 8443. Kubernetes does not allow specifying a port in the webhook configuration; it always assumes the HTTPS port 443. However, since a service object is required anyway, we can easily map port 443 of the service to port 8443 on the container:
apiVersion: v1
kind: Service
metadata:
name: webhook-server
namespace: webhook-demo
spec:
selector:
app: webhook-server # specified by the deployment/pod
ports:
- port: 443
targetPort: webhook-api # name of port 8443 of the container
Object Modification Logic
In a mutating admission controller webhook, mutations are performed via JSON patches. While the JSON patch standard includes a lot of intricacies that go well beyond the scope of this discussion, the Go data structure in our example as well as its usage should give the user a good initial overview of how JSON patches work:
type patchOperation struct {
Op string `json:"op"`
Path string `json:"path"`
Value interface{} `json:"value,omitempty"`
}
For setting the field .spec.securityContext.runAsNonRoot of a pod to true, we construct the following patchOperation object:
patches = append(patches, patchOperation{
Op: "add",
Path: "/spec/securityContext/runAsNonRoot",
Value: true,
})
TLS Certificates
Since a webhook must be served via HTTPS, we need proper certificates for the server. These certificates can be self-signed (rather: signed by a self-signed CA), but we need Kubernetes to instruct the respective CA certificate when talking to the webhook server. In addition, the common name (CN) of the certificate must match the server name used by the Kubernetes API server, which for internal services is <service-name>.<namespace>.svc, i.e., webhook-server.webhook-demo.svc in our case. Since the generation of self-signed TLS certificates is well documented across the Internet, we simply refer to the respective shell script in our example.
The webhook configuration shown previously contains a placeholder ${CA_PEM_B64}. Before we can create this configuration, we need to replace this portion with the Base64-encoded PEM certificate of the CA. The openssl base64 -A command can be used for this purpose.
Testing the Webhook
After deploying the webhook server and configuring it, which can be done by invoking the ./deploy.sh script from the repository, it is time to test and verify that the webhook indeed does its job. The repository contains three examples:
- A pod that does not specify a security context (
pod-with-defaults). We expect this pod to be run as non-root with user id 1234. - A pod that does specify a security context, explicitly allowing it to run as root (
pod-with-override). - A pod with a conflicting configuration, specifying it must run as non-root but with a user id of 0 (
pod-with-conflict). To showcase the rejection of object creation requests, we have augmented our admission controller logic to reject such obvious misconfigurations.
Create one of these pods by running kubectl create -f examples/<name>.yaml. In the first two examples, you can verify the user id under which the pod ran by inspecting the logs, for example:
$ kubectl create -f examples/pod-with-defaults.yaml
$ kubectl logs pod-with-defaults
I am running as user 1234
In the third example, the object creation should be rejected with an appropriate error message:
$ kubectl create -f examples/pod-with-conflict.yaml
Error from server (InternalError): error when creating "examples/pod-with-conflict.yaml": Internal error occurred: admission webhook "webhook-server.webhook-demo.svc" denied the request: runAsNonRoot specified, but runAsUser set to 0 (the root user)
Feel free to test this with your own workloads as well. Of course, you can also experiment a little bit further by changing the logic of the webhook and see how the changes affect object creation. More information on how to do experiment with such changes can be found in the repository’s readme.
Summary
Kubernetes admission controllers offer significant advantages for security. Digging into two powerful examples, with accompanying available code, will help you get started on leveraging these powerful capabilities.
References:
- https://kubernetes.io/docs/reference/access-authn-authz/admission-controllers/
- https://docs.okd.io/latest/architecture/additional_concepts/dynamic_admission_controllers.html
- https://kubernetes.io/blog/2018/01/extensible-admission-is-beta/
- https://medium.com/ibm-cloud/diving-into-kubernetes-mutatingadmissionwebhook-6ef3c5695f74
- https://github.com/kubernetes/kubernetes/blob/v1.10.0-beta.1/test/images/webhook/main.go
- https://github.com/istio/istio
- https://www.stackrox.com/post/2019/02/the-runc-vulnerability-a-deep-dive-on-protecting-yourself/
A Look Back and What's in Store for Kubernetes Contributor Summits
Seattle Contributor Summit
As our contributing community grows in great numbers, with more than 16,000 contributors this year across 150+ GitHub repositories, it’s important to provide face to face connections for our large distributed teams to have opportunities for collaboration and learning. In Contributor Experience, our methodology with planning events is a lot like our documentation; we build from personas -- interests, skills, and motivators to name a few. This way we ensure there is valuable content and learning for everyone.
We build the contributor summits around you:
- New Contributor
- Current Contributor
- docs
- code
- community management
- Subproject OWNERs - aka maintainers in other OSS circles.
- Special Interest Group (SIG) / Working Group (WG) Chair or Tech Lead
- Active Contributors
- Casual Contributors
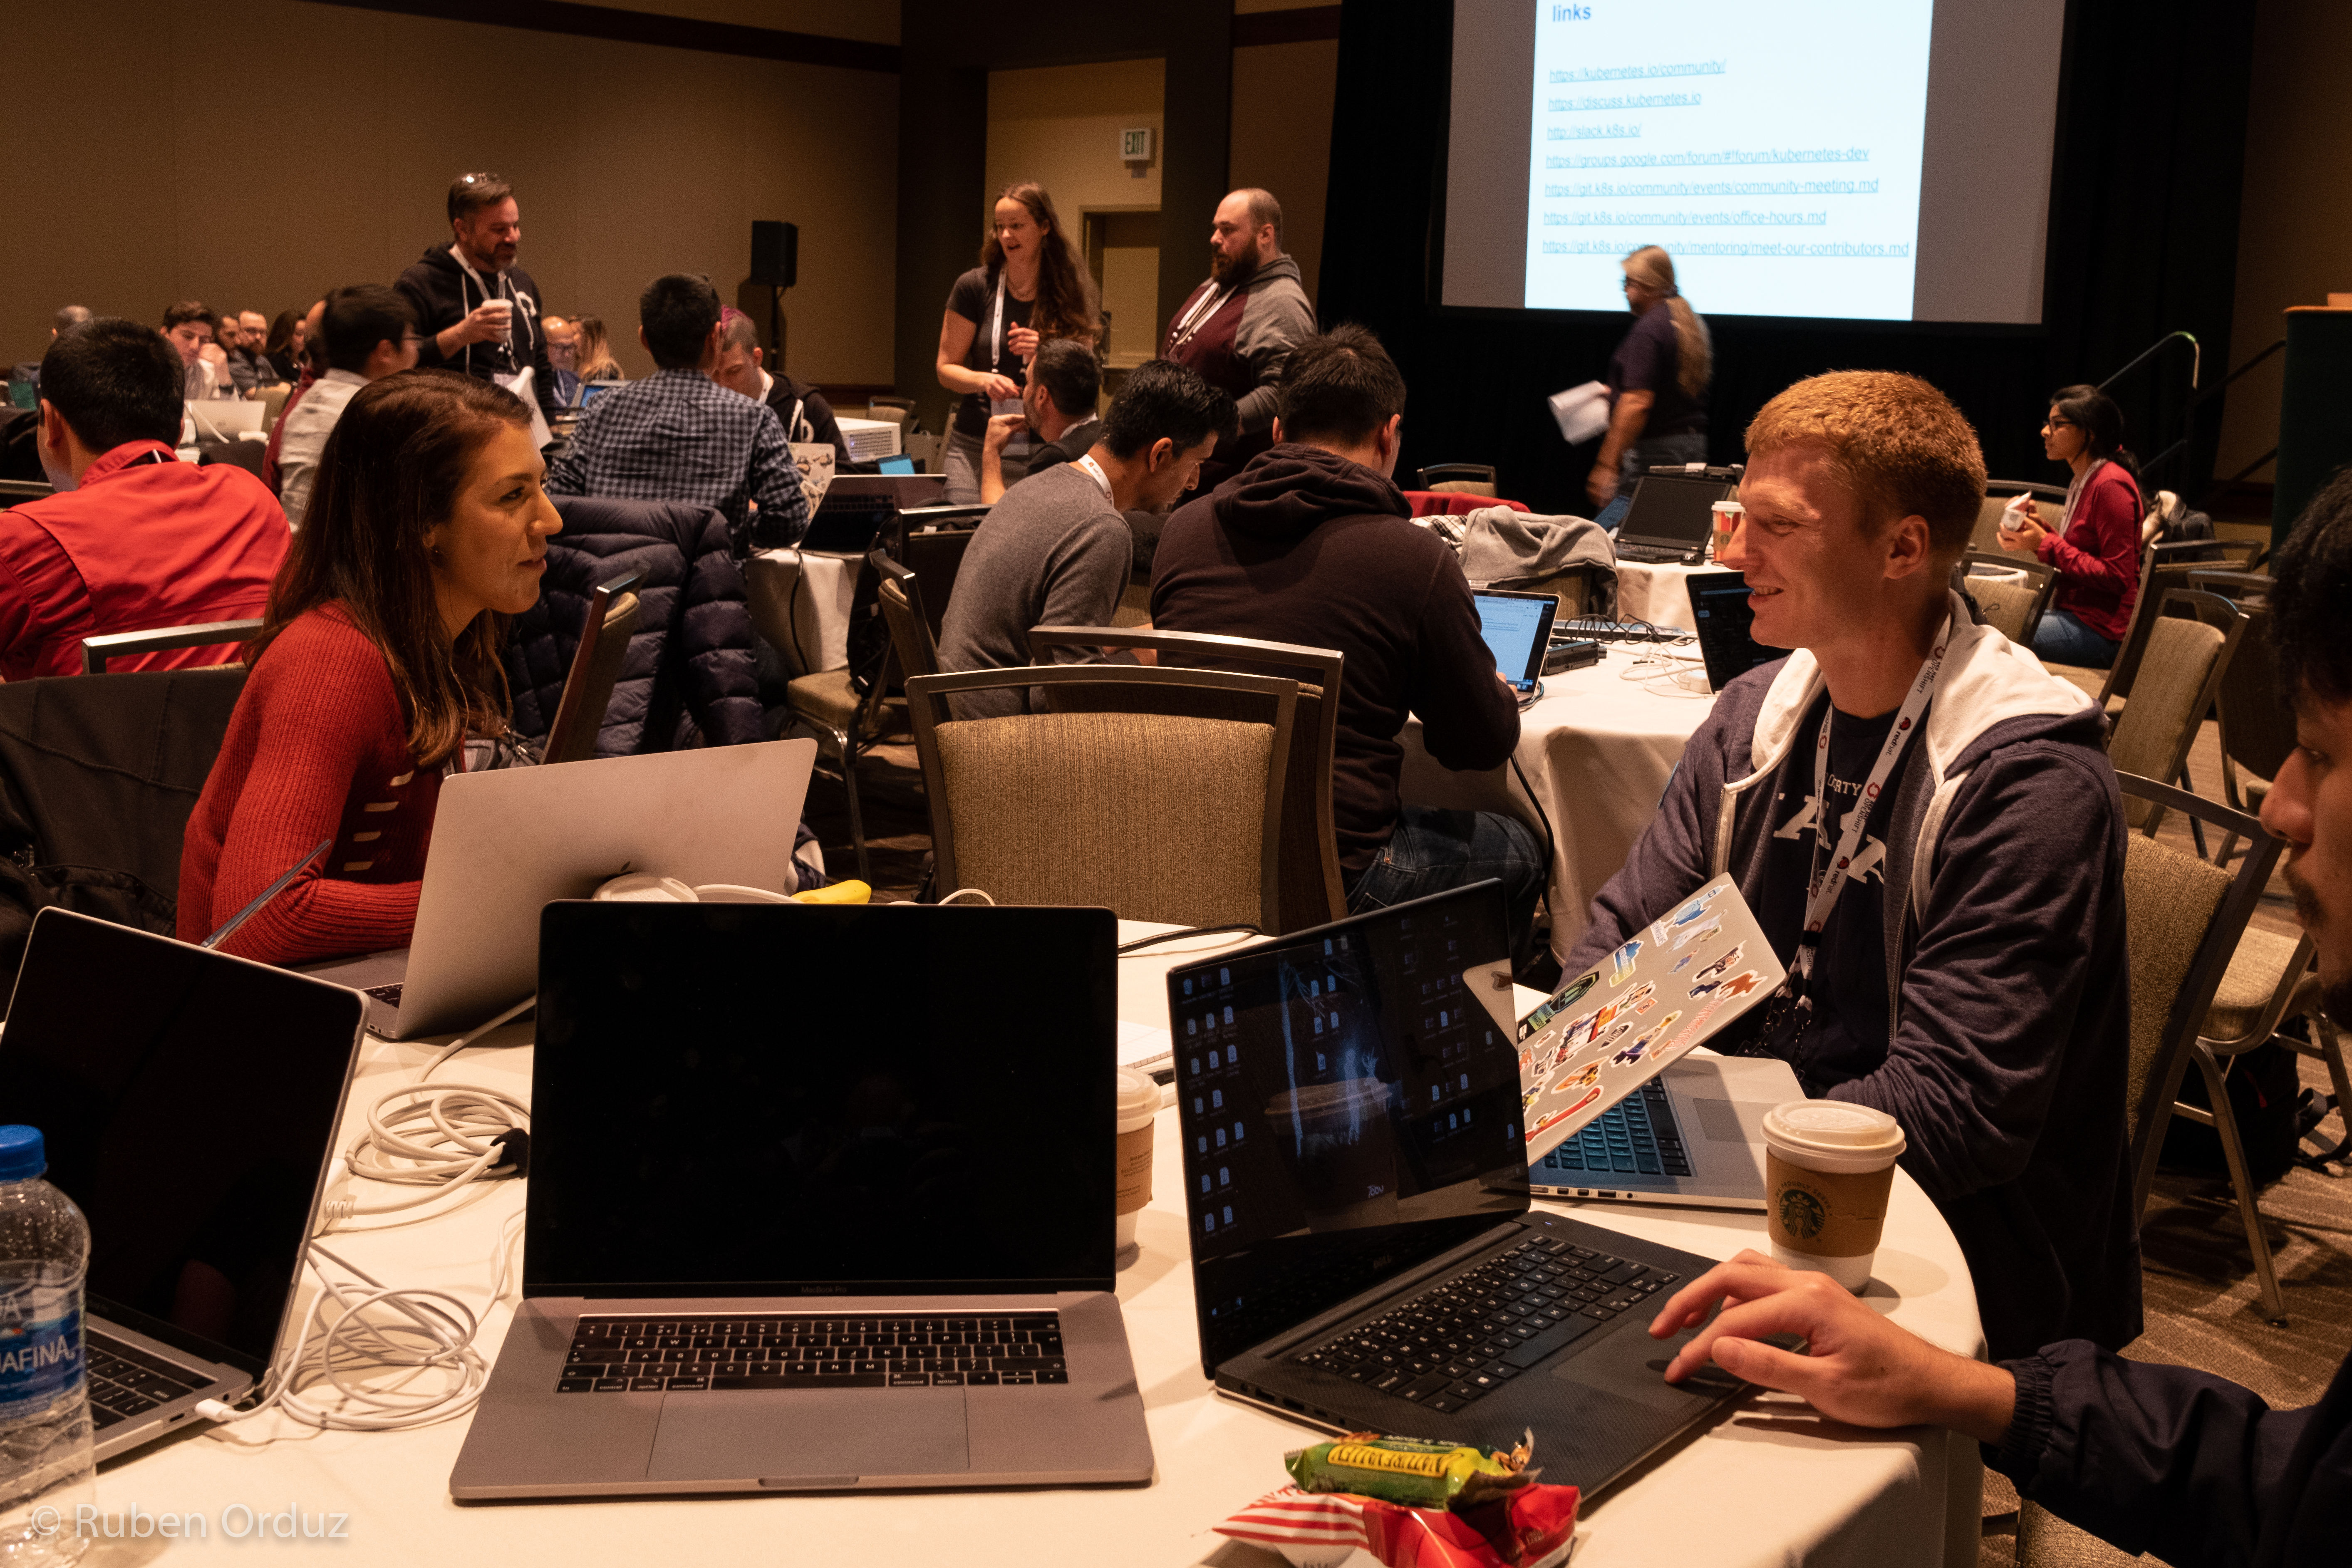
New Contributor Workshop
These personas combined with ample feedback from previous events, produce the altogether experience that welcomed over 600 contributors in Copenhagen (May), Shanghai(November), and Seattle(December) in 2018. Seattle's event drew over 300+ contributors, equal to Shanghai and Copenhagen combined, for the 6th contributor event in Kubernetes history. In true Kubernetes fashion, we expect another record breaking year of attendance. We've pre-ordered 900+ contributor patches, a tradition, and we are looking forward to giving them to you!
With that said…
Save the Dates:
Barcelona: May 19th (evening) and 20th (all day)
Shanghai: June 24th (all day)
San Diego: November 18th, 19th, and activities in KubeCon/CloudNativeCon week
In an effort of continual improvement, here's what to expect from us this year:
- Large new contributor workshops and contributor socials at all three events expected to break previous attendance records
- A multiple track event in San Diego for all contributor types including workshops, birds of a feather, lightning talks and more
- Addition of a “201” / “Intermediate” edition of the new contributor workshop in San Diego
- An event website!
- Follow along with updates: kubernetes-dev@googlegroups.com is our main communication hub as always; however, we will also blog here, our Thursday Kubernetes Community Meeting, twitter, SIG meetings, event site, discuss.kubernetes.io, and #contributor-summit on Slack.
- Opportunities to get involved: We still have 2019 roles available! Reach out to Contributor Experience via community@kubernetes.io, stop by a Wednesday SIG update meeting, or catch us on Slack (#sig-contribex).
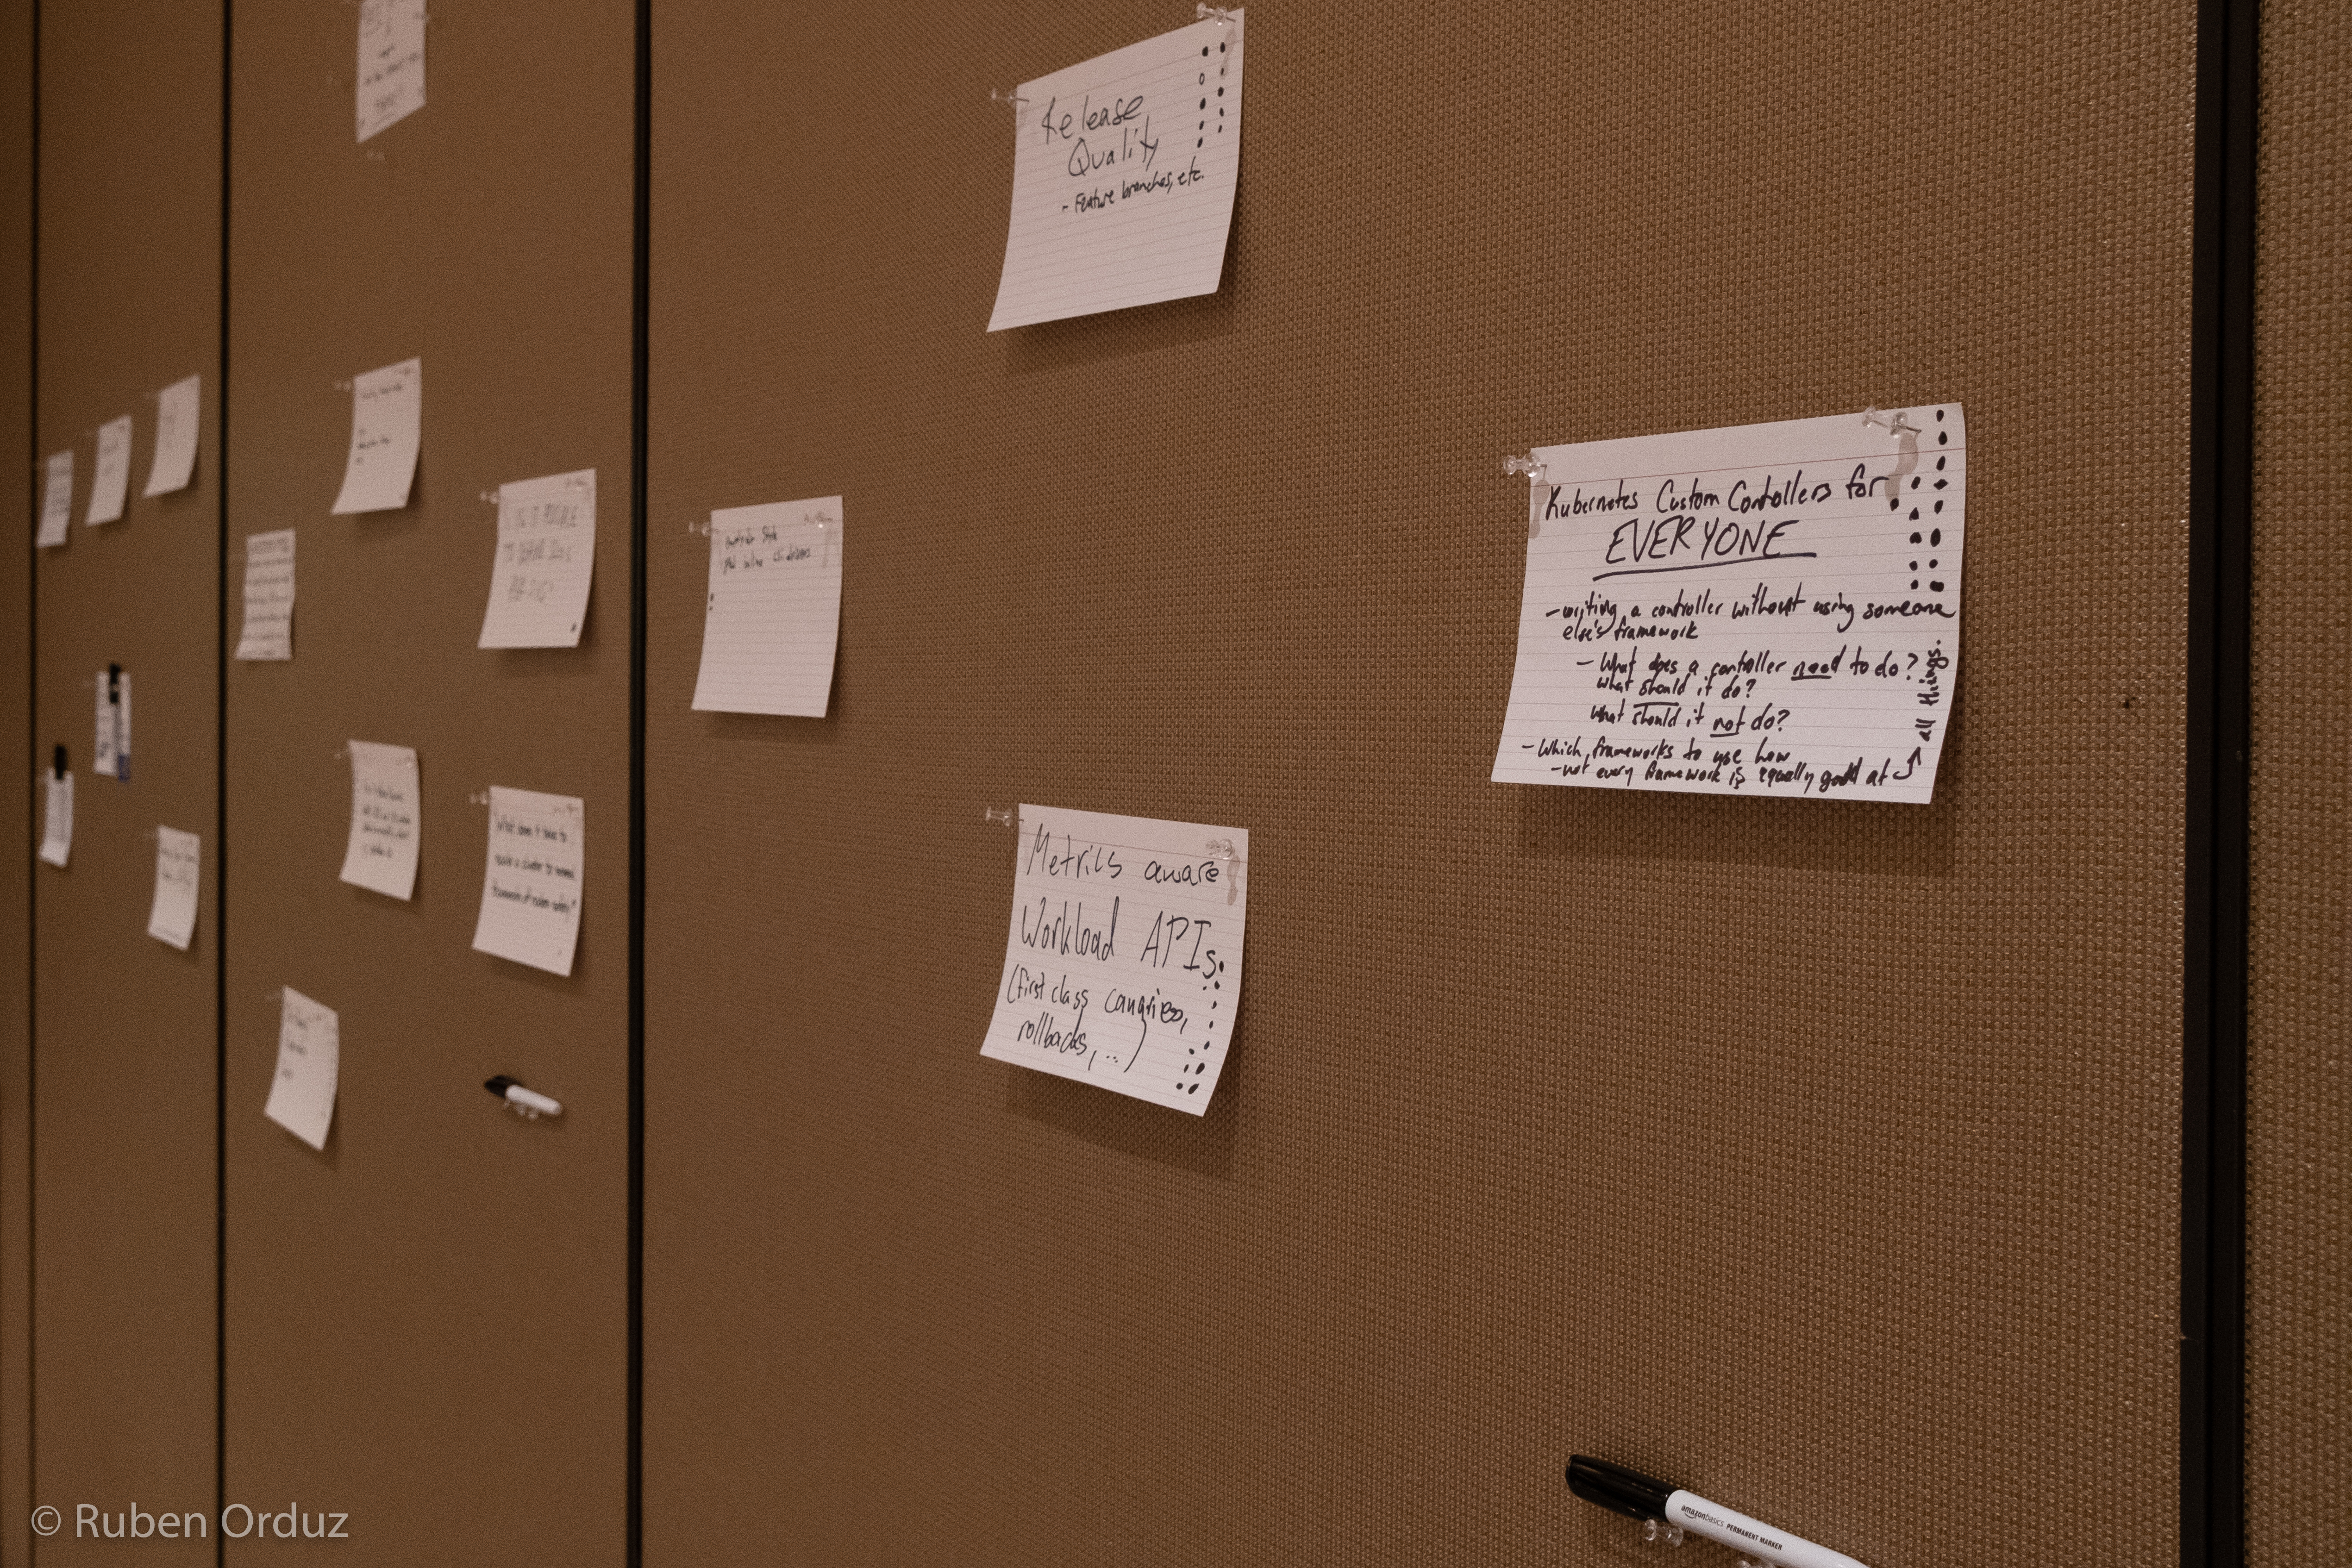
Unconference voting
Thanks!
Our 2018 crew 🥁
Jorge Castro, Paris Pittman, Bob Killen, Jeff Sica, Megan Lehn, Guinevere Saenger, Josh Berkus, Noah Abrahams, Yang Li, Xiangpeng Zhao, Puja Abbassi, Lindsey Tulloch, Zach Corleissen, Tim Pepper, Ihor Dvoretskyi, Nancy Mohamed, Chris Short, Mario Loria, Jason DeTiberus, Sahdev Zala, Mithra Raja
And an introduction to our 2019 crew (a thanks in advance ;) )…
Jonas Rosland, Josh Berkus, Paris Pittman, Jorge Castro, Bob Killen, Deb Giles, Guinevere Saenger, Noah Abrahams, Yang Li, Xiangpeng Zhao, Puja Abbassi, Rui Chen, Tim Pepper, Ihor Dvoretskyi, Dawn Foster
Relive Seattle Contributor Summit
📈 80% growth rate since the Austin 2017 December event
📜 Event waiting list: 103
🎓 76 contributors were on-boarded through the New Contributor Workshop
🎉 92% of the current contributors RSVPs attended and of those:
👩🏻🚒 25% were Special Interest Group or Working Group Chairs or Tech Leads
🗳 70% were eligible to vote in the last steering committee election - more than 50 contributions in 2018
📹 20+ Sessions
👀 Most watched to date: Technical Vision, Security, API Code Base Tour
🌟 Top 3 according to survey: Live API Code Review, Deflaking Unconference, Technical Vision
🎱 🎳 160 attendees for the social at Garage on Sunday night where we sunk eight balls and recorded strikes (out in some cases)
🏆 Special recognition: SIG Storage, @dims, and @jordan
📸 Pictures (special thanks to rdodev)
Some of the group in Seattle
“I love Contrib Summit! The intros and deep dives during KubeCon were a great extension of Contrib Summit. Y'all did an excellent job in the morning to level set expectations and prime everyone.” -- julianv
“great work! really useful and fun!” - coffeepac
KubeEdge, a Kubernetes Native Edge Computing Framework
KubeEdge becomes the first Kubernetes Native Edge Computing Platform with both Edge and Cloud components open sourced!
Open source edge computing is going through its most dynamic phase of development in the industry. So many open source platforms, so many consolidations and so many initiatives for standardization! This shows the strong drive to build better platforms to bring cloud computing to the edges to meet ever increasing demand. KubeEdge, which was announced last year, now brings great news for cloud native computing! It provides a complete edge computing solution based on Kubernetes with separate cloud and edge core modules. Currently, both the cloud and edge modules are open sourced.
Unlike certain light weight kubernetes platforms available around, KubeEdge is made to build edge computing solutions extending the cloud. The control plane resides in cloud, though scalable and extendable. At the same time, the edge can work in offline mode. Also it is lightweight and containerized, and can support heterogeneous hardware at the edge. With the optimization in edge resource utlization, KubeEdge positions to save significant setup and operation cost for edge solutions. This makes it the most compelling edge computing platform in the world currently, based on Kubernetes!
Kube(rnetes)Edge! - Opening up a new Kubernetes-based ecosystem for Edge Computing
The key goal for KubeEdge is extending Kubernetes ecosystem from cloud to edge. From the time it was announced to the public at KubeCon in Shanghai in November 2018, the architecture direction for KubeEdge was aligned to Kubernetes, as its name!
It started with its v0.1 providing the basic edge computing features. Now, with its latest release v0.2, it brings the cloud components to connect and complete the loop. With consistent and scalable Kubernetes-based interfaces, KubeEdge enables the orchestration and management of edge clusters similar to how Kubernetes manages in the cloud. This opens up seamless possibilities of bringing cloud computing capabilities to the edge, quickly and efficiently.
KubeEdge Links:
Based on its roadmap and architecture, KubeEdge tries to support all edge nodes, applications, devices and even the cluster management consistent with the Kuberenetes interface. This will help the edge cloud act exactly like a cloud cluster. This can save a lot of time and cost on the edge cloud development deployment based on KubeEdge.
KubeEdge provides a containerized edge computing platform, which is inherently scalable. As it's modular and optimized, it is lightweight (66MB foot print and ~30MB running memory) and could be deployed on low resource devices. Similarly, the edge node can be of different hardware architecture and with different hardware configurations. For the device connectivity, it can support multiple protocols and it uses a standard MQTT-based communication. This helps in scaling the edge clusters with new nodes and devices efficiently.
You heard it right! KubeEdge Cloud Core modules are open sourced!
By open sourcing both the edge and cloud modules, KubeEdge brings a complete cloud vendor agnostic lightweight heterogeneous edge computing platform. It is now ready to support building a complete Kubernetes ecosystem for edge computing, exploiting most of the existing cloud native projects or software modules. This can enable a mini-cloud at the edge to support demanding use cases like data analytics, video analytics, machine learning and more.
KubeEdge Architecture: Building Kuberenetes Native Edge computing!
The core architecture tenet for KubeEdge is to build interfaces that are consistent with Kubernetes, be it on the cloud side or edge side.
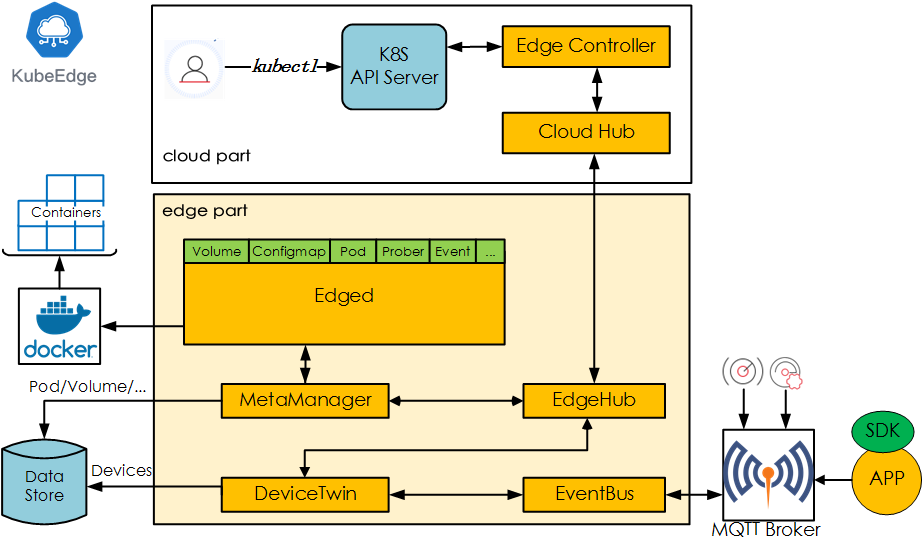
Edged: Manages containerized Applications at the Edge.
EdgeHub: Communication interface module at the Edge. It is a web socket client responsible for interacting with Cloud Service for edge computing.
CloudHub: Communication interface module at the Cloud. A web socket server responsible for watching changes on the cloud side, caching and sending messages to EdgeHub.
EdgeController: Manages the Edge nodes. It is an extended Kubernetes controller which manages edge nodes and pods metadata so that the data can be targeted to a specific edge node.
EventBus: Handles the internal edge communications using MQTT. It is an MQTT client to interact with MQTT servers (mosquitto), offering publish and subscribe capabilities to other components.
DeviceTwin: It is software mirror for devices that handles the device metadata. This module helps in handling device status and syncing the same to cloud. It also provides query interfaces for applications, as it interfaces to a lightweight database (SQLite).
MetaManager: It manages the metadata at the edge node. This is the message processor between edged and edgehub. It is also responsible for storing/retrieving metadata to/from a lightweight database (SQLite).
Even if you want to add more control plane modules based on the architecture refinement and improvement (for example enhanced security), it is simple as it uses consistent registration and modular communication within these modules.
KubeEdge provides scalable lightweight Kubernetes Native Edge Computing Platform which can work in offline mode.
It helps simplify edge application development and deployment.
Cloud vendor agnostic and can run the cloud core modules on any compute node.
Release 0.1 to 0.2 -- game changer!
KubeEdge v0.1 was released at the end of December 2018 with very basic edge features to manage edge applications along with Kubernetes API primitives for node, pod, config etc. In ~2 months, KubeEdge v0.2 was release on March 5th, 2019. This release provides the cloud core modules and enables the end to end open source edge computing solution. The cloud core modules can be deployed to any compute node from any cloud vendors or on-prem.
Now, the complete edge solution can be installed and tested very easily, also with a laptop.
Run Anywhere - Simple and Light
As described, the KubeEdge Edge and Cloud core components can be deployed easily and can run the user applications. The edge core has a foot print of 66MB and just needs 30MB memory to run. Similarly the cloud core can run on any cloud nodes. (User can experience by running it on a laptop as well)
The installation is simple and can be done in few steps:
- Setup the pre-requisites Docker, Kubernetes, MQTT and openssl
- Clone and Build KubeEdge Cloud and Edge
- Run Cloud
- Run Edge
The detailed steps for each are available at KubeEdge/kubeedge
Future: Taking off with competent features and community collaboration
KubeEdge has been developed by members from the community who are active contributors to Kubernetes/CNCF and doing research in edge computing. The KubeEdge team is also actively collaborating with Kubernetes IOT/EDGE WORKING GROUP. Within a few months of the KubeEdge announcement it has attracted members from different organizations including JingDong, Zhejiang University, SEL Lab, Eclipse, China Mobile, ARM, Intel to collaborate in building the platform and ecosystem.
KubeEdge has a clear roadmap for its upcoming major releases in 2019. vc1.0 targets to provide a complete edge cluster and device management solution with standard edge to edge communication, while v2.0 targets to have advanced features like service mesh, function service , data analytics etc at edge. Also, for all the features, KubeEdge architecture would attempt to utilize the existing CNCF projects/software.
The KubeEdge community needs varied organizations, their requirements, use cases and support to build it. Please join to make a kubernetes native edge computing platform which can extend the cloud native computing paradigm to edge cloud.
How to Get Involved?
We welcome more collaboration to build the Kubernetes native edge computing ecosystem. Please join us!
- Twitter: https://twitter.com/kubeedge
- Slack: kubeedge.slack.com
- Website: https://kubeedge.io
- GitHub: https://github.com/kubeedge/kubeedge
- Email: kubeedge@gmail.com
Kubernetes Setup Using Ansible and Vagrant
Objective
This blog post describes the steps required to setup a multi node Kubernetes cluster for development purposes. This setup provides a production-like cluster that can be setup on your local machine.
Why do we require multi node cluster setup?
Multi node Kubernetes clusters offer a production-like environment which has various advantages. Even though Minikube provides an excellent platform for getting started, it doesn't provide the opportunity to work with multi node clusters which can help solve problems or bugs that are related to application design and architecture. For instance, Ops can reproduce an issue in a multi node cluster environment, Testers can deploy multiple versions of an application for executing test cases and verifying changes. These benefits enable teams to resolve issues faster which make the more agile.
Why use Vagrant and Ansible?
Vagrant is a tool that will allow us to create a virtual environment easily and it eliminates pitfalls that cause the works-on-my-machine phenomenon. It can be used with multiple providers such as Oracle VirtualBox, VMware, Docker, and so on. It allows us to create a disposable environment by making use of configuration files.
Ansible is an infrastructure automation engine that automates software configuration management. It is agentless and allows us to use SSH keys for connecting to remote machines. Ansible playbooks are written in yaml and offer inventory management in simple text files.
Prerequisites
- Vagrant should be installed on your machine. Installation binaries can be found here.
- Oracle VirtualBox can be used as a Vagrant provider or make use of similar providers as described in Vagrant's official documentation.
- Ansible should be installed in your machine. Refer to the Ansible installation guide for platform specific installation.
Setup overview
We will be setting up a Kubernetes cluster that will consist of one master and two worker nodes. All the nodes will run Ubuntu Xenial 64-bit OS and Ansible playbooks will be used for provisioning.
Step 1: Creating a Vagrantfile
Use the text editor of your choice and create a file with named Vagrantfile, inserting the code below. The value of N denotes the number of nodes present in the cluster, it can be modified accordingly. In the below example, we are setting the value of N as 2.
IMAGE_NAME = "bento/ubuntu-16.04"
N = 2
Vagrant.configure("2") do |config|
config.ssh.insert_key = false
config.vm.provider "virtualbox" do |v|
v.memory = 1024
v.cpus = 2
end
config.vm.define "k8s-master" do |master|
master.vm.box = IMAGE_NAME
master.vm.network "private_network", ip: "192.168.50.10"
master.vm.hostname = "k8s-master"
master.vm.provision "ansible" do |ansible|
ansible.playbook = "kubernetes-setup/master-playbook.yml"
ansible.extra_vars = {
node_ip: "192.168.50.10",
}
end
end
(1..N).each do |i|
config.vm.define "node-#{i}" do |node|
node.vm.box = IMAGE_NAME
node.vm.network "private_network", ip: "192.168.50.#{i + 10}"
node.vm.hostname = "node-#{i}"
node.vm.provision "ansible" do |ansible|
ansible.playbook = "kubernetes-setup/node-playbook.yml"
ansible.extra_vars = {
node_ip: "192.168.50.#{i + 10}",
}
end
end
end
end
Step 2: Create an Ansible playbook for Kubernetes master.
Create a directory named kubernetes-setup in the same directory as the Vagrantfile. Create two files named master-playbook.yml and node-playbook.yml in the directory kubernetes-setup.
In the file master-playbook.yml, add the code below.
Step 2.1: Install Docker and its dependent components.
We will be installing the following packages, and then adding a user named “vagrant” to the “docker” group.
- docker-ce
- docker-ce-cli
- containerd.io
---
- hosts: all
become: true
tasks:
- name: Install packages that allow apt to be used over HTTPS
apt:
name: "{{ packages }}"
state: present
update_cache: yes
vars:
packages:
- apt-transport-https
- ca-certificates
- curl
- gnupg-agent
- software-properties-common
- name: Add an apt signing key for Docker
apt_key:
url: https://download.docker.com/linux/ubuntu/gpg
state: present
- name: Add apt repository for stable version
apt_repository:
repo: deb [arch=amd64] https://download.docker.com/linux/ubuntu xenial stable
state: present
- name: Install docker and its dependecies
apt:
name: "{{ packages }}"
state: present
update_cache: yes
vars:
packages:
- docker-ce
- docker-ce-cli
- containerd.io
notify:
- docker status
- name: Add vagrant user to docker group
user:
name: vagrant
group: docker
Step 2.2: Kubelet will not start if the system has swap enabled, so we are disabling swap using the below code.
- name: Remove swapfile from /etc/fstab
mount:
name: "{{ item }}"
fstype: swap
state: absent
with_items:
- swap
- none
- name: Disable swap
command: swapoff -a
when: ansible_swaptotal_mb > 0
Step 2.3: Installing kubelet, kubeadm and kubectl using the below code.
- name: Add an apt signing key for Kubernetes
apt_key:
url: https://packages.cloud.google.com/apt/doc/apt-key.gpg
state: present
- name: Adding apt repository for Kubernetes
apt_repository:
repo: deb https://apt.kubernetes.io/ kubernetes-xenial main
state: present
filename: kubernetes.list
- name: Install Kubernetes binaries
apt:
name: "{{ packages }}"
state: present
update_cache: yes
vars:
packages:
- kubelet
- kubeadm
- kubectl
- name: Configure node ip
lineinfile:
path: /etc/default/kubelet
line: KUBELET_EXTRA_ARGS=--node-ip={{ node_ip }}
- name: Restart kubelet
service:
name: kubelet
daemon_reload: yes
state: restarted
Step 2.3: Initialize the Kubernetes cluster with kubeadm using the below code (applicable only on master node).
- name: Initialize the Kubernetes cluster using kubeadm
command: kubeadm init --apiserver-advertise-address="192.168.50.10" --apiserver-cert-extra-sans="192.168.50.10" --node-name k8s-master --pod-network-cidr=192.168.0.0/16
Step 2.4: Setup the kube config file for the vagrant user to access the Kubernetes cluster using the below code.
- name: Setup kubeconfig for vagrant user
command: "{{ item }}"
with_items:
- mkdir -p /home/vagrant/.kube
- cp -i /etc/kubernetes/admin.conf /home/vagrant/.kube/config
- chown vagrant:vagrant /home/vagrant/.kube/config
Step 2.5: Setup the container networking provider and the network policy engine using the below code.
- name: Install calico pod network
become: false
command: kubectl create -f https://docs.projectcalico.org/v3.4/getting-started/kubernetes/installation/hosted/calico.yaml
Step 2.6: Generate kube join command for joining the node to the Kubernetes cluster and store the command in the file named join-command.
- name: Generate join command
command: kubeadm token create --print-join-command
register: join_command
- name: Copy join command to local file
local_action: copy content="{{ join_command.stdout_lines[0] }}" dest="./join-command"
Step 2.7: Setup a handler for checking Docker daemon using the below code.
handlers:
- name: docker status
service: name=docker state=started
Step 3: Create the Ansible playbook for Kubernetes node.
Create a file named node-playbook.yml in the directory kubernetes-setup.
Add the code below into node-playbook.yml
Step 3.1: Start adding the code from Steps 2.1 till 2.3.
Step 3.2: Join the nodes to the Kubernetes cluster using below code.
- name: Copy the join command to server location
copy: src=join-command dest=/tmp/join-command.sh mode=0777
- name: Join the node to cluster
command: sh /tmp/join-command.sh
Step 3.3: Add the code from step 2.7 to finish this playbook.
Step 4: Upon completing the Vagrantfile and playbooks follow the below steps.
$ cd /path/to/Vagrantfile
$ vagrant up
Upon completion of all the above steps, the Kubernetes cluster should be up and running. We can login to the master or worker nodes using Vagrant as follows:
$ ## Accessing master
$ vagrant ssh k8s-master
vagrant@k8s-master:~$ kubectl get nodes
NAME STATUS ROLES AGE VERSION
k8s-master Ready master 18m v1.13.3
node-1 Ready <none> 12m v1.13.3
node-2 Ready <none> 6m22s v1.13.3
$ ## Accessing nodes
$ vagrant ssh node-1
$ vagrant ssh node-2
Raw Block Volume support to Beta
Kubernetes v1.13 moves raw block volume support to beta. This feature allows persistent volumes to be exposed inside containers as a block device instead of as a mounted file system.
What are block devices?
Block devices enable random access to data in fixed-size blocks. Hard drives, SSDs, and CD-ROMs drives are all examples of block devices.
Typically persistent storage is implemented in a layered maner with a file system (like ext4) on top of a block device (like a spinning disk or SSD). Applications then read and write files instead of operating on blocks. The operating systems take care of reading and writing files, using the specified filesystem, to the underlying device as blocks.
It's worth noting that while whole disks are block devices, so are disk partitions, and so are LUNs from a storage area network (SAN) device.
Why add raw block volumes to kubernetes?
There are some specialized applications that require direct access to a block device because, for example, the file system layer introduces unneeded overhead. The most common case is databases, which prefer to organize their data directly on the underlying storage. Raw block devices are also commonly used by any software which itself implements some kind of storage service (software defined storage systems).
From a programmer's perspective, a block device is a very large array of bytes, usually with some minimum granularity for reads and writes, often 512 bytes, but frequently 4K or larger.
As it becomes more common to run database software and storage infrastructure software inside of Kubernetes, the need for raw block device support in Kubernetes becomes more important.
Which volume plugins support raw blocks?
As of the publishing of this blog, the following in-tree volumes types support raw blocks:
- AWS EBS
- Azure Disk
- Cinder
- Fibre Channel
- GCE PD
- iSCSI
- Local volumes
- RBD (Ceph)
- Vsphere
Out-of-tree CSI volume drivers may also support raw block volumes. Kubernetes CSI support for raw block volumes is currently alpha. See documentation here.
Kubernetes raw block volume API
Raw block volumes share a lot in common with ordinary volumes. Both are requested by creating PersistentVolumeClaim objects which bind to PersistentVolume objects, and are attached to Pods in Kubernetes by including them in the volumes array of the PodSpec.
There are 2 important differences however. First, to request a raw block PersistentVolumeClaim, you must set volumeMode = "Block" in the PersistentVolumeClaimSpec. Leaving volumeMode blank is the same as specifying volumeMode = "Filesystem" which results in the traditional behavior. PersistentVolumes also have a volumeMode field in their PersistentVolumeSpec, and "Block" type PVCs can only bind to "Block" type PVs and "Filesystem" PVCs can only bind to "Filesystem" PVs.
Secondly, when using a raw block volume in your Pods, you must specify a VolumeDevice in the Container portion of the PodSpec rather than a VolumeMount. VolumeDevices have devicePaths instead of mountPaths, and inside the container, applications will see a device at that path instead of a mounted file system.
Applications open, read, and write to the device node inside the container just like they would interact with any block device on a system in a non-containerized or virtualized context.
Creating a new raw block PVC
First, ensure that the provisioner associated with the storage class you choose is one that support raw blocks. Then create the PVC.
apiVersion: v1
kind: PersistentVolumeClaim
metadata:
name: my-pvc
spec:
accessModes:
- ReadWriteMany
volumeMode: Block
storageClassName: my-sc
resources:
requests:
storage: 1Gi
Using a raw block PVC
When you use the PVC in a pod definition, you get to choose the device path for the block device rather than the mount path for the file system.
apiVersion: v1
kind: Pod
metadata:
name: my-pod
spec:
containers:
- name: my-container
image: busybox
command:
- sleep
- “3600”
volumeDevices:
- devicePath: /dev/block
name: my-volume
imagePullPolicy: IfNotPresent
volumes:
- name: my-volume
persistentVolumeClaim:
claimName: my-pvc
As a storage vendor, how do I add support for raw block devices to my CSI plugin?
Raw block support for CSI plugins is still alpha, but support can be added today. The CSI specification details how to handle requests for volume that have the BlockVolume capability instead of the MountVolume capability. CSI plugins can support both kinds of volumes, or one or the other. For more details see documentation here.
Issues/gotchas
Because block devices are actually devices, it’s possible to do low-level actions on them from inside containers that wouldn’t be possible with file system volumes. For example, block devices that are actually SCSI disks support sending SCSI commands to the device using Linux ioctls.
By default, Linux won’t allow containers to send SCSI commands to disks from inside containers though. In order to do so, you must grant the SYS_RAWIO capability to the container security context to allow this. See documentation here.
Also, while Kubernetes is guaranteed to deliver a block device to the container, there’s no guarantee that it’s actually a SCSI disk or any other kind of disk for that matter. The user must either ensure that the desired disk type is used with his pods, or only deploy applications that can handle a variety of block device types.
How can I learn more?
Check out additional documentation on the snapshot feature here: Raw Block Volume Support
How do I get involved?
Join the Kubernetes storage SIG and the CSI community and help us add more great features and improve existing ones like raw block storage!
https://github.com/kubernetes/community/tree/master/sig-storage https://github.com/container-storage-interface/community/blob/master/README.md
Special thanks to all the contributors who helped add block volume support to Kubernetes including:
- Ben Swartzlander (https://github.com/bswartz)
- Brad Childs (https://github.com/childsb)
- Erin Boyd (https://github.com/erinboyd)
- Masaki Kimura (https://github.com/mkimuram)
- Matthew Wong (https://github.com/wongma7)
- Michelle Au (https://github.com/msau42)
- Mitsuhiro Tanino (https://github.com/mtanino)
- Saad Ali (https://github.com/saad-ali)
Automate Operations on your Cluster with OperatorHub.io
One of the important challenges facing developers and Kubernetes administrators has been a lack of ability to quickly find common services that are operationally ready for Kubernetes. Typically, the presence of an Operator for a specific service - a pattern that was introduced in 2016 and has gained momentum - is a good signal for the operational readiness of the service on Kubernetes. However, there has to date not existed a registry of Operators to simplify the discovery of such services.
To help address this challenge, today Red Hat is launching OperatorHub.io in collaboration with AWS, Google Cloud and Microsoft. OperatorHub.io enables developers and Kubernetes administrators to find and install curated Operator-backed services with a base level of documentation, active maintainership by communities or vendors, basic testing, and packaging for optimized life-cycle management on Kubernetes.
The Operators currently in OperatorHub.io are just the start. We invite the Kubernetes community to join us in building a vibrant community for Operators by developing, packaging, and publishing Operators on OperatorHub.io.
What does OperatorHub.io provide?
OperatorHub.io is designed to address the needs of both Kubernetes developers and users. For the former it provides a common registry where they can publish their Operators alongside with descriptions, relevant details like version, image, code repository and have them be readily packaged for installation. They can also update already published Operators to new versions when they are released.
Users get the ability to discover and download Operators at a central location, that has content which has been screened for the previously mentioned criteria and scanned for known vulnerabilities. In addition, developers can guide users of their Operators with prescriptive examples of the CustomResources that they introduce to interact with the application.
What is an Operator?
Operators were first introduced in 2016 by CoreOS and have been used by Red Hat and the Kubernetes community as a way to package, deploy and manage a Kubernetes-native application. A Kubernetes-native application is an application that is both deployed on Kubernetes and managed using the Kubernetes APIs and well-known tooling, like kubectl.
An Operator is implemented as a custom controller that watches for certain Kubernetes resources to appear, be modified or deleted. These are typically CustomResourceDefinitions that the Operator “owns.” In the spec properties of these objects the user declares the desired state of the application or the operation. The Operator’s reconciliation loop will pick these up and perform the required actions to achieve the desired state. For example, the intent to create a highly available etcd cluster could be expressed by creating an new resource of type EtcdCluster:
apiVersion: "etcd.database.coreos.com/v1beta2"
kind: "EtcdCluster"
metadata:
name: "my-etcd-cluster"
spec:
size: 3
version: "3.3.12"
The EtcdOperator would be responsible for creating a 3-node etcd cluster running version v3.3.12 as a result. Similarly, an object of type EtcdBackup could be defined to express the intent to create a consistent backup of the etcd database to an S3 bucket.
How do I create and run an Operator?
One way to get started is with the Operator Framework, an open source toolkit that provides an SDK, lifecycle management, metering and monitoring capabilities. It enables developers to build, test, and package Operators. Operators can be implemented in several programming and automation languages, including Go, Helm, and Ansible, all three of which are supported directly by the SDK.
If you are interested in creating your own Operator, we recommend checking out the Operator Framework to get started.
Operators vary in where they fall along the capability spectrum ranging from basic functionality to having specific operational logic for an application to automate advanced scenarios like backup, restore or tuning. Beyond basic installation, advanced Operators are designed to handle upgrades more seamlessly and react to failures automatically. Currently, Operators on OperatorHub.io span the maturity spectrum, but we anticipate their continuing maturation over time.
While Operators on OperatorHub.io don’t need to be implemented using the SDK, they are packaged for deployment through the Operator Lifecycle Manager (OLM). The format mainly consists of a YAML manifest referred to as [ClusterServiceVersion](https://github.com/operator-framework/operator-lifecycle-manager/blob/master/doc/design/building-your-csv.md) which provides information about the CustomResourceDefinitions the Operator owns or requires, which RBAC definition it needs, where the image is stored, etc. This file is usually accompanied by additional YAML files which define the Operators’ own CRDs. This information is processed by OLM at the time a user requests to install an Operator to provide dependency resolution and automation.
What does listing of an Operator on OperatorHub.io mean?
To be listed, Operators must successfully show cluster lifecycle features, be packaged as a CSV to be maintained through OLM, and have acceptable documentation for its intended users.
Some examples of Operators that are currently listed on OperatorHub.io include: Amazon Web Services Operator, Couchbase Autonomous Operator, CrunchyData’s PostgreSQL, etcd Operator, Jaeger Operator for Kubernetes, Kubernetes Federation Operator, MongoDB Enterprise Operator, Percona MySQL Operator, PlanetScale’s Vitess Operator, Prometheus Operator, and Redis Operator.
Want to add your Operator to OperatorHub.io? Follow these steps
If you have an existing Operator, follow the contribution guide using a fork of the community-operators repository. Each contribution contains the CSV, all of the CustomResourceDefinitions, access control rules and references to the container image needed to install and run your Operator, plus other info like a description of its features and supported Kubernetes versions. A complete example, including multiple versions of the Operator, can be found with the EtcdOperator.
After testing out your Operator on your own cluster, submit a PR to the community repository with all of YAML files following this directory structure. Subsequent versions of the Operator can be published in the same way. At first this will be reviewed manually, but automation is on the way. After it’s merged by the maintainers, it will show up on OperatorHub.io along with its documentation and a convenient installation method.
Want to learn more?
- Attend one of the upcoming Kubernetes Operator Framework hands-on workshops at ScaleX in Pasadena on March 7 and at the OpenShift Commons Gathering on Operating at Scale in Santa Clara on March 11
- Listen to this OpenShift Commons Briefing on “The State of Operators” with Daniel Messer and Diane Mueller
- Join in on the online conversations in the community Kubernetes-Operator Slack Channel and the Operator Framework Google Group
- Finally, read up on how to add your Operator to OperatorHub.io: https://operatorhub.io/contribute
Building a Kubernetes Edge (Ingress) Control Plane for Envoy v2
Kubernetes has become the de facto runtime for container-based microservice applications, but this orchestration framework alone does not provide all of the infrastructure necessary for running a distributed system. Microservices typically communicate through Layer 7 protocols such as HTTP, gRPC, or WebSockets, and therefore having the ability to make routing decisions, manipulate protocol metadata, and observe at this layer is vital. However, traditional load balancers and edge proxies have predominantly focused on L3/4 traffic. This is where the Envoy Proxy comes into play.
Envoy proxy was designed as a universal data plane from the ground-up by the Lyft Engineering team for today's distributed, L7-centric world, with broad support for L7 protocols, a real-time API for managing its configuration, first-class observability, and high performance within a small memory footprint. However, Envoy's vast feature set and flexibility of operation also makes its configuration highly complicated -- this is evident from looking at its rich but verbose control plane syntax.
With the open source Ambassador API Gateway, we wanted to tackle the challenge of creating a new control plane that focuses on the use case of deploying Envoy as an forward-facing edge proxy within a Kubernetes cluster, in a way that is idiomatic to Kubernetes operators. In this article, we'll walk through two major iterations of the Ambassador design, and how we integrated Ambassador with Kubernetes.
Ambassador pre-2019: Envoy v1 APIs, Jinja Template Files, and Hot Restarts
Ambassador itself is deployed within a container as a Kubernetes service, and uses annotations added to Kubernetes Services as its core configuration model. This approach enables application developers to manage routing as part of the Kubernetes service definition. We explicitly decided to go down this route because of limitations in the current Ingress API spec, and we liked the simplicity of extending Kubernetes services, rather than introducing another custom resource type. An example of an Ambassador annotation can be seen here:
kind: Service
apiVersion: v1
metadata:
name: my-service
annotations:
getambassador.io/config: |
---
apiVersion: ambassador/v0
kind: Mapping
name: my_service_mapping
prefix: /my-service/
service: my-service
spec:
selector:
app: MyApp
ports:
- protocol: TCP
port: 80
targetPort: 9376
Translating this simple Ambassador annotation config into valid Envoy v1 config was not a trivial task. By design, Ambassador's configuration isn't based on the same conceptual model as Envoy's configuration -- we deliberately wanted to aggregate and simplify operations and config. Therefore, translating between one set of concepts to the other involves a fair amount of logic within Ambassador.
In this first iteration of Ambassador we created a Python-based service that watched the Kubernetes API for changes to Service objects. When new or updated Ambassador annotations were detected, these were translated from the Ambassador syntax into an intermediate representation (IR) which embodied our core configuration model and concepts. Next, Ambassador translated this IR into a representative Envoy configuration which was saved as a file within pods associated with the running Ambassador k8s Service. Ambassador then "hot-restarted" the Envoy process running within the Ambassador pods, which triggered the loading of the new configuration.
There were many benefits with this initial implementation. The mechanics involved were fundamentally simple, the transformation of Ambassador config into Envoy config was reliable, and the file-based hot restart integration with Envoy was dependable.
However, there were also notable challenges with this version of Ambassador. First, although the hot restart was effective for the majority of our customers' use cases, it was not very fast, and some customers (particularly those with huge application deployments) found it was limiting the frequency with which they could change their configuration. Hot restart can also drop connections, especially long-lived connections like WebSockets or gRPC streams.
More crucially, though, the first implementation of the IR allowed rapid prototyping but was primitive enough that it proved very difficult to make substantial changes. While this was a pain point from the beginning, it became a critical issue as Envoy shifted to the Envoy v2 API. It was clear that the v2 API would offer Ambassador many benefits -- as Matt Klein outlined in his blog post, "The universal data plane API" -- including access to new features and a solution to the connection-drop problem noted above, but it was also clear that the existing IR implementation was not capable of making the leap.
Ambassador >= v0.50: Envoy v2 APIs (ADS), Testing with KAT, and Golang
In consultation with the Ambassador community, the Datawire team undertook a redesign of the internals of Ambassador in 2018. This was driven by two key goals. First, we wanted to integrate Envoy's v2 configuration format, which would enable the support of features such as SNI, rate limiting and gRPC authentication APIs. Second, we also wanted to do much more robust semantic validation of Envoy configuration due to its increasing complexity (particularly when operating with large-scale application deployments).
Initial stages
We started by restructuring the Ambassador internals more along the lines of a multipass compiler. The class hierarchy was made to more closely mirror the separation of concerns between the Ambassador configuration resources, the IR, and the Envoy configuration resources. Core parts of Ambassador were also redesigned to facilitate contributions from the community outside Datawire. We decided to take this approach for several reasons. First, Envoy Proxy is a very fast moving project, and we realized that we needed an approach where a seemingly minor Envoy configuration change didn't result in days of reengineering within Ambassador. In addition, we wanted to be able to provide semantic verification of configuration.
As we started working more closely with Envoy v2, a testing challenge was quickly identified. As more and more features were being supported in Ambassador, more and more bugs appeared in Ambassador's handling of less common but completely valid combinations of features. This drove to creation of a new testing requirement that meant Ambassador's test suite needed to be reworked to automatically manage many combinations of features, rather than relying on humans to write each test individually. Moreover, we wanted the test suite to be fast in order to maximize engineering productivity.
Thus, as part of the Ambassador rearchitecture, we introduced the Kubernetes Acceptance Test (KAT) framework. KAT is an extensible test framework that:
- Deploys a bunch of services (along with Ambassador) to a Kubernetes cluster
- Run a series of verification queries against the spun up APIs
- Perform a bunch of assertions on those query results
KAT is designed for performance -- it batches test setup upfront, and then runs all the queries in step 3 asynchronously with a high performance client. The traffic driver in KAT runs locally using Telepresence, which makes it easier to debug issues.
Introducing Golang to the Ambassador Stack
With the KAT test framework in place, we quickly ran into some issues with Envoy v2 configuration and hot restart, which presented the opportunity to switch to use Envoy’s Aggregated Discovery Service (ADS) APIs instead of hot restart. This completely eliminated the requirement for restart on configuration changes, which we found could lead to dropped connection under high loads or long-lived connections.
However, we faced an interesting question as we considered the move to the ADS. The ADS is not as simple as one might expect: there are explicit ordering dependencies when sending updates to Envoy. The Envoy project has reference implementations of the ordering logic, but only in Go and Java, where Ambassador was primarily in Python. We agonized a bit, and decided that the simplest way forward was to accept the polyglot nature of our world, and do our ADS implementation in Go.
We also found, with KAT, that our testing had reached the point where Python’s performance with many network connections was a limitation, so we took advantage of Go here, as well, writing KAT’s querying and backend services primarily in Go. After all, what’s another Golang dependency when you’ve already taken the plunge?
With a new test framework, new IR generating valid Envoy v2 configuration, and the ADS, we thought we were done with the major architectural changes in Ambassador 0.50. Alas, we hit one more issue. On the Azure Kubernetes Service, Ambassador annotation changes were no longer being detected.
Working with the highly-responsive AKS engineering team, we were able to identify the issue -- namely, the Kubernetes API server in AKS is exposed through a chain of proxies, requiring clients to be updating to understand how to connect using the FQDN of the API server, which is provided through a mutating webhook in AKS. Unfortunately, support for this feature was not available in the official Kubernetes Python client, so this was the third spot where we chose to switch to Go instead of Python.
This raises the interesting question of, “why not ditch all the Python code, and just rewrite Ambassador entirely in Go?” It’s a valid question. The main concern with a rewrite is that Ambassador and Envoy operate at different conceptual levels rather than simply expressing the same concepts with different syntax. Being certain that we’ve expressed the conceptual bridges in a new language is not a trivial challenge, and not something to undertake without already having really excellent test coverage in place
At this point, we use Go to coverage very specific, well-contained functions that can be verified for correctness much more easily that we could verify a complete Golang rewrite. In the future, who knows? But for 0.50.0, this functional split let us both take advantage of Golang’s strengths, while letting us retain more confidence about all the changes already in 0.50.
Lessons Learned
We've learned a lot in the process of building Ambassador 0.50. Some of our key takeaways:
- Kubernetes and Envoy are very powerful frameworks, but they are also extremely fast moving targets -- there is sometimes no substitute for reading the source code and talking to the maintainers (who are fortunately all quite accessible!)
- The best supported libraries in the Kubernetes / Envoy ecosystem are written in Go. While we love Python, we have had to adopt Go so that we're not forced to maintain too many components ourselves.
- Redesigning a test harness is sometimes necessary to move your software forward.
- The real cost in redesigning a test harness is often in porting your old tests to the new harness implementation.
- Designing (and implementing) an effective control plane for the edge proxy use case has been challenging, and the feedback from the open source community around Kubernetes, Envoy and Ambassador has been extremely useful.
Migrating Ambassador to the Envoy v2 configuration and ADS APIs was a long and difficult journey that required lots of architecture and design discussions and plenty of coding, but early feedback from results have been positive. Ambassador 0.50 is available now, so you can take it for a test run and share your feedback with the community on our Slack channel or on Twitter.
Runc and CVE-2019-5736
This morning a container escape vulnerability in runc was announced. We wanted to provide some guidance to Kubernetes users to ensure everyone is safe and secure.
What is runc?
Very briefly, runc is the low-level tool which does the heavy lifting of spawning a Linux container. Other tools like Docker, Containerd, and CRI-O sit on top of runc to deal with things like data formatting and serialization, but runc is at the heart of all of these systems.
Kubernetes in turn sits on top of those tools, and so while no part of Kubernetes itself is vulnerable, most Kubernetes installations are using runc under the hood.
What is the vulnerability?
While full details are still embargoed to give people time to patch, the rough version is that when running a process as root (UID 0) inside a container, that process can exploit a bug in runc to gain root privileges on the host running the container. This then allows them unlimited access to the server as well as any other containers on that server.
If the process inside the container is either trusted (something you know is not hostile) or is not running as UID 0, then the vulnerability does not apply. It can also be prevented by SELinux, if an appropriate policy has been applied. RedHat Enterprise Linux and CentOS both include appropriate SELinux permissions with their packages and so are believed to be unaffected if SELinux is enabled.
The most common source of risk is attacker-controller container images, such as unvetted images from public repositories.
What should i do?
As with all security issues, the two main options are to mitigate the vulnerability or upgrade your version of runc to one that includes the fix.
As the exploit requires UID 0 within the container, a direct mitigation is to ensure all your containers are running as a non-0 user. This can be set within the container image, or via your pod specification:
---
apiVersion: v1
kind: Pod
metadata:
name: run-as-uid-1000
spec:
securityContext:
runAsUser: 1000
# ...
This can also be enforced globally using a PodSecurityPolicy:
---
apiVersion: policy/v1beta1
kind: PodSecurityPolicy
metadata:
name: non-root
spec:
privileged: false
allowPrivilegeEscalation: false
runAsUser:
# Require the container to run without root privileges.
rule: 'MustRunAsNonRoot'
Setting a policy like this is highly encouraged given the overall risks of running as UID 0 inside a container.
Another potential mitigation is to ensure all your container images are vetted and trusted. This can be accomplished by building all your images yourself, or by vetting the contents of an image and then pinning to the image version hash (image: external/someimage@sha256:7832659873hacdef).
Upgrading runc can generally be accomplished by upgrading the package runc for your distribution or by upgrading your OS image if using immutable images. This is a list of known safe versions for various distributions and platforms:
- Ubuntu -
runc 1.0.0~rc4+dfsg1-6ubuntu0.18.10.1 - Debian -
runc 1.0.0~rc6+dfsg1-2 - RedHat Enterprise Linux -
docker 1.13.1-91.git07f3374.el7(if SELinux is disabled) - Amazon Linux -
docker 18.06.1ce-7.25.amzn1.x86_64 - CoreOS - Stable:
1967.5.0/ Beta:2023.2.0/ Alpha:2051.0.0 - Kops Debian - in progress (see advisory for how to address until Kops Debian is patched)
- Docker -
18.09.2
Some platforms have also posted more specific instructions:
Google Container Engine (GKE)
Google has issued a security bulletin with more detailed information but in short, if you are using the default GKE node image then you are safe. If you are using an Ubuntu node image then you will need to mitigate or upgrade to an image with a fixed version of runc.
Amazon Elastic Container Service for Kubernetes (EKS)
Amazon has also issued a security bulletin with more detailed information. All EKS users should mitigate the issue or upgrade to a new node image.
Azure Kubernetes Service (AKS)
Microsoft has issued a security bulletin with detailed information on mitigating the issue. Microsoft recommends all AKS users to upgrade their cluster to mitigate the issue.
Kops
Kops has issued an advisory with detailed information on mitigating this issue.
Docker
We don't have specific confirmation that Docker for Mac and Docker for Windows are vulnerable, however it seems likely. Docker has released a fix in version 18.09.2 and it is recommended you upgrade to it. This also applies to other deploy systems using Docker under the hood.
If you are unable to upgrade Docker, the Rancher team has provided backports of the fix for many older versions at github.com/rancher/runc-cve.
Getting more information
If you have any further questions about how this vulnerability impacts Kubernetes, please join us at discuss.kubernetes.io.
If you would like to get in contact with the runc team, you can reach them on Google Groups or #opencontainers on Freenode IRC.
Poseidon-Firmament Scheduler – Flow Network Graph Based Scheduler
Introduction
Cluster Management systems such as Mesos, Google Borg, Kubernetes etc. in a cloud scale datacenter environment (also termed as Datacenter-as-a-Computer or Warehouse-Scale Computing - WSC) typically manage application workloads by performing tasks such as tracking machine live-ness, starting, monitoring, terminating workloads and more importantly using a Cluster Scheduler to decide on workload placements.
A Cluster Scheduler essentially performs the scheduling of workloads to compute resources – combining the global placement of work across the WSC environment makes the “warehouse-scale computer” more efficient, increases utilization, and saves energy. Cluster Scheduler examples are Google Borg, Kubernetes, Firmament, Mesos, Tarcil, Quasar, Quincy, Swarm, YARN, Nomad, Sparrow, Apollo etc.
In this blog post, we briefly describe the novel Firmament flow network graph based scheduling approach (OSDI paper) in Kubernetes. We specifically describe the Firmament Scheduler and how it integrates with the Kubernetes cluster manager using Poseidon as the integration glue. We have seen extremely impressive scheduling throughput performance benchmarking numbers with this novel scheduling approach. Originally, Firmament Scheduler was conceptualized, designed and implemented by University of Cambridge researchers, Malte Schwarzkopf & Ionel Gog.
Poseidon-Firmament Scheduler – How It Works
At a very high level, Poseidon-Firmament scheduler augments the current Kubernetes scheduling capabilities by incorporating novel flow network graph based scheduling capabilities alongside the default Kubernetes Scheduler. It models the scheduling problem as a constraint-based optimization over a flow network graph – by reducing scheduling to a min-cost max-flow optimization problem. Due to the inherent rescheduling capabilities, the new scheduler enables a globally optimal scheduling environment that constantly keeps refining the workloads placements dynamically.
Key Advantages
Flow graph scheduling based Poseidon-Firmament scheduler provides the following key advantages:
Workloads (pods) are bulk scheduled to enable scheduling decisions at massive scale.
Based on the extensive performance test results, Poseidon-Firmament scales much better than Kubernetes default scheduler as the number of nodes increase in a cluster. This is due to the fact that Poseidon-Firmament is able to amortize more and more work across workloads.
Poseidon-Firmament Scheduler outperforms the Kubernetes default scheduler by a wide margin when it comes to throughput performance numbers for scenarios where compute resource requirements are somewhat uniform across jobs (Replicasets/Deployments/Jobs). Poseidon-Firmament scheduler end-to-end throughput performance numbers, including bind time, consistently get better as the number of nodes in a cluster increase. For example, for a 2,700 node cluster (shown in the graphs here), Poseidon-Firmament scheduler achieves a 7X or greater end-to-end throughput than the Kubernetes default scheduler, which includes bind time.
Availability of complex rule constraints.
Scheduling in Poseidon-Firmament is very dynamic; it keeps cluster resources in a global optimal state during every scheduling run.
Highly efficient resource utilizations.
Firmament Flow Network Graph – An Overview
Firmament scheduler runs a min-cost flow algorithm over the flow network to find an optimal flow, from which it extracts the implied workload (pod placements). A flow network is a directed graph whose arcs carry flow from source nodes (i.e. pod nodes) to a sink node. A cost and capacity associated with each arc constrain the flow, and specify preferential routes for it.
Figure 1 below shows an example of a flow network for a cluster with two tasks (workloads or pods) and four machines (nodes) – each workload on the left hand side, is a source of one unit of flow. All such flow must be drained into the sink node (S) for a feasible solution to the optimization problem.
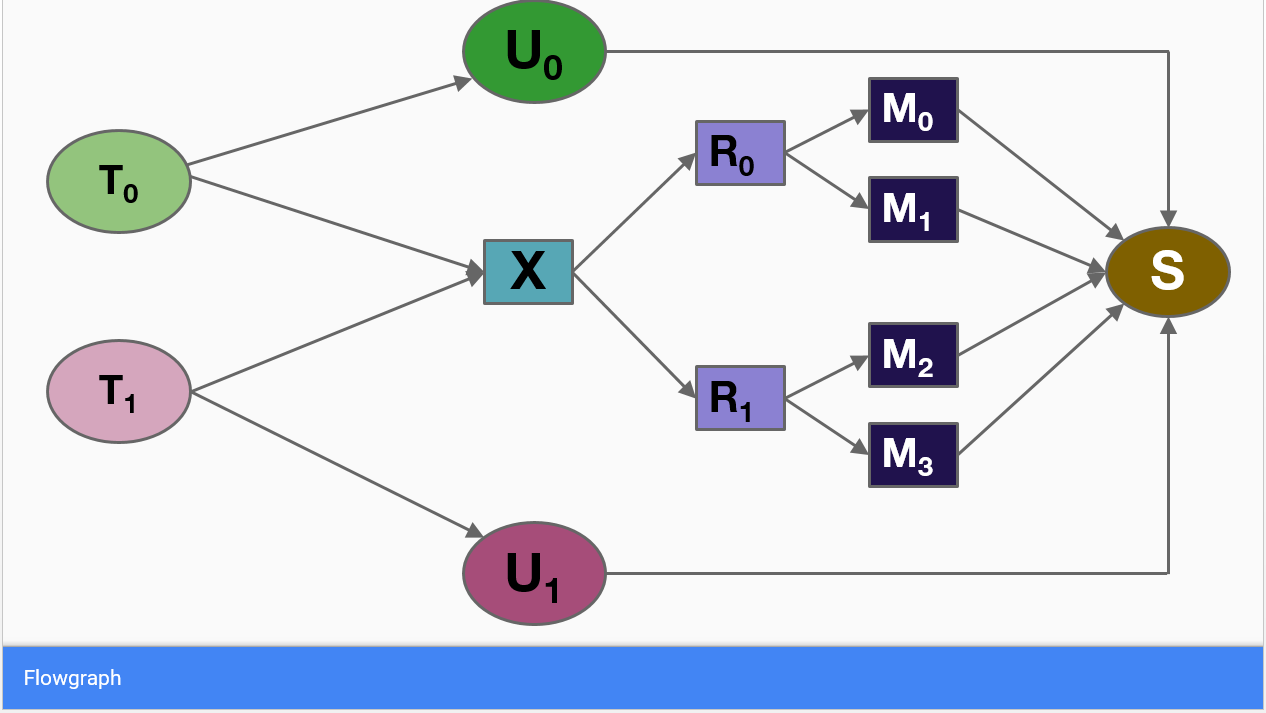
Figure 1. Example of a Flow Network
Poseidon Mediation Layer – An Overview
Poseidon is a service that acts as the integration glue for the Firmament scheduler with Kubernetes. It augments the current Kubernetes scheduling capabilities by incorporating new flow network graph based Firmament scheduling capabilities alongside the default Kubernetes Scheduler; multiple schedulers running simultaneously. Figure 2 below describes the high level overall design as far as how Poseidon integration glue works in conjunction with the underlying Firmament flow network graph based scheduler.
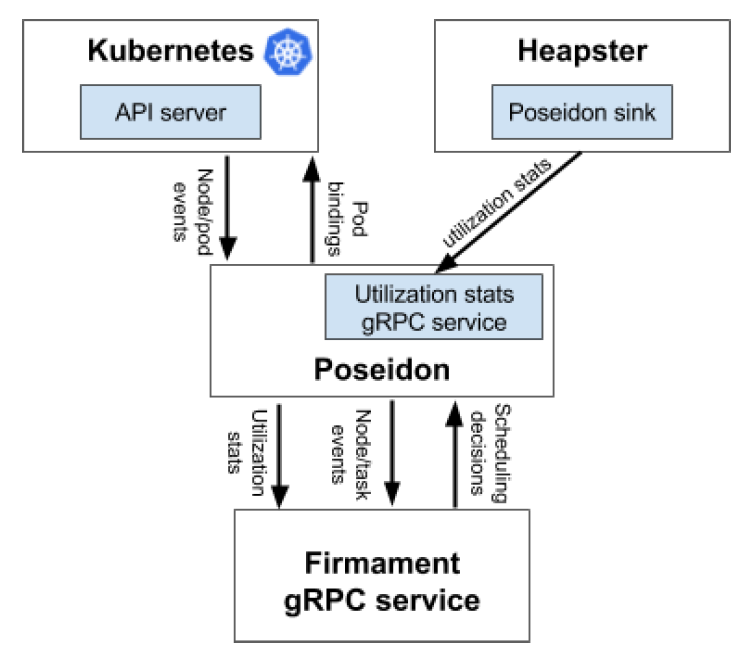
Figure 2. Firmament Kubernetes Integration Overview
As part of the Kubernetes multiple schedulers support, each new pod is typically scheduled by the default scheduler, but Kubernetes can be instructed to use another scheduler by specifying the name of another custom scheduler (in our case, Poseidon-Firmament) at the time of pod deployment. In this case, the default scheduler will ignore that Pod and allow Poseidon scheduler to schedule the Pod to a relevant node.
Note:
For details about the design of this project see the design document.Possible Use Case Scenarios – When To Use It
Poseidon-Firmament scheduler enables extremely high throughput scheduling environment at scale due to its bulk scheduling approach superiority versus K8s pod-at-a-time approach. In our extensive tests, we have observed substantial throughput benefits as long as resource requirements (CPU/Memory) for incoming Pods is uniform across jobs (Replicasets/Deployments/Jobs), mainly due to efficient amortization of work across jobs.
Although, Poseidon-Firmament scheduler is capable of scheduling various types of workloads (service, batch, etc.), following are the few use cases where it excels the most:
For “Big Data/AI” jobs consisting of a large number of tasks, throughput benefits are tremendous.
Substantial throughput benefits also for service or batch job scenarios where workload resource requirements are uniform across jobs (Replicasets/Deplyments/Jobs).
Current Project Stage
Currently Poseidon-Firmament project is an incubation project. Alpha Release is available at https://github.com/kubernetes-sigs/poseidon.
Update on Volume Snapshot Alpha for Kubernetes
Volume snapshotting support was introduced in Kubernetes v1.12 as an alpha feature. In Kubernetes v1.13, it remains an alpha feature, but a few enhancements were added and some breaking changes were made. This post summarizes the changes.
Breaking Changes
CSI spec v1.0 introduced a few breaking changes to the volume snapshot feature. CSI driver maintainers should be aware of these changes as they upgrade their drivers to support v1.0.
SnapshotStatus replaced with Boolean ReadyToUse
CSI v0.3.0, defined a SnapshotStatus enum in CreateSnapshotResponse which indicates whether the snapshot is READY, UPLOADING, or ERROR_UPLOADING. In CSI v1.0, SnapshotStatus has been removed from CreateSnapshotResponse and replaced with a boolean ReadyToUse. A ReadyToUse value of true indicates that post snapshot processing (such as uploading) is complete and the snapshot is ready to be used as a source to create a volume.
Storage systems that need to do post snapshot processing (such as uploading after the snapshot is cut) should return a successful CreateSnapshotResponse with the ReadyToUse field set to false as soon as the snapshot has been taken. This indicates that the Container Orchestration System (CO) can resume any workload that was quiesced for the snapshot to be taken. The CO can then repeatedly call CreateSnapshot until the ReadyToUse field is set to true or the call returns an error indicating a problem in processing. The CSI ListSnapshot call could be used along with snapshot_id filtering to determine if the snapshot is ready to use, but is not recommended because it provides no way to detect errors during processing (the ReadyToUse field simply remains false indefinitely).
The v1.x.x releases of the CSI external-snapshotter sidecar container already handle this change by calling CreateSnapshot instead of ListSnapshots to check if a snapshot is ready to use. When upgrading their drivers to CSI 1.0, driver maintainers should use the appropriate 1.0 compatible sidecar container.
To be consistent with the change in the CSI spec, the Ready field in the VolumeSnapshot API object has been renamed to ReadyToUse. This change is visible to the user when running kubectl describe volumesnapshot to view the details of a snapshot.
Timestamp Data Type
The creation time of a snapshot is available to Kubernetes admins as part of the VolumeSnapshotContent API object. This field is populated using the creation_time field in the CSI CreateSnapshotResponse. In CSI v1.0, this creation_time field type was changed to .google.protobuf.Timestamp instead of int64. When upgrading drivers to CSI 1.0, driver maintainers must make changes accordingly. The v1.x.x releases of the CSI external-snapshotter sidecar container has been updated to handle this change.
Deprecations
The following VolumeSnapshotClass parameters are deprecated and will be removed in a future release. They will be replaced with parameters listed in the Replacement section below.
Deprecated Replacement csiSnapshotterSecretName csi.storage.k8s.io/snapshotter-secret-name csiSnapshotterSecretNameSpace csi.storage.k8s.io/snapshotter-secret-namespace
New Features
SnapshotContent Deletion/Retain Policy
As described in the initial blog post announcing the snapshot alpha, the Kubernetes snapshot APIs are similar to the PV/PVC APIs: just like a volume is represented by a bound PVC and PV pair, a snapshot is represented by a bound VolumeSnapshot and VolumeSnapshotContent pair.
With PV/PVC pairs, when a user is done with a volume, they can delete the PVC. And the reclaim policy on the PV determines what happens to the PV (whether it is also deleted or retained).
In the initial alpha release, snapshots did not support the ability to specify a reclaim policy. Instead when a snapshot object was deleted it always resulted in the snapshot being deleted. In Kubernetes v1.13, a snapshot content DeletionPolicy was added. It enables an admin to configure what what happens to a VolumeSnapshotContent after the VolumeSnapshot object it is bound to is deleted. The DeletionPolicy of a volume snapshot can either be Retain or Delete. If the value is not specified, the default depends on whether the SnapshotContent object was created via static binding or dynamic provisioning.
Retain
The Retain policy allows for manual reclamation of the resource. If a VolumeSnapshotContent is statically created and bound, the default DeletionPolicy is Retain. When the VolumeSnapshot is deleted, the VolumeSnapshotContent continues to exist and the VolumeSnapshotContent is considered “released”. But it is not available for binding to other VolumeSnapshot objects because it contains data. It is up to an administrator to decide how to handle the remaining API object and resource cleanup.
Delete
A Delete policy enables automatic deletion of the bound VolumeSnapshotContent object from Kubernetes and the associated storage asset in the external infrastructure (such as an AWS EBS snapshot or GCE PD snapshot, etc.). Snapshots that are dynamically provisioned inherit the deletion policy of their VolumeSnapshotClass, which defaults to Delete. The administrator should configure the VolumeSnapshotClass with the desired retention policy. The policy may be changed for individual VolumeSnapshotContent after it is created by patching the object.
The following example demonstrates how to check the deletion policy of a dynamically provisioned VolumeSnapshotContent.
$ kubectl create -f ./examples/kubernetes/demo-defaultsnapshotclass.yaml
$ kubectl create -f ./examples/kubernetes/demo-snapshot.yaml
$ kubectl get volumesnapshots demo-snapshot-podpvc -o yaml
apiVersion: snapshot.storage.k8s.io/v1alpha1
kind: VolumeSnapshot
metadata:
creationTimestamp: "2018-11-27T23:57:09Z"
...
spec:
snapshotClassName: default-snapshot-class
snapshotContentName: snapcontent-26cd0db3-f2a0-11e8-8be6-42010a800002
source:
apiGroup: null
kind: PersistentVolumeClaim
name: podpvc
status:
…
$ kubectl get volumesnapshotcontent snapcontent-26cd0db3-f2a0-11e8-8be6-42010a800002 -o yaml
apiVersion: snapshot.storage.k8s.io/v1alpha1
kind: VolumeSnapshotContent
…
spec:
csiVolumeSnapshotSource:
creationTime: 1546469777852000000
driver: pd.csi.storage.gke.io
restoreSize: 6442450944
snapshotHandle: projects/jing-k8s-dev/global/snapshots/snapshot-26cd0db3-f2a0-11e8-8be6-42010a800002
deletionPolicy: Delete
persistentVolumeRef:
apiVersion: v1
kind: PersistentVolume
name: pvc-853622a4-f28b-11e8-8be6-42010a800002
resourceVersion: "21117"
uid: ae400e9f-f28b-11e8-8be6-42010a800002
snapshotClassName: default-snapshot-class
volumeSnapshotRef:
apiVersion: snapshot.storage.k8s.io/v1alpha1
kind: VolumeSnapshot
name: demo-snapshot-podpvc
namespace: default
resourceVersion: "6948065"
uid: 26cd0db3-f2a0-11e8-8be6-42010a800002
User can change the deletion policy by using patch:
$ kubectl patch volumesnapshotcontent snapcontent-26cd0db3-f2a0-11e8-8be6-42010a800002 -p '{"spec":{"deletionPolicy":"Retain"}}' --type=merge
$ kubectl get volumesnapshotcontent snapcontent-26cd0db3-f2a0-11e8-8be6-42010a800002 -o yaml
apiVersion: snapshot.storage.k8s.io/v1alpha1
kind: VolumeSnapshotContent
...
spec:
csiVolumeSnapshotSource:
...
deletionPolicy: Retain
persistentVolumeRef:
apiVersion: v1
kind: PersistentVolume
name: pvc-853622a4-f28b-11e8-8be6-42010a800002
...
Snapshot Object in Use Protection
The purpose of the Snapshot Object in Use Protection feature is to ensure that in-use snapshot API objects are not removed from the system (as this may result in data loss). There are two cases that require “in-use” protection:
- If a volume snapshot is in active use by a persistent volume claim as a source to create a volume.
- If a
VolumeSnapshotContentAPI object is bound to a VolumeSnapshot API object, the content object is considered in use.
If a user deletes a VolumeSnapshot API object in active use by a PVC, the VolumeSnapshot object is not removed immediately. Instead, removal of the VolumeSnapshot object is postponed until the VolumeSnapshot is no longer actively used by any PVCs. Similarly, if an admin deletes a VolumeSnapshotContent that is bound to a VolumeSnapshot, the VolumeSnapshotContent is not removed immediately. Instead, the VolumeSnapshotContent removal is postponed until the VolumeSnapshotContent is not bound to the VolumeSnapshot object.
Which volume plugins support Kubernetes Snapshots?
Snapshots are only supported for CSI drivers (not for in-tree or FlexVolume). To use the Kubernetes snapshots feature, ensure that a CSI Driver that implements snapshots is deployed on your cluster.
As of the publishing of this blog post, the following CSI drivers support snapshots:
- GCE Persistent Disk CSI Driver
- OpenSDS CSI Driver
- Ceph RBD CSI Driver
- Portworx CSI Driver
- GlusterFS CSI Driver
- DigitalOcean CSI Driver
- Ember CSI Driver
- Cinder CSI Driver
- Datera CSI Driver
- NexentaStor CSI Driver
Snapshot support for other drivers is pending, and should be available soon. Read the “Container Storage Interface (CSI) for Kubernetes GA” blog post to learn more about CSI and how to deploy CSI drivers.
What’s next?
Depending on feedback and adoption, the Kubernetes team plans to push the CSI Snapshot implementation to beta in either 1.15 or 1.16. Some of the features we are interested in supporting include consistency groups, application consistent snapshots, workload quiescing, in-place restores, and more.
How can I learn more?
The code repository for snapshot APIs and controller is here: https://github.com/kubernetes-csi/external-snapshotter
Check out additional documentation on the snapshot feature here: http://k8s.io/docs/concepts/storage/volume-snapshots and https://kubernetes-csi.github.io/docs/
How do I get involved?
This project, like all of Kubernetes, is the result of hard work by many contributors from diverse backgrounds working together.
Special thanks to all the contributors that helped add CSI v1.0 support and improve the snapshot feature in this release, including Saad Ali (saadali), Michelle Au (msau42), Deep Debroy (ddebroy), James DeFelice (jdef), John Griffith (j-griffith), Julian Hjortshoj (julian-hj), Tim Hockin (thockin), Patrick Ohly (pohly), Luis Pabon (lpabon), Cheng Xing (verult), Jing Xu (jingxu97), Shiwei Xu (wackxu), Xing Yang (xing-yang), Jie Yu (jieyu), David Zhu (davidz627).
Those interested in getting involved with the design and development of CSI or any part of the Kubernetes Storage system, join the Kubernetes Storage Special Interest Group (SIG). We’re rapidly growing and always welcome new contributors.
We also hold regular SIG-Storage Snapshot Working Group meetings. New attendees are welcome to join for design and development discussions.
Container Storage Interface (CSI) for Kubernetes GA

The Kubernetes implementation of the Container Storage Interface (CSI) has been promoted to GA in the Kubernetes v1.13 release. Support for CSI was introduced as alpha in Kubernetes v1.9 release, and promoted to beta in the Kubernetes v1.10 release.
The GA milestone indicates that Kubernetes users may depend on the feature and its API without fear of backwards incompatible changes in future causing regressions. GA features are protected by the Kubernetes deprecation policy.
Why CSI?
Although prior to CSI Kubernetes provided a powerful volume plugin system, it was challenging to add support for new volume plugins to Kubernetes: volume plugins were “in-tree” meaning their code was part of the core Kubernetes code and shipped with the core Kubernetes binaries—vendors wanting to add support for their storage system to Kubernetes (or even fix a bug in an existing volume plugin) were forced to align with the Kubernetes release process. In addition, third-party storage code caused reliability and security issues in core Kubernetes binaries and the code was often difficult (and in some cases impossible) for Kubernetes maintainers to test and maintain.
CSI was developed as a standard for exposing arbitrary block and file storage systems to containerized workloads on Container Orchestration Systems (COs) like Kubernetes. With the adoption of the Container Storage Interface, the Kubernetes volume layer becomes truly extensible. Using CSI, third-party storage providers can write and deploy plugins exposing new storage systems in Kubernetes without ever having to touch the core Kubernetes code. This gives Kubernetes users more options for storage and makes the system more secure and reliable.
What’s new?
With the promotion to GA, the Kubernetes implementation of CSI introduces the following changes:
- Kubernetes is now compatible with CSI spec v1.0 and v0.3 (instead of CSI spec v0.2).
- There were breaking changes between CSI spec v0.3.0 and v1.0.0, but Kubernetes v1.13 supports both versions so either version will work with Kubernetes v1.13.
- Please note that with the release of the CSI 1.0 API, support for CSI drivers using 0.3 and older releases of the CSI API is deprecated, and is planned to be removed in Kubernetes v1.15.
- There were no breaking changes between CSI spec v0.2 and v0.3, so v0.2 drivers should also work with Kubernetes v1.10.0+.
- There were breaking changes between the CSI spec v0.1 and v0.2, so very old drivers implementing CSI 0.1 must be updated to be at least 0.2 compatible before use with Kubernetes v1.10.0+.
- The Kubernetes
VolumeAttachmentobject (introduced in v1.9 in the storage v1alpha1 group, and added to the v1beta1 group in v1.10) has been added to the storage v1 group in v1.13. - The Kubernetes
CSIPersistentVolumeSourcevolume type has been promoted to GA. - The Kubelet device plugin registration mechanism, which is the means by which kubelet discovers new CSI drivers, has been promoted to GA in Kubernetes v1.13.
How to deploy a CSI driver?
Kubernetes users interested in how to deploy or manage an existing CSI driver on Kubernetes should look at the documentation provided by the author of the CSI driver.
How to use a CSI volume?
Assuming a CSI storage plugin is already deployed on a Kubernetes cluster, users can use CSI volumes through the familiar Kubernetes storage API objects: PersistentVolumeClaims, PersistentVolumes, and StorageClasses. Documented here.
Although the Kubernetes implementation of CSI is a GA feature in Kubernetes v1.13, it may require the following flag:
- API server binary and kubelet binaries:
--allow-privileged=true- Most CSI plugins will require bidirectional mount propagation, which can only be enabled for privileged pods. Privileged pods are only permitted on clusters where this flag has been set to true (this is the default in some environments like GCE, GKE, and kubeadm).
Dynamic Provisioning
You can enable automatic creation/deletion of volumes for CSI Storage plugins that support dynamic provisioning by creating a StorageClass pointing to the CSI plugin.
The following StorageClass, for example, enables dynamic creation of “fast-storage” volumes by a CSI volume plugin called “csi-driver.example.com”.
kind: StorageClass
apiVersion: storage.k8s.io/v1
metadata:
name: fast-storage
provisioner: csi-driver.example.com
parameters:
type: pd-ssd
csi.storage.k8s.io/provisioner-secret-name: mysecret
csi.storage.k8s.io/provisioner-secret-namespace: mynamespace
New for GA, the CSI external-provisioner (v1.0.1+) reserves the parameter keys prefixed with csi.storage.k8s.io/. If the keys do not correspond to a set of known keys the values are simply ignored (and not passed to the CSI driver). The older secret parameter keys (csiProvisionerSecretName, csiProvisionerSecretNamespace, etc.) are also supported by CSI external-provisioner v1.0.1 but are deprecated and may be removed in future releases of the CSI external-provisioner.
Dynamic provisioning is triggered by the creation of a PersistentVolumeClaim object. The following PersistentVolumeClaim, for example, triggers dynamic provisioning using the StorageClass above.
apiVersion: v1
kind: PersistentVolumeClaim
metadata:
name: my-request-for-storage
spec:
accessModes:
- ReadWriteOnce
resources:
requests:
storage: 5Gi
storageClassName: fast-storage
When volume provisioning is invoked, the parameter type: pd-ssd and the secret any referenced secret(s) are passed to the CSI plugin csi-driver.example.com via a CreateVolume call. In response, the external volume plugin provisions a new volume and then automatically create a PersistentVolume object to represent the new volume. Kubernetes then binds the new PersistentVolume object to the PersistentVolumeClaim, making it ready to use.
If the fast-storage StorageClass is marked as “default”, there is no need to include the storageClassName in the PersistentVolumeClaim, it will be used by default.
Pre-Provisioned Volumes
You can always expose a pre-existing volume in Kubernetes by manually creating a PersistentVolume object to represent the existing volume. The following PersistentVolume, for example, exposes a volume with the name “existingVolumeName” belonging to a CSI storage plugin called “csi-driver.example.com”.
apiVersion: v1
kind: PersistentVolume
metadata:
name: my-manually-created-pv
spec:
capacity:
storage: 5Gi
accessModes:
- ReadWriteOnce
persistentVolumeReclaimPolicy: Retain
csi:
driver: csi-driver.example.com
volumeHandle: existingVolumeName
readOnly: false
fsType: ext4
volumeAttributes:
foo: bar
controllerPublishSecretRef:
name: mysecret1
namespace: mynamespace
nodeStageSecretRef:
name: mysecret2
namespace: mynamespace
nodePublishSecretRef
name: mysecret3
namespace: mynamespace
Attaching and Mounting
You can reference a PersistentVolumeClaim that is bound to a CSI volume in any pod or pod template.
kind: Pod
apiVersion: v1
metadata:
name: my-pod
spec:
containers:
- name: my-frontend
image: nginx
volumeMounts:
- mountPath: "/var/www/html"
name: my-csi-volume
volumes:
- name: my-csi-volume
persistentVolumeClaim:
claimName: my-request-for-storage
When the pod referencing a CSI volume is scheduled, Kubernetes will trigger the appropriate operations against the external CSI plugin (ControllerPublishVolume, NodeStageVolume, NodePublishVolume, etc.) to ensure the specified volume is attached, mounted, and ready to use by the containers in the pod.
For more details please see the CSI implementation design doc and documentation.
How to write a CSI Driver?
The kubernetes-csi site details how to develop, deploy, and test a CSI driver on Kubernetes. In general, CSI Drivers should be deployed on Kubernetes along with the following sidecar (helper) containers:
- external-attacher
- Watches Kubernetes
VolumeAttachmentobjects and triggersControllerPublishandControllerUnpublishoperations against a CSI endpoint.
- Watches Kubernetes
- external-provisioner
- Watches Kubernetes
PersistentVolumeClaimobjects and triggersCreateVolumeandDeleteVolumeoperations against a CSI endpoint.
- Watches Kubernetes
- node-driver-registrar
- Registers the CSI driver with kubelet using the Kubelet device plugin mechanism.
- cluster-driver-registrar (Alpha)
- Registers a CSI Driver with the Kubernetes cluster by creating a
CSIDriverobject which enables the driver to customize how Kubernetes interacts with it.
- Registers a CSI Driver with the Kubernetes cluster by creating a
- external-snapshotter (Alpha)
- Watches Kubernetes
VolumeSnapshotCRD objects and triggersCreateSnapshotandDeleteSnapshotoperations against a CSI endpoint.
- Watches Kubernetes
- livenessprobe
- May be included in a CSI plugin pod to enable the Kubernetes Liveness Probe mechanism.
Storage vendors can build Kubernetes deployments for their plugins using these components, while leaving their CSI driver completely unaware of Kubernetes.
List of CSI Drivers
CSI drivers are developed and maintained by third parties. You can find a non-definitive list of CSI drivers here.
What about in-tree volume plugins?
There is a plan to migrate most of the persistent, remote in-tree volume plugins to CSI. For more details see design doc.
Limitations of GA
The GA implementation of CSI has the following limitations:
- Ephemeral local volumes must create a PVC (pod inline referencing of CSI volumes is not supported).
What’s next?
- Work on moving Kubernetes CSI features that are still alpha to beta:
- Raw block volumes
- Topology awareness (the ability for Kubernetes to understand and influence where a CSI volume is provisioned (zone, regions, etc.).
- Features depending on CSI CRDs (e.g. “Skip attach” and “Pod info on mount”).
- Volume Snapshots
- Work on completing support for local ephemeral volumes.
- Work on migrating remote persistent in-tree volume plugins to CSI.
How to get involved?
The Kubernetes Slack channel wg-csi and the Google group kubernetes-sig-storage-wg-csi along with any of the standard SIG storage communication channels are all great mediums to reach out to the SIG Storage team.
This project, like all of Kubernetes, is the result of hard work by many contributors from diverse backgrounds working together. We offer a huge thank you to the new contributors who stepped up this quarter to help the project reach GA:
- Saad Ali (saad-ali)
- Michelle Au (msau42)
- Serguei Bezverkhi (sbezverk)
- Masaki Kimura (mkimuram)
- Patrick Ohly (pohly)
- Luis Pabón (lpabon)
- Jan Šafránek (jsafrane)
- Vladimir Vivien (vladimirvivien)
- Cheng Xing (verult)
- Xing Yang (xing-yang)
- David Zhu (davidz627)
If you’re interested in getting involved with the design and development of CSI or any part of the Kubernetes Storage system, join the Kubernetes Storage Special Interest Group (SIG). We’re rapidly growing and always welcome new contributors.
APIServer dry-run and kubectl diff
Declarative configuration management, also known as configuration-as-code, is
one of the key strengths of Kubernetes. It allows users to commit the desired state of
the cluster, and to keep track of the different versions, improve auditing and
automation through CI/CD pipelines. The Apply working-group
is working on fixing some of the gaps, and is happy to announce that Kubernetes
1.13 promoted server-side dry-run and kubectl diff to beta. These
two features are big improvements for the Kubernetes declarative model.
Challenges
A few pieces are still missing in order to have a seamless declarative experience with Kubernetes, and we tried to address some of these:
- While compilers and linters do a good job to detect errors in pull-requests
for code, a good validation is missing for Kubernetes configuration files.
The existing solution is to run
kubectl apply --dry-run, but this runs a local dry-run that doesn't talk to the server: it doesn't have server validation and doesn't go through validating admission controllers. As an example, Custom resource names are only validated on the server so a local dry-run won't help. - It can be difficult to know how your object is going to be applied by the
server for multiple reasons:
- Defaulting will set some fields to potentially unexpected values,
- Mutating webhooks might set fields or clobber/change some values.
- Patch and merges can have surprising effects and result in unexpected objects. For example, it can be hard to know how lists are going to be ordered once merged.
The working group has tried to address these problems.
APIServer dry-run
APIServer dry-run was implemented to address these two problems:
- it allows individual requests to the apiserver to be marked as "dry-run",
- the apiserver guarantees that dry-run requests won't be persisted to storage,
- the request is still processed as typical request: the fields are defaulted, the object is validated, it goes through the validation admission chain, and through the mutating admission chain, and then the final object is returned to the user as it normally would, without being persisted.
While dynamic admission controllers are not supposed to have side-effects on each request, dry-run requests are only processed if all admission controllers explicitly announce that they don't have any dry-run side-effects.
How to enable it
Server-side dry-run is enabled through a feature-gate. Now that the feature is
Beta in 1.13, it should be enabled by default, but still can be enabled/disabled
using kube-apiserver --feature-gates DryRun=true.
If you have dynamic admission controllers, you might have to fix them to:
- Remove any side-effects when the dry-run parameter is specified on the webhook request,
- Specify in the
sideEffectsfield of theadmissionregistration.k8s.io/v1beta1.Webhookobject to indicate that the object doesn't have side-effects on dry-run (or at all).
How to use it
You can trigger the feature from kubectl by using kubectl apply --server-dry-run, which will decorate the request with the dryRun flag
and return the object as it would have been applied, or an error if it would
have failed.
Kubectl diff
APIServer dry-run is convenient because it lets you see how the object would be
processed, but it can be hard to identify exactly what changed if the object is
big. kubectl diff does exactly what you want by showing the differences between
the current "live" object and the new "dry-run" object. It makes it very
convenient to focus on only the changes that are made to the object, how the
server has merged these and how the mutating webhooks affects the output.
How to use it
kubectl diff is meant to be as similar as possible to kubectl apply:
kubectl diff -f some-resources.yaml will show a diff for the resources in the yaml file. One can even use the diff program of their choice by using the KUBECTL_EXTERNAL_DIFF environment variable, for example:
KUBECTL_EXTERNAL_DIFF=meld kubectl diff -f some-resources.yaml
What's next
The working group is still busy trying to improve some of these things:
- Server-side apply is trying to improve the apply scenario, by adding owner semantics to fields! It's also going to improve support for CRDs and unions!
- Some kubectl apply features are missing from diff and could be useful, like the ability to filter by label, or to display pruned resources.
- Eventually, kubectl diff will use server-side apply!
Note:
The flagkubectl apply --server-dry-run is deprecated in v1.18.
Use the flag --dry-run=server for using server-side dry-run in
kubectl apply and other subcommands.Kubernetes Federation Evolution
Kubernetes provides great primitives for deploying applications to a cluster: it can be as simple as kubectl create -f app.yaml. Deploy apps across multiple clusters has never been that simple. How should app workloads be distributed? Should the app resources be replicated into all clusters, replicated into selected clusters, or partitioned into clusters? How is access to the clusters managed? What happens if some of the resources that a user wants to distribute pre-exist, in some or all of the clusters, in some form?
In SIG Multicluster, our journey has revealed that there are multiple possible models to solve these problems and there probably is no single best-fit, all-scenario solution. Kubernetes Cluster Federation (KubeFed for short), however, is the single biggest Kubernetes open source sub-project, and has seen the maximum interest and contribution from the community in this problem space. The project initially reused the Kubernetes API to do away with any added usage complexity for an existing Kubernetes user. This approach was not viable, because of the problems summarised below:
- Difficulties in re-implementing the Kubernetes API at the cluster level, as federation-specific extensions were stored in annotations.
- Limited flexibility in federated types, placement and reconciliation, due to 1:1 emulation of the Kubernetes API.
- No settled path to GA, and general confusion on API maturity; for example, Deployments are GA in Kubernetes but not even Beta in Federation v1.
The ideas have evolved further with a federation-specific API architecture and a community effort which now continues as Federation v2.
Conceptual Overview
Because Federation attempts to address a complex set of problems, it pays to break the different parts of those problems down. Let’s take a look at the different high-level areas involved: Kubernetes Federation v2 Concepts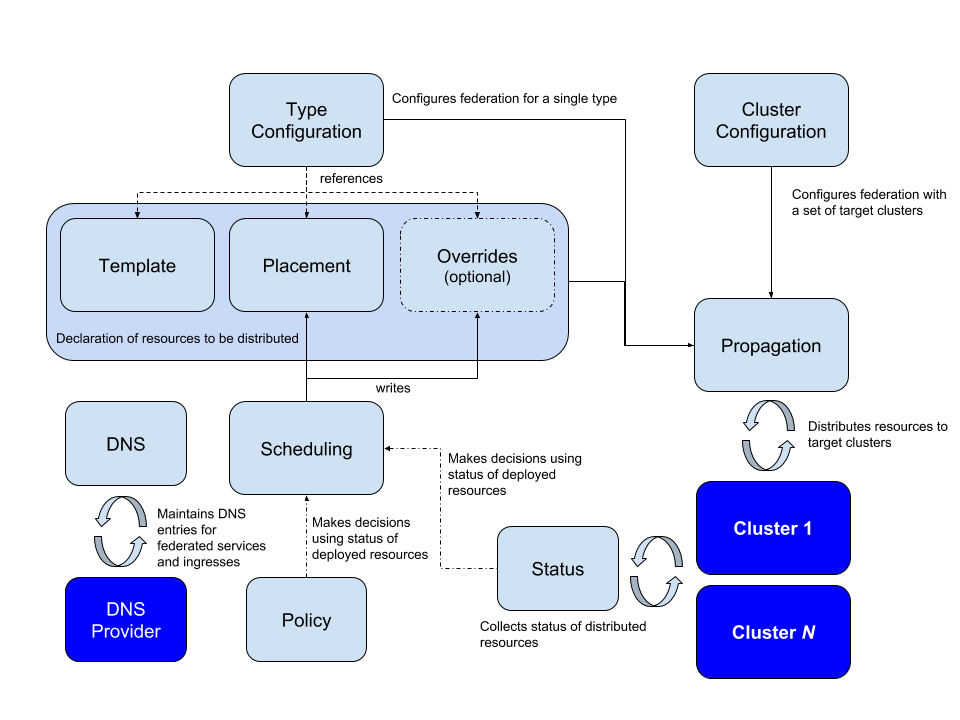
Federating arbitrary resources
One of the main goals of Federation is to be able to define the APIs and API groups which encompass basic tenets needed to federate any given Kubernetes resource. This is crucial, due to the popularity of CustomResourceDefinitions as a way to extend Kubernetes with new APIs.
The workgroup arrived at a common definition of the federation API and API groups as 'a mechanism that distributes “normal” Kubernetes API resources into different clusters'. The distribution in its most simple form could be imagined as simple propagation of this 'normal Kubernetes API resource' across the federated clusters. A thoughtful reader can certainly discern more complicated mechanisms, other than this simple propagation of the Kubernetes resources.
During the journey of defining building blocks of the federation APIs, one of the near term goals also evolved as 'to be able to create a simple federation a.k.a. simple propagation of any Kubernetes resource or a CRD, writing almost zero code'. What ensued further was a core API group defining the building blocks as a Template resource, a Placement resource and an Override resource per given Kubernetes resource, a TypeConfig to specify sync or no sync for the given resource and associated controller(s) to carry out the sync. More details follow in the next section. Further sections will also talk about being able to follow a layered behaviour with higher-level federation APIs consuming the behaviour of these core building blocks, and users being able to consume whole or part of the API and associated controllers. Lastly, this architecture also allows the users to write additional controllers or replace the available reference controllers with their own, to carry out desired behaviour.
The ability to 'easily federate arbitrary Kubernetes resources', and a decoupled API, divided into building blocks APIs, higher level APIs and possible user intended types, presented such that different users can consume parts and write controllers composing solutions specific to them, makes a compelling case for Federation v2.
Federating resources: the details
Fundamentally, federation must be configured with two types of information:
- Which API types federation should handle
- Which clusters federation should target for distributing those resources.
For each API type that federation handles, different parts of the declared state live in different API resources:
- A
Templatetype holds the base specification of the resource - for example, a type calledFederatedReplicaSetholds the base specification of aReplicaSetthat should be distributed to the targeted clusters - A
Placementtype holds the specification of the clusters the resource should be distributed to - for example, a type calledFederatedReplicaSetPlacementholds information about which clustersFederatedReplicaSetsshould be distributed to - An optional
Overridestype holds the specification of how theTemplateresource should be varied in some clusters - for example, a type calledFederatedReplicaSetOverridesholds information about how aFederatedReplicaSetshould be varied in certain clusters.
These types are all associated by name - meaning that for a particular Template resource with name foo, the Placement and Override information for that resource are contained by the Override and Placement resources with the name foo and in the same namespace as the Template.
Higher-level behaviour
The architecture of the v2 API allows higher-level APIs to be constructed using the mechanics provided by the core API types (Template, Placement and Override), and associated controllers, for a given resource. In the community we uncovered a few use cases and implemented the higher-level APIs and associated controllers useful for those cases. Some of these types described in further sections also provide an useful reference to anybody interested in solving more complex use cases, building on top of the mechanics already available with the v2 API.
ReplicaSchedulingPreference
ReplicaSchedulingPreference provides an automated mechanism of distributing and maintaining total number of replicas for Deployment or ReplicaSet-based federated workloads into federated clusters. This is based on high-level user preferences given by the user. These preferences include the semantics of weighted distribution and limits (min and max) for distributing the replicas. These also include semantics to allow redistribution of replicas dynamically in case some replica Pods remain unscheduled in some clusters, for example due to insufficient resources in that cluster.
More details can be found at the user guide for ReplicaSchedulingPreferences.
Federated services & cross-cluster service discovery
Kubernetes Services are very useful in constructing a microservices architecture. There is a clear desire to deploy services across cluster, zone, region and cloud boundaries. Services that span clusters provide geographic distribution, enable hybrid and multi-cloud scenarios and improve the level of high availability beyond single cluster deployments. Customers who want their services to span one or more (possibly remote) clusters, need them to be reachable in a consistent manner from both within and outside their clusters.
Federated Service, at its core, contains a Template (a definition of a Kubernetes Service), a Placement (which clusters to be deployed into), an Override (optional variation in particular clusters) and a ServiceDNSRecord (specifying details on how to discover it).
Note: The federated service has to be of type LoadBalancer in order for it to be discoverable across clusters.
Discovering a federated service from Pods inside your federated clusters
By default, Kubernetes clusters come preconfigured with a cluster-local DNS server, as well as an intelligently constructed DNS search path, which together ensure that DNS queries like myservice, myservice.mynamespace, or some-other-service.other-namespace, issued by software running inside Pods, are automatically expanded and resolved correctly to the appropriate IP of Services running in the local cluster.
With the introduction of federated services and cross-cluster service discovery, this concept is extended to cover Kubernetes Services running in any other cluster across your cluster federation, globally. To take advantage of this extended range, you use a slightly different DNS name (e.g. myservice.mynamespace.myfederation) to resolve federated services. Using a different DNS name also avoids having your existing applications accidentally traversing cross-zone or cross-region networks and you incurring perhaps unwanted network charges or latency, without you explicitly opting in to this behavior.
Lets consider an example, using a service named nginx.
A Pod in a cluster in the us-central1-a availability zone needs to contact our nginx service. Rather than use the service’s traditional cluster-local DNS name (nginx.mynamespace, which is automatically expanded to nginx.mynamespace.svc.cluster.local) it can now use the service’s federated DNS name, which is nginx.mynamespace.myfederation. This will be automatically expanded and resolved to the closest healthy shard of my nginx service, wherever in the world that may be. If a healthy shard exists in the local cluster, that service’s cluster-local IP address will be returned (by the cluster-local DNS). This is exactly equivalent to non-federated service resolution.
If the Service does not exist in the local cluster (or it exists but has no healthy backend pods), the DNS query is automatically expanded to nginx.mynamespace.myfederation.svc.us-central1-a.us-central1.example.com. Behind the scenes, this finds the external IP of one of the shards closest to my availability zone. This expansion is performed automatically by the cluster-local DNS server, which returns the associated CNAME record. This results in a traversal of the hierarchy of DNS records, and ends up at one of the external IP’s of the federated service nearby.
It is also possible to target service shards in availability zones and regions other than the ones local to a Pod by specifying the appropriate DNS names explicitly, and not relying on automatic DNS expansion. For example, nginx.mynamespace.myfederation.svc.europe-west1.example.comwill resolve to all of the currently healthy service shards in Europe, even if the Pod issuing the lookup is located in the U.S., and irrespective of whether or not there are healthy shards of the service in the U.S. This is useful for remote monitoring and other similar applications.
Discovering a federated service from other clients outside your federated clusters
For external clients, automatic DNS expansion described is not currently possible. External clients need to specify one of the fully qualified DNS names of the federated service, be that a zonal, regional or global name. For convenience reasons, it is often a good idea to manually configure additional static CNAME records in your service, for example:
| SHORT NAME | CNAME |
|---|---|
| eu.nginx.acme.com | nginx.mynamespace.myfederation.svc.europe-west1.example.com |
| us.nginx.acme.com | nginx.mynamespace.myfederation.svc.us-central1.example.com |
| nginx.acme.com | nginx.mynamespace.myfederation.svc.example.com |
That way, your clients can always use the short form on the left, and always be automatically routed to the closest healthy shard on their home continent. All of the required failover is handled for you automatically by Kubernetes cluster federation.
As further reading, a more elaborate example for users is available in the Multi-Cluster Service DNS with ExternalDNS guide
Try it yourself
To get started with Federation v2, please refer to the user guide. Deployment can be accomplished with a Helm chart, and once the control plane is available, the user guide’s example can be used to get some hands-on experience with using Federation V2.
Federation v2 can be deployed in both cluster-scoped and namespace-scoped configurations. A cluster-scoped deployment will require cluster-admin privileges to both host and member clusters, and may be a good fit for evaluating federation on clusters that are not running critical workloads. Namespace-scoped deployment requires access to only a single namespace on host and member clusters, and is a better fit for evaluating federation on clusters running workloads. Most of the user guide refers to cluster-scoped deployment, with the namespaced federation section documenting how use of a namespaced deployment differs. The same cluster can host multiple federations, and clusters can be part of multiple federations when using namespaced federation.
Next Steps
As we noted in the beginning of this post, the multicluster problem space is extremely broad. It can be difficult to know exactly how to handle such broad problem spaces without concrete pieces of software to frame those conversations around. Our hope in the Federation working group is that Federation v2 can be a concrete artifact to frame discussions around. We would love to know experiences that folks have had in this problem space, how they feel about Federation v2, and what use-cases they’re interested in exploring in the future.
Please feel welcome to join us at the sig-multicluster slack channel or at Federation working group meetings on Wednesdays at 07:30 PST.
etcd: Current status and future roadmap
etcd is a distributed key value store that provides a reliable way to manage the coordination state of distributed systems. etcd was first announced in June 2013 by CoreOS (part of Red Hat as of 2018). Since its adoption in Kubernetes in 2014, etcd has become a fundamental part of the Kubernetes cluster management software design, and the etcd community has grown exponentially. etcd is now being used in production environments of multiple companies, including large cloud provider environments such as AWS, Google Cloud Platform, Azure, and other on-premises Kubernetes implementations. CNCF currently has 32 conformant Kubernetes platforms and distributions, all of which use etcd as the datastore.
In this blog post, we’ll review some of the milestones achieved in latest etcd releases, and go over the future roadmap for etcd. Share your thoughts and feedback on features you consider important on the mailing list: etcd-dev@googlegroups.com.
etcd, 2013
In June 2014, Kubernetes was released with etcd as a backing storage for all master states. Kubernetes v0.4 used etcd v0.2 API, which was in an alpha stage at the time. As Kubernetes reached the v1.0 milestone in 2015, etcd stabilized its v2.0 API. The widespread adoption of Kubernetes led to a dramatic increase in the scalability requirements for etcd. To handle large number of workloads and the growing requirements on scale, etcd released v3.0 API in June 2016. Kubernetes v1.13 finally dropped support for etcd v2.0 API and adopted the etcd v3.0 API. The table below gives a visual snapshot of the release cycles of etcd and Kubernetes.
| etcd | Kubernetes | |
|---|---|---|
| Initial Commit | June 2, 2013 | June 1, 2014 |
| First Stable Release | January 28, 2015 (v2.0.0) | July 13, 2015 (v1.0.0) |
| Latest Release | October 10, 2018 (v3.3.10) | December 3, 2018 (v1.13.0) |
etcd v3.1, early 2017
etcd v3.1 features provide better read performance and better availability during version upgrades. Given the high use of etcd in production even to this day, these features were very useful for users. It implements Raft read index, which bypasses Raft WAL disk writes for linearizable reads. The follower requests read index from the leader. Responses from the leader indicate whether a follower has advanced as much as the leader. When the follower's logs are up-to-date, quorum read is served locally without going through the full Raft protocol. Thus, no disk write is required for read requests. etcd v3.1 introduces automatic leadership transfer. When etcd leader receives an interrupt signal, it automatically transfers its leadership to a follower. This provides higher availability when the cluster adds or loses a member.
etcd v3.2 (summer 2017)
etcd v3.2 focuses on stability. Its client was shipped in Kubernetes v1.10, v1.11, and v1.12. The etcd team still actively maintains the branch by backporting all the bug fixes. This release introduces gRPC proxy to support, watch, and coalesce all watch event broadcasts into one gRPC stream. These event broadcasts can go up to one million events per second.
etcd v3.2 also introduces changes such as “snapshot-count” default value from 10,000 to 100,000. With higher snapshot count, etcd server holds Raft entries in-memory for longer periods before compacting the old ones. etcd v3.2 default configuration shows higher memory usage, while giving more time for slow followers to catch up. It is a trade-off between less frequent snapshot sends and higher memory usage. Users can employ lower etcd --snapshot-count value to reduce the memory usage or higher “snapshot-count” value to increase the availability of slow followers.
Another new feature backported to etcd v3.2.19 was etcd --initial-election-tick-advance flag. By default, a rejoining follower fast-forwards election ticks to speed up its initial cluster bootstrap. For example, the starting follower node only waits 200ms instead of full election timeout 1-second before starting an election. Ideally, within the 200ms, it receives a leader heartbeat and immediately joins the cluster as a follower. However, if network partition happens, heartbeat may drop and thus leadership election will be triggered. A vote request from a partitioned node is quite disruptive. If it contains a higher Raft term, current leader is forced to step down. With “initial-election-tick-advance” set to false, a rejoining node has more chance to receive leader heartbeats before disrupting the cluster.
etcd v3.3 (early 2018)
etcd v3.3 continues the theme of stability. Its client is included in Kubernetes v1.13. Previously, etcd client carelessly retried on network disconnects without any backoff or failover logic. The client was often stuck with a partitioned node, affecting several production users. v3.3 client balancer now maintains a list of unhealthy endpoints using gRPC health checking protocol, making more efficient retries and failover in the face of transient disconnects and network partitions. This was backported to etcd v3.2 and also included in Kubernetes v1.10 API server. etcd v3.3 also provides more predictable database size. etcd used to maintain a separate freelist DB to track pages that were no longer in use and freed after transactions, so that following transactions can reuse them. However, it turns out persisting freelist demands high disk space and introduces high latency for Kubernetes workloads. Especially when there were frequent snapshots with lots of read transactions, etcd database size quickly grew from 16 MB to 4 GB. etcd v3.3 disables freelist sync and rebuilds the freelist on restart. The overhead is so small that it is unnoticeable to most users. See "database space exceeded" issue for more information on this.
etcd v3.4 and beyond
etcd v3.4 focuses on improving the operational experience. It adds Raft pre-vote feature to improve the robustness of leadership election. When a node becomes isolated (e.g. network partition), this member will start an election requesting votes with increased Raft terms. When a leader receives a vote request with a higher term, it steps down to a follower. With pre-vote, Raft runs an additional election phase to check if the candidate can get enough votes to win an election. The isolated follower's vote request is rejected because it does not contain the latest log entries.
etcd v3.4 adds a Raft learner that joins the cluster as a non-voting member that still receives all the updates from leader. Adding a learner node does not increase the size of quorum and hence improves the cluster availability during membership reconfiguration. It only serves as a standby node until it gets promoted to a voting member. Moreover, to handle unexpected upgrade failures, v3.4 introduces etcd downgrade feature.
etcd v3 storage uses multi-version concurrency control model to preserve key updates as event history. Kubernetes runs compaction to discard the event history that is no longer needed, and reclaims the storage space. etcd v3.4 will improve this storage compact operation, boost backend concurrency for large read transactions, and optimize storage commit interval for Kubernetes use-case.
To further improve etcd client load balancer, the v3.4 balancer was rewritten to leverage the newly introduced gRPC load balancing API. By leveraging gPRC, the etcd client load balancer codebase was substantially simplified while retaining feature parity with the v3.3 implementation and improving overall load balancing by round-robining requests across healthy endpoints. See Client Architecture for more details.
Additionally, etcd maintainers will continue to make improvements to Kubernetes test frameworks: kubemark integration for scalability tests, Kubernetes API server conformance tests with etcd to provide release recommends and version skew policy, specifying conformance testing requirements for each cloud provider, etc.
etcd Joins CNCF
etcd now has a new home at etcd-io and joined CNCF as an incubating project.
The synergistic efforts with Kubernetes have driven the evolution of etcd. Without community feedback and contribution, etcd could not have achieved its maturity and reliability. We’re looking forward to continuing the growth of etcd as an open source project and are excited to work with the Kubernetes and the wider CNCF community.
Finally, we’d like to thank all contributors with special thanks to Xiang Li for his leadership in etcd and Kubernetes.
New Contributor Workshop Shanghai
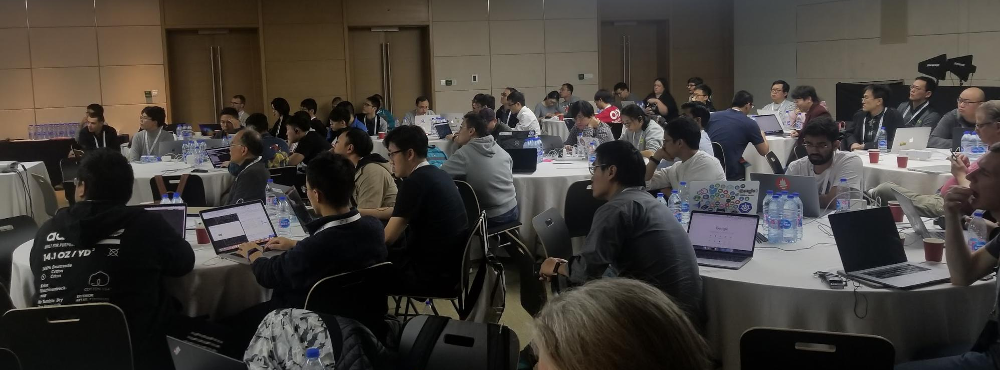
Kubecon Shanghai New Contributor Summit attendees. Photo by Jerry Zhang
We recently completed our first New Contributor Summit in China, at the first KubeCon in China. It was very exciting to see all of the Chinese and Asian developers (plus a few folks from around the world) interested in becoming contributors. Over the course of a long day, they learned how, why, and where to contribute to Kubernetes, created pull requests, attended a panel of current contributors, and got their CLAs signed.
This was our second New Contributor Workshop (NCW), building on the one created and led by SIG Contributor Experience members in Copenhagen. Because of the audience, it was held in both Chinese and English, taking advantage of the superb simultaneous interpretation services the CNCF sponsored. Likewise, the NCW team included both English and Chinese-speaking members of the community: Yang Li, XiangPeng Zhao, Puja Abbassi, Noah Abrahams, Tim Pepper, Zach Corleissen, Sen Lu, and Josh Berkus. In addition to presenting and helping students, the bilingual members of the team translated all of the slides into Chinese. Fifty-one students attended.
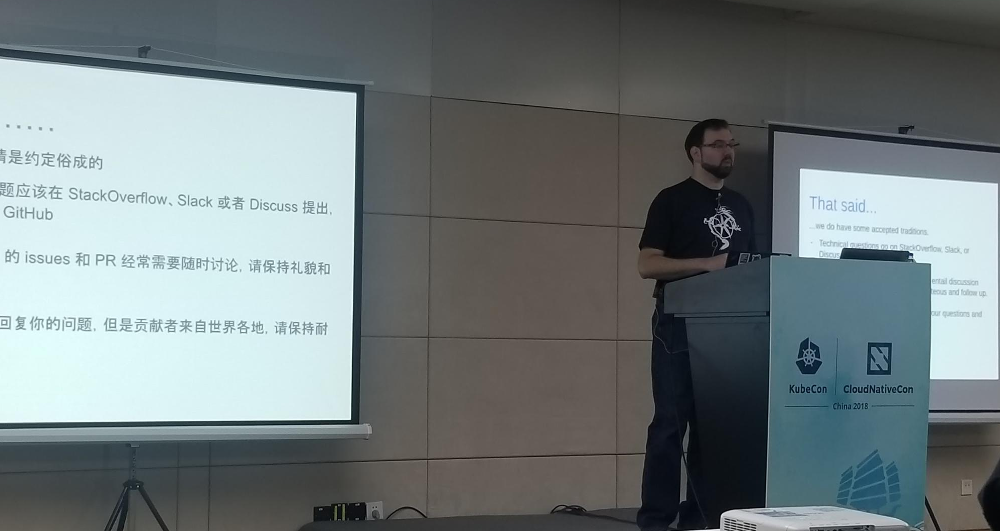
Noah Abrahams explains Kubernetes communications channels. Photo by Jerry Zhang
The NCW takes participants through the stages of contributing to Kubernetes, starting from deciding where to contribute, followed by an introduction to the SIG system and our repository structure. We also have "guest speakers" from Docs and Test Infrastructure who cover contributing in those areas. We finally wind up with some hands-on exercises in filing issues and creating and approving PRs.
Those hands-on exercises use a repository known as the contributor playground, created by SIG Contributor Experience as a place for new contributors to try out performing various actions on a Kubernetes repo. It has modified Prow and Tide automation, uses Owners files like in the real repositories. This lets students learn how the mechanics of contributing to our repositories work without disrupting normal development.
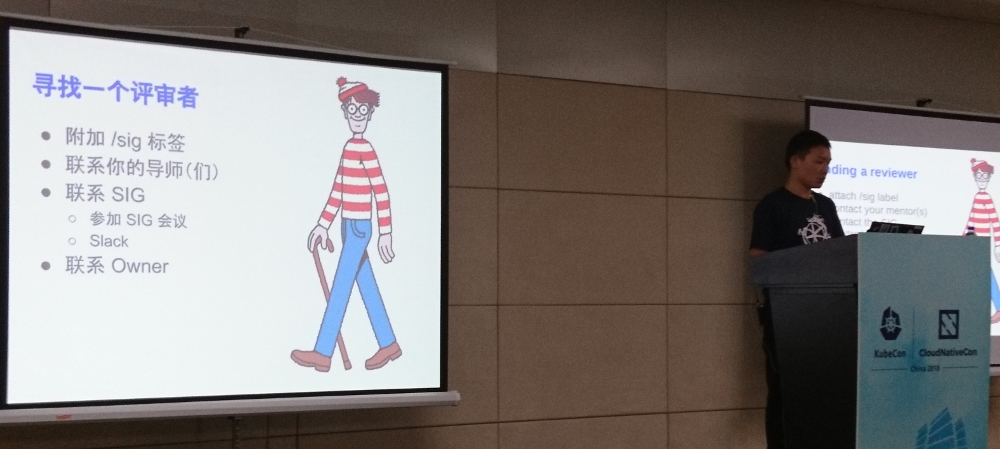
Yang Li talks about getting your PRs reviewed. Photo by Josh Berkus
Both the "Great Firewall" and the language barrier prevent contributing Kubernetes from China from being straightforward. What's more, because open source business models are not mature in China, the time for employees work on open source projects is limited.
Chinese engineers are eager to participate in the development of Kubernetes, but many of them don't know where to start since Kubernetes is such a large project. With this workshop, we hope to help those who want to contribute, whether they wish to fix some bugs they encountered, improve or localize documentation, or they need to work with Kubernetes at their work. We are glad to see more and more Chinese contributors joining the community in the past few years, and we hope to see more of them in the future.
"I have been participating in the Kubernetes community for about three years," said XiangPeng Zhao. "In the community, I notice that more and more Chinese developers are showing their interest in contributing to Kubernetes. However, it's not easy to start contributing to such a project. I tried my best to help those who I met in the community, but I think there might still be some new contributors leaving the community due to not knowing where to get help when in trouble. Fortunately, the community initiated NCW at KubeCon Copenhagen and held a second one at KubeCon Shanghai. I was so excited to be invited by Josh Berkus to help organize this workshop. During the workshop, I met community friends in person, mentored attendees in the exercises, and so on. All of this was a memorable experience for me. I also learned a lot as a contributor who already has years of contributing experience. I wish I had attended such a workshop when I started contributing to Kubernetes years ago."
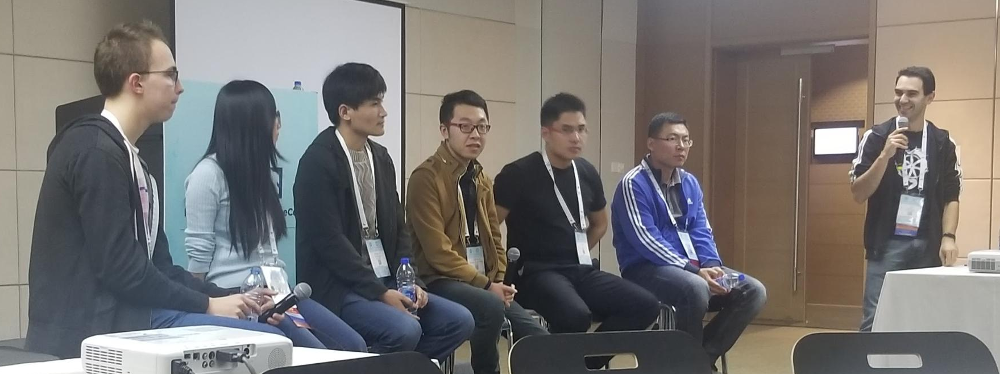
Panel of contributors. Photo by Jerry Zhang
The workshop ended with a panel of current contributors, featuring Lucas Käldström, Janet Kuo, Da Ma, Pengfei Ni, Zefeng Wang, and Chao Xu. The panel aimed to give both new and current contributors a look behind the scenes on the day-to-day of some of the most active contributors and maintainers, both from China and around the world. Panelists talked about where to begin your contributor's journey, but also how to interact with reviewers and maintainers. They further touched upon the main issues of contributing from China and gave attendees an outlook into exciting features they can look forward to in upcoming releases of Kubernetes.
After the workshop, Xiang Peng Zhao chatted with some attendees on WeChat and Twitter about their experiences. They were very glad to have attended the NCW and had some suggestions on improving the workshop. One attendee, Mohammad, said, "I had a great time at the workshop and learned a lot about the entire process of k8s for a contributor." Another attendee, Jie Jia, said, "The workshop was wonderful. It systematically explained how to contribute to Kubernetes. The attendee could understand the process even if s/he knew nothing about that before. For those who were already contributors, they could also learn something new. Furthermore, I could make new friends from inside or outside of China in the workshop. It was awesome!"
SIG Contributor Experience will continue to run New Contributor Workshops at each upcoming Kubecon, including Seattle, Barcelona, and the return to Shanghai in June 2019. If you failed to get into one this year, register for one at a future Kubecon. And, when you meet an NCW attendee, make sure to welcome them to the community.
Links:
- English versions of the slides: PDF or Google Docs with speaker notes
- Chinese version of the slides: PDF
- Contributor playground
Production-Ready Kubernetes Cluster Creation with kubeadm
kubeadm is a tool that enables Kubernetes administrators to quickly and easily bootstrap minimum viable clusters that are fully compliant with Certified Kubernetes guidelines. It's been under active development by SIG Cluster Lifecycle since 2016 and we're excited to announce that it has now graduated from beta to stable and generally available (GA)!
This GA release of kubeadm is an important event in the progression of the Kubernetes ecosystem, bringing stability to an area where stability is paramount.
The goal of kubeadm is to provide a foundational implementation for Kubernetes cluster setup and administration. kubeadm ships with best-practice defaults but can also be customized to support other ecosystem requirements or vendor-specific approaches. kubeadm is designed to be easy to integrate into larger deployment systems and tools.
The scope of kubeadm
kubeadm is focused on bootstrapping Kubernetes clusters on existing infrastructure and performing an essential set of maintenance tasks. The core of the kubeadm interface is quite simple: new control plane nodes are created by running kubeadm init and worker nodes are joined to the control plane by running kubeadm join. Also included are utilities for managing already bootstrapped clusters, such as control plane upgrades and token and certificate renewal.
To keep kubeadm lean, focused, and vendor/infrastructure agnostic, the following tasks are out of its scope:
- Infrastructure provisioning
- Third-party networking
- Non-critical add-ons, e.g. for monitoring, logging, and visualization
- Specific cloud provider integrations
Infrastructure provisioning, for example, is left to other SIG Cluster Lifecycle projects, such as the Cluster API. Instead, kubeadm covers only the common denominator in every Kubernetes cluster: the control plane. The user may install their preferred networking solution and other add-ons on top of Kubernetes after cluster creation.
What kubeadm's GA release means
General Availability means different things for different projects. For kubeadm, going GA means not only that the process of creating a conformant Kubernetes cluster is now stable, but also that kubeadm is flexible enough to support a wide variety of deployment options.
We now consider kubeadm to have achieved GA-level maturity in each of these important domains:
- Stable command-line UX --- The kubeadm CLI conforms to #5a GA rule of the Kubernetes Deprecation Policy, which states that a command or flag that exists in a GA version must be kept for at least 12 months after deprecation.
- Stable underlying implementation --- kubeadm now creates a new Kubernetes cluster using methods that shouldn't change any time soon. The control plane, for example, is run as a set of static Pods, bootstrap tokens are used for the
kubeadm joinflow, and ComponentConfig is used for configuring the kubelet. - Configuration file schema --- With the new v1beta1 API version, you can now tune almost every part of the cluster declaratively and thus build a "GitOps" flow around kubeadm-built clusters. In future versions, we plan to graduate the API to version v1 with minimal changes (and perhaps none).
- The "toolbox" interface of kubeadm --- Also known as phases. If you don't want to perform all
kubeadm inittasks, you can instead apply more fine-grained actions using thekubeadm init phasecommand (for example generating certificates or control plane Static Pod manifests). - Upgrades between minor versions --- The
kubeadm upgradecommand is now fully GA. It handles control plane upgrades for you, which includes upgrades to etcd, the API Server, the Controller Manager, and the Scheduler. You can seamlessly upgrade your cluster between minor or patch versions (e.g. v1.12.2 -> v1.13.1 or v1.13.1 -> v1.13.3). - etcd setup --- etcd is now set up in a way that is secure by default, with TLS communication everywhere, and allows for expanding to a highly available cluster when needed.
Who will benefit from a stable kubeadm
SIG Cluster Lifecycle has identified a handful of likely kubeadm user profiles, although we expect that kubeadm at GA can satisfy many other scenarios as well.
Here's our list:
- You're a new user who wants to take Kubernetes for a spin. kubeadm is the fastest way to get up and running on Linux machines. If you're using Minikube on a Mac or Windows workstation, you're actually already running kubeadm inside the Minikube VM!
- You're a system administrator responsible for setting up Kubernetes on bare metal machines and you want to quickly create Kubernetes clusters that are secure and in conformance with best practices but also highly configurable.
- You're a cloud provider who wants to add a Kubernetes offering to your suite of cloud services. kubeadm is the go-to tool for creating clusters at a low level.
- You're an organization that requires highly customized Kubernetes clusters. Existing public cloud offerings like Amazon EKS and Google Kubernetes Engine won't cut it for you; you need customized Kubernetes clusters tailored to your hardware, security, policy, and other needs.
- You're creating a higher-level cluster creation tool than kubeadm, building the cluster experience from the ground up, but you don't want to reinvent the wheel. You can "rebase" on top of kubeadm and utilize the common bootstrapping tools kubeadm provides for you. Several community tools have adopted kubeadm, and it's a perfect match for Cluster API implementations.
All these users can benefit from kubeadm graduating to a stable GA state.
kubeadm survey
Although kubeadm is GA, the SIG Cluster Lifecycle will continue to be committed to improving the user experience in managing Kubernetes clusters. We're launching a survey to collect community feedback about kubeadm for the sake of future improvement.
The survey is available at https://bit.ly/2FPfRiZ. Your participation would be highly valued!
Thanks to the community!
This release wouldn't have been possible without the help of the great people that have been contributing to the SIG. SIG Cluster Lifecycle would like to thank a few key kubeadm contributors:
| Name | Organization | Role |
|---|---|---|
| Tim St. Clair | Heptio | SIG co-chair |
| Robert Bailey | SIG co-chair | |
| Fabrizio Pandini | Independent | Approver |
| Lubomir Ivanov | VMware | Approver |
| Mike Danese | Emeritus approver | |
| Ilya Dmitrichenko | Weaveworks | Emeritus approver |
| Peter Zhao | ZTE | Reviewer |
| Di Xu | Ant Financial | Reviewer |
| Chuck Ha | Heptio | Reviewer |
| Liz Frost | Heptio | Reviewer |
| Jason DeTiberus | Heptio | Reviewer |
| Alexander Kanievsky | Intel | Reviewer |
| Ross Georgiev | VMware | Reviewer |
| Yago Nobre | Nubank | Reviewer |
We also want to thank all the companies making it possible for their developers to work on Kubernetes, and all the other people that have contributed in various ways towards making kubeadm as stable as it is today!
About the authors
Lucas Käldström
- kubeadm subproject owner and SIG Cluster Lifecycle co-chair
- Kubernetes upstream contractor, last two years contracting for Weaveworks
- CNCF Ambassador
- GitHub: luxas
Luc Perkins
- CNCF Developer Advocate
- Kubernetes SIG Docs contributor and SIG Docs tooling WG chair
- GitHub: lucperkins
Kubernetes 1.13: Simplified Cluster Management with Kubeadm, Container Storage Interface (CSI), and CoreDNS as Default DNS are Now Generally Available
We’re pleased to announce the delivery of Kubernetes 1.13, our fourth and final release of 2018!
Kubernetes 1.13 has been one of the shortest releases to date at 10 weeks. This release continues to focus on stability and extensibility of Kubernetes with three major features graduating to general availability this cycle in the areas of Storage and Cluster Lifecycle. Notable features graduating in this release include: simplified cluster management with kubeadm, Container Storage Interface (CSI), and CoreDNS as the default DNS.
These stable graduations are an important milestone for users and operators in terms of setting support expectations. In addition, there’s a continual and steady stream of internal improvements and new alpha features that are made available to the community in this release. These features are discussed in the “additional notable features” section below.
Let’s dive into the key features of this release:
Simplified Kubernetes Cluster Management with kubeadm in GA
Most people who have gotten hands-on with Kubernetes have at some point been hands-on with kubeadm. It's an essential tool for managing the cluster lifecycle, from creation to configuration to upgrade; and now kubeadm is officially GA. kubeadm handles the bootstrapping of production clusters on existing hardware and configuring the core Kubernetes components in a best-practice-manner to providing a secure yet easy joining flow for new nodes and supporting easy upgrades. What’s notable about this GA release are the now graduated advanced features, specifically around pluggability and configurability. The scope of kubeadm is to be a toolbox for both admins and automated, higher-level system and this release is a significant step in that direction.
Container Storage Interface (CSI) Goes GA
The Container Storage Interface (CSI) is now GA after being introduced as alpha in v1.9 and beta in v1.10. With CSI, the Kubernetes volume layer becomes truly extensible. This provides an opportunity for third party storage providers to write plugins that interoperate with Kubernetes without having to touch the core code. The specification itself has also reached a 1.0 status.
With CSI now stable, plugin authors are developing storage plugins out of core, at their own pace. You can find a list of sample and production drivers in the CSI Documentation.
CoreDNS is Now the Default DNS Server for Kubernetes
In 1.11, we announced CoreDNS had reached General Availability for DNS-based service discovery. In 1.13, CoreDNS is now replacing kube-dns as the default DNS server for Kubernetes. CoreDNS is a general-purpose, authoritative DNS server that provides a backwards-compatible, but extensible, integration with Kubernetes. CoreDNS has fewer moving parts than the previous DNS server, since it’s a single executable and a single process, and supports flexible use cases by creating custom DNS entries. It’s also written in Go making it memory-safe.
CoreDNS is now the recommended DNS solution for Kubernetes 1.13+. The project has switched the common test infrastructure to use CoreDNS by default and we recommend users switching as well. KubeDNS will still be supported for at least one more release, but it's time to start planning your migration. Many OSS installer tools have already made the switch, including Kubeadm in 1.11. If you use a hosted solution, please work with your vendor to understand how this will impact you.
Additional Notable Feature Updates
Support for 3rd party device monitoring plugins has been introduced as an alpha feature. This removes current device-specific knowledge from the kubelet to enable future use-cases requiring device-specific knowledge to be out-of-tree.
Kubelet Device Plugin Registration is graduating to stable. This creates a common Kubelet plugin discovery model that can be used by different types of node-level plugins, such as device plugins, CSI and CNI, to establish communication channels with Kubelet.
Topology Aware Volume Scheduling is now stable. This make the scheduler aware of a Pod's volume's topology constraints, such as zone or node.
APIServer DryRun is graduating to beta. This moves "apply" and declarative object management from kubectl to the apiserver in order to fix many of the existing bugs that can't be fixed today.
Kubectl Diff is graduating to beta. This allows users to run a kubectl command to view the difference between a locally declared object configuration and the current state of a live object.
Raw block device using persistent volume source is graduating to beta. This makes raw block devices (non-networked) available for consumption via a Persistent Volume Source.
Each Special Interest Group (SIG) within the community continues to deliver the most-requested enhancements, fixes, and functionality for their respective specialty areas. For a complete list of inclusions by SIG, please visit the release notes.
Availability
Kubernetes 1.13 is available for download on GitHub. To get started with Kubernetes, check out these interactive tutorials. You can also easily install 1.13 using kubeadm.
Features Blog Series
If you’re interested in exploring these features more in depth, check back tomorrow for our 5 Days of Kubernetes series where we’ll highlight detailed walkthroughs of the following features:
- Day 1 - Simplified Kubernetes Cluster Creation with Kubeadm
- Day 2 - Out-of-tree CSI Volume Plugins
- Day 3 - Switch default DNS plugin to CoreDNS
- Day 4 - New CLI Tips and Tricks (Kubectl Diff and APIServer Dry run)
- Day 5 - Raw Block Volume
Release team
This release is made possible through the effort of hundreds of individuals who contributed both technical and non-technical content. Special thanks to the release team led by Aishwarya Sundar, Software Engineer at Google. The 39 individuals on the release team coordinate many aspects of the release, from documentation to testing, validation, and feature completeness.
As the Kubernetes community has grown, our release process represents an amazing demonstration of collaboration in open source software development. Kubernetes continues to gain new users at a rapid clip. This growth creates a positive feedback cycle where more contributors commit code creating a more vibrant ecosystem. Kubernetes has over 25,000 individual contributors to date and an active community of more than 51,000 people.
Project Velocity
The CNCF has continued refining DevStats, an ambitious project to visualize the myriad contributions that go into the project. K8s DevStats illustrates the breakdown of contributions from major company contributors, as well as an impressive set of preconfigured reports on everything from individual contributors to pull request lifecycle times. On average over the past year, 347 different companies and over 2,372 individuals contribute to Kubernetes each month. Check out DevStats to learn more about the overall velocity of the Kubernetes project and community.
User Highlights
Established, global organizations are using Kubernetes in production at massive scale. Recently published user stories from the community include:
- IBM Cloud, a leading provider of public, private, and hybrid cloud functionality, is using cloud native technology for high-availability deployments with three instances across two zones in each of the five regions, load balanced with failover support.
- The National Association of Insurance Commissioners (NAIC), the U.S. standard-setting and regulatory support organization, leverages Kubernetes to create rapid prototypes in two days that would have previously taken at least a month.
- Ocado, the world’s largest online-only grocery retailer, use 15-25% less hardware resources to host the same applications in Kubernetes in their test environments.
- Adform, a provider of advertising technology to enable digital ads across devices, uses Kubernetes to reduce utilization of hardware resources, with containers notching 2-3 times more efficiency over virtual machines.
Is Kubernetes helping your team? Share your story with the community.
Ecosystem Updates
- CNCF recently released the findings of their bi-annual CNCF survey in Mandarin, finding that cloud usage in Asia has grown 135% since March 2018.
- CNCF expanded its certification offerings to include a Certified Kubernetes Application Developer exam. The CKAD exam certifies an individual's ability to design, build, configure, and expose cloud native applications for Kubernetes. More information can be found here.
- CNCF added a new partner category, Kubernetes Training Partners (KTP). KTPs are a tier of vetted training providers who have deep experience in cloud native technology training. View partners and learn more here.
- CNCF also offers online training that teaches the skills needed to create and configure a real-world Kubernetes cluster.
- Kubernetes documentation now features user journeys: specific pathways for learning based on who readers are and what readers want to do. Learning Kubernetes is easier than ever for beginners, and more experienced users can find task journeys specific to cluster admins and application developers.
KubeCon
The world’s largest Kubernetes gathering, KubeCon + CloudNativeCon is coming to Seattle from December 10-13, 2018 and Barcelona from May 20-23, 2019. This conference will feature technical sessions, case studies, developer deep dives, salons, and more. Registration will open up in early 2019.
Webinar
Join members of the Kubernetes 1.13 release team on January 10th at 9am PDT to learn about the major features in this release. Register here.
Get Involved
The simplest way to get involved with Kubernetes is by joining one of the many Special Interest Groups (SIGs) that align with your interests. Have something you’d like to broadcast to the Kubernetes community? Share your voice at our weekly community meeting, and through the channels below.
Thank you for your continued feedback and support.
- Post questions (or answer questions) on Stack Overflow
- Join the community discussion on Discuss Kubernetes
- Follow us on Twitter @Kubernetesio for latest updates
- Chat with the community on Slack
- Share your Kubernetes story.
Kubernetes Docs Updates, International Edition
As a co-chair of SIG Docs, I'm excited to share that Kubernetes docs have a fully mature workflow for localization (l10n).
Abbreviations galore
L10n is an abbreviation for localization.
I18n is an abbreviation for internationalization.
I18n is what you do to make l10n easier. L10n is a fuller, more comprehensive process than translation (t9n).
Why localization matters
The goal of SIG Docs is to make Kubernetes easier to use for as many people as possible.
One year ago, we looked at whether it was possible to host the output of a Chinese team working independently to translate the Kubernetes docs. After many conversations (including experts on OpenStack l10n), much transformation, and renewed commitment to easier localization, we realized that open source documentation is, like open source software, an ongoing exercise at the edges of what's possible.
Consolidating workflows, language labels, and team-level ownership may seem like simple improvements, but these features make l10n scalable for increasing numbers of l10n teams. While SIG Docs continues to iterate improvements, we've paid off a significant amount of technical debt and streamlined l10n in a single workflow. That's great for the future as well as the present.
Consolidated workflow
Localization is now consolidated in the kubernetes/website repository. We've configured the Kubernetes CI/CD system, Prow, to handle automatic language label assignment as well as team-level PR review and approval.
Language labels
Prow automatically applies language labels based on file path. Thanks to SIG Docs contributor June Yi, folks can also manually assign language labels in pull request (PR) comments. For example, when left as a comment on an issue or PR, this command assigns the label language/ko (Korean).
/language ko
These repo labels let reviewers filter for PRs and issues by language. For example, you can now filter the kubernetes/website dashboard for PRs with Chinese content.
Team review
L10n teams can now review and approve their own PRs. For example, review and approval permissions for English are assigned in an OWNERS file in the top subfolder for English content.
Adding OWNERS files to subdirectories lets localization teams review and approve changes without requiring a rubber stamp approval from reviewers who may lack fluency.
What's next
We're looking forward to the doc sprint in Shanghai to serve as a resource for the Chinese l10n team.
We're excited to continue supporting the Japanese and Korean l10n teams, who are making excellent progress.
If you're interested in localizing Kubernetes for your own language or region, check out our guide to localizing Kubernetes docs and reach out to a SIG Docs chair for support.
Get involved with SIG Docs
If you're interested in Kubernetes documentation, come to a SIG Docs weekly meeting, or join #sig-docs in Kubernetes Slack.
gRPC Load Balancing on Kubernetes without Tears
Many new gRPC users are surprised to find that Kubernetes's default load balancing often doesn't work out of the box with gRPC. For example, here's what happens when you take a simple gRPC Node.js microservices app and deploy it on Kubernetes:
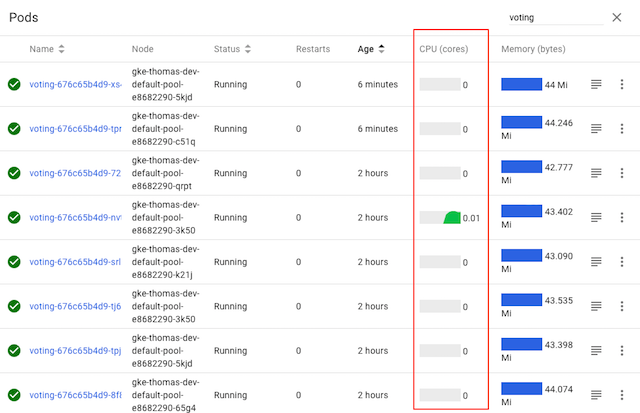
While the voting service displayed here has several pods, it's clear from
Kubernetes's CPU graphs that only one of the pods is actually doing any
work—because only one of the pods is receiving any traffic. Why?
In this blog post, we describe why this happens, and how you can easily fix it by adding gRPC load balancing to any Kubernetes app with Linkerd, a CNCF service mesh and service sidecar.
Why does gRPC need special load balancing?
First, let's understand why we need to do something special for gRPC.
gRPC is an increasingly common choice for application developers. Compared to alternative protocols such as JSON-over-HTTP, gRPC can provide some significant benefits, including dramatically lower (de)serialization costs, automatic type checking, formalized APIs, and less TCP management overhead.
However, gRPC also breaks the standard connection-level load balancing, including what's provided by Kubernetes. This is because gRPC is built on HTTP/2, and HTTP/2 is designed to have a single long-lived TCP connection, across which all requests are multiplexed—meaning multiple requests can be active on the same connection at any point in time. Normally, this is great, as it reduces the overhead of connection management. However, it also means that (as you might imagine) connection-level balancing isn't very useful. Once the connection is established, there's no more balancing to be done. All requests will get pinned to a single destination pod, as shown below:
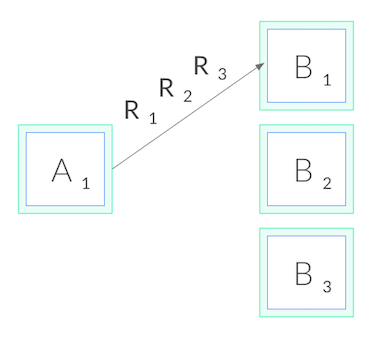
Why doesn't this affect HTTP/1.1?
The reason why this problem doesn't occur in HTTP/1.1, which also has the concept of long-lived connections, is because HTTP/1.1 has several features that naturally result in cycling of TCP connections. Because of this, connection-level balancing is "good enough", and for most HTTP/1.1 apps we don't need to do anything more.
To understand why, let's take a deeper look at HTTP/1.1. In contrast to HTTP/2,
HTTP/1.1 cannot multiplex requests. Only one HTTP request can be active at a
time per TCP connection. The client makes a request, e.g. GET /foo, and then
waits until the server responds. While that request-response cycle is
happening, no other requests can be issued on that connection.
Usually, we want lots of requests happening in parallel. Therefore, to have concurrent HTTP/1.1 requests, we need to make multiple HTTP/1.1 connections, and issue our requests across all of them. Additionally, long-lived HTTP/1.1 connections typically expire after some time, and are torn down by the client (or server). These two factors combined mean that HTTP/1.1 requests typically cycle across multiple TCP connections, and so connection-level balancing works.
So how do we load balance gRPC?
Now back to gRPC. Since we can't balance at the connection level, in order to do gRPC load balancing, we need to shift from connection balancing to request balancing. In other words, we need to open an HTTP/2 connection to each destination, and balance requests across these connections, as shown below:
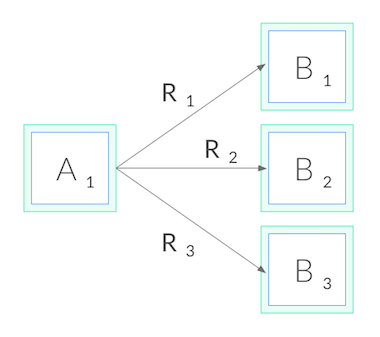
In network terms, this means we need to make decisions at L5/L7 rather than L3/L4, i.e. we need to understand the protocol sent over the TCP connections.
How do we accomplish this? There are a couple options. First, our application code could manually maintain its own load balancing pool of destinations, and we could configure our gRPC client to use this load balancing pool. This approach gives us the most control, but it can be very complex in environments like Kubernetes where the pool changes over time as Kubernetes reschedules pods. Our application would have to watch the Kubernetes API and keep itself up to date with the pods.
Alternatively, in Kubernetes, we could deploy our app as headless services. In this case, Kubernetes will create multiple A records in the DNS entry for the service. If our gRPC client is sufficiently advanced, it can automatically maintain the load balancing pool from those DNS entries. But this approach restricts us to certain gRPC clients, and it's rarely possible to only use headless services.
Finally, we can take a third approach: use a lightweight proxy.
gRPC load balancing on Kubernetes with Linkerd
Linkerd is a CNCF-hosted service mesh for Kubernetes. Most relevant to our purposes, Linkerd also functions as a service sidecar, where it can be applied to a single service—even without cluster-wide permissions. What this means is that when we add Linkerd to our service, it adds a tiny, ultra-fast proxy to each pod, and these proxies watch the Kubernetes API and do gRPC load balancing automatically. Our deployment then looks like this:
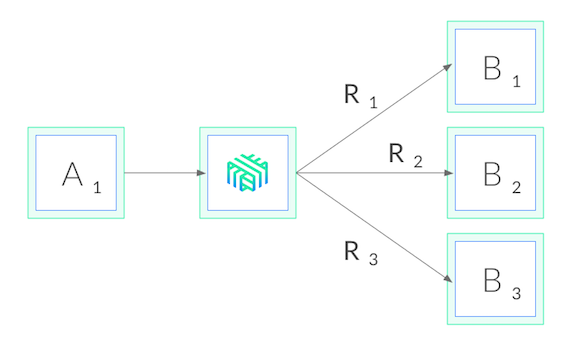
Using Linkerd has a couple advantages. First, it works with services written in any language, with any gRPC client, and any deployment model (headless or not). Because Linkerd's proxies are completely transparent, they auto-detect HTTP/2 and HTTP/1.x and do L7 load balancing, and they pass through all other traffic as pure TCP. This means that everything will just work.
Second, Linkerd's load balancing is very sophisticated. Not only does Linkerd maintain a watch on the Kubernetes API and automatically update the load balancing pool as pods get rescheduled, Linkerd uses an exponentially-weighted moving average of response latencies to automatically send requests to the fastest pods. If one pod is slowing down, even momentarily, Linkerd will shift traffic away from it. This can reduce end-to-end tail latencies.
Finally, Linkerd's Rust-based proxies are incredibly fast and small. They introduce <1ms of p99 latency and require <10mb of RSS per pod, meaning that the impact on system performance will be negligible.
gRPC Load Balancing in 60 seconds
Linkerd is very easy to try. Just follow the steps in the Linkerd Getting Started Instructions—install the CLI on your laptop, install the control plane on your cluster, and "mesh" your service (inject the proxies into each pod). You'll have Linkerd running on your service in no time, and should see proper gRPC balancing immediately.
Let's take a look at our sample voting service again, this time after
installing Linkerd:
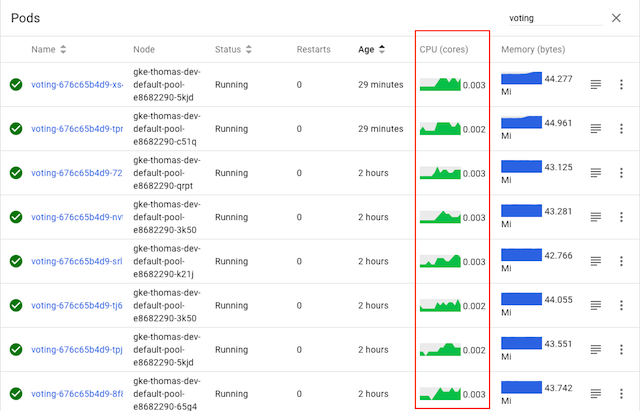
As we can see, the CPU graphs for all pods are active, indicating that all pods are now taking traffic—without having to change a line of code. Voila, gRPC load balancing as if by magic!
Linkerd also gives us built-in traffic-level dashboards, so we don't even need to guess what's happening from CPU charts any more. Here's a Linkerd graph that's showing the success rate, request volume, and latency percentiles of each pod:
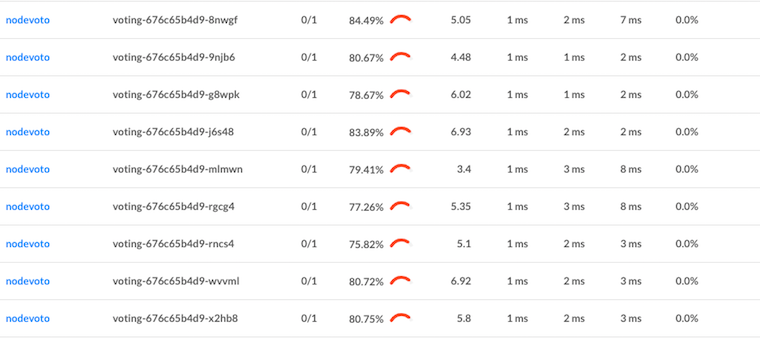
We can see that each pod is getting around 5 RPS. We can also see that, while we've solved our load balancing problem, we still have some work to do on our success rate for this service. (The demo app is built with an intentional failure—as an exercise to the reader, see if you can figure it out by using the Linkerd dashboard!)
Wrapping it up
If you're interested in a dead simple way to add gRPC load balancing to your Kubernetes services, regardless of what language it's written in, what gRPC client you're using, or how it's deployed, you can use Linkerd to add gRPC load balancing in a few commands.
There's a lot more to Linkerd, including security, reliability, and debugging and diagnostics features, but those are topics for future blog posts.
Want to learn more? We’d love to have you join our rapidly-growing community! Linkerd is a CNCF project, hosted on GitHub, and has a thriving community on Slack, Twitter, and the mailing lists. Come and join the fun!
Tips for Your First Kubecon Presentation - Part 2
Hello and welcome back to the second and final part about tips for KubeCon first-time speakers. If you missed the last post, please give it a read here.
The Day before the Show
Tip #13 - Get enough sleep. I don't know about you, but when I don't get enough sleep (especially when beer is in the game), the next day my brain power is around 80% at best. It's very easy to get distracted at KubeCon (in a positive sense). "Let's have dinner tonight and chat about XYZ". Get some food, beer or wine because you're so excited and all the good resolutions you had set for the day before your presentation are forgotten :)
OK, I'm slightly exaggerating here. But don't underestimate the dynamics of this conference, the amazing people you meet, the inspiring talks and of course the conference party. Be disciplined, at least that one day. There's enough time to party after your great presentation!
Tip #14 - A final dry-run. Usually, I do a final dry-run of my presentation the day before the talk. This helps me to recall the first few sentences I want to say so I keep the flow no matter what happens when the red recording light goes on. Especially when your talk is later during the conference, there's so much new stuff your brain has to digest which could "overwrite" the very important parts of your presentation. I think you know what I mean. So, if you're like me, a final dry-run is never a bad idea (also to check equipment, demos, etc.).
Tip #15 - Promote your session, again. Send out a final reminder on your social media channels so your followers (and KubeCon attendees) will recall to attend your session (again, KubeCon is busy and it's hard to keep up with all the talks you wanted to attend). I was surprised to see my attendee list jumping from ~80 at the beginning of the week to >300 the day before the talk. The number kept rising even an hour before going on stage. So don't worry about the stats too early.
Tip #16 - Ask your idols to attend. Steve Wong, a colleague of mine who I really admire for his knowledge and passion, gave me a great advise. Reach out to the people you always wanted to attend your talk and kindly ask them to come along.
So I texted the one and only Tim Hockin. Even though these well-respected community leaders are super busy and thus usually cannot attend many talks during the conference, the worst thing that can happen is that they cannot show up and will let you know. (see the end of this post to find out whether or not I was lucky :))
The show is on!
Your day has come and it doesn't make any sense to make big changes to your presentation now! Actually, that's a very bad idea unless you're an expert and your heartbeat at rest is around 40 BPM. (But even then many things can go horribly wrong).
So, without further ado, here are my final tips for you.
Tip #17 - Arrive ahead of time. Set an alert (or two) to not miss your presentation, e.g. because somebody caught you on the way to the room or you got a call/have been pulled in a meeting. It's a good idea to find out were your room is at least some hours before your talk. These conference buildings can be very large. Also look for last minute schedule (time/room) changes, just because you never know...
Tip #18 - Ask a friend to take photos. My dear colleague Bjoern, without me asking for it, took a lot of pictures and watched the audience during the talk. This was really helpful, not just because I now have some nice shots that will always remind me of this great day. He also gave me honest feedback, e.g. what people said, whether they liked it or what I could have done better.
Tip #19 - Restroom. If you're like me, when I'm nervous I could run every 15 minutes. The last thing you want is that you are fully cabled (microphone), everything is set up and two minutes before your presentation you feel like "oh oh"...nothing more to say here ;)
Tip #20 - The audience. I had many examples and references from other Kubernetes users (and their postmortem stories) in my talk. So I tried to give them credit and actually some of them were in the room and really liked that I did so. It gave them (and hopefully the rest of the audience as well) the feeling that I did not invent the wheel and we are all in the same boat. Also feel free to ask some questions in the beginning, e.g. to get a better feeling about who is attending your talk, or who would consider himself an expert in the area of what you are talking about, etc.
Tip #21 - Repeat questions. Always. Because of the time constraints, questions should be asked at the end of your presentation (unless you are giving a community meeting or panel of course). Always (always!) repeat the questions at the end. Sometimes people will not use the microphone. This is not only hard for the people in the back, but also it won't be captured on the recording. I am sure you also had that moment watching a recording and not getting what is being asked/discussed because the question was not captured.
Tip #22 - Feedback. Don't forget to ask the audience to fill out the survey. They're not always enforced/mandatory during conferences (especially not at KubeCon), so it's easy to forget to give the speaker feedback. Feedback is super critical (also for the committee) as sometimes people won't directly tell you but rather write their thoughts. Also, you might want to block your calendar to leave some time after the presentation for follow-up questions, so you are not in the hurry to catch your next meeting/session.
Tip #23 - Invite your audience. No, I don't mean to throw a round of beer for everyone attending your talk (I mean, you could). But you might let them know, at the end of your presentation, that you would like to hang out, have dinner, etc. A great opportunity to reflect and geek out with like-minded friends.
Final Tip - Your Voice matters. Don't underestimate the power of giving a talk at a conference. In my case I was lucky that the Zalando crew was in the room and took this talk as an opportunity for an ad hoc meeting after the conference. This drove an important performance fix forward, which eventually was merged (kudos to the Zalando team again!).
Embrace the opportunity to give a talk at a conference, take it serious, be professional and make the best use of your time. But I'm sure I don't have to tell you that ;)
Now it's on you :)
I hope some of these tips are useful for you as well. And I wish you all the best for your upcoming talk!!! Believing in and being yourself is key to success. And perhaps your Kubernetes idol is in the room and has some nice words for you after your presentation!
Besides my fantastic reviewers and the speaker support team already mentioned above, I also would like to thank the people who supported me along this KubeCon journey: Bjoern, Timo, Emad and Steve!
#KubeCon @embano1 is laying down an homage to an earlier @thockin presentation in his "Inside K8S Resource Management" session, if you didn't make it in the door, check out the deck here https://t.co/4xQq5CQ3aZ pic.twitter.com/ObFEuKskhB
— Steve Wong (@cantbewong) May 4, 2018
Tips for Your First Kubecon Presentation - Part 1
First of all, let me congratulate you to this outstanding achievement. Speaking at KubeCon, especially if it's your first time, is a tremendous honor and experience. Well done!
Congrats to everyone who got Kubecon talks accepted! 👏👏👏
— Justin Garrison (@rothgar) September 24, 2018
To everyone who got a rejection don't feel bad. Only 13% could be accepted. Keep trying. There will be other opportunities.
When I was informed that my KubeCon talk about Kubernetes Resource Management was accepted for KubeCon EU in Denmark (2018), I really could not believe it. By then, the chances to get your talk accepted were around 10% (or less, don't really remember the exact number). There were over a 1,000 submissions just for that KubeCon (recall that we now have three KubeCon events during the year - US, EU and Asia region). The popularity of Kubernetes is ever increasing and so is the number of people trying to get a talk accepted. Once again, outstanding achievement to get your talk in!
But now comes the tough part - research, write, practice, repeat, go on stage, perform :) Let me tell you that I went through several sleepless nights preparing for my first KubeCon talk. The day of the presentation, until I got on stage, was a mixture of every emotion I could have possibly gone through. Even though I had presented uncountable times before, including large industry conferences, KubeCon was very different. Different because it was the first time everything was recorded (including the presenter on stage) and I did not really know the audience, or more precisely: I was assuming everyone in the room is a Kubernetes expert and that my presentation not only had to be entertaining but also technically deep and 100% accurate. It's not seldom that maintainers and SIG (Special Interest Group) leads are in the room as well.
Another challenge for me was squeezing a topic, that can easily fill a full-day workshop, into a 35min presentation (including Q&A). Before KubeCon, I was used to giving breakouts which were typically 60 minutes long. This doesn't say anything about the quality of the presentation but I knew how many slides I can squeeze into 60 minutes, covering important details but not killing people with "Death by PowerPoint".
So I learned a lot going through this endless cycle of preparation, practicing, these doubts of failing and time pressure finishing your deck, and of course giving the talk. When I left Copenhagen, I took some notes based on my speaker experience during the flight, which my friend Bjoern encouraged me to share. Not all of them might apply to you, but I still hope some of them are useful for your first KubeCon talk.
Submitting a Good Talk
Some of you might read these lines even though you did not submit a talk or it wasn't accepted. I found these resources (not specifically targeted at KubeCon) for writing a good proposal very useful:
- How to write with Style
- Talk Framework by the incredible goinggodotnet
- Lachie’s 7 step guide to writing a winning tech conference CFP
Believe it or not, mine went through several reviews by Justin Garrison, Liz Rice, Bill Kennedy, Emad Benjamin and Kelsey Hightower (yes, THE Kelsey Hightower)! Some of them didn't know me before, they just live by our community values to grow newcomers and thus drive this great community forward every day.
I think, without their feedback my proposal wouldn't have been on point to be selected. Their feedback was often direct and required me to completely change the first revisions. But they were right and their feedback was useful to stay within the character limit while still standing out with the proposal.
Feel free to reach out for professional and/or experienced speakers. They know this stuff. And I was surprised by the support and help offered. Many had their DMs in Twitter open, so ask for help and you will be helped :) Besides Twitter, related forums to ask for assistance might be Discuss and Reddit.
Preparing for your Presentation
Tip #1 - Appreciate that you were selected and don't be upset about the slot your presentation was scheduled in. For example, my talk was put as second last presentation of final KubeCon day (Friday). I was like, who's going to stay there and not catch his/her flight or hang out and relax after this crazy week? The session stats, where speakers can see who signed up, were slowly increasing until the week of KubeCon. I think at the beginning of the week it showed ~80 people interested in my session (there is no mandatory sign-up). I was so happy, especially since there were some interesting talks running at the same time as my presentation.
Without spoiling (see below), the KubeCon community and attendees fully leverage the time and effort they've put into traveling to KubeCon. Rest assured that even if you have the last presentation at KubeCon, people will show up!
Tip #2 - Study the Masters on Youtube. Get some inspirations from great speakers (some of them already mentioned above) and top rated sessions of previous KubeCons. Observe how they present and interact with the audience, while still keeping the tough timing throughout the presentation.
Tip #3 - Find reviewers. Having experienced or professional speakers review your slides is super critical. Not only to check for language/translation (see below) but also to improve the flow of your presentation and get feedback on whether the content is logically structured and not too dense (too many slides, timing). They will help you to leave out less important information while also making the presentation fit for your audience (not everyone has the level of knowledge as you in your specific area).
Tip #4 - Language barriers. Nobody is perfect and the community encourages diversity. This makes us all better and is what I probably like the most about the Kubernetes community. However, make sure that the audience understands the message of your talk. For non-native speakers, it can be really hard to present in English (e.g. at the US/EU conferences), especially if you're not used to it. Add to that the tension during the talk and it can become really hard for the audience to follow.
I am not saying that everyone has to present in perfect business English. Nobody expects that, let me be very clear. But if you feel that this could be an issue for you, reach out for help. Reviewers can help fix grammar and wording in your slide deck. Practicing and recording yourself (see below) are helpful to reflect yourself. The slides should reflect your message so people can read along if they lost you. Simple, less busy slides are definitely recommended. Make sure to add speaker notes to your presentation. Not only does this help with getting better every time you run through your presentation (memory effect and the flow). It also serves as a safety net when you think language will definitely be an issue, or when you're suddenly completely lost during the presentation on stage.
Tip #5 - Study the Speaker Guidelines. Nothing to add here, take them seriously and reach out to the (fantastic) speaker support if you have questions. Also submit your presentation in time (plan ahead accordingly) to not risk any trouble with the committee.
Tip #6 - Practice like never before. Practicing is probably the most important tip I can give you. I don't know how many times I practiced my talk, e.g. at home but also at some local Meetups to get some early feedback. First I was shocked with timing. Even though I had my deck down to 40min in my dry runs at home, at the Meetup I completely run out of time (50min). I was shocked, as I didn't know what to leave out.
The feedback from these sessions helped me to trim down content as it helped me to understand what to leave out/shorten. Keep in mind to also leave room for questions as a best practice (requirement?) by the speaker guidelines.
Tip #7 - The Demo Gods are not always with you. Demos can and will go wrong. Not just because of the typical suspect like slow WiFi, etc. I heard horror stories about expired certificates, daylight saving times (for those traveling through time zones on their way to KubeCon) affecting deployments, the content of a variable in your BASH script changing (e.g. when curling stuff from the web), keyboards breaking (Mac lovers, can you believe that?), hard disks crashing (even the backup disk not working), and so on.
Never ever rely on the demo gods, especially when you're not Kelsey Hightower :) Take video recordings of your demos so you not only have a backup when the live demo breaks. But also in case you're afraid of running out of time. In order to avoid the primary and backup disks crashing (yes, it happened at that KubeCon I was told), store a copy at your trusted cloud provider.
Tip #8 - The right Tools for the job. Sometimes you want to highlight something on your slide. This has two potentially issues. First, you have to constantly turn away from the audience which does not necessarily look good (if you can avoid it). Second, it might not always work depending on the (laser) pointer and room equipment (light, background).
This presenter from Logitech has really served me well. It has several useful features, the "Spotlight" (that's why the name) being my favorite feature. You'll never want to go back.
Tip #9 - Being recorded. I am not sure if you can opt-out from being recorded (please check with speaker support on the latest guidelines here) if you don't want to appear on Youtube for the rest of your life. But audio definitely will be recorded so chose your words (jokes) wisely. Again, practicing and reviewing helps. If you're ok with being recorded, at least think about which shirt (logos and "art") you want to be remembered by the internet ;)
Tip #10 - Social media. Social media is great for promoting your session and you should definitely send out reminders on various channels for your presentation. Something that is missing almost every time in the presentation templates (if you want to use them) is placeholders for your social media account and, more importantly, for your session ID. Even if the conference does not use session IDs externally (in the schedule builder), you might still want to add a handle to every slide so people can refer to your presentation (or particular slide) on social media with a hashtag that you then can search for feedback, questions, etc.
Tip #11 - Be yourself. Be authentic and don't try to sound super smart or funny (unless you are ;)). Seriously. Just be yourself and people will love you. Authenticity is key for a great presentation and the audience will smell when you try to fool them. It also makes practicing and the live performance easier as you don't have to pay attention on acting like somebody else.
From a content perspective make sure that you own and develop the content and you did not copy and paste like crazy from the Kubernetes docs or other presentations. It's absolutely ok to reference other sources, but please give them credit. Again, the audience will smell if you make things up. You should know what you're speaking about (not saying that you have to be an expert, but experience is what makes your talk unique). The final proof is during Q&A and KubeCon is a sharp audience ;)
Tip #12 - Changes to the proposal. The committee, based on your proposal description and details, might change the audience level. For example, I put my talk in as intermediate, but it was changed to all skill levels. This is not bad per se. Just watch out for changes and adapt your presentation accordingly or reach out to speaker support. If you were not expecting beginners or architects in your talk (because you had chosen another skill level and target group), you might lose parts of your audience. This could also negatively affect your session feedback/scores.
Wrapping up
I hope some of these tips are already useful and will help you getting started to work on your presentation. In the next post we are going to cover speaker tips when you are finally at the KubeCon event.
Kubernetes 2018 North American Contributor Summit
The 2018 North American Kubernetes Contributor Summit to be hosted right before KubeCon + CloudNativeCon Seattle is shaping up to be the largest yet. It is an event that brings together new and current contributors alike to connect and share face-to-face; and serves as an opportunity for existing contributors to help shape the future of community development. For new community members, it offers a welcoming space to learn, explore and put the contributor workflow to practice.
Unlike previous Contributor Summits, the event now spans two-days with a more relaxed ‘hallway’ track and general Contributor get-together to be hosted from 5-8pm on Sunday December 9th at the Garage Lounge and Gaming Hall, just a short walk away from the Convention Center. There, contributors can enjoy billiards, bowling, trivia and more; accompanied by a variety of food and drink.
Things pick up the following day, Monday the 10th with three separate tracks:
New contributor workshop
A half day workshop aimed at getting new and first time contributors onboarded and comfortable with working within the Kubernetes Community. Staying for the duration is required; this is not a workshop you can drop into.
Current contributor track
Reserved for those that are actively engaged with the development of the project; the Current Contributor Track includes Talks, Workshops, Birds of a Feather, Unconferences, Steering Committee Sessions, and more! Keep an eye on the schedule in GitHub as content is frequently being updated.
Docs sprint
SIG Docs will have a curated list of issues and challenges to be tackled closer to the event date.
How To Register
To register for the Contributor Summit, see the Registration section of the Event Details in GitHub. Please note that registrations are being reviewed. If you select the “Current Contributor Track” and are not an active contributor, you will be asked to attend the New Contributor Workshop, or asked to be put on a waitlist. With thousands of contributors and only 300 spots, we need to make sure the right folks are in the room.
If you have any questions or concerns, please don’t hesitate to reach out to the Contributor Summit Events Team at community@kubernetes.io.
Look forward to seeing everyone there!
2018 Steering Committee Election Results
Results
The Kubernetes Steering Committee Election is now complete and the following candidates came ahead to secure two year terms that start immediately:
- Aaron Crickenberger, Google, @spiffxp
- Davanum Srinivas, Huawei, @dims
- Tim St. Clair, Heptio, @timothysc
Big Thanks!
- Steering Committee Member Emeritus Quinton Hoole for his service to the community over the past year. We look forward to
- The candidates that came forward to run for election. May we always have a strong set of people who want to push community forward like yours in every election.
- All 307 voters who cast a ballot.
- And last but not least...Cornell University for hosting CIVS!
Get Involved with the Steering Committee
You can follow along to Steering Committee backlog items and weigh in by filing an issue or creating a PR against their repo. They meet bi-weekly on Wednesdays at 8pm UTC and regularly attend Meet Our Contributors.
Steering Committee Meetings:
Meet Our Contributors Steering AMA’s:
Topology-Aware Volume Provisioning in Kubernetes
The multi-zone cluster experience with persistent volumes is improving in Kubernetes 1.12 with the topology-aware dynamic provisioning beta feature. This feature allows Kubernetes to make intelligent decisions when dynamically provisioning volumes by getting scheduler input on the best place to provision a volume for a pod. In multi-zone clusters, this means that volumes will get provisioned in an appropriate zone that can run your pod, allowing you to easily deploy and scale your stateful workloads across failure domains to provide high availability and fault tolerance.
Previous challenges
Before this feature, running stateful workloads with zonal persistent disks (such as AWS ElasticBlockStore, Azure Disk, GCE PersistentDisk) in multi-zone clusters had many challenges. Dynamic provisioning was handled independently from pod scheduling, which meant that as soon as you created a PersistentVolumeClaim (PVC), a volume would get provisioned. This meant that the provisioner had no knowledge of what pods were using the volume, and any pod constraints it had that could impact scheduling.
This resulted in unschedulable pods because volumes were provisioned in zones that:
- did not have enough CPU or memory resources to run the pod
- conflicted with node selectors, pod affinity or anti-affinity policies
- could not run the pod due to taints
Another common issue was that a non-StatefulSet pod using multiple persistent volumes could have each volume provisioned in a different zone, again resulting in an unschedulable pod.
Suboptimal workarounds included overprovisioning of nodes, or manual creation of volumes in the correct zones, making it difficult to dynamically deploy and scale stateful workloads.
The topology-aware dynamic provisioning feature addresses all of the above issues.
Supported Volume Types
In 1.12, the following drivers support topology-aware dynamic provisioning:
- AWS EBS
- Azure Disk
- GCE PD (including Regional PD)
- CSI (alpha) - currently only the GCE PD CSI driver has implemented topology support
Design Principles
While the initial set of supported plugins are all zonal-based, we designed this feature to adhere to the Kubernetes principle of portability across environments. Topology specification is generalized and uses a similar label-based specification like in Pod nodeSelectors and nodeAffinity. This mechanism allows you to define your own topology boundaries, such as racks in on-premise clusters, without requiring modifications to the scheduler to understand these custom topologies.
In addition, the topology information is abstracted away from the pod specification, so a pod does not need knowledge of the underlying storage system’s topology characteristics. This means that you can use the same pod specification across multiple clusters, environments, and storage systems.
Getting Started
To enable this feature, all you need to do is to create a StorageClass with volumeBindingMode set to WaitForFirstConsumer:
kind: StorageClass
apiVersion: storage.k8s.io/v1
metadata:
name: topology-aware-standard
provisioner: kubernetes.io/gce-pd
volumeBindingMode: WaitForFirstConsumer
parameters:
type: pd-standard
This new setting instructs the volume provisioner to not create a volume immediately, and instead, wait for a pod using an associated PVC to run through scheduling. Note that previous StorageClass zone and zones parameters do not need to be specified anymore, as pod policies now drive the decision of which zone to provision a volume in.
Next, create a pod and PVC with this StorageClass. This sequence is the same as before, but with a different StorageClass specified in the PVC. The following is a hypothetical example, demonstrating the capabilities of the new feature by specifying many pod constraints and scheduling policies:
- multiple PVCs in a pod
- nodeAffinity across a subset of zones
- pod anti-affinity on zones
apiVersion: apps/v1
kind: StatefulSet
metadata:
name: web
spec:
serviceName: "nginx"
replicas: 2
selector:
matchLabels:
app: nginx
template:
metadata:
labels:
app: nginx
spec:
affinity:
nodeAffinity:
requiredDuringSchedulingIgnoredDuringExecution:
nodeSelectorTerms:
- matchExpressions:
- key: failure-domain.beta.kubernetes.io/zone
operator: In
values:
- us-central1-a
- us-central1-f
podAntiAffinity:
requiredDuringSchedulingIgnoredDuringExecution:
- labelSelector:
matchExpressions:
- key: app
operator: In
values:
- nginx
topologyKey: failure-domain.beta.kubernetes.io/zone
containers:
- name: nginx
image: gcr.io/google_containers/nginx-slim:0.8
ports:
- containerPort: 80
name: web
volumeMounts:
- name: www
mountPath: /usr/share/nginx/html
- name: logs
mountPath: /logs
volumeClaimTemplates:
- metadata:
name: www
spec:
accessModes: [ "ReadWriteOnce" ]
storageClassName: topology-aware-standard
resources:
requests:
storage: 10Gi
- metadata:
name: logs
spec:
accessModes: [ "ReadWriteOnce" ]
storageClassName: topology-aware-standard
resources:
requests:
storage: 1Gi
Afterwards, you can see that the volumes were provisioned in zones according to the policies set by the pod:
$ kubectl get pv -o=jsonpath='{range .items[*]}{.spec.claimRef.name}{"\t"}{.metadata.labels.failure\-domain\.beta\.kubernetes\.io/zone}{"\n"}{end}'
www-web-0 us-central1-f
logs-web-0 us-central1-f
www-web-1 us-central1-a
logs-web-1 us-central1-a
How can I learn more?
Official documentation on the topology-aware dynamic provisioning feature is available here
Documentation for CSI drivers is available at https://kubernetes-csi.github.io/docs/
What’s next?
We are actively working on improving this feature to support:
- more volume types, including dynamic provisioning for local volumes
- dynamic volume attachable count and capacity limits per node
How do I get involved?
If you have feedback for this feature or are interested in getting involved with the design and development, join the Kubernetes Storage Special-Interest-Group (SIG). We’re rapidly growing and always welcome new contributors.
Special thanks to all the contributors that helped bring this feature to beta, including Cheng Xing (verult), Chuqiang Li (lichuqiang), David Zhu (davidz627), Deep Debroy (ddebroy), Jan Šafránek (jsafrane), Jordan Liggitt (liggitt), Michelle Au (msau42), Pengfei Ni (feiskyer), Saad Ali (saad-ali), Tim Hockin (thockin), and Yecheng Fu (cofyc).
Kubernetes v1.12: Introducing RuntimeClass
Kubernetes originally launched with support for Docker containers running native applications on a Linux host. Starting with rkt in Kubernetes 1.3 more runtimes were coming, which lead to the development of the Container Runtime Interface (CRI). Since then, the set of alternative runtimes has only expanded: projects like Kata Containers and gVisor were announced for stronger workload isolation, and Kubernetes' Windows support has been steadily progressing.
With runtimes targeting so many different use cases, a clear need for mixed runtimes in a cluster arose. But all these different ways of running containers have brought a new set of problems to deal with:
- How do users know which runtimes are available, and select the runtime for their workloads?
- How do we ensure pods are scheduled to the nodes that support the desired runtime?
- Which runtimes support which features, and how can we surface incompatibilities to the user?
- How do we account for the varying resource overheads of the runtimes?
RuntimeClass aims to solve these issues.
RuntimeClass in Kubernetes 1.12
RuntimeClass was recently introduced as an alpha feature in Kubernetes 1.12. The initial implementation focuses on providing a runtime selection API, and paves the way to address the other open problems.
The RuntimeClass resource represents a container runtime supported in a Kubernetes cluster. The cluster provisioner sets up, configures, and defines the concrete runtimes backing the RuntimeClass. In its current form, a RuntimeClassSpec holds a single field, the RuntimeHandler. The RuntimeHandler is interpreted by the CRI implementation running on a node, and mapped to the actual runtime configuration. Meanwhile the PodSpec has been expanded with a new field, RuntimeClassName, which names the RuntimeClass that should be used to run the pod.
Why is RuntimeClass a pod level concept? The Kubernetes resource model expects certain resources to be shareable between containers in the pod. If the pod is made up of different containers with potentially different resource models, supporting the necessary level of resource sharing becomes very challenging. For example, it is extremely difficult to support a loopback (localhost) interface across a VM boundary, but this is a common model for communication between two containers in a pod.
What's next?
The RuntimeClass resource is an important foundation for surfacing runtime properties to the control plane. For example, to implement scheduler support for clusters with heterogeneous nodes supporting different runtimes, we might add NodeAffinity terms to the RuntimeClass definition. Another area to address is managing the variable resource requirements to run pods of different runtimes. The Pod Overhead proposal was an early take on this that aligns nicely with the RuntimeClass design, and may be pursued further.
Many other RuntimeClass extensions have also been proposed, and will be revisited as the feature continues to develop and mature. A few more extensions that are being considered include:
- Surfacing optional features supported by runtimes, and better visibility into errors caused by incompatible features.
- Automatic runtime or feature discovery, to support scheduling decisions without manual configuration.
- Standardized or conformant RuntimeClass names that define a set of properties that should be supported across clusters with RuntimeClasses of the same name.
- Dynamic registration of additional runtimes, so users can install new runtimes on existing clusters with no downtime.
- "Fitting" a RuntimeClass to a pod's requirements. For instance, specifying runtime properties and letting the system match an appropriate RuntimeClass, rather than explicitly assigning a RuntimeClass by name.
RuntimeClass will be under active development at least through 2019, and we’re excited to see the feature take shape, starting with the RuntimeClass alpha in Kubernetes 1.12.
Learn More
- Take it for a spin! As an alpha feature, there are some additional setup steps to use RuntimeClass. Refer to the RuntimeClass documentation for how to get it running.
- Check out the RuntimeClass Kubernetes Enhancement Proposal for more nitty-gritty design details.
- The Sandbox Isolation Level Decision documents the thought process that initially went into making RuntimeClass a pod-level choice.
- Join the discussions and help shape the future of RuntimeClass with the SIG-Node community
Introducing Volume Snapshot Alpha for Kubernetes
Kubernetes v1.12 introduces alpha support for volume snapshotting. This feature allows creating/deleting volume snapshots, and the ability to create new volumes from a snapshot natively using the Kubernetes API.
What is a Snapshot?
Many storage systems (like Google Cloud Persistent Disks, Amazon Elastic Block Storage, and many on-premise storage systems) provide the ability to create a "snapshot" of a persistent volume. A snapshot represents a point-in-time copy of a volume. A snapshot can be used either to provision a new volume (pre-populated with the snapshot data) or to restore the existing volume to a previous state (represented by the snapshot).
Why add Snapshots to Kubernetes?
The Kubernetes volume plugin system already provides a powerful abstraction that automates the provisioning, attaching, and mounting of block and file storage.
Underpinning all these features is the Kubernetes goal of workload portability: Kubernetes aims to create an abstraction layer between distributed systems applications and underlying clusters so that applications can be agnostic to the specifics of the cluster they run on and application deployment requires no “cluster specific” knowledge.
The Kubernetes Storage SIG identified snapshot operations as critical functionality for many stateful workloads. For example, a database administrator may want to snapshot a database volume before starting a database operation.
By providing a standard way to trigger snapshot operations in the Kubernetes API, Kubernetes users can now handle use cases like this without having to go around the Kubernetes API (and manually executing storage system specific operations).
Instead, Kubernetes users are now empowered to incorporate snapshot operations in a cluster agnostic way into their tooling and policy with the comfort of knowing that it will work against arbitrary Kubernetes clusters regardless of the underlying storage.
Additionally these Kubernetes snapshot primitives act as basic building blocks that unlock the ability to develop advanced, enterprise grade, storage administration features for Kubernetes: such as data protection, data replication, and data migration.
Which volume plugins support Kubernetes Snapshots?
Kubernetes supports three types of volume plugins: in-tree, Flex, and CSI. See Kubernetes Volume Plugin FAQ for details.
Snapshots are only supported for CSI drivers (not for in-tree or Flex). To use the Kubernetes snapshots feature, ensure that a CSI Driver that implements snapshots is deployed on your cluster.
As of the publishing of this blog, the following CSI drivers support snapshots:
Snapshot support for other drivers is pending, and should be available soon. Read the “Container Storage Interface (CSI) for Kubernetes Goes Beta” blog post to learn more about CSI and how to deploy CSI drivers.
Kubernetes Snapshots API
Similar to the API for managing Kubernetes Persistent Volumes, Kubernetes Volume Snapshots introduce three new API objects for managing snapshots:
VolumeSnapshot- Created by a Kubernetes user to request creation of a snapshot for a specified volume. It contains information about the snapshot operation such as the timestamp when the snapshot was taken and whether the snapshot is ready to use.
- Similar to the
PersistentVolumeClaimobject, the creation and deletion of this object represents a user desire to create or delete a cluster resource (a snapshot).
VolumeSnapshotContent- Created by the CSI volume driver once a snapshot has been successfully created. It contains information about the snapshot including snapshot ID.
- Similar to the
PersistentVolumeobject, this object represents a provisioned resource on the cluster (a snapshot). - Like
PersistentVolumeClaimandPersistentVolumeobjects, once a snapshot is created, theVolumeSnapshotContentobject binds to the VolumeSnapshot for which it was created (with a one-to-one mapping).
VolumeSnapshotClass- Created by cluster administrators to describe how snapshots should be created. including the driver information, the secrets to access the snapshot, etc.
It is important to note that unlike the core Kubernetes Persistent Volume objects, these Snapshot objects are defined as CustomResourceDefinitions (CRDs). The Kubernetes project is moving away from having resource types pre-defined in the API server, and is moving towards a model where the API server is independent of the API objects. This allows the API server to be reused for projects other than Kubernetes, and consumers (like Kubernetes) can simply install the resource types they require as CRDs.
CSI Drivers that support snapshots will automatically install the required CRDs. Kubernetes end users only need to verify that a CSI driver that supports snapshots is deployed on their Kubernetes cluster.
In addition to these new objects, a new, DataSource field has been added to the PersistentVolumeClaim object:
type PersistentVolumeClaimSpec struct {
AccessModes []PersistentVolumeAccessMode
Selector *metav1.LabelSelector
Resources ResourceRequirements
VolumeName string
StorageClassName *string
VolumeMode *PersistentVolumeMode
DataSource *TypedLocalObjectReference
}
This new alpha field enables a new volume to be created and automatically pre-populated with data from an existing snapshot.
Kubernetes Snapshots Requirements
Before using Kubernetes Volume Snapshotting, you must:
- Ensure a CSI driver implementing snapshots is deployed and running on your Kubernetes cluster.
- Enable the Kubernetes Volume Snapshotting feature via new Kubernetes feature gate (disabled by default for alpha):
- Set the following flag on the API server binary:
--feature-gates=VolumeSnapshotDataSource=true
- Set the following flag on the API server binary:
Before creating a snapshot, you also need to specify CSI driver information for snapshots by creating a VolumeSnapshotClass object and setting the snapshotter field to point to your CSI driver. In the example of VolumeSnapshotClass below, the CSI driver is com.example.csi-driver. You need at least one VolumeSnapshotClass object per snapshot provisioner. You can also set a default VolumeSnapshotClass for each individual CSI driver by putting an annotation snapshot.storage.kubernetes.io/is-default-class: "true" in the class definition.
apiVersion: snapshot.storage.k8s.io/v1alpha1
kind: VolumeSnapshotClass
metadata:
name: default-snapclass
annotations:
snapshot.storage.kubernetes.io/is-default-class: "true"
snapshotter: com.example.csi-driver
apiVersion: snapshot.storage.k8s.io/v1alpha1
kind: VolumeSnapshotClass
metadata:
name: csi-snapclass
snapshotter: com.example.csi-driver
parameters:
fakeSnapshotOption: foo
csiSnapshotterSecretName: csi-secret
csiSnapshotterSecretNamespace: csi-namespace
You must set any required opaque parameters based on the documentation for your CSI driver. As the example above shows, the parameter fakeSnapshotOption: foo and any referenced secret(s) will be passed to CSI driver during snapshot creation and deletion. The default CSI external-snapshotter reserves the parameter keys csiSnapshotterSecretName and csiSnapshotterSecretNamespace. If specified, it fetches the secret and passes it to the CSI driver when creating and deleting a snapshot.
And finally, before creating a snapshot, you must provision a volume using your CSI driver and populate it with some data that you want to snapshot (see the CSI blog post on how to create and use CSI volumes).
Creating a new Snapshot with Kubernetes
Once a VolumeSnapshotClass object is defined and you have a volume you want to snapshot, you may create a new snapshot by creating a VolumeSnapshot object.
The source of the snapshot specifies the volume to create a snapshot from. It has two parameters:
kind- must bePersistentVolumeClaimname- the PVC API object name
The namespace of the volume to snapshot is assumed to be the same as the namespace of the VolumeSnapshot object.
apiVersion: snapshot.storage.k8s.io/v1alpha1
kind: VolumeSnapshot
metadata:
name: new-snapshot-demo
namespace: demo-namespace
spec:
snapshotClassName: csi-snapclass
source:
name: mypvc
kind: PersistentVolumeClaim
In the VolumeSnapshot spec, user can specify the VolumeSnapshotClass which has the information about which CSI driver should be used for creating the snapshot . When the VolumeSnapshot object is created, the parameter fakeSnapshotOption: foo and any referenced secret(s) from the VolumeSnapshotClass are passed to the CSI plugin com.example.csi-driver via a CreateSnapshot call.
In response, the CSI driver triggers a snapshot of the volume and then automatically creates a VolumeSnapshotContent object to represent the new snapshot, and binds the new VolumeSnapshotContent object to the VolumeSnapshot, making it ready to use. If the CSI driver fails to create the snapshot and returns error, the snapshot controller reports the error in the status of VolumeSnapshot object and does not retry (this is different from other controllers in Kubernetes, and is to prevent snapshots from being taken at an unexpected time).
If a snapshot class is not specified, the external snapshotter will try to find and set a default snapshot class for the snapshot. The CSI driver specified by snapshotter in the default snapshot class must match the CSI driver specified by the provisioner in the storage class of the PVC.
Please note that the alpha release of Kubernetes Snapshot does not provide any consistency guarantees. You have to prepare your application (pause application, freeze filesystem etc.) before taking the snapshot for data consistency.
You can verify that the VolumeSnapshot object is created and bound with VolumeSnapshotContent by running kubectl describe volumesnapshot:
Readyshould be set to true underStatusto indicate this volume snapshot is ready for use.Creation Timefield indicates when the snapshot is actually created (cut).Restore Sizefield indicates the minimum volume size when restoring a volume from the snapshot.Snapshot Content Namefield in thespecpoints to theVolumeSnapshotContentobject created for this snapshot.
Importing an existing snapshot with Kubernetes
You can always import an existing snapshot to Kubernetes by manually creating a VolumeSnapshotContent object to represent the existing snapshot. Because VolumeSnapshotContent is a non-namespace API object, only a system admin may have the permission to create it. Once a VolumeSnapshotContent object is created, the user can create a VolumeSnapshot object pointing to the VolumeSnapshotContent object. The external-snapshotter controller will mark snapshot as ready after verifying the snapshot exists and the binding between VolumeSnapshot and VolumeSnapshotContent objects is correct. Once bound, the snapshot is ready to use in Kubernetes.
A VolumeSnapshotContent object should be created with the following fields to represent a pre-provisioned snapshot:
csiVolumeSnapshotSource- Snapshot identifying information.snapshotHandle- name/identifier of the snapshot. This field is required.driver- CSI driver used to handle this volume. This field is required. It must match the snapshotter name in the snapshot controller.creationTimeandrestoreSize- these fields are not required for pre-provisioned volumes. The external-snapshotter controller will automatically update them after creation.
volumeSnapshotRef- Pointer to theVolumeSnapshotobject this object should bind to.nameandnamespace- It specifies the name and namespace of theVolumeSnapshotobject which the content is bound to.UID- these fields are not required for pre-provisioned volumes.The external-snapshotter controller will update the field automatically after binding. If user specifies UID field, he/she must make sure that it matches with the binding snapshot’s UID. If the specified UID does not match the binding snapshot’s UID, the content is considered an orphan object and the controller will delete it and its associated snapshot.
snapshotClassName- This field is optional. The external-snapshotter controller will update the field automatically after binding.
apiVersion: snapshot.storage.k8s.io/v1alpha1
kind: VolumeSnapshotContent
metadata:
name: static-snapshot-content
spec:
csiVolumeSnapshotSource:
driver: com.example.csi-driver
snapshotHandle: snapshotcontent-example-id
volumeSnapshotRef:
kind: VolumeSnapshot
name: static-snapshot-demo
namespace: demo-namespace
A VolumeSnapshot object should be created to allow a user to use the snapshot:
snapshotClassName- name of the volume snapshot class. This field is optional. If set, the snapshotter field in the snapshot class must match the snapshotter name of the snapshot controller. If not set, the snapshot controller will try to find a default snapshot class.snapshotContentName- name of the volume snapshot content. This field is required for pre-provisioned volumes.
apiVersion: snapshot.storage.k8s.io/v1alpha1
kind: VolumeSnapshot
metadata:
name: static-snapshot-demo
namespace: demo-namespace
spec:
snapshotClassName: csi-snapclass
snapshotContentName: static-snapshot-content
Once these objects are created, the snapshot controller will bind them together, and set the field Ready (under Status) to True to indicate the snapshot is ready to use.
Provision a new volume from a snapshot with Kubernetes
To provision a new volume pre-populated with data from a snapshot object, use the new dataSource field in the PersistentVolumeClaim. It has three parameters:
- name - name of the
VolumeSnapshotobject representing the snapshot to use as source - kind - must be
VolumeSnapshot - apiGroup - must be
snapshot.storage.k8s.io
The namespace of the source VolumeSnapshot object is assumed to be the same as the namespace of the PersistentVolumeClaim object.
apiVersion: v1
kind: PersistentVolumeClaim
metadata:
name: pvc-restore
Namespace: demo-namespace
spec:
storageClassName: csi-storageclass
dataSource:
name: new-snapshot-demo
kind: VolumeSnapshot
apiGroup: snapshot.storage.k8s.io
accessModes:
- ReadWriteOnce
resources:
requests:
storage: 1Gi
When the PersistentVolumeClaim object is created, it will trigger provisioning of a new volume that is pre-populated with data from the specified snapshot.
As a storage vendor, how do I add support for snapshots to my CSI driver?
To implement the snapshot feature, a CSI driver MUST add support for additional controller capabilities CREATE_DELETE_SNAPSHOT and LIST_SNAPSHOTS, and implement additional controller RPCs: CreateSnapshot, DeleteSnapshot, and ListSnapshots. For details, see the CSI spec.
Although Kubernetes is as minimally prescriptive on the packaging and deployment of a CSI Volume Driver as possible, it provides a suggested mechanism for deploying an arbitrary containerized CSI driver on Kubernetes to simplify deployment of containerized CSI compatible volume drivers.
As part of this recommended deployment process, the Kubernetes team provides a number of sidecar (helper) containers, including a new external-snapshotter sidecar container.
The external-snapshotter watches the Kubernetes API server for VolumeSnapshot and VolumeSnapshotContent objects and triggers CreateSnapshot and DeleteSnapshot operations against a CSI endpoint. The CSI external-provisioner sidecar container has also been updated to support restoring volume from snapshot using the new dataSource PVC field.
In order to support snapshot feature, it is recommended that storage vendors deploy the external-snapshotter sidecar containers in addition to the external provisioner the external attacher, along with their CSI driver in a statefulset as shown in the following diagram.
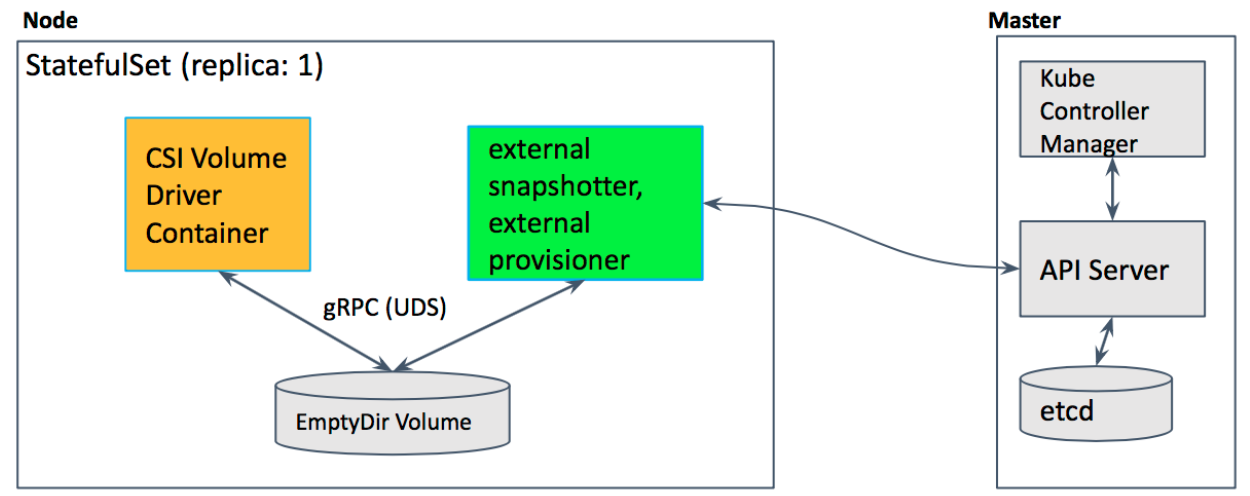
In this example deployment yaml file, two sidecar containers, the external provisioner and the external snapshotter, and CSI drivers are deployed together with the hostpath CSI plugin in the statefulset pod. Hostpath CSI plugin is a sample plugin, not for production.
What are the limitations of alpha?
The alpha implementation of snapshots for Kubernetes has the following limitations:
- Does not support reverting an existing volume to an earlier state represented by a snapshot (alpha only supports provisioning a new volume from a snapshot).
- Does not support “in-place restore” of an existing PersistentVolumeClaim from a snapshot: i.e. provisioning a new volume from a snapshot, but updating an existing PersistentVolumeClaim to point to the new volume and effectively making the PVC appear to revert to an earlier state (alpha only supports using a new volume provisioned from a snapshot via a new PV/PVC).
- No snapshot consistency guarantees beyond any guarantees provided by storage system (e.g. crash consistency).
What’s next?
Depending on feedback and adoption, the Kubernetes team plans to push the CSI Snapshot implementation to beta in either 1.13 or 1.14.
How can I learn more?
Check out additional documentation on the snapshot feature here: http://k8s.io/docs/concepts/storage/volume-snapshots and https://kubernetes-csi.github.io/docs/
How do I get involved?
This project, like all of Kubernetes, is the result of hard work by many contributors from diverse backgrounds working together.
In addition to the contributors who have been working on the Snapshot feature:
- Xing Yang (xing-yang)
- Jing Xu (jingxu97)
- Huamin Chen (rootfs)
- Tomas Smetana (tsmetana)
- Shiwei Xu (wackxu)
We offer a huge thank you to all the contributors in Kubernetes Storage SIG and CSI community who helped review the design and implementation of the project, including but not limited to the following:
- Saad Ali (saadali)
- Tim Hockin (thockin)
- Jan Šafránek (jsafrane)
- Luis Pabon (lpabon)
- Jordan Liggitt (liggitt)
- David Zhu (davidz627)
- Garth Bushell (garthy)
- Ardalan Kangarlou (kangarlou)
- Seungcheol Ko (sngchlko)
- Michelle Au (msau42)
- Humble Devassy Chirammal (humblec)
- Vladimir Vivien (vladimirvivien)
- John Griffith (j-griffith)
- Bradley Childs (childsb)
- Ben Swartzlander (bswartz)
If you’re interested in getting involved with the design and development of CSI or any part of the Kubernetes Storage system, join the Kubernetes Storage Special Interest Group (SIG). We’re rapidly growing and always welcome new contributors.
Support for Azure VMSS, Cluster-Autoscaler and User Assigned Identity
Introduction
With Kubernetes v1.12, Azure virtual machine scale sets (VMSS) and cluster-autoscaler have reached their General Availability (GA) and User Assigned Identity is available as a preview feature.
Azure VMSS allow you to create and manage identical, load balanced VMs that automatically increase or decrease based on demand or a set schedule. This enables you to easily manage and scale multiple VMs to provide high availability and application resiliency, ideal for large-scale applications like container workloads [1].
Cluster autoscaler allows you to adjust the size of the Kubernetes clusters based on the load conditions automatically.
Another exciting feature which v1.12 brings to the table is the ability to use User Assigned Identities with Kubernetes clusters [12].
In this article, we will do a brief overview of VMSS, cluster autoscaler and user assigned identity features on Azure.
VMSS
Azure’s Virtual Machine Scale sets (VMSS) feature offers users an ability to automatically create VMs from a single central configuration, provide load balancing via L4 and L7 load balancing, provide a path to use availability zones for high availability, provides large-scale VM instances et. al.
VMSS consists of a group of virtual machines, which are identical and can be managed and configured at a group level. More details of this feature in Azure itself can be found at the following link [1].
With Kubernetes v1.12 customers can create k8s cluster out of VMSS instances and utilize VMSS features.
Cluster components on Azure
Generally, standalone Kubernetes cluster in Azure consists of the following parts
- Compute - the VM itself and its properties.
- Networking - this includes the IPs and load balancers.
- Storage - the disks which are associated with the VMs.
Compute
Compute in cloud k8s cluster consists of the VMs. These VMs are created by provisioning tools such as acs-engine or AKS (in case of managed service). Eventually, they run various system daemons such as kubelet, kube-api server etc. either as a process (in some versions) or as a docker container.
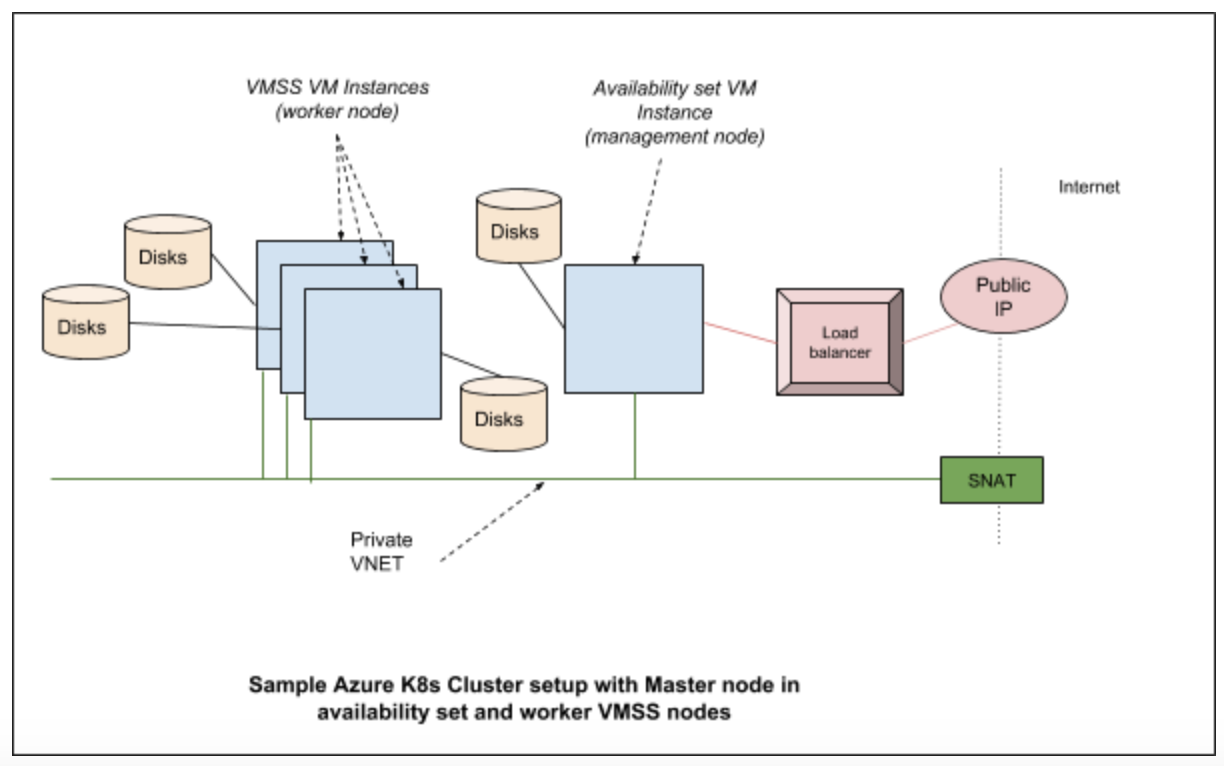
Networking
In Azure Kubernetes cluster various networking components are brought together to provide features required for users. Typically they consist of the network interfaces, network security groups, public IP resource, VNET (virtual networks), load balancers etc.
Storage
Kubernetes clusters are built on top of disks created in Azure. In a typical configuration, we have managed disks which are used to hold the regular OS images and a separate disk is used for etcd.
Cloud provider components
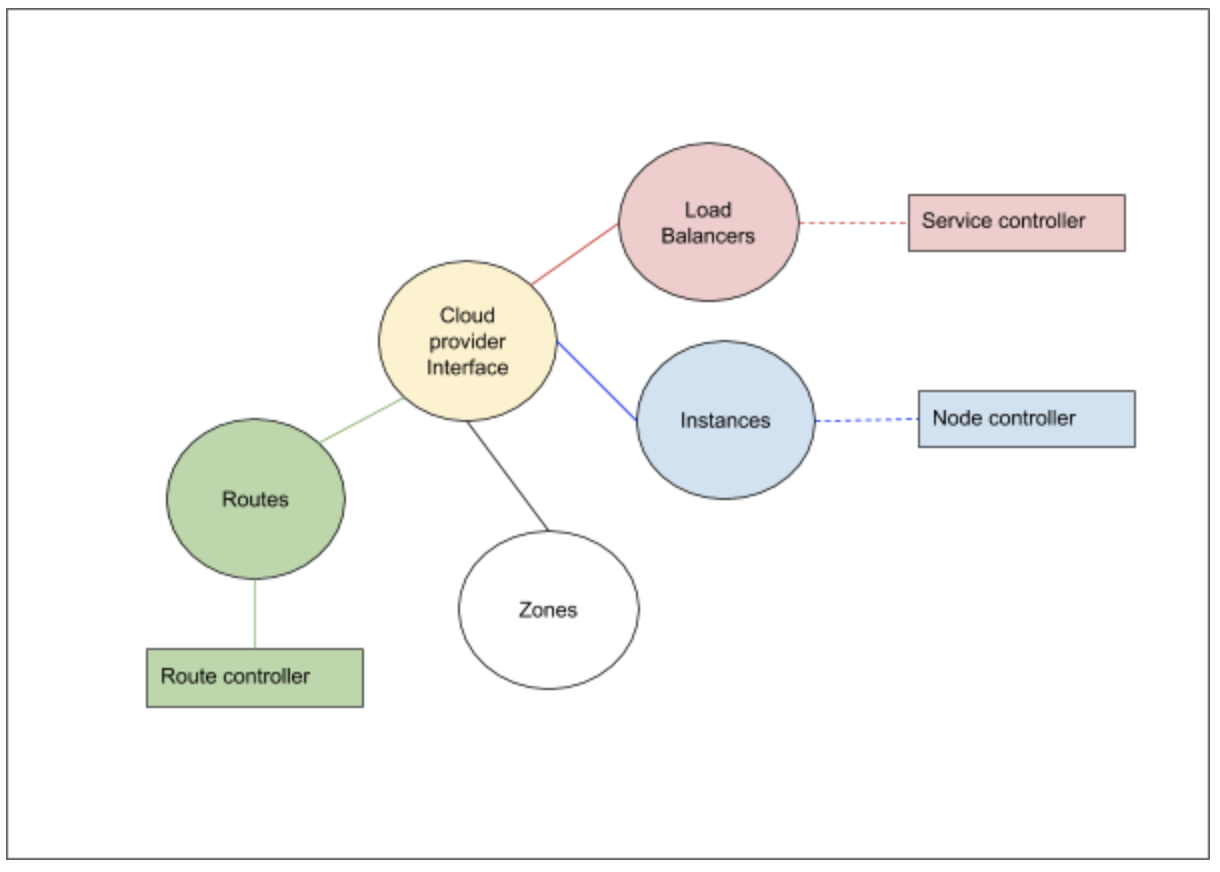
Kubernetes cloud provider interface provides interactions with clouds for managing cloud-specific resources, e.g. public IPs and routes. A good overview of these components is given in [2]. In case of Azure Kubernetes cluster, the Kubernetes interactions go through the Azure cloud provider layer and contact the various services running in the cloud.
The cloud provider implementation of K8s can be largely divided into the following component interfaces which we need to implement:
- Load Balancer
- Instances
- Zones
- Routes
In addition to the above interfaces, the storage services from the cloud provider is linked via the volume plugin layer.
Azure cloud provider implementation and VMSS
In the Azure cloud provider, for every type of cluster we implement, there is a VMType option which we specify. In case of VMSS, the VM type is “vmss”. The provisioning software (acs-engine, in future AKS etc.) would setup these values in /etc/kubernetes/azure.json file. Based on this type, various implementations would get instantiated [3]
The load balancer interface provides access to the underlying cloud provider load balancer service. The information about the load balancers and the control operations on them are required for Kubernetes to handle the services which gets hosted on the Kubernetes cluster. For VMSS support the changes ensure that the VMSS instances are part of the load balancer pool as required.
The instances interfaces help the cloud controller to get various details about a node from the cloud provider layer. For example, the details of a node like the IP address, the instance id etc, is obtained by the controller by means of the instances interfaces which the cloud provider layer registers with it. In case of VMSS support, we talk to VMSS service to gather information regarding the instances.
The zones interfaces help the cloud controller to get zone information for each node. Scheduler could spread pods to different availability zones with such information. It is also required for supporting topology aware dynamic provisioning features, e.g. AzureDisk. Each VMSS instances will be labeled with its current zone and region.
The routes interfaces help the cloud controller to setup advanced routes for Pod network. For example, a route with prefix node’s podCIDR and next hop node’s internal IP will be set for each node. In case of VMSS support, the next hops are VMSS virtual machines’ internal IP address.
The Azure volume plugin interfaces have been modified for VMSS to work properly. For example, the attach/detach to the AzureDisk have been modified to perform these operations at VMSS instance level.
Setting up a VMSS cluster on Azure
The following link [4] provides an example of acs-engine to create a Kubernetes cluster.
acs-engine deploy --subscription-id <subscription id> \
--dns-prefix <dns> --location <location> \
--api-model examples/kubernetes.json
API model file provides various configurations which acs-engine uses to create a cluster. The API model here [5] gives a good starting configuration to setup the VMSS cluster.
Once a VMSS cluster is created, here are some of the steps you can run to understand more about the cluster setup. Here is the output of kubectl get nodes from a cluster created using the above command:
$ kubectl get nodes
NAME STATUS ROLES AGE VERSION
k8s-agentpool1-92998111-vmss000000 Ready agent 1h v1.12.0-rc.2
k8s-agentpool1-92998111-vmss000001 Ready agent 1h v1.12.0-rc.2
k8s-master-92998111-0 Ready master 1h v1.12.0-rc.2
This cluster consists of two worker nodes and one master. Now how do we check which node is which in Azure parlance? In VMSS listing, we can see a single VMSS:
$ az vmss list -o table -g k8sblogkk1
Name ResourceGroup Location Zones Capacity Overprovision UpgradePolicy
---------------------------- --------------- ---------- ------- ---------- --------------- ---------------
k8s-agentpool1-92998111-vmss k8sblogkk1 westus2 2 False Manual
The nodes which we see as agents (in the kubectl get nodes command) are part of this vmss. We can use the following command to list the instances which are part of the VM scale set:
$ az vmss list-instances -g k8sblogkk1 -n k8s-agentpool1-92998111-vmss -o table
InstanceId LatestModelApplied Location Name ProvisioningState ResourceGroup VmId
------------ -------------------- ---------- ------------------------------ ------------------- --------------- ------------------------------------
0 True westus2 k8s-agentpool1-92998111-vmss_0 Succeeded K8SBLOGKK1 21c57d6c-9c8f-4a62-970f-63ed0fcba53f
1 True westus2 k8s-agentpool1-92998111-vmss_1 Succeeded K8SBLOGKK1 840743b9-0076-4a2e-920e-5ba9da296665
The node name does not match the name in the vm scale set, but if we run the following command to list the providerID we can find the matching node which resembles the instance name:
$ kubectl describe nodes k8s-agentpool1-92998111-vmss000000| grep ProviderID
ProviderID: azure:///subscriptions/<subscription id>/resourceGroups/k8sblogkk1/providers/Microsoft.Compute/virtualMachineScaleSets/k8s-agentpool1-92998111-vmss/virtualMachines/0
Current Status and Future
Currently the following is supported:
- VMSS master nodes and worker nodes
- VMSS on worker nodes and Availability set on master nodes combination.
- Per vm disk attach
- Azure Disk & Azure File support
- Availability zones (Alpha)
In future there will be support for the following:
- AKS with VMSS support
- Per VM instance public IP
Cluster Autoscaler
A Kubernetes cluster consists of nodes. These nodes can be virtual machines, bare metal servers or could be even virtual node (virtual kubelet). To avoid getting lost in permutations and combinations of Kubernetes ecosystem ;-), let's consider that the cluster we are discussing consists of virtual machines, which are hosted in a cloud (eg: Azure, Google or AWS). What this effectively means is that you have access to virtual machines which run Kubernetes agents and a master node which runs k8s services like API server. A detailed version of k8s architecture can be found here [11].
The number of nodes which are required on a cluster depends on the workload on the cluster. When the load goes up there is a need to increase the nodes and when it subsides, there is a need to reduce the nodes and clean up the resources which are no longer in use. One way this can be taken care of is to manually scale up the nodes which are part of the Kubernetes cluster and manually scale down when the demand reduces. But shouldn’t this be done automatically ? Answer to this question is the Cluster Autoscaler (CA).
The cluster autoscaler itself runs as a pod within the kubernetes cluster. The following figure illustrates the high level view of the setup with respect to the k8s cluster:
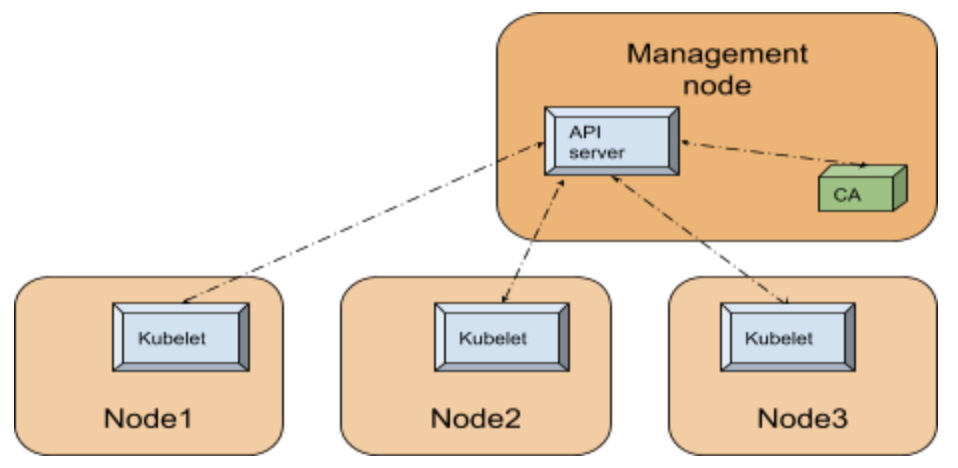
Since Cluster Autoscaler is a pod within the k8s cluster, it can use the in-cluster config and the Kubernetes go client [10] to contact the API server.
Internals
The API server is the central service which manages the state of the k8s cluster utilizing a backing store (an etcd database), runs on the management node or runs within the cloud (in case of managed service such as AKS). For any component within the Kubernetes cluster to figure out the state of the cluster, like for example the nodes registered in the cluster, contacting the API server is the way to go.
In order to simplify our discussion let’s divide the CA functionality into 3 parts as given below:
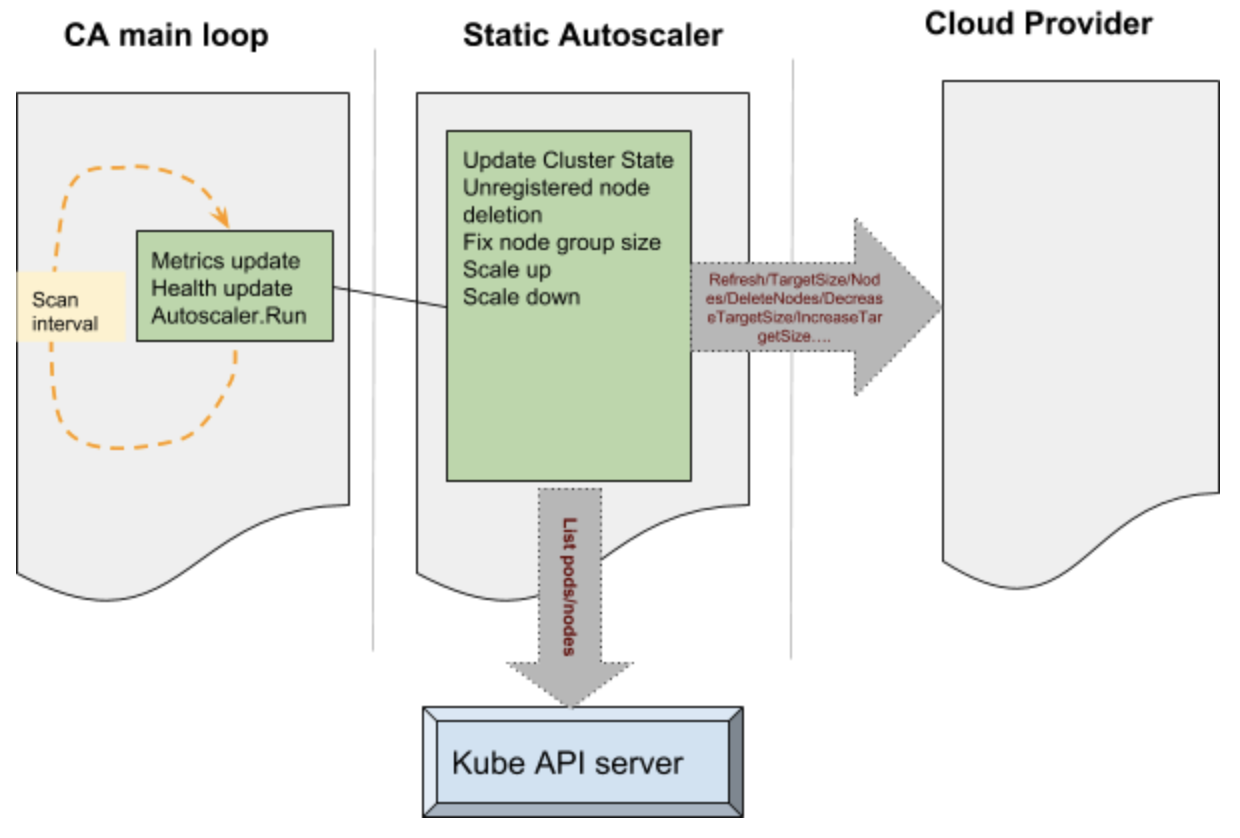
The main portion of the CA is a control loop which keeps running at every scan interval. This loop is responsible for updating the autoscaler metrics and health probes. Before this loop is entered auto scaler performs various operations such as claiming the leader state after performing a Kubernetes leader election. The main loop initializes static autoscaler component. This component initializes the underlying cloud provider based on the parameters passed onto the CA.
Various operations performed by the CA to manage the state of the cluster is passed onto the cloud provider component. Some examples like - increase target size, decrease target size etc, results in the cloud provider component talking to the cloud services internally and performing operations such as adding a node or deleting a node. These operations are performed on group of nodes in the cluster. The static autoscaler also keeps tab on the state of the system by querying the API server - operations such as list pods and list nodes are used to get hold of such information.
The decision to make a scale up is based on pods which remain unscheduled and a variety of checks and balances. The nodes which are free to be scaled down are deleted from the cluster and deleted from the cloud itself. The cluster autoscaler applies checks and balances before scaling up and scaling down - for example the nodes which have been recently added are given special consideration. During the deletion the nodes are drained to ensure that no disruption happens to the running pods.
Setting up CA on Azure:
Cluster Autoscaler is available as an add-on with acs-engine. The following link [15] has an example configuration file used to deploy autoscaler with acs-engine. The following link [8] provides details on manual step by step way to do the same.
In acs-engine case we use the regular command line to deploy:
acs-engine deploy --subscription-id <subscription id> \
--dns-prefix <dns> --location <location> \
--api-model examples/kubernetes.json
The main difference are the following lines in the config file at [15] makes sure that CA is deployed as an addon:
"addons": [
{
"name": "cluster-autoscaler",
"enabled": true,
"config": {
"minNodes": "1",
"maxNodes": "5"
}
}
]
The config section in the json above can be used to provide the configuration to the cluster autoscaler pod, eg: min and max nodes as above.
Once the setup completes we can see that the cluster-autoscaler pod is deployed in the system namespace:
$kubectl get pods -n kube-system | grep autoscaler
cluster-autoscaler-7bdc74d54c-qvbjs 1/1 Running 1 6m
Here is the output from the CA configmap and events from a sample cluster:
$kubectl -n kube-system describe configmap cluster-autoscaler-status
Name: cluster-autoscaler-status
Namespace: kube-system
Labels: <none>
Annotations: cluster-autoscaler.kubernetes.io/last-updated=2018-10-02 01:21:17.850010508 +0000 UTC
Data
====
status:
----
Cluster-autoscaler status at 2018-10-02 01:21:17.850010508 +0000 UTC:
Cluster-wide:
Health: Healthy (ready=3 unready=0 notStarted=0 longNotStarted=0 registered=3 longUnregistered=0)
LastProbeTime: 2018-10-02 01:21:17.772229859 +0000 UTC m=+3161.412682204
LastTransitionTime: 2018-10-02 00:28:49.944222739 +0000 UTC m=+13.584675084
ScaleUp: NoActivity (ready=3 registered=3)
LastProbeTime: 2018-10-02 01:21:17.772229859 +0000 UTC m=+3161.412682204
LastTransitionTime: 2018-10-02 00:28:49.944222739 +0000 UTC m=+13.584675084
ScaleDown: NoCandidates (candidates=0)
LastProbeTime: 2018-10-02 01:21:17.772229859 +0000 UTC m=+3161.412682204
LastTransitionTime: 2018-10-02 00:39:50.493307405 +0000 UTC m=+674.133759650
NodeGroups:
Name: k8s-agentpool1-92998111-vmss
Health: Healthy (ready=2 unready=0 notStarted=0 longNotStarted=0 registered=2 longUnregistered=0 cloudProviderTarget=2 (minSize=1, maxSize=5))
LastProbeTime: 2018-10-02 01:21:17.772229859 +0000 UTC m=+3161.412682204
LastTransitionTime: 2018-10-02 00:28:49.944222739 +0000 UTC m=+13.584675084
ScaleUp: NoActivity (ready=2 cloudProviderTarget=2)
LastProbeTime: 2018-10-02 01:21:17.772229859 +0000 UTC m=+3161.412682204
LastTransitionTime: 2018-10-02 00:28:49.944222739 +0000 UTC m=+13.584675084
ScaleDown: NoCandidates (candidates=0)
LastProbeTime: 2018-10-02 01:21:17.772229859 +0000 UTC m=+3161.412682204
LastTransitionTime: 2018-10-02 00:39:50.493307405 +0000 UTC m=+674.133759650
Events:
Type Reason Age From Message
---- ------ ---- ---- -------
Normal ScaleDownEmpty 42m cluster-autoscaler Scale-down: removing empty node k8s-agentpool1-92998111-vmss000002
As can be seen the events, the cluster autoscaler scaled down and deleted a node as there was no load on this cluster. The rest of the configmap in this case indicates that there are no further actions which the autoscaler is taking at this moment.
Current status and future:
Cluster Autoscaler currently supports four VM types: standard (VMAS), VMSS, ACS and AKS. In the future, Cluster Autoscaler will be integrated within AKS product, so that users can enable it by one-click.
User Assigned Identity
Inorder for the Kubernetes cluster components to securely talk to the cloud services, it needs to authenticate with the cloud provider. In Azure Kubernetes clusters, up until now this was done using two ways - Service Principals or Managed Identities. In case of service principal the credentials are stored within the cluster and there are password rotation and other challenges which user needs to incur to accommodate this model. Managed service identities takes out this burden from the user and manages the service instances directly [12].
There are two kinds of managed identities possible - one is system assigned and another is user assigned. In case of system assigned identity each vm in the Kubernetes cluster is assigned a managed identity during creation. This identity is used by various Kubernetes components needing access to Azure resources. Examples to these operations are getting/updating load balancer configuration, getting/updating vm information etc. With the system assigned managed identity, user has no control over the identity which is assigned to the underlying vm. The system automatically assigns it and this reduces the flexibility for the user.
With v1.12 we bring user assigned managed identity support for Kubernetes. With this support user does not have to manage any passwords but at the same time has the flexibility to manage the identity which is used by the cluster. For example if the user needs to allow access to a cluster for a specific storage account or a Azure key vault, the user assigned identity can be created in advance and key vault access provided.
Internals
To understand the internals, we will focus on a cluster created using acs-engine. This can be configured in other ways, but the basic interactions are of the same pattern.
The acs-engine sets up the cluster with the required configuration. The /etc/kubernetes/azure.json file provides a way for the cluster components (eg: kube-apiserver) to gather configuration on how to access the cloud resources. In a user managed identity cluster there is a value filled with the key as UserAssignedIdentityID. This value is filled with the client id of the user assigned identity created by acs-engine or provided by the user, however the case may be. The code which does the authentication for Kubernetes on azure can be found here [14]. This code uses Azure adal packages to get authenticated to access various resources in the cloud. In case of user assigned identity the following API call is made to get new token:
adal.NewServicePrincipalTokenFromMSIWithUserAssignedID(msiEndpoint,
env.ServiceManagementEndpoint,
config.UserAssignedIdentityID)
This calls hits either the instance metadata service or the vm extension [12] to gather the token which is then used to access various resources.
Setting up a cluster with user assigned identity
With the upstream support for user assigned identity in v1.12, it is now supported in the acs-engine to create a cluster with the user assigned identity. The json config files present here [13] can be used to create a cluster with user assigned identity. The same step used to create a vmss cluster can be used to create a cluster which has user assigned identity assigned.
acs-engine deploy --subscription-id <subscription id> \
--dns-prefix <dns> --location <location> \
--api-model examples/kubernetes-msi-userassigned/kube-vmss.json
The main config values here are the following:
"useManagedIdentity": true
"userAssignedID": "acsenginetestid"
The first one useManagedIdentity indicates to acs-engine that we are going to use the managed identity extension. This sets up the necessary packages and extensions required for the managed identities to work. The next one userAssignedID provides the information on the user identity which is to be used with the cluster.
Current status and future
Currently we support the user assigned identity creation with the cluster using deploy of the acs-engine. In future this will become part of AKS.
Get involved
For azure specific discussions - please checkout the Azure SIG page at [6] and come and join the #sig-azure slack channel for more.
For CA, please checkout the Autoscaler project here [7] and join the #sig-autoscaling Slack for more discussions.
For the acs-engine (the unmanaged variety) on Azure docs can be found here: [9]. More details about the managed service from Azure Kubernetes Service (AKS) here [5].
References
https://learn.microsoft.com/en-us/azure/virtual-machine-scale-sets/overview
/docs/concepts/architecture/cloud-controller/
https://github.com/Azure/acs-engine/blob/master/docs/kubernetes/deploy.md
https://github.com/kubernetes/community/tree/master/sig-azure
/docs/concepts/architecture/
https://learn.microsoft.com/en-us/azure/active-directory/managed-identities-azure-resources/overview
https://github.com/Azure/acs-engine/tree/master/examples/kubernetes-msi-userassigned
14)https://github.com/kubernetes/kubernetes/blob/release-1.17/staging/src/k8s.io/legacy-cloud-providers/azure/auth/azure_auth.go
Introducing the Non-Code Contributor’s Guide
It was May 2018 in Copenhagen, and the Kubernetes community was enjoying the contributor summit at KubeCon/CloudNativeCon, complete with the first run of the New Contributor Workshop. As a time of tremendous collaboration between contributors, the topics covered ranged from signing the CLA to deep technical conversations. Along with the vast exchange of information and ideas, however, came continued scrutiny of the topics at hand to ensure that the community was being as inclusive and accommodating as possible. Over that spring week, some of the pieces under the microscope included the many themes being covered, and how they were being presented, but also the overarching characteristics of the people contributing and the skill sets involved. From the discussions and analysis that followed grew the idea that the community was not benefiting as much as it could from the many people who wanted to contribute, but whose strengths were in areas other than writing code.
This all led to an effort called the Non-Code Contributor’s Guide.
Now, it’s important to note that Kubernetes is rare, if not unique, in the open source world, in that it was defined very early on as both a project and a community. While the project itself is focused on the codebase, it is the community of people driving it forward that makes the project successful. The community works together with an explicit set of community values, guiding the day-to-day behavior of contributors whether on GitHub, Slack, Discourse, or sitting together over tea or coffee.
By having a community that values people first, and explicitly values a diversity of people, the Kubernetes project is building a product to serve people with diverse needs. The different backgrounds of the contributors bring different approaches to the problem solving, with different methods of collaboration, and all those different viewpoints ultimately create a better project.
The Non-Code Contributor’s Guide aims to make it easy for anyone to contribute to the Kubernetes project in a way that makes sense for them. This can be in many forms, technical and non-technical, based on the person's knowledge of the project and their available time. Most individuals are not developers, and most of the world’s developers are not paid to fully work on open source projects. Based on this we have started an ever-growing list of possible ways to contribute to the Kubernetes project in a Non-Code way!
Get Involved
Some of the ways that you can contribute to the Kubernetes community without writing a single line of code include:
- Community education, answering questions on Discuss, StackOverflow, and Slack
- Outward facing community work such as hosting meetups and events
- Writing project documentation
- Writing operational manuals, helping users understand how to run Kubernetes
- Helping deliver Kubernetes, as a part of the release team
- Project, program, and product management
- And many more!
The guide to get started with Kubernetes project contribution is documented on GitHub, and as the Non-Code Contributors Guide is a part of that Kubernetes Contributors Guide, it can be found here. As stated earlier, this list is not exhaustive and will continue to be a work in progress.
To date, the typical Non-Code contributions fall into the following categories:
- Roles that are based on skill sets other than “software developer”
- Non-Code contributions in primarily code-based roles
- “Post-Code” roles, that are not code-based, but require knowledge of either the code base or management of the code base
If you, dear reader, have any additional ideas for a Non-Code way to contribute, whether or not it fits in an existing category, the team will always appreciate if you could help us expand the list.
If a contribution of the Non-Code nature appeals to you, please read the Non-Code Contributions document, and then check the Contributor Role Board to see if there are any open positions where your expertise could be best used! If there are no listed open positions that match your skill set, drop on by the #sig-contribex channel on Slack, and we’ll point you in the right direction.
We hope to see you contributing to the Kubernetes community soon!
KubeDirector: The easy way to run complex stateful applications on Kubernetes
KubeDirector is an open source project designed to make it easy to run complex stateful scale-out application clusters on Kubernetes. KubeDirector is built using the custom resource definition (CRD) framework and leverages the native Kubernetes API extensions and design philosophy. This enables transparent integration with Kubernetes user/resource management as well as existing clients and tools.
We recently introduced the KubeDirector project, as part of a broader open source Kubernetes initiative we call BlueK8s. I’m happy to announce that the pre-alpha code for KubeDirector is now available. And in this blog post, I’ll show how it works.
KubeDirector provides the following capabilities:
- The ability to run non-cloud native stateful applications on Kubernetes without modifying the code. In other words, it’s not necessary to decompose these existing applications to fit a microservices design pattern.
- Native support for preserving application-specific configuration and state.
- An application-agnostic deployment pattern, minimizing the time to onboard new stateful applications to Kubernetes.
KubeDirector enables data scientists familiar with data-intensive distributed applications such as Hadoop, Spark, Cassandra, TensorFlow, Caffe2, etc. to run these applications on Kubernetes -- with a minimal learning curve and no need to write GO code. The applications controlled by KubeDirector are defined by some basic metadata and an associated package of configuration artifacts. The application metadata is referred to as a KubeDirectorApp resource.
To understand the components of KubeDirector, clone the repository on GitHub using a command similar to:
git clone http://<userid>@github.com/bluek8s/kubedirector.
The KubeDirectorApp definition for the Spark 2.2.1 application is located
in the file kubedirector/deploy/example_catalog/cr-app-spark221e2.json.
~> cat kubedirector/deploy/example_catalog/cr-app-spark221e2.json
{
"apiVersion": "kubedirector.bluedata.io/v1alpha1",
"kind": "KubeDirectorApp",
"metadata": {
"name" : "spark221e2"
},
"spec" : {
"systemctlMounts": true,
"config": {
"node_services": [
{
"service_ids": [
"ssh",
"spark",
"spark_master",
"spark_worker"
],
…
The configuration of an application cluster is referred to as a KubeDirectorCluster resource. The
KubeDirectorCluster definition for a sample Spark 2.2.1 cluster is located in the file
kubedirector/deploy/example_clusters/cr-cluster-spark221.e1.yaml.
~> cat kubedirector/deploy/example_clusters/cr-cluster-spark221.e1.yaml
apiVersion: "kubedirector.bluedata.io/v1alpha1"
kind: "KubeDirectorCluster"
metadata:
name: "spark221e2"
spec:
app: spark221e2
roles:
- name: controller
replicas: 1
resources:
requests:
memory: "4Gi"
cpu: "2"
limits:
memory: "4Gi"
cpu: "2"
- name: worker
replicas: 2
resources:
requests:
memory: "4Gi"
cpu: "2"
limits:
memory: "4Gi"
cpu: "2"
- name: jupyter
…
Running Spark on Kubernetes with KubeDirector
With KubeDirector, it’s easy to run Spark clusters on Kubernetes.
First, verify that Kubernetes (version 1.9 or later) is running, using the command kubectl version
~> kubectl version
Client Version: version.Info{Major:"1", Minor:"11", GitVersion:"v1.11.3", GitCommit:"a4529464e4629c21224b3d52edfe0ea91b072862", GitTreeState:"clean", BuildDate:"2018-09-09T18:02:47Z", GoVersion:"go1.10.3", Compiler:"gc", Platform:"linux/amd64"}
Server Version: version.Info{Major:"1", Minor:"11", GitVersion:"v1.11.3", GitCommit:"a4529464e4629c21224b3d52edfe0ea91b072862", GitTreeState:"clean", BuildDate:"2018-09-09T17:53:03Z", GoVersion:"go1.10.3", Compiler:"gc", Platform:"linux/amd64"}
Deploy the KubeDirector service and the example KubeDirectorApp resource definitions with the commands:
cd kubedirector
make deploy
These will start the KubeDirector pod:
~> kubectl get pods
NAME READY STATUS RESTARTS AGE
kubedirector-58cf59869-qd9hb 1/1 Running 0 1m
List the installed KubeDirector applications with kubectl get KubeDirectorApp
~> kubectl get KubeDirectorApp
NAME AGE
cassandra311 30m
spark211up 30m
spark221e2 30m
Now you can launch a Spark 2.2.1 cluster using the example KubeDirectorCluster file and the
kubectl create -f deploy/example_clusters/cr-cluster-spark211up.yaml command.
Verify that the Spark cluster has been started:
~> kubectl get pods
NAME READY STATUS RESTARTS AGE
kubedirector-58cf59869-djdwl 1/1 Running 0 19m
spark221e2-controller-zbg4d-0 1/1 Running 0 23m
spark221e2-jupyter-2km7q-0 1/1 Running 0 23m
spark221e2-worker-4gzbz-0 1/1 Running 0 23m
spark221e2-worker-4gzbz-1 1/1 Running 0 23m
The running services now include the Spark services:
~> kubectl get service
NAME TYPE CLUSTER-IP EXTERNAL-IP PORT(S) AGE
kubedirector ClusterIP 10.98.234.194 <none> 60000/TCP 1d
kubernetes ClusterIP 10.96.0.1 <none> 443/TCP 1d
svc-spark221e2-5tg48 ClusterIP None <none> 8888/TCP 21s
svc-spark221e2-controller-tq8d6-0 NodePort 10.104.181.123 <none> 22:30534/TCP,8080:31533/TCP,7077:32506/TCP,8081:32099/TCP 20s
svc-spark221e2-jupyter-6989v-0 NodePort 10.105.227.249 <none> 22:30632/TCP,8888:30355/TCP 20s
svc-spark221e2-worker-d9892-0 NodePort 10.107.131.165 <none> 22:30358/TCP,8081:32144/TCP 20s
svc-spark221e2-worker-d9892-1 NodePort 10.110.88.221 <none> 22:30294/TCP,8081:31436/TCP 20s
Pointing the browser at port 31533 connects to the Spark Master UI:
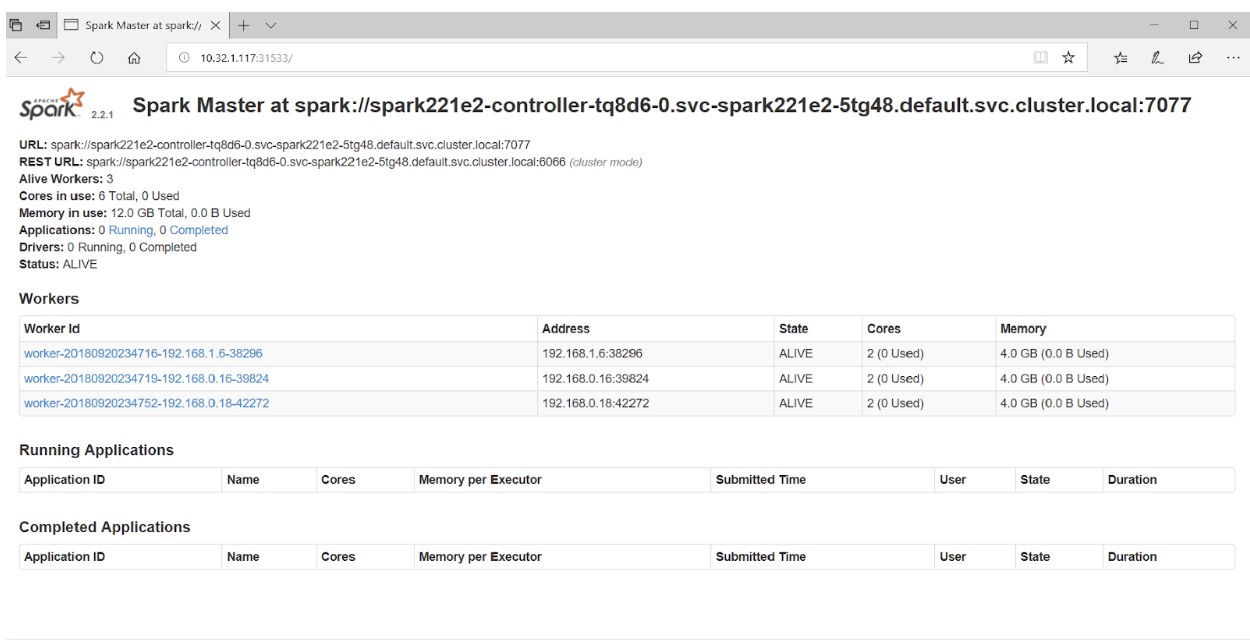
That’s all there is to it! In fact, in the example above we also deployed a Jupyter notebook along with the Spark cluster.
To start another application (e.g. Cassandra), just specify another KubeDirectorApp file:
kubectl create -f deploy/example_clusters/cr-cluster-cassandra311.yaml
See the running Cassandra cluster:
~> kubectl get pods
NAME READY STATUS RESTARTS AGE
cassandra311-seed-v24r6-0 1/1 Running 0 1m
cassandra311-seed-v24r6-1 1/1 Running 0 1m
cassandra311-worker-rqrhl-0 1/1 Running 0 1m
cassandra311-worker-rqrhl-1 1/1 Running 0 1m
kubedirector-58cf59869-djdwl 1/1 Running 0 1d
spark221e2-controller-tq8d6-0 1/1 Running 0 22m
spark221e2-jupyter-6989v-0 1/1 Running 0 22m
spark221e2-worker-d9892-0 1/1 Running 0 22m
spark221e2-worker-d9892-1 1/1 Running 0 22m
Now you have a Spark cluster (with a Jupyter notebook) and a Cassandra cluster running on Kubernetes.
Use kubectl get service to see the set of services.
~> kubectl get service
NAME TYPE CLUSTER-IP EXTERNAL-IP PORT(S) AGE
kubedirector ClusterIP 10.98.234.194 <none> 60000/TCP 1d
kubernetes ClusterIP 10.96.0.1 <none> 443/TCP 1d
svc-cassandra311-seed-v24r6-0 NodePort 10.96.94.204 <none> 22:31131/TCP,9042:30739/TCP 3m
svc-cassandra311-seed-v24r6-1 NodePort 10.106.144.52 <none> 22:30373/TCP,9042:32662/TCP 3m
svc-cassandra311-vhh29 ClusterIP None <none> 8888/TCP 3m
svc-cassandra311-worker-rqrhl-0 NodePort 10.109.61.194 <none> 22:31832/TCP,9042:31962/TCP 3m
svc-cassandra311-worker-rqrhl-1 NodePort 10.97.147.131 <none> 22:31454/TCP,9042:31170/TCP 3m
svc-spark221e2-5tg48 ClusterIP None <none> 8888/TCP 24m
svc-spark221e2-controller-tq8d6-0 NodePort 10.104.181.123 <none> 22:30534/TCP,8080:31533/TCP,7077:32506/TCP,8081:32099/TCP 24m
svc-spark221e2-jupyter-6989v-0 NodePort 10.105.227.249 <none> 22:30632/TCP,8888:30355/TCP 24m
svc-spark221e2-worker-d9892-0 NodePort 10.107.131.165 <none> 22:30358/TCP,8081:32144/TCP 24m
svc-spark221e2-worker-d9892-1 NodePort 10.110.88.221 <none> 22:30294/TCP,8081:31436/TCP 24m
Get Involved
KubeDirector is a fully open source, Apache v2 licensed, project – the first of multiple open source projects within a broader initiative we call BlueK8s. The pre-alpha code for KubeDirector has just been released and we would love for you to join the growing community of developers, contributors, and adopters. Follow @BlueK8s on Twitter and get involved through these channels:
- KubeDirector chat room on Slack
- KubeDirector GitHub repo
Building a Network Bootable Server Farm for Kubernetes with LTSP

In this post, I'm going to introduce you to a cool technology for Kubernetes, LTSP. It is useful for large baremetal Kubernetes deployments.
You don't need to think about installing an OS and binaries on each node anymore. Why? You can do that automatically through Dockerfile!
You can buy and put 100 new servers into a production environment and get them working immediately - it's really amazing!
Intrigued? Let me walk you through how it works.
Summary
Please note: this is a cool hack, but is not officially supported in Kubernetes.
First, we need to understand how exactly it works.
In short, for all nodes we have prepared the image with the OS, Docker, Kubelet and everything else that you need there. This image with the kernel is building automatically by CI using Dockerfile. End nodes are booting the kernel and OS from this image via the network.
Nodes are using overlays as the root filesystem and after reboot any changes will be lost (like in Docker containers). You have a config-file where you can describe mounts and some initial commands which should be executed during node boot (Example: set root user ssh-key and kubeadm join commands)
Image Preparation Process
We will use LTSP project because it's gives us everything we need to organize the network booting environment. Basically, LTSP is a pack of shell-scripts which makes our life much easier.
LTSP provides a initramfs module, a few helper-scripts, and the configuration system which prepare the system during the early state of boot, before the main init process call.
This is what the image preparation procedure looks like:
- You're deploying the basesystem in the chroot environment.
- Make any needed changes there, install software.
- Run the
ltsp-build-imagecommand
After that, you will get the squashed image from the chroot with all the software inside. Each node will download this image during the boot and use it as the rootfs. For the update node, you can just reboot it. The new squashed image will be downloaded and mounted into the rootfs.
Server Components
The server part of LTSP includes two components in our case:
- TFTP-server - TFTP is the initial protocol, it is used the download the kernel, initramfs and main config - lts.conf.
- NBD-server - NBD protocol is used to distribute the squashed rootfs image to the clients. It is the fastest way, but if you want, it can be replaced by the NFS or AoE protocol.
You should also have:
- DHCP-server - it will distribute the IP-settings and a few specific options to the clients to make it possible for them to boot from our LTSP-server.
Node Booting Process
This is how the node is booting up
- The first time, the node will ask DHCP for IP-settings and
next-server,filenameoptions. - Next, the node will apply settings and download bootloader (pxelinux or grub)
- Bootloader will download and read config with the kernel and initramfs image.
- Then bootloader will download the kernel and initramfs and execute it with specific cmdline options.
- During the boot, initramfs modules will handle options from cmdline and do some actions like connect NBD-device, prepare overlay rootfs, etc.
- Afterwards it will call the ltsp-init system instead of the normal init.
- ltsp-init scripts will prepare the system on the earlier stage, before the main init will be called. Basically it applies the setting from lts.conf (main config): write fstab and rc.local entries etc.
- Call the main init (systemd) which is booting the configured system as usual, mounts shares from fstab, start targets and services, executes commands from rc.local file.
- In the end you have a fully configured and booted system ready for further operations.
Preparing the Server
As I said before, I'm preparing the LTSP-server with the squashed image automatically using Dockerfile. This method is quite good because you have all steps described in your git repository. You have versioning, branches, CI and everything that you used to use for preparing your usual Docker projects.
Otherwise, you can deploy the LTSP server manually by executing all steps by hand. This is a good practice for learning and understanding the basic principles.
Just repeat all the steps listed here by hand, just to try to install LTSP without Dockerfile.
Used Patches List
LTSP still has some issues which authors don’t want to apply, yet. However LTSP is easy customizable so I prepared a few patches for myself and will share them here.
I’ll create a fork if the community will warmly accept my solution.
- feature-grub.diff LTSP does not support EFI by default, so I've prepared a patch which adds GRUB2 with EFI support.
- feature_preinit.diff This patch adds a PREINIT option to lts.conf, which allows you to run custom commands before the main init call. It may be useful to modify the systemd units and configure the network. It's remarkable that all environment variables from the boot environment are saved and you can use them in your scripts.
- feature_initramfs_params_from_lts_conf.diff Solves a problem with NBD_TO_RAM option, after this patch you can specify it on lts.conf inside chroot. (not in tftp directory)
- nbd-server-wrapper.sh This is not a patch but a special wrapper script which allows you to run NBD-server in the foreground. It is useful if you want to run it inside a Docker container.
Dockerfile Stages
We will use stage building in our Dockerfile to leave only the needed parts in our Docker image. The unused parts will be removed from the final image.
ltsp-base
(install basic LTSP server software)
|
|---basesystem
| (prepare chroot with main software and kernel)
| |
| |---builder
| | (build additional software from sources, if needed)
| |
| '---ltsp-image
| (install additional software, docker, kubelet and build squashed image)
|
'---final-stage
(copy squashed image, kernel and initramfs into first stage)
Stage 1: ltsp-base
Let's start writing our Dockerfile. This is the first part:
FROM ubuntu:16.04 as ltsp-base
ADD nbd-server-wrapper.sh /bin/
ADD /patches/feature-grub.diff /patches/feature-grub.diff
RUN apt-get -y update \
&& apt-get -y install \
ltsp-server \
tftpd-hpa \
nbd-server \
grub-common \
grub-pc-bin \
grub-efi-amd64-bin \
curl \
patch \
&& sed -i 's|in_target mount|in_target_nofail mount|' \
/usr/share/debootstrap/functions \
# Add EFI support and Grub bootloader (#1745251)
&& patch -p2 -d /usr/sbin < /patches/feature-grub.diff \
&& rm -rf /var/lib/apt/lists \
&& apt-get clean
At this stage our Docker image has already been installed:
- NBD-server
- TFTP-server
- LTSP-scripts with grub bootloader support (for EFI)
Stage 2: basesystem
In this stage we will prepare a chroot environment with basesystem, and install basic software with the kernel.
We will use the classic debootstrap instead of ltsp-build-client to prepare the base image, because ltsp-build-client will install GUI and few other things which we don't need for the server deployment.
FROM ltsp-base as basesystem
ARG DEBIAN_FRONTEND=noninteractive
# Prepare base system
RUN debootstrap --arch amd64 xenial /opt/ltsp/amd64
# Install updates
RUN echo "\
deb http://archive.ubuntu.com/ubuntu xenial main restricted universe multiverse\n\
deb http://archive.ubuntu.com/ubuntu xenial-updates main restricted universe multiverse\n\
deb http://archive.ubuntu.com/ubuntu xenial-security main restricted universe multiverse" \
> /opt/ltsp/amd64/etc/apt/sources.list \
&& ltsp-chroot apt-get -y update \
&& ltsp-chroot apt-get -y upgrade
# Installing LTSP-packages
RUN ltsp-chroot apt-get -y install ltsp-client-core
# Apply initramfs patches
# 1: Read params from /etc/lts.conf during the boot (#1680490)
# 2: Add support for PREINIT variables in lts.conf
ADD /patches /patches
RUN patch -p4 -d /opt/ltsp/amd64/usr/share < /patches/feature_initramfs_params_from_lts_conf.diff \
&& patch -p3 -d /opt/ltsp/amd64/usr/share < /patches/feature_preinit.diff
# Write new local client config for boot NBD image to ram:
RUN echo "[Default]\nLTSP_NBD_TO_RAM = true" \
> /opt/ltsp/amd64/etc/lts.conf
# Install packages
RUN echo 'APT::Install-Recommends "0";\nAPT::Install-Suggests "0";' \
>> /opt/ltsp/amd64/etc/apt/apt.conf.d/01norecommend \
&& ltsp-chroot apt-get -y install \
software-properties-common \
apt-transport-https \
ca-certificates \
ssh \
bridge-utils \
pv \
jq \
vlan \
bash-completion \
screen \
vim \
mc \
lm-sensors \
htop \
jnettop \
rsync \
curl \
wget \
tcpdump \
arping \
apparmor-utils \
nfs-common \
telnet \
sysstat \
ipvsadm \
ipset \
make
# Install kernel
RUN ltsp-chroot apt-get -y install linux-generic-hwe-16.04
Note that you may encounter problems with some packages, such as lvm2.
They have not fully optimized for installing in an unprivileged chroot.
Their postinstall scripts try to call some privileged commands which can fail with errors and block the package installation.
Solution:
- Some of them can be installed before the kernel without any problems (like
lvm2) - But for some of them you will need to use this workaround to install without the postinstall script.
Stage 3: builder
Now we can build all the necessary software and kernel modules. It's really cool that you can do that automatically in this stage. You can skip this stage if you have nothing to do here.
Here is example for install latest MLNX_EN driver:
FROM basesystem as builder
# Set cpuinfo (for building from sources)
RUN cp /proc/cpuinfo /opt/ltsp/amd64/proc/cpuinfo
# Compile Mellanox driver
RUN ltsp-chroot sh -cx \
' VERSION=4.3-1.0.1.0-ubuntu16.04-x86_64 \
&& curl -L http://www.mellanox.com/downloads/ofed/MLNX_EN-${VERSION%%-ubuntu*}/mlnx-en-${VERSION}.tgz \
| tar xzf - \
&& export \
DRIVER_DIR="$(ls -1 | grep "MLNX_OFED_LINUX-\|mlnx-en-")" \
KERNEL="$(ls -1t /lib/modules/ | head -n1)" \
&& cd "$DRIVER_DIR" \
&& ./*install --kernel "$KERNEL" --without-dkms --add-kernel-support \
&& cd - \
&& rm -rf "$DRIVER_DIR" /tmp/mlnx-en* /tmp/ofed*'
# Save kernel modules
RUN ltsp-chroot sh -c \
' export KERNEL="$(ls -1t /usr/src/ | grep -m1 "^linux-headers" | sed "s/^linux-headers-//g")" \
&& tar cpzf /modules.tar.gz /lib/modules/${KERNEL}/updates'
Stage 4: ltsp-image
In this stage we will install what we built in the previous step:
FROM basesystem as ltsp-image
# Retrieve kernel modules
COPY --from=builder /opt/ltsp/amd64/modules.tar.gz /opt/ltsp/amd64/modules.tar.gz
# Install kernel modules
RUN ltsp-chroot sh -c \
' export KERNEL="$(ls -1t /usr/src/ | grep -m1 "^linux-headers" | sed "s/^linux-headers-//g")" \
&& tar xpzf /modules.tar.gz \
&& depmod -a "${KERNEL}" \
&& rm -f /modules.tar.gz'
Then do some additional changes to finalize our ltsp-image:
# Install docker
RUN ltsp-chroot sh -c \
' curl -fsSL https://download.docker.com/linux/ubuntu/gpg | apt-key add - \
&& echo "deb https://download.docker.com/linux/ubuntu xenial stable" \
> /etc/apt/sources.list.d/docker.list \
&& apt-get -y update \
&& apt-get -y install \
docker-ce=$(apt-cache madison docker-ce | grep 18.06 | head -1 | awk "{print $ 3}")'
# Configure docker options
RUN DOCKER_OPTS="$(echo \
--storage-driver=overlay2 \
--iptables=false \
--ip-masq=false \
--log-driver=json-file \
--log-opt=max-size=10m \
--log-opt=max-file=5 \
)" \
&& sed "/^ExecStart=/ s|$| $DOCKER_OPTS|g" \
/opt/ltsp/amd64/lib/systemd/system/docker.service \
> /opt/ltsp/amd64/etc/systemd/system/docker.service
# Install kubeadm, kubelet and kubectl
RUN ltsp-chroot sh -c \
' curl -s https://packages.cloud.google.com/apt/doc/apt-key.gpg | apt-key add - \
&& echo "deb http://apt.kubernetes.io/ kubernetes-xenial main" \
> /etc/apt/sources.list.d/kubernetes.list \
&& apt-get -y update \
&& apt-get -y install kubelet kubeadm kubectl cri-tools'
# Disable automatic updates
RUN rm -f /opt/ltsp/amd64/etc/apt/apt.conf.d/20auto-upgrades
# Disable apparmor profiles
RUN ltsp-chroot find /etc/apparmor.d \
-maxdepth 1 \
-type f \
-name "sbin.*" \
-o -name "usr.*" \
-exec ln -sf "{}" /etc/apparmor.d/disable/ \;
# Write kernel cmdline options
RUN KERNEL_OPTIONS="$(echo \
init=/sbin/init-ltsp \
forcepae \
console=tty1 \
console=ttyS0,9600n8 \
nvme_core.default_ps_max_latency_us=0 \
)" \
&& sed -i "/^CMDLINE_LINUX_DEFAULT=/ s|=.*|=\"${KERNEL_OPTIONS}\"|" \
"/opt/ltsp/amd64/etc/ltsp/update-kernels.conf"
Then we will make the squashed image from our chroot:
# Cleanup caches
RUN rm -rf /opt/ltsp/amd64/var/lib/apt/lists \
&& ltsp-chroot apt-get clean
# Build squashed image
RUN ltsp-update-image
Stage 5: Final Stage
In the final stage we will save only our squashed image and kernels with initramfs.
FROM ltsp-base
COPY --from=ltsp-image /opt/ltsp/images /opt/ltsp/images
COPY --from=ltsp-image /etc/nbd-server/conf.d /etc/nbd-server/conf.d
COPY --from=ltsp-image /var/lib/tftpboot /var/lib/tftpboot
Ok, now we have docker image which includes:
- TFTP-server
- NBD-server
- configured bootloader
- kernel with initramfs
- squashed rootfs image
Usage
OK, now when our docker-image with LTSP-server, kernel, initramfs and squashed rootfs fully prepared we can run the deployment with it.
We can do that as usual, but one more thing is networking. Unfortunately, we can't use the standard Kubernetes service abstraction for our deployment, because TFTP can't work behind the NAT. During the boot, our nodes are not part of Kubernetes cluster and they requires ExternalIP, but Kubernetes always enables NAT for ExternalIPs, and there is no way to override this behavior.
For now I have two ways for avoid this: use hostNetwork: true or use pipework. The second option will also provide you redundancy because, in case of failure, the IP will be moved with the Pod to another node. Unfortunately, pipework is not native and a less secure method.
If you have some better option for that please let me know.
Here is example for deployment with hostNetwork:
apiVersion: extensions/v1beta1
kind: Deployment
metadata:
name: ltsp-server
labels:
app: ltsp-server
spec:
selector:
matchLabels:
name: ltsp-server
replicas: 1
template:
metadata:
labels:
name: ltsp-server
spec:
hostNetwork: true
containers:
- name: tftpd
image: registry.example.org/example/ltsp:latest
command: [ "/usr/sbin/in.tftpd", "-L", "-u", "tftp", "-a", ":69", "-s", "/var/lib/tftpboot" ]
lifecycle:
postStart:
exec:
command: ["/bin/sh", "-c", "cd /var/lib/tftpboot/ltsp/amd64; ln -sf config/lts.conf ." ]
volumeMounts:
- name: config
mountPath: "/var/lib/tftpboot/ltsp/amd64/config"
- name: nbd-server
image: registry.example.org/example/ltsp:latest
command: [ "/bin/nbd-server-wrapper.sh" ]
volumes:
- name: config
configMap:
name: ltsp-config
As you can see it also requires configmap with lts.conf file. Here is example part from mine:
apiVersion: v1
kind: ConfigMap
metadata:
name: ltsp-config
data:
lts.conf: |
[default]
KEEP_SYSTEM_SERVICES = "ssh ureadahead dbus-org.freedesktop.login1 systemd-logind polkitd cgmanager ufw rpcbind nfs-kernel-server"
PREINIT_00_TIME = "ln -sf /usr/share/zoneinfo/Europe/Prague /etc/localtime"
PREINIT_01_FIX_HOSTNAME = "sed -i '/^127.0.0.2/d' /etc/hosts"
PREINIT_02_DOCKER_OPTIONS = "sed -i 's|^ExecStart=.*|ExecStart=/usr/bin/dockerd -H fd:// --storage-driver overlay2 --iptables=false --ip-masq=false --log-driver=json-file --log-opt=max-size=10m --log-opt=max-file=5|' /etc/systemd/system/docker.service"
FSTAB_01_SSH = "/dev/data/ssh /etc/ssh ext4 nofail,noatime,nodiratime 0 0"
FSTAB_02_JOURNALD = "/dev/data/journal /var/log/journal ext4 nofail,noatime,nodiratime 0 0"
FSTAB_03_DOCKER = "/dev/data/docker /var/lib/docker ext4 nofail,noatime,nodiratime 0 0"
# Each command will stop script execution when fail
RCFILE_01_SSH_SERVER = "cp /rofs/etc/ssh/*_config /etc/ssh; ssh-keygen -A"
RCFILE_02_SSH_CLIENT = "mkdir -p /root/.ssh/; echo 'ssh-rsa AAAAB3NzaC1yc2EAAAADAQABAAABAQDBSLYRaORL2znr1V4a3rjDn3HDHn2CsvUNK1nv8+CctoICtJOPXl6zQycI9KXNhANfJpc6iQG1ZPZUR74IiNhNIKvOpnNRPyLZ5opm01MVIDIZgi9g0DUks1g5gLV5LKzED8xYKMBmAfXMxh/nsP9KEvxGvTJB3OD+/bBxpliTl5xY3Eu41+VmZqVOz3Yl98+X8cZTgqx2dmsHUk7VKN9OZuCjIZL9MtJCZyOSRbjuo4HFEssotR1mvANyz+BUXkjqv2pEa0I2vGQPk1VDul5TpzGaN3nOfu83URZLJgCrX+8whS1fzMepUYrbEuIWq95esjn0gR6G4J7qlxyguAb9 admin@kubernetes' >> /root/.ssh/authorized_keys"
RCFILE_03_KERNEL_DEBUG = "sysctl -w kernel.unknown_nmi_panic=1 kernel.softlockup_panic=1; modprobe netconsole netconsole=@/vmbr0,@10.9.0.15/"
RCFILE_04_SYSCTL = "sysctl -w fs.file-max=20000000 fs.nr_open=20000000 net.ipv4.neigh.default.gc_thresh1=80000 net.ipv4.neigh.default.gc_thresh2=90000 net.ipv4.neigh.default.gc_thresh3=100000"
RCFILE_05_FORWARD = "echo 1 > /proc/sys/net/ipv4/ip_forward"
RCFILE_06_MODULES = "modprobe br_netfilter"
RCFILE_07_JOIN_K8S = "kubeadm join --token 2a4576.504356e45fa3d365 10.9.0.20:6443 --discovery-token-ca-cert-hash sha256:e3b0c44298fc1c149afbf4c8996fb92427ae41e4649b934ca495991b7852b855"
- KEEP_SYSTEM_SERVICES - during the boot, LTSP automatically removes some services, this variable is needed to prevent this behavior.
- PREINIT_* - commands listed here will be executed before systemd runs (this function was added by the feature_preinit.diff patch)
- FSTAB_* - entries written here will be added to the
/etc/fstabfile. As you can see, I use thenofailoption, that means that if a partition doesn't exist, it will continue to boot without error. If you have fully diskless nodes you can remove the FSTAB settings or configure the remote filesystem there. - RCFILE_* - those commands will be written to
rc.localfile, which will be called by systemd during the boot. Here I load the kernel modules and add some sysctl tunes, then call thekubeadm joincommand, which adds my node to the Kubernetes cluster.
You can get more details on all the variables used from lts.conf manpage.
Now you can configure your DHCP. Basically you should set the next-server and filename options.
I use ISC-DHCP server, and here is an example dhcpd.conf:
shared-network ltsp-network {
subnet 10.9.0.0 netmask 255.255.0.0 {
authoritative;
default-lease-time -1;
max-lease-time -1;
option domain-name "example.org";
option domain-name-servers 10.9.0.1;
option routers 10.9.0.1;
next-server ltsp-1; # write LTSP-server hostname here
if option architecture = 00:07 {
filename "/ltsp/amd64/grub/x86_64-efi/core.efi";
} else {
filename "/ltsp/amd64/grub/i386-pc/core.0";
}
range 10.9.200.0 10.9.250.254;
}
You can start from this, but what about me, I have multiple LTSP-servers and I configure leases statically for each node via the Ansible playbook.
Try to run your first node. If everything was right, you will have a running system there. The node also will be added to your Kubernetes cluster.
Now you can try to make your own changes.
If you need something more, note that LTSP can be easily changed to meet your needs. Feel free to look into the source code and you can find many answers there.
UPD: Many people asking me: Why not simple use CoreOS and Ignition?
I can answer. The main feature here is image preparation process, not configuration. In case with LTSP you have classic Ubuntu system, and everything that can be installed on Ubuntu it can also be written here in the Dockerfile. In case CoreOS you have no so many freedom and you can’t easily add custom kernel modules and packages at the build stage of the boot image.
Health checking gRPC servers on Kubernetes
Update (December 2021): Kubernetes now has built-in gRPC health probes starting in v1.23. To learn more, see Configure Liveness, Readiness and Startup Probes. This article was originally written about an external tool to achieve the same task.
gRPC is on its way to becoming the lingua franca for communication between cloud-native microservices. If you are deploying gRPC applications to Kubernetes today, you may be wondering about the best way to configure health checks. In this article, we will talk about grpc-health-probe, a Kubernetes-native way to health check gRPC apps.
If you're unfamiliar, Kubernetes health checks (liveness and readiness probes) is what's keeping your applications available while you're sleeping. They detect unresponsive pods, mark them unhealthy, and cause these pods to be restarted or rescheduled.
Kubernetes does not support gRPC health checks natively. This leaves the gRPC developers with the following three approaches when they deploy to Kubernetes:
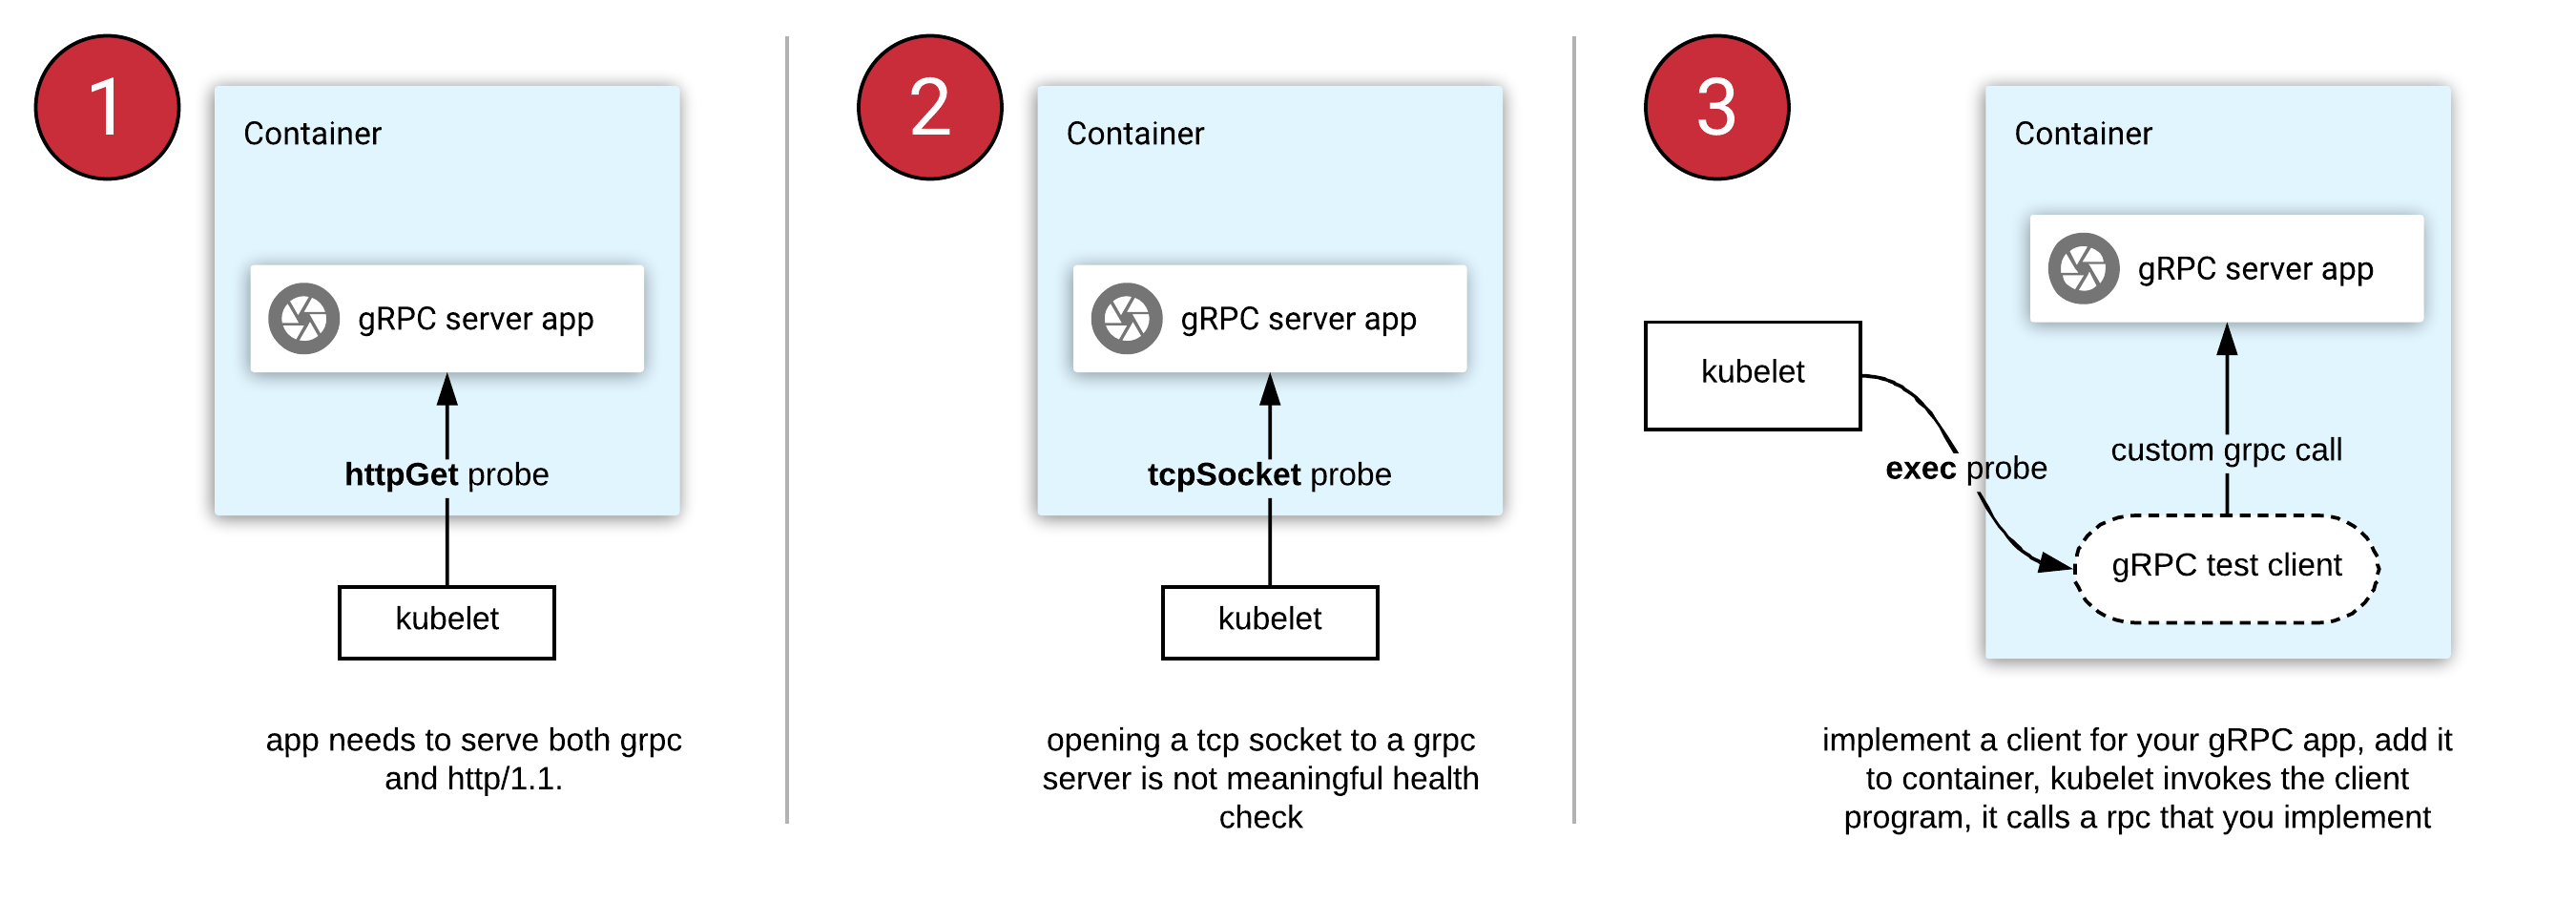
- httpGet probe: Cannot be natively used with gRPC. You need to refactor your app to serve both gRPC and HTTP/1.1 protocols (on different port numbers).
- tcpSocket probe: Opening a socket to gRPC server is not meaningful, since it cannot read the response body.
- exec probe: This invokes a program in a container's ecosystem periodically. In the case of gRPC, this means you implement a health RPC yourself, then write and ship a client tool with your container.
Can we do better? Absolutely.
Introducing “grpc-health-probe”
To standardize the "exec probe" approach mentioned above, we need:
- a standard health check "protocol" that can be implemented in any gRPC server easily.
- a standard health check "tool" that can query the health protocol easily.
Thankfully, gRPC has a standard health checking protocol. It can be used easily from any language. Generated code and the utilities for setting the health status are shipped in nearly all language implementations of gRPC.
If you
implement
this health check protocol in your gRPC apps, you can then use a standard/common
tool to invoke this Check() method to determine server status.
The next thing you need is the "standard tool", and it's the grpc-health-probe.
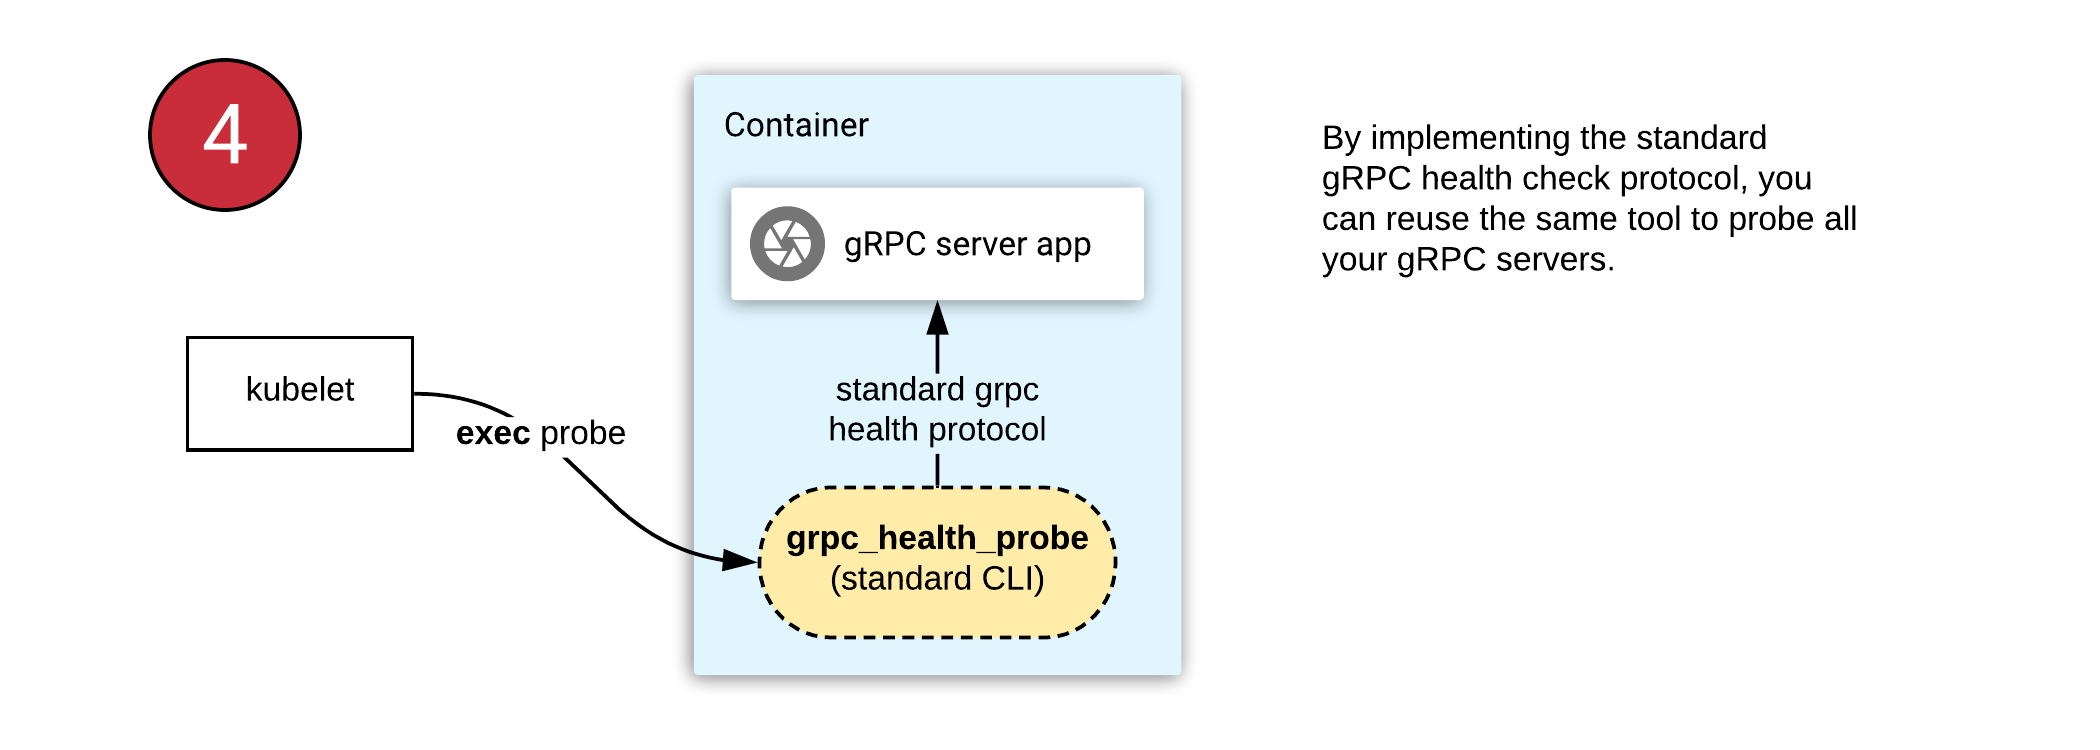
With this tool, you can use the same health check configuration in all your gRPC applications. This approach requires you to:
- Find the gRPC "health" module in your favorite language and start using it (example Go library).
- Ship the grpc_health_probe binary in your container.
- Configure Kubernetes "exec" probe to invoke the "grpc_health_probe" tool in the container.
In this case, executing "grpc_health_probe" will call your gRPC server over
localhost, since they are in the same pod.
What's next
grpc-health-probe project is still in its early days and it needs your feedback. It supports a variety of features like communicating with TLS servers and configurable connection/RPC timeouts.
If you are running a gRPC server on Kubernetes today, try using the gRPC Health Protocol and try the grpc-health-probe in your deployments, and give feedback.
Further reading
- Protocol: GRPC Health Checking Protocol (health.proto)
- Documentation: Kubernetes liveness and readiness probes
- Article: Advanced Kubernetes Health Check Patterns
Kubernetes 1.12: Kubelet TLS Bootstrap and Azure Virtual Machine Scale Sets (VMSS) Move to General Availability
We’re pleased to announce the delivery of Kubernetes 1.12, our third release of 2018!
Today’s release continues to focus on internal improvements and graduating features to stable in Kubernetes. This newest version graduates key features such as security and Azure. Notable additions in this release include two highly-anticipated features graduating to general availability: Kubelet TLS Bootstrap and Support for Azure Virtual Machine Scale Sets (VMSS).
These new features mean increased security, availability, resiliency, and ease of use to get production applications to market faster. The release also signifies the increasing maturation and sophistication of Kubernetes on the developer side.
Let’s dive into the key features of this release:
Introducing General Availability of Kubelet TLS Bootstrap
We’re excited to announce General Availability (GA) of Kubelet TLS Bootstrap. In Kubernetes 1.4, we introduced an API for requesting certificates from a cluster-level Certificate Authority (CA). The original intent of this API is to enable provisioning of TLS client certificates for kubelets. This feature allows for a kubelet to bootstrap itself into a TLS-secured cluster. Most importantly, it automates the provision and distribution of signed certificates.
Before, when a kubelet ran for the first time, it had to be given client credentials in an out-of-band process during cluster startup. The burden was on the operator to provision these credentials. Because this task was so onerous to manually execute and complex to automate, many operators deployed clusters with a single credential and single identity for all kubelets. These setups prevented deployment of node lockdown features like the Node authorizer and the NodeRestriction admission controller.
To alleviate this, SIG Auth introduced a way for kubelet to generate a private key and a CSR for submission to a cluster-level certificate signing process. The v1 (GA) designation indicates production hardening and readiness, and comes with the guarantee of long-term backwards compatibility.
Alongside this, Kubelet server certificate bootstrap and rotation is moving to beta. Currently, when a kubelet first starts, it generates a self-signed certificate/key pair that is used for accepting incoming TLS connections. This feature introduces a process for generating a key locally and then issuing a Certificate Signing Request to the cluster API server to get an associated certificate signed by the cluster’s root certificate authority. Also, as certificates approach expiration, the same mechanism will be used to request an updated certificate.
Support for Azure Virtual Machine Scale Sets (VMSS) and Cluster-Autoscaler is Now Stable
Azure Virtual Machine Scale Sets (VMSS) allow you to create and manage a homogenous VM pool that can automatically increase or decrease based on demand or a set schedule. This enables you to easily manage, scale, and load balance multiple VMs to provide high availability and application resiliency, ideal for large-scale applications that can run as Kubernetes workloads.
With this new stable feature, Kubernetes supports the scaling of containerized applications with Azure VMSS, including the ability to integrate it with cluster-autoscaler to automatically adjust the size of the Kubernetes clusters based on the same conditions.
Additional Notable Feature Updates
RuntimeClass is a new cluster-scoped resource that surfaces container runtime properties to the control plane being released as an alpha feature.
Snapshot / restore functionality for Kubernetes and CSI is being introduced as an alpha feature. This provides standardized APIs design (CRDs) and adds PV snapshot/restore support for CSI volume drivers.
Topology aware dynamic provisioning is now in beta, meaning storage resources can now understand where they live. This also includes beta support to AWS EBS and GCE PD.
Configurable pod process namespace sharing is moving to beta, meaning users can configure containers within a pod to share a common PID namespace by setting an option in the PodSpec.
Taint node by condition is now in beta, meaning users have the ability to represent node conditions that block scheduling by using taints.
Arbitrary / Custom Metrics in the Horizontal Pod Autoscaler is moving to a second beta to test some additional feature enhancements. This reworked Horizontal Pod Autoscaler functionality includes support for custom metrics and status conditions.
Improvements that will allow the Horizontal Pod Autoscaler to reach proper size faster are moving to beta.
Vertical Scaling of Pods is now in beta, which makes it possible to vary the resource limits on a pod over its lifetime. In particular, this is valuable for pets (i.e., pods that are very costly to destroy and re-create).
Encryption at rest via KMS is now in beta. This adds multiple encryption providers, including Google Cloud KMS, Azure Key Vault, AWS KMS, and Hashicorp Vault, that will encrypt data as it is stored to etcd.
Availability
Kubernetes 1.12 is available for download on GitHub. To get started with Kubernetes, check out these interactive tutorials. You can also install 1.12 using Kubeadm.
5 Day Features Blog Series
If you’re interested in exploring these features more in depth, check back next week for our 5 Days of Kubernetes series where we’ll highlight detailed walkthroughs of the following features:
- Day 1 - Kubelet TLS Bootstrap
- Day 2 - Support for Azure Virtual Machine Scale Sets (VMSS) and Cluster-Autoscaler
- Day 3 - Snapshots Functionality
- Day 4 - RuntimeClass
- Day 5 - Topology Resources
Release team
This release is made possible through the effort of hundreds of individuals who contributed both technical and non-technical content. Special thanks to the release team led by Tim Pepper, Orchestration & Containers Lead, at VMware Open Source Technology Center. The 36 individuals on the release team coordinate many aspects of the release, from documentation to testing, validation, and feature completeness.
As the Kubernetes community has grown, our release process represents an amazing demonstration of collaboration in open source software development. Kubernetes continues to gain new users at a rapid clip. This growth creates a positive feedback cycle where more contributors commit code creating a more vibrant ecosystem. Kubernetes has over 22,000 individual contributors to date and an active community of more than 45,000 people.
Project Velocity
The CNCF has continued refining DevStats, an ambitious project to visualize the myriad contributions that go into the project. K8s DevStats illustrates the breakdown of contributions from major company contributors, as well as an impressive set of preconfigured reports on everything from individual contributors to pull request lifecycle times. On average, 259 different companies and over 1,400 individuals contribute to Kubernetes each month. Check out DevStats to learn more about the overall velocity of the Kubernetes project and community.
User Highlights
Established, global organizations are using Kubernetes in production at massive scale. Recently published user stories from the community include:
- Ygrene, a PACE (Property Assessed Clean Energy) financing company, is using cloud native to bring security and scalability to the finance industry, cutting deployment times down to five minutes with Kubernetes.
- Sling TV, a live TV streaming service, uses Kubernetes to enable their hybrid cloud strategy and deliver a high-quality service for their customers.
- ING, a Dutch multinational banking and financial services corporation, moved to Kubernetes with the intent to eventually be able to go from idea to production within 48 hours.
- Pinterest, a web and mobile application company that is running on 1,000 microservices and hundreds of thousands of data jobs, moved to Kubernetes to build on-demand scaling and simply the deployment process.
- Pearson, a global education company serving 75 million learners, is using Kubernetes to transform the way that educational content is delivered online and has saved 15-20% in developer productivity.
Is Kubernetes helping your team? Share your story with the community.
Ecosystem Updates
- CNCF recently released the findings of their bi-annual CNCF survey, finding that the use of cloud native technologies in production has grown over 200% within the last six months.
- CNCF expanded its certification offerings to include a Certified Kubernetes Application Developer exam. The CKAD exam certifies an individual's ability to design, build, configure, and expose cloud native applications for Kubernetes. More information can be found here.
- CNCF added a new partner category, Kubernetes Training Partners (KTP). KTPs are a tier of vetted training providers who have deep experience in cloud native technology training. View partners and learn more here.
- CNCF also offers online training that teaches the skills needed to create and configure a real-world Kubernetes cluster.
- Kubernetes documentation now features user journeys: specific pathways for learning based on who readers are and what readers want to do. Learning Kubernetes is easier than ever for beginners, and more experienced users can find task journeys specific to cluster admins and application developers.
KubeCon
The world’s largest Kubernetes gathering, KubeCon + CloudNativeCon is coming to Shanghai from November 13-15, 2018 and Seattle from December 10-13, 2018. This conference will feature technical sessions, case studies, developer deep dives, salons and more! Register today!
Webinar
Join members of the Kubernetes 1.12 release team on November 6th at 10am PDT to learn about the major features in this release. Register here.
Get Involved
The simplest way to get involved with Kubernetes is by joining one of the many Special Interest Groups (SIGs) that align with your interests. Have something you’d like to broadcast to the Kubernetes community? Share your voice at our weekly community meeting, and through the channels below.
Thank you for your continued feedback and support.
- Post questions (or answer questions) on Stack Overflow
- Join the community portal for advocates on K8sPort
- Follow us on Twitter @Kubernetesio for latest updates
- Chat with the community on Slack
- Share your Kubernetes story
Hands On With Linkerd 2.0
Linkerd 2.0 was recently announced as generally available (GA), signaling its readiness for production use. In this tutorial, we’ll walk you through how to get Linkerd 2.0 up and running on your Kubernetes cluster in a matter seconds.
But first, what is Linkerd and why should you care? Linkerd is a service sidecar that augments a Kubernetes service, providing zero-config dashboards and UNIX-style CLI tools for runtime debugging, diagnostics, and reliability. Linkerd is also a service mesh, applied to multiple (or all) services in a cluster to provide a uniform layer of telemetry, security, and control across them.
Linkerd works by installing ultralight proxies into each pod of a service. These proxies report telemetry data to, and receive signals from, a control plane. This means that using Linkerd doesn’t require any code changes, and can even be installed live on a running service. Linkerd is fully open source, Apache v2 licensed, and is hosted by the Cloud Native Computing Foundation (just like Kubernetes itself!)
Without further ado, let’s see just how quickly you can get Linkerd running on your Kubernetes cluster. In this tutorial, we’ll walk you through how to deploy Linkerd on any Kubernetes 1.9+ cluster and how to use it to debug failures in a sample gRPC application.
Step 1: Install the demo app 🚀
Before we install Linkerd, let’s start by installing a basic gRPC demo application called Emojivoto onto your Kubernetes cluster. To install Emojivoto, run:
curl https://run.linkerd.io/emojivoto.yml | kubectl apply -f -
This command downloads the Kubernetes manifest for Emojivoto, and uses kubectl to apply it to your Kubernetes cluster. Emojivoto is comprised of several services that run in the “emojivoto” namespace. You can see the services by running:
kubectl get -n emojivoto deployments
You can also see the app live by running
minikube -n emojivoto service web-svc --url # if you’re on minikube
… or:
kubectl get svc web-svc -n emojivoto -o jsonpath="{.status.loadBalancer.ingress[0].*}" #
… if you’re somewhere else
Click around. You might notice that some parts of the application are broken! If you were to inspect your handly local Kubernetes dashboard, you wouldn’t see very much interesting---as far as Kubernetes is concerned, the app is running just fine. This is a very common situation! Kubernetes understands whether your pods are running, but not whether they are responding properly.
In the next few steps, we’ll walk you through how to use Linkerd to diagnose the problem.
Step 2: Install Linkerd’s CLI
We’ll start by installing Linkerd’s command-line interface (CLI) onto your local machine. Visit the Linkerd releases page, or simply run:
curl -sL https://run.linkerd.io/install | sh
Once installed, add the linkerd command to your path with:
export PATH=$PATH:$HOME/.linkerd2/bin
You should now be able to run the command linkerd version, which should display:
Client version: v2.0
Server version: unavailable
“Server version: unavailable” means that we need to add Linkerd’s control plane to the cluster, which we’ll do next. But first, let’s validate that your cluster is prepared for Linkerd by running:
linkerd check --pre
This handy command will report any problems that will interfere with your ability to install Linkerd. Hopefully everything looks OK and you’re ready to move on to the next step.
Step 3: Install Linkerd’s control plane onto the cluster
In this step, we’ll install Linkerd’s lightweight control plane into its own namespace (“linkerd”) on your cluster. To do this, run:
linkerd install | kubectl apply -f -
This command generates a Kubernetes manifest and uses kubectl command to apply it to your Kubernetes cluster. (Feel free to inspect the manifest before you apply it.)
(Note: if your Kubernetes cluster is on GKE with RBAC enabled, you’ll need an extra step: you must grant a ClusterRole of cluster-admin to your Google Cloud account first, in order to install certain telemetry features in the control plane. To do that, run: kubectl create clusterrolebinding cluster-admin-binding-$USER --clusterrole=cluster-admin --user=$(gcloud config get-value account).)
Depending on the speed of your internet connection, it may take a minute or two for your Kubernetes cluster to pull the Linkerd images. While that’s happening, we can validate that everything’s happening correctly by running:
linkerd check
This command will patiently wait until Linkerd has been installed and is running.
Finally, we’re ready to view Linkerd’s dashboard! Just run:
linkerd dashboard
If you see something like below, Linkerd is now running on your cluster. 🎉
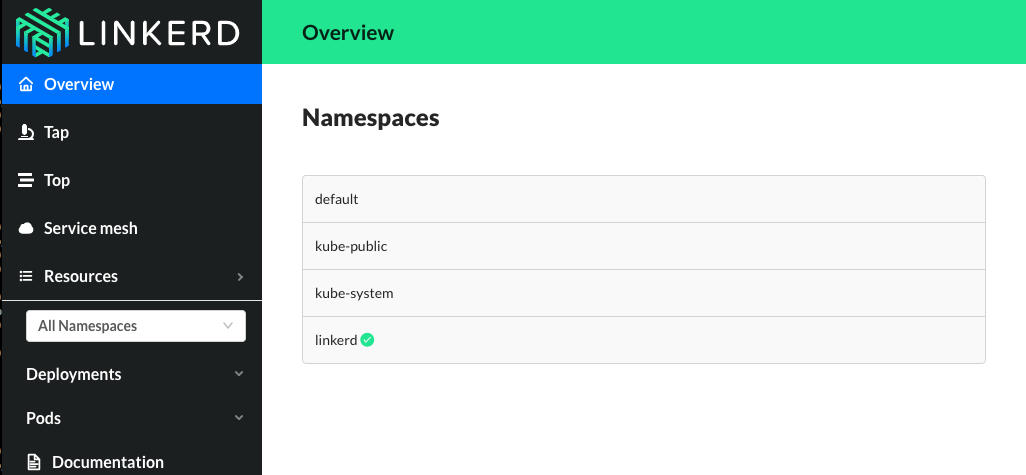
Step 4: Add Linkerd to the web service
At this point we have the Linkerd control plane installed in the “linkerd” namespace, and we have our emojivoto demo app installed in the “emojivoto” namespace. But we haven’t actually added Linkerd to our service yet. So let’s do that.
In this example, let’s pretend we are the owners of the “web” service. Other services, like “emoji” and “voting”, are owned by other teams--so we don’t want to touch them.
There are a couple ways to add Linkerd to our service. For demo purposes, the easiest is to do something like this:
kubectl get -n emojivoto deploy/web -o yaml | linkerd inject - | kubectl apply -f -
This command retrieves the manifest of the “web” service from Kubernetes, runs this manifest through linkerd inject, and finally reapplies it to the Kubernetes cluster. The linkerd inject command augments the manifest to include Linkerd’s data plane proxies. As with linkerd install, linkerd inject is a pure text operation, meaning that you can inspect the input and output before you use it. Since “web” is a Deployment, Kubernetes is kind enough to slowly roll the service one pod at a time--meaning that “web” can be serving traffic live while we add Linkerd to it!
We now have a service sidecar running on the “web” service!
Step 5: Debugging for Fun and for Profit
Congratulations! You now have a full gRPC application running on your Kubernetes cluster with Linkerd installed on the “web” service. Of course, that application is failing when you use it--so now let’s use Linkerd to track down those errors.
If you glance at the Linkerd dashboard (the linkerd dashboard command), you should see all services in the “emojivoto” namespace show up. Since “web” has the Linkerd service sidecar installed on it, you’ll also see success rate, requests per second, and latency percentiles show up.
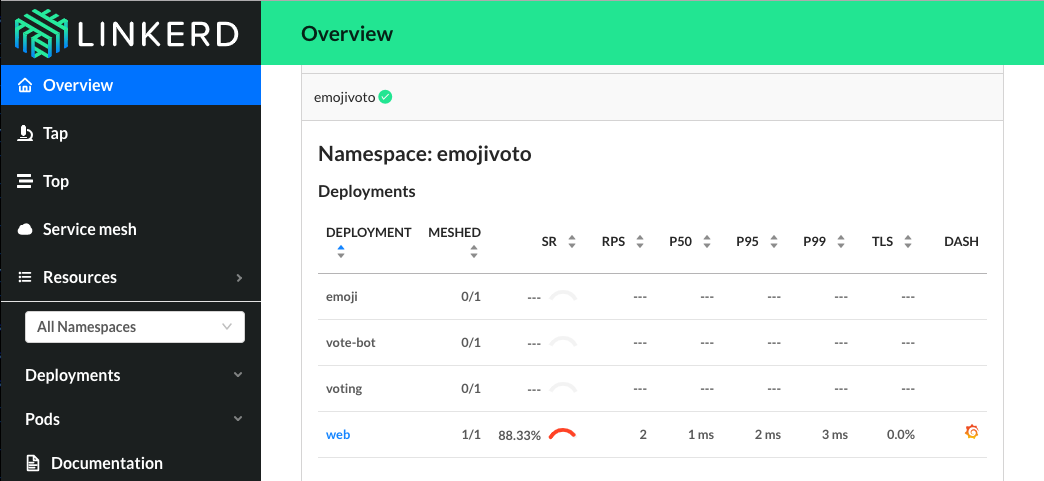
That’s pretty neat, but the first thing you might notice is that success rate is well below 100%! Click on “web” and let’s dig in.
You should now be looking at the Deployment page for the web service. The first thing you’ll see here is that web is taking traffic from vote-bot (a service included in the Emojivoto manifest to continually generate a low level of live traffic), and has two outgoing dependencies, emoji and voting.
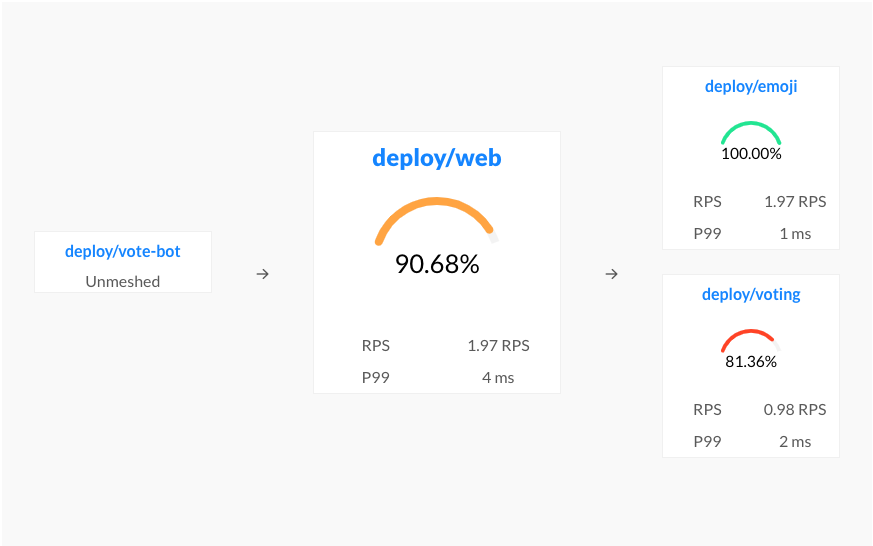
The emoji service is operating at 100%, but the voting service is failing! A failure in a dependent service may be exactly what’s causing the errors that web is returning.
Let’s scroll a little further down the page, we’ll see a live list of all traffic endpoints that “web” is receiving. This is interesting:
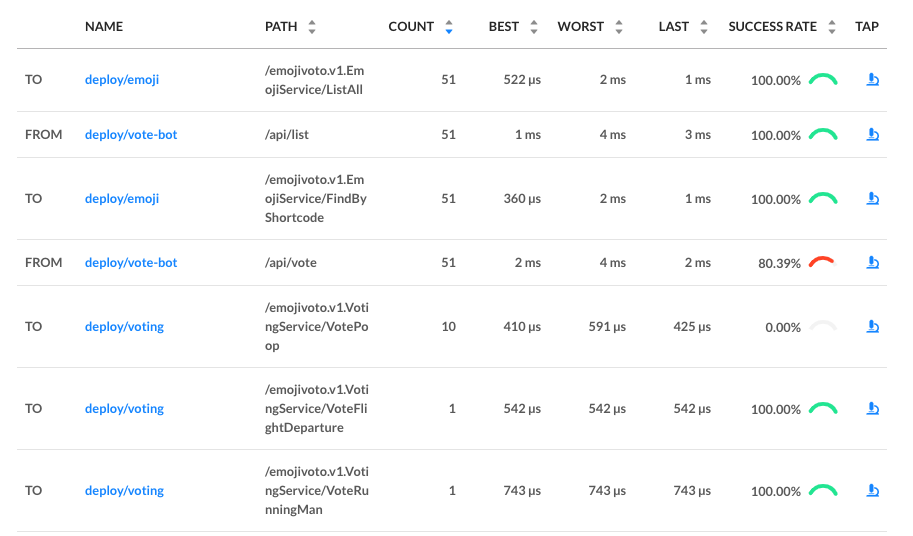
There are two calls that are not at 100%: the first is vote-bot’s call the “/api/vote” endpoint. The second is the “VotePoop” call from the web service to the voting service. Very interesting! Since /api/vote is an incoming call, and “/VotePoop” is an outgoing call, this is a good clue that the failure of the vote service’s VotePoop endpoint is what’s causing the problem!
Finally, if we click on the “tap” icon for that row in the far right column, we’ll be taken to live list of requests that match this endpoint. This allows us to confirm that the requests are failing (they all have gRPC status code 2, indicating an error).
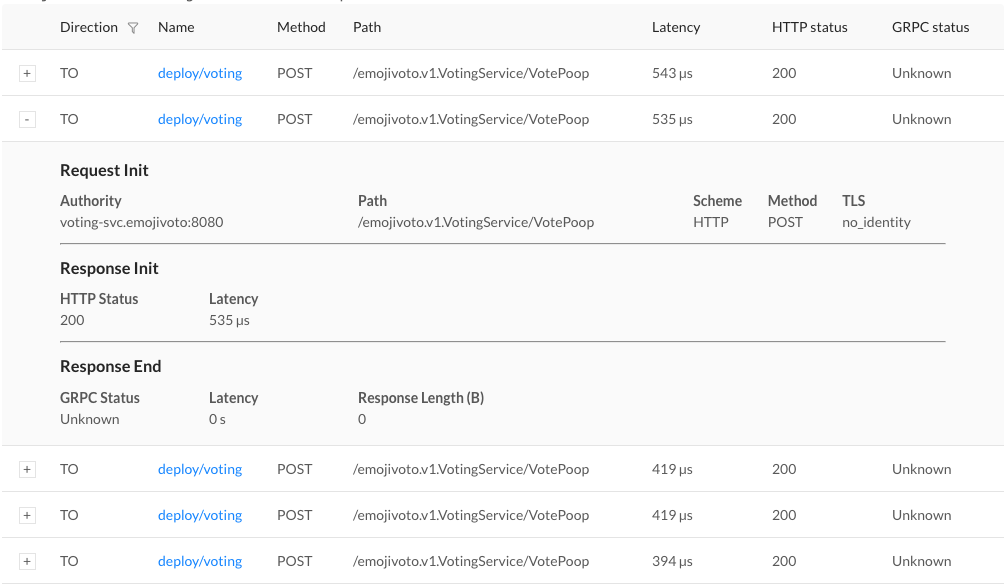
At this point we have the ammunition we need to talk to the owners of the vote “voting” service. We’ve identified an endpoint on their service that consistently returns an error, and have found no other obvious sources of failures in the system.
We hope you’ve enjoyed this journey through Linkerd 2.0. There is much more for you to explore. For example, everything we did above using the web UI can also be accomplished via pure CLI commands, e.g. linkerd top, linkerd stat, and linkerd tap.
Also, did you notice the little Grafana icon on the very first page we looked at? Linkerd ships with automatic Grafana dashboards for all those metrics, allowing you to view everything you’re seeing in the Linkerd dashboard in a time series format. Check it out!
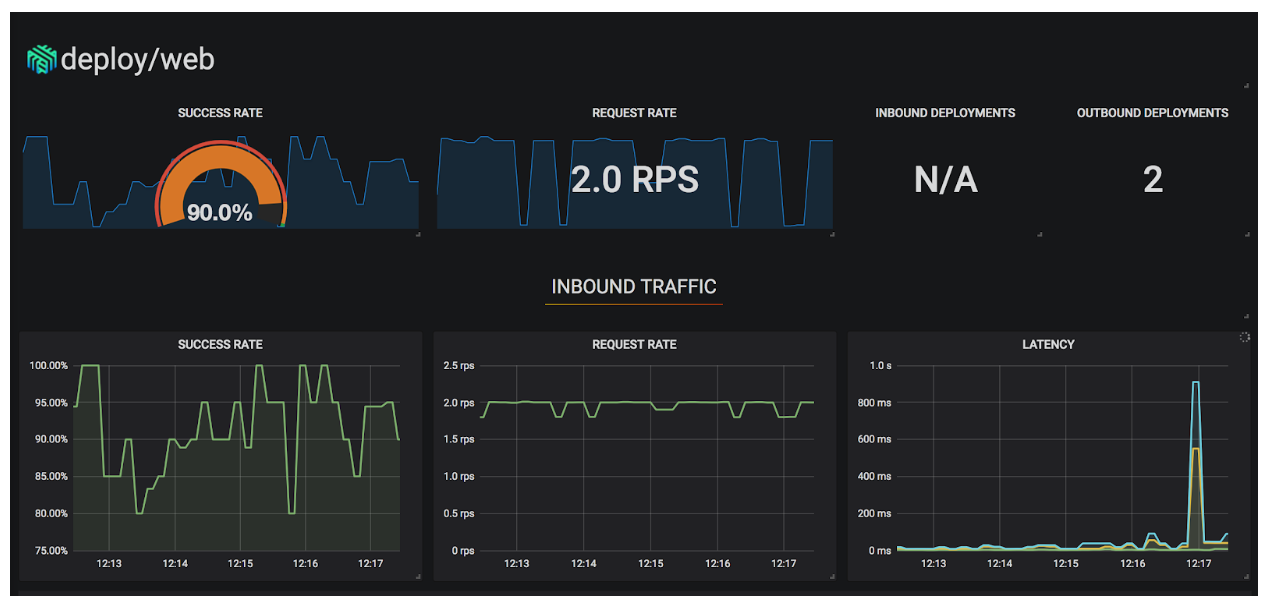
Want more?
In this tutorial, we’ve shown you how to install Linkerd on a cluster, add it as a service sidecar to just one service--while the service is receiving live traffic!---and use it to debug a runtime issue. But this is just the tip of the iceberg. We haven’t even touched any of Linkerd’s reliability or security features!
Linkerd has a thriving community of adopters and contributors, and we’d love for YOU to be a part of it. For more, check out the docs and GitHub repo, join the Linkerd Slack and mailing lists (users, developers, announce), and, of course, follow @linkerd on Twitter! We can’t wait to have you aboard!
2018 Steering Committee Election Cycle Kicks Off
Having a clear, definable governance model is crucial for the health of open source projects. For one of the highest velocity projects in the open source world, governance is critical especially for one as large and active as Kubernetes, which is one of the most high-velocity projects in the open source world. A clear structure helps users trust that the project will be nurtured and progress forward. Initially, this structure was laid by the former 7 member bootstrap committee composed of founders and senior contributors with a goal to create the foundational governance building blocks.
The initial charter and establishment of an election process to seat a full Steering Committee was a part of those first building blocks. Last year, the bootstrap committee kicked off the first Kubernetes Steering Committee election which brought forth 6 new members from the community as voted on by contributors. These new members plus the bootstrap committee formed the Steering Committee that we know today. This yearly election cycle will continue to ensure that new representatives get cycled through to add different voices and thoughts on the Kubernetes project strategy.
The committee has worked hard on topics that will streamline the project and how we operate. SIG (Special Interest Group) governance was an overarching recurring theme this year: Kubernetes community is not a monolithic organization, but a huge, distributed community, where Special Interest Groups (SIGs) and Working Groups (WGs) are the atomic community units, that are making Kubernetes so successful from the ground.
Contributors - this is where you come in.
There are three seats up for election this year. The voters guide will get you up to speed on the specifics of this years election including candidate bios as they are updated in real time. The elections process doc will steer you towards eligibility, operations, and the fine print.
- Nominate yourself, someone else, and/or put your support to others.
Want to help chart our course? Interested in governance and community topics? Add your name! The nomination process is optional.
- Vote.
On September 19th, eligible voters will receive an email poll invite conducted by CIVS. The newly elected will be announced at the weekly community meeting on Thursday, October 4th at 5pm UTC.
To those who are running:

Helpful resources
- Steering Committee - who sits on the committee and terms, their projects and meetings info
- Steering Committee Charter - this is a great read if you’re interested in running (or assessing for the best candidates!)
- Election Process
- Voters Guide! - Updated on a rolling basis. This guide will always have the latest information throughout the election cycle. The complete schedule of events and candidate bios will be housed here.
The Machines Can Do the Work, a Story of Kubernetes Testing, CI, and Automating the Contributor Experience
“Large projects have a lot of less exciting, yet, hard work. We value time spent automating repetitive work more highly than toil. Where that work cannot be automated, it is our culture to recognize and reward all types of contributions. However, heroism is not sustainable.” - Kubernetes Community Values
Like many open source projects, Kubernetes is hosted on GitHub. We felt the barrier to participation would be lowest if the project lived where developers already worked, using tools and processes developers already knew. Thus the project embraced the service fully: it was the basis of our workflow, our issue tracker, our documentation, our blog platform, our team structure, and more.
This strategy worked. It worked so well that the project quickly scaled past its contributors’ capacity as humans. What followed was an incredible journey of automation and innovation. We didn’t just need to rebuild our airplane mid-flight without crashing, we needed to convert it into a rocketship and launch into orbit. We needed machines to do the work.
The Work
Initially, we focused on the fact that we needed to support the sheer volume of tests mandated by a complex distributed system such as Kubernetes. Real world failure scenarios had to be exercised via end-to-end (e2e) tests to ensure proper functionality. Unfortunately, e2e tests were susceptible to flakes (random failures) and took anywhere from an hour to a day to complete.
Further experience revealed other areas where machines could do the work for us:
- PR Workflow
- Did the contributor sign our CLA?
- Did the PR pass tests?
- Is the PR mergeable?
- Did the merge commit pass tests?
- Triage
- Who should be reviewing PRs?
- Is there enough information to route an issue to the right people?
- Is an issue still relevant?
- Project Health
- What is happening in the project?
- What should we be paying attention to?
As we developed automation to improve our situation, we followed a few guiding principles:
- Follow the push/poll control loop patterns that worked well for Kubernetes
- Prefer stateless loosely coupled services that do one thing well
- Prefer empowering the entire community over empowering a few core contributors
- Eat our own dogfood and avoid reinventing wheels
Enter Prow
This led us to create Prow as the central component for our automation. Prow is sort of like an If This, Then That for GitHub events, with a built-in library of commands, plugins, and utilities. We built Prow on top of Kubernetes to free ourselves from worrying about resource management and scheduling, and ensure a more pleasant operational experience.
Prow lets us do things like:
- Allow our community to triage issues/PRs by commenting commands such as “/priority critical-urgent”, “/assign mary” or “/close”
- Auto-label PRs based on how much code they change, or which files they touch
- Age out issues/PRs that have remained inactive for too long
- Auto-merge PRs that meet our PR workflow requirements
- Run CI jobs defined as Knative Builds, Kubernetes Pods, or Jenkins jobs
- Enforce org-wide and per-repo GitHub policies like branch protection and GitHub labels
Prow was initially developed by the engineering productivity team building Google Kubernetes Engine, and is actively contributed to by multiple members of Kubernetes SIG Testing. Prow has been adopted by several other open source projects, including Istio, JetStack, Knative and OpenShift. Getting started with Prow takes a Kubernetes cluster and kubectl apply starter.yaml (running pods on a Kubernetes cluster).
Once we had Prow in place, we began to hit other scaling bottlenecks, and so produced additional tooling to support testing at the scale required by Kubernetes, including:
- Boskos: manages job resources (such as GCP projects) in pools, checking them out for jobs and cleaning them up automatically (with monitoring)
- ghProxy: a reverse proxy HTTP cache optimized for use with the GitHub API, to ensure our token usage doesn’t hit API limits (with monitoring)
- Greenhouse: allows us to use a remote bazel cache to provide faster build and test results for PRs (with monitoring)
- Splice: allows us to test and merge PRs in a batch, ensuring our merge velocity is not limited to our test velocity
- Tide: allows us to merge PRs selected via GitHub queries rather than ordered in a queue, allowing for significantly higher merge velocity in tandem with splice
Scaling Project Health
With workflow automation addressed, we turned our attention to project health. We chose to use Google Cloud Storage (GCS) as our source of truth for all test data, allowing us to lean on established infrastructure, and allowed the community to contribute results. We then built a variety of tools to help individuals and the project as a whole make sense of this data, including:
- Gubernator: display the results and test history for a given PR
- Kettle: transfer data from GCS to a publicly accessible bigquery dataset
- PR dashboard: a workflow-aware dashboard that allows contributors to understand which PRs require attention and why
- Triage: identify common failures that happen across all jobs and tests
- Testgrid: display test results for a given job across all runs, summarize test results across groups of jobs
We approached the Cloud Native Computing Foundation (CNCF) to develop DevStats to glean insights from our GitHub events such as:
- Which prow commands are people most actively using
- PR reviews by contributor over time
- Time spent in each phase of our PR workflow
Into the Beyond
Today, the Kubernetes project spans over 125 repos across five orgs. There are 31 Special Interests Groups and 10 Working Groups coordinating development within the project. In the last year the project has had participation from over 13,800 unique developers on GitHub.
On any given weekday our Prow instance runs over 10,000 CI jobs; from March 2017 to March 2018 it ran 4.3 million jobs. Most of these jobs involve standing up an entire Kubernetes cluster, and exercising it using real world scenarios. They allow us to ensure all supported releases of Kubernetes work across cloud providers, container engines, and networking plugins. They make sure the latest releases of Kubernetes work with various optional features enabled, upgrade safely, meet performance requirements, and work across architectures.
With today’s announcement from CNCF – noting that Google Cloud has begun transferring ownership and management of the Kubernetes project’s cloud resources to CNCF community contributors, we are excited to embark on another journey. One that allows the project infrastructure to be owned and operated by the community of contributors, following the same open governance model that has worked for the rest of the project. Sound exciting to you? Come talk to us at #sig-testing on kubernetes.slack.com.
Want to find out more? Come check out these resources:
Introducing Kubebuilder: an SDK for building Kubernetes APIs using CRDs
How can we enable applications such as MySQL, Spark and Cassandra to manage themselves just like Kubernetes Deployments and Pods do? How do we configure these applications as their own first class APIs instead of a collection of StatefulSets, Services, and ConfigMaps?
We have been working on a solution and are happy to introduce kubebuilder, a comprehensive development kit for rapidly building and publishing Kubernetes APIs and Controllers using CRDs. Kubebuilder scaffolds projects and API definitions and is built on top of the controller-runtime libraries.
Why Kubebuilder and Kubernetes APIs?
Applications and cluster resources typically require some operational work - whether it is replacing failed replicas with new ones, or scaling replica counts while resharding data. Running the MySQL application may require scheduling backups, reconfiguring replicas after scaling, setting up failure detection and remediation, etc.
With the Kubernetes API model, management logic is embedded directly into an application specific Kubernetes API, e.g. a “MySQL” API. Users then declaratively manage the application through YAML configuration using tools such as kubectl, just like they do for Kubernetes objects. This approach is referred to as an Application Controller, also known as an Operator. Controllers are a powerful technique backing the core Kubernetes APIs that may be used to build many kinds of solutions in addition to Applications; such as Autoscalers, Workload APIs, Configuration APIs, CI/CD systems, and more.
However, while it has been possible for trailblazers to build new Controllers on top of the raw API machinery, doing so has been a DIY “from scratch” experience, requiring developers to learn low level details about how Kubernetes libraries are implemented, handwrite boilerplate code, and wrap their own solutions for integration testing, RBAC configuration, documentation, etc. Kubebuilder makes this experience simple and easy by applying the lessons learned from building the core Kubernetes APIs.
Getting Started Building Application Controllers and Kubernetes APIs
By providing an opinionated and structured solution for creating Controllers and Kubernetes APIs, developers have a working “out of the box” experience that uses the lessons and best practices learned from developing the core Kubernetes APIs. Creating a new "Hello World" Controller with kubebuilder is as simple as:
- Create a project with
kubebuilder init - Define a new API with
kubebuilder create api - Build and run the provided main function with
make install & make run
This will scaffold the API and Controller for users to modify, as well as scaffold integration tests, RBAC rules, Dockerfiles, Makefiles, etc. After adding their implementation to the project, users create the artifacts to publish their API through:
- Build and push the container image from the provided Dockerfile using
make docker-buildandmake docker-pushcommands - Deploy the API using
make deploycommand
Whether you are already a Controller aficionado or just want to learn what the buzz is about, check out the kubebuilder repo or take a look at an example in the kubebuilder book to learn about how simple and easy it is to build Controllers.
Get Involved
Kubebuilder is a project under SIG API Machinery and is being actively developed by contributors from many companies such as Google, Red Hat, VMware, Huawei and others. Get involved by giving us feedback through these channels:
- Kubebuilder chat room on Slack
- SIG mailing list
- GitHub issues
- Send a pull request in the kubebuilder repo
Out of the Clouds onto the Ground: How to Make Kubernetes Production Grade Anywhere
This blog offers some guidelines for running a production grade Kubernetes cluster in an environment like an on-premise data center or edge location.
What does it mean to be “production grade”?
- The installation is secure
- The deployment is managed with a repeatable and recorded process
- Performance is predictable and consistent
- Updates and configuration changes can be safely applied
- Logging and monitoring is in place to detect and diagnose failures and resource shortages
- Service is “highly available enough” considering available resources, including constraints on money, physical space, power, etc.
- A recovery process is available, documented, and tested for use in the event of failures
In short, production grade means anticipating accidents and preparing for recovery with minimal pain and delay.
This article is directed at on-premise Kubernetes deployments on a hypervisor or bare-metal platform, facing finite backing resources compared to the expansibility of the major public clouds. However, some of these recommendations may also be useful in a public cloud if budget constraints limit the resources you choose to consume.
A single node bare-metal Minikube deployment may be cheap and easy, but is not production grade. Conversely, you’re not likely to achieve Google’s Borg experience in a retail store, branch office, or edge location, nor are you likely to need it.
This blog offers some guidance on achieving a production worthy Kubernetes deployment, even when dealing with some resource constraints.

Critical components in a Kubernetes cluster
Before we dive into the details, it is critical to understand the overall Kubernetes architecture.
A Kubernetes cluster is a highly distributed system based on a control plane and clustered worker node architecture as depicted below.
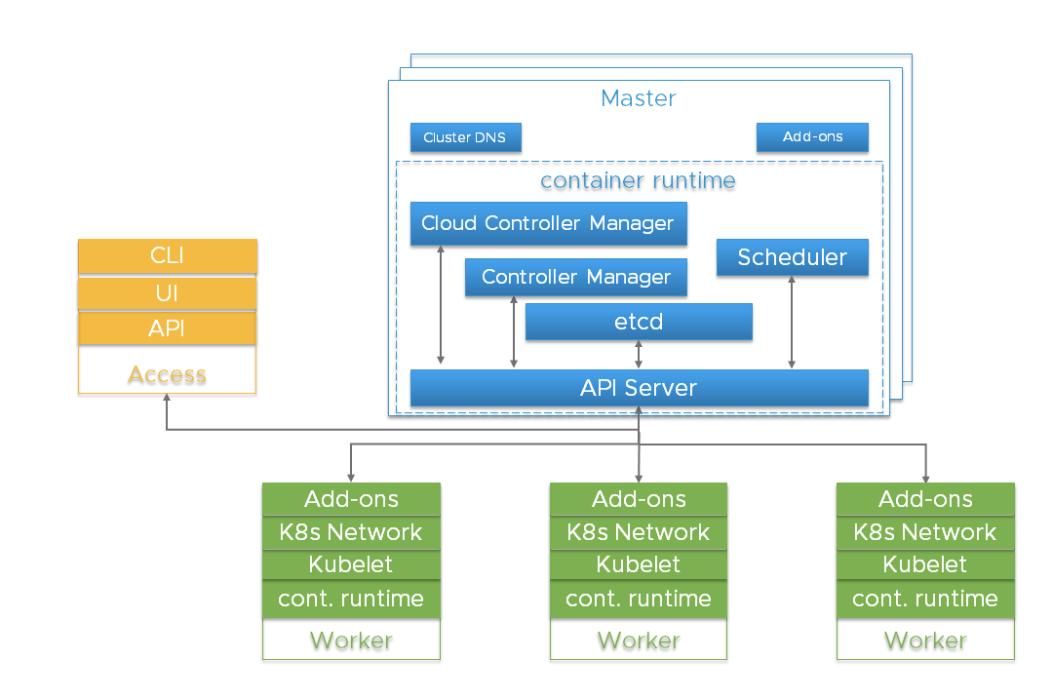
Typically the API server, Controller Manager and Scheduler components are co-located within multiple instances of control plane (aka Master) nodes. Master nodes usually include etcd too, although there are high availability and large cluster scenarios that call for running etcd on independent hosts. The components can be run as containers, and optionally be supervised by Kubernetes, i.e. running as statics pods.
For high availability, redundant instances of these components are used. The importance and required degree of redundancy varies.
Kubernetes components from an HA perspective
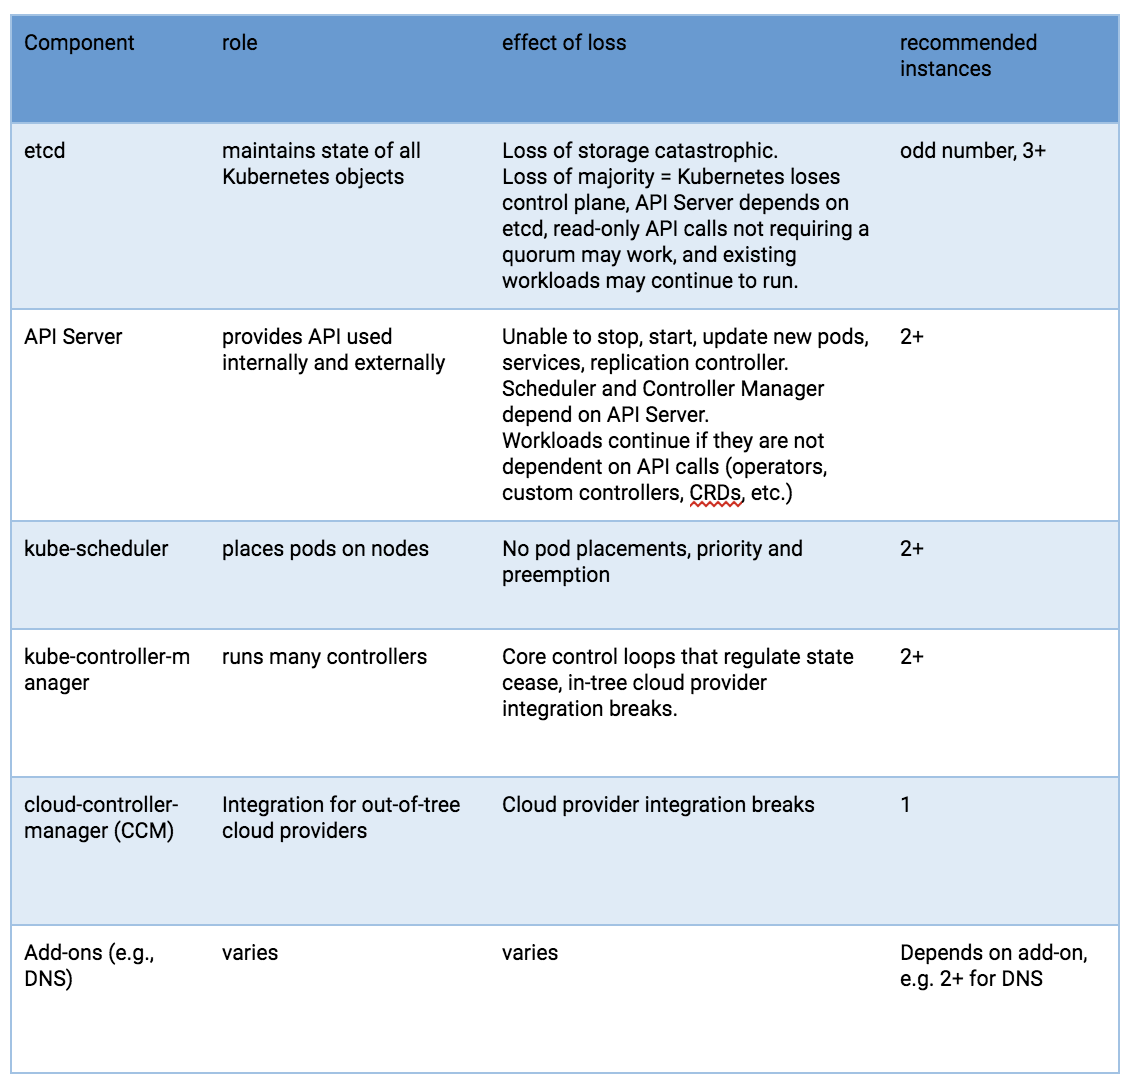
Risks to these components include hardware failures, software bugs, bad updates, human errors, network outages, and overloaded systems resulting in resource exhaustion. Redundancy can mitigate the impact of many of these hazards. In addition, the resource scheduling and high availability features of a hypervisor platform can be useful to surpass what can be achieved using the Linux operating system, Kubernetes, and a container runtime alone.
The API Server uses multiple instances behind a load balancer to achieve scale and availability. The load balancer is a critical component for purposes of high availability. Multiple DNS API Server ‘A’ records might be an alternative if you don’t have a load balancer.
The kube-scheduler and kube-controller-manager engage in a leader election process, rather than utilizing a load balancer. Since a cloud-controller-manager is used for selected types of hosting infrastructure, and these have implementation variations, they will not be discussed, beyond indicating that they are a control plane component.
Pods running on Kubernetes worker nodes are managed by the kubelet agent. Each worker instance runs the kubelet agent and a CRI-compatible container runtime. Kubernetes itself is designed to monitor and recover from worker node outages. But for critical workloads, hypervisor resource management, workload isolation and availability features can be used to enhance availability and make performance more predictable.
etcd
etcd is the persistent store for all Kubernetes objects. The availability and recoverability of the etcd cluster should be the first consideration in a production-grade Kubernetes deployment.
A five-node etcd cluster is a best practice if you can afford it. Why? Because you could engage in maintenance on one and still tolerate a failure. A three-node cluster is the minimum recommendation for production-grade service, even if only a single hypervisor host is available. More than seven nodes is not recommended except for very large installations straddling multiple availability zones.
The minimum recommendation for hosting an etcd cluster node is 2GB of RAM with 8GB of SSD-backed disk. Usually, 8GB RAM and a 20GB disk will be enough. Disk performance affects failed node recovery time. See https://coreos.com/etcd/docs/latest/op-guide/hardware.html for more on this.
Consider multiple etcd clusters in special situations
For very large Kubernetes clusters, consider using a separate etcd cluster for Kubernetes events so that event storms do not impact the main Kubernetes API service. If you use flannel networking, it retains configuration in etcd and may have differing version requirements than Kubernetes, which can complicate etcd backup -- consider using a dedicated etcd cluster for flannel.
Single host deployments
The availability risk list includes hardware, software and people. If you are limited to a single host, the use of redundant storage, error-correcting memory and dual power supplies can reduce hardware failure exposure. Running a hypervisor on the physical host will allow operation of redundant software components and add operational advantages related to deployment, upgrade, and resource consumption governance, with predictable and repeatable performance under stress. For example, even if you can only afford to run singletons of the master services, they need to be protected from overload and resource exhaustion while competing with your application workload. A hypervisor can be more effective and easier to manage than configuring Linux scheduler priorities, cgroups, Kubernetes flags, etc.
If resources on the host permit, you can deploy three etcd VMs. Each of the etcd VMs should be backed by a different physical storage device, or they should use separate partitions of a backing store using redundancy (mirroring, RAID, etc).
Dual redundant instances of the API server, scheduler and controller manager would be the next upgrade, if your single host has the resources.
Single host deployment options, least production worthy to better
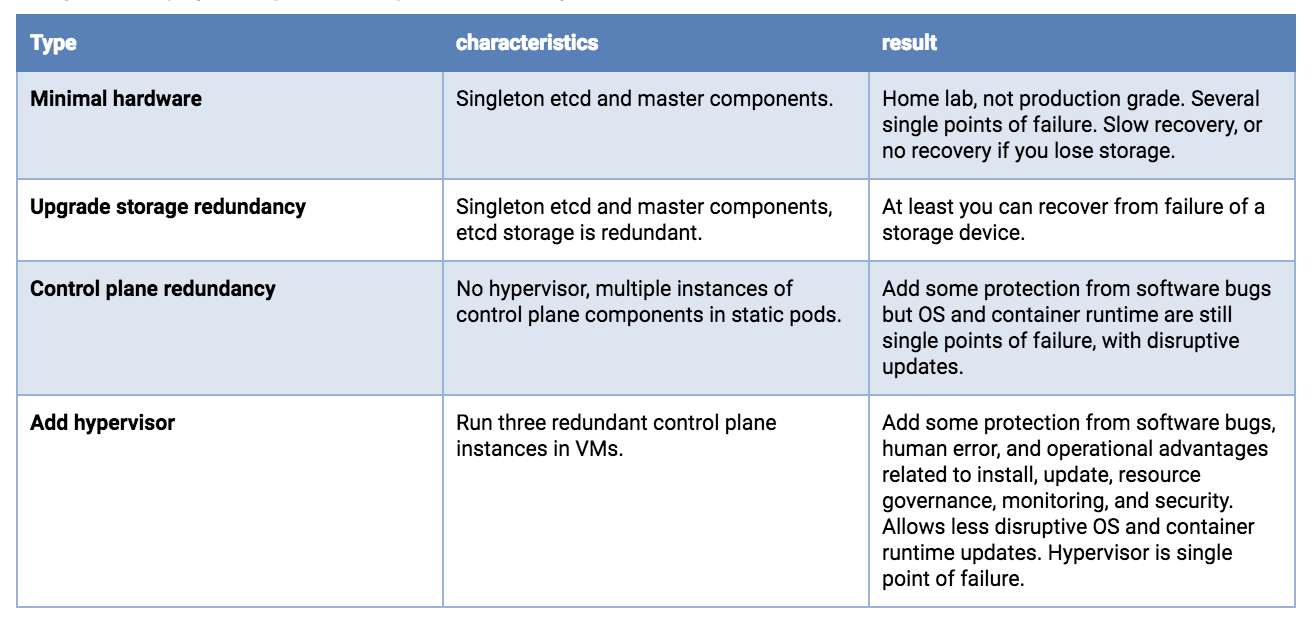
Dual host deployments
With two hosts, storage concerns for etcd are the same as a single host, you want redundancy. And you would preferably run 3 etcd instances. Although possibly counter-intuitive, it is better to concentrate all etcd nodes on a single host. You do not gain reliability by doing a 2+1 split across two hosts - because loss of the node holding the majority of etcd instances results in an outage, whether that majority is 2 or 3. If the hosts are not identical, put the whole etcd cluster on the most reliable host.
Running redundant API Servers, kube-schedulers, and kube-controller-managers is recommended. These should be split across hosts to minimize risk due to container runtime, OS and hardware failures.
Running a hypervisor layer on the physical hosts will allow operation of redundant software components with resource consumption governance, and can have planned maintenance operational advantages.
Dual host deployment options, least production worthy to better
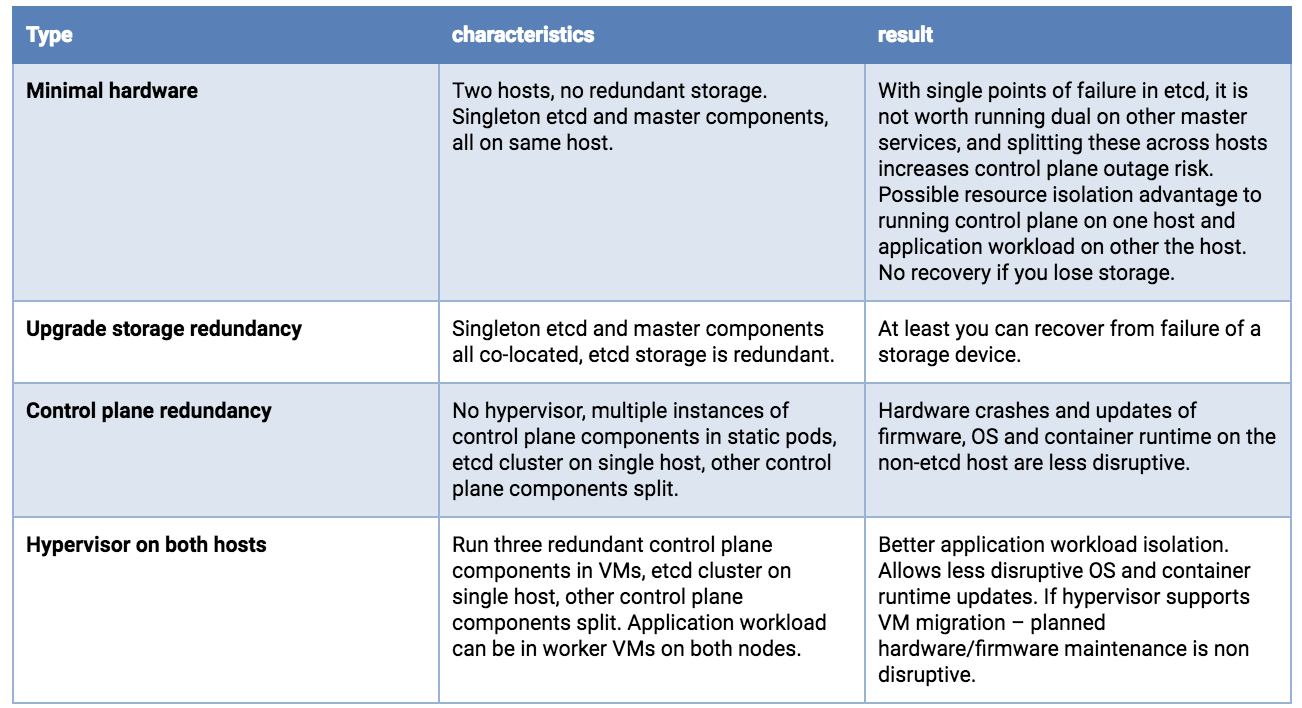
Triple (or larger) host deployments -- Moving into uncompromised production-grade service Splitting etcd across three hosts is recommended. A single hardware failure will reduce application workload capacity, but should not result in a complete service outage.
With very large clusters, more etcd instances will be required.
Running a hypervisor layer offers operational advantages and better workload isolation. It is beyond the scope of this article, but at the three-or-more host level, advanced features may be available (clustered redundant shared storage, resource governance with dynamic load balancing, automated health monitoring with live migration or failover).
Triple (or more) host options, least production worthy to better
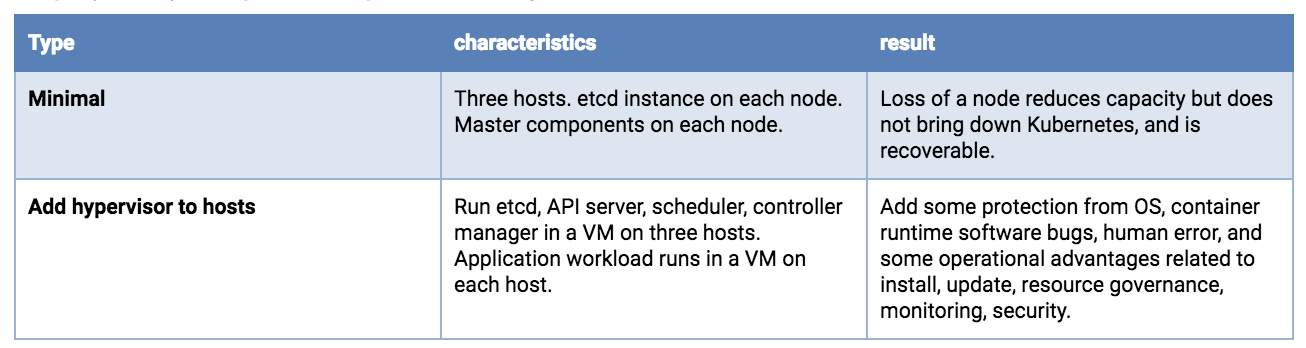
Kubernetes configuration settings
Master and Worker nodes should be protected from overload and resource exhaustion. Hypervisor features can be used to isolate critical components and reserve resources. There are also Kubernetes configuration settings that can throttle things like API call rates and pods per node. Some install suites and commercial distributions take care of this, but if you are performing a custom Kubernetes deployment, you may find that the defaults are not appropriate, particularly if your resources are small or your cluster is large.
Resource consumption by the control plane will correlate with the number of pods and the pod churn rate. Very large and very small clusters will benefit from non-default settings of kube-apiserver request throttling and memory. Having these too high can lead to request limit exceeded and out of memory errors.
On worker nodes, Node Allocatable should be configured based on a reasonable supportable workload density at each node. Namespaces can be created to subdivide the worker node cluster into multiple virtual clusters with resource CPU and memory quotas. Kubelet handling of out of resource conditions can be configured.
Security
Every Kubernetes cluster has a cluster root Certificate Authority (CA). The Controller Manager, API Server, Scheduler, kubelet client, kube-proxy and administrator certificates need to be generated and installed. If you use an install tool or a distribution this may be handled for you. A manual process is described here. You should be prepared to reinstall certificates in the event of node replacements or expansions.
As Kubernetes is entirely API driven, controlling and limiting who can access the cluster and what actions they are allowed to perform is essential. Encryption and authentication options are addressed in this documentation.
Kubernetes application workloads are based on container images. You want the source and content of these images to be trustworthy. This will almost always mean that you will host a local container image repository. Pulling images from the public Internet can present both reliability and security issues. You should choose a repository that supports image signing, security scanning, access controls on pushing and pulling images, and logging of activity.
Processes must be in place to support applying updates for host firmware, hypervisor, OS, Kubernetes, and other dependencies. Version monitoring should be in place to support audits.
Recommendations:
- Tighten security settings on the control plane components beyond defaults (e.g., locking down worker nodes)
- Utilize Pod Security Policies
- Consider the NetworkPolicy integration available with your networking solution, including how you will accomplish tracing, monitoring and troubleshooting.
- Use RBAC to drive authorization decisions and enforcement.
- Consider physical security, especially when deploying to edge or remote office locations that may be unattended. Include storage encryption to limit exposure from stolen devices and protection from attachment of malicious devices like USB keys.
- Protect Kubernetes plain-text cloud provider credentials (access keys, tokens, passwords, etc.)
Kubernetes secret objects are appropriate for holding small amounts of sensitive data. These are retained within etcd. These can be readily used to hold credentials for the Kubernetes API but there are times when a workload or an extension of the cluster itself needs a more full-featured solution. The HashiCorp Vault project is a popular solution if you need more than the built-in secret objects can provide.
Disaster Recovery and Backup
Utilizing redundancy through the use of multiple hosts and VMs helps reduce some classes of outages, but scenarios such as a sitewide natural disaster, a bad update, getting hacked, software bugs, or human error could still result in an outage.
A critical part of a production deployment is anticipating a possible future recovery.
It’s also worth noting that some of your investments in designing, documenting, and automating a recovery process might also be re-usable if you need to do large-scale replicated deployments at multiple sites.
Elements of a DR plan include backups (and possibly replicas), replacements, a planned process, people who can carry out the process, and recurring training. Regular test exercises and chaos engineering principles can be used to audit your readiness.
Your availability requirements might demand that you retain local copies of the OS, Kubernetes components, and container images to allow recovery even during an Internet outage. The ability to deploy replacement hosts and nodes in an “air-gapped” scenario can also offer security and speed of deployment advantages.
All Kubernetes objects are stored on etcd. Periodically backing up the etcd cluster data is important to recover Kubernetes clusters under disaster scenarios, such as losing all master nodes.
Backing up an etcd cluster can be accomplished with etcd’s built-in snapshot mechanism, and copying the resulting file to storage in a different failure domain. The snapshot file contains all the Kubernetes states and critical information. In order to keep the sensitive Kubernetes data safe, encrypt the snapshot files.
Using disk volume based snapshot recovery of etcd can have issues; see #40027. API-based backup solutions (e.g., Ark) can offer more granular recovery than a etcd snapshot, but also can be slower. You could utilize both snapshot and API-based backups, but you should do one form of etcd backup as a minimum.
Be aware that some Kubernetes extensions may maintain state in independent etcd clusters, on persistent volumes, or through other mechanisms. If this state is critical, it should have a backup and recovery plan.
Some critical state is held outside etcd. Certificates, container images, and other configuration- and operation-related state may be managed by your automated install/update tooling. Even if these items can be regenerated, backup or replication might allow for faster recovery after a failure. Consider backups with a recovery plan for these items:
- Certificate and key pairs
- CA
- API Server
- Apiserver-kubelet-client
- ServiceAccount signing
- “Front proxy”
- Front proxy client
- Critical DNS records
- IP/subnet assignments and reservations
- External load-balancers
- kubeconfig files
- LDAP or other authentication details
- Cloud provider specific account and configuration data
Considerations for your production workloads
Anti-affinity specifications can be used to split clustered services across backing hosts, but at this time the settings are used only when the pod is scheduled. This means that Kubernetes can restart a failed node of your clustered application, but does not have a native mechanism to rebalance after a fail back. This is a topic worthy of a separate blog, but supplemental logic might be useful to achieve optimal workload placements after host or worker node recoveries or expansions. The Pod Priority and Preemption feature can be used to specify a preferred triage in the event of resource shortages caused by failures or bursting workloads.
For stateful services, external attached volume mounts are the standard Kubernetes recommendation for a non-clustered service (e.g., a typical SQL database). At this time Kubernetes managed snapshots of these external volumes is in the category of a roadmap feature request, likely to align with the Container Storage Interface (CSI) integration. Thus performing backups of such a service would involve application specific, in-pod activity that is beyond the scope of this document. While awaiting better Kubernetes support for a snapshot and backup workflow, running your database service in a VM rather than a container, and exposing it to your Kubernetes workload may be worth considering.
Cluster-distributed stateful services (e.g., Cassandra) can benefit from splitting across hosts, using local persistent volumes if resources allow. This would require deploying multiple Kubernetes worker nodes (could be VMs on hypervisor hosts) to preserve a quorum under single point failures.
Other considerations
Logs and metrics (if collected and persistently retained) are valuable to diagnose outages, but given the variety of technologies available it will not be addressed in this blog. If Internet connectivity is available, it may be desirable to retain logs and metrics externally at a central location.
Your production deployment should utilize an automated installation, configuration and update tool (e.g., Ansible, BOSH, Chef, Juju, kubeadm, Puppet, etc.). A manual process will have repeatability issues, be labor intensive, error prone, and difficult to scale. Certified distributions are likely to include a facility for retaining configuration settings across updates, but if you implement your own install and config toolchain, then retention, backup and recovery of the configuration artifacts is essential. Consider keeping your deployment components and settings under a version control system such as Git.
Outage recovery
Runbooks documenting recovery procedures should be tested and retained offline -- perhaps even printed. When an on-call staff member is called up at 2 am on a Friday night, it may not be a great time to improvise. Better to execute from a pre-planned, tested checklist -- with shared access by remote and onsite personnel.
Final thoughts

Buying a ticket on a commercial airline is convenient and safe. But when you travel to a remote location with a short runway, that commercial Airbus A320 flight isn’t an option. This doesn’t mean that air travel is off the table. It does mean that some compromises are necessary.
The adage in aviation is that on a single engine aircraft, an engine failure means you crash. With twin engines, at the very least, you get more choices of where you crash. Kubernetes on a small number of hosts is similar, and if your business case justifies it, you might scale up to a larger fleet of mixed large and small vehicles (e.g., FedEx, Amazon).
Those designing a production-grade Kubernetes solution have a lot of options and decisions. A blog-length article can’t provide all the answers, and can’t know your specific priorities. We do hope this offers a checklist of things to consider, along with some useful guidance. Some options were left “on the cutting room floor” (e.g., running Kubernetes components using self-hosting instead of static pods). These might be covered in a follow up if there is interest. Also, Kubernetes’ high enhancement rate means that if your search engine found this article after 2019, some content might be past the “sell by” date.
Dynamically Expand Volume with CSI and Kubernetes
There is a very powerful storage subsystem within Kubernetes itself, covering a fairly broad spectrum of use cases. Whereas, when planning to build a product-grade relational database platform with Kubernetes, we face a big challenge: coming up with storage. This article describes how to extend latest Container Storage Interface 0.2.0 and integrate with Kubernetes, and demonstrates the essential facet of dynamically expanding volume capacity.
Introduction
As we focalize our customers, especially in financial space, there is a huge upswell in the adoption of container orchestration technology.
They are looking forward to open source solutions to redesign already existing monolithic applications, which have been running for several years on virtualization infrastructure or bare metal.
Considering extensibility and the extent of technical maturity, Kubernetes and Docker are at the very top of the list. But migrating monolithic applications to a distributed orchestration like Kubernetes is challenging, the relational database is critical for the migration.
With respect to the relational database, we should pay attention to storage. There is a very powerful storage subsystem within Kubernetes itself. It is very useful and covers a fairly broad spectrum of use cases. When planning to run a relational database with Kubernetes in production, we face a big challenge: coming up with storage. There are still some fundamental functionalities which are left unimplemented. Specifically, dynamically expanding volume. It sounds boring but is highly required, except for actions like create and delete and mount and unmount.
Currently, expanding volume is only available with those storage provisioners:
- gcePersistentDisk
- awsElasticBlockStore
- OpenStack Cinder
- glusterfs
- rbd
In order to enable this feature, we should set feature gate ExpandPersistentVolumes true and turn on the PersistentVolumeClaimResize admission plugin. Once PersistentVolumeClaimResize has been enabled, resizing will be allowed by a Storage Class whose allowVolumeExpansion field is set to true.
Unfortunately, dynamically expanding volume through the Container Storage Interface (CSI) and Kubernetes is unavailable, even though the underlying storage providers have this feature.
This article will give a simplified view of CSI, followed by a walkthrough of how to introduce a new expanding volume feature on the existing CSI and Kubernetes. Finally, the article will demonstrate how to dynamically expand volume capacity.
Container Storage Interface (CSI)
To have a better understanding of what we're going to do, the first thing we need to know is what the Container Storage Interface is. Currently, there are still some problems for already existing storage subsystem within Kubernetes. Storage driver code is maintained in the Kubernetes core repository which is difficult to test. But beyond that, Kubernetes needs to give permissions to storage vendors to check code into the Kubernetes core repository. Ideally, that should be implemented externally.
CSI is designed to define an industry standard that will enable storage providers who enable CSI to be available across container orchestration systems that support CSI.
This diagram depicts a kind of high-level Kubernetes archetypes integrated with CSI:
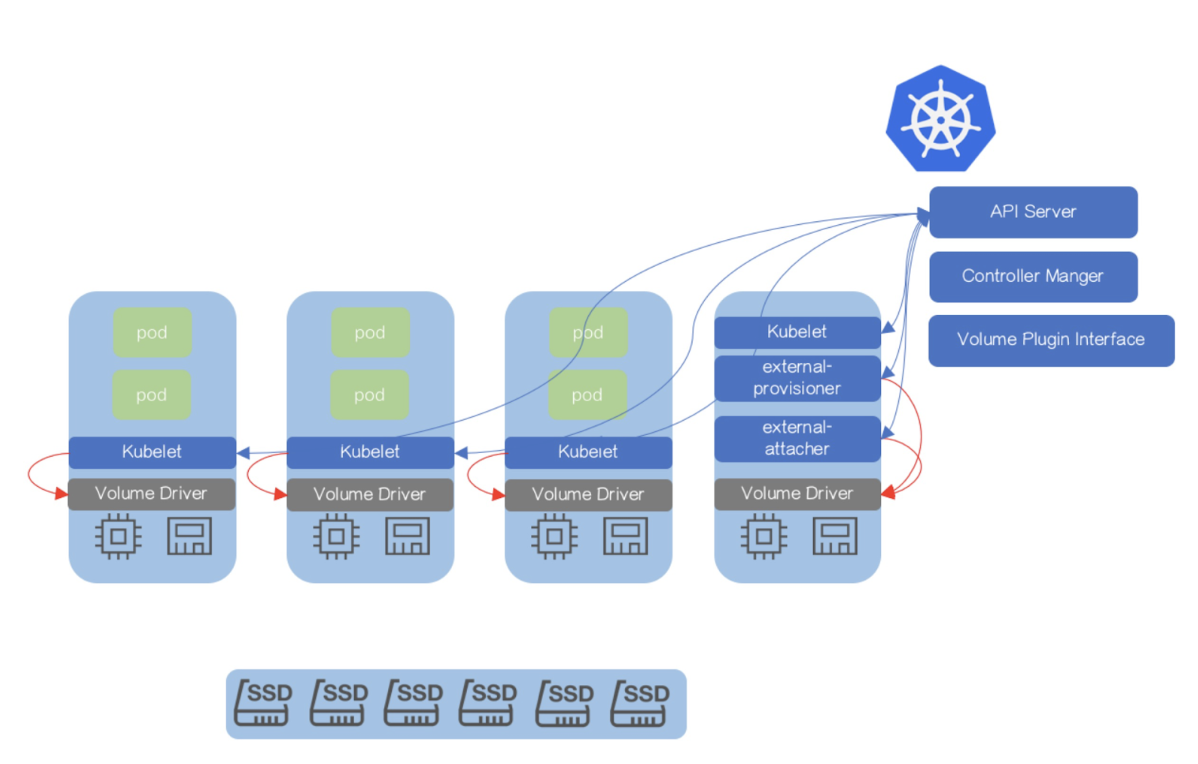
- Three new external components are introduced to decouple Kubernetes and Storage Provider logic
- Blue arrows present the conventional way to call against API Server
- Red arrows present gRPC to call against Volume Driver
For more details, please visit: https://github.com/container-storage-interface/spec/blob/master/spec.md
Extend CSI and Kubernetes
In order to enable the feature of expanding volume atop Kubernetes, we should extend several components including CSI specification, “in-tree” volume plugin, external-provisioner and external-attacher.
Extend CSI spec
The feature of expanding volume is still undefined in latest CSI 0.2.0. The new 3 RPCs, including RequiresFSResize and ControllerResizeVolume and NodeResizeVolume, should be introduced.
service Controller {
rpc CreateVolume (CreateVolumeRequest)
returns (CreateVolumeResponse) {}
……
rpc RequiresFSResize (RequiresFSResizeRequest)
returns (RequiresFSResizeResponse) {}
rpc ControllerResizeVolume (ControllerResizeVolumeRequest)
returns (ControllerResizeVolumeResponse) {}
}
service Node {
rpc NodeStageVolume (NodeStageVolumeRequest)
returns (NodeStageVolumeResponse) {}
……
rpc NodeResizeVolume (NodeResizeVolumeRequest)
returns (NodeResizeVolumeResponse) {}
}
Extend “In-Tree” Volume Plugin
In addition to the extend CSI specification, the csiPlugin interface within Kubernetes should also implement expandablePlugin. The csiPlugin interface will expand PersistentVolumeClaim representing for ExpanderController.
type ExpandableVolumePlugin interface {
VolumePlugin
ExpandVolumeDevice(spec Spec, newSize resource.Quantity, oldSize resource.Quantity) (resource.Quantity, error)
RequiresFSResize() bool
}
Implement Volume Driver
Finally, to abstract complexity of the implementation, we should hard code the separate storage provider management logic into the following functions which is well-defined in the CSI specification:
- CreateVolume
- DeleteVolume
- ControllerPublishVolume
- ControllerUnpublishVolume
- ValidateVolumeCapabilities
- ListVolumes
- GetCapacity
- ControllerGetCapabilities
- RequiresFSResize
- ControllerResizeVolume
Demonstration
Let’s demonstrate this feature with a concrete user case.
- Create storage class for CSI storage provisioner
allowVolumeExpansion: true
apiVersion: storage.k8s.io/v1
kind: StorageClass
metadata:
name: csi-qcfs
parameters:
csiProvisionerSecretName: orain-test
csiProvisionerSecretNamespace: default
provisioner: csi-qcfsplugin
reclaimPolicy: Delete
volumeBindingMode: Immediate
Deploy CSI Volume Driver including storage provisioner
csi-qcfspluginacross Kubernetes clusterCreate PVC
qcfs-pvcwhich will be dynamically provisioned by storage classcsi-qcfs
apiVersion: v1
kind: PersistentVolumeClaim
metadata:
name: qcfs-pvc
namespace: default
....
spec:
accessModes:
- ReadWriteOnce
resources:
requests:
storage: 300Gi
storageClassName: csi-qcfs
- Create MySQL 5.7 instance to use PVC
qcfs-pvc - In order to mirror the exact same production-level scenario, there are actually two different types of workloads including:
- Batch insert to make MySQL consuming more file system capacity
- Surge query request
- Dynamically expand volume capacity through edit pvc
qcfs-pvcconfiguration
The Prometheus and Grafana integration allows us to visualize corresponding critical metrics.
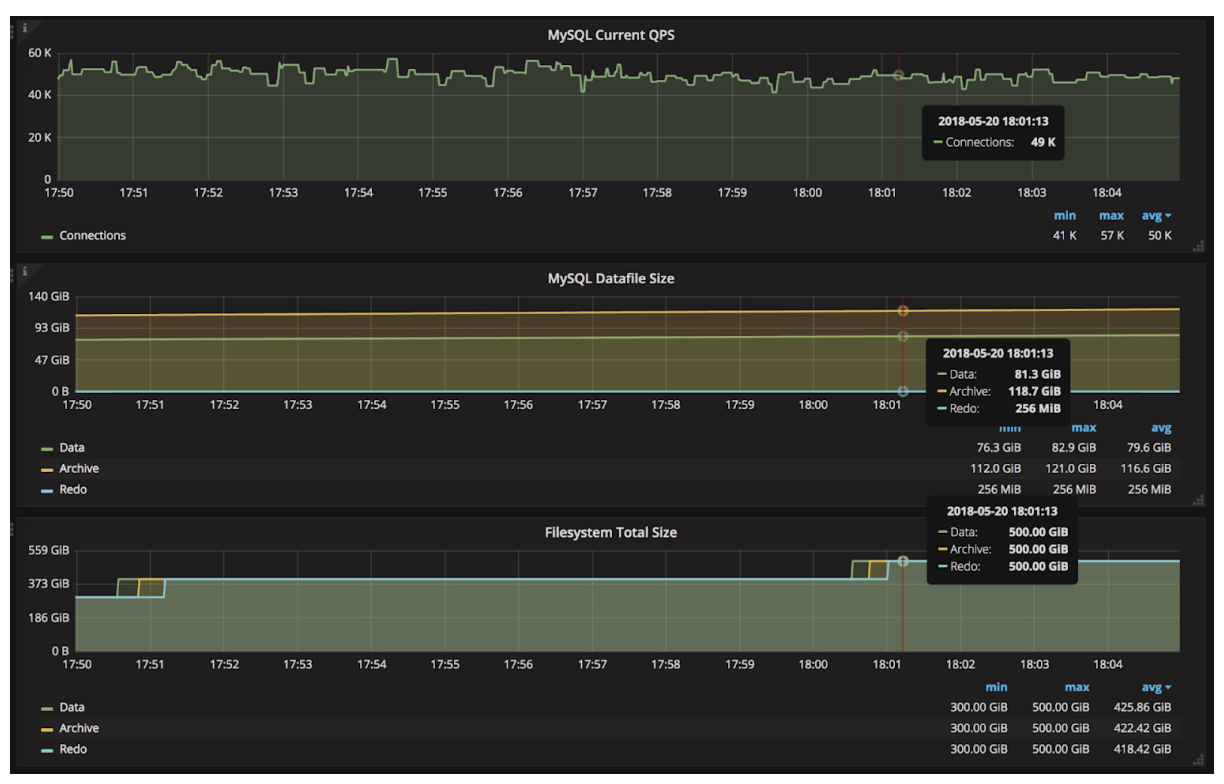
We notice that the middle reading shows MySQL datafile size increasing slowly during bulk inserting. At the same time, the bottom reading shows file system expanding twice in about 20 minutes, from 300 GiB to 400 GiB and then 500 GiB. Meanwhile, the upper reading shows the whole process of expanding volume immediately completes and hardly impacts MySQL QPS.
Conclusion
Regardless of whatever infrastructure applications have been running on, the database is always a critical resource. It is essential to have a more advanced storage subsystem out there to fully support database requirements. This will help drive the more broad adoption of cloud native technology.
KubeVirt: Extending Kubernetes with CRDs for Virtualized Workloads
What is KubeVirt?
KubeVirt is a Kubernetes addon that provides users the ability to schedule traditional virtual machine workloads side by side with container workloads. Through the use of Custom Resource Definitions (CRDs) and other Kubernetes features, KubeVirt seamlessly extends existing Kubernetes clusters to provide a set of virtualization APIs that can be used to manage virtual machines.
Why Use CRDs Over an Aggregated API Server?
Back in the middle of 2017, those of us working on KubeVirt were at a crossroads. We had to make a decision whether or not to extend Kubernetes using an aggregated API server or to make use of the new Custom Resource Definitions (CRDs) feature.
At the time, CRDs lacked much of the functionality we needed to deliver our feature set. The ability to create our own aggregated API server gave us all the flexibility we needed, but it had one major flaw. An aggregated API server significantly increased the complexity involved with installing and operating KubeVirt.
The crux of the issue for us was that aggregated API servers required access to etcd for object persistence. This meant that cluster admins would have to either accept that KubeVirt needs a separate etcd deployment which increases complexity, or provide KubeVirt with shared access to the Kubernetes etcd store which introduces risk.
We weren’t okay with this tradeoff. Our goal wasn’t to just extend Kubernetes to run virtualization workloads, it was to do it in the most seamless and effortless way possible. We felt that the added complexity involved with an aggregated API server sacrificed the part of the user experience involved with installing and operating KubeVirt.
Ultimately we chose to go with CRDs and trust that the Kubernetes ecosystem would grow with us to meet the needs of our use case. Our bets were well placed. At this point there are either solutions in place or solutions under discussion that solve every feature gap we encountered back in 2017 when were evaluating CRDs vs an aggregated API server.
Building Layered “Kubernetes like” APIs with CRDs
We designed KubeVirt’s API to follow the same patterns users are already familiar with in the Kubernetes core API.
For example, in Kubernetes the lowest level unit that users create to perform work is a Pod. Yes, Pods do have multiple containers but logically the Pod is the unit at the bottom of the stack. A Pod represents a mortal workload. The Pod gets scheduled, eventually the Pod’s workload terminates, and that’s the end of the Pod’s lifecycle.
Workload controllers such as the ReplicaSet and StatefulSet are layered on top of the Pod abstraction to help manage scale out and stateful applications. From there we have an even higher level controller called a Deployment which is layered on top of ReplicaSets help manage things like rolling updates.
In KubeVirt, this concept of layering controllers is at the very center of our design. The KubeVirt VirtualMachineInstance (VMI) object is the lowest level unit at the very bottom of the KubeVirt stack. Similar in concept to a Pod, a VMI represents a single mortal virtualized workload that executes once until completion (powered off).
Layered on top of VMIs we have a workload controller called a VirtualMachine (VM). The VM controller is where we really begin to see the differences between how users manage virtualized workloads vs containerized workloads. Within the context of existing Kubernetes functionality, the best way to describe the VM controller’s behavior is to compare it to a StatefulSet of size one. This is because the VM controller represents a single stateful (immortal) virtual machine capable of persisting state across both node failures and multiple restarts of its underlying VMI. This object behaves in the way that is familiar to users who have managed virtual machines in AWS, GCE, OpenStack or any other similar IaaS cloud platform. The user can shutdown a VM, then choose to start that exact same VM up again at a later time.
In addition to VMs, we also have a VirtualMachineInstanceReplicaSet (VMIRS) workload controller which manages scale out of identical VMI objects. This controller behaves nearly identically to the Kubernetes ReplicSet controller. The primary difference being that the VMIRS manages VMI objects and the ReplicaSet manages Pods. Wouldn’t it be nice if we could come up with a way to use the Kubernetes ReplicaSet controller to scale out CRDs?
Each one of these KubeVirt objects (VMI, VM, VMIRS) are registered with Kubernetes as a CRD when the KubeVirt install manifest is posted to the cluster. By registering our APIs as CRDs with Kubernetes, all the tooling involved with managing Kubernetes clusters (like kubectl) have access to the KubeVirt APIs just as if they are native Kubernetes objects.
Dynamic Webhooks for API Validation
One of the responsibilities of the Kubernetes API server is to intercept and validate requests prior to allowing objects to be persisted into etcd. For example, if someone tries to create a Pod using a malformed Pod specification, the Kubernetes API server immediately catches the error and rejects the POST request. This all occurs before the object is persistent into etcd preventing the malformed Pod specification from making its way into the cluster.
This validation occurs during a process called admission control. Until recently, it was not possible to extend the default Kubernetes admission controllers without altering code and compiling/deploying an entirely new Kubernetes API server. This meant that if we wanted to perform admission control on KubeVirt’s CRD objects while they are posted to the cluster, we’d have to build our own version of the Kubernetes API server and convince our users to use that instead. That was not a viable solution for us.
Using the new Dynamic Admission Control feature that first landed in Kubernetes 1.9, we now have a path for performing custom validation on KubeVirt API through the use of a ValidatingAdmissionWebhook. This feature allows KubeVirt to dynamically register an HTTPS webhook with Kubernetes at KubeVirt install time. After registering the custom webhook, all requests related to KubeVirt API objects are forwarded from the Kubernetes API server to our HTTPS endpoint for validation. If our endpoint rejects a request for any reason, the object will not be persisted into etcd and the client receives our response outlining the reason for the rejection.
For example, if someone posts a malformed VirtualMachine object, they’ll receive an error indicating what the problem is.
$ kubectl create -f my-vm.yaml
Error from server: error when creating "my-vm.yaml": admission webhook "virtualmachine-validator.kubevirt.io" denied the request: spec.template.spec.domain.devices.disks[0].volumeName 'registryvolume' not found.
In the example output above, that error response is coming directly from KubeVirt’s admission control webhook.
CRD OpenAPIv3 Validation
In addition to the validating webhook, KubeVirt also uses the ability to provide an OpenAPIv3 validation schema when registering a CRD with the cluster. While the OpenAPIv3 schema does not let us express some of the more advanced validation checks that the validation webhook provides, it does offer the ability to enforce simple validation checks involving things like required fields, max/min value lengths, and verifying that values are formatted in a way that matches a regular expression string.
Dynamic Webhooks for “PodPreset Like” Behavior
The Kubernetes Dynamic Admission Control feature is not only limited to validation logic, it also provides the ability for applications like KubeVirt to both intercept and mutate requests as they enter the cluster. This is achieved through the use of a MutatingAdmissionWebhook object. In KubeVirt, we are looking to use a mutating webhook to support our VirtualMachinePreset (VMPreset) feature.
A VMPreset acts in a similar way to a PodPreset. Just like a PodPreset allows users to define values that should automatically be injected into pods at creation time, a VMPreset allows users to define values that should be injected into VMs at creation time. Through the use of a mutating webhook, KubeVirt can intercept a request to create a VM, apply VMPresets to the VM spec, and then validate that the resulting VM object. This all occurs before the VM object is persisted into etcd which allows KubeVirt to immediately notify the user of any conflicts at the time the request is made.
Subresources for CRDs
When comparing the use of CRDs to an aggregated API server, one of the features CRDs lack is the ability to support subresources. Subresources are used to provide additional resource functionality. For example, the pod/logs and pod/exec subresource endpoints are used behind the scenes to provide the kubectl logs and kubectl exec command functionality.
Just like Kubernetes uses the pod/exec subresource to provide access to a pod’s environment, in KubeVirt we want subresources to provide serial-console, VNC, and SPICE access to a virtual machine. By adding virtual machine guest access through subresources, we can leverage RBAC to provide access control for these features.
So, given that the KubeVirt team decided to use CRD’s instead of an aggregated API server for custom resource support, how can we have subresources for CRDs when the CRD feature expiclity does not support subresources?
We created a workaround for this limitation by implementing a stateless aggregated API server that exists only to serve subresource requests. With no state, we don’t have to worry about any of the issues we identified earlier with regards to access to etcd. This means the KubeVirt API is actually supported through a combination of both CRDs for resources and an aggregated API server for stateless subresources.
This isn’t a perfect solution for us. Both aggregated API servers and CRDs require us to register an API GroupName with Kubernetes. This API GroupName field essentially namespaces the API’s REST path in a way that prevents API naming conflicts between other third party applications. Because CRDs and aggregated API servers can’t share the same GroupName, we have to register two separate GroupNames. One is used by our CRDs and the other is used by the aggregated API server for subresource requests.
Having two GroupNames in our API is slightly inconvenient because it means the REST path for the endpoints that serve the KubeVirt subresource requests have a slightly different base path than the resources.
For example, the endpoint to create a VMI object is as follows.
/apis/kubevirt.io/v1alpha2/namespaces/my-namespace/virtualmachineinstances/my-vm
However, the subresource endpoint to access graphical VNC looks like this.
/apis/subresources.kubevirt.io/v1alpha2/namespaces/my-namespace/virtualmachineinstances/my-vm/vnc
Notice that the first request uses kubevirt.io and the second request uses subresource.kubevirt.io. We don’t like that, but that’s how we’ve managed to combine CRDs with a stateless aggregated API server for subresources.
One thing worth noting is that in Kubernetes 1.10 a very basic form of CRD subresource support was added in the form of the /status and /scale subresources. This support does not help us deliver the virtualization features we want subresources for. However, there have been discussions about exposing custom CRD subresources as webhooks in a future Kubernetes version. If this functionality lands, we will gladly transition away from our stateless aggregated API server workaround to use a subresource webhook feature.
CRD Finalizers
A CRD finalizer is a feature that lets us provide a pre-delete hook in order to perform actions before allowing a CRD object to be removed from persistent storage. In KubeVirt, we use finalizers to guarantee a virtual machine has completely terminated before we allow the corresponding VMI object to be removed from etcd.
API Versioning for CRDs
The Kubernetes core APIs have the ability to support multiple versions for a single object type and perform conversions between those versions. This gives the Kubernetes core APIs a path for advancing the v1alpha1 version of an object to a v1beta1 version and so forth.
Prior to Kubernetes 1.11, CRDs did not have support for multiple versions. This meant when we wanted to progress a CRD from kubevirt.io/v1alpha1 to kubevirt.io/v1beta1, the only path available to was to backup our CRD objects, delete the registered CRD from Kubernetes, register a new CRD with the updated version, convert the backed up CRD objects to the new version, and finally post the migrated CRD objects back to the cluster.
That strategy was not exactly a viable option for us.
Fortunately thanks to some recent work to rectify this issue in Kubernetes, the latest Kubernetes v1.11 now supports CRDs with multiple versions. Note however that this initial multi version support is limited. While a CRD can now have multiple versions, the feature does not currently contain a path for performing conversions between versions. In KubeVirt, the lack of conversion makes it difficult us to evolve our API as we progress versions. Luckily, support for conversions between versions is underway and we look forward to taking advantage of that feature once it lands in a future Kubernetes release.
Feature Highlight: CPU Manager
This blog post describes the CPU Manager, a beta feature in Kubernetes. The CPU manager feature enables better placement of workloads in the Kubelet, the Kubernetes node agent, by allocating exclusive CPUs to certain pod containers.
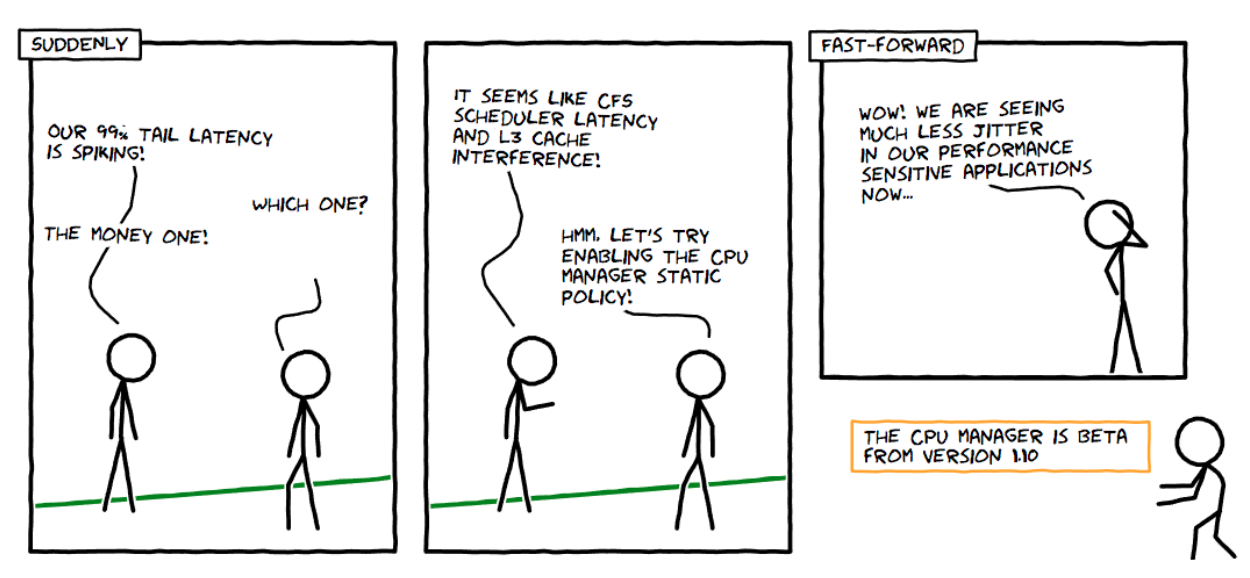
Sounds Good! But Does the CPU Manager Help Me?
It depends on your workload. A single compute node in a Kubernetes cluster can run many pods and some of these pods could be running CPU-intensive workloads. In such a scenario, the pods might contend for the CPU resources available in that compute node. When this contention intensifies, the workload can move to different CPUs depending on whether the pod is throttled and the availability of CPUs at scheduling time. There might also be cases where the workload could be sensitive to context switches. In all the above scenarios, the performance of the workload might be affected.
If your workload is sensitive to such scenarios, then CPU Manager can be enabled to provide better performance isolation by allocating exclusive CPUs for your workload.
CPU manager might help workloads with the following characteristics:
- Sensitive to CPU throttling effects.
- Sensitive to context switches.
- Sensitive to processor cache misses.
- Benefits from sharing a processor resources (e.g., data and instruction caches).
- Sensitive to cross-socket memory traffic.
- Sensitive or requires hyperthreads from the same physical CPU core.
Ok! How Do I use it?
Using the CPU manager is simple. First, enable CPU manager with the Static policy in the Kubelet running on the compute nodes of your cluster. Then configure your pod to be in the Guaranteed Quality of Service (QoS) class. Request whole numbers of CPU cores (e.g., 1000m, 4000m) for containers that need exclusive cores. Create your pod in the same way as before (e.g., kubectl create -f pod.yaml). And voilà, the CPU manager will assign exclusive CPUs to each of container in the pod according to their CPU requests.
apiVersion: v1
kind: Pod
metadata:
name: exclusive-2
spec:
containers:
- image: quay.io/connordoyle/cpuset-visualizer
name: exclusive-2
resources:
# Pod is in the Guaranteed QoS class because requests == limits
requests:
# CPU request is an integer
cpu: 2
memory: "256M"
limits:
cpu: 2
memory: "256M"
Pod specification requesting two exclusive CPUs.
Hmm … How Does the CPU Manager Work?
For Kubernetes, and the purposes of this blog post, we will discuss three kinds of CPU resource controls available in most Linux distributions. The first two are CFS shares (what's my weighted fair share of CPU time on this system) and CFS quota (what's my hard cap of CPU time over a period). The CPU manager uses a third control called CPU affinity (on what logical CPUs am I allowed to execute).
By default, all the pods and the containers running on a compute node of your Kubernetes cluster can execute on any available cores in the system. The total amount of allocatable shares and quota are limited by the CPU resources explicitly reserved for kubernetes and system daemons. However, limits on the CPU time being used can be specified using CPU limits in the pod spec. Kubernetes uses CFS quota to enforce CPU limits on pod containers.
When CPU manager is enabled with the "static" policy, it manages a shared pool of CPUs. Initially this shared pool contains all the CPUs in the compute node. When a container with integer CPU request in a Guaranteed pod is created by the Kubelet, CPUs for that container are removed from the shared pool and assigned exclusively for the lifetime of the container. Other containers are migrated off these exclusively allocated CPUs.
All non-exclusive-CPU containers (Burstable, BestEffort and Guaranteed with non-integer CPU) run on the CPUs remaining in the shared pool. When a container with exclusive CPUs terminates, its CPUs are added back to the shared CPU pool.
More Details Please ...
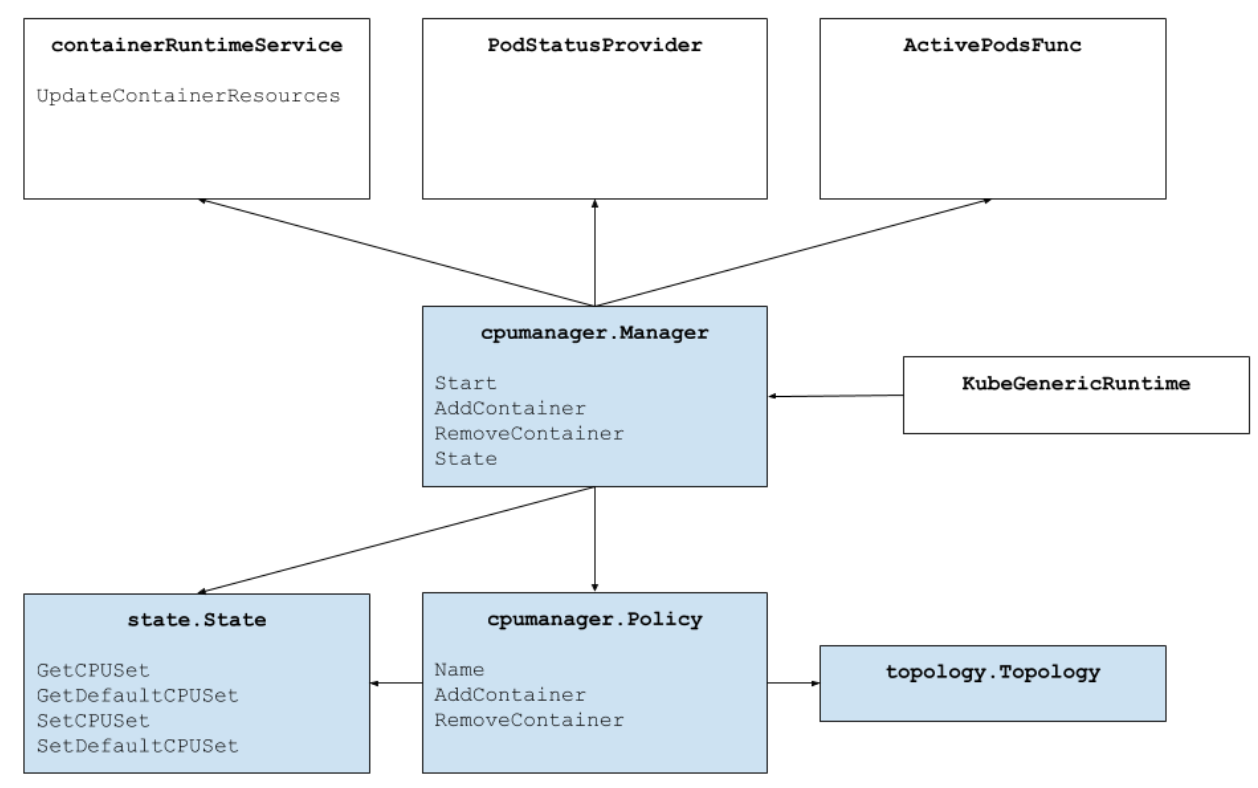
The figure above shows the anatomy of the CPU manager. The CPU Manager uses the Container Runtime Interface's UpdateContainerResources method to modify the CPUs on which containers can run. The Manager periodically reconciles the current State of the CPU resources of each running container with cgroupfs.
The CPU Manager uses Policies to decide the allocation of CPUs. There are two policies implemented: None and Static. By default, the CPU manager is enabled with the None policy from Kubernetes version 1.10.
The Static policy allocates exclusive CPUs to pod containers in the Guaranteed QoS class which request integer CPUs. On a best-effort basis, the Static policy tries to allocate CPUs topologically in the following order:
- Allocate all the CPUs in the same processor socket if available and the container requests at least an entire socket worth of CPUs.
- Allocate all the logical CPUs (hyperthreads) from the same physical CPU core if available and the container requests an entire core worth of CPUs.
- Allocate any available logical CPU, preferring to acquire CPUs from the same socket.
How is Performance Isolation Improved by CPU Manager?
With CPU manager static policy enabled, the workloads might perform better due to one of the following reasons:
- Exclusive CPUs can be allocated for the workload container but not the other containers. These containers do not share the CPU resources. As a result, we expect better performance due to isolation when an aggressor or a co-located workload is involved.
- There is a reduction in interference between the resources used by the workload since we can partition the CPUs among workloads. These resources might also include the cache hierarchies and memory bandwidth and not just the CPUs. This helps improve the performance of workloads in general.
- CPU Manager allocates CPUs in a topological order on a best-effort basis. If a whole socket is free, the CPU Manager will exclusively allocate the CPUs from the free socket to the workload. This boosts the performance of the workload by avoiding any cross-socket traffic.
- Containers in Guaranteed QoS pods are subject to CFS quota. Very bursty workloads may get scheduled, burn through their quota before the end of the period, and get throttled. During this time, there may or may not be meaningful work to do with those CPUs. Because of how the resource math lines up between CPU quota and number of exclusive CPUs allocated by the static policy, these containers are not subject to CFS throttling (quota is equal to the maximum possible cpu-time over the quota period).
Ok! Ok! Do You Have Any Results?
Glad you asked! To understand the performance improvement and isolation provided by enabling the CPU Manager feature in the Kubelet, we ran experiments on a dual-socket compute node (Intel Xeon CPU E5-2680 v3) with hyperthreading enabled. The node consists of 48 logical CPUs (24 physical cores each with 2-way hyperthreading). Here we demonstrate the performance benefits and isolation provided by the CPU Manager feature using benchmarks and real-world workloads for three different scenarios.
How Do I Interpret the Plots?
For each scenario, we show box plots that illustrates the normalized execution time and its variability of running a benchmark or real-world workload with and without CPU Manager enabled. The execution time of the runs are normalized to the best-performing run (1.00 on y-axis represents the best performing run and lower is better). The height of the box plot shows the variation in performance. For example if the box plot is a line, then there is no variation in performance across runs. In the box, middle line is the median, upper line is 75th percentile and lower line is 25th percentile. The height of the box (i.e., difference between 75th and 25th percentile) is defined as the interquartile range (IQR). Whiskers shows data outside that range and the points show outliers. The outliers are defined as any data 1.5x IQR below or above the lower or upper quartile respectively. Every experiment is run ten times.
Protection from Aggressor Workloads
We ran six benchmarks from the PARSEC benchmark suite (the victim workloads) co-located with a CPU stress container (the aggressor workload) with and without the CPU Manager feature enabled. The CPU stress container is run as a pod in the Burstable QoS class requesting 23 CPUs with --cpus 48 flag. The benchmarks are run as pods in the Guaranteed QoS class requesting a full socket worth of CPUs (24 CPUs on this system). The figure below plots the normalized execution time of running a benchmark pod co-located with the stress pod, with and without the CPU Manager static policy enabled. We see improved performance and reduced performance variability when static policy is enabled for all test cases.
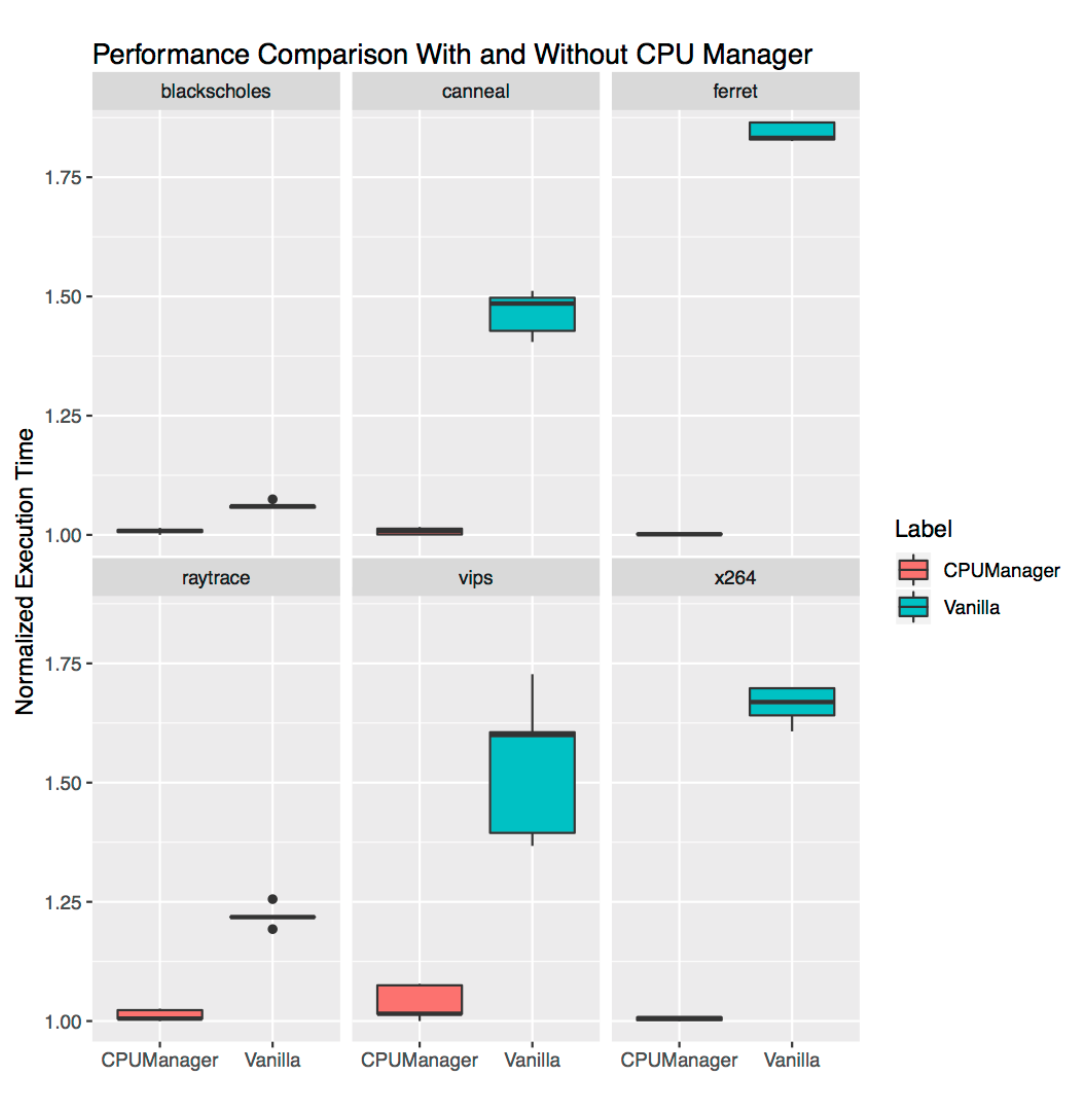
Performance Isolation for Co-located Workloads
In this section, we demonstrate how CPU manager can be beneficial to multiple workloads in a co-located workload scenario. In the box plots below we show the performance of two benchmarks (Blackscholes and Canneal) from the PARSEC benchmark suite run in the Guaranteed (Gu) and Burstable (Bu) QoS classes co-located with each other, with and without the CPU manager static policy enabled.
Starting from the top left and proceeding clockwise, we show the performance of Blackscholes in the Bu QoS class (top left), Canneal in the Bu QoS class (top right), Canneal in Gu QoS class (bottom right) and Blackscholes in the Gu QoS class (bottom left, respectively. In each case, they are co-located with Canneal in the Gu QoS class (top left), Blackscholes in the Gu QoS class (top right), Blackscholes in the Bu QoS class (bottom right) and Canneal in the Bu QoS class (bottom left) going clockwise from top left, respectively. For example, Bu-blackscholes-Gu-canneal plot (top left) is showing the performance of Blackscholes running in the Bu QoS class when co-located with Canneal running in the Gu QoS class. In each case, the pod in Gu QoS class requests cores worth a whole socket (i.e., 24 CPUs) and the pod in Bu QoS class request 23 CPUs.
There is better performance and less performance variation for both the co-located workloads in all the tests. For example, consider the case of Bu-blackscholes-Gu-canneal (top left) and Gu-canneal-Bu-blackscholes (bottom right). They show the performance of Blackscholes and Canneal run simultaneously with and without the CPU manager enabled. In this particular case, Canneal gets exclusive cores due to CPU manager since it is in the Gu QoS class and requesting integer number of CPU cores. But Blackscholes also gets exclusive set of CPUs as it is the only workload in the shared pool. As a result, both Blackscholes and Canneal get some performance isolation benefits due to the CPU manager.
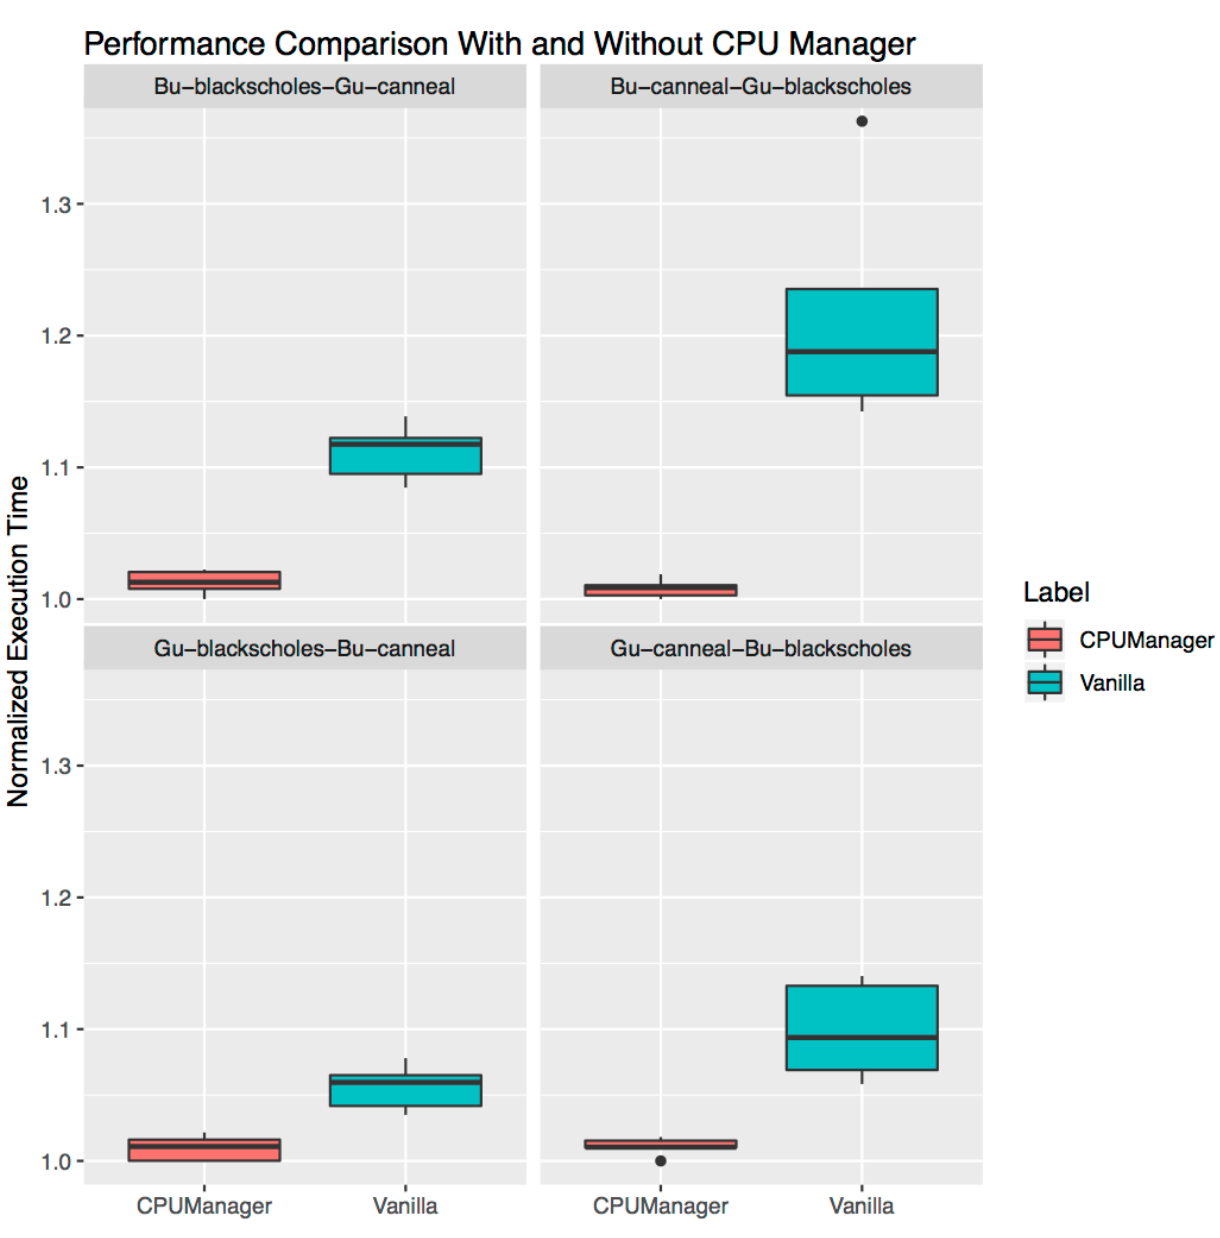
Performance Isolation for Stand-Alone Workloads
This section shows the performance improvement and isolation provided by the CPU manager for stand-alone real-world workloads. We use two workloads from the TensorFlow official models: wide and deep and ResNet. We use the census and CIFAR10 dataset for the wide and deep and ResNet models respectively. In each case the pods (wide and deep, ResNet request 24 CPUs which corresponds to a whole socket worth of cores. As shown in the plots, CPU manager enables better performance isolation in both cases.
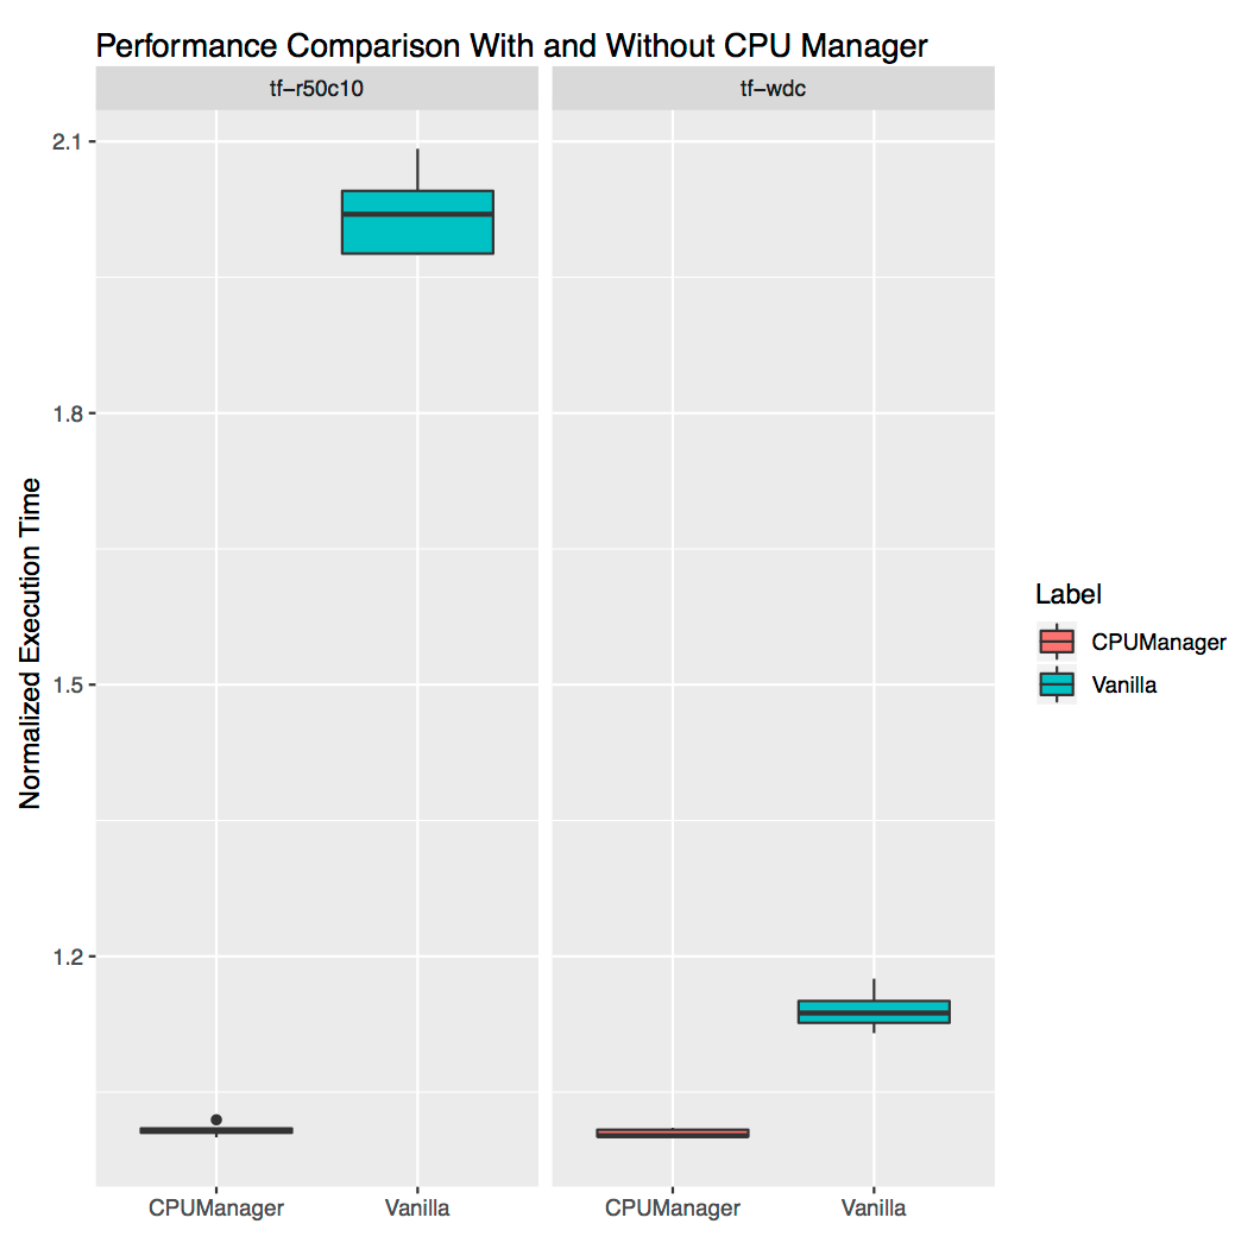
Limitations
Users might want to get CPUs allocated on the socket near to the bus which connects to an external device, such as an accelerator or high-performance network card, in order to avoid cross-socket traffic. This type of alignment is not yet supported by CPU manager. Since the CPU manager provides a best-effort allocation of CPUs belonging to a socket and physical core, it is susceptible to corner cases and might lead to fragmentation. The CPU manager does not take the isolcpus Linux kernel boot parameter into account, although this is reportedly common practice for some low-jitter use cases.
Acknowledgements
We thank the members of the community who have contributed to this feature or given feedback including members of WG-Resource-Management and SIG-Node. cmx.io (for the fun drawing tool).
Notices and Disclaimers
Software and workloads used in performance tests may have been optimized for performance only on Intel microprocessors. Performance tests, such as SYSmark and MobileMark, are measured using specific computer systems, components, software, operations and functions. Any change to any of those factors may cause the results to vary. You should consult other information and performance tests to assist you in fully evaluating your contemplated purchases, including the performance of that product when combined with other products. For more information go to www.intel.com/benchmarks.
Intel technologies’ features and benefits depend on system configuration and may require enabled hardware, software or service activation. Performance varies depending on system configuration. No computer system can be absolutely secure. Check with your system manufacturer or retailer or learn more at intel.com.
Workload Configuration: https://gist.github.com/balajismaniam/fac7923f6ee44f1f36969c29354e3902 https://gist.github.com/balajismaniam/7c2d57b2f526a56bb79cf870c122a34c https://gist.github.com/balajismaniam/941db0d0ec14e2bc93b7dfe04d1f6c58 https://gist.github.com/balajismaniam/a1919010fe9081ca37a6e1e7b01f02e3 https://gist.github.com/balajismaniam/9953b54dd240ecf085b35ab1bc283f3c
System Configuration: CPU Architecture: x86_64 CPU op-mode(s): 32-bit, 64-bit Byte Order: Little Endian CPU(s): 48 On-line CPU(s) list: 0-47 Thread(s) per core: 2 Core(s) per socket: 12 Socket(s): 2 NUMA node(s): 2 Vendor ID: GenuineIntel Model name: Intel(R) Xeon(R) CPU E5-2680 v3 Memory 256 GB OS/Kernel Linux 3.10.0-693.21.1.el7.x86_64
Intel, the Intel logo, Xeon are trademarks of Intel Corporation or its subsidiaries in the U.S. and/or other countries.
*Other names and brands may be claimed as the property of others.
© Intel Corporation.
The History of Kubernetes & the Community Behind It
It is remarkable to me to return to Portland and OSCON to stand on stage with members of the Kubernetes community and accept this award for Most Impactful Open Source Project. It was scarcely three years ago, that on this very same stage we declared Kubernetes 1.0 and the project was added to the newly formed Cloud Native Computing Foundation.
To think about how far we have come in that short period of time and to see the ways in which this project has shaped the cloud computing landscape is nothing short of amazing. The success is a testament to the power and contributions of this amazing open source community. And the daily passion and quality contributions of our endlessly engaged, world-wide community is nothing short of humbling.
Congratulations @kubernetesio for winning the "most impact" award at #OSCON I'm so proud to be a part of this amazing community! @CloudNativeFdn pic.twitter.com/5sRUYyefAK
— Jaice Singer DuMars (@jaydumars) July 19, 2018
👏 congrats @kubernetesio community on winning the #oscon Most Impact Award, we are proud of you! pic.twitter.com/5ezDphi6J6
— CNCF (@CloudNativeFdn) July 19, 2018
At a meetup in Portland this week, I had a chance to tell the story of Kubernetes’ past, its present and some thoughts about its future, so I thought I would write down some pieces of what I said for those of you who couldn’t be there in person.
It all began in the fall of 2013, with three of us: Craig McLuckie, Joe Beda and I were working on public cloud infrastructure. If you cast your mind back to the world of cloud in 2013, it was a vastly different place than it is today. Imperative bash scripts were only just starting to give way to declarative configuration of IaaS with systems. Netflix was popularizing the idea of immutable infrastructure but doing it with heavy-weight full VM images. The notion of orchestration, and certainly container orchestration existed in a few internet scale companies, but not in cloud and certainly not in the enterprise.
Docker changed all of that. By popularizing a lightweight container runtime and providing a simple way to package, distributed and deploy applications onto a machine, the Docker tooling and experience popularized a brand-new cloud native approach to application packaging and maintenance. Were it not for Docker’s shifting of the cloud developer’s perspective, Kubernetes simply would not exist.
I think that it was Joe who first suggested that we look at Docker in the summer of 2013, when Craig, Joe and I were all thinking about how we could bring a cloud native application experience to a broader audience. And for all three of us, the implications of this new tool were immediately obvious. We knew it was a critical component in the development of cloud native infrastructure.
But as we thought about it, it was equally obvious that Docker, with its focus on a single machine, was not the complete solution. While Docker was great at building and packaging individual containers and running them on individual machines, there was a clear need for an orchestrator that could deploy and manage large numbers of containers across a fleet of machines.
As we thought about it some more, it became increasingly obvious to Joe, Craig and I, that not only was such an orchestrator necessary, it was also inevitable, and it was equally inevitable that this orchestrator would be open source. This realization crystallized for us in the late fall of 2013, and thus began the rapid development of first a prototype, and then the system that would eventually become known as Kubernetes. As 2013 turned into 2014 we were lucky to be joined by some incredibly talented developers including Ville Aikas, Tim Hockin, Dawn Chen, Brian Grant and Daniel Smith.
Happy to see k8s team members winning the “most impact” award. #oscon pic.twitter.com/D6mSIiDvsU
— Bridget Kromhout (@bridgetkromhout) July 19, 2018
Kubernetes won the O'Reilly Most Impact Award. Thanks to our contributors and users! pic.twitter.com/T6Co1wpsAh
— Brian Grant (@bgrant0607) July 19, 2018
The initial goal of this small team was to develop a “minimally viable orchestrator.” From experience we knew that the basic feature set for such an orchestrator was:
- Replication to deploy multiple instances of an application
- Load balancing and service discovery to route traffic to these replicated containers
- Basic health checking and repair to ensure a self-healing system
- Scheduling to group many machines into a single pool and distribute work to them
Along the way, we also spent a significant chunk of our time convincing executive leadership that open sourcing this project was a good idea. I’m endlessly grateful to Craig for writing numerous whitepapers and to Eric Brewer, for the early and vocal support that he lent us to ensure that Kubernetes could see the light of day.
In June of 2014 when Kubernetes was released to the world, the list above was the sum total of its basic feature set. As an early stage open source community, we then spent a year building, expanding, polishing and fixing this initial minimally viable orchestrator into the product that we released as a 1.0 in OSCON in 2015. We were very lucky to be joined early on by the very capable OpenShift team which lent significant engineering and real world enterprise expertise to the project. Without their perspective and contributions, I don’t think we would be standing here today.
Three years later, the Kubernetes community has grown exponentially, and Kubernetes has become synonymous with cloud native container orchestration. There are more than 1700 people who have contributed to Kubernetes, there are more than 500 Kubernetes meetups worldwide and more than 42000 users have joined the #kubernetes-dev channel. What’s more, the community that we have built works successfully across geographic, language and corporate boundaries. It is a truly open, engaged and collaborative community, and in-and-of-itself and amazing achievement. Many thanks to everyone who has helped make it what it is today. Kubernetes is a commodity in the public cloud because of you.
But if Kubernetes is a commodity, then what is the future? Certainly, there are an endless array of tweaks, adjustments and improvements to the core codebase that will occupy us for years to come, but the true future of Kubernetes are the applications and experiences that are being built on top of this new, ubiquitous platform.
Kubernetes has dramatically reduced the complexity to build new developer experiences, and a myriad of new experiences have been developed or are in the works that provide simplified or targeted developer experiences like Functions-as-a-Service, on top of core Kubernetes-as-a-Service.
The Kubernetes cluster itself is being extended with custom resource definitions (which I first described to Kelsey Hightower on a walk from OSCON to a nearby restaurant in 2015), these new resources allow cluster operators to enable new plugin functionality that extend and enhance the APIs that their users have access to.
By embedding core functionality like logging and monitoring in the cluster itself and enabling developers to take advantage of such services simply by deploying their application into the cluster, Kubernetes has reduced the learning necessary for developers to build scalable reliable applications.
Finally, Kubernetes has provided a new, common vocabulary for expressing the patterns and paradigms of distributed system development. This common vocabulary means that we can more easily describe and discuss the common ways in which our distributed systems are built, and furthermore we can build standardized, re-usable implementations of such systems. The net effect of this is the development of higher quality, reliable distributed systems, more quickly.
It’s truly amazing to see how far Kubernetes has come, from a rough idea in the minds of three people in Seattle to a phenomenon that has redirected the way we think about cloud native development across the world. It has been an amazing journey, but what’s truly amazing to me, is that I think we’re only just now scratching the surface of the impact that Kubernetes will have. Thank you to everyone who has enabled us to get this far, and thanks to everyone who will take us further.
Brendan
Kubernetes Wins the 2018 OSCON Most Impact Award
We are humbled to be recognized by the community with this award.
We had high hopes when we created Kubernetes. We wanted to change the way cloud applications were deployed and managed. Whether we’d succeed or not was very uncertain. And look how far we’ve come in such a short time.
The core technology behind Kubernetes was informed by lessons learned from Google’s internal infrastructure, but nobody can deny the enormous role of the Kubernetes community in the success of the project. The community, of which Google is a part, now drives every aspect of the project: the design, development, testing, documentation, releases, and more. That is what makes Kubernetes fly.
While we actively sought partnerships and community engagement, none of us anticipated just how important the open-source community would be, how fast it would grow, or how large it would become. Honestly, we really didn’t have much of a plan.
We looked to other open-source projects for inspiration and advice: Docker (now Moby), other open-source projects at Google such as Angular and Go, the Apache Software Foundation, OpenStack, Node.js, Linux, and others. But it became clear that there was no clear-cut recipe we could follow. So we winged it.
Rather than rehashing history, we thought we’d share two high-level lessons we learned along the way.
First, in order to succeed, community health and growth needs to be treated as a top priority. It’s hard, and it is time-consuming. It requires attention to both internal project dynamics and outreach, as well as constant vigilance to build and sustain relationships, be inclusive, maintain open communication, and remain responsive to contributors and users. Growing existing contributors and onboarding new ones is critical to sustaining project growth, but that takes time and energy that might otherwise be spent on development. These things have to become core values in order for contributors to keep them going.
Second, start simple with how the project is organized and operated, but be ready to adopt to more scalable approaches as it grows. Over time, Kubernetes has transitioned from what was effectively a single team and git repository to many subgroups (Special Interest Groups and Working Groups), sub-projects, and repositories. From manual processes to fully automated ones. From informal policies to formal governance.
We certainly didn’t get everything right or always adapt quickly enough, and we constantly struggle with scale. At this point, Kubernetes has more than 20,000 contributors and is approaching one million comments on its issues and pull requests, making it one of the fastest moving projects in the history of open source.
Thank you to all our contributors and to all the users who’ve stuck with us on the sometimes bumpy journey. This project would not be what it is today without the community.
11 Ways (Not) to Get Hacked
Kubernetes security has come a long way since the project's inception, but still contains some gotchas. Starting with the control plane, building up through workload and network security, and finishing with a projection into the future of security, here is a list of handy tips to help harden your clusters and increase their resilience if compromised.
Part One: The Control Plane
The control plane is Kubernetes' brain. It has an overall view of every container and pod running on the cluster, can schedule new pods (which can include containers with root access to their parent node), and can read all the secrets stored in the cluster. This valuable cargo needs protecting from accidental leakage and malicious intent: when it's accessed, when it's at rest, and when it's being transported across the network.
1. TLS Everywhere
TLS should be enabled for every component that supports it to prevent traffic sniffing, verify the identity of the server, and (for mutual TLS) verify the identity of the client.
Note that some components and installation methods may enable local ports over HTTP and administrators should familiarize themselves with the settings of each component to identify potentially unsecured traffic.
This network diagram by Lucas Käldström demonstrates some of the places TLS should ideally be applied: between every component on the master, and between the Kubelet and API server. Kelsey Hightower's canonical Kubernetes The Hard Way provides detailed manual instructions, as does etcd's security model documentation.
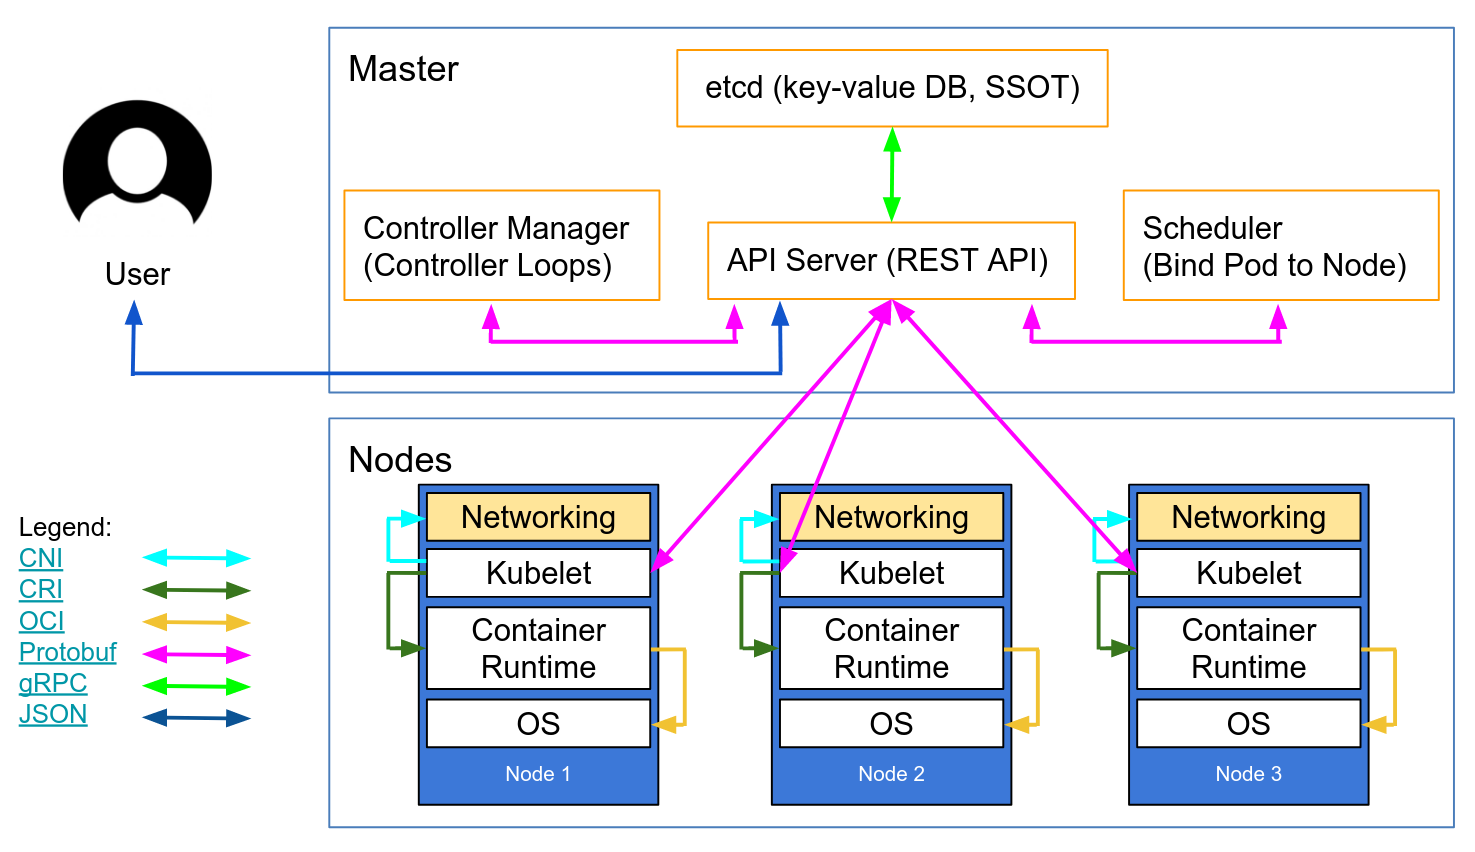
Autoscaling Kubernetes nodes was historically difficult, as each node requires a TLS key to connect to the master, and baking secrets into base images is not good practice. Kubelet TLS bootstrapping provides the ability for a new kubelet to create a certificate signing request so that certificates are generated at boot time.
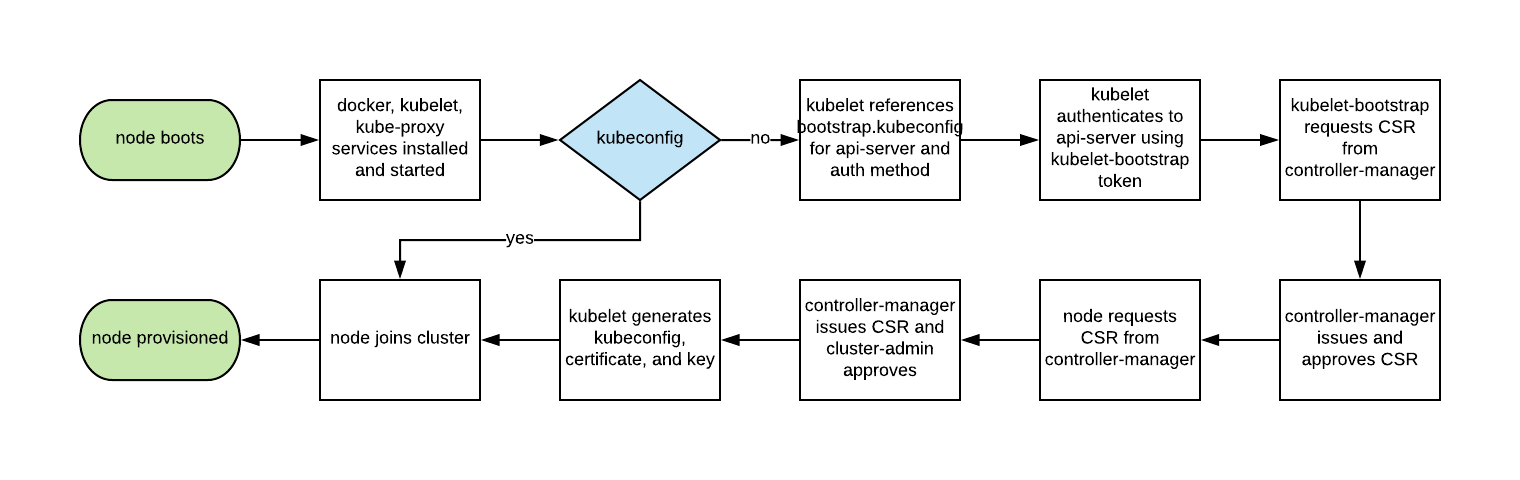
2. Enable RBAC with Least Privilege, Disable ABAC, and Monitor Logs
Role-based access control provides fine-grained policy management for user access to resources, such as access to namespaces.
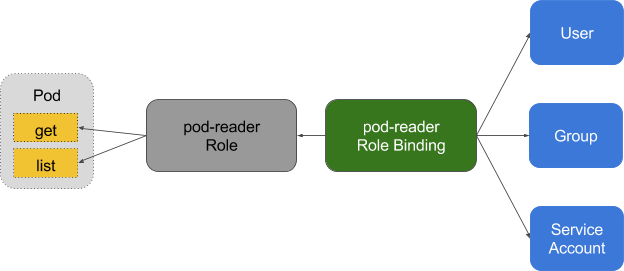
Kubernetes' ABAC (Attribute Based Access Control) has been superseded by RBAC since release 1.6, and should not be enabled on the API server. Use RBAC instead:
--authorization-mode=RBAC
Or use this flag to disable it in GKE:
--no-enable-legacy-authorization
There are plenty of good examples of RBAC policies for cluster services, as well as the docs. And it doesn't have to stop there - fine-grained RBAC policies can be extracted from audit logs with audit2rbac.
Incorrect or excessively permissive RBAC policies are a security threat in case of a compromised pod. Maintaining least privilege, and continuously reviewing and improving RBAC rules, should be considered part of the "technical debt hygiene" that teams build into their development lifecycle.
Audit Logging (beta in 1.10) provides customisable API logging at the payload (e.g. request and response), and also metadata levels. Log levels can be tuned to your organisation's security policy - GKE provides sane defaults to get you started.
For read requests such as get, list, and watch, only the request object is saved in the audit logs; the response object is not. For requests involving sensitive data such as Secret and ConfigMap, only the metadata is exported. For all other requests, both request and response objects are saved in audit logs.
Don't forget: keeping these logs inside the cluster is a security threat in case of compromise. These, like all other security-sensitive logs, should be transported outside the cluster to prevent tampering in the event of a breach.
3. Use Third Party Auth for API Server
Centralising authentication and authorisation across an organisation (aka Single Sign On) helps onboarding, offboarding, and consistent permissions for users.
Integrating Kubernetes with third party auth providers (like Google or GitHub) uses the remote platform's identity guarantees (backed up by things like 2FA) and prevents administrators having to reconfigure the Kubernetes API server to add or remove users.
Dex is an OpenID Connect Identity (OIDC) and OAuth 2.0 provider with pluggable connectors. Pusher takes this a stage further with some custom tooling, and there are some other helpers available with slightly different use cases.
4. Separate and Firewall your etcd Cluster
etcd stores information on state and secrets, and is a critical Kubernetes component - it should be protected differently from the rest of your cluster.
Write access to the API server's etcd is equivalent to gaining root on the entire cluster, and even read access can be used to escalate privileges fairly easily.
The Kubernetes scheduler will search etcd for pod definitions that do not have a node. It then sends the pods it finds to an available kubelet for scheduling. Validation for submitted pods is performed by the API server before it writes them to etcd, so malicious users writing directly to etcd can bypass many security mechanisms - e.g. PodSecurityPolicies.
etcd should be configured with peer and client TLS certificates, and deployed on dedicated nodes. To mitigate against private keys being stolen and used from worker nodes, the cluster can also be firewalled to the API server.
5. Rotate Encryption Keys
A security best practice is to regularly rotate encryption keys and certificates, in order to limit the "blast radius" of a key compromise.
Kubernetes will rotate some certificates automatically (notably, the kubelet client and server certs) by creating new CSRs as its existing credentials expire.
However, the symmetric encryption keys that the API server uses to encrypt etcd values are not automatically rotated - they must be rotated manually. Master access is required to do this, so managed services (such as GKE or AKS) abstract this problem from an operator.
Part Two: Workloads
With minimum viable security on the control plane the cluster is able to operate securely. But, like a ship carrying potentially dangerous cargo, the ship's containers must be protected to contain that cargo in the event of an unexpected accident or breach. The same is true for Kubernetes workloads (pods, deployments, jobs, sets, etc.) - they may be trusted at deployment time, but if they're internet-facing there's always a risk of later exploitation. Running workloads with minimal privileges and hardening their runtime configuration can help to mitigate this risk.
6. Use Linux Security Features and PodSecurityPolicies
The Linux kernel has a number of overlapping security extensions (capabilities, SELinux, AppArmor, seccomp-bpf) that can be configured to provide least privilege to applications.
Tools like bane can help to generate AppArmor profiles, and docker-slim for seccomp profiles, but beware - a comprehensive test suite it required to exercise all code paths in your application when verifying the side effects of applying these policies.
PodSecurityPolicies can be used to mandate the use of security extensions and other Kubernetes security directives. They provide a minimum contract that a pod must fulfil to be submitted to the API server - including security profiles, the privileged flag, and the sharing of host network, process, or IPC namespaces.
These directives are important, as they help to prevent containerised processes from escaping their isolation boundaries, and Tim Allclair's example PodSecurityPolicy is a comprehensive resource that you can customise to your use case.
7. Statically Analyse YAML
Where PodSecurityPolicies deny access to the API server, static analysis can also be used in the development workflow to model an organisation's compliance requirements or risk appetite.
Sensitive information should not be stored in pod-type YAML resource (deployments, pods, sets, etc.), and sensitive configmaps and secrets should be encrypted with tools such as vault (with CoreOS's operator), git-crypt, sealed secrets, or cloud provider KMS.
Static analysis of YAML configuration can be used to establish a baseline for runtime security. kubesec generates risk scores for resources:
{
"score": -30,
"scoring": {
"critical": [{
"selector": "containers[] .securityContext .privileged == true",
"reason": "Privileged containers can allow almost completely unrestricted host access"
}],
"advise": [{
"selector": "containers[] .securityContext .runAsNonRoot == true",
"reason": "Force the running image to run as a non-root user to ensure least privilege"
}, {
"selector": "containers[] .securityContext .capabilities .drop",
"reason": "Reducing kernel capabilities available to a container limits its attack surface",
"href": "/docs/tasks/configure-pod-container/security-context/"
}]
}
}
And kubetest is a unit test framework for Kubernetes configurations:
#// vim: set ft=python:
def test_for_team_label():
if spec["kind"] == "Deployment":
labels = spec["spec"]["template"]["metadata"]["labels"]
assert_contains(labels, "team", "should indicate which team owns the deployment")
test_for_team_label()
These tools "shift left" (moving checks and verification earlier in the development cycle). Security testing in the development phase gives users fast feedback about code and configuration that may be rejected by a later manual or automated check, and can reduce the friction of introducing more secure practices.
8. Run Containers as a Non-Root User
Containers that run as root frequently have far more permissions than their workload requires which, in case of compromise, could help an attacker further their attack.
Containers still rely on the traditional Unix security model (called discretionary access control or DAC) - everything is a file, and permissions are granted to users and groups.
User namespaces are not enabled in Kubernetes. This means that a container's user ID table maps to the host's user table, and running a process as the root user inside a container runs it as root on the host. Although we have layered security mechanisms to prevent container breakouts, running as root inside the container is still not recommended.
Many container images use the root user to run PID 1 - if that process is compromised, the attacker has root in the container, and any mis-configurations become much easier to exploit.
Bitnami has done a lot of work moving their container images to non-root users (especially as OpenShift requires this by default), which may ease a migration to non-root container images.
This PodSecurityPolicy snippet prevents running processes as root inside a container, and also escalation to root:
# Required to prevent escalations to root.
allowPrivilegeEscalation: false
runAsUser:
# Require the container to run without root privileges.
rule: 'MustRunAsNonRoot'
Non-root containers cannot bind to the privileged ports under 1024 (this is gated by the CAP_NET_BIND_SERVICE kernel capability), but services can be used to disguise this fact. In this example the fictional MyApp application is bound to port 8443 in its container, but the service exposes it on 443 by proxying the request to the targetPort:
kind: Service
apiVersion: v1
metadata:
name: my-service
spec:
selector:
app: MyApp
ports:
- protocol: TCP
port: 443
targetPort: 8443
Having to run workloads as a non-root user is not going to change until user namespaces are usable, or the ongoing work to run containers without root lands in container runtimes.
9. Use Network Policies
By default, Kubernetes networking allows all pod to pod traffic; this can be restricted using a Network Policy .
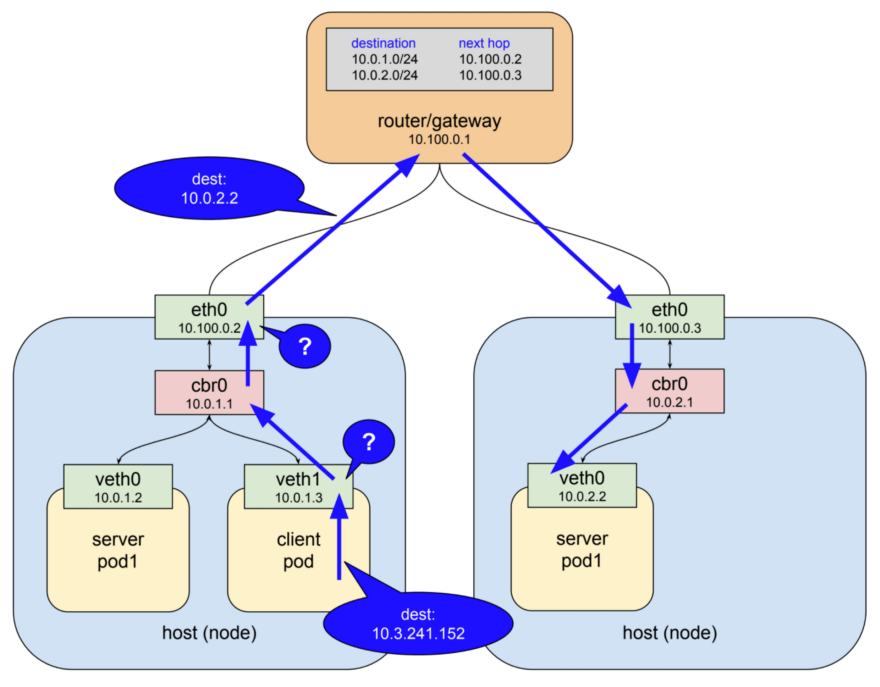
Traditional services are restricted with firewalls, which use static IP and port ranges for each service. As these IPs very rarely change they have historically been used as a form of identity. Containers rarely have static IPs - they are built to fail fast, be rescheduled quickly, and use service discovery instead of static IP addresses. These properties mean that firewalls become much more difficult to configure and review.
As Kubernetes stores all its system state in etcd it can configure dynamic firewalling - if it is supported by the CNI networking plugin. Calico, Cilium, kube-router, Romana, and Weave Net all support network policy.
It should be noted that these policies fail-closed, so the absence of a podSelector here defaults to a wildcard:
apiVersion: networking.k8s.io/v1
kind: NetworkPolicy
metadata:
name: default-deny
spec:
podSelector:
Here's an example NetworkPolicy that denies all egress except UDP 53 (DNS), which also prevents inbound connections to your application. NetworkPolicies are stateful, so the replies to outbound requests still reach the application.
apiVersion: networking.k8s.io/v1
kind: NetworkPolicy
metadata:
name: myapp-deny-external-egress
spec:
podSelector:
matchLabels:
app: myapp
policyTypes:
- Egress
egress:
- ports:
- port: 53
protocol: UDP
- to:
- namespaceSelector: {}
Kubernetes network policies can not be applied to DNS names. This is because DNS can resolve round-robin to many IPs, or dynamically based on the calling IP, so network policies can be applied to a fixed IP or podSelector (for dynamic Kubernetes IPs) only.
Best practice is to start by denying all traffic for a namespace and incrementally add routes to allow an application to pass its acceptance test suite. This can become complex, so ControlPlane hacked together netassert - network security testing for DevSecOps workflows with highly parallelised nmap:
k8s: # used for Kubernetes pods
deployment: # only deployments currently supported
test-frontend: # pod name, defaults to `default` namespace
test-microservice: 80 # `test-microservice` is the DNS name of the target service
test-database: -80 # `test-frontend` should not be able to access test-database’s port 80
169.254.169.254: -80, -443 # AWS metadata API
metadata.google.internal: -80, -443 # GCP metadata API
new-namespace:test-microservice: # `new-namespace` is the namespace name
test-database.new-namespace: 80 # longer DNS names can be used for other namespaces
test-frontend.default: 80
169.254.169.254: -80, -443 # AWS metadata API
metadata.google.internal: -80, -443 # GCP metadata API
Cloud provider metadata APIs are a constant source of escalation (as the recent Shopify bug bounty demonstrates), so specific tests to confirm that the APIs are blocked on the container network helps to guard against accidental misconfiguration.
10. Scan Images and Run IDS
Web servers present an attack surface to the network they're attached to: scanning an image's installed files ensures the absence of known vulnerabilities that an attacker could exploit to gain remote access to the container. An IDS (Intrusion Detection System) detects them if they do.
Kubernetes permits pods into the cluster through a series of admission controller gates, which are applied to pods and other resources like deployments. These gates can validate each pod for admission or change its contents, and they now support backend webhooks.
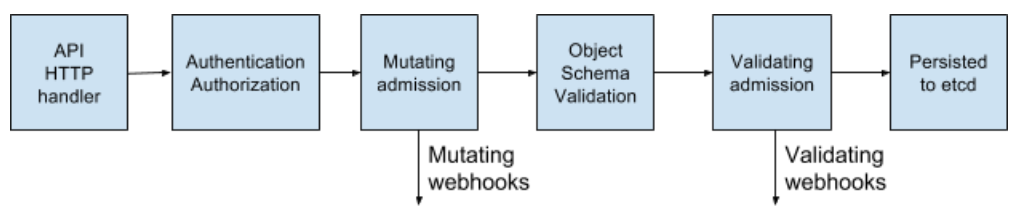
These webhooks can be used by container image scanning tools to validate images before they are deployed to the cluster. Images that have failed checks can be refused admission.
Scanning container images for known vulnerabilities can reduce the window of time that an attacker can exploit a disclosed CVE. Free tools such as CoreOS's Clair and Aqua's Micro Scanner should be used in a deployment pipeline to prevent the deployment of images with critical, exploitable vulnerabilities.
Tools such as Grafeas can store image metadata for constant compliance and vulnerability checks against a container's unique signature (a content addressable hash). This means that scanning a container image with that hash is the same as scanning the images deployed in production, and can be done continually without requiring access to production environments.
Unknown Zero Day vulnerabilities will always exist, and so intrusion detection tools such as Twistlock, Aqua, and Sysdig Secure should be deployed in Kubernetes. IDS detects unusual behaviours in a container and pauses or kills it - Sysdig's Falco is a an Open Source rules engine, and an entrypoint to this ecosystem.
Part Three: The Future
The next stage of security's "cloud native evolution" looks to be the service mesh, although adoption may take time - migration involves shifting complexity from applications to the mesh infrastructure, and organisations will be keen to understand best-practice.
11. Run a Service Mesh
A service mesh is a web of encrypted persistent connections, made between high performance "sidecar" proxy servers like Envoy and Linkerd. It adds traffic management, monitoring, and policy - all without microservice changes.
Offloading microservice security and networking code to a shared, battle tested set of libraries was already possible with Linkerd, and the introduction of Istio by Google, IBM, and Lyft, has added an alternative in this space. With the addition of SPIFFE for per-pod cryptographic identity and a plethora of other features, Istio could simplify the deployment of the next generation of network security.
In "Zero Trust" networks there may be no need for traditional firewalling or Kubernetes network policy, as every interaction occurs over mTLS (mutual TLS), ensuring that both parties are not only communicating securely, but that the identity of both services is known.
This shift from traditional networking to Cloud Native security principles is not one we expect to be easy for those with a traditional security mindset, and the Zero Trust Networking book from SPIFFE's Evan Gilman is a highly recommended introduction to this brave new world.
Istio 0.8 LTS is out, and the project is rapidly approaching a 1.0 release. Its stability versioning is the same as the Kubernetes model: a stable core, with individual APIs identifying themselves under their own alpha/beta stability namespace. Expect to see an uptick in Istio adoption over the coming months.
Conclusion
Cloud Native applications have a more fine-grained set of lightweight security primitives to lock down workloads and infrastructure. The power and flexibility of these tools is both a blessing and curse - with insufficient automation it has become easier to expose insecure workloads which permit breakouts from the container or its isolation model.
There are more defensive tools available than ever, but caution must be taken to reduce attack surfaces and the potential for misconfiguration.
However if security slows down an organisation's pace of feature delivery it will never be a first-class citizen. Applying Continuous Delivery principles to the software supply chain allows an organisation to achieve compliance, continuous audit, and enforced governance without impacting the business's bottom line.
Iteratating quickly on security is easiest when supported by a comprehensive test suite. This is achieved with Continuous Security - an alternative to point-in-time penetration tests, with constant pipeline validation ensuring an organisation's attack surface is known, and the risk constantly understood and managed.
This is ControlPlane's modus operandi: if we can help kickstart a Continuous Security discipline, deliver Kubernetes security and operations training, or co-implement a secure cloud native evolution for you, please get in touch.
Andrew Martin is a co-founder at @controlplaneio and tweets about cloud native security at @sublimino
How the sausage is made: the Kubernetes 1.11 release interview, from the Kubernetes Podcast
At KubeCon EU, my colleague Adam Glick and I were pleased to announce the Kubernetes Podcast from Google. In this weekly conversation, we focus on all the great things that are happening in the world of Kubernetes and Cloud Native. From the news of the week, to interviews with people in the community, we help you stay up to date on everything Kubernetes.
We recently had the pleasure of speaking to the release manager for Kubernetes 1.11, Josh Berkus from Red Hat, and the release manager for the upcoming 1.12, Tim Pepper from VMware.
In this conversation we learned about the release process, the impact of quarterly releases on end users, and how Kubernetes is like baking.
I encourage you to listen to the podcast version if you have a commute, or a dog to walk. If you like what you hear, we encourage you to subscribe! In case you're short on time, or just want to browse quickly, we are delighted to share the transcript with you.
CRAIG BOX: First of all, congratulations both, and thank you.
JOSH BERKUS: Well, thank you. Congratulations for me, because my job is done.
[LAUGHTER]
Congratulations and sympathy for Tim.
[LAUGH]
TIM PEPPER: Thank you, and I guess thank you?
[LAUGH]
ADAM GLICK: For those that don't know a lot about the process, why don't you help people understand — what is it like to be the release manager? What's the process that a release goes through to get to the point when everyone just sees, OK, it's released — 1.11 is available? What does it take to get up to that?
JOSH BERKUS: We have a quarterly release cycle. So every three months, we're releasing. And ideally and fortunately, this is actually now how we are doing things. Somewhere around two, three weeks before the previous release, somebody volunteers to be the release lead. That person is confirmed by SIG Release. So far, we've never had more than one volunteer, so there hasn't been really a fight about it.
And then that person starts working with others to put together a team called the release team. Tim's just gone through this with Stephen Augustus and picking out a whole bunch of people. And then after or a little before— probably after, because we want to wait for the retrospective from the previous release— the release lead then sets a schedule for the upcoming release, as in when all the deadlines will be.
And this is a thing, because we're still tinkering with relative deadlines, and how long should code freeze be, and how should we track features? Because we don't feel that we've gotten down that sort of cadence perfectly yet. I mean, like, we've done pretty well, but we don't feel like we want to actually set [in stone], this is the schedule for each and every release.
Also, we have to adjust the schedule because of holidays, right? Because you can't have the code freeze deadline starting on July 4 or in the middle of design or sometime else when we're going to have a large group of contributors who are out on vacation.
TIM PEPPER: This is something I've had to spend some time looking at, thinking about 1.12. Going back to early June as we were tinkering with the code freeze date, starting to think about, well, what are the implications going to be on 1.12? When would these things start falling on the calendar? And then also for 1.11, we had one complexity. If we slipped the release past this week, we start running into the US 4th of July holiday, and we're not likely to get a lot done.
So much of a slip would mean slipping into the middle of July before we'd really know that we were successfully triaging things. And worst case maybe, we're quite a bit later into July.
So instead of quarterly with a three-month sort of cadence, well, maybe we've accidentally ended up chopping out one month out of the next release or pushing it quite a bit into the end of the year. And that made the deliberation around things quite complex, but thankfully this week, everything's gone smoothly in the end.
CRAIG BOX: All the releases so far have been one quarter — they've been a 12-week release cycle, give or take. Is that something that you think will continue going forward, or is the release team thinking about different ways they could run releases?
TIM PEPPER: The whole community is thinking about this. There are voices who'd like the cadence to be faster, and there are voices who'd like it to be shorter. And there's good arguments for both.
ADAM GLICK: Because it's interesting. It sounds like it is a date-driven release cycle versus a feature-driven release cycle.
JOSH BERKUS: Yeah, certainly. I really honestly think everybody in the world of software recognizes that feature-driven release cycles just don't work. And a big part of the duties of the release team collectively— several members of the team do this— is yanking things out of the release that are not ready. And the hard part of that is figuring out which things aren't ready, right? Because the person who's working on it tends to be super optimistic about what they can get done and what they can get fixed before the deadline.
ADAM GLICK: Of course.
TIM PEPPER: And this is one of the things I think that's useful about the process we have in place on the release team for having shadows who spend some time on the release team, working their way up into more of a lead position and gaining some experience, starting to get some exposure to see that optimism and see the processes for vetting.
And it's even an overstatement to say the process. Just see the way that we build the intuition for how to vet and understand and manage the risk, and really go after and chase things down proactively and early to get resolution in a timely way versus continuing to just all be optimistic and letting things maybe languish and put a release at risk.
CRAIG BOX: I've been reading this week about the introduction of feature branches to Kubernetes. The new server-side apply feature, for example, is being built in a branch so that it didn't have to be half-built in master and then ripped out again as the release approached, if the feature wasn't ready. That seems to me like something that's a normal part of software development? Is there a reason it's taken so long to bring that to core Kubernetes?
JOSH BERKUS: I don't actually know the history of why we're not using feature branches. I mean, the reason why we're not using feature branches pervasively now is that we have to transition from a different system. And I'm not really clear on how we adopted that linear development system. But it's certainly something we discussed on the release team, because there were issues of features that we thought were going to be ready, and then developed major problems. And we're like, if we have to back this out, that's going to be painful. And we did actually have to back one feature out, which involved not pulling out a Git commit, but literally reversing the line changes, which is really not how you want to be doing things.
CRAIG BOX: No.
TIM PEPPER: The other big benefit, I think, to the release branches if they are well integrated with the CI system for continuous integration and testing, you really get the feedback, and you can demonstrate, this set of stuff is ready. And then you can do deferred commitment on the master branch. And what comes in to a particular release on the timely cadence that users are expecting is stuff that's ready. You don't have potentially destabilizing things, because you can get a lot more proof and evidence of readiness.
ADAM GLICK: What are you looking at in terms of the tool chain that you're using to do this? You mentioned a couple of things, and I know it's obviously run through GitHub. But I imagine you have a number of other tools that you're using in order to manage the release, to make sure that you understand what's ready, what's not. You mentioned balancing between people who are very optimistic about the feature they're working on making it in versus the time-driven deadline, and balancing those two. Is that just a manual process, or do you have a set of tools that help you do that?
JOSH BERKUS: Well, there's code review, obviously. So just first of all, process was somebody wants to actually put in a feature, commit, or any kind of merge really, right? So that has to be assigned to one of the SIGs, one of these Special Interest Groups. Possibly more than one, depending on what areas it touches.
And then two generally overlapping groups of people have to approve that. One would be the SIG that it's assigned to, and the second would be anybody represented in the OWNERS files in the code tree of the directories which get touched.
Now sometimes those are the same group of people. I'd say often, actually. But sometimes they're not completely the same group of people, because sometimes you're making a change to the network, but that also happens to touch GCP support and OpenStack support, and so they need to review it as well.
So the first part is the human part, which is a bunch of other people need to look at this. And possibly they're going to comment "Hey. This is a really weird way to do this. Do you have a reason for it?"
Then the second part of it is the automated testing that happens, the automated acceptance testing that happens via webhook on there. And actually, one of the things that we did that was a significant advancement in this release cycle— and by we, I actually mean not me, but the great folks at SIG Scalability did— was add an additional acceptance test that does a mini performance test.
Because one of the problems we've had historically is our major performance tests are large and take a long time to run, and so by the time we find out that we're failing the performance tests, we've already accumulated, you know, 40, 50 commits. And so now we're having to do git bisect to find out which of those commits actually caused the performance regression, which can make them very slow to address.
And so adding that performance pre-submit, the performance acceptance test really has helped stabilize performance in terms of new commits. So then we have that level of testing that you have to get past.
And then when we're done with that level of testing, we run a whole large battery of larger tests— end-to-end tests, performance tests, upgrade and downgrade tests. And one of the things that we've added recently and we're integrating to the process something called conformance tests. And the conformance test is we're testing whether or not you broke backwards compatibility, because it's obviously a big deal for Kubernetes users if you do that when you weren't intending to.
One of the busiest roles in the release team is a role called CI Signal. And it's that person's job just to watch all of the tests for new things going red and then to try to figure out why they went red and bring it to people's attention.
ADAM GLICK: I've often heard what you're referring to kind of called a breaking change, because it breaks the existing systems that are running. How do you identify those to people so when they see, hey, there's a new version of Kubernetes out there, I want to try it out, is that just going to release notes? Or is there a special way that you identify breaking changes as opposed to new features?
JOSH BERKUS: That goes into release notes. I mean, keep in mind that one of the things that happens with Kubernetes' features is we go through this alpha, beta, general availability phase, right? So a feature's alpha for a couple of releases and then becomes beta for a release or two, and then it becomes generally available. And part of the idea of having this that may require a feature to go through that cycle for a year or more before its general availability is by the time it's general availability, we really want it to be, we are not going to change the API for this.
However, stuff happens, and we do occasionally have to do those. And so far, our main way to identify that to people actually is in the release notes. If you look at the current release notes, there are actually two things in there right now that are sort of breaking changes.
One of them is the bit with priority and preemption in that preemption being on by default now allows badly behaved users of the system to cause trouble in new ways. I'd actually have to look at the release notes to see what the second one was...
TIM PEPPER: The JSON capitalization case sensitivity.
JOSH BERKUS: Right. Yeah. And that was one of those cases where you have to break backwards compatibility, because due to a library switch, we accidentally enabled people using JSON in a case-insensitive way in certain APIs, which was never supposed to be the case. But because we didn't have a specific test for that, we didn't notice that we'd done it.
And so for three releases, people could actually shove in malformed JSON, and Kubernetes would accept it. Well, we have to fix that now. But that does mean that there are going to be users out in the field who have malformed JSON in their configuration management that is now going to break.
CRAIG BOX: But at least the good news is Kubernetes was always outputting correct formatted JSON during this period, I understand.
JOSH BERKUS: Mm-hmm.
TIM PEPPER: I think that also kind of reminds of one of the other areas— so kind of going back to the question of, well, how do you share word of breaking changes? Well, one of the ways you do that is to have as much quality CI that you can to catch these things that are important. Give the feedback to the developer who's making the breaking change, such that they don't make the breaking change. And then you don't actually have to communicate it out to users.
So some of this is bound to happen, because you always have test escapes. But it's also a reminder of the need to ensure that you're also really building and maintaining your test cases and the quality and coverage of your CI system over time.
ADAM GLICK: What do you mean when you say test escapes?
TIM PEPPER: So I guess it's a term in the art, but for those who aren't familiar with it, you have intended behavior that wasn't covered by test, and as a result, an unintended change happens to that. And instead of your intended behavior being shipped, you're shipping something else.
JOSH BERKUS: The JSON change is a textbook example of this, which is we were testing that the API would continue to accept correct JSON. We were not testing adequately that it wouldn't accept incorrect JSON.
TIM PEPPER: A test escape, another way to think of it as you shipped a bug because there was not a test case highlighting the possibility of the bug.
ADAM GLICK: It's the classic, we tested to make sure the feature worked. We didn't test to make sure that breaking things didn't work.
TIM PEPPER: It's common for us to focus on "I've created this feature and I'm testing the positive cases". And this also comes to thinking about things like secure by default and having a really robust system. A harder piece of engineering often is to think about the failure cases and really actively manage those well.
JOSH BERKUS: I had a conversation with a contributor recently where it became apparent that contributor had never worked on a support team, because their conception of a badly behaved user was, like, a hacker, right? An attacker who comes from outside.
And I'm like, no, no, no. You're stable of badly behaved users is your own staff. You know, they will do bad things, not necessarily intending to do bad things, but because they're trying to take a shortcut. And that is actually your primary concern in terms of preventing breaking the system.
CRAIG BOX: Josh, what was your preparation to be release manager for 1.11?
JOSH BERKUS: I was on the release team for two cycles, plus I was kind of auditing the release team for half a cycle before that. So in 1.9, I originally joined to be the shadow for bug triage, except I ended up not being the shadow, because the person who was supposed to be the lead for bug triage then dropped out. Then I ended up being the bug triage lead, and had to kind of improvise it because there wasn't documentation on what was involved in the role at the time.
And then I was bug triage lead for a second cycle, for the 1.10 cycle, and then took over as release lead for the cycle. And one of the things on my to-do list is to update the requirements to be release lead, because we actually do have written requirements, and to say that the expectation now is that you spend at least two cycles on the release team, one of them either as a lead or as a shadow to the release lead.
CRAIG BOX: And is bug triage lead just what it sounds like?
JOSH BERKUS: Yeah. Pretty much. There's more tracking involved than triage. Part of it is just deficiencies in tooling, something we're looking to address. But things like GitHub API limitations make it challenging to build automated tools that help us intelligently track issues. And we are actually working with GitHub on that. Like, they've been helpful. It's just, they have their own scaling problems.
But then beyond that, you know, a lot of that, it's what you would expect it to be in terms of what triage says, right? Which is looking at every issue and saying, first of all, is this a real issue? Second, is it a serious issue? Third, who needs to address this?
And that's a lot of the work, because for anybody who is a regular contributor to Kubernetes, the number of GitHub notifications that they receive per day means that most of us turn our GitHub notifications off.
CRAIG BOX: Indeed.
JOSH BERKUS: Because it's just this fire hose. And as a result, when somebody really needs to pay attention to something right now, that generally requires a human to go and track them down by email or Slack or whatever they prefer. Twitter in some cases. I've done that. And say, hey. We really need you to look at this issue, because it's about to hold up the beta release.
ADAM GLICK: When you look at the process that you're doing now, what are the changes that are coming in the future that will make the release process even better and easier?
JOSH BERKUS: Well, we just went through this whole retro, and I put in some recommendations for things. Obviously, some additional automation, which I'm going to be looking at doing now that I'm cycling off of the release team for a quarter and can actually look at more longer term goals, will help, particularly now that we've addressed actually some of our GitHub data flow issues.
Beyond that, I put in a whole bunch of recommendations in the retro, but it's actually up to Tim which recommendations he's going to try to implement. So I'll let him [comment].
TIM PEPPER: I think one of the biggest changes that happened in the 1.11 cycle is this emphasis on trying to keep our continuous integration test status always green. That is huge for software development and keeping velocity. If you have this more, I guess at this point antiquated notion of waterfall development, where you do feature development for a while and are accepting of destabilization, and somehow later you're going to come back and spend a period on stabilization and fixing, that really elongates the feedback loop for developers.
And they don't realize what was broken, and the problems become much more complex to sort out as time goes by. One, developers aren't thinking about what it was that they'd been working on anymore. They've lost the context to be able to efficiently solve the problem.
But then you start also getting interactions. Maybe a bug was introduced, and other people started working around it or depending on it, and you get complex dependencies then that are harder to fix. And when you're trying to do that type of complex resolution late in the cycle, it becomes untenable over time. So I think continuing on that and building on it, I'm seeing a little bit more focus on test cases and meaningful test coverage. I think that's a great cultural change to have happening.
And maybe because I'm following Josh into this role from a bug triage position and in his mentions earlier of just the communications and tracking involved with that versus triage, I do have a bit of a concern that at times, email and Slack are relatively quiet. Some of the SIG meeting notes are a bit sparse or YouTube videos slow to upload. So the general artifacts around choice making I think is an area where we need a little more rigor. So I'm hoping to see some of that.
And that can be just as subtle as commenting on issues like, hey, this commit doesn't say what it's doing. And for that reason on the release team, we can't assess its risk versus value. So could you give a little more information here? Things like that give more information both to the release team and the development community as well, because this is open source. And to collaborate, you really do need to communicate in depth.
CRAIG BOX: Speaking of cultural changes, professional baker to Kubernetes' release lead sounds like quite a journey.
JOSH BERKUS: There was a lot of stuff in between.
CRAIG BOX: Would you say there are a lot of similarities?
JOSH BERKUS: You know, believe it or not, there actually are similarities. And here's where it's similar, because I was actually thinking about this earlier. So when I was a professional baker, one of the things that I had to do was morning pastry. Like, I was actually in charge of doing several other things for custom orders, but since I had to come to work at 3:00 AM anyway— which also distressingly has similarities with some of this process. Because I had to come to work at 3:00 AM anyway, one of my secondary responsibilities was traying the morning pastry.
And one of the parts of that is you have this great big gas-fired oven with 10 rotating racks in it that are constantly rotating. Like, you get things in and out in the oven by popping them in and out while the racks are moving. That takes a certain amount of skill. You get burn marks on your wrists for your first couple of weeks of work. And then different pastries require a certain number of rotations to be done.
And there's a lot of similarities to the release cadence, because what you're doing is you're popping something in the oven or you're seeing something get kicked off, and then you have a certain amount of time before you need to check on it or you need to pull it out. And you're doing that in parallel with a whole bunch of other things. You know, with 40 other trays.
CRAIG BOX: And with presumably a bunch of colleagues who are all there at the same time.
JOSH BERKUS: Yeah. And the other thing is that these deadlines are kind of absolute, right? You can't say, oh, well, I was reading a magazine article, and I didn't have time to pull that tray out. It's too late. The pastry is burned, and you're going to have to throw it away, and they're not going to have enough pastry in the front case for the morning rush. And the customers are not interested in your excuses for that.
So from that perspective, from the perspective of saying, hey, we have a bunch of things that need to happen in parallel, they have deadlines and those deadlines are hard deadlines, there it's actually fairly similar.
CRAIG BOX: Tim, do you have any other history that helped get you to where you are today?
TIM PEPPER: I think in some ways I'm more of a traditional journey. I've got a computer engineering bachelor's degree. But I'm also maybe a bit of an outlier. In the late '90s, I found a passion for open source and Linux. Maybe kind of an early adopter, early believer in that.
And was working in the industry in the Bay Area for a while. Got involved in the Silicon Valley and Bay Area Linux users groups a bit, and managed to find work as a Linux sysadmin, and then doing device driver and kernel work and on up into distro. So that was all kind of standard in a way. And then I also did some other work around hardware enablement, high-performance computing, non-uniform memory access. Things that are really, really systems work.
And then about three years ago, my boss was really bending my ear and trying to get me to work on this cloud-related project. And that just felt so abstract and different from the low-level bits type of stuff that I'd been doing.
But kind of grudgingly, I eventually came around to the realization that the cloud is interesting, and it's so much more complex than local machine-only systems work, the type of things that I'd been doing before. It's massively distributed and you have a high-latency, low-reliability interconnect on all the nodes in the distributed network. So it's wildly complex engineering problems that need solved.
And so that got me interested. Started working then on this open source orchestrator for virtual machines and containers. It was written in Go and was having a lot of fun. But it wasn't Kubernetes, and it was becoming clear that Kubernetes was taking off. So about a year ago, I made the deliberate choice to move over to Kubernetes work.
ADAM GLICK: Previously, Josh, you spoke a little bit about your preparation for becoming a release manager. For other folks that are interested in getting involved in the community and maybe getting involved in release management, should they follow the same path that you did? Or what are ways that would be good for them to get involved? And for you, Tim, how you've approached the preparation for taking on the next release.
JOSH BERKUS: The great thing with the release team is that we have this formal mentorship path. And it's fast, right? That's the advantage of releasing quarterly, right? Is that within six months, you can go from joining the team as a shadow to being the release lead if you have the time. And you know, by the time you work your way up to release time, you better have support from your boss about this, because you're going to end up spending a majority of your work time towards the end of the release on release management.
So the answer is to sign up to look when we're getting into the latter half of release cycle, to sign up as a shadow. Or at the beginning of a release cycle, to sign up as a shadow. Some positions actually can reasonably use more than one shadow. There's some position that just require a whole ton of legwork like release notes. And as a result, could actually use more than one shadow meaningfully. So there's probably still places where people could sign up for 1.12. Is that true, Tim?
TIM PEPPER: Definitely. I think— gosh, right now we have 34 volunteers on the release team, which is—
ADAM GLICK: Wow.
JOSH BERKUS: OK. OK. Maybe not then.
[LAUGH]
TIM PEPPER: It's potentially becoming a lot of cats to herd. But I think even outside of that formal volunteering to be a named shadow, anybody is welcome to show up to the release team meetings, follow the release team activities on Slack, start understanding how the process works. And really, this is the case all across open source. It doesn't even have to be the release team. If you're passionate about networking, start following what SIG Network is doing. It's the same sort of path, I think, into any area on the project.
Each of the SIGs [has] a channel. So it would be #SIG-whatever the name is. [In our] case, #SIG-Release.
I'd also maybe give a plug for a talk I did at KubeCon in Copenhagen this spring, talking about how the release team specifically can be a path for new contributors coming in. And had some ideas and suggestions there for newcomers.
CRAIG BOX: There's three questions in the Google SRE postmortem template that I really like. And I'm sure you will have gone through these in the retrospective process as you released 1.11, so I'd like to ask them now one at a time.
First of all, what went well?
JOSH BERKUS: Two things, I think, really improved things, both for contributors and for the release team. Thing number one was putting a strong emphasis on getting the test grid green well ahead of code freeze.
TIM PEPPER: Definitely.
JOSH BERKUS: Now partly that went well because we had a spectacular CI lead, Aish Sundar, who's now in training to become the release lead.
TIM PEPPER: And I'd count that partly as one of the "Where were you lucky?" areas. We happened upon a wonderful person who just popped up and volunteered.
JOSH BERKUS: Yes. And then but part of that was also that we said, hey. You know, we're not going to do what we've done before which is not really care about these tests until code slush. We're going to care about these tests now.
And importantly— this is really important to the Kubernetes community— when we went to the various SIGs, the SIG Cluster Lifecycle and SIG Scalability and SIG Node and the other ones who were having test failures, and we said this to them. They didn't say, get lost. I'm busy. They said, what's failing?
CRAIG BOX: Great.
JOSH BERKUS: And so that made a big difference. And the second thing that was pretty much allowed by the first thing was to shorten the code freeze period. Because the code freeze period is frustrating for developers, because if they don't happen to be working on a 1.11 feature, even if they worked on one before, and they delivered it early in the cycle, and it's completely done, they're kind of paralyzed, and they can't do anything during code freeze. And so it's very frustrating for them, and we want to make that period as short as possible. And we did that this time, and I think it helped everybody.
CRAIG BOX: What went poorly?
JOSH BERKUS: We had a lot of problems with flaky tests. We have a lot of old tests that are not all that well maintained, and they're testing very complicated things like upgrading a cluster that has 40 nodes. And as a result, these tests have high failure rates that have very little to do with any change in the code.
And so one of the things that happened, and the reason we had a one-day delay in the release is, you know, we're a week out from release, and just by random luck of the draw, a bunch of these tests all at once got a run of failures. And it turned out that run of failures didn't actually mean anything, having anything to do with Kubernetes. But there was no way for us to tell that without a lot of research, and we were not going to have enough time for that research without delaying the release.
So one of the things we're looking to address in the 1.12 cycle is to actually move some of those flaky tests out. Either fix them or move them out of the release blocking category.
TIM PEPPER: In a way, I think this also highlights one of the things that Josh mentioned that went well, the emphasis early on getting the test results green, it allows us to see the extent to which these flakes are such a problem. And then the unlucky occurrence of them all happening to overlap on a failure, again, highlights that these flakes have been called out in the community for quite some time. I mean, at least a year. I know one contributor who was really concerned about them.
But they became a second order concern versus just getting things done in the short term, getting features and proving that the features worked, and kind of accepting in a risk management way on the release team that, yes, those are flakes. We don't have time to do something about them, and it's OK. But because of the emphasis on keeping the test always green now, we have the luxury maybe to focus on improving these flakes, and really get to where we have truly high quality CI signal, and can really believe in the results that we have on an ongoing basis.
JOSH BERKUS: And having solved some of the more basic problems, we're now seeing some of the other problems like coordination between related features. Like we right now have a feature where— and this is one of the sort of backwards compatibility release notes— where the feature went into beta, and is on by default.
And the second feature that was supposed to provide access control for the first feature did not go in as beta, and is not on by default. And the team for the first feature did not realize the second feature was being held up until two days before the release. So it's going to result in us actually patching something in 11.1.
And so like, we put that into something that didn't go well. But on the other hand, as Tim points out, a few release cycles ago, we wouldn't even have identified that as a problem, because we were still struggling with just individual features having a clear idea well ahead of the release of what was going in and what wasn't going in.
TIM PEPPER: I think something like this also is a case that maybe advocates for the use of feature branches. If these things are related, we might have seen it and done more pre-testing within that branch and pre-integration, and decide maybe to merge a couple of what initially had been disjoint features into a single feature branch, and really convince ourselves that together they were good. And cross all the Ts, dot all the Is on them, and not have something that's gated on an alpha feature that's possibly falling away.
CRAIG BOX: And then the final question, which I think you've both touched on a little. Where did you get lucky, or unlucky perhaps?
JOSH BERKUS: I would say number one where I got lucky is truly having a fantastic team. I mean, we just had a lot of terrific people who were very good and very energetic and very enthusiastic about taking on their release responsibilities including Aish and Tim and Ben and Nick and Misty who took over Docs four weeks into the release. And then went crazy with it and said, well, I'm new here, so I'm going to actually change a bunch of things we've been doing that didn't work in the first place. So that was number one. I mean, that really made honestly all the difference.
And then the second thing, like I said, is that we didn't have sort of major, unexpected monkey wrenches thrown at us. So in the 1.10 cycle, we actually had two of those, which is why I still count Jace as heroic for pulling off a release that was only a week late.
You know, number one was having the scalability tests start failing for unrelated reasons for a long period, which then masked the fact that they were actually failing for real reasons when we actually got them working again. And as a result, ending up debugging a major and super complicated scalability issue within days of what was supposed to be the original release date. So that was monkey wrench number one for the 1.10 cycle.
Monkey wrench number two for the 1.10 cycle was we got a security hole that needed to be patched. And so again, a week out from what was supposed to be the original release date, we were releasing a security update, and that security update required patching the release branch. And it turns out that patch against the release branch broke a bunch of incoming features. And we didn't get anything of that magnitude in the 1.11 release, and I'm thankful for that.
TIM PEPPER: Also, I would maybe argue in a way that a portion of that wasn't just luck. The extent to which this community has a good team, not just the release team but beyond, some of this goes to active work that folks all across the project, but especially in the contributor experience SIG are doing to cultivate a positive and inclusive culture here. And you really see that. When problems crop up, you're seeing people jump on and really try to constructively tackle them. And it's really fun to be a part of that.
Thanks to Josh Berkus and Tim Pepper for talking to the Kubernetes Podcast from Google.
Josh Berkus hangs out in #sig-release on the Kubernetes Slack. He maintains a newsletter called "Last Week in Kubernetes Development", with Noah Kantrowitz. You can read him on Twitter at @fuzzychef, but he does warn you that there's a lot of politics there as well.
Tim Pepper is also on Slack - he's always open to folks reaching out with a question, looking for help or advice. On Twitter you'll find him at @pythomit, which is "Timothy P" backwards. Tim is an avid soccer fan and season ticket holder for the Portland Timbers and the Portland Thorns, so you'll get all sorts of opinions on soccer in addition to technology!
You can find the Kubernetes Podcast from Google at @kubernetespod on Twitter, and you can subscribe so you never miss an episode.
Resizing Persistent Volumes using Kubernetes
Editor’s note: this post is part of a series of in-depth articles on what’s new in Kubernetes 1.11
In Kubernetes v1.11 the persistent volume expansion feature is being promoted to beta. This feature allows users to easily resize an existing volume by editing the PersistentVolumeClaim (PVC) object. Users no longer have to manually interact with the storage backend or delete and recreate PV and PVC objects to increase the size of a volume. Shrinking persistent volumes is not supported.
Volume expansion was introduced in v1.8 as an Alpha feature, and versions prior to v1.11 required enabling the feature gate, ExpandPersistentVolumes, as well as the admission controller, PersistentVolumeClaimResize (which prevents expansion of PVCs whose underlying storage provider does not support resizing). In Kubernetes v1.11+, both the feature gate and admission controller are enabled by default.
Although the feature is enabled by default, a cluster admin must opt-in to allow users to resize their volumes. Kubernetes v1.11 ships with volume expansion support for the following in-tree volume plugins: AWS-EBS, GCE-PD, Azure Disk, Azure File, Glusterfs, Cinder, Portworx, and Ceph RBD. Once the admin has determined that volume expansion is supported for the underlying provider, they can make the feature available to users by setting the allowVolumeExpansion field to true in their StorageClass object(s). Only PVCs created from that StorageClass will be allowed to trigger volume expansion.
~> cat standard.yaml
apiVersion: storage.k8s.io/v1
kind: StorageClass
metadata:
name: standard
parameters:
type: pd-standard
provisioner: kubernetes.io/gce-pd
allowVolumeExpansion: true
reclaimPolicy: Delete
Any PVC created from this StorageClass can be edited (as illustrated below) to request more space. Kubernetes will interpret a change to the storage field as a request for more space, and will trigger automatic volume resizing.
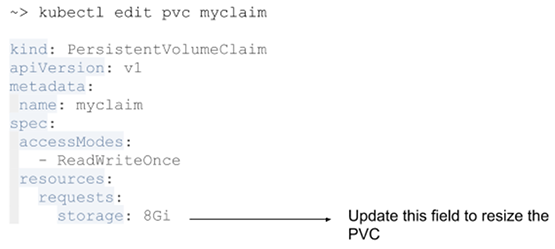
File System Expansion
Block storage volume types such as GCE-PD, AWS-EBS, Azure Disk, Cinder, and Ceph RBD typically require a file system expansion before the additional space of an expanded volume is usable by pods. Kubernetes takes care of this automatically whenever the pod(s) referencing your volume are restarted.
Network attached file systems (like Glusterfs and Azure File) can be expanded without having to restart the referencing Pod, because these systems do not require special file system expansion.
File system expansion must be triggered by terminating the pod using the volume. More specifically:
- Edit the PVC to request more space.
- Once underlying volume has been expanded by the storage provider, then the PersistentVolume object will reflect the updated size and the PVC will have the
FileSystemResizePendingcondition.
You can verify this by running kubectl get pvc <pvc_name> -o yaml
~> kubectl get pvc myclaim -o yaml
apiVersion: v1
kind: PersistentVolumeClaim
metadata:
name: myclaim
namespace: default
uid: 02d4aa83-83cd-11e8-909d-42010af00004
spec:
accessModes:
- ReadWriteOnce
resources:
requests:
storage: 14Gi
storageClassName: standard
volumeName: pvc-xxx
status:
capacity:
storage: 9G
conditions:
- lastProbeTime: null
lastTransitionTime: 2018-07-11T14:51:10Z
message: Waiting for user to (re-)start a pod to finish file system resize of
volume on node.
status: "True"
type: FileSystemResizePending
phase: Bound
- Once the PVC has the condition
FileSystemResizePendingthen pod that uses the PVC can be restarted to finish file system resizing on the node. Restart can be achieved by deleting and recreating the pod or by scaling down the deployment and then scaling it up again. - Once file system resizing is done, the PVC will automatically be updated to reflect new size.
Any errors encountered while expanding file system should be available as events on pod.
Online File System Expansion
Kubernetes v1.11 also introduces an alpha feature called online file system expansion. This feature enables file system expansion while a volume is still in-use by a pod. Because this feature is alpha, it requires enabling the feature gate, ExpandInUsePersistentVolumes. It is supported by the in-tree volume plugins GCE-PD, AWS-EBS, Cinder, and Ceph RBD. When this feature is enabled, pod referencing the resized volume do not need to be restarted. Instead, the file system will automatically be resized while in use as part of volume expansion. File system expansion does not happen until a pod references the resized volume, so if no pods referencing the volume are running file system expansion will not happen.
How can I learn more?
Check out additional documentation on this feature here: http://k8s.io/docs/concepts/storage/persistent-volumes.
Dynamic Kubelet Configuration
Editor’s note: The feature has been removed in the version 1.24 after deprecation in 1.22.
Editor’s note: this post is part of a series of in-depth articles on what’s new in Kubernetes 1.11
Why Dynamic Kubelet Configuration?
Kubernetes provides API-centric tooling that significantly improves workflows for managing applications and infrastructure. Most Kubernetes installations, however, run the Kubelet as a native process on each host, outside the scope of standard Kubernetes APIs.
In the past, this meant that cluster administrators and service providers could not rely on Kubernetes APIs to reconfigure Kubelets in a live cluster. In practice, this required operators to either ssh into machines to perform manual reconfigurations, use third-party configuration management automation tools, or create new VMs with the desired configuration already installed, then migrate work to the new machines. These approaches are environment-specific and can be expensive.
Dynamic Kubelet configuration gives cluster administrators and service providers the ability to reconfigure Kubelets in a live cluster via Kubernetes APIs.
What is Dynamic Kubelet Configuration?
Kubernetes v1.10 made it possible to configure the Kubelet via a beta config file API. Kubernetes already provides the ConfigMap abstraction for storing arbitrary file data in the API server.
Dynamic Kubelet configuration extends the Node object so that a Node can refer to a ConfigMap that contains the same type of config file. When a Node is updated to refer to a new ConfigMap, the associated Kubelet will attempt to use the new configuration.
How does it work?
Dynamic Kubelet configuration provides the following core features:
- Kubelet attempts to use the dynamically assigned configuration.
- Kubelet "checkpoints" configuration to local disk, enabling restarts without API server access.
- Kubelet reports assigned, active, and last-known-good configuration sources in the Node status.
- When invalid configuration is dynamically assigned, Kubelet automatically falls back to a last-known-good configuration and reports errors in the Node status.
To use the dynamic Kubelet configuration feature, a cluster administrator or service provider will first post a ConfigMap containing the desired configuration, then set each Node.Spec.ConfigSource.ConfigMap reference to refer to the new ConfigMap. Operators can update these references at their preferred rate, giving them the ability to perform controlled rollouts of new configurations.
Each Kubelet watches its associated Node object for changes. When the Node.Spec.ConfigSource.ConfigMap reference is updated, the Kubelet will "checkpoint" the new ConfigMap by writing the files it contains to local disk. The Kubelet will then exit, and the OS-level process manager will restart it. Note that if the Node.Spec.ConfigSource.ConfigMap reference is not set, the Kubelet uses the set of flags and config files local to the machine it is running on.
Once restarted, the Kubelet will attempt to use the configuration from the new checkpoint. If the new configuration passes the Kubelet's internal validation, the Kubelet will update Node.Status.Config to reflect that it is using the new configuration. If the new configuration is invalid, the Kubelet will fall back to its last-known-good configuration and report an error in Node.Status.Config.
Note that the default last-known-good configuration is the combination of Kubelet command-line flags with the Kubelet's local configuration file. Command-line flags that overlap with the config file always take precedence over both the local configuration file and dynamic configurations, for backwards-compatibility.
See the following diagram for a high-level overview of a configuration update for a single Node:
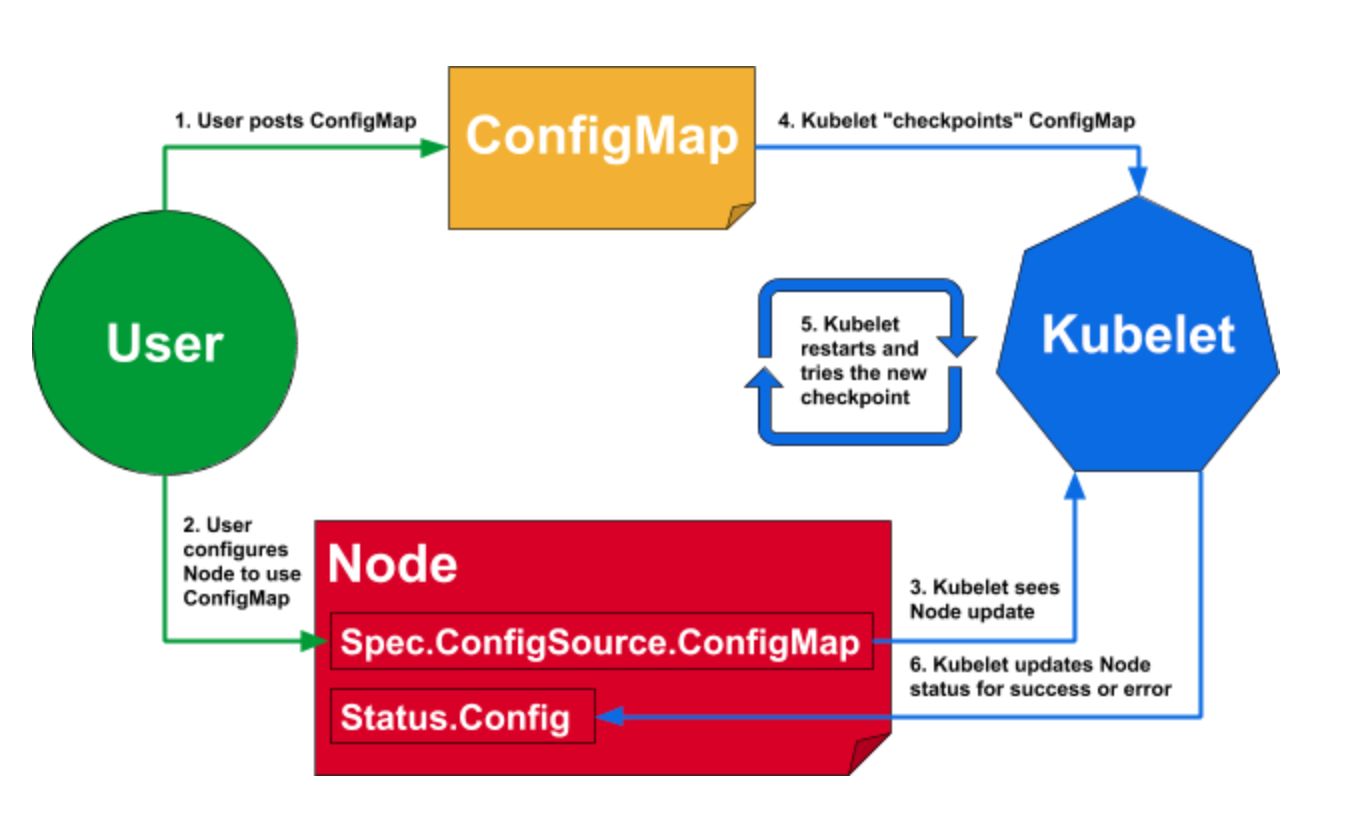
How can I learn more?
Please see the official tutorial at /docs/tasks/administer-cluster/reconfigure-kubelet/, which contains more in-depth details on user workflow, how a configuration becomes "last-known-good," how the Kubelet "checkpoints" config, and possible failure modes.
CoreDNS GA for Kubernetes Cluster DNS
Editor’s note: this post is part of a series of in-depth articles on what’s new in Kubernetes 1.11
Introduction
In Kubernetes 1.11, CoreDNS has reached General Availability (GA) for DNS-based service discovery, as an alternative to the kube-dns addon. This means that CoreDNS will be offered as an option in upcoming versions of the various installation tools. In fact, the kubeadm team chose to make it the default option starting with Kubernetes 1.11.
DNS-based service discovery has been part of Kubernetes for a long time with the kube-dns cluster addon. This has generally worked pretty well, but there have been some concerns around the reliability, flexibility and security of the implementation.
CoreDNS is a general-purpose, authoritative DNS server that provides a backwards-compatible, but extensible, integration with Kubernetes. It resolves the issues seen with kube-dns, and offers a number of unique features that solve a wider variety of use cases.
In this article, you will learn about the differences in the implementations of kube-dns and CoreDNS, and some of the helpful extensions offered by CoreDNS.
Implementation differences
In kube-dns, several containers are used within a single pod: kubedns, dnsmasq, and sidecar. The kubedns
container watches the Kubernetes API and serves DNS records based on the Kubernetes DNS specification, dnsmasq provides caching and stub domain support, and sidecar provides metrics and health checks.
This setup leads to a few issues that have been seen over time. For one, security vulnerabilities in dnsmasq have led to the need
for a security-patch release of Kubernetes in the past. Additionally, because dnsmasq handles the stub domains,
but kubedns handles the External Services, you cannot use a stub domain in an external service, which is very
limiting to that functionality (see dns#131).
All of these functions are done in a single container in CoreDNS, which is running a process written in Go. The different plugins that are enabled replicate (and enhance) the functionality found in kube-dns.
Configuring CoreDNS
In kube-dns, you can modify a ConfigMap to change the behavior of your service discovery. This allows the addition of features such as serving stub domains, modifying upstream nameservers, and enabling federation.
In CoreDNS, you similarly can modify the ConfigMap for the CoreDNS Corefile to change how service discovery works. This Corefile configuration offers many more options than you will find in kube-dns, since it is the primary configuration file that CoreDNS uses for configuration of all of its features, even those that are not Kubernetes related.
When upgrading from kube-dns to CoreDNS using kubeadm, your existing ConfigMap will be used to generate the
customized Corefile for you, including all of the configuration for stub domains, federation, and upstream nameservers. See Using CoreDNS for Service Discovery for more details.
Bug fixes and enhancements
There are several open issues with kube-dns that are resolved in CoreDNS, either in default configuration or with some customized configurations.
dns#55 - Custom DNS entries for kube-dns may be handled using the "fallthrough" mechanism in the kubernetes plugin, using the rewrite plugin, or simply serving a subzone with a different plugin such as the file plugin.
dns#116 - Only one A record set for headless service with pods having single hostname. This issue is fixed without any additional configuration.
dns#131 - externalName not using stubDomains settings. This issue is fixed without any additional configuration.
dns#167 - enable skyDNS round robin A/AAAA records. The equivalent functionality can be configured using the load balance plugin.
dns#190 - kube-dns cannot run as non-root user. This issue is solved today by using a non-default image, but it will be made the default CoreDNS behavior in a future release.
dns#232 - fix pod hostname to be podname for dns srv records is an enhancement that is supported through the "endpoint_pod_names" feature described below.
Metrics
The functional behavior of the default CoreDNS configuration is the same as kube-dns. However,
one difference you need to be aware of is that the published metrics are not the same. In kube-dns,
you get separate metrics for dnsmasq and kubedns (skydns). In CoreDNS there is a completely
different set of metrics, since it is all a single process. You can find more details on these
metrics on the CoreDNS Prometheus plugin page.
Some special features
The standard CoreDNS Kubernetes configuration is designed to be backwards compatible with the prior kube-dns behavior. But with some configuration changes, CoreDNS can allow you to modify how the DNS service discovery works in your cluster. A number of these features are intended to still be compliant with the Kubernetes DNS specification; they enhance functionality but remain backward compatible. Since CoreDNS is not only made for Kubernetes, but is instead a general-purpose DNS server, there are many things you can do beyond that specification.
Pods verified mode
In kube-dns, pod name records are "fake". That is, any "a-b-c-d.namespace.pod.cluster.local" query will return the IP address "a.b.c.d". In some cases, this can weaken the identity guarantees offered by TLS. So, CoreDNS offers a "pods verified" mode, which will only return the IP address if there is a pod in the specified namespace with that IP address.
Endpoint names based on pod names
In kube-dns, when using a headless service, you can use an SRV request to get a list of all endpoints for the service:
dnstools# host -t srv headless
headless.default.svc.cluster.local has SRV record 10 33 0 6234396237313665.headless.default.svc.cluster.local.
headless.default.svc.cluster.local has SRV record 10 33 0 6662363165353239.headless.default.svc.cluster.local.
headless.default.svc.cluster.local has SRV record 10 33 0 6338633437303230.headless.default.svc.cluster.local.
dnstools#
However, the endpoint DNS names are (for practical purposes) random. In CoreDNS, by default, you get endpoint DNS names based upon the endpoint IP address:
dnstools# host -t srv headless
headless.default.svc.cluster.local has SRV record 0 25 443 172-17-0-14.headless.default.svc.cluster.local.
headless.default.svc.cluster.local has SRV record 0 25 443 172-17-0-18.headless.default.svc.cluster.local.
headless.default.svc.cluster.local has SRV record 0 25 443 172-17-0-4.headless.default.svc.cluster.local.
headless.default.svc.cluster.local has SRV record 0 25 443 172-17-0-9.headless.default.svc.cluster.local.
For some applications, it is desirable to have the pod name for this, rather than the pod IP address (see for example kubernetes#47992 and coredns#1190). To enable this in CoreDNS, you specify the "endpoint_pod_names" option in your Corefile, which results in this:
dnstools# host -t srv headless
headless.default.svc.cluster.local has SRV record 0 25 443 headless-65bb4c479f-qv84p.headless.default.svc.cluster.local.
headless.default.svc.cluster.local has SRV record 0 25 443 headless-65bb4c479f-zc8lx.headless.default.svc.cluster.local.
headless.default.svc.cluster.local has SRV record 0 25 443 headless-65bb4c479f-q7lf2.headless.default.svc.cluster.local.
headless.default.svc.cluster.local has SRV record 0 25 443 headless-65bb4c479f-566rt.headless.default.svc.cluster.local.
Autopath
CoreDNS also has a special feature to improve latency in DNS requests for external names. In Kubernetes, the
DNS search path for pods specifies a long list of suffixes. This enables the use of short names when requesting
services in the cluster - for example, "headless" above, rather than "headless.default.svc.cluster.local". However,
when requesting an external name - "infoblox.com", for example - several invalid DNS queries are made by the client,
requiring a roundtrip from the client to kube-dns each time (actually to dnsmasq and then to kubedns, since negative caching is disabled):
- infoblox.com.default.svc.cluster.local -> NXDOMAIN
- infoblox.com.svc.cluster.local -> NXDOMAIN
- infoblox.com.cluster.local -> NXDOMAIN
- infoblox.com.your-internal-domain.com -> NXDOMAIN
- infoblox.com -> returns a valid record
In CoreDNS, an optional feature called autopath can be enabled that will cause this search path to be followed in the server. That is, CoreDNS will figure out from the source IP address which namespace the client pod is in, and it will walk this search list until it gets a valid answer. Since the first 3 of these are resolved internally within CoreDNS itself, it cuts out all of the back and forth between the client and server, reducing latency.
A few other Kubernetes specific features
In CoreDNS, you can use standard DNS zone transfer to export the entire DNS record set. This is useful for debugging your services as well as importing the cluster zone into other DNS servers.
You can also filter by namespaces or a label selector. This can allow you to run specific CoreDNS instances that will only server records that match the filters, exposing only a limited set of your services via DNS.
Extensibility
In addition to the features described above, CoreDNS is easily extended. It is possible to build custom versions of CoreDNS that include your own features. For example, this ability has been used to extend CoreDNS to do recursive resolution with the unbound plugin, to server records directly from a database with the pdsql plugin, and to allow multiple CoreDNS instances to share a common level 2 cache with the redisc plugin.
Many other interesting extensions have been added, which you will find on the External Plugins page of the CoreDNS site. One that is really interesting for Kubernetes and Istio users is the kubernetai plugin, which allows a single CoreDNS instance to connect to multiple Kubernetes clusters and provide service discovery across all of them.
What's Next?
CoreDNS is an independent project, and as such is developing many features that are not directly related to Kubernetes. However, a number of these will have applications within Kubernetes. For example, the upcoming integration with policy engines will allow CoreDNS to make intelligent choices about which endpoint to return when a headless service is requested. This could be used to route traffic to a local pod, or to a more responsive pod. Many other features are in development, and of course as an open source project, we welcome you to suggest and contribute your own features!
The features and differences described above are a few examples. There is much more you can do with CoreDNS. You can find out more on the CoreDNS Blog.
Get involved with CoreDNS
CoreDNS is an incubated CNCF project.
We're most active on Slack (and GitHub):
- Slack: #coredns on https://slack.cncf.io
- GitHub: https://github.com/coredns/coredns
More resources can be found:
- Website: https://coredns.io
- Blog: https://blog.coredns.io
- Twitter: @corednsio
- Mailing list/group: coredns-discuss@googlegroups.com
Meet Our Contributors - Monthly Streaming YouTube Mentoring Series
July 11th at 2:30pm and 8pm UTC kicks off our next installment of Meet Our Contributors YouTube series. This month is special: members of the steering committee will be on to answer any and all questions from the community on the first 30 minutes of the 8pm UTC session. More on submitting questions below.
Meet Our Contributors was created to give an opportunity to new and current contributors alike to get time in front of our upstream community to ask questions that you would typically ask a mentor. We have 3-6 contributors on each session (an AM and PM session depending on where you are in the world!) answer questions live on a YouTube stream. If you miss it, don’t stress, the recording is up after it’s over. Check out a past episode here.
As you can imagine, the questions span broadly from introductory - “what’s a SIG?” to more advanced - “why’s my test flaking?” You’ll also hear growth related advice questions such as “what’s my best path to becoming an approver?” We’re happy to do a live code/docs review or explain part of the codebase as long as we have a few days notice.
We answer at least 10 questions per session and have helped 500+ people to date. This is a scalable mentoring initiative that makes it easy for all parties to share information, get advice, and get going with what they are trying to accomplish. We encourage you to submit questions for our next session:
- Join the Kubernetes Slack channel - #meet-our-contributors - to ask your question or for more detailed information. DM paris@ if you would like to remain anonymous.
- Twitter works, too, with the hashtag #k8smoc
If you are contributor reading this that has wanted to mentor but just can’t find the time - this is for you! Reach out to us.
You can join us live on June 6th at 2:30pm and 8pm UTC, and every first Wednesday of the month, on the Kubernetes Community live stream. We look forward to seeing you there!
IPVS-Based In-Cluster Load Balancing Deep Dive
Editor’s note: this post is part of a series of in-depth articles on what’s new in Kubernetes 1.11
Introduction
Per the Kubernetes 1.11 release blog post , we announced that IPVS-Based In-Cluster Service Load Balancing graduates to General Availability. In this blog, we will take you through a deep dive of the feature.
What Is IPVS?
IPVS (IP Virtual Server) is built on top of the Netfilter and implements transport-layer load balancing as part of the Linux kernel.
IPVS is incorporated into the LVS (Linux Virtual Server), where it runs on a host and acts as a load balancer in front of a cluster of real servers. IPVS can direct requests for TCP- and UDP-based services to the real servers, and make services of the real servers appear as virtual services on a single IP address. Therefore, IPVS naturally supports Kubernetes Service.
Why IPVS for Kubernetes?
As Kubernetes grows in usage, the scalability of its resources becomes more and more important. In particular, the scalability of services is paramount to the adoption of Kubernetes by developers/companies running large workloads.
Kube-proxy, the building block of service routing has relied on the battle-hardened iptables to implement the core supported Service types such as ClusterIP and NodePort. However, iptables struggles to scale to tens of thousands of Services because it is designed purely for firewalling purposes and is based on in-kernel rule lists.
Even though Kubernetes already support 5000 nodes in release v1.6, the kube-proxy with iptables is actually a bottleneck to scale the cluster to 5000 nodes. One example is that with NodePort Service in a 5000-node cluster, if we have 2000 services and each services have 10 pods, this will cause at least 20000 iptable records on each worker node, and this can make the kernel pretty busy.
On the other hand, using IPVS-based in-cluster service load balancing can help a lot for such cases. IPVS is specifically designed for load balancing and uses more efficient data structures (hash tables) allowing for almost unlimited scale under the hood.
IPVS-based Kube-proxy
Parameter Changes
Parameter: --proxy-mode In addition to existing userspace and iptables modes, IPVS mode is configured via --proxy-mode=ipvs. It implicitly uses IPVS NAT mode for service port mapping.
Parameter: --ipvs-scheduler
A new kube-proxy parameter has been added to specify the IPVS load balancing algorithm, with the parameter being --ipvs-scheduler. If it’s not configured, then round-robin (rr) is the default value.
- rr: round-robin
- lc: least connection
- dh: destination hashing
- sh: source hashing
- sed: shortest expected delay
- nq: never queue
In the future, we can implement Service specific scheduler (potentially via annotation), which has higher priority and overwrites the value.
Parameter: --cleanup-ipvs Similar to the --cleanup-iptables parameter, if true, cleanup IPVS configuration and IPTables rules that are created in IPVS mode.
Parameter: --ipvs-sync-period Maximum interval of how often IPVS rules are refreshed (e.g. '5s', '1m'). Must be greater than 0.
Parameter: --ipvs-min-sync-period Minimum interval of how often the IPVS rules are refreshed (e.g. '5s', '1m'). Must be greater than 0.
Parameter: --ipvs-exclude-cidrs A comma-separated list of CIDR's which the IPVS proxier should not touch when cleaning up IPVS rules because IPVS proxier can't distinguish kube-proxy created IPVS rules from user original IPVS rules. If you are using IPVS proxier with your own IPVS rules in the environment, this parameter should be specified, otherwise your original rule will be cleaned.
Design Considerations
IPVS Service Network Topology
When creating a ClusterIP type Service, IPVS proxier will do the following three things:
- Make sure a dummy interface exists in the node, defaults to kube-ipvs0
- Bind Service IP addresses to the dummy interface
- Create IPVS virtual servers for each Service IP address respectively
Here comes an example:
# kubectl describe svc nginx-service
Name: nginx-service
...
Type: ClusterIP
IP: 10.102.128.4
Port: http 3080/TCP
Endpoints: 10.244.0.235:8080,10.244.1.237:8080
Session Affinity: None
# ip addr
...
73: kube-ipvs0: <BROADCAST,NOARP> mtu 1500 qdisc noop state DOWN qlen 1000
link/ether 1a:ce:f5:5f:c1:4d brd ff:ff:ff:ff:ff:ff
inet 10.102.128.4/32 scope global kube-ipvs0
valid_lft forever preferred_lft forever
# ipvsadm -ln
IP Virtual Server version 1.2.1 (size=4096)
Prot LocalAddress:Port Scheduler Flags
-> RemoteAddress:Port Forward Weight ActiveConn InActConn
TCP 10.102.128.4:3080 rr
-> 10.244.0.235:8080 Masq 1 0 0
-> 10.244.1.237:8080 Masq 1 0 0
Please note that the relationship between a Kubernetes Service and IPVS virtual servers is 1:N. For example, consider a Kubernetes Service that has more than one IP address. An External IP type Service has two IP addresses - ClusterIP and External IP. Then the IPVS proxier will create 2 IPVS virtual servers - one for Cluster IP and another one for External IP. The relationship between a Kubernetes Endpoint (each IP+Port pair) and an IPVS virtual server is 1:1.
Deleting of a Kubernetes service will trigger deletion of the corresponding IPVS virtual server, IPVS real servers and its IP addresses bound to the dummy interface.
Port Mapping
There are three proxy modes in IPVS: NAT (masq), IPIP and DR. Only NAT mode supports port mapping. Kube-proxy leverages NAT mode for port mapping. The following example shows IPVS mapping Service port 3080 to Pod port 8080.
TCP 10.102.128.4:3080 rr
-> 10.244.0.235:8080 Masq 1 0 0
-> 10.244.1.237:8080 Masq 1 0
Session Affinity
IPVS supports client IP session affinity (persistent connection). When a Service specifies session affinity, the IPVS proxier will set a timeout value (180min=10800s by default) in the IPVS virtual server. For example:
# kubectl describe svc nginx-service
Name: nginx-service
...
IP: 10.102.128.4
Port: http 3080/TCP
Session Affinity: ClientIP
# ipvsadm -ln
IP Virtual Server version 1.2.1 (size=4096)
Prot LocalAddress:Port Scheduler Flags
-> RemoteAddress:Port Forward Weight ActiveConn InActConn
TCP 10.102.128.4:3080 rr persistent 10800
Iptables & Ipset in IPVS Proxier
IPVS is for load balancing and it can't handle other workarounds in kube-proxy, e.g. packet filtering, hairpin-masquerade tricks, SNAT, etc.
IPVS proxier leverages iptables in the above scenarios. Specifically, ipvs proxier will fall back on iptables in the following 4 scenarios:
- kube-proxy start with --masquerade-all=true
- Specify cluster CIDR in kube-proxy startup
- Support Loadbalancer type service
- Support NodePort type service
However, we don't want to create too many iptables rules. So we adopt ipset for the sake of decreasing iptables rules. The following is the table of ipset sets that IPVS proxier maintains:
| set name | members | usage |
|---|---|---|
| KUBE-CLUSTER-IP | All Service IP + port | masquerade for cases that masquerade-all=true or clusterCIDR specified |
| KUBE-LOOP-BACK | All Service IP + port + IP | masquerade for resolving hairpin issue |
| KUBE-EXTERNAL-IP | Service External IP + port | masquerade for packets to external IPs |
| KUBE-LOAD-BALANCER | Load Balancer ingress IP + port | masquerade for packets to Load Balancer type service |
| KUBE-LOAD-BALANCER-LOCAL | Load Balancer ingress IP + port with externalTrafficPolicy=local | accept packets to Load Balancer with externalTrafficPolicy=local |
| KUBE-LOAD-BALANCER-FW | Load Balancer ingress IP + port with loadBalancerSourceRanges | Drop packets for Load Balancer type Service with loadBalancerSourceRanges specified |
| KUBE-LOAD-BALANCER-SOURCE-CIDR | Load Balancer ingress IP + port + source CIDR | accept packets for Load Balancer type Service with loadBalancerSourceRanges specified |
| KUBE-NODE-PORT-TCP | NodePort type Service TCP port | masquerade for packets to NodePort(TCP) |
| KUBE-NODE-PORT-LOCAL-TCP | NodePort type Service TCP port with externalTrafficPolicy=local | accept packets to NodePort Service with externalTrafficPolicy=local |
| KUBE-NODE-PORT-UDP | NodePort type Service UDP port | masquerade for packets to NodePort(UDP) |
| KUBE-NODE-PORT-LOCAL-UDP | NodePort type service UDP port with externalTrafficPolicy=local | accept packets to NodePort Service with externalTrafficPolicy=local |
In general, for IPVS proxier, the number of iptables rules is static, no matter how many Services/Pods we have.
Run kube-proxy in IPVS Mode
Currently, local-up scripts, GCE scripts, and kubeadm support switching IPVS proxy mode via exporting environment variables (KUBE_PROXY_MODE=ipvs) or specifying flag (--proxy-mode=ipvs). Before running IPVS proxier, please ensure IPVS required kernel modules are already installed.
ip_vs
ip_vs_rr
ip_vs_wrr
ip_vs_sh
nf_conntrack_ipv4
Finally, for Kubernetes v1.10, feature gate SupportIPVSProxyMode is set to true by default. For Kubernetes v1.11, the feature gate is entirely removed. However, you need to enable --feature-gates=SupportIPVSProxyMode=true explicitly for Kubernetes before v1.10.
Get Involved
The simplest way to get involved with Kubernetes is by joining one of the many Special Interest Groups (SIGs) that align with your interests. Have something you’d like to broadcast to the Kubernetes community? Share your voice at our weekly community meeting, and through the channels below.
Thank you for your continued feedback and support. Post questions (or answer questions) on Stack Overflow Join the community portal for advocates on K8sPort Follow us on Twitter @Kubernetesio for latest updates Chat with the community on Slack Share your Kubernetes story
Airflow on Kubernetes (Part 1): A Different Kind of Operator
Introduction
As part of Bloomberg's continued commitment to developing the Kubernetes ecosystem, we are excited to announce the Kubernetes Airflow Operator; a mechanism for Apache Airflow, a popular workflow orchestration framework to natively launch arbitrary Kubernetes Pods using the Kubernetes API.
What Is Airflow?
Apache Airflow is one realization of the DevOps philosophy of "Configuration As Code." Airflow allows users to launch multi-step pipelines using a simple Python object DAG (Directed Acyclic Graph). You can define dependencies, programmatically construct complex workflows, and monitor scheduled jobs in an easy to read UI.
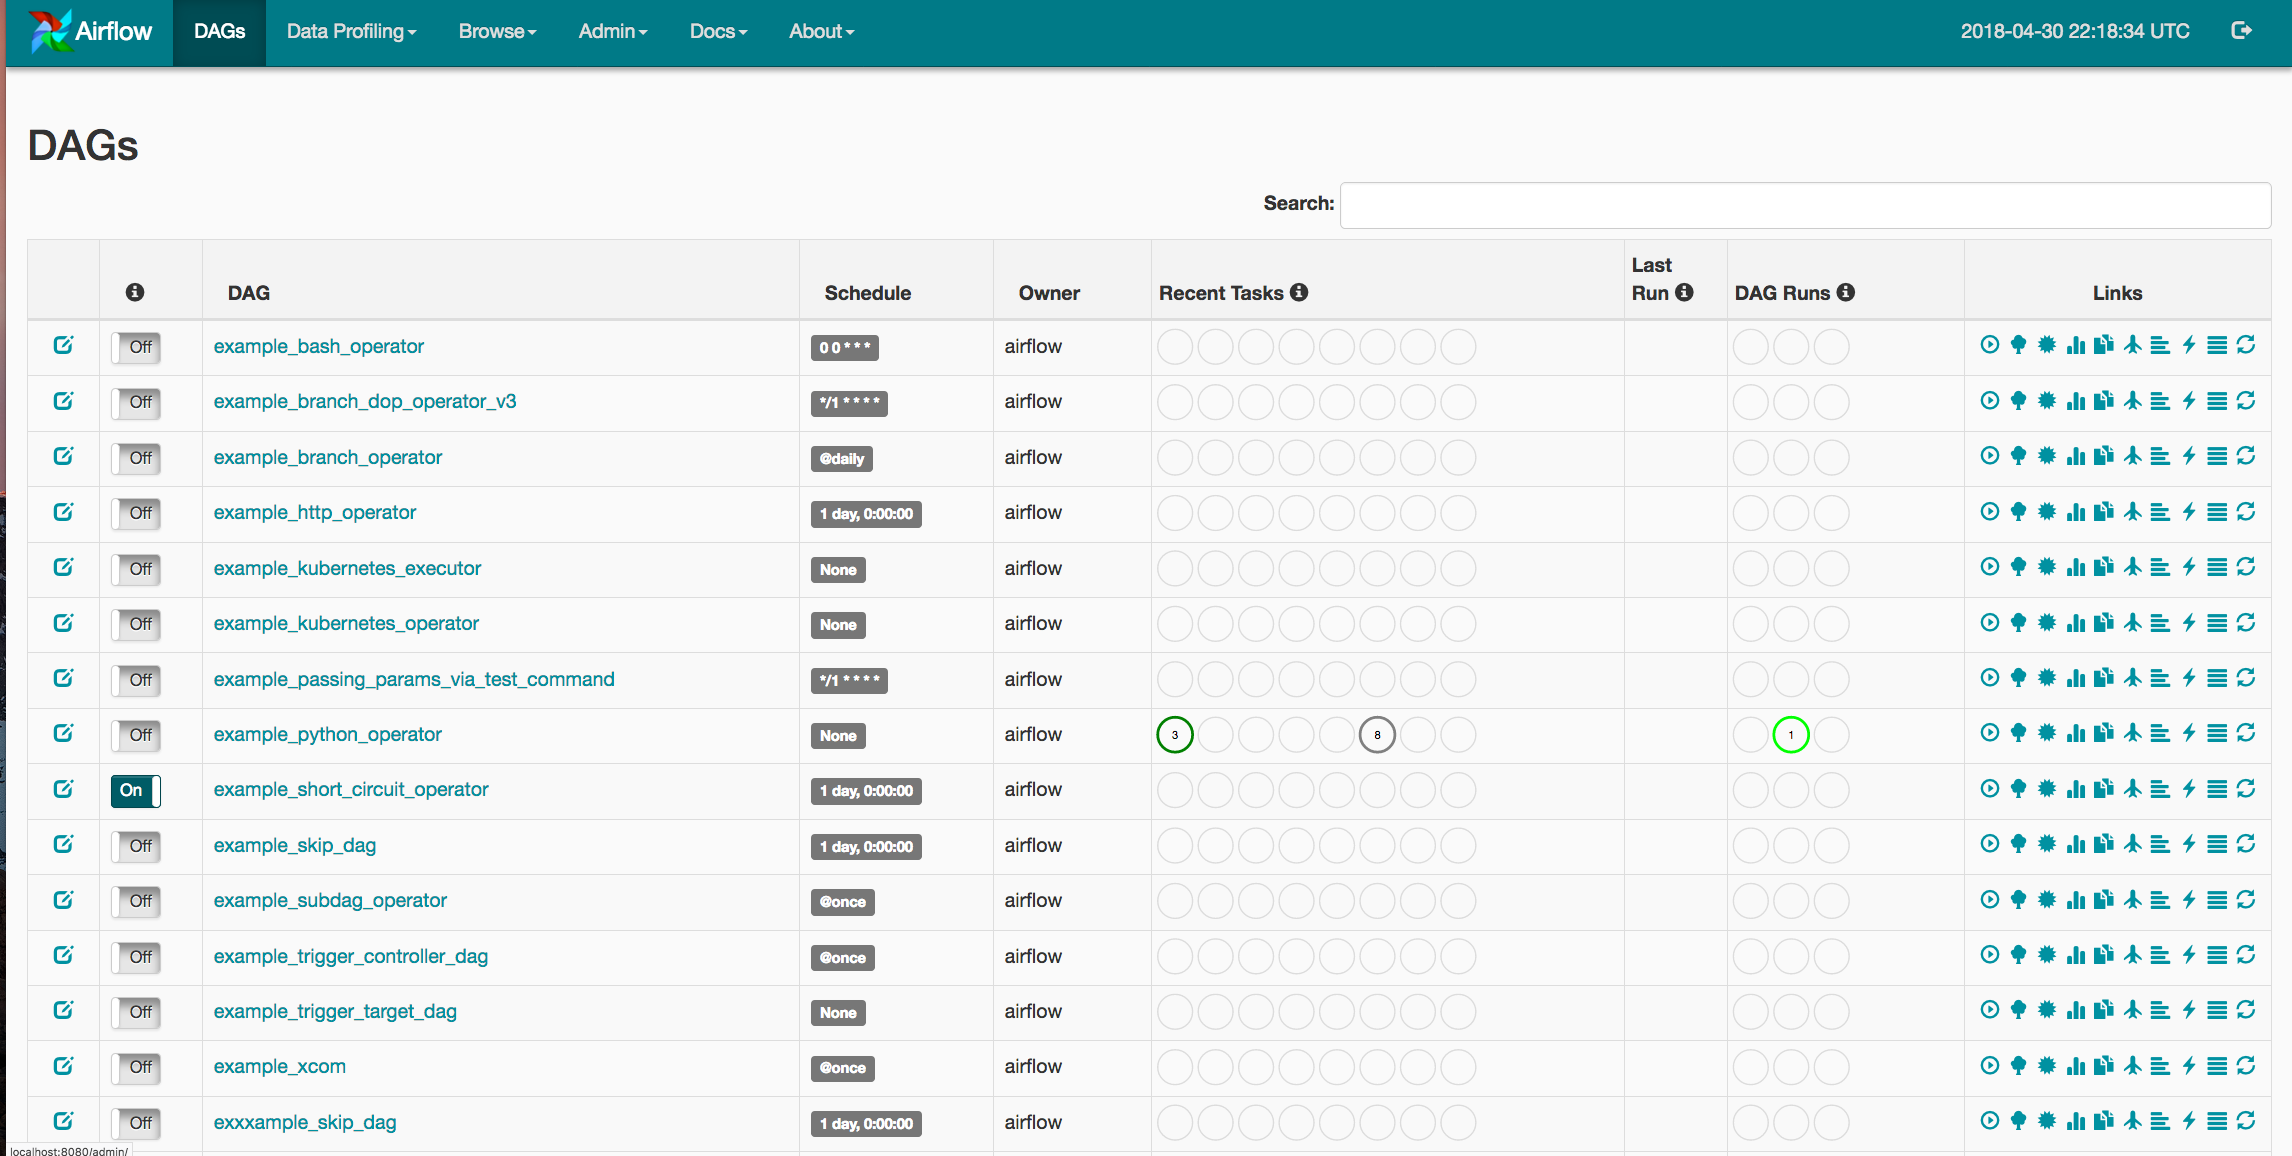
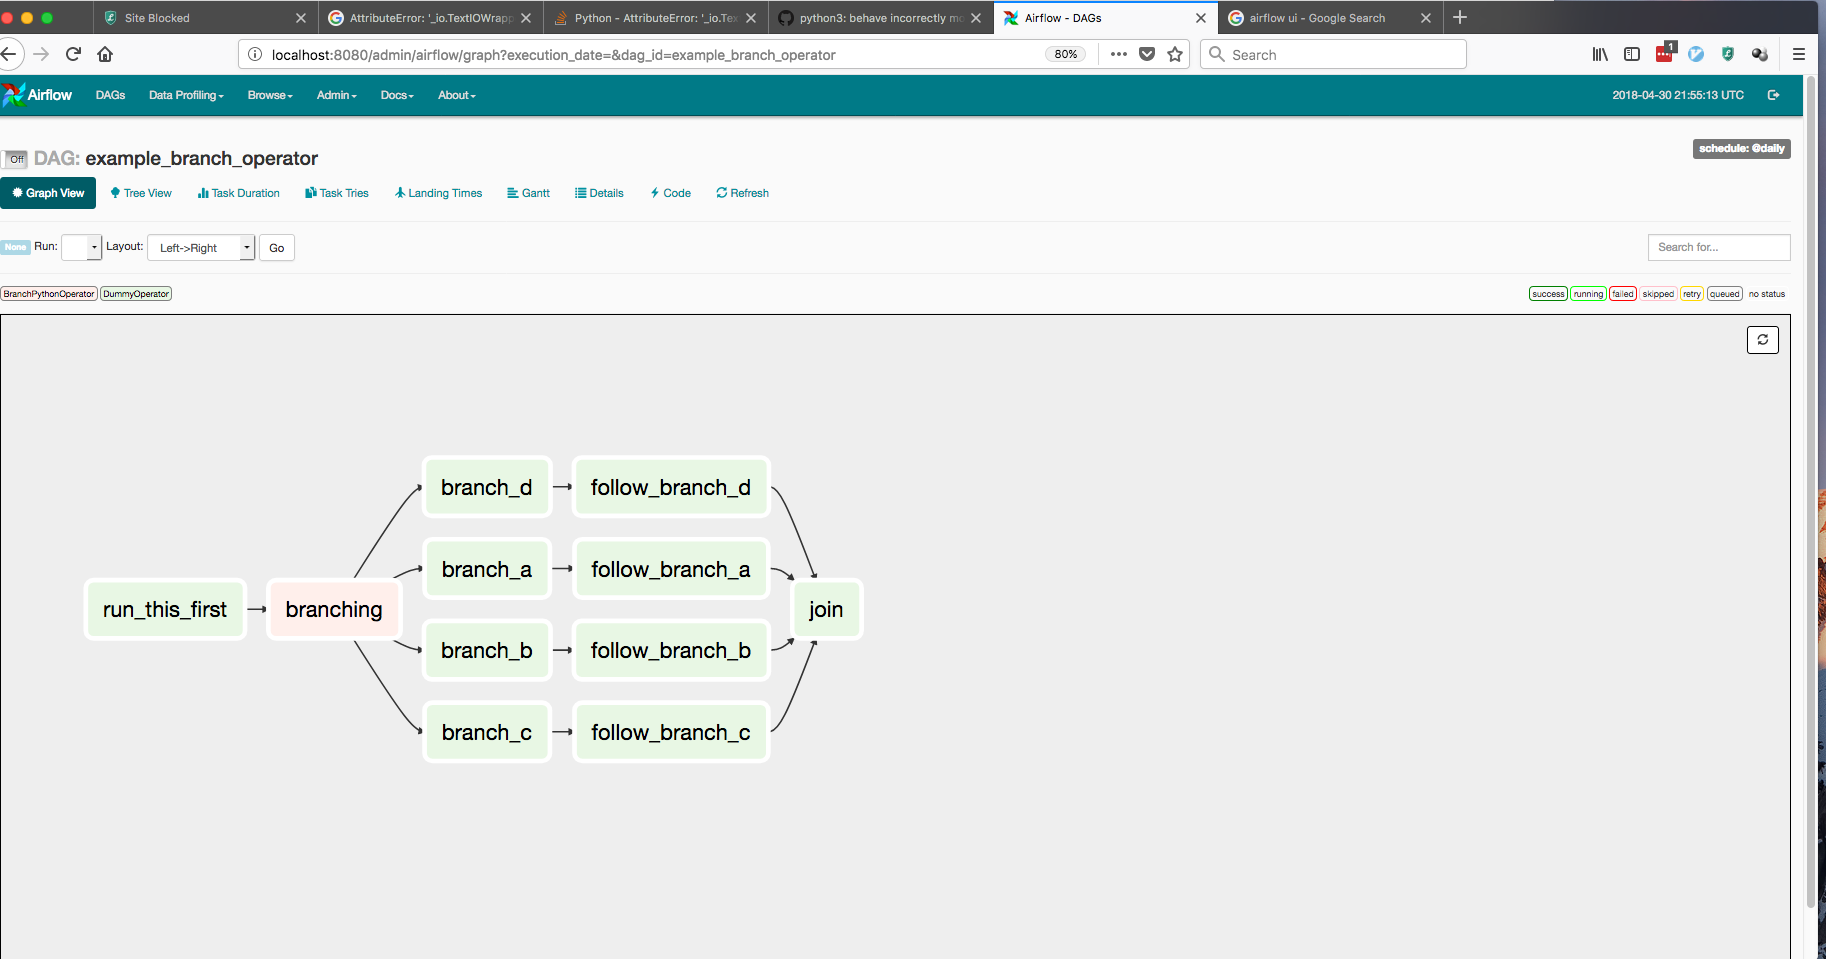
Why Airflow on Kubernetes?
Since its inception, Airflow's greatest strength has been its flexibility. Airflow offers a wide range of integrations for services ranging from Spark and HBase, to services on various cloud providers. Airflow also offers easy extensibility through its plug-in framework. However, one limitation of the project is that Airflow users are confined to the frameworks and clients that exist on the Airflow worker at the moment of execution. A single organization can have varied Airflow workflows ranging from data science pipelines to application deployments. This difference in use-case creates issues in dependency management as both teams might use vastly different libraries for their workflows.
To address this issue, we've utilized Kubernetes to allow users to launch arbitrary Kubernetes pods and configurations. Airflow users can now have full power over their run-time environments, resources, and secrets, basically turning Airflow into an "any job you want" workflow orchestrator.
The Kubernetes Operator
Before we move any further, we should clarify that an Operator in Airflow is a task definition. When a user creates a DAG, they would use an operator like the "SparkSubmitOperator" or the "PythonOperator" to submit/monitor a Spark job or a Python function respectively. Airflow comes with built-in operators for frameworks like Apache Spark, BigQuery, Hive, and EMR. It also offers a Plugins entrypoint that allows DevOps engineers to develop their own connectors.
Airflow users are always looking for ways to make deployments and ETL pipelines simpler to manage. Any opportunity to decouple pipeline steps, while increasing monitoring, can reduce future outages and fire-fights. The following is a list of benefits provided by the Airflow Kubernetes Operator:
Increased flexibility for deployments:
Airflow's plugin API has always offered a significant boon to engineers wishing to test new functionalities within their DAGs. On the downside, whenever a developer wanted to create a new operator, they had to develop an entirely new plugin. Now, any task that can be run within a Docker container is accessible through the exact same operator, with no extra Airflow code to maintain.Flexibility of configurations and dependencies: For operators that are run within static Airflow workers, dependency management can become quite difficult. If a developer wants to run one task that requires SciPy and another that requires NumPy, the developer would have to either maintain both dependencies within all Airflow workers or offload the task to an external machine (which can cause bugs if that external machine changes in an untracked manner). Custom Docker images allow users to ensure that the tasks environment, configuration, and dependencies are completely idempotent.
Usage of kubernetes secrets for added security: Handling sensitive data is a core responsibility of any DevOps engineer. At every opportunity, Airflow users want to isolate any API keys, database passwords, and login credentials on a strict need-to-know basis. With the Kubernetes operator, users can utilize the Kubernetes Vault technology to store all sensitive data. This means that the Airflow workers will never have access to this information, and can simply request that pods be built with only the secrets they need.
Architecture
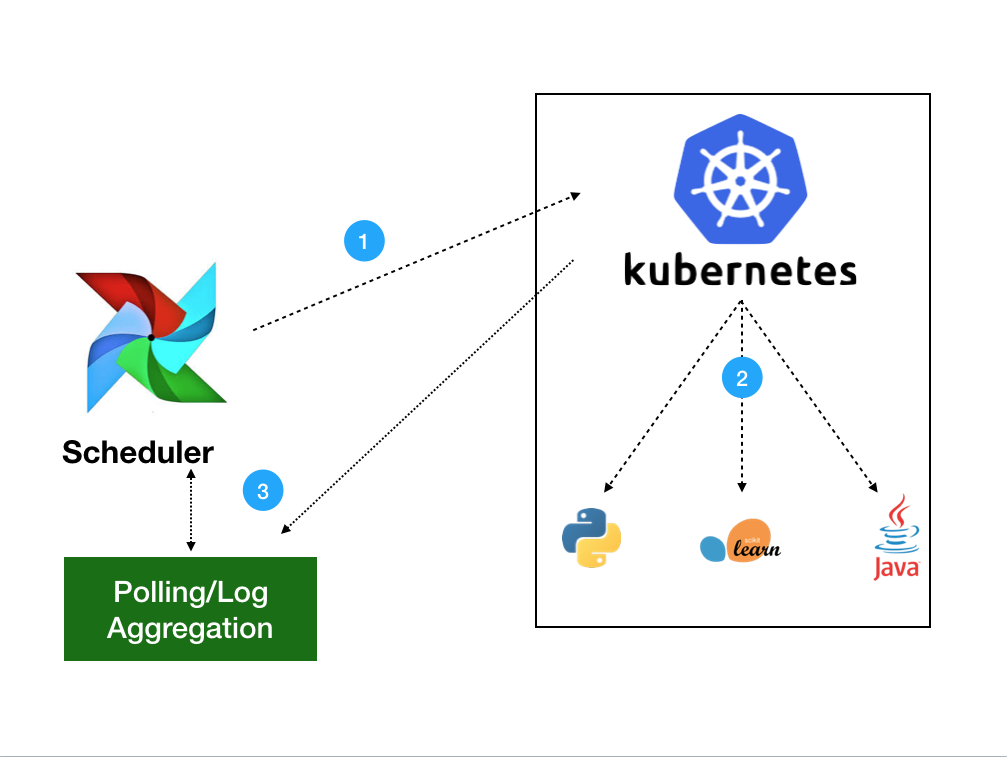
The Kubernetes Operator uses the Kubernetes Python Client to generate a request that is processed by the APIServer (1). Kubernetes will then launch your pod with whatever specs you've defined (2). Images will be loaded with all the necessary environment variables, secrets and dependencies, enacting a single command. Once the job is launched, the operator only needs to monitor the health of track logs (3). Users will have the choice of gathering logs locally to the scheduler or to any distributed logging service currently in their Kubernetes cluster.
Using the Kubernetes Operator
A Basic Example
The following DAG is probably the simplest example we could write to show how the Kubernetes Operator works. This DAG creates two pods on Kubernetes: a Linux distro with Python and a base Ubuntu distro without it. The Python pod will run the Python request correctly, while the one without Python will report a failure to the user. If the Operator is working correctly, the passing-task pod should complete, while the failing-task pod returns a failure to the Airflow webserver.
from airflow import DAG
from datetime import datetime, timedelta
from airflow.contrib.operators.kubernetes_pod_operator import KubernetesPodOperator
from airflow.operators.dummy_operator import DummyOperator
default_args = {
'owner': 'airflow',
'depends_on_past': False,
'start_date': datetime.utcnow(),
'email': ['airflow@example.com'],
'email_on_failure': False,
'email_on_retry': False,
'retries': 1,
'retry_delay': timedelta(minutes=5)
}
dag = DAG(
'kubernetes_sample', default_args=default_args, schedule_interval=timedelta(minutes=10))
start = DummyOperator(task_id='run_this_first', dag=dag)
passing = KubernetesPodOperator(namespace='default',
image="Python:3.6",
cmds=["Python","-c"],
arguments=["print('hello world')"],
labels={"foo": "bar"},
name="passing-test",
task_id="passing-task",
get_logs=True,
dag=dag
)
failing = KubernetesPodOperator(namespace='default',
image="ubuntu:1604",
cmds=["Python","-c"],
arguments=["print('hello world')"],
labels={"foo": "bar"},
name="fail",
task_id="failing-task",
get_logs=True,
dag=dag
)
passing.set_upstream(start)
failing.set_upstream(start)
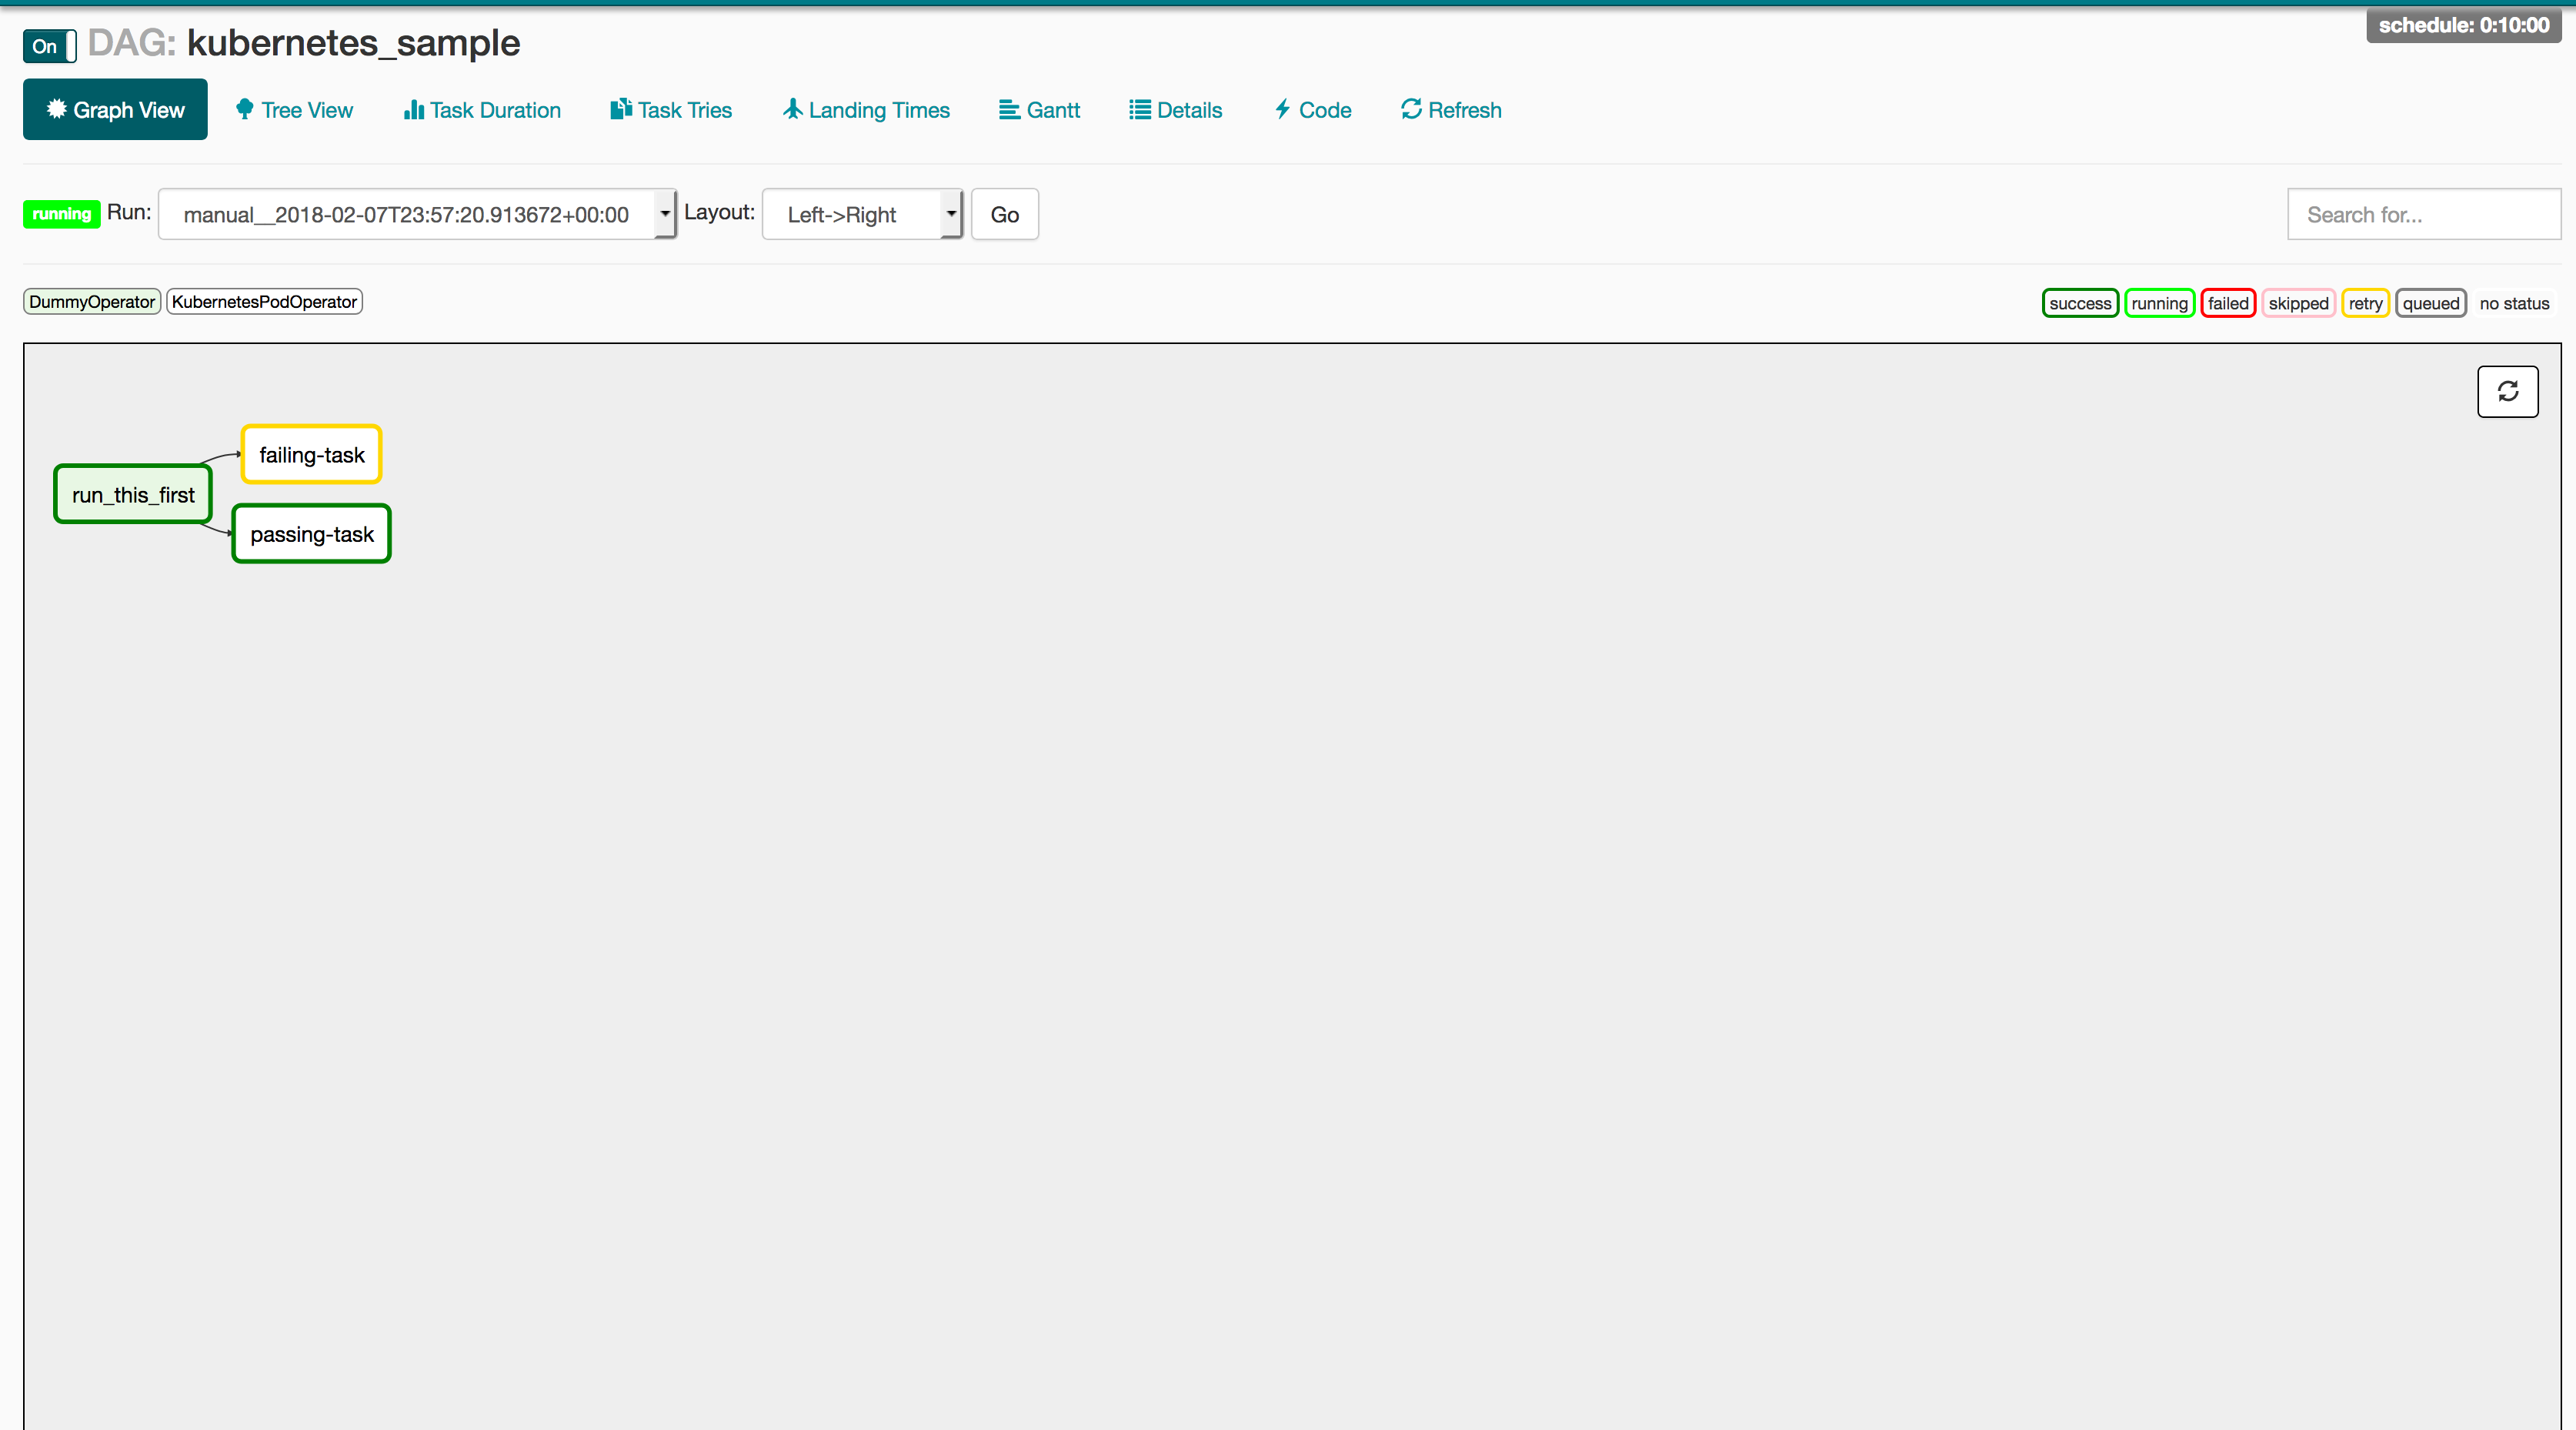
But how does this relate to my workflow?
While this example only uses basic images, the magic of Docker is that this same DAG will work for any image/command pairing you want. The following is a recommended CI/CD pipeline to run production-ready code on an Airflow DAG.
1: PR in github
Use Travis or Jenkins to run unit and integration tests, bribe your favorite team-mate into PR'ing your code, and merge to the master branch to trigger an automated CI build.
2: CI/CD via Jenkins -> Docker Image
Generate your Docker images and bump release version within your Jenkins build.
3: Airflow launches task
Finally, update your DAGs to reflect the new release version and you should be ready to go!
production_task = KubernetesPodOperator(namespace='default',
# image="my-production-job:release-1.0.1", <-- old release
image="my-production-job:release-1.0.2",
cmds=["Python","-c"],
arguments=["print('hello world')"],
name="fail",
task_id="failing-task",
get_logs=True,
dag=dag
)
Launching a test deployment
Since the Kubernetes Operator is not yet released, we haven't released an official helm chart or operator (however both are currently in progress). However, we are including instructions for a basic deployment below and are actively looking for foolhardy beta testers to try this new feature. To try this system out please follow these steps:
Step 1: Set your kubeconfig to point to a kubernetes cluster
Step 2: Clone the Airflow Repo:
Run git clone https://github.com/apache/incubator-airflow.git to clone the official Airflow repo.
Step 3: Run
To run this basic deployment, we are co-opting the integration testing script that we currently use for the Kubernetes Executor (which will be explained in the next article of this series). To launch this deployment, run these three commands:
sed -ie "s/KubernetesExecutor/LocalExecutor/g" scripts/ci/kubernetes/kube/configmaps.yaml
./scripts/ci/kubernetes/Docker/build.sh
./scripts/ci/kubernetes/kube/deploy.sh
Before we move on, let's discuss what these commands are doing:
sed -ie "s/KubernetesExecutor/LocalExecutor/g" scripts/ci/kubernetes/kube/configmaps.yaml
The Kubernetes Executor is another Airflow feature that allows for dynamic allocation of tasks as idempotent pods. The reason we are switching this to the LocalExecutor is simply to introduce one feature at a time. You are more then welcome to skip this step if you would like to try the Kubernetes Executor, however we will go into more detail in a future article.
./scripts/ci/kubernetes/Docker/build.sh
This script will tar the Airflow master source code build a Docker container based on the Airflow distribution
./scripts/ci/kubernetes/kube/deploy.sh
Finally, we create a full Airflow deployment on your cluster. This includes Airflow configs, a postgres backend, the webserver + scheduler, and all necessary services between. One thing to note is that the role binding supplied is a cluster-admin, so if you do not have that level of permission on the cluster, you can modify this at scripts/ci/kubernetes/kube/airflow.yaml
Step 4: Log into your webserver
Now that your Airflow instance is running let's take a look at the UI! The UI lives in port 8080 of the Airflow pod, so simply run
WEB=$(kubectl get pods -o go-template --template '{{range .items}}{{.metadata.name}}{{"\n"}}{{end}}' | grep "airflow" | head -1)
kubectl port-forward $WEB 8080:8080
Now the Airflow UI will exist on http://localhost:8080. To log in simply enter airflow/airflow and you should have full access to the Airflow web UI.
Step 5: Upload a test document
To modify/add your own DAGs, you can use kubectl cp to upload local files into the DAG folder of the Airflow scheduler. Airflow will then read the new DAG and automatically upload it to its system. The following command will upload any local file into the correct directory:
kubectl cp <local file> <namespace>/<pod>:/root/airflow/dags -c scheduler
Step 6: Enjoy!
So when will I be able to use this?
While this feature is still in the early stages, we hope to see it released for wide release in the next few months.
Get Involved
This feature is just the beginning of multiple major efforts to improves Apache Airflow integration into Kubernetes. The Kubernetes Operator has been merged into the 1.10 release branch of Airflow (the executor in experimental mode), along with a fully k8s native scheduler called the Kubernetes Executor (article to come). These features are still in a stage where early adopters/contributors can have a huge influence on the future of these features.
For those interested in joining these efforts, I'd recommend checkint out these steps:
- Join the airflow-dev mailing list at dev@airflow.apache.org.
- File an issue in Apache Airflow JIRA
- Join our SIG-BigData meetings on Wednesdays at 10am PST.
- Reach us on slack at #sig-big-data on kubernetes.slack.com
Special thanks to the Apache Airflow and Kubernetes communities, particularly Grant Nicholas, Ben Goldberg, Anirudh Ramanathan, Fokko Dreisprong, and Bolke de Bruin, for your awesome help on these features as well as our future efforts.
Kubernetes 1.11: In-Cluster Load Balancing and CoreDNS Plugin Graduate to General Availability
We’re pleased to announce the delivery of Kubernetes 1.11, our second release of 2018!
Today’s release continues to advance maturity, scalability, and flexibility of Kubernetes, marking significant progress on features that the team has been hard at work on over the last year. This newest version graduates key features in networking, opens up two major features from SIG-API Machinery and SIG-Node for beta testing, and continues to enhance storage features that have been a focal point of the past two releases. The features in this release make it increasingly possible to plug any infrastructure, cloud or on-premise, into the Kubernetes system.
Notable additions in this release include two highly-anticipated features graduating to general availability: IPVS-based In-Cluster Load Balancing and CoreDNS as a cluster DNS add-on option, which means increased scalability and flexibility for production applications.
Let’s dive into the key features of this release:
IPVS-Based In-Cluster Service Load Balancing Graduates to General Availability
In this release, IPVS-based in-cluster service load balancing has moved to stable. IPVS (IP Virtual Server) provides high-performance in-kernel load balancing, with a simpler programming interface than iptables. This change delivers better network throughput, better programming latency, and higher scalability limits for the cluster-wide distributed load-balancer that comprises the Kubernetes Service model. IPVS is not yet the default but clusters can begin to use it for production traffic.
CoreDNS Promoted to General Availability
CoreDNS is now available as a cluster DNS add-on option, and is the default when using kubeadm. CoreDNS is a flexible, extensible authoritative DNS server and directly integrates with the Kubernetes API. CoreDNS has fewer moving parts than the previous DNS server, since it’s a single executable and a single process, and supports flexible use cases by creating custom DNS entries. It’s also written in Go making it memory-safe. You can learn more about CoreDNS here.
Dynamic Kubelet Configuration Moves to Beta
This feature makes it possible for new Kubelet configurations to be rolled out in a live cluster. Currently, Kubelets are configured via command-line flags, which makes it difficult to update Kubelet configurations in a running cluster. With this beta feature, users can configure Kubelets in a live cluster via the API server.
Custom Resource Definitions Can Now Define Multiple Versions
Custom Resource Definitions are no longer restricted to defining a single version of the custom resource, a restriction that was difficult to work around. Now, with this beta feature, multiple versions of the resource can be defined. In the future, this will be expanded to support some automatic conversions; for now, this feature allows custom resource authors to “promote with safe changes, e.g. v1beta1 to v1,” and to create a migration path for resources which do have changes.
Custom Resource Definitions now also support "status" and "scale" subresources, which integrate with monitoring and high-availability frameworks. These two changes advance the ability to run cloud-native applications in production using Custom Resource Definitions.
Enhancements to CSI
Container Storage Interface (CSI) has been a major topic over the last few releases. After moving to beta in 1.10, the 1.11 release continues enhancing CSI with a number of features. The 1.11 release adds alpha support for raw block volumes to CSI, integrates CSI with the new kubelet plugin registration mechanism, and makes it easier to pass secrets to CSI plugins.
New Storage Features
Support for online resizing of Persistent Volumes has been introduced as an alpha feature. This enables users to increase the size of PVs without having to terminate pods and unmount volume first. The user will update the PVC to request a new size and kubelet will resize the file system for the PVC.
Support for dynamic maximum volume count has been introduced as an alpha feature. This new feature enables in-tree volume plugins to specify the maximum number of volumes that can be attached to a node and allows the limit to vary depending on the type of node. Previously, these limits were hard coded or configured via an environment variable.
The StorageObjectInUseProtection feature is now stable and prevents the removal of both Persistent Volumes that are bound to a Persistent Volume Claim, and Persistent Volume Claims that are being used by a pod. This safeguard will help prevent issues from deleting a PV or a PVC that is currently tied to an active pod.
Each Special Interest Group (SIG) within the community continues to deliver the most-requested enhancements, fixes, and functionality for their respective specialty areas. For a complete list of inclusions by SIG, please visit the release notes.
Availability
Kubernetes 1.11 is available for download on GitHub. To get started with Kubernetes, check out these interactive tutorials.
You can also install 1.11 using Kubeadm. Version 1.11.0 will be available as Deb and RPM packages, installable using the Kubeadm cluster installer sometime on June 28th.
4 Day Features Blog Series
If you’re interested in exploring these features more in depth, check back in two weeks for our 4 Days of Kubernetes series where we’ll highlight detailed walkthroughs of the following features:
- Day 1: IPVS-Based In-Cluster Service Load Balancing Graduates to General Availability
- Day 2: CoreDNS Promoted to General Availability
- Day 3: Dynamic Kubelet Configuration Moves to Beta
- Day 4: Resizing Persistent Volumes using Kubernetes
Release team
This release is made possible through the effort of hundreds of individuals who contributed both technical and non-technical content. Special thanks to the release team led by Josh Berkus, Kubernetes Community Manager at Red Hat. The 20 individuals on the release team coordinate many aspects of the release, from documentation to testing, validation, and feature completeness.
As the Kubernetes community has grown, our release process represents an amazing demonstration of collaboration in open source software development. Kubernetes continues to gain new users at a rapid clip. This growth creates a positive feedback cycle where more contributors commit code creating a more vibrant ecosystem. Kubernetes has over 20,000 individual contributors to date and an active community of more than 40,000 people.
Project Velocity
The CNCF has continued refining DevStats, an ambitious project to visualize the myriad contributions that go into the project. K8s DevStats illustrates the breakdown of contributions from major company contributors, as well as an impressive set of preconfigured reports on everything from individual contributors to pull request lifecycle times. On average, 250 different companies and over 1,300 individuals contribute to Kubernetes each month. Check out DevStats to learn more about the overall velocity of the Kubernetes project and community.
User Highlights
Established, global organizations are using Kubernetes in production at massive scale. Recently published user stories from the community include:
- The New York Times, known as the newspaper of record, moved out of its data centers and into the public cloud with the help of Google Cloud Platform and Kubernetes. This move meant a significant increase in speed of delivery, from 45 minutes to just a few seconds with Kubernetes.
- Nordstrom, a leading fashion retailer based in the U.S., began their cloud native journey by adopting Docker containers orchestrated with Kubernetes. The results included a major increase in Ops efficiency, improving CPU utilization from 5x to 12x depending on the workload.
- Squarespace, a SaaS solution for easily building and hosting websites, moved their monolithic application to microservices with the help of Kubernetes. This resulted in a deployment time reduction of almost 85%.
- Crowdfire, a leading social media management platform, moved from a monolithic application to a custom Kubernetes-based setup. This move reduced deployment time from 15 minutes to less than a minute.
Is Kubernetes helping your team? Share your story with the community.
Ecosystem Updates
- The CNCF recently expanded its certification offerings to include a Certified Kubernetes Application Developer exam. The CKAD exam certifies an individual's ability to design, build, configure, and expose cloud native applications for Kubernetes. More information can be found here.
- The CNCF recently added a new partner category, Kubernetes Training Partners (KTP). KTPs are a tier of vetted training providers who have deep experience in cloud native technology training. View partners and learn more here.
- CNCF also offers online training that teaches the skills needed to create and configure a real-world Kubernetes cluster.
- Kubernetes documentation now features user journeys: specific pathways for learning based on who readers are and what readers want to do. Learning Kubernetes is easier than ever for beginners, and more experienced users can find task journeys specific to cluster admins and application developers.
KubeCon
The world’s largest Kubernetes gathering, KubeCon + CloudNativeCon is coming to [Shanghai](https://events.linuxfoundation.cn/events/kubecon-cloudnativecon-china-2018/ from November 14-15, 2018 and Seattle from December 11-13, 2018. This conference will feature technical sessions, case studies, developer deep dives, salons and more! The CFP for both event is currently open. Submit your talk and register today!
Webinar
Join members of the Kubernetes 1.11 release team on July 31st at 10am PDT to learn about the major features in this release including In-Cluster Load Balancing and the CoreDNS Plugin. Register here.
Get Involved
The simplest way to get involved with Kubernetes is by joining one of the many Special Interest Groups (SIGs) that align with your interests. Have something you’d like to broadcast to the Kubernetes community? Share your voice at our weekly community meeting, and through the channels below.
Thank you for your continued feedback and support.
- Post questions (or answer questions) on Stack Overflow
- Join the community portal for advocates on K8sPort
- Follow us on Twitter @Kubernetesio for latest updates
- Chat with the community on Slack
- Share your Kubernetes story
Dynamic Ingress in Kubernetes
Kubernetes makes it easy to deploy applications that consist of many microservices, but one of the key challenges with this type of architecture is dynamically routing ingress traffic to each of these services. One approach is Ambassador, a Kubernetes-native open source API Gateway built on the Envoy Proxy. Ambassador is designed for dynamic environment where services may come and go frequently.
Ambassador is configured using Kubernetes annotations. Annotations are used to configure specific mappings from a given Kubernetes service to a particular URL. A mapping can include a number of annotations for configuring a route. Examples include rate limiting, protocol, cross-origin request sharing, traffic shadowing, and routing rules.
A Basic Ambassador Example
Ambassador is typically installed as a Kubernetes deployment, and is also available as a Helm chart. To configure Ambassador, create a Kubernetes service with the Ambassador annotations. Here is an example that configures Ambassador to route requests to /httpbin/ to the public httpbin.org service:
apiVersion: v1
kind: Service
metadata:
name: httpbin
annotations:
getambassador.io/config: |
---
apiVersion: ambassador/v0
kind: Mapping
name: httpbin_mapping
prefix: /httpbin/
service: httpbin.org:80
host_rewrite: httpbin.org
spec:
type: ClusterIP
ports:
- port: 80
A mapping object is created with a prefix of /httpbin/ and a service name of httpbin.org. The host_rewrite annotation specifies that the HTTP host header should be set to httpbin.org.
Kubeflow
Kubeflow provides a simple way to easily deploy machine learning infrastructure on Kubernetes. The Kubeflow team needed a proxy that provided a central point of authentication and routing to the wide range of services used in Kubeflow, many of which are ephemeral in nature.
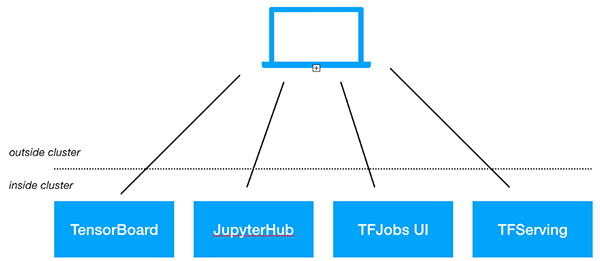
Service configuration
With Ambassador, Kubeflow can use a distributed model for configuration. Instead of a central configuration file, Ambassador allows each service to configure its route in Ambassador via Kubernetes annotations. Here is a simplified example configuration:
---
apiVersion: ambassador/v0
kind: Mapping
name: tfserving-mapping-test-post
prefix: /models/test/
rewrite: /model/test/:predict
method: POST
service: test.kubeflow:8000
In this example, the “test” service uses Ambassador annotations to dynamically configure a route to the service, triggered only when the HTTP method is a POST, and the annotation also specifies a rewrite rule.
Kubeflow and Ambassador
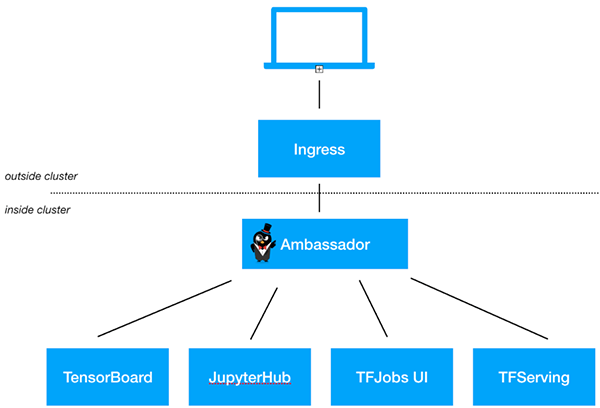
With Ambassador, Kubeflow manages routing easily with Kubernetes annotations. Kubeflow configures a single ingress object that directs traffic to Ambassador, then creates services with Ambassador annotations as needed to direct traffic to specific backends. For example, when deploying TensorFlow services, Kubeflow creates and annotates a K8s service so that the model will be served at https://
If you’re interested in using Ambassador with Kubeflow, the standard Kubeflow install automatically installs and configures Ambassador.
If you’re interested in using Ambassador as an API Gateway or Kubernetes ingress solution for your non-Kubeflow services, check out the Getting Started with Ambassador guide.
4 Years of K8s
On June 6, 2014 I checked in the first commit of what would become the public repository for Kubernetes. Many would assume that is where the story starts. It is the beginning of history, right? But that really doesn’t tell the whole story.

The cast leading up to that commit was large and the success for Kubernetes since then is owed to an ever larger cast.
Kubernetes was built on ideas that had been proven out at Google over the previous ten years with Borg. And Borg, itself, owed its existence to even earlier efforts at Google and beyond.
Concretely, Kubernetes started as some prototypes from Brendan Burns combined with ongoing work from me and Craig McLuckie to better align the internal Google experience with the Google Cloud experience. Brendan, Craig, and I really wanted people to use this, so we made the case to build out this prototype as an open source project that would bring the best ideas from Borg out into the open.
After we got the nod, it was time to actually build the system. We took Brendan’s prototype (in Java), rewrote it in Go, and built just enough to get the core ideas across. By this time the team had grown to include Ville Aikas, Tim Hockin, Brian Grant, Dawn Chen and Daniel Smith. Once we had something working, someone had to sign up to clean things up to get it ready for public launch. That ended up being me. Not knowing the significance at the time, I created a new repo, moved things over, and checked it in. So while I have the first public commit to the repo, there was work underway well before that.
The version of Kubernetes at that point was really just a shadow of what it was to become. The core concepts were there but it was very raw. For example, Pods were called Tasks. That was changed a day before we went public. All of this led up to the public announcement of Kubernetes on June 10th, 2014 in a keynote from Eric Brewer at the first DockerCon. You can watch that video here:
But, however raw, that modest start was enough to pique the interest of a community that started strong and has only gotten stronger. Over the past four years Kubernetes has exceeded the expectations of all of us that were there early on. We owe the Kubernetes community a huge debt. The success the project has seen is based not just on code and technology but also the way that an amazing group of people have come together to create something special. The best expression of this is the set of Kubernetes values that Sarah Novotny helped curate.
Here is to another 4 years and beyond! 🎉🎉🎉
Say Hello to Discuss Kubernetes
Communication is key when it comes to engaging a community of over 35,000 people in a global and remote environment. Keeping track of everything in the Kubernetes community can be an overwhelming task. On one hand we have our official resources, like Stack Overflow, GitHub, and the mailing lists, and on the other we have more ephemeral resources like Slack, where you can hop in, chat with someone, and then go on your merry way.
Slack is great for casual and timely conversations and keeping up with other community members, but communication can't be easily referenced in the future. Plus it can be hard to raise your hand in a room filled with 35,000 participants and find a voice. Mailing lists are useful when trying to reach a specific group of people with a particular ask and want to keep track of responses on the thread, but can be daunting with a large amount of people. Stack Overflow and GitHub are ideal for collaborating on projects or questions that involve code and need to be searchable in the future, but certain topics like "What's your favorite CI/CD tool" or "Kubectl tips and tricks" are offtopic there.
While our current assortment of communication channels are valuable in their own rights, we found that there was still a gap between email and real time chat. Across the rest of the web, many other open source projects like Docker, Mozilla, Swift, Ghost, and Chef have had success building communities on top of Discourse, an open source discussion platform. So what if we could use this tool to bring our discussions together under a modern roof, with an open API, and perhaps not let so much of our information fade into the ether? There's only one way to find out: Welcome to discuss.kubernetes.io
Right off the bat we have categories that users can browse. Checking and posting in these categories allow users to participate in things they might be interested in without having to commit to subscribing to a list. Granular notification controls allow the users to subscribe to just the category or tag they want, and allow for responding to topics via email.
Ecosystem partners and developers now have a place where they can announce projects that they're working on to users without wondering if it would be offtopic on an official list. We can make this place be not just about core Kubernetes, but about the hundreds of wonderful tools our community is building.
This new community forum gives people a place to go where they can discuss Kubernetes, and a sounding board for developers to make announcements of things happening around Kubernetes, all while being searchable and easily accessible to a wider audience.
Hop in and take a look. We're just getting started, so you might want to begin by introducing yourself and then browsing around. Apps are also available for Android and iOS.
Introducing kustomize; Template-free Configuration Customization for Kubernetes
If you run a Kubernetes environment, chances are you’ve customized a Kubernetes configuration — you've copied some API object YAML files and edited them to suit your needs.
But there are drawbacks to this approach — it can be hard to go back to the source material and incorporate any improvements that were made to it. Today Google is announcing kustomize, a command-line tool contributed as a subproject of SIG-CLI. The tool provides a new, purely declarative approach to configuration customization that adheres to and leverages the familiar and carefully designed Kubernetes API.
Here’s a common scenario. Somewhere on the internet you find someone’s Kubernetes configuration for a content management system. It's a set of files containing YAML specifications of Kubernetes API objects. Then, in some corner of your own company you find a configuration for a database to back that CMS — a database you prefer because you know it well.
You want to use these together, somehow. Further, you want to customize the files so that your resource instances appear in the cluster with a label that distinguishes them from a colleague’s resources who’s doing the same thing in the same cluster. You also want to set appropriate values for CPU, memory and replica count.
Additionally, you’ll want multiple variants of the entire configuration: a small variant (in terms of computing resources used) devoted to testing and experimentation, and a much larger variant devoted to serving outside users in production. Likewise, other teams will want their own variants.
This raises all sorts of questions. Do you copy your configuration to multiple locations and edit them independently? What if you have dozens of development teams who need slightly different variations of the stack? How do you maintain and upgrade the aspects of configuration that they share in common? Workflows using kustomize provide answers to these questions.
Customization is reuse
Kubernetes configurations aren't code (being YAML specifications of API objects, they are more strictly viewed as data), but configuration lifecycle has many similarities to code lifecycle.
You should keep configurations in version control. Configuration owners aren’t necessarily the same set of people as configuration users. Configurations may be used as parts of a larger whole. Users will want to reuse configurations for different purposes.
One approach to configuration reuse, as with code reuse, is to simply copy it all and customize the copy. As with code, severing the connection to the source material makes it difficult to benefit from ongoing improvements to the source material. Taking this approach with many teams or environments, each with their own variants of a configuration, makes a simple upgrade intractable.
Another approach to reuse is to express the source material as a parameterized template. A tool processes the template—executing any embedded scripting and replacing parameters with desired values—to generate the configuration. Reuse comes from using different sets of values with the same template. The challenge here is that the templates and value files are not specifications of Kubernetes API resources. They are, necessarily, a new thing, a new language, that wraps the Kubernetes API. And yes, they can be powerful, but bring with them learning and tooling costs. Different teams want different changes—so almost every specification that you can include in a YAML file becomes a parameter that needs a value. As a result, the value sets get large, since all parameters (that don't have trusted defaults) must be specified for replacement. This defeats one of the goals of reuse—keeping the differences between the variants small in size and easy to understand in the absence of a full resource declaration.
A new option for configuration customization
Compare that to kustomize, where the tool’s
behavior is determined by declarative specifications
expressed in a file called kustomization.yaml.
The kustomize program reads the file and the Kubernetes API resource files it references, then emits complete resources to standard output. This text output can be further processed by other tools, or streamed directly to kubectl for application to a cluster.
For example, if a file called kustomization.yaml
containing
commonLabels:
app: hello
resources:
- deployment.yaml
- configMap.yaml
- service.yaml
is in the current working directory, along with the three resource files it mentions, then running
kustomize build
emits a YAML stream that includes the three given
resources, and adds a common label app: hello to
each resource.
Similarly, you can use a commonAnnotations field to add an annotation to all resources, and a namePrefix field to add a common prefix to all resource names. This trivial yet common customization is just the beginning.
A more common use case is that you’ll need multiple variants of a common set of resources, e.g., a development, staging and production variant.
For this purpose, kustomize supports the idea of an overlay and a base. Both are represented by a kustomization file. The base declares things that the variants share in common (both resources and a common customization of those resources), and the overlays declare the differences.
Here’s a file system layout to manage a staging and production variant of a given cluster app:
someapp/
├── base/
│ ├── kustomization.yaml
│ ├── deployment.yaml
│ ├── configMap.yaml
│ └── service.yaml
└── overlays/
├── production/
│ └── kustomization.yaml
│ ├── replica_count.yaml
└── staging/
├── kustomization.yaml
└── cpu_count.yaml
The file someapp/base/kustomization.yaml specifies the
common resources and common customizations to those
resources (e.g., they all get some label, name prefix
and annotation).
The contents of
someapp/overlays/production/kustomization.yaml could
be
commonLabels:
env: production
bases:
- ../../base
patches:
- replica_count.yaml
This kustomization specifies a patch file
replica_count.yaml, which could be:
apiVersion: apps/v1
kind: Deployment
metadata:
name: the-deployment
spec:
replicas: 100
A patch is a partial resource declaration, in this case
a patch of the deployment in
someapp/base/deployment.yaml, modifying only the
replicas count to handle production traffic.
The patch, being a partial deployment spec, has a clear context and purpose and can be validated even if it’s read in isolation from the remaining configuration. It’s not just a context free {parameter name, value} tuple.
To create the resources for the production variant, run
kustomize build someapp/overlays/production
The result is printed to stdout as a set of complete resources, ready to be applied to a cluster. A similar command defines the staging environment.
In summary
With kustomize, you can manage an arbitrary number of distinctly customized Kubernetes configurations using only Kubernetes API resource files. Every artifact that kustomize uses is plain YAML and can be validated and processed as such. kustomize encourages a fork/modify/rebase workflow.
To get started, try the hello world example. For discussion and feedback, join the mailing list or open an issue. Pull requests are welcome.
Kubernetes Containerd Integration Goes GA
Kubernetes Containerd Integration Goes GA
In a previous blog - Containerd Brings More Container Runtime Options for Kubernetes, we introduced the alpha version of the Kubernetes containerd integration. With another 6 months of development, the integration with containerd is now generally available! You can now use containerd 1.1 as the container runtime for production Kubernetes clusters!
Containerd 1.1 works with Kubernetes 1.10 and above, and supports all Kubernetes features. The test coverage of containerd integration on Google Cloud Platform in Kubernetes test infrastructure is now equivalent to the Docker integration (See: test dashboard).
We're very glad to see containerd rapidly grow to this big milestone. Alibaba Cloud started to use containerd actively since its first day, and thanks to the simplicity and robustness emphasise, make it a perfect container engine running in our Serverless Kubernetes product, which has high qualification on performance and stability. No doubt, containerd will be a core engine of container era, and continue to driving innovation forward.
— Xinwei, Staff Engineer in Alibaba Cloud
Architecture Improvements
The Kubernetes containerd integration architecture has evolved twice. Each evolution has made the stack more stable and efficient.
Containerd 1.0 - CRI-Containerd (end of life)
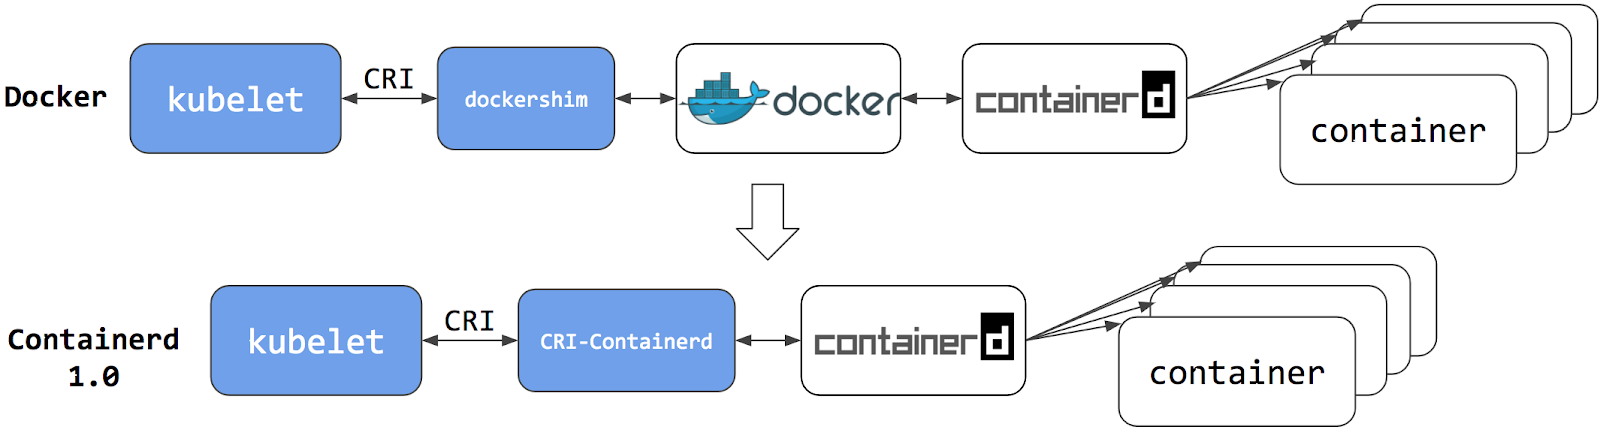
For containerd 1.0, a daemon called cri-containerd was required to operate between Kubelet and containerd. Cri-containerd handled the Container Runtime Interface (CRI) service requests from Kubelet and used containerd to manage containers and container images correspondingly. Compared to the Docker CRI implementation (dockershim), this eliminated one extra hop in the stack.
However, cri-containerd and containerd 1.0 were still 2 different daemons which interacted via grpc. The extra daemon in the loop made it more complex for users to understand and deploy, and introduced unnecessary communication overhead.
Containerd 1.1 - CRI Plugin (current)
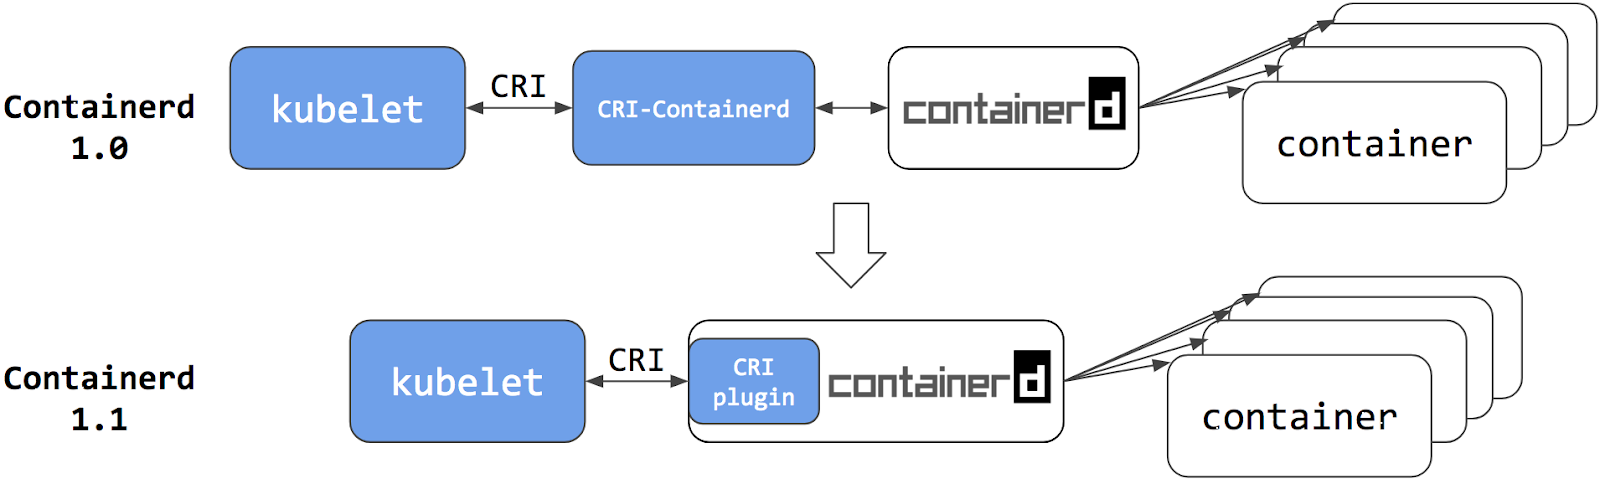
In containerd 1.1, the cri-containerd daemon is now refactored to be a containerd CRI plugin. The CRI plugin is built into containerd 1.1, and enabled by default. Unlike cri-containerd, the CRI plugin interacts with containerd through direct function calls. This new architecture makes the integration more stable and efficient, and eliminates another grpc hop in the stack. Users can now use Kubernetes with containerd 1.1 directly. The cri-containerd daemon is no longer needed.
Performance
Improving performance was one of the major focus items for the containerd 1.1 release. Performance was optimized in terms of pod startup latency and daemon resource usage.
The following results are a comparison between containerd 1.1 and Docker 18.03 CE. The containerd 1.1 integration uses the CRI plugin built into containerd; and the Docker 18.03 CE integration uses the dockershim.
The results were generated using the Kubernetes node performance benchmark, which is part of Kubernetes node e2e test. Most of the containerd benchmark data is publicly accessible on the node performance dashboard.
Pod Startup Latency
The "105 pod batch startup benchmark" results show that the containerd 1.1 integration has lower pod startup latency than Docker 18.03 CE integration with dockershim (lower is better).
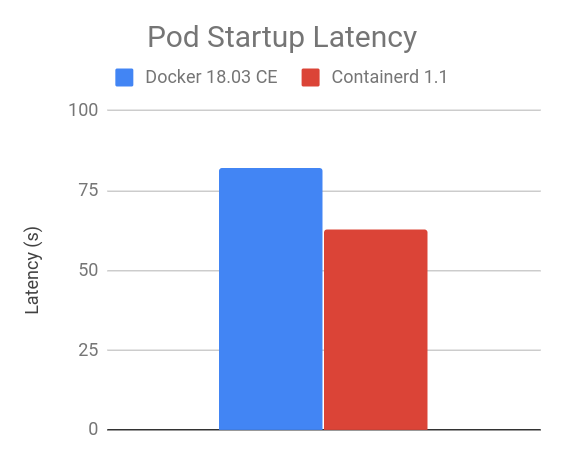
CPU and Memory
At the steady state, with 105 pods, the containerd 1.1 integration consumes less CPU and memory overall compared to Docker 18.03 CE integration with dockershim. The results vary with the number of pods running on the node, 105 is chosen because it is the current default for the maximum number of user pods per node.
As shown in the figures below, compared to Docker 18.03 CE integration with dockershim, the containerd 1.1 integration has 30.89% lower kubelet cpu usage, 68.13% lower container runtime cpu usage, 11.30% lower kubelet resident set size (RSS) memory usage, 12.78% lower container runtime RSS memory usage.
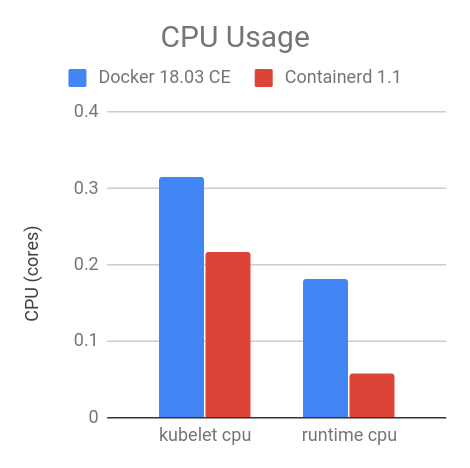
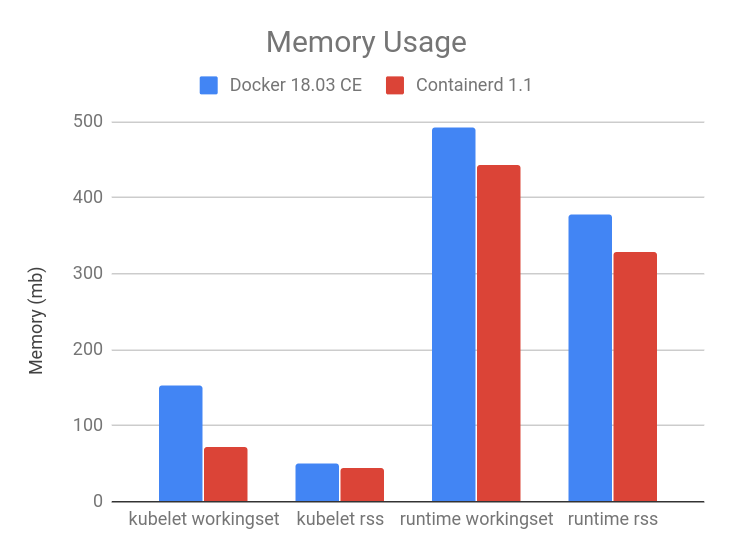
crictl
Container runtime command-line interface (CLI) is a useful tool for system and application troubleshooting. When using Docker as the container runtime for Kubernetes, system administrators sometimes login to the Kubernetes node to run Docker commands for collecting system and/or application information. For example, one may use docker ps and docker inspect to check application process status, docker images to list images on the node, and docker info to identify container runtime configuration, etc.
For containerd and all other CRI-compatible container runtimes, e.g. dockershim, we recommend using crictl as a replacement CLI over the Docker CLI for troubleshooting pods, containers, and container images on Kubernetes nodes.
crictl is a tool providing a similar experience to the Docker CLI for Kubernetes node troubleshooting and crictl works consistently across all CRI-compatible container runtimes. It is hosted in the kubernetes-incubator/cri-tools repository and the current version is v1.0.0-beta.1. crictl is designed to resemble the Docker CLI to offer a better transition experience for users, but it is not exactly the same. There are a few important differences, explained below.
Limited Scope - crictl is a Troubleshooting Tool
The scope of crictl is limited to troubleshooting, it is not a replacement to docker or kubectl. Docker's CLI provides a rich set of commands, making it a very useful development tool. But it is not the best fit for troubleshooting on Kubernetes nodes. Some Docker commands are not useful to Kubernetes, such as docker network and docker build; and some may even break the system, such as docker rename. crictl provides just enough commands for node troubleshooting, which is arguably safer to use on production nodes.
Kubernetes Oriented
crictl offers a more kubernetes-friendly view of containers. Docker CLI lacks core Kubernetes concepts, e.g. pod and namespace, so it can't provide a clear view of containers and pods. One example is that docker ps shows somewhat obscure, long Docker container names, and shows pause containers and application containers together:

However, pause containers are a pod implementation detail, where one pause container is used for each pod, and thus should not be shown when listing containers that are members of pods.
crictl, by contrast, is designed for Kubernetes. It has different sets of commands for pods and containers. For example, crictl pods lists pod information, and crictl ps only lists application container information. All information is well formatted into table columns.


As another example, crictl pods includes a --namespace option for filtering pods by the namespaces specified in Kubernetes.

For more details about how to use crictl with containerd:
What about Docker Engine?
"Does switching to containerd mean I can't use Docker Engine anymore?" We hear this question a lot, the short answer is NO.
Docker Engine is built on top of containerd. The next release of Docker Community Edition (Docker CE) will use containerd version 1.1. Of course, it will have the CRI plugin built-in and enabled by default. This means users will have the option to continue using Docker Engine for other purposes typical for Docker users, while also being able to configure Kubernetes to use the underlying containerd that came with and is simultaneously being used by Docker Engine on the same node. See the architecture figure below showing the same containerd being used by Docker Engine and Kubelet:
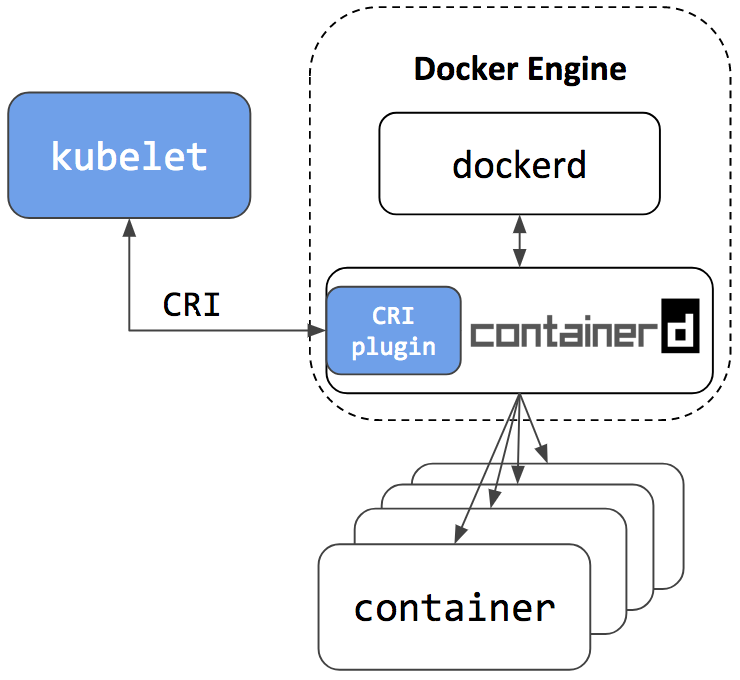
Since containerd is being used by both Kubelet and Docker Engine, this means users who choose the containerd integration will not just get new Kubernetes features, performance, and stability improvements, they will also have the option of keeping Docker Engine around for other use cases.
A containerd namespace mechanism is employed to guarantee that Kubelet and Docker Engine won't see or have access to containers and images created by each other. This makes sure they won't interfere with each other. This also means that:
- Users won't see Kubernetes created containers with the docker ps command. Please use crictl ps instead. And vice versa, users won't see Docker CLI created containers in Kubernetes or with crictl ps command. The crictl create and crictl runp commands are only for troubleshooting. Manually starting pod or container with crictl on production nodes is not recommended.
- Users won't see Kubernetes pulled images with the docker images command. Please use the crictl images command instead. And vice versa, Kubernetes won't see images created by docker pull, docker load or docker build commands. Please use the crictl pull command instead, and ctr cri load if you have to load an image.
Summary
- Containerd 1.1 natively supports CRI. It can be used directly by Kubernetes.
- Containerd 1.1 is production ready.
- Containerd 1.1 has good performance in terms of pod startup latency and system resource utilization.
- crictl is the CLI tool to talk with containerd 1.1 and other CRI-conformant container runtimes for node troubleshooting.
- The next stable release of Docker CE will include containerd 1.1. Users have the option to continue using Docker for use cases not specific to Kubernetes, and configure Kubernetes to use the same underlying containerd that comes with Docker.
We'd like to thank all the contributors from Google, IBM, Docker, ZTE, ZJU and many other individuals who made this happen!
For a detailed list of changes in the containerd 1.1 release, please see the release notes here: https://github.com/containerd/containerd/releases/tag/v1.1.0
Try it out
To setup a Kubernetes cluster using containerd as the container runtime:
- For a production quality cluster on GCE brought up with kube-up.sh, see here.
- For a multi-node cluster installer and bring up steps using Ansible and kubeadm, see here.
- For creating a cluster from scratch on Google Cloud, see Kubernetes the Hard Way.
- For a custom installation from release tarball, see here.
- To install using LinuxKit on a local VM, see here.
Contribute
The containerd CRI plugin is an open source github project within containerd https://github.com/containerd/cri. Any contributions in terms of ideas, issues, and/or fixes are welcome. The getting started guide for developers is a good place to start for contributors.
Community
The project is developed and maintained jointly by members of the Kubernetes SIG-Node community and the containerd community. We'd love to hear feedback from you. To join the communities:
- sig-node community site
- Slack:
- #sig-node channel in kubernetes.slack.com
- #containerd channel in https://dockr.ly/community
- Mailing List: https://groups.google.com/forum/#!forum/kubernetes-sig-node
Getting to Know Kubevirt
Once you've become accustomed to running Linux container workloads on Kubernetes, you may find yourself wishing that you could run other sorts of workloads on your Kubernetes cluster. Maybe you need to run an application that isn't architected for containers, or that requires a different version of the Linux kernel -- or an all together different operating system -- than what's available on your container host.
These sorts of workloads are often well-suited to running in virtual machines (VMs), and KubeVirt, a virtual machine management add-on for Kubernetes, is aimed at allowing users to run VMs right alongside containers in the their Kubernetes or OpenShift clusters.
KubeVirt extends Kubernetes by adding resource types for VMs and sets of VMs through Kubernetes' Custom Resource Definitions API (CRD). KubeVirt VMs run within regular Kubernetes pods, where they have access to standard pod networking and storage, and can be managed using standard Kubernetes tools such as kubectl.
Running VMs with Kubernetes involves a bit of an adjustment compared to using something like oVirt or OpenStack, and understanding the basic architecture of KubeVirt is a good place to begin.
In this post, we’ll talk about some of the components that are involved in KubeVirt at a high level. The components we’ll check out are CRDs, the KubeVirt virt-controller, virt-handler and virt-launcher components, libvirt, storage, and networking.
KubeVirt Components
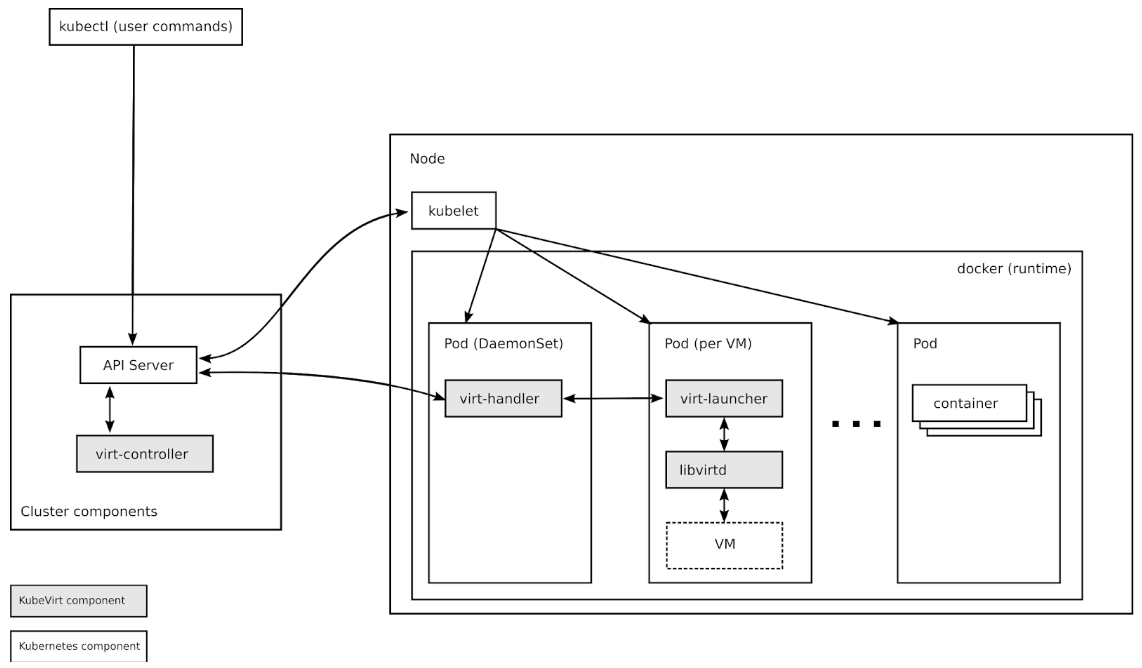
Custom Resource Definitions
Kubernetes resources are endpoints in the Kubernetes API that store collections of related API objects. For instance, the built-in pods resource contains a collection of Pod objects. The Kubernetes Custom Resource Definition API allows users to extend Kubernetes with additional resources by defining new objects with a given name and schema. Once you've applied a custom resource to your cluster, the Kubernetes API server serves and handles the storage of your custom resource.
KubeVirt's primary CRD is the VirtualMachine (VM) resource, which contains a collection of VM objects inside the Kubernetes API server. The VM resource defines all the properties of the Virtual machine itself, such as the machine and CPU type, the amount of RAM and vCPUs, and the number and type of NICs available in the VM.
virt-controller
The virt-controller is a Kubernetes Operator that’s responsible for cluster-wide virtualization functionality. When new VM objects are posted to the Kubernetes API server, the virt-controller takes notice and creates the pod in which the VM will run. When the pod is scheduled on a particular node, the virt-controller updates the VM object with the node name, and hands off further responsibilities to a node-specific KubeVirt component, the virt-handler, an instance of which runs on every node in the cluster.
virt-handler
Like the virt-controller, the virt-handler is also reactive, watching for changes to the VM object, and performing all necessary operations to change a VM to meet the required state. The virt-handler references the VM specification and signals the creation of a corresponding domain using a libvirtd instance in the VM's pod. When a VM object is deleted, the virt-handler observes the deletion and turns off the domain.
virt-launcher
For every VM object one pod is created. This pod's primary container runs the virt-launcher KubeVirt component. The main purpose of the virt-launcher Pod is to provide the cgroups and namespaces which will be used to host the VM process.
virt-handler signals virt-launcher to start a VM by passing the VM's CRD object to virt-launcher. virt-launcher then uses a local libvirtd instance within its container to start the VM. From there virt-launcher monitors the VM process and terminates once the VM has exited.
If the Kubernetes runtime attempts to shutdown the virt-launcher pod before the VM has exited, virt-launcher forwards signals from Kubernetes to the VM process and attempts to hold off the termination of the pod until the VM has shutdown successfully.
# kubectl get pods
NAME READY STATUS RESTARTS AGE
virt-controller-7888c64d66-dzc9p 1/1 Running 0 2h
virt-controller-7888c64d66-wm66x 0/1 Running 0 2h
virt-handler-l2xkt 1/1 Running 0 2h
virt-handler-sztsw 1/1 Running 0 2h
virt-launcher-testvm-ephemeral-dph94 2/2 Running 0 2h
libvirtd
An instance of libvirtd is present in every VM pod. virt-launcher uses libvirtd to manage the life-cycle of the VM process.
Storage and Networking
KubeVirt VMs may be configured with disks, backed by volumes.
Persistent Volume Claim volumes make Kubernetes persistent volume available as disks directly attached to the VM. This is the primary way to provide KubeVirt VMs with persistent storage. Currently, persistent volumes must be iscsi block devices, although work is underway to enable file-based pv disks.
Ephemeral Volumes are a local copy on write images that use a network volume as a read-only backing store. KubeVirt dynamically generates the ephemeral images associated with a VM when the VM starts, and discards the ephemeral images when the VM stops. Currently, ephemeral volumes must be backed by pvc volumes.
Registry Disk volumes reference docker image that embed a qcow or raw disk. As the name suggests, these volumes are pulled from a container registry. Like regular ephemeral container images, data in these volumes persists only while the pod lives.
CloudInit NoCloud volumes provide VMs with a cloud-init NoCloud user-data source, which is added as a disk to the VM, where it's available to provide configuration details to guests with cloud-init installed. Cloud-init details can be provided in clear text, as base64 encoded UserData files, or via Kubernetes secrets.
In the example below, a Registry Disk is configured to provide the image from which to boot the VM. A cloudInit NoCloud volume, paired with an ssh-key stored as clear text in the userData field, is provided for authentication with the VM:
apiVersion: kubevirt.io/v1alpha1
kind: VirtualMachine
metadata:
name: myvm
spec:
terminationGracePeriodSeconds: 5
domain:
resources:
requests:
memory: 64M
devices:
disks:
- name: registrydisk
volumeName: registryvolume
disk:
bus: virtio
- name: cloudinitdisk
volumeName: cloudinitvolume
disk:
bus: virtio
volumes:
- name: registryvolume
registryDisk:
image: kubevirt/cirros-registry-disk-demo:devel
- name: cloudinitvolume
cloudInitNoCloud:
userData: |
ssh-authorized-keys:
- ssh-rsa AAAAB3NzaK8L93bWxnyp test@test.com
Just as with regular Kubernetes pods, basic networking functionality is made available automatically to each KubeVirt VM, and particular TCP or UDP ports can be exposed to the outside world using regular Kubernetes services. No special network configuration is required.
Getting Involved
KubeVirt development is accelerating, and the project is eager for new contributors. If you're interested in getting involved, check out the project's open issues and check out the project calendar.
If you need some help or want to chat you can connect to the team via freenode IRC in #kubevirt, or on the KubeVirt mailing list. User documentation is available at https://kubevirt.gitbooks.io/user-guide/.
Gardener - The Kubernetes Botanist
Today, Kubernetes is the natural choice for running software in the Cloud. More and more developers and corporations are in the process of containerizing their applications, and many of them are adopting Kubernetes for automated deployments of their Cloud Native workloads.
There are many Open Source tools which help in creating and updating single Kubernetes clusters. However, the more clusters you need the harder it becomes to operate, monitor, manage, and keep all of them alive and up-to-date.
And that is exactly what project "Gardener" focuses on. It is not just another provisioning tool, but it is rather designed to manage Kubernetes clusters as a service. It provides Kubernetes-conformant clusters on various cloud providers and the ability to maintain hundreds or thousands of them at scale. At SAP, we face this heterogeneous multi-cloud & on-premise challenge not only in our own platform, but also encounter the same demand at all our larger and smaller customers implementing Kubernetes & Cloud Native.
Inspired by the possibilities of Kubernetes and the ability to self-host, the foundation of Gardener is Kubernetes itself. While self-hosting, as in, to run Kubernetes components inside Kubernetes is a popular topic in the community, we apply a special pattern catering to the needs of operating a huge number of clusters with minimal total cost of ownership. We take an initial Kubernetes cluster (called "seed" cluster) and seed the control plane components (such as the API server, scheduler, controller-manager, etcd and others) of an end-user cluster as simple Kubernetes pods. In essence, the focus of the seed cluster is to deliver a robust Control-Plane-as-a-Service at scale. Following our botanical terminology, the end-user clusters when ready to sprout are called "shoot" clusters. Considering network latency and other fault scenarios, we recommend a seed cluster per cloud provider and region to host the control planes of the many shoot clusters.
Overall, this concept of reusing Kubernetes primitives already simplifies deployment, management, scaling & patching/updating of the control plane. Since it builds upon highly available initial seed clusters, we can evade multiple quorum number of master node requirements for shoot cluster control planes and reduce waste/costs. Furthermore, the actual shoot cluster consists only of worker nodes for which full administrative access to the respective owners could be granted, thereby structuring a necessary separation of concerns to deliver a higher level of SLO. The architectural role & operational ownerships are thus defined as following (cf. Figure 1):
- Kubernetes as a Service provider owns, operates, and manages the garden and the seed clusters. They represent parts of the required landscape/infrastructure.
- The control planes of the shoot clusters are run in the seed and, consequently, within the separate security domain of the service provider.
- The shoot clusters' machines are run under the ownership of and in the cloud provider account and the environment of the customer, but still managed by the Gardener.
- For on-premise or private cloud scenarios the delegation of ownership & management of the seed clusters (and the IaaS) is feasible.
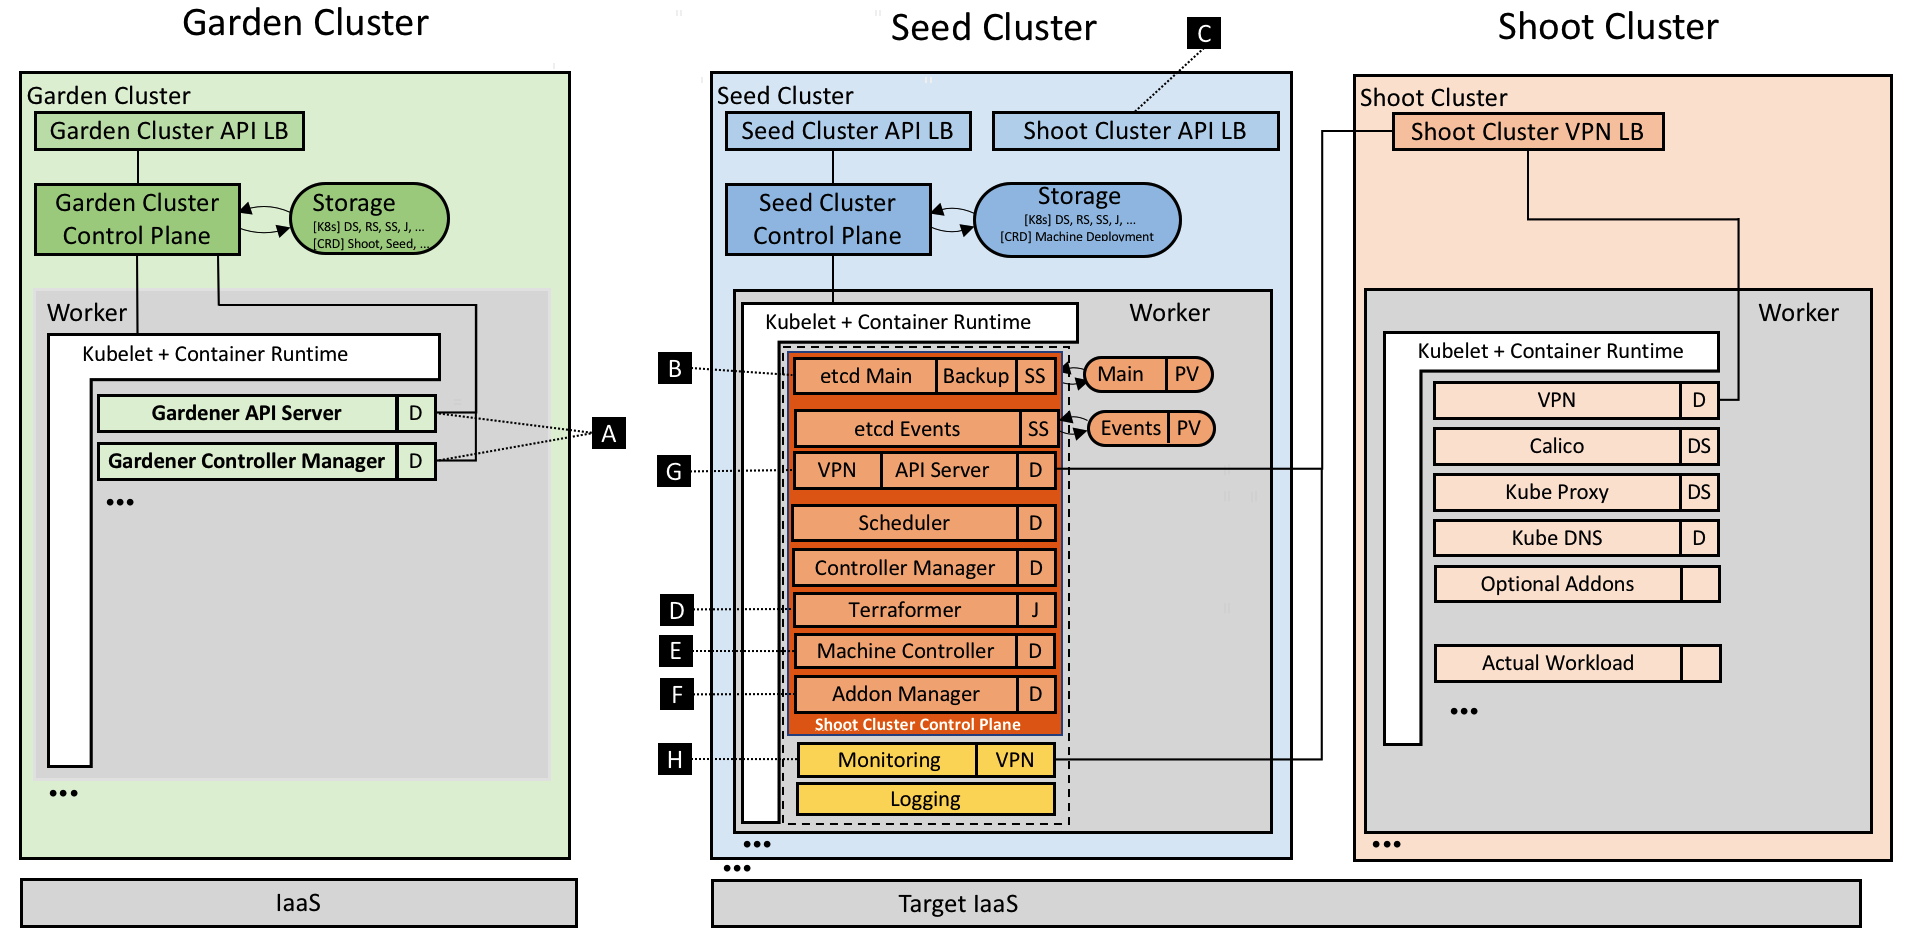
Figure 1 Technical Gardener landscape with components.
The Gardener is developed as an aggregated API server and comes with a bundled set of controllers. It runs inside another dedicated Kubernetes cluster (called "garden" cluster) and it extends the Kubernetes API with custom resources. Most prominently, the Shoot resource allows a description of the entire configuration of a user's Kubernetes cluster in a declarative way. Corresponding controllers will, just like native Kubernetes controllers, watch these resources and bring the world's actual state to the desired state (resulting in create, reconcile, update, upgrade, or delete operations.) The following example manifest shows what needs to be specified:
apiVersion: garden.sapcloud.io/v1beta1
kind: Shoot
metadata:
name: dev-eu1
namespace: team-a
spec:
cloud:
profile: aws
region: us-east-1
secretBindingRef:
name: team-a-aws-account-credentials
aws:
machineImage:
ami: ami-34237c4d
name: CoreOS
networks:
vpc:
cidr: 10.250.0.0/16
...
workers:
- name: cpu-pool
machineType: m4.xlarge
volumeType: gp2
volumeSize: 20Gi
autoScalerMin: 2
autoScalerMax: 5
dns:
provider: aws-route53
domain: dev-eu1.team-a.example.com
kubernetes:
version: 1.10.2
backup:
...
maintenance:
...
addons:
cluster-autoscaler:
enabled: true
...
Once sent to the garden cluster, Gardener will pick it up and provision the actual shoot. What is not shown above is that each action will enrich the Shoot's status field indicating whether an operation is currently running and recording the last error (if there was any) and the health of the involved components. Users are able to configure and monitor their cluster's state in true Kubernetes style. Our users have even written their own custom controllers watching & mutating these Shoot resources.
Technical deep dive
The Gardener implements a Kubernetes inception approach; thus, it leverages Kubernetes capabilities to perform its operations. It provides a couple of controllers (cf. [A]) watching Shoot resources whereas the main controller is responsible for the standard operations like create, update, and delete. Another controller named "shoot care" is performing regular health checks and garbage collections, while a third's ("shoot maintenance") tasks are to cover actions like updating the shoot's machine image to the latest available version.
For every shoot, Gardener creates a dedicated Namespace in the seed with appropriate security policies and within it pre-creates the later required certificates managed as Secrets.
etcd
The backing data store etcd (cf. [B]) of a Kubernetes cluster is deployed as a StatefulSet with one replica and a PersistentVolume(Claim). Embracing best practices, we run another etcd shard-instance to store Events of a shoot. Anyway, the main etcd pod is enhanced with a sidecar validating the data at rest and taking regular snapshots which are then efficiently backed up to an object store. In case etcd's data is lost or corrupt, the sidecar restores it from the latest available snapshot. We plan to develop incremental/continuous backups to avoid discrepancies (in case of a recovery) between a restored etcd state and the actual state [1].
Kubernetes control plane
As already mentioned above, we have put the other Kubernetes control plane components into native Deployments and run them with the rolling update strategy. By doing so, we can not only leverage the existing deployment and update capabilities of Kubernetes, but also its monitoring and liveliness proficiencies. While the control plane itself uses in-cluster communication, the API Servers' Service is exposed via a load balancer for external communication (cf. [C]). In order to uniformly generate the deployment manifests (mainly depending on both the Kubernetes version and cloud provider), we decided to utilize Helm charts whereas Gardener leverages only Tillers rendering capabilities, but deploys the resulting manifests directly without running Tiller at all [2].
Infrastructure preparation
One of the first requirements when creating a cluster is a well-prepared infrastructure on the cloud provider side including networks and security groups. In our current provider specific in-tree implementation of Gardener (called the "Botanist"), we employ Terraform to accomplish this task. Terraform provides nice abstractions for the major cloud providers and implements capabilities like parallelism, retry mechanisms, dependency graphs, idempotency, and more. However, we found that Terraform is challenging when it comes to error handling and it does not provide a technical interface to extract the root cause of an error. Currently, Gardener generates a Terraform script based on the shoot specification and stores it inside a ConfigMap in the respective namespace of the seed cluster. The Terraformer component then runs as a Job (cf. [D]), executes the mounted Terraform configuration, and writes the produced state back into another ConfigMap. Using the Job primitive in this manner helps to inherit its retry logic and achieve fault tolerance against temporary connectivity issues or resource constraints. Moreover, Gardener only needs to access the Kubernetes API of the seed cluster to submit the Job for the underlying IaaS. This design is important for private cloud scenarios in which typically the IaaS API is not exposed publicly.
Machine controller manager
What is required next are the nodes to which the actual workload of a cluster is to be scheduled. However, Kubernetes offers no primitives to request nodes forcing a cluster administrator to use external mechanisms. The considerations include the full lifecycle, beginning with initial provisioning and continuing with providing security fixes, and performing health checks and rolling updates. While we started with instantiating static machines or utilizing instance templates of the cloud providers to create the worker nodes, we concluded (also from our previous production experience with running a cloud platform) that this approach requires extensive effort. During discussions at KubeCon 2017, we recognized that the best way, of course, to manage cluster nodes is to again apply core Kubernetes concepts and to teach the system to self-manage the nodes/machines it runs. For that purpose, we developed the machine controller manager (cf. [E]) which extends Kubernetes with MachineDeployment, MachineClass, MachineSet & Machine resources and enables declarative management of (virtual) machines from within the Kubernetes context just like Deployments, ReplicaSets & Pods. We reused code from existing Kubernetes controllers and just needed to abstract a few IaaS/cloud provider specific methods for creating, deleting, and listing machines in dedicated drivers. When comparing Pods and Machines a subtle difference becomes evident: creating virtual machines directly results in costs, and if something unforeseen happens, these costs can increase very quickly. To safeguard against such rampage, the machine controller manager comes with a safety controller that terminates orphaned machines and freezes the rollout of MachineDeployments and MachineSets beyond certain thresholds and time-outs. Furthermore, we leverage the existing official cluster-autoscaler already including the complex logic of determining which node pool to scale out or down. Since its cloud provider interface is well-designed, we enabled the autoscaler to directly modify the number of replicas in the respective MachineDeployment resource when triggering to scale out or down.
Addons
Besides providing a properly setup control plane, every Kubernetes cluster requires a few system components to work. Usually, that's the kube-proxy, an overlay network, a cluster DNS, and an ingress controller. Apart from that, Gardener allows to order optional add-ons configurable by the user (in the shoot resource definition), e.g. Heapster, the Kubernetes Dashboard, or Cert-Manager. Again, the Gardener renders the manifests for all these components via Helm charts (partly adapted and curated from the upstream charts repository). However, these resources are managed in the shoot cluster and can thus be tweaked by users with full administrative access. Hence, Gardener ensures that these deployed resources always match the computed/desired configuration by utilizing an existing watch dog, the kube-addon-manager (cf. [F]).
Network air gap
While the control plane of a shoot cluster runs in a seed managed & supplied by your friendly platform-provider, the worker nodes are typically provisioned in a separate cloud provider (billing) account of the user. Typically, these worker nodes are placed into private networks [3] to which the API Server in the seed control plane establishes direct communication, using a simple VPN solution based on ssh (cf. [G]). We have recently migrated the SSH-based implementation to an OpenVPN-based implementation which significantly increased the network bandwidth.
Monitoring & Logging
Monitoring, alerting, and logging are crucial to supervise clusters and keep them healthy so as to avoid outages and other issues. Prometheus has become the most used monitoring system in the Kubernetes domain. Therefore, we deploy a central Prometheus instance into the garden namespace of every seed. It collects metrics from all the seed's kubelets including those for all pods running in the seed cluster. In addition, next to every control plane a dedicated tenant Prometheus instance is provisioned for the shoot itself (cf. [H]). It gathers metrics for its own control plane as well as for the pods running on the shoot's worker nodes. The former is done by fetching data from the central Prometheus' federation endpoint and filtering for relevant control plane pods of the particular shoot. Other than that, Gardener deploys two kube-state-metrics instances, one responsible for the control plane and one for the workload, exposing cluster-level metrics to enrich the data. The node exporter provides more detailed node statistics. A dedicated tenant Grafana dashboard displays the analytics and insights via lucid dashboards. We also defined alerting rules for critical events and employed the AlertManager to send emails to operators and support teams in case any alert is fired.
[1] This is also the reason for not supporting point-in-time recovery. There is no reliable infrastructure reconciliation implemented in Kubernetes so far. Thus, restoring from an old backup without refreshing the actual workload and state of the concerned cluster would generally not be of much help.
[2] The most relevant criteria for this decision was that Tiller requires a port-forward connection for communication which we experienced to be too unstable and error-prone for our automated use case. Nevertheless, we are looking forward to Helm v3 hopefully interacting with Tiller using CustomResourceDefinitions.
[3] Gardener offers to either create & prepare these networks with the Terraformer or it can be instructed to reuse pre-existing networks.
Usability and Interaction
Despite requiring only the familiar kubectl command line tool for managing all of Gardener, we provide a central dashboard for comfortable interaction. It enables users to easily keep track of their clusters' health, and operators to monitor, debug, and analyze the clusters they are responsible for. Shoots are grouped into logical projects in which teams managing a set of clusters can collaborate and even track issues via an integrated ticket system (e.g. GitHub Issues). Moreover, the dashboard helps users to add & manage their infrastructure account secrets and to view the most relevant data of all their shoot clusters in one place while being independent from the cloud provider they are deployed to.
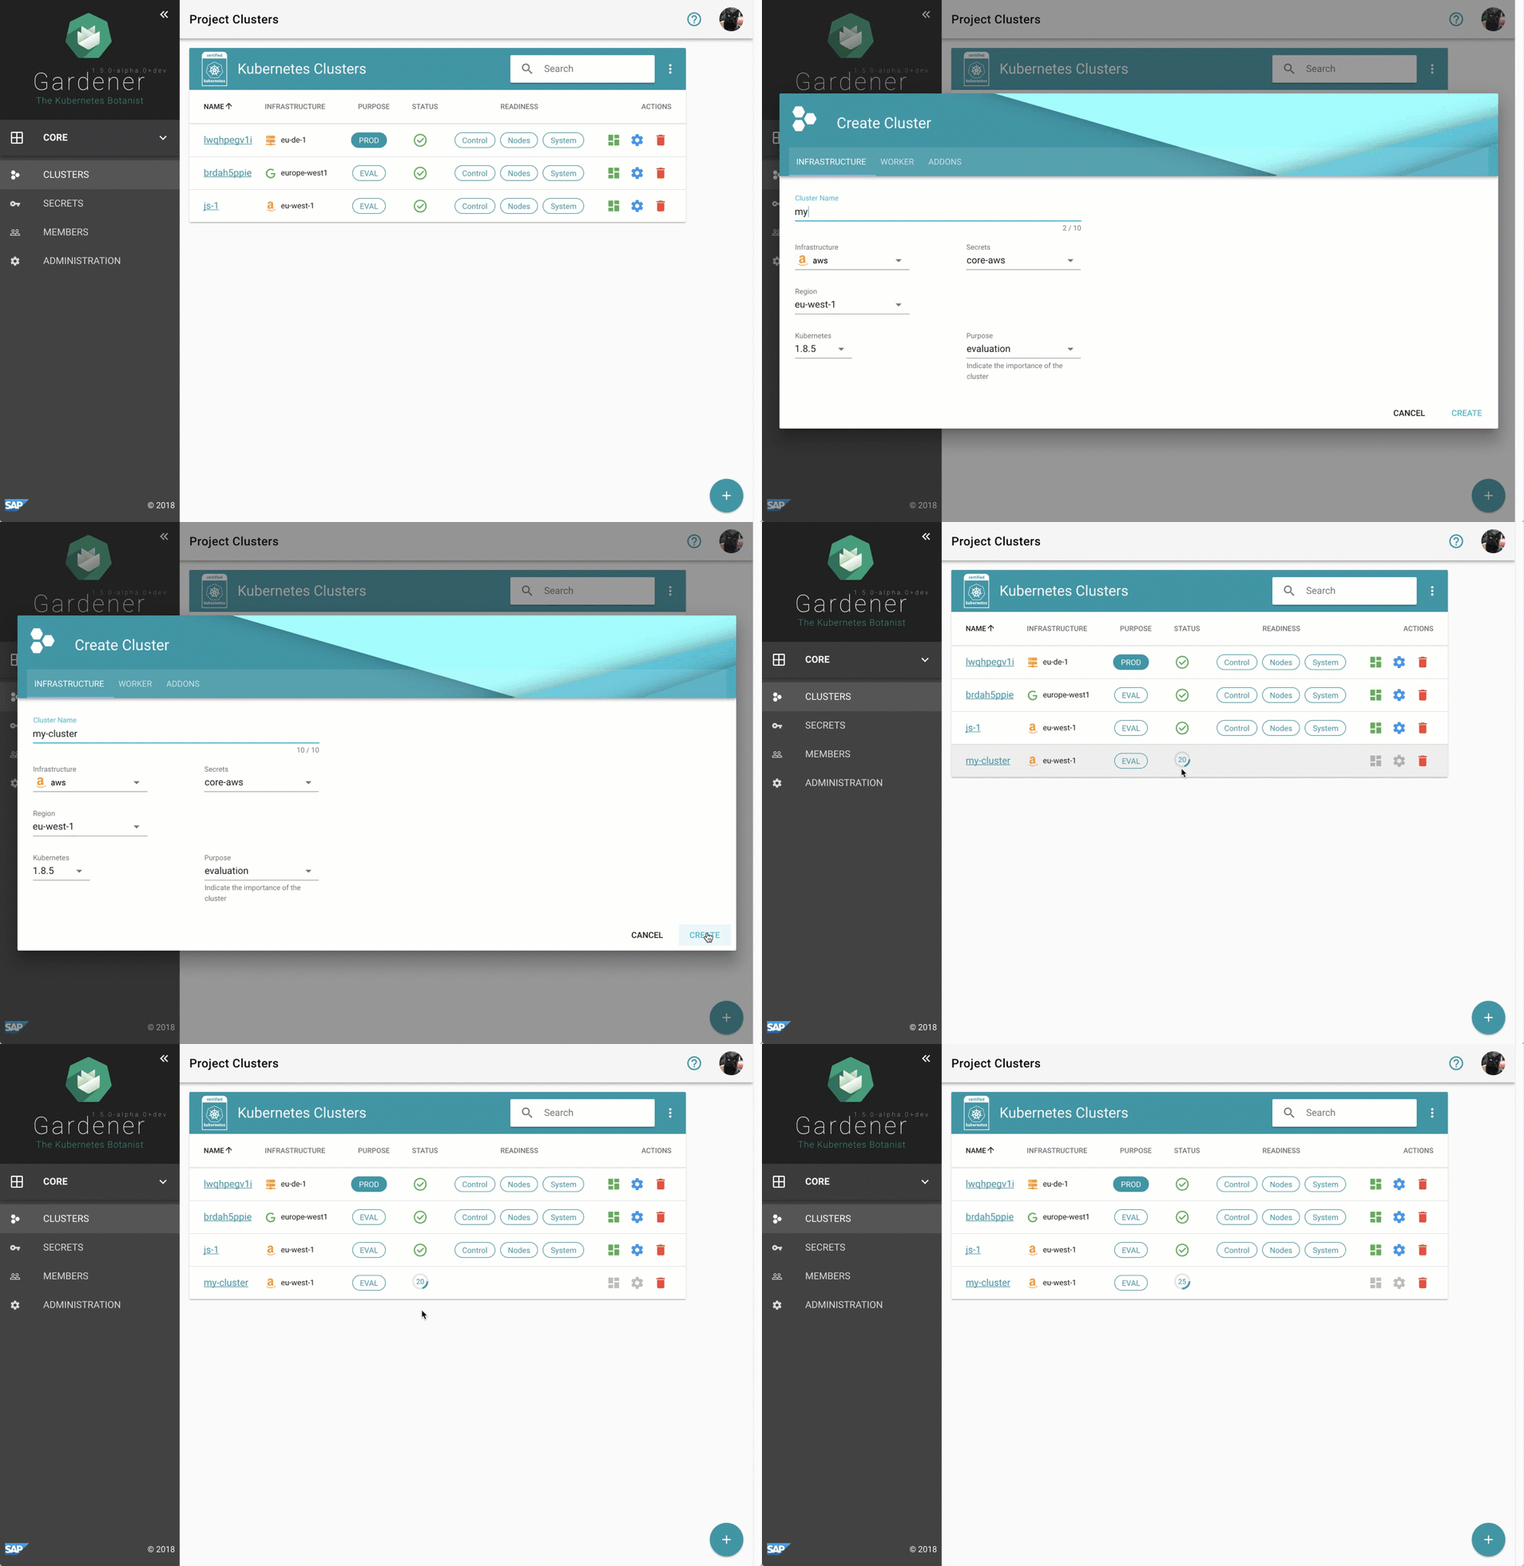
Figure 2 Animated Gardener dashboard.
More focused on the duties of developers and operators, the Gardener command line client gardenctl simplifies administrative tasks by introducing easy higher-level abstractions with simple commands that help condense and multiplex information & actions from/to large amounts of seed and shoot clusters.
$ gardenctl ls shoots
projects:
- project: team-a
shoots:
- dev-eu1
- prod-eu1
$ gardenctl target shoot prod-eu1
[prod-eu1]
$ gardenctl show prometheus
NAME READY STATUS RESTARTS AGE IP NODE
prometheus-0 3/3 Running 0 106d 10.241.241.42 ip-10-240-7-72.eu-central-1.compute.internal
URL: https://user:password@p.prod-eu1.team-a.seed.aws-eu1.example.com
Outlook and future plans
The Gardener is already capable of managing Kubernetes clusters on AWS, Azure, GCP, OpenStack [4]. Actually, due to the fact that it relies only on Kubernetes primitives, it nicely connects to private cloud or on-premise requirements. The only difference from Gardener's point of view would be the quality and scalability of the underlying infrastructure - the lingua franca of Kubernetes ensures strong portability guarantees for our approach.
Nevertheless, there are still challenges ahead. We are probing a possibility to include an option to create a federation control plane delegating to multiple shoot clusters in this Open Source project. In the previous sections we have not explained how to bootstrap the garden and the seed clusters themselves. You could indeed use any production ready cluster provisioning tool or the cloud providers' Kubernetes as a Service offering. We have built an uniform tool called Kubify based on Terraform and reused many of the mentioned Gardener components. We envision the required Kubernetes infrastructure to be able to be spawned in its entirety by an initial bootstrap Gardener and are already discussing how we could achieve that.
Another important topic we are focusing on is disaster recovery. When a seed cluster fails, the user's static workload will continue to operate. However, administrating the cluster won't be possible anymore. We are considering to move control planes of the shoots hit by a disaster to another seed. Conceptually, this approach is feasible and we already have the required components in place to implement that, e.g. automated etcd backup and restore. The contributors for this project not only have a mandate for developing Gardener for production, but most of us even run it in true DevOps mode as well. We completely trust the Kubernetes concepts and are committed to follow the "eat your own dog food" approach.
In order to enable a more independent evolution of the Botanists, which contain the infrastructure provider specific parts of the implementation, we plan to describe well-defined interfaces and factor out the Botanists into their own components. This is similar to what Kubernetes is currently doing with the cloud-controller-manager. Currently, all the cloud specifics are part of the core Gardener repository presenting a soft barrier to extending or supporting new cloud providers.
When taking a look at how the shoots are actually provisioned, we need to gain more experience on how really large clusters with thousands of nodes and pods (or more) behave. Potentially, we will have to deploy e.g. the API server and other components in a scaled-out fashion for large clusters to spread the load. Fortunately, horizontal pod autoscaling based on custom metrics from Prometheus will make this relatively easy with our setup. Additionally, the feedback from teams who run production workloads on our clusters, is that Gardener should support with prearranged Kubernetes QoS. Needless to say, our aspiration is going to be the integration and contribution to the vision of Kubernetes Autopilot.
[4] Prototypes already validated CTyun & Aliyun.
Gardener is open source
The Gardener project is developed as Open Source and hosted on GitHub: https://github.com/gardener
SAP is working on Gardener since mid 2017 and is focused on building up a project that can easily be evolved and extended. Consequently, we are now looking for further partners and contributors to the project. As outlined above, we completely rely on Kubernetes primitives, add-ons, and specifications and adapt its innovative Cloud Native approach. We are looking forward to aligning with and contributing to the Kubernetes community. In fact, we envision contributing the complete project to the CNCF.
At the moment, an important focus on collaboration with the community is the Cluster API working group within the SIG Cluster Lifecycle founded a few months ago. Its primary goal is the definition of a portable API representing a Kubernetes cluster. That includes the configuration of control planes and the underlying infrastructure. The overlap of what we have already in place with Shoot and Machine resources compared to what the community is working on is striking. Hence, we joined this working group and are actively participating in their regular meetings, trying to contribute back our learnings from production. Selfishly, it is also in our interest to shape a robust API.
If you see the potential of the Gardener project then please learn more about it on GitHub and help us make Gardener even better by asking questions, engaging in discussions, and by contributing code. Also, try out our quick start setup.
We are looking forward to seeing you there!
Docs are Migrating from Jekyll to Hugo
Changing the site framework
After nearly a year of investigating how to enable multilingual support for Kubernetes docs, we've decided to migrate the site's static generator from Jekyll to Hugo.
What does the Hugo migration mean for users and contributors?
Things will break
Hugo's Markdown parser is differently strict than Jekyll's. As a consequence, some Markdown formatting that rendered fine in Jekyll now produces some unexpected results: strange left nav ordering, vanishing tutorials, and broken links, among others.
If you encounter any site weirdness or broken formatting, please open an issue. You can see the list of issues that are specific to Hugo migration.
Multilingual support is coming
Our initial search focused on finding a language selector that would play well with Jekyll. The projects we found weren't well-supported, and a prototype of one plugin made it clear that a Jekyll implementation would create technical debt that drained resources away from the quality of the docs.
We chose Hugo after months of research and conversations with other open source translation projects. (Special thanks to Andreas Jaeger and his experience at OpenStack). Hugo's multilingual support is built in and easy.
Pain now, relief later
Another advantage of Hugo is that build performance scales well at size. At 250+ pages, the Kubernetes site's build times suffered significantly with Jekyll. We're excited about removing the barrier to contribution created by slow site build times.
Again, if you encounter any broken, missing, or unexpected content, please open an issue and let us know.
Announcing Kubeflow 0.1
Since Last We Met
Since the initial announcement of Kubeflow at the last KubeCon+CloudNativeCon, we have been both surprised and delighted by the excitement for building great ML stacks for Kubernetes. In just over five months, the Kubeflow project now has:
- 70+ contributors
- 20+ contributing organizations
- 15 repositories
- 3100+ GitHub stars
- 700+ commits
and already is among the top 2% of GitHub projects ever.
People are excited to chat about Kubeflow as well! The Kubeflow community has also held meetups, talks and public sessions all around the world with thousands of attendees. With all this help, we’ve started to make substantial in every step of ML, from building your first model all the way to building a production-ready, high-scale deployments. At the end of the day, our mission remains the same: we want to let data scientists and software engineers focus on the things they do well by giving them an easy-to-use, portable and scalable ML stack.
Introducing Kubeflow 0.1
Today, we’re proud to announce the availability of Kubeflow 0.1, which provides a minimal set of packages to begin developing, training and deploying ML. In just a few commands, you can get:
- Jupyter Hub - for collaborative & interactive training
- A TensorFlow Training Controller with native distributed training
- A TensorFlow Serving for hosting
- Argo for workflows
- SeldonCore for complex inference and non TF models
- Ambassador for Reverse Proxy
- Wiring to make it work on any Kubernetes anywhere
To get started, it’s just as easy as it always has been:
# Create a namespace for kubeflow deployment
NAMESPACE=kubeflow
kubectl create namespace ${NAMESPACE}
VERSION=v0.1.3
# Initialize a ksonnet app. Set the namespace for its default environment.
APP_NAME=my-kubeflow
ks init ${APP_NAME}
cd ${APP_NAME}
ks env set default --namespace ${NAMESPACE}
# Install Kubeflow components
ks registry add kubeflow github.com/kubeflow/kubeflow/tree/${VERSION}/kubeflow
ks pkg install kubeflow/core@${VERSION}
ks pkg install kubeflow/tf-serving@${VERSION}
ks pkg install kubeflow/tf-job@${VERSION}
# Create templates for core components
ks generate kubeflow-core kubeflow-core
# Deploy Kubeflow
ks apply default -c kubeflow-core
And thats it! JupyterHub is deployed so we can now use Jupyter to begin developing models. Once we have python code to build our model we can build a docker image and train our model using our TFJob operator by running commands like the following:
ks generate tf-job my-tf-job --name=my-tf-job --image=gcr.io/my/image:latest
ks apply default -c my-tf-job
We could then deploy the model by doing
ks generate tf-serving ${MODEL_COMPONENT} --name=${MODEL_NAME}
ks param set ${MODEL_COMPONENT} modelPath ${MODEL_PATH}
ks apply ${ENV} -c ${MODEL_COMPONENT}
Within just a few commands, data scientists and software engineers can now create even complicated ML solutions and focus on what they do best: answering business critical questions.
Community Contributions
It’d be impossible to have gotten where we are without enormous help from everyone in the community. Some specific contributions that we want to highlight include:
- Argo for managing ML workflows
- Caffe2 Operator for running Caffe2 jobs
- Horovod & OpenMPI for improved distributed training performance of TensorFlow
- Identity Aware Proxy, which enables using security your services with identities, rather than VPNs and Firewalls
- Katib for hyperparameter tuning
- Kubernetes volume controller which provides basic volume and data management using volumes and volume sources in a Kubernetes cluster.
- Kubebench for benchmarking of HW and ML stacks
- Pachyderm for managing complex data pipelines
- PyTorch operator for running PyTorch jobs
- Seldon Core for running complex model deployments and non-TensorFlow serving
It’s difficult to overstate how much the community has helped bring all these projects (and more) to fruition. Just a few of the contributing companies include: Alibaba Cloud, Ant Financial, Caicloud, Canonical, Cisco, Datawire, Dell, GitHub, Google, Heptio, Huawei, Intel, Microsoft, Momenta, One Convergence, Pachyderm, Project Jupyter, Red Hat, Seldon, Uber and Weaveworks.
Learning More
If you’d like to try out Kubeflow, we have a number of options for you:
- You can use sample walkthroughs hosted on Katacoda
- You can follow a guided tutorial with existing models from the examples repository. These include the GitHub Issue Summarization, MNIST and Reinforcement Learning with Agents.
- You can start a cluster on your own and try your own model. Any Kubernetes conformant cluster will support Kubeflow including those from contributors Caicloud, Canonical, Google, Heptio, Mesosphere, Microsoft, IBM, Red Hat/Openshift and Weaveworks.
There were also a number of sessions at KubeCon + CloudNativeCon EU 2018 covering Kubeflow. The links to the talks are here; the associated videos will be posted in the coming days.
Wednesday, May 2:
Thursday, May 3:
- Kubeflow Deep Dive - Jeremy Lewi, Google
- Write Once, Train & Predict Everywhere: Portable ML Stacks with Kubeflow - Jeremy Lewi, Google & Stephan Fabel, Canonical
- Compliant Data Management and Machine Learning on Kubernetes - Daniel Whitenack, Pachyderm
- Bringing Your Data Pipeline into The Machine Learning Era - Chris Gaun & Jörg Schad, Mesosphere
Friday, May 4:
What’s Next?
Our next major release will be 0.2 coming this summer. In it, we expect to land the following new features:
- Simplified setup via a bootstrap container
- Improved accelerator integration
- Support for more ML frameworks, e.g., Spark ML, XGBoost, sklearn
- Autoscaled TF Serving
- Programmatic data transforms, e.g., tf.transform
But the most important feature is the one we haven’t heard yet. Please tell us! Some options for making your voice heard include:
- The Kubeflow Slack channel
- The Kubeflow-discuss email list
- The Kubeflow twitter account
- Our weekly community meeting
- Please download and run kubeflow, and submit bugs!
Current State of Policy in Kubernetes
Kubernetes has grown dramatically in its impact to the industry; and with rapid growth, we are beginning to see variations across components in how they define and apply policies.
Currently, policy related components could be found in identity services, networking services, storage services, multi-cluster federation, RBAC and many other areas, with different degree of maturity and also different motivations for specific problems. Within each component, some policies are extensible while others are not. The languages used by each project to express intent vary based on the original authors and experience. Driving consistent views of policies across the entire domain is a daunting task.
Adoption of Kubernetes in regulated industries will also drive the need to ensure that a deployed cluster confirms with various legal requirements, such as PCI, HIPPA, or GDPR. Each of these compliance standards enforces a certain level of privacy around user information, data, and isolation.
The core issues with the current Kubernetes policy implementations are identified as follows:
- Lack of big picture across the platform
- Lack of coordination and common language among different policy components
- Lack of consistency for extensible policy creation across the platform.
- There are areas where policy components are extensible, and there are also areas where strict end-to-end solutions are enforced. No consensus is established on the preference to a extensible and pluggable architecture.
- Lack of consistent auditability across the Kubernetes architecture of policies which are created, modified, or disabled as well as the actions performed on behalf of the policies which are applied.
Forming Kubernetes Policy WG
We have established a new WG to directly address these issues. We intend to provide an overall architecture that describes both the current policy related implementations as well as future policy related proposals in Kubernetes. Through a collaborative method, we want to present both dev and end user a universal view of policy in Kubernetes.
We are not seeking to redefine and replace existing implementations which have been reached by thorough discussion and consensus. Rather to establish a summarized review of current implementation and addressing gaps to address broad end to end scenarios as defined in our initial design proposal.
Kubernetes Policy WG has been focusing on the design proposal document and using the weekly meeting for discussions among WG members. The design proposal outlines the background and motivation of why we establish the WG, the concrete use cases from which the gaps/requirement analysis is deduced, the overall architecture and the container policy interface proposal.
Key Policy Scenarios in Kubernetes
Among several use cases the workgroup has brainstormed, eventually three major scenario stands out.
The first one is about legislation/regulation compliance which requires the Kubernetes clusters conform to. The compliance scenario takes GDPR as an legislation example and the suggested policy architecture out of the discussion is to have a datapolicy controller responsible for the auditing.
The second scenario is about capacity leasing, or multi-tenant quota in traditional IaaS concept, which deals with when a large enterprise want to delegate the resource control to various Lines Of Business it has, how the Kubernetes cluster should be configured to have a policy driven mechanism to enforce the quota system. The ongoing multi-tenant controller design proposed in the multi-tenancy working group could be an ideal enforcement point for the quota policy controller, which in turn might take a look at kube-arbitrator for inspiration.
The last scenario is about cluster policy which refers to the general security and resource oriented policy control. Luster policy will involve both cluster level and namespace level policy control as well as enforcement, and there is a proposal called Kubernetes Security Profile that is under development by the Policy WG member to provide a PoC for this use case.
Kubernetes Policy Architecture
Building upon the three scenarios, the WG is now working on three concrete proposals together with sig-arch, sig-auth and other related projects. Besides the Kubernetes security profile proposal aiming at the cluster policy use case, we also have the scheduling policy proposal which partially targets the capacity leasing use case and the topology service policy proposal which deals with affinity based upon service requirement and enforcement on routing level.
When these concrete proposals got clearer the WG will be able to provide a high level Kubernetes policy architecture as part of the motivation of the establishment of the Policy WG.
Towards Cloud Native Policy Driven Architecture
Policy is definitely something goes beyond Kubernetes and applied to a broader cloud native context. Our work in the Kubernetes Policy WG will provide the foundation of building a CNCF wide policy architecture, with the integration of Kubernetes and various other cloud native components such as open policy agent, Istio, Envoy, SPIFEE/SPIRE and so forth. The Policy WG has already collaboration with the CNCF SAFE WG (in-forming) team, and will work on more alignments to make sure a community driven cloud native policy architecture design.
Developing on Kubernetes
How do you develop a Kubernetes app? That is, how do you write and test an app that is supposed to run on Kubernetes? This article focuses on the challenges, tools and methods you might want to be aware of to successfully write Kubernetes apps alone or in a team setting.
We’re assuming you are a developer, you have a favorite programming language, editor/IDE, and a testing framework available. The overarching goal is to introduce minimal changes to your current workflow when developing the app for Kubernetes. For example, if you’re a Node.js developer and are used to a hot-reload setup—that is, on save in your editor the running app gets automagically updated—then dealing with containers and container images, with container registries, Kubernetes deployments, triggers, and more can not only be overwhelming but really take all the fun out if it.
In the following, we’ll first discuss the overall development setup, then review tools of the trade, and last but not least do a hands-on walkthrough of three exemplary tools that allow for iterative, local app development against Kubernetes.
Where to run your cluster?
As a developer you want to think about where the Kubernetes cluster you’re developing against runs as well as where the development environment sits. Conceptually there are four development modes:
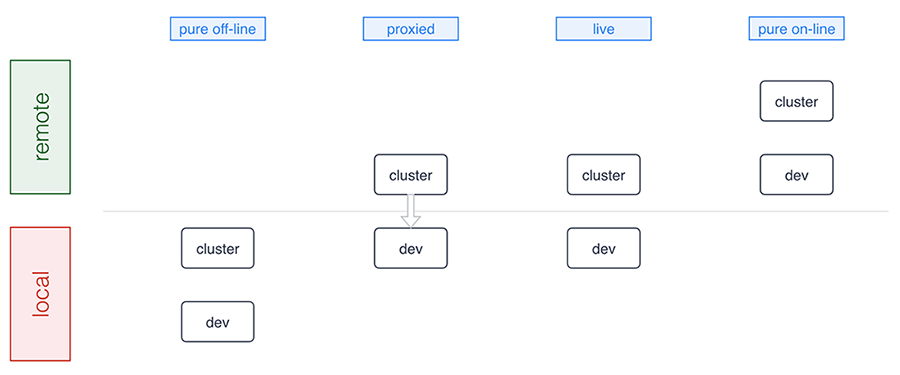
A number of tools support pure offline development including Minikube, Docker for Mac/Windows, Minishift, and the ones we discuss in detail below. Sometimes, for example, in a microservices setup where certain microservices already run in the cluster, a proxied setup (forwarding traffic into and from the cluster) is preferable and Telepresence is an example tool in this category. The live mode essentially means you’re building and/or deploying against a remote cluster and, finally, the pure online mode means both your development environment and the cluster are remote, as this is the case with, for example, Eclipse Che or Cloud 9. Let’s now have a closer look at the basics of offline development: running Kubernetes locally.
Minikube is a popular choice for those who prefer to run Kubernetes in a local VM. More recently Docker for Mac and Windows started shipping Kubernetes as an experimental package (in the “edge” channel). Some reasons why you may want to prefer using Minikube over the Docker desktop option are:
- You already have Minikube installed and running
- You prefer to wait until Docker ships a stable package
- You’re a Linux desktop user
- You are a Windows user who doesn’t have Windows 10 Pro with Hyper-V
Running a local cluster allows folks to work offline and that you don’t have to pay for using cloud resources. Cloud provider costs are often rather affordable and free tiers exists, however some folks prefer to avoid having to approve those costs with their manager as well as potentially incur unexpected costs, for example, when leaving cluster running over the weekend.
Some developers prefer to use a remote Kubernetes cluster, and this is usually to allow for larger compute and storage capacity and also enable collaborative workflows more easily. This means it’s easier for you to pull in a colleague to help with debugging or share access to an app in the team. Additionally, for some developers it can be critical to mirror production environment as closely as possible, especially when it comes down to external cloud services, say, proprietary databases, object stores, message queues, external load balancer, or mail delivery systems.
In summary, there are good reasons for you to develop against a local cluster as well as a remote one. It very much depends on in which phase you are: from early prototyping and/or developing alone to integrating a set of more stable microservices.
Now that you have a basic idea of the options around the runtime environment, let’s move on to how to iteratively develop and deploy your app.
The tools of the trade
We are now going to review tooling allowing you to develop apps on Kubernetes with the focus on having minimal impact on your existing workflow. We strive to provide an unbiased description including implications of using each of the tools in general terms.
Note that this is a tricky area since even for established technologies such as, for example, JSON vs YAML vs XML or REST vs gRPC vs SOAP a lot depends on your background, your preferences and organizational settings. It’s even harder to compare tooling in the Kubernetes ecosystem as things evolve very rapidly and new tools are announced almost on a weekly basis; during the preparation of this post alone, for example, Gitkube and Watchpod came out. To cover these new tools as well as related, existing tooling such as Weave Flux and OpenShift’s S2I we are planning a follow-up blog post to the one you’re reading.
Draft
Draft aims to help you get started deploying any app to Kubernetes. It is capable of applying heuristics as to what programming language your app is written in and generates a Dockerfile along with a Helm chart. It then runs the build for you and deploys resulting image to the target cluster via the Helm chart. It also allows user to setup port forwarding to localhost very easily.
Implications:
- User can customise the chart and Dockerfile templates however they like, or even create a custom pack (with Dockerfile, the chart and more) for future use
- It’s not very simple to guess how just any app is supposed to be built, in some cases user may need to tweak Dockerfile and the Helm chart that Draft generates
- With Draft version 0.12.0 or older, every time user wants to test a change, they need to wait for Draft to copy the code to the cluster, then run the build, push the image and release updated chart; this can timely, but it results in an image being for every single change made by the user (whether it was committed to git or not)
- As of Draft version 0.12.0, builds are executed locally
- User doesn’t have an option to choose something other than Helm for deployment
- It can watch local changes and trigger deployments, but this feature is not enabled by default
- It allows developer to use either local or remote Kubernetes cluster
- Deploying to production is up to the user, Draft authors recommend their other project – Brigade
- Can be used instead of Skaffold, and along the side of Squash
More info:
Skaffold
Skaffold is a tool that aims to provide portability for CI integrations with different build system, image registry and deployment tools. It is different from Draft, yet somewhat comparable. It has a basic capability for generating manifests, but it’s not a prominent feature. Skaffold is extendible and lets user pick tools for use in each of the steps in building and deploying their app.
Implications:
- Modular by design
- Works independently of CI vendor, user doesn’t need Docker or Kubernetes plugin
- Works without CI as such, i.e. from the developer’s laptop
- It can watch local changes and trigger deployments
- It allows developer to use either local or remote Kubernetes cluster
- It can be used to deploy to production, user can configure how exactly they prefer to do it and provide different kind of pipeline for each target environment
- Can be used instead of Draft, and along the side with most other tools
More info:
Squash
Squash consists of a debug server that is fully integrated with Kubernetes, and a IDE plugin. It allows you to insert breakpoints and do all the fun stuff you are used to doing when debugging an application using an IDE. It bridges IDE debugging experience with your Kubernetes cluster by allowing you to attach the debugger to a pod running in your Kubernetes cluster.
Implications:
- Can be used independently of other tools you chose
- Requires a privileged DaemonSet
- Integrates with popular IDEs
- Supports Go, Python, Node.js, Java and gdb
- User must ensure application binaries inside the container image are compiled with debug symbols
- Can be used in combination with any other tools described here
- It can be used with either local or remote Kubernetes cluster
More info:
Telepresence
Telepresence connects containers running on developer’s workstation with a remote Kubernetes cluster using a two-way proxy and emulates in-cluster environment as well as provides access to config maps and secrets. It aims to improve iteration time for container app development by eliminating the need for deploying app to the cluster and leverages local container to abstract network and filesystem interface in order to make it appear as if the app was running in the cluster.
Implications:
- It can be used independently of other tools you chose
- Using together with Squash is possible, although Squash would have to be used for pods in the cluster, while conventional/local debugger would need to be used for debugging local container that’s connected to the cluster via Telepresence
- Telepresence imposes some network latency
- It provides connectivity via a side-car process - sshuttle, which is based on SSH
- More intrusive dependency injection mode with LD_PRELOAD/DYLD_INSERT_LIBRARIES is also available
- It is most commonly used with a remote Kubernetes cluster, but can be used with a local one also
More info:
- Telepresence: fast, realistic local development for Kubernetes microservices
- Getting Started Guide
- How It Works
Ksync
Ksync synchronizes application code (and configuration) between your local machine and the container running in Kubernetes, akin to what oc rsync does in OpenShift. It aims to improve iteration time for app development by eliminating build and deployment steps.
Implications:
- It bypasses container image build and revision control
- Compiled language users have to run builds inside the pod (TBC)
- Two-way sync – remote files are copied to local directory
- Container is restarted each time remote filesystem is updated
- No security features – development only
- Utilizes Syncthing, a Go library for peer-to-peer sync
- Requires a privileged DaemonSet running in the cluster
- Node has to use Docker with overlayfs2 – no other CRI implementations are supported at the time of writing
More info:
- Getting Started Guide
- How It Works
- Katacoda scenario to try out ksync in your browser
- Syncthing Specification
Hands-on walkthroughs
The app we will be using for the hands-on walkthroughs of the tools in the following is a simple stock market simulator, consisting of two microservices:
- The
stock-genmicroservice is written in Go and generates stock data randomly and exposes it via HTTP endpoint/stockdata. * A second microservice,stock-conis a Node.js app that consumes the stream of stock data fromstock-genand provides an aggregation in form of a moving average via the HTTP endpoint/average/$SYMBOLas well as a health-check endpoint at/healthz.
Overall, the default setup of the app looks as follows:
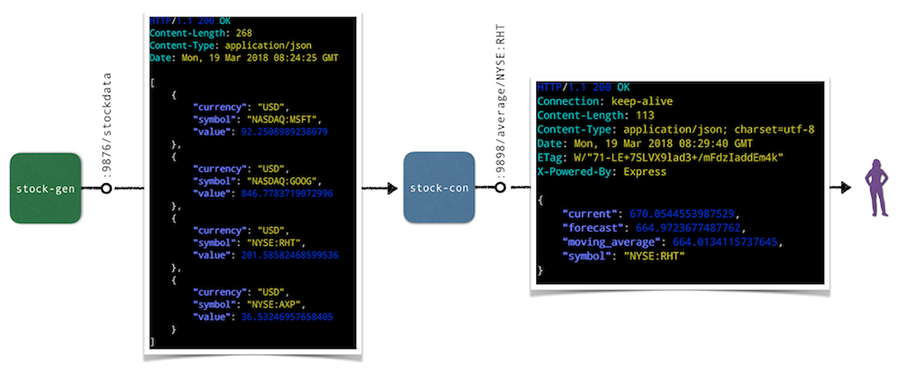
In the following we’ll do a hands-on walkthrough for a representative selection of tools discussed above: ksync, Minikube with local build, as well as Skaffold. For each of the tools we do the following:
- Set up the respective tool incl. preparations for the deployment and local consumption of the
stock-conmicroservice. - Perform a code update, that is, change the source code of the
/healthzendpoint in thestock-conmicroservice and observe the updates.
Note that for the target Kubernetes cluster we’ve been using Minikube locally, but you can also a remote cluster for ksync and Skaffold if you want to follow along.
Walkthrough: ksync
As a preparation, install ksync and then carry out the following steps to prepare the development setup:
$ mkdir -p $(pwd)/ksync
$ kubectl create namespace dok
$ ksync init -n dok
With the basic setup completed we're ready to tell ksync’s local client to watch a certain Kubernetes namespace and then we create a spec to define what we want to sync (the directory $(pwd)/ksync locally with /app in the container). Note that target pod is specified via the selector parameter:
$ ksync watch -n dok
$ ksync create -n dok --selector=app=stock-con $(pwd)/ksync /app
$ ksync get -n dok
Now we deploy the stock generator and the stock consumer microservice:
$ kubectl -n=dok apply \
-f https://raw.githubusercontent.com/kubernauts/dok-example-us/master/stock-gen/app.yaml
$ kubectl -n=dok apply \
-f https://raw.githubusercontent.com/kubernauts/dok-example-us/master/stock-con/app.yaml
Once both deployments are created and the pods are running, we forward the stock-con service for local consumption (in a separate terminal session):
$ kubectl get -n dok po --selector=app=stock-con \
-o=custom-columns=:metadata.name --no-headers | \
xargs -IPOD kubectl -n dok port-forward POD 9898:9898
With that we should be able to consume the stock-con service from our local machine; we do this by regularly checking the response of the healthz endpoint like so (in a separate terminal session):
$ watch curl localhost:9898/healthz
Now change the code in the ksync/stock-condirectory, for example update the /healthz endpoint code in service.js by adding a field to the JSON response and observe how the pod gets updated and the response of the curl localhost:9898/healthz command changes. Overall you should have something like the following in the end:
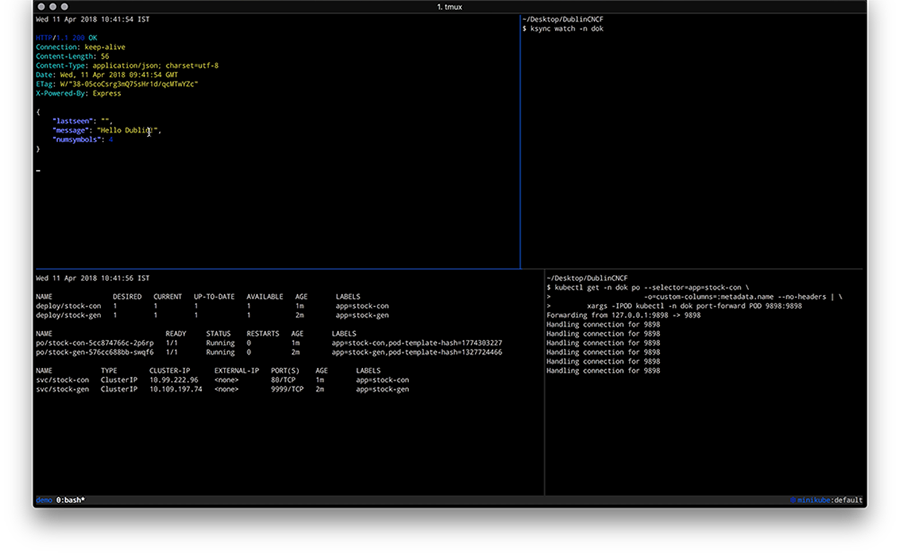
Walkthrough: Minikube with local build
For the following you will need to have Minikube up and running and we will leverage the Minikube-internal Docker daemon for building images, locally. As a preparation, do the following
$ git clone https://github.com/kubernauts/dok-example-us.git && cd dok-example-us
$ eval $(minikube docker-env)
$ kubectl create namespace dok
Now we deploy the stock generator and the stock consumer microservice:
$ kubectl -n=dok apply -f stock-gen/app.yaml
$ kubectl -n=dok apply -f stock-con/app.yaml
Once both deployments are created and the pods are running, we forward the stock-con service for local consumption (in a separate terminal session) and check the response of the healthz endpoint:
$ kubectl get -n dok po --selector=app=stock-con \
-o=custom-columns=:metadata.name --no-headers | \
xargs -IPOD kubectl -n dok port-forward POD 9898:9898 &
$ watch curl localhost:9898/healthz
Now change the code in the stock-condirectory, for example, update the /healthz endpoint code in service.js by adding a field to the JSON response. Once you’re done with your code update, the last step is to build a new container image and kick off a new deployment like shown below:
$ docker build -t stock-con:dev -f Dockerfile .
$ kubectl -n dok set image deployment/stock-con *=stock-con:dev
Overall you should have something like the following in the end:
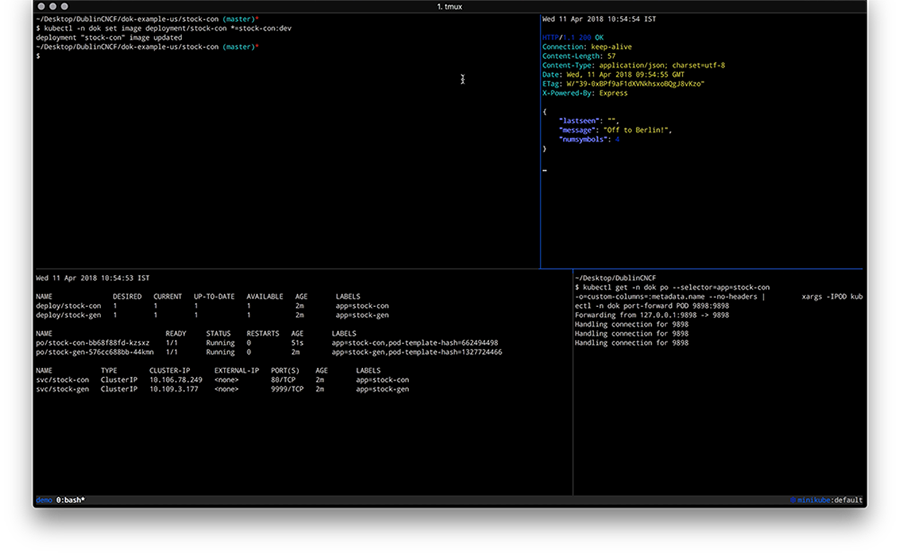
Walkthrough: Skaffold
To perform this walkthrough you first need to install Skaffold. Once that is done, you can do the following steps to prepare the development setup:
$ git clone https://github.com/kubernauts/dok-example-us.git && cd dok-example-us
$ kubectl create namespace dok
Now we deploy the stock generator (but not the stock consumer microservice, that is done via Skaffold):
$ kubectl -n=dok apply -f stock-gen/app.yaml
Note that initially we experienced an authentication error when doing skaffold dev and needed to apply a fix as described in Issue 322. Essentially it means changing the content of ~/.docker/config.json to:
{
"auths": {}
}
Next, we had to patch stock-con/app.yaml slightly to make it work with Skaffold:
Add a namespace field to both the stock-con deployment and the service with the value of dok.
Change the image field of the container spec to quay.io/mhausenblas/stock-con since Skaffold manages the container image tag on the fly.
The resulting app.yaml file stock-con looks as follows:
apiVersion: apps/v1beta1
kind: Deployment
metadata:
labels:
app: stock-con
name: stock-con
namespace: dok
spec:
replicas: 1
template:
metadata:
labels:
app: stock-con
spec:
containers:
- name: stock-con
image: quay.io/mhausenblas/stock-con
env:
- name: DOK_STOCKGEN_HOSTNAME
value: stock-gen
- name: DOK_STOCKGEN_PORT
value: "9999"
ports:
- containerPort: 9898
protocol: TCP
livenessProbe:
initialDelaySeconds: 2
periodSeconds: 5
httpGet:
path: /healthz
port: 9898
readinessProbe:
initialDelaySeconds: 2
periodSeconds: 5
httpGet:
path: /healthz
port: 9898
---
apiVersion: v1
kind: Service
metadata:
labels:
app: stock-con
name: stock-con
namespace: dok
spec:
type: ClusterIP
ports:
- name: http
port: 80
protocol: TCP
targetPort: 9898
selector:
app: stock-con
The final step before we can start development is to configure Skaffold. So, create a file skaffold.yaml in the stock-con/ directory with the following content:
apiVersion: skaffold/v1alpha2
kind: Config
build:
artifacts:
- imageName: quay.io/mhausenblas/stock-con
workspace: .
docker: {}
local: {}
deploy:
kubectl:
manifests:
- app.yaml
Now we’re ready to kick off the development. For that execute the following in the stock-con/ directory:
$ skaffold dev
Above command triggers a build of the stock-con image and then a deployment. Once the pod of the stock-con deployment is running, we again forward the stock-con service for local consumption (in a separate terminal session) and check the response of the healthz endpoint:
$ kubectl get -n dok po --selector=app=stock-con \
-o=custom-columns=:metadata.name --no-headers | \
xargs -IPOD kubectl -n dok port-forward POD 9898:9898 &
$ watch curl localhost:9898/healthz
If you now change the code in the stock-condirectory, for example, by updating the /healthz endpoint code in service.js by adding a field to the JSON response, you should see Skaffold noticing the change and create a new image as well as deploy it. The resulting screen would look something like this:
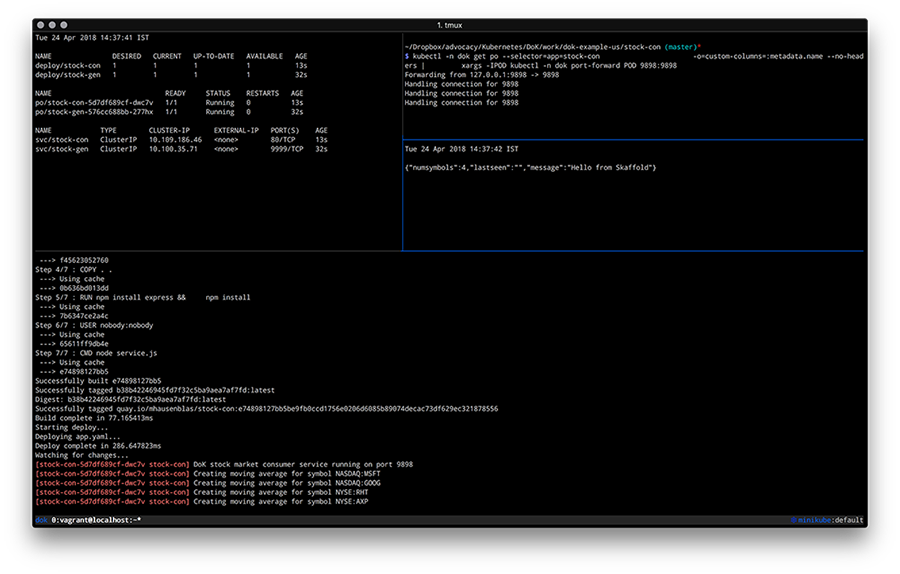
By now you should have a feeling how different tools enable you to develop apps on Kubernetes and if you’re interested to learn more about tools and or methods, check out the following resources:
- Blog post by Shahidh K Muhammed on Draft vs Gitkube vs Helm vs Ksonnet vs Metaparticle vs Skaffold (03/2018)
- Blog post by Gergely Nemeth on Using Kubernetes for Local Development, with a focus on Skaffold (03/2018)
- Blog post by Richard Li on Locally developing Kubernetes services (without waiting for a deploy), with a focus on Telepresence
- Blog post by Abhishek Tiwari on Local Development Environment for Kubernetes using Minikube (09/2017)
- Blog post by Aymen El Amri on Using Kubernetes for Local Development — Minikube (08/2017)
- Blog post by Alexis Richardson on GitOps - Operations by Pull Request (08/2017)
- Slide deck GitOps: Drive operations through git, with a focus on Gitkube by Tirumarai Selvan (03/2018)
- Slide deck Developing apps on Kubernetes, a talk Michael Hausenblas gave at a CNCF Paris meetup (04/2018)
- YouTube videos:
- Raw responses to the Kubernetes Application Survey 2018 by SIG Apps
With that we wrap up this post on how to go about developing apps on Kubernetes, we hope you learned something and if you have feedback and/or want to point out a tool that you found useful, please let us know via Twitter: Ilya and Michael.
Zero-downtime Deployment in Kubernetes with Jenkins
Ever since we added the Kubernetes Continuous Deploy and Azure Container Service plugins to the Jenkins update center, "How do I create zero-downtime deployments" is one of our most frequently-asked questions. We created a quickstart template on Azure to demonstrate what zero-downtime deployments can look like. Although our example uses Azure, the concept easily applies to all Kubernetes installations.
Rolling Update
Kubernetes supports the RollingUpdate strategy to replace old pods with new ones gradually, while continuing to serve clients without incurring downtime. To perform a RollingUpdate deployment:
- Set
.spec.strategy.typetoRollingUpdate(the default value). - Set
.spec.strategy.rollingUpdate.maxUnavailableand.spec.strategy.rollingUpdate.maxSurgeto some reasonable value.maxUnavailable: the maximum number of pods that can be unavailable during the update process. This can be an absolute number or percentage of the replicas count; the default is 25%.maxSurge: the maximum number of pods that can be created over the desired number of pods. Again this can be an absolute number or a percentage of the replicas count; the default is 25%.
- Configure the
readinessProbefor your service container to help Kubernetes determine the state of the pods. Kubernetes will only route the client traffic to the pods with a healthy liveness probe.
We'll use deployment of the official Tomcat image to demonstrate this:
apiVersion: extensions/v1beta1
kind: Deployment
metadata:
name: tomcat-deployment-rolling-update
spec:
replicas: 2
template:
metadata:
labels:
app: tomcat
role: rolling-update
spec:
containers:
- name: tomcat-container
image: tomcat:${TOMCAT_VERSION}
ports:
- containerPort: 8080
readinessProbe:
httpGet:
path: /
port: 8080
strategy:
type: RollingUpdate
rollingUp maxSurge: 50%
If the Tomcat running in the current deployments is version 7, we can replace ${TOMCAT_VERSION} with 8 and apply this to the Kubernetes cluster. With the Kubernetes Continuous Deploy or the Azure Container Service plugin, the value can be fetched from an environment variable which eases the deployment process.
Behind the scenes, Kubernetes manages the update like so:
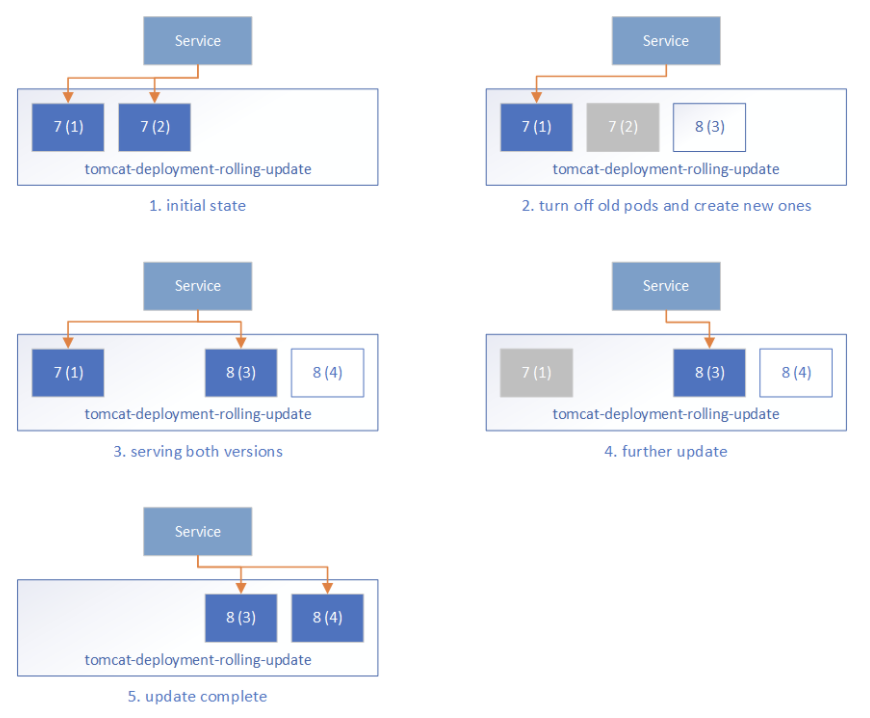
- Initially, all pods are running Tomcat 7 and the frontend Service routes the traffic to these pods.
- During the rolling update, Kubernetes takes down some Tomcat 7 pods and creates corresponding new Tomcat 8 pods. It ensures:
- at most
maxUnavailablepods in the desired Pods can be unavailable, that is, at least (replicas-maxUnavailable) pods should be serving the client traffic, which is 2-1=1 in our case. - at most maxSurge more pods can be created during the update process, that is 2*50%=1 in our case.
- at most
- One Tomcat 7 pod is taken down, and one Tomcat 8 pod is created. Kubernetes will not route the traffic to any of them because their readiness probe is not yet successful.
- When the new Tomcat 8 pod is ready as determined by the readiness probe, Kubernetes will start routing the traffic to it. This means during the update process, users may see both the old service and the new service.
- The rolling update continues by taking down Tomcat 7 pods and creating Tomcat 8 pods, and then routing the traffic to the ready pods.
- Finally, all pods are on Tomcat 8.
The Rolling Update strategy ensures we always have some Ready backend pods serving client requests, so there's no service downtime. However, some extra care is required:
- During the update, both the old pods and new pods may serve the requests. Without well defined session affinity in the Service layer, a user may be routed to the new pods and later back to the old pods.
- This also requires you to maintain well-defined forward and backward compatibility for both data and the API, which can be challenging.
- It may take a long time before a pod is ready for traffic after it is started. There may be a long window of time where the traffic is served with less backend pods than usual. Generally, this should not be a problem as we tend to do production upgrades when the service is less busy. But this will also extend the time window for issue 1.
- We cannot do comprehensive tests for the new pods being created. Moving application changes from dev / QA environments to production can represent a persistent risk of breaking existing functionality. The readiness probe can do some work to check readiness, however, it should be a lightweight task that can be run periodically, and not suitable to be used as an entry point to start the complete tests.
Blue/green Deployment
Blue/green deployment quoted from TechTarget
A blue/green deployment is a change management strategy for releasing software code. Blue/green deployments, which may also be referred to as A/B deployments require two identical hardware environments that are configured exactly the same way. While one environment is active and serving end users, the other environment remains idle.
Container technology offers a stand-alone environment to run the desired service, which makes it super easy to create identical environments as required in the blue/green deployment. The loosely coupled Services - ReplicaSets, and the label/selector-based service routing in Kubernetes make it easy to switch between different backend environments. With these techniques, the blue/green deployments in Kubernetes can be done as follows:
- Before the deployment, the infrastructure is prepared like so:
- Prepare the blue deployment and green deployment with
TOMCAT_VERSION=7andTARGET_ROLEset to blue or green respectively.
- Prepare the blue deployment and green deployment with
apiVersion: extensions/v1beta1
kind: Deployment
metadata:
name: tomcat-deployment-${TARGET_ROLE}
spec:
replicas: 2
template:
metadata:
labels:
app: tomcat
role: ${TARGET_ROLE}
spec:
containers:
- name: tomcat-container
image: tomcat:${TOMCAT_VERSION}
ports:
- containerPort: 8080
readinessProbe:
httpGet:
path: /
port: 8080
- Prepare the public service endpoint, which initially routes to one of the backend environments, say
TARGET_ROLE=blue.
kind: Service
apiVersion: v1
metadata:
name: tomcat-service
labels:
app: tomcat
role: ${TARGET_ROLE}
env: prod
spec:
type: LoadBalancer
selector:
app: tomcat
role: ${TARGET_ROLE}
ports:
- port: 80
targetPort: 8080
- Optionally, prepare a test endpoint so that we can visit the backend environments for testing. They are similar to the public service endpoint, but they are intended to be accessed internally by the dev/ops team only.
kind: Service
apiVersion: v1
metadata:
name: tomcat-test-${TARGET_ROLE}
labels:
app: tomcat
role: test-${TARGET_ROLE}
spec:
type: LoadBalancer
selector:
app: tomcat
role: ${TARGET_ROLE}
ports:
- port: 80
targetPort: 8080
- Update the application in the inactive environment, say green environment. Set
TARGET_ROLE=greenandTOMCAT_VERSION=8in the deployment config to update the green environment. - Test the deployment via the
tomcat-test-greentest endpoint to ensure the green environment is ready to serve client traffic. - Switch the frontend Service routing to the green environment by updating the Service config with
TARGET_ROLE=green. - Run additional tests on the public endpoint to ensure it is working properly.
- Now the blue environment is idle and we can:
- leave it with the old application so that we can roll back if there's issue with the new application
- update it to make it a hot backup of the active environment
- reduce its replica count to save the occupied resources
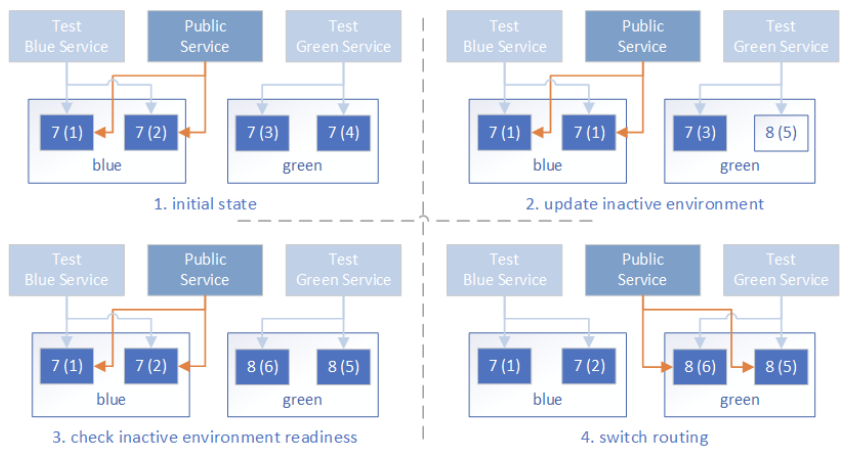
As compared to Rolling Update, the blue/green up* The public service is either routed to the old applications, or new applications, but never both at the same time.
- The time it takes for the new pods to be ready does not affect the public service quality, as the traffic will only be routed to the new pods when all of them are tested to be ready.
- We can do comprehensive tests on the new environment before it serves any public traffic. Just keep in mind this is in production, and the tests should not pollute live application data.
Jenkins Automation
Jenkins provides easy-to-setup workflow to automate your deployments. With Pipeline support, it is flexible to build the zero-downtime deployment workflow, and visualize the deployment steps. To facilitate the deployment process for Kubernetes resources, we published the Kubernetes Continuous Deploy and the Azure Container Service plugins built based on the kubernetes-client. You can deploy the resource to Azure Kubernetes Service (AKS) or the general Kubernetes clusters without the need of kubectl, and it supports variable substitution in the resource configuration so you can deploy environment-specific resources to the clusters without updating the resource config. We created a Jenkins Pipeline to demonstrate the blue/green deployment to AKS. The flow is like the following:

- Pre-clean: clean workspace.
- SCM: pulling code from the source control management system.
- Prepare Image: prepare the application docker images and upload them to some Docker repository.
- Check Env: determine the active and inactive environment, which drives the following deployment.
- Deploy: deploy the new application resource configuration to the inactive environment. With the Azure Container Service plugin, this can be done with:
acsDeploy azureCredentialsId: 'stored-azure-credentials-id',
configFilePaths: "glob/path/to/*/resource-config-*.yml",
containerService: "aks-name | AKS",
resourceGroupName: "resource-group-name",
enableConfigSubstitution: true
- Verify Staged: verify the deployment to the inactive environment to ensure it is working properly. Again, note this is in the production environment, so be careful not to pollute live application data during tests.
- Confirm: Optionally, send email notifications for manual user approval to proceed with the actual environment switch.
- Switch: Switch the frontend service endpoint routing to the inactive environment. This is just another service deployment to the AKS Kubernetes cluster.
- Verify Prod: verify the frontend service endpoint is working properly with the new environment.
- Post-clean: do some post clean on the temporary files.
For the Rolling Update strategy, simply deploy the deployment configuration to the Kubernetes cluster, which is a simple, single step.
Put It All Together
We built a quickstart template on Azure to demonstrate how we can do the zero-downtime deployment to AKS (Kubernetes) with Jenkins. Go to Jenkins Blue-Green Deployment on Kubernetes and click the button Deploy to Azure to get the working demo. This template will provision:
- An AKS cluster, with the following resources:
- Two similar deployments representing the environments "blue" and "green". Both are initially set up with the
tomcat:7 image. - Two test endpoint services (
tomcat-test-blueandtomcat-test-green), which are connected to the corresponding deployments, and can be used to test if the deployments are ready for production use. - A production service endpoint (
tomcat-service) which represents the public endpoint that the users will access. Initially it is routing to the "blue" environment.
- Two similar deployments representing the environments "blue" and "green". Both are initially set up with the
- A Jenkins master running on an Ubuntu 16.04 VM, with the Azure service principal credentials configured. The Jenkins instance has two sample jobs:
- AKS Kubernetes Rolling Update Deployment pipeline to demonstrate the Rolling Update deployment to AKS.
- AKS Kubernetes Blue/green Deployment pipeline to demonstrate the blue/green deployment to AKS.
- We didn't include the email confirmation step in the quickstart template. To add that, you need to configure the email SMTP server details in the Jenkins system configuration, and then add a Pipeline stage before Switch:
stage('Confirm') {
mail (to: 'to@example.com',
subject: "Job '${env.JOB_NAME}' (${env.BUILD_NUMBER}) is waiting for input",
body: "Please go to ${env.BUILD_URL}.")
input 'Ready to go?'
}
Follow the Steps to setup the resources and you can try it out by start the Jenkins build jobs.
Kubernetes Community - Top of the Open Source Charts in 2017
2017 was a huge year for Kubernetes, and GitHub’s latest Octoverse report illustrates just how much attention this project has been getting.
Kubernetes, an open source platform for running application containers, provides a consistent interface that enables developers and ops teams to automate the deployment, management, and scaling of a wide variety of applications on just about any infrastructure.
Solving these shared challenges by leveraging a wide community of expertise and industrial experience, as Kubernetes does, helps engineers focus on building their own products at the top of the stack, rather than needlessly duplicating work that now exists as a standard part of the “cloud native” toolkit.
However, achieving these gains via ad-hoc collective organizing is its own unique challenge, one which makes it increasingly difficult to support open source, community-driven efforts through periods of rapid growth.
Read on to find out how the Kubernetes Community has addressed these scaling challenges to reach the top of the charts in GitHub’s 2017 Octoverse report.
Most-Discussed on GitHub
The top two most-discussed repos of 2017 are both based on Kubernetes:
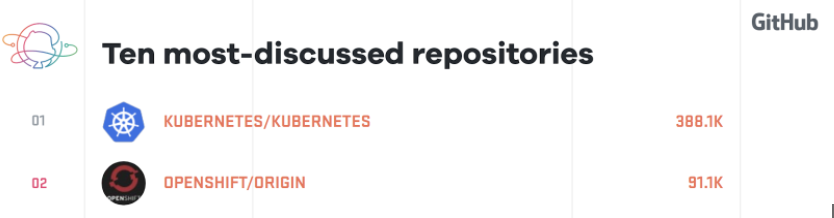
Of all the open source repositories on GitHub, none received more issue comments than kubernetes/kubernetes. OpenShift, a CNCF certified distribution of Kubernetes, took second place.
Open discussion with ample time for community feedback and review helps build shared infrastructure and establish new standards for cloud native computing.
Most Reviewed on GitHub
Successfully scaling an open source effort’s communications often leads to better coordination and higher-quality feature delivery. The Kubernetes project’s Special Interest Group (SIG) structure has helped it become GitHub’s second most reviewed project:
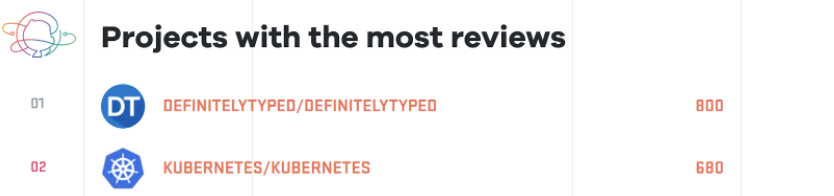
Using SIGs to segment and standardize mechanisms for community participation helps channel more frequent reviews from better-qualified community members.
When managed effectively, active community discussions indicate more than just a highly contentious codebase, or a project with an extensive list of unmet needs.
Scaling a project’s capacity to handle issues and community interactions helps to expand the conversation. Meanwhile, large communities come with more diverse use cases and a larger array of support problems to manage. The Kubernetes SIG organization structure helps to address the challenges of complex communication at scale.
SIG meetings provide focused opportunities for users, maintainers, and specialists from various disciplines to collaborate together in support of this community effort. These investments in organizing help create an environment where it’s easier to prioritize architecture discussion and planning over commit velocity; enabling the project to sustain this kind of scale.
Join the party!
You may already be using solutions that are successfully managed and scaled on Kubernetes. For example, GitHub.com, which hosts Kubernetes’ upstream source code, now runs on Kubernetes as well!
Check out the Kubernetes Contributors’ guide for more information on how to get started as a contributor.
You can also join the weekly Kubernetes Community meeting and consider joining a SIG or two.
Kubernetes Application Survey 2018 Results
Understanding how people use or want to use Kubernetes can help us shape everything from what we build to how we do it. To help us understand how application developers, application operators, and ecosystem tool developers are using and want to use Kubernetes, the Application Definition Working Group recently performed a survey. The survey focused in on these types of user roles and the features and sub-projects owned by the Kubernetes organization. That included kubectl, Dashboard, Minikube, Helm, the Workloads API, etc.
The results are in and the raw data is now available for everyone.
There is too much data to summarize in a single blog post and we hope people will be able to find useful information by pouring over the data. Here are some of the highlights that caught our attention.
Participation
First, I would like to thank the 380 people who took the survey and provided feedback. We appreciate the time put into to share so much detail.
6.8x Response Increase
In the summer of 2016 we ran a survey on application usage. Kubernetes was much newer and the number of people talking about operating applications was much smaller.
The number of respondents in the past year and 10 months increased at a rate of 6.8 times.
Where Are We In Innovation Lifecycle?
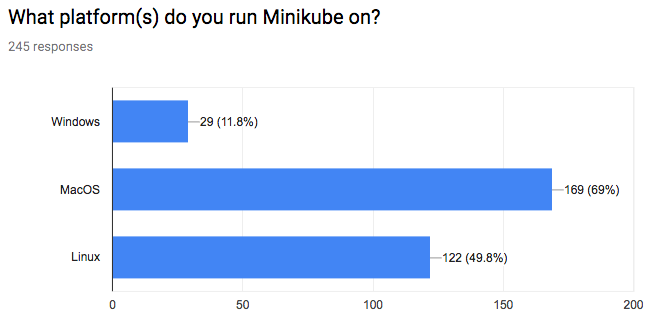
Minikube is used primarily by people on macOS and Linux. Yet, according to the 2018 Stack Overflow survey, almost half of developers use Windows as their primary operating system. This is where Minikube would run.
Seeing differences from other data sets is worth looking more deeply at to better understand our audience, where Kubernetes is at, and where it is on the journey it's headed.
Plenty of Custom Tooling
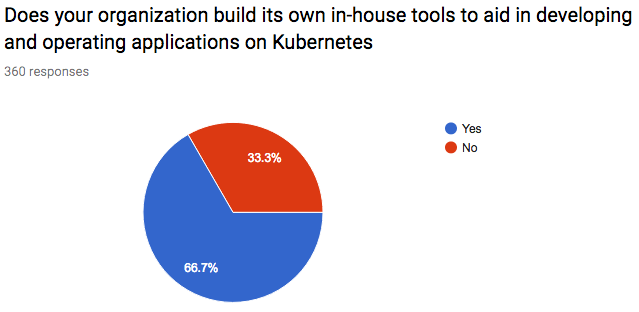
Two thirds of respondents work for organizations developing their own tooling to help with application development and operation. We wondered why this might happen so we asked why as a follow-up question. 44% of people who took the survey told us why they do it.
App Management Tools
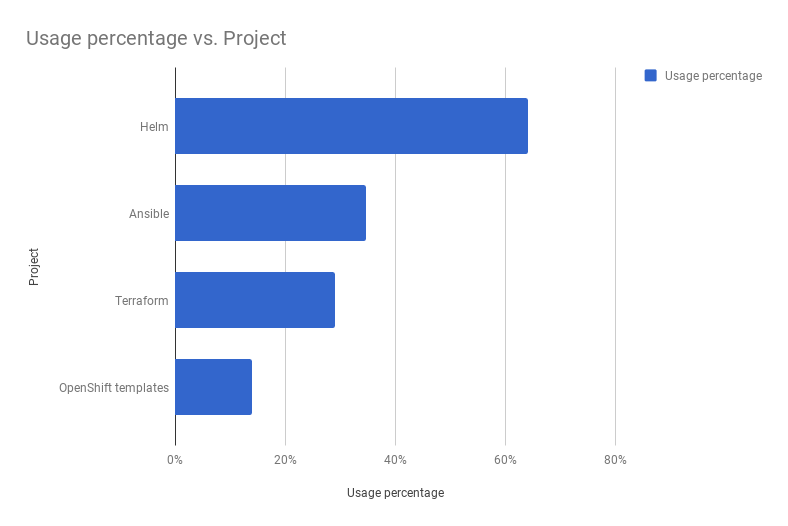
Only 4 tools were in use by more than 10% of those who took the survey with Helm being in use by 64% of them. Many more tools were used by more than 1% of people including those we directly asked about and the space for people to fill in those we didn't ask about. The long tail, captured in the survey, contained more than 80 tools in use.
Want To See More?
As the Application Definition Working Group is working through the data we're putting observations into a Google Slides Document. This is a living document that will continue to grow while we look over and discuss the data.
There is a session at KubeCon where the Application Definition Working Group will be meeting and discussing the survey. This is a session open to anyone in attendance, if you would like to attend.
While this working group is doing analysis and sharing it, we want to encourage others to look at the data and share any insights that might be gained.
Note, the survey questions were generated by the application definition working group with the help of people working on various sub-projects included in the survey. This is the reason some sub-projects have more and varied questions compared to some others. The survey was shared on social media, on mailing lists, in blog posts, in various meetings, and beyond while collecting information for two weeks.
Local Persistent Volumes for Kubernetes Goes Beta
The Local Persistent Volumes beta feature in Kubernetes 1.10 makes it possible to leverage local disks in your StatefulSets. You can specify directly-attached local disks as PersistentVolumes, and use them in StatefulSets with the same PersistentVolumeClaim objects that previously only supported remote volume types.
Persistent storage is important for running stateful applications, and Kubernetes has supported these workloads with StatefulSets, PersistentVolumeClaims and PersistentVolumes. These primitives have supported remote volume types well, where the volumes can be accessed from any node in the cluster, but did not support local volumes, where the volumes can only be accessed from a specific node. The demand for using local, fast SSDs in replicated, stateful workloads has increased with demand to run more workloads in Kubernetes.
Addressing hostPath challenges
The prior mechanism of accessing local storage through hostPath volumes had many challenges. hostPath volumes were difficult to use in production at scale: operators needed to care for local disk management, topology, and scheduling of individual pods when using hostPath volumes, and could not use many Kubernetes features (like StatefulSets). Existing Helm charts that used remote volumes could not be easily ported to use hostPath volumes. The Local Persistent Volumes feature aims to address hostPath volumes’ portability, disk accounting, and scheduling challenges.
Disclaimer
Before going into details about how to use Local Persistent Volumes, note that local volumes are not suitable for most applications. Using local storage ties your application to that specific node, making your application harder to schedule. If that node or local volume encounters a failure and becomes inaccessible, then that pod also becomes inaccessible. In addition, many cloud providers do not provide extensive data durability guarantees for local storage, so you could lose all your data in certain scenarios.
For those reasons, most applications should continue to use highly available, remotely accessible, durable storage.
Suitable workloads
Some use cases that are suitable for local storage include:
- Caching of datasets that can leverage data gravity for fast processing
- Distributed storage systems that shard or replicate data across multiple nodes. Examples include distributed datastores like Cassandra, or distributed file systems like Gluster or Ceph.
Suitable workloads are tolerant of node failures, data unavailability, and data loss. They provide critical, latency-sensitive infrastructure services to the rest of the cluster, and should run with high priority compared to other workloads.
Enabling smarter scheduling and volume binding
An administrator must enable smarter scheduling for local persistent volumes. Before any PersistentVolumeClaims for your local PersistentVolumes are created, a StorageClass must be created with the volumeBindingMode set to “WaitForFirstConsumer”:
kind: StorageClass
apiVersion: storage.k8s.io/v1
metadata:
name: local-storage
provisioner: kubernetes.io/no-provisioner
volumeBindingMode: WaitForFirstConsumer
This setting tells the PersistentVolume controller to not immediately bind a PersistentVolumeClaim. Instead, the system waits until a Pod that needs to use a volume is scheduled. The scheduler then chooses an appropriate local PersistentVolume to bind to, taking into account the Pod’s other scheduling constraints and policies. This ensures that the initial volume binding is compatible with any Pod resource requirements, selectors, affinity and anti-affinity policies, and more.
Note that dynamic provisioning is not supported in beta. All local PersistentVolumes must be statically created.
Creating a local persistent volume
For this initial beta offering, local disks must first be pre-partitioned, formatted, and mounted on the local node by an administrator. Directories on a shared file system are also supported, but must also be created before use.
Once you set up the local volume, you can create a PersistentVolume for it. In this example, the local volume is mounted at “/mnt/disks/vol1” on node “my-node”:
apiVersion: v1
kind: PersistentVolume
metadata:
name: example-local-pv
spec:
capacity:
storage: 500Gi
accessModes:
- ReadWriteOnce
persistentVolumeReclaimPolicy: Retain
storageClassName: local-storage
local:
path: /mnt/disks/vol1
nodeAffinity:
required:
nodeSelectorTerms:
- matchExpressions:
- key: kubernetes.io/hostname
operator: In
values:
- my-node
Note that there’s a new nodeAffinity field in the PersistentVolume object: this is how the Kubernetes scheduler understands that this PersistentVolume is tied to a specific node. nodeAffinity is a required field for local PersistentVolumes.
When local volumes are manually created like this, the only supported persistentVolumeReclaimPolicy is “Retain”. When the PersistentVolume is released from the PersistentVolumeClaim, an administrator must manually clean up and set up the local volume again for reuse.
Automating local volume creation and deletion
Manually creating and cleaning up local volumes is a big administrative burden, so we’ve written a simple local volume manager to automate some of these pieces. It’s available in the external-storage repo as an optional program that you can deploy in your cluster, including instructions and example deployment specs for how to run it.
To use this, the local volumes must still first be set up and mounted on the local node by an administrator. The administrator needs to mount the local volume into a configurable “discovery directory” that the local volume manager recognizes. Directories on a shared file system are supported, but they must be bind-mounted into the discovery directory.
This local volume manager monitors the discovery directory, looking for any new mount points. The manager creates a PersistentVolume object with the appropriate storageClassName, path, nodeAffinity, and capacity for any new mount point that it detects. These PersistentVolume objects can eventually be claimed by PersistentVolumeClaims, and then mounted in Pods.
After a Pod is done using the volume and deletes the PersistentVolumeClaim for it, the local volume manager cleans up the local mount by deleting all files from it, then deleting the PersistentVolume object. This triggers the discovery cycle: a new PersistentVolume is created for the volume and can be reused by a new PersistentVolumeClaim.
Once the administrator initially sets up the local volume mount, this local volume manager takes over the rest of the PersistentVolume lifecycle without any further administrator intervention required.
Using local volumes in a pod
After all that administrator work, how does a user actually mount a local volume into their Pod? Luckily from the user’s perspective, a local volume can be requested in exactly the same way as any other PersistentVolume type: through a PersistentVolumeClaim. Just specify the appropriate StorageClassName for local volumes in the PersistentVolumeClaim object, and the system takes care of the rest!
kind: PersistentVolumeClaim
apiVersion: v1
metadata:
name: example-local-claim
spec:
accessModes:
- ReadWriteOnce
storageClassName: local-storage
resources:
requests:
storage: 500Gi
Or in a StatefulSet as a volumeClaimTemplate:
kind: StatefulSet
...
volumeClaimTemplates:
- metadata:
name: example-local-claim
spec:
accessModes:
- ReadWriteOnce
storageClassName: local-storage
resources:
requests:
storage: 500Gi
Documentation
The Kubernetes website provides full documentation for local persistent volumes.
Future enhancements
The local persistent volume beta feature is not complete by far. Some notable enhancements under development:
- Starting in 1.10, local raw block volumes is available as an alpha feature. This is useful for workloads that need to directly access block devices and manage their own data format.
- Dynamic provisioning of local volumes using LVM is under design and an alpha implementation will follow in a future release. This will eliminate the current need for an administrator to pre-partition, format and mount local volumes, as long as the workload’s performance requirements can tolerate sharing disks.
Complementary features
Pod priority and preemption is another Kubernetes feature that is complementary to local persistent volumes. When your application uses local storage, it must be scheduled to the specific node where the local volume resides. You can give your local storage workload high priority so if that node ran out of room to run your workload, Kubernetes can preempt lower priority workloads to make room for it.
Pod disruption budget is also very important for those workloads that must maintain quorum. Setting a disruption budget for your workload ensures that it does not drop below quorum due to voluntary disruption events, such as node drains during upgrade.
Pod affinity and anti-affinity ensures that your workloads stay either co-located or spread out across failure domains. If you have multiple local persistent volumes available on a single node, it may be preferable to specify an pod anti-affinity policy to spread your workload across nodes. Note that if you want multiple pods to share the same local persistent volume, you do not need to specify a pod affinity policy. The scheduler understands the locality constraints of the local persistent volume and schedules your pod to the correct node.
Getting involved
If you have feedback for this feature or are interested in getting involved with the design and development, join the Kubernetes Storage Special-Interest-Group (SIG). We’re rapidly growing and always welcome new contributors.
Special thanks to all the contributors from multiple companies that helped bring this feature to beta, including Cheng Xing (verult), David Zhu (davidz627), Deyuan Deng (ddysher), Dhiraj Hedge (dhirajh), Ian Chakeres (ianchakeres), Jan Šafránek (jsafrane), Matthew Wong (wongma7), Michelle Au (msau42), Serguei Bezverkhi (sbezverk), and Yuquan Ren (nickrenren).
Migrating the Kubernetes Blog
We recently migrated the Kubernetes Blog from the Blogger platform to GitHub. With the change in platform comes a change in URL: formerly at http://blog.kubernetes.io, the blog now resides at https://kubernetes.io/blog.
All existing posts redirect from their former URLs with <rel=canonical> tags, preserving SEO values.
Why and how we migrated the blog
Our primary reasons for migrating were to streamline blog submissions and reviews, and to make the overall blog process faster and more transparent. Blogger's web interface made it difficult to provide drafts to multiple reviewers without also granting unnecessary access permissions and compromising security. GitHub's review process offered clear improvements.
We learned from Jim Brikman's experience during his own site migration away from Blogger.
Our migration was broken into several pull requests, but you can see the work that went into the primary migration PR.
We hope that making blog submissions more accessible will encourage greater community involvement in creating and reviewing blog content.
How to Submit a Blog Post
You can submit a blog post for consideration one of two ways:
- Submit a Google Doc through the blog submission form
- Open a pull request against the website repository as described here
If you have a post that you want to remain confidential until your publish date, please submit your post via the Google form. Otherwise, you can choose your submission process based on your comfort level and preferred workflow.
Note:
Our workflow hasn't changed for confidential advance drafts. Additionally, we'll coordinate publishing for time sensitive posts to ensure that information isn't released prematurely through an open pull request.Call for reviewers
The Kubernetes Blog needs more reviewers! If you're interested in contributing to the Kubernetes project and can participate on a regular, weekly basis, send an introductory email to k8sblog@linuxfoundation.org.
Container Storage Interface (CSI) for Kubernetes Goes Beta
The Kubernetes implementation of the Container Storage Interface (CSI) is now beta in Kubernetes v1.10. CSI was introduced as alpha in Kubernetes v1.9.
Kubernetes features are generally introduced as alpha and moved to beta (and eventually to stable/GA) over subsequent Kubernetes releases. This process allows Kubernetes developers to get feedback, discover and fix issues, iterate on the designs, and deliver high quality, production grade features.
Why introduce Container Storage Interface in Kubernetes?
Although Kubernetes already provides a powerful volume plugin system that makes it easy to consume different types of block and file storage, adding support for new volume plugins has been challenging. Because volume plugins are currently “in-tree”—volume plugins are part of the core Kubernetes code and shipped with the core Kubernetes binaries—vendors wanting to add support for their storage system to Kubernetes (or even fix a bug in an existing volume plugin) must align themselves with the Kubernetes release process.
With the adoption of the Container Storage Interface, the Kubernetes volume layer becomes truly extensible. Third party storage developers can now write and deploy volume plugins exposing new storage systems in Kubernetes without ever having to touch the core Kubernetes code. This will result in even more options for the storage that backs Kubernetes users’ stateful containerized workloads.
What’s new in Beta?
With the promotion to beta CSI is now enabled by default on standard Kubernetes deployments instead of being opt-in.
The move of the Kubernetes implementation of CSI to beta also means:
- Kubernetes is compatible with v0.2 of the CSI spec (instead of v0.1)
- There were breaking changes between the CSI spec v0.1 and v0.2, so existing CSI drivers must be updated to be 0.2 compatible before use with Kubernetes 1.10.0+.
- Mount propagation, a feature that allows bidirectional mounts between containers and host (a requirement for containerized CSI drivers), has also moved to beta.
- The Kubernetes
VolumeAttachmentobject, introduced in v1.9 in the storage v1alpha1 group, has been added to the storage v1beta1 group. - The Kubernetes
CSIPersistentVolumeSourceobject has been promoted to beta. AVolumeAttributesfield was added to KubernetesCSIPersistentVolumeSourceobject (in alpha this was passed around via annotations). - Node authorizer has been updated to limit access to
VolumeAttachmentobjects from kubelet. - The Kubernetes
CSIPersistentVolumeSourceobject and the CSI external-provisioner have been modified to allow passing of secrets to the CSI volume plugin. - The Kubernetes
CSIPersistentVolumeSourcehas been modified to allow passing in filesystem type (previously always assumed to beext4). - A new optional call,
NodeStageVolume, has been added to the CSI spec, and the Kubernetes CSI volume plugin has been modified to callNodeStageVolumeduringMountDevice(in alpha this step was a no-op).
How do I deploy a CSI driver on a Kubernetes Cluster?
CSI plugin authors must provide their own instructions for deploying their plugin on Kubernetes.
The Kubernetes-CSI implementation team created a sample hostpath CSI driver. The sample provides a rough idea of what the deployment process for a CSI driver looks like. Production drivers, however, would deploy node components via a DaemonSet and controller components via a StatefulSet rather than a single pod (for example, see the deployment files for the GCE PD driver).
How do I use a CSI Volume in my Kubernetes pod?
Assuming a CSI storage plugin is already deployed on your cluster, you can use it through the familiar Kubernetes storage primitives: PersistentVolumeClaims, PersistentVolumes, and StorageClasses.
CSI is a beta feature in Kubernetes v1.10. Although it is enabled by default, it may require the following flag:
- API server binary and kubelet binaries:
--allow-privileged=true- Most CSI plugins will require bidirectional mount propagation, which can only be enabled for privileged pods. Privileged pods are only permitted on clusters where this flag has been set to true (this is the default in some environments like GCE, GKE, and kubeadm).
Dynamic Provisioning
You can enable automatic creation/deletion of volumes for CSI Storage plugins that support dynamic provisioning by creating a StorageClass pointing to the CSI plugin.
The following StorageClass, for example, enables dynamic creation of “fast-storage” volumes by a CSI volume plugin called “com.example.csi-driver”.
kind: StorageClass
apiVersion: storage.k8s.io/v1
metadata:
name: fast-storage
provisioner: com.example.csi-driver
parameters:
type: pd-ssd
csiProvisionerSecretName: mysecret
csiProvisionerSecretNamespace: mynamespace
New for beta, the default CSI external-provisioner reserves the parameter keys csiProvisionerSecretName and csiProvisionerSecretNamespace. If specified, it fetches the secret and passes it to the CSI driver during provisioning.
Dynamic provisioning is triggered by the creation of a PersistentVolumeClaim object. The following PersistentVolumeClaim, for example, triggers dynamic provisioning using the StorageClass above.
apiVersion: v1
kind: PersistentVolumeClaim
metadata:
name: my-request-for-storage
spec:
accessModes:
- ReadWriteOnce
resources:
requests:
storage: 5Gi
storageClassName: fast-storage
When volume provisioning is invoked, the parameter type: pd-ssd and the secret any referenced secret(s) are passed to the CSI plugin com.example.csi-driver via a CreateVolume call. In response, the external volume plugin provisions a new volume and then automatically create a PersistentVolume object to represent the new volume. Kubernetes then binds the new PersistentVolume object to the PersistentVolumeClaim, making it ready to use.
If the fast-storage StorageClass is marked as “default”, there is no need to include the storageClassName in the PersistentVolumeClaim, it will be used by default.
Pre-Provisioned Volumes
You can always expose a pre-existing volume in Kubernetes by manually creating a PersistentVolume object to represent the existing volume. The following PersistentVolume, for example, exposes a volume with the name “existingVolumeName” belonging to a CSI storage plugin called “com.example.csi-driver”.
apiVersion: v1
kind: PersistentVolume
metadata:
name: my-manually-created-pv
spec:
capacity:
storage: 5Gi
accessModes:
- ReadWriteOnce
persistentVolumeReclaimPolicy: Retain
csi:
driver: com.example.csi-driver
volumeHandle: existingVolumeName
readOnly: false
fsType: ext4
volumeAttributes:
foo: bar
controllerPublishSecretRef:
name: mysecret1
namespace: mynamespace
nodeStageSecretRef:
name: mysecret2
namespace: mynamespace
nodePublishSecretRef
name: mysecret3
namespace: mynamespace
Attaching and Mounting
You can reference a PersistentVolumeClaim that is bound to a CSI volume in any pod or pod template.
kind: Pod
apiVersion: v1
metadata:
name: my-pod
spec:
containers:
- name: my-frontend
image: nginx
volumeMounts:
- mountPath: "/var/www/html"
name: my-csi-volume
volumes:
- name: my-csi-volume
persistentVolumeClaim:
claimName: my-request-for-storage
When the pod referencing a CSI volume is scheduled, Kubernetes will trigger the appropriate operations against the external CSI plugin (ControllerPublishVolume, NodeStageVolume, NodePublishVolume, etc.) to ensure the specified volume is attached, mounted, and ready to use by the containers in the pod.
For more details please see the CSI implementation design doc and documentation.
How do I write a CSI driver?
CSI Volume Driver deployments on Kubernetes must meet some minimum requirements.
The minimum requirements document also outlines the suggested mechanism for deploying an arbitrary containerized CSI driver on Kubernetes. This mechanism can be used by a Storage Provider to simplify deployment of containerized CSI compatible volume drivers on Kubernetes.
As part of the suggested deployment process, the Kubernetes team provides the following sidecar (helper) containers:
- external-attacher
- watches Kubernetes
VolumeAttachmentobjects and triggersControllerPublishandControllerUnpublishoperations against a CSI endpoint
- watches Kubernetes
- external-provisioner
- watches Kubernetes
PersistentVolumeClaimobjects and triggersCreateVolumeandDeleteVolumeoperations against a CSI endpoint
- watches Kubernetes
- driver-registrar
- registers the CSI driver with kubelet (in the future) and adds the drivers custom
NodeId(retrieved viaGetNodeIDcall against the CSI endpoint) to an annotation on the Kubernetes Node API Object
- registers the CSI driver with kubelet (in the future) and adds the drivers custom
- livenessprobe
- can be included in a CSI plugin pod to enable the Kubernetes Liveness Probe mechanism
Storage vendors can build Kubernetes deployments for their plugins using these components, while leaving their CSI driver completely unaware of Kubernetes.
Where can I find CSI drivers?
CSI drivers are developed and maintained by third parties. You can find a non-definitive list of some sample and production CSI drivers.
What about FlexVolumes?
As mentioned in the alpha release blog post, FlexVolume plugin was an earlier attempt to make the Kubernetes volume plugin system extensible. Although it enables third party storage vendors to write drivers “out-of-tree”, because it is an exec based API, FlexVolumes requires files for third party driver binaries (or scripts) to be copied to a special plugin directory on the root filesystem of every node (and, in some cases, master) machine. This requires a cluster admin to have write access to the host filesystem for each node and some external mechanism to ensure that the driver file is recreated if deleted, just to deploy a volume plugin.
In addition to being difficult to deploy, Flex did not address the pain of plugin dependencies: Volume plugins tend to have many external requirements (on mount and filesystem tools, for example). These dependencies are assumed to be available on the underlying host OS, which is often not the case.
CSI addresses these issues by not only enabling storage plugins to be developed out-of-tree, but also containerized and deployed via standard Kubernetes primitives.
If you still have questions about in-tree volumes vs CSI vs Flex, please see the Volume Plugin FAQ.
What will happen to the in-tree volume plugins?
Once CSI reaches stability, we plan to migrate most of the in-tree volume plugins to CSI. Stay tuned for more details as the Kubernetes CSI implementation approaches stable.
What are the limitations of beta?
The beta implementation of CSI has the following limitations:
- Block volumes are not supported; only file.
- CSI drivers must be deployed with the provided external-attacher sidecar plugin, even if they don’t implement
ControllerPublishVolume. - Topology awareness is not supported for CSI volumes, including the ability to share information about where a volume is provisioned (zone, regions, etc.) with the Kubernetes scheduler to allow it to make smarter scheduling decisions, and the ability for the Kubernetes scheduler or a cluster administrator or an application developer to specify where a volume should be provisioned.
driver-registrarrequires permissions to modify all Kubernetes node API objects which could result in a compromised node gaining the ability to do the same.
What’s next?
Depending on feedback and adoption, the Kubernetes team plans to push the CSI implementation to GA in 1.12.
The team would like to encourage storage vendors to start developing CSI drivers, deploying them on Kubernetes, and sharing feedback with the team via the Kubernetes Slack channel wg-csi, the Google group kubernetes-sig-storage-wg-csi, or any of the standard SIG storage communication channels.
How do I get involved?
This project, like all of Kubernetes, is the result of hard work by many contributors from diverse backgrounds working together.
In addition to the contributors who have been working on the Kubernetes implementation of CSI since alpha:
- Bradley Childs (childsb)
- Chakravarthy Nelluri (chakri-nelluri)
- Jan Šafránek (jsafrane)
- Luis Pabón (lpabon)
- Saad Ali (saad-ali)
- Vladimir Vivien (vladimirvivien)
We offer a huge thank you to the new contributors who stepped up this quarter to help the project reach beta:
- David Zhu (davidz627)
- Edison Xiang (edisonxiang)
- Felipe Musse (musse)
- Lin Ml (mlmhl)
- Lin Youchong (linyouchong)
- Pietro Menna (pietromenna)
- Serguei Bezverkhi (sbezverk)
- Xing Yang (xing-yang)
- Yuquan Ren (NickrenREN)
If you’re interested in getting involved with the design and development of CSI or any part of the Kubernetes Storage system, join the Kubernetes Storage Special Interest Group (SIG). We’re rapidly growing and always welcome new contributors.
Fixing the Subpath Volume Vulnerability in Kubernetes
On March 12, 2018, the Kubernetes Product Security team disclosed CVE-2017-1002101, which allowed containers using subpath volume mounts to access files outside of the volume. This means that a container could access any file available on the host, including volumes for other containers that it should not have access to.
The vulnerability has been fixed and released in the latest Kubernetes patch releases. We recommend that all users upgrade to get the fix. For more details on the impact and how to get the fix, please see the announcement. (Note, some functional regressions were found after the initial fix and are being tracked in issue #61563).
This post presents a technical deep dive on the vulnerability and the solution.
Kubernetes Background
To understand the vulnerability, one must first understand how volume and subpath mounting works in Kubernetes.
Before a container is started on a node, the kubelet volume manager locally mounts all the volumes specified in the PodSpec under a directory for that Pod on the host system. Once all the volumes are successfully mounted, it constructs the list of volume mounts to pass to the container runtime. Each volume mount contains information that the container runtime needs, the most relevant being:
- Path of the volume in the container
- Path of the volume on the host (
/var/lib/kubelet/pods/<pod uid>/volumes/<volume type>/<volume name>)
When starting the container, the container runtime creates the path in the container root filesystem, if necessary, and then bind mounts it to the provided host path.
Subpath mounts are passed to the container runtime just like any other volume. The container runtime does not distinguish between a base volume and a subpath volume, and handles them the same way. Instead of passing the host path to the root of the volume, Kubernetes constructs the host path by appending the Pod-specified subpath (a relative path) to the base volume’s host path.
For example, here is a spec for a subpath volume mount:
apiVersion: v1
kind: Pod
metadata:
name: my-pod
spec:
containers:
- name: my-container
<snip>
volumeMounts:
- mountPath: /mnt/data
name: my-volume
subPath: dataset1
volumes:
- name: my-volume
emptyDir: {}
In this example, when the Pod gets scheduled to a node, the system will:
- Set up an EmptyDir volume at
/var/lib/kubelet/pods/1234/volumes/kubernetes.io~empty-dir/my-volume - Construct the host path for the subpath mount:
/var/lib/kubelet/pods/1234/volumes/kubernetes.io~empty-dir/my-volume/ + dataset1 - Pass the following mount information to the container runtime:
- Container path:
/mnt/data - Host path:
/var/lib/kubelet/pods/1234/volumes/kubernetes.io~empty-dir/my-volume/dataset1
- Container path:
- The container runtime bind mounts
/mnt/datain the container root filesystem to/var/lib/kubelet/pods/1234/volumes/kubernetes.io~empty-dir/my-volume/dataset1on the host. - The container runtime starts the container.
The Vulnerability
The vulnerability with subpath volumes was discovered by Maxim Ivanov, by making a few observations:
- Subpath references files or directories that are controlled by the user, not the system.
- Volumes can be shared by containers that are brought up at different times in the Pod lifecycle, including by different Pods.
- Kubernetes passes host paths to the container runtime to bind mount into the container.
The basic example below demonstrates the vulnerability. It takes advantage of the observations outlined above by:
- Using an init container to setup the volume with a symlink.
- Using a regular container to mount that symlink as a subpath later.
- Causing kubelet to evaluate the symlink on the host before passing it into the container runtime.
apiVersion: v1
kind: Pod
metadata:
name: my-pod
spec:
initContainers:
- name: prep-symlink
image: "busybox"
command: ["bin/sh", "-ec", "ln -s / /mnt/data/symlink-door"]
volumeMounts:
- name: my-volume
mountPath: /mnt/data
containers:
- name: my-container
image: "busybox"
command: ["/bin/sh", "-ec", "ls /mnt/data; sleep 999999"]
volumeMounts:
- mountPath: /mnt/data
name: my-volume
subPath: symlink-door
volumes:
- name: my-volume
emptyDir: {}
For this example, the system will:
- Setup an EmptyDir volume at
/var/lib/kubelet/pods/1234/volumes/kubernetes.io~empty-dir/my-volume - Pass the following mount information for the init container to the container runtime:
- Container path:
/mnt/data - Host path:
/var/lib/kubelet/pods/1234/volumes/kubernetes.io~empty-dir/my-volume
- Container path:
- The container runtime bind mounts
/mnt/datain the container root filesystem to/var/lib/kubelet/pods/1234/volumes/kubernetes.io~empty-dir/my-volumeon the host. - The container runtime starts the init container.
- The init container creates a symlink inside the container:
/mnt/data/symlink-door->/, and then exits. - Kubelet starts to prepare the volume mounts for the normal containers.
- It constructs the host path for the subpath volume mount:
/var/lib/kubelet/pods/1234/volumes/kubernetes.io~empty-dir/my-volume/ + symlink-door. - And passes the following mount information to the container runtime:
- Container path:
/mnt/data - Host path:
/var/lib/kubelet/pods/1234/volumes/kubernetes.io~empty-dir/my-volume/symlink-door
- Container path:
- The container runtime bind mounts
/mnt/datain the container root filesystem to/var/lib/kubelet/pods/1234/volumes/kubernetes.io~empty~dir/my-volume/symlink-door - However, the bind mount resolves symlinks, which in this case, resolves to
/on the host! Now the container can see all of the host’s filesystem through its mount point/mnt/data.
This is a manifestation of a symlink race, where a malicious user program can gain access to sensitive data by causing a privileged program (in this case, kubelet) to follow a user-created symlink.
It should be noted that init containers are not always required for this exploit, depending on the volume type. It is used in the EmptyDir example because EmptyDir volumes cannot be shared with other Pods, and only created when a Pod is created, and destroyed when the Pod is destroyed. For persistent volume types, this exploit can also be done across two different Pods sharing the same volume.
The Fix
The underlying issue is that the host path for subpaths are untrusted and can point anywhere in the system. The fix needs to ensure that this host path is both:
- Resolved and validated to point inside the base volume.
- Not changeable by the user in between the time of validation and when the container runtime bind mounts it.
The Kubernetes product security team went through many iterations of possible solutions before finally agreeing on a design.
Idea 1
Our first design was relatively simple. For each subpath mount in each container:
- Resolve all the symlinks for the subpath.
- Validate that the resolved path is within the volume.
- Pass the resolved path to the container runtime.
However, this design is prone to the classic time-of-check-to-time-of-use (TOCTTOU) problem. In between steps 2) and 3), the user could change the path back to a symlink. The proper solution needs some way to “lock” the path so that it cannot be changed in between validation and bind mounting by the container runtime. All the subsequent ideas use an intermediate bind mount by kubelet to achieve this “lock” step before handing it off to the container runtime. Once a bind mount is performed, the mount source is fixed and cannot be changed.
Idea 2
We went a bit wild with this idea:
- Create a working directory under the kubelet’s pod directory. Let’s call it
dir1. - Bind mount the base volume to under the working directory,
dir1/volume. - Chroot to the working directory
dir1. - Inside the chroot, bind mount
volume/subpathtosubpath. This ensures that any symlinks get resolved to inside the chroot environment. - Exit the chroot.
- On the host again, pass the bind mounted
dir1/subpathto the container runtime.
While this design does ensure that the symlinks cannot point outside of the volume, it was ultimately rejected due to difficulties of implementing the chroot mechanism in 4) across all the various distros and environments that Kubernetes has to support, including containerized kubelets.
Idea 3
Coming back to earth a little bit, our next idea was to:
- Bind mount the subpath to a working directory under the kubelet’s pod directory.
- Get the source of the bind mount, and validate that it is within the base volume.
- Pass the bind mount to the container runtime.
In theory, this sounded pretty simple, but in reality, 2) was quite difficult to implement correctly. Many scenarios had to be handled where volumes (like EmptyDir) could be on a shared filesystem, on a separate filesystem, on the root filesystem, or not on the root filesystem. NFS volumes ended up handling all bind mounts as a separate mount, instead of as a child to the base volume. There was additional uncertainty about how out-of-tree volume types (that we couldn’t test) would behave.
The Solution
Given the amount of scenarios and corner cases that had to be handled with the previous design, we really wanted to find a solution that was more generic across all volume types. The final design that we ultimately went with was to:
- Resolve all the symlinks in the subpath.
- Starting with the base volume, open each path segment one by one, using the
openat()syscall, and disallow symlinks. With each path segment, validate that the current path is within the base volume. - Bind mount
/proc/<kubelet pid>/fd/<final fd>to a working directory under the kubelet’s pod directory. The proc file is a link to the opened file. If that file gets replaced while kubelet still has it open, then the link will still point to the original file. - Close the fd and pass the bind mount to the container runtime.
Note that this solution is different for Windows hosts, where the mounting semantics are different than Linux. In Windows, the design is to:
- Resolve all the symlinks in the subpath.
- Starting with the base volume, open each path segment one by one with a file lock, and disallow symlinks. With each path segment, validate that the current path is within the base volume.
- Pass the resolved subpath to the container runtime, and start the container.
- After the container has started, unlock and close all the files.
Both solutions are able to address all the requirements of:
- Resolving the subpath and validating that it points to a path inside the base volume.
- Ensuring that the subpath host path cannot be changed in between the time of validation and when the container runtime bind mounts it.
- Being generic enough to support all volume types.
Acknowledgements
Special thanks to many folks involved with handling this vulnerability:
- Maxim Ivanov, who responsibly disclosed the vulnerability to the Kubernetes Product Security team.
- Kubernetes storage and security engineers from Google, Microsoft, and RedHat, who developed, tested, and reviewed the fixes.
- Kubernetes test-infra team, for setting up the private build infrastructure
- Kubernetes patch release managers, for coordinating and handling all the releases.
- All the production release teams that worked to deploy the fix quickly after release.
If you find a vulnerability in Kubernetes, please follow our responsible disclosure process and let us know; we want to do our best to make Kubernetes secure for all users.
Kubernetes 1.10: Stabilizing Storage, Security, and Networking
We’re pleased to announce the delivery of Kubernetes 1.10, our first release of 2018!
Today’s release continues to advance maturity, extensibility, and pluggability of Kubernetes. This newest version stabilizes features in 3 key areas, including storage, security, and networking. Notable additions in this release include the introduction of external kubectl credential providers (alpha), the ability to switch DNS service to CoreDNS at install time (beta), and the move of Container Storage Interface (CSI) and persistent local volumes to beta.
Let’s dive into the key features of this release:
Storage - CSI and Local Storage move to beta
This is an impactful release for the Storage Special Interest Group (SIG), marking the culmination of their work on multiple features. The Kubernetes implementation of the Container Storage Interface (CSI) moves to beta in this release: installing new volume plugins is now as easy as deploying a pod. This in turn enables third-party storage providers to develop their solutions independently outside of the core Kubernetes codebase. This continues the thread of extensibility within the Kubernetes ecosystem.
Durable (non-shared) local storage management progressed to beta in this release, making locally attached (non-network attached) storage available as a persistent volume source. This means higher performance and lower cost for distributed file systems and databases.
This release also includes many updates to Persistent Volumes. Kubernetes can automatically prevent deletion of Persistent Volume Claims that are in use by a pod (beta) and prevent deletion of a Persistent Volume that is bound to a Persistent Volume Claim (beta). This helps ensure that storage API objects are deleted in the correct order.
Security - External credential providers (alpha)
Kubernetes, which is already highly extensible, gains another extension point in 1.10 with external kubectl credential providers (alpha). Cloud providers, vendors, and other platform developers can now release binary plugins to handle authentication for specific cloud-provider IAM services, or that integrate with in-house authentication systems that aren’t supported in-tree, such as Active Directory. This complements the Cloud Controller Manager feature added in 1.9.
Networking - CoreDNS as a DNS provider (beta)
The ability to switch the DNS service to CoreDNS at install time is now in beta. CoreDNS has fewer moving parts: it’s a single executable and a single process, and supports additional use cases.
Each Special Interest Group (SIG) within the community continues to deliver the most-requested enhancements, fixes, and functionality for their respective specialty areas. For a complete list of inclusions by SIG, please visit the release notes.
Availability
Kubernetes 1.10 is available for download on GitHub. To get started with Kubernetes, check out these interactive tutorials.
2 Day Features Blog Series
If you’re interested in exploring these features more in depth, check back next week for our 2 Days of Kubernetes series where we’ll highlight detailed walkthroughs of the following features:
Day 1 - Container Storage Interface (CSI) for Kubernetes going Beta Day 2 - Local Persistent Volumes for Kubernetes going Beta
Release team
This release is made possible through the effort of hundreds of individuals who contributed both technical and non-technical content. Special thanks to the release team led by Jaice Singer DuMars, Kubernetes Ambassador for Microsoft. The 10 individuals on the release team coordinate many aspects of the release, from documentation to testing, validation, and feature completeness.
As the Kubernetes community has grown, our release process represents an amazing demonstration of collaboration in open source software development. Kubernetes continues to gain new users at a rapid clip. This growth creates a positive feedback cycle where more contributors commit code creating a more vibrant ecosystem.
Project Velocity
The CNCF has continued refining an ambitious project to visualize the myriad contributions that go into the project. K8s DevStats illustrates the breakdown of contributions from major company contributors, as well as an impressive set of preconfigured reports on everything from individual contributors to pull request lifecycle times. Thanks to increased automation, issue count at the end of the release was only slightly higher than it was at the beginning. This marks a major shift toward issue manageability. With 75,000+ comments, Kubernetes remains one of the most actively discussed projects on GitHub.
User Highlights
According to a recent CNCF survey, more than 49% of Asia-based respondents use Kubernetes in production, with another 49% evaluating it for use in production. Established, global organizations are using Kubernetes in production at massive scale. Recently published user stories from the community include:
- Huawei, the largest telecommunications equipment manufacturer in the world, moved its internal IT department’s applications to run on Kubernetes. This resulted in the global deployment cycles decreasing from a week to minutes, and the efficiency of application delivery improved by tenfold.
- Jinjiang Travel International, one of the top 5 largest OTA and hotel companies, use Kubernetes to speed up their software release velocity from hours to just minutes. Additionally, they leverage Kubernetes to increase the scalability and availability of their online workloads.
- Haufe Group, the Germany-based media and software company, utilized Kubernetes to deliver a new release in half an hour instead of days. The company is also able to scale down to around half the capacity at night, saving 30 percent on hardware costs.
- BlackRock, the world’s largest asset manager, was able to move quickly using Kubernetes and built an investor research web app from inception to delivery in under 100 days. Is Kubernetes helping your team? Share your story with the community.
Ecosystem Updates
- The CNCF is expanding its certification offerings to include a Certified Kubernetes Application Developer exam. The CKAD exam certifies an individual's ability to design, build, configure, and expose cloud native applications for Kubernetes. The CNCF is looking for beta testers for this new program. More information can be found here.
- Kubernetes documentation now features user journeys: specific pathways for learning based on who readers are and what readers want to do. Learning Kubernetes is easier than ever for beginners, and more experienced users can find task journeys specific to cluster admins and application developers.
- CNCF also offers online training that teaches the skills needed to create and configure a real-world Kubernetes cluster.
KubeCon
The world’s largest Kubernetes gathering, KubeCon + CloudNativeCon is coming to Copenhagen from May 2-4, 2018 and will feature technical sessions, case studies, developer deep dives, salons and more! Check out the schedule of speakers and register today!
Webinar
Join members of the Kubernetes 1.10 release team on April 10th at 10am PDT to learn about the major features in this release including Local Persistent Volumes and the Container Storage Interface (CSI). Register here.
Get Involved
The simplest way to get involved with Kubernetes is by joining one of the many Special Interest Groups (SIGs) that align with your interests. Have something you’d like to broadcast to the Kubernetes community? Share your voice at our weekly community meeting, and through the channels below.
Thank you for your continued feedback and support.
- Post questions (or answer questions) on Stack Overflow
- Join the community portal for advocates on K8sPort
- Follow us on Twitter @Kubernetesio for latest updates
- Chat with the community on Slack
- Share your Kubernetes story.
Principles of Container-based Application Design
It's possible nowadays to put almost any application in a container and run it. Creating cloud-native applications, however—containerized applications that are automated and orchestrated effectively by a cloud-native platform such as Kubernetes—requires additional effort. Cloud-native applications anticipate failure; they run and scale reliably even when their infrastructure experiences outages. To offer such capabilities, cloud-native platforms like Kubernetes impose a set of contracts and constraints on applications. These contracts ensure that applications they run conform to certain constraints and allow the platform to automate application management.
I've outlined seven principlesfor containerized applications to follow in order to be fully cloud-native.
| Container Design Principles |
|---|
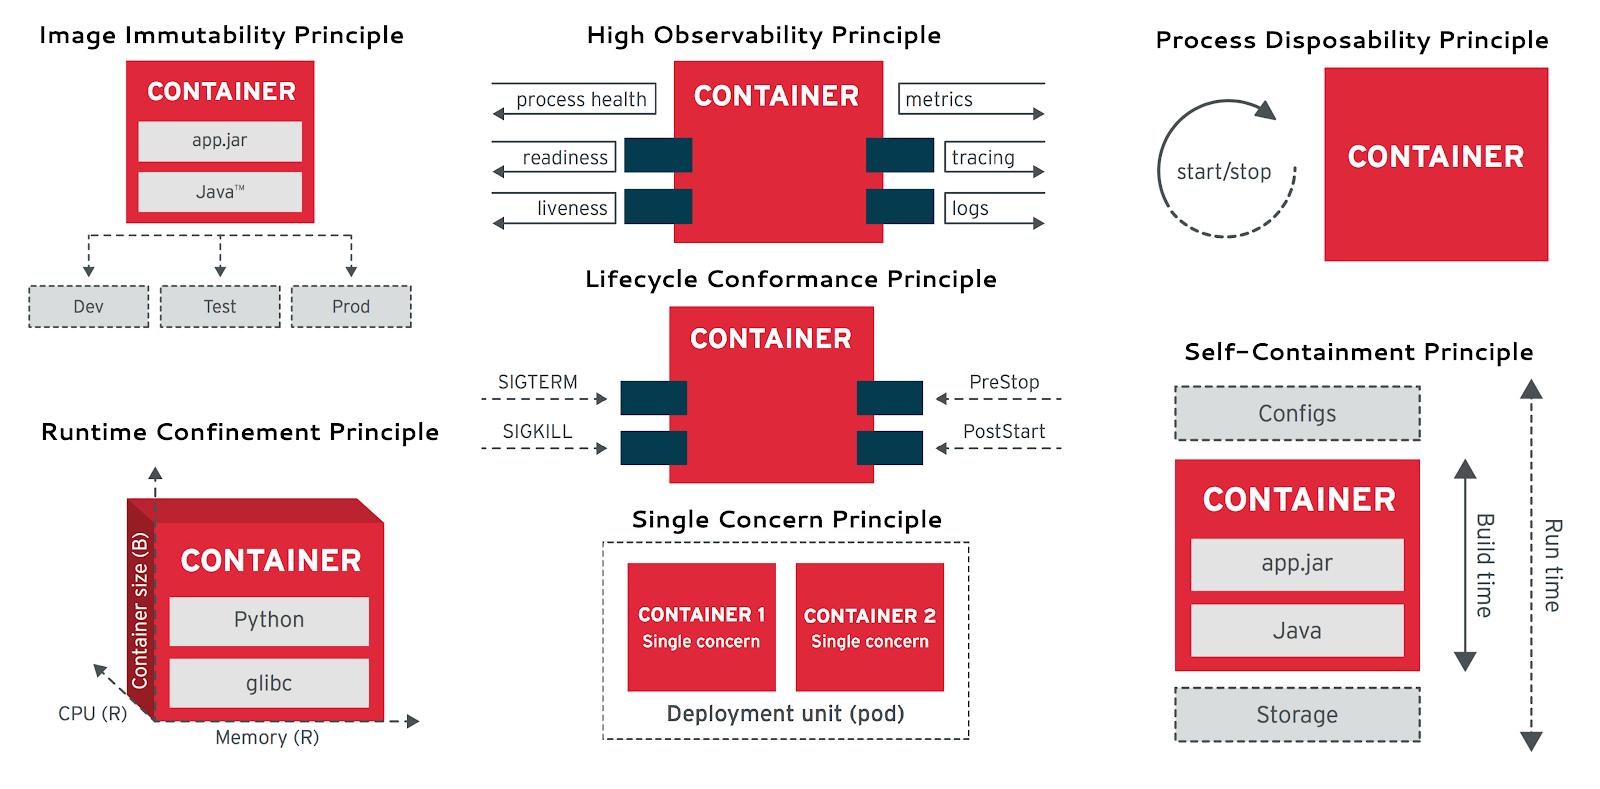 |
These seven principles cover both build time and runtime concerns.
Build time
- Single Concern: Each container addresses a single concern and does it well.
- Self-Containment: A container relies only on the presence of the Linux kernel. Additional libraries are added when the container is built.
- Image Immutability: Containerized applications are meant to be immutable, and once built are not expected to change between different environments.
Runtime
- High Observability: Every container must implement all necessary APIs to help the platform observe and manage the application in the best way possible.
- Lifecycle Conformance: A container must have a way to read events coming from the platform and conform by reacting to those events.
- Process Disposability: Containerized applications must be as ephemeral as possible and ready to be replaced by another container instance at any point in time.
- Runtime Confinement: Every container must declare its resource requirements and restrict resource use to the requirements indicated. The build time principles ensure that containers have the right granularity, consistency, and structure in place. The runtime principles dictate what functionalities must be implemented in order for containerized applications to possess cloud-native function. Adhering to these principles helps ensure that your applications are suitable for automation in Kubernetes.
The white paper is freely available for download:
To read more about designing cloud-native applications for Kubernetes, check out my Kubernetes Patterns book.
Twitter:
Blog: http://www.ofbizian.com
Linkedin:
Bilgin Ibryam (@bibryam) is a principal architect at Red Hat, open source committer at ASF, blogger, author, and speaker. He is the author of Camel Design Patterns and Kubernetes Patterns books. In his day-to-day job, Bilgin enjoys mentoring, training and leading teams to be successful with distributed systems, microservices, containers, and cloud-native applications in general.
Expanding User Support with Office Hours
Today's post is on Kubernetes office hours.
Today's developer has an almost overwhelming amount of resources available for learning. Kubernetes development teams use StackOverflow, user documentation, Slack, and the mailing lists. Additionally, the community itself continues to amass an awesome list of resources.
One of the challenges of large projects is keeping user resources relevant and useful. While documentation can be useful, great learning also happens in Q&A sessions at conferences, or by learning with someone whose explanation matches your learning style. Consider that learning Kung Fu from Morpheus would be a lot more fun than reading a book about Kung Fu!

We as Kubernetes developers want to create an interactive experience: where Kubernetes users can get their questions answered by experts in real time, or at least referred to the best known documentation or code example.
Having discussed a few broad ideas, we eventually decided to make Kubernetes Office Hours a live stream where we take user questions from the audience and present them to our panel of contributors and expert users. We run two sessions: one for European time zones, and one for the Americas. These streaming setup guidelines make office hours extensible—for example, if someone wants to run office hours for Asia/Pacific timezones, or for another CNCF project.
To give you an idea of what Kubernetes office hours are like, here's Josh Berkus answering a question on running databases on Kubernetes. Despite the popularity of this topic, it's still difficult for a new user to get a constructive answer. Here's an excellent response from Josh:
It's often easier to field this kind of question in office hours than it is to ask a developer to write a full-length blog post. [Editor's note: That's legit!] Because we don't have infinite developers with infinite time, this kind of focused communication creates high-bandwidth help while limiting developer commitments to 1 hour per month. This allows a rotating set of experts to share the load without overwhelming any one person.
We hold office hours the third Wednesday of every month on the Kubernetes YouTube Channel. You can post questions on the #office-hours channel on Slack, or you can submit your question to Stack Overflow and post a link on Slack. If you post a question in advance, you might get better answers, as volunteers have more time to research and prepare. If a question can't be fully solved during the call, the team will try their best to point you in the right direction and/or ping other people in the community to take a look. Check out this page for more details on what's off- and on topic as well as meeting information for your time zone. We hope to hear your questions soon!
Special thanks to Amazon, Bitnami, Giant Swarm, Heptio, Liquidweb, Northwestern Mutual, Packet.net, Pivotal, Red Hat, Weaveworks, and VMWare for donating engineering time to office hours.
And thanks to Alan Pope, Joe Beda, and Charles Butler for technical support in making our livestream better.
How to Integrate RollingUpdate Strategy for TPR in Kubernetes
With Kubernetes, it's easy to manage and scale stateless applications like web apps and API services right out of the box. To date, almost all of the talks about Kubernetes has been about microservices and stateless applications.
With the popularity of container-based microservice architectures, there is a strong need to deploy and manage RDBMS(Relational Database Management Systems). RDBMS requires experienced database-specific knowledge to correctly scale, upgrade, and re-configure while protecting against data loss or unavailability.
For example, MySQL (the most popular open source RDBMS) needs to store data in files that are persistent and exclusive to each MySQL database's storage. Each MySQL database needs to be individually distinct, another, more complex is in cluster that need to distinguish one MySQL database from a cluster as a different role, such as master, slave, or shard. High availability and zero data loss are also hard to accomplish when replacing database nodes on failed machines.
Using powerful Kubernetes API extension mechanisms, we can encode RDBMS domain knowledge into software, named WQ-RDS, running atop Kubernetes like built-in resources.
WQ-RDS leverages Kubernetes primitive resources and controllers, it deliveries a number of enterprise-grade features and brings a significantly reliable way to automate time-consuming operational tasks like database setup, patching backups, and setting up high availability clusters. WQ-RDS supports mainstream versions of Oracle and MySQL (both compatible with MariaDB).
Let's demonstrate how to manage a MySQL sharding cluster.
MySQL Sharding Cluster
MySQL Sharding Cluster is a scale-out database architecture. Based on the hash algorithm, the architecture distributes data across all the shards of the cluster. Sharding is entirely transparent to clients: Proxy is able to connect to any Shards in the cluster and issue queries to the correct shards directly.
| ----- |
| 
Note: Each shard corresponds to a single MySQL instance. Currently, WQ-RDS supports a maximum of 64 shards.
|
All of the shards are built with Kubernetes Statefulset, Services, Storage Class, configmap, secrets and MySQL. WQ-RDS manages the entire lifecycle of the sharding cluster. Advantages of the sharding cluster are obvious:
- Scale out queries per second (QPS) and transactions per second (TPS)
- Scale out storage capacity: gain more storage by distributing data to multiple nodes
Create a MySQL Sharding Cluster
Let's create a Kubernetes cluster with 8 shards.
kubectl create -f mysqlshardingcluster.yaml
Next, create a MySQL Sharding Cluster including 8 shards.
- TPR : MysqlCluster and MysqlDatabase
[root@k8s-master ~]# kubectl get mysqlcluster
NAME KIND
clustershard-c MysqlCluster.v1.mysql.orain.com
MysqlDatabase from clustershard-c0 to clustershard-c7 belongs to MysqlCluster clustershard-c.
[root@k8s-master ~]# kubectl get mysqldatabase
NAME KIND
clustershard-c0 MysqlDatabase.v1.mysql.orain.com
clustershard-c1 MysqlDatabase.v1.mysql.orain.com
clustershard-c2 MysqlDatabase.v1.mysql.orain.com
clustershard-c3 MysqlDatabase.v1.mysql.orain.com
clustershard-c4 MysqlDatabase.v1.mysql.orain.com
clustershard-c5 MysqlDatabase.v1.mysql.orain.com
clustershard-c6 MysqlDatabase.v1.mysql.orain.com
clustershard-c7 MysqlDatabase.v1.mysql.orain.com
Next, let's look at two main features: high availability and RollingUpdate strategy.
To demonstrate, we'll start by running sysbench to generate some load on the cluster. In this example, QPS metrics are generated by MySQL export, collected by Prometheus, and visualized in Grafana.
Feature: high availability
WQ-RDS handles MySQL instance crashes while protecting against data loss.
When killing clustershard-c0, WQ-RDS will detect that clustershard-c0 is unavailable and replace clustershard-c0 on failed machine, taking about 35 seconds on average.

zero data loss at same time.

Feature : RollingUpdate Strategy
MySQL Sharding Cluster brings us not only strong scalability but also some level of maintenance complexity. For example, when updating a MySQL configuration like innodb_buffer_pool_size, a DBA has to perform a number of steps:
1. Apply change time.
2. Disable client access to database proxies.
3. Start a rolling upgrade.
Rolling upgrades need to proceed in order and are the most demanding step of the process. One cannot continue a rolling upgrade until and unless previous updates to MySQL instances are running and ready.
4 Verify the cluster.
5. Enable client access to database proxies.
Possible problems with a rolling upgrade include:
- node reboot
- MySQL instances restart
- human error Instead, WQ-RDS enables a DBA to perform rolling upgrades automatically.
StatefulSet RollingUpdate in Kubernetes
Kubernetes 1.7 includes a major feature that adds automated updates to StatefulSets and supports a range of update strategies including rolling updates.
Note: For more information about StatefulSet RollingUpdate, see the Kubernetes docs.
Because TPR (currently CRD) does not support the rolling upgrade strategy, we needed to integrate the RollingUpdate strategy into WQ-RDS. Fortunately, the Kubernetes repo is a treasure for learning. In the process of implementation, there are some points to share:
**MySQL Sharding Cluster has **changed: Each StatefulSet has its corresponding ControllerRevision, which records all the revision data and order (like git). Whenever StatefulSet is syncing, StatefulSet Controller will firstly compare it's spec to the latest corresponding ControllerRevision data (similar to git diff). If changed, a new ControllerrRevision will be generated, and the revision number will be incremented by 1. WQ-RDS borrows the process, MySQL Sharding Cluster object will record all the revision and order in ControllerRevision.
**How to initialize MySQL Sharding Cluster to meet request **replicas: Statefulset supports two Pod management policies: Parallel and OrderedReady. Because MySQL Sharding Cluster doesn't require ordered creation for its initial processes, we use the Parallel policy to accelerate the initialization of the cluster.
**How to perform a Rolling **Upgrade: Statefulset recreates pods in strictly decreasing order. The difference is that WQ-RDS updates shards instead of recreating them, as shown below:
When RollingUpdate ends: Kubernetes signals termination clearly. A rolling update completes when all of a set's Pods have been updated to the updateRevision. The status's currentRevision is set to updateRevision and its updateRevision is set to the empty string. The status's currentReplicas is set to updateReplicas and its updateReplicas are set to 0.

Controller revision in WQ-RDS
Revision information is stored in MysqlCluster.Status and is no different than Statefulset.Status.
root@k8s-master ~]# kubectl get mysqlcluster -o yaml clustershard-c
apiVersion: v1
items:
\- apiVersion: mysql.orain.com/v1
kind: MysqlCluster
metadata:
creationTimestamp: 2017-10-20T08:19:41Z
labels:
AppName: clustershard-crm
Createdby: orain.com
DBType: MySQL
name: clustershard-c
namespace: default
resourceVersion: "415852"
uid: 6bb089bb-b56f-11e7-ae02-525400e717a6
spec:
dbresourcespec:
limitedcpu: 1200m
limitedmemory: 400Mi
requestcpu: 1000m
requestmemory: 400Mi
status:
currentReplicas: 8
currentRevision: clustershard-c-648d878965
replicas: 8
updateRevision: clustershard-c-648d878965
kind: List
Example: Perform a rolling upgrade
Finally, We can now update "clustershard-c" to update configuration "innodb_buffer_pool_size" from 6GB to 7GB and reboot.
The process takes 480 seconds.

The upgrade is in monotonically decreasing manner:


Conclusion
RollingUpgrade is meaningful to database administrators. It provides a more effective way to operator database.
Apache Spark 2.3 with Native Kubernetes Support
Kubernetes and Big Data
The open source community has been working over the past year to enable first-class support for data processing, data analytics and machine learning workloads in Kubernetes. New extensibility features in Kubernetes, such as custom resources and custom controllers, can be used to create deep integrations with individual applications and frameworks.
Traditionally, data processing workloads have been run in dedicated setups like the YARN/Hadoop stack. However, unifying the control plane for all workloads on Kubernetes simplifies cluster management and can improve resource utilization.
"Bloomberg has invested heavily in machine learning and NLP to give our clients a competitive edge when it comes to the news and financial information that powers their investment decisions. By building our Data Science Platform on top of Kubernetes, we're making state-of-the-art data science tools like Spark, TensorFlow, and our sizable GPU footprint accessible to the company's 5,000+ software engineers in a consistent, easy-to-use way." - Steven Bower, Team Lead, Search and Data Science Infrastructure at Bloomberg
Introducing Apache Spark + Kubernetes
Apache Spark 2.3 with native Kubernetes support combines the best of the two prominent open source projects — Apache Spark, a framework for large-scale data processing; and Kubernetes.
Apache Spark is an essential tool for data scientists, offering a robust platform for a variety of applications ranging from large scale data transformation to analytics to machine learning. Data scientists are adopting containers en masse to improve their workflows by realizing benefits such as packaging of dependencies and creating reproducible artifacts. Given that Kubernetes is the de facto standard for managing containerized environments, it is a natural fit to have support for Kubernetes APIs within Spark.
Starting with Spark 2.3, users can run Spark workloads in an existing Kubernetes 1.7+ cluster and take advantage of Apache Spark's ability to manage distributed data processing tasks. Apache Spark workloads can make direct use of Kubernetes clusters for multi-tenancy and sharing through Namespaces and Quotas, as well as administrative features such as Pluggable Authorization and Logging. Best of all, it requires no changes or new installations on your Kubernetes cluster; simply create a container image and set up the right RBAC roles for your Spark Application and you're all set.
Concretely, a native Spark Application in Kubernetes acts as a custom controller, which creates Kubernetes resources in response to requests made by the Spark scheduler. In contrast with deploying Apache Spark in Standalone Mode in Kubernetes, the native approach offers fine-grained management of Spark Applications, improved elasticity, and seamless integration with logging and monitoring solutions. The community is also exploring advanced use cases such as managing streaming workloads and leveraging service meshes like Istio.

To try this yourself on a Kubernetes cluster, simply download the binaries for the official Apache Spark 2.3 release. For example, below, we describe running a simple Spark application to compute the mathematical constant Pi across three Spark executors, each running in a separate pod. Please note that this requires a cluster running Kubernetes 1.7 or above, a kubectl client that is configured to access it, and the necessary RBAC rules for the default namespace and service account.
$ kubectl cluster-info
Kubernetes master is running at https://xx.yy.zz.ww
$ bin/spark-submit
--master k8s://https://xx.yy.zz.ww
--deploy-mode cluster
--name spark-pi
--class org.apache.spark.examples.SparkPi
--conf spark.executor.instances=5
--conf spark.kubernetes.container.image=
--conf spark.kubernetes.driver.pod.name=spark-pi-driver
local:///opt/spark/examples/jars/spark-examples_2.11-2.3.0.jar
To watch Spark resources that are created on the cluster, you can use the following kubectl command in a separate terminal window.
$ kubectl get pods -l 'spark-role in (driver, executor)' -w
NAME READY STATUS RESTARTS AGE
spark-pi-driver 1/1 Running 0 14s
spark-pi-da1968a859653d6bab93f8e6503935f2-exec-1 0/1 Pending 0 0s
The results can be streamed during job execution by running:
$ kubectl logs -f spark-pi-driver
When the application completes, you should see the computed value of Pi in the driver logs.
In Spark 2.3, we're starting with support for Spark applications written in Java and Scala with support for resource localization from a variety of data sources including HTTP, GCS, HDFS, and more. We have also paid close attention to failure and recovery semantics for Spark executors to provide a strong foundation to build upon in the future. Get started with the open-source documentation today.
Get Involved
There's lots of exciting work to be done in the near future. We're actively working on features such as dynamic resource allocation, in-cluster staging of dependencies, support for PySpark & SparkR, support for Kerberized HDFS clusters, as well as client-mode and popular notebooks' interactive execution environments. For people who fell in love with the Kubernetes way of managing applications declaratively, we've also been working on a Kubernetes Operator for spark-submit, which allows users to declaratively specify and submit Spark Applications.
And we're just getting started! We would love for you to get involved and help us evolve the project further.
Huge thanks to the Apache Spark and Kubernetes contributors spread across multiple organizations who spent many hundreds of hours working on this effort. We look forward to seeing more of you contribute to the project and help it evolve further.
Kubernetes: First Beta Version of Kubernetes 1.10 is Here
The Kubernetes community has released the first beta version of Kubernetes 1.10, which means you can now try out some of the new features and give your feedback to the release team ahead of the official release. The release, currently scheduled for March 21, 2018, is targeting the inclusion of more than a dozen brand new alpha features and more mature versions of more than two dozen more.
Specifically, Kubernetes 1.10 will include production-ready versions of Kubelet TLS Bootstrapping, API aggregation, and more detailed storage metrics.
Some of these features will look familiar because they emerged at earlier stages in previous releases. Each stage has specific meanings:
- stable: The same as "generally available", features in this stage have been thoroughly tested and can be used in production environments.
- beta: The feature has been around long enough that the team is confident that the feature itself is on track to be included as a stable feature, and any API calls aren't going to change. You can use and test these features, but including them in mission-critical production environments is not advised because they are not completely hardened.
- alpha: New features generally come in at this stage. These features are still being explored. APIs and options may change in future versions, or the feature itself may disappear. Definitely not for production environments. You can download the latest release of Kubernetes 1.10 from . To give feedback to the development community, create an issue in the Kubernetes 1.10 milestone and tag the appropriate SIG before March 9.
Here's what to look for, though you should remember that while this is the current plan as of this writing, there's always a possibility that one or more features may be held for a future release. We'll start with authentication.
Authentication (SIG-Auth)
- Kubelet TLS Bootstrap (stable): Kubelet TLS bootstrapping is probably the "headliner" of the Kubernetes 1.10 release as it becomes available for production environments. It provides the ability for a new kubelet to create a certificate signing request, which enables you to add new nodes to your cluster without having to either manually add security certificates or use self-signed certificates that eliminate many of the benefits of having certificates in the first place.
- Pod Security Policy moves to its own API group (beta): The beta release of the Pod Security Policy lets administrators decide what contexts pods can run in. In other words, you have the ability to prevent unprivileged users from creating privileged pods -- that is, pods that can perform actions such as writing files or accessing Secrets -- in particular namespaces.
- Limit node access to API (beta): Also in beta, you now have the ability to limit calls to the API on a node to just that specific node, and to ensure that a node is only calling its own API, and not those on other nodes.
- External client-go credential providers (alpha): client-go is the Go language client for accessing the Kubernetes API. This feature adds the ability to add external credential providers. For example, Amazon might want to create its own authenticator to validate interaction with EKS clusters; this feature enables them to do that without having to include their authenticator in the Kubernetes codebase.
- TokenRequest API (alpha): The TokenRequest API provides the groundwork for much needed improvements to service account tokens; this feature enables creation of tokens that aren't persisted in the Secrets API, that are targeted for specific audiences (such as external secret stores), have configurable expiries, and are bindable to specific pods.
Networking (SIG-Network)
- Support configurable pod resolv.conf (beta): You now have the ability to specifically control DNS for a single pod, rather than relying on the overall cluster DNS.
- Although the feature is called Switch default DNS plugin to CoreDNS (beta), that's not actually what will happen in this cycle. The community has been working on the switch from kube-dns, which includes dnsmasq, to CoreDNS, another CNCF project with fewer moving parts, for several releases. In Kubernetes 1.10, the default will still be kube-dns, but when CoreDNS reaches feature parity with kube-dns, the team will look at making it the default.
- Topology aware routing of services (alpha): The ability to distribute workloads is one of the advantages of Kubernetes, but one thing that has been missing until now is the ability to keep workloads and services geographically close together for latency purposes. Topology aware routing will help with this problem. (This functionality may be delayed until Kubernetes 1.11.)
- Make NodePort IP address configurable (alpha): Not having to specify IP addresses in a Kubernetes cluster is great -- until you actually need to know what one of those addresses is ahead of time, such as for setting up database replication or other tasks. You will now have the ability to specifically configure NodePort IP addresses to solve this problem. (This functionality may be delayed until Kubernetes 1.11.)
Kubernetes APIs (SIG-API-machinery)
- API Aggregation (stable): Kubernetes makes it possible to extend its API by creating your own functionality and registering your functions so that they can be served alongside the core K8s functionality. This capability will be upgraded to "stable" in Kubernetes 1.10, so you can use it in production. Additionally, SIG-CLI is adding a feature called kubectl get and describe should work well with extensions (alpha) to make the server, rather than the client, return this information for a smoother user experience.
- Support for self-hosting authorizer webhook (alpha): Earlier versions of Kubernetes brought us the authorizer webhooks, which make it possible to customize the enforcement of permissions before commands are executed. Those webhooks, however, have to live somewhere, and this new feature makes it possible to host them in the cluster itself.
Storage (SIG-Storage)
- Detailed storage metrics of internal state (stable): With a distributed system such as Kubernetes, it's particularly important to know what's going on inside the system at any given time, either for troubleshooting purposes or simply for automation. This release brings to general availability detailed metrics of what's going in inside the storage systems, including metrics such as mount and unmount time, number of volumes in a particular state, and number of orphaned pod directories. You can find a full list in this design document.
- Mount namespace propagation (beta): This feature allows a container to mount a volume as rslave so that host mounts can be seen inside the container, or as rshared so that any mounts from inside the container are reflected in the host's mount namespace. The default for this feature is rslave.
- Local Ephemeral Storage Capacity Isolation (beta): Without this feature in place, every pod on a node that is using ephemeral storage is pulling from the same pool, and allocating storage is on a "best-effort" basis; in other words, a pod never knows for sure how much space it has available. This function provides the ability for a pod to reserve its own storage.
- Out-of-tree CSI Volume Plugins (beta): Kubernetes 1.9 announced the release of the Container Storage Interface, which provides a standard way for vendors to provide storage to Kubernetes. This function makes it possible for them to create drivers that live "out-of-tree", or out of the normal Kubernetes core. This means that vendors can control their own plugins and don't have to rely on the community for code reviews and approvals.
- Local Persistent Storage (beta): This feature enables PersistentVolumes to be created with locally attached disks, and not just network volumes.
- Prevent deletion of Persistent Volume Claims that are used by a pod (beta) and 7. Prevent deletion of Persistent Volume that is bound to a Persistent Volume Claim (beta): In previous versions of Kubernetes it was possible to delete storage that is in use by a pod, causing massive problems for the pod. These features provide validation that prevents that from happening.
- Running out of storage space on your Persistent Volume? If you are, you can use Add support for online resizing of PVs (alpha) to enlarge the underlying volume it without disrupting existing data. This also works in conjunction with the new Add resize support for FlexVolume (alpha); FlexVolumes are vendor-supported volumes implemented through FlexVolume plugins.
- Topology Aware Volume Scheduling (beta): This feature enables you to specify topology constraints on PersistentVolumes and have those constraints evaluated by the scheduler. It also delays the initial PersistentVolumeClaim binding until the Pod has been scheduled so that the volume binding decision is smarter and considers all Pod scheduling constraints as well. At the moment, this feature is most useful for local persistent volumes, but support for dynamic provisioning is under development.
Node management (SIG-Node)
- Dynamic Kubelet Configuration (beta): Kubernetes makes it easy to make changes to existing clusters, such as increasing the number of replicas or making a service available over the network. This feature makes it possible to change Kubernetes itself (or rather, the Kubelet that runs Kubernetes behind the scenes) without bringing down the node on which Kubelet is running.
- CRI validation test suite (beta): The Container Runtime Interface (CRI) makes it possible to run containers other than Docker (such as Rkt containers or even virtual machines using Virtlet) on Kubernetes. This features provides a suite of validation tests to make certain that these CRI implementations are compliant, enabling developers to more easily find problems.
- Configurable Pod Process Namespace Sharing (alpha): Although pods can easily share the Kubernetes namespace, the process, or PID namespace has been a more difficult issue due to lack of support in Docker. This feature enables you to set a parameter on the pod to determine whether containers get their own operating system processes or share a single process.
- Add support for Windows Container Configuration in CRI (alpha): The Container Runtime Interface was originally designed with Linux-based containers in mind, and it was impossible to implement support for Windows-based containers using CRI. This feature solves that problem, making it possible to specify a WindowsContainerConfig.
- Debug Containers (alpha): It's easy to debug a container if you have the appropriate utilities. But what if you don't? This feature makes it possible to run debugging tools on a container even if those tools weren't included in the original container image.
Other changes:
- Deployment (SIG-Cluster Lifecycle): Support out-of-process and out-of-tree cloud providers (beta): As Kubernetes gains acceptance, more and more cloud providers will want to make it available. To do that more easily, the community is working on extracting provider-specific binaries so that they can be more easily replaced.
- Kubernetes on Azure (SIG-Azure): Kubernetes has a cluster-autoscaler that automatically adds nodes to your cluster if you're running too many workloads, but until now it wasn't available on Azure. The Add Azure support to cluster-autoscaler (alpha) feature aims to fix that. Closely related, the Add support for Azure Virtual Machine Scale Sets (alpha) feature makes use of Azure's own autoscaling capabilities to make resources available.
You can download the Kubernetes 1.10 beta from . Again, if you've got feedback (and the community hopes you do) please add an issue to the 1.10 milestone and tag the relevant SIG before March 9.
_
(Many thanks to community members Michelle Au, Jan Šafránek, Eric Chiang, Michał Nasiadka, Radosław Pieczonka, Xing Yang, Daniel Smith, sylvain boily, Leo Sunmo, Michal Masłowski, Fernando Ripoll, ayodele abejide, Brett Kochendorfer, Andrew Randall, Casey Davenport, Duffie Cooley, Bryan Venteicher, Mark Ayers, Christopher Luciano, and Sandor Szuecs for their invaluable help in reviewing this article for accuracy.)_
Reporting Errors from Control Plane to Applications Using Kubernetes Events
At Box, we manage several large scale Kubernetes clusters that serve as an internal platform as a service (PaaS) for hundreds of deployed microservices. The majority of those microservices are applications that power box.com for over 80,000 customers. The PaaS team also deploys several services affiliated with the platform infrastructure as the control plane.
One use case of Box’s control plane is public key infrastructure (PKI) processing. In our infrastructure, applications needing a new SSL certificate also need to trigger some processing in the control plane. The majority of our applications are not allowed to generate new SSL certificates due to security reasons. The control plane has a different security boundary and network access, and is therefore allowed to generate certificates.
| |
| Figure1: Block Diagram of the PKI flow |
If an application needs a new certificate, the application owner explicitly adds a Custom Resource Definition (CRD) to the application’s Kubernetes config [1]. This CRD specifies parameters for the SSL certificate: name, common name, and others. A microservice in the control plane watches CRDs and triggers some processing for SSL certificate generation [2]. Once the certificate is ready, the same control plane service sends it to the API server in a Kubernetes Secret [3]. After that, the application containers access their certificates using Kubernetes Secret VolumeMounts [4]. You can see a working demo of this system in our example application on GitHub.
The rest of this post covers the error scenarios in this “triggered” processing in the control plane. In particular, we are especially concerned with user input errors. Because the SSL certificate parameters come from the application’s config file in a CRD format, what should happen if there is an error in that CRD specification? Even a typo results in a failure of the SSL certificate creation. The error information is available in the control plane even though the root cause is most probably inside the application’s config file. The application owner does not have access to the control plane’s state or logs.
Providing the right diagnosis to the application owner so she can fix the mistake becomes a serious productivity problem at scale. Box’s rapid migration to microservices results in several new deployments every week. Numerous first time users, who do not know every detail of the infrastructure, need to succeed in deploying their services and troubleshooting problems easily. As the owners of the infrastructure, we do not want to be the bottleneck while reading the errors from the control plane logs and passing them on to application owners. If something in an owner’s configuration causes an error somewhere else, owners need a fully empowering diagnosis. This error data must flow automatically without any human involvement.
After considerable thought and experimentation, we found that Kubernetes Events work great to automatically communicate these kind of errors. If the error information is placed in a pod’s event stream, it shows up in kubectl describe output. Even beginner users can execute kubectl describe pod and obtain an error diagnosis.
We experimented with a status web page for the control plane service as an alternative to Kubernetes Events. We determined that the status page could update every time after processing an SSL certificate, and that application owners could probe the status page and get the diagnosis from there. After experimenting with a status page initially, we have seen that this does not work as effectively as the Kubernetes Events solution. The status page becomes a new interface to learn for the application owner, a new web address to remember, and one more context switch to a distinct tool during troubleshooting efforts. On the other hand, Kubernetes Events show up cleanly at the kubectl describe output, which is easily recognized by the developers.
Here is a simplified example showing how we used Kubernetes Events for error reporting across distinct services. We have open sourced a sample golang application representative of the previously mentioned control plane service. It watches changes on CRDs and does input parameter checking. If an error is discovered, a Kubernetes Event is generated and the relevant pod’s event stream is updated.
The sample application executes this code to setup the Kubernetes Event generation:
// eventRecorder returns an EventRecorder type that can be
// used to post Events to different object's lifecycles.
func eventRecorder(
kubeClient \*kubernetes.Clientset) (record.EventRecorder, error) {
eventBroadcaster := record.NewBroadcaster()
eventBroadcaster.StartLogging(glog.Infof)
eventBroadcaster.StartRecordingToSink(
&typedcorev1.EventSinkImpl{
Interface: kubeClient.CoreV1().Events("")})
recorder := eventBroadcaster.NewRecorder(
scheme.Scheme,
v1.EventSource{Component: "controlplane"})
return recorder, nil
}
After the one-time setup, the following code generates events affiliated with pods:
ref, err := reference.GetReference(scheme.Scheme, &pod)
if err != nil {
glog.Fatalf("Could not get reference for pod %v: %v\n",
pod.Name, err)
}
recorder.Event(ref, v1.EventTypeWarning, "pki ServiceName error",
fmt.Sprintf("ServiceName: %s in pki: %s is not found in"+
" allowedNames: %s", pki.Spec.ServiceName, pki.Name,
allowedNames))
Further implementation details can be understood by running the sample application.
As mentioned previously, here is the relevant kubectl describe output for the application owner.
Events:
FirstSeen LastSeen Count From SubObjectPath Type Reason Message
--------- -------- ----- ---- ------------- -------- ------
....
1d 1m 24 controlplane Warning pki ServiceName error ServiceName: appp1 in pki: app1-pki is not found in allowedNames: [app1 app2]
....
We have demonstrated a practical use case with Kubernetes Events. The automated feedback to programmers in the case of configuration errors has significantly improved our troubleshooting efforts. In the future, we plan to use Kubernetes Events in various other applications under similar use cases. The recently created sample-controller example also utilizes Kubernetes Events in a similar scenario. It is great to see there are more sample applications to guide the community. We are excited to continue exploring other use cases for Events and the rest of the Kubernetes API to make development easier for our engineers.
If you have a Kubernetes experience you’d like to share, submit your story. If you use Kubernetes in your organization and want to voice your experience more directly, consider joining the CNCF End User Community that Box and dozens of like-minded companies are part of.
Special thanks for Greg Lyons and Mohit Soni for their contributions.
Core Workloads API GA
DaemonSet, Deployment, ReplicaSet, and StatefulSet are GA
Editor’s Note: We’re happy to announce that the Core Workloads API is GA in Kubernetes 1.9! This blog post from Kenneth Owens reviews how Core Workloads got to GA from its origins, reveals changes in 1.9, and talks about what you can expect going forward.
In the Beginning …
There were Pods, tightly coupled containers that share resource requirements, networking, storage, and a lifecycle. Pods were useful, but, as it turns out, users wanted to seamlessly, reproducibly, and automatically create many identical replicas of the same Pod, so we created ReplicationController.
Replication was a step forward, but what users really needed was higher level orchestration of their replicated Pods. They wanted rolling updates, roll backs, and roll overs. So the OpenShift team created DeploymentConfig. DeploymentConfigs were also useful, and OpenShift users were happy. In order to allow all OSS Kubernetes uses to share in the elation, and to take advantage of set-based label selectors, ReplicaSet and Deployment were added to the extensions/v1beta1 group version providing rolling updates, roll backs, and roll overs for all Kubernetes users.
That mostly solved the problem of orchestrating containerized 12 factor apps on Kubernetes, so the community turned its attention to a different problem. Replicating a Pod <n> times isn’t the right hammer for every nail in your cluster. Sometimes, you need to run a Pod on every Node, or on a subset of Nodes (for example, shared side cars like log shippers and metrics collectors, Kubernetes add-ons, and Distributed File Systems). The state of the art was Pods combined with NodeSelectors, or static Pods, but this is unwieldy. After having grown used to the ease of automation provided by Deployments, users demanded the same features for this category of application, so DaemonSet was added to extension/v1beta1 as well.
For a time, users were content, until they decided that Kubernetes needed to be able to orchestrate more than just 12 factor apps and cluster infrastructure. Whether your architecture is N-tier, service oriented, or micro-service oriented, your 12 factor apps depend on stateful workloads (for example, RDBMSs, distributed key value stores, and messaging queues) to provide services to end users and other applications. These stateful workloads can have availability and durability requirements that can only be achieved by distributed systems, and users were ready to use Kubernetes to orchestrate the entire stack.
While Deployments are great for stateless workloads, they don’t provide the right guarantees for the orchestration of distributed systems. These applications can require stable network identities, ordered, sequential deployment, updates, and deletion, and stable, durable storage. PetSet was added to the apps/v1beta1 group version to address this category of application. Unfortunately, we were less than thoughtful with its naming, and, as we always strive to be an inclusive community, we renamed the kind to StatefulSet.
Finally, we were done.

...Or were we?
Kubernetes 1.8 and apps/v1beta2
Pod, ReplicationController, ReplicaSet, Deployment, DaemonSet, and StatefulSet came to collectively be known as the core workloads API. We could finally orchestrate all of the things, but the API surface was spread across three groups, had many inconsistencies, and left users wondering about the stability of each of the core workloads kinds. It was time to stop adding new features and focus on consistency and stability.
Pod and ReplicationController were at GA stability, and even though you can run a workload in a Pod, it’s a nucleus primitive that belongs in core. As Deployments are the recommended way to manage your stateless apps, moving ReplicationController would serve no purpose. In Kubernetes 1.8, we moved all the other core workloads API kinds (Deployment, DaemonSet, ReplicaSet, and StatefulSet) to the apps/v1beta2 group version. This had the benefit of providing a better aggregation across the API surface, and allowing us to break backward compatibility to fix inconsistencies. Our plan was to promote this new surface to GA, wholesale and as is, when we were satisfied with its completeness. The modifications in this release, which are also implemented in apps/v1, are described below.
Selector Defaulting Deprecated
In prior versions of the apps and extensions groups, label selectors of the core workloads API kinds were, when left unspecified, defaulted to a label selector generated from the kind’s template’s labels.
This was completely incompatible with strategic merge patch and kubectl apply. Moreover, we’ve found that defaulting the value of a field from the value of another field of the same object is an anti-pattern, in general, and particularly dangerous for the API objects used to orchestrate workloads.
Immutable Selectors
Selector mutation, while allowing for some use cases like promotable Deployment canaries, is not handled gracefully by our workload controllers, and we have always strongly cautioned users against it. To provide a consistent, usable, and stable API, selectors were made immutable for all kinds in the workloads API.
We believe that there are better ways to support features like promotable canaries and orchestrated Pod relabeling, but, if restricted selector mutation is a necessary feature for our users, we can relax immutability in the future without breaking backward compatibility.
The development of features like promotable canaries, orchestrated Pod relabeling, and restricted selector mutability is driven by demand signals from our users. If you are currently modifying the selectors of your core workload API objects, please tell us about your use case via a GitHub issue, or by participating in SIG apps.
Default Rolling Updates
Prior to apps/v1beta2, some kinds defaulted their update strategy to something other than RollingUpdate (e.g. app/v1beta1/StatefulSet uses OnDelete by default). We wanted to be confident that RollingUpdate worked well prior to making it the default update strategy, and we couldn’t change the default behavior in released versions without breaking our promise with respect to backward compatibility. In apps/v1beta2 we enabled RollingUpdate for all core workloads kinds by default.
CreatedBy Annotation Deprecated
The "kubernetes.io/created-by" was a legacy hold over from the days before garbage collection. Users should use an object’s ControllerRef from its ownerReferences to determine object ownership. We deprecated this feature in 1.8 and removed it in 1.9.
Scale Subresources
A scale subresource was added to all of the applicable kinds in apps/v1beta2 (DaemonSet scales based on its node selector).
Kubernetes 1.9 and apps/v1
In Kubernetes 1.9, as planned, we promoted the entire core workloads API surface to GA in the apps/v1 group version. We made a few more changes to make the API consistent, but apps/v1 is mostly identical to apps/v1beta2. The reality is that most users have been treating the beta versions of the core workloads API as GA for some time now. Anyone who is still using ReplicationControllers and shying away from DaemonSets, Deployments, and StatefulSets, due to a perceived lack of stability, should plan migrate their workloads (where applicable) to apps/v1. The minor changes that were made during promotion are described below.
Garbage Collection Defaults to Delete
Prior to apps/v1 the default garbage collection policy for Pods in a DaemonSet, Deployment, ReplicaSet, or StatefulSet, was to orphan the Pods. That is, if you deleted one of these kinds, the Pods that they owned would not be deleted automatically unless cascading deletion was explicitly specified. If you use kubectl, you probably didn’t notice this, as these kinds are scaled to zero prior to deletion. In apps/v1 all core worloads API objects will now, by default, be deleted when their owner is deleted. For most users, this change is transparent.
Status Conditions
Prior to apps/v1 only Deployment and ReplicaSet had Conditions in their Status objects. For consistency's sake, either all of the objects or none of them should have conditions. After some debate, we decided that Conditions are useful, and we added Conditions to StatefulSetStatus and DaemonSetStatus. The StatefulSet and DaemonSet controllers currently don’t populate them, but we may choose communicate conditions to clients, via this mechanism, in the future.
Scale Subresource Migrated to autoscale/v1
We originally added a scale subresource to the apps group. This was the wrong direction for integration with the autoscaling, and, at some point, we would like to use custom metrics to autoscale StatefulSets. So the apps/v1 group version uses the autoscaling/v1 scale subresource.
Migration and Deprecation
The question most you’re probably asking now is, “What’s my migration path onto apps/v1 and how soon should I plan on migrating?” All of the group versions prior to apps/v1 are deprecated as of Kubernetes 1.9, and all new code should be developed against apps/v1, but, as discussed above, many of our users treat extensions/v1beta1 as if it were GA. We realize this, and the minimum support timelines in our deprecation policy are just that, minimums.
In future releases, before completely removing any of the group versions, we will disable them by default in the API Server. At this point, you will still be able to use the group version, but you will have to explicitly enable it. We will also provide utilities to upgrade the storage version of the API objects to apps/v1. Remember, all of the versions of the core workloads kinds are bidirectionally convertible. If you want to manually update your core workloads API objects now, you can use kubectl convert to convert manifests between group versions.
What’s Next?
The core workloads API surface is stable, but it’s still software, and software is never complete. We often add features to stable APIs to support new use cases, and we will likely do so for the core workloads API as well. GA stability means that any new features that we do add will be strictly backward compatible with the existing API surface. From this point forward, nothing we do will break our backwards compatibility guarantees. If you’re looking to participate in the evolution of this portion of the API, please feel free to get involved in GitHub or to participate in SIG Apps.
- Download Kubernetes
- Get involved with the Kubernetes project on GitHub
- Post questions (or answer questions) on Stack Overflow
- Connect with the community on Slack
- Follow us on Twitter @Kubernetesio for latest updates
Introducing client-go version 6
The Kubernetes API server exposes a REST interface consumable by any client. client-go is the official client library for the Go programming language. It is used both internally by Kubernetes itself (for example, inside kubectl) as well as by numerous external consumers:operators like the etcd-operator or prometheus-operator;higher level frameworks like KubeLess and OpenShift; and many more.
The version 6 update to client-go adds support for Kubernetes 1.9, allowing access to the latest Kubernetes features. While the changelog contains all the gory details, this blog post highlights the most prominent changes and intends to guide on how to upgrade from version 5.
This blog post is one of a number of efforts to make client-go more accessible to third party consumers. Easier access is a joint effort by a number of people from numerous companies, all meeting in the #client-go-docs channel of the Kubernetes Slack. We are happy to hear feedback and ideas for further improvement, and of course appreciate anybody who wants to contribute.
API group changes
The following API group promotions are part of Kubernetes 1.9:
- Workload objects (Deployments, DaemonSets, ReplicaSets, and StatefulSets) have been promoted to the apps/v1 API group in Kubernetes 1.9. client-go follows this transition and allows developers to use the latest version by importing the k8s.io/api/apps/v1 package instead of k8s.io/api/apps/v1beta1 and by using Clientset.AppsV1().
- Admission Webhook Registration has been promoted to the admissionregistration.k8s.io/v1beta1 API group in Kubernetes 1.9. The former ExternalAdmissionHookConfiguration type has been replaced by the incompatible ValidatingWebhookConfiguration and MutatingWebhookConfiguration types. Moreover, the webhook admission payload type AdmissionReview in admission.k8s.io has been promoted to v1beta1. Note that versioned objects are now passed to webhooks. Refer to the admission webhook documentation for details.
Validation for CustomResources
In Kubernetes 1.8 we introduced CustomResourceDefinitions (CRD) pre-persistence schema validation as an alpha feature. With 1.9, the feature got promoted to beta and will be enabled by default. As a client-go user, you will find the API types at k8s.io/apiextensions-apiserver/pkg/apis/apiextensions/v1beta1.
The OpenAPI v3 schema can be defined in the CRD spec as:
apiVersion: apiextensions.k8s.io/v1beta1
kind: CustomResourceDefinition
metadata: ...
spec:
...
validation:
openAPIV3Schema:
properties:
spec:
properties:
version:
type: string
enum:
- "v1.0.0"
- "v1.0.1"
replicas:
type: integer
minimum: 1
maximum: 10
The schema in the above CRD applies following validations for the instance:
- spec.version must be a string and must be either “v1.0.0” or “v1.0.1”.
- spec.replicas must be an integer and must have a minimum value of 1 and a maximum value of 10. A CustomResource with invalid values for spec.version (v1.0.2) and spec.replicas (15) will be rejected:
apiVersion: mygroup.example.com/v1
kind: App
metadata:
name: example-app
spec:
version: "v1.0.2"
replicas: 15
$ kubectl create -f app.yaml
The App "example-app" is invalid: []: Invalid value: map[string]interface {}{"apiVersion":"mygroup.example.com/v1", "kind":"App", "metadata":map[string]interface {}{"creationTimestamp":"2017-08-31T20:52:54Z", "uid":"5c674651-8e8e-11e7-86ad-f0761cb232d1", "clusterName":"", "name":"example-app", "namespace":"default", "deletionTimestamp":interface {}(nil), "deletionGracePeriodSeconds":(\*int64)(nil)}, "spec":map[string]interface {}{"replicas":15, "version":"v1.0.2"}}:
validation failure list:
spec.replicas in body should be less than or equal to 10
spec.version in body should be one of [v1.0.0 v1.0.1]
Note that with Admission Webhooks, Kubernetes 1.9 provides another beta feature to validate objects before they are created or updated. Starting with 1.9, these webhooks also allow mutation of objects (for example, to set defaults or to inject values). Of course, webhooks work with CRDs as well. Moreover, webhooks can be used to implement validations that are not easily expressible with CRD validation. Note that webhooks are harder to implement than CRD validation, so for many purposes, CRD validation is the right tool.
Creating namespaced informers
Often objects in one namespace or only with certain labels are to be processed in a controller. Informers now allow you to tweak the ListOptions used to query the API server to list and watch objects. Uninitialized objects (for consumption by initializers) can be made visible by setting IncludeUnitialized to true. All this can be done using the new NewFilteredSharedInformerFactory constructor for shared informers:
import “k8s.io/client-go/informers”
...
sharedInformers := informers.NewFilteredSharedInformerFactory(
client,
30\*time.Minute,
“some-namespace”,
func(opt \*metav1.ListOptions) {
opt.LabelSelector = “foo=bar”
},
)
Note that the corresponding lister will only know about the objects matching the namespace and the given ListOptions. Note that the same restrictions apply for a List or Watch call on a client.
This production code example of a cert-manager demonstrates how namespace informers can be used in real code.
Polymorphic scale client
Historically, only types in the extensions API group would work with autogenerated Scale clients. Furthermore, different API groups use different Scale types for their /scale subresources. To remedy these issues, k8s.io/client-go/scale provides a polymorphic scale client to scale different resources in different API groups in a coherent way:
import (
apimeta "k8s.io/apimachinery/pkg/api/meta"
discocache "k8s.io/client-go/discovery/cached"
"k8s.io/client-go/discovery"
"k8s.io/client-go/dynamic"
“k8s.io/client-go/scale”
)
...
cachedDiscovery := discocache.NewMemCacheClient(client.Discovery())
restMapper := discovery.NewDeferredDiscoveryRESTMapper(
cachedDiscovery,
apimeta.InterfacesForUnstructured,
)
scaleKindResolver := scale.NewDiscoveryScaleKindResolver(
client.Discovery(),
)
scaleClient, err := scale.NewForConfig(
client, restMapper,
dynamic.LegacyAPIPathResolverFunc,
scaleKindResolver,
)
scale, err := scaleClient.Scales("default").Get(groupResource, "foo")
The returned scale object is generic and is exposed as the autoscaling/v1.Scale object. It is backed by an internal Scale type, with conversions defined to and from all the special Scale types in the API groups supporting scaling. We planto extend this to CustomResources in 1.10.
If you’re implementing support for the scale subresource, we recommend that you expose the autoscaling/v1.Scale object.
Type-safe DeepCopy
Deeply copying an object formerly required a call to Scheme.Copy(Object) with the notable disadvantage of losing type safety. A typical piece of code from client-go version 5 required type casting:
newObj, err := runtime.NewScheme().Copy(node)
if err != nil {
return fmt.Errorf("failed to copy node %v: %s”, node, err)
}
newNode, ok := newObj.(\*v1.Node)
if !ok {
return fmt.Errorf("failed to type-assert node %v", newObj)
}
Thanks to k8s.io/code-generator, Copy has now been replaced by a type-safe DeepCopy method living on each object, allowing you to simplify code significantly both in terms of volume and API error surface:
newNode := node.DeepCopy()
No error handling is necessary: this call never fails. If and only if the node is nil does DeepCopy() return nil.
To copy runtime.Objects there is an additional DeepCopyObject() method in the runtime.Object interface.
With the old method gone for good, clients need to update their copy invocations accordingly.
Code generation and CustomResources
Using client-go’s dynamic client to access CustomResources is discouraged and superseded by type-safe code using the generators in k8s.io/code-generator. Check out the Deep Dive on the Open Shift blog to learn about using code generation with client-go.
Comment Blocks
You can now place tags in the comment block just above a type or function, or in the second block above. There is no distinction anymore between these two comment blocks. This used to a be a source of subtle errors when using the generators:
// second block above
// +k8s:some-tag
// first block above
// +k8s:another-tag
type Foo struct {}
Custom Client Methods
You can now use extended tag definitions to create custom verbs . This lets you expand beyond the verbs defined by HTTP. This opens the door to higher levels of customization.
For example, this block leads to the generation of the method UpdateScale(s *autoscaling.Scale) (*autoscaling.Scale, error):
// genclient:method=UpdateScale,verb=update,subresource=scale,input=k8s.io/kubernetes/pkg/apis/autoscaling.Scale,result=k8s.io/kubernetes/pkg/apis/autoscaling.Scale
Resolving Golang Naming Conflicts
In more complex API groups it’s possible for Kinds, the group name, the Go package name, and the Go group alias name to conflict. This was not handled correctly prior to 1.9. The following tags resolve naming conflicts and make the generated code prettier:
// +groupName=example2.example.com
// +groupGoName=SecondExample
These are usually in the doc.go file of an API package. The first is used as the CustomResource group name when RESTfully speaking to the API server using HTTP. The second is used in the generated Golang code (for example, in the clientset) to access the group version:
clientset.SecondExampleV1()
It’s finally possible to have dots in Go package names. In this section’s example, you would put the groupName snippet into the pkg/apis/example2.example.com directory of your project.
Example projects
Kubernetes 1.9 includes a number of example projects which can serve as a blueprint for your own projects:
- k8s.io/sample-apiserver is a simple user-provided API server that is integrated into a cluster via API aggregation.
- k8s.io/sample-controller is a full-featured controller (also called an operator) with shared informers and a workqueue to process created, changed or deleted objects. It is based on CustomResourceDefinitions and uses k8s.io/code-generator to generate deepcopy functions, typed clientsets, informers, and listers.
Vendoring
In order to update from the previous version 5 to version 6 of client-go, the library itself as well as certain third-party dependencies must be updated. Previously, this process had been tedious due to the fact that a lot of code got refactored or relocated within the existing package layout across releases. Fortunately, far less code had to move in the latest version, which should ease the upgrade procedure for most users.
State of the published repositories
In the past k8s.io/client-go, k8s.io/api, and k8s.io/apimachinery were updated infrequently. Tags (for example, v4.0.0) were created quite some time after the Kubernetes releases. With the 1.9 release we resumed running a nightly bot that updates all the repositories for public consumption, even before manual tagging. This includes the branches:
- master
- release-1.8 / release-5.0
- release-1.9 / release-6.0 Kubernetes tags (for example, v1.9.1-beta1) are also applied automatically to the published repositories, prefixed with kubernetes- (for example, kubernetes-1.9.1-beta1).
These tags have limited test coverage, but can be used by early adopters of client-go and the other libraries. Moreover, they help to vendor the correct version of k8s.io/api and k8s.io/apimachinery. Note that we only create a v6.0.3-like semantic versioning tag on k8s.io/client-go. The corresponding tag for k8s.io/api and k8s.io/apimachinery is kubernetes-1.9.3.
Also note that only these tags correspond to tested releases of Kubernetes. If you depend on the release branch, e.g., release-1.9, your client is running on unreleased Kubernetes code.
State of vendoring of client-go
In general, the list of which dependencies to vendor is automatically generated and written to the file Godeps/Godeps.json. Only the revisions listed there are tested. This means especially that we do not and cannot test the code-base against master branches of our dependencies. This puts us in the following situation depending on the used vendoring tool:
- godep reads Godeps/Godeps.json by running godep restore from k8s.io/client-go in your GOPATH. Then use godep save to vendor in your project. godep will choose the correct versions from your GOPATH.
- glide reads Godeps/Godeps.json automatically from its dependencies including from k8s.io/client-go, both on init and on update. Hence, glide should be mostly automatic as long as there are no conflicts.
- dep does not currently respect Godeps/Godeps.json in a consistent way, especially not on updates. It is crucial to specify client-go dependencies manually as constraints or overrides, also for non k8s.io/* dependencies. Without those, dep simply chooses the dependency master branches, which can cause problems as they are updated frequently.
- The Kubernetes and golang/dep community are aware of the problems [issue #1124, issue #1236] and are working together on solutions. Until then special care must be taken. Please see client-go’s INSTALL.md for more details.
Updating dependencies – golang/dep
Even with the deficiencies of golang/dep today, dep is slowly becoming the de-facto standard in the Go ecosystem. With the necessary care and the awareness of the missing features, dep can be (and is!) used successfully. Here’s a demonstration of how to update a project with client-go 5 to the latest version 6 using dep:
(If you are still running client-go version 4 and want to play it safe by not skipping a release, now is a good time to check out this excellent blog post describing how to upgrade to version 5, put together by our friends at Heptio.)
Before starting, it is important to understand that client-go depends on two other Kubernetes projects: k8s.io/apimachinery and k8s.io/api. In addition, if you are using CRDs, you probably also depend on k8s.io/apiextensions-apiserver for the CRD client. The first exposes lower-level API mechanics (such as schemes, serialization, and type conversion), the second holds API definitions, and the third provides APIs related to CustomResourceDefinitions. In order for client-go to operate correctly, it needs to have its companion libraries vendored in correspondingly matching versions. Each library repository provides a branch named release-<version> where <version> refers to a particular Kubernetes version; for client-go version 6, it is imperative to refer to the release-1.9 branch on each repository.
Assuming the latest version 5 patch release of client-go being vendored through dep, the Gopkg.toml manifest file should look something like this (possibly using branches instead of versions):
[[constraint]]
name = "k8s.io/api"
version = "kubernetes-1.8.1"
[[constraint]]
name = "k8s.io/apimachinery"
version = "kubernetes-1.8.1"
[[constraint]]
name = "k8s.io/apiextensions-apiserver"
version = "kubernetes-1.8.1"
[[constraint]]
name = "k8s.io/client-go"
version = "5.0.1"
Note that some of the libraries could be missing if they are not actually needed by the client.
Upgrading to client-go version 6 means bumping the version and tag identifiers as following ( emphasis given):
[constraint]]
name = "k8s.io/api"
version = "kubernetes-1.9.0"
[[constraint]]
name = "k8s.io/apimachinery"
version = "kubernetes-1.9.0"
[[constraint]]
name = "k8s.io/apiextensions-apiserver"
version = "kubernetes-1.9.0"
[[constraint]]
name = "k8s.io/client-go"
version = "6.0.0"
The result of the upgrade can be found here.
A note of caution: dep cannot capture the complete set of dependencies in a reliable and reproducible fashion as described above. This means that for a 100% future-proof project you have to add constraints (or even overrides) to many other packages listed in client-go’s Godeps/Godeps.json. Be prepared to add them if something breaks. We are working with the golang/dep community to make this an easier and more smooth experience.
Finally, we need to tell dep to upgrade to the specified versions by executing dep ensure. If everything goes well, the output of the command invocation should be empty, with the only indication that it was successful being a number of updated files inside the vendor folder.
If you are using CRDs, you probably also use code-generation. The following block for Gopkg.toml will add the required code-generation packages to your project:
required = [
"k8s.io/code-generator/cmd/client-gen",
"k8s.io/code-generator/cmd/conversion-gen",
"k8s.io/code-generator/cmd/deepcopy-gen",
"k8s.io/code-generator/cmd/defaulter-gen",
"k8s.io/code-generator/cmd/informer-gen",
"k8s.io/code-generator/cmd/lister-gen",
]
[[constraint]]
branch = "kubernetes-1.9.0"
name = "k8s.io/code-generator"
Whether you would also like to prune unneeded packages (such as test files) through dep or commit the changes into the VCS at this point is up to you -- but from an upgrade perspective, you should now be ready to harness all the fancy new features that Kubernetes 1.9 brings through client-go.
Extensible Admission is Beta
In this post we review a feature, available in the Kubernetes API server, that allows you to implement arbitrary control decisions and which has matured considerably in Kubernetes 1.9.
The admission stage of API server processing is one of the most powerful tools for securing a Kubernetes cluster by restricting the objects that can be created, but it has always been limited to compiled code. In 1.9, we promoted webhooks for admission to beta, allowing you to leverage admission from outside the API server process.
What is Admission?
Admission is the phase of handling an API server request that happens before a resource is persisted, but after authorization. Admission gets access to the same information as authorization (user, URL, etc) and the complete body of an API request (for most requests).

The admission phase is composed of individual plugins, each of which are narrowly focused and have semantic knowledge of what they are inspecting. Examples include: PodNodeSelector (influences scheduling decisions), PodSecurityPolicy (prevents escalating containers), and ResourceQuota (enforces resource allocation per namespace).
Admission is split into two phases:
- Mutation, which allows modification of the body content itself as well as rejection of an API request.
- Validation, which allows introspection queries and rejection of an API request. An admission plugin can be in both phases, but all mutation happens before validation.
Mutation
The mutation phase of admission allows modification of the resource content before it is persisted. Because the same field can be mutated multiple times while in the admission chain, the order of the admission plugins in the mutation matters.
One example of a mutating admission plugin is the PodNodeSelector plugin, which uses an annotation on a namespace namespace.annotations[“scheduler.alpha.kubernetes.io/node-selector”] to find a label selector and add it to the pod.spec.nodeselector field. This positively restricts which nodes the pods in a particular namespace can land on, as opposed to taints, which provide negative restriction (also with an admission plugin).
Validation
The validation phase of admission allows the enforcement of invariants on particular API resources. The validation phase runs after all mutators finish to ensure that the resource isn’t going to change again.
One example of a validation admission plugin is also the PodNodeSelector plugin, which ensures that all pods’ spec.nodeSelector fields are constrained by the node selector restrictions on the namespace. Even if a mutating admission plugin tries to change the spec.nodeSelector field after the PodNodeSelector runs in the mutating chain, the PodNodeSelector in the validating chain prevents the API resource from being created because it fails validation.
What are admission webhooks?
Admission webhooks allow a Kubernetes installer or a cluster-admin to add mutating and validating admission plugins to the admission chain of kube-apiserver as well as any extensions apiserver based on k8s.io/apiserver 1.9, like metrics, service-catalog, or kube-projects, without recompiling them. Both kinds of admission webhooks run at the end of their respective chains and have the same powers and limitations as compiled admission plugins.
What are they good for?
Webhook admission plugins allow for mutation and validation of any resource on any API server, so the possible applications are vast. Some common use-cases include:
- Mutation of resources like pods. Istio has talked about doing this to inject side-car containers into pods. You could also write a plugin which forcefully resolves image tags into image SHAs.
- Name restrictions. On multi-tenant systems, reserving namespaces has emerged as a use-case.
- Complex CustomResource validation. Because the entire object is visible, a clever admission plugin can perform complex validation on dependent fields (A requires B) and even external resources (compare to LimitRanges).
- Security response. If you forced image tags into image SHAs, you could write an admission plugin that prevents certain SHAs from running.
Registration
Webhook admission plugins of both types are registered in the API, and all API servers (kube-apiserver and all extension API servers) share a common config for them. During the registration process, a webhook admission plugin describes:
- How to connect to the webhook admission server
- How to verify the webhook admission server (Is it really the server I expect?)
- Where to send the data at that server (which URL path)
- Which resources and which HTTP verbs it will handle
- What an API server should do on connection failures (for example, if the admission webhook server goes down)
1 apiVersion: admissionregistration.k8s.io/v1beta1
2 kind: ValidatingWebhookConfiguration
3 metadata:
4 name: namespacereservations.admission.online.openshift.io
5 webhooks:
6 - name: namespacereservations.admission.online.openshift.io
7 clientConfig:
8 service:
9 namespace: default
10 name: kubernetes
11 path: /apis/admission.online.openshift.io/v1alpha1/namespacereservations
12 caBundle: KUBE\_CA\_HERE
13 rules:
14 - operations:
15 - CREATE
16 apiGroups:
17 - ""
18 apiVersions:
19 - "\*"
20 resources:
21 - namespaces
22 failurePolicy: Fail
Line 6: name - the name for the webhook itself. For mutating webhooks, these are sorted to provide ordering.
Line 7: clientConfig - provides information about how to connect to, trust, and send data to the webhook admission server.
Line 13: rules - describe when an API server should call this admission plugin. In this case, only for creates of namespaces. You can specify any resource here so specifying creates of serviceinstances.servicecatalog.k8s.io is also legal.
Line 22: failurePolicy - says what to do if the webhook admission server is unavailable. Choices are “Ignore” (fail open) or “Fail” (fail closed). Failing open makes for unpredictable behavior for all clients.
Authentication and trust
Because webhook admission plugins have a lot of power (remember, they get to see the API resource content of any request sent to them and might modify them for mutating plugins), it is important to consider:
- How individual API servers verify their connection to the webhook admission server
- How the webhook admission server authenticates precisely which API server is contacting it
- Whether that particular API server has authorization to make the request There are three major categories of connection:
- From kube-apiserver or extension-apiservers to externally hosted admission webhooks (webhooks not hosted in the cluster)
- From kube-apiserver to self-hosted admission webhooks
- From extension-apiservers to self-hosted admission webhooks To support these categories, the webhook admission plugins accept a kubeconfig file which describes how to connect to individual servers. For interacting with externally hosted admission webhooks, there is really no alternative to configuring that file manually since the authentication/authorization and access paths are owned by the server you’re hooking to.
For the self-hosted category, a cleverly built webhook admission server and topology can take advantage of the safe defaulting built into the admission plugin and have a secure, portable, zero-config topology that works from any API server.
Simple, secure, portable, zero-config topology
If you build your webhook admission server to also be an extension API server, it becomes possible to aggregate it as a normal API server. This has a number of advantages:
- Your webhook becomes available like any other API under default kube-apiserver service
kubernetes.default.svc(e.g. https://kubernetes.default.svc/apis/admission.example.com/v1/mymutatingadmissionreviews). Among other benefits, you can test usingkubectl. - Your webhook automatically (without any config) makes use of the in-cluster authentication and authorization provided by kube-apiserver. You can restrict access to your webhook with normal RBAC rules.
- Your extension API servers and kube-apiserver automatically (without any config) make use of their in-cluster credentials to communicate with the webhook.
- Extension API servers do not leak their service account token to your webhook because they go through kube-apiserver, which is a secure front proxy.
Source: https://drive.google.com/a/redhat.com/file/d/12nC9S2fWCbeX_P8nrmL6NgOSIha4HDNp

In short: a secure topology makes use of all security mechanisms of API server aggregation and additionally requires no additional configuration.
Other topologies are possible but require additional manual configuration as well as a lot of effort to create a secure setup, especially when extension API servers like service catalog come into play. The topology above is zero-config and portable to every Kubernetes cluster.
How do I write a webhook admission server?
Writing a full server complete with authentication and authorization can be intimidating. To make it easier, there are projects based on Kubernetes 1.9 that provide a library for building your webhook admission server in 200 lines or less. Take a look at the generic-admission-apiserver and the kubernetes-namespace-reservation projects for the library and an example of how to build your own secure and portable webhook admission server.
With the admission webhooks introduced in 1.9 we’ve made Kubernetes even more adaptable to your needs. We hope this work, driven by both Red Hat and Google, will enable many more workloads and support ecosystem components. (Istio is one example.) Now is a good time to give it a try!
If you’re interested in giving feedback or contributing to this area, join us in the SIG API machinery.
Introducing Container Storage Interface (CSI) Alpha for Kubernetes
One of the key differentiators for Kubernetes has been a powerful volume plugin system that enables many different types of storage systems to:
- Automatically create storage when required.
- Make storage available to containers wherever they’re scheduled.
- Automatically delete the storage when no longer needed. Adding support for new storage systems to Kubernetes, however, has been challenging.
Kubernetes 1.9 introduces an alpha implementation of the Container Storage Interface (CSI) which makes installing new volume plugins as easy as deploying a pod. It also enables third-party storage providers to develop solutions without the need to add to the core Kubernetes codebase.
Because the feature is alpha in 1.9, it must be explicitly enabled. Alpha features are not recommended for production usage, but are a good indication of the direction the project is headed (in this case, towards a more extensible and standards based Kubernetes storage ecosystem).
Why Kubernetes CSI?
Kubernetes volume plugins are currently “in-tree”, meaning they’re linked, compiled, built, and shipped with the core kubernetes binaries. Adding support for a new storage system to Kubernetes (a volume plugin) requires checking code into the core Kubernetes repository. But aligning with the Kubernetes release process is painful for many plugin developers.
The existing Flex Volume plugin attempted to address this pain by exposing an exec based API for external volume plugins. Although it enables third party storage vendors to write drivers out-of-tree, in order to deploy the third party driver files it requires access to the root filesystem of node and master machines.
In addition to being difficult to deploy, Flex did not address the pain of plugin dependencies: Volume plugins tend to have many external requirements (on mount and filesystem tools, for example). These dependencies are assumed to be available on the underlying host OS which is often not the case (and installing them requires access to the root filesystem of node machine).
CSI addresses all of these issues by enabling storage plugins to be developed out-of-tree, containerized, deployed via standard Kubernetes primitives, and consumed through the Kubernetes storage primitives users know and love (PersistentVolumeClaims, PersistentVolumes, StorageClasses).
What is CSI?
The goal of CSI is to establish a standardized mechanism for Container Orchestration Systems (COs) to expose arbitrary storage systems to their containerized workloads. The CSI specification emerged from cooperation between community members from various Container Orchestration Systems (COs)--including Kubernetes, Mesos, Docker, and Cloud Foundry. The specification is developed, independent of Kubernetes, and maintained at https://github.com/container-storage-interface/spec/blob/master/spec.md.
Kubernetes v1.9 exposes an alpha implementation of the CSI specification enabling CSI compatible volume drivers to be deployed on Kubernetes and consumed by Kubernetes workloads.
How do I deploy a CSI driver on a Kubernetes Cluster?
CSI plugin authors will provide their own instructions for deploying their plugin on Kubernetes.
How do I use a CSI Volume?
Assuming a CSI storage plugin is already deployed on your cluster, you can use it through the familiar Kubernetes storage primitives: PersistentVolumeClaims, PersistentVolumes, and StorageClasses.
CSI is an alpha feature in Kubernetes v1.9. To enable it, set the following flags:
CSI is an alpha feature in Kubernetes v1.9. To enable it, set the following flags:
API server binary:
--feature-gates=CSIPersistentVolume=true
--runtime-config=storage.k8s.io/v1alpha1=true
API server binary and kubelet binaries:
--feature-gates=MountPropagation=true
--allow-privileged=true
Dynamic Provisioning
You can enable automatic creation/deletion of volumes for CSI Storage plugins that support dynamic provisioning by creating a StorageClass pointing to the CSI plugin.
The following StorageClass, for example, enables dynamic creation of “fast-storage” volumes by a CSI volume plugin called “com.example.team/csi-driver”.
kind: StorageClass
apiVersion: storage.k8s.io/v1
metadata:
name: fast-storage
provisioner: com.example.team/csi-driver
parameters:
type: pd-ssd
To trigger dynamic provisioning, create a PersistentVolumeClaim object. The following PersistentVolumeClaim, for example, triggers dynamic provisioning using the StorageClass above.
apiVersion: v1
kind: PersistentVolumeClaim
metadata:
name: my-request-for-storage
spec:
accessModes:
- ReadWriteOnce
resources:
requests:
storage: 5Gi
storageClassName: fast-storage
When volume provisioning is invoked, the parameter “type: pd-ssd” is passed to the CSI plugin “com.example.team/csi-driver” via a “CreateVolume” call. In response, the external volume plugin provisions a new volume and then automatically create a PersistentVolume object to represent the new volume. Kubernetes then binds the new PersistentVolume object to the PersistentVolumeClaim, making it ready to use.
If the “fast-storage” StorageClass is marked default, there is no need to include the storageClassName in the PersistentVolumeClaim, it will be used by default.
Pre-Provisioned Volumes
You can always expose a pre-existing volume in Kubernetes by manually creating a PersistentVolume object to represent the existing volume. The following PersistentVolume, for example, exposes a volume with the name “existingVolumeName” belonging to a CSI storage plugin called “com.example.team/csi-driver”.
apiVersion: v1
kind: PersistentVolume
metadata:
name: my-manually-created-pv
spec:
capacity:
storage: 5Gi
accessModes:
- ReadWriteOnce
persistentVolumeReclaimPolicy: Retain
csi:
driver: com.example.team/csi-driver
volumeHandle: existingVolumeName
readOnly: false
Attaching and Mounting
You can reference a PersistentVolumeClaim that is bound to a CSI volume in any pod or pod template.
kind: Pod
apiVersion: v1
metadata:
name: my-pod
spec:
containers:
- name: my-frontend
image: dockerfile/nginx
volumeMounts:
- mountPath: "/var/www/html"
name: my-csi-volume
volumes:
- name: my-csi-volume
persistentVolumeClaim:
claimName: my-request-for-storage
When the pod referencing a CSI volume is scheduled, Kubernetes will trigger the appropriate operations against the external CSI plugin (ControllerPublishVolume, NodePublishVolume, etc.) to ensure the specified volume is attached, mounted, and ready to use by the containers in the pod.
For more details please see the CSI implementation design doc and documentation.
How do I create a CSI driver?
Kubernetes is as minimally prescriptive on the packaging and deployment of a CSI Volume Driver as possible. The minimum requirements for deploying a CSI Volume Driver on Kubernetes are documented here.
The minimum requirements document also contains a section outlining the suggested mechanism for deploying an arbitrary containerized CSI driver on Kubernetes. This mechanism can be used by a Storage Provider to simplify deployment of containerized CSI compatible volume drivers on Kubernetes.
As part of this recommended deployment process, the Kubernetes team provides the following sidecar (helper) containers:
- Sidecar container that watches Kubernetes VolumeAttachment objects and triggers ControllerPublish and ControllerUnpublish operations against a CSI endpoint.
- Sidecar container that watches Kubernetes PersistentVolumeClaim objects and triggers CreateVolume and DeleteVolume operations against a CSI endpoint.
- Sidecar container that registers the CSI driver with kubelet (in the future), and adds the drivers custom NodeId (retrieved via GetNodeID call against the CSI endpoint) to an annotation on the Kubernetes Node API Object
Storage vendors can build Kubernetes deployments for their plugins using these components, while leaving their CSI driver completely unaware of Kubernetes.
Where can I find CSI drivers?
CSI drivers are developed and maintained by third-parties. You can find example CSI drivers here, but these are provided purely for illustrative purposes, and are not intended to be used for production workloads.
What about Flex?
The Flex Volume plugin exists as an exec based mechanism to create “out-of-tree” volume plugins. Although it has some drawbacks (mentioned above), the Flex volume plugin coexists with the new CSI Volume plugin. SIG Storage will continue to maintain the Flex API so that existing third-party Flex drivers (already deployed in production clusters) continue to work. In the future, new volume features will only be added to CSI, not Flex.
What will happen to the in-tree volume plugins?
Once CSI reaches stability, we plan to migrate most of the in-tree volume plugins to CSI. Stay tuned for more details as the Kubernetes CSI implementation approaches stable.
What are the limitations of alpha?
The alpha implementation of CSI has the following limitations:
- The credential fields in CreateVolume, NodePublishVolume, and ControllerPublishVolume calls are not supported.
- Block volumes are not supported; only file.
- Specifying filesystems is not supported, and defaults to ext4.
- CSI drivers must be deployed with the provided “external-attacher,” even if they don’t implement “ControllerPublishVolume”.
- Kubernetes scheduler topology awareness is not supported for CSI volumes: in short, sharing information about where a volume is provisioned (zone, regions, etc.) to allow k8s scheduler to make smarter scheduling decisions.
What’s next?
Depending on feedback and adoption, the Kubernetes team plans to push the CSI implementation to beta in either 1.10 or 1.11.
How Do I Get Involved?
This project, like all of Kubernetes, is the result of hard work by many contributors from diverse backgrounds working together. A huge thank you to Vladimir Vivien (vladimirvivien), Jan Šafránek (jsafrane), Chakravarthy Nelluri (chakri-nelluri), Bradley Childs (childsb), Luis Pabón (lpabon), and Saad Ali (saad-ali) for their tireless efforts in bringing CSI to life in Kubernetes.
If you’re interested in getting involved with the design and development of CSI or any part of the Kubernetes Storage system, join the Kubernetes Storage Special-Interest-Group (SIG). We’re rapidly growing and always welcome new contributors.
Kubernetes v1.9 releases beta support for Windows Server Containers
At the time of publication, Michael Michael was writing as SIG-Windows Lead.
With the release of Kubernetes v1.9, our mission of ensuring Kubernetes works well everywhere and for everyone takes a great step forward. We’ve advanced support for Windows Server to beta along with continued feature and functional advancements on both the Kubernetes and Windows platforms. SIG-Windows has been working since March of 2016 to open the door for many Windows-specific applications and workloads to run on Kubernetes, significantly expanding the implementation scenarios and the enterprise reach of Kubernetes.
Enterprises of all sizes have made significant investments in .NET and Windows based applications. Many enterprise portfolios today contain .NET and Windows, with Gartner claiming that 80% of enterprise apps run on Windows. According to StackOverflow Insights, 40% of professional developers use the .NET programming languages (including .NET Core).
But why is all this information important? It means that enterprises have both legacy and new born-in-the-cloud (microservice) applications that utilize a wide array of programming frameworks. There is a big push in the industry to modernize existing/legacy applications to containers, using an approach similar to “lift and shift”. Modernizing existing applications into containers also provides added flexibility for new functionality to be introduced in additional Windows or Linux containers. Containers are becoming the de facto standard for packaging, deploying, and managing both existing and microservice applications. IT organizations are looking for an easier and homogenous way to orchestrate and manage containers across their Linux and Windows environments. Kubernetes v1.9 now offers beta support for Windows Server containers, making it the clear choice for orchestrating containers of any kind.
Features
Alpha support for Windows Server containers in Kubernetes was great for proof-of-concept projects and visualizing the road map for support of Windows in Kubernetes. The alpha release had significant drawbacks, however, and lacked many features, especially in networking. SIG-Windows, Microsoft, Cloudbase Solutions, Apprenda, and other community members banded together to create a comprehensive beta release, enabling Kubernetes users to start evaluating and using Windows.
Some key feature improvements for Windows Server containers on Kubernetes include:
- Improved support for pods! Multiple Windows Server containers in a pod can now share the network namespace using network compartments in Windows Server. This feature brings the concept of a pod to parity with Linux-based containers
- Reduced network complexity by using a single network endpoint per pod
- Kernel-Based load-balancing using the Virtual Filtering Platform (VFP) Hyper-v Switch Extension (analogous to Linux iptables)
- Container Runtime Interface (CRI) pod and node level statistics. Windows Server containers can now be profiled for Horizontal Pod Autoscaling using performance metrics gathered from the pod and the node
- Support for kubeadm commands to add Windows Server nodes to a Kubernetes environment. Kubeadm simplifies the provisioning of a Kubernetes cluster, and with the support for Windows Server, you can use a single tool to deploy Kubernetes in your infrastructure
- Support for ConfigMaps, Secrets, and Volumes. These are key features that allow you to separate, and in some cases secure, the configuration of the containers from the implementation The crown jewels of Kubernetes 1.9 Windows support, however, are the networking enhancements. With the release of Windows Server 1709, Microsoft has enabled key networking capabilities in the operating system and the Windows Host Networking Service (HNS) that paved the way to produce a number of CNI plugins that work with Windows Server containers in Kubernetes. The Layer-3 routed and network overlay plugins that are supported with Kubernetes 1.9 are listed below:
- Upstream L3 Routing - IP routes configured in upstream ToR
- Host-Gateway - IP routes configured on each host
- Open vSwitch (OVS) & Open Virtual Network (OVN) with Overlay - Supports STT and Geneve tunneling types You can read more about each of their configuration, setup, and runtime capabilities to make an informed selection for your networking stack in Kubernetes.
Even though you have to continue running the Kubernetes Control Plane and Master Components in Linux, you are now able to introduce Windows Server as a Node in Kubernetes. As a community, this is a huge milestone and achievement. We will now start seeing .NET, .NET Core, ASP.NET, IIS, Windows Services, Windows executables and many more windows-based applications in Kubernetes.
What’s coming next
A lot of work went into this beta release, but the community realizes there are more areas of investment needed before we can release Windows support as GA (General Availability) for production workloads. Some keys areas of focus for the first two quarters of 2018 include:
- Continue to make progress in the area of networking. Additional CNI plugins are under development and nearing completion
- Overlay - win-overlay (vxlan or IP-in-IP encapsulation using Flannel)
- Win-l2bridge (host-gateway)
- OVN using cloud networking - without overlays
- Support for Kubernetes network policies in ovn-kubernetes
- Support for Hyper-V Isolation
- Support for StatefulSet functionality for stateful applications
- Produce installation artifacts and documentation that work on any infrastructure and across many public cloud providers like Microsoft Azure, Google Cloud, and Amazon AWS
- Continuous Integration/Continuous Delivery (CI/CD) infrastructure for SIG-Windows
- Scalability and Performance testing Even though we have not committed to a timeline for GA, SIG-Windows estimates a GA release in the first half of 2018.
Get Involved
As we continue to make progress towards General Availability of this feature in Kubernetes, we welcome you to get involved, contribute code, provide feedback, deploy Windows Server containers to your Kubernetes cluster, or simply join our community.
- If you want to get started on deploying Windows Server containers in Kubernetes, read our getting started guide at /docs/getting-started-guides/windows/
- We meet every other Tuesday at 12:30 Eastern Standard Time (EST) at https://zoom.us/my/sigwindows. All our meetings are recorded on youtube and referenced at https://www.youtube.com/playlist?list=PL69nYSiGNLP2OH9InCcNkWNu2bl-gmIU4
- Chat with us on Slack at https://kubernetes.slack.com/messages/sig-windows
- Find us on GitHub at https://github.com/kubernetes/community/tree/master/sig-windows
Five Days of Kubernetes 1.9
Kubernetes 1.9 is live, made possible by hundreds of contributors pushing thousands of commits in this latest releases.
The community has tallied around 32,300 commits in the main repo and continues rapid growth outside of the main repo, which signals growing maturity and stability for the project. The community has logged more than 90,700 commits across all repos and 7,800 commits across all repos for v1.8.0 to v1.9.0 alone.
With the help of our growing community of 1,400 plus contributors, we issued more than 4,490 PRs and pushed more than 7,800 commits to deliver Kubernetes 1.9 with many notable updates, including enhancements for the workloads and stateful application support areas. This all points to increased extensibility and standards-based Kubernetes ecosystem.
While many improvements have been contributed, we highlight key features in this series of in-depth posts listed below. Follow along and see what’s new and improved with workloads, Windows support and more.
Day 1: 5 Days of Kubernetes 1.9
Day 2: Windows and Docker support for Kubernetes (beta)
Day 3: Storage, CSI framework (alpha)
Day 4: Web Hook and Mission Critical, Dynamic Admission Control
Day 5: Introducing client-go version 6
Day 6: Workloads API
Connect
- Post questions (or answer questions) on Stack Overflow
- Join the community portal for advocates on K8sPort
- Follow us on Twitter @Kubernetesio for latest updates
- Connect with the community on Slack
- Get involved with the Kubernetes project on GitHub
Introducing Kubeflow - A Composable, Portable, Scalable ML Stack Built for Kubernetes
Kubernetes and Machine Learning
Kubernetes has quickly become the hybrid solution for deploying complicated workloads anywhere. While it started with just stateless services, customers have begun to move complex workloads to the platform, taking advantage of rich APIs, reliability and performance provided by Kubernetes. One of the fastest growing use cases is to use Kubernetes as the deployment platform of choice for machine learning.
Building any production-ready machine learning system involves various components, often mixing vendors and hand-rolled solutions. Connecting and managing these services for even moderately sophisticated setups introduces huge barriers of complexity in adopting machine learning. Infrastructure engineers will often spend a significant amount of time manually tweaking deployments and hand rolling solutions before a single model can be tested.
Worse, these deployments are so tied to the clusters they have been deployed to that these stacks are immobile, meaning that moving a model from a laptop to a highly scalable cloud cluster is effectively impossible without significant re-architecture. All these differences add up to wasted effort and create opportunities to introduce bugs at each transition.
Introducing Kubeflow
To address these concerns, we’re announcing the creation of the Kubeflow project, a new open source GitHub repo dedicated to making using ML stacks on Kubernetes easy, fast and extensible. This repository contains:
- JupyterHub to create & manage interactive Jupyter notebooks
- A Tensorflow Custom Resource (CRD) that can be configured to use CPUs or GPUs, and adjusted to the size of a cluster with a single setting
- A TF Serving container Because this solution relies on Kubernetes, it runs wherever Kubernetes runs. Just spin up a cluster and go!
Using Kubeflow
Let's suppose you are working with two different Kubernetes clusters: a local minikube cluster; and a GKE cluster with GPUs; and that you have two kubectl contexts defined named minikube and gke.
First we need to initialize our ksonnet application and install the Kubeflow packages. (To use ksonnet, you must first install it on your operating system - the instructions for doing so are here)
ks init my-kubeflow
cd my-kubeflow
ks registry add kubeflow \
github.com/google/kubeflow/tree/master/kubeflow
ks pkg install kubeflow/core
ks pkg install kubeflow/tf-serving
ks pkg install kubeflow/tf-job
ks generate core kubeflow-core --name=kubeflow-core
We can now define environments corresponding to our two clusters.
kubectl config use-context minikube
ks env add minikube
kubectl config use-context gke
ks env add gke
And we’re done! Now just create the environments on your cluster. First, on minikube:
ks apply minikube -c kubeflow-core
And to create it on our multi-node GKE cluster for quicker training:
ks apply gke -c kubeflow-core
By making it easy to deploy the same rich ML stack everywhere, the drift and rewriting between these environments is kept to a minimum.
To access either deployments, you can execute the following command:
kubectl port-forward tf-hub-0 8100:8000
and then open up http://127.0.0.1:8100 to access JupyterHub. To change the environment used by kubectl, use either of these commands:
# To access minikube
kubectl config use-context minikube
# To access GKE
kubectl config use-context gke
When you execute apply you are launching on K8s
- JupyterHub for launching and managing Jupyter notebooks on K8s
- A TF CRD
Let's suppose you want to submit a training job. Kubeflow provides ksonnet prototypes that make it easy to define components. The tf-job prototype makes it easy to create a job for your code but for this example, we'll use the tf-cnn prototype which runs TensorFlow's CNN benchmark.
To submit a training job, you first generate a new job from a prototype:
ks generate tf-cnn cnn --name=cnn
By default the tf-cnn prototype uses 1 worker and no GPUs which is perfect for our minikube cluster so we can just submit it.
ks apply minikube -c cnn
On GKE, we’ll want to tweak the prototype to take advantage of the multiple nodes and GPUs. First, let’s list all the parameters available:
# To see a list of parameters
ks prototype list tf-job
Now let’s adjust the parameters to take advantage of GPUs and access to multiple nodes.
ks param set --env=gke cnn num\_gpus 1
ks param set --env=gke cnn num\_workers 1
ks apply gke -c cnn
Note how we set those parameters so they are used only when you deploy to GKE. Your minikube parameters are unchanged!
After training, you export your model to a serving location.
Kubeflow also includes a serving package as well.
To deploy a the trained model for serving, execute the following:
ks generate tf-serving inception --name=inception
---namespace=default --model\_path=gs://$bucket_name/$model_loc
ks apply gke -c inception
This highlights one more option in Kubeflow - the ability to pass in inputs based on your deployment. This command creates a tf-serving service on the GKE cluster, and makes it available to your application.
For more information about of deploying and monitoring TensorFlow training jobs and TensorFlow models please refer to the user guide.
Kubeflow + ksonnet
One choice we want to call out is the use of the ksonnet project. We think working with multiple environments (dev, test, prod) will be the norm for most Kubeflow users. By making environments a first class concept, ksonnet makes it easy for Kubeflow users to easily move their workloads between their different environments.
Particularly now that Helm is integrating ksonnet with the next version of their platform, we felt like it was the perfect choice for us. More information about ksonnet can be found in the ksonnet docs.
We also want to thank the team at Heptio for expediting features critical to Kubeflow's use of ksonnet.
What’s Next?
We are in the midst of building out a community effort right now, and we would love your help! We’ve already been collaborating with many teams - CaiCloud, Red Hat & OpenShift, Canonical, Weaveworks, Container Solutions and many others. CoreOS, for example, is already seeing the promise of Kubeflow:
“The Kubeflow project was a needed advancement to make it significantly easier to set up and productionize machine learning workloads on Kubernetes, and we anticipate that it will greatly expand the opportunity for even more enterprises to embrace the platform. We look forward to working with the project members in providing tight integration of Kubeflow with Tectonic, the enterprise Kubernetes platform.” -- Reza Shafii, VP of product, CoreOS
If you’d like to try out Kubeflow right now right in your browser, we’ve partnered with Katacoda to make it super easy. You can try it here!
And we’re just getting started! We would love for you to help. How you might ask? Well…
- Please join theslack channel
- Please join thekubeflow-discuss email list
- Please subscribe to theKubeflow twitter account
- Please download and run kubeflow, and submit bugs! Thank you for your support so far, we could not be more excited!
Note:
- This article was amended in June 2023 to update the trained model bucket location.
Kubernetes 1.9: Apps Workloads GA and Expanded Ecosystem
We’re pleased to announce the delivery of Kubernetes 1.9, our fourth and final release this year.
Today’s release continues the evolution of an increasingly rich feature set, more robust stability, and even greater community contributions. As the fourth release of the year, it gives us an opportunity to look back at the progress made in key areas. Particularly notable is the advancement of the Apps Workloads API to stable. This removes any reservations potential adopters might have had about the functional stability required to run mission-critical workloads. Another big milestone is the beta release of Windows support, which opens the door for many Windows-specific applications and workloads to run in Kubernetes, significantly expanding the implementation scenarios and enterprise readiness of Kubernetes.
Workloads API GA
We’re excited to announce General Availability (GA) of the apps/v1 Workloads API, which is now enabled by default. The Apps Workloads API groups the DaemonSet, Deployment, ReplicaSet, and StatefulSet APIs together to form the foundation for long-running stateless and stateful workloads in Kubernetes. Note that the Batch Workloads API (Job and CronJob) is not part of this effort and will have a separate path to GA stability.
Deployment and ReplicaSet, two of the most commonly used objects in Kubernetes, are now stabilized after more than a year of real-world use and feedback. SIG Apps has applied the lessons from this process to all four resource kinds over the last several release cycles, enabling DaemonSet and StatefulSet to join this graduation. The v1 (GA) designation indicates production hardening and readiness, and comes with the guarantee of long-term backwards compatibility.
Windows Support (beta)
Kubernetes was originally developed for Linux systems, but as our users are realizing the benefits of container orchestration at scale, we are seeing demand for Kubernetes to run Windows workloads. Work to support Windows Server in Kubernetes began in earnest about 12 months ago. SIG-Windowshas now promoted this feature to beta status, which means that we can evaluate it for usage.
Storage Enhancements
From the first release, Kubernetes has supported multiple options for persistent data storage, including commonly-used NFS or iSCSI, along with native support for storage solutions from the major public and private cloud providers. As the project and ecosystem grow, more and more storage options have become available for Kubernetes. Adding volume plugins for new storage systems, however, has been a challenge.
Container Storage Interface (CSI) is a cross-industry standards initiative that aims to lower the barrier for cloud native storage development and ensure compatibility. SIG-Storage and the CSI Community are collaborating to deliver a single interface for provisioning, attaching, and mounting storage compatible with Kubernetes.
Kubernetes 1.9 introduces an alpha implementation of the Container Storage Interface (CSI), which will make installing new volume plugins as easy as deploying a pod, and enable third-party storage providers to develop their solutions without the need to add to the core Kubernetes codebase.
Because the feature is alpha in 1.9, it must be explicitly enabled and is not recommended for production usage, but it indicates the roadmap working toward a more extensible and standards-based Kubernetes storage ecosystem.
Additional Features
Custom Resource Definition (CRD) Validation, now graduating to beta and enabled by default, helps CRD authors give clear and immediate feedback for invalid objects
SIG Node hardware accelerator moves to alpha, enabling GPUs and consequently machine learning and other high performance workloads
CoreDNS alpha makes it possible to install CoreDNS with standard tools
IPVS mode for kube-proxy goes beta, providing better scalability and performance for large clusters
Each Special Interest Group (SIG) in the community continues to deliver the most requested user features for their area. For a complete list, please visit the release notes.
Availability
Kubernetes 1.9 is available for download on GitHub. To get started with Kubernetes, check out these interactive tutorials.
Release team
This release is made possible through the effort of hundreds of individuals who contributed both technical and non-technical content. Special thanks to the release team led by Anthony Yeh, Software Engineer at Google. The 14 individuals on the release team coordinate many aspects of the release, from documentation to testing, validation, and feature completeness.
As the Kubernetes community has grown, our release process has become an amazing demonstration of collaboration in open source software development. Kubernetes continues to gain new users at a rapid clip. This growth creates a positive feedback cycle where more contributors commit code creating a more vibrant ecosystem.
Project Velocity
The CNCF has embarked on an ambitious project to visualize the myriad contributions that go into the project. K8s DevStats illustrates the breakdown of contributions from major company contributors. Open issues remained relatively stable over the course of the release, while forks rose approximately 20%, as did individuals starring the various project repositories. Approver volume has risen slightly since the last release, but a lull is commonplace during the last quarter of the year. With 75,000+ comments, Kubernetes remains one of the most actively discussed projects on GitHub.
User highlights
According to the latest survey conducted by CNCF, 61 percent of organizations are evaluating and 83 percent are using Kubernetes in production. Example of user stories from the community include:
BlaBlaCar, the world’s largest long distance carpooling community connects 40 million members across 22 countries. The company has about 3,000 pods, with 1,200 of them running on Kubernetes, leading to improved website availability for customers.
Pokémon GO, the popular free-to-play, location-based augmented reality game developed by Niantic for iOS and Android devices, has its application logic running on Google Container Engine powered by Kubernetes. This was the largest Kubernetes deployment ever on Google Container Engine.
Is Kubernetes helping your team? Share your story with the community.
Ecosystem updates
Announced on November 13, the Certified Kubernetes Conformance Program ensures that Certified Kubernetes™ products deliver consistency and portability. Thirty-two Certified Kubernetes Distributions and Platforms are now available. Development of the certification program involved close collaboration between CNCF and the rest of the Kubernetes community, especially the Testing and Architecture Special Interest Groups (SIGs). The Kubernetes Architecture SIG is the final arbiter of the definition of API conformance for the program. The program also includes strong guarantees that commercial providers of Kubernetes will continue to release new versions to ensure that customers can take advantage of the rapid pace of ongoing development.
CNCF also offers online training that teaches the skills needed to create and configure a real-world Kubernetes cluster.
KubeCon
For recorded sessions from the largest Kubernetes gathering, KubeCon + CloudNativeCon in Austin from December 6-8, 2017, visit YouTube/CNCF. The premiere Kubernetes event will be back May 2-4, 2018 in Copenhagen and will feature technical sessions, case studies, developer deep dives, salons and more! CFP closes January 12, 2018.
Webinar
Join members of the Kubernetes 1.9 release team on January 9th from 10am-11am PT to learn about the major features in this release as they demo some of the highlights in the areas of Windows and Docker support, storage, admission control, and the workloads API. Register here.
Get involved:
The simplest way to get involved with Kubernetes is by joining one of the many Special Interest Groups (SIGs) that align with your interests. Have something you’d like to broadcast to the Kubernetes community? Share your voice at our weekly community meeting, and through the channels below.
Thank you for your continued feedback and support.
- Post questions (or answer questions) on Stack Overflow
- Join the community portal for advocates on K8sPort
- Follow us on Twitter @Kubernetesio for latest updates
- Chat with the community on Slack
- Share your Kubernetes story.
Using eBPF in Kubernetes
Introduction
Kubernetes provides a high-level API and a set of components that hides almost all of the intricate and—to some of us—interesting details of what happens at the systems level. Application developers are not required to have knowledge of the machines' IP tables, cgroups, namespaces, seccomp, or, nowadays, even the container runtime that their application runs on top of. But underneath, Kubernetes and the technologies upon which it relies (for example, the container runtime) heavily leverage core Linux functionalities.
This article focuses on a core Linux functionality increasingly used in networking, security and auditing, and tracing and monitoring tools. This functionality is called extended Berkeley Packet Filter (eBPF)
Note: In this article we use both acronyms: eBPF and BPF. The former is used for the extended BPF functionality, and the latter for "classic" BPF functionality.
What is BPF?
BPF is a mini-VM residing in the Linux kernel that runs BPF programs. Before running, BPF programs are loaded with the bpf() syscall and are validated for safety: checking for loops, code size, etc. BPF programs are attached to kernel objects and executed when events happen on those objects—for example, when a network interface emits a packet.
BPF Superpowers
BPF programs are event-driven by definition, an incredibly powerful concept, and executes code in the kernel when an event occurs. Netflix's Brendan Gregg refers to BPF as a Linux superpower.
The 'e' in eBPF
Traditionally, BPF could only be attached to sockets for socket filtering. BPF’s first use case was in tcpdump. When you run tcpdump the filter is compiled into a BPF program and attached to a raw AF_PACKET socket in order to print out filtered packets.
But over the years, eBPF added the ability to attach to other kernel objects. In addition to socket filtering, some supported attach points are:
- Kprobes (and userspace equivalents uprobes)
- Tracepoints
- Network schedulers or qdiscs for classification or action (tc)
- XDP (eXpress Data Path) This and other, newer features like in-kernel helper functions and shared data-structures (maps) that can be used to communicate with user space, extend BPF’s capabilities.
Existing Use Cases of eBPF with Kubernetes
Several open-source Kubernetes tools already use eBPF and many use cases warrant a closer look, especially in areas such as networking, monitoring and security tools.
Dynamic Network Control and Visibility with Cilium
Cilium is a networking project that makes heavy use of eBPF superpowers to route and filter network traffic for container-based systems. By using eBPF, Cilium can dynamically generate and apply rules—even at the device level with XDP—without making changes to the Linux kernel itself.
The Cilium Agent runs on each host. Instead of managing IP tables, it translates network policy definitions to BPF programs that are loaded into the kernel and attached to a container's virtual ethernet device. These programs are executed—rules applied—on each packet that is sent or received.
This diagram shows how the Cilium project works:

Depending on what network rules are applied, BPF programs may be attached with tc or XDP. By using XDP, Cilium can attach the BPF programs at the lowest possible point, which is also the most performant point in the networking software stack.
If you'd like to learn more about how Cilium uses eBPF, take a look at the project's BPF and XDP reference guide.
Tracking TCP Connections in Weave Scope
Weave Scope is a tool for monitoring, visualizing and interacting with container-based systems. For our purposes, we'll focus on how Weave Scope gets the TCP connections.

Weave Scope employs an agent that runs on each node of a cluster. The agent monitors the system, generates a report and sends it to the app server. The app server compiles the reports it receives and presents the results in the Weave Scope UI.
To accurately draw connections between containers, the agent attaches a BPF program to kprobes that track socket events: opening and closing connections. The BPF program, tcptracer-bpf, is compiled into an ELF object file and loaded using gobpf.
(As a side note, Weave Scope also has a plugin that make use of eBPF: HTTP statistics.)
To learn more about how this works and why it's done this way, read this extensive post that the Kinvolk team wrote for the Weaveworks Blog. You can also watch a recent talk about the topic.
Limiting syscalls with seccomp-bpf
Linux has more than 300 system calls (read, write, open, close, etc.) available for use—or misuse. Most applications only need a small subset of syscalls to function properly. seccomp is a Linux security facility used to limit the set of syscalls that an application can use, thereby limiting potential misuse.
The original implementation of seccomp was highly restrictive. Once applied, if an application attempted to do anything beyond reading and writing to files it had already opened, seccomp sent a SIGKILL signal.
seccomp-bpf enables more complex filters and a wider range of actions. Seccomp-bpf, also known as seccomp mode 2, allows for applying custom filters in the form of BPF programs. When the BPF program is loaded, the filter is applied to each syscall and the appropriate action is taken (Allow, Kill, Trap, etc.).
seccomp-bpf is widely used in Kubernetes tools and exposed in Kubernetes itself. For example, seccomp-bpf is used in Docker to apply custom seccomp security profiles, in rkt to apply seccomp isolators, and in Kubernetes itself in its Security Context.
But in all of these cases the use of BPF is hidden behind libseccomp. Behind the scenes, libseccomp generates BPF code from rules provided to it. Once generated, the BPF program is loaded and the rules applied.
Potential Use Cases for eBPF with Kubernetes
eBPF is a relatively new Linux technology. As such, there are many uses that remain unexplored. eBPF itself is also evolving: new features are being added in eBPF that will enable new use cases that aren’t currently possible. In the following sections, we're going to look at some of these that have only recently become possible and ones on the horizon. Our hope is that these features will be leveraged by open source tooling.
Pod and container level network statistics
BPF socket filtering is nothing new, but BPF socket filtering per cgroup is. Introduced in Linux 4.10, cgroup-bpf allows attaching eBPF programs to cgroups. Once attached, the program is executed for all packets entering or exiting any process in the cgroup.
A cgroup is, amongst other things, a hierarchical grouping of processes. In Kubernetes, this grouping is found at the container level. One idea for making use of cgroup-bpf, is to install BPF programs that collect detailed per-pod and/or per-container network statistics.
Generally, such statistics are collected by periodically checking the relevant file in Linux's /sys directory or using Netlink. By using BPF programs attached to cgroups for this, we can get much more detailed statistics: for example, how many packets/bytes on tcp port 443, or how many packets/bytes from IP 10.2.3.4. In general, because BPF programs have a kernel context, they can safely and efficiently deliver more detailed information to user space.
To explore the idea, the Kinvolk team implemented a proof-of-concept: https://github.com/kinvolk/cgnet. This project attaches a BPF program to each cgroup and exports the information to Prometheus.
There are of course other interesting possibilities, like doing actual packet filtering. But the obstacle currently standing in the way of this is having cgroup v2 support—required by cgroup-bpf—in Docker and Kubernetes.
Application-applied LSM
Linux Security Modules (LSM) implements a generic framework for security policies in the Linux kernel. SELinux and AppArmor are examples of these. Both of these implement rules at a system-global scope, placing the onus on the administrator to configure the security policies.
Landlock is another LSM under development that would co-exist with SELinux and AppArmor. An initial patchset has been submitted to the Linux kernel and is in an early stage of development. The main difference with other LSMs is that Landlock is designed to allow unprivileged applications to build their own sandbox, effectively restricting themselves instead of using a global configuration. With Landlock, an application can load a BPF program and have it executed when the process performs a specific action. For example, when the application opens a file with the open() system call, the kernel will execute the BPF program, and, depending on what the BPF program returns, the action will be accepted or denied.
In some ways, it is similar to seccomp-bpf: using a BPF program, seccomp-bpf allows unprivileged processes to restrict what system calls they can perform. Landlock will be more powerful and provide more flexibility. Consider the following system call:
C
fd = open(“myfile.txt”, O\_RDWR);
The first argument is a “char *”, a pointer to a memory address, such as 0xab004718.
With seccomp, a BPF program only has access to the parameters of the syscall but cannot dereference the pointers, making it impossible to make security decisions based on a file. seccomp also uses classic BPF, meaning it cannot make use of eBPF maps, the mechanism for interfacing with user space. This restriction means security policies cannot be changed in seccomp-bpf based on a configuration in an eBPF map.
BPF programs with Landlock don’t receive the arguments of the syscalls but a reference to a kernel object. In the example above, this means it will have a reference to the file, so it does not need to dereference a pointer, consider relative paths, or perform chroots.
Use Case: Landlock in Kubernetes-based serverless frameworks
In Kubernetes, the unit of deployment is a pod. Pods and containers are the main unit of isolation. In serverless frameworks, however, the main unit of deployment is a function. Ideally, the unit of deployment equals the unit of isolation. This puts serverless frameworks like Kubeless or OpenFaaS into a predicament: optimize for unit of isolation or deployment?
To achieve the best possible isolation, each function call would have to happen in its own container—ut what's good for isolation is not always good for performance. Inversely, if we run function calls within the same container, we increase the likelihood of collisions.
By using Landlock, we could isolate function calls from each other within the same container, making a temporary file created by one function call inaccessible to the next function call, for example. Integration between Landlock and technologies like Kubernetes-based serverless frameworks would be a ripe area for further exploration.
Auditing kubectl-exec with eBPF
In Kubernetes 1.7 the audit proposal started making its way in. It's currently pre-stable with plans to be stable in the 1.10 release. As the name implies, it allows administrators to log and audit events that take place in a Kubernetes cluster.
While these events log Kubernetes events, they don't currently provide the level of visibility that some may require. For example, while we can see that someone has used kubectl exec to enter a container, we are not able to see what commands were executed in that session. With eBPF one can attach a BPF program that would record any commands executed in the kubectl exec session and pass those commands to a user-space program that logs those events. We could then play that session back and know the exact sequence of events that took place.
Learn more about eBPF
If you're interested in learning more about eBPF, here are some resources:
A comprehensive reading list about eBPF for doing just that
BCC (BPF Compiler Collection) provides tools for working with eBPF as well as many example tools making use of BCC.
Some videos
- BPF: Tracing and More by Brendan Gregg
- Cilium - Container Security and Networking Using BPF and XDP by Thomas Graf
- Using BPF in Kubernetes by Alban Crequy
Conclusion
We are just starting to see the Linux superpowers of eBPF being put to use in Kubernetes tools and technologies. We will undoubtedly see increased use of eBPF. What we have highlighted here is just a taste of what you might expect in the future. What will be really exciting is seeing how these technologies will be used in ways that we have not yet thought about. Stay tuned!
The Kinvolk team will be hanging out at the Kinvolk booth at KubeCon in Austin. Come by to talk to us about all things, Kubernetes, Linux, container runtimes and yeah, eBPF.
PaddlePaddle Fluid: Elastic Deep Learning on Kubernetes
Editor's note: Today's post is a joint post from the deep learning team at Baidu and the etcd team at CoreOS
PaddlePaddle Fluid: Elastic Deep Learning on Kubernetes
Two open source communities—PaddlePaddle, the deep learning framework originated in Baidu, and Kubernetes®, the most famous containerized application scheduler—are announcing the Elastic Deep Learning (EDL) feature in PaddlePaddle’s new release codenamed Fluid.
Fluid EDL includes a Kubernetes controller, PaddlePaddle auto-scaler, which changes the number of processes of distributed jobs according to the idle hardware resource in the cluster, and a new fault-tolerable architecture as described in the PaddlePaddle design doc.
Industrial deep learning requires significant computation power. Research labs and companies often build GPU clusters managed by SLURM, MPI, or SGE. These clusters either run a submitted job if it requires less than the idle resource, or pend the job for an unpredictably long time. This approach has its drawbacks: in an example with 99 available nodes and a submitted job that requires 100, the job has to wait without using any of the available nodes. Fluid works with Kubernetes to power elastic deep learning jobs, which often lack optimal resources, by helping to expose potential algorithmic problems as early as possible.
Another challenge is that industrial users tend to run deep learning jobs as a subset stage of the complete data pipeline, including the web server and log collector. Such general-purpose clusters require priority-based elastic scheduling. This makes it possible to run more processes in the web server job and less in deep learning during periods of high web traffic, then prioritize deep learning when web traffic is low. Fluid talks to Kubernetes' API server to understand the global picture and orchestrate the number of processes affiliated with various jobs.
In both scenarios, PaddlePaddle jobs are tolerant to a process spikes and decreases. We achieved this by implementing the new design, which introduces a master process in addition to the old PaddlePaddle architecture as described in a previous blog post. In the new design, as long as there are three processes left in a job, it continues. In extreme cases where all processes are killed, the job can be restored and resume.
We tested Fluid EDL for two use cases: 1) the Kubernetes cluster runs only PaddlePaddle jobs; and 2) the cluster runs PaddlePaddle and Nginx jobs.
In the first test, we started up to 20 PaddlePaddle jobs one by one with a 10-second interval. Each job has 60 trainers and 10 parameter server processes, and will last for hours. We repeated the experiment 20 times: 10 with FluidEDL turned off and 10 with FluidEDL turned on. In Figure one, solid lines correspond to the first 10 experiments and dotted lines the rest. In the upper part of the figure, we see that the number of pending jobs increments monotonically without EDL. However, when EDL is turned on, resources are evenly distributed to all jobs. Fluid EDL kills some existing processes to make room for new jobs and jobs coming in at a later point in time. In both cases, the cluster is equally utilized (see lower part of figure).
|  |
| Figure 1. Fluid EDL evenly distributes resource among jobs.
|
| Figure 1. Fluid EDL evenly distributes resource among jobs.
|
In the second test, each experiment ran 400 Nginx pods, which has higher priority than the six PaddlePaddle jobs. Initially, each PaddlePaddle job had 15 trainers and 10 parameter servers. We killed 100 Nginx pods every 90 seconds until 100 left, and then we started to increase the number of Nginx jobs by 100 every 90 seconds. The upper part of Figure 2 shows this process. The middle of the diagram shows that Fluid EDL automatically started some PaddlePaddle processes by decreasing Nginx pods, and killed PaddlePaddle processes by increasing Nginx pods later on. As a result, the cluster maintains around 90% utilization as shown in the bottom of the figure. When Fluid EDL was turned off, there were no PaddlePaddle processes autoincrement, and the utilization fluctuated with the varying number of Nginx pods.
|  |
| Figure 2. Fluid changes PaddlePaddle processes with the change of Nginx processes. |
|
| Figure 2. Fluid changes PaddlePaddle processes with the change of Nginx processes. |
We continue to work on FluidEDL and welcome comments and contributions. Visit the PaddlePaddle repo, where you can find the design doc, a simple tutorial, and experiment details.
Autoscaling in Kubernetes
Kubernetes allows developers to automatically adjust cluster sizes and the number of pod replicas based on current traffic and load. These adjustments reduce the amount of unused nodes, saving money and resources. In this talk, Marcin Wielgus of Google walks you through the current state of pod and node autoscaling in Kubernetes: how it works, and how to use it, including best practices for deployments in production applications.
Enjoyed this talk? Join us for more exciting sessions on scaling and automating your
Kubernetes clusters at KubeCon in Austin on December 6-8.
Register now.
Be sure to check out Automating and Testing Production Ready Kubernetes Clusters in the Public Cloud by Ron Lipke, Senior Developer, Platform as a Service, Gannet/USA Today Network.
Certified Kubernetes Conformance Program: Launch Celebration Round Up
 This week the CNCFⓇ certified the first group of KubernetesⓇ offerings under the Certified Kubernetes Conformance Program. These first certifications follow a beta phase during which we invited participants to submit conformance results. The community response was overwhelming: CNCF certified offerings from 32 vendors!
The new Certified Kubernetes Conformance Program gives enterprise organizations the confidence that workloads running on any Certified Kubernetes distribution or platform will work correctly on other Certified Kubernetes distributions or platforms. A Certified Kubernetes product guarantees that the complete Kubernetes API functions as specified, so users can rely on a seamless, stable experience.
Here’s what the world had to say about the Certified Kubernetes Conformance Program.
Press coverage:
IBM, Google, Microsoft, and 33 more partner to ensure Kubernetes workload portability, VentureBeat.
The CNCF just got 36 companies to agree to a Kubernetes certification standard, TechCrunch
CNCF Ensures Kubernetes Interoperability with a New Cert Program, The New Stack
Cloud Native launches Certified Kubernetes program, SD Times
CNCF offers Kubernetes Software Conformance Certification program RCR Wireless
New Kubernetes Certification Program Announced Virtualization Review
Key Cloud Computing Group Launches Interoperability Certification for Kubernetes GeekWire
New Kubernetes Certification Program Helps Deliver Consistency in the Cloud BetaNews
CNCF Launches Kubernetes Conformance Certification Program, sdxcentral Community blog round-up:
Introducing Certified Kubernetes (and Google Kubernetes Engine!), Google
Certified Kubernetes: A key step forward for the open source ecosystem, Heptio
VMware Pivotal Container Service Achieves Kubernetes Certification, VMWare Pivotal
Huawei Cloud Container Engine gained first wave of Certificated Kubernetes Qualification, Huawei
Cloud Foundry Container Runtime Gets Kubernetes-Certified, Cloud Foundry
SUSE CaaS Platform 2 certified under Kubernetes Conformance Software Certification, SUSE
Kubernetes on Mesosphere DC/OS now certified by CNCF, Mesosphere
Rancher joins the CNCF Kubernetes Software Conformance Certification program, Rancher
StackPointCloud Becomes First Multi-Cloud CNCF Certified Kubernetes Offering, StackPointCloud Visit https://www.cncf.io/certification/software-conformance for more information about the Certified Kubernetes Conformance Program, and learn how you can join a growing list of Certified Kubernetes providers.
“Cloud Native Computing Foundation”, “CNCF” and “Kubernetes” are registered trademarks of The Linux Foundation in the United States and other countries. “Certified Kubernetes” and the Certified Kubernetes design are trademarks of The Linux Foundation in the United States and other countries.
Kubernetes is Still Hard (for Developers)
Kubernetes has made the Ops experience much easier, but how does the developer experience compare? Ops teams can deploy a Kubernetes cluster in a matter of minutes. But developers need to understand a host of new concepts before beginning to work with Kubernetes. This can be a tedious and manual process, but it doesn’t have to be. In this talk, Michelle Noorali, co-lead of SIG-Apps, reimagines the Kubernetes developer experience. She shares her top 3 tips for building a successful developer experience including:
- A framework for thinking about cloud native applications
- An integrated experience for debugging and fine-tuning cloud native applicationsA way to get a cloud native application out the door quickly Interested in learning how far the Kubernetes developer experience has come? Join us at KubeCon in Austin on December 6-8. Register Now >>
Check out Michelle’s keynote to learn about exciting new updates from CNCF projects.
Securing Software Supply Chain with Grafeas
Kubernetes has evolved to support increasingly complex classes of applications, enabling the development of two major industry trends: hybrid cloud and microservices. With increasing complexity in production environments, customers—especially enterprises—are demanding better ways to manage their software supply chain with more centralized visibility and control over production deployments.
On October 12th, Google and partners announced Grafeas, an open source initiative to define a best practice for auditing and governing the modern software supply chain. With Grafeas (“scribe” in Greek), developers can plug in components of the CI/CD pipeline into a central source of truth for tracking and enforcing policies. Google is also working on Kritis (“judge” in Greek), allowing devOps teams to enforce deploy-time image policy using metadata and attestations stored in Grafeas.
Grafeas allows build, auditing and compliance tools to exchange comprehensive metadata on container images using a central API. This allows enforcing policies that provide central control over the software supply process.

Example application: PaymentProcessor
Let’s consider a simple application, PaymentProcessor, that retrieves, processes and updates payment info stored in a database. This application is made up of two containers: a standard ruby container and custom logic.
Due to the sensitive nature of the payment data, the developers and DevOps team really want to make sure that the code meets certain security and compliance requirements, with detailed records on the provenance of this code. There are CI/CD stages that validate the quality of the PaymentProcessor release, but there is no easy way to centrally view/manage this information:

Visibility and governance over the PaymentProcessor Code
Grafeas provides an API for customers to centrally manage metadata created by various CI/CD components and enables deploy time policy enforcement through a Kritis implementation.

Let’s consider a basic example of how Grafeas can provide deploy time control for the PaymentProcessor app using a demo verification pipeline.
Assume that a PaymentProcessor container image has been created and pushed to Google Container Registry. This example uses the gcr.io/exampleApp/PaymentProcessor container for testing. You as the QA engineer want to create an attestation certifying this image for production usage. Instead of trusting an image tag like 0.0.1, which can be reused and point to a different container image later, we can trust the image digest to ensure the attestation links to the full image contents.
1. Set up the environment
Generate a signing key:
gpg --quick-generate-key --yes qa\_bob@example.com
Export the image signer's public key:
gpg --armor --export image.signer@example.com \> ${GPG\_KEY\_ID}.pub
Create the ‘qa’ AttestationAuthority note via the Grafeas API:
curl -X POST \
"http://127.0.0.1:8080/v1alpha1/projects/image-signing/notes?noteId=qa" \
-d @note.json
Create the Kubernetes ConfigMap for admissions control and store the QA signer's public key:
kubectl create configmap image-signature-webhook \
--from-file ${GPG\_KEY\_ID}.pub
kubectl get configmap image-signature-webhook -o yaml
Set up an admissions control webhook to require QA signature during deployment.
kubectl apply -f kubernetes/image-signature-webhook.yaml
2. Attempt to deploy an image without QA attestation
Attempt to run the image in paymentProcessor.ymal before it is QA attested:
kubectl apply -f pods/nginx.yaml
apiVersion: v1
kind: Pod
metadata:
name: payment
spec:
containers:
- name: payment
image: "gcr.io/hightowerlabs/payment@sha256:aba48d60ba4410ec921f9d2e8169236c57660d121f9430dc9758d754eec8f887"
Create the paymentProcessor pod:
kubectl apply -f pods/paymentProcessor.yaml
Notice the paymentProcessor pod was not created and the following error was returned:
The "" is invalid: : No matched signatures for container image: gcr.io/hightowerlabs/payment@sha256:aba48d60ba4410ec921f9d2e8169236c57660d121f9430dc9758d754eec8f887
3. Create an image signature
Assume the image digest is stored in Image-digest.txt, sign the image digest:
gpg -u qa\_bob@example.com \
--armor \
--clearsign \
--output=signature.gpg \
Image-digest.txt
4. Upload the signature to the Grafeas API
Generate a pgpSignedAttestation occurrence from the signature :
cat \> occurrence.json \<\<EOF
{
"resourceUrl": "$(cat image-digest.txt)",
"noteName": "projects/image-signing/notes/qa",
"attestation": {
"pgpSignedAttestation": {
"signature": "$(cat signature.gpg)",
"contentType": "application/vnd.gcr.image.url.v1",
"pgpKeyId": "${GPG\_KEY\_ID}"
}
}
}
EOF
Upload the attestation through the Grafeas API:
curl -X POST \
'http://127.0.0.1:8080/v1alpha1/projects/image-signing/occurrences' \
-d @occurrence.json
5. Verify QA attestation during a production deployment
Attempt to run the image in paymentProcessor.ymal now that it has the correct attestation in the Grafeas API:
kubectl apply -f pods/paymentProcessor.yaml
pod "PaymentProcessor" created
With the attestation added the pod will be created as the execution criteria are met.
For more detailed information, see this Grafeas tutorial.
Summary
The demo above showed how you can integrate your software supply chain with Grafeas and gain visibility and control over your production deployments. However, the demo verification pipeline by itself is not a full Kritis implementation. In addition to basic admission control, Kritis provides additional support for workflow enforcement, multi-authority signing, breakglass deployment and more. You can read the Kritis whitepaper for more details. The team is actively working on a full open-source implementation. We’d love your feedback!
In addition, a hosted alpha implementation of Kritis, called Binary Authorization, is available on Google Container Engine and will be available for broader consumption soon.
Google, JFrog, and other partners joined forces to create Grafeas based on our common experiences building secure, large, and complex microservice deployments for internal and enterprise customers. Grafeas is an industry-wide community effort.
To learn more about Grafeas and contribute to the project:
- Register for the JFrog-Google webinar [here]
- Try Grafeas now and join the GitHub project: https://github.com/grafeas
- Try out the Grafeas demo and tutorial: https://github.com/kelseyhightower/grafeas-tutorial
- Attend Shopify’s talks at KubeCon in December
- Fill out [this form] if you’re interested in learning more about our upcoming releases or talking to us about integrations
- See grafeas.io for documentation and examples
We hope you join us!
The Grafeas Team
Containerd Brings More Container Runtime Options for Kubernetes
Update: Kubernetes support for Docker via dockershim is now deprecated.
For more information, read the deprecation notice.
You can also discuss the deprecation via a dedicated GitHub issue.
A container runtime is software that executes containers and manages container images on a node. Today, the most widely known container runtime is Docker, but there are other container runtimes in the ecosystem, such as rkt, containerd, and lxd. Docker is by far the most common container runtime used in production Kubernetes environments, but Docker’s smaller offspring, containerd, may prove to be a better option. This post describes using containerd with Kubernetes.
Kubernetes 1.5 introduced an internal plugin API named Container Runtime Interface (CRI) to provide easy access to different container runtimes. CRI enables Kubernetes to use a variety of container runtimes without the need to recompile. In theory, Kubernetes could use any container runtime that implements CRI to manage pods, containers and container images.
Over the past 6 months, engineers from Google, Docker, IBM, ZTE, and ZJU have worked to implement CRI for containerd. The project is called cri-containerd, which had its feature complete v1.0.0-alpha.0 release on September 25, 2017. With cri-containerd, users can run Kubernetes clusters using containerd as the underlying runtime without Docker installed.
containerd
Containerd is an OCI compliant core container runtime designed to be embedded into larger systems. It provides the minimum set of functionality to execute containers and manages images on a node. It was initiated by Docker Inc. and donated to CNCF in March of 2017. The Docker engine itself is built on top of earlier versions of containerd, and will soon be updated to the newest version. Containerd is close to a feature complete stable release, with 1.0.0-beta.1 available right now.
Containerd has a much smaller scope than Docker, provides a golang client API, and is more focused on being embeddable.The smaller scope results in a smaller codebase that’s easier to maintain and support over time, matching Kubernetes requirements as shown in the following table:
| Containerd Scope (In/Out) | Kubernetes Requirement | |
|---|---|---|
| Container Lifecycle Management | In | Container Create/Start/Stop/Delete/List/Inspect (✔️) |
| Image Management | In | Pull/List/Inspect (✔️) |
| Networking | Out No concrete network solution. User can setup network namespace and put containers into it. | Kubernetes networking deals with pods, rather than containers, so container runtimes should not provide complex networking solutions that don't satisfy requirements. (✔️) |
| Volumes | Out, No volume management. User can setup host path, and mount it into container. | Kubernetes manages volumes. Container runtimes should not provide internal volume management that may conflict with Kubernetes. (✔️) |
| Persistent Container Logging | Out, No persistent container log. Container STDIO is provided as FIFOs, which can be redirected/decorated as is required. | Kubernetes has specific requirements for persistent container logs, such as format and path etc. Container runtimes should not persist an unmanageable container log. (✔️) |
| Metrics | In Containerd provides container and snapshot metrics as part of the API. | Kubernetes expects container runtime to provide container metrics (CPU, Memory, writable layer size, etc.) and image filesystem usage (disk, inode usage, etc.). (✔️) |
| Overall, from a technical perspective, containerd is a very good alternative container runtime for Kubernetes. |
cri-containerd
Cri-containerd is exactly that: an implementation of CRI for containerd. It operates on the same node as the Kubelet and containerd. Layered between Kubernetes and containerd, cri-containerd handles all CRI service requests from the Kubelet and uses containerd to manage containers and container images. Cri-containerd manages these service requests in part by forming containerd service requests while adding sufficient additional function to support the CRI requirements.
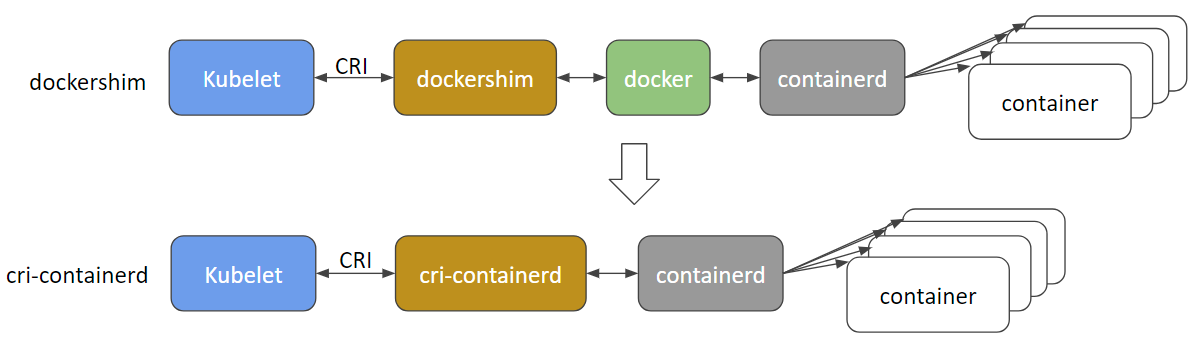
Compared with the current Docker CRI implementation (dockershim), cri-containerd eliminates an extra hop in the stack, making the stack more stable and efficient.
Architecture
Cri-containerd uses containerd to manage the full container lifecycle and all container images. As also shown below, cri-containerd manages pod networking via CNI (another CNCF project).
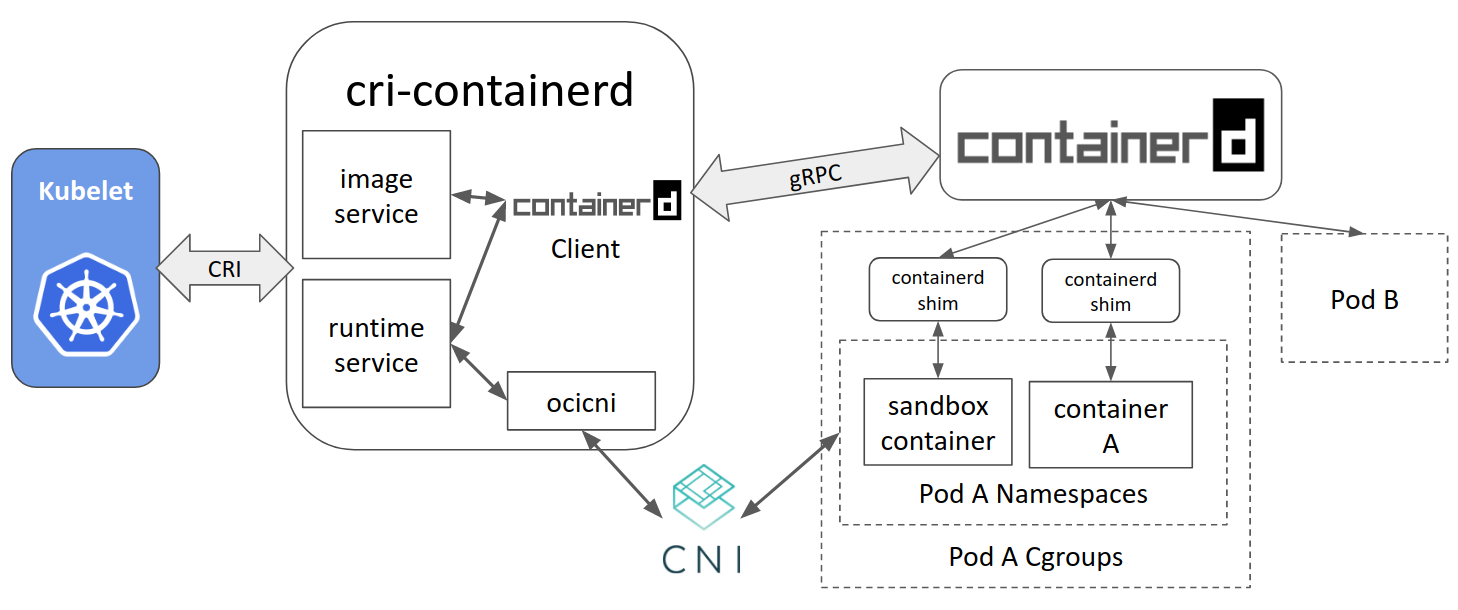
Let’s use an example to demonstrate how cri-containerd works for the case when Kubelet creates a single-container pod:
- Kubelet calls cri-containerd, via the CRI runtime service API, to create a pod;
- cri-containerd uses containerd to create and start a special pause container (the sandbox container) and put that container inside the pod’s cgroups and namespace (steps omitted for brevity);
- cri-containerd configures the pod’s network namespace using CNI;
- Kubelet subsequently calls cri-containerd, via the CRI image service API, to pull the application container image;
- cri-containerd further uses containerd to pull the image if the image is not present on the node;
- Kubelet then calls cri-containerd, via the CRI runtime service API, to create and start the application container inside the pod using the pulled container image;
- cri-containerd finally calls containerd to create the application container, put it inside the pod’s cgroups and namespace, then to start the pod’s new application container. After these steps, a pod and its corresponding application container is created and running.
Status
Cri-containerd v1.0.0-alpha.0 was released on Sep. 25, 2017.
It is feature complete. All Kubernetes features are supported.
All CRI validation tests have passed. (A CRI validation is a test framework for validating whether a CRI implementation meets all the requirements expected by Kubernetes.)
All regular node e2e tests have passed. (The Kubernetes test framework for testing Kubernetes node level functionalities such as managing pods, mounting volumes etc.)
To learn more about the v1.0.0-alpha.0 release, see the project repository.
Try it Out
For a multi-node cluster installer and bring up steps using ansible and kubeadm, see this repo link.
For creating a cluster from scratch on Google Cloud, see Kubernetes the Hard Way.
For a custom installation from release tarball, see this repo link.
For a installation with LinuxKit on a local VM, see this repo link.
Next Steps
We are focused on stability and usability improvements as our next steps.
Stability:
- Set up a full set of Kubernetes integration test in the Kubernetes test infrastructure on various OS distros such as Ubuntu, COS (Container-Optimized OS) etc.
- Actively fix any test failures and other issues reported by users.
Usability:
- Improve the user experience of crictl. Crictl is a portable command line tool for all CRI container runtimes. The goal here is to make it easy to use for debug and development scenarios.
- Integrate cri-containerd with kube-up.sh, to help users bring up a production quality Kubernetes cluster using cri-containerd and containerd.
- Improve our documentation for users and admins alike.
We plan to release our v1.0.0-beta.0 by the end of 2017.
Contribute
Cri-containerd is a Kubernetes incubator project located at https://github.com/kubernetes-incubator/cri-containerd. Any contributions in terms of ideas, issues, and/or fixes are welcome. The getting started guide for developers is a good place to start for contributors.
Community
Cri-containerd is developed and maintained by the Kubernetes SIG-Node community. We’d love to hear feedback from you. To join the community:
- sig-node community site
- Slack: #sig-node channel in Kubernetes (kubernetes.slack.com)
- Mailing List: https://groups.google.com/forum/#!forum/kubernetes-sig-node
Kubernetes the Easy Way
Kelsey Hightower wrote an invaluable guide for Kubernetes called Kubernetes the Hard Way. It’s an awesome resource for those looking to understand the ins and outs of Kubernetes—but what if you want to put Kubernetes on easy mode? That’s something we’ve been working on together with Google Cloud. In this guide, we’ll show you how to get a cluster up and running, as well as how to actually deploy your code to that cluster and run it.
This is Kubernetes the easy way.
What We’ll Accomplish
- 1.Set up a cluster
- 2.Deploy an application to the cluster
- 3.Automate deployment with rolling updates
Prerequisites
- A containerized application
- You can also use a demo app.
- A Google Cloud Account or a Kubernetes cluster on another provider
- Everything after Cluster creation is identical with all providers.
- A free account on Codefresh
- Codefresh is a service that handles Kubernetes deployment configuration and automation.
We made Codefresh free for open-source projects and offer 200 builds/mo free for private projects, to make adopting Kubernetes as easy as possible. Deploy as much as you like on as many clusters as you like.
Set Up a Cluster
- Create an account at cloud.google.com and log in.
Note: If you’re using a Cluster outside of Google Cloud, you can skip this step.
Google Container Engine is Google Cloud’s managed Kubernetes service. In our testing, it’s both powerful and easy to use.
If you’re new to the platform, you can get a $500 credit at the end of this process.
- Open the menu and scroll down to Container Engine. Then select Container Clusters.

- Click Create cluster.
We’re done with step 1. In my experience it usually takes less than 5 minutes for a cluster to be created.
Deploy an Application to Kubernetes
First go to Codefresh and create an account using GitHub, Bitbucket, or Gitlab. As mentioned previously, Codefresh is free for both open source and smaller private projects. We’ll use it to create the configuration Yaml necessary to deploy our application to Kubernetes. Then we'll deploy our application and automate the process to happen every time we commit code changes. Here are the steps:
- 1.Create a Codefresh account
- 2.Connect to Google Cloud (or other cluster)
- 3.Add Cluster
- 4.Deploy static image
- 5.Build and deploy an image
- 6.Automate the process
Connect to Google Cloud
To connect your Clusters in Google Container Engine, go to Account Settings > Integrations > Kubernetes and click Authenticate. This prompts you to login with your Google credentials.
Once you log in, all of your clusters are available within Codefresh.

Add Cluster
To add your cluster, click the down arrow, and then click add cluster, select the project and cluster name. You can now deploy images!
Optional: Use an Alternative Cluster
To connect a non-GKE cluster we’ll need to add a token and certificate to Codefresh. Go to Account Settings (bottom left) > Integrations > Kubernetes > Configure > Add Provider > Custom Providers. Expand the dropdown and click Add Cluster.

Follow the instructions on how to generate the needed information and click Save. Your cluster now appears under the Kubernetes tab.
Deploy Static Image to Kubernetes
Now for the fun part! Codefresh provides an easily modifiable boilerplate that takes care of the heavy lifting of configuring Kubernetes for your application.
- Click on the Kubernetes tab: this shows a list of namespaces.
Think of namespaces as acting a bit like VLANs on a Kubernetes cluster. Each namespace can contain all the services that need to talk to each other on a Kubernetes cluster. For now, we’ll just work off the default namespace (the easy way!).
- Click Add Service and fill in the details.
You can use the demo application I mentioned earlier that has a Node.js frontend with a MongoDB.

Here’s the info we need to pass:
Cluster - This is the cluster we added earlier, our application will be deployed there.
Namespace - We’ll use default for our namespace but you can create and use a new one if you’d prefer. Namespaces are discrete units for grouping all the services associated with an application.
Service name - You can name the service whatever you like. Since we’re deploying Mongo, I’ll just name it mongo!
Expose port - We don’t need to expose the port outside of our cluster so we won’t check the box for now but we will specify a port where other containers can talk to this service. Mongo’s default port is ‘27017’.
Image - Mongo is a public image on Dockerhub, so I can reference it by name and tag, ‘mongo:latest’.
Internal Ports - This is the port the mongo application listens on, in this case it’s ‘27017’ again.
We can ignore the other options for now.
- Scroll down and click Deploy.

Boom! You’ve just deployed this image to Kubernetes. You can see by clicking on the status that the service, deployment, replicas, and pods are all configured and running. If you click Edit > Advanced, you can see and edit all the raw YAML files associated with this application, or copy them and put them into your repository for use on any cluster.
Build and Deploy an Image
To get the rest of our demo application up and running we need to build and deploy the Node.js portion of the application. To do that we’ll need to add our repository to Codefresh.
- Click on Repositories > Add Repository, then copy and paste the demochat repo url (or use your own repo).

We have the option to use a dockerfile, or to use a template if we need help creating a dockerfile. In this case, the demochat repo already has a dockerfile so we’ll select that. Click through the next few screens until the image builds.
Once the build is finished the image is automatically saved inside of the Codefresh docker registry. You can also add any other registry to your account and use that instead.
To deploy the image we’ll need
- a pull secret
- the image name and registry
- the ports that will be used
Creating the Pull Secret
The pull secret is a token that the Kubernetes cluster can use to access a private Docker registry. To create one, we’ll need to generate the token and save it to Codefresh.
Click on User Settings (bottom left) and generate a new token.
Copy the token to your clipboard.

Go to Account Settings > Integrations > Docker Registry > Add Registry and select Codefresh Registry. Paste in your token and enter your username (entry is case sensitive). Your username must match your name displayed at the bottom left of the screen.
Test and save it.
We’ll now be able to create our secret later on when we deploy our image.
Get the image name
- Click on Images and open the image you just built. Under Comment you’ll see the image name starting with r.cfcr.io.

- Copy the image name; we’ll need to paste it in later.
Deploy the private image to Kubernetes
We’re now ready to deploy the image we built.
- Go to the Kubernetes page and, like we did with mongo, click Add Service and fill out the page. Make sure to select the same namespace you used to deploy mongo earlier.

Now let’s expose the port so we can access this application. This provisions an IP address and automatically configures ingress.
- Click Deploy : your application will be up and running within a few seconds! The IP address may take longer to provision depending on your cluster location.

From this view you can scale the replicas, see application status, and similar tasks.
- Click on the IP address to view the running application.

At this point you should have your entire application up and running! Not so bad huh? Now to automate deployment!
Automate Deployment to Kubernetes
Every time we make a change to our application, we want to build a new image and deploy it to our cluster. We’ve already set up automated builds, but to automate deployment:
Click on Repositories (top left).
Click on the pipeline for the demochat repo (the gear icon).

It’s a good idea to run some tests before deploying. Under Build and Unit Test, add npm test for the unit test script.
Click Deploy Script and select Kubernetes (Beta). Enter the information for the service you’ve already deployed.

You can see the option to use a deployment file from your repo, or to use the deployment file that you just generated.
- Click Save.
You’re done with deployment automation! Now whenever a change is made, the image will build, test, and deploy.
Conclusions
We want to make it easy for every team, not just big enterprise teams, to adopt Kubernetes while preserving all of Kubernetes’ power and flexibility. At any point on the Kubernetes service screen you can switch to YAML to view all of the YAMLfiles generated by the configuration you performed in this walkthrough. You can tweak the file content, copy and paste them into local files, etc.
This walkthrough gives everyone a solid base to start with. When you’re ready, you can tweak the entities directly to specify the exact configuration you’d like.
We’d love your feedback! Please share with us on Twitter, or reach out directly.
Addendums
Do you have a video to walk me through this? You bet.
Does this work with Helm Charts? Yes! We’re currently piloting Helm Charts with a limited set of users. Ping us if you’d like to try it early.
Does this work with any Kubernetes cluster? It should work with any Kubernetes cluster and is tested for Kubernetes 1.5 forward.
Can I deploy Codefresh in my own data center? Sure, Codefresh is built on top of Kubernetes using Helm Charts. Codefresh cloud is free for open source, and 200 builds/mo. Codefresh on prem is currently for enterprise users only.
Won’t the database be wiped every time we update? Yes, in this case we skipped creating a persistent volume. It’s a bit more work to get the persistent volume configured, if you’d like, feel free to reach out and we’re happy to help!
Enforcing Network Policies in Kubernetes
Editor's note: this post is part of a series of in-depth articles on what's new in Kubernetes 1.8.
Kubernetes now offers functionality to enforce rules about which pods can communicate with each other using network policies. This feature is has become stable Kubernetes 1.7 and is ready to use with supported networking plugins. The Kubernetes 1.8 release has added better capabilities to this feature.
Network policy: What does it mean?
In a Kubernetes cluster configured with default settings, all pods can discover and communicate with each other without any restrictions. The new Kubernetes object type NetworkPolicy lets you allow and block traffic to pods.
If you’re running multiple applications in a Kubernetes cluster or sharing a cluster among multiple teams, it’s a security best practice to create firewalls that permit pods to talk to each other while blocking other network traffic. Networking policy corresponds to the Security Groups concepts in the Virtual Machines world.
How do I add Network Policy to my cluster?
Networking Policies are implemented by networking plugins. These plugins typically install an overlay network in your cluster to enforce the Network Policies configured. A number of networking plugins, including Calico, Romana and Weave Net, support using Network Policies.
Google Container Engine (GKE) also provides beta support for Network Policies using the Calico networking plugin when you create clusters with the following command:
gcloud beta container clusters create --enable-network-policy
How do I configure a Network Policy?
Once you install a networking plugin that implements Network Policies, you need to create a Kubernetes resource of type NetworkPolicy. This object describes two set of label-based pod selector fields, matching:
- a set of pods the network policy applies to (required)
- a set of pods allowed access to each other (optional). If you omit this field, it matches to no pods; therefore, no pods are allowed. If you specify an empty pod selector, it matches to all pods; therefore, all pods are allowed.
Example: restricting traffic to a pod
The following example of a network policy blocks all in-cluster traffic to a set of web server pods, except the pods allowed by the policy configuration.

To achieve this setup, create a NetworkPolicy with the following manifest:
kind: NetworkPolicy
apiVersion: networking.k8s.io/v1
metadata:
name: access-nginx
spec:
podSelector:
matchLabels:
app: nginx
ingress:
- from:
- podSelector:
matchLabels:
app: foo
Once you apply this configuration, only pods with label app: foo can talk to the pods with the label app: nginx. For a more detailed tutorial, see the Kubernetes documentation.
Example: restricting traffic between all pods by default
If you specify the spec.podSelector field as empty, the set of pods the network policy matches to all pods in the namespace, blocking all traffic between pods by default. In this case, you must explicitly create network policies whitelisting all communication between the pods.

You can enable a policy like this by applying the following manifest in your Kubernetes cluster:
apiVersion: networking.k8s.io/v1
kind: NetworkPolicy
metadata:
name: default-deny
spec:
podSelector:
Other Network Policy features
In addition to the previous examples, you can make the Network Policy API enforce more complicated rules:
- Egress network policies: Introduced in Kubernetes 1.8, you can restrict your workloads from establishing connections to resources outside specified IP ranges.
- IP blocks support: In addition to using podSelector/namespaceSelector, you can specify IP ranges with CIDR blocks to allow/deny traffic in ingress or egress rules.
- Cross-namespace policies: Using the ingress.namespaceSelector field, you can enforce Network Policies for particular or for all namespaces in the cluster. For example, you can create privileged/system namespaces that can communicate with pods even though the default policy is to block traffic.
- Restricting traffic to port numbers: Using the ingress.ports field, you can specify port numbers for the policy to enforce. If you omit this field, the policy matches all ports by default. For example, you can use this to allow a monitoring pod to query only the monitoring port number of an application.
- Multiple ingress rules on a single policy: Because spec.ingress field is an array, you can use the same NetworkPolicy object to give access to different ports using different pod selectors. For example, a NetworkPolicy can have one ingress rule giving pods with the kind: monitoring label access to port 9000, and another ingress rule for the label app: foo giving access to port 80, without creating an additional NetworkPolicy resource.
Learn more
- Read more: Networking Policy documentation
- Read more: Unofficial Network Policy Guide
- Hands-on: Declare a Network Policy
- Try: Network Policy Recipes
Using RBAC, Generally Available in Kubernetes v1.8
Editor's note: this post is part of a series of in-depth articles on what's new in Kubernetes 1.8.
Kubernetes 1.8 represents a significant milestone for the role-based access control (RBAC) authorizer, which was promoted to GA in this release. RBAC is a mechanism for controlling access to the Kubernetes API, and since its beta in 1.6, many Kubernetes clusters and provisioning strategies have enabled it by default.
Going forward, we expect to see RBAC become a fundamental building block for securing Kubernetes clusters. This post explores using RBAC to manage user and application access to the Kubernetes API.
Granting access to users
RBAC is configured using standard Kubernetes resources. Users can be bound to a set of roles (ClusterRoles and Roles) through bindings (ClusterRoleBindings and RoleBindings). Users start with no permissions and must explicitly be granted access by an administrator.
All Kubernetes clusters install a default set of ClusterRoles, representing common buckets users can be placed in. The “edit” role lets users perform basic actions like deploying pods; “view” lets a user observe non-sensitive resources; “admin” allows a user to administer a namespace; and “cluster-admin” grants access to administer a cluster.
$ kubectl get clusterroles
NAME AGE
admin 40m
cluster-admin 40m
edit 40m
# ...
view 40m
ClusterRoleBindings grant a user, group, or service account a ClusterRole’s power across the entire cluster. Using kubectl, we can let a sample user “jane” perform basic actions in all namespaces by binding her to the “edit” ClusterRole:
$ kubectl create clusterrolebinding jane --clusterrole=edit --user=jane
$ kubectl get namespaces --as=jane
NAME STATUS AGE
default Active 43m
kube-public Active 43m
kube-system Active 43m
$ kubectl auth can-i create deployments --namespace=dev --as=jane
yes
RoleBindings grant a ClusterRole’s power within a namespace, allowing administrators to manage a central list of ClusterRoles that are reused throughout the cluster. For example, as new resources are added to Kubernetes, the default ClusterRoles are updated to automatically grant the correct permissions to RoleBinding subjects within their namespace.
Next we’ll let the group “infra” modify resources in the “dev” namespace:
$ kubectl create rolebinding infra --clusterrole=edit --group=infra --namespace=dev
rolebinding "infra" created
Because we used a RoleBinding, these powers only apply within the RoleBinding’s namespace. In our case, a user in the “infra” group can view resources in the “dev” namespace but not in “prod”:
$ kubectl get deployments --as=dave --as-group=infra --namespace dev
No resources found.
$ kubectl get deployments --as=dave --as-group=infra --namespace prod
Error from server (Forbidden): deployments.extensions is forbidden: User "dave" cannot list deployments.extensions in the namespace "prod".
Creating custom roles
When the default ClusterRoles aren’t enough, it’s possible to create new roles that define a custom set of permissions. Since ClusterRoles are just regular API resources, they can be expressed as YAML or JSON manifests and applied using kubectl.
Each ClusterRole holds a list of permissions specifying “rules.” Rules are purely additive and allow specific HTTP verb to be performed on a set of resource. For example, the following ClusterRole holds the permissions to perform any action on "deployments”, “configmaps,” or “secrets”, and to view any “pod”:
kind: ClusterRole
apiVersion: rbac.authorization.k8s.io/v1
metadata:
name: deployer
rules:
- apiGroups: ["apps"]
resources: ["deployments"]
verbs: ["get", "list", "watch", "create", "delete", "update", "patch"]
- apiGroups: [""] # "" indicates the core API group
resources: ["configmaps", "secrets"]
verbs: ["get", "list", "watch", "create", "delete", "update", "patch"]
- apiGroups: [""] # "" indicates the core API group
resources: ["pods"]
verbs: ["get", "list", "watch"]
Verbs correspond to the HTTP verb of the request, while the resource and API groups refer to the resource being referenced. Consider the following Ingress resource:
apiVersion: extensions/v1beta1
kind: Ingress
metadata:
name: test-ingress
spec:
backend:
serviceName: testsvc
servicePort: 80
To POST the resource, the user would need the following permissions:
rules:
- apiGroups: ["extensions"] # "apiVersion" without version
resources: ["ingresses"] # Plural of "kind"
verbs: ["create"] # "POST" maps to "create"
Roles for applications
When deploying containers that require access to the Kubernetes API, it’s good practice to ship an RBAC Role with your application manifests. Besides ensuring your app works on RBAC enabled clusters, this helps users audit what actions your app will perform on the cluster and consider their security implications.
A namespaced Role is usually more appropriate for an application, since apps are traditionally run inside a single namespace and the namespace's resources should be tied to the lifecycle of the app. However, Roles cannot grant access to non-namespaced resources (such as nodes) or across namespaces, so some apps may still require ClusterRoles.
The following Role allows a Prometheus instance to monitor and discover services, endpoints, and pods in the “dev” namespace:
kind: Role
metadata:
name: prometheus-role
namespace: dev
rules:
- apiGroups: [""] # "" refers to the core API group
Resources: ["services", "endpoints", "pods"]
verbs: ["get", "list", "watch"]
Containers running in a Kubernetes cluster receive service account credentials to talk to the Kubernetes API, and service accounts can be targeted by a RoleBinding. Pods normally run with the “default” service account, but it’s good practice to run each app with a unique service account so RoleBindings don’t unintentionally grant permissions to other apps.
To run a pod with a custom service account, create a ServiceAccount resource in the same namespace and specify the serviceAccountName field of the manifest.
apiVersion: apps/v1beta2 # Abbreviated, not a full manifest
kind: Deployment
metadata:
name: prometheus-deployment
namespace: dev
spec:
replicas: 1
template:
spec:
containers:
- name: prometheus
image: prom/prometheus:v1.8.0
command: ["prometheus", "-config.file=/etc/prom/config.yml"]
# Run this pod using the "prometheus-sa" service account.
serviceAccountName: prometheus-sa
---
apiVersion: v1
kind: ServiceAccount
metadata:
name: prometheus-sa
namespace: dev
Get involved
Development of RBAC is a community effort organized through the Auth Special Interest Group, one of the many SIGs responsible for maintaining Kubernetes. A great way to get involved in the Kubernetes community is to join a SIG that aligns with your interests, provide feedback, and help with the roadmap.
About the author
Eric Chiang is a software engineer and technical lead of Kubernetes development at CoreOS, the creator of Tectonic, the enterprise-ready Kubernetes platform. Eric co-leads Kubernetes SIG Auth and maintains several open source projects and libraries on behalf of CoreOS.
It Takes a Village to Raise a Kubernetes
Editor’s note: this post is part of a series of in-depth articles on what's new in Kubernetes 1.8, written by Jaice Singer DuMars from Microsoft.
Each time we release a new version of Kubernetes, it’s enthralling to see how the community responds to all of the hard work that went into it. Blogs on new or enhanced capabilities crop up all over the web like wildflowers in the spring. Talks, videos, webinars, and demos are not far behind. As soon as the community seems to take this all in, we turn around and add more to the mix. It’s a thrilling time to be a part of this project, and even more so, the movement. It’s not just software anymore.
When circumstances opened the door for me to lead the 1.8 release, I signed on despite a minor case of the butterflies. In a private conversation with another community member, they assured me that “being organized, following up, and knowing when to ask for help” were the keys to being a successful lead. That’s when I knew I could do it — and so I did.
From that point forward, I was wrapped in a patchwork quilt of community that magically appeared at just the right moments. The community’s commitment and earnest passion for quality, consistency, and accountability formed a bedrock from which the release itself was chiseled.
The 1.8 release team proved incredibly cohesive despite a late start. We approached even the most difficult situations with humor, diligence, and sincere curiosity. My experience leading large teams served me well, and underscored another difference about this release: it was more valuable for me to focus on leadership than diving into the technical weeds to solve every problem.
Also, the uplifting power of emoji in Slack cannot be overestimated.
An important inflection point is underway in the Kubernetes project. If you’ve taken a ride on a “startup rollercoaster,” this is a familiar story. You come up with an idea so crazy that it might work. You build it, get traction, and slowly clickity-clack up that first big hill. The view from the top is dizzying, as you’ve poured countless hours of life into something completely unknown. Once you go over the top of that hill, everything changes. Breakneck acceleration defines or destroys what has been built.
In my experience, that zero gravity point is where everyone in the company (or in this case, project) has to get serious about not only building something, but also maintaining it. Without a commitment to maintenance, things go awry really quickly. From codebases that resemble the Winchester Mystery House to epidemics of crashing production implementations, a fiery descent into chaos can happen quickly despite the outward appearance of success. Thankfully, the Kubernetes community seems to be riding our growth rollercoaster with increasing success at each release.
As software startups mature, there is a natural evolution reflected in the increasing distribution of labor. Explosive adoption means that full-time security, operations, quality, documentation, and project management staff become necessary to deliver stability, reliability, and extensibility. Also, you know things are getting serious when intentional architecture becomes necessary to ensure consistency over time.
Kubernetes has followed a similar path. In the absence of company departments or skill-specific teams, Special Interest Groups (SIGs) have organically formed around core project needs like storage, networking, API machinery, applications, and the operational lifecycle. As SIGs have proliferated, the Kubernetes governance model has crystallized around them, providing a framework for code ownership and shared responsibility. SIGs also help ensure the community is sustainable because success is often more about people than code.
At the Kubernetes leadership summit in June, a proposed SIG architecture was ratified with a unanimous vote, underscoring a stability theme that seemed to permeate every conversation in one way or another. The days of filling in major functionality gaps appear to be over, and a new era of feature depth has emerged in its place.
Another change is the move away from project-level release “feature themes” to SIG-level initiatives delivered in increments over the course of several releases. That’s an important shift: SIGs have a mission, and everything they deliver should ultimately serve that. As a community, we need to provide facilitation and support so SIGs are empowered to do their best work with minimal overhead and maximum transparency.
Wisely, the community also spotted the opportunity to provide safe mechanisms for innovation that are increasingly less dependent on the code in kubernetes/kubernetes. This in turn creates a flourishing habitat for experimentation without hampering overall velocity. The project can also address technical debt created during the initial ride up the rollercoaster. However, new mechanisms for innovation present an architectural challenge in defining what is and is not Kubernetes. SIG Architecture addresses the challenge of defining Kubernetes’ boundaries. It’s a work in progress that trends toward continuous improvement.
This can be a little overwhelming at the individual level. In reality, it’s not that much different from any other successful startup, save for the fact that authority does not come from a traditional org chart. It comes from SIGs, community technical leaders, the newly-formed steering committee, and ultimately you.
The Kubernetes release process provides a special opportunity to see everything that makes this project tick. I’ll tell you what I saw: people, working together, to do the best they can, in service to everyone who sets out on the cloud native journey.
kubeadm v1.8 Released: Introducing Easy Upgrades for Kubernetes Clusters
Editor's note: this post is part of a series of in-depth articles on what's new in Kubernetes 1.8.
Since its debut in September 2016, the Cluster Lifecycle Special Interest Group (SIG) has established kubeadm as the easiest Kubernetes bootstrap method. Now, we’re releasing kubeadm v1.8.0 in tandem with the release of Kubernetes v1.8.0. In this blog post, I’ll walk you through the changes we’ve made to kubeadm since the last update, the scope of kubeadm, and how you can contribute to this effort.
Security first: kubeadm v1.6 & v1.7
Previously, we discussed planned updates for kubeadm v1.6. Our primary focus for v1.6 was security. We started enforcing role based access control (RBAC) as it graduated to beta, gave unique identities and locked-down privileges for different system components in the cluster, disabled the insecure localhost:8080 API server port, started authorizing all API calls to the kubelets, and improved the token discovery method used formerly in v1.5. Token discovery (aka Bootstrap Tokens) graduated to beta in v1.8.
In number of features, kubeadm v1.7.0 was a much smaller release compared to v1.6.0 and v1.8.0. The main additions were enforcing the Node Authorizer, which significantly reduces the attack surface for a Kubernetes cluster, and initial, limited upgrading support from v1.6 clusters.
Easier upgrades, extensibility, and stabilization in v1.8
We had eight weeks between Kubernetes v1.7.0 and our stabilization period (code freeze) to implement new features and to stabilize the upcoming v1.8.0 release. Our goal for kubeadm v1.8.0 was to make it more extensible. We wanted to add a lot of new features and improvements in this cycle, and we succeeded.Upgrades along with better introspectability. The most important update in kubeadm v1.8.0 (and my favorite new feature) is one-command upgrades of the control plane. While v1.7.0 had the ability to upgrade clusters, the user experience was far from optimal, and the process was risky.
Now, you can easily check to see if your system can handle an upgrade by entering:
$ kubeadm upgrade plan
This gives you information about which versions you can upgrade to, as well as the health of your cluster.
You can examine the effects an upgrade will have on your system by specifying the --dry-run flag. In previous versions of kubeadm, upgrades were essentially blind in that you could only make assumptions about how an upgrade would impact your cluster. With the new dry run feature, there is no more mystery. You can see exactly what applying an upgrade would do before applying it.
After checking to see how an upgrade will affect your cluster, you can apply the upgrade by typing:
$ kubeadm upgrade apply v1.8.0
This is a much cleaner and safer way of performing an upgrade than the previous version. As with any type of upgrade or downgrade, it’s a good idea to backup your cluster first using your preferred solution.
Self-hosting
Self-hosting in this context refers to a specific way of setting up the control plane. The self-hosting concept was initially developed by CoreOS in their bootkube project. The long-term goal is to move this functionality (currently in an alpha stage) to the generic kubeadm toolbox. Self-hosting means that the control plane components, the API Server, Controller Manager and Scheduler are workloads themselves in the cluster they run. This means the control plane components can be managed using Kubernetes primitives, which has numerous advantages. For instance, leader-elected components like the scheduler and controller-manager will automatically be run on all masters when HA is implemented if they are run in a DaemonSet. Rolling upgrades in Kubernetes can be used for upgrades of the control plane components, and next to no extra code has to be written for that to work; it’s one of Kubernetes’ built-in primitives!
Self-hosting won’t be the default until v1.9.0, but users can easily test the feature in experimental clusters. If you test this feature, we’d love your feedback!
You can test out self-hosting by enabling its feature gate:
$ kubeadm init --feature-gates=SelfHosting=true
Extensibility
We’ve added some new extensibility features. You can delegate some tasks, like generating certificates or writing control plane arguments to kubeadm, but still drive the control plane bootstrap process yourself. Basically, you can let kubeadm do some parts and fill in yourself where you need customizations. Previously, you could only use kubeadm init to perform “the full meal deal.” The inclusion of the kubeadm alpha phase command supports our aim to make kubeadm more modular, letting you invoke atomic sub-steps of the bootstrap process.
In v1.8.0, kubeadm alpha phase is just that: an alpha preview. We hope that we can graduate the command to beta as kubeadm phase in v1.9.0. We can’t wait for feedback from the community on how to better improve this feature!
Improvements
Along with our new kubeadm features, we’ve also made improvements to existing ones. The Bootstrap Token feature that makes kubeadm join so short and sweet has graduated from alpha to beta and gained even more security features.
If you made customizations to your system in v1.6 or v1.7, you had to remember what those customizations were when you upgraded your cluster. No longer: beginning with v1.8.0, kubeadm uploads your configuration to a ConfigMap inside of the cluster, and later reads that configuration when upgrading for a seamless user experience.
The first certificate rotation feature has graduated to beta in v1.8, which is great to see. Thanks to the Auth Special Interest Group, the Kubernetes node component kubelet can now rotate its client certificate automatically. We expect this area to improve continuously, and will continue to be a part of this cross-SIG effort to easily rotate all certificates in any cluster.
Last but not least, kubeadm is more resilient now. kubeadm init will detect even more faulty environments earlier, and time out instead of waiting forever for the expected condition.
The scope of kubeadm
As there are so many different end-to-end installers for Kubernetes, there is some fragmentation in the ecosystem. With each new release of Kubernetes, these installers naturally become more divergent. This can create problems down the line if users rely on installer-specific variations and hooks that aren’t standardized in any way. Our goal from the beginning has been to make kubeadm a building block for deploying Kubernetes clusters and to provide kubeadm init and kubeadm join as best-practice “fast paths” for new Kubernetes users. Ideally, using kubeadm as the basis of all deployments will make it easier to create conformant clusters.
kubeadm performs the actions necessary to get a minimum viable cluster up and running. It only cares about bootstrapping, not about provisioning machines, by design. Likewise, installing various nice-to-have addons by default like the Kubernetes Dashboard, some monitoring solution, cloud provider-specific addons, etc. is not in scope. Instead, we expect higher-level and more tailored tooling to be built on top of kubeadm, that installs the software the end user needs.
v1.9.0 and beyond
What’s in store for the future of kubeadm?
Planned features
We plan to address high availability (replicated etcd and multiple, redundant API servers and other control plane components) as an alpha feature in v1.9.0. This has been a regular request from our user base.
Also, we want to make self-hosting the default way to deploy your control plane: Kubernetes becomes much easier to manage if we can rely on Kubernetes' own tools to manage the cluster components.
Promoting kubeadm adoption and getting involved
The kubeadm adoption working group is an ongoing effort between SIG Cluster Lifecycle and other parties in the Kubernetes ecosystem. This working group focuses on making kubeadm more extensible in order to promote adoption of it for other end-to-end installers in the community. Everyone is welcome to join. So far, we’re glad to announce that kubespray started using kubeadm under the hood, and gained new features at the same time! We’re excited to see others follow and make the ecosystem stronger.
kubeadm is a great way to learn about Kubernetes: it binds all of Kubernetes’ components together in a single package. To learn more about what kubeadm really does under the hood, this document describes kubeadm functions in v1.8.0.
If you want to get involved in these efforts, join SIG Cluster Lifecycle. We meet on Zoom once a week on Tuesdays at 16:00 UTC. For more information about what we talk about in our weekly meetings, check out our meeting notes. Meetings are a great educational opportunity, even if you don’t want to jump in and present your own ideas right away. You can also sign up for our mailing list, join our Slack channel, or check out the video archive of our past meetings. Even if you’re only interested in watching the video calls initially, we’re excited to welcome you as a new member to SIG Cluster Lifecycle!
If you want to know what a kubeadm developer does at a given time in the Kubernetes release cycle, check out this doc. Finally, don’t hesitate to join if any of our upcoming projects are of interest to you!
Five Days of Kubernetes 1.8
Kubernetes 1.8 is live, made possible by hundreds of contributors pushing thousands of commits in this latest releases.
The community has tallied more than 66,000 commits in the main repo and continues rapid growth outside of the main repo, which signals growing maturity and stability for the project. The community has logged more than 120,000 commits across all repos and 17,839 commits across all repos for v1.7.0 to v1.8.0 alone.
With the help of our growing community of 1,400 plus contributors, we issued more than 3,000 PRs and pushed more than 5,000 commits to deliver Kubernetes 1.8 with significant security and workload support updates. This all points to increased stability, a result of our project-wide focus on maturing process, formalizing architecture, and strengthening Kubernetes’ governance model.
While many improvements have been contributed, we highlight key features in this series of in-depth posts listed below. Follow along and see what’s new and improved with storage, security and more.
Day 1: 5 Days of Kubernetes 1.8
Day 2: kubeadm v1.8 Introduces Easy Upgrades for Kubernetes Clusters
Day 3: Kubernetes v.1.8 Retrospective: It Takes a Village to Raise a Kubernetes
Day 4: Using RBAC, Generally Available in Kubernetes v1.8
Day 5: Enforcing Network Policies in Kubernetes
Connect
- Post questions (or answer questions) on Stack Overflow
- Join the community portal for advocates on K8sPort
- Follow us on Twitter @Kubernetesio for latest updates
- Connect with the community on Slack
- Get involved with the Kubernetes project on GitHub
Introducing Software Certification for Kubernetes
Over the last three years, Kubernetes® has seen wide-scale adoption by a vibrant and diverse community of providers. In fact, there are now more than 60 known Kubernetes platforms and distributions. From the start, one goal of Kubernetes has been consistency and portability.
In order to better serve this goal, today the Kubernetes community and the Cloud Native Computing Foundation® (CNCF®) announce the availability of the beta Certified Kubernetes Conformance Program. The Kubernetes conformance certification program gives users the confidence that when they use a Certified Kubernetes™ product, they can rely on a high level of common functionality. Certification provides Independent Software Vendors (ISVs) confidence that if their customer is using a Certified Kubernetes product, their software will behave as expected.
CNCF and the Kubernetes Community invites all vendors to run the conformance test suite, and submit conformance testing results for review and certification by the CNCF. When the program graduates to GA (generally available) later this year, all vendors receiving certification during the beta period will be listed in the launch announcement.
Just like Kubernetes itself, conformance certification is an evolving program managed by contributors in our community. Certification is versioned alongside Kubernetes, and certification requirements receive updates with each version of Kubernetes as features are added and the architecture changes. The Kubernetes community, through SIG Architecture, controls changes and overseers what it means to be Certified Kubernetes. The Testing SIG works on the mechanics of conformance tests, while the Conformance Working Group develops process and policy for the certification program.

Once the program moves to GA, certified products can proudly display the new Certified Kubernetes logo mark with stylized version information on their marketing materials. Certified products can also take advantage of a new combination trademark rule the CNCF adopted for Certified Kubernetes providers that keep their certification up to date.
Products must complete a recertification each year for the current or previous version of Kubernetes to remain certified. This ensures that when you see the Certified Kubernetes™ mark on a product, you’re not only getting something that’s proven conformant, but also contains the latest features and improvements from the community.
Visit https://github.com/cncf/k8s-conformance for more information about the Certified Kubernetes Conformance Program, and learn how you can include your product in a growing list of Certified Kubernetes providers.
“Cloud Native Computing Foundation”, “CNCF” and “Kubernetes” are registered trademarks of The Linux Foundation in the United States and other countries. “Certified Kubernetes” and the Certified Kubernetes design are trademarks of The Linux Foundation in the United States and other countries.
Request Routing and Policy Management with the Istio Service Mesh
Editor's note: Today’s post is the second post in a three-part series on Istio.
In a previous article, we looked at a simple application (Bookinfo) that is composed of four separate microservices. The article showed how to deploy an application with Kubernetes and an Istio-enabled cluster without changing any application code. The article also outlined how to view Istio provided L7 metrics on the running services.
This article follows up by taking a deeper look at Istio using Bookinfo. Specifically, we’ll look at two more features of Istio: request routing and policy management.
Running the Bookinfo Application
As before, we run the v1 version of the Bookinfo application. After installing Istio in our cluster, we start the app defined in bookinfo-v1.yaml using the following command:
kubectl apply -f \<(istioctl kube-inject -f bookinfo-v1.yaml)
We created an Ingress resource for the app:
cat \<\<EOF | kubectl create -f -
apiVersion: extensions/v1beta1
kind: Ingress
metadata:
name: bookinfo
annotations:
kubernetes.io/ingress.class: "istio"
spec:
rules:
- http:
paths:
- path: /productpage
backend:
serviceName: productpage
servicePort: 9080
- path: /login
backend:
serviceName: productpage
servicePort: 9080
- path: /logout
backend:
serviceName: productpage
servicePort: 9080
EOF
Then we retrieved the NodePort address of the Istio Ingress controller:
export BOOKINFO\_URL=$(kubectl get po -n istio-system -l istio=ingress -o jsonpath={.items[0].status.hostIP}):$(kubectl get svc -n istio-system istio-ingress -o jsonpath={.spec.ports[0].nodePort})
Finally, we pointed our browser to http://$BOOKINFO_URL/productpage, to see the running v1 application:

HTTP request routing
Existing container orchestration platforms like Kubernetes, Mesos, and other microservice frameworks allow operators to control when a particular set of pods/VMs should receive traffic (e.g., by adding/removing specific labels). Unlike existing techniques, Istio decouples traffic flow and infrastructure scaling. This allows Istio to provide a variety of traffic management features that reside outside the application code, including dynamic HTTP request routing for A/B testing, canary releases, gradual rollouts, failure recovery using timeouts, retries, circuit breakers, and fault injection to test compatibility of failure recovery policies across services.
To demonstrate, we’ll deploy v2 of the reviews service and use Istio to make it visible only for a specific test user. We can create a Kubernetes deployment, reviews-v2, with this YAML file:
apiVersion: extensions/v1beta1
kind: Deployment
metadata:
name: reviews-v2
spec:
replicas: 1
template:
metadata:
labels:
app: reviews
version: v2
spec:
containers:
- name: reviews
image: istio/examples-bookinfo-reviews-v2:0.2.3
imagePullPolicy: IfNotPresent
ports:
- containerPort: 9080
From a Kubernetes perspective, the v2 deployment adds additional pods that the reviews service selector includes in the round-robin load balancing algorithm. This is also the default behavior for Istio.
Before we start reviews:v2, we’ll start the last of the four Bookinfo services, ratings, which is used by the v2 version to provide ratings stars corresponding to each review:
kubectl apply -f \<(istioctl kube-inject -f bookinfo-ratings.yaml)
If we were to start reviews:v2 now, we would see browser responses alternating between v1 (reviews with no corresponding ratings) and v2 (review with black rating stars). This will not happen, however, because we’ll use Istio’s traffic management feature to control traffic.
With Istio, new versions don’t need to become visible based on the number of running pods. Version visibility is controlled instead by rules that specify the exact criteria. To demonstrate, we start by using Istio to specify that we want to send 100% of reviews traffic to v1 pods only.
Immediately setting a default rule for every service in the mesh is an Istio best practice. Doing so avoids accidental visibility of newer, potentially unstable versions. For the purpose of this demonstration, however, we’ll only do it for the reviews service:
cat \<\<EOF | istioctl create -f -
apiVersion: config.istio.io/v1alpha2
kind: RouteRule
metadata:
name: reviews-default
spec:
destination:
name: reviews
route:
- labels:
version: v1
weight: 100
EOF
This command directs the service mesh to send 100% of traffic for the reviews service to pods with the label “version: v1”. With this rule in place, we can safely deploy the v2 version without exposing it.
kubectl apply -f \<(istioctl kube-inject -f bookinfo-reviews-v2.yaml)
Refreshing the Bookinfo web page confirms that nothing has changed.
At this point we have all kinds of options for how we might want to expose reviews:v2. If for example we wanted to do a simple canary test, we could send 10% of the traffic to v2 using a rule like this:
apiVersion: config.istio.io/v1alpha2
kind: RouteRule
metadata:
name: reviews-default
spec:
destination:
name: reviews
route:
- labels:
version: v2
weight: 10
- labels:
version: v1
weight: 90
A better approach for early testing of a service version is to instead restrict access to it much more specifically. To demonstrate, we’ll set a rule to only make reviews:v2 visible to a specific test user. We do this by setting a second, higher priority rule that will only be applied if the request matches a specific condition:
cat \<\<EOF | istioctl create -f -
apiVersion: config.istio.io/v1alpha2
kind: RouteRule
metadata:
name: reviews-test-v2
spec:
destination:
name: reviews
precedence: 2
match:
request:
headers:
cookie:
regex: "^(.\*?;)?(user=jason)(;.\*)?$"
route:
- labels:
version: v2
weight: 100
EOF
Here we’re specifying that the request headers need to include a user cookie with value “tester” as the condition. If this rule is not matched, we fall back to the default routing rule for v1.
If we login to the Bookinfo UI with the user name “tester” (no password needed), we will now see version v2 of the application (each review includes 1-5 black rating stars). Every other user is unaffected by this change.

Once the v2 version has been thoroughly tested, we can use Istio to proceed with a canary test using the rule shown previously, or we can simply migrate all of the traffic from v1 to v2, optionally in a gradual fashion by using a sequence of rules with weights less than 100 (for example: 10, 20, 30, ... 100). This traffic control is independent of the number of pods implementing each version. If, for example, we had auto scaling in place, and high traffic volumes, we would likely see a corresponding scale up of v2 and scale down of v1 pods happening independently at the same time. For more about version routing with autoscaling, check out "Canary Deployments using Istio".
In our case, we’ll send all of the traffic to v2 with one command:
cat \<\<EOF | istioctl replace -f -
apiVersion: config.istio.io/v1alpha2
kind: RouteRule
metadata:
name: reviews-default
spec:
destination:
name: reviews
route:
- labels:
version: v2
weight: 100
EOF
We should also remove the special rule we created for the tester so that it doesn’t override any future rollouts we decide to do:
istioctl delete routerule reviews-test-v2
In the Bookinfo UI, we’ll see that we are now exposing the v2 version of reviews to all users.
Policy enforcement
Istio provides policy enforcement functions, such as quotas, precondition checking, and access control. We can demonstrate Istio’s open and extensible framework for policies with an example: rate limiting.
Let’s pretend that the Bookinfo ratings service is an external paid service--for example, Rotten Tomatoes®--with a free quota of 1 request per second (req/sec). To make sure the application doesn’t exceed this limit, we’ll specify an Istio policy to cut off requests once the limit is reached. We’ll use one of Istio’s built-in policies for this purpose.
To set a 1 req/sec quota, we first configure a memquota handler with rate limits:
cat \<\<EOF | istioctl create -f -
apiVersion: "config.istio.io/v1alpha2"
kind: memquota
metadata:
name: handler
namespace: default
spec:
quotas:
- name: requestcount.quota.default
maxAmount: 5000
validDuration: 1s
overrides:
- dimensions:
destination: ratings
maxAmount: 1
validDuration: 1s
EOF
Then we create a quota instance that maps incoming attributes to quota dimensions, and create a rule that uses it with the memquota handler:
cat \<\<EOF | istioctl create -f -
apiVersion: "config.istio.io/v1alpha2"
kind: quota
metadata:
name: requestcount
namespace: default
spec:
dimensions:
source: source.labels["app"] | source.service | "unknown"
sourceVersion: source.labels["version"] | "unknown"
destination: destination.labels["app"] | destination.service | "unknown"
destinationVersion: destination.labels["version"] | "unknown"
---
apiVersion: "config.istio.io/v1alpha2"
kind: rule
metadata:
name: quota
namespace: default
spec:
actions:
- handler: handler.memquota
instances:
- requestcount.quota
EOF
To see the rate limiting in action, we’ll generate some load on the application:
wrk -t1 -c1 -d20s http://$BOOKINFO\_URL/productpage
In the web browser, we’ll notice that while the load generator is running (i.e., generating more than 1 req/sec), browser traffic is cut off. Instead of the black stars next to each review, the page now displays a message indicating that ratings are not currently available.
Stopping the load generator means the limit will no longer be exceeded: the black stars return when we refresh the page.
Summary
We’ve shown you how to introduce advanced features like HTTP request routing and policy injection into a service mesh configured with Istio without restarting any of the services. This lets you develop and deploy without worrying about the ongoing management of the service mesh; service-wide policies can always be added later.
In the next and last installment of this series, we’ll focus on Istio’s security and authentication capabilities. We’ll discuss how to secure all interservice communications in a mesh, even against insiders with access to the network, without any changes to the application code or the deployment.
Kubernetes Community Steering Committee Election Results
Beginning with the announcement of Kubernetes 1.0 at OSCON in 2015, there has been a concerted effort to share the power and burden of leadership across the Kubernetes community.
With the work of the Bootstrap Governance Committee, consisting of Brandon Philips, Brendan Burns, Brian Grant, Clayton Coleman, Joe Beda, Sarah Novotny and Tim Hockin - a cross section of long-time leaders representing 5 different companies with major investments of talent and effort in the Kubernetes Ecosystem - we wrote an initial Steering Committee Charter and launched a community wide election to seat a Kubernetes Steering Committee.
To quote from the Charter -
The initial role of the steering committee is to instantiate the formal process for Kubernetes governance. In addition to defining the initial governance process, the bootstrap committee strongly believes that it is important to provide a means for iterating the processes defined by the steering committee. We do not believe that we will get it right the first time, or possibly ever, and won’t even complete the governance development in a single shot. The role of the steering committee is to be a live, responsive body that can refactor and reform as necessary to adapt to a changing project and community.
This is our largest step yet toward making an implicit governance structure explicit. Kubernetes vision has been one of an inclusive and broad community seeking to build software which empowers our users with the portability of containers. The Steering Committee will be a strong leadership voice guiding the project toward success.
The Kubernetes Community is pleased to announce the results of the 2017 Steering Committee Elections. Please congratulate Aaron Crickenberger, Derek Carr, Michelle Noorali, Phillip Wittrock, Quinton Hoole and Timothy St. Clair , who will be joining the members of the Bootstrap Governance committee on the newly formed Kubernetes Steering Committee. Derek, Michelle, and Phillip will serve for 2 years. Aaron, Quinton, and Timothy will serve for 1 year.
This group will meet regularly in order to clarify and streamline the structure and operation of the project. Early work will include electing a representative to the CNCF Governing Board, evolving project processes, refining and documenting the vision and scope of the project, and chartering and delegating to more topical community groups.
Please see the full Steering Committee backlog for more details.
Kubernetes 1.8: Security, Workloads and Feature Depth
We’re pleased to announce the delivery of Kubernetes 1.8, our third release this year. Kubernetes 1.8 represents a snapshot of many exciting enhancements and refinements underway. In addition to functional improvements, we’re increasing project-wide focus on maturing process, formalizing architecture, and strengthening Kubernetes’ governance model. The evolution of mature processes clearly signals that sustainability is a driving concern, and helps to ensure that Kubernetes is a viable and thriving project far into the future.
Spotlight on security
Kubernetes 1.8 graduates support for role based access control (RBAC) to stable. RBAC allows cluster administrators to dynamically define roles to enforce access policies through the Kubernetes API. Beta support for filtering outbound traffic through network policies augments existing support for filtering inbound traffic to a pod. RBAC and Network Policies are two powerful tools for enforcing organizational and regulatory security requirements within Kubernetes.
Transport Layer Security (TLS) certificate rotation for the Kubelet graduates to beta. Automatic certificate rotation eases secure cluster operation.
Spotlight on workload support
Kubernetes 1.8 promotes the core Workload APIs to beta with the apps/v1beta2 group and version. The beta contains the current version of Deployment, DaemonSet, ReplicaSet, and StatefulSet. The Workloads APIs provide a stable foundation for migrating existing workloads to Kubernetes as well as developing cloud native applications that target Kubernetes natively.
For those considering running Big Data workloads on Kubernetes, the Workloads API now enables native Kubernetes support in Apache Spark.
Batch workloads, such as nightly ETL jobs, will benefit from the graduation of CronJobs to beta.
Custom Resource Definitions (CRDs) remain in beta for Kubernetes 1.8. A CRD provides a powerful mechanism to extend Kubernetes with user-defined API objects. One use case for CRDs is the automation of complex stateful applications such as key-value stores, databases and storage engines through the Operator Pattern. Expect continued enhancements to CRDs such as validation as stabilization continues.
Spoilers ahead
Volume snapshots, PV resizing, automatic taints, priority pods, kubectl plugins, oh my!
In addition to stabilizing existing functionality, Kubernetes 1.8 offers a number of alpha features that preview new functionality.
Each Special Interest Group (SIG) in the community continues to deliver the most requested user features for their area. For a complete list, please visit the release notes.
Availability
Kubernetes 1.8 is available for download on GitHub. To get started with Kubernetes, check out these interactive tutorials.
Release team
The Release team for 1.8 was led by Jaice Singer DuMars, Kubernetes Ambassador at Microsoft, and was comprised of 14 individuals responsible for managing all aspects of the release, from documentation to testing, validation, and feature completeness.
As the Kubernetes community has grown, our release process has become an amazing demonstration of collaboration in open source software development. Kubernetes continues to gain new users at a rapid clip. This growth creates a positive feedback cycle where more contributors commit code creating a more vibrant ecosystem.
User highlights
According to Redmonk, 54 percent of Fortune 100 companies are running Kubernetes in some form with adoption coming from every sector across the world. Recent user stories from the community include:
- Ancestry.com currently holds 20 billion historical records and 90 million family trees, making it the largest consumer genomics DNA network in the world. With the move to Kubernetes, its deployment time for its Shaky Leaf icon service was cut down from 50 minutes to 2 or 5 minutes.
- Wink, provider of smart home devices and apps, runs 80 percent of its workloads on a unified stack of Kubernetes-Docker-CoreOS, allowing them to continually innovate and improve its products and services.
- Pear Deck, a teacher communication app for students, ported their Heroku apps into Kubernetes, allowing them to deploy the exact same configuration in lots of different clusters in 30 seconds.
- Buffer, social media management for agencies and marketers, has a remote team of 80 spread across a dozen different time zones. Kubernetes has provided the kind of liquid infrastructure where a developer could create an app and deploy it and scale it horizontally as necessary.
Is Kubernetes helping your team? Share your story with the community.
Ecosystem updates
Announced on September 11, Kubernetes Certified Service Providers (KCSPs) are pre-qualified organizations with deep experience helping enterprises successfully adopt Kubernetes. Individual professionals can now register for the new Certified Kubernetes Administrator (CKA) program and exam, which requires passing an online, proctored, performance-based exam that tests one’s ability to solve multiple issues in a hands-on, command-line environment.
CNCF also offers online training that teaches the skills needed to create and configure a real-world Kubernetes cluster.
KubeCon
Join the community at KubeCon + CloudNativeCon in Austin, December 6-8 for the largest Kubernetes gathering ever. The premiere Kubernetes event will feature technical sessions, case studies, developer deep dives, salons and more! A full schedule of events and speakers will be available here on September 28. Discounted registration ends October 6.
Open Source Summit EU
Ihor Dvoretskyi, Kubernetes 1.8 features release lead, will present new features and enhancements at Open Source Summit EU in Prague, October 23. Registration is still open.
Get involved
The simplest way to get involved with Kubernetes is by joining one of the many Special Interest Groups (SIGs) that align with your interests. Have something you’d like to broadcast to the Kubernetes community? Share your voice at our weekly community meeting, and through the channels below.
- Thank you for your continued feedback and support.
- Post questions (or answer questions) on Stack Overflow
- Join the community portal for advocates on K8sPort
- Follow us on Twitter @Kubernetesio for latest updates
- Chat with the community on Slack.
- Share your Kubernetes story.
Editor's note: this announcement was authored by Aparna Sinha (Google), Ihor Dvoretskyi (CNCF), Jaice Singer DuMars (Microsoft), and Caleb Miles (CoreOS).
Kubernetes StatefulSets & DaemonSets Updates
This post talks about recent updates to the DaemonSet and StatefulSet API objects for Kubernetes. We explore these features using Apache ZooKeeper and Apache Kafka StatefulSets and a Prometheus node exporter DaemonSet.
In Kubernetes 1.6, we added the RollingUpdate update strategy to the DaemonSet API Object. Configuring your DaemonSets with the RollingUpdate strategy causes the DaemonSet controller to perform automated rolling updates to the Pods in your DaemonSets when their spec.template are updated.
In Kubernetes 1.7, we enhanced the DaemonSet controller to track a history of revisions to the PodTemplateSpecs of DaemonSets. This allows the DaemonSet controller to roll back an update. We also added the RollingUpdate strategy to the StatefulSet API Object, and implemented revision history tracking for the StatefulSet controller. Additionally, we added the Parallel pod management policy to support stateful applications that require Pods with unique identities but not ordered Pod creation and termination.
StatefulSet rolling update and Pod management policy
First, we’re going to demonstrate how to use StatefulSet rolling updates and Pod management policies by deploying a ZooKeeper ensemble and a Kafka cluster.
Prerequisites
To follow along, you’ll need to set up a Kubernetes 1.7 cluster with at least 3 schedulable nodes. Each node needs 1 CPU and 2 GiB of memory available. You will also need either a dynamic provisioner to allow the StatefulSet controller to provision 6 persistent volumes (PVs) with 10 GiB each, or you will need to manually provision the PVs prior to deploying the ZooKeeper ensemble or deploying the Kafka cluster.
Deploying a ZooKeeper ensemble
Apache ZooKeeper is a strongly consistent, distributed system used by other distributed systems for cluster coordination and configuration management.
Note: You can create a ZooKeeper ensemble using this zookeeper_mini.yaml manifest. You can learn more about running a ZooKeeper ensemble on Kubernetes here, as well as a more in-depth explanation of the manifest and its contents.
When you apply the manifest, you will see output like the following.
$ kubectl apply -f zookeeper\_mini.yaml
service "zk-hs" created
service "zk-cs" created
poddisruptionbudget "zk-pdb" created
statefulset "zk" created
The manifest creates an ensemble of three ZooKeeper servers using a StatefulSet, zk; a Headless Service, zk-hs, to control the domain of the ensemble; a Service, zk-cs, that clients can use to connect to the ready ZooKeeper instances; and a PodDisruptionBugdet, zk-pdb, that allows for one planned disruption. (Note that while this ensemble is suitable for demonstration purposes, it isn’t sized correctly for production use.)
If you use kubectl get to watch Pod creation in another terminal you will see that, in contrast to the OrderedReady strategy (the default policy that implements the full version of the StatefulSet guarantees), all of the Pods in the zk StatefulSet are created in parallel.
$ kubectl get po -lapp=zk -w
NAME READY STATUS RESTARTS AGE
zk-0 0/1 Pending 0 0s
zk-0 0/1 Pending 0 0s
zk-1 0/1 Pending 0 0s
zk-1 0/1 Pending 0 0s
zk-0 0/1 ContainerCreating 0 0s
zk-2 0/1 Pending 0 0s
zk-1 0/1 ContainerCreating 0 0s
zk-2 0/1 Pending 0 0s
zk-2 0/1 ContainerCreating 0 0s
zk-0 0/1 Running 0 10s
zk-2 0/1 Running 0 11s
zk-1 0/1 Running 0 19s
zk-0 1/1 Running 0 20s
zk-1 1/1 Running 0 30s
zk-2 1/1 Running 0 30s
This is because the zookeeper_mini.yaml manifest sets the podManagementPolicy of the StatefulSet to Parallel.
apiVersion: apps/v1beta1
kind: StatefulSet
metadata:
name: zk
spec:
serviceName: zk-hs
replicas: 3
updateStrategy:
type: RollingUpdate
podManagementPolicy: Parallel
...
Many distributed systems, like ZooKeeper, do not require ordered creation and termination for their processes. You can use the Parallel Pod management policy to accelerate the creation and deletion of StatefulSets that manage these systems. Note that, when Parallel Pod management is used, the StatefulSet controller will not block when it fails to create a Pod. Ordered, sequential Pod creation and termination is performed when a StatefulSet’s podManagementPolicy is set to OrderedReady.
Deploying a Kafka Cluster
Apache Kafka is a popular distributed streaming platform. Kafka producers write data to partitioned topics which are stored, with a configurable replication factor, on a cluster of brokers. Consumers consume the produced data from the partitions stored on the brokers.
Note: Details of the manifests contents can be found here. You can learn more about running a Kafka cluster on Kubernetes here.
To create a cluster, you only need to download and apply the kafka_mini.yaml manifest. When you apply the manifest, you will see output like the following:
$ kubectl apply -f kafka\_mini.yaml
service "kafka-hs" created
poddisruptionbudget "kafka-pdb" created
statefulset "kafka" created
The manifest creates a three broker cluster using the kafka StatefulSet, a Headless Service, kafka-hs, to control the domain of the brokers; and a PodDisruptionBudget, kafka-pdb, that allows for one planned disruption. The brokers are configured to use the ZooKeeper ensemble we created above by connecting through the zk-cs Service. As with the ZooKeeper ensemble deployed above, this Kafka cluster is fine for demonstration purposes, but it’s probably not sized correctly for production use.
If you watch Pod creation, you will notice that, like the ZooKeeper ensemble created above, the Kafka cluster uses the Parallel podManagementPolicy.
$ kubectl get po -lapp=kafka -w
NAME READY STATUS RESTARTS AGE
kafka-0 0/1 Pending 0 0s
kafka-0 0/1 Pending 0 0s
kafka-1 0/1 Pending 0 0s
kafka-1 0/1 Pending 0 0s
kafka-2 0/1 Pending 0 0s
kafka-0 0/1 ContainerCreating 0 0s
kafka-2 0/1 Pending 0 0s
kafka-1 0/1 ContainerCreating 0 0s
kafka-1 0/1 Running 0 11s
kafka-0 0/1 Running 0 19s
kafka-1 1/1 Running 0 23s
kafka-0 1/1 Running 0 32s
Producing and consuming data
You can use kubectl run to execute the kafka-topics.sh script to create a topic named test.
$ kubectl run -ti --image=gcr.io/google\_containers/kubernetes-kafka:1.0-10.2.1 createtopic --restart=Never --rm -- kafka-topics.sh --create \
\> --topic test \
\> --zookeeper zk-cs.default.svc.cluster.local:2181 \
\> --partitions 1 \
\> --replication-factor 3
Now you can use kubectl run to execute the kafka-console-consumer.sh command to listen for messages.
$ kubectl run -ti --image=gcr.io/google\_containers/kubnetes-kafka:1.0-10.2.1 consume --restart=Never --rm -- kafka-console-consumer.sh --topic test --bootstrap-server kafka-0.kafka-hs.default.svc.cluster.local:9093
In another terminal, you can run the kafka-console-producer.sh command.
$kubectl run -ti --image=gcr.io/google\_containers/kubernetes-kafka:1.0-10.2.1 produce --restart=Never --rm \
\> -- kafka-console-producer.sh --topic test --broker-list kafka-0.kafka-hs.default.svc.cluster.local:9093,kafka-1.kafka-hs.default.svc.cluster.local:9093,kafka-2.kafka-hs.default.svc.cluster.local:9093
Output from the second terminal appears in the first terminal. If you continue to produce and consume messages while updating the cluster, you will notice that no messages are lost. You may see error messages as the leader for the partition changes when individual brokers are updated, but the client retries until the message is committed. This is due to the ordered, sequential nature of StatefulSet rolling updates which we will explore further in the next section.
Updating the Kafka cluster
StatefulSet updates are like DaemonSet updates in that they are both configured by setting the spec.updateStrategy of the corresponding API object. When the update strategy is set to OnDelete, the respective controllers will only create new Pods when a Pod in the StatefulSet or DaemonSet has been deleted. When the update strategy is set to RollingUpdate, the controllers will delete and recreate Pods when a modification is made to the spec.template field of a DaemonSet or StatefulSet. You can use rolling updates to change the configuration (via environment variables or command line parameters), resource requests, resource limits, container images, labels, and/or annotations of the Pods in a StatefulSet or DaemonSet. Note that all updates are destructive, always requiring that each Pod in the DaemonSet or StatefulSet be destroyed and recreated. StatefulSet rolling updates differ from DaemonSet rolling updates in that Pod termination and creation is ordered and sequential.
You can patch the kafka StatefulSet to reduce the CPU resource request to 250m.
$ kubectl patch sts kafka --type='json' -p='[{"op": "replace", "path": "/spec/template/spec/containers/0/resources/requests/cpu", "value":"250m"}]'
statefulset "kafka" patched
If you watch the status of the Pods in the StatefulSet, you will see that each Pod is deleted and recreated in reverse ordinal order (starting with the Pod with the largest ordinal and progressing to the smallest). The controller waits for each updated Pod to be running and ready before updating the subsequent Pod.
$kubectl get po -lapp=kafka -w
NAME READY STATUS RESTARTS AGE
kafka-0 1/1 Running 0 13m
kafka-1 1/1 Running 0 13m
kafka-2 1/1 Running 0 13m
kafka-2 1/1 Terminating 0 14m
kafka-2 0/1 Terminating 0 14m
kafka-2 0/1 Terminating 0 14m
kafka-2 0/1 Terminating 0 14m
kafka-2 0/1 Pending 0 0s
kafka-2 0/1 Pending 0 0s
kafka-2 0/1 ContainerCreating 0 0s
kafka-2 0/1 Running 0 10s
kafka-2 1/1 Running 0 21s
kafka-1 1/1 Terminating 0 14m
kafka-1 0/1 Terminating 0 14m
kafka-1 0/1 Terminating 0 14m
kafka-1 0/1 Terminating 0 14m
kafka-1 0/1 Pending 0 0s
kafka-1 0/1 Pending 0 0s
kafka-1 0/1 ContainerCreating 0 0s
kafka-1 0/1 Running 0 11s
kafka-1 1/1 Running 0 21s
kafka-0 1/1 Terminating 0 14m
kafka-0 0/1 Terminating 0 14m
kafka-0 0/1 Terminating 0 14m
kafka-0 0/1 Terminating 0 14m
kafka-0 0/1 Pending 0 0s
kafka-0 0/1 Pending 0 0s
kafka-0 0/1 ContainerCreating 0 0s
kafka-0 0/1 Running 0 10s
kafka-0 1/1 Running 0 22s
Note that unplanned disruptions will not lead to unintentional updates during the update process. That is, the StatefulSet controller will always recreate the Pod at the correct version to ensure the ordering of the update is preserved. If a Pod is deleted, and if it has already been updated, it will be created from the updated version of the StatefulSet’s spec.template. If the Pod has not already been updated, it will be created from the previous version of the StatefulSet’s spec.template. We will explore this further in the following sections.
Staging an update
Depending on how your organization handles deployments and configuration modifications, you may want or need to stage updates to a StatefulSet prior to allowing the roll out to progress. You can accomplish this by setting a partition for the RollingUpdate. When the StatefulSet controller detects a partition in the updateStrategy of a StatefulSet, it will only apply the updated version of the StatefulSet’s spec.template to Pods whose ordinal is greater than or equal to the value of the partition.
You can patch the kafka StatefulSet to add a partition to the RollingUpdate update strategy. If you set the partition to a number greater than or equal to the StatefulSet’s spec.replicas (as below), any subsequent updates you perform to the StatefulSet’s spec.template will be staged for roll out, but the StatefulSet controller will not start a rolling update.
$ kubectl patch sts kafka -p '{"spec":{"updateStrategy":{"type":"RollingUpdate","rollingUpdate":{"partition":3}}}}'
statefulset "kafka" patched
If you patch the StatefulSet to set the requested CPU to 0.3, you will notice that none of the Pods are updated.
$ kubectl patch sts kafka --type='json' -p='[{"op": "replace", "path": "/spec/template/spec/containers/0/resources/requests/cpu", "value":"0.3"}]'
statefulset "kafka" patched
Even if you delete a Pod and wait for the StatefulSet controller to recreate it, you will notice that the Pod is recreated with current CPU request.
$ kubectl delete po kafka-1
pod "kafka-1" deleted
$ kubectl get po kafka-1 -w
NAME READY STATUS RESTARTS AGE
kafka-1 0/1 ContainerCreating 0 10s
kafka-1 0/1 Running 0 19s
kafka-1 1/1 Running 0 21s
$ kubectl get po kafka-1 -o yaml
apiVersion: v1
kind: Pod
metadata:
...
resources:
requests:
cpu: 250m
memory: 1Gi
Rolling out a canary
Often, we want to verify an image update or configuration change on a single instance of an application before rolling it out globally. If you modify the partition created above to be 2, the StatefulSet controller will roll out a canary that can be used to verify that the update is working as intended.
$ kubectl patch sts kafka -p '{"spec":{"updateStrategy":{"type":"RollingUpdate","rollingUpdate":{"partition":2}}}}'
statefulset "kafka" patched
You can watch the StatefulSet controller update the kafka-2 Pod and pause after the update is complete.
$ kubectl get po -lapp=kafka -w
NAME READY STATUS RESTARTS AGE
kafka-0 1/1 Running 0 50m
kafka-1 1/1 Running 0 10m
kafka-2 1/1 Running 0 29s
kafka-2 1/1 Terminating 0 34s
kafka-2 0/1 Terminating 0 38s
kafka-2 0/1 Terminating 0 39s
kafka-2 0/1 Terminating 0 39s
kafka-2 0/1 Pending 0 0s
kafka-2 0/1 Pending 0 0s
kafka-2 0/1 Terminating 0 20s
kafka-2 0/1 Terminating 0 20s
kafka-2 0/1 Pending 0 0s
kafka-2 0/1 Pending 0 0s
kafka-2 0/1 ContainerCreating 0 0s
kafka-2 0/1 Running 0 19s
kafka-2 1/1 Running 0 22s
Phased roll outs
Similar to rolling out a canary, you can roll out updates based on a phased progression (e.g. linear, geometric, or exponential roll outs).
If you patch the kafka StatefulSet to set the partition to 1, the StatefulSet controller updates one more broker.
$ kubectl patch sts kafka -p '{"spec":{"updateStrategy":{"type":"RollingUpdate","rollingUpdate":{"partition":1}}}}'
statefulset "kafka" patched
If you set it to 0, the StatefulSet controller updates the final broker and completes the update.
$ kubectl patch sts kafka -p '{"spec":{"updateStrategy":{"type":"RollingUpdate","rollingUpdate":{"partition":0}}}}'
statefulset "kafka" patched
Note that you don’t have to decrement the partition by one. For a larger StatefulSet--for example, one with 100 replicas--you might use a progression more like 100, 99, 90, 50, 0. In this case, you would stage your update, deploy a canary, roll out to 10 instances, update fifty percent of the Pods, and then complete the update.
Cleaning up
To delete the API Objects created above, you can use kubectl delete on the two manifests you used to create the ZooKeeper ensemble and the Kafka cluster.
$ kubectl delete -f kafka\_mini.yaml
service "kafka-hs" deleted
poddisruptionbudget "kafka-pdb" deleted
Statefulset “kafka” deleted
$ kubectl delete -f zookeeper\_mini.yaml
service "zk-hs" deleted
service "zk-cs" deleted
poddisruptionbudget "zk-pdb" deleted
statefulset "zk" deleted
By design, the StatefulSet controller does not delete any persistent volume claims (PVCs): the PVCs created for the ZooKeeper ensemble and the Kafka cluster must be manually deleted. Depending on the storage reclamation policy of your cluster, you many also need to manually delete the backing PVs.
DaemonSet rolling update, history, and rollback
In this section, we’re going to show you how to perform a rolling update on a DaemonSet, look at its history, and then perform a rollback after a bad rollout. We will use a DaemonSet to deploy a Prometheus node exporter on each Kubernetes node in the cluster. These node exporters export node metrics to the Prometheus monitoring system. For the sake of simplicity, we’ve omitted the installation of the Prometheus server and the service for communication with DaemonSet pods from this blogpost.
Prerequisites
To follow along with this section of the blog, you need a working Kubernetes 1.7 cluster and kubectl version 1.7 or later. If you followed along with the first section, you can use the same cluster.
DaemonSet rolling upFirst, prepare the node exporter DaemonSet manifest to run a v0.13 Prometheus node exporter on every node in the cluster:
$ cat \>\> node-exporter-v0.13.yaml \<\<EOF
apiVersion: extensions/v1beta1
kind: DaemonSet
metadata:
name: node-exporter
spec:
updateStrategy:
type: RollingUpdate
template:
metadata:
labels:
app: node-exporter
name: node-exporter
spec:
containers:
- image: prom/node-exporter:v0.13.0
name: node-exporter
ports:
- containerPort: 9100
hostPort: 9100
name: scrape
hostNetwork: true
hostPID: true
EOF
Note that you need to enable the DaemonSet rolling update feature by explicitly setting DaemonSet .spec.updateStrategy.type to RollingUpdate.
Apply the manifest to create the node exporter DaemonSet:
$ kubectl apply -f node-exporter-v0.13.yaml --record
daemonset "node-exporter" created
Wait for the first DaemonSet rollout to complete:
$ kubectl rollout status ds node-exporter
daemon set "node-exporter" successfully rolled out
You should see each of your node runs one copy of the node exporter pod:
$ kubectl get pods -l app=node-exporter -o wide
To perform a rolling update on the node exporter DaemonSet, prepare a manifest that includes the v0.14 Prometheus node exporter:
$ cat node-exporter-v0.13.yaml ``` sed "s/v0.13.0/v0.14.0/g" \> node-exporter-v0.14.yaml
Then apply the v0.14 node exporter DaemonSet:
$ kubectl apply -f node-exporter-v0.14.yaml --record
daemonset "node-exporter" configured
Wait for the DaemonSet rolling update to complete:
$ kubectl rollout status ds node-exporter
...
Waiting for rollout to finish: 3 out of 4 new pods have been updated...
Waiting for rollout to finish: 3 of 4 updated pods are available...
daemon set "node-exporter" successfully rolled out
We just triggered a DaemonSet rolling update by updating the DaemonSet template. By default, one old DaemonSet pod will be killed and one new DaemonSet pod will be created at a time.
Now we’ll cause a rollout to fail by updating the image to an invalid value:
$ cat node-exporter-v0.13.yaml | sed "s/v0.13.0/bad/g" \> node-exporter-bad.yaml
$ kubectl apply -f node-exporter-bad.yaml --record
daemonset "node-exporter" configured
Notice that the rollout never finishes:
$ kubectl rollout status ds node-exporter
Waiting for rollout to finish: 0 out of 4 new pods have been updated...
Waiting for rollout to finish: 1 out of 4 new pods have been updated…
# Use ^C to exit
This behavior is expected. We mentioned earlier that a DaemonSet rolling update kills and creates one pod at a time. Because the new pod never becomes available, the rollout is halted, preventing the invalid specification from propagating to more than one node. StatefulSet rolling updates implement the same behavior with respect to failed deployments. Unsuccessful updates are blocked until it corrected via roll back or by rolling forward with a specification.
$ kubectl get pods -l app=node-exporter
NAME READY STATUS RESTARTS AGE
node-exporter-f2n14 0/1 ErrImagePull 0 3m
...
# N = number of nodes
$ kubectl get ds node-exporter
NAME DESIRED CURRENT READY UP-TO-DATE AVAILABLE NODE SELECTOR AGE
node-exporter N N N-1 1 N \<none\> 46m
DaemonSet history, rollbacks, and rolling forward
Next, perform a rollback. Take a look at the node exporter DaemonSet rollout history:
$ kubectl rollout history ds node-exporter
daemonsets "node-exporter"
REVISION CHANGE-CAUSE
1 kubectl apply --filename=node-exporter-v0.13.yaml --record=true
2 kubectl apply --filename=node-exporter-v0.14.yaml --record=true
3 kubectl apply --filename=node-exporter-bad.yaml --record=true
Check the details of the revision you want to roll back to:
$ kubectl rollout history ds node-exporter --revision=2
daemonsets "node-exporter" with revision #2
Pod Template:
Labels: app=node-exporter
Containers:
node-exporter:
Image: prom/node-exporter:v0.14.0
Port: 9100/TCP
Environment: \<none\>
Mounts: \<none\>
Volumes: \<none\>
You can quickly roll back to any DaemonSet revision you found through kubectl rollout history:
# Roll back to the last revision
$ kubectl rollout undo ds node-exporter
daemonset "node-exporter" rolled back
# Or use --to-revision to roll back to a specific revision
$ kubectl rollout undo ds node-exporter --to-revision=2
daemonset "node-exporter" rolled back
A DaemonSet rollback is done by rolling forward. Therefore, after the rollback, DaemonSet revision 2 becomes revision 4 (current revision):
$ kubectl rollout history ds node-exporter
daemonsets "node-exporter"
REVISION CHANGE-CAUSE
1 kubectl apply --filename=node-exporter-v0.13.yaml --record=true
3 kubectl apply --filename=node-exporter-bad.yaml --record=true
4 kubectl apply --filename=node-exporter-v0.14.yaml --record=true
The node exporter DaemonSet is now healthy again:
$ kubectl rollout status ds node-exporter
daemon set "node-exporter" successfully rolled out
# N = number of nodes
$ kubectl get ds node-exporter
NAME DESIRED CURRENT READY UP-TO-DATE AVAILABLE NODE SELECTOR AGE
node-exporter N N N N N \<none\> 46m
If current DaemonSet revision is specified while performing a rollback, the rollback is skipped:
$ kubectl rollout undo ds node-exporter --to-revision=4
daemonset "node-exporter" skipped rollback (current template already matches revision 4)
You will see this complaint from kubectl if the DaemonSet revision is not found:
$ kubectl rollout undo ds node-exporter --to-revision=10
error: unable to find specified revision 10 in history
Note that kubectl rollout history and kubectl rollout status support StatefulSets, too!
Cleaning up
$ kubectl delete ds node-exporter
What’s next for DaemonSet and StatefulSet
Rolling updates and roll backs close an important feature gap for DaemonSets and StatefulSets. As we plan for Kubernetes 1.8, we want to continue to focus on advancing the core controllers to GA. This likely means that some advanced feature requests (e.g. automatic roll back, infant mortality detection) will be deferred in favor of ensuring the consistency, usability, and stability of the core controllers. We welcome feedback and contributions, so please feel free to reach out on Slack, to ask questions on Stack Overflow, or open issues or pull requests on GitHub.
- Post questions (or answer questions) on Stack Overflow
- Join the community portal for advocates on K8sPort
- Follow us on Twitter @Kubernetesio for latest updates
- Connect with the community on Slack
- Get involved with the Kubernetes project on GitHub
Introducing the Resource Management Working Group
Why are we here?
Kubernetes has evolved to support diverse and increasingly complex classes of applications. We can onboard and scale out modern, cloud-native web applications based on microservices, batch jobs, and stateful applications with persistent storage requirements.
However, there are still opportunities to improve Kubernetes; for example, the ability to run workloads that require specialized hardware or those that perform measurably better when hardware topology is taken into account. These conflicts can make it difficult for application classes (particularly in established verticals) to adopt Kubernetes.
We see an unprecedented opportunity here, with a high cost if it’s missed. The Kubernetes ecosystem must create a consumable path forward to the next generation of system architectures by catering to needs of as-yet unserviced workloads in meaningful ways. The Resource Management Working Group, along with other SIGs, must demonstrate the vision customers want to see, while enabling solutions to run well in a fully integrated, thoughtfully planned end-to-end stack.
Kubernetes Working Groups are created when a particular challenge requires cross-SIG collaboration. The Resource Management Working Group, for example, works primarily with sig-node and sig-scheduling to drive support for additional resource management capabilities in Kubernetes. We make sure that key contributors from across SIGs are frequently consulted because working groups are not meant to make system-level decisions on behalf of any SIG.
An example and key benefit of this is the working group’s relationship with sig-node. We were able to ensure completion of several releases of node reliability work (complete in 1.6) before contemplating feature design on top. Those designs are use-case driven: research into technical requirements for a variety of workloads, then sorting based on measurable impact to the largest cross-section.
Target Workloads and Use-cases
One of the working group’s key design tenets is that user experience must remain clean and portable, while still surfacing infrastructure capabilities that are required by businesses and applications.
While not representing any commitment, we hope in the fullness of time that Kubernetes can optimally run financial services workloads, machine learning/training, grid schedulers, map-reduce, animation workloads, and more. As a use-case driven group, we account for potential application integration that can also facilitate an ecosystem of complementary independent software vendors to flourish on top of Kubernetes.
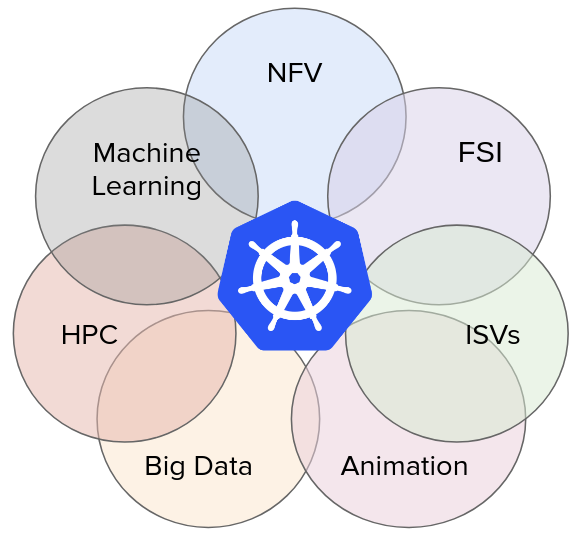
Why do this?
Kubernetes covers generic web hosting capabilities very well, so why go through the effort of expanding workload coverage for Kubernetes at all? The fact is that workloads elegantly covered by Kubernetes today, only represent a fraction of the world’s compute usage. We have a tremendous opportunity to safely and methodically expand upon the set of workloads that can run optimally on Kubernetes.
To date, there’s demonstrable progress in the areas of expanded workload coverage:
- Stateful applications such as Zookeeper, etcd, MySQL, Cassandra, ElasticSearch
- Jobs, such as timed events to process the day’s logs or any other batch processing
- Machine Learning and compute-bound workload acceleration through Alpha GPU support Collectively, the folks working on Kubernetes are hearing from their customers that we need to go further. Following the tremendous popularity of containers in 2014, industry rhetoric circled around a more modern, container-based, datacenter-level workload orchestrator as folks looked to plan their next architectures.
As a consequence, we began advocating for increasing the scope of workloads covered by Kubernetes, from overall concepts to specific features. Our aim is to put control and choice in users hands, helping them move with confidence towards whatever infrastructure strategy they choose. In this advocacy, we quickly found a large group of like-minded companies interested in broadening the types of workloads that Kubernetes can orchestrate. And thus the working group was born.
Genesis of the Resource Management Working Group
After extensive development/feature discussions during the Kubernetes Developer Summit 2016 after CloudNativeCon | KubeCon Seattle, we decided to formalize our loosely organized group. In January 2017, the Kubernetes Resource Management Working Group was formed. This group (led by Derek Carr from Red Hat and Vishnu Kannan from Google) was originally cast as a temporary initiative to provide guidance back to sig-node and sig-scheduling (primarily). However, due to the cross-cutting nature of the goals within the working group, and the depth of roadmap quickly uncovered, the Resource Management Working Group became its own entity within the first few months.
Recently, Brian Grant from Google (@bgrant0607) posted the following image on his Twitter feed. This image helps to explain the role of each SIG, and shows where the Resource Management Working Group fits into the overall project organization.
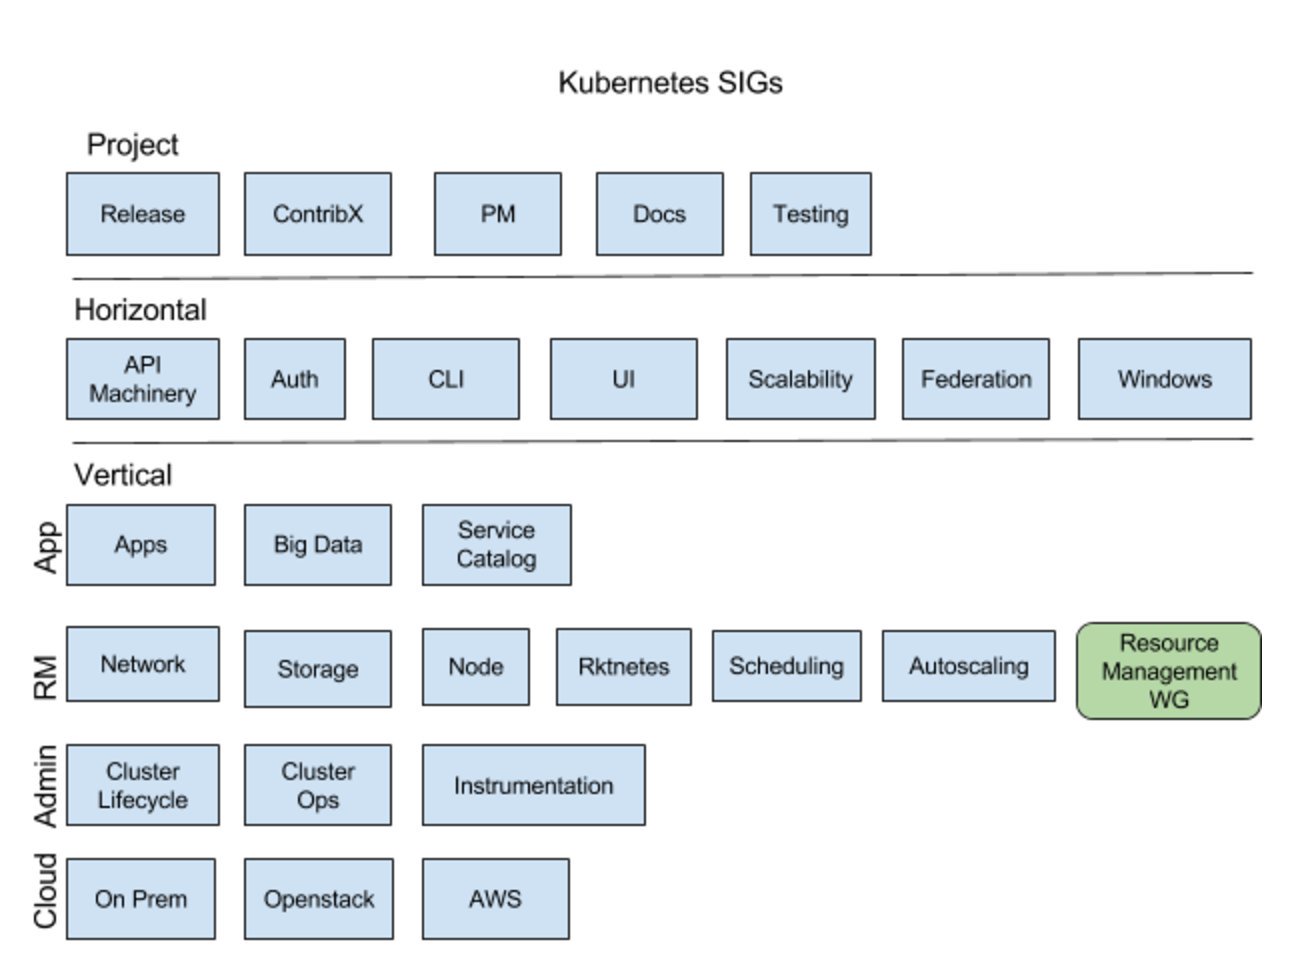
To help bootstrap this effort, the Resource Management Working Group had its first face-to-face kickoff meeting in May 2017. Thanks to Google for hosting!
Folks from Intel, NVIDIA, Google, IBM, Red Hat. and Microsoft (among others) participated.
You can read the outcomes of that 3-day meeting here.
The group’s prioritized list of features for increasing workload coverage on Kubernetes enumerated in the charter of the Resource Management Working group includes:
- Support for performance sensitive workloads (exclusive cores, cpu pinning strategies, NUMA)
- Integrating new hardware devices (GPUs, FPGAs, Infiniband, etc.)
- Improving resource isolation (local storage, hugepages, caches, etc.)
- Improving Quality of Service (performance SLOs)
- Performance benchmarking
- APIs and extensions related to the features mentioned above The discussions made it clear that there was tremendous overlap between needs for various workloads, and that we ought to de-duplicate requirements, and plumb generically.
Workload Characteristics
The set of initially targeted use-cases share one or more of the following characteristics:
- Deterministic performance (address long tail latencies)
- Isolation within a single node, as well as within groups of nodes sharing a control plane
- Requirements on advanced hardware and/or software capabilities
- Predictable, reproducible placement: applications need granular guarantees around placement The Resource Management Working Group is spearheading the feature design and development in support of these workload requirements. Our goal is to provide best practices and patterns for these scenarios.
Initial Scope
In the months leading up to our recent face-to-face, we had discussed how to safely abstract resources in a way that retains portability and clean user experience, while still meeting application requirements. The working group came away with a multi-release roadmap that included 4 short- to mid-term targets with great overlap between target workloads:
Device Manager (Plugin) Proposal
- Kubernetes should provide access to hardware devices such as NICs, GPUs, FPGA, Infiniband and so on.
- Kubernetes should provide a way for users to request static CPU assignment via the Guaranteed QoS tier. No support for NUMA in this phase.
HugePages support in Kubernetes
- Kubernetes should provide a way for users to consume huge pages of any size.
- Kubernetes should implement an abstraction layer (analogous to StorageClasses) for devices other than CPU and memory that allows a user to consume a resource in a portable way. For example, how can a pod request a GPU that has a minimum amount of memory?
Getting Involved & Summary
Our charter document includes a Contact Us section with links to our mailing list, Slack channel, and Zoom meetings. Recordings of previous meetings are uploaded to Youtube. We plan to discuss these topics and more at the 2017 Kubernetes Developer Summit at CloudNativeCon | KubeCon in Austin. Please come and join one of our meetings (users, customers, software and hardware vendors are all welcome) and contribute to the working group!
Windows Networking at Parity with Linux for Kubernetes
Since I last blogged about Kubernetes Networking for Windows four months ago, the Windows Core Networking team has made tremendous progress in both the platform and open source Kubernetes projects. With the updates, Windows is now on par with Linux in terms of networking. Customers can now deploy mixed-OS, Kubernetes clusters in any environment including Azure, on-premises, and on 3rd-party cloud stacks with the same network primitives and topologies supported on Linux without any workarounds, “hacks”, or 3rd-party switch extensions.
"So what?", you may ask. There are multiple application and infrastructure-related reasons why these platform improvements make a substantial difference in the lives of developers and operations teams wanting to run Kubernetes. Read on to learn more!
Tightly-Coupled Communication
These improvements enable tightly-coupled communication between multiple Windows Server containers (without Hyper-V isolation) within a single "Pod". Think of Pods as the scheduling unit for the Kubernetes cluster, inside of which, one or more application containers are co-located and able to share storage and networking resources. All containers within a Pod shared the same IP address and port range and are able to communicate with each other using localhost. This enables applications to easily leverage "helper" programs for tasks such as monitoring, configuration updates, log management, and proxies. Another way to think of a Pod is as a compute host with the app containers representing processes.
Simplified Network Topology
We also simplified the network topology on Windows nodes in a Kubernetes cluster by reducing the number of endpoints required per container (or more generally, per pod) to one. Previously, Windows containers (pods) running in a Kubernetes cluster required two endpoints - one for external (internet) communication and a second for intra-cluster communication between between other nodes or pods in the cluster. This was due to the fact that external communication from containers attached to a host network with local scope (i.e. not publicly routable) required a NAT operation which could only be provided through the Windows NAT (WinNAT) component on the host. Intra-cluster communication required containers to be attached to a separate network with "global" (cluster-level) scope through a second endpoint. Recent platform improvements now enable NAT''ing to occur directly on a container endpoint which is implemented with the Microsoft Virtual Filtering Platform (VFP) Hyper-V switch extension. Now, both external and intra-cluster traffic can flow through a single endpoint.
Load-Balancing using VFP in Windows kernel
Kubernetes worker nodes rely on the kube-proxy to load-balance ingress network traffic to Service IPs between pods in a cluster. Previous versions of Windows implemented the Kube-proxy's load-balancing through a user-space proxy. We recently added support for "Proxy mode: iptables" which is implemented using VFP in the Windows kernel so that any IP traffic can be load-balanced more efficiently by the Windows OS kernel. Users can also configure an external load balancer by specifying the externalIP parameter in a service definition. In addition to the aforementioned improvements, we have also added platform support for the following:
- Support for DNS search suffixes per container / Pod (Docker improvement - removes additional work previously done by kube-proxy to append DNS suffixes)
- [Platform Support] 5-tuple rules for creating ACLs (Looking for help from community to integrate this with support for K8s Network Policy)
Now that Windows Server has joined the Windows Insider Program, customers and partners can take advantage of these new platform features today which accrue value to eagerly anticipated, new feature release later this year and new build after six months. The latest Windows Server insider build now includes support for all of these platform improvements.
In addition to the platform improvements for Windows, the team submitted code (PRs) for CNI, kubelet, and kube-proxy with the goal of mainlining Windows support into the Kubernetes v1.8 release. These PRs remove previous work-arounds required on Windows for items such as user-mode proxy for internal load balancing, appending additional DNS suffixes to each Kube-DNS request, and a separate container endpoint for external (internet) connectivity.
- https://github.com/kubernetes/kubernetes/pull/51063
- https://github.com/kubernetes/kubernetes/pull/51064
These new platform features and work on kubelet and kube-proxy align with the CNI network model used by Kubernetes on Linux and simplify the deployment of a K8s cluster without additional configuration or custom (Azure) resource templates. To this end, we completed work on CNI network and IPAM plugins to create/remove endpoints and manage IP addresses. The CNI plugin works through kubelet to target the Windows Host Networking Service (HNS) APIs to create an 'l2bridge' network (analogous to macvlan on Linux) which is enforced by the VFP switch extension.
The 'l2bridge' network driver re-writes the MAC address of container network traffic on ingress and egress to use the container host's MAC address. This obviates the need for multiple MAC addresses (one per container running on the host) to be "learned" by the upstream network switch port to which the container host is connected. This preserves memory space in physical switch TCAM tables and relies on the Hyper-V virtual switch to do MAC address translation in the host to forward traffic to the correct container. IP addresses are managed by a default, Windows IPAM plug-in which requires that POD CIDR IPs be taken from the container host's network IP space.
The team demoed (link to video) these new platform features and open-source updates to the SIG-Windows group on 8/8. We are working with the community to merge the kubelet and kube-proxy PRs to mainline these changes in time for the Kubernetes v1.8 release due out this September. These capabilities can then be used on current Windows Server insider builds and the Windows Server, version 1709.
Soon after RTM, we will also introduce these improvements into the Azure Container Service (ACS) so that Windows worker nodes and the containers hosted are first-class, Azure VNet citizens. An Azure IPAM plugin for Windows CNI will enable these endpoints to directly attach to Azure VNets with network policies for Windows containers enforced the same way as VMs.
| Feature | Windows Server 2016 (In-Market) | Next Windows Server Feature Release, Semi-Annual Channel | Linux | | Multiple Containers per Pod with shared network namespace (Compartment) | One Container per Pod | ✔ | ✔ | | Single (Shared) Endpoint per Pod | Two endpoints: WinNAT (External) + Transparent (Intra-Cluster) | ✔ | ✔ | | User-Mode, Load Balancing | ✔ | ✔ | ✔ | | Kernel-Mode, Load Balancing | Not Supported | ✔ | ✔ | | Support for DNS search suffixes per Pod (Docker update) | Kube-Proxy added multiple DNS suffixes to each request | ✔ | ✔ | | CNI Plugin Support | Not Supported | ✔ | ✔ |
The Kubernetes SIG Windows group meets bi-weekly on Tuesdays at 12:30 PM ET. To join or view notes from previous meetings, check out this document.
Kubernetes Meets High-Performance Computing
Anyone who has worked with Docker can appreciate the enormous gains in efficiency achievable with containers. While Kubernetes excels at orchestrating containers, high-performance computing (HPC) applications can be tricky to deploy on Kubernetes.
In this post, I discuss some of the challenges of running HPC workloads with Kubernetes, explain how organizations approach these challenges today, and suggest an approach for supporting mixed workloads on a shared Kubernetes cluster. We will also provide information and links to a case study on a customer, IHME, showing how Kubernetes is extended to service their HPC workloads seamlessly while retaining scalability and interfaces familiar to HPC users.
HPC workloads unique challenges
In Kubernetes, the base unit of scheduling is a Pod: one or more Docker containers scheduled to a cluster host. Kubernetes assumes that workloads are containers. While Kubernetes has the notion of Cron Jobs and Jobs that run to completion, applications deployed on Kubernetes are typically long-running services, like web servers, load balancers or data stores and while they are highly dynamic with pods coming and going, they differ greatly from HPC application patterns.
Traditional HPC applications often exhibit different characteristics:
- In financial or engineering simulations, a job may be comprised of tens of thousands of short-running tasks, demanding low-latency and high-throughput scheduling to complete a simulation in an acceptable amount of time.
- A computational fluid dynamics (CFD) problem may execute in parallel across many hundred or even thousands of nodes using a message passing library to synchronize state. This requires specialized scheduling and job management features to allocate and launch such jobs and then to checkpoint, suspend/resume or backfill them.
- Other HPC workloads may require specialized resources like GPUs or require access to limited software licenses. Organizations may enforce policies around what types of resources can be used by whom to ensure projects are adequately resourced and deadlines are met.
HPC workload schedulers have evolved to support exactly these kinds of workloads. Examples include Univa Grid Engine, IBM Spectrum LSF and Altair’s PBS Professional. Sites managing HPC workloads have come to rely on capabilities like array jobs, configurable pre-emption, user, group or project based quotas and a variety of other features.
Blurring the lines between containers and HPC
HPC users believe containers are valuable for the same reasons as other organizations. Packaging logic in a container to make it portable, insulated from environmental dependencies, and easily exchanged with other containers clearly has value. However, making the switch to containers can be difficult.
HPC workloads are often integrated at the command line level. Rather than requiring coding, jobs are submitted to queues via the command line as binaries or simple shell scripts that act as wrappers. There are literally hundreds of engineering, scientific and analytic applications used by HPC sites that take this approach and have mature and certified integrations with popular workload schedulers.
While the notion of packaging a workload into a Docker container, publishing it to a registry, and submitting a YAML description of the workload is second nature to users of Kubernetes, this is foreign to most HPC users. An analyst running models in R, MATLAB or Stata simply wants to submit their simulation quickly, monitor their execution, and get a result as quickly as possible.
Existing approaches
To deal with the challenges of migrating to containers, organizations running container and HPC workloads have several options:
- Maintain separate infrastructures
For sites with sunk investments in HPC, this may be a preferred approach. Rather than disrupt existing environments, it may be easier to deploy new containerized applications on a separate cluster and leave the HPC environment alone. The challenge is that this comes at the cost of siloed clusters, increasing infrastructure and management cost.
- Run containerized workloads under an existing HPC workload manager
For sites running traditional HPC workloads, another approach is to use existing job submission mechanisms to launch jobs that in turn instantiate Docker containers on one or more target hosts. Sites using this approach can introduce containerized workloads with minimal disruption to their environment. Leading HPC workload managers such as Univa Grid Engine Container Edition and IBM Spectrum LSF are adding native support for Docker containers. Shifter and Singularity are important open source tools supporting this type of deployment also. While this is a good solution for sites with simple requirements that want to stick with their HPC scheduler, they will not have access to native Kubernetes features, and this may constrain flexibility in managing long-running services where Kubernetes excels.
- Use native job scheduling features in Kubernetes
Sites less invested in existing HPC applications can use existing scheduling facilities in Kubernetes for jobs that run to completion. While this is an option, it may be impractical for many HPC users. HPC applications are often either optimized towards massive throughput or large scale parallelism. In both cases startup and teardown latencies have a discriminating impact. Latencies that appear to be acceptable for containerized microservices today would render such applications unable to scale to the required levels.
All of these solutions involve tradeoffs. The first option doesn’t allow resources to be shared (increasing costs) and the second and third options require customers to pick a single scheduler, constraining future flexibility.
Mixed workloads on Kubernetes
A better approach is to support HPC and container workloads natively in the same shared environment. Ideally, users should see the environment appropriate to their workload or workflow type.
One approach to supporting mixed workloads is to allow Kubernetes and the HPC workload manager to co-exist on the same cluster, throttling resources to avoid conflicts. While simple, this means that neither workload manager can fully utilize the cluster.
Another approach is to use a peer scheduler that coordinates with the Kubernetes scheduler. Navops Command by Univa is a solution that takes this third approach, augmenting the functionality of the Kubernetes scheduler. Navops Command provides its own web interface and CLI and allows additional scheduling policies to be enabled on Kubernetes without impacting the operation of the Kubernetes scheduler and existing containerized applications. Navops Command plugs into the Kubernetes architecture via the 'schedulerName' attribute in the pod spec as a peer scheduler that workloads can choose to use instead of the Kubernetes stock scheduler as shown below.

With this approach, Kubernetes acts as a resource manager, making resources available to a separate HPC scheduler. Cluster administrators can use a visual interface to allocate resources based on policy or simply drag sliders via a web UI to allocate different proportions of the Kubernetes environment to non-container (HPC) workloads, and native Kubernetes applications and services.

From a client perspective, the HPC scheduler runs as a service deployed in Kubernetes pods, operating just as it would on a bare metal cluster. Navops Command provides additional scheduling features including things like resource reservation, run-time quotas, workload preemption and more. This environment works equally well for on-premise, cloud-based or hybrid deployments.
Deploying mixed workloads at IHME
One client having success with mixed workloads is the Institute for Health Metrics & Evaluation (IHME), an independent health research center at the University of Washington. In support of their globally recognized Global Health Data Exchange (GHDx), IHME operates a significantly sized environment comprised of 500 nodes and 20,000 cores running a mix of analytic, HPC, and container-based applications on Kubernetes. This case study describes IHME’s success hosting existing HPC workloads on a shared Kubernetes cluster using Navops Command.

For sites deploying new clusters that want access to the rich capabilities in Kubernetes but need the flexibility to run non-containerized workloads, this approach is worth a look. It offers the opportunity for sites to share infrastructure between Kubernetes and HPC workloads without disrupting existing applications and businesses processes. It also allows them to migrate their HPC workloads to use Docker containers at their own pace.
High Performance Networking with EC2 Virtual Private Clouds
One of the most popular platforms for running Kubernetes is Amazon Web Services’ Elastic Compute Cloud (AWS EC2). With more than a decade of experience delivering IaaS, and expanding over time to include a rich set of services with easy to consume APIs, EC2 has captured developer mindshare and loyalty worldwide.
When it comes to networking, however, EC2 has some limits that hinder performance and make deploying Kubernetes clusters to production unnecessarily complex. The preview release of Romana v2.0, a network and security automation solution for Cloud Native applications, includes features that address some well known network issues when running Kubernetes in EC2.
Traditional VPC Networking Performance Roadblocks
A Kubernetes pod network is separate from an Amazon Virtual Private Cloud (VPC) instance network; consequently, off-instance pod traffic needs a route to the destination pods. Fortunately, VPCs support setting these routes. When building a cluster network with the kubenet plugin, whenever new nodes are added, the AWS cloud provider will automatically add a VPC route to the pods running on that node.
Using kubenet to set routes provides native VPC network performance and visibility. However, since kubenet does not support more advanced network functions like network policy for pod traffic isolation, many users choose to run a Container Network Interface (CNI) provider on the back end.
Before Romana v2.0, all CNI network providers required an overlay when used across Availability Zones (AZs), leaving CNI users who want to deploy HA clusters unable to get the performance of native VPC networking.
Even users who don’t need advanced networking encounter restriction, since the VPC route tables support a maximum of 50 entries, which limits the size of a cluster to 50 nodes (or less, if some VPC routes are needed for other purposes). Until Romana v2.0, users also needed to run an overlay network to get around this limit.
Whether you were interested in advanced networking for traffic isolation or running large production HA clusters (or both), you were unable to get the performance and visibility of native VPC networking.
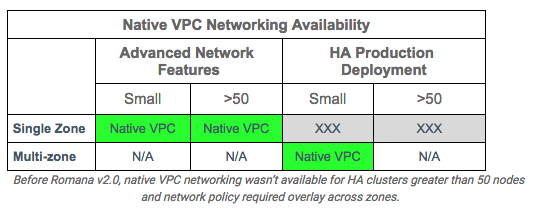
Kubernetes on Multi-Segment Networks
The way to avoid running out of VPC routes is to use them sparingly by making them forward pod traffic for multiple instances. From a networking perspective, what that means is that the VPC route needs to forward to a router, which can then forward traffic on to the final destination instance.
Romana is a CNI network provider that configures routes on the host to forward pod network traffic without an overlay. Since inter-node routes are installed on hosts, no VPC routes are necessary at all. However, when the VPC is split into subnets for an HA deployment across zones, VPC routes are necessary.
Fortunately, inter-node routes on hosts allows them to act as a network router and forward traffic inbound from another zone just as it would for traffic from local pods. This makes any Kubernetes node configured by Romana able to accept inbound pod traffic from other zones and forward it to the proper destination node on the subnet.
Because of this local routing function, top-level routes to pods on other instances on the subnet can be aggregated, collapsing the total number of routes necessary to as few as one per subnet. To avoid using a single instance to forward all traffic, more routes can be used to spread traffic across multiple instances, up to the maximum number of available routes (i.e. equivalent to kubenet).
The net result is that you can now build clusters of any size across AZs without an overlay. Romana clusters also support network policies for better security through network isolation.
Making it All Work
While the combination of aggregated routes and node forwarding on a subnet eliminates overlays and avoids the VPC 50 route limitation, it imposes certain requirements on the CNI provider. For example, hosts should be configured with inter-node routes only to other nodes in the same zone on the local subnet. Traffic to all other hosts must use the default route off host, then use the (aggregated) VPC route to forward traffic out of the zone. Also: when adding a new host, in order to maintain aggregated VPC routes, the CNI plugin needs to use IP addresses for pods that are reachable on the new host.
The latest release of Romana also addresses questions about how VPC routes are installed; what happens when a node that is forwarding traffic fails; how forwarding node failures are detected; and how routes get updated and the cluster recovers.
Romana v2.0 includes a new AWS route configuration function to set VPC routes. This is part of a new set of network advertising features that automate route configuration in L3 networks. Romana v2.0 includes topology-aware IP address management (IPAM) that enables VPC route aggregation to stay within the 50 route limit as described here, as well as new health checks to update VPC routes when a routing instance fails. For smaller clusters, Romana configures VPC routes as kubenet does, with a route to each instance, taking advantage of every available VPC route.
Native VPC Networking Everywhere
When using Romana v2.0, native VPC networking is now available for clusters of any size, with or without network policies and for HA production deployment split across multiple zones.

Kompose Helps Developers Move Docker Compose Files to Kubernetes
I'm pleased to announce that Kompose, a conversion tool for developers to transition Docker Compose applications to Kubernetes, has graduated from the Kubernetes Incubator to become an official part of the project.
Since our first commit on June 27, 2016, Kompose has achieved 13 releases over 851 commits, gaining 21 contributors since the inception of the project. Our work started at Skippbox (now part of Bitnami) and grew through contributions from Google and Red Hat.
The Kubernetes Incubator allowed contributors to get to know each other across companies, as well as collaborate effectively under guidance from Kubernetes contributors and maintainers. Our incubation led to the development and release of a new and useful tool for the Kubernetes ecosystem.
We’ve created a reliable, scalable Kubernetes environment from an initial Docker Compose file. We worked hard to convert as many keys as possible to their Kubernetes equivalent. Running a single command gets you up and running on Kubernetes: kompose up.
We couldn’t have done it without feedback and contributions from the community!
If you haven’t yet tried Kompose on GitHub check it out!
Kubernetes guestbook
The go-to example for Kubernetes is the famous guestbook, which we use as a base for conversion.
Here is an example from the official kompose.io site, starting with a simple Docker Compose file).
First, we’ll retrieve the file:
$ wget https://raw.githubusercontent.com/kubernetes/kompose/master/examples/docker-compose.yaml
You can test it out by first deploying to Docker Compose:
$ docker-compose up -d
Creating network "examples\_default" with the default driver
Creating examples\_redis-slave\_1
Creating examples\_frontend\_1
Creating examples\_redis-master\_1
And when you’re ready to deploy to Kubernetes:
$ kompose up
We are going to create Kubernetes Deployments, Services and PersistentVolumeClaims for your Dockerized application.
If you need different kind of resources, use the kompose convert and kubectl create -f commands instead.
INFO Successfully created Service: redis
INFO Successfully created Service: web
INFO Successfully created Deployment: redis
INFO Successfully created Deployment: web
Your application has been deployed to Kubernetes. You can run kubectl get deployment,svc,pods,pvc for details
Check out other examples of what Kompose can do.
Converting to alternative Kubernetes controllers
Kompose can also convert to specific Kubernetes controllers with the use of flags:
$ kompose convert --help
Usage:
kompose convert [file] [flags]
Kubernetes Flags:
--daemon-set Generate a Kubernetes daemonset object
-d, --deployment Generate a Kubernetes deployment object
-c, --chart Create a Helm chart for converted objects
--replication-controller Generate a Kubernetes replication controller object
…
For example, let’s convert our guestbook example to a DaemonSet:
$ kompose convert --daemon-set
INFO Kubernetes file "frontend-service.yaml" created
INFO Kubernetes file "redis-master-service.yaml" created
INFO Kubernetes file "redis-slave-service.yaml" created
INFO Kubernetes file "frontend-daemonset.yaml" created
INFO Kubernetes file "redis-master-daemonset.yaml" created
INFO Kubernetes file "redis-slave-daemonset.yaml" created
Key Kompose 1.0 features
With our graduation, comes the release of Kompose 1.0.0, here’s what’s new:
- Docker Compose Version 3: Kompose now supports Docker Compose Version 3. New keys such as ‘deploy’ now convert to their Kubernetes equivalent.
- Docker Push and Build Support: When you supply a ‘build’ key within your
docker-compose.yamlfile, Kompose will automatically build and push the image to the respective Docker repository for Kubernetes to consume. - New Keys: With the addition of version 3 support, new keys such as pid and deploy are supported. For full details on what Kompose supports, view our conversion document.
- Bug Fixes: In every release we fix any bugs related to edge-cases when converting. This release fixes issues relating to converting volumes with ‘./’ in the target name.
What’s ahead?
As we continue development, we will strive to convert as many Docker Compose keys as possible for all future and current Docker Compose releases, converting each one to their Kubernetes equivalent. All future releases will be backwards-compatible.
Post questions (or answer questions) onStack Overflow
Join the community portal for advocates onK8sPort
Follow us on Twitter@Kubernetesio for latest updates
Connect with the community onSlack
Get involved with the Kubernetes project onGitHub
Happy Second Birthday: A Kubernetes Retrospective
As we do every July, we’re excited to celebrate Kubernetes 2nd birthday! In the two years since GA 1.0 launched as an open source project, Kubernetes (abbreviated as K8s) has grown to become the highest velocity cloud-related project. With more than 2,611 diverse contributors, from independents to leading global companies, the project has had 50,685 commits in the last 12 months. Of the 54 million projects on GitHub, Kubernetes is in the top 5 for number of unique developers contributing code. It also has more pull requests and issue comments than any other project on GitHub.

Figure 1: Kubernetes Rankings
At the center of the community are Special Interest Groups with members from different companies and organizations, all with a common interest in a specific topic. Given how fast Kubernetes is growing, SIGs help nurture and distribute leadership, while advancing new proposals, designs and release updates. Here's a look at the SIG building blocks supporting Kubernetes:

Kubernetes has also earned the trust of many Fortune 500 companies with deployments at Box, Comcast, Pearson, GolfNow, eBay, Ancestry.com and contributions from CoreOS, Fujitsu, Google, Huawei, Mirantis, Red Hat, Weaveworks and ZTE Company and others. Today, on the second anniversary of the Kubernetes 1.0 launch, we take a look back at some of the major accomplishments of the last year:
July 2016
- Kubernauts celebrated its first anniversary of the Kubernetes 1.0 launch with 20 #k8sbday parties hosted worldwide
- Kubernetes v1.3 release
September 2016
- Kubernetes v1.4 release
- Launch of kubeadm, a tool that makes Kubernetes dramatically easier to install
- Pokemon Go - one of the largest installs of Kubernetes ever
October 2016
- Introduced Kubernetes service partners program and a redesigned partners page
November 2016
- CloudNativeCon/KubeCon Seattle
- Cloud Native Computing Foundation partners with The Linux Foundation to launch a new Kubernetes certification, training and managed service provider program
December 2016
- Kubernetes v1.5 release
January 2017
- Survey from CloudNativeCon + KubeCon Seattle showcases the maturation of Kubernetes deployment
March 2017
- CloudNativeCon/KubeCon Europe
- Kubernetesv1.6 release
April 2017
- The Battery Open Source Software (BOSS) Index lists Kubernetes as #33 in the top 100 popular open-source software projects
May 2017
- Four Kubernetes projects accepted to The Google Summer of Code (GSOC) 2017 program
- Stutterstock and Kubernetes appear in The Wall Street Journal: “On average we [Shutterstock] deploy 45 different releases into production a day using that framework. We use Docker, Kubernetes and Jenkins [to build and run containers and automate development,” said CTO Marty Brodbeck on the company’s IT overhaul and adoption of containerization.
June 2017
- Kubernetes v1.7 release
- Survey from CloudNativeCon + KubeCon Europe shows Kubernetes leading as the orchestration platform of choice
- Kubernetes ranked #4 in the 30 highest velocity open source projects

Figure 2: The 30 highest velocity open source projects. Source: https://github.com/cncf/velocity
July 2017
- Kubernauts celebrate the second anniversary of the Kubernetes 1.0 launch with #k8sbday parties worldwide!
At the one year anniversary of the Kubernetes 1.0 launch, there were 130 Kubernetes-related Meetup groups. Today, there are more than 322 Meetup groups with 104,195 members. Local Meetups around the world joined the #k8sbday celebration! Take a look at some of the pictures from their celebrations. We hope you’ll join us at CloudNativeCon + KubeCon, December 6- 8 in Austin, TX.

Celebrating at the K8s birthday party in San Francisco

Celebrating in RTP, NC with a presentation from Jason McGee, VP and CTO, IBM Cloud Platform. Photo courtesy of @FranklyBriana

The Kubernetes Singapore meetup celebrating with an intro to GKE. Photo courtesy of @hunternield


New York celebrated with mini k8s cupcakes and a presentation on the history of cloud native from CNCF Executive Director, Dan Kohn. Photo courtesy of @arieljatib and @coreos


Quebec City had custom k8s cupcakes too! Photo courtesy of @zig_max

Beijing celebrated with custom k8s lollipops. Photo courtesy of @maxwell9215
-- Sarah Novotny, Program Manager, Kubernetes Community
How Watson Health Cloud Deploys Applications with Kubernetes
Today’s post is by Sandhya Kapoor, Senior Technologist, Watson Platform for Health, IBM
For more than a year, Watson Platform for Health at IBM deployed healthcare applications in virtual machines on our cloud platform. Because virtual machines had been a costly, heavyweight solution for us, we were interested to evaluate Kubernetes for our deployments.
Our design was to set up the application and data containers in the same namespace, along with the required agents using sidecars, to meet security and compliance requirements in the healthcare industry.
I was able to run more processes on a single physical server than I could using a virtual machine. Also, running our applications in containers ensured optimal usage of system resources.
To orchestrate container deployment, we are using IBM Cloud Kubernetes Service infrastructure, a Kubernetes implementation by IBM for automating deployment, scaling, and operations of application containers across clusters of hosts, providing container-centric infrastructure.
With Kubernetes, our developers can rapidly develop highly available applications by leveraging the power and flexibility of containers, and with integrated and secure volume service, we can store persistent data, share data between Kubernetes pods, and restore data when needed.
Here is a snapshot of Watson Care Manager, running inside a Kubernetes cluster:


Before deploying an app, a user must create a worker node cluster. I can create a cluster using the kubectl cli commands or create it from the IBM Cloud dashboard.
Our clusters consist of one or more physical or virtual machines, also known as worker nodes, that are loosely coupled, extensible, and centrally monitored and managed by the Kubernetes master. When we deploy a containerized app, the Kubernetes master decides where to deploy the app, taking into consideration the deployment requirements and available capacity in the cluster.
A user makes a request to Kubernetes to deploy the containers, specifying the number of replicas required for high availability. The Kubernetes scheduler decides where the pods (groups of one or more containers) will be scheduled and which worker nodes they will be deployed on, storing this information internally in Kubernetes and etcd. The deployment of pods in worker nodes is updated based on load at runtime, optimizing the placement of pods in the cluster.
Kubelet running in each worker node regularly polls the kube API server. If there is new work to do, kubelet pulls the configuration information and takes action, for example, spinning off a new pod.
Process Flow:
| 
Usage of GitLab in the Process Flow:
We stored all our artifacts in GitLab, which includes the Docker files that are required for creating the image, YAML files needed to create a pod, and the configuration files to make the Healthcare application run.
GitLab and Jenkins interaction in the Process Flow:
We use Jenkins for continuous integration and build automation to create/pull/retag the Docker image and push the image to a Docker registry in the cloud.
Basically, we have a Jenkins job configured to interact with GitLab project to get the latest artifacts and, based on requirements, it will either create a new Docker image from scratch by pulling the needed intermediate images from Docker/Bluemix repository or update the Docker image.
After the image is created/updated the Jenkins job pushes the image to a Bluemix repository to save the latest image to be pulled by UrbanCode Deploy (UCD) component.
Jenkins and UCD interaction in the Process Flow:
The Jenkins job is configured to use the UCD component and its respective application, application process, and the UCD environment to deploy the application. The Docker image version files that will be used by the UCD component are also passed via Jenkins job to the UCD component.
Usage of UCD in the Process Flow:
UCD is used for deployment and the end-to end deployment process is automated here. UCD component process involves the following steps:
- Download the required artifacts for deployment from the Gitlab.
- Login to Bluemix and set the KUBECONFIG based on the Kubernetes cluster used for creating the pods.
- Create the application pod in the cluster using kubectl create command.
- If needed, run a rolling update to update the existing pod.

Deploying the application in IBM Cloud Kubernetes Service:
Provision a cluster in IBM Cloud Kubernetes Service with <x> worker nodes. Create Kubernetes controllers for deploying the containers in worker nodes, the IBM Cloud Kubernetes Service infrastructure pulls the Docker images from IBM Cloud Container Registry to create containers. We tried deploying an application container and running a logmet agent (see Reading and displaying logs using logmet container, below) inside the containers that forwards the application logs to an IBM Cloud logging service. As part of the process, YAML files are used to create a controller resource for the UrbanCode Deploy (UCD). UCD agent is deployed as a DaemonSet controller, which is used to connect to the UCD server. The whole process of deployment of application happens in UCD. To support the application for public access, we created a service resource to interact between pods and access container services. For storage support, we created persistent volume claims and mounted the volume for the containers.
| 
Reading and displaying logs using logmet container:
Logmet is a cloud logging service that helps to collect, store, and analyze an application’s log data. It also aggregates application and environment logs for consolidated application or environment insights and forwards them. Metrics are transmitted with collectd. We chose a model that runs a logmet agent process inside the container. The agent takes care of forwarding the logs to the cloud logging service configured in containers.
The application pod mounts the application logging directory to the storage space, which is created by persistent volume claim, and stores the logs, which are not lost even when the pod dies. Kibana is an open source data visualization plugin for Elasticsearch. It provides visualization capabilities on top of the content indexed on an Elasticsearch cluster.

Exposing services with Ingress:
Ingress controllers are reverse proxies that expose services outside cluster through URLs. They act as an external HTTP load balancer that uses a unique public entry point to route requests to the application.
To expose our services to outside the cluster, we used Ingress. In IBM Cloud Kubernetes Service, if we create a paid cluster, an Ingress controller is automatically installed for us to use. We were able to access services through Ingress by creating a YAML resource file that specifies the service path.
- Post questions (or answer questions) on Stack Overflow
- Join the community portal for advocates on K8sPort
- Follow us on Twitter @Kubernetesio for latest updates
- Connect with the community on Slack
- Get involved with the Kubernetes project on GitHub
Kubernetes 1.7: Security Hardening, Stateful Application Updates and Extensibility
This article is by Aparna Sinha and Ihor Dvoretskyi, on behalf of the Kubernetes 1.7 release team.
Today we’re announcing Kubernetes 1.7, a milestone release that adds security, storage and extensibility features motivated by widespread production use of Kubernetes in the most demanding enterprise environments.
At-a-glance, security enhancements in this release include encrypted secrets, network policy for pod-to-pod communication, node authorizer to limit kubelet access and client / server TLS certificate rotation.
For those of you running scale-out databases on Kubernetes, this release has a major feature that adds automated updates to StatefulSets and enhances updates for DaemonSets. We are also announcing alpha support for local storage and a burst mode for scaling StatefulSets faster.
Also, for power users, API aggregation in this release allows user-provided apiservers to be served along with the rest of the Kubernetes API at runtime. Additional highlights include support for extensible admission controllers, pluggable cloud providers, and container runtime interface (CRI) enhancements.
What’s New
Security:
- The Network Policy API is promoted to stable. Network policy, implemented through a network plug-in, allows users to set and enforce rules governing which pods can communicate with each other.
- Node authorizer and admission control plugin are new additions that restrict kubelet’s access to secrets, pods and other objects based on its node.
- Encryption for Secrets, and other resources in etcd, is now available as alpha.
- Kubelet TLS bootstrapping now supports client and server certificate rotation.
- Audit logs stored by the API server are now more customizable and extensible with support for event filtering and webhooks. They also provide richer data for system audit.
Stateful workloads:
- StatefulSet Updates is a new beta feature in 1.7, allowing automated updates of stateful applications such as Kafka, Zookeeper and etcd, using a range of update strategies including rolling updates.
- StatefulSets also now support faster scaling and startup for applications that do not require ordering through Pod Management Policy. This can be a major performance improvement.
- Local Storage (alpha) was one of most frequently requested features for stateful applications. Users can now access local storage volumes through the standard PVC/PV interface and via StorageClasses in StatefulSets.
- DaemonSets, which create one pod per node already have an update feature, and in 1.7 have added smart rollback and history capability.
- A new StorageOS Volume plugin provides highly-available cluster-wide persistent volumes from local or attached node storage.
Extensibility:
API aggregation at runtime is the most powerful extensibility features in this release, allowing power users to add Kubernetes-style pre-built, 3rd party or user-created APIs to their cluster.
Container Runtime Interface (CRI) has been enhanced with New RPC calls to retrieve container metrics from the runtime. Validation tests for the CRI have been published and Alpha integration with containerd, which supports basic pod lifecycle and image management is now available. Read our previous in-depth post introducing CRI.
Additional Features:
- Alpha support for external admission controllers is introduced, providing two options for adding custom business logic to the API server for modifying objects as they are created and validating policy.
- Policy-based Federated Resource Placement is introduced as Alpha providing placement policies for the federated clusters, based on custom requirements such as regulation, pricing or performance.
Deprecation:
- Third Party Resource (TPR) has been replaced with Custom Resource Definitions (CRD) which provides a cleaner API, and resolves issues and corner cases that were raised during the beta period of TPR. If you use the TPR beta feature, you are encouraged to migrate, as it is slated for removal by the community in Kubernetes 1.8.
The above are a subset of the feature highlights in Kubernetes 1.7. For a complete list please visit the release notes.
Adoption
This release is possible thanks to our vast and open community. Together, we’ve already pushed more than 50,000 commits in just three years, and that’s only in the main Kubernetes repo. Additional extensions to Kubernetes are contributed in associated repos bringing overall stability to the project. This velocity makes Kubernetes one of the fastest growing open source projects -- ever.
Kubernetes adoption has been coming from every sector across the world. Recent user stories from the community include:
- GolfNow, a member of the NBC Sports Group, migrated their application to Kubernetes giving them better resource utilization andslashing their infrastructure costs in half.
- Bitmovin, provider of video infrastructure solutions, showed us how they’re using Kubernetes to do multi-stage canary deployments in the cloud and on-prem.
- Ocado, world’s largest online supermarket, uses Kubernetes to create a distributed data center for their smart warehouses. Read about their full setup here.
- Is Kubernetes helping your team? Share your story with the community. See our growing resource of user case studies and learn from great companies like Box that have adopted Kubernetes in their organization.
Huge kudos and thanks go out to the Kubernetes 1.7 release team, led by Dawn Chen of Google.
Availability
Kubernetes 1.7 is available for download on GitHub. To get started with Kubernetes, try one of the these interactive tutorials.
Get Involved
Join the community at CloudNativeCon + KubeCon in Austin Dec. 6-8 for the largest Kubernetes gathering ever. Speaking submissions are open till August 21 and discounted registration ends October 6.
The simplest way to get involved is joining one of the many Special Interest Groups (SIGs) that align with your interests. Have something you’d like to broadcast to the Kubernetes community? Share your voice at our weekly community meeting, and these channels:
- Post questions (or answer questions) on Stack Overflow
- Join the community portal for advocates on K8sPort
- Follow us on Twitter @Kubernetesio for latest updates
- Connect with the community on Slack
- Share your Kubernetes story.
Many thanks to our vast community of contributors and supporters in making this and all releases possible.
Managing microservices with the Istio service mesh
Today’s post is by the Istio team showing how you can get visibility, resiliency, security and control for your microservices in Kubernetes.
Services are at the core of modern software architecture. Deploying a series of modular, small (micro-)services rather than big monoliths gives developers the flexibility to work in different languages, technologies and release cadence across the system; resulting in higher productivity and velocity, especially for larger teams.
With the adoption of microservices, however, new problems emerge due to the sheer number of services that exist in a larger system. Problems that had to be solved once for a monolith, like security, load balancing, monitoring, and rate limiting need to be handled for each service.
Kubernetes and Services
Kubernetes supports a microservices architecture through the Service construct. It allows developers to abstract away the functionality of a set of Pods, and expose it to other developers through a well-defined API. It allows adding a name to this level of abstraction and perform rudimentary L4 load balancing. But it doesn’t help with higher-level problems, such as L7 metrics, traffic splitting, rate limiting, circuit breaking, etc.
Istio, announced last week at GlueCon 2017, addresses these problems in a fundamental way through a service mesh framework. With Istio, developers can implement the core logic for the microservices, and let the framework take care of the rest – traffic management, discovery, service identity and security, and policy enforcement. Better yet, this can be also done for existing microservices without rewriting or recompiling any of their parts. Istio uses Envoy as its runtime proxy component and provides an extensible intermediation layer which allows global cross-cutting policy enforcement and telemetry collection.
The current release of Istio is targeted to Kubernetes users and is packaged in a way that you can install in a few lines and get visibility, resiliency, security and control for your microservices in Kubernetes out of the box.
In a series of blog posts, we'll look at a simple application that is composed of 4 separate microservices. We'll start by looking at how the application can be deployed using plain Kubernetes. We'll then deploy the exact same services into an Istio-enabled cluster without changing any of the application code -- and see how we can observe metrics.
In subsequent posts, we’ll focus on more advanced capabilities such as HTTP request routing, policy, identity and security management.
Example Application: BookInfo
We will use a simple application called BookInfo, that displays information, reviews and ratings for books in a store. The application is composed of four microservices written in different languages:

It’s worth noting that these services have no dependencies on Kubernetes and Istio, but make an interesting case study. Particularly, the multitude of services, languages and versions for the reviews service make it an interesting service mesh example. More information about this example can be found here.
Running the Bookinfo Application in Kubernetes
In this post we’ll focus on the v1 version of the app:

Deploying it with Kubernetes is straightforward, no different than deploying any other services. Service and Deployment resources for the productpage microservice looks like this:
apiVersion: v1
kind: Service
metadata:
name: productpage
labels:
app: productpage
spec:
type: NodePort
ports:
- port: 9080
name: http
selector:
app: productpage
---
apiVersion: extensions/v1beta1
kind: Deployment
metadata:
name: productpage-v1
spec:
replicas: 1
template:
metadata:
labels:
app: productpage
track: stable
spec:
containers:
- name: productpage
image: istio/examples-bookinfo-productpage-v1
imagePullPolicy: IfNotPresent
ports:
- containerPort: 9080
The other two services that we will need to deploy if we want to run the app are details and reviews-v1. We don’t need to deploy the ratings service at this time because v1 of the reviews service doesn’t use it. The remaining services follow essentially the same pattern as productpage. The yaml files for all services can be found here.
To run the services as an ordinary Kubernetes app:
kubectl apply -f bookinfo-v1.yaml
To access the application from outside the cluster we’ll need the NodePort address of the productpage service:
export BOOKINFO\_URL=$(kubectl get po -l app=productpage -o jsonpath={.items[0].status.hostIP}):$(kubectl get svc productpage -o jsonpath={.spec.ports[0].nodePort})
We can now point the browser to http://$BOOKINFO_URL/productpage, and see:

Running the Bookinfo Application with Istio
Now that we’ve seen the app, we’ll adjust our deployment slightly to make it work with Istio. We first need to install Istio in our cluster. To see all of the metrics and tracing features in action, we also install the optional Prometheus, Grafana, and Zipkin addons. We can now delete the previous app and start the Bookinfo app again using the exact same yaml file, this time with Istio:
kubectl delete -f bookinfo-v1.yaml
kubectl apply -f \<(istioctl kube-inject -f bookinfo-v1.yaml)
Notice that this time we use the istioctl kube-inject command to modify bookinfo-v1.yaml before creating the deployments. It injects the Envoy sidecar into the Kubernetes pods as documented here. Consequently, all of the microservices are packaged with an Envoy sidecar that manages incoming and outgoing traffic for the service.
In the Istio service mesh we will not want to access the application productpage directly, as we did in plain Kubernetes. Instead, we want an Envoy sidecar in the request path so that we can use Istio’s management features (version routing, circuit breakers, policies, etc.) to control external calls to productpage , just like we can for internal requests. Istio’s Ingress controller is used for this purpose.
To use the Istio Ingress controller, we need to create a Kubernetes Ingress resource for the app, annotated with kubernetes.io/ingress.class: "istio", like this:
cat \<\<EOF ``` kubectl create -f -
apiVersion: extensions/v1beta1
kind: Ingress
metadata:
name: bookinfo
annotations:
kubernetes.io/ingress.class: "istio"
spec:
rules:
- http:
paths:
- path: /productpage
backend:
serviceName: productpage
servicePort: 9080
- path: /login
backend:
serviceName: productpage
servicePort: 9080
- path: /logout
backend:
serviceName: productpage
servicePort: 9080
EOF
The resulting deployment with Istio and v1 version of the bookinfo app looks like this:

This time we will access the app using the NodePort address of the Istio Ingress controller:
export BOOKINFO\_URL=$(kubectl get po -l istio=ingress -o jsonpath={.items[0].status.hostIP}):$(kubectl get svc istio-ingress -o jsonpath={.spec.ports[0].nodePort})
We can now load the page at http://$BOOKINFO_URL/productpage and once again see the running app -- there should be no difference from the previous deployment without Istio for the user.
However, now that the application is running in the Istio service mesh, we can immediately start to see some benefits.
Metrics collection
The first thing we get from Istio out-of-the-box is the collection of metrics in Prometheus. These metrics are generated by the Istio filter in Envoy, collected according to default rules (which can be customized), and then sent to Prometheus. The metrics can be visualized in the Istio dashboard in Grafana. Note that while Prometheus is the out-of-the-box default metrics backend, Istio allows you to plug in to others, as we’ll demonstrate in future blog posts.
To demonstrate, we'll start by running the following command to generate some load on the application:
wrk -t1 -c1 -d20s http://$BOOKINFO\_URL/productpage
We obtain Grafana’s NodePort URL:
export GRAFANA\_URL=$(kubectl get po -l app=grafana -o jsonpath={.items[0].status.hostIP}):$(kubectl get svc grafana -o jsonpath={.spec.ports[0].nodePort})
We can now open a browser at http://$GRAFANA_URL/dashboard/db/istio-dashboard and examine the various performance metrics for each of the Bookinfo services:

Distributed tracing The next thing we get from Istio is call tracing with Zipkin. We obtain its NodePort URL:
export ZIPKIN\_URL=$(kubectl get po -l app=zipkin -o jsonpath={.items[0].status.hostIP}):$(kubectl get svc zipkin -o jsonpath={.spec.ports[0].nodePort})
We can now point a browser at http://$ZIPKIN_URL/ to see request trace spans through the Bookinfo services.

Although the Envoy proxies send trace spans to Zipkin out-of-the-box, to leverage its full potential, applications need to be Zipkin aware and forward some headers to tie the individual spans together. See zipkin-tracing for details.
Holistic view of the entire fleet The metrics that Istio provides are much more than just a convenience. They provide a consistent view of the service mesh, by generating uniform metrics throughout. We don’t have to worry about reconciling different types of metrics emitted by various runtime agents, or add arbitrary agents to gather metrics for legacy uninstrumented apps. We also no longer have to rely on the development process to properly instrument the application to generate metrics. The service mesh sees all the traffic, even into and out of legacy "black box" services, and generates metrics for all of it. Summary The demo above showed how in a few steps, we can launch Istio-backed services and observe L7 metrics on them. Over the next weeks we’ll follow on with demonstration of more Istio capabilities like policy management and HTTP request routing. Google, IBM and Lyft joined forces to create Istio based on our common experiences building and operating large and complex microservice deployments for internal and enterprise customers. Istio is an industry-wide community effort. We’ve been thrilled to see the enthusiasm from the industry partners and the insights they brought. As we take the next step and release Istio to the wild, we cannot wait to see what the broader community of contributors will bring to it. If you’re using or considering to use a microservices architecture on Kubernetes, we encourage you to give Istio a try, learn about it more at istio.io, let us know what you think, or better yet, join the developer community to help shape its future!
--On behalf of the Istio team. Frank Budinsky, Software Engineer at IBM, Andra Cismaru, Software Engineer and Israel Shalom, Product Manager at Google.
- Get involved with the Kubernetes project on GitHub
- Post questions (or answer questions) on Stack Overflow
- Connect with the community on Slack
- Follow us on Twitter @Kubernetesio for latest updates
Draft: Kubernetes container development made easy
About a month ago Microsoft announced the acquisition of Deis to expand our expertise in containers and Kubernetes. Today, I’m excited to announce a new open source project derived from this newly expanded Azure team: Draft.
While by now the strengths of Kubernetes for deploying and managing applications at scale are well understood. The process of developing a new application for Kubernetes is still too hard. It’s harder still if you are new to containers, Kubernetes, or developing cloud applications.
Draft fills this role. As its name implies it is a tool that helps you begin that first draft of a containerized application running in Kubernetes. When you first run the draft tool, it automatically discovers the code that you are working on and builds out the scaffolding to support containerizing your application. Using heuristics and a variety of pre-defined project templates draft will create an initial Dockerfile to containerize your application, as well as a Helm Chart to enable your application to be deployed and maintained in a Kubernetes cluster. Teams can even bring their own draft project templates to customize the scaffolding that is built by the tool.
But the value of draft extends beyond simply scaffolding in some files to help you create your application. Draft also deploys a server into your existing Kubernetes cluster that is automatically kept in sync with the code on your laptop. Whenever you make changes to your application, the draft daemon on your laptop synchronizes that code with the draft server in Kubernetes and a new container is built and deployed automatically without any user action required. Draft enables the “inner loop” development experience for the cloud.
Of course, as is the expectation with all infrastructure software today, Draft is available as an open source project, and it itself is in “draft” form :) We eagerly invite the community to come and play around with draft today, we think it’s pretty awesome, even in this early form. But we’re especially excited to see how we can develop a community around draft to make it even more powerful for all developers of containerized applications on Kubernetes.
To give you a sense for what Draft can do, here is an example drawn from the Getting Started page in the GitHub repository.
There are multiple example applications included within the examples directory. For this walkthrough, we'll be using the python example application which uses Flask to provide a very simple Hello World webserver.
$ cd examples/python
Draft Create
We need some "scaffolding" to deploy our app into a Kubernetes cluster. Draft can create a Helm chart, a Dockerfile and a draft.toml with draft create:
$ draft create
--\> Python app detected
--\> Ready to sail
$ ls
Dockerfile app.py chart/ draft.toml requirements.txt
The chart/ and Dockerfile assets created by Draft default to a basic Python configuration. This Dockerfile harnesses the python:onbuild image, which will install the dependencies in requirements.txt and copy the current directory into /usr/src/app. And to align with the service values in chart/values.yaml, this Dockerfile exposes port 80 from the container.
The draft.toml file contains basic configuration about the application like the name, which namespace it will be deployed to, and whether to deploy the app automatically when local files change.
$ cat draft.toml
[environments]
[environments.development]
name = "tufted-lamb"
namespace = "default"
watch = true
watch\_delay = 2
Draft Up
Now we're ready to deploy app.py to a Kubernetes cluster.
Draft handles these tasks with one draft up command:
- reads configuration from draft.toml
- compresses the chart/ directory and the application directory as two separate tarballs
- uploads the tarballs to draftd, the server-side component
- draftd then builds the docker image and pushes the image to a registry
- draftd instructs helm to install the Helm chart, referencing the Docker registry image just built
With the watch option set to true, we can let this run in the background while we make changes later on…
$ draft up
--\> Building Dockerfile
Step 1 : FROM python:onbuild
onbuild: Pulling from library/python
...
Successfully built 38f35b50162c
--\> Pushing docker.io/microsoft/tufted-lamb:5a3c633ae76c9bdb81b55f5d4a783398bf00658e
The push refers to a repository [docker.io/microsoft/tufted-lamb]
...
5a3c633ae76c9bdb81b55f5d4a783398bf00658e: digest: sha256:9d9e9fdb8ee3139dd77a110fa2d2b87573c3ff5ec9c045db6009009d1c9ebf5b size: 16384
--\> Deploying to Kubernetes
Release "tufted-lamb" does not exist. Installing it now.
--\> Status: DEPLOYED
--\> Notes:
1. Get the application URL by running these commands:
NOTE: It may take a few minutes for the LoadBalancer IP to be available.
You can watch the status of by running 'kubectl get svc -w tufted-lamb-tufted-lamb'
export SERVICE\_IP=$(kubectl get svc --namespace default tufted-lamb-tufted-lamb -o jsonpath='{.status.loadBalancer.ingress[0].ip}')
echo http://$SERVICE\_IP:80
Watching local files for changes...
Interact with the Deployed App
Using the handy output that follows successful deployment, we can now contact our app. Note that it may take a few minutes before the load balancer is provisioned by Kubernetes. Be patient!
$ export SERVICE\_IP=$(kubectl get svc --namespace default tufted-lamb-tufted-lamb -o jsonpath='{.status.loadBalancer.ingress[0].ip}')
$ curl [http://$SERVICE\_IP](http://%24service_ip/)
When we curl our app, we see our app in action! A beautiful "Hello World!" greets us.
Update the App
Now, let's change the "Hello, World!" output in app.py to output "Hello, Draft!" instead:
$ cat \<\<EOF \> app.py
from flask import Flask
app = Flask(\_\_name\_\_)
@app.route("/")
def hello():
return "Hello, Draft!\n"
if \_\_name\_\_ == "\_\_main\_\_":
app.run(host='0.0.0.0', port=8080)
EOF
Draft Up(grade)
Now if we watch the terminal that we initially called draft up with, Draft will notice that there were changes made locally and call draft up again. Draft then determines that the Helm release already exists and will perform a helm upgrade rather than attempting another helm install:
--\> Building Dockerfile
Step 1 : FROM python:onbuild
...
Successfully built 9c90b0445146
--\> Pushing docker.io/microsoft/tufted-lamb:f031eb675112e2c942369a10815850a0b8bf190e
The push refers to a repository [docker.io/microsoft/tufted-lamb]
...
--\> Deploying to Kubernetes
--\> Status: DEPLOYED
--\> Notes:
1. Get the application URL by running these commands:
NOTE: It may take a few minutes for the LoadBalancer IP to be available.
You can watch the status of by running 'kubectl get svc -w tufted-lamb-tufted-lamb'
export SERVICE\_IP=$(kubectl get svc --namespace default tufted-lamb-tufted-lamb -o jsonpath='{.status.loadBalancer.ingress[0].ip}')
echo [http://$SERVICE\_IP:80](http://%24service_ip/)
Now when we run curl http://$SERVICE_IP, our first app has been deployed and updated to our Kubernetes cluster via Draft!
We hope this gives you a sense for everything that Draft can do to streamline development for Kubernetes. Happy drafting!
- Post questions (or answer questions) on Stack Overflow
- Join the community portal for advocates on K8sPort
- Follow us on Twitter @Kubernetesio for latest updates
- Connect with the community on Slack
- Get involved with the Kubernetes project on GitHub
Kubernetes: a monitoring guide
Container technologies are taking the infrastructure world by storm. While containers solve or simplify infrastructure management processes, they also introduce significant complexity in terms of orchestration. That’s where Kubernetes comes to our rescue. Just like a conductor directs an orchestra, Kubernetes oversees our ensemble of containers—starting, stopping, creating, and destroying them automatically to keep our applications humming along.
Kubernetes makes managing a containerized infrastructure much easier by creating levels of abstractions such as pods and services. We no longer have to worry about where applications are running or if they have enough resources to work properly. But that doesn’t change the fact that, in order to ensure good performance, we need to monitor our applications, the containers running them, and Kubernetes itself.
Rethinking monitoring for the Kubernetes era
Just as containers have completely transformed how we think about running services on virtual machines, Kubernetes has changed the way we interact with containers. The good news is that with proper monitoring, the abstraction levels inherent to Kubernetes provide a comprehensive view of your infrastructure, even if the containers and applications are constantly moving. But Kubernetes monitoring requires us to rethink and reorient our strategies, since it differs from monitoring traditional hosts such as VMs or physical machines in several ways.
Tags and labels become essential
With containers and their orchestration completely managed by Kubernetes, labels are now the only way we have to interact with pods and containers. That’s why they are absolutely crucial for monitoring since all metrics and events will be sliced and diced using labels across the different layers of your infrastructure. Defining your labels with a logical and easy-to-understand schema is essential so your metrics will be as useful as possible.
There are now more components to monitor

Applications are constantly moving
Kubernetes schedules applications dynamically based on scheduling policy, so you don’t always know where applications are running. But they still need to be monitored. That’s why using a monitoring system or tool with service discovery is a must. It will automatically adapt metric collection to moving containers so applications can be continuously monitored without interruption.
Be prepared for distributed clusters
Kubernetes has the ability to distribute containerized applications across multiple data centers and potentially different cloud providers. That means metrics must be collected and aggregated among all these different sources.
For more details about all these new monitoring challenges inherent to Kubernetes and how to overcome them, we recently published an in-depth Kubernetes monitoring guide. Part 1 of the series covers how to adapt your monitoring strategies to the Kubernetes era.
Metrics to monitor
Whether you use Heapster data or a monitoring tool integrating with Kubernetes and its different APIs, there are several key types of metrics that need to be closely tracked:
- Running pods and their deployments
- Usual resource metrics such as CPU, memory usage, and disk I/O
- Container-native metrics
- Application metrics for which a service discovery feature in your monitoring tool is essential
All these metrics should be aggregated using Kubernetes labels and correlated with events from Kubernetes and container technologies.
Part 2 of our series on Kubernetes monitoring guides you through all the data that needs to be collected and tracked.
Collecting these metrics
Whether you want to track these key performance metrics by combining Heapster, a storage backend, and a graphing tool, or by integrating a monitoring tool with the different components of your infrastructure, Part 3, about Kubernetes metric collection, has you covered.
Anchors aweigh!
Using Kubernetes drastically simplifies container management. But it requires us to rethink our monitoring strategies on several fronts, and to make sure all the key metrics from the different components are properly collected, aggregated, and tracked. We hope our monitoring guide will help you to effectively monitor your Kubernetes clusters. Feedback and suggestions are more than welcome.
- Get involved with the Kubernetes project on GitHub
- Post questions (or answer questions) on Stack Overflow
- Connect with the community on Slack
- Follow us on Twitter @Kubernetesio for latest updates
Kubespray Ansible Playbooks foster Collaborative Kubernetes Ops
Why Kubespray?
Making Kubernetes operationally strong is a widely held priority and I track many deployment efforts around the project. The incubated Kubespray project is of particular interest for me because it uses the popular Ansible toolset to build robust, upgradable clusters on both cloud and physical targets. I believe using tools familiar to operators grows our community.
We’re excited to see the breadth of platforms enabled by Kubespray and how well it handles a wide range of options like integrating Ceph for StatefulSet persistence and Helm for easier application uploads. Those additions have allowed us to fully integrate the OpenStack Helm charts (demo video).
By working with the upstream source instead of creating different install scripts, we get the benefits of a larger community. This requires some extra development effort; however, we believe helping share operational practices makes the whole community stronger. That was also the motivation behind the SIG-Cluster Ops.
With Kubespray delivering robust installs, we can focus on broader operational concerns.
For example, we can now drive parallel deployments, so it’s possible to fully exercise the options enabled by Kubespray simultaneously for development and testing.
That’s helpful to built-test-destroy coordinated Kubernetes installs on CentOS, Red Hat and Ubuntu as part of an automation pipeline. We can also set up a full classroom environment from a single command using Digital Rebar’s providers, tenants and cluster definition JSON.
Let’s explore the classroom example:
First, we define a student cluster in JSON like the snippet below
| {
"attribs": {
"k8s-version": "v1.6.0",
"k8s-kube_network_plugin": "calico",
"k8s-docker_version": "1.12"
},
"name": "cluster01",
"tenant": "cluster01",
"public_keys": {
"cluster01": "ssh-rsa AAAAB..... user@example.com"
},
"provider": {
"name": "google-provider"
},
"nodes": [
{
"roles": ["etcd","k8s-addons", "k8s-master"],
"count": 1
},
{
"roles": ["k8s-worker"],
"count": 3
}
]
} |
Then we run the Digital Rebar workloads Multideploy.sh reference script which inspects the deployment files to pull out key information. Basically, it automates the following steps:
| rebar provider create {“name”:“google-provider”, [secret stuff]}
rebar tenants create {“name”:“cluster01”}
rebar deployments create [contents from cluster01 file] |
The deployments create command will automatically request nodes from the provider. Since we’re using tenants and SSH key additions, each student only gets access to their own cluster. When we’re done, adding the --destroy flag will reverse the process for the nodes and deployments but leave the providers and tenants.
We are invested in operational scripts like this example using Kubespray and Digital Rebar because if we cannot manage variation in a consistent way then we’re doomed to operational fragmentation.
I am excited to see and be part of the community progress towards enterprise-ready Kubernetes operations on both cloud and on-premises. That means I am seeing reasonable patterns emerge with sharable/reusable automation. I strongly recommend watching (or better, collaborating in) these efforts if you are deploying Kubernetes even at experimental scale. Being part of the community requires more upfront effort but returns dividends as you get the benefits of shared experience and improvement.
When deploying at scale, how do you set up a system to be both repeatable and multi-platform without compromising scale or security?
With Kubespray and Digital Rebar as a repeatable base, extensions get much faster and easier. Even better, using upstream directly allows improvements to be quickly cycled back into upstream. That means we’re closer to building a community focused on the operational side of Kubernetes with an SRE mindset.
If this is interesting, please engage with us in the Cluster Ops SIG, Kubespray or Digital Rebar communities.
- Get involved with the Kubernetes project on GitHub
- Post questions (or answer questions) on Stack Overflow
- Connect with the community on Slack
- Follow us on Twitter @Kubernetesio for latest updates
Dancing at the Lip of a Volcano: The Kubernetes Security Process - Explained
Software running on servers underpins ever growing amounts of the world's commerce, communications, and physical infrastructure. And nearly all of these systems are connected to the internet; which means vital security updates must be applied rapidly. As software developers and IT professionals, we often find ourselves dancing on the edge of a volcano: we may either fall into magma induced oblivion from a security vulnerability exploited before we can fix it, or we may slide off the side of the mountain because of an inadequate process to address security vulnerabilities.
The Kubernetes community believes that we can help teams restore their footing on this volcano with a foundation built on Kubernetes. And the bedrock of this foundation requires a process for quickly acknowledging, patching, and releasing security updates to an ever growing community of Kubernetes users.
With over 1,200 contributors and over a million lines of code, each release of Kubernetes is a massive undertaking staffed by brave volunteer release managers. These normal releases are fully transparent and the process happens in public. However, security releases must be handled differently to keep potential attackers in the dark until a fix is made available to users.
We drew inspiration from other open source projects in order to create the Kubernetes security release process. Unlike a regularly scheduled release, a security release must be delivered on an accelerated schedule, and we created the Product Security Team to handle this process.
This team quickly selects a lead to coordinate work and manage communication with the persons that disclosed the vulnerability and the Kubernetes community. The security release process also documents ways to measure vulnerability severity using the Common Vulnerability Scoring System (CVSS) Version 3.0 Calculator. This calculation helps inform decisions on release cadence in the face of holidays or limited developer bandwidth. By making severity criteria transparent we are able to better set expectations and hit critical timelines during an incident where we strive to:
- Respond to the person or team who reported the vulnerability and staff a development team responsible for a fix within 24 hours
- Disclose a forthcoming fix to users within 7 days of disclosure
- Provide advance notice to vendors within 14 days of disclosure
- Release a fix within 21 days of disclosure
As we continue to harden Kubernetes, the security release process will help ensure that Kubernetes remains a secure platform for internet scale computing. If you are interested in learning more about the security release process please watch the presentation from KubeCon Europe 2017 on YouTube and follow along with the slides. If you are interested in learning more about authentication and authorization in Kubernetes, along with the Kubernetes cluster security model, consider joining Kubernetes SIG Auth. We also hope to see you at security related presentations and panels at the next Kubernetes community event: CoreOS Fest 2017 in San Francisco on May 31 and June 1.
As a thank you to the Kubernetes community, a special 25 percent discount to CoreOS Fest is available using k8s25code or via this special 25 percent off link to register today for CoreOS Fest 2017.
- Post questions (or answer questions) on Stack Overflow
- Join the community portal for advocates on K8sPort
- Follow us on Twitter @Kubernetesio for latest updates
- Connect with the community on Slack
- Get involved with the Kubernetes project on GitHub
How Bitmovin is Doing Multi-Stage Canary Deployments with Kubernetes in the Cloud and On-Prem
Running a large scale video encoding infrastructure on multiple public clouds is tough. At Bitmovin, we have been doing it successfully for the last few years, but from an engineering perspective, it’s neither been enjoyable nor particularly fun.
So obviously, one of the main things that really sold us on using Kubernetes, was it’s common abstraction from the different supported cloud providers and the well thought out programming interface it provides. More importantly, the Kubernetes project did not settle for the lowest common denominator approach. Instead, they added the necessary abstract concepts that are required and useful to run containerized workloads in a cloud and then did all the hard work to map these concepts to the different cloud providers and their offerings.
The great stability, speed and operational reliability we saw in our early tests in mid-2016 made the migration to Kubernetes a no-brainer.
And, it didn’t hurt that the vision for scale the Kubernetes project has been pursuing is closely aligned with our own goals as a company. Aiming for >1,000 node clusters might be a lofty goal, but for a fast growing video company like ours, having your infrastructure aim to support future growth is essential. Also, after initial brainstorming for our new infrastructure, we immediately knew that we would be running a huge number of containers and having a system, with the expressed goal of working at global scale, was the perfect fit for us. Now with the recent Kubernetes 1.6 release and its support for 5,000 node clusters, we feel even more validated in our choice of a container orchestration system.
During the testing and migration phase of getting our infrastructure running on Kubernetes, we got quite familiar with the Kubernetes API and the whole ecosystem around it. So when we were looking at expanding our cloud video encoding offering for customers to use in their own datacenters or cloud environments, we quickly decided to leverage Kubernetes as our ubiquitous cloud operating system to base the solution on.
Just a few months later this effort has become our newest service offering: Bitmovin Managed On-Premise encoding. Since all Kubernetes clusters share the same API, adapting our cloud encoding service to also run on Kubernetes enabled us to deploy into our customer’s datacenter, regardless of the hardware infrastructure running underneath. With great tools from the community, like kube-up and turnkey solutions, like Google Container Engine, anyone can easily provision a new Kubernetes cluster, either within their own infrastructure or in their own cloud accounts.
To give us the maximum flexibility for customers that deploy to bare metal and might not have any custom cloud integrations for Kubernetes yet, we decided to base our solution solely on facilities that are available in any Kubernetes install and don’t require any integration into the surrounding infrastructure (it will even run inside Minikube!). We don’t rely on Services of type LoadBalancer, primarily because enterprise IT is usually reluctant to open up ports to the open internet - and not every bare metal Kubernetes install supports externally provisioned load balancers out of the box. To avoid these issues, we deploy a BitmovinAgent that runs inside the Cluster and polls our API for new encoding jobs without requiring any network setup. This agent then uses the locally available Kubernetes credentials to start up new deployments that run the encoders on the available hardware through the Kubernetes API.
Even without having a full cloud integration available, the consistent scheduling, health checking and monitoring we get from using the Kubernetes API really enabled us to focus on making the encoder work inside a container rather than spending precious engineering resources on integrating a bunch of different hypervisors, machine provisioners and monitoring systems.

Our first encounters with the Kubernetes API were not for the On-Premise encoding product. Building our containerized encoding workflow on Kubernetes was rather a decision we made after seeing how incredibly easy and powerful the Kubernetes platform proved during development and rollout of our Bitmovin API infrastructure. We migrated to Kubernetes around four months ago and it has enabled us to provide rapid development iterations to our service while meeting our requirements of downtime-free deployments and a stable development to production pipeline. To achieve this we came up with an architecture that runs almost a thousand containers and meets the following requirements we had laid out on day one:
- 1.Zero downtime deployments for our customers
- 2.Continuous deployment to production on each git mainline push
- 3.High stability of deployed services for customers
Obviously #2 and #3 are at odds with each other, if each merged feature gets deployed to production right away - how can we ensure these releases are bug-free and don’t have adverse side effects for our customers?
To overcome this oxymoron, we came up with a four-stage canary pipeline for each microservice where we simultaneously deploy to production and keep changes away from customers until the new build has proven to work reliably and correctly in the production environment.
Once a new build is pushed, we deploy it to an internal stage that’s only accessible for our internal tests and the integration test suite. Once the internal test suite passes, QA reports no issues, and we don’t detect any abnormal behavior, we push the new build to our free stage. This means that 5% of our free users would get randomly assigned to this new build. After some time in this stage the build gets promoted to the next stage that gets 5% of our paid users routed to it. Only once the build has successfully passed all 3 of these hurdles, does it get deployed to the production tier, where it will receive all traffic from our remaining users as well as our enterprise customers, which are not part of the paid bucket and never see their traffic routed to a canary track.

This setup makes us a pretty big Kubernetes installation by default, since all of our canary tiers are available at a minimum replication of 2. Since we are currently deploying around 30 microservices (and growing) to our clusters, it adds up to a minimum of 10 pods per service (8 application pods + minimum 2 HAProxy pods that do the canary routing). Although, in reality our preferred standard configuration is usually running 2 internal, 4 free, 4 others and 10 production pods alongside 4 HAProxy pods - totalling around 700 pods in total. This also means that we are running at least 150 services that provide a static ClusterIP to their underlying microservice canary tier.
A typical deployment looks like this:
| Services (ClusterIP) | Deployments | #Pods | | account-service | account-service-haproxy | 4 | | account-service-internal | account-service-internal-v1.18.0 | 2 | | account-service-canary | account-service-canary-v1.17.0 | 4 | | account-service-paid | account-service-paid-v1.15.0 | 4 | | account-service-production | account-service-production-v1.15.0 | 10 |
An example service definition the production track will have the following label selectors:
apiVersion: v1
kind: Service
metadata:
name: account-service-production
labels:
app: account-service-production
tier: service
lb: private
spec:
ports:
- port: 8080
name: http
targetPort: 8080
protocol: TCP
selector:
app: account-service
tier: service
track: production
In front of the Kubernetes services, load balancing the different canary versions of the service, lives a small cluster of HAProxy pods that get their haproxy.conf from the Kubernetes ConfigMaps that looks something like this:
frontend http-in
bind \*:80
log 127.0.0.1 local2 debug
acl traffic\_internal hdr(X-Traffic-Group) -m str -i INTERNAL
acl traffic\_free hdr(X-Traffic-Group) -m str -i FREE
acl traffic\_enterprise hdr(X-Traffic-Group) -m str -i ENTERPRISE
use\_backend internal if traffic\_internal
use\_backend canary if traffic\_free
use\_backend enterprise if traffic\_enterprise
default\_backend paid
backend internal
balance roundrobin
server internal-lb user-resource-service-internal:8080 resolvers dns check inter 2000
backend canary
balance roundrobin
server canary-lb user-resource-service-canary:8080 resolvers dns check inter 2000 weight 5
server production-lb user-resource-service-production:8080 resolvers dns check inter 2000 weight 95
backend paid
balance roundrobin
server canary-paid-lb user-resource-service-paid:8080 resolvers dns check inter 2000 weight 5
server production-lb user-resource-service-production:8080 resolvers dns check inter 2000 weight 95
backend enterprise
balance roundrobin
server production-lb user-resource-service-production:8080 resolvers dns check inter 2000 weight 100
Each HAProxy will inspect a header that gets assigned by our API-Gateway called X-Traffic-Group that determines which bucket of customers this request belongs to. Based on that, a decision is made to hit either a canary deployment or the production deployment.
Obviously, at this scale, kubectl (while still our main day-to-day tool to work on the cluster) doesn’t really give us a good overview of whether everything is actually running as it’s supposed to and what is maybe over or under replicated.
Since we do blue/green deployments, we sometimes forget to shut down the old version after the new one comes up, so some services might be running over replicated and finding these issues in a soup of 25 deployments listed in kubectl is not trivial, to say the least.
So, having a container orchestrator like Kubernetes, that’s very API driven, was really a godsend for us, as it allowed us to write tools that take care of that.
We built tools that either run directly off kubectl (eg bash-scripts) or interact directly with the API and understand our special architecture to give us a quick overview of the system. These tools were mostly built in Go using the client-go library.
One of these tools is worth highlighting, as it’s basically our only way to really see service health at a glance. It goes through all our Kubernetes services that have the tier: service selector and checks if the accompanying HAProxy deployment is available and all pods are running with 4 replicas. It also checks if the 4 services behind the HAProxys (internal, free, others and production) have at least 2 endpoints running. If any of these conditions are not met, we immediately get a notification in Slack and by email.
Managing this many pods with our previous orchestrator proved very unreliable and the overlay network frequently caused issues. Not so with Kubernetes - even doubling our current workload for test purposes worked flawlessly and in general, the cluster has been working like clockwork ever since we installed it.
Another advantage of switching over to Kubernetes was the availability of the kubernetes resource specifications, in addition to the API (which we used to write some internal tools for deployment). This enabled us to have a Git repo with all our Kubernetes specifications, where each track is generated off a common template and only contains placeholders for variable things like the canary track and the names.
All changes to the cluster have to go through tools that modify these resource specifications and get checked into git automatically so, whenever we see issues, we can debug what changes the infrastructure went through over time!
To summarize this post - by migrating our infrastructure to Kubernetes, Bitmovin is able to have:
- Zero downtime deployments, allowing our customers to encode 24/7 without interruption
- Fast development to production cycles, enabling us to ship new features faster
- Multiple levels of quality assurance and high confidence in production deployments
- Ubiquitous abstractions across cloud architectures and on-premise deployments
- Stable and reliable health-checking and scheduling of services
- Custom tooling around our infrastructure to check and validate the system
- History of deployments (resource specifications in git + custom tooling)
We want to thank the Kubernetes community for the incredible job they have done with the project. The velocity at which the project moves is just breathtaking! Maintaining such a high level of quality and robustness in such a diverse environment is really astonishing.
- Post questions (or answer questions) on Stack Overflow
- Join the community portal for advocates on K8sPort
- Get involved with the Kubernetes project on GitHub
- Follow us on Twitter @Kubernetesio for latest updates
- Connect with the community on Slack
- Download Kubernetes
RBAC Support in Kubernetes
Editor’s note: this post is part of a series of in-depth articles on what's new in Kubernetes 1.6
One of the highlights of the Kubernetes 1.6 release is the RBAC authorizer feature moving to beta. RBAC, Role-based access control, is an authorization mechanism for managing permissions around Kubernetes resources. RBAC allows configuration of flexible authorization policies that can be updated without cluster restarts.
The focus of this post is to highlight some of the interesting new capabilities and best practices.
RBAC vs ABAC
Currently there are several authorization mechanisms available for use with Kubernetes. Authorizers are the mechanisms that decide who is permitted to make what changes to the cluster using the Kubernetes API. This affects things like kubectl, system components, and also certain applications that run in the cluster and manipulate the state of the cluster, like Jenkins with the Kubernetes plugin, or Helm that runs in the cluster and uses the Kubernetes API to install applications in the cluster. Out of the available authorization mechanisms, ABAC and RBAC are the mechanisms local to a Kubernetes cluster that allow configurable permissions policies.
ABAC, Attribute Based Access Control, is a powerful concept. However, as implemented in Kubernetes, ABAC is difficult to manage and understand. It requires ssh and root filesystem access on the master VM of the cluster to make authorization policy changes. For permission changes to take effect the cluster API server must be restarted.
RBAC permission policies are configured using kubectl or the Kubernetes API directly. Users can be authorized to make authorization policy changes using RBAC itself, making it possible to delegate resource management without giving away ssh access to the cluster master. RBAC policies map easily to the resources and operations used in the Kubernetes API.
Based on where the Kubernetes community is focusing their development efforts, going forward RBAC should be preferred over ABAC.
Basic Concepts
There are a few basic ideas behind RBAC that are foundational in understanding it. At its core, RBAC is a way of granting users granular access to Kubernetes API resources.

The connection between user and resources is defined in RBAC using two objects.
Roles
A Role is a collection of permissions. For example, a role could be defined to include read permission on pods and list permission for pods. A ClusterRole is just like a Role, but can be used anywhere in the cluster.
Role Bindings
A RoleBinding maps a Role to a user or set of users, granting that Role's permissions to those users for resources in that namespace. A ClusterRoleBinding allows users to be granted a ClusterRole for authorization across the entire cluster.

Additionally there are cluster roles and cluster role bindings to consider. Cluster roles and cluster role bindings function like roles and role bindings except they have wider scope. The exact differences and how cluster roles and cluster role bindings interact with roles and role bindings are covered in the Kubernetes documentation.
RBAC in Kubernetes
RBAC is now deeply integrated into Kubernetes and used by the system components to grant the permissions necessary for them to function. System roles are typically prefixed with system: so they can be easily recognized.
➜ kubectl get clusterroles --namespace=kube-system
NAME KIND
admin ClusterRole.v1beta1.rbac.authorization.k8s.io
cluster-admin ClusterRole.v1beta1.rbac.authorization.k8s.io
edit ClusterRole.v1beta1.rbac.authorization.k8s.io
kubelet-api-admin ClusterRole.v1beta1.rbac.authorization.k8s.io
system:auth-delegator ClusterRole.v1beta1.rbac.authorization.k8s.io
system:basic-user ClusterRole.v1beta1.rbac.authorization.k8s.io
system:controller:attachdetach-controller ClusterRole.v1beta1.rbac.authorization.k8s.io
system:controller:certificate-controller ClusterRole.v1beta1.rbac.authorization.k8s.io
...
The RBAC system roles have been expanded to cover the necessary permissions for running a Kubernetes cluster with RBAC only.
During the permission translation from ABAC to RBAC, some of the permissions that were enabled by default in many deployments of ABAC authorized clusters were identified as unnecessarily broad and were scoped down in RBAC. The area most likely to impact workloads on a cluster is the permissions available to service accounts. With the permissive ABAC configuration, requests from a pod using the pod mounted token to authenticate to the API server have broad authorization. As a concrete example, the curl command at the end of this sequence will return a JSON formatted result when ABAC is enabled and an error when only RBAC is enabled.
➜ kubectl run nginx --image=nginx:latest
➜ kubectl exec -it $(kubectl get pods -o jsonpath='{.items[0].metadata.name}') bash
➜ apt-get update && apt-get install -y curl
➜ curl -ik \
-H "Authorization: Bearer $(cat /var/run/secrets/kubernetes.io/serviceaccount/token)" \
https://kubernetes/api/v1/namespaces/default/pods
Any applications you run in your Kubernetes cluster that interact with the Kubernetes API have the potential to be affected by the permissions changes when transitioning from ABAC to RBAC.
To smooth the transition from ABAC to RBAC, you can create Kubernetes 1.6 clusters with both ABAC and RBAC authorizers enabled. When both ABAC and RBAC are enabled, authorization for a resource is granted if either authorization policy grants access. However, under that configuration the most permissive authorizer is used and it will not be possible to use RBAC to fully control permissions.
At this point, RBAC is complete enough that ABAC support should be considered deprecated going forward. It will still remain in Kubernetes for the foreseeable future but development attention is focused on RBAC.
Two different talks at the at the Google Cloud Next conference touched on RBAC related changes in Kubernetes 1.6, jump to the relevant parts here and here. For more detailed information about using RBAC in Kubernetes 1.6 read the full RBAC documentation.
Get Involved
If you’d like to contribute or simply help provide feedback and drive the roadmap, join our community. Specifically interested in security and RBAC related conversation, participate through one of these channels:
- Chat with us on the Kubernetes Slack sig-auth channel
- Join the biweekly SIG-Auth meetings on Wednesday at 11:00 AM PT
Thanks for your support and contributions. Read more in-depth posts on what's new in Kubernetes 1.6 here.
- Post questions (or answer questions) on Stack Overflow
- Join the community portal for advocates on K8sPort
- Get involved with the Kubernetes project on GitHub
- Follow us on Twitter @Kubernetesio for latest updates
- Connect with the community on Slack
- Download Kubernetes
Configuring Private DNS Zones and Upstream Nameservers in Kubernetes
Editor’s note: this post is part of a series of in-depth articles on what's new in Kubernetes 1.6
Many users have existing domain name zones that they would like to integrate into their Kubernetes DNS namespace. For example, hybrid-cloud users may want to resolve their internal “.corp” domain addresses within the cluster. Other users may have a zone populated by a non-Kubernetes service discovery system (like Consul). We’re pleased to announce that, in Kubernetes 1.6, kube-dns adds support for configurable private DNS zones (often called “stub domains”) and external upstream DNS nameservers. In this blog post, we describe how to configure and use this feature.
Default lookup flow

Kubernetes currently supports two DNS policies specified on a per-pod basis using the dnsPolicy flag: “Default” and “ClusterFirst”. If dnsPolicy is not explicitly specified, then “ClusterFirst” is used:
- If dnsPolicy is set to “Default”, then the name resolution configuration is inherited from the node the pods run on. Note: this feature cannot be used in conjunction with dnsPolicy: “Default”.
- If dnsPolicy is set to “ClusterFirst”, then DNS queries will be sent to the kube-dns service. Queries for domains rooted in the configured cluster domain suffix (any address ending in “.cluster.local” in the example above) will be answered by the kube-dns service. All other queries (for example, www.kubernetes.io) will be forwarded to the upstream nameserver inherited from the node. Before this feature, it was common to introduce stub domains by replacing the upstream DNS with a custom resolver. However, this caused the custom resolver itself to become a critical path for DNS resolution, where issues with scalability and availability may cause the cluster to lose DNS functionality. This feature allows the user to introduce custom resolution without taking over the entire resolution path.
Customizing the DNS Flow
Beginning in Kubernetes 1.6, cluster administrators can specify custom stub domains and upstream nameservers by providing a ConfigMap for kube-dns. For example, the configuration below inserts a single stub domain and two upstream nameservers. As specified, DNS requests with the “.acme.local” suffix will be forwarded to a DNS listening at 1.2.3.4. Additionally, Google Public DNS will serve upstream queries. See ConfigMap Configuration Notes at the end of this section for a few notes about the data format.
apiVersion: v1
kind: ConfigMap
metadata:
name: kube-dns
namespace: kube-system
data:
stubDomains: |
{“acme.local”: [“1.2.3.4”]}
upstreamNameservers: |
[“8.8.8.8”, “8.8.4.4”]
The diagram below shows the flow of DNS queries specified in the configuration above. With the dnsPolicy set to “ClusterFirst” a DNS query is first sent to the DNS caching layer in kube-dns. From here, the suffix of the request is examined and then forwarded to the appropriate DNS. In this case, names with the cluster suffix (e.g.; “.cluster.local”) are sent to kube-dns. Names with the stub domain suffix (e.g.; “.acme.local”) will be sent to the configured custom resolver. Finally, requests that do not match any of those suffixes will be forwarded to the upstream DNS.

Below is a table of example domain names and the destination of the queries for those domain names:
| Domain name | Server answering the query |
| kubernetes.default.svc.cluster.local | kube-dns |
| foo.acme.local | custom DNS (1.2.3.4) |
| widget.com | upstream DNS (one of 8.8.8.8, 8.8.4.4) |
ConfigMap Configuration Notes
stubDomains (optional)
- Format: a JSON map using a DNS suffix key (e.g.; “acme.local”) and a value consisting of a JSON array of DNS IPs.
- Note: The target nameserver may itself be a Kubernetes service. For instance, you can run your own copy of dnsmasq to export custom DNS names into the ClusterDNS namespace.
upstreamNameservers (optional)
- Format: a JSON array of DNS IPs.
- Note: If specified, then the values specified replace the nameservers taken by default from the node’s /etc/resolv.conf
- Limits: a maximum of three upstream nameservers can be specified
Example #1: Adding a Consul DNS Stub Domain
In this example, the user has Consul DNS service discovery system they wish to integrate with kube-dns. The consul domain server is located at 10.150.0.1, and all consul names have the suffix “.consul.local”. To configure Kubernetes, the cluster administrator simply creates a ConfigMap object as shown below. Note: in this example, the cluster administrator did not wish to override the node’s upstream nameservers, so they didn’t need to specify the optional upstreamNameservers field.
apiVersion: v1
kind: ConfigMap
metadata:
name: kube-dns
namespace: kube-system
data:
stubDomains: |
{“consul.local”: [“10.150.0.1”]}
Example #2: Replacing the Upstream Nameservers
In this example the cluster administrator wants to explicitly force all non-cluster DNS lookups to go through their own nameserver at 172.16.0.1. Again, this is easy to accomplish; they just need to create a ConfigMap with the upstreamNameservers field specifying the desired nameserver.
apiVersion: v1
kind: ConfigMap
metadata:
name: kube-dns
namespace: kube-system
data:
upstreamNameservers: |
[“172.16.0.1”]
**Get involved**
If you’d like to contribute or simply help provide feedback and drive the roadmap, [join our community](https://github.com/kubernetes/community#kubernetes-community). Specifically for network related conversations participate though one of these channels:
- Chat with us on the Kubernetes [Slack network channel](https://kubernetes.slack.com/messages/sig-network/)
- Join our Special Interest Group, [SIG-Network](https://github.com/kubernetes/community/wiki/SIG-Network), which meets on Tuesdays at 14:00 PT
Thanks for your support and contributions. Read more in-depth posts on what's new in Kubernetes 1.6 [here](https://kubernetes.io/blog/2017/03/five-days-of-kubernetes-1-6).
- Post questions (or answer questions) on [Stack Overflow](http://stackoverflow.com/questions/tagged/kubernetes)
- Join the community portal for advocates on [K8sPort](http://k8sport.org/)
- Get involved with the Kubernetes project on [GitHub](https://github.com/kubernetes/kubernetes)
- Follow us on Twitter [@Kubernetesio](https://twitter.com/kubernetesio) for latest updates
- Connect with the community on [Slack](http://slack.k8s.io/)
- [Download](http://get.k8s.io/) Kubernetes
Advanced Scheduling in Kubernetes
Editor’s note: this post is part of a series of in-depth articles on what's new in Kubernetes 1.6
The Kubernetes scheduler’s default behavior works well for most cases -- for example, it ensures that pods are only placed on nodes that have sufficient free resources, it ties to spread pods from the same set (ReplicaSet, StatefulSet, etc.) across nodes, it tries to balance out the resource utilization of nodes, etc.
But sometimes you want to control how your pods are scheduled. For example, perhaps you want to ensure that certain pods only schedule on nodes with specialized hardware, or you want to co-locate services that communicate frequently, or you want to dedicate a set of nodes to a particular set of users. Ultimately, you know much more about how your applications should be scheduled and deployed than Kubernetes ever will. So Kubernetes 1.6 offers four advanced scheduling features: node affinity/anti-affinity, taints and tolerations, pod affinity/anti-affinity, and custom schedulers. Each of these features are now in beta in Kubernetes 1.6.
Node Affinity/Anti-Affinity
Node Affinity/Anti-Affinity is one way to set rules on which nodes are selected by the scheduler. This feature is a generalization of the nodeSelector feature which has been in Kubernetes since version 1.0. The rules are defined using the familiar concepts of custom labels on nodes and selectors specified in pods, and they can be either required or preferred, depending on how strictly you want the scheduler to enforce them.
Required rules must be met for a pod to schedule on a particular node. If no node matches the criteria (plus all of the other normal criteria, such as having enough free resources for the pod’s resource request), then the pod won’t be scheduled. Required rules are specified in the requiredDuringSchedulingIgnoredDuringExecution field of nodeAffinity.
For example, if we want to require scheduling on a node that is in the us-central1-a GCE zone of a multi-zone Kubernetes cluster, we can specify the following affinity rule as part of the Pod spec:
affinity:
nodeAffinity:
requiredDuringSchedulingIgnoredDuringExecution:
nodeSelectorTerms:
- matchExpressions:
- key: "failure-domain.beta.kubernetes.io/zone"
operator: In
values: ["us-central1-a"]
“IgnoredDuringExecution” means that the pod will still run if labels on a node change and affinity rules are no longer met. There are future plans to offer requiredDuringSchedulingRequiredDuringExecution which will evict pods from nodes as soon as they don’t satisfy the node affinity rule(s).
Preferred rules mean that if nodes match the rules, they will be chosen first, and only if no preferred nodes are available will non-preferred nodes be chosen. You can prefer instead of require that pods are deployed to us-central1-a by slightly changing the pod spec to use preferredDuringSchedulingIgnoredDuringExecution:
affinity:
nodeAffinity:
preferredDuringSchedulingIgnoredDuringExecution:
nodeSelectorTerms:
- matchExpressions:
- key: "failure-domain.beta.kubernetes.io/zone"
operator: In
values: ["us-central1-a"]
Node anti-affinity can be achieved by using negative operators. So for instance if we want our pods to avoid us-central1-a we can do this:
affinity:
nodeAffinity:
requiredDuringSchedulingIgnoredDuringExecution:
nodeSelectorTerms:
- matchExpressions:
- key: "failure-domain.beta.kubernetes.io/zone"
operator: NotIn
values: ["us-central1-a"]
Valid operators you can use are In, NotIn, Exists, DoesNotExist. Gt, and Lt.
Additional use cases for this feature are to restrict scheduling based on nodes’ hardware architecture, operating system version, or specialized hardware. Node affinity/anti-affinity is beta in Kubernetes 1.6.
Taints and Tolerations
A related feature is “taints and tolerations,” which allows you to mark (“taint”) a node so that no pods can schedule onto it unless a pod explicitly “tolerates” the taint. Marking nodes instead of pods (as in node affinity/anti-affinity) is particularly useful for situations where most pods in the cluster should avoid scheduling onto the node. For example, you might want to mark your master node as schedulable only by Kubernetes system components, or dedicate a set of nodes to a particular group of users, or keep regular pods away from nodes that have special hardware so as to leave room for pods that need the special hardware.
The kubectl command allows you to set taints on nodes, for example:
kubectl taint nodes node1 key=value:NoSchedule
creates a taint that marks the node as unschedulable by any pods that do not have a toleration for taint with key key, value value, and effect NoSchedule. (The other taint effects are PreferNoSchedule, which is the preferred version of NoSchedule, and NoExecute, which means any pods that are running on the node when the taint is applied will be evicted unless they tolerate the taint.) The toleration you would add to a PodSpec to have the corresponding pod tolerate this taint would look like this
tolerations:
- key: "key"
operator: "Equal"
value: "value"
effect: "NoSchedule"
In addition to moving taints and tolerations to beta in Kubernetes 1.6, we have introduced an alpha feature that uses taints and tolerations to allow you to customize how long a pod stays bound to a node when the node experiences a problem like a network partition instead of using the default five minutes. See this section of the documentation for more details.
Pod Affinity/Anti-Affinity
Node affinity/anti-affinity allows you to constrain which nodes a pod can run on based on the nodes’ labels. But what if you want to specify rules about how pods should be placed relative to one another, for example to spread or pack pods within a service or relative to pods in other services? For that you can use pod affinity/anti-affinity, which is also beta in Kubernetes 1.6.
Let’s look at an example. Say you have front-ends in service S1, and they communicate frequently with back-ends that are in service S2 (a “north-south” communication pattern). So you want these two services to be co-located in the same cloud provider zone, but you don’t want to have to choose the zone manually--if the zone fails, you want the pods to be rescheduled to another (single) zone. You can specify this with a pod affinity rule that looks like this (assuming you give the pods of this service a label “service=S2” and the pods of the other service a label “service=S1”):
affinity:
podAffinity:
requiredDuringSchedulingIgnoredDuringExecution:
- labelSelector:
matchExpressions:
- key: service
operator: In
values: [“S1”]
topologyKey: failure-domain.beta.kubernetes.io/zone
As with node affinity/anti-affinity, there is also a preferredDuringSchedulingIgnoredDuringExecution variant.
Pod affinity/anti-affinity is very flexible. Imagine you have profiled the performance of your services and found that containers from service S1 interfere with containers from service S2 when they share the same node, perhaps due to cache interference effects or saturating the network link. Or maybe due to security concerns you never want containers of S1 and S2 to share a node. To implement these rules, just make two changes to the snippet above -- change podAffinity to podAntiAffinity and change topologyKey to kubernetes.io/hostname.
Custom Schedulers
If the Kubernetes scheduler’s various features don’t give you enough control over the scheduling of your workloads, you can delegate responsibility for scheduling arbitrary subsets of pods to your own custom scheduler(s) that run(s) alongside, or instead of, the default Kubernetes scheduler. Multiple schedulers is beta in Kubernetes 1.6.
Each new pod is normally scheduled by the default scheduler. But if you provide the name of your own custom scheduler, the default scheduler will ignore that Pod and allow your scheduler to schedule the Pod to a node. Let’s look at an example.
Here we have a Pod where we specify the schedulerName field:
apiVersion: v1
kind: Pod
metadata:
name: nginx
labels:
app: nginx
spec:
schedulerName: my-scheduler
containers:
- name: nginx
image: nginx:1.10
If we create this Pod without deploying a custom scheduler, the default scheduler will ignore it and it will remain in a Pending state. So we need a custom scheduler that looks for, and schedules, pods whose schedulerName field is my-scheduler.
A custom scheduler can be written in any language and can be as simple or complex as you need. Here is a very simple example of a custom scheduler written in Bash that assigns a node randomly. Note that you need to run this along with kubectl proxy for it to work.
#!/bin/bash
SERVER='localhost:8001'
while true;
do
for PODNAME in $(kubectl --server $SERVER get pods -o json | jq '.items[] | select(.spec.schedulerName == "my-scheduler") | select(.spec.nodeName == null) | .metadata.name' | tr -d '"')
;
do
NODES=($(kubectl --server $SERVER get nodes -o json | jq '.items[].metadata.name' | tr -d '"'))
NUMNODES=${#NODES[@]}
CHOSEN=${NODES[$[$RANDOM % $NUMNODES]]}
curl --header "Content-Type:application/json" --request POST --data '{"apiVersion":"v1", "kind": "Binding", "metadata": {"name": "'$PODNAME'"}, "target": {"apiVersion": "v1", "kind"
: "Node", "name": "'$CHOSEN'"}}' http://$SERVER/api/v1/namespaces/default/pods/$PODNAME/binding/
echo "Assigned $PODNAME to $CHOSEN"
done
sleep 1
done
Learn more
The Kubernetes 1.6 release notes have more information about these features, including details about how to change your configurations if you are already using the alpha version of one or more of these features (this is required, as the move from alpha to beta is a breaking change for these features).
Acknowledgements
The features described here, both in their alpha and beta forms, were a true community effort, involving engineers from Google, Huawei, IBM, Red Hat and more.
Get Involved
Share your voice at our weekly community meeting:
- Post questions (or answer questions) on Stack Overflow
- Follow us on Twitter @Kubernetesio for latest updates
- Connect with the community on Slack (room #sig-scheduling)
Many thanks for your contributions.
Scalability updates in Kubernetes 1.6: 5,000 node and 150,000 pod clusters
Editor’s note: this post is part of a series of in-depth articles on what's new in Kubernetes 1.6
Last summer we shared updates on Kubernetes scalability, since then we’ve been working hard and are proud to announce that Kubernetes 1.6 can handle 5,000-node clusters with up to 150,000 pods. Moreover, those cluster have even better end-to-end pod startup time than the previous 2,000-node clusters in the 1.3 release; and latency of the API calls are within the one-second SLO.
In this blog post we review what metrics we monitor in our tests and describe our performance results from Kubernetes 1.6. We also discuss what changes we made to achieve the improvements, and our plans for upcoming releases in the area of system scalability.
X-node clusters - what does it mean?
Now that Kubernetes 1.6 is released, it is a good time to review what it means when we say we “support” X-node clusters. As described in detail in a previous blog post, we currently have two performance-related Service Level Objectives (SLO):
- API-responsiveness : 99% of all API calls return in less than 1s
- Pod startup time : 99% of pods and their containers (with pre-pulled images) start within 5s. As before, it is possible to run larger deployments than the stated supported 5,000-node cluster (and users have), but performance may be degraded and it may not meet our strict SLO defined above.
We are aware of the limited scope of these SLOs. There are many aspects of the system that they do not exercise. For example, we do not measure how soon a new pod that is part of a service will be reachable through the service IP address after the pod is started. If you are considering using large Kubernetes clusters and have performance requirements not covered by our SLOs, please contact the Kubernetes Scalability SIG so we can help you understand whether Kubernetes is ready to handle your workload now.
The top scalability-related priority for upcoming Kubernetes releases is to enhance our definition of what it means to support X-node clusters by:
- refining currently existing SLOs
- adding more SLOs (that will cover various areas of Kubernetes, including networking)
Kubernetes 1.6 performance metrics at scale
So how does performance in large clusters look in Kubernetes 1.6? The following graph shows the end-to-end pod startup latency with 2000- and 5000-node clusters. For comparison, we also show the same metric from Kubernetes 1.3, which we published in our previous scalability blog post that described support for 2000-node clusters. As you can see, Kubernetes 1.6 has better pod startup latency with both 2000 and 5000 nodes compared to Kubernetes 1.3 with 2000 nodes [1].

The next graph shows API response latency for a 5000-node Kubernetes 1.6 cluster. The latencies at all percentiles are less than 500ms, and even 90th percentile is less than about 100ms.

How did we get here?
Over the past nine months (since the last scalability blog post), there have been a huge number of performance and scalability related changes in Kubernetes. In this post we will focus on the two biggest ones and will briefly enumerate a few others.
etcd v3
In Kubernetes 1.6 we switched the default storage backend (key-value store where the whole cluster state is stored) from etcd v2 to etcd v3. The initial works towards this transition has been started during the 1.3 release cycle. You might wonder why it took us so long, given that:
the first stable version of etcd supporting the v3 API was announced on June 30, 2016
the new API was designed together with the Kubernetes team to support our needs (from both a feature and scalability perspective)
the integration of etcd v3 with Kubernetes had already mostly been finished when etcd v3 was announced (indeed CoreOS used Kubernetes as a proof-of-concept for the new etcd v3 API) As it turns out, there were a lot of reasons. We will describe the most important ones below.
Changing storage in a backward incompatible way, as is in the case for the etcd v2 to v3 migration, is a big change, and thus one for which we needed a strong justification. We found this justification in September when we determined that we would not be able to scale to 5000-node clusters if we continued to use etcd v2 (kubernetes/32361 contains some discussion about it). In particular, what didn’t scale was the watch implementation in etcd v2. In a 5000-node cluster, we need to be able to send at least 500 watch events per second to a single watcher, which wasn’t possible in etcd v2.
Once we had the strong incentive to actually update to etcd v3, we started thoroughly testing it. As you might expect, we found some issues. There were some minor bugs in Kubernetes, and in addition we requested a performance improvement in etcd v3’s watch implementation (watch was the main bottleneck in etcd v2 for us). This led to the 3.0.10 etcd patch release.
Once those changes had been made, we were convinced that new Kubernetes clusters would work with etcd v3. But the large challenge of migrating existing clusters remained. For this we needed to automate the migration process, thoroughly test the underlying CoreOS etcd upgrade tool, and figure out a contingency plan for rolling back from v3 to v2. But finally, we are confident that it should work.
Switching storage data format to protobuf
In the Kubernetes 1.3 release, we enabled protobufs as the data format for Kubernetes components to communicate with the API server (in addition to maintaining support for JSON). This gave us a huge performance improvement.
However, we were still using JSON as a format in which data was stored in etcd, even though technically we were ready to change that. The reason for delaying this migration was related to our plans to migrate to etcd v3. Now you are probably wondering how this change was depending on migration to etcd v3. The reason for it was that with etcd v2 we couldn’t really store data in binary format (to workaround it we were additionally base64-encoding the data), whereas with etcd v3 it just worked. So to simplify the transition to etcd v3 and avoid some non-trivial transformation of data stored in etcd during it, we decided to wait with switching storage data format to protobufs until migration to etcd v3 storage backend is done.
Other optimizations
We made tens of optimizations throughout the Kubernetes codebase during the last three releases, including:
- optimizing the scheduler (which resulted in 5-10x higher scheduling throughput)
- switching all controllers to a new recommended design using shared informers, which reduced resource consumption of controller-manager - for reference see this document
- optimizing individual operations in the API server (conversions, deep-copies, patch)
- reducing memory allocation in the API server (which significantly impacts the latency of API calls) We want to emphasize that the optimization work we have done during the last few releases, and indeed throughout the history of the project, is a joint effort by many different companies and individuals from the whole Kubernetes community.
What’s next?
People frequently ask how far we are going to go in improving Kubernetes scalability. Currently we do not have plans to increase scalability beyond 5000-node clusters (within our SLOs) in the next few releases. If you need clusters larger than 5000 nodes, we recommend to use federation to aggregate multiple Kubernetes clusters.
However, that doesn’t mean we are going to stop working on scalability and performance. As we mentioned at the beginning of this post, our top priority is to refine our two existing SLOs and introduce new ones that will cover more parts of the system, e.g. networking. This effort has already started within the Scalability SIG. We have made significant progress on how we would like to define performance SLOs, and this work should be finished in the coming month.
Join the effort
If you are interested in scalability and performance, please join our community and help us shape Kubernetes. There are many ways to participate, including:
- Chat with us in the Kubernetes Slack scalability channel:
- Join our Special Interest Group, SIG-Scalability, which meets every Thursday at 9:00 AM PST Thanks for the support and contributions! Read more in-depth posts on what's new in Kubernetes 1.6 here.
[1] We are investigating why 5000-node clusters have better startup time than 2000-node clusters. The current theory is that it is related to running 5000-node experiments using 64-core master and 2000-node experiments using 32-core master.
Dynamic Provisioning and Storage Classes in Kubernetes
Editor’s note: this post is part of a series of in-depth articles on what's new in Kubernetes 1.6
Storage is a critical part of running stateful containers, and Kubernetes offers powerful primitives for managing it. Dynamic volume provisioning, a feature unique to Kubernetes, allows storage volumes to be created on-demand. Before dynamic provisioning, cluster administrators had to manually make calls to their cloud or storage provider to provision new storage volumes, and then create PersistentVolume objects to represent them in Kubernetes. With dynamic provisioning, these two steps are automated, eliminating the need for cluster administrators to pre-provision storage. Instead, the storage resources can be dynamically provisioned using the provisioner specified by the StorageClass object (see user-guide). StorageClasses are essentially blueprints that abstract away the underlying storage provider, as well as other parameters, like disk-type (e.g.; solid-state vs standard disks).
StorageClasses use provisioners that are specific to the storage platform or cloud provider to give Kubernetes access to the physical media being used. Several storage provisioners are provided in-tree (see user-guide), but additionally out-of-tree provisioners are now supported (see kubernetes-incubator).
In the Kubernetes 1.6 release, dynamic provisioning has been promoted to stable (having entered beta in 1.4). This is a big step forward in completing the Kubernetes storage automation vision, allowing cluster administrators to control how resources are provisioned and giving users the ability to focus more on their application. With all of these benefits, there are a few important user-facing changes (discussed below) that are important to understand before using Kubernetes 1.6.
Storage Classes and How to Use them
StorageClasses are the foundation of dynamic provisioning, allowing cluster administrators to define abstractions for the underlying storage platform. Users simply refer to a StorageClass by name in the PersistentVolumeClaim (PVC) using the “storageClassName” parameter.
In the following example, a PVC refers to a specific storage class named “gold”.
apiVersion: v1
kind: PersistentVolumeClaim
metadata:
name: mypvc
namespace: testns
spec:
accessModes:
- ReadWriteOnce
resources:
requests:
storage: 100Gi
storageClassName: gold
In order to promote the usage of dynamic provisioning this feature permits the cluster administrator to specify a default StorageClass. When present, the user can create a PVC without having specifying a storageClassName, further reducing the user’s responsibility to be aware of the underlying storage provider. When using default StorageClasses, there are some operational subtleties to be aware of when creating PersistentVolumeClaims (PVCs). This is particularly important if you already have existing PersistentVolumes (PVs) that you want to re-use:
PVs that are already “Bound” to PVCs will remain bound with the move to 1.6
- They will not have a StorageClass associated with them unless the user manually adds it
- If PVs become “Available” (i.e.; if you delete a PVC and the corresponding PV is recycled), then they are subject to the following
If storageClassName is not specified in the PVC, the default storage class will be used for provisioning.
- Existing, “Available”, PVs that do not have the default storage class label will not be considered for binding to the PVC
If storageClassName is set to an empty string (‘’) in the PVC, no storage class will be used (i.e.; dynamic provisioning is disabled for this PVC)
- Existing, “Available”, PVs (that do not have a specified storageClassName) will be considered for binding to the PVC
If storageClassName is set to a specific value, then the matching storage class will be used
- Existing, “Available”, PVs that have a matching storageClassName will be considered for binding to the PVC
- If no corresponding storage class exists, the PVC will fail. To reduce the burden of setting up default StorageClasses in a cluster, beginning with 1.6, Kubernetes installs (via the add-on manager) default storage classes for several cloud providers. To use these default StorageClasses, users do not need refer to them by name – that is, storageClassName need not be specified in the PVC.
The following table provides more detail on default storage classes pre-installed by cloud provider as well as the specific parameters used by these defaults.
| Cloud Provider | Default StorageClass Name | Default Provisioner |
|---|---|---|
| Amazon Web Services | gp2 | aws-ebs |
| Microsoft Azure | standard | azure-disk |
| Google Cloud Platform | standard | gce-pd |
| OpenStack | standard | cinder |
| VMware vSphere | thin | vsphere-volume |
While these pre-installed default storage classes are chosen to be “reasonable” for most storage users, this guide provides instructions on how to specify your own default.
Dynamically Provisioned Volumes and the Reclaim Policy
All PVs have a reclaim policy associated with them that dictates what happens to a PV once it becomes released from a claim (see user-guide). Since the goal of dynamic provisioning is to completely automate the lifecycle of storage resources, the default reclaim policy for dynamically provisioned volumes is “delete”. This means that when a PersistentVolumeClaim (PVC) is released, the dynamically provisioned volume is de-provisioned (deleted) on the storage provider and the data is likely irretrievable. If this is not the desired behavior, the user must change the reclaim policy on the corresponding PersistentVolume (PV) object after the volume is provisioned.
How do I change the reclaim policy on a dynamically provisioned volume?
You can change the reclaim policy by editing the PV object and changing the “persistentVolumeReclaimPolicy” field to the desired value. For more information on various reclaim policies see user-guide.
FAQs
How do I use a default StorageClass?
If your cluster has a default StorageClass that meets your needs, then all you need to do is create a PersistentVolumeClaim (PVC) and the default provisioner will take care of the rest – there is no need to specify the storageClassName:
apiVersion: v1
kind: PersistentVolumeClaim
metadata:
name: mypvc
namespace: testns
spec:
accessModes:
- ReadWriteOnce
resources:
requests:
storage: 100Gi
Can I add my own storage classes?
Yes. To add your own storage class, first determine which provisioners will work in your cluster. Then, create a StorageClass object with parameters customized to meet your needs (see user-guide for more detail). For many users, the easiest way to create the object is to write a yaml file and apply it with “kubectl create -f”. The following is an example of a StorageClass for Google Cloud Platform named “gold” that creates a “pd-ssd”. Since multiple classes can exist within a cluster, the administrator may leave the default enabled for most workloads (since it uses a “pd-standard”), with the “gold” class reserved for workloads that need extra performance.
kind: StorageClass
apiVersion: storage.k8s.io/v1
metadata:
name: gold
provisioner: kubernetes.io/gce-pd
parameters:
type: pd-ssd
How do I check if I have a default StorageClass Installed?
You can use kubectl to check for StorageClass objects. In the example below there are two storage classes: “gold” and “standard”. The “gold” class is user-defined, and the “standard” class is installed by Kubernetes and is the default.
$ kubectl get sc
NAME TYPE
gold kubernetes.io/gce-pd
standard (default) kubernetes.io/gce-pd
$ kubectl describe storageclass standard
Name: standard
IsDefaultClass: Yes
Annotations: storageclass.beta.kubernetes.io/is-default-class=true
Provisioner: kubernetes.io/gce-pd
Parameters: type=pd-standard
Events: \<none\>
Can I delete/turn off the default StorageClasses?
You cannot delete the default storage class objects provided. Since they are installed as cluster addons, they will be recreated if they are deleted.
You can, however, disable the defaulting behavior by removing (or setting to false) the following annotation: storageclass.beta.kubernetes.io/is-default-class.
If there are no StorageClass objects marked with the default annotation, then PersistentVolumeClaim objects (without a StorageClass specified) will not trigger dynamic provisioning. They will, instead, fall back to the legacy behavior of binding to an available PersistentVolume object.
Can I assign my existing PVs to a particular StorageClass?
Yes, you can assign a StorageClass to an existing PV by editing the appropriate PV object and adding (or setting) the desired storageClassName field to it.
What happens if I delete a PersistentVolumeClaim (PVC)?
If the volume was dynamically provisioned, then the default reclaim policy is set to “delete”. This means that, by default, when the PVC is deleted, the underlying PV and storage asset will also be deleted. If you want to retain the data stored on the volume, then you must change the reclaim policy from “delete” to “retain” after the PV is provisioned.
- Post questions (or answer questions) on Stack Overflow
- Join the community portal for advocates on K8sPort
- Get involved with the Kubernetes project on GitHub
- Follow us on Twitter @Kubernetesio for latest updates
- Connect with the community on Slack
- Download Kubernetes
Five Days of Kubernetes 1.6
With the help of our growing community of 1,110 plus contributors, we pushed around 5,000 commits to deliver Kubernetes 1.6, bringing focus on multi-user, multi-workloads at scale. While many improvements have been contributed, we selected few features to highlight in a series of in-depths posts listed below.
Follow along and read what’s new:
Connect
- Follow us on Twitter @Kubernetesio for latest updates
- Post questions (or answer questions) on Stack Overflow
- Join the community portal for advocates on K8sPort
- Get involved with the Kubernetes project on GitHub
- Connect with the community on Slack
- Download Kubernetes
Kubernetes 1.6: Multi-user, Multi-workloads at Scale
This article is by Aparna Sinha on behalf of the Kubernetes 1.6 release team.
Today we’re announcing the release of Kubernetes 1.6.
In this release the community’s focus is on scale and automation, to help you deploy multiple workloads to multiple users on a cluster. We are announcing that 5,000 node clusters are supported. We moved dynamic storage provisioning to stable. Role-based access control (RBAC), kubefed, kubeadm, and several scheduling features are moving to beta. We have also added intelligent defaults throughout to enable greater automation out of the box.
What’s New
Scale and Federation : Large enterprise users looking for proof of at-scale performance will be pleased to know that Kubernetes’ stringent scalability SLO now supports 5,000 node (150,000 pod) clusters. This 150% increase in total cluster size, powered by a new version of etcd v3 by CoreOS, is great news if you are deploying applications such as search or games which can grow to consume larger clusters.
For users who want to scale beyond 5,000 nodes or spread across multiple regions or clouds, federation lets you combine multiple Kubernetes clusters and address them through a single API endpoint. In this release, the kubefed command line utility graduated to beta - with improved support for on-premise clusters. kubefed now automatically configures kube-dns on joining clusters and can pass arguments to federated components.
Security and Setup : Users concerned with security will find that RBAC, now beta adds a significant security benefit through more tightly scoped default roles for system components. The default RBAC policies in 1.6 grant scoped permissions to control-plane components, nodes, and controllers. RBAC allows cluster administrators to selectively grant particular users or service accounts fine-grained access to specific resources on a per-namespace basis. RBAC users upgrading from 1.5 to 1.6 should view the guidance here.
Users looking for an easy way to provision a secure cluster on physical or cloud servers can use kubeadm, which is now beta. kubeadm has been enhanced with a set of command line flags and a base feature set that includes RBAC setup, use of the Bootstrap Token system and an enhanced Certificates API.
Advanced Scheduling : This release adds a set of powerful and versatile scheduling constructs to give you greater control over how pods are scheduled, including rules to restrict pods to particular nodes in heterogeneous clusters, and rules to spread or pack pods across failure domains such as nodes, racks, and zones.
Node affinity/anti-affinity, now in beta, allows you to restrict pods to schedule only on certain nodes based on node labels. Use built-in or custom node labels to select specific zones, hostnames, hardware architecture, operating system version, specialized hardware, etc. The scheduling rules can be required or preferred, depending on how strictly you want the scheduler to enforce them.
A related feature, called taints and tolerations, makes it possible to compactly represent rules for excluding pods from particular nodes. The feature, also now in beta, makes it easy, for example, to dedicate sets of nodes to particular sets of users, or to keep nodes that have special hardware available for pods that need the special hardware by excluding pods that don’t need it.
Sometimes you want to co-schedule services, or pods within a service, near each other topologically, for example to optimize North-South or East-West communication. Or you want to spread pods of a service for failure tolerance, or keep antagonistic pods separated, or ensure sole tenancy of nodes. Pod affinity and anti-affinity, now in beta, enables such use cases by letting you set hard or soft requirements for spreading and packing pods relative to one another within arbitrary topologies (node, zone, etc.).
Lastly, for the ultimate in scheduling flexibility, you can run your own custom scheduler(s) alongside, or instead of, the default Kubernetes scheduler. Each scheduler is responsible for different sets of pods. Multiple schedulers is beta in this release.
Dynamic Storage Provisioning : Users deploying stateful applications will benefit from the extensive storage automation capabilities in this release of Kubernetes.
Since its early days, Kubernetes has been able to automatically attach and detach storage, format disk, mount and unmount volumes per the pod spec, and do so seamlessly as pods move between nodes. In addition, the PersistentVolumeClaim (PVC) and PersistentVolume (PV) objects decouple the request for storage from the specific storage implementation, making the pod spec portable across a range of cloud and on-premise environments. In this release StorageClass and dynamic volume provisioning are promoted to stable, completing the automation story by creating and deleting storage on demand, eliminating the need to pre-provision.
The design allows cluster administrators to define and expose multiple flavors of storage within a cluster, each with a custom set of parameters. End users can stop worrying about the complexity and nuances of how storage is provisioned, while still selecting from multiple storage options.
In 1.6 Kubernetes comes with a set of built-in defaults to completely automate the storage provisioning lifecycle, freeing you to work on your applications. Specifically, Kubernetes now pre-installs system-defined StorageClass objects for AWS, Azure, GCP, OpenStack and VMware vSphere by default. This gives Kubernetes users on these providers the benefits of dynamic storage provisioning without having to manually setup StorageClass objects. This is a change in the default behavior of PVC objects on these clouds. Note that default behavior is that dynamically provisioned volumes are created with the “delete” reclaim policy. That means once the PVC is deleted, the dynamically provisioned volume is automatically deleted so users do not have the extra step of ‘cleaning up’.
In addition, we have expanded the range of storage supported overall including:
- ScaleIO Kubernetes Volume Plugin enabling pods to seamlessly access and use data stored on ScaleIO volumes.
- Portworx Kubernetes Volume Plugin adding the capability to use Portworx as a storage provider for Kubernetes clusters. Portworx pools your server capacity and turns your servers or cloud instances into converged, highly available compute and storage nodes.
- Support for NFSv3, NFSv4, and GlusterFS on clusters using the COS node image
- Support for user-written/run dynamic PV provisioners. A golang library and examples can be found here.
- Beta support for mount options in persistent volumes
Container Runtime Interface, etcd v3 and Daemon set updates : while users may not directly interact with the container runtime or the API server datastore, they are foundational components for user facing functionality in Kubernetes’. As such the community invests in expanding the capabilities of these and other system components.
- The Docker-CRI implementation is beta and is enabled by default in kubelet. Alpha support for other runtimes, cri-o, frakti, rkt, has also been implemented.
- The default backend storage for the API server has been upgraded to use etcd v3 by default for new clusters. If you are upgrading from a 1.5 cluster, care should be taken to ensure continuity by planning a data migration window.
- Node reliability is improved as Kubelet exposes an admin configurable Node Allocatable feature to reserve compute resources for system daemons.
- Daemon set updates lets you perform rolling updates on a daemon set
Alpha features : this release was mostly focused on maturing functionality, however, a few alpha features were added to support the roadmap
- Out-of-tree cloud provider support adds a new cloud-controller-manager binary that may be used for testing the new out-of-core cloud provider flow
- Per-pod-eviction in case of node problems combined with tolerationSeconds, lets users tune the duration a pod stays bound to a node that is experiencing problems
- Pod Injection Policy adds a new API resource PodPreset to inject information such as secrets, volumes, volume mounts, and environment variables into pods at creation time.
- Custom metrics support in the Horizontal Pod Autoscaler changed to use
- Multiple Nvidia GPU support is introduced with the Docker runtime only
These are just some of the highlights in our first release for the year. For a complete list please visit the release notes.
Community
This release is possible thanks to our vast and open community. Together, we’ve pushed nearly 5,000 commits by some 275 authors. To bring our many advocates together, the community has launched a new program called K8sPort, an online hub where the community can participate in gamified challenges and get credit for their contributions. Read more about the program here.
Release Process
A big thanks goes out to the release team for 1.6 (lead by Dan Gillespie of CoreOS) for their work bringing the 1.6 release to light. This release team is an exemplar of the Kubernetes community’s commitment to community governance. Dan is the first non-Google release manager and he, along with the rest of the team, worked throughout the release (building on the 1.5 release manager, Saad Ali’s, great work) to uncover and document tribal knowledge, shine light on tools and processes that still require special permissions, and prioritize work to improve the Kubernetes release process. Many thanks to the team.
User Adoption
We’re continuing to see rapid adoption of Kubernetes in all sectors and sizes of businesses. Furthermore, adoption is coming from across the globe, from a startup in Tennessee, USA to a Fortune 500 company in China.
- JD.com, one of China's largest internet companies, uses Kubernetes in conjunction with their OpenStack deployment. They’ve move 20% of their applications thus far on Kubernetes and are already running 20,000 pods daily. Read more about their setup here.
- Spire, a startup based in Tennessee, witnessed their public cloud provider experience an outage, but suffered zero downtime because Kubernetes was able to move their workloads to different zones. Read their full experience here.
“With Kubernetes, there was never a moment of panic, just a sense of awe watching the automatic mitigation as it happened.”
- Share your Kubernetes use case story with the community here.
Availability
Kubernetes 1.6 is available for download here on GitHub and via get.k8s.io. To get started with Kubernetes, try one of the these interactive tutorials.
Get Involved
CloudNativeCon + KubeCon in Berlin is this week March 29-30, 2017. We hope to get together with much of the community and share more there!
Share your voice at our weekly community meeting:
- Post questions (or answer questions) on Stack Overflow
- Follow us on Twitter @Kubernetesio for latest updates
- Connect with the community on Slack
Many thanks for your contributions and advocacy!
PS: read this series of in-depth articles on what's new in Kubernetes 1.6
The K8sPort: Engaging Kubernetes Community One Activity at a Time
The K8sPort is a hub designed to help you, the Kubernetes community, earn credit for the hard work you’re putting forth in making this one of the most successful open source projects ever. Back at KubeCon Seattle in November, I presented a lightning talk of a preview of K8sPort.
This hub, and our intentions in helping to drive this initiative in the community, grew out of a desire to help cultivate an engaged community of Kubernetes advocates. This is done through gamification in a community hub full of different activities called “challenges,” which are activities meant to help direct members of the community to attend various events and meetings, share and provide feedback on important content, answer questions posed on sites like Stack Overflow, and more.
By completing these challenges, you collect points and can redeem them for different types of rewards and experiences, examples of which include charitable donations, gift certificates, conference tickets and more. As advocates complete challenges and gain points, they’ll earn performance-related badges, move up in community tiers and participate in a fun community leaderboard.
My presentation at KubeCon, simply put, was a call for early signups. Those who’ve been piloting the program have, for the most part, had positive things to say about their experiences.
I know I'm the only one playing with @K8sPort but it may be the most important thing the #Kubernetes community has.
— Justin Garrison (@rothgar) November 22, 2016
- “Great way of improving the community and documentation. The gamification of Kubernetes gave me more insight into the stack as well.”
- Jonas Kint, Devops Engineer at Showpad
- _“A great way to engage with the kubernetes project and also help the community. Fun stuff.” _
- Kevin Duane, Systems Engineer at The Walt Disney Company
- “K8sPort seems like an awesome idea for incentivising giving back to the community in a way that will hopefully cause more valuable help from more people than might usually be helping.”
- William Stewart, Site Reliability Engineer at Superbalist
Today I am pleased to announce that the Cloud Native Computing Foundation (CNCF) is making the K8sPort generally available to the entire contributing community! We’ve simplified the signup process by allowing would-be advocates to authenticate and register through the use of their existing GitHub accounts.

If you’re a contributing member of the Kubernetes community and you have an active GitHub account tied to the Kubernetes repository at GitHub, you can authenticate using your GitHub credentials and gain access to the K8sPort.

If you’re interested in joining the advocacy hub, please join us at k8sport.org! We hope you’re as excited about what you see as we are to continue to build it and present it to you.
For a quick walkthrough on K8sPort authentication and the hub itself, see this quick demo, below.
Deploying PostgreSQL Clusters using StatefulSets
Editor’s note: Today’s guest post is by Jeff McCormick, a developer at Crunchy Data, showing how to build a PostgreSQL cluster using the new Kubernetes StatefulSet feature.
In an earlier post, I described how to deploy a PostgreSQL cluster using Helm, a Kubernetes package manager. The following example provides the steps for building a PostgreSQL cluster using the new Kubernetes StatefulSets feature.
StatefulSets Example
Step 1 - Create Kubernetes Environment
StatefulSets is a new feature implemented in Kubernetes 1.5 (prior versions it was known as PetSets). As a result, running this example will require an environment based on Kubernetes 1.5.0 or above.
The example in this blog deploys on Centos7 using kubeadm. Some instructions on what kubeadm provides and how to deploy a Kubernetes cluster is located here.
Step 2 - Install NFS
The example in this blog uses NFS for the Persistent Volumes, but any shared file system would also work (ex: ceph, gluster).
The example script assumes your NFS server is running locally and your hostname resolves to a known IP address.
In summary, the steps used to get NFS working on a Centos 7 host are as follows:
sudo setsebool -P virt\_use\_nfs 1
sudo yum -y install nfs-utils libnfsidmap
sudo systemctl enable rpcbind nfs-server
sudo systemctl start rpcbind nfs-server rpc-statd nfs-idmapd
sudo mkdir /nfsfileshare
sudo chmod 777 /nfsfileshare/
sudo vi /etc/exports
sudo exportfs -r
The /etc/exports file should contain a line similar to this one except with the applicable IP address specified:
/nfsfileshare 192.168.122.9(rw,sync)
After these steps NFS should be running in the test environment.
Step 3 - Clone the Crunchy PostgreSQL Container Suite
The example used in this blog is found at in the Crunchy Containers GitHub repo here. Clone the Crunchy Containers repository to your test Kubernertes host and go to the example:
cd $HOME
git clone https://github.com/CrunchyData/crunchy-containers.git
cd crunchy-containers/examples/kube/statefulset
Next, pull down the Crunchy PostgreSQL container image:
docker pull crunchydata/crunchy-postgres:centos7-9.5-1.2.6
Step 4 - Run the Example
To begin, it is necessary to set a few of the environment variables used in the example:
export BUILDBASE=$HOME/crunchy-containers
export CCP\_IMAGE\_TAG=centos7-9.5-1.2.6
BUILDBASE is where you cloned the repository and CCP_IMAGE_TAG is the container image version we want to use.
Next, run the example:
./run.sh
That script will create several Kubernetes objects including:
- Persistent Volumes (pv1, pv2, pv3)
- Persistent Volume Claim (pgset-pvc)
- Service Account (pgset-sa)
- Services (pgset, pgset-master, pgset-replica)
- StatefulSet (pgset)
- Pods (pgset-0, pgset-1)
At this point, two pods will be running in the Kubernetes environment:
$ kubectl get pod
NAME READY STATUS RESTARTS AGE
pgset-0 1/1 Running 0 2m
pgset-1 1/1 Running 1 2m
Immediately after the pods are created, the deployment will be as depicted below:

Step 5 - What Just Happened?
This example will deploy a StatefulSet, which in turn creates two pods.
The containers in those two pods run the PostgreSQL database. For a PostgreSQL cluster, we need one of the containers to assume the master role and the other containers to assume the replica role.
So, how do the containers determine who will be the master, and who will be the replica?
This is where the new StateSet mechanics come into play. The StateSet mechanics assign a unique ordinal value to each pod in the set.
The StatefulSets provided unique ordinal value always start with 0. During the initialization of the container, each container examines its assigned ordinal value. An ordinal value of 0 causes the container to assume the master role within the PostgreSQL cluster. For all other ordinal values, the container assumes a replica role. This is a very simple form of discovery made possible by the StatefulSet mechanics.
PostgreSQL replicas are configured to connect to the master database via a Service dedicated to the master database. In order to support this replication, the example creates a separate Service for each of the master role and the replica role. Once the replica has connected, the replica will begin replicating state from the master.
During the container initialization, a master container will use a Service Account (pgset-sa) to change it’s container label value to match the master Service selector. Changing the label is important to enable traffic destined to the master database to reach the correct container within the Stateful Set. All other pods in the set assume the replica Service label by default.
Step 6 - Deployment Diagram
The example results in a deployment depicted below:

In this deployment, there is a Service for the master and a separate Service for the replica. The replica is connected to the master and replication of state has started.
The Crunchy PostgreSQL container supports other forms of cluster deployment, the style of deployment is dictated by setting the PG_MODE environment variable for the container. In the case of a StatefulSet deployment, that value is set to: PG_MODE=set
This environment variable is a hint to the container initialization logic as to the style of deployment we intend.
Step 7 - Testing the Example
The tests below assume that the psql client has been installed on the test system. If not, the psql client has been previously installed, it can be installed as follows:
sudo yum -y install postgresql
In addition, the tests below assume that the tested environment DNS resolves to the Kube DNS and that the tested environment DNS search path is specified to match the applicable Kube namespace and domain. The master service is named pgset-master and the replica service is named pgset-replica.
Test the master as follows (the password is password):
psql -h pgset-master -U postgres postgres -c 'table pg\_stat\_replication'
If things are working, the command above will return output indicating that a single replica is connecting to the master.
Next, test the replica as follows:
psql -h pgset-replica -U postgres postgres -c 'create table foo (id int)'
The command above should fail as the replica is read-only within a PostgreSQL cluster.
Next, scale up the set as follows:
kubectl scale statefulset pgset --replicas=3
The command above should successfully create a new replica pod called pgset-2 as depicted below:

Step 8 - Persistence Explained
Take a look at the persisted PostgreSQL data files on the resulting NFS mount path:
$ ls -l /nfsfileshare/
total 12
drwx------ 20 26 26 4096 Jan 17 16:35 pgset-0
drwx------ 20 26 26 4096 Jan 17 16:35 pgset-1
drwx------ 20 26 26 4096 Jan 17 16:48 pgset-2
Each container in the stateful set binds to the single NFS Persistent Volume Claim (pgset-pvc) created in the example script.
Since NFS and the PVC can be shared, each pod can write to this NFS path.
The container is designed to create a subdirectory on that path using the pod host name for uniqueness.
Conclusion
StatefulSets is an exciting feature added to Kubernetes for container builders that are implementing clustering. The ordinal values assigned to the set provide a very simple mechanism to make clustering decisions when deploying a PostgreSQL cluster.
Containers as a Service, the foundation for next generation PaaS
Containers are revolutionizing the way that people build, package and deploy software. But what is often overlooked is how they are revolutionizing the way that people build the software that builds, packages and deploys software. (it’s ok if you have to read that sentence twice…) Today, and in a talk at Container World tomorrow, I’m taking a look at how container orchestrators like Kubernetes form the foundation for next generation platform as a service (PaaS). In particular, I’m interested in how cloud container as a service (CaaS) platforms like Azure Container Service, Google Container Engine and others are becoming the new infrastructure layer that PaaS is built upon.
To see this, it’s important to consider the set of services that have traditionally been provided by PaaS platforms:
- Source code and executable packaging and distribution
- Reliable, zero-downtime rollout of software versions
- Healing, auto-scaling, load balancing
When you look at this list, it’s clear that most of these traditional “PaaS” roles have now been taken over by containers. The container image and container image build tooling has become the way to package up your application. Container registries have become the way to distribute your application across the world. Reliable software rollout is achieved using orchestrator concepts like Deployment in Kubernetes, and service healing, auto-scaling and load-balancing are all properties of an application deployed in Kubernetes using ReplicaSets and Services.
What then is left for PaaS? Is PaaS going to be replaced by container as a service? I think the answer is “no.” The piece that is left for PaaS is the part that was always the most important part of PaaS in the first place, and that’s the opinionated developer experience. In addition to all of the generic parts of PaaS that I listed above, the most important part of a PaaS has always been the way in which the developer experience and application framework made developers more productive within the boundaries of the platform. PaaS enables developers to go from source code on their laptop to a world-wide scalable service in less than an hour. That’s hugely powerful.
However, in the world of traditional PaaS, the skills needed to build PaaS infrastructure itself, the software on which the user’s software ran, required very strong skills and experience with distributed systems. Consequently, PaaS tended to be built by distributed system engineers rather than experts in a particular vertical developer experience. This means that PaaS platforms tended towards general purpose infrastructure rather than targeting specific verticals. Recently, we have seen this start to change, first with PaaS targeted at mobile API backends, and later with PaaS targeting “function as a service”. However, these products were still built from the ground up on top of raw infrastructure.
More recently, we are starting to see these platforms build on top of container infrastructure. Taking for example “function as a service” there are at least two (and likely more) open source implementations of functions as a service that run on top of Kubernetes (fission and funktion). This trend will only continue. Building a platform as a service, on top of container as a service is easy enough that you could imagine giving it out as an undergraduate computer science assignment. This ease of development means that individual developers with specific expertise in a vertical (say software for running three-dimensional simulations) can and will build PaaS platforms targeted at that specific vertical experience. In turn, by targeting such a narrow experience, they will build an experience that fits that narrow vertical perfectly, making their solution a compelling one in that target market.
This then points to the other benefit of next generation PaaS being built on top of container as a service. It frees the developer from having to make an “all-in” choice on a particular PaaS platform. When layered on top of container as a service, the basic functionality (naming, discovery, packaging, etc) are all provided by the CaaS and thus common across multiple PaaS that happened to be deployed on top of that CaaS. This means that developers can mix and match, deploying multiple PaaS to the same container infrastructure, and choosing for each application the PaaS platform that best suits that particular platform. Also, importantly, they can choose to “drop down” to raw CaaS infrastructure if that is a better fit for their application. Freeing PaaS from providing the infrastructure layer, enables PaaS to diversify and target specific experiences without fear of being too narrow. The experiences become more targeted, more powerful, and yet by building on top of container as a service, more flexible as well.
Kubernetes is infrastructure for next generation applications, PaaS and more. Given this, I’m really excited by our announcement today that Kubernetes on Azure Container Service has reached general availability. When you deploy your next generation application to Azure, whether on a PaaS or deployed directly onto Kubernetes itself (or both) you can deploy it onto a managed, supported Kubernetes cluster.
Furthermore, because we know that the world of PaaS and software development in general is a hybrid one, we’re excited to announce the preview availability of Windows clusters in Azure Container Service. We’re also working on hybrid clusters in ACS-Engine and expect to roll those out to general availability in the coming months.
I’m thrilled to see how containers and container as a service is changing the world of compute, I’m confident that we’re only scratching the surface of the transformation we’ll see in the coming months and years.
- Get involved with the Kubernetes project on GitHub
- Post questions (or answer questions) on Stack Overflow
- Download Kubernetes
- Connect with the community on Slack
- Follow us on Twitter @Kubernetesio for latest updates
Inside JD.com's Shift to Kubernetes from OpenStack
Editor's note: Today’s post is by the Infrastructure Platform Department team at JD.com about their transition from OpenStack to Kubernetes. JD.com is one of China’s largest companies and the first Chinese Internet company to make the Global Fortune 500 list.

History of cluster building
The era of physical machines (2004-2014)
Before 2014, our company's applications were all deployed on the physical machine. In the age of physical machines, we needed to wait an average of one week for the allocation to application coming on-line. Due to the lack of isolation, applications would affected each other, resulting in a lot of potential risks. At that time, the average number of tomcat instances on each physical machine was no more than nine. The resource of physical machine was seriously wasted and the scheduling was inflexible. The time of application migration took hours due to the breakdown of physical machines. And the auto-scaling cannot be achieved. To enhance the efficiency of application deployment, we developed compilation-packaging, automatic deployment, log collection, resource monitoring and some other systems.
Containerized era (2014-2016)
The Infrastructure Platform Department (IPD) led by Liu Haifeng--Chief Architect of JD.COM, sought a new resolution in the fall of 2014. Docker ran into our horizon. At that time, docker had been rising, but was slightly weak and lacked of experience in production environment. We had repeatedly tested docker. In addition, docker was customized to fix a couple of issues, such as system crash caused by device mapper and some Linux kernel bugs. We also added plenty of new features into docker, including disk speed limit, capacity management, and layer merging in image building and so on.
To manage the container cluster properly, we chose the architecture of OpenStack + Novadocker driver. Containers are managed as virtual machines. It is known as the first generation of JD container engine platform--JDOS1.0 (JD Datacenter Operating System). The main purpose of JDOS 1.0 is to containerize the infrastructure. All applications run in containers rather than physical machines since then. As for the operation and maintenance of applications, we took full advantage of existing tools. The time for developers to request computing resources in production environment reduced to several minutes rather than a week. After the pooling of computing resources, even the scaling of 1,000 containers would be finished in seconds. Application instances had been isolated from each other. Both the average deployment density of applications and the physical machine utilization had increased by three times, which brought great economic benefits.
We deployed clusters in each IDC and provided unified global APIs to support deployment across the IDC. There are 10,000 compute nodes at most and 4,000 at least in a single OpenStack distributed container cluster in our production environment. The first generation of container engine platform (JDOS 1.0) successfully supported the “6.18” and “11.11” promotional activities in both 2015 and 2016. There are already 150,000 running containers online by November 2016.
“6.18” and “11.11” are known as the two most popular online promotion of JD.COM, similar to the black Friday promotions. Fulfilled orders in November 11, 2016 reached 30 million.
In the practice of developing and promoting JDOS 1.0, applications were migrated directly from physical machines to containers. Essentially, JDOS 1.0 was an implementation of IaaS. Therefore, deployment of applications was still heavily dependent on compilation-packaging and automatic deployment tools. However, the practice of JDOS1.0 is very meaningful. Firstly, we successfully moved business into containers. Secondly, we have a deep understanding of container network and storage, and know how to polish them to the best. Finally, all the experiences lay a solid foundation for us to develop a brand new application container platform.
New container engine platform (JDOS 2.0)
Platform architecture
When JDOS 1.0 grew from 2,000 containers to 100,000, we launched a new container engine platform (JDOS 2.0). The goal of JDOS 2.0 is not just an infrastructure management platform, but also a container engine platform faced to applications. On the basic of JDOS 1.0 and Kubernetes, JDOS 2.0 integrates the storage and network of JDOS 1.0, gets through the process of CI/CD from the source to the image, and finally to the deployment. Also, JDOS 2.0 provides one-stop service such as log, monitor, troubleshooting, terminal and orchestration. The platform architecture of JDOS 2.0 is shown below.

| Function | Product |
|---|---|
| Source Code Management | Gitlab |
| Container Tool | Docker |
| Container Networking | Cane |
| Container Engine | Kubernetes |
| Image Registry | Harbor |
| CI Tool | Jenkins |
| Log Management | Logstash + Elastic Search |
| Monitor | Prometheus |
In JDOS 2.0, we define two levels, system and application. A system consists of several applications and an application consists of several Pods which provide the same service. In general, a department can apply for one or more systems which directly corresponds to the namespace of Kubernetes. This means that the Pods of the same system will be in the same namespace.
Most of the JDOS 2.0 components (GitLab / Jenkins / Harbor / Logstash / Elastic Search / Prometheus) are also containerized and deployed on the Kubernetes platform.
One Stop Solution

- 1.JDOS 2.0 takes docker image as the core to implement continuous integration and continuous deployment.
- 2.Developer pushes code to git.
- 3.Git triggers the jenkins master to generate build job.
- 4.Jenkins master invokes Kubernetes to create jenkins slave Pod.
- 5.Jenkins slave pulls the source code, compiles and packs.
- 6.Jenkins slave sends the package and the Dockerfile to the image build node with docker.
- 7.The image build node builds the image.
- 8.The image build node pushes the image to the image registry Harbor.
- 9.User creates or updates app Pods in different zone.
The docker image in JDOS 1.0 consisted primarily of the operating system and the runtime software stack of the application. So, the deployment of applications was still dependent on the auto-deployment and some other tools. While in JDOS 2.0, the deployment of the application is done during the image building. And the image contains the complete software stack, including App. With the image, we can achieve the goal of running applications as designed in any environment.

Networking and External Service Load Balancing
JDOS 2.0 takes the network solution of JDOS 1.0, which is implemented with the VLAN model of OpenStack Neutron. This solution enables highly efficient communication between containers, making it ideal for a cluster environment within a company. Each Pod occupies a port in Neutron, with a separate IP. Based on the Container Network Interface standard (CNI) standard, we have developed a new project Cane for integrating kubelet and Neutron.

At the same time, Cane is also responsible for the management of LoadBalancer in Kubernetes service. When a LoadBalancer is created / deleted / modified, Cane will call the creating / removing / modifying interface of the lbaas service in Neutron. In addition, the Hades component in the Cane project provides an internal DNS resolution service for the Pods.
The source code of the Cane project is currently being finished and will be released on GitHub soon.
Flexible Scheduling

Summary
The rich functionality of Kubernetes allows us to pay more attention to the entire ecosystem of the platform, such as network performance, rather than the platform itself. In particular, the SREs highly appreciated the functionality of replication controller. With it, the scaling of the applications is achieved in several seconds. JDOS 2.0 now has accessed about 20% of the applications, and deployed 2 clusters with about 20,000 Pods running daily. We plan to access more applications of our company, to replace the current JDOS 1.0. And we are also glad to share our experience in this process with the community.
Thank you to all the contributors of Kubernetes and the other open source projects.
--Infrastructure Platform Department team at JD.com
- Get involved with the Kubernetes project on GitHub
- Post questions (or answer questions) on Stack Overflow
- Download Kubernetes
- Connect with the community on Slack
- Follow us on Twitter @Kubernetesio for latest updates
Run Deep Learning with PaddlePaddle on Kubernetes

What is PaddlePaddle
PaddlePaddle is an easy-to-use, efficient, flexible and scalable deep learning platform originally developed at Baidu for applying deep learning to Baidu products since 2014.
There have been more than 50 innovations created using PaddlePaddle supporting 15 Baidu products ranging from the search engine, online advertising, to Q&A and system security.
In September 2016, Baidu open sourced PaddlePaddle, and it soon attracted many contributors from outside of Baidu.
Why Run PaddlePaddle on Kubernetes
PaddlePaddle is designed to be slim and independent of computing infrastructure. Users can run it on top of Hadoop, Spark, Mesos, Kubernetes and others.. We have a strong interest with Kubernetes because of its flexibility, efficiency and rich features.
While we are applying PaddlePaddle in various Baidu products, we noticed two main kinds of PaddlePaddle usage -- research and product. Research data does not change often, and the focus is fast experiments to reach the expected scientific measurement. Products data changes often. It usually comes from log messages generated from the Web services.
A successful deep learning project includes both the research and the data processing pipeline. There are many parameters to be tuned. A lot of engineers work on the different parts of the project simultaneously.
To ensure the project is easy to manage and utilize hardware resource efficiently, we want to run all parts of the project on the same infrastructure platform.
The platform should provide:
fault-tolerance. It should abstract each stage of the pipeline as a service, which consists of many processes that provide high throughput and robustness through redundancy.
auto-scaling. In the daytime, there are usually many active users, the platform should scale out online services. While during nights, the platform should free some resources for deep learning experiments.
job packing and isolation. It should be able to assign a PaddlePaddle trainer process requiring the GPU, a web backend service requiring large memory, and a CephFS process requiring disk IOs to the same node to fully utilize its hardware.
What we want is a platform which runs the deep learning system, the Web server (e.g., Nginx), the log collector (e.g., fluentd), the distributed queue service (e.g., Kafka), the log joiner and other data processors written using Storm, Spark, and Hadoop MapReduce on the same cluster. We want to run all jobs -- online and offline, production and experiments -- on the same cluster, so we could make full utilization of the cluster, as different kinds of jobs require different hardware resource.
We chose container based solutions since the overhead introduced by VMs is contradictory to our goal of efficiency and utilization.
Based on our research of different container based solutions, Kubernetes fits our requirement the best.
Distributed Training on Kubernetes
PaddlePaddle supports distributed training natively. There are two roles in a PaddlePaddle cluster: parameter server and trainer. Each parameter server process maintains a shard of the global model. Each trainer has its local copy of the model, and uses its local data to update the model. During the training process, trainers send model updates to parameter servers, parameter servers are responsible for aggregating these updates, so that trainers can synchronize their local copy with the global model.
| 
Some other approaches use a set of parameter servers to collectively hold a very large model in the CPU memory space on multiple hosts. But in practice, it is not often that we have such big models, because it would be very inefficient to handle very large model due to the limitation of GPU memory. In our configuration, multiple parameter servers are mostly for fast communications. Suppose there is only one parameter server process working with all trainers, the parameter server would have to aggregate gradients from all trainers and becomes a bottleneck. In our experience, an experimentally efficient configuration includes the same number of trainers and parameter servers. And we usually run a pair of trainer and parameter server on the same node. In the following Kubernetes job configuration, we start a job that runs N Pods, and in each Pod there are a parameter server and a trainer process.
yaml
apiVersion: batch/v1
kind: Job
metadata:
name: PaddlePaddle-cluster-job
spec:
parallelism: 3
completions: 3
template:
metadata:
name: PaddlePaddle-cluster-job
spec:
volumes:
- name: jobpath
hostPath:
path: /home/admin/efs
containers:
- name: trainer
image: your\_repo/paddle:mypaddle
command: ["bin/bash", "-c", "/root/start.sh"]
env:
- name: JOB\_NAME
value: paddle-cluster-job
- name: JOB\_PATH
value: /home/jobpath
- name: JOB\_NAMESPACE
value: default
volumeMounts:
- name: jobpath
mountPath: /home/jobpath
restartPolicy: Never
We can see from the config that parallelism, completions are both set to 3. So this job will simultaneously start up 3 PaddlePaddle pods, and this job will be finished when all 3 pods finishes.
| 
Figure 2: Job A of three pods and Job B of one pod running on two nodes. |
The entrypoint of each pod is start.sh. It downloads data from a storage service, so that trainers can read quickly from the pod-local disk space. After downloading completes, it runs a Python script, start_paddle.py, which starts a parameter server, waits until parameter servers of all pods are ready to serve, and then starts the trainer process in the pod.
This waiting is necessary because each trainer needs to talk to all parameter servers, as shown in Figure. 1. Kubernetes API enables trainers to check the status of pods, so the Python script could wait until all parameter servers’ status change to "running" before it triggers the training process.
Currently, the mapping from data shards to pods/trainers is static. If we are going to run N trainers, we would need to partition the data into N shards, and statically assign each shard to a trainer. Again we rely on the Kubernetes API to enlist pods in a job so could we index pods / trainers from 1 to N. The i-th trainer would read the i-th data shard.
Training data is usually served on a distributed filesystem. In practice we use CephFS on our on-premise clusters and Amazon Elastic File System on AWS. If you are interested in building a Kubernetes cluster to run distributed PaddlePaddle training jobs, please follow this tutorial.
What’s Next
We are working on running PaddlePaddle with Kubernetes more smoothly.
As you might notice the current trainer scheduling fully relies on Kubernetes based on a static partition map. This approach is simple to start, but might cause a few efficiency problems.
First, slow or dead trainers block the entire job. There is no controlled preemption or rescheduling after the initial deployment. Second, the resource allocation is static. So if Kubernetes has more available resources than we anticipated, we have to manually change the resource requirements. This is tedious work, and is not aligned with our efficiency and utilization goal.
To solve the problems mentioned above, we will add a PaddlePaddle master that understands Kubernetes API, can dynamically add/remove resource capacity, and dispatches shards to trainers in a more dynamic manner. The PaddlePaddle master uses etcd as a fault-tolerant storage of the dynamic mapping from shards to trainers. Thus, even if the master crashes, the mapping is not lost. Kubernetes can restart the master and the job will keep running.
Another potential improvement is better PaddlePaddle job configuration. Our experience of having the same number of trainers and parameter servers was mostly collected from using special-purpose clusters. That strategy was observed performant on our clients' clusters that run only PaddlePaddle jobs. However, this strategy might not be optimal on general-purpose clusters that run many kinds of jobs.
PaddlePaddle trainers can utilize multiple GPUs to accelerate computations. GPU is not a first class resource in Kubernetes yet. We have to manage GPUs semi-manually. We would love to work with Kubernetes community to improve GPU support to ensure PaddlePaddle runs the best on Kubernetes.
- Download Kubernetes
- Get involved with the Kubernetes project on GitHub
- Post questions (or answer questions) on Stack Overflow
- Connect with the community on Slack
- Follow us on Twitter @Kubernetesio for latest updates
Highly Available Kubernetes Clusters
Today’s post shows how to set-up a reliable, highly available distributed Kubernetes cluster. The support for running such clusters on Google Compute Engine (GCE) was added as an alpha feature in Kubernetes 1.5 release.
Motivation
We will create a Highly Available Kubernetes cluster, with master replicas and worker nodes distributed among three zones of a region. Such setup will ensure that the cluster will continue operating during a zone failure.
Setting Up HA cluster
The following instructions apply to GCE. First, we will setup a cluster that will span over one zone (europe-west1-b), will contain one master and three worker nodes and will be HA-compatible (will allow adding more master replicas and more worker nodes in multiple zones in future). To implement this, we’ll export the following environment variables:
$ export KUBERNETES\_PROVIDER=gce
$ export NUM\_NODES=3
$ export MULTIZONE=true
$ export ENABLE\_ETCD\_QUORUM\_READ=true
and run kube-up script (note that the entire cluster will be initially placed in zone europe-west1-b):
$ KUBE\_GCE\_ZONE=europe-west1-b ./cluster/kube-up.sh
Now, we will add two additional pools of worker nodes, each of three nodes, in zones europe-west1-c and europe-west1-d (more details on adding pools of worker nodes can be find here):
$ KUBE\_USE\_EXISTING\_MASTER=true KUBE\_GCE\_ZONE=europe-west1-c ./cluster/kube-up.sh
$ KUBE\_USE\_EXISTING\_MASTER=true KUBE\_GCE\_ZONE=europe-west1-d ./cluster/kube-up.sh
To complete setup of HA cluster, we will add two master replicase, one in zone europe-west1-c, the other in europe-west1-d:
$ KUBE\_GCE\_ZONE=europe-west1-c KUBE\_REPLICATE\_EXISTING\_MASTER=true ./cluster/kube-up.sh
$ KUBE\_GCE\_ZONE=europe-west1-d KUBE\_REPLICATE\_EXISTING\_MASTER=true ./cluster/kube-up.sh
Note that adding the first replica will take longer (~15 minutes), as we need to reassign the IP of the master to the load balancer in front of replicas and wait for it to propagate (see design doc for more details).
Verifying in HA cluster works as intended
We may now list all nodes present in the cluster:
$ kubectl get nodes
NAME STATUS AGE
kubernetes-master Ready,SchedulingDisabled 48m
kubernetes-master-2d4 Ready,SchedulingDisabled 5m
kubernetes-master-85f Ready,SchedulingDisabled 32s
kubernetes-minion-group-6s52 Ready 39m
kubernetes-minion-group-cw8e Ready 48m
kubernetes-minion-group-fw91 Ready 48m
kubernetes-minion-group-h2kn Ready 31m
kubernetes-minion-group-ietm Ready 39m
kubernetes-minion-group-j6lf Ready 31m
kubernetes-minion-group-soj7 Ready 31m
kubernetes-minion-group-tj82 Ready 39m
kubernetes-minion-group-vd96 Ready 48m
As we can see, we have 3 master replicas (with disabled scheduling) and 9 worker nodes.
We will deploy a sample application (nginx server) to verify that our cluster is working correctly:
$ kubectl run nginx --image=nginx --expose --port=80
After waiting for a while, we can verify that both the deployment and the service were correctly created and are running:
$ kubectl get pods
NAME READY STATUS RESTARTS AGE
...
nginx-3449338310-m7fjm 1/1 Running 0 4s
...
$ kubectl run -i --tty test-a --image=busybox /bin/sh
If you don't see a command prompt, try pressing enter.
# wget -q -O- http://nginx.default.svc.cluster.local
...
\<title\>Welcome to nginx!\</title\>
...
Now, let’s simulate failure of one of master’s replicas by executing halt command on it (kubernetes-master-137, zone europe-west1-c):
$ gcloud compute ssh kubernetes-master-2d4 --zone=europe-west1-c
...
$ sudo halt
After a while the master replica will be marked as NotReady:
$ kubectl get nodes
NAME STATUS AGE
kubernetes-master Ready,SchedulingDisabled 51m
kubernetes-master-2d4 NotReady,SchedulingDisabled 8m
kubernetes-master-85f Ready,SchedulingDisabled 4m
...
However, the cluster is still operational. We may verify it by checking if our nginx server works correctly:
$ kubectl run -i --tty test-b --image=busybox /bin/sh
If you don't see a command prompt, try pressing enter.
# wget -q -O- http://nginx.default.svc.cluster.local
...
\<title\>Welcome to nginx!\</title\>
...
We may also run another nginx server:
$ kubectl run nginx-next --image=nginx --expose --port=80
The new server should be also working correctly:
$ kubectl run -i --tty test-c --image=busybox /bin/sh
If you don't see a command prompt, try pressing enter.
# wget -q -O- http://nginx-next.default.svc.cluster.local
...
\<title\>Welcome to nginx!\</title\>
...
Let’s now reset the broken replica:
$ gcloud compute instances start kubernetes-master-2d4 --zone=europe-west1-c
After a while, the replica should be re-attached to the cluster:
$ kubectl get nodes
NAME STATUS AGE
kubernetes-master Ready,SchedulingDisabled 57m
kubernetes-master-2d4 Ready,SchedulingDisabled 13m
kubernetes-master-85f Ready,SchedulingDisabled 9m
...
Shutting down HA cluster
To shutdown the cluster, we will first shut down master replicas in zones D and E:
$ KUBE\_DELETE\_NODES=false KUBE\_GCE\_ZONE=europe-west1-c ./cluster/kube-down.sh
$ KUBE\_DELETE\_NODES=false KUBE\_GCE\_ZONE=europe-west1-d ./cluster/kube-down.sh
Note that the second removal of replica will take longer (~15 minutes), as we need to reassign the IP of the load balancer in front of replicas to the remaining master and wait for it to propagate (see design doc for more details).
Then, we will remove the additional worker nodes from zones europe-west1-c and europe-west1-d:
$ KUBE\_USE\_EXISTING\_MASTER=true KUBE\_GCE\_ZONE=europe-west1-c ./cluster/kube-down.sh
$ KUBE\_USE\_EXISTING\_MASTER=true KUBE\_GCE\_ZONE=europe-west1-d ./cluster/kube-down.sh
And finally, we will shutdown the remaining master with the last group of nodes (zone europe-west1-b):
$ KUBE\_GCE\_ZONE=europe-west1-b ./cluster/kube-down.sh
Conclusions
We have shown how, by adding worker node pools and master replicas, a Highly Available Kubernetes cluster can be created. As of Kubernetes version 1.5.2, it is supported in kube-up/kube-down scripts for GCE (as alpha). Additionally, there is a support for HA cluster on AWS in kops scripts (see this article for more details).
- Download Kubernetes
- Get involved with the Kubernetes project on GitHub
- Post questions (or answer questions) on Stack Overflow
- Connect with the community on Slack
- Follow us on Twitter @Kubernetesio for latest updates
Fission: Serverless Functions as a Service for Kubernetes
Fission is a Functions as a Service (FaaS) / Serverless function framework built on Kubernetes.
Fission allows you to easily create HTTP services on Kubernetes from functions. It works at the source level and abstracts away container images (in most cases). It also simplifies the Kubernetes learning curve, by enabling you to make useful services without knowing much about Kubernetes.
To use Fission, you simply create functions and add them with a CLI. You can associate functions with HTTP routes, Kubernetes events, or other triggers. Fission supports NodeJS and Python today.
Functions are invoked when their trigger fires, and they only consume CPU and memory when they're running. Idle functions don't consume any resources except storage.
Why make a FaaS framework on Kubernetes?
We think there's a need for a FaaS framework that can be run on diverse infrastructure, both in public clouds and on-premise infrastructure. Next, we had to decide whether to build it from scratch, or on top of an existing orchestration system. It was quickly clear that we shouldn't build it from scratch -- we would just end up having to re-invent cluster management, scheduling, network management, and lots more.
Kubernetes offered a powerful and flexible orchestration system with a comprehensive API backed by a strong and growing community. Building on it meant Fission could leave container orchestration functionality to Kubernetes, and focus on FaaS features.
The other reason we don't want a separate FaaS cluster is that FaaS works best in combination with other infrastructure. For example, it may be the right fit for a small REST API, but it needs to work with other services to store state. FaaS also works great as a mechanism for event handlers to handle notifications from storage, databases, and from Kubernetes itself. Kubernetes is a great platform for all these services to interoperate on top of.
Deploying and Using Fission
Fission can be installed with a kubectl create command: see the project README for instructions.
Here's how you’d write a "hello world" HTTP service:
$ cat \> hello.py
def main(context):
print "Hello, world!"
$ fission function create --name hello --env python --code hello.py --route /hello
$ curl http://\<fission router\>/hello
Hello, world!
Fission takes care of loading the function into a container, routing the request to it, and so on. We go into more details in the next section.
How Fission Is Implemented on Kubernetes
At its core, a FaaS framework must (1) turn functions into services and (2) manage the lifecycle of these services.
There are a number of ways to achieve these goals, and each comes with different tradeoffs. Should the framework operate at the source-level, or at the level of Docker images (or something in-between, like "buildpacks")? What's an acceptable amount of overhead the first time a function runs? Choices made here affect platform flexibility, ease of use, resource usage and costs, and of course, performance.
Packaging, source code, and images
One of our goals is to make Fission very easy to use for new users. We chose to operate
at the source level, so that users can avoid having to deal with container image building, pushing images to registries, managing registry credentials, image versioning, and so on.
However, container images are the most flexible way to package apps. A purely source-level interface wouldn't allow users to package binary dependencies, for example.
So, Fission goes with a hybrid approach -- container images that contain a dynamic loader for functions. This approach allows most users to use Fission purely at the source level, but enables them to customize the container image when needed.
These images, called "environment images" in Fission, contain the runtime for the language (such as NodeJS or Python), a set of commonly used dependencies and a dynamic loader for functions. If these dependencies are sufficient for the function the user is writing, no image rebuilding is needed. Otherwise, the list of dependencies can be modified, and the image rebuilt.
These environment images are the only language-specific parts of Fission. They present a uniform interface to the rest of the framework. This design allows Fission to be easily extended to more languages.
Cold start performance
One of the goals of the serverless functions is that functions use CPU/memory resources only when running. This optimizes the resource cost of functions, but it comes at the cost of some performance overhead when starting from idle (the "cold start" overhead).
Cold start overhead is important in many use cases. In particular, with functions used in an interactive use case -- like a web or mobile app, where a user is waiting for the action to complete -- several-second cold start latencies would be unacceptable.
To optimize cold start overheads, Fission keeps a running pool of containers for each environment. When a request for a function comes in, Fission doesn't have to deploy a new container -- it just chooses one that's already running, copies the function into the container, loads it dynamically, and routes the request to that instance. The overhead of this process takes on the order of 100msec for NodeJS and Python functions.
How Fission works on Kubernetes

routes, event triggers, and environment images. A Pool Manager manages pools of idle environment containers, the loading of functions into these containers, and the killing of function instances when they're idle. A Router receives HTTP requests and routes them to function instances, requesting an instance from the Pool Manager if necessary.
The controller serves the fission API. All the other components watch the controller for updates. The router is exposed as a Kubernetes Service of the LoadBalancer or NodePort type, depending on where the Kubernetes cluster is hosted.
When the router gets a request, it looks up a cache to see if this request already has a service it should be routed to. If not, it looks up the function to map the request to, and requests the poolmgr for an instance. The poolmgr has a pool of idle pods; it picks one, loads the function into it (by sending a request into a sidecar container in the pod), and returns the address of the pod to the router. The router proxies over the request to this pod. The pod is cached for subsequent requests, and if it's been idle for a few minutes, it is killed.
(For now, Fission maps one function to one container; autoscaling to multiple instances is planned for a later release. Re-using function pods to host multiple functions is also planned, for cases where isolation isn't a requirement.)
Use Cases for Fission
Bots, Webhooks, REST APIs
Fission is a good framework to make small REST APIs, implement webhooks, and write chatbots for Slack or other services.
As an example of a simple REST API, we've made a small guestbook app that uses functions for reading and writing to guestbook, and works with a redis instance to keep track of state. You can find the app in the Fission GitHub repo.
The app contains two end points -- the GET endpoint lists out guestbook entries from redis and renders them into HTML. The POST endpoint adds a new entry to the guestbook list in redis. That’s all there is -- there’s no Dockerfile to manage, and updating the app is as simple as calling fission function update.
Handling Kubernetes Events
Fission also supports triggering functions based on Kubernetes watches. For example, you can setup a function to watch for all pods in a certain namespace matching a certain label. The function gets the serialized object and the watch event type (added/removed/updated) in its context.
These event handler functions could be used for simple monitoring -- for example, you could send a slack message whenever a new service is added to the cluster. There are also more complex use cases, such as writing a custom controller by watching Kubernetes' Third Party Resources.
Status and Roadmap
Fission is in early alpha for now (Jan 2017). It's not ready for production use just yet. We're looking for early adopters and feedback.
What's ahead for Fission? We're working on making FaaS on Kubernetes more convenient, easy to use and easier to integrate with. In the coming months we're working on adding support for unit testing, integration with Git, function monitoring and log aggregation. We're also working on integration with other sources of events.
Creating more language environments is also in the works. NodeJS and Python are supported today. Preliminary support for C# .NET has been contributed by Klavs Madsen.
You can find our current roadmap on our GitHub issues and projects.
Get Involved
Fission is open source and developed in the open by Platform9 Systems. Check us out on GitHub, and join our slack channel if you’d like to chat with us. We're also on twitter at @fissionio.
- Download Kubernetes
- Get involved with the Kubernetes project on GitHub
- Post questions (or answer questions) on Stack Overflow
- Connect with the community on Slack
- Follow us on Twitter @Kubernetesio for latest updates
Running MongoDB on Kubernetes with StatefulSets
Warning:
This post is several years old. The code examples need changes to work on a current Kubernetes cluster.Conventional wisdom says you can’t run a database in a container. “Containers are stateless!” they say, and “databases are pointless without state!”
Of course, this is not true at all. At Google, everything runs in a container, including databases. You just need the right tools. Kubernetes 1.5 includes the new StatefulSet API object (in previous versions, StatefulSet was known as PetSet). With StatefulSets, Kubernetes makes it much easier to run stateful workloads such as databases.
If you’ve followed my previous posts, you know how to create a MEAN Stack app with Docker, then migrate it to Kubernetes to provide easier management and reliability, and create a MongoDB replica set to provide redundancy and high availability.
While the replica set in my previous blog post worked, there were some annoying steps that you needed to follow. You had to manually create a disk, a ReplicationController, and a service for each replica. Scaling the set up and down meant managing all of these resources manually, which is an opportunity for error, and would put your stateful application at risk In the previous example, we created a Makefile to ease the management of these resources, but it would have been great if Kubernetes could just take care of all of this for us.
With StatefulSets, these headaches finally go away. You can create and manage your MongoDB replica set natively in Kubernetes, without the need for scripts and Makefiles. Let’s take a look how.
Note: StatefulSets are currently a beta resource. The sidecar container used for auto-configuration is also unsupported.
Prerequisites and Setup
Before we get started, you’ll need a Kubernetes 1.5+ and the Kubernetes command line tool. If you want to follow along with this tutorial and use Google Cloud Platform, you also need the Google Cloud SDK.
Once you have a Google Cloud project created and have your Google Cloud SDK setup (hint: gcloud init), we can create our cluster.
To create a Kubernetes 1.5 cluster, run the following command:
gcloud container clusters create "test-cluster"
This will make a three node Kubernetes cluster. Feel free to customize the command as you see fit.
Then, authenticate into the cluster:
gcloud container clusters get-credentials test-cluster
Setting up the MongoDB replica set
To set up the MongoDB replica set, you need three things: A StorageClass, a Headless Service, and a StatefulSet.
I’ve created the configuration files for these already, and you can clone the example from GitHub:
git clone https://github.com/thesandlord/mongo-k8s-sidecar.git
cd /mongo-k8s-sidecar/example/StatefulSet/
To create the MongoDB replica set, run these two commands:
kubectl apply -f googlecloud\_ssd.yaml
kubectl apply -f mongo-statefulset.yaml
That's it! With these two commands, you have launched all the components required to run an highly available and redundant MongoDB replica set.
At an high level, it looks something like this:

Let’s examine each piece in more detail.
StorageClass
The storage class tells Kubernetes what kind of storage to use for the database nodes. You can set up many different types of StorageClasses in a ton of different environments. For example, if you run Kubernetes in your own datacenter, you can use GlusterFS. On GCP, your storage choices are SSDs and hard disks. There are currently drivers for AWS, Azure, Google Cloud, GlusterFS, OpenStack Cinder, vSphere, Ceph RBD, and Quobyte.
The configuration for the StorageClass looks like this:
kind: StorageClass
apiVersion: storage.k8s.io/v1beta1
metadata:
name: fast
provisioner: kubernetes.io/gce-pd
parameters:
type: pd-ssd
This configuration creates a new StorageClass called “fast” that is backed by SSD volumes. The StatefulSet can now request a volume, and the StorageClass will automatically create it!
Deploy this StorageClass:
kubectl apply -f googlecloud\_ssd.yaml
Headless Service
Now you have created the Storage Class, you need to make a Headless Service. These are just like normal Kubernetes Services, except they don’t do any load balancing for you. When combined with StatefulSets, they can give you unique DNS addresses that let you directly access the pods! This is perfect for creating MongoDB replica sets, because our app needs to connect to all of the MongoDB nodes individually.
The configuration for the Headless Service looks like this:
apiVersion: v1
kind: Service
metadata:
name: mongo
labels:
name: mongo
spec:
ports:
- port: 27017
targetPort: 27017
clusterIP: None
selector:
role: mongo
You can tell this is a Headless Service because the clusterIP is set to “None.” Other than that, it looks exactly the same as any normal Kubernetes Service.
StatefulSet
The pièce de résistance. The StatefulSet actually runs MongoDB and orchestrates everything together. StatefulSets differ from Kubernetes ReplicaSets (not to be confused with MongoDB replica sets!) in certain ways that makes them more suited for stateful applications. Unlike Kubernetes ReplicaSets, pods created under a StatefulSet have a few unique attributes. The name of the pod is not random, instead each pod gets an ordinal name. Combined with the Headless Service, this allows pods to have stable identification. In addition, pods are created one at a time instead of all at once, which can help when bootstrapping a stateful system. You can read more about StatefulSets in the documentation.
Just like before, this “sidecar” container will configure the MongoDB replica set automatically. A “sidecar” is a helper container which helps the main container do its work.
The configuration for the StatefulSet looks like this:
apiVersion: apps/v1beta1
kind: StatefulSet
metadata:
name: mongo
spec:
selector:
matchLabels:
role: mongo
environment: test
serviceName: "mongo"
replicas: 3
template:
metadata:
labels:
role: mongo
environment: test
spec:
terminationGracePeriodSeconds: 10
containers:
- name: mongo
image: mongo
command:
- mongod
- "--replSet"
- rs0
- "--smallfiles"
- "--noprealloc"
ports:
- containerPort: 27017
volumeMounts:
- name: mongo-persistent-storage
mountPath: /data/db
- name: mongo-sidecar
image: cvallance/mongo-k8s-sidecar
env:
- name: MONGO_SIDECAR_POD_LABELS
value: "role=mongo,environment=test"
volumeClaimTemplates:
- metadata:
name: mongo-persistent-storage
spec:
storageClassName: "fast"
accessModes: ["ReadWriteOnce"]
resources:
requests:
storage: 100Gi
It’s a little long, but fairly straightforward.
The first second describes the StatefulSet object. Then, we move into the Metadata section, where you can specify labels and the number of replicas.
Next comes the pod spec. The terminationGracePeriodSeconds is used to gracefully shutdown the pod when you scale down the number of replicas, which is important for databases! Then the configurations for the two containers is shown. The first one runs MongoDB with command line flags that configure the replica set name. It also mounts the persistent storage volume to /data/db, the location where MongoDB saves its data. The second container runs the sidecar.
Finally, there is the volumeClaimTemplates. This is what talks to the StorageClass we created before to provision the volume. It will provision a 100 GB disk for each MongoDB replica.
Using the MongoDB replica set
At this point, you should have three pods created in your cluster. These correspond to the three nodes in your MongoDB replica set. You can see them with this command:
kubectl get pods
NAME READY STATUS RESTARTS AGE
mongo-0 2/2 Running 0 3m
mongo-1 2/2 Running 0 3m
mongo-2 2/2 Running 0 3m
Each pod in a StatefulSet backed by a Headless Service will have a stable DNS name. The template follows this format: <pod-name>.<service-name>
This means the DNS names for the MongoDB replica set are:
mongo-0.mongo
mongo-1.mongo
mongo-2.mongo
You can use these names directly in the connection string URI of your app.
In this case, the connection string URI would be:
mongodb://mongo-0.mongo,mongo-1.mongo,mongo-2.mongo:27017/dbname\_?
That’s it!
Scaling the MongoDB replica set
A huge advantage of StatefulSets is that you can scale them just like Kubernetes ReplicaSets. If you want 5 MongoDB Nodes instead of 3, just run the scale command:
kubectl scale --replicas=5 statefulset mongo
The sidecar container will automatically configure the new MongoDB nodes to join the replica set.
Include the two new nodes (mongo-3.mongo & mongo-4.mongo) in your connection string URI and you are good to go. Too easy!
Cleaning Up
To clean up the deployed resources, delete the StatefulSet, Headless Service, and the provisioned volumes.
Delete the StatefulSet:
kubectl delete statefulset mongo
Delete the Service:
kubectl delete svc mongo
Delete the Volumes:
kubectl delete pvc -l role=mongo
Finally, you can delete the test cluster:
gcloud container clusters delete "test-cluster"
Happy Hacking!
For more cool Kubernetes and Container blog posts, follow me on Twitter and Medium.
How we run Kubernetes in Kubernetes aka Kubeception
Giant Swarm’s container infrastructure started out with the goal to be an easy way for developers to deploy containerized microservices. Our first generation was extensively using fleet as a base layer for our infrastructure components as well as for scheduling user containers.
In order to give our users a more powerful way to manage their containers we introduced Kubernetes into our stack in early 2016. However, as we needed a quick way to flexibly spin up and manage different users’ Kubernetes clusters resiliently we kept the underlying fleet layer.
As we insist on running all our underlying infrastructure components in containers, fleet gave us the flexibility of using systemd unit files to define our infrastructure components declaratively. Our self-developed deployment tooling allowed us to deploy and manage the infrastructure without the need for imperative configuration management tools.
However, fleet is just a distributed init and not a complete scheduling and orchestration system. Next to a lot of work on our tooling, it required significant improvements in terms of communication between peers, its reconciliation loop, and stability that we had to work on. Also the uptake in Kubernetes usage would ensure that issues are found and fixed faster.
As we had made good experience with introducing Kubernetes on the user side and with recent developments like rktnetes and stackanetes it felt like time for us to also move our base layer to Kubernetes.
Why Kubernetes in Kubernetes
Now, you could ask, why would anyone want to run multiple Kubernetes clusters inside of a Kubernetes cluster? Are we crazy? The answer is advanced multi-tenancy use cases as well as operability and automation thereof.
Kubernetes comes with its own growing feature set for multi-tenancy use cases. However, we had the goal of offering our users a fully-managed Kubernetes without any limitations to the functionality they would get using any vanilla Kubernetes environment, including privileged access to the nodes. Further, in bigger enterprise scenarios a single Kubernetes cluster with its inbuilt isolation mechanisms is often not sufficient to satisfy compliance and security requirements. More advanced (firewalled) zoning or layered security concepts are tough to reproduce with a single installation. With namespace isolation both privileged access as well as firewalled zones can hardly be implemented without sidestepping security measures.
Now you could go and set up multiple completely separate (and federated) installations of Kubernetes. However, automating the deployment and management of these clusters would need additional tooling and complex monitoring setups. Further, we wanted to be able to spin clusters up and down on demand, scale them, update them, keep track of which clusters are available, and be able to assign them to organizations and teams flexibly. In fact this setup can be combined with a federation control plane to federate deployments to the clusters over one API endpoint.
And wouldn’t it be nice to have an API and frontend for that?
Enter Giantnetes
Based on the above requirements we set out to build what we call Giantnetes - or if you’re into movies, Kubeception. At the most basic abstraction it is an outer Kubernetes cluster (the actual Giantnetes), which is used to run and manage multiple completely isolated user Kubernetes clusters.

The physical machines are bootstrapped by using our CoreOS Container Linux bootstrapping tool, Mayu. The Giantnetes components themselves are self-hosted, i.e. a kubelet is in charge of automatically bootstrapping the components that reside in a manifests folder. You could call this the first level of Kubeception.
Once the Giantnetes cluster is running we use it to schedule the user Kubernetes clusters as well as our tooling for managing and securing them.
We chose Calico as the Giantnetes network plugin to ensure security, isolation, and the right performance for all the applications running on top of Giantnetes.
Then, to create the inner Kubernetes clusters, we initiate a few pods, which configure the network bridge, create certificates and tokens, and launch virtual machines for the future cluster. To do so, we use lightweight technologies such as KVM and qemu to provision CoreOS Container Linux VMs that become the nodes of an inner Kubernetes cluster. You could call this the second level of Kubeception.
Currently this means we are starting Pods with Docker containers that in turn start VMs with KVM and qemu. However, we are looking into doing this with rkt qemu-kvm, which would result in using a rktnetes setup for our Giantnetes.

The networking solution for the inner Kubernetes clusters has two levels. It on a combination of flannel’s server/client architecture model and Calico BGP. While a flannel client is used to create the network bridge between the VMs of each virtualized inner Kubernetes cluster, Calico is running inside the virtual machines to connect the different Kubernetes nodes and create a single network for the inner Kubernetes. By using Calico, we mimic the Giantnetes networking solution inside of each Kubernetes cluster and provide the primitives to secure and isolate workloads through the Kubernetes network policy API.
Regarding security, we aim for separating privileges as much as possible and making things auditable. Currently this means we use certificates to secure access to the clusters and encrypt communication between all the components that form a cluster is (i.e. VM to VM, Kubernetes components to each other, etcd master to Calico workers, etc). For this we create a PKI backend per cluster and then issue certificates per service in Vault on-demand. Every component uses a different certificate, thus, avoiding to expose the whole cluster if any of the components or nodes gets compromised. We further rotate the certificates on a regular basis.
For ensuring access to the API and to services of each inner Kubernetes cluster from the outside we run a multi-level HAproxy ingress controller setup in the Giantnetes that connects the Kubernetes VMs to hardware load balancers.
Looking into Giantnetes with kubectl
Let’s have a look at a minimal sample deployment of Giantnetes.

In the above example you see a user Kubernetes cluster customera running in VM-containers on top of Giantnetes. We currently use Jobs for the network and certificate setups.
Peeking inside the user cluster, you see the DNS pods and a helloworld running.

Each one of these user clusters can be scheduled and used independently. They can be spun up and down on-demand.
Conclusion
To sum up, we could show how Kubernetes is able to easily not only self-host but also flexibly schedule a multitude of inner Kubernetes clusters while ensuring higher isolation and security aspects. A highlight in this setup is the composability and automation of the installation and the robust coordination between the Kubernetes components. This allows us to easily create, destroy, and reschedule clusters on-demand without affecting users or compromising the security of the infrastructure. It further allows us to spin up clusters with varying sizes and configurations or even versions by just changing some arguments at cluster creation.
This setup is still in its early days and our roadmap is planning for improvements in many areas such as transparent upgrades, dynamic reconfiguration and scaling of clusters, performance improvements, and (even more) security. Furthermore, we are looking forward to improve on our setup by making use of the ever advancing state of Kubernetes operations tooling and upcoming features, such as Init Containers, Scheduled Jobs, Pod and Node affinity and anti-affinity, etc.
Most importantly, we are working on making the inner Kubernetes clusters a third party resource that can then be managed by a custom controller. The result would be much like the Operator concept by CoreOS. And to ensure that the community at large can benefit from this project we will be open sourcing this in the near future.
Scaling Kubernetes deployments with Policy-Based Networking
Although it’s just been eighteen-months since Kubernetes 1.0 was released, we’ve seen Kubernetes emerge as the leading container orchestration platform for deploying distributed applications. One of the biggest reasons for this is the vibrant open source community that has developed around it. The large number of Kubernetes contributors come from diverse backgrounds means we, and the community of users, are assured that we are investing in an open platform. Companies like Google (Container Engine), Red Hat (OpenShift), and CoreOS (Tectonic) are developing their own commercial offerings based on Kubernetes. This is a good thing since it will lead to more standardization and offer choice to the users.
Networking requirements for Kubernetes applications
For companies deploying applications on Kubernetes, one of biggest questions is how to deploy and orchestrate containers at scale. They’re aware that the underlying infrastructure, including networking and storage, needs to support distributed applications. Software-defined networking (SDN) is a great fit for such applications because the flexibility and agility of the networking infrastructure can match that of the applications themselves. The networking requirements of such applications include:
- Network automation
- Distributed load balancing and service discovery
- Distributed security with fine-grained policies
- QoS Policies
- Scalable Real-time Monitoring
- Hybrid application environments with Services spread across Containers, VMs and Bare Metal Servers
- Service Insertion (e.g. firewalls)
- Support for Private and Public Cloud deployments
Kubernetes Networking
Kubernetes provides a core set of platform services exposed through APIs. The platform can be extended in several ways through the extensions API, plugins and labels. This has allowed a wide variety integrations and tools to be developed for Kubernetes. Kubernetes recognizes that the network in each deployment is going to be unique. Instead of trying to make the core system try to handle all those use cases, Kubernetes chose to make the network pluggable.
With Nuage Networks we provide a scalable policy-based SDN platform. The platform is managed by a Network Policy Engine that abstracts away the complexity associated with configuring the system. There is a separate SDN Controller that comes with a very rich routing feature set and is designed to scale horizontally. Nuage uses the open source Open vSwitch (OVS) for the data plane with some enhancements in the OVS user space. Just like Kubernetes, Nuage has embraced openness as a core tenet for its platform. Nuage provides open APIs that allow users to orchestrate their networks and integrate network services such as firewalls, load balancers, IPAM tools etc. Nuage is supported in a wide variety of cloud platforms like OpenStack and VMware as well as container platforms like Kubernetes and others.
The Nuage platform implements a Kubernetes network plugin that creates VXLAN overlays to provide seamless policy-based networking between Kubernetes Pods and non-Kubernetes environments (VMs and bare metal servers). Each Pod is given an IP address from a network that belongs to a Namespace and is not tied to the Kubernetes node.
As cloud applications are built using microservices, the ability to control traffic among these microservices is a fundamental requirement. It is important to point out that these network policies also need to control traffic that is going to/coming from external networks and services. Nuage’s policy abstraction model makes it easy to declare fine-grained ingress/egress policies for applications. Kubernetes has a beta Network Policy API implemented using the Kubernetes Extensions API. Nuage implements this Network Policy API to address a wide variety of policy use cases such as:
- Kubernetes Namespace isolation
- Inter-Namespace policies
- Policies between groups of Pods (Policy Groups) for Pods in same or different Namespaces
- Policies between Kubernetes Pods/Namespaces and external Networks/Services

A key question for users to consider is the scalability of the policy implementation. Some networking setups require creating access control list (ACL) entries telling Pods how they can interact with one another. In most cases, this eventually leads to an n-squared pileup of ACL entries. The Nuage platform avoids this problem and can quickly assign a policy that applies to a whole group of Pods. The Nuage platform implements these policies using a fully distributed stateful firewall based on OVS.
Being able to monitor the traffic flowing between Kubernetes Pods is very useful to both development and operations teams. The Nuage platform’s real-time analytics engine enables visibility and security monitoring for Kubernetes applications. Users can get a visual representation of the traffic flows between groups of Pods, making it easy to see how the network policies are taking effect. Users can also get a rich set of traffic and policy statistics. Further, users can set alerts to be triggered based on policy event thresholds.

Conclusion
Even though we started working on our integration with Kubernetes over a year ago, it feels we are just getting started. We have always felt that this is a truly open community and we want to be an integral part of it. You can find out more about our Kubernetes integration on our GitHub page.
A Stronger Foundation for Creating and Managing Kubernetes Clusters
Last time you heard from us was in September, when we announced kubeadm. The work on making kubeadm a first-class citizen in the Kubernetes ecosystem has continued and evolved. Some of us also met before KubeCon and had a very productive meeting where we talked about what the scopes for our SIG, kubeadm, and kops are.
Continuing to Define SIG-Cluster-Lifecycle
What is the scope for kubeadm?
We want kubeadm to be a common set of building blocks for all Kubernetes deployments; the piece that provides secure and recommended ways to bootstrap Kubernetes. Since there is no one true way to setup Kubernetes, kubeadm will support more than one method for each phase. We want to identify the phases every deployment of Kubernetes has in common and make configurable and easy-to-use kubeadm commands for those phases. If your organization, for example, requires that you distribute the certificates in the cluster manually or in a custom way, skip using kubeadm just for that phase. We aim to keep kubeadm usable for all other phases in that case. We want you to be able to pick which things you want kubeadm to do and let you do the rest yourself.
Therefore, the scope for kubeadm is to be easily extendable, modular and very easy to use. Right now, with this v1.5 release we have, kubeadm can only do the “full meal deal” for you. In future versions that will change as kubeadm becomes more componentized, while still leaving the opportunity to do everything for you. But kubeadm will still only handle the bootstrapping of Kubernetes; it won’t ever handle provisioning of machines for you since that can be done in many more ways. In addition, we want kubeadm to work everywhere, even on multiple architectures, therefore we built in multi-architecture support from the beginning.
What is the scope for kops?
The scope for kops is to automate full cluster operations: installation, reconfiguration of your cluster, upgrading kubernetes, and eventual cluster deletion. kops has a rich configuration model based on the Kubernetes API Machinery, so you can easily customize some parameters to your needs. kops (unlike kubeadm) handles provisioning of resources for you. kops aims to be the ultimate out-of-the-box experience on AWS (and perhaps other providers in the future). In the future kops will be adopting more and more of kubeadm for the bootstrapping phases that exist. This will move some of the complexity inside kops to a central place in the form of kubeadm.
What is the scope for SIG-Cluster-Lifecycle?
The SIG-Cluster-Lifecycle actively tries to simplify the Kubernetes installation and management story. This is accomplished by modifying Kubernetes itself in many cases, and factoring out common tasks. We are also trying to address common problems in the cluster lifecycle (like the name says!). We maintain and are responsible for kubeadm and kops. We discuss problems with the current way to bootstrap clusters on AWS (and beyond) and try to make it easier. We hangout on Slack in the #sig-cluster-lifecycle and #kubeadm channels. We meet and discuss current topics once a week on Zoom. Feel free to come and say hi! Also, don’t be shy to contribute; we’d love your comments and insight!
Looking forward to v1.6
Our goals for v1.6 are centered around refactoring, stabilization and security.
First and foremost, we want to get kubeadm and its composable configuration experience to beta. We will refactor kubeadm so each phase in the bootstrap process is invokable separately. We want to bring the TLS Bootstrap API, the Certificates API and the ComponentConfig API to beta, and to get kops (and other tools) using them.
We will also graduate the token discovery we’re using now (aka. the gcr.io/google_containers/kube-discovery:1.0 image) to beta by adding a new controller to the controller manager: the BootstrapSigner. Using tokens managed as Secrets, that controller will sign the contents (a kubeconfig file) of a well known ConfigMap in a new kube-public namespace. This object will be available to unauthenticated users in order to enable a secure bootstrap with a simple and short shared token.You can read the full proposal here.
In addition to making it possible to invoke phases separately, we will also add a new phase for bringing up the control plane in a self-hosted mode (as opposed to the current static pod technique). The self-hosted technique was developed by CoreOS in the form of bootkube, and will now be incorporated as an alternative into an official Kubernetes product. Thanks to CoreOS for pushing that paradigm forward! This will be done by first setting up a temporary control plane with static pods, injecting the Deployments, ConfigMaps and DaemonSets as necessary, and lastly turning down the temporary control plane. For now, etcd will still be in a static pod by default.
We are supporting self hosting, initially, because we want to support doing patch release upgrades with kubeadm. It should be easy to upgrade from v1.6.2 to v1.6.4 for instance. We consider the built-in upgrade support a critical capability for a real cluster lifecycle tool. It will still be possible to upgrade without self-hosting but it will require more manual work.
On the stabilization front, we want to start running kubeadm e2e tests. In this v1.5 timeframe, we added unit tests and we will continue to increase that coverage. We want to expand this to per-PR e2e tests as well that spin up a cluster with kubeadm init and kubeadm join; runs some kubeadm-specific tests and optionally the Conformance test suite.
Finally, on the security front, we also want to kubeadm to be as secure as possible by default. We look to enable RBAC for v1.6, lock down what kubelet and built-in services like kube-dns and kube-proxy can do, and maybe create specific user accounts that have different permissions.
Regarding releasing, we want to have the official kubeadm v1.6 binary in the kubernetes v1.6 tarball. This means syncing our release with the official one. More details on what we’ve done so far can be found here. As it becomes possible, we aim to move the kubeadm code out to the kubernetes/kubeadm repo (This is blocked on some Kubernetes code-specific infrastructure issues that may take some time to resolve.)
Nice-to-haves for v1.6 would include an official CoreOS Container Linux installer container that does what the debs/rpms are doing for Ubuntu/CentOS. In general, it would be nice to extend the distro support. We also want to adopt Kubelet Dynamic Settings so configuration passed to kubeadm init flows down to nodes automatically (it requires manual configuration currently). We want it to be possible to test Kubernetes from HEAD by using kubeadm.
Through 2017 and beyond
Apart from everything mentioned above, we want kubeadm to simply be a production grade (GA) tool you can use for bootstrapping a Kubernetes cluster. We want HA/multi-master to be much easier to achieve generally than it is now across platforms (though kops makes this easy on AWS today!). We want cloud providers to be out-of-tree and installable separately. kubectl apply -f my-cloud-provider-here.yaml should just work. The documentation should be more robust and should go deeper. Container Runtime Interface (CRI) and Federation should work well with kubeadm. Outdated getting started guides should be removed so new users aren’t mislead.
Refactoring the cloud provider integration plugins
Right now, the cloud provider integrations are built into the controller-manager, the kubelet and the API Server. This combined with the ever-growing interest for Kubernetes makes it unmaintainable to have the cloud provider integrations compiled into the core. Features that are clearly vendor-specific should not be a part of the core Kubernetes project, rather available as an addon from third party vendors. Everything cloud-specific should be moved into one controller, or a few if there’s need. This controller will be maintained by a third-party (usually the company behind the integration) and will implement cloud-specific features. This migration from in-core to out-of-core is disruptive yes, but it has very good side effects: leaner core, making it possible for more than the seven existing clouds to be integrated with Kubernetes and much easier installation. For example, you could run the cloud controller binary in a Deployment and install it with kubectl apply easily.
The plan for v1.6 is to make it possible to:
- Create and run out-of-core cloud provider integration controllers
- Ship a new and temporary binary in the Kubernetes release: the cloud-controller-manager. This binary will include the seven existing cloud providers and will serve as a way of validating, testing and migrating to the new flow.
In a future release (v1.9 is proposed), the
--cloud-providerflag will stop working, and the temporary cloud-controller-manager binary won’t be shipped anymore. Instead, a repository called something like kubernetes/cloud-providers will serve as a place for officially-validated cloud providers to evolve and exist, but all providers there will be independent to each other. (issue #2770; proposal #128; code #3473.)
Changelogs from v1.4 to v1.5
kubeadm
v1.5 is a stabilization release for kubeadm. We’ve worked on making kubeadm more user-friendly, transparent and stable. Some new features have been added making it more configurable.
Here’s a very short extract of what’s changed:
- Made the console output of kubeadm cleaner and more user-friendly #37568
- Implemented kubeadm reset and to drain and cleanup a node #34807 and #37831
- Preflight checks implementation that fails fast if the environment is invalid #34341 and #36334
- kubectl logs and kubectl exec can now be used with kubeadm #37568
- and a lot of other improvements, please read the full changelog.
kops
Here’s a short extract of what’s changed:
- Support for CNI network plugins (Weave, Calico, Kope.io)
- Fully private deployments, where nodes and masters do not have public IPs
- Improved rolling update of clusters, in particular of HA clusters
- OS support for CentOS / RHEL / Ubuntu along with Debian, and support for sysdig & perf tools
Go and check out the kops releases page in order to get information about the latest and greatest kops release.
Summary
In short, we're excited on the roadmap ahead in bringing a lot of these improvements to you in the coming releases. Which we hope will make the experience to start much easier and lead to increased adoption of Kubernetes.
Thank you for all the feedback and contributions. I hope this has given you some insight in what we’re doing and encouraged you to join us at our meetings to say hi!
Kubernetes UX Survey Infographic
The following infographic summarizes the findings of a survey that the team behind Dashboard, the official web UI for Kubernetes, sent during KubeCon in November 2016. Following the KubeCon launch of the survey, it was promoted on Twitter and various Slack channels over a two week period and generated over 100 responses. We’re delighted with the data it provides us to now make feature and roadmap decisions more in-line with the needs of you, our users.
Satisfaction with Dashboard

Less than a year old, Dashboard is still very early in its development and we realize it has a long way to go, but it was encouraging to hear it’s tracking on the axis of MVP and even with its basic feature set is adding value for people. Respondents indicated that they like how quickly the Dashboard project is moving forward and the activity level of its contributors. Specific appreciation was given for the value Dashboard brings to first-time Kubernetes users and encouraging exploration. Frustration voiced around Dashboard centered on its limited capabilities: notably, the lack of RBAC and limited visualization of cluster objects and their relationships.
Respondent Demographics

Kubernetes Usage

People are using Dashboard in production, which is fantastic; it’s that setting that the team is focused on optimizing for.
Feature Priority

In building Dashboard, we want to continually make alignments between the needs of Kubernetes users and our product. Feature areas have intentionally been kept as high-level as possible, so that UX designers on the Dashboard team can creatively transform those use cases into specific features. While there’s nothing wrong with “faster horses”, we want to make sure we’re creating an environment for the best possible innovation to flourish.
Troubleshooting & Debugging as a strong frontrunner in requested feature area is consistent with the previous KubeCon survey, and this is now our top area of investment. Currently in-progress is the ability to be able to exec into a Pod, and next up will be providing aggregated logs views across objects. One of a UI’s strengths over a CLI is its ability to show things, and the troubleshooting and debugging feature area is a prime application of this capability.
In addition to a continued ongoing investment in troubleshooting and debugging functionality, the other focus of the Dashboard team’s efforts currently is RBAC / IAM within Dashboard. Though #4 on the ranking of feature areas, In various conversations at KubeCon and the days following, this emerged as a top-requested feature of Dashboard, and the one people were most passionate about. This is a deal-breaker for many companies, and we’re confident its enablement will open many doors for Dashboard’s use in production.
Conclusion
It’s invaluable to have data from Kubernetes users on how they’re putting Dashboard to use and how well it’s serving their needs. If you missed the survey response window but still have something you’d like to share, we’d love to connect with you and hear feedback or answer questions:
- Email us at the SIG-UI mailing list
- Chat with us on the Kubernetes Slack #SIG-UI channel
- Join our weekly meetings at 4PM CEST. See the SIG-UI calendar for details.
Kubernetes supports OpenAPI
Editor's note: this post is part of a series of in-depth articles on what's new in Kubernetes 1.5
OpenAPI allows API providers to define their operations and models, and enables developers to automate their tools and generate their favorite language’s client to talk to that API server. Kubernetes has supported swagger 1.2 (older version of OpenAPI spec) for a while, but the spec was incomplete and invalid, making it hard to generate tools/clients based on it.
In Kubernetes 1.4, we introduced alpha support for the OpenAPI spec (formerly known as swagger 2.0 before it was donated to the Open API Initiative) by upgrading the current models and operations. Beginning in Kubernetes 1.5, the support for the OpenAPI spec has been completed by auto-generating the spec directly from Kubernetes source, which will keep the spec--and documentation--completely in sync with future changes in operations/models.
The new spec enables us to have better API documentation and we have even introduced a supported python client.
The spec is modular, divided by GroupVersion: this is future-proof, since we intend to allow separate GroupVersions to be served out of separate API servers.
The structure of spec is explained in detail in OpenAPI spec definition. We used operation’s tags to separate each GroupVersion and filled as much information as we can about paths/operations and models. For a specific operation, all parameters, method of call, and responses are documented.
For example, OpenAPI spec for reading a pod information is:
{
...
"paths": {
"/api/v1/namespaces/{namespace}/pods/{name}": {
"get": {
"description": "read the specified Pod",
"consumes": [
"\*/\*"
],
"produces": [
"application/json",
"application/yaml",
"application/vnd.kubernetes.protobuf"
],
"schemes": [
"https"
],
"tags": [
"core\_v1"
],
"operationId": "readCoreV1NamespacedPod",
"parameters": [
{
"uniqueItems": true,
"type": "boolean",
"description": "Should the export be exact. Exact export maintains cluster-specific fields like 'Namespace'.",
"name": "exact",
"in": "query"
},
{
"uniqueItems": true,
"type": "boolean",
"description": "Should this value be exported. Export strips fields that a user can not specify.",
"name": "export",
"in": "query"
}
],
"responses": {
"200": {
"description": "OK",
"schema": {
"$ref": "#/definitions/v1.Pod"
}
},
"401": {
"description": "Unauthorized"
}
}
},
…
}
…
Using this information and the URL of kube-apiserver, one should be able to make the call to the given url (/api/v1/namespaces/{namespace}/pods/{name}) with parameters such as name, exact, export, etc. to get pod’s information. Client libraries generators would also use this information to create an API function call for reading pod’s information. For example, python client makes it easy to call this operation like this:
from kubernetes import client
ret = client.CoreV1Api().read\_namespaced\_pod(name="pods\_name", namespace="default")
A simplified version of generated read_namespaced_pod, can be found here.
Swagger-codegen document generator would also be able to create documentation using the same information:
GET /api/v1/namespaces/{namespace}/pods/{name}
(readCoreV1NamespacedPod)
read the specified Pod
Path parameters
name (required)
Path Parameter — name of the Pod
namespace (required)
Path Parameter — object name and auth scope, such as for teams and projects
Consumes
This API call consumes the following media types via the Content-Type request header:
-
\*/\*
Query parameters
pretty (optional)
Query Parameter — If 'true', then the output is pretty printed.
exact (optional)
Query Parameter — Should the export be exact. Exact export maintains cluster-specific fields like 'Namespace'.
export (optional)
Query Parameter — Should this value be exported. Export strips fields that a user can not specify.
Return type
v1.Pod
Produces
This API call produces the following media types according to the Accept request header; the media type will be conveyed by the Content-Type response header.
-
application/json
-
application/yaml
-
application/vnd.kubernetes.protobuf
Responses
200
OK v1.Pod
401
Unauthorized
There are two ways to access OpenAPI spec:
- From
kuber-apiserver/swagger.json. This file will have all enabled GroupVersions routes and models and would be most up-to-date file with an specifickube-apiserver. - From Kubernetes GitHub repository with all core GroupVersions enabled. You can access it on master or an specific release (for example 1.5 release).
There are numerous tools that works with this spec. For example, you can use the swagger editor to open the spec file and render documentation, as well as generate clients; or you can directly use swagger codegen to generate documentation and clients. The clients this generates will mostly work out of the box--but you will need some support for authorization and some Kubernetes specific utilities. Use python client as a template to create your own client.
If you want to get involved in development of OpenAPI support, client libraries, or report a bug, you can get in touch with developers at SIG-API-Machinery.
- Download Kubernetes
- Get involved with the Kubernetes project on GitHub
- Post questions (or answer questions) on Stack Overflow
- Connect with the community on Slack
- Follow us on Twitter @Kubernetesio for latest updates
Cluster Federation in Kubernetes 1.5
Editor's note: this post is part of a series of in-depth articles on what's new in Kubernetes 1.5
In the latest Kubernetes 1.5 release, you’ll notice that support for Cluster Federation is maturing. That functionality was introduced in Kubernetes 1.3, and the 1.5 release includes a number of new features, including an easier setup experience and a step closer to supporting all Kubernetes API objects.
A new command line tool called ‘kubefed’ was introduced to make getting started with Cluster Federation much simpler. Also, alpha level support was added for Federated DaemonSets, Deployments and ConfigMaps. In summary:
- DaemonSets are Kubernetes deployment rules that guarantee that a given pod is always present at every node, as new nodes are added to the cluster (more info).
- Deployments describe the desired state of Replica Sets (more info).
- ConfigMaps are variables applied to Replica Sets (which greatly improves image reusability as their parameters can be externalized - more info). Federated DaemonSets , Federated Deployments , Federated ConfigMaps take the qualities of the base concepts to the next level. For instance, Federated DaemonSets guarantee that a pod is deployed on every node of the newly added cluster.
But what actually is “federation”? Let’s explain it by what needs it satisfies. Imagine a service that operates globally. Naturally, all its users expect to get the same quality of service, whether they are located in Asia, Europe, or the US. What this means is that the service must respond equally fast to requests at each location. This sounds simple, but there’s lots of logic involved behind the scenes. This is what Kubernetes Cluster Federation aims to do.
How does it work? One of the Kubernetes clusters must become a master by running a Federation Control Plane. In practice, this is a controller that monitors the health of other clusters, and provides a single entry point for administration. The entry point behaves like a typical Kubernetes cluster. It allows creating Replica Sets, Deployments, Services, but the federated control plane passes the resources to underlying clusters. This means that if we request the federation control plane to create a Replica Set with 1,000 replicas, it will spread the request across all underlying clusters. If we have 5 clusters, then by default each will get its share of 200 replicas.
This on its own is a powerful mechanism. But there’s more. It’s also possible to create a Federated Ingress. Effectively, this is a global application-layer load balancer. Thanks to an understanding of the application layer, it allows load balancing to be “smarter” -- for instance, by taking into account the geographical location of clients and servers, and routing the traffic between them in an optimal way.
In summary, with Kubernetes Cluster Federation, we can facilitate administration of all the clusters (single access point), but also optimize global content delivery around the globe. In the following sections, we will show how it works.
Creating a Federation Plane
In this exercise, we will federate a few clusters. For convenience, all commands have been grouped into 6 scripts available here:
- 0-settings.sh
- 1-create.sh
- 2-getcredentials.sh
- 3-initfed.sh
- 4-joinfed.sh
- 5-destroy.sh First we need to define several variables (0-settings.sh)
$ cat 0-settings.sh && . 0-settings.sh
# this project create 3 clusters in 3 zones. FED\_HOST\_CLUSTER points to the one, which will be used to deploy federation control plane
export FED\_HOST\_CLUSTER=us-east1-b
# Google Cloud project name
export FED\_PROJECT=\<YOUR PROJECT e.g. company-project\>
# DNS suffix for this federation. Federated Service DNS names are published with this suffix. This must be a real domain name that you control and is programmable by one of the DNS providers (Google Cloud DNS or AWS Route53)
export FED\_DNS\_ZONE=\<YOUR DNS SUFFIX e.g. example.com\>
And get kubectl and kubefed binaries. (for installation instructions refer to guides here and here).
Now the setup is ready to create a few Google Container Engine (GKE) clusters with gcloud container clusters create (1-create.sh). In this case one is in US, one in Europe and one in Asia.
$ cat 1-create.sh && . 1-create.sh
gcloud container clusters create gce-us-east1-b --project=${FED\_PROJECT} --zone=us-east1-b --scopes cloud-platform,storage-ro,logging-write,monitoring-write,service-control,service-management,https://www.googleapis.com/auth/ndev.clouddns.readwrite
gcloud container clusters create gce-europe-west1-b --project=${FED\_PROJECT} --zone=europe-west1-b --scopes cloud-platform,storage-ro,logging-write,monitoring-write,service-control,service-management,https://www.googleapis.com/auth/ndev.clouddns.readwrite
gcloud container clusters create gce-asia-east1-a --project=${FED\_PROJECT} --zone=asia-east1-a --scopes cloud-platform,storage-ro,logging-write,monitoring-write,service-control,service-management,https://www.googleapis.com/auth/ndev.clouddns.readwrite
The next step is fetching kubectl configuration with gcloud -q container clusters get-credentials (2-getcredentials.sh). The configurations will be used to indicate the current context for kubectl commands.
$ cat 2-getcredentials.sh && . 2-getcredentials.sh
gcloud -q container clusters get-credentials gce-us-east1-b --zone=us-east1-b --project=${FED\_PROJECT}
gcloud -q container clusters get-credentials gce-europe-west1-b --zone=europe-west1-b --project=${FED\_PROJECT}
gcloud -q container clusters get-credentials gce-asia-east1-a --zone=asia-east1-a --project=${FED\_PROJECT}
Let’s verify the setup:
$ kubectl config get-contexts
CURRENT NAME CLUSTER AUTHINFO NAMESPACE
\*
gke\_container-solutions\_europe-west1-b\_gce-europe-west1-b
gke\_container-solutions\_europe-west1-b\_gce-europe-west1-b
gke\_container-solutions\_europe-west1-b\_gce-europe-west1-b
gke\_container-solutions\_us-east1-b\_gce-us-east1-b
gke\_container-solutions\_us-east1-b\_gce-us-east1-b
gke\_container-solutions\_us-east1-b\_gce-us-east1-b
gke\_container-solutions\_asia-east1-a\_gce-asia-east1-a
gke\_container-solutions\_asia-east1-a\_gce-asia-east1-a
gke\_container-solutions\_asia-east1-a\_gce-asia-east1-a
We have 3 clusters. One, indicated by the FED_HOST_CLUSTER environment variable, will be used to run the federation plane. For this, we will use the kubefed init federation command (3-initfed.sh).
$ cat 3-initfed.sh && . 3-initfed.sh
kubefed init federation --host-cluster-context=gke\_${FED\_PROJECT}\_${FED\_HOST\_CLUSTER}\_gce-${FED\_HOST\_CLUSTER} --dns-zone-name=${FED\_DNS\_ZONE}
You will notice that after executing the above command, a new kubectl context has appeared:
$ kubectl config get-contexts
CURRENT NAME CLUSTER AUTHINFO NAMESPACE
...
federation
federation
The federation context will become our administration entry point. Now it’s time to join clusters (4-joinfed.sh):
$ cat 4-joinfed.sh && . 4-joinfed.sh
kubefed --context=federation join cluster-europe-west1-b --cluster-context=gke\_${FED\_PROJECT}\_europe-west1-b\_gce-europe-west1-b --host-cluster-context=gke\_${FED\_PROJECT}\_${FED\_HOST\_CLUSTER}\_gce-${FED\_HOST\_CLUSTER}
kubefed --context=federation join cluster-asia-east1-a --cluster-context=gke\_${FED\_PROJECT}\_asia-east1-a\_gce-asia-east1-a --host-cluster-context=gke\_${FED\_PROJECT}\_${FED\_HOST\_CLUSTER}\_gce-${FED\_HOST\_CLUSTER}
kubefed --context=federation join cluster-us-east1-b --cluster-context=gke\_${FED\_PROJECT}\_us-east1-b\_gce-us-east1-b --host-cluster-context=gke\_${FED\_PROJECT}\_${FED\_HOST\_CLUSTER}\_gce-${FED\_HOST\_CLUSTER}
Note that cluster gce-us-east1-b is used here to run the federation control plane and also to work as a worker cluster. This circular dependency helps to use resources more efficiently and it can be verified by using the kubectl --context=federation get clusters command:
$ kubectl --context=federation get clusters
NAME STATUS AGE
cluster-asia-east1-a Ready 7s
cluster-europe-west1-b Ready 10s
cluster-us-east1-b Ready 10s
We are good to go.
Using Federation To Run An Application
In our repository you will find instructions on how to build a docker image with a web service that displays the container’s hostname and the Google Cloud Platform (GCP) zone.
An example output might look like this:
{"hostname":"k8shserver-6we2u","zone":"europe-west1-b"}
Now we will deploy the Replica Set (k8shserver.yaml):
$ kubectl --context=federation create -f rs/k8shserver
And a Federated Service (k8shserver.yaml):
$ kubectl --context=federation create -f service/k8shserver
As you can see, the two commands refer to the “federation” context, i.e. to the federation control plane. After a few minutes, you will realize that underlying clusters run the Replica Set and the Service.
Creating The Ingress
After the Service is ready, we can create Ingress - the global load balancer. The command is like this:
kubectl --context=federation create -f ingress/k8shserver.yaml
The contents of the file point to the service we created in the previous step:
apiVersion: extensions/v1beta1
kind: Ingress
metadata:
name: k8shserver
spec:
backend:
serviceName: k8shserver
servicePort: 80
After a few minutes, we should get a global IP address:
$ kubectl --context=federation get ingress
NAME HOSTS ADDRESS PORTS AGE
k8shserver \* 130.211.40.125 80 20m
Effectively, the response of:
$ curl 130.211.40.125
depends on the location of client. Something like this would be expected in the US:
{"hostname":"k8shserver-w56n4","zone":"us-east1-b"}
Whereas in Europe, we might have:
{"hostname":"k8shserver-z31p1","zone":"eu-west1-b"}
Please refer to this issue for additional details on how everything we've described works.
Demo
Summary
Cluster Federation is actively being worked on and is still not fully General Available. Some APIs are in beta and others are in alpha. Some features are missing, for instance cross-cloud load balancing is not supported (federated ingress currently only works on Google Cloud Platform as it depends on GCP HTTP(S) Load Balancing).
Nevertheless, as the functionality matures, it will become an enabler for all companies that aim at global markets, but currently cannot afford sophisticated administration techniques as used by the likes of Netflix or Amazon. That’s why we closely watch the technology, hoping that it soon fulfills its promise.
PS. When done, remember to destroy your clusters:
$ . 5-destroy.sh
Windows Server Support Comes to Kubernetes
Editor's note: this post is part of a series of in-depth articles on what's new in Kubernetes 1.5
Extending on the theme of giving users choice, Kubernetes 1.5 release includes the support for Windows Servers. WIth more than 80% of enterprise apps running Java on Linux or .Net on Windows, Kubernetes is previewing capabilities that extends its reach to the mass majority of enterprise workloads.
The new Kubernetes Windows Server 2016 and Windows Container support includes public preview with the following features:
Containerized Multiplatform Applications - Applications developed in operating system neutral languages like Go and .NET Core were previously impossible to orchestrate between Linux and Windows. Now, with support for Windows Server 2016 in Kubernetes, such applications can be deployed on both Windows Server as well as Linux, giving the developer choice of the operating system runtime. This capability has been desired by customers for almost two decades.
Support for Both Windows Server Containers and Hyper-V Containers - There are two types of containers in Windows Server 2016. Windows Containers is similar to Docker containers on Linux, and uses kernel sharing. The other, called Hyper-V Containers, is more lightweight than a virtual machine while at the same time offering greater isolation, its own copy of the kernel, and direct memory assignment. Kubernetes can orchestrate both these types of containers.
Expanded Ecosystem of Applications - One of the key drivers of introducing Windows Server support in Kubernetes is to expand the ecosystem of applications supported by Kubernetes: IIS, .NET, Windows Services, ASP.NET, .NET Core, are some of the application types that can now be orchestrated by Kubernetes, running inside a container on Windows Server.
Coverage for Heterogeneous Data Centers - Organizations already use Kubernetes to host tens of thousands of application instances across Global 2000 and Fortune 500. This will allow them to expand Kubernetes to the large footprint of Windows Server.
The process to bring Windows Server to Kubernetes has been a truly multi-vendor effort and championed by the Windows Special Interest Group (SIG) - Apprenda, Google, Red Hat and Microsoft were all involved in bringing Kubernetes to Windows Server. On the community effort to bring Kubernetes to Windows Server, Taylor Brown, Principal Program Manager at Microsoft stated that “This new Kubernetes community work furthers Windows Server container support options for popular orchestrators, reinforcing Microsoft’s commitment to choice and flexibility for both Windows and Linux ecosystems.”
Guidance for Current Usage
| Where to use Windows Server support? | Right now organizations should start testing Kubernetes on Windows Server and provide feedback. Most organizations take months to set up hardened production environments and general availability should be available in next few releases of Kubernetes. | | What works? | Most of the Kubernetes constructs, such as Pods, Services, Labels, etc. work with Windows Containers. | | What doesn’t work yet? |
- Pod abstraction is not same due to networking namespaces. Net result is that Windows containers in a single POD cannot communicate over localhost. Linux containers can share networking stack by placing them in the same network namespace.
- DNS capabilities are not fully implemented
- UDP is not supported inside a container
| | When will it be ready for all production workloads (general availability)? | The goal is to refine the networking and other areas that need work to get Kubernetes users a production version of Windows Server 2016 - including with Windows Nano Server and Windows Server Core installation options - support in the next couple releases. |
Technical Demo
Roadmap
Support for Windows Server-based containers is in alpha release mode for Kubernetes 1.5, but the community is not stopping there. Customers want enterprise hardened container scheduling and management for their entire tech portfolio. That has to include full parity of features among Linux and Windows Server in production. The Windows Server SIG will deliver that parity within the next one or two releases of Kubernetes through a few key areas of investment:
- Networking - the SIG will continue working side by side with Microsoft to enhance the networking backbone of Windows Server Containers, specifically around lighting up container mode networking and native network overlay support for container endpoints.
- OOBE - Improving the setup, deployment, and diagnostics for a Windows Server node, including the ability to deploy to any cloud (Azure, AWS, GCP)
- Runtime Operations - the SIG will play a key part in defining the monitoring interface of the Container Runtime Interface (CRI), leveraging it to provide deep insight and monitoring for Windows Server-based containers Get Started
To get started with Kubernetes on Windows Server 2016, please visit the GitHub guide for more details.
If you want to help with Windows Server support, then please connect with the Windows Server SIG or connect directly with Michael Michael, the SIG lead, on GitHub.
| 
StatefulSet: Run and Scale Stateful Applications Easily in Kubernetes
Editor's note: this post is part of a series of in-depth articles on what's new in Kubernetes 1.5
In the latest release, Kubernetes 1.5, we’ve moved the feature formerly known as PetSet into beta as StatefulSet. There were no major changes to the API Object, other than the community selected name, but we added the semantics of “at most one pod per index” for deployment of the Pods in the set. Along with ordered deployment, ordered termination, unique network names, and persistent stable storage, we think we have the right primitives to support many containerized stateful workloads. We don’t claim that the feature is 100% complete (it is software after all), but we believe that it is useful in its current form, and that we can extend the API in a backwards-compatible way as we progress toward an eventual GA release.
When is StatefulSet the Right Choice for my Storage Application?
Deployments and ReplicaSets are a great way to run stateless replicas of an application on Kubernetes, but their semantics aren’t really right for deploying stateful applications. The purpose of StatefulSet is to provide a controller with the correct semantics for deploying a wide range of stateful workloads. However, moving your storage application onto Kubernetes isn’t always the correct choice. Before you go all in on converging your storage tier and your orchestration framework, you should ask yourself a few questions.
Can your application run using remote storage or does it require local storage media?
Currently, we recommend using StatefulSets with remote storage. Therefore, you must be ready to tolerate the performance implications of network attached storage. Even with storage optimized instances, you won’t likely realize the same performance as locally attached, solid state storage media. Does the performance of network attached storage, on your cloud, allow your storage application to meet its SLAs? If so, running your application in a StatefulSet provides compelling benefits from the perspective of automation. If the node on which your storage application is running fails, the Pod containing the application can be rescheduled onto another node, and, as it’s using network attached storage media, its data are still available after it’s rescheduled.
Do you need to scale your storage application?
What is the benefit you hope to gain by running your application in a StatefulSet? Do you have a single instance of your storage application for your entire organization? Is scaling your storage application a problem that you actually have? If you have a few instances of your storage application, and they are successfully meeting the demands of your organization, and those demands are not rapidly increasing, you’re already at a local optimum.
If, however, you have an ecosystem of microservices, or if you frequently stamp out new service footprints that include storage applications, then you might benefit from automation and consolidation. If you’re already using Kubernetes to manage the stateless tiers of your ecosystem, you should consider using the same infrastructure to manage your storage applications.
How important is predictable performance?
Kubernetes doesn’t yet support isolation for network or storage I/O across containers. Colocating your storage application with a noisy neighbor can reduce the QPS that your application can handle. You can mitigate this by scheduling the Pod containing your storage application as the only tenant on a node (thus providing it a dedicated machine) or by using Pod anti-affinity rules to segregate Pods that contend for network or disk, but this means that you have to actively identify and mitigate hot spots.
If squeezing the absolute maximum QPS out of your storage application isn’t your primary concern, if you’re willing and able to mitigate hotspots to ensure your storage applications meet their SLAs, and if the ease of turning up new "footprints" (services or collections of services), scaling them, and flexibly re-allocating resources is your primary concern, Kubernetes and StatefulSet might be the right solution to address it.
Does your application require specialized hardware or instance types?
If you run your storage application on high-end hardware or extra-large instance sizes, and your other workloads on commodity hardware or smaller, less expensive images, you may not want to deploy a heterogenous cluster. If you can standardize on a single instance size for all types of apps, then you may benefit from the flexible resource reallocation and consolidation, that you get from Kubernetes.
A Practical Example - ZooKeeper
ZooKeeper is an interesting use case for StatefulSet for two reasons. First, it demonstrates that StatefulSet can be used to run a distributed, strongly consistent storage application on Kubernetes. Second, it's a prerequisite for running workloads like Apache Hadoop and Apache Kakfa on Kubernetes. An in-depth tutorial on deploying a ZooKeeper ensemble on Kubernetes is available in the Kubernetes documentation, and we’ll outline a few of the key features below.
Creating a ZooKeeper Ensemble
Creating an ensemble is as simple as using kubectl create to generate the objects stored in the manifest.
$ kubectl create -f [http://k8s.io/docs/tutorials/stateful-application/zookeeper.yaml](https://raw.githubusercontent.com/kubernetes/kubernetes.github.io/master/docs/tutorials/stateful-application/zookeeper.yaml)
service "zk-headless" created
configmap "zk-config" created
poddisruptionbudget "zk-budget" created
statefulset "zk" created
When you create the manifest, the StatefulSet controller creates each Pod, with respect to its ordinal, and waits for each to be Running and Ready prior to creating its successor.
$ kubectl get -w -l app=zk
NAME READY STATUS RESTARTS AGE
zk-0 0/1 Pending 0 0s
zk-0 0/1 Pending 0 0s
zk-0 0/1 Pending 0 7s
zk-0 0/1 ContainerCreating 0 7s
zk-0 0/1 Running 0 38s
zk-0 1/1 Running 0 58s
zk-1 0/1 Pending 0 1s
zk-1 0/1 Pending 0 1s
zk-1 0/1 ContainerCreating 0 1s
zk-1 0/1 Running 0 33s
zk-1 1/1 Running 0 51s
zk-2 0/1 Pending 0 0s
zk-2 0/1 Pending 0 0s
zk-2 0/1 ContainerCreating 0 0s
zk-2 0/1 Running 0 25s
zk-2 1/1 Running 0 40s
Examining the hostnames of each Pod in the StatefulSet, you can see that the Pods’ hostnames also contain the Pods’ ordinals.
$ for i in 0 1 2; do kubectl exec zk-$i -- hostname; done
zk-0
zk-1
zk-2
ZooKeeper stores the unique identifier of each server in a file called “myid”. The identifiers used for ZooKeeper servers are just natural numbers. For the servers in the ensemble, the “myid” files are populated by adding one to the ordinal extracted from the Pods’ hostnames.
$ for i in 0 1 2; do echo "myid zk-$i";kubectl exec zk-$i -- cat /var/lib/zookeeper/data/myid; done
myid zk-0
1
myid zk-1
2
myid zk-2
3
Each Pod has a unique network address based on its hostname and the network domain controlled by the zk-headless Headless Service.
$ for i in 0 1 2; do kubectl exec zk-$i -- hostname -f; done
zk-0.zk-headless.default.svc.cluster.local
zk-1.zk-headless.default.svc.cluster.local
zk-2.zk-headless.default.svc.cluster.local
The combination of a unique Pod ordinal and a unique network address allows you to populate the ZooKeeper servers’ configuration files with a consistent ensemble membership.
$ kubectl exec zk-0 -- cat /opt/zookeeper/conf/zoo.cfg
clientPort=2181
dataDir=/var/lib/zookeeper/data
dataLogDir=/var/lib/zookeeper/log
tickTime=2000
initLimit=10
syncLimit=2000
maxClientCnxns=60
minSessionTimeout= 4000
maxSessionTimeout= 40000
autopurge.snapRetainCount=3
autopurge.purgeInteval=1
server.1=zk-0.zk-headless.default.svc.cluster.local:2888:3888
server.2=zk-1.zk-headless.default.svc.cluster.local:2888:3888
server.3=zk-2.zk-headless.default.svc.cluster.local:2888:3888
StatefulSet lets you deploy ZooKeeper in a consistent and reproducible way. You won’t create more than one server with the same id, the servers can find each other via a stable network addresses, and they can perform leader election and replicate writes because the ensemble has consistent membership.
The simplest way to verify that the ensemble works is to write a value to one server and to read it from another. You can use the “zkCli.sh” script that ships with the ZooKeeper distribution, to create a ZNode containing some data.
$ kubectl exec zk-0 zkCli.sh create /hello world
...
WATCHER::
WatchedEvent state:SyncConnected type:None path:null
Created /hello
You can use the same script to read the data from another server in the ensemble.
$ kubectl exec zk-1 zkCli.sh get /hello
...
WATCHER::
WatchedEvent state:SyncConnected type:None path:null
world
...
You can take the ensemble down by deleting the zk StatefulSet.
$ kubectl delete statefulset zk
statefulset "zk" deleted
The cascading delete destroys each Pod in the StatefulSet, with respect to the reverse order of the Pods’ ordinals, and it waits for each to terminate completely before terminating its predecessor.
$ kubectl get pods -w -l app=zk
NAME READY STATUS RESTARTS AGE
zk-0 1/1 Running 0 14m
zk-1 1/1 Running 0 13m
zk-2 1/1 Running 0 12m
NAME READY STATUS RESTARTS AGE
zk-2 1/1 Terminating 0 12m
zk-1 1/1 Terminating 0 13m
zk-0 1/1 Terminating 0 14m
zk-2 0/1 Terminating 0 13m
zk-2 0/1 Terminating 0 13m
zk-2 0/1 Terminating 0 13m
zk-1 0/1 Terminating 0 14m
zk-1 0/1 Terminating 0 14m
zk-1 0/1 Terminating 0 14m
zk-0 0/1 Terminating 0 15m
zk-0 0/1 Terminating 0 15m
zk-0 0/1 Terminating 0 15m
You can use kubectl apply to recreate the zk StatefulSet and redeploy the ensemble.
$ kubectl apply -f [http://k8s.io/docs/tutorials/stateful-application/zookeeper.yaml](https://raw.githubusercontent.com/kubernetes/kubernetes.github.io/master/docs/tutorials/stateful-application/zookeeper.yaml)
service "zk-headless" configured
configmap "zk-config" configured
statefulset "zk" created
If you use the “zkCli.sh” script to get the value entered prior to deleting the StatefulSet, you will find that the ensemble still serves the data.
$ kubectl exec zk-2 zkCli.sh get /hello
...
WATCHER::
WatchedEvent state:SyncConnected type:None path:null
world
...
StatefulSet ensures that, even if all Pods in the StatefulSet are destroyed, when they are rescheduled, the ZooKeeper ensemble can elect a new leader and continue to serve requests.
Tolerating Node Failures
ZooKeeper replicates its state machine to different servers in the ensemble for the explicit purpose of tolerating node failure. By default, the Kubernetes Scheduler could deploy more than one Pod in the zk StatefulSet to the same node. If the zk-0 and zk-1 Pods were deployed on the same node, and that node failed, the ZooKeeper ensemble couldn’t form a quorum to commit writes, and the ZooKeeper service would experience an outage until one of the Pods could be rescheduled.
You should always provision headroom capacity for critical processes in your cluster, and if you do, in this instance, the Kubernetes Scheduler will reschedule the Pods on another node and the outage will be brief.
If the SLAs for your service preclude even brief outages due to a single node failure, you should use a PodAntiAffinity annotation. The manifest used to create the ensemble contains such an annotation, and it tells the Kubernetes Scheduler to not place more than one Pod from the zk StatefulSet on the same node.
Tolerating Planned Maintenance
The manifest used to create the ZooKeeper ensemble also creates a PodDistruptionBudget, zk-budget. The zk-budget informs Kubernetes about the upper limit of disruptions (unhealthy Pods) that the service can tolerate.
{
"podAntiAffinity": {
"requiredDuringSchedulingRequiredDuringExecution": [{
"labelSelector": {
"matchExpressions": [{
"key": "app",
"operator": "In",
"values": ["zk-headless"]
}]
},
"topologyKey": "kubernetes.io/hostname"
}]
}
}
}
$ kubectl get poddisruptionbudget zk-budget
NAME MIN-AVAILABLE ALLOWED-DISRUPTIONS AGE
zk-budget 2 1 2h
zk-budget indicates that at least two members of the ensemble must be available at all times for the ensemble to be healthy. If you attempt to drain a node prior taking it offline, and if draining it would terminate a Pod that violates the budget, the drain operation will fail. If you use kubectl drain, in conjunction with PodDisruptionBudgets, to cordon your nodes and to evict all Pods prior to maintenance or decommissioning, you can ensure that the procedure won’t be disruptive to your stateful applications.
Looking Forward
As the Kubernetes development looks towards GA, we are looking at a long list of suggestions from users. If you want to dive into our backlog, checkout the GitHub issues with the stateful label. However, as the resulting API would be hard to comprehend, we don't expect to implement all of these feature requests. Some feature requests, like support for rolling updates, better integration with node upgrades, and using fast local storage, would benefit most types of stateful applications, and we expect to prioritize these. The intention of StatefulSet is to be able to run a large number of applications well, and not to be able to run all applications perfectly. With this in mind, we avoided implementing StatefulSets in a way that relied on hidden mechanisms or inaccessible features. Anyone can write a controller that works similarly to StatefulSets. We call this "making it forkable."
Over the next year, we expect many popular storage applications to each have their own community-supported, dedicated controllers or "operators". We've already heard of work on custom controllers for etcd, Redis, and ZooKeeper. We expect to write some more ourselves and to support the community in developing others.
The Operators for etcd and Prometheus from CoreOS, demonstrate an approach to running stateful applications on Kubernetes that provides a level of automation and integration beyond that which is possible with StatefulSet alone. On the other hand, using a generic controller like StatefulSet or Deployment means that a wide range of applications can be managed by understanding a single config object. We think Kubernetes users will appreciate having the choice of these two approaches.
- Download Kubernetes
- Get involved with the Kubernetes project on GitHub
- Post questions (or answer questions) on Stack Overflow
- Connect with the community on Slack
- Follow us on Twitter @Kubernetesio for latest updates
Five Days of Kubernetes 1.5
With the help of our growing community of 1,000 contributors, we pushed some 5,000 commits to extend support for production workloads and deliver Kubernetes 1.5. While many improvements and new features have been added, we selected few to highlight in a series of in-depths posts listed below.
This progress is our commitment in continuing to make Kubernetes best way to manage your production workloads at scale.
Connect
- Download Kubernetes
- Get involved with the Kubernetes project on GitHub
- Post questions (or answer questions) on Stack Overflow
- Connect with the community on Slack
- Follow us on Twitter @Kubernetesio for latest updates
Introducing Container Runtime Interface (CRI) in Kubernetes
Editor's note: this post is part of a series of in-depth articles on what's new in Kubernetes 1.5
At the lowest layers of a Kubernetes node is the software that, among other things, starts and stops containers. We call this the “Container Runtime”. The most widely known container runtime is Docker, but it is not alone in this space. In fact, the container runtime space has been rapidly evolving. As part of the effort to make Kubernetes more extensible, we've been working on a new plugin API for container runtimes in Kubernetes, called "CRI".
What is the CRI and why does Kubernetes need it?
Each container runtime has it own strengths, and many users have asked for Kubernetes to support more runtimes. In the Kubernetes 1.5 release, we are proud to introduce the Container Runtime Interface (CRI) -- a plugin interface which enables kubelet to use a wide variety of container runtimes, without the need to recompile. CRI consists of a protocol buffers and gRPC API, and libraries, with additional specifications and tools under active development. CRI is being released as Alpha in Kubernetes 1.5.
Supporting interchangeable container runtimes is not a new concept in Kubernetes. In the 1.3 release, we announced the rktnetes project to enable rkt container engine as an alternative to the Docker container runtime. However, both Docker and rkt were integrated directly and deeply into the kubelet source code through an internal and volatile interface. Such an integration process requires a deep understanding of Kubelet internals and incurs significant maintenance overhead to the Kubernetes community. These factors form high barriers to entry for nascent container runtimes. By providing a clearly-defined abstraction layer, we eliminate the barriers and allow developers to focus on building their container runtimes. This is a small, yet important step towards truly enabling pluggable container runtimes and building a healthier ecosystem.
Overview of CRI
Kubelet communicates with the container runtime (or a CRI shim for the runtime) over Unix sockets using the gRPC framework, where kubelet acts as a client and the CRI shim as the server.
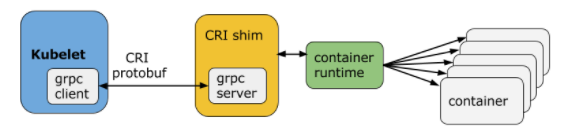
The protocol buffers API includes two gRPC services, ImageService, and RuntimeService. The ImageService provides RPCs to pull an image from a repository, inspect, and remove an image. The RuntimeService contains RPCs to manage the lifecycle of the pods and containers, as well as calls to interact with containers (exec/attach/port-forward). A monolithic container runtime that manages both images and containers (e.g., Docker and rkt) can provide both services simultaneously with a single socket. The sockets can be set in Kubelet by --container-runtime-endpoint and --image-service-endpoint flags.
Pod and container lifecycle management
service RuntimeService {
// Sandbox operations.
rpc RunPodSandbox(RunPodSandboxRequest) returns (RunPodSandboxResponse) {}
rpc StopPodSandbox(StopPodSandboxRequest) returns (StopPodSandboxResponse) {}
rpc RemovePodSandbox(RemovePodSandboxRequest) returns (RemovePodSandboxResponse) {}
rpc PodSandboxStatus(PodSandboxStatusRequest) returns (PodSandboxStatusResponse) {}
rpc ListPodSandbox(ListPodSandboxRequest) returns (ListPodSandboxResponse) {}
// Container operations.
rpc CreateContainer(CreateContainerRequest) returns (CreateContainerResponse) {}
rpc StartContainer(StartContainerRequest) returns (StartContainerResponse) {}
rpc StopContainer(StopContainerRequest) returns (StopContainerResponse) {}
rpc RemoveContainer(RemoveContainerRequest) returns (RemoveContainerResponse) {}
rpc ListContainers(ListContainersRequest) returns (ListContainersResponse) {}
rpc ContainerStatus(ContainerStatusRequest) returns (ContainerStatusResponse) {}
...
}
A Pod is composed of a group of application containers in an isolated environment with resource constraints. In CRI, this environment is called PodSandbox. We intentionally leave some room for the container runtimes to interpret the PodSandbox differently based on how they operate internally. For hypervisor-based runtimes, PodSandbox might represent a virtual machine. For others, such as Docker, it might be Linux namespaces. The PodSandbox must respect the pod resources specifications. In the v1alpha1 API, this is achieved by launching all the processes within the pod-level cgroup that kubelet creates and passes to the runtime.
Before starting a pod, kubelet calls RuntimeService.RunPodSandbox to create the environment. This includes setting up networking for a pod (e.g., allocating an IP). Once the PodSandbox is active, individual containers can be created/started/stopped/removed independently. To delete the pod, kubelet will stop and remove containers before stopping and removing the PodSandbox.
Kubelet is responsible for managing the lifecycles of the containers through the RPCs, exercising the container lifecycles hooks and liveness/readiness checks, while adhering to the restart policy of the pod.
Why an imperative container-centric interface?
Kubernetes has a declarative API with a Pod resource. One possible design we considered was for CRI to reuse the declarative Pod object in its abstraction, giving the container runtime freedom to implement and exercise its own control logic to achieve the desired state. This would have greatly simplified the API and allowed CRI to work with a wider spectrum of runtimes. We discussed this approach early in the design phase and decided against it for several reasons. First, there are many Pod-level features and specific mechanisms (e.g., the crash-loop backoff logic) in kubelet that would be a significant burden for all runtimes to reimplement. Second, and more importantly, the Pod specification was (and is) still evolving rapidly. Many of the new features (e.g., init containers) would not require any changes to the underlying container runtimes, as long as the kubelet manages containers directly. CRI adopts an imperative container-level interface so that runtimes can share these common features for better development velocity. This doesn't mean we're deviating from the "level triggered" philosophy - kubelet is responsible for ensuring that the actual state is driven towards the declared state.
Exec/attach/port-forward requests
service RuntimeService {
...
// ExecSync runs a command in a container synchronously.
rpc ExecSync(ExecSyncRequest) returns (ExecSyncResponse) {}
// Exec prepares a streaming endpoint to execute a command in the container.
rpc Exec(ExecRequest) returns (ExecResponse) {}
// Attach prepares a streaming endpoint to attach to a running container.
rpc Attach(AttachRequest) returns (AttachResponse) {}
// PortForward prepares a streaming endpoint to forward ports from a PodSandbox.
rpc PortForward(PortForwardRequest) returns (PortForwardResponse) {}
...
}
Kubernetes provides features (e.g. kubectl exec/attach/port-forward) for users to interact with a pod and the containers in it. Kubelet today supports these features either by invoking the container runtime’s native method calls or by using the tools available on the node (e.g., nsenter and socat). Using tools on the node is not a portable solution because most tools assume the pod is isolated using Linux namespaces. In CRI, we explicitly define these calls in the API to allow runtime-specific implementations.
Another potential issue with the kubelet implementation today is that kubelet handles the connection of all streaming requests, so it can become a bottleneck for the network traffic on the node. When designing CRI, we incorporated this feedback to allow runtimes to eliminate the middleman. The container runtime can start a separate streaming server upon request (and can potentially account the resource usage to the pod!), and return the location of the server to kubelet. Kubelet then returns this information to the Kubernetes API server, which opens a streaming connection directly to the runtime-provided server and connects it to the client.
There are many other aspects of CRI that are not covered in this blog post. Please see the list of design docs and proposals for all the details.
Current status
Although CRI is still in its early stages, there are already several projects under development to integrate container runtimes using CRI. Below are a few examples:
- cri-o: OCI conformant runtimes.
- rktlet: the rkt container runtime.
- frakti: hypervisor-based container runtimes.
- docker CRI shim.
If you are interested in trying these alternative runtimes, you can follow the individual repositories for the latest progress and instructions.
For developers interested in integrating a new container runtime, please see the developer guide for the known limitations and issues of the API. We are actively incorporating feedback from early developers to improve the API. Developers should expect occasional API breaking changes (it is Alpha, after all).
Try the new CRI-Docker integration
Kubelet does not yet use CRI by default, but we are actively working on making this happen. The first step is to re-integrate Docker with kubelet using CRI. In the 1.5 release, we extended kubelet to support CRI, and also added a built-in CRI shim for Docker. This allows kubelet to start the gRPC server on Docker’s behalf. To try out the new kubelet-CRI-Docker integration, you simply have to start the Kubernetes API server with --feature-gates=StreamingProxyRedirects=true to enable the new streaming redirect feature, and then start the kubelet with --experimental-cri=true.
Besides a few missing features, the new integration has consistently passed the main end-to-end tests. We plan to expand the test coverage soon and would like to encourage the community to report any issues to help with the transition.
CRI with Minikube
If you want to try out the new integration, but don’t have the time to spin up a new test cluster in the cloud yet, minikube is a great tool to quickly spin up a local cluster. Before you start, follow the instructions to download and install minikube.
- Check the available Kubernetes versions and pick the latest 1.5.x version available. We will use v1.5.0-beta.1 as an example.
$ minikube get-k8s-versions
- Start a minikube cluster with the built-in docker CRI integration.
$ minikube start --kubernetes-version=v1.5.0-beta.1 --extra-config=kubelet.EnableCRI=true --network-plugin=kubenet --extra-config=kubelet.PodCIDR=10.180.1.0/24 --iso-url=http://storage.googleapis.com/minikube/iso/buildroot/minikube-v0.0.6.iso
--extra-config=kubelet.EnableCRI=true` turns on the CRI implementation in kubelet. --network-plugin=kubenet and --extra-config=kubelet.PodCIDR=10.180.1.0/24 sets the network plugin to kubenet and ensures a PodCIDR is assigned to the node. Alternatively, you can use the cni plugin which does not rely on the PodCIDR. --iso-url sets an iso image for minikube to launch the node with. The image used in the example
- Check the minikube log to check that CRI is enabled.
$ minikube logs | grep EnableCRI
I1209 01:48:51.150789 3226 localkube.go:116] Setting EnableCRI to true on kubelet.
- Create a pod and check its status. You should see a “SandboxReceived” event as a proof that Kubelet is using CRI!
$ kubectl run foo --image=gcr.io/google\_containers/pause-amd64:3.0
deployment "foo" created
$ kubectl describe pod foo
...
... From Type Reason Message
... ----------------- ----- --------------- -----------------------------
...{default-scheduler } Normal Scheduled Successfully assigned foo-141968229-v1op9 to minikube
...{kubelet minikube} Normal SandboxReceived Pod sandbox received, it will be created.
...
_Note that kubectl attach/exec/port-forward does not work with CRI enabled in minikube yet, but this will be addressed in the newer version of minikube. _
Community
CRI is being actively developed and maintained by the Kubernetes SIG-Node community. We’d love to hear feedback from you. To join the community:
- Post issues or feature requests on GitHub
- Join the #sig-node channel on Slack
- Subscribe to the SIG-Node mailing list
- Follow us on Twitter @Kubernetesio for latest updates
Kubernetes 1.5: Supporting Production Workloads
Today we’re announcing the release of Kubernetes 1.5. This release follows close on the heels of KubeCon/CloundNativeCon, where users gathered to share how they’re running their applications on Kubernetes. Many of you expressed interest in running stateful applications in containers with the eventual goal of running all applications on Kubernetes. If you have been waiting to try running a distributed database on Kubernetes, or for ways to guarantee application disruption SLOs for stateful and stateless apps, this release has solutions for you.
StatefulSet and PodDisruptionBudget are moving to beta. Together these features provide an easier way to deploy and scale stateful applications, and make it possible to perform cluster operations like node upgrade without violating application disruption SLOs.
You will also find usability improvements throughout the release, starting with the kubectl command line interface you use so often. For those who have found it hard to set up a multi-cluster federation, a new command line tool called ‘kubefed’ is here to help. And a much requested multi-zone Highly Available (HA) master setup script has been added to kube-up.
Did you know the Kubernetes community is working to support Windows containers? If you have .NET developers, take a look at the work on Windows containers in this release. This work is in early stage alpha and we would love your feedback.
Lastly, for those interested in the internals of Kubernetes, 1.5 introduces Container Runtime Interface or CRI, which provides an internal API abstracting the container runtime from kubelet. This decoupling of the runtime gives users choice in selecting a runtime that best suits their needs. This release also introduces containerized node conformance tests that verify that the node software meets the minimum requirements to join a Kubernetes cluster.
What’s New
StatefulSet beta (formerly known as PetSet) allows workloads that require persistent identity or per-instance storage to be created, scaled, deleted and repaired on Kubernetes. You can use StatefulSets to ease the deployment of any stateful service, and tutorial examples are available in the repository. In order to ensure that there are never two pods with the same identity, the Kubernetes node controller no longer force deletes pods on unresponsive nodes. Instead, it waits until the old pod is confirmed dead in one of several ways: automatically when the kubelet reports back and confirms the old pod is terminated; automatically when a cluster-admin deletes the node; or when a database admin confirms it is safe to proceed by force deleting the old pod. Users are now warned if they try to force delete pods via the CLI. For users who will be migrating from PetSets to StatefulSets, please follow the upgrade guide.
PodDisruptionBudget beta is an API object that specifies the minimum number or minimum percentage of replicas of a collection of pods that must be up at any time. With PodDisruptionBudget, an application deployer can ensure that cluster operations that voluntarily evict pods will never take down so many simultaneously as to cause data loss, an outage, or an unacceptable service degradation. In Kubernetes 1.5 the “kubectl drain” command supports PodDisruptionBudget, allowing safe draining of nodes for maintenance activities, and it will soon also be used by node upgrade and cluster autoscaler (when removing nodes). This can be useful for a quorum based application to ensure the number of replicas running is never below the number needed for quorum, or for a web front end to ensure the number of replicas serving load never falls below a certain percentage.
Kubefed alpha is a new command line tool to help you manage federated clusters, making it easy to deploy new federation control planes and add or remove clusters from existing federations. Also new in cluster federation is the addition of ConfigMaps alpha and DaemonSets alpha and deployments alpha to the federation API allowing you to create, update and delete these objects across multiple clusters from a single endpoint.
HA Masters alpha provides the ability to create and delete clusters with highly available (replicated) masters on GCE using the kube-up/kube-down scripts. Allows setup of zone distributed HA masters, with at least one etcd replica per zone, at least one API server per zone, and master-elected components like scheduler and controller-manager distributed across zones.
Windows server containers alpha provides initial support for Windows Server 2016 nodes and scheduling Windows Server Containers.
Container Runtime Interface (CRI) alpha introduces the v1 CRI API to allow pluggable container runtimes; an experimental docker-CRI integration is ready for testing and feedback.
Node conformance test beta is a containerized test framework that provides a system verification and functionality test for nodes. The test validates whether the node meets the minimum requirements for Kubernetes; a node that passes the tests is qualified to join a Kubernetes. Node conformance test is available at: gcr.io/google_containers/node-test:0.2 for users to verify node setup.
These are just some of the highlights in our last release for the year. For a complete list please visit the release notes.
Availability
Kubernetes 1.5 is available for download here on GitHub and via get.k8s.io. To get started with Kubernetes, try one of the new interactive tutorials. Don’t forget to take 1.5 for a spin before the holidays!
User Adoption
It’s been a year-and-a-half since GA, and the rate of Kubernetes user adoption continues to surpass estimates. Organizations running production workloads on Kubernetes include the world's largest companies, young startups, and everything in between. Since Kubernetes is open and runs anywhere, we’ve seen adoption on a diverse set of platforms; Pokémon Go (Google Cloud), Ticketmaster (AWS), SAP (OpenStack), Box (bare-metal), and hybrid environments that mix-and-match the above. Here are a few user highlights:
- Yahoo! JAPAN -- built an automated tool chain making it easy to go from code push to deployment, all while running OpenStack on Kubernetes.
- Walmart -- will use Kubernetes with OneOps to manage its incredible distribution centers, helping its team with speed of delivery, systems uptime and asset utilization.
- Monzo -- a European startup building a mobile first bank, is using Kubernetes to power its core platform that can handle extreme performance and consistency requirements.
Kubernetes Ecosystem
The Kubernetes ecosystem is growing rapidly, including Microsoft's support for Kubernetes in Azure Container Service, VMware's integration of Kubernetes in its Photon Platform, and Canonical’s commercial support for Kubernetes. This is in addition to the thirty plus Technology & Service Partners that already provide commercial services for Kubernetes users.
The CNCF recently announced the Kubernetes Managed Service Provider (KMSP) program, a pre-qualified tier of service providers with experience helping enterprises successfully adopt Kubernetes. Furthering the knowledge and awareness of Kubernetes, The Linux Foundation, in partnership with CNCF, will develop and operate the Kubernetes training and certification program -- the first course designed is Kubernetes Fundamentals.
Community Velocity
In the past three months we’ve seen more than a hundred new contributors join the project with some 5,000 commits pushed, reaching new milestones by bringing the total for the core project to 1,000+ contributors and 40,000+ commits. This incredible momentum is only possible by having an open design, being open to new ideas, and empowering an open community to be welcoming to new and senior contributors alike. A big thanks goes out to the release team for 1.5 -- Saad Ali of Google, Davanum Srinivas of Mirantis, and Caleb Miles of CoreOS for their work bringing the 1.5 release to light.
Offline, the community can be found at one of the many Kubernetes related meetups around the world. The strength and scale of the community was visible in the crowded halls of CloudNativeCon/KubeCon Seattle (the recorded user talks are here). The next CloudNativeCon + KubeCon is in Berlin March 29-30, 2017, be sure to get your ticket and submit your talk before the CFP deadline of Dec 16th.
Ready to start contributing? Share your voice at our weekly community meeting.
- Post questions (or answer questions) on Stack Overflow
- Follow us on Twitter @Kubernetesio for latest updates
- Connect with the community on Slack
Thank you for your contributions and support!
From Network Policies to Security Policies
Kubernetes Network Policies
Kubernetes supports a new API for network policies that provides a sophisticated model for isolating applications and reducing their attack surface. This feature, which came out of the SIG-Network group, makes it very easy and elegant to define network policies by using the built-in labels and selectors Kubernetes constructs.
Kubernetes has left it up to third parties to implement these network policies and does not provide a default implementation.
We want to introduce a new way to think about “Security” and “Network Policies”. We want to show that security and reachability are two different problems, and that security policies defined using endpoints (pods labels for example) do not specifically need to be implemented using network primitives.
Most of us at Aporeto come from a Network/SDN background, and we knew how to implement those policies by using traditional networking and firewalling: Translating the pods identity and policy definitions to network constraints, such as IP addresses, subnets, and so forth.
However, we also knew from past experiences that using an external control plane also introduces a whole new set of challenges: This distribution of ACLs requires very tight synchronization between Kubernetes workers; and every time a new pod is instantiated, ACLs need to be updated on all other pods that have some policy related to the new pod. Very tight synchronization is fundamentally a quadratic state problem and, while shared state mechanisms can work at a smaller scale, they often have convergence, security, and eventual consistency issues in large scale clusters.
From Network Policies to Security Policies
At Aporeto, we took a different approach to the network policy enforcement, by actually decoupling the network from the policy. We open sourced our solution as Trireme, which translates the network policy to an authorization policy, and it implements a transparent authentication and authorization function for any communication between pods. Instead of using IP addresses to identify pods, it defines a cryptographically signed identity for each pod as the set of its associated labels. Instead of using ACLs or packet filters to enforce policy, it uses an authorization function where a container can only receive traffic from containers with an identity that matches the policy requirements.
The authentication and authorization function in Trireme is overlaid on the TCP negotiation sequence. Identity (i.e. set of labels) is captured as a JSON Web Token (JWT), signed by local keys, and exchanged during the Syn/SynAck negotiation. The receiving worker validates that the JWTs are signed by a trusted authority (authentication step) and validates against a cached copy of the policy that the connection can be accepted. Once the connection is accepted, the rest of traffic flows through the Linux kernel and all of the protections that it can potentially offer (including conntrack capabilities if needed). The current implementation uses a simple user space process that captures the initial negotiation packets and attaches the authorization information as payload. The JWTs include nonces that are validated during the Ack packet and can defend against man-in-the-middle or replay attacks.

The Trireme implementation talks directly to the Kubernetes master without an external controller and receives notifications on policy updates and pod instantiations so that it can maintain a local cache of the policy and update the authorization rules as needed. There is no requirement for any shared state between Trireme components that needs to be synchronized. Trireme can be deployed either as a standalone process in every worker or by using Daemon Sets. In the latter case, Kubernetes takes ownership of the lifecycle of the Trireme pods.
Trireme's simplicity is derived from the separation of security policy from network transport. Policy enforcement is linked directly to the labels present on the connection, irrespective of the networking scheme used to make the pods communicate. This identity linkage enables tremendous flexibility to operators to use any networking scheme they like without tying security policy enforcement to network implementation details. Also, the implementation of security policy across the federated clusters becomes simple and viable.
Kubernetes and Trireme deployment
Kubernetes is unique in its ability to scale and provide an extensible security support for the deployment of containers and microservices. Trireme provides a simple, secure, and scalable mechanism for enforcing these policies.
You can deploy and try Trireme on top of Kubernetes by using a provided Daemon Set. You'll need to modify some of the YAML parameters based on your cluster architecture. All the steps are described in detail in the deployment GitHub folder. The same folder contains an example 3-tier policy that you can use to test the traffic pattern.
To learn more, download the code, and engage with the project, visit:
Kompose: a tool to go from Docker-compose to Kubernetes
At Skippbox, we developed kompose a tool to automatically transform your Docker Compose application into Kubernetes manifests. Allowing you to start a Compose application on a Kubernetes cluster with a single kompose up command. We’re extremely happy to have donated kompose to the Kubernetes Incubator. So here’s a quick introduction about it and some motivating factors that got us to develop it.
Docker is terrific for developers. It allows everyone to get started quickly with an application that has been packaged in a Docker image and is available on a Docker registry. To build a multi-container application, Docker has developed Docker-compose (aka Compose). Compose takes in a yaml based manifest of your multi-container application and starts all the required containers with a single command docker-compose up. However Compose only works locally or with a Docker Swarm cluster.
But what if you wanted to use something else than Swarm? Like Kubernetes of course.
The Compose format is not a standard for defining distributed applications. Hence you are left re-writing your application manifests in your container orchestrator of choice.
We see kompose as a terrific way to expose Kubernetes principles to Docker users as well as to easily migrate from Docker Swarm to Kubernetes to operate your applications in production.
Over the summer, Kompose has found a new gear with help from Tomas Kral and Suraj Deshmukh from Red Hat, and Janet Kuo from Google. Together with our own lead kompose developer Nguyen An-Tu they are making kompose even more exciting. We proposed Kompose to the Kubernetes Incubator within the SIG-apps and we received approval from the general Kubernetes community; you can now find kompose in the Kubernetes Incubator.
Kompose now supports Docker-compose v2 format, persistent volume claims have been added recently, as well as multiple container per pods. It can also be used to target OpenShift deployments, by specifying a different provider than the default Kubernetes. Kompose is also now available in Fedora packages and we look forward to see it in CentOS distributions in the coming weeks.
kompose is a single Golang binary that you build or install from the release on GitHub. Let’s skip the build instructions and dive straight into an example.
Let's take it for a spin!
Guestbook application with Docker
The Guestbook application has become the canonical example for Kubernetes. In Docker-compose format, the guestbook can be started with this minimal file:
version: "2"
services:
redis-master:
image: gcr.io/google\_containers/redis:e2e
ports:
- "6379"
redis-slave:
image: gcr.io/google\_samples/gb-redisslave:v1
ports:
- "6379"
environment:
- GET\_HOSTS\_FROM=dns
frontend:
image: gcr.io/google-samples/gb-frontend:v4
ports:
- "80:80"
environment:
- GET\_HOSTS\_FROM=dns
It consists of three services. A redis-master node, a set of redis-slave that can be scaled and find the redis-master via its DNS name. And a PHP frontend that exposes itself on port 80. The resulting application allows you to leave short messages which are stored in the redis cluster.
To get it started with docker-compose on a vanilla Docker host do:
$ docker-compose -f docker-guestbook.yml up -d
Creating network "examples\_default" with the default driver
Creating examples\_redis-slave\_1
Creating examples\_frontend\_1
Creating examples\_redis-master\_1
So far so good, this is plain Docker usage. Now let’s see how to get this on Kubernetes without having to re-write anything.
Guestbook with 'kompose'
Kompose currently has three main commands up, down and convert. Here for simplicity we will show a single usage to bring up the Guestbook application.
Similarly to docker-compose, we can use the kompose up command pointing to the Docker-compose file representing the Guestbook application. Like so:
$ kompose -f ./examples/docker-guestbook.yml up
We are going to create Kubernetes deployment and service for your dockerized application.
If you need more kind of controllers, use 'kompose convert' and 'kubectl create -f' instead.
INFO[0000] Successfully created service: redis-master
INFO[0000] Successfully created service: redis-slave
INFO[0000] Successfully created service: frontend
INFO[0000] Successfully created deployment: redis-master
INFO[0000] Successfully created deployment: redis-slave
INFO[0000] Successfully created deployment: frontend
Application has been deployed to Kubernetes. You can run 'kubectl get deployment,svc' for details.
kompose automatically converted the Docker-compose file into Kubernetes objects. By default, it created one deployment and one service per compose services. In addition it automatically detected your current Kubernetes endpoint and created the resources onto it. A set of flags can be used to generate Replication Controllers, Replica Sets or Daemon Sets instead of Deployments.
And that's it! Nothing else to do, the conversion happened automatically.
Now, if you already now Kubernetes a bit, you’re familiar with the client kubectl and you can check what was created on your cluster.
$ kubectl get pods,svc,deployments
NAME READY STATUS RESTARTS AGE
frontend-3780173733-0ayyx 1/1 Running 0 1m
redis-master-3028862641-8miqn 1/1 Running 0 1m
redis-slave-3788432149-t3ejp 1/1 Running 0 1m
NAME CLUSTER-IP EXTERNAL-IP PORT(S) AGE
frontend 10.0.0.34 \<none\> 80/TCP 1m
redis-master 10.0.0.219 \<none\> 6379/TCP 1m
redis-slave 10.0.0.84 \<none\> 6379/TCP 1m
NAME DESIRED CURRENT UP-TO-DATE
AVAILABLE AGE
frontend 1 1 1 1 1m
redis-master 1 1 1 1 1m
redis-slave 1 1 1 1 1m
Indeed you see the three services, the three deployments and the resulting three pods. To access the application quickly, access the frontend service locally and enjoy the Guestbook application, but this time started from a Docker-compose file.

Hopefully this gave you a quick tour of kompose and got you excited. They are more exciting features, like creating different type of resources, creating Helm charts and even using the experimental Docker bundle format as input. Check Lachlan Evenson’s blog on using a Docker bundle with Kubernetes. For an overall demo, see our talk from KubeCon
Head over to the Kubernetes Incubator and check out kompose, it will help you move easily from your Docker compose applications to Kubernetes clusters in production.
- Download Kubernetes
- Get involved with the Kubernetes project on GitHub
- Post questions (or answer questions) on Stack Overflow
- Connect with the community on Slack
- Follow us on Twitter @Kubernetesio for latest updates
Kubernetes Containers Logging and Monitoring with Sematext
Managing microservices in containers is typically done with Cluster Managers and Orchestration tools. Each container platform has a slightly different set of options to deploy containers or schedule tasks on each cluster node. Because we do container monitoring and logging at Sematext, part of our job is to share our knowledge of these tools, especially as it pertains to container observability and devops. Today we’ll show a tutorial for Container Monitoring and Log Collection on Kubernetes.
Dynamic Deployments Require Dynamic Monitoring
The high level of automation for the container and microservice lifecycle makes the monitoring of Kubernetes more challenging than in more traditional, more static deployments. Any static setup to monitor specific application containers would not work because Kubernetes makes its own decisions according to the defined deployment rules. It is not only the deployed microservices that need to be monitored. It is equally important to watch metrics and logs for Kubernetes core services themselves, such as Kubernetes Master running etcd, controller-manager, scheduler and apiserver and Kubernetes Workers (fka minions) running kubelet and proxy service. Having a centralized place to keep an eye on all these services, their metrics and logs helps one spot problems in the cluster infrastructure. Kubernetes core services could be installed on bare metal, in virtual machines or as containers using Docker. Deploying Kubernetes core services in containers could be helpful with deployment and monitoring operations - tools for container monitoring would cover both core services and application containers. So how does one monitor such a complex and dynamic environment?
Agent for Kubernetes Metrics and Logs
There are a number of open source docker monitoring and logging projects one can cobble together to build a monitoring and log collection system (or systems). The advantage is that the code is all free. The downside is that this takes times - both initially when setting it up and later when maintaining. That’s why we built Sematext Docker Agent - a modern, Docker-aware metrics, events, and log collection agent. It runs as a tiny container on every Docker host and collects logs, metrics and events for all cluster nodes and all containers. It discovers all containers (one pod might contain multiple containers) including containers for Kubernetes core services, if core services are deployed in Docker containers. Let’s see how to deploy this agent.
**Deploying Agent to all Kubernetes Nodes **
Kubernetes provides DaemonSets, which ensure pods are added to nodes as nodes are added to the cluster. We can use this to easily deploy Sematext Agent to each cluster node!
Configure Sematext Docker Agent for Kubernetes
Let’s assume you’ve created an SPM app for your Kubernetes metrics and events, and a Logsene app for your Kubernetes logs, each of which comes with its own token. The Sematext Docker Agent README lists all configurations (e.g. filter for specific pods/images/containers), but we’ll keep it simple here.
- Grab the latest sematext-agent-daemonset.yml (raw plain-text) template (also shown below)
- Save it somewhere on disk
- Replace the SPM_TOKEN and LOGSENE_TOKEN placeholders with your SPM and Logsene App tokens
apiVersion: extensions/v1beta1
kind: DaemonSet
metadata:
name: sematext-agent
spec:
template:
metadata:
labels:
app: sematext-agent
spec:
selector: {}
dnsPolicy: "ClusterFirst"
restartPolicy: "Always"
containers:
- name: sematext-agent
image: sematext/sematext-agent-docker:latest
imagePullPolicy: "Always"
env:
- name: SPM\_TOKEN
value: "REPLACE THIS WITH YOUR SPM TOKEN"
- name: LOGSENE\_TOKEN
value: "REPLACE THIS WITH YOUR LOGSENE TOKEN"
- name: KUBERNETES
value: "1"
volumeMounts:
- mountPath: /var/run/docker.sock
name: docker-sock
- mountPath: /etc/localtime
name: localtime
volumes:
- name: docker-sock
hostPath:
path: /var/run/docker.sock
- name: localtime
hostPath:
path: /etc/localtime
Run Agent as DaemonSet
Activate Sematext Agent Docker with kubectl:
\> kubectl create -f sematext-agent-daemonset.yml
daemonset "sematext-agent-daemonset" created
Now let’s check if the agent got deployed to all nodes:
\> kubectl get pods
NAME READY STATUS RESTARTS AGE
sematext-agent-nh4ez 0/1 ContainerCreating 0 6s
sematext-agent-s47vz 0/1 ImageNotReady 0 6s
The status “ImageNotReady” or “ContainerCreating” might be visible for a short time because Kubernetes must download the image for sematext/sematext-agent-docker first. The setting imagePullPolicy: "Always" specified in sematext-agent-daemonset.yml makes sure that Sematext Agent gets updated automatically using the image from Docker-Hub.
If we check again we’ll see Sematext Docker Agent got deployed to (all) cluster nodes:
\> kubectl get pods -l sematext-agent
NAME READY STATUS RESTARTS AGE
sematext-agent-nh4ez 1/1 Running 0 8s
sematext-agent-s47vz 1/1 Running 0 8s
Less than a minute after the deployment you should see your Kubernetes metrics and logs! Below are screenshots of various out of the box reports and explanations of various metrics’ meanings.
Interpretation of Kubernetes Metrics
The metrics from all Kubernetes nodes are collected in a single SPM App, which aggregates metrics on several levels:
- Cluster - metrics aggregated over all nodes displayed in SPM overview
- Host / node level - metrics aggregated per node
- Docker Image level - metrics aggregated by image name, e.g. all nginx webserver containers
- Docker Container level - metrics aggregated for a single container
| 
Each detailed chart has filter options for Node, Docker Image, and Docker Container. As Kubernetes uses the pod name in the name of the Docker Containers a search by pod name in the Docker Container filter makes it easy to select all containers for a specific pod.
Let’s have a look at a few Kubernetes (and Docker) key metrics provided by SPM.
Host Metrics such as CPU, Memory and Disk space usage. Docker images and containers consume more disk space than regular processes installed on a host. For example, an application image might include a Linux operating system and might have a size of 150-700 MB depending on the size of the base image and installed tools in the container. Data containers consume disk space on the host as well. In our experience watching the disk space and using cleanup tools is essential for continuous operations of Docker hosts.

Container count - represents the number of running containers per host
| 
Container Memory and Memory Fail Counters. These metrics are important to watch and very important to tune applications. Memory limits should fit the footprint of the deployed pod (application) to avoid situations where Kubernetes uses default limits (e.g. defined for a namespace), which could lead to OOM kills of containers. Memory fail counters reflect the number of failed memory allocations in a container, and in case of OOM kills a Docker Event is triggered. This event is then displayed in SPM because Sematext Docker Agents collects all Docker Events. The best practice is to tune memory setting in a few iterations:
- Monitor memory usage of the application container
- Set memory limits according to the observations
- Continue monitoring of memory, memory fail counters, and Out-Of-Memory events. If OOM events happen, the container memory limits may need to be increased, or debugging is required to find the reason for the high memory consumptions.
| 
Container CPU usage and throttled CPU time. The CPU usage can be limited by CPU shares - unlike memory, CPU usage it is not a hard limit. Containers might use more CPU as long the resource is available, but in situations where other containers need the CPU limits apply and the CPU gets throttled to the limit.

There are more docker metrics to watch, like disk I/O throughput, network throughput and network errors for containers, but let’s continue by looking at Kubernetes Logs next.
Understand Kubernetes Logs
Kubernetes containers’ logs are not much different from Docker container logs. However, Kubernetes users need to view logs for the deployed pods. That’s why it is very useful to have Kubernetes-specific information available for log search, such as:
- Kubernetes name space
- Kubernetes pod name
- Kubernetes container name
- Docker image name
- Kubernetes UID
Sematext Docker Agent extracts this information from the Docker container names and tags all logs with the information mentioned above. Having these data extracted in individual fields makes it is very easy to watch logs of deployed pods, build reports from logs, quickly narrow down to problematic pods while troubleshooting, and so on! If Kubernetes core components (such as kubelet, proxy, api server) are deployed via Docker the Sematext Docker Agent will collect Kubernetes core components logs as well.
| 
There are many other useful features Logsene and Sematext Docker Agent give you out of the box, such as:
Automatic format detection and parsing of logs
- Sematext Docker Agent includes patterns to recognize and parse many log formats
Custom pattern definitions for specific images and application types
Filtering logs e.g. to exclude noisy services
Masking of sensitive data in specific log fields (phone numbers, payment information, authentication tokens)
Alerts and scheduled reports based on logs
Analytics for structured logs e.g. in Kibana or Grafana
Most of those topics are described in our Docker Log Management post and are relevant for Kubernetes log management as well. If you want to learn more about Docker monitoring, read more on our blog.
- Download Kubernetes
- Get involved with the Kubernetes project on GitHub
- Post questions (or answer questions) on Stack Overflow
- Connect with the community on Slack
- Follow us on Twitter @Kubernetesio for latest updates
Visualize Kubelet Performance with Node Dashboard
Since this article was published, the Node Performance Dashboard was retired and is no longer available.
This retirement happened in early 2019, as part of the kubernetes/contrib
repository deprecation.
In Kubernetes 1.4, we introduced a new node performance analysis tool, called the node performance dashboard, to visualize and explore the behavior of the Kubelet in much richer details. This new feature will make it easy to understand and improve code performance for Kubelet developers, and lets cluster maintainer set configuration according to provided Service Level Objectives (SLOs).
Background
A Kubernetes cluster is made up of both master and worker nodes. The master node manages the cluster’s state, and the worker nodes do the actual work of running and managing pods. To do so, on each worker node, a binary, called Kubelet, watches for any changes in pod configuration, and takes corresponding actions to make sure that containers run successfully. High performance of the Kubelet, such as low latency to converge with new pod configuration and efficient housekeeping with low resource usage, is essential for the entire Kubernetes cluster. To measure this performance, Kubernetes uses end-to-end (e2e) tests to continuously monitor benchmark changes of latest builds with new features.
Kubernetes SLOs are defined by the following benchmarks :
* API responsiveness : 99% of all API calls return in less than 1s.
* Pod startup time : 99% of pods and their containers (with pre-pulled images) start within 5s.
Prior to 1.4 release, we’ve only measured and defined these at the cluster level, opening up the risk that other factors could influence the results. Beyond these, we also want to have more performance related SLOs such as the maximum number of pods for a specific machine type allowing maximum utilization of your cluster. In order to do the measurement correctly, we want to introduce a set of tests isolated to just a node’s performance. In addition, we aim to collect more fine-grained resource usage and operation tracing data of Kubelet from the new tests.
Data Collection
The node specific density and resource usage tests are now added into e2e-node test set since 1.4. The resource usage is measured by a standalone cAdvisor pod for flexible monitoring interval (comparing with Kubelet integrated cAdvisor). The performance data, such as latency and resource usage percentile, are recorded in persistent test result logs. The tests also record time series data such as creation time, running time of pods, as well as real-time resource usage. Tracing data of Kubelet operations are recorded in its log stored together with test results.
Node Performance Dashboard
Since Kubernetes 1.4, we are continuously building the newest Kubelet code and running node performance tests. The data is collected by our new performance dashboard available at node-perf-dash.k8s.io. Figure 1 gives a preview of the dashboard. You can start to explore it by selecting a test, either using the drop-down list of short test names (region (a)) or by choosing test options one by one (region (b)). The test details show up in region (c) containing the full test name from Ginkgo (the Go test framework used by Kubernetes). Then select a node type (image and machine) in region (d).
| 
The "BUILDS" page exhibits the performance data across different builds (Figure 2). The plots include pod startup latency, pod creation throughput, and CPU/memory usage of Kubelet and runtime (currently Docker). In this way it’s easy to monitor the performance change over time as new features are checked in.
| 
Compare Different Node Configurations
It’s always interesting to compare the performance between different configurations, such as comparing startup latency of different machine types, different numbers of pods, or comparing resource usage of hosting different number of pods. The dashboard provides a convenient way to do this. Just click the "Compare it" button the right up corner of test selection menu (region (e) in Figure 1). The selected tests will be added to a comparison list in the "COMPARISON" page, as shown in Figure 3. Data across a series of builds are aggregated to a single value to facilitate comparison and are displayed in bar charts.
| 
Time Series and Tracing: Diving Into Performance Data
Pod startup latency is an important metric for Kubelet, especially when creating a large number of pods per node. Using the dashboard you can see the change of latency, for example, when creating 105 pods, as shown in Figure 4. When you see the highly variable lines, you might expect that the variance is due to different builds. However, as these test here were run against the same Kubernetes code, we can conclude the variance is due to performance fluctuation. The variance is close to 40s when we compare the 99% latency of build #162 and #173, which is very large. To drill into the source of the fluctuation, let’s check out the "TIME SERIES" page.
| 
Looking specifically at build #162, we are able to see that the tracing data plotted in the pod creation latency chart (Figure 5). Each curve is an accumulated histogram of the number of pod operations which have already arrive at a certain tracing probe. The timestamp of tracing pod is either collected from the performance tests or by parsing the Kubelet log. Currently we collect the following tracing data:
- "create" (in test): the test creates pods through API client;
- "running" (in test): the test watches that pods are running from API server;
- "pod_config_change": pod config change detected by Kubelet SyncLoop;
- "runtime_manager": runtime manager starts to create containers;
- "infra_container_start": the infra container of a pod starts;
- "container_start': the container of a pod starts;
- "pod_running": a pod is running;
- "pod_status_running": status manager updates status for a running pod;
The time series chart illustrates that it is taking a long time for the status manager to update pod status (the data of "running" is not shown since it overlaps with "pod_status_running"). We figure out this latency is introduced due to the query per second (QPS) limits of Kubelet to the API server (default is 5). After being aware of this, we find in additional tests that by increasing QPS limits, curve "running" gradually converges with "pod_running', and results in much lower latency. Therefore the previous e2e test pod startup results reflect the combined latency of both Kubelet and time of uploading status, the performance of Kubelet is thus under-estimated.
| 
Further, by comparing the time series data of build #162 (Figure 5) and build #173 (Figure 6), we find that the performance pod startup latency fluctuation actually happens during updating pod statuses. Build #162 has several straggler "pod_status_running" events with a long latency tails. It thus provides useful ideas for future optimization.
| 
In future we plan to use events in Kubernetes which has a fixed log format to collect tracing data more conveniently. Instead of extracting existing log entries, then you can insert your own tracing probes inside Kubelet and obtain the break-down latency of each segment.
You can check the latency between any two probes across different builds in the “TRACING” page, as shown in Figure 7. For example, by selecting "pod_config_change" as the start probe, and "pod_status_running' as the end probe, it gives the latency variance of Kubelet over continuous builds without status updating overhead. With this feature, developers are able to monitor the performance change of a specific part of code inside Kubelet.
| 
Future Work
The node performance dashboard is a brand new feature. It is still alpha version under active development. We will keep optimizing the data collecting and visualization, providing more tests, metrics and tools to the developers and the cluster maintainers.
Please join our community and help us build the future of Kubernetes! If you’re particularly interested in nodes or performance testing, participate by chatting with us in our Slack channel or join our meeting which meets every Tuesday at 10 AM PT on this SIG-Node Hangout.
- Download Kubernetes
- Get involved with the Kubernetes project on GitHub
- Post questions (or answer questions) on Stack Overflow
- Connect with the community on Slack
- Follow us on Twitter @Kubernetesio for latest updates
CNCF Partners With The Linux Foundation To Launch New Kubernetes Certification, Training and Managed Service Provider Program
Today the CNCF is pleased to launch a new training, certification and Kubernetes Managed Service Provider (KMSP) program.
The goal of the program is to ensure enterprises get the support they’re looking for to get up to speed and roll out new applications more quickly and more efficiently. The Linux Foundation, in partnership with CNCF, will develop and operate the Kubernetes training and certification.
Interested in this course? Sign up here to pre-register. The course, expected to be available in early 2017, is open now at the discounted price of $99 (regularly $199) for a limited time, and the certification program is expected to be available in the second quarter of 2017.
The KMSP program is a pre-qualified tier of highly vetted service providers who have deep experience helping enterprises successfully adopt Kubernetes. The KMSP partners offer SLA-backed Kubernetes support, consulting, professional services and training for organizations embarking on their Kubernetes journey. In contrast to the Kubernetes Service Partners program outlined recently in this blog, to become a Kubernetes Managed Service Provider the following additional requirements must be met: three or more certified engineers, an active contributor to Kubernetes, and a business model to support enterprise end users.
As part of the program, a new CNCF Certification Working Group is starting up now. The group will help define the program's open source curriculum, which will be available under the Creative Commons By Attribution 4.0 International license for anyone to use. Any Kubernetes expert can join the working group via this link. Google has committed to assist, and many others, including Apprenda, Container Solutions, CoreOS, Deis and Samsung SDS, have expressed interest in participating in the Working Group.
To learn more about the new program and the first round of KMSP partners that we expect to grow weekly, check out today's announcement here.
Bringing Kubernetes Support to Azure Container Service
With more than a thousand people coming to KubeCon in my hometown of Seattle, nearly three years after I helped start the Kubernetes project, it’s amazing and humbling to see what a small group of people and a radical idea have become after three years of hard work from a large and growing community. In July of 2014, scarcely a month after Kubernetes became publicly available, Microsoft announced its initial support for Azure. The release of Kubernetes 1.4, brought support for native Microsoft networking, load-balancer and disk integration.
Today, Microsoft announced the next step in Kubernetes on Azure: the introduction of Kubernetes as a supported orchestrator in Azure Container Service (ACS). It’s been really exciting for me to join the ACS team and help build this new addition. The integration of Kubernetes into ACS means that with a few clicks in the Azure portal, or by running a single command in the new python-based Azure command line tool, you will be able to create a fully functional Kubernetes cluster that is integrated with the rest of your Azure resources.
Kubernetes is available in public preview in Azure Container Service today. Community participation has always been an important part of the Kubernetes experience. Over the next few months, I hope you’ll join us and provide your feedback on the experience as we bring it to general availability.
In the spirit of community, we are also excited to announce a new open source project: ACS Engine. The goal of ACS Engine is to provide an open, community driven location to develop and share best practices for orchestrating containers on Azure. All of our knowledge of running containers in Azure has been captured in that repository, and we look forward to improving and extending it as we move forward with the community. Going forward, the templates in ACS Engine will be the basis for clusters deployed via the ACS API, and thus community driven improvements, features and more will have a natural path into the Azure Container Service. We’re excited to invite you to join us in improving ACS. Prior to the creation of ACS Engine, customers with unique requirements not supported by the ACS API needed to maintain variations on our templates. While these differences start small, they grew larger over time as the mainline template was improved and users also iterated their templates. These differences and drift really impact the ability for users to collaborate, since their templates are all different. Without the ability to share and collaborate, it’s difficult to form a community since every user is siloed in their own variant.
To solve this problem, the core of ACS Engine is a template processor, built in Go, that enables you to dynamically combine different pieces of configuration together to form a final template that can be used to build up your cluster. Thus, each user can mix and match the pieces build the final container cluster that suits their needs. At the same time, each piece can be built and maintained collaboratively by the community. We’ve been beta testing this approach with some customers and the feedback we’ve gotten so far has been really positive.
Beyond services to help you run containers on Azure, I think it’s incredibly important to improve the experience of developing and deploying containerized applications to Kubernetes. To that end, I’ve been doing a bunch of work lately to build a Kubernetes extension for the really excellent, open source, Visual Studio Code. The Kubernetes extension enables you to quickly deploy JSON or YAML files you are editing onto a Kubernetes cluster. Additionally, it enables you to import existing Kubernetes objects into Code for easy editing. Finally, it enables synchronization between your running containers and the source code that you are developing for easy debugging of issues you are facing in production.
But really, a demo is worth a thousand words, so please have a look at this video:
Of course, like everything else in Kubernetes it’s released as open source, and I look forward to working on it further with the community. Thanks again, I look forward to seeing everyone at the OpenShift Gathering today, as well as at the Microsoft Azure booth during KubeCon tomorrow and Wednesday. Welcome to Seattle!
- Download Kubernetes
- Get involved with the Kubernetes project on GitHub
- Post questions (or answer questions) on Stack Overflow
- Connect with the community on Slack
- Follow us on Twitter @Kubernetesio for latest updates
Modernizing the Skytap Cloud Micro-Service Architecture with Kubernetes
Skytap is a global public cloud that provides our customers the ability to save and clone complex virtualized environments in any given state. Our customers include enterprise organizations running applications in a hybrid cloud, educational organizations providing virtual training labs, users who need easy-to-maintain development and test labs, and a variety of organizations with diverse DevOps workflows.
Some time ago, we started growing our business at an accelerated pace — our user base and our engineering organization continue to grow simultaneously. These are exciting, rewarding challenges! However, it's difficult to scale applications and organizations smoothly, and we’re approaching the task carefully. When we first began looking at improvements to scale our toolset, it was very clear that traditional OS virtualization was not going to be an effective way to achieve our scaling goals. We found that the persistent nature of VMs encouraged engineers to build and maintain bespoke ‘pet’ VMs; this did not align well with our desire to build reusable runtime environments with a stable, predictable state. Fortuitously, growth in the Docker and Kubernetes communities has aligned with our growth, and the concurrent explosion in community engagement has (from our perspective) helped these tools mature.
In this article we’ll explore how Skytap uses Kubernetes as a key component in services that handle production workloads growing the Skytap Cloud.
As we add engineers, we want to maintain our agility and continue enabling ownership of components throughout the software development lifecycle. This requires a lot of modularization and consistency in key aspects of our process. Previously, we drove reuse with systems-level packaging through our VM and environment templates, but as we scale, containers have become increasingly important as a packaging mechanism due to their comparatively lightweight and precise control of the runtime environment.
In addition to this packaging flexibility, containers help us establish more efficient resource utilization, and they head off growing complexity arising from the natural inclination of teams to mix resources into large, highly-specialized VMs. For example, our operations team would install tools for monitoring health and resource utilization, a development team would deploy a service, and the security team might install traffic monitoring; combining all of that into a single VM greatly increases the test burden and often results in surprises—oops, you pulled in a new system-level Ruby gem!
Containerization of individual components in a service is pretty trivial with Docker. Getting started is easy, but as anyone who has built a distributed system with more than a handful of components knows, the real difficulties are deployment, scaling, availability, consistency, and communication between each unit in the cluster.
Let’s containerize!
We’d begun to trade a lot of our heavily-loved pet VMs for, as the saying goes, cattle.
_____
/ Moo \
\---- /
\ ^__^
\ (oo)\_______
(__)\ )\/\
||-----w |
|| ||
The challenges of distributed systems aren’t simplified by creating a large herd of free-range containers, though. When we started using containers, we recognized the need for a container management framework. We evaluated Docker Swarm, Mesosphere, and Kubernetes, but we found that the Mesosphere usage model didn’t match our needs — we need the ability to manage discrete VMs; this doesn’t match the Mesosphere ‘distributed operating system’ model — and Docker Swarm was still not mature enough. So, we selected Kubernetes.
Launching Kubernetes and building a new distributed service is relatively easy (inasmuch as this can be said for such a service: you can’t beat CAP theorem). However, we need to integrate container management with our existing platform and infrastructure. Some components of the platform are better served by VMs, and we need the ability to containerize services iteratively.
We broke this integration problem down into four categories:
- 1.Service control and deployment
- 2.Inter-service communication
- 3.Infrastructure integration
- 4.Engineering support and education
Service Control and Deployment
We use a custom extension of Capistrano (we call it ‘Skycap’) to deploy services and manage those services at runtime. It is important for us to manage both containerized and classic services through a single, well-established framework. We also need to isolate Skycap from the inevitable breaking changes inherent in an actively-developed tool like Kubernetes.
To handle this, we use wrappers in to our service control framework that isolate kubectl behind Skycap and handle issues like ignoring spurious log messages.
Deployment adds a layer of complexity for us. Docker images are a great way to package software, but historically, we’ve deployed from source, not packages. Our engineering team expects that making changes to source is sufficient to get their work released; devs don’t expect to handle additional packaging steps. Rather than rebuild our entire deployment and orchestration framework for the sake of containerization, we use a continuous integration pipeline for our containerized services. We automatically build a new Docker image for every commit to a project, and then we tag it with the Mercurial (Hg) changeset number of that commit. On the Skycap side, a deployment from a specific Hg revision will then pull the Docker images that are tagged with that same revision number.
We reuse container images across multiple environments. This requires environment-specific configuration to be injected into each container instance. Until recently, we used similar source-based principles to inject these configuration values: each container would copy relevant configuration files from Hg by cURL-ing raw files from the repo at run time. Network availability and variability are a challenge best avoided, though, so we now load the configuration into Kubernetes’ ConfigMap feature. This not only simplifies our Docker images, but it also makes pod startup faster and more predictable (because containers don’t have to download files from Hg).
Inter-service communication
Our services communicate using two primary methods. The first, message brokering, is typical for process-to-process communication within the Skytap platform. The second is through direct point-to-point TCP connections, which are typical for services that communicate with the outside world (such as web services). We’ll discuss the TCP method in the next section, as a component of infrastructure integration.
Managing direct connections between pods in a way that services can understand is complicated. Additionally, our containerized services need to communicate with classic VM-based services. To mitigate this complexity, we primarily use our existing message queueing system. This helped us avoid writing a TCP-based service discovery and load balancing system for handling traffic between pods and non-Kubernetes services.
This reduces our configuration load—services only need to know how to talk to the message queues, rather than to every other service they need to interact with. We have additional flexibility for things like managing the run-state of pods; messages buffer in the queue while nodes are restarting, and we avoid the overhead of re-configuring TCP endpoints each time a pod is added or removed from the cluster. Furthermore, the MQ model allows us to manage load balancing with a more accurate ‘pull’ based approach, in which recipients determine when they are ready to process a new message, instead of using heuristics like ‘least connections’ that simply count the number of open sockets to estimate load.
Migrating MQ-enabled services to Kubernetes is relatively straightforward compared to migrating services that use the complex TCP-based direct or load balanced connections. Additionally, the isolation provided by the message broker means that the switchover from a classic service to a container-based service is essentially transparent to any other MQ-enabled service.
Infrastructure Integration
As an infrastructure provider, we face some unique challenges in configuring Kubernetes for use with our platform. AWS & GCP provide out-of-box solutions that simplify Kubernetes provisioning but make assumptions about the underlying infrastructure that do not match our reality. Some organizations have purpose-built data centers. This option would have required us to abandon our existing load balancing infrastructure, our Puppet based provisioning system and the expertise we’d built up around these tools. We weren’t interested in abandoning the tools or our vested experience, so we needed a way to manage Kubernetes that could integrate with our world instead of rebuild it.
So, we use Puppet to provision and configure VMs that, in turn, run the Skytap Platform. We wrote custom deployment scripts to install Kubernetes on these, and we coordinate with our operations team to do capacity planning for Kube-master and Kube-node hosts.
In the previous section, we mentioned point-to-point TCP-based communication. For customer-facing services, the pods need a way to interface with Skytap’s layer 3 network infrastructure. Examples at Skytap include our web applications and API over HTTPS, Remote Desktop over Web Sockets, FTP, TCP/UDP port forwarding services, full public IPs, etc. We need careful management of network ingress and egress for this external traffic, and have historically used F5 load balancers. The MQ infrastructure for internal services is inadequate for handling this workload because the protocols used by various clients (like web browsers) are very specific and TCP is the lowest common denominator.
To get our load balancers communicating with our Kubernetes pods, we run the kube-proxy on each node. Load balancers route to the node, and kube-proxy handles the final handoff to the appropriate pod.
We mustn’t forget that Kubernetes needs to route traffic between pods (for both TCP-based and MQ-based messaging). We use the Calico plugin for Kubernetes networking, with a specialized service to reconfigure the F5 when Kubernetes launches or reaps pods. Calico handles route advertisement with BGP, which eases integration with the F5.
F5s also need to have their load balancing pool reconfigured when pods enter or leave the cluster. The F5 appliance maintains a pool of load-balanced back-ends; ingress to a containerized service is directed through this pool to one of the nodes hosting a service pod. This is straightforward for static network configurations – but since we're using Kubernetes to manage pod replication and availability, our networking situation becomes dynamic. To handle changes, we have a 'load balancer' pod that monitors the Kubernetes svc object for changes; if a pod is removed or added, the ‘load balancer’ pod will detect this change through the svc object, and then update the F5 configuration through the appliance's web API. This way, Kubernetes transparently handles replication and failover/recovery, and the dynamic load balancer configuration lets this process remain invisible to the service or user who originated the request. Similarly, the combination of the Calico virtual network plus the F5 load balancer means that TCP connections should behave consistently for services that are running on both the traditional VM infrastructure, or that have been migrated to containers.

With dynamic reconfiguration of the network, the replication mechanics of Kubernetes make horizontal scaling and (most) failover/recovery very straightforward. We haven’t yet reached the reactive scaling milestone, but we've laid the groundwork with the Kubernetes and Calico infrastructure, making one avenue to implement it straightforward:
- Configure upper and lower bounds for service replication
- Build a load analysis and scaling service (easy, right?)
- If load patterns match the configured triggers in the scaling service (for example, request rate or volume above certain bounds), issue: kubectl scale --replicas=COUNT rc NAME
This would allow us fine-grained control of autoscaling at the platform level, instead of from the applications themselves – but we’ll also evaluate Horizontal Pod Autoscaling in Kubernetes; which may suit our need without a custom service.
Keep an eye on our GitHub account and the Skytap blog; as our solutions to problems like these mature, we hope to share what we’ve built with the open source community.
Engineering Support
A transition like our containerization project requires the engineers involved in maintaining and contributing to the platform change their workflow and learn new methods for creating and troubleshooting services.
Because a variety of learning styles require a multi-faceted approach, we handle this in three ways: with documentation, with direct outreach to engineers (that is, brownbag sessions or coaching teams), and by offering easy-to-access, ad-hoc support.
We continue to curate a collection of documents that provide guidance on transitioning classic services to Kubernetes, creating new services, and operating containerized services. Documentation isn’t for everyone, and sometimes it’s missing or incomplete despite our best efforts, so we also run an internal #kube-help Slack channel, where anyone can stop in for assistance or arrange a more in-depth face-to-face discussion.
We have one more powerful support tool: we automatically construct and test prod-like environments that include this Kubernetes infrastructure, which allows engineers a lot of freedom to experiment and work with Kubernetes hands-on. We explore the details of automated environment delivery in more detail in this post.
Final Thoughts
We’ve had great success with Kubernetes and containerization in general, but we’ve certainly found that integrating with an existing full-stack environment has presented many challenges. While not exactly plug-and-play from an enterprise lifecycle standpoint, the flexibility and configurability of Kubernetes still remains a very powerful tool for building our modularized service ecosystem.
We love application modernization challenges. The Skytap platform is well suited for these sorts of migration efforts – we run Skytap in Skytap, of course, which helped us tremendously in our Kubernetes integration project. If you’re planning modernization efforts of your own, connect with us, we’re happy to help.
- Download Kubernetes
- Get involved with the Kubernetes project on GitHub
- Post questions (or answer questions) on Stack Overflow
- Connect with the community on Slack
- Follow us on Twitter @Kubernetesio for latest updates
Introducing Kubernetes Service Partners program and a redesigned Partners page
Kubernetes has become a leading container orchestration system by being a powerful and flexible way to run distributed systems at scale. Through our very active open source community, equating to hundreds of person years of work, Kubernetes achieved four major releases in just one year to become a critical part of thousands of companies infrastructures. However, even with all that momentum, adopting cloud native computing is a significant transition for many organizations. It can be challenging to adopt a new methodology, and many teams are looking for advice and support through that journey.
Today, we’re excited to launch the Kubernetes Service Partners program. A Service Partner is a company that provides support and consulting for customers building applications on Kubernetes. This program is an addition to our existing Kubernetes Technology Partners who provide software and offer support services for their software.
The Service Partners provide hands-on best practice guidance for running your apps on Kubernetes, and are available to work with companies of all sizes to get started; the first batch of participants includes: Apprenda, Container Solutions, Deis, Livewyer, ReactiveOps and Samsung SDS. You’ll find their listings along with our existing Technology Partners on the newly redesigned Partners Page, giving you a single view into the Kubernetes ecosystem.
The list of partners will grow weekly, and we look forward to collaborating with the community to build a vibrant Kubernetes ecosystem.
- Download Kubernetes
- Get involved with the Kubernetes project on GitHub
- Post questions (or answer questions) on Stack Overflow
- Connect with the community on Slack
- Follow us on Twitter @Kubernetesio for latest updates
Tail Kubernetes with Stern
We love Kubernetes here at Wercker and build all our infrastructure on top of it. When deploying anything you need to have good visibility to what's going on and logs are a first view into the inner workings of your application. Good old tail -f has been around for a long time and Kubernetes has this too, built right into kubectl.
I should say that tail is by no means the tool to use for debugging issues but instead you should feed the logs into a more persistent place, such as Elasticsearch. However, there's still a place for tail where you need to quickly debug something or perhaps you don't have persistent logging set up yet (such as when developing an app in Minikube).
Multiple Pods
Kubernetes has the concept of Replication Controllers which ensure that n pods are running at the same time. This allows rolling updates and redundancy. Considering they're quite easy to set up there's really no reason not to do so.
However now there are multiple pods running and they all have a unique id. One issue here is that you'll need to know the exact pod id (kubectl get pods) but that changes every time a pod is created so you'll need to do this every time. Another consideration is the fact that Kubernetes load balances the traffic so you won't know at which pod the request ends up at. If you're tailing pod A but the traffic ends up at pod B you'll miss what happened.
Let's say we have a pod called service with 3 replicas. Here's what that would look like:
$ kubectl get pods # get pods to find pod ids
$ kubectl log -f service-1786497219-2rbt1 # pod 1
$ kubectl log -f service-1786497219-8kfbp # pod 2
$ kubectl log -f service-1786497219-lttxd # pod 3
Multiple containers
We're heavy users gRPC for internal services and expose the gRPC endpoints over REST using gRPC Gateway. Typically we have server and gateway living as two containers in the same pod (same binary that sets the mode by a cli flag). The gateway talks to the server in the same pod and both ports are exposed to Kubernetes. For internal services we can talk directly to the gRPC endpoint while our website communicates using standard REST to the gateway.
This poses a problem though; not only do we now have multiple pods but we also have multiple containers within the pod. When this is the case the built-in logging of kubectl requires you to specify which containers you want logs from.
If we have 3 replicas of a pod and 2 containers in the pod you'll need 6 kubectl log -f <pod id> <container id>. We work with big monitors but this quickly gets out of hand…
If our service pod has a server and gateway container we'd be looking at something like this:
$ kubectl get pods # get pods to find pod ids
$ kubectl describe pod service-1786497219-2rbt1 # get containers in pod
$ kubectl log -f service-1786497219-2rbt1 server # pod 1
$ kubectl log -f service-1786497219-2rbt1 gateway # pod 1
$ kubectl log -f service-1786497219-8kfbp server # pod 2
$ kubectl log -f service-1786497219-8kfbp gateway # pod 2
$ kubectl log -f service-1786497219-lttxd server # pod 3
$ kubectl log -f service-1786497219-lttxd gateway # pod 3
Stern
To get around this we built Stern. It's a super simple utility that allows you to specify both the pod id and the container id as regular expressions. Any match will be followed and the output is multiplexed together, prefixed with the pod and container id, and color-coded for human consumption (colors are stripped if piping to a file).
Here's how the service example would look:
$ stern service
This will match any pod containing the word service and listen to all containers within it. If you only want to see traffic to the server container you could do stern --container server service and it'll stream the logs of all the server containers from the 3 pods.
The output would look something like this:
$ stern service
+ service-1786497219-2rbt1 › server
+ service-1786497219-2rbt1 › gateway
+ service-1786497219-8kfbp › server
+ service-1786497219-8kfbp › gateway
+ service-1786497219-lttxd › server
+ service-1786497219-lttxd › gateway
+ service-1786497219-8kfbp server Log message from server
+ service-1786497219-2rbt1 gateway Log message from gateway
+ service-1786497219-8kfbp gateway Log message from gateway
+ service-1786497219-lttxd gateway Log message from gateway
+ service-1786497219-lttxd server Log message from server
+ service-1786497219-2rbt1 server Log message from server
In addition, if a pod is killed and recreated during a deployment Stern will stop listening to the old pod and automatically hook into the new one. There's no more need to figure out what the id of that newly created pod is.
Configuration options
Stern was deliberately designed to be minimal so there's not much to it. However, there are still a couple configuration options we can highlight here. They're very similar to the ones built into kubectl so if you're familiar with that you should feel right at home.
- timestamps adds the timestamp to each line
- since shows log entries since a certain time (for instance --since 15min)
- kube-config allows you to specify another Kubernetes config. Defaults to ~/.kube/config
- namespace allows you to only limit the search to a certain namespaceRun stern --help for all options.
Examples
Tail the gateway container running inside of the envvars pod on staging
+ stern --context staging --container gateway envvars
Show auth activity from 15min ago with timestamps
+ stern -t --since 15m auth
Follow the development of some-new-feature in minikube
+ stern --context minikube some-new-feature
View pods from another namespace
+ stern --namespace kube-system kubernetes-dashboard
Get Stern
Stern is open source and available on GitHub, we'd love your contributions or ideas. If you don't want to build from source you can also download a precompiled binary from GitHub releases.

How We Architected and Run Kubernetes on OpenStack at Scale at Yahoo! JAPAN
Editor’s note: today’s post is by the Infrastructure Engineering team at Yahoo! JAPAN, talking about how they run OpenStack on Kubernetes. This post has been translated and edited for context with permission -- originally published on the Yahoo! JAPAN engineering blog.
Intro
This post outlines how Yahoo! JAPAN, with help from Google and Solinea, built an automation tool chain for “one-click” code deployment to Kubernetes running on OpenStack.
We’ll also cover the basic security, networking, storage, and performance needs to ensure production readiness.
Finally, we will discuss the ecosystem tools used to build the CI/CD pipeline, Kubernetes as a deployment platform on VMs/bare metal, and an overview of Kubernetes architecture to help you architect and deploy your own clusters.
Preface
Since our company started using OpenStack in 2012, our internal environment has changed quickly. Our initial goal of virtualizing hardware was achieved with OpenStack. However, due to the progress of cloud and container technology, we needed the capability to launch services on various platforms. This post will provide our example of taking applications running on OpenStack and porting them to Kubernetes.
Coding Lifecycle
The goal of this project is to create images for all required platforms from one application code, and deploy those images onto each platform. For example, when code is changed at the code registry, bare metal images, Docker containers and VM images are created by CI (continuous integration) tools, pushed into our image registry, then deployed to each infrastructure platform.

We use following products in our CICD pipeline:
| Function | Product |
|---|---|
| Code registry | GitHub Enterprise |
| CI tools | Jenkins |
| Image registry | Artifactory |
| Bug tracking system | JIRA |
| deploying Bare metal platform | OpenStack Ironic |
| deploying VM platform | OpenStack |
| deploying container platform | Kubernetes |
Image Creation. Each image creation workflow is shown in the next diagram.
VM Image Creation :

- 1.push code to GitHub
- 2.hook to Jenkins master
- 3.Launch job at Jenkins slave
- 4.checkout Packer repository
- 5.Run Service Job
- 6.Execute Packer by build script
- 7.Packer start VM for OpenStack Glance
- 8.Configure VM and install required applications
- 9.create snapshot and register to glance 10.10.Download the new created image from Glance 11.11.Upload the image to Artifactory
Bare Metal Image Creation:

- 1.push code to GitHub
- 2.hook to Jenkins master
- 3.Launch job at Jenkins slave
- 4.checkout Packer repository
- 5.Run Service Job
- 6.Download base bare metal image by build script
- 7.build script execute diskimage-builder with Packer to create bare metal image
- 8.Upload new created image to Glance
- 9.Upload the image to Artifactory
Container Image Creation:

- 1.push code to GitHub
- 2.hook to Jenkins master
- 3.Launch job at Jenkins slave
- 4.checkout Dockerfile repository
- 5.Run Service Job
- 6.Download base docker image from Artifactory
- 7.If no docker image found at Artifactory, download from Docker Hub
- 8.Execute docker build and create image
- 9.Upload the image to Artifactory
Platform Architecture.
Let’s focus on the container workflow to walk through how we use Kubernetes as a deployment platform. This platform architecture is as below.

| Function | Product |
|---|---|
| Infrastructure Services | OpenStack |
| Container Host | CentOS |
| Container Cluster Manager | Kubernetes |
| Container Networking | Project Calico |
| Container Engine | Docker |
| Container Registry | Artifactory |
| Service Registry | etcd |
| Source Code Management | GitHub Enterprise |
| CI tool | Jenkins |
| Infrastructure Provisioning | Terraform |
| Logging | Fluentd, Elasticsearch, Kibana |
| Metrics | Heapster, Influxdb, Grafana |
| Service Monitoring | Prometheus |
We use CentOS for Container Host (OpenStack instances) and install Docker, Kubernetes, Calico, etcd and so on. Of course, it is possible to run various container applications on Kubernetes. In fact, we run OpenStack as one of those applications. That's right, OpenStack on Kubernetes on OpenStack. We currently have more than 30 OpenStack clusters, that quickly become hard to manage and operate. As such, we wanted to create a simple, base OpenStack cluster to provide the basic functionality needed for Kubernetes and make our OpenStack environment easier to manage.
Kubernetes Architecture
Let me explain Kubernetes architecture in some more detail. The architecture diagram is below.
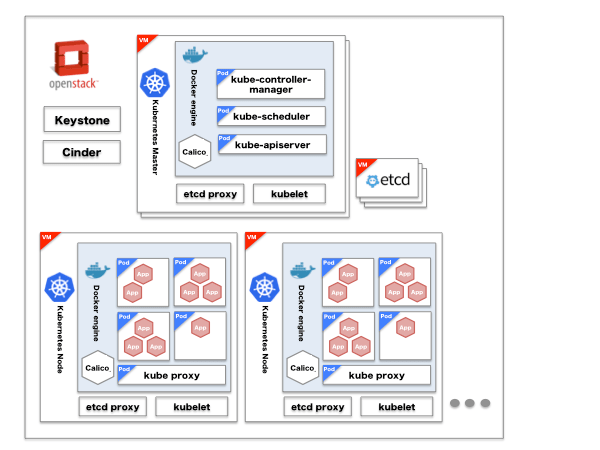
|Product |Description | |OpenStack Keystone|Kubernetes Authentication and Authorization | |OpenStack Cinder |External volume used from Pod (grouping of multiple containers) | |kube-apiserver |Configure and validate objects like Pod or Services (definition of access to services in container) through REST API| |kube-scheduler |Allocate Pods to each node | |kube-controller-manager |Execute Status management, manage replication controller | |kubelet |Run on each node as agent and manage Pod | |calico |Enable inter-Pod connection using BGP | |kube-proxy |Configure iptable NAT tables to configure IP and load balance (ClusterIP) | |etcd |Distribute KVS to store Kubernetes and Calico information | |etcd-proxy |Run on each node and transfer client request to etcd clusters|
Tenant Isolation To enable multi-tenant usage like OpenStack, we utilize OpenStack Keystone for authentication and authorization.
Authentication With a Kubernetes plugin, OpenStack Keystone can be used for Authentication. By Adding authURL of Keystone at startup Kubernetes API server, we can use OpenStack OS_USERNAME and OS_PASSWORD for Authentication. Authorization We currently use the ABAC (Attribute-Based Access Control) mode of Kubernetes Authorization. We worked with a consulting company, Solinea, who helped create a utility to convert OpenStack Keystone user and tenant information to Kubernetes JSON policy file that maps Kubernetes ABAC user and namespace information to OpenStack tenants. We then specify that policy file when launching Kubernetes API Server. This utility also creates namespaces from tenant information. These configurations enable Kubernetes to authenticate with OpenStack Keystone and operate in authorized namespaces. Volumes and Data Persistence Kubernetes provides “Persistent Volumes” subsystem which works as persistent storage for Pods. “Persistent Volumes” is capable to support cloud-provider storage, it is possible to utilize OpenStack cinder-volume by using OpenStack as cloud provider. Networking Flannel and various networking exists as networking model for Kubernetes, we used Project Calico for this project. Yahoo! JAPAN recommends to build data center with pure L3 networking like redistribute ARP validation or IP CLOS networking, Project Calico matches this direction. When we apply overlay model like Flannel, we cannot access to Pod IP from outside of Kubernetes clusters. But Project Calico makes it possible. We also use Project Calico for Load Balancing we describe later.
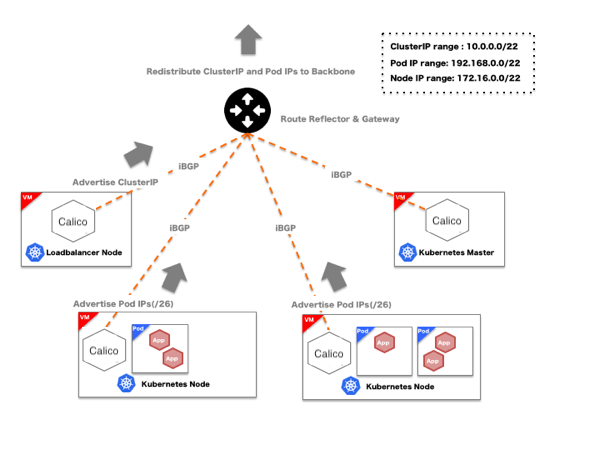
In Project Calico, broadcast production IP by BGP working on BIRD containers (OSS routing software) launched on each nodes of Kubernetes. By default, it broadcast in cluster only. By setting peering routers outside of clusters, it makes it possible to access a Pod from outside of the clusters. External Service Load Balancing
There are multiple choices of external service load balancers (access to services from outside of clusters) for Kubernetes such as NodePort, LoadBalancer and Ingress. We could not find solution which exactly matches our requirements. However, we found a solution that almost matches our requirements by broadcasting Cluster IP used for Internal Service Load Balancing (access to services from inside of clusters) with Project Calico BGP which enable External Load Balancing at Layer 4 from outside of clusters.

Service Discovery
Service Discovery is possible at Kubernetes by using SkyDNS addon. This is provided as cluster internal service, it is accessible in cluster like ClusterIP. By broadcasting ClusterIP by BGP, name resolution works from outside of clusters. By combination of Image creation workflow and Kubernetes, we built the following tool chain which makes it easy from code push to deployment.
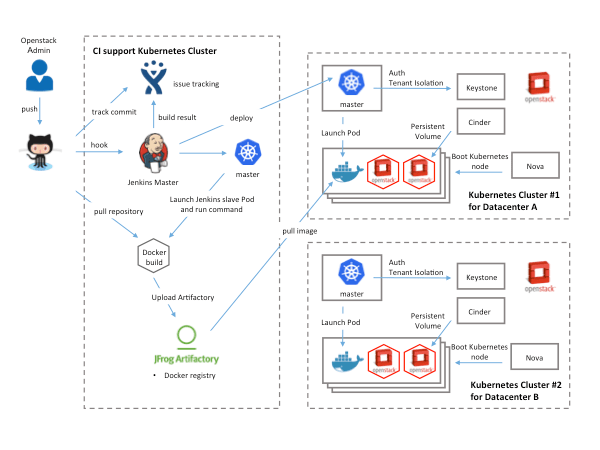
Summary
In summary, by combining Image creation workflows and Kubernetes, Yahoo! JAPAN, with help from Google and Solinea, successfully built an automated tool chain which makes it easy to go from code push to deployment, while taking multi-tenancy, authn/authz, storage, networking, service discovery and other necessary factors for production deployment. We hope you found the discussion of ecosystem tools used to build the CI/CD pipeline, Kubernetes as a deployment platform on VMs/bare-metal, and the overview of Kubernetes architecture to help you architect and deploy your own clusters. Thank you to all of the people who helped with this project. --Norifumi Matsuya, Hirotaka Ichikawa, Masaharu Miyamoto and Yuta Kinoshita. This post has been translated and edited for context with permission -- originally published on the Yahoo! JAPAN engineer blog where this was one in a series of posts focused on Kubernetes.
Building Globally Distributed Services using Kubernetes Cluster Federation
In Kubernetes 1.3, we announced Kubernetes Cluster Federation and introduced the concept of Cross Cluster Service Discovery, enabling developers to deploy a service that was sharded across a federation of clusters spanning different zones, regions or cloud providers. This enables developers to achieve higher availability for their applications, without sacrificing quality of service, as detailed in our previous blog post.
In the latest release, Kubernetes 1.4, we've extended Cluster Federation to support Replica Sets, Secrets, Namespaces and Ingress objects. This means that you no longer need to deploy and manage these objects individually in each of your federated clusters. Just create them once in the federation, and have its built-in controllers automatically handle that for you.
Federated Replica Sets leverage the same configuration as non-federated Kubernetes Replica Sets and automatically distribute Pods across one or more federated clusters. By default, replicas are evenly distributed across all clusters, but for cases where that is not the desired behavior, we've introduced Replica Set preferences, which allow replicas to be distributed across only some clusters, or in non-equal proportions (define annotations).
Starting with Google Cloud Platform (GCP), we’ve introduced Federated Ingress as a Kubernetes 1.4 alpha feature which enables external clients point to a single IP address and have requests sent to the closest cluster with usable capacity in any region, zone of the Federation.
Federated Secrets automatically create and manage secrets across all clusters in a Federation, automatically ensuring that these are kept globally consistent and up-to-date, even if some clusters are offline when the original updates are applied.
Federated Namespaces are similar to the traditional Kubernetes Namespaces providing the same functionality. Creating them in the Federation control plane ensures that they are synchronized across all the clusters in Federation.
Federated Events are similar to the traditional Kubernetes Events providing the same functionality. Federation Events are stored only in Federation control plane and are not passed on to the underlying kubernetes clusters.
Let’s walk through how all this stuff works. We’re going to provision 3 clusters per region, spanning 3 continents (Europe, North America and Asia).

The next step is to federate these clusters. Kelsey Hightower developed a tutorial for setting up a Kubernetes Cluster Federation. Follow the tutorial to configure a Cluster Federation with clusters in 3 zones in each of the 3 GCP regions, us-central1, europe-west1 and asia-east1. For the purpose of this blog post, we’ll provision the Federation Control Plane in the us-central1-b zone. Note that more highly available, multi-cluster deployments are also available, but not used here in the interests of simplicity.
The rest of the blog post assumes that you have a running Kubernetes Cluster Federation provisioned.
Let’s verify that we have 9 clusters in 3 regions running.
$ kubectl --context=federation-cluster get clusters
NAME STATUS AGE
gce-asia-east1-a Ready 17m
gce-asia-east1-b Ready 15m
gce-asia-east1-c Ready 10m
gce-europe-west1-b Ready 7m
gce-europe-west1-c Ready 7m
gce-europe-west1-d Ready 4m
gce-us-central1-a Ready 1m
gce-us-central1-b Ready 53s
gce-us-central1-c Ready 39s
| You can download the source used in this blog post here. The source consists of the following files: | |
|---|---|
| configmaps/zonefetch.yaml | retrieves the zone from the instance metadata server and concatenates into volume mount path |
| replicasets/nginx-rs.yaml | deploys a Pod consisting of an nginx and busybox container |
| ingress/ingress.yaml | creates a load balancer with a global VIP that distributes requests to the closest nginx backend |
| services/nginx.yaml | exposes the nginx backend as an external service |
In our example, we’ll be deploying the service and ingress object using the federated control plane. The ConfigMap object isn’t currently supported by Federation, so we’ll be deploying it manually in each of the underlying Federation clusters. Our cluster deployment will look as follows:
We’re going to deploy a Service that is sharded across our 9 clusters. The backend deployment will consist of a Pod with 2 containers:
- busybox container that fetches the zone and outputs an HTML with the zone embedded in it into a Pod volume mount path
- nginx container that reads from that Pod volume mount path and serves an HTML containing the zone it’s running in
Let’s start by creating a federated service object in the federation-cluster context.
$ kubectl --context=federation-cluster create -f services/nginx.yaml
It will take a few minutes for the service to propagate across the 9 clusters.
$ kubectl --context=federation-cluster describe services nginx
Name: nginx
Namespace: default
Labels: app=nginx
Selector: app=nginx
Type: LoadBalancer
IP:
LoadBalancer Ingress: 108.59.xx.xxx, 104.199.xxx.xxx, ...
Port: http 80/TCP
NodePort: http 30061/TCP
Endpoints: <none>
Session Affinity: None
Let’s now create a Federated Ingress. Federated Ingresses are created in much that same way as traditional Kubernetes Ingresses: by making an API call which specifies the desired properties of your logical ingress point. In the case of Federated Ingress, this API call is directed to the Federation API endpoint, rather than a Kubernetes cluster API endpoint. The API for Federated Ingress is 100% compatible with the API for traditional Kubernetes Services.
$ cat ingress/ingress.yaml
apiVersion: extensions/v1beta1
kind: Ingress
metadata:
name: nginx
spec:
backend:
serviceName: nginx
servicePort: 80
$ kubectl --context=federation-cluster create -f ingress/ingress.yaml
ingress "nginx" created
Once created, the Federated Ingress controller automatically:
- 1.creates matching Kubernetes Ingress objects in every cluster underlying your Cluster Federation
- 2.ensures that all of these in-cluster ingress objects share the same logical global L7 (i.e. HTTP(S)) load balancer and IP address
- 3.monitors the health and capacity of the service “shards” (i.e. your Pods) behind this ingress in each cluster
- 4.ensures that all client connections are routed to an appropriate healthy backend service endpoint at all times, even in the event of Pod, cluster, availability zone or regional outages We can verify the ingress objects are matching in the underlying clusters. Notice the ingress IP addresses for all 9 clusters is the same.
$ for c in $(kubectl config view -o jsonpath='{.contexts[*].name}'); do kubectl --context=$c get ingress; done
NAME HOSTS ADDRESS PORTS AGE
nginx \* 80 1h
NAME HOSTS ADDRESS PORTS AGE
nginx \* 130.211.40.xxx 80 40m
NAME HOSTS ADDRESS PORTS AGE
nginx \* 130.211.40.xxx 80 1h
NAME HOSTS ADDRESS PORTS AGE
nginx \* 130.211.40.xxx 80 26m
NAME HOSTS ADDRESS PORTS AGE
nginx \* 130.211.40.xxx 80 1h
NAME HOSTS ADDRESS PORTS AGE
nginx \* 130.211.40.xxx 80 25m
NAME HOSTS ADDRESS PORTS AGE
nginx \* 130.211.40.xxx 80 38m
NAME HOSTS ADDRESS PORTS AGE
nginx \* 130.211.40.xxx 80 3m
NAME HOSTS ADDRESS PORTS AGE
nginx \* 130.211.40.xxx 80 57m
NAME HOSTS ADDRESS PORTS AGE
nginx \* 130.211.40.xxx 80 56m
Note that in the case of Google Cloud Platform, the logical L7 load balancer is not a single physical device (which would present both a single point of failure, and a single global network routing choke point), but rather a truly global, highly available load balancing managed service, globally reachable via a single, static IP address.
Clients inside your federated Kubernetes clusters (i.e. Pods) will be automatically routed to the cluster-local shard of the Federated Service backing the Ingress in their cluster if it exists and is healthy, or the closest healthy shard in a different cluster if it does not. Note that this involves a network trip to the HTTP(S) load balancer, which resides outside your local Kubernetes cluster but inside the same GCP region.
The next step is to schedule the service backends. Let’s first create the ConfigMap in each cluster in the Federation.
We do this by submitting the ConfigMap to each cluster in the Federation.
$ for c in $(kubectl config view -o jsonpath='{.contexts[\*].name}'); do kubectl --context=$c create -f configmaps/zonefetch.yaml; done
Let’s have a quick peek at our Replica Set:
$ cat replicasets/nginx-rs.yaml
apiVersion: extensions/v1beta1
kind: ReplicaSet
metadata:
name: nginx
labels:
app: nginx
type: demo
spec:
replicas: 9
template:
metadata:
labels:
app: nginx
spec:
containers:
- image: nginx
name: frontend
ports:
- containerPort: 80
volumeMounts:
- name: html-dir
mountPath: /usr/share/nginx/html
- image: busybox
name: zone-fetcher
command:
- "/bin/sh"
- "-c"
- "/zonefetch/zonefetch.sh"
volumeMounts:
- name: zone-fetch
mountPath: /zonefetch
- name: html-dir
mountPath: /usr/share/nginx/html
volumes:
- name: zone-fetch
configMap:
defaultMode: 0777
name: zone-fetch
- name: html-dir
emptyDir:
medium: ""
The Replica Set consists of 9 replicas, spread evenly across 9 clusters within the Cluster Federation. Annotations can also be used to control which clusters Pods are scheduled to. This is accomplished by adding annotations to the Replica Set spec, as follows:
apiVersion: extensions/v1beta1
kind: ReplicaSet
metadata:
name: nginx-us
annotations:
federation.kubernetes.io/replica-set-preferences: ```
{
"rebalance": true,
"clusters": {
"gce-us-central1-a": {
"minReplicas": 2,
"maxReplicas": 4,
"weight": 1
},
"gce-us-central10b": {
"minReplicas": 2,
"maxReplicas": 4,
"weight": 1
}
}
}
For the purpose of our demo, we’ll keep things simple and spread our Pods evenly across the Cluster Federation.
Let’s create the federated Replica Set:
$ kubectl --context=federation-cluster create -f replicasets/nginx-rs.yaml
Verify the Replica Sets and Pods were created in each cluster:
$ for c in $(kubectl config view -o jsonpath='{.contexts[\*].name}'); do kubectl --context=$c get rs; done
NAME DESIRED CURRENT READY AGE
nginx 1 1 1 42s
NAME DESIRED CURRENT READY AGE
nginx 1 1 1 14m
NAME DESIRED CURRENT READY AGE
nginx 1 1 1 45s
NAME DESIRED CURRENT READY AGE
nginx 1 1 1 46s
NAME DESIRED CURRENT READY AGE
nginx 1 1 1 47s
NAME DESIRED CURRENT READY AGE
nginx 1 1 1 48s
NAME DESIRED CURRENT READY AGE
nginx 1 1 1 49s
NAME DESIRED CURRENT READY AGE
nginx 1 1 1 49s
NAME DESIRED CURRENT READY AGE
nginx 1 1 1 49s
$ for c in $(kubectl config view -o jsonpath='{.contexts[\*].name}'); do kubectl --context=$c get po; done
NAME READY STATUS RESTARTS AGE
nginx-ph8zx 2/2 Running 0 25s
NAME READY STATUS RESTARTS AGE
nginx-sbi5b 2/2 Running 0 27s
NAME READY STATUS RESTARTS AGE
nginx-pf2dr 2/2 Running 0 28s
NAME READY STATUS RESTARTS AGE
nginx-imymt 2/2 Running 0 30s
NAME READY STATUS RESTARTS AGE
nginx-9cd5m 2/2 Running 0 31s
NAME READY STATUS RESTARTS AGE
nginx-vxlx4 2/2 Running 0 33s
NAME READY STATUS RESTARTS AGE
nginx-itagl 2/2 Running 0 33s
NAME READY STATUS RESTARTS AGE
nginx-u7uyn 2/2 Running 0 33s
NAME READY STATUS RESTARTS AGE
nginx-i0jh6 2/2 Running 0 34s
Below is an illustration of how the nginx service and associated ingress deployed. To summarize, we have a global VIP (130.211.23.176) exposed using a Global L7 load balancer that forwards requests to the closest cluster with available capacity.

To test this out, we’re going to spin up 2 Google Cloud Engine (GCE) instances, one in us-west1-b and the other in asia-east1-a. All client requests are automatically routed, via the shortest network path, to a healthy Pod in the closest cluster to the origin of the request. So for example, HTTP(S) requests from Asia will be routed directly to the closest cluster in Asia that has available capacity. If there are no such clusters in Asia, the request will be routed to the next closest cluster (in this case the U.S.). This works irrespective of whether the requests originate from a GCE instance or anywhere else on the internet. We only use a GCE instance for simplicity in the demo.

We can SSH directly into the VMs using the Cloud Console or by issuing a gcloud SSH command.
$ gcloud compute ssh test-instance-asia --zone asia-east1-a
-----
user@test-instance-asia:~$ curl 130.211.40.186
<!DOCTYPE html>
<html>
<head>
<title>Welcome to the global site!</title>
</head>
<body>
<h1>Welcome to the global site! You are being served from asia-east1-b</h1>
<p>Congratulations!</p>
user@test-instance-asia:~$ exit
----
$ gcloud compute ssh test-instance-us --zone us-west1-b
----
user@test-instance-us:~$ curl 130.211.40.186
<!DOCTYPE html>
<html>
<head>
<title>Welcome to the global site!</title>
</head>
<body>
<h1>Welcome to the global site! You are being served from us-central1-b</h1>
<p>Congratulations!</p>
----
Federations of Kubernetes Clusters can include clusters running in different cloud providers (e.g. GCP, AWS), and on-premises (e.g. on OpenStack). However, in Kubernetes 1.4, Federated Ingress is only supported across Google Cloud Platform clusters. In future versions we intend to support hybrid cloud Ingress-based deployments.
To summarize, we walked through leveraging the Kubernetes 1.4 Federated Ingress alpha feature to deploy a multi-homed service behind a global load balancer. External clients point to a single IP address and are sent to the closest cluster with usable capacity in any region, zone of the Federation, providing higher levels of availability without sacrificing latency or ease of operation.
We'd love to hear feedback on Kubernetes Cross Cluster Services. To join the community:
- Post issues or feature requests on GitHub
- Join us in the #federation channel on Slack
- Participate in the Cluster Federation SIG
- Download Kubernetes
- Follow Kubernetes on Twitter @Kubernetesio for latest updates
Helm Charts: making it simple to package and deploy common applications on Kubernetes
There are thousands of people and companies packaging their applications for deployment on Kubernetes. This usually involves crafting a few different Kubernetes resource definitions that configure the application runtime, as well as defining the mechanism that users and other apps leverage to communicate with the application. There are some very common applications that users regularly look for guidance on deploying, such as databases, CI tools, and content management systems. These types of applications are usually not ones that are developed and iterated on by end users, but rather their configuration is customized to fit a specific use case. Once that application is deployed users can link it to their existing systems or leverage their functionality to solve their pain points.
For best practices on how these applications should be configured, users could look at the many resources available such as: the examples folder in the Kubernetes repository, the Kubernetes contrib repository, the Helm Charts repository, and the Bitnami Charts repository. While these different locations provided guidance, it was not always formalized or consistent such that users could leverage similar installation procedures across different applications.
So what do you do when there are too many places for things to be found?

In this case, we’re not creating Yet Another Place for Applications, rather promoting an existing one as the canonical location. As part of the Special Interest Group Apps (SIG Apps) work for the Kubernetes 1.4 release, we began to provide a home for these Kubernetes deployable applications that provides continuous releases of well documented and user friendly packages. These packages are being created as Helm Charts and can be installed using the Helm tool. Helm allows users to easily templatize their Kubernetes manifests and provide a set of configuration parameters that allows users to customize their deployment.
Helm is the package manager (analogous to yum and apt) and Charts are packages (analogous to debs and rpms). The home for these Charts is the Kubernetes Charts repository which provides continuous integration for pull requests, as well as automated releases of Charts in the master branch.
There are two main folders where charts reside. The stable folder hosts those applications which meet minimum requirements such as proper documentation and inclusion of only Beta or higher Kubernetes resources. The incubator folder provides a place for charts to be submitted and iterated on until they’re ready for promotion to stable at which time they will automatically be pushed out to the default repository. For more information on the repository structure and requirements for being in stable, have a look at this section in the README.
The following applications are now available:
| Stable repository | Incubating repository |
|---|---|
| Drupal | Consul |
| Jenkins | Elasticsearch |
| MariaDB | etcd |
| MySQL | Grafana |
| Redmine | MongoDB |
| Wordpress | Patroni |
| Prometheus | |
| Spark | |
| ZooKeeper |
Example workflow for a Chart developer
- Create a chart
- Developer provides parameters via the values.yaml file allowing users to customize their deployment. This can be seen as the API between chart devs and chart users.
- A README is written to help describe the application and its parameterized values.
- Once the application installs properly and the values customize the deployment appropriately, the developer adds a NOTES.txt file that is shown as soon as the user installs. This file generally points out the next steps for the user to connect to or use the application.
- If the application requires persistent storage, the developer adds a mechanism to store the data such that pod restarts do not lose data. Most charts requiring this today are using dynamic volume provisioning to abstract away underlying storage details from the user which allows a single configuration to work against Kubernetes installations.
- Submit a Pull Request to the Kubernetes Charts repo. Once tested and reviewed, the PR will be merged.
- Once merged to the master branch, the chart will be packaged and released to Helm’s default repository and available for users to install.
Example workflow for a Chart user
$ helm search
NAME VERSION DESCRIPTION stable/drupal 0.3.1 One of the most versatile open source content m...stable/jenkins 0.1.0 A Jenkins Helm chart for Kubernetes. stable/mariadb 0.4.0 Chart for MariaDB stable/mysql 0.1.0 Chart for MySQL stable/redmine 0.3.1 A flexible project management web application. stable/wordpress 0.3.0 Web publishing platform for building blogs and ...
$ helm install stable/jenkins
- 5.After the install
Notes:
1. Get your 'admin' user password by running:
printf $(printf '\%o' `kubectl get secret --namespace default brawny-frog-jenkins -o jsonpath="{.data.jenkins-admin-password[*]}"`);echo
2. Get the Jenkins URL to visit by running these commands in the same shell:
\*\*\*\* NOTE: It may take a few minutes for the LoadBalancer IP to be available. \*\*\*\*
\*\*\*\* You can watch the status of by running 'kubectl get svc -w brawny-frog-jenkins' \*\*\*\*
export SERVICE\_IP=$(kubectl get svc --namespace default brawny-frog-jenkins -o jsonpath='{.status.loadBalancer.ingress[0].ip}')
echo http://$SERVICE\_IP:8080/login
- Login with the password from step 1 and the username: admin
For more information on running Jenkins on Kubernetes, visit here.
Conclusion
Now that you’ve seen workflows for both developers and users, we hope that you’ll join us in consolidating the breadth of application deployment knowledge into a more centralized place. Together we can raise the quality bar for both developers and users of Kubernetes applications. We’re always looking for feedback on how we can better our process. Additionally, we’re looking for contributions of new charts or updates to existing ones. Join us in the following places to get engaged:
SIG Apps - Slack Channel
SIG Apps - Weekly Meeting
Submit a Kubernetes Charts Issue A big thank you to the folks at Bitnami, Deis, Google and the other contributors who have helped get the Charts repository to where it is today. We still have a lot of work to do but it's been wonderful working together as a community to move this effort forward.
Download Kubernetes
Get involved with the Kubernetes project on GitHub
Post questions (or answer questions) on Stack Overflow
Connect with the community on Slack
Follow us on Twitter @Kubernetesio for latest updates
Dynamic Provisioning and Storage Classes in Kubernetes
Storage is a critical part of running containers, and Kubernetes offers some powerful primitives for managing it. Dynamic volume provisioning, a feature unique to Kubernetes, allows storage volumes to be created on-demand. Without dynamic provisioning, cluster administrators have to manually make calls to their cloud or storage provider to create new storage volumes, and then create PersistentVolume objects to represent them in Kubernetes. The dynamic provisioning feature eliminates the need for cluster administrators to pre-provision storage. Instead, it automatically provisions storage when it is requested by users. This feature was introduced as alpha in Kubernetes 1.2, and has been improved and promoted to beta in the latest release, 1.4. This release makes dynamic provisioning far more flexible and useful.
What’s New?
The alpha version of dynamic provisioning only allowed a single, hard-coded provisioner to be used in a cluster at once. This meant that when Kubernetes determined storage needed to be dynamically provisioned, it always used the same volume plugin to do provisioning, even if multiple storage systems were available on the cluster. The provisioner to use was inferred based on the cloud environment - EBS for AWS, Persistent Disk for Google Cloud, Cinder for OpenStack, and vSphere Volumes on vSphere. Furthermore, the parameters used to provision new storage volumes were fixed: only the storage size was configurable. This meant that all dynamically provisioned volumes would be identical, except for their storage size, even if the storage system exposed other parameters (such as disk type) for configuration during provisioning.
Although the alpha version of the feature was limited in utility, it allowed us to “get some miles” on the idea, and helped determine the direction we wanted to take.
The beta version of dynamic provisioning, new in Kubernetes 1.4, introduces a new API object, StorageClass. Multiple StorageClass objects can be defined each specifying a volume plugin (aka provisioner) to use to provision a volume and the set of parameters to pass to that provisioner when provisioning. This design allows cluster administrators to define and expose multiple flavors of storage (from the same or different storage systems) within a cluster, each with a custom set of parameters. This design also ensures that end users don’t have to worry about the complexity and nuances of how storage is provisioned, but still have the ability to select from multiple storage options.
How Do I use It?
Below is an example of how a cluster administrator would expose two tiers of storage, and how a user would select and use one. For more details, see the reference and example docs.
Admin Configuration
The cluster admin defines and deploys two StorageClass objects to the Kubernetes cluster:
kind: StorageClass
apiVersion: storage.k8s.io/v1beta1
metadata:
name: slow
provisioner: kubernetes.io/gce-pd
parameters:
type: pd-standard
This creates a storage class called “slow” which will provision standard disk-like Persistent Disks.
kind: StorageClass
apiVersion: storage.k8s.io/v1beta1
metadata:
name: fast
provisioner: kubernetes.io/gce-pd
parameters:
type: pd-ssd
This creates a storage class called “fast” which will provision SSD-like Persistent Disks.
User Request
Users request dynamically provisioned storage by including a storage class in their PersistentVolumeClaim. For the beta version of this feature, this is done via the volume.beta.kubernetes.io/storage-class annotation. The value of this annotation must match the name of a StorageClass configured by the administrator.
To select the “fast” storage class, for example, a user would create the following PersistentVolumeClaim:
{
"kind": "PersistentVolumeClaim",
"apiVersion": "v1",
"metadata": {
"name": "claim1",
"annotations": {
"volume.beta.kubernetes.io/storage-class": "fast"
}
},
"spec": {
"accessModes": [
"ReadWriteOnce"
],
"resources": {
"requests": {
"storage": "30Gi"
}
}
}
}
This claim will result in an SSD-like Persistent Disk being automatically provisioned. When the claim is deleted, the volume will be destroyed.
Defaulting Behavior
Dynamic Provisioning can be enabled for a cluster such that all claims are dynamically provisioned without a storage class annotation. This behavior is enabled by the cluster administrator by marking one StorageClass object as “default”. A StorageClass can be marked as default by adding the storageclass.beta.kubernetes.io/is-default-class annotation to it.
When a default StorageClass exists and a user creates a PersistentVolumeClaim without a storage-class annotation, the new DefaultStorageClass admission controller (also introduced in v1.4), automatically adds the class annotation pointing to the default storage class.
Can I Still Use the Alpha Version?
Kubernetes 1.4 maintains backwards compatibility with the alpha version of the dynamic provisioning feature to allow for a smoother transition to the beta version. The alpha behavior is triggered by the existence of the alpha dynamic provisioning annotation (volume. alpha.kubernetes.io/storage-class). Keep in mind that if the beta annotation (volume. beta.kubernetes.io/storage-class) is present, it takes precedence, and triggers the beta behavior.
Support for the alpha version is deprecated and will be removed in a future release.
What’s Next?
Dynamic Provisioning and Storage Classes will continue to evolve and be refined in future releases. Below are some areas under consideration for further development.
Standard Cloud Provisioners
For deployment of Kubernetes to cloud providers, we are considering automatically creating a provisioner for the cloud’s native storage system. This means that a standard deployment on AWS would result in a StorageClass that provisions EBS volumes, a standard deployment on Google Cloud would result in a StorageClass that provisions GCE PDs. It is also being debated whether these provisioners should be marked as default, which would make dynamic provisioning the default behavior (no annotation required).
Out-of-Tree Provisioners
There has been ongoing discussion about whether Kubernetes storage plugins should live “in-tree” or “out-of-tree”. While the details for how to implement out-of-tree plugins is still in the air, there is a proposal introducing a standardized way to implement out-of-tree dynamic provisioners.
How Do I Get Involved?
If you’re interested in getting involved with the design and development of Kubernetes Storage, join the Kubernetes Storage Special-Interest-Group (SIG). We’re rapidly growing and always welcome new contributors.
- Download Kubernetes
- Get involved with the Kubernetes project on GitHub
- Post questions (or answer questions) on Stack Overflow
- Connect with the community on Slack
- Follow us on Twitter @Kubernetesio for latest updates
How we improved Kubernetes Dashboard UI in 1.4 for your production needs
With the release of Kubernetes 1.4 last week, Dashboard – the official web UI for Kubernetes – has a number of exciting updates and improvements of its own. The past three months have been busy ones for the Dashboard team, and we’re excited to share the resulting features of that effort here. If you’re not familiar with Dashboard, the GitHub repo is a great place to get started.
A quick recap before unwrapping our shiny new features: Dashboard was initially released March 2016. One of the focuses for Dashboard throughout its lifetime has been the onboarding experience; it’s a less intimidating way for Kubernetes newcomers to get started, and by showing multiple resources at once, it provides contextualization lacking in kubectl (the CLI). After that initial release though, the product team realized that fine-tuning for a beginner audience was getting ahead of ourselves: there were still fundamental product requirements that Dashboard needed to satisfy in order to have a productive UX to onboard new users too. That became our mission for this release: closing the gap between Dashboard and kubectl by showing more resources, leveraging a web UI’s strengths in monitoring and troubleshooting, and architecting this all in a user friendly way.
Monitoring Graphs
Real time visualization is a strength that UI’s have over CLI’s, and with 1.4 we’re happy to capitalize on that capability with the introduction of real-time CPU and memory usage graphs for all workloads running on your cluster. Even with the numerous third-party solutions for monitoring, Dashboard should include at least some basic out-of-the box functionality in this area. Next up on the roadmap for graphs is extending the timespan the graph represents, adding drill-down capabilities to reveal more details, and improving the UX of correlating data between different graphs.

Logs
Based on user research with Kubernetes’ predecessor Borg and continued community feedback, we know logs are tremendously important to users. For this reason we’re constantly looking for ways to improve these features in Dashboard. This release includes a fix for an issue wherein large numbers of logs would crash the system, as well as the introduction of the ability to view logs by date.
Showing More Resources
The previous release brought all workloads to Dashboard: Pods, Pet Sets, Daemon Sets, Replication Controllers, Replica Set, Services, & Deployments. With 1.4, we expand upon that set of objects by including Services, Ingresses, Persistent Volume Claims, Secrets, & ConfigMaps. We’ve also introduced an “Admin” section with the Namespace-independent global objects of Namespaces, Nodes, and Persistent Volumes. With the addition of roles, these will be shown only to cluster operators, and developers’ side nav will begin with the Namespace dropdown.
Like glue binding together a loose stack of papers into a book, we needed some way to impose order on these resources for their value to be realized, so one of the features we’re most excited to announce in 1.4 is navigation.
Navigation
In 1.1, all resources were simply stacked on top of each other in a single page. The introduction of a side nav provides quick access to any aspect of your cluster you’d like to check out. Arriving at this solution meant a lot of time put toward thinking about the hierarchy of Kubernetes objects – a difficult task since by design things fit together more like a living organism than a nested set of linear relationships. The solution we’ve arrived at balances the organizational need for grouping and desire to retain a bird’s-eye view of as much relevant information as possible. The design of the side nav is simple and flexible, in order to accommodate more resources in the future. Its top level objects (e.g. “Workloads”, “Services and Discovery”) roll up their child objects and will eventually include aggregated data for said objects.

Closer Alignment with Material Design
Dashboard follows Google’s Material design system, and the implementation of those principles is refined in the new UI: the global create options have been reduced from two choices to one initial “Create” button, the official Kubernetes logo is displayed as an SVG rather than simply as text, and cards were introduced to help better group different types of content (e.g. a table of Replication Controllers and a table of Pods on your “Workloads” page). Material’s guidelines around desktop-focused enterprise-level software are currently limited (and instead focus on a mobile-first context), so we’ve had to improvise with some aspects of the UI and have worked closely with the UX team at Google Cloud Platform to do this – drawing on their expertise in implementing Material in a more information-dense setting.
Sample Use Case
To showcase Dashboard 1.4’s new suite of features and how they’ll make users’ lives better in the real world, let’s imagine the following scenario:
I am a cluster operator and a customer pings me warning that their app, Kubernetes Dashboard, is suffering performance issues. My first step in addressing the issue is to switch to the correct Namespace, kube-system, to examine what could be going on.

Once in the relevant Namespace, I check out my Deployments to see if anything seems awry. Sure enough, I notice a spike in CPU usage.

I realize we need to perform a rolling update to a newer version of that app that can handle the increased requests it’s evidently getting, so I update this Deployment’s image, which in turn creates a new Replica Set.

Now that Replica Set’s been created, I can open the logs for one of its pods to confirm that it’s been successfully connected to the API server.

Easy as that, we’ve debugged our issue. Dashboard provided us a centralized location to scan for the origin of the problem, and once we had that identified we were able to drill down and address the root of the problem.
Why the Skipped Versions?
If you’ve been following along with Dashboard since 1.0, you may have been confused by the jump in our versioning; we went 1.0, 1.1...1.4. We did this to synchronize with the main Kubernetes distro, and hopefully going forward this will make that relationship easier to understand.
There’s a Lot More Where That Came From
Dashboard is gaining momentum, and these early stages are a very exciting and rewarding time to be involved. If you’d like to learn more about contributing, check out SIG UI. Chat with us Kubernetes Slack: #sig-ui channel.
- Download Kubernetes
- Get involved with the Kubernetes project on GitHub
- Post questions (or answer questions) on Stack Overflow
- Connect with the community on Slack
- Follow us on Twitter @Kubernetesio for latest updates
How we made Kubernetes insanely easy to install
Over at SIG-cluster-lifecycle, we've been hard at work the last few months on kubeadm, a tool that makes Kubernetes dramatically easier to install. We've heard from users that installing Kubernetes is harder than it should be, and we want folks to be focused on writing great distributed apps not wrangling with infrastructure!
There are three stages in setting up a Kubernetes cluster, and we decided to focus on the second two (to begin with):
- Provisioning : getting some machines
- Bootstrapping : installing Kubernetes on them and configuring certificates
- Add-ons : installing necessary cluster add-ons like DNS and monitoring services, a pod network, etc We realized early on that there's enormous variety in the way that users want to provision their machines.
They use lots of different cloud providers, private clouds, bare metal, or even Raspberry Pi's, and almost always have their own preferred tools for automating provisioning machines: Terraform or CloudFormation, Chef, Puppet or Ansible, or even PXE booting bare metal. So we made an important decision: kubeadm would not provision machines. Instead, the only assumption it makes is that the user has some computers running Linux.
Another important constraint was we didn't want to just build another tool that "configures Kubernetes from the outside, by poking all the bits into place". There are many external projects out there for doing this, but we wanted to aim higher. We chose to actually improve the Kubernetes core itself to make it easier to install. Luckily, a lot of the groundwork for making this happen had already been started.
We realized that if we made Kubernetes insanely easy to install manually, it should be obvious to users how to automate that process using any tooling.
So, enter kubeadm. It has no infrastructure dependencies, and satisfies the requirements above. It's easy to use and should be easy to automate. It's still in alpha , but it works like this:
- You install Docker and the official Kubernetes packages for you distribution.
- Select a master host, run kubeadm init.
- This sets up the control plane and outputs a kubeadm join [...] command which includes a secure token.
- On each host selected to be a worker node, run the kubeadm join [...] command from above.
- Install a pod network. Weave Net is a great place to start here. Install it using just kubectl apply -f https://git.io/weave-kube Presto! You have a working Kubernetes cluster! Try kubeadm today.
For a video walkthrough, check this out:
Follow the kubeadm getting started guide to try it yourself, and please give us feedback on GitHub, mentioning @kubernetes/sig-cluster-lifecycle!
Finally, I want to give a huge shout-out to so many people in the SIG-cluster-lifecycle, without whom this wouldn't have been possible. I'll mention just a few here:
- Joe Beda kept us focused on keeping things simple for the user.
- Mike Danese at Google has been an incredible technical lead and always knows what's happening. Mike also tirelessly kept up on the many code reviews necessary.
- Ilya Dmitrichenko, my colleague at Weaveworks, wrote most of the kubeadm code and also kindly helped other folks contribute.
- Lucas Käldström from Finland has got to be the youngest contributor in the group and was merging last-minute pull requests on the Sunday night before his school math exam.
- Brandon Philips and his team at CoreOS led the development of TLS bootstrapping, an essential component which we couldn't have done without.
- Devan Goodwin from Red Hat built the JWS discovery service that Joe imagined and sorted out our RPMs.
- Paulo Pires from Portugal jumped in to help out with external etcd support and picked up lots of other bits of work.
- And many other contributors!
This truly has been an excellent cross-company and cross-timezone achievement, with a lovely bunch of people. There's lots more work to do in SIG-cluster-lifecycle, so if you’re interested in these challenges join our SIG. Looking forward to collaborating with you all!
- Try kubeadm to install Kubernetes today
- Get involved with the Kubernetes project on GitHub
- Post questions (or answer questions) on Stack Overflow
- Connect with the community on Slack
- Follow us on Twitter @Kubernetesio for latest updates
How Qbox Saved 50% per Month on AWS Bills Using Kubernetes and Supergiant
Editor’s Note: Today’s post is by the team at Qbox, a hosted Elasticsearch provider sharing their experience with Kubernetes and how it helped save them fifty-percent off their cloud bill.
A little over a year ago, we at Qbox faced an existential problem. Just about all of the major IaaS providers either launched or acquired services that competed directly with our Hosted Elasticsearch service, and many of them started offering it for free. The race to zero was afoot unless we could re-engineer our infrastructure to be more performant, more stable, and less expensive than the VM approach we had had before, and the one that is in use by our IaaS brethren. With the help of Kubernetes, Docker, and Supergiant (our own hand-rolled layer for managing distributed and stateful data), we were able to deliver 50% savings, a mid-five figure sum. At the same time, support tickets plummeted. We were so pleased with the results that we decided to open source Supergiant as its own standalone product. This post will demonstrate how we accomplished it.
Back in 2013, when not many were even familiar with Elasticsearch, we launched our as-a-service offering with a dedicated, direct VM model. We hand-selected certain instance types optimized for Elasticsearch, and users configured single-tenant, multi-node clusters running on isolated virtual machines in any region. We added a markup on the per-compute-hour price for the DevOps support and monitoring, and all was right with the world for a while as Elasticsearch became the global phenomenon that it is today.
Background
As we grew to thousands of clusters, and many more thousands of nodes, it wasn’t just our AWS bill getting out of hand. We had 4 engineers replacing dead nodes and answering support tickets all hours of the day, every day. What made matters worse was the volume of resources allocated compared to the usage. We had thousands of servers with a collective CPU utilization under 5%. We were spending too much on processors that were doing absolutely nothing.
How we got there was no great mystery. VM’s are a finite resource, and with a very compute-intensive, burstable application like Elasticsearch, we would be juggling the users that would either undersize their clusters to save money or those that would over-provision and overspend. When the aforementioned competitive pressures forced our hand, we had to re-evaluate everything.
Adopting Docker and Kubernetes
Our team avoided Docker for a while, probably on the vague assumption that the network and disk performance we had with VMs wouldn't be possible with containers. That assumption turned out to be entirely wrong.
To run performance tests, we had to find a system that could manage networked containers and volumes. That's when we discovered Kubernetes. It was alien to us at first, but by the time we had familiarized ourselves and built a performance testing tool, we were sold. It was not just as good as before, it was better.
The performance improvement we observed was due to the number of containers we could “pack” on a single machine. Ironically, we began the Docker experiment wanting to avoid “noisy neighbor,” which we assumed was inevitable when several containers shared the same VM. However, that isolation also acted as a bottleneck, both in performance and cost. To use a real-world example, If a machine has 2 cores and you need 3 cores, you have a problem. It’s rare to come across a public-cloud VM with 3 cores, so the typical solution is to buy 4 cores and not utilize them fully.
This is where Kubernetes really starts to shine. It has the concept of requests and limits, which provides granular control over resource sharing. Multiple containers can share an underlying host VM without the fear of “noisy neighbors”. They can request exclusive control over an amount of RAM, for example, and they can define a limit in anticipation of overflow. It’s practical, performant, and cost-effective multi-tenancy. We were able to deliver the best of both the single-tenant and multi-tenant worlds.
Kubernetes + Supergiant
We built Supergiant originally for our own Elasticsearch customers. Supergiant solves Kubernetes complications by allowing pre-packaged and re-deployable application topologies. In more specific terms, Supergiant lets you use Components, which are somewhat similar to a microservice. Components represent an almost-uniform set of Instances of software (e.g., Elasticsearch, MongoDB, your web application, etc.). They roll up all the various Kubernetes and cloud operations needed to deploy a complex topology into a compact entity that is easy to manage.
For Qbox, we went from needing 1:1 nodes to approximately 1:11 nodes. Sure, the nodes were larger, but the utilization made a substantial difference. As in the picture below, we could cram a whole bunch of little instances onto one big instance and not lose any performance. Smaller users would get the added benefit of higher network throughput by virtue of being on bigger resources, and they would also get greater CPU and RAM bursting.

Adding Up the Cost Savings
The packing algorithm in Supergiant, with its increased utilization, resulted in an immediate 25% drop in our infrastructure footprint. Remember, this came with better performance and fewer support tickets. We could dial up the packing algorithm and probably save even more money. Meanwhile, because our nodes were larger and far more predictable, we could much more fully leverage the economic goodness that is AWS Reserved Instances. We went with 1-year partial RI’s, which cut the remaining costs by 40%, give or take. Our customers still had the flexibility to spin up, down, and out their Elasticsearch nodes, without forcing us to constantly juggle, combine, split, and recombine our reservations. At the end of the day, we saved 50%. That is $600k per year that can go towards engineering salaries instead of enriching our IaaS provider.
- Download Kubernetes
- Get involved with the Kubernetes project on GitHub
- Post questions (or answer questions) on Stack Overflow
- Connect with the community on Slack
- Follow us on Twitter @Kubernetesio for latest updates
Kubernetes 1.4: Making it easy to run on Kubernetes anywhere
Today we’re happy to announce the release of Kubernetes 1.4.
Since the release to general availability just over 15 months ago, Kubernetes has continued to grow and achieve broad adoption across the industry. From brand new startups to large-scale businesses, users have described how big a difference Kubernetes has made in building, deploying and managing distributed applications. However, one of our top user requests has been making Kubernetes itself easier to install and use. We’ve taken that feedback to heart, and 1.4 has several major improvements.
These setup and usability enhancements are the result of concerted, coordinated work across the community - more than 20 contributors from SIG-Cluster-Lifecycle came together to greatly simplify the Kubernetes user experience, covering improvements to installation, startup, certificate generation, discovery, networking, and application deployment.
Additional product highlights in this release include simplified cluster deployment on any cloud, easy installation of stateful apps, and greatly expanded Cluster Federation capabilities, enabling a straightforward deployment across multiple clusters, and multiple clouds.
What’s new:
Cluster creation with two commands - To get started with Kubernetes a user must provision nodes, install Kubernetes and bootstrap the cluster. A common request from users is to have an easy, portable way to do this on any cloud (public, private, or bare metal).
- Kubernetes 1.4 introduces ‘kubeadm’ which reduces bootstrapping to two commands, with no complex scripts involved. Once kubernetes is installed, kubeadm init starts the master while kubeadm join joins the nodes to the cluster.
- Installation is also streamlined by packaging Kubernetes with its dependencies, for most major Linux distributions including Red Hat and Ubuntu Xenial. This means users can now install Kubernetes using familiar tools such as apt-get and yum.
- Add-on deployments, such as for an overlay network, can be reduced to one command by using a DaemonSet.
- Enabling this simplicity is a new certificates API and its use for kubelet TLS bootstrap, as well as a new discovery API.
Expanded stateful application support - While cloud-native applications are built to run in containers, many existing applications need additional features to make it easy to adopt containers. Most commonly, these include stateful applications such as batch processing, databases and key-value stores. In Kubernetes 1.4, we have introduced a number of features simplifying the deployment of such applications, including:
- ScheduledJob is introduced as Alpha so users can run batch jobs at regular intervals.
- Init-containers are Beta, addressing the need to run one or more containers before starting the main application, for example to sequence dependencies when starting a database or multi-tier app.
- Dynamic PVC Provisioning moved to Beta. This feature now enables cluster administrators to expose multiple storage provisioners and allows users to select them using a new Storage Class API object.
- Curated and pre-tested Helm charts for common stateful applications such as MariaDB, MySQL and Jenkins will be available for one-command launches using version 2 of the Helm Package Manager.
Cluster federation API additions - One of the most requested capabilities from our global customers has been the ability to build applications with clusters that span regions and clouds.
- Federated Replica Sets Beta - replicas can now span some or all clusters enabling cross region or cross cloud replication. The total federated replica count and relative cluster weights / replica counts are continually reconciled by a federated replica-set controller to ensure you have the pods you need in each region / cloud.
- Federated Services are now Beta, and secrets, events and namespaces have also been added to the federation API.
- Federated Ingress Alpha - starting with Google Cloud Platform (GCP), users can create a single L7 globally load balanced VIP that spans services deployed across a federation of clusters within GCP. With Federated Ingress in GCP, external clients point to a single IP address and are sent to the closest cluster with usable capacity in any region or zone of the federation in GCP.
Container security support - Administrators of multi-tenant clusters require the ability to provide varying sets of permissions among tenants, infrastructure components, and end users of the system.
- Pod Security Policy is a new object that enables cluster administrators to control the creation and validation of security contexts for pods/containers. Admins can associate service accounts, groups, and users with a set of constraints to define a security context.
- AppArmor support is added, enabling admins to run a more secure deployment, and provide better auditing and monitoring of their systems. Users can configure a container to run in an AppArmor profile by setting a single field.
Infrastructure enhancements - We continue adding to the scheduler, storage and client capabilities in Kubernetes based on user and ecosystem needs.
- Scheduler - introducing inter-pod affinity and anti-affinity Alpha for users who want to customize how Kubernetes co-locates or spreads their pods. Also priority scheduling capability for cluster add-ons such as DNS, Heapster, and the Kube Dashboard.
- Disruption SLOs - Pod Disruption Budget is introduced to limit impact of pods deleted by cluster management operations (such as node upgrade) at any one time.
- Storage - New volume plugins for Quobyte and Azure Data Disk have been added.
- Clients - Swagger 2.0 support is added, enabling non-Go clients.
Kubernetes Dashboard UI - lastly, a great looking Kubernetes Dashboard UI with 90% CLI parity for at-a-glance management.
For a complete list of updates see the release notes on GitHub. Apart from features the most impressive aspect of Kubernetes development is the community of contributors. This is particularly true of the 1.4 release, the full breadth of which will unfold in upcoming weeks.
Availability
Kubernetes 1.4 is available for download at get.k8s.io and via the open source repository hosted on GitHub. To get started with Kubernetes try the Hello World app.
To get involved with the project, join the weekly community meeting or start contributing to the project here (marked help).
Users and Case Studies
Over the past fifteen months since the Kubernetes 1.0 GA release, the adoption and enthusiasm for this project has surpassed everyone's imagination. Kubernetes runs in production at hundreds of organization and thousands more are in development. Here are a few unique highlights of companies running Kubernetes:
- Box -- accelerated their time to delivery from six months to launch a service to less than a week. Read more on how Box runs mission critical production services on Kubernetes.
- Pearson -- minimized complexity and increased their engineer productivity. Read how Pearson is using Kubernetes to reinvent the world’s largest educational company.
- OpenAI -- a non-profit artificial intelligence research company, built infrastructure for deep learning with Kubernetes to maximize productivity for researchers allowing them to focus on the science.
We’re very grateful to our community of over 900 contributors who contributed more than 5,000 commits to make this release possible. To get a closer look on how the community is using Kubernetes, join us at the user conference KubeCon to hear directly from users and contributors.
Connect
- Post questions (or answer questions) on Stack Overflow
- Connect with the community on Slack
- Follow us on Twitter @Kubernetesio for latest updates
Thank you for your support!
High performance network policies in Kubernetes clusters
Network Policies
Since the release of Kubernetes 1.3 back in July, users have been able to define and enforce network policies in their clusters. These policies are firewall rules that specify permissible types of traffic to, from and between pods. If requested, Kubernetes blocks all traffic that is not explicitly allowed. Policies are applied to groups of pods identified by common labels. Labels can then be used to mimic traditional segmented networks often used to isolate layers in a multi-tier application: You might identify your front-end and back-end pods by a specific “segment” label, for example. Policies control traffic between those segments and even traffic to or from external sources.
Segmenting traffic
What does this mean for the application developer? At last, Kubernetes has gained the necessary capabilities to provide "defence in depth". Traffic can be segmented and different parts of your application can be secured independently. For example, you can very easily protect each of your services via specific network policies: All the pods identified by a Replication Controller behind a service are already identified by a specific label. Therefore, you can use this same label to apply a policy to those pods.
Defense in depth has long been recommended as best practice. This kind of isolation between different parts or layers of an application is easily achieved on AWS and OpenStack by applying security groups to VMs.
However, prior to network policies, this kind of isolation for containers was not possible. VXLAN overlays can provide simple network isolation, but application developers need more fine grained control over the traffic accessing pods. As you can see in this simple example, Kubernetes network policies can manage traffic based on source and origin, protocol and port.
apiVersion: extensions/v1beta1
kind: NetworkPolicy
metadata:
name: pol1
spec:
podSelector:
matchLabels:
role: backend
ingress:
- from:
- podSelector:
matchLabels:
role: frontend
ports:
- protocol: tcp
port: 80
Not all network backends support policies
Network policies are an exciting feature, which the Kubernetes community has worked on for a long time. However, it requires a networking backend that is capable of applying the policies. By themselves, simple routed networks or the commonly used flannel network driver, for example, cannot apply network policy.
There are only a few policy-capable networking backends available for Kubernetes today: Romana, Calico, and Canal; with Weave indicating support in the near future. Red Hat’s OpenShift includes network policy features as well.
We chose Romana as the back-end for these tests because it configures pods to use natively routable IP addresses in a full L3 configuration. Network policies, therefore, can be applied directly by the host in the Linux kernel using iptables rules. This results is a high performance, easy to manage network.
Testing performance impact of network policies
After network policies have been applied, network packets need to be checked against those policies to verify that this type of traffic is permissible. But what is the performance penalty for applying a network policy to every packet? Can we use all the great policy features without impacting application performance? We decided to find out by running some tests.
Before we dive deeper into these tests, it is worth mentioning that ‘performance’ is a tricky thing to measure, network performance especially so.
Throughput (i.e. data transfer speed measured in Gpbs) and latency (time to complete a request) are common measures of network performance. The performance impact of running an overlay network on throughput and latency has been examined previously here and here. What we learned from these tests is that Kubernetes networks are generally pretty fast, and servers have no trouble saturating a 1G link, with or without an overlay. It's only when you have 10G networks that you need to start thinking about the overhead of encapsulation.
This is because during a typical network performance benchmark, there’s no application logic for the host CPU to perform, leaving it available for whatever network processing is required. For this reason we ran our tests in an operating range that did not saturate the link, or the CPU. This has the effect of isolating the impact of processing network policy rules on the host. For these tests we decided to measure latency as measured by the average time required to complete an HTTP request across a range of response sizes.
Test setup
- Hardware: Two servers with Intel Core i5-5250U CPUs (2 core, 2 threads per core) running at 1.60GHz, 16GB RAM and 512GB SSD. NIC: Intel Ethernet Connection I218-V (rev 03)
- Ubuntu 14.04.5
- Kubernetes 1.3 for data collection (verified samples on v1.4.0-beta.5)
- Romana v0.9.3.1
- Client and server load test software
For the tests we had a client pod send 2,000 HTTP requests to a server pod. HTTP requests were sent by the client pod at a rate that ensured that neither the server nor network ever saturated. We also made sure each request started a new TCP session by disabling persistent connections (i.e. HTTP keep-alive). We ran each test with different response sizes and measured the average request duration time (how long does it take to complete a request of that size). Finally, we repeated each set of measurements with different policy configurations.
Romana detects Kubernetes network policies when they’re created, translates them to Romana’s own policy format, and then applies them on all hosts. Currently, Kubernetes network policies only apply to ingress traffic. This means that outgoing traffic is not affected.
First, we conducted the test without any policies to establish a baseline. We then ran the test again, increasing numbers of policies for the test's network segment. The policies were of the common “allow traffic for a given protocol and port” format. To ensure packets had to traverse all the policies, we created a number of policies that did not match the packet, and finally a policy that would result in acceptance of the packet.
The table below shows the results, measured in milliseconds for different request sizes and numbers of policies:
Response Size
|Policies |.5k |1k |10k |100k |1M | |---|---|---|---|---| |0 |0.732 |0.738 |1.077 |2.532 |10.487 | |10 |0.744 |0.742 |1.084 |2.570 |10.556 | |50 |0.745 |0.755 |1.086 |2.580 |10.566 | |100 |0.762 |0.770 |1.104 |2.640 |10.597 | |200 |0.783 |0.783 |1.147 |2.652 |10.677 |
What we see here is that, as the number of policies increases, processing network policies introduces a very small delay, never more than 0.2ms, even after applying 200 policies. For all practical purposes, no meaningful delay is introduced when network policy is applied. Also worth noting is that doubling the response size from 0.5k to 1.0k had virtually no effect. This is because for very small responses, the fixed overhead of creating a new connection dominates the overall response time (i.e. the same number of packets are transferred).

Note: .5k and 1k lines overlap at ~.8ms in the chart above
Even as a percentage of baseline performance, the impact is still very small. The table below shows that for the smallest response sizes, the worst case delay remains at 7%, or less, up to 200 policies. For the larger response sizes the delay drops to about 1%.
Response Size
| Policies | .5k | 1k | 10k | 100k | 1M |
|---|---|---|---|---|---|
| 0 | 0.0% | 0.0% | 0.0% | 0.0% | 0.0% |
| 10 | -1.6% | -0.5% | -0.6% | -1.5% | -0.7% |
| 50 | -1.8% | -2.3% | -0.8% | -1.9% | -0.8% |
| 100 | -4.1% | -4.3% | -2.5% | -4.3% | -1.0% |
| 200 | -7.0% | -6.1% | -6.5% | -4.7% | -1.8% |

What is also interesting in these results is that as the number of policies increases, we notice that larger requests experience a smaller relative (i.e. percentage) performance degradation.
This is because when Romana installs iptables rules, it ensures that packets belonging to established connection are evaluated first. The full list of policies only needs to be traversed for the first packets of a connection. After that, the connection is considered ‘established’ and the connection’s state is stored in a fast lookup table. For larger requests, therefore, most packets of the connection are processed with a quick lookup in the ‘established’ table, rather than a full traversal of all rules. This iptables optimization results in performance that is largely independent of the number of network policies.
Such ‘flow tables’ are common optimizations in network equipment and it seems that iptables uses the same technique quite effectively.
Its also worth noting that in practise, a reasonably complex application may configure a few dozen rules per segment. It is also true that common network optimization techniques like Websockets and persistent connections will improve the performance of network policies even further (especially for small request sizes), since connections are held open longer and therefore can benefit from the established connection optimization.
These tests were performed using Romana as the backend policy provider and other network policy implementations may yield different results. However, what these tests show is that for almost every application deployment scenario, network policies can be applied using Romana as a network back end without any negative impact on performance.
If you wish to try it for yourself, we invite you to check out Romana. In our GitHub repo you can find an easy to use installer, which works with AWS, Vagrant VMs or any other servers. You can use it to quickly get you started with a Romana powered Kubernetes or OpenStack cluster.
Creating a PostgreSQL Cluster using Helm
Crunchy Data supplies a set of open source PostgreSQL and PostgreSQL related containers. The Crunchy PostgreSQL Container Suite includes containers that deploy, monitor, and administer the open source PostgreSQL database, for more details view this GitHub repository.
In this post we’ll show you how to deploy a PostgreSQL cluster using Helm, a Kubernetes package manager. For reference, the Crunchy Helm Chart examples used within this post are located here, and the pre-built containers can be found on DockerHub at this location.
This example will create the following in your Kubernetes cluster:
- postgres master service
- postgres replica service
- postgres 9.5 master database (pod)
- postgres 9.5 replica database (replication controller)

This example creates a simple Postgres streaming replication deployment with a master (read-write), and a single asynchronous replica (read-only). You can scale up the number of replicas dynamically.
Contents
The example is made up of various Chart files as follows:
| values.yaml | This file contains values which you can reference within the database templates allowing you to specify in one place values like database passwords |
| templates/master-pod.yaml | The postgres master database pod definition. This file causes a single postgres master pod to be created. |
| templates/master-service.yaml | The postgres master database has a service created to act as a proxy. This file causes a single service to be created to proxy calls to the master database. |
| templates/replica-rc.yaml | The postgres replica database is defined by this file. This file causes a replication controller to be created which allows the postgres replica containers to be scaled up on-demand. |
| templates/replica-service.yaml | This file causes the service proxy for the replica database container(s) to be created. |
Installation
Install Helm according to their GitHub documentation and then install the examples as follows:
helm init
cd crunchy-containers/examples/kubehelm
helm install ./crunchy-postgres
Testing
After installing the Helm chart, you will see the following services:
kubectl get services
NAME CLUSTER-IP EXTERNAL-IP PORT(S) AGE
crunchy-master 10.0.0.171 \<none\> 5432/TCP 1h
crunchy-replica 10.0.0.31 \<none\> 5432/TCP 1h
kubernetes 10.0.0.1 \<none\> 443/TCP 1h
It takes about a minute for the replica to begin replicating with the master. To test out replication, see if replication is underway with this command, enter password for the password when prompted:
psql -h crunchy-master -U postgres postgres -c 'table pg\_stat\_replication'
If you see a line returned from that query it means the master is replicating to the slave. Try creating some data on the master:
psql -h crunchy-master -U postgres postgres -c 'create table foo (id int)'
psql -h crunchy-master -U postgres postgres -c 'insert into foo values (1)'
Then verify that the data is replicated to the slave:
psql -h crunchy-replica -U postgres postgres -c 'table foo'
You can scale up the number of read-only replicas by running the following kubernetes command:
kubectl scale rc crunchy-replica --replicas=2
It takes 60 seconds for the replica to start and begin replicating from the master.
The Kubernetes Helm and Charts projects provide a streamlined way to package up complex applications and deploy them on a Kubernetes cluster. Deploying PostgreSQL clusters can sometimes prove challenging, but the task is greatly simplified using Helm and Charts.
- Download Kubernetes
- Get involved with the Kubernetes project on GitHub
- Post questions (or answer questions) on Stack Overflow
- Connect with the community on Slack
- Follow us on Twitter @Kubernetesio for latest updates
Deploying to Multiple Kubernetes Clusters with kit
Our Docker journey at InVision may sound familiar. We started with Docker in our development environments, trying to get consistency there first. We wrangled our legacy monolith application into Docker images and streamlined our Dockerfiles to minimize size and amp the efficiency. Things were looking good. Did we learn a lot along the way? For sure. But at the end of it all, we had our entire engineering team working with Docker locally for their development environments. Mission accomplished! Well, not quite. Development was one thing, but moving to production was a whole other ballgame.
Along Came Kubernetes
Kubernetes came into our lives during our evaluation of orchestrators and schedulers last December. AWS ECS was still fresh and Docker had just released 1.9 (networking overlay release). We spent the month evaluating our choices, narrowing it down to native Docker tooling (Machine, Swarm, Compose), ECS and Kubernetes. Well, needless to say, Kubernetes was our clear winner and we started the new year moving headlong to leverage Kubernetes to get us to production. But it wasn't long when we ran into a tiny complication...
Automated Deployments With A Catch
Here at InVision, we have a unique challenge. We just don’t have a single production environment running Kubernetes, but several, all needing automated updates via our CI/CD process. And although the code running on these environments was similar, the configurations were not. Things needed to work smoothly, automatically, as we couldn't afford to add friction to the deploy process or encumber our engineering teams.
Having several near duplicate clusters could easily turn into a Kubernetes manifest nightmare. Anti-patterns galore, as we copy and paste 95% of the manifests to get a new cluster. Scalable? No. Headache? Yes. Keeping those manifests up-to-date and accurate would be a herculean (and error-prone) task. We needed something easier, something that allows reuse, keeping the maintenance low, and that we could incorporate into our CI/CD system.
So after looking for a project or tooling that could fit our needs, we came up empty. At InVision, we love to create tools to help us solve problems, and figuring we may not be the only team in this situation we decided to roll up our sleeves and created something of our own. The result is our open-source tool, kit! (short for Kubernetes + git)
Hello kit!
kit is a suite of components that, when plugged into your CI/CD system and source control, allows you to continuously deploy updates (or entirely new services!) to as many clusters as needed, all leveraging webhooks and without having to host an external service.
Using kit’s templating format, you can define your service files once and have them reused across multiple clusters. It works by building on top of your usual Kubernetes manifest files allowing them to be defined once and then reused across clusters by only defining the unique configuration needed for that specific cluster. This allows you to easily build the orchestration for your application and deploy it to as many clusters as needed. It also allows the ability to group variations of your application so you could have clusters that run the “development” version of your application while others run the “production” version and so on.
Developers simply commit code to their branches as normal and kit deploys to all clusters running that service. Kit then manages updating the image and tag that is used for a given service directly to the repository containing all your kit manifest templates. This means any and all changes to your clusters, from environment variables, or configurations to image updates are all tracked under source control history providing you with an audit trail for every cluster you have.
We made all of this Open Source so you can check out the kit repo!
Is kit Right For Us?
If you are running Kubernetes across several clusters (or namespaces) all needing to continuously deploy, you bet! Because using kit doesn’t require hosting any external server, your team can leverage the webhooks you probably already have with github and your CI/CD system to get started. From there you create a repo to host your Kubernetes manifest files which tells what services are deployed to which clusters. Complexity of these files is greatly simplified thanks to kit’s templating engine.The kit-image-deployer component is incorporated into the CI/CD process and whenever a developer commits code to master and the build passes, it’s automatically deployed to all configured clusters.
So What Are The Components?
kit is comprised of several components each building on the next. The general flow is a developer commits code to their repository, an image is built and then kit-image-deployer commits the new image and tag to your manifests repository. From there the kit-deploymentizer runs, parsing all your manifest templates to generate the raw Kubernetes manifest files. Finally the kit-deployer runs and takes all the built manifest files and deploys them to all the appropriate clusters. Here is a summary of the components and the flow:
kit-image-deployer
A service that can be used to update given yaml files within a git repository with a new Docker image path. This can be used in collaboration with kit-deploymentizer and kit-deployer to automatically update the images used for a service across multiple clusters.
kit-deploymentizer
This service intelligently builds deployment files as to allow reusability of environment variables and other forms of configuration. It also supports aggregating these deployments for multiple clusters. In the end, it generates a list of clusters and a list of deployment files for each of these clusters. Best used in collaboration with kit-deployer and kit-image-deployer to achieve a continuous deployment workflow.
kit-deployer
Use this service to deploy files to multiple Kubernetes clusters. Just organize your manifest files into directories that match the names of your clusters (the name defined in your kubeconfig files). Then you provide a directory of kubeconfig files and the kit-deployer will asynchronously send all manifests up to their corresponding clusters.
So What's Next?
In the near future, we want to make deployments even smarter so as to handle updating things like mongo replicasets. We also want to add in smart monitoring to further improve on the self-healing nature of Kubernetes. We’re also working on adding additional integrations (such as Slack) and notification methods. And most importantly we’re working towards shifting more control to the individual developers of each service by allowing the kit manifest templates to exist in each individual service repository instead of a single master manifest repository. This will allow them to manage their service completely from development straight to production across all clusters.
We hope you take a closer look at kit and tell us what you think! Check out our InVision Engineering blog for more posts about the cool things we are up to at InVision. If you want to work on kit or other interesting things like this, click through to our jobs page. We'd love to hear from you!
- Download Kubernetes
- Get involved with the Kubernetes project on GitHub
- Post questions (or answer questions) on Stack Overflow
- Connect with the community on Slack
- Follow us on Twitter @Kubernetesio for latest updates
Cloud Native Application Interfaces
Standard Interfaces (or, the Thirteenth Factor)
When you say we need ‘software standards’ in erudite company, you get some interesting looks. Most concede that software standards have been central to the success of the boldest and most successful projects out there (like the Internet). Most are also skeptical about how they apply to the innovative world we live in today. Our projects are executed in week increments, not years. Getting bogged down behind mega-software-corporation-driven standards practices would be the death knell in this fluid, highly competitive world.
This isn’t about ‘those’ standards. The ones that emerge after years of deep consideration and negotiation that are eventually published by a body with a four-letter acronym for a name. This is about a different approach: finding what is working in the real world, and acting as a community to embrace it.
Let’s go back to first principles. To describe Cloud Native in one word, we'd choose "automatable".
Most existing applications are not.
Applications have many interfaces with their environment, whether with management infrastructure, shared services, or other applications. For us to remove the operator from patching, scaling, migrating an app from one environment to another, changing out dependencies, and handling of failure conditions, a set of well structured common interfaces is essential. It goes without saying that these interfaces must be designed for machines, not just humans. Machine-friendly interfaces allow automation systems to understand the systems under management, and create the loose coupling needed for applications to live in automated environments.
As containerized infrastructure gets built there are a set of critical interfaces available to applications that go far beyond what is available to a single node today. The adoption of ‘serverless patterns’ (meaning ephemeral, event driven function execution) will further compound the need to make sense of running code in an environment that is completely decoupled from the node. The services needed will start with application configuration and extend to monitoring, logging, autoscaling and beyond. The set of capabilities will only grow as applications continue to adapt to be fuller citizens in a "cloud native" world.
Exploring one example a little further, a number of service-discovery solutions have been developed but are often tied to a particular storage implementation, a particular programming language, a non-standard protocol, and/or are opinionated in some other way (e.g., dictating application naming structure). This makes them unsuitable for general-purpose use. While DNS has limitations (that will eventually need to be addressed), it's at least a standard protocol with room for innovation in its implementation. This is demonstrated by CoreDNS and other cloud-native DNS implementations.
When we look inside the systems at Google, we have been able to achieve very high levels of automation without formal interface definitions thanks to a largely homogeneous software and hardware environment. Adjacent systems can safely make assumptions about interfaces, and by providing a set of universally used libraries we can skirt the issue. A good example of this is our log format doesn’t need to be formally specified because the libraries that generate logs are maintained by the teams that maintain the logs processing systems. This means that we have been able to get by to date without something like fluentd (which is solving the problem in the community of interfacing with logging systems).
Even though Google has managed to get by this way, it hurts us. One way is when we acquire a company. Porting their technology to run in our automation systems requires a spectacular amount of work. Doing that work while continuing to innovate is particularly tough. Even more significant though, there’s a lot of innovation happening in the open source world that isn’t easy for us to tap into. When new technology emerges, we would like to be able to experiment with it, adopt it piecemeal, and perhaps contribute back to it. When you run a vertically integrated, bespoke stack, that is a hard thing to do.
The lack of standard interfaces leaves customers with three choices:
- Live with high operations cost (the status quo), and accept that your developers in many cases will spend the majority of their time dealing with the care and feeding of applications.
- Sign-up to be like Google (build your own everything, down to the concrete in the floor).
- Rely on a single, or a small collection of vendors to provide a complete solution and accept some degree of lock-in. Few in companies of any size (from enterprise to startup) find this appealing. It is our belief that an open community is more powerful and that customers benefit when there is competition at every layer of the stack. It should be possible to pull together a stack with best-of-breed capabilities at every level -- logging, monitoring, orchestration, container runtime environment, block and file-system storage, SDN technology, etc.
Standardizing interfaces (at least by convention) between the management system and applications is critical. One might consider the use of common conventions for interfaces as a thirteenth factor (expanding on the 12-factor methodology) in creating modern systems that work well in the cloud and at scale.
Kubernetes and Cloud Native Computing Foundation (CNCF) represent a great opportunity to support the emergence of standard interfaces, and to support the emergence of a fully automated software world. We’d love to see this community embrace the ideal of promoting standard interfaces from working technology. The obvious first step is to identify the immediate set of critical interfaces, and establish working groups in CNCF to start assess what exists in this area as candidates, and to sponsor work to start developing standard interfaces that work across container formats, orchestrators, developer tools and the myriad other systems that are needed to deliver on the Cloud Native vision.
Security Best Practices for Kubernetes Deployment
Note: some of the recommendations in this post are no longer current. Current cluster hardening options are described in this documentation.
Editor’s note: today’s post is by Amir Jerbi and Michael Cherny of Aqua Security, describing security best practices for Kubernetes deployments, based on data they’ve collected from various use-cases seen in both on-premises and cloud deployments.
Kubernetes provides many controls that can greatly improve your application security. Configuring them requires intimate knowledge with Kubernetes and the deployment’s security requirements. The best practices we highlight here are aligned to the container lifecycle: build, ship and run, and are specifically tailored to Kubernetes deployments. We adopted these best practices in our own SaaS deployment that runs Kubernetes on Google Cloud Platform.
The following are our recommendations for deploying a secured Kubernetes application:
**Ensure That Images Are Free of Vulnerabilities **
Having running containers with vulnerabilities opens your environment to the risk of being easily compromised. Many of the attacks can be mitigated simply by making sure that there are no software components that have known vulnerabilities.
Implement Continuous Security Vulnerability Scanning -- Containers might include outdated packages with known vulnerabilities (CVEs). This cannot be a ‘one off’ process, as new vulnerabilities are published every day. An ongoing process, where images are continuously assessed, is crucial to insure a required security posture.
Regularly Apply Security Updates to Your Environment -- Once vulnerabilities are found in running containers, you should always update the source image and redeploy the containers. Try to avoid direct updates (e.g. ‘apt-update’) to the running containers, as this can break the image-container relationship. Upgrading containers is extremely easy with the Kubernetes rolling updates feature - this allows gradually updating a running application by upgrading its images to the latest version.
Ensure That Only Authorized Images are Used in Your Environment
Without a process that ensures that only images adhering to the organization’s policy are allowed to run, the organization is open to risk of running vulnerable or even malicious containers. Downloading and running images from unknown sources is dangerous. It is equivalent to running software from an unknown vendor on a production server. Don’t do that.
Use private registries to store your approved images - make sure you only push approved images to these registries. This alone already narrows the playing field, reducing the number of potential images that enter your pipeline to a fraction of the hundreds of thousands of publicly available images. Build a CI pipeline that integrates security assessment (like vulnerability scanning), making it part of the build process.
The CI pipeline should ensure that only vetted code (approved for production) is used for building the images. Once an image is built, it should be scanned for security vulnerabilities, and only if no issues are found then the image would be pushed to a private registry, from which deployment to production is done. A failure in the security assessment should create a failure in the pipeline, preventing images with bad security quality from being pushed to the image registry.
There is work in progress being done in Kubernetes for image authorization plugins (expected in Kubernetes 1.4), which will allow preventing the shipping of unauthorized images. For more info see this pull request.
Limit Direct Access to Kubernetes Nodes
You should limit SSH access to Kubernetes nodes, reducing the risk for unauthorized access to host resource. Instead you should ask users to use "kubectl exec", which will provide direct access to the container environment without the ability to access the host.
You can use Kubernetes Authorization Plugins to further control user access to resources. This allows defining fine-grained-access control rules for specific namespace, containers and operations.
Create Administrative Boundaries between Resources
Limiting the scope of user permissions can reduce the impact of mistakes or malicious activities. A Kubernetes namespace allows you to partition created resources into logically named groups. Resources created in one namespace can be hidden from other namespaces. By default, each resource created by a user in Kubernetes cluster runs in a default namespace, called default. You can create additional namespaces and attach resources and users to them. You can use Kubernetes Authorization plugins to create policies that segregate access to namespace resources between different users.
For example: the following policy will allow ‘alice’ to read pods from namespace ‘fronto’.
{
"apiVersion": "abac.authorization.kubernetes.io/v1beta1",
"kind": "Policy",
"spec": {
"user": "alice",
"namespace": "fronto",
"resource": "pods",
"readonly": true
}
}
Define Resource Quota
An option of running resource-unbound containers puts your system in risk of DoS or “noisy neighbor” scenarios. To prevent and minimize those risks you should define resource quotas. By default, all resources in Kubernetes cluster are created with unbounded CPU and memory requests/limits. You can create resource quota policies, attached to Kubernetes namespace, in order to limit the CPU and memory a pod is allowed to consume.
The following is an example for namespace resource quota definition that will limit number of pods in the namespace to 4, limiting their CPU requests between 1 and 2 and memory requests between 1GB to 2GB.
compute-resources.yaml:
apiVersion: v1
kind: ResourceQuota
metadata:
name: compute-resources
spec:
hard:
pods: "4"
requests.cpu: "1"
requests.memory: 1Gi
limits.cpu: "2"
limits.memory: 2Gi
Assign a resource quota to namespace:
kubectl create -f ./compute-resources.yaml --namespace=myspace
Implement Network Segmentation
Running different applications on the same Kubernetes cluster creates a risk of one compromised application attacking a neighboring application. Network segmentation is important to ensure that containers can communicate only with those they are supposed to.
One of the challenges in Kubernetes deployments is creating network segmentation between pods, services and containers. This is a challenge due to the “dynamic” nature of container network identities (IPs), along with the fact that containers can communicate both inside the same node or between nodes.
Users of Google Cloud Platform can benefit from automatic firewall rules, preventing cross-cluster communication. A similar implementation can be deployed on-premises using network firewalls or SDN solutions. There is work being done in this area by the Kubernetes Network SIG, which will greatly improve the pod-to-pod communication policies. A new network policy API should address the need to create firewall rules around pods, limiting the network access that a containerized can have.
The following is an example of a network policy that controls the network for “backend” pods, only allowing inbound network access from “frontend” pods:
POST /apis/net.alpha.kubernetes.io/v1alpha1/namespaces/tenant-a/networkpolicys
{
"kind": "NetworkPolicy",
"metadata": {
"name": "pol1"
},
"spec": {
"allowIncoming": {
"from": [{
"pods": { "segment": "frontend" }
}],
"toPorts": [{
"port": 80,
"protocol": "TCP"
}]
},
"podSelector": {
"segment": "backend"
}
}
}
Read more about Network policies here.
Apply Security Context to Your Pods and Containers
When designing your containers and pods, make sure that you configure the security context for your pods, containers and volumes. A security context is a property defined in the deployment yaml. It controls the security parameters that will be assigned to the pod/container/volume. Some of the important parameters are:
| Security Context Setting | Description |
|---|---|
| SecurityContext->runAsNonRoot | Indicates that containers should run as non-root user |
| SecurityContext->Capabilities | Controls the Linux capabilities assigned to the container. |
| SecurityContext->readOnlyRootFilesystem | Controls whether a container will be able to write into the root filesystem. |
| PodSecurityContext->runAsNonRoot | Prevents running a container with 'root' user as part of the pod |
The following is an example for pod definition with security context parameters:
apiVersion: v1
kind: Pod
metadata:
name: hello-world
spec:
containers:
# specification of the pod’s containers
# ...
securityContext:
readOnlyRootFilesystem: true
runAsNonRoot: true
Reference here.
In case you are running containers with elevated privileges (--privileged) you should consider using the “DenyEscalatingExec” admission control. This control denies exec and attach commands to pods that run with escalated privileges that allow host access. This includes pods that run as privileged, have access to the host IPC namespace, and have access to the host PID namespace. For more details on admission controls, see the Kubernetes documentation.
Log Everything
Kubernetes supplies cluster-based logging, allowing to log container activity into a central log hub. When a cluster is created, the standard output and standard error output of each container can be ingested using a Fluentd agent running on each node into either Google Stackdriver Logging or into Elasticsearch and viewed with Kibana.
Summary
Kubernetes supplies many options to create a secured deployment. There is no one-size-fit-all solution that can be used everywhere, so a certain degree of familiarity with these options is required, as well as an understanding of how they can enhance your application’s security.
We recommend implementing the best practices that were highlighted in this blog, and use Kubernetes flexible configuration capabilities to incorporate security processes into the continuous integration pipeline, automating the entire process with security seamlessly “baked in”.
- Download Kubernetes
- Get involved with the Kubernetes project on GitHub
- Post questions (or answer questions) on Stack Overflow
- Connect with the community on Slack
- Follow us on Twitter @Kubernetesio for latest updates
Scaling Stateful Applications using Kubernetes Pet Sets and FlexVolumes with Datera Elastic Data Fabric
Introduction
Persistent volumes in Kubernetes are foundational as customers move beyond stateless workloads to run stateful applications. While Kubernetes has supported stateful applications such as MySQL, Kafka, Cassandra, and Couchbase for a while, the introduction of Pet Sets has significantly improved this support. In particular, the procedure to sequence the provisioning and startup, the ability to scale and associate durably by Pet Sets has provided the ability to automate to scale the “Pets” (applications that require consistent handling and durable placement).
Datera, elastic block storage for cloud deployments, has seamlessly integrated with Kubernetes through the FlexVolume framework. Based on the first principles of containers, Datera allows application resource provisioning to be decoupled from the underlying physical infrastructure. This brings clean contracts (aka, no dependency or direct knowledge of the underlying physical infrastructure), declarative formats, and eventually portability to stateful applications.
While Kubernetes allows for great flexibility to define the underlying application infrastructure through yaml configurations, Datera allows for that configuration to be passed to the storage infrastructure to provide persistence. Through the notion of Datera AppTemplates, in a Kubernetes environment, stateful applications can be automated to scale.
Deploying Persistent Storage
Persistent storage is defined using the Kubernetes PersistentVolume subsystem. PersistentVolumes are volume plugins and define volumes that live independently of the lifecycle of the pod that is using it. They are implemented as NFS, iSCSI, or by cloud provider specific storage system. Datera has developed a volume plugin for PersistentVolumes that can provision iSCSI block storage on the Datera Data Fabric for Kubernetes pods.
The Datera volume plugin gets invoked by kubelets on minion nodes and relays the calls to the Datera Data Fabric over its REST API. Below is a sample deployment of a PersistentVolume with the Datera plugin:
apiVersion: v1
kind: PersistentVolume
metadata:
name: pv-datera-0
spec:
capacity:
storage: 100Gi
accessModes:
- ReadWriteOnce
persistentVolumeReclaimPolicy: Retain
flexVolume:
driver: "datera/iscsi"
fsType: "xfs"
options:
volumeID: "kube-pv-datera-0"
size: “100"
replica: "3"
backstoreServer: "[tlx170.tlx.daterainc.com](http://tlx170.tlx.daterainc.com/):7717”
This manifest defines a PersistentVolume of 100 GB to be provisioned in the Datera Data Fabric, should a pod request the persistent storage.
[root@tlx241 /]# kubectl get pv
NAME CAPACITY ACCESSMODES STATUS CLAIM REASON AGE
pv-datera-0 100Gi RWO Available 8s
pv-datera-1 100Gi RWO Available 2s
pv-datera-2 100Gi RWO Available 7s
pv-datera-3 100Gi RWO Available 4s
Configuration
The Datera PersistenceVolume plugin is installed on all minion nodes. When a pod lands on a minion node with a valid claim bound to the persistent storage provisioned earlier, the Datera plugin forwards the request to create the volume on the Datera Data Fabric. All the options that are specified in the PersistentVolume manifest are sent to the plugin upon the provisioning request.
Once a volume is provisioned in the Datera Data Fabric, volumes are presented as an iSCSI block device to the minion node, and kubelet mounts this device for the containers (in the pod) to access it.

Using Persistent Storage
Kubernetes PersistentVolumes are used along with a pod using PersistentVolume Claims. Once a claim is defined, it is bound to a PersistentVolume matching the claim’s specification. A typical claim for the PersistentVolume defined above would look like below:
kind: PersistentVolumeClaim
apiVersion: v1
metadata:
name: pv-claim-test-petset-0
spec:
accessModes:
- ReadWriteOnce
resources:
requests:
storage: 100Gi
When this claim is defined and it is bound to a PersistentVolume, resources can be used with the pod specification:
[root@tlx241 /]# kubectl get pv
NAME CAPACITY ACCESSMODES STATUS CLAIM REASON AGE
pv-datera-0 100Gi RWO Bound default/pv-claim-test-petset-0 6m
pv-datera-1 100Gi RWO Bound default/pv-claim-test-petset-1 6m
pv-datera-2 100Gi RWO Available 7s
pv-datera-3 100Gi RWO Available 4s
[root@tlx241 /]# kubectl get pvc
NAME STATUS VOLUME CAPACITY ACCESSMODES AGE
pv-claim-test-petset-0 Bound pv-datera-0 0 3m
pv-claim-test-petset-1 Bound pv-datera-1 0 3m
A pod can use a PersistentVolume Claim like below:
apiVersion: v1
kind: Pod
metadata:
name: kube-pv-demo
spec:
containers:
- name: data-pv-demo
image: nginx
volumeMounts:
- name: test-kube-pv1
mountPath: /data
ports:
- containerPort: 80
volumes:
- name: test-kube-pv1
persistentVolumeClaim:
claimName: pv-claim-test-petset-0
The result is a pod using a PersistentVolume Claim as a volume. It in-turn sends the request to the Datera volume plugin to provision storage in the Datera Data Fabric.
[root@tlx241 /]# kubectl describe pods kube-pv-demo
Name: kube-pv-demo
Namespace: default
Node: tlx243/172.19.1.243
Start Time: Sun, 14 Aug 2016 19:17:31 -0700
Labels: \<none\>
Status: Running
IP: 10.40.0.3
Controllers: \<none\>
Containers:
data-pv-demo:
Container ID: [docker://ae2a50c25e03143d0dd721cafdcc6543fac85a301531110e938a8e0433f74447](about:blank)
Image: nginx
Image ID: [docker://sha256:0d409d33b27e47423b049f7f863faa08655a8c901749c2b25b93ca67d01a470d](about:blank)
Port: 80/TCP
State: Running
Started: Sun, 14 Aug 2016 19:17:34 -0700
Ready: True
Restart Count: 0
Environment Variables: \<none\>
Conditions:
Type Status
Initialized True
Ready True
PodScheduled True
Volumes:
test-kube-pv1:
Type: PersistentVolumeClaim (a reference to a PersistentVolumeClaim in the same namespace)
ClaimName: pv-claim-test-petset-0
ReadOnly: false
default-token-q3eva:
Type: Secret (a volume populated by a Secret)
SecretName: default-token-q3eva
QoS Tier: BestEffort
Events:
FirstSeen LastSeen Count From SubobjectPath Type Reason Message
--------- -------- ----- ---- ------------- -------- ------ -------
43s 43s 1 {default-scheduler } Normal Scheduled Successfully assigned kube-pv-demo to tlx243
42s 42s 1 {kubelet tlx243} spec.containers{data-pv-demo} Normal Pulling pulling image "nginx"
40s 40s 1 {kubelet tlx243} spec.containers{data-pv-demo} Normal Pulled Successfully pulled image "nginx"
40s 40s 1 {kubelet tlx243} spec.containers{data-pv-demo} Normal Created Created container with docker id ae2a50c25e03
40s 40s 1 {kubelet tlx243} spec.containers{data-pv-demo} Normal Started Started container with docker id ae2a50c25e03
The persistent volume is presented as iSCSI device at minion node (tlx243 in this case):
[root@tlx243 ~]# lsscsi
[0:2:0:0] disk SMC SMC2208 3.24 /dev/sda
[11:0:0:0] disk DATERA IBLOCK 4.0 /dev/sdb
[root@tlx243 datera~iscsi]# mount ``` grep sdb
/dev/sdb on /var/lib/kubelet/pods/6b99bd2a-628e-11e6-8463-0cc47ab41442/volumes/datera~iscsi/pv-datera-0 type xfs (rw,relatime,attr2,inode64,noquota)
Containers running in the pod see this device mounted at /data as specified in the manifest:
[root@tlx241 /]# kubectl exec kube-pv-demo -c data-pv-demo -it bash
root@kube-pv-demo:/# mount ``` grep data
/dev/sdb on /data type xfs (rw,relatime,attr2,inode64,noquota)
Using Pet Sets
Typically, pods are treated as stateless units, so if one of them is unhealthy or gets superseded, Kubernetes just disposes it. In contrast, a PetSet is a group of stateful pods that has a stronger notion of identity. The goal of a PetSet is to decouple this dependency by assigning identities to individual instances of an application that are not anchored to the underlying physical infrastructure.
A PetSet requires {0..n-1} Pets. Each Pet has a deterministic name, PetSetName-Ordinal, and a unique identity. Each Pet has at most one pod, and each PetSet has at most one Pet with a given identity. A PetSet ensures that a specified number of “pets” with unique identities are running at any given time. The identity of a Pet is comprised of:
- a stable hostname, available in DNS
- an ordinal index
- stable storage: linked to the ordinal & hostname
A typical PetSet definition using a PersistentVolume Claim looks like below:
# A headless service to create DNS records
apiVersion: v1
kind: Service
metadata:
name: test-service
labels:
app: nginx
spec:
ports:
- port: 80
name: web
clusterIP: None
selector:
app: nginx
---
apiVersion: apps/v1alpha1
kind: PetSet
metadata:
name: test-petset
spec:
serviceName: "test-service"
replicas: 2
template:
metadata:
labels:
app: nginx
annotations:
[pod.alpha.kubernetes.io/initialized:](http://pod.alpha.kubernetes.io/initialized:) "true"
spec:
terminationGracePeriodSeconds: 0
containers:
- name: nginx
image: [gcr.io/google\_containers/nginx-slim:0.8](http://gcr.io/google_containers/nginx-slim:0.8)
ports:
- containerPort: 80
name: web
volumeMounts:
- name: pv-claim
mountPath: /data
volumeClaimTemplates:
- metadata:
name: pv-claim
annotations:
[volume.alpha.kubernetes.io/storage-class:](http://volume.alpha.kubernetes.io/storage-class:) anything
spec:
accessModes: ["ReadWriteOnce"]
resources:
requests:
storage: 100Gi
We have the following PersistentVolume Claims available:
[root@tlx241 /]# kubectl get pvc
NAME STATUS VOLUME CAPACITY ACCESSMODES AGE
pv-claim-test-petset-0 Bound pv-datera-0 0 41m
pv-claim-test-petset-1 Bound pv-datera-1 0 41m
pv-claim-test-petset-2 Bound pv-datera-2 0 5s
pv-claim-test-petset-3 Bound pv-datera-3 0 2s
When this PetSet is provisioned, two pods get instantiated:
[root@tlx241 /]# kubectl get pods
NAMESPACE NAME READY STATUS RESTARTS AGE
default test-petset-0 1/1 Running 0 7s
default test-petset-1 1/1 Running 0 3s
Here is how the PetSet test-petset instantiated earlier looks like:
[root@tlx241 /]# kubectl describe petset test-petset
Name: test-petset
Namespace: default
Image(s): [gcr.io/google\_containers/nginx-slim:0.8](http://gcr.io/google_containers/nginx-slim:0.8)
Selector: app=nginx
Labels: app=nginx
Replicas: 2 current / 2 desired
Annotations: \<none\>
CreationTimestamp: Sun, 14 Aug 2016 19:46:30 -0700
Pods Status: 2 Running / 0 Waiting / 0 Succeeded / 0 Failed
No volumes.
No events.
Once a PetSet is instantiated, such as test-petset below, upon increasing the number of replicas (i.e. the number of pods started with that PetSet), more pods get instantiated and more PersistentVolume Claims get bound to new pods:
[root@tlx241 /]# kubectl patch petset test-petset -p'{"spec":{"replicas":"3"}}'
"test-petset” patched
[root@tlx241 /]# kubectl describe petset test-petset
Name: test-petset
Namespace: default
Image(s): [gcr.io/google\_containers/nginx-slim:0.8](http://gcr.io/google_containers/nginx-slim:0.8)
Selector: app=nginx
Labels: app=nginx
Replicas: 3 current / 3 desired
Annotations: \<none\>
CreationTimestamp: Sun, 14 Aug 2016 19:46:30 -0700
Pods Status: 3 Running / 0 Waiting / 0 Succeeded / 0 Failed
No volumes.
No events.
[root@tlx241 /]# kubectl get pods
NAME READY STATUS RESTARTS AGE
test-petset-0 1/1 Running 0 29m
test-petset-1 1/1 Running 0 28m
test-petset-2 1/1 Running 0 9s
Now the PetSet is running 3 pods after patch application.
When the above PetSet definition is patched to have one more replica, it introduces one more pod in the system. This in turn results in one more volume getting provisioned on the Datera Data Fabric. So volumes get dynamically provisioned and attached to a pod upon the PetSet scaling up.
To support the notion of durability and consistency, if a pod moves from one minion to another, volumes do get attached (mounted) to the new minion node and detached (unmounted) from the old minion to maintain persistent access to the data.
Conclusion
This demonstrates Kubernetes with Pet Sets orchestrating stateful and stateless workloads. While the Kubernetes community is working on expanding the FlexVolume framework’s capabilities, we are excited that this solution makes it possible for Kubernetes to be run more widely in the datacenters.
Join and contribute: Kubernetes Storage SIG.
- Download Kubernetes
- Get involved with the Kubernetes project on GitHub
- Post questions (or answer questions) on Stack Overflow
- Connect with the community on the k8s Slack
- Follow us on Twitter @Kubernetesio for latest updates
Kubernetes Namespaces: use cases and insights
“Who's on first, What's on second, I Don't Know's on third”
Who's on First? by Abbott and Costello
Introduction
Kubernetes is a system with several concepts. Many of these concepts get manifested as “objects” in the RESTful API (often called “resources” or “kinds”). One of these concepts is Namespaces. In Kubernetes, Namespaces are the way to partition a single Kubernetes cluster into multiple virtual clusters. In this post we’ll highlight examples of how our customers are using Namespaces.
But first, a metaphor: Namespaces are like human family names. A family name, e.g. Wong, identifies a family unit. Within the Wong family, one of its members, e.g. Sam Wong, is readily identified as just “Sam” by the family. Outside of the family, and to avoid “Which Sam?” problems, Sam would usually be referred to as “Sam Wong”, perhaps even “Sam Wong from San Francisco”.
Namespaces are a logical partitioning capability that enable one Kubernetes cluster to be used by multiple users, teams of users, or a single user with multiple applications without concern for undesired interaction. Each user, team of users, or application may exist within its Namespace, isolated from every other user of the cluster and operating as if it were the sole user of the cluster. (Furthermore, Resource Quotas provide the ability to allocate a subset of a Kubernetes cluster’s resources to a Namespace.)
For all but the most trivial uses of Kubernetes, you will benefit by using Namespaces. In this post, we’ll cover the most common ways that we’ve seen Kubernetes users on Google Cloud Platform use Namespaces, but our list is not exhaustive and we’d be interested to learn other examples from you.
Use-cases covered
- Roles and Responsibilities in an enterprise for namespaces
- Partitioning landscapes: dev vs. test vs. prod
- Customer partitioning for non-multi-tenant scenarios
- When not to use namespaces
Use-case #1: Roles and Responsibilities in an Enterprise
A typical enterprise contains multiple business/technology entities that operate independently of each other with some form of overarching layer of controls managed by the enterprise itself. Operating a Kubernetes clusters in such an environment can be done effectively when roles and responsibilities pertaining to Kubernetes are defined.
Below are a few recommended roles and their responsibilities that can make managing Kubernetes clusters in a large scale organization easier.
- Designer/Architect role: This role will define the overall namespace strategy, taking into account product/location/team/cost-center and determining how best to map these to Kubernetes Namespaces. Investing in such a role prevents namespace proliferation and “snowflake” Namespaces.
- Admin role: This role has admin access to all Kubernetes clusters. Admins can create/delete clusters and add/remove nodes to scale the clusters. This role will be responsible for patching, securing and maintaining the clusters. As well as implementing Quotas between the different entities in the organization. The Kubernetes Admin is responsible for implementing the namespaces strategy defined by the Designer/Architect.
These two roles and the actual developers using the clusters will also receive support and feedback from the enterprise security and network teams on issues such as security isolation requirements and how namespaces fit this model, or assistance with networking subnets and load-balancers setup.
Anti-patterns
- Isolated Kubernetes usage “Islands” without centralized control: Without the initial investment in establishing a centralized control structure around Kubernetes management there is a risk of ending with a “mushroom farm” topology i.e. no defined size/shape/structure of clusters within the org. The result is a difficult to manage, higher risk and elevated cost due to underutilization of resources.
- Old-world IT controls choking usage and innovation: A common tendency is to try and transpose existing on-premises controls/procedures onto new dynamic frameworks .This results in weighing down the agile nature of these frameworks and nullifying the benefits of rapid dynamic deployments.
- Omni-cluster: Delaying the effort of creating the structure/mechanism for namespace management can result in one large omni-cluster that is hard to peel back into smaller usage groups.
Use-case #2: Using Namespaces to partition development landscapes
Software development teams customarily partition their development pipelines into discrete units. These units take various forms and use various labels but will tend to result in a discrete dev environment, a testing|QA environment, possibly a staging environment and finally a production environment. The resulting layouts are ideally suited to Kubernetes Namespaces. Each environment or stage in the pipeline becomes a unique namespace.
The above works well as each namespace can be templated and mirrored to the next subsequent environment in the dev cycle, e.g. dev->qa->prod. The fact that each namespace is logically discrete allows the development teams to work within an isolated “development” namespace. DevOps (The closest role at Google is called Site Reliability Engineering “SRE”) will be responsible for migrating code through the pipelines and ensuring that appropriate teams are assigned to each environment. Ultimately, DevOps is solely responsible for the final, production environment where the solution is delivered to the end-users.
A major benefit of applying namespaces to the development cycle is that the naming of software components (e.g. micro-services/endpoints) can be maintained without collision across the different environments. This is due to the isolation of the Kubernetes namespaces, e.g. serviceX in dev would be referred to as such across all the other namespaces; but, if necessary, could be uniquely referenced using its full qualified name serviceX.development.mycluster.com in the development namespace of mycluster.com.
Anti-patterns
- Abusing the namespace benefit resulting in unnecessary environments in the development pipeline. So; if you don’t do staging deployments, don’t create a “staging” namespace.
- Overcrowding namespaces e.g. having all your development projects in one huge “development” namespace. Since namespaces attempt to partition, use these to partition by your projects as well. Since Namespaces are flat, you may wish something similar to: projectA-dev, projectA-prod as projectA’s namespaces.
Use-case #3: Partitioning of your Customers
If you are, for example, a consulting company that wishes to manage separate applications for each of your customers, the partitioning provided by Namespaces aligns well. You could create a separate Namespace for each customer, customer project or customer business unit to keep these distinct while not needing to worry about reusing the same names for resources across projects.
An important consideration here is that Kubernetes does not currently provide a mechanism to enforce access controls across namespaces and so we recommend that you do not expose applications developed using this approach externally.
Anti-patterns
- Multi-tenant applications don’t need the additional complexity of Kubernetes namespaces since the application is already enforcing this partitioning.
- Inconsistent mapping of customers to namespaces. For example, you win business at a global corporate, you may initially consider one namespace for the enterprise not taking into account that this customer may prefer further partitioning e.g. BigCorp Accounting and BigCorp Engineering. In this case, the customer’s departments may each warrant a namespace.
When Not to use Namespaces
In some circumstances Kubernetes Namespaces will not provide the isolation that you need. This may be due to geographical, billing or security factors. For all the benefits of the logical partitioning of namespaces, there is currently no ability to enforce the partitioning. Any user or resource in a Kubernetes cluster may access any other resource in the cluster regardless of namespace. So, if you need to protect or isolate resources, the ultimate namespace is a separate Kubernetes cluster against which you may apply your regular security|ACL controls.
Another time when you may consider not using namespaces is when you wish to reflect a geographically distributed deployment. If you wish to deploy close to US, EU and Asia customers, a Kubernetes cluster deployed locally in each region is recommended.
When fine-grained billing is required perhaps to chargeback by cost-center or by customer, the recommendation is to leave the billing to your infrastructure provider. For example, in Google Cloud Platform (GCP), you could use a separate GCP Project or Billing Account and deploy a Kubernetes cluster to a specific-customer’s project(s).
In situations where confidentiality or compliance require complete opaqueness between customers, a Kubernetes cluster per customer/workload will provide the desired level of isolation. Once again, you should delegate the partitioning of resources to your provider.
Work is underway to provide (a) ACLs on Kubernetes Namespaces to be able to enforce security; (b) to provide Kubernetes Cluster Federation. Both mechanisms will address the reasons for the separate Kubernetes clusters in these anti-patterns.
An easy to grasp anti-pattern for Kubernetes namespaces is versioning. You should not use Namespaces as a way to disambiguate versions of your Kubernetes resources. Support for versioning is present in the containers and container registries as well as in Kubernetes Deployment resource. Multiple versions should coexist by utilizing the Kubernetes container model which also provides for auto migration between versions with deployments. Furthermore versions scope namespaces will cause massive proliferation of namespaces within a cluster making it hard to manage.
Caveat Gubernator
You may wish to, but you cannot create a hierarchy of namespaces. Namespaces cannot be nested within one another. You can’t, for example, create my-team.my-org as a namespace but could perhaps have team-org.
Namespaces are easy to create and use but it’s also easy to deploy code inadvertently into the wrong namespace. Good DevOps hygiene suggests documenting and automating processes where possible and this will help. The other way to avoid using the wrong namespace is to set a kubectl context.
As mentioned previously, Kubernetes does not (currently) provide a mechanism to enforce security across Namespaces. You should only use Namespaces within trusted domains (e.g. internal use) and not use Namespaces when you need to be able to provide guarantees that a user of the Kubernetes cluster or ones its resources be unable to access any of the other Namespaces resources. This enhanced security functionality is being discussed in the Kubernetes Special Interest Group for Authentication and Authorization, get involved at SIG-Auth.
- Download Kubernetes
- Get involved with the Kubernetes project on GitHub
- Post questions (or answer questions) on Stack Overflow
- Connect with the community on Slack
- Follow us on Twitter @Kubernetesio for latest updates
SIG Apps: build apps for and operate them in Kubernetes
Editor's note: This post is by the Kubernetes SIG-Apps team sharing how they focus on the developer and devops experience of running applications in Kubernetes.
Kubernetes is an incredible manager for containerized applications. Because of this, numerous companies have started to run their applications in Kubernetes.
Kubernetes Special Interest Groups (SIGs) have been around to support the community of developers and operators since around the 1.0 release. People organized around networking, storage, scaling and other operational areas.
As Kubernetes took off, so did the need for tools, best practices, and discussions around building and operating cloud native applications. To fill that need the Kubernetes SIG Apps came into existence.
SIG Apps is a place where companies and individuals can:
- see and share demos of the tools being built to enable app operators
- learn about and discuss needs of app operators
- organize around efforts to improve the experience
Since the inception of SIG Apps we’ve had demos of projects like KubeFuse, KPM, and StackSmith. We’ve also executed on a survey of those operating apps in Kubernetes.
From the survey results we’ve learned a number of things including:
- That 81% of respondents want some form of autoscaling
- To store secret information 47% of respondents use built-in secrets. At reset these are not currently encrypted. (If you want to help add encryption there is an issue for that.)
- The most responded questions had to do with 3rd party tools and debugging
- For 3rd party tools to manage applications there were no clear winners. There are a wide variety of practices
- An overall complaint about a lack of useful documentation. (Help contribute to the docs here.)
- There’s a lot of data. Many of the responses were optional so we were surprised that 935 of all questions across all candidates were filled in. If you want to look at the data yourself it’s available online.
When it comes to application operation there’s still a lot to be figured out and shared. If you've got opinions about running apps, tooling to make the experience better, or just want to lurk and learn about what's going please come join us.
- Chat with us on SIG-Apps Slack channel
- Email as at SIG-Apps mailing list
- Join our open meetings: weekly at 9AM PT on Wednesdays, full details here.
Create a Couchbase cluster using Kubernetes
Couchbase Server is an open source, distributed NoSQL document-oriented database. It exposes a fast key-value store with managed cache for submillisecond data operations, purpose-built indexers for fast queries and a query engine for executing SQL queries. For mobile and Internet of Things (IoT) environments, Couchbase Lite runs native on-device and manages sync to Couchbase Server.
Couchbase Server 4.5 was recently announced, bringing many new features, including production certified support for Docker. Couchbase is supported on a wide variety of orchestration frameworks for Docker containers, such as Kubernetes, Docker Swarm and Mesos, for full details visit this page.
This blog post will explain how to create a Couchbase cluster using Kubernetes. This setup is tested using Kubernetes 1.3.3, Amazon Web Services, and Couchbase 4.5 Enterprise Edition.
Like all good things, this post is standing on the shoulder of giants. The design pattern used in this blog was defined in a Friday afternoon hack with @saturnism. A working version of the configuration files was contributed by @r_schmiddy.
Couchbase Cluster
A cluster of Couchbase Servers is typically deployed on commodity servers. Couchbase Server has a peer-to-peer topology where all the nodes are equal and communicate to each other on demand. There is no concept of master nodes, slave nodes, config nodes, name nodes, head nodes, etc, and all the software loaded on each node is identical. It allows the nodes to be added or removed without considering their “type”. This model works particularly well with cloud infrastructure in general. For Kubernetes, this means that we can use the exact same container image for all Couchbase nodes.
A typical Couchbase cluster creation process looks like:
- Start Couchbase: Start n Couchbase servers
- Create cluster: Pick any server, and add all other servers to it to create the cluster
- Rebalance cluster: Rebalance the cluster so that data is distributed across the cluster
In order to automate using Kubernetes, the cluster creation is split into a “master” and “worker” Replication Controller (RC).
The master RC has only one replica and is also published as a Service. This provides a single reference point to start the cluster creation. By default services are visible only from inside the cluster. This service is also exposed as a load balancer. This allows the Couchbase Web Console to be accessible from outside the cluster.
The worker RC use the exact same image as master RC. This keeps the cluster homogenous which allows to scale the cluster easily.

Configuration files used in this blog are available here. Let’s create the Kubernetes resources to create the Couchbase cluster.
Create Couchbase “master” Replication Controller
Couchbase master RC can be created using the following configuration file:
apiVersion: v1
kind: ReplicationController
metadata:
name: couchbase-master-rc
spec:
replicas: 1
selector:
app: couchbase-master-pod
template:
metadata:
labels:
app: couchbase-master-pod
spec:
containers:
- name: couchbase-master
image: arungupta/couchbase:k8s
env:
- name: TYPE
value: MASTER
ports:
- containerPort: 8091
----
apiVersion: v1
kind: Service
metadata:
name: couchbase-master-service
labels:
app: couchbase-master-service
spec:
ports:
- port: 8091
selector:
app: couchbase-master-pod
type: LoadBalancer
This configuration file creates a couchbase-master-rc Replication Controller. This RC has one replica of the pod created using the arungupta/couchbase:k8s image. This image is created using the Dockerfile here. This Dockerfile uses a configuration script to configure the base Couchbase Docker image. First, it uses Couchbase REST API to setup memory quota, setup index, data and query services, security credentials, and loads a sample data bucket. Then, it invokes the appropriate Couchbase CLI commands to add the Couchbase node to the cluster or add the node and rebalance the cluster. This is based upon three environment variables:
- TYPE: Defines whether the joining pod is worker or master
- AUTO_REBALANCE: Defines whether the cluster needs to be rebalanced
- COUCHBASE_MASTER: Name of the master service
For this first configuration file, the TYPE environment variable is set to MASTER and so no additional configuration is done on the Couchbase image.
Let’s create and verify the artifacts.
Create Couchbase master RC:
kubectl create -f cluster-master.yml
replicationcontroller "couchbase-master-rc" created
service "couchbase-master-service" created
List all the services:
kubectl get svc
NAME CLUSTER-IP EXTERNAL-IP PORT(S) AGE
couchbase-master-service 10.0.57.201 8091/TCP 30s
kubernetes 10.0.0.1 \<none\> 443/TCP 5h
Output shows that couchbase-master-service is created.
Get all the pods:
kubectl get po
NAME READY STATUS RESTARTS AGE
couchbase-master-rc-97mu5 1/1 Running 0 1m
A pod is created using the Docker image specified in the configuration file.
Check the RC:
kubectl get rc
NAME DESIRED CURRENT AGE
couchbase-master-rc 1 1 1m
It shows that the desired and current number of pods in the RC are matching.
Describe the service:
kubectl describe svc couchbase-master-service
Name: couchbase-master-service
Namespace: default
Labels: app=couchbase-master-service
Selector: app=couchbase-master-pod
Type: LoadBalancer
IP: 10.0.57.201
LoadBalancer Ingress: a94f1f286590c11e68e100283628cd6c-1110696566.us-west-2.elb.amazonaws.com
Port: \<unset\> 8091/TCP
NodePort: \<unset\> 30019/TCP
Endpoints: 10.244.2.3:8091
Session Affinity: None
Events:
FirstSeen LastSeen Count From SubobjectPath Type Reason Message
--------- -------- ----- ---- ------------- -------- ------ -------
2m 2m 1 {service-controller } Normal CreatingLoadBalancer Creating load balancer
2m 2m 1 {service-controller } Normal CreatedLoadBalancer Created load balancer
Among other details, the address shown next to LoadBalancer Ingress is relevant for us. This address is used to access the Couchbase Web Console.
Wait for ~3 mins for the load balancer to be ready to receive requests. Couchbase Web Console is accessible at <ip>:8091 and looks like:

The image used in the configuration file is configured with the Administrator username and password password. Enter the credentials to see the console:

Click on Server Nodes to see how many Couchbase nodes are part of the cluster. As expected, it shows only one node:

Click on Data Buckets to see a sample bucket that was created as part of the image:

This shows the travel-sample bucket is created and has 31,591 JSON documents.
Create Couchbase “worker” Replication Controller
Now, let’s create a worker replication controller. It can be created using the configuration file:
apiVersion: v1
kind: ReplicationController
metadata:
name: couchbase-worker-rc
spec:
replicas: 1
selector:
app: couchbase-worker-pod
template:
metadata:
labels:
app: couchbase-worker-pod
spec:
containers:
- name: couchbase-worker
image: arungupta/couchbase:k8s
env:
- name: TYPE
value: "WORKER"
- name: COUCHBASE\_MASTER
value: "couchbase-master-service"
- name: AUTO\_REBALANCE
value: "false"
ports:
- containerPort: 8091
This RC also creates a single replica of Couchbase using the same arungupta/couchbase:k8s image. The key differences here are:
- TYPE environment variable is set to WORKER. This adds a worker Couchbase node to be added to the cluster.
- COUCHBASE_MASTER environment variable is passed the value of couchbase-master-service. This uses the service discovery mechanism built into Kubernetes for pods in the worker and the master to communicate.
- AUTO_REBALANCE environment variable is set to false. This ensures that the node is only added to the cluster but the cluster itself is not rebalanced. Rebalancing is required to re-distribute data across multiple nodes of the cluster. This is the recommended way as multiple nodes can be added first, and then cluster can be manually rebalanced using the Web Console. Let’s create a worker:
kubectl create -f cluster-worker.yml
replicationcontroller "couchbase-worker-rc" created
Check the RC:
kubectl get rc
NAME DESIRED CURRENT AGE
couchbase-master-rc 1 1 6m
couchbase-worker-rc 1 1 22s
A new couchbase-worker-rc is created where the desired and the current number of instances are matching.
Get all pods:
kubectl get po
NAME READY STATUS RESTARTS AGE
couchbase-master-rc-97mu5 1/1 Running 0 6m
couchbase-worker-rc-4ik02 1/1 Running 0 46s
An additional pod is now created. Each pod’s name is prefixed with the corresponding RC’s name. For example, a worker pod is prefixed with couchbase-worker-rc.
Couchbase Web Console gets updated to show that a new Couchbase node is added. This is evident by red circle with the number 1 on the Pending Rebalance tab.

Clicking on the tab shows the IP address of the node that needs to be rebalanced:

Scale Couchbase cluster
Now, let’s scale the Couchbase cluster by scaling the replicas for worker RC:
kubectl scale rc couchbase-worker-rc --replicas=3
replicationcontroller "couchbase-worker-rc" scaled
Updated state of RC shows that 3 worker pods have been created:
kubectl get rc
NAME DESIRED CURRENT AGE
couchbase-master-rc 1 1 8m
couchbase-worker-rc 3 3 2m
This can be verified again by getting the list of pods:
kubectl get po
NAME READY STATUS RESTARTS AGE
couchbase-master-rc-97mu5 1/1 Running 0 8m
couchbase-worker-rc-4ik02 1/1 Running 0 2m
couchbase-worker-rc-jfykx 1/1 Running 0 53s
couchbase-worker-rc-v8vdw 1/1 Running 0 53s
Pending Rebalance tab of Couchbase Web Console shows that 3 servers have now been added to the cluster and needs to be rebalanced.

Rebalance Couchbase Cluster
Finally, click on Rebalance button to rebalance the cluster. A message window showing the current state of rebalance is displayed:

Once all the nodes are rebalanced, Couchbase cluster is ready to serve your requests:

In addition to creating a cluster, Couchbase Server supports a range of high availability and disaster recovery (HA/DR) strategies. Most HA/DR strategies rely on a multi-pronged approach of maximizing availability, increasing redundancy within and across data centers, and performing regular backups.
Now that your Couchbase cluster is ready, you can run your first sample application.
For further information check out the Couchbase Developer Portal and Forums, or see questions on Stack Overflow.
- Download Kubernetes
- Get involved with the Kubernetes project on GitHub
- Post questions (or answer questions) on Stack Overflow
- Connect with the community on Slack
- Follow @Kubernetesio on Twitter for latest updates
Challenges of a Remotely Managed, On-Premises, Bare-Metal Kubernetes Cluster
Introduction
The recently announced Platform9 Managed Kubernetes (PMK) is an on-premises enterprise Kubernetes solution with an unusual twist: while clusters run on a user’s internal hardware, their provisioning, monitoring, troubleshooting and overall life cycle is managed remotely from the Platform9 SaaS application. While users love the intuitive experience and ease of use of this deployment model, this approach poses interesting technical challenges. In this article, we will first describe the motivation and deployment architecture of PMK, and then present an overview of the technical challenges we faced and how our engineering team addressed them.
Multi-OS bootstrap model
Like its predecessor, Managed OpenStack, PMK aims to make it as easy as possible for an enterprise customer to deploy and operate a “private cloud”, which, in the current context, means one or more Kubernetes clusters. To accommodate customers who standardize on a specific Linux distro, our installation process uses a “bare OS” or “bring your own OS” model, which means that an administrator deploys PMK to existing Linux nodes by installing a simple RPM or Deb package on their favorite OS (Ubuntu-14, CentOS-7, or RHEL-7). The package, which the administrator downloads from their Platform9 SaaS portal, starts an agent which is preconfigured with all the information and credentials needed to securely connect to and register itself with the customer’s Platform9 SaaS controller running on the WAN.
Node management
The first challenge was configuring Kubernetes nodes in the absence of a bare-metal cloud API and SSH access into nodes. We solved it using the node pool concept and configuration management techniques. Every node running the agent automatically shows up in the SaaS portal, which allows the user to authorize the node for use with Kubernetes. A newly authorized node automatically enters a node pool, indicating that it is available but not used in any clusters. Independently, the administrator can create one or more Kubernetes clusters, which start out empty. At any later time, he or she can request one or more nodes to be attached to any cluster. PMK fulfills the request by transferring the specified number of nodes from the pool to the cluster. When a node is authorized, its agent becomes a configuration management agent, polling for instructions from a CM server running in the SaaS application and capable of downloading and configuring software.
Cluster creation and node attach/detach operations are exposed to administrators via a REST API, a CLI utility named qb, and the SaaS-based Web UI. The following screenshot shows the Web UI displaying one 3-node cluster named clus100, one empty cluster clus101, and the three nodes.

Cluster initialization
The first time one or more nodes are attached to a cluster, PMK configures the nodes to form a complete Kubernetes cluster. Currently, PMK automatically decides the number and placement of Master and Worker nodes. In the future, PMK will give administrators an “advanced mode” option allowing them to override and customize those decisions. Through the CM server, PMK then sends to each node a configuration and a set of scripts to initialize each node according to the configuration. This includes installing or upgrading Docker to the required version; starting 2 docker daemons (bootstrap and main), creating the etcd K/V store, establishing the flannel network layer, starting kubelet, and running the Kubernetes appropriate for the node’s role (master vs. worker). The following diagram shows the component layout of a fully formed cluster.

Containerized kubelet?
Another hurdle we encountered resulted from our original decision to run kubelet as recommended by the Multi-node Docker Deployment Guide. We discovered that this approach introduces complexities that led to many difficult-to-troubleshoot bugs that were sensitive to the combined versions of Kubernetes, Docker, and the node OS. Example: kubelet’s need to mount directories containing secrets into containers to support the Service Accounts mechanism. It turns out that doing this from inside of a container is tricky, and requires a complex sequence of steps that turned out to be fragile. After fixing a continuing stream of issues, we finally decided to run kubelet as a native program on the host OS, resulting in significantly better stability.
Overcoming networking hurdles
The Beta release of PMK currently uses flannel with UDP back-end for the network layer. In a Kubernetes cluster, many infrastructure services need to communicate across nodes using a variety of ports (443, 4001, etc..) and protocols (TCP and UDP). Often, customer nodes intentionally or unintentionally block some or all of the traffic, or run existing services that conflict with the required ports, resulting in non-obvious failures. To address this, we try to detect configuration problems early and inform the administrator immediately. PMK runs a “preflight” check on all nodes participating in a cluster before installing the Kubernetes software. This means running small test programs on each node to verify that (1) the required ports are available for binding and listening; and (2) nodes can connect to each other using all required ports and protocols. These checks run in parallel and take less than a couple of seconds before cluster initialization.
Monitoring
One of the values of a SaaS-managed private cloud is constant monitoring and early detection of problems by the SaaS team. Issues that can be addressed without intervention by the customer are handled automatically, while others trigger proactive communication with the customer via UI alerts, email, or real-time channels. Kubernetes monitoring is a huge topic worthy of its own blog post, so we’ll just briefly touch upon it. We broadly classify the problem into layers: (1) hardware & OS, (2) Kubernetes core (e.g. API server, controllers and kubelets), (3) add-ons (e.g. SkyDNS & ServiceLoadbalancer) and (4) applications. We are currently focused on layers 1-3. A major source of issues we’ve seen is add-on failures. If either DNS or the ServiceLoadbalancer reverse http proxy (soon to be upgraded to an Ingress Controller) fails, application services will start failing. One way we detect such failures is by monitoring the components using the Kubernetes API itself, which is proxied into the SaaS controller, allowing the PMK support team to monitor any cluster resource. To detect service failure, one metric we pay attention to is pod restarts. A high restart count indicates that a service is continually failing.
Future topics
We faced complex challenges in other areas that deserve their own posts: (1) Authentication and authorization with Keystone, the identity manager used by Platform9 products; (2) Software upgrades, i.e. how to make them brief and non-disruptive to applications; and (3) Integration with customer’s external load-balancers (in the absence of good automation APIs).
Conclusion
Platform9 Managed Kubernetes uses a SaaS-managed model to try to hide the complexity of deploying, operating and maintaining bare-metal Kubernetes clusters in customers’ data centers. These requirements led to the development of a unique cluster deployment and management architecture, which in turn led to unique technical challenges.This article described an overview of some of those challenges and how we solved them. For more information on the motivation behind PMK, feel free to view Madhura Maskasky's blog post.
Why OpenStack's embrace of Kubernetes is great for both communities
Today, Mirantis, the leading contributor to OpenStack, announced that it will re-write its private cloud platform to use Kubernetes as its underlying orchestration engine. We think this is a great step forward for both the OpenStack and Kubernetes communities. With Kubernetes under the hood, OpenStack users will benefit from the tremendous efficiency, manageability and resiliency that Kubernetes brings to the table, while positioning their applications to use more cloud-native patterns. The Kubernetes community, meanwhile, can feel confident in their choice of orchestration framework, while gaining the ability to manage both container- and VM-based applications from a single platform.
The Path to Cloud Native
Google spent over ten years developing, applying and refining the principles of cloud native computing. A cloud-native application is:
- Container-packaged. Applications are composed of hermetically sealed, reusable units across diverse environments;
- Dynamically scheduled, for increased infrastructure efficiency and decreased operational overhead; and
- Microservices-based. Loosely coupled components significantly increase the overall agility, resilience and maintainability of applications.
These principles have enabled us to build the largest, most efficient, most powerful cloud infrastructure in the world, which anyone can access via Google Cloud Platform. They are the same principles responsible for the recent surge in popularity of Linux containers. Two years ago, we open-sourced Kubernetes to spur adoption of containers and scalable, microservices-based applications, and the recently released Kubernetes version 1.3 introduces a number of features to bridge enterprise and cloud native workloads. We expect that adoption of cloud-native principles will drive the same benefits within the OpenStack community, as well as smoothing the path between OpenStack and the public cloud providers that embrace them.
Making OpenStack better
We hear from enterprise customers that they want to move towards cloud-native infrastructure and application patterns. Thus, it is hardly surprising that OpenStack would also move in this direction [1], with large OpenStack users such as eBay and GoDaddy adopting Kubernetes as key components of their stack. Kubernetes and cloud-native patterns will improve OpenStack lifecycle management by enabling rolling updates, versioning, and canary deployments of new components and features. In addition, OpenStack users will benefit from self-healing infrastructure, making OpenStack easier to manage and more resilient to the failure of core services and individual compute nodes. Finally, OpenStack users will realize the developer and resource efficiencies that come with a container-based infrastructure.
OpenStack is a great tool for Kubernetes users
Conversely, incorporating Kubernetes into OpenStack will give Kubernetes users access to a robust framework for deploying and managing applications built on virtual machines. As users move to the cloud-native model, they will be faced with the challenge of managing hybrid application architectures that contain some mix of virtual machines and Linux containers. The combination of Kubernetes and OpenStack means that they can do so on the same platform using a common set of tools.
We are excited by the ever increasing momentum of the cloud-native movement as embodied by Kubernetes and related projects, and look forward to working with Mirantis, its partner Intel, and others within the OpenStack community to brings the benefits of cloud-native to their applications and infrastructure.
[1] Check out the announcement of Kubernetes-OpenStack Special Interest Group here, and a great talk about OpenStack on Kubernetes by CoreOS CEO Alex Polvi at the most recent OpenStack summit here.
A Very Happy Birthday Kubernetes
Last year at OSCON, I got to reconnect with a bunch of friends and see what they have been working on. That turned out to be the Kubernetes 1.0 launch event. Even that day, it was clear the project was supported by a broad community -- a group that showed an ambitious vision for distributed computing.
Today, on the first anniversary of the Kubernetes 1.0 launch, it’s amazing to see what a community of dedicated individuals can do. Kubernauts have collectively put in 237 person years of coding effort since launch to bring forward our most recent release 1.3. However the community is much more than simply coding effort. It is made up of people -- individuals that have given their expertise and energy to make this project flourish. With more than 830 diverse contributors, from independents to the largest companies in the world, it’s their work that makes Kubernetes stand out. Here are stories from a couple early contributors reflecting back on the project:
- Sam Ghods, services architect and co-founder at Box
- Justin Santa Barbara, independent Kubernetes contributor
- Clayton Coleman, contributor and architect on Kubernetes on OpenShift at Red Hat
The community is also more than online GitHub and Slack conversation; year one saw the launch of KubeCon, the Kubernetes user conference, which started as a grassroot effort that brought together 1,000 individuals between two events in San Francisco and London. The advocacy continues with users globally. There are more than 130 Meetup groups that mention Kubernetes, many of which are helping celebrate Kubernetes’ birthday. To join the celebration, participate at one of the 20 #k8sbday parties worldwide: Austin, Bangalore, Beijing, Boston, Cape Town, Charlotte, Cologne, Geneva, Karlsruhe, Kisumu, Montreal, Portland, Raleigh, Research Triangle, San Francisco, Seattle, Singapore, SF Bay Area, or Washington DC.
The Kubernetes community continues to work to make our project more welcoming and open to our kollaborators. This spring, Kubernetes and KubeCon moved to the Cloud Native Compute Foundation (CNCF), a Linux Foundation Project, to accelerate the collaborative vision outlined only a year ago at OSCON …. lifting a glass to another great year.

Happy Birthday Kubernetes. Oh, the places you’ll go!
Dear K8s,
It’s hard to believe you’re only one - you’ve grown up so fast. On the occasion of your first birthday, I thought I would write a little note about why I was so excited when you were born, why I feel fortunate to be part of the group that is raising you, and why I’m eager to watch you continue to grow up!
--Justin
You started with an excellent foundation - good declarative functionality, built around a solid API with a well defined schema and the machinery so that we could evolve going forwards. And sure enough, over your first year you grew so fast: autoscaling, HTTP load-balancing support (Ingress), support for persistent workloads including clustered databases (PetSets). You’ve made friends with more clouds (welcome Azure & OpenStack to the family), and even started to span zones and clusters (Federation). And these are just some of the most visible changes - there’s so much happening inside that brain of yours!
I think it’s wonderful you’ve remained so open in all that you do - you seem to write down everything on GitHub - for better or worse. I think we’ve all learned a lot about that on the way, like the perils of having engineers make scaling statements that are then weighed against claims made without quite the same framework of precision and rigor. But I’m proud that you chose not to lower your standards, but rose to the challenge and just ran faster instead - it might not be the most realistic approach, but it is the only way to move mountains!
And yet, somehow, you’ve managed to avoid a lot of the common dead-ends that other open source software has fallen into, particularly as those projects got bigger and the developers end up working on it more than they use it directly. How did you do that? There’s a probably-apocryphal story of an employee at IBM that makes a huge mistake, and is summoned to meet with the big boss, expecting to be fired, only to be told “We just spent several million dollars training you. Why would we want to fire you?”. Despite all the investment google is pouring into you (along with Redhat and others), I sometimes wonder if the mistakes we are avoiding could be worth even more. There is a very open development process, yet there’s also an “oracle” that will sometimes course-correct by telling us what happens two years down the road if we make a particular design decision. This is a parent you should probably listen to!
And so although you’re only a year old, you really have an old soul. I’m just one of the many people raising you, but it’s a wonderful learning experience for me to be able to work with the people that have built these incredible systems and have all this domain knowledge. Yet because we started from scratch (rather than taking the existing Borg code) we’re at the same level and can still have genuine discussions about how to raise you. Well, at least as close to the same level as we could ever be, but it’s to their credit that they are all far too nice ever to mention it!
If I would pick just two of the wise decisions those brilliant people made:
- Labels & selectors give us declarative “pointers”, so we can say “why” we want things, rather than listing the things directly. It’s the secret to how you can scale to great heights; not by naming each step, but saying “a thousand more steps just like that first one”.
- Controllers are state-synchronizers: we specify the goals, and your controllers will indefatigably work to bring the system to that state. They work through that strongly-typed API foundation, and are used throughout the code, so Kubernetes is more of a set of a hundred small programs than one big one. It’s not enough to scale to thousands of nodes technically; the project also has to scale to thousands of developers and features; and controllers help us get there.
And so on we will go! We’ll be replacing those controllers and building on more, and the API-foundation lets us build anything we can express in that way - with most things just a label or annotation away! But your thoughts will not be defined by language: with third party resources you can express anything you choose. Now we can build Kubernetes without building in Kubernetes, creating things that feel as much a part of Kubernetes as anything else. Many of the recent additions, like ingress, DNS integration, autoscaling and network policies were done or could be done in this way. Eventually it will be hard to imagine you before these things, but tomorrow’s standard functionality can start today, with no obstacles or gatekeeper, maybe even for an audience of one.
So I’m looking forward to seeing more and more growth happen further and further from the core of Kubernetes. We had to work our way through those phases; starting with things that needed to happen in the kernel of Kubernetes - like replacing replication controllers with deployments. Now we’re starting to build things that don’t require core changes. But we’re still still talking about infrastructure separately from applications. It’s what comes next that gets really interesting: when we start building applications that rely on the Kubernetes APIs. We’ve always had the Cassandra example that uses the Kubernetes API to self-assemble, but we haven’t really even started to explore this more widely yet. In the same way that the S3 APIs changed how we build things that remember, I think the k8s APIs are going to change how we build things that think.
So I’m looking forward to your second birthday: I can try to predict what you’ll look like then, but I know you’ll surpass even the most audacious things I can imagine. Oh, the places you’ll go!
The Bet on Kubernetes, a Red Hat Perspective
Two years ago, Red Hat made a big bet on Kubernetes. We bet on a simple idea: that an open source community is the best place to build the future of application orchestration, and that only an open source community could successfully integrate the diverse range of capabilities necessary to succeed. As a Red Hatter, that idea is not far-fetched - we’ve seen it successfully applied in many communities, but we’ve also seen it fail, especially when a broad reach is not supported by solid foundations. On the one year anniversary of Kubernetes 1.0, two years after the first open-source commit to the Kubernetes project, it’s worth asking the question:
Was Kubernetes the right bet?
The success of software is measured by the successes of its users - whether that software enables for them new opportunities or efficiencies. In that regard, Kubernetes has succeeded beyond our wildest dreams. We know of hundreds of real production deployments of Kubernetes, in the enterprise through Red Hat’s multi-tenant enabled OpenShift distribution, on Google Container Engine (GKE), in heavily customized versions run by some of the world's largest software companies, and through the education, entertainment, startup, and do-it-yourself communities. Those deployers report improved time to delivery, standardized application lifecycles, improved resource utilization, and more resilient and robust applications. And that’s just from customers or contributors to the community - I would not be surprised if there were now thousands of installations of Kubernetes managing tens of thousands of real applications out in the wild.
I believe that reach to be a validation of the vision underlying Kubernetes: to build a platform for all applications by providing tools for each of the core patterns in distributed computing. Those patterns:
- simple replicated web software
- distributed load balancing and service discovery
- immutable images run in containers
- co-location of related software into pods
- simplified consumption of network attached storage
- flexible and powerful resource scheduling
- running batch and scheduled jobs alongside service workloads
- managing and maintaining clustered software like databases and message queues
Allow developers and operators to move to the next scale of abstraction, just like they have enabled Google and others in the tech ecosystem to scale to datacenter computers and beyond. From Kubernetes 1.0 to 1.3 we have continually improved the power and flexibility of the platform while ALSO improving performance, scalability, reliability, and usability. The explosion of integrations and tools that run on top of Kubernetes further validates core architectural decisions to be composable, to expose open and flexible APIs, and to deliberately limit the core platform and encourage extension.
Today Kubernetes has one of the largest and most vibrant communities in the open source ecosystem, with almost a thousand contributors, one of the highest human-generated commit rates of any single-repository project on GitHub, over a thousand projects based around Kubernetes, and correspondingly active Stack Overflow and Slack channels. Red Hat is proud to be part of this ecosystem as the largest contributor to Kubernetes after Google, and every day more companies and individuals join us. The idea of Kubernetes found fertile ground, and you, the community, provided the excitement and commitment that made it grow.
So, did we bet correctly? For all the reasons above, and hundreds more: Yes.
What’s next?
Happy as we are with the success of Kubernetes, this is no time to rest! While there are many more features and improvements we want to build into Kubernetes, I think there is a general consensus that we want to focus on the only long term goal that matters - a healthy, successful, and thriving technical community around Kubernetes. As John F. Kennedy probably said:
> Ask not what your community can do for you, but what you can do for your community
In a recent post to the kubernetes-dev list, Brian Grant laid out a great set of near term goals - goals that help grow the community, refine how we execute, and enable future expansion. In each of the Kubernetes Special Interest Groups we are trying to build sustainable teams that can execute across companies and communities, and we are actively working to ensure each of these SIGs is able to contribute, coordinate, and deliver across a diverse range of interests under one vision for the project.
Of special interest to us is the story of extension - how the core of Kubernetes can become the beating heart of the datacenter operating system, and enable even more patterns for application management to build on top of Kubernetes, not just into it. Work done in the 1.2 and 1.3 releases around third party APIs, API discovery, flexible scheduler policy, external authorization and authentication (beyond those built into Kubernetes) is just the start. When someone has a need, we want them to easily find a solution, and we also want it to be easy for others to consume and contribute to that solution. Likewise, the best way to prove ideas is to prototype them against real needs and to iterate against real problems, which should be easy and natural.
By Kubernetes’ second birthday, I hope to reflect back on a long year of refinement, user success, and community participation. It has been a privilege and an honor to contribute to Kubernetes, and it still feels like we are just getting started. Thank you, and I hope you come along for the ride!
Bringing End-to-End Kubernetes Testing to Azure (Part 2)
Historically, Kubernetes testing has been hosted by Google, running e2e tests on Google Compute Engine (GCE) and Google Container Engine (GKE). In fact, the gating checks for the submit-queue are a subset of tests executed on these test platforms. Federated testing aims to expand test coverage by enabling organizations to host test jobs for a variety of platforms and contribute test results to benefit the Kubernetes project. Members of the Kubernetes test team at Google and SIG-Testing have created a Kubernetes test history dashboard that publishes the results from all federated test jobs (including those hosted by Google).
In this blog post, we describe extending the e2e test jobs for Azure, and show how to contribute a federated test to the Kubernetes project.
END-TO-END INTEGRATION TESTS FOR AZURE
After successfully implementing “development distro” scripts to automate deployment of Kubernetes on Azure, our next goal was to run e2e integration tests and share the results with the Kubernetes community.
We automated our workflow for executing e2e tests of Kubernetes on Azure by defining a nightly job in our private Jenkins server. Figure 2 shows the workflow that uses kube-up.sh to deploy Kubernetes on Ubuntu virtual machines running in Azure, then executes the e2e tests. On completion of the tests, the job uploads the test results and logs to a Google Cloud Storage directory, in a format that can be processed by the scripts that produce the test history dashboard. Our Jenkins job uses the hack/jenkins/e2e-runner.sh and hack/jenkins/upload-to-gcs.sh scripts to produce the results in the correct format.
| 
HOW TO CONTRIBUTE AN E2E TEST
Throughout our work to create the Azure e2e test job, we have collaborated with members of SIG-Testing to find a way to publish the results to the Kubernetes community. The results of this collaboration are documentation and a streamlined process to contribute results from a federated test job. The steps to contribute e2e test results can be summarized in 4 steps.
- Create a Google Cloud Storage bucket in which to publish the results.
- Define an automated job to run the e2e tests. By setting a few environment variables, hack/jenkins/e2e-runner.sh deploys Kubernetes binaries and executes the tests.
- Upload the results using hack/jenkins/upload-to-gcs.sh.
- Incorporate the results into the test history dashboard by submitting a pull-request with modifications to a few files in kubernetes/test-infra.
The federated tests documentation describes these steps in more detail. The scripts to run e2e tests and upload results simplifies the work to contribute a new federated test job. The specific steps to set up an automated test job and an appropriate environment in which to deploy Kubernetes are left to the reader’s preferences. For organizations using Jenkins, the jenkins-job-builder configurations for GCE and GKE tests may provide helpful examples.
RETROSPECTIVE
The e2e tests on Azure have been running for several weeks now. During this period, we have found two issues in Kubernetes. Weixu Zhuang immediately published fixes that have been merged into the Kubernetes master branch.
The first issue happened when we wanted to bring up the Kubernetes cluster using SaltStack on Azure using Ubuntu VMs. A commit (07d7cfd3) modified the OpenVPN certificate generation script to use a variable that was only initialized by scripts in the cluster/ubuntu. Strict checking on existence of parameters by the certificate generation script caused other platforms that use the script to fail (e.g. our changes to support Azure). We submitted a pull-request that fixed the issue by initializing the variable with a default value to make the certificate generation scripts more robust across all platform types.
The second pull-request cleaned up an unused import in the Daemonset unit test file. The import statement broke the unit tests with golang 1.4. Our nightly Jenkins job helped us find this error and we promptly pushed a fix for it.
CONCLUSION AND FUTURE WORK
The addition of a nightly e2e test job for Kubernetes on Azure has helped to define the process to contribute a federated test to the Kubernetes project. During the course of the work, we also saw the immediate benefit of expanding test coverage to more platforms when our Azure test job identified compatibility issues.
We want to thank Aaron Crickenberger, Erick Fejta, Joe Finney, and Ryan Hutchinson for their help to incorporate the results of our Azure e2e tests into the Kubernetes test history. If you’d like to get involved with testing to create a stable, high quality releases of Kubernetes, join us in the Kubernetes Testing SIG (sig-testing).
Dashboard - Full Featured Web Interface for Kubernetes
Editor's note: this post is part of a series of in-depth articles on what's new in Kubernetes 1.3
Kubernetes Dashboard is a project that aims to bring a general purpose monitoring and operational web interface to the Kubernetes world. Three months ago we released the first production ready version, and since then the dashboard has made massive improvements. In a single UI, you’re able to perform majority of possible interactions with your Kubernetes clusters without ever leaving your browser. This blog post breaks down new features introduced in the latest release and outlines the roadmap for the future.
Full-Featured Dashboard
Thanks to a large number of contributions from the community and project members, we were able to deliver many new features for Kubernetes 1.3 release. We have been carefully listening to all the great feedback we have received from our users (see the summary infographics) and addressed the highest priority requests and pain points.
The Dashboard UI now handles all workload resources. This means that no matter what workload type you run, it is visible in the web interface and you can do operational changes on it. For example, you can modify your stateful MySQL installation with Pet Sets, do a rolling update of your web server with Deployments or install cluster monitoring with DaemonSets.

In addition to viewing resources, you can create, edit, update, and delete them. This feature enables many use cases. For example, you can kill a failed Pod, do a rolling update on a Deployment, or just organize your resources. You can also export and import YAML configuration files of your cloud apps and store them in a version control system.

The release includes a beta view of cluster nodes for administration and operational use cases. The UI lists all nodes in the cluster to allow for overview analysis and quick screening for problematic nodes. The details view shows all information about the node and links to pods running on it.

There are also many smaller scope new features that the we shipped with the release, namely: support for namespaced resources, internationalization, performance improvements, and many bug fixes (find out more in the release notes). All these improvements result in a better and simpler user experience of the product.
Future Work
The team has ambitious plans for the future spanning across multiple use cases. We are also open to all feature requests, which you can post on our issue tracker.
Here is a list of our focus areas for the following months:
- Handle more Kubernetes resources - To show all resources that a cluster user may potentially interact with. Once done, Dashboard can act as a complete replacement for CLI.
- Monitoring and troubleshooting - To add resource usage statistics/graphs to the objects shown in Dashboard. This focus area will allow for actionable debugging and troubleshooting of cloud applications.
- Security, auth and logging in - Make Dashboard accessible from networks external to a Cluster and work with custom authentication systems.
Connect With Us
We would love to talk with you and hear your feedback!
- Email us at the SIG-UI mailing list
- Chat with us on the Kubernetes Slack #SIG-UI channel
- Join our meetings: 4PM CEST. See the SIG-UI calendar for details.
Steering an Automation Platform at Wercker with Kubernetes
At Wercker we run millions of containers that execute our users’ CI/CD jobs. The vast majority of them are ephemeral and only last as long as builds, tests and deploys take to run, the rest are ephemeral, too -- aren't we all --, but tend to last a bit longer and run our infrastructure. As we are running many containers across many nodes, we were in need of a highly scalable scheduler that would make our lives easier, and as such, decided to implement Kubernetes.
Wercker is a container-centric automation platform that helps developers build, test and deploy their applications. We support any number of pipelines, ranging from building code, testing API-contracts between microservices, to pushing containers to registries, and deploying to schedulers. All of these pipeline jobs run inside Docker containers and each artifact can be a Docker container.
And of course we use Wercker to build Wercker, and deploy itself onto Kubernetes!
Overview
Because we are a platform for running multi-service cloud-native code we've made many design decisions around isolation. On the base level we use CoreOS and cloud-init to bootstrap a cluster of heterogeneous nodes which I have named Patricians, Peasants, as well as controller nodes that don't have a cool name and are just called Controllers. Maybe we should switch to Constables.

Patrician nodes are where the bulk of our infrastructure runs. These nodes have appropriate network interfaces to communicate with our backend services as well as be routable by various load balancers. This is where our logging is aggregated and sent off to logging services, our many microservices for reporting and processing the results of job runs, and our many microservices for handling API calls.
On the other end of the spectrum are the Peasant nodes where the public jobs are run. Public jobs consist of worker pods reading from a job queue and dynamically generating new runner pods to handle execution of the job. The job itself is an incarnation of our open source CLI tool, the same one you can run on your laptop with Docker installed. These nodes have very limited access to the rest of the infrastructure and the containers the jobs themselves run in are even further isolated.
Controllers are controllers, I bet ours look exactly the same as yours.
Dynamic Pods
Our heaviest use of the Kubernetes API is definitely our system of creating dynamic pods to serve as the runtime environment for our actual job execution. After pulling job descriptions from the queue we define a new pod containing all the relevant environment for checking out code, managing a cache, executing a job and uploading artifacts. We launch the pod, monitor its progress, and destroy it when the job is done.
Ingresses
In order to provide a backend for HTTP API calls and allow self-registration of handlers we make use of the Ingress system in Kubernetes. It wasn't the clearest thing to set up, but reading through enough of the nginx example eventually got us to a good spot where it is easy to connect services to the frontend.
Upcoming Features in 1.3
While we generally treat all of our pods and containers as ephemeral and expect rapid restarts on failures, we are looking forward to Pet Sets and Init Containers as ways to optimize some of our processes. We are also pleased with official support for Minikube coming along as it improves our local testing and development.
Conclusion
Kubernetes saves us the non-trivial task of managing many, many containers across many nodes. It provides a robust API and tooling for introspecting these containers, and it includes much built in support for logging, metrics, monitoring and debugging. Service discovery and networking alone saves us so much time and speeds development immensely.
Cheers to you Kubernetes, keep up the good work :)
Citrix + Kubernetes = A Home Run
Technical collaboration is like sports. If you work together as a team, you can go down the homestretch and pull through for a win. That’s our experience with the Google Cloud Platform team.
Recently, we approached Google Cloud Platform (GCP) to collaborate on behalf of Citrix customers and the broader enterprise market looking to migrate workloads. This migration required including the NetScaler Docker load balancer, CPX, into Kubernetes nodes and resolving any issues with getting traffic into the CPX proxies.
Why NetScaler and Kubernetes?
- Citrix customers want the same Layer 4 to Layer 7 capabilities from NetScaler that they have on-prem as they move to the cloud as they begin deploying their container and microservices architecture with Kubernetes
- Kubernetes provides a proven infrastructure for running containers and VMs with automated workload delivery
- NetScaler CPX provides Layer 4 to Layer 7 services and highly efficient telemetry data to a logging and analytics platform, NetScaler Management and Analytics System
I wish all our experiences working together with a technical partner were as good as working with GCP. We had a list of issues to enable our use cases and were able to collaborate swiftly on a solution. To resolve these, GCP team offered in depth technical assistance, working with Citrix such that NetScaler CPX can spin up and take over as a client-side proxy running on each host.
Next, NetScaler CPX needed to be inserted in the data path of GCP ingress load balancer so that NetScaler CPX can spread traffic to front end web servers. The NetScaler team made modifications so that NetScaler CPX listens to API server events and configures itself to create a VIP, IP table rules and server rules to take ingress traffic and load balance across front end applications. Google Cloud Platform team provided feedback and assistance to verify modifications made to overcome the technical hurdles. Done!
NetScaler CPX use case is supported in Kubernetes 1.3. Citrix customers and the broader enterprise market will have the opportunity to leverage NetScaler with Kubernetes, thereby lowering the friction to move workloads to the cloud.
You can learn more about NetScaler CPX here.
Cross Cluster Services - Achieving Higher Availability for your Kubernetes Applications
Editor's note: this post is part of a series of in-depth articles on what's new in Kubernetes 1.3
As Kubernetes users scale their production deployments we’ve heard a clear desire to deploy services across zone, region, cluster and cloud boundaries. Services that span clusters provide geographic distribution, enable hybrid and multi-cloud scenarios and improve the level of high availability beyond single cluster multi-zone deployments. Customers who want their services to span one or more (possibly remote) clusters, need them to be reachable in a consistent manner from both within and outside their clusters.
In Kubernetes 1.3, our goal was to minimize the friction points and reduce the management/operational overhead associated with deploying a service with geographic distribution to multiple clusters. This post explains how to do this.
Note: Though the examples used here leverage Google Container Engine (GKE) to provision Kubernetes clusters, they work anywhere you want to deploy Kubernetes.
Let’s get started. The first step is to create is to create Kubernetes clusters into 4 Google Cloud Platform (GCP) regions using GKE.
- asia-east1-b
- europe-west1-b
- us-east1-b
- us-central1-b
Let’s run the following commands to build the clusters:
gcloud container clusters create gce-asia-east1 \
--scopes cloud-platform \
--zone asia-east1-b
gcloud container clusters create gce-europe-west1 \
--scopes cloud-platform \
--zone=europe-west1-b
gcloud container clusters create gce-us-east1 \
--scopes cloud-platform \
--zone=us-east1-b
gcloud container clusters create gce-us-central1 \
--scopes cloud-platform \
--zone=us-central1-b
Let’s verify the clusters are created:
gcloud container clusters list
NAME ZONE MASTER\_VERSION MASTER\_IP NUM\_NODES STATUS
gce-asia-east1 asia-east1-b 1.2.4 104.XXX.XXX.XXX 3 RUNNING
gce-europe-west1 europe-west1-b 1.2.4 130.XXX.XX.XX 3 RUNNING
gce-us-central1 us-central1-b 1.2.4 104.XXX.XXX.XX 3 RUNNING
gce-us-east1 us-east1-b 1.2.4 104.XXX.XX.XXX 3 RUNNING

The next step is to bootstrap the clusters and deploy the federation control plane on one of the clusters that has been provisioned. If you’d like to follow along, refer to Kelsey Hightower’s tutorial which walks through the steps involved.
Federated Services
Federated Services are directed to the Federation API endpoint and specify the desired properties of your service.
Once created, the Federated Service automatically:
- creates matching Kubernetes Services in every cluster underlying your cluster federation,
- monitors the health of those service "shards" (and the clusters in which they reside), and
- manages a set of DNS records in a public DNS provider (like Google Cloud DNS, or AWS Route 53), thus ensuring that clients of your federated service can seamlessly locate an appropriate healthy service endpoint at all times, even in the event of cluster, availability zone or regional outages.
Clients inside your federated Kubernetes clusters (i.e. Pods) will automatically find the local shard of the federated service in their cluster if it exists and is healthy, or the closest healthy shard in a different cluster if it does not.
Federations of Kubernetes Clusters can include clusters running in different cloud providers (e.g. GCP, AWS), and on-premise (e.g. on OpenStack). All you need to do is create your clusters in the appropriate cloud providers and/or locations, and register each cluster's API endpoint and credentials with your Federation API Server.
In our example, we have clusters created in 4 regions along with a federated control plane API deployed in one of our clusters, that we’ll be using to provision our service. See diagram below for visual representation.

Creating a Federated Service
Let’s list out all the clusters in our federation:
kubectl --context=federation-cluster get clusters
NAME STATUS VERSION AGE
gce-asia-east1 Ready 1m
gce-europe-west1 Ready 57s
gce-us-central1 Ready 47s
gce-us-east1 Ready 34s
Let’s create a federated service object:
kubectl --context=federation-cluster create -f services/nginx.yaml
The '--context=federation-cluster' flag tells kubectl to submit the request to the Federation API endpoint, with the appropriate credentials. The federated service will automatically create and maintain matching Kubernetes services in all of the clusters underlying your federation.
You can verify this by checking in each of the underlying clusters, for example:
kubectl --context=gce-asia-east1a get svc nginx
NAME CLUSTER-IP EXTERNAL-IP PORT(S) AGE
nginx 10.63.250.98 104.199.136.89 80/TCP 9m
The above assumes that you have a context named 'gce-asia-east1a' configured in your client for your cluster in that zone. The name and namespace of the underlying services will automatically match those of the federated service that you created above.
The status of your Federated Service will automatically reflect the real-time status of the underlying Kubernetes services, for example:
kubectl --context=federation-cluster describe services nginx
Name: nginx
Namespace: default
Labels: run=nginx
Selector: run=nginx
Type: LoadBalancer
IP:
LoadBalancer Ingress: 104.XXX.XX.XXX, 104.XXX.XX.XXX, 104.XXX.XX.XXX, 104.XXX.XXX.XX
Port: http 80/TCP
Endpoints: \<none\>
Session Affinity: None
No events.
The 'LoadBalancer Ingress' addresses of your federated service corresponds with the 'LoadBalancer Ingress' addresses of all of the underlying Kubernetes services. For inter-cluster and inter-cloud-provider networking between service shards to work correctly, your services need to have an externally visible IP address. Service Type: Loadbalancer is typically used here.
Note also what we have not yet provisioned any backend Pods to receive the network traffic directed to these addresses (i.e. 'Service Endpoints'), so the federated service does not yet consider these to be healthy service shards, and has accordingly not yet added their addresses to the DNS records for this federated service.
Adding Backend Pods
To render the underlying service shards healthy, we need to add backend Pods behind them. This is currently done directly against the API endpoints of the underlying clusters (although in future the Federation server will be able to do all this for you with a single command, to save you the trouble). For example, to create backend Pods in our underlying clusters:
for CLUSTER in asia-east1-a europe-west1-a us-east1-a us-central1-a
do
kubectl --context=$CLUSTER run nginx --image=nginx:1.11.1-alpine --port=80
done
Verifying Public DNS Records
Once the Pods have successfully started and begun listening for connections, Kubernetes in each cluster (via automatic health checks) will report them as healthy endpoints of the service in that cluster. The cluster federation will in turn consider each of these service 'shards' to be healthy, and place them in serving by automatically configuring corresponding public DNS records. You can use your preferred interface to your configured DNS provider to verify this. For example, if your Federation is configured to use Google Cloud DNS, and a managed DNS domain 'example.com':
$ gcloud dns managed-zones describe example-dot-com
creationTime: '2016-06-26T18:18:39.229Z'
description: Example domain for Kubernetes Cluster Federation
dnsName: example.com.
id: '3229332181334243121'
kind: dns#managedZone
name: example-dot-com
nameServers:
- ns-cloud-a1.googledomains.com.
- ns-cloud-a2.googledomains.com.
- ns-cloud-a3.googledomains.com.
- ns-cloud-a4.googledomains.com.
$ gcloud dns record-sets list --zone example-dot-com
NAME TYPE TTL DATA
example.com. NS 21600 ns-cloud-e1.googledomains.com., ns-cloud-e2.googledomains.com.
example.com. SOA 21600 ns-cloud-e1.googledomains.com. cloud-dns-hostmaster.google.com. 1 21600 3600 1209600 300
nginx.mynamespace.myfederation.svc.example.com. A 180 104.XXX.XXX.XXX, 130.XXX.XX.XXX, 104.XXX.XX.XXX, 104.XXX.XXX.XX
nginx.mynamespace.myfederation.svc.us-central1-a.example.com. A 180 104.XXX.XXX.XXX
nginx.mynamespace.myfederation.svc.us-central1.example.com.
nginx.mynamespace.myfederation.svc.us-central1.example.com. A 180 104.XXX.XXX.XXX, 104.XXX.XXX.XXX, 104.XXX.XXX.XXX
nginx.mynamespace.myfederation.svc.asia-east1-a.example.com. A 180 130.XXX.XX.XXX
nginx.mynamespace.myfederation.svc.asia-east1.example.com.
nginx.mynamespace.myfederation.svc.asia-east1.example.com. A 180 130.XXX.XX.XXX, 130.XXX.XX.XXX
nginx.mynamespace.myfederation.svc.europe-west1.example.com. CNAME 180 nginx.mynamespace.myfederation.svc.example.com.
... etc.
Note: If your Federation is configured to use AWS Route53, you can use one of the equivalent AWS tools, for example:
$aws route53 list-hosted-zones
and
$aws route53 list-resource-record-sets --hosted-zone-id Z3ECL0L9QLOVBX
Whatever DNS provider you use, any DNS query tool (for example 'dig' or 'nslookup') will of course also allow you to see the records created by the Federation for you.
Discovering a Federated Service from pods Inside your Federated Clusters
By default, Kubernetes clusters come preconfigured with a cluster-local DNS server ('KubeDNS'), as well as an intelligently constructed DNS search path which together ensure that DNS queries like "myservice", "myservice.mynamespace", "bobsservice.othernamespace" etc issued by your software running inside Pods are automatically expanded and resolved correctly to the appropriate service IP of services running in the local cluster.
With the introduction of Federated Services and Cross-Cluster Service Discovery, this concept is extended to cover Kubernetes services running in any other cluster across your Cluster Federation, globally. To take advantage of this extended range, you use a slightly different DNS name (e.g. myservice.mynamespace.myfederation) to resolve federated services. Using a different DNS name also avoids having your existing applications accidentally traversing cross-zone or cross-region networks and you incurring perhaps unwanted network charges or latency, without you explicitly opting in to this behavior.
So, using our NGINX example service above, and the federated service DNS name form just described, let's consider an example: A Pod in a cluster in the us-central1-a availability zone needs to contact our NGINX service. Rather than use the service's traditional cluster-local DNS name ("nginx.mynamespace", which is automatically expanded to"nginx.mynamespace.svc.cluster.local") it can now use the service's Federated DNS name, which is"nginx.mynamespace.myfederation". This will be automatically expanded and resolved to the closest healthy shard of my NGINX service, wherever in the world that may be. If a healthy shard exists in the local cluster, that service's cluster-local (typically 10.x.y.z) IP address will be returned (by the cluster-local KubeDNS). This is exactly equivalent to non-federated service resolution.
If the service does not exist in the local cluster (or it exists but has no healthy backend pods), the DNS query is automatically expanded to "nginx.mynamespace.myfederation.svc.us-central1-a.example.com". Behind the scenes, this is finding the external IP of one of the shards closest to my availability zone. This expansion is performed automatically by KubeDNS, which returns the associated CNAME record. This results in a traversal of the hierarchy of DNS records in the above example, and ends up at one of the external IP's of the Federated Service in the local us-central1 region.
It is also possible to target service shards in availability zones and regions other than the ones local to a Pod by specifying the appropriate DNS names explicitly, and not relying on automatic DNS expansion. For example, "nginx.mynamespace.myfederation.svc.europe-west1.example.com" will resolve to all of the currently healthy service shards in Europe, even if the Pod issuing the lookup is located in the U.S., and irrespective of whether or not there are healthy shards of the service in the U.S. This is useful for remote monitoring and other similar applications.
Discovering a Federated Service from Other Clients Outside your Federated Clusters
For external clients, automatic DNS expansion described is no longer possible. External clients need to specify one of the fully qualified DNS names of the federated service, be that a zonal, regional or global name. For convenience reasons, it is often a good idea to manually configure additional static CNAME records in your service, for example:
eu.nginx.acme.com CNAME nginx.mynamespace.myfederation.svc.europe-west1.example.com.
us.nginx.acme.com CNAME nginx.mynamespace.myfederation.svc.us-central1.example.com.
nginx.acme.com CNAME nginx.mynamespace.myfederation.svc.example.com.
That way your clients can always use the short form on the left, and always be automatically routed to the closest healthy shard on their home continent. All of the required failover is handled for you automatically by Kubernetes Cluster Federation.
Handling Failures of Backend Pods and Whole Clusters
Standard Kubernetes service cluster-IP's already ensure that non-responsive individual Pod endpoints are automatically taken out of service with low latency. The Kubernetes cluster federation system automatically monitors the health of clusters and the endpoints behind all of the shards of your federated service, taking shards in and out of service as required. Due to the latency inherent in DNS caching (the cache timeout, or TTL for federated service DNS records is configured to 3 minutes, by default, but can be adjusted), it may take up to that long for all clients to completely fail over to an alternative cluster in in the case of catastrophic failure. However, given the number of discrete IP addresses which can be returned for each regional service endpoint (see e.g. us-central1 above, which has three alternatives) many clients will fail over automatically to one of the alternative IP's in less time than that given appropriate configuration.
Community
We'd love to hear feedback on Kubernetes Cross Cluster Services. To join the community:
- Post issues or feature requests on GitHub
- Join us in the #federation channel on Slack
- Participate in the Cluster Federation SIG
Please give Cross Cluster Services a try, and let us know how it goes!
Stateful Applications in Containers!? Kubernetes 1.3 Says “Yes!”
Congratulations to the Kubernetes community on another value-packed release. A focus on stateful applications and federated clusters are two reasons why I’m so excited about 1.3. Kubernetes support for stateful apps such as Cassandra, Kafka, and MongoDB is critical. Important services rely on databases, key value stores, message queues, and more. Additionally, relying on one data center or container cluster simply won’t work as apps grow to serve millions of users around the world. Cluster federation allows users to deploy apps across multiple clusters and data centers for scale and resiliency.
You may have heard me say before that containers are the next great application platform. Diamanti is accelerating container adoption for stateful apps in production - where performance and ease of deployment really matter.
Apps Need More Than Cattle
Beyond stateless containers like web servers (so-called “cattle” because they are interchangeable), users are increasingly deploying stateful workloads with containers to benefit from “build once, run anywhere” and to improve bare metal efficiency/utilization. These “pets” (so-called because each requires special handling) bring new requirements including longer life cycle, configuration dependencies, stateful failover, and performance sensitivity. Container orchestration must address these needs to successfully deploy and scale apps.
Enter Pet Set, a new object in Kubernetes 1.3 for improved stateful application support. Pet Set sequences through the startup phase of each database replica (for example), ensuring orderly master/slave configuration. Pet Set also simplifies service discovery by leveraging ubiquitous DNS SRV records, a well-recognized and long-understood mechanism.
Diamanti’s FlexVolume contribution to Kubernetes enables stateful workloads by providing persistent volumes with low-latency storage and guaranteed performance, including enforced quality-of-service from container to media.
A Federalist
Users who are planning for application availability must contend with issues of failover and scale across geography. Cross-cluster federated services allows containerized apps to easily deploy across multiple clusters. Federated services tackles challenges such as managing multiple container clusters and coordinating service deployment and discovery across federated clusters.
Like a strictly centralized model, federation provides a common app deployment interface. With each cluster retaining autonomy, however, federation adds flexibility to manage clusters locally during network outages and other events. Cross-cluster federated services also applies consistent service naming and adoption across container clusters, simplifying DNS resolution.
It’s easy to imagine powerful multi-cluster use cases with cross-cluster federated services in future releases. An example is scheduling containers based on governance, security, and performance requirements. Diamanti’s scheduler extension was developed with this concept in mind. Our first implementation makes the Kubernetes scheduler aware of network and storage resources local to each cluster node. Similar concepts can be applied in the future to broader placement controls with cross-cluster federated services.
Get Involved
With interest growing in stateful apps, work has already started to further enhance Kubernetes storage. The Storage Special Interest Group is discussing proposals to support local storage resources. Diamanti is looking forward to extend FlexVolume to include richer APIs that enable local storage and storage services including data protection, replication, and reduction. We’re also working on proposals for improved app placement, migration, and failover across container clusters through Kubernetes cross-cluster federated services.
Join the conversation and contribute! Here are some places to get started:
- Product Management group
- Kubernetes Storage SIG
- Kubernetes Cluster Federation SIG
Thousand Instances of Cassandra using Kubernetes Pet Set
Editor's note: this post is part of a series of in-depth articles on what's new in Kubernetes 1.3
Running The Greek Pet Monster Races
For the Kubernetes 1.3 launch, we wanted to put the new Pet Set through its paces. By testing a thousand instances of Cassandra, we could make sure that Kubernetes 1.3 was production ready. Read on for how we adapted Cassandra to Kubernetes, and had our largest deployment ever.
It’s fairly straightforward to use containers with basic stateful applications today. Using a persistent volume, you can mount a disk in a pod, and ensure that your data lasts beyond the life of your pod. However, with deployments of distributed stateful applications, things can become more tricky. With Kubernetes 1.3, the new Pet Set component makes everything much easier. To test this new feature out at scale, we decided to host the Greek Pet Monster Races! We raced Centaurs and other Ancient Greek Monsters over hundreds of thousands of races across multiple availability zones.

As many of you know Kubernetes is from the Ancient Greek: κυβερνήτης. This means helmsman, pilot, steersman, or ship master. So in order to keep track of race results, we needed a data store, and we choose Cassandra. Κασσάνδρα, Cassandra who was the daughter of King of Priam and Queen Hecuba of Troy. With multiple references to the ancient Greek language, we thought it would be appropriate to race ancient Greek monsters.
From there the story kinda goes sideways because Cassandra was actually the Pets as well. Read on and we will explain.
One of the new exciting features in Kubernetes 1.3 is Pet Set. In order to organize the deployment of containers inside of Kubernetes, different deployment mechanisms are available. Examples of these components include Resource Controllers and Daemon Set. Pet Sets is a new feature that delivers the capability to deploy containers, as Pets, inside of Kubernetes. Pet Sets provide a guarantee of identity for various aspects of the pet / pod deployment: DNS name, consistent storage, and ordered pod indexing. Previously, using components like Deployments and Replication Controllers, would only deploy an application with a weak uncoupled identity. A weak identity is great for managing applications such as microservices, where service discovery is important, the application is stateless, and the naming of individual pods does not matter. Many software applications do require strong identity, including many different types of distributed stateful systems. Cassandra is a great example of a distributed application that requires consistent network identity, and stable storage.
Pet Sets provides the following capabilities:
- A stable hostname, available to others in DNS. Number is based off of the Pet Set name and starts at zero. For example cassandra-0.
- An ordinal index of Pets. 0, 1, 2, 3, etc.
- Stable storage linked to the ordinal and hostname of the Pet.
- Peer discovery is available via DNS. With Cassandra the names of the peers are known before the Pets are created.
- Startup and Teardown ordering. Which numbered Pet is going to be created next is known, and which Pet will be destroyed upon reducing the Pet Set size. This feature is useful for such admin tasks as draining data from a Pet, when reducing the size of a cluster.
If your application has one or more of these requirements, then it may be a candidate for Pet Set.
A relevant analogy is that a Pet Set is composed of Pet dogs. If you have a white, brown or black dog and the brown dog runs away, you can replace it with another brown dog no one would notice. If over time you can keep replacing your dogs with only white dogs then someone would notice. Pet Set allows your application to maintain the unique identity or hair color of your Pets.
Example workloads for Pet Set:
- Clustered software like Cassandra, Zookeeper, etcd, or Elastic require stable membership.
- Databases like MySQL or PostgreSQL that require a single instance attached to a persistent volume at any time.
Only use Pet Set if your application requires some or all of these properties. Managing pods as stateless replicas is vastly easier.
So back to our races!
As we have mentioned, Cassandra was a perfect candidate to deploy via a Pet Set. A Pet Set is much like a Replica Controller with a few new bells and whistles. Here's an example YAML manifest:
Headless service to provide DNS lookup
apiVersion: v1
kind: Service
metadata:
labels:
app: cassandra
name: cassandra
spec:
clusterIP: None
ports:
- port: 9042
selector:
app: cassandra-data
----
# new API name
apiVersion: "apps/v1alpha1"
kind: PetSet
metadata:
name: cassandra
spec:
serviceName: cassandra
# replicas are the same as used by Replication Controllers
# except pets are deployed in order 0, 1, 2, 3, etc
replicas: 5
template:
metadata:
annotations:
pod.alpha.kubernetes.io/initialized: "true"
labels:
app: cassandra-data
spec:
# just as other component in Kubernetes one
# or more containers are deployed
containers:
- name: cassandra
image: "cassandra-debian:v1.1"
imagePullPolicy: Always
ports:
- containerPort: 7000
name: intra-node
- containerPort: 7199
name: jmx
- containerPort: 9042
name: cql
resources:
limits:
cpu: "4"
memory: 11Gi
requests:
cpu: "4"
memory: 11Gi
securityContext:
privileged: true
env:
- name: MAX\_HEAP\_SIZE
value: 8192M
- name: HEAP\_NEWSIZE
value: 2048M
# this is relying on guaranteed network identity of Pet Sets, we
# will know the name of the Pets / Pod before they are created
- name: CASSANDRA\_SEEDS
value: "cassandra-0.cassandra.default.svc.cluster.local,cassandra-1.cassandra.default.svc.cluster.local"
- name: CASSANDRA\_CLUSTER\_NAME
value: "OneKDemo"
- name: CASSANDRA\_DC
value: "DC1-Data"
- name: CASSANDRA\_RACK
value: "OneKDemo-Rack1-Data"
- name: CASSANDRA\_AUTO\_BOOTSTRAP
value: "false"
# this variable is used by the read-probe looking
# for the IP Address in a `nodetool status` command
- name: POD\_IP
valueFrom:
fieldRef:
fieldPath: status.podIP
readinessProbe:
exec:
command:
- /bin/bash
- -c
- /ready-probe.sh
initialDelaySeconds: 15
timeoutSeconds: 5
# These volume mounts are persistent. They are like inline claims,
# but not exactly because the names need to match exactly one of
# the pet volumes.
volumeMounts:
- name: cassandra-data
mountPath: /cassandra\_data
# These are converted to volume claims by the controller
# and mounted at the paths mentioned above. Storage can be automatically
# created for the Pets depending on the cloud environment.
volumeClaimTemplates:
- metadata:
name: cassandra-data
annotations:
volume.alpha.kubernetes.io/storage-class: anything
spec:
accessModes: ["ReadWriteOnce"]
resources:
requests:
storage: 380Gi
You may notice that these containers are on the rather large size, and it is not unusual to run Cassandra in production with 8 CPU and 16GB of ram. There are two key new features that you will notice above; dynamic volume provisioning, and of course Pet Set. The above manifest will create 5 Cassandra Pets / Pods starting with the number 0: cassandra-data-0, cassandra-data-1, etc.
In order to generate data for the races, we used another Kubernetes feature called Jobs. Simple python code was written to generate the random speed of the monster for every second of the race. Then that data, position information, winners, other data points, and metrics were stored in Cassandra. To visualize the data, we used JHipster to generate a AngularJS UI with Java services, and then used D3 for graphing.
An example of one of the Jobs:
apiVersion: batch/v1
kind: Job
metadata:
name: pet-race-giants
labels:
name: pet-races
spec:
parallelism: 2
completions: 4
template:
metadata:
name: pet-race-giants
labels:
name: pet-races
spec:
containers:
- name: pet-race-giants
image: py3numpy-job:v1.0
command: ["pet-race-job", --length=100", "--pet=Giants", "--scale=3"]
resources:
limits:
cpu: "2"
requests:
cpu: "2"
restartPolicy: Never
 Since we are talking about Monsters, we had to go big. We deployed 1,009 minion nodes to Google Compute Engine (GCE), spread across 4 zones, running a custom version of the Kubernetes 1.3 beta. We ran this demo on beta code since the demo was being set up before the 1.3 release date. For the minion nodes, GCE virtual machine n1-standard-8 machine size was chosen, which is vm with 8 virtual CPUs and 30GB of memory. It would allow for a single instance of Cassandra to run on one node, which is recommended for disk I/O.
Then the pets were deployed! One thousand of them, in two different Cassandra Data Centers. Cassandra distributed architecture is specifically tailored for multiple-data center deployment. Often multiple Cassandra data centers are deployed inside the same physical or virtual data center, in order to separate workloads. Data is replicated across all data centers, but workloads can be different between data centers and thus application tuning can be different. Data centers named 'DC1-Analytics' and ‘DC1-Data’ where deployed with 500 pets each. The race data was created by the python Batch Jobs connected to DC1-Data, and the JHipster UI was connected DC1-Analytics.
Here are the final numbers:
- 8,072 Cores. The master used 24, minion nodes used the rest
- 1,009 IP addresses
- 1,009 routes setup by Kubernetes on Google Cloud Platform
- 100,510 GB persistent disk used by the Minions and the Master
- 380,020 GB SSD disk persistent disk. 20 GB for the master and 340 GB per Cassandra Pet.
- 1,000 deployed instances of Cassandra Yes we deployed 1,000 pets, but one really did not want to join the party! Technically with the Cassandra setup, we could have lost 333 nodes without service or data loss.
Limitations with Pet Sets in 1.3 Release
- Pet Set is an alpha resource not available in any Kubernetes release prior to 1.3.
- The storage for a given pet must either be provisioned by a dynamic storage provisioner based on the requested storage class, or pre-provisioned by an admin.
- Deleting the Pet Set will not delete any pets or Pet storage. You will need to delete your Pets and possibly its storage by hand.
- All Pet Sets currently require a "governing service", or a Service responsible for the network identity of the pets. The user is responsible for this Service.
- Updating an existing Pet Set is currently a manual process. You either need to deploy a new Pet Set with the new image version or orphan Pets one by one and update their image, which will join them back to the cluster.
Resources and References
- The source code for the demo is available on GitHub: (Pet Set examples will be merged into the Kubernetes Cassandra Examples).
- More information about Jobs
- Documentation for Pet Set
- Image credits: Cassandra image and Cyclops image
Autoscaling in Kubernetes
Editor's note: this post is part of a series of in-depth articles on what's new in Kubernetes 1.3
Customers using Kubernetes respond to end user requests quickly and ship software faster than ever before. But what happens when you build a service that is even more popular than you planned for, and run out of compute? In Kubernetes 1.3, we are proud to announce that we have a solution: autoscaling. On Google Compute Engine (GCE) and Google Container Engine (GKE) (and coming soon on AWS), Kubernetes will automatically scale up your cluster as soon as you need it, and scale it back down to save you money when you don’t.
Benefits of Autoscaling
To understand better where autoscaling would provide the most value, let’s start with an example. Imagine you have a 24/7 production service with a load that is variable in time, where it is very busy during the day in the US, and relatively low at night. Ideally, we would want the number of nodes in the cluster and the number of pods in deployment to dynamically adjust to the load to meet end user demand. The new Cluster Autoscaling feature together with Horizontal Pod Autoscaler can handle this for you automatically.
Setting Up Autoscaling on GCE
The following instructions apply to GCE. For GKE please check the autoscaling section in cluster operations manual available here.
Before we begin, we need to have an active GCE project with Google Cloud Monitoring, Google Cloud Logging and Stackdriver enabled. For more information on project creation, please read our Getting Started Guide. We also need to download a recent version of Kubernetes project (version v1.3.0 or later).
First, we set up a cluster with Cluster Autoscaler turned on. The number of nodes in the cluster will start at 2, and autoscale up to a maximum of 5. To implement this, we’ll export the following environment variables:
export NUM\_NODES=2
export KUBE\_AUTOSCALER\_MIN\_NODES=2
export KUBE\_AUTOSCALER\_MAX\_NODES=5
export KUBE\_ENABLE\_CLUSTER\_AUTOSCALER=true
and start the cluster by running:
./cluster/kube-up.sh
The kube-up.sh script creates a cluster together with Cluster Autoscaler add-on. The autoscaler will try to add new nodes to the cluster if there are pending pods which could schedule on a new node.
Let’s see our cluster, it should have two nodes:
$ kubectl get nodes
NAME STATUS AGE
kubernetes-master Ready,SchedulingDisabled 2m
kubernetes-minion-group-de5q Ready 2m
kubernetes-minion-group-yhdx Ready 1m
Run & Expose PHP-Apache Server
To demonstrate autoscaling we will use a custom docker image based on php-apache server. The image can be found here. It defines index.php page which performs some CPU intensive computations.
First, we’ll start a deployment running the image and expose it as a service:
$ kubectl run php-apache \
--image=gcr.io/google\_containers/hpa-example \
--requests=cpu=500m,memory=500M --expose --port=80
service "php-apache" createddeployment "php-apache" created
Now, we will wait some time and verify that both the deployment and the service were correctly created and are running:
$ kubectl get deployment
NAME DESIRED CURRENT UP-TO-DATE AVAILABLE AGE
php-apache 1 1 1 1 49s
$ kubectl get pods
NAME READY STATUS RESTARTS AGE
php-apache-2046965998-z65jn 1/1 Running 0 30s
We may now check that php-apache server works correctly by calling wget with the service's address:
$ kubectl run -i --tty service-test --image=busybox /bin/sh
Hit enter for command prompt
$ wget -q -O- http://php-apache.default.svc.cluster.local
OK!
Starting Horizontal Pod Autoscaler
Now that the deployment is running, we will create a Horizontal Pod Autoscaler for it. To create it, we will use kubectl autoscale command, which looks like this:
$ kubectl autoscale deployment php-apache --cpu-percent=50 --min=1 --max=10
This defines a Horizontal Ppod Autoscaler that maintains between 1 and 10 replicas of the Pods controlled by the php-apache deployment we created in the first step of these instructions. Roughly speaking, the horizontal autoscaler will increase and decrease the number of replicas (via the deployment) so as to maintain an average CPU utilization across all Pods of 50% (since each pod requests 500 milli-cores by kubectl run, this means average CPU usage of 250 milli-cores). See here for more details on the algorithm.
We may check the current status of autoscaler by running:
$ kubectl get hpa
NAME REFERENCE TARGET CURRENT MINPODS MAXPODS AGE
php-apache Deployment/php-apache/scale 50% 0% 1 20 14s
Please note that the current CPU consumption is 0% as we are not sending any requests to the server (the CURRENT column shows the average across all the pods controlled by the corresponding replication controller).
Raising the Load
Now, we will see how our autoscalers (Cluster Autoscaler and Horizontal Pod Autoscaler) react on the increased load of the server. We will start two infinite loops of queries to our server (please run them in different terminals):
$ kubectl run -i --tty load-generator --image=busybox /bin/sh
Hit enter for command prompt
$ while true; do wget -q -O- http://php-apache.default.svc.cluster.local; done
We need to wait a moment (about one minute) for stats to propagate. Afterwards, we will examine status of Horizontal Pod Autoscaler:
$ kubectl get hpa
NAME REFERENCE TARGET CURRENT MINPODS MAXPODS AGE
php-apache Deployment/php-apache/scale 50% 310% 1 20 2m
$ kubectl get deployment php-apache
NAME DESIRED CURRENT UP-TO-DATE AVAILABLE AGE
php-apache 7 7 7 3 4m
Horizontal Pod Autoscaler has increased the number of pods in our deployment to 7. Let’s now check, if all the pods are running:
jsz@jsz-desk2:~/k8s-src$ kubectl get pods
php-apache-2046965998-3ewo6 0/1 Pending 0 1m
php-apache-2046965998-8m03k 1/1 Running 0 1m
php-apache-2046965998-ddpgp 1/1 Running 0 5m
php-apache-2046965998-lrik6 1/1 Running 0 1m
php-apache-2046965998-nj465 0/1 Pending 0 1m
php-apache-2046965998-tmwg1 1/1 Running 0 1m
php-apache-2046965998-xkbw1 0/1 Pending 0 1m
As we can see, some pods are pending. Let’s describe one of pending pods to get the reason of the pending state:
$ kubectl describe pod php-apache-2046965998-3ewo6
Name: php-apache-2046965998-3ewo6
Namespace: default
...
Events:
FirstSeen From SubobjectPath Type Reason Message
1m {default-scheduler } Warning FailedScheduling pod (php-apache-2046965998-3ewo6) failed to fit in any node
fit failure on node (kubernetes-minion-group-yhdx): Insufficient CPU
fit failure on node (kubernetes-minion-group-de5q): Insufficient CPU
1m {cluster-autoscaler } Normal TriggeredScaleUp pod triggered scale-up, mig: kubernetes-minion-group, sizes (current/new): 2/3
The pod is pending as there was no CPU in the system for it. We see there’s a TriggeredScaleUp event connected with the pod. It means that the pod triggered reaction of Cluster Autoscaler and a new node will be added to the cluster. Now we’ll wait for the reaction (about 3 minutes) and list all nodes:
$ kubectl get nodes
NAME STATUS AGE
kubernetes-master Ready,SchedulingDisabled 9m
kubernetes-minion-group-6z5i Ready 43s
kubernetes-minion-group-de5q Ready 9m
kubernetes-minion-group-yhdx Ready 9m
As we see a new node kubernetes-minion-group-6z5i was added by Cluster Autoscaler. Let’s verify that all pods are now running:
$ kubectl get pods
NAME READY STATUS RESTARTS AGE
php-apache-2046965998-3ewo6 1/1 Running 0 3m
php-apache-2046965998-8m03k 1/1 Running 0 3m
php-apache-2046965998-ddpgp 1/1 Running 0 7m
php-apache-2046965998-lrik6 1/1 Running 0 3m
php-apache-2046965998-nj465 1/1 Running 0 3m
php-apache-2046965998-tmwg1 1/1 Running 0 3m
php-apache-2046965998-xkbw1 1/1 Running 0 3m
After the node addition all php-apache pods are running!
Stop Load
We will finish our example by stopping the user load. We’ll terminate both infinite while loops sending requests to the server and verify the result state:
$ kubectl get hpa
NAME REFERENCE TARGET CURRENT MINPODS MAXPODS AGE
php-apache Deployment/php-apache/scale 50% 0% 1 10 16m
$ kubectl get deployment php-apache
NAME DESIRED CURRENT UP-TO-DATE AVAILABLE AGE
php-apache 1 1 1 1 14m
As we see, in the presented case CPU utilization dropped to 0, and the number of replicas dropped to 1.
After deleting pods most of the cluster resources are unused. Scaling the cluster down may take more time than scaling up because Cluster Autoscaler makes sure that the node is really not needed so that short periods of inactivity (due to pod upgrade etc) won’t trigger node deletion (see cluster autoscaler doc). After approximately 10-12 minutes you can verify that the number of nodes in the cluster dropped:
$ kubectl get nodes
NAME STATUS AGE
kubernetes-master Ready,SchedulingDisabled 37m
kubernetes-minion-group-de5q Ready 36m
kubernetes-minion-group-yhdx Ready 36m
The number of nodes in our cluster is now two again as node kubernetes-minion-group-6z5i was removed by Cluster Autoscaler.
Other use cases
As we have shown, it is very easy to dynamically adjust the number of pods to the load using a combination of Horizontal Pod Autoscaler and Cluster Autoscaler.
However Cluster Autoscaler alone can also be quite helpful whenever there are irregularities in the cluster load. For example, clusters related to development or continuous integration tests can be less needed on weekends or at night. Batch processing clusters may have periods when all jobs are over and the new will only start in couple hours. Having machines that do nothing is a waste of money.
In all of these cases Cluster Autoscaler can reduce the number of unused nodes and give quite significant savings because you will only pay for these nodes that you actually need to run your pods. It also makes sure that you always have enough compute power to run your tasks.
Kubernetes in Rancher: the further evolution
Kubernetes was the first external orchestration platform supported by Rancher, and since its release, it has become one of the most widely used among our users, and continues to grow rapidly in adoption. As Kubernetes has evolved, so has Rancher in terms of adapting new Kubernetes features. We’ve started with supporting Kubernetes version 1.1, then switched to 1.2 as soon as it was released, and now we’re working on supporting the exciting new features in 1.3. I’d like to walk you through the features that we’ve been adding support for during each of these stages.
Rancher and Kubernetes 1.2
Kubernetes 1.2 introduced enhanced Ingress object to simplify allowing inbound connections to reach the cluster services: here’s an excellent blog post about ingress policies. Ingress resource allows users to define host name routing rules and TLS config for the Load Balancer in a user friendly way. Then it should be backed up by an Ingress controller that would configure a corresponding cloud provider’s Load Balancer with the Ingress rules. Since Rancher already included a software defined Load Balancer based on HAproxy, we already supported all of the configuration requirements of the Ingress resource, and didn’t have to do any changes on the Rancher side to adopt Ingress. What we had to do was write an Ingress controller that would listen to Kubernetes ingress specific events, configure the Rancher Load Balancer accordingly, and propagate the Load Balancer public entry point back to Kubernetes:

Now, the ingress controller gets deployed as a part of our Rancher Kubernetes system stack, and is managed by Rancher. Rancher monitors Ingress controller health, and recreates it in case of any failures. In addition to standard ingress features, Rancher also lets you to horizontally scale the Load Balancer supporting the ingress service by specifying scale via Ingress annotations. For example:
apiVersion: extensions/v1beta1
kind: Ingress
metadata:
name: scalelb
annotations:
scale: "2"
spec:
rules:
- host: foo.bar.com
http:
paths:
- path: /foo
backend:
serviceName: nginx-service
servicePort: 80
As a result of the above, 2 instances of Rancher Load Balancer will get started on separate hosts, and Ingress will get updated with 2 public ip addresses:
kubectl get ingress
NAME RULE BACKEND ADDRESS
scalelb - 104.154.107.202, 104.154.107.203 // hosts ip addresses where Rancher LB instances are deployed
foo.bar.com
/foo nginx-service:80
More details on Rancher Ingress Controller implementation for Kubernetes can be found here:
Rancher and Kubernetes 1.3
We’ve very excited about Kubernetes 1.3 release, and all the new features that are included with it. There are two that we are especially interested in: Stateful Apps and Cluster Federation.
Kubernetes Stateful Apps
Stateful Apps is a new resource to Kubernetes to represent a set of pods in stateful application. This is an alternative to the using Replication Controllers, which are best leveraged for running stateless apps. This feature is specifically useful for apps that rely on quorum with leader election (such as MongoDB, Zookeeper, etcd) and decentralized quorum (Cassandra). Stateful Apps create and maintains a set of pods, each of which have a stable network identity. In order to provide the network identity, it must be possible to have a resolvable DNS name for the pod that is tied to the pod identity as per Kubernetes design doc:
# service mongo pointing to pods created by PetSet mdb, with identities mdb-1, mdb-2, mdb-3
dig mongodb.namespace.svc.cluster.local +short A
172.130.16.50
dig mdb-1.mongodb.namespace.svc.cluster.local +short A
# IP of pod created for mdb-1
dig mdb-2.mongodb.namespace.svc.cluster.local +short A
# IP of pod created for mdb-2
dig mdb-3.mongodb.namespace.svc.cluster.local +short A
# IP of pod created for mdb-3
The above is implemented via an annotation on pods, which is surfaced to endpoints, and finally surfaced as DNS on the service that exposes those pods. Currently Rancher simplifies DNS configuration by leveraging Rancher DNS as a drop-in replacement for SkyDNS. Rancher DNS is fast, stable, and scalable - every host in cluster gets DNS server running. Kubernetes services get programmed to Rancher DNS, and being resolved to either service’s cluster IP from 10,43.x.x address space, or to set of Pod ip addresses for headless service. To make PetSet work with Kubernetes via Rancher, we’ll have to add support for Pod Identities to Rancher DNS configuration. We’re working on this now and should have it supported in one of the upcoming Rancher releases.
Cluster Federation
Cluster Federation is a control plane of cluster federation in Kubernetes. It offers improved application availability by spreading applications across multiple clusters (the image below is a courtesy of Kubernetes):

Each Kubernetes cluster exposes an API endpoint and gets registered to Cluster Federation as a part of Federation object. Then using Cluster Federation API, you can create federated services. Those objects are comprised of multiple equivalent underlying Kubernetes resources. Assuming that the 3 clusters on the picture above belong to the same Federation object, each Service created via Cluster Federation, will get equivalent service created in each of the clusters. Besides that, a Cluster Federation service will get publicly resolvable DNS name resolvable to Kubernetes service’s public ip addresses (DNS record gets programmed to a one of the public DNS providers below):

To support Cluster Federation via Kubernetes in Rancher, certain changes need to be done. Today each Kubernetes cluster is represented as a Rancher environment. In each Kubernetes environment, we create a full Kubernetes system stack comprised of several services: Kubernetes API server, Scheduler, Ingress controller, persistent etcd, Controller manager, Kubelet and Proxy (2 last ones run on every host). To setup Cluster Federation, we will create one extra environment where Cluster Federation stack is going to run:

Then every underlying Kubernetes cluster represented by Rancher environment, should be registered to a specific Cluster Federation. Potentially each cluster can be auto-discovered by Rancher Cluster Federation environment via label representing federation name on Kubernetes cluster. We’re still working through finalizing our design, but we’re very excited by this feature, and see a lot of use cases it can solve. Cluster Federation doc references:
- Kubernetes cluster federation design doc
- Kubernetes blog post on multi zone clusters
- Kubernetes federated services design doc
Plans for Kubernetes 1.4
When we launched Kubernetes support in Rancher we decided to maintain our own distribution of Kubernetes in order to support Rancher’s native networking. We were aware that by having our own distribution, we’d need to update it every time there were changes made to Kubernetes, but we felt it was necessary to support the use cases we were working on for users. As part of our work for 1.4 we looked at our networking approach again, and re-analyzed the initial need for our own fork of Kubernetes. Other than the networking integration, all of the work we’ve done with Kubernetes has been developed as a Kubernetes plugin:
- Rancher as a CloudProvider (to support Load Balancers).
- Rancher as a CredentialProvider (to support Rancher private registries).
- Rancher Ingress controller to back up Kubernetes ingress resource.
So we’ve decided to eliminate the need of Rancher Kubernetes distribution, and try to upstream all our changes to the Kubernetes repo. To do that, we will be reworking our networking integration, and support Rancher networking as a CNI plugin for Kubernetes. More details on that will be shared as soon as the feature design is finalized, but expect it to come in the next 2-3 months. We will also continue investing in Rancher’s core capabilities integrated with Kubernetes, including, but not limited to:
- Access rights management via Rancher environment that represents Kubernetes cluster
- Credential management and easy web-based access to standard kubectl cli
- Load Balancing support
- Rancher internal DNS support
- Catalog support for Kubernetes templates
- Enhanced UI to represent even more Kubernetes objects like: Deployment, Ingress, Daemonset.
All of that is to make Kubernetes experience even more powerful and user intuitive. We’re so excited by all of the progress in the Kubernetes community, and thrilled to be participating. Kubernetes 1.3 is an incredibly significant release, and you’ll be able to upgrade to it very soon within Rancher.

Five Days of Kubernetes 1.3
Last week we released Kubernetes 1.3, two years from the day when the first Kubernetes commit was pushed to GitHub. Now 30,000+ commits later from over 800 contributors, this 1.3 releases is jam packed with updates driven by feedback from users.
While many new improvements and features have been added in the latest release, we’ll be highlighting several that stand-out. Follow along and read these in-depth posts on what’s new and how we continue to make Kubernetes the best way to manage containers at scale.
| Day 1 |
* Minikube: easily run Kubernetes locally
* rktnetes: brings rkt container engine to Kubernetes
|
|
Day 2
|
* Autoscaling in Kubernetes
* Partner post: Kubernetes in Rancher, the further evolution
|
|
Day 3
|
* Deploying thousand instances of Cassandra using Pet Set
* Partner post: Stateful Applications in Containers, by Diamanti
|
|
Day 4
|
* Cross Cluster Services
* Partner post: Citrix and NetScaler CPX
|
|
Day 5
|
* Dashboard - Full Featured Web Interface for Kubernetes
* Partner post: Steering an Automation Platform at Wercker with Kubernetes
|
|
Bonus
|
* Updates to Performance and Scalability
|
Connect
We’d love to hear from you and see you participate in this growing community:
- Get involved with the Kubernetes project on GitHub
- Post questions (or answer questions) on Stackoverflow
- Connect with the community on Slack
- Follow us on Twitter @Kubernetesio for latest updates
Minikube: easily run Kubernetes locally
Editor's note: This is the first post in a series of in-depth articles on what's new in Kubernetes 1.3
While Kubernetes is one of the best tools for managing containerized applications available today, and has been production-ready for over a year, Kubernetes has been missing a great local development platform.
For the past several months, several of us from the Kubernetes community have been working to fix this in the Minikube repository on GitHub. Our goal is to build an easy-to-use, high-fidelity Kubernetes distribution that can be run locally on Mac, Linux and Windows workstations and laptops with a single command.
Thanks to lots of help from members of the community, we're proud to announce the official release of Minikube. This release comes with support for Kubernetes 1.3, new commands to make interacting with your local cluster easier and experimental drivers for xhyve (on macOS) and KVM (on Linux).
Using Minikube
Minikube ships as a standalone Go binary, so installing it is as simple as downloading Minikube and putting it on your path:
Minikube currently requires that you have VirtualBox installed, which you can download here.
_(This is for Mac, for Linux substitute “minikube-darwin-amd64” with “minikube-linux-amd64”)curl -Lo minikube https://storage.googleapis.com/minikube/releases/latest/minikube-darwin-amd64 && chmod +x minikube && sudo mv minikube /usr/local/bin/
To start a Kubernetes cluster in Minikube, use the minikube start command:
$ minikube start
Starting local Kubernetes cluster...
Kubernetes is available at https://192.168.99.100:443
Kubectl is now configured to use the cluster

At this point, you have a running single-node Kubernetes cluster on your laptop! Minikube also configures kubectl for you, so you're also ready to run containers with no changes.
Minikube creates a Host-Only network interface that routes to your node. To interact with running pods or services, you should send traffic over this address. To find out this address, you can use the minikube ip command:

Minikube also comes with the Kubernetes Dashboard. To open this up in your browser, you can use the built-in minikube dashboard command:


In general, Minikube supports everything you would expect from a Kubernetes cluster. You can use kubectl exec to get a bash shell inside a pod in your cluster. You can use the kubectl port-forward and kubectl proxy commands to forward traffic from localhost to a pod or the API server.
Since Minikube is running locally instead of on a cloud provider, certain provider-specific features like LoadBalancers and PersistentVolumes will not work out-of-the-box. However, you can use NodePort LoadBalancers and HostPath PersistentVolumes.
Architecture
Minikube is built on top of Docker's libmachine, and leverages the driver model to create, manage and interact with locally-run virtual machines.
RedSpread was kind enough to donate their localkube codebase to the Minikube repo, which we use to spin up a single-process Kubernetes cluster inside a VM. Localkube bundles etcd, DNS, the Kubelet and all the Kubernetes master components into a single Go binary, and runs them all via separate goroutines.
Upcoming Features
Minikube has been a lot of fun to work on so far, and we're always looking to improve Minikube to make the Kubernetes development experience better. If you have any ideas for features, don't hesitate to let us know in the issue tracker.
Here's a list of some of the things we're hoping to add to Minikube soon:
- Native hypervisor support for macOS and Windows
- We're planning to remove the dependency on Virtualbox, and integrate with the native hypervisors included in macOS and Windows (Hypervisor.framework and Hyper-v, respectively).
- Improved support for Kubernetes features
- We're planning to increase the range of supported Kubernetes features, to include things like Ingress.
- Configurable versions of Kubernetes
- Today Minikube only supports Kubernetes 1.3. We're planning to add support for user-configurable versions of Kubernetes, to make it easier to match what you have running in production on your laptop.
Community
We'd love to hear feedback on Minikube. To join the community:
Please give Minikube a try, and let us know how it goes!
rktnetes brings rkt container engine to Kubernetes
Editor's note: this post is part of a series of in-depth articles on what's new in Kubernetes 1.3
As part of Kubernetes 1.3, we’re happy to report that our work to bring interchangeable container engines to Kubernetes is bearing early fruit. What we affectionately call “rktnetes” is included in the version 1.3 Kubernetes release, and is ready for development use. rktnetes integrates support for CoreOS rkt into Kubernetes as the container runtime on cluster nodes, and is now part of the mainline Kubernetes source code. Today it’s easier than ever for developers and ops pros with container portability in mind to try out running Kubernetes with a different container engine.
"We find CoreOS’s rkt a compelling container engine in Kubernetes because of how rkt is composed with the underlying systemd,” said Mark Petrovic, senior MTS and architect at Xoom, a PayPal service. “The rkt runtime assumes only the responsibility it needs to, then delegates to other system services where appropriate. This separation of concerns is important to us.”
What’s rktnetes?
rktnetes is the nickname given to the code that enables Kubernetes nodes to execute application containers with the rkt container engine, rather than with Docker. This change adds new abilities to Kubernetes, for instance running containers under flexible levels of isolation. rkt explores an alternative approach to container runtime architecture, aimed to reflect the Unix philosophy of cleanly separated, modular tools. Work done to support rktnetes also opens up future possibilities for Kubernetes, such as multiple container image format support, and the integration of other container runtimes tailored for specific use cases or platforms.
Why does Kubernetes need rktnetes?
rktnetes is about more than just rkt. It’s also about refining and exercising Kubernetes interfaces, and paving the way for other modular runtimes in the future. While the Docker container engine is well known, and is currently the default Kubernetes container runtime, a number of benefits derive from pluggable container environments. Some clusters may call for very specific container engine implementations, for example, and ensuring the Kubernetes design is flexible enough to support alternate runtimes, starting with rkt, helps keep the interfaces between components clean and simple.
Separation of concerns: Decomposing the monolithic container daemon
The current container runtime used by Kubernetes imposes a number of design decisions. Experimenting with other container execution architectures is worthwhile in such a rapidly evolving space. Today, when Kubernetes sends a request to a node to start running a pod, it communicates through the kubelet on each node with the default container runtime’s central daemon, responsible for managing all of the node’s containers.
rkt does not implement a monolithic container management daemon. (It is worth noting that the default container runtime is in the midst of refactoring its original monolithic architecture.) The rkt design has from day one tried to apply the principle of modularity to the fullest, including reusing well-tested system components, rather than reimplementing them.
The task of building container images is abstracted away from the container runtime core in rkt, and implemented by an independent utility. The same approach is taken to ongoing container lifecycle management. A single binary, rkt, configures the environment and prepares container images for execution, then sets the container application and its isolation environment running. At this point, the rkt program has done its “one job”, and the container isolator takes over.
The API for querying container engine and pod state, used by Kubernetes to track cluster work on each node, is implemented in a separate service, isolating coordination and orchestration features from the core container runtime. While the API service does not fully implement all the API features of the current default container engine, it already helps isolate containers from failures and upgrades in the core runtime, and provides the read-only parts of the expected API for querying container metadata.
Modular container isolation levels
With rkt managing container execution, Kubernetes can take advantage of the CoreOS container engine’s modular stage1 isolation mechanism. The typical container runs under rkt in a software-isolated environment constructed from Linux kernel namespaces, cgroups, and other facilities. Containers isolated in this common way nevertheless share a single kernel with all the other containers on a system, making for lightweight isolation of running apps.
However, rkt features pluggable isolation environments, referred to as stage1s, to change how containers are executed and isolated. For example, the rkt fly stage1 runs containers in the host namespaces (PID, mount, network, etc), granting containers greater power on the host system. Fly is used for containerizing lower-level system and network software, like the kubelet itself. At the other end of the isolation spectrum, the KVM stage1 runs standard app containers as individual virtual machines, each above its own Linux kernel, managed by the KVM hypervisor. This isolation level can be useful for high security and multi-tenant cluster workloads.

Currently, rktnetes can use the KVM stage1 to execute all containers on a node with VM isolation by setting the kubelet’s --rkt-stage1-image option. Experimental work exists to choose the stage1 isolation regime on a per-pod basis with a Kubernetes annotation declaring the pod’s appropriate stage1. KVM containers and standard Linux containers can be mixed together in the same cluster.
How rkt works with Kubernetes
Kubernetes today talks to the default container engine over an API provided by the Docker daemon. rktnetes communicates with rkt a little bit differently. First, there is a distinction between how Kubernetes changes the state of a node’s containers – how it starts and stops pods, or reschedules them for failover or scaling – and how the orchestrator queries pod metadata for regular, read-only bookkeeping. Two different facilities implement these two different cases.

Managing microservice lifecycles
The kubelet on each cluster node communicates with rkt to prepare containers and their environments into pods, and with systemd, the linux service management framework, to invoke and manage the pod processes. Pods are then managed as systemd services, and the kubelet sends systemd commands over dbus to manipulate them. Lifecycle management, such as restarting failed pods and killing completed processes, is handled by systemd, at the kubelet’s behest.
The API service for reading pod data
A discrete rkt api-service implements the pod introspection mechanisms expected by Kubernetes. While each node’s kubelet uses systemd to start, stop, and restart pods as services, it contacts the API service to read container runtime metadata. This includes basic orchestration information such as the number of pods running on the node, the names and networks of those pods, and the details of pod configuration, resource limits and storage volumes (think of the information shown by the kubectl describe subcommand).
Pod logs, having been written to journal files, are made available for kubectl logs and other forensic subcommands by the API service as well, which reads from log files to provide pod log data to the kubelet for answering control plane requests.
This dual interface to the container environment is an area of very active development, and plans are for the API service to expand to provide methods for the pod manipulation commands. The underlying mechanism will continue to keep separation of concerns in mind, but will hide more of this from the kubelet. The methods the kubelet uses to control the rktnetes container engine will grow less different from the default container runtime interface over time.
Try rktnetes
So what can you do with rktnetes today? Currently, rktnetes passes all of the applicable Kubernetes “end-to-end” (aka “e2e”) tests, provides standard metrics to cAdvisor, manages networks using CNI, handles per-container/pod logs, and automatically garbage collects old containers and images. Kubernetes running on rkt already provides more than the basics of a modular, flexible container runtime for Kubernetes clusters, and it is already a functional part of our development environment at CoreOS.
Developers and early adopters can follow the known issues in the rktnetes notes to get an idea of the wrinkles and bumps test-drivers can expect to encounter. This list groups the high-level pieces required to bring rktnetes to feature parity with the existing container runtime and API. We hope you’ll try out rktnetes in your Kubernetes clusters, too.
Use rkt with Kubernetes Today
The introductory guide Running Kubernetes on rkt walks through the steps to spin up a rktnetes cluster, from kubelet --container-runtime=rkt to networking and starting pods. This intro also sketches the configuration you’ll need to start a cluster on GCE with the Kubernetes kube-up.sh script.
Recent work aims to make rktnetes cluster creation much easier, too. While not yet merged, an in-progress pull request creates a single rktnetes configuration toggle to select rkt as the container engine when deploying a Kubernetes cluster with the coreos-kubernetes configuration tools. You can also check out the rktnetes workshop project, which launches a single-node rktnetes cluster on just about any developer workstation with one vagrant up command.
We’re excited to see the experiments the wider Kubernetes and CoreOS communities devise to put rktnetes to the test, and we welcome your input – and pull requests!
Updates to Performance and Scalability in Kubernetes 1.3 -- 2,000 node 60,000 pod clusters
We are proud to announce that with the release of version 1.3, Kubernetes now supports 2000-node clusters with even better end-to-end pod startup time. The latency of our API calls are within our one-second Service Level Objective (SLO) and most of them are even an order of magnitude better than that. It is possible to run larger deployments than a 2,000 node cluster, but performance may be degraded and it may not meet our strict SLO.
In this blog post we discuss the detailed performance results from Kubernetes 1.3 and what changes we made from version 1.2 to achieve these results. We also describe Kubemark, a performance testing tool that we’ve integrated into our continuous testing framework to detect performance and scalability regressions.
Evaluation Methodology
We have described our test scenarios in a previous blog post. The biggest change since the 1.2 release is that in our API responsiveness tests we now create and use multiple namespaces. In particular for the 2000-node/60000 pod cluster tests we create 8 namespaces. The change was done because we believe that users of such very large clusters are likely to use many namespaces, certainly at least 8 in the cluster in total.
Metrics from Kubernetes 1.3
So, what is the performance of Kubernetes version 1.3? The following graph shows the end-to-end pod startup latency with a 2000 and 1000 node cluster. For comparison we show the same metric from Kubernetes 1.2 with a 1000-node cluster.


How did we achieve these improvements?
The biggest change that we made for scalability in Kubernetes 1.3 was adding an efficient Protocol Buffer-based serialization format to the API as an alternative to JSON. It is primarily intended for communication between Kubernetes control plane components, but all API server clients can use this format. All Kubernetes control plane components now use it for their communication, but the system continues to support JSON for backward compatibility.
We didn’t change the format in which we store cluster state in etcd to Protocol Buffers yet, as we’re still working on the upgrade mechanism. But we’re very close to having this ready, and we expect to switch the storage format to Protocol Buffers in Kubernetes 1.4. Our experiments show that this should reduce pod startup end-to-end latency by another 30%.
How do we test Kubernetes at scale?
Spawning clusters with 2000 nodes is expensive and time-consuming. While we need to do this at least once for each release to collect real-world performance and scalability data, we also need a lighter-weight mechanism that can allow us to quickly evaluate our ideas for different performance improvements, and that we can run continuously to detect performance regressions. To address this need we created a tool call “Kubemark.”
What is “Kubemark”?
Kubemark is a performance testing tool which allows users to run experiments on emulated clusters. We use it for measuring performance in large clusters.
A Kubemark cluster consists of two parts: a real master node running the normal master components, and a set of “hollow” nodes. The prefix “hollow” means an implementation/instantiation of a component with some “moving parts” mocked out. The best example is hollow-kubelet, which pretends to be an ordinary Kubelet, but doesn’t start any containers or mount any volumes. It just claims it does, so from master components’ perspective it behaves like a real Kubelet.
Since we want a Kubemark cluster to be as similar to a real cluster as possible, we use the real Kubelet code with an injected fake Docker client. Similarly hollow-proxy (KubeProxy equivalent) reuses the real KubeProxy code with injected no-op Proxier interface (to avoid mutating iptables).
Thanks to those changes
- many hollow-nodes can run on a single machine, because they are not modifying the environment in which they are running
- without real containers running and the need for a container runtime (e.g. Docker), we can run up to 14 hollow-nodes on a 1-core machine.
- yet hollow-nodes generate roughly the same load on the API server as their “whole” counterparts, so they provide a realistic load for performance testing [the only fundamental difference is that we are not simulating any errors that can happens in reality (e.g. failing containers) - adding support for this is a potential extension to the framework in the future]
How do we set up Kubemark clusters?
To create a Kubemark cluster we use the power the Kubernetes itself gives us - we run Kubemark clusters on Kubernetes. Let’s describe this in detail.
In order to create a N-node Kubemark cluster, we:
- create a regular Kubernetes cluster where we can run N hollow-nodes [e.g. to create 2000-node Kubemark cluster, we create a regular Kubernetes cluster with 22 8-core nodes]
- create a dedicated VM, where we start all master components for our Kubemark cluster (etcd, apiserver, controllers, scheduler, …).
- schedule N “hollow-node” pods on the base Kubernetes cluster. Those hollow-nodes are configured to talk to the Kubemark API server running on the dedicated VM
- finally, we create addon pods (currently just Heapster) by scheduling them on the base cluster and configuring them to talk to the Kubemark API server Once this done, you have a usable Kubemark cluster that you can run your (performance) tests on. We have scripts for doing all of this on Google Compute Engine (GCE). For more details, take a look at our guide.
One thing worth mentioning here is that while running Kubemark, underneath we’re also testing Kubernetes correctness. Obviously your Kubemark cluster will not work correctly if the base Kubernetes cluster under it doesn’t work.
Performance measured in real clusters vs Kubemark
Crucially, the performance of Kubemark clusters is mostly similar to the performance of real clusters. For the pod startup end-to-end latency, as shown in the graph below, the difference is negligible:

For the API-responsiveness, the differences are higher, though generally less than 2x. However, trends are exactly the same: an improvement/regression in a real cluster is visible as a similar percentage drop/increase in metrics in Kubemark.

We continue to improve the performance and scalability of Kubernetes. In this blog post we
showed that the 1.3 release scales to 2000 nodes while meeting our responsiveness SLOs
explained the major change we made to improve scalability from the 1.2 release, and
described Kubemark, our emulation framework that allows us to quickly evaluate the performance impact of code changes, both when experimenting with performance improvement ideas and to detect regressions as part of our continuous testing infrastructure.
Please join our community and help us build the future of Kubernetes! If you’re particularly interested in scalability, participate by:
- chatting with us on our Slack channel
- joining the scalability Special Interest Group, which meets every Thursday at 9 AM Pacific Time on this SIG-Scale Hangout
For more information about the Kubernetes project, visit kubernetes.io and follow us on Twitter @Kubernetesio.
Kubernetes 1.3: Bridging Cloud Native and Enterprise Workloads
Nearly two years ago, when we officially kicked off the Kubernetes project, we wanted to simplify distributed systems management and provide the core technology required to everyone. The community’s response to this effort has blown us away. Today, thousands of customers, partners and developers are running clusters in production using Kubernetes and have joined the cloud native revolution.
Thanks to the help of over 800 contributors, we are pleased to announce today the availability of Kubernetes 1.3, our most robust and feature-rich release to date.
As our users scale their production deployments we’ve heard a clear desire to deploy services across cluster, zone and cloud boundaries. We’ve also heard a desire to run more workloads in containers, including stateful services. In this release, we’ve worked hard to address these two problems, while making it easier for new developers and enterprises to use Kubernetes to manage distributed systems at scale.
Product highlights in Kubernetes 1.3 include the ability to bridge services across multiple clouds (including on-prem), support for multiple node types, integrated support for stateful services (such as key-value stores and databases), and greatly simplified cluster setup and deployment on your laptop. Now, developers at organizations of all sizes can build production scale apps more easily than ever before.
What’s new
Increased scale and automation - Customers want to scale their services up and down automatically in response to application demand. In 1.3 we have made it easier to autoscale clusters up and down while doubling the maximum number of nodes per cluster. Customers no longer need to think about cluster size, and can allow the underlying cluster to respond to demand.
Cross-cluster federated services - Customers want their services to span one or more (possibly remote) clusters, and for them to be reachable in a consistent manner from both within and outside their clusters. Services that span clusters have higher availability, provide geographic distribution and enable hybrid and multi-cloud scenarios. Kubernetes 1.3 introduces cross-cluster service discovery so containers, and external clients can consistently resolve to services irrespective of whether they are running partially or completely in other clusters.
Stateful applications - Customers looking to use containers for stateful workloads (such as databases or key value stores) will find a new ‘PetSet’ object with raft of alpha features, including:
- Permanent hostnames that persist across restarts
- Automatically provisioned persistent disks per container that live beyond the life of a container
- Unique identities in a group to allow for clustering and leader election
- Initialization containers which are critical for starting up clustered applications
Ease of use for local development - Developers want an easy way to learn to use Kubernetes. In Kubernetes 1.3 we are introducing Minikube, where with one command a developer can start a local Kubernetes cluster on their laptop that is API compatible with a full Kubernetes cluster. This enable developers to test locally, and push to their Kubernetes clusters when they are ready.
Support for rkt and container standards OCI & CNI - Kubernetes is an extensible and modular orchestration platform. Part of what has made Kubernetes successful is our commitment to giving customers access to the latest container technologies that best suit their environment. In Kubernetes 1.3 we support emerging standards such as the Container Network Interface (CNI) natively, and have already taken steps to the Open Container Initiative (OCI), which is still being ratified. We are also introducing rkt as an alternative container runtime in Kubernetes node, with a first-class integration between rkt and the kubelet. This allows Kubernetes users to take advantage of some of rkt's unique features.
Updated Kubernetes dashboard UI - Customers can now use the Kubernetes open source dashboard for the majority of interactions with their clusters, rather than having to use the CLI. The updated UI lets users control, edit and create all workload resources (including Deployments and PetSets).
And many more. For a complete list of updates, see the release notes on GitHub.
Community
We could not have achieved this milestone without the tireless effort of countless people that are part of the Kubernetes community. We have 19 different Special Interest Groups, and over 100 meetups around the world. Kubernetes is a community project, built in the open, and it truly would not be possible without the over 233 person-years of effort the community has put in to date. Woot!
Availability
Kubernetes 1.3 is available for download at get.k8s.io and via the open source repository hosted on GitHub. To get started with Kubernetes try our Hello World app.
To learn the latest about the project, we encourage everyone to join the weekly community meeting or watch a recorded hangout.
Connect
We’d love to hear from you and see you participate in this growing community:
- Get involved with the Kubernetes project on GitHub
- Post questions (or answer questions) on Stackoverflow
- Connect with the community on Slack
- Follow us on Twitter @Kubernetesio for latest updates
Thank you for your support!
Container Design Patterns
Kubernetes automates deployment, operations, and scaling of applications, but our goals in the Kubernetes project extend beyond system management -- we want Kubernetes to help developers, too. Kubernetes should make it easy for them to write the distributed applications and services that run in cloud and datacenter environments. To enable this, Kubernetes defines not only an API for administrators to perform management actions, but also an API for containerized applications to interact with the management platform.
Our work on the latter is just beginning, but you can already see it manifested in a few features of Kubernetes. For example:
- The “graceful termination” mechanism provides a callback into the container a configurable amount of time before it is killed (due to a rolling update, node drain for maintenance, etc.). This allows the application to cleanly shut down, e.g. persist in-memory state and cleanly conclude open connections.
- Liveness and readiness probes check a configurable application HTTP endpoint (other probe types are supported as well) to determine if the container is alive and/or ready to receive traffic. The response determines whether Kubernetes will restart the container, include it in the load-balancing pool for its Service, etc.
- ConfigMap allows applications to read their configuration from a Kubernetes resource rather than using command-line flags.
More generally, we see Kubernetes enabling a new generation of design patterns, similar to object oriented design patterns, but this time for containerized applications. That design patterns would emerge from containerized architectures is not surprising -- containers provide many of the same benefits as software objects, in terms of modularity/packaging, abstraction, and reuse. Even better, because containers generally interact with each other via HTTP and widely available data formats like JSON, the benefits can be provided in a language-independent way.
This week Kubernetes co-founder Brendan Burns is presenting a paper outlining our thoughts on this topic at the 8th Usenix Workshop on Hot Topics in Cloud Computing (HotCloud ‘16), a venue where academic researchers and industry practitioners come together to discuss ideas at the forefront of research in private and public cloud technology. The paper describes three classes of patterns: management patterns (such as those described above), patterns involving multiple cooperating containers running on the same node, and patterns involving containers running across multiple nodes. We don’t want to spoil the fun of reading the paper, but we will say that you’ll see that the Pod abstraction is a key enabler for the last two types of patterns.
As the Kubernetes project continues to bring our decade of experience with Borg to the open source community, we aim not only to make application deployment and operations at scale simple and reliable, but also to make it easy to create “cloud-native” applications in the first place. Our work on documenting our ideas around design patterns for container-based services, and Kubernetes’s enabling of such patterns, is a first step in this direction. We look forward to working with the academic and practitioner communities to identify and codify additional patterns, with the aim of helping containers fulfill the promise of bringing increased simplicity and reliability to the entire software lifecycle, from development, to deployment, to operations.
To learn more about the Kubernetes project visit kubernetes.io or chat with us on Slack at slack.kubernetes.io.
The Illustrated Children's Guide to Kubernetes
Kubernetes is an open source project with a growing community. We love seeing the ways that our community innovates inside and on top of Kubernetes. Deis is an excellent example of company who understands the strategic impact of strong container orchestration. They contribute directly to the project; in associated subprojects; and, delightfully, with a creative endeavor to help our user community understand more about what Kubernetes is. Want to contribute to Kubernetes? One way is to get involved here and help us with code. But, please don’t consider that the only way to contribute. This little adventure that Deis takes us is an example of how open source isn’t only code.
Have your own Kubernetes story you’d like to tell, let us know!
-- @sarahnovotny Community Wonk, Kubernetes project.
Guest post is by Beau Vrolyk, CEO of Deis, the open source Kubernetes-native PaaS.
Over at Deis, we’ve been busy building open source tools for Kubernetes. We’re just about to finish up moving our easy-to-use application platform to Kubernetes and couldn’t be happier with the results. In the Kubernetes project we’ve found not only a growing and vibrant community but also a well-architected system, informed by years of experience running containers at scale.
But that’s not all! As we’ve decomposed, ported, and reborn our PaaS as a Kubernetes citizen; we found a need for tools to help manage all of the ephemera that comes along with building and running Kubernetes-native applications. The result has been open sourced as Helm and we’re excited to see increasing adoption and growing excitement around the project.
There’s fun in the Deis offices too -- we like to add some character to our architecture diagrams and pull requests. This time, literally. Meet Phippy--the intrepid little PHP app--and her journey to Kubernetes. What better way to talk to your parents, friends, and co-workers about this Kubernetes thing you keep going on about, than a little story time. We give to you The Illustrated Children's Guide to Kubernetes, conceived of and narrated by our own Matt Butcher and lovingly illustrated by Bailey Beougher. Join the fun on YouTube and tweet @opendeis to win your own copy of the book or a squishy little Phippy of your own.
Bringing End-to-End Kubernetes Testing to Azure (Part 1)
At AppFormix, continuous integration testing is part of our culture. We see many benefits to running end-to-end tests regularly, including minimizing regressions and ensuring our software works together as a whole. To ensure a high quality experience for our customers, we require the ability to run end-to-end testing not just for our application, but for the entire orchestration stack. Our customers are adopting Kubernetes as their container orchestration technology of choice, and they demand choice when it comes to where their containers execute, from private infrastructure to public providers, including Azure. After several weeks of work, we are pleased to announce we are contributing a nightly, continuous integration job that executes e2e tests on the Azure platform. After running the e2e tests each night for only a few weeks, we have already found and fixed two issues in Kubernetes. We hope our contribution of an e2e job will help the community maintain support for the Azure platform as Kubernetes evolves.
In this blog post, we describe the journey we took to implement deployment scripts for the Azure platform. The deployment scripts are a prerequisite to the e2e test job we are contributing, as the scripts make it possible for our e2e test job to test the latest commits to the Kubernetes master branch. In a subsequent blog post, we will describe details of the e2e tests that will help maintain support for the Azure platform, and how to contribute federated e2e test results to the Kubernetes project.
BACKGROUND
While Kubernetes is designed to operate on any IaaS, and solution guides exist for many platforms including Google Compute Engine, AWS, Azure, and Rackspace, the Kubernetes project refers to these as “versioned distros,” as they are only tested against a particular binary release of Kubernetes. On the other hand, “development distros” are used daily by automated, e2e tests for the latest Kubernetes source code, and serve as gating checks to code submission.
When we first surveyed existing support for Kubernetes on Azure, we found documentation for running Kubernetes on Azure using CoreOS and Weave. The documentation includes scripts for deployment, but the scripts do not conform to the cluster/kube-up.sh framework for automated cluster creation required by a “development distro.” Further, there did not exist a continuous integration job that utilized the scripts to validate Kubernetes using the end-to-end test scenarios (those found in test/e2e in the Kubernetes repository).
With some additional investigation into the project history (side note: git log --all --grep='azure' --oneline was quite helpful), we discovered that there previously existed a set of scripts that integrated with the cluster/kube-up.sh framework. These scripts were discarded on October 16, 2015 (commit 8e8437d) because the scripts hadn’t worked since before Kubernetes version 1.0. With these commits as a starting point, we set out to bring the scripts up to date, and create a supported continuous integration job that will aid continued maintenance.
CLUSTER DEPLOYMENT SCRIPTS
To setup a Kubernetes cluster with Ubuntu VMs on Azure, we followed the groundwork laid by the previously abandoned commit, and tried to leverage the existing code as much as possible. The solution uses SaltStack for deployment and OpenVPN for networking between the master and the minions. SaltStack is also used for configuration management by several other solutions, such as AWS, GCE, Vagrant, and Vsphere. Resurrecting the discarded commit was a starting point, but we soon realized several key elements that needed attention:
- Install Docker and Kubernetes on the nodes using SaltStack
- Configure authentication for services
- Configure networking
The cluster setup scripts ensure Docker is installed, copy the Kubernetes Docker images to the master and minions nodes, and load the images. On the master node, SaltStack launches kubelet, which in turn launches the following Kubernetes services running in containers: kube-api-server, kube-scheduler, and kube-controller-manager. On each of the minion nodes, SaltStack launches kubelet, which starts kube-proxy.
Kubernetes services must authenticate when communicating with each other. For example, minions register with the kube-api service on the master. On the master node, scripts generate a self-signed certificate and key that kube-api uses for TLS. Minions are configured to skip verification of the kube-api’s (self-signed) TLS certificate. We configure the services to use username and password credentials. The username and password are generated by the cluster setup scripts, and stored in the kubeconfig file on each node.
Finally, we implemented the networking configuration. To keep the scripts parameterized and minimize assumptions about the target environment, the scripts create a new Linux bridge device (cbr0), and ensure that all containers use that interface to access the network. To configure networking, we use OpenVPN to establish tunnels between master and minion nodes. For each minion, we reserve a /24 subnet to use for its pods. Azure assigned each node its own IP address. We also added the necessary routing table entries for this bridge to use OpenVPN interfaces. This is required to ensure pods in different hosts can communicate with each other. The routes on the master and minion are the following:
master
Destination Gateway Genmask Flags Metric Ref Use Iface
10.8.0.0 10.8.0.2 255.255.255.0 UG 0 0 0 tun0
10.8.0.2 0.0.0.0 255.255.255.255 UH 0 0 0 tun0
10.244.1.0 10.8.0.2 255.255.255.0 UG 0 0 0 tun0
10.244.2.0 10.8.0.2 255.255.255.0 UG 0 0 0 tun0
172.18.0.0 0.0.0.0 255.255.0.0 U 0 0 0 cbr0
minion-1
10.8.0.0 10.8.0.5 255.255.255.0 UG 0 0 0 tun0
10.8.0.5 0.0.0.0 255.255.255.255 UH 0 0 0 tun0
10.244.1.0 0.0.0.0 255.255.255.0 U 0 0 0 cbr0
10.244.2.0 10.8.0.5 255.255.255.0 UG 0 0 0 tun0
minion-2
10.8.0.0 10.8.0.9 255.255.255.0 UG 0 0 0 tun0
10.8.0.9 0.0.0.0 255.255.255.255 UH 0 0 0 tun0
10.244.1.0 10.8.0.9 255.255.255.0 UG 0 0 0 tun0
10.244.2.0 0.0.0.0 255.255.255.0 U 0 0 0 cbr0
 |
| Figure 1 - OpenVPN network configuration |
|
| Figure 1 - OpenVPN network configuration |
FUTURE WORK With the deployment scripts implemented, a subset of e2e test cases are passing on the Azure platform. Nightly results are published to the Kubernetes test history dashboard. Weixu Zhuang made a pull request on Kubernetes GitHub, and we are actively working with the Kubernetes community to merge the Azure cluster deployment scripts necessary for a nightly e2e test job. The deployment scripts provide a minimal working environment for Kubernetes on Azure. There are several next steps to continue the work, and we hope the community will get involved to achieve them.
- Only a subset of the e2e scenarios are passing because some cloud provider interfaces are not yet implemented for Azure, such as load balancer and instance information. To this end, we seek community input and help to define an Azure implementation of the cloudprovider interface (pkg/cloudprovider/). These interfaces will enable features such as Kubernetes pods being exposed to the external network and cluster DNS.
- Azure has new APIs for interacting with the service. The submitted scripts currently use the Azure Service Management APIs, which are deprecated. The Azure Resource Manager APIs should be used in the deployment scripts. The team at AppFormix is pleased to contribute support for Azure to the Kubernetes community. We look forward to feedback about how we can work together to improve Kubernetes on Azure.
Editor's Note: Want to contribute to Kubernetes, get involved here. Have your own Kubernetes story you’d like to tell, let us know!
Part II is available here.
Hypernetes: Bringing Security and Multi-tenancy to Kubernetes
While many developers and security professionals are comfortable with Linux containers as an effective boundary, many users need a stronger degree of isolation, particularly for those running in a multi-tenant environment. Sadly, today, those users are forced to run their containers inside virtual machines, even one VM per container.
Unfortunately, this results in the loss of many of the benefits of a cloud-native deployment: slow startup time of VMs; a memory tax for every container; low utilization resulting in wasting resources.
In this post, we will introduce HyperContainer, a hypervisor based container and see how it naturally fits into the Kubernetes design, and enables users to serve their customers directly with virtualized containers, instead of wrapping them inside of full blown VMs.
HyperContainer
HyperContainer is a hypervisor-based container, which allows you to launch Docker images with standard hypervisors (KVM, Xen, etc.). As an open-source project, HyperContainer consists of an OCI compatible runtime implementation, named runV, and a management daemon named hyperd. The idea behind HyperContainer is quite straightforward: to combine the best of both virtualization and container.
We can consider containers as two parts (as Kubernetes does). The first part is the container runtime, where HyperContainer uses virtualization to achieve execution isolation and resource limitation instead of namespaces and cgroups. The second part is the application data, where HyperContainer leverages Docker images. So in HyperContainer, virtualization technology makes it possible to build a fully isolated sandbox with an independent guest kernel (so things like top and /proc all work), but from developer’s view, it’s portable and behaves like a standard container.
HyperContainer as Pod
The interesting part of HyperContainer is not only that it is secure enough for multi-tenant environments (such as a public cloud), but also how well it fits into the Kubernetes philosophy.
One of the most important concepts in Kubernetes is Pods. The design of Pods is a lesson learned (Borg paper section 8.1) from real world workloads, where in many cases people want an atomic scheduling unit composed of multiple containers (please check this example for further information). In the context of Linux containers, a Pod wraps and encapsulates several containers into a logical group. But in HyperContainer, the hypervisor serves as a natural boundary, and Pods are introduced as first-class objects:

HyperContainer wraps a Pod of light-weight application containers and exposes the container interface at Pod level. Inside the Pod, a minimalist Linux kernel called HyperKernel is booted. This HyperKernel is built with a tiny Init service called HyperStart. It will act as the PID 1 process and creates the Pod, setup Mount namespace, and launch apps from the loaded images.
This model works nicely with Kubernetes. The integration of HyperContainer with Kubernetes, as we indicated in the title, is what makes up the Hypernetes project.
Hypernetes
One of the best parts of Kubernetes is that it is designed to support multiple container runtimes, meaning users are not locked-in to a single vendor. We are very pleased to announce that we have already begun working with the Kubernetes team to integrate HyperContainer into Kubernetes upstream. This integration involves:
- container runtime optimizing and refactoring
- new client-server mode runtime interface
- containerd integration to support runV
The OCI standard and kubelet’s multiple runtime architecture make this integration much easier even though HyperContainer is not based on Linux container technology stack.
On the other hand, in order to run HyperContainers in multi-tenant environment, we also created a new network plugin and modified an existing volume plugin. Since Hypernetes runs Pod as their own VMs, it can make use of your existing IaaS layer technologies for multi-tenant network and persistent volumes. The current Hypernetes implementation uses standard Openstack components.
Below we go into further details about how all those above are implemented.
Identity and Authentication
In Hypernetes we chose Keystone to manage different tenants and perform identification and authentication for tenants during any administrative operation. Since Keystone comes from the OpenStack ecosystem, it works seamlessly with the network and storage plugins we used in Hypernetes.
Multi-tenant Network Model
For a multi-tenant container cluster, each tenant needs to have strong network isolation from each other tenant. In Hypernetes, each tenant has its own Network. Instead of configuring a new network using OpenStack, which is complex, with Hypernetes, you just create a Network object like below.
apiVersion: v1
kind: Network
metadata:
name: net1
spec:
tenantID: 065f210a2ca9442aad898ab129426350
subnets:
subnet1:
cidr: 192.168.0.0/24
gateway: 192.168.0.1
Note that the tenantID is supplied by Keystone. This yaml will automatically create a new Neutron network with a default router and a subnet 192.168.0.0/24.
A Network controller will be responsible for the life-cycle management of any Network instance created by the user. This Network can be assigned to one or more Namespaces, and any Pods belonging to the same Network can reach each other directly through IP address.
apiVersion: v1
kind: Namespace
metadata:
name: ns1
spec:
network: net1
If a Namespace does not have a Network spec, it will use the default Kubernetes network model instead, including the default kube-proxy. So if a user creates a Pod in a Namespace with an associated Network, Hypernetes will follow the Kubernetes Network Plugin Model to set up a Neutron network for this Pod. Here is a high level example:

Hypernetes uses a standalone gRPC handler named kubestack to translate the Kubernetes Pod request into the Neutron network API. Moreover, kubestack is also responsible for handling another important networking feature: a multi-tenant Service proxy.
In a multi-tenant environment, the default iptables-based kube-proxy can not reach the individual Pods, because they are isolated into different networks. Instead, Hypernetes uses a built-in HAproxy in every HyperContainer as the portal. This HAproxy will proxy all the Service instances in the namespace of that Pod. Kube-proxy will be responsible for updating these backend servers by following the standard OnServiceUpdate and OnEndpointsUpdate processes, so that users will not notice any difference. A downside of this method is that HAproxy has to listen to some specific ports which may conflicts with user’s containers.That’s why we are planning to use LVS to replace this proxy in the next release.
With the help of the Neutron based network plugin, the Hypernetes Service is able to provide an OpenStack load balancer, just like how the “external” load balancer does on GCE. When user creates a Service with external IPs, an OpenStack load balancer will be created and endpoints will be automatically updated through the kubestack workflow above.
Persistent Storage
When considering storage, we are actually building a tenant-aware persistent volume in Kubernetes. The reason we decided not to use existing Cinder volume plugin of Kubernetes is that its model does not work in the virtualization case. Specifically:
The Cinder volume plugin requires OpenStack as the Kubernetes provider.
The OpenStack provider will find on which VM the target Pod is running on
Cinder volume plugin will mount a Cinder volume to a path inside the host VM of Kubernetes.
The kubelet will bind mount this path as a volume into containers of target Pod.
But in Hypernetes, things become much simpler. Thanks to the physical boundary of Pods, HyperContainer can mount Cinder volumes directly as block devices into Pods, just like a normal VM. This mechanism eliminates extra time to query Nova to find out the VM of target Pod in the existing Cinder volume workflow listed above.
The current implementation of the Cinder plugin in Hypernetes is based on Ceph RBD backend, and it works the same as all other Kubernetes volume plugins, one just needs to remember to create the Cinder volume (referenced by volumeID below) beforehand.
apiVersion: v1
kind: Pod
metadata:
name: nginx
labels:
app: nginx
spec:
containers:
- name: nginx
image: nginx
ports:
- containerPort: 80
volumeMounts:
- name: nginx-persistent-storage
mountPath: /var/lib/nginx
volumes:
- name: nginx-persistent-storage
cinder:
volumeID: 651b2a7b-683e-47e1-bdd6-e3c62e8f91c0
fsType: ext4
So when the user provides a Pod yaml with a Cinder volume, Hypernetes will check if kubelet is using the Hyper container runtime. If so, the Cinder volume can be mounted directly to the Pod without any extra path mapping. Then the volume metadata will be passed to the Kubelet RunPod process as part of HyperContainer spec. Done!
Thanks to the plugin model of Kubernetes network and volume, we can easily build our own solutions above for HyperContainer though it is essentially different from the traditional Linux container. We also plan to propose these solutions to Kubernetes upstream by following the CNI model and volume plugin standard after the runtime integration is completed.
We believe all of these open source projects are important components of the container ecosystem, and their growth depends greatly on the open source spirit and technical vision of the Kubernetes team.
Conclusion
This post introduces some of the technical details about HyperContainer and the Hypernetes project. We hope that people will be interested in this new category of secure container and its integration with Kubernetes. If you are looking to try out Hypernetes and HyperContainer, we have just announced the public beta of our new secure container cloud service (Hyper_), which is built on these technologies. But even if you are running on-premise, we believe that Hypernetes and HyperContainer will let you run Kubernetes in a more secure way.
CoreOS Fest 2016: CoreOS and Kubernetes Community meet in Berlin (& San Francisco)
CoreOS Fest 2016 will bring together the container and open source distributed systems community, including many thought leaders in the Kubernetes space. It is the second annual CoreOS community conference, held for the first time in Berlin on May 9th and 10th. CoreOS believes Kubernetes is the container orchestration component to deliver GIFEE (Google’s Infrastructure for Everyone Else).
At this year’s CoreOS Fest, there are tracks dedicated to Kubernetes where you’ll hear about various topics ranging from Kubernetes performance and scalability, continuous delivery and Kubernetes, rktnetes, stackanetes and more. In addition, there will be a variety of talks, from introductory workshops to deep-dives into all things containers and related software.
Don’t miss these great speaker sessions at the conference in Berlin :
- Kubernetes Performance & Scalability Deep-Dive by Filip Grzadkowski, Senior Software Engineer at Google
- Launching a complex application in a Kubernetes cloud by Thomas Fricke and Jannis Rake-Revelant, Operations & Infrastructure Lead, immmr Gmbh (a service developed by the Deutsche Telekom’s R&D department)
- I have Kubernetes, now what? by Gabriel Monroy, CTO of Engine Yard and creator of Deis
- When rkt meets Kubernetes: a troubleshooting tale by Luca Marturana, Software Engineer at Sysdig
- Use Kubernetes to deploy telecom applications by Victor Hu, Senior Engineer at Huawei Technologies
- Continuous Delivery, Kubernetes and You by Micha Hernandez van Leuffen, CEO and founder of Wercker
- #GIFEE, More Containers, More Problems by Ed Rooth, Head of Tectonic at CoreOS
- Kubernetes Access Control with dex by Eric Chiang, Software Engineer at CoreOS
If you can’t make it to Berlin, Kubernetes is also a focal point at the CoreOS Fest San Franciscosatellite event, a one day event dedicated to CoreOS and Kubernetes. In fact, Tim Hockin, senior staff engineer at Google and one of the creators of Kubernetes, will be kicking off the day with a keynote dedicated to Kubernetes updates.
San Francisco sessions dedicated to Kubernetes include:
- Tim Hockin’s keynote address, Senior Staff Engineer at Google
- When rkt meets Kubernetes: a troubleshooting tale by Loris Degioanni, CEO of Sysdig
- rktnetes: what's new with container runtimes and Kubernetes by Derek Gonyeo, Software Engineer at CoreOS
- Magical Security Sprinkles: Secure, Resilient Microservices on CoreOS and Kubernetes by Oliver Gould, CTO of Buoyant
Kubernetes Workshop in SF : Getting Started with Kubernetes, hosted at Google San Francisco office (345 Spear St - 7th floor) by Google Developer Program Engineers Carter Morgan and Bill Prin on Tuesday May 10th from 9:00am to 1:00pm, lunch will be served afterwards. Limited seats, please RSVP for free here.
Get your tickets :
- CoreOS Fest - Berlin, at the Berlin Congress Center (hotel option)
- satellite event in San Francisco, at the 111 Minna Gallery
Learn more at: coreos.com/fest/ and on Twitter @CoreOSFest #CoreOSFest
Introducing the Kubernetes OpenStack Special Interest Group
Editor's note: This week we’re featuring Kubernetes Special Interest Groups; Today’s post is by the SIG-OpenStack team about their mission to facilitate ideas between the OpenStack and Kubernetes communities.
The community around the Kubernetes project includes a number of Special Interest Groups (SIGs) for the purposes of facilitating focused discussions relating to important subtopics between interested contributors. Today we would like to highlight the Kubernetes OpenStack SIG focused on the interaction between Kubernetes and OpenStack, the Open Source cloud computing platform.
There are two high level scenarios that are being discussed in the SIG:
- Using Kubernetes to manage containerized workloads running on top of OpenStack
- Using Kubernetes to manage containerized OpenStack services themselves
In both cases the intent is to help facilitate the inter-pollination of ideas between the growing Kubernetes and OpenStack communities. The OpenStack community itself includes a number of projects broadly aimed at assisting with both of these use cases including:
- Kolla - Provides OpenStack service containers and deployment tooling for operating OpenStack clouds.
- Kuryr - Provides bridges between container networking/storage framework models and OpenStack infrastructure services.
- Magnum - Provides containers as a service for OpenStack.
- Murano - Provides an Application Catalog service for OpenStack including support for Kubernetes itself, and for containerized applications, managed by Kubernetes.
There are also a number of example templates available to assist with using the OpenStack Orchestration service (Heat) to deploy and configure either Kubernetes itself or offerings built around Kubernetes such as OpenShift. While each of these approaches has their own pros and cons the common theme is the ability, or potential ability, to use Kubernetes and where available leverage deeper integration between it and the OpenStack services themselves.
Current SIG participants represent a broad array of organizations including but not limited to: CoreOS, eBay, GoDaddy, Google, IBM, Intel, Mirantis, OpenStack Foundation, Rackspace, Red Hat, Romana, Solinea, VMware.
The SIG is currently working on collating information about these approaches to help Kubernetes users navigate the OpenStack ecosystem along with feedback on which approaches to the requirements presented work best for operators.
Kubernetes at OpenStack Summit Austin
The OpenStack Summit is in Austin from April 25th to 29th and is packed with sessions related to containers and container management using Kubernetes. If you plan on joining us in Austin you can review the schedule online where you will find a number of sessions, both in the form of presentations and hands on workshops, relating to Kubernetes and containerization at large. Folks from the Kubernetes OpenStack SIG are particularly keen to get the thoughts of operators in the “Ops: Containers on OpenStack” and “Ops: OpenStack in Containers” working sessions.
Kubernetes community experts will also be on hand in the Container Expert Lounge to answer your burning questions. You can find the lounge on the 4th floor of the Austin Convention Center.
Follow @kubernetesio and #OpenStackSummit to keep up with the latest updates on Kubernetes at OpenStack Summit throughout the week.
Connect With Us
If you’re interested in Kubernetes and OpenStack, there are several ways to participate:
- Email us at the SIG-OpenStack mailing list
- Chat with us on the Kubernetes Slack: #sig-openstack channel and #openstack-kubernetes on freenode
- Join our meeting occurring every second Tuesday at 2 PM PDT; attend via the zoom videoconference found in our meeting notes.
SIG-UI: the place for building awesome user interfaces for Kubernetes
Editor's note: This week we’re featuring Kubernetes Special Interest Groups; Today’s post is by the SIG-UI team describing their mission and showing the cool projects they work on.
Kubernetes has been handling production workloads for a long time now (see case studies). It runs on public, private and hybrid clouds as well as bare metal. It can handle all types of workloads (web serving, batch and mixed) and enable zero-downtime rolling updates. It abstracts service discovery, load balancing and storage so that applications running on Kubernetes aren’t restricted to a specific cloud provider or environment.
The abundance of features that Kubernetes offers is fantastic, but implementing a user-friendly, easy-to-use user interface is quite challenging. How shall all the features be presented to users? How can we gradually expose the Kubernetes concepts to newcomers, while empowering experts? There are lots of other challenges like these that we’d like to solve. This is why we created a special interest group for Kubernetes user interfaces.
Meet SIG-UI: the place for building awesome user interfaces for Kubernetes
The SIG UI mission is simple: we want to radically improve the user experience of all Kubernetes graphical user interfaces. Our goal is to craft UIs that are used by devs, ops and resource managers across their various environments, that are simultaneously intuitive enough for newcomers to Kubernetes to understand and use.
SIG UI members have been independently working on a variety of UIs for Kubernetes. So far, the projects we’ve seen have been either custom internal tools coupled to their company workflows, or specialized API frontends. We have realized that there is a need for a universal UI that can be used standalone or be a standard base for custom vendors. That’s how we started the Dashboard UI project. Version 1.0 has been recently released and is included with Kubernetes as a cluster addon. The Dashboard project was recently featured in a talk at KubeCon EU, and we have ambitious plans for the future!
| 
Since the initial release of the Dashboard UI we have been thinking hard about what to do next and what users of UIs for Kubernetes think about our plans. We’ve had many internal discussions on this topic, but most importantly, reached out directly to our users. We created a questionnaire asking a few demographic questions as well as questions for prioritizing use cases. We received more than 200 responses from a wide spectrum of user types, which in turn helped to shape the Dashboard UI’s current roadmap. Our members from LiveWyer summarised the results in a nice infographic.
Connect with us
We believe that collaboration is the key to SIG UI success, so we invite everyone to connect with us. Whether you’re a Kubernetes user who wants to provide feedback, develop your own UIs, or simply want to collaborate on the Dashboard UI project, feel free to get in touch. There are many ways you can contact us:
- Email us at the sig-ui mailing list
- Chat with us on the Kubernetes Slack: #sig-ui channel
- Join our meetings: biweekly on Wednesdays 9AM PT (US friendly) and weekly 10AM CET (Europe friendly). See the SIG-UI calendar for details.
SIG-ClusterOps: Promote operability and interoperability of Kubernetes clusters
Editor's note: This week we’re featuring Kubernetes Special Interest Groups; Today’s post is by the SIG-ClusterOps team whose mission is to promote operability and interoperability of Kubernetes clusters -- to listen, help & escalate.
We think Kubernetes is an awesome way to run applications at scale! Unfortunately, there's a bootstrapping problem: we need good ways to build secure & reliable scale environments around Kubernetes. While some parts of the platform administration leverage the platform (cool!), there are fundamental operational topics that need to be addressed and questions (like upgrade and conformance) that need to be answered.
Enter Cluster Ops SIG – the community members who work under the platform to keep it running.
Our objective for Cluster Ops is to be a person-to-person community first, and a source of opinions, documentation, tests and scripts second. That means we dedicate significant time and attention to simply comparing notes about what is working and discussing real operations. Those interactions give us data to form opinions. It also means we can use real-world experiences to inform the project.
We aim to become the forum for operational review and feedback about the project. For Kubernetes to succeed, operators need to have a significant voice in the project by weekly participation and collecting survey data. We're not trying to create a single opinion about ops, but we do want to create a coordinated resource for collecting operational feedback for the project. As a single recognized group, operators are more accessible and have a bigger impact.
What about real world deliverables?
We've got plans for tangible results too. We’re already driving toward concrete deliverables like reference architectures, tool catalogs, community deployment notes and conformance testing. Cluster Ops wants to become the clearing house for operational resources. We're going to do it based on real world experience and battle tested deployments.
Connect with us.
Cluster Ops can be hard work – don't do it alone. We're here to listen, to help when we can and escalate when we can't. Join the conversation at:
- Chat with us on the Cluster Ops Slack channel
- Email us at the Cluster Ops SIG email list
The Cluster Ops Special Interest Group meets weekly at 13:00PT on Thursdays, you can join us via the video hangout and see latest meeting notes for agendas and topics covered.
SIG-Networking: Kubernetes Network Policy APIs Coming in 1.3
Editor's note: This week we’re featuring Kubernetes Special Interest Groups; Today’s post is by the Network-SIG team describing network policy APIs coming in 1.3 - policies for security, isolation and multi-tenancy.
The Kubernetes network SIG has been meeting regularly since late last year to work on bringing network policy to Kubernetes and we’re starting to see the results of this effort.
One problem many users have is that the open access network policy of Kubernetes is not suitable for applications that need more precise control over the traffic that accesses a pod or service. Today, this could be a multi-tier application where traffic is only allowed from a tier’s neighbor. But as new Cloud Native applications are built by composing microservices, the ability to control traffic as it flows among these services becomes even more critical.
In most IaaS environments (both public and private) this kind of control is provided by allowing VMs to join a ‘security group’ where traffic to members of the group is defined by a network policy or Access Control List (ACL) and enforced by a network packet filter.
The Network SIG started the effort by identifying specific use case scenarios that require basic network isolation for enhanced security. Getting the API right for these simple and common use cases is important because they are also the basis for the more sophisticated network policies necessary for multi-tenancy within Kubernetes.
From these scenarios several possible approaches were considered and a minimal policy specification was defined. The basic idea is that if isolation were enabled on a per namespace basis, then specific pods would be selected where specific traffic types would be allowed.
The simplest way to quickly support this experimental API is in the form of a ThirdPartyResource extension to the API Server, which is possible today in Kubernetes 1.2.
If you’re not familiar with how this works, the Kubernetes API can be extended by defining ThirdPartyResources that create a new API endpoint at a specified URL.
third-party-res-def.yaml
kind: ThirdPartyResource
apiVersion: extensions/v1beta1
metadata:
name: network-policy.net.alpha.kubernetes.io
description: "Network policy specification"
versions:
- name: v1alpha1
$kubectl create -f third-party-res-def.yaml
This will create an API endpoint (one for each namespace):
/net.alpha.kubernetes.io/v1alpha1/namespace/default/networkpolicys/
Third party network controllers can now listen on these endpoints and react as necessary when resources are created, modified or deleted. Note: With the upcoming release of Kubernetes 1.3 - when the Network Policy API is released in beta form - there will be no need to create a ThirdPartyResource API endpoint as shown above.
Network isolation is off by default so that all pods can communicate as they normally do. However, it’s important to know that once network isolation is enabled, all traffic to all pods, in all namespaces is blocked, which means that enabling isolation is going to change the behavior of your pods
Network isolation is enabled by defining the network-isolation annotation on namespaces as shown below:
net.alpha.kubernetes.io/network-isolation: [on | off]
Once network isolation is enabled, explicit network policies must be applied to enable pod communication.
A policy specification can be applied to a namespace to define the details of the policy as shown below:
POST /apis/net.alpha.kubernetes.io/v1alpha1/namespaces/tenant-a/networkpolicys/
{
"kind": "NetworkPolicy",
"metadata": {
"name": "pol1"
},
"spec": {
"allowIncoming": {
"from": [
{ "pods": { "segment": "frontend" } }
],
"toPorts": [
{ "port": 80, "protocol": "TCP" }
]
},
"podSelector": { "segment": "backend" }
}
}
In this example, the ‘ tenant-a ’ namespace would get policy ‘ pol1 ’ applied as indicated. Specifically, pods with the segment label ‘ backend ’ would allow TCP traffic on port 80 from pods with the segment label ‘ frontend ’ to be received.
Today, Romana, OpenShift, OpenContrail and Calico support network policies applied to namespaces and pods. Cisco and VMware are working on implementations as well. Both Romana and Calico demonstrated these capabilities with Kubernetes 1.2 recently at KubeCon. You can watch their presentations here: Romana (slides), Calico (slides).
How does it work?
Each solution has their their own specific implementation details. Today, they rely on some kind of on-host enforcement mechanism, but future implementations could also be built that apply policy on a hypervisor, or even directly by the network itself.
External policy control software (specifics vary across implementations) will watch the new API endpoint for pods being created and/or new policies being applied. When an event occurs that requires policy configuration, the listener will recognize the change and a controller will respond by configuring the interface and applying the policy. The diagram below shows an API listener and policy controller responding to updates by applying a network policy locally via a host agent. The network interface on the pods is configured by a CNI plugin on the host (not shown).

If you’ve been holding back on developing applications with Kubernetes because of network isolation and/or security concerns, these new network policies go a long way to providing the control you need. No need to wait until Kubernetes 1.3 since network policy is available now as an experimental API enabled as a ThirdPartyResource.
If you’re interested in Kubernetes and networking, there are several ways to participate - join us at:
- Our Networking slack channel
- Our Kubernetes Networking Special Interest Group email list
The Networking “Special Interest Group,” which meets bi-weekly at 3pm (15h00) Pacific Time at SIG-Networking hangout.
How to deploy secure, auditable, and reproducible Kubernetes clusters on AWS
At CoreOS, we're all about deploying Kubernetes in production at scale. Today we are excited to share a tool that makes deploying Kubernetes on Amazon Web Services (AWS) a breeze. Kube-aws is a tool for deploying auditable and reproducible Kubernetes clusters to AWS, currently used by CoreOS to spin up production clusters.
Today you might be putting the Kubernetes components together in a more manual way. With this helpful tool, Kubernetes is delivered in a streamlined package to save time, minimize interdependencies and quickly create production-ready deployments.
A simple templating system is leveraged to generate cluster configuration as a set of declarative configuration templates that can be version controlled, audited and re-deployed. Since the entirety of the provisioning is by AWS CloudFormation and cloud-init, there’s no need for external configuration management tools on your end. Batteries included!
To skip the talk and go straight to the project, check out the latest release of kube-aws, which supports Kubernetes 1.2.x. To get your cluster running, check out the documentation.
Why kube-aws? Security, auditability and reproducibility
Kube-aws is designed with three central goals in mind.
Secure : TLS assets are encrypted via the AWS Key Management Service (KMS) before being embedded in the CloudFormation JSON. By managing IAM policy for the KMS key independently, an operator can decouple operational access to the CloudFormation stack from access to the TLS secrets.
Auditable : kube-aws is built around the concept of cluster assets. These configuration and credential assets represent the complete description of the cluster. Since KMS is used to encrypt TLS assets, you can feel free to check your unencrypted stack JSON into version control as well!
Reproducible : The --export option packs your parameterized cluster definition into a single JSON file which defines a CloudFormation stack. This file can be version controlled and submitted directly to the CloudFormation API via existing deployment tooling, if desired.
How to get started with kube-aws
On top of this foundation, kube-aws implements features that make Kubernetes deployments on AWS easier to manage and more flexible. Here are some examples.
Route53 Integration : Kube-aws can manage your cluster DNS records as part of the provisioning process.
cluster.yaml
externalDNSName: my-cluster.kubernetes.coreos.com
createRecordSet: true
hostedZone: kubernetes.coreos.com
recordSetTTL: 300
Existing VPC Support : Deploy your cluster to an existing VPC.
cluster.yaml
vpcId: vpc-xxxxx
routeTableId: rtb-xxxxx
Validation : Kube-aws supports validation of cloud-init and CloudFormation definitions, along with any external resources that the cluster stack will integrate with. For example, here’s a cloud-config with a misspelled parameter:
userdata/cloud-config-worker
#cloud-config
coreos:
flannel:
interrface: $private\_ipv4
etcd\_endpoints: {{ .ETCDEndpoints }}
$ kube-aws validate
> Validating UserData...
Error: cloud-config validation errors:
UserDataWorker: line 4: warning: unrecognized key "interrface"
To get started, check out the kube-aws documentation.
Future Work
As always, the goal with kube-aws is to make deployments that are production ready. While we use kube-aws in production on AWS today, this project is pre-1.0 and there are a number of areas in which kube-aws needs to evolve.
Fault tolerance : At CoreOS we believe Kubernetes on AWS is a potent platform for fault-tolerant and self-healing deployments. In the upcoming weeks, kube-aws will be rising to a new challenge: surviving the Chaos Monkey – control plane and all!
Zero-downtime updates : Updating CoreOS nodes and Kubernetes components can be done without downtime and without interdependency with the correct instance replacement strategy.
A github issue tracks the work towards this goal. We look forward to seeing you get involved with the project by filing issues or contributing directly.
Learn more about Kubernetes and meet the community at CoreOS Fest Berlin - May 9-10, 2016
Adding Support for Kubernetes in Rancher
Over the last year, we’ve seen a tremendous increase in the number of companies looking to leverage containers in their software development and IT organizations. To achieve this, organizations have been looking at how to build a centralized container management capability that will make it simple for users to get access to containers, while centralizing visibility and control with the IT organization. In 2014 we started the open-source Rancher project to address this by building a management platform for containers.
Recently we shipped Rancher v1.0. With this latest release, Rancher, an open-source software platform for managing containers, now supports Kubernetes as a container orchestration framework when creating environments. Now, launching a Kubernetes environment with Rancher is fully automated, delivering a functioning cluster in just 5-10 minutes.
We created Rancher to provide organizations with a complete management platform for containers. As part of that, we’ve always supported deploying Docker environments natively using the Docker API and Docker Compose. Since its inception, we’ve been impressed with the operational maturity of Kubernetes, and with this release, we’re making it possible to deploy a variety of container orchestration and scheduling frameworks within the same management platform.
Adding Kubernetes gives users access to one of the fastest growing platforms for deploying and managing containers in production. We’ll provide first-class Kubernetes support in Rancher going forward and continue to support native Docker deployments.
Bringing Kubernetes to Rancher

Our platform was already extensible for a variety of different packaging formats, so we were optimistic about embracing Kubernetes. We were right, working with the Kubernetes project has been a fantastic experience as developers. The design of the project made this incredibly easy, and we were able to utilize plugins and extensions to build a distribution of Kubernetes that leveraged our infrastructure and application services. For instance, we were able to plug in Rancher’s software defined networking, storage management, load balancing, DNS and infrastructure management functions directly into Kubernetes, without even changing the code base.
Even better, we have been able to add a number of services around the core Kubernetes functionality. For instance, we implemented our popular application catalog on top of Kubernetes. Historically we’ve used Docker Compose to define application templates, but with this release, we now support Kubernetes services, replication controllers and pods to deploy applications. With the catalog, users connect to a git repo and automate deployment and upgrade of an application deployed as Kubernetes services. Users then configure and deploy a complex multi-node enterprise application with one click of a button. Upgrades are fully automated as well, and pushed out centrally to users.
Giving Back
Like Kubernetes, Rancher is an open-source software project, free to use by anyone, and given to the community without any restrictions. You can find all of the source code, upcoming releases and issues for Rancher on GitHub. We’re thrilled to be joining the Kubernetes community, and look forward to working with all of the other contributors. View a demo of the new Kubernetes support in Rancher here.
Container survey results - March 2016
Last month, we had our third installment of our container survey and today we look at the results. (raw data is available here)
Looking at the headline number, “how many people are using containers” we see a decrease in the number of people currently using containers from 89% to 80%. Obviously, we can’t be certain for the cause of this decrease, but it’s my believe that the previous number was artificially high due to sampling biases and we did a better job getting a broader reach of participants in the March survey and so the March numbers more accurately represent what is going on in the world.
Along the lines of getting an unbiased sample, I’m excited to announce that going forward, we will be partnering with The New Stack and theCloud Native Compute Foundation to publicize and distribute this container survey. This partnership will enable us to reach a broader audience than we are reaching and thus obtain a significantly more unbiased sample and representative portrayal of current container usage. I’m really excited about this collaboration!
But without further ado, more on the data.
For the rest of the numbers, the March survey shows steady continuation of the numbers that we saw in February. Most of the container usage is still in Development and Testing, though a solid majority (60%) are using it for production as well. For the remaining folks using containers there continues to be a plan to bring containers to production as the “I am planning to” number for production use matches up nearly identically with the numbers for people currently in testing.
Physical and virtual machines continue to be the most popular places to deploy containers, though the March survey shows a fairly substantial drop (48% -> 35%) in people deploying to physical machines.
Likewise hosted container services show growth, with nearly every service showing some growth. Google Container Engine continues to be the most popular in the survey, followed by the Amazon EC2 Container Service. It will be interesting to see how those numbers change as we move to the New Stack survey.
Finally, Kubernetes is still the favorite for container manager, with Bash scripts are still in second place. As with the container service provider numbers I’ll be quite interested to see what this looks like with a broader sample set.
Finally, the absolute use of containers appears to be ticking up. The number of people running more than 250 containers has grown from 12% to nearly 20%. And the number people running containers on 50 or more machines has grown from 10% to 18%.
As always, the raw data is available for you to analyze here.
Configuration management with Containers
Editor's note: this is our seventh post in a series of in-depth posts on what's new in Kubernetes 1.2
A good practice when writing applications is to separate application code from configuration. We want to enable application authors to easily employ this pattern within Kubernetes. While the Secrets API allows separating information like credentials and keys from an application, no object existed in the past for ordinary, non-secret configuration. In Kubernetes 1.2, we've added a new API resource called ConfigMap to handle this type of configuration data.
The basics of ConfigMap
The ConfigMap API is simple conceptually. From a data perspective, the ConfigMap type is just a set of key-value pairs. Applications are configured in different ways, so we need to be flexible about how we let users store and consume configuration data. There are three ways to consume a ConfigMap in a pod:
- Command line arguments
- Environment variables
- Files in a volume
These different methods lend themselves to different ways of modeling the data being consumed. To be as flexible as possible, we made ConfigMap hold both fine- and/or coarse-grained data. Further, because applications read configuration settings from both environment variables and files containing configuration data, we built ConfigMap to support either method of access. Let’s take a look at an example ConfigMap that contains both types of configuration:
apiVersion: v1
kind: ConfigMap
metadata:
Name: example-configmap
data:
# property-like keys
game-properties-file-name: game.properties
ui-properties-file-name: ui.properties
# file-like keys
game.properties: |
enemies=aliens
lives=3
enemies.cheat=true
enemies.cheat.level=noGoodRotten
secret.code.passphrase=UUDDLRLRBABAS
secret.code.allowed=true
secret.code.lives=30
ui.properties: |
color.good=purple
color.bad=yellow
allow.textmode=true
how.nice.to.look=fairlyNice
Users that have used Secrets will find it easy to begin using ConfigMap — they’re very similar. One major difference in these APIs is that Secret values are stored as byte arrays in order to support storing binaries like SSH keys. In JSON and YAML, byte arrays are serialized as base64 encoded strings. This means that it’s not easy to tell what the content of a Secret is from looking at the serialized form. Since ConfigMap is intended to hold only configuration information and not binaries, values are stored as strings, and thus are readable in the serialized form.
We want creating ConfigMaps to be as flexible as storing data in them. To create a ConfigMap object, we’ve added a kubectl command called kubectl create configmap that offers three different ways to specify key-value pairs:
- Specify literal keys and value
- Specify an individual file
- Specify a directory to create keys for each file
These different options can be mixed, matched, and repeated within a single command:
$ kubectl create configmap my-config \
--from-literal=literal-key=literal-value \
--from-file=ui.properties \
--from=file=path/to/config/dir
Consuming ConfigMaps is simple and will also be familiar to users of Secrets. Here’s an example of a Deployment that uses the ConfigMap above to run an imaginary game server:
apiVersion: extensions/v1beta1
kind: Deployment
metadata:
name: configmap-example-deployment
labels:
name: configmap-example-deployment
spec:
replicas: 1
selector:
matchLabels:
name: configmap-example
template:
metadata:
labels:
name: configmap-example
spec:
containers:
- name: game-container
image: imaginarygame
command: ["game-server", "--config-dir=/etc/game/cfg"]
env:
# consume the property-like keys in environment variables
- name: GAME\_PROPERTIES\_NAME
valueFrom:
configMapKeyRef:
name: example-configmap
key: game-properties-file-name
- name: UI\_PROPERTIES\_NAME
valueFrom:
configMapKeyRef:
name: example-configmap
key: ui-properties-file-name
volumeMounts:
- name: config-volume
mountPath: /etc/game
volumes:
# consume the file-like keys of the configmap via volume plugin
- name: config-volume
configMap:
name: example-configmap
items:
- key: ui.properties
path: cfg/ui.properties
- key: game.properties
path: cfg/game.properties
restartPolicy: Never
In the above example, the Deployment uses keys of the ConfigMap via two of the different mechanisms available. The property-like keys of the ConfigMap are used as environment variables to the single container in the Deployment template, and the file-like keys populate a volume. For more details, please see the ConfigMap docs.
We hope that these basic primitives are easy to use and look forward to seeing what people build with ConfigMaps. Thanks to the community members that provided feedback about this feature. Special thanks also to Tamer Tas who made a great contribution to the proposal and implementation of ConfigMap.
If you’re interested in Kubernetes and configuration, you’ll want to participate in:
- Our Configuration Slack channel
- Our Kubernetes Configuration Special Interest Group email list
- The Configuration “Special Interest Group,” which meets weekly on Wednesdays at 10am (10h00) Pacific Time at SIG-Config hangout
And of course for more information about the project in general, go to www.kubernetes.io and follow us on Twitter @Kubernetesio.
Using Deployment objects with Kubernetes 1.2
Editor's note: this is the seventh post in a series of in-depth posts on what's new in Kubernetes 1.2
Kubernetes has made deploying and managing applications very straightforward, with most actions a single API or command line away, including rolling out new applications, canary testing and upgrading. So why would we need Deployments?
Deployment objects automate deploying and rolling updating applications. Compared with kubectl rolling-update, Deployment API is much faster, is declarative, is implemented server-side and has more features (for example, you can rollback to any previous revision even after the rolling update is done).
In today’s blogpost, we’ll cover how to use Deployments to:
- Deploy/rollout an application
- Update the application declaratively and progressively, without a service outage
- Rollback to a previous revision, if something’s wrong when you’re deploying/updating the application

Without further ado, let’s start playing around with Deployments!
Getting started
If you want to try this example, basically you’ll need 3 things:
- A running Kubernetes cluster : If you don’t already have one, check the Getting Started guides for a list of solutions on a range of platforms, from your laptop, to VMs on a cloud provider, to a rack of bare metal servers.
- Kubectl, the Kubernetes CLI : If you see a URL response after running kubectl cluster-info, you’re ready to go. Otherwise, follow the instructions to install and configure kubectl; or the instructions for hosted solutions if you have a Google Container Engine cluster.
- The configuration files for this demo. If you choose not to run this example yourself, that’s okay. Just watch this video to see what’s going on in each step.
Diving in
The configuration files contain a static website. First, we want to start serving its static content. From the root of the Kubernetes repository, run:
$ kubectl proxy --www=docs/user-guide/update-demo/local/ &
Starting to serve on …
This runs a proxy on the default port 8001. You may now visit http://localhost:8001/static/ the demo website (and it should be a blank page for now). Now we want to run an app and show it on the website.
$ kubectl run update-demo
--image=gcr.io/google\_containers/update-demo:nautilus --port=80 -l name=update-demo
deployment “update-demo” created
This deploys 1 replica of an app with the image “update-demo:nautilus” and you can see it visually on http://localhost:8001/static/.1

The card showing on the website represents a Kubernetes pod, with the pod’s name (ID), status, image, and labels.
Getting bigger
Now we want more copies of this app!
$ kubectl scale deployment/update-demo --replicas=4
deployment "update-demo" scaled

Updating your application
How about updating the app?
$ kubectl edit deployment/update-demo
This opens up your default editor, and you can update the deployment on the fly. Find .spec.template.spec.containers[0].image and change nautilus to kitty. Save the file, and you’ll see:
deployment "update-demo" edited
You’re now updating the image of this app from “update-demo:nautilus” to “update-demo:kitty”. Deployments allow you to update the app progressively, without a service outage.

After a while, you’ll find the update seems stuck. What happened?
Debugging your rollout
If you look closer, you’ll find that the pods with the new “kitty” tagged image stays pending. The Deployment automatically stops the rollout if it’s failing. Let’s look at one of the new pod to see what happened:
$ kubectl describe pod/update-demo-1326485872-a4key
Looking at the events of this pod, you’ll notice that Kubernetes failed to pull the image because the “kitty” tag wasn’t found:
Failed to pull image "gcr.io/google_containers/update-demo:kitty": Tag kitty not found in repository gcr.io/google_containers/update-demo
Rolling back
Ok, now we want to undo the changes and then take our time to figure out which image tag we should use.
$ kubectl rollout undo deployment/update-demo
deployment "update-demo" rolled back
Everything’s back to normal, phew!
To learn more about rollback, visit rolling back a Deployment.
Updating your application (for real)
After a while, we finally figure that the right image tag is “kitten”, instead of “kitty”. Now change .spec.template.spec.containers[0].image tag from “nautilus“ to “kitten“.
$ kubectl edit deployment/update-demo
deployment "update-demo" edited

Now you see there are 4 cute kittens on the demo website, which means we’ve updated the app successfully! If you want to know the magic behind this, look closer at the Deployment:
$ kubectl describe deployment/update-demo
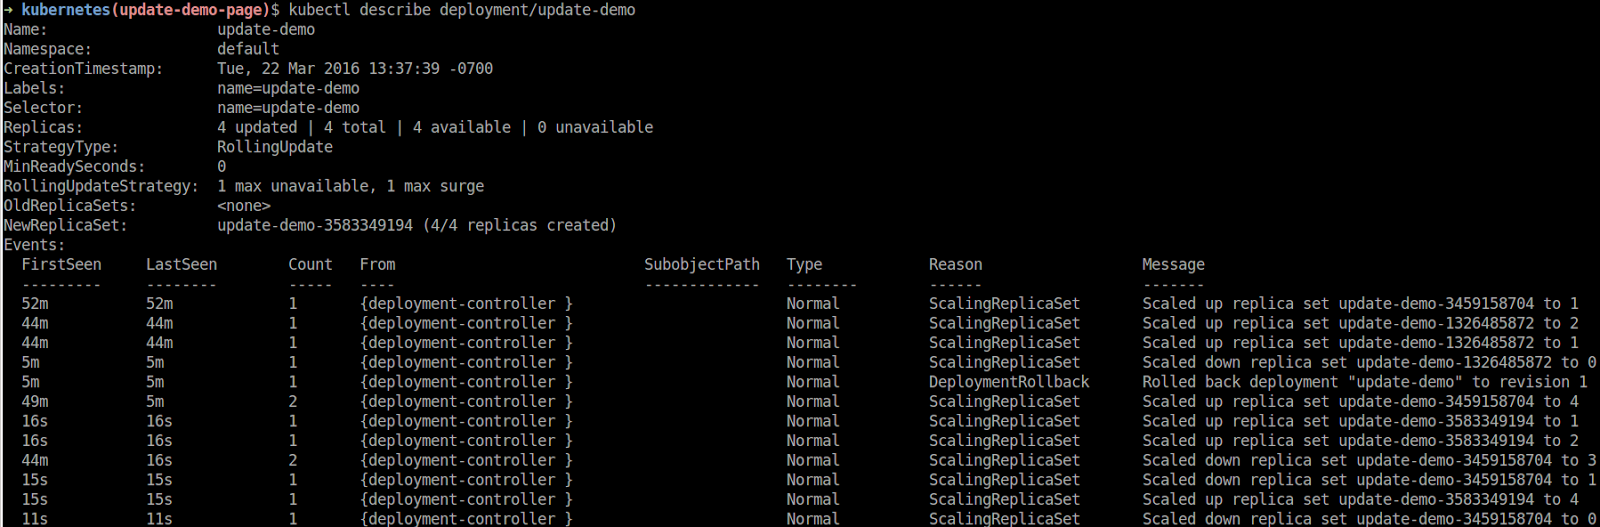
From the events section, you’ll find that the Deployment is managing another resource called Replica Set, each controls the number of replicas of a different pod template. The Deployment enables progressive rollout by scaling up and down Replica Sets of new and old pod templates.
Conclusion
Now, you’ve learned the basic use of Deployment objects:
- Deploy an app with a Deployment, using kubectl run
- Updating the app by updating the Deployment with kubectl edit
- Rolling back to a previously deployed app with kubectl rollout undo But there’s so much more in Deployment that this article didn’t cover! To discover more, continue reading Deployment’s introduction.
Note: In Kubernetes 1.2, Deployment (beta release) is now feature-complete and enabled by default. For those of you who have tried Deployment in Kubernetes 1.1, please delete all Deployment 1.1 resources (including the Replication Controllers and Pods they manage) before trying out Deployments in 1.2. This is necessary because we made some non-backward-compatible changes to the API.
If you’re interested in Kubernetes and configuration, you’ll want to participate in:
- Our Configuration slack channel
- Our Kubernetes Configuration Special Interest Group email list
- The Configuration “Special Interest Group,” which meets weekly on Wednesdays at 10am (10h00) Pacific Time at SIG-Config hangout And of course for more information about the project in general, go to www.kubernetes.io.
1 “kubectl run” outputs the type and name of the resource(s) it creates. In 1.2, it now creates a deployment resource. You can use that in subsequent commands, such as "kubectl get deployment ", or "kubectl expose deployment ". If you want to write a script to do that automatically, in a forward-compatible manner, use "-o name" flag with "kubectl run", and it will generate short output "deployments/", which can also be used on subsequent command lines. The "--generator" flag can be used with "kubectl run" to generate other types of resources, for example, set it to "run/v1" to create a Replication Controller, which was the default in 1.1 and 1.0, and to "run-pod/v1" to create a Pod, such as for --restart=Never pods.
Kubernetes 1.2 and simplifying advanced networking with Ingress
Editor's note: This is the sixth post in a series of in-depth posts on what's new in Kubernetes 1.2
Ingress is currently in beta and under active development.
In Kubernetes, Services and Pods have IPs only routable by the cluster network, by default. All traffic that ends up at an edge router is either dropped or forwarded elsewhere. In Kubernetes 1.2, we’ve made improvements to the Ingress object, to simplify allowing inbound connections to reach the cluster services. It can be configured to give services externally-reachable URLs, load balance traffic, terminate SSL, offer name based virtual hosting and lots more.
Ingress controllers
Today, with containers or VMs, configuring a web server or load balancer is harder than it should be. Most web server configuration files are very similar. There are some applications that have weird little quirks that tend to throw a wrench in things, but for the most part, you can apply the same logic to them and achieve a desired result. In Kubernetes 1.2, the Ingress resource embodies this idea, and an Ingress controller is meant to handle all the quirks associated with a specific "class" of Ingress (be it a single instance of a load balancer, or a more complicated setup of frontends that provide GSLB, CDN, DDoS protection etc). An Ingress Controller is a daemon, deployed as a Kubernetes Pod, that watches the ApiServer's /ingresses endpoint for updates to the Ingress resource. Its job is to satisfy requests for ingress.
Your Kubernetes cluster must have exactly one Ingress controller that supports TLS for the following example to work. If you’re on a cloud-provider, first check the “kube-system” namespace for an Ingress controller RC. If there isn’t one, you can deploy the nginx controller, or write your own in < 100 lines of code.
Please take a minute to look over the known limitations of existing controllers (gce, nginx).
TLS termination and HTTP load-balancing
Since the Ingress spans Services, it’s particularly suited for load balancing and centralized security configuration. If you’re familiar with the go programming language, Ingress is like net/http’s “Server” for your entire cluster. The following example shows you how to configure TLS termination. Load balancing is not optional when dealing with ingress traffic, so simply creating the object will configure a load balancer.
First create a test Service. We’ll run a simple echo server for this example so you know exactly what’s going on. The source is here.
$ kubectl run echoheaders
--image=gcr.io/google\_containers/echoserver:1.3 --port=8080
$ kubectl expose deployment echoheaders --target-port=8080
--type=NodePort
If you’re on a cloud-provider, make sure you can reach the Service from outside the cluster through its node port.
$ NODE_IP=$(kubectl get node `kubectl get po -l run=echoheaders
--template '{{range .items}}{{.spec.nodeName}}{{end}}'` --template
'{{range $i, $n := .status.addresses}}{{if eq $n.type
"ExternalIP"}}{{$n.address}}{{end}}{{end}}')
$ NODE_PORT=$(kubectl get svc echoheaders --template '{{range $i, $e
:= .spec.ports}}{{$e.nodePort}}{{end}}')
$ curl $NODE_IP:$NODE_PORT
This is a sanity check that things are working as expected. If the last step hangs, you might need a firewall rule.
Now lets create our TLS secret:
$ openssl req -x509 -nodes -days 365 -newkey rsa:2048 -keyout
/tmp/tls.key -out /tmp/tls.crt -subj "/CN=echoheaders/O=echoheaders"
$ echo "
apiVersion: v1
kind: Secret
metadata:
name: tls
data:
tls.crt: `base64 -w 0 /tmp/tls.crt`
tls.key: `base64 -w 0 /tmp/tls.key`
" | kubectl create -f
And the Ingress:
$ echo "
apiVersion: extensions/v1beta1
kind: Ingress
metadata:
name: test
spec:
tls:
- secretName: tls
backend:
serviceName: echoheaders
servicePort: 8080
" | kubectl create -f -
You should get a load balanced IP soon:
$ kubectl get ing
NAME RULE BACKEND ADDRESS AGE
test - echoheaders:8080 130.X.X.X 4m
And if you wait till the Ingress controller marks your backends as healthy, you should see requests to that IP on :80 getting redirected to :443 and terminated using the given TLS certificates.
$ curl 130.X.X.X
\<html\>
\<head\>\<title\>301 Moved Permanently\</title\>\</head\>\<body bgcolor="white"\>\<center\>\<h1\>301 Moved Permanently\</h1\>\</center\>
$ curl https://130.X.X.X -kCLIENT VALUES:client\_address=10.48.0.1command=GETreal path=/
$ curl 130.X.X.X -Lk
CLIENT VALUES:client\_address=10.48.0.1command=GETreal path=/
Future work
You can read more about the Ingress API or controllers by following the links. The Ingress is still in beta, and we would love your input to grow it. You can contribute by writing controllers or evolving the API. All things related to the meaning of the word “ingress” are in scope, this includes DNS, different TLS modes, SNI, load balancing at layer 4, content caching, more algorithms, better health checks; the list goes on.
There are many ways to participate. If you’re particularly interested in Kubernetes and networking, you’ll be interested in:
- Our Networking slack channel
- Our Kubernetes Networking Special Interest Group email list
- The Big Data “Special Interest Group,” which meets biweekly at 3pm (15h00) Pacific Time at SIG-Networking hangout
And of course for more information about the project in general, go towww.kubernetes.io
Using Spark and Zeppelin to process big data on Kubernetes 1.2
Editor's note: this is the fifth post in a series of in-depth posts on what's new in Kubernetes 1.2
With big data usage growing exponentially, many Kubernetes customers have expressed interest in running Apache Spark on their Kubernetes clusters to take advantage of the portability and flexibility of containers. Fortunately, with Kubernetes 1.2, you can now have a platform that runs Spark and Zeppelin, and your other applications side-by-side.
Why Zeppelin?
Apache Zeppelin is a web-based notebook that enables interactive data analytics. As one of its backends, Zeppelin connects to Spark. Zeppelin allows the user to interact with the Spark cluster in a simple way, without having to deal with a command-line interpreter or a Scala compiler.
Why Kubernetes?
There are many ways to run Spark outside of Kubernetes:
- You can run it using dedicated resources, in Standalone mode
- You can run it on a YARN cluster, co-resident with Hadoop and HDFS
- You can run it on a Mesos cluster alongside other Mesos applications
So why would you run Spark on Kubernetes?
- A single, unified interface to your cluster: Kubernetes can manage a broad range of workloads; no need to deal with YARN/HDFS for data processing and a separate container orchestrator for your other applications.
- Increased server utilization: share nodes between Spark and cloud-native applications. For example, you may have a streaming application running to feed a streaming Spark pipeline, or a nginx pod to serve web traffic — no need to statically partition nodes.
- Isolation between workloads: Kubernetes' Quality of Service mechanism allows you to safely co-schedule batch workloads like Spark on the same nodes as latency-sensitive servers.
Launch Spark
For this demo, we’ll be using Google Container Engine (GKE), but this should work anywhere you have installed a Kubernetes cluster. First, create a Container Engine cluster with storage-full scopes. These Google Cloud Platform scopes will allow the cluster to write to a private Google Cloud Storage Bucket (we’ll get to why you need that later):
$ gcloud container clusters create spark --scopes storage-full
--machine-type n1-standard-4
Note: We’re using n1-standard-4 (which are larger than the default node size) to demonstrate some features of Horizontal Pod Autoscaling. However, Spark works just fine on the default node size of n1-standard-1.
After the cluster’s created, you’re ready to launch Spark on Kubernetes using the config files in the Kubernetes GitHub repo:
$ git clone https://github.com/kubernetes/kubernetes.git
$ kubectl create -f kubernetes/examples/spark
‘kubernetes/examples/spark’ is a directory, so this command tells kubectl to create all of the Kubernetes objects defined in all of the YAML files in that directory. You don’t have to clone the entire repository, but it makes the steps of this demo just a little easier.
The pods (especially Apache Zeppelin) are somewhat large, so may take some time for Docker to pull the images. Once everything is running, you should see something similar to the following:
$ kubectl get pods
NAME READY STATUS RESTARTS AGE
spark-master-controller-v4v4y 1/1 Running 0 21h
spark-worker-controller-7phix 1/1 Running 0 21h
spark-worker-controller-hq9l9 1/1 Running 0 21h
spark-worker-controller-vwei5 1/1 Running 0 21h
zeppelin-controller-t1njl 1/1 Running 0 21h
You can see that Kubernetes is running one instance of Zeppelin, one Spark master and three Spark workers.
Set up the Secure Proxy to Zeppelin
Next you’ll set up a secure proxy from your local machine to Zeppelin, so you can access the Zeppelin instance running in the cluster from your machine. (Note: You’ll need to change this command to the actual Zeppelin pod that was created on your cluster.)
$ kubectl port-forward zeppelin-controller-t1njl 8080:8080
This establishes a secure link to the Kubernetes cluster and pod (zeppelin-controller-t1njl) and then forwards the port in question (8080) to local port 8080, which will allow you to use Zeppelin safely.
Now that I have Zeppelin up and running, what do I do with it?
For our example, we’re going to show you how to build a simple movie recommendation model. This is based on the code on the Spark website, modified slightly to make it interesting for Kubernetes.
Now that the secure proxy is up, visit http://localhost:8080/. You should see an intro page like this:

Click “Import note,” give it an arbitrary name (e.g. “Movies”), and click “Add from URL.” For a URL, enter:
https://gist.githubusercontent.com/zmerlynn/875fed0f587d12b08ec9/raw/6
eac83e99caf712482a4937800b17bbd2e7b33c4/movies.json
Then click “Import Note.” This will give you a ready-made Zeppelin note for this demo. You should now have a “Movies” notebook (or whatever you named it). If you click that note, you should see a screen similar to this:

You can now click the Play button, near the top-right of the PySpark code block, and you’ll create a new, in-memory movie recommendation model! In the Spark application model, Zeppelin acts as a Spark Driver Program, interacting with the Spark cluster master to get its work done. In this case, the driver program that’s running in the Zeppelin pod fetches the data and sends it to the Spark master, which farms it out to the workers, which crunch out a movie recommendation model using the code from the driver. With a larger data set in Google Cloud Storage (GCS), it would be easy to pull the data from GCS as well. In the next section, we’ll talk about how to save your data to GCS.
Working with Google Cloud Storage (Optional)
For this demo, we’ll be using Google Cloud Storage, which will let us store our model data beyond the life of a single pod. Spark for Kubernetes is built with the Google Cloud Storage connector built-in. As long as you can access your data from a virtual machine in the Google Container Engine project where your Kubernetes nodes are running, you can access your data with the GCS connector on the Spark image.
If you want, you can change the variables at the top of the note so that the example will actually save and restore a model for the movie recommendation engine — just point those variables at a GCS bucket that you have access to. If you want to create a GCS bucket, you can do something like this on the command line:
$ gsutil mb gs://my-spark-models
You’ll need to change this URI to something that is unique for you. This will create a bucket that you can use in the example above.
Note:
Computing the model and saving it is much slower than computing the model and throwing it away. This is expected. However, if you plan to reuse a model, it’s faster to compute the model and save it and then restore it each time you want to use it, rather than throw away and recompute the model each time.Using Horizontal Pod Autoscaling with Spark (Optional)
Spark is somewhat elastic to workers coming and going, which means we have an opportunity: we can use use Kubernetes Horizontal Pod Autoscaling to scale-out the Spark worker pool automatically, setting a target CPU threshold for the workers and a minimum/maximum pool size. This obviates the need for having to configure the number of worker replicas manually.
Create the Autoscaler like this (note: if you didn’t change the machine type for the cluster, you probably want to limit the --max to something smaller):
$ kubectl autoscale --min=1 --cpu-percent=80 --max=10 \
rc/spark-worker-controller
To see the full effect of autoscaling, wait for the replication controller to settle back to one replica. Use ‘kubectl get rc’ and wait for the “replicas” column on spark-worker-controller to fall back to 1.
The workload we ran before ran too quickly to be terribly interesting for HPA. To change the workload to actually run long enough to see autoscaling become active, change the “rank = 100” line in the code to “rank = 200.” After you hit play, the Spark worker pool should rapidly increase to 20 pods. It will take up to 5 minutes after the job completes before the worker pool falls back down to one replica.
Conclusion
In this article, we showed you how to run Spark and Zeppelin on Kubernetes, as well as how to use Google Cloud Storage to store your Spark model and how to use Horizontal Pod Autoscaling to dynamically size your Spark worker pool.
This is the first in a series of articles we’ll be publishing on how to run big data frameworks on Kubernetes — so stay tuned!
Please join our community and help us build the future of Kubernetes! There are many ways to participate. If you’re particularly interested in Kubernetes and big data, you’ll be interested in:
- Our Big Data slack channel
- Our Kubernetes Big Data Special Interest Group email list
- The Big Data “Special Interest Group,” which meets every Monday at 1pm (13h00) Pacific Time at SIG-Big-Data hangout And of course for more information about the project in general, go to www.kubernetes.io.
AppFormix: Helping Enterprises Operationalize Kubernetes
If you run clouds for a living, you’re well aware that the tools we've used since the client/server era for monitoring, analytics and optimization just don’t cut it when applied to the agile, dynamic and rapidly changing world of modern cloud infrastructure.
And, if you’re an operator of enterprise clouds, you know that implementing containers and container cluster management is all about giving your application developers a more agile, responsive and efficient cloud infrastructure. Applications are being rewritten and new ones developed – not for legacy environments where relatively static workloads are the norm, but for dynamic, scalable cloud environments. The dynamic nature of cloud native applications coupled with the shift to continuous deployment means that the demands placed by the applications on the infrastructure are constantly changing.
This shift necessitates infrastructure transparency and real-time monitoring and analytics. Without these key pieces, neither applications nor their underlying plumbing can deliver the low-latency user experience end users have come to expect.
AppFormix Architectural Review
From an operational standpoint, it is necessary to understand how applications are consuming infrastructure resources in order to maximize ROI and guarantee SLAs. AppFormix software empowers operators and developers to monitor, visualize, and control how physical resources are utilized by cloud workloads.
At the center of the software, the AppFormix Data Platform provides a distributed analysis engine that performs configurable, real-time evaluation of in-depth, high-resolution metrics. On each host, the resource-efficient AppFormix Agent collects and evaluates multi-layer metrics from the hardware, virtualization layer, and up to the application. Intelligent agents offer sub-second response times that make it possible to detect and solve problems before they start to impact applications and users. The raw data is associated with the elements that comprise a cloud-native environment: applications, virtual machines, containers, hosts. The AppFormix Agent then publishes metrics and events to a Data Manager that stores and forwards the data to Analytics modules. Events are based on predefined or dynamic conditions set by users or infrastructure operators to make sure that SLAs and policies are being met.
| 
| 
Additional subsystems are the Policy Controller and Analytics. The Policy Controller manages policies for resource monitoring, analysis, and control. It also provides role-based access control. The Analytics modules analyze metrics and events produced by Data Platform, enabling correlation across multiple elements to provide higher-level information to operators and developers. The Analytics modules may also configure policies in Policy Controller in response to conditions in the infrastructure.
AppFormix organizes elements of cloud infrastructure around hosts and instances (either containers or virtual machines), and logical groups of such elements. AppFormix integrates with cloud platforms using Adapter modules that discover the physical and virtual elements in the environment and configure those elements into the Policy Controller.
Integrating AppFormix with Kubernetes
Enterprises often run many environments located on- or off-prem, as well as running different compute technologies (VMs, containers, bare metal). The analytics platform we’ve developed at AppFormix gives Kubernetes users a single pane of glass from which to monitor and manage container clusters in private and hybrid environments.
The AppFormix Kubernetes Adapter leverages the REST-based APIs of Kubernetes to discover nodes, pods, containers, services, and replication controllers. With the relational information about each element, Kubernetes Adapter is able to represent all of these elements in our system. A pod is a group of containers. A service and a replication controller are both different types of pod groups. In addition, using the watch endpoint, Kubernetes Adapter stays aware of changes to the environment.
DevOps in the Enterprise with AppFormix
With AppFormix, developers and operators can work collaboratively to optimize applications and infrastructure. Users can access a self-service IT experience that delivers visibility into CPU, memory, storage, and network consumption by each layer of the stack: physical hardware, platform, and application software.
- Real-time multi-layer performance metrics - In real-time, developers can view multi-layer metrics that show container resource consumption in context of the physical node on which it executes. With this context, developers can determine if application performance is limited by the physical infrastructure, due to contention or resource exhaustion, or by application design.
- Proactive resource control - AppFormix Health Analytics provides policy-based actions in response to conditions in the cluster. For example, when resource consumption exceeds threshold on a worker node, Health Analytics can remove the node from the scheduling pool by invoking Kubernetes REST APIs. This dynamic control is driven by real-time monitoring at each node.
- Capacity planning - Kubernetes will schedule workloads, but operators need to understand how the resources are being utilized. What resources have the most demand? How is demand trending over time? Operators can generate reports that provide necessary data for capacity planning.
As you can see, we’re working hard to give Kubernetes users a useful, performant toolset for both OpenStack and Kubernetes environments that allows operators to deliver self-service IT to their application developers. We’re excited to be partner contributing to the Kubernetes ecosystem and community.
Building highly available applications using Kubernetes new multi-zone clusters (a.k.a. 'Ubernetes Lite')
Editor's note: this is the third post in a series of in-depth posts on what's new in Kubernetes 1.2
Introduction
One of the most frequently-requested features for Kubernetes is the ability to run applications across multiple zones. And with good reason — developers need to deploy applications across multiple domains, to improve availability in thxe advent of a single zone outage.
Kubernetes 1.2, released two weeks ago, adds support for running a single cluster across multiple failure zones (GCP calls them simply "zones," Amazon calls them "availability zones," here we'll refer to them as "zones"). This is the first step in a broader effort to allow federating multiple Kubernetes clusters together (sometimes referred to by the affectionate nickname "Ubernetes"). This initial version (referred to as "Ubernetes Lite") offers improved application availability by spreading applications across multiple zones within a single cloud provider.
Multi-zone clusters are deliberately simple, and by design, very easy to use — no Kubernetes API changes were required, and no application changes either. You simply deploy your existing Kubernetes application into a new-style multi-zone cluster, and your application automatically becomes resilient to zone failures.
Now into some details . . .
Ubernetes Lite works by leveraging the Kubernetes platform’s extensibility through labels. Today, when nodes are started, labels are added to every node in the system. With Ubernetes Lite, the system has been extended to also add information about the zone it's being run in. With that, the scheduler can make intelligent decisions about placing application instances.
Specifically, the scheduler already spreads pods to minimize the impact of any single node failure. With Ubernetes Lite, via SelectorSpreadPriority, the scheduler will make a best-effort placement to spread across zones as well. We should note, if the zones in your cluster are heterogenous (e.g., different numbers of nodes or different types of nodes), you may not be able to achieve even spreading of your pods across zones. If desired, you can use homogenous zones (same number and types of nodes) to reduce the probability of unequal spreading.
This improved labeling also applies to storage. When persistent volumes are created, the PersistentVolumeLabel admission controller automatically adds zone labels to them. The scheduler (via the VolumeZonePredicate predicate) will then ensure that pods that claim a given volume are only placed into the same zone as that volume, as volumes cannot be attached across zones.
Walkthrough
We're now going to walk through setting up and using a multi-zone cluster on both Google Compute Engine (GCE) and Amazon EC2 using the default kube-up script that ships with Kubernetes. Though we highlight GCE and EC2, this functionality is available in any Kubernetes 1.2 deployment where you can make changes during cluster setup. This functionality will also be available in Google Container Engine (GKE) shortly.
Bringing up your cluster
Creating a multi-zone deployment for Kubernetes is the same as for a single-zone cluster, but you’ll need to pass an environment variable ("MULTIZONE”) to tell the cluster to manage multiple zones. We’ll start by creating a multi-zone-aware cluster on GCE and/or EC2.
GCE:
curl -sS https://get.k8s.io | MULTIZONE=true KUBERNETES_PROVIDER=gce
KUBE_GCE_ZONE=us-central1-a NUM_NODES=3 bash
EC2:
curl -sS https://get.k8s.io | MULTIZONE=true KUBERNETES_PROVIDER=aws
KUBE_AWS_ZONE=us-west-2a NUM_NODES=3 bash
At the end of this command, you will have brought up a cluster that is ready to manage nodes running in multiple zones. You’ll also have brought up NUM_NODES nodes and the cluster's control plane (i.e., the Kubernetes master), all in the zone specified by KUBE_{GCE,AWS}_ZONE. In a future iteration of Ubernetes Lite, we’ll support a HA control plane, where the master components are replicated across zones. Until then, the master will become unavailable if the zone where it is running fails. However, containers that are running in all zones will continue to run and be restarted by Kubelet if they fail, thus the application itself will tolerate such a zone failure.
Nodes are labeled
To see the additional metadata added to the node, simply view all the labels for your cluster (the example here is on GCE):
$ kubectl get nodes --show-labels
NAME STATUS AGE LABELS
kubernetes-master Ready,SchedulingDisabled 6m
beta.kubernetes.io/instance-type=n1-standard-1,failure-domain.beta.kubernetes.
io/region=us-central1,failure-domain.beta.kubernetes.io/zone=us-central1-a,kub
ernetes.io/hostname=kubernetes-master
kubernetes-minion-87j9 Ready 6m
beta.kubernetes.io/instance-type=n1-standard-2,failure-domain.beta.kubernetes.
io/region=us-central1,failure-domain.beta.kubernetes.io/zone=us-central1-a,kub
ernetes.io/hostname=kubernetes-minion-87j9
kubernetes-minion-9vlv Ready 6m
beta.kubernetes.io/instance-type=n1-standard-2,failure-domain.beta.kubernetes.
io/region=us-central1,failure-domain.beta.kubernetes.io/zone=us-central1-a,kub
ernetes.io/hostname=kubernetes-minion-9vlv
kubernetes-minion-a12q Ready 6m
beta.kubernetes.io/instance-type=n1-standard-2,failure-domain.beta.kubernetes.
io/region=us-central1,failure-domain.beta.kubernetes.io/zone=us-central1-a,kub
ernetes.io/hostname=kubernetes-minion-a12q
The scheduler will use the labels attached to each of the nodes (failure-domain.beta.kubernetes.io/region for the region, and failure-domain.beta.kubernetes.io/zone for the zone) in its scheduling decisions.
Add more nodes in a second zone
Let's add another set of nodes to the existing cluster, but running in a different zone (us-central1-b for GCE, us-west-2b for EC2). We run kube-up again, but by specifying KUBE_USE_EXISTING_MASTER=1 kube-up will not create a new master, but will reuse one that was previously created.
GCE:
KUBE_USE_EXISTING_MASTER=true MULTIZONE=true KUBERNETES_PROVIDER=gce
KUBE_GCE_ZONE=us-central1-b NUM_NODES=3 kubernetes/cluster/kube-up.sh
On EC2, we also need to specify the network CIDR for the additional subnet, along with the master internal IP address:
KUBE_USE_EXISTING_MASTER=true MULTIZONE=true KUBERNETES_PROVIDER=aws
KUBE_AWS_ZONE=us-west-2b NUM_NODES=3 KUBE_SUBNET_CIDR=172.20.1.0/24
MASTER_INTERNAL_IP=172.20.0.9 kubernetes/cluster/kube-up.sh
View the nodes again; 3 more nodes will have been launched and labelled (the example here is on GCE):
$ kubectl get nodes --show-labels
NAME STATUS AGE LABELS
kubernetes-master Ready,SchedulingDisabled 16m
beta.kubernetes.io/instance-type=n1-standard-1,failure-domain.beta.kubernetes.
io/region=us-central1,failure-domain.beta.kubernetes.io/zone=us-central1-a,kub
ernetes.io/hostname=kubernetes-master
kubernetes-minion-281d Ready 2m
beta.kubernetes.io/instance-type=n1-standard-2,failure-domain.beta.kubernetes.
io/region=us-central1,failure-domain.beta.kubernetes.io/zone=us-central1-b,kub
ernetes.io/hostname=kubernetes-minion-281d
kubernetes-minion-87j9 Ready 16m
beta.kubernetes.io/instance-type=n1-standard-2,failure-domain.beta.kubernetes.
io/region=us-central1,failure-domain.beta.kubernetes.io/zone=us-central1-a,kub
ernetes.io/hostname=kubernetes-minion-87j9
kubernetes-minion-9vlv Ready 16m
beta.kubernetes.io/instance-type=n1-standard-2,failure-domain.beta.kubernetes.
io/region=us-central1,failure-domain.beta.kubernetes.io/zone=us-central1-a,kub
ernetes.io/hostname=kubernetes-minion-9vlv
kubernetes-minion-a12q Ready 17m
beta.kubernetes.io/instance-type=n1-standard-2,failure-domain.beta.kubernetes.
io/region=us-central1,failure-domain.beta.kubernetes.io/zone=us-central1-a,kub
ernetes.io/hostname=kubernetes-minion-a12q
kubernetes-minion-pp2f Ready 2m
beta.kubernetes.io/instance-type=n1-standard-2,failure-domain.beta.kubernetes.
io/region=us-central1,failure-domain.beta.kubernetes.io/zone=us-central1-b,kub
ernetes.io/hostname=kubernetes-minion-pp2f
kubernetes-minion-wf8i Ready 2m
beta.kubernetes.io/instance-type=n1-standard-2,failure-domain.beta.kubernetes.
io/region=us-central1,failure-domain.beta.kubernetes.io/zone=us-central1-b,kub
ernetes.io/hostname=kubernetes-minion-wf8i
Let’s add one more zone:
GCE:
KUBE_USE_EXISTING_MASTER=true MULTIZONE=true KUBERNETES_PROVIDER=gce
KUBE_GCE_ZONE=us-central1-f NUM_NODES=3 kubernetes/cluster/kube-up.sh
EC2:
KUBE_USE_EXISTING_MASTER=true MULTIZONE=true KUBERNETES_PROVIDER=aws
KUBE_AWS_ZONE=us-west-2c NUM_NODES=3 KUBE_SUBNET_CIDR=172.20.2.0/24
MASTER_INTERNAL_IP=172.20.0.9 kubernetes/cluster/kube-up.sh
Verify that you now have nodes in 3 zones:
kubectl get nodes --show-labels
Highly available apps, here we come.
Deploying a multi-zone application
Create the guestbook-go example, which includes a ReplicationController of size 3, running a simple web app. Download all the files from here, and execute the following command (the command assumes you downloaded them to a directory named “guestbook-go”:
kubectl create -f guestbook-go/
You’re done! Your application is now spread across all 3 zones. Prove it to yourself with the following commands:
$ kubectl describe pod -l app=guestbook | grep Node
Node: kubernetes-minion-9vlv/10.240.0.5
Node: kubernetes-minion-281d/10.240.0.8
Node: kubernetes-minion-olsh/10.240.0.11
$ kubectl get node kubernetes-minion-9vlv kubernetes-minion-281d
kubernetes-minion-olsh --show-labels
NAME STATUS AGE LABELS
kubernetes-minion-9vlv Ready 34m
beta.kubernetes.io/instance-type=n1-standard-2,failure-domain.beta.kubernetes.
io/region=us-central1,failure-domain.beta.kubernetes.io/zone=us-central1-a,kub
ernetes.io/hostname=kubernetes-minion-9vlv
kubernetes-minion-281d Ready 20m
beta.kubernetes.io/instance-type=n1-standard-2,failure-domain.beta.kubernetes.
io/region=us-central1,failure-domain.beta.kubernetes.io/zone=us-central1-b,kub
ernetes.io/hostname=kubernetes-minion-281d
kubernetes-minion-olsh Ready 3m
beta.kubernetes.io/instance-type=n1-standard-2,failure-domain.beta.kubernetes.
io/region=us-central1,failure-domain.beta.kubernetes.io/zone=us-central1-f,kub
ernetes.io/hostname=kubernetes-minion-olsh
Further, load-balancers automatically span all zones in a cluster; the guestbook-go example includes an example load-balanced service:
$ kubectl describe service guestbook | grep LoadBalancer.Ingress
LoadBalancer Ingress: 130.211.126.21
ip=130.211.126.21
$ curl -s http://${ip}:3000/env | grep HOSTNAME
"HOSTNAME": "guestbook-44sep",
$ (for i in `seq 20`; do curl -s http://${ip}:3000/env | grep HOSTNAME; done)
| sort | uniq
"HOSTNAME": "guestbook-44sep",
"HOSTNAME": "guestbook-hum5n",
"HOSTNAME": "guestbook-ppm40",
The load balancer correctly targets all the pods, even though they’re in multiple zones.
Shutting down the cluster
When you're done, clean up:
GCE:
KUBERNETES_PROVIDER=gce KUBE_USE_EXISTING_MASTER=true
KUBE_GCE_ZONE=us-central1-f kubernetes/cluster/kube-down.sh
KUBERNETES_PROVIDER=gce KUBE_USE_EXISTING_MASTER=true
KUBE_GCE_ZONE=us-central1-b kubernetes/cluster/kube-down.sh
KUBERNETES_PROVIDER=gce KUBE_GCE_ZONE=us-central1-a
kubernetes/cluster/kube-down.sh
EC2:
KUBERNETES_PROVIDER=aws KUBE_USE_EXISTING_MASTER=true KUBE_AWS_ZONE=us-west-2c
kubernetes/cluster/kube-down.sh
KUBERNETES_PROVIDER=aws KUBE_USE_EXISTING_MASTER=true KUBE_AWS_ZONE=us-west-2b
kubernetes/cluster/kube-down.sh
KUBERNETES_PROVIDER=aws KUBE_AWS_ZONE=us-west-2a
kubernetes/cluster/kube-down.sh
Conclusion
A core philosophy for Kubernetes is to abstract away the complexity of running highly available, distributed applications. As you can see here, other than a small amount of work at cluster spin-up time, all the complexity of launching application instances across multiple failure domains requires no additional work by application developers, as it should be. And we’re just getting started!
Please join our community and help us build the future of Kubernetes! There are many ways to participate. If you’re particularly interested in scalability, you’ll be interested in:
- Our federation slack channel
- The federation “Special Interest Group,” which meets every Thursday at 9:30 a.m. Pacific Time at SIG-Federation hangout
And of course for more information about the project in general, go to www.kubernetes.io
1000 nodes and beyond: updates to Kubernetes performance and scalability in 1.2
Editor's note: this is the first in a series of in-depth posts on what's new in Kubernetes 1.2
We're proud to announce that with the release of 1.2, Kubernetes now supports 1000-node clusters, with a reduction of 80% in 99th percentile tail latency for most API operations. This means in just six months, we've increased our overall scale by 10 times while maintaining a great user experience — the 99th percentile pod startup times are less than 3 seconds, and 99th percentile latency of most API operations is tens of milliseconds (the exception being LIST operations, which take hundreds of milliseconds in very large clusters).
Words are fine, but nothing speaks louder than a demo. Check this out!
In the above video, you saw the cluster scale up to 10 M queries per second (QPS) over 1,000 nodes, including a rolling update, with zero downtime and no impact to tail latency. That’s big enough to be one of the top 100 sites on the Internet!
In this blog post, we’ll cover the work we did to achieve this result, and discuss some of our future plans for scaling even higher.
Methodology
We benchmark Kubernetes scalability against the following Service Level Objectives (SLOs):
- API responsiveness 1 99% of all API calls return in less than 1s
- Pod startup time : 99% of pods and their containers (with pre-pulled images) start within 5s. We say Kubernetes scales to a certain number of nodes only if both of these SLOs are met. We continuously collect and report the measurements described above as part of the project test framework. This battery of tests breaks down into two parts: API responsiveness and Pod Startup Time.
API responsiveness for user-level abstractions2
Kubernetes offers high-level abstractions for users to represent their applications. For example, the ReplicationController is an abstraction representing a collection of pods. Listing all ReplicationControllers or listing all pods from a given ReplicationController is a very common use case. On the other hand, there is little reason someone would want to list all pods in the system — for example, 30,000 pods (1000 nodes with 30 pods per node) represent ~150MB of data (~5kB/pod * 30k pods). So this test uses ReplicationControllers.
For this test (assuming N to be number of nodes in the cluster), we:
Create roughly 3xN ReplicationControllers of different sizes (5, 30 and 250 replicas), which altogether have 30xN replicas. We spread their creation over time (i.e. we don’t start all of them at once) and wait until all of them are running.
Perform a few operations on every ReplicationController (scale it, list all its instances, etc.), spreading those over time, and measuring the latency of each operation. This is similar to what a real user might do in the course of normal cluster operation.
Stop and delete all ReplicationControllers in the system. For results of this test see the “Metrics for Kubernetes 1.2” section below.
For the v1.3 release, we plan to extend this test by also creating Services, Deployments, DaemonSets, and other API objects.
Pod startup end-to-end latency3
Users are also very interested in how long it takes Kubernetes to schedule and start a pod. This is true not only upon initial creation, but also when a ReplicationController needs to create a replacement pod to take over from one whose node failed.
We (assuming N to be the number of nodes in the cluster):
Create a single ReplicationController with 30xN replicas and wait until all of them are running. We are also running high-density tests, with 100xN replicas, but with fewer nodes in the cluster.
Launch a series of single-pod ReplicationControllers - one every 200ms. For each, we measure “total end-to-end startup time” (defined below).
Stop and delete all pods and replication controllers in the system. We define “total end-to-end startup time” as the time from the moment the client sends the API server a request to create a ReplicationController, to the moment when “running & ready” pod status is returned to the client via watch. That means that “pod startup time” includes the ReplicationController being created and in turn creating a pod, scheduler scheduling that pod, Kubernetes setting up intra-pod networking, starting containers, waiting until the pod is successfully responding to health-checks, and then finally waiting until the pod has reported its status back to the API server and then API server reported it via watch to the client.
While we could have decreased the “pod startup time” substantially by excluding for example waiting for report via watch, or creating pods directly rather than through ReplicationControllers, we believe that a broad definition that maps to the most realistic use cases is the best for real users to understand the performance they can expect from the system.
Metrics from Kubernetes 1.2
So what was the result?We run our tests on Google Compute Engine, setting the size of the master VM based on the size of the Kubernetes cluster. In particular for 1000-node clusters we use a n1-standard-32 VM for the master (32 cores, 120GB RAM).
API responsiveness
The following two charts present a comparison of 99th percentile API call latencies for the Kubernetes 1.2 release and the 1.0 release on 100-node clusters. (Smaller bars are better)

We present results for LIST operations separately, since these latencies are significantly higher. Note that we slightly modified our tests in the meantime, so running current tests against v1.0 would result in higher latencies than they used to.

We also ran these tests against 1000-node clusters. Note: We did not support clusters larger than 100 on GKE, so we do not have metrics to compare these results to. However, customers have reported running on 1,000+ node clusters since Kubernetes 1.0.

Since LIST operations are significantly larger, we again present them separately: All latencies, in both cluster sizes, are well within our 1 second SLO.

Pod startup end-to-end latency
The results for “pod startup latency” (as defined in the “Pod-Startup end-to-end latency” section) are presented in the following graph. For reference we are presenting also results from v1.0 for 100-node clusters in the first part of the graph.

As you can see, we substantially reduced tail latency in 100-node clusters, and now deliver low pod startup latency up to the largest cluster sizes we have measured. It is noteworthy that the metrics for 1000-node clusters, for both API latency and pod startup latency, are generally better than those reported for 100-node clusters just six months ago!
How did we make these improvements?
To make these significant gains in scale and performance over the past six months, we made a number of improvements across the whole system. Some of the most important ones are listed below.
- _ Created a “read cache” at the API server level _
(https://github.com/kubernetes/kubernetes/issues/15945 )
Since most Kubernetes control logic operates on an ordered, consistent snapshot kept up-to-date by etcd watches (via the API server), a slight delay in that arrival of that data has no impact on the correct operation of the cluster. These independent controller loops, distributed by design for extensibility of the system, are happy to trade a bit of latency for an increase in overall throughput.
In Kubernetes 1.2 we exploited this fact to improve performance and scalability by adding an API server read cache. With this change, the API server’s clients can read data from an in-memory cache in the API server instead of reading it from etcd. The cache is updated directly from etcd via watch in the background. Those clients that can tolerate latency in retrieving data (usually the lag of cache is on the order of tens of milliseconds) can be served entirely from cache, reducing the load on etcd and increasing the throughput of the server. This is a continuation of an optimization begun in v1.1, where we added support for serving watch directly from the API server instead of etcd:https://github.com/kubernetes/kubernetes/blob/master/docs/proposals/apiserver-watch.md.
Thanks to contributions from Wojciech Tyczynski at Google and Clayton Coleman and Timothy St. Clair at Red Hat, we were able to join careful system design with the unique advantages of etcd to improve the scalability and performance of Kubernetes.
- Introduce a “Pod Lifecycle Event Generator” (PLEG) in the Kubelet (https://github.com/kubernetes/kubernetes/blob/master/docs/proposals/pod-lifecycle-event-generator.md)
Kubernetes 1.2 also improved density from a pods-per-node perspective — for v1.2 we test and advertise up to 100 pods on a single node (vs 30 pods in the 1.1 release). This improvement was possible because of diligent work by the Kubernetes community through an implementation of the Pod Lifecycle Event Generator (PLEG).
The Kubelet (the Kubernetes node agent) has a worker thread per pod which is responsible for managing the pod’s lifecycle. In earlier releases each worker would periodically poll the underlying container runtime (Docker) to detect state changes, and perform any necessary actions to ensure the node’s state matched the desired state (e.g. by starting and stopping containers). As pod density increased, concurrent polling from each worker would overwhelm the Docker runtime, leading to serious reliability and performance issues (including additional CPU utilization which was one of the limiting factors for scaling up).
To address this problem we introduced a new Kubelet subcomponent — the PLEG — to centralize state change detection and generate lifecycle events for the workers. With concurrent polling eliminated, we were able to lower the steady-state CPU usage of Kubelet and the container runtime by 4x. This also allowed us to adopt a shorter polling period, so as to detect and react to changes more quickly.


Improved scheduler throughput Kubernetes community members from CoreOS (Hongchao Deng and Xiang Li) helped to dive deep into the Kubernetes scheduler and dramatically improve throughput without sacrificing accuracy or flexibility. They cut total time to schedule 30,000 pods by nearly 1400%! You can read a great blog post on how they approached the problem here: https://coreos.com/blog/improving-kubernetes-scheduler-performance.html
A more efficient JSON parser Go’s standard library includes a flexible and easy-to-use JSON parser that can encode and decode any Go struct using the reflection API. But that flexibility comes with a cost — reflection allocates lots of small objects that have to be tracked and garbage collected by the runtime. Our profiling bore that out, showing that a large chunk of both client and server time was spent in serialization. Given that our types don’t change frequently, we suspected that a significant amount of reflection could be bypassed through code generation.
After surveying the Go JSON landscape and conducting some initial tests, we found the ugorji codec library offered the most significant speedups - a 200% improvement in encoding and decoding JSON when using generated serializers, with a significant reduction in object allocations. After contributing fixes to the upstream library to deal with some of our complex structures, we switched Kubernetes and the go-etcd client library over. Along with some other important optimizations in the layers above and below JSON, we were able to slash the cost in CPU time of almost all API operations, especially reads.
Other notable changes led to significant wins, including:
- Reducing the number of broken TCP connections, which were causing unnecessary new TLS sessions: https://github.com/kubernetes/kubernetes/issues/15664

- Improving the performance of ReplicationController in large clusters:https://github.com/kubernetes/kubernetes/issues/21672
In both cases, the problem was debugged and/or fixed by Kubernetes community members, including Andy Goldstein and Jordan Liggitt from Red Hat, and Liang Mingqiang from NetEase.
Kubernetes 1.3 and Beyond
Of course, our job is not finished. We will continue to invest in improving Kubernetes performance, as we would like it to scale to many thousands of nodes, just like Google’s Borg. Thanks to our investment in testing infrastructure and our focus on how teams use containers in production, we have already identified the next steps on our path to improving scale.
On deck for Kubernetes 1.3:
Our main bottleneck is still the API server, which spends the majority of its time just marshaling and unmarshaling JSON objects. We plan to add support for protocol buffers to the API as an optional path for inter-component communication and for storing objects in etcd. Users will still be able to use JSON to communicate with the API server, but since the majority of Kubernetes communication is intra-cluster (API server to node, scheduler to API server, etc.) we expect a significant reduction in CPU and memory usage on the master.
Kubernetes uses labels to identify sets of objects; For example, identifying which pods belong to a given ReplicationController requires iterating over all pods in a namespace and choosing those that match the controller’s label selector. The addition of an efficient indexer for labels that can take advantage of the existing API object cache will make it possible to quickly find the objects that match a label selector, making this common operation much faster.
Scheduling decisions are based on a number of different factors, including spreading pods based on requested resources, spreading pods with the same selectors (e.g. from the same Service, ReplicationController, Job, etc.), presence of needed container images on the node, etc. Those calculations, in particular selector spreading, have many opportunities for improvement — see https://github.com/kubernetes/kubernetes/issues/22262 for just one suggested change.
We are also excited about the upcoming etcd v3.0 release, which was designed with Kubernetes use case in mind — it will both improve performance and introduce new features. Contributors from CoreOS have already begun laying the groundwork for moving Kubernetes to etcd v3.0 (see https://github.com/kubernetes/kubernetes/pull/22604). While this list does not capture all the efforts around performance, we are optimistic we will achieve as big a performance gain as we saw going from Kubernetes 1.0 to 1.2.
Conclusion
In the last six months we’ve significantly improved Kubernetes scalability, allowing v1.2 to run 1000-node clusters with the same excellent responsiveness (as measured by our SLOs) as we were previously achieving only on much smaller clusters. But that isn’t enough — we want to push Kubernetes even further and faster. Kubernetes v1.3 will improve the system’s scalability and responsiveness further, while continuing to add features that make it easier to build and run the most demanding container-based applications.
Please join our community and help us build the future of Kubernetes! There are many ways to participate. If you’re particularly interested in scalability, you’ll be interested in:
- Our scalability slack channel
- The scalability “Special Interest Group”, which meets every Thursday at 9 AM Pacific Time at SIG-Scale hangout And of course for more information about the project in general, go to www.kubernetes.io
1We exclude operations on “events” since these are more like system logs and are not required for the system to operate properly.
2This is test/e2e/load.go from the Kubernetes github repository.
3This is test/e2e/density.go test from the Kubernetes github repository
4We are looking into optimizing this in the next release, but for now using a smaller master can result in significant (order of magnitude) performance degradation. We encourage anyone running benchmarking against Kubernetes or attempting to replicate these findings to use a similarly sized master, or performance will suffer.
Five Days of Kubernetes 1.2
The Kubernetes project has had some huge milestones over the past few weeks. We released Kubernetes 1.2, had our first conference in Europe, and were accepted into the Cloud Native Computing Foundation. While we catch our breath, we would like to take a moment to highlight some of the great work contributed by the community since our last milestone, just four months ago.
Our mission is to make building distributed systems easy and accessible for all. While Kubernetes 1.2 has LOTS of new features, there are a few that really highlight the strides we’re making towards that goal. Over the course of the next week, we’ll be publishing a series of in-depth posts covering what’s new, so come back daily this week to read about the new features that continue to make Kubernetes the easiest way to run containers at scale. Thanks, and stay tuned!
|
3/28
|
* 1000 nodes and Beyond: Updates to Kubernetes performance and scalability in 1.2
* Guest post by Sysdig: How container metadata changes your point of view
|
|
3/29
|
* Building highly available applications using Kubernetes new multi-zone clusters (a.k.a. Ubernetes Lite")
* Guest post by AppFormix: Helping Enterprises Operationalize Kubernetes
|
|
3/30
|
* Using Spark and Zeppelin to process big data on Kubernetes 1.2.
|
|
3/31
|
* Kubernetes 1.2 and simplifying advanced networking with Ingress
|
|
4/1
|
* Using Deployment Objects with Kubernetes 1.2
|
|
BONUS
|
* ConfigMap API Configuration management with Containers
|
You can follow us on twitter here @Kubernetesio
How container metadata changes your point of view
Sure, metadata is a fancy word. It actually means “data that describes other data.” While that definition isn’t all that helpful, it turns out metadata itself is especially helpful in container environments. When you have any complex system, the availability of metadata helps you sort and process the variety of data coming out of that system, so that you can get to the heart of an issue with less headache.
In a Kubernetes environment, metadata can be a crucial tool for organizing and understanding the way containers are orchestrated across your many services, machines, availability zones or (in the future) multiple clouds. This metadata can also be consumed by other services running on top of your Kubernetes system and can help you manage your applications.
We’ll take a look at some examples of this below, but first...
A quick intro to Kubernetes metadata Kubernetes metadata is abundant in the form of labels and annotations. Labels are designed to be identifying metadata for your infrastructure, whereas annotations are designed to be non-identifying. For both, they’re simply generic key:value pairs that look like this:
"labels": {
"key1" : "value1",
"key2" : "value2"
}
Labels are not designed to be unique; you can expect any number of objects in your environment to carry the same label, and you can expect that an object could have many labels.
What are some examples of labels you might use? Here are just a few. WARNING: Once you start, you might find more than a few ways to use this functionality!
- Environment: Dev, Prod, Test, UAT
- Customer: Cust A, Cust B, Cust C
- Tier: Frontend, Backend
- App: Cache, Web, Database, Auth
In addition to custom labels you might define, Kubernetes also automatically applies labels to your system with useful metadata. Default labels supply key identifying information about your entire Kubernetes hierarchy: Pods, Services, Replication Controllers,and Namespaces.
Putting your metadata to work
Once you spend a little time with Kubernetes, you’ll see that labels have one particularly powerful application that makes them essential:
Kubernetes labels allows you to easily move between a “physical” view of your hosts and containers, and a “logical” view of your applications and micro-services.
At its core, a platform like Kubernetes is designed to orchestrate the optimal use of underlying physical resources. This is a powerful way to consume private or public cloud resources very efficiently, and sometimes you need to visualize those physical resources. In reality, however, most of the time you care about the performance of the service first and foremost.
But in a Kubernetes world, achieving that high utilization means a service’s containers may be scattered all over the place! So how do you actually measure the service’s performance? That’s where the metadata comes in. With Kubernetes metadata, you can create a deep understanding of your service’s performance, regardless of where the underlying containers are physically located.
Paint me a picture
Let’s look at a quick example to make this more concrete: monitoring your application. Let’s work with a small, 3 node deployment running on GKE. For visualizing the environment we’ll use Sysdig Cloud. Here’s a list of the nodes — note the “gke” prepended to the name of each host. We see some basic performance details like CPU, memory and network.

Each of these hosts has a number of containers running on it. Drilling down on the hosts, we see the containers associated with each:

Simply scanning this list of containers on a single host, I don’t see much organization to the responsibilities of these objects. For example, some of these containers run Kubernetes services (like kube-ui) and we presume others have to do with the application running (like javaapp.x).
Now let’s use some of the metadata provided by Kubernetes to take an application-centric view of the system. Let’s start by creating a hierarchy of components based on labels, in this order:
Kubernetes namespace -> replication controller -> pod -> container
This aggregates containers at corresponding levels based on the above labels. In the app UI below, this aggregation and hierarchy are shown in the grey “grouping” bar above the data about our hosts. As you can see, we have a “prod” namespace with a group of services (replication controllers) below it. Each of those replication controllers can then consist of multiple pods, which are in turn made up of containers.

In addition to organizing containers via labels, this view also aggregates metrics across relevant containers, giving a singular view into the performance of a namespace or replication controller.
In other words, with this aggregated view based on metadata, you can now start by monitoring and troubleshooting services, and drill into hosts and containers only if needed.
Let’s do one more thing with this environment — let’s use the metadata to create a visual representation of services and the topology of their communications. Here you see our containers organized by services, but also a map-like view that shows you how these services relate to each other.

The boxes represent services that are aggregates of containers (the number in the upper right of each box tells you how many containers), and the lines represent communications between services and their latencies.
This kind of view provides yet another logical, instead of physical, view of how these application components are working together. From here I can understand service performance, relationships and underlying resource consumption (CPU in this example).
Metadata: love it, use it
This is a pretty quick tour of metadata, but I hope it inspires you to spend a little time thinking about the relevance to your own system and how you could leverage it. Here we built a pretty simple example — apps and services — but imagine collecting metadata across your apps, environments, software components and cloud providers. You could quickly assess performance differences across any slice of this infrastructure effectively, all while Kubernetes is efficiently scheduling resource usage.
Get started with metadata for visualizing these resources today, and in a followup post we’ll talk about the power of adaptive alerting based on metadata.
Scaling neural network image classification using Kubernetes with TensorFlow Serving
In 2011, Google developed an internal deep learning infrastructure called DistBelief, which allowed Googlers to build ever larger neural networks and scale training to thousands of cores. Late last year, Google introduced TensorFlow, its second-generation machine learning system. TensorFlow is general, flexible, portable, easy-to-use and, most importantly, developed with the open source community.

The process of introducing machine learning into your product involves creating and training a model on your dataset, and then pushing the model to production to serve requests. In this blog post, we’ll show you how you can use Kubernetes with TensorFlow Serving, a high performance, open source serving system for machine learning models, to meet the scaling demands of your application.
Let’s use image classification as an example. Suppose your application needs to be able to correctly identify an image across a set of categories. For example, given the cute puppy image below, your system should classify it as a retriever.
|  |
| Image via Wikipedia |
|
| Image via Wikipedia |
You can implement image classification with TensorFlow using the Inception-v3 model trained on the data from the ImageNet dataset. This dataset contains images and their labels, which allows the TensorFlow learner to train a model that can be used for by your application in production.
 Once the model is trained and exported, TensorFlow Serving uses the model to perform inference — predictions based on new data presented by its clients. In our example, clients submit image classification requests over gRPC, a high performance, open source RPC framework from Google.
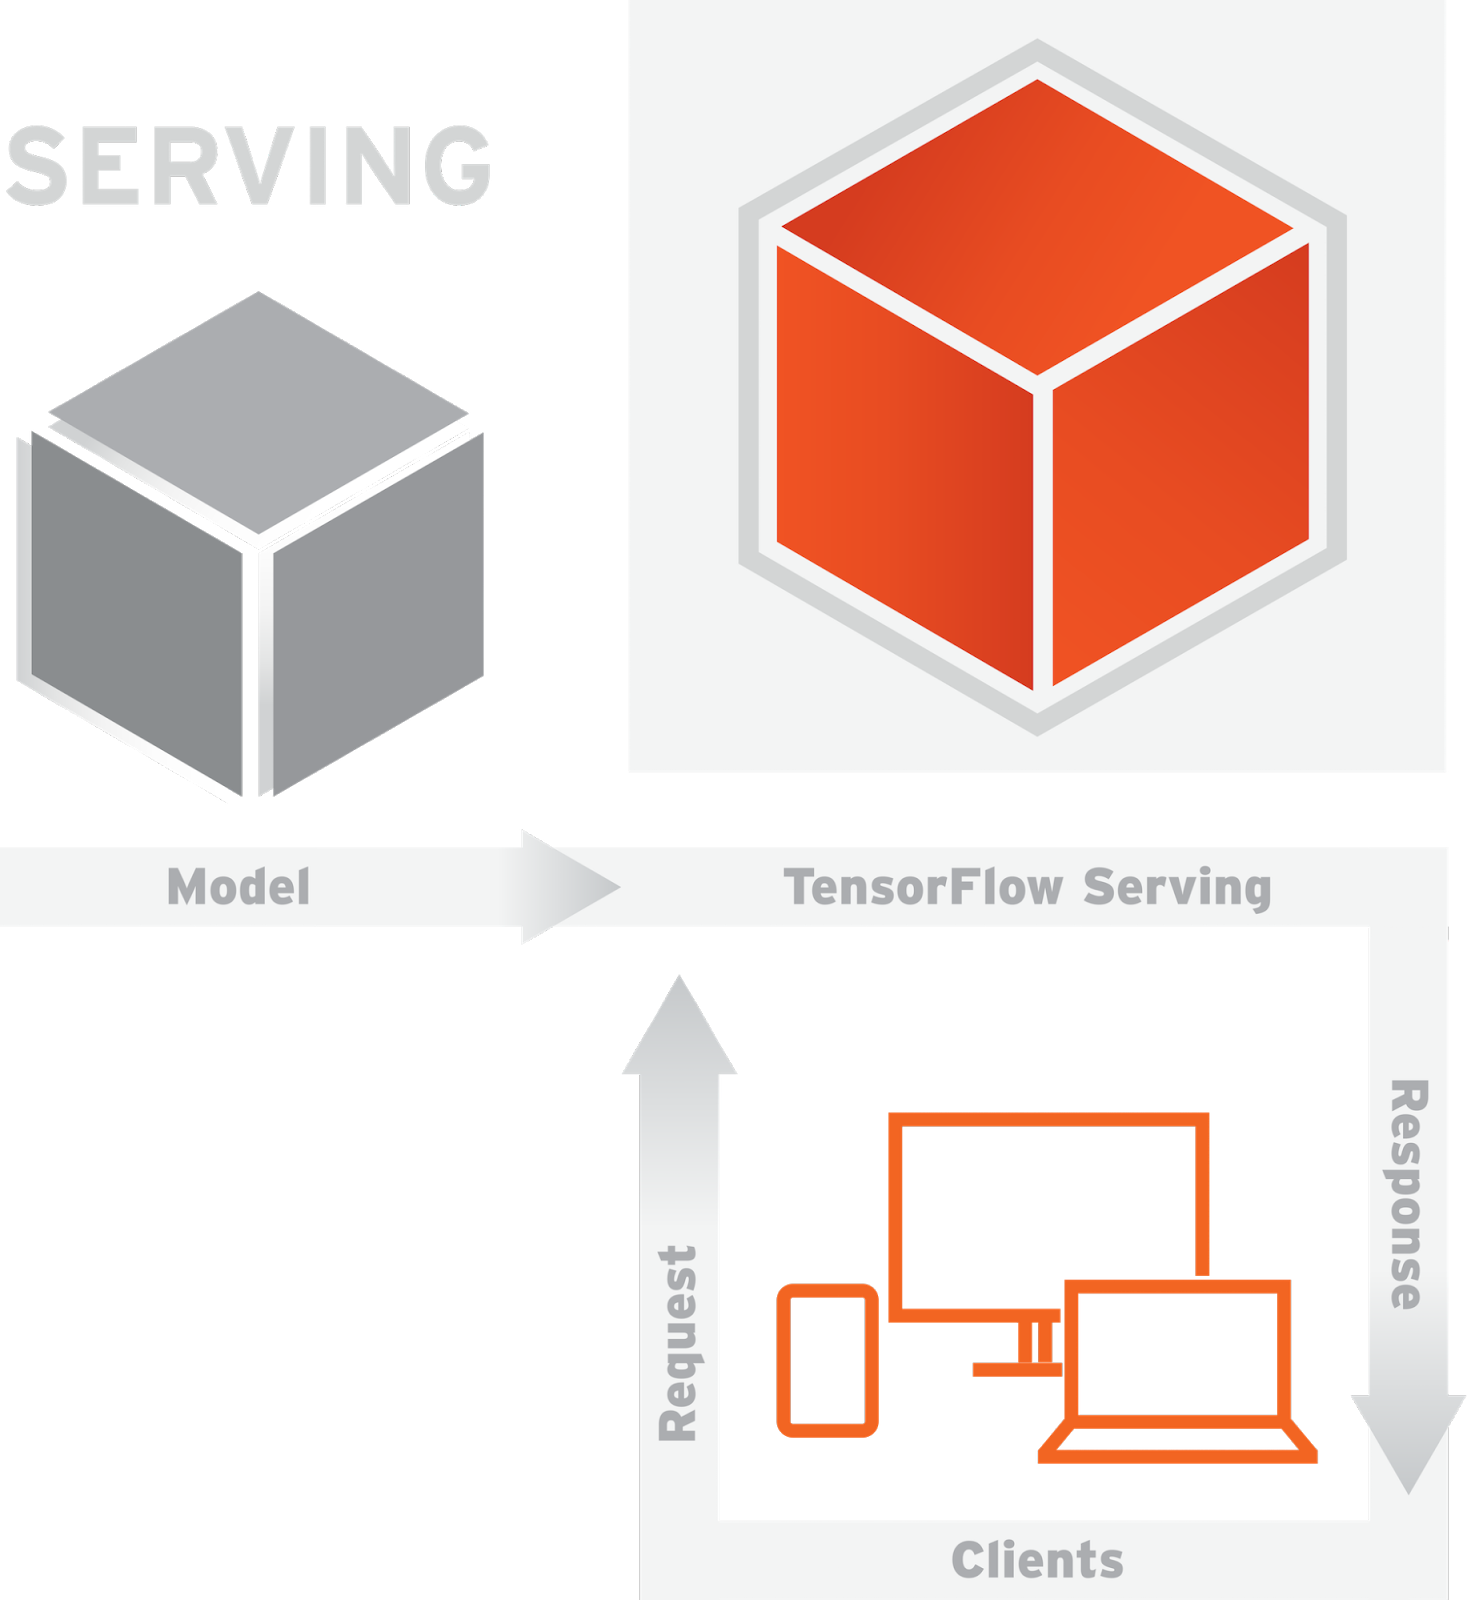
Inference can be very resource intensive. Our server executes the following TensorFlow graph to process every classification request it receives. The Inception-v3 model has over 27 million parameters and runs 5.7 billion floating point operations per inference.
|  |
| Schematic diagram of Inception-v3 |
|
| Schematic diagram of Inception-v3 |
Fortunately, this is where Kubernetes can help us. Kubernetes distributes inference request processing across a cluster using its External Load Balancer. Each pod in the cluster contains a TensorFlow Serving Docker image with the TensorFlow Serving-based gRPC server and a trained Inception-v3 model. The model is represented as a set of files describing the shape of the TensorFlow graph, model weights, assets, and so on. Since everything is neatly packaged together, we can dynamically scale the number of replicated pods using the Kubernetes Replication Controller to keep up with the service demands.
To help you try this out yourself, we’ve written a step-by-step tutorial, which shows you how to create the TensorFlow Serving Docker container to serve the Inception-v3 image classification model, configure a Kubernetes cluster and run classification requests against it. We hope this will make it easier for you to integrate machine learning into your own applications and scale it with Kubernetes! To learn more about TensorFlow Serving, check out tensorflow.github.io/serving.
Kubernetes 1.2: Even more performance upgrades, plus easier application deployment and management
Today the Kubernetes project released Kubernetes 1.2. This release represents significant improvements for large organizations building distributed systems. Now with over 680 unique contributors to the project, this release represents our largest yet.
From the beginning, our mission has been to make building distributed systems easy and accessible for all. With the Kubernetes 1.2 release we’ve made strides towards our goal by increasing scale, decreasing latency and overall simplifying the way applications are deployed and managed. Now, developers at organizations of all sizes can build production scale apps more easily than ever before.
What’s new
Significant scale improvements. Increased cluster scale by 400% to 1,000 nodes and 30,000 containers per cluster.
Simplified application deployment and management.
- Dynamic Configuration (via the ConfigMap API) enables applications to pull their configuration when they run rather than packaging it in at build time.
- Turnkey Deployments (via the Beta Deployment API) let you declare your application and Kubernetes will do the rest. It handles versioning, multiple simultaneous rollouts, aggregating status across all pods, maintaining application availability and rollback.
Automated cluster management :
- Improved reliability through cross-zone failover and multi-zone scheduling
- Simplified One-Pod-Per-Node Applications (via the Beta DaemonSet API) allows you to schedule a service (such as a logging agent) that runs one, and only one, pod per node.
- TLS and L7 support (via the Beta Ingress API) provides a straightforward way to integrate into custom networking environments by supporting TLS for secure communication and L7 for http-based traffic routing.
- Graceful Node Shutdown (aka Node Drain) takes care of transitioning pods off a node and allowing it to be shut down cleanly.
- Custom Metrics for Autoscaling now supports custom metrics, allowing you to specify a set of signals to indicate autoscaling pods.
New GUI allows you to get started quickly and enables the same functionality found in the CLI for a more approachable and discoverable interface.

- And many more. For a complete list of updates, see the release notes on github.
Community
All these improvements would not be possible without our enthusiastic and global community. The momentum is astounding. We’re seeing over 400 pull requests per week, a 50% increase since the previous 1.1 release. There are meetups and conferences discussing Kubernetes nearly every day, on top of the 85 Kubernetes related meetup groups around the world. We’ve also seen significant participation in the community in the form of Special Interest Groups, with 18 active SIGs that cover topics from AWS and OpenStack to big data and scalability, to get involved join or start a new SIG. Lastly, we’re proud that Kubernetes is the first project to be accepted to the Cloud Native Computing Foundation (CNCF), read more about the announcement here.
Documentation
With Kubernetes 1.2 comes a relaunch of our website at kubernetes.io. We’ve slimmed down the docs contribution process so that all you have to do is fork/clone and send a PR. And the site works the same whether you’re staging it on your laptop, on github.io, or viewing it in production. It’s a pure GitHub Pages project; no scripts, no plugins.
From now on, our docs are at a new repo: https://github.com/kubernetes/kubernetes.github.io
To entice you even further to contribute, we’re also announcing our new bounty program. For every “bounty bug” you address with a merged pull request, we offer the listed amount in credit for Google Cloud Platform services. Just look for bugs labeled “Bounty” in the new repo for more details.
Roadmap
All of our work is done in the open, to learn the latest about the project join the weekly community meeting or watch a recorded hangout. In keeping with our major release schedule of every three to four months, here are just a few items that are in development for next release and beyond:
- Improved stateful application support (aka Pet Set)
- Cluster Federation (aka Ubernetes)
- Even more (more!) performance improvements
- In-cluster IAM
- Cluster autoscaling
- Scheduled job
- Public dashboard that allows for nightly test runs across multiple cloud providers
- Lots, lots more! Kubernetes 1.2 is available for download at get.k8s.io and via the open source repository hosted on GitHub. To get started with Kubernetes try our new Hello World app.
Connect
We’d love to hear from you and see you participate in this growing community:
- Get involved with the Kubernetes project on GitHub
- Post questions (or answer questions) on Stackoverflow
- Connect with the community on Slack
- Follow us on Twitter @Kubernetesio for latest updates
Thank you for your support!
ElasticBox introduces ElasticKube to help manage Kubernetes within the enterprise
Today’s guest post is brought to you by Brannan Matherson, from ElasticBox, who’ll discuss a new open source project to help standardize container deployment and management in enterprise environments. This highlights the advantages of authentication and user management for containerized applications
I’m delighted to share some exciting work that we’re doing at ElasticBox to contribute to the open source community regarding the rapidly changing advancements in container technologies. Our team is kicking off a new initiative called ElasticKube to help solve the problem of challenging container management scenarios within the enterprise. This project is a native container management experience that is specific to Kubernetes and leverages automation to provision clusters for containerized applications based on the latest release of Kubernetes 1.2.
I’ve talked to many enterprise companies, both large and small, and the plethora of cloud offering capabilities is often confusing and makes the evaluation process very difficult, so why Kubernetes? Of the large public cloud players - Amazon Web Services, Microsoft Azure, and Google Cloud Platform - Kubernetes is poised to take an innovative leadership role in framing the container management space. The Kubernetes platform does not restrict or dictate any given technical approach for containers, but encourages the community to collectively solve problems as this container market still takes form. With a proven track record of supporting open source efforts, Kubernetes platform allows my team and me to actively contribute to this fundamental shift in the IT and developer world.
We’ve chosen Kubernetes, not just for the core infrastructure services, but also the agility of Kubernetes to leverage the cluster management layer across any cloud environment - GCP, AWS, Azure, vSphere, and Rackspace. Kubernetes also provides a huge benefit for users to run clusters for containers locally on many popular technologies such as: Docker, Vagrant (and VirtualBox), CoreOS, Mesos and more. This amount of choice enables our team and many others in the community to consider solutions that will be viable for a wide range of enterprise scenarios. In the case of ElasticKube, we’re pleased with Kubernetes 1.2 which includes the full release of the deployment API. This provides the ability for us to perform seamless rolling updates of containerized applications that are running in production. In addition, we’ve been able to support new resource types like ConfigMaps and Horizontal Pod Autoscalers.
Fundamentally, ElasticKube delivers a web console for which compliments Kubernetes for users managing their clusters. The initial experience incorporates team collaboration, lifecycle management and reporting, so organizations can efficiently manage resources in a predictable manner. Users will see an ElasticKube portal that takes advantage of the infrastructure abstraction that enables users to run a container that has already been built. With ElasticKube assuming the cluster has been deployed, the overwhelming value is to provide visibility into who did what and define permissions for access to the cluster with multiple containers running on them. Secondly, by partitioning clusters into namespaces, authorization management is more effective. Finally, by empowering users to build a set of reusable templates in a modern portal, ElasticKube provides a vehicle for delivering a self-service template catalog that can be stored in GitHub (for instance, using Helm templates) and deployed easily.
ElasticKube enables organizations to accelerate adoption by developers, application operations and traditional IT operations teams and shares a mutual goal of increasing developer productivity, driving efficiency in container management and promoting the use of microservices as a modern application delivery methodology. When leveraging ElasticKube in your environment, users need to ensure the following technologies are configured appropriately to guarantee everything runs correctly:
- Configure Google Container Engine (GKE) for cluster installation and management
- Use Kubernetes to provision the infrastructure and clusters for containers
- Use your existing tools of choice to actually build your containers
- Use ElasticKube to run, deploy and manage your containers and services
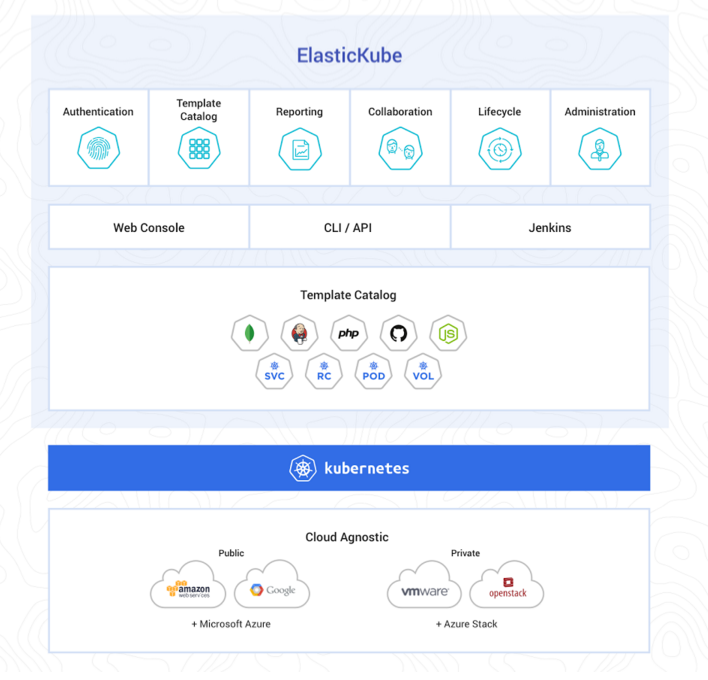
Getting Started with Kubernetes and ElasticKube
(this is a 3min walk through video with the following topics)
- Deploy ElasticKube to a Kubernetes cluster
- Configuration
- Admin: Setup and invite a user
- Deploy an instance
Hear What Others are Saying
“Kubernetes has provided us the level of sophistication required for enterprises to manage containers across complex networking environments and the appropriate amount of visibility into the application lifecycle. Additionally, the community commitment and engagement has been exceptional, and we look forward to being a major contributor to this next wave of modern cloud computing and application management.”
~Alberto Arias Maestro, Co-founder and Chief Technology Officer, ElasticBox
Kubernetes in the Enterprise with Fujitsu’s Cloud Load Control
Earlier this year, Fujitsu released its Kubernetes-based offering Fujitsu ServerViewCloud Load Control (CLC) to the public. Some might be surprised since Fujitsu’s reputation is not necessarily related to software development, but rather to hardware manufacturing and IT services. As a long-time member of the Linux foundation and founding member of the Open Container Initiative and the Cloud Native Computing Foundation, Fujitsu does not only build software, but is committed to open source software, and contributes to several projects, including Kubernetes. But we not only believe in Kubernetes as an open source project, we also chose it as the core of our offering, because it provides the best balance of feature set, resource requirements and complexity to run distributed applications at scale.
Today, we want to take you on a short tour explaining the background of our offering, why we think Kubernetes is the right fit for your customers and what value Cloud Load Control provides on top of it. A long long time ago…
In mid 2014 we looked at the challenges enterprises are facing in the context of digitization, where traditional enterprises experience that more and more competitors from the IT sector are pushing into the core of their markets. A big part of Fujitsu’s customers are such traditional businesses, so we considered how we could help them and came up with three basic principles:
- Decouple applications from infrastructure - Focus on where the value for the customer is: the application.
- Decompose applications - Build applications from smaller, loosely coupled parts. Enable reconfiguration of those parts depending on the needs of the business. Also encourage innovation by low-cost experiments.
- Automate everything - Fight the increasing complexity of the first two points by introducing a high degree of automation.
We found that Linux containers themselves cover the first point and touch the second. But at this time there was little support for creating distributed applications and running them managed automatically. We found Kubernetes as the missing piece. Not a free lunch
The general approach of Kubernetes in managing containerized workload is convincing, but as we looked at it with the eyes of customers, we realized that it’s not a free lunch. Many customers are medium-sized companies whose core business is often bound to strict data protection regulations. The top three requirements we identified are:
- On-premise deployments (with the option for hybrid scenarios)
- Efficient operations as part of a (much) bigger IT infrastructure
- Enterprise-grade support, potentially on global scale
We created Cloud Load Control with these requirements in mind. It is basically a distribution of Kubernetes targeted for on-premise use, primarily focusing on operational aspects of container infrastructure. We are committed to work with the community, and contribute all relevant changes and extensions upstream to the Kubernetes project. On-premise deployments
As Kubernetes core developer Tim Hockin often puts it in histalks, Kubernetes is "a story with two parts" where setting up a Kubernetes cluster is not the easy part and often challenging due to variations in infrastructure. This is in particular true when it comes to production-ready deployments of Kubernetes. In the public cloud space, a customer could choose a service like Google Container Engine (GKE) to do this job. Since customers have less options on-premise, often they have to consider the deployment by themselves.
Cloud Load Control addresses these issues. It enables customers to reliably and readily provision a production grade Kubernetes clusters on their own infrastructure, with the following benefits:
- Proven setup process, lowers risk of problems while setting up the cluster
- Reduction of provisioning time to minutes
- Repeatable process, relevant especially for large, multi-tenant environments
Cloud Load Control delivers these benefits for a range of platforms, starting from selected OpenStack distributions in the first versions of Cloud Load Control, and successively adding more platforms depending on customer demand. We are especially excited about the option to remove the virtualization layer and support Kubernetes bare-metal on Fujitsu servers in the long run. By removing a layer of complexity, the total cost to run the system would be decreased and the missing hypervisor would increase performance.
Right now we are in the process of contributing a generic provider to set up Kubernetes on OpenStack. As a next step in driving multi-platform support, Docker-based deployment of Kubernetes seems to be crucial. We plan to contribute to this feature to ensure it is going to be Beta in Kubernetes 1.3. Efficient operations
Reducing operation costs is the target of any organization providing IT infrastructure. This can be achieved by increasing the efficiency of operations and helping operators to get their job done. Considering large-scale container infrastructures, we found it is important to differentiate between two types of operations:
- Platform-oriented, relates to the overall infrastructure, often including various systems, one of which might be Kubernetes.
- Application-oriented, focusses rather on a single, or a small set of applications deployed on Kubernetes.
Kubernetes is already great for the application-oriented part. Cloud Load Control was created to help platform-oriented operators to efficiently manage Kubernetes as part of the overall infrastructure and make it easy to execute Kubernetes tasks relevant to them.
The first version of Cloud Load Control provides a user interface integrated in the OpenStack Horizon dashboard which enables the Platform ops to create and manage their Kubernetes clusters.

Clusters are treated as first-class citizens of OpenStack. Their creation is as simple as the creation of a virtual machine. Operators do not need to learn a new system or method of provisioning, and the self-service approach enables large organizations to rapidly provide the Kubernetes infrastructure to their tenants.
An intuitive UI is crucial for the simplification of operations. This is why we heavily contributed to theKubernetes Dashboard project and ship it in Cloud Load Control. Especially for operators who don’t know the Kubernetes CLI by heart, because they have to care about other systems too, a great UI is perfectly suitable to get typical operational tasks done, such as checking the health of the system or deploying a new application.
Monitoring is essential. With the dashboard, it is possible to get insights on cluster level. To ensure that the OpenStack operators have a deep understanding of their platform, we will soon add an integration withMonasca, OpenStack’s monitoring-as-a-service project, so metrics of Kubernetes can be analyzed together with OpenStack metrics from a single point of access. Quality and enterprise-grade support
As a Japanese company, quality and customer focus have the highest priority in every product and service we ship. This is where the actual value of Cloud Cloud Control comes from: it provides a specific version of the open source software which has been intensively tested and hardened to ensure stable operations on a particular set of platforms.
Acknowledging that container technology and Kubernetes is new territory for a lot of enterprises, expert assistance is the key for setting up and running a production-grade container infrastructure. Cloud Load Control comes with a support service leveraging Fujitsu’s proven support structure. This enables support also for customers operating Kubernetes in different regions of the world, like Europe and Japan, as part of the same offering. Conclusion
2014 seems to be light years away, we believe the decision for Kubernetes was the right one. It is built from the ground-up to enable the creation of container-based, distributed applications, and best supports this use case.
With Cloud Load Control, we’re excited to enable enterprises to run Kubernetes in production environments and to help their operators to efficiently use it, so DevOps teams can build awesome applications on top of it.
Kubernetes Community Meeting Notes - 20160225
February 25th - Redspread demo, 1.2 update and planning 1.3, newbie introductions, SIG-networking and a shout out to CoreOS blog post.
The Kubernetes contributing community meets most Thursdays at 10:00PT to discuss the project's status via videoconference. Here are the notes from the latest meeting.
Note taker: [Ilan Rabinovich]
- Quick call out for sharing presentations/slides [JBeda]
- Demo (10 min): Redspread [Mackenzie Burnett, Dan Gillespie]
- 1.2 Release Watch [T.J. Goltermann]
- currently about 80 issues in the queue that need to be addressed before branching.
- currently looks like March 7th may slip to later in the week, but up in the air until flakey tests are resolved.
- non-1.2 changes may be delayed in review/merging until 1.2 stabilization work completes.
- 1.3 release planning
- currently about 80 issues in the queue that need to be addressed before branching.
- Newbie Introductions
- SIG Reports -
- Networking [Tim Hockin]
- Scale [Bob Wise]
- meeting last Friday went very well. Discussed charter AND a working deployment
- moved meeting to Thursdays @ 1 (so in 3 hours!)
- Rob is posting a Cluster Ops announce on TheNewStack to recruit more members
- GSoC participation -- no application submitted. [Sarah Novotny]
- Brian Grant has offered to review PRs that need attention for 1.2
- Dynamic Provisioning
- Currently overlaps a bit with the ubernetes work
- PR in progress.
- Should work in 1.2, but being targeted more in 1.3
- Next meeting is March 3rd.
- Demo from Weave on Kubernetes Anywhere
- Another Kubernetes 1.2 update
- Update from CNCF update
- 1.3 commitments from google
- No meeting on March 10th.
To get involved in the Kubernetes community consider joining our Slack channel, taking a look at the Kubernetes project on GitHub, or join the Kubernetes-dev Google group. If you're really excited, you can do all of the above and join us for the next community conversation — March 3rd, 2016. Please add yourself or a topic you want to know about to the agenda and get a calendar invitation by joining this group.
The full recording is available on YouTube in the growing archive of Kubernetes Community Meetings. -- Kubernetes Community
State of the Container World, February 2016
Hello, and welcome to the second installment of the Kubernetes state of the container world survey. At the beginning of February we sent out a survey about people’s usage of containers, and wrote about the results from the January survey. Here we are again, as before, while we try to reach a large and representative set of respondents, this survey was publicized across the social media account of myself and others on the Kubernetes team, so I expect some pro-container and Kubernetes bias in the data.We continue to try to get as large an audience as possible, and in that vein, please go and take the March survey and share it with your friends and followers everywhere! Without further ado, the numbers...
Containers continue to gain ground
In January, 71% of respondents were currently using containers, in February, 89% of respondents were currently using containers. The percentage of users not even considering containers also shrank from 4% in January to a surprising 0% in February. Will see if that holds consistent in March.Likewise, the usage of containers continued to march across the dev/canary/prod lifecycle. In all parts of the lifecycle, container usage increased:
- Development: 80% -> 88%
- Test: 67% -> 72%
- Pre production: 41% -> 55%
- Production: 50% -> 62%
What is striking in this is that pre-production growth continued, even as workloads were clearly transitioned into true production. Likewise the share of people considering containers for production rose from 78% in January to 82% in February. Again we’ll see if the trend continues into March.
Container and cluster sizes
We asked some new questions in the survey too, around container and cluster sizes, and there were some interesting numbers:
How many containers are you running?

How many machines are you running containers on?

So while container usage continues to grow, the size and scope continues to be quite modest, with more than 50% of users running fewer than 50 containers on fewer than 10 machines.
Things stay the same
Across the orchestration space, things seemed pretty consistent between January and February (Kubernetes is quite popular with folks (54% -> 57%), though again, please see the note at the top about the likely bias in our survey population. Shell scripts likewise are also quite popular and holding steady. You all certainly love your Bash (don’t worry, we do too ;) Likewise people continue to use cloud services both in raw IaaS form (10% on GCE, 30% on EC2, 2% on Azure) as well as cloud container services (16% for GKE, 11% on ECS, 1% on ACS). Though the most popular deployment target by far remains your laptop/desktop at ~53%.
Raw data
As always, the complete raw data is available in a spreadsheet here.
Conclusions
Containers continue to gain in popularity and usage. The world of orchestration is somewhat stabilizing, and cloud services continue to be a common place to run containers, though your laptop is even more popular.
And if you are just getting started with containers (or looking to move beyond your laptop) please visit us at kubernetes.io and Google Container Engine. ‘Till next month, please get your friends, relatives and co-workers to take our March survey!
Thanks!
-- Brendan Burns, Software Engineer, Google
KubeCon EU 2016: Kubernetes Community in London
KubeCon EU 2016 is the inaugural European Kubernetes community conference that follows on the American launch in November 2015. KubeCon is fully dedicated to education and community engagement for Kubernetes enthusiasts, production users and the surrounding ecosystem.
Come join us in London and hang out with hundreds from the Kubernetes community and experience a wide variety of deep technical expert talks and use cases.
Don’t miss these great speaker sessions at the conference:
“Kubernetes Hardware Hacks: Exploring the Kubernetes API Through Knobs, Faders, and Sliders” by Ian Lewis and Brian Dorsey, Developer Advocate, Google https://sched.co/6Bl3
“rktnetes: what's new with container runtimes and Kubernetes” by Jonathan Boulle, Developer and Team Lead at CoreOS https://sched.co/6BY7
“Kubernetes Documentation: Contributing, fixing issues, collecting bounties” by John Mulhausen, Lead Technical Writer, Google https://sched.co/6BUP
“What is OpenStack's role in a Kubernetes world?” By Thierry Carrez, Director of Engineering, OpenStack Foundation https://sched.co/6BYC
“A Practical Guide to Container Scheduling” by Mandy Waite, Developer Advocate, Google https://sched.co/6BZa
“Kubernetes in Production in The New York Times newsroom” Eric Lewis, Web Developer, New York Times https://sched.co/67f2
“Creating an Advanced Load Balancing Solution for Kubernetes with NGINX” by Andrew Hutchings, Technical Product Manager, NGINX https://sched.co/6Bc9
…and many more https://kubeconeurope2016.sched.org/
Get your KubeCon EU tickets here.
Venue Location: CodeNode * 10 South Pl, London, United Kingdom
Accommodations: hotels
Website: kubecon.io
Twitter: @KubeConio #KubeCon
Google is a proud Diamond sponsor of KubeCon EU 2016. Come to London next month, March 10th & 11th, and visit booth #13 to learn all about Kubernetes, Google Container Engine (GKE) and Google Cloud Platform!
Kubernetes Community Meeting Notes - 20160218
February 18th - kmachine demo, clusterops SIG formed, new k8s.io website preview, 1.2 update and planning 1.3
The Kubernetes contributing community meets most Thursdays at 10:00PT to discuss the project's status via videoconference. Here are the notes from the latest meeting.
- Note taker: Rob Hirschfeld
- Demo (10 min): kmachine [Sebastien Goasguen]
- started :01 intro video
- looking to create mirror of Docker tools for Kubernetes (similar to machine, compose, etc)
- kmachine (forked from Docker Machine, so has the same endpoints)
- Use Case (10 min): started at :15
- SIG Report starter
- Cluster Ops launch meeting Friday (doc). [Rob Hirschfeld]
- Time Zone Discussion [:22]
- This timezone does not work for Asia.
- Considering rotation - once per month
- Likely 5 or 6 PT
- Rob suggested moving the regular meeting up a little
- k8s.io website preview [John Mulhausen] [:27]
- using github for docs. you can fork and do a pull request against the site
- will be its own kubernetes organization BUT not in the code repo
- Google will offer a "doc bounty" where you can get GCP credits for working on docs
- Uses Jekyll to generate the site (e.g. the ToC)
- Principle will be to 100% GitHub Pages; no script trickery or plugins, just fork/clone, edit, and push
- Hope to launch at Kubecon EU
- Home Page Only Preview: http://kub.unitedcreations.xyz
- 1.2 Release Watch [T.J. Goltermann] [:38]
- 1.3 Planning update [T.J. Goltermann]
- GSoC participation -- deadline 2/19 [Sarah Novotny]
- March 10th meeting? [Sarah Novotny]
To get involved in the Kubernetes community consider joining our Slack channel, taking a look at the Kubernetes project on GitHub, or join the Kubernetes-dev Google group. If you're really excited, you can do all of the above and join us for the next community conversation — February 25th, 2016. Please add yourself or a topic you want to know about to the agenda and get a calendar invitation by joining this group.
"https://youtu.be/L5BgX2VJhlY?list=PL69nYSiGNLP1pkHsbPjzAewvMgGUpkCnJ"
-- Kubernetes Community
Kubernetes Community Meeting Notes - 20160211
February 11th - Pangaea Demo, #AWS SIG formed, release automation and documentation team introductions. 1.2 update and planning 1.3.
The Kubernetes contributing community meets most Thursdays at 10:00PT to discuss the project's status via videoconference. Here are the notes from the latest meeting.
Note taker: Rob Hirschfeld
Demo: Pangaea [Shahidh K Muhammed, Tanmai Gopal, and Akshaya Acharya]
- Microservices packages
- Focused on Application developers
- Demo at recording +4 minutes
- Single node kubernetes cluster — runs locally using Vagrant CoreOS image
- Single user/system cluster allows use of DNS integration (unlike Compose)
- Can run locally or in cloud
- SIG Report:
- Release Automation and an introduction to David McMahon
- Docs and k8s website redesign proposal and an introduction to John Mulhausen
- This will allow the system to build docs correctly from GitHub w/ minimal effort
- Will be check-in triggered
- Getting website style updates
- Want to keep authoring really light
- There will be some automated checks
- Next week: preview of the new website during the community meeting
[@goltermann] 1.2 Release Watch (time +34 minutes)
- code slush * no major features or refactors accepted
- discussion about release criteria: we will hold release date for bugs
Testing flake surge is over (one time event and then maintain test stability)
1.3 Planning (time +40 minutes)
- working to cleanup the GitHub milestones — they should be a source of truth. you can use GitHub for bug reporting
- push off discussion while 1.2 crunch is under
- Framework
- dates
- prioritization
- feedback
- Design Review meetings
- General discussion about the PRD process — still at the beginning states
- Working on a contributor conference
- Rob suggested tracking relationships between PRD/Mgmr authors
- PLEASE DO REVIEWS — talked about the way people are authorized to +2 reviews.
To get involved in the Kubernetes community consider joining our Slack channel, taking a look at the Kubernetes project on GitHub, or join the Kubernetes-dev Google group. If you're really excited, you can do all of the above and join us for the next community conversation — February 18th, 2016. Please add yourself or a topic you want to know about to the agenda and get a calendar invitation by joining this group.
The full recording is available on YouTube in the growing archive of Kubernetes Community Meetings.
ShareThis: Kubernetes In Production
ShareThis has grown tremendously since its first days as a tiny widget that allowed you to share to your favorite social services. It now serves over 4.5 million domains per month, helping publishers create a more authentic digital experience.
Fast growth came with a price. We leveraged technical debt to scale fast and to grow our products, particularly when it came to infrastructure. As our company expanded, the infrastructure costs mounted as well - both in terms of inefficient utilization and in terms of people costs. About 1 year ago, it became clear something needed to change.
TL;DRKubernetes has been a key component for us to reduce technical debt in our infrastructure by:
- Fostering the Adoption of Docker
- Simplifying Container Management
- Onboarding Developers On Infrastructure
- Unlocking Continuous Integration and Delivery We accomplished this by radically adopting Kubernetes and switching our DevOps team to a Cloud Platform team that worked in terms of containers and microservices. This included creating some tools to get around our own legacy debt.
The Problem
Alas, the cloud was new and we were young. We started with a traditional data-center mindset. We managed all of our own services: MySQL, Cassandra, Aerospike, Memcache, you name it. We set up VM’s just like you would traditional servers, installed our applications on them, and managed them in Nagios or Ganglia.
Unfortunately, this way of thinking was antithetical to a cloud-centric approach. Instead of thinking in terms of services, we were thinking in terms of servers. Instead of using modern cloud approaches such as autoscaling, microservices, or even managed VM’s, we were thinking in terms of scripted setups, server deployments, and avoiding vendor lock-in.
These ways of thinking were not bad per se, they were simply inefficient. They weren’t taking advantage of the changes to the cloud that were happening very quickly. It also meant that when changes needed to take place, we were treating those changes as big slow changes to a datacenter, rather than small fast changes to the cloud.
The Solution
Kubernetes As A Tool To Foster Docker Adoption
As Docker became more of a force in our industry, engineers at ShareThis also started experimenting with it to good effect. It soon became obvious that we needed to have a working container for every app in our company just so we could simplify testing in our development environment.
Some apps moved quickly into Docker because they were simple and had few dependencies. For those that had small dependencies, we were able to manage using Fig (Fig was the original name of Docker Compose). Still, many of our data pipelines or interdependent apps were too gnarly to be directly dockerized. We still wanted to do it, but Docker was not enough.
In late 2015, we were frustrated enough with our legacy infrastructure that we finally bit the bullet. We evaluated Docker’s tools, ECS, Kubernetes, and Mesosphere. It was quickly obvious that Kubernetes was in a more stable and user friendly state than its competitors for our infrastructure. As a company, we could solidify our infrastructure on Docker by simply setting the goal of having all of our infrastructure on Kubernetes.
Engineers were skeptical at first. However, once they saw applications scale effortlessly into hundreds of instances per application, they were hooked. Now, not only was there the pain points driving us forward into Docker and by extension Kubernetes, but there was genuine excitement for the technology pulling us in. This has allowed us to make an incredibly difficult migration fairly quickly. We now run Kubernetes in multiple regions on about 65 large VMs and increasing to over 100 in the next couple months. Our Kubernetes cluster currently processes 800 million requests per day with the plan to process over 2 billion requests per day in the coming months.
Kubernetes As A Tool To Manage Containers
Our earliest use of Docker was promising for development, but not so much so for production. The biggest friction point was the inability to manage Docker components at scale. Knowing which containers were running where, what version of a deployment was running, what state an app was in, how to manage subnets and VPCs, etc, plagued any chance of it going to production. The tooling required would have been substantial.
When you look at Kubernetes, there are several key features that were immediately attractive:
- It is easy to install on AWS (where all our apps were running)
- There is a direct path from a Dockerfile to a replication controller through a yaml/json file
- Pods are able to scale in number easily
- We can easily scale the number of VM’s running on AWS in a Kubernetes cluster
- Rolling deployments and rollback are built into the tooling
- Each pod gets monitored through health checks
- Service endpoints are managed by the tool
- There is an active and vibrant community
Unfortunately, one of the biggest pain points was that the tooling didn’t solve our existing legacy infrastructure, it just provided an infrastructure to move onto. There were still a variety of network quirks which disallowed us from directly moving our applications onto a new VPC. In addition, the reworking of so many applications required developers to jump onto problems that have classically been solved by sys admins and operations teams.
Kubernetes As A Tool For Onboarding Developers On Infrastructure
When we decided to make the switch from what was essentially a Chef-run setup to Kubernetes, I do not think we understood all of the pain points that we would hit. We ran our servers in a variety of different ways in a variety of different network configurations that were considerably different than the clean setup that you find on a fresh Kubernetes VPC.
In production we ran in both AWS VPCs and AWS classic across multiple regions. This means that we managed several subnets with different access controls across different applications. Our most recent applications were also very secure, having no public endpoints. This meant that we had a combination of VPC peering, network address translation (NAT), and proxies running in varied configurations.
In the Kubernetes world, there’s only the VPC. All the pods can theoretically talk to each other, and services endpoints are explicitly defined. It’s easy for the developer to gloss over some of the details and it removes the need for operations (mostly).
We made the decision to convert all of our infrastructure / DevOps developers into application developers (really!). We had already started hiring them on the basis of their development skills rather than their operational skills anyway, so perhaps that is not as wild as it sounds.
We then made the decision to onboard our entire engineering organization onto Operations. Developers are flexible, they enjoy challenges, and they enjoy learning. It was remarkable. After 1 month, our organization went from having a few DevOps folks, to having every engineer capable of modifying our architecture.
The training ground for onboarding on networking, productionization, problem solving, root cause analysis, etc, was getting Kubernetes into prod at scale. After the first month, I was biting my nails and worrying about our choices. After 2 months, it looked like it might some day be viable. After 3 months, we were deploying 10 times per week. After 4 months, 40 apps per week. Only 30% of our apps have been migrated, yet the gains are not only remarkable, they are astounding. Kubernetes allowed us to go from an infrastructure-is-slowing-us-down-ugh! organization, to an infrastructure-is-speeding-us-up-yay! organization.
Kubernetes As A Means To Unlock Continuous Integration And Delivery
How did we get to 40+ deployments per week? Put simply, continuous integration and deployment (CI/CD) came as a byproduct of our migration. Our first application in Kubernetes was Jenkins, and every app that went in also was added to Jenkins. As we moved forward, we made Jenkins more automatic until pods were being added and taken from Kubernetes faster than we could keep track.
Interestingly, our problems with scaling are now about wanting to push out too many changes at once and people having to wait until their turn. Our goal is to get 100 deployments per week through the new infrastructure. This is achievable if we can continue to execute on our migration and on our commitment to a CI/CD process on Kubernetes and Jenkins.
Next Steps
We need to finish our migration. At this point the problems are mostly solved, the biggest difficulties are in the tedium of the task at hand. To move things out of our legacy infrastructure meant changing the network configurations to allow access to and from the Kubernetes VPC and across the regions. This is still a very real pain, and one we continue to address.
Some services do not play well in Kubernetes -- think stateful distributed databases. Luckily, we can usually migrate those to a 3rd party who will manage it for us. At the end of this migration, we will only be running pods on Kubernetes. Our infrastructure will become much simpler.
All these changes do not come for free; committing our entire infrastructure to Kubernetes means that we need to have Kubernetes experts. Our team has been unblocked in terms of infrastructure and they are busy adding business value through application development (as they should). However, we do not (yet) have committed engineers to stay up to date with changes to Kubernetes and cloud computing.
As such, we have transferred one engineer to a new “cloud platform team” and will hire a couple of others (have I mentioned we’re hiring!). They will be responsible for developing tools that we can use to interface well with Kubernetes and manage all of our cloud resources. In addition, they will be working in the Kubernetes source code, part of Kubernetes SIGs, and ideally, pushing code into the open source project.
Summary
All in all, while the move to Kubernetes initially seemed daunting, it was far less complicated and disruptive than we thought. And the reward at the other end was a company that could respond as fast as our customers wanted.Editor's note: at a recent Kubernetes meetup, the team at ShareThis gave a talk about their production use of Kubernetes. Video is embedded below.
Kubernetes Community Meeting Notes - 20160204
February 4th - rkt demo (congratulations on the 1.0, CoreOS!), eBay puts k8s on Openstack and considers Openstack on k8s, SIGs, and flaky test surge makes progress.
The Kubernetes contributing community meets most Thursdays at 10:00PT to discuss the project's status via a videoconference. Here are the notes from the latest meeting.
- Note taker: Rob Hirschfeld
- Demo (20 min): CoreOS rkt + Kubernetes [Shaya Potter]
- expect to see integrations w/ rkt & k8s in the coming months ("rkt-netes"). not integrated into the v1.2 release.
- Shaya gave a demo (8 minutes into meeting for video reference)
CLI of rkt shown spinning up containers
[note: audio is garbled at points]
Discussion about integration w/ k8s & rkt
rkt community sync next week: https://groups.google.com/forum/#!topic/rkt-dev/FlwZVIEJGbY
Dawn Chen:
- The remaining issues of integrating rkt with kubernetes: 1) cadivsor 2) DNS 3) bugs related to logging
- But need more work on e2e test suites
- Use Case (10 min): eBay k8s on OpenStack and OpenStack on k8s [Ashwin Raveendran]
- eBay is currently running Kubernetes on OpenStack
- Goal for eBay is to manage the OpenStack control plane w/ k8s. Goal would be to achieve upgrades
- OpenStack Kolla creates containers for the control plane. Uses Ansible+Docker for management of the containers.
- Working on k8s control plan management - Saltstack is proving to be a management challenge at the scale they want to operate. Looking for automated management of the k8s control plane.
- SIG Report
- Testing update [Jeff, Joe, and Erick]
- Working to make the workflow about contributing to K8s easier to understanding
- pull/19714 has flow chart of the bot flow to help users understand
- Need a consistent way to run tests w/ hacking config scripts (you have to fake a Jenkins process right now)
- Want to create necessary infrastructure to make test setup less flaky
- want to decouple test start (single or full) from Jenkins
- goal is to get to point where you have 1 script to run that can be pointed to any cluster
- demo included Google internal views - working to try get that external.
- want to be able to collect test run results
- Bob Wise calls for testing infrastructure to be a blocker on v1.3
- Long discussion about testing practices…
- consensus that we want to have tests work over multiple platforms.
- would be helpful to have a comprehensive state dump for test reports
- "phone-home" to collect stack traces - should be available
- Working to make the workflow about contributing to K8s easier to understanding
- 1.2 Release Watch
- CoC [Sarah]
- GSoC [Sarah]
To get involved in the Kubernetes community consider joining our Slack channel, taking a look at the Kubernetes project on GitHub, or join the Kubernetes-dev Google group. If you're really excited, you can do all of the above and join us for the next community conversation — February 11th, 2016. Please add yourself or a topic you want to know about to the agenda and get a calendar invitation by joining this group.
"https://youtu.be/IScpP8Cj0hw?list=PL69nYSiGNLP1pkHsbPjzAewvMgGUpkCnJ"
Kubernetes Community Meeting Notes - 20160128
January 28 - 1.2 release update, Deis demo, flaky test surge and SIGs
The Kubernetes contributing community meets once a week to discuss the project's status via a videoconference. Here are the notes from the latest meeting.
Note taker: Erin Boyd
- Discuss process around code freeze/code slush (TJ Goltermann)
- Code wind down was happening during holiday (for 1.1)
- Releasing ~ every 3 months
- Build stability is still missing
- Issue on Transparency (Bob Wise)
- Email from Sarah for call to contribute (Monday, January 25)
- Concern over publishing dates / understanding release schedule /etc…
- Email from Sarah for call to contribute (Monday, January 25)
- Release targeted for early March
- Where does one find information on the release schedule with the committed features?
- For 1.2 - Send email / Slack to TJ
- For 1.3 - Working on better process to communicate to the community
- Wiki
- GitHub Milestones
- Where does one find information on the release schedule with the committed features?
- How to better communicate issues discovered in the SIG
- AI: People need to email the kubernetes-dev@ mailing list with summary of findings
- AI: Each SIG needs a note taker
- Release planning vs Release testing
- Testing SIG lead Ike McCreery
- Also part of the testing infrastructure team at Google
- Community being able to integrate into the testing framework
- Federated testing
- Release Manager = David McMahon
- Request to introduce him to the community meeting
- Testing SIG lead Ike McCreery
- Demo: Jason Hansen Deis
- Implemented simple REST API to interact with the platform
- Deis managed application (deployed via)
- Source -> image
- Rolling upgrades -> Rollbacks
- AI: Jason will provide the slides & notes
- Adding an administrative component (dashboard)
- Helm wraps kubectl
- Testing
- Called for community interaction
- Need to understand friction points from community
- Better documentation
- Better communication on how things “should work"
- Internally, Google is having daily calls to resolve test flakes
- Started up SIG testing meetings (Tuesday at 10:30 am PT)
- Everyone wants it, but no one want to pony up the time to make it happen
- Google is dedicating headcount to it (3-4 people, possibly more)
- https://groups.google.com/forum/?hl=en#!forum/kubernetes-sig-testing
- Best practices for labeling
- Are there tools built on top of these to leverage
- AI: Generate artifact for labels and what they do (Create doc)
- Help Wanted Label - good for new community members
- Classify labels for team and area
- User experience, test infrastructure, etc..
- SIG Config (not about deployment)
- Any interest in ansible, etc.. type
- SIG Scale meeting (Bob Wise & Tim StClair)
- Tests related to performance SLA get relaxed in order to get the tests to pass
- exposed process issues
- AI: outline of a proposal for a notice policy if things are being changed that are critical to the system (Bob Wise/Samsung)
- Create a Best Practices of set of constants into well documented place
- Tests related to performance SLA get relaxed in order to get the tests to pass
To get involved in the Kubernetes community consider joining our Slack channel, taking a look at the Kubernetes project on GitHub, or join the Kubernetes-dev Google group. If you’re really excited, you can do all of the above and join us for the next community conversation — February 4th, 2016. Please add yourself or a topic you want to know about to the agenda and get a calendar invitation by joining this group.
The full recording is available on YouTube in the growing archive of Kubernetes Community Meetings.
State of the Container World, January 2016
At the start of the new year, we sent out a survey to gauge the state of the container world. We’re ready to send the February edition, but before we do, let’s take a look at the January data from the 119 responses (thank you for participating!).
A note about these numbers: First, you may notice that the numbers don’t add up to 100%, the choices were not exclusive in most cases and so percentages given are the percentage of all respondents who selected a particular choice. Second, while we attempted to reach a broad cross-section of the cloud community, the survey was initially sent out via Twitter to followers of @brendandburns, @kelseyhightower, @sarahnovotny, @juliaferraioli, @thagomizer_rb, so the audience is likely not a perfect cross-section. We’re working to broaden our sample size (have I mentioned our February survey? Come take it now).
Now, without further ado, the data:
First off, lots of you are using containers! 71% are currently using containers, while 24% of you are considering using them soon. Obviously this indicates a somewhat biased sample set. Numbers for container usage in the broader community vary, but are definitely lower than 71%. Consequently, take all of the rest of these numbers with a grain of salt.
So what are folks using containers for? More than 80% of respondents are using containers for development, while only 50% are using containers for production. But you plan to move to production soon, as 78% of container users said that you were planning on moving to production sometime soon.
Where do you deploy containers? Your laptop was the clear winner here, with 53% of folks deploying to laptops. Next up was 44% of people running on their own VMs (Vagrant? OpenStack? we’ll try dive into this in the February survey), followed by 33% of folks running on physical infrastructure, and 31% on public cloud VMs.
And how are you deploying containers? 54% of you are using Kubernetes, awesome to see, though likely somewhat biased by the sample set (see the notes above), possibly more surprising, 45% of you are using shell scripts. Is it because of the extensive (and awesome) Bash scripting going on in the Kubernetes repository? Go on, you can tell me the truth… Rounding out the numbers, 25% are using CAPS (Chef/Ansible/Puppet/Salt) systems, and roughly 13% are using Docker Swarm, Mesos or other systems.
Finally, we asked people for free-text answers about the challenges of working with containers. Some of the most interesting answers are grouped and reproduced here:
Development Complexity
- “Silo'd development environments / workflows can be fragmented, ease of access to tools like logs is available when debugging containers but not intuitive at times, massive amounts of knowledge is required to grasp the whole infrastructure stack and best practices from say deploying / updating kubernetes, to underlying networking etc.”
- “Migrating developer workflow. People uninitiated with containers, volumes, etc just want to work.”
Security
- “Network Security”
- “Secrets”
Immaturity
- “Lack of a comprehensive non-proprietary standard (i.e. non-Docker) like e.g runC / OCI”
- “Still early stage with few tools and many missing features.”
- “Poor CI support, a lot of tooling still in very early days.”
- "We've never done it that way before."
Complexity
- “Networking support, providing ip per pod on bare metal for kubernetes”
- “Clustering is still too hard”
- “Setting up Mesos and Kubernetes too damn complicated!!”
Data
- “Lack of flexibility of volumes (which is the same problem with VMs, physical hardware, etc)”
- “Persistency”
- “Storage”
- “Persistent Data”
Download the full survey results here (CSV file).
Kubernetes Community Meeting Notes - 20160114
January 14 - RackN demo, testing woes, and KubeCon EU CFP.
Note taker: Joe Beda
Demonstration: Automated Deploy on Metal, AWS and others w/ Digital Rebar, Rob Hirschfeld and Greg Althaus from RackN
Greg Althaus. CTO. Digital Rebar is the product. Bare metal provisioning tool.
Detect hardware, bring it up, configure raid, OS and get workload deployed.
Been working on Kubernetes workload.
Seeing trend to start in cloud and then move back to bare metal.
New provider model to use provisioning system on both cloud and bare metal.
UI, REST API, CLI
Demo: Packet -- bare metal as a service
4 nodes running grouped into a "deployment"
Functional roles/operations selected per node.
Decomposed the kubernetes bring up into units that can be ordered and synchronized. Dependency tree -- things like wait for etcd to be up before starting k8s master.
Using the Ansible playbook under the covers.
Demo brings up 5 more nodes -- packet will build those nodes
Pulled out basic parameters from the ansible playbook. Things like the network config, dns set up, etc.
Hierarchy of roles pulls in other components -- making a node a master brings in a bunch of other roles that are necessary for that.
Has all of this combined into a command line tool with a simple config file.
Forward: extending across multiple clouds for test deployments. Also looking to create split/replicated across bare metal and cloud.
Q: secrets?
A: using ansible playbooks. Builds own certs and then distributes them. Wants to abstract them out and push that stuff upstream.Q: Do you support bringing up from real bare metal with PXE boot?
A: yes -- will discover bare metal systems and install OS, install ssh keys, build networking, etc.
[from SIG-scalability] Q: What is the status of moving to golang 1.5?
A: At HEAD we are 1.5 but will support 1.4 also. Some issues with flakiness but looks like things are stable now.Also looking to use the 1.5 vendor experiment. Move away from godep. But can't do that until 1.5 is the baseline.
Sarah: one of the things we are working on is rewards for doing stuff like this. Cloud credits, tshirts, poker chips, ponies.
[from SIG-scalability] Q: What is the status of cleaning up the jenkins based submit queue? What can the community do to help out?
A: It has been rocky the last few days. There should be issues associated with each of these. There is a flake label on those issues.Still working on test federation. More test resources now. Happening slowly but hopefully faster as new people come up to speed. Will be great to having lots of folks doing e2e tests on their environments.
Erick Fjeta is the new test lead
Brendan is happy to help share details on Jenkins set up but that shouldn't be necessary.
Federation may use Jenkins API but doesn't require Jenkins itself.
Joe bitches about the fact that running the e2e tests in the way Jenkins is tricky. Brendan says it should be runnable easily. Joe will take another look.
Conformance tests? etune did this but he isn't here. - revisit 20150121
* March 10-11 in London. Venue to be announced this week.Please send talks! CFP deadline looks to be Feb 5.
Lots of excitement. Looks to be 700-800 people. Bigger than SF version (560 ppl).
Buy tickets early -- early bird prices will end soon and price will go up 100 GBP.
Accommodations provided for speakers?
Q from Bob @ Samsung: Can we get more warning/planning for stuff like this:
A: Sarah -- I don't hear about this stuff much in advance but will try to pull together a list. Working to make the events page on kubernetes.io easier to use.
A: JJ -- we'll make sure we give more info earlier for the next US conf.
Scale tests [Rob Hirschfeld from RackN] -- if you want to help coordinate on scale tests we'd love to help.
Bob invited Rob to join the SIG-scale group.
There is also a big bare metal cluster through the CNCF (from Intel) that will be useful too. No hard dates yet on that.
Notes/video going to be posted on k8s blog. (Video for 20150114 wasn't recorded. Fail.)
To get involved in the Kubernetes community consider joining our Slack channel, taking a look at the Kubernetes project on GitHub, or join the Kubernetes-dev Google group. If you're really excited, you can do all of the above and join us for the next community conversation - January 27th, 2016. Please add yourself or a topic you want to know about to the agenda and get a calendar invitation by joining this group.
Kubernetes Community Meeting Notes - 20160121
January 21 - Configuration, Federation and Testing, oh my.
Note taker: Rob Hirshfeld
Use Case (10 min): SFDC Paul Brown
SIG Report - SIG-config and the story of #18215.
- Application config IN K8s not deployment of K8s
- Topic has been reuse of configuration,specifically parameterization(aka templates). Needs:
- include scoping(cluster namespace)
- slight customization (naming changes, but not major config)
- multiple positions on how todo this including allowing external or simple extensions
- PetSet creates instances w/stable namespace
Workflow proposal
- Distributed Chron. Challenge is that configs need to create multiple objects in sequence
- Trying to figure out how balance the many config options out there (compose, terraform,ansible/etc)
- Goal is to “meet people where they are” to keep it simple
- Q: is there an opinion for the keystore sizing
- large size / data blob would not be appropriate
- you can pull data(config) from another store for larger objects
SIG Report - SIG-federation - progress on Ubernetes-Lite & Ubernetes design
Goal is to be able to have a cluster manager, so you can federate clusters. They will automatically distribute the pods.
Plan is to use the same API for the master cluster
Conformance testing Q+A Isaac Hollander McCreery
- status on conformance testing for release process
- expect to be forward compatible but not backwards
- is there interest for a sig-testing meeting
- testing needs to a higher priority for the project
- lots of focus on trying to make this a higher priority To get involved in the Kubernetes community consider joining our Slack channel, taking a look at the Kubernetes project on GitHub, or join the Kubernetes-dev Google group. If you’re really excited, you can do all of the above and join us for the next community conversation -- January 27th, 2016. Please add yourself or a topic you want to know about to the agenda and get a calendar invitation by joining this group.
Still want more Kubernetes? Check out the recording of this meeting and the growing of the archive of Kubernetes Community Meetings.
Why Kubernetes doesn’t use libnetwork
Kubernetes has had a very basic form of network plugins since before version 1.0 was released — around the same time as Docker's libnetwork and Container Network Model (CNM) was introduced. Unlike libnetwork, the Kubernetes plugin system still retains its "alpha" designation. Now that Docker's network plugin support is released and supported, an obvious question we get is why Kubernetes has not adopted it yet. After all, vendors will almost certainly be writing plugins for Docker — we would all be better off using the same drivers, right?
Before going further, it's important to remember that Kubernetes is a system that supports multiple container runtimes, of which Docker is just one. Configuring networking is a facet of each runtime, so when people ask "will Kubernetes support CNM?" what they really mean is "will kubernetes support CNM drivers with the Docker runtime?" It would be great if we could achieve common network support across runtimes, but that’s not an explicit goal.
Indeed, Kubernetes has not adopted CNM/libnetwork for the Docker runtime. In fact, we’ve been investigating the alternative Container Network Interface (CNI) model put forth by CoreOS and part of the App Container (appc) specification. Why? There are a number of reasons, both technical and non-technical.
First and foremost, there are some fundamental assumptions in the design of Docker's network drivers that cause problems for us.
Docker has a concept of "local" and "global" drivers. Local drivers (such as "bridge") are machine-centric and don’t do any cross-node coordination. Global drivers (such as "overlay") rely on libkv (a key-value store abstraction) to coordinate across machines. This key-value store is a another plugin interface, and is very low-level (keys and values, no semantic meaning). To run something like Docker's overlay driver in a Kubernetes cluster, we would either need cluster admins to run a whole different instance of consul, etcd or zookeeper (see multi-host networking), or else we would have to provide our own libkv implementation that was backed by Kubernetes.
The latter sounds attractive, and we tried to implement it, but the libkv interface is very low-level, and the schema is defined internally to Docker. We would have to either directly expose our underlying key-value store or else offer key-value semantics (on top of our structured API which is itself implemented on a key-value system). Neither of those are very attractive for performance, scalability and security reasons. The net result is that the whole system would significantly be more complicated, when the goal of using Docker networking is to simplify things.
For users that are willing and able to run the requisite infrastructure to satisfy Docker global drivers and to configure Docker themselves, Docker networking should "just work." Kubernetes will not get in the way of such a setup, and no matter what direction the project goes, that option should be available. For default installations, though, the practical conclusion is that this is an undue burden on users and we therefore cannot use Docker's global drivers (including "overlay"), which eliminates a lot of the value of using Docker's plugins at all.
Docker's networking model makes a lot of assumptions that aren’t valid for Kubernetes. In docker versions 1.8 and 1.9, it includes a fundamentally flawed implementation of "discovery" that results in corrupted /etc/hosts files in containers (docker #17190) — and this cannot be easily turned off. In version 1.10 Docker is planning to bundle a new DNS server, and it’s unclear whether this will be able to be turned off. Container-level naming is not the right abstraction for Kubernetes — we already have our own concepts of service naming, discovery, and binding, and we already have our own DNS schema and server (based on the well-established SkyDNS). The bundled solutions are not sufficient for our needs but are not disableable.
Orthogonal to the local/global split, Docker has both in-process and out-of-process ("remote") plugins. We investigated whether we could bypass libnetwork (and thereby skip the issues above) and drive Docker remote plugins directly. Unfortunately, this would mean that we could not use any of the Docker in-process plugins, "bridge" and "overlay" in particular, which again eliminates much of the utility of libnetwork.
On the other hand, CNI is more philosophically aligned with Kubernetes. It's far simpler than CNM, doesn't require daemons, and is at least plausibly cross-platform (CoreOS’s rkt container runtime supports it). Being cross-platform means that there is a chance to enable network configurations which will work the same across runtimes (e.g. Docker, Rocket, Hyper). It follows the UNIX philosophy of doing one thing well.
Additionally, it's trivial to wrap a CNI plugin and produce a more customized CNI plugin — it can be done with a simple shell script. CNM is much more complex in this regard. This makes CNI an attractive option for rapid development and iteration. Early prototypes have proven that it's possible to eject almost 100% of the currently hard-coded network logic in kubelet into a plugin.
We investigated writing a "bridge" CNM driver for Docker that ran CNI drivers. This turned out to be very complicated. First, the CNM and CNI models are very different, so none of the "methods" lined up. We still have the global vs. local and key-value issues discussed above. Assuming this driver would declare itself local, we have to get info about logical networks from Kubernetes.
Unfortunately, Docker drivers are hard to map to other control planes like Kubernetes. Specifically, drivers are not told the name of the network to which a container is being attached — just an ID that Docker allocates internally. This makes it hard for a driver to map back to any concept of network that exists in another system.
This and other issues have been brought up to Docker developers by network vendors, and are usually closed as "working as intended" (libnetwork #139, libnetwork #486, libnetwork #514, libnetwork #865, docker #18864), even though they make non-Docker third-party systems more difficult to integrate with. Throughout this investigation Docker has made it clear that they’re not very open to ideas that deviate from their current course or that delegate control. This is very worrisome to us, since Kubernetes complements Docker and adds so much functionality, but exists outside of Docker itself.
For all of these reasons we have chosen to invest in CNI as the Kubernetes plugin model. There will be some unfortunate side-effects of this. Most of them are relatively minor (for example, docker inspect will not show an IP address), but some are significant. In particular, containers started by docker run might not be able to communicate with containers started by Kubernetes, and network integrators will have to provide CNI drivers if they want to fully integrate with Kubernetes. On the other hand, Kubernetes will get simpler and more flexible, and a lot of the ugliness of early bootstrapping (such as configuring Docker to use our bridge) will go away.
As we proceed down this path, we’ll certainly keep our eyes and ears open for better ways to integrate and simplify. If you have thoughts on how we can do that, we really would like to hear them — find us on slack or on our network SIG mailing-list.
Simple leader election with Kubernetes and Docker
Overview
Kubernetes simplifies the deployment and operational management of services running on clusters. However, it also simplifies the development of these services. In this post we'll see how you can use Kubernetes to easily perform leader election in your distributed application. Distributed applications usually replicate the tasks of a service for reliability and scalability, but often it is necessary to designate one of the replicas as the leader who is responsible for coordination among all of the replicas.
Typically in leader election, a set of candidates for becoming leader is identified. These candidates all race to declare themselves the leader. One of the candidates wins and becomes the leader. Once the election is won, the leader continually "heartbeats" to renew their position as the leader, and the other candidates periodically make new attempts to become the leader. This ensures that a new leader is identified quickly, if the current leader fails for some reason.
Implementing leader election usually requires either deploying software such as ZooKeeper, etcd or Consul and using it for consensus, or alternately, implementing a consensus algorithm on your own. We will see below that Kubernetes makes the process of using leader election in your application significantly easier.
Implementing leader election in Kubernetes
The first requirement in leader election is the specification of the set of candidates for becoming the leader. Kubernetes already uses Endpoints to represent a replicated set of pods that comprise a service, so we will re-use this same object. (aside: You might have thought that we would use ReplicationControllers, but they are tied to a specific binary, and generally you want to have a single leader even if you are in the process of performing a rolling update)
To perform leader election, we use two properties of all Kubernetes API objects:
- ResourceVersions - Every API object has a unique ResourceVersion, and you can use these versions to perform compare-and-swap on Kubernetes objects
- Annotations - Every API object can be annotated with arbitrary key/value pairs to be used by clients.
Given these primitives, the code to use master election is relatively straightforward, and you can find it here. Let's run it ourselves.
$ kubectl run leader-elector --image=gcr.io/google_containers/leader-elector:0.4 --replicas=3 -- --election=example
This creates a leader election set with 3 replicas:
$ kubectl get pods
NAME READY STATUS RESTARTS AGE
leader-elector-inmr1 1/1 Running 0 13s
leader-elector-qkq00 1/1 Running 0 13s
leader-elector-sgwcq 1/1 Running 0 13s
To see which pod was chosen as the leader, you can access the logs of one of the pods, substituting one of your own pod's names in place of
${pod_name}, (e.g. leader-elector-inmr1 from the above)
$ kubectl logs -f ${name}
leader is (leader-pod-name)
… Alternately, you can inspect the endpoints object directly:
'example' is the name of the candidate set from the above kubectl run … command
$ kubectl get endpoints example -o yaml
Now to validate that leader election actually works, in a different terminal, run:
$ kubectl delete pods (leader-pod-name)
This will delete the existing leader. Because the set of pods is being managed by a replication controller, a new pod replaces the one that was deleted, ensuring that the size of the replicated set is still three. Via leader election one of these three pods is selected as the new leader, and you should see the leader failover to a different pod. Because pods in Kubernetes have a grace period before termination, this may take 30-40 seconds.
The leader-election container provides a simple webserver that can serve on any address (e.g. http://localhost:4040). You can test this out by deleting the existing leader election group and creating a new one where you additionally pass in a --http=(host):(port) specification to the leader-elector image. This causes each member of the set to serve information about the leader via a webhook.
# delete the old leader elector group
$ kubectl delete rc leader-elector
# create the new group, note the --http=localhost:4040 flag
$ kubectl run leader-elector --image=gcr.io/google_containers/leader-elector:0.4 --replicas=3 -- --election=example --http=0.0.0.0:4040
# create a proxy to your Kubernetes api server
$ kubectl proxy
You can then access:
http://localhost:8001/api/v1/proxy/namespaces/default/pods/(leader-pod-name):4040/
And you will see:
{"name":"(name-of-leader-here)"}
Leader election with sidecars
Ok, that's great, you can do leader election and find out the leader over HTTP, but how can you use it from your own application? This is where the notion of sidecars come in. In Kubernetes, Pods are made up of one or more containers. Often times, this means that you add sidecar containers to your main application to make up a Pod. (for a much more detailed treatment of this subject see my earlier blog post).
The leader-election container can serve as a sidecar that you can use from your own application. Any container in the Pod that's interested in who the current master is can simply access http://localhost:4040 and they'll get back a simple JSON object that contains the name of the current master. Since all containers in a Pod share the same network namespace, there's no service discovery required!
For example, here is a simple Node.js application that connects to the leader election sidecar and prints out whether or not it is currently the master. The leader election sidecar sets its identifier to hostname by default.
var http = require('http');
// This will hold info about the current master
var master = {};
// The web handler for our nodejs application
var handleRequest = function(request, response) {
response.writeHead(200);
response.end("Master is " + master.name);
};
// A callback that is used for our outgoing client requests to the sidecar
var cb = function(response) {
var data = '';
response.on('data', function(piece) { data = data + piece; });
response.on('end', function() { master = JSON.parse(data); });
};
// Make an async request to the sidecar at http://localhost:4040
var updateMaster = function() {
var req = http.get({host: 'localhost', path: '/', port: 4040}, cb);
req.on('error', function(e) { console.log('problem with request: ' + e.message); });
req.end();
};
/ / Set up regular updates
updateMaster();
setInterval(updateMaster, 5000);
// set up the web server
var www = http.createServer(handleRequest);
www.listen(8080);
Of course, you can use this sidecar from any language that you choose that supports HTTP and JSON.
Conclusion
Hopefully I've shown you how easy it is to build leader election for your distributed application using Kubernetes. In future installments we'll show you how Kubernetes is making building distributed systems even easier. In the meantime, head over to Google Container Engine or kubernetes.io to get started with Kubernetes.
Creating a Raspberry Pi cluster running Kubernetes, the installation (Part 2)
At Devoxx Belgium and Devoxx Morocco, Ray Tsang and I (Arjen Wassink) showed a Raspberry Pi cluster we built at Quintor running HypriotOS, Docker and Kubernetes. While we received many compliments on the talk, the most common question was about how to build a Pi cluster themselves! We’ll be doing just that, in two parts. The first part covered the shopping list for the cluster, and this second one will show you how to get kubernetes up and running . . .
Now you got your Raspberry Pi Cluster all setup, it is time to run some software on it. As mentioned in the previous blog I based this tutorial on the Hypriot linux distribution for the ARM processor. Main reason is the bundled support for Docker. I used this version of Hypriot for this tutorial, so if you run into trouble with other versions of Hypriot, please consider the version I’ve used.
First step is to make sure every Pi has Hypriot running, if not yet please check the getting started guide of them. Also hook up the cluster switch to a network so that Internet is available and every Pi get an IP-address assigned via DHCP. Because we will be running multiple Pi’s it is practical to give each Pi a unique hostname. I renamed my Pi’s to rpi-master, rpi-node-1, rpi-node-2, etc for my convenience. Note that on Hypriot the hostname is set by editing the /boot/occidentalis.txt file, not the /etc/hostname. You could also set the hostname using the Hypriot flash tool.
The most important thing about running software on a Pi is the availability of an ARM distribution. Thanks to Brendan Burns, there are Kubernetes components for ARM available in the Google Cloud Registry. That’s great. The second hurdle is how to install Kubernetes. There are two ways; directly on the system or in a Docker container. Although the container support has an experimental status, I choose to go for that because it makes it easier to install Kubernetes for you. Kubernetes requires several processes (etcd, flannel, kubectl, etc) to run on a node, which should be started in a specific order. To ease that, systemd services are made available to start the necessary processes in the right way. Also the systemd services make sure that Kubernetes is spun up when a node is (re)booted. To make the installation real easy I created an simple install script for the master node and the worker nodes. All is available at GitHub. So let’s get started now!
Installing the Kubernetes master node
First we will be installing Kubernetes on the master node and add the worker nodes later to the cluster. It comes basically down to getting the git repository content and executing the installation script.
$ curl -L -o k8s-on-rpi.zip https://github.com/awassink/k8s-on-rpi/archive/master.zip
$ apt-get update
$ apt-get install unzip
$ unzip k8s-on-rpi.zip
$ k8s-on-rpi-master/install-k8s-master.sh
The install script will install five services:
- docker-bootstrap.service - is a separate Docker daemon to run etcd and flannel because flannel needs to be running before the standard Docker daemon (docker.service) because of network configuration.
- k8s-etcd.service - is the etcd service for storing flannel and kubelet data.
- k8s-flannel.service - is the flannel process providing an overlay network over all nodes in the cluster.
- docker.service - is the standard Docker daemon, but with flannel as a network bridge. It will run all Docker containers.
- k8s-master.service - is the kubernetes master service providing the cluster functionality.
The basic details of this installation procedure is also documented in the Getting Started Guide of Kubernetes. Please check it to get more insight on how a multi node Kubernetes cluster is setup.
Let’s check if everything is working correctly. Two docker daemon processes must be running.
$ ps -ef|grep docker
root 302 1 0 04:37 ? 00:00:14 /usr/bin/docker daemon -H unix:///var/run/docker-bootstrap.sock -p /var/run/docker-bootstrap.pid --storage-driver=overlay --storage-opt dm.basesize=10G --iptables=false --ip-masq=false --bridge=none --graph=/var/lib/docker-bootstrap
root 722 1 11 04:38 ? 00:16:11 /usr/bin/docker -d -bip=10.0.97.1/24 -mtu=1472 -H fd:// --storage-driver=overlay -D
The etcd and flannel containers must be up.
$ docker -H unix:///var/run/docker-bootstrap.sock ps
CONTAINER ID IMAGE COMMAND CREATED STATUS PORTS NAMES
4855cc1450ff andrewpsuedonym/flanneld "flanneld --etcd-endp" 2 hours ago Up 2 hours k8s-flannel
ef410b986cb3 andrewpsuedonym/etcd:2.1.1 "/bin/etcd --addr=127" 2 hours ago Up 2 hours k8s-etcd
The hyperkube kubelet, apiserver, scheduler, controller and proxy must be up.
$ docker ps
CONTAINER ID IMAGE COMMAND CREATED STATUS PORTS NAMES
a17784253dd2 gcr.io/google\_containers/hyperkube-arm:v1.1.2 "/hyperkube controller" 2 hours ago Up 2 hours k8s\_controller-manager.7042038a\_k8s-master-127.0.0.1\_default\_43160049df5e3b1c5ec7bcf23d4b97d0\_2174a7c3
a0fb6a169094 gcr.io/google\_containers/hyperkube-arm:v1.1.2 "/hyperkube scheduler" 2 hours ago Up 2 hours k8s\_scheduler.d905fc61\_k8s-master-127.0.0.1\_default\_43160049df5e3b1c5ec7bcf23d4b97d0\_511945f8
d93a94a66d33 gcr.io/google\_containers/hyperkube-arm:v1.1.2 "/hyperkube apiserver" 2 hours ago Up 2 hours k8s\_apiserver.f4ad1bfa\_k8s-master-127.0.0.1\_default\_43160049df5e3b1c5ec7bcf23d4b97d0\_b5b4936d
db034473b334 gcr.io/google\_containers/hyperkube-arm:v1.1.2 "/hyperkube kubelet -" 2 hours ago Up 2 hours k8s-master
f017f405ff4b gcr.io/google\_containers/hyperkube-arm:v1.1.2 "/hyperkube proxy --m" 2 hours ago Up 2 hours k8s-master-proxy
Deploying the first pod and service on the cluster
When that’s looking good we’re able to access the master node of the Kubernetes cluster with kubectl. Kubectl for ARM can be downloaded from googleapis storage. kubectl get nodes shows which cluster nodes are registered with its status. The master node is named 127.0.0.1.
$ curl -fsSL -o /usr/bin/kubectl https://dl.k8s.io/release/v1.1.2/bin/linux/arm/kubectl
$ kubectl get nodes
NAME LABELS STATUS AGE
127.0.0.1 kubernetes.io/hostname=127.0.0.1 Ready 1h
An easy way to test the cluster is by running a busybox docker image for ARM. kubectl run can be used to run the image as a container in a pod. kubectl get pods shows the pods that are registered with its status.
$ kubectl run busybox --image=hypriot/rpi-busybox-httpd
$ kubectl get pods -o wide
NAME READY STATUS RESTARTS AGE NODE
busybox-fry54 1/1 Running 1 1h 127.0.0.1
k8s-master-127.0.0.1 3/3 Running 6 1h 127.0.0.1
Now the pod is running but the application is not generally accessible. That can be achieved by creating a service. The cluster IP-address is the IP-address the service is avalailable within the cluster. Use the IP-address of your master node as external IP and the service becomes available outside of the cluster (e.g. at http://192.168.192.161 in my case).
$ kubectl expose rc busybox --port=90 --target-port=80 --external-ip=\<ip-address-master-node\>
$ kubectl get svc
NAME CLUSTER\_IP EXTERNAL\_IP PORT(S) SELECTOR AGE
busybox 10.0.0.87 192.168.192.161 90/TCP run=busybox 1h
kubernetes 10.0.0.1 \<none\> 443/TCP \<none\> 2h
$ curl http://10.0.0.87:90/
\<html\>
\<head\>\<title\>Pi armed with Docker by Hypriot\</title\>
\<body style="width: 100%; background-color: black;"\>
\<div id="main" style="margin: 100px auto 0 auto; width: 800px;"\>
\<img src="pi\_armed\_with\_docker.jpg" alt="pi armed with docker" style="width: 800px"\>
\</div\>
\</body\>
\</html\>
Installing the Kubernetes worker nodes
The next step is installing Kubernetes on each worker node and add it to the cluster. This also comes basically down to getting the git repository content and executing the installation script. Though in this installation the k8s.conf file needs to be copied on forehand and edited to contain the IP-address of the master node.
$ curl -L -o k8s-on-rpi.zip https://github.com/awassink/k8s-on-rpi/archive/master.zip
$ apt-get update
$ apt-get install unzip
$ unzip k8s-on-rpi.zip
$ mkdir /etc/kubernetes
$ cp k8s-on-rpi-master/rootfs/etc/kubernetes/k8s.conf /etc/kubernetes/k8s.conf
Change the ip-address in /etc/kubernetes/k8s.conf to match the master node
$ k8s-on-rpi-master/install-k8s-worker.sh
The install script will install four services. These are the quite similar to ones on the master node, but with the difference that no etcd service is running and the kubelet service is configured as worker node.
Once all the services on the worker node are up and running we can check that the node is added to the cluster on the master node.
$ kubectl get nodes
NAME LABELS STATUS AGE
127.0.0.1 kubernetes.io/hostname=127.0.0.1 Ready 2h
192.168.192.160 kubernetes.io/hostname=192.168.192.160 Ready 1h
$ kubectl scale --replicas=2 rc/busybox
$ kubectl get pods -o wide
NAME READY STATUS RESTARTS AGE NODE
busybox-fry54 1/1 Running 1 1h 127.0.0.1
busybox-j2slu 1/1 Running 0 1h 192.168.192.160
k8s-master-127.0.0.1 3/3 Running 6 2h 127.0.0.1
Enjoy your Kubernetes cluster!
Congratulations! You now have your Kubernetes Raspberry Pi cluster running and can start playing with Kubernetes and start learning. Checkout the Kubernetes User Guide to find out what you all can do. And don’t forget to pull some plugs occasionally like Ray and I do :-)
Managing Kubernetes Pods, Services and Replication Controllers with Puppet
People familiar with Puppet might have used it for managing files, packages and users on host computers. But Puppet is first and foremost a configuration management tool, and config management is a much broader discipline than just managing host-level resources. A good definition of configuration management is that it aims to solve four related problems: identification, control, status accounting and verification and audit. These problems exist in the operation of any complex system, and with the new Puppet Kubernetes module we’re starting to look at how we can solve those problems for Kubernetes.
The Puppet Kubernetes Module
The Puppet Kubernetes module currently assumes you already have a Kubernetes cluster up and running;Its focus is on managing the resources in Kubernetes, like Pods, Replication Controllers and Services, not (yet) on managing the underlying kubelet or etcd services. Here’s a quick snippet of code describing a Pod in Puppet’s DSL.
kubernetes_pod { 'sample-pod':
ensure => present,
metadata => {
namespace => 'default',
},
spec => {
containers => [{
name => 'container-name',
image => 'nginx',
}]
},
}
If you’re familiar with the YAML file format, you’ll probably recognise the structure immediately. The interface is intentionally identical to aid conversion between different formats — in fact, the code powering this is autogenerated from the Kubernetes API Swagger definitions. Running the above code, assuming we save it as pod.pp, is as simple as:
puppet apply pod.pp
Authentication uses the standard kubectl configuration file. You can find complete installation instructions in the module's README.
Kubernetes has several resources, from Pods and Services to Replication Controllers and Service Accounts. You can see an example of the module managing these resources in the Kubernetes guestbook sample in Puppet post. This demonstrates converting the canonical hello-world example to use Puppet code.
One of the main advantages of using Puppet for this, however, is that you can create your own higher-level and more business-specific interfaces to Kubernetes-managed applications. For instance, for the guestbook, you could create something like the following:
guestbook { 'myguestbook':
redis_slave_replicas => 2,
frontend_replicas => 3,
redis_master_image => 'redis',
redis_slave_image => 'gcr.io/google_samples/gb-redisslave:v1',
frontend_image => 'gcr.io/google_samples/gb-frontend:v3',
}
You can read more about using Puppet’s defined types, and see lots more code examples, in the Puppet blog post, Building Your Own Abstractions for Kubernetes in Puppet.
Conclusions
The advantages of using Puppet rather than just the standard YAML files and kubectl are:
- The ability to create your own abstractions to cut down on repetition and craft higher-level user interfaces, like the guestbook example above.
- Use of Puppet’s development tools for validating code and for writing unit tests.
- Integration with other tools such as Puppet Server, for ensuring that your model in code matches the state of your cluster, and with PuppetDB for storing reports and tracking changes.
- The ability to run the same code repeatedly against the Kubernetes API, to detect any changes or remediate configuration drift.
It’s also worth noting that most large organisations will have very heterogenous environments, running a wide range of software and operating systems. Having a single toolchain that unifies those discrete systems can make adopting new technology like Kubernetes much easier.
It’s safe to say that Kubernetes provides an excellent set of primitives on which to build cloud-native systems. And with Puppet, you can address some of the operational and configuration management issues that come with running any complex system in production. Let us know what you think if you try the module out, and what else you’d like to see supported in the future.
How Weave built a multi-deployment solution for Scope using Kubernetes
Earlier this year at Weaveworks we launched Weave Scope, an open source solution for visualization and monitoring of containerised apps and services. Recently we released a hosted Scope service into an Early Access Program. Today, we want to walk you through how we initially prototyped that service, and how we ultimately chose and deployed Kubernetes as our platform.
A cloud-native architecture
Scope already had a clean internal line of demarcation between data collection and user interaction, so it was straightforward to split the application on that line, distribute probes to customers, and host frontends in the cloud. We built out a small set of microservices in the 12-factor model, which includes:
- A users service, to manage and authenticate user accounts
- A provisioning service, to manage the lifecycle of customer Scope instances
- A UI service, hosting all of the fancy HTML and JavaScript content
- A frontend service, to route requests according to their properties
- A monitoring service, to introspect the rest of the system
All services are built as Docker images, FROM scratch where possible. We knew that we wanted to offer at least 3 deployment environments, which should be as near to identical as possible.
- An "Airplane Mode" local environment, on each developer's laptop
- A development or staging environment, on the same infrastructure that hosts production, with different user credentials
- The production environment itself
These were our application invariants. Next, we had to choose our platform and deployment model.
Our first prototype
There are a seemingly infinite set of choices, with an infinite set of possible combinations. After surveying the landscape in mid-2015, we decided to make a prototype with
- Amazon EC2 as our cloud platform, including RDS for persistence
- Docker Swarm as our "scheduler"
- Consul for service discovery when bootstrapping Swarm
- Weave Net for our network and service discovery for the application itself
- Terraform as our provisioner
This setup was fast to define and fast to deploy, so it was a great way to validate the feasibility of our ideas. But we quickly hit problems.
- Terraform's support for Docker as a provisioner is barebones, and we uncovered some bugs when trying to use it to drive Swarm.
- Largely as a consequence of the above, managing a zero-downtime deploy of Docker containers with Terraform was very difficult.
- Swarm's raison d'être is to abstract the particulars of multi-node container scheduling behind the familiar Docker CLI/API commands. But we concluded that the API is insufficiently expressive for the kind of operations that are necessary at scale in production.
- Swarm provides no fault tolerance in the case of e.g. node failure.
We also made a number of mistakes when designing our workflow.
- We tagged each container with its target environment at build time, which simplified our Terraform definitions, but effectively forced us to manage our versions via image repositories. That responsibility belongs in the scheduler, not the artifact store.
- As a consequence, every deploy required artifacts to be pushed to all hosts. This made deploys slow, and rollbacks unbearable.
- Terraform is designed to provision infrastructure, not cloud applications. The process is slower and more deliberate than we’d like. Shipping a new version of something to prod took about 30 minutes, all-in.
When it became clear that the service had potential, we re-evaluated the deployment model with an eye towards the long-term.
Rebasing on Kubernetes
It had only been a couple of months, but a lot had changed in the landscape.
- HashiCorp released Nomad
- Kubernetes hit 1.0
- Swarm was soon to hit 1.0
While many of our problems could be fixed without making fundamental architectural changes, we wanted to capitalize on the advances in the industry, by joining an existing ecosystem, and leveraging the experience and hard work of its contributors.
After some internal deliberation, we did a small-scale audition of Nomad and Kubernetes. We liked Nomad a lot, but felt it was just too early to trust it with our production service. Also, we found the Kubernetes developers to be the most responsive to issues on GitHub. So, we decided to go with Kubernetes.
Local Kubernetes
First, we would replicate our Airplane Mode local environment with Kubernetes. Because we have developers on both Mac and Linux laptops, it’s important that the local environment is containerised. So, we wanted the Kubernetes components themselves (kubelet, API server, etc.) to run in containers.
We encountered two main problems. First, and most broadly, creating Kubernetes clusters from scratch is difficult, as it requires deep knowledge of how Kubernetes works, and quite some time to get the pieces to fall in place together. local-cluster-up.sh seems like a Kubernetes developer’s tool and didn’t leverage containers, and the third-party solutions we found, like Kubernetes Solo, require a dedicated VM or are platform-specific.
Second, containerised Kubernetes is still missing several important pieces. Following the official Kubernetes Docker guide yields a barebones cluster without certificates or service discovery. We also encountered a couple of usability issues (#16586, #17157), which we resolved by submitting a patch and building our own hyperkube image from master.
In the end, we got things working by creating our own provisioning script. It needs to do things like generate the PKI keys and certificates and provision the DNS add-on, which took a few attempts to get right. We’ve also learned of a commit to add certificate generation to the Docker build, so things will likely get easier in the near term.
Kubernetes on AWS
Next, we would deploy Kubernetes to AWS, and wire it up with the other AWS components. We wanted to stand up the service in production quickly, and we only needed to support Amazon, so we decided to do so without Weave Net and to use a pre-existing provisioning solution. But we’ll definitely revisit this decision in the near future, leveraging Weave Net via Kubernetes plugins.
Ideally we would have used Terraform resources, and we found a couple: kraken (using Ansible), kubestack (coupled to GCE), kubernetes-coreos-terraform (outdated Kubernetes) and coreos-kubernetes. But they all build on CoreOS, which was an extra moving part we wanted to avoid in the beginning. (On our next iteration, we’ll probably audition CoreOS.) If you use Ansible, there are playbooks available in the main repo. There are also community-drive Chef cookbooks and Puppet modules. I’d expect the community to grow quickly here.
The only other viable option seemed to be kube-up, which is a collection of scripts that provision Kubernetes onto a variety of cloud providers. By default, kube-up onto AWS puts the master and minion nodes into their own VPC, or Virtual Private Cloud. But our RDS instances were provisioned in the region-default VPC, which meant that communication from a Kubernetes minion to the DB would be possible only via VPC peering or by opening the RDS VPC's firewall rules manually.
To get traffic to traverse a VPC peer link, your destination IP needs to be in the target VPC's private address range. But it turns out that resolving the RDS instance's hostname from anywhere outside the same VPC will yield the public IP. And performing the resolution is important, because RDS reserves the right to change the IP for maintenance. This wasn't ever a concern in the previous infrastructure, because our Terraform scripts simply placed everything in the same VPC. So I thought I'd try the same with Kubernetes; the kube-up script ostensibly supports installing to an existing VPC by specifying a VPC_ID environment variable, so I tried installing Kubernetes to the RDS VPC. kube-up appeared to succeed, but service integration via ELBs broke andteardown via kube-down stopped working. After some time, we judged it best to let kube-up keep its defaults, and poked a hole in the RDS VPC.
This was one hiccup among several that we encountered. Each one could be fixed in isolation, but the inherent fragility of using a shell script to provision remote state seemed to be the actual underlying cause. We fully expect the Terraform, Ansible, Chef, Puppet, etc. packages to continue to mature, and hope to switch soon.
Provisioning aside, there are great things about the Kubernetes/AWS integration. For example, Kubernetes services of the correct type automatically generate ELBs, and Kubernetes does a great job of lifecycle management there. Further, the Kubernetes domain model—services, pods, replication controllers, the labels and selector model, and so on—is coherent, and seems to give the user the right amount of expressivity, though the definition files do tend to stutter needlessly. The kubectl tool is good, albeit daunting at first glance. The rolling-update command in particular is brilliant: exactly the semantics and behavior I'd expect from a system like this. Indeed, once Kubernetes was up and running, it just worked, and exactly as I expected it to. That’s a huge thing.
Conclusions
After a couple weeks of fighting with the machines, we were able to resolve all of our integration issues, and have rolled out a reasonably robust Kubernetes-based system to production.
- Provisioning Kubernetes is difficult , owing to a complex architecture and young provisioning story. This shows all signs of improving.
- Kubernetes’ non-optional security model takes time to get right.
- The Kubernetes domain language is a great match to the problem domain.
- We have a lot more confidence in operating our application (It's a lot faster, too.).
- And we're very happy to be part of a growing Kubernetes userbase , contributing issues and patches as we can and benefitting from the virtuous cycle of open-source development that powers the most exciting software being written today.
Weave Scope is an open source solution for visualization and monitoring of containerised apps and services. For a hosted Scope service, request an invite to Early Access program at scope.weave.works.
Creating a Raspberry Pi cluster running Kubernetes, the shopping list (Part 1)
At Devoxx Belgium and Devoxx Morocco, Ray Tsang and I showed a Raspberry Pi cluster we built at Quintor running HypriotOS, Docker and Kubernetes. For those who did not see the talks, you can check out an abbreviated version of the demo or the full talk by Ray on developing and deploying Java-based microservices in Kubernetes. While we received many compliments on the talk, the most common question was about how to build a Pi cluster themselves! We’ll be doing just that, in two parts. This first post will cover the shopping list for the cluster, and the second will show you how to get it up and running . . .
Wait! Why the heck build a Raspberry Pi cluster running Kubernetes?
We had two big reasons to build the Pi cluster at Quintor. First of all we wanted to experiment with container technology at scale on real hardware. You can try out container technology using virtual machines, but Kubernetes runs great on bare metal too. To explore what that’d be like, we built a Raspberry Pi cluster just like we would build a cluster of machines in a production datacenter. This allowed us to understand and simulate how Kubernetes would work when we move it to our data centers.
Secondly, we did not want to blow the budget to do this exploration. And what is cheaper than a Raspberry Pi! If you want to build a cluster comprising many nodes, each node should have a good cost to performance ratio. Our Pi cluster has 20 CPU cores, which is more than many servers, yet cost us less than $400. Additionally, the total power consumption is low and the form factor is small, which is great for these kind of demo systems.
So, without further ado, let’s get to the hardware.
The Shopping List:
| 5 | Raspberry Pi 2 model B | ~$200 |
| 5 | 16 GB micro SD-card class 10 | ~ $45 |
| 1 | D-Link Switch GO-SW-8E 8-Port | ~$15 |
| 1 | Anker 60W 6-Port PowerPort USB Charger (white) | ~$35 |
| 3 | ModMyPi Multi-Pi Stackable Raspberry Pi Case | ~$60 |
| 1 | ModMyPi Multi-Pi Stackable Raspberry Pi Case - Bolt Pack | ~$7 |
| 5 | Micro USB cable (white) 1ft long | ~ $10 |
| 5 | UTP cat5 cable (white) 1ft long | ~ $10 |
For a total of approximately $380 you will have a building set to create a Raspberry Pi cluster like we built! [1](#1)
Some of our considerations
We used the Raspberry Pi 2 model B boards in our cluster rather than the Pi 1 boards because of the CPU power (quadcore @ 900MHz over a dualcore @ 700MHz) and available memory (1 GB over 512MB). These specs allowed us to run multiple containers on each Pi to properly experiment with Kubernetes.
We opted for a 16GB SD-card in each Pi to be at the save side on filesystem storage. In hindsight, 8GB seemed to be enough.
Note the GeauxRobot Stackable Case looks like an alternative for the ModMyPi Stackable Case, but it’s smaller which can cause a problem fitting in the Anker USB Adapter and placing the D-Link Network Switch. So, we stuck with the ModMyPi case.
Putting it together
Building the Raspberry Pi cluster is pretty straight forward. Most of the work is putting the stackable casing together and mounting the Pi boards on the plexiglass panes. We mounted the network switch and USB Adapter using double side foam tape, which feels strong enough for most situations. Finally, we connected the USB and UTP cables. Next, we installed HypriotOS on every Pi. HypriotOS is a Raspbian based Linux OS for Raspberry Pi’s extended with Docker support. The Hypriot team has an excellent tutorial on Getting started with Docker on your Raspberry Pi. Follow this tutorial to get Linux and Docker running on all Pi’s.
With that, you’re all set! Next up will be running Kubernetes on the Raspberry Pi cluster. We’ll be covering this the next post, so stay tuned!
** ## [1] ## ** **[1] **To save ~$90 by making a stack of four Pi’s (instead of five). This also means you can use a 5-Port Anker USB Charger instead of the 6-Port one.
Monitoring Kubernetes with Sysdig
Today we’re sharing a guest post by Chris Crane from Sysdig about their monitoring integration into Kubernetes.
Kubernetes offers a full environment to write scalable and service-based applications. It takes care of things like container grouping, discovery, load balancing and healing so you don’t have to worry about them. The design is elegant, scalable and the APIs are a pleasure to use.
And like any new infrastructure platform, if you want to run Kubernetes in production, you’re going to want to be able to monitor and troubleshoot it. We’re big fans of Kubernetes here at Sysdig, and, well: we’re here to help.
Sysdig offers native visibility into Kubernetes across the full Sysdig product line. That includes sysdig, our open source, CLI system exploration tool, and Sysdig Cloud, the first and only monitoring platform designed from the ground up to support containers and microservices.
At a high level, Sysdig products are aware of the entire Kubernetes cluster hierarchy, including namespaces, services, replication controllers and labels. So all of the rich system and application data gathered is now available in the context of your Kubernetes infrastructure. What does this mean for you? In a nutshell, we believe Sysdig can be your go-to tool for making Kubernetes environments significantly easier to monitor and troubleshoot!
In this post I will quickly preview the Kubernetes visibility in both open source sysdig and Sysdig Cloud, and show off a couple interesting use cases. Let’s start with the open source solution.
Exploring a Kubernetes Cluster with csysdig
The easiest way to take advantage of sysdig’s Kubernetes support is by launching csysdig, the sysdig ncurses UI:
> csysdig -k http://127.0.0.1:8080
*Note: specify the address of your Kubernetes API server with the -k command, and sysdig will poll all the relevant information, leveraging both the standard and the watch API.
Now that csysdig is running, hit F2 to bring up the views panel, and you'll notice the presence of a bunch of new views. The k8s Namespaces view can be used to see the list of namespaces and observe the amount of CPU, memory, network and disk resources each of them is using on this machine:

Similarly, you can select k8s Services to see the same information broken up by service:

or k8s Controllers to see the replication controllers:

or k8s Pods to see the list of pods running on this machine and the resources they use:

Drill Down-Based Navigation
A cool feature in csysdig is the ability to drill down: just select an element, click on enter and – boom – now you're looking inside it. Drill down is also aware of the Kubernetes hierarchy, which means I can start from a service, get the list of its pods, see which containers run inside one of the pods, and go inside one of the containers to explore files, network connections, processes or even threads. Check out the video below.

Actions!
One more thing about csysdig. As recently announced, csysdig also offers “control panel” functionality, making it possible to use hotkeys to execute command lines based on the element currently selected. So we made sure to enrich the Kubernetes views with a bunch of useful hotkeys. For example, you can delete a namespace or a service by pressing "x," or you can describe them by pressing "d."
My favorite hotkeys, however, are "f," to follow the logs that a pod is generating, and "b," which leverages kubectl exec to give you a shell inside a pod. Being brought into a bash prompt for the pod you’re observing is really useful and, frankly, a bit magic. :-)
So that’s a quick preview of Kubernetes in sysdig. Note though, that all of this functionality is only for a single machine. What happens if you want to monitor a distributed Kubernetes cluster? Enter Sysdig Cloud.
Monitoring Kubernetes with Sysdig Cloud
Let’s start with a quick review of Kubernetes’ architecture. From the physical/infrastructure point of view, a Kubernetes cluster is made up of a set of minion machines overseen by a master machine. The master’s tasks include orchestrating containers across minions, keeping track of state and exposing cluster control through a REST API and a UI.
On the other hand, from the logical/application point of view, Kubernetes clusters are arranged in the hierarchical fashion shown in this picture:

- All containers run inside pods. A pod can host a single container, or multiple cooperating containers; in the latter case, the containers in the pod are guaranteed to be co-located on the same machine and can share resources.
- Pods typically sit behind services , which take care of balancing the traffic, and also expose the set of pods as a single discoverable IP address/port.
- Services are scaled horizontally by replication controllers (“RCs”) which create/destroy pods for each service as needed.
- Namespaces are virtual clusters that can include one or more services.
So just to be clear, multiple services and even multiple namespaces can be scattered across the same physical infrastructure.
After talking to hundreds of Kubernetes users, it seems that the typical cluster administrator is often interested in looking at things from the physical point of view, while service/application developers tend to be more interested in seeing things from the logical point of view.
With both these use cases in mind, Sysdig Cloud’s support for Kubernetes works like this:
- By automatically connecting to a Kubernetes’ cluster API Server and querying the API (both the regular and the watch API), Sysdig Cloud is able to infer both the physical and the logical structure of your microservice application.
- In addition, we transparently extract important metadata such as labels.
- This information is combined with our patent-pending ContainerVision technology, which makes it possible to inspect applications running inside containers without requiring any instrumentation of the container or application. Based on this, Sysdig Cloud can provide rich visibility and context from both an infrastructure-centric and an application-centric point of view. Best of both worlds! Let’s check out what this actually looks like.
One of the core features of Sysdig Cloud is groups, which allow you to define the hierarchy of metadata for your applications and infrastructure. By applying the proper groups, you can explore your containers based on their physical hierarchy (for example, physical cluster > minion machine > pod > container) or based on their logical microservice hierarchy (for example, namespace > replication controller > pod > container – as you can see in this example).
If you’re interested in the utilization of your underlying physical resource – e.g., identifying noisy neighbors – then the physical hierarchy is great. But if you’re looking to explore the performance of your applications and microservices, then the logical hierarchy is often the best place to start.

For example: here you can see the overall performance of our WordPress service:

Keep in mind that the pods implementing this service are scattered across multiple machines, but we can still total request counts, response times and URL statistics aggregated together for this service. And don’t forget: this doesn’t require any configuration or instrumentation of wordpress, apache, or the underlying containers!
And from this view, I can now easily create alerts for these service-level metrics, and I can dig down into any individual container for deep inspection - down to the process level – whenever I want, including back in time!
Visualizing Your Kubernetes Services
We’ve also included Kubernetes awareness in Sysdig Cloud’s famous topology view, at both the physical and logical level.


The two pictures below show the exact same infrastructure and services. But the first one depicts the physical hierarchy, with a master node and three minion nodes; while the second one groups containers into namespaces, services and pods, while abstracting the physical location of the containers.
Hopefully it’s self-evident how much more natural and intuitive the second (services-oriented) view is. The structure of the application and the various dependencies are immediately clear. The interactions between various microservices become obvious, despite the fact that these microservices are intermingled across our machine cluster!
Conclusion
I’m pretty confident that what we’re delivering here represents a huge leap in visibility into Kubernetes environments and it won’t disappoint you. I also hope it can be a useful tool enabling you to use Kubernetes in production with a little more peace of mind. Thanks, and happy digging!
You can find open source sysdig on github and at sysdig.org, and you can sign up for free trial of Sysdig Cloud at sysdig.com.
To see a live demo and meet some of the folks behind the project join us this Thursday for a Kubernetes and Sysdig Meetup in San Francisco.
One million requests per second: Dependable and dynamic distributed systems at scale
Recently, I’ve gotten in the habit of telling people that building a reliable service isn’t that hard. If you give me two Compute Engine virtual machines, a Cloud Load balancer, supervisord and nginx, I can create you a static web service that will serve a static web page, effectively forever.
The real challenge is building agile AND reliable services. In the new world of software development it's trivial to spin up enormous numbers of machines and push software to them. Developing a successful product must also include the ability to respond to changes in a predictable way, to handle upgrades elegantly and to minimize downtime for users. Missing on any one of these elements results in an unsuccessful product that's flaky and unreliable. I remember a time, not that long ago, when it was common for websites to be unavailable for an hour around midnight each day as a safety window for software upgrades. My bank still does this. It’s really not cool.
Fortunately, for developers, our infrastructure is evolving along with the requirements that we’re placing on it. Kubernetes has been designed from the ground up to make it easy to design, develop and deploy dependable, dynamic services that meet the demanding requirements of the cloud native world.
To demonstrate exactly what we mean by this, I've developed a simple demo of a Container Engine cluster serving 1 million HTTP requests per second. In all honesty, serving 1 million requests per second isn’t really that exciting. In fact, it’s really so very 2013.

What is exciting is that while successfully handling 1 million HTTP requests per second with uninterrupted availability, we have Kubernetes perform a zero-downtime rolling upgrade of the service to a new version of the software while we're still serving 1 million requests per second.

This is only possible due to a large number of performance tweaks and enhancements that have gone into the Kubernetes 1.1 release. I’m incredibly proud of all of the features that our community has built into this release. Indeed in addition to making it possible to serve 1 million requests per second, we’ve also added an auto-scaler, so that you won’t even have to wake up in the middle of the night to scale your service in response to load or memory pressures.
If you want to try this out on your own cluster (or use the load test framework to test your own service) the code for the demo is available on github. And the full video is available.
I hope I’ve shown you how Kubernetes can enable developers of distributed systems to achieve both reliability and agility at scale, and as always, if you’re interested in learning more, head over to kubernetes.io or github and connect with the community on our Slack channel.
"https://www.youtube.com/embed/7TOWLerX0Ps"
Kubernetes 1.1 Performance upgrades, improved tooling and a growing community
Since the Kubernetes 1.0 release in July, we’ve seen tremendous adoption by companies building distributed systems to manage their container clusters. We’re also been humbled by the rapid growth of the community who help make Kubernetes better everyday. We have seen commercial offerings such as Tectonic by CoreOS and RedHat Atomic Host emerge to deliver deployment and support of Kubernetes. And a growing ecosystem has added Kubernetes support including tool vendors such as Sysdig and Project Calico.
With the help of hundreds of contributors, we’re proud to announce the availability of Kubernetes 1.1, which offers major performance upgrades, improved tooling, and new features that make applications even easier to build and deploy.
Some of the work we’d like to highlight includes:
Substantial performance improvements : We have architected Kubernetes from day one to handle Google-scale workloads, and our customers have put it through their paces. In Kubernetes 1.1, we have made further investments to ensure that you can run in extremely high-scale environments; later this week, we will be sharing examples of running thousand node clusters, and running over a million QPS against a single cluster.
Significant improvement in network throughput : Running Google-scale workloads also requires Google-scale networking. In Kubernetes 1.1, we have included an option to use native IP tables offering an 80% reduction in tail latency, an almost complete elimination of CPU overhead and improvements in reliability and system architecture ensuring Kubernetes can handle high-scale throughput well into the future.
Horizontal pod autoscaling (Beta): Many workloads can go through spiky periods of utilization, resulting in uneven experiences for your users. Kubernetes now has support for horizontal pod autoscaling, meaning your pods can scale up and down based on CPU usage. Read more about Horizontal pod autoscaling.
HTTP load balancer (Beta): Kubernetes now has the built-in ability to route HTTP traffic based on the packets introspection. This means you can have ‘http://foo.com/bar’ go to one service, and ‘http://foo.com/meep’ go to a completely independent service. Read more about the Ingress object.
Job objects (Beta): We’ve also had frequent request for integrated batch jobs, such as processing a batch of images to create thumbnails or a particularly large data file that has been broken down into many chunks. Job objects introduces a new API object that runs a workload, restarts it if it fails, and keeps trying until it’s successfully completed. Read more about theJob object.
New features to shorten the test cycle for developers : We continue to work on making developing for applications for Kubernetes quick and easy. Two new features that speeds developer’s workflows include the ability to run containers interactively, and improved schema validation to let you know if there are any issues with your configuration files before you deploy them.
Rolling update improvements : Core to the DevOps movement is being able to release new updates without any affect on a running service. Rolling updates now ensure that updated pods are healthy before continuing the update.
And many more. For a complete list of updates, see the 1.1. release notes on GitHub
Today, we’re also proud to mark the inaugural Kubernetes conference, KubeCon, where some 400 community members along with dozens of vendors are in attendance supporting the Kubernetes project.
We’d love to highlight just a few of the many partners making Kubernetes better:
“We are betting our major product, Tectonic – which enables any company to deploy, manage and secure its containers anywhere – on Kubernetes because we believe it is the future of the data center. The release of Kubernetes 1.1 is another major milestone that will create more widespread adoption of distributed systems and containers, and puts us on a path that will inevitably lead to a whole new generation of products and services.” – Alex Polvi, CEO, CoreOS.
“Univa’s customers are looking for scalable, enterprise-caliber solutions to simplify managing container and non-container workloads in the enterprise. We selected Kubernetes as a foundational element of our new Navops suite which will help IT and DevOps rapidly integrate containerized workloads into their production systems and extend these workloads into cloud services.” – Gary Tyreman, CEO, Univa.
“The tremendous customer demand we’re seeing to run containers at scale with Kubernetes is a critical element driving growth in our professional services business at Redapt. As a trusted advisor, it’s great to have a tool like Kubernetes in our tool belt to help our customers achieve their objectives.” – Paul Welch, SR VP Cloud Solutions, Redapt
As we mentioned above, we would love your help:
- Get involved with the Kubernetes project on GitHub
- Connect with the community on Slack
- Follow us on Twitter @Kubernetesio for latest updates
- Post questions (or answer questions) on StackOverflow
- Get started running, deploying, and using Kubernetes guides;
But, most of all, just let us know how you are transforming your business using Kubernetes, and how we can help you do it even faster. Thank you for your support!
Kubernetes as Foundation for Cloud Native PaaS
With Kubernetes continuing to gain momentum as a critical tool for building and scaling container based applications, we’ve been thrilled to see a growing number of platform as a service (PaaS) offerings adopt it as a foundation. PaaS developers have been drawn to Kubernetes by its rapid rate of maturation, the soundness of its core architectural concepts, and the strength of its contributor community. The Kubernetes ecosystem continues to grow, and these PaaS projects are great additions to it.

“Deis is the leading Docker PaaS with over a million downloads, actively used by companies like Mozilla, The RealReal, ShopKeep and Coinbase. Deis provides software teams with a turn-key platform for running containers in production, featuring the ability to build and store Docker images, production-grade load balancing, a streamlined developer interface and an ops-ready suite of logging and monitoring infrastructure backed by world-class 24x7x365 support. After a community-led evaluation of alternative orchestrators, it was clear that Kubernetes represents a decade of experience running containers at scale inside Google. The Deis project is proud to be rebasing onto Kubernetes and is thrilled to join its vibrant community." - Gabriel Monroy, CTO of Engine Yard, Inc.

OpenShift by Red Hat helps organizations accelerate application delivery by enabling development and IT operations teams to be more agile, responsive and efficient. OpenShift Enterprise 3 is the first fully supported, enterprise-ready, web-scale container application platform that natively integrates the Docker container runtime and packaging format, Kubernetes container orchestration and management engine, on a foundation of Red Hat Enterprise Linux 7, all fully supported by Red Hat from the operating system to application runtimes.
“Kubernetes provides OpenShift users with a powerful model for application orchestration, leveraging concepts like pods and services, to deploy (micro)services that inherently span multiple containers and application topologies that will require wiring together multiple services. Pods can be optionally mapped to storage, which means you can run both stateful and stateless services in OpenShift. Kubernetes also provides a powerful declarative management model to manage the lifecycle of application containers. Customers can then use Kubernetes’ integrated scheduler to deploy and manage containers across multiple hosts. As a leading contributor to both the Docker and Kubernetes open source projects, Red Hat is not just adopting these technologies but actively building them upstream in the community.” - Joe Fernandes, Director of Product Management for Red Hat OpenShift.

Huawei, a leading global ICT technology solution provider, will offer container as a service (CaaS) built on Kubernetes in the public cloud for customers with Docker based applications. Huawei CaaS services will manage multiple clusters across data centers, and deploy, monitor and scale containers with high availability and high resource utilization for their customers. For example, one of Huawei’s current software products for their telecom customers utilizes tens of thousands of modules and hundreds of instances in virtual machines. By moving to a container based PaaS platform powered by Kubernetes, Huawei is migrating this product into a micro-service based, cloud native architecture. By decoupling the modules, they’re creating a high performance, scalable solution that runs hundreds, even thousands of containers in the system. Decoupling existing heavy modules could have been a painful exercise. However, using several key concepts introduced by Kubernetes, such as pods, services, labels, and proxies, Huawei has been able to re-architect their software with great ease.
Huawei has made Kubernetes the core runtime engine for container based applications/services, and they’ve been building other PaaS components or capabilities around Kubernetes, such as user access management, composite API, Portal and multiple cluster management. Additionally, as part of the migration to the new platform, they’re enhancing their PaaS solution in the areas of advanced scheduling algorithm, multi tenant support and enhanced container network communication to support customer needs.
“Huawei chose Kubernetes as the foundation for our offering because we like the abstract concepts of services, pod and label for modeling and distributed applications. We developed an application model based on these concepts to model existing complex applications which works well for moving legacy applications into the cloud. In addition, Huawei intends for our PaaS platform to support many scenarios, and Kubernetes’ flexible architecture with its plug-in capability is key to our platform architecture.”- Ying Xiong, Chief Architect of PaaS at Huawei.

Gondoris a PaaS with a focus on application hosting throughout the lifecycle, from development to testing to staging to production. It supports Python, Go, and Node.js applications as well as technologies such as Postgres, Redis and Elasticsearch. The Gondor team recently re-architected Gondor to incorporate Kubernetes, and discussed this in a blog post.
“There are two main reasons for our move to Kubernetes: One, by taking care of the lower layers in a truly scalable fashion, Kubernetes lets us focus on providing a great product at the application layer. Two, the portability of Kubernetes allows us to expand our PaaS offering to on-premises, private cloud and a multitude of alternative infrastructure providers.” - Brian Rosner, Chief Architect at Eldarion (the driving force behind Gondor)
- Martin Buhr, Google Business Product Manager
Some things you didn’t know about kubectl
kubectl is the command line tool for interacting with Kubernetes clusters. Many people use it every day to deploy their container workloads into production clusters. But there’s more to kubectl than just kubectl create -f or kubectl rolling-update. kubectl is a veritable multi-tool of container orchestration and management. Below we describe some of the features of kubectl that you may not have seen.
Run interactive commands
kubectl run has been in kubectl since the 1.0 release, but recently we added the ability to run interactive containers in your cluster. That means that an interactive shell in your Kubernetes cluster is as close as:
$> kubectl run -i --tty busybox --image=busybox --restart=Never -- sh
Waiting for pod default/busybox-tv9rm to be running, status is Pending, pod ready: false
Waiting for pod default/busybox-tv9rm to be running, status is Running, pod ready: false
$> # ls
bin dev etc home proc root sys tmp usr var
$> # exit
The above kubectl command is equivalent to docker run -i -t busybox sh. Sadly we mistakenly used -t for template in kubectl 1.0, so we need to retain backwards compatibility with existing CLI user. But the existing use of -t is deprecated and we’ll eventually shorten --tty to -t.
In this example, -i indicates that you want an allocated stdin for your container and indicates that you want an interactive session, --restart=Never indicates that the container shouldn’t be restarted after you exit the terminal and --tty requests that you allocate a TTY for that session.
View your Pod’s logs
Sometimes you just want to watch what’s going on in your server. For this, kubectl logs is the subcommand to use. Adding the -f flag lets you live stream new logs to your terminal, just like tail -f.
$> kubectl logs -f redis-izl09
Attach to existing containers
In addition to interactive execution of commands, you can now also attach to any running process. Like kubectl logs, you’ll get stderr and stdout data, but with attach, you’ll also be able to send stdin from your terminal to the program. Awesome for interactive debugging, or even just sending ctrl-c to a misbehaving application.
$> kubectl attach redis -i
1:C 12 Oct 23:05:11.848 # Warning: no config file specified, using the default config. In order to specify a config file use redis-server /path/to/redis.conf
_._
_.-``__''-._
_.-`` `. `_. ''-._ Redis 3.0.3 (00000000/0) 64 bit
.-`` .-```. ```\/ _.,_ ''-._
( ' , .-` | `, ) Running in standalone mode
|`-._`-...-` __...-.``-._|'` _.-'| Port: 6379
| `-._ `._ / _.-' | PID: 1
`-._ `-._ `-./ _.-' _.-'
|`-._`-._ `-.__.-' _.-'_.-'|
| `-._`-._ _.-'_.-' | http://redis.io
`-._ `-._`-.__.-'_.-' _.-'
|`-._`-._ `-.__.-' _.-'_.-'|
| `-._`-._ _.-'_.-' |
`-._ `-._`-.__.-'_.-' _.-'
`-._ `-.__.-' _.-'
`-._ _.-'
`-.__.-'
1:M 12 Oct 23:05:11.849 # Server started, Redis version 3.0.3
Forward ports from Pods to your local machine
Often times you want to be able to temporarily communicate with applications in your cluster without exposing them to the public internet for security reasons. To achieve this, the port-forward command allows you to securely forward a port on your local machine through the kubernetes API server to a Pod running in your cluster. For example:
$> kubectl port-forward redis-izl09 6379
Opens port 6379 on your local machine and forwards communication to that port to the Pod or Service in your cluster. For example, you can use the telnet command to poke at a Redis service in your cluster:
$> telnet localhost 6379
INCR foo
:1
INCR foo
:2
Execute commands inside an existing container
In addition to being able to attach to existing processes inside a container, the exec command allows you to spawn new processes inside existing containers. This can be useful for debugging, or examining your pods to see what’s going on inside without interrupting a running service. kubectl exec is different from kubectl run, because it runs a command inside of an existing container, rather than spawning a new container for execution.
$> kubectl exec redis-izl09 -- ls /
bin
boot
data
dev
entrypoint.sh
etc
home
Add or remove Labels
Sometimes you want to dynamically add or remove labels from a Pod, Service or Replication controller. Maybe you want to add an existing Pod to a Service, or you want to remove a Pod from a Service. No matter what you want, you can easily and dynamically add or remove labels using the kubectl label subcommand:
`$> kubectl label pods redis-izl09 mylabel=awesome `
`pod "redis-izl09" labeled`
Add annotations to your objects
Just like labels, you can add or remove annotations from API objects using the kubectl annotate subcommand. Unlike labels, annotations are there to help describe your object, but aren’t used to identify pods via label queries (more details on annotations). For example, you might add an annotation of an icon for a GUI to use for displaying your pods.
$> kubectl annotate pods redis-izl09 icon-url=http://goo.gl/XXBTWq
pod "redis-izl09" annotated
Output custom format
Sometimes, you want to customize the fields displayed when kubectl summarizes an object from your cluster. To do this, you can use the custom-columns-file format. custom-columns-file takes in a template file for rendering the output. Again, JSONPath expressions are used in the template to specify fields in the API object. For example, the following template first shows the number of restarts, and then the name of the object:
$> cat cols.tmpl
RESTARTS NAME
.status.containerStatuses[0].restartCount .metadata.name
If you pass this template to the kubectl get pods command you get a list of pods with the specified fields displayed.
$> kubectl get pods redis-izl09 -o=custom-columns-file --template=cols.tmpl RESTARTS NAME
0 redis-izl09
1 redis-abl42
Easily manage multiple Kubernetes clusters
If you’re running multiple Kubernetes clusters, you know it can be tricky to manage all of the credentials for the different clusters. Using the kubectl config subcommands, switching between different clusters is as easy as:
$> kubectl config use-context
Not sure what clusters are available? You can view currently configured clusters with:
$> kubectl config view
Phew, that outputs a lot of text. To restrict it down to only the things we’re interested in, we can use a JSONPath template:
$> kubectl config view -o jsonpath="{.context[*].name}"
Ahh, that’s better.
Conclusion
So there you have it, nine new and exciting things you can do with your Kubernetes cluster and the kubectl command line. If you’re just getting started with Kubernetes, check out Google Container Engine or other ways to get started with Kubernetes.
Kubernetes Performance Measurements and Roadmap
No matter how flexible and reliable your container orchestration system is, ultimately, you have some work to be done, and you want it completed quickly. For big problems, a common answer is to just throw more machines at the problem. After all, more compute = faster, right?
Interestingly, adding more nodes is a little like the tyranny of the rocket equation - in some systems, adding more machines can actually make your processing slower. However, unlike the rocket equation, we can do better. Kubernetes in v1.0 version supports clusters with up to 100 nodes. However, we have a goal to 10x the number of nodes we will support by the end of 2015. This blog post will cover where we are and how we intend to achieve the next level of performance.
What do we measure?
The first question we need to answer is: “what does it mean that Kubernetes can manage an N-node cluster?” Users expect that it will handle all operations “reasonably quickly,” but we need a precise definition of that. We decided to define performance and scalability goals based on the following two metrics:
1.“API-responsiveness”: 99% of all our API calls return in less than 1 second
2.“Pod startup time”: 99% of pods (with pre-pulled images) start within 5 seconds
Note that for “pod startup time” we explicitly assume that all images necessary to run a pod are already pre-pulled on the machine where it will be running. In our experiments, there is a high degree of variability (network throughput, size of image, etc) between images, and these variations have little to do with Kubernetes’ overall performance.
The decision to choose those metrics was made based on our experience spinning up 2 billion containers a week at Google. We explicitly want to measure the latency of user-facing flows since that’s what customers will actually care about.
How do we measure?
To monitor performance improvements and detect regressions we set up a continuous testing infrastructure. Every 2-3 hours we create a 100-node cluster from HEAD and run our scalability tests on it. We use a GCE n1-standard-4 (4 cores, 15GB of RAM) machine as a master and n1-standard-1 (1 core, 3.75GB of RAM) machines for nodes.
In scalability tests, we explicitly focus only on the full-cluster case (full N-node cluster is a cluster with 30 * N pods running in it) which is the most demanding scenario from a performance point of view. To reproduce what a customer might actually do, we run through the following steps:
Populate pods and replication controllers to fill the cluster
Generate some load (create/delete additional pods and/or replication controllers, scale the existing ones, etc.) and record performance metrics
Stop all running pods and replication controllers
Scrape the metrics and check whether they match our expectations
It is worth emphasizing that the main parts of the test are done on full clusters (30 pods per node, 100 nodes) - starting a pod in an empty cluster, even if it has 100 nodes will be much faster.
To measure pod startup latency we are using very simple pods with just a single container running the “gcr.io/google_containers/pause:go” image, which starts and then sleeps forever. The container is guaranteed to be already pre-pulled on nodes (we use it as the so-called pod-infra-container).
Performance data
The following table contains percentiles (50th, 90th and 99th) of pod startup time in 100-node clusters which are 10%, 25%, 50% and 100% full.
| 10%-full | 25%-full | 50%-full | 100%-full | |
|---|---|---|---|---|
| 50th percentile | .90s | 1.08s | 1.33s | 1.94s |
| 90th percentile | 1.29s | 1.49s | 1.72s | 2.50s |
| 99th percentile | 1.59s | 1.86s | 2.56s | 4.32s |
As for api-responsiveness, the following graphs present 50th, 90th and 99th percentiles of latencies of API calls grouped by kind of operation and resource type. However, note that this also includes internal system API calls, not just those issued by users (in this case issued by the test itself).


Some resources only appear on certain graphs, based on what was running during that operation (e.g. no namespace was put at that time).
As you can see in the results, we are ahead of target for our 100-node cluster with pod startup time even in a fully-packed cluster occurring 14% faster in the 99th percentile than 5 seconds. It’s interesting to point out that LISTing pods is significantly slower than any other operation. This makes sense: in a full cluster there are 3000 pods and each of pod is roughly few kilobytes of data, meaning megabytes of data that need to processed for each LIST.
#####Work done and some future plans
The initial performance work to make 100-node clusters stable enough to run any tests on them involved a lot of small fixes and tuning, including increasing the limit for file descriptors in the apiserver and reusing tcp connections between different requests to etcd.
However, building a stable performance test was just step one to increasing the number of nodes our cluster supports by tenfold. As a result of this work, we have already taken on significant effort to remove future bottlenecks, including:
Rewriting controllers to be watch-based: Previously they were relisting objects of a given type every few seconds, which generated a huge load on the apiserver.
Using code generators to produce conversions and deep-copy functions: Although the default implementation using Go reflections are very convenient, they proved to be extremely slow, as much as 10X in comparison to the generated code.
Adding a cache to apiserver to avoid deserialization of the same data read from etcd multiple times
Reducing frequency of updating statuses: Given the slow changing nature of statutes, it only makes sense to update pod status only on change and node status only every 10 seconds.
Implemented watch at the apiserver instead of redirecting the requests to etcd: We would prefer to avoid watching for the same data from etcd multiple times, since, in many cases, it was filtered out in apiserver anyway.
Looking further out to our 1000-node cluster goal, proposed improvements include:
Moving events out from etcd: They are more like system logs and are neither part of system state nor are crucial for Kubernetes to work correctly.
Using better json parsers: The default parser implemented in Go is very slow as it is based on reflection.
Rewriting the scheduler to make it more efficient and concurrent
Improving efficiency of communication between apiserver and Kubelets: In particular, we plan to reduce the size of data being sent on every update of node status.
This is by no means an exhaustive list. We will be adding new elements (or removing existing ones) based on the observed bottlenecks while running the existing scalability tests and newly-created ones. If there are particular use cases or scenarios that you’d like to see us address, please join in!
- We have weekly meetings for our Kubernetes Scale Special Interest Group on Thursdays 11am PST where we discuss ongoing issues and plans for performance tracking and improvements.
- If you have specific performance or scalability questions before then, please join our scalability special interest group on Slack: https://kubernetes.slack.com/messages/sig-scale
- General questions? Feel free to join our Kubernetes community on Slack: https://kubernetes.slack.com/messages/kubernetes-users/
- Submit a pull request or file an issue! You can do this in our GitHub repository. Everyone is also enthusiastically encouraged to contribute with their own experiments (and their result) or PR contributions improving Kubernetes.
Using Kubernetes Namespaces to Manage Environments
One of the advantages that Kubernetes provides is the ability to manage various environments easier and better than traditional deployment strategies. For most nontrivial applications, you have test, staging, and production environments. You can spin up a separate cluster of resources, such as VMs, with the same configuration in staging and production, but that can be costly and managing the differences between the environments can be difficult.
Kubernetes includes a cool feature called [namespaces][4], which enable you to manage different environments within the same cluster. For example, you can have different test and staging environments in the same cluster of machines, potentially saving resources. You can also run different types of server, batch, or other jobs in the same cluster without worrying about them affecting each other.
The Default Namespace
Specifying the namespace is optional in Kubernetes because by default Kubernetes uses the "default" namespace. If you've just created a cluster, you can check that the default namespace exists using this command:
$ kubectl get namespaces
NAME LABELS STATUS
default Active
kube-system Active
Here you can see that the default namespace exists and is active. The status of the namespace is used later when turning down and deleting the namespace.
Creating a New Namespace
You create a namespace in the same way you would any other resource. Create a my-namespace.yaml file and add these contents:
kind: Namespace
apiVersion: v1
metadata:
name: my-namespace
labels:
name: my-namespace
Then you can run this command to create it:
$ kubectl create -f my-namespace.yaml
Service Names
With namespaces you can have your apps point to static service endpoints that don't change based on the environment. For instance, your MySQL database service could be named mysql in production and staging even though it runs on the same infrastructure.
This works because each of the resources in the cluster will by default only "see" the other resources in the same namespace. This means that you can avoid naming collisions by creating pods, services, and replication controllers with the same names provided they are in separate namespaces. Within a namespace, short DNS names of services resolve to the IP of the service within that namespace. So for example, you might have an Elasticsearch service that can be accessed via the DNS name elasticsearch as long as the containers accessing it are located in the same namespace.
You can still access services in other namespaces by looking it up via the full DNS name which takes the form of SERVICE-NAME.NAMESPACE-NAME. So for example, elasticsearch.prod or elasticsearch.canary for the production and canary environments respectively.
An Example
Lets look at an example application. Let’s say you want to deploy your music store service MyTunes in Kubernetes. You can run the application production and staging environment as well as some one-off apps running in the same cluster. You can get a better idea of what’s going on by running some commands:
~$ kubectl get namespaces
NAME LABELS STATUS
default Active
mytunes-prod Active
mytunes-staging Active
my-other-app Active
Here you can see a few namespaces running. Next let’s list the services in staging:
~$ kubectl get services --namespace=mytunes-staging
NAME LABELS SELECTOR IP(S) PORT(S)
mytunes name=mytunes,version=1 name=mytunes 10.43.250.14 80/TCP
104.185.824.125
mysql name=mysql name=mysql 10.43.250.63 3306/TCP
Next check production:
~$ kubectl get services --namespace=mytunes-prod
NAME LABELS SELECTOR IP(S) PORT(S)
mytunes name=mytunes,version=1 name=mytunes 10.43.241.145 80/TCP
104.199.132.213
mysql name=mysql name=mysql 10.43.245.77 3306/TCP
Notice that the IP addresses are different depending on which namespace is used even though the names of the services themselves are the same. This capability makes configuring your app extremely easy—since you only have to point your app at the service name—and has the potential to allow you to configure your app exactly the same in your staging or test environments as you do in production.
Caveats
While you can run staging and production environments in the same cluster and save resources and money by doing so, you will need to be careful to set up resource limits so that your staging environment doesn't starve production for CPU, memory, or disk resources. Setting resource limits properly, and testing that they are working takes a lot of time and effort so unless you can measurably save money by running production in the same cluster as staging or test, you may not really want to do that.
Whether or not you run staging and production in the same cluster, namespaces are a great way to partition different apps within the same cluster. Namespaces will also serve as a level where you can apply resource limits so look for more resource management features at the namespace level in the future.
Weekly Kubernetes Community Hangout Notes - July 31 2015
Every week the Kubernetes contributing community meet virtually over Google Hangouts. We want anyone who's interested to know what's discussed in this forum.
Here are the notes from today's meeting:
Private Registry Demo - Muhammed
Run docker-registry as an RC/Pod/Service
Run a proxy on every node
Access as localhost:5000
Discussion:
Should we back it by GCS or S3 when possible?
Run real registry backed by $object_store on each node
DNS instead of localhost?
disassemble image strings?
more like DNS policy?
Running Large Clusters - Joe
Samsung keen to see large scale O(1000)
- Starting on AWS
RH also interested - test plan needed
Plan for next week: discuss working-groups
If you are interested in joining conversation on cluster scalability send mail to [joe@0xBEDA.com][4]
Resource API Proposal - Clayton
New stuff wants more info on resources
Proposal for resources API - ask apiserver for info on pods
Send feedback to: #11951
Discussion on snapshot vs time-series vs aggregates
Containerized kubelet - Clayton
Open pull
Docker mount propagation - RH carries patches
Big issues around whole bootstrap of the system
- dual: boot-docker/system-docker
Kube-in-docker is really nice, but maybe not critical
Do the small stuff to make progress
Keep pressure on docker
Web UI (preilly)
Where does web UI stand?
OK to split it back out
Use it as a container image
Build image as part of kube release process
Vendor it back in? Maybe, maybe not.
Will DNS be split out?
- Probably more tightly integrated, instead
Other potential spin-outs:
apiserver
clients
The Growing Kubernetes Ecosystem
Over the past year, we’ve seen fantastic momentum in the Kubernetes project, culminating with the release of Kubernetes v1 earlier this week. We’ve also witnessed the ecosystem around Kubernetes blossom, and wanted to draw attention to some of the cooler offerings we’ve seen.
| ----- | |

|
CloudBees and the Jenkins community have created a Kubernetes plugin, allowing Jenkins slaves to be built as Docker images and run in Docker hosts managed by Kubernetes, either on the Google Cloud Platform or on a more local Kubernetes instance. These elastic slaves are then brought online as Jenkins schedules jobs for them and destroyed after their builds are complete, ensuring masters have steady access to clean workspaces and minimizing builds’ resource footprint.
|
|

|
CoreOS has created launched Tectonic, an opinionated enterprise distribution of Kubernetes, CoreOS and Docker. Tectonic includes a management console for workflows and dashboards, an integrated registry to build and share containers, and additional tools to automate deployment and customize rolling updates. At KuberCon, CoreOS launched Tectonic Preview, giving users easy access to Kubernetes 1.0, 24x7 enterprise ready support, Kubernetes guides and Kubernetes training to help enterprises begin experiencing the power of Kubernetes, CoreOS and Docker.
|
|

|
Hitachi Data Systems has announced that Kubernetes now joins the list of solutions validated to run on their enterprise Unified Computing Platform. With this announcement Hitachi has validated Kubernetes and VMware running side-by-side on the UCP platform, providing an enterprise solution for container-based applications and traditional virtualized workloads.
|
|

|
Kismatic is providing enterprise support for pure play open source Kubernetes. They have announced open source and commercially supported Kubernetes plug-ins specifically built for production-grade enterprise environments. Any Kubernetes deployment can now benefit from modular role-based access controls (RBAC), Kerberos for bedrock authentication, LDAP/AD integration, rich auditing and platform-agnostic Linux distro packages.
|
|

|
Meteor Development Group, creators of Meteor, a JavaScript App Platform, are using Kubernetes to build Galaxy to run Meteor apps in production. Galaxy will scale from free test apps to production-suitable high-availability hosting.
|
|

|
Mesosphere has incorporated Kubernetes into its Data Center Operating System (DCOS) platform as a first class citizen. Using DCOS, enterprises can deploy Kubernetes across thousands of nodes, both bare-metal and virtualized machines that can run on-premise and in the cloud. Mesosphere also launched a beta of their Kubernetes Training Bootcamp and will be offering more in the future.
|
|

|
Mirantis is enabling hybrid cloud applications across OpenStack and other clouds supporting Kubernetes. An OpenStack Murano app package supports full application lifecycle actions such as deploy, create cluster, create pod, add containers to pods, scale up and scale down.
|
|

|
OpenContrail is creating a kubernetes-contrail plugin designed to stitch the cluster management capabilities of Kubernetes with the network service automation capabilities of OpenContrail. Given the event-driven abstractions of pods and services inherent in Kubernetes, it is a simple extension to address network service enforcement by leveraging OpenContrail’s Virtual Network policy approach and programmatic API’s.
|
|

|
Pachyderm is a containerized data analytics engine which provides the broad functionality of Hadoop with the ease of use of Docker. Users simply provide containers with their data analysis logic and Pachyderm will distribute that computation over the data. They have just released full deployment on Kubernetes for on premise deployments, and on Google Container Engine, eliminating all the operational overhead of running a cluster yourself.
|
|

|
Platalytics, Inc. and announced the release of one-touch deploy-anywhere feature for its Spark Application Platform. Based on Kubernetes, Docker, and CoreOS, it allows simple and automated deployment of Apache Hadoop, Spark, and Platalytics platform, with a single click, to all major public clouds, including Google, Amazon, Azure, DigitalOcean, and private on-premise clouds. It also enables hybrid cloud scenarios, where resources on public and private clouds can be mixed.
|
|
|
Rackspace has created Corekube as a simple, quick way to deploy Kubernetes on OpenStack. By using a decoupled infrastructure that is coordinated by etcd, fleet and flannel, it enables users to try Kubernetes and CoreOS without all the fuss of setting things up by hand.
|
|
|
Red Hat is a long time proponent of Kubernetes, and a significant contributor to the project. In their own words, “From Red Hat Enterprise Linux 7 and Red Hat Enterprise Linux Atomic Host to OpenShift Enterprise 3 and the forthcoming Red Hat Atomic Enterprise Platform, we are well-suited to bring container innovations into the enterprise, leveraging Kubernetes as the common backbone for orchestration.”
|
|

|
Redapt has launching a variety of turnkey, on-premises Kubernetes solutions co-engineered with other partners in the Kubernetes partner ecosystem. These include appliances built to leverage the CoreOS/Tectonic, Mirantis OpenStack, and Mesosphere platforms for management and provisioning. Redapt also offers private, public, and multi-cloud solutions that help customers accelerate their Kubernetes deployments successfully into production.
|
| ----- | |
|
|
We’ve also seen a community of services partners spring up to assist in adopting Kubernetes and containers:
| ----- | |

|
Biarca is using Kubernetes to ease application deployment and scale on demand across available hybrid and multi-cloud clusters through strategically managed policy. A video on their website illustrates how to use Kubernetes to deploy applications in a private cloud infrastructure based on OpenStack and use a public cloud like GCE to address bursting demand for applications.
|
|

|
Cloud Technology Partners has developed a Container Services Offering featuring Kubernetes to assist enterprises with container best practices, adoption and implementation. This offering helps organizations understand how containers deliver competitive edge.
|
|

|
DoIT International is offering a Kubernetes Bootcamp which consists of a series of hands-on exercises interleaved with mini-lectures covering hands on topics such as Container Basics, Using Docker, Kubernetes and Google Container Engine.
|
|

|
OpenCredo provides a practical, lab style container and scheduler course in addition to consulting and solution delivery. The three-day course allows development teams to quickly ramp up and make effective use of containers in real world scenarios, covering containers in general along with Docker and Kubernetes.
|
|

|
Pythian focuses on helping clients design, implement, and manage systems that directly contribute to revenue and business success. They provide small, dedicated teams of highly trained and experienced data experts have the deep Kubernetes and container experience necessary to help companies solve Big Data problems with containers.
|
Weekly Kubernetes Community Hangout Notes - July 17 2015
Every week the Kubernetes contributing community meet virtually over Google Hangouts. We want anyone who's interested to know what's discussed in this forum.
Here are the notes from today's meeting:
Eric Paris: replacing salt with ansible (if we want)
In contrib, there is a provisioning tool written in ansible
The goal in the rewrite was to eliminate as much of the cloud provider stuff as possible
The salt setup does a bunch of setup in scripts and then the environment is setup with salt
- This means that things like generating certs is done differently on GCE/AWS/Vagrant
For ansible, everything must be done within ansible
Background on ansible
- Does not have clients
- Provisioner ssh into the machine and runs scripts on the machine
- You define what you want your cluster to look like, run the script, and it sets up everything at once
- If you make one change in a config file, ansible re-runs everything (which isn’t always desirable)
- Uses a jinja2 template
Create machines with minimal software, then use ansible to get that machine into a runnable state
- Sets up all of the add-ons
Eliminates the provisioner shell scripts
Full cluster setup currently takes about 6 minutes
- CentOS with some packages
- Redeploy to the cluster takes 25 seconds
Questions for Eric
Where does the provider-specific configuration go?
- The only network setup that the ansible config does is flannel; you can turn it off
What about init vs. systemd?
- Should be able to support in the code w/o any trouble (not yet implemented)
Discussion
Why not push the setup work into containers or kubernetes config?
- To bootstrap a cluster drop a kubelet and a manifest
Running a kubelet and configuring the network should be the only things required. We can cut a machine image that is preconfigured minus the data package (certs, etc)
- The ansible scripts install kubelet & docker if they aren’t already installed
Each OS (RedHat, Debian, Ubuntu) could have a different image. We could view this as part of the build process instead of the install process.
There needs to be solution for bare metal as well.
In favor of the overall goal -- reducing the special configuration in the salt configuration
Everything except the kubelet should run inside a container (eventually the kubelet should as well)
- Running in a container doesn’t cut down on the complexity that we currently have
- But it does more clearly define the interface about what the code expects
These tools (Chef, Puppet, Ansible) conflate binary distribution with configuration
- Containers more clearly separate these problems
The mesos deployment is not completely automated yet, but the mesos deployment is completely different: kubelets get put on top on an existing mesos cluster
- The bash scripts allow the mesos devs to see what each cloud provider is doing and re-use the relevant bits
- There was a large reverse engineering curve, but the bash is at least readable as opposed to the salt
Openstack uses a different deployment as well
We need a well documented list of steps (e.g. create certs) that are necessary to stand up a cluster
- This would allow us to compare across cloud providers
- We should reduce the number of steps as much as possible
- Ansible has 241 steps to launch a cluster
1.0 Code freeze
How are we getting out of code freeze?
This is a topic for next week, but the preview is that we will move slowly rather than totally opening the firehose
- We want to clear the backlog as fast as possible while maintaining stability both on HEAD and on the 1.0 branch
- The backlog of almost 300 PRs but there are also various parallel feature branches that have been developed during the freeze
Cutting a cherry pick release today (1.0.1) that fixes a few issues
Next week we will discuss the cadence for patch releases
Strong, Simple SSL for Kubernetes Services
Hi, I’m Evan Brown (@evandbrown) and I work on the solutions architecture team for Google Cloud Platform. I recently wrote an article and tutorial about using Jenkins on Kubernetes to automate the Docker and GCE image build process. Today I’m going to discuss how I used Kubernetes services and secrets to add SSL to the Jenkins web UI. After reading this, you’ll be able to add SSL termination (and HTTP->HTTPS redirects + basic auth) to your public HTTP Kubernetes services.
In the beginning
In the spirit of minimum viability, the first version of Jenkins-on-Kubernetes I built was very basic but functional:
- The Jenkins leader was just a single container in one pod, but it was managed by a replication controller, so if it failed it would automatically respawn.
- The Jenkins leader exposes two ports - TCP 8080 for the web UI and TCP 50000 for build agents to register - and those ports are made available as a Kubernetes service with a public load balancer.
Here’s a visual of that first version:

This works, but I have a few problems with it. First, authentication isn’t configured in a default Jenkins installation. The leader is sitting on the public Internet, accessible to anyone, until you connect and configure authentication. And since there’s no encryption, configuring authentication is kind of a symbolic gesture. We need SSL, and we need it now!
Do what you know
For a few milliseconds I considered trying to get SSL working directly on Jenkins. I’d never done it before, and I caught myself wondering if it would be as straightforward as working with SSL on Nginx, something I do have experience with. I’m all for learning new things, but this seemed like a great place to not invent a new wheel: SSL on Nginx is straightforward and well documented (as are its reverse-proxy capabilities), and Kubernetes is all about building functionality by orchestrating and composing containers. Let’s use Nginx, and add a few bonus features that Nginx makes simple: HTTP->HTTPS redirection, and basic access authentication.
SSL termination proxy as an nginx service
I started by putting together a Dockerfile that inherited from the standard nginx image, copied a few Nginx config files, and added a custom entrypoint (start.sh). The entrypoint script checks an environment variable (ENABLE_SSL) and activates the correct Nginx config accordingly (meaning that unencrypted HTTP reverse proxy is possible, but that defeats the purpose). The script also configures basic access authentication if it’s enabled (the ENABLE_BASIC_AUTH env var).
Finally, start.sh evaluates the SERVICE_HOST_ENV_NAME and SERVICE_PORT_ENV_NAME env vars. These variables should be set to the names of the environment variables for the Kubernetes service you want to proxy to. In this example, the service for our Jenkins leader is cleverly named jenkins, which means pods in the cluster will see an environment variable named JENKINS_SERVICE_HOST and JENKINS_SERVICE_PORT_UI (the port that 8080 is mapped to on the Jenkins leader). SERVICE_HOST_ENV_NAME and SERVICE_PORT_ENV_NAME simply reference the correct service to use for a particular scenario, allowing the image to be used generically across deployments.
Defining the Controller and Service
LIke every other pod in this example, we’ll deploy Nginx with a replication controller, allowing us to scale out or in, and recover automatically from container failures. This excerpt from acomplete descriptor in the sample app shows some relevant bits of the pod spec:
spec:
containers:
-
name: "nginx-ssl-proxy"
image: "gcr.io/cloud-solutions-images/nginx-ssl-proxy:latest"
env:
-
name: "SERVICE\_HOST\_ENV\_NAME"
value: "JENKINS\_SERVICE\_HOST"
-
name: "SERVICE\_PORT\_ENV\_NAME"
value: "JENKINS\_SERVICE\_PORT\_UI"
-
name: "ENABLE\_SSL"
value: "true"
-
name: "ENABLE\_BASIC\_AUTH"
value: "true"
ports:
-
name: "nginx-ssl-proxy-http"
containerPort: 80
-
name: "nginx-ssl-proxy-https"
containerPort: 443
The pod will have a service exposing TCP 80 and 443 to a public load balancer. Here’s the service descriptor (also available in the sample app):
kind: "Service"
apiVersion: "v1"
metadata:
name: "nginx-ssl-proxy"
labels:
name: "nginx"
role: "ssl-proxy"
spec:
ports:
-
name: "https"
port: 443
targetPort: "nginx-ssl-proxy-https"
protocol: "TCP"
-
name: "http"
port: 80
targetPort: "nginx-ssl-proxy-http"
protocol: "TCP"
selector:
name: "nginx"
role: "ssl-proxy"
type: "LoadBalancer"
And here’s an overview with the SSL termination proxy in place. Notice that Jenkins is no longer directly exposed to the public Internet:

Now, how did the Nginx pods get ahold of the super-secret SSL key/cert and htpasswd file (for basic access auth)?
Keep it secret, keep it safe
Kubernetes has an API and resource for Secrets. Secrets “are intended to hold sensitive information, such as passwords, OAuth tokens, and ssh keys. Putting this information in a secret is safer and more flexible than putting it verbatim in a pod definition or in a docker image.”
You can create secrets in your cluster in 3 simple steps:
Base64-encode your secret data (i.e., SSL key pair or htpasswd file)
$ cat ssl.key | base64
LS0tLS1CRUdJTiBDRVJUS...
Create a json document describing your secret, and add the base64-encoded values:
apiVersion: "v1"
kind: "Secret"
metadata:
name: "ssl-proxy-secret"
namespace: "default"
data:
proxycert: "LS0tLS1CRUd..."
proxykey: "LS0tLS1CR..."
htpasswd: "ZXZhb..."
Create the secrets resource:
$ kubectl create -f secrets.json
To access the secrets from a container, specify them as a volume mount in your pod spec. Here’s the relevant excerpt from the Nginx proxy template we saw earlier:
spec:
containers:
-
name: "nginx-ssl-proxy"
image: "gcr.io/cloud-solutions-images/nginx-ssl-proxy:latest"
env: [...]
ports: ...[]
volumeMounts:
-
name: "secrets"
mountPath: "/etc/secrets"
readOnly: true
volumes:
-
name: "secrets"
secret:
secretName: "ssl-proxy-secret"
A volume of type secret that points to the ssl-proxy-secret secret resource is defined, and then mounted into /etc/secrets in the container. The secrets spec in the earlier example defined data.proxycert, data.proxykey, and data.htpasswd, so we would see those files appear (base64-decoded) in /etc/secrets/proxycert, /etc/secrets/proxykey, and /etc/secrets/htpasswd for the Nginx process to access.
All together now
I have “containers and Kubernetes are fun and cool!” moments all the time, like probably every day. I’m beginning to have “containers and Kubernetes are extremely useful and powerful and are adding value to what I do by helping me do important things with ease” more frequently. This SSL termination proxy with Nginx example is definitely one of the latter. I didn’t have to waste time learning a new way to use SSL. I was able to solve my problem using well-known tools, in a reusable way, and quickly (from idea to working took about 2 hours).
Check out the complete Automated Image Builds with Jenkins, Packer, and Kubernetes repo to see how the SSL termination proxy is used in a real cluster, or dig into the details of the proxy image in the nginx-ssl-proxy repo (complete with a Dockerfile and Packer template so you can build the image yourself).
Weekly Kubernetes Community Hangout Notes - July 10 2015
Every week the Kubernetes contributing community meet virtually over Google Hangouts. We want anyone who's interested to know what's discussed in this forum.
Here are the notes from today's meeting:
- Eric Paris: replacing salt with ansible (if we want)
- In contrib, there is a provisioning tool written in ansible
- The goal in the rewrite was to eliminate as much of the cloud provider stuff as possible
- The salt setup does a bunch of setup in scripts and then the environment is setup with salt
- This means that things like generating certs is done differently on GCE/AWS/Vagrant
- For ansible, everything must be done within ansible
- Background on ansible
- Does not have clients
- Provisioner ssh into the machine and runs scripts on the machine
- You define what you want your cluster to look like, run the script, and it sets up everything at once
- If you make one change in a config file, ansible re-runs everything (which isn’t always desirable)
- Uses a jinja2 template
- Create machines with minimal software, then use ansible to get that machine into a runnable state
- Sets up all of the add-ons
- Eliminates the provisioner shell scripts
- Full cluster setup currently takes about 6 minutes
- CentOS with some packages
- Redeploy to the cluster takes 25 seconds
- Questions for Eric
- Where does the provider-specific configuration go?
- The only network setup that the ansible config does is flannel; you can turn it off
- What about init vs. systemd?
- Should be able to support in the code w/o any trouble (not yet implemented)
- Where does the provider-specific configuration go?
- Discussion
- Why not push the setup work into containers or kubernetes config?
- To bootstrap a cluster drop a kubelet and a manifest
- Running a kubelet and configuring the network should be the only things required. We can cut a machine image that is preconfigured minus the data package (certs, etc)
- The ansible scripts install kubelet & docker if they aren’t already installed
- Each OS (RedHat, Debian, Ubuntu) could have a different image. We could view this as part of the build process instead of the install process.
- There needs to be solution for bare metal as well.
- In favor of the overall goal -- reducing the special configuration in the salt configuration
- Everything except the kubelet should run inside a container (eventually the kubelet should as well)
- Running in a container doesn’t cut down on the complexity that we currently have
- But it does more clearly define the interface about what the code expects
- These tools (Chef, Puppet, Ansible) conflate binary distribution with configuration
- Containers more clearly separate these problems
- The mesos deployment is not completely automated yet, but the mesos deployment is completely different: kubelets get put on top on an existing mesos cluster
- The bash scripts allow the mesos devs to see what each cloud provider is doing and re-use the relevant bits
- There was a large reverse engineering curve, but the bash is at least readable as opposed to the salt
- Openstack uses a different deployment as well
- We need a well documented list of steps (e.g. create certs) that are necessary to stand up a cluster
- This would allow us to compare across cloud providers
- We should reduce the number of steps as much as possible
- Ansible has 241 steps to launch a cluster
- Why not push the setup work into containers or kubernetes config?
- 1.0 Code freeze
- How are we getting out of code freeze?
- This is a topic for next week, but the preview is that we will move slowly rather than totally opening the firehose
- We want to clear the backlog as fast as possible while maintaining stability both on HEAD and on the 1.0 branch
- The backlog of almost 300 PRs but there are also various parallel feature branches that have been developed during the freeze
- Cutting a cherry pick release today (1.0.1) that fixes a few issues
- Next week we will discuss the cadence for patch releases
Announcing the First Kubernetes Enterprise Training Course
At Google we rely on Linux application containers to run our core infrastructure. Everything from Search to Gmail runs in containers. In fact, we like containers so much that even our Google Compute Engine VMs run in containers! Because containers are critical to our business, we have been working with the community on many of the basic container technologies (from cgroups to Docker’s LibContainer) and even decided to build the next generation of Google’s container scheduling technology, Kubernetes, in the open.
One year into the Kubernetes project, and on the eve of our planned V1 release at OSCON, we are pleased to announce the first-ever formal Kubernetes enterprise-focused training session organized by a key Kubernetes contributor, Mesosphere. The inaugural session will be taught by Zed Shaw and Michael Hausenblas from Mesosphere, and will take place on July 20 at OSCON in Portland. Pre-registration is free for early registrants, but space is limited so act soon!
This one-day course will cover the basics of building and deploying containerized applications using Kubernetes. It will walk attendees through the end-to-end process of creating a Kubernetes application architecture, building and configuring Docker images, and deploying them on a Kubernetes cluster. Users will also learn the fundamentals of deploying Kubernetes applications and services on our Google Container Engine and Mesosphere’s Datacenter Operating System.
The upcoming Kubernetes bootcamp will be a great way to learn how to apply Kubernetes to solve long-standing deployment and application management problems. This is just the first of what we hope are many, and from a broad set of contributors.
How did the Quake demo from DockerCon Work?
Shortly after its release in 2013, Docker became a very popular open source container management tool for Linux. Docker has a rich set of commands to control the execution of a container. Commands such as start, stop, restart, kill, pause, and unpause. However, what is still missing is the ability to Checkpoint and Restore (C/R) a container natively via Docker itself.
We’ve been actively working with upstream and community developers to add support in Docker for native C/R and hope that checkpoint and restore commands will be introduced in Docker 1.8. As of this writing, it’s possible to C/R a container externally because this functionality was recently merged in libcontainer.
External container C/R was demo’d at DockerCon 2015:

Container C/R offers many benefits including the following:
- Stop and restart the Docker daemon (say for an upgrade) without having to kill the running containers and restarting them from scratch, losing precious work they had done when they were stopped
- Reboot the system without having to restart the containers from scratch. Same benefits as use case 1 above
- Speed up the start time of slow-start applications
- “Forensic debugging" of processes running in a container by examining their checkpoint images (open files, memory segments, etc.)
- Migrate containers by restoring them on a different machine
CRIU
Implementing C/R functionality from scratch is a major undertaking and a daunting task. Fortunately, there is a powerful open source tool written in C that has been used in production for checkpointing and restoring entire process trees in Linux. The tool is called CRIU which stands for Checkpoint Restore In Userspace (http://criu.org). CRIU works by:
- Freezing a running application.
- Checkpointing the address space and state of the entire process tree to a collection of “image” files.
- Restoring the process tree from checkpoint image files.
- Resuming application from the point it was frozen.
In April 2014, we decided to find out if CRIU could checkpoint and restore Docker containers to facilitate container migration.
Phase 1 - External C/R
The first phase of this effort invoking CRIU directly to dump a process tree running inside a container and determining why the checkpoint or restore operation failed. There were quite a few issues that caused CRIU failure. The following three issues were among the more challenging ones.
External Bind Mounts
Docker sets up /etc/{hostname,hosts,resolv.conf} as targets with source files outside the container's mount namespace.
The --ext-mount-map command line option was added to CRIU to specify the path of the external bind mounts. For example, assuming default Docker configuration, /etc/hostname in the container's mount namespace is bind mounted from the source at /var/lib/docker/containers/<container-id>/hostname. When checkpointing, we tell CRIU to record /etc/hostname's "map" as, say, etc_hostname. When restoring, we tell CRIU that the file previously recorded as etc_hostname should be mapped from the external bind mount at /var/lib/docker/containers/<container-id>/hostname.

AUFS Pathnames
Docker initially used AUFS as its preferred filesystem which is still in wide usage (the preferred filesystem is now OverlayFS).. Due to a bug, the AUFS symbolic link paths of /proc/<pid>/map_files point inside AUFS branches instead of their pathnames relative to the container's root. This problem has been fixed in AUFS source code but hasn't made it to all the distros yet. CRIU would get confused seeing the same file in its physical location (in the branch) and its logical location (from the root of mount namespace).
The --root command line option that was used only during restore was generalized to understand the root of the mount namespace during checkpoint and automatically "fix" the exposed AUFS pathnames.
Cgroups
After checkpointing, the Docker daemon removes the container’s cgroups subdirectories (because the container has “exited”). This causes restore to fail.
The --manage-cgroups command line option was added to CRIU to dump and restore the process's cgroups along with their properties.
The CRIU command lines are a simple container are shown below:
$ docker run -d busybox:latest /bin/sh -c 'i=0; while true; do echo $i \>\> /foo; i=$(expr $i + 1); sleep 3; done'
$ docker ps
CONTAINER ID IMAGE COMMAND CREATED STATUS
168aefb8881b busybox:latest "/bin/sh -c 'i=0; 6 seconds ago Up 4 seconds
$ sudo criu dump -o dump.log -v4 -t 17810 \
-D /tmp/img/\<container\_id\> \
--root /var/lib/docker/aufs/mnt/\<container\_id\> \
--ext-mount-map /etc/resolv.conf:/etc/resolv.conf \
--ext-mount-map /etc/hosts:/etc/hosts \
--ext-mount-map /etc/hostname:/etc/hostname \
--ext-mount-map /.dockerinit:/.dockerinit \
--manage-cgroups \
--evasive-devices
$ docker ps -a
CONTAINER ID IMAGE COMMAND CREATED STATUS
168aefb8881b busybox:latest "/bin/sh -c 'i=0; 6 minutes ago Exited (-1) 4 minutes ago
$ sudo mount -t aufs -o br=\
/var/lib/docker/aufs/diff/\<container\_id\>:\
/var/lib/docker/aufs/diff/\<container\_id\>-init:\
/var/lib/docker/aufs/diff/a9eb172552348a9a49180694790b33a1097f546456d041b6e82e4d7716ddb721:\
/var/lib/docker/aufs/diff/120e218dd395ec314e7b6249f39d2853911b3d6def6ea164ae05722649f34b16:\
/var/lib/docker/aufs/diff/42eed7f1bf2ac3f1610c5e616d2ab1ee9c7290234240388d6297bc0f32c34229:\
/var/lib/docker/aufs/diff/511136ea3c5a64f264b78b5433614aec563103b4d4702f3ba7d4d2698e22c158:\
none /var/lib/docker/aufs/mnt/\<container\_id\>
$ sudo criu restore -o restore.log -v4 -d
-D /tmp/img/\<container\_id\> \
--root /var/lib/docker/aufs/mnt/\<container\_id\> \
--ext-mount-map /etc/resolv.conf:/var/lib/docker/containers/\<container\_id\>/resolv.conf \
--ext-mount-map /etc/hosts:/var/lib/docker/containers/\<container\_id\>/hosts \
--ext-mount-map /etc/hostname:/var/lib/docker/containers/\<container\_id\>/hostname \
--ext-mount-map /.dockerinit:/var/lib/docker/init/dockerinit-1.0.0 \
--manage-cgroups \
--evasive-devices
$ ps -ef | grep /bin/sh
root 18580 1 0 12:38 ? 00:00:00 /bin/sh -c i=0; while true; do echo $i \>\> /foo; i=$(expr $i + 1); sleep 3; done
$ docker ps -a
CONTAINER ID IMAGE COMMAND CREATED STATUS
168aefb8881b busybox:latest "/bin/sh -c 'i=0; 7 minutes ago Exited (-1) 5 minutes ago
docker\_cr.sh
Since the command line arguments to CRIU were long, a helper script called docker_cr.sh was provided in the CRIU source tree to simplify the process. So, for the above container, one would simply C/R the container as follows (for details see http://criu.org/Docker):
$ sudo docker\_cr.sh -c 4397
dump successful
$ sudo docker\_cr.sh -r 4397
restore successful
At the end of Phase 1, it was possible to externally checkpoint and restore a Docker 1.0 container using either VFS, AUFS, or UnionFS storage drivers with CRIU v1.3.
Phase 2 - Native C/R
While external C/R served as a successful proof of concept for container C/R, it had the following limitations:
- State of a checkpointed container would show as "Exited".
- Docker commands such as logs, kill, etc. will not work on a restored container.
- The restored process tree will be a child of /etc/init instead of the Docker daemon.
Therefore, the second phase of the effort concentrated on adding native checkpoint and restore commands to Docker.
libcontainer, nsinit
Libcontainer is Docker’s native execution driver. It provides a set of APIs to create and manage containers. The first step of adding native support was the introduction of two methods, checkpoint() and restore(), to libcontainer and the corresponding checkpoint and restore subcommands to nsinit. Nsinit is a simple utility that is used to test and debug libcontainer.
docker checkpoint, docker restore
With C/R support in libcontainer, the next step was adding checkpoint and restore subcommands to Docker itself. A big challenge in this step was to rebuild the “plumbing” between the container and the daemon. When the daemon initially starts a container, it sets up individual pipes between itself (parent) and the standard input, output, and error file descriptors of the container (child). This is how docker logs can show the output of a container.
When a container exits after being checkpointed, the pipes between it and the daemon are deleted. During container restore, it’s actually CRIU that is the parent. Therefore, setting up a pipe between the child (container) and an unrelated process (Docker daemon) required is not a bit of challenge.
To address this issue, the --inherit-fd command line option was added to CRIU. Using this option, the Docker daemon tells CRIU to let the restored container “inherit” certain file descriptors passed from the daemon to CRIU.
The first version of native C/R was demo'ed at the Linux Plumbers Conference (LPC) in October 2014 (http://linuxplumbersconf.org/2014/ocw/proposals/1899).





The LPC demo was done with a simple container that did not require network connectivity. Support for restoring network connections was done in early 2015 and demonstrated in this 2-minute video clip.
Current Status of Container C/R
In May 2015, the criu branch of libcontainer was merged into master. Using the newly-introduced lightweight runC container runtime, container migration was demo’ed at DockerCon15. In this
 (minute 23:00), a container running Quake was checkpointed and restored on a different machine, effectively implementing container migration.
At the time of this writing, there are two repos on GitHub that have native C/R support in Docker:
- Docker 1.5 (old libcontainer, relatively stable)
- Docker 1.7 (newer, less stable)
Work is underway to merge C/R functionality into Docker. You can use either of the above repositories to experiment with Docker C/R. If you are using OverlayFS or your container workload uses AIO, please note the following:
OverlayFS
When OverlayFS support was officially merged into the Linux kernel version 3.18, it became the preferred storage driver (instead of AUFS) . However, OverlayFS in 3.18 has the following issues:
- /proc/<pid>/fdinfo/<fd> contains mnt_id which isn’t in /proc/<pid>/mountinfo
- /proc/<pid>/fd/<fd> does not contain an absolute path to the opened file
Both issues are fixed in this patch but the patch has not been merged upstream yet.
AIO
If you are using a kernel older than 3.19 and your container uses AIO, you need the following kernel patches from 3.19:
- torvalds: bd9b51e7 by Al Viro
- torvalds: e4a0d3e72 by Pavel Emelyanov
Kubernetes 1.0 Launch Event at OSCON
In case you haven't heard, the Kubernetes project team & community have some awesome stuff lined up for our release event at OSCON in a few weeks.
If you haven't already registered for in person or live stream, please do it now! check out kuberneteslaunch.com for all the details. You can also find out there how to get a free expo pass for OSCON which you'll need to attend in person.
We'll have talks from Google executives Brian Stevens, VP of Cloud Product, and Eric Brewer, VP of Google Infrastructure. They will share their perspective on where Kubernetes is and where it's going that you won't want to miss.
Several of our community partners will be there including CoreOS, Redapt, Intel, Mesosphere, Mirantis, the OpenStack Foundation, CloudBees, Kismatic and Bitnami.
And real life users of Kubernetes will be there too. We've announced that zulily Principal Engineer Steve Reed is speaking, and we will let you know about others over the next few days. Let's just say it's a pretty cool list.
Check it out now - kuberneteslaunch.com
The Distributed System ToolKit: Patterns for Composite Containers
Having had the privilege of presenting some ideas from Kubernetes at DockerCon 2015, I thought I would make a blog post to share some of these ideas for those of you who couldn’t be there.
Over the past two years containers have become an increasingly popular way to package and deploy code. Container images solve many real-world problems with existing packaging and deployment tools, but in addition to these significant benefits, containers offer us an opportunity to fundamentally re-think the way we build distributed applications. Just as service oriented architectures (SOA) encouraged the decomposition of applications into modular, focused services, containers should encourage the further decomposition of these services into closely cooperating modular containers. By virtue of establishing a boundary, containers enable users to build their services using modular, reusable components, and this in turn leads to services that are more reliable, more scalable and faster to build than applications built from monolithic containers.
In many ways the switch from VMs to containers is like the switch from monolithic programs of the 1970s and early 80s to modular object-oriented programs of the late 1980s and onward. The abstraction layer provided by the container image has a great deal in common with the abstraction boundary of the class in object-oriented programming, and it allows the same opportunities to improve developer productivity and application quality. Just like the right way to code is the separation of concerns into modular objects, the right way to package applications in containers is the separation of concerns into modular containers. Fundamentally this means breaking up not just the overall application, but also the pieces within any one server into multiple modular containers that are easy to parameterize and re-use. In this way, just like the standard libraries that are ubiquitous in modern languages, most application developers can compose together modular containers that are written by others, and build their applications more quickly and with higher quality components.
The benefits of thinking in terms of modular containers are enormous, in particular, modular containers provide the following:
- Speed application development, since containers can be re-used between teams and even larger communities
- Codify expert knowledge, since everyone collaborates on a single containerized implementation that reflects best-practices rather than a myriad of different home-grown containers with roughly the same functionality
- Enable agile teams, since the container boundary is a natural boundary and contract for team responsibilities
- Provide separation of concerns and focus on specific functionality that reduces spaghetti dependencies and un-testable components
Building an application from modular containers means thinking about symbiotic groups of containers that cooperate to provide a service, not one container per service. In Kubernetes, the embodiment of this modular container service is a Pod. A Pod is a group of containers that share resources like file systems, kernel namespaces and an IP address. The Pod is the atomic unit of scheduling in a Kubernetes cluster, precisely because the symbiotic nature of the containers in the Pod require that they be co-scheduled onto the same machine, and the only way to reliably achieve this is by making container groups atomic scheduling units.
When you start thinking in terms of Pods, there are naturally some general patterns of modular application development that re-occur multiple times. I’m confident that as we move forward in the development of Kubernetes more of these patterns will be identified, but here are three that we see commonly:
Example #1: Sidecar containers
Sidecar containers extend and enhance the "main" container, they take existing containers and make them better. As an example, consider a container that runs the Nginx web server. Add a different container that syncs the file system with a git repository, share the file system between the containers and you have built Git push-to-deploy. But you’ve done it in a modular manner where the git synchronizer can be built by a different team, and can be reused across many different web servers (Apache, Python, Tomcat, etc). Because of this modularity, you only have to write and test your git synchronizer once and reuse it across numerous apps. And if someone else writes it, you don’t even need to do that.
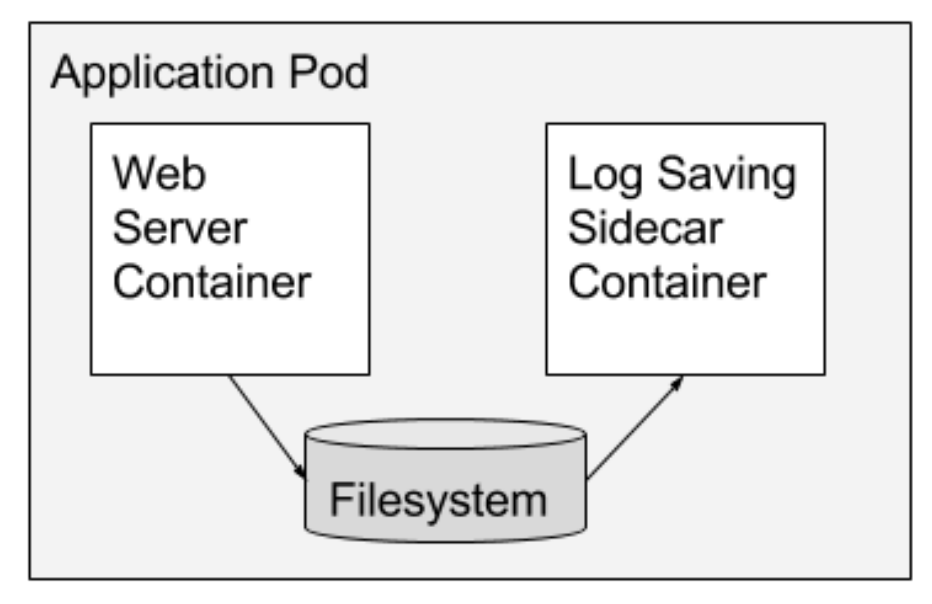
Example #2: Ambassador containers
Ambassador containers proxy a local connection to the world. As an example, consider a Redis cluster with read-replicas and a single write master. You can create a Pod that groups your main application with a Redis ambassador container. The ambassador is a proxy is responsible for splitting reads and writes and sending them on to the appropriate servers. Because these two containers share a network namespace, they share an IP address and your application can open a connection on “localhost” and find the proxy without any service discovery. As far as your main application is concerned, it is simply connecting to a Redis server on localhost. This is powerful, not just because of separation of concerns and the fact that different teams can easily own the components, but also because in the development environment, you can simply skip the proxy and connect directly to a Redis server that is running on localhost.
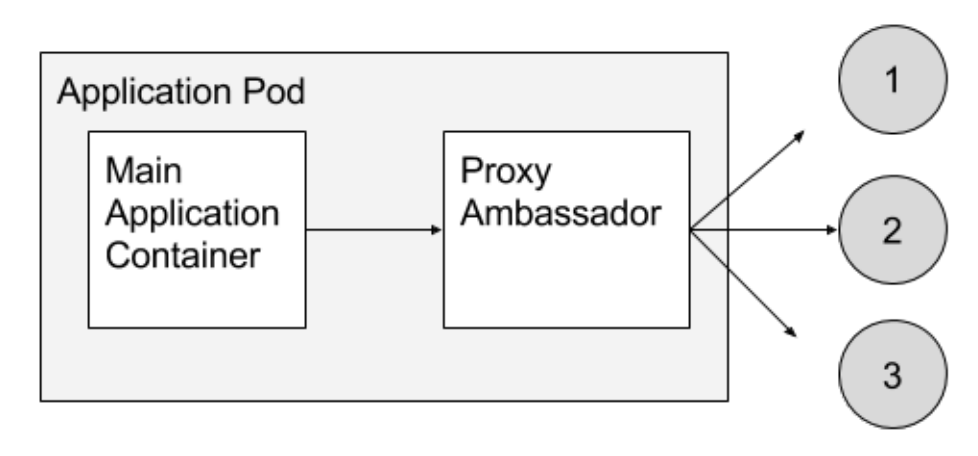
Example #3: Adapter containers
Adapter containers standardize and normalize output. Consider the task of monitoring N different applications. Each application may be built with a different way of exporting monitoring data. (e.g. JMX, StatsD, application specific statistics) but every monitoring system expects a consistent and uniform data model for the monitoring data it collects. By using the adapter pattern of composite containers, you can transform the heterogeneous monitoring data from different systems into a single unified representation by creating Pods that groups the application containers with adapters that know how to do the transformation. Again because these Pods share namespaces and file systems, the coordination of these two containers is simple and straightforward.
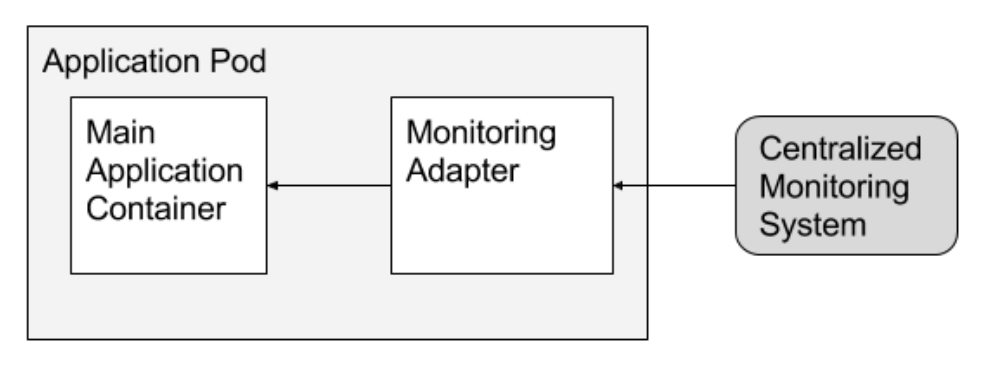
In all of these cases, we've used the container boundary as an encapsulation/abstraction boundary that allows us to build modular, reusable components that we combine to build out applications. This reuse enables us to more effectively share containers between different developers, reuse our code across multiple applications, and generally build more reliable, robust distributed systems more quickly. I hope you’ve seen how Pods and composite container patterns can enable you to build robust distributed systems more quickly, and achieve container code re-use. To try these patterns out yourself in your own applications. I encourage you to go check out open source Kubernetes or Google Container Engine.
Slides: Cluster Management with Kubernetes, talk given at the University of Edinburgh
On Friday 5 June 2015 I gave a talk called Cluster Management with Kubernetes to a general audience at the University of Edinburgh. The talk includes an example of a music store system with a Kibana front end UI and an Elasticsearch based back end which helps to make concrete concepts like pods, replication controllers and services.
Cluster Level Logging with Kubernetes
A Kubernetes cluster will typically be humming along running many system and application pods. How does the system administrator collect, manage and query the logs of the system pods? How does a user query the logs of their application which is composed of many pods which may be restarted or automatically generated by the Kubernetes system? These questions are addressed by the Kubernetes cluster level logging services.
Cluster level logging for Kubernetes allows us to collect logs which persist beyond the lifetime of the pod’s container images or the lifetime of the pod or even cluster. In this article we assume that a Kubernetes cluster has been created with cluster level logging support for sending logs to Google Cloud Logging. This is an option when creating a Google Container Engine (GKE) cluster, and is enabled by default for the open source Google Compute Engine (GCE) Kubernetes distribution. After a cluster has been created you will have a collection of system pods running that support monitoring, logging and DNS resolution for names of Kubernetes services:
$ kubectl get pods
NAME READY REASON RESTARTS AGE
fluentd-cloud-logging-kubernetes-minion-0f64 1/1 Running 0 32m
fluentd-cloud-logging-kubernetes-minion-27gf 1/1 Running 0 32m
fluentd-cloud-logging-kubernetes-minion-pk22 1/1 Running 0 31m
fluentd-cloud-logging-kubernetes-minion-20ej 1/1 Running 0 31m
kube-dns-v3-pk22 3/3 Running 0 32m
monitoring-heapster-v1-20ej 0/1 Running 9 32m
Here is the same information in a picture which shows how the pods might be placed on specific nodes.

Here is a close up of what is running on each node.


The first diagram shows four nodes created on a GCE cluster with the name of each VM node on a purple background. The internal and public IPs of each node are shown on gray boxes and the pods running in each node are shown in green boxes. Each pod box shows the name of the pod and the namespace it runs in, the IP address of the pod and the images which are run as part of the pod’s execution. Here we see that every node is running a fluentd-cloud-logging pod which is collecting the log output of the containers running on the same node and sending them to Google Cloud Logging. A pod which provides a cluster DNS service runs on one of the nodes and a pod which provides monitoring support runs on another node.
To help explain how cluster level logging works let’s start off with a synthetic log generator pod specification counter-pod.yaml:
apiVersion : v1
kind : Pod
metadata :
name : counter
spec :
containers :
- name : count
image : ubuntu:14.04
args : [bash, -c,
'for ((i = 0; ; i++)); do echo "$i: $(date)"; sleep 1; done']
This pod specification has one container which runs a bash script when the container is born. This script simply writes out the value of a counter and the date once per second and runs indefinitely. Let’s create the pod.
$ kubectl create -f counter-pod.yaml
pods/counter
We can observe the running pod:
$ kubectl get pods
NAME READY REASON RESTARTS AGE
counter 1/1 Running 0 5m
fluentd-cloud-logging-kubernetes-minion-0f64 1/1 Running 0 55m
fluentd-cloud-logging-kubernetes-minion-27gf 1/1 Running 0 55m
fluentd-cloud-logging-kubernetes-minion-pk22 1/1 Running 0 55m
fluentd-cloud-logging-kubernetes-minion-20ej 1/1 Running 0 55m
kube-dns-v3-pk22 3/3 Running 0 55m
monitoring-heapster-v1-20ej 0/1 Running 9 56m
This step may take a few minutes to download the ubuntu:14.04 image during which the pod status will be shown as Pending.
One of the nodes is now running the counter pod:

When the pod status changes to Running we can use the kubectl logs command to view the output of this counter pod.
$ kubectl logs counter
0: Tue Jun 2 21:37:31 UTC 2015
1: Tue Jun 2 21:37:32 UTC 2015
2: Tue Jun 2 21:37:33 UTC 2015
3: Tue Jun 2 21:37:34 UTC 2015
4: Tue Jun 2 21:37:35 UTC 2015
5: Tue Jun 2 21:37:36 UTC 2015
This command fetches the log text from the Docker log file for the image that is running in this container. We can connect to the running container and observe the running counter bash script.
$ kubectl exec -i counter bash
ps aux
USER PID %CPU %MEM VSZ RSS TTY STAT START TIME COMMAND
root 1 0.0 0.0 17976 2888 ? Ss 00:02 0:00 bash -c for ((i = 0; ; i++)); do echo "$i: $(date)"; sleep 1; done
root 468 0.0 0.0 17968 2904 ? Ss 00:05 0:00 bash
root 479 0.0 0.0 4348 812 ? S 00:05 0:00 sleep 1
root 480 0.0 0.0 15572 2212 ? R 00:05 0:00 ps aux
What happens if for any reason the image in this pod is killed off and then restarted by Kubernetes? Will we still see the log lines from the previous invocation of the container followed by the log lines for the started container? Or will we lose the log lines from the original container’s execution and only see the log lines for the new container? Let’s find out. First let’s stop the currently running counter.
$ kubectl stop pod counter
pods/counter
Now let’s restart the counter.
$ kubectl create -f counter-pod.yaml
pods/counter
Let’s wait for the container to restart and get the log lines again.
$ kubectl logs counter
0: Tue Jun 2 21:51:40 UTC 2015
1: Tue Jun 2 21:51:41 UTC 2015
2: Tue Jun 2 21:51:42 UTC 2015
3: Tue Jun 2 21:51:43 UTC 2015
4: Tue Jun 2 21:51:44 UTC 2015
5: Tue Jun 2 21:51:45 UTC 2015
6: Tue Jun 2 21:51:46 UTC 2015
7: Tue Jun 2 21:51:47 UTC 2015
8: Tue Jun 2 21:51:48 UTC 2015
Oh no! We’ve lost the log lines from the first invocation of the container in this pod! Ideally, we want to preserve all the log lines from each invocation of each container in the pod. Furthermore, even if the pod is restarted we would still like to preserve all the log lines that were ever emitted by the containers in the pod. But don’t fear, this is the functionality provided by cluster level logging in Kubernetes. When a cluster is created, the standard output and standard error output of each container can be ingested using a Fluentd agent running on each node into either Google Cloud Logging or into Elasticsearch and viewed with Kibana. This blog article focuses on Google Cloud Logging.
When a Kubernetes cluster is created with logging to Google Cloud Logging enabled, the system creates a pod called fluentd-cloud-logging on each node of the cluster to collect Docker container logs. These pods were shown at the start of this blog article in the response to the first get pods command.
This log collection pod has a specification which looks something like this fluentd-gcp.yaml:
apiVersion: v1
kind: Pod
metadata:
name: fluentd-cloud-logging
spec:
containers:
- name: fluentd-cloud-logging
image: gcr.io/google\_containers/fluentd-gcp:1.6
env:
- name: FLUENTD\_ARGS
value: -qq
volumeMounts:
- name: containers
mountPath: /var/lib/docker/containers
volumes:
- name: containers
hostPath:
path: /var/lib/docker/containers
This pod specification maps the directory on the host containing the Docker log files, /var/lib/docker/containers, to a directory inside the container which has the same path. The pod runs one image, gcr.io/google_containers/fluentd-gcp:1.6, which is configured to collect the Docker log files from the logs directory and ingest them into Google Cloud Logging. One instance of this pod runs on each node of the cluster. Kubernetes will notice if this pod fails and automatically restart it.
We can click on the Logs item under the Monitoring section of the Google Developer Console and select the logs for the counter container, which will be called kubernetes.counter_default_count. This identifies the name of the pod (counter), the namespace (default) and the name of the container (count) for which the log collection occurred. Using this name we can select just the logs for our counter container from the drop down menu:
(image-counter-new-logs.png)
When we view the logs in the Developer Console we observe the logs for both invocations of the container.
(image-screenshot-2015-06-02)
Note the first container counted to 108 and then it was terminated. When the next container image restarted the counting process resumed from 0. Similarly if we deleted the pod and restarted it we would capture the logs for all instances of the containers in the pod whenever the pod was running.
Logs ingested into Google Cloud Logging may be exported to various other destinations including Google Cloud Storage buckets and BigQuery. Use the Exports tab in the Cloud Logging console to specify where logs should be streamed to (or follow this link to the settings tab).
We could query the ingested logs from BigQuery using the SQL query which reports the counter log lines showing the newest lines first.
SELECT metadata.timestamp, structPayload.log FROM [mylogs.kubernetes_counter_default_count_20150611] ORDER BY metadata.timestamp DESC
Here is some sample output:
(image-bigquery-log-new.png)
We could also fetch the logs from Google Cloud Storage buckets to our desktop or laptop and then search them locally. The following command fetches logs for the counter pod running in a cluster which is itself in a GCE project called myproject. Only logs for the date 2015-06-11 are fetched.
$ gsutil -m cp -r gs://myproject/kubernetes.counter\_default\_count/2015/06/11 .
Now we can run queries over the ingested logs. The example below uses thejq program to extract just the log lines.
$ cat 21\:00\:00\_21\:59\:59\_S0.json | jq '.structPayload.log'
"0: Thu Jun 11 21:39:38 UTC 2015\n"
"1: Thu Jun 11 21:39:39 UTC 2015\n"
"2: Thu Jun 11 21:39:40 UTC 2015\n"
"3: Thu Jun 11 21:39:41 UTC 2015\n"
"4: Thu Jun 11 21:39:42 UTC 2015\n"
"5: Thu Jun 11 21:39:43 UTC 2015\n"
"6: Thu Jun 11 21:39:44 UTC 2015\n"
"7: Thu Jun 11 21:39:45 UTC 2015\n"
This article has touched briefly on the underlying mechanisms that support gathering cluster level logs on a Kubernetes deployment. The approach here only works for gathering the standard output and standard error output of the processes running in the pod’s containers. To gather other logs that are stored in files one can use a sidecar container to gather the required files as described at the page Collecting log files within containers with Fluentd and sending them to the Google Cloud Logging service.
Weekly Kubernetes Community Hangout Notes - May 22 2015
Every week the Kubernetes contributing community meet virtually over Google Hangouts. We want anyone who's interested to know what's discussed in this forum.
Discussion / Topics
- Code Freeze
- Upgrades of cluster
- E2E test issues
Code Freeze process starts EOD 22-May, including
- Code Slush -- draining PRs that are active. If there are issues for v1 to raise, please do so today.
- Community PRs -- plan is to reopen in ~6 weeks.
- Key areas for fixes in v1 -- docs, the experience.
E2E issues and LGTM process
Seen end-to-end tests go red.
Plan is to limit merging to on-call. Quinton to communicate.
Can we expose Jenkins runs to community? (Paul)
Question/concern to work out is securing Jenkins. Short term conclusion: Will look at pushing Jenkins logs into GCS bucket. Lavalamp will follow up with Jeff Grafton.
Longer term solution may be a merge queue, where e2e runs for each merge (as opposed to multiple merges). This exists in OpenShift today.
Cluster Upgrades for Kubernetes as final v1 feature
GCE will use Persistent Disk (PD) to mount new image.
OpenShift will follow a tradition update model, with "yum update".
A strawman approach is to have an analog of "kube-push" to update the master, in-place. Feedback in the meeting was
Upgrading Docker daemon on the master will kill the master's pods. Agreed. May consider an 'upgrade' phase or explicit step.
How is this different than HA master upgrade? See HA case as a superset. The work to do an upgrade would be a prerequisite for HA master upgrade.
Mesos scheduler implements a rolling node upgrade.
Attention requested for v1 in the Hangout
Discussed that it's an eventually consistent design.*
- In the meeting, the outcome was: seeking a pattern for atomicity of update across multiple piece. Paul to ping Tim when ready to review.
Regression in e2e #8499 (Eric Paris)
Asking for review of direction, if not review. #8334 (Mark)
Handling graceful termination (e.g. sigterm to postgres) is not implemented. #2789 (Clayton)
Need is to bump up grace period or finish plumbing. In API, client tools, missing is kubelet does use and we don't set the timeout (>0) value.
Brendan will look into this graceful term issue.
Load balancer almost ready by JustinSB.
Kubernetes on OpenStack

Today, the OpenStack foundation made it even easier for you deploy and manage clusters of Docker containers on OpenStack clouds by including Kubernetes in its Community App Catalog. At a keynote today at the OpenStack Summit in Vancouver, Mark Collier, COO of the OpenStack Foundation, and Craig Peters, Mirantis product line manager, demonstrated the Community App Catalog workflow by launching a Kubernetes cluster in a matter of seconds by leveraging the compute, storage, networking and identity systems already present in an OpenStack cloud.
The entries in the catalog include not just the ability to start a Kubernetes cluster, but also a range of applications deployed in Docker containers managed by Kubernetes. These applications include:
- Apache web server
- Nginx web server
- Crate - The Distributed Database for Docker
- GlassFish - Java EE 7 Application Server
- Tomcat - An open-source web server and servlet container
- InfluxDB - An open-source, distributed, time series database
- Grafana - Metrics dashboard for InfluxDB
- Jenkins - An extensible open source continuous integration server
- MariaDB database
- MySql database
- Redis - Key-value cache and store
- PostgreSQL database
- MongoDB NoSQL database
- Zend Server - The Complete PHP Application Platform
This list will grow, and is curated here. You can examine (and contribute to) the YAML file that tells Murano how to install and start the Kubernetes cluster here.
The Kubernetes open source project has continued to see fantastic community adoption and increasing momentum, with over 11,000 commits and 7,648 stars on GitHub. With supporters ranging from Red Hat and Intel to CoreOS and Box.net, it has come to represent a range of customer interests ranging from enterprise IT to cutting edge startups. We encourage you to give it a try, give us your feedback, and get involved in our growing community.
Docker and Kubernetes and AppC
Recently we announced the intent in Kubernetes, our open source cluster manager, to support AppC and RKT, an alternative container format that has been driven by CoreOS with input from many companies (including Google). This announcement has generated a surprising amount of buzz and has been construed as a move from Google to support Appc over Docker. Many have taken it as signal that Google is moving away from supporting Docker. I would like to take a moment to clarify Google’s position in this.
Google has consistently supported the Docker initiative and has invested heavily in Docker. In the early days of containers, we decided to de-emphasize our own open source offering (LMCTFY) and to instead focus on Docker. As a result of that we have two engineers that are active maintainers of LibContainer, a critical piece of the Docker ecosystem and are working closely with Docker to add many additional features and capabilities. Docker is currently the only supported runtime in GKE (Google Container Engine) our commercial containers product, and in GAE (Google App Engine), our Platform-as-a-Service product.
While we may introduce AppC support at some point in the future to GKE based on our customers demand, we intend to continue to support the Docker project and product, and Docker the company indefinitely. To date Docker is by far the most mature and widely used container offering in the market, with over 400 million downloads. It has been production ready for almost a year and seen widespread use in industry, and also here inside Google.
Beyond the obvious traction Docker has in the market, we are heartened by many of Docker’s recent initiatives to open the project and support ‘batteries included, but swappable options across the stack and recognize that it offers a great developer experience for engineers new to the containers world. We are encouraged, for example, by the separation of the Docker Machine and Swarm projects from the core runtime, and are glad to see support for Docker Machine emerging for Google Compute Engine.
Our intent with our announcement for AppC and RKT support was to establish Kubernetes (our open source project) as a neutral ground in the world of containers. Customers should be able to pick their container runtime and format based solely on its technical merits, and we do see AppC as offering some legitimate potential merits as the technology matures. Somehow this was misconstrued as an ‘a vs b’ selection which is simply untrue. The world is almost always better for having choice, and it is perfectly natural that different tools should be available for different purposes.
Stepping back a little, one must recognize that Docker has done remarkable work in democratizing container technologies and making them accessible to everyone. We believe that Docker will continue to drive great experiences for developers looking to use containers and plan to support this technology and its burgeoning community indefinitely. We, for one, are looking forward to the upcoming Dockercon where Brendan Burns (a Kubernetes co-founder) will be talking about the role of Docker in modern distributed systems design.
Weekly Kubernetes Community Hangout Notes - May 15 2015
Every week the Kubernetes contributing community meet virtually over Google Hangouts. We want anyone who's interested to know what's discussed in this forum.
- v1 API - what's in, what's out
- We're trying to fix critical issues we discover with v1beta3
- Would like to make a number of minor cleanups that will be expensive to do later
- defaulting replication controller spec default to 1
- deduplicating security context
- change id field to name
- rename host
- inconsistent times
- typo in container states terminated (termination vs. terminated)
- flatten structure (requested by heavy API user)
- pod templates - could be added after V1, field is not implemented, remove template ref field
- in general remove any fields not implemented (can be added later)
- if we want to change any of the identifier validation rules, should do it now
- recently changed label validation rules to be more precise
- Bigger changes
- generalized label selectors
- service - change the fields in a way that we can add features in a forward compatible manner if possible
- public IPs - what to do from a security perspective
- Support aci format - there is an image field - add properties to signify the image, or include it in a string
- inconsistent on object use / cross reference - needs design discussion
- Things to do later
- volume source cleanup
- multiple API prefixes
- watch changes - watch client is not notified of progress
- A few other proposals
- swagger spec fixes - ongoing
- additional field selectors - additive, backward compatible
- additional status - additive, backward compatible
- elimination of phase - won't make it for v1
- Service discussion - Public IPs
- with public IPs as it exists we can't go to v1
- Tim has been developing a mitigation if we can't get Justin's overhaul in (but hopefully we will)
- Justin's fix will describe public IPs in a much better way
- The general problem is it's too flexible and you can do things that are scary, the mitigation is to restrict public ip usage to specific use cases -- validated public IPs would be copied to status, which is what kube-proxy would use
- public IPs used for -
- binding to nodes / node
- request a specific load balancer IP (GCE only)
- emulate multi-port services -- now we support multi-port services, so no longer necessary
- This is a large change, 70% code complete, Tim & Justin working together, parallel code review and updates, need to reconcile and test
- Do we want to allow people to request host ports - is there any value in letting people ask for a public port? or should we assign you one?
- Tim: we should assign one
- discussion of what to do with status - if users set to empty then probably their intention
- general answer to the pattern is binding
- post v1: if we can make portal ip a non-user settable field, then we need to figure out the transition plan. need to have a fixed ip for dns.
- we should be able to just randomly assign services a new port and everything should adjust, but this is not feasible for v1
- next iteration of the proposal: PR is being iterated on, testing over the weekend, so PR hopefully ready early next week - gonna be a doozie!
- API transition
- actively removing all dependencies on v1beta1 and v1beta2, announced their going away
- working on a script that will touch everything in the system and will force everything to flip to v1beta3
- a release with both APIs supported and with this script can make sure clusters are moved over and we can move the API
- Should be gone by 0.19
- Help is welcome, especially for trivial things and will try to get as much done as possible in next few weeks
- Release candidate targeting mid june
- The new kubectl will not work for old APIs, will be a problem for GKE for clusters pinned to old version. Will be a problem for k8s users as well if they update kubectl
- Since there's no way to upgrade a GKE cluster, users are going to have to tear down and upgrade their cluster
- we're going to stop testing v1beta1 very soon, trying to streamline the testing paths in our CI pipelines
- Did we decide we are not going to do namespace autoprovisioning?
- Brian would like to turn it off - no objections
- Documentation should include creating namepspaces
- Would like to impose a default CPU for the default namespace
- would cap the number of pods, would reduce the resource exhaustion issue
- would eliminate need to explicitly cap the number of pods on a node due to IP exhaustion
- could add resources as arguments to the porcelain commands
- kubectl run is a simplified command, but it could include some common things (image, command, ports). but could add resources
- Kubernetes 1.0 Launch Event
- Save the * Blog posts, whitepapers, etc. welcome to be published
- Event will be live streamed, mostly demos & customer talks, keynote
- Big launch party in the evening
- Kit to send more info in next couple weeks
Kubernetes Release: 0.17.0
Release Notes:
Cleanups
v1beta3
- update example/walkthrough to v1beta3 #7940 (caesarxuchao)
- update example/rethinkdb to v1beta3 #7946 (caesarxuchao)
- verify the v1beta3 yaml files all work; merge the yaml files #7917 (caesarxuchao)
- update examples/cassandra to api v1beta3 #7258 (caesarxuchao)
- update service.json in persistent-volume example to v1beta3 #7899 (caesarxuchao)
- update mysql-wordpress example to use v1beta3 API #7864 (caesarxuchao)
- Update examples/meteor to use API v1beta3 #7848 (caesarxuchao)
- update node-selector example to API v1beta3 #7872 (caesarxuchao)
- update logging-demo to use API v1beta3; modify the way to access Elasticsearch and Kibana services #7824 (caesarxuchao)
- Convert the skydns rc to use v1beta3 and add a health check to it #7619 (a-robinson)
- update the hazelcast example to API version v1beta3 #7728 (caesarxuchao)
- Fix YAML parsing for v1beta3 objects in the kubelet for file/http #7515 (brendandburns)
- Updated kubectl cluster-info to show v1beta3 addresses #7502 (piosz)
Kubelet
- kubelet: Fix racy kubelet tests. #7980 (yifan-gu)
- kubelet/container: Move prober.ContainerCommandRunner to container. #8079 (yifan-gu)
- Kubelet: set host field in the pending pod status #6127 (yujuhong)
- Fix the kubelet node watch #6442 (yujuhong)
- Kubelet: recreate mirror pod if the static pod changes #6607 (yujuhong)
- Kubelet: record the timestamp correctly in the runtime cache #7749 (yujuhong)
- Kubelet: wait until container runtime is up #7729 (yujuhong)
- Kubelet: replace DockerManager with the Runtime interface #7674 (yujuhong)
- Kubelet: filter out terminated pods in SyncPods #7301 (yujuhong)
- Kubelet: parallelize cleaning up containers in unwanted pods #7048 (yujuhong)
- kubelet: Add container runtime option for rkt. #7952 (yifan-gu)
- kubelet/rkt: Remove build label. #7916 (yifan-gu)
- kubelet/metrics: Move instrumented_docker.go to dockertools. #7327 (yifan-gu)
- kubelet/rkt: Add GetPods() for rkt. #7599 (yifan-gu)
- kubelet/rkt: Add KillPod() and GetPodStatus() for rkt. #7605 (yifan-gu)
- pkg/kubelet: Fix logging. #4755 (yifan-gu)
- kubelet: Refactor RunInContainer/ExecInContainer/PortForward. #6491 (yifan-gu)
- kubelet/DockerManager: Fix returning empty error from GetPodStatus(). #6609 (yifan-gu)
- kubelet: Move pod infra container image setting to dockertools. #6634 (yifan-gu)
- kubelet/fake_docker_client: Use self's PID instead of 42 in testing. #6653 (yifan-gu)
- kubelet/dockertool: Move Getpods() to DockerManager. #6778 (yifan-gu)
- kubelet/dockertools: Add puller interfaces in the containerManager. #6776 (yifan-gu)
- kubelet: Introduce PodInfraContainerChanged(). #6608 (yifan-gu)
- kubelet/container: Replace DockerCache with RuntimeCache. #6795 (yifan-gu)
- kubelet: Clean up computePodContainerChanges. #6844 (yifan-gu)
- kubelet: Refactor prober. #7009 (yifan-gu)
- kubelet/container: Update the runtime interface. #7466 (yifan-gu)
- kubelet: Refactor isPodRunning() in runonce.go #7477 (yifan-gu)
- kubelet/rkt: Add basic rkt runtime routines. #7465 (yifan-gu)
- kubelet/rkt: Add podInfo. #7555 (yifan-gu)
- kubelet/container: Add GetContainerLogs to runtime interface. #7488 (yifan-gu)
- kubelet/rkt: Add routines for converting kubelet pod to rkt pod. #7543 (yifan-gu)
- kubelet/rkt: Add RunPod() for rkt. #7589 (yifan-gu)
- kubelet/rkt: Add RunInContainer()/ExecInContainer()/PortForward(). #7553 (yifan-gu)
- kubelet/container: Move ShouldContainerBeRestarted() to runtime. #7613 (yifan-gu)
- kubelet/rkt: Add SyncPod() to rkt. #7611 (yifan-gu)
- Kubelet: persist restart count of a container #6794 (yujuhong)
- kubelet/container: Move pty*.go to container runtime package. #7951 (yifan-gu)
- kubelet: Add container runtime option for rkt. #7900 (yifan-gu)
- kubelet/rkt: Add docker prefix to image string. #7803 (yifan-gu)
- kubelet/rkt: Inject dependencies to rkt. #7849 (yifan-gu)
- kubelet/rkt: Remove dependencies on rkt.store #7859 (yifan-gu)
- Kubelet talks securely to apiserver #2387 (erictune)
- Rename EnvVarSource.FieldPath -> FieldRef and add example #7592 (pmorie)
- Add containerized option to kubelet binary #7741 (pmorie)
- Ease building kubelet image #7948 (pmorie)
- Remove unnecessary bind-mount from dockerized kubelet run #7854 (pmorie)
- Add ability to dockerize kubelet in local cluster #7798 (pmorie)
- Create docker image for kubelet #7797 (pmorie)
- Security context - types, kubelet, admission #7343 (pweil-)
- Kubelet: Add rkt as a runtime option #7743 (vmarmol)
- Fix kubelet's docker RunInContainer implementation #7746 (vishh)
AWS
- AWS: Don't try to copy gce_keys in jenkins e2e job #8018 (justinsb)
- AWS: Copy some new properties from config-default => config.test #7992 (justinsb)
- AWS: make it possible to disable minion public ip assignment #7928 (manolitto)
- update AWS CloudFormation template and cloud-configs #7667 (antoineco)
- AWS: Fix variable naming that meant not all tokens were written #7736 (justinsb)
- AWS: Change apiserver to listen on 443 directly, not through nginx #7678 (justinsb)
- AWS: Improving getting existing VPC and subnet #6606 (gust1n)
- AWS EBS volume support #5138 (justinsb)
Introduce an 'svc' segment for DNS search #8089 (thockin)
Adds ability to define a prefix for etcd paths #5707 (kbeecher)
Add kubectl log --previous support to view last terminated container log #7973 (dchen1107)
Add a flag to disable legacy APIs #8083 (brendandburns)
make the dockerkeyring handle mutiple matching credentials #7971 (deads2k)
Convert Fluentd to Cloud Logging pod specs to YAML #8078 (satnam6502)
Use etcd to allocate PortalIPs instead of in-mem #7704 (smarterclayton)
eliminate auth-path #8064 (deads2k)
Record failure reasons for image pulling #7981 (yujuhong)
Rate limit replica creation #7869 (bprashanth)
Upgrade to Kibana 4 for cluster logging #7995 (satnam6502)
Added name to kube-dns service #8049 (piosz)
Fix validation by moving it into the resource builder. #7919 (brendandburns)
Add cache with multiple shards to decrease lock contention #8050 (fgrzadkowski)
Delete status from displayable resources #8039 (nak3)
Refactor volume interfaces to receive pod instead of ObjectReference #8044 (pmorie)
fix kube-down for provider gke #7565 (jlowdermilk)
Service port names are required for multi-port #7786 (thockin)
Increase disk size for kubernetes master. #8051 (fgrzadkowski)
expose: Load input object for increased safety #7774 (kargakis)
Improments to conversion methods generator #7896 (wojtek-t)
Added displaying external IPs to kubectl cluster-info #7557 (piosz)
Add missing Errorf formatting directives #8037 (shawnps)
Add startup code to apiserver to migrate etcd keys #7567 (kbeecher)
Use error type from docker go-client instead of string #8021 (ddysher)
Accurately get hardware cpu count in Vagrantfile. #8024 (BenTheElder)
Stop setting a GKE specific version of the kubeconfig file #7921 (roberthbailey)
Make the API server deal with HEAD requests via the service proxy #7950 (satnam6502)
GlusterFS Critical Bug Resolved - Removing warning in README #7983 (wattsteve)
Don't use the first token
uname -nas the hostname #7967 (yujuhong)Call kube-down in test-teardown for vagrant. #7982 (BenTheElder)
defaults_tests: verify defaults when converting to an API object #6235 (yujuhong)
Use the full hostname for mirror pod name. #7910 (yujuhong)
Removes RunPod in the Runtime interface #7657 (yujuhong)
Clean up dockertools/manager.go and add more unit tests #7533 (yujuhong)
Adapt pod killing and cleanup for generic container runtime #7525 (yujuhong)
Fix pod filtering in replication controller #7198 (yujuhong)
Print container statuses in
kubectl get pods#7116 (yujuhong)Prioritize deleting the non-running pods when reducing replicas #6992 (yujuhong)
Fix locking issue in pod manager #6872 (yujuhong)
Limit the number of concurrent tests in integration.go #6655 (yujuhong)
Fix typos in different config comments #7931 (pmorie)
Update cAdvisor dependency. #7929 (vmarmol)
Ubuntu-distro: deprecate & merge ubuntu single node work to ubuntu cluster node stuff#5498 (resouer)
Add control variables to Jenkins E2E script #7935 (saad-ali)
Check node status as part of validate-cluster.sh. #7932 (fabioy)
Add old endpoint cleanup function #7821 (lavalamp)
Support recovery from in the middle of a rename. #7620 (brendandburns)
Update Exec and Portforward client to use pod subresource #7715 (csrwng)
Added NFS to PV structs #7564 (markturansky)
Fix environment variable error in Vagrant docs #7904 (posita)
Adds a simple release-note builder that scrapes the GitHub API for recent PRs #7616(brendandburns)
Scheduler ignores nodes that are in a bad state #7668 (bprashanth)
Set GOMAXPROCS for etcd #7863 (fgrzadkowski)
Auto-generated conversion methods calling one another #7556 (wojtek-t)
Bring up a kuberenetes cluster using coreos image as worker nodes #7445 (dchen1107)
Godep: Add godep for rkt. #7410 (yifan-gu)
Add volumeGetter to rkt. #7870 (yifan-gu)
Update cAdvisor dependency. #7897 (vmarmol)
DNS: expose 53/TCP #7822 (thockin)
Set NodeReady=False when docker is dead #7763 (wojtek-t)
Ignore latency metrics for events #7857 (fgrzadkowski)
SecurityContext admission clean up #7792 (pweil-)
Support manually-created and generated conversion functions #7832 (wojtek-t)
Add latency metrics for etcd operations #7833 (fgrzadkowski)
Update errors_test.go #7885 (hurf)
Change signature of container runtime PullImage to allow pull w/ secret #7861 (pmorie)
Fix bug in Service documentation: incorrect location of "selector" in JSON #7873(bkeroackdsc)
Fix controller-manager manifest for providers that don't specify CLUSTER_IP_RANGE#7876 (cjcullen)
Fix controller unittests #7867 (bprashanth)
Enable GCM and GCL instead of InfluxDB on GCE #7751 (saad-ali)
Remove restriction that cluster-cidr be a class-b #7862 (cjcullen)
Fix OpenShift example #7591 (derekwaynecarr)
API Server - pass path name in context of create request for subresource #7718 (csrwng)
Rolling Updates: Add support for --rollback. #7575 (brendandburns)
Update to container-vm-v20150505 (Also updates GCE to Docker 1.6) #7820 (zmerlynn)
Fix metric label #7830 (rhcarvalho)
Fix v1beta1 typos in v1beta2 conversions #7838 (pmorie)
skydns: use the etcd-2.x native syntax, enable IANA attributed ports. #7764(AntonioMeireles)
Added port 6443 to kube-proxy default IP address for api-server #7794 (markllama)
Added client header info for authentication doc. #7834 (ashcrow)
Clean up safe_format_and_mount spam in the startup logs #7827 (zmerlynn)
Set allocate_node_cidrs to be blank by default. #7829 (roberthbailey)
Fix event doc link #7823 (saad-ali)
Cobra update and bash completions fix #7776 (eparis)
Fix kube2sky flakes. Fix tools.GetEtcdVersion to work with etcd > 2.0.7 #7675 (cjcullen)
Change kube2sky to use token-system-dns secret, point at https endpoint ... #7154(cjcullen)
replica: serialize created-by reference #7468 (simon3z)
Inject mounter into volume plugins #7702 (pmorie)
bringing CoreOS cloud-configs up-to-date (against 0.15.x and latest OS' alpha) #6973(AntonioMeireles)
Update kubeconfig-file doc. #7787 (jlowdermilk)
Throw an API error when deleting namespace in termination #7780 (derekwaynecarr)
Fix command field PodExecOptions #7773 (csrwng)
Start ImageManager housekeeping in Run(). #7785 (vmarmol)
fix DeepCopy to properly support runtime.EmbeddedObject #7769 (deads2k)
fix master service endpoint system for multiple masters #7273 (lavalamp)
Add genbashcomp to KUBE_TEST_TARGETS #7757 (nak3)
Change the cloud provider TCPLoadBalancerExists function to GetTCPLoadBalancer...#7669 (a-robinson)
Add containerized option to kubelet binary #7772 (pmorie)
Fix swagger spec #7779 (pmorie)
FIX: Issue #7750 - Hyperkube docker image needs certificates to connect to cloud-providers#7755 (viklas)
Add build labels to rkt #7752 (vmarmol)
Check license boilerplate for python files #7672 (eparis)
Reliable updates in rollingupdate #7705 (bprashanth)
Don't exit abruptly if there aren't yet any minions right after the cluster is created. #7650(roberthbailey)
A guide to set up kubernetes multiple nodes cluster with flannel on fedora #7357(aveshagarwal)
Setup generators in factory #7760 (kargakis)
Reduce usage of time.After #7737 (lavalamp)
Remove node status from "componentstatuses" call. #7735 (fabioy)
React to failure by growing the remaining clusters #7614 (tamsky)
Fix typo in runtime_cache.go #7725 (pmorie)
Update non-GCE Salt distros to 1.6.0, fallback to ContainerVM Docker version on GCE#7740 (zmerlynn)
Skip SaltStack install if it's already installed #7744 (zmerlynn)
Expose pod name as a label on containers. #7712 (rjnagal)
Log which SSH key is used in e2e SSH test #7732 (mbforbes)
Add a central simple getting started guide with kubernetes guide. #7649 (brendandburns)
Explicitly state the lack of support for 'Requests' for the purposes of scheduling #7443(vishh)
Select IPv4-only from host interfaces #7721 (smarterclayton)
Metrics tests can't run on Mac #7723 (smarterclayton)
Add step to API changes doc for swagger regen #7727 (pmorie)
Add NsenterMounter mount implementation #7703 (pmorie)
add StringSet.HasAny #7509 (deads2k)
Add an integration test that checks for the metrics we expect to be exported from the master #6941 (a-robinson)
Minor bash update found by shellcheck.net #7722 (eparis)
Add --hostport to run-container. #7536 (rjnagal)
Have rkt implement the container Runtime interface #7659 (vmarmol)
Change the order the different versions of API are registered #7629 (caesarxuchao)
expose: Create objects in a generic way #7699 (kargakis)
Requeue rc if a single get/put retry on status.Replicas fails #7643 (bprashanth)
logs for master components #7316 (ArtfulCoder)
cloudproviders: add ovirt getting started guide #7522 (simon3z)
Make rkt-install a oneshot. #7671 (vmarmol)
Provide container_runtime flag to Kubelet in CoreOS. #7665 (vmarmol)
Boilerplate speedup #7654 (eparis)
Log host for failed pod in Density test #7700 (wojtek-t)
Removes spurious quotation mark #7655 (alindeman)
Add kubectl_label to custom functions in bash completion #7694 (nak3)
Enable profiling in kube-controller #7696 (wojtek-t)
Set vagrant test cluster default NUM_MINIONS=2 #7690 (BenTheElder)
Add metrics to measure cache hit ratio #7695 (fgrzadkowski)
Change IP to IP(S) in service columns for kubectl get #7662 (jlowdermilk)
annotate required flags for bash_completions #7076 (eparis)
(minor) Add pgrep debugging to etcd error #7685 (jayunit100)
Fixed nil pointer issue in describe when volume is unbound #7676 (markturansky)
Removed unnecessary closing bracket #7691 (piosz)
Added TerminationGracePeriod field to PodSpec and grace-period flag to kubectl stop#7432 (piosz)
Fix boilerplate in test/e2e/scale.go #7689 (wojtek-t)
Update expiration timeout based on observed latencies #7628 (bprashanth)
Output generated conversion functions/names #7644 (liggitt)
Moved the Scale tests into a scale file. #7645 #7646 (rrati)
Truncate GCE load balancer names to 63 chars #7609 (brendandburns)
Add SyncPod() and remove Kill/Run InContainer(). #7603 (vmarmol)
Merge release 0.16 to master #7663 (brendandburns)
Update license boilerplate for examples/rethinkdb #7637 (eparis)
First part of improved rolling update, allow dynamic next replication controller generation.#7268 (brendandburns)
Add license boilerplate to examples/phabricator #7638 (eparis)
Use generic copyright holder name in license boilerplate #7597 (eparis)
Retry incrementing quota if there is a conflict #7633 (derekwaynecarr)
Remove GetContainers from Runtime interface #7568 (yujuhong)
Add image-related methods to DockerManager #7578 (yujuhong)
Remove more docker references in kubelet #7586 (yujuhong)
Add KillContainerInPod in DockerManager #7601 (yujuhong)
Kubelet: Add container runtime option. #7652 (vmarmol)
bump heapster to v0.11.0 and grafana to v0.7.0 #7626 (idosh)
Build github.com/onsi/ginkgo/ginkgo as a part of the release #7593 (ixdy)
Do not automatically decode runtime.RawExtension #7490 (smarterclayton)
Update changelog. #7500 (brendandburns)
Add SyncPod() to DockerManager and use it in Kubelet #7610 (vmarmol)
Build: Push .md5 and .sha1 files for every file we push to GCS #7602 (zmerlynn)
Fix rolling update --image #7540 (bprashanth)
Update license boilerplate for docs/man/md2man-all.sh #7636 (eparis)
Include shell license boilerplate in examples/k8petstore #7632 (eparis)
Add --cgroup_parent flag to Kubelet to set the parent cgroup for pods #7277 (guenter)
change the current dir to the config dir #7209 (you-n-g)
Set Weave To 0.9.0 And Update Etcd Configuration For Azure #7158 (idosh)
Augment describe to search for matching things if it doesn't match the original resource.#7467 (brendandburns)
Add a simple cache for objects stored in etcd. #7559 (fgrzadkowski)
Rkt gc #7549 (yifan-gu)
Rkt pull #7550 (yifan-gu)
Implement Mount interface using mount(8) and umount(8) #6400 (ddysher)
Trim Fleuntd tag for Cloud Logging #7588 (satnam6502)
GCE CoreOS cluster - set master name based on variable #7569 (bakins)
Capitalization of KubeProxyVersion wrong in JSON #7535 (smarterclayton)
Make nodes report their external IP rather than the master's. #7530 (mbforbes)
Trim cluster log tags to pod name and container name #7539 (satnam6502)
Handle conversion of boolean query parameters with a value of "false" #7541 (csrwng)
Add image-related methods to Runtime interface. #7532 (vmarmol)
Test whether auto-generated conversions weren't manually edited #7560 (wojtek-t)
Mention :latest behavior for image version tag #7484 (colemickens)
readinessProbe calls livenessProbe.Exec.Command which cause "invalid memory address or nil pointer dereference". #7487 (njuicsgz)
Add RuntimeHooks to abstract Kubelet logic #7520 (vmarmol)
Expose URL() on Request to allow building URLs #7546 (smarterclayton)
Add a simple cache for objects stored in etcd #7288 (fgrzadkowski)
Prepare for chaining autogenerated conversion methods #7431 (wojtek-t)
Increase maxIdleConnection limit when creating etcd client in apiserver. #7353 (wojtek-t)
Improvements to generator of conversion methods. #7354 (wojtek-t)
Code to automatically generate conversion methods #7107 (wojtek-t)
Support recovery for anonymous roll outs #7407 (brendandburns)
Bump kube2sky to 1.2. Point it at https endpoint (3rd try). #7527 (cjcullen)
cluster/gce/coreos: Add metadata-service in node.yaml #7526 (yifan-gu)
Move ComputePodChanges to the Docker runtime #7480 (vmarmol)
Cobra rebase #7510 (eparis)
Adding system oom events from kubelet #6718 (vishh)
Move Prober to its own subpackage #7479 (vmarmol)
Fix parallel-e2e.sh to work on my macbook (bash v3.2) #7513 (cjcullen)
Move network plugin TearDown to DockerManager #7449 (vmarmol)
Fixes #7498 - CoreOS Getting Started Guide had invalid cloud config #7499 (elsonrodriguez)
Fix invalid character '"' after object key:value pair #7504 (resouer)
Fixed kubelet deleting data from volumes on stop (#7317). #7503 (jsafrane)
Fixing hooks/description to catch API fields without description tags #7482 (nikhiljindal)
cadvisor is obsoleted so kubelet service does not require it. #7457 (aveshagarwal)
Set the default namespace for events to be "default" #7408 (vishh)
Fix typo in namespace conversion #7446 (liggitt)
Convert Secret registry to use update/create strategy, allow filtering by Type #7419 (liggitt)
Use pod namespace when looking for its GlusterFS endpoints. #7102 (jsafrane)
Fixed name of kube-proxy path in deployment scripts. #7427 (jsafrane)
To download, please visit https://github.com/GoogleCloudPlatform/kubernetes/releases/tag/v0.17.0
Resource Usage Monitoring in Kubernetes
Understanding how an application behaves when deployed is crucial to scaling the application and providing a reliable service. In a Kubernetes cluster, application performance can be examined at many different levels: containers, pods, services, and whole clusters. As part of Kubernetes we want to provide users with detailed resource usage information about their running applications at all these levels. This will give users deep insights into how their applications are performing and where possible application bottlenecks may be found. In comes Heapster, a project meant to provide a base monitoring platform on Kubernetes.
Overview
Heapster is a cluster-wide aggregator of monitoring and event data. It currently supports Kubernetes natively and works on all Kubernetes setups. Heapster runs as a pod in the cluster, similar to how any Kubernetes application would run. The Heapster pod discovers all nodes in the cluster and queries usage information from the nodes’ Kubelets, the on-machine Kubernetes agent. The Kubelet itself fetches the data from cAdvisor. Heapster groups the information by pod along with the relevant labels. This data is then pushed to a configurable backend for storage and visualization. Currently supported backends include InfluxDB (with Grafana for visualization), Google Cloud Monitoring and many others described in more details here. The overall architecture of the service can be seen below:

Let’s look at some of the other components in more detail.
cAdvisor
cAdvisor is an open source container resource usage and performance analysis agent. It is purpose built for containers and supports Docker containers natively. In Kubernetes, cadvisor is integrated into the Kubelet binary. cAdvisor auto-discovers all containers in the machine and collects CPU, memory, filesystem, and network usage statistics. cAdvisor also provides the overall machine usage by analyzing the ‘root’? container on the machine.
On most Kubernetes clusters, cAdvisor exposes a simple UI for on-machine containers on port 4194. Here is a snapshot of part of cAdvisor’s UI that shows the overall machine usage:

Kubelet
The Kubelet acts as a bridge between the Kubernetes master and the nodes. It manages the pods and containers running on a machine. Kubelet translates each pod into its constituent containers and fetches individual container usage statistics from cAdvisor. It then exposes the aggregated pod resource usage statistics via a REST API.
STORAGE BACKENDS
InfluxDB and Grafana
A Grafana setup with InfluxDB is a very popular combination for monitoring in the open source world. InfluxDB exposes an easy to use API to write and fetch time series data. Heapster is setup to use this storage backend by default on most Kubernetes clusters. A detailed setup guide can be found here. InfluxDB and Grafana run in Pods. The pod exposes itself as a Kubernetes service which is how Heapster discovers it.
The Grafana container serves Grafana’s UI which provides an easy to configure dashboard interface. The default dashboard for Kubernetes contains an example dashboard that monitors resource usage of the cluster and the pods inside of it. This dashboard can easily be customized and expanded. Take a look at the storage schema for InfluxDB here.
Here is a video showing how to monitor a Kubernetes cluster using heapster, InfluxDB and Grafana:

Here is a snapshot of the default Kubernetes Grafana dashboard that shows the CPU and Memory usage of the entire cluster, individual pods and containers:

Google Cloud Monitoring
Google Cloud Monitoring is a hosted monitoring service that allows you to visualize and alert on important metrics in your application. Heapster can be setup to automatically push all collected metrics to Google Cloud Monitoring. These metrics are then available in the Cloud Monitoring Console. This storage backend is the easiest to setup and maintain. The monitoring console allows you to easily create and customize dashboards using the exported data.
Here is a video showing how to setup and run a Google Cloud Monitoring backed Heapster: "https://youtube.com/embed/xSMNR2fcoLs" Here is a snapshot of the a Google Cloud Monitoring dashboard showing cluster-wide resource usage.

Try it out!
Now that you’ve learned a bit about Heapster, feel free to try it out on your own clusters! The Heapster repository is available on GitHub. It contains detailed instructions to setup Heapster and its storage backends. Heapster runs by default on most Kubernetes clusters, so you may already have it! Feedback is always welcome. Please let us know if you run into any issues via the troubleshooting channels.
Weekly Kubernetes Community Hangout Notes - May 1 2015
Every week the Kubernetes contributing community meet virtually over Google Hangouts. We want anyone who's interested to know what's discussed in this forum.
Simple rolling update - Brendan
Rolling update = nice example of why RCs and Pods are good.
...pause… (Brendan needs demo recovery tips from Kelsey)
Rolling update has recovery: Cancel update and restart, update continues from where it stopped.
New controller gets name of old controller, so appearance is pure update.
Can also name versions in update (won't do rename at the end).
Rocket demo - CoreOS folks
2 major differences between rocket & docker: Rocket is daemonless & pod-centric.
Rocket has AppContainer format as native, but also supports docker image format.
Can run AppContainer and docker containers in same pod.
Changes are close to merged.
demo service accounts and secrets being added to pods - Jordan
Problem: It's hard to get a token to talk to the API.
New API object: "ServiceAccount"
ServiceAccount is namespaced, controller makes sure that at least 1 default service account exists in a namespace.
Typed secret "ServiceAccountToken", controller makes sure there is at least 1 default token.
DEMO
* Can create new service account with ServiceAccountToken. Controller will create token for it.Can create a pod with service account, pods will have service account secret mounted at /var/run/secrets/kubernetes.io/…
Kubelet running in a container - Paul
- Kubelet successfully ran pod w/ mounted secret.
Kubernetes Release: 0.16.0
Release Notes:
- Bring up a kuberenetes cluster using coreos image as worker nodes #7445 (dchen1107)
- Cloning v1beta3 as v1 and exposing it in the apiserver #7454 (nikhiljindal)
- API Conventions for Late-initializers #7366 (erictune)
- Upgrade Elasticsearch to 1.5.2 for cluster logging #7455 (satnam6502)
- Make delete actually stop resources by default. #7210 (brendandburns)
- Change kube2sky to use token-system-dns secret, point at https endpoint ... #7154(cjcullen)
- Updated CoreOS bare metal docs for 0.15.0 #7364 (hvolkmer)
- Print named ports in 'describe service' #7424 (thockin)
- AWS
- Return public & private addresses in GetNodeAddresses #7040 (justinsb)
- Improving getting existing VPC and subnet #6606 (gust1n)
- Set hostname_override for minions, back to fully-qualified name #7182 (justinsb)
- Conversion to v1beta3
- Convert node level logging agents to v1beta3 #7274 (satnam6502)
- Removing more references to v1beta1 from pkg/ #7128 (nikhiljindal)
- update examples/cassandra to api v1beta3 #7258 (caesarxuchao)
- Convert Elasticsearch logging to v1beta3 and de-salt #7246 (satnam6502)
- Update examples/storm for v1beta3 #7231 (bcbroussard)
- Update examples/spark for v1beta3 #7230 (bcbroussard)
- Update Kibana RC and service to v1beta3 #7240 (satnam6502)
- Updating the guestbook example to v1beta3 #7194 (nikhiljindal)
- Update Phabricator to v1beta3 example #7232 (bcbroussard)
- Update Kibana pod to speak to Elasticsearch using v1beta3 #7206 (satnam6502)
- Validate Node IPs; clean up validation code #7180 (ddysher)
- Add PortForward to runtime API. #7391 (vmarmol)
- kube-proxy uses token to access port 443 of apiserver #7303 (erictune)
- Move the logging-related directories to where I think they belong #7014 (a-robinson)
- Make client service requests use the default timeout now that external load balancers are created asynchronously #6870 (a-robinson)
- Fix bug in kube-proxy of not updating iptables rules if a service's public IPs change #6123(a-robinson)
- PersistentVolumeClaimBinder #6105 (markturansky)
- Fixed validation message when trying to submit incorrect secret #7356 (soltysh)
- First step to supporting multiple k8s clusters #6006 (justinsb)
- Parity for namespace handling in secrets E2E #7361 (pmorie)
- Add cleanup policy to RollingUpdater #6996 (ironcladlou)
- Use narrowly scoped interfaces for client access #6871 (ironcladlou)
- Warning about Critical bug in the GlusterFS Volume Plugin #7319 (wattsteve)
- Rolling update
- First part of improved rolling update, allow dynamic next replication controller generation. #7268 (brendandburns)
- Further implementation of rolling-update, add rename #7279 (brendandburns)
- Added basic apiserver authz tests. #7293 (ashcrow)
- Retry pod update on version conflict error in e2e test. #7297 (quinton-hoole)
- Add "kubectl validate" command to do a cluster health check. #6597 (fabioy)
- coreos/azure: Weave version bump, various other enhancements #7224 (errordeveloper)
- Azure: Wait for salt completion on cluster initialization #6576 (jeffmendoza)
- Tighten label parsing #6674 (kargakis)
- fix watch of single object #7263 (lavalamp)
- Upgrade go-dockerclient dependency to support CgroupParent #7247 (guenter)
- Make secret volume plugin idempotent #7166 (pmorie)
- Salt reconfiguration to get rid of nginx on GCE #6618 (roberthbailey)
- Revert "Change kube2sky to use token-system-dns secret, point at https e... #7207 (fabioy)
- Pod templates as their own type #5012 (smarterclayton)
- iscsi Test: Add explicit check for attach and detach calls. #7110 (swagiaal)
- Added field selector for listing pods #7067 (ravigadde)
- Record an event on node schedulable changes #7138 (pravisankar)
- Resolve #6812, limit length of load balancer names #7145 (caesarxuchao)
- Convert error strings to proper validation errors. #7131 (rjnagal)
- ResourceQuota add object count support for secret and volume claims #6593(derekwaynecarr)
- Use Pod.Spec.Host instead of Pod.Status.HostIP for pod subresources #6985 (csrwng)
- Prioritize deleting the non-running pods when reducing replicas #6992 (yujuhong)
- Kubernetes UI with Dashboard component #7056 (preillyme)
To download, please visit https://github.com/GoogleCloudPlatform/kubernetes/releases/tag/v0.16.0
AppC Support for Kubernetes through RKT
We very recently accepted a pull request to the Kubernetes project to add appc support for the Kubernetes community. Appc is a new open container specification that was initiated by CoreOS, and is supported through CoreOS rkt container runtime.
This is an important step forward for the Kubernetes project and for the broader containers community. It adds flexibility and choice to the container-verse and brings the promise of compelling new security and performance capabilities to the Kubernetes developer.
Container based runtimes (like Docker or rkt) when paired with smart orchestration technologies (like Kubernetes and/or Apache Mesos) are a legitimate disruption to the way that developers build and run their applications. While the supporting technologies are relatively nascent, they do offer the promise of some very powerful new ways to assemble, deploy, update, debug and extend solutions. I believe that the world has not yet felt the full potential of containers and the next few years are going to be particularly exciting! With that in mind it makes sense for several projects to emerge with different properties and different purposes. It also makes sense to be able to plug together different pieces (whether it be the container runtime or the orchestrator) based on the specific needs of a given application.
Docker has done an amazing job of democratizing container technologies and making them accessible to the outside world, and we expect Kubernetes to support Docker indefinitely. CoreOS has also started to do interesting work with rkt to create an elegant, clean, simple and open platform that offers some really interesting properties. It looks poised deliver a secure and performant operating environment for containers. The Kubernetes team has been working with the appc team at CoreOS for a while and in many ways they built rkt with Kubernetes in mind as a simple pluggable runtime component.
The really nice thing is that with Kubernetes you can now pick the container runtime that works best for you based on your workloads’ needs, change runtimes without having the replace your cluster environment, or even mix together applications where different parts are running in different container runtimes in the same cluster. Additional choices can’t help but ultimately benefit the end developer.
Weekly Kubernetes Community Hangout Notes - April 24 2015
Every week the Kubernetes contributing community meet virtually over Google Hangouts. We want anyone who's interested to know what's discussed in this forum.
Agenda:
- Flocker and Kubernetes integration demo
Notes:
- flocker and kubernetes integration demo
Flocker Q/A
Does the file still exists on node1 after migration?
Brendan: Any plan this to make it a volume? So we don't need powerstrip?
Luke: Need to figure out interest to decide if we want to make it a first-class persistent disk provider in kube.
Brendan: Removing need for powerstrip would make it simple to use. Totally go for it.
Tim: Should take no more than 45 minutes to add it to kubernetes:)
Derek: Contrast this with persistent volumes and claims?
Luke: Not much difference, except for the novel ZFS based backend. Makes workloads really portable.
Tim: very different than network-based volumes. Its interesting that it is the only offering that allows upgrading media.
Brendan: claims, how does it look for replicated claims? eg Cassandra wants to have replicated data underneath. It would be efficient to scale up and down. Create storage on the fly based on load dynamically. Its step beyond taking snapshots - programmatically creating replicas with preallocation.
Tim: helps with auto-provisioning.
Brian: Does flocker requires any other component?
Kai: Flocker control service co-located with the master. (dia on blog post). Powerstrip + Powerstrip Flocker. Very interested in mpersisting state in etcd. It keeps metadata about each volume.
Brendan: In future, flocker can be a plugin and we'll take care of persistence. Post v1.0.
Brian: Interested in adding generic plugin for services like flocker.
Luke: Zfs can become really valuable when scaling to lot of containers on a single node.
Alex: Can flocker service can be run as a pod?
Kai: Yes, only requirement is the flocker control service should be able to talk to zfs agent. zfs agent needs to be installed on the host and zfs binaries need to be accessible.
Brendan: In theory, all zfs bits can be put it into a container with devices.
Luke: Yes, still working through cross-container mounting issue.
Tim: pmorie is working through it to make kubelet work in a container. Possible re-use.
Kai: Cinder support is coming. Few days away.
- Bob: What's the process of pushing kube to GKE? Need more visibility for confidence.
Borg: The Predecessor to Kubernetes
Google has been running containerized workloads in production for more than a decade. Whether it's service jobs like web front-ends and stateful servers, infrastructure systems like Bigtable and Spanner, or batch frameworks like MapReduce and Millwheel, virtually everything at Google runs as a container. Today, we took the wraps off of Borg, Google’s long-rumored internal container-oriented cluster-management system, publishing details at the academic computer systems conference Eurosys. You can find the paper here.
Kubernetes traces its lineage directly from Borg. Many of the developers at Google working on Kubernetes were formerly developers on the Borg project. We've incorporated the best ideas from Borg in Kubernetes, and have tried to address some pain points that users identified with Borg over the years.
To give you a flavor, here are four Kubernetes features that came from our experiences with Borg:
- Pods. A pod is the unit of scheduling in Kubernetes. It is a resource envelope in which one or more containers run. Containers that are part of the same pod are guaranteed to be scheduled together onto the same machine, and can share state via local volumes.
Borg has a similar abstraction, called an alloc (short for “resource allocation”). Popular uses of allocs in Borg include running a web server that generates logs alongside a lightweight log collection process that ships the log to a cluster filesystem (not unlike fluentd or logstash); running a web server that serves data from a disk directory that is populated by a process that reads data from a cluster filesystem and prepares/stages it for the web server (not unlike a Content Management System); and running user-defined processing functions alongside a storage shard. Pods not only support these use cases, but they also provide an environment similar to running multiple processes in a single VM -- Kubernetes users can deploy multiple co-located, cooperating processes in a pod without having to give up the simplicity of a one-application-per-container deployment model.
Services. Although Borg’s primary role is to manage the lifecycles of tasks and machines, the applications that run on Borg benefit from many other cluster services, including naming and load balancing. Kubernetes supports naming and load balancing using the service abstraction: a service has a name and maps to a dynamic set of pods defined by a label selector (see next section). Any container in the cluster can connect to the service using the service name. Under the covers, Kubernetes automatically load-balances connections to the service among the pods that match the label selector, and keeps track of where the pods are running as they get rescheduled over time due to failures.
Labels. A container in Borg is usually one replica in a collection of identical or nearly identical containers that correspond to one tier of an Internet service (e.g. the front-ends for Google Maps) or to the workers of a batch job (e.g. a MapReduce). The collection is called a Job, and each replica is called a Task. While the Job is a very useful abstraction, it can be limiting. For example, users often want to manage their entire service (composed of many Jobs) as a single entity, or to uniformly manage several related instances of their service, for example separate canary and stable release tracks. At the other end of the spectrum, users frequently want to reason about and control subsets of tasks within a Job -- the most common example is during rolling updates, when different subsets of the Job need to have different configurations.
Kubernetes supports more flexible collections than Borg by organizing pods using labels, which are arbitrary key/value pairs that users attach to pods (and in fact to any object in the system). Users can create groupings equivalent to Borg Jobs by using a “job:<jobname>” label on their pods, but they can also use additional labels to tag the service name, service instance (production, staging, test), and in general, any subset of their pods. A label query (called a “label selector”) is used to select which set of pods an operation should be applied to. Taken together, labels and replication controllers allow for very flexible update semantics, as well as for operations that span the equivalent of Borg Jobs.
- IP-per-Pod. In Borg, all tasks on a machine use the IP address of that host, and thus share the host’s port space. While this means Borg can use a vanilla network, it imposes a number of burdens on infrastructure and application developers: Borg must schedule ports as a resource; tasks must pre-declare how many ports they need, and take as start-up arguments which ports to use; the Borglet (node agent) must enforce port isolation; and the naming and RPC systems must handle ports as well as IP addresses.
Thanks to the advent of software-defined overlay networks such as flannel or those built into public clouds, Kubernetes is able to give every pod and service its own IP address. This removes the infrastructure complexity of managing ports, and allows developers to choose any ports they want rather than requiring their software to adapt to the ones chosen by the infrastructure. The latter point is crucial for making it easy to run off-the-shelf open-source applications on Kubernetes--pods can be treated much like VMs or physical hosts, with access to the full port space, oblivious to the fact that they may be sharing the same physical machine with other pods.
With the growing popularity of container-based microservice architectures, the lessons Google has learned from running such systems internally have become of increasing interest to the external DevOps community. By revealing some of the inner workings of our cluster manager Borg, and building our next-generation cluster manager as both an open-source project (Kubernetes) and a publicly available hosted service (Google Container Engine), we hope these lessons can benefit the broader community outside of Google and advance the state-of-the-art in container scheduling and cluster management.
Kubernetes and the Mesosphere DCOS
Kubernetes and the Mesosphere DCOS
Today Mesosphere announced the addition of Kubernetes as a standard part of their DCOS offering. This is a great step forwards in bringing cloud native application management to the world, and should lay to rest many questions we hear about 'Kubernetes or Mesos, which one should I use?'. Now you can have your cake and eat it too: use both. Today's announcement extends the reach of Kubernetes to a new class of users, and add some exciting new capabilities for everyone.
By way of background, Kubernetes is a cluster management framework that was started by Google nine months ago, inspired by the internal system known as Borg. You can learn a little more about Borg by checking out this paper. At the heart of it Kubernetes offers what has been dubbed 'cloud native' application management. To us, there are three things that together make something 'cloud native':
- Container oriented deployments Package up your application components with all their dependencies and deploy them using technologies like Docker or Rocket. Containers radically simplify the deployment process, making rollouts repeatable and predictable.
- Dynamically managed Rely on modern control systems to make moment-to-moment decisions around the health management and scheduling of applications to radically improve reliability and efficiency. There are some things that just machines do better than people, and actively running applications is one of those things.
- Micro-services oriented Tease applications apart into small semi-autonomous services that can be consumed easily so that the resulting systems are easier to understand, extend and adapt.
Kubernetes was designed from the start to make these capabilities available to everyone, and built by the same engineers that built the system internally known as Borg. For many users the promise of 'Google style app management' is interesting, but they want to run these new classes of applications on the same set of physical resources as their existing workloads like Hadoop, Spark, Kafka, etc. Now they will have access to commercially supported offering that brings the two worlds together.
Mesosphere, one of the earliest supporters of the Kubernetes project, has been working closely with the core Kubernetes team to create a natural experience for users looking to get the best of both worlds, adding Kubernetes to every Mesos deployment they instantiate, whether it be in the public cloud, private cloud, or in a hybrid deployment model. This is well aligned with the overall Kubernetes vision of creating ubiquitous management framework that runs anywhere a container can. It will be interesting to see how you blend together the old world and the new on a commercially supported, versatile platform.
Weekly Kubernetes Community Hangout Notes - April 17 2015
Every week the Kubernetes contributing community meet virtually over Google Hangouts. We want anyone who's interested to know what's discussed in this forum.
Agenda
- Mesos Integration
- High Availability (HA)
- Adding performance and profiling details to e2e to track regressions
- Versioned clients
Notes
Mesos integration
Mesos integration proposal:
No blockers to integration.
Documentation needs to be updated.
HA
Proposal should land today.
Etcd cluster.
Load-balance apiserver.
Cold standby for controller manager and other master components.
Adding performance and profiling details to e2e to track regression
Want red light for performance regression
Need a public DB to post the data
- See
Justin working on multi-platform e2e dashboard
Versioned clients
*
* Client library currently uses internal API objects.
* Nobody reported that frequent changes to types.go have been painful, but we are worried about it.
* Structured types are useful in the client. Versioned structs would be ok.
* If start with json/yaml (kubectl), shouldn’t convert to structured types. Use swagger.
Security context
* Administrators can restrict who can run privileged containers or require specific unix uids
* Kubelet will be able to get pull credentials from apiserver
* Policy proposal coming in the next week or so
Discussing upstreaming of users, etc. into Kubernetes, at least as optional
1.0 Roadmap
Focus is performance, stability, cluster upgrades
TJ has been making some edits to roadmap.md but hasn’t sent out a PR yet
Kubernetes UI
Dependencies broken out into third-party
@lavalamp is reviewer
[*[3:27 PM]: 2015-04-17T15:27:00-07:00
Introducing Kubernetes API Version v1beta3
We've been hard at work on cleaning up the API over the past several months (see https://github.com/GoogleCloudPlatform/kubernetes/issues/1519 for details). The result is v1beta3, which is considered to be the release candidate for the v1 API.
We would like you to move to this new API version as soon as possible. v1beta1 and v1beta2 are deprecated, and will be removed by the end of June, shortly after we introduce the v1 API.
As of the latest release, v0.15.0, v1beta3 is the primary, default API. We have changed the default kubectl and client API versions as well as the default storage version (which means objects persisted in etcd will be converted from v1beta1 to v1beta3 as they are rewritten).
You can take a look at v1beta3 examples such as:
https://github.com/GoogleCloudPlatform/kubernetes/tree/master/examples/guestbook/v1beta3
https://github.com/GoogleCloudPlatform/kubernetes/tree/master/examples/walkthrough/v1beta3
https://github.com/GoogleCloudPlatform/kubernetes/tree/master/examples/update-demo/v1beta3
To aid the transition, we've also created a conversion tool and put together a list of important different API changes.
- The resource
idis now calledname. name,labels,annotations, and other metadata are now nested in a map calledmetadatadesiredStateis now calledspec, andcurrentStateis now calledstatus/minionshas been moved to/nodes, and the resource has kindNode- The namespace is required (for all namespaced resources) and has moved from a URL parameter to the path:
/api/v1beta3/namespaces/{namespace}/{resource_collection}/{resource_name} - The names of all resource collections are now lower cased - instead of
replicationControllers, usereplicationcontrollers. - To watch for changes to a resource, open an HTTP or Websocket connection to the collection URL and provide the
?watch=trueURL parameter along with the desiredresourceVersionparameter to watch from. - The container
entrypointhas been renamed tocommand, andcommandhas been renamed toargs. - Container, volume, and node resources are expressed as nested maps (e.g.,
resources{cpu:1}) rather than as individual fields, and resource values support scaling suffixes rather than fixed scales (e.g., milli-cores). - Restart policy is represented simply as a string (e.g., "Always") rather than as a nested map ("always{}").
- The volume
sourceis inlined intovolumerather than nested. - Host volumes have been changed to hostDir to hostPath to better reflect that they can be files or directories
And the most recently generated Swagger specification of the API is here:
http://kubernetes.io/third_party/swagger-ui/#!/v1beta3
More details about our approach to API versioning and the transition can be found here:
https://github.com/GoogleCloudPlatform/kubernetes/blob/master/docs/api.md
Another change we discovered is that with the change to the default API version in kubectl, commands that use "-o template" will break unless you specify "--api-version=v1beta1" or update to v1beta3 syntax. An example of such a change can be seen here:
https://github.com/GoogleCloudPlatform/kubernetes/pull/6377/files
If you use "-o template", I recommend always explicitly specifying the API version rather than relying upon the default. We may add this setting to kubeconfig in the future.
Let us know if you have any questions. As always, we're available on IRC (#google-containers) and github issues.
Kubernetes Release: 0.15.0
Release Notes:
- Enables v1beta3 API and sets it to the default API version (#6098)
- Added multi-port Services (#6182)
- Added a controller framework (#5270, #5473)
- The Kubelet now listens on a secure HTTPS port (#6380)
- Made kubectl errors more user-friendly (#6338)
- The apiserver now supports client cert authentication (#6190)
- The apiserver now limits the number of concurrent requests it processes (#6207)
- Added rate limiting to pod deleting (#6355)
- Implement Balanced Resource Allocation algorithm as a PriorityFunction in scheduler package (#6150)
- Enabled log collection from master (#6396)
- Added an api endpoint to pull logs from Pods (#6497)
- Added latency metrics to scheduler (#6368)
- Added latency metrics to REST client (#6409)
- etcd now runs in a pod on the master (#6221)
- nginx now runs in a container on the master (#6334)
- Began creating Docker images for master components (#6326)
- Updated GCE provider to work with gcloud 0.9.54 (#6270)
- Updated AWS provider to fix Region vs Zone semantics (#6011)
- Record event when image GC fails (#6091)
- Add a QPS limiter to the kubernetes client (#6203)
- Decrease the time it takes to run make release (#6196)
- New volume support
- Updated to heapster version to v0.10.0 (#6331)
- Updated to etcd 2.0.9 (#6544)
- Updated to Kibana to v1.2 (#6426)
- Bug Fixes
To download, please visit https://github.com/GoogleCloudPlatform/kubernetes/releases/tag/v0.15.0
Weekly Kubernetes Community Hangout Notes - April 10 2015
Every week the Kubernetes contributing community meet virtually over Google Hangouts. We want anyone who's interested to know what's discussed in this forum.
Agenda:
- kubectl tooling, rolling update, deployments, imperative commands.
- Downward API / env. substitution, and maybe preconditions/dependencies.
Notes from meeting:
1. kubectl improvements
make it simpler to use, finish rolling update, higher-level deployment concepts.
rolling update
today
can replace one rc by another rc specified by a file.
no explicit support for rollback, can sort of do it by doing rolling update to old version.
we keep annotations on rcs to keep track of desired # instances; won't work for rollback case b/c not symmetric.
need immutable image ids; currently no uuid that corresponds to image,version so if someone pushes on top you'll re-pull that; in API server we should translate images into uuids (as close to edge as possible).
would be nice to auto-gen new rc instead of having user update it (e.g. when change image tag for container, etc.; currently need to change rc name and label value; could automate generating new rc).
treating rcs as pets vs. cattle.
"roll me from v1 to v2" (or v2 to v1) - good enough for most people. don't care about record of what happened in the past.
we're providing the module ansible can call to make something happen.
how do you keep track of multiple templates; today we use multiple RCs.
if we had a deployment controller; deployment config spawns pos that runs rolling update; trigger is level-based update of image repository.
alternative short-term proposal: create new rc as clone of old one, futz with counts so new one is old one and vv, bring prev-named one (pet) down to zero and bring it back up with new template (this is very similar to how Borg does job updates).
- is it worthwhile if we want to have the deployments anyway? Yes b/c we have lots of concepts already; need to simplify.
deployment controller keeps track of multiple templates which is what you need for rolling updates and canaries.
only reason for new thing is to move the process into the server instead of the client?
may not need to make it an API object; should provide experience where it's not an API object and is just something client side.
need an experience now so need to do it in client because object won't land before 1.0.
having simplified experience for people who only want to enageg w/ RCs.
how does rollback work: ctrl-c, rollout v2 v1. rollback pattern can be in person's head. 2 kinds of rollback: i'm at steady state and want to go back, and i've got canary deployment and hit ctrl-c how do i get rid of the canary deployment (e.g. new is failing). ctrl-c might not work. delete canary controller and its pods. wish there was a command to also delete pods (there is -- kbectl stop). argument for not reusing name: when you move fwd you can stop the new thing and you're ok, vs. if you replace the old one and you've created a copy if you hit ctrl-c you don't have anything you can stop. but you could wait to flip the name until the end, use naming convention so can figure out what is going on, etc.
two different experiences: (1) i'm using version control, have version history of last week rollout this week, rolling update with two files -> create v2, ??? v1, don't have a pet - moved into world of version control where have cumulative history and; (1) imperative kubectl v1 v2 where sys takes care of details, that's where we use the snapshot pattern.
other imperative commands
run-container (or just run): spec command on command line which makes it more similar to docker run; but not multi-container pods.
--forever vs. not (one shot exec via simple command).
would like it go interactive - run -it and runs in cluster but you have interactive terminal to your process.
how do command line args work. could say --image multiple times. will cobra support? in openshift we have clever syntax for grouping arguments together. doesn't work for real structured parameters.
alternative: create pod; add container add container ...; run pod -- build and don't run object until 'run pod'.
-- to separate container args.
create a pod, mutate it before you run it - like initializer pattern.
kind discovery
if we have run and sometimes it creates an rc and sometimes it doesn't, how does user know what to delete if they want to delete whatever they created with run.
bburns has proposal for don't specify kind if you do command like stop, delete; let kubectl figure it out.
alternative: allow you to define alias from name to set of resource types, eg. delete all which would follow that alias (all could mean everything in some namespace, or unscoped, etc.) - someone explicitly added something to a set vs. accidentally showed up like nodes.
would like to see extended to allow tools to specify their own aliases (not just users); e.g. resize can say i can handle RCs, delete can say I can handle everything, et.c so we can automatically do these things w/o users have to specify stuff. but right mechanism.
resourcebuilder has concept of doing that kind of expansion depending on how we fit in targeted commands. for instance if you want to add a volume to pods and rcs, you need something to go find the pod template and change it. there's the search part of it (delete nginx -> you have to figure out what object they are referring to) and then command can say i got a pod i know what to do with a pod.
alternative heuristic: what if default target of all commands was deployments. kubectl run -> deployment. too much work, easier to clean up existing CLI. leave door open for that. macro objects OK but a lot more work to make that work. eventually will want index to make these efficient. could rely more on swagger to tell us types.
2. paul/downward api: env substitution
- create ad-hoc env var like strings, e.g. k8s_pod_name that would get sub'd by system in objects.
- allow people to create env vars that refer to fields of k8s objects w/o query api from inside their container; in some cases enables query api from their container (e.g. pass obj names, namespaces); e.g. sidecar containers need this for pulling things from api server.
- another proposal similar: instead of env var like names, have JSON-path-like syntax for referring to object field names; e.g. $.metadata.name to refer to name of current object, maybe have some syntax for referring to related objects like node that a pod is on. advantage of JSON path-like syntax is that it's less ad hoc. disadvantage is that you can only refer to things that are fields of objects.
- for both, if you populate env vars then you have drawback that fields only set when container is created. but least degree of coupling -- off the shelf containers, containers don't need to know how to talk to k8s API. keeps the k8s concepts in the control plane.
- we were converging on JSON path like approach. but need prototype or at least deeper proposal to demo.
- paul: one variant is for env vars in addition to value field have different sources which is where you would plug in e.g. syntax you use to describe a field of an object; another source would be a source that described info about the host. have partial prototype. clean separation between what's in image vs. control plane. could use source idea for volume plugin.
- use case: provide info for sidecar container to contact API server.
- use case: pass down unique identifiers or things like using UID as unique identifier.
- clayton: for rocket or gce metadata service being available for every pod for more sophisticated things; most containers want to find endpoint of service.
3. preconditions/dependencies
- when you create pods that talk to services, the service env vars only get populated if you create the objs in the right order. if you use dns it's less of a problem but some apps are fragile. may crash if svc they depend on is not there, may take a long time to restart. proposal to have preconds that block starting pods until objs they depend on exist.
- infer automatically if we ask people to declare which env vars they wanted, or have dep mech at pod or rc or obj level to say this obj doesn't become active until this other thing exists.
- can use event hook? only app owner knows their dependency or when service is ready to serve.
- one proposal is to use pre-start hook. another is precondition probe - pre-start hook could do a probe. does anything respond when i hit this svc address or ip, then probe fails. could be implemented in pre-start hook. more useful than post-start. is part of rkt spec. has stages 0, 1, 2. hard to do in docker today, easy in rocket.
- pre-start hook in container: how will affect readiness probe since the container might have a lock until some arbitrary condition is met if you implement with prestart hook. there has to be some compensation on when kubelet runs readiness/liveness probes if you have a hook. Systemd has timeouts around the stages of process lifecycle.
- if we go to black box model of container pre-start makes sense; if container spec becomes more descriptive of process model like systemd, then does kubelet need to know more about process model to do the right thing.
- ideally msg from inside the container to say i've done all of my pre-start actions. sdnotify for systemd does this. you tell systemd that you're done, it will communicate to other deps that you're alive.
- but... someone could just implement preconds inside their container. makes it easier to adapt an app w/o having to change their image. alternative is just have a pattern how they do it themselves but we don't do it for them.
Faster than a speeding Latte
Check out Brendan Burns racing Kubernetes.
Weekly Kubernetes Community Hangout Notes - April 3 2015
Kubernetes: Weekly Kubernetes Community Hangout Notes
Every week the Kubernetes contributing community meet virtually over Google Hangouts. We want anyone who's interested to know what's discussed in this forum.
Agenda:
- Quinton - Cluster federation
- Satnam - Performance benchmarking update
Notes from meeting:
- Quinton - Cluster federation
- Ideas floating around after meetup in SF
- Please read and comment
- Not 1.0, but put a doc together to show roadmap
- Can be built outside of Kubernetes
- API to control things across multiple clusters, include some logic
Auth(n)(z)
Scheduling Policies
…
- Different reasons for cluster federation
Zone (un) availability : Resilient to zone failures
Hybrid cloud: some in cloud, some on prem. for various reasons
Avoid cloud provider lock-in. For various reasons
"Cloudbursting" - automatic overflow into the cloud
- Hard problems
Location affinity. How close do pods need to be?
Workload coupling
Absolute location (e.g. eu data needs to be in eu)
Cross cluster service discovery
- How does service/DNS work across clusters
Cross cluster workload migration
- How do you move an application piece by piece across clusters?
Cross cluster scheduling
How do know enough about clusters to know where to schedule
Possibly use a cost function to achieve affinities with minimal complexity
Can also use cost to determine where to schedule (under used clusters are cheaper than over-used clusters)
- Implicit requirements
Cross cluster integration shouldn't create cross-cluster failure modes
- Independently usable in a disaster situation where Ubernetes dies.
Unified visibility
- Want to have unified monitoring, alerting, logging, introspection, ux, etc.
Unified quota and identity management
- Want to have user database and auth(n)/(z) in a single place
- Important to note, most causes of software failure are not the infrastructure
Botched software upgrades
Botched config upgrades
Botched key distribution
Overload
Failed external dependencies
- Discussion:
Where do you draw the "ubernetes" line
- Likely at the availability zone, but could be at the rack, or the region
Important to not pigeon hole and prevent other users
Satnam - Soak Test
- Want to measure things that run for a long time to make sure that the cluster is stable over time. Performance doesn't degrade, no memory leaks, etc.
- github.com/GoogleCloudPlatform/kubernetes/test/soak/…
- Single binary, puts lots of pods on each node, and queries each pod to make sure that it is running.
- Pods are being created much, much more quickly (even in the past week) to make things go more quickly.
- Once the pods are up running, we hit the pods via the proxy. Decision to hit the proxy was deliberate so that we test the kubernetes apiserver.
- Code is already checked in.
- Pin pods to each node, exercise every pod, make sure that you get a response for each node.
- Single binary, run forever.
- Brian - v1beta3 is enabled by default, v1beta1 and v1beta2 deprecated, turned off in June. Should still work with upgrading existing clusters, etc.
Participate in a Kubernetes User Experience Study
We need your help in shaping the future of Kubernetes and Google Container Engine, and we'd love to have you participate in a remote UX research study to help us learn about your experiences! If you're interested in participating, we invite you to take this brief survey to see if you qualify. If you’re selected to participate, we’ll follow up with you directly.
- Length: 60 minute interview
- Date: April 7th-15th
- Location: Remote
- Your gift: $100 Perks gift code*
- Study format: Interview with our researcher
Interested in participating? Take this brief survey.
* Perks gift codes can be redeemed for gift certificates from VISA and used at a number of online retailers (http://www.google.com/forms/perks/index1.html). Gift codes are only for participants who successfully complete the study session. You’ll be emailed the gift code after you complete the study session.
Weekly Kubernetes Community Hangout Notes - March 27 2015
Every week the Kubernetes contributing community meet virtually over Google Hangouts. We want anyone who's interested to know what's discussed in this forum.
Agenda:
- Andy - demo remote execution and port forwarding
- Quinton - Cluster federation - Postponed
- Clayton - UI code sharing and collaboration around Kubernetes
Notes from meeting:
1. Andy from RedHat:
Demo remote execution
kubectl exec -p $POD -- $CMD
Makes a connection to the master as proxy, figures out which node the pod is on, proxies connection to kubelet, which does the interesting bit. via nsenter.
Multiplexed streaming over HTTP using SPDY
Also interactive mode:
Assumes first container. Can use -c $CONTAINER to pick a particular one.
If have gdb pre-installed in container, then can interactively attach it to running process
- backtrace, symbol tbles, print, etc. Most things you can do with gdb.
Can also with careful flag crafting run rsync over this or set up sshd inside container.
Some feedback via chat:
Andy also demoed port forwarding
nsenter vs. docker exec
want to inject a binary under control of the host, similar to pre-start hooks
socat, nsenter, whatever the pre-start hook needs
would be nice to blog post on this
version of nginx in wheezy is too old to support needed master-proxy functionality
2. Clayton: where are we wrt a community organization for e.g. kubernetes UI components?
- google-containers-ui IRC channel, mailing list.
- Tim: google-containers prefix is historical, should just do "kubernetes-ui"
- also want to put design resources in, and bower expects its own repo.
- General agreement
3. Brian Grant:
- Testing v1beta3, getting that ready to go in.
- Paul working on changes to commandline stuff.
- Early to mid next week, try to enable v1beta3 by default?
- For any other changes, file issue and CC thockin.
4. General consensus that 30 minutes is better than 60
- Shouldn't artificially try to extend just to fill time.
Kubernetes Gathering Videos
If you missed the Kubernetes Gathering in SF last month, fear not! Here are the videos from the evening presentations organized into a playlist on YouTube
Welcome to the Kubernetes Blog!
Welcome to the new Kubernetes Blog. Follow this blog to learn about the Kubernetes Open Source project. We plan to post release notes, how-to articles, events, and maybe even some off topic fun here from time to time.
If you are using Kubernetes or contributing to the project and would like to do a guest post, please let me know.
To start things off, here's a roundup of recent Kubernetes posts from other sites:
- Scaling MySQL in the cloud with Vitess and Kubernetes
- Container Clusters on VMs
- Everything you wanted to know about Kubernetes but were afraid to ask
- What makes a container cluster?
- Integrating OpenStack and Kubernetes with Murano
- An introduction to containers, Kubernetes, and the trajectory of modern cloud computing
- What is Kubernetes and how to use it?
- OpenShift V3, Docker and Kubernetes Strategy
- An Introduction to Kubernetes
Happy cloud computing!